Embed Size (px)
Citation preview

© 2011-2014 Epic Gardening
Hydroponic Herb Garden
Fresh Herbs Year Round For Practically
Free
By Epic Gardening

Epic Gardening Hydroponic Herb Garden Guide
Visit Epic Gardening to learn more about urban gardening, hydroponics, and aquaponics 2
CONTENTS – CLICK TO SKIP TO SECTION
Introduction: The Herb Hassle .................................................................................................... 4
Cheap, Fresh Herbs Year Round .............................................................................................. 4
Materials .................................................................................................................................... 5
Shopping List .......................................................................................................................... 6
Plastic Tote ............................................................................................................ 7
Spraypaint ............................................................................................................. 7
Aquarium Airstone ................................................................................................. 8
Aquarium Air Pump ............................................................................................... 8
Opaque Airline Tubing ........................................................................................... 8
Airline Tubing Holders ........................................................................................... 9
2” Hole Saw and Pilot Bit ........................................................................................ 9
Eight 2” Net Pots .................................................................................................... 9
Growing Medium* ................................................................................................ 10
pH Testing Kit ...................................................................................................... 10
Nutrients ............................................................................................................. 10
Plants .................................................................................................................. 11
Construction ............................................................................................................................ 12
Step 1 - Wash and Tape Reservoir ......................................................................................... 12
Wash ................................................................................................................... 12
Tape .................................................................................................................... 12
Step 2 – Spray Paint The Tote ................................................................................................ 13
Step 3 – Drill/Cut The Holes .................................................................................................. 13
Net Pots ............................................................................................................... 13
Airline Hole .......................................................................................................... 14

Epic Gardening Hydroponic Herb Garden Guide
Visit Epic Gardening to learn more about urban gardening, hydroponics, and aquaponics 3
Step 4 – Install Air System and Add Water ............................................................................. 14
Air System ........................................................................................................... 14
Add Water ............................................................................................................ 14
Step 5 – pH and Add Nutrients .............................................................................................. 15
pH Your Tap Water ............................................................................................... 15
Add Nutrients ...................................................................................................... 16
Step 6 – Add Growing Media & Plants ....................................................................................... 17
Finished Product ................................................................................................................... 18
Maintenance ............................................................................................................................. 20
Lighting................................................................................................................................. 20
Watering................................................................................................................................ 20
Harvesting ............................................................................................................................. 20
Contact .................................................................................................................................... 21

Epic Gardening Hydroponic Herb Garden Guide
Visit Epic Gardening to learn more about urban gardening, hydroponics, and aquaponics 4
INTRODUCTION: THE HERB HASSLE
I’m willing to bet that you love using fresh herbs in the meals you prepare for yourself and your
family. Herbs are a fantastic way to add flavor and zest to any dish imaginable. Most of the
time, we settle for dried herbs for a couple of reasons. First, dried herbs save money. Fresh,
organic herbs are expensive! Additionally, if we buy fresh we might not use all of the herbs and
our money will go to waste.
If you do decide to buy your herbs fresh from a grocery or farmer’s market, they are going to
cost you. A pre-packaged container of fresh organic basil can cost up to $3.99 at most grocery
stores. Other popular organic herbs like chives, thyme, rosemary and oregano all cost around
the same amount.
Price isn’t the only concern. One of the strangest things about buying organic herbs is their
plastic packaging. Almost all of the companies that sell organic herbs use plastic disposable
packaging. I might be on my own here, but part of the reason I buy organic is to tap into a
more natural way of growing and consuming food. Plastic doesn’t fit into my picture of organic
food very well.
If you decide not to buy organic you will certainly pay a cheaper price, but you won’t be able to
guarantee the quality of the herbs. Because we don’t eat huge quantities of herbs in one
sitting, the flavor is extremely important. We use them to delicately flavor our food, so buying
herbs that aren’t grown in the best of conditions will only harm the flavors of your dishes.
CHEAP, FRESH HERBS YEAR ROUND
Wouldn’t you love it if you had a source of fresh herbs throughout the year? You’re in luck –
that’s why I’ve created this guide! In my posts at xPonics I like to focus on growing plants in
easy, affordable and unique ways. I’ve decided to put together a Mini Hydroponic Herb Garden
plan for all of you who wish you could have fresh herbs year round but don’t know where to
begin when it comes to growing your own.
The goal in this guide is to make it as cheap and easy as possible for you to construct your
garden using materials you can find at most home improvement and pet stores. I want to make
the use of herbs in your kitchen a more dynamic process. From seed to sprout to harvest, I’ll
teach you a way to build and maintain a hydroponic herb garden that thrives.

Epic Gardening Hydroponic Herb Garden Guide
Visit Epic Gardening to learn more about urban gardening, hydroponics, and aquaponics 5
MATERIALS
The plans that I’ve included in this eBook are designed for an eight-plant herb garden. If you
want to expand it, feel free to do so – there’s plenty of room to grow more herbs. Eight plants
allow you to grow a lot of different types of herbs. Basil, sage, oregano, thyme, parsley, chives,
tarragon and cilantro are among the most popular herbs, but they aren’t mandatory by any
means. Plant whatever you like in your garden, as long as it isn’t an herb that grows to a
massive size.
The entire shopping list comes out to around $80 or so depending on where you get your
materials. That might seem like a lot of money to start out your garden but remember – you’ll
be harvesting fresh herbs year round. In basil alone you’re saving yourself at least $50 by
growing it yourself!

Epic Gardening Hydroponic Herb Garden Guide
Visit Epic Gardening to learn more about urban gardening, hydroponics, and aquaponics 6
SHOPPING LIST
Feel free to print this page out and take it along with you when you head out to grab your
materials. I’ve tried to make it as easy as possible for you to locate everything. Read on for a
detailed breakdown of what each item does for your garden.
If you’re looking for a one-stop shop, feel free to go to the Epic Gardening store and click the
“Hydroponic Herb Garden” category. Everything you need is listed there for you:
Go To The Epic Gardening Store
Category Item Amount Location Price
Reservoir Plastic Tote 1 Amazon / Home Depot $5.50
Spray Paint 1 Amazon / Home Depot $7.00
Air Supply Round Airstone 1 Amazon / Pet Store $6.00
Air Pump 1 Amazon / Pet Store $12.00
Airline Tubing 1 Amazon / Pet Store $3.50
Airline Tubing Holders 2 Amazon / Pet Store $3.50
Nutrients/Water pH Testing Kit 1 Amazon / Pet Store $8.00
General Hydroponics FloraGro 1 Amazon $12.00
2" Net Pots 8 Amazon $4.00 Growing Media/Plants Herb Seeds/Seedlings 8
Home Depot / Garden Store $10
Aquarium Gravel/Hydroton/Perlite 1
Amazon / Pet Store $5
Optional 2" Hole Saw bit w/ pilot bit 1 Home Depot $15
Total $76.50
Total w/ Drill Bit $91.50

Epic Gardening Hydroponic Herb Garden Guide
Visit Epic Gardening to learn more about urban gardening, hydroponics, and aquaponics 7
Materials Breakdown
PLASTIC TOTE
Price: $5.50
Location: Amazon or Home Depot
A container of some kind is needed to house the water and nutrient
mixture. It’s important that this be opaque, because any light that
enters the reservoir has the potential to encourage algae growth. Too
much algae can interfere with the herbs’ root systems by blocking the
amount of nutrients they can absorb. Too much light can also warm up
the reservoir, stunting our plant.
I get my totes from Home Depot. The Sterilite line has a 15 quart tote
that works well, though they’re clear so I have to spray paint them.
Make sure that you get a sealable, airtight container with a flat lid –
cutting holes in a ridged lid can be a hassle! Also get one that is at least
six inches tall to give the roots room to spread and grow.
SPRAYPAINT
Price: $7.00
Location: Amazon or Home Depot
If you can’t find a tote that is completely opaque you may want to pick up a
can of spray paint. I chose a grayish color because black tends to absorb
sunlight and heat up the reservoir too much. In my prototype garden, even grey absorbed too
much heat – I would recommend buying white spray paint to reflect as much light as possible.

Epic Gardening Hydroponic Herb Garden Guide
Visit Epic Gardening to learn more about urban gardening, hydroponics, and aquaponics 8
AQUARIUM AIRSTONE
Price: $6.00
Location: Amazon or Aquarium Supply Store
We need an airstone to evenly distribute small bubbles of air throughout
the reservoir. Because the roots of our plants will be sitting in water
instead of soil, we have to make sure that they get enough oxygen or else
they will drown and wilt. The air bubbles oxygenate the water and allow
us to fully submerge the roots without any consequences.
I like the round airstones – they stay secured to the bottom of your
reservoir much better than the 12” long models.
AQUARIUM AIR PUMP
Price: $12.00
Location: Amazon or Aquarium Supply Store
Our air pump will allow us to oxygenate our nutrient mixture. Without
fresh air circulating through the nutrient mix, the roots of our herbs will
drown. Roots need a constant supply of oxygen in this hydroponic setup,
because they will be fully submerged in water.
You don’t need a fancy pump – the smallest and cheapest air pump will
work. I got the cheapest model I could find at the local Petco.
OPAQUE AIRLINE TUBING
Price: $3.50
Location: Amazon or Aquarium Supply Store
You need this to connect your pump to our airstone. Most packs have
around 8’ of tubing which is more than enough for your garden. Be sure to
grab a package of black tubing to avoid any algae buildup in the airline. If you get algae, the
airline may clog and starve your plants of the oxygen they need to grow.

Epic Gardening Hydroponic Herb Garden Guide
Visit Epic Gardening to learn more about urban gardening, hydroponics, and aquaponics 9
AIRLINE TUBING HOLDERS
Price: $3.50
Location: Amazon or Aquarium Supply Store
These are going to hold your airline tube down, so the airstone will stay on
the bottom of your reservoir. I’ve tried building this in the past without
using these and it doesn’t work out too well. The airstone tends to flip over and float around
the reservoir, causing an uneven flow of air bubbles. Without the bubbles, our plants will
drown.
2” HOLE SAW AND PILOT BIT
Price: $15.00
Location: Home Depot
This is optional – you can definitely cut out the 2” diameter holes on the
top of the container with an exacto knife or some scissors. I just prefer
the hole saw because it makes the whole process a lot easier. With a
pilot bit and the 2” drill bit you can bang out eight 2” holes in less than five minutes. Cutting
takes a lot longer and potentially looks worse if you don’t know your way around a knife.
EIGHT 2” NET POTS
Price: $4.00
Location: Amazon or Hydroponic Store
These are what we’ll be placing in the holes that we drill. They will hold the
plants in place and, in combination with a growing medium, will give the roots
something to grab onto as they make their way into the reservoir.
You can find these at any hydroponics store or you can shell out five bucks and
buy a 10 pack on Amazon.

Epic Gardening Hydroponic Herb Garden Guide
Visit Epic Gardening to learn more about urban gardening, hydroponics, and aquaponics 10
GROWING MEDIUM*
Price: $5.00
Location: Amazon, Petco, Aquarium Supply Store, or Hydroponics
Store
The root systems of your herbs will need something to grab onto
before they make their way into the nutrient reservoir. The cheapest option is aquarium gravel,
found at any pet or aquarium store. If you want to purchase a better growing medium, feel free
to take a look at my hydroponic media guide to get a feel for what growing media you want to
use.
*Pictured: Hydroton Expanded Clay Pellets
PH TESTING KIT
Price: $8.00
Location: Amazon or Aquarium Supply Store
Our pH testing kit will help us ensure that the pH of the nutrient
mixture in our reservoir is at the correct levels. Without a correct pH,
our herbs will not be able to absorb nutrients at optimum levels. Most
tap water has a pH of 7.0-8.0 and our plants require a pH of 6.0-6.5. This is one of the most
crucial items that we need for our garden.
NUTRIENTS
Price: $12.00
Location: Amazon or Hydroponics Store
Without adequate nutrition, our herbs will starve. We need to mix a nutrient
solution into our water in the appropriate amount for them to absorb
through their roots.
For beginners, General Hydroponic Flora Gro is by far the best nutrient to start with. Because
we are growing herbs, we only need the nutrients that stimulate growth. We don’t want to

Epic Gardening Hydroponic Herb Garden Guide
Visit Epic Gardening to learn more about urban gardening, hydroponics, and aquaponics 11
bloom our herbs because it tends to make them bitter. This makes hydroponic herb gardening
very cost-effective.
PLANTS
The final ingredient is the most crucial – the plants! It’s up to you
whether you want to start your herb garden out from seed or buy some
seedling starts from your local Home Depot or garden center. I’ve done
it both ways.
Starting from seed is cheaper over the long term, because the cost of a
pack of seeds is close to the cost of one herb seedling. However, some
of you might want to give your garden a head start. For you, seedlings
are the way to go. There’s something satisfying about building your
hydroponic system and then planting it right away.

Epic Gardening Hydroponic Herb Garden Guide
Visit Epic Gardening to learn more about urban gardening, hydroponics, and aquaponics 12
CONSTRUCTION This garden is simple to build. You should be able to finish building and planting it in under
two hours if you’ve got all the materials. Be sure to follow the instructions, because there are a
few key tips and pointers in here that are going to save you a lot of trouble later on down the
road. Let’s get started!
STEP 1 - WASH AND TAPE RESERVOIR
WASH
You need to spray paint your tote if it isn’t
already opaque to avoid algae buildup in
the reservoir. The tote needs to be
perfectly clean before you paint. Make
sure to wash and dry it completely to get
ensure a smooth, dry surface.
Once your tote is dry, take a net pot and
place it parallel to the top of the tote.
Make a mark on your tote at the bottom of
the net pot - this is where our water line
will be.
TAPE
Take a piece of tape and tape off the
area from the mark to the bottom of
the tote. After we spray paint the tote
we’ll peel this off to reveal a perfect
water level gauge.
Trust me - you’re going to want this
little feature. Without it you’ll have to
keep opening the top to check on your
water levels, which gets to be a hassle
once your herbs start to thrive.
Epic Gardening Hydroponic Herb Garden Guide
Visit Epic Gardening to learn more about urban gardening, hydroponics, and aquaponics 13
STEP 2 – SPRAY PAINT THE TOTE
Throw down some old newspaper or paper
towels and place your tote on top. Make sure
the top is fastened tight. Use broad strokes
with a can of spray paint to cover the top and
all of the sides except for the bottom with a
light coat of spray paint.
After ten minutes, give each side a heavier
coat. You want to make sure that as little
light as possible penetrates the reservoir. Let
it dry for 45 minutes.
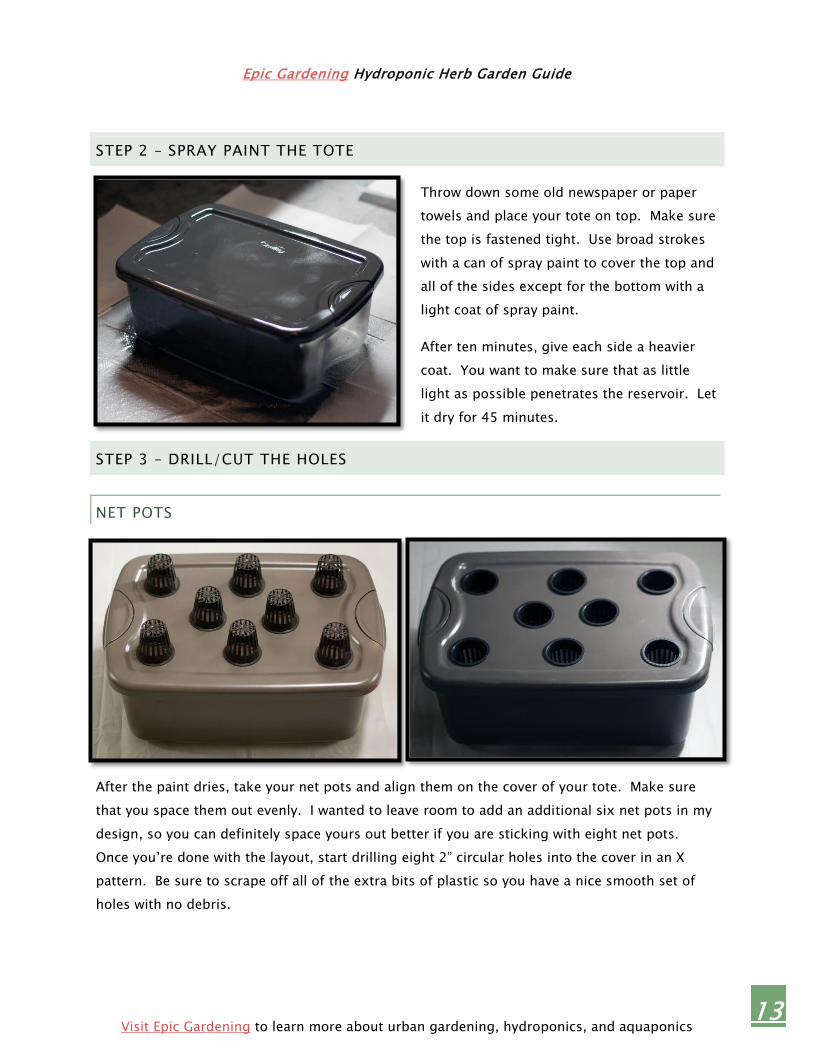
STEP 3 – DRILL/CUT THE HOLES
NET POTS
After the paint dries, take your net pots and align them on the cover of your tote. Make sure
that you space them out evenly. I wanted to leave room to add an additional six net pots in my
design, so you can definitely space yours out better if you are sticking with eight net pots.
Once you’re done with the layout, start drilling eight 2” circular holes into the cover in an X
pattern. Be sure to scrape off all of the extra bits of plastic so you have a nice smooth set of
holes with no debris.

Epic Gardening Hydroponic Herb Garden Guide
Visit Epic Gardening to learn more about urban gardening, hydroponics, and aquaponics 14
AIRLINE HOLE
Drill a hole slightly larger than your 1/8”
airline tubing in the short side of your tote,
just below the top edge. This will be the
airline feed hole. It’s important that this hole
be drilled above your water line, or you’ll have
a constant leak and never be able to maintain
adequate water levels in your reservoir.
STEP 4 – INSTALL AIR SYSTEM AND ADD WATER
AIR SYSTEM
Feed your airline through the hole you just
drilled. Use a suction cup on the side and
bottom of your tote to secure the airline and
then connect the airstone to the inside of the
tote.
ADD WATER
If you bought a 15 quart tote, you’ll need
around 2.5 gallons of water to fill the
reservoir to the water line. Regardless of
how much water your reservoir requires, be
sure to write it down. We need this number
for later when we add our nutrient solution.

Epic Gardening Hydroponic Herb Garden Guide
Visit Epic Gardening to learn more about urban gardening, hydroponics, and aquaponics 15
STEP 5 – PH AND ADD NUTRIENTS
PH YOUR TAP WATER
Now that we have built our reservoir and filled it with
water, we need to pH the water and add nutrients.
Most tap water is in the 7.0-8.0 range. The herbs you
will be growing need water with a pH in the 6.0-6.5
range, so you will need to use some pH down. The
picture to the left shows the forest green color of
average tap water in the 7.0-8.0 range.
pH down is highly corrosive, so be sure not to get it
on any part of your body. You don’t need much to
adjust the water – try a few drops to start. Mix it into
the water thoroughly and then test again. When the
color on the strip matches the 6.0-6.5 range like the
picture on the right, you’re ready to mix the nutrients.
It can take a while to get the color just right – try not
to get frustrated. This is one of the most important
steps in making sure that your plants get all of the
nutrients that they require for vigorous growth. If you
don’t correctly adjust pH, you will prevent your plants’
roots from absorbing certain nutrients. Click here for
more information about how pH interacts with
nutrient uptake.
Epic Gardening Hydroponic Herb Garden Guide
Visit Epic Gardening to learn more about urban gardening, hydroponics, and aquaponics 16
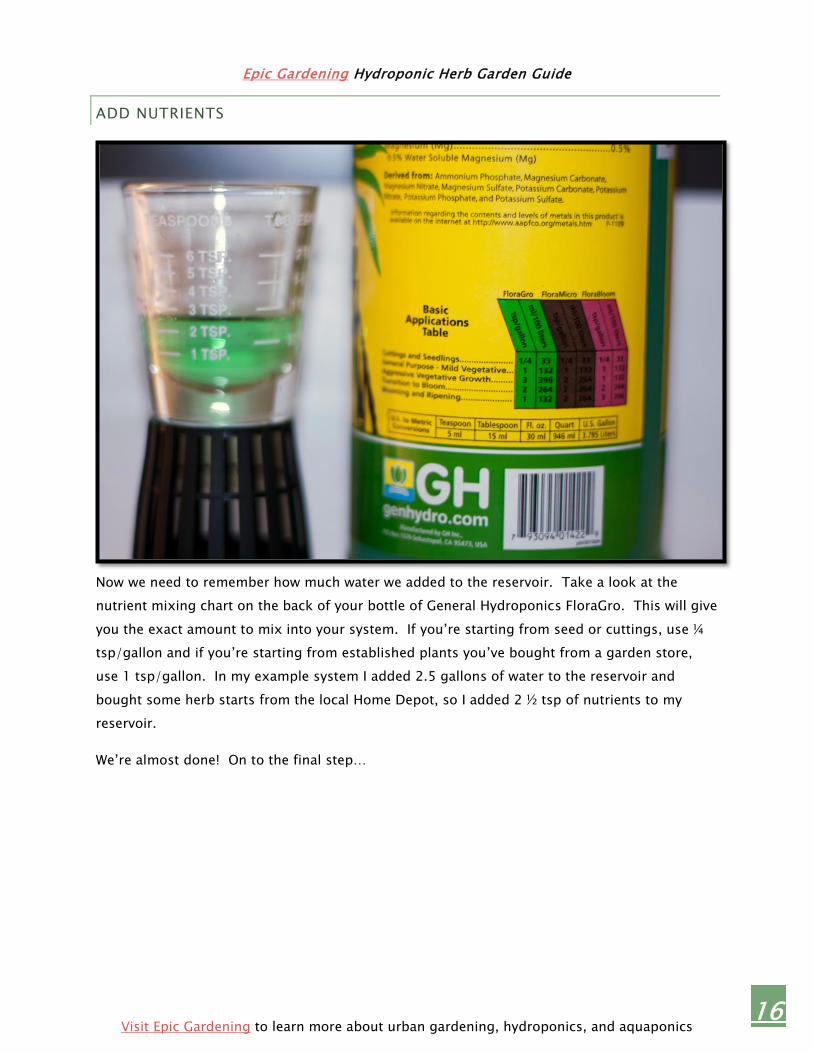
ADD NUTRIENTS
Now we need to remember how much water we added to the reservoir. Take a look at the
nutrient mixing chart on the back of your bottle of General Hydroponics FloraGro. This will give
you the exact amount to mix into your system. If you’re starting from seed or cuttings, use ¼
tsp/gallon and if you’re starting from established plants you’ve bought from a garden store,
use 1 tsp/gallon. In my example system I added 2.5 gallons of water to the reservoir and
bought some herb starts from the local Home Depot, so I added 2 ½ tsp of nutrients to my
reservoir.
We’re almost done! On to the final step…

Epic Gardening Hydroponic Herb Garden Guide
Visit Epic Gardening to learn more about urban gardening, hydroponics, and aquaponics 17
STEP 6 – ADD GROWING MEDIA & PLANTS
Now you need to add a bit of your growing media
to the bottom of each net pot. This will provide a
little base support for the root structure once we
begin to plant our herbs.
If you’re not starting from seed but instead
decided to get some herb seedlings, then
you’ll need to wash away the dirt from the
root systems. You want to start out with as
clean a plant as possible to avoid any
contamination in your reservoir.
Gently wash the dirt away from the roots,
being careful to damage your plant as little
as possible. When it is about as clean as
shown in the picture to the left, you can go
ahead and place it in your net pot.
If there are long roots that you can pull
through the gaps in the net pot, go for it!
This helps the root system hit the water
sooner and flourish in the rich nutrient bath.
If not, that’s okay – just cover the rest of the
root system up with your growing media and
plant the rest of your herbs.
Epic Gardening Hydroponic Herb Garden Guide
Visit Epic Gardening to learn more about urban gardening, hydroponics, and aquaponics 18
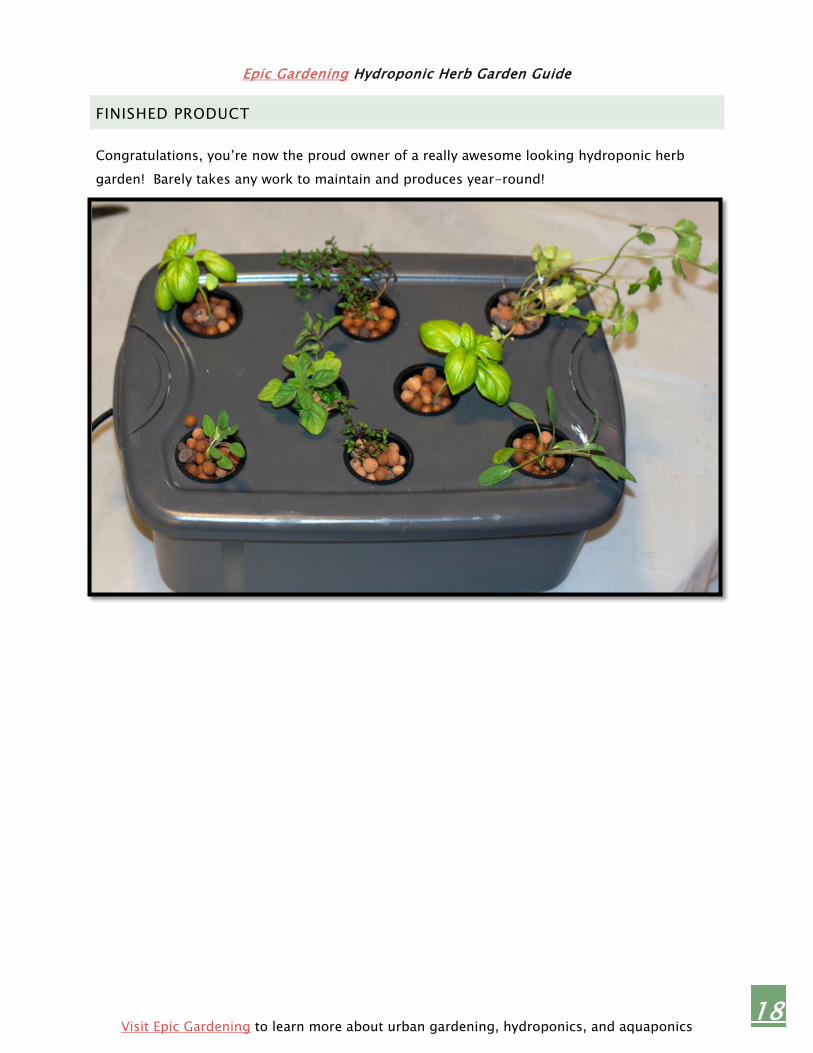
FINISHED PRODUCT
Congratulations, you’re now the proud owner of a really awesome looking hydroponic herb
garden! Barely takes any work to maintain and produces year-round!

Epic Gardening Hydroponic Herb Garden Guide
Visit Epic Gardening to learn more about urban gardening, hydroponics, and aquaponics 19
PLANT DETAILS
Here’s a list of all of the herbs that do well in a hydroponic environment. I’ve listed the most
popular five at the top. I’d be wary of planting mint or tarragon because they need to come
from a cutting, but you can buy seedlings if you want – it’s up to you! I made this chart to give
you an idea of when you can expect your herbs to be fully grown. Typically, hydroponically
grown plants mature much faster than their soil counterparts, so I wouldn’t be surprised if the
times listed here could be sped up by a few weeks.
Herbs Germination (days)
Seedling (weeks)
Harvest (weeks)
Basil 5-10 days 8 weeks 5 weeks
Chives 15-21 days 12-16 weeks 11 weeks
Oregano 8-14 days 6 weeks 6 weeks
Thyme 8-20 days 6-8 weeks 4-6 weeks
Sage 10-21 days 8 weeks 4-6 weeks
Mint 12-16 days Cutting 4 weeks
Tarragon 10-14 days Cutting 7 weeks
Marjoram 8-14 days 6 weeks 2-4 weeks
In my example garden, I planted Sweet Basil, German Thyme, Greek Oregano, Common Sage
and Cilantro, doubling up on a few of the herbs that I use all of the time. I would recommend
all of these herbs if you’re new to hydroponic gardening. They transplant well and thrive in a
hydroponic environment. It’s your garden though, so get creative – it’s up to you to plant your
garden however you wish!
Epic Gardening Hydroponic Herb Garden Guide
Visit Epic Gardening to learn more about urban gardening, hydroponics, and aquaponics 20
MAINTENANCE
LIGHTING
Place your garden in an area that gets as much natural sunlight as possible. Ideally, you want
an area that’s getting at least six hours a day. If you can’t find a spot in your home that fits
these requirements, you may want to consider lighting it artificially. A compact fluorescent
bulb (CFL) will do wonders for these plants. Make sure that your plants get no less than six
hours of sun per day, supplementing with lights if you can’t get this much light naturally.
WATERING
Taking care of your hydroponic herb garden is simple. All you have to do is make sure that you
keep the water at the correct level. To save time, just pH and mix a few gallons of the nutrient
solution to keep on hand when the water levels dip.
HARVESTING
Harvest your herbs whenever you need them. By only using FloraGro, we are keeping them in a
permanent vegetative state. If some of your herbs start to “bolt”, which means put out flowers,
then you should pinch off these flowers and let them continue to grow. Once these herbs put
out flowers they tend to lose some of their taste, so be sure to pinch off the flowers and harvest
continually!

Epic Gardening Hydroponic Herb Garden Guide
Visit Epic Gardening to learn more about urban gardening, hydroponics, and aquaponics 21
CONTACT
Thanks for checking out my first hydroponics guide. Hopefully you’ll use this and some of your
own creativity to build an indoor herb garden that fills your kitchen with fresh herbs throughout
the years!
If you have any questions that I didn’t answer in this guide, shoot me a message on any of
these:
http://www.facebook.com/epicgardening
http://www.twitter.com/epicgardening
http://instagram.com/epicgardening
http://www.pinterest.com/epicgardening
http://www.youtube.com/epicgardening
http://www.epicgardening.com/forums
Keep growing,
Kevin from Epic Gardening