Embed Size (px)
Citation preview

Frequently Asked Questions
Below are responses to some of the questions most commonly answered by our Lexis Back Office Technical Support Department. Categories are: • Moving Lexis Back Office time billing and legal accounting software from one computer to another • Installing Lexis Back Office Powered by PCLaw • Using Lexis Back Office Powered by PCLaw • Data Entry Features • Firm Procedures • Correcting Entries • Billing • Taxes • Interest • Reports and Retrieving Information • Bank Reconciliation • Calendar • Payroll • For Former TimeSlips® Users • Other Issues • Troubleshooting • Other Computers and Devices
How do I move PCLaw / PCLawPro / LegalPro / SoloPro to another computer?
The following instructions are for the use of hardware technicians who need to move PCLaw or LegalPRO/SoloPRO software from one standalone computer to another or to move software from one network server to another.
How do I move PCLaw (Windows) Versions 8.20 and up?
How do I move PCLaw (Windows) Versions 3.xx – 7.xx
Perform the following steps to move PCLaw from one computer to another. Since both the programs and data are
moved, no CD is required.
1. Determine the location of your PCLaw DATA and COMMON files.
To determine the location of your PCLaw DATA files:
o Start PCLaw.
o On the Select Set of Books window, highlight your firm name.
o The location of your data files is listed at the bottom of the window to the right of the word
PATH.

To determine the location of your PCLaw COMMON files:
o Start PCLaw.
o Click the Help pull-down menu.
o Click About PCLaw.
o Hold down the Ctrl key and the Shift key on your keyboard while you click Tech Support.
o On the Alumni Computer Group Data Directory Dump window, the location of your common
files is listed to the right of the word COMMON.
2. Make sure no one is running PCLaw.
3. Copy the DATA and COMMON directories and their contents, including all subdirectories, from the old
computer to the new computer (or backup these directories and restore them to the new computer).
Technical Note: It is important that the DATA and COMMON subdirectories are on the same directory level for the setup program to automatically detect the PCLaw data.

4. Run the SETUP program on the new computer:
o Click Start.
o Click Run.
o In the Open box, type pclawpath\COMMON\INSTALL\SETUP
o (where pclawpath represents the location of the COMMON directory on the new computer)
o Click OK.
o Follow the instructions of the Setup Wizard.
Networking Note: To connect a new workstation to a new dedicated server, follow the instructions for a Workstation Installation in the PCLaw for Windows User Guide. If the existing workstations are not being changed, they will automatically run PCLaw on the new server as long as the same drive letter is used to map to the new server as was used to map to the old server.
CAUTION: Do not remove your original PCLaw until you have verified that the program is working correctly with
current data on the new computer.
Installing PCLaw
How do I install PCLaw on additional workstations?
First, determine the location of the Shared Components of PCLaw:
1. On the Help pull-down menu, click About PCLaw(Pro).
2. While holding down the Ctrl and Shift keys, click Tech Support. The following window appears:
3. Write down the path listed beside the word COMMON.
4. Click OK.
5. Click Close.
Next, install PCLaw on the workstation. The workstation must have full access rights to the computer where the
Shared Components reside. The PCLaw CD is not required.
On the workstation:

1. Click Start.
2. Click Run.
3. In the Open box, type the location of the PCLaw Shared Components as determined in Step 3 above.
4. Append the path with: \INSTALL\SETUP.
5. Click OK.
6. On the Welcome window, click Accept if you accept the Software License Agreement.
7. On the PCLaw Installation window, select Attach to a PCLaw system already installed.
8. Click Next.
9. Follow the instructions of the Installation Wizard.
10.
11. For more information, see "Installing on Subsequent Workstations" in the PCLaw User Guide.
What are the minimum hardware and software requirements for PCLaw?
Why is PCLaw slow now that I've upgraded to a newer version?
Many times when a firm updates PCLaw, they also update their computer systems. This may result in a change in the antivirus settings.
Compare your antivirus settings to the settings recommended at www.pclaw.com/networking/basic/#3. Your computer administrator may want to change the settings.
Using PCLaw
Whenever I type a matter description containing numbers, such as Purchase of Lot 14, PCLaw changes the numbers to words so it says Purchase of Lot Review of. How can I type a number and have it remain a number?
PCLaw automatically expands explanation code 14 into the associated text Review of (see Options > Explanation
Codes) when you press the spacebar.
You can disable the auto expansion of explanation codes in Workstation Settings:
1 On the Options pull-down menu, click Workstation Settings.
2 Click the Data Entry tab. The window on the right hand side appears:
3 Clear Auto Expand Explanation Codes on <Space>.
4 Click OK.
If you also experience "auto expansion" when typing explanation codes followed by punctuation marks (for example, when typing Mr.), clear Auto Expand Explanation Codes on , . ; : . With both controls cleared, explanation codes only expand when holding down the Shift key while pressing the Spacebar.
These are workstation settings and only affect the workstation on which they are made.

How can I use PCLaw for time and billing but not accounting?
To use PCLaw for only time and billing, follow these rules:
• If a default G/L account appears when entering transactions, accept it.
• If a G/L account is required when entering transactions, use 5000 (Expenses with the Simplified set of G/L
accounts).
You don't have to print financial statements, close the month or reconcile the bank. Just ignore these features.
How do I find out what version of PCLaw I am running?
In PCLaw, point to the Help pull-down menu and click About PCLaw (or About LexisNexis PCLaw) . This
window shows the version number at the top.
How do I find out what folders contain PCLaw data so that I can do a backup?
When you start PCLaw, your set of books is displayed with the location of the data files listed in the Path column.
Backup this folder and all the folders inside it. What is the difference between explanation codes and task codes?
Explanation codes are abbreviations or short forms of commonly-used phrases that describe such things as work

performed, costs, payees, etc. They are used to easily recall the phrase when entering data. They are also used to
store Activity Codes for task-based billing.
Task codes are used to classify time and fee entries so you can produce reports sorted by task code or restricted to a particular task code. Task codes also contain the codes required for task-based billing.
I've read about a function in the PCLaw User Guide. Now I'd like to try it out. Where can I find step-by-step instructions?
Step-by-step instructions are found in the Help files of PCLaw. When you are looking at any window, simply click
the Help button to see the instructions for that window.
On any window, click the Help button for step-by-step instructions. I would like to start PCLaw from an icon on my desktop. How do I create a PCLaw icon?
To create an icon, you must first have PCLaw installed on your workstation. Then follow these instructions:
1. On your Windows desktop, right-mouse click on the Start button.
2. On the menu that appears, click Explore.
3. Double-click on the Programs folder.
4. Double-click on the PCLaw (32 Bit) folder.
5. Click once on the PCLaw icon to highlight it.
6. Right-mouse click on the PCLaw icon.
7. On the menu that appears, click Copy. This copies the PCLaw icon into memory.
8. Close the Exploring/Explorer window by clicking the X in the upper-right corner.
9. Point anywhere on the Windows desktop and right-mouse click.
10. On the menu that appears, click Paste. This pastes the PCLaw icon on to your desktop.
Once you have created the PCLaw icon, you can start PCLaw by double-clicking on the icon.

I prefer to use the keyboard instead of the mouse. How can I access PCLaw functions without using a mouse?
You can access any of the PCLaw pull-down menus using the Alt key in combination with the underlined letter in
the name of the menu.
For example, to access the Billing menu, press the Alt key and then press B (B is the underlined letter on the
Billing pull-down menu).
To exit from a pull-down menu, press Esc.
Once you are looking at a pull-down menu, you can access any of the functions on that menu by pressing the
underlined letter on the menu option.
For example, once you are looking at the Billing pull-down menu, you can access the Recreate Bill function by
pressing R (R is the underlined letter in the Recreate Bill menu option).
Some PCLaw functions can also be accessed using the combination keys on the right hand side.
To use a combination key, hold down the Ctrl key while you press the letter indicated. For example, to access the
Create Bill function, hold down the Ctrl key while you press B.
To move from field to field in a PCLaw window, use the Tab key. (If you selected Process ENTER Key as Tab Key
on the Workstation tab of System Settings, use the Enter key to move from field to field.)
To use a PCLaw button, such as the Cancel button, highlight the button by tabbing to it and press Enter.
Combination
Keys PCLaw
Function
Ctrl+A General Retainer
Ctrl+B Create Bill
Ctrl+D Deposit Slips
Ctrl+E Expense Recovery
Ctrl+F Fee Sheet
Ctrl+G General-to-General Transfer
Ctrl+H General Check
Ctrl+I Firm Receipt
Ctrl+J Create General Journal Entry
Ctrl+K Trust Check
Ctrl+L Client Ledger

Ctrl+M Mortgage Amortization
Ctrl+N New Matter
Ctrl+O Open Matter
Ctrl+P Create Pre-Bill
Ctrl+Q Quick Timer
Ctrl+R Receive Payment
Ctrl+S Time Sheet
Ctrl+T Trust Receipt
Ctrl+U New Payable
Ctrl+W Change Bill
Ctrl+Y Quick Summary
Ctrl+Z Trust-to-General Transfer
Ctrl+F1 List Help
Ctrl+F4 Closes the window
Ctrl+F10 Same as the Alt key
Shift+F1 Field Help
F1 General Help
When I run PCLaw I can't see some of the buttons on my screen. Why? PCLaw requires a minimum screen resolution of 800 x 600 pixels. If your resolution is set lower you will not be able to see all the elements of a window on your screen.
To find instructions for changing your screen resolution, search for "screen resolution" in your Microsoft help files.
What is this symbol that occasionally appears when I'm running PCLaw and why does it appear? This symbol, which represents Pop Up Help, appears whenever the mouse pointer is held over a box where a list of possible entries is available.
For example, when the mouse pointer is held over a Matter box, the Pop Up Help symbol indicates you can access a list of matters in the box.
Can I change the colors on the Quick Step menu? Yes. If you right-click on an empty area of the Quick Step menu and choose Customize, you can select different colors. You can also use your own digital picture for a background or choose from the schemes provided. Is there any way to turn off the Help Panel on the Quick Step menu? Yes. Right-click on an empty area of the Quick Step menu and click Show Help Panel. How can I get rid of the tips that pop up whenever I hold the mouse pointer over a button on the Quick Step menu? Right-click in a blank area on the Quick Step menu and click Show Tool Tip.

Data Entry Features When I am entering transactions into PCLaw, I cannot see the entire window on my monitor. How can I fix this?
Please change your monitor resolution to 800 x 600 or higher. If you do not know how to do this, please contact
your computer technician. When I am entering transactions into PCLaw, the date that automatically appears is not today's date. How can I make it use today's date by default?
When you start PCLaw, it reads your computer's system date and uses that date by default.
When you enter your password, you have the option of overriding the PCLaw date. If the date that appears on
data entry windows is not today's date, your computer system does not have the correct date or the date is being
overridden when PCLaw is started.
What G/L account should I use when entering a client expense recovery?
If you are using the Simplified Set of G/L Accounts, use the Client Recovery account.
If you are using the Extended Set of G/L Accounts:
• Use the Expense account (for example, Photocopy Expense) to see the net result of expenses minus
recoveries on the Income Statement.
• Use the Recovery account (for example, Photocopy Recovery) to see the total firm expense and the total
firm recoveries separately on the Income Statement.
For more information, see the Frequently Asked Questions chapter of the PCLaw for Windows User Guide.
I'm using quick check printing and my fonts are too small, how do I change them?
The fonts used in quick check printing are the default fonts from your Windows operating system and cannot be
changed from within PCLaw. Some printers allow you to change the font directly on the printer itself.
You can, however, use alternate fonts if you de-select Quick Check Printing and use a check template on the
Banking tab of Options - System Settings. You can change the font by modifying the check template in Tools -
Template Editor. After modifying the template, test the changes by printing a check on blank paper and holding

the paper over a blank check.
Deselect Quick Check Printing and select a Template for Checks.
I am starting to use PCLaw partway through the fiscal year. What figures should I enter into PCLaw for the General Ledger?
If you want the Income Statement and Balance Sheet to reflect the whole year, then use the G/L Opening
Balances function to enter the year-to-date trial balance figures from your former accounting system. However, be
aware that the Income Statement for the first month will include year-to-date figures. I was creating a General Journal Entry and I got a message "A journal entry made to this account will not effect the associated sub-ledgers". What does this mean?
This means you are using a "reserved" G/L account. Reserved accounts are control accounts for PCLaw journals
(from the Reports - Journals pull-down menu). If you make an entry directly to a reserved account, the
corresponding journal will no longer balance with the account on the trial balance.
For example, Genbank1 (1000 General Bank Account 1) holds the balance of the bank from the General Bank
Journal. It increases when a receipt is entered and decreases when a check is issued. If a general journal entry is
made directly to this account, the Trial Balance will reflect the change to the account, but the General Bank Journal
will not. Therefore, in most cases, it is not a good idea to post directly to reserved accounts.
If it is necessary to adjust the balance in the general bank account, you should enter either a receipt or a check to
affect both the journal (General Bank Journal) and the control account Genbank1 (1000 General Bank Account 1).
Follow this rule: If a reserved G/L account appears automatically, then use it. If you are warned against using an
account, do not use it.
Example
In the illustration shown, the following general journal entry was made directly to the General Bank:
Since general journal entries, which are recorded in the General Journal, affect the Trial Balance directly, they have
no effect on the other journals.

In this example, the bank balance on the Trial Balance was reduced but the balance on the General Bank Journal
was not. The Trial Balance no longer matches the General Bank Journal.
The correct way to handle this transaction is to issue a General Check and allocate the check to the Mortgage Payable and Mortgage Interest accounts. Account Debit Credit Mortgage Payable $850.00 Mortgage Interest $150.00 General Bank $1000.00 Which account should I use when I record photocopies for a client — 5520 Photocopy Expense or 5521 Photocopy Recovery?
The answer to this question is "either one". Both accounts are expense accounts and reduce the firm’s net profit.
The difference lies in how you want to see the expense information on your Income Statement.
Assume that you have already purchased photocopy paper and toner with a check for $90. The check was entered
and posted to 5520 — Photocopy Expense.
Scenario 1: Using account 5520 — Photocopy Expense
When you make an expense recovery entry for $3.00 to 5520 — Photocopy Expense, PCLaw debits either 1210 —
Client Disbursement Recoverable (Accrual and Modified Cash methods of accounting) or 5010 — Client
Disbursement Expense (Cash method of accounting). It credits the account that you specify, in this case, 5520 —
Photocopy Expense. Your Income Statement reflects part of the transaction like this:
Photocopy Expense consists of a debit of $90.00 from the initial purchase of photocopy supplies and a credit of $3.00 from the expense recovery entry.
Expenses
5520 Photocopy Expense 87.00
5521 Photocopy Recovery 0.00

Total Expenses 87.00
Scenario 2: Using account 5521 — Photocopy Recovery
When you make the expense recovery entry for $3.00 to 5521 — Photocopy Recovery, PCLaw debits either 1210
— Client Disbursement Recoverable (Accrual and Modified Cash methods of accounting) or 5010 — Client
Disbursement Expense (Cash method of accounting). It credits the account that you specify, 5521 — Photocopy
Recovery. Your Income Statement reflects part of the transaction like this: Photocopy Expense consists of a debit of $90.00 from the initial purchase of photocopy supplies and Photocopy Recovery consists of a credit of $3.00 from the expense recovery entry. Expenses
5520 Photocopy Expense 90.00
5521 Photocopy Recovery -3.00
Total Expenses 87.00
Notice that the only difference between these two scenarios is that in scenario 2 you can see the total photocopy
expense before recoveries in one account and the total photocopy recoveries in the other account.
It makes no difference which method you use because the total expenses (and therefore, the net income) are the
same in each situation.
For more information about expense recoveries and accounting, see Processing Client Expenses on page 201 of
your user manual.
I issued a check for a matter’s courier charge and then did an expense recovery entry. Why does the charge appear twice on the pre-bill?
When the check was produced, a matter nickname was specified. This added the charge to the client ledger for
subsequent billing. When the expense recovery entry was made, the charge was also added to the client ledger.
It is not necessary, when issuing a check with a matter nickname, to make an expense recovery entry. Specifying a
matter nickname on the general check window makes the expense recovery entry occur automatically.
To apply advanced costs to a client’s account, use one of the following methods:
Method 1:
1. Issue a general check with the General Check function, specifying a matter nickname.
Method 2:
1. Issue a general check with the General Check function, without a matter nickname.
2. Record the advanced cost with the Expense Recovery function, specifying a matter nickname.
Both methods are acceptable because they result in a check being issued and a charge being added to the Client
Ledger.
When I produce a check with a matter nickname, G/L account 5210 is assigned automatically. What is this account and how is it used?
G/L account 5210 is the Client Disbursement Clearing account which is used automatically whenever a matter
nickname is specified on a general check.

When the check is saved, two debit/credit transactions are made:
1. For the general check portion of the transaction, PCLaw:
Debits the account specified
Credits the general bank account
2. For the expense recovery portion of the check, PCLaw:
Debits 1210 Client Disbursement Recoverable (accrual/modified cash)
Debits 5010 Client Disbursement Expense (cash)
Credits the account specified
Notice how the net effect on the account specified, in this case 5210 — Client Disbursement Clearing, is zero. Even
if you use a different G/L account, the net effect will still be zero. The reason we use 5210 is to keep all the
clearing transactions in one account.
In general, you can follow these rules:
• If Client Disbursement Clearing (5210) is used by default, you should accept that G/L account nickname.
• If Client Disbursement Clearing (5210) is not used by default, you should not specify this account.
The Client Disbursement Clearing account is defined on the General tab of System Settings. If you use
G/L account 5210 for some other purpose, you should change the default account on this screen.
When I print a general check, it does not line up with my printed form. How do I change the check layout?
There are two ways to change the PCLaw check layout, depending on which layout type you are using. To
determine which layout type you are using:
1. On the Options menu, select System Settings.
2. Click the Banking tab.
3. In the General Bank Account area, look at the Quick Check Printing box.
4. If Quick Check Printing is selected, you are using the Quick Check Layout and can modify the layout by clicking the Quick Check Layout button on this screen.
— or —
If Quick Check Printing is not selected, you are using a template. To determine the name of the check template
you are using, look in the Template for Checks box. You can modify the template using the Template Editor
function from the Tools menu.
For more information about the template editor, see "Template Editor" on page 317 of your user manual.
When should I use the Trust-to-General Transfer function?
This function is equivalent to issuing a trust check and then entering a general retainer, a receive payment, or

both. You use this function to perform these functions in one step.
Use the Trust-to-General Transfer function in the following situations:
• You have just created a bill and want to transfer trust funds to your general account to pay off the bill.
• You are about to create a bill and you want a transfer of trust funds to the general account to appear on
the bill.
• You want to transfer trust funds to the general account to pay off an Accounts Receivable balance.
• The last retainer the client gave you has been used up and you need more funds for the general account.
Warning: Consult your local bar association or law society to determine the regulations you must follow regarding
trust funds and general retainers.
For more information about Trust-to-General Transfers, see "Trust-to-General Transfer" on page 214 of your user
manual.
When should I use the Receive Payment function as opposed to the General Retainer function when entering a receipt from a client?
The Receive Payment function should be used if the payment from a client should be applied to an invoice that has
already been created. The General Retainer function should be used if the payment should be applied to items that
will be billed in the future.
In general, determine if the items for which you want to pay have been billed. If they have, use the Receive
Payment function. If they have not, use the General Retainer function.
Example 1:
You discuss a case with a client and agree to take on the case. The client gives you a check for $500 toward the
work you will do. Since no bills have been created for this client, you should use the General Retainer function to
receive the funds. When you eventually bill the client, the $500 general retainer will be automatically applied to the
bill to reduce the amount owing.
Example 2:
You have worked on a case for a client and have entered time and expense recovery entries. A bill is created and
mailed to the client. A week later, you receive a check for $650.00, the total amount of the bill. In this scenario,
the items being paid have already been billed; therefore, the funds should be entered with the Receive Payment
function.
If the amount entered with the Receive Payment function exceeds the amount owing on a bill, the
excess amount will be treated as a general retainer.
For more information about the Receive Payment function, refer to "Receiving a Payment From a Client" on
page 254 and "Exercise 8: Processing a payment from a client" on page 120. Pages 91 and 258 contain more
information about General Retainers.
How do I record that a receipt I entered came back to the bank as an NSF check?
If a check you received did not clear the bank, use the following procedure to correct the problem:

1. Reverse the original receipt by running the appropriate function again, type the original amount with a
minus sign (-) in front.
2. For a Receive Payment transaction only, select Pay Invoices Manually. (If you do not, the system
deducts the amount beginning with the first billed invoice. This may not be the invoice you are trying to
correct.)
3. You may also have to record a bank service charge. Enter a General Check transaction for the amount of the charge, specifying a check number of DM, and allocating it to the matter. (If you are doing so before receiving your bank statement, remember not to include the charge again when you reconcile your bank accounts.)
Important: You must use the same function that was used for the transaction. In other words, a
Receive Payment cannot be corrected using a General Retainer or a Firm Receipt. If you attempt to
do so, the amount will not be deducted from your accounts receivable and the bill will still show as having
been paid.
Note: To correct a receipt using the original date, that date must be in a month that is not yet closed. If it is
closed, reverse the receipt and enter the bank charges using a date in the current month.
How do I record an overpayment from a client?
If you receive a payment from a client that is higher than the amount owing, PCLaw handles it automatically. Use
the Receive Payment function to enter the full amount of the receipt.
PCLaw records the amount that is applied towards Accounts Receivable as a Receive Payment. When it detects
that there is still an amount being received for which there is no Accounts Receivable to apply it, PCLaw records the
overpayment as a General Retainer.
If you leave the general retainer on the client’s account, the overpayment will be applied to the next bill that is
created for this matter.
Some jurisdictions do not allow General Retainers. To refund the overpayment to the client, follow these
steps:
1. Write a refund check to the client using the General Check function. This transaction appears as an unbilled disbursement on the Client Ledger.
At this point, the Client Ledger shows an unbilled disbursement and a general retainer of the same
amount.
Create a bill using the Create Bill function to cancel out the General Retainer with the Unbilled

Disbursement.
How can I apply a client receipt to multiple matters?
Use the Receive Payment function on the Data Entry - General pull-down menu.
1. Type the client's name in the From box.
2. Type the check amount in the Amount box.
3. Type an explanation in the Explanation box.
In the allocation area,
4. Leave the Matter box empty.
5. Type or select the client nickname in the Client box.
6. Leave the Invoice box empty.
7. Type the amount of the check in the Amount box.
8. To control which invoices are paid, select Pay Invoices Manually.
9. Click OK.
The Payment Allocation window appears, listing all invoices for the client, regardless of the matter.
10. Type the payment and/or interest amount beside each invoice you wish to pay.
11. When the total allocated equals the check amount, click OK.
The General Bank Journal will show a receipt applied to multiple matters.
I have a matter with a general retainer and an Accounts Receivable (A/R) balance of the same amount. How can I use the general retainer to pay the outstanding balance?
There are two steps to this procedure:
1. Use the General Retainer feature with a negative amount to remove the general retainer.
Use the Receive Payment feature with a positive amount to pay the outstanding invoice.
What is the difference between a trust receipt and a general retainer? A trust receipt is physically deposited into the trust bank account. General retainers are physically deposited into the operating account.
Warning: In many jurisdictions, funds advanced to you must be deposited directly into the trust bank account.
Firm Procedures

I need to write a check to pay for a credit card bill. The bill contains charges for meals, gasoline and a dinner with a prospective client. How do I enter the check for this bill?
Use the General Check function from the Data Entry - General menu:
1. Enter the name of the credit card company in the To box.
2. Enter the date of the check in the Date box.
3. Enter the full amount of the check in the Amount box.
4. Canadian users should enter the total amount of GST from the bill in the GST box.
5. Enter the appropriate text in the Explanation box.
In the Allocation area:
1. On the first line, enter the meal amount and use G/L Account 5330 — Meals.
2. On the second line, enter the gasoline amount and use G/L account 5050 — Auto Expense.
3. On the third line, enter the dinner amount and use G/L account 5250 — Entertainment.
The total of the allocations must equal the amount entered in the check area of the screen (minus GST, if
applicable).
If there are personal charges on the credit card statement, enter the amount in the Allocation area and use a G/L
account such as Drawings (for partners) or Employee Loans (for employees).
If you are running PCLawPro or have the Accounts Payable optional module, you can enter each charge from your
statement as a separate A/P invoice, and then pay all the invoices with the Process Payables function.
Correcting Entries
I printed and processed a general check and have since discovered that it needs to be changed. How can I change the check?
To correct a general check, use the Correct Check function from the Data Entry - General menu. To select which
check to edit:
1. Leave the Matter box empty.
2. Leave the Entry # box empty.
3. Type the check number in the Che # box.
4. Type or select the date of the check in the Start Date box.
5. Type or select the date of the check in the End Date box.
6. Click OK. The check is displayed on the screen.
7. Make any necessary corrections.
8. To save your corrections, click Next.

If you receive a message that the entry cannot be found, read the next section. It describes the conditions that
prevent a transaction from being changed.
You can also correct a check with the Working With - General Bank function from the Data Entry menu.
Why is the Change button grayed out when I am using the Working With Client Ledger function?
When you correct a transaction using the Working With - Client Ledger function (or any other Working With
function), it is the same as using any of the "correct" functions (such as Correct Check, Correct Receipt, etc.).
Whether or not you can change a transaction, and whether or not the Change button is grayed out, depends on
the condition of the transaction. In many cases, you can only change an entry if:
• it has not been billed
• it is in a month which has not been closed
• it is not part of a transaction where part of the entry has been billed
• it is in a month where the bank has not been reconciled (if you are using PCLawPro or have the
Bank Reconciliation optional module).
If the Change button is grayed out or you receive a message that you cannot change the entry, it means that the
entry does not meet the conditions for editing.
I can’t change a check because I get the message, "Date entered is prior to accounting restriction date"
This message indicates that the month in which the check was originally written has been closed. You can only
change PCLaw entries from open months because in closed months, all the transactions have been posted
permanently to the General Ledger.
There are two ways to correct a transaction from a closed month:
Method 1:
1. Re-open the month using the Reopen Month function from the G/L menu and then make the correction.
Be sure to get your bookkeeper’s permission before re-opening a month.
Method 2:
1. Enter the incorrect transaction in the current month with a negative amount. This reverses the original
entry.
Re-enter the transaction in the current month with the correct information.
I re-opened a month to make a correction to an entry. When I attempt to correct the entry, I receive the message "You cannot make changes to an entry in a closed month." Why does PCLaw not recognize that I re-opened the month? PCLaw will not recognize that you have re-opened the month until you exit and restart PCLaw. Once you restart PCLaw, you will be able to correct the entry.
Billing

How do I show a discount on a client's bill?
There are two methods you can use to show a discount on a bill:
When creating a bill, make sure that Prompt for Changes to Billed Amounts is selected on the Options tab.
When PCLaw displays the total charges for the bill, reduce the total fees. When you click OK to produce the bill,
PCLaw prompts you for an explanation of the fee change. Type the appropriate explanation for the reduction in
fees and it will appear on the bill.
OR
Use the Fee Sheet function from the Data Entry - Fee Sheet menu to enter a flat fee with a negative amount
and an appropriate explanation such as "Courtesy Discount". When you bill the client, the total amount owing is
reduced by the negative fee entry.
How do I get my unused general retainer balance to show on the client's invoice?
Using the Template Editor from the Tools menu, add the token Balance General Retainer (represented as Bal Rtnrs
on the template) to the bill. Use a text box to the left of the token to add your own descriptive text. How can I edit the appearance of bills after they are created?
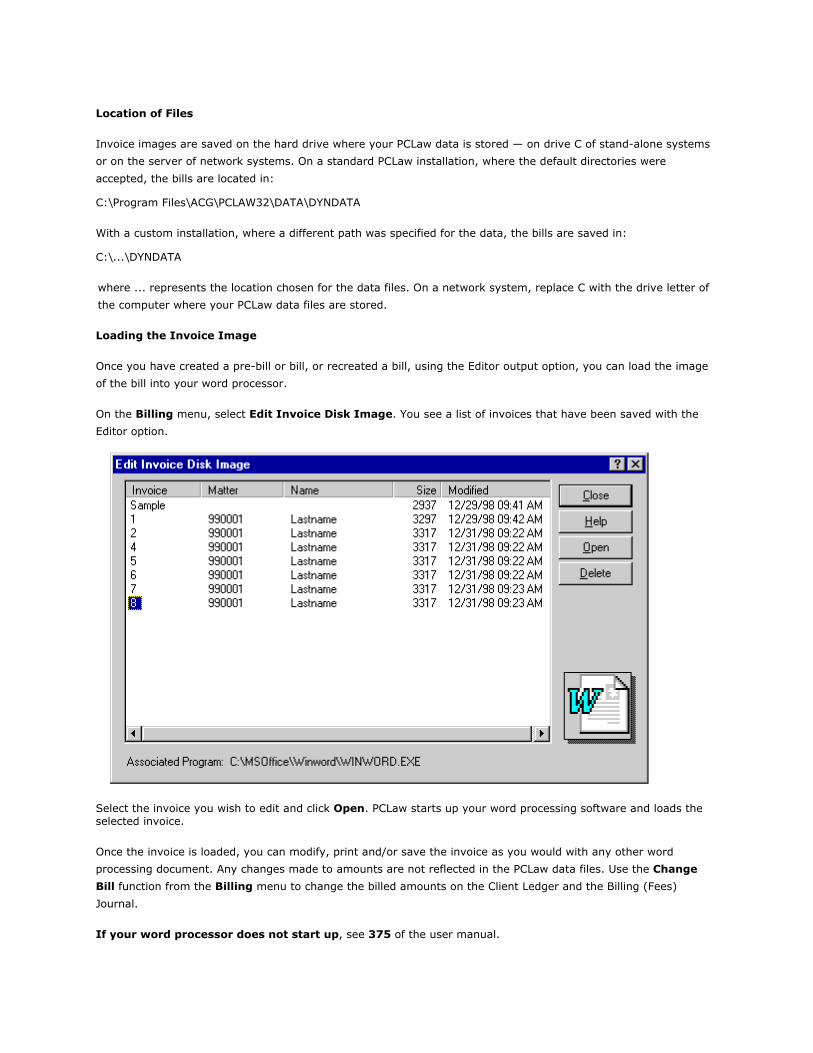
Using the Edit Invoice Disk Image Function
You can edit pre-bills, bills and recreated bills by using the Editor output option in conjunction with the Edit Invoice
Disk Image function.
To use this feature:
• word processing software must be installed on your workstation
• the word processor must have the ability to read RTF (rich text format) files
Two steps must be followed to edit invoice images:
1. Create a pre-bill or bill, or recreate a bill, selecting the Editor output option.
2. Use the Edit Invoice Disk Image function from the Billing menu to load the bill as a document in your
word processor.
Using the Editor Output Option On the Main tab of the Create Pre-Bill, Create Bill or Recreate Bill function, select the Editor option in the
Output area. This option saves the invoice as a file in rich text format.
To edit invoice images, you must first use the Editor output option:
Filenames
The filename assigned to a pre-bill is SAMPLE.RTF; however, you can save the bill with a different
name by filling in the Disk File box. For example, if you type PREBILL in the Disk File box, the
pre-bill is saved in the file PREBILL.RTF. Do not type .RTF in the box. It is automatically appended to the filename.
Bills and recreated bills use a filename consisting of the invoice number with the .RTF file extension. For example, if
you create or recreate invoice number 8331, the bill is saved in the file 8331.RTF.
Location of Files
Invoice images are saved on the hard drive where your PCLaw data is stored — on drive C of stand-alone systems
or on the server of network systems. On a standard PCLaw installation, where the default directories were
accepted, the bills are located in:
C:\Program Files\ACG\PCLAW32\DATA\DYNDATA
With a custom installation, where a different path was specified for the data, the bills are saved in:
C:\...\DYNDATA
where ... represents the location chosen for the data files. On a network system, replace C with the drive letter of
the computer where your PCLaw data files are stored.
Loading the Invoice Image
Once you have created a pre-bill or bill, or recreated a bill, using the Editor output option, you can load the image
of the bill into your word processor.
On the Billing menu, select Edit Invoice Disk Image. You see a list of invoices that have been saved with the
Editor option.
Select the invoice you wish to edit and click Open. PCLaw starts up your word processing software and loads the selected invoice.
Once the invoice is loaded, you can modify, print and/or save the invoice as you would with any other word
processing document. Any changes made to amounts are not reflected in the PCLaw data files. Use the Change
Bill function from the Billing menu to change the billed amounts on the Client Ledger and the Billing (Fees)
Journal.
If your word processor does not start up, see 375 of the user manual.

System Settings that Affect the Editor
PCLaw is initially set up to save 20 invoice images on your hard drive, which means that when you save the 21st
invoice image, the first one is deleted. You can change the maximum number of invoice images that are stored by
using the History setting on the General tab of System Settings.
When you are mass billing, you should increase this setting to a number higher than the number of bills that will be
created. For example, if between 150 and 200 bills are created when you mass bill, you should increase the History
setting to at least 200. This ensures that invoice images are saved for all the bills.
The maximum number of invoice images you can save depends entirely on the amount of hard drive space
available on the computer where your PCLaw data files are stored.
System Settings and the Appearance of Bills
The appearance of bills in RTF files is controlled by the template used when creating the bill. By default, pre-bills
use the SDETAIL template and bills/recreated bills use the template called DETAIL.
You can change which template is used for pre-bills on the Matter tab of System Settings. The bill template is
changed on the Billing/Past Due/Taxes tab of the Open Matter window.
For more information about editing bills, see page 243, or click Help in the Edit Invoice Disk Image
window.
When I look at my bill in RTF format, it contains odd-looking boxes.
The contents of your invoice are displayed in tables and cells. Consult your word processing documentation for
information about manipulating tables and cells. When I click Open, my word processor does not start up.
If your word processing software does not automatically start up when you click Open, you need to associate your
word processor with RTF files. Follow these steps only once on any workstation where the invoice does not load.
1. On the Windows desktop, double-click My Computer.
2. On the View menu, select Options or Folder Options.
3. Click the File Types tab.
4. In the list of file types, click RTF files or Rich Text Format.
5. Click Edit.
6. In the Actions box, click Open.
7. Click Edit.
8. Select the word processing software you want to use to edit PCLaw invoices. (Use the Browse button to
find the appropriate software.)
9. Click OK.

10. Click Close.
Click Close again.
When I created a bill, I forgot to use the Editor output option.
If you forgot to use the Editor output option when a bill was created, simply use the Recreate Bill function from
the Billing menu and select the Editor output option. I have some old bills for which I cannot collect the amount outstanding. How do I write off these bills?
You can reduce the balance owing on an outstanding invoice with the Change Bill function:
1. On the Billing menu, select Change Bill.
2. In the Matter box, type or select the matter nickname.
3. In the Invoice box, type or select the invoice number that you want to write off.
4. In the Task Code box, select a task code that describes the write off. (Many clients use WD — Write
Down.)
5. In the Explanation box, describe why the bill is being changed. (Many clients use "To write off
uncollectable Accounts Receivable".)
6. In the New Amount boxes, enter all zeroes. When you tab out of a New Amount box, the amount of the
write off is shown in the Change box as a negative number.
7. In the Disbursement (G/L Account) box, type or select the G/L account to debit with the disbursement write off amount.
Note: With the Cash method of accounting, PCLaw debits the account specified and credits 1210 — Client
Disbursement Recoverable. Modified Cash systems debit the account specified and credit 5010 — Client
Disbursement Expense. Accrual systems debit the account specified and credit 1200 — Accounts
Receivable.
8. Click OK.
Note: Consult your accountant or bookkeeper to determine which G/L account you should use for disbursement
write-offs.
For a detailed explanation of the debits and credits of the Change Bill function, see page 246 to
page 251 of the user manual.
Bills can also be written up or written down using this method. If the amount in the Change column is positive, the
bill is written up (in other words, the amount owing is increased). If the amount in the Change column is negative,
the bill is written down (or the amount owing is decreased).
Taxes
For firms using GST or VAT. - I received a $500 GST/VAT refund from the government. How do I enter this receipt?
There are three steps to process the GST/VAT refund:
A. Record the receipt using the Firm Receipt function.
B. Reallocate the GST/VAT as a refund using the General Cheque function.
C. Allocate the receipt to the GST/VAT Journal and correct the General Bank journal using the General Cheque
function.
A. Record the receipt using the Firm Receipt function:
1. On the Data Entry pull-down menu, point to General and click Firm Receipt.
2. In the Receipt area:
3. Type the name of the government agency in the From box.
4. Type or select the date in the Date box. To use a calendar, double-click in the box.
5. Type 500 in the Amount box.
6. Type GST/VAT Refund in the Explanation box.
7. In the Allocation area:
8. Accept the value of 500 in the Amount box.
9. Type or select G/L account 9999, or Suspense if you use the Simplified set of G/L accounts, in the G/L
Account box.
10. To save the receipt, click OK.
B. Reallocate the GST/VAT as a refund using the General Cheque function:
1. On the Data Entry pull-down menu, point to General and click Cheque.
2. In the Cheque area:
3. Type ADJ in the Cheque box.
4. Type the name of the government agency in the To box.
5. Type or select the date in the Date box. To use a calendar, double-click in the box.
6. Type 500 in the Amount box.
7. Type or select E from the Pay GST/VAT list.
8. Accept the amount of 0.00 in the GST/VAT box.
9. Type Reallocate receipt in the Explanation box.
10. In the Allocation area:

11. Leave the Matter box empty.
12. Leave the GST/VAT box empty.
13. Accept the amount of 500 in the Amount box.
14. Type or select G/L account 9999, or Suspense if you use the Simplified set of G/L accounts, in the G/L
Account box.
15. To save the entry, click OK
C. Allocate the receipt to the GST/VAT Journal using the General Cheque function:
1. On the Data Entry pull-down menu, point to General and click Cheque.
2. In the Cheque area:
3. Type ADJ in the Cheque box.
4. Type the name of the government agency in the To box.
5. Type -500 in the Amount box.
6. Select Z from the Pay GST/VAT list.
7. Type GST/VAT Refund in the Explanation box.
8. To save the entry, click OK.
For firms using GST or VAT. - I received a $10.70 refund that includes GST/VAT from ComPro Software, Inc., a vendor. How do I enter this receipt?
There are two steps to process a refund including GST/VAT from the vendor:
A. Record the receipt using the Firm Receipt function.
B. Reallocate the GST/VAT as a refund using the General Cheque function.
A. Record the receipt using the Firm Receipt function:
1. On the Data Entry pull-down menu, point to General and click Firm Receipt.
2. In the Receipt area:
3. Type ComPro Software, Inc. in the From box.
4. Type or select the date of the receipt in the Date box.
5. Type 10.70 in the Amount box.
6. Type GST/VAT Refund from Vendor in the Explanation box.
7. In the Allocation area:

8. Accept the amount of 10.70 in the Amount box.
9. Type or select the appropriate Software Expense account in the G/L Account box.
10. To save the entry, click OK.
B. Re-allocate the GST/VAT portion of the receipt to the GST/VAT Journal using the General Cheque
function:
1. On the Data Entry pull-down menu, point to General and click Cheque.
2. In the Cheque area:
3. Type ADJ in the Cheque box.
4. Type ComPro Software, Inc. in the To box.
5. Type or select the date in the Date box.
6. Type 0.00 in the Amount box.
7. Type or select Y in the Pay GST/VAT box.
8. Type -0.70 in the GST/VAT box.
9. Type Reallocate receipt in the Explanation box.
10. In the Allocation area:
11. Leave the Matter box empty.
12. Leave the GST/VAT box empty.
13. Accept .70 in the Amount box.
14. Type the appropriate Software Expense account in the G/L Account box or double-click to select from a
list of G/L accounts.
15. To save the adjustment, click OK.
Interest
I charge interest on overdue accounts; however, I do not charge interest for the first 30 days. Can I do this in PCLaw?
Yes. In PCLaw, specify a grace period:
1. On the Options pull-down menu, click System Settings.
2. Click the Interest tab. (If you have PCLawPro or the Past Due Notices optional module, click the Past
Due Notices tab.)
3. In the Grace Period area, click 30 Days. (If you have PCLawPro or the Past Due Notices optional
module, select End of Grace Period and type 30 in the Days box.)

4. Click OK.
5. PCLaw will not charge interest on overdue accounts for the first 30 days after the invoice date.
How can I prevent one matter from being charged interest on their overdue account?
Disable interest for the one matter:
1. On the toolbar, click .
2. Type the matter nickname in the Matter box or double-click to select from a list of matters.
3. Click OK.
4. Click the Selections tab. The following window appears:
5. In the Past Due area, clear the Apply Interest box.
6. Click Save/Close.
7.
8. PCLaw will not charge interest on this matter.
I want to charge interest on overdue accounts as of September 1. How can I charge interest as of September 1 but not before that date?

To prevent interest being charged before a specific date on all matters:
1. On the File pull-down menu, point to Matter and click Global Change.
2. On the Select Matters to View window, click OK.
3. At the prompt, click OK. The following window appears:
4. In the Charge for All Dates box, click Clear.
5. Select No Interest Before and type or select the date on which to begin charging interest.
6. Click the Apply button. You see the following prompt:
7. To change the interest settings for all matters, click Yes.
PCLaw changes the interest settings on the Selections tab of the Open Matter window for all matters.
To prevent interest being charged before a specific date on one matter:

1. On the toolbar, click .
2. Type the matter nickname in the Matter box or double-click to select from a list of matters.
3. Click OK.
4. Click the Selections tab. The following window appears:
5. In the Past Due area, clear the Charge Interest For All Dates check box.
6. Type the date on which to begin charging interest in the No Interest Before box.
7. Click Save/Close.
8.
9. PCLaw does not charge interest before the specified date for the one matter.

I charge interest of 10% but I'd like to charge 6% for one matter. How can I charge a different rate for one matter?
Override the default interest rate assigned to new matters.
To override the interest rate for a particular matter:
1. On the toolbar, click .
2. Type the matter nickname in the Matter box or double-click to select from a list of matters.
3. Click OK.
4. Click the Selections tab. The following window appears:
5. Clear the Use Default Rate box.
6. Type the rate to use for this matter in the Specific box.
7. Click Save/Close.
8. PCLaw assigns the interest rate defined here to all new invoices created for this matter.
I processed some invoices but the interest rate assigned to them is incorrect. How can I change the interest rate assigned to existing invoices?

To change the interest rate assigned to existing invoices:
1. On the Billing pull-down menu, click Change Interest on Invoices.
2. Type the matter nickname in the Matter box or double-click to select from a list of matters.
3. To change the interest rate for one invoice, type the invoice number in the Invoice box or double-click to
select from a list of invoices.
4. - or -
5. To change the interest rate for all invoices, leave the Invoice box empty.
6. To change the interest rate for invoices created between a specific set of dates, type the date range in the
Start Date and End Date boxes.
7. Type the interest rate to assign to the invoices in the Interest Rate box.
8. Click OK.
9. PCLaw changes the interest rate assigned to all invoices with the specified criteria.
For PCLawPro or the Past Due Notices optional module. The interest rates I charge are based on the bank's prime rate plus 2%. I update these rates on a monthly basis. How can I charge different rates each month?

Set up an interest rate table:
1. On the Options pull-down menu, click System Settings.
2. Click the Past Due Notices tab.
3. Click Use Rate Table.
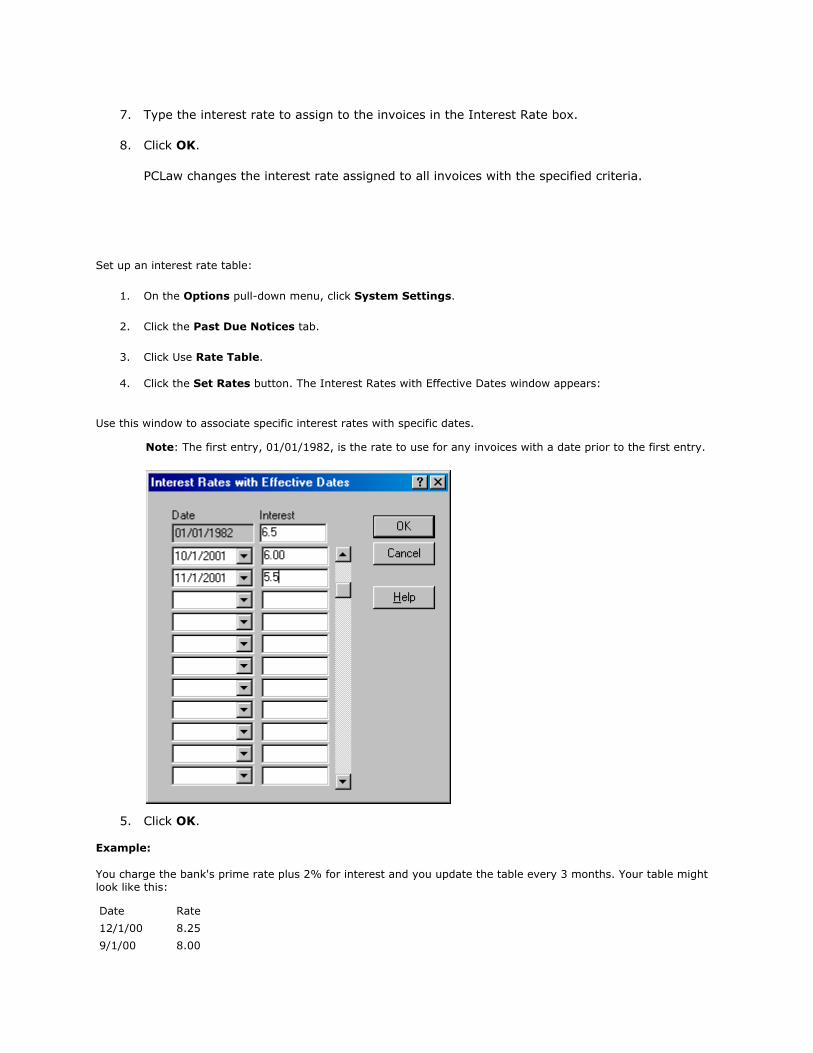
4. Click the Set Rates button. The Interest Rates with Effective Dates window appears:
Use this window to associate specific interest rates with specific dates.
Note: The first entry, 01/01/1982, is the rate to use for any invoices with a date prior to the first entry.
5. Click OK.
Example:
You charge the bank's prime rate plus 2% for interest and you update the table every 3 months. Your table might look like this:
Date Rate
12/1/00 8.25
9/1/00 8.00
3/1/01 7.75
6/1/01 8..25
Assume the invoice date for a bill is November 4, 2000 and there is a 30 day grace period which expires on
December 4, 2000. If a past due notice is created for the client on April 1, 2001, interest will be calculated based
on:
•86 days at 8.00% (27 in December, plus January and February).

•32 days at 7.75% (March, plus April 1).
For PCLawPro or the Past Due Notices optional module. How can I compound the interest on invoices twice per year?

Select a compounding frequency:
1. On the Options pull-down menu, click System Settings.
2. Click the Past Due Notices tab. The following window appears:
3. In the Compounding Frequency area, select Semi-Annually.
4. Click OK.
5.
6. After 6 months, PCLaw charges interest on the accumulated interest.
For PCLawPro or the Past Due Notices optional module. The grace period for interest on invoices is 30 days but for a few matters I would like to extend their grace period to 60 days. How can I do this in PCLaw?

I charge interest on overdue accounts; however, I do not charge interest for the first 30 days. Can I do this in PCLaw? Yes. In PCLaw, specify a grace period:
1. On the Options pull-down menu, click System Settings.
2. Click the Interest tab. (If you have PCLawPro or the Past Due Notices optional module, click the Past Due Notices tab.)
3. In the Grace Period area, click 30 Days. (If you have PCLawPro or the Past Due Notices optional module, select End of Grace Period and type 30 in the Days box.)
4. Click OK.
PCLaw will not charge interest on overdue accounts for the first 30 days after the invoice date.
How can I prevent one matter from being charged interest on their overdue account? Disable interest for the one matter:
1. On the toolbar, click .
2. Type the matter nickname in the Matter box or double-click to select from a list of matters.
3. Click OK.
4. Click the Selections tab. The following window appears:
5. In the Past Due area, clear the Apply Interest box.
Click Save/Close.

PCLaw will not charge interest on this matter.
I want to charge interest on overdue accounts as of September 1. How can I charge interest as of September 1 but not before that date? To prevent interest being charged before a specific date on all matters:
1. On the File pull-down menu, point to Matter and click Global Change.
2. On the Select Matters to View window, click OK.
3. At the prompt, click OK. The following window appears:
4. In the Charge for All Dates box, click Clear.
5. Select No Interest Before and type or select the date on which to begin charging interest.
6. Click the Apply button. You see the following prompt:
7. To change the interest settings for all matters, click Yes.
PCLaw changes the interest settings on the Selections tab of the Open Matter window for all matters.

To prevent interest being charged before a specific date on one matter:
1. On the toolbar, click .
2. Type the matter nickname in the Matter box or double-click to select from a list of matters.
3. Click OK.
4. Click the Selections tab. The following window appears:
5. In the Past Due area, clear the Charge Interest For All Dates check box.
6. Type the date on which to begin charging interest in the No Interest Before box.
Click Save/Close.
PCLaw does not charge interest before the specified date for the one matter.
I charge interest of 10% but I'd like to charge 6% for one matter. How can I charge a different rate for one matter? Override the default interest rate assigned to new matters.
To override the interest rate for a particular matter:
1. On the toolbar, click .

2. Type the matter nickname in the Matter box or double-click to select from a list of matters.
3. Click OK.
4. Click the Selections tab. The following window appears:
5. Clear the Use Default Rate box.
6. Type the rate to use for this matter in the Specific box.
7. Click Save/Close.
PCLaw assigns the interest rate defined here to all new invoices created for this matter.
I processed some invoices but the interest rate assigned to them is incorrect. How can I change the interest rate assigned to existing invoices? To change the interest rate assigned to existing invoices:
1. On the Billing pull-down menu, click Change Interest on Invoices.
2. Type the matter nickname in the Matter box or double-click to select from a list of matters.
3. To change the interest rate for one invoice, type the invoice number in the Invoice box or double-click to select from a list of invoices.
4. - or -
5. To change the interest rate for all invoices, leave the Invoice box empty.
6. To change the interest rate for invoices created between a specific set of dates, type the date range in the Start Date and End Date boxes.
7. Type the interest rate to assign to the invoices in the Interest Rate box.
8. Click OK.
PCLaw changes the interest rate assigned to all invoices with the specified criteria.
For PCLawPro or the Past Due Notices optional module. The interest rates I charge are based on the bank's prime rate plus 2%. I update these rates on a monthly basis. How can I charge different rates each month? Set up an interest rate table:
1. On the Options pull-down menu, click System Settings.
2. Click the Past Due Notices tab.
3. Click Use Rate Table.
4. Click the Set Rates button. The Interest Rates with Effective Dates window appears:
Use this window to associate specific interest rates with specific dates.
Note: The first entry, 01/01/1982, is the rate to use for any invoices with a date prior to the first entry.
5. Click OK.
Example:
You charge the bank's prime rate plus 2% for interest and you update the table every 3 months. Your table might look like this:
Date Rate
12/1/00 8.25
9/1/00 8.00

3/1/01 7.75
6/1/01 8..25
Assume the invoice date for a bill is November 4, 2000 and there is a 30 day grace period which expires on
December 4, 2000. If a past due notice is created for the client on April 1, 2001, interest will be calculated based
on:
•86 days at 8.00% (27 in December, plus January and February).
•32 days at 7.75% (March, plus April 1).
For PCLawPro or the Past Due Notices optional module. How can I compound the interest on invoices twice per year? Select a compounding frequency:
1. On the Options pull-down menu, click System Settings.
2. Click the Past Due Notices tab. The following window appears:
3. In the Compounding Frequency area, select Semi-Annually.
Click OK.
After 6 months, PCLaw charges interest on the accumulated interest.
For PCLawPro or the Past Due Notices optional module. The grace period for interest on invoices is 30 days but for a few matters I would like to extend their
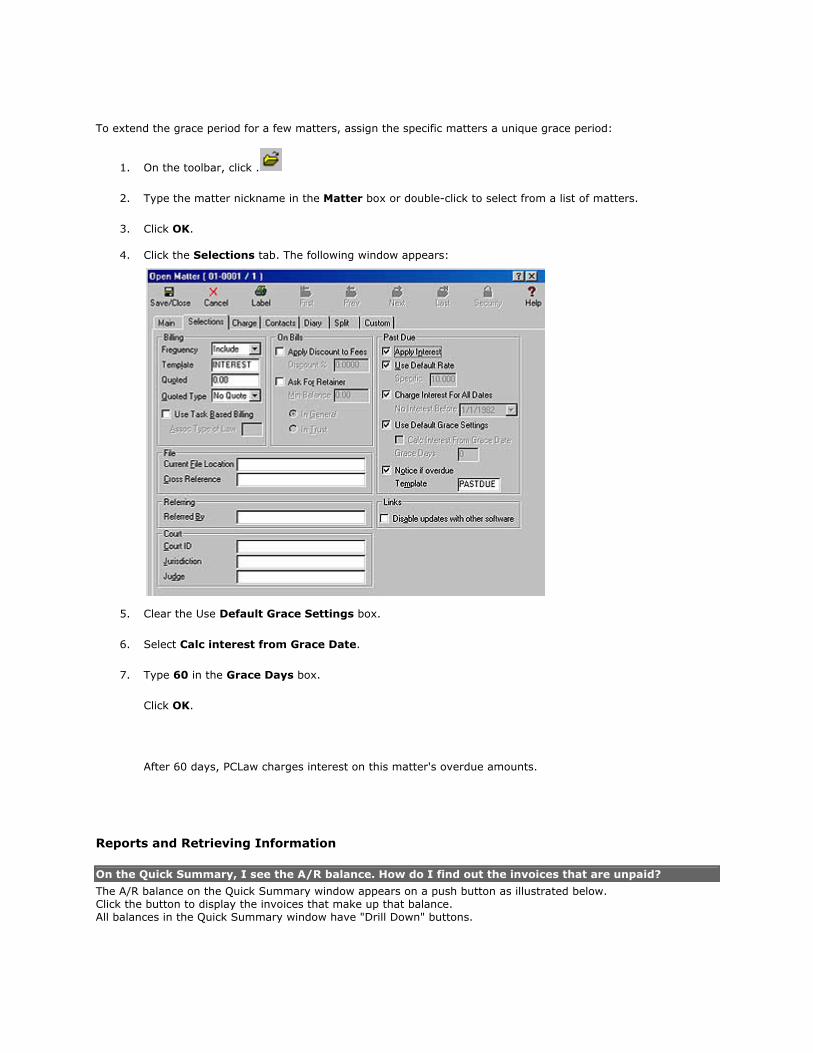
grace period to 60 days. How can I do this in PCLaw? To extend the grace period for a few matters, assign the specific matters a unique grace period:
1. On the toolbar, click .
2. Type the matter nickname in the Matter box or double-click to select from a list of matters.
3. Click OK.
4. Click the Selections tab. The following window appears:
5. Clear the Use Default Grace Settings box.
6. Select Calc interest from Grace Date.
7. Type 60 in the Grace Days box.
Click OK.
After 60 days, PCLaw charges interest on this matter's overdue amounts.
Reports and Retrieving Information
On the Quick Summary, I see the A/R balance. How do I find out the invoices that are unpaid?
The A/R balance on the Quick Summary window appears on a push button as illustrated below. Click the button to display the invoices that make up that balance. All balances in the Quick Summary window have "Drill Down" buttons.

How can I quickly look up the balances of a matter?
To see the status of a matter without printing a report, you can use the Quick Summary feature.
1. In PCLaw, hold down the Ctrl key while you press Y.
2. Type or select the matter nickname.
3. Click Select.
The screen displays general information about the matter and a summary of accounting information. The following
information is displayed:
Last Trust Date of last trust transaction.
Last Billed Date of last bill.
Last Entry Date of last transaction.
A/R Bal Total amount owing from bills.
Unbd Disb Total amount of advanced costs which have not yet been billed.
Unbd Fees Total amount of time and fee entries which have not yet been billed.
Total Trust Total amount held in the trust bank account for this matter.
Gen Rtnr Total amount of receipts which have not been applied to outstanding invoices.
Unbd Hrs Total number of hours spent on this matter which have not yet been billed.
Trust Bals Lists the balance held in each trust bank account.
To see a summary of all matters for a particular client, omit the matter nickname and type a client
nickname.

Which report shows all of today’s general checks?
To produce a list of checks issued for a particular day, use the General Bank function on the Reports - Journals
menu.
1. Use today’s date in the Start Date and End Date boxes.
2. In the Include area, select Disbs.
3. To include checks from all bank accounts, leave the Acct box empty.
4. — or —
5. Enter a bank account nickname in the Acct box to restrict the report to one general bank account.
6. Leave the Che/Rec # and G/L Account boxes empty.
7. Select Printer in the Output area.
If you want a list of receipts only, select Receipts in the Include area. You can include both disbursements and receipts by selecting Both.
When I print a general bank journal, it includes all the checks and receipts from all the general accounts. How can I get a list of transactions from one account only?
If you need a list of entries from one bank account only, simply select a bank account nickname. The report will be
restricted to entries from that account only.
I want to produce a report that shows all the unbilled time for a specific lawyer’s matters. Where can I find this information?
Use the Work in Progress report from the Reports - Clients menu.
On the Common tab:
1. Leave the Matter box empty.
2. Leave the Client box empty.
3. Type or select the nickname for the responsible lawyer for which you would like to produce the report.
4. In the End Date box, use today’s date to see a list of unbilled time as of today.
5. Deselect the Totals Only check box.
6. Deselect the Firm Totals Only check box.
On the Matters tab:
1. Accept all the preset selections.
On the Advanced tab:
1. Select the Time/Fees check box.

2. Deselect the Disbs check box.
3. Accept today’s date in the Age From box to age all entries as of today.
The report lists all the unbilled time and fee entries for all matters that have the responsible lawyer that you
specified.
Bank Reconciliation
How do I reconcile my first bank statement in PCLaw?
To reconcile the first bank statement, make sure you have the following items:
•completed bank reconciliation for the previous period
•bank statement for the current period
Then follow these instructions:
1 On the Tools pull-down menu, click Bank Reconciliation.
The Select Account window appears: (see right hand
image)
2 Select either General or Trust.
3 In the Acct box, type the bank account to reconcile or
double-click to select from a list of bank accounts.
4 Type the starting date from the bank statement in the
Start Date box or double-click to use the calendar.
5 Type the ending date from the bank statement in the End
Date box or double-click to use the calendar.
6 Type the beginning balance from the bank statement in the Opening Balance box.
7 Type the ending balance from the bank statement in the Closing Balance box.
8 Select Skip zero balance receipts to ignore receipts with a value of 0.00.
9 Select Skip zero balance checks to ignore checks with a value of 0.00.
10 Deselect Read Bank Statement from disk.
11 Select Auto Save every and specify the number of minutes to have PCLaw automatically save the bank at the
specified frequency.
12 Click OK. The Mark Items window appears.

1 Click Prior to enter outstanding checks and receipts from the previous reconciliation.
2 Click a transaction to marked it cleared (with a check mark P) or outstanding (no check mark).
3 Click Select All or Deselect All to mark all items cleared or outstanding respectively.
4 Click Find & Mark to find a specific check and mark it cleared automatically.
5 Click New Errors to enter new errors from the bank statement. Use positive amounts when the bank errs in
your favor and negative amounts when the bank errs in their favor.
6 When the difference is zero (see the Difference box at the bottom of the Mark Items window), the following
message appears:
7 Click Close.
8 Click Report to print the Reconciliation Report.
9 Click OK to proceed to the next reconciliation period.

Reconciliation Tips
If the difference is not zero, look for:
· Entries marked cleared that are actually outstanding.
· Cleared entries on the bank statement that are not in PCLaw.
· Duplicate entries in PCLaw.
· Entries with incorrect amounts.
· Entries with the incorrect bank account.
· Entries with incorrect dates.
· Bank balances that do not match the previous period's reconciliation.
If the difference is evenly divisible by nine, look for entries with transposed numbers (42 instead of 24) or with the
decimal point in the wrong place (3.10 instead of 31.00).
If the difference is zero at the bottom of the window but the calculated closing balance is not equal to PCLaw's
bank journal balance, the following message appears:
This occurs when:
• An outstanding check or receipt from a previous period is not entered using the Prior button.
• The general bank opening balance is incorrect (use Tools>General Bank Opening Balances to correct the
opening bank balance).
I've reconciled my bank and the Calculated Closing Balance is zero but I get the message "The calculated statement balance matches the bank statement balance. However, the calculated bank journal balance does not match the actual bank journal balance...". What does this mean?
This message means that the bank statement is balanced, but when this reconciled balance is compared to the
"book" balance in PCLaw, it is not the same. It appears when:
• you are performing the first reconciliation in PCLaw and have not entered all the outstanding checks or
receipts from a previous period
• the bank opening balance was entered incorrectly with the General Bank Opening Balances function
(when reconciling a General bank account)
• the trust opening balances were entered incorrectly with the Matter Opening Balances function (when
reconciling a Trust bank account)
• an entry was made in a month where the bank was already reconciled (known as a backdated entry)

If this is your first reconciliation, make sure all outstanding checks and receipts have been entered using the Prior
button in the Bank Reconciliation window, check the General Bank Opening Balances on the Tools pull-down menu
and check the Matter Opening Balances on the Tools pull-down menu.
If a backdated entry has been made, change the date of the entry to the month you are reconciling. If you cannot
change the date, you must reprocess the bank reconciliation for the month with the backdated entry and every
month after it.
To prevent a backdated entry from occurring in the future, read all PCLaw messages carefully when entering
transactions. PCLaw warns you when you are attempting to make a backdated entry.
Calendar
How do I turn off the Diary listing that appears the first time I start PCLaw each day?
The first time you start PCLaw every day, the Calendar/Diary Report appears automatically to remind you of your
appointments.
If you do not want this report to appear automatically, select System Settings from the Options pull-down menu.
On the Workstation tab, deselectDisplay Reminders at Startup and click OK.
Payroll

I just closed a payroll period and realized that one of the checks needs to be adjusted. How can I
reprocess this check?
The easiest way to adjust a check from a payroll period that was just closed is to reopen the entire payroll period
and reprocess the period. Follow these steps:
1. Use the File - Recover function in payroll to reopen the payroll period.
2. Use the G/L - Journal Entry - Change function in PCLaw to delete the journal entry produced by Payroll.
3. Use the Working With (General Bank) function to remove all the payroll checks for the period.
4. Use the Check - Regular function in Payroll to reprocess the payroll checks.
What is the purpose of the Check - After the Fact function? (American firms)
Check - After the Fact lets you enter the details of a payroll check into the payroll system without affecting your
PCLaw bank journal or general journal. It is most often used to record a payroll check that was processed
manually.
Why is Line 2 on the Federal 941 Worksheet different from the gross wages for the quarter? (American
firms)
In PCLaw, the Payroll optional module prints the taxable wages on line 2, not the gross wages. Taxable wages are
those upon which federal tax was charged.
Taxable wages may be higher than gross wages if there is a company benefit, non-cash earning, or a pretax
deduction where the employer matches the employee contribution.
Taxable wages may be lower than gross wages if there is a pretax deduction such as a 401K or Cafeteria plan.
Some plans reduce the amount of taxable wages by the amount of the employee contribution.
How do I process a separate Bonus Check? (US Firms)
To produce separate bonus checks with taxes, follow these steps:
1. Process bonus checks before processing regular checks.
2. On the Company menu, point to Earnings and select Other Earnings-1. Select the Supplemental
Checks check box. Click OK.
3. On the Company menu, point to Taxes and select Social Security. Select the Supplemental Checks
check box. Click Next.
4. On each of the tax screens that follow, select the Supplemental Checks check box for each tax that
should be deducted from the bonus check.
5. On the Check menu, select Regular.
6. Select the Supplemental check box and click OK. (If the box is unavailable, repeat steps 2 to 4.)
7. For each employee who is receiving a bonus check,

8. • Select the employee.
9. •Click Ask/Occasional.
10. • Type the gross amount of the bonus in the Bonus box.
11. • Click OK.
12. For each employee who is not receiving a bonus check, · Select the employee. · Click Put On Leave.
13. To automatically calculate the taxes, click Calculate. (Tax amounts can be overridden using the Override
button. Check with your Accountant before using this option.)
14. To print the bonus checks, click Checks.
15. To print the reports and finalize the pay period, click Close Period.
16. Post the payroll period.
I manually processed a payroll check and entered it into PCLaw. How do I enter this check in Payroll?
Use the Check - After the Fact function to add a check to payroll that has already been printed and saved in
PCLaw. After the Fact checks appear on the Payroll History report and increase the W2 totals for the year;
however, they do not post to PCLaw's General Bank Journal or General Journal.
To add a Check - After the Fact, follow these steps:
1. On the Check pull-down menu, click After the Fact.
2. On the After the Fact Payroll Setup window, click the employee who received the check.
3. In the Check / Period end date box, type the date of the check.
4. Click the Edit button.
5. You see the After the Fact window

If the Add button is gray, you are looking at an existing After the Fact check. Click the Exit button, change the date by one day and click the Edit button again. You can only have one After the Fact check per day per employee in Payroll.
- or -
If the Add button is black, you are looking at a new After the Fact check. Figures appear automatically based on the numbers from the last regular pay check.
6. Type the check number in the Check Number box.
7. DO NOT USE A CHECK NUMBER OF ZERO.
8. Change the figures to reflect the check that was already processed in PCLaw.
9. To add the check to Payroll, click the Add button.
10. To exit the After the Fact window, click the Exit button.
11. To return to the main Payroll window, click the Exit button once more.
Notes:
• If you see the warning message, "Tax amounts should not be blank when Wages amount is greater than zero.",
you have entered an amount in a Wages box without an amount in the corresponding Employee and/or
Company box. Click the Redo button to make corrections and click the Add button when you are finished.
• If you see the warning message, "Wages amount should not be blank when Tax amounts are greater than zero.",
You have entered an amount in an Employee and/or Company box without an amount in the corresponding
Wages box. Click the Redo button to make corrections and click the Add button when you are finished.
• If you are deliberately increasing only the tax or only the wage amount, click the Ignore button; however, the
integrity of your quarterly federal and state reports may be jeopardized. •If you see the warning message, "Minus
value and/or letters are NOT allowed.", You have entered negative numbers or letters in one of the boxes. Click the
Redo button to make corrections and click the Add button when you are finished. ·
•If you are deliberately entering negative numbers to reverse a check, click the Ignore button; however, the

integrity of your quarterly federal and state reports may be jeopardized.
How do I set up a 401(K) Plan.
PCLaw Payroll can handle most pretax deductions such as 401(K) and Cafeteria style plans. It keeps track of both
the amount deducted for the employee and the amount contributed by the company, if applicable.
1. Use the Deductions (pretax) option on the Company menu to enable the plan for this set of books.
2. Use the Deductions (pretax) option on the Employee menu to enable the plan for individual employees.
On the Employee - Deductions (pretax) window:
Calculation method
• Use Amount per period if the amount to contribute to the plan is the same every pay period.
• Use Automatic calculation if the amount to contribute is based on a percentage of gross pay.
• Use Amount per month if the amount to contribute each month remains the same regardless of the
number of pay periods in a month. (If a pay frequency other than monthly is used, the amount
contributed each pay period will vary based on the number of pay periods in the month.)

General Ledger Accounts
Debit Enter the G/L account to debit with the company contribution. This is typically an expense account.
Credit Enter the G/L account to credit with both the employee deduction and the company contribution. This is
typically a withholding (liability) account.
For the cash method of accounting: If you do not want to account for the withholding until it is actually
remitted, use the same expense account in both the Debit and Credit boxes. When the remittance is paid, allocate
the check to the expense account. After the remittance is paid, the net balance in this account is the expense
portion contributed by the company. (Use a payroll history report for the period in question to determine the
amount to remit.)
Plan Type
The plan type determines whether taxes will be charged on the contributions.
401(K) Plan
Social Security, Medicare, Federal and State Unemployment, State Disability and Workers Compensation
calculations are based on the Gross Wages.
Federal, State and Local Income Tax calculations are based on the Gross Wages minus the Employee Contribution.
Cafeteria Plan
All tax calculations are based on the Gross Wages minus the Employee Contribution.
User Defined Plan
In Company - Deductions (Pretax), define on which amounts the tax calculations should be based. Use the
Taxes for User Defined button.

When a tax is selected, its calculation is based on the Gross Wages plus the Employer Contribution.
When a tax is not selected, its calculation is based on the Gross Wages minus the Employee Contribution.
In this illustration, the federal income tax calculation is based on the gross wages plus the company contribution.
The calculation for all other taxes is based on the gross wages minus the employee contribution.
To handle more complicated tax calculations, set up the employee contribution as one pretax deduction with its
own set of tax rules and set up the company contribution as a second pretax deduction with its required tax rules.
Consult the firm's accountant or plan administrator to determine which tax rules to use with the plan.
• Contributions per period Enter the percentage of gross wages to deduct from the employee's pay plus
the percentage contributed by the company.
• Company paid portion Enter the percentage of the total that is paid by the company.
• Yearly maximum If there is a maximum the employee and company can contribute per year, enter the
amount in this box. When the total contributed by the employee and the company reach this amount,
Payroll will stop deducting for this plan.
• Paid so far this year If Payroll was just installed and contributions have already been made this year,
enter the amount already contributed by both the Employee and the Company in this box.
• W2 box To show the total employee contribution on the W2 form, select a box number. Box 13 and 14
require a Code or Label that identifies the plan. Consult the firm's accountant or plan administrator to
determine the proper code or label to use.
Example:
Alumni Law Firm has a retirement plan to which both the employee and the employer contribute. The employee
contribution is 3% of their gross wages. The employer will contribute another 3%. The maximum contribution for
both the employee and employer is $6000 per year. When taxes are calculated, federal income tax, state income
tax and local income tax are based on the gross wages minus the employee contribution. All other tax calculation
are based on the gross wages. The employee contribution must be reported in Box 13 with a Code of D.
The following illustration shows how to set up the retirement plan:
A 401(K) Plan Type is used because the federal, state and local tax calculations are based on the gross wages
minus the employee contribution. All other taxes are based on the gross wages.

Notice how the Contributions per period box contains a 6 - meaning that a total of 6% of the gross wages will be
contributed toward the plan. The Company paid portion is 50%, meaning half of the contribution is paid by the
company.
For example, if the gross wages are $1000, the total contribution is 6% of $1000 - $60.00. Half of this amount is
contributed by the company and the other half is deducted from the employee's pay.
How can I check the year-end W2 figures in Payroll?
Run a Payroll History report (Report > Pay History) from January 1 to December 31 and compare the figures to a
W2 Information report (Report > Employee > W2).
Take into consideration that taxable wages may be higher or lower than gross wages if you have taxable benefits,
company benefits, non-cash earnings, non-tax payments or pre-tax deductions such as 401(k) or cafeteria plan.
For Former Timeslips Users
I’ve just converted from Timeslips® to PCLaw. What differences in terminology should I be aware of when using PCLaw?
The following table compares Timeslips® and PCLaw terminology:

Timeslips® PCLaw
Client Client
Project Matter
User (or Timekeeper) Lawyer
Client History Matter Opening Balances
Expense Expense Recovery
Slip Time Entry
Abbreviations/Activity Lists Explanation Codes
Case Type Type of Law
Client Status Billing Frequency
TSLayout Template Editor
TSTimer Quick Timer
Navigator Quick Step
Why is there a separate function for fees? Timeslips® uses one function to enter both time and fees.
When PCLaw was first designed in 1982, there were separate time and fee entry functions. Since then, we have
added the ability to enter a flat fee with the Time Entry function by omitting the hours. Because many of our
clients still use the Fee Entry function, we have not removed it.
What is the difference between the Receive Payment function and the General Retainer function?
The Receive Payment and General Retainer functions are used to receive funds on behalf of a client into the
General bank account. The Receive Payment function is used when the funds should be applied to outstanding
invoices. The General Retainer function is used when the funds should be applied to future invoices, as in the case
of an advance.
Why do you have to close months? What happens if you do not close them?
When you close a month in PCLaw, you finalize the General Ledger figures for that month and by doing so, prevent
any financial items from being entered in that month. This is useful especially when the bank has been reconciled.
When a month is closed, you can no longer make any more entries in that month.
Closing a month also allows PCLaw to do some "housekeeping". Any billed items from closed months over two
years old are summarized to reduce hard drive usage.
If you do not close months, your PCLaw data files will continue to expand. Reports will eventually take a long time
to produce because PCLaw has to read through large files.
Unlike some accounting systems, you do not have to close a month before entering transactions in the following
months.

What & where are my Timeslips®?
In PCLaw, time records are called Time Entries and they are made using the Time Sheet function on the Data
Entry – Time Entry pull-down menu.
You can view, modify and print time entries using the Working With (Time Entries) function from the Data
Entry pull-down menu.
Must I wait for the start of my year-end to convert from Timeslips® to PCLaw?
No. You can end a month in Timeslips® and start the next month in PCLaw. For General Ledger purposes, take the
year-to-date figures from your accountant and enter them with PCLaw’s G/L Opening Balances function.
The first month in PCLaw will show year-to-date figures but every month after that will show the correct Income
Statement figures for the month.
For audit trail purposes, you should keep your Timeslips® system intact. This way you can still look up entries
made prior to converting to PCLaw.
Other Issues
Transaction Levy (Ontario firms) - I’m entering a transaction levy. What amount and GST code should I use?
If the matter was opened on or after January 1, 1999, enter $50.00 as the amount. This is the amount charged
before taxes. Use a GST code of N to indicate that there is no GST Input Tax Credit included in the $50.00. $50.00
will be added to the Client Ledger. When the levy is billed, the client will be charged $3.50 GST on top of the
$50.00.
If the matter was opened prior to January 1, 1999, use $50.00 as the amount and a GST code is Y. This indicates
that there is a GST Input Tax Credit included in the $50.00. PCLaw puts the amount of $46.96 on the Client
Ledger. When the levy is billed, the client will be charged $3.29 GST on top of the $46.96.
PCLaw automatically uses the correct amount and GST code based on the Opening Date of the matter. After
entering the matter nickname and pressing TAB, the amount and GST code are updated.
Time Matters® Link - What are the differences between Time Matters® and PCLaw?

The following table compares the
terminology used in Time Matters®
and PCLaw:
For more information about the Time
Matters®/PCLaw Link, see the Time
Matters User Manual:
• Version 3 User Manual – pages
254 to 265
• Version 2 User Manual – pages
217 to 231
Time Matters® PCLaw
Contacts Clients
Matters Matters
Billing Slip Time Entry
Staff Lawyer
Event Classification Code Task Code
Memo Description
Duration Time
I am working on a contingency case where I will not be billing the matter until the case is completed. The fee will be determined at that time. How can I keep track of the work done without billing the client?
To prevent the matter from being billed until the case is completed:
1. On the File menu, point to Matter and click Open Matter.
2. Type or select the matter nickname for this case and click OK.
3. Click the Billing/Past Due/Taxes tab.
4. In the Frequency box, select Exclude.
5. In the Quoted Type box, select Contingency.
6. To save your changes, click OK.
The billing frequency of Exclude prevents this matter from being billed if you do mass billing.
To make time entries for the work you have done:
1. Enter time dockets using the Time Sheet function as you would with any other matter, using a rate of
zero on the time entries.
When the case is completed, produce the bill using the Create Bill function from the Billing menu:
1. On the Main tab, type or select the matter nickname in the Matter box.
2. Click OK.
3. In the Fees box, enter the fee amount for the whole case.
4. Click OK.
5. On the Explanation for Fee Adjustment screen, type in the text to appear on the bill.

6. Click OK.
The bill will include a list of time entries with zero dollar amounts and one fee entry with the final fee amount.
If you do not want the zero-rated time entries to appear on the bill, use the Select Charges feature
on the Options tab of billing to exclude these entries.
For more information, see "Processing Contingency Matters" on page 269 of the user manual.
I am trying to use the Template Editor but I can’t figure it out.
The template editor is used to modify the layouts of bills, checks, receipts and G/L statements. It is for advanced
users who are familiar with desktop publishing programs. If you are not an advanced user, you can use the
following resources to help learn about the template editor:
• Thoroughly review "Template Editor" on page 317. It contains complete step-by-step instructions for using
the program.
• After you have gone through the chapter on the Template Editor, try modifying some templates in the
Experimental Set of Books. You can "play" in this area without affecting your firm’s set of books.
• Purchase the Template Editor Training Video.
When modifying your good templates in PCLaw, use the File - Save As function to make a copy of the
original template with a different name. This ensures that if the template is damaged beyond repair, you still have
a good copy of the original template to work with.
There is a function on my Tools menu called Verify Data Integrity. What does this do?
This function reads the selected files and their associated index files to make sure there is no data corruption in
your PCLaw files. If any corruption is found, PCLaw will attempt to correct the problem. If a problem is detected
that cannot be corrected, a report is printed that can be faxed to LexisNexis PCLaw’s Technical Support Department
(see "Getting Technical Support" on page 8 of the user manual).
If you experience unusual problems in PCLaw, you should use this function to ensure that all your data files are
valid. If the problem persists, contact Technical Support.
This process can take a long time to complete, depending on the size of your data files. You may want to
start this function at the end of the day and let it run overnight.
Whenever I exit PCLaw I get a message asking if I want the program to make a copy of the data files. What does this do?
When you exit PCLaw, the program prompts you to make a copy of your data files on your computer's hard drive.
PCLaw saves your files in the following default location:
C:\Program Files\ACG\PCLAW32\DATA\BKUP
(If you are running PCLaw on a network, replace "C" with the drive letter that represents your server.)

You can change the location of the copied files by using the Browse button.
To copy your PCLaw data files:
1. On the File pull-down menu, click Exit.
2. The Daily Data Copy window appears:
1. To change the location of the files, click Browse and choose a different path.
2. To start the copy, click Yes.
3.
4. — or —
5.
6. To exit PCLaw without copying the files, click No.
To prevent this prompt from appearing the next time you exit the program, select Don’t ask me again.
1. If the file copy was successful, this message appears:
2. If the file copy was unsuccessful, you may see this window:
The message may indicate that there is not enough space in the location specified for the files.
1. Click OK.
To turn the copy prompt on or off, use the Workstation tab in System Settings.
Warning:The copy made of your PCLaw data files is NOT a backup. You are still responsible for performing a tape/disk backup of your computer on a regular basis.
For more information about backups, see "The Importance of Backups" on page 163.
I would like extra copies of the PCLaw User Guide. Where can I get a copy in electronic format that I can print myself?
The PCLaw User Guide is available in PDF (portable document file) format from within PCLaw.
1. On the Help pull-down menu, click Online Manual.
If the document does not open up, you need Adobe Acrobat Reader. You can download this software free of charge
from www.adobe.com.
If Online Manual is not listed on the Help pull-down menu, you didn't install the online manual, lessons and quick
tour when you installed PCLaw. To install them:
1. Click Start.
2. Point to Programs > Alumni Computer - PCLaw > Setup.
3. Click PCLaw Setup Wizard.
4. On the Books or Components window, select Re-install PCLaw programs on this computer and Online
Manual, Quick Tour and Lessons.
5. Click Next.
6. Follow the instructions of the Setup Wizard.
Troubleshooting PCLaw
When I attempt to close the month in PCLaw, I receive a message that someone else is in the system. I checked all the workstations on the network; no one else is in PCLaw. Why do I still get this message?
PCLaw thinks someone is in the program when:
• the program terminates prematurely
• a workstation loses connection with the server
Contact LexisNexis PCLaw Technical Support
When I attempt to close a month, I see the message "You may not close more than 12 months in one year." Why does this message appear and how can I close the month?
This message indicates that 12 months have already been closed and you need to close the year before you can close the month.
To close the year, use the End of Year feature on the G/L pull-down menu.
Other Computers and Devices
Will PCLaw run on my handheld computer?

A mini version of PCLaw called PCLaw TE (Travel Edition) runs on devices with the Palm O/S Version 3.5 or higher,
Pocket PC 2002 or 2003 os, and the BlackBerry™ Wireless handheld.
Where does the Satellite optional module get the e-mail addresses it lists?
It accesses the e-mail addresses defined for each user in Options > Administrator > Security.