Embed Size (px)
Citation preview

2/09/2016
Manufactured By
ROBAND AUSTRALIA PTY LTD
OPERATING INSTRUCTIONS
FREE STANDING HOTPLATE
Models: AHT860 Version 3
Special Features:
Ultra-Durable Stainless Steel Elements
12mm Steel Plate
Adjustable legs & Rear Castors
Digital LED Temperature Display
Independently Controlled Grill
Cook/Idle Selector Switch
These instructions cover the models of High Performance Hotplates listed above. Although there are slight variances between models, the installation, operation, care and maintenance procedure is the same for all.

Roband® Australia is a wholly Australian owned company and has been manufacturing quality commercial catering equipment for the food service industry for more than 50 years. Roband products are engineered and manufactured to the highest standards to provide functionality, reliability and durability, and our quality products are exported world-wide.
Included in the comprehensive Roband® range are Toasters, Fryers, Milkshake Mixers, Rotisseries, Food Display Cabinets and much more.
Roband® Australia also acts as the Australian agents for Vitamix® Blenders, Noaw® Meat Slicers, Förje® Cookware, RobalecTM Soup/Rice Warmers, Robatherm Urns, Austheat® Fryers, Dipo Induction & Autofry Machines. Roband also has its own line of commercial cookware and cutlery under the Robinox® brand name.
For a complete set of brochures please contact your nearest authorised dealer or contact Roband directly at our head office.
© Copyright 2015 – Roband® Australia Pty Ltd All rights reserved. No part of this work may be reproduced or copied in any form or by any means, electronic or mechanical, including photocopying or posting to a website, without the written permission of the publisher. The material contained within this document is intended entirely for instructional purposes.
Roband Head Office Sydney, Australia
Roband Australia Pty Ltd Tel: +61 2 9971 1788
1 Inman Road Fax: +61 2 9971 1336
Dee Why NSW 2099 Email: [email protected]
AUSTRALIA Web: www.roband.com.au
International Agents For additional agents please email Head Office
Belgium Linum Europe
Noumea: Comptoir Materiel Professionnel
Ph: +32 (0)56 35 92 96 Ph: +687 28 50 43
Fiji: Hotel Equipment Ltd Papua New
Guinea:
Brian Bell & Company Pty Ltd
Ph: +679 672 0666 Ph: +675 325 5411
Germany Lolsburg
Singapore: Allied Foodservice Equipment
Ph: +49 93059878-0 Ph: +65 62525880
GREECE K&N Engineers Ltd
South Africa Foodservice Solutions (Pty) Ltd
Ph: +30 210 520 0440 Ph: +31 306 017 442
Hong Kong: Chung Wah Kitchen Machine Ltd
Thailand: Seven Five Distributors Co Ltd
Ph: +852 2334 5411 Ph: +662 866 5858
Italy NOAW United
Kingdom
Metcalfe Catering Equipment
Ph: +39 0331 219723 Ph: +44 (0) 1766 830456
Malaysia: Allied Food Equipment United Arab
Emirates:
Boncafe Middle East LLC
Ph: +603 9133 5833 +9714 282 8742
Maldives: Radiant Heat Maldives Pty Ltd United Arab
Emirates:
Nisa Trading LLC
Ph: +960 333 4845 +9714 396 6132
New Zealand:
Roband New Zealand U.S.A.
Smart Kitchen Solutions
Ph: +649 274 1354 Ph: +1 508 244 1365

CONTENTS
INTRODUCTION ..................................................................................................... 1
GENERAL PRECAUTIONS ..................................................................................... 1
PACKAGING ........................................................................................................... 2
COMPLIANCE ......................................................................................................... 2
INSTALLATION ....................................................................................................... 3
GENERAL ARRANGEMENT ................................................................................... 5
CONTROL PANEL LAYOUT ................................................................................... 6
OPERATION.......................................................................................................... 10
TOASTING ADVICE .............................................................................................. 12
GENERAL SAFETY ............................................................................................... 13
GENERAL FIRE SAFETY ...................................................................................... 13
SAFETY OF SERVICEPERSONS ......................................................................... 13
CLEANING, CARE & MAINTENANCE .................................................................. 14
TROUBLESHOOTING ........................................................................................... 15
CIRCUIT DIAGRAM............................................................................................... 16
SPECIFICATIONS ................................................................................................. 17
EXPLODED DIAGRAMS ....................................................................................... 18
EC DECLARATION OF CONFORMITY ................................................................. 27
WARRANTY .......................................................................................................... 28
Page: 1
INTRODUCTION
Congratulations on your purchase of this quality AUSTHEAT® product. With
proper care and management, your new purchase will give you years of trouble free service.
By reading these instructions carefully you can ensure that this machine is used and maintained properly, helping your new investment to perform well for you now, and to continue performing in the many years to come.
GENERAL PRECAUTIONS
These units must only be operated by qualified person(s) who are fully versed in the operating and safety instructions described in this manual. Servicepersons should be instructed to familiarise themselves with any and all safety instructions described in this manual prior to commencement of any maintenance or service.
In the case of new personnel, training is to be provided in advance. These machines should not be operated by persons (including children) with reduced physical, sensory or mental capabilities, or lack of experience or knowledge, unless they have been given supervision or instruction concerning the safe use of the appliance by a person responsible for their safety.
These units should NOT be left unattended during operation.
These Hotplates are heating units, and, as with any commercial heating unit the surfaces on them will get hot. Always be careful when near an operating
hotplate, and ensure that any risk to unwary customers or staff is minimised with additional signage if necessary. Due to the obvious heat hazard, AUSTHEAT®
recommends that these Hotplates be kept out of reach of children.
These units should be disconnected from all power via the main switch and allowed to cool before attempting to carry out any cleaning and maintenance routines.
Austheat® will not accept liability if;
Non-authorised personnel have tampered with the machine.
The instructions in this manual have not been followed correctly.
Non-original spare parts are used.
The machine is not cleaned and maintained correctly.
There is any damage to the unit caused by the operator.

Page: 2
PACKAGING
All care is taken when packing and Austheat® ensures that every unit is functional and undamaged at the time of packaging.
The Package of these Hotplates should include: 1) One AH 800 series Hotplate (appropriate model)
2) 1 Toaster rack (for AHT Models)
3) This manual
4) Packaging materials
Any damage to the machine as a result of freight must be reported to the Freight Company and to the agent responsible for the dispatch of the said unit within 24 hours of receipt. No claims will be accepted or entertained after this period.
COMPLIANCE
RCM:
Austheat® products have been designed and manufactured to comply with any and all specifications set out by the Australian Communications and Media Authority (ACMA) in regards to Electromagnetic Compatibility. As testament to such compliance these units bear the RCM symbol.
For further information contact the Australian Communications Authority, PO Box 13112, Law Courts, Melbourne VIC 8010.
ACSS (ADVANCE CONTROL SAFETY SYSTEM):
The ACSS framework is a stringent and specific set of voluntary requirements aimed at the electrical safety, reliability and longevity of equipment used in the foodservice industry.
The ACSS framework has been developed as both a guide to the engineering and development of products as well as a guarantee to consumers that Austheat® equipment bearing this mark not only meets the requirements of the Australian Standards, they exceed them.
A unit bearing the ACSS mark is your guarantee that you are purchasing a machine built to far exceed the Australian standards. The unit has been designed to be safer, particularly from an electrical aspect, and last longer than similar units on the market today.

Page: 3
INSTALLATION
BEFORE CONNECTION TO POWER SUPPLY
Remove all the packaging materials and tape, as well as any protective plastic from the machine. Clean off any glue residue left over from the protective plastic using methylated spirit.
Place the free-standing hotplate on a firm, level floor in the required position. The legs can be adjusted for slightly uneven floors.
National Standards exist outlining the positioning, spacing and ventilation requirements when installing new appliances. These Standards should be consulted and new equipment should be installed accordingly. In any situation where specifications allow a distance of less than 100mm we would still recommend that a well-ventilated air gap of not less than 100mm be maintained where possible. If the machine is near particularly heat-sensitive materials common sense should be employed in determining sufficient distancing.
These units may be located in a “bank” or “row” of machines. If machines are located directly adjacent to this machine care must be taken to ensure that adjacent machines do not restrict the movement of air through the ventilation holes of this machine (both front and rear). These machines have a protrusion at the rear of the unit that provides a minimum spacing distance from any walls. This Spacer Protrusion should never be removed or altered in such a way that the minimum spacing distance may be compromised.
Ventilation systems within this machine will blow warm air out through the top of the toaster at the front of the machine. This flow of air must not be obstructed, deflected or inhibited as this will result in tripping of the thermal protective circuits within the unit.
Consideration should be given to securing the unit or limiting mobility if the unit is hard-wired. Appropriate standards should be consulted when any installation is undertaken to ensure compliance with all requirements.
We recommend the use of an RCD (Residual Current Device) rated at not less than 30mA for circuit protection when using these units. Note that if one RCD is used to protect multiple appliances, the RCD shall be appropriately rated so as to allow up to 30mA leakage current from these machines alone.
CAUTION: Do not attach any other items, machines or brackets to these units as any such alterations may change the thermal properties or safety
aspects of the machine.
CAUTION: In order to avoid inadvertent re-setting of thermal cutouts used in some models, these units must not be wired through an external switching
device, such as a timer, or any device that is regularly switched on and off by the utility.
Page: 4
ELECTRICAL CONNECTION
Before connecting the hotplate to the power supply ensure that all the controls are in the “OFF” position.
A licensed electrician must install this hotplate to comply with national installation codes and regulations. The hotplates are supplied ready for connection to a three phase plus neutral and earth mains supply. Means for disconnection from supply must be incorporated in the fixed wiring in accordance with the wiring rules.
WARNING - THIS UNIT MUST BE EARTHED. We also advise that this unit, and any other stationary appliances, be connected to an
Equipotential bonding grid to eliminate any differences in electrical potential within the kitchen environment.
WARNING - If the electrical mains supply cabling is damaged, the machine must not be used until a suitably qualified person has replaced
the supply cabling and has deemed the unit to be functioning properly.
There are two main supply connection points in the unit. The first is through the lower back panel at the rear of the unit. The second connection point is through the base of the machine at the rear. Both connection points have three choices of holes for the cable to pass through. Protection must be given to the mains cables if they are positioned such that they can contact the hot surfaces of the unit. A suitable cable gland is required for the cable to pass through.
Each Hotplate must be connected to an adequately protected power supply and an isolation switch mounted adjacent to, but not behind the Hotplate. This switch must be clearly marked and readily accessible in case of fire.
CAUTION: In order to avoid a hazard due to inadvertent resetting of the thermal cutout, this appliance must not be supplied through an external switching device, such as a timer, or connected to a circuit that is regularly switched on and off by the utility.
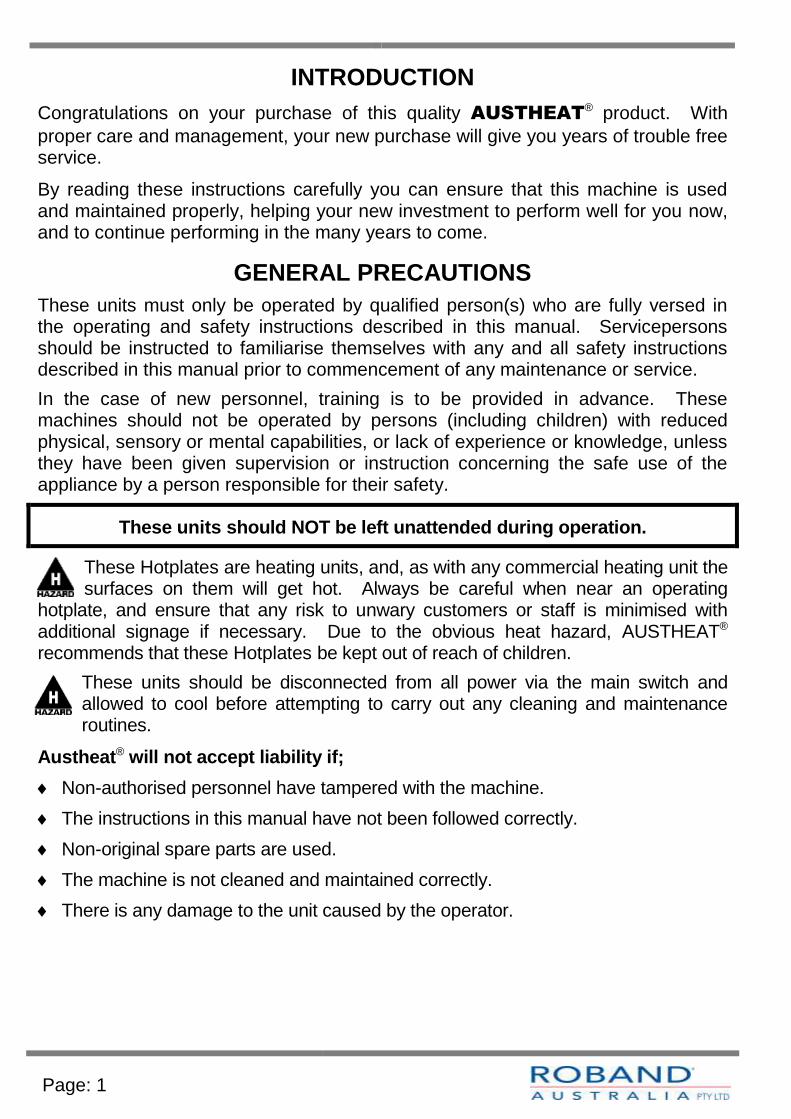
ELECTRICAL REQUIREMENTS
The following table shows the electrical requirements for your Hotplate.
Model Total Power Amps/Phase Supply
AHT860 12.486 kW 15.2 / 15.2 / 23.9 A 400 VAC, 3 Phase + N + E

Page: 5
GENERAL ARRANGEMENT
These Hotplates are designed as floor mounted units. They have a central cooking plate with a protective splash guard. The controls are located along the front display panel and also below the Toaster (for applicable models).
The Grease channel is welded to the front of the plate and provides a drainage point to the Grease Box below.
WARNING: Always ensure the Hotplate is OFF, and is allowed to cool before cleaning.
These units generate an extreme amount of heat, which has the capacity to adversely affect some components within the machine. To prevent any internal damage, and to provide an air curtain across the toaster front (appropriate models only), these units are fitted with internal fans.
In the event of a failure of an internal fan, a safety thermostat will operate and cut power to the machine. The result will be a sudden loss of power and the temperature displays will no longer be lit.
If such a shutdown occurs, leave the unit to cool for 30 minutes and turn the unit off and back on. This electrical reset will allow the unit to begin operating again. If the unit shuts down a second time this is confirmation that the unit is overheating and you should call Austheat® or your local electrician for service.
Cleaning is generally a simple procedure and details are provided in the following pages. A strong Pest-Eradication program should be in place in any kitchen before installing this or any similar machines.
WARNING: pouring cold water onto a hot plate will cause spitting and may result in damage to the plate.
If required, the unit can be moved by lifting from underneath the front, just above the door, and pulling it along on the rear castors.
Page: 6
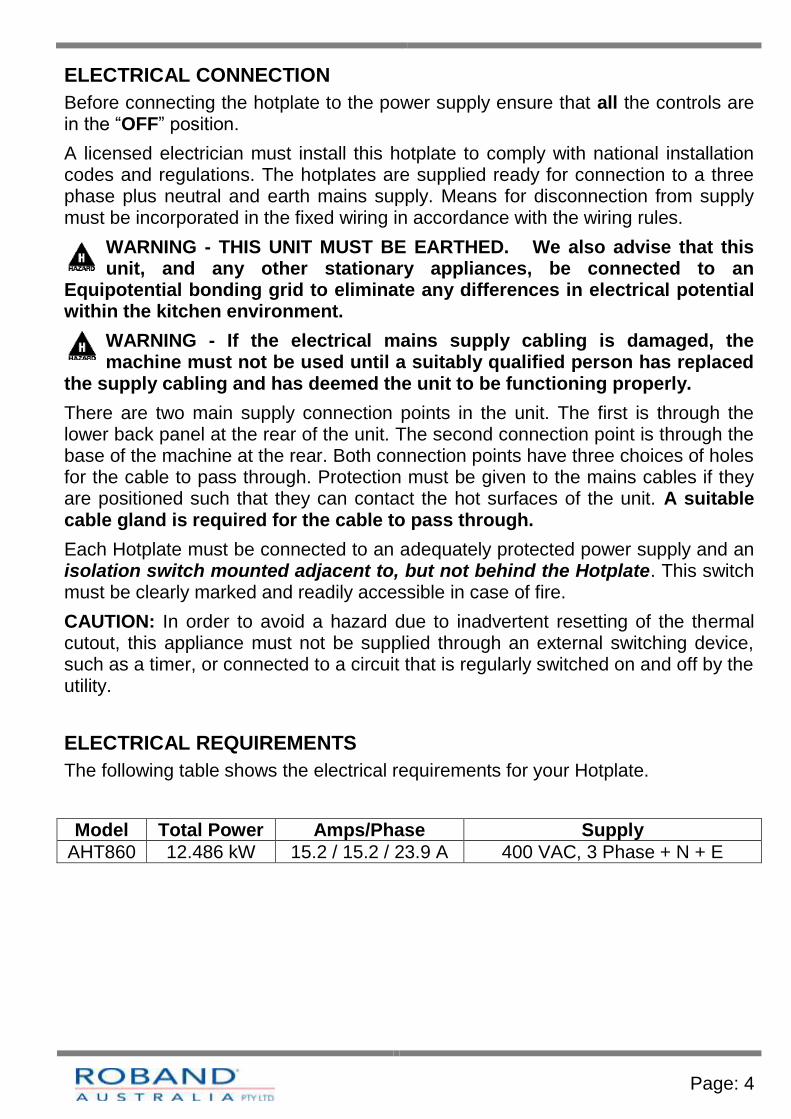
CONTROL PANEL LAYOUT
Take a moment to familiarise yourself with the general arrangement of the Hotplate before going any further. The controls are located beneath the toaster (appropriate models) and along the front display panel. The controls should be similar to those indicated above but will vary between models and functions (AHT860 pictured above).
CONTROLS DESCRIPTION
The controls consist of the following;
An “ON/OFF SWITCH” (note, does not provide complete isolation of the machine – refer to “Electrical Connection”).
1-2 primary thermostats, labelled “COOK”.
1-2 secondary thermostats labelled “IDLE”.
1 Primary Energy Regulator and 1 Secondary Energy regulator (models incorporating Toaster/Frill only).
1-2 digital temperature displays (Dependant on Model) located at the right hand side of the Display Panel.
1 Cook/Idle switch for the Toaster, located on the Front Display Panel to the right of the Grease Box (appropriate Models only)
Grease Box
TOP DISPLAY PANEL CONTROLS
Cook/Idle switch – Left
Heating Zone
Cook/Idle switch – Right Heating Zone
Cook/Idle switch – Toaster
Thermometer Displays
Lower Control Panel
Left Zone Thermostats
Right Zone Thermostats
On/Off Switch
Toaster Controls

Page: 7
1-2 thermostat selector switch (Cook/Idle). This is mounted on the left side of the Hotplate on the front display panel opposite the temperature display.
Various pilot lights indicating states of operation. These will be described in the following text.
PLATE THERMOSTATS
These Hotplates have 2 thermostats per heating “Zone”, 1 primary (Cook) and 1 Secondary (Idle). Only one thermostat is in use at a time. The thermostat selector switch on the front display panel (also referred to as the Cook/Idle switch) is used to select which thermostat is to be used.
The secondary thermostat is designed to be used as a back up control if the primary thermostat fails, OR as an “IDLE” thermostat when the plate needs to remain warm but not cook.
If failure occurs in the primary thermostat, set the Cook/Idle selector switch to the IDLE position to continue cooking with the secondary thermostat. In the IDLE position, only the secondary thermostat is used – by adjusting the setting of the secondary thermostat you can continue operation. This will allow the Hotplate to continue functioning until the primary thermostat is repaired. After the repair has been made the switch can be returned to the PRIMARY (i.e. Cook) position.
COOKING/HEATING ZONES
The Hotplate may be divided into distinct cooking “Zones”, depending on the model selected. On a 450mm wide unit there is only one Zone, heated by two elements beneath the plate. On larger units the plate is heated by 3 elements and divided into two Zones.
Where multiple heating Zones exist, the unit is fitted with individual heating controls for each Zone. In general, the Left Zone is controlled by the thermostats on the left, and the Right Zone is controlled by the thermostats on the right.
Note that these Zones are not equal in size. The following table gives an indication of the heating controls of these machines and this is also indicated graphically on the labels surrounding the thermostats on the control panel.
Model Width of Plate # of Heating
Zones Left/Right proportion of
plate
AHT845 450mm 1 Not split
AHT860 600mm 2
2/3 Left / 1/3 right

Page: 8
The current temperature of the underside of the plate surface (which provides a reliable approximation of the cooking surface temperature) is shown in the Display Panel on the right hand side of the machine.
Note that the front and rear corners are comparatively cooler and can therefore be used to help balance the cooking times of multiple products. The Thermal image pictured shows the temperature distribution (from around 300°C in the centre to around 200°C at the front corners).
TOASTER CONTROLS
For units incorporating a Toaster/Grill beneath the hotplate, the machines are provided with an individual heating element and separate controls. The incorporation of a separate heating unit means that the Plate elements and the Toasting element are completely separate entities and have no crossover in function.
The benefit of this arrangement is that the Toaster will give far more consistent heating and toasting results and will therefore require less focus to avoid burnt toast.
The Toaster element is controlled by the two Energy Regulators beneath the Toaster, on the right hand side. Again, there is a Primary and Secondary control. We recommend that the primary control be set between “4” and “HI”, and that the secondary control be set somewhere around “2”.
The Primary (Cook) and Secondary (Idle) settings are selected simply by rotating the Cook/Idle switch at the right hand side of the front display panel.
The settings detailed above will allow the elements to stay warm when the machine is in Idle mode, which will speed up the recovery time when the Cook setting is later selected. The above settings are a guide – experience will dictate the best settings for your particular bread/buns.
A handy reference on the characteristics of Toasters is located in the Operation section of this instruction manual to assist you to get the best performance from your Toaster/Grill.
When handling the Toast Rack always wear gloves, as the frame is metal and will therefore conduct the heat from the toasting elements. Burns may result if gloves are not used, and all staff should be forewarned of this hazard.
Thermal Image of Plate
Top = Rear, Bottom = Front

Page: 9
TEMPERATURE DISPLAY
The temperature displays can be seen on the display panel, located on the front of the Hotplate on the right hand side. It displays the current approximate temperature of the appropriate hotplate heating “Zone”.
In the event of an Overheat situation, the display panel(s) will also be shut down and will not re-illuminate until the machine is turned off and turned back on (after cooling).
WHAT TO DO IF THE THERMAL CUT-OUT TRIPS:
These units are fitted with an internal Safety Thermostat designed to cut power if the internal temperatures reach a point where other components may be damaged. There are a number of possible situations that may cause the safety thermostat to cut out, such as a thermostat failure or the failure of an internal fan. You may follow the procedure below as a first step to rectifying the problem.
1. Switch the Hotplate OFF using the main On/Off switch and allow it to cool for approximately 30 minutes.
2. Switch the unit back on – operation can now continue as normal.
3. If the unit has activated the thermal cut-out switch twice in a short time, set the thermostat selector switch(s) to the SECONDARY/IDLE position. This procedure assumes you were using the primary thermostat. If you were using the secondary thermostat when the fault occurred then select the PRIMARY/COOK position in this procedure. Adjust the Secondary Thermostat to the desired cooking temperature.
4. Repeat steps 1 and 2.
5. If the unit again trips out it may be the result of a failure in an internal fan - phone for service.
If the Hotplate continues to perform without any further tripping of the thermal cut-out after step 4, then there is a strong possibility that the thermostat in use at the time is faulty, or that one of the internal cooling fans is no longer functioning. This should be attended to by qualified electrical personnel. If the machines have tripped the thermal cut-out two or three times switch the unit off and refrain from further use until the unit has been repaired. Continuing to use the machine may cause premature failure of other components if repeatedly exposed to over-temperature situations.
Page: 10
OPERATION
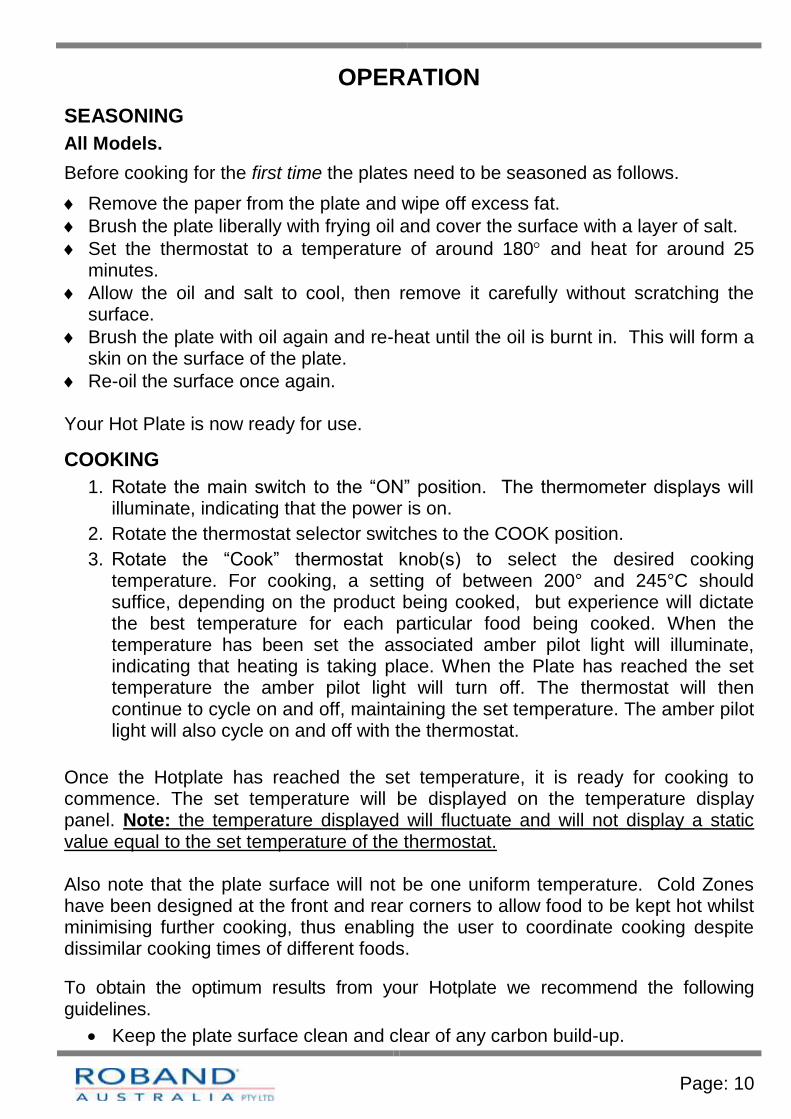
SEASONING
All Models.
Before cooking for the first time the plates need to be seasoned as follows.
Remove the paper from the plate and wipe off excess fat.
Brush the plate liberally with frying oil and cover the surface with a layer of salt.
Set the thermostat to a temperature of around 180 and heat for around 25 minutes.
Allow the oil and salt to cool, then remove it carefully without scratching the surface.
Brush the plate with oil again and re-heat until the oil is burnt in. This will form a skin on the surface of the plate.
Re-oil the surface once again.
Your Hot Plate is now ready for use.
COOKING
1. Rotate the main switch to the “ON” position. The thermometer displays will illuminate, indicating that the power is on.
2. Rotate the thermostat selector switches to the COOK position.
3. Rotate the “Cook” thermostat knob(s) to select the desired cooking temperature. For cooking, a setting of between 200° and 245°C should suffice, depending on the product being cooked, but experience will dictate the best temperature for each particular food being cooked. When the temperature has been set the associated amber pilot light will illuminate, indicating that heating is taking place. When the Plate has reached the set temperature the amber pilot light will turn off. The thermostat will then continue to cycle on and off, maintaining the set temperature. The amber pilot light will also cycle on and off with the thermostat.
Once the Hotplate has reached the set temperature, it is ready for cooking to commence. The set temperature will be displayed on the temperature display panel. Note: the temperature displayed will fluctuate and will not display a static value equal to the set temperature of the thermostat. Also note that the plate surface will not be one uniform temperature. Cold Zones have been designed at the front and rear corners to allow food to be kept hot whilst minimising further cooking, thus enabling the user to coordinate cooking despite dissimilar cooking times of different foods.
To obtain the optimum results from your Hotplate we recommend the following guidelines.
Keep the plate surface clean and clear of any carbon build-up.

Page: 11
Never scrub the plate back to its original appearance, as you will then need to re-season the plate.
Clean the unit regularly and often.
TOASTING Models purchased with the Toaster/Grill also have the advantage of a grilling / toasting rack which can be used at any time, regardless of whether or not the Plate is being used.
The toasting rack is placed on the runners and can be used in any of the different height positions to produce satisfactory results.
In all cases these units should be given sufficient time to reach the set temperature before cooking is commenced.
FIRST TIME OPERATION – “OFF-GASSING”
Note that these units are built utilising insulation materials within the body of the machine. These insulating materials help to reduce external panel temperatures and increase the overall operating efficiency of the machine.
Insulating materials such as those used within these machines are typically starch-based products with a “binding agent”. On first heating up, this binding agent will release some small amounts of vapour (commonly referred to as “Off-Gassing”). For this reason we recommend that operators run the machine with all controls in their highest setting for at least an hour before operating. Note that the vapours produced may sting the eyes of anyone leaning over the Display Panel.
The Off-gassing will typically last no more than an hour, and, once the off-gassing process is complete, no further off-gassing will occur unless the unit overheats. In a fault condition, where the machine overheats, some additional off-gassing may occur before the unit’s safety over-temperature device cuts the power.
The gaseous vapours emitted in the “off-gassing” period are non-toxic. They have a slightly unpleasant smell and may sting the eyes if in very close proximity.
WORKSTATION LAYOUT These units are likely to be installed next to similar sized machines (eg Fryers) that will perform complimentary roles. In most cases, operators will be using this machine in conjunction with a bench or suitable surface on which burgers and other food products can be assembled or prepared.
For this reason, we recommend that areas between this unit and other machines and work-surfaces be kept clear of any potential obstacle or trip
hazard. Work areas should also be cleaned and floors should be oil-free to reduce the likelihood of slipping.
It is anticipated that these machines will be operating beneath a suitable exhaust/extraction unit to reduce the ambient temperatures around the operator.

Page: 12
TOASTING ADVICE
(Article Excerpt)
Regardless of the brand, any radiant heat toaster will run into problems when faced with the nasty prospect of fresh bread. The reason for this is simple; the high moisture content in fresh bread acts to counter the toasting effect. The moisture in each slice is driven down through the body of the bread (ie the top dries out faster) resulting in the top of the bread toasting before the bottom.
It is annoying for several reasons…. Primarily commercial restaurants and cafes want their toast done as fast as possible, but high moisture content slows this toasting down, and the uneven toast produced can be quite frustrating.
The solution to this is very simple and widely known; the bread needs to be a day old before toasting. By using day old bread you effectively bypass the problem of moisture content, as most breads will have lost a significant portion after a single day. Some breads have particularly high moisture contents and these may retain a higher level of moisture than your standard Sunblest or Tip Top breads.
Toasting can be further improved by ensuring that the bread is not stored in a fridge or cool-room prior to toasting. Refrigerated bread will not only start the bread cold and extend the toasting time further; it will also serve to retain within the bread the very moisture we are trying to get rid of.
Page: 13
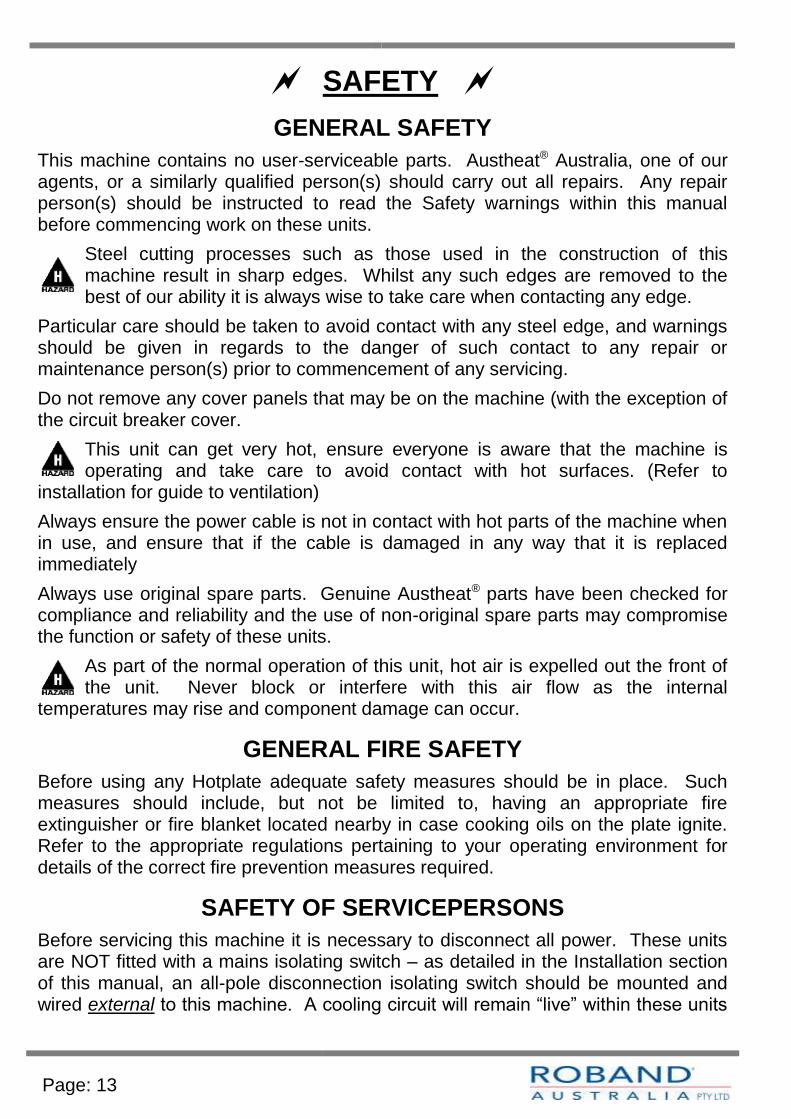
SAFETY
GENERAL SAFETY
This machine contains no user-serviceable parts. Austheat® Australia, one of our agents, or a similarly qualified person(s) should carry out all repairs. Any repair person(s) should be instructed to read the Safety warnings within this manual before commencing work on these units.
Steel cutting processes such as those used in the construction of this machine result in sharp edges. Whilst any such edges are removed to the best of our ability it is always wise to take care when contacting any edge.
Particular care should be taken to avoid contact with any steel edge, and warnings should be given in regards to the danger of such contact to any repair or maintenance person(s) prior to commencement of any servicing.
Do not remove any cover panels that may be on the machine (with the exception of the circuit breaker cover.
This unit can get very hot, ensure everyone is aware that the machine is operating and take care to avoid contact with hot surfaces. (Refer to
installation for guide to ventilation)
Always ensure the power cable is not in contact with hot parts of the machine when in use, and ensure that if the cable is damaged in any way that it is replaced immediately
Always use original spare parts. Genuine Austheat® parts have been checked for compliance and reliability and the use of non-original spare parts may compromise the function or safety of these units.
As part of the normal operation of this unit, hot air is expelled out the front of the unit. Never block or interfere with this air flow as the internal
temperatures may rise and component damage can occur.
GENERAL FIRE SAFETY
Before using any Hotplate adequate safety measures should be in place. Such measures should include, but not be limited to, having an appropriate fire extinguisher or fire blanket located nearby in case cooking oils on the plate ignite. Refer to the appropriate regulations pertaining to your operating environment for details of the correct fire prevention measures required.
SAFETY OF SERVICEPERSONS
Before servicing this machine it is necessary to disconnect all power. These units are NOT fitted with a mains isolating switch – as detailed in the Installation section of this manual, an all-pole disconnection isolating switch should be mounted and wired external to this machine. A cooling circuit will remain “live” within these units
Page: 14
even when turned “off” at the control panel. Please consider this before allowing qualified servicepersons to gain access to the machine.
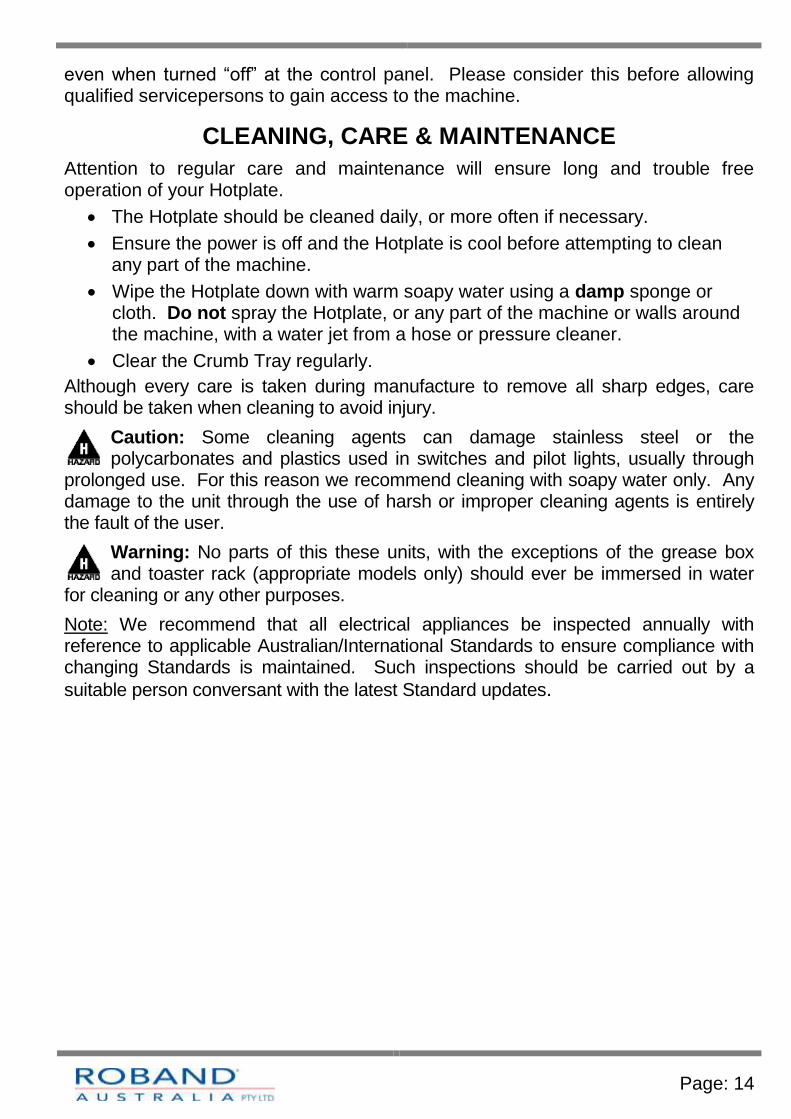
CLEANING, CARE & MAINTENANCE
Attention to regular care and maintenance will ensure long and trouble free operation of your Hotplate.
The Hotplate should be cleaned daily, or more often if necessary.
Ensure the power is off and the Hotplate is cool before attempting to clean any part of the machine.
Wipe the Hotplate down with warm soapy water using a damp sponge or cloth. Do not spray the Hotplate, or any part of the machine or walls around the machine, with a water jet from a hose or pressure cleaner.
Clear the Crumb Tray regularly.
Although every care is taken during manufacture to remove all sharp edges, care should be taken when cleaning to avoid injury.
Caution: Some cleaning agents can damage stainless steel or the polycarbonates and plastics used in switches and pilot lights, usually through
prolonged use. For this reason we recommend cleaning with soapy water only. Any damage to the unit through the use of harsh or improper cleaning agents is entirely the fault of the user.
Warning: No parts of this these units, with the exceptions of the grease box and toaster rack (appropriate models only) should ever be immersed in water
for cleaning or any other purposes.
Note: We recommend that all electrical appliances be inspected annually with reference to applicable Australian/International Standards to ensure compliance with changing Standards is maintained. Such inspections should be carried out by a
suitable person conversant with the latest Standard updates.

Page: 15
TROUBLESHOOTING
If the Hotplate does not function check the following points before calling for service.
The power is switched “on”, both on the unit and at any other point that supplies power to the machine (eg an isolating switch on the wall).
The mains power is not faulty.
The temperature has been set correctly and the thermal cut-out has not tripped. Refer to the “Thermal Cut-Out” section previous for more information on this control.
The thermostat knobs are not loose or broken, rendering the thermostats inoperable.
The circuit breakers located inside the lower section of the unit are all in the “on” position”. These are located behind a cover panel
Symptom Check Probable Cause
All Power shut off Is air still blowing out from beneath the Display Panel?
Yes – Overtemp has cut out. Allow to cool and turn the unit off and then on again. May be 2nd fan failure of thermostat failure.
No – Possible failure of primary fan or on/off switch.
Plate takes too long to heat/cook
Circuit breakers are all in the ON position
If Circuit breakers have tripped, possible element failure – reset and operate as normal, call for Service if the circuit breaker trips again.
Grinding noise coming from inside the unit
Does this sound like a fan turning but being noisy?
Yes – monitor to see if this gets worse. If the noise gets worse it is a sign that a bearing in the fan may be failing. It is better to call for service before the fan fails as failure of a cooling fan will cause the machine to overheat and shut down.

Page: 16
CIRCUIT DIAGRAM
MODELS: AHT860VER2
Note: These circuit diagrams have been provided for reference and to assist qualified service and repair agents only. Under no circumstances should a person not suitably qualified attempt repairs to any electrical equipment.

Page: 17
SPECIFICATIONS
Nominal Dimensions
Model Power Source
Power Consumption
Width Height Depth
AHT845
400-415V AC 50/60
Hz 3 Phase + Neutral
+ Earth
8,470W 450mm 1080mm 855mm
AHT860 12,840W 590mm 1080mm 855mm
The operating noise levels of these machines do not exceed 70dB.
Constant Research & Development may necessitate machine changes at any time.
Page: 18
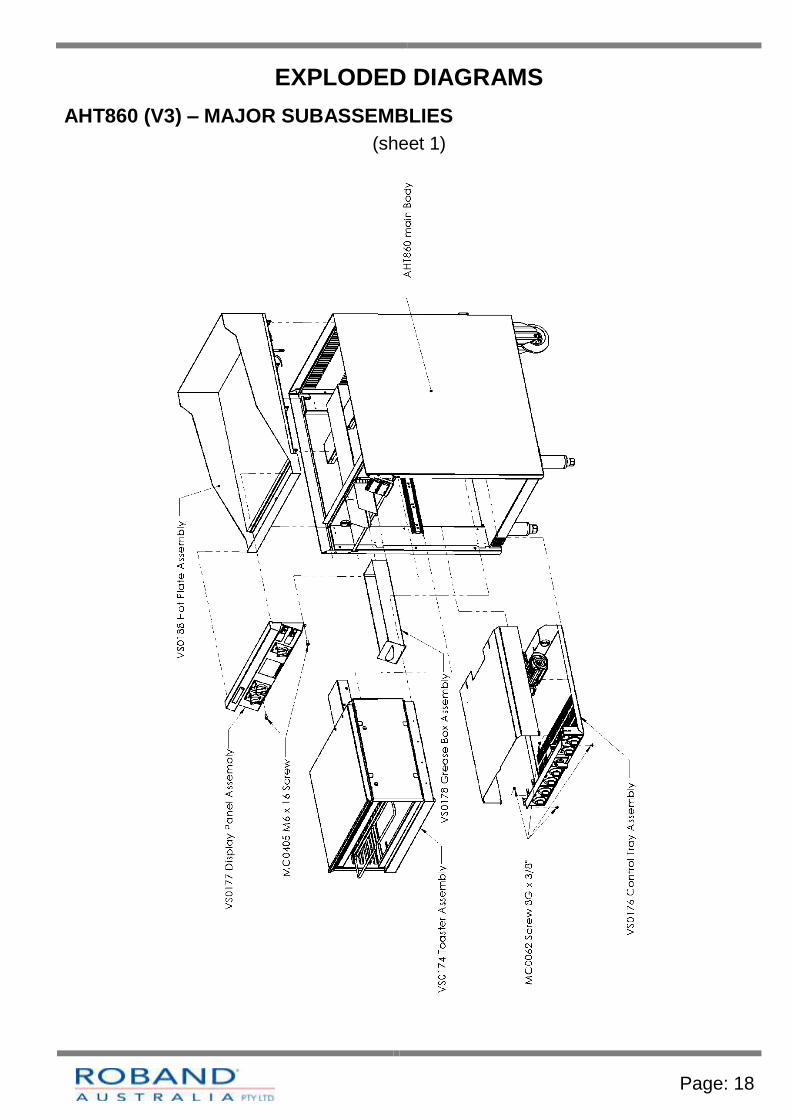
EXPLODED DIAGRAMS
AHT860 (V3) – MAJOR SUBASSEMBLIES
(sheet 1)

Page: 19
AHT860 (V3) – ELECTRICAL - FRONT
(sheet 2)

Page: 20
AHT860 (V3) – ELECTRICAL – REAR
(sheet 3)
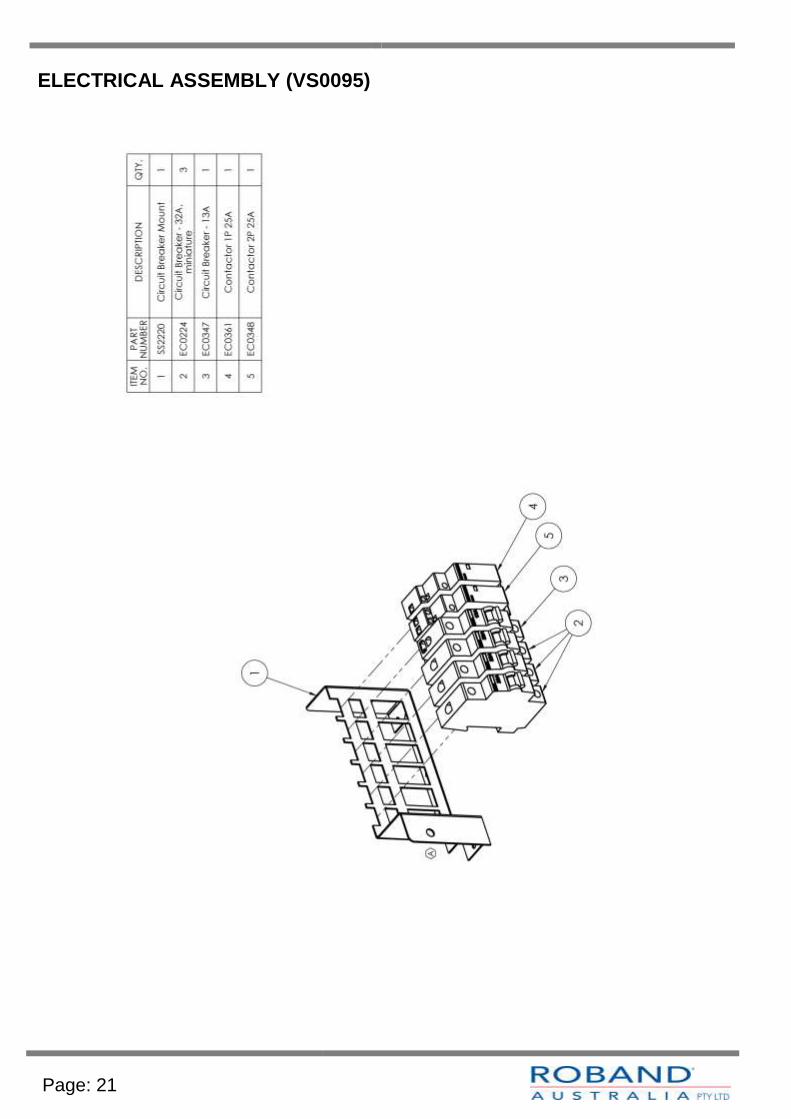
Page: 21
ELECTRICAL ASSEMBLY (VS0095)

Page: 22
CONTROL TRAY ASSEMBLY (VS0176)
Page: 23
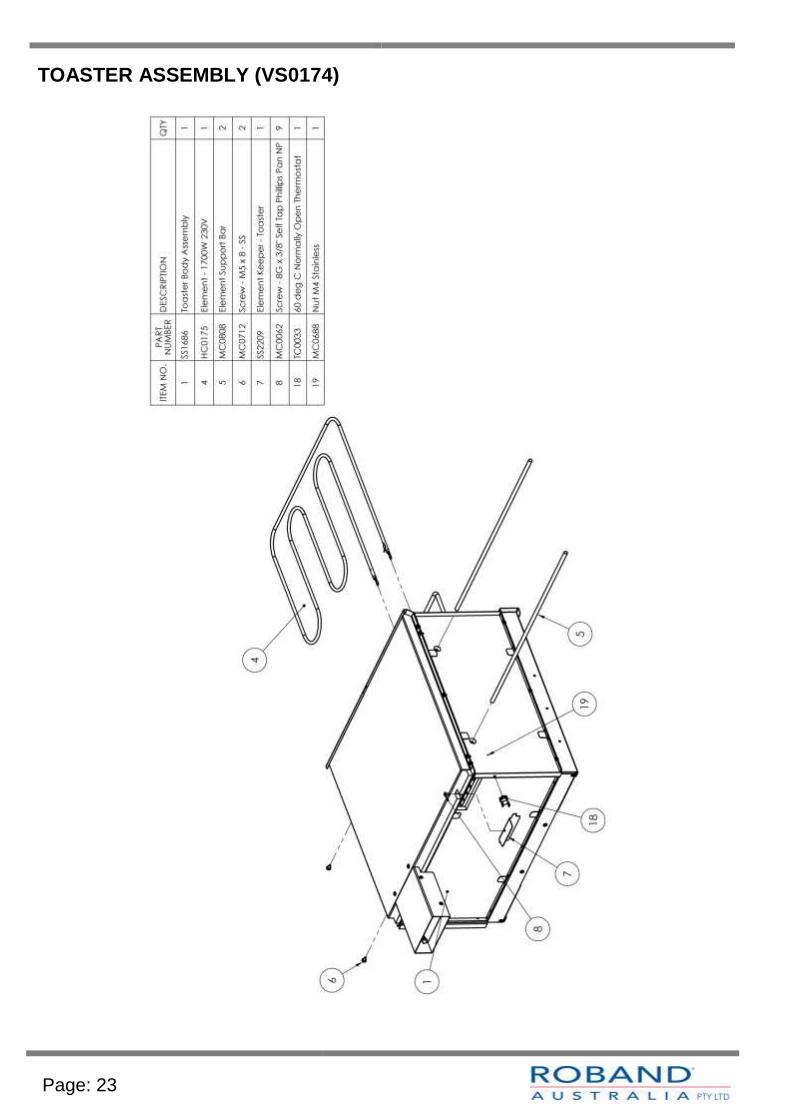
TOASTER ASSEMBLY (VS0174)
Page: 24
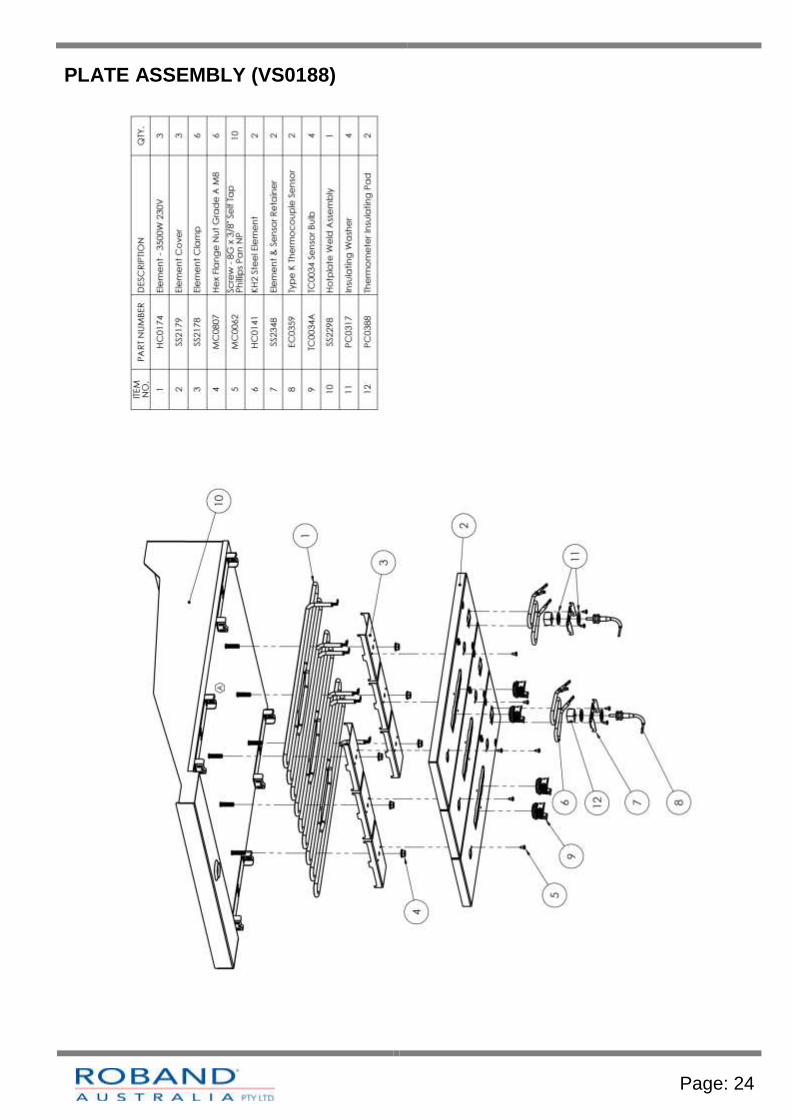
PLATE ASSEMBLY (VS0188)
Page: 25
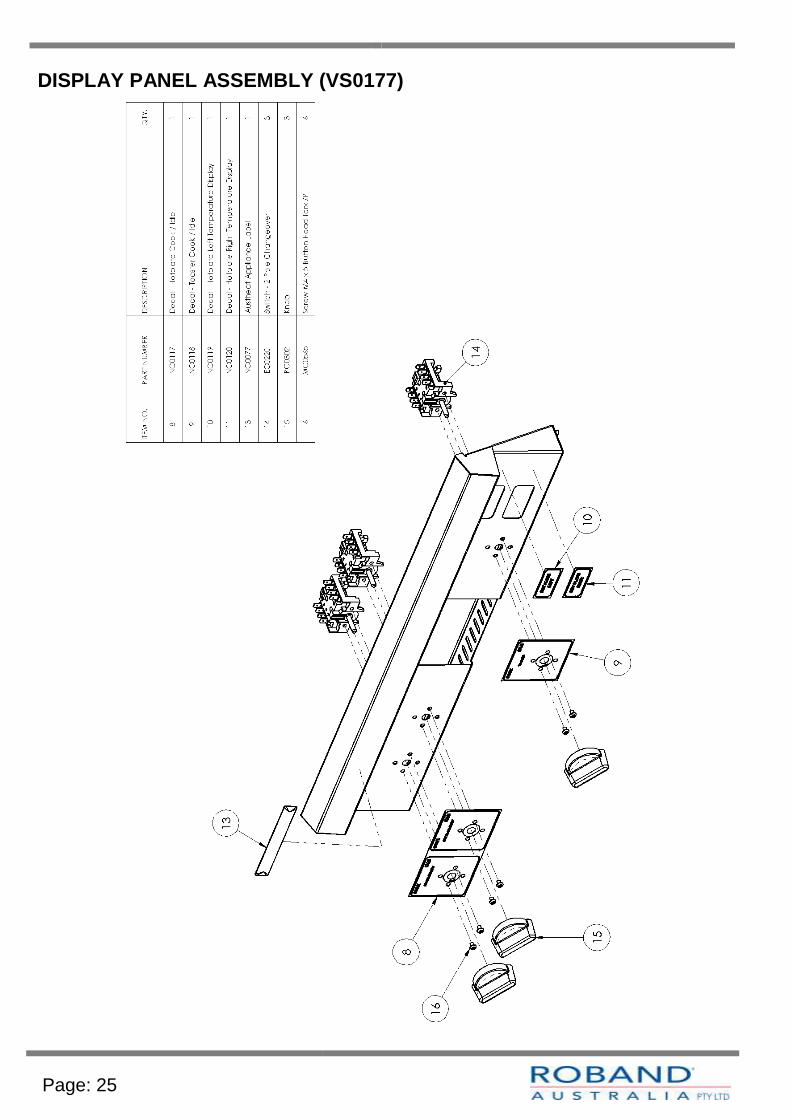
DISPLAY PANEL ASSEMBLY (VS0177)
Page: 26
NOTES
This page is intentionally left blank. Please note your favourite settings here.

Page: 27
EC DECLARATION OF CONFORMITY
Manufacturer
Roband Australia 1 Inman Rd Cromer NSW, 2099 Australia
Model Type Austheat® Hotplates (AHT Series Hotplate/Toasters)
Description Hotplate/Hotplate & Toaster – 3 Phase
Date of first CE Marking 1st April 2008
Specific Models AHT860
STANDARDS:
This machine is designed in compliance with
Machinery Directive 2006/42/EC
Low Voltage Directive 2006/95/EC
EMC Directive 89/336/EEC including amendments to 93/68/EEC
WEEE Directive 2002/96/EC (WEEE)
Restriction of Hazardous Substances in Electrical and Electronic Equipment
2002/95/EC (RoHS)
EN60335.1 Household and similar Electrical Appliances
EN60335-2-48 Commercial Electric Toasters and Grillers
EN55014.2: 1997 Electromagnetic compatibility. Requirements for household
appliances, electric tools and similar apparatus. Immunity.
ENVIRONMENTAL:
This product is designed in order to contribute as little as possible to the quantity and noxious nature of waste and risk of pollution or other environmental contamination.
Packaging materials used in this machine are designed to be recyclable.
DECLARATION
I hereby declare under our sole responsibility that the product mentioned above to which this declaration relates complies with the above-mentioned standard(s).
Roband Australia has appointed Valera Ltd as our EU Authorised Representative of :
5-7 The Glade Business Centre, Eastern Ave, West Thurrock, Essex, RM203FH , UK. Tel: 08 45 270 4321 Fax: 0845 270 4323 E-Mail : [email protected]
Signature of Authorised Person: Date: 14th April 2008
Print Name: Gordon Thorpe Position: Director of Engineering

Page: 28
WARRANTYEvery care is taken to ensure that no defective equipment leaves our factory and all goods manufactured by us are guaranteed against defective workmanship and materials for a period of 12 months from the date of purchase. Roband Australia’s obligations pursuant to this express warranty being limited to the repair or replacement of the defective goods or materials, at is option and subject to the terms contained within this Warranty statement. Where relevant, glass, Teflon® and lamps are not included in this warranty and RCD tripping due to moisture absorption by Tubular Heating Elements is not considered a warranty fault.
Generally, all goods claimed under this warranty must be returned to the factory or an authorized service agent, freight prepaid, for inspection. All parts deemed to be defective will be replaced, however, no claims will be entertained for second hand products, or parts damaged in transport, misused or modified in any way without our approval. For machines that are not considered to be portable (e.g. food bars, rotisseries, large hotplates and some bain maries), on site warranty service will be provided in capital city metropolitan areas only. In all other locations, the customer is responsible for all travelling time/service call costs and payment for this will be required prior to the commencement of the repair. The labour costs to actually repair the fault will be met by the company.
Any repairs or replacement of defective goods or materials pursuant to this warranty, must be authorized by Roband Australia prior to any action being taken. The company reserves the right to reject a claim for warranty if it is not completely satisfied with the circumstances under which it occurred and any other costs incurred for false claims or faults due to incorrect usage etc. are the responsibility of the claimant. Roband Australia Pty Ltd nor any subsidiary company or Agent shall be liable for loss of profit or damage to other equipment and property except where it is in breach of the guarantees provided in accordance with Schedule 2 of the Competition and Consumer Act 2010 (Cth) or the applicable legislation from time to time.
The goods come with guarantees that cannot be excluded under the Australian Consumer Law (ACL). You are entitled to a replacement or refund for a major failure and for compensation for any other reasonably forseeable loss or damage. You are also entitled to have the goods repaired or replaced if they fail to be of acceptable quality and the failure does not constitute a major failure.
Generally, authorized service agents are located in all areas which have authorized distribution dealers. For the name of your nearest Australian authorised service agent, please contact:
Roband Australia Pty Ltd
1 Inman Road, Cromer, NSW 2099
Warranty Number: 1800 268 848
Phone: (02) 9971 1788 Fax: (02) 9971 1336
All other countries please contact your selling Agent.
Please complete the following details and keep this card in a safe place.
NAME
ADDRESS
MODEL No: SERIAL No: DATE PURCHASE
NAME OF DEALER:
PLEASE RETAIN THIS SECTION FOR YOUR RECORDS
DO NOT POST
ROBAND® AUSTRALIA PTY LTD
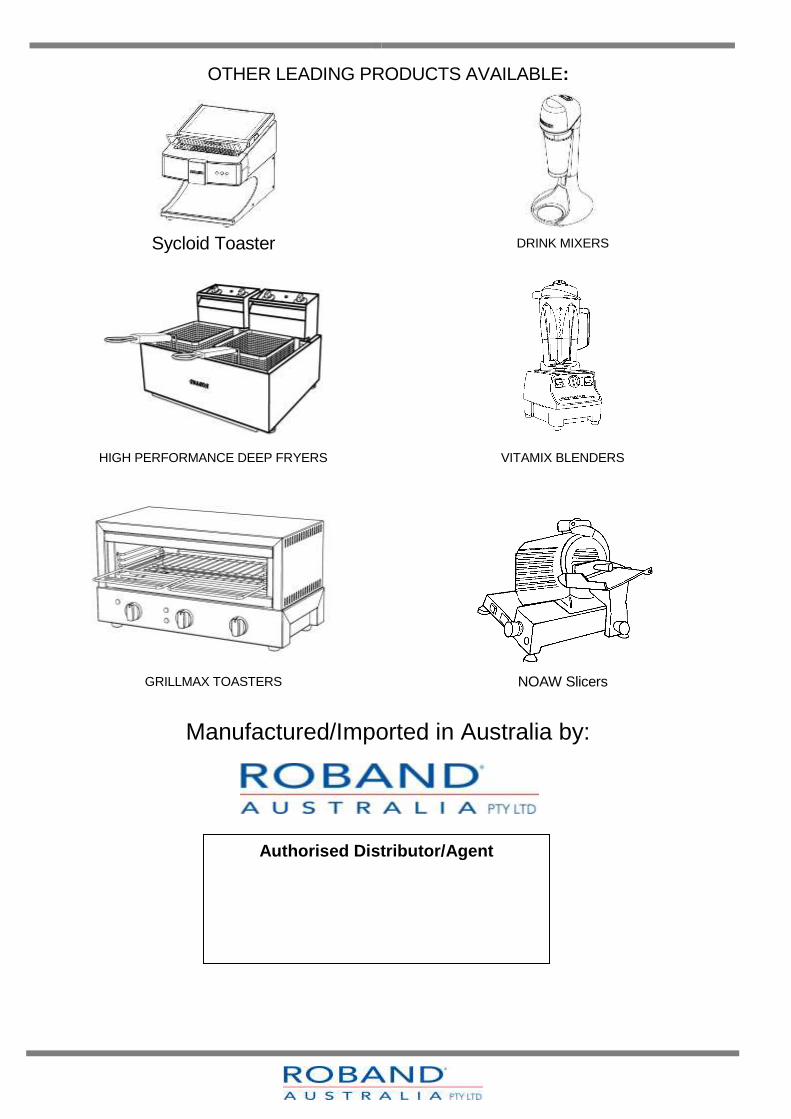
OTHER LEADING PRODUCTS AVAILABLE:
Sycloid Toaster DRINK MIXERS
HIGH PERFORMANCE DEEP FRYERS VITAMIX BLENDERS
GRILLMAX TOASTERS NOAW Slicers
Manufactured/Imported in Australia by:
Authorised Distributor/Agent