Embed Size (px)
Citation preview

www.kewlox.com
FRNotice de montageMeuble & penderieUne question lors du montage ? Consultez notre siteinternet www.kewlox.com ou contactez notre serviceclientèle au +32 (0) 81/51 17 91.
NLMontage-instructiesMeubel & hangkledingkastEen vraag bij de montage ? Raadpleeg onze websitewww.kewlox.com of contacteer onze klantendienstop +32 (0) 3/237 46 48.
EN Assembly manualCabinet & wardrobeHave you got a question about assembly? Instructions are available on our website www.kewlox.com or contact the customer service centre on +32 (0) 81/51 17 91.
Le meuble de rangementHet opbergmeubel

www.kewlox.com 2

www.kewlox.com 3
NOTE IMPORTANTE AVANT DE COMMENCERBELANGRIJK NOTA VOORDAT U BEGINTIMPORTANT NOTE BEFORE YOU START
fr Trier les colis ayant la même référence (ex. MS 1A1B-10Y/G ou !1234512). Les meubles peuvent être composés de plusieurs paquets, les inscriptions vous permettent de grouper les paquets d’un meuble. Enduire les angles des traverses en bois avec de la paraffine avant chaque opération. Mettre de côté les traverses sans rainures, dites supérieures et marquées du logo Kewlox®, elles serviront pour la dernière ceinture du meuble. (exception voir page 20 variante sans portes)
nl Sorteer de pakketten met dezelfde referentie (bv. MS 1A1B-10Y/G of !1234512). Een kast kan uit één of meerdere pakketten bestaan. De geschreven nummers geven aan welke pakketten tezamen één meubel vormen. Smeer de hoeken van de houten dwarslatten vóór elke handeling met paraffine in. Zet de dwarslatten met de Kewlox® stempel opzij (dwarslatten zonder bovenste gleuven); ze worden voor de laatste band van het meubelstuk gebruikt. (uitzondering : zie p 20 het geval van de modellen zonder deuren)
en Locate parcels with the same reference number (e.g. MS 1A1B-10Y/G or !1234512). The written inscriptions will enable you to identify combinations of packets for the samepiece of furniture.Coat the edges of the wooden cross pieces with paraffin wax before each step.Put the cross-pieces with no top grooves and marked with the Kewlox logo to one side.These are used for the final belt-line of the furniture (exception: see page 20 for version without doors)

www.kewlox.com 4
Traverse (sans rainures sur le dessus)Dwarslat (zonder groeven bovenop)Cross piece (without top grooves)
CornièreHoekprofielSteel corner
Panneau (porte)Paneel (deur)Pane (door)
ÉLÉMENTS DE BASEBASISSTUKKENBASIC ELEMENTS
Traverse (avec double rainure)Dwarslat (met dubbel groef)Cross piece (with double groove)

www.kewlox.com 5
Traverse (sans rainures sur le dessus)Dwarslat (zonder groeven bovenop)Cross piece (without top grooves)
ATTENTIONOPGELET WARNING
fr Si votre meuble fait plus d’un mètre de largeur, les traverses frontales seront renforcées. Le principe de montage reste le même
nl Als uw meubel breder dan een meter is, dan zijn de voorste dwarslatten verstevigd. De manier van monteren blijft hetzelfde.
en If your piece of furniture is larger than one metre, the front rails will be reinforced. The assembly principles remain the same.
Traverse (avec double rainure)Dwarslat (met dubbel groef)Cross piece (with double groove)

www.kewlox.com 6
1fr Pincer légèrement au préalable le bas de chaque cornière de façon à y coincer les 2 traverses ou le tasseaux de pied que vous insérerez au démarrage de la construction. Utiliser un linge pour réaliser cette opération sans abimer les cornières. Passer directement à l’étape 2, si le meuble ne comporte pas de pieds. Si le meuble comporte des pieds, glisser ceux-ci dans les cornières avant tout assemblage. nl Knijp vooraf één uiteinde van elke hoekprofiel lichtjes toe zodat de dwarslatten of de afstandstukken van de poten ingeklemd blijven. Gebruik hiervoor een stuk stof om de hoekprofielen niet te beschadigen. Ga direct door naar stap 2 als uw meubel geen poten heeft. Wanneer uw meubel van pootjes is voorzien, schuif deze dan vóór de montage in de hoekprofielen en Slightly pinch the bottom of the corner beforehand so that the cross pieces or the feet mounts that you are inserting are wedged at the end of the steel corner. Use a piece of cloth for this operation so as not to damage the steel corners. Jump to step 2 if the cabinet does not have feet. If your furniture has feet, slide them into the steel corners before any assembly.
PRINCIPE DE MONTAGEMONTAGEPRINCIPEPRINCIPLES OF ASSEMBLY

www.kewlox.com 7
PIEDS ALUMINIUM RÉGLABLESVERSTELBARE POOTJESADJUSTABLE ALUMINUM FEET
fr Après avoir pincé la cornière, glisser le tasseau de pied en aluminium de manière à ce que le pas de vis soit dirigé vers le bas et orienté vers l’extérieur de la cornière. Ne mettre les vis de réglage sur les tasseaux que quand le meuble est monté.
nl Na het hoekprofiel te hebben geknepen, schuif het aluminium afstandstuk van de poot met de schroefdraad naar beneden en gericht naar de buitenkant van het hoekprofiel. Plaats de stelschroeven pas op de afstandsstukken wanneer het meubelstuk is gemonteerd.
en After having pinched the steel corner, slide the aluminium foot mount in such a way that the screw threads are pointing towards the ground and facing the outside of the corner. Only put in the adjustment screws on the mounts when the piece of furniture is assembled.

www.kewlox.com 8
2 Meuble sans piedsKast zonder potenCabinet without feet
ParaffineParrafine Paraffin wax

www.kewlox.com 9
3

www.kewlox.com 10
4

www.kewlox.com 11
5 fr Insérer la dernière traverse simultanément dans les deux cornières. Veiller à ce que celle-ci reste le plus possible parallèle au sol.
nl Steek de uiteinden van de laatste dwarslat tegelijk in de twee hoekprofielen. Hierbij moet de dwarslat zo parallel mogelijk tot de grond worden gehouden.
en Insert the last cross-piece simultaneously in the two steel corners. Make sure these remain parallel to the ground as far as possible.

www.kewlox.com 12
6 fr Positionner les tasseaux suivant l’ordre des casiers choisis.
nl Plaats de afstandstukken volgens de volgorde van de gekozen vakken.
en Position the mounts according to the type of compartments chosen.

www.kewlox.com 13
8
7
fr Si vous ne réussissez pas à effectuer les étapes 7 et 8, vérifiez que vous avez correctement réalisé les précédentes.
nl Wanneer de stappen 7 en 8 niet lukken, controleer dan of de vorige stappen goed werden uitgevoerd.
en If you are unable to perform steps 7 and 8, check that you have correctly performed the preceding steps.

www.kewlox.com 14
9
1
23
4
fr Si le meuble comprend des casiers ouverts (sans portes), rendez-vous à la page 20 pour cette variante. Si le meuble comprend un casier penderie, rendez-vous aux pages 21 à 26.
nl Als uw meubel open vakken bevat (zonder deuren), ga dan naar bladzijde 20 voor deze variant. Als uw meubel een kledinghangvak bevat, ga dan naar de bladzijden 21 tot 26.
en If your furniture includes open compartments (without doors), go to page 20 for this option. If your furniture includes a wardrobe compartments, go to pages 21-26.

www.kewlox.com 15
10 fr Enduire la tranche inférieure des portes avec de la paraffine pour faciliter leur glissement.
nl Smeer de onderste rand van de deuren met paraffine in om het schuiven te vergemakkelijken.
en Coat the bottom of the door with paraffin wax to make sliding easier.
www.kewlox.com 16
11
6-9
12
6-10
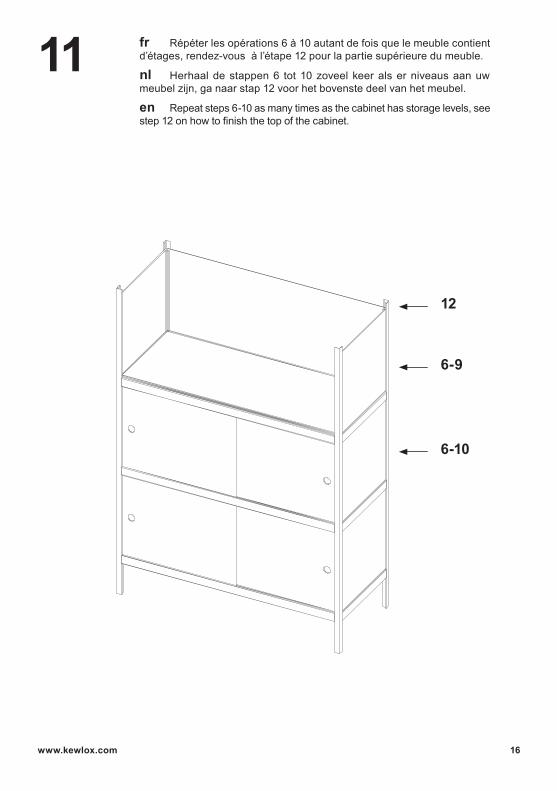
fr Répéter les opérations 6 à 10 autant de fois que le meuble contient d’étages, rendez-vous à l’étape 12 pour la partie supérieure du meuble.
nl Herhaal de stappen 6 tot 10 zoveel keer als er niveaus aan uw meubel zijn, ga naar stap 12 voor het bovenste deel van het meubel.
en Repeat steps 6-10 as many times as the cabinet has storage levels, see step 12 on how to finish the top of the cabinet.

www.kewlox.com 17
12
1
2 3
4

www.kewlox.com 18
13 fr Si le meuble comporte des pieds réglables, placer les vis de réglage de ceux-ci une fois l’assemblage du meuble entièrement terminé.
nl Wanneer uw meubel vestelbare pootjes heeft, plaats dan de stelschroef ervan zodra het meubel volledig is gemonteerd.
en If your piece of furniture has adjustable feet, fit the adjustment screws once assembly is completely finished.

www.kewlox.com 19
141
2
fr Après avoir placé le meuble à l’endroit souhaité, le mettre à niveau à l’aide des pieds réglables. Utiliser un niveau à eau. nl Nadat u uw kast op de gewenste plaats hebt gemonteerd, kunt u ze met behulp van de verstelbare pootjes waterpas zetten. en After having placed your cabinet in the desired location, use the adjustable feet to adjust it to the correct level.
3
4

www.kewlox.com 20
VARIANTE SANS PORTESVARIANT ZONDER DEUREN (KOLOM)VARIATION DOORLESS LOCKERS
fr Pour les colonnes et pour les casiers d’armoires qui ne comporteraient pas de portes, utilisez une traverse estampillée du cachet Kewlox® (sans rainure supérieure). Le principe de montage reste le même.
nl In het geval van een kolomkast of van een vak zonder deuren, is voorste dwarslat (zonder bovenste groeven) voorzien van de Kewlox® stempel. Het principe van de montage blijft hetzelfde.
en For column units and for cabinet compartments which do not have doors, use a cross-piece stamped with the Kewlox® logo (with no top groove). The assembly principle remains thesame.
1
2 3
4

www.kewlox.com 21
VARIANTE PENDERIEVARIANT HANGKLEDINGKASTENVARIATION WARDROBE
1 fr Utiliser un maillet et une cale pour faciliter l’insertion de la pièce de blocage avant.
nl Gebruik een houten of rubber hamertje en een wig om het kleine voorste blokkeerstuk er gemakkelijker in te steken.
en Use a mallet and a wedge to make it easier to insert the small front blocking part..
Traverse latérale ZijlatLateral cross-piece

www.kewlox.com 22
2a fr Tringle de penderie entre 2 casiers
nl Kledinghangvak tussen 2 vakken
en Wardrobe rail between 2 compartments

www.kewlox.com 23
fr Tringle de penderie au niveau supérieur
nl Kledinghangvak in het bovenste gedeelte
en Wardrobe rail on the top
2b

www.kewlox.com 24
3

www.kewlox.com 25
4
www.kewlox.com 26
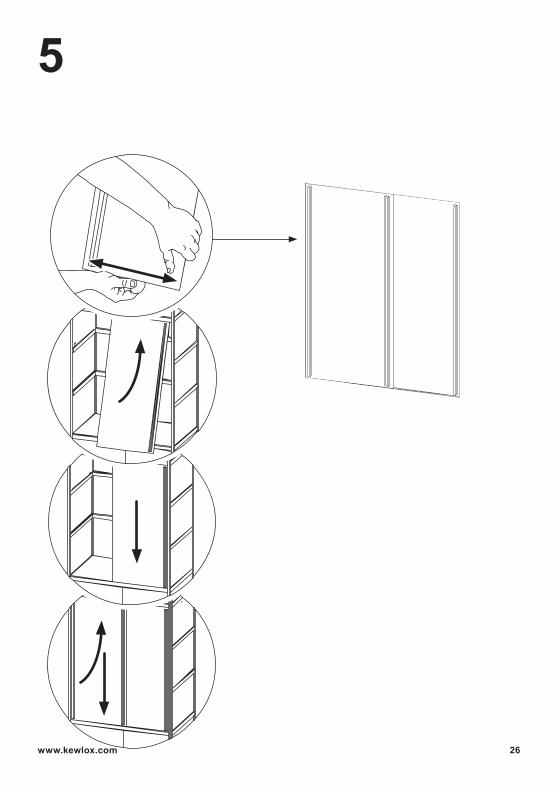
5

www.kewlox.com 27

www.kewlox.com 28
TABLETTES INTERMÉDIAIRESTUSSENTABLETTENINTERMEDIATE SHELVES
1

www.kewlox.com 29
verreglasglass
standardstandaardstandard
2 fr Pour les modèles en verre, placez les petites ferrures en acier sur la tranche supérieure des supports en verre avant de placer la tablette. Pour les modèles de grande dimension, un support supplémentaire est nécessaire dans le fond du meuble.
nl Voor de glazen modellen plaatst u de metalen haakjes op de bovenste rand van de glazen steunen van de glasplaat. Voor de modellen van een grotere omvang is een bijkomende houder achteraan in het meubel nodig.
en For glass models, fit the small steel fittings on the upper part of the glass brackets before fitting the shelf. For large size models, an additional support is needed at the back of the piece.
x4

www.kewlox.com 30
fr Pour les vitrines et meubles lourds, enlever les portes et les plateaux avant toute manipulation.
nl Verwijder voor vitrinekasten en zware meubels de deuren en bladen vóór elke verplaatsing.
en For display cabinets and heavy furniture, remove the doors and shelves before handling or moving the furniture.

www.kewlox.com 31
GARANTIE À VIELEVENSLANGE GARANTIELIFETIME WARRANTY
fr Conservez le “label” (document A4 joint avec votre meuble). Il comporte la référence qui vous sera réclamée en cas d’intervention sous garantie ou de remplacement de pièces dans le futur.Les éléments de structure du meuble (traverses, tasseaux, cornières) sont garantis à vie contre la rupture, en usage en bon père de famille. Fort d’une expérience de plus de 50 ans, Kewlox® garantit à vie la structure de ses meubles en usage normal (ambiance sèche, charges nominales), et propose l’échange des cornières en acier ou inox, des traverses et tasseaux en bois ou en alu en cas de rupture de ceux-ci.Les autres éléments du meuble sont garantis contre les défauts de fabrication pendant une période de 2 ans, outre l’application éventuelle des dispositions du code civil relatives aux vices cachés. La garantie prévoit l’échange standard des pièces défectueuses en nos magasins. La garantie ne couvre pas les variations de teintes ou de nuances ni l’usure normale, ni les pièces surchargées, modifiées ou maltraitées par l’acheteur (traces de coups), ou placées dans une atmosphère dont l’humidité relative est de plus de 65%. La facture d’achat ou le label d’identification du meuble doivent obligatoirement accompagner la demande d’échange standard.
nl Bewaar het “etiket” (het A4-document dat met uw meubel werd meegeleverd). Het bevat het referentienummer dat u zal worden gevraagd wanneer u in de toekomst een beroep doet op de garantie of een vervanging van onderdelen aanvraagt.Voor de structurele elementen van het meubel (dwarslatten, afstandsstuk, hoekprofielen) geven wij een levenslange garantie tegen breuk bij gebruik als een goede huisvader. Met meer dan 50 jaren ervaring geeft Kewlox® op de constructie van zijn meubels bij normaal gebruik (droge omgeving, nominale last) een levenslange garantie en biedt een omruiling van de (roestvrij) stalen hoekprofielen, de houten of aluminium dwarslatten en afstandsstukken wanneer deze breken.Voor de overige elementen van het meubel geldt een garantie tegen fabricagefouten voor een periode van 2 jaar, naast de eventuele toepassing van de bepalingen van het Burgerlijk Wetboek betreffende verborgen gebreken. De garantie voorziet in de normale vervanging van defecte onderdelen in onze winkels. De garantie geldt niet voor kleurverschillen en -afwijkingen noch voor normale slijtage, noch voor delen die door de koper te zwaar werden belast, gewijzigd of fout behandeld werden (sporen van stoten), of die in een omgeving met een relatieve luchtvochtigheid van meer dan 65 % werden geplaatst. De aankoopfactuur of het identificatie-etiket van het meubel moet verplicht aan de aanvraag voor een standaard omruiling worden bijgevoegd.
en Keep the “label” (the A4 document attached to your piece of furniture). It contains the reference code necessary for any claims on the guarantee or any future replacement of parts. The structural elements of the furniture item (cross-pieces, mounts, steel corners) have a lifetime guarantee against breakage if used a prudent and responsible fashion. With over 40 years of experience, Kewlox® offers a lifetime warranty for the structure of their furniture items when in normal use (dry environment, recommended loads etc.), and offers replacement of the stainless steel and steel corners, and the wooden or aluminium cross-pieces and mounts if they break. Other elements of the furniture item are guaranteed against manufacturing defects for a period of two years, in addition to the possible application of the provisions of the Civil Code relating to hidden defects. The standard guarantee includes the replacement of defective parts in our stores. The guarantee does not cover variations of colour or shade, general wear and tear, excessive usage, modification or abuse by the buyer (dents from impacts) or if the piece in question is placed in an atmosphere where the relative humidity is over 65%. The invoice or the identification label of the furniture item must be included with any requests for replacements.

32octobre 2017 - oktober 2017 - October 2017


![UN CONFORT A VOTRE MESURE. - behagen.ru file[4] [5] … Affirmée, la rainure verticale asymétrique de la TOPFLAIR lui offre un charme et une originalité familière, non ?... Simple,](https://img.dokumen.tips/doc/110x75/5b9d81d709d3f253238c4238/un-confort-a-votre-mesure-4-5-affirmee-la-rainure-verticale-asymetrique.jpg)