Embed Size (px)
Citation preview

Approximate Weight: 17,000 lbs
www.midwestmanufacturing.com
Approximate Size: 17’ 3” W x 5’ 4” D x 8’ 5-1/2”H
FOUNTAIN OF FIRESKU: 198-2065
2 Prepare
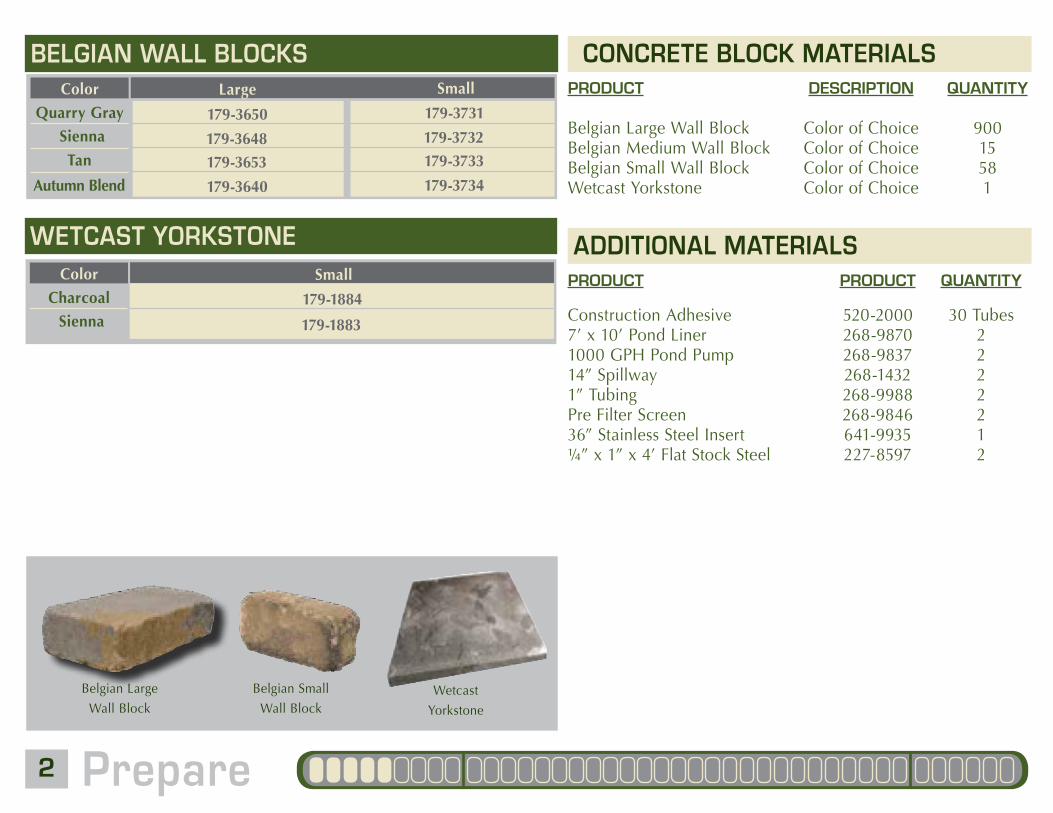
BELGIAN WALL BLOCKS
Belgian Large
Wall Block
PRODUCT
Construction Adhesive7’ x 10’ Pond Liner1000 GPH Pond Pump14” Spillway1” TubingPre Filter Screen 36” Stainless Steel Insert¼” x 1” x 4’ Flat Stock Steel
ADDITIONAL MATERIALS
179-3650
179-3648179-3653
179-3640
Large179-3731
179-3732179-3733
179-3734
SiennaQuarry Gray
Tan
Autumn Blend
SmallColor
CONCRETE BLOCK MATERIALSPRODUCT
Belgian Large Wall Block Belgian Medium Wall BlockBelgian Small Wall Block Wetcast Yorkstone
DESCRIPTION
Color of ChoiceColor of ChoiceColor of ChoiceColor of Choice
QUANTITY
90015581
PRODUCT
520-2000268-9870268-9837268-1432268-9988268-9846641-9935227-8597
QUANTITY
30 Tubes2222212
Belgian Small
Wall Block
WETCAST YORKSTONE
179-1884
179-1883SiennaCharcoal
SmallColor
Wetcast
Yorkstone

3Prepare
A solid foundation is necessary to prevent settling and tiling of each project. We recommend using a leveling pad, unless local building code requires you to pour a concrete foundation or build another type of foundation.
FOUNDATION:
• Choose the location for the completed project; place and mark the position of the base layer of blocks. Once marked, remove the blocks and the organic top soil within the marked area.
• If applicable to your area, create a leveling pad with a non-frost susceptible, well graded, compacted angular gravel-sand mixture with fines (GW as per ASTM D248). The leveling pad should be a minimum of 4 to 6 inches thick. For leveling pads greater than 8” thick, the fill material shall be placed in more than one lift. Each layer or lift of fill material shall be leveled and compacted to a 95% Standard Proctor density before moving on.
• Once the top layer of fill material is compacted and level, place the base layer of blocks. The base layer should sit 1 to 2 inches below grade to help further prevent shifting. Use additional fill material to level the base layer as needed.
* If a concrete slab is required, prepare a leveling pad using the procedures listed in the paragraphs above. The concrete Shall have a minimum compressive strength of 2500 psi. A 4-inch thick concrete slab should be more than sufficient. A thickened edge and reinforcement of the leveling slabs may be required. Please consult a professional engineer for specific requirements.
TIPS FOR BUILDING LEVELING PADS:
Rubber Mallet
Level
Utility Knife
Caulk Gun
Protective Equipment
Tape Measure
TOOL CHECK LIST These plans will walk you through each step as you Prepare, Assemble and Enjoy the new addition to your yard. Check out the Progress Bar at the bottom of each page to track your advancements as you complete each phase of your project!
INSTRUCTIONS:
• Please research and follow local building codes prior to the excavation, construc-tion and assembly of your project.
• Exercise caution when you work with Concrete Block designs. Wear pro-tective safety equipment such as safety glasses, dust masks, gloves and a hard hat.
• Whether you plan to build the project yourself or to hire a professional, every project requires a call to mark your utility lines.
BEFORE YOU BEGIN:
It is the responsibility of the owner to ensure compliance with all applicable laws, codes and regulations for any project. Proper safety precautions must be taken prior to and during the construction of each project. Please follow standard safety guidelines and wear necessary protective equipment when building and using your new backyard addition.
RESPONSIBILITIES:
ChiselStandard Hammer
This is an advanced to expert plan; cutting block will be necessary for assembly. A block fitter and circular saw with masonry cutting blade are ideal tools to work with. Necessary cuts will be called on the plans.
NOTE:

4 Prepare
TABLE OF CONTENTS
ASSEMBLE:
ENJOY:
56789
1011121314151617181920
FOUNTAIN DIMENSIONS
212223
PREPARE:23
Follow suggestions on page 3 to build a proper foundation before starting your new project. If not already set, place the first level of block 1”- 2” below grade, level and fill in any gaps. Use Level 1 as a reference to place the blocks for all remaining levels.
Refer to the illustrations on the following pages to guide you through each step. Prior to adhering each level to the previously laid block, place the entire level of blocks and check to make sure it fits properly. Remove small sections at a time to place 1/4”-3/8” bead of adhesive.
Once all levels are complete, assemble and position the grill in the finished enclosure. Wait a minimum of two days before using the grill.
INSTALLATION INSTRUCTIONS
Prep - Level 2Level 3 - Level 4Fireplace Insert - Level 5Pond Liner - Level 6Level 7 - Level 8 Level 9 - Level 10 Level 11 - Level 12Level 13 - Level 14Steel Placement - Level 15Level 16 - Level 17Level 18 - Level 19 Level 20 - Level 21Level 22 - Level 23Level 24 - Level 25Level 26 - Level 27Level 28 - Level 30
* Do not over apply adhesive. It may reduce effectiveness. Use mineral spirits to remove any unwanted adhesive.
Finished ElevationsUse and Care InstructionsMore Concrete Block Ideas
Materials ListGuidelines & Checklist
17’ 3”
8’ 5-1/2”
5’ 4”

5Assemble
(67) Belgian Large Wall BlockLevel 1 Level 2
PREPARATIONSThe Fountain of Fire was designed to add versatility and style to your backyard and create a space to enjoy for years to come. This Fountain should be built on a solid, level surface. Check local building codes before choosing the location and beginning this project.
(75) Belgian Large Wall Block
Trim blocks as needed to match diagram.Trim blocks as needed to match diagram.

6 Assemble
Level 4Level 3(67) Belgian Large Wall Blocks (70) Belgian Large Wall Blocks
(6) Belgian Small Wall Blocks
Trim blocks as needed to fit.
Trim blocks as needed to match diagram. Trim blocks as needed to match diagram.

7Assemble
Level 5Fireplace Insert(1) 36” Stainless Steel Insert (51) Belgian Large Wall Blocks
Belgian Large Wall Block will need to be cut in order for the 1” pond tubing to run from the Pond Pump to the Spillway on level 13. The tubing will be run after the Pond Pump has been installed.
Wait for glue to fully dry before proceeding to the next steps. Refer to the label on your construction adhesive for dry times.
Build remaining layers around the 36” Stainless Steel Insert.

8 Assemble
Level 6Pond Liner Installation(60) Belgian Large Wall Block(2) Pond liner
Center the Pond Liner above the basins, then conform the liners to fit the interior. Do not trim the extra liner until after there has been water added to the basin.
(2) Pond Pump
After placing the Pond Pump attach the pre screen filter to the pump.
Partially fill the basin with water, allowing for the pond liner to stretch and conform to the interior of the basin. Check to make sure the liner is holding water, then continue to fill the basin untill full.
Attach the 1” tubing to the pond pump. The tubing will need to extend to the spillway on level 13. For now run the tubing and the pump power cord through the chiseled groove into the back of the basins.
Once the basin has been filled trim the liner to 1½” from the outside edge of the Belgian Large Wall Blocks.
Glue sections of 4 or more Belgian Wall Blocks surrounding the basins togather. Do not glue blocks to the pond liner in case the liner ever has to be replaced.
(2) 1” Tubing

9Assemble
Level 8Level 7(39) Belgian Large Wall Block (40) Belgian Large Wall Block
Trim blocks as needed to match diagram. Trim blocks as needed to match diagram.

10 Assemble
Level 9(39) Belgian Large Wall Blocks
Level 10(40) Belgian Large Wall Blocks
Trim blocks as needed to match diagram. Trim blocks as needed to match diagram.

11Assemble
Level 12Level 11(39) Belgian Large Wall Blocks (40) Belgian Large Wall Blocks
Trim blocks as needed to match diagram. Trim blocks as needed to match diagram.

12 Assemble
Level 14Level 13(40) Belgian Large Wall Block(37) Belgian Large Wall Block
(2) 14” Spillways(8) Belgian Small Wall Block
Small Belgians are laid below the spillway to support it.
Trim blocks as needed to match diagram. Trim blocks as needed to match diagram.
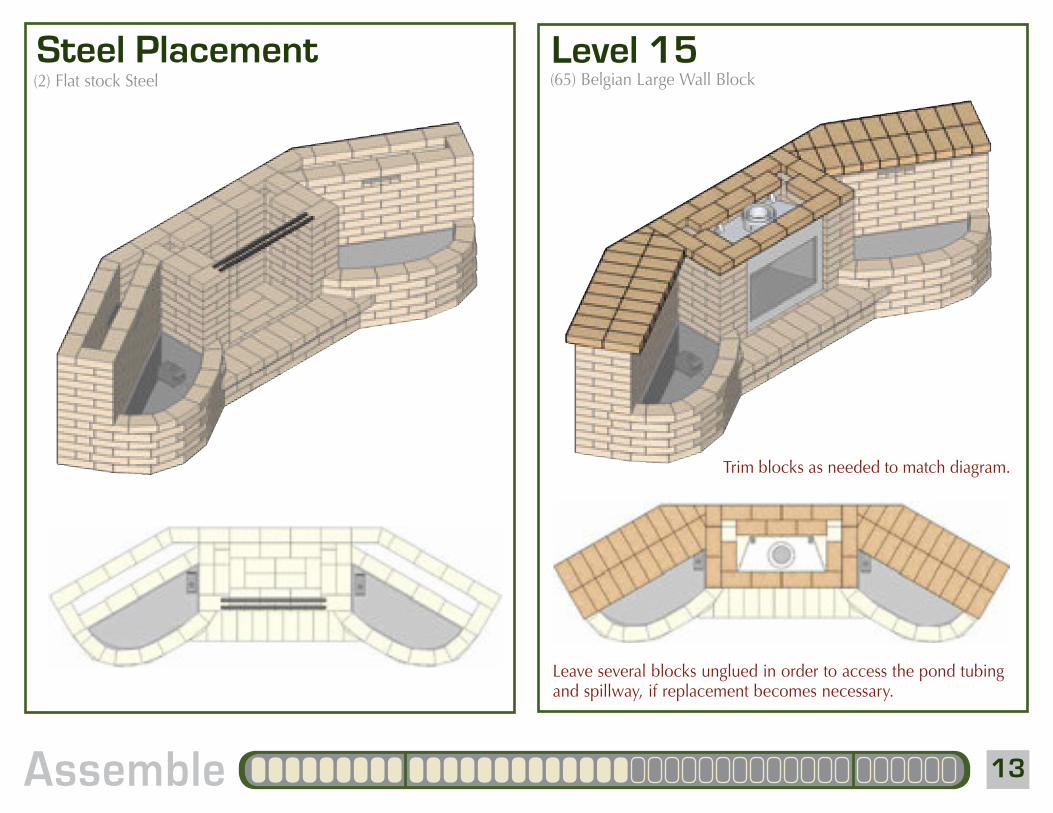
13Assemble
Level 15Steel Placement(65) Belgian Large Wall Block(2) Flat stock Steel
Leave several blocks unglued in order to access the pond tubing and spillway, if replacement becomes necessary.
Trim blocks as needed to match diagram.
14 Assemble
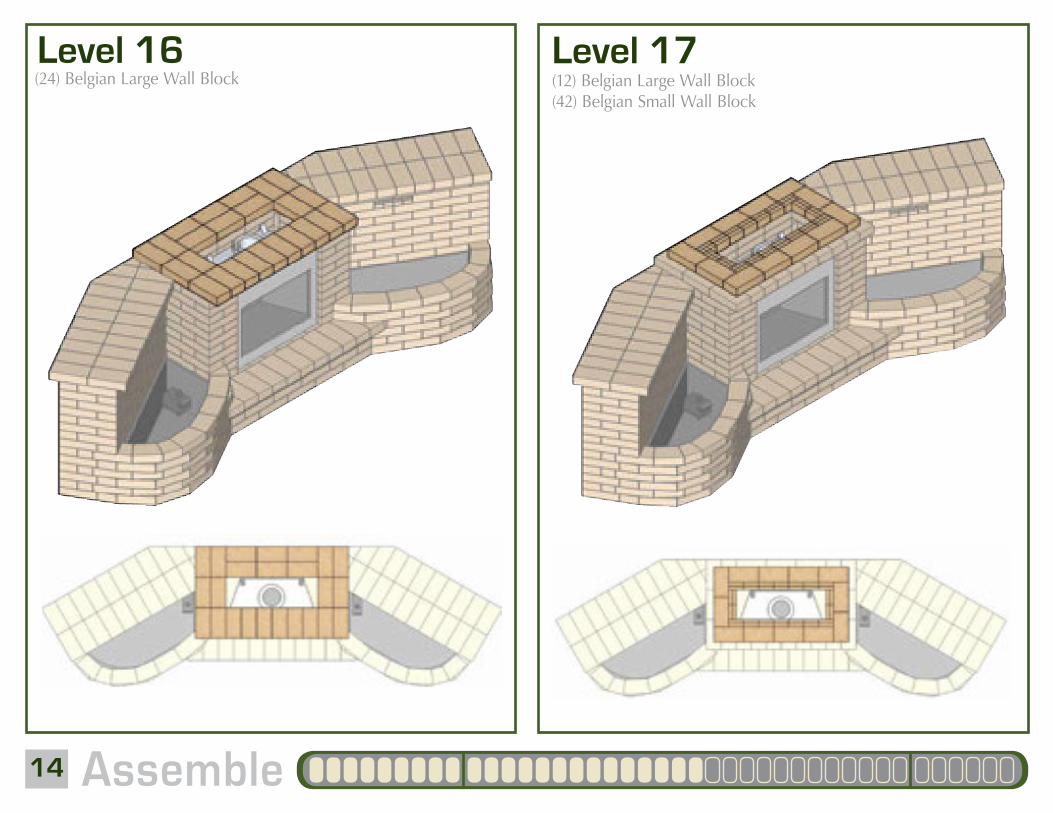
Level 17Level 16(24) Belgian Large Wall Block (12) Belgian Large Wall Block
(42) Belgian Small Wall Block

15Assemble
Level 19Level 18(9) Belgian Large Wall Block (10) Belgian Large Wall Block
Half blocks

16 Assemble
Level 21Level 20(8) Belgian Large Wall Block (8) Belgian Large Wall Block

17Assemble
Level 23Level 22(8) Belgian Large Wall Block (8) Belgian Large Wall Block

18 Assemble
Level 24(8) Belgian Large Wall Block
Level 25(8) Belgian Large Wall Block

19Assemble
Level 26(8) Belgian Large Wall Block
Level 27(8) Belgian Large Wall Block
20 Assemble
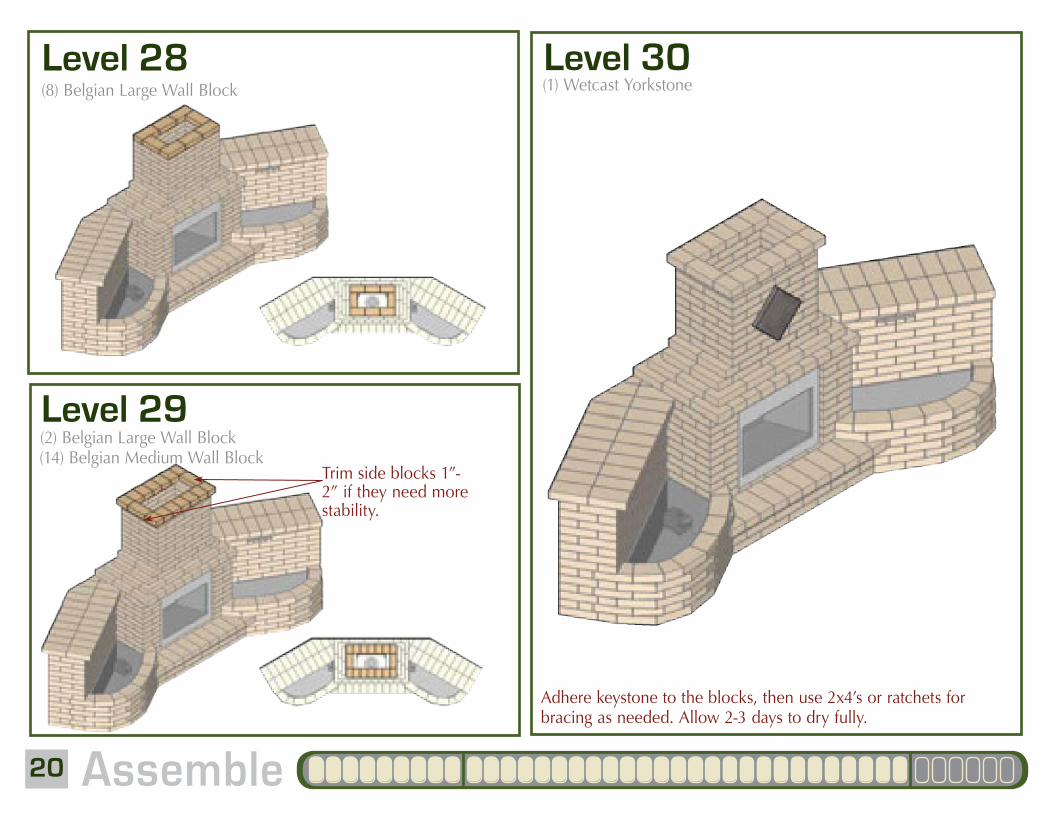
Level 28
Level 29
Level 30(8) Belgian Large Wall Block
(2) Belgian Large Wall Block
Trim side blocks 1”-2” if they need more stability.
(14) Belgian Medium Wall Block
(1) Wetcast Yorkstone
Adhere keystone to the blocks, then use 2x4’s or ratchets for bracing as needed. Allow 2-3 days to dry fully.

21Assemble
FOUNTAIN OF FIREELEVATIONS
Back View
Top View
Right ViewLeft View
Front View

22 Assemble
With proper use and maintenance you can enjoy this new addition to your landscape for years to come.
Use and Maintenance
FOUNTAIN MAINTENANCE: • Make sure water remains clear of all debris and change filters
according to the package directions.
• Concrete blocks can be cleaned by wiping down with water or gently spraying with a hose.
• Make sure proper drainage is allowed at the base of the fireplace. Proper drainage gives water a way to escape so it doesn’t build up, seep through gaps or erode blocks.
FOUNTAIN USE:• Refer to the pond pump’s instructions manuals for use and cleaning tips
• Make sure that all electrical outlets and connections for the pump and spillway are safely installed in away from standing water
Fireplace Use:• When using your fireplace, always follow burning regulations in your
area, keep the area free from combustible material and never leave a fire unattended.
• Refer to the fireplace insert’s instruction manual for use and tips.

NORTHERN LIGHTS COLLECTIONCantwell Fireplace 179-7903
Kodiak Firepit 179-7902
Sitka Bench 179-7900
Fjord Fountain 179-7901
PRAIRIE COLLECTIONHearthstone Fireplace 179-7852
Plateau Bar 179-7851
Echelon Planter 179-7853
Courting Bench 179-7854
CLEARWATER COLLECTIONAlpine Fireplace 179-7800, 7801, 7802
Nordic Bar 179-7812
Cascade Fountain with Brighton Pillars 179-7810
LAKESHORE COLLECTIONStockton Firepit 179-7950
Seawall Bench 179-7955, 7954
Starboard Column 179-7952
Saxon Waterwall 179-7956
Poseidon’s Point 179-7953
Portside Pillar 179-7951
STAIR COLLECTION
Four Stair Set 179-7702
Three Stair Set 179-7701
Two Stair Set 179-7703
OUTDOOR LIVING KITS
Check out these Outdoor Living Kits and many more ways to create your own
landscaped paradise by visiting: