Embed Size (px)
Citation preview

Desired Results
BVSD Standard(s)/Grade‐Level Expectations Second Grade Science GLE1.1. Changes in speed or direction of motion are caused by forces such as pushes and pulls. Second Grade Math GLE3.1. Visual displays of data can be constructed in a variety of formats to solve problems. GLE4.2. Some attributes of objects are measurable and can be quantified using different tools. Second Grade Language Arts GLE1.2. Students will engage effectively in classroom discussions. GLE2.2. Students will use a range of strategies efficiently to construct meaning while reading informational texts. GLE2.3. Students will know and apply grade‐level phonics and word analysis skills to decode words. GLE2.5. Students will use a range of strategies to determine and use new words and phrases acquired through conversations, reading or being read to, and responding to texts. GLE3.2. Students will plan, organize, write and publish informative/explanatory and opinion pieces for a variety of audiences and purposes. GLE3.3. Students will apply conventions of standard English grammar and usage, capitalization, punctuation and spelling consistently. GLE4.1. Students will participate in shared research projects by recalling information from experiences and gathering information from sources to answer questions.
Unit Essential Questions 1. What must be known about a force to predict how it will change an object’s motion? 2. How does applying a force affect the way an object moves? 3. How do an object’s properties affect how the object will move when a force is applied?
Students will know…
Technology makes our lives easier by applying what we know about how forces can affect objects such as tires, bicycles and snow throwers.
In many recreational activities, such as tug‐of‐war, there is a relationship between forces and changes in motion.
Objects and systems that turn on a central axis exhibit rotational motion.
The amount and position of mass affect how an object rotates.
A push or pull (a force) is needed to initiate rotational motion in objects and systems.
Things move in many different ways.
Students will be able to…
Identify and predict how the direction or speed of an object may change due to an outside force.
Analyze and interpret observable data about the impact of forces on the motion of objects.
Select appropriate tools for data collection.
Measure the change in speed or direction of an object using appropriate units.
Collaboratively design an experiment, identifying the constants and variables.
�
FOSS Force and Motion Unit Plan
1

Wheels and spheres roll down a slope.
Axles support wheels.
Wheel‐and‐axle systems with wheels of different sizes roll toward the smaller wheel.
The amount and location of an added weight can change the way a system rolls.
2

Language Objectives
Share a connection or prior experience that they have had with forces and motion.
Use the words “rotate,” “spin,” “axis,” “disk,” “motion,” “twist” and “twirl” to describe the movement of a top.
Use words related to table of contents and keeping a science notebook (notebook, page, table of contents).
Point to a top, runway and loop when prompted.
Select a book and use it to support their understanding of force and motion.
Complete a CLOZE activity about force using the words “force,” “friction,” “variable,” “constant” and “speed.”
Academic vocabulary Investigation 1
Direction Drop Force
Gravity Pull Push
Investigation 2 Air resistance Axis
Balance
Disk Knot Motion
Rotate Shaft Spin
Stable Swirl Top
Twirl Twirler Twist
Whirl Wing Zoomer
Investigation 3 Axle Disk
Motion
Ramp Roll Slope
Wheel
Investigation 4
Constant Data Force
Friction Loop Result
Speed Sphere Variable
3

Assessment Evidence
Pre‐/post‐assessment Science notebook entries Informal observation and class discussion Assessment checklists
Materials and Resources
Materials
Science notebooks for students
Large, class model science notebook
FOSS Balance and Motion kit
BVSD Force and Motion guide
Additional picture books related to force and motion
4

General Anticipation Guide Directions An anticipation guide can be used to assess a student’s prior knowledge, focus reading, motivate students to read and increase comprehension ability. The anticipation guide activates prior knowledge before reading and sets purpose for reading. Readence, Bean and Baldwin first created the strategy in 1981. Because the anticipation guide uses statements instead of questions that are focused on major concepts in the reading, students are motivated to read closely to find information in the reading that supports their predictions. An anticipation guide usually consists of four to six statements about the content reading material. These statements should support or challenge what students know. Not all statements should be true, nor should they be simply written. The order of statements generally follows the order of what is presented in the reading material. Procedure 1. Present the guide to your students. You may read the directions and statements aloud to the class. Students need to decide if they agree or disagree with each statement and give reason(s) for their responses. Tell them they will need to give reasons for their positions. 2. Discuss each statement. Ask students to respond in the before-reading column. Then ask how many students agree or disagree with the statement. Tally the responses. Have at least one student from each side explain his or her reasoning behind the response. 3. You can read the content material aloud or let students read it. As you/they read, tell students to find evidence that supports their response and evidence that might support other students’ responses. 4. Reread each statement and ask students to respond again in the after-reading column. They can change statements in writing to make them true (optional). 5. Discuss the statements after reading the material. Talk about new knowledge and/or how their thinking might have changed. Note: Some teachers have students use two different colored pens to distinguish between their thoughts prior to reading the content material from their thoughts after reading the material. Students do not like to be wrong. Linda Block-Gandy
5

Book List for FOSS Force and Motion Bradley, Kimberly Brubaker. 2005. Forces Make Things Move. New York: HarperCollins Publishers. Hewitt, Sally. 1997. Forces Around Us. Danbury, Conn.: Children’s Press. Hewitt, Sally. 2008. Amazing Forces and Movement. New York: Crabtree Publishing Company. Higgins, Nadia. 2009. Marvelous Motion. Edina, Minn.: Magic Wagon. Manolis, Kay. 2009. Motion. Minneapolis: Bellwether Media, Inc. (Scholastic). Stille, Darlene. 2004. Motion: Push and Pull, Fast and Slow. Mankato, Minn.: Picture Window Books. Twist, Clint. 2006. Force & Motion. New York: Bearport Publishing Company. Welch, Catherine A. 2006. Forces and Motion: A Question and Answer Book. Mankato, Minn.: Capstone Press.
6

Anecdotal Notes
7

Assessment Checklist – Notebooks Force and Motion
+ = Got it! √ = Basic understanding ‐ = Needs help
Keeps up table of
contents
Completes
glossary en
tries
Writes questions
Makes predictions
Writes plans /
procedures
Records data
Analyzes and
interprets data
Communicates
science
understanding
Reflections/next
step
s
Notes about student
notebooks
Student Names
8

FOSS Force and Motion Unit Investigation 1
Essential Questions 1. What makes objects move? 2. What is the relationship between force and motion? 3. What types of forces can I identify?
Session Content Objectives Language Objectives
1 & 2
Pre-Assessment and Introduction to Vocabulary
Work collaboratively with a partner.
Observe types of motion.
Explain prior understanding of motion and forces used to cause motion.
Discover vocabulary used to study force and motion.
Students will be able to:
Share prior understanding of force and motion.
Explain the difference between force and motion.
Tally data accurately.
Students will share scientific thinking with a partner using the vocabulary terms being introduced.
Students will make statements about data using sentence frames and graphic organizers.
Students will match key concepts to focus questions.
3 Science Stories: “Push or Pull?”
Participate in a shared reading.
Provide a reading response.
Perform additional center activities to revisit text.
Students will be able to:
Transfer understanding to new contexts.
Students will identify key vocabulary in text.
Students will make glossary entries.
4 & 5
Identifying Force and Using Vocabulary
Work collaboratively with a partner.
Identify correct force and describe using correct vocabulary.
Record data.
Students will be able to:
Identify push and pull as forces.
Distinguish between push and pull, and provide examples.
Identify spin, rotate and drop as types of motion.
Explain that force can cause motion.
Describe gravity as a [fundamental] force.
Students will discuss how objects move because of forces.
Students will use scientific vocabulary to describe the connection between force and motion.
Students will make science notebook entries (question, prediction, procedure, results, conclusion).
Students will make statements about data using sentence frames and graphic organizers.
Students will make glossary entries.
Students will match key concepts to focus questions.
The purpose of this initial unit is to pre-assess student understanding, set up learning behaviors for collaborative inquiry, and introduce and practice using vocabulary and data-collecting/reporting skills.
9

Name: ____________________________________ Force and Motion Pre‐/Post‐Assessment 1. Write as many words as you can that describe the different ways things move.
________________________________________________________________________
________________________________________________________________________
________________________________________________________________________
2. What is needed to start an object moving?
________________________________________________________________________
________________________________________________________________________
3. How does a bicycle move?
A. Draw an arrow to show where force is used to make a bicycle move.
(Image from atlantabike.org) B. Is the force a push or a pull? ___________________________
10

C. Which way will the bicycle move? Draw an arrow.
(Image from atlantabike.org)
4. What force makes objects roll down hills? ___________________________________ 5. Where will the marble go? Draw the path you think the marble will take when it rolls off the track.
11

6. Look at the rollers in the box.
Which roller went down each ramp shown below?
Top Top Top
Roller _________ Roller ________ Roller ________
�
12

7. In this tug‐of‐war game:
Team A Team B
A. Which direction does the ribbon move if Team A pulls harder? (Circle one.) B. Which direction does the ribbon move if Team B pulls harder? (Circle one.)
13

Name: __________KEY_________________ Force and Motion Pre‐/Post‐Assessment 1. Write as many words as you can that describe the different ways things move.
3 = at least three content‐specific words
2 = at least three general words
1 = an attempt is made
0 = blank or off‐topic response
Content‐Specific Words General Words
Roll Rotate Slide Spin Twirl
Around Back and forth Down Fast Slow Smooth Up Wobbly Zigzag
2. What is needed to start an object moving?
3 = force
2 = push or pull
1 = off‐topic response 3. How does a bicycle move? A. Draw an arrow to show where force is used to make a bicycle move.
(Rider pushes down on pedal to make the bike move.)
3 = The arrow points down toward the pedal. (Pushing down on the pedal makes the pedal system move forward.)
2 = The arrow points down and forward on the pedal.
1 = The arrow is near the pedal, but not pointing down or forward.
0 = No arrow is drawn or the arrow is not near the pedal. B. Is the force a push or a pull? _________push_________ C. Which way will the bicycle move? Draw an arrow. The bicycle will move forward once a force (push) is applied to the pedal.
14

3 = The arrow points left.
2 = The arrow points right.
1 = There is an arrow drawn in a direction.
0 = No arrow is drawn.
4. What force makes objects roll down hills?
3 = gravity
2 = pull
1 = incorrect response
0 = no response given 5. The marble’s path should be a straight line.
2 = straight path
1 = any other path (curved, zigzag, etc.)
0 = no path drawn 6. Look at the rollers in the box. Which roller went down each ramp shown below? CAB is the correct order.
3 = all three correct
2 = two of the three correct
1 = one correct
0 = no correct response 7. A. Which direction does the ribbon move if Team A pulls harder? (Circle one.)
2 = arrow pointing to the left
1 = arrow pointing to the right
0 = no response
B. Which direction does the ribbon move if Team B pulls harder? (Circle one.)
2 = arrow pointing to the right
1 = arrow pointing to the left
0 = no response
15
FOSS Force and Motion Investigation 1 Sessions 1 and 2: Pre‐Assessment and Introduction to Vocabulary Preparation time: 30‐45 minutes
Materials needed Papers to copy, cut and prepare Students will need
Chart paper or document camera Teacher science notebook Playground to observe (while another class is on the playground) Assessment checklist
Scaffolded glossary sheet for students who need it Chart 1:1 to record student observations for Session 1 and 2 Playground map: Draw a map of the playground or print the actual playground from Google Maps. Copy a map for each student to record observations for Session 1. Index cards (about 15 for whole class): Write “push,” “pull” and “both” on the cards for Session 2, or ask students to write “push/pull/both” on the large classroom chart. Table 1:1 for each student and large version for teacher to model (Whenever possible, teach students to make their own graphic organizers and use copies for students who need more support.) Sentence strips with the following:
What makes objects move?
Objects move when force is applied.
What is the relationship between force and motion?
What types of forces can I identify?
Force and motion are not the same.
Objects move when force is applied.
Pencil Science notebook Glue Scissors
16

A force can often be described as a push or a pull.
Gravity is a type of force.
Preparation: Read “Taking FOSS Outdoors” for guidelines and tips on managing outdoor investigations: http://fossweb.schoolspecialty.com/delegate/ssi‐foss‐ucm?dDocName=D567152. Gather and assemble materials. You may want to make a large version of Chart 1.1 and Table 2.1. To make the map, choose one of the following options:
Draw a simple map, adding symbols of the playground, for students to use to record observations of movement.
Use Google Maps to print a picture of your school playground. (See instructions below.)
Collaborate with your school’s fourth‐ or fifth‐grade teams to have their students create a map of the schoolyard.
Choose which sections of the playground you will have students observe. Optional: Have students use the map as part of a social studies (SS 2.1‐Geography) activity. To make the map on Google:
1. Open Google Maps at https://maps.google.com. 2. Enter your school address. 3. If the map opens in street map view, click on “Satellite” in the right‐hand corner of the
map.
17

4. Zoom in until you have a clear picture of the area you wish to print.
5. Use the Snipping Tool to cut out the portion of the map you want and save it as a JPEG file to create the map sheet on Word or Publisher. A less maneuverable option is to print directly from Google Maps. It is important to go to the settings icon in the upper right‐hand corner (under the red X) rather than the print icon (which will print the street map, not the satellite photo).
Align the portion of the map you want to print as far to the upper left‐hand corner as possible. You may need to experiment with landscape printing and photo placement a few times to get the portion of the map you want. After you have positioned the map on the page, type in a space for students to write their name and the focus question, “What makes objects move?,” at the top of the page. At the bottom of the page, type in the sentence stem students will use to report their observations: “We saw [object] [movement] and we think it was caused by ________.”
18

6. Insert or draw a large grid onto your map with letters on the top and bottom and numbers on the sides so you can easily assign areas to observe. Make copies.
Assign student teams ahead of time. (We suggest pairs.) Consider incorporating Social Studies Civics standards 4.1 and 4.2 in the unit:
4.1. Responsible community members advocate for their ideas.
a. List ways that people express their ideas respectfully. b. Identify how people monitor and influence decisions in their community. c. Describe ways in which you can take an active part in improving your school
or community.
A B C D
A B C D
4
3
2
1
4
3
2
1
19

d. Identify and give examples of civic responsibilities that are important to individuals, families and communities.
e. Describe important characteristics of a responsible community member.
4.2. People use multiple ways to resolve conflicts or differences. a. Give examples of ways that individuals, groups and communities manage
conflict and promote equality, justice and responsibility. b. Identify examples of power and authority, and strategies that could be used
to address an imbalance, including bullying as power without authority. c. Identify and give examples of appropriate and inappropriate uses of power
and the consequences. d. Demonstrate skills to resolve conflicts or differences.
20

Session 1: Pre‐Assessment
1. Introduce the pre‐assessment investigation Show and discuss the map. Set up the behavior expectations for scientific inquiry. Set up the behavior expectations for collaborative observations and working outdoors. Have students cut and glue the map into their science notebook.
2. Introduce the focus question
Write the focus question “What makes objects move?” on the side of the map. Explain that teams of two students will go out and observe objects within a section of the playground. They will both mark an X on their map for three moving objects and discuss what they saw. Reiterate that both team members should mark the same objects on their individual maps so they can compare observations and discuss causes. They should practice using the sentence stem to report their observations. Remind them to observe objects only in their section of the map/playground. Students may focus on people moving, which is fine if the people are doing something like sliding down the slide, swinging, etc. It is more difficult to talk about walking and running and getting into the complexity of muscles. You may wish to focus more on objects.
3. Report student observations Record student observations on Chart 1:1 using the document camera or on a large version of the chart: “We saw [object] [movement] and we think it was caused by [what they think caused the movement].” For example, “We saw a ball rolling and we think it was caused by a kick.” As you record student observations on the chart, listen to their current understandings and misconceptions. Some may use “force” or “gravity” as their cause. If they say “force,” ask for a more specific describing word. If they say “gravity,” ask students:
How do you know it’s gravity?
Listen for accurate descriptions and vocabulary. Big ideas and concepts you may hear include:
Push (a type of force)
Pull (a type of force)
Gravity (fundamental force)
Spin (a type of movement)
Rotate (a type of movement)
Drop (a type of movement)
Speed (describes a movement)
Direction (describes a movement)
21

Note: Other movement or force words like “zigzag,” “twirl,” “loop‐d‐loops,” “swerve,” “lift,” “hit” and “throw” will also come up. It may be beneficial to create a chart with all types of movement words.
As you are recording observations, ask other teams to listen and then choose a different object, movement and/or force. The aim is to list a variety of observations.
After all teams have reported their observations, ask for a few more ideas to get the types of forces and movements you want on the final chart. For example, in the handwritten example of Chart 1:1 below, “falling” was missing from the first round of observations, so the teacher asked for more examples until the word was suggested. Note: The forces (push/pull/both) in the last column of Chart 1:1 were added in Session 2.
22

23

Glossary – Investigation 1
data
Draw a picture:
Copy the word:
direction
Draw a picture:
Copy the word:
drop
Draw a picture:
Copy the word:
force
Draw a picture:
Copy the word:
gravity
Draw a picture:
Copy the word:
movement
Draw a picture:
Copy the word:
24

pull
Draw a picture:
Copy the word:
push
Draw a picture:
Copy the word:
rotate
Draw a picture:
Copy the word:
spin
Draw a picture:
Copy the word:
speed
Draw a picture:
Copy the word:
Draw a picture:
Copy the word:
25

Draw a picture:
Copy the word:
Draw a picture:
Copy the word:
Draw a picture:
Copy the word:
Draw a picture:
Copy the word:
Draw a picture:
Copy the word:
Draw a picture:
Copy the word:
Draw a picture
Copy the word:
Draw a picture:
Copy the word:
26

Chart 1:1 Chart 1:1
27

Table 1:1 Table 1:1
28

FOSS Force and Motion Investigation 1 Session 3: Science Stories: “Push or Pull?” [30 minutes] Preparation: 15 minutes
Materials needed Papers to copy, cut and prepare Students will need
Chart paper or document camera Teacher science notebook FOSS Science Stories
Science Stories: Push or Pull 3‐2‐1 Reflection Glossary Sentence strips with the following:
What is the relationship between force and motion?
Force and motion are not the same.
Science Stories book to share Pencil Science notebook Glue
Preparation: Gather and assemble materials. Read “Push or Pull?” from Science Stories.
1. Introduce the focus question On chart paper or using a document camera, write the focus question “What is the relationship between force and motion?”
2. Distribute glossary pages and Science Stories: Push or Pull 3‐2‐1 Reflection student sheet. Have students glue the sheet into their science notebook.
3. Introduce the book Call students to the rug to begin a shared reading. Show them the front cover of the book. Then look at the table of contents. Have students predict what they think they can learn from this book.
4. Read “Push or Pull?”
Read “Push or Pull?” to your students, taking the time to discuss pictures and concepts in the story.
5. Introduce glossary At the end of the story, go back and find the key vocabulary words and definitions to enter in the glossary. As you are doing so, think aloud about the differences between the motion and force words.
6. Complete activity
29

Have students fill out the Science Stories: Push or Pull 3‐2‐1 Reflection student sheet. The final part asks students to identify the relationship between motion and force. The main concepts to look for are that objects that change position over time are in motion, and force is needed to make an object move. Look for a cause‐and‐effect relationship. A simplified version for students might be that objects move when force is applied or when there is force on the object.
To give students additional time on text with Balance and Motion Science Stories, set up a listening center and download the audio stories from the FOSS website at http://fossweb.schoolspecialty.com/web/foss‐fossweb/foss‐content?htmlContentID=D1484184&redirectUrl=/web/foss‐fossweb/foss‐content or iTunes U.
30

31
Chart 1:1
32

Chart 1:1 Chart 1:1
33

FOSS Force and Motion Investigation 1 Session 4: Identifying Force and Using Vocabulary [40 minutes] Preparation: 20 minutes
Materials needed Papers to copy, cut and prepare Students will need
Chart paper or document camera Teacher science notebook “OK Go – This Too Shall Pass” (Rube Goldberg Machine Version) http://www.youtube.com/watch?v=qybUFnY7Y8w
Table 2:1 OK Go Video: Forces Observed Tally Sheet (Whenever possible, guide students to make their own tally sheet in their journal and use copies for students who need more support.) Glossary* Sentence strips with the following:
What types of forces can I identify?
A force can often be described as a push or a pull.
Gravity is a type of force.
Pencil Science notebookGlue
*A scaffolded glossary sheet is provided for students needing extra language support. Preparation: Gather and assemble materials. Set up projector to show video.
1. Introduce focus question Post the focus question, “What types of forces can I identify?,” in the front of the room for student reference. Tell students to use the Think‐Pair‐Share strategy to talk about the objects they see that move throughout the day and the forces that are at work. Guide them through the process: 1. Think about it. 2. Tell a partner. 3. Share with the class. (Call on a few pairs of students.)
2. Watch the video
Distribute Table 2:1 OK Go Video: Forces Observed Tally Sheet to each student. Tell students, We are going to practice identifying force in different situations and recording data on what we see. We will first practice recording data by watching a video three times. The first time, we will all just observe. The second time, one partner will quietly call out what he or she sees while the other partner keeps a record. Then the partners will switch roles and watch the video again. You don’t have to mark every
34

single instance. For example, in the beginning, there is a line of dominoes. You don’t have to count every single domino. Count the force in each section of the video. You may need to review how to tally and how to organize the tallies. Teams will, no doubt, have different numbers for their observations. Have students discuss with their partners why this may have happened. What could have been done to keep this from happening? Share some of those reasons. For example:
The motions happen too fast.
Motions are simultaneous.
Many students miss the gravitational pull forces in the video.
3. Review video You may not want to go through the entire video again, but it is helpful to view the first minute and stop the video every few seconds to point out the different forces taking place, possibly identifying ones that students might have missed.
4. Update glossaries and word wall Tell students, Let’s add “data” to our glossaries and word wall. Model for students how to write the word and definition in the glossary using the teacher science notebook under the document camera. Add the word to the class word wall.
5. Answer the focus question Ask students to answer the focus question, “What types of forces can I identify?,” in their science notebook. Optional: Distribute a copy of the focus question and ask students to glue it on the first clean page in their science notebook. Students should be able to recognize push, pull and gravity as forces they can identify in the video. Write anecdotal notes about students who can identify the forces and those who still need more experiences with different forces, or keep track of student progress on the assessment checklist.
35

Table 2:1 Table 2:1
36

FOSS Force and Motion Investigation 1 Session 5: Identifying Force and Using Vocabulary (Continued) [40 minutes] Preparation: 30‐45 minutes
Materials needed Papers to copy, cut and prepare Students will need
Chart paper or document camera Teacher science notebook Resealable bags for each team filled with a piece of paper, pencil, pencil sharpener, glue stick or glue bottle, marker and scissors
Table 2:2 Data Sheet Sentence strips with the following:
What makes objects move?
Objects move when force is applied.
What is the relationship between force and motion?
Force and motion are not the same.
What types of forces can I identify?
A force can often be described as a push or a pull.
Gravity is a type of force.
What forces do I use doing work at my desk?
Pencil Science notebook Glue
Preparation: Fill bags with materials for each team/student, depending on whether students will work in teams or individually for this exercise.
1. Introduce the focus question
Explain to students that an investigation that they will do today will help them answer the focus question, “What forces do I use doing work at my desk?”
2. Identify force in the classroom Distribute Table 2:2 to each student. It is best to use this sheet rather than create a tally so the results are more accurate. Distribute bags of supplies to each team, or have one student from each team gather the supplies.
37
Read each instruction to one partner from each team. That partner completes the activity, while the other partner observes and tallies the force data. Then tell the partners to switch roles and repeat the activity. Model with a partner how this should look using the first two to three instructions in the activity.
It is important that the partner who is observing is silent so that instructions are heard.
Be sure to clarify that you want students to observe and record the main force that is taking place. For example, when students are putting the items away, picking up the item to drop into the bag and the item dropping in the bag are two instances of force in that one direction. Each instance is a pull. But clarify that the object movement when it is dropped in the bag is the force you want students to record.
Let students revisit the movements and decide on the force by discussing with their science partner and providing evidence when there is disagreement.
3. Analyze the data On the back of Table 2:2 are some writing prompts.
Based on the data collected, our data show ____________________. (A more scaffolded prompt): Our data show ___________ was the most observed type of force in the classroom scenario. How do the classroom results compare to the playground results? (See teacher chart.) ___________________________________________________ ___________________________________________________
Have students analyze the data and write a statement about the data in their science notebook.
4. Reflect on focus questions and key concepts
Address the focus questions and key concepts from Investigation 1. Read a key concept.
Have students discuss with their partner which focus question belongs to the key
concept. Call on individuals to share their ideas. Post the key concept under the
question, and then move on to the next key concept.
Focus question: “What makes objects move?” Key concept: Objects move when force is applied.
38
Focus question: “What is the relationship between force and motion?” Key concept: Force and motion are not the same. (Students should be able to draw or describe the difference.) Focus question: “What types of forces can I identify?” Key concept: A force can often be described as a push or a pull. Key concept: Gravity is a type of force.
By the end of Investigation 1, students should be able to identify the difference between force and motion, and the types of force being used. They should accurately use the words “force,” “motion,” “push,” “pull” and “gravity” when they describe a moving object. Students should be able to draw an object, label the motion and identify the force being used to move it. Additional practice may be necessary at home and at school. See the homework page in the teacher materials. Fill out the assessment checklist for your students as one record of their progress. Additional, optional online sources: http://www.bbc.co.uk/schools/scienceclips/ages/5_6/pushes_pulls.shtml http://www.bbc.co.uk/schools/scienceclips/ages/6_7/forces_movement.shtml
39
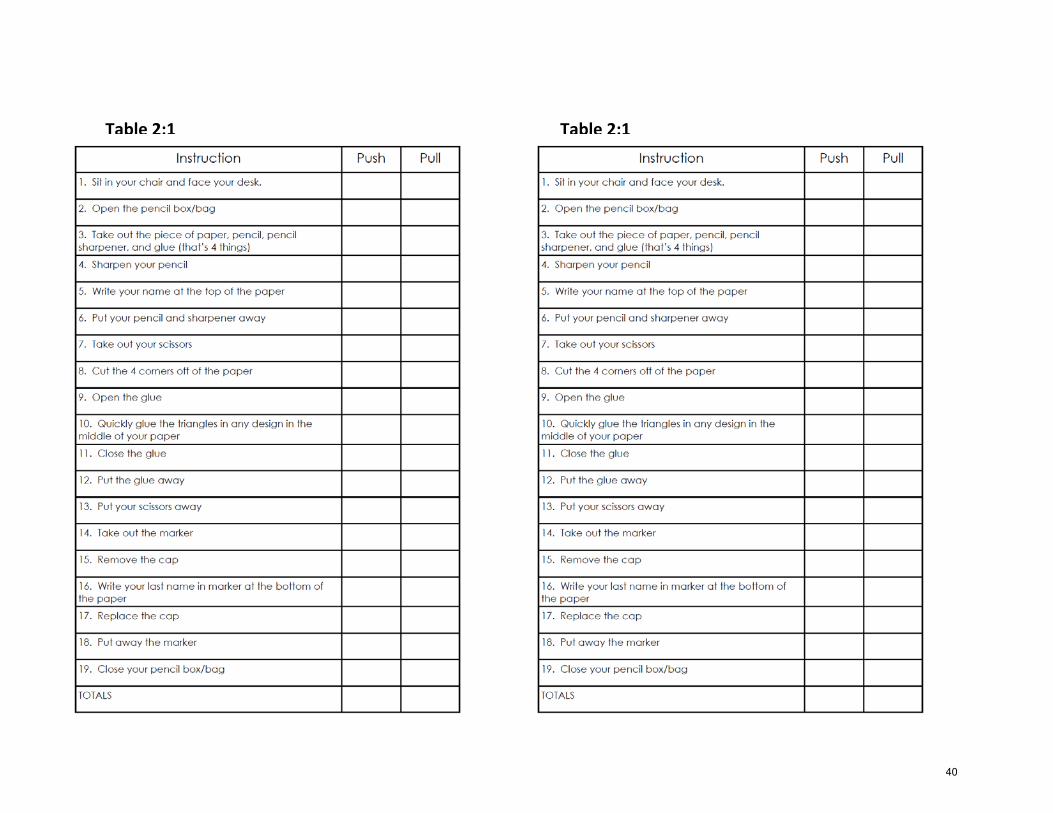
Table 2:1 Table 2:1
40

FOSS Force and Motion Unit Investigation 2
Essential Questions 1. How can spinning tops be changed? 2. How can a spinning object be kept in motion? 3. How can air start an object spinning?
Session Content Objectives Language Objectives
1 & 2
Tops
Make tops from plastic disks and shafts, and spin them.
Determine arrangement of tops to make the best top.
Make tops from other materials.
Students will be able to:
Explain that you need a force to start a top spinning.
Communicate that fast-spinning tops are more stable than slow-spinning ones.
Discover that bigger tops are more stable and spin longer. (Bigger can mean using large disks instead of small disks, or using lots of small disks.)
Explain that a force is a push or pull that makes objects start to move or spin.
Students will share their scientific thinking with a partner.
Students will use sentence frames and graphic organizers to make predictions about what makes a good top.
Students will use sentence frames and graphic organizers to state claims and evidence about what makes a good top.
Students will match key concepts to focus questions.
3 Zoomers
Use disks and length of string to make zoomers.
Determine how to make a zoomer spin faster.
Students will be able to:
Explain that both tops and zoomers spin.
Describe how tops are put in motion by pushing the straw around; zoomers are put in motion by pulling on the string. Both need a force to start.
Discover that speed can be determined by the amount of
Students will discuss how spinners can be kept in motion.
Students will construct and operate zoomers using spoken directions.
Students will make science notebook entries (question, prediction, procedure, results, conclusion).
Students will make glossary entries.
Students will match key concepts to
41

force. (You can speed up a zoomer by pulling on the string with more force.)
focus questions.
4 Science Stories: “Tools and Machines” and “Move It, But Don’t Touch It” (Optional)
Students will be able to:
Describe how tools and machines help us apply forces more easily.
Students will read the text.
Students will use an anticipation guide with the stories.
Students will discuss the ideas on the pages using sentence frames as support.
5 Twirlers: Spinners
Make twirlers that rotate by air resistance when straws are modified with wings.
Students will be able to:
Explain that tops, zoomers and twirlers all rotate (spin).
Determine that twirlers move when air pushes against the extended wings.
Identify everyday objects that spin: Electric beaters, propellers and fans spin. People can spin when they dance or ice-skate.
Students will discuss how a spinning object can be kept in motion.
Students will discuss how air can start an object moving.
Students will determine how to get a straw spinning.
Students will create and test twirlers.
6 Twirlers: Twirly Birds
Make twirly birds from paper and paper clips.
Students will be able to:
Explain that tops, zoomers and twirlers all rotate (spin).
Determine that twirlers move when air pushes against the extended wings.
Identify everyday objects that spin: Electric beaters, propellers and fans spin. People can spin when they dance or ice-skate.
Make predictions for how to get a twirly bird spinning.
Students will discuss how air can start an object moving.
Students will follow oral and written instructions to make twirly birds.
Students will record the results of an experiment.
Students will measure the change in speed or direction of an object using appropriate units.
Students will record a conclusion.
Students will make glossary entries.
Students will match concepts to
42

Develop a procedure for how to test the prediction.
Identify and predict how the direction or speed of an object may change due to an outside force.
Analyze and interpret observable data about the impact of forces on the motion of objects.
Select appropriate tools for data collection.
questions.
7 Science Stories: “Things That Spin” Students will be able to:
Identify how objects spin. Students will read the text.
Students will fill in an anticipation guide before and after reading.
Students will write a reading reflection using the sentence frame “Some things that spin are ___________________.”
43

FOSS Force and Motion Investigation 2 Sessions 1 and 2: Tops [50 minutes and 50+ minutes] Setup: 30+ minutes
Materials needed Papers to copy, cut and prepare Students will need
Chart paper or document camera Teacher science notebook Science Stories Balance and Motion Items for kit inventory (One kit for each student; put in Zip bags) 2 large plastic disks, red 2 small plastic disks, yellow 1 slim shaft 1 paper clip 4 drawing tops Cardboard disks, 12‐cm diameter Felt‐tipped pens Transparent tape Card stock (optional) Zip bags (optional) Assessment checklist Equipment cards
“Make It Balance!” anticipation guide
Tops Testing Prediction Large Tops Testing Prediction Small Tops Data and Graphing Large Tops Data and Graphing Small Tops Conclusion Glossary Investigation 2* Sentence strips with the following:
What is the best design for a top that spins a long time?
What is the best design for a top that spins fast?
How do you get a top to start rotating?
Which is more stable: a fast‐spinning top or a slow‐spinning top?
How does the way a top is made change the way it spins?
The size and position of the disks can change the stability of the top.
A top with a large mass low on the shaft will spin longer.
A top with a large mass low on the shaft will spin faster.
A force is needed to start a top spinning.
Fast‐spinning tops are more stable than slow‐spinning ones.
Bigger tops are more stable and spin
Pencil Science notebook Glue Scissors Crayons or markers
44

longer. Bigger can mean using large disks instead of small disks, or using lots of small disks.
What is the best position of a disk for a top to spin?
Word cards: bigger, disk, shaft, spin, size, position, stable/stability, top
*A scaffolded glossary sheet is provided for students needing more language support. Preparation: Gather and assemble materials. Set up two demonstration tops in preparation for interviewing the students. Make one with two large red disks, placing the disks 4 cm from the bottom of the shaft. Make the other the same, but with two small yellow disks. Become familiar with the disks (the shafts insert more easily on the side with the mold marks); they should be snug. Practice spinning the tops. Session 1: Tops
1. Introduce motion Call students to the rug. Ask students for their ideas about motion.
2. Propose tops
Ask students if they know what a top is. Most will have had some experience with tops. Explain to the class that today they are going to build tops and use them to observe one kind of motion. Tell students, Your job will be to find out how to put some materials together to make a good top. To do that, you will first need to learn about two very special science concepts: balance and stability.
3. Introduce balance and stability through literature
Tell students they are going to read “Make It Balance!” in Science Stories: Balance and Motion. Distribute the anticipation guides to each student. Read the directions aloud to the class. Tell students that they will need to decide if each statement is true or false, and give a reason(s) for their responses. Read and discuss each statement. Ask students to respond in the before‐reading column. Then ask how many students think the statement is true or false. Tally the responses. Have at least one student from each side explain his or her reasoning behind the response.
45

Read “Make It Balance!” aloud. As you read, tell students to find evidence that supports their response and evidence that might support other students’ responses. Reread each statement in the anticipation guide and ask students to respond again in the after‐reading column. They can change statements in writing to make them true (optional). Discuss the statements after reading the material. Talk about new knowledge and/or how their thinking might have changed. Note: Some teachers have students use two different colored pens to distinguish between their thoughts prior to reading the content material from their thoughts after reading the material.
4. Conduct kit inventory Explain to students that they are doing a kit inventory of materials they will use for their Investigation. Hold up each item in the kit inventory. Ask students if they recognize any of the materials and how they might be used to build a top. Share the appropriate word cards and equipment cards with students.
5. Review the meaning of balanced and stable Create a class chart and record what the students know about spinning or what they think they might know about spinning. Point out that an object is stable when it is not wobbling but is balanced on a point. Ask students to describe a sign that would indicate a top was stable. First, have students discuss this idea with their partners. Then have students share their ideas with the class. (A top is stable if it is spinning and balanced on a point and not wobbling.) Tell students that you have a challenge for them. Ask students:
What do you think the best design for a top that spins a long time might be?
Post the focus question “What is the best design for a top that spins a long time?” on the wall. Ask students:
What do you think the best design for a top that spins fast might be?
Post the focus question “What is the best design for a top that spins fast?” Explain to students that their job will be to predict, explore and share what they discover about tops.
6. Make predictions
46

Show an example of each item students will use in the challenge. Tell students that everyone will get a shaft, two small disks and two large disks. Their job is to find out how to put the materials together to make a good top. Ask students again:
What do you think the best design for a top that spins a long time might be?
What do you think the best design for a top that spins fast might be?
Have students write their predictions and draw a drawing.
7. Distribute kit inventory Organize students into groups of four. Assign one student from each team to get materials for each student in the group.
8. Visit students as they work [10 minutes]
Circulate among the groups to provide encouragement and to acknowledge interesting ways to make tops. If a student’s top won’t spin effectively, check that the disks are very snug on the shaft. If the shaft rotates easily in the disks, provide a new shaft.
9. Discuss progress After about 10 minutes, call for attention. Ask students:
Did you make a top?
What did you use to make your top?
How do you know when you have made a top?
How do you get your top to start rotating? (Post this focus question on the wall.)
How does a top move when it is working?
What kind of motion does a top make when it is going? Explain that when something turns in circles or goes around and around a lot of times, we say it is rotating, which is the scientific word for spinning. Also explain that tops rotate on an axis, which, in this case, is the shaft. Introduce the focus question for the lesson, “When I change the size of the disks and the location of the disks, what happens to the spinning of the top?” Post the focus question for everyone to see and reference.
10. Make predictions to test Distribute the Tops Testing Predictions student sheet. Tell students that they will make a testable prediction. Have students predict where to position the large disk on the shaft to make the most stable top. They can choose from zone A, B or C. Model for them how to make a prediction. (You should predict that the large disk should be on the top.) I predict that when I put the large disk on the (top, middle or bottom)
47

of the shaft, it will spin _________. This is what the large top looks like: (Share your drawing.)
Ask a few more questions to challenge students further:
What is the best design for a top that spins a long time?
What is the best design for a top that spins fast?
Does it make a difference if you use the big or small disks?
After they complete the first investigation, students can do a second investigation testing the small disk. Model how to make a prediction: I predict that when I put the small disk on the (top, middle or bottom) of the shaft, it will spin ________________.
Note: Teachers can add an optional center where students explore how they can make a crayfish shape balance on their finger. Provide crayfish cutouts and clothespins for students to investigate.
48

Session 2: Tops (Continued)
11. Review Session 1 investigation Review the focus question, “When I change the size of the disks and the location of the disks, what happens to the spinning of the top?,” posted in the front of the room. First, have students use the Think‐Pair‐Share strategy to discuss their reasoning about the best design for a top that spins for a long time. Guide them through the process: 1. Think about it. 2. Tell a partner. 3. Share with the class. (Call on a few pairs of students.) Follow the same procedure with the other focus questions:
“What is the best design for a top that spins fast?”
“How do you get a top to start rotating?”
“Which is more stable: a fast‐spinning top or a slow‐spinning top?”
“How does the way a top is made change the way it spins?”
12. Introduce focus question and data collection Post the focus question, “What is the best position of a disk for a top to spin?,” in the front of the room for student reference. Tell students, We want to collect data to determine if the prediction is correct or not. Since we are trying to determine the best positioning for the disk, we have to test the different positions to see what is best. For each zone placement, spin the top three times, trying to spin it with the same amount of force each time.
13. Assign roles
Assign each student a job as the spinner, recorder, timer or observer.
The spinner will apply the same amount of force each time.
The recorder will record how long the top continued spinning.
The timer will calculate the amount of time that the top was spinning, from when it started to when it stopped.
The observer will tell the timer when to start and when to stop timing based on when the spinner releases the top and when the top is no longer spinning upright.
14. Collect data
Distribute the Tops Data and Graphing student sheet. The recorder will record the data in the data chart. All students will then record that data into their charts and create a graph (with your help) based on the data.
49
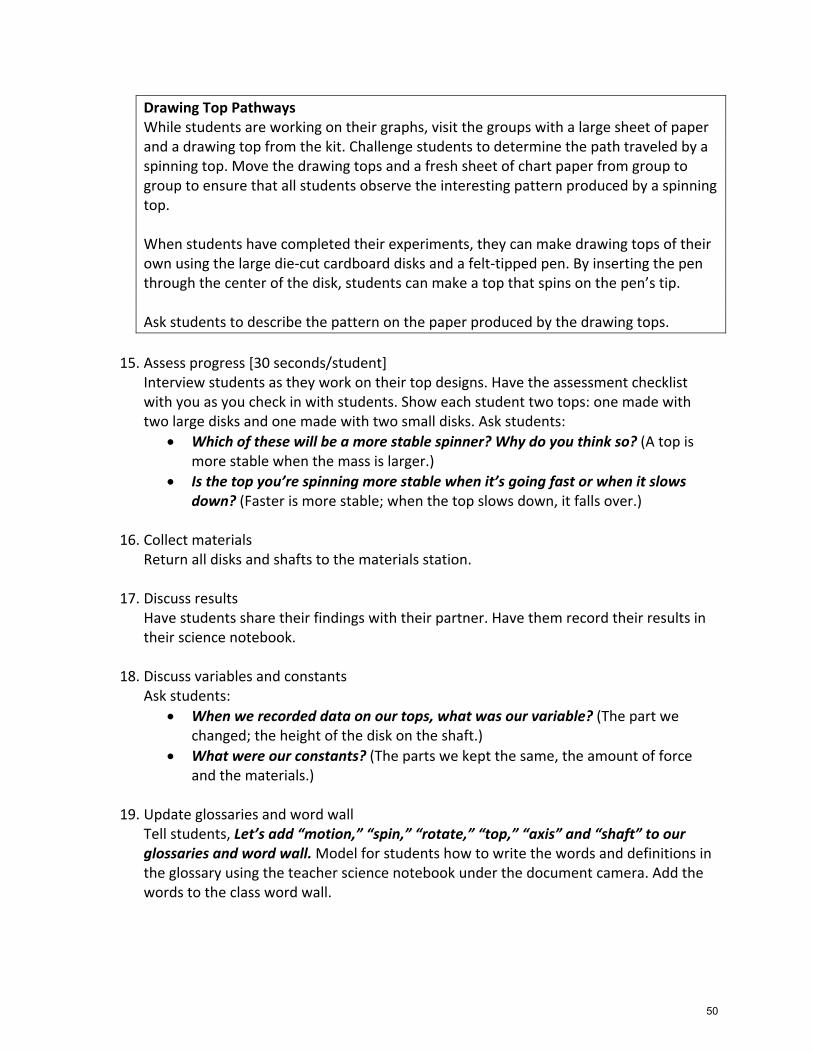
Drawing Top Pathways While students are working on their graphs, visit the groups with a large sheet of paper and a drawing top from the kit. Challenge students to determine the path traveled by a spinning top. Move the drawing tops and a fresh sheet of chart paper from group to group to ensure that all students observe the interesting pattern produced by a spinning top. When students have completed their experiments, they can make drawing tops of their own using the large die‐cut cardboard disks and a felt‐tipped pen. By inserting the pen through the center of the disk, students can make a top that spins on the pen’s tip. Ask students to describe the pattern on the paper produced by the drawing tops.
15. Assess progress [30 seconds/student]
Interview students as they work on their top designs. Have the assessment checklist with you as you check in with students. Show each student two tops: one made with two large disks and one made with two small disks. Ask students:
Which of these will be a more stable spinner? Why do you think so? (A top is more stable when the mass is larger.)
Is the top you’re spinning more stable when it’s going fast or when it slows down? (Faster is more stable; when the top slows down, it falls over.)
16. Collect materials
Return all disks and shafts to the materials station.
17. Discuss results Have students share their findings with their partner. Have them record their results in their science notebook.
18. Discuss variables and constants Ask students:
When we recorded data on our tops, what was our variable? (The part we changed; the height of the disk on the shaft.)
What were our constants? (The parts we kept the same, the amount of force and the materials.)
19. Update glossaries and word wall
Tell students, Let’s add “motion,” “spin,” “rotate,” “top,” “axis” and “shaft” to our glossaries and word wall. Model for students how to write the words and definitions in the glossary using the teacher science notebook under the document camera. Add the words to the class word wall.
50

20. Reflect on focus questions and key concepts Address the focus questions and key concepts from Session 2. Read a key concept. Have students discuss with their partner which focus question belongs to the key concept. Call on individuals to share their ideas. Post the key concept under the focus question, and then move on to the next key concept.
Focus question: “How can spinning tops be changed?” Key concept: The size and position of the disks can change the stability of the top. Focus question: “How do you get a top to start rotating?” Key concept: You need a force to start a top spinning. Focus question: “Which is more stable: a fast‐spinning top or a slow‐spinning top?” Key concept: Fast‐spinning tops are more stable than slow‐spinning ones. Focus question: “What is the best design for a top that spins a long time?” Key concept: Tops spin for longer and are more stable with more mass lower on the shaft.
21. Update science notebook
Have students record what they learned from the day’s lesson on a reflection page in their science notebook.
22. Assess student notebooks Check science notebook entries for student understanding. Look for evidence of the following:
• Students understand that a stable position is steady, that the object (top) is not falling over.
• Students understand that a force is needed to start rotational motion. • Students understand that the amount and position of mass affect how an object
(top) spins. • Students understand that objects and systems that turn on an axis spin or rotate. • Students understand that data that is collected makes sense. • Students were able to create a graph with multiple trial data with the help of the
teacher. Use the assessment checklist to record information about each student.
51
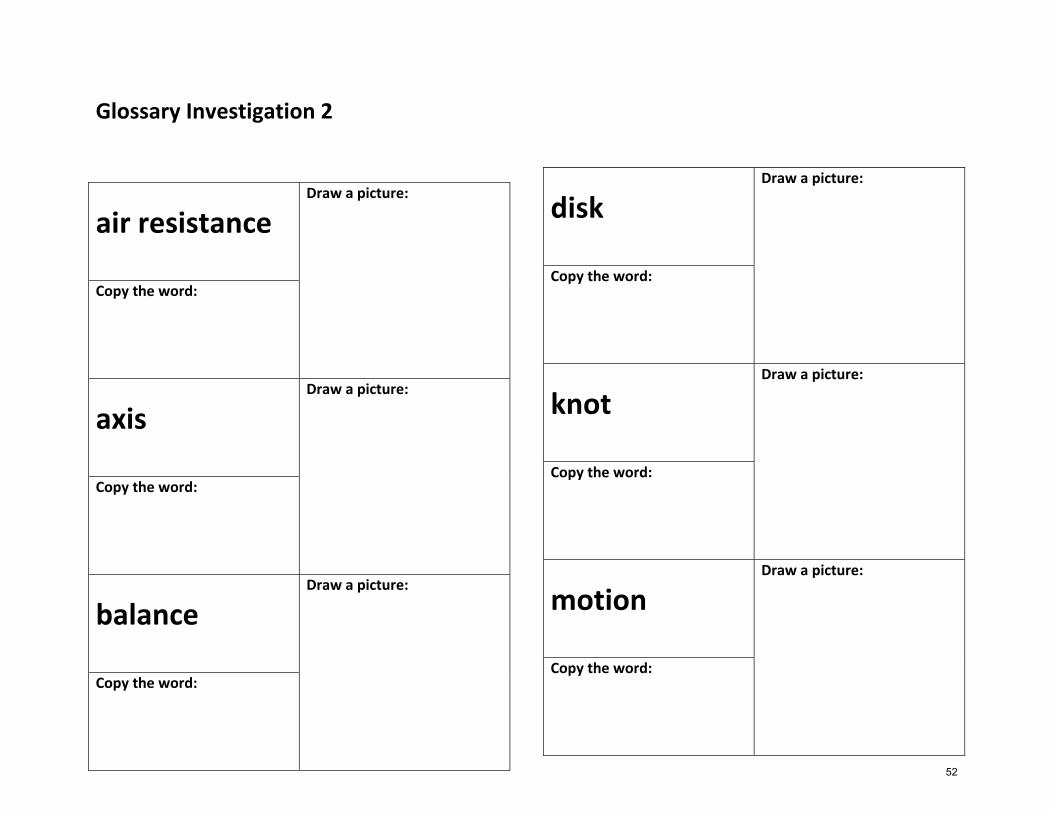
Glossary Investigation 2
air resistance Draw a picture:
Copy the word:
axis
Draw a picture:
Copy the word:
balance
Draw a picture:
Copy the word:
disk
Draw a picture:
Copy the word:
knot
Draw a picture:
Copy the word:
motion
Draw a picture:
Copy the word:
52

rotate
Draw a picture:
Copy the word:
shaft
Draw a picture:
Copy the word:
spin
Draw a picture:
Copy the word:
stable
Draw a picture:
Copy the word:
swirl
Draw a picture:
Copy the word:
top
Draw a picture:
Copy the word:
53

twirl
Draw a picture:
Copy the word:
twist
Draw a picture:
Copy the word:
whirl
Draw a picture:
Copy the word:
wing
Draw a picture:
Copy the word:
zoomer
Draw a picture:
Copy the word:
stable
Draw a picture:
Copy the word:
54

balance
Draw a picture:
Copy the word:
Draw a picture:
Copy the word:
Draw a picture:
Copy the word:
Draw a picture:
Copy the word:
Draw a picture:
Copy the word:
Draw a picture:
Copy the word:
55
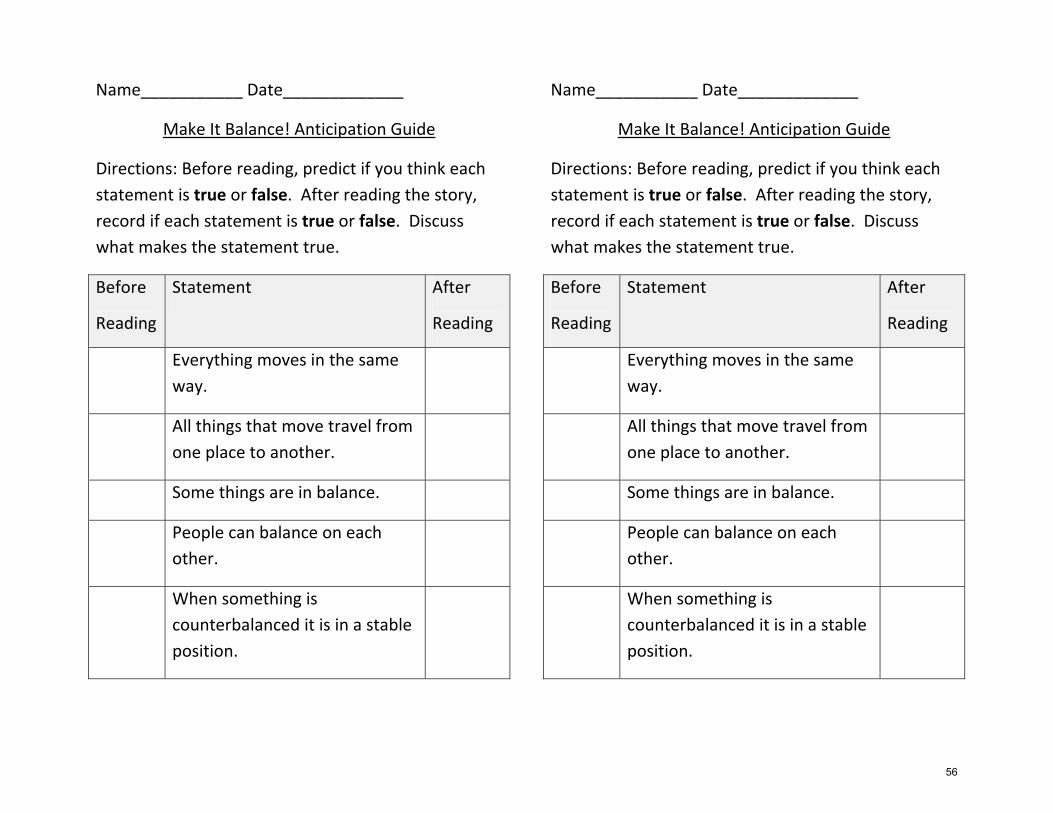
Name___________ Date_____________
Make It Balance! Anticipation Guide
Directions: Before reading, predict if you think each
statement is true or false. After reading the story,
record if each statement is true or false. Discuss
what makes the statement true.
Before
Reading
Statement After
Reading
Everything moves in the same
way.
All things that move travel from
one place to another.
Some things are in balance.
People can balance on each
other.
When something is
counterbalanced it is in a stable
position.
56

Tops Testing Prediction
Prediction: I predict that when I put large disk on
the
Circle one: top (Zone A), middle (Zone B), or
bottom (Zone C) of the shaft, it will __________
_____________________________________ .
This is what a “good” large top should look like.
(Draw the disk).
Tops Testing Prediction
Prediction: I predict that when I put large disk on
the
Circle one: top (Zone A), middle (Zone B), or
bottom (Zone C) of the shaft, it will __________
_____________________________________ .
This is what a “good” large top should look like.
(Draw the disk).
Zone
A
Zone B
Zone C
Zone
A
Zone B
Zone C
57

Tops Testing Prediction
Prediction: I predict that when I put the small disk
on
Circle one: top (Zone A), middle (Zone B), or
bottom (Zone C) of the shaft, it will _________
_____________________________________ .
This is what a “good” small top should look like.
(Draw the disk).
Tops Testing Prediction
Prediction: I predict that when I put the small disk
on
Circle one: top (Zone A), middle (Zone B), or
bottom (Zone C) of the shaft, it will _________
_____________________________________ .
This is what a “good” small top should look like.
(Draw the disk).
Zone
A
Zone B
Zone C
Zone
A
Zone B
Zone C
58

Tops Seconds Spinning
Data
Large Disk Trial
Zone A 1
2
3
Zone B 1
2
3
Zone C 1
2
3
How Long Does the Large Disk Spin in Each Zone?
A1
A2
A3
B1
B2
B3
C1
C2
C3
Zone and Trial Number
Number of Seconds the Top Spun
59

Tops Seconds Spinning
Data
Small Disk Trial
Zone A 1
2
3
Zone B 1
2
3
Zone C 1
2
3
How Long Does the Small Disk Spin in Each Zone?
A1
A2
A3
B1
B2
B3
C1
C2
C3
Zone and Trial Number
Number of Seconds the Top Spun
60

Tops Conclusion
The best way to make a good stable top is to put the
Circle one: large small disk on the
Circle one: top middle bottom of the shaft.
This is what a good top looks like. (Draw the disk).
I know this because:
My top kept spinning for (circle one)
longer or shorter with this design.
My top wobbled (circle one ) more or less
with this design.
61
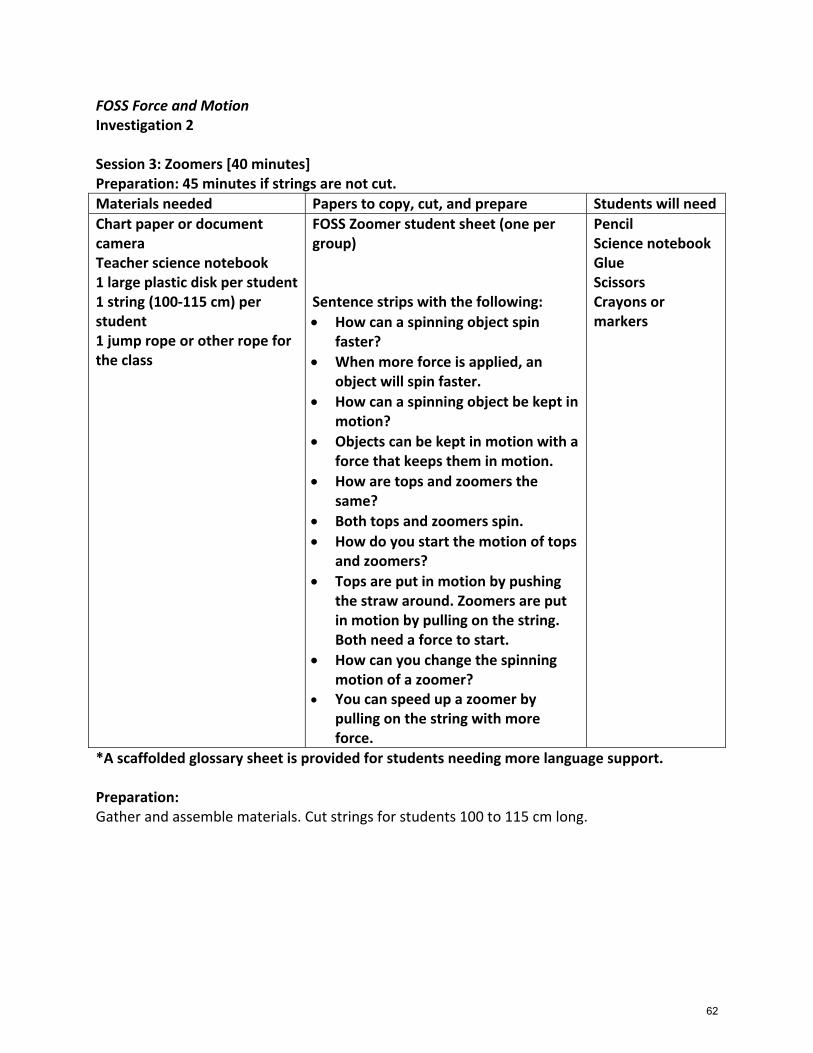
FOSS Force and Motion Investigation 2 Session 3: Zoomers [40 minutes] Preparation: 45 minutes if strings are not cut.
Materials needed Papers to copy, cut, and prepare Students will need
Chart paper or document camera Teacher science notebook 1 large plastic disk per student 1 string (100‐115 cm) per student 1 jump rope or other rope for the class
FOSS Zoomer student sheet (one per group) Sentence strips with the following:
How can a spinning object spin faster?
When more force is applied, an object will spin faster.
How can a spinning object be kept in motion?
Objects can be kept in motion with a force that keeps them in motion.
How are tops and zoomers the same?
Both tops and zoomers spin.
How do you start the motion of tops and zoomers?
Tops are put in motion by pushing the straw around. Zoomers are put in motion by pulling on the string. Both need a force to start.
How can you change the spinning motion of a zoomer?
You can speed up a zoomer by pulling on the string with more force.
Pencil Science notebook Glue Scissors Crayons or markers
*A scaffolded glossary sheet is provided for students needing more language support. Preparation: Gather and assemble materials. Cut strings for students 100 to 115 cm long.
62

Practice with zoomers: Run one end of the string through one of the outside holes in the large disk and back through the other outside hole. Tie the two ends of the string together.
Operate the zoomer by sticking your thumbs through the loops formed by the ends of the string.
Whirl the disk around between your hands 15 to 20 times to twist the string.
Pull the string taut to start the disk spinning. Release tension so that the string can wind up as much as possible in the opposite direction. Apply tension again to make the disk rotate rapidly in the other direction.
Continue pulling and releasing to get the disk rotating rapidly. Feel for the rhythm – you’ll know when you’ve got it. Listen for the zoom. Check the teacher preparation video for a demonstration if you have problems getting the zoomer to work.
63

1. Review spinning
Call students to the rug. Review the investigation with tops. Ask students what kinds of motion tops make. Confirm that tops spin or rotate when they are in motion.
2. Introduce focus questions
Post the focus question, “How can a spinning object spin faster?,” in the front of the room for student reference. Tell students to use the Think‐Pair‐Share strategy to discuss how spinning objects can spin faster. Guide them through the process: 1. Think about it. 2. Tell a partner. 3. Share with the class. (Call on a few pairs of students.) Then lead them through that process with another focus question: “How can a spinning object be kept in motion?”
3. Introduce zoomers Tell students that tops are not the only things that spin. Zoomers also spin when they are in motion. Hold up a zoomer and point out that it is made with a string that runs through two holes in a large disk. Demonstrate how to twirl the large disk and bring the zoomer into action.
4. Demonstrate knot tying Tell students to tie a knot in the zoomer string to make a loop. Use a piece of rope, if you have one, to demonstrate how to bring the ends together, make a loop and bring the ends through the loop to make an overhand knot. If small ropes or cords are available, conduct a practice session. This knot‐tying sequence is illustrated on the FOSS Zoomer student sheet.
5. Construct zoomers Assign a student from each team to get a large disk for each student in the group. Visit the groups with the bundle of strings. To prevent tangling, hold the bundle at both ends and let each student carefully pull out one string. Later, visit the groups and show them how your zoomer is assembled. Leave a FOSS Zoomer student sheet with each group. It will be a challenge for some students to get the zoomer assembled properly. Allow them to work at the problem for a while before you offer assistance.
6. Spin the zoomers Explain the process of twirling the disk, pulling on the string to get the disk spinning and releasing the tension to let the disk wind up again. Demonstrate how your hands go apart and together, apart and together. It is sometimes effective to stand behind a student and hold his or her wrists to help with the rhythm. Soon students will be having success with the zoomers. Ask students:
64

How do you start the motion of tops and zoomers?
How can you change the spinning motion of a zoomer? Post these focus questions on the wall.
7. Update science notebook Guide students through filling out their science notebook. They will use their zoomer to test their prediction and follow the procedure. Once they have a good sense of how the zoomer works, they will record their results and conclusion. Focus question: “How can a spinning object spin faster?” Prediction: (I have to pull harder on the string. I have to apply more force because….) Procedure: (Set up the zoomer. Try pulling hard on the string. Try pulling soft on the string. Try not pulling on the string anymore. Try keeping the string tight. Try keeping the string loose.) Results: (The harder you pull, the faster it spins. The tighter the string the longer and faster it keeps spinning.) Conclusion: Students should answer the focus question, “How can a spinning object spin faster?” (When you give the zoomer more force, it spins faster; when you pull harder on the string, it spins faster.)
8. Collect materials
Have a student from each team collect the plastic disks from their group and return the disks to the materials station. Return the disks to their storage containers, accounting for all the disks.
9. Update glossaries and word wall Tell students, Let’s add “zoomer” and “knot” to our glossaries and word wall. Model for students how to write the words and definitions in the glossary using the teacher science notebook under the document camera. Add the words to the class word wall.
10. Reflect on focus questions and key concepts Address the focus questions for the lesson. Read a key concept. Have students discuss with their partner which focus question belongs to the key concept. Call on individuals to share their ideas. Post the key concept under the focus question, and then move on to the next key concept. Focus question: “How can a spinning object spin faster?” Key concept: When more force is applied, an object will spin faster. Focus question: “How can a spinning object be kept in motion?” Key concept: Objects can be kept in motion with a force that keeps them in motion. Focus question: “How are tops and zoomers the same?”
65

Key concept: Both tops and zoomers spin. Focus question: “How do you start the motion of tops and zoomers?” Key concept: Tops are put in motion by pushing the straw around. Zoomers are put in motion by pulling on the string. Both need a force to start. Focus question: “How can you change the spinning motion of a zoomer?” Key concept: You can speed up a zoomer by pulling on the string with more force.
11. Assess science notebooks Check science notebook entries for student understanding. Use the assessment checklist to record information about each student.
66

67

FOSS Force and Motion Investigation 2 Session 4: Science Stories “Tools and Machines” and “Move It, But Don’t Touch It” [30 minutes]
Materials needed Papers to copy, cut and prepare Students will need
Chart paper or document camera Teacher science notebook Science Stories
“Tools and Machines” Anticipation Guide and Reflection “Move It, But Don’t Touch It” Anticipation Guide and Reflection (optional)
Pencil Science notebook Glue
Preparation: Gather and assemble materials. Read “Tools and Machines.” Read “Move It, But Don’t Touch It” (optional).
1. Review Session 3 focus question Review the focus question from Session 3, “How can a spinning object spin faster?” Tell students to use the Think‐Pair‐Share strategy to discuss ideas about how spinning objects can be kept in motion. Guide them through the process: 1. Think about it. 2. Tell a partner. 3. Share with the class. (Call on a few pairs of students.)
2. Introduce focus question Introduce the focus question, “How can tools and machines help people do work?”
3. Introduce the reading Introduce the story “Tools and Machines.” Distribute Tools and Machines Anticipation Guide and Reflection to each student. Read the directions aloud to the class. Tell students that they will need to decide if each statement is true or false, and give a reason(s) for their responses. Read and discuss each statement. Ask students to respond in the before‐reading column. Then ask how many students think the statement is true or false. Tally the responses. Have at least one student from each side explain his or her reasoning behind the response. Read “Tools and Machines” aloud. As you read, tell students to find evidence that supports their response and evidence that might support other students’ responses.
68

Reread each statement in the anticipation guide and ask students to respond again in the after‐reading column. They can change statements in writing to make them true (optional). Discuss the statements after reading the material. Talk about new knowledge and/or how their thinking might have changed. Follow the same procedure with “Move It, But Don’t Touch It” if you use the story with your class. Note: Some teachers have students use two different colored pens to distinguish between their thoughts prior to reading the content material from their thoughts after reading the material.
4. Discuss reading
Tell students to use the Think‐Pair‐Share strategy to discuss ideas from the story. Have students share what they learned. Guide them through the process: 1. Think about it. 2. Tell a partner. 3. Share with the class. (Call on a few pairs of students.) Discuss the focus question, “How can tools and machines help people do work?” Post the sentence frame “I learned __________________.”
5. Record reflection Tell students to record something they learned. Ask students to also write an “I wonder…” statement. Check notebooks for student understanding.
69

Tools and Machines Anticipation Guide
Directions: Before reading: Decide if you think each statement
is true or false. After reading: Come back the guide. See if
each statement is true or false. Discuss what makes the
statement true.
Before
Reading
Statement After
Reading
People use tools and machines to
help them do work.
Hammers use motion to push a nail
into wood.
Hammers can pull with force.
With a wrench you apply less force to
tighten nuts and bolts.
Machines can help people move
things when a lot of force is needed.
70

Science Stories: Move it, But, Don’t Touch It Reading
Reflection
According to the story, how can we move something
without touching it?
_____________________________________
_____________________________________
_____________________________________
Why is magnetism considered a force?
_______________________________________
What can a magnet pull?
71

FOSS Force and Motion Investigation 2 Session 5: Twirlers: Spinners [40 minutes]
Materials needed Papers to copy, cut and prepare Students will need
Chart paper or document camera Science teacher notebook 1 jumbo straw per student
Twirler Wings (one‐half sheet per student) Seed Pictures
Pencil Science notebook Glue Scissors Tape
Preparation: Gather and assemble materials. Practice with straw twirlers:
Make a copy of Twirler Wings. Cut the sheet in half on the heavy central line. There are two different wing designs on each half sheet. Cut the wings on the solid lines and fold them on the dashed lines. Practice making the twirlers with both kinds of wings:
Start with a half sheet. Cut the two wings apart. Cut off and discard the dark gray areas on the larger wing.
Cut a 1‐cm slit in one end of a jumbo straw.
72

Fold one of the wings in half. Insert the fold into the slit. Note: You may want to have students tape the wings to the straw.
Drop the twirler from as high as you can reach.
1. Review Session 4 Call students to the rug. Review the spinning motions of the tops and zoomers. Review one of Session 3’s focus questions, “How can a spinning object be kept in motion?” Tell students to use the Think‐Pair‐Share strategy to discuss how spinning objects can be kept in motion. Guide them through the process: 1. Think about it. 2. Tell a partner. 3. Share with the class. (Call on a few pairs of students.) Point out that in both cases, students had to start the tops and zoomers spinning by applying a force.
2. Introduce focus question Present the focus question, “How can air start an object spinning?” Tell students to use the Think‐Pair‐Share strategy to discuss the question. Guide them through the process: 1. Think about it. 2. Tell a partner. 3. Share with the class. (Call on a few pairs of students.)
3. Set challenge Tell students, Today you will make a new kind of spinner. Hold up a jumbo straw. Tell students, Your job is to make the straw spin.
4. Distribute straws Form groups. Have one student from each group get a jumbo straw for each student in the group. Let students find out if the straws spin by themselves when they are dropped. Ask students:
Did you figure it out? Did you get your straw to spin?
What do you think we could do to get your straw to spin?
Have you ever seen something falling and spinning in nature?
Does that give you any clues about how we could get these straws to spin? Show pictures of spinning seeds – seeds that are moved by wind. (See pictures following the investigation).
5. Suggest wings
Tell students that wings might help the straw to spin. Tell them to split one end of their straw about 1 cm. Tell them that 1 cm is about the width of their little finger at the knuckle below the nail. Demonstrate how to cut into the end of a straw with your scissors, producing a slit. Tell students they will use that slit in the end of the straw to help them attach wings.
73
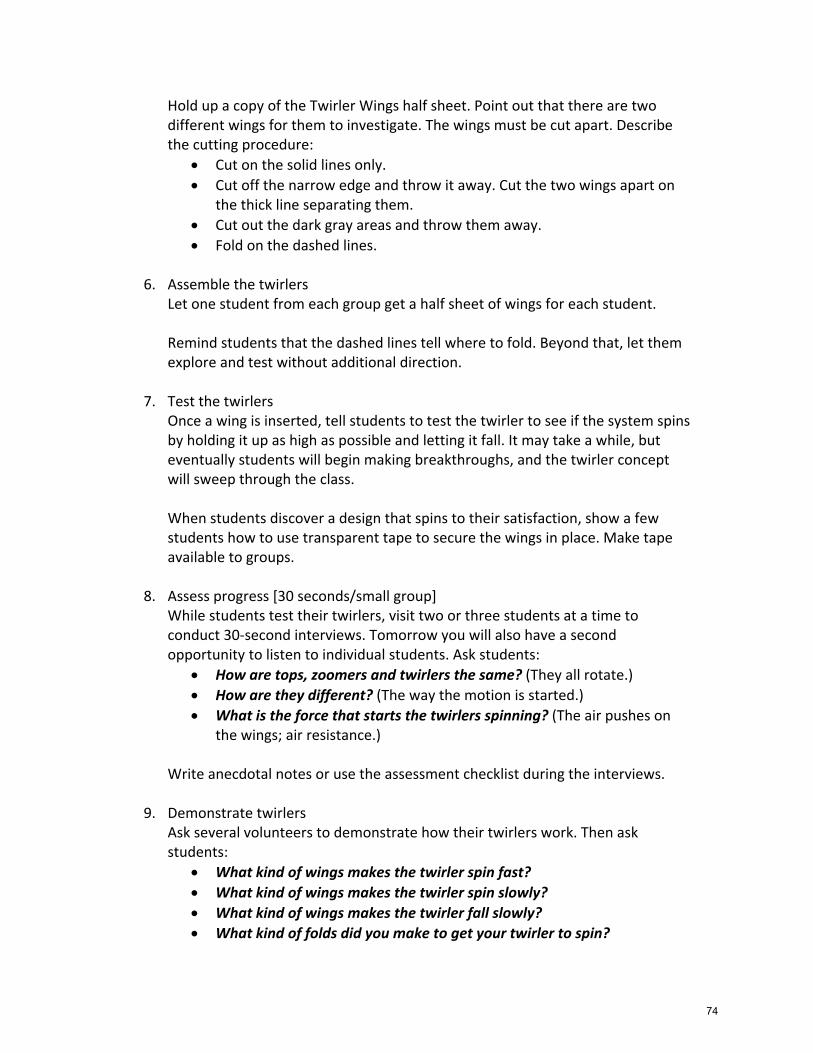
Hold up a copy of the Twirler Wings half sheet. Point out that there are two different wings for them to investigate. The wings must be cut apart. Describe the cutting procedure:
Cut on the solid lines only.
Cut off the narrow edge and throw it away. Cut the two wings apart on the thick line separating them.
Cut out the dark gray areas and throw them away.
Fold on the dashed lines.
6. Assemble the twirlers Let one student from each group get a half sheet of wings for each student. Remind students that the dashed lines tell where to fold. Beyond that, let them explore and test without additional direction.
7. Test the twirlers Once a wing is inserted, tell students to test the twirler to see if the system spins by holding it up as high as possible and letting it fall. It may take a while, but eventually students will begin making breakthroughs, and the twirler concept will sweep through the class. When students discover a design that spins to their satisfaction, show a few students how to use transparent tape to secure the wings in place. Make tape available to groups.
8. Assess progress [30 seconds/small group] While students test their twirlers, visit two or three students at a time to conduct 30‐second interviews. Tomorrow you will also have a second opportunity to listen to individual students. Ask students:
How are tops, zoomers and twirlers the same? (They all rotate.)
How are they different? (The way the motion is started.)
What is the force that starts the twirlers spinning? (The air pushes on the wings; air resistance.)
Write anecdotal notes or use the assessment checklist during the interviews.
9. Demonstrate twirlers Ask several volunteers to demonstrate how their twirlers work. Then ask students:
What kind of wings makes the twirler spin fast?
What kind of wings makes the twirler spin slowly?
What kind of wings makes the twirler fall slowly?
What kind of folds did you make to get your twirler to spin?
74
How could you change your twirler to make it better?
10. Update science notebook Have students write about and/or draw the kinds of changes they would make to their twirlers to make them better. Ask students to answer the focus question, “How can air start an object spinning?”
11. Update glossaries and word wall Tell students, Let’s add “air resistance” and “twirl” to our glossaries and word wall. Model for students how to write the words and definitions in the glossary using the teacher science notebook under the document camera. Add the words to the class word wall.
75

FOS
S B
alance and M
otion Mod
ule©
The Regents of the U
niversity of California
Can b
e dup
licated for classroom
or workshop
use.
Investigation 2: Sp
innersN
o. 7—S
tudent S
heet
○
○
○
○
○
○
○
○
○
○
○
○
○
○
○
○
○
○
○
○
○
○
○
○
○
○
TWIRLER W
INGS○
○
○
○
○
○
○
○
○
○
○
○
○
○
○
○
○
○
○
○
○
○
○
○
○
○
TWIRLER W
INGS
76

Seed Pictures
77

78

FOSS Force and Motion Investigation 2 Session 6: Twirlers: Twirly Birds [50 minutes] Preparation: 15 minutes
Materials needed Papers to copy, cut and prepare Students will need
Chart paper or document camera Science teacher notebook 1 paper clip per student
Twirly Bird Student Sheet Pencil Science notebook Glue Scissors Tape
Preparation: Gather and assemble materials. Practice with twirly bird: Make a copy of the Twirly Bird student sheet. Cut the sheet into four pieces on the heavy lines. Cut one of the patterns on the solid lines and fold on the dashed lines. The body will be three sheets thick, and wings should stick out in opposite directions. Attach a paper clip to the end of the bird and drop the twirly bird from as high as you can reach.
1. Review Session 5 focus question Review the focus question from Session 5, “How can air start an object spinning?” Tell students to use the Think‐Pair‐Share strategy to discuss how spinning objects can be kept in motion. Guide them through the process: 1. Think about it. 2. Tell a partner. 3. Share with the class. (Call on a few pairs of students.)
2. Introduce the twirly bird Show students the pattern for a different kind of flying spinner, a twirly bird. Tell students that, as before, they should cut on the solid lines and fold on the dashed lines. Demonstrate how to fold the twirly bird. Attach a paper clip to the end of the bird.
79
3. Make twirly birds Let a student from each team get one Twirly Bird pattern and one paper clip for each student in their group. Make sure students have scissors. Let them make and fly their twirly birds.
4. Assess progress [30 seconds/small group] While students test their twirly birds, visit two or three students at a time to conduct 30‐second interviews. Ask students:
How are tops, zoomers and twirly birds the same? (They all rotate.)
How are they different? (The way the motion is started.)
What is the force that starts the twirly birds spinning? (The air pushes on the wings; air resistance.)
Write anecdotal notes and use the assessment checklist during the interviews.
5. Make predictions Ask students:
How long can twirly birds stay in the air? Distribute the twirly bird student sheet. Help students with the process of making a prediction about the time their twirly birds spin. First, discuss what they did in Session 5 to make their twirlers spin. Next, have students tell their partners how they think they can measure how long their twirly birds spin. Then, have a few students share a prediction they have about how to time the twirly birds’ spin. Have students write the focus question, “How long can twirly birds stay in the air?” (or glue the focus question on the top of a clean page), and record their predictions in their science notebook. Use the sentence frame, “I think ___________ because __________.”
6. Develop a plan, then a procedure Help students develop a plan and procedure for the investigation. Have them talk with their partners about what they did with the twirlers in Session 5 and use that information to help them develop a plan with this new challenge. Have students discuss what they are going to test with their partners. They need to identify what will be kept the same (constants) and what they are going to change (variables) in order to find out how long a twirly bird stays in the air. During this planning stage, it may be helpful to post the following questions:
What will be kept the same?
What will be changed?
What will be observed or measured?
What procedures (steps) will you take? (First, second, next, etc.)
80
Have some groups share their constants and variables as well as the procedures (steps) they developed. Have students record their procedures in their science notebook.
7. Collect data Have students record how long it takes for their twirly birds to hit the ground from a certain measured point. They will use this data to create a class graph of the speed of the twirly birds. Ask students:
What happens when wings are bent in the opposite direction?
Let them explore if they haven’t already discovered the differences that occur when wings are bent in different directions.
8. Demonstrate twirly birds
Ask for volunteers to show how their twirly birds fly. Discuss how they will record their results for how well the twirly birds worked.
9. Record results Ask students:
How long can twirly birds stay in the air?
What did you learn from the investigation?
Did you learn anything new about twirly birds?
Were there any problems doing the investigation? Also review earlier questions:
What helps keep the twirly birds in the air? (Air resistance.)
What force pulls the whirly bird to the ground? (Gravity.) Give students time to write about what they have learned and ask new questions they might have after completing the investigation. Students should write about gravity, how air resistance pushed on wings to make the twirly bird spin, that the flaps had to point in two different directions so that the twirly bird would spin easily, etc.
10. Connect to home
Let students take the straw twirlers and twirly birds home to share with their families.
11. Update glossaries and word walls Tell students, Let’s add “twirler” and “wing” to our glossaries and word wall. Model for students how to write the words and definitions in the glossary using the teacher science notebook under the document camera. Add the words to the class word wall.
12. Reflect on focus questions and key concepts
81

Address the focus questions and key concepts from Session 6. Read a key concept. Have students discuss with their partner which focus question belongs to the key concept. Call on individuals to share their ideas. Post the key concept under the focus question, and then move on to the next key concept. Focus question: “How can air start an object spinning?” Key concept: The forces of gravity and air resistance start an object spinning. Focus question: “How are tops, zoomers and twirlers the same?” Key concept: Tops, zoomers and twirlers all rotate (spin). Focus question: “What makes twirler wings and twirly birds spin?” Key concept: Twirlers move when air pushes against the extended wings. Focus question: “What other kinds of things rotate or spin?” Key concept: Electric beaters, propellers and fans spin. People spin when they dance or ice‐skate.
13. Update science notebook Allow time after the discussion for students to add to their science notebook. This may be changes or additions to what they have learned. They can write this information in their conclusions.
82

FOSS Balance and Motion Module© The Regents of the University of CaliforniaCan be duplicated for classroom or workshop use.
○ ○ ○ ○ ○ ○ ○ ○ ○ ○ ○ ○ ○ ○ ○ ○ ○ ○ ○ ○ ○ ○ ○ ○
TWIRLY BIRD
○ ○ ○ ○ ○ ○ ○ ○ ○ ○ ○ ○ ○ ○ ○ ○ ○ ○ ○ ○ ○ ○ ○ ○
TWIRLY BIRD
○ ○ ○ ○ ○ ○ ○ ○ ○ ○ ○ ○ ○ ○ ○ ○ ○ ○ ○ ○ ○ ○ ○ ○
TWIRLY BIRD
○ ○ ○ ○ ○ ○ ○ ○ ○ ○ ○ ○ ○ ○ ○ ○ ○ ○ ○ ○ ○ ○ ○ ○
TWIRLY BIRD
Investigation 2: SpinnersNo. 8—Student Sheet
83

Twirly bird Student Sheet
Date: _____________
Question:
How long will my twirly bird stay
in the air?
Prediction:
___________________________
___________________________
___________________________
___________________________
___________________________
Procedure:
(This is what we did)
________________________
________________________
________________________
________________________
________________________
________________________
________________________
________________________
84

Results:
This is what the twirly bird did:
________________________
________________________
________________________
________________________
Conclusion (This is what I
learned):
___________________________
___________________________
___________________________
___________________________
___________________________
___________________________
85

FOSS Force and Motion Investigation 2 Session 7: Science Stories: “Things That Spin” [15 minutes] Preparation: 20 minutes
Materials needed Papers to copy, cut and prepare Students will need
Chart paper or document camera Teacher science notebook Science Stories: Balance and Motion
Science Stories: “Things That Spin” 3‐2‐1 Reflection Sentence strips with the following:
How do objects spin?
Objects spin on an axis.
Pencil Science notebook Glue
Preparation: Gather and assemble materials. Read “Things That Spin.”
1. Introduce focus question Introduce the focus question, “How do objects spin?” Tell students to use the Think‐Pair‐Share strategy to talk about how objects spin. Guide them through the process: 1. Think about it. 2. Tell a partner. 3. Share with the class. (Call on a few pairs of students.)
2. Introduce the reading Do a picture walk of “Things That Spin.” Have students discuss what they see in the pictures. Then read the story to your students.
3. Discuss reading After reading page 15, ask students:
Why do some things need to spin fast to balance and other things can spin slowly?
Model how to use the sentence frames below and let the students share their thinking. Tell students to use the Think‐Pair‐Share strategy. Guide them through the process: 1. Think about it. 2. Tell a partner. 3. Share with the class. (Call on a few pairs of students.) Sentence frames:
Some things need to spin fast because __________________________.
Some things spin slowly because ______________________________.
4. Complete Science Stories: “Things That Spin” 3‐2‐1 Reflection
86

Distribute the Science Stories: “Things That Spin”3‐2‐1 Reflection student sheet. Ask students to fill it out and glue it in their science notebook. Have Science Stories: Balance and Motion readily available as a resource for students.
5. Review the focus question and key concept:
“How do objects spin?”
Objects spin on an axis.
Fast and slow will also be brought up as an answer. Point out that an object can turn fast or slow on its axis.
87

Science Stories: Things That Spin 3‐2‐1 Reflection
From the story: List 3 objects that spin fast. __________________________________ __________________________________ __________________________________ List 2 objects that spin slowly. __________________________________ __________________________________ List 1 object that doesn’t spin. __________________________________
88

FOSS Force and Motion Unit Investigation 3
Essential Questions 1. How can a wheel‐and‐axle system be changed?
Session Content Objectives Language Objectives
1 Rolling Wheels
Roll plastic disks down cardboard ramps.
Put disks on slim shafts to make wheel‐and‐axle systems.
Try different configurations of wheel size, axle length and axle position to get the rolling systems to perform a variety of tricks.
Students will be able to:
Explain that wheels roll down a slope.
Explain that a slope is a surface that is higher on one end.
Explain that axles support wheels.
Observe and compare wheel‐and‐axle systems with wheels of different sizes and find that the system rolls toward the smaller wheel.
Identify and predict how the direction or speed of an object may change due to an outside force.
Students will share scientific thinking with a partner.
Students will make predictions about how different variables affect a system.
Students will use sentence frames and a graphic organizer to state claims and evidence about what makes different systems roll in different directions.
Students will match key concepts to focus questions.
89

FOSS Force and Motion Investigation 3 Session 1: Rolling Wheels [50 minutes or longer] Preparation Time: 30+ minutes
Materials needed Papers to copy, cut and prepare Students will need
Chart paper or document camera Teacher science notebook Items for kit inventory (One kit for each student) 2 large plastic disks, red 2 small plastic disks, yellow 1 slim shaft 1 cardboard ramp (30 cm x 45 cm) and 4 clothespins for each pair of students Extra slim shafts Transparent tape Zip bags (optional)
Rollers Focus Question Rollers Prediction Rollers Observation System Designs and Paths Glossary Investigation 3* Sentence strips with the following:
Which direction do things roll on a ramp?
Things roll down ramps.
How would you make a wheel system that goes straight?
Use two wheels the same size on an axle to roll straight.
How would you make a wheel system that turns?
Use wheels of different sizes to make a roller that turns.
What other objects roll?
Some things that roll are rolling pins, carts, pencils and balls.
Pencil Science notebook Glue
*A scaffolded glossary is provided for students needing extra language support. Preparation: Gather and assemble materials. Practice setting up the ramps. First, clip two clothespins on one end of the cardboard rectangle (illustration A).
A. B.
90

Clip a second clothespin on each of the first two clothespins to make legs (illustration B). Practice rolling a few wheels‐and‐axle combinations down the ramp. Repair any clothespins that need repairing. (To repair them, place the tapered end of the loose wood piece under the end of the spring and keep sliding it along until it snaps back into place.)
Organize students into groups of four.
1. Review spinning
Call students to the rug to begin a kit inventory of Investigation 3 materials: ramp, axle and plastic disks (wheels). Ask the students if they recognize any of the materials and how they could be used. Create a class chart and record what the students know about rolling or what they think they might know about rolling.
2. Introduce wheels
Hold up one of the large plastic disks. Tell students that today they will use the plastic disks like wheels.
Ask students:
Which direction do things roll on a ramp?
3. Demonstrate setting up a ramp Hold up one of the cardboard ramps. Show students how to use clothespins (and only clothespins) to prop up one end of the cardboard to make a ramp. Caution your students not to lean on the ramps.
91

4. Assign partners Tell students that they will work with a partner at a ramp, but everyone will get a set of disks to use as wheels.
5. Distribute ramps and large disks
Organize students into groups of four. Have one student from each group get a sheet of cardboard and four clothespins for each pair of students in the groups. While students are assembling the ramps, visit each group and distribute two large disks to each student.
6. Discuss early results Call for attention. Ask students how their wheels moved. They will probably report that they slide and roll. Tell students, When wheels go around on their edge, it is called “rolling.”
7. Distribute axles Ask students to suggest ways for getting their wheels to roll more effectively. Hold up one of the little shafts. Tell students, A shaft can be used as an axle. An axle is a rod or shaft to which wheels can be attached. Have one student from each group get one shaft, two large wheels and two small wheels for each student. Ask students:
How would you make a wheel system that goes straight? Tell students that they will look for ways to answer the question.
8. Roll away!
Have students free explore the materials and determine how different wheeled systems act.
9. Make predictions After students have succeeded in rolling wheels and axles, call for attention. Ask students to explain and show how they got the wheels to roll straight. Ask students if they can change their rolling systems to do tricks. Distribute the Rollers Prediction student sheet. Post the focus question for the lesson: “How would you make a wheel system that turns?” Distribute the sentence strip of the focus question and have students glue it into their science notebook. Distribute the prediction student sheet and have students glue it into their science notebook. Have students then predict how to make the system turn to one side. Model for them how to make a prediction. (“I predict that you can make the system turn by
92
putting both wheels on one side of the axle, because when the wheels are on two different sides of the axle it rolls straight.”) Distribute the observation student sheet and have students glue it into their science notebook. Model how to record observations.
10. Making more discoveries
Challenge students to try making:
A wobbly roller
A roller that goes around the corner
A roller that goes back and forth
A roller that does a new kind of trick
Encourage students to work with a partner to make different wheel systems. Students may want to put two ramps together, either side by side or facing each other.
11. Record results Distribute System Designs and Paths student sheet. Model for students how to draw a system with details and then draw the path that system took down the ramp. Have students record the designs they created and the path that each system design took.
12. Share results Ask several students to show, describe and demonstrate some of the interesting wheel systems they created. Systems may include:
Big wheel on one end of the axle and small wheel on the other
Axle between two holes that are not center holes, making a wobbly roll
Axle stuck into the edge grooves to make a “lawn mower”
Big wheel in the middle with little wheels on both ends
13. Conduct show‐and‐tell After students have made a few additional wheel systems, wrap up the investigation. Have another show‐and‐tell session. Set up a couple of ramps in a central location and let students take turns demonstrating their rollers. Have a roll‐off, releasing two rollers at a time to find out which designs are faster and which roll farther. Then have students group their rollers according to which roll fast, which roll slow, which travel long distances and so forth. Discuss similarities for each group.
14. Return materials Have students disassemble wheel systems and ramp systems. Have one student from each group return the materials to the materials station.
15. Update glossaries and word wall
93

Tell students, Let’s add “roll,” “wheel,” “axle,” “slope” and “ramp” to our glossaries and word wall. Model for students how to write the words and definitions in the glossary using the teacher science notebook under the document camera. Add the words to the class word wall.
16. Review focus questions and key concepts
Address the focus questions and key concepts from the investigation. Read a key concept. Have students discuss with their partner which focus question belongs to the key concept. Call on students to share their ideas. Post the key concept under the focus question, and then move on to the next key concept. Focus question: “Which direction do things roll on a ramp?” Key concept: Things roll down ramps. Focus question: “How would you make a wheel system that goes straight?” Key concept: Use two wheels the same size on an axle to roll straight. Focus question: “How would you make a wheel system that turns?” Key concept: Use wheels of different sizes to make a roller that turns. Focus question: “What other objects roll?” Key concept: Some things that roll are rolling pins, carts, pencils and balls.
17. Update science notebook
Ask students to answer the focus question, “How can you change a wheel system so that it turns different ways?,” in their science notebook. They can use words and drawings.
18. Assess student notebooks Check student notebook entries for student understanding. Look at glossary entries, student sheets and answers to the focus question for the investigation.
94

Glossary Investigation 3.1
axle
Draw a picture:
Copy the word:
ramp
Draw a picture:
Copy the word:
roll
Draw a picture:
Copy the word:
slope
Draw a picture:
Copy the word:
95

ramp
Draw a picture:
Copy the word:
wheel
Draw a picture:
Copy the word:
Draw a picture:
Copy the word:
Draw a picture:
Copy the word:
96

How can you change a wheel system so that it turns different ways?
How can you change a wheel system so that it turns different ways?
How can you change a wheel system so that it turns different ways?
How can you change a wheel system so that it turns different ways?
How can you change a wheel system so that it turns different ways?
How can you change a wheel system so that it turns different ways?
How can you change a wheel system so that it turns different ways?
How can you change a wheel system so that it turns different ways?
How can you change a wheel system so that it turns different ways?
How can you change a wheel system so that it turns different ways?
97

Rollers Prediction
I predict that the roller system will turn if
___________________________________________
___________________________________________
because ___________________________________
___________________________________________
___________________________________________
Rollers Prediction
I predict that the roller system will turn if
___________________________________________
___________________________________________
because ___________________________________
___________________________________________
___________________________________________
98

Rollers Observation
Observation:
I observed
___________________________________________
___________________________________________
___________________________________________
___________________________
The actual path of the roller was:
Rollers Observation
Observation:
I observed
___________________________________________
___________________________________________
___________________________________________
___________________________
The actual path of the roller was:
99

System Designs and Paths
Wheel System Design
Path of the Wheel System
System Designs and Paths
Wheel System Design
Path of the Wheel System
100

FOSS Force and Motion Unit Investigation 4
Essential Questions
What is a variable? What is a constant?
How does a variable in force change how an object moves?
How does a variable in the properties of an object change the amount of force needed to move it?
Session Content Objectives Language Objectives
1 Variables in Force and Objects: Push Experiment
Participate in a guided group experiment to identify variables and constants.
Practice a collaborative experiment changing variables in force OR objects
Practice recording and analyzing data
Practice making predictions
Students will be able to:
Identify a constant.
Identify a variable.
Apply a change in a variable.
Record and analyze data with changes in variables.
Work collaboratively on an experiment with a partner
Make predictions based on current understanding
State claims and evidence about how changes in variables effect changes in force required to move an object.
Match key concepts to focus questions
2 Isolating Variables: Pull Experiment
Participate in a guided collaborative experiment with a partner.
Practice isolating variables in the object, applied force, or surface force (friction).
Practice recording and analyzing data
Practice making predictions
Students will be able to:
Identify a constant and variable (s).
Record and analyze data on more than one variable.
Work collaboratively on an experiment with a partner
Make predictions based on current understanding
State claims and evidence about how changes in variables effect changes in force required to move an object.
Match key concepts to focus questions
101
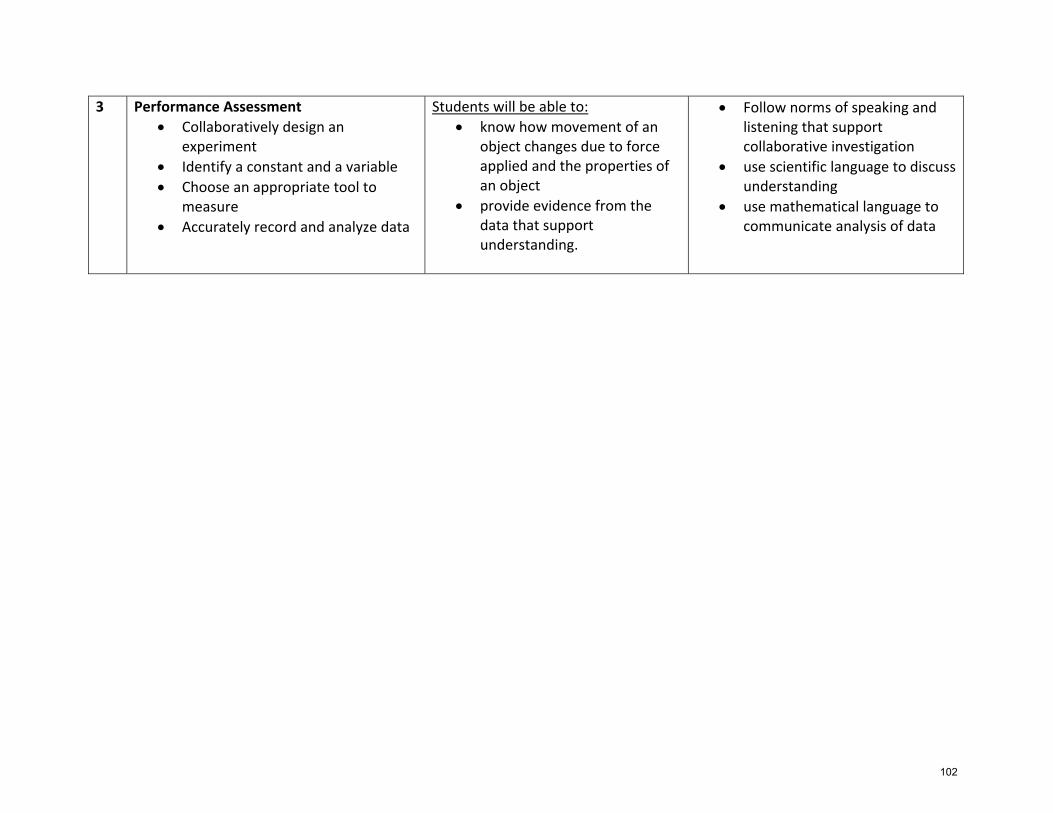
3 Performance Assessment
Collaboratively design an experiment
Identify a constant and a variable
Choose an appropriate tool to measure
Accurately record and analyze data
Students will be able to:
know how movement of an object changes due to force applied and the properties of an object
provide evidence from the data that support understanding.
Follow norms of speaking and listening that support collaborative investigation
use scientific language to discuss understanding
use mathematical language to communicate analysis of data
102

FOSS Force & Motion
Investigation 4: Investigating Constants and Variables and Performance Assessment
Session 1: Push [40 minutes]
Materials Needed Papers to copy, cut, and prepare Students will need
Chart paper or document camera Science teacher notebook Cardboard ramp 6 clothespins Geoblocks – a large, medium, and small cube, or a large and medium cube with a triangular prism. 1” ruled paper (included in materials) – may want 2 sheets Large copy of data collecting sheet
1” ruled paper copies – may want to tape two together to make it longer Glossary Inv. 4* Sentence Strips with the following prepared:
What is a variable?
What is a constant?
How do I use a variable to test a prediction?
A variable in an investigation is something that changes.
A constant in an investigation is something that doesn’t change.
Science notebooks Pencil Glue Scissors Crayons or markers Teams will need: Cardboard ramp 6 clothespins 3‐4 sizes of geoblocks – same shape preferably 1 other small to medium geoblock (triangular prism works well). 1”ruled paper Data collecting sheets
*Scaffolded glossary is provided for students that need extra language support. Preparation: Gather and assemble materials, set up an area for the guided group experiment with a large version of the data collecting sheet. Have materials ready for partner experiment.
103
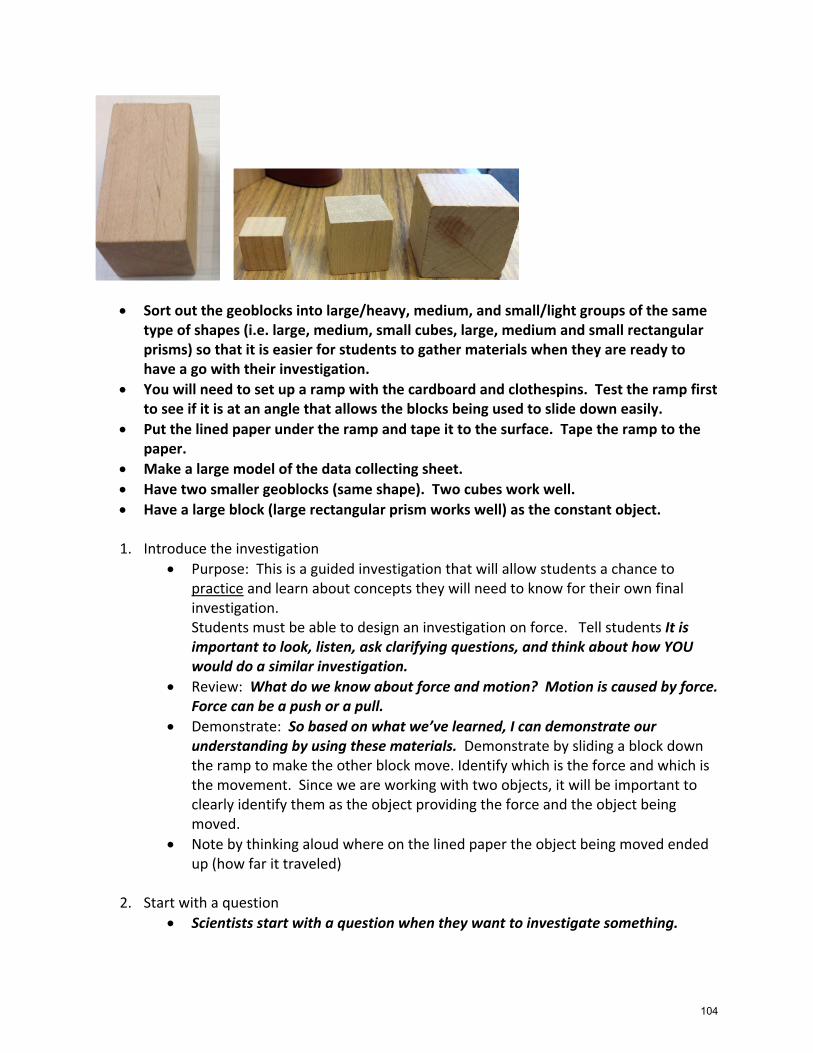
Sort out the geoblocks into large/heavy, medium, and small/light groups of the same type of shapes (i.e. large, medium, small cubes, large, medium and small rectangular prisms) so that it is easier for students to gather materials when they are ready to have a go with their investigation.
You will need to set up a ramp with the cardboard and clothespins. Test the ramp first to see if it is at an angle that allows the blocks being used to slide down easily.
Put the lined paper under the ramp and tape it to the surface. Tape the ramp to the paper.
Make a large model of the data collecting sheet.
Have two smaller geoblocks (same shape). Two cubes work well.
Have a large block (large rectangular prism works well) as the constant object.
1. Introduce the investigation
Purpose: This is a guided investigation that will allow students a chance to practice and learn about concepts they will need to know for their own final investigation. Students must be able to design an investigation on force. Tell students It is important to look, listen, ask clarifying questions, and think about how YOU would do a similar investigation.
Review: What do we know about force and motion? Motion is caused by force. Force can be a push or a pull.
Demonstrate: So based on what we’ve learned, I can demonstrate our understanding by using these materials. Demonstrate by sliding a block down the ramp to make the other block move. Identify which is the force and which is the movement. Since we are working with two objects, it will be important to clearly identify them as the object providing the force and the object being moved.
Note by thinking aloud where on the lined paper the object being moved ended up (how far it traveled)
2. Start with a question
Scientists start with a question when they want to investigate something.
104

My question is, “How will the same amount of force affect the movement of a larger object?”
3. Talk about change
What needs to change to answer my question? I will need a larger object to push so that I can compare the movement of the larger object with the movement of the smaller object.
The thing that we change in an experiment is called a variable. It varies or changes so that we can investigate the affect of the change.
Something that doesn’t change in an investigation is called a constant.
Misconception: Some students confuse variable with movement – they think if we are making something move, that is the “change” we are thinking about (it’s moving so it’s changing places). Be sure to clarify the difference between a variable change and movement.
Add the words “constant” and “variable” to the glossary
4. Make a prediction
I predict that as my object being pushed gets larger, the same amount of force will not push it as far.
5. Design the investigation
Think aloud the process about how to design an investigation that would test this prediction. Be certain to only change one variable – the size of the object being pushed (in other words – don’t change the object causing the force or the incline of the ramp, also)
Show the chart: What am I going to change?, What am I going to keep the same?, What am I going to measure?
Think aloud about how you will record data that will provide evidence to support or not support your prediction.
Talk about trials and why it might be important to try something more than once. To make sure results are consistent.
6. Carry out the investigation
Demonstrate the care and precision you will want your students to show when they do their investigation.
Demonstrate common errors in carrying out the investigation (i.e. imprecise execution, the force being applied inconsistently (redo if it hits the object wrong), changing multiple variables, inconsistent variables, inaccurate measurement, etc.)
Be sure to start the block from the same spot on the ramp.
Be sure not to add a push at the top of the ramp.
7. Record the data.
105

Since you will have three trials for each size, we will use the median (cross out the high and low. The median may match one of these numbers.)
8. Analyze the data and make a statement about the results. For example: The larger block did not move as far as the smaller block when it was pushed with the same amount of force. The data show that the large block only moved 2”, while the small block moved 5”. Make sure to include specific evidence that supports the claim.
9. Give the students the same materials, and have them practice doing an investigation in
pairs with a variable (force using increased incline, or object being moved). The students do not need to record their investigations at this point. This is an opportunity for informal investigation in order to give them ideas for their final performance task and to provide opportunity to practice using the ramp and block system. As you circulate to observe and coach groups,
Check for an isolated variable (the one thing they’re changing), careful execution, accurate data collection, and collaboration.
Be sure to check the ramp – some students want to set the incline more than necessary for the crashing vs. pushing effect.
Questions you can ask students as you observe:
What has stayed constant during each trial?
What has varied or changed in each trial? Is that the only thing?
What is the force involved?
Is that the only type of force you observe?
Can you hypothesize on what too much force might look like?
Can you think of a real life situation like this?
106

Place edge of ramp on this line
0 1
” ru
led
pap
er
Cut on this line and tape onto another piece if necessary 107
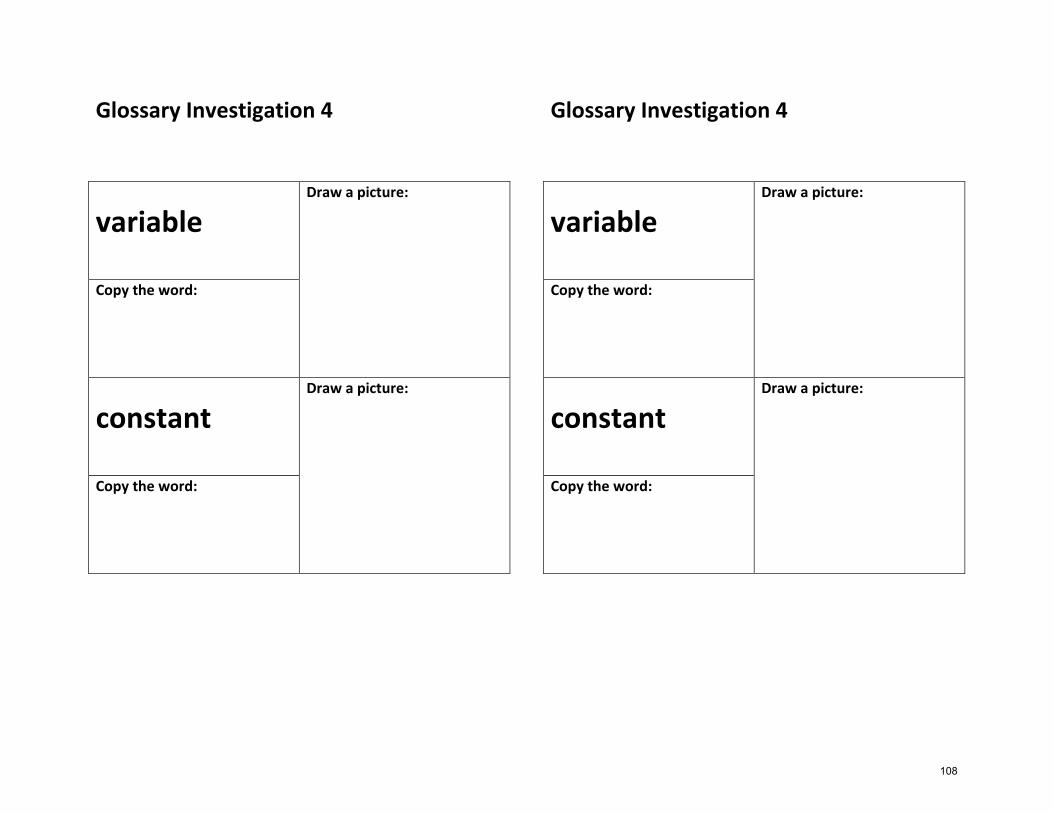
Glossary Investigation 4
variable Draw a picture:
Copy the word:
constant
Draw a picture:
Copy the word:
Glossary Investigation 4
variable Draw a picture:
Copy the word:
constant
Draw a picture:
Copy the word:
108

FOSS Force & Motion
Investigation 4: Investigating Variables and Performance Assessment
Session 2: Pull [40 minutes]
Materials Needed Papers to copy, cut, and prepare Students will need
Chart paper or document camera Science teacher notebook Tagboard “truck” Thick Rubber band Ruled paper Sets of books (same size/shape/weight) Various surfaces (for example: carpet, desk, hard floor, paper) Large copy of class data collecting sheet
1” ruled paper copies – may want to tape two together to make it longer Science Notebook entry Tagboard sheets with a hole punched on one end and folded so it can be pulled the direction of the arrow Glossary Inv. 4* Data collection sheets Optional: Preprinted questions and predictions
Science Notebooks Pencil Glue Scissors Crayons or markers Per Team: Tagboard “truck” Thick Rubber band Ruled paper Sets of books (same size/shape/weight)Various surfaces (carpet, desk, hardfloor, paper) Copies of Data collecting sheets
*Scaffolded glossary is provided for students that need extra language support. Before class: Gather and assemble materials, set up an area for the guided group experiment with a large version of the data collecting sheet. Have materials ready for partner experiment. You will need to set up an area to demonstrate the example.
1. Introduce the investigation
This is a guided investigation that will allow students a chance to practice and learn about concepts they will need to do for their own final investigation. It is important to look, listen, ask clarifying questions, and think about how YOU would do a similar investigation.
Review what we know about force and motion.
109

Review what we know about constants and variables. What were the constants and variables in the last investigation?
2. Start with a question
Investigations start with a question.
My question is, “How does the weight (number of books) we put in a truck affect how far it moves when a force is applied to it?”
Have students write this question in their notebooks or give them a preprinted version of the question.
3. Make a prediction
Example: I predict that a heavier weight in the truck will not move as far as a lighter weight in the truck when the same amount of force is applied because that is what happened with the ramp experiment before.
Have students write this prediction in their notebooks or give them a scaffolded sheet to complete.
4. Design the investigation
I have an investigation using pull as the force.
Show the investigation set up with the “truck” [picture]
careful execution sloppy execution (not starting at 0,
wrinkled surface)
5. Talk about change
There is one variable I am testing. I am testing how far objects of different weights move when I apply a pulling force.
What is the variable I am testing? – weight of the object
110

Show the recording sheet. Give each student a copy of the recording sheet, and have them glue or tape it into their notebook.
6. Model with a partner or have two students model. Note that this is a very controlled
experiment – small amounts of movement and force are what we’re measuring.
1. Putting two books on the truck, have the partner hold down the truck. 2. Pull the rubber band to 2” (or some spot) on the ruled paper. Make sure you don’t
pull it to a point where the truck runs into your finger – apply just enough pull to make the truck move.
3. Have the partner release the truck and see what happens. 4. Record the data (the point on the paper the truck moved to) 5. Repeat the process with that weight 2 more times, and find the median for that trial. 6. Repeat more trials using more weight.
*an alternative for more capable students is to adjust the placement of the rubber band as you add more weight to see if you can move the heavier truck to the same spot on the paper. This may take more trials to discover the amount of force needed.
7. Give the students the same materials. Have them practice doing the investigation in
pairs with the weight variable. Display the instructions under the document camera or create a large version of the instructions to display fort he students to refer to as they are working.
8. Use a class data collection sheet to record the data from the various groups.
Class Data Collection Sheet
Median distance
Travelled by Truck
Carrying Light Weight
(2 books)
Median distance Travelled
by Truck Carrying Heavy
Weight
( ___ books)
Group 1
Group 2
Group 3
111

9. Analyze the data and make a statement about the results. For example: “Our data show that the more weight we put in the truck, the less far it moved when we used the same amount of force. The truck with the light weight moved 5 inches, while the truck with the heavy weight moved 2 inches. The amount of force we used was the same. ”
10. Gather at the end, or at another time to discuss the investigation – what worked well, what was difficult, including the collaboration, recording of data, and interpretation. Write down a list of things to think about when designing an investigation. You may use questions listed in the Investigations 4 materials. Be sure to include collaboration skills that helped/hindered the investigation.
112

Focus Question
How does the weight (number of books) we put in a
truck affect how far it moves when a force is applied
to it?
Focus Question
How does the weight (number of books) we put in a
truck affect how far it moves when a force is applied
to it?
Focus Question
How does the weight (number of books) we put in a
truck affect how far it moves when a force is applied
to it?
Focus Question
How does the weight (number of books) we put in a
truck affect how far it moves when a force is applied
to it?
Focus Question
How does the weight (number of books) we put in a
truck affect how far it moves when a force is applied
to it?
Focus Question
How does the weight (number of books) we put in a
truck affect how far it moves when a force is applied
to it?
Focus Question
How does the weight (number of books) we put in a
truck affect how far it moves when a force is applied
to it?
Focus Question
How does the weight (number of books) we put in a
truck affect how far it moves when a force is applied
to it?
113

Prediction
I think
_______________________________________
_______________________________________
because________________________________
_______________________________________
_______________________________________.
Prediction
I think
_______________________________________
_______________________________________
because________________________________
_______________________________________
_______________________________________.
114

Data Collection Sheet
Distance Travelled by Truck Carrying Light Weight (2 books)
Distance Travelled by Truck Carrying Heavy Weight ( ___ books)
Trial 1
Trial 2
Trial 3
Median distance travelled by light object: _________
Median distance travelled by heavy object: ________
Data Collection Sheet
Distance Travelled by Truck Carrying Light Weight (2 books)
Distance Travelled by Truck Carrying Heavy Weight ( ___ books)
Trial 1
Trial 2
Trial 3
Median distance travelled by light object: _________
Median distance travelled by heavy object: ________
115
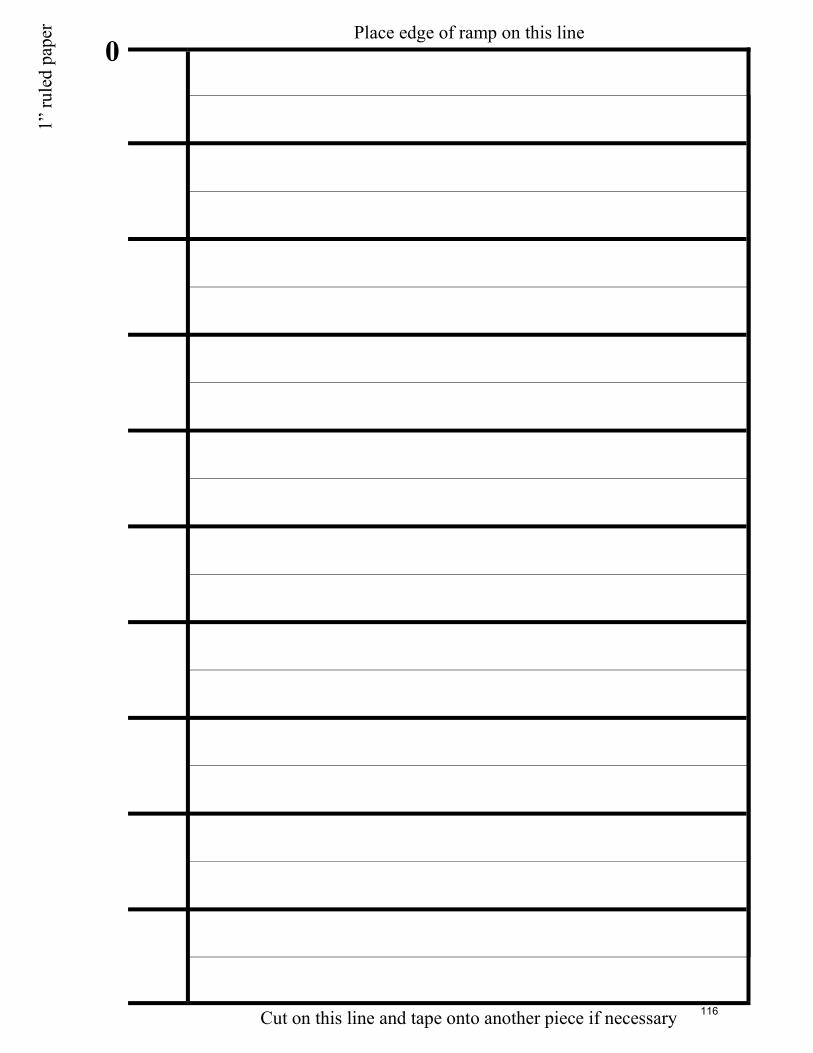
Place edge of ramp on this line
0 1
” ru
led
pap
er
Cut on this line and tape onto another piece if necessary 116

FOSS Force & Motion
Investigation 4: Investigating Variables and Performance Assessment
Session 3: Performance Assessment
Materials Needed Papers to copy, cut, and prepare
Students will need
Chart paper or document camera Science teacher notebook Cardboard ramp 6 clothespins Geoblocks Papercups Tape Pennies (for weights) Various items to be used for student-designed investigations
1” ruled paper copies – may want to tape two together to make it longer Investigation design proposal Rubric
Science Notebooks Pencil Glue Scissors Crayons or markers Teams will need: Items to be used for student designed investigations
Preparation: Gather and assemble materials, set up an area for the guided group experiment with a large version of the data collecting sheet. Have materials ready for partner experiment
1. Quick exploration with cups You will need to demonstrate how the cups can be used for an investigation. Students can tape two cups together with closed ends together or open ends together. Penny weights can be added to the middle, inside, or outside at different points, but the positioning should be intentional for the purpose of investigating force and motion. It’s important to tape the weights securely. You can demonstrate using the ramp and how to make the cup flip and “park” under the ramp (see original FOSS investigation in envelop included with kit). Give students some time just to experiment and explore with these materials prior to introducing the assessment.
2. Explain the assessment In second grade, students should be able to collaboratively design an investigation about force and motion. They should be able to work together to identify variables and constants, make a prediction, and record and analyze data about their investigation.
117

You will be placed in teams of ____ and given an organizer to design your investigation. All students will fill one out individually, but you will work together to decide what it should say. Once your investigation has been approved, you will gather your materials and carefully perform your investigation, record and analyze the data. As you design your investigation, pay close attention to the things we’ve discussed before and this list of questions that will help you plan the important details of your investigation. You will have control of the materials you are allowing them to use. This will freedom will allow for differentiation for the most basic to the more advanced.
You may want to have a checklist for the process
Talk with your teammate(s) about possible investigations by thinking of a question. Talk about the force and motion, the constants and variable, and the materials you might need.
Decide as a team what you will propose for your investigation.
Fill out your proposal.
Once it is checked, gather your supplies.
Carefully set up your investigation, including tools and materials you need to gather and record the data.
Carry out your investigation. You make need to make adjustments to the process once you begin. Approve these adjustments with the teacher first. If you do make adjustments to your investigation, you will need to restart recording your data.
After you do the investigation, analyze your data. Write statements about your data.
See the rubric to share expectations with the kids so they can self-assess their own proficiency as they go.
118

Force and Motion Experiment Proposal
Team: Ques on:
Predic on:
Force:
Constants:
Variable being tested:
Materials:
Data collec ng devices and tools:
Notes:
119

�
Rubric for Performance Assessment
1 2 3 4
Students will collaboratively design an experiment using force
teacher supports throughout design process
teacher helps students with one aspect of the experiment
as part of a team, students independently design an experiment that uses a force, and has 1 constant and 1 variable that provide measurable data
as part of a team, students independently design an experiment that uses a force, and has 1 constant and multiple variables using scientific reasoning�
Students select appropriate tools for data collection
No Yes
Students record data = changes in speed or direction
mostly inaccurate mostly accurate accurate accurate data on multiple variables
Identify constant and variables
No Yes
�
120

Place edge of ramp on this line
0 1
” ru
led
pap
er
Cut on this line and tape onto another piece if necessary 121