Embed Size (px)
Citation preview

Forno Bravo, LLC
Giardino Refractory Oven, Including:
Giardino60 (SKUFG60)
Giardino70 (SKUFG70)
Installation and Operating Manual
A MAJOR CAUSE OF OVEN-RELATED FIRE IS FAILURE TO MAINTAIN REQUIRED
CLEARANCES (AIR SPACES) TO COMBUSTIBLE MATERIALS. IT IS OF UTMOST
IMPORTANCE THAT THIS OVEN BE INSTALLED ONLY IN ACCORDANCE WITH THESE
INSTRUCTIONS.
This Oven is Designed and Intended for Outdoor Installation Only.
Forno Bravo, LLC744 Neeson RoadMarina, CA 93933
(800) [email protected]
http://www.fornobravo.com
SAVE THESE INSTRUCTIONS
Giardino Installation and Operating Manual
© Forno Bravo, LLC 2010. All Rights Served. Ver. 1.3 1

WARNINGREAD ALL INSTRUCTIONS BEFORE INSTALLING AND USING THE APPLIANCE. FAILURE TO FOLLOW INSTRUCTIONS MAY RESULT IN PROPERTY DAMAGE, BODILY INJURY, OR EVEN DEATH.When this oven is not properly installed, a fire may result. To reduce the risk of fire, follow the installation instructions. It is
essential to use only building and insulation materials designed for the purpose.
Use proper safety equipment when installing this oven, including gloves and professional breathing masks.
Contact your local building or fire officials for clarification on any restrictions on installation of this oven in your area, or need for inspection of the oven installation.
HOT WHILE IN OPERATION. KEEP CHILDREN, CLOTHING AND FURNITURE AWAY. CONTACT MAY CAUSE SKIN BURNS.
DO NOT BURN GARBAGE OR FLAMMABLE FLUIDS.
DO NOT CONNECT THIS UNIT TO A CHIMNEY FLUE SERVING ANOTHER APPLIANCE.
Keep children and pets away from hot oven.
Use firewood for burning only. DO NOT use charcoal, pressure treated lumber, chipped wood products, sappy wood such as pine, laminated wood or any material other than dry medium or hard firewood.
DO NOT USE liquid fuel (firelighter fluid, gasoline, lantern oil, kerosene or similar liquids) to start or maintain a fire.
BEWARE of very high temperatures in the oven and use long oven gloves and mitts to handle pots and tools. DO NOT put
unprotected hands or arms inside oven while it is lit.
Dispose of ashes using a metal shovel and place in a metal bin with a tightly fitting lid. The container should be stored on a
non-combustible surface, away from all combustible materials. Ensure ashes are completely cold before disposing of them appropriately.
BEWARE of flying sparks from mouth of oven. Ensure that no combustible materials are within range of oven at any time.
DO NOT close the oven door fully while a fire is in the oven. Closing the door fully will cut off oxygen to the fire, causing the
fire to erupt suddenly when the door is removed. Always keep door tilted to allow air to circulate in the oven.
DO NOT use water to dampen or extinguish fire in the oven.
DO NOT pack required air spaces with insulation or other materials.
When the curing of the refractories is not done as part of the manufacturing process, the manufacturer’s recommended
curing process shall be specified. Follow the instructions for curing the oven. Failure to follow the curing schedule can cause damage to the oven, and void the oven warranty.
Giardino Installation and Operating Manual
© Forno Bravo, LLC 2010. All Rights Served. Ver. 1.3 2
Limited WarrantyForno Bravo, LLC Ovens and FireplacesTHE WARRANTYForno Bravo, LLC, an importer and producer of ovens and
fireplaces, warrants it ovens and fireplaces (herein referred to as Product) to be free from defects in materials and
workmanship for a period of (1) one year from the date of shipment.
QUALIFICATIONS TO THE WARRANTY
The complete Product Warranty outlined above does not apply under the following circumstances:
(1) The Product was not installed in accordance with Forno Bravo installation instructions and local building codes.
(2) The Product has been subjected to non-standard use, including burning fuels with abnormal burning
characteristics including, driftwood, coal, plywood and wood products using a binder that may burn at excessive
temperatures and cause damage to the Product.
(3) This Warranty does not apply to normal wear and tear.
(4) This Warranty does not apply to any cracking caused by over-firing or the failure to follow a proper curing schedule.
(5) In the event that the Listing plate has been removed, altered or obliterated.
(6) On parts that would be normally worn or replaced under normal conditions.
(7) Normal cracking due to expansion and contraction stress relief in either the dome or floor tiles.
LIMITATION ON LIABILITYIt is expressly agreed and understood that Forno Bravo's sole obligation and purchaser's exclusive remedy under
this Warranty, under any other warranty, expressed or implied, otherwise, shall be limited to replacement, repair,
or refund, as specified above, and such liability shall not
include, and purchaser specifically renounces any rights to recover, special, incidental, consequential or other
damages of any kind whatsoever, including, but not limited to, injuries to persons or damage to property, loss of profits
or anticipated profits, or loss of use of the product.
In no event shall Forno Bravo be responsible for any
incidental or consequential damages caused by defects in its products, whether such damage occurs or is discovered
before or after replacement or repair, and whether or not such damage is caused by Forno Bravo’s negligence.
Some states do not allow the exclusion or limitation of incidental or consequential damages, so the above
limitation or exclusion may not apply to you. The duration of any implied warranty with respect to this Product is
limited to the duration of the foregoing warranty. Some states do not allow limitations on how long an implied
warranty lasts, so the above may not apply to you.
INVESTIGATION OF CLAIMS AGAINST WARRANTYForno Bravo reserves the right to investigate any and all
claims against this Warranty and to decide upon method of settlement.
DEALERS HAVE NO AUTHORITY TO ALTER THIS WARRANTY
Forno Bravo's employees and dealers have no authority to make any warranties nor to authorize any remedies in
addition to or inconsistent with those stated above.
HOW TO REGISTER A CLAIM AGAINST WARRANTYIn order for any claim under this Warranty to be valid, Forno
Bravo must be notified of the claimed defect in writing or by telephone to Forno Bravo, 744 Neeson Road, Marina,
CA, 93933. Claims against this Warranty in writing should include the date of installation, and a description of the
defect.
Giardino Installation and Operating Manual
© Forno Bravo, LLC 2010. All Rights Served. Ver. 1.3 3

Table of Contents............................................................................................................................................Contained in the Crate 5
...............................................................................................................................................................At a Glance 6
.....................................................................................................................................................Oven Clearances 7
....................................................................................................................................................Oven Dimensions 8
..................................................................................................................................................Quick Start Guide 17
.........................................................................................................................................................1. Foundation 20
.................................................................................................................................................2. The Oven Stand 23
........................................................................................................................................3. The Insulating Hearth 26
.......................................................................................................................................4. Set the Cooking Floor 28
.................................................................................................................................................5. Dome Assembly 29
.........................................................................................................................................6. Chimney Installation 30
...............................................................................................................................................7. Insulate the Oven 33
...........................................................................................................................................8. Optional Brick Arch 34
...................................................................................................................................9. Enclosure Design Styles 35
...............................................................................................................................................10. Igloo Enclosure 38
...........................................................................................................................................11. Walled Enclosures 39
............................................................................................................................................12. Curing Your Oven 41
............................................................................................................................................11. Curing Your Oven 41
.......................................................................................................................................13. Firing and Operation 42
.............................................................................................................................14. Maintenance and Cleaning 43
..........................................................................................................................................Appendix 1. Tools List 44
......................................................................................................................................Appendix 2. Material List 45
Giardino Installation and Operating Manual
© Forno Bravo, LLC 2010. All Rights Served. Ver. 1.3 4

Contained in the CrateEach Forno Bravo Giardino Pizza Oven kit includes:
Oven dome with integral vent;
Firebrick tile oven floor and landing;
Steel door with thermometer;
3” (3 x 1”) woven ceramic oven dome insulating blanket;
2” ceramic board oven floor insulation;
High temp, waterproof mortar;
12” terracotta chimney with detached rain cap.
Options
Three-piece decorative brick arch
DuraTechUL103 double wall chimney system
Infrared thermometer
Remote probe thermometer
Tuscan grill
Pizza peels
Oven brushes, rakes and shovels
Terracotta bakeware
Imported Italian pizza ingredients
Note: the decorative brick arch is an optional accessory.
Giardino Installation and Operating Manual
© Forno Bravo, LLC 2010. All Rights Served. Ver. 1.3 5

At a GlanceGiardino60 Giardino70
Cooking Floor 24”W x 30”D 28”W x 34.5”D
External Dimensions 27”W x 31.5”D x 19”H 31”W x 36”D x 19”H
Oven Opening 16”W x 9.5”H 16”W x 9.5”H
Vent Landing 16”W x 5”D 16”W x 5”D
Dome Height 16.5” 13.5”
Monoblock Oven Opening with Integral Vent ✔ ✔
Vent Opening Diameter 5” 5”
Chimney Type Single wall steel, UL103, or clay Single wall steel, UL103, or clay
Commercial Grade, Kiln-Fired Cooking Floor ✔ ✔
3” Ceramic Blanket Insulation 40 sq. ft. 60 sq. ft.
2” Floor Ceramic Board Insulation 3 sq. ft. 4 sq. ft.
High Temp, Waterproof Mortar 10 lbs. 10 lbs
5” x 12” Terracotta Chimney Pipe ✔ ✔
Steel Door with Thermometer ✔ ✔
Dome Pieces 1 1
Pizzas at a Time 1 2
Weight 450 lbs. 500 lbs.
Giardino Installation and Operating Manual
© Forno Bravo, LLC 2010. All Rights Served. Ver. 1.3 6

Oven ClearancesIt is essential to maintain clearance space between the oven
components and any combustible material, such as walls and ceilings. Failure to maintain these clearances can result in fire.
Combustible Wall Clearance
The oven must have a minimum 1" (25 mm) clearance to combustibles from all sides, and 14" (356 mm) clearance
to combustibles from the top.
If building materials will contact the oven, they must be
completely noncombustible. Please note that standard drywall (or sheet rock) is considered a combustible.
The area directly above the doorway and 6" (152 mm) to each side of the doorway must be covered with non-
combustible material.
Non-combustible construction may contact the oven and
must then maintain 1" (25 mm) clearance to combustibles.
If the space between the legs of the stand is used for wood storage, it is recommended that it be a covered
container or box to prevent the possibility of sparks or embers from making contact with the stored wood. An
8-1/2" (eight and one-half inch) air space clearance is required between the bottom of the oven and any wood
storage container.
Floor Hearth ExtensionThe minimum floor hearth extension areas from the oven
door opening to combustible floors are as follows:
• 30” (762) to each side of the door opening• 36” (914 mm) in front of the door opening
Giardino Installation and Operating Manual
© Forno Bravo, LLC 2010. All Rights Served. Ver. 1.3 7

Oven DimensionsGiardino60 Front View
Giardino60 Top View
Giardino Installation and Operating Manual
© Forno Bravo, LLC 2010. All Rights Served. Ver. 1.3 8

Giardino60 Side View
Giardino70 Front View
Giardino Installation and Operating Manual
© Forno Bravo, LLC 2010. All Rights Served. Ver. 1.3 9

Giardino70 Top View
Giardino70 Side View
Giardino Installation and Operating Manual
© Forno Bravo, LLC 2010. All Rights Served. Ver. 1.3 10

Top Elevation
Giardino Installation and Operating Manual
© Forno Bravo, LLC 2010. All Rights Served. Ver. 1.3 11

Front Elevation
The example uses standard concrete blocks (CMU).
Giardino Installation and Operating Manual
© Forno Bravo, LLC 2010. All Rights Served. Ver. 1.3 12

Cross Section: Igloo
Giardino Installation and Operating Manual
© Forno Bravo, LLC 2010. All Rights Served. Ver. 1.3 13

Cross Section: Walled Enclosure
Giardino Installation and Operating Manual
© Forno Bravo, LLC 2010. All Rights Served. Ver. 1.3 14

Stand Dimensions
Oven Exterior
Hearth Width
Hearth Depth
Giardino60 27”W x 30.5”D 37” 41.5”
Giardino70 31"W x 34.5"D 41” 45.5”
The stand dimensions for your specific oven installation are based on the following formula:
Width = Oven exterior width + insulation thickness + enclosure wall thickness.
Depth = Oven exterior depth + rear insulation thickness + rear enclosure wall thickness + landing depth
The sample dimensions above are based on 3” woven ceramic insulation, 2” upper walls and a 6” oven landing. Adjust your dimensions according to your specific installation.
Corner Installation: Giardino60
Giardino Installation and Operating Manual
© Forno Bravo, LLC 2010. All Rights Served. Ver. 1.3 15

Corner Installation: Giardino70
Giardino Installation and Operating Manual
© Forno Bravo, LLC 2010. All Rights Served. Ver. 1.3 16

Quick Start GuideThe Quick Start Guide gives you a snapshot overview of the installation process.
Foundation SlabFrame and pour a standard 3 1/2” rebar reinforced concrete slab.
Oven StandAssembled a block stand to the appropriate hearth width.
Concrete HearthFrame and pour a 3 1/2” rebar reinforced concrete hearth using Hardibacker as a permanent bottom form.
Giardino Installation and Operating Manual
© Forno Bravo, LLC 2010. All Rights Served. Ver. 1.3 17

Floor InsulationAssemble the pre-cut FB Board insulating board to fit under the oven. It can be assembled on wet or dry concrete. Do not use adhesive.
Oven Floor AssemblyAssemble and level the cooking floor on a bed of fine sand.
Oven Dome AssemblySeal the bottom of the dome and the oven landing to the insulation board using refractory mortar.
Giardino Installation and Operating Manual
© Forno Bravo, LLC 2010. All Rights Served. Ver. 1.3 18

Chimney AssemblySeal the 5” x 12” terracotta chimney to the vent opening with the high temp mortar provided with the oven.
For UL103 installation, screw the chimney system anchor place in place using chimney caulk to seal.
For refractory chimney installation, follow the instructions in Chapter 6 of this manual.
Oven InsulationWrap the oven in three layers of 1” FB Blanket. Overlap the joints.
Finish the EnclosureShape the Igloo with Wire lathe and cover with a two coat stucco system.
For other enclosure types, refer to Chapter 9 of this manual.
Giardino Installation and Operating Manual
© Forno Bravo, LLC 2010. All Rights Served. Ver. 1.3 19

1. FoundationOverviewYour oven stand and oven chamber are installed on a
concrete pad. We recommend a minimum thickness of 5 ½ inches (14 cm) for the Foundation slab, however your
location, soil conditions and local building ordinances will dictate the thickness required.
The slab dimensions listed below are 8 " wider than the dimensions of your concrete block stand, providing you
with 2" for finish material, and a 2" reveal on either side of the stand. The slab is also 10" deep, allowing for 4" in the
back (2" finish and reveal), and 6" in front (the additional space makes a nice edge for your wood storage). The
foundation slab will also be used to support forms that you will use during the hearth slab construction The finished
top of the slab should be 2"-3" above ground level.
InstructionsFirst, excavate your foundation. The slab frame for a 5
½"(14 cm) foundation is best composed of 2x6 inch lumber set so the top of the form is 2-3” (5-8 cm) above ground
level. The longer form boards should sit inside the shorter boards, and the completed form can be held in place by
driving wooden stakes into the ground around the perimeter. Before securing everything permanently, check
to make sure the form is located and faces exactly where you want it, and is level and square.
1.1. Use a tiller to break up the soil.
Lay a 3" base of pea gravel (or crushed rock), compact the
rock, and cover it with a layer of 6 ml plastic sheeting to stop the slab from wicking water.
1.2. A gravel or crushed rock bed.
Place a sheet of wire mesh inside the foundation frame,
and install a two-piece grid using 1/2" rebar (#4) set 4" and 8" inside the foundation frame. Tie the rebar together with
tie wire, then set the wire mesh and rebar half way up the pad (2 3/4"), using either rebar stand-offs or fragments of
brick.
Giardino Installation and Operating Manual
© Forno Bravo, LLC 2010. All Rights Served. Ver. 1.3 20

Mix and pour the concrete, and then level it. Use a 2"x4" to
screed and level the concrete, then finish to a smoothness that works for you as the bottom of your wood storage
area. Allow the slab to cure for a day or two. Keeping it damp will help it cure better and become stronger.
1.3. Using a mixer.
1.4. The finished foundation ready to cure.
Other ConsiderationsDepending on where you live, you may have to excavate 18” or more, of topsoil to reach a stable substrate such as
hard clay. If you do excavate to a depth greater than the foundation form height, you will need to add a material,
such as thoroughly compacted pea gravel or crushed rock,
which will allow for the drainage of water from under the
concrete slab. Placing a layer of plastic sheeting over the material will help prevent it from wicking water from the
slab too quickly, making it brittle and prone to cracking.
You may also want to install your Giardino oven as part of a
larger outdoor kitchen project. Use the dimensions for the oven in conjunction with your other kitchen elements, such
as counters, a grill, storage, a sink, and refrigeration. You might find it easier to form your entire kitchen at one time.
1.5. A complete outdoor kitchen foundation.
1.6. The foundation and first course of stand blocks.
Giardino Installation and Operating Manual
© Forno Bravo, LLC 2010. All Rights Served. Ver. 1.3 21

Hints and TipsUse a tiller to break up the ground before you excavate.
You can rent one from Home Depot. If your ground is hard and/or dry, water it with a sprinkler for a couple of days
before you start. Your site should be soft, but not muddy.
Compare both diagonal measurements of your foundation
frame to ensure that your foundation will be square. Double check that your foundation really faces the exact direction
you want your oven to face. Once the diagonals are of equal length, you may want to temporarily attach 2”x4”
lumber horizontally to form triangles at the corners and hold your form square during the pour.
1.7. 2”x4” studs hold the form square and plumb.
The weight of concrete in the foundation can be heavy (40
80 lb. bags or more), and mixing it by hand in a wheelbarrow might use up energy and time that will serve
you better later in the project. Rent a mixer from Home Depot, and ask a friend (or pay a local teenager) to help
you mix and pour the slab.
There are also mix-on-your-site trucks that come and just
make as much concrete as you need on site, so you might want to price this option if available in your area.
Check with your local equipment rental company for a 1-
yard mixer that you can tow behind a standard pickup truck.
If your building site is far from your street or curb, you can hire a concrete pump to shoot the concrete where you
want it. The pump rental is typically a different company from the concrete delivery truck.
Remember that while the slab has to be square, level, plumb, and structurally sound to get your oven off on the
right foot, it will never be seen. It is worth saving your best finish work for later in the project.
Giardino Installation and Operating Manual
© Forno Bravo, LLC 2010. All Rights Served. Ver. 1.3 22

2. The Oven StandOverviewThe oven stand is typically constructed using standard
(8”x8”x16” and 8”x8”x8”) concrete blocks, though it can also be made from brick or metal, or formed concrete.
Instructions
Build a block stand comprised of four courses using standard 8"x16"x8" and 8"x8"x8" concrete blocks. The first
three courses of the block stand form a three-sided U, leaving an opening in the oven front that provides access
for wood storage. The fourth course of blocks spans the opening at the front of the U, by resting on two pieces of
2"x2"x3/8" angle iron.
Using a chalk line, mark the layout of your block stand
directly on the foundation slab. Make sure that it faces exactly where you want your oven opening to face. Then,
lay your first course of blocks directly on your slab. Use pre-mixed mortar where necessary to ensure that the first
course of blocks is level, front and back, side to side, and on the diagonals.
Take your time with getting the first course set correctly, because it will be increasingly difficult to correct problems
later.
2.1. Carefully lay out the first course of blocks.
In the following courses, stagger your blocks using either
8"x8"X8" blocks, or cut blocks, to ensure that the joints are offset. Lay the next two courses, for a total of three.
After you have laid your first three courses, set your two pieces of 2"x2" angle iron across the opening between the
two legs of the U shape. Note that the back piece of angle iron must be cut to allow clearance for the rest of the top
course of blocks.
2.2. Cut the back angle iron to leave room for blocks.
Grind, or cut, 3/8" from the edges of each block that rests on the angle iron, so that they lie flush with the rest of the
fourth course. Finish laying the rest of the fourth course of blocks.
Giardino Installation and Operating Manual
© Forno Bravo, LLC 2010. All Rights Served. Ver. 1.3 23

2.3. The finished stand.
After you have completely assembled the block stand, check that the walls are square, level and plumb. Drop a
section of 1/2" rebar in every other core, and fill those cores with concrete.
VariationsVariations include round stands, corner ovens, oven with an attached outdoor kitchen, pre-cast lintels, and metal
stands.
2.4. A corner installation.
2.5. Custom metal stand with stud frame.
2.6. Stand with cast lintels.
Tips and HintsWhen selecting the direction your oven will face, consider
making sure that your opening does not face possible
Giardino Installation and Operating Manual
© Forno Bravo, LLC 2010. All Rights Served. Ver. 1.3 24

winds, which might disrupt your cooking and fire
management.
We also recommend dry stacking your blocks, then filling
every other core (or the corners) with concrete. It's a lot faster, and sturdier as well.
Block the cores that you have not filled with your empty concrete bag to stop your hearth concrete from spilling into
the holes.
2.6. Filling the cores.
Giardino Installation and Operating Manual
© Forno Bravo, LLC 2010. All Rights Served. Ver. 1.3 25
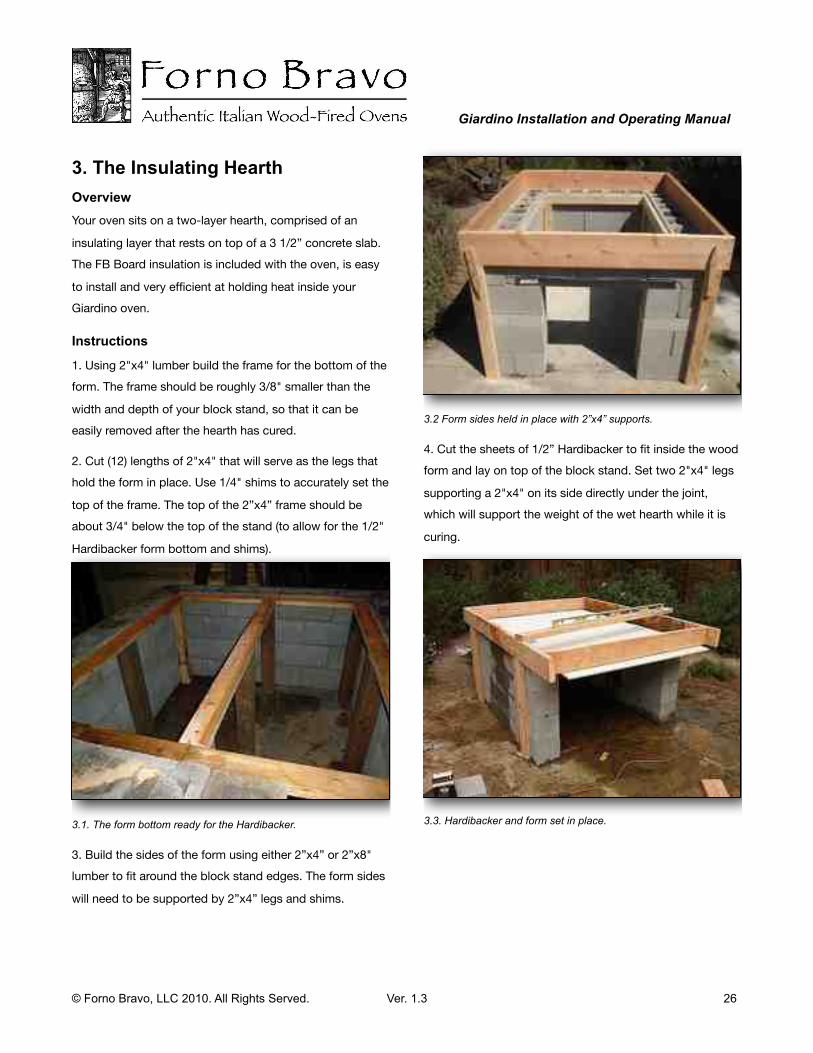
3. The Insulating HearthOverviewYour oven sits on a two-layer hearth, comprised of an
insulating layer that rests on top of a 3 1/2” concrete slab. The FB Board insulation is included with the oven, is easy
to install and very efficient at holding heat inside your Giardino oven.
Instructions
1. Using 2"x4" lumber build the frame for the bottom of the form. The frame should be roughly 3/8" smaller than the
width and depth of your block stand, so that it can be easily removed after the hearth has cured.
2. Cut (12) lengths of 2"x4" that will serve as the legs that hold the form in place. Use 1/4" shims to accurately set the
top of the frame. The top of the 2”x4” frame should be about 3/4" below the top of the stand (to allow for the 1/2"
Hardibacker form bottom and shims).
3.1. The form bottom ready for the Hardibacker.
3. Build the sides of the form using either 2”x4” or 2”x8" lumber to fit around the block stand edges. The form sides
will need to be supported by 2”x4” legs and shims.
3.2 Form sides held in place with 2”x4” supports.
4. Cut the sheets of 1/2” Hardibacker to fit inside the wood form and lay on top of the block stand. Set two 2"x4" legs
supporting a 2"x4" on its side directly under the joint, which will support the weight of the wet hearth while it is
curing.
3.3. Hardibacker and form set in place.
Giardino Installation and Operating Manual
© Forno Bravo, LLC 2010. All Rights Served. Ver. 1.3 26

5. Build a grid of 1/2" rebar slightly shorter than the
external dimension of the wood forms, on 12" centers, starting 6" in from the edges of the form, set half-way up
the 3 1/2” concrete layer (about 1 3/4”).
3.4 Rebar set in center of the concrete pad.
6. Pour 3 1/2” of standard concrete and allow for it to start curing before adding the FB Board. Yo do not want to
install FB Board on wet concrete, as it will wick up water
3.6. Structural layer waiting on insulating layer.
7. Cut and place the FB Board insulation, making sure the insulation and the Giardino oven face straight forward and
that the front of the oven is exactly where you want it.
3.7. FB Board set in place.
Giardino Installation and Operating Manual
© Forno Bravo, LLC 2010. All Rights Served. Ver. 1.3 27

4. Set the Cooking FloorOverviewMeasure your hearth to ensure that you are centering your
oven left and right on the hearth. How far back you set the cooking surface will depend on the size and material you
are using for the oven landing in front of the oven opening. Do a trial layout using your oven landing material and your
oven floor. This will help you place your oven to the correct depth on the hearth slab.
Instructions
Spread a 3/8" layer of fine sand using a notched trowel. Lay your cooking surface in place, butting the joints tightly
together. Check for level. This is your true cooking surface, so it is vital that it is completely level in all directions.
Check again that the oven "faces" straight forward.
4.1. Set the cooking floor on a thin bed of sand.
4.2. Set the vent landing level with the cooking floor.
Giardino Installation and Operating Manual
© Forno Bravo, LLC 2010. All Rights Served. Ver. 1.3 28

5. Dome AssemblyOverviewThe dome and vent pieces make up the oven cooking
chamber and ventilation system. The Giardino oven rests on the FB Board insulation and encloses the cooking floor.
Instructions
Set your oven dome pieces around the cooking floor and vent floor, taking care to ensure that the oven faces in the
proper direction.
5.1. Line up the dome pieces.
Seal the oven dome and the vent land floor piece to the
insulating board using high heat mortar.
Giardino Installation and Operating Manual
© Forno Bravo, LLC 2010. All Rights Served. Ver. 1.3 29

6. Chimney InstallationOverviewYour Giardino can be attached to one of three types of
chimney system: the single wall stainless steel chimney supplied with the oven, a UL103HT Listed chimney system,
or a refractory chimney flue liner. DO NOT CONNECT THIS UNIT TO A CHIMNEY FLUE SERVING ANOTHER
APPLIANCE.
Terracotta ChimneyEach Giardino oven kit contains a 5” x 12” terracotta
chimney pipe, intended for outdoor installations. Use the high temp, waterproof mortar to seal the chimney to the
oven vent.
6.1 Giardino oven with the provide terracotta chimney.
UL103HT Chimney SystemThe Giardino oven can also be used with a 6” UL103
chimney system, such as DuraTech. These manufactured chimney systems allow for more complex installations,
including longer chimney pipe lengths and 30º angle sets to create an offset. The system specifies a clearance of at
least 2” between the chimney and any combustible materials, and a height of 3” above the roof, and 2” above
any roof within 10’.
6.2. The DuraTech system feature angles and a chimney cap.
Attach the anchor plate to the Giardino chimney manifold using four concrete screws.
6.3. Attach the anchor plate using concrete screws.
Masonry Chimney For indoor installations, the minimum air space clearance between interior masonry chimneys and combustible
materials shall be 2”. Any chimney with at least one interior wall shall be treated as interior. All spaces between
chimneys and floors or ceilings through which chimneys pass shall be fire stopped with non-combustible material.
The fire stopping of spaces between chimneys and wood joists, beams or headers shall be galvanized steel not less
Giardino Installation and Operating Manual
© Forno Bravo, LLC 2010. All Rights Served. Ver. 1.3 30

thinner than 26 gage in thickness or non combustible sheet
material not more thicker than 1/2 in.
If it is necessary to pass through combustible walls to
connect the oven to a chimney liner, the following clearances must be maintained.
Method A. 12” (304.8 mm) Clearance to Combustible Wall Member: Using a minimum thickness 3.5” (89 mm) brick
and a 5/8” (15.9 mm) minimum wall thickness clay liner, construct a wall pass-through. The clay liner must conform
to ASTM C315 (Standard Specification for Clay Fire Linings) or its equivalent. Keep a minimum of 12” (304.8
mm) of brick masonry between the clay liner and wall combustibles. The clay liner shall run from the brick
masonry outer surface to the inner surface of the chimney flue liner but not past the inner surface. Firmly grout or
cement the clay liner in place to the chimney flue liner.
Method B. 9” (228.6 mm) Clearance to Combustible Wall
Member: Using a 6” (152.4 mm) inside diameter, listed factory-built Solid-Pak chimney section with insulation of
1” (25.4 mm) or more, build a wall pass-through with a minimum 9” (228.6 mm) air space between the outer wall of
the chimney length and wall combustibles. Use sheet metal supports fastened securely to wall surfaces on all sides, to
maintain the 9” (228.6 mm) air space. When fastening supports to chimney length, do not penetrate the chimney
liner (the inside wall of the Solid-Pak chimney). The inner end of the Solid-Pak chimney section shall be flush with
the inside of the masonry chimney flue, and sealed with a
non-water soluble refractory cement. Use this cement to
also seal to the brick masonry penetration.
Method C. 6” (152.4 mm) Clearance to Combustible Wall
Member: Starting with a minimum 24 gage (.024” [.61 mm]) 6” (152.4 mm) metal chimney connector, and a minimum 24
gage ventilated wall thimble which has two air channels of 1” (25.4 mm) each, construct a wall pass-through. There
shall be a minimum 6” (152.4) mm separation area containing fiberglass insulation, from the outer surface of
the wall thimble to wall combustibles. Support the wall thimble, and cover its opening with a 24-gage minimum
sheet metal support. Maintain the 6” (152.4 mm) space. There should also be a support sized to fit and hold the
metal chimney connector. See that the supports are fastened securely to wall surfaces on all sides. Make sure
fasteners used to secure the metal chimney connector do not penetrate chimney flue liner.
Giardino Installation and Operating Manual
© Forno Bravo, LLC 2010. All Rights Served. Ver. 1.3 31

Method D. 2” (50.8 mm) Clearance to Combustible Wall Member: Start with a solid-pak listed factory built chimney
section at least 12” (304 mm) long, with insulation of
1” (25.4 mm) or more, and an inside diameter of 8” (2 inches [51 mm] larger than the 6” [152.4 mm] chimney connector). Use this as a pass-through for a minimum 24-
gage single wall steel chimney connector. Keep solid-pak
section concentric with and spaced 1” (25.4 mm) off the chimney connector by way of sheet metal support plates at both ends of chimney section. Cover opening with and
support chimney section on both sides with 24 gage
minimum sheet metal supports. See that the supports are fastened securely to wall surfaces on all sides. Make sure fasteners used to secure chimney flue liner.
Giardino Installation and Operating Manual
© Forno Bravo, LLC 2010. All Rights Served. Ver. 1.3 32

7. Insulate the OvenThe Giardino oven kit includes 3 x 1” of ceramic insulation,
enough to fully insulate your oven to where the outside of the oven enclosure will remain cool to the touch while the
oven reaches temperatures in excess of 900ºF.
7.1. The layers of FB Blanket.
InstructionsBlanket insulation such as FB Blanket is easy to work with,
is easy to cut and shape. Always use a mask when working with any ceramic insulation. Take care to overlap any joints.
Alternatively, you can hold it in place with a metal band or wire mesh.
7.2. Stucco lathe holds the FB Board in place and can shape the Igloo.
Giardino Installation and Operating Manual
© Forno Bravo, LLC 2010. All Rights Served. Ver. 1.3 33

8. Optional Brick ArchThe Giardino oven can be purchased with an optional brick
arch. The arch rests on top of the oven landing at the same height as the cooking floor, and attaches to the front of the
oven dome body and vent assembly. A custom, site-built arch can also be used, and can be constructed from
virtually any non-combustible material.
Attach the brick arch to the front of your oven enclosure
using standard mortar.
8.1 The Giardino brick arch on a brick oven landing.
Giardino Installation and Operating Manual
© Forno Bravo, LLC 2010. All Rights Served. Ver. 1.3 34

9. Enclosure Design StylesOverviewThe oven enclosure must be sealed to protect your
Giardino oven and its insulation from water. It can be constructed from concrete block, rebar and stucco mesh,
metal stud and concrete board or free standing brick or stone. Basically, the style of the enclosure is up to you,
your imagination, and the availability of local materials. The examples shown here from around the country will give you
a start.
A MAJOR CAUSE OF OVEN-RELATED FIRED IS FAILURE TO MAINTAIN REQUIRED CLEARANCES (AIR SPACES) TO COMBUSTIBLE MATERIALS. IT IS OF UTMOST IMPORTANCE THAT THIS OVEN BE INSTALLED ONLY IN ACCORDANCE WITH THESE INSTRUCTIONS.
For more design ideas, visit us at www.fornobravo.com.
Barrel Vault
Gable House
Stone House
Stucco House
Indoor Corner Oven
Giardino Installation and Operating Manual
© Forno Bravo, LLC 2010. All Rights Served. Ver. 1.3 35

Igloo
Brick House
Wall Oven
Igloo
Stone House
Gabled House
Giardino Installation and Operating Manual
© Forno Bravo, LLC 2010. All Rights Served. Ver. 1.3 36

Stone House
Corner Oven
Gabled Stone House
Stone House
Giardino Installation and Operating Manual
© Forno Bravo, LLC 2010. All Rights Served. Ver. 1.3 37

10. Igloo EnclosureOverviewThe Igloo is a traditional Italian and Mediterranean pizza
oven design style where the enclosure follows the basic lines of the oven dome and chimney -- thus the Igloo.
Instructions
There are two ways of making the Igloo shape, both of which follow the guidelines set forth in Graphic 9.1. First,
you can create the Igloo using stucco lathe and insulating concrete. The insulating concrete is then covered with a
thin finish coat of waterproof stucco.
Second, the Igloo shape can be created with rebar and
stucco lathe, separately from the dome. Drill 1/4” holes around the perimeter of the oven hearth, the distance you
want away from the exterior of your oven, to accommodate your insulation thickness. Insert pieces of pencil rebar in
the holes, and bend them to the desired Igloo shape. Cover the pencil rebar with stucco mesh, and secure it in place
with concrete tie wire to make the Igloo frame solid.
Cover the entire structure with a 1/2"-3/4" undercoat of
stucco, followed by a finish stucco coat to the style you prefer. Finally, seal the entire oven with a weatherproof
stucco coat or paint.
10.1 The sections of an Igloo oven.
10.2. The oven dome and lathe shape the Igloo.
10.3. Rough coat of stucco on wire lathe.
Giardino Installation and Operating Manual
© Forno Bravo, LLC 2010. All Rights Served. Ver. 1.3 38

11. Walled EnclosuresOverviewThe Gabled House, or walled enclosure, is one of the most
traditional ways to finish a brick oven. There are examples of these ovens throughout the Italian countryside.
The basic process for finishing your oven this way is straightforward. Construct walls around your oven using
metal studs to a height of at least 6" higher than the top of your insulated oven dome. Face the metal studs with
concrete board, and finish the exterior of the oven with stucco, brick, or stone. The roof design is up to the builder,
and it can be finished with stone, clay tile or modern composite tile.
____________________________________________________
DO NOT USE WOOD STUDS, DRYALL OR PLYWOOD TO FRAME THE OVEN ENCLOSURE.____________________________________________________
Instructions
Using traditional partition wall building techniques, build a wall using a single metal stud lying flat as a bottom plate,
and two metal studs lying flat as the top plates for each wall. Attach the bottom plate to the concrete hearth slab
using concrete screws. Set metal studs every 16" in the body of the wall to support the concrete board.
Interlock the top two metal stud top plates at each corner to give the structure more strength. Set two vertical studs
at each corner for a larger face to attach the concrete board, and to give the structure more strength.
The Oven Opening
Set the location of the front wall of the oven enclosure so that the brick arch at the oven opening projects forward by
a couple of inches. Set one horizontal stud at the top of the arch, and set two additional studs at a 45-degree angle on
the sides of the arch to provide support for the concrete
board.
FinishAttach your concrete board using metal stud screws. You
can finish your enclosure walls with stucco, brick, or stone. The roof design is up to the designer, and can be finished
with stone, clay tile or composite tile. The gap between the oven and the enclosure walls is filled with FB Blanket.
11.1. The basic walled enclosure.
Giardino Installation and Operating Manual
© Forno Bravo, LLC 2010. All Rights Served. Ver. 1.3 39

11.2. The layers of a walled enclosure oven.
11.3. Metal studs and a gabled roof.
11.4. Attach concrete board.
Tips and TechniquesBuild your walled enclosure the same way you would build a partition wall using wood studs. Set the vertical studs on
15” centers, and always center your concrete board seams directly on your vertical studs.
Use the flat head screws design specifically for attaching concrete board to metal studs, as they do a good job of
drilling into the metal studs, and leave a flat surface that can be easily finished with stucco or stone.
Giardino Installation and Operating Manual
© Forno Bravo, LLC 2010. All Rights Served. Ver. 1.3 40

12. Curing Your Oven11. Curing Your OvenIt is important at this point that you cure your oven slowly,
by building a series of five increasingly larger fires, starting
with a low temperature. If you begin building large fires in
your oven right way, you will compromise your oven's
longevity and ability to cook well, and cause damage,
including cracking.
After you have installed your oven, there is still a great deal
of moisture in the mortars, hearth concrete, vermiculite, and
the oven chamber and vent. Each of these oven
components was recently produced using an air-drying,
water-based process. Simply letting the oven stand for a
week does not "cure" the moisture out of them oven.
Before you start the curing process, let the complete oven
sit for one week. Then, start a series of low and growing
fires, using the analog temperature gauge provided in the
oven door/frame. The temperature gauge reads the oven’s
air temperature. For a more accurate temperature reading
of the oven refractory surfaces, which can be use for many
types of cooking, you can use the optional Digital Infrared
Thermometer, which can be purchased in the Forno Bravo
Store.
Day 1. Maintain a fire temperature of 300ºF throughout the
day and as long as possible into the evening.
Day 2. Repeat at 350ºF.
___________________________________________
Important Note. While it is difficult to maintain consistent, low temperature fires, it is critical for proper curing that you do not go above these temperatures during the first two days.
___________________________________________
Day 3. Repeat at 400ºF.
Day 4. Repeat at 450ºF.
Day 5. Repeat at 500ºF.
Close the oven door every evening to preserve dryness and
heat.
Important Notes
Use solid wood fuels only. DO NOT use charcoal,
pressure treated lumber, chipped wood products, sappy
wood such as pine, laminated wood or any material other
than dry medium or hard firewood.
Do not use products not specified for use with this oven.
DO NOT USE liquid fuel (firelighter fluid, gasoline, lantern
oil, kerosene or similar liquids) to start or maintain a fire.
Never use water to lower temperature inside the oven, or to
extinguish the fire.
There must be a period of time between completing the
masonry work and beginning the actual firing cure. Longer
is better than shorter, particularly for the actual dome
cement. The cement and mortar must cure first and this
process is actually improved by keeping the cement moist
and not letting it dry out.
Also, using a space heater can help, but only so far. It is not
an alternative to fire curing. We tested a space heater in an
assembled Forno Bravo precast oven for two days, then
quickly heated the oven up, (don't do this at home -- it was
an experiment to see what would happen to an oven that
we have here) and we found that we created a very large
amount of steam from the oven, mortars and vermiculite,
which went on for hours and hours.
Giardino Installation and Operating Manual
© Forno Bravo, LLC 2010. All Rights Served. Ver. 1.3 41

13. Firing and OperationOven floor bricks intended for direct contact with bread
and/or pizza products only. All other food products must not come into contact with brick surface but should be
contained within approved cookware.
Start your fire using a taste-free, odor-free fire starter and
dry kindling. Build your fire up slowly, adding wood to the back and sides as the fire grows.
Continue to add wood until the oven reaches the desired temperature. Then, move the fire to one side and brush the
oven floor. Only use the copper brush that was provided with your oven, and do not use steel wire brushes, natural
fiber brushes or wet clothes to clean the oven floor.
The fire must be built directly on the oven floor.
You can monitor your oven temperature using the analog oven air temperature gauge provided with the oven, or with
an optional Digital Infrared Thermometer.
DO NOT over fire your oven, or build a fire where flame
exits the oven door opening.
BEWARE of very high temperatures in the oven and use
long oven gloves and mitts to handle pots and tools. DO NOT put unprotected hands or arms inside oven while it is
lit.
BEWARE of flying sparks from mouth of oven. Ensure that
no combustible materials are within range of oven at any time.
DO NOT close the oven door fully while a fire is in the oven. Closing the door fully will cut off oxygen to the fire, causing
the fire to erupt suddenly when the door is removed. Always keep door tilted to allow air to circulate in the oven.
Never use gasoline, gasoline-type lantern fuel, kerosene, charcoal lighter fluid, or similar liquids to start or “freshen
up” a fire in the oven. Keep all such liquids well away from
the oven when in use.
The oven should be operated only with the doors fully
opened or fully closed. When doors are left partially open, gas and flame may be drawn out of the oven opening,
creating the risk of both fire and smoke.
Keep the oven door opening free of all combustible
materials when the oven is in operation.
Disposal of Ashes. Ashes should be placed in a metal
container with a tight-fitting lid. The closed container of ashes should be placed on a non-combustible floor, or on
the ground, well away from all combustible materials pending disposal. When the ashes are disposed by burial in
soil, or otherwise locally dispersed, they should be retained in the closed container until all cinders have thoroughly
cooled.
Wood can be stacked in the area under the oven hearth.
Giardino Installation and Operating Manual
© Forno Bravo, LLC 2010. All Rights Served. Ver. 1.3 42

14. Maintenance and CleaningThe oven can inspected through the door opening. Allow
the oven to completely cool before inspecting the vent and chimney pipe for creosote build up.
Have your chimney cleaned by a professional chimney sweep if you have doubts about your ability to clean it. Use
a plastic, wood, or steel brush. Do not use a brush that will scratch the stainless steel liner of your chimney. Scrub the
spark arrestor with a wire brush.
To remove the Chimney Cap for cleaning, either twist
counter-clockwise to remove the entire cap, or unscrew the four (4) screws that attach the cap’s support legs to the cap
base. The Tee Cleanout Cap can be removed by turning counter-clockwise. Be sure to replace Tee Cleanout Cap
when you are finished cleaning the chimney.
Creosote – Formation and need for removal. When wood is
burned slowly, it produces tar and other organic vapors that combine with expelled moisture to form creosote. The
creosote vapors condense in a relatively cook oven flue and exhaust hood of a slow burning fire. As a result,
creosote residue accumulates on the flue lining and exhaust hood. When ignited, this creosote makes an
extremely hot fire.
The oven flue should be inspected at least twice a year to
determine when creosote buildup has occurred.
When creosote has accumulated, it should be removed to
reduce risk of fire.
Giardino Installation and Operating Manual
© Forno Bravo, LLC 2010. All Rights Served. Ver. 1.3 43

Appendix 1. Tools ListTools• A circular saw with three blades: general-purpose
wood, metal and diamond masonry. The diamond
masonry blade costs more, but last longer and cuts
quickly.• A hammer.• A rubber mallet.• 2'-3' level.• Grinder (optional). You can use the grinder to cut rebar,
wire, and concrete block. It will save you time from not
having to frequently change blades on your circular
saw.• A chalk line.• A builder’s pencil.• A notched tile trowel for setting the cooking floor.• Goggles and a dust mask.• A mixing tub.• A hoe for mixing.• A square-edged transfer shovels.• A tamper.• Concrete mixer (optional). You can rent one.• A bucket, scrub brush and sponge for clean up.• A garden sprayer to keep your masonry damp.
Giardino Installation and Operating Manual
© Forno Bravo, LLC 2010. All Rights Served. Ver. 1.3 44

Appendix 2. Material ListPlease calculate your exact requirements depending on
your oven size and enclosure design.
Giardino60/70
Foundation• (25) 80 lb. bags of Ready-Mix concrete• (6) 1/2" x10’ rebar, (4) cut to 80";(4) cut to 94"• (4) 2"x6"x8' studs, (2) cut to 83";(2) cut to 94"• (48) Sq ft of wire mesh• (12) Rebar stand-offs• (104) Sq ft of 6 mil plastic sheeting• Handful of plastic zip-ties, or ball of tie wire• 1/2 cu yd of gravel• (1) Box 2 1/2" framing nails
Block Stand• (40) 8"x8"x16" blocks• (5) 8"x8"x8" blocks• (3) ½” x 10' 1/2" rebar, each cut into (3) 40" sections to
fill nine block cores• (10) 80 lb. bags concrete for filling every other core• (2) 1.5"x1.5"x56" angle iron (for front span)• (1) 60 lb. bag mortar (to level first course of blocks)
Concrete Hearth• (2) 4'x'8x3/4" sheets of plywood or particle board• (4) 2"x4"x8' wood studs• (4) 2"x6"x8' wood studs• (1) Box shims (or make your own from scrap wood)• The rest of the 2 1/2" framing nails• (12) ½” x 10' rebar, (6) cut to 72"; (6) cut to 84"• (10) 80 lb. bags of pre-mixed concrete
Giardino Installation and Operating Manual
© Forno Bravo, LLC 2010. All Rights Served. Ver. 1.3 45