Embed Size (px)
Citation preview

FLUXX® Auger Pan Feeding System Installation, Operation and Parts Replacement Guide
Instr. # 11-31-3602 07/11
FLUXX 330For the following models:
11-31-470011-31-471011-31-471111-31-475011-31-4760
(See page 21 for Model Descriptions)
267UX007

2 Instr. # 11-31-3602 07/11
FLUXX® Auger Pan Feeding System Big Dutchman Inc., 2011
This manual contains Notes, Warnings, and Cautions in addition to the assembly instructions.NOTE: Provide additional comments to help with installation and set up.
CAUTION: Provide notification of situations that can cause damage to machinery and tools.
WARNING! Provide alerts to situations that can cause personal injury or death.
Please take the time to read and understand this manual before beginning assembly.CAREFULLY FOLLOW THE SAFETY AND OPERATING INSTRUCTIONS in this manual.Observe the following precautions when working on or near the machinery:• Understand the limitations and hazards
associated with operating this equipment before using.
• Wear appropriate eye protection whenassembling and using this equipment.
• Donotwearlooseclothing,jewelry,etc.• Keepsleevesrolledabovetheelbows.• Confinelonghair.• Alwayswearapprovedprotectivefootwear.
MAKE SURE ALL PERSONNEL UNDERSTAND THE POTENTIAL DANGER of someone getting toocloseortryingtomakerepairsoradjustmentswhile the machine is running. This equipment has several AREAS WHERE INJURIES COULD OCCUR IF GUARDS OR COVERS ARE REMOVED.
KEEP ALL COVERS AND GUARDS IN PLACE WHILE EQUIPMENT IS IN OPERATION.
Observe the following precautions when servicing the machinery:• Donotremoveguardsexceptwhenperforming
maintenance.• Donotoperatethemachinewithguardsor
covers removed.• When performingmaintenance or repairs
make sure the local control switch is OFF and the main power control panel is OFF and tagged “DO NOT OPERATE.”
• MakealladjustmentswiththepowerOFF.
• NEVER reach into the machine while the systemisoperating,keephandsoutof themachinechainandbeltareas.Keepallguardsand covers in place when power is on.
• Work carefully and give thework you aredoingyourundividedattention.Donot lookaway,talkorplayaround.Carelessactscancause SERIOUS INJURY.
Notes, Warnings, and Cautions

Instr. # 11-31-3602 07/11 3
Big Dutchman Inc., 2011 FLUXX® Auger Pan Feeding System
ContentsPanAssemblySteps...................................................................................................4PanAssembly-Cont. ...................................................................................................5Inner/OuterCylinder ...................................................................................................5AssemblyandGrille...................................................................................................5PanAssemblySteps...................................................................................................6FasteningtheDishtotheGrille ..................................................................................6Locking Tabs ...............................................................................................................6FasteningthePantoAugerTube ...............................................................................7RemovingthePanfromtheAugerTube ....................................................................7CleaningthePans ......................................................................................................9PowerWashingthePans ...........................................................................................9Opening the Pan.........................................................................................................9DryingthePans ..........................................................................................................9ControlPans-SwitchReplacement-..........................................................................10ForIntermediateandEndControlPan .....................................................................10ControlPans-SwitchReplacement-ForIntermediateandEndControlPan(Cont.) 11ControlPanRe-Assembly .......................................................................................12EndControlPanAugerTubeAssembly ...................................................................13IntermediateControlPan-ExplodedView .................................................................14IntermediateControlPan-PartsList .........................................................................15EndControlPan-Exploded(seepage11) ................................................................16EndControlPan-PartsList .......................................................................................17WiringDiagram-FeedLevelControl ........................................................................18MechanicalSwitch230v1ph ....................................................................................18IntermediateControlPanCutout ..............................................................................18TubeCutoutforIntermediateControlPan ................................................................19Pan Replacement Parts List .....................................................................................20PanReplacementPartsList-Cont. .........................................................................21

4 Instr. # 11-31-3602 07/11
FLUXX® Auger Pan Feeding System Big Dutchman Inc., 2011
IMPORTANT:Prior to assembly, removeShipping- Reinforcement-Connector Tabfrom grille as shown in Detail "A".
Removal of tab allowsthe pan to assembleflush as in Detail "B".
Detail "A"
RemoveShipping-Reinforcement-Connector
Tab
Shipping-Reinforcement-Connector Tab removed. Detail "B"
Pan Assembly Steps

Instr. # 11-31-3602 07/11 5
Big Dutchman Inc., 2011 FLUXX® Auger Pan Feeding System
Pan Assembly-Cont.1. Assembletheinnerandoutercylindersas
shown.
267UX009
Assemble Innerand Outer Cylinder
267UX029
ArrowTab
Line upArrow Tab
and Slot Seven(Step 1)
Line up(Step 1)
RotateCylinder
Assembly(Step 2)
Grille
Inner/OuterCylinder
Assembly
Inner/Outer CylinderAssembly and Grille IMPORTANT! Follow the steps below
exactly as shown.1. Insert the inner/outer cylinder assembly into
thegrille,liningupthearrowtabwithslotseven.
2. Rotate the cylinder assembly to slot one to lock it in place.
6 Instr. # 11-31-3602 07/11
FLUXX® Auger Pan Feeding System Big Dutchman Inc., 2011
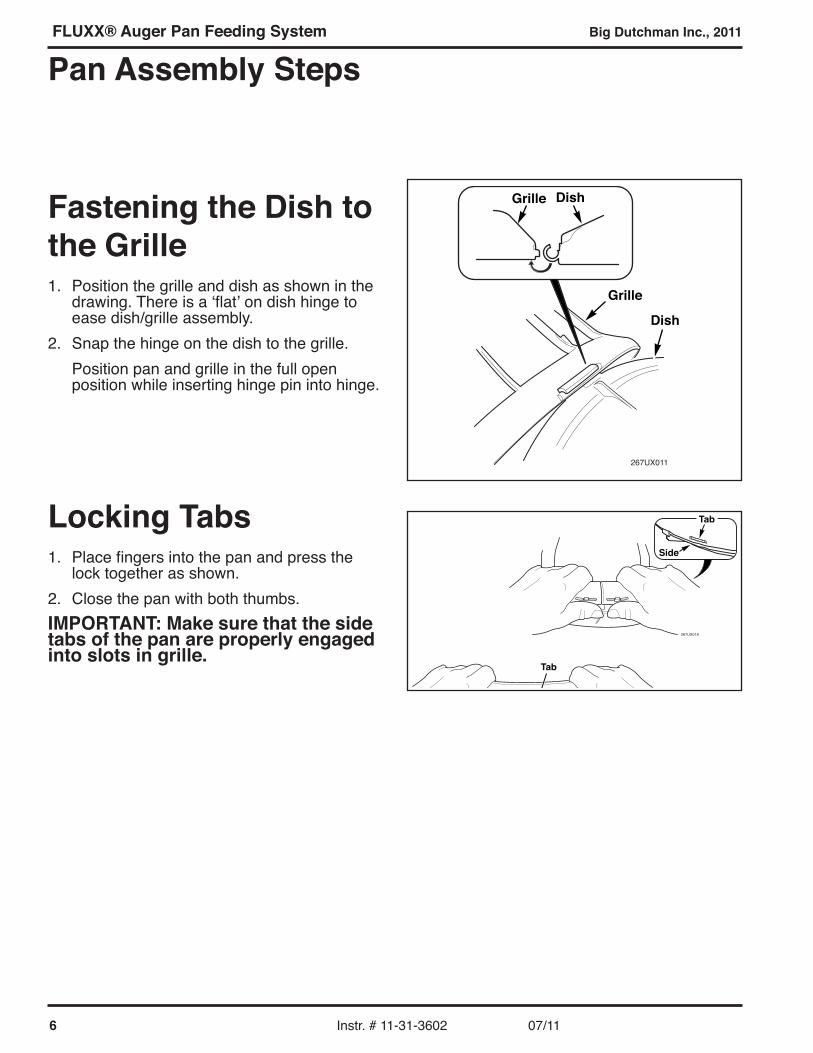
267UX011
Grille
Grille
Dish
DishFastening the Dish to the Grille1. Position the grille and dish as shown in the
drawing.Thereisa‘flat’ondishhingetoease dish/grille assembly.
2. Snapthehingeonthedishtothegrille. Position pan and grille in the full open
position while inserting hinge pin into hinge.
Locking Tabs1. Placefingersintothepanandpressthe
lock together as shown.2. Closethepanwithboththumbs.IMPORTANT: Make sure that the side tabs of the pan are properly engaged into slots in grille.
267UX019
Tab
Side
267UX019
Tab
Locks
Pan Assembly Steps
Instr. # 11-31-3602 07/11 7
Big Dutchman Inc., 2011 FLUXX® Auger Pan Feeding System
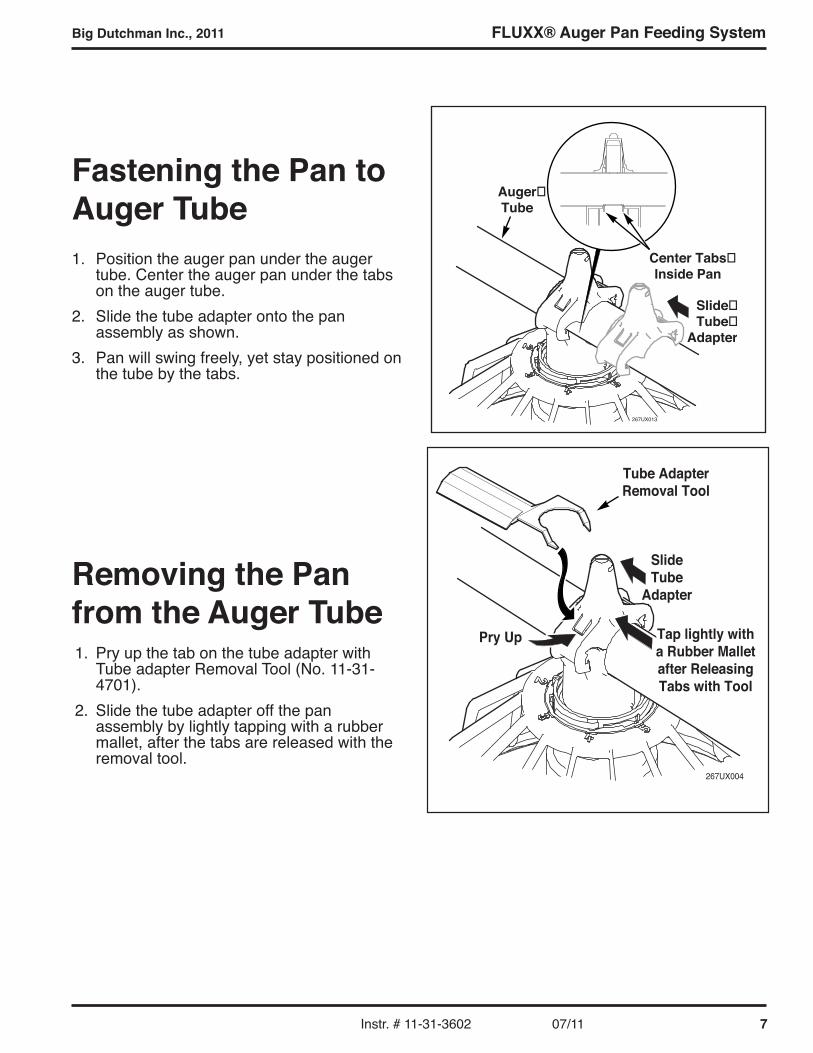
Slide�Tube�
Adapter
Center Tabs�Inside Pan
Auger�Tube
267UX013
Pry Up
SlideTube
Adapter
267UX004
Tube AdapterRemoval Tool
Tap lightly witha Rubber Malletafter ReleasingTabs with Tool
Fastening the Pan to Auger Tube1. Position the auger pan under the auger
tube.Centertheaugerpanunderthetabson the auger tube.
2. Slidethetubeadapterontothepanassembly as shown.
3. Panwillswingfreely,yetstaypositionedonthe tube by the tabs.
Removing the Pan from the Auger Tube 1. Pry up the tab on the tube adapter with
TubeadapterRemovalTool(No.11-31-4701).
2. Slidethetubeadapteroffthepanassembly by lightly tapping with a rubber mallet,afterthetabsarereleasedwiththeremoval tool.

8 Instr. # 11-31-3602 07/11
FLUXX® Auger Pan Feeding System Big Dutchman Inc., 2011
Pan Settings Management Guide
360°
Full
Floo
ding
Feed
Pos
ition
Win
chU
P
At 5
-7 d
ays,
the
syst
em is
win
ched
up
a m
inim
um 1
-3/8
in. [
35m
m] w
hich
sto
ps
flo
od
ing
, and
is fu
rther
adj
uste
dto
mai
ntai
n th
e pr
oper
feed
ing
heig
htof
the
pan
lip to
the
heig
ht o
f the
bird
.R
aisi
ng th
e pa
n al
so a
llow
s th
e fe
edto
ent
er o
nly
und
er th
e ou
ter c
one
at th
e pr
e-se
t ope
ning
s.
Gro
w P
osi
tion
Pro
per
fee
d m
anag
emen
t pro
mote
s im
pro
ved
feed
conve
rsio
n a
nd o
vera
ll pan
per
form
ance
.
Afte
r 12-
14 d
ays,
the
pans
shou
ld b
e a
t le
ast
1 in
. [25
mm
]of
f the
floo
r to
allo
w th
e pa
n to
mov
e, w
hich
rest
ricts
the
bird
sfro
m e
nter
ing
the
pan.
Conti
nued
Gro
w S
etti
ngs
Sta
rt w
ith F
lood P
osi
tion
Flood a
nd G
row
Adju
stm
ents
Bro
iler
Pan
Man
agem
ent
Guid
e
At s
tart
(or f
ull f
lood
) the
feed
er re
sts
onth
e lit
ter,
allo
win
g t
he
pa
n t
o f
loo
d.
Use
th
is p
osi
tio
n w
hen
new
chi
cks
are
star
ted
in th
e ho
use.
Top
of P
an L
ipM
eets
the
Bre
ast
1-3/
8 in
.[3
5mm
]
1 in
.[2
5mm
]
Firs
t 1-5
Day
s12
-14
Day
s
Top
of P
an M
eets
Whe
reth
e N
eck
Leav
es th
e B
reas
t
As th
e bi
rds
grow
, win
ch th
e sy
stem
up
1 to
2 c
rank
s pe
r wee
k.
Conti
nued
Set
tings
2 W
eeks
to F
inis
h5-
12 D
ays
Rot
ate
Pan
to A
djus
tPo
sitio
nLi
ft Pa
nU
P
Feed
Lev
el A
dju
stm
ent
The
ad
just
me
nt
po
siti
on
s co
ntro
l the
am
ount
of f
eed
in th
e pa
n in
the
grow
pos
ition
.Th
is w
ill va
ry w
ith th
e ty
pe o
f fee
d us
ed a
s w
ell a
s th
e m
oist
ure
and
fat c
onte
nt o
f the
feed
.Li
ft th
e pa
n u
p to
the
tube
and
rota
te th
e gr
ille o
n th
e pa
n to
adj
ust t
he fl
ow o
f fee
d.IM
POR
TAN
T: S
tart
at p
osi
tio
n N
o. 5
and
adj
ust a
ccor
ding
ly.Fo
r mo
re fe
ed m
ove
to 6
. For
less
feed
mov
e to
set
ting
num
ber 4
.
Pan
Setti
ngs
Tabl
e1
= 1/
2 in
.
(13m
m)
2 =
5/8
in.
(1
6mm
)3
= 3/
4 in
.
(19m
m)
4 =
15/1
6 in
. (2
4mm
)5
= 1
1/16
in. (
27m
m)
6 =
1 1/
4 in
. (3
2mm
)7
= 1
7/16
in. (
36m
m)
Top
of P
an

Instr. # 11-31-3602 07/11 9
Big Dutchman Inc., 2011 FLUXX® Auger Pan Feeding System
Cleaning the Pans
Power Washing the PansSpraythepansintheclosedpositionasshown.The pan will spin freely as it is sprayed.IMPORTANT: Do NOT spray the pans with the dish open!
Opening the Pan1.Placefingersintothepanandthumbs
under the outer rim of the grille.2. Push the rim inward and down on top of the
grille above the snaps to release the grille from the dish.
IMPORTANT: Do not pull on the rim of the grille.
Drying the PansThe pan will swing down allowing water to drain.Afterdrying,lockthepansasshownonprevious pages.You will have to practice and acquire a “feel” for the locking and unlocking procedure.Besuretotestthepantoensurethatitisfirmlylocked into place.
267UX020
Pan SpinsTo
Aid Washing
267UX012
PUSH INWARDAND DOWN
ON TOP OF GRILLE
DishPUSH
267UX018
Pan Maintenance

10 Instr. # 11-31-3602 07/11
FLUXX® Auger Pan Feeding System Big Dutchman Inc., 2011
SCREWCOVERCAPS
SCREWDRIVERACCESS
SCREWDRIVER
SCREW
COVER
SWITCH SWITCHWIRES
SWITCHBRACKET
IMPORTANT!DO NOT BEND
IMPORTANT!DO NOT BEND
SWITCH BRACKETWHEN REMOVING
HARDWARE
SWITCHREPLACEMENT
Control Pans-Switch Replacement-For Intermediate and End Control Pan
REMOVING THE SWITCH 1. Remove the screws and cover as shown
below.2. Removethetwoscrewcover‘caps’.3. Remove the screws holding the switch in
place.4. Remove the wires attached to the switch. Continuestepsonfollowingpage.
Switch replacement part components.
IMPORTANT! Take caution when replacing switch. Do not flex or bend the switch bracket when removing hardware from the switch. Follow the steps below.

Instr. # 11-31-3602 07/11 11
Big Dutchman Inc., 2011 FLUXX® Auger Pan Feeding System
SHEETMETAL
HOUSING
ORANGEPLASTICBOTTOM
PADDLE
ORANGEPLASTICBOTTOM
SIDE VIEW
SWITCH
THERE SHOULDBE A 1/16" TO 1/8"GAP AT SWITCH
ACTIVATIONPOINT
1/8" GAP BETWEEN PADDLE
AND HOUSING
REMOVE THE FEED BAFFLEAND VIEW FROM THE TOP
TO CHECK THE GAP.(GAP SHOULD BE 1/8 in.)PADDLE
DO NOT BEND!
INSTALLING THE NEW SWITCH
1. Install the wires to the new switch and tighten the screws.
2. Attachtheswitchtotheswitchbracket.Donotbendorflextheswitchbracketwhiletightening hardware.
3. Doublecheckswitchsettingafterinstallation to ensure proper switch adjustment.Seedrawingbelow.
Control Pans-Switch Replacement- For Intermediate and End Control Pan (Cont.)
Installing the switch.

12 Instr. # 11-31-3602 07/11
FLUXX® Auger Pan Feeding System Big Dutchman Inc., 2011
Control Pan Re-Assembly Caution: Failure to follow the steps
as shown in the sequence below can result in possible damage to the pan assembly.
1.AssembletheOuterCylinderandtheInnerCylinder.Seedrawing.
2.InserttheInnerandtheOuterCylinderassemblythroughthegrille.Seedrawing.
3.RemoveControlPanfromfeedlineandtipupside down on the work bench.
This is NECESSARY to prevent bending the control pan paddle.
4. Insert the grille & cylinder assembly into the control.
267UX026
Grille &Cylinder
Assembly
Rotate 90°Either WayTo Remove
When you insert thecylinder into the control,
orient the innercylinder slots 90° fromthe tabs on the bottom.
Then push down androtate the insert
90° so that the tabswill 'snap' into place.
Tabs on controlmust 'snap' and lock
into slots
Slots
*Lower RingInner Cylinder
*For Control Pans ONLY
Pan
Control
Paddle
TabsPaddle
Grille
OuterCylinder
InnerCylinder
Control
Slots
Tabs
IMPORTANT: Care must be taken when installing not to catch, bend, or snag the paddle during installation.
IMPORTANT! Position the inner cylinder slots 90° from the tabs on the bottom and push theassemblydownoverthetabs(seedrawingbelow).
5. Then twist the inner cylinder until slots lock over tabs in the bottom.
This procedure protects the inner cylinder from breaking out slots.
6.Checkswitchadjustmentafterinstallation.Refer to page 8 and 9.
Perform these steps with the control pan assembly UPSIDE DOWN on a workbench.

Instr. # 11-31-3602 07/11 13
Big Dutchman Inc., 2011 FLUXX® Auger Pan Feeding System
Auger TubeStop Tabs
AugerTube
EndContPanFluxx-4
1.InserttheAugerTubeintotheHousingsothatitstopsagainsttheAugerTubeStopTabs.
End Control Pan Auger Tube Assembly
Auger Tube Installation.

14 Instr. # 11-31-3602 07/11
FLUXX® Auger Pan Feeding System Big Dutchman Inc., 2011
Intermediate Control Pan-Exploded View
3
12
21
22
2328
1619
9
818
6911
1
32
2724
5
426
20816
1828
2
19
15
29
30 *33
*For Control Pans ONLY
1713
10
IntermedContPanFluxx
7
31

Instr. # 11-31-3602 07/11 15
Big Dutchman Inc., 2011 FLUXX® Auger Pan Feeding System
Intermediate Control Pan-Parts List
Item Part# Description1 11-00-0808 SupportBracket,F/HoldDownBracket2 11-00-0805 Lower End Flange3 11-00-0802 SidePanelF/InternalMechanicalControlPan,SwitchBracket4 11-00-0818 F/Mech,ControlPan,MechanicalControlPan5 11-00-0806 HoldDownPaddle,F/Bracket6 11-00-0801 Mech.ControlPanSide,PanelF/Int.7 11-00-0798 FeedPanelAssembly8 11-00-0755 TubeClamp9 99-10-2001 PopRivet,3/16x5/3215/32in.10 99-10-1251 CarriageBolt,1/4-20x5/8in.ShortNeck11 11-00-0810 PaddleAssembly12 11-00-0812 ControlPanF/Intermediate13 99-10-0195 CarriageBolt,1/4-20x5/8in.ShortNeck14 99-20-0030 FlatWasher,#1015 99-20-0089 10-24HexNylockLockNut16 99-10-0134 1/4-20HexNylockLockNut17 99-10-1316 HexWashScrew18 99-20-0176 HexLockNut,5/16-1819 99-10-0283 HexBolt,5/16-18x1.0in.20 99-10-0056 MachineScrew,10-24x3/8in.21 99-10-2002 MachineScrew,10-24x1-1/4in.22 11-00-0307 Anti-RoostInsulator23 99-10-0988 HexScrew,#8x3/8in.24 00-00-0182 Wire,Elec.14MTW,STR,GRN25 99-40-0909 Wire,Elec.16MTW,STR,BLK,(UL)TEW(CSA)26 99-10-0654 MachineScrew,6-32x1.0in.27 99-20-0217 KepLockNut,10-2428 11-00-0842 Bottom,CNTL,Box,F/Fluxx29 11-00-0842 ElecBox,F/MechCntlPan,Assy30 83-01-9064 PreliminaryModifiedInnerCylinder31 11-00-0814 CoverF/Paddle,Assembly32 91-CP-1401 Switch,Micro,MakeFrom91-CP-140033 11-00-0843 LowerRing,InnerCylinder

16 Instr. # 11-31-3602 07/11
FLUXX® Auger Pan Feeding System Big Dutchman Inc., 2011
End Control Pan-Exploded (see page 11)
EndContPanFluxx-3
1
3
4
See Inst. pg. 11for Switch Install 11
17
14
1020
2322
19
56
3426
30
31
15
24
8
13
21
2
1230
28
27
319
29
*35
*For Control Pans ONLY
725
24
32
16

Instr. # 11-31-3602 07/11 17
Big Dutchman Inc., 2011 FLUXX® Auger Pan Feeding System
End Control Pan-Parts List
Item Part# Description1 11-00-0793 HousingControlBox2 11-00-0739 Liner,PlasticF/ControlBox3 11-00-0346 HingeWire4 11-00-0798 FeedBaffleAssembly5 11-00-0792 ControlBoxCover,Inj.6 11-00-0307 Anti-RoostInsulator7 11-00-0846 HoldDownPaddle,F/Bracket8 11-00-0807 F/Mech.ControlPan,MechanicalControlPan9 00-00-0182 WireElec.14MTW,STR,GRN10 11-00-0755 TubeClamp11 11-00-0814 Cover,F/Paddle,Assembly12 91-CP-1401 Switch,Micro.MakeFrom91-CP-140013 83-01-9064 PreliminaryModifiedInnerCylinder14 11-00-0811 PaddleAssembly15 11-00-0847 SupportBracket,F/HoldDownbracket16 11-00-0820 PlateHingeF/Paddle17 99-10-2001 PopRivet,3/16x5/3215/32in.18 99-10-1251 CarriageBolt,1/4-20x1/2in.ShortNeck19 99-20-0134 HexNylock,LockNut,1/4-2020 99-10-0195 CarriageBolt,1/4-20x5/8in.ShortNeck21 99-10-0824 HexScrew,Washer,#!0-24x1/2in.22 99-20-0176 HexLockNut,5/16-1623 99-10-0283 HexHeadBolt,5/16-18x1/2in.24 99-20-0089 10-24HexNylockLockNut25 99-10-1319 MachineScrew,10-24x3/8in.26 99-10-2002 MachineScrew,10-24x1-1/4in.27 92-40-0909 Wire,Elec.16MTW,STR,BLK,(UL),TEW,(CS)28 92-40-0909 Wire,Elec,16MTW,STR,BLK,(UL),TEW,(CS)29 99-10-0654 MachineScrew,6-32x1.0in.30 99-20-0217 KepLockNut,10-2431 99-20-0030 FlatWasher,#1032 11-00-0842 Elecbox,F/MechControlPan,Assy33 99-50-8048 1/4 in. Retainer34 99-50-8049 HexScrew,Washer,#14x1/2in.*35 11-00-0843 LowerRing,InnerCylinder

18 Instr. # 11-31-3602 07/11
FLUXX® Auger Pan Feeding System Big Dutchman Inc., 2011
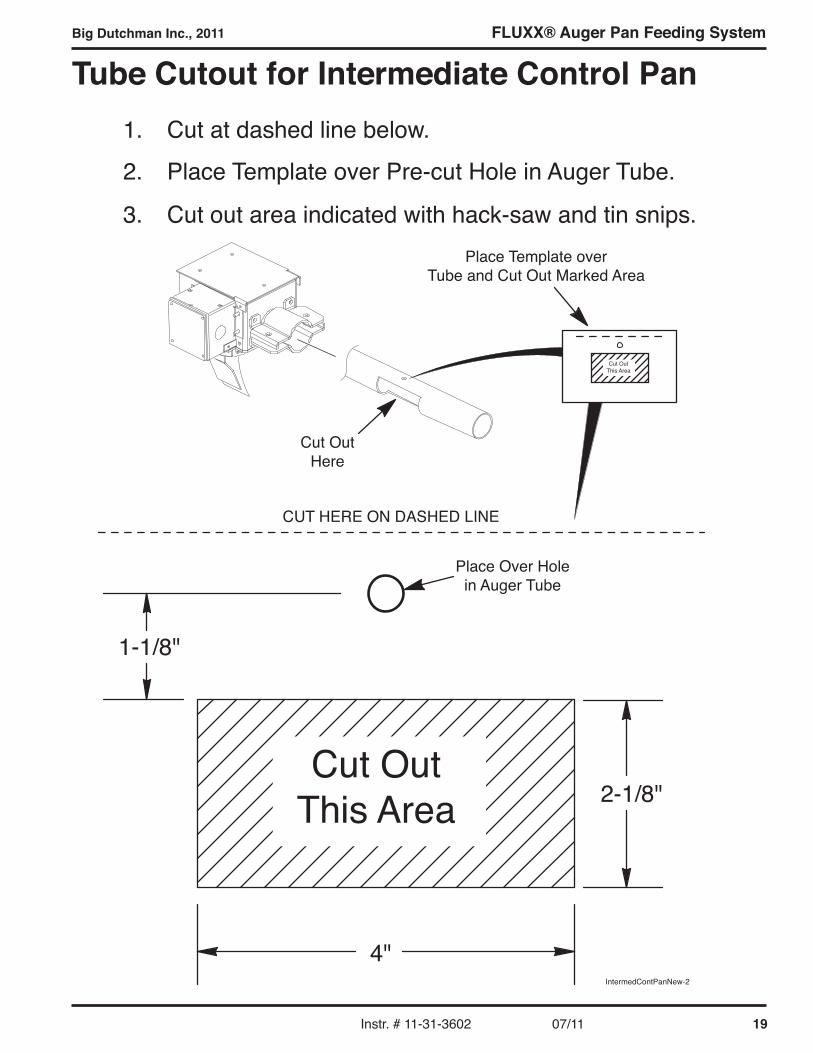
The facing page shows a cut-out required for an intermediate control pan ONLY.
The cutout is not required for the end control pan.
Intermediate Control Pan Cutout
L1
POWER SUPPLY230vac 1ph 60hz
L2
G
C NC
FEED LEVEL SWITCH(CLOSED ON LOW LEVEL)
NOTES:Install wiring per current nationaland local electrical codes.
NO
T1 MOTOR230V 1ph 60hz2hp Max.
Refer to motorwiring diagramfor connections.
T2
G
Fluxxwiring
Wiring Diagram-Feed Level Control Mechanical Switch 230v 1ph
Instr. # 11-31-3602 07/11 19
Big Dutchman Inc., 2011 FLUXX® Auger Pan Feeding System
IntermedContPanNew-2
CUT HERE ON DASHED LINE
Place Over Holein Auger Tube
Place Template overTube and Cut Out Marked Area
4"
2-1/8"
2.
3.
1.
Cut OutHere
Cut OutThis Area
1-1/8"
Cut OutThis Area
Cut at dashed line below.
Place Template over Pre-cut Hole in Auger Tube.
Cut out area indicated with hack-saw and tin snips.
Tube Cutout for Intermediate Control Pan

20 Instr. # 11-31-3602 07/11
FLUXX® Auger Pan Feeding System Big Dutchman Inc., 2011
Pan Replacement Parts List
267UX031
Fluxx Assy11-31-4700Standard Pan14 Arm Grille
Fluxx Assy11-31-4710Serrated Pan14 Arm Grille
Fluxx Assy11-31-4760Serrated Pan5 Arm Grille
Fluxx Assy11-31-4750Standard Pan5 Arm Grille
1
1 1
7 7
2
2 2
6
4
4
5
3
3 3
5
1
2
6
3
Fluxx Assy11-31-4711Serrated Pan14 Arm Grille
5
1
2
6
3
9
8

Instr. # 11-31-3602 07/11 21
Big Dutchman Inc., 2011 FLUXX® Auger Pan Feeding System
Pan Replacement Parts List - Cont.
Pan StylePos. Description 11-31-4700 11-31-4710 11-31-4711 11-31-4750 11-31-4760
1 Tube Adapter 83-00-8718 83-00-8718 83-00-8718 83-00-8718 83-00-87182 Outer Cylinder 83-00-8717 83-00-8717 83-00-8717 83-00-8717 83-00-87173 Inner Cylinder 83-00-8716 83-00-8716 83-00-8716 83-00-8716 83-00-87164 Dish, BP330 Stan-
dard Pan11-31-3511 n/a n/a 11-31-3511 n/a
5 Dish, BP330 Ser-rated Pan
n/a 11-31-3711 n/a n/a 11-31-3711
6 Grille 14 Arm 83-00-8545 83-00-8545 83-00-8545 n/a n/a7 Grille 5 Arm n/a n/a n/a 83-00-8530 83-00-85308 Retaining Spring n/a n/a 11-31-3596 n/a n/a9 Locking Pin n/a n/a 86-00-2132 n/a n/a

22 Instr. # 11-31-3602 07/11
FLUXX® Auger Pan Feeding System Big Dutchman Inc., 2011
IndexPart Number ..............................................................................................................Page Number00-00-0182 ............................................................................................................................. 15,1711-00-0307 ............................................................................................................................. 15,1711-00-0346 .................................................................................................................................. 1711-00-0739 .................................................................................................................................. 1711-00-0755 ............................................................................................................................. 15,1711-00-0792 .................................................................................................................................. 1711-00-0793 .................................................................................................................................. 1711-00-0798 ............................................................................................................................. 15,1711-00-0801 .................................................................................................................................. 1511-00-0802 .................................................................................................................................. 1511-00-0805 .................................................................................................................................. 1511-00-0806 .................................................................................................................................. 1511-00-0807 .................................................................................................................................. 1711-00-0808 .................................................................................................................................. 1511-00-0810 .................................................................................................................................. 1511-00-0811 ................................................................................................................................... 1711-00-0812 .................................................................................................................................. 1511-00-0814 ............................................................................................................................. 15,1711-00-0818 .................................................................................................................................. 1511-00-0820 .................................................................................................................................. 1711-00-0842 ............................................................................................................................. 15,1711-00-0843 ............................................................................................................................. 15,1711-00-0846 .................................................................................................................................. 1711-00-0847 .................................................................................................................................. 1711-31-3511 ................................................................................................................................... 2011-31-3596 .................................................................................................................................. 2011-31-3597 .................................................................................................................................. 2011-31-3711 ................................................................................................................................... 2083-00-8530 .................................................................................................................................. 2083-00-8545 .................................................................................................................................. 2083-00-8716 .................................................................................................................................. 2083-00-8717 .................................................................................................................................. 2083-00-8718 .................................................................................................................................. 2083-01-9064 ............................................................................................................................. 15,1791-CP-1401 ............................................................................................................................ 15,1792-40-0909 .................................................................................................................................. 1799-10-0056 .................................................................................................................................. 1599-10-0134 .................................................................................................................................. 1599-10-0195 ............................................................................................................................. 15,1799-10-0283 ............................................................................................................................. 15,1799-10-0654 ............................................................................................................................. 15,1799-10-0824 .................................................................................................................................. 1799-10-0988 .................................................................................................................................. 1599-10-1251 ............................................................................................................................. 15,17

Instr. # 11-31-3602 07/11 23
Big Dutchman Inc., 2011 FLUXX® Auger Pan Feeding System
99-10-1316 .................................................................................................................................. 1599-10-1319 .................................................................................................................................. 1799-10-2001 ............................................................................................................................. 15,1799-10-2002 ............................................................................................................................. 15,1799-20-0030 ............................................................................................................................. 15,1799-20-0089 ............................................................................................................................. 15,1799-20-0134 .................................................................................................................................. 1799-20-0176 ............................................................................................................................. 15,1799-20-0217 ............................................................................................................................. 15,1799-40-0909 .................................................................................................................................. 1599-50-8048 .................................................................................................................................. 1799-50-8049 .................................................................................................................................. 17

Big Dutchman, Inc. Limited Warranty1. BigDutchmanwarrantstotheoriginalpurchaserthatastoanyproductofitsmanufactureprovingtobedefectiveinmaterial or
workmanshipundernormalandintendeduseandservicewithinoneyearfromdateofpurchasethereofBigDutchmanwill,atitsoption,(a)repairorreplacesuchproductfreeofcharge,or(b)inlieuofrepairorreplacement,refundtotheoriginalpurchasertheoriginalpurchasepricelessthereasonablevalueoftheproduct’susetotheoriginalpurchaser.
2. AnycomponentpartsthatarenotmanufacturedbyBigDutchman,suchaselectricalmotorsandcontrols,areexcludedfromthiswarranty,althoughsuchpartsmaybecoveredbyseparatewarrantiesoftherespectivemanufacturers.Copiesofthoseotherwarranties,ifany,maybeobtainedthroughBigDutchman.
3. ThiswarrantydoesnotapplyifallcomponentsofasystemarenotsuppliedbyBigDutchman,oriftheproductisnotpurchasedfromandinstalledbyanauthorizedBigDutchmandistributororcompanywarehouse,orinstalledandoperatedinaccordancewithBigDutchmanspecificationsandinstructions.
4. Thiswarrantydoesnotcovermalfunctionsorfailuresresultingfrommisuse,abuse,negligence,alterations,unauthorizedorimproperrepairs,accident,damagewhileintransit,orlackofauthorizedorpropermaintenanceorinstallation.Inaddition,thiswarrantydoesnotcovernormalwearandtearoranyproblemwithaproductnotcausedbyadefectinBigDutchmanmaterials or workmanship.
5. TheobligationsofBigDutchmanunderthiswarrantydonotincludeshippingcharges,labor(whetherfordismantling,installing,replacingorrepairing),travelandsubsistenceallowance.
6. This warranty applies only to systems for the care of poultry and livestock. It does not apply to industrial or commercialinstallation.Inaddition,withrespecttoBigDutchman’sbreedernestsystem,BigDutchmanmakesnowarrantyorguaranteethatindividualbirdsoranygivenpopulationofbirdswillutilizethenests.
7. WarrantyclaimsmustbemadeinwritingtoBigDutchmanwithin20daysofdiscoveryandInaccordancewithBigDutchman’spublishedreturn-goodsprocedures,acopyofwhichmaybeobtainedfromBigDutchman.Forthiswarrantytoapply,theproductmustbereturnedtoafacilityspecifiedbyBigDutchman,freightprepaidandinsuredwithproofoforiginalpurchaseand date.
8. TheacceptancebyBigDutchmanofanyproductforrepair,replacementorrefundwillnotbedeemedanadmissionbyBigDutchmanthattheproductisdefectiveorinviolationofanywarranty.ProductsthatarereplacedorforwhicharefundisissuedbecomethepropertyofBigDutchman.
9. The rights and obligations of the purchaser under this warranty may neither be assigned nor delegated without the prior writtenpermissionofanauthorizedofficerofBigDutchman.
10. ThiswarrantycontainstheentirewarrantyagreementbetweenBigDutchmanandthepurchaser,andthetermsandconditionsofthiswarrantysupersedeanyandallotherunderstandings,representationsorproposalsbetweenBigDutchmanandthepurchaser with respect to the matters covered by this warranty. This warranty shall not be modified by any custom or practiceofthetradeoroftheparties,norbyanyinstancesofBigDutchman’swaiveroforfailuretoenforceanyoftheprovisionsofthis warranty.
11. ThiswarrantymaybemodifiedoramendedonlyinwritingsignedbyboththepurchaserandanauthorizedofficerofBigDutchman,andnootheragent,employee,salesman,representative,dealerordistributorisauthorizedtomakeortobindBigDutchmantoanyrepresentation,affirmationorwarrantyconcerningtheproductsinanymannerwhatsoever.
12. IfBigDutchmanfailstofulfillitsobligationsinthiswarranty,orifBigDutchmanisdeterminedtobeliabletothepurchaser oranyotherpersonforanyreasonrelatedtoanyproductcoveredbythiswarrantyorthesaleofthatproduct,themaximumamountofdamages,whetherarisingoutoftort,contract,negligenceorotherwise,recoverablefromBigDutchmanbythepurchasershallbelimitedtothepurchasepriceoftheproductwithrespecttowhichBigDutchman’sobligationsorliabilityarises,lessthereasonablevalueoftheproduct’susetothepurchaser.
13. THEOBLIGATIONSANDLIABILITIESOFBIGDUTCHMANANDTHERIGHTSANDREMEDIESOFTHEPURCHASERUNDERTHISWARRANTYAREEXCLUSIVEANDINLIEUOFALLOTHERWARRANTIES,GUARANTEES,OBLIGATIONS,LIABILITIES,RIGHTSANDREMEDIES,EXPRESSEDORIMPLIED,ARISINGBYLAWOROTHERWISE,INCLUDINGBUTNOTLIMITEDTOTHEIMPLIEDWARRANTYOFMERCHANTABILITY,THEIMPLIEDWARRANTYOFFITNESSFORAPARTICULARPURPOSE,ANDANYIMPLIEDOREXPRESSEDWARRANTYARISINGFROMTHECOURSEOFPERFORMANCE,COURSEOFDEALINGORUSAGEORTRADE.BIGDUTCHMANSHALLHAVENOOBLIGATIONORLIABILITY,WHETHERUNDERTHISWARRANTYOROTHERWISE,FORINCIDENTAL,CONSEQUENTIALORSPECIALDAMAGES,LOSTPROFITS,REVENUEOROTHERINCOME,LOSSOFUSE,DAMAGESFORINJURYTOPERSONSORPROPERTY,ORANYOTHERDAMAGES.
14. Somestatesdonotallowlimitationsonhowlonganimpliedwarrantylastsortheexclusionorlimitationofincidentalorconsequentialdamages,sotheabovelimitationsandexclusionsmaynotapplytoeachpurchaser.Thiswarrantygivesthepurchaserspecificlegalrights,andthepurchasermayhaveotherrightsthatvaryfromstatetostate.
GermanyP.O. Box 11 63 • D-49360 Vechta • Germanytel +49 (0) 44 47 801 0 • fax +49 (0) 44 47 801 237www.bigdutchman.com • [email protected]. 25 Jalan Pemberita (U1/49), Temasya Industrial Park40150 Shah Alam • Selangor Darul Ehsan • Malaysiatel +603 5569 2320 • fax +603 5569 [email protected]
USAP.O. Box 1017 • Holland, MI 49422-1017 • USAtel +1 616 392 5981 • fax +1 616 392 6188www.bigdutchman.com • [email protected] Postal 84 Rua Victorio Milani, 125 Caxias do Sul, RS 95095-107 Brasiltel +55 (0) 54 226 2200 • fax +55 (0) 54 226 1424www.bigdutchman.com.br [email protected]
•
•
•