Embed Size (px)
Citation preview
FloTrac Sensor / EV1000 Clinical Platform
Setup Guide
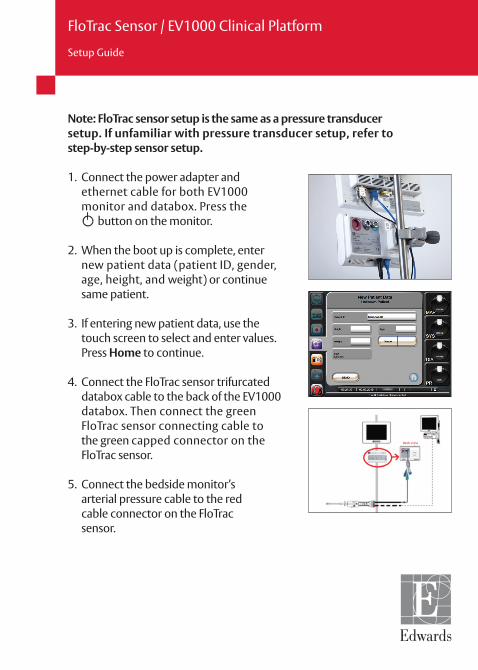
Note: FloTrac sensor setup is the same as a pressure transducer setup. If unfamiliar with pressure transducer setup, refer to step-by-step sensor setup.
1. Connect the power adapter and ethernet cable for both EV1000 monitor and databox. Press the button on the monitor.
2. When the boot up is complete, enter new patient data (patient ID, gender, age, height, and weight) or continue same patient.
3. If entering new patient data, use the touch screen to select and enter values. Press Home to continue.
4. Connect the FloTrac sensor trifurcated databox cable to the back of the EV1000 databox. Then connect the green FloTrac sensor connecting cable to the green capped connector on the FloTrac sensor.
5. Connect the bedside monitor’s arterial pressure cable to the red cable connector on the FloTrac sensor.

6. Touch Clinical Actions and then touch Zero & Waveform.
7. Open the FloTrac sensor to atmospheric air. Touch -0- for arterial channel. Then touch Home. Close the FloTrac sensor to atmospheric air.
8. Cardiac output will be displayed within 40 seconds and will update every 20 seconds thereafter.
9. Monitor patient in real-time with one of the available screens.
10. Choose parameters to view on screen by touching outside of the parameter globe. Displayed parameters are outlined, whereas the selected parameters are circled with pink fill.
11. Visual targets and alarms can be set by touching inside parameters globe.

FloTrac Sensor Setup
1. Open the FloTrac sensor packaging and inspect contents. Replace all caps with non-vented caps and ensure that all connections are tight.
2. Remove the FloTrac sensor from packaging and insert onto the EV1000 databox or pressure transducer backplate that is secured on an I.V. pole.
3. To de-air and prime I.V. bag and FloTrac system: Invert NaCl I.V. bag (anticoagulation per institution policy). Spike I.V. bag with fluid administration set, keeping drip chamber upright. While keeping I.V. bag inverted, gently squeeze air out of bag with one hand while pulling flush tab with the other hand until air is emptied from I.V. bag and drip chamber is filled half-way.
4. Insert I.V. bag into the Pressure Bag and hang on I.V. pole (do not inflate).
5. With gravity only (no pressure in Pressure Bag), flush FloTrac sensor holding pressure tubing in upright position as the column of fluid raises through the tubing, pushing air out of the pressure tubing until the fluid reaches the end of the tubing.

CAUTION: Federal (United States) law restricts this device to sale by or on the order of a physician. See instructions for use for full prescribing information, including indications, contraindications, warnings, precautions and adverse events.
Edwards, Edwards Lifesciences, the stylized E logo, EV1000, and FloTrac are trademarks of Edwards Lifesciences Corporation.
© 2016 Edwards Lifesciences Corporation. All rights reserved. PP--US-1771 v1.0
Edwards Lifesciences • edwards.com One Edwards Way, Irvine CA 92614 USA
6. Pressurize the Pressure Bag until it reaches 300 mmHg.
7. Fast-flush the FloTrac sensor and tap on tubing and stopcocks to remove any residual bubbles.
8. Connect tubing to arterial catheter, then aspirate and flush system to assure no residual bubbles remain.
9. Level the FloTrac sensor to the phlebostatic axis. Note: It is important to keep the FloTrac sensor level to the phlebostatic axis at all times to ensure accuracy of cardiac output.