Embed Size (px)
Citation preview

FlexStation™ II and FlexStation™ II384
Benchtop Scanning Fluorometer
and Integrated Fluid Transfer Workstation
Operator’s Manual
PN 0112-0077 – Rev. D

Revision History:
Date Revision Version Description
03/01 A 1.0 Initial release.
05/01 B 1.1 Text changes.
08/01 C 1.2 Text changes.
03/03 D 1.3 Text changes.
Molecular Devices Corporation 1311 Orleans Drive Sunnyvale, CA 94089 USA Tel: 408.747.1700 Online: www.moldev.com
Sales Offices USA/Canada 800.635.5577 UK +44.118.944.8000 Germany: +49.89.9620.2340 Japan +81.797.32.2877
Copyright
© Copyright 2003, Molecular Devices Corporation. All rights reserved. No part of this publication may be reproduced, transmitted, transcribed, stored in a retrieval system, or translated into any language or computer language, in any form or by any means, electronic, mechanical, magnetic, optical, chemical, manual, or otherwise, without the prior written permission of Molecular Devices Corporation, 1311 Orleans Drive, Sunnyvale, California, 94089, United States of America.
Patents
The FlexStation instrument and methods have US and International patents pending.
Trademarks
SPECTRAplate and AUTOMIX are trademarks and FlexStation and SOFTmax are registered trademarks of Molecular Devices Corporation. Cliniplate is a registered trademark of Labsystems. DELFIA is a registered trademark of Wallac Oy. Emerald II is a trademark of Tropix, Inc. All other company and product names are trademarks or registered trademarks of their respective owners.
Disclaimer
Molecular Devices Corporation reserves the right to change its products and services at any time to incorporate technological developments. This manual is subject to change without notice. Although this manual has been prepared with every precaution to ensure accuracy, Molecular Devices Corporation assumes no liability for any errors or omissions, nor for any damages resulting from the application or use of this information.
ii FlexStation II Operator’s Manual – Rev. D

Contents
1 System Description. . . . . . . . . . . . . . . . . . . . . . . . . . . . . . . . . . . . . . . . . . . . . . . . . . . 1
1.1 Introduction . . . . . . . . . . . . . . . . . . . . . . . . . . . . . . . . . . . . . . . . . . . . . . . . . . . . . . . . . . 1
1.2 Operator’s Manual Overview . . . . . . . . . . . . . . . . . . . . . . . . . . . . . . . . . . . . . . . . . . . . 3
1.3 Safety Information . . . . . . . . . . . . . . . . . . . . . . . . . . . . . . . . . . . . . . . . . . . . . . . . . . . . 4
1.4 System Components. . . . . . . . . . . . . . . . . . . . . . . . . . . . . . . . . . . . . . . . . . . . . . . . . . . 6
1.4.1 Covers and Instrument Panels . . . . . . . . . . . . . . . . . . . . . . . . . . . . . . . . . . . . . . . 7
1.4.2 Drawers . . . . . . . . . . . . . . . . . . . . . . . . . . . . . . . . . . . . . . . . . . . . . . . . . . . . . . . . 9
1.4.3 Fluidics Module . . . . . . . . . . . . . . . . . . . . . . . . . . . . . . . . . . . . . . . . . . . . . . . . 11
1.4.4 Detection Module . . . . . . . . . . . . . . . . . . . . . . . . . . . . . . . . . . . . . . . . . . . . . . . 13
1.4.5 Computer . . . . . . . . . . . . . . . . . . . . . . . . . . . . . . . . . . . . . . . . . . . . . . . . . . . . . 15
1.4.6 Accessories. . . . . . . . . . . . . . . . . . . . . . . . . . . . . . . . . . . . . . . . . . . . . . . . . . . . . 16
1.4.7 Consumables . . . . . . . . . . . . . . . . . . . . . . . . . . . . . . . . . . . . . . . . . . . . . . . . . . . 17
1.5 Overview of Operation . . . . . . . . . . . . . . . . . . . . . . . . . . . . . . . . . . . . . . . . . . . . . . . . 18
1.6 Theory of Operation . . . . . . . . . . . . . . . . . . . . . . . . . . . . . . . . . . . . . . . . . . . . . . . . . . 19
1.6.1 Introduction to Fluorometry . . . . . . . . . . . . . . . . . . . . . . . . . . . . . . . . . . . . . . . 19
1.6.2 Instrument Design. . . . . . . . . . . . . . . . . . . . . . . . . . . . . . . . . . . . . . . . . . . . . . . 21
1.6.3 Modes of Operation . . . . . . . . . . . . . . . . . . . . . . . . . . . . . . . . . . . . . . . . . . . . . 24
1.7 Introduction to SOFTmax PRO Application Software . . . . . . . . . . . . . . . . . . . . . . . . 27
2 Installation Procedures . . . . . . . . . . . . . . . . . . . . . . . . . . . . . . . . . . . . . . . . . . . . . . 31
2.1 General Precautionary Information . . . . . . . . . . . . . . . . . . . . . . . . . . . . . . . . . . . . . . 31
2.2 Unpacking the System . . . . . . . . . . . . . . . . . . . . . . . . . . . . . . . . . . . . . . . . . . . . . . . . 32
2.3 Installing the Fluidics Module . . . . . . . . . . . . . . . . . . . . . . . . . . . . . . . . . . . . . . . . . . . 35
2.4 Installing the Pipettor Head . . . . . . . . . . . . . . . . . . . . . . . . . . . . . . . . . . . . . . . . . . . . 37
2.5 Setting Up the Computer . . . . . . . . . . . . . . . . . . . . . . . . . . . . . . . . . . . . . . . . . . . . . . 40
2.6 Connecting the Cables . . . . . . . . . . . . . . . . . . . . . . . . . . . . . . . . . . . . . . . . . . . . . . . . 41
2.7 Installing the Drawer Adapters . . . . . . . . . . . . . . . . . . . . . . . . . . . . . . . . . . . . . . . . . . 42
2.8 Installing SOFTmax PRO . . . . . . . . . . . . . . . . . . . . . . . . . . . . . . . . . . . . . . . . . . . . . . . 42
3 Operating Procedures . . . . . . . . . . . . . . . . . . . . . . . . . . . . . . . . . . . . . . . . . . . . . . . 43
3.1 Overview . . . . . . . . . . . . . . . . . . . . . . . . . . . . . . . . . . . . . . . . . . . . . . . . . . . . . . . . . . . 44
3.2 Starting Up the System . . . . . . . . . . . . . . . . . . . . . . . . . . . . . . . . . . . . . . . . . . . . . . . 45
3.3 Setting the Temperature. . . . . . . . . . . . . . . . . . . . . . . . . . . . . . . . . . . . . . . . . . . . . . . 49
FlexStation II Operator’s Manual – Rev. D iii

Contents
3.3.1 Displaying Temperature . . . . . . . . . . . . . . . . . . . . . . . . . . . . . . . . . . . . . . . . . . 49
3.3.2 Setting the Temperature with the Control Panel . . . . . . . . . . . . . . . . . . . . . . . . 49
3.3.3 Setting the Temperature with SOFTmax PRO . . . . . . . . . . . . . . . . . . . . . . . . . 50
3.4 Setting Up the Software . . . . . . . . . . . . . . . . . . . . . . . . . . . . . . . . . . . . . . . . . . . . . . . 51
3.5 Configuring Instrument Settings in Flex Mode . . . . . . . . . . . . . . . . . . . . . . . . . . . . . 54
3.5.1 Wavelengths . . . . . . . . . . . . . . . . . . . . . . . . . . . . . . . . . . . . . . . . . . . . . . . . . . . 55
3.5.2 Sensitivity . . . . . . . . . . . . . . . . . . . . . . . . . . . . . . . . . . . . . . . . . . . . . . . . . . . . . 57
3.5.3 Timing . . . . . . . . . . . . . . . . . . . . . . . . . . . . . . . . . . . . . . . . . . . . . . . . . . . . . . . 58
3.5.4 Automix . . . . . . . . . . . . . . . . . . . . . . . . . . . . . . . . . . . . . . . . . . . . . . . . . . . . . . 59
3.5.5 AutoCalibrate . . . . . . . . . . . . . . . . . . . . . . . . . . . . . . . . . . . . . . . . . . . . . . . . . . 59
3.5.6 Assay Plate Type . . . . . . . . . . . . . . . . . . . . . . . . . . . . . . . . . . . . . . . . . . . . . . . . 60
3.5.7 Wells to Read . . . . . . . . . . . . . . . . . . . . . . . . . . . . . . . . . . . . . . . . . . . . . . . . . . 61
3.5.8 Compound Source . . . . . . . . . . . . . . . . . . . . . . . . . . . . . . . . . . . . . . . . . . . . . . 63
3.5.9 Compound Transfer . . . . . . . . . . . . . . . . . . . . . . . . . . . . . . . . . . . . . . . . . . . . . 64
3.5.10 Triturate Selection . . . . . . . . . . . . . . . . . . . . . . . . . . . . . . . . . . . . . . . . . . . . . . . 67
3.5.11 Pipette Tips Layout . . . . . . . . . . . . . . . . . . . . . . . . . . . . . . . . . . . . . . . . . . . . . . 68
3.5.12 Compound and Tip Columns . . . . . . . . . . . . . . . . . . . . . . . . . . . . . . . . . . . . . . 69
3.5.13 AutoRead . . . . . . . . . . . . . . . . . . . . . . . . . . . . . . . . . . . . . . . . . . . . . . . . . . . . . 72
3.5.14 Pipette Tip Air Gap. . . . . . . . . . . . . . . . . . . . . . . . . . . . . . . . . . . . . . . . . . . . . . 72
3.5.15 Settings Displayed in Plate Sections . . . . . . . . . . . . . . . . . . . . . . . . . . . . . . . . . . 73
3.6 Other Software Settings . . . . . . . . . . . . . . . . . . . . . . . . . . . . . . . . . . . . . . . . . . . . . . . 74
3.7 Reading the Microplate . . . . . . . . . . . . . . . . . . . . . . . . . . . . . . . . . . . . . . . . . . . . . . . . 75
3.8 Shutdown . . . . . . . . . . . . . . . . . . . . . . . . . . . . . . . . . . . . . . . . . . . . . . . . . . . . . . . . . . 78
3.9 Other Read Modes. . . . . . . . . . . . . . . . . . . . . . . . . . . . . . . . . . . . . . . . . . . . . . . . . . . . 78
3.10 Optimizing Fluorescence Assays in Spectrum Mode . . . . . . . . . . . . . . . . . . . . . . . . . 79
4 Applications. . . . . . . . . . . . . . . . . . . . . . . . . . . . . . . . . . . . . . . . . . . . . . . . . . . . . . . . . . 85
5 Service and Maintenance Procedures . . . . . . . . . . . . . . . . . . . . . . . . . . . . . . 87
5.1 Technical Support . . . . . . . . . . . . . . . . . . . . . . . . . . . . . . . . . . . . . . . . . . . . . . . . . . . . 87
5.2 Moving the Instrument . . . . . . . . . . . . . . . . . . . . . . . . . . . . . . . . . . . . . . . . . . . . . . . . 88
5.3 Cleaning the Instrument . . . . . . . . . . . . . . . . . . . . . . . . . . . . . . . . . . . . . . . . . . . . . . . 88
5.4 Using the Microplate Adapters . . . . . . . . . . . . . . . . . . . . . . . . . . . . . . . . . . . . . . . . . . 89
5.5 Using the Compound Baseplate . . . . . . . . . . . . . . . . . . . . . . . . . . . . . . . . . . . . . . . . . 89
5.6 Replacing Fuses. . . . . . . . . . . . . . . . . . . . . . . . . . . . . . . . . . . . . . . . . . . . . . . . . . . . . . 90
5.7 Replacing the Flash Lamp . . . . . . . . . . . . . . . . . . . . . . . . . . . . . . . . . . . . . . . . . . . . . . 92
5.8 Long-Term Shutdown . . . . . . . . . . . . . . . . . . . . . . . . . . . . . . . . . . . . . . . . . . . . . . . . . 95
iv FlexStation II Operator’s Manual – Rev. D

Contents
6 Troubleshooting Procedures . . . . . . . . . . . . . . . . . . . . . . . . . . . . . . . . . . . . . . . . 97
6.1 Problems During Startup . . . . . . . . . . . . . . . . . . . . . . . . . . . . . . . . . . . . . . . . . . . . . . 97
6.2 Opening a Drawer Manually . . . . . . . . . . . . . . . . . . . . . . . . . . . . . . . . . . . . . . . . . . . . 99
6.3 Understanding Potential Mechanical Problems . . . . . . . . . . . . . . . . . . . . . . . . . . . . 100
6.3.1 Background . . . . . . . . . . . . . . . . . . . . . . . . . . . . . . . . . . . . . . . . . . . . . . . . . . . 100
6.3.2 Before Using the Instrument . . . . . . . . . . . . . . . . . . . . . . . . . . . . . . . . . . . . . . 100
6.3.3 Avoiding Mechanical Problems . . . . . . . . . . . . . . . . . . . . . . . . . . . . . . . . . . . . 101
6.3.4 In Case of Power Failure . . . . . . . . . . . . . . . . . . . . . . . . . . . . . . . . . . . . . . . . . 101
6.4 Recovering from Mechanical Problems in Flex Mode . . . . . . . . . . . . . . . . . . . . . . . 102
6.4.1 Assessing a Mechanical Problem . . . . . . . . . . . . . . . . . . . . . . . . . . . . . . . . . . . 103
6.4.2 Opening the Instrument . . . . . . . . . . . . . . . . . . . . . . . . . . . . . . . . . . . . . . . . . 104
6.4.3 Evaluating the Tip Rack . . . . . . . . . . . . . . . . . . . . . . . . . . . . . . . . . . . . . . . . . 105
6.4.4 Inspecting Inside the Fluidics Module . . . . . . . . . . . . . . . . . . . . . . . . . . . . . . . 106
6.4.5 Removing the Pipettor Head . . . . . . . . . . . . . . . . . . . . . . . . . . . . . . . . . . . . . . 109
6.4.6 Expelling Undispensed Fluid from Tips. . . . . . . . . . . . . . . . . . . . . . . . . . . . . . 111
6.4.7 Recovery Procedure . . . . . . . . . . . . . . . . . . . . . . . . . . . . . . . . . . . . . . . . . . . . . 112
6.5 General Error Messages . . . . . . . . . . . . . . . . . . . . . . . . . . . . . . . . . . . . . . . . . . . . . . 113
6.6 Tilting or Removing the Fluidics Module . . . . . . . . . . . . . . . . . . . . . . . . . . . . . . . . . 115
6.6.1 Tilting the Fluidics Module . . . . . . . . . . . . . . . . . . . . . . . . . . . . . . . . . . . . . . . 116
6.6.2 Removing the Fluidics Module . . . . . . . . . . . . . . . . . . . . . . . . . . . . . . . . . . . . 117
7 Appendices. . . . . . . . . . . . . . . . . . . . . . . . . . . . . . . . . . . . . . . . . . . . . . . . . . . . . . . . . . 119
7.1 Parts and Accessories . . . . . . . . . . . . . . . . . . . . . . . . . . . . . . . . . . . . . . . . . . . . . . . . 119
7.2 Performance Specifications . . . . . . . . . . . . . . . . . . . . . . . . . . . . . . . . . . . . . . . . . . . 120
7.3 Warranty . . . . . . . . . . . . . . . . . . . . . . . . . . . . . . . . . . . . . . . . . . . . . . . . . . . . . . . . . . 122
7.4 Index . . . . . . . . . . . . . . . . . . . . . . . . . . . . . . . . . . . . . . . . . . . . . . . . . . . . . . . . . . . . . 123
FlexStation II Operator’s Manual – Rev. D v

FlexStation II Operator’s Manual – Rev. D vi
1 System Description
Part 1 of this manual provides background information on the system, including descriptions of the principal components and overviews of how the system functions. It is divided into the following sections:
• 1.1: Introduction
• 1.2: Operator’s Manual Overview
• 1.3: Safety Information
• 1.4: System Components
• 1.5: Overview of Operation
• 1.6: Theory of Operation
• 1.7: Introduction to SOFTmax PRO Application Software
1.1 Introduction
FlexStation™ II Systems provide integrated fluid transfer capability from a source plate or reservoir to an assay plate with concurrent kinetic fluorometric analysis of reactions. Data collection speed is sufficient for running fast cell-based kinetic assays. The instruments feature a bottom-read mode ideal for whole-cell-based assays, and may be automatically switched to a top-read mode for solution-phase reactions.
FlexStation II Systems can be used for drug discovery research and development, secondary and post screen analysis. The instruments are available in two models:
• The FlexStation™ II instrument is designed specifically for 96-well microplates.
• The FlexStation™ II³⁸⁴ instrument is designed for 96- and 384-well microplates.
The instruments offer 96- and 384-well microplate-to-microplate fluid transfer (8 or 16 wells at a time), and can read microplates having 6, 12, 24, 48, 96, and 384-well formats. Top or bottom detection is available with a simple click of a button.
A microplate adapter is required in the reading chamber drawer for 96- and 384-well assay plates, for both bottom and top reading. The black adapter allows for optimal signal for bottom readings, and the purple adapter optimizes top-read scenarios. A different baseplate is provided for the compound plate drawer.
The instrument is controlled by an external personal computer running the SOFTmax® PRO software, which provides integrated instrument control, data display, and statistical data analysis.
The system can perform a variety of fluorescence applications, as well as some limited time-resolved fluorescence and luminescence operations. The system’s extreme flexibility and high sensitivity make it appropriate for applications in biochemistry, cell biology, immunology, molecular biology, and microbiology. The instrument uses two holographic diffraction grating monochromators that allow for individual optimization of both excitation and emission wavelengths. The dual-scanning capability can also be used to determine excitation and emission settings for new fluorescent probes. Mirrored
FlexStation II Operator’s Manual – Rev. D 1

1 System Description
optics focus the light into the sample, and cutoff filters reduce stray light and minimize background interference. The light source is a high-power xenon flash lamp. The system provides additional flexibility by allowing a variable number of lamp flashes per reading.
The temperature in the microplate reading chamber is isothermal, both at ambient and when the incubator is turned on. When the incubator is on, the system controls the incubator temperature from 1 °C above ambient to 45 °C.
The system operates in one integrated fluidics/read mode and four read-only modes.
Using the Automix feature, the contents of the wells in a microplate can be mixed automatically by shaking, which makes it possible to perform kinetic analysis of solid-phase, enzyme-mediated reactions such as a kinetic ELISA. In Flex mode, the pipettor can also be used to mix the contents of the compound plate or the assay plate, a procedure called trituration.
actual˚C
set pt˚C
Set Temp
Tempon/off
Drawers
readingchamber
compounds
tip rack
FlexStation™ II Instrument
2 FlexStation II Operator’s Manual – Rev. D

1.2 Operator’s Manual Overview
1.2 Operator’s Manual Overview
This manual was written to ensure safe and proper use of the system. Before use, read this manual carefully in order to realize the full capabilities of the system. Also, if something is unclear during daily use or if a problem occurs, please refer to this manual.
This manual is organized as follows:
Part 1: System Description provides background information on the system, including descriptions of the principal components and overviews of how the system functions.
Part 2: Installation Procedures provide instructions for assembling the instrument and installing the SOFTmax PRO application on your Windows-based computer.
Part 3: Operating Procedures provides instructions for operating the system with the SOFTmax PRO application software in Flex fluidics + read mode.
Part 4: Applications provides a space for detailed protocols for several FlexStation II mode experiments.
Part 5: Service and Maintenance Procedures provide instructions for routine mainte-nance including replacing the lamp, changing the pipettor head, moving the system to a new location, and minor cleaning.
Part 6: Troubleshooting Procedures provide instructions for diagnosing and solving common problems, as well as a list of error conditions.
Part 7: Appendices provides technical specifications, a list of spare parts, the index, and warranty statement.
Conventions Used in this Manual
The names of keys that appear on the FlexStation II control panel and icons that appear in the SOFTmax PRO software are shown in boxed type. Example: [Start].
The term ‘instrument’ refers generally refers to the fluidics and detection modules. ‘System’ refers generally to all the components (detection module, fluidics module, computer, software, accessories, and consumables).
FlexStation II Operator’s Manual – Rev. D 3

1 System Description
1.3 Safety Information
When operated properly in a safe environment and according to the instructions in this manual, there are no known hazards associated with the FlexStation II System. However, proper use requires an understanding of situations that are potentially dangerous and can result in serious injury. All users must be familiar with the guidelines in this section before working with the system.
Conventions Used for Precautionary Information
This manual uses the following conventions to provide technical and safety information of special interest.
Note: Background information provided to clarify a particular step or procedure.
Caution: An instruction that, if not followed, can result in damage to the system.
Important! An instruction provided to ensure correct results and optimal performance. An instruction that, if not followed, could result in loss of data.
Warning! An instruction that, if not followed, can result in potential injury to a person working with the system.
Biohazard: Indicates a condition involving potentially infectious biological agents requiring that proper handling precautions be taken.
Electrical Safety
Warning! Follow all instructions in this manual and on system labels. If you use the system in a manner not specified by Molecular Devices, any protections provided by the system may be impaired.
Service-Trained Users
There are two types of users described in this manual. Most procedures required for operating and troubleshooting can be performed by any user who has read the instructions in this manual and is familiar with the system. However, all installation procedures, and some more complex service and troubleshooting procedures, require the expertise of a service-trained user. Whenever the following warning message appears, a service-trained user must perform the procedure to ensure user safety and to prevent instrument damage.
Example: Warning! The following procedures must be completed by a service-
trained user. Do not attempt the following procedures if you have not been trained properly by appropriate Molecular Devices personnel.
Avoiding Mechanical Problems In Flex Mode
Because of the complex mechanical nature of the FlexStation II instrument, including both fluidics and optical reading, smooth and reliable operation of the system depends on both good design and operator knowledge.
In order to prevent problems of a mechanical nature, be sure to read all sections of this manual prior to attempting a reading in Flex mode. See especially section 6.3, Understanding Potential Mechanical Problems.
4 FlexStation II Operator’s Manual – Rev. D

1.3 Safety Information
Safety Messages
Observe the following warnings and precautions:
High internal voltages. Always turn off power switch and unplug system power cord before removing labeled covers or panels.
Xenon-arc flash lamp. Do not look directly at the flash lamp while illuminated. The lamp emits ultraviolet radiation at levels that can injure the eye if viewed directly.
Electrical grounding. Never use a two-prong plug or extension cord to connect primary power to the system. Use of a two-prong adapter disconnects the utility ground, creating a severe shock hazard. Always connect the system power cord directly to a three-prong receptacle with a functional ground.
Spilled liquids. Avoid spilling liquids on the system. Fluid spilled into internal com-ponents creates a potential shock hazard. Wipe up all spills immediately. Do not operate the system if internal components have been exposed to spilled fluid. Unplug instrument if there is a fluid spill in the instrument and contact Technical Support.
Replacement fuses. Use replacement fuses with the required current rating and specification. Improper fuses or short-circuiting the fuse holders can cause fire or damage the instrument.
Power rating. Ensure the system is connected to a power receptacle that provides voltage and current within the specified rating for the system. Use of an incompatible power receptacle can create electrical shock and fire hazards.
Remove watches and jewelry before removing any panels from the instrument.
Warning labels. There are several labels affixed to the instrument covers and inside panels. The purpose of these labels is to alert you to use caution when servicing a component or the instrument. Be aware that ignoring the instructions on any instrument label can result in a hazardous condition that can cause injury.
Identification Labels: The following labels, among others, appear on the instrument.
USC
FlexStation II FlexStation II 384
100-240V 5A 50-60 Hz FUSE: T6.3 AHSLO-BLO
~Molecular Devices
1311 Orleans Drive, SunnyvaleCA 94089 408 747-1700
100-240V 5A 50-60 Hz FUSE: T6.3 AHSLO-BLO
~Molecular Devices
1311 Orleans Drive, SunnyvaleCA 94089 408 747-1700
FlexStation II Operator’s Manual – Rev. D 5

1 System Description
1.4 System Components
This section describes the major system components listed below.
• 1.4.1: Covers and Instrument Panels
• 1.4.2: Drawers
• 1.4.3: Fluidics Module
• 1.4.4: Detection Module
• 1.4.5: Computer
• 1.4.6: Accessories
• 1.4.7: Consumables
actual˚C
set pt˚C
Set Temp
Tempon/off
Drawers
readingchamber
compounds
tip rack
Instrument, Front View
FLEXstation™
100-240V~ 5A 50-60 Hz T6.3 AH
s/n FS 01001
CNRTL/C
LR88026
"PATENTS PENDING"
US
Instrument, Rear View
6 FlexStation II Operator’s Manual – Rev. D

1.4 System Components
1.4.1 Covers and Instrument Panels
Top Cover
The instrument is protected by a molded plastic housing. The large top cover protects the fluidics module and the exposed portions of the detection module.
Note: The top cover can be lifted back, as shown in the figure below, for certain limited troubleshooting procedures. See section 6.4.2, Opening the Instrument.
Important! To achieve optimal performance during readings, you must operate the system with the top cover in place.
actual˚C
set pt˚C
Set Temp
Tempon/off
Drawers
readingchamber
compounds
tip rack
Lifting Off the Top Cover
Control Panel
The control panel consists of an LCD and six pressure-sensitive membrane keys which can be used to initiate and regulate the temperature and to open/close the drawers.
A 2 × 3-character liquid crystal display (LCD) shows the current instrument temperature at all times, and the set point temperature when the incubator is on.
Note: See sections 3.2, Starting Up the System, and 3.3, Setting the Temperature, for information about using the control panel.
actual˚C
set pt˚C
Set Temp
Tempon/off
Drawers
readingchamber
compounds
tip rack
Control Panel
FlexStation II Operator’s Manual – Rev. D 7

1 System Description
Input/Output Panels
There are two input/output panels on the rear of the instrument.
• The upper input/output panel, on the back cover, consists of a power switch, fuse box cover, and power cord receptacle.
• The lower panel consists of an RS-232 serial port and parallel port (not currently active). There are also a number of labels.
Note: See section 2.6, Connecting the Cables, for information about attaching the computer cable and power cords to the instrument.
FLEXstation™
100-240V~ 5A 50-60 Hz T6.3 AH
s/n FS 01001
CNRTL/C
LR88026
"PATENTS PENDING"
US
Parallel Port (not currently in use)
RS-232 Serial PortPower Cord Receptacle
RS-232 Serial CablePower Cord
Fuse Box CoverPower Switch
Input/Output Panels
Lamp Cover
The plastic lamp cover provides access to the flash lamp on the right side of the instrument (as viewed from the rear).
Note: For further information, see section 5.7, Replacing the Flash Lamp.
Caution: Flash lamp access and maintenance are restricted to service-trained users.
Lamp Cover
Rear View
8 FlexStation II Operator’s Manual – Rev. D

1.4 System Components
1.4.2 Drawers
The instrument has three drawers that open on the right side. The two drawers in the fluidics module open and close to move the pipette tip rack and compound plates (or reservoirs) into and out of the instrument. The reading chamber drawer in the detection module transports the assay microplate into the reading chamber.
actual˚C
set pt˚C
Set Temp
Tempon/off
Drawers
readingchamber
compounds
tip rack
Tip Rack Drawer
Compound Plate Drawer
Reading Chamber Drawer
Instrument with Drawers Open and Carriages Accessible
Small plastic pushers, located in the front left corner of each drawer, hold the plates, racks, or reservoirs, securely in place when the drawers are closed
Carrier
Pusher
Drawer Detail
Caution: Do not obstruct the movement of any of the drawers. If you must retrieve a plate after an error condition or power outage, and if the drawer will not open, it is possible to open the drawer manually. See section 6.2, Opening a Drawer Manually.
FlexStation II Operator’s Manual – Rev. D 9

1 System Description
You can open and close the drawers using either the SOFTmax PRO application or by manually pressing the drawer keys on the instrument control panel.
Using SOFTmax PRO, go the Control menu and select Tip drawer (for the tip rack drawer), Compound Drawer (for the compound plate drawer), or Open Drawer (for the reading chamber drawer).
You can also open or close the reading chamber drawer with the Drawer icon on the Status Bar.
Tip Rack Drawer
The top drawer holds the pipette tip rack.
Only tips specified by Molecular Devices for use with the FlexStation II System can be safely used. For further information, see section 7.1, Parts and Accessories.
Caution: Do not use parts and accessories that are not authorized, specified by or provided by Molecular Devices. Using unauthorized parts can damage the instrument.
Compound Plate Drawer
The compound plate drawer holds a 96- and 384-well microplate or reservoir trough. The instrument can simultaneously transfer a column of either:
• Eight fluids from a 96-well compound plate to a 96-well assay plate, or
• Sixteen fluids from a 384-well compound plate to a 384-well assay plate.
Important! Be sure to install the compound baseplate before placing a compound plate in the drawer.
Reading Chamber Drawer
The reading chamber drawer opens to accept a 96- and 384-well microplate for analysis in the reading chamber. It is the lowest of the three drawers.
The reading chamber drawer operation varies, depending on the incubator status. When the incubator is off, the reading chamber drawer is open at power up and after a read. When the incubator is on, the drawer closes automatically to maintain the temperature of the reading chamber.
Important! Be sure to install a microplate adapter before placing an assay plate in the drawer (for standard microplates). For further information, see section 2.7, Installing the Drawer Adapters.
10 FlexStation II Operator’s Manual – Rev. D

1.4 System Components
1.4.3 Fluidics Module
The fluidics module houses the pipettor head, several motors, and all the fluidics components. There are two horizontally-moving carriers, one for the pipette tip rack and the other for the compound plate. The pipettor head moves vertically between the drawers.
The fluidics module can be opened, by service-trained users, from the inside front panel, if necessary for maintenance, or from the inside top panel to install or remove the pipettor head. The entire fluidics module can be removed for maintenance or to transport the system to another location.
For further information, see 2.3, Installing the Fluidics Module. See part 6, Troubleshooting Procedures, for related service procedures.
Inside Front Panel
Detection Module
Inside Top Panel
Fluidics Module
Fluidics Module
FlexStation II Operator’s Manual – Rev. D 11

1 System Description
Pipettor Head
The instrument is configured with an eight-channel pipettor head for use with 96-well microplates. In addition, the FlexStation II³⁸⁴ includes a 16-channel pipettor head for use with 384-well microplates.
Note: For further information, see 2.4, Installing the Pipettor Head.
Eight- orSixteen-Channel
Pipettor Head
Inside Top Panel Opened
Pipettor Head
12 FlexStation II Operator’s Manual – Rev. D

1.4 System Components
1.4.4 Detection Module
The detection module is the lower portion of the instrument. This module houses the reading chamber, the optics bench, several cables and optic fibers, the power supply, the flash lamp, and other hardware. The fluidics module attaches to the detection module and can be tilted off to the side, to provide access to the optical system for troubleshooting or maintenance. The detection module is contained in a molded plastic housing, to which the top cover is attached at the back of the instrument.
Reading Chamber Drawer with Assay Plate
Top Cover
Housing
Reading Chamber
Detection Module
Fluidics Module
Detection Module Detail
Reading Chamber
The reading chamber includes the assay plate carriage, which holds the assay microplate in the reading chamber during read cycles. The reading chamber may be maintained at an elevated temperature. It contains both top and bottom read heads, which can be selected via software command.
The instrument utilizes a plate sensor to assure that an assay plate is present in the reading chamber before a reading begins.
FlexStation II Operator’s Manual – Rev. D 13

1 System Description
Optical System
The optical system includes a xenon flash lamp, the monochromators, excitation bandpass filters, emission cut-off filters, and a PMT detector.
There are a number of cables and fibers that exit the optics bench and enter the read chamber. They are the excitation fiber (thin and black, has a collar and pins), emission fiber (fatter, with attached electrical cord), electrical connector to the read head (black with brass fitting).
Caution: Optical fibers are very fragile, especially the excitation fiber. Handle cables with extreme care. Do not flex, twist, bend, or stretch the optical cables.
Flash Lamp
PhotomultiplierTube
ExcitationMonochromator
Microplate
Elliptical FocusingMirrors
EmissionMonochromator
Flash Lamp
CollimationMirror
Optical System
Overview of Optical System
1 The excitation light source is a xenon-arc flash lamp. (Note that the lamp is off when luminescence mode is selected.)
2 The light passes through a band-pass filter which reduces the amount of stray light to the excitation monochromator.
3 The holographic diffraction grating monochromator selects the desired excitation wavelength.
14 FlexStation II Operator’s Manual – Rev. D

1.4 System Components
4 The excitation beam is collimated by a mirror to a 1.5mm diameter beam before entering the sample in the microplate well (in bottom-read mode). This focusing helps to prevent part of the beam from striking adjacent wells.
5 The light beam enters the well and, if fluorescent molecules are present, light of the emission wavelength is emitted back out to mirrors that focus it and send it to an optical bundle.
6 The emission monochromator (also a holographic diffraction grating monochromator) allows light of the chosen emission wavelength to pass to the emission filter wheel.
7 Long-pass filters in the emission filter wheel further condition the light prior to detection by the photo-multiplier tube (PMT). Using SOFTmax PRO, you can choose which filter to use, or use none, or have a filter automatically selected.
8 The PMT detects the emitted light and passes a quantitative signal to the instrument’s electronics, which then send the data to the computer.
1.4.5 Computer
The FlexStation II instrument works as a system with the SOFTmax PRO application software. SOFTmax PRO must be installed on a dedicated personal computer to communicate with and control instrument functions.
• The instrument is equipped with an 8-pin DIN RS-232 serial port for connecting to a personal computer.
• SOFTmax PRO software, version 4.4 or greater, is required to control the FlexStation II instrument.
• The minimum computer configuration includes a Pentium processor, with 256K RAM, a 10 GB hard drive, CD-ROM drive, and Windows 98/2000/NT.
For further information, see sections 2.8, Installing SOFTmax PRO, and 3.4, Setting Up the Software.
FlexStation II Operator’s Manual – Rev. D 15
1 System Description
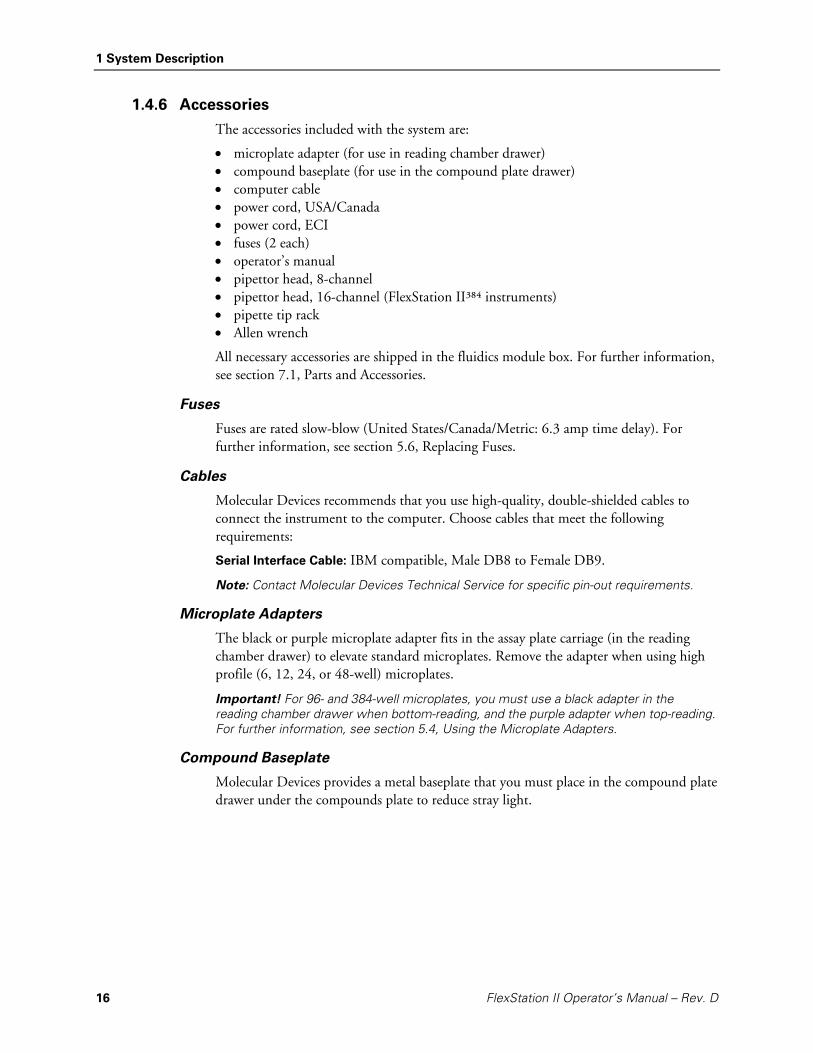
1.4.6 Accessories
The accessories included with the system are:
• microplate adapter (for use in reading chamber drawer) • compound baseplate (for use in the compound plate drawer) • computer cable • power cord, USA/Canada • power cord, ECI • fuses (2 each) • operator’s manual • pipettor head, 8-channel • pipettor head, 16-channel (FlexStation II³⁸⁴ instruments) • pipette tip rack • Allen wrench
All necessary accessories are shipped in the fluidics module box. For further information, see section 7.1, Parts and Accessories.
Fuses
Fuses are rated slow-blow (United States/Canada/Metric: 6.3 amp time delay). For further information, see section 5.6, Replacing Fuses.
Cables
Molecular Devices recommends that you use high-quality, double-shielded cables to connect the instrument to the computer. Choose cables that meet the following requirements:
Serial Interface Cable: IBM compatible, Male DB8 to Female DB9.
Note: Contact Molecular Devices Technical Service for specific pin-out requirements.
Microplate Adapters
The black or purple microplate adapter fits in the assay plate carriage (in the reading chamber drawer) to elevate standard microplates. Remove the adapter when using high profile (6, 12, 24, or 48-well) microplates.
Important! For 96- and 384-well microplates, you must use a black adapter in the reading chamber drawer when bottom-reading, and the purple adapter when top-reading. For further information, see section 5.4, Using the Microplate Adapters.
Compound Baseplate
Molecular Devices provides a metal baseplate that you must place in the compound plate drawer under the compounds plate to reduce stray light.
16 FlexStation II Operator’s Manual – Rev. D

1.4 System Components
1.4.7 Consumables
The system consumables include:
• Microplates • Pipette tips and racks
One rack of pipette tips is shipped with the system. For further information, see section 7.1, Parts and Accessories.
Caution: Do not use parts and accessories that are not authorized, specified by or provided by Molecular Devices. Using unauthorized parts can damage the instrument.
Microplates
The instrument can accommodate standard 6, 12, 24, 48, 96 and 384-well microplates. In Flex mode, however, you can only use 96- or 384-well formatted assay plates.
1
A
A1 A12
H1 H12
B
C
D
E
F
G
H
2 3 4 5 6 7 8 9 10 11 12
Top View of a 96-Well Microplate
For fluorescence, Molecular Devices generally recommends black-walled, clear-bottom microplates for bottom reading, and all-black microplates for top reading, because they have lower backgrounds than clear plates.
For luminescence, white microplates may optimize light collection.
Note: Not all microplates are made with the same materials. Some plastics, most notably polystyrene, have significant native fluorescence and can cause moderate to sever background fluorescence, especially in the UV range. If your fluorescence experiments require high sensitivity, it may be appropriate to use microplates designed and designated by the manufacturer to reduce background fluorescence.
Pipette Tips and Racks
• For 96-well assays, Molecular Devices specifies 200 µL Robbins brand, new-generation Super Seal Autotips. For clear tips, use Molecular Devices PN 9000-0623.
• For 384-well assays, Molecular Devices specifies 45 µL Lab Systems brand tips. For clear tips, use Molecular Devices PN 9000-0512.
FlexStation II Operator’s Manual – Rev. D 17

1 System Description
1.5 Overview of Operation
Using the FlexStation II system is a process in five stages:
1 Choosing an experiment
2 Preparing the instrument
3 Preparing the software
4 Running the experiment
5 Analyzing the data
Choosing an experiment consists of:
• New or repeated experiment? • Does protocol exist?
Preparing the instrument consists of:
• Turning on the power • Setting temperature, if needed • Preparing and loading tips, plates and compounds
Preparing the software consists of:
• Entering software preferences • Selecting instrument settings • Defining templates, reduction parameters, and display parameters • Confirming hardware and software set up
Running the experiment consists of:
• Initiating the operation (detection or fluidics plus detection) • Saving the data file
Analyzing the data consists of:
• Modifying the template or parameters as desired • Saving the data file • Analyzing the data • Exporting data to another software application as desired
18 FlexStation II Operator’s Manual – Rev. D

1.6 Theory of Operation
1.6 Theory of Operation
This section includes the following topics:
• 1.6.1: Introduction to Fluorometry
• 1.6.2: Instrument Design
• 1.6.3: Modes of Operation
1.6.1 Introduction to Fluorometry
Fluorescence is the light emitted by certain substances resulting from the absorption of incident radiation. Fluorescent materials, or materials that absorb light energy of a characteristic wavelength (excitation), undergo an electronic state change, and instantaneously emit light of a longer wavelength (emission). Most common fluorescent materials have well-characterized excitation and emission spectra.
The first figure below shows an example of excitation and emission spectra for a fluorophore. In general, excitation and emission bands are broad, with half-bandwidths of approximately 40 nm, and wavelength differences between the excitation and emission maxima (the Stokes shift) is relatively small, about 30 nm. Exceptions to this rule include the lanthanide dyes used in time-resolved fluorescence: they have a Stokes shift that is typically about 300 nm. There is considerable overlap between the excitation and emission spectra (gray area) when a small Stokes shift is present.
ExcitationMaximum
EmissionMaximum
StokesShift1.0
0.5
0500 550 600 650
Wavelength (nm)
Rela
tive
Fluo
resc
ence
Excitation and Emission Spectra
Because the intensity of the excitation light is usually many tens of thousands of times greater than that of the emitted light, some type of spectral separation is necessary to reduce the interference of the excitation light with detection of the emitted light. The FlexStation II instrument incorporates many features designed to restrict interference from reflected excitation light. Among these features is a set of band-pass cutoff filters that may be set automatically by the system or manually by the user. In addition, if the Stokes shift is small, it may be advisable to choose an excitation wavelength that is as far
FlexStation II Operator’s Manual – Rev. D 19

1 System Description
away from the emission maximum as possible while still being able to stimulate the fluorophore. This allows a more accurate quantitation of light emission.
ExcitationReading
Wavelength
Fluorophore'sExcitationMaximum
Fluorophore'sEmissionMaximum
EmissionReadingWavelength
1.0
0.5
0500 550 600 650
Wavelength (nm)
Rela
tive
Fluo
resc
ence
Optimized Excitation and Emission Reading Wavelengths
The figure above shows an example of a fluorophore with small Stokes shift. When the reading wavelengths for excitation and emission are separated, a smaller amount of excitation light will pass through to the emission monochromator (gray area) and on to the PMT, resulting in a purer emission signal and more accurate data.
The instrument allows scanning of both excitation and emission wavelengths, using separate tunable monochromators. One benefit of being able to scan emission spectra is that you can assess more accurately whether the emission is due to the expected fluorophore, multiple fluorophores, or a variety of background sources or contaminants. Another benefit is that, if interfering fluorescent species are present, you may be able to find excitation and emission wavelengths that avoid this interference.
For this reason, it is desirable to scan emission for both an intermediate concentration of labeled sample, as well as unlabeled sample (background). The settings that yield the maximal ratio of sample emission to background emission are optimal.
To measure fluorescence accurately, it is necessary to reduce light scatter. The governing equation for fluorescence is:
Fluorescence = extinction coefficient × concentration × quantum yield × excitation intensity × path length × emission collection efficiency
For more information regarding optimizing excitation and emission wavelengths using the spectral scanning capabilities of the instrument, see 3.10, Optimizing Fluorescence Assays in Spectrum Mode.
20 FlexStation II Operator’s Manual – Rev. D

1.6 Theory of Operation
1.6.2 Instrument Design
Fluidics
The instrument is designed with a fluidics module that transfers liquids to the assay plate during the kinetic reading.
The fluidics module incorporates an eight-channel pipettor that automatically changes tips and transfers reagents to the plate that is read in the fluorometer. Pipette height and dispensing rate are adjustable. The instrument can add reagents within milliseconds of a column being read, enabling fast kinetic assays of transient responses.
As many as three compounds can be transferred from columns in a compound plate to a single column in an assay plate, at different points during the total read time.
Automix
The Automix function permits automatic shaking of the microplate at preset intervals, thereby mixing of the contents within each well. Automix must be selected before beginning a reading. Automix settings vary with operation mode.
For Endpoint mode, enabling Automix will shake the plate for a definable number of seconds and then read at all selected wavelengths. When kinetic mode is chosen, two types of Automix can be enabled: you can set Automix to shake the plate for a definable number of seconds before the initial reading and/or for a definable number of seconds before each subsequent reading. Use of Automix is strongly recommended for ELlSA and other solid-phase, enzyme-mediated reactions to enhance accuracy.
Temperature Regulation
The instrument regulates the temperature of the microplate chamber from 1 °C above ambient to 45 °C. Upon power up, when the incubator is off, the temperature in the reading chamber is ambient and isothermal. Turning on the incubator by pressing the (Incubator) key will cause the instrument to begin warming the reading chamber and the fluidics module. The temperature set point defaults to 37 °C at start-up. With the incubator on, the temperature of the reading chamber can be set and regulated from 1 °C above ambient to 45 °C. Accuracy of the temperature set point is only guaranteed if the set point is at least 1 °C above ambient. If the temperature set point is lower than the ambient temperature, the chamber temperature will remain at ambient. Temperature regulation is controlled by heaters only and, therefore, cannot cool the temperature to a setting lower than ambient.
Temperature regulation and control of the reading chamber is achieved through electric heaters, a fan, efficient insulation, and temperature sensors. The heaters are located within the instrument, which is insulated to maintain the temperature set point. The seven sensors are mounted inside the chamber and measure the air temperature and chamber temperature. The temperature feedback closed-loop control algorithms measure the chamber air temperature, compares it to the temperature set point, and use the difference to calculate the regulation of the heating cycles. This technique results in accurate, precise control of the reading chamber temperature with a temperature variation of the air across the entire assay plate of less than 0.5 °C. (Temperature uniformity within the assay plate itself will depend upon its design, materials, and/or configuration.)
FlexStation II Operator’s Manual – Rev. D 21

1 System Description
Important! Temperature of samples in all assay plates will be affected by evaporation.
Time-Tagged Data
The FlexStation II platform is a single channel reading system. Although the scan time is very fast (8 wells in about 1.0 seconds; 1 well in about 50 ms), the difference in the exact time each well is read is dependent on the number of rows chosen in a column. This difference is an important factor in fast kinetic assays.
For this reason, all readings are tagged with an exact read-time, and when multiple-well fast kinetic responses are plotted, the curves overlie each other as plotted by SOFTmax PRO. If kinetic data are to be exported, you may choose either time-interpolated data or raw time-tagged data. Molecular Devices recommends that you select time-interpolated data. This option is explained in more detail in the SOFTmax PRO user’s manual.
Time-Tagged Data Example
Optical System
The instrument uses excitation and emission filter wheels to decrease interference by stray light, thus augmenting the wavelength selection that is provided by the monochromators. Two independent, single-channel reading heads can service top and bottom reading requirements. The top reading head supports coaxial excitation and emission beams; in the case of the bottom reading head, excitation and emission beams are also both coaxial.
The instrument’s electrical, firmware, and optical designs incorporate many features that work together to virtually eliminate instrument-based day-to-day and instrument-to-instrument variations in fluorescence values measured.
For more detail of the optical design and an illustration of the optical system, see section 1.4.4, Detection Module.
Bottom and Top Reading
Switching to bottom or top reading capability is activated through software – no manual positional switching of the read-head is required. Bottom reading allows for well
22 FlexStation II Operator’s Manual – Rev. D

1.6 Theory of Operation
scanning ability maximizing the sampling area for 6, 12, 24, 48, 96, and 384-well microplates. Bottom reading functions in all detection modes.
Important! Clear bottom plates must be used when using bottom reading. Bottom reading is intended for cell-based assays.
Note: RFU scale is ten times (10×) larger during bottom reading.
FlexStation II Operator’s Manual – Rev. D 23

1 System Description
1.6.3 Modes of Operation
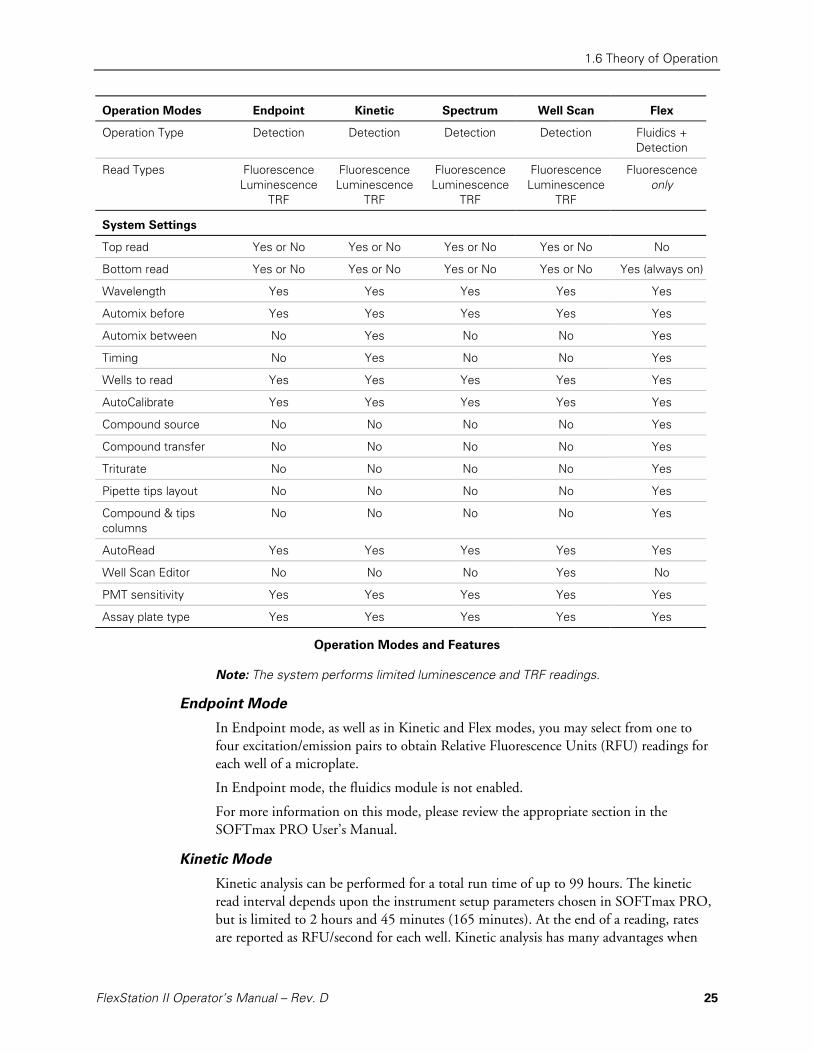
The instrument operates in one integrated fluidics/read (Flex) mode and four read-only modes. The table below compares the types of operation and features that are available in the different operating modes.
Note: This operator’s manual describes instrument behavior for Flex mode primarily. Refer to the SOFTmax PRO User’s Manual for instructions on other operating modes.
Flex Mode
The fluidics module for is designed to aspirate fluids from a compound source plate and dispense them into an assay plate. Fluid transfer is made possible with an eight-channel pipettor that is fully automated, including changing the tips from a tip rack.
In Flex mode, one to eight or one to 16 wells in one column of the assay plate are read repeatedly for a selected total experimental time. At a preselected point or points during that time sequence, the pipettor may transfer up to three reagents from the compound plate to the assay plate. The instrument continues to read at the preselected time intervals before and after fluid transfer. After completion of reading the column (or partial column) for a preselected time, the instrument can repeat this cycle with other columns. All the data is collected in one data file represented as a 96- or 384-well plate.
For example, an experiment with a two-minute run time will accommodate a 96-well plate in about 24 minutes.
Run time × Number of columns = Plate time
2 minutes × 12 columns = 24 minutes
The source for transferred reagents can be either a compound plate or reservoir trough located in the fluidics module.
24 FlexStation II Operator’s Manual – Rev. D
1.6 Theory of Operation
Operation Modes Endpoint Kinetic Spectrum Well Scan Flex
Operation Type Detection Detection Detection Detection Fluidics + Detection
Read Types Fluorescence Luminescence
TRF
FluorescenceLuminescence
TRF
FluorescenceLuminescence
TRF
Fluorescence Luminescence
TRF
Fluorescence only
System Settings
Top read Yes or No Yes or No Yes or No Yes or No No
Bottom read Yes or No Yes or No Yes or No Yes or No Yes (always on)
Wavelength Yes Yes Yes Yes Yes
Automix before Yes Yes Yes Yes Yes
Automix between No Yes No No Yes
Timing No Yes No No Yes
Wells to read Yes Yes Yes Yes Yes
AutoCalibrate Yes Yes Yes Yes Yes
Compound source No No No No Yes
Compound transfer No No No No Yes
Triturate No No No No Yes
Pipette tips layout No No No No Yes
Compound & tips columns
No No No No Yes
AutoRead Yes Yes Yes Yes Yes
Well Scan Editor No No No Yes No
PMT sensitivity Yes Yes Yes Yes Yes
Assay plate type Yes Yes Yes Yes Yes
Operation Modes and Features
Note: The system performs limited luminescence and TRF readings.
Endpoint Mode
In Endpoint mode, as well as in Kinetic and Flex modes, you may select from one to four excitation/emission pairs to obtain Relative Fluorescence Units (RFU) readings for each well of a microplate.
In Endpoint mode, the fluidics module is not enabled.
For more information on this mode, please review the appropriate section in the SOFTmax PRO User’s Manual.
Kinetic Mode
Kinetic analysis can be performed for a total run time of up to 99 hours. The kinetic read interval depends upon the instrument setup parameters chosen in SOFTmax PRO, but is limited to 2 hours and 45 minutes (165 minutes). At the end of a reading, rates are reported as RFU/second for each well. Kinetic analysis has many advantages when
FlexStation II Operator’s Manual – Rev. D 25

1 System Description
determining the relative activity of an enzyme in different types of assays, including the purification and characterization of enzymes and enzyme conjugates.
In Kinetic mode, the fluidics module is not enabled.
For more information on this mode, please review the appropriate section in the SOFTmax PRO User’s Manual.
Spectrum Mode
Spectral analysis measures fluorescence across a spectrum of wavelengths (excitation 250–850 nm, emission 360–850 nm). When reading using fluorescence, you may set a fixed wavelength for excitation and scan the emission wavelengths, and vice versa. All spectrum readings are made using scanning monochromators.
In Spectrum mode, the fluidics module is not enabled.
For more information on this mode, please review the appropriate section in the SOFTmax PRO User’s Manual.
Well Scan Mode
Some applications that involve the detection of whole cells in large area tissue culture plates may require the use of Well Scan mode. As many cell lines tend to grow in aggregates or in the edges of microplate wells, this non-confluent growth pattern may require multiple reads at different locations in a well.
When used with 6, 12, 24, 48, or 96-well plates, well scanning allows maximum surface area detection for whole cell assays. No plate adapter is used for tissue culture plates of 24 wells or less.
In Well Scan mode, the fluidics module is not enabled.
For more information on this mode, please review the appropriate section in the SOFTmax PRO User’s Manual.
26 FlexStation II Operator’s Manual – Rev. D

1.7 Introduction to SOFTmax PRO Application Software
1.7 Introduction to SOFTmax PRO Application Software
The SOFTmax PRO application software controls all aspects and operations of the system. You will set up and run experiments using this software, as well as use it to perform data analysis. The SOFTmax PRO application also allows you to store experiment files (data and protocols) on your PC, or to export files for further manipulation.
The software uses standard Windows conventions for menus, dialog boxes, windows and mouse control. These instructions assume that you are familiar with the basic operation of your computer.
This FlexStation II Operator’s Manual describes using the SOFTmax PRO application to run FlexStation II experiments. There is limited information about using the software for the other read modes. For further details about the software, including how to install SOFTmax PRO on your PC, and to fully understand its multifaceted design (including customization of the software), refer to your SOFTmax PRO operator’s manual.
FlexStation II Operator’s Manual – Rev. D 27

1 System Description
User Interface
This section briefly presents the basic features of the SOFTmax PRO user interface. More instructions regarding how to use the interface will appear throughout these instructions during relevant steps.
You can control the instrument by using either buttons and icons in the windows and along the tool bars, or by using the pull-down menus. You can use either your mouse or keystrokes to make selections.
Note: For complete details about the SOFTmax PRO application and user interface, refer to your SOFTmax PRO Operator’s manual. Refer specifically to the following chapters:
• Chapter 6 for a discussion of Flex mode setup
• Chapter 8 for information about data analysis in Flex mode
• Chapter 10, Tutorial 2, for experience with a typical Flex mode template
Untitled Window, Flex Mode
28 FlexStation II Operator’s Manual – Rev. D

1.7 Introduction to SOFTmax PRO Application Software
The Status bar allows you to monitor instrument status and access several functions with the click of a button. You can verify communication with SOFTmax Pro, and monitor the reading chamber temperature. The Status bar also provides buttons used to begin a reading, open the Incubator dialog box, shake the microplate (Automix), and open or close the instrument drawers. The status bar can be hidden by selecting Hide Status from the View menu.
The following icons are present in the Status bar and are used to set up the instrument or interact with it during operation.
Note: Different Molecular Devices systems have different icons.
This Icon… Has the Following Function…
The Instrument Status icon provides visual confirmation that SOFTmax PRO is communicating with the instrument. Double-click this icon to display Preferences dialog box.
Displays the current temperature inside the instrument. Click this icon to display the Preferences dialog box.
Click to begin reading. It changes to [Stop] during a reading. Clicking this button also closes any open drawers.
Click the Incubator button to open the Incubator dialog box to change temperature settings.
Click the Automix button to manually shake the assay plate.
Note: The manual shaking that occurs when you click this button differs from the Automixing that can be selected as an instrument setting.
Click the Drawer button to open or close the Reading chamber drawer.
FlexStation II Operator’s Manual – Rev. D 29

1 System Description
One SOFTmax PRO file contains at least one experiment, but may contain more than one. Each experiment can contain a section for Notes and one or more Plates. You can enter Notes and edit Plates using the tool bars shown below.
The following icons appear on the Plate Section tool bar.
This Icon… Has the Following Function…
Double-click the Plate icon to open the Plate section in a new window.
Double-click the Name of Plate icon to open the Section dialog box.
Click the Setup button to open the Instrument Settings dialog box for this plate.
Click the Template icon to open the Template dialog box, where you can create or edit the template. This is used to group table setup for defining areas of the assay plate.
Click the Reduction icon to configure settings for data analysis and graph reduction.
Click the Display icon to open the Display dialog box and change your display properties.
Click the Graph icon to enlarge sections of the display into graphic form.
Click the Mask icon to mask selected wells.
Click the Printer icon to include or exclude an section from a printed report.
SOFTmax PRO provides other icons and tool bars. For example, you can keepNotes on the experiment in the Notes section. Groups are also contained in experiments when you define a template. You may create Graph sections as desired. Groups are automatic, Graphs are optional. See your SOFTmax PRO User’s Manual for details.
30 FlexStation II Operator’s Manual – Rev. D

2 Installation Procedures
Part 2 provides information about how to install the FlexStation II system in your laboratory. Installation must be done by qualified Molecular Devices personnel or a service-trained user.
Caution: The following procedures must be completed by a service-trained user. Do not attempt the installation procedures if you have not been trained properly by appropriate Molecular Devices Personnel.
The following sections describe the installation procedure:
• 2.1: General Precautionary Information
• 2.2: Unpacking the System
• 2.3: Installing the Fluidics Module
• 2.4: Installing the Pipettor Head
• 2.5: Setting Up the Computer
• 2.6: Connecting the
• 2.7: Installing the Drawer Adapters
• 2.8: Installing SOFTmax PRO
2.1 General Precautionary Information
Warning! Always make sure the power switch on the instrument is in the OFF position and remove the power cord from the back of the instrument prior to any installation or relocation of the system.
Warning! Do not install or operate the system in an environment where potentially damaging liquids or gases are present.
Caution: Do not touch or loosen any screws or parts other than those specifically designated in the instructions. Doing so might cause misalignment and will void the system warranty.
Caution: Do not attempt to assemble or disassemble the instrument with the pipettor tips in place. Spillage or damage to the pipettor tips or the instrument can occur.
FlexStation II Operator’s Manual – Rev. D 31

2 Installation Procedures
2.2 Unpacking the System
If you are reading this, you have already located the Operator’s Manual. This part provides instructions on how to continue to unpack the system safely.
Warning! The instrument weighs approximately 55 pounds and should be lifted with care. It is recommended that two persons lift the instrument together, taking the proper precautions to avoid injury.
Each FlexStation II instrument comes in five specially designed shipping cartons.
• Fluidics module and accessories • Detection module (main instrument body) in housing • Personal computer • Computer monitor • SOFTmax PRO software package
Please retain the cartons, all boxes, and any significant packing materials. If the system needs to be moved to a different location, use the original packing materials and cartons whenever possible. If the cartons have been damaged in transit, it is particularly important that you retain them for inspection by the carrier in case there has also been damage to the instrument.
As you unpack the system pieces, examine the packing list that accompanies the system to be sure all items are present.
Unpacking the Fluidics Module and Accessories
1 Remove the fluidics module from the protective foam. Set in a safe place.
2 Remove the box (containing the pipettor head) and the bags of accessories.
3 Open the accessories bags; remove cables and the Allen wrench. You will need them later in the assembly procedure.
4 Set packaging aside.
Tools Needed
• Allen wrench, hex, 3/32" ball drive, L (provided)
• Phillips screwdriver (not provided)
Unpacking the Detection Module
Important! The system should be kept in a location that is dedicated to its use, on a level surface, away from direct sun-light, dust, drafts, vibration, and moisture.
1 Locate the largest carton, which contains the main instrument body (detection module). It weighs approximately 55 pounds (25 kilograms).
2 Place the box either on the floor next to the bench where you intend to install it, or on the bench itself.
3 Remove shipping clips.
a Locate the four plastic clips holding the top of the carton in place. There is a clip in the bottom center of each box face.
b First press inward on the two vertical tabs (middle of the clip recess).
32 FlexStation II Operator’s Manual – Rev. D

2.2 Unpacking the System
c Squeeze the tabs together and pull outward. The tabs should pivot up and out, and the whole clip should come out.
4 Remove the upper shipping carton and the upper foam.
5 Open the twist tie at the top of the plastic bag (enclosing the instrument) and slide the bag down out of the way, around the base of the detection module.
6 Together with another person, reach inside the bag and under the instrument. Lift the instrument out of its shipping tray (the bottom of the carton) and place it on the bench.
Warning! The FlexStation II instrument weighs approximately 55 pounds and should be lifted with care. It is recommended that two persons lift the instrument together, taking proper precautions to avoid injury.
7 Set shipping materials out of the way.
Removing Shipping Screws
1 There are two shipping screws holding down the cover of the instrument. Locate these stainless steel screws under the front flange of the detection module.
actual˚C
set pt˚C
Set Temp
Tempon/off
Drawers
readingchamber
reagents
tip rack
Shipping Screws (captive)
Location of Shipping Screws
2 Unscrew the shipping screws with the Allen wrench. It may be necessary to move the instrument to the front of the bench to reach the screws from below. The screws remain captured in the base.
FlexStation II Operator’s Manual – Rev. D 33

2 Installation Procedures
3 Open the top cover by depressing the latch in the handle and pivoting the cover up and back.
Top Cover
Reading Chamber
Detection Module
Opening the Top Cover
34 FlexStation II Operator’s Manual – Rev. D

2.3 Installing the Fluidics Module
2.3 Installing the Fluidics Module
The next step is to install the fluidics module onto the detection module.
Caution: Use caution during this procedure. Follow these instructions and any instruction labels on the instrument exactly.
Warning! Do not remove cover until power is disconnected. Do not operate instrument unless all covers are in place.
1 Locate fluidics module hardware.
a With the cover open, you can see the hinged flange (metal plate) to the left side of the exposed reading chamber.
b Notice also the two quarter-turn fasteners (Zeus screws) attached to the flange, and two locating pins near the middle of the reading chamber.
Top Cover
Read Chamber
Detection Module
Hinged Flange withQuarter-Turn Fasteners (2)
Electrical Connector
Fluidics Module
Handle Holes for Locating Pins
Locating Pins
Positioning the Fluidics Module
2 Lift fluidics module into position.
Warning! You may need two people to continue with this procedure. The fluidics module is heavy and it may be difficult and awkward to both hold it in place and attach it to the base.
a Lift fluidics module, using the handle, into position over the detection module, just to the left of the metal flange.
b Tilt module up at about 90°, align the quarter-turn fasteners (in the flange) to the holes in the bottom of the fluidics module.
FlexStation II Operator’s Manual – Rev. D 35

2 Installation Procedures
c Connect the quarter-turn fasteners to the bottom of the fluidics module. Lock the fasteners into place.
3 Attach electrical connector.
a Hold fluidics module tilted back with your left hand, and use your right hand to connect the 15-pin sub-D electrical connector. The connector fits into the communication port on the far bottom edge of the fluidics module. It must be aligned properly to fit.
b Press connector in firmly.
c Secure two communication port screws lightly with your fingers.
FLUIDICS�CONNECTOR
CONNECT
FLUIDICS HERE
Note: There are labels on both the fluidics connector [‘Fluidics Connector’] and near the communication port [‘Connect Fluidics Here’] that help identify these parts.
4 Lower fluidics module into place.
Caution: Be careful when lowering the fluidics module that you do not trap or compress any of the optical fibers coming up from the detection module.
a Ensure that all cables and wires are tucked out of the way.
b Gently lower the fluidics module by the handle down over the detection module and onto the locating pins.
c Check that the fluidics module sits securely on the detection module.
Caution: When installing the fluidics module, ensure module is firmly seated.
36 FlexStation II Operator’s Manual – Rev. D

2.4 Installing the Pipettor Head
2.4 Installing the Pipettor Head
The next step in installing the instrument is to place the pipettor head into the fluidics module. Use the same procedure for both the 8-channel and 16-channel pipettor heads.
Caution: Use caution during this procedure. Follow these instructions and any instruction labels on the instrument exactly.
DO NOT REMOVE COVERUNTIL POWER IS DISCONNECTED.
FOR TRAINED SERVICE PERSONNEL ONLY.Do not operate instrument
unless all covers are in place.
1 Remove pipettor head from its corrugated plastic carton.
2 Open the inside top panel of the instrument. Turn the quarter-turn fastener on the inside top cover and unfold the cover off the fluidics module to the right.
Opening Inside Top Cover
3 Attach round connector.
a Hold the pipettor head in your left hand and the round, black, 14-pin connector in your right hand.
b Move the pipettor head into its approximate position under the z-stage plate and red mounting knob.
c Maneuver the cable down toward the back of the cavity and align the connector over the receptacle.
d Press the connector in place and screw down the black outer collar over the pins.
FlexStation II Operator’s Manual – Rev. D 37

2 Installation Procedures
14-Pin Connector
Pipettor Head
Attaching Connector
e Press the first four loops of white spiral cord onto the coil hook in the upper left corner of the top panel opening. This secures the cable up out of the way of the pipettor head when it moves about in the fluidics module during operation.
Coil Hook
Securing Spiral Cord to Hook
38 FlexStation II Operator’s Manual – Rev. D

2.4 Installing the Pipettor Head
4 Attach the pipettor head.
a With one hand, pull up on the red knob.
b With the other hand, align the metal plate at the back of the pipettor head, with the screw hole and the two locating pins, underneath the red knob. Slide the plate up into place.
Red Knob
Alignment Pins
Positioning Pipettor Head
c Screw down the red knob, securing the pipettor head so that it hangs in place from the black bar.
Caution: Ensure the red knob (the pipettor retaining nut) is tightened as firmly as possible.
The pipettor head is now installed.
5 Close the fluidics module.
Fold the inside top panel back over the pipettor head and lock the quarter-turn screw in place.
FlexStation II Operator’s Manual – Rev. D 39

2 Installation Procedures
6 Close the top cover.
Bring the top cover back over the fluidics module and snap it into place at the handle on the detection module. Make sure the latch clicks shut.
Eight- orSixteen-Channel
Pipettor Head
Inside Top Panel Opened
Pipettor Head Installed
2.5 Setting Up the Computer
Set up the computer and monitor, according to the instructions that come in their packaging. Place them close to the instrument on the bench.
The power cords for the computer and monitor are provided in the computer packaging. Connect them to the computer hardware (see next section), but not to the power outlet at the wall.
Caution: Do not attach the computer to a power outlet until the computer and the instrument are connected.
40 FlexStation II Operator’s Manual – Rev. D

2.6 Connecting the Cables
2.6 Connecting the Cables
After the instrument is assembled and the computer is set up, proceed to connect the power cords and computer cables.
Caution: Make sure that all assembly is completed before connecting power cord.
FLEXstation™
100-240V~ 5A 50-60 Hz T6.3 AH
s/n FS 01001
CNRTL/C
LR88026
"PATENTS PENDING"
US
Parallel Port (not currently in use)
RS-232 Serial PortPower Cord Receptacle
RS-232 Serial CablePower Cord
Fuse Box CoverPower Switch
Power Cord Locations
1 Locate the instrument power cord (P/N 4400-0002) and the computer serial cable (P/N 9000-0149) in the FlexStation II accessories box.
2 Insert the 8-pin DIN round end of the serial cable into the RS-232 serial port receptacle on the back panel of the instrument. Attach the other end to the COM serial port on the back of the computer.
3 Insert the female end of the power cord into the power receptacle at the rear of the instrument.
4 Connect the instrument power cord a grounded power outlet of the appropriate voltage. Molecular Devices recommends that you use a surge protector between the power cord and the grounded power outlet.
5 Connect the computer hardware power cords to similarly grounded power outlets.
Caution: Be sure no cables run beneath the instrument. Leave at least three inches between the back of the instrument and the nearest objects or surfaces to ensure proper ventilation and cooling.
FlexStation II Operator’s Manual – Rev. D 41

2 Installation Procedures
2.7 Installing the Drawer Adapters
The drawer adapters include the microplate adapters and compound baseplate.
Microplate Adapter Installation
In order to bottom-read a standard 96- or 384-well microplate, you need to install the black microplate adapter in the reading chamber drawer. The black adapter elevates the plate in the drawer. Similarly, use the purple microplate adapter for top reading when using 96- or 384-well plates.
Caution: Incorrect insertion or removal of the adapter may cause damage to the microplate drawer.
1 Turn power to the instrument on.
2 Press the [Reading Chamber] button on the front panel. The reading chamber drawer opens.
3 Hold the adapter so that the label is on the left side facing up.
4 Place the top back (Row A) portion of the adapter into the drawer first. While pushing against the back edge of the adapter, lower the front of the adapter into the drawer.
Compound Baseplate Installation
Place the metal compound baseplate into the bottom of the compound plate drawer.
1 Turn on power to the instrument.
2 Press the [Compounds] button on the front panel. The compound plate drawer opens.
3 Lower the baseplate into the compound drawer with its cutout corner facing the front left corner of the drawer.
Caution: Always remove any plates and adapters from the instrument drawers before moving the instrument or before any service or maintenance procedures. Plates and adapters can easily become jammed inside the instrument, causing damage. For instructions on removing adapters, see section 5.4, Using the Microplate Adapters.
2.8 Installing SOFTmax PRO
Install the SOFTmax PRO software application onto the personal computer according to the instructions in the SOFTmax PRO User’s Manual.
42 FlexStation II Operator’s Manual – Rev. D

3 Operating Procedures
Part 3 explains how to start up the system and how to use the control panel and the SOFTmax PRO application software to configure instrument settings, define experiment protocols, and run the analysis, as described in the following sections.
• 3.1: Overview
• 3.2: Starting Up the System
• 3.3: Setting the Temperature
• 3.4: Setting Up the Software
• 3.5: Configuring Instrument Settings in Flex Mode
• 3.6: Other Software Settings
• 3.7: Reading the Microplate
• 3.8: Shutdown
• 3.9: Other Read Modes
• 3.10: Optimizing Fluorescence Assays in Spectrum Mode
Note: Information in part 3 assumes the instrument and computer are installed and connected properly. For further information, see part 2, Installation Procedures.
FlexStation II Operator’s Manual – Rev. D 43

3 Operating Procedures
3.1 Overview
The following list provides an overview of the basic operating procedures required before using the system.
1 Start up the system.
Turn on the power to the instrument and then the computer (if they are not already on). Launch the SOFTmax PRO application software.
2 Check the temperature or turn on the incubator.
View the Control Panel and note the temperature inside the reading chamber.
Use the control panel to turn on the incubator, if it is required by your experiment. It may take a while for the temperature to stabilize, so do this before configuring other instrument parameters.
Note: Incubator settings can also be set using SOFTmax PRO.
3 Configure instrument settings using SOFTmax PRO.
Configure the read mode, type of analysis, template, etc., as desired. Create sections (Notes and Plates) as needed in the Experiment Section of the Software window.
4 Load prepared pipette tip rack and microplates into drawers.
Load prepared racks and microplates into the drawers. Use drawer adapters as needed.
5 Begin reading.
Using SOFTmax PRO, start the reading.
Detailed instructions for these and other procedures are located in the following sections of part 3.
44 FlexStation II Operator’s Manual – Rev. D

3.2 Starting Up the System
3.2 Starting Up the System
Normally, you do not need to switch off power at the end of the day. If the system will not be used for more than a day, it is best to turn off the instrument. Use the following procedure only if the system has been switched off.
Note: Refer to the SOFTmax PRO operator’s manual for software installation and registration instructions. These instructions assume the software is completely loaded on your computer and you are ready to begin an experiment.
1 Switch on instrument power.
a Locate the power switch for the instrument as shown in the figure below.
b Press the rocker switch to the ON position (I).
FLEXstation™
100-240V~ 5A 50-60 Hz T6.3 AH
s/n FS 01001
CNRTL/C
LR88026
"PATENTS PENDING"
US
Parallel Port (not currently in use)
RS-232 Serial PortPower Cord Receptacle
RS-232 Serial CablePower Cord
Fuse Box CoverPower Switch
Power Switch Location
The instrument automatically performs diagnostic checks to ensure that it is functioning correctly. All three drawers open and shut. After about four minutes, the control panel should display the temperature inside the reading chamber. The reading chamber drawer automatically opens.
After about five minutes, the instrument will be warmed up and ready.
Note: There will be no set point temperature displayed at this point because the incubator has not been turned on.
actual˚C
set pt˚C
Set Temp
Tempon/off
Drawers
readingchamber
compounds
tip rack
Control Panel Ready
FlexStation II Operator’s Manual – Rev. D 45

3 Operating Procedures
2 Switch on host computer and click on the SOFTmax PRO icon.
a Turn on the host computer and allow Windows to start up. b Click on the SOFTmax PRO icon to start the program.
3 View Untitled SOFTmax PRO window.
Note: If you get an error message while the software is starting up, see part 6, Troubleshooting Procedures.
After the SOFTmax PRO screen appears, an Untitled window appears.
SOFTmax PRO New Untitled Window
The first window comes up in Flex mode, with a default template selected.
46 FlexStation II Operator’s Manual – Rev. D

3.2 Starting Up the System
Users new to SOFTmax PRO
If you are new to SOFTmax PRO, familiarize yourself with the software by reading about the default protocol, and running the tutorial described in this window.
Note: Refer to Chapter 10 of your SOFTmax PRO User’s Manual.
Users familiar with SOFTmax PRO
If you are already familiar with SOFTmax PRO software, you can close the Notes section and open the Plate section. You are now ready to begin setting up your experiment protocols.
Untitled Window: Plate Section of Default Template
Note: For instructions on adjusting software settings, see section 3.4, Setting Up the Software
FlexStation II Operator’s Manual – Rev. D 47

3 Operating Procedures
Using the Control Panel
You can interact with the instrument by using the keys on the instrument control panel. All control panel key functions can also be commanded in software.
actual˚C
set pt˚C
Set Temp
Tempon/off
Drawers
readingchamber
compounds
tip rack
Detail of Control Panel with LCD
This
button…
Allows you to…
Tempon/off
Enable or disable the incubator. When the incubator is on, the set temperature and measured internal temperature are shown on the front panel LCD display.
Enter a set point for the temperature in the instrument reading chamber. Use these keys to adjust the temperature up or down, starting at the previous temperature setting (or the default of 37 °C, if no setting had been made). Press either arrow once to increase or decrease the temperature shown in the display by an increment of 0.1°C; press and hold to scroll.
tip rack
Open or close the tip rack drawer.
compounds
Open or close the compound plate drawer.
readingchamber
Open or close the reading chamber drawer. Whether or not the drawer will remain open depends on the incubator setting. If the incubator is off, the drawer will remain open; if the incubator is on, the drawer will close after approximately 10 seconds to assist in maintaining temperature control within the microplate chamber.
Note: If the AutoRead feature is selected in Instrument Setup, the drawer remains closed after the assay plate reading.
This
indicator...
Provides...
actual˚C The actual temperature inside the reading chamber at any given time (the number displayed in the top of the LCD).
set pt˚C The set point temperature you select for the current experiment (the number displayed in the lower portion of the LCD). This number is only displayed when the incubator is on.
48 FlexStation II Operator’s Manual – Rev. D

3.3 Setting the Temperature
3.3 Setting the Temperature
If you want an elevated temperature within the instrument for your experiment, turn on the incubator at least 20 minutes before you plan to start plate reading. Up to 20 minutes may be required for the temperature within the chamber to reach the set point. Turning on the incubator and choosing a temperature set point can be done using the software or the front panel of the instrument.
Range: The instrument will operate with a chamber temperature between 1 °C above ambient and 45 °C. Temperature cannot be regulated at a set point that is outside this range.
Note: It is possible to enter a temperature setting that is outside the operational range, either through software or with the control panel. However, the instrument will not respond with a temperature outside the allowable range.
3.3.1 Displaying Temperature
Two temperatures are displayed in the LCD on the control panel. The upper reading is the temperature measured inside the reading chamber. When the incubator is off, this upper number will be the ambient temperature. The lower reading is the set point, that is, the temperature you desire for the current experiment, and it is displayed when the incubator is enabled.
actual˚C
set pt˚C
Set Temp
Tempon/off
3.3.2 Setting the Temperature with the Control Panel
To enable the incubator, press the [Temp on/off] key on the control panel. The display will indicate that temperature control is on by displaying numbers in the lower half of the LCD. The instrument will set the instrument to the default temperature, 37 °C.
To change the temperature set point, press the up or down arrow keys until the desired temperature set point appears on the display.
The reading chamber temperature will be maintained at the set point until you disable temperature control by touching the [Temp on/off] key again. When the incubator is off, the temperature within the reading chamber returns to ambient.
Note: If the power is shut off to the instrument for any reason, you will need to turn on the incubator again and allow sufficient time (at least 10 minutes) for the control algorithm to fully stabilize the reading chamber temperature.
FlexStation II Operator’s Manual – Rev. D 49

3 Operating Procedures
3.3.3 Setting the Temperature with SOFTmax PRO
You can turn on the incubator with software by selecting Incubator from the Control menu. Or, you can click on the Incubator button on the instrument Status bar. The Incubator dialog window appears.
Incubator Dialog Window
You can leave the temperature setting at the default value or you can type a different value into the highlighted box.
Note: The incubator setting is independent of the protocol being run. Running an experiment does not automatically select the temperature set point. After a reading, the temperature set point, range, and average actual temperature are recorded in the saved file.
50 FlexStation II Operator’s Manual – Rev. D

3.4 Setting Up the Software
3.4 Setting Up the Software
Use the following procedure to check instrument status and settings.
1 Observe SOFTmax PRO Untitled window.
a Observe the Instrument Status icon in the left corner of the Status bar. The icon is purple when the SOFTmax PRO application correctly recognizes the instrument.
b Observe the temperature displayed in the Temperature display field.
Instrument Status Bar
Important! If there is a red ‘X’ in front of the Instrument Status icon, if there is no temperature in the Temperature display field, or if you see other problems, you may need to adjust instrument preferences. See next step.
2 Confirm Flex preferences. Confirm that the instrument is communicating properly with the computer as part of routine software setup.
a Select Preferences from the Edit menu. The Preferences dialog box appears.
Preferences Dialog Window
b Make sure that the serial port setting agrees with the actual port the computer cable (RS 232 cable) is connected to. This is usually Com1.
c The serial comm speed should be 9600 Baud.
Note: Once you read an assay plate in Flex mode, the serial communication speed will change to 57600 Baud.
Important! If you have correctly configured the settings in the Preferences dialog box as described in the steps above, and you are still observing problems (a red ‘X’ over the Flex icon, no temperature in the temperature display box, etc.), then you will have to take further steps to establish communication between the computer and the instrument, or
FlexStation II Operator’s Manual – Rev. D 51

3 Operating Procedures
to resolve a different instrument problem. See part 6, Troubleshooting Procedures, for instructions.
3 View Flex mode setting. The SOFTmax PRO application defaults to Flex mode every time you start the software. You can confirm this mode, if desired, by selecting Instrument Setup from the Control drop-down menu.
You can also click on the Setup button on the Plate Section tool bar to view the Instrument Settings screen.
Instrument Settings Screen
Notice that the [FLEX] button on the right is highlighted.
Note: You can select a different read mode from the Instrument Settings screen by clicking on one of the other four buttons at the top of the window. The rest of these instructions assume you are remaining in Flex mode.
52 FlexStation II Operator’s Manual – Rev. D

3.4 Setting Up the Software
4 Return to the Untitled window. Click [OK] to return to the Untitled window.
Untitled Window, Flex Mode
5 Create or edit Plate section(s). Before continuing with other software settings, create or edit the Plate section(s) you will need. Use New Plate from the Experiment menu in the Menu bar to create more Plate sections.
If you wish to create a plate with settings identical to a particular existing plate, highlight that plate, then select Duplicate from the Edit drop-down menu.
Double click on the Plate word in the Plate Section tool bar to open a dialog box and name your Plate sections.
Note: Refer to SOFTmax PRO user manual for details about this procedure.
FlexStation II Operator’s Manual – Rev. D 53
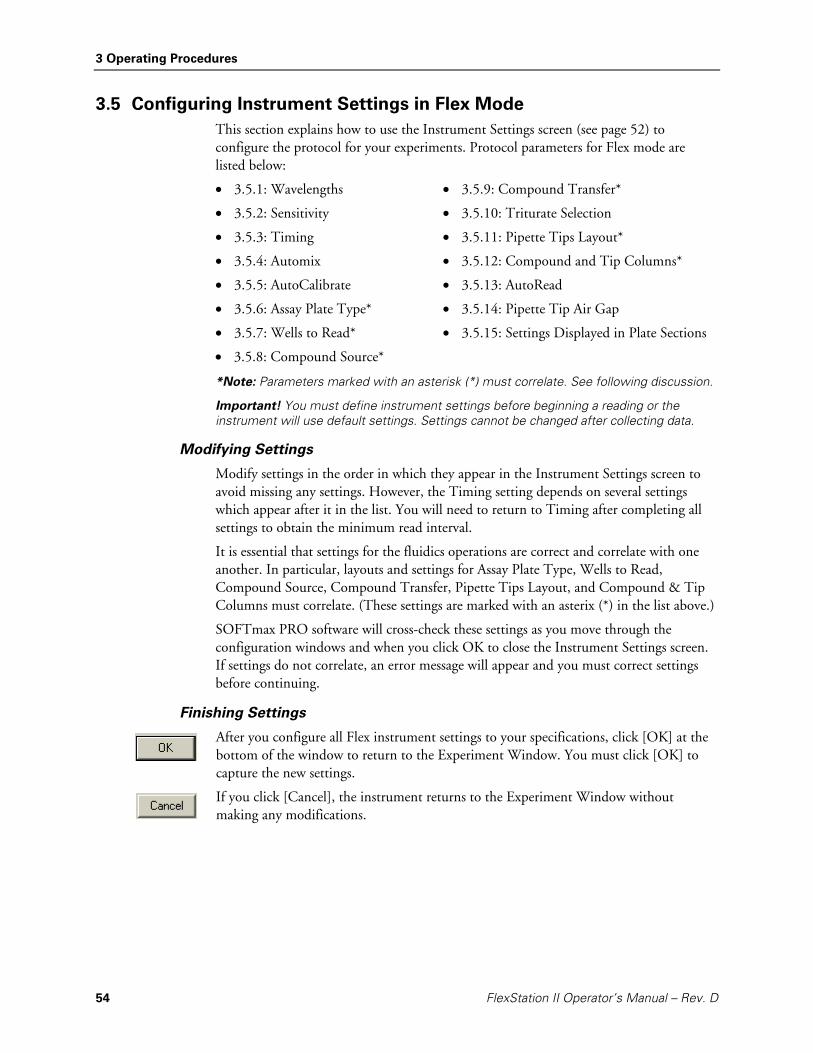
3 Operating Procedures
3.5 Configuring Instrument Settings in Flex Mode
This section explains how to use the Instrument Settings screen (see page 52) to configure the protocol for your experiments. Protocol parameters for Flex mode are listed below:
• 3.5.1: Wavelengths
• 3.5.2: Sensitivity
• 3.5.3: Timing
• 3.5.4: Automix
• 3.5.5: AutoCalibrate
• 3.5.6: Assay Plate Type*
• 3.5.7: Wells to Read*
• 3.5.8: Compound Source*
• 3.5.9: Compound Transfer*
• 3.5.10: Triturate Selection
• 3.5.11: Pipette Tips Layout*
• 3.5.12: Compound and Tip Columns*
• 3.5.13: AutoRead
• 3.5.14: Pipette Tip Air Gap
• 3.5.15: Settings Displayed in Plate Sections
*Note: Parameters marked with an asterisk (*) must correlate. See following discussion.
Important! You must define instrument settings before beginning a reading or the instrument will use default settings. Settings cannot be changed after collecting data.
Modifying Settings
Modify settings in the order in which they appear in the Instrument Settings screen to avoid missing any settings. However, the Timing setting depends on several settings which appear after it in the list. You will need to return to Timing after completing all settings to obtain the minimum read interval.
It is essential that settings for the fluidics operations are correct and correlate with one another. In particular, layouts and settings for Assay Plate Type, Wells to Read, Compound Source, Compound Transfer, Pipette Tips Layout, and Compound & Tip Columns must correlate. (These settings are marked with an asterix (*) in the list above.)
SOFTmax PRO software will cross-check these settings as you move through the configuration windows and when you click OK to close the Instrument Settings screen. If settings do not correlate, an error message will appear and you must correct settings before continuing.
Finishing Settings
After you configure all Flex instrument settings to your specifications, click [OK] at the bottom of the window to return to the Experiment Window. You must click [OK] to capture the new settings.
If you click [Cancel], the instrument returns to the Experiment Window without making any modifications.
54 FlexStation II Operator’s Manual – Rev. D

3.5 Configuring Instrument Settings in Flex Mode
3.5.1 Wavelengths
You can select the number of wavelengths (wavelength pairs) to be read in the Wavelengths options dialog box. You can select as many as four excitation and emission wavelength pairs.
You can select an emission cutoff filter for each pair, or you can use Auto Cutoff.
Selecting more than one wavelength expands the settings box to a maximum of four wavelengths.
Default settings, or previously specified wavelengths will be displayed. You can choose a wavelength from the common choices in the pull-down menu or simply type over an existing setting. You can choose any wavelength within available range.
Scanning monochromator wavelength ranges:
• Excitation λ range = 250–850 nm
• Emission λ range = 360–850 nm
Emission Cutoff Filter Settings
Select an emission cutoff filter that will block as much of the residual excitation light as possible without unduly reducing the fluorescence signal. The cutoff wavelength options are 420, 435, 475, 495, 515, 530, 550, 570, 590, 610, 630, 665, or 695 nm. You can also select None, if you don’t want any cutoff. The cutoff value should be near the maximum emission wavelength (preferably between the excitation wavelength and the maximal emission wavelength) but at least 10 nm greater than the excitation wavelength.
Flex mode offers 14 emission cutoff filters. The nominal value of a cutoff filter is the wavelength at which the filter transmission is 50%. Above that wavelength, transmission is nearly 0%. In general, you should choose a cutoff filter at a wavelength below the emission lambda (Em λ) maximum of the fluorophore. The goal is to block residual excitation light and increase the signal-to-background ratio. Sometimes it is appropriate
FlexStation II Operator’s Manual – Rev. D 55

3 Operating Procedures
to select a cutoff filter at, or even above, the lambda maximum. For example, this is a good idea with fluorophores with small Stokes shift or when multiple fluorophores must be discriminated. For further information, see section 3.10, Optimizing Fluorescence Assays in Spectrum Mode.
Important: If you select an emission wavelength that is close to two times the excitation wavelength (if EM λ = 2 × EX λ) always be sure to use an emission cutoff filter to ensure you are blocking monochromator second order light. If you run an experiment like this without an emission filter, you will always observe an emission peak at two times the excitation wavelength, but it is not fluorescence emission.
56 FlexStation II Operator’s Manual – Rev. D

3.5 Configuring Instrument Settings in Flex Mode
3.5.2 Sensitivity
This setting determines the number of readings that will be performed on each well of the microplate (readings are averaged and the average reading is displayed).
The default setting is six readings per well for fluorescence and can be adjusted between Fast and Precise. Increase reading precision by moving the bar toward the right and increasing the number of readings per well. Decrease the reading precision by moving the bar to the left and reducing the number of readings per well.
Readings per well range: 1 to 30 readings per well.
Typically the default setting is adequate. Only in wells with very low signal will you get improved precision by increasing the number of reads per well.
Note: Increasing the number of reads also increases the total read time.
Sensitivity Settings
The photomultiplier tube (PMT) is a photon detector that detects light, through the use of photoemission and successive instances of secondary emission, to produce enough electrons to generate a strong signal.
PMT Settings
Click in the PMT Sensitivity box to display the menu choices. Settings are manual and limited to High, Medium, or Low.
Set the voltage of the PMT to Low for samples having a higher concentration. Choose High PMT sensitivity for samples with lower concentration.
Note: An additional setting, Automatic, is available only in for Endpoint reads and Spectral scans. Automatic is not available for Kinetic or Flex modes.
FlexStation II Operator’s Manual – Rev. D 57

3 Operating Procedures
3.5.3 Timing
Important! The Timing setting depends on several settings which appear after it in the list. You will need to return to Timing after completing all settings to obtain the minimum read interval.
Timing for readings can be adjusted in this window. You can enter the total run time and the time interval between readings.
Timing Setting Dialog Box
• To change the default values, click in the appropriate box.
• Type in the desired run time or interval. The acceptable run time range is from zero to a thousand (0-1000) seconds.
When you have entered the values you desire, the total Number of Reads calculated by the instrument is displayed automatically. Depending on what sensitivity you have selected in the previous setting box, the Minimum Interval and the Minimum Run Time will automatically adjust. The minimum interval is also dependent on the Compound Transfer settings and the number of wells to be read per column.
Errors: If you select a time out of range, an error message appears:
If you select an inappropriate interval, an error message appears at the bottom of the window:
58 FlexStation II Operator’s Manual – Rev. D

3.5 Configuring Instrument Settings in Flex Mode
3.5.4 Automix
The Automix function is a patented feature that allows you to set automated shaking of the microplate before and/or in between readings.
Select Before First Read to shake the plate before the first wavelength reading only. You can also set Automix to shake the plate Between Reads.
• Click in the box next to the type of shaking you want.
• Type a value in the box on the right to indicate how long shaking should last. Automix time can last from 1 to 999 seconds.
Automix Settings
3.5.5 AutoCalibrate
This checkbox allows you to disable or enable automatic calibration. The default is enabled. Turn autocalibration off to allow the instrument to begin or complete readings more quickly.
Important! Allow the instrument to perform an autocalibration of at least one plate before you disable this function.
Note: The instrument maintains the most recent autocalibration settings in memory (NVRAM) until another autocalibration is performed.
AutoCalibrate Selection
FlexStation II Operator’s Manual – Rev. D 59

3 Operating Procedures
3.5.6 Assay Plate Type
You can select the type of assay plate you want to use from the following menu:
Assay Plate Types
Be sure to select a plate type that matches the type and well configuration of the actual microplate you will be using. Plates do vary, particularly with regard to well bottom height.
Note: If you change the Assay Plate Type setting, within a Plate section, the well assignments stored in the previous template will be discarded. The previously created groups remain, however, so you can select new wells and apply existing groups to them.
Note: The Assay Plate setting takes precedence over all other fluidics module settings and will affect the correctness of other settings.
Important! If you go back and change this setting after you have selected settings that follow, for example, Pipette Tips Layout, Compound Source, or Compound and Tip Columns, the earlier settings may be automatically reconfigured to reflect the new Assay Plate Type and well layout. Be sure to check any earlier assignments to ensure they remain correct.
60 FlexStation II Operator’s Manual – Rev. D

3.5 Configuring Instrument Settings in Flex Mode
3.5.7 Wells to Read
From this dialog box you can choose which plate wells to read in your experiment. You can choose a combination of wells, from one well only to all the wells in a plate. Partial-plate reading may significantly reduce the time required for certain types of readings because the instrument does not have to read the entire plate.
Wells to Read Window
Highlight the wells you want read with the cursor. Wells must be contiguous, and in a rectangular arrangement, but do not need to start in the ‘1’ column. You may choose a partial row or column, or a single well.
Note: In planning your experiment remember that the instrument makes fluid transfers and readings one column at a time. You may want to use partial rows (A–H) rather than partial columns (1–12 or 1–24) for most situations.
Important! Selected wells must be contiguous and in a rectangular arrangement.
FlexStation II Operator’s Manual – Rev. D 61

3 Operating Procedures
If you select a partial-plate for reading, only those wells selected will be visible in the data display. In the figure below, the Plate section reflects that wells A1 through H2 have been selected for reading.
Plate Section with Selected Wells to Read
62 FlexStation II Operator’s Manual – Rev. D

3.5 Configuring Instrument Settings in Flex Mode
3.5.8 Compound Source
This setting allows you to select a compound source plate. Compound plates store fluids that are aspirated (withdrawn from the compound plate) and then injected (dispensed) into the assay plate during the run.
Be sure to select a plate type that matches the type and well configuration of the actual compound plate you will be using and the number of wells selected in the Assay Plate Type setting.
In particular, the well bottom height is different for different types of plates, and selecting plate type correctly is important to prevent jamming pipette tips into the bottom of the well. The instrument assumes a 20-µL pipette height when aspirating from a compound source plate. See illustration below.
Compound Plate
Aspirate Height20 µL Default
(10 µL for 384 wells)
Pipette Tip
Well Bottom Height
Well Bottom Height
Caution: Selecting an incorrect compound plate type can result in pipette tips jamming into the wells and damaging the plate and the instrument.
Compound Source Settings Dialog Window
FlexStation II Operator’s Manual – Rev. D 63

3 Operating Procedures
3.5.9 Compound Transfer
Compound Transfer is an important setting to configure correctly. In addition to configuring precise fluid transfers for your experiments, this dialog box also helps prevent flooding of the assay plate.
The fields in this dialog box will allow you to set volumes for up to three transfers. However, you must be careful to keep in mind the actual maximum volume allowed in the wells you are using as you move through the settings in this dialog box. The maximum cumulative volume depends on the assay plate type you select.
Compound Transfer Dialog Window
Assay Plate Fluid/Initial Volume
Enter a value in the Assay Plate Fluid box that equals the largest initial volume (prior to compound transfers) for any well in the assay plate. This value can be set at 0–269 microliters (µL), although obviously typical values will be about 10–200 µL for a 96-well microplate.
SOFTmax PRO assumes all wells hold the same initial volume. The software uses this value to compute the total volume in each well after all fluids have been dispensed. The software makes this calculation to warn you regarding potential overflow of fluid from the wells.
If there is no fluid volume in the assay plate prior to compound transfers, do not enter a value in this box.
Any value entered is saved with the file but the value is not displayed anywhere except in the Compound Transfer setting.
Values for a 384-well microplate can be set at 0–120 µL.
64 FlexStation II Operator’s Manual – Rev. D

3.5 Configuring Instrument Settings in Flex Mode
Transfers
You can enable up to three compound transfers, within a single well, during a run time. The default value for the number of transfers is one (1). As you enable transfers, color-coded transfer buttons appear next to the Transfers box.
When you select one of the Transfer buttons, that button will appear with a darker gray background. You can then enter the parameters for that particular transfer in the Transfer Settings portion of this dialog box.
Important: There is nothing else in the Transfer Settings portion of the box to indicate which transfer you are configuring. Pay close attention to which transfer settings you are modifying.
Transfer Settings
• Pipette Height (1 to 999 µL): This setting determines the volume of fluid (in microliters, measured from the bottom of the assay plate microplate well) above which the tip of the pipette will remain during the dispensing portion of the transfer event. This setting helps ensure that the tip of the pipette is below the surface of the liquid at the end of the transfer, thus minimizing the possibility that undispensed drops remain on the tips.
Important! As you configure subsequent transfers you must calculate the amount of fluid added and set the pipette height accordingly.
• Rate (1–8): This setting determines the rate at which the fluid is dispensed into the well of the assay microplate. A setting of 1 is equal to 16 µL/second and each subsequent number increases in increments of 16 microliters. Therefore, a setting of 2 is equal to 32 µL/second, etc. A setting of 3 or 4 may help minimize cell damage or dislodgment.
Note: For non-contact dispensing, use a rate of 8 to ensure all liquid is dispensed from pipette tip.
• Volume: This setting determines the volume of material to be dispensed from the source to each individual well chosen to receive that transfer. For a 96-well microplate, the range is 1–200 µL. For a 384-well microplate, the range is 1–30 µL.
Important! Keep in mind the maximum total volume each well can hold as you accumulate volumes with multiple transfers.
FlexStation II Operator’s Manual – Rev. D 65

3 Operating Procedures
• Time Point (Minimum Time to 9999 seconds): This setting determines the time after the start of the reading when the fluid is scheduled to begin being dispensed. Your time point will eventually be your baseline time. (This is not the time interval between transfers.)
Important! The Time Point cannot be smaller than the Minimum Time identified by the software for each transfer.
• Minimum Time: This information line automatically displays the minimum time required before a pipetting event can occur. This minimum time value is cumulative (not an interval between pipetting events). The value is the minimum number of seconds of elapsed time from the beginning of the read. It takes into account the mechanical speed of the pipette head and the time needed to aspirate and dispense fluids, trituration, and Automixing.
The minimum time for the second pipetting event depends on when the first pipetting event occurred. The calculation for the second event starts at the end of the first event and adds to that the total time that will be necessary to aspirate new fluids from the compound plate and dispense them into the assay plate.
Possible Problems
Time point calculations are based on the number of wells read, the tip column and compound column used during transfer. If you select time points that are not long enough (incompatible with the selected volumes and transfer speed) you will see one or both of the following messages:
If you select transfer volumes that add up to more than the maximum can be accommodated by the assay plate, this overflow warning will appear:
Be sure to pay attention to the minimum time value displayed under the time point box for each transfer, as the minimum time values are different depending on which transfer you are configuring.
Note: The Compound Transfer setting works in conjunction with the Compound & Tip Columns setting described below. Until well assignments are made in the Compounds & Columns setting, the Compound Transfer setting will show ‘No targets assigned.’
66 FlexStation II Operator’s Manual – Rev. D

3.5 Configuring Instrument Settings in Flex Mode
3.5.10 Triturate Selection
Note: The choices shown in this section are based on the number of compound transfers you specified in the previous settings window. If no transfers are enabled, no triturate settings are applicable.
Trituration is mixing of the contents of the wells in either or both the compound source and assay plates. Trituration is accomplished by fluid being alternately aspirated from and dispensed back into a well.
• First, select the transfer (if more than one is enabled) during which you wish to perform trituration.
• Then, click in the box to select either Compound Source or Assay Plate, or both.
• You can set the Volume of fluid to be withdrawn from the well and the number of times (Cycles) it will be aspirated and dispensed back into that well.
• In addition, for assay plates, you must also enter a value for the Height at which the trituration occurs. The height setting should take into account the volume selected, so that the tips remain below the liquid surface and do not draw air.
Triturate Settings
If you choose dispense times that are incompatible with the settings in this window, an error message will appear.
Return to the Transfer Settings part of the Compound Transfer settings window to modify the dispensing time.
FlexStation II Operator’s Manual – Rev. D 67

3 Operating Procedures
3.5.11 Pipette Tips Layout
Note: The Assay Plate setting takes precedence over all other fluidics module settings. If you change the assay plate after specifying Pipette Tips Layout, your tip settings will be canceled and the layout will revert to default.
Molecular Devices recommends that you always use a full rack of tips (the default setting). If you use less than a full rack of tips, it is imperative that you configure this setting to correctly match the number and positions of the actual tips inserted in the tip rack drawer, because the instrument cannot determine how many tips are actually present. While it is possible to use a partial rack of tips, and to choose which tips are available in the Pipette Tips Layout setting, do so with caution. Be sure that the layout described in the software matches the actual tips inserted in the tip drawer.
Caution: Molecular Devices recommends using a full rack of tips each time you perform a transfer of fluid in Flex mode. If you mistakenly enable a pipetting function from a tip that is not present, or if you enable more or fewer tips than are actually available, the instrument can malfunction, potentially causing serious damage.
Pipette Tips Layout Settings
The dimension of this layout will be determined by the Assay Plate Type you select.
Highlight the tips you want use with the cursor. Tips must be contiguous, but do not need to start in the ‘1’ column. You cannot choose a partial row or column, or a single well.
Important! Selected tips must be contiguous.
68 FlexStation II Operator’s Manual – Rev. D

3.5 Configuring Instrument Settings in Flex Mode
3.5.12 Compound and Tip Columns
The choices in this window depend upon the number of transfers chosen in the Compound Transfer window. When one or more transfers are enabled, these settings allow you to choose the tips and compounds that will be used for transfers.
The settings in this window are either automatically assigned by the software or you can manually assign them into any configuration you require.
Compound & Tip Columns Automatically Assigned
SOFTmax PRO automatically enters information in the Compound & Tip Columns window taking into consideration the number of transfers, the Wells to Read section, and the Pipette Tips Layout selected area already selected. The software assumes fluid will be aspirated from the compound plate starting with the first available column indicated in the Pipette Tip Layout. Aspirated fluid will then be dispensed to the first available column indicated in the Wells to Read selection.
The software assumes:
• All columns in the Wells to Read selection should receive fluid;
• The fluids are transferred from left to right; the read-transfer-read sequence in each column is initiated only after the previous column’s read-transfer-read event is completed (the total read time for that column);
• The fluid transfer targets are cumulative from transfer to transfer (that is, the second transfer’s targets start with the next available clean tip and untargeted compound column rather than reusing tips and compound columns targeted by the preceding fluid transfer); and
• Each fluid transfer will use a new tip.
The software assumes that all of the columns in the Wells to Read area will receive fluid during the initial transfer. The Tips target grid will be filled left to right starting with the first available tip column and incrementing the Tip target by one until all columns in the Wells to Read selection have been filled.
FlexStation II Operator’s Manual – Rev. D 69

3 Operating Procedures
Compound & Tips Columns Window with Three Transfers
In the illustration above, the instrument is configured for three fluid transfers as follows:
• Wells to Read selection of columns 1 through 4, • Compound Source selection of a 12-column compound plate, • Pipette Tips Layout selection of a full rack of tips.
From those settings, SOFTmax PRO selects tip and compound columns 1 through 4 for the first transfer. The second transfer uses the next four columns (5 through 8) and the third transfer employs the remaining four unused columns (9 through 12).
When the number of columns configured in the Wells to Read setting is the same or greater than the number of columns of both Tips and Columns, the algorithm fills the Tips and Columns targets as before (that is, each assay plate column is targeted with a new tip column and new compound column until all tips and columns have been targeted). SOFTmax PRO does not fill beyond the limitations of the available Tips and Compound columns. Once all available tips and compound columns have been assigned, SOFTmax PRO simply stops assigning targets.
This setting window displays one, two, or three transfers (with blue, pink, and green color-coded tips to match the setting made in the Compound Transfer window) and two pop-up menus: Tips Column and Compound Column.
• The Tips Column menu displays a sequence of numbers that match the selected columns in the Pipette Tips tab.
• The Compound Column menu displays numbers from 1 through the number of columns of the compound plate or the number of troughs selected in the Compound Source tab.
A Tips or Compound row displays 12 columns to represent the number of columns in a 96-well assay plate. The actual number of columns and their placement further depends on the number of columns and their locations as selected in the Wells to Read settings window.
70 FlexStation II Operator’s Manual – Rev. D

3.5 Configuring Instrument Settings in Flex Mode
Manually Assigning Tips and Compounds
Alternatively to automatic assignment, you may assign any tip column and any compound column to correspond to any assay plate column.
To assign a tip to an assay plate well, highlight one or more tip cells and select one of the items available in the Tips pop-up menu. The tip column selected in the pop-up menu will be shown as a number in the selected Tip row(s). Choosing the Fill option at the top of the menu fills the selected cells with the tip numbers that correspond to the same column numbers (tip 3 with column 3, etc.). Note that Fill does not take into account the actual tips that are available if less than a full rack is used, whereas the choices in the menu beneath Fill represent the actual tip numbers that are listed as being available in the Pipette Tips Layout tab.
Similarly, to assign a compound, highlight one or more compound cells and select one of the items from the Compound pop-up menu.
The wells shown in this settings window convey graphically the volumes of liquid in the assay plate for each pipetting event. Using the color associated with each event, the compound settings display the dispensed compound volume as a percentage of the total assay well volume. If you entered an initial volume (in the Compound Transfer settings window), that will be shown as a gray fill. As the liquid volumes are cumulative, the first event’s volume is shown above the initial liquid volume (if any), the second event’s volume will be shown above the first, and the third event’s volume above the second.
To deselect a tip or compound assignment, first select the appropriate cell(s) and then press Backspace on the computer keyboard. To change an assignment, select the well(s) and choose new values or type a value on the keyboard.
Important! If you have multiple wells selected, and you type a value, that value will be shown in the first selected well and subsequent wells will increment to the next higher value. Again, this does not take into account the actual pipette tips shown to be available in the Pipette Tips Layout selection.
FlexStation II Operator’s Manual – Rev. D 71

3 Operating Procedures
3.5.13 AutoRead
The AutoRead feature allows automatic readings of subsequent Plate sections in the order in which they appear in the experiment. Click in the check box to enable AutoRead. You can set an interval between automatic plate readings by typing a number in the Delay box.
Setting AutoRead Delay
3.5.14 Pipette Tip Air Gap
To set the pipette tip air gap (the volume between the end of the pipette tip and the bottom of the liquid in the tip) select Select Air Gap from the Control menu to reveal the dialog box.
The value allowed is 0–200 µL for 96 wells and 0–30 µL for 384 wells.
Air Gap
Pipette Tip
Setting Pipette Tip Air Gap Pipette Tip Air Gap
72 FlexStation II Operator’s Manual – Rev. D

3.5 Configuring Instrument Settings in Flex Mode
3.5.15 Settings Displayed in Plate Sections
The Plate section will provide visual feedback on all instrument settings in the Instrument Settings Box, the gray area to the far right of the Plate section. Information about wells to read and transfer settings are also displayed in the Data Display section.
For example, the figure below shows a Plate section with three sets of transfers. The wells with blue squares in their upper left corners were selected for the first transfer, wells with red triangles (upper right corners) were selected for the second transfer, and wells with a green triangle (lower left corner) were selected for the third transfer.
Plate section with wells selected for injection
The Plate section also provides information on the transfer settings and the compound sources. The information will be carried below the plate table.
FlexStation II Operator’s Manual – Rev. D 73

3 Operating Procedures
3.6 Other Software Settings
There are other software settings that deal with data calculation and display. In contrast to Instrument Setup parameters, these data settings can be configured before, during, or after running an experiment. These include:
• Setting reduction parameters
• Setting data display parameters
• Using the Template Editor
Molecular Devices strongly recommends that you define a template and set the reduction and display parameters prior to reading the assay plate, because these parameters determine how data is displayed and analyzed. You can set up or modify templates, reduction and display parameters after collection, but this may be complicated or confusing.
Refer to your SOFTmax PRO User’s Manual for information about using the software to continue to prepare for an experiment.
Note: While it is strongly recommended that you use the Template Editor before running an experiment, it is not strictly necessary. The values received from the instrument are raw fluorescence, and are not affected by settings in the Template Editor.
74 FlexStation II Operator’s Manual – Rev. D
3.7 Reading the Microplate
3.7 Reading the Microplate
Loading Tips and Microplates
Prepare your tip rack, compound plate, and the assay plate you want to analyze and load them into the instrument.
Caution: Be sure the underside of the assay plate is dry before you place it in the reading chamber drawer. Damage to the lower read head can occur from liquids that come into contact with it.
Biohazard: If the microplate has fluid on the underside, dry it using a paper towel (or equivalent) before placing it in the drawer.
1 Open the appropriate drawer.
Open the drawers by either manually pressing the appropriate drawer buttons on the control panel, or by using SOFTmax PRO.
2 Insert tips and plates.
Insert the filled tip rack and plates into the drawers, placing well A1 into the upper left corner of the drawer as you look at it.
• Make sure the compound plate is flat against the compound baseplate.
• Make sure the assay plate is flat against the black adapter (for 96- and 384-well microplates), or the drawer bottom (for 6, 12, 24, or 48-well microplates and non-Flex applications).
Note: For further information, see sections 5.4, Using the Microplate Adapters, and 5.5, Using the Compound Baseplate.
3 Close drawers.
Press the buttons on the control panel or use SOFTmax PRO to close the drawers again.
FlexStation II Operator’s Manual – Rev. D 75

3 Operating Procedures
Starting the Reading
Important! Be sure you have completed all desired settings configurations before starting the reading. You cannot change settings during reading, or after reading and data collection are complete.
You can start reading at any time after defining instrument settings.
To read the microplates, click on the [Read] button on the SOFTmax PRO tool bar or select Read from the Control menu. You can also type Ctrl + R on the keyboard.
Selecting a Plate
If you have created more than one Plate section, and no Plate section is active, choosing the [Read] command will display a dialog box requiring you to choose which section to read.
Select the correct section and click [OK]. If a Plate section is active, starting a read will read the active plate.
Replacing Data in a Plate
If you select a Plate section that already contains data and select the [Read] command, an alert appears, requiring you to confirm that you want to replace the data with data from the new reading.
• Click [Replace] to proceed with the reading and replace previous data with new data.
• Click [Cancel] to stop the reading from beginning.
76 FlexStation II Operator’s Manual – Rev. D

3.7 Reading the Microplate
View Experiment Progress
During the reading, the Status bar will display information about the current reading.
The [Read] button changes to [Stop]. Clicking on the [Stop] button will halt the reading.
The plate name and icon appear to indicate which Plate section is currently being read.
This box displays the amount of time elapsed since the beginning of the reading.
This box displays the portion of the reading currently under way.
Data Display
You can observe the gradual accumulation of data in the Plate section of the SOFTmax PRO window. The values read by the instrument will appear in the data display of the Plate section as they are received from the instrument to the software (in real time).
See SOFTmax PRO User’s Manual for information about how to change the data display.
FlexStation II Operator’s Manual – Rev. D 77

3 Operating Procedures
3.8 Shutdown
When a reading is completed, you can perform more readings, or shut down the instrument.
Shutting down the FlexStation II instrument includes the following steps:
• Make sure all three drawers are empty of pipette tips and trays.
• Clean up any spills that may have occurred during the day’s experiments.
• Save any data files desired in SOFTmax PRO.
• Turn off the instrument and/or the computer according to your laboratory’s practice.
Note: Normally, you do not need to switch off the power at the end of the day. If the system will not be used for more than one day, it is best to turn off the instrument.
3.9 Other Read Modes
In addition to operating the FlexStation II instrument in Flex mode (fluidics + read), the instrument can operate in four read-only modes:
• Endpoint Mode • Kinetic Mode • Spectrum Mode • Well Scan Mode
Instrument Mode Icons
Refer to Chapter 5 of your SOFTmax PRO User’s Manual for general information on how to use the FlexStation II instrument to read microplates in one of these four read modes.
78 FlexStation II Operator’s Manual – Rev. D

3.10 Optimizing Fluorescence Assays in Spectrum Mode
3.10 Optimizing Fluorescence Assays in Spectrum Mode
Introduction
The optimum instrument settings for detection of a particular fluorophore depend on a number of different factors. Settings that can be adjusted for assay optimization include the excitation and emission wavelengths, emission cutoff filter, readings per well, the PMT voltage, the temperature of the reading chamber, and the length of delay time for time-resolved fluorescence.
• The excitation and emission wavelengths may be set in 1-nm increments within the range of the instrument (250–850 nm for excitation and 375–850 nm for emission). A procedure to optimize excitation and emission wavelengths for a given assay is outlined below.
• The 14 emission cutoff filters assist in reducing background. Sources of back-ground include stray excitation light and native fluorescence of plate materials, sample constituents, and solvents. SOFTmax PRO has default settings (see table following) for Endpoint and Kinetic modes, which you can override if desired. The spectral scan mode default uses no cutoff filter.
• The number of readings per well may vary between 1 (used for a quick estimate) and 30 (for more precise measurements). The default number of readings per well varies with the read mode: for fluorescence, the default is 6; for luminescence, the default is 30; for time-resolved fluorescence, the default is 20.
• The voltage of the photomultiplier tube may be set to low (for higher concentration samples), medium, or high (for lower concentration samples) in all read modes. In Endpoint and Spectrum mode, there is an additional setting, automatic, in which the instrument will automatically adjust the PMT voltage for varying concentrations of sample in the plate.
Other important factors that are independent of the instrument but which affect assay optimization include the Stokes shift. When the Stokes’ shift is very small, optimizing the excitation and emission wavelengths and correct cutoff filter choices are very important.
Optimizing Excitation and Emission Wavelengths with Spectrum Scanning
Optimizing excitation and emission wavelengths is a simple three step procedure that maximizes the fluorescence signal and minimizes background noise.
• Preliminary excitation scan to find peak excitation wavelength (λ).
• Preliminary emission scan to find peak emission wavelength (λ).
• Emission scan with Autofilter function selected to optimize signal to background ratio.
• Optional excitation scan with both Autofilters functioning to further optimize signal to background ratio.
This process requires samples in the microplate that contain moderate concentrations of the fluorophore, and samples representative of the background (i.e., buffer) without fluorophore.
FlexStation II Operator’s Manual – Rev. D 79

3 Operating Procedures
1 Preliminary Excitation Scan (Scan Figure 1)
a Using SOFTmax PRO, set up a Plate section for a fluorescence read, spectrum mode, Em Fixed/Ex Scan, with no cutoff filter (default), and medium PMT.
b Set emission wavelength based on the tentative value from the literature (or from a customary filter set used to measure your fluorophore) and add 30 nm. If the emission wavelength is not known, select a tentative emission wavelength about 50 nanometers greater than the absorbance maximum of the fluorophore. If necessary, the absorbance maximum can be determined by performing a spectral scan in a UV/Vis spectrophotometer.
Scan Figure 1
c Set excitation scan to start/stop approximately 50 nm below/above the tentative excitation value obtained from the literature (or the customary excitation filter).
d Set step increment to 1 or 2 nm. (You may choose to do a preliminary scan with a 10-nm increment to determine the approximate peak location, and then repeat the scan over a narrower wavelength range with a 1 or 2 nm increment.)
e Perform scan and view the results as a plot of emission fluorescence vs. excitation wavelength. Note the excitation wavelength at the emission peak and the maximum RFU value.
Note: If an error message reporting missing data points occurs, it may be due to possible saturation reported by SOFTmax PRO at the end of the spectral scan. Reset the PMT to ‘low’ and rescan the sample (scan the buffer blank with the PMT set to ‘medium’ or ‘high’). If the error occurs after scanning with the PMT set to ‘low,’ it may be necessary to dilute the sample.
Note: If the excitation scan shows no apparent peak, change the PMT setting to ‘high’ and rescan the sample. If the spectral scan still shows no apparent peak, adjust the Y-scale of the zoom plot so that the plot fills the graph.
f Select the optimal excitation wavelength. If the excitation peak wavelength and emission wavelength are separated by more than 30 nm, use the excitation peak wavelength value. If the excitation and emission wavelengths are less than 30 nm apart, use the shortest excitation wave-length that gives 90% maximal emission.
80 FlexStation II Operator’s Manual – Rev. D

3.10 Optimizing Fluorescence Assays in Spectrum Mode
(Follow the plot to the left of the peak until the RFU value falls to approximately 90% of the maximum and then drop a line from the 90% point on the plot to the x-axis – refer to the figure below.)
RFU
Wavelength
RFU at 90% of max λ
max λ
90% of max λ
Plot of RFU vs. Wavelength
2 Preliminary Emission Scan (Scan Figure 2)
The preliminary emission scan without filters allows you to see the actual emission spectrum peak.
a In SOFTmax PRO, set up a second Plate section for a fluorescence read, spectrum mode, Ex Fixed/Em Scan, with no cutoff filter (default), and medium PMT.
b Set excitation wavelength to the value determined in 1f above.
c Set emission scan to start/stop approximately 50 nm below/above the tentative emission value obtained from the literature (or existing filter pair).
d Set step increment to 1–2 nm (or do a preliminary scan with a 10-nm increment to determine the approximate peak location and then repeat the scan over a narrower wavelength range using a 1–2 nm increment.)
e Perform scan and view results as a plot of fluorescence vs. emission wavelength.
Scan Figure 2
FlexStation II Operator’s Manual – Rev. D 81

3 Operating Procedures
3 Emission Scan with Emission Autofilter (Scan Figure 3)
When you use Autofilter in Endpoint mode for the emission cutoff filter, a filter is automatically selected that will block as much of the residual excitation light as possible without unduly reducing the fluorescence signal.
In Spectrum mode, the default is ‘no filter’. You can determine the optimum filter, as follows:
a First select an emission filter that is at least 20 nm larger than the selected excitation wavelength.
b Complete emission scan from the filter wavelength over a range of 50 nm to 100 nm larger.
c Compare signal to buffer background in the scan and choose the wavelength with the maximum ration.
d You may want to repeat the scan with the next larger emission filter and compare results. An example is shown in the Scan Figure 3. Note that the optimal emission wavelength is 525 nm.
Scan Figure 3
82 FlexStation II Operator’s Manual – Rev. D

3.10 Optimizing Fluorescence Assays in Spectrum Mode
The alternative cutoff wavelength choices are listed in the following table. The cutoff value should be near the maximum emission wavelength (preferably between the excitation wavelength and the maximal emission wavelength).
Automatic Cutoff Selection Endpoint and Kinetic Modes
# Lambda λ (nm) Emission λ (nm)
1 None < 415
2 420 415-434
3 435 435-454
4 455 455-474
5 475 475-494
6 495 495-514
7 515 515-529
8 530 530-549
9 550 550-569
10 570 570-589
11 590 590-609
12 610 610-629
13 630 630-664
14 665 665-694
15 695 695-850
Emission Cutoff Filter Default Settings
Note: For Spectrum mode, the default is Manual (that is, no automatic cutoff).
FlexStation II Operator’s Manual – Rev. D 83

3 Operating Procedures
4 Optional Excitation Scan with both Autofilters (Scan Figure 4)
In some Assays, a final excitation scan with the desired emission filter and the automatic excitation filter will show additional background reduction. In the example (Scan Figure
4), note that the 445 nm peak, occurring in all but an empty well, is the Raman spectrum for water. Note that the optimal excitation wavelength is 485 nm.
Scan Figure 4
5 Comments
a In endpoint or kinetic fluorescence modes, the Autofilter feature will generally select the same cutoff filter wavelength as will the above optimization method. If desired, however, you may specify the cutoff filters manually.
b For emission wavelengths where there is no cutoff filter (less than 420 nm or greater than 695 nm) experimental iteration is usually the best method of determining the optimal emission and excitation wavelengths. Begin optimization by performing steps 1–3 above. For excitation wavelengths greater than 695 nm, use the 695 emission cutoff filter. Note that the emission optics block all wavelengths below 360 nm.
84 FlexStation II Operator’s Manual – Rev. D

4 Applications
Keep your Application Notes and Protocols in this part of your Operator’s Manual for handy reference.
Protocols
Stay up to date with Molecular Devices’ FlexStation II Application Notes and Protocols. You can locate these on the company’s web site: www.moldev.com.
Data Management
See the SOFTmax PRO User’s Manual for all information regarding data management.
FlexStation II Operator’s Manual – Rev. D 85

4 Applications
86 FlexStation II Operator’s Manual – Rev. D
5 Service and Maintenance Procedures
Part 5 provides procedures for regular maintenance that the FlexStation II instrument will need, as well as instructions for contacting Technical Support.
• 5.1: Technical Support
• 5.2: Moving the Instrument
• 5.3: Cleaning the Instrument
• 5.4: Using the Microplate Adapters
• 5.5: Using the Compound Baseplate
• 5.6: Replacing Fuses
• 5.7: Replacing the Flash Lamp
• 5.8: Long-Term Shutdown
Service-Trained Users: Whenever the following warning message appears, a service-trained user must perform the procedure to ensure user safety and to prevent instrument damage.
Example: Warning! The following procedures must be completed by a service-
trained user. Do not attempt the following procedures if you have not been trained properly by appropriate Molecular Devices Personnel.
5.1 Technical Support
Molecular Devices Corporation is a leading worldwide manufacturer and distributor of analytical instrumentation. We are committed to the quality of our products and to fully supporting our customers with the highest possible level of technical service. In order to fully benefit from our technical services, please complete the registration warranty card and return it to the address printed on the card.
If you have any problems using the FlexStation II instrument in the United States, contact the Technical Services group at 1-800-635-5577; elsewhere contact your local representative.
Warning! All maintenance procedures described in this manual can be safely performed by qualified personnel. Maintenance not covered in this manual should be performed only by a Molecular Devices representative.
Warning! Turn off the power switch and disconnect the power cord from the main power source before performing any maintenance procedure that requires removal of any panel, cover, or disassembly of any interior instrument component.
FlexStation II Operator’s Manual – Rev. D 87
5 Service and Maintenance Procedures
5.2 Moving the Instrument
If you need to relocate the FlexStation II instrument, follow these steps.
Warning! The FlexStation II instrument weighs approximately 55 pounds. To avoid injury, it is recommended that two people lift the instrument together, using proper lifting techniques.
1 Ensure that the new location meets the proper specifications as described in section 2, Installation.
2 Remove any microplates, (and adapters, if any), reservoirs, and any tips from all three drawers and then close the drawers.
Caution: Remove all plates and adapters before moving the instrument. Anything left in the instrument could come loose and jam inside the instrument, causing damage.
3 Be sure reading chamber screws are still in place. Contact Technical Service if reading chamber screws have been removed.
4 Be sure all covers are closed and securely fastened.
5 Turn off the power switch and unplug the power cord from the source and from the receptacle on the back of the instrument.
6 Disconnect the instrument from the computer and any printer.
7 Remove the fluidics module. For related instructions, see section 2.3, Installing the Fluidics Module.
8 Depending on the distance that you will be moving the instrument, you may wish to repackage the FlexStation II instrument in its original shipping cartons. Otherwise, carry the instrument or place it on a rolling cart to transport it.
5.3 Cleaning the Instrument
Biohazard! Wear gloves during any cleaning procedure that could involve contact with either hazardous or biohazardous materials or fluids.
Periodically, you should clean the outside surfaces of the FlexStation II instrument using a cloth or sponge that has been dampened with water. Do not use abrasive cleaners. If required, clean the surfaces using a mild soap solution diluted with water or a glass cleaner and then wipe with a damp cloth or sponge to remove any residue.
Caution: Do not spray cleaner directly onto the instrument or into any openings.
If needed, clean the reading chamber drawer using a cloth or sponge that has been dampened with water.
Caution: Never clean the inside of the instrument. Do not allow excess water or other fluids to drip inside the instrument.
Cleaning Up Spills
Caution: Be sure the power is off to the instrument and the power cord is detached from the rear panel before opening any covers or panels.
If fluids spill into the bottom of the reading chamber (when the reading chamber drawer is outside the instrument), they will be directed to a tray at the bottom of the instrument, from which they will exit to the bench or counter beneath the instrument. Wipe up spills immediately. Clean the exterior of the unit and the drawer as necessary.
88 FlexStation II Operator’s Manual – Rev. D

5.4 Using the Microplate Adapters
5.4 Using the Microplate Adapters
Microplate Adapter Installation
If you are reading standard 96- or 384-well microplates, you need to install a microplate adapter in the reading chamber drawer. The black adapter elevates the plate in the drawer for optimum performance with standard 96- or 384-well microplates in bottom-read mode. The purple adapter optimizes performance with standard 96- or 384-well microplates in top-read mode.
Caution: Incorrect insertion or removal of the adapter may cause damage to the microplate drawer.
1 Turn power to the instrument on.
2 Press the [Reading Chamber] button on the front panel, or select Open Drawer from the Control menu.
3 Hold the adapter so that the label is on the left side facing up.
4 Place the top back (Row A) portion of the adapter into the drawer first. While pushing against the back edge of the adapter, lower the front of the adapter into the drawer.
Removing the Microplate Adapter
If you are reading ‘high profile’ (6, 12, 24, or 48-well) plates and the adapter is in the drawer, you will need to remove the adapter.
1 Turn power to the instrument on.
2 Press the [Reading Chamber] button on the front panel, or select Open Drawer from the Control menu.
3 Hold the adapter at the front (long side of the drawer) and push toward the back (Row A).
4 Lift the front (Row H) of the adapter and remove it from the drawer.
5.5 Using the Compound Baseplate
To use the compound baseplate, place the metal baseplate into the bottom of the compound plate drawer under the compound plate.
1 Turn power to the instrument on.
2 Press the [Compounds] button on the control panel, or select Open Compound Drawer from the Control menu.
3 Lower the compound baseplate into the compound drawer with its cutout corner facing the front left corner of the drawer.
Remove the compound baseplate in the same way.
Caution: Always remove any plates and adapters from the instrument drawers before moving the instrument or before any service or maintenance procedures. Plates and adapters can easily become jammed inside the instrument, causing damage.
FlexStation II Operator’s Manual – Rev. D 89

5 Service and Maintenance Procedures
5.6 Replacing Fuses
Fuses burn out occasionally and must be replaced. If the instrument does not seem to be getting power after switching it on (the LCD shows no display), first check to see whether the power cord is securely plugged in to a functioning power outlet and to the receptacle at the rear of the instrument. If power failed while the instrument was already on, check that the power cord is not loose or disconnected and that power to the power outlet is functioning properly. If these checks fail to remedy the loss of power, follow the steps listed below to replace the fuses. Spare fuses are shipped with the instrument.
If you no longer have spare fuses, you may obtain new ones from Molecular Devices (part number 4600-0029) or from a local hardware store. Make sure fuses are rated slowblow (6.3-amp).
Use the following procedure for replacing the fuses.
1 Disconnect power to the instrument.
a Turn off power to the instrument. Remove the power cord from the outlet and from the instrument power cord receptacle.
b Remove the printer cable and computer cable (if connected) from the back of the instrument.
2 Locate the fuse box.
a Turn the instrument if necessary to access the rear panel.
b On the left-hand side of the rear panel (viewed from the back) is the power switch, fuse box, and power cord receptacle.
FLEXstation™
100-240V~ 5A 50-60 Hz T6.3 AH
s/n FS 01001
Fuse Box Cover
Fuse Box Location
3 Remove fuse box.
a Press to the right of the black plastic cover of the fuse box to release it. Pull the fuse box cover away from the instrument. The fuse box will begin to slide forward.
b Continue gently pulling the fuse box forward until it is free of the instrument.
90 FlexStation II Operator’s Manual – Rev. D

5.6 Replacing Fuses
4 Replace fuse(s).
a Once the fuse holder is out of the instrument, you can see that it contains two fuses.
b It is possible that only one of the fuses may have blown. Molecular Devices recommends that you replace both fuses, however, to ensure continued proper operation. Pull both fuses out of the holder and discard them.
c Insert new slow-blow rated fuses into the fuse holder. Either end of the fuse may be forward.
5 Replace fuse box.
a Insert the fuse box into the opening in the instrument, making sure that the fuses are on the right side (toward the power receptacle).
b Press the fuse box into place, making sure the cover snaps closed.
6 Reconnect the instrument.
a Plug the power cord to the back into the instrument and then into the wall outlet.
b Reconnect other cables previously disconnected.
FlexStation II Operator’s Manual – Rev. D 91

5 Service and Maintenance Procedures
5.7 Replacing the Flash Lamp
The flash lamp should be replaced when an error message appears in SOFTmax PRO to indicate replacement is necessary.
Caution: This procedure requires trained service personnel. The instrument warranty may be voided unless lamp is replaced according to these Instructions.
Caution: Use caution during this procedure. Follow these instructions and any instruction labels on the instrument exactly.
LAMP COVERDisconnect power cord
before removing
Requires trained service personnel.WARRANTY MAY BE VOIDED
unless lamp is replaced according toinstructions in the operators manualunder "Flash Lamp Replacement".
Lamp Cover
Flash Lamp Location
Tools Required
• Allen and/or ball-driver hex wrenches 3/32", 9/64", 5/32" • #2 Phillips screwdriver
1 Turn off power.
Turn off the instrument power switch and unplug the power cord and the computer cable from the rear of the instrument.
2 Remove lamp cover.
a Remove the Phillips head screw on the top of the cover and lift the cover off vertically.
b Set the cover aside, and keep track of the screw.
Note: There is an interlock switch, which is depressed by the lamp cover, which interrupts power to the flash lamp automatically when the cover is removed.
92 FlexStation II Operator’s Manual – Rev. D

5.7 Replacing the Flash Lamp
Lamp Cover
Screw
Flash Lamp Assembly
Removing the Lamp Cover
3 Loosen screws on flash lamp assembly.
a Use a 9/64" hex Allen wrench to loosen the clamp screw, located on the lamp mounting block and facing the rear of the instrument. Leave the clamp screw in place.
b Use a 5/32" hex ball end driver or Allen wrench to loosen the two vertical-mounting cap screws that are holding the Litepac mounting block to the base plate. They are located toward the inside of the lamp’s mounting box. The two cap screws will stay in a raised position (spring loaded) so that you can slide out the entire Litepac without the screws getting caught in the holes.
Note: You may need a flashlight to see the cap screws.
Clamp Screw
Flash Lamp Assembly
Vertical Mounting Screws(Spring-loaded, but shownraised here for identification)
Removing Litepac Mounting Block Screws
FlexStation II Operator’s Manual – Rev. D 93

5 Service and Maintenance Procedures
4 Open top cover.
Open the top cover of the instrument to provide better access and clearance to the lamp’s mounting box. This will make it easier to remove the lamp assembly.
5 Remove flash lamp assembly.
Slide the lamp assembly horizontally out the side of the instrument and lay it on its heat sink fins, leaving the orange electrical cord connected.
Mounting Block
Mounting Screws(Spring-loaded)
Flash Lamp
Removing the Flash Lamp Assembly
6 Withdraw lamp from assembly.
a Use a 3/32" Allen wrench to remove the two screws that hold down the diamond shaped retainer. Be careful not to lose screws.
Flashlamp Retainer
Flashlamp
Window
Copper Coil Spring
Multi-pin Socket
Withdraw Lamp
94 FlexStation II Operator’s Manual – Rev. D

5.8 Long-Term Shutdown
b Withdraw the silver-colored lamp from its multi-pin socket by gently rocking it and pulling it upward.
c Notice the location of the copper coil spring and keep it at hand.
7 Install new lamp.
a Remove the new lamp from its packaging; be careful not to touch the lamp window.
Caution: Do not touch the window at any time.
b With the copper coil spring in place around the socket, carefully align the lamp pins in the proper orientation according to the pin pattern. Again, do not touch the window.
c Install the lamp with a gentle rocking motion and steady downward pressure.
d Replace the diamond shaped lamp retainer over the new lamp, and install the 2 screws using the 3/32" Allen wrench.
e Tighten the two screws securely and evenly, compressing the coil spring until the lamp is seated.
8 Replace the lamp assembly.
a Tilt up the lamp assembly and line up the lamp with the bore of the mounting block.
b Slide the lamp all the way into the block, orienting the assembly to clear the base plate. Slide it in until it stops.
c Tuck the orange power cord inside, behind the assembly.
9 Close the instrument top cover.
10 Tighten the screws.
a Use the 5/32" hex ball-driver to tighten the two vertical mounting screws (which should still be captured). Tighten them very firmly.
b Tighten the clamp screw snugly but not tightly. Use caution not to over-tighten.
Caution: Do not over-tighten the clamp screw or the lamp could crack inside.
11 Replace lamp cover.
a Place the plastic lamp cover over the opening. Be careful not to pinch the orange power cord if it is not tucked away.
b Replace and install the screw.
12 Replace cords.
Plug in the power cord and the computer cord.
5.8 Long-Term Shutdown
If you will not be using the FlexStation II instrument for an extended period of time, clean the external surfaces of the instrument before storage.
Be sure the instrument is emptied of all plates and tips before storage.
Keep cables and accessories with the instrument during storage.
FlexStation II Operator’s Manual – Rev. D 95

5 Service and Maintenance Procedures
96 FlexStation II Operator’s Manual – Rev. D
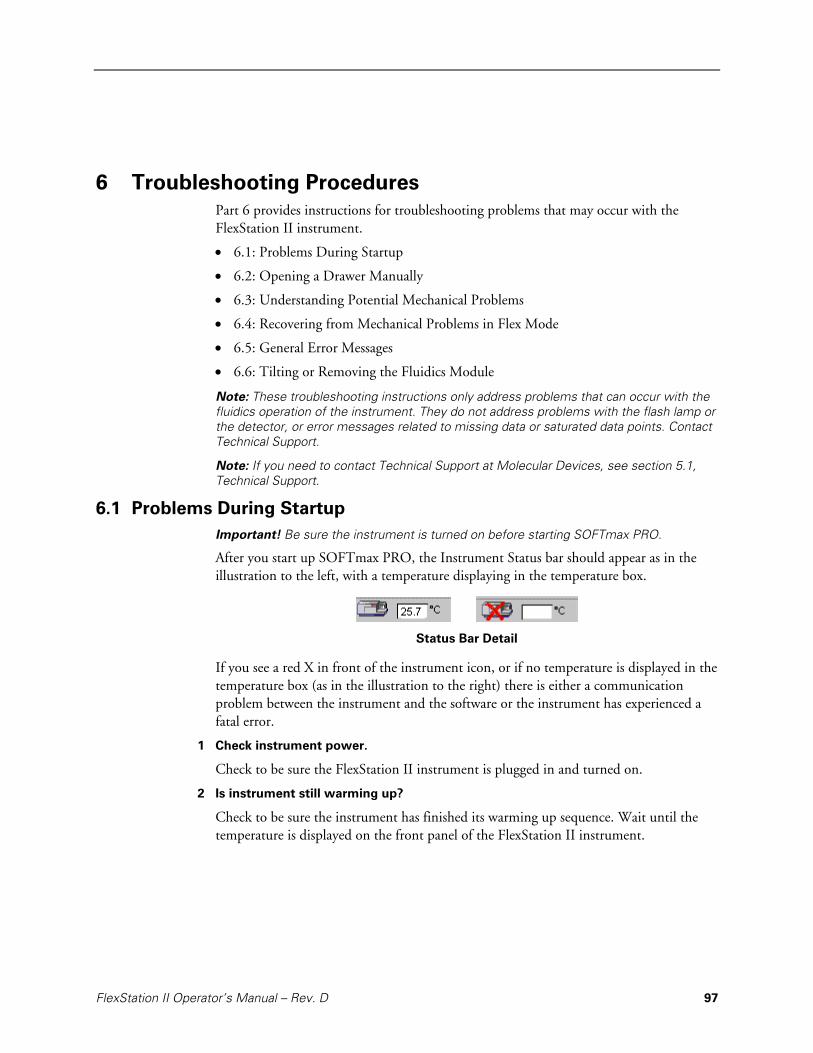
6 Troubleshooting Procedures
Part 6 provides instructions for troubleshooting problems that may occur with the FlexStation II instrument.
• 6.1: Problems During Startup
• 6.2: Opening a Drawer Manually
• 6.3: Understanding Potential Mechanical Problems
• 6.4: Recovering from Mechanical Problems in Flex Mode
• 6.5: General Error Messages
• 6.6: Tilting or Removing the Fluidics Module
Note: These troubleshooting instructions only address problems that can occur with the fluidics operation of the instrument. They do not address problems with the flash lamp or the detector, or error messages related to missing data or saturated data points. Contact Technical Support.
Note: If you need to contact Technical Support at Molecular Devices, see section 5.1, Technical Support.
6.1 Problems During Startup
Important! Be sure the instrument is turned on before starting SOFTmax PRO.
After you start up SOFTmax PRO, the Instrument Status bar should appear as in the illustration to the left, with a temperature displaying in the temperature box.
Status Bar Detail
If you see a red X in front of the instrument icon, or if no temperature is displayed in the temperature box (as in the illustration to the right) there is either a communication problem between the instrument and the software or the instrument has experienced a fatal error.
1 Check instrument power.
Check to be sure the FlexStation II instrument is plugged in and turned on.
2 Is instrument still warming up?
Check to be sure the instrument has finished its warming up sequence. Wait until the temperature is displayed on the front panel of the FlexStation II instrument.
FlexStation II Operator’s Manual – Rev. D 97

6 Troubleshooting Procedures
3 Check Preferences.
Go to Preferences in the Edit drop down menu of the software. View the Preferences dialog box.
Edit Preferences Dialog Box
There are two settings in this dialog box that must be correct for the instrument to operate.
a Make sure the Serial Port selected is the same as the one on the computer to which the instrument is physically connected. It may be COM1 or COM2.
b Make sure the Serial Comm Speed is correctly selected. The communication speed is 9600 during the instrument’s initial warm up sequence, while it is first communicating with the software.
Note: The Serial Comm Speed automatically changes to 57,600 when you select Flex mode from the Settings window.
If you follow these steps and are still having trouble starting up the system, contact Technical Support.
98 FlexStation II Operator’s Manual – Rev. D

6.2 Opening a Drawer Manually
6.2 Opening a Drawer Manually
Under some circumstances it may be necessary to open an instrument drawer manually. 1 If the power is not already off (as can occur with a power failure, or if you are already
troubleshooting the instrument with the covers open), turn off the power. Disconnect the power cord from the instrument, and the computer cables from the computer.
Warning! The power must be off for this procedure. If the power is not disconnected, and a jammed carriage or drawer is suddenly freed, the instrument could suddenly move, resulting in operator injury.
2 Using your fingernail, or a narrow blade inserted about ⅛ inch, open the drawer door (to its horizontal position) and pull out the carriage slowly, and as gently as possible.
Caution: Never force a carriage out of the instrument if it does not come out reasonably easily. Contact Technical Support.
FlexStation II Operator’s Manual – Rev. D 99

6 Troubleshooting Procedures
6.3 Understanding Potential Mechanical Problems
Important! Read these instructions before attempting to use the FlexStation II instrument in Flex mode.
6.3.1 Background The FlexStation II instrument’s intended function dictates that it have many moving parts. Furthermore, the operator interacts extensively with the instrument by introducing various types of plastic disposable plates, tips, and troughs. Molecular Devices has made every effort to ensure smooth and reliable operation of the FlexStation II instrument. However, problems can occur. For example:
• Pipette tips can jam in the rack (possibly due to imperfectly molded tips).
• After transfer, an unreleased tip may remain on the nose cone and be jammed against one of the lower drawers or into another tip during a subsequent transfer operation.
• If the tips are accidentally released from the nose cones during operation, they may fall outside of the rack.
• If the power fails during a pipetting step, serious damage can result to the instrument if appropriate corrective steps are not taken.
As can be seen, there are several opportunities for mechanical problems within the fluidics module. Fortunately, these problems will be rare if you understand how to avoid them. Furthermore, the design of the FlexStation II instrument provides the means for successfully recovering from most problems.
6.3.2 Before Using the Instrument
Molecular Devices recommends that you disconnect the power and open up the instrument to become familiar with the mechanical parts of the fluidics module. Observe that it is possible to manually (and always gently) move the drawers, doors and pipettor head. Moving the parts manually is important for recovering from some mechanical problems. For further information, see 6.2, Opening a Drawer Manually.
100 FlexStation II Operator’s Manual – Rev. D

6.3 Understanding Potential Mechanical Problems
6.3.3 Avoiding Mechanical Problems
Following a few simple steps will help avoid many potential problems.
• Make sure the red knob that holds the pipettor head in place is securely tightened.
• Only use tips specified for the FlexStation II instrument in a 96- or 384-rack configuration.
96-Rack Configuration 384-Rack Configuration Clear tips: MDC PN 9000-0623 Clear tips: MDC PN 9000-0512
• Make sure you maintain appropriate well formats (i.e., 384-rack tips with 384-compound plate and 384-assay microplate).
• Remove the lid of the tip rack before placing it in the tip rack drawer.
• Make sure you seat the tip rack, plates, (and troughs, if applicable) securely in the correct drawers.
• Make sure that the layout of the tips that you specify in your SOFTmax PRO protocol accurately represents what you have in the in the tip rack.
• Make sure that the compound and assay plates that you specify in your SOFTmax PRO protocol accurately represent microplates you are actually using.
Note: The software has no way of confirming the presence, absence, or configuration of tips or plates in the instrument drawers.
6.3.4 In Case of Power Failure
Interacting properly with the instrument following a power failure is very important. If there is a power failure while the instrument is running, you must manually turn off the power switch at the back of the instrument. Follow the instructions in the next section to avoid instrument damage.
FlexStation II Operator’s Manual – Rev. D 101

6 Troubleshooting Procedures
6.4 Recovering from Mechanical Problems in Flex Mode
The procedures in this section are intended for cases in which tips have jammed, or the power fails while you are using the instrument in Flex mode, and you see an error message on the computer screen indicating a problem with the instrument. You may need to open the instrument in order to locate and correct the problem. The procedures in this section include:
• 6.4.1: Assessing a Mechanical Problem
• 6.4.2: Opening the Instrument
• 6.4.3: Evaluating the Tip Rack
• 6.4.4: Inspecting Inside the Fluidics Module
• 6.4.5: Removing the Pipettor Head
• 6.4.6: Expelling Undispensed Fluid from Tips
Warning! Always make sure the power switch on the instrument is in the OFF position, and remove the power cord from the back of the instrument, prior to removing any interior panels.
Caution: Do not touch or loosen any screws or parts other than those specifically designated in these instructions. Doing so may cause misalignment and will void the instrument warranty.
102 FlexStation II Operator’s Manual – Rev. D

6.4 Recovering from Mechanical Problems in Flex Mode
6.4.1 Assessing a Mechanical Problem
Depending on when the problem occurs during the fluidics operation, one of several error messages may appear in SOFTmax PRO.
The error message may not provide complete information about what has occurred. The software cannot confirm presence, absence, or exact position of tips and or plates. Whenever you experience a mechanical failure of the fluidics operation, follow the entire procedure until you can pinpoint the source of the problem.
Fluidics Error 1: Fluidics module not detected.
This message may occur if the fluidics module is not correctly installed.
Fluidics Error 2: Pipetter failure 1.
This message may occur if the tip rack is jammed. Tips may be missing.
Fluidics Error 3: Pipetter failure 2.
This message occurs if fluid remains in the tips. The instrument needs to be manually recovered at this point.
Note: If you need to contact Technical Support during the following procedures, be sure to note which error message you observed.
FlexStation II Operator’s Manual – Rev. D 103

6 Troubleshooting Procedures
6.4.2 Opening the Instrument
Caution: Use caution during this procedure. Follow these instructions and any instruction labels on the instrument exactly.
1 Power off.
Turn the power off to the instrument. Disconnect the power cords from the instrument and the cables connected to the computer.
2 Lift up instrument cover.
Press in the handle at the bottom of the top cover and lift the cover back off the detection module, revealing the fluidics module.
Inside Front Panel
Fluidics Module
Detection Module
Inside Top Panel
Tip Rack Drawer
Location of Inside Panels and Tip Rack Drawer
3 Remove front panel of fluidics module.
DO NOT REMOVE COVERUNTIL POWER IS DISCONNECTED.
FOR TRAINED SERVICE PERSONNEL ONLY.Do not operate instrument
unless all covers are in place.
Turn the four quarter-turn screws and lift the front panel out.
You many need to inspect the interior of the module to determine if the pipettor was in the process of a fluid transfer when the power was interrupted. The pipettor head should be at rest in the uppermost (“home”) position. If not, there may be fluid in the tips that needs to be removed. Instructions for these procedures follow.
104 FlexStation II Operator’s Manual – Rev. D

6.4 Recovering from Mechanical Problems in Flex Mode
6.4.3 Evaluating the Tip Rack
1 Inspect the tip rack drawer.
The problem may be obvious and visible from the outside if the tip rack drawer is partially open and jammed. Possible scenarios include:
2 Tip rack cover was not removed.
• If the cover was not removed from the tip rack, gently pull the tip rack carriage out of the fluidics module to the right. Remove the tip rack cover and reposition the tip rack in the carriage.
• Replace the inside front panel and top cover. Reattach the power cord and computer cable to the instrument and reboot the instrument.
• Save your SOFTmax PRO file (to prevent loss of data), then close and restart the software.
Important! Failure to restart SOFTmax PRO may result in communication problems between the instrument and computer.
3 Tip rack is improperly positioned.
• If the tip rack is jammed because it was not positioned securely in the drawer, pull the carriage out of the instrument to access the rack.
• If all the tips are accounted for, reposition the rack in the carriage.
• Replace the inside front panel and top cover. Reattach the power cord and computer cable to the instrument and reboot the instrument.
• Save your SOFTmax PRO file (to prevent loss of data), then close and restart the software.
Important! Failure to restart SOFTmax PRO may result in communication problems between the instrument and computer.
4 Tips are not seated properly.
• If the tip rack is jammed because one or more tips are not seated properly in the rack and preventing the drawer from opening, you may be able to remove the rack and problematic tips from outside the fluidics module by pulling the tip rack all the way out.
• If not, gently push the tip rack back inside the instrument. Reach in from the front and remove the tip rack by lifting it up and out toward you. Be careful not to spill tips inside the instrument.
5 Tips are missing.
• If the tip rack is jammed and there are tips missing, you must attempt to retrieve them from inside the instrument. Continue with the following procedure.
FlexStation II Operator’s Manual – Rev. D 105

6 Troubleshooting Procedures
6.4.4 Inspecting Inside the Fluidics Module
If there is any chance at all that there could be fluid in the pipette tips, you must remove the pipettor head from the instrument and dispel the fluid or remove the tips outside the instrument. This must be done to avoid spilling fluid in the reading chamber.
Important! Failure to dispel fluid outside the instrument may result in damage to the optical components.
Biohazard: This procedure includes steps involving potentially infectious biological agents requiring that proper handling precautions be taken. Follow your institution's protocol.
1 Inspect the interior of the fluidics module.
Determine the position of the pipettor head and the location of all the tips that were originally in the tip rack. Things to consider include:
• Is the pipettor head loose? Is the red knob tightened securely?
• Is the pipettor head up and out of the way (in home position) or is it down in the tip rack area, the compounds plate area, or the reading chamber?
• Are there any pipet tips on the pipettor head?
• Is there is any chance there is liquid remaining in the tips? If so, remove the head and expel the liquid safely. See procedures in sections 6.4.5, Removing the Pipettor Head, and 6.4.6, Expelling Undispensed Fluid from Tips.
Caution: Take care that you do not inadvertently dispel fluid before the pipettor head is outside the instrument.
• Can you account for all tips or is there a possibility that some have dropped out of sight?
• Do all the drawers move freely to gentle pressure or is there a plate or tip rack jamming them?
Once you have determined the status of pipettor head and tips, there are a number of procedure you may need to follow to resolve the problem. Possible scenarios include:
2 Pipettor head is in home position, without tips.
• If the pipettor head is up and out of the way (without tips) but the tip rack is jammed, it may be because one or more tips are not seated properly and are blocking the drawer movement.
• Reach into the fluidics module from the front panel and remove the tip rack by lifting it up and out toward you. If the tip rack drawer is not all the way inside the instrument (in its leftmost position), you may need to gently push it inside (to the left) in order to get the rack out.
3 Pipettor head is in home position, without tips, but tips are missing.
• If the pipettor head is up and out of the way (without tips) but there are tips missing from the rack, then you must locate and recover the missing tips before proceeding.
• Retrieve any tips you can easily see and reach through the front panel.
• It may be necessary to raise the fluidics module, to gain access to the reading chamber. See section 6.6, Tilting or Removing the Fluidics Module.
106 FlexStation II Operator’s Manual – Rev. D

6.4 Recovering from Mechanical Problems in Flex Mode
4 Pipettor head is in lowest position, without tips, all tips are accounted for.
• If the pipettor head is all the way down its carrier bar (not in home position), without tips on the nose cones, and all tips are safely in the rack, you can remove the tip rack easily. The compound plate may also be stuck inside the fluidics module.
• Gently push the tip rack and compound plate (or trough) drawers all the way outside to the right.
5 Pipettor head is not in home position, with tips.
• If the pipettor head is somewhere other than home position, and has tips on it, you must proceed carefully. The pipettor head may or may not be obviously jammed. Tips could be jammed in the tip rack, in the compound plate, or in the assay plate.)
• Carefully raise the pipettor head to home position by manually moving the belt.
• If there is any chance there is liquid in the tips, you must then remove the pipettor head as described in sections 6.4.2 and 6.4.3 and dispel the liquid safely outside the instrument.
Caution: Do not attempt to remove the pipettor head through the front inside panel. See instructions in section 6.4.5, Removing the Pipettor Head.
• If you are certain there is no liquid in the tips, remove the tips from the pipettor head manually. Reach into the fluidics module and gently pull the tips off the cones.
• Gently push the tip rack and compound plate (or trough) drawers all the way outside to the right.
6 Close the instrument and reboot.
Once you have secured all tips and returned the tip rack and compound plate drawers to their outside, rightmost position, you can close the instrument and return to operation.
• Replace the inside front panel and lower the top cover.
• Reattach the power cord to the instrument and reconnect the instrument to the computer.
• Turn the power on the to instrument. It will take about two minutes for the instrument to complete its startup sequence.
• Save your SOFTmax PRO file (to prevent loss of data), then close and restart the software.
Important! Failure to restart SOFTmax PRO may result in communication problems between the instrument and computer.
FlexStation II Operator’s Manual – Rev. D 107

6 Troubleshooting Procedures
7 Confirm instrument-to-computer communication.
When communication between the instrument and computer is interrupted, as with a power failure, a red X appears over the FLEX icon on the SOFTmax PRO status bar. Once you correct the problem, and the instrument has completed its startup cycle again, the red X over the instrument icon in the status bar should disappear, indicating that communication has been successfully reestablished.
FLEX Icon, Ready FLEX Icon, No Communication
If the red X remains after the warm up sequence, select Preferences from the Edit menu of SOFTmax PRO and view the Preferences dialog box.
Preferences Dialog Box
Make sure the Serial Comm Speed (the communication rate, or baud rate) is set to 9600.
Note: When the FlexStation II instrument starts up, it begins with a serial comm rate of 9600 Baud. Upon initiation of a microplate reading, SOFTmax PRO issues a command to change the rate to 57600 Baud, where it remains until power is shut off to the instrument.
If you continue to see the red X after confirming the Serial Comm Speed, see section 6.4.7, Recovery Procedure.
108 FlexStation II Operator’s Manual – Rev. D

6.4 Recovering from Mechanical Problems in Flex Mode
6.4.5 Removing the Pipettor Head
You may need to remove the pipettor head to remove empty tips or to dispel liquid remaining in tips after a mechanical failure.
To remove the pipettor head, follow the instructions in this procedure. To reinstall the pipettor head, see instructions in section 2.4, Installing the Pipettor Head.
Caution: Use caution during this procedure. Follow these instructions exactly and any instruction labels on the instrument.
TO REMOVE PIPETTOR HEAD:1) Disconnect Power2) Open access door3) Loosen red retainer nut4) Partially remove pipettor head5) Pull spiral cord from mount6) Rotate electrical connector lock and pull
WHEN REINSTALLING, INSURE PIPETTE RETAIN NUT IS FIRMLY TIGHTENED(AS TIGHT AS POSSIBLE).
Biohazard: Use proper handling precautions. This procedure may include steps involving potentially infectious biological agents. Follow your institution's protocol.
1 Confirm that all power to the instrument is turned off.
2 Unplug the power cord and the computer cable from the rear of the instrument.
3 Open the instrument top cover.
actual˚C
set pt˚C
Set Temp
Tempon/off
Drawers
readingchamber
compounds
tip rack
Opening Instrument Cover
4 Open the inside top panel of the fluidics module. Turn the quarter-turn fastener on the inside top panel and unfold the panel off the fluidics module to the right.
5 Inside the open chamber, loosen the red mounting knob (called the red retainer nut on the label).
FlexStation II Operator’s Manual – Rev. D 109
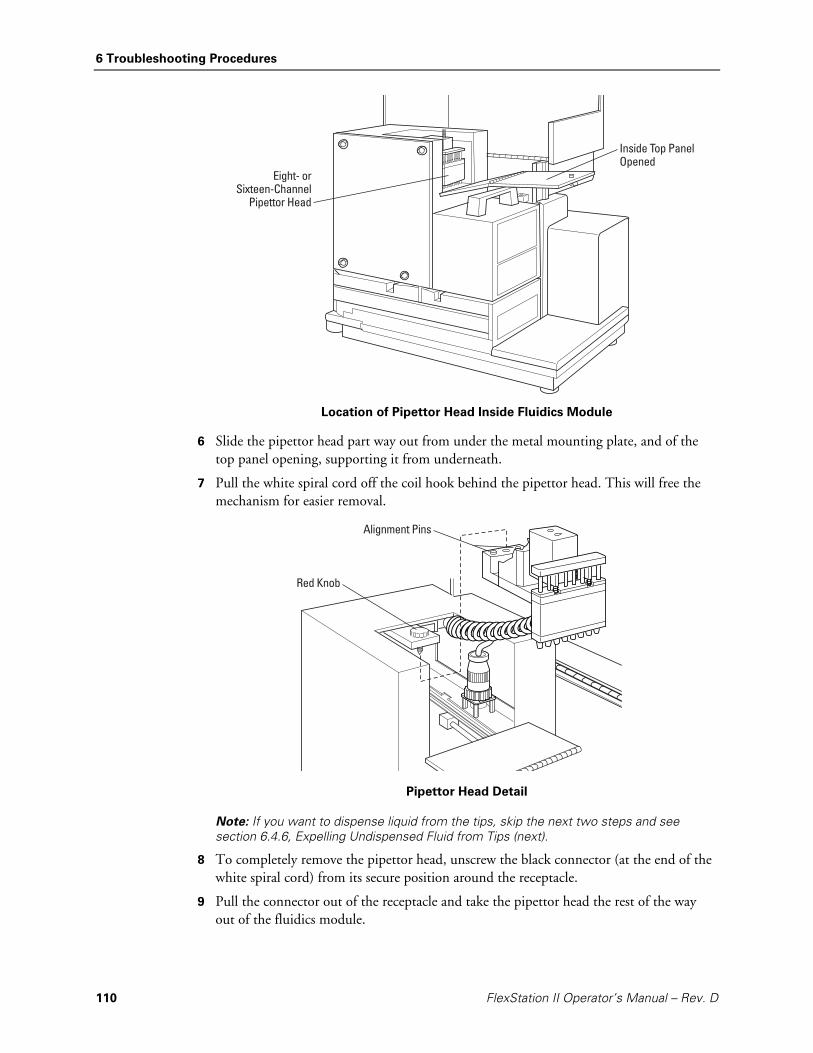
6 Troubleshooting Procedures
Eight- orSixteen-Channel
Pipettor Head
Inside Top Panel Opened
Location of Pipettor Head Inside Fluidics Module
6 Slide the pipettor head part way out from under the metal mounting plate, and of the top panel opening, supporting it from underneath.
7 Pull the white spiral cord off the coil hook behind the pipettor head. This will free the mechanism for easier removal.
Red Knob
Alignment Pins
Pipettor Head Detail
Note: If you want to dispense liquid from the tips, skip the next two steps and see section 6.4.6, Expelling Undispensed Fluid from Tips (next).
8 To completely remove the pipettor head, unscrew the black connector (at the end of the white spiral cord) from its secure position around the receptacle.
9 Pull the connector out of the receptacle and take the pipettor head the rest of the way out of the fluidics module.
110 FlexStation II Operator’s Manual – Rev. D

6.4 Recovering from Mechanical Problems in Flex Mode
6.4.6 Expelling Undispensed Fluid from Tips
Biohazard: This procedure includes steps involving potentially infectious biological agents requiring that proper handling precautions be taken. Follow your institution's biohazard protocol.
This procedure assumes you have opened the instrument and accessed the pipettor head as described in the above sections.
1 Lift the pipettor head out of the fluidics module carefully, as it is still connected inside the instrument.
2 Hold the pipettor head over a tray or something into which you can expel liquid and remove tips.
3 With your other hand, rotate the black pulley on the bottom of the pipettor motor clockwise. This moves the plungers and any liquid will be expelled and any tips will be ejected.
Replace the Pipettor Head
Note: See section 2.4, Installing the Pipettor Head, for a more complete version of these next steps, with illustrations.
1 Slide the pipettor head back under its mounting plate inside the fluidics module, making sure to secure the white spiral cord back on its retaining hook.
2 Screw the red knob (retainer nut) to secure the pipettor head. Make sure the knob is as tight as possible.
3 Replace the inner front panel and lower the cover back onto the instrument.
4 Reattach the power cord to the instrument and reconnect the instrument to the computer.
5 Turn the power on the to instrument. It will take about two minutes for the instrument to complete its startup sequence.
6 Save your SOFTmax PRO file, if necessary, to prevent loss of data, then close and restart the software.
FlexStation II Operator’s Manual – Rev. D 111

6 Troubleshooting Procedures
6.4.7 Recovery Procedure
When there is an instrument malfunction in which fluid was left in the tips, rebooting the instrument does not automatically reset the fluidics module. An additional recover cycle is necessary to restore successful communication between the instrument and the computer. This procedure is a precautionary step, designed to minimize the potentially very serious consequences of liquid spillage in the instrument.
1 Observe instrument display.
After the instrument completes the restart sequence (booting up), you will observe that the temperature display on the front panel of the instrument displays the actual current temperature again. However, the red X is still covering the instrument icon on the SOFTmax PRO status bar.
2 Select Recover from the Control menu.
In SOFTmax PRO, select Recover from the Control menu. The recover process is essentially a second startup cycle which restores the fluidics module to operating conditions and reboots the instrument.
Press [Continue] to recover the software.
Recover Dialog Box
3 Double check preferences.
If the red X still remains after the Recover procedure, return to the Preferences dialog box in the software and recheck that the serial comm rate is set to 9600. For instructions, see section 6.1, Problems During Startup.
If you cannot establish communication between the instrument and the computer with the recover procedure, contact Technical Support.
112 FlexStation II Operator’s Manual – Rev. D

6.5 General Error Messages
6.5 General Error Messages
Error messages can appear during operation of the instrument. Follow any instructions present in the message. Anytime a message persists, or if you cannot return the instrument and software to normal operation, contact Technical Support and be sure to note which error message you observed.
Note: See section 6.4.1, Assessing a Mechanical Problem, for error messages specific to fluidics operation failures.
General Error 1: No assay plate
If you get this message, check to be sure there is an assay plate correctly placed in the reading chamber drawer. Start the reading again.
If you get any one of the following messages, attempt your reading again before continuing with troubleshooting.
General Error 2: Unexpected response, result code 105
General Error 3: Communication problem, response to late
General Error 4: Unexpected response
General Error 5: Measurement aborted
FlexStation II Operator’s Manual – Rev. D 113

6 Troubleshooting Procedures
General Error 6: Result code
General Error 7: Fatal error
If you observe the following message, try to determine if there are tips jamming the read head (follow procedure in section 6.7.1). If this is not the case, call Technical Support.
114 FlexStation II Operator’s Manual – Rev. D

6.6 Tilting or Removing the Fluidics Module
6.6 Tilting or Removing the Fluidics Module
If you need to tilt or remove the fluidics module to clean up after a large spill, or to recover tips, follow these instructions.
Warning! The following procedures must be completed by a service-trained user. Do not attempt the following procedures if you have not been trained properly by appropriate Molecular Devices Personnel.
Warning! Do not remove cover until power is disconnected. Do not operate instrument unless all covers are in place.
Biohazard: This procedure includes steps involving potentially infectious biological agents requiring that proper handling precautions be taken. Follow your institution’s biohazard protocol.
actual˚C
set pt˚C
Set Temp
Tempon/off
Drawers
readingchamber
compounds
tip rack
Opening the Top Cover
FlexStation II Operator’s Manual – Rev. D 115

6 Troubleshooting Procedures
6.6.1 Tilting the Fluidics Module
1 Power off.
Turn the power off to the instrument. Disconnect the power cords from the instrument and the cables connected to the computer.
Caution: Never operate the instrument with the covers removed. Damage to the instrument can occur. Read and obey all warning labels.
2 Lift up instrument cover.
Press in the handle at the bottom of the top cover and lift the cover back off the detection module, revealing the fluidics module.
3 Tilt fluidics module.
Using the handle, tilt the fluidics module to the left.
4 Clean spill.
If you can clean up the spill, or remove the tips, without removing the fluidics module, do so now. If you need to remove the fluidics module, continue with the instructions in the section below.
5 Replace the fluidics module.
Using the handle, lower the fluidics module carefully back over the detection module. Make sure it is firmly seated.
6 Replace cover and reattach cables.
Lower the top cover over the instrument. Reattach the power cord and computer cables.
Emission Fiber and Restraint
Electrical Connectionto Fluidics Module
Fluidics Module
Excitation Fiberand Restraint
Tilting the Fluidics Module
116 FlexStation II Operator’s Manual – Rev. D

6.6 Tilting or Removing the Fluidics Module
6.6.2 Removing the Fluidics Module
Caution: Use caution during this procedure. Follow these instructions exactly and any instruction labels on the instrument.
TO REMOVE FLUIDICS MODULE:1) Using handle, rotate module up2) Disconnect electrical connection3) Disconnect restraint4) Loosen 1/4 turn fasteners on � bottom of module
WHEN REINSTALLING, INSURE�MODULE IS FIRMLY SEATED
Follow the steps in procedure 6.7.1 to step 4.
1 Disconnect the fluidics module.
a Locate the electrical connector between the bottom of the fluidics module and the housing.
b Unscrew the retaining screws and unplug the connector.
c Locate the fluidics module restraint (a green cable). Disconnect the restraint from the housing.
2 Release fluidics module from plate.
a Locate and loosen the quarter-turn fasteners in the metal plate where the bottom of the fluidics module is attached to the detection chamber.
b Lift the fluidics module carefully off the detection chamber and set it on the bench.
3 Clean up spill and/or retrieve tips.
a Clean the spill. If you are attempting to remove tips, remove any obvious ones on top, or around the sides, of the reading chamber. Look through the openings in the read head; you may be able to see tips inside.
b If you see tips all the way down in the bottom tray of the instrument, you can safely leave them there. They will be out of the way of the operation of the read heads.
c Reattach the fluidics module by following the steps above in the reverse order.
Note: For detailed instructions and illustrations, see section 2.3, Installing the Fluidics Module.
d Follow steps 5 and 6 in the above procedure to reassemble the instrument.
4 Contact Technical Support.
If you see tips lodged inside the reading chamber, contact Technical Support. Do not attempt to tilt or remove the read heads on your own.
Caution: Do not attempt to tilt or remove the read heads. Failure to do so can damage fragile optical components and may void your warranty.
FlexStation II Operator’s Manual – Rev. D 117

6 Troubleshooting Procedures
118 FlexStation II Operator’s Manual – Rev. D

7 Appendices
The Appendices include the following sections:
• 7.1: Parts and Accessories
• 7.2: Performance Specifications
• 7.3: Warranty
• 7.4: Index
7.1 Parts and Accessories
Caution: Do not use parts and accessories not authorized, specified by, or provided by Molecular Devices. Using unauthorized parts can damage the instrument.
Contact Molecular Devices Customer Service or your authorized service representative to obtain parts and accessories.
Molecular Devices Corporation 1311 Orleans Drive Sunnyvale, California 94089 Tel: (408) 747-1700 Fax: (408) 747-3601 US/Canada Toll Free: (800) 635-5577 Online: www.moldev.com
Part Number Accessory
4400-0002 Power cord, US
4400-0036 Power cord, European
9000-0149 Computer cable
2300-0800 Top-read microplate adapter (reading chamber)
0310-9336 Bottom-read microplate adapter (reading chamber)
2500-1029 Compound Baseplate (compound plate drawer)
4600-0029 Fuse
0310-3992 Pipettor head, 8-channel
0310-4034 Pipettor head, 16-channel
0112-0077 Operator’s manual
9100-0051 Allen wrench (hex, 3/32" ball, L-shape)
9000-0512 Tips, clear (384 wells), 30 µl capacity, 10 racks/case
9000-0623 Tips, clear (96 wells), 200 µl capacity, 10 racks/case (Robbins PN 1043-04-5MD)
FlexStation II Operator’s Manual – Rev. D 119
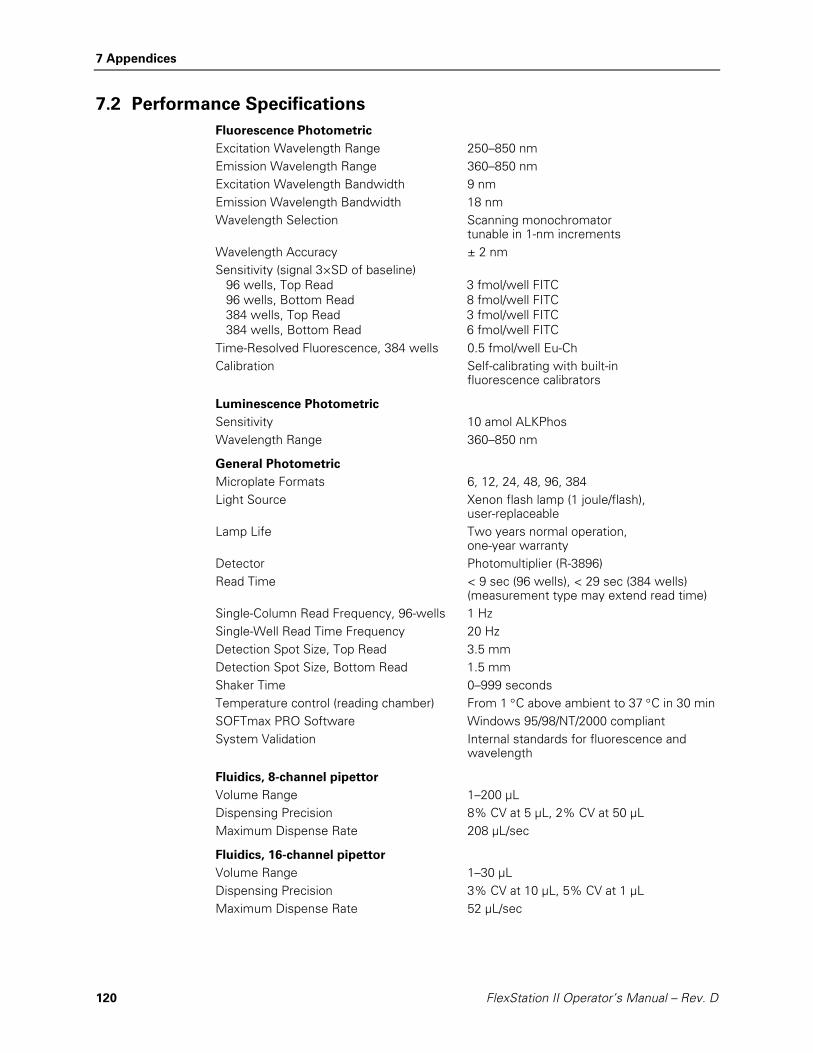
7 Appendices
7.2 Performance Specifications
Fluorescence Photometric Excitation Wavelength Range 250–850 nm Emission Wavelength Range 360–850 nm Excitation Wavelength Bandwidth 9 nm Emission Wavelength Bandwidth 18 nm Wavelength Selection Scanning monochromator
tunable in 1-nm increments Wavelength Accuracy ± 2 nm Sensitivity (signal 3×SD of baseline) 96 wells, Top Read 3 fmol/well FITC 96 wells, Bottom Read 8 fmol/well FITC 384 wells, Top Read 3 fmol/well FITC 384 wells, Bottom Read 6 fmol/well FITC Time-Resolved Fluorescence, 384 wells 0.5 fmol/well Eu-Ch Calibration Self-calibrating with built-in
fluorescence calibrators Luminescence Photometric Sensitivity 10 amol ALKPhos Wavelength Range 360–850 nm General Photometric Microplate Formats 6, 12, 24, 48, 96, 384 Light Source Xenon flash lamp (1 joule/flash),
user-replaceable Lamp Life Two years normal operation,
one-year warranty Detector Photomultiplier (R-3896) Read Time < 9 sec (96 wells), < 29 sec (384 wells)
(measurement type may extend read time) Single-Column Read Frequency, 96-wells 1 Hz Single-Well Read Time Frequency 20 Hz Detection Spot Size, Top Read 3.5 mm Detection Spot Size, Bottom Read 1.5 mm Shaker Time 0–999 seconds Temperature control (reading chamber) From 1 °C above ambient to 37 °C in 30 min SOFTmax PRO Software Windows 95/98/NT/2000 compliant System Validation Internal standards for fluorescence and
wavelength Fluidics, 8-channel pipettor Volume Range 1–200 µL Dispensing Precision 8% CV at 5 µL, 2% CV at 50 µL Maximum Dispense Rate 208 µL/sec Fluidics, 16-channel pipettor Volume Range 1–30 µL Dispensing Precision 3% CV at 10 µL, 5% CV at 1 µL Maximum Dispense Rate 52 µL/sec
120 FlexStation II Operator’s Manual – Rev. D

7.2 Performance Specifications
Environmental Turn-On Time <5 minutes for rated accuracy Operating Conditions 15–35 °C Electrical Power Consumption 450 VA Line Voltage and Frequency 90–240 VAC, 50–60 Hz Physical Size (h × w × d) 19.3 × 22.8 × 15.7 in
49 cm × 58 cm × 40 cm Weight 65 lb (29.5 kg)
FlexStation II Operator’s Manual – Rev. D 121

7 Appendices
7.3 Warranty
Molecular Devices Corporation Instrument Warranty
Molecular Devices Corporation warrants this product against defects in material or workmanship as follows:
1 All parts of the FlexStation II instrument are warranted for a period of one (1) year from the original date of delivery.
2 All labor charges to repair the product for a period of one (1) year from the original date of delivery will be paid by Molecular Devices Corporation.
3 This warranty covers the FlexStation II instrument only, and does not extend to any computer, printer, software, reagents, or disposables used with the instrument.
Labor and Parts
To obtain warranty service during the applicable warranty period, you must take the product or deliver the product properly packaged in the original shipping materials and carton to an authorized Molecular Devices Corporation service facility. You must call or write to the nearest Molecular Devices Corporation service facility to schedule warranty service. You may call Molecular Devices Corporation at the telephone number or address below to locate the nearest service facility. You must schedule warranty service prior to bringing or shipping the product for servicing. At the time of requesting warranty service, you must present proof of purchase documentation which includes the date of purchase and Molecular Devices Corporation must have the enclosed Warranty Registration form completed, signed and returned by you within ten (10) working days of the date of delivery.
This warranty only covers defects arising under normal usage and does not cover malfunctions of failures resulting from misuse, abuse, neglect, alteration, modification, or repairs by other than an authorized Molecular Devices Corporation service facility.
Repair or replacement as provided under this warranty is the exclusive remedy to the purchaser (the ‘Buyer’). Molecular Devices Corporation (the ‘Seller’) shall not be liable for any incidental or consequential damages for breach of any express or implied warranty on this product, except to the extent required by applicable law. The Seller specifically excludes all express and implied warranties including without limitation any implied warranty that the products sold under this agreement are merchantable or are fit for any particular purpose, except such warranties expressly identified as warranties and set forth in the seller’s current operating manual, catalog or written guarantee covering such product. The Seller also makes no warranty that the products sold under this agreement are delivered free of the rightful claim of any third party by way of patent infringement or the like. If the Buyer furnishes specifications to the Seller, the Buyer agrees to hold the Seller harmless against any claim which arises out of compliance with the specifications.
Any description of the products contained in this agreement is for the sole purpose of identifying them. Any such description is not part of the basis of the bargain, and does not constitute a warranty that the products shall conform to that description. Any sample or model used in connection with this agreement is for illustrative purposes only, is not part of the basis of the bargain, and is not to be construed as a warranty that the products will conform to the sample or model. No affirmation of fact or promise made by the Seller, whether or not in this agreement, shall constitute a warranty that the products will conform to the affirmation or the promise.
For the name of the nearest authorized Molecular Devices Corporation service facility please contact Molecular Devices at one of the following telephone numbers: (800) 635-5577 (US and Canada).
122 FlexStation II Operator’s Manual – Rev. D

7.4 Index
7.4 Index
A accessories, 16
part numbers for, 119 unpacking, 32
adapters, microplate, 16 installing, 89 removing, 89
air gap, pipette tip. See pipette tips air gap
application notes, 85 assay plate, 25, 54
loading, 75 selecting, 60
AutoCalibrate, 25, 54, 59 Automix, 25, 54
button, 29 function, 21 setting, 59
AutoRead, 25, 48, 54 settings for, 72
B bottom reading, 15, 17, 22, 23, 25 buttons
Automix, 29 Compounds, 42, 89 Drawer, 29 FLEX, 52 Incubator, 29, 50 Read, 29, 76, 77 Reading Chamber, 42, 89 Setup, 30, 52 Stop, 29, 77 Transfer, 65
C cables, 16, 90, 109, 119 cleaning the instrument, 88 components, system, 6–17
accessories, 16 computer, 15
consumables, 17 covers, 7–8 detection module, 13–14 drawers, 9–10 fluidics module, 11–12 optical system, 14–15 panels, 7–8 pipettor head, 12
compound and tip columns, 25, 54, 69–71
compound baseplate, 16 installing, 42 use of, 89
compound plate, 89 for each operational mode, 25 loading, 75 selecting, 63
compound plate drawer, 9–10, 89 opening and closing, 48
compound source, 54 compound transfer, 54, 58
for each operational mode, 25 settings, 64–66 settings window, 67, 69–71
Compounds button, 42, 89 compounds key, 48 computer, 1, 32
minimum configuration, 15 setting up, 40 starting up, 46
computer cable, 16, 51, 90, 109, 119 connecting, 41
control panel, 7 [Compounds] button, 89 temperature display, 45 using, 48, 49 using to load microplates, 75 using to turn on incubator, 44
covers, 7–8 fuse, 90
FlexStation II Operator’s Manual – Rev. D 123

7 Appendices
lamp, 8, 92, 93, 95 removing shipping screws, 33 tip rack, 105 top, 7, 34, 37, 40, 94, 95, 104, 109,
115, 116
D data
appearing in Plate section, 77 display parameters, 74 management, 85 replacing with new, 76
design, instrument, 21–23 detection module, 11, 13–14
unpacking, 32–34 Display icon, 30 drawer adapters, installing, 42 Drawer button, 29 drawers, 9–10, 42, 44, 45. See also
reading chamber drawer, tip rack drawer, compound plate drawer closing, 29 emptying, 78 opening, 75 opening manually, 99
E Endpoint mode, 25, 78 error messages
fluidics module, 103 general, 113–14
F filters, emission cutoff, 55–56 flash lamp, 2, 8, 13, 14, 120
precautionary statement, 5 replacing, 92–95
FLEX button, 52 Flex mode, 24, 46, 53
avoiding mechanical problems, 4 default at startup, 52 instrument settings in, 54–73 recovering from mechanical
problems, 102–12 serial communication speed, 51
fluidics module, 11–12 design, 21 inspecting inside of, 106–8
installing, 35–36 tilting or removing, 115–17 unpacking, 32
fluorescence assays, 79–84 fuses, 16
replacing, 90–91
G Graph icon, 30
I icons
Display, 30 Graph, 30 Instrument Status, 29, 51 Mask, 30 Name of Plate, 30 Plate, 30, 77 Printer, 30 Reduction, 30 Template, 30
incubator, 2, 7, 10, 21 setting temperature, 49, 50 switching on, 44, 48
Incubator button, 29, 50 input/output panels, 8 installation procedures, 31–42
connecting the power cords, 41 general precautions, 31 installing SOFTmax PRO, 42 installing the drawer adapters, 42 installing the fluidics module, 35–36 installing the pipettor head, 37–40 setting up the computer, 40 unpacking the system, 32–34
Instrument Settings screen, 52, 54 assay plate type, 60 AutoCalibrate selection, 59 Automix, 59 AutoRead, 72 compound and tip columns, 69–71 compound source, 63 compound transfer, 64–66 pipette tips layout, 68 sensitivity, 57 timing, 58 triturate selection, 67 wavelengths, 55
124 FlexStation II Operator’s Manual – Rev. D

7.4 Index
wells to read, 61–62 Instrument Status icon, 29, 51 introduction to system, 1–2
K Kinetic mode, 26, 78
L lamp cover, 8
M maintenance procedures. See service and
maintenance procedures Mask icon, 30 mechanical problems
avoiding, 101 before using the instrument, 100 power failure, 101 understanding, 100–101
mechanical problems, Flex mode, 102–12 assessing, 103 evaluating the tip rack, 105 expelling fluid from tips, 111 inspecting inside fluidics module,
106–8 opening the instrument, 104 pipettor head, removing, 109–10 recovery procedure, 112
microplate adapters. See adapters, microplate
microplates, 17 loading, 44 reading, 75–77
modes, operational, 24–26 moving the instrument, 88
N Name of Plate icon, 30
O operating procedures, 43–84
configuring instrument settings, 54–73
optimizing fluorescence assays, 79–84
overview, 18, 44 reading microplates, 75–77
setting the temperature, 49–50 setting up the software, 51–53 shutdown, 78 starting up the system, 45–48
optical system, 14–15, 22 overview of operation, 18, 44 overview of operator’s manual, 3
P panels, 7–8, 104 parallel port, 8 parts, replaceable, 119 performance specifications, 121 photomultiplier tube, 57
sensitivity, 25 setting voltage, 79
pipette tip rack, 16, 17 loading, 44
pipette tips, 17 air gap, 54, 72 expelling fluid from, 111 layout, 54, 68 setting layout for each operational
mode, 25 pipettor head, 12, 16
installing, 37–40 removal, 109–10
Plate icon, 30, 77 Plate Section screen, 62, 73 Plate Section tool bar, 30 Plate sections, 77
creating and editing, 53 selecting, 76
power cord, 8, 16, 109, 119 connecting, 41
power failure, 101 power switch, 8, 45 Preferences dialog window, 51 printer cable, 90 Printer icon, 30 procedures
installation. See installation procedures
maintenance. See service and maintenance procedures
operating. See operating procedures service. See service and maintenance
procedures
FlexStation II Operator’s Manual – Rev. D 125

7 Appendices
troubleshooting. See troubleshooting procedures
protocols, 85
R Read button, 29, 76, 77 read modes, 78 reading chamber, 13 Reading Chamber button, 42, 89 reading chamber drawer, 9–10, 13
cleaning, 88 installing microplate adapter, 89 opening and closing, 48
reading chamber key, 48 readings per well
for fluorescence assays, 79 recovery procedure, 112 Reduction icon, 30 reduction parameters, 74 RS-232 port, 8
S safety information, 4–5
conventions used in manual, 4 screens
Instrument Settings, 52, 54 Plate Section, 62, 73 Preferences dialog, 51 Untitled window, 28 Untitled window, Flex mode, 53 Untitled, new, 46 Untitled, Plate Section, 47
sensitivity, 54 setting, 57
serial port, 8, 51 service and maintenance procedures,
87–95 cleaning the instrument, 88 long-term shutdown, 95 moving the instrument, 88 replacing the flash lamp, 92–95 technical support, 87 using microplate adapters, 89 using the compound baseplate, 89,
90–91 set point temperature indicator, 48 settings, instrument, 54–73
assay plate, 60
AutoCalibrate, 59 Automix, 59 AutoRead, 72 compound and tip columns, 69–71 compound source selection, 63 compound transfer, 64–66 finishing, 54 modifying, 54 on Plate Section screen, 73 pipette tip air gap, 72 pipette tips layout, 68 sensitivity, 57 timing, 58 triturate selection, 67 wavelengths, 55–56 wells to read, 61–62
Setup button, 30, 52 shipping containers, 32 shutdown procedures, 78
long-term, 95 SOFTmax PRO, 15, 27
installing, 42 introduction to, 27–30
software settings, 51–53, 74 specifications, performance, 121 Spectrum mode, 26, 78
optimizing fluorescence assays, 79–84
starting up the system, 45–48 Status bar, 29, 51
during readings, 77 Stop button, 29, 77 system
installing the, 31–42 operating procedures, 43–84 setting the temperature, 49–50 starting up the, 45–48
system components. See components, system
system description, 1–30 components, system, 6–17 introduction, 1–2 overview of operation, 18 overview of operator’s manual, 3 safety information, 4–5 theory of operation, 19–20
126 FlexStation II Operator’s Manual – Rev. D

7.4 Index
T technical support, 87 Temp on/off key, 48, 49 temperature
display on control panel, 49 indicator, 48 regulation, 21 setting, 48, 49–50
Temperature display field, 29, 51 Template Editor, 74 Template icon, 30 theory of operation, 19–20 time elapsed in current run, 77 time-tagged data, 22 timing, 54
for each operational mode, 25 setting, 58
tip rack drawer, 9–10, 68, 101 inspecting, 105 opening and closing, 48
tip rack key, 48 top reading, 17, 22, 23, 25 Transfer button, 65 triturate, 25, 54
selecting, 67 troubleshooting procedures, 97–117
assessing mechanical problems, 103 expelling fluid from tips, 111 fluidics module, inspecting inside,
106–8 fluidics module, tilting or removing,
115–17
general error messages, 113–14 mechanical problems, Flex mode,
102–12 opening drawers manually, 99 opening the instrument, 104 pipettor head, removing, 109–10 problems during startup, 97–117 recovery procedure, 112 tip rack, evaluating problems with,
105 understanding mechanical problems,
100–101
U Untitled window, 28
Flex mode, 53 new, 46 Plate Section, 47
user interface, 28–30
W warranty statement, 122 wavelengths, 25, 54
selecting, 55 well scan editor, 25 Well Scan mode, 26, 78 wells to read, 54
for each operational mode, 25 selecting, 61–62
FlexStation II Operator’s Manual – Rev. D 127

7 Appendices
128 FlexStation II Operator’s Manual – Rev. D