Embed Size (px)
Citation preview
8/6/2019 Flex Android 90 Minutes
http://slidepdf.com/reader/full/flex-android-90-minutes 1/22
1
Flex for Android in 90 Minutes
Christophe Coenraets
Adobe Technical EvangelistBlog: http://coenraets.org
Twitter: @ccoenraets
Updated on 12/02/2010
Overview
In this tutorial, you use Flash Builder “Burrito” and Flex “Hero” to build a simple, yet fully functional
employee directory application for Android devices. “Burrito” is the code name for the next version of Flash Builder, and “Hero” is the code name for the next version of the Flex SDK.
You don’t need an Android device to complete this tutorial: you can use the simple emulator available inFlash Builder Burrito to run and debug the application.
The Employee Directory application allows you to:
Search for employees
View employee details
Navigate up and down the org chart
Call, text, and email employees
Before you start
1. Download and install Flash Builder Burrito. Flash Builder Burrito is available here:http://labs.adobe.com/technologies/flashbuilder_burrito
2. Download FlexAndroid90Minutes.zip from
http://coenraets.org/flexandroid90/FlexAndroid90Minutes.zip and unzip the file anywhere onyour file system.
8/6/2019 Flex Android 90 Minutes
http://slidepdf.com/reader/full/flex-android-90-minutes 2/22
2
Part 1: Creating a Basic Mobile Application
In this section, you build a simple mobile application that shows a list of employees.
Step 1: Create the Flex Mobile Project
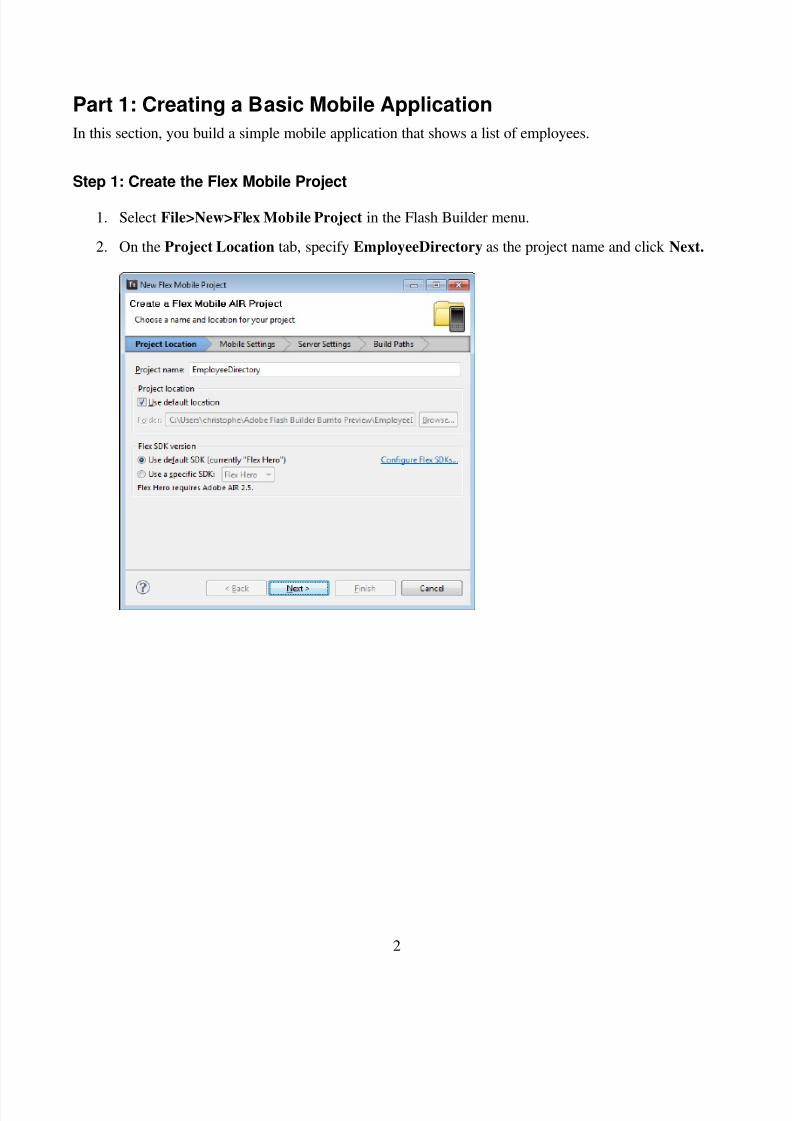
1. Select File>New>Flex Mobile Project in the Flash Builder menu.
2. On the Project Location tab, specify EmployeeDirectory as the project name and click Next.
8/6/2019 Flex Android 90 Minutes
http://slidepdf.com/reader/full/flex-android-90-minutes 3/22
3
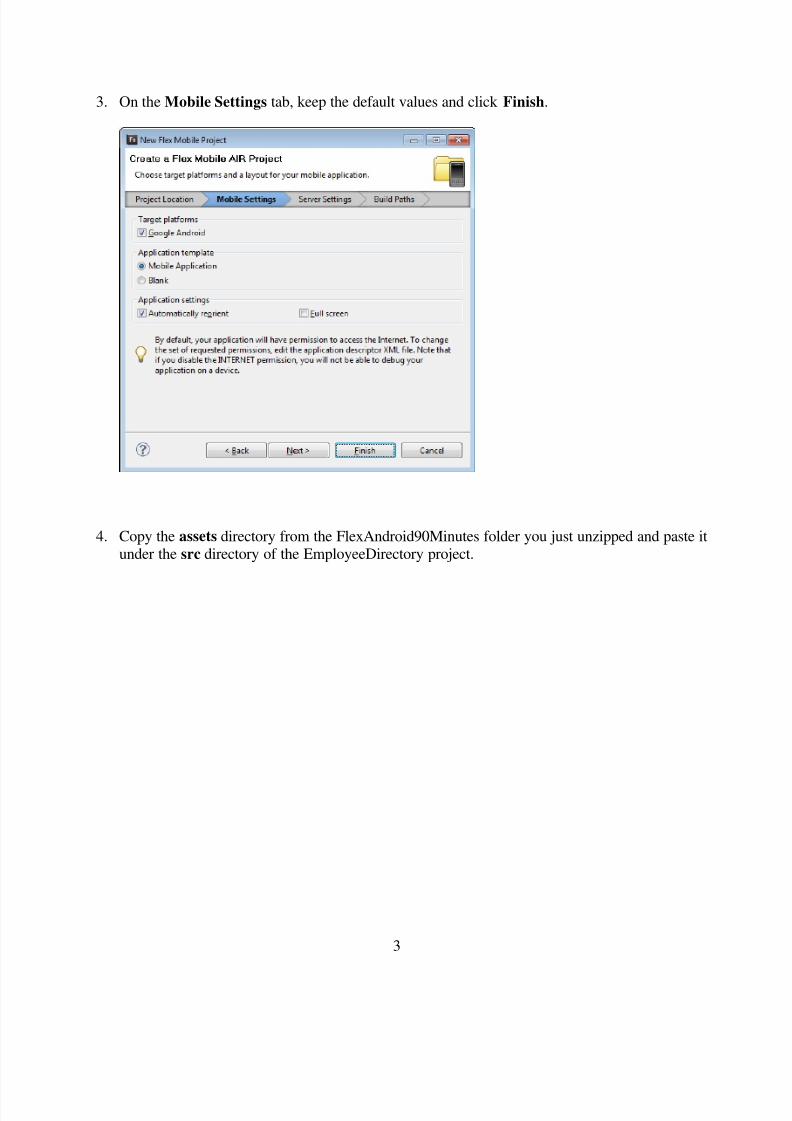
3. On the Mobile Settings tab, keep the default values and click Finish.
4. Copy the assets directory from the FlexAndroid90Minutes folder you just unzipped and paste itunder the src directory of the EmployeeDirectory project.
8/6/2019 Flex Android 90 Minutes
http://slidepdf.com/reader/full/flex-android-90-minutes 4/22
4
Step 2: Code the Application
1. Open EmployeeDirectory.mxml:
Notice the root node: MobileApplication
Notice the firstView attribute of MobileApplication referencing EmployeeDirectoryHome
2. Open EmployeeDirectoryHome.mxml and implement the View as follows:
<?xml version="1.0" encoding="utf-8"?>
<s:View xmlns:fx="http://ns.adobe.com/mxml/2009"
xmlns:s="library://ns.adobe.com/flex/spark" title="Home"
creationComplete="srv.send()">
<fx:Declarations>
<s:HTTPService id="srv" url="assets/employees.xml"/>
</fx:Declarations>
<s:List id="list" top="0" bottom="0" left="0" right="0"dataProvider="{srv.lastResult.list.employee}"
labelField="lastName"/>
</s:View>
Notes:
Make sure you implement this code in EmployeeDirectoryHome.mxml, not
EmployeeDirectory.mxml.
Don’t forget to add the creationComplete event to the view.

8/6/2019 Flex Android 90 Minutes
http://slidepdf.com/reader/full/flex-android-90-minutes 5/22
5
Step 3: Run the Application
1. Right-click anywhere in EmployeeDirectory.mxml and select Run AS>Mobile Application
2. Select On desktop and choose a device to simulate. For example, Google Nexus One.
8/6/2019 Flex Android 90 Minutes
http://slidepdf.com/reader/full/flex-android-90-minutes 6/22
6
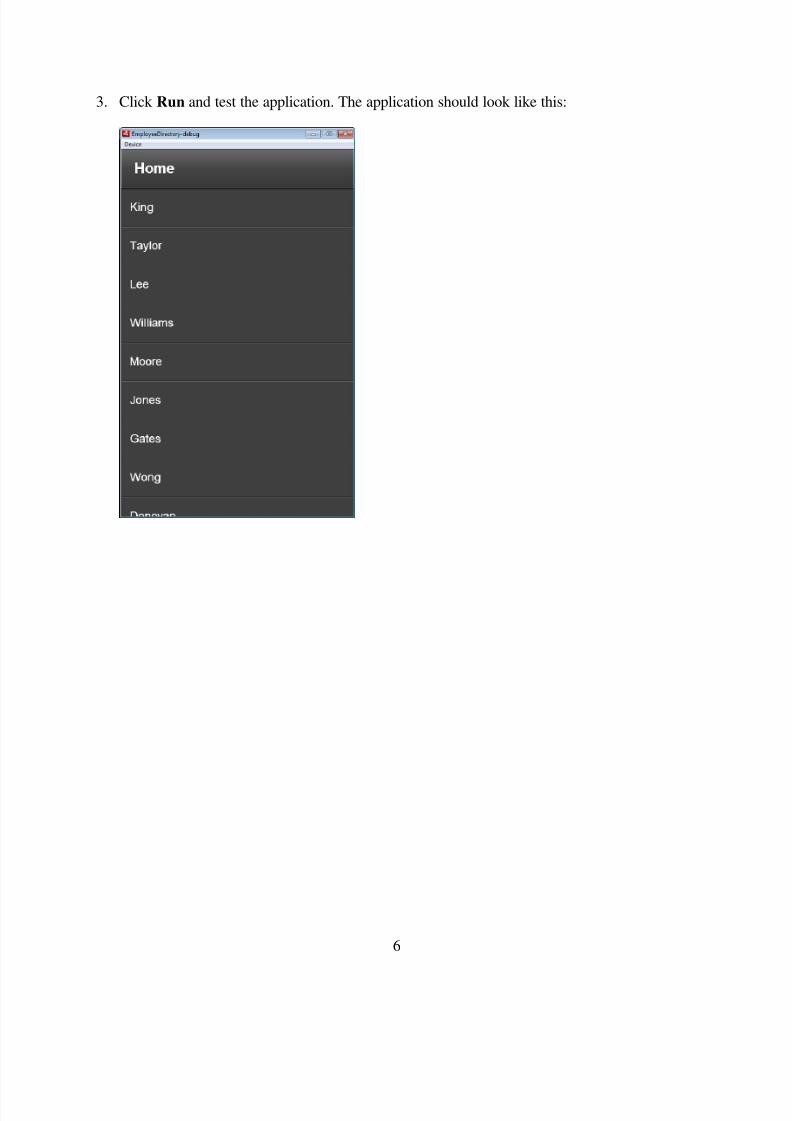
3. Click Run and test the application. The application should look like this:
8/6/2019 Flex Android 90 Minutes
http://slidepdf.com/reader/full/flex-android-90-minutes 7/22
7
Part 2: Using a Mobile Item Renderer
In this section, you define a mobile item renderer for the list of employees.
Steps
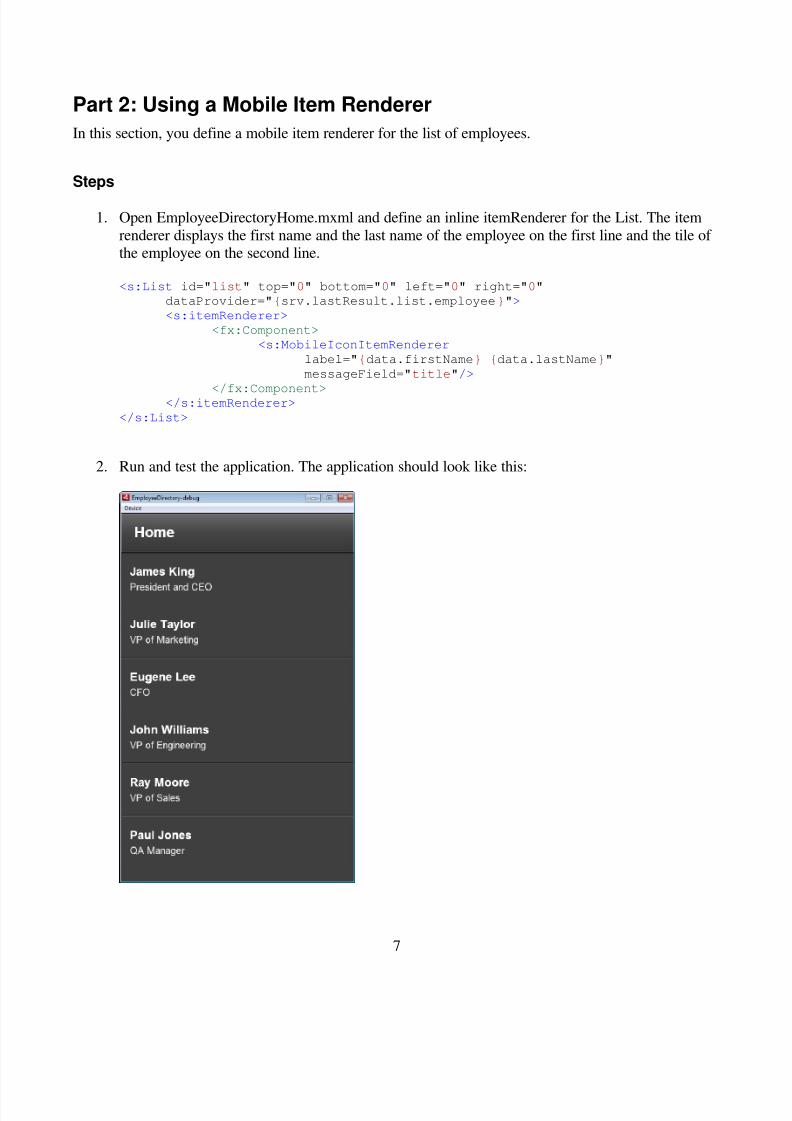
1. Open EmployeeDirectoryHome.mxml and define an inline itemRenderer for the List. The item
renderer displays the first name and the last name of the employee on the first line and the tile of the employee on the second line.
<s:List id="list" top="0" bottom="0" left="0" right="0"
dataProvider="{srv.lastResult.list.employee}">
<s:itemRenderer>
<fx:Component>
<s:MobileIconItemRenderer
label="{data.firstName} {data.lastName}"
messageField="title"/>
</fx:Component> </s:itemRenderer>
</s:List>
2. Run and test the application. The application should look like this:
8/6/2019 Flex Android 90 Minutes
http://slidepdf.com/reader/full/flex-android-90-minutes 8/22
8
Part 3: Navigating Between Views
In this section, you create an EmployeeDetails view that shows the details of the employee selected inthe list. You learn how to navigate and pass information between views.
Step 1: Creating the EmployeeDetails View
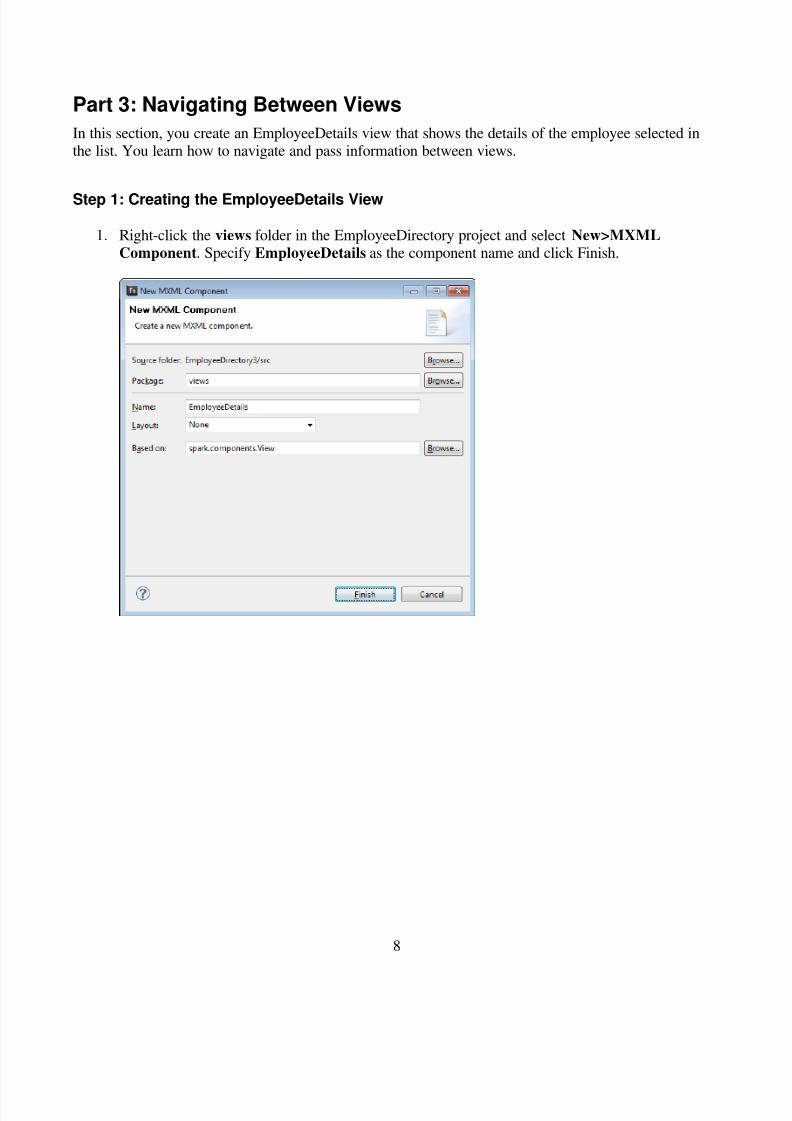
1. Right-click the views folder in the EmployeeDirectory project and select New>MXML
Component. Specify EmployeeDetails as the component name and click Finish.
8/6/2019 Flex Android 90 Minutes
http://slidepdf.com/reader/full/flex-android-90-minutes 9/22
9
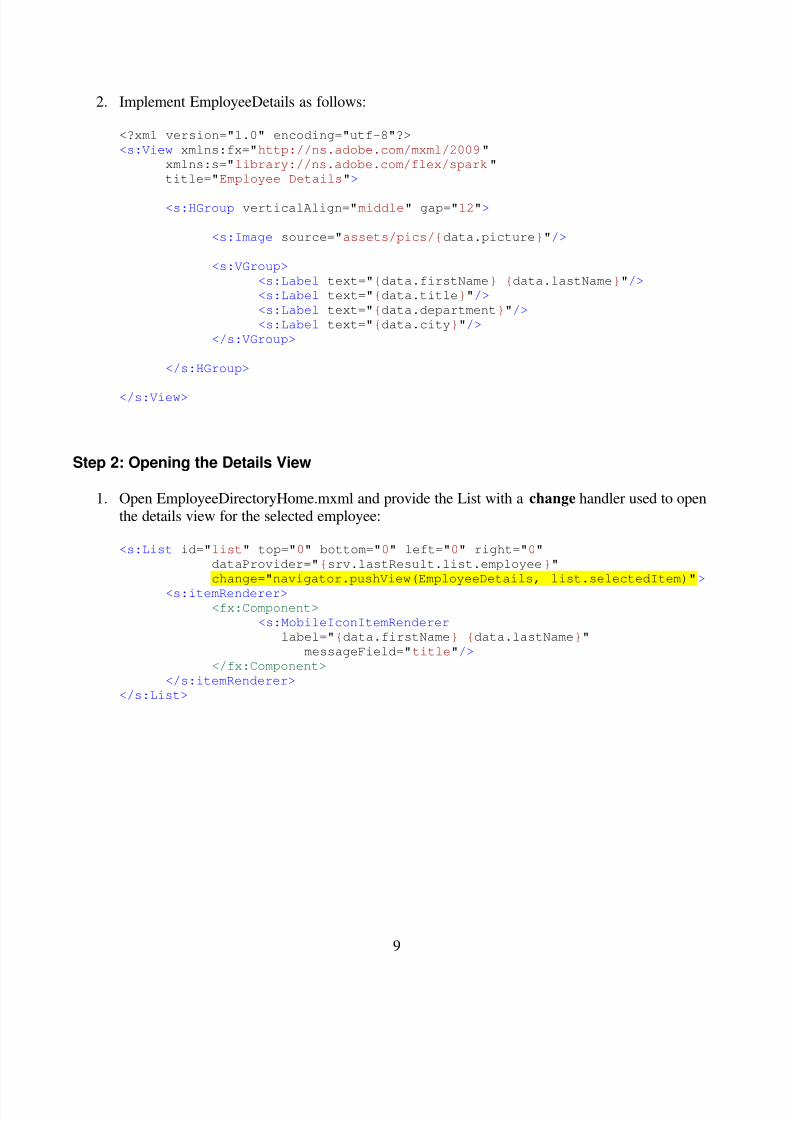
2. Implement EmployeeDetails as follows:
<?xml version="1.0" encoding="utf-8"?>
<s:View xmlns:fx="http://ns.adobe.com/mxml/2009"
xmlns:s="library://ns.adobe.com/flex/spark"
title="Employee Details">
<s:HGroup verticalAlign="middle" gap="12">
<s:Image source="assets/pics/{data.picture}"/>
<s:VGroup>
<s:Label text="{data.firstName} {data.lastName}"/>
<s:Label text="{data.title}"/>
<s:Label text="{data.department}"/>
<s:Label text="{data.city}"/>
</s:VGroup>
</s:HGroup>
</s:View>
Step 2: Opening the Details View
1. Open EmployeeDirectoryHome.mxml and provide the List with a change handler used to openthe details view for the selected employee:
<s:List id="list" top="0" bottom="0" left="0" right="0"
dataProvider="{srv.lastResult.list.employee}"
change="navigator.pushView(EmployeeDetails, list.selectedItem)">
<s:itemRenderer> <fx:Component>
<s:MobileIconItemRenderer
label="{data.firstName} {data.lastName}"
messageField="title"/>
</fx:Component>
</s:itemRenderer>
</s:List>
8/6/2019 Flex Android 90 Minutes
http://slidepdf.com/reader/full/flex-android-90-minutes 10/22
10
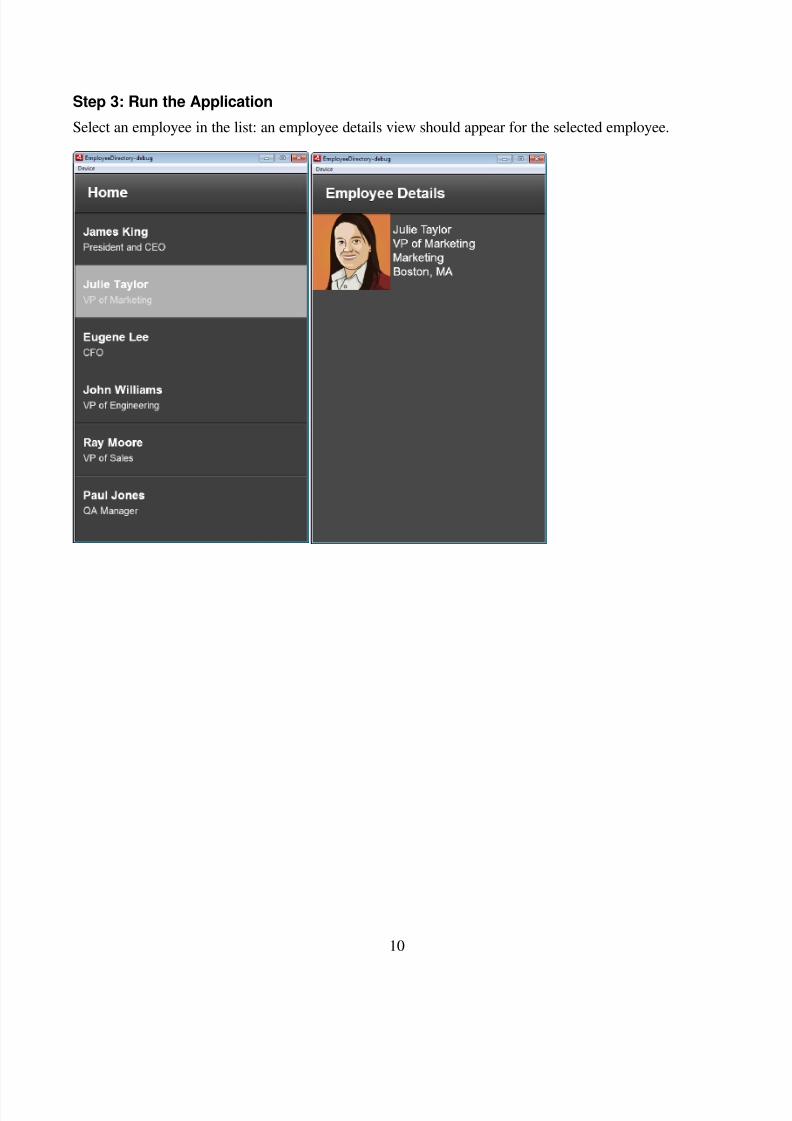
Step 3: Run the Application
Select an employee in the list: an employee details view should appear for the selected employee.
8/6/2019 Flex Android 90 Minutes
http://slidepdf.com/reader/full/flex-android-90-minutes 11/22
11
Part 4: Creating an Action Bar
In this section, you provide the Employee Directory with an Action Bar:
You provide all the views of the application with a Home button that the user can click to goback to the first view of the application.
You provide the EmployeeDirectoryHome’s Action Bar with search controls to search foremployees.
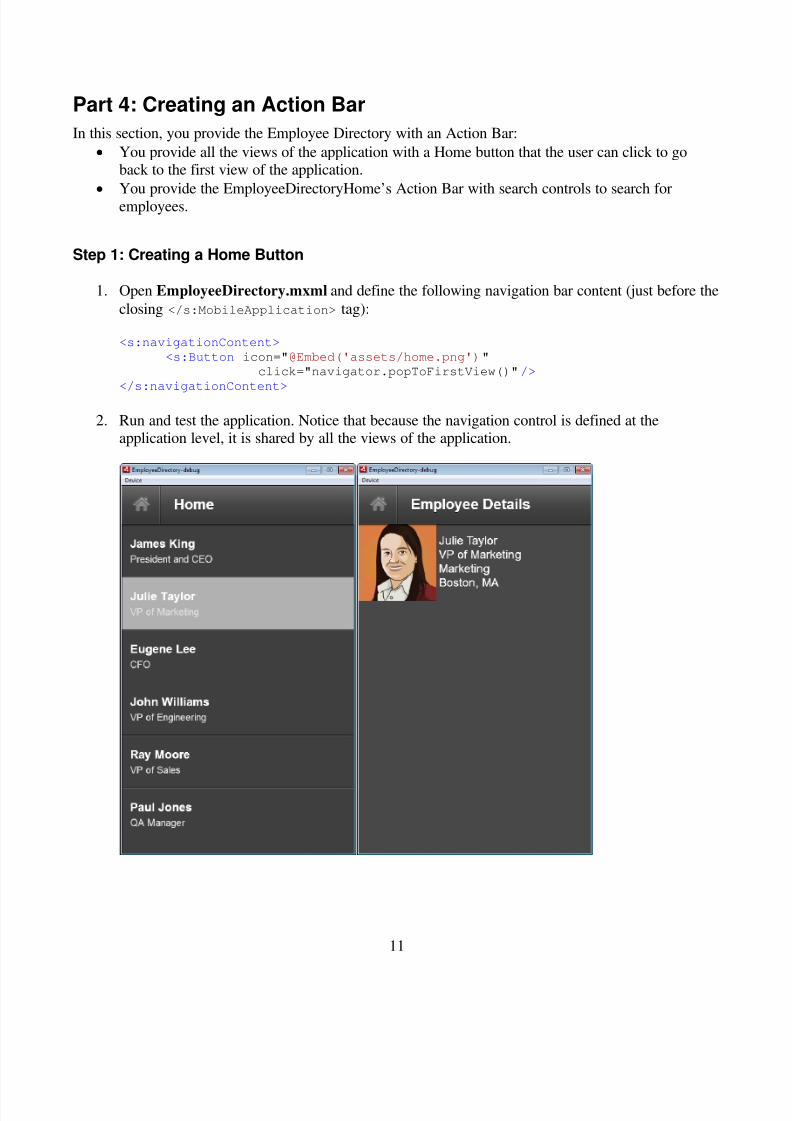
Step 1: Creating a Home Button
1. Open EmployeeDirectory.mxml and define the following navigation bar content (just before the
closing </s:MobileApplication> tag):
<s:navigationContent>
<s:Button icon="@Embed('assets/home.png')"
click="navigator.popToFirstView()"/>
</s:navigationContent>
2. Run and test the application. Notice that because the navigation control is defined at theapplication level, it is shared by all the views of the application.
8/6/2019 Flex Android 90 Minutes
http://slidepdf.com/reader/full/flex-android-90-minutes 12/22
12
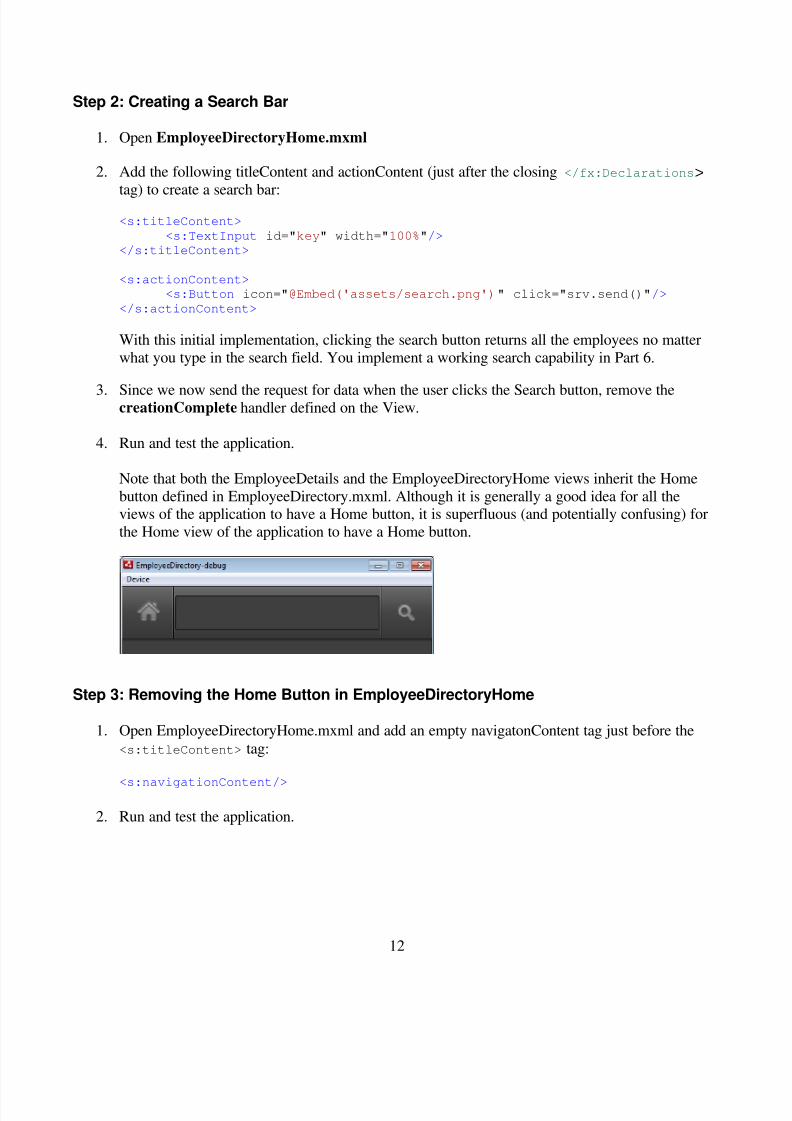
Step 2: Creating a Search Bar
1. Open EmployeeDirectoryHome.mxml
2. Add the following titleContent and actionContent (just after the closing </fx:Declarations>
tag) to create a search bar:
<s:titleContent>
<s:TextInput id="key" width="100%"/>
</s:titleContent>
<s:actionContent>
<s:Button icon="@Embed('assets/search.png')" click="srv.send()"/>
</s:actionContent>
With this initial implementation, clicking the search button returns all the employees no matter
what you type in the search field. You implement a working search capability in Part 6.
3. Since we now send the request for data when the user clicks the Search button, remove thecreationComplete handler defined on the View.
4. Run and test the application.
Note that both the EmployeeDetails and the EmployeeDirectoryHome views inherit the Home
button defined in EmployeeDirectory.mxml. Although it is generally a good idea for all theviews of the application to have a Home button, it is superfluous (and potentially confusing) for
the Home view of the application to have a Home button.
Step 3: Removing the Home Button in EmployeeDirectoryHome
1. Open EmployeeDirectoryHome.mxml and add an empty navigatonContent tag just before the
<s:titleContent> tag:
<s:navigationContent/>
2. Run and test the application.
8/6/2019 Flex Android 90 Minutes
http://slidepdf.com/reader/full/flex-android-90-minutes 13/22
13
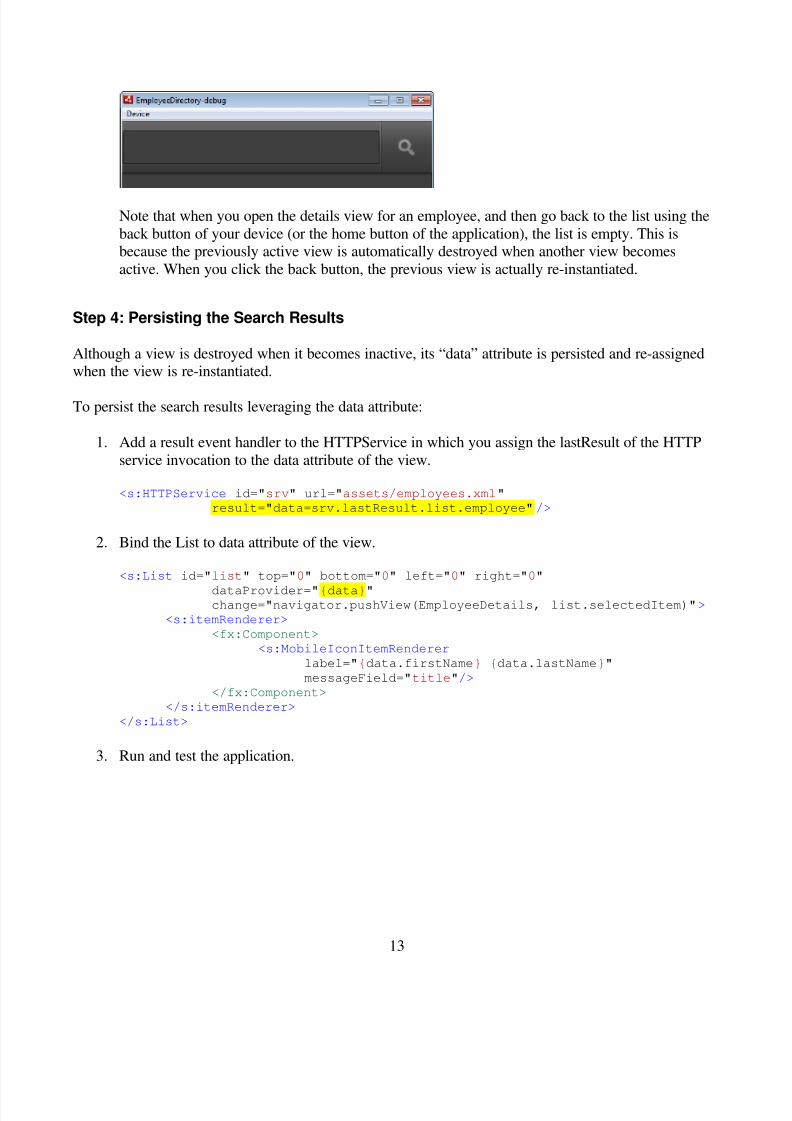
Note that when you open the details view for an employee, and then go back to the list using the
back button of your device (or the home button of the application), the list is empty. This isbecause the previously active view is automatically destroyed when another view becomes
active. When you click the back button, the previous view is actually re-instantiated.
Step 4: Persisting the Search Results
Although a view is destroyed when it becomes inactive, its “data” attribute is persisted and re-assignedwhen the view is re-instantiated.
To persist the search results leveraging the data attribute:
1. Add a result event handler to the HTTPService in which you assign the lastResult of the HTTP
service invocation to the data attribute of the view.
<s:HTTPService id="srv" url="assets/employees.xml"
result="data=srv.lastResult.list.employee"/>
2. Bind the List to data attribute of the view.
<s:List id="list" top="0" bottom="0" left="0" right="0"
dataProvider="{data}"change="navigator.pushView(EmployeeDetails, list.selectedItem)">
<s:itemRenderer>
<fx:Component>
<s:MobileIconItemRenderer
label="{data.firstName} {data.lastName}"
messageField="title"/>
</fx:Component>
</s:itemRenderer>
</s:List>
3. Run and test the application.
8/6/2019 Flex Android 90 Minutes
http://slidepdf.com/reader/full/flex-android-90-minutes 14/22
14
Part 5: Integrating with the Device Capabilities
In this section, you allow the user to call, text, or email an employee from within the application.
Step 1: Display a List of Actions
1. In EmployeeDetails.mxml, add a <fx:Script> block just before the <s:HGoup> opening tag.
<fx:Script>
<![CDATA[
]]>
</fx:Script>
2. Inside the new <fx:Script> block, define a bindable ArrayCollection to hold the list of actions
available for the selected employee:
[Bindable]
protected var actions:ArrayCollection;
Note: Make sure you import the ArrayCollection class for this code to compile:
import mx.collections.ArrayCollection;
3. Define the following embedded icons. You’ll use them in the action list itemRenderer.
[Embed("assets/sms.png")]
private var smsIcon:Class;
[Embed("assets/phone.png")] private var phoneIcon:Class;
[Embed("assets/mail.png")]
private var mailIcon:Class;
8/6/2019 Flex Android 90 Minutes
http://slidepdf.com/reader/full/flex-android-90-minutes 15/22
15
4. Override the setter for the “data” attribute of the view to populate the action list with the actionsavailable for the employee based on the available data. For example, an “SMS” action should
only be presented to the user if the mobile phone number is available.
override public function set data(value:Object):void
{
super.data = value;actions = new ArrayCollection();
if (data.officePhone)
{
actions.addItem({type: "tel", name: "Call office",
details: data.officePhone, icon:phoneIcon});
}
if (data.cellPhone)
{
actions.addItem({type: "tel", name: "Call mobile",
details: data.cellPhone, icon:phoneIcon});
actions.addItem({type: "sms", name: "SMS",
details: data.cellPhone, icon:smsIcon});}
if (data.email)
{
actions.addItem({type: "mailto", name: "Email",
details: data.email, icon:mailIcon});
}
}
5. Display the list of actions: Below the closing </s:HGroup> tag, add a List component bound to
the actions list.
<s:List id="list" dataProvider="{actions}"
top="160" left="0" right="0" bottom="0">
<s:itemRenderer>
<fx:Component>
<s:MobileIconItemRenderer
paddingTop="8" paddingBottom="8" verticalGap="6"
labelField="name"
messageField="details"
decoratorClass="{data.icon}"/>
</fx:Component>
</s:itemRenderer>
</s:List>
8/6/2019 Flex Android 90 Minutes
http://slidepdf.com/reader/full/flex-android-90-minutes 16/22
16
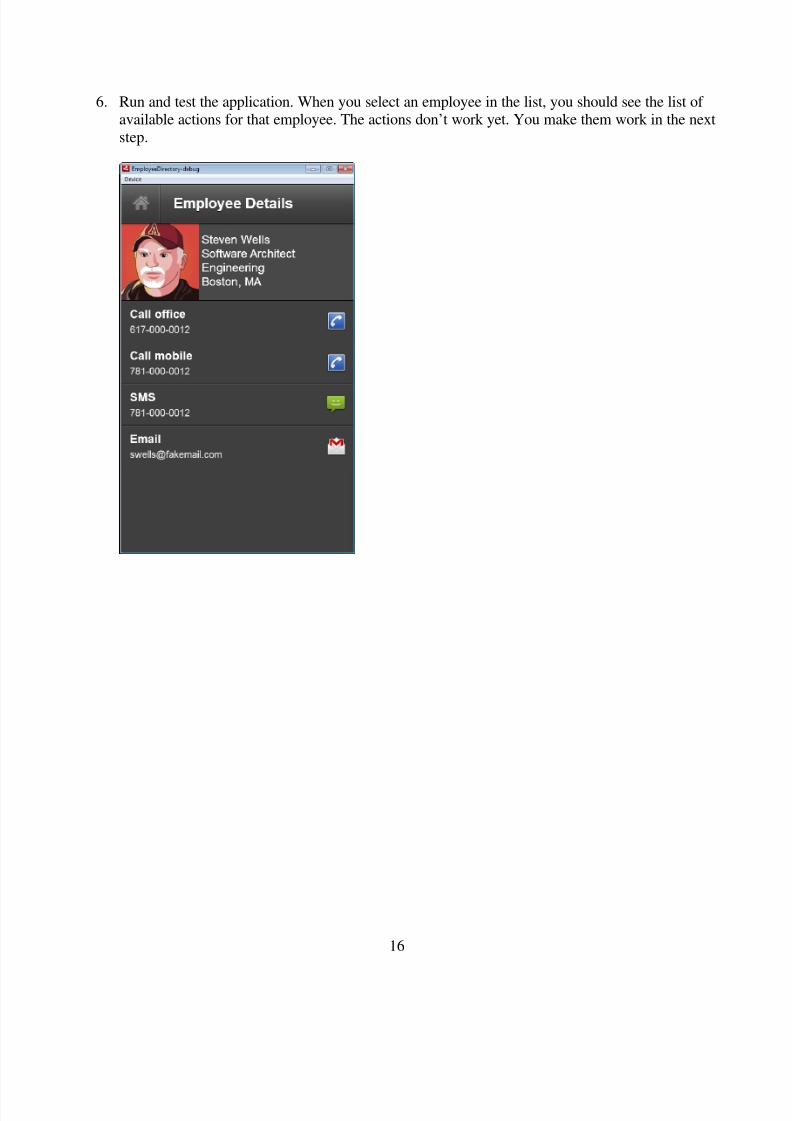
6. Run and test the application. When you select an employee in the list, you should see the list of available actions for that employee. The actions don’t work yet. You make them work in the next
step.
8/6/2019 Flex Android 90 Minutes
http://slidepdf.com/reader/full/flex-android-90-minutes 17/22
17
Step 2: Triggering the Actions
1. Add a change handler to the List:
<s:List id="list" dataProvider="{actions}"
top="160" left="0" right="0" bottom="0"
change="list_changeHandler(event)"> <s:itemRenderer>
<fx:Component>
<s:MobileIconItemRenderer
paddingTop="8" paddingBottom="8" verticalGap="6"
labelField="name"
messageField="details"
decoratorClass="{data.icon}"/>
</fx:Component>
</s:itemRenderer>
</s:List>
2. Implement list_changeHandler as follows:
protected function list_changeHandler(event:IndexChangeEvent):void
{
var action:Object = list.selectedItem;
switch (action.type)
{
case "tel":
navigateToURL(new URLRequest("tel:"+action.details)); break;
case "sms":navigateToURL(new URLRequest("sms:"+action.details));
break;
case "mailto":navigateToURL(new URLRequest("mailto:"+action.details));
break;
}
}
Note: Make sure you import spark.events.IndexChangeEvent (and notmx.events.IndexChangedEvent) for this code to compile:
import spark.events.IndexChangeEvent;
3. Run and test the application
8/6/2019 Flex Android 90 Minutes
http://slidepdf.com/reader/full/flex-android-90-minutes 18/22
18
Part 6: Using a RemoteObject
In this section, you make the search feature work. You replace the HTTPService with a RemoteObjectthat provides a findByName method. For your convenience, the RemoteObject is hosted in the cloud so
you don’t have to deploy anything in your own infrastructure.
You could of course have implemented the search feature using an HTTPService. The reason we are
switching to a RemoteObject is to experiment with different data access strategies.
If you are not interested in using a RemoteObject, you can move straight to Part 7.
Steps
1. Open EmployeeDirectoryHome.mxml. Replace the HTTPService with a RemoteObject definedas follows:
<s:RemoteObject id="srv" destination="employeeService"endpoint="http://flex.org:8080/extras/messagebroker/amf"
result="data=srv.findByName.lastResult"/>
2. Modify the click handler of the search button: use the RemoteObject’s findByName method tofind the employees matching the search key entered by the user.
<s:Button icon="@Embed('assets/search.png')"
click="srv.findByName(key.text)"/>
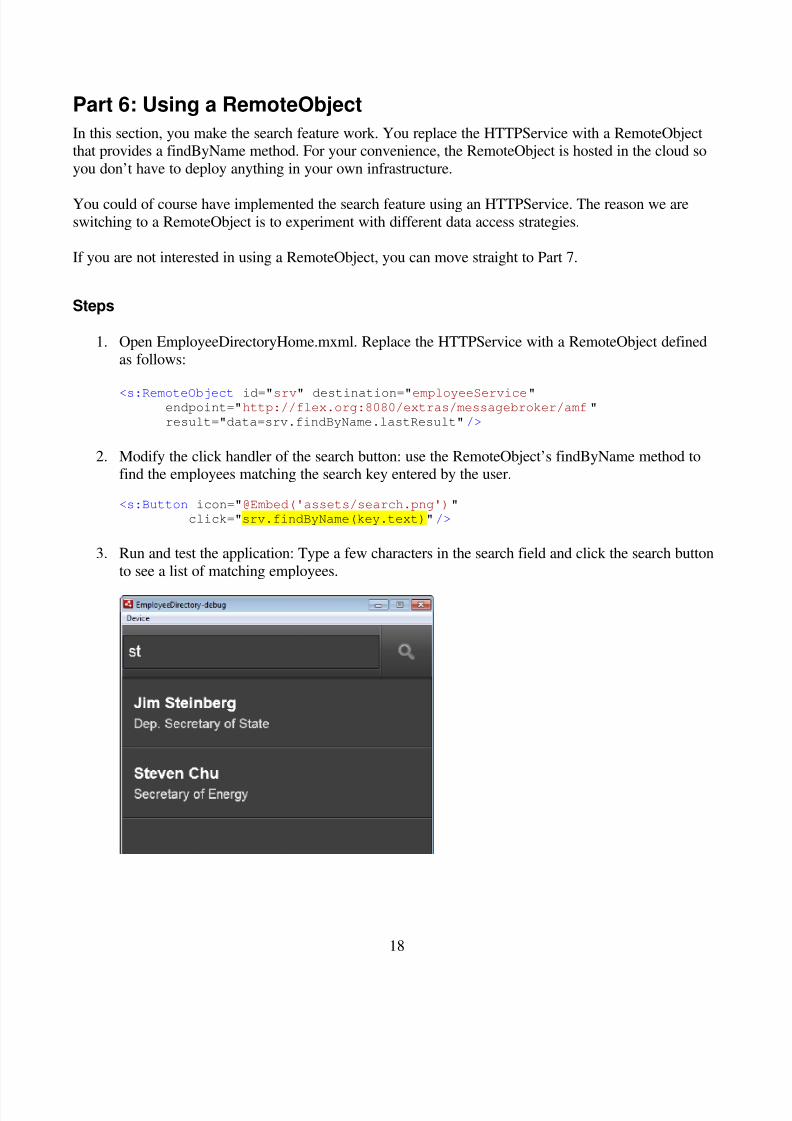
3. Run and test the application: Type a few characters in the search field and click the search button
to see a list of matching employees.
8/6/2019 Flex Android 90 Minutes
http://slidepdf.com/reader/full/flex-android-90-minutes 19/22
19
Part 7: Using the Local SQLite Database
In this section, you change the data access logic of the application: instead of using a RemoteObject (oran HTTPService), you use the SQLite database available on your device to access the data.
Steps
1. Copy the model directory from the FlexAndroid90Minutes folder and paste it under the src directory of the EmployeeDirectory project.
2. Explore the source code of the EmployeeDAO and Employee classes:
The EmployeeDAO class provides a basic implementation of the Data Access Objectpattern: it encapsulates the data access logic to create, update and delete employees. If the
employee table doesn’t exist in the database, EmployeeDAO also includes some logic to
create it and populate it with sample data.
Employee is a basic value object that also provides some lazy loading logic to load theemployee’s manager and direct reports as needed.
3. In EmployeeDirectoryHome.mxml, replace the RemoteObject (or the HTTPService if you didn’t
complete Part 6) with an instance of EmployeeDAO
<model:EmployeeDAO id="srv"/>
Note: Make sure the model namespace is bound in the View definition at the top of the mxml
document:
<s:View xmlns:fx="http://ns.adobe.com/mxml/2009"
xmlns:s="library://ns.adobe.com/flex/spark" title="Home"
xmlns:model="model.*">
4. Modify the search button click event handler accordingly.
<s:Button icon="@Embed('assets/search.png')"
click="data=srv.findByName(key.text)"/>
Note that in this case, we can directly assign the return value of the findByName function to data
because EmployeeDAO uses the synchronous version of the database access API.
5. Open EmployeeDirectory-app.xml, and scroll down to the end of the document. Add the
following permission inside the manifest tag (right after the android.permission.INTERNET permission):
<uses-permission android:name="android.permission.WRITE_EXTERNAL_STORAGE"/>
6. Run and test the application
8/6/2019 Flex Android 90 Minutes
http://slidepdf.com/reader/full/flex-android-90-minutes 20/22
20
Part 8: Navigating the Org Chart
In this section, you add the “View manager” and “View direct reports” actions to the Employee Detailsview to allow the user to navigate up and down the org chart.
Step 1: Create the DirectReports View
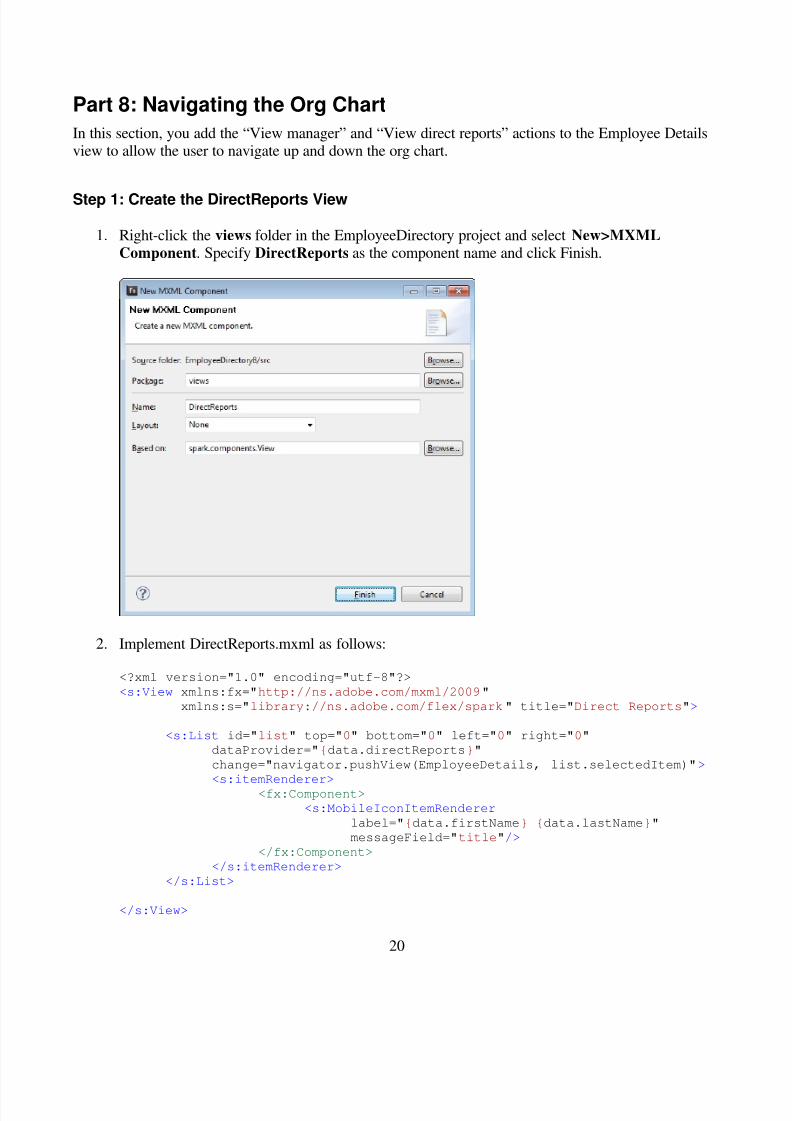
1. Right-click the views folder in the EmployeeDirectory project and select New>MXML
Component. Specify DirectReports as the component name and click Finish.
2. Implement DirectReports.mxml as follows:
<?xml version="1.0" encoding="utf-8"?>
<s:View xmlns:fx="http://ns.adobe.com/mxml/2009"
xmlns:s="library://ns.adobe.com/flex/spark" title="Direct Reports">
<s:List id="list" top="0" bottom="0" left="0" right="0"
dataProvider="{data.directReports}"
change="navigator.pushView(EmployeeDetails, list.selectedItem)">
<s:itemRenderer>
<fx:Component>
<s:MobileIconItemRenderer
label="{data.firstName} {data.lastName}"
messageField="title"/>
</fx:Component>
</s:itemRenderer>
</s:List>
</s:View>
8/6/2019 Flex Android 90 Minutes
http://slidepdf.com/reader/full/flex-android-90-minutes 21/22
21
Step 2: Add the Actions to Navigate the Org Chart
1. In EmployeeDetails.mxml, add two possible actions to the set data function:
if (data.manager)
{
actions.addItem({type: "employee", name: "View manager",details: data.manager.firstName + " " + data.manager.lastName,
employee: data.manager});
}
if (data.directReports && data.directReports.length > 0)
{
actions.addItem({type: "reports", name: "View direct reports",details: "(" + data.directReports.length + ")",
employee: data});
}
2. In the List change handler, add two case statements to trigger the corresponding actions:
case "employee":navigator.pushView(EmployeeDetails, action.employee);
break;
case "reports":
navigator.pushView(DirectReports, action.employee);
break;

8/6/2019 Flex Android 90 Minutes
http://slidepdf.com/reader/full/flex-android-90-minutes 22/22
22
Step 3: Run the application.
1. Select an employee who has a manager and click the “View manager” action2. Select an employee who has a direct reports and click the “View direct reports” action