Embed Size (px)
DESCRIPTION
Information about identification of trigger points
Citation preview

i
FLASHCARDS
for Palpation, Trigger Points,
and Referral Patterns
JOSEPH E. MUSCOLINO, DCInstructor, Connecticut Center for Massage Therapy
Westport, ConnecticutOwner, The Art and Science of Kinesiology
Redding, Connecticut
FM_i-xx_A05169.indd iFM_i-xx_A05169.indd i 10/1/08 5:36:15 PM10/1/08 5:36:15 PM

Copyright © 2009 M
osby, Inc., an affi liate of Elsevier, Inc.PART 1: Muscle Palpation
Section 1: Palpation of the Muscles of the Shoulder Girdle
TrapeziusStarting Position:• Client prone with arm resting on the table at the side of the body• Therapist standing to the side of the client• Palpating hand placed just lateral to the lower thoracic spine (on the
lower trapezius)Palpation Steps:1. Ask the client to abduct the arm at the shoulder joint to 90 degrees
with the elbow joint extended, and to slightly retract the scapula at the scapulocostal joint by pinching the shoulder blade toward the spine (Figure A). Adding gentle resistance to the client’s arm abduc-tion with your support hand might be helpful.
2. Palpate the lower trapezius. To locate the lateral border, palpate per-pendicular to it (Figure A). Once located, palpate the entirety of the lower trapezius.
3. Repeat for the middle trapezius between the scapula and the spine. Strum perpendicular to the direction of the fi bers (i.e., strum verti-cally) (Figure B).
4. Repeat for the upper trapezius.5. To further engage the upper trapezius, ask the client to do slight ex-
tension of the head and neck at the spinal joints. Then palpate the entirety of the upper trapezius (Figure C).
6. Once the trapezius has been located, have the client relax it and pal-pate to assess its baseline tone.
Palpation Note:1. Abducting the arm at the shoulder joint requires an upward rotation
force by the upper and lower trapezius to stabilize the scapula. Re-tracting the scapula engages the entire trapezius, especially the mid-dle trapezius.
CARD # 1
P1S01_001-030_A05169.indd 1P1S01_001-030_A05169.indd 1 10/1/08 5:07:26 PM10/1/08 5:07:26 PM

Copyright © 2009 M
osby, Inc., an affi liate of Elsevier, Inc.Trapezius
C
A
B
Palpation Key: Fly like an airplane: If both trapezius muscles are palpated at the same time, both arms out to the sides make the client
appear to be fl ying like an airplane.
The
Mus
cle
and
Bone
Pal
patio
n M
anua
l, Fi
gure
10-
9, A
-C, P
age
143
P1S01_001-030_A05169.indd 2P1S01_001-030_A05169.indd 2 10/1/08 5:07:26 PM10/1/08 5:07:26 PM

Copyright © 2009 M
osby, Inc., an affi liate of Elsevier, Inc.PART 1: Muscle Palpation
Section 1: Palpation of the Muscles of the Shoulder Girdle
Rhomboids
Starting Position:• Client prone with the hand resting in the small of the back• Therapist standing to the side of the client• Palpating hand placed between the spinal column and the scapula at
the midscapular levelPalpation Steps:1. Ask the client to lift the hand away from the small of the back
(Figure A).2. Look for the lower border of the rhomboids to become visible (Figure B);
make sure you are not covering the lower border with your palpating hand).
3. Palpate the rhomboids from the inferior aspect to the superior aspect. When palpating, strum perpendicular to the direction of the fi bers.
4. Once the rhomboids have been located, have the client relax them and palpate to assess their baseline tone.
Palpation Notes:1. Having the client place the hand in the small of the back requires ex-
tension and adduction of the arm at the shoulder joint. This requires the coupled action of downward rotation of the scapula at the scapu-locostal joint, which will cause the trapezius to relax (due to recipro-cal inhibition) so that we can palpate through it. It will also engage the rhomboids so that their contraction will be clearly felt.
2. The superior border of the rhomboids is more diffi cult to visualize and palpate than the inferior border. However, it can usually be palpated. Feel for a gap between the rhomboids and the levator scapulae.
3. It is usually not possible to clearly distinguish the border between the rhomboid major and rhomboid minor.
CARD # 2
P1S01_001-030_A05169.indd 3P1S01_001-030_A05169.indd 3 10/1/08 5:07:28 PM10/1/08 5:07:28 PM

Copyright © 2009 M
osby, Inc., an affi liate of Elsevier, Inc.Rhomboids
A
BThe
Mus
cle
and
Bone
Pal
patio
n M
anua
l, Fi
gure
s 10
-14
and
10-1
5, P
ages
146
-147
Palpation Key: Client’s hand in the small of the back.
P1S01_001-030_A05169.indd 4P1S01_001-030_A05169.indd 4 10/1/08 5:07:28 PM10/1/08 5:07:28 PM

Copyright © 2009 M
osby, Inc., an affi liate of Elsevier, Inc.PART 1: Muscle Palpation
Section 4: Palpation of the Muscles of the Arm
CoracobrachialisStarting Position:• Client seated with the arm abducted to 90 degrees and laterally ro-
tated at the shoulder joint, and the forearm fl exed at the elbow joint approximately 90 degrees
• Therapist seated or standing in front of the client• Palpating hand placed on the medial aspect of the proximal half of
the client’s arm• Support hand placed on the distal end of the client’s arm, just proxi-
mal to the elbow jointPalpation Steps:1. Resist the client from horizontal fl exion of the arm at the shoulder
joint and feel for the contraction of the coracobrachialis.2. Strumming perpendicular to the fi bers, palpate from attachment to
attachment.3. Once the coracobrachialis has been located, have the client relax it
and palpate to assess its baseline tone.Palpation Notes:1. To easily discern the coracobrachialis from the short head of the
biceps brachii, it is important for the forearm to be passively fl exed 90 degrees or more so that the biceps brachii stays relaxed.
2. If there is doubt as to whether you are on the coracobrachialis or the short head of the biceps brachii, resist the client from performing fl exion of the forearm at the elbow joint. This will cause the short head of the biceps brachii to contract, but not the coracobrachialis. Where these two muscles overlap, the coracobrachialis is deep (posterior) to the short head of the biceps brachii.
3. Palpation of the coracobrachialis must be done prudently because of the presence of the brachial artery and the median, ulnar, and mus-culocutaneous nerves.
CARD # 49
P1S04_089-104_A05169.indd 97P1S04_089-104_A05169.indd 97 10/1/08 5:09:09 PM10/1/08 5:09:09 PM

Copyright © 2009 M
osby, Inc., an affi liate of Elsevier, Inc.Coracobrachialis
The
Mus
cle
and
Bone
Pal
patio
n M
anua
l, Fi
gure
13-
26, P
age
271
Palpation Key: Resist horizontal fl exion of the arm with the elbow joint fl exed.
P1S04_089-104_A05169.indd 98P1S04_089-104_A05169.indd 98 10/1/08 5:09:09 PM10/1/08 5:09:09 PM

Copyright © 2009 M
osby, Inc., an affi liate of Elsevier, Inc.PART 1: Muscle Palpation
Section 7: Palpation of the Trunk Muscles
Quadratus Lumborum (QL)Starting Position:• Client prone• Therapist standing to the side of the client• Palpating hand placed just lateral to the lateral border of the erector
spinae in the lumbar region• Support hand sometimes placed directly on the palpation hand for
support (not shown)Palpation Steps:1. First locate the lateral border of the erector spinae musculature (to do
so, ask the client to raise the head and upper trunk from the table); then place palpating fi nger just lateral to the lateral border of the erector spinae.
2. Direct palpating pressure medially, deep to the erector spinae muscu-lature, and feel for the quadratus lumborum (QL).
3. To engage the QL to be certain that you are on it: ask the client to ele-vate the pelvis on that side at the lumbosacral joint (Note: This in-volves moving the pelvis along the plane of the table toward the head; in other words, the pelvis should not lift up in the air, away from the table.) and feel for its contraction (Figure A).
4. Once located, palpate medially and superiorly toward the twelfth rib, medially and inferiorly toward the iliac crest, and directly medially to-ward the transverse processes of the lumbar spine (Figure B).
5. Once the QL has been located, have the client relax it and palpate to assess its baseline tone.
Palpation Notes:1. To successfully palpate the QL, you must be lateral to the erector spi-
nae and then press in fi rmly with a medial direction to your pressure.2. Whenever pressing deeply to palpate a muscle, always press in fi rmly,
but slowly.
CARD # 85
P1S07_159-194_A05169.indd 169P1S07_159-194_A05169.indd 169 10/1/08 5:10:42 PM10/1/08 5:10:42 PM

Copyright © 2009 M
osby, Inc., an affi liate of Elsevier, Inc.Quadratus Lumborum (QL)
The
Mus
cle
and
Bone
Pal
patio
n M
anua
l, Fi
gure
s 16
-27
and
16-2
8, P
age
366
Palpation Key: Lateral to the erector spinae and press in medially.
A
B
P1S07_159-194_A05169.indd 170P1S07_159-194_A05169.indd 170 10/1/08 5:10:42 PM10/1/08 5:10:42 PM

Copyright © 2009 M
osby, Inc., an affi liate of Elsevier, Inc.PART 1: Muscle Palpation
Section 7: Palpation of the Trunk Muscles
External and Internal Abdominal ObliquesStarting Position:• Client supine with a small roll under the knees• Therapist standing to the side of the client• Palpating hand placed on the anterolateral abdominal wallPalpation Steps:1. With palpating hand on the anterolateral abdominal wall between the
iliac crest and the lower ribs (be sure that you are lateral to the rectus abdominis), ask the client to rotate the trunk to the opposite side of the body (contralateral rotation) and feel for the contraction of the ex-ternal abdominal oblique (Figure A).
2. Try to feel for the diagonal orientation of the external abdominal oblique fi bers by strumming perpendicular to them.
3. Continue palpating the external abdominal oblique toward its supe-rior and inferior attachments.
4. Repeat the same procedure for the internal abdominal oblique, asking the client to instead fl ex and ipsilaterally rotate the trunk at the spinal joints (Figure B).
5. Once the external abdominal and internal abdominal obliques have been located, have the client relax them and palpate to assess their baseline tone.
Palpation Notes:1. When asking the client to contralaterally rotate (to isolate the external
abdominal oblique) and ipsilaterally rotate (to isolate the internal ab-dominal oblique), try to have the client do as little fl exion as possible, or both abdominal obliques will contract.
2. The fi ber direction of the external abdominal oblique is similar to the orientation of a coat pocket.
3. Feeling the fi ber direction of each of the abdominal obliques and dis-tinguishing between the external and internal abdominal obliques on one side can be challenging.
CARD # 92
P1S07_159-194_A05169.indd 183P1S07_159-194_A05169.indd 183 10/1/08 5:10:55 PM10/1/08 5:10:55 PM

Copyright © 2009 M
osby, Inc., an affi liate of Elsevier, Inc.External and Internal Abdominal Obliques
The
Mus
cle
and
Bone
Pal
patio
n M
anua
l, Fi
gure
16-
53, A
-B, P
age
379
Palpation Key: Flex and contralaterally rotate for the external abdominal oblique; fl ex and ipsilaterally rotate
for the internal abdominal oblique.
A
B
P1S07_159-194_A05169.indd 184P1S07_159-194_A05169.indd 184 10/1/08 5:10:56 PM10/1/08 5:10:56 PM

Copyright © 2009 M
osby, Inc., an affi liate of Elsevier, Inc.PART 1: Muscle Palpation
Section 8: Palpation of the Pelvic Muscles
PiriformisStarting Position:• Client prone with the leg fl exed to 90 degrees at the knee joint• Therapist standing to the side of the client• Palpating hand placed just lateral to the sacrum, halfway between
the posterior superior iliac spine (PSIS) and the apex of the sacrum• Support hand placed on the medial surface of the distal leg, just
proximal to the ankle jointPalpation Steps:1. Begin by fi nding the point on the lateral sacrum that is halfway be-
tween the PSIS and the apex of the sacrum. Drop just off the sacrum laterally at this point and you will be on the piriformis.
2. Resist the client from laterally rotating the thigh at the hip joint and feel for the contraction of the piriformis. Note: Lateral rotation of the client’s thigh involves the client’s foot moving medially toward the midline (and opposite side) of the body.
3. Continue palpating the piriformis laterally toward the superior border of the greater trochanter of the femur by strumming perpendicular to the fi bers as the client alternately contracts (against resistance) and relaxes the piriformis.
4. Once the piriformis has been located, have the client relax it and pal-pate to assess its baseline tone.
Palpation Notes:1. It can be challenging to discern the borders between the piriformis
and the gluteus medius superiorly and superior gemellus inferiorly.2. When giving resistance to the client’s lateral rotation of the thigh at
the hip joint, do not let the client contract too forcefully, or the more superfi cial gluteus maximus (also a lateral rotator) may be engaged, blocking palpation of the deeper piriformis.
CARD # 101
P1S08_195-206_A05169.indd 201P1S08_195-206_A05169.indd 201 10/1/08 5:11:17 PM10/1/08 5:11:17 PM

Copyright © 2009 M
osby, Inc., an affi liate of Elsevier, Inc.Piriformis
The
Mus
cle
and
Bone
Pal
patio
n M
anua
l, Fi
gure
17-
22, P
age
407
Palpation Key: Find the midpoint of the lateral border of the sacrum. Then draw a line from there to the greater trochanter.
P1S08_195-206_A05169.indd 202P1S08_195-206_A05169.indd 202 10/1/08 5:11:17 PM10/1/08 5:11:17 PM

Copyright © 2009 M
osby, Inc., an affi liate of Elsevier, Inc.PART 1: Muscle Palpation
Section 10: Palpation of the Leg Muscles
Tibialis Anterior
Starting Position:• Client supine• Therapist standing to the side of the client• Palpating hand not yet placed on the client• Support hand placed on the medial side of the distal footPalpation Steps:1. Resist the client from dorsifl exing and inverting the foot and look for
the distal tendon of the tibialis anterior on the medial side of the foot; it is usually visible (Figure A).
2. Palpate the distal tendon by strumming perpendicularly across it. Continue palpating the tibialis anterior proximally to the lateral tibial condyle by strumming perpendicular to the fi bers. Its belly is located directly lateral to the border of the tibia in the anterior leg (Figure B).
3. Once the tibialis anterior has been located, have the client relax it and palpate to assess its baseline tone.
Palpation Notes:1. As with all superfi cial muscles, it is always best to look before placing
your palpating hand over the muscle; otherwise your hand may block you seeing and locating the muscle or its tendon.
2. The distal tendon of the tibialis anterior is usually very prominent and visible. The belly is also usually prominent and visible directly lateral to the shaft of the tibia in the anterior leg. If the tendon and belly are not visible, they can usually be easily palpated by strumming perpendicularly.
3. To clearly discern the border between the tibialis anterior and the ad-jacent extensor digitorum longus (EDL), use inversion and eversion. Inversion will engage the tibialis anterior but not the EDL; eversion will engage the EDL but not the tibialis anterior.
CARD # 116
P1S10_231-254_A05169.indd 231P1S10_231-254_A05169.indd 231 10/1/08 5:11:59 PM10/1/08 5:11:59 PM

Copyright © 2009 M
osby, Inc., an affi liate of Elsevier, Inc.Tibialis AnteriorTh
e M
uscl
e an
d Bo
ne P
alpa
tion
Man
ual,
Figu
res
19-7
and
19-
8, P
ages
456
-457
Palpation Key: First look for the distal tendon.
A
B
P1S10_231-254_A05169.indd 232P1S10_231-254_A05169.indd 232 10/1/08 5:12:00 PM10/1/08 5:12:00 PM

Copyright © 2009 M
osby, Inc., an affi liate of Elsevier, Inc.PART 2: Bone Palpation
Upper ExtremitySection 1: Shoulder Girdle
CARD # 142 A
The
Mus
cle
and
Bone
Pal
patio
n M
anua
l, Fi
gure
7-7
, Pag
e 72
Post
erol
ater
al v
iew
of th
e sc
apul
a.
Po
ster
ola
tera
l vie
w
Sup
erio
r an
gle
Sup
erio
r bo
rder
Spi
ne o
f sca
pula
Acr
omio
npr
oces
s
Late
ral b
orde
r
Sup
rasp
inou
sfo
ssa
Infr
aspi
nous
foss
a
Med
ial b
orde
r
Infe
rior
angl
e
P2_277-416_A05169.indd 283P2_277-416_A05169.indd 283 10/1/08 5:13:10 PM10/1/08 5:13:10 PM

Copyright © 2009 M
osby, Inc., an affi liate of Elsevier, Inc.
Posterolateral view
Posterolateral view
A
B
PART 2: Bone Palpation
Upper ExtremitySection 1: Shoulder Girdle
CARD # 142 B
The
Mus
cle
and
Bone
Pal
patio
n M
anua
l, Fi
gure
7-8
, A-B
, Pag
e 72
Acromion process and spine of the scapula: The spine of the scapula is the posterior continuation of the acromion process. To locate the spine of the scapula, begin on the acromion process (A) and continue palpating along it posteriorly. The spine of the scapula (B) can be palpated all the way to the medial border of the scapula. The spine of the scapula can be best palpated if you strum it perpendicularly by moving your palpating fi ngers up and down across it as you work your way posteriorly.
P2_277-416_A05169.indd 284P2_277-416_A05169.indd 284 10/1/08 5:13:11 PM10/1/08 5:13:11 PM

Copyright © 2009 M
osby, Inc., an affi liate of Elsevier, Inc.PART 2: Bone Palpation
Upper ExtremitySection 1: Shoulder Girdle
CARD # 143 A
The
Mus
cle
and
Bone
Pal
patio
n M
anua
l, Fi
gure
7-9
, Pag
e 73
Supraspinous fossa: To palpate the supraspinous fossa of the scapula, locate the spine of the scapula and drop just off it superiorly. Palpate along the superior border of the spine of the scapula within the supraspi-nous fossa.
Posterolateral view
P2_277-416_A05169.indd 285P2_277-416_A05169.indd 285 10/1/08 5:13:12 PM10/1/08 5:13:12 PM

Copyright © 2009 M
osby, Inc., an affi liate of Elsevier, Inc.PART 2: Bone Palpation
Upper ExtremitySection 1: Shoulder Girdle
CARD # 143 B
The
Mus
cle
and
Bone
Pal
patio
n M
anua
l, Fi
gure
7-1
0, P
age
73
Infraspinous fossa of the scapula: To palpate the infraspinous fossa of the scapula, locate the spine of the scapula and drop just off it inferiorly. The infraspinous fossa is larger than the supraspinous fossa.
Posterolateral view
P2_277-416_A05169.indd 286P2_277-416_A05169.indd 286 10/1/08 5:13:13 PM10/1/08 5:13:13 PM

Copyright © 2009 M
osby, Inc., an affi liate of Elsevier, Inc.PART 2: Bone Palpation
Axial BodySection 4: Posterior Neck
CARD # 175 B
The
Mus
cle
and
Bone
Pal
patio
n M
anua
l, Fi
gure
8-1
8, P
age
102
Spinous processes of C2 through C7: The spinous processes (SPs) of the cervical spine are palpated in the midline of the posterior neck. The most prominent cervical SPs are the second and seventh (C7 is called the vertebra prominens). Begin at the external occipital protuberance of the occiput (see Flashcard #172B); then drop inferiorly onto the cervical spine, feeling for the SP of C2. As with most cervical SPs, it is bifi d (it has two points). Continue palpating inferiorly, feeling for additional cervical SPs. Note: C1 (the atlas) does not have a SP; it has a posterior tubercle. To palpate the posterior tubercle of C1, palpate between the SP of C2 and the occiput, pressing anteriorly into the soft tissue.
Lateral view
P2_277-416_A05169.indd 350P2_277-416_A05169.indd 350 10/1/08 5:13:59 PM10/1/08 5:13:59 PM

Copyright © 2009 M
osby, Inc., an affi liate of Elsevier, Inc.PART 2: Bone Palpation
Axial BodySection 4: Posterior Neck
CARD # 176 A
The
Mus
cle
and
Bone
Pal
patio
n M
anua
l, Fi
gure
8-1
9, P
age
103
Articular processes (facet joints) of the cervical spine: The inferior and superior articular processes of the cervical spine create what is called the cervical pillar (articular pillar) due to the manner in which they stack upon one other. They are easily palpable at the lateral side of the laminar groove (approximately 1 inch [2.5 cm] lateral to the spinous pro-cesses). The client must be supine and relaxed for palpation to be suc-cessful. Begin palpation at the spinous process of C2 (see Flashcard #175B) and palpate laterally for the articular process of C2. Continue to palpate inferiorly until you reach the bottom of the neck. Note: The articu-lar processes of the cervical spine are an excellent contact point when performing specifi c joint mobilizations to the cervical spine.
Lateral view
P2_277-416_A05169.indd 351P2_277-416_A05169.indd 351 10/1/08 5:14:01 PM10/1/08 5:14:01 PM
TrP � Trigger Point
Copyright © 2009 M
osby, Inc., an affi liate of Elsevier, Inc.
B
A
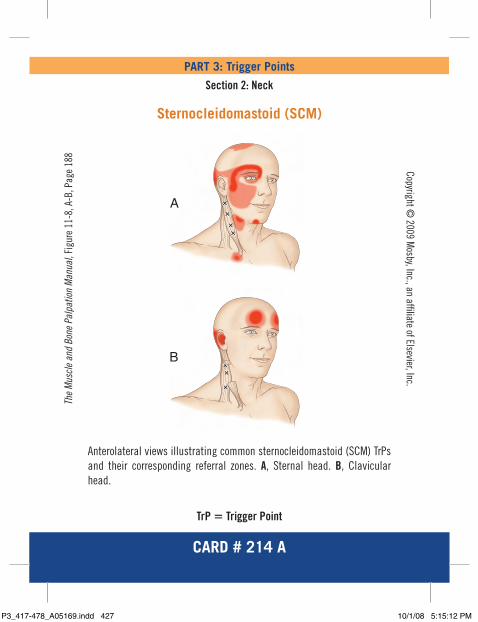
PART 3: Trigger Points
Section 2: Neck
Sternocleidomastoid (SCM)
CARD # 214 A
The
Mus
cle
and
Bone
Pal
patio
n M
anua
l, Fi
gure
11-
8, A
-B, P
age
188
Anterolateral views illustrating common sternocleidomastoid (SCM) TrPs and their corresponding referral zones. A, Sternal head. B, Clavicular head.
P3_417-478_A05169.indd 427P3_417-478_A05169.indd 427 10/1/08 5:15:12 PM10/1/08 5:15:12 PM

TrP � Trigger Point
Copyright © 2009 M
osby, Inc., an affi liate of Elsevier, Inc.PART 3: Trigger Points
Section 2: Neck
Scalenes
CARD # 214 B
The
Mus
cle
and
Bone
Pal
patio
n M
anua
l, Fi
gure
11-
15, A
-B, P
age
192
A, Anterior view illustrating common scalene TrPs and their correspond-ing referral zone. B, Posterior view showing the remainder of the referral zone.
BA
P3_417-478_A05169.indd 428P3_417-478_A05169.indd 428 10/1/08 5:15:13 PM10/1/08 5:15:13 PM

TrP � Trigger Point
Copyright © 2009 M
osby, Inc., an affi liate of Elsevier, Inc.PART 3: Trigger Points
Section 7: Pelvis
Piriformis
CARD # 232 A
The
Mus
cle
and
Bone
Pal
patio
n M
anua
l, Fi
gure
17-
24, P
age
408
Posterior view of common piriformis TrPs and their corresponding referral zones.
P3_417-478_A05169.indd 463P3_417-478_A05169.indd 463 10/1/08 5:15:35 PM10/1/08 5:15:35 PM

TrP � Trigger Point
Copyright © 2009 M
osby, Inc., an affi liate of Elsevier, Inc.
A B
PART 3: Trigger Points
Section 8: Thigh
Hamstring Group
CARD # 232 B
The
Mus
cle
and
Bone
Pal
patio
n M
anua
l, Fi
gure
18-
10, A
-B, P
age
422
Posterior views of common lateral and medial hamstring TrPs and their corresponding referral zones. A, Lateral hamstring (biceps femoris). B, Medial hamstrings (semitendinosus and semimembranosus).
P3_417-478_A05169.indd 464P3_417-478_A05169.indd 464 10/1/08 5:15:36 PM10/1/08 5:15:36 PM