Embed Size (px)
Citation preview

02/21/05 Part Number 56033201
PHONECELL® SX6P-200C CDMAFixed Cellular Phone
USER MANUAL


QUICK CONNECTION GUIDE
Phonecell SX6P-200C Fixed Cellular Phone
LIST OF COMPONENTS
Before installing your Phonecell® SX6P, carefully remove the contents from the shipping carton andcheck for evidence of shipping damage. If damage is found, contact your Authorized TelularDistributor or shipping agent immediately.
Phonecell® SX6P Desktop Phone Spike Antenna AC Power Cord
Spike Antenna
Phonecell® SX6P CDMA i User Manual
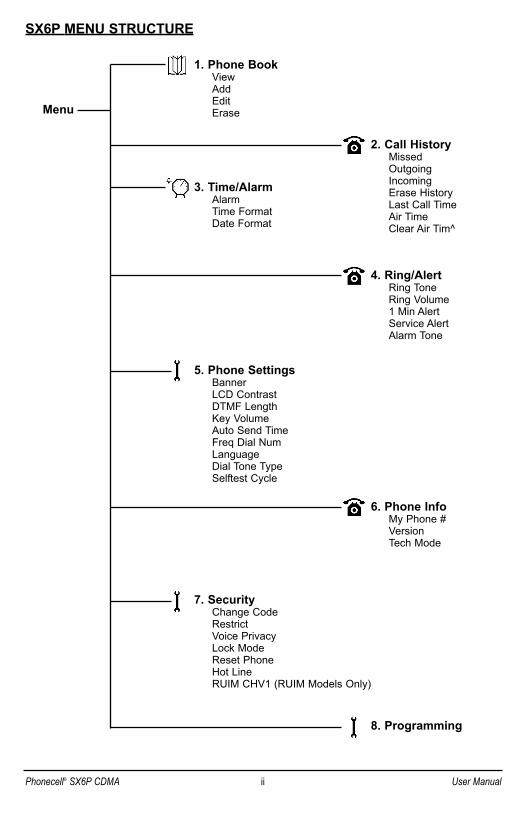
SX6P MENU STRUCTURE
1. Phone BookViewAddEditErase
3. Time/AlarmAlarmTime FormatDate Format
5. Phone SettingsBannerLCD ContrastDTMF LengthKey VolumeAuto Send TimeFreq Dial NumLanguageDial Tone TypeSelftest Cycle
2. Call HistoryMissedOutgoingIncomingErase HistoryLast Call TimeAir TimeClear Air Tim^
Menu
4. Ring/AlertRing ToneRing Volume1 Min AlertService AlertAlarm Tone
6. Phone InfoMy Phone #VersionTech Mode
7. SecurityChange CodeRestrictVoice PrivacyLock ModeReset PhoneHot LineRUIM CHV1 (RUIM Models Only)
8. Programming
Phonecell® SX6P CDMA ii User Manual

SAFE OPERATION INSTRUCTIONSIMPORTANT! Before installing or operating this product, read the SAFETY INFORMATIONsection of this manual.
•• Install unit indoors.
•• Install unit on hard, flat surface for proper ventilation.
•• Do not expose unit to rain or moisture.•• Do not place unit on or close to sources of heat.
IMPORTANT NOTICESTERMS AND CONDITIONS FOR USE OF PHONECELL® PRODUCTS ("Product")
These Terms and Conditions are a legal contract between you and Telular Corporation for the title toand use of the Product. BY RETAINING AND USING THE PRODUCTAFTER RECEIPT OF IT, YOUAGREE TO THE TERMS AND CONDITIONS INCLUDING WARRANTY DISCLAIMERS,LIMITATIONS OF LIABILITYAND INDEMNIFICATION PROVISIONS BELOW. IF YOU DO NOTAGREE TO THE TERMS AND CONDITIONS, DO NOT USE THE PRODUCTAND IMMEDIATELYRETURN THE UNUSED PRODUCT FOR ACOMPLETE REFUND. You agree to accept soleresponsibility for any misuse of the Product by you; and, in addition, any negligent or illegal act oromission of your or your agents, contractors, servants, employees, or other users of the Product solong as the Product was obtained from you, in the use and operation of the Product.
INDEMNIFICATION OF TELULAR CORPORATION ("TELULAR")YOU SHALLINDEMNIFY, DEFEND AND HOLD HARMLESS TELULAR FOR ANYOF THE COST,INCLUDING REASONABLE ATTORNEYS' FEES, AND FROM CLAIMS ARISING OUT OF YOU,YOUR CLIENTS' OR OTHER THIRD PARTIES' USE OR OPERATION OF THE PRODUCT: (i) FORMISUSE OR IN AMANNER NOT CONTEMPLATED BYYOU AND TELULAR OR INCONSISTENTWITH THE PROVISIONS OF THIS MANUAL; (ii) IN AN ILLEGALMANNER OR AGAINST PUBLICPOLICY; (iii) IN AMANNER SPECIFICALLYUNAUTHORIZED IN THIS MANUAL; (iv) IN AMANNER HARMFULOR DANGEROUS TO THIRD PARTIES; (v) FROM CLAIMS BYANYONERESPECTING PROBLEMS, ERRORS OR MISTAKES OF THE PRODUCT; OR (vi)COMBINATION OF THE PRODUCT WITH MATERIAL, MODIFICATION OF THE PRODUCT ORUSE OF THE PRODUCT IN AN ENVIRONMENT NOT PROVIDED, OR PERMITTED, BYTELULAR IN WRITING. THE PARTIES SHALLGIVE EACH OTHER PROMPT NOTICE OF ANYSUCH COST OR CLAIMS AND COOPERATE, EACH WITH THE OTHER, TO EFFECTUATE THISINDEMNIFICATION, DEFENSE AND HOLD HARMLESS.
TELULAR CORPORATIONCorporate Headquarters
647 North Lakeview ParkwayVernon Hills, Illinois 60061, USA
Technical SupportTel: 847-247-9400 • Fax: 847-247-0021
E-mail: [email protected] • http://www.telular.com
Part Number 56033201 ©Telular Corporation, All Rights Reserved
Please see the IMPORTANT NOTICES, SAFETY INFORMATION, and WARRANTY sections of this manualfor important information on use, warranty, and indemnification.
Phonecell® SX6P CDMA iii User Manual

Table of ContentsQuick Connection Guide ...................................................................................................iList of Components............................................................................................................iSX6P Menu Structure ........................................................................................................iiSafe Operation Instructions ............................................................................................iiiImportant Notices .............................................................................................................iiiSX6P Setup ........................................................................................................................1
RUIM Card Installation (RUIM Model Only) ................................................................................1Battery Installation .......................................................................................................................2Battery Operation ........................................................................................................................2Location and Setup......................................................................................................................2Connecting the Handset ..............................................................................................................3Wall Mounting ..............................................................................................................................3Connecting the SX6P to AC Power .............................................................................................4RUIM Usage (RUIM Models Only) ..............................................................................................5
Getting to Know Your SX6P .............................................................................................6Function Keys..............................................................................................................................6LCD Screen Icons .......................................................................................................................7Service Indication ........................................................................................................................7
Call Functions....................................................................................................................8Making Calls ................................................................................................................................8Receiving Calls ............................................................................................................................8Ending Calls ................................................................................................................................8In-Call Functions..........................................................................................................................8Voicemail Access.........................................................................................................................9Reading Text (SMS) Messages...................................................................................................9Sending a Text Message ...........................................................................................................10Deleting All Text Messages........................................................................................................10Using Message Lock .................................................................................................................10Activating Message Alert ...........................................................................................................10
Phone Book......................................................................................................................11Speed Dialing by Location .........................................................................................................11Searching the Phone Book and Dialing a Phone Book Entry ...................................................11Adding a New Phone Book Entry ..............................................................................................11Editing a Phone Book Entry ......................................................................................................12Erasing a Phone Book Entry .....................................................................................................12
Call History.......................................................................................................................12Viewing Missed Calls.................................................................................................................12Viewing Outgoing Calls .............................................................................................................12Viewing Incoming Calls .............................................................................................................12Erasing All Call History ..............................................................................................................12Viewing Last Call Time ..............................................................................................................13Viewing Total Air Time ...............................................................................................................13Clearing Air Time .......................................................................................................................13
Time / Alarm .....................................................................................................................13Alarm .........................................................................................................................................13Time Format ..............................................................................................................................13Date Format ..............................................................................................................................13
Ring / Alert .......................................................................................................................14Ring Tone...................................................................................................................................14Ring Volume ..............................................................................................................................14One Minute Alert........................................................................................................................14Service Alert ..............................................................................................................................14Alarm Tone.................................................................................................................................14
Phonecell® SX6P CDMA iv User Manual
Phone Settings ................................................................................................................15Banner .......................................................................................................................................15LCD Contrast .............................................................................................................................15DTMF Length.............................................................................................................................15Key Volume ...............................................................................................................................15Auto Send Time .........................................................................................................................15Frequently Dialed Number.........................................................................................................15Change Language Displayed On LCD......................................................................................16Dial Tone Type...........................................................................................................................16Self Test Cycle ..........................................................................................................................16
Phone Info ........................................................................................................................16My Phone # (display only) .........................................................................................................16Software Version Information ....................................................................................................16Tech Mode .................................................................................................................................16
Security ............................................................................................................................17Change Code ............................................................................................................................17Restrict Outgoing Calls..............................................................................................................17Voice Privacy .............................................................................................................................17Lock Mode .................................................................................................................................17Reset Phone..............................................................................................................................18Hotline........................................................................................................................................18RUIM CHV1 (RUIM Models Only) .............................................................................................18
SX6P Troubleshooting ....................................................................................................20Conformance Statements ...............................................................................................21Safety Information ...........................................................................................................21
Phonecell® SX6P CDMA v User Manual


SX6P SetupRUIM Card Installation (RUIM Model Only)
Consult your service provider to determine if your unit requires the use of a RUIM (Removable UserIdentity Module). If it is a RUIM model, your SX6P will only be able to place emergency calls until youinstall a RUIM card. It will not receive calls or allow non-emergency outgoing calls without the RUIMcard installed. For an explanation of how to configure your RUIM once your SX6P is set up, seeRUIM Usage on page 5.
1. Remove the power cord if it has already been connected. The power cord must be removedwhenever a RUIM Card is removed or installed.
2. Remove the RUIM compartment cover. - see Figure 1.
3. Open the RUIM compartment holder.
4. Line up the RUIM card with the arrow on the RUIM card holder - see Figure 2.
5. Gently insert the RUIM card in the slot of the RUIM card holder.
6. Close the RUIM card holder.
7. Reattach the RUIM compartment cover, closing it with the separate cover screw provided.
RUIM Compartment Cover
RUIM CardHolder RUIM Card
Figure 1 - RUIM compartment cover.
Cover Screw
Figure 2 - RUIM card installation.
Note: Do not force the RUIM card holder shut. Make sure the RUIM card is aligned properly with thedirectional arrow on the holder.
Phonecell® SX6P CDMA 1 User Manual
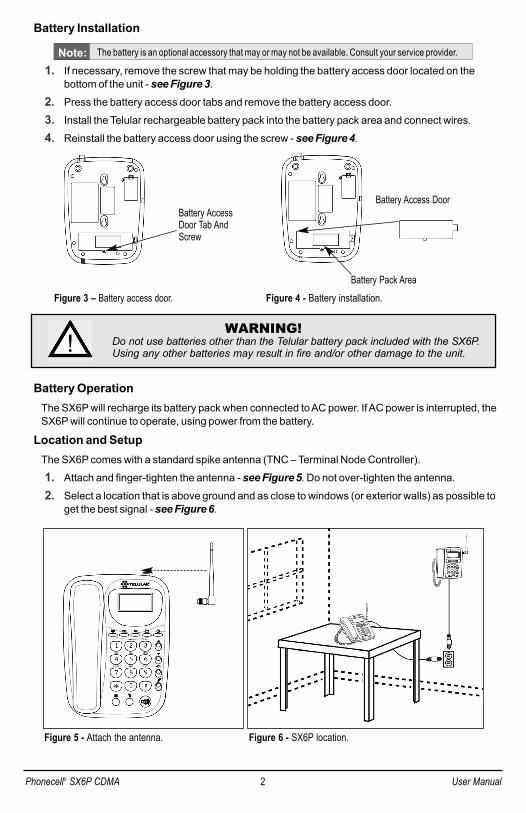
Battery Installation
1. If necessary, remove the screw that may be holding the battery access door located on thebottom of the unit - see Figure 3.
2. Press the battery access door tabs and remove the battery access door.
3. Install the Telular rechargeable battery pack into the battery pack area and connect wires.
4. Reinstall the battery access door using the screw - see Figure 4.
Battery OperationThe SX6P will recharge its battery pack when connected to AC power. If AC power is interrupted, theSX6P will continue to operate, using power from the battery.
Location and SetupThe SX6P comes with a standard spike antenna (TNC – Terminal Node Controller).
1. Attach and finger-tighten the antenna - see Figure 5. Do not over-tighten the antenna.
2. Select a location that is above ground and as close to windows (or exterior walls) as possible toget the best signal - see Figure 6.
Figure 6 - SX6P location.Figure 5 - Attach the antenna.
WARNING!Do not use batteries other than the Telular battery pack included with the SX6P.Using any other batteries may result in fire and/or other damage to the unit.!
Battery Access Door
Figure 4 - Battery installation.Battery Pack Area
Figure 3 – Battery access door.
Battery AccessDoor Tab AndScrew
Note: The battery is an optional accessory that may or may not be available. Consult your service provider.
Phonecell® SX6P CDMA 2 User Manual

Connecting the HandsetBefore you use can use the SX6P, you must connect the handset cable.
1. Connect the handset cable to the phone jack - see Figure 7.
2. Connect the handset cable to the handset - see Figure 7.
Wall Mounting1. Remove the mounting clip from the cradle and re-insert it with the tab pointing up - see Figures
8 and 9.
2. Mark two hole locations 83 mm (3-1/4 inches) vertically apart and drill two holes into the wall.
InsertMountingClip intothe Cradle(tab up)
Mounting Clip inCradle (tab up)
Figure 9 – Handset mounting clip for wall-mount.
RemoveMounting Clip
from the Cradle(tab down)
Figure 8 – Handset mounting clip assembly.
Phone jack
Handset cable
Handset
Figure 7 – SX6P handset connection.
Phonecell® SX6P CDMA 3 User Manual
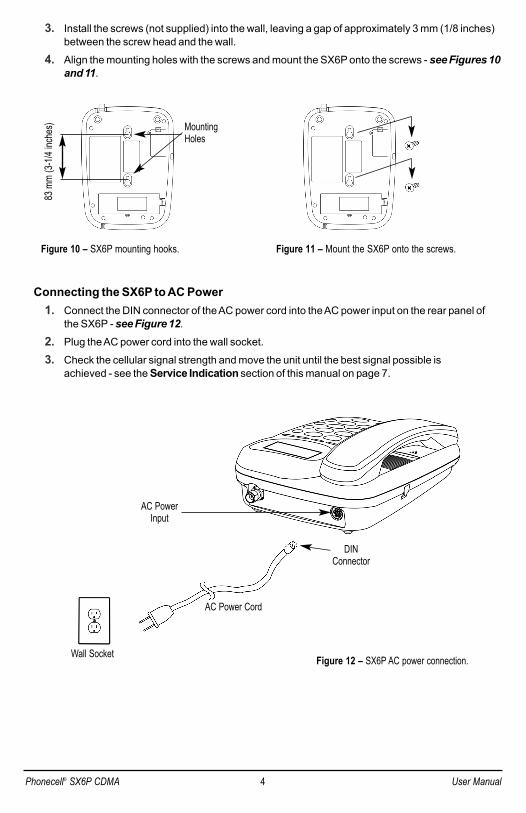
3. Install the screws (not supplied) into the wall, leaving a gap of approximately 3 mm (1/8 inches)between the screw head and the wall.
4. Align the mounting holes with the screws and mount the SX6P onto the screws - see Figures 10and 11.
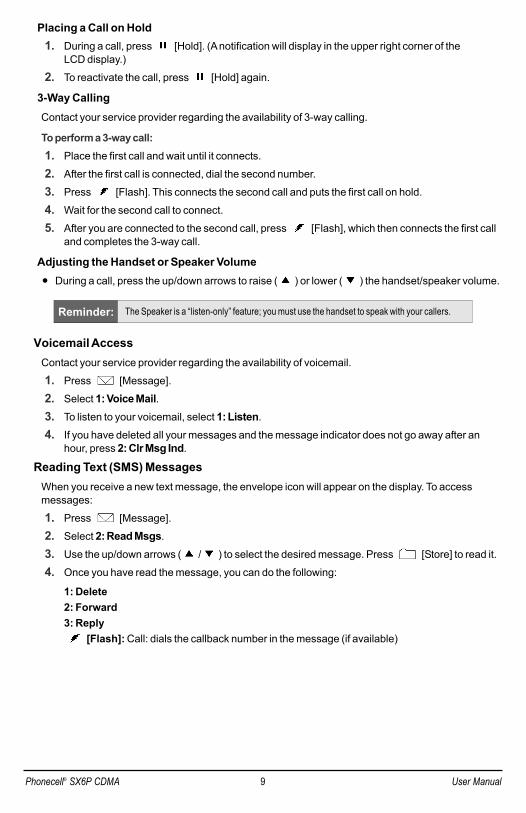
Connecting the SX6P to AC Power1. Connect the DIN connector of the AC power cord into the AC power input on the rear panel of
the SX6P - see Figure 12.
2. Plug the AC power cord into the wall socket.
3. Check the cellular signal strength and move the unit until the best signal possible is achieved - see the Service Indication section of this manual on page 7.
AC Power Cord
Wall Socket
AC PowerInput
DINConnector
Figure 12 – SX6P AC power connection.
Figure 11 – Mount the SX6P onto the screws.
83 m
m (3-
1/4 in
ches
)
Figure 10 – SX6P mounting hooks.
MountingHoles
Phonecell® SX6P CDMA 4 User Manual

RUIM Usage (RUIM Models Only)Your service provider may require you to install a RUIM (Removable User Identity Module) in yourSX6P for it to operate normally (see RUIM Card Installation on page 1 for details). Without a RUIM,these SX6P models will reject incoming calls and allow only emergency outgoing calls.
Once a RUIM-using SX6P is operating normally, you can use it to set its RUIM to require a PIN(Personal Identification Number, also called Cardholder Verification, or CHV), not require a PIN, orchange the existing PIN. See Security (page 17) for details.
Starting Your SX6P with a RUIM PIN
If your RUIM requires a PIN, follow these steps: 1. Power on your SX6P.
2. The SX6P will prompt you to enter your PIN. Enter the PIN for your RUIM, then press [Store].
3. If you enter the wrong PIN, the SX6P will display an error message and ask you to reenter the PIN.
4. Entering an incorrect PIN three times will cause the SX6P to block the inserted RUIM. If yourRUIM is blocked due to incorrect PIN use, it will prompt you to enter the unblocking code. Youmust contact your service provider to obtain this unblocking code. Do not guess at the blockcode or use your own PIN to attempt to unblock the SX6P; entering wrong codes will eventuallycause the RUIM to become permanently blocked.
5. If you are unable to enter the correct PIN for the inserted RUIM, the SX6P will not operate normally. It will reject incoming calls and permit only emergency outgoing calls.
Starting Your SX6P if Your RUIM Requires No PINPower on your SX6P. No additional steps are necessary.
Starting Your SX6P if it is Bonded to a RUIMAn SX6P may be bonded to a specific RUIM. Once it has been bonded, the SX6P will not operatenormally with any other RUIM installed in it. It will reject incoming calls and permit only emergencyoutgoing calls. The same holds true for any other SX6P that the bonded RUIM is installed into: it willnot operate normally.
To start a bonded SX6P, power it on. No additional steps are necessary if the correct RUIM isinserted into the SX6P.
If you want to bond an SX6P to an RUIM, contact your service provider.
Phonecell® SX6P CDMA 5 User Manual

Getting to Know Your SX6PFunction Keys
Figure 13 – SX6P keypad and function keys.
LCD Screen - Displaysicons, information, andmenu options necessary tooperate the SX6P.
Mute - Prevents the party on theother end of a call from hearing anysound from the SX6P.
Speaker - Engages the “listen-only” speaker feature (dialing orlistening only).
Menu - Used to access phonesettings and features.
Message - To access voicemail or tosend an SMS (text message).
Clear - To clear an entry,erase a digit during entry, orto go back one menu level.
Asterisk/Star Key - Used asa backspace key whenentering text.
Hold - Used to put the active call on hold or to reactivate an on-hold call.
Power - Used to power the unit on and off.
Pound/Hash Key - Used as aspace key when entering text.
Flash - Used to answer call-waiting calls and to connect 3-waycalls. Also used to automaticallyconnect a call after dialing (skipdial delay).
Redial - Dials the last numbercalled from the SX6P.
Up/Down Arrows - Scroll throughphone menus; control volumelevel for the handset and the“listen-only” speaker when theSX6P is off-hook.
Store - Used to store an entry.
Phonecell® SX6P CDMA 6 User Manual

LCD Screen IconsIcons displayed on the LCD screen indicate the features that are in use, the status of the phone,signal strength and battery status - see Figure 14.
Service IndicationFull ServiceWhen powered on, the banner and current date and time will display. If service is available, theantenna icon will display indicator bars. The number and height of the indicator bars increases as thesignal grows stronger (the more bars, the better the signal).
No ServiceWhen no service is available, the antenna icon will not display indicator lines. Contact your serviceprovider to verify cellular service is activated. No calls can be made in this condition.
Figure 14 – SX6P LCD screen icons.
Received SignalStrength - Indicates thestrength of the currentsignal. The more bars, thestronger the signal.
Message - Displays when a new text or voicemail message has been received.
Speaker - Indicates “listen-only” speaker is activated.
Battery - Indicates the levelof battery power. The morebars, the more power.
Clock - Displays thecurrent time.
Roam - Indicates thatthe unit is roaming.
Off-Hook - Indicates handsetis off the cradle.
Date - Displays thecurrent date and dayof the week.
Alarm - Indicates thatthe alarm feature hasbeen set.
Private - Indicatesenhanced voice privacymode.
Phonecell® SX6P CDMA 7 User Manual

Call FunctionsMaking Calls
1. Pick up the handset or press [Speaker] (listening only). The SX6P is now “off-hook.”
2. Listen for dial tone.
3. Dial the phone number. The dialed number will be displayed. The name will also be displayed ifit is stored in the phone book.
Correcting Dialing Errors
• To erase one digit, press [Clear] once.
• To erase all digits, press and hold down [Clear] until all digits are erased.
Redialing the Last Telephone Number Dialed1. Pick up the handset or press [Speaker] (listening only). The SX6P is now “off-hook.”
2. Press [Redial].
Receiving CallsWhen there is an incoming call, the SX6P rings, an incoming call notification displays the call typeand Caller ID information (if available).
To answer an incoming call:
• Pick up the handset and begin talking.
– or –
Press [Speaker] (listening only).
Receiving a Call When Caller ID Is ActivatedThe Caller ID feature displays the caller’s number when the SX6P rings. If the caller’s name andnumber are stored together in the SX6P phone book, the caller’s name and number will bedisplayed. Contact your service provider to activate this feature.
Ending Calls
• To end a call, hang up the phone by placing the handset back onto the SX6P cradle.
– or –
Press the speaker key again to end the call (if the phone is in listening only mode).
In-Call FunctionsMuting a Call
1. During a call, press [Mute]. Anotification will display in the upper right corner of the LCD screen.
2. Press [Mute] again to un-mute the microphone.
Using Call Waiting
• To answer an incoming call while you’re on another call, press [Flash]. Press [Flash]again to switch between calls. Contact your service provider regarding the availability of the callwaiting feature.
Note: If there are missed calls (calls not answered), MISSED CALLS will be displayed with the number ofcalls missed. See the Call History section of this manual on page 12 for more information.
Phonecell® SX6P CDMA 8 User Manual
Placing a Call on Hold1. During a call, press [Hold]. (Anotification will display in the upper right corner of the
LCD display.)
2. To reactivate the call, press [Hold] again.
3-Way CallingContact your service provider regarding the availability of 3-way calling.
To perform a 3-way call:1. Place the first call and wait until it connects.
2. After the first call is connected, dial the second number.
3. Press [Flash]. This connects the second call and puts the first call on hold.
4. Wait for the second call to connect.
5. After you are connected to the second call, press [Flash], which then connects the first calland completes the 3-way call.
Adjusting the Handset or Speaker Volume
• During a call, press the up/down arrows to raise ( ) or lower ( ) the handset/speaker volume.
Voicemail AccessContact your service provider regarding the availability of voicemail.
1. Press [Message].
2. Select 1: Voice Mail.3. To listen to your voicemail, select 1: Listen.
4. If you have deleted all your messages and the message indicator does not go away after anhour, press 2: Clr Msg Ind.
Reading Text (SMS) MessagesWhen you receive a new text message, the envelope icon will appear on the display. To accessmessages:
1. Press [Message].
2. Select 2: Read Msgs.
3. Use the up/down arrows ( / ) to select the desired message. Press [Store] to read it.
4. Once you have read the message, you can do the following:
1: Delete2: Forward3: Reply
[Flash]: Call: dials the callback number in the message (if available)
Reminder: The Speaker is a “listen-only” feature; you must use the handset to speak with your callers.
Phonecell® SX6P CDMA 9 User Manual

Sending a Text Message1. Press [Message].
2. Select 3: Create Message.
3. Select 1: New Message or 2: Sent Messages.
4. Select 1: From Phonebook or 2: Enter Number.(If you select From Phonebook, your phone book entries will be displayed alphabetically.Select an entry and press [Store] to initiate a message to that number.)(If you select Enter Number, use your keypad to enter a number and press to continue.)
5. Type the message using the keypad. Press [Store] when you are finished writing themessage.
To erase one character, press [Clear] once; to erase the entire screen, press and hold .
# and down arrow ( ): move forward one character.
* and up arrow ( ): move backward one character.MSG key: switch between uppercase, lowercase, and special characters.
6. Enter the callback number that you want included with the message and press [Store]. If you do not want a callback number, press [Store].
7. Select the message priority as Normal or Urgent, then press [Store].
8. Select Send & Save, then press [Store] if you want to send the message immediately andsave a copy to the Sent Messages folder.
– or –
Select Send, then press [Store] if you want to send the message immediately withoutsaving a copy.
Deleting All Text Messages1. Press [Message].
2. Select 4: Delete Msgs.
3. Use the up and down arrows to select whether you would like to delete all messages, then press [Store].
Using Message LockMessage Lock adds password protection to the voicemail/SMS menu. If the message lock is activeand you press [Message] from the idle screen, the unit will prompt you for a password (which isyour lock code; the default is 0000).
1. Press [Message].
2. Select 5: Message Option.
3. Select 1: Message Lock.
4. Select the desired option using the up/down arrows and press [Store] to save.
Activating Message AlertMessage Alert turns on and off the message alert tone. When off, the envelope icon will still bedisplayed on the LCD but there is no alert tone.
1. Press [Message].
2. Select 5: Message Option.
3. Select 2: Message Alert.4. Select the desired option using the up/down arrows and press [Store] to save.
Note: Individual messages can be deleted from the Read Msgs option.
Phonecell® SX6P CDMA 10 User Manual

Phone BookThe SX6P can be programmed to store frequently called numbers via an electronic phone book. The SX6P phone book can hold up to 99 entries.
Speed Dialing by LocationTo speed dial a phone book entry:
• For entries 1-9 – Lift the handset and hold down the location number until it dials.
• For entries 10-99 – Lift the handset, press the first digit and then hold down the 2nd digit until it dials.
Searching the Phone Book and Dialing a Phone Book Entry1. Press [Menu] to access the main menu.
2. Select 1: Phonebook.
3. Select 1: View.
There are two options for browsing the electronic phone book:
1. Name - View all entries sorted alphabetically. To narrow your search, use your keypad toenter the first letter of the entry you’re looking for (for example, press 5 once to display the“J” listings; press 5 three times to display the “L” listings).
2. Location - View all entries sorted by their 2-digit location 01 through 99.
• To dial the selected entry, press [Flash]. Then pick up the handset if desired. (You can also press [Store] to view the selected entry’s phone number.)
Adding a New Phone Book Entry1. Enter the phone number to be stored.
2. Press [Store].
3. Enter the name to be stored, then press [Store] again.
• To enter a letter, press the phone button with that letter on it, pressing it multiple times to cyclethrough the available letters. (Press [Clear] to erase a character; press and hold toerase an entire entry.)
* key = backspace
# key = space
[Message] = shift between UPPERCASE and lowercase letters and special characters
[Clear] = press once to erase a character; press and hold to erase an entire entry
4. When the unit displays, "Location auto=XX", press [Store] to save the entry.
– or –
Use your keypad or the up/down arrows ( / ) to select the desired location number, thenpress [Store] to save the entry.
Note: You can also add an entry to the phone book through the Phonebook Add option: (MENU > 1: Phonebook > 2: Add).
Phonecell® SX6P CDMA 11 User Manual

Editing a Phone Book Entry1. Press [Menu] to access the main menu.
2. Select 1: Phone Book.
3. Select 3: Edit.
There are two options to locate an entry for editing:
1. Name - View all entries sorted alphabetically. To narrow your search, use your keypad toenter the first letter of the entry you’re looking for (for example, press 5 once to display the“J” listings; press 5 three times to display the “L” listings).
2. Location - View all entries sorted by their two-digit location 01 through 99.
Erasing a Phone Book Entry1. Press [Menu] to access the main menu.
2. Select 1: Phonebook.
3. Select 4: Erase.
There are two options for locating an entry to erase:
1. Name - View all entries sorted alphabetically. To narrow your search, use your keypad toenter the first letter of the entry you’re looking for (for example, press 5 once to display the“J” listings; press 5 three times to display the “L” listings).
2. Location - View all entries sorted by their two-digit location 01 through 99.
Call HistoryThe SX6P saves a log of the last 10 missed, outgoing, and incoming calls.
Viewing Missed Calls1. Press [Menu] to access the main menu.
2. Select 2: Call History.
3. Select 1: Missed.
4. Use the up/down arrows ( / ) to select the desired call and press [Store] to view it.
• To dial the selected entry, press [Flash]. Then pick up the handset if desired.
Viewing Outgoing Calls1. Press [Menu] to access the main menu.
2. Select 2: Call History.
3. Select 2: Outgoing.
4. Use the up/down arrows ( / ) to select the desired call and press [Store] to view it.
• To dial the selected entry, press [Flash]. Then pick up the handset if desired.
Viewing Incoming Calls1. Press [Menu] to access the main menu.
2. Select 2: Call History.
3. Select 3: Incoming.
4. Use the up/down arrows ( / ) to select the desired call and press [Store] to view it.
• To dial the selected entry, press [Flash]. Then pick up the handset if desired.
Erasing All Call History1. Press [Menu] to access the main menu.
2. Select 2: Call History.
Phonecell® SX6P CDMA 12 User Manual

3. Select 4: Erase History and use the up arrow ( ) to select Erase.
4. Press [Store] to erase the Call History.
Viewing Last Call TimeTo display the duration of the previous call:1. Press [Menu] to access the main menu.
2. Select 2: Call History.
3. Select 5: Last Call Time.
Viewing Total Air TimeTo display the total air time used by the phone since its memory was last cleared: 1. Press [Menu] to access the main menu.
2. Select 2: Call History.
3. Select 6: Air Time.
Clearing Air TimeTo clear the phone’s airtime memory and reset it to zero:1. Press [Menu] to access the main menu.
2. Select 2: Call History.
3. Select 7: Clear Air Tim.
Time / AlarmAlarm
The SX6P allows you to set an alarm clock that can be used one time or for every day.
1. Press [Menu] to access the main menu.
2. Select 3: Time / Alarm.
3. Select 1: Alarm.
Time FormatTo select a time format for your SX6P(12-hour or 24-hour):1. Press [Menu] to access the main menu.
2. Select 3: Time / Alarm.
3. Select 2: Time Format.
Date Format To select a date format (MM/DD or DD/MM):1. Press [Menu] to access the main menu.
2. Select 3: Time / Alarm.
3. Select 3: Date Format.
Note: The current time is set by the network; you cannot set the time on the phone. You may elect not todisplay the time and date.
Note: The airtime displayed is based on a calculation performed by the phone; your actual airtime asdetermined by the network may vary.
Phonecell® SX6P CDMA 13 User Manual

Ring / AlertThe SX6P is capable of supporting multiple ring tones and types of alerts. To adjust these settings, follow these instructions.
Ring Tone1. Press [Menu] to access the main menu.
2. Select 4: Ring/Alert.3. Select 1: Ring Tone.
4. Use the up/down arrows ( / ) to select the desired ring tone and press [Store] to save.
Ring Volume1. Press [Menu] to access the main menu.
2. Select 4: Ring/Alert.3. Select 2: Ring Volume.
4. Use the up/down arrows ( / ) to select a setting and press [Store] to save.
One Minute AlertThe one-minute alert beep alerts the user after every minute during a call.
1. Press [Menu] to access the main menu.
2. Select 4: Ring/Alert.3. Select 3: 1 Min Alert.4. Use the up/down arrows ( / ) to select ON or OFF and press [Store].
Service AlertThe Service Alert is an alert that sounds when entering or leaving a service area.
1. Press [Menu] to access the main menu.
2. Select 4: Ring / Alert.3. Select 4: Service Alert.4. Use the up/down arrows ( / ) to select the desired option and press [Store] to save
your setting.
Alarm ToneThe alarm tone is the sound that the alarm clock makes when it rings.
1. Press [Menu] to access the main menu.
2. Select 4: Ring / Alert.3. Select 5: Alarm Tone.
4. Use the up/down arrows ( / ) to select the desired ring tone and press [Store] to saveyour setting.
Phonecell® SX6P CDMA 14 User Manual

Phone SettingsBanner
The banner is the text displayed on the screen when the phone is not in use. This can be used topersonalize your phone.
To set your phone’s banner display:1. Press [Menu] to access the main menu.
2. Select 5: Phone Settings.
3. Select 1: Banner.4. Use your keypad to enter your desired banner and press [Store] to save.
LCD Contrast1. Press [Menu] to access the main menu.
2. Select 5: Phone Settings.
3. Select 2: LCD Contrast.4. Select the desired setting and press [Store] to save.
DTMF LengthSome applications may require changing the DTMF (Dual Tone Multi-Frequency) tone length.
1. Press [Menu] to access the main menu.
2. Select 5: Phone Settings.
3. Select 3: DTMF Length.
4. Select the desired option and press [Store] to save.
Key VolumeThe key volume is the loudness of the tones generated when you press the phone's keys.
1. Press [Menu] to access the main menu.
2. Select 5: Phone Settings.
3. Select 4: Key Volume.
4. Select the desired setting and press [Store] to save.
Auto Send TimeThe auto send time is the amount of time the unit waits after you have stopped entering digits beforedialing the number.
1. Press [Menu] to access the main menu.
2. Select 5: Phone Settings.
3. Select 5: Auto Send Time.
4. Enter the desired setting and press [Store] to save.
Frequently Dialed NumberIf you dial a phone number twice and stay connected for at least 15 seconds, the unit will rememberthat phone number and automatically send it without delay. This feature may be enabled or disabled.
1. Press [Menu] to access the main menu.
2. Select 5: Phone Settings.
3. Select 6: Freq Dial Number.4. Select the desired setting and press [Store] to save.
Phonecell® SX6P CDMA 15 User Manual
Change Language Displayed On LCDThe SX6P is capable of displaying multiple languages on the LCD screen.
1. Press [Menu] to access the main menu.
2. Select 5: Phone Settings.
3. Select 7: Language.
4. Select the desired setting and press [Store] to save.
Dial Tone TypeYour SX6P can produce the corresponding dial tones for phone systems in several countries.
To select a regional dial tone type:1. Press [Menu] to access the main menu.
2. Select 5: Phone Settings.
3. Select 8: Dial Tone Type.
4. Select the desired setting and press [Store] to save.
1. North America (low 350 Hz, high 440 Hz)
2. Latin America (low 425 Hz, high 425 Hz)
3. East Europe (low 425 Hz, high 425 Hz)
4. China (low 450 Hz, high 450 Hz)
5. Nicaragua (low 450 Hz, high 450 Hz)
6. India (low 375.5 Hz, high 412.5 Hz)
Self Test Cycle The unit will perform a periodic self test to ensure the proper operation of the phone. The defaultsetting is 180 minutes (3 hours).
To set the self test cycle interval:1. Press [Menu] to access the main menu.
2. Select 5: Phone Settings.
3. Select 9: Selftest Cycle.
4. Select between 0 (disables self test) and 65535 minutes and press [Store] to save.
Phone InfoMy Phone # (display only)
1. Press [Menu] to access the main menu.
2. Select 6: Phone Info.
3. Select 1: My Phone #.
Software Version Information1. Press [Menu] to access the main menu.
2. Select 6: Phone Info.
3. Select 2: Version.
Tech Mode1. Press [Menu] to access the main menu.
2. Select 6: Phone Info.
3. Select 3: Tech Mode.
Phonecell® SX6P CDMA 16 User Manual

SecurityChange Code
The lock code is a 4-digit password used to prevent unauthorized access to the phone. This setting allows you to change your phone’s lock code. The default lock code is 0000.
To change your phone’s lock code:1. Press [Menu] to access the main menu.
2. Select 7: Security.
3. Enter the current lock code. (The default lock code is 0000.)
4. Select 1: Change Code.
5. Enter your new lock code and press [Store] to save the new setting.
Restrict Outgoing Calls1. Press [Menu] to access the main menu.
2. Select 7: Security.
3. Enter the current lock code.
4. Select 2: Restrict.5. Select the desired option and press [Store] to save.
Voice PrivacyThe cellular CDMAnetwork offers inherent voice privacy. Check with your service provider for theavailability of enhanced voice privacy mode. If Enhanced is selected, the phone will requestEnhanced Voice Privacy and a "P" will be shown on the display (if Enhanced Voice Privacy has beengranted by the network).
To set your Voice Privacy level:1. Press [Menu] to access the main menu.
2. Select 7: Security.
3. Enter the current lock code.
4. Select 3: Voice Privacy.
5. Select the desired option and press [Store] to save.
Lock ModeThe Lock Mode setting determines whether the phone will automatically lock. If Lock Mode isenabled, you are required to enter your lock code before being able to access the phone.
1. Press [Menu] to access the main menu.
2. Select 7: Security.
3. Enter the current lock code.
4. Select 4: Lock Mode.
5. Select the desired option and press [Store] to save.
Note: The phone’s default lock code is 0000.
Phonecell® SX6P CDMA 17 User Manual
Reset PhoneThis setting is used to reset the SX6P’s settings to the user default values.
1. Press [Menu] to access the main menu.
2. Select 7: Security.
3. Enter the current lock code.
4. Select 5: Reset Phone.
5. Select RESET and press [Store] to save.
Hotline1. Press [Menu] to access the main menu.
2. Select 7: Security.
3. Enter the current lock code.
4. Select 6: Hot Line.
5. Select Enable (followed by phone number to dial automatically) or Disable and press [Store].
RUIM CHV1 (RUIM Models Only)If your SX6P requires an RUIM, this setting allows you to enable, disable, or change its PIN(Personal Identification Number, also called the CHV1 [Card Holder Verification 1]).
This menu option is not available if your SX6P is bonded to a RUIM.
1. Press [Menu] to access the main menu.
2. Select 7: Security.
3. Enter the current lock code.
4. Select 7: RUIM CHV1.
5. Select the desired option and press [Store].
6. Enter the SX6P’s PIN.
7. If you are changing the PIN, enter the new PIN.
ProgrammingIf your phone number has not been programmed into your SX6P, the programming menu allows youto enter your phone number, or MIN (Mobile Identification Number), into the phone.
To program your phone number into your SX6P:1. Press [Menu] to access the main menu.
2. Select 8: Programming.
3. Enter the current lock code.
4. Enter the phone number (or MIN) and press [Store].
Phonecell® SX6P CDMA 18 User Manual

BONDING AN SX6P TO A RUIMYou can bond an SX6P to the RUIM that is inserted in it. Once an SX6P has been bonded to a RUIM,the SX6P will not operate normally with any other RUIM installed in it. It will reject incoming calls andpermit only emergency outgoing calls. The same holds true for any other SX6P the bonded RUIM isinstalled into; it will not operate normally.
Bonding an SX6P to a RUIM can only be done once. It cannot be undone by the user.
Before you can bond the SX6P to a RUIM, the RUIM must have a PIN enabled. See Security(page 17) for details.
1. Press [Menu] to access the main menu.
2. Select 6: Phone Info.
3. Select 3: Tech Mode.
4. Enter your Tech User Password.
5. Select 8: Bonding PIN.
6. Enter the inserted RUIM’s PIN.
7. Cycle your SX6P’s power. After the unit reboots, it will be bonded to the RUIM.
Phonecell® SX6P CDMA 19 User Manual

SX6P TroubleshootingTelephone Service is Not Working (Cannot place or receive calls)• Make sure the SX6P powered on properly.
• Make sure any equipment that is externally connected to the SX6P is correctly connected.
• Test any externally connected equipment on a known system to verify operation.
• Make sure the antenna is properly connected.
• Make sure your wireless account is activated and service is established.
Unable to Receive Calls• Is the handset on the cradle? If not, place the handset on the cradle and try again.
• Is the SX6P making a loud repetitive tone (ROH - Receiver Off-Hook)? If so, either the speaker orthe handset is off-hook. Hang up and try again.
Unable to Place Calls• If you do not hear a standard dial tone when the phone is off-hook, then there may be a problem
with your service. Contact your service provider if you think the issue is service-related.
Moisture or Ventilation Problems• Is moisture forming on or around the SX6? Remove any moisture with a clean dry towel and
move the unit to a well ventilated area. Review the Temperature and Environment section of thismanual (page 21) for more information.
No Power• Is the power supply connected to the unit? Make sure power is available and that the power
supply is properly connected to the SX6P.
• The power supply is connected but the unit still has no power. Make sure the circuit is functioningto the power supply. Check breakers and contact your power company. The power may be off atyour location.
Phonecell® SX6P CDMA 20 User Manual

Conformance StatementsFCC Part 15 Class B Compliance
This Phonecell® SX6P model has been tested and found to comply with the limits for a Class B digital device, pursuant to Part 15 of the FCC rules. Changes or modifications not expressly approvedby Telular Corporation will void your authority to operate the equipment per FCC part 15 paragraph15.21.These limits are designed to provide reasonable protection against harmful interference in aresidential installation. This equipment generates, uses and can radiate radio frequency energy and,if not installed and used in accordance with the instructions, may cause harmful interference to radiocommunications. However, there is no guarantee that interference will not occur in a particularinstallation. If this equipment does cause harmful interference to radio or television reception, whichcan be determined by turning the equipment OFF and ON, the user is encouraged to try to correct theinterference by one or more of the following measures:
• Reorient or relocate the antenna.
• Increase the separation between the equipment and the terminal.
• Connect the equipment into an outlet on a circuit different from that to which the terminal isconnected.
• Consult your Authorized Telular Distributor or an experienced radio/TV technician for help.
Safety InformationThe Phonecell® SX6P functions as both a radio transmitter and receiver. When it is ON, the SX6Preceives and sends out radio frequency (RF) energy. The SX6P CDMAunit operates in thefrequency ranges of 824 MHz to 894 MHz and / or 1850 MHz to 1910 MHz. When you use the SX6P,the cellular system handling your call controls the power level at which the unit transmits.
Exposure to RF (Radio Frequency) EnergyIn 1991, the Institute of Electrical and Electronics Engineers (IEEE), and in 1992, the AmericanNational Standards Institute (ANSI), updated the 1982 ANSI Standard for safety levels with respectto human exposure to RF energy. After reviewing the available body of research, more than 120scientists, engineers and physicians from universities, government health agencies and industrydeveloped this updated Standard. In March, 1993, the U.S. Federal Communications Commission(FCC) proposed the adoption of this updated Standard.
The design of your Telular Phonecell® SX6P complies with this updated Standard. Of course, if youwant to limit RF exposure even further than the updated ANSI Standard, you may choose to controlthe duration of your calls and operate your phone in the most power-efficient manner.
Safe Operation RequirementThe Phonecell® SX6P must be either wall mounted or desk mounted and should not be operatedwhen any person is within 203 mm (8 inches) of the antenna.
Temperature and EnvironmentOperating Temperature: From -10°C to +50°C ; Up to 95% relative humidity (non-condensing).
Storage Temperature: From -40°C to +60°C; Up to 95% relative humidity (non-condensing).
Antenna Care and ReplacementDo not use the Phonecell® SX6P with a damaged antenna. If a damaged antenna comes into contactwith the skin, a minor burn may result. Have your antenna replaced by a qualified technicianimmediately. Use only a manufacturer-approved antenna. Unauthorized antennas, modifications, orattachments could damage the Phonecell® SX6P.
Phonecell® SX6P CDMA 21 User Manual

DrivingCheck the laws and regulations on the use of cellular products in the areas where you drive. Somejurisdictions prohibit your using a cellular device while driving a vehicle. Even if your jurisdiction doesnot have such a law, we strongly suggest that, for safety reasons, the driver use extreme cautionwhen operating the cellular device while the vehicle is in motion. Always obey the law.
Electronic DevicesMost modern electronic equipment is shielded from RF energy. However, RF energy from cellulardevices may affect inadequately shielded electronic equipment.
RF energy may affect improperly installed or inadequately shielded electronic operating andentertainment systems in motor vehicles. Check with the manufacturer or its representative todetermine if these systems are adequately shielded from external RF energy. You should also checkwith the manufacturer of any equipment that has been added to your vehicle.
Consult the manufacturer of any personal medical devices (such as pacemakers, hearing aids, etc.)to determine if they are adequately shielded from external RF energy.
Turn your Phonecell® SX6P OFF in health care facilities when any regulations posted in the areasinstruct you to do so. Hospitals or health care facilities may be using equipment that could besensitive to external RF energy.
AircraftTurn OFF your Phonecell® SX6P before boarding any aircraft.
• Use it on the ground only with crew permission.
• Do not use it in the air.
To prevent possible interference with aircraft systems, U.S. Federal Aviation Administration (FAA)regulations require you to have permission from a crew member to use your cellular phone (or anyother cellular product) while the plane is on the ground. To prevent interference with aircraft systems,FCC regulations prohibit using your cellular device while the plane is in the air.
ChildrenDo not allow children to play with your Phonecell® SX6P to prevent damage to the unit.
Blasting AreasConstruction crews often use remote control RF devices to set off explosives. Therefore, to avoidinterfering with blasting operations, turn your Phonecell® SX6P OFF when in a "blasting area" or inareas posted: "Turn off two-way radio."
Potentially Explosive AtmospheresTurn your Phonecell® SX6P OFF when in any area with a potentially explosive atmosphere. It is rare,but your Phonecell® SX6P or its accessories could generate sparks. Sparks in such areas couldcause an explosion or fire resulting in bodily injury or even death.
Areas with a potentially explosive atmosphere are often, but not always, clearly marked. Theyinclude fueling areas such as gas stations; below deck on boats; fuel or chemical transfer or storagefacilities; areas where the air contains chemicals or particles, such as grain, dust, or metal powders;and any other area where you would normally be advised to turn off your vehicle engine.
Do not transport or store flammable gas, liquid or explosives in the area of your Phonecell® SX6P oraccessories.
Vehicles using liquefied petroleum gas (such as propane or butane) must comply with the NationalFire Protection Standard (FPA-58). For a copy of this standard, contact the National Fire ProtectionAssociation, One Batterymarch Park, Quincy, MA02269, Attn: Publications Sales Division.
Phonecell® SX6P CDMA 22 User Manual

Patents:Telular Corporation products are protected and manufactured under one or more of the followingU.S. patents and related international patents and patents pending relating thereto: 4,658,096;4,737,975; 4,775,997; 4,868,519; 4,922,517; 5,134,651; 5,361,297; 5,469,494; 5,046,085;5,715,296.
Trademarks:Telular Corporation owns the following registered trademarks: TELULAR and design, TELULAR,CELJACK, MAXJACK, TELCEL, HEXAGON LOGO, PHONECELL, CELSERV, TELGUARD, CPX,and AXCELL.
“Licensed by QUALCOMM Incorporated under one or more of the following Patents:
4,901,307 5,490,165 5,056,109 5,504,773 5,101,501 5,778,338
5,506,865 5,109,390 5,511,073 5,228,054 5,535,239 5,710,784
5,267,261 5,544,196 5,267,262 5,568,483 5,337,338 5,659,569
5,600,754 5,414,796 5,657,420 5,416,797 6,775,522 6,785,517
Phonecell® SX6P CDMA 23 User Manual

©2005 Telular Corporation, all rights reserved. Part Number 56033201


![(A70434) CELLULAR AND MOBILE COMMUNICATIONS R13 Set … · 2018-10-08 · 5. a) Differentiate between fixed and non-fixed channel assignment in detail. [8] b) What are the advantages](https://img.dokumen.tips/doc/110x75/5e8744bcae381059447c88ef/a70434-cellular-and-mobile-communications-r13-set-2018-10-08-5-a-differentiate.jpg)