Embed Size (px)
Citation preview
First Year Eclipse Tutorials
Copying a ClassThis tutorial will show you how to copy a class from another project to the current project, maintainingthe same class name.
It applies to an older version of 114, so although specific file names and projects no longer apply, theconcepts still hold.
You will be copying Exercise1d.java from project Exercise1d , to project Exercise2b . The name willremain Exercise1d.java .
Make a new project called Exercise2b , referring to the Application Tutorial for more information ifneeded.You will be copying files to Exercise2b.
1.
If it's not already open, open the Exercise1d project, by right-clicking on the Exercise1d project,and choosing Open Project from the context menu that appears.
2.
First Year Eclipse Tutorials https://moodle.cs.ualberta.ca/file.php/79/courseresources/eclipsetutor...
1 of 23 12-08-22 9:49 AM

If prompted with Should referenced projects also be opened where applicable? , click YesYou will be copying files from Exercise1d.
Right-click on Exercise1d.java , and choose copy from the context menu. If Exercise1d.java is notvisible in the Package Explorer , you will first need to click the arrow (plus signs in the screenshotbelow will be arrows in the lab's version of Eclipse.) beside the Exercise1d project, then the arrowbeside src (not shown in screenshot), and then the arrow beside (default package) .
Note the plus signs in the screenshot below will be arrows in the lab's version of Eclipse.
3.
First Year Eclipse Tutorials https://moodle.cs.ualberta.ca/file.php/79/courseresources/eclipsetutor...
2 of 23 12-08-22 9:49 AM

Right-click on the src directory of the Exercise2b project (the screenshot does not show this), andchoose Paste . Click on arrows appropriately if src is not visible.
4.
First Year Eclipse Tutorials https://moodle.cs.ualberta.ca/file.php/79/courseresources/eclipsetutor...
3 of 23 12-08-22 9:49 AM

Your code is now copied. To keep things simple, it is likely best to close the Exercise1d project byright-clicking on it, and choosing Close Project from the context menu.
5.
Renaming a ClassThis tutorial continues from the previous Copying a Class tutorial.
It applies to an older version of 114, so although specific file names and projects no longer apply, theconcepts still hold.
You will now change Exercise1d.java in the Exercise2b project to Exercise2b.java :
Make sure Exercise1d.java is visible (the class you just copied in the Copying a Class tutorial). If itis not, click on the arrow beside the Exercise2b project, click the arrow beside src (not shown in thescreenshot), then click on the arrow beside (default package) .
1.
First Year Eclipse Tutorials https://moodle.cs.ualberta.ca/file.php/79/courseresources/eclipsetutor...
4 of 23 12-08-22 9:49 AM

First Year Eclipse Tutorials https://moodle.cs.ualberta.ca/file.php/79/courseresources/eclipsetutor...
5 of 23 12-08-22 9:49 AM

Right-click Exercise1d.java , and highlight Refactor in the context menu that appears, then chooseRename... from the submenu that appears.
A Rename Compilation Unit pop-up window will appear.
2.
Change "Exercise1d" to "Exercise2b" beside the New name: field, then click the Finish button.3.
Not only have you renamed the file, but the class name and any other occurrences of Exercise1d in theExercise2b project have been changed to Exercise2b .
Changing an Applet's Width and HeightCompile the Applet project.1.Select the Applet project. Ensure you've run it at least once.2.Choose Run Configurations... from the Run menu.3.Change Width and Height appropriately in the Parameters tab, and click Run .4.
Handling Infinite Loops
First Year Eclipse Tutorials https://moodle.cs.ualberta.ca/file.php/79/courseresources/eclipsetutor...
6 of 23 12-08-22 9:49 AM
You first need to recognize that your program has an infinite loop. This isn't obvious when new to Eclipse,but once you know what to look for, and get in the habit of checking for infinite loops, they are easy todetect.
Once you have diagnosed an infinite loop, you must end your program by terminating the infinite loop,and then should attempt to fix your code.
A related problem occurs when you have many programs running at the same time which slows Eclipsedown. This often happens because you have had an infinite loop which you did not previously detect. Torectify this, you need to terminate these previous processes .
Recognizing an Infinite Loop
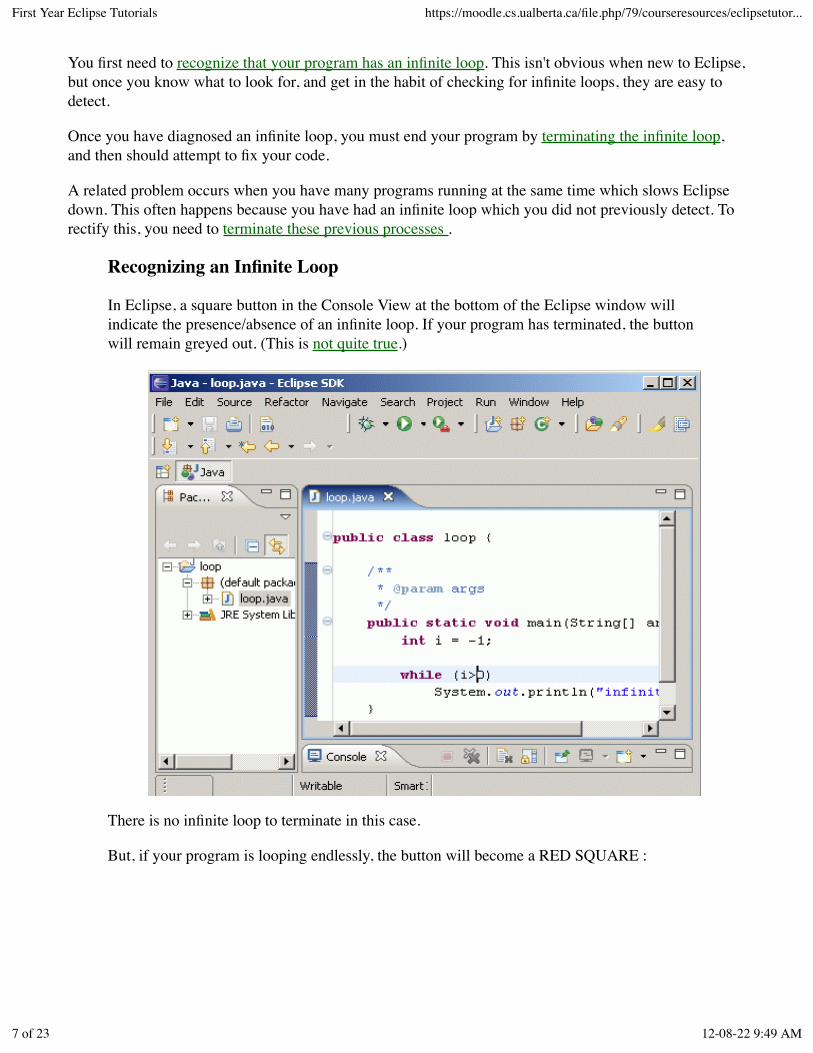
In Eclipse, a square button in the Console View at the bottom of the Eclipse window willindicate the presence/absence of an infinite loop. If your program has terminated, the buttonwill remain greyed out. (This is not quite true.)
There is no infinite loop to terminate in this case.
But, if your program is looping endlessly, the button will become a RED SQUARE :
First Year Eclipse Tutorials https://moodle.cs.ualberta.ca/file.php/79/courseresources/eclipsetutor...
7 of 23 12-08-22 9:49 AM

You can now terminate that infinite loop.
Get into the habit of checking for infinite loops after each program, especially if yourprogram contains at least one loop. Note also that an infinite loop is quite obvious if yourprogram produces output within the loop. The program above outputs "infinite loop"infinitely.
The following is likely not necessary to read, but does describe things more accurately.
The square button is red whenever the program executes, not only for infinite loops. Forexample, when your program is supposed to run for a long time, or when you are using theEclipse Debugger, the square button is red, but you have no infinite loop.
So, although the previous description suffices in most cases, realize you have an infinite looponly when the square button remains red longer than expected.
Terminating an Infinite Loop
Once you have recognized that an infinite loop is running, terminate it by doing thefollowing:
Go to the Console View at the bottom of the Eclipse windowClick on the RED SQUARE button shown below, sometimes you may have to clickmore than once.
The infinite loop will now end.
First Year Eclipse Tutorials https://moodle.cs.ualberta.ca/file.php/79/courseresources/eclipsetutor...
8 of 23 12-08-22 9:49 AM

The RED SQUARE button can also be used to terminate a program if it is waiting for userinput.
After terminating the infinite loop, you may also need to erase buffered output from theConsole by clicking the Clear Console button.
Ending Previous Programs (Often Solves Eclipse Acting Slowly)
First Year Eclipse Tutorials https://moodle.cs.ualberta.ca/file.php/79/courseresources/eclipsetutor...
9 of 23 12-08-22 9:49 AM

Eclipse will slow down if you have multiple Java programs running. This often happens ifyou forget to terminate previous infinite loops, or previous programs that are waiting forinput.
Never close Eclipse while it is running one or more programs. This will cause moreproblems than it will solve.
Instead, you can prevent Eclipse from slowing down by always detecting and thenterminating infinite loops (or programs waiting for user input).
Or, if you forget to do this, go to the Console View at the bottom of the Eclipse window, andclick on the small down arrow beside the Display Selected Console icon:
In the menu that appears, any process that does not have the phrase <terminated> beside itneeds to be terminated (the third one in the above example, whereas the 2nd one hasterminated properly). Click on each process and terminate it as you terminated infinite loops.
Importing an eclipse project into your workspace
(This assumes that you have already copied your project(s) into your workspace directory)
In Eclipse, go to the File menu, and choose Import....1.In the Import sub-window, click the arrow beside General. It expands.2.Under General, choose Existing Projects into Workspace.3.Click the Next > button.4.Click Browse..., then navigate to your workspace directory5.
First Year Eclipse Tutorials https://moodle.cs.ualberta.ca/file.php/79/courseresources/eclipsetutor...
10 of 23 12-08-22 9:49 AM

Click OK6.Click the Finish button.7.
(There are other, likely better ways to do this such as copying the project directories by checking the'copy projects into workspace' checkbox while importing.)
Reconfiguring Eclipse/Fixing Eclipse Problems In-lab
If Eclipse is not configured properly, or you get some "weird" problems with Eclipse, you may need toreinstall your Eclipse workspace.Some examples of "weird" problems follow:
Being unable to create a project, even though you are doing everything correctly.Not being able to open projects.Noticing that other normally present Eclipse functionality is missing.Other specific problems and solutions
Ask your TA first, as there may be an easier and less potentially dangerous fix than the following.
Ask a TA for help; it's not recommended you do this on your own1.Save all your work in Eclipse, then close Eclipse2.Back-up your workspace This means make a copy of the entire workspace directory.3.If you haven't done so already back-up your workspace (yeah, it's important)4.Delete your original workspace which, of course, you've already backed-up5.Download workspace.zip to your home directory.6.Navigate to your home directory, unzip workspace.zip by double-clicking on workspace.zip andextracting the files. (We're hoping you will quickly see how to extract files. If not, please ask a TA.)A new workspace folder will be created.
7.
Copy over any Eclipse project directories you want to use from your backed-up workspace into thenew workspace directory
8.
Then import each project into Eclipse.9.
Potential Problems / Fixes
You may get an error similar to the following in the "Problems" view:
Description Resource Path Location TypeAccess restriction: The field in from the type Keyboard isnot accessible due to restriction on required libraryC:\Program Files\Java\jdk1.6.0_31\jre\lib\ext\UofAC114.jar
test3a.java /test4/src line 14 JavaProblem
You need to configure Eclipse like in the lab. There are more details in the Keyboard section.
If you get "Exception in thread "main" java.lang.NoClassDefFoundError" (in the Problems View):
You may need to build your project first.
First Year Eclipse Tutorials https://moodle.cs.ualberta.ca/file.php/79/courseresources/eclipsetutor...
11 of 23 12-08-22 9:49 AM

Other Handy FeaturesEclipse has a number of useful tools that you may find handy while using Eclipse.
Refactoring Code
Refactoring is a useful feature if you ever decide to move or rename a variable or class. Thisguide is more focused on renaming variables. To refactor classes, see Renaming a class.
Note that several other types of code refactoring are possible besides renaming, but those willnot be explored in depth here. Feel free to experiement with the available options though.
Imagine you have the code below, and you want to rename the elements variable to items:
Click on the word elements, then select "Rename" from the "Refactor" menu.1.A colored box will appear around the variable name. As you edit the variable name, allother instances of that variable will also change in the code. This means that not onlywill instances of Reverser.elements be changed in this file, but any other references tothis variable in other classes in the project will be changed as well.
2.
First Year Eclipse Tutorials https://moodle.cs.ualberta.ca/file.php/79/courseresources/eclipsetutor...
12 of 23 12-08-22 9:49 AM

Press Enter to finish refactoring.3.
Formatting Code
Eclipse can also reformat code: it will correct indentation, align trailing comments, and ingeneral make code more readable.
Note: The format feature should not be exclusively relied upon to clean up your code. Ingeneral, you should try to produce cleanly indented code on your own, as it is simply properform, and because not all IDEs you may encounter have this feature.
Take the code below for example:
First Year Eclipse Tutorials https://moodle.cs.ualberta.ca/file.php/79/courseresources/eclipsetutor...
13 of 23 12-08-22 9:49 AM

Glancing at the code, you will notice that the indentation is rather messy.
Highlight the code you want to reformat.1.From the Source menu, select Format (or type Shift+Ctrl+F)2.
First Year Eclipse Tutorials https://moodle.cs.ualberta.ca/file.php/79/courseresources/eclipsetutor...
14 of 23 12-08-22 9:49 AM

After reformatting is finished, the code is correctly indented, and you can see that Eclipseattempted to shorten a very long System.out.println line by breaking it into two.
You can also reformat an entire file by having nothing selected when you click the Formatmenu item.
Installing Eclipse at Home
First Year Eclipse Tutorials https://moodle.cs.ualberta.ca/file.php/79/courseresources/eclipsetutor...
15 of 23 12-08-22 9:49 AM

To get Eclipse to work as in-lab, you will need to install Java, install Eclipse and then configure Eclipse.This section shows you roughly how to do this on Windows. See below for a guide to installing Eclipseon a Mac. Note the following:
This guide is geared towards installing the lab versions for Java and Eclipse on a Windows Vista32-bit computer (it is likely similar on Windows 7). It was done use Firefox.Basic familiarity with Windows, Firefox (or Internet Explorer) and WinZip (or 7-zip or theWindows built-in extractor) are assumed.If a link is mentioned, and you cannot find that link, search for that link (i.e., using Ctrl-F inFirefox.)This guide may not be fully applicable since the Sun site (where to download Java) and the Eclipsesite are in constant flux.There are many other ways to install (and configure) Java and Eclipse.If you have problems, please ask your TA; if they can help, they will. Note that you are ultimatelyresponsible for solving problems on your home computer, though.Installing Eclipse and/or Java should not harm your computer, yet Computing Science staff are notresponsible for any problems that occur as a result of following these instructions.Eclipse does not need to be installed at home; you can work in-lab, or can program in Java at homeusing software other than Eclipse.
Downloading and Installing Java
Ensure you read over the above notes before installing Java. The following is a guide forinstalling the Java Development Kit (JDK) 1.6.0_31 , which is similar to the version installedin the labs.
Go to the 1.6.0_31 download page.1.Read and accept the license agreement.2.Right-click on jdk-6u31-windows-i586.exe link, choose Save Link As..., and save thefile. (On Windows 7, using IE, it'll be Save target as.)
Note this file is for 32-bit windows.Save it in an appropriate place, such as your Desktop.
3.
Go to where you saved that file (e.g., your Desktop), and double click on jdk-6u31-windows-i586.exe, and follow the instructions.
You may need to enter an Administrator password before running the .exe file.If the installation fails, try disabling installation of certain unnecessarycomponents, such as "source code" - this may fix the installation issues you arehaving. This has been an issue in rare cases on Windows 7.Note a later step, configuring Eclipse, assumes you chose the default locationC:\Program Files\Java\jdk1.6.0_31\ [or similar, likely C:\Program Files(x86)\Java\jdk1.6.0_31, if on a 64-bit Windows 7 system]Later during the install, you will be prompted to install into C:\ProgramFiles\Java\jre6. Accept this, but note this is a different part of the installationwhich will not be referenced in this tutorial.
4.
See below for a guide to installing Eclipse on a Mac. Note you do not need to install Java ona Mac.
First Year Eclipse Tutorials https://moodle.cs.ualberta.ca/file.php/79/courseresources/eclipsetutor...
16 of 23 12-08-22 9:49 AM

You should now install Eclipse.
Downloading and Installing Eclipse
Ensure you read over the above notes before installing Eclipse. The following is a guide forinstalling Eclipse 3.6.2, which is the same version as in the labs.
Save eclipse-java-helios-SR2-win32.zip to your computer.1.Unzip it to your C drive (If your system does not have a built-in ability to unzip .zipfiles, you can use 7-zip.)
You may need to save it to your Desktop, then move it to your C drive, enteringan Administrator password.You will likely need to explictly specify C:\ as the location of the extract.Note the next step, configuring Eclipse, assumes you have a resulting C:\eclipsefolder.
2.
You should now configure Eclipse.
See below for a guide to installing and configuring Eclipse on a Mac.
Configuring Eclipse Like in the Lab
Ensure you read over the above notes (this applies to a Windows machine ... see the bottomof this section for a link to configuring Eclipse on a Mac), have installed Java, and haveinstalled Eclipse before configuring Eclipse. The following is a guide for configuring Eclipse3.6.2 as it is configured in the labs.
If installing Eclipse, download workspace.zip, and unzip it in your C drive, resulting inC:\workspace.
You may need to save it to your Desktop, then move it to your C drive, enteringan Administrator password.If your system does not have a built-in ability to unzip .zip files, you can use7-zipYou will likely need to explictly specify C:\ as the location of the extract.In C:\workspace is a file WORKSPACE_3.6.2_SETTINGS. It's a text filecontaining all modified settings.
1.
Create a shortcut to C:\eclipse\eclipse.exe.
Note This assumes you installed Eclipse as described above. If you have not, installthings again, but this time in the specified locations, or adjust appropriately during thefollowing steps.
Right click on C:\eclipse\eclipse.exe.1.Choose Send To -> Desktop.2.
See this Vista tutorial on shortcuts for more details.
2.
Modify the shortcut's target so it has the following command3.
First Year Eclipse Tutorials https://moodle.cs.ualberta.ca/file.php/79/courseresources/eclipsetutor...
17 of 23 12-08-22 9:49 AM

C:\eclipse\eclipse.exe -vm "C:\Program Files\Java\jdk1.6.0_31\bin\javaw.exe" -data "C:\wor
You can now double-click on the shortcut to run Eclipse.
Note:
-vm C:\Program Files\Java\jdk1.6.0_31\bin\javaw.exe is the location of your Javainstallation.
Note that if you are using 64-Bit Windows, Java may be installed in C:\Program Files(x86)\Java\jdk1.6.0_31\bin\javaw.exe
If you get a message similar to "A Java Runtime Environment (JRE) or javaDevelopment Kit (JDK) must be available in order to run Eclipse. No Java virtualmachine was found after searching the following location: C:\Program Files\Java\jdk1.6.0_31\bin\javaw.exe" you may need to change this path.
C:\workspace is the location of your eclipse projects containing your .java files.-vmargs -Dfile.encoding=utf-8 was in the past needed for 115 projects.
See below for a guide to installing Eclipse on a Mac.. It also shows you how to configure itroughly like in the lab.
Getting Keyboard to Work at Home
(This applies to Windows ... see the bottom of this section for a link to getting Keyboard towork on a Mac.)
Close down Eclipse, first.
Then, to get Keyboard.java and RandomInt.java working at home, you must installUofAC114.jar . The easiest and best way to do this is as follows:
Right click on this UofAC114.jar link and click Save Link As ... . An Enter name of fileto save to... window appears. (Applies to Firefox on Windows Vista.)
1.
Save it in the lib\ext directory of your java installation. If you installed Java asdescribed above, then it'll be similar to
C:\Program Files\Java\jdk1.6.0_31\jre\lib\ext
If it does not allow you to save this file, try saving it to your Desktop, thenmoving it to the ext directory, entering your Administrator user's password if andwhen prompted.If on a 64-bit system, it's likely you must instead use this path: C:\ProgramFiles (x86)\Java\jdk1.6.0_31\jre\lib\ext
2.
Start up Eclipse, and now any project will have Keyboard available.3.
If you have installed Keyboard as above and you are not using the provided workspacedirectory, your programs that use Keyboard may not compile, with the errors displayed
First Year Eclipse Tutorials https://moodle.cs.ualberta.ca/file.php/79/courseresources/eclipsetutor...
18 of 23 12-08-22 9:49 AM

below.
To fix this problem, you must configure Eclipse like in the lab.
(This example applies to a Windows machine, but it is similar to other OSs and in-lab.)
See below for how to get Keyboard working for a Mac
That be it. If it doesn't work, ensure you've installed Java, installed Eclipse and configuredEclipse properly, as specified above. And, if needed add the Keyboard.java orRandomInt.java files directly to each project where they must be used. These files must beadded under the (default package) , or to the project itself, but not to the JRE System Library.
For more advanced courses, you may need to install Eclipse plug-ins.
Installing and Configuring Eclipse at Home on a MacYou may wish to see some notes about the installation on a Mac.
In your browser, go to http://www.eclipse.org/1.Select Downloads.2.Select Older Versions (easiest to search for it; it's a bit hard to spot).3.Select Eclipse Helios SR2 Packages (v 3.6.2)4.Select the Eclipse IDE for Java Developers.5.On the right side of the page, click Mac OS X(Cocoa 32).
For a 64-bit Mac, click Mac OS X(Cocoa 64)6.
Click the green download arrow. It should download eclipse-java-helios-SR2-macosx-cocoa.tar.gzFor a 64-bit Mac, it should download eclipse-java-helios-SR2-macosx-cocoa-x86_64.tar.gz
7.
When the download is complete, move the archive into the appropriate folder and unzip it. (Likelyunzip by double-clicking.) Eclipse is now installed.
Put it in the Applications folder, if you're not certain which folder is appropriate.
8.
configuring Eclipse like in the lab: Download workspace.zip. Move it to the Documents folder.
If it didn't automatically unzip, double-click to unzip it. A workspace directory will be created.
9.
First Year Eclipse Tutorials https://moodle.cs.ualberta.ca/file.php/79/courseresources/eclipsetutor...
19 of 23 12-08-22 9:49 AM

This contains the configuration settings for Eclipse, and will also contain your .java files.
Go into the eclipse folder (created when you unzipped it), and run Eclipse.If you put it in the Applications folder, go to Applications in the dock, go into the Eclipsefolder, and single click Eclipse (or Eclipse.app).If you did not put Eclipse in the Applications folder, then in Finder go to the Eclipse folder,and double-click Eclipse (you may see it as Eclipse.app).
If you get a message similar to Eclipse is an application downloaded from the Internet. Are yousure you want to open it?, click Open.
10.
When prompted, select the workspace (/Users/your_Mac_user_name/Documents/workspace), andchoose use this as the default and do not ask again.
11.
Now move onto the next section where you specify the Java version.
Specifying Java Version in Eclipse
Note you may only have one choice, in which case you cannot specify another version. It should not inthis case be needed, though.
At the top of the Eclipse window select the Eclipse menu.1.Select Preferences... .2.In the left column of the window that appears, expand Java.3.Select Installed JREs.4.From the menu that appears choose JVM 1.6 and then press Okay.5.
Eclipse is now using the Mac version of Java closest to the Java used in-lab.
Notes on Mac Installation
Done on Mac OS X 10.5.8, with a Power PC G4 (which is 32 bit).Also tested briefly on 10.7.1, 64 bit.
It was assumed the Mac supported both the Cocoa and Carbon versions of Eclipse, but Cocoa waschosen because it was newer.When choosing the Java version, 1.6 was arbitrarily chosen over 1.6.0.Eclipse should work similarly to the lab, but there will be at least a few differences. For example,short cut keys will be different.The version of Java is not exactly the same as the lab (i.e., 1.6 was used instead of 1.6.0_31 ... using1.6.0_31 on a Mac is likely not possible), and the configuration settings are not exactly the sameeither (no command line arguments were given). You can try creating a shortcut, which on a Mac iscalled an alias. Using the eclipse.ini file may also work.It is unnecessary to install Java, as Macs come with Java already installed.
Getting Keyboard to Work at Home (Mac)
Ensure you've first followed the installation instructions precisely.
Before creating the Eclipse project, close Eclipse.1.In Finder, go to the Macintosh HD (in Finder, left pane under Devices. In Finder, you may first2.
First Year Eclipse Tutorials https://moodle.cs.ualberta.ca/file.php/79/courseresources/eclipsetutor...
20 of 23 12-08-22 9:49 AM

instead need to go to the Go menu, and choose Computer. It also may display as the name youchose for your computer, instead of Macintosh HD.)Choose Library -> Java -> Extensions3.Download UofAC114.jar and save it in Extensions.4.Start up Eclipse, and now any project will have Keyboard available.5.
If that didn't work, so for example code with Keyboard is still not compiling, first ensure you putUofAC114.jar in the proper path, as specified above ... it must not be, for example, if your user directory'sLibrary/Java/ext directory.
If you get an Access restriction error, you likely did not configure Eclipse properly.
You can also try some alternatives.
For more advanced courses, you may need to install Eclipse plug-ins.
Installing Eclipse Plug-InsSee Installed Plugins for a list of plugins installed on ugrad computers.
First Year Eclipse Tutorials https://moodle.cs.ualberta.ca/file.php/79/courseresources/eclipsetutor...
21 of 23 12-08-22 9:49 AM
You can install plug-ins for Eclipse to add extra functionality that is not included in the core program.
In the "Help" menu, select "Install new software..."1.Select a plug-in repository from the "Work with:" menu. If the repository you need is not listed,follow the four steps below. Otherwise, you can skip those.
2.
Click "Add..."3.In the "Name" field, type the name of what you are trying to add. What you type does not matter-this will only help you recognize the plug-in source in the future.
4.
In the "Location" field, type in the address of the plug-in repository you want to add.For Eclipse Helios, the main repository is http://download.eclipse.org/releases/helios .For Eclipse Galileo, the main repository http://download.eclipse.org/webtools/updates .You can install Perl-related plugins with http://e-p-i-c.sf.net/updates .Other plug-in repositories can be found through search engines.
5.
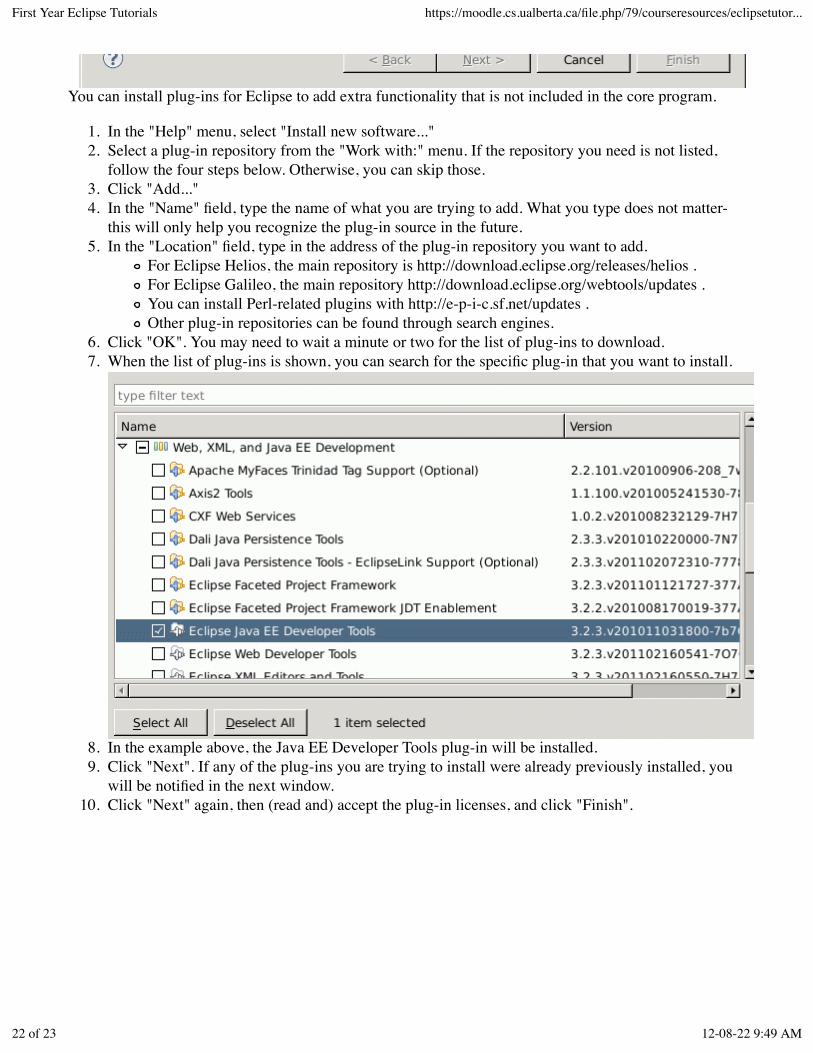
Click "OK". You may need to wait a minute or two for the list of plug-ins to download.6.When the list of plug-ins is shown, you can search for the specific plug-in that you want to install.7.
In the example above, the Java EE Developer Tools plug-in will be installed.8.Click "Next". If any of the plug-ins you are trying to install were already previously installed, youwill be notified in the next window.
9.
Click "Next" again, then (read and) accept the plug-in licenses, and click "Finish".10.
First Year Eclipse Tutorials https://moodle.cs.ualberta.ca/file.php/79/courseresources/eclipsetutor...
22 of 23 12-08-22 9:49 AM

You may be notified by a security warning if the plug-in you are installing is unsigned. Generallythat means the author is not verified, but in most cases, it is safe to continue.
11.
Restart Eclipse12.
Installed Plugins
For a list of system-installed plugins on the ugrad installation of Eclipse, open up Eclipse ona ugrad computer, go to Help >> Install New Software ... and click on What is alreadyinstalled?
First Year Eclipse Tutorials https://moodle.cs.ualberta.ca/file.php/79/courseresources/eclipsetutor...
23 of 23 12-08-22 9:49 AM


![Introduction to Junit, Eclipse, Build Environmentdslab.konkuk.ac.kr/Class/2015/15SV/Team Project/1/[SV]_T2... · 2015-03-19 · Introduction to Junit, Eclipse, Build Environment 200611494](https://img.dokumen.tips/doc/110x75/5ed6736fe7590808d702fdfa/introduction-to-junit-eclipse-build-project1svt2-2015-03-19-introduction.jpg)