Embed Size (px)
Citation preview

Indiana Fire & Public Safety Academy Training System Module A Firefighter Practical Skill Evaluation Form
1 of 46
Effective 03/18 **This skill sheet applies to Mandatory, Module A and FF I**
MANDATORY FIRE Firefighter Module A GHTER
Board of Firefighting Personnel
Standards and Education
Lead Evaluator Handbook
This handbook should be used by the Lead Instructor and Lead Evaluator in planning this course.
March 2018
V2

Indiana Fire & Public Safety Academy Training System Module A Firefighter Practical Skill Evaluation Form
2 of 46
Effective 03/18 **This skill sheet applies to Mandatory, Module A and FF I**
Module A Firefighter Lead Evaluator Handbook
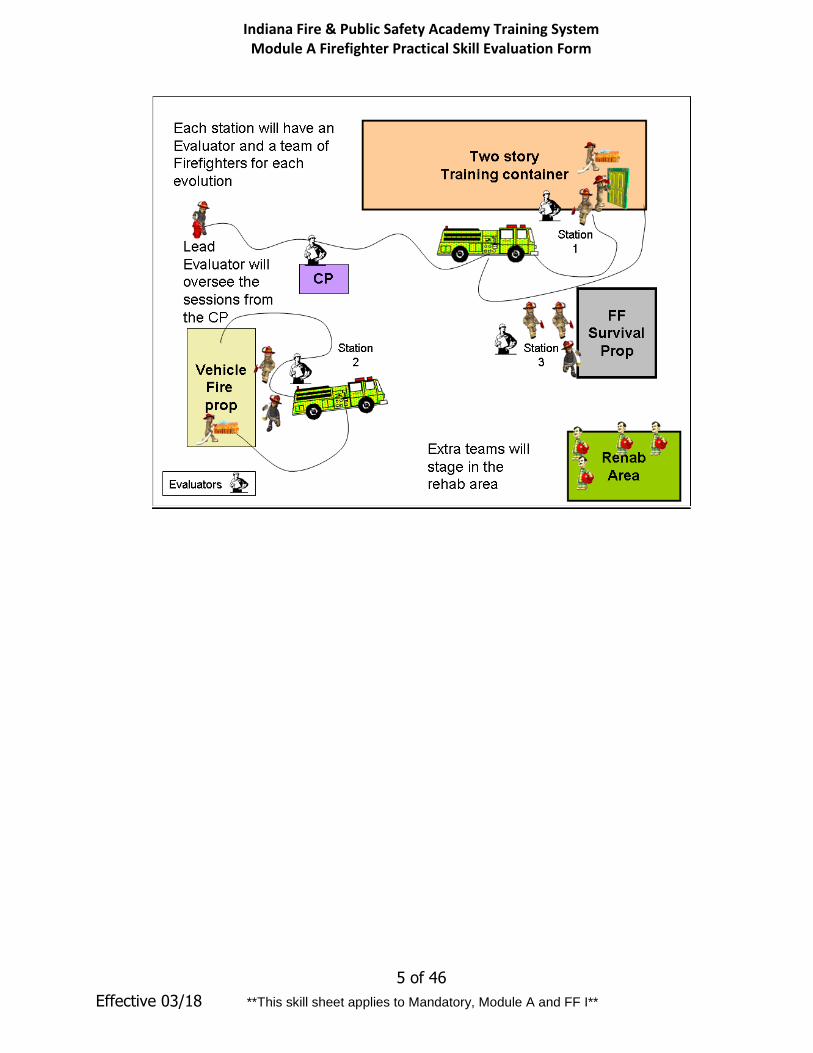
This document is intended to provide guidance for Lead Evaluators that are conducting Module A firefighter classes. It is the responsibility of the Lead Instructor to ensure that all students comply with skill requirements prior to taking the final skills practical exam and written exam. Contents of this document include; 22 individual skill sheets for Module A Courses Student Competency Profile Sample Practical Skill Layout List of which individual skill with special instructions or considerations Lead Instructors are to ensure that all students receive training on each of the 22 Mandatory skills. Also each student must demonstrate competency for each of the skills. Once the student demonstrates competency for a skill the instructor shall make arrangements for the student to be evaluated on that skill. Instructors can arrange for each skill be evaluated as they are completed or they can be evaluated on a single day at the end of the course or evaluated in groups on a few select dates throughout the class. Once a student has passed a skill evaluation the evaluator shall sign off on the Competency Profile. Once a student completes the entire competency profile the Lead Evaluator shall sign at the bottom of the form.
Evaluators will use this document as a reference while evaluating skills examinations. It has been determined that the skills contained in this document are necessary to meet the objectives of NFPA 1001 2012 edition. Currently each skill has been laid out in the following format
Name and Objective Directions Equipment/Materials List Task List
While this serves as a solid guideline that will cover the vast majority as written it is understood that there may be times that adjustments to the equipment, materials list and the task steps will be necessary to complete the objectives. Adjustments may be required if the host department does not have the exact equipment as listed. In this instance an alternative piece of equipment may be used as long as the intent of the objective is met. It may also be necessary to adjust the task steps based on equipment, procedures or manufacturers recommendations. In the event that an adjustment is necessary during training or testing, documentation of the adjustment should be made in the comment section of the students check off sheet.
Indiana Fire & Public Safety Academy Training System Module A Firefighter Practical Skill Evaluation Form
3 of 46
Effective 03/18 **This skill sheet applies to Mandatory, Module A and FF I**
The intent of this document is to ensure that all persons who achieve certification have met the minimum NFPA Standard. All persons seeking certification must demonstrate all skills contained in this document. This is true even if the student is not required to perform the skill at his/her fire department. For instance, your jurisdiction does not have any structures that employ the use of sprinklers; therefore your fire department does not train on sprinkler systems. You will still be required to complete all the sprinkler skills contained in this document. It will be the responsibility of the Lead Instructor to schedule the use of facilities and/or assemble all props necessary to ensure that training on all skills is completed. To assist with this we have identified skills that may be difficult to complete by providing guidance that will ensure compliance. The guidance is located on the identified skill sheet. In addition we are recommending the follow actions be taken to provide students with quality instruction and a positive learning experience;
Determine your resource needs and identify where you can get them o Props o Books o Instructors o Evaluators o Your District Fire Training Council is a good starting point with this
Conduct skill sessions at a training center Small classes should combine with neighboring fire departments this will help with ensuring the necessary resources are available
The following skill sheets have been identified and have special instructions or specific guidance; Module A 2- SCBA Module A-3 Emergency Procedures for SCBA Module A-9 Leg Lock Module A-11 Ventilate a Basement Module A-12 Hydrants Module A-13 Portable Water Tank Module A-17 Advance a Line Up and Down Stairs Module A-19 Exit a Constricted Opening If you find that you are unable to complete any skills you must contact the IDHS Fire Training Staff and provide justification. Your justification will be taken into consideration and further direction will be given at that time. It is critical to preplan your courses to avoid last minute problems. Failure to obtain a prop will not excuse you from completing any of the required skills but will result in delaying the completion of the class. The skill sheets in this document are used as a reference for the practical skills examination. During practical skills evaluations students will be instructed to complete a series of evolutions that may include any of the skill sheets contained in this document. At no time will a student be asked to perform or be evaluated on a skill that is not listed.

Indiana Fire & Public Safety Academy Training System Module A Firefighter Practical Skill Evaluation Form
4 of 46
Effective 03/18 **This skill sheet applies to Mandatory, Module A and FF I**
Sample Practical Skill Diagrams
Indiana Fire & Public Safety Academy Training System Module A Firefighter Practical Skill Evaluation Form
5 of 46
Effective 03/18 **This skill sheet applies to Mandatory, Module A and FF I**

Indiana Fire & Public Safety Academy Training System Module A Firefighter Practical Skill Evaluation Form
6 of 46
Effective 03/18 **This skill sheet applies to Mandatory, Module A and FF I**
Skill # Module A- 1 JPR# NFPA 1001,
5.2.1 & 5.2.2 & 5.2.3 Task: Answering a Call & Transmit and Receive Messages via Fire Department Radio
Candidate Name: PSID:
Training Location: Date:
Equipment:
Telephone and department radio.
Intercom (where applicable)
Documentation material (e.g., notepad, intake form, etc.)
Pen or pencil
Instructions
In this evaluation you will be expected to operate fire department communications equipment, relay information, and record information so that all necessary information is obtained, equipment is operated correctly and information is relayed promptly and accurately. You will be expected to differentiate between routine and emergency traffic
Task Steps Initial Retest Retest
Answering a Telephone Call Yes No Yes No Yes No
1. Obtains all necessary information
2. Differentiates between routine and emergency traffic
3. Utilizes communication equipment
4. Relays information accurately
5. Documents according to SOPs/SOGs
6. Obtains all necessary information
Task Steps Transmit and Receive Messages via Fire Department Radio
1. Candidate properly turns on the radio and selects the appropriate channel designated by the instructor
2. Candidate receives a message.
3. Candidate properly responds to the message by using the push-to-talk system and holding the radio at a 45-degree angle to his or her mouth and speaking clearly.
Final Result
Comments:
First Attempt Evaluator Name: Time: Date:
Second Attempt Evaluator Name: Time: Date:
Third Attempt Evaluator Name: Time: Date:
Lead Evaluator Name: Date:

Indiana Fire & Public Safety Academy Training System Module A Firefighter Practical Skill Evaluation Form
7 of 46
Effective 03/18 **This skill sheet applies to Mandatory, Module A and FF I**
Skill # Module A - 2 JPR# NFPA 1001, 5.1.2,
5.3.1 Task: Inspect PPE/SCBA, Don and Doff PPE/SCBA, Replace SCBA Cylinder, Clean and Sanitize PPE/SCBA
Candidate Name: PSID:
Training Location: Date:
Equipment: Personal protective equipment
SCBA
Instructions Properly Inspect, Clean, Sanitize, Don and Doff PPE and SCBA.
Task Steps Initial Retest Retest
Inspect PPE Yes No Yes No Yes No
1. Separate the outer shell from the inner liner so each component can be inspected
2. Check that the outer shell does not have any holes, cuts, separated seams, or missing reflective striping. All snaps, Velcro, and fasteners must be in working order.
3. Check that the moisture barrier is uniform in color. All seams should be intact. There should not be any signs of abrasion (typically in joint and pressure point areas such as the knees, shoulders, and elbows).
4. In the thermal liner, look for signs of staining, worn seams, and quilting becoming unwoven
5. When any damage is found, the PPE needs to be taken out of service and either repaired by the manufacturer or certified repair facility or replaced. If you find or suspect any damage, report it to the station officer in charge of PPE.
Inspect SCBA
1. Checks that cylinder is full (or at least 90%)
2. Checks operation of all gauges. Verifies that the difference between cylinder and regulator gauge does not exceed 100 psi
3. Tests operation of low pressure alarm (to activate at 25%of cylinder)
4. Checks all hose connections
5. Checks condition of facepiece
6. Checks condition of harness and straps
7. Checks operation of donning and bypass valves
8. Checks that unit is clean and sanitized
9. Tests PASS device
Don PPE
1. Properly don boots and pants according to manufacturer’s specifications
2. Don Hood
3. Don coat
4. Don Helmet
5. Don Gloves
6. Complete within one minute

Indiana Fire & Public Safety Academy Training System Module A Firefighter Practical Skill Evaluation Form
8 of 46
Effective 03/18 **This skill sheet applies to Mandatory, Module A and FF I**
Don SCBA Coat Method Yes No Yes No Yes No
1. Make sure that your turnout coat is fully closed, and place the unit so the cylinder valve is facing toward you and the straps are to the
sides.Place your helmet, gloves, and facepiece to the side. (Make
sure the straps on your facepiece are fully extended.)
2. Pull your hood back.
3. Check that your cylinder is full. Fully open the main cylinder valve. As the pressure increases, both visible and audible alarms activate automatically, indicating that the alarms are functional. When the system is fully pressurized, the alarms enter the normal use mode.
4. Grasp the left shoulder strap. Lift the unit and swing it over your shoulder, then slide the right arm through the right shoulder strap.
5. Adjust straps
6. Pick up your facepiece and set your chin in the chin pocket of the mask and fit the facepiece to your face and bring the straps or webbing over your head and adjust straps.
7. Insert the regulator into the facepiece.
8. Place the helmet on your head and secure the chin strap.
9. Don your gloves and report to duty.
Don SCBA Over the Head Method
1 Make sure that your turnout coat is fully closed, and place the unit so the cylinder valve is facing toward you and the straps are to the
sides.Place your helmet, gloves, and facepiece to the side. (Make
sure the straps on your facepiece are fully extended.)
2 Pull your hood back.
3 Check that your cylinder is full. Fully open the main cylinder valve. As the pressure increases, both visible and audible alarms activate automatically, indicating that the alarms are functional. When the system is fully pressurized, the alarms enter the normal use mode.
1. Kneel down in front of the unit and grasp the backplate with both hands, and lift the unit over your head
2. While the unit is over your head, tuck your arms in close to your body and slowly slide the unit down your back, while making sure that your arms slide into the shoulder straps.
3. Adjust straps
4. Pick up your facepiece and set your chin in the chin pocket of the mask and fit the facepiece to your face and bring the straps or webbing over your head and adjust straps.
5. Insert the regulator into the facepiece.
6. Place the helmet on your head and secure the chin strap.
7. Don your gloves and report to duty.
Doff PPE Yes No Yes No Yes No
1. Doff and properly store helmet
2. Doff and properly store gloves

Indiana Fire & Public Safety Academy Training System Module A Firefighter Practical Skill Evaluation Form
9 of 46
Effective 03/18 **This skill sheet applies to Mandatory, Module A and FF I**
3. Doff and properly store hood
4. Doff and properly store coat
5. Doff and properly store pant and boots
Doff SCBA
1. Remove the regulator from the mask and stow the regulator.
2. Close the cylinder valve fully.
3. Open the bypass to release system pressure. Close the bypass
4. Turn off the integrated PASS device.
5. Fully loosen the head harness straps, and pull the facepiece up and away from your head.
6. Release the waist strap.
7. Loosen the shoulder straps by grabbing the release loop. Pull them out and away from your body.
8. Slip your right arm out of the shoulder strap first, then remove the harness.
9. Be sure to replace a less than full cylinder with a full one and store SCBA.
Replace SCBA Cylinder
1. Doffs SCBA correctly
2. Closes cylinder and properly bleeds off pressure
3. Removes, positions, protects high pressure hose
4. Releases empty cylinder and removes from SCBA
5. Checks that replacement cylinder is full
6. Places replacement cylinder into SCBA and secures
7. Checks valve opening and “O” ring
8. Connects high pressure hose
9. Opens cylinder fully
10. Checks all gauges
Clean and Sanitize PPE
1. Clean all articles of PPE as per manufacturer’s instructions.
2. Hang all PPE so all articles dry thoroughly.
3. After dry inspect all articles of PPE.

Indiana Fire & Public Safety Academy Training System Module A Firefighter Practical Skill Evaluation Form
10 of 46
Effective 03/18 **This skill sheet applies to Mandatory, Module A and FF I**
Clean and Sanitize SCBA Yes No Yes No Yes No
1. Inspect the unit prior to cleaning.
2. Remove the facepiece from the regulator and place on the side.
3. Remove the cylinder from the SCBA harness
4. Rinse all parts of the unit with clean water to remove any debris
5. Use a soap and water solution, and scrub the cylinder and harness with a bristle brush
6. Rinse the harness and cylinder off andset aside to dry. (If the
manufacturer recommends a different solution, defer to the manufacturer’s recommendation.)
7. Place the facepiece in the solution recommended by the manufacturer and allow to soak.
8. Clean and sanitize the regulator with the solution recommended by the manufacturer; if necessary, use a soft bristle brush. Avoid getting soap inside the regulator.
9. Rinse the facepiece and regulator with clean water and set aside to dry
10. Reassemble and inspect the unit before placing back in service
Final Result
Comments:
First Attempt Evaluator Date:
Second Attempt Evaluator Date:
Third Attempt Evaluator Date:

Indiana Fire & Public Safety Academy Training System Module A Firefighter Practical Skill Evaluation Form
11 of 46
Effective 03/18 **This skill sheet applies to Mandatory, Module A and FF I**
Skill # Module A - 3 JPR# NFPA 1001,
5.3.1 Task: Controlled Breathing Techniques, Emergency Use of Regulator Bypass, Procedure for Crack or Leak In the Facepiece, No Air Maneuver
Candidate Name: PSID:
Training Location: Date:
Equipment: PPE
SCBA
Instructions Candidates will demonstrate controlled breathing techniques, emergency use of the regulator bypass, procedure for dealing with a crack or leak in the facepiece and the no air maneuver.
Task Steps Initial Retest Retest
Controlled Breathing Technique One Yes No Yes No Yes No
1. Inhale through the nose and exhale through the mouth for two minutes. Breathe in slowly and deeply, holding air in the lungs for 3-4 seconds.
Controlled Breathing Technique Two
1. Inhale through mouth and exhale through nose. Inhale rapidly and fully while exhaling slowly
Emergency Use of the Regulator Bypass
1. Twist the bypass valve counterclockwise to supply air directly to your mask, bypassing the regulator
2. Twist the bypass valve clockwise to turn off the bypassed air supply, either between breaths, or if your regulator returns to normal use.
3. Notify the officer and exit the IDLH atmosphere immediately. Make sure to properly document the incident and place the equipment out of service.
Procedure for Crack or Leak In the Facepiece
1. In the event of a minor crack or leak in the facepiece, don’t panic. Remain calm, and leave your facepiece on. It will continue to provide protection to the lungs, eyes, nose, mouth, and skin.
2. Place your hand on the facepiece or regulator and press it against your face
3. Conserve air.
4. Notify the officer and leave the area immediately with another member
5. In the event of a major crack or leak, continue to cover the damaged area
6. Press the manual shutoff after each breath. If air still seems to be leaking out, excess air is being lost even while a hand covers the crack or hole. Continue to engage the manual shutoff after each breath. This will limit the amount of air from the cylinder that will be lost due to the positive pressure of the system.
7. If manual shutoff will not release in inhalation, control the air flow using the bypass valve. If a gloved hand over the leak does not cover enough of the crack or hole, the inhalation may not be strong enough to activate the flow of air out of the regulator. Therefore continue to have the manual shutoff engaged and use the bypass valve to allow enough air to enter the facepiece. A partial opening of the bypass valve may be enough for a breath; then close the valve after each breath.
8. Notify the officer and leave the area immediately with another member
Indiana Fire & Public Safety Academy Training System Module A Firefighter Practical Skill Evaluation Form
12 of 46
Effective 03/18 **This skill sheet applies to Mandatory, Module A and FF I**
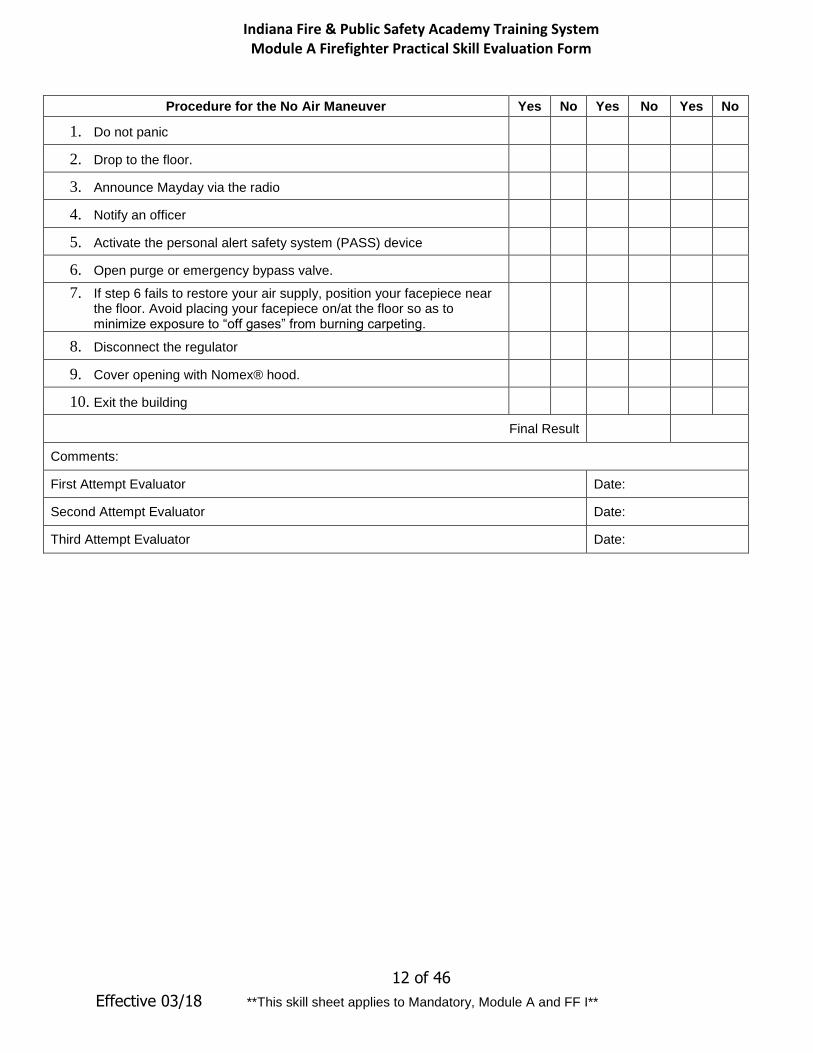
Procedure for the No Air Maneuver Yes No Yes No Yes No
1. Do not panic
2. Drop to the floor.
3. Announce Mayday via the radio
4. Notify an officer
5. Activate the personal alert safety system (PASS) device
6. Open purge or emergency bypass valve.
7. If step 6 fails to restore your air supply, position your facepiece near the floor. Avoid placing your facepiece on/at the floor so as to minimize exposure to “off gases” from burning carpeting.
8. Disconnect the regulator
9. Cover opening with Nomex® hood.
10. Exit the building
Final Result
Comments:
First Attempt Evaluator Date:
Second Attempt Evaluator Date:
Third Attempt Evaluator Date:

Indiana Fire & Public Safety Academy Training System Module A Firefighter Practical Skill Evaluation Form
13 of 46
Effective 03/18 **This skill sheet applies to Mandatory, Module A and FF I**
Skill # Module A - 4 JPR# NFPA 1001
5.5.1 Task: Clean, Inspect and Maintain Hand/Power Tools
Candidate Name: PSID:
Training Location: Date:
Equipment:
Cutting Tools
Push/Pulling Tools
Maintenance Tools (Wrench, sockets, ratchets etc.)
Salvage Cover
Instructions Candidates will clean, inspect and Maintain various hand and power tools
Task Steps Initial Retest Retest
Hand Tool Cleaning Yes No Yes No Yes No
1. Wash tools with mild detergent or per manufacturer’s guidelines. Rinse and wipe dry. Do not soak wooden handles in water because it will cause the wood to swell
Hand Tool Inspection
2. Inspect tool handles for cracks, splinters, or other damage.
3. Inspect tool head for tightness.
4. Inspect working surface for dullness, damage, chips, cracks, or metal fatigue.
5. Notify officer of any problems identified so that corrective actions can be taken.
Power Tool Cleaning
1. Clean tools according to manufacturer’s guidelines
Power Tool Inspection
1. Inspect tools for damage.
2. Inspect parts for tightness and function. Ensure that all guards are functional and in place. Check all electrical components for cuts or other damage.
3. Inspect working surface for damage or wear.
Power Tool Maintenance
1. Change a cutting blade on a power tool. Check blades for damage or wear. Replace blades that are damaged or worn.
2. Check fuel level in all power tools and fill as necessary. Use correct fuel type. Ensure that fuel is fresh.
3. Check oil level in all tools and fill as necessary.
4. Start all power tools and keep them running. Ensure power tools will start manually. Ensure battery packs are fully charged.
5. Tag a tool that is out of service. Place appropriate notification on the tool. Communicate the situation with officer.
Final Result
Comments:
First Attempt Evaluator Date:
Second Attempt Evaluator Date:
Third Attempt Evaluator Date:
Indiana Fire & Public Safety Academy Training System Module A Firefighter Practical Skill Evaluation Form
14 of 46
Effective 03/18 **This skill sheet applies to Mandatory, Module A and FF I**
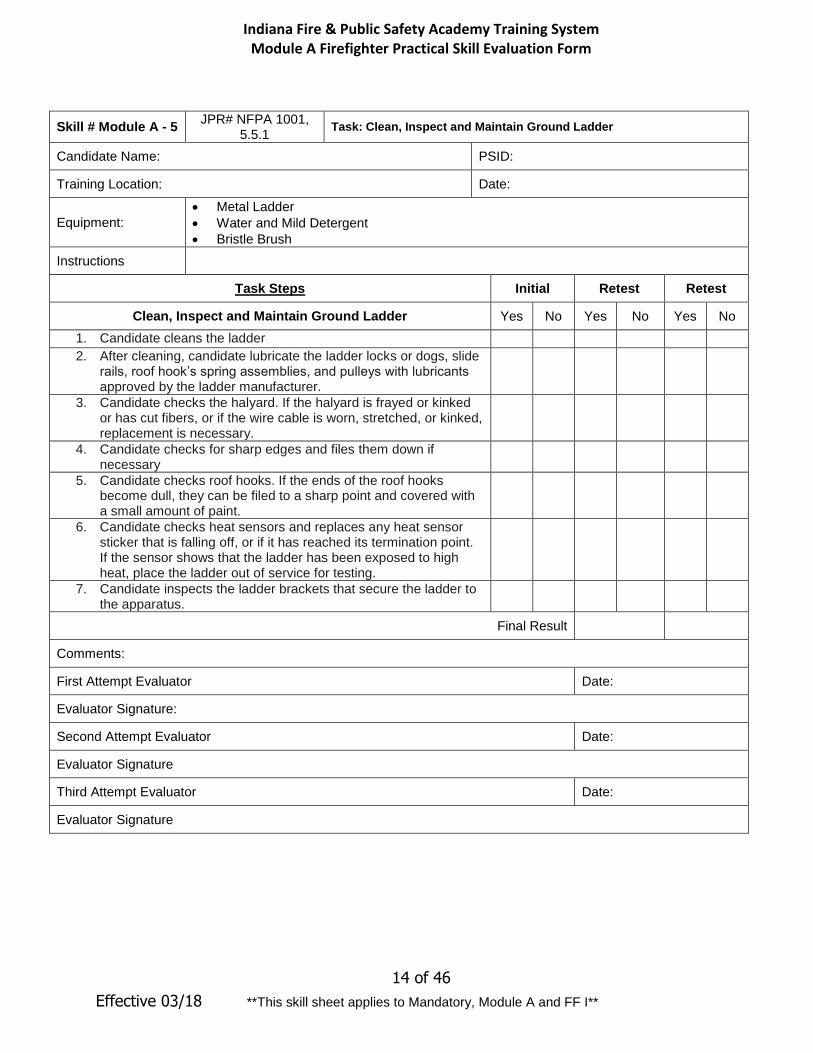
Skill # Module A - 5 JPR# NFPA 1001,
5.5.1 Task: Clean, Inspect and Maintain Ground Ladder
Candidate Name: PSID:
Training Location: Date:
Equipment:
Metal Ladder
Water and Mild Detergent
Bristle Brush
Instructions
Task Steps Initial Retest Retest
Clean, Inspect and Maintain Ground Ladder Yes No Yes No Yes No
1. Candidate cleans the ladder
2. After cleaning, candidate lubricate the ladder locks or dogs, slide rails, roof hook’s spring assemblies, and pulleys with lubricants approved by the ladder manufacturer.
3. Candidate checks the halyard. If the halyard is frayed or kinked or has cut fibers, or if the wire cable is worn, stretched, or kinked, replacement is necessary.
4. Candidate checks for sharp edges and files them down if necessary
5. Candidate checks roof hooks. If the ends of the roof hooks become dull, they can be filed to a sharp point and covered with a small amount of paint.
6. Candidate checks heat sensors and replaces any heat sensor sticker that is falling off, or if it has reached its termination point. If the sensor shows that the ladder has been exposed to high heat, place the ladder out of service for testing.
7. Candidate inspects the ladder brackets that secure the ladder to the apparatus.
Final Result
Comments:
First Attempt Evaluator Date:
Evaluator Signature:
Second Attempt Evaluator Date:
Evaluator Signature
Third Attempt Evaluator Date:
Evaluator Signature

Indiana Fire & Public Safety Academy Training System Module A Firefighter Practical Skill Evaluation Form
15 of 46
Effective 03/18 **This skill sheet applies to Mandatory, Module A and FF I**
Skill # Module A - 6 JPR# NFPA 1001,
5.3.6
Task: Single Firefighter Shoulder Carry, Two-Firefighter Shoulder Carry, Single-Firefighter High-Shoulder, Single Firefighter Suitcase Carry, Two-Firefighter Suitcase Carry
Candidate Name: PSID:
Training Location: Date:
Equipment:
Portable Ladder
Pike Pole
PPE
Instructions Candidate shall demonstrate a Single Firefighter Shoulder Carry, Two-Firefighter Shoulder Carry, Single-Firefighter High-Shoulder, Single Firefighter Suitcase Carry, Two-Firefighter Suitcase Carry
Task Steps Initial Retest Retest
Single Firefighter Shoulder Carry Yes No Yes No Yes No
1. Go to the center of the ladder at its balance point.
2. Squat, grab a rung, and, with your leg muscles, lift the ladder onto your shoulder, with the butt end facing toward the direction of travel.
3. The same arm then enters between the rungs and grabs the next forward rung.
4. As the ladder sits on your shoulder, it can betilted down slightly.
This helps control the ladder, provides good visibility, and prevents striking other persons with the butt.
Two-Firefighter Shoulder Carry
1. Two firefighters face the same direction on the same side of the ladder, one at the butt, and one at the tip.
2. They both squat, grab a rung, and with their leg muscles, lift the ladder onto their shoulders.
3. The same arm then enters between the rungs and grabs the next forward rung.
4. The butt firefighter should be inside the first rung spacing to protect the butt and use the other arm to warn approaching firefighters. The tip firefighter steers the ladder around obstructions.
Single-Firefighter High-Shoulder
1. Remove the ladder off of the apparatus and carry the balance point of the lower beam of the ladder on the top of your shoulder.
2. Tilt the base of the ladder toward the ground, so that the ladder toes not strike another firefighter during transport.
3. As you approach the building, the foot of the lower beam is planted into the ground and acts as the foot.
4. Now you will push up on the ladder and walk it up in a hand-over-hand motion and beam raise position.
Single Firefighter Suitcase Carry
1. Position yourself at the balance point of the ladder.
2. Grab the beam of the ladder, and using your leg muscles, begin to stand. Your arms and body raise the ladder to a vertical carry position that resembles a suitcase.

Indiana Fire & Public Safety Academy Training System Module A Firefighter Practical Skill Evaluation Form
16 of 46
Effective 03/18 **This skill sheet applies to Mandatory, Module A and FF I**
Two-Firefighter Suitcase Carry Yes No Yes No Yes No
1. Two firefighters position themselves on the same side of the ladder and face the same direction. One firefighter is at the butt, and one at the tip.
2. Both firefighters squat, grab the beam of the ladder, and prepare to lift.
3. Using their leg muscles, both firefighters begin to stand. Their
arms and bodies raise the ladder toa vertical carry position that
resembles a suitcase. The butt firefighter must maintain a position to protect the butt of the ladder from striking another firefighter or object.
Final Result
Comments:
First Attempt Evaluator Date:
Second Attempt Evaluator Date:
Third Attempt Evaluator Date:

Indiana Fire & Public Safety Academy Training System Module A Firefighter Practical Skill Evaluation Form
17 of 46
Effective 03/18 **This skill sheet applies to Mandatory, Module A and FF I**
Skill # Module A - 7 JPR# NFPA 1001,
5.3.6 Task: Single-Firefighter Flat Raise, Two-Firefighter Flat Raise, Two-Firefighter Beam Raise
Candidate Name: PSID:
Training Location: Date:
Equipment: Portable Ladder
PPE
Instructions Candidates will demonstrate a Single-Firefighter Flat Raise, Two-Firefighter Flat Raise, Two-Firefighter Beam Raise,
Task Steps Initial Retest Retest
Single-Firefighter Flat Raise Yes No Yes No Yes No
1. After a single-carry transport technique, check for overhead obstructions such as tree branches and overhead electrical lines.
2. Place the butt of the ladder against the structure for bracing.
3. Kneel or bend at the tip of the ladder, and using your leg muscles, lift the tip off the ground.
4. Walk the ladder up, with your hands sliding up the rails of the beam and eyes focused on the ladder rising overhead.
Two-Firefighter Flat Raise
1. The ladder is positioned flat, with both feet lying on the ground. The footer positions his or her feet onto the bottom rung or onto both rails of the ladder. He or she crouches with arms extended to grab a forward rung of the ladder. A firefighter’s physical makeup determines which rung is feasible and comfortable to grab.
2. As the ladder is lifted and raised, the footer maintains this position, leans slightly back to counterweight, and assists in lifting the ladder.
3. As the ladder approaches vertical, the footer removes one foot and places it behind him or her for balance.
4. The firefighter raising the ladder checks for obstructions then raises the ladder, walking at a steady pace and sliding hands up the ladder’s rails to raise it to the vertical position. Take care to slide arms up the ladder’s rails, using leg muscles to drive the ladder upward.
5. Once the ladder is vertical, both firefighters assume positions on opposite sides of the ladder with one foot against the ladder’s butt to steady it and the other placed behind them for balance. They can untie the halyard now and extend the ladder to its objective.
Two-Firefighter Beam Raise
1. After the ladder reaches the desired location, the butt end firefighter places the ladder the proper distance from the building with the fly section out, and out of the way of overhead obstructions. This should be about one-fourth the working distance of the ladder, so the ladder won’t need to be repositioned once it is vertical.
2. The butt firefighter places the ladder with one beam planted on the ground, so it is in the vertical position on one beam.

Indiana Fire & Public Safety Academy Training System Module A Firefighter Practical Skill Evaluation Form
18 of 46
Effective 03/18 **This skill sheet applies to Mandatory, Module A and FF I**
Yes No Yes No Yes No
3. The footer places one foot on the ladder’s butt end on the ground. The other foot goes comfortably behind the firefighter. This leg should not be directly in line with the ladder because it could get struck as the ladder rises.
4. The footer’s hands go onto the beam. The arm that is on the same side as the leg on the ladder’s butt extends forward. The back arm now goes on the beam near the ladder’s butt.
5. The firefighter at the tip rechecks the overhead clearance and raises the ladder, while the footer leans back and, pulling slightly, reducing the weight of the ladder and assisting with the raise.
6. Next, the tip firefighter positions his or her body on the inside of the ladder with the ladder sitting on the opposite shoulder, then walks the ladder up hand-over-hand while watching for overhead obstructions.
7. Once the ladder is vertical, both firefighters assume positions on opposite sides of the ladder with one foot against the butt to steady it and the other leg behind them for balance.
8. One of the firefighters then unties the halyard and extends the ladder, pulling on the halyard in a hand-over-hand motion.
9. As the halyard is being raised, the other firefighter positions both hands outside the ladder’s beams to steady it.
10. The halyard firefighter ties off the halyard to a rung of the ladder using a clove hitch.
When the ladder reaches the desired height, the firefighters slowly lean it into the building, placing one foot against an opposite foot on the ladder and using their arms to control the ladder’s lowering into the building.
Final Result
Comments:
First Attempt Evaluator Date:
Second Attempt Evaluator Date:
Third Attempt Evaluator Date:

Indiana Fire & Public Safety Academy Training System Module A Firefighter Practical Skill Evaluation Form
19 of 46
Effective 03/18 **This skill sheet applies to Mandatory, Module A and FF I**
Skill # Module A - 8 JPR# NFPA 1001, 5.3.12, 5.3.6, 5.3.9
Task: Two-Firefighter Roof Ladder Placement, Raising and Positioning a Ladder, Rolling a Ladder, Portable Ladder Placement and Entry: Roof Level, Portable Ladder Placement and Entry: Windows, Portable Ladder Positioned to a Balcony Deck or Fire Escape
Candidate Name: PSID:
Training Location: Date:
Equipment:
Portable Ladder
Roof Ladder
Peaked Roof structure or prop
PPE
Instructions Candidate will demonstrate Two-Firefighter Roof Ladder Placement, Raising and Positioning a Ladder, Rolling a Ladder, Portable Ladder Placement and Entry: Roof Level, Portable Ladder Placement and Entry: Windows, Portable Ladder Positioned to a Balcony Deck or Fire Escape
Task Steps Initial Retest Retest
Two-Firefighter Roof Ladder Placement Yes No Yes No Yes No
1. After the extension ladder is in proper climbing position, the roof ladder’s hooks are opened, and the ladder is raised next to the extension ladder. The roof ladder can be placed on one beam and next to the extension ladder, with the roof hooks facing away.
2. One firefighter should climb to a position nearthe top of the
extension ladder. This allows the firefighter to transfer the ladder from the extension ladder to its locked position on the roof. This firefighter should either lock into the ladder with a leg-lock maneuver or use a safety belt.
3. The firefighter on the ground will now raise the roof ladder to the firefighter on the ladder. He or she can remain on the ground and transfer the ladder upward by using his or her arms, or the firefighter on the ground can hand the roof ladder upward to the firefighter on the ladder. As the ladder is raised, the firefighter on the ground can now climb up the extension ladder to help raise and balance the roof ladder.
4. The roof ladder will begin to pivot over the roof’s edge. The roof ladder can now be pushed up the roof either on the beam or laid flat.
5. Once the ladder goes over the roof’s ridge, the firefighter will pull back on the ladder, sinking the roof hooks into the ridge.
Raising and Positioning a Ladder
1. The firefighter at the butt position is in control. Check for overhead obstructions.
2. Untie the halyard and place it out of the way.
3. The firefighter should place his or her right or left boot up against the butt of the ladder to brace it as the ladder is raised.
4. Pull down the halyard in one smooth hand-over- hand motion while listening for the clicks of the dogs as they go over the rungs. Do not wrap your arms or hands around the halyard when performing this tactic. It can cause injury.
5. The halyard firefighter ties off the halyard to a rung of the ladder using a clove hitch.
6. Once the ladder has been raised to its desired height, it should be lowered into the building with the firefighter between the ladder and the building supporting the ladder and the firefighter on the outside to support and lower the ladder into place. The outside firefighter should watch the tip to make sure it is properly placed.

Indiana Fire & Public Safety Academy Training System Module A Firefighter Practical Skill Evaluation Form
20 of 46
Effective 03/18 **This skill sheet applies to Mandatory, Module A and FF I**
Rolling a Ladder Yes No Yes No Yes No
1. Take a well-balanced position in front of the ladder, with your back leaning slightly into the ladder and your feet behind it.
2. Perform a push-pull motion with your arms to roll the ladder to its desired location. When the ladder is being moved to the left, your right arm pulls the right beam forward, and the left arm pushes the left beam backward. The motion is opposite when moving the ladder to the right.
3. Keep your feet and legs away from the rotating ladder. In the event that you lose control, press both your hands into the building to regain control.
Portable Ladder Placement and Entry: Roof Level
1. Portable ladders placed up to a roof should be positioned with at least five rungs extending past the roofline.
2. To transfer from the ladder, first determine the stability of the roof by sounding the roof with a tool or boot.
3. Do not jump onto the roof; make a slow transition.
Portable Ladder Placement and Entry: Windows
1. A portable ladder placed to a window should be positioned with the tip of the ladder slightly below or level with the windowsill. This makes entry and egress easier.
2. To enter, approach the window, put yourself in a leg log or attach with a harness, and prepare to ventilate the window to be entered.
3. Once the window is removed, the firefighter sweeps the area near the window for any debris or for victims.
4. Drive your right shoulder into the bottom of the left side of the window frame, facing outward while climbing toward the top rung.
5. As you climb over the top rung, your right leg will enter the window, while your left hand maintains a grip on the ladder’s rung or beam.
6. As your right leg enters the room, it will again sweep and sound the floor.
7. If the window’s opening is small, lift your head into the room and over the sill. Ride down the wall to the room’s floor. Your left leg will naturally follow as you enter the room.
8. If the window opening is larger, you can often bring the leg foot up and behind you and into the window, while still keeping your head outside. Alternatively, you can enter the window headfirst; however, there are several disadvantages to that method.
Portable Ladder Positioned to a Balcony Deck or Fire Escape
1. Place the ladder to the side of the balcony, deck, or fire escape, and use the building as the ladders main support. Place it to the side of the structure, with several rungs above the side of the railing, and with the beam next to the railing.
2. Swing your leg over the railing and maintain a handhold on the ladder as you check for structural stability with your leg.
Final Result
Comments:
First Attempt Evaluator Date:
Second Attempt Evaluator Date:
Third Attempt Evaluator Date:

Indiana Fire & Public Safety Academy Training System Module A Firefighter Practical Skill Evaluation Form
21 of 46
Effective 03/18 **This skill sheet applies to Mandatory, Module A and FF I**
Skill # Module A - 9 JPR# NFPA 1001, 5.3.6, 5.3.9, 5.3.10,
5.3.12
Task: Climbing a Portable Ladder, Climbing a Portable Ladder with a Tool, Climbing a Portable Ladder with an Uncharged Hoseline and Charged Hoseline, Leg Lock Maneuver, Portable Ladder Rescue of a Conscious Victim
Candidate Name: PSID:
Training Location: Date:
Equipment:
Metal Ladder
PPE
Axe or Halligan
Uncharged Hoseline
Charged Hoseline
Instructions Candidate will demonstrate Climbing a Portable Ladder, Climbing a Portable Ladder with a Tool, Climbing a Portable Ladder with an Uncharged Hoseline, Climbing a Portable Ladder with a Charged Hoseline, Leg Lock Maneuver, Portable Ladder Rescue of a Conscious Victim
Task Steps Initial Retest Retest
Climbing a Portable Ladder Yes No Yes No Yes No
1. First check to make sure that all of the dogs have locked, and that the ladder is heeled properly.
2. Climb the portable ladder on the balls of your feet, with hands positioned on the underside of the beams. Maintain a fluid, deliberate motion while ascending. This method gives you three points of contact at all times.
3. Keep your eyes focused on the destination. Do not race up the ladder, but maintain a balanced, fluid climbing motion.
4. In rain, snow, or ice, place the arch of your boot near the heel next to the rung, to permit a better grip onto the ladder. The climbing motion should be slow, deliberate, and consistent with weather conditions.
5. If two or more firefighters are on a ladder, they should be evenly spaced. The rule of thumb is one firefighter on each section of the ladder. When climbing an aerial ladder, firefighters should space themselves at 10-ft intervals.
Climbing a Portable Ladder with a Tool
1. Find a comfortable hand position to climb with a hand tool.
2. Find the balance point of the tool and carry it there by sliding it up the outside of the ladder’s beam. If the tool is thin enough, this allows you to grip the underside of the beam. At all times, your free hand must maintain a position under the opposite beam and slide up the beam.
Climbing a Portable Ladder with an Uncharged Hoseline,
1. Make sure there is sufficient hose at or near the base of the ladder to ensure that it is deployed smoothly.
2. A firefighter should be positioned at the base of the ladder to feed the hose up as another firefighter climbs. If it is a long stretch, a third firefighter may need to be positioned in the middle of the climb.
3. The climbing firefighter should place the nozzle and hose under one shoulder and over the opposite shoulder, with about 2 to 3 ft of hose extending over the back.

Indiana Fire & Public Safety Academy Training System Module A Firefighter Practical Skill Evaluation Form
22 of 46
Effective 03/18 **This skill sheet applies to Mandatory, Module A and FF I**
Yes No Yes No Yes No
4. The firefighter at the base of the ladder positions the fire hose on one shoulder on the side the hose is being raised. The hose should have some slack in it and form a small loop off to the side of the ladder; this prevents firefighters from being pulled off the ladder. Hose is fed from the ground at a pace equal to the pace of the climbing firefighter.
Climbing a Portable Ladder with a Charged Hoseline
1. Place firefighters at equal positions along the raised ladder. Ensure that they are properly spaced and secured to the ladder using approved safety belt or leg lock.
2. If it is a short climbing distance, advance hose up using a utility rope or strap.
Leg Lock Maneuver
1. When you reach the proper working height on the ladder, climb to the next highest rung.
2. Place the leg opposite the work side through the rung spacing. As your knee approaches the rung, you can begin to bend the leg back toward the next lower rung.
3. The foot can be locked onto the outside of the ladder’s beam or onto the next lower rung.
4. Now step down a rung and place a boot nearest the work side, next to the beam of the ladder.
Portable Ladder Rescue of a Conscious Victim
1. Make sure the victim faces into the ladder. Places both your arms around the victim and onto the back of the beams of the ladder.
2. If the victim becomes panicked at any time during the descent, you can press the victim into the ladder to gain control or stop the victim’s descent.
Final Result
Comments:
First Attempt Evaluator Date:
Second Attempt Evaluator Date:
Third Attempt Evaluator Date:

Indiana Fire & Public Safety Academy Training System Module A Firefighter Practical Skill Evaluation Form
23 of 46
Effective 03/18 **This skill sheet applies to Mandatory, Module A and FF I**
Skill # Module A - 10 JPR# NFPA 1001,
5.3.11 Task: Positive Pressure Ventilation and Hydraulic Ventilation
Candidate Name: PSID:
Training Location: Date:
Equipment:
Personal protective equipment
Self-contained breathing apparatus
Positive pressure fan
Power line (if applicable)
Charged hoseline (1½-inch minimum)
Instructions Candidates will demonstrate Positive Pressure Ventilation and Hydraulic Ventilation
Task Steps Initial Retest Retest
Positive Pressure Ventilation Yes No Yes No Yes No
1. Wears full protective equipment properly
2. Selects proper point of entry
3. Selects proper exit point to remove smoke (other areas should be closed)
4. Properly positions fan to completely cover entry with cone of air
5. Properly connects to power source (if applicable)
Hydraulic Ventilation
1. Wears full protective equipment properly
2. Verbalizes proper methodology to perform task for various nozzles used by AHJ
3. Selects and demonstrates proper pattern to cover 85 to 90% of window or door opening
4. Selects proper distance from opening for maximum effectiveness
5. Closes nozzle slowly
Final Result
Comments:
First Attempt Evaluator Date:
Second Attempt Evaluator Date:
Third Attempt Evaluator Date:

Indiana Fire & Public Safety Academy Training System Module A Firefighter Practical Skill Evaluation Form
24 of 46
Effective 03/18 **This skill sheet applies to Mandatory, Module A and FF I**
Skill # Module A - 11 JPR# NFPA 1001, 5.3.12
Task: Vertical Ventilation Pitched Roof, Vertical Ventilation Flat Roof, Vertical Ventilation Basement
Candidate Name: PSID:
Training Location: Date:
Equipment:
Pitched and flat roof or roof prop
Power Saw
Ladder
Pike Pole
PPE
Instructions Candidates will demonstrate Vertical Ventilation on a Pitched Roof, Vertical Ventilation Flat Roof, Vertical Ventilation Basement
Task Steps Initial Retest Retest
Vertical Ventilation Pitched Roof Yes No Yes No Yes No
1. Size up scene for any hazards.
2. Select location for ventilation.
3. Outline ventilation opening with pick on axe or other similar tool.
4. Cut roof deck across the rafters on the high side of the roof parallel to the ridge. Cut is at least 4’ (1.2 m) long or three rafters wide – inside 1st rafter, over 2nd rafter and inside 3rd rafter. Cut is completely through decking material but not through structural framing.
5. Cut roof deck on furthest side of ventilation opening perpendicular to the cut made in Step 4.
6. Cut roof deck on opposite side of cut made in Step 5.
7. Complete the ventilation opening by cutting between the bottom of the two parallel cuts made in Steps 5 and 6.
8. Remove decking from the ventilation opening with axe or pike pole.
9. Plunge down through the ceiling using pike pole working from upwind side of ventilation opening.
10. Report to officer completion of assigned task.
Vertical Ventilation Flat Roof
1. Confirm order with officer to ventilate flat roof.
2. Size up scene for any hazards.
3. Select location for ventilation.
4. Outline ventilation opening with pick on axe or other similar tool.
5. Cut three-sided (triangular) inspection opening in roof to determine fire conditions.
6. Cut roof deck parallel to a roof truss or support on side furthest away from ladder or escape route. This is cut #1.
7. Cut roof deck on one side of opening perpendicular to the first cut – cut must intersect first cut in Step 6. This is cut #2.
8. Cut roof deck on opposite side of cut made in Step 7 – cut must intersect cut made in Step 6. This is cut #3.

Indiana Fire & Public Safety Academy Training System Module A Firefighter Practical Skill Evaluation Form
25 of 46
Effective 03/18 **This skill sheet applies to Mandatory, Module A and FF I**
Yes No Yes No Yes No
9. Complete the ventilation hole by cutting between cut #2 and cut #3.
10. Remove decking from the ventilation opening with axe, pike pole, or other sounding tool.
11. Plunge through interior ceiling using pike pole working from upwind side of ventilation hole.
Vertical Ventilation Basement
1. Confirm order with officer to ventilate the basement.
2. Size up scene for any hazards.
3. Set fan at top of stairway.
4. Ensure an exit opening is made. Open a window or exterior door if possible.
5. Monitor smoke removal.
6. If the basement has no exit doors or windows. Cut a hole in the floor.
7. Select location near an exterior window. Begin by removing all carpet and flooring material. Then make first cut.
8. Cut floor on the inside of the 3rd joist. This is cut #2.
9. Cut floor on opposite side of cut made in Step 7 – cut must intersect cut made in Step 8. This is cut #3.
10. Complete the ventilation hole by cutting opposite side of cut #2
11. Remove flooring from the ventilation opening with haligan bar or another prying tool.
12. Plunge through interior ceiling using pike pole.
Final Result
Comments:
First Attempt Evaluator Date:
Second Attempt Evaluator Date:
Third Attempt Evaluator Date:

Indiana Fire & Public Safety Academy Training System Module A Firefighter Practical Skill Evaluation Form
26 of 46
Effective 03/18 **This skill sheet applies to Mandatory, Module A and FF I**
Skill # Module A - 12 JPR# NFPA 1001,
5.3.15 Task: Hydrant Operations, Forward Lay, Reverse Lay
Candidate Name: PSID:
Training Location: Date:
Equipment:
Hydrant
Hydrant Bag
LDH
Radio
PPE
Instructions Candidate will demonstrate hooking up to a hydrant, perform a forward lay, perform a reverse lay
Task Steps Initial Retest Retest
Hydrant Operations Yes No Yes No Yes No
1. Approach the hydrant, making sure to watch for traffic. Quickly examine the hydrant for gross problems such as missing caps, broken or damaged spindles, or damaged operating nut as well as serious problems such as missing flange bolts or vehicle damage. If any are found determine the hydrant operability. If operable, move on to step 2.
2. Remove the hydrant cap with a proper hydrant wrench. Quickly check threads on the hydrant for damage that would prevent use.
3. Look in the nozzle or barrel for gross problems such as visible debris. If debris is observed, make sure to note that for clearing during hydrant flushing. Never try to remove debris by hand.
4. Ensure that hydrant outlets that are not going to be used are capped securely.
5. Place the hydrant wrench on the operating nut or the correct
operating stem behind the removedcap. Flush the hydrant
thoroughly by opening the hydrant. Always stand behind the hydrant when opening or closing it. This is done by making several full turns of the operating nut or spindle in a slow and controlled manner in the open direction. Most hydrants open by turning to the left or the counter clockwise direction however some hydrants have an operating nut that open in the clockwise direction. Allow all the debris to flow out. Make sure you are confident the hydrant has good flow.
6. Once this is established, shut the hydrant down so that you can connect the supply hose.
7. Connect the supply hose by turning it in a clockwise motion. Take the time to line the hose up and mate the threads properly to prevent cross threading. Make sure to get it tight. This will take several turns.
8. When the proper call for water comes from the engineer or officer, fully charge the hydrant and supply line. This is done by
completely openingthe hydrant using the operating nut or
spindle. Depending on the type of hydrant, this shouldtake
roughly 10 to 14 turns. Make sure to open the hydrant slowly to avoid water hammer. Once water is flowing, the operating rate can increase. It is very important to ensure that the hydrant is fully open so access to all available water is achieved. It should be noted that fully opened, dry barrel hydrants are designed to

Indiana Fire & Public Safety Academy Training System Module A Firefighter Practical Skill Evaluation Form
27 of 46
Effective 03/18 **This skill sheet applies to Mandatory, Module A and FF I**
plug their drain hole. This prevents damage from occurring. Once these actions are completed, the hydrant firefighter has successfully charged the hydrant. It is recommended that all tools used such as the hydrant wrench, be picked up and placed on the engine the hydrant is supplying. This prevents anyone from tampering with the hydrant when it is in use.
Forward lay Yes No Yes No Yes No
1. First the engine addresses a hydrant near the fire. The hydrant firefighter exits the vehicle, goes to the rear of the engine and removed the necessary equipment.
2. The firefighter then grabs the proper supply line, ensuring there is enough hose to reach the hydrant.
3. The firefighter folds the hose over so that the coupling is toward the engine and kneels on the fold to anchor the supply line.
4. Alternately, the hydrant firefighter can wrap the hydrant. (AHJ will designate appropriate technique)
5. The hydrant firefighter gives the order to release the engine, and the engine drives to the fire building.
6. The hydrant firefighter removes the proper outlet cap and ensures that any hydrant outlet that is not to be used is secured and tight.
7. The firefighter then flushes the hydrant fully.
8. After flushing the hydrant, the firefighter closes the hydrant and attaches the hose.
9. Once the engine is at the fire scene, the engineer establishes a water supply. The engineer first breaks the supply line from the hose bed.
10. The engineer now attaches the hose to the pump intake.
11. Once the supply line is in place, the engineer calls for water. The hydrant firefighter confirms the call for water and charges the line
Reverse Lay
1. Whether supporting supply or attack lines, a reverse lay always starts at the fire building. Once on scene at the fire building, an engine completing a reverse lay will stop. The company, except for the engineer, will get off the engine.
2. The company member’s on-scene will then pull the required hose and equipment; this step is sometimes called the strip. Once the strip has been completed, the engine is then released to lay line to the hydrant.
3. The company members left at the scene will then start to flake the pulled attack line(s) or supply line(s) and complete all the tasks necessary to be ready to call for water.
4. The engineer, once released, will drive away from the fire, laying line to the nearest hydrant. Once a hydrant is located, the engineer will spot it while remaining aware of proper apparatus placement.
5. It is now important to immediately check the hydrant for water by flushing it. This allows for a recovery if the hydrant is frozen or not working. If the hydrant is not functional, the engineer can simply proceed on to the next hydrant.

Indiana Fire & Public Safety Academy Training System Module A Firefighter Practical Skill Evaluation Form
28 of 46
Effective 03/18 **This skill sheet applies to Mandatory, Module A and FF I**
Yes No Yes No Yes No
6. After flushing the hydrant, both the hydrant connection, using a suction jumper, and discharge connection(s) to the laid line(s) are made. The pump is supplied water by the hydrant, and the supply line(s) or attack line(s) are charged once the call for water comes from the rest of the company at the fire scene. Some departments initially charge the supply line(s) or attack line(s) using tank water. This process completes the water supply evolution of a reverse lay.
Final Result
Comments:
First Attempt Evaluator Date:
Second Attempt Evaluator Date:
Third Attempt Evaluator Date:

Indiana Fire & Public Safety Academy Training System Module A Firefighter Practical Skill Evaluation Form
29 of 46
Effective 03/18 **This skill sheet applies to Mandatory, Module A and FF I**
Skill # Module A - 13 JPR# NFPA 1001,
5.3.15 Task: Deploying a Portable Water Tank and Drafting Equipment
Candidate Name: PSID:
Training Location: Date:
Equipment:
Tarp
Portable Water Tank
Hard suction hose
strainer
PPE
Instructions Candidate will deploy a portable water tank and drafting equipment
Task Steps Initial Retest Retest
Yes No Yes No Yes No
1. Place a tarp on the spot where the portable water tank is to be placed.
2. Two firefighters remove the portable tank from the apparatus.
3. Turn the tank so that it is right side up. Expand the frame and place it on the tarp. Place the outlet on the downhill side.
4. The tank can be filled by dumping directly from a tanker, or by pumping from a different source.
5. To draft from the drop tank, remove an appropriate number of hard suction hose sections from the apparatus. Place a strainer on the end of the hard suction hose.
6. Place the strainer into the tank.
7. Attach the other end to the inlet on the apparatus pump panel.
8. The pump operator can now draft from the drop tank.
9. When it is time to leave the scene, open the drop tank drain to let the water flow out.
10. Collapse the frame, turn it over and place on the apparatus. Fold up the tarp and place on the apparatus.
Comments:
First Attempt Evaluator Date:
Second Attempt Evaluator Date:
Third Attempt Evaluator Date:

Indiana Fire & Public Safety Academy Training System Module A Firefighter Practical Skill Evaluation Form
30 of 46
Effective 03/18 **This skill sheet applies to Mandatory, Module A and FF I**
Skill # Module A - 14 JPR# NFPA 1001,
5.3.10, 5.5.2 Task: Coupling a Hose, Uncouple a Hose, Make a Straight Roll, Replace a Burst Hoseline
Candidate Name: PSID:
Training Location: Date:
Equipment: Length of hose
PPE
Instructions Candidate will couple a hose, uncouple a hose, perform a straight roll, replace a burst hoseline
Task Steps Initial Retest Retest
Couple a Hose Yes No Yes No Yes No
1. Each firefighter grabs a coupling, one male and one female.
2. Now facing each other, the firefighter with the male coupling holds the male shanks rigid at waist height.
3. The firefighter with the female coupling then mates the two and turns the female coupling clockwise until tight.
Uncouple a Hose
1. Sometimes when trying to uncouple hose by yourself, you may run into a coupling that is too tight to use the standard foot tilt method. In this case, you can use the knee press maneuver.
2. Bend the hose back and drive the male shank into the ground by pushing on the female shank with your knee. This compresses the hose gasket.
3. While compressing the coupling with your knee, reach down and loosen the female swivel by turning to the left or counterclockwise.
Make a Straight Roll
1. Start at one coupling and roll the hose along the ground until you get to the other coupling. If you are rolling a hose that is to remain in service, start at the male coupling. If you are rolling a hose to be placed out of service, start at the female coupling.
Replacing a Burst Hoseline
1. Place a hose clamp just prior to the burst section of hose, cutting off the water supply.
2. Bleed the line.
3. Remove the damaged section of hose.
4. Replace the damaged section of hose with two sections of undamaged hose.
5. Flake out the hose and release the hose clamp, releasing the water supply.
Final Result
Comments:
First Attempt Evaluator Date:
Second Attempt Evaluator Date:
Third Attempt Evaluator Date:

Indiana Fire & Public Safety Academy Training System Module A Firefighter Practical Skill Evaluation Form
31 of 46
Effective 03/18 **This skill sheet applies to Mandatory, Module A and FF I**
Skill # Module A - 15 JPR# NFPA 1001,
5.5.2 Task: Pre-connected Flat Load, Deploying Pre-connected Flat Load, Load a Flat Load
Candidate Name: PSID:
Training Location: Date:
Equipment:
8 or 10 lengths of hose.
Engine or hose bed prop
PPE
Instructions Candidate will create a pre-connected flat load, deploy a pre-connected flat load, load a flat load
Task Steps Initial Retest Retest
Pre-connected Flat Load Yes No Yes No Yes No
1. Connect the female end of hose load to the male end of the discharge outlet. Load the bay using the flat-load method.
2. When you reach the one-third length of the hose load, extend that
loop an extra 6 in., creatinga dog ear.
3. At the two-thirds point, create a second dog ear, larger in length.
4. Continue loading the remaining hose.
Deploy a Pre-connected Flat Load
1. Approach the bay, placing the larger dog ear around your shoulder and holding the small dog ear in one hand and the nozzle in the other hand.
2. Walk away from the engine toward your destination. Drop the loop from your hand when it becomes taut.
3. Drop the loop from your shoulder when it becomes taut. Now take the nozzle and move to your destination.
Load a Flat Load
1. Start by placing the coupling at the front of the hosebed, along either the left or right edge. Lay the hose out flat, toward the rear of the bed.
2. At the rear of the bed, fold the hose over on itself, laying it flat up to the front of the hosebed.
3. When folding the hose over for the second pass, offset the rear fold to lay the hose right next to the previous fold.
4. Continue this pattern, moving back and forth along the hosebed, until the hose is completely loaded.
Final Result
Comments:
First Attempt Evaluator Date:
Second Attempt Evaluator Date:
Third Attempt Evaluator Date:

Indiana Fire & Public Safety Academy Training System Module A Firefighter Practical Skill Evaluation Form
32 of 46
Effective 03/18 **This skill sheet applies to Mandatory, Module A and FF I**
Skill # Module A - 16 JPR# NFPA 1001,
5.3.10 Task: Smooth Bore Operation, Fog Nozzle Operation, Stream Patterns
Candidate Name: PSID:
Training Location: Date:
Equipment:
Hoseline
Apparatus with a pump
Smooth Bore Nozzle
Combination (Fog) Nozzle
PPE
Instructions Candidate will demonstrate using a smooth bore nozzle, using a fog nozzle, hose movement during a fire attack
Task Steps Initial Retest Retest
Smooth Bore Operation (Solid Stream) Yes No Yes No Yes No
1. Hold the nozzle so that the bale is at arm’s length, while maintaining a secure stance.
2. Open the water supply by pulling the bale toward you.
3. Turn off the nozzle by pushing forward on the bale. When shutting
down the water to the nozzle, doit in a smooth slow motion, to
reduce the water hammer effect.
Combination Nozzle Operation: Fog/Straight
1. Hold the nozzle so that the bale is at arm’s length, while maintaining a secure stance.
2. Open the water supply by pulling the bale toward you.
3. Rotate the nozzle to the left to widen the fog pattern.
4. Rotate the nozzle to the right to make the stream more narrow.
5. Turn off the nozzle by pushing forward on the bale. When shutting down the water to the nozzle, do so in a smooth slow motion, to alleviate the water hammer effect.
Stream Patterns
1. Candidate demonstrates various stream patterns. Candidate advances on a fire, making sure to sweep the floor.
2. Candidate rapidly moves the stream pattern side to side off the ceiling to distribute water droplets to the fire area.
3. Candidate uses the clockwise pattern of stream application.
Final Result
Comments:
First Attempt Evaluator Date:
Second Attempt Evaluator Date:
Third Attempt Evaluator Date:

Indiana Fire & Public Safety Academy Training System Module A Firefighter Practical Skill Evaluation Form
33 of 46
Effective 03/18 **This skill sheet applies to Mandatory, Module A and FF I**
Skill # Module A - 17 JPR# NFPA 1001,
5.3.10 & 5.3.15 Task: Advancing a Charged and Uncharged Line Up and Down an Interior and Exterior Stairway
Candidate Name: PSID:
Training Location: Date:
Equipment:
Hoseline
Engine
PPE
Stairway
Instructions Candidate will advance a charged and an uncharged line up and down an Interior and Exterior stairway
Task Steps Initial Retest Retest
Advancing an Uncharged Line Up and Down an Interior/Exterior Stairway
Yes No Yes No Yes No
1. To advance an uncharged line up a stairway, first remove the hoseline from the apparatus in an approved manner, flake out the hoseline up the stairs.
2. Place the hoseline on the outsides of the stairs to help alleviate kinking when the hose is charged.
3. Stage hose in the stairwell above the floor.
4. Call for water and bleed the line.
5. After properly donning your SCBA, advance on the fire, and into the IDLH atmosphere.
6. When removing the hose, if safety permits, the line can be bled and removed as an uncharged line.
7. To advance an uncharged line down a stairway, first remove the hoseline from the apparatus in an approved manner, flake out the hoseline down the stairs.
8. Place the hoseline on the outsides of the stairs to help alleviate kinking when the hose is charged.
9. Stage hose on the landing
10. Call for water and bleed the line.
11. After properly donning your SCBA, advance on the fire, and into the IDLH atmosphere.
12. When removing the hose, if safety permits, the line can be bled and removed as an uncharged line.
Advancing a Charged Line Up and Down an Interior/Exterior Stairway
1. When advancing a charged line up a stairwell, remove the hoseline from the apparatus in an approved manner and flake out the hoseline outside of the structure.
2. Don your SCBA and all appropriate safety equipment. Call for water and bleed the line.
3. After ensuring that the entire hose team is ready, advance up the stairs in a steady fashion, staying to the outside of the stairs, to minimize kinks in the corners.
4. When available, have extra personnel manage the hoseline on the corners.
5. When advancing a charged line down a stairwell, remove the hoseline from the apparatus in an approved manner and flake out the hoseline outside of the structure.

Indiana Fire & Public Safety Academy Training System Module A Firefighter Practical Skill Evaluation Form
34 of 46
Effective 03/18 **This skill sheet applies to Mandatory, Module A and FF I**
Yes No Yes No Yes No
6. Don your SCBA and all appropriate safety equipment. Call for water and bleed the line.
7. After ensuring that the entire hose team is ready, advance down the stairs in a swift and steady fashion.
8. Stay low to minimize head exposure and stay to the outside of the stairs to minimize kinks on the corners.
9. When available, have extra personnel manage the hoseline on the corners.
Final Result
Comments:
First Attempt Evaluator Date:
Second Attempt Evaluator Date:
Third Attempt Evaluator Date:

Indiana Fire & Public Safety Academy Training System Module A Firefighter Practical Skill Evaluation Form
35 of 46
Effective 03/18 **This skill sheet applies to Mandatory, Module A and FF I**
Skill # Module A - 18 JPR# NFPA 1001, 5.3.2, 5.3.3, 5.3.18
Task: Mounting and Dismounting an Apparatus, Creating a Protected Area / Deploying Traffic Cones, Controlling Utilities
Candidate Name: PSID:
Training Location: Date:
Equipment:
PPE
Apparatus
Traffic Cones
Instructions Candidate will properly mount and dismount an apparatus, deploy traffic cones, turn off various utilities
Task Steps Initial Retest Retest
Mounting and Dismounting an Apparatus Yes No Yes No Yes No
1. While mounting and dismounting an apparatus, make sure to use available hand-rails and safety steps.
2. The firefighter should have three points of contact at all times while transferring in and out of the vehicle.
Creating a Protected Area / Deploying Traffic Cones
1. On scene, it is important to create a protectedarea for the
firefighters to work. This is partially done by the positioning of the apparatus. The placing of traffic cones or traffic control devices can augment this.
2. Candidate sets up cones to divert traffic.
Controlling Utilities
1. When assigned the task of controlling utilities, first don all appropriate PPE, including SCBA.
2. Locate the exterior gas shut-off valve. Using a tool, turn the shut off valve to the off position.
3. Locate the exterior electrical panel. Using a gloved hand, turn the master switch to the off position.
4. Locate the water meter for the property. Using a tool, turn the meter to the off position.
5. Inform the IC that the utilities have been secured.
Final Result
Comments:
First Attempt Evaluator Date:
Second Attempt Evaluator Date:
Third Attempt Evaluator Date:

Indiana Fire & Public Safety Academy Training System Module A Firefighter Practical Skill Evaluation Form
36 of 46
Effective 03/18 **This skill sheet applies to Mandatory, Module A and FF I**
Skill # Module A - 19 JPR# NFPA 1001,
5.2.4 Task: Calling a Mayday, Vision Obscured Operations/Finding a Safe Haven, Using SCBA Through a Restricted Passage
Candidate Name: PSID:
Training Location: Date:
Equipment:
PPE
SCBA
Restricted Passage
Instructions Candidate will demonstrate calling a Mayday, work in vision obscured situations and explain the importance of locating a safe haven, using an SCBA in a restricted passage
Task Steps Initial Retest Retest
Calling a Mayday Yes No Yes No Yes No
1. Working in an area of obscured visibility.
2. Activate your PASS device.
3. Deactivate your PASS device and transmit the Mayday utilizing the acronym LUNAR
4. State “Mayday” over the radio three times and then inform the IC of your location, unit, name, air (and assignment), and resources needed.
Finding a Safe Haven
1. Whether working on a hose team, or a search team. You must always work with your team as an active team member.
2. Officers must manage their firefighters, and firefighters must stick with and follow the direction of their officer. Freelancing is prohibited.
3. While entering and traversing a structure, always be on the lookout for safe havens. In the event of an unexpected fire growth or other changes in conditions, the firefighter must have a plan to exit to a safer environment. These safe havens can be doors to the outside, bedrooms, or even windows.
Using SCBA Through a Restricted Passage
1. After sounding the floor ahead of the firefighter, lay down on the same side as your air supply hose, which is usually on the left side.
2. Loosen and release your waist strap. Then loosen your right shoulder strap.
3. Roll out of your SCBA. Grasp your left shoulder strap and air supply hose with your left hand. Do not let go of that strap until the
evolutionis complete.
4. Push the SCBA through the restricted opening and then climb through after the SCBA.
5. Once through the opening, place the SCBA back on using the coat method, never letting go of the shoulder strap with the air supply until the pack is securely on your back.
Final Result
Comments:
First Attempt Evaluator Date:
Second Attempt Evaluator Date:
Third Attempt Evaluator Date:

Indiana Fire & Public Safety Academy Training System Module A Firefighter Practical Skill Evaluation Form
37 of 46
Effective 03/18 **This skill sheet applies to Mandatory, Module A and FF I**
Skill # Module A - 20 JPR# NFPA 1001,
5.3.8 Task: Suppress Ground Cover Fire Using Water
Candidate Name: PSID:
Training Location: Date:
Equipment: Hoseline
Engine
Instructions Candidate will suppress a ground cover fire with water.
Task Steps Initial Retest Retest
Suppress Ground Cover Fire Using Water Yes No Yes No Yes No
1. Candidate demonstrates assessing the direction of the fire spread, approaches from the burned side and uses a sweeping motion to extinguish the fire.
Final Result
Comments:
First Attempt Evaluator Date:
Second Attempt Evaluator Date:
Third Attempt Evaluator Date:

Indiana Fire & Public Safety Academy Training System Module A Firefighter Practical Skill Evaluation Form
38 of 46
Effective 03/18 **This skill sheet applies to Mandatory, Module A and FF I**
Skill # Module A - 21 JPR# NFPA 1001,
5.3.8 Task: Exterior Class A Fire Suppression – Dumpster Fire
Candidate Name: PSID:
Training Location: Date:
Equipment:
PPE
Hoseline
Engine
Class A prop
Pike pole
Instructions Candidate will extinguish a dumpster fire
Task Steps Initial Retest Retest
Exterior Class A Fire Suppression – Dumpster Fire Yes No Yes No Yes No
1. When attacking an exterior class A fire the attack team, wearing full PPE and SCBA, should approach the fire in a coordinated fashion.
2. In the event that the dumpster lid is closed, use a wide fog pattern to protect the hose team as the backup firefighter, using a tool, opens the dumpster lid.
3. The nozzle team now approaches and extinguishes the fire.
4. The backup firefighter, using the full reach of the tool, should break up the burning material, searching for and exposing hidden fire.
5. Adjust the nozzle pattern to maximize water penetration. This is a tight fog pattern sometimes referred to as a power cone. You will need to adjust your nozzle pattern depending on the material burning.
6. If needed, the attack team should reapply water and continue to break apart the material until complete extinguishment is achieved.
Final Result
Comments:
First Attempt Evaluator Date:
Second Attempt Evaluator Date:
Third Attempt Evaluator Date:

Indiana Fire & Public Safety Academy Training System Module A Firefighter Practical Skill Evaluation Form
39 of 46
Effective 03/18 **This skill sheet applies to Mandatory, Module A and FF I**
Skill # Module A - 22 JPR# NFPA 1001, 5.3.10
Task: Attacking a Fire on Grade Level, Attacking a Fire Above Grade Level, Attacking a Fire Below Grade Level
Candidate Name: PSID:
Training Location: Date:
Equipment:
PPE
Hoseline
Engine
Acquired Structure or Multi-Story Training Tower
Instructions Candidate will attack a fire on grade level, above grade and below grade
Task Steps Initial Retest Retest
Attacking a Fire on Grade Level Yes No Yes No Yes No
1. Flake out an adequate amount of hose to reach the seat of the fire.
2. Call for water and bleed the line.
3. Check with the hose team to make sure everyone is prepared and wearing full PPE.
4. As the ventilation is competed on the structure, advance into the structure and extinguish the fire using an approved method.
Attacking a Fire Above Grade Level
1. First assemble the team on the floor below the fire.
2. Make sure you have brought enough hose to stretch to the seat of the fire.
3. Scout the floor below the fire floor to see the layout. Most high-
rise buildings have similar layouts onall floors.
4. Locate a standpipe in the stairwell, one floor below the fire floor. Check that all pressure-reduction devices have been removed from the standpipe.
5. Attach the female fitting of the hose bundle to the male fitting of the standpipe.
6. Flake out the appropriate hose length, advancing it to the door of the fire floor. Charge and bleed the line.
7. Check to ensure that everyone is prepared and wearing full PPE.
8. Enter the fire floor, advance to the fire, and extinguish it with an approved method.
Attacking a Fire Below Grade Level
1. Flake out an adequate amount of hose to reach the seat of the fire.
2. Call for water and bleed the line.
3. Every effort should be made to properly ventilate the space. Sometimes basements have small windows that can be broken to ventilate. Another option would be to breach the floor above the fire to ventilate the space.

Indiana Fire & Public Safety Academy Training System Module A Firefighter Practical Skill Evaluation Form
40 of 46
Effective 03/18 **This skill sheet applies to Mandatory, Module A and FF I**
Yes No Yes No Yes No
4. Check with the hose team to make sure everyone is prepared and wearing full PPE.
5. Simultaneously with the completion of the ventilation, advance the line down the stairs.
6. Once the entire team has advanced to the bottom of the stairs, advance to the fire and extinguish using an approved method. Do not open up the line prior to advancing all the way down the stairs. Doing so could cause steam to envelop and burn the hose team.
Final Result
Comments:
First Attempt Evaluator Date:
Second Attempt Evaluator Date:
Third Attempt Evaluator Date:

Indiana Fire & Public Safety Academy Training System Module A Firefighter Practical Skill Evaluation Form
41 of 46
Effective 03/18 **This skill sheet applies to Mandatory, Module A and FF I**
This page intentionally left blank

Indiana Fire & Public Safety Academy Training System Module A Firefighter Practical Skill Evaluation Form
42 of 46
Effective 03/18 **This skill sheet applies to Mandatory, Module A and FF I**
Section II
Practical Skills Competency Profile
This section is to be completed by all candidates who desire to achieve State Certification. The
competition of this section is proof that all candidates have shown competence in the requisite skills for each JPR in NFPA 1001, 2013 Edition. A Lead Instructor shall sign this portion as verification. An
Instructor shall be identified for each individual skill along with the date the training was completed.

Indiana Fire & Public Safety Academy Training System Module A Firefighter Practical Skill Evaluation Form
43 of 46
Effective 03/18 **This skill sheet applies to Mandatory, Module A and FF I**
Module A Practical Skills Competency Profile Student Name (Last, First, MI) PSID Number
Fire Department / Agency IDHS Course Number
Module A Firefighter Skills
Communications Exam Date Evaluator Name
Handle business calls and reports of emergencies. (NFPA® 1001, 5.2.1, 5.5.2)
Use a portable radio for routine and emergency traffic. (NFPA® 1001, 5.2.3)
Firefighter Safety and Health Exam Date Evaluator Name
Respond to an incident, correctly mounting and dismounting an apparatus (NFPA®
1001,5.3.2)
Set up and operate in work areas at an incident using traffic and scene control devices.
(NFPA® 1001, 5.3.3)
PPE/SCBA Exam Date Evaluator Name
Don PPE and SCBA and prepare for emergency scene use. (NFPA® 1001, 5.1.1.2)
Doff PPE and SCBA and prepare for reuse. (NFPA® 1001, 5.1.1.2)
Inspect PPE and SCBA for use at an emergency incident. (NFPA® 1001, 5.5.1)
Clean and sanitize PPE and SCBA. (NFPA® 1001, 5.5.1)
Perform emergency operations procedures for an SCBA. (NFPA® 1001, 5.3.1)
Change an SCBA cylinder — One-person method. (NFPA® 1001, 5.3.1)
Change an SCBA cylinder — Two-person method. (NFPA® 1001, 5.3.1)
Service Test Fire Hose (NFPA® 1001, 6.5.5)
Tools Exam Date Evaluator Name
Clean, Inspect, Maintain Hand/Power Tools

Indiana Fire & Public Safety Academy Training System Module A Firefighter Practical Skill Evaluation Form
44 of 46
Effective 03/18 **This skill sheet applies to Mandatory, Module A and FF I**
Ladders Exam Date Evaluator Name
Clean, inspect, and maintain a ladder. (NFPA® 1001, 5.5.1)
Carry a ladder: One-firefighter low-shoulder method. (NFPA® 1001, 5.3.6)
Carry a ladder — Two-firefighter low-shoulder method. (NFPA® 1001, 5.3.6)
Tie the halyard. (NFPA® 1001, 5.3.6)
Raise a ladder: One-firefighter method. (NFPA® 1001, 5.3.6)
Raise a ladder — Two-firefighter flat raise. (NFPA® 1001, 5.3.6)
Raise a ladder — Two-firefighter beam raise. (NFPA® 1001, 5.3.6)
Deploy a roof ladder — One-firefighter method. (NFPA® 1001, 5.3.6)
Pivot a ladder — Two-firefighter method. (NFPA® 1001, 5.3.6)
Shift a ladder — One-firefighter method. (NFPA® 1001, 5.3.6)
Shift a ladder — Two-firefighter method. (NFPA® 1001, 5.3.6)
Leg lock on a ground ladder. (NFPA® 1001, 5.3.6)
Assist a conscious victim down a ground ladder. (NFPA® 1001, 5.3.9)
Select, carry, and raise a ladder properly for various types of activities. (NFPA® 1001, 5.3.6)
Ventilation Exam Date Evaluator Name
Ventilate a pitched roof, flat roof and basement. (NFPA® 1001, 5.3.12)
Ventilate a structure using positive pressure and horizontal hydraulic ventilation. (NFPA®
1001, 5.3.11)
Water Supplies Training Date Instructor Name
Operate a hydrant. (NFPA® 1001, 5.3.15)
Make soft-sleeve hydrant connection and connect to a hydrant for a forward and reverse lay
(NFPA® 1001, 5.3.15, 5.5.2)
Connect and place a hard-suction hose for drafting from a static water source. (NFPA® 1001,
5.3.15)
Deploy a portable water tank. (NFPA® 1001, 5.3.15)

Indiana Fire & Public Safety Academy Training System Module A Firefighter Practical Skill Evaluation Form
45 of 46
Effective 03/18 **This skill sheet applies to Mandatory, Module A and FF I**
Hose Exam Date Evaluator Name
Inspect and maintain hose. (NFPA® 1001, 5.5.2)
Make a straight hose roll. (NFPA® 1001, 5.5.2)
Couple a hose. (NFPA® 1001, 5.3.10)
Uncouple a hose. (NFPA® 1001, 5.3.10)
Make the flat hose load. (NFPA® 1001, 5.5.2)
Make the pre-connected flat hose load. (NFPA® 1001, 5.5.2)
Advance the pre-connected flat hose load. (NFPA® 1001, 5.3.10)
Advance a line into a structure. (NFPA® 1001, 5.3.10)
Advance a line up and down an interior and exterior stairway. (NFPA® 1001, 5.3.10)
Advance an uncharged line up a ladder into a window. (NFPA® 1001, 5.3.10)
Advance a charged line up a ladder into a window. (NFPA® 1001, 5.3.10)
Extend a hoseline. (NFPA® 1001, 5.3.10)
Replace a burst hoseline. (NFPA® 1001, 5.3.10)
Operate a charged attack line from a ladder. (NFPA® 1001, 5.3.10)
Service test fire hose. (NFPA® 1001, 6.5.5)
Fire Streams Exam Date Evaluator Name
Operate a solid stream nozzle. (NFPA® 1001, 5.3.10)
Operate a fog-stream nozzle. (NFPA® 1001, 5.3.10)
Firefighter Safety and Health Exam Date Evaluator Name
Respond to an incident, correctly mounting and dismounting an apparatus (NFPA®
1001,5.3.2)
Set up and operate in work areas at an incident using traffic and scene control devices.
(NFPA® 1001, 5.3.3)
Controlling Utilities (NFPA® 1001, 5.3.18)
Calling a Mayday (NFPA® 1001, 5.2.4)
Operating in Obscured Visibility/Finding a Safe Haven (NFPA® 1001, 5.3.5)
Exit a constricted opening while wearing standard SCBA. (NFPA® 1001, 5.3.9)

Indiana Fire & Public Safety Academy Training System Module A Firefighter Practical Skill Evaluation Form
46 of 46
Effective 03/18 **This skill sheet applies to Mandatory, Module A and FF I**
Basic Fire Attack Exam Date Evaluator Name
Attack a structure fire - Interior attack grade, above grade and below grade levels. (NFPA®
1001, 5.3.10)
Attack a fire in stacked/piled materials. (NFPA® 1001, 5.3.8)
Attack a ground cover fire. (NFPA® 1001, 5.3.19)
This competency profile is intended to be used as a record of a student's performance of each skill listed and its associated NFPA 1001 2013
edition objective. This sheet should be used for the instruction and evaluation of the student; however, the Instructor should refer to the IDHS
Module I Practical Skills Sheets and NFPA standards for additional guidance on the proper completion of the demonstrated skill. Students
should place a copy of this document in their departmental training file. REPORT ANY ERRORS OR PROBLEMS TO THE IDHS
TRAINING SECTION 317-508-9165 LEAD EVALUATOR CERTIFICATION OF SKILLS
I certify that the student identified on this form has been trained and successfully completed an evaluation of all practical skills listed. Falsification
of this information may result in disciplinary action against the Instructor by the Board of Fire Fighter Personnel Standards and Education.
Student Name PSID
Number
Name Signature
PSID Number Date