Embed Size (px)
Citation preview

Financial Profile User’s Guide
Version 1.0
United States Patent and Trademark Office Office of the Chief Financial Officer
Office of Finance – Receipts Accounting Division
Financial Profile User’s Guide February 2010
Table of Contents
Overview Page 3
Section 1 – Establish a Financial Profile Account Page 4
Section 2 – My Accounts Page 7 • add, edit, and remove accounts to/from a Financial Profile • replenish USPTO deposit accounts and transfer funds • view and download monthly statements
Section 3 – Transaction Search Page 10 • search for specific transactions between a period of time • view and download reports
Section 4 – My Profile Page 13 • change password • update Financial Profile contact information
2

Financial Profile User’s Guide February 2010
Overview
The Financial Profile (FP) system provides a secure, fast, and convenient method to access payment history information anytime over the United States Patent and Trademark Office (USPTO) Web site. The FP system helps with reconciling your payment activities by providing detailed transaction information and reports for all fees paid to the USPTO.
As a FP user, you are able to:
• Create, activate, and maintain your unique FP account via a self-service registration process;
• Add multiple payment types used at the USPTO to your FP account (e.g., credit card accounts, USPTO deposit accounts, and USPTO EFT accounts);
• View/print detailed transaction information (e.g., patent/application number, attorney docket number, payment amount, fee code, and fee code description);
• View/print/download (PDF and CSV files) monthly statements for each payment type registered;
• Search for specific transactions by attorney docket number (i.e., client matter number), application number, transaction type (e.g., sale or refund), and/or payment amount; and
• Replenish deposit accounts by EFT, transfer funds between existing deposit accounts, and select an option to stop receiving paper deposit account statements by mail (deposit account holders only). Note: After adding a USPTO EFT account(s) to your FP, information for both EFT and paper check payments will be available since transactions processed are based on your banking information.
The FP system is available at https://ramps.uspto.gov/ramfp/welcome.html.
If you have any questions or issues with the FP system, please send an e-mail to [email protected] for assistance.
3
Financial Profile User’s Guide February 2010
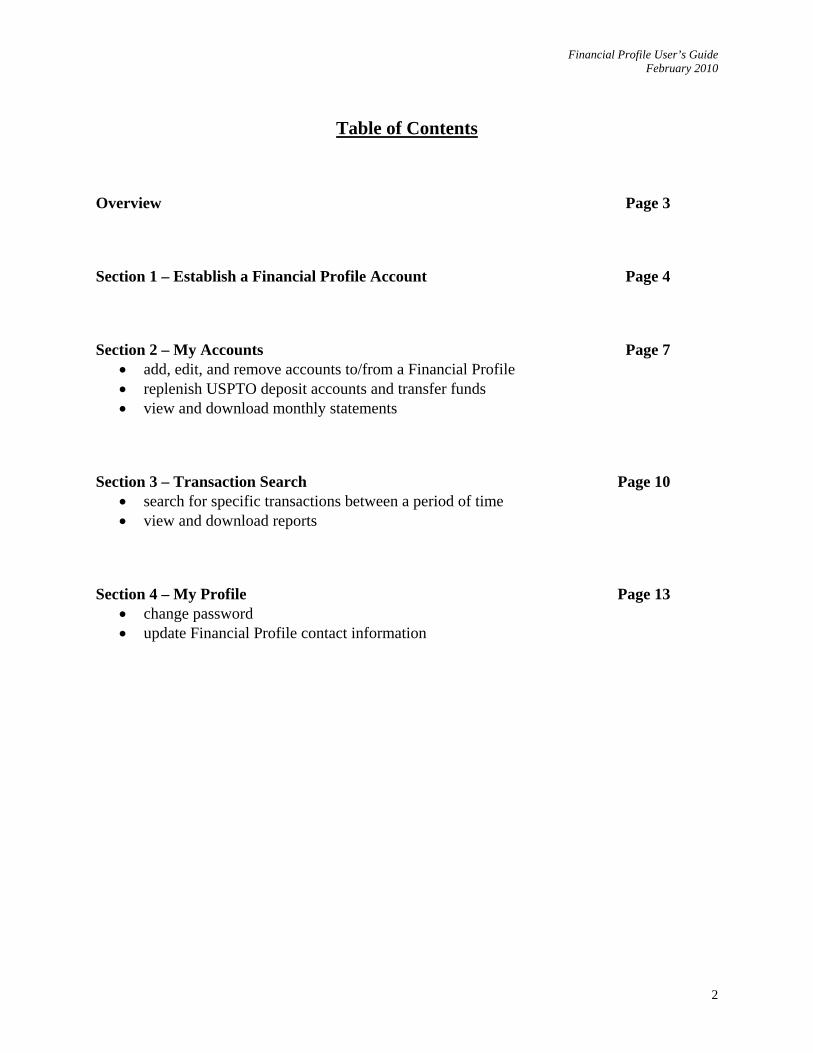
Section 1 – Establish a Financial Profile Account
Each user should establish a separate Financial Profile (FP) account. There are two types of FP accounts, which are “Report Only” and “Standard”. Once the FP account has been established, the profile type cannot be changed.
The “Report Only” allows adding up to 50 payment account types. The “Standard” allows only adding up to 5 payment account types, but also allows the user to replenish deposit accounts via electronic funds transfer (EFT) and to transfer funds between existing USPTO deposit accounts.
Step 1 of 6 – Click on the “Sign Up” tab (see screen shot below).
Click “Sign Up”
Step 2 of 6 – Enter the required information, select the “Profile Type”, and click “Next” (see screen shot below).
4

Financial Profile User’s Guide February 2010
Step 3 of 6 – Enter your mailing address information, and click “Next” (see screen shot below).
Step 4 of 6 – Click on the “Notifications” box to receive notifications by e-mail. Read the User Agreement and select “I Agree”, and click “Next” (see screen shot below).
Click here to receive notifications
Click “I Agree” to accept User Agreement
5

Financial Profile User’s Guide February 2010
Step 5 of 6 – The next screen displays a summary of the information that was entered. Verify the information is accurate, and click “Submit”. You will then receive a message that your FP account was successfully registered (see screen shot below).
Step 6 of 6 – The message below is sent to the e-mail address that was provided in Step 2. (Note: You may need to check your spam or junk e-mail folder.) Click on the link to activate your FP account.
Your USPTO Financial Profile has been registered successfully. You must click the below link to activate your profile before attempting to login.
https://ramps.uspto.gov/ramfp/activation.html?userName=dGhvb3BlcjE=&activationId=YU81eHBNS2JxX0NjWHRSUUVPdDgwZGU=
If you have difficulty activating your profile, you should copy and paste the entire link above into your browser. Note: you may need to disable word wrap.
Click here to activate
If you need further assistance, please send an e-mail to [email protected] and include the User ID for the account you wish to activate. Never include your password in any correspondence relating to your Financial Profile.
You will receive a confirmation that your account has been activated successfully (see screen shot below).
6
Financial Profile User’s Guide February 2010
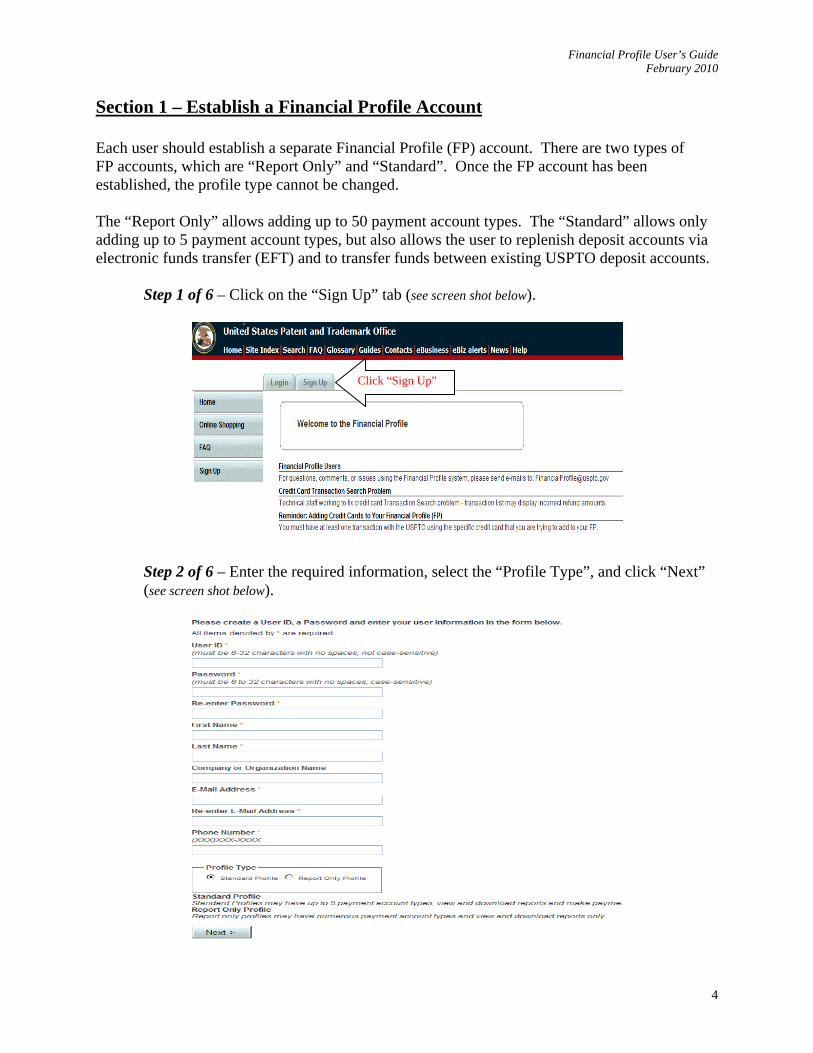
Section 2 – My Accounts
The “My Accounts” tab allows users to add credit cards, deposit accounts, or EFT accounts to their FP account. In addition, users can edit or remove accounts, replenish deposit accounts, transfer funds between two deposit accounts, and view and download statements for each of their associated accounts as a PDF or CSV file.
Add an Account
Step 1 of 2 – Click the drop down box to select the account type, and click “Add Account” (see screen shot below).
Then click here to add the account
First click here to select the account type
Step 2 of 2 – Enter the required information for each account type, and click “Next” (see screen shot below, which shows an example for Credit Card).
7

Financial Profile User’s Guide February 2010
Once an account is added to a FP, users have the following options (you will see the “Replenish” and “Transfer Funds” options only if the requirements are met):
Account Options DescriptionEdit – make changes to this account in your Financial Profile only (nick name, address, etc.).Remove – remove the account from your Financial Profile only.Replenish – add funds to the Deposit Account from an Electronic Funds Transfer (EFT) account (requires at least one Deposit Account and one EFT account on your Financial Profile).Transfer Funds – move funds between two Deposit Accounts (requires at least two Deposit Accounts on your Financial Profile)
Below are helpful tips for adding accounts to your FP.
Credit Card: The credit card must first have been used to pay a fee at the USPTO. In addition, the cardholder name must be entered exactly as it appears on the card.
Deposit Account: You will need at least the deposit account number and the access code, and must be an authorized user of the deposit account.
Electronic Funds Transfer (EFT): You will need the EFT account user ID and password. An EFT account cannot be established using the FP system, but must be set up on the USPTO Web site at https://ramps.uspto.gov/eram/. It takes up to 7-8 business days for an EFT account to become active.
View and Download Statements
Monthly statements can be viewed for any of the accounts associated with your FP account. The atements can also be downloaded as a PDF or CSV file. st
Step 1 of 2 – Select the “Month” and “Year” for the account that you would like, and click “View” (see screen shot below).
First click here to select month and year
Then click here to view the statement
8

Financial Profile User’s Guide February 2010
Step 2 of 2 – The monthly statement will appear on the screen (see screen shot below). Download the statement by clicking the “PDF” or “CSV” links at the bottom right corner of the screen.
The “Download Statement” provides the same information appearing on the screen, and the “Download Statement Details” contains more detailed information.
The PDF version of the “Download Statement” appears below.
9

Financial Profile User’s Guide February 2010
The PDF version of the “Download Statement Details” appears below.
Section 3 – Transaction Search
The “Transaction Search” tab allows users to search for specific transactions over a given period of time.
Step 1 of 4 – Select the account to query by clicking on the drop down box (see screen shot below).
Click here to select the account
10

Financial Profile User’s Guide February 2010
Step 2 of 4 – Enter the “From Accounting Date” and “To Accounting Date” to search between a range of days or several months (see screen shot below).
Enter the dates, or select the dates using the drop down calendar
Step 3 of 4 – Select the “Transaction Type” that you would like to query. You can search all or only a specific type of transaction (see screen shot below).
Click here to select the “Transaction Type”
11
Financial Profile User’s Guide February 2010
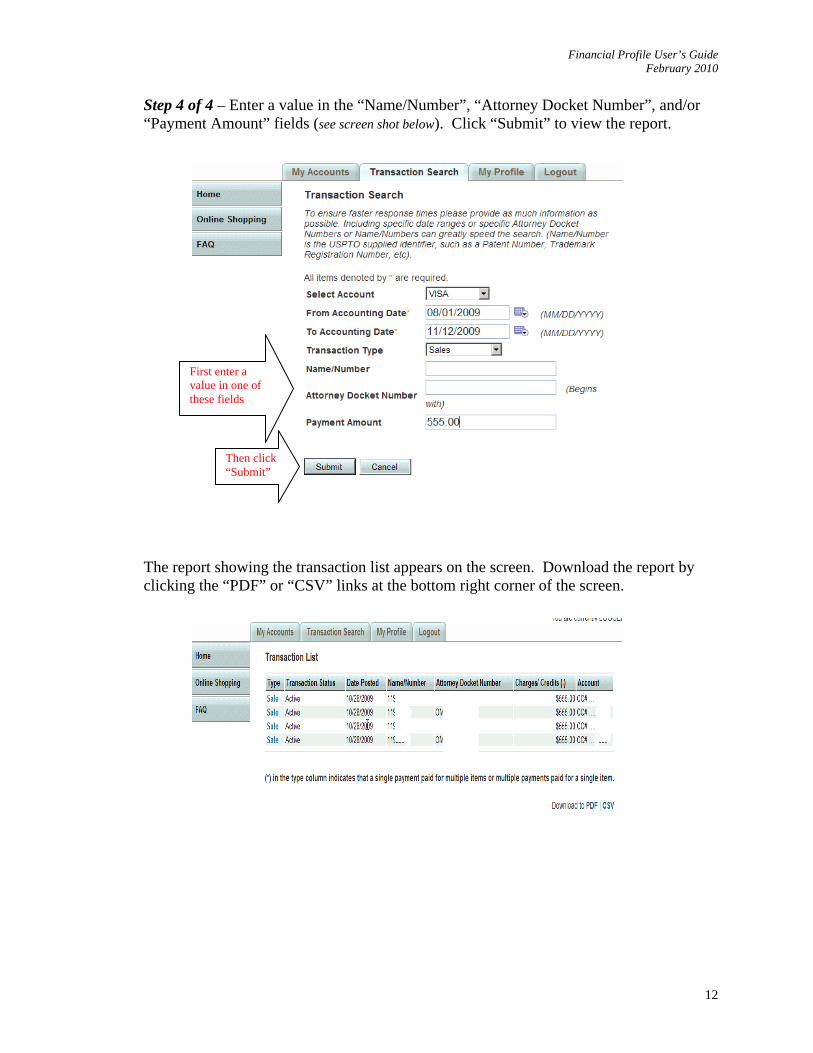
Step 4 of 4 – Enter a value in the “Name/Number”, “Attorney Docket Number”, and/or “Payment Amount” fields (see screen shot below). Click “Submit” to view the report.
Then click “Submit”
First enter a value in one of these fields
The report showing the transaction list appears on the screen. Download the report by clicking the “PDF” or “CSV” links at the bottom right corner of the screen.
12

Financial Profile User’s Guide February 2010
Section 4 – My Profile
The “My Profile” tab is used to change the password and update the FP contact information.
Change Password
Step 1 of 2 – Click the “Change Password” button (see screen shot below).
Click here to change your password
Step 2 of 2 – Enter the current password, enter the new password twice, and then click “Submit” (see screen shot below).
13

Financial Profile User’s Guide February 2010
Update FP Contact Information
Step 1 of 2 – Click the “Edit” button (see screen shot below).
Click hereto edit theaccount
Step 2 of 2 – Make the necessary changes, and click “Submit” (see screen shot below).
14