Embed Size (px)
Citation preview

TheFinancialEdge™
Payroll Processing Guide
101811
©2011 Blackbaud, Inc. This publication, or any part thereof, may not be reproduced or transmitted in any form or by any means, electronic, or mechanical, including photocopying, recording, storage in an information retrieval system, or otherwise, without the prior written permission of Blackbaud, Inc.
The information in this manual has been carefully checked and is believed to be accurate. Blackbaud, Inc., assumes no responsibility for any inaccuracies, errors, or omissions in this manual. In no event will Blackbaud, Inc., be liable for direct, indirect, special, incidental, or consequential damages resulting from any defect or omission in this manual, even if advised of the possibility of damages.
In the interest of continuing product development, Blackbaud, Inc., reserves the right to make improvements in this manual and the products it describes at any time, without notice or obligation.
All Blackbaud product names appearing herein are trademarks or registered trademarks of Blackbaud, Inc.
All other products and company names mentioned herein are trademarks of their respective holder.
FE-PayrollProcessingGuide-101811
Contents
PAYROLL PROCESSING BASICS. . . . . . . . . . . . . . . . . . . . . . . . . . . . . . . . . . . . . . . . . . . . 1
Understanding the Payroll Cycle . . . . . . . . . . . . . . . . . . . . . . . . . . . . . . . . . . . . . . . . . . . . . . . . . . . . . . . . 2Accessing Payroll Processing . . . . . . . . . . . . . . . . . . . . . . . . . . . . . . . . . . . . . . . . . . . . . . . . . . . . . . . . . . . 3Creating Group Assignments . . . . . . . . . . . . . . . . . . . . . . . . . . . . . . . . . . . . . . . . . . . . . . . . . . . . . . . . . . . 5Adding New Employee Information . . . . . . . . . . . . . . . . . . . . . . . . . . . . . . . . . . . . . . . . . . . . . . . . . . . . . 6
Assigning Pay Types . . . . . . . . . . . . . . . . . . . . . . . . . . . . . . . . . . . . . . . . . . . . . . . . . . . . . . . . . . . . . . . . . . 8Assigning Benefits . . . . . . . . . . . . . . . . . . . . . . . . . . . . . . . . . . . . . . . . . . . . . . . . . . . . . . . . . . . . . . . . . . . 12Assigning Deductions . . . . . . . . . . . . . . . . . . . . . . . . . . . . . . . . . . . . . . . . . . . . . . . . . . . . . . . . . . . . . . . . 16Assigning Attendance Records . . . . . . . . . . . . . . . . . . . . . . . . . . . . . . . . . . . . . . . . . . . . . . . . . . . . . . . . . 19Assigning Events . . . . . . . . . . . . . . . . . . . . . . . . . . . . . . . . . . . . . . . . . . . . . . . . . . . . . . . . . . . . . . . . . . . . 24Assigning Attendance Plans . . . . . . . . . . . . . . . . . . . . . . . . . . . . . . . . . . . . . . . . . . . . . . . . . . . . . . . . . . . 29
MANAGING TIME AND ATTENDANCE . . . . . . . . . . . . . . . . . . . . . . . . . . . . . . . . . . . . . 33
Understanding the Enter Time Worked Process . . . . . . . . . . . . . . . . . . . . . . . . . . . . . . . . . . . . . . . . . . . 35Opening Batches . . . . . . . . . . . . . . . . . . . . . . . . . . . . . . . . . . . . . . . . . . . . . . . . . . . . . . . . . . . . . . . . . . . . 35Entering Time and Attendance . . . . . . . . . . . . . . . . . . . . . . . . . . . . . . . . . . . . . . . . . . . . . . . . . . . . . . . . 37
Creating Time and Attendance Batches with the Wizard . . . . . . . . . . . . . . . . . . . . . . . . . . . . . . . . . . . 38Creating Batches Manually . . . . . . . . . . . . . . . . . . . . . . . . . . . . . . . . . . . . . . . . . . . . . . . . . . . . . . . . . . . . 44Copying Time and Attendance Batches . . . . . . . . . . . . . . . . . . . . . . . . . . . . . . . . . . . . . . . . . . . . . . . . . 49
Importing Time and Attendance Batches . . . . . . . . . . . . . . . . . . . . . . . . . . . . . . . . . . . . . . . . . . . . . . . . 51Importing Time and Attendance Batches in Blackbaud File Format . . . . . . . . . . . . . . . . . . . . . . . . . . 51Importing Time and Attendance Batches from Unitime . . . . . . . . . . . . . . . . . . . . . . . . . . . . . . . . . . . . 54
Maintaining Time and Attendance Batches . . . . . . . . . . . . . . . . . . . . . . . . . . . . . . . . . . . . . . . . . . . . . . 55Calculating Time and Attendance Batches . . . . . . . . . . . . . . . . . . . . . . . . . . . . . . . . . . . . . . . . . . . . . . . 56Changing Time and Attendance Batch Status . . . . . . . . . . . . . . . . . . . . . . . . . . . . . . . . . . . . . . . . . . . . 59
MANAGING PAYROLL EXPENSES . . . . . . . . . . . . . . . . . . . . . . . . . . . . . . . . . . . . . . . . . 63
Creating AP Invoices for Payroll Liabilities . . . . . . . . . . . . . . . . . . . . . . . . . . . . . . . . . . . . . . . . . . . . . . . 64Accruing Attendance Expenses . . . . . . . . . . . . . . . . . . . . . . . . . . . . . . . . . . . . . . . . . . . . . . . . . . . . . . . . 66
RUNNING PAYROLL . . . . . . . . . . . . . . . . . . . . . . . . . . . . . . . . . . . . . . . . . . . . . . . . . . 73
Understanding the Create Calculations Process . . . . . . . . . . . . . . . . . . . . . . . . . . . . . . . . . . . . . . . . . . . 74Creating Calculations . . . . . . . . . . . . . . . . . . . . . . . . . . . . . . . . . . . . . . . . . . . . . . . . . . . . . . . . . . . . . . . . 76Viewing Calculations . . . . . . . . . . . . . . . . . . . . . . . . . . . . . . . . . . . . . . . . . . . . . . . . . . . . . . . . . . . . . . . . . 80
Printing Checks and EFT Notices . . . . . . . . . . . . . . . . . . . . . . . . . . . . . . . . . . . . . . . . . . . . . . . . . . . . . . . 86
MAINTAINING PAYROLL RECORDS . . . . . . . . . . . . . . . . . . . . . . . . . . . . . . . . . . . . . . . 93
Copying Payroll Records . . . . . . . . . . . . . . . . . . . . . . . . . . . . . . . . . . . . . . . . . . . . . . . . . . . . . . . . . . . . . . 94Copying Pay Types . . . . . . . . . . . . . . . . . . . . . . . . . . . . . . . . . . . . . . . . . . . . . . . . . . . . . . . . . . . . . . . . . . 94Copying Benefits . . . . . . . . . . . . . . . . . . . . . . . . . . . . . . . . . . . . . . . . . . . . . . . . . . . . . . . . . . . . . . . . . . . . 98Copying Deductions . . . . . . . . . . . . . . . . . . . . . . . . . . . . . . . . . . . . . . . . . . . . . . . . . . . . . . . . . . . . . . . . 101
Creating a One-Time Calculation . . . . . . . . . . . . . . . . . . . . . . . . . . . . . . . . . . . . . . . . . . . . . . . . . . . . . . 105Promoting Employees . . . . . . . . . . . . . . . . . . . . . . . . . . . . . . . . . . . . . . . . . . . . . . . . . . . . . . . . . . . . . . 108Terminating Employees . . . . . . . . . . . . . . . . . . . . . . . . . . . . . . . . . . . . . . . . . . . . . . . . . . . . . . . . . . . . . 111Accessing Employee Records . . . . . . . . . . . . . . . . . . . . . . . . . . . . . . . . . . . . . . . . . . . . . . . . . . . . . . . . . 115
INDEX . . . . . . . . . . . . . . . . . . . . . . . . . . . . . . . . . . . . . . . . . . . . . . . . . . . . . . . . . . 119

1chapter
Payroll Processing Basics
Understanding the Payroll Cycle. . . . . . . . . . . . . . . . . . . . . . . . . . . . . . . . . . . . . . . . . . . . . . . . . . . . . . . . . . . . . . . . . 2Accessing Payroll Processing . . . . . . . . . . . . . . . . . . . . . . . . . . . . . . . . . . . . . . . . . . . . . . . . . . . . . . . . . . . . . . . . . . . . 3Creating Group Assignments. . . . . . . . . . . . . . . . . . . . . . . . . . . . . . . . . . . . . . . . . . . . . . . . . . . . . . . . . . . . . . . . . . . . 5Adding New Employee Information . . . . . . . . . . . . . . . . . . . . . . . . . . . . . . . . . . . . . . . . . . . . . . . . . . . . . . . . . . . . . . 6Assigning Pay Types. . . . . . . . . . . . . . . . . . . . . . . . . . . . . . . . . . . . . . . . . . . . . . . . . . . . . . . . . . . . . . . . . . . . . . . . . . . . . . 8Assigning Benefits . . . . . . . . . . . . . . . . . . . . . . . . . . . . . . . . . . . . . . . . . . . . . . . . . . . . . . . . . . . . . . . . . . . . . . . . . . . . . . 12Assigning Deductions . . . . . . . . . . . . . . . . . . . . . . . . . . . . . . . . . . . . . . . . . . . . . . . . . . . . . . . . . . . . . . . . . . . . . . . . . . . 16Assigning Attendance Records . . . . . . . . . . . . . . . . . . . . . . . . . . . . . . . . . . . . . . . . . . . . . . . . . . . . . . . . . . . . . . . . . . . . 19Assigning Events . . . . . . . . . . . . . . . . . . . . . . . . . . . . . . . . . . . . . . . . . . . . . . . . . . . . . . . . . . . . . . . . . . . . . . . . . . . . . . . 24Assigning Attendance Plans . . . . . . . . . . . . . . . . . . . . . . . . . . . . . . . . . . . . . . . . . . . . . . . . . . . . . . . . . . . . . . . . . . . . . . 29

2 CH A PT E R
A payroll department functions cyclically and includes both specific payroll and human resources tasks. You enter compensation-related information for employees; record wages and salaries, bonuses, and hours worked; process payroll and pay your employees; charge payroll expenses to respective departments; and eventually terminate employees when they resign, retire, or otherwise leave your organization. You process employee changes, from hiring to training and promotions and to termination. Employees in your organization who perform payroll and human resources functions must work closely together in updating and maintaining employee records, whether they are separate departments or one.
Typically, a human resources administrator establishes pay types; benefits and deductions; attendance plans, types, and codes; and events that occur when employees are associated with your organization. Based on organization charts, she creates records for departments and positions. With first knowledge of new employees or changes on current employees, human resources adds new records and initiates changes on current records.As payroll administrator, you use these records to maintain and update employee pay, benefits and deductions, attendance, and events. You enter employee time and attendance, calculate pay, and print paychecks or transmit direct deposits. You may charge payroll expenses to departments throughout your organization. If you have large groups of employee records to process, it can be time consuming. In Payroll you can perform the tasks quickly and accurately to all the records at once. To add information to one employee record, we recommend you use the Employees page in Records. For more information about employee records, see the Employees chapter of the Records Guide for Payroll.
In this guide, we illustrate setting up basic information and running payroll for a group of new employees. We use scenarios and examples of information and processes for this group throughout the guide. We enter the employees’ initial payroll data at the point of hire, enter time and attendance, run payroll for their first pay period, process paychecks and EFTs, and print a payroll journal report. While the procedures use information specific to the scenario, once you perform the task with the given data, you can perform the task with your organization’s data.
Once the foundation is laid, you can maintain employees’ entire “life cycles” with your organization in Payroll. On the Payroll Processing page, you can flow through a typical payroll cycle by clicking the links on the page. In this chapter, we start the cycle with a group of new employees.
Understanding the Payroll Cycle
Note: Visit our Web site at www.blackbaud.com for the latest documentation and information.
Note: You can customize functions and details for payroll processes in Configuration. These settings can increase the efficiency of your processing, speed data entry, and provide for security checks-and-balances. For more information, see the Configuration Guide for Payroll.
Warning: This guide documents processing groups of employee records. For information about processing one record, see the Employees chapter of the Records Guide for Payroll.
Note: You can update the information for current employees, such as pay raises, promotions, and terminations. For more information about updating payroll records, see “Maintaining Payroll Records” on page 93.
Warning: To ensure success with your processing, before you begin entering data into Payroll, confirm that your organization has properly set up the program, using the steps outlined on the Set up Payroll page of Configuration.

PAY RO L L P RO C ES S I N G B AS I C S 3
As a payroll administrator, you may find yourself performing some tasks daily, some tasks with each pay period, and some tasks only occasionally. These tasks are all part of the payroll cycle. One of the first tasks you perform is entering payroll information for a group of new employees. You can do this efficiently using Group Assignment because you enter the same data for everyone in the group quickly and accurately. However, before you can set up group assignments, human resources must create employee records for each worker.The next task in the cycle is entering the amount of time worked. You must enter time worked for hourly-paid employees before you can calculate and run payroll. In Payroll Processing, you enter time and attendance for this same group of employees. Then you create time and attendance batches that are used in calculating the payroll.One of the most important tasks in the cycle is calculating the payroll for the employees in your organization. The program uses information in the employee time and attendance record or the default pay settings from the employee record to calculate gross pay. Payroll calculates and journalizes the benefits, taxes, and deductions.Once you calculate payroll, you set up EFTs (electronic fund transfers) to automatically deposit employees’ money into their bank accounts and print checks for employees not using EFT. Maintaining correct payroll data for compensation and compliance with federal regulations is critical. To complete the cycle, you charge payroll expenses back to the respective departments or accounts. In Payroll Processing, you can create accounts payable invoices to ensure accurate accrual and payment of payroll expenses.As the need arises, you can change the status of a batch, make payroll adjustments, and promote and terminate employees. Your organization may require that you import time and attendance from another program into Payroll.
Accessing Payroll Processing
To access Payroll Processing, on the navigation bar in Payroll, click Payroll Processing. The Payroll Processing page appears.
Warning: Because payroll processes impact the entire program, we strongly recommend that only users with the proper security rights have access to these features. For more information about security settings, see the Security chapter of the Administration Guide for The Financial Edge.
4 CH A PT E R
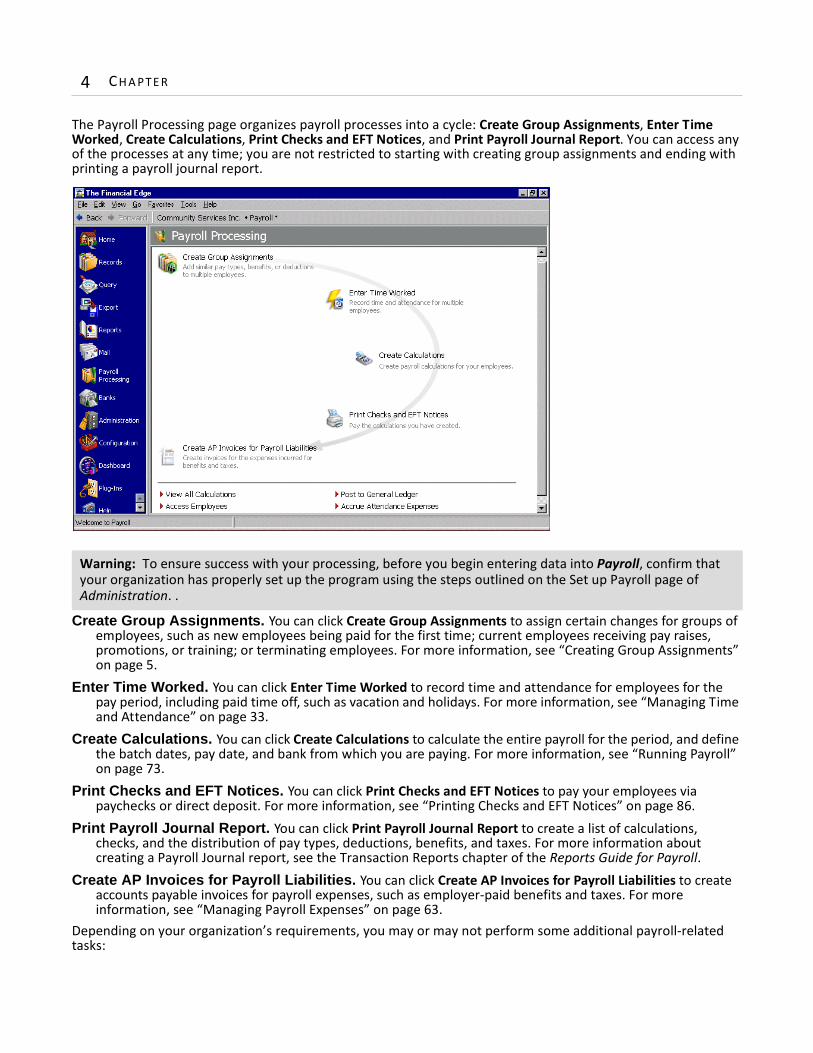
The Payroll Processing page organizes payroll processes into a cycle: Create Group Assignments, Enter Time Worked, Create Calculations, Print Checks and EFT Notices, and Print Payroll Journal Report. You can access any of the processes at any time; you are not restricted to starting with creating group assignments and ending with printing a payroll journal report.
Create Group Assignments. You can click Create Group Assignments to assign certain changes for groups of employees, such as new employees being paid for the first time; current employees receiving pay raises, promotions, or training; or terminating employees. For more information, see “Creating Group Assignments” on page 5.
Enter Time Worked. You can click Enter Time Worked to record time and attendance for employees for the pay period, including paid time off, such as vacation and holidays. For more information, see “Managing Time and Attendance” on page 33.
Create Calculations. You can click Create Calculations to calculate the entire payroll for the period, and define the batch dates, pay date, and bank from which you are paying. For more information, see “Running Payroll” on page 73.
Print Checks and EFT Notices. You can click Print Checks and EFT Notices to pay your employees via paychecks or direct deposit. For more information, see “Printing Checks and EFT Notices” on page 86.
Print Payroll Journal Report. You can click Print Payroll Journal Report to create a list of calculations, checks, and the distribution of pay types, deductions, benefits, and taxes. For more information about creating a Payroll Journal report, see the Transaction Reports chapter of the Reports Guide for Payroll.
Create AP Invoices for Payroll Liabilities. You can click Create AP Invoices for Payroll Liabilities to create accounts payable invoices for payroll expenses, such as employer-paid benefits and taxes. For more information, see “Managing Payroll Expenses” on page 63.
Depending on your organization’s requirements, you may or may not perform some additional payroll-related tasks:
Warning: To ensure success with your processing, before you begin entering data into Payroll, confirm that your organization has properly set up the program using the steps outlined on the Set up Payroll page of Administration. .
PAY RO L L P RO C ES S I N G B AS I C S 5
• Viewing calculations for all payroll batches, which you can access by clicking View All Calculations at the bottom of the Payroll Processing page. For more information about viewing batches, see “Viewing Calculations” on page 80.
• Adding employee records, which you can access by clicking Access Employees at the bottom of the Payroll Processing page. For more information about accessing employee records, see “Accessing Employee Records” on page 115.
• Posting payroll transactions to General Ledger, which you can access by clicking Post to General Ledger. For more information about posting, see the Administration Guide for The Financial Edge.
• Creating journal entry batches for accruing expenses for attendance balances, which you can access by clicking Accrue Attendance Expenses at the bottom of the Payroll Processing page. For more information about attendance accrual, see “Accruing Attendance Expenses” on page 66.
Creating Group Assignments
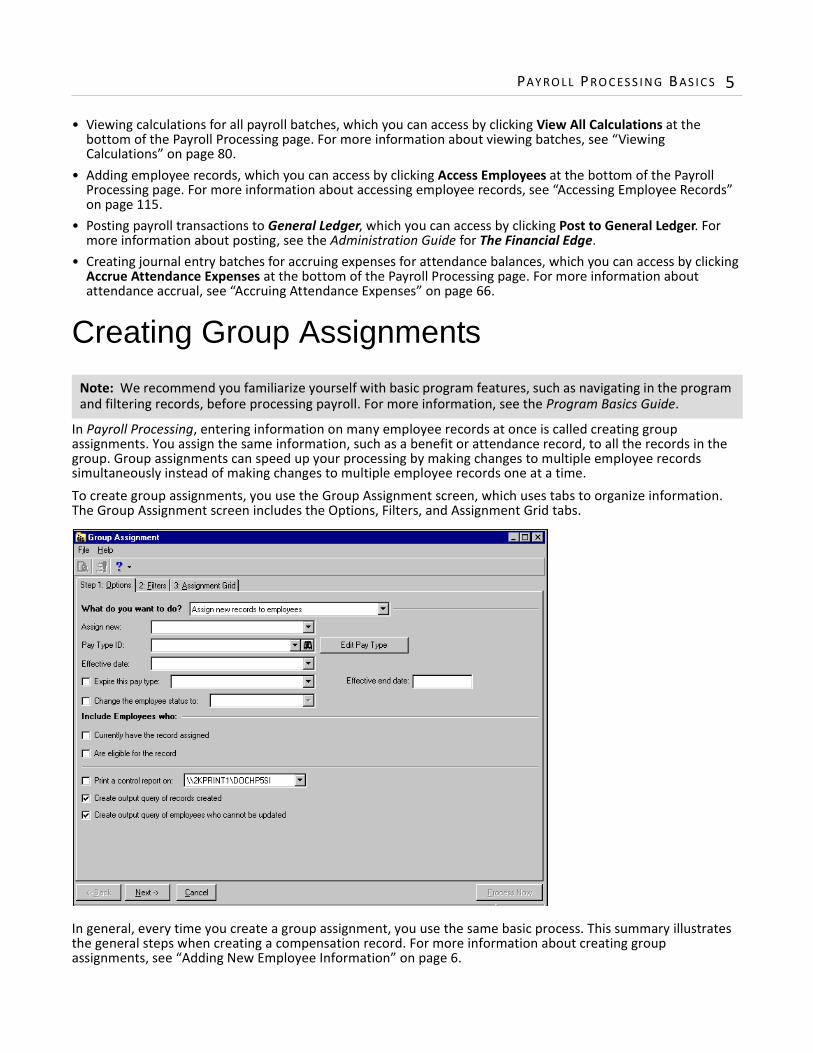
In Payroll Processing, entering information on many employee records at once is called creating group assignments. You assign the same information, such as a benefit or attendance record, to all the records in the group. Group assignments can speed up your processing by making changes to multiple employee records simultaneously instead of making changes to multiple employee records one at a time.To create group assignments, you use the Group Assignment screen, which uses tabs to organize information. The Group Assignment screen includes the Options, Filters, and Assignment Grid tabs.
In general, every time you create a group assignment, you use the same basic process. This summary illustrates the general steps when creating a compensation record. For more information about creating group assignments, see “Adding New Employee Information” on page 6.
Note: We recommend you familiarize yourself with basic program features, such as navigating in the program and filtering records, before processing payroll. For more information, see the Program Basics Guide.
6 CH A PT E R
Step 1. On the navigation bar, click Payroll Processing to access the Payroll Processing page. Click Create Group Assignments to access the Group Assignment screen.
Step 2. On the Options tab, select to assign new records or copy existing records. Checkboxes and fields on the Options tab depend on the assignment you select.
Step 3. Define dates and select employees to include in the processing. Select whether to print a control report and create output queries.
Step 4. On the Filters tab, select filters to determine the employee records to update.Step 5. On the Assignment Grid tab, edit information for employees and designate the employees in the group
to update.Step 6. Click Process Now to make the updates to the group.Step 7. If selected on the Options tab, review the control report and output queries of records created and not
created.
Adding New Employee Information
Correctly recording information about new employees is one of the most important aspects of a successful payroll system. For example, a mistake in tax withholding information can leave an employee owing state or federal taxes when he expects a refund. By entering accurate information, such as W-4 withholding, you can ensure accurate employee records.
In this chapter, we use a scenario to illustrate creating group assignments for a pay type, benefit, deduction, attendance plan, and attendance record for the same group of employees. For each procedure, we use the pertinent part from the entire scenario.
Warning: Before adding information to groups of employee records, be sure you have a backup of your database.
Tip: You can terminate employees you anticipate rehiring. Payroll saves a record of each hire and termination as an event and keeps the historic employment records, so you do not have to reenter the information upon rehire.
Note: Pay types, benefits, deductions, events, attendance codes and types, and event IDs are defined in Configuration. For more information, see the Configuration Guide for Payroll.
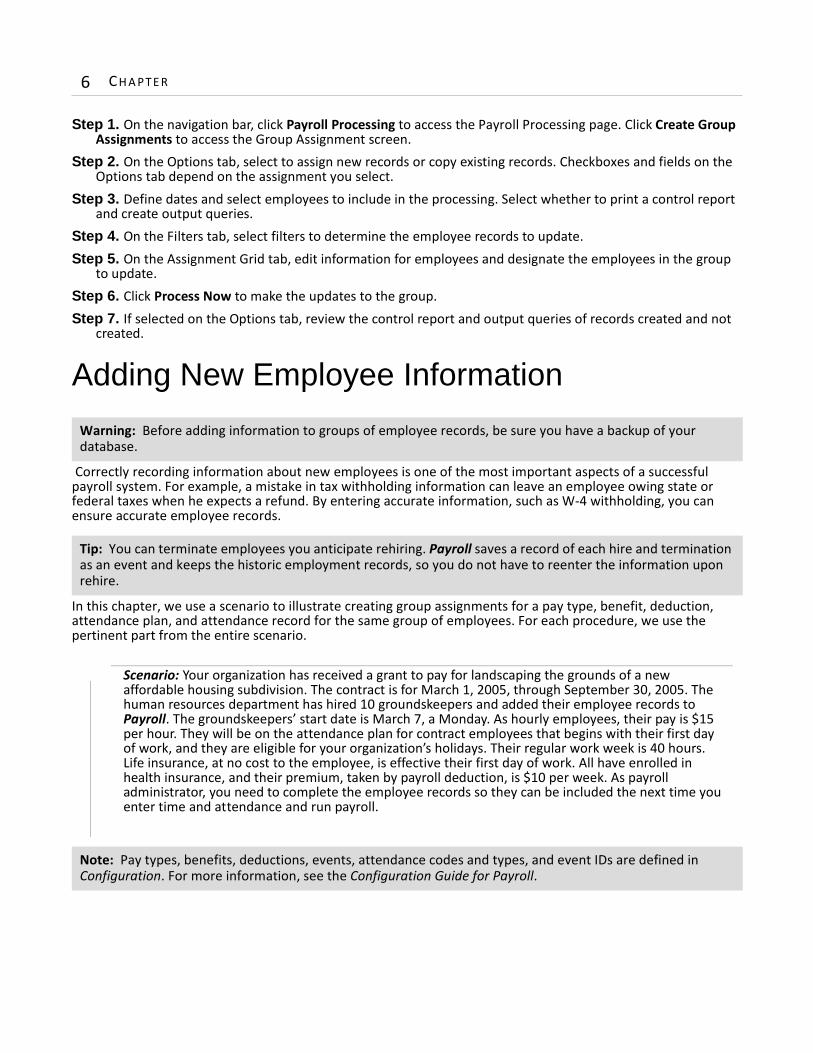
Scenario: Your organization has received a grant to pay for landscaping the grounds of a new affordable housing subdivision. The contract is for March 1, 2005, through September 30, 2005. The human resources department has hired 10 groundskeepers and added their employee records to Payroll. The groundskeepers’ start date is March 7, a Monday. As hourly employees, their pay is $15 per hour. They will be on the attendance plan for contract employees that begins with their first day of work, and they are eligible for your organization’s holidays. Their regular work week is 40 hours. Life insurance, at no cost to the employee, is effective their first day of work. All have enrolled in health insurance, and their premium, taken by payroll deduction, is $10 per week. As payroll administrator, you need to complete the employee records so they can be included the next time you enter time and attendance and run payroll.
PAY RO L L P RO C ES S I N G B AS I C S 7
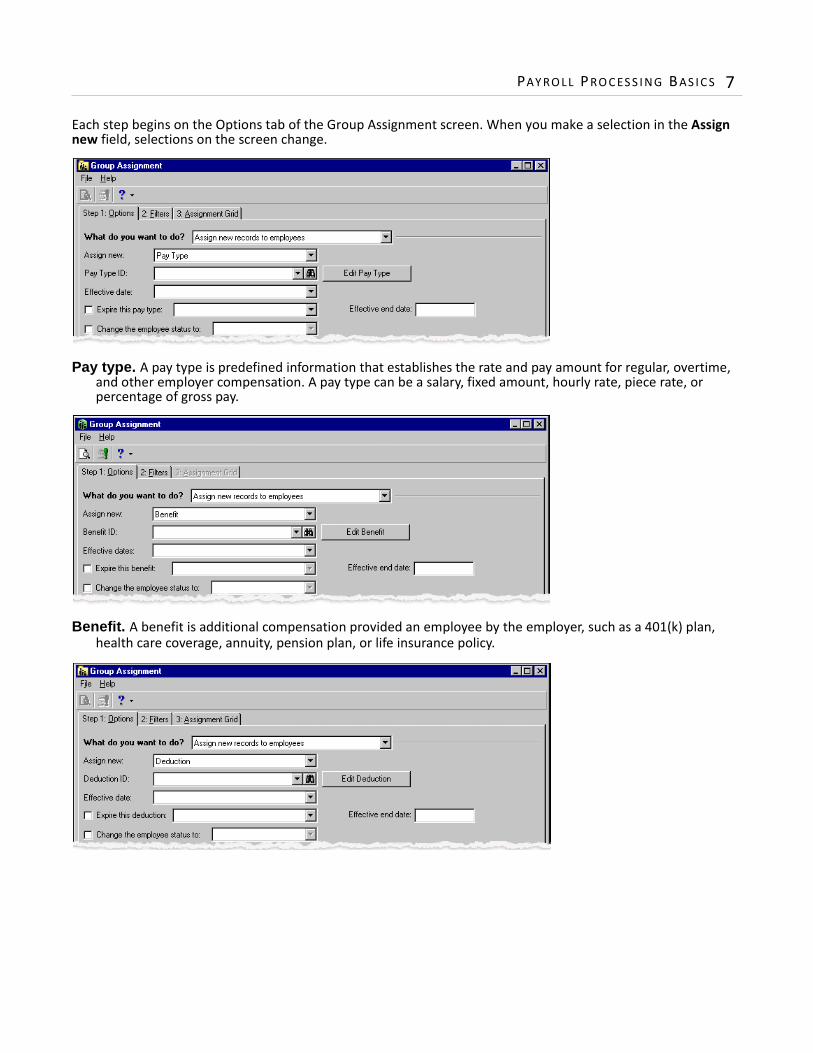
Each step begins on the Options tab of the Group Assignment screen. When you make a selection in the Assign new field, selections on the screen change.
Pay type. A pay type is predefined information that establishes the rate and pay amount for regular, overtime, and other employer compensation. A pay type can be a salary, fixed amount, hourly rate, piece rate, or percentage of gross pay.
Benefit. A benefit is additional compensation provided an employee by the employer, such as a 401(k) plan, health care coverage, annuity, pension plan, or life insurance policy.
8 CH A PT E R
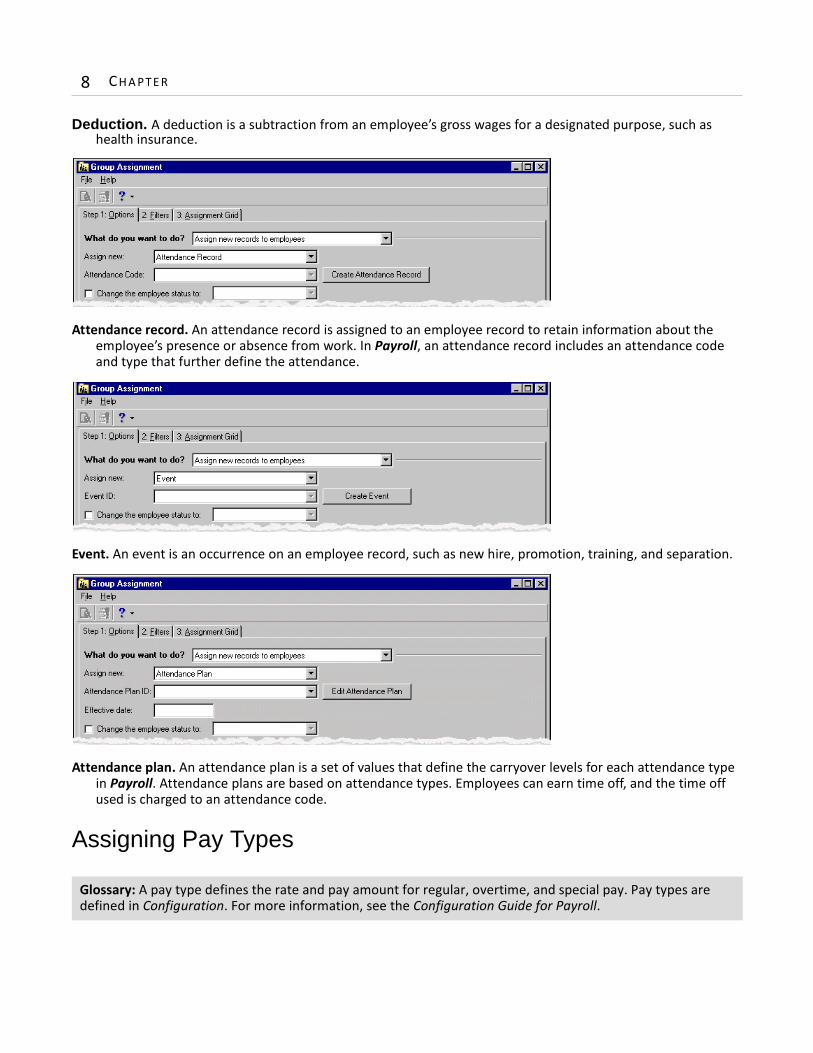
Deduction. A deduction is a subtraction from an employee’s gross wages for a designated purpose, such as health insurance.
Attendance record. An attendance record is assigned to an employee record to retain information about the employee’s presence or absence from work. In Payroll, an attendance record includes an attendance code and type that further define the attendance.
Event. An event is an occurrence on an employee record, such as new hire, promotion, training, and separation.
Attendance plan. An attendance plan is a set of values that define the carryover levels for each attendance type in Payroll. Attendance plans are based on attendance types. Employees can earn time off, and the time off used is charged to an attendance code.
Assigning Pay Types
Glossary: A pay type defines the rate and pay amount for regular, overtime, and special pay. Pay types are defined in Configuration. For more information, see the Configuration Guide for Payroll.
PAY RO L L P RO C ES S I N G B AS I C S 9
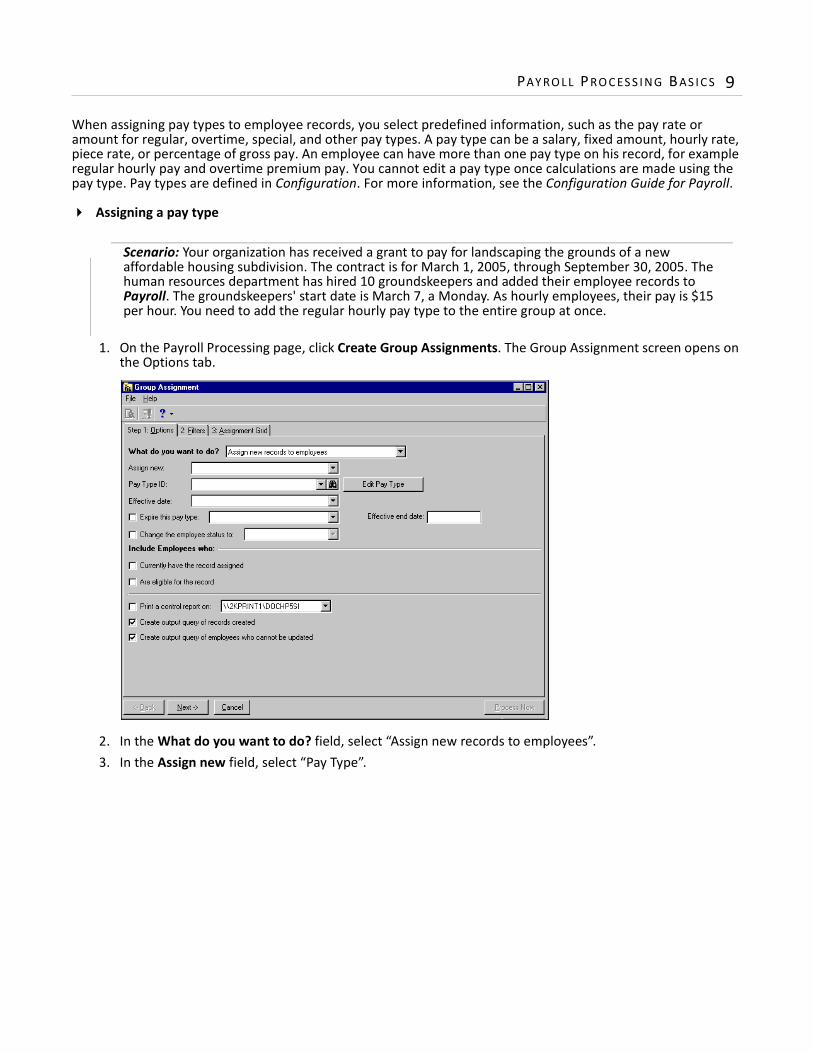
When assigning pay types to employee records, you select predefined information, such as the pay rate or amount for regular, overtime, special, and other pay types. A pay type can be a salary, fixed amount, hourly rate, piece rate, or percentage of gross pay. An employee can have more than one pay type on his record, for example regular hourly pay and overtime premium pay. You cannot edit a pay type once calculations are made using the pay type. Pay types are defined in Configuration. For more information, see the Configuration Guide for Payroll.
Assigning a pay type
1. On the Payroll Processing page, click Create Group Assignments. The Group Assignment screen opens on the Options tab.
2. In the What do you want to do? field, select “Assign new records to employees”.3. In the Assign new field, select “Pay Type”.
Scenario: Your organization has received a grant to pay for landscaping the grounds of a new affordable housing subdivision. The contract is for March 1, 2005, through September 30, 2005. The human resources department has hired 10 groundskeepers and added their employee records to Payroll. The groundskeepers' start date is March 7, a Monday. As hourly employees, their pay is $15 per hour. You need to add the regular hourly pay type to the entire group at once.
10 CH A PT E R
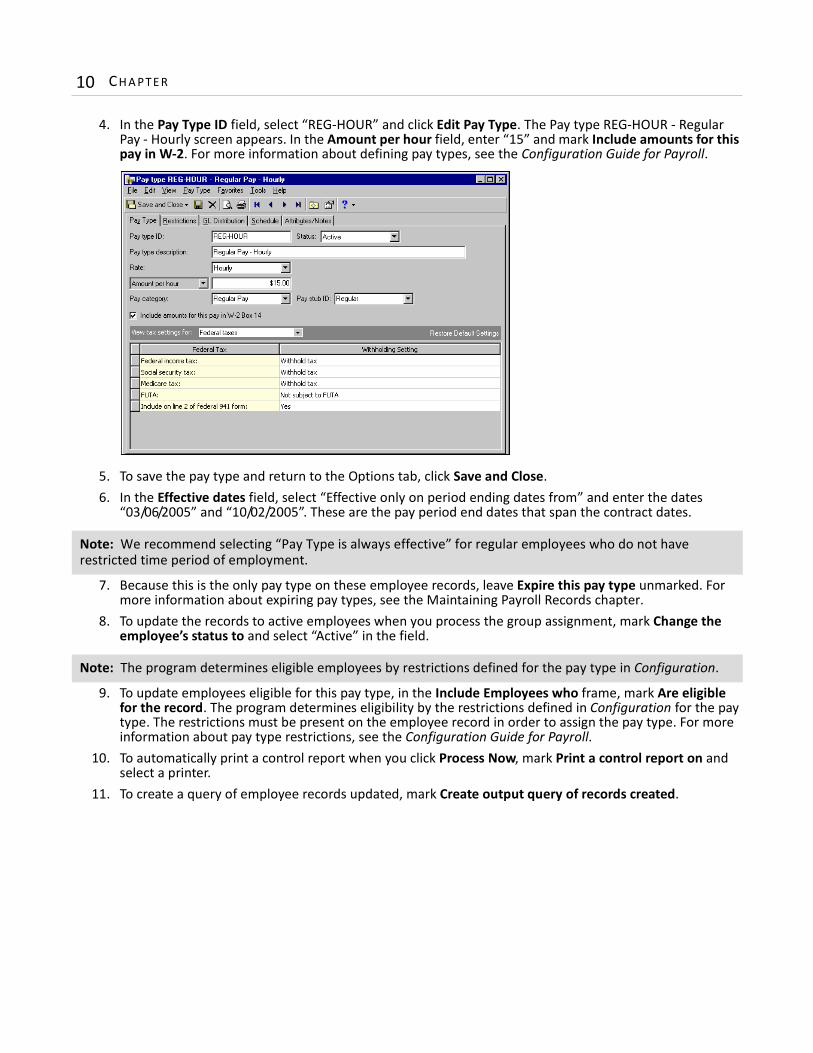
4. In the Pay Type ID field, select “REG-HOUR” and click Edit Pay Type. The Pay type REG-HOUR - Regular Pay - Hourly screen appears. In the Amount per hour field, enter “15” and mark Include amounts for this pay in W-2. For more information about defining pay types, see the Configuration Guide for Payroll.
5. To save the pay type and return to the Options tab, click Save and Close.6. In the Effective dates field, select “Effective only on period ending dates from” and enter the dates
“03/06/2005” and “10/02/2005”. These are the pay period end dates that span the contract dates.
7. Because this is the only pay type on these employee records, leave Expire this pay type unmarked. For more information about expiring pay types, see the Maintaining Payroll Records chapter.
8. To update the records to active employees when you process the group assignment, mark Change the employee’s status to and select “Active” in the field.
9. To update employees eligible for this pay type, in the Include Employees who frame, mark Are eligible for the record. The program determines eligibility by the restrictions defined in Configuration for the pay type. The restrictions must be present on the employee record in order to assign the pay type. For more information about pay type restrictions, see the Configuration Guide for Payroll.
10. To automatically print a control report when you click Process Now, mark Print a control report on and select a printer.
11. To create a query of employee records updated, mark Create output query of records created.
Note: We recommend selecting “Pay Type is always effective” for regular employees who do not have restricted time period of employment.
Note: The program determines eligible employees by restrictions defined for the pay type in Configuration.
PAY RO L L P RO C ES S I N G B AS I C S 11
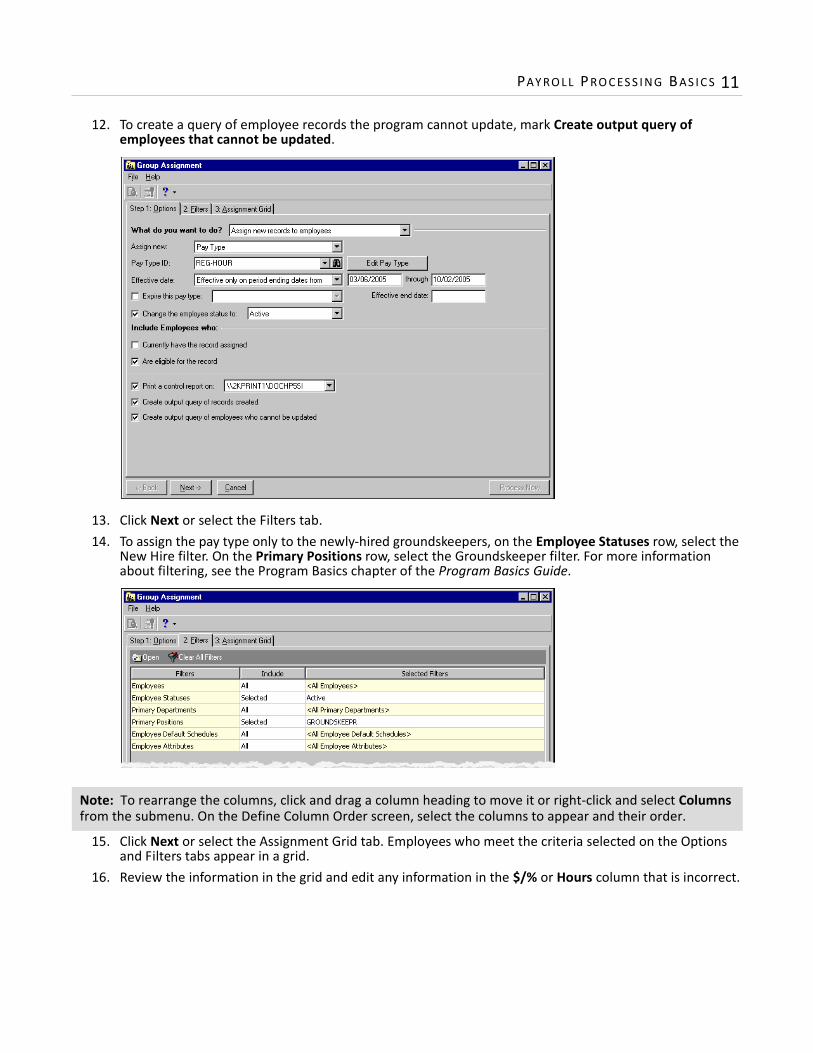
12. To create a query of employee records the program cannot update, mark Create output query of employees that cannot be updated.
13. Click Next or select the Filters tab.14. To assign the pay type only to the newly-hired groundskeepers, on the Employee Statuses row, select the
New Hire filter. On the Primary Positions row, select the Groundskeeper filter. For more information about filtering, see the Program Basics chapter of the Program Basics Guide.
15. Click Next or select the Assignment Grid tab. Employees who meet the criteria selected on the Options and Filters tabs appear in a grid.
16. Review the information in the grid and edit any information in the $/% or Hours column that is incorrect.
Note: To rearrange the columns, click and drag a column heading to move it or right-click and select Columns from the submenu. On the Define Column Order screen, select the columns to appear and their order.
12 CH A PT E R
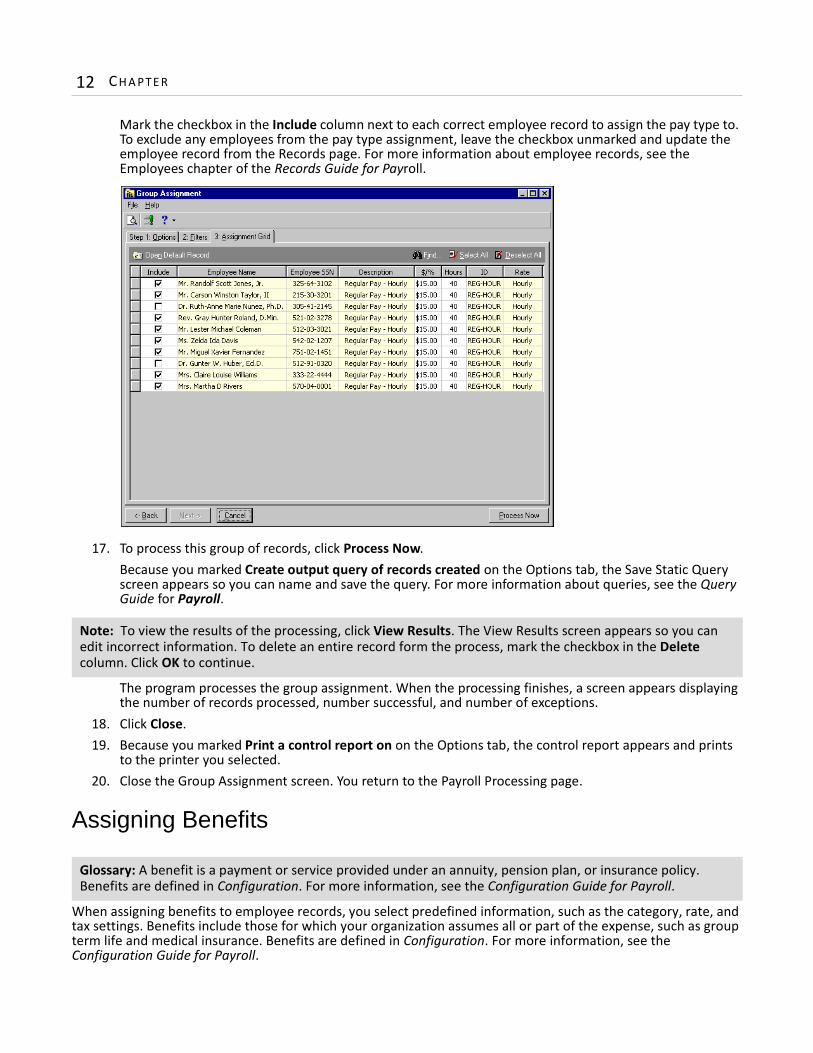
Mark the checkbox in the Include column next to each correct employee record to assign the pay type to. To exclude any employees from the pay type assignment, leave the checkbox unmarked and update the employee record from the Records page. For more information about employee records, see the Employees chapter of the Records Guide for Payroll.
17. To process this group of records, click Process Now.Because you marked Create output query of records created on the Options tab, the Save Static Query screen appears so you can name and save the query. For more information about queries, see the Query Guide for Payroll.
The program processes the group assignment. When the processing finishes, a screen appears displaying the number of records processed, number successful, and number of exceptions.
18. Click Close.19. Because you marked Print a control report on on the Options tab, the control report appears and prints
to the printer you selected.20. Close the Group Assignment screen. You return to the Payroll Processing page.
Assigning Benefits
When assigning benefits to employee records, you select predefined information, such as the category, rate, and tax settings. Benefits include those for which your organization assumes all or part of the expense, such as group term life and medical insurance. Benefits are defined in Configuration. For more information, see the Configuration Guide for Payroll.
Note: To view the results of the processing, click View Results. The View Results screen appears so you can edit incorrect information. To delete an entire record form the process, mark the checkbox in the Delete column. Click OK to continue.
Glossary: A benefit is a payment or service provided under an annuity, pension plan, or insurance policy. Benefits are defined in Configuration. For more information, see the Configuration Guide for Payroll.
PAY RO L L P RO C ES S I N G B AS I C S 13
Assigning a benefit
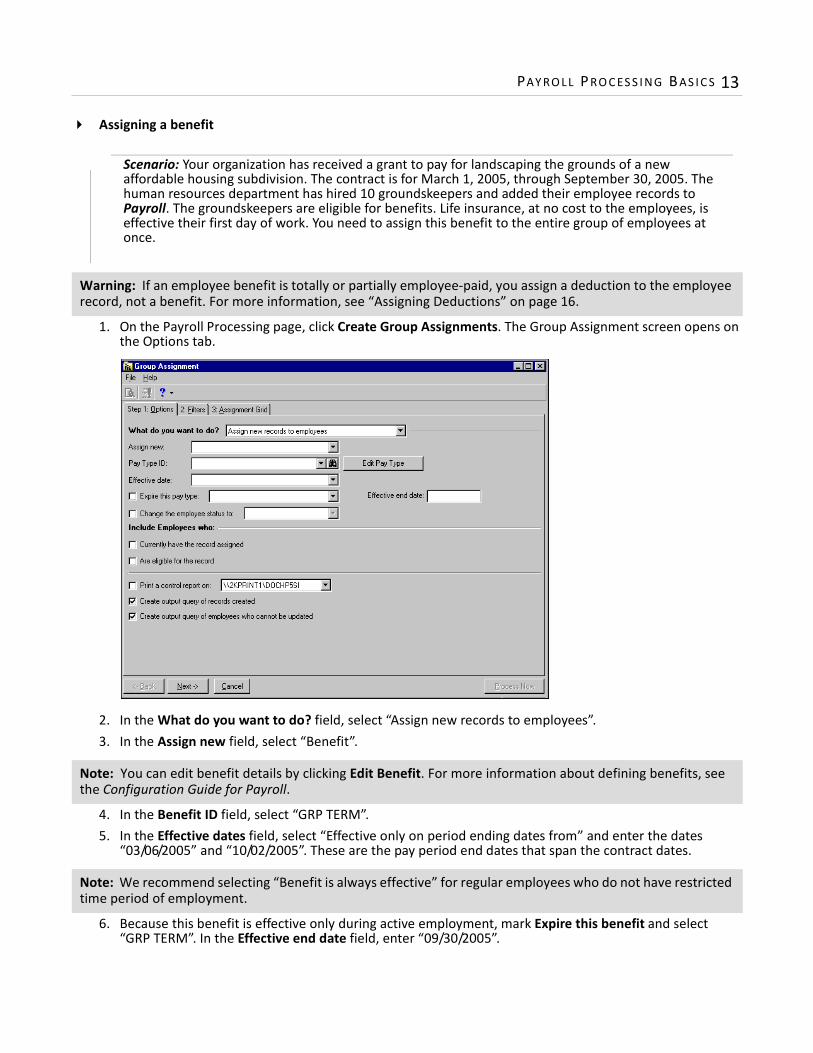
1. On the Payroll Processing page, click Create Group Assignments. The Group Assignment screen opens on the Options tab.
2. In the What do you want to do? field, select “Assign new records to employees”.3. In the Assign new field, select “Benefit”.
4. In the Benefit ID field, select “GRP TERM”.5. In the Effective dates field, select “Effective only on period ending dates from” and enter the dates
“03/06/2005” and “10/02/2005”. These are the pay period end dates that span the contract dates.
6. Because this benefit is effective only during active employment, mark Expire this benefit and select “GRP TERM”. In the Effective end date field, enter “09/30/2005”.
Warning: If an employee benefit is totally or partially employee-paid, you assign a deduction to the employee record, not a benefit. For more information, see “Assigning Deductions” on page 16.
Note: You can edit benefit details by clicking Edit Benefit. For more information about defining benefits, see the Configuration Guide for Payroll.
Note: We recommend selecting “Benefit is always effective” for regular employees who do not have restricted time period of employment.
Scenario: Your organization has received a grant to pay for landscaping the grounds of a new affordable housing subdivision. The contract is for March 1, 2005, through September 30, 2005. The human resources department has hired 10 groundskeepers and added their employee records to Payroll. The groundskeepers are eligible for benefits. Life insurance, at no cost to the employees, is effective their first day of work. You need to assign this benefit to the entire group of employees at once.
14 CH A PT E R
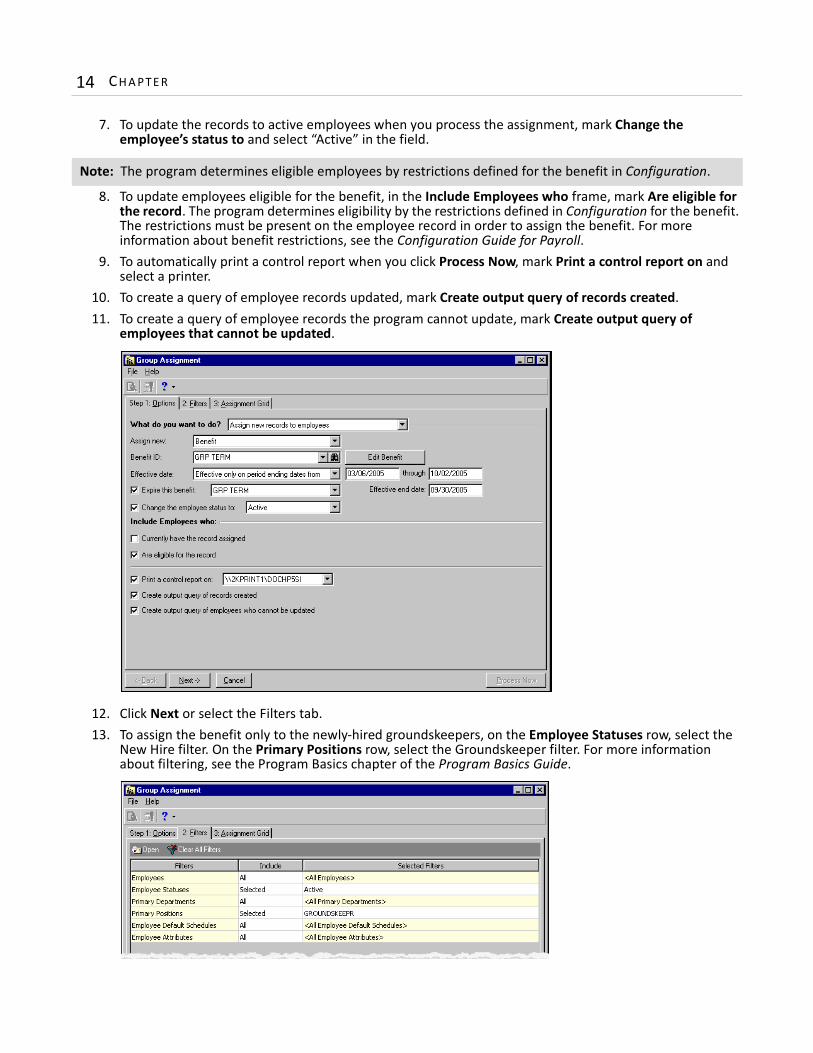
7. To update the records to active employees when you process the assignment, mark Change the employee’s status to and select “Active” in the field.
8. To update employees eligible for the benefit, in the Include Employees who frame, mark Are eligible for the record. The program determines eligibility by the restrictions defined in Configuration for the benefit. The restrictions must be present on the employee record in order to assign the benefit. For more information about benefit restrictions, see the Configuration Guide for Payroll.
9. To automatically print a control report when you click Process Now, mark Print a control report on and select a printer.
10. To create a query of employee records updated, mark Create output query of records created.11. To create a query of employee records the program cannot update, mark Create output query of
employees that cannot be updated.
12. Click Next or select the Filters tab.13. To assign the benefit only to the newly-hired groundskeepers, on the Employee Statuses row, select the
New Hire filter. On the Primary Positions row, select the Groundskeeper filter. For more information about filtering, see the Program Basics chapter of the Program Basics Guide.
Note: The program determines eligible employees by restrictions defined for the benefit in Configuration.
PAY RO L L P RO C ES S I N G B AS I C S 15
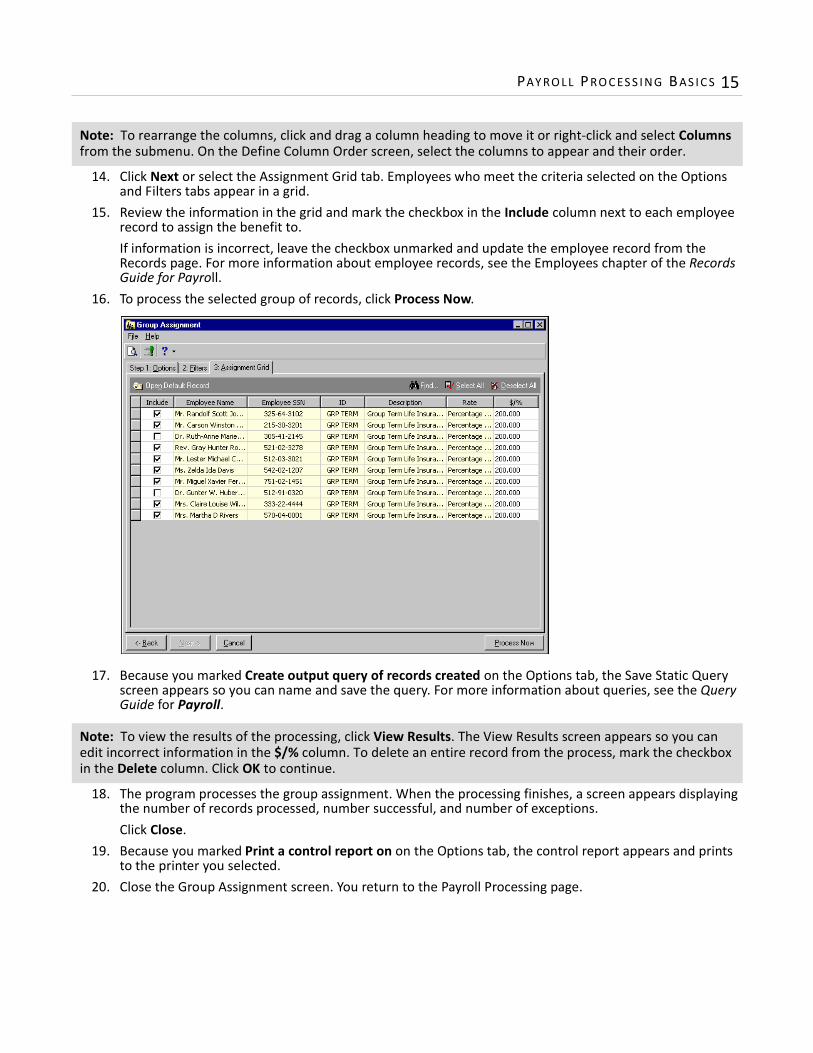
14. Click Next or select the Assignment Grid tab. Employees who meet the criteria selected on the Options and Filters tabs appear in a grid.
15. Review the information in the grid and mark the checkbox in the Include column next to each employee record to assign the benefit to. If information is incorrect, leave the checkbox unmarked and update the employee record from the Records page. For more information about employee records, see the Employees chapter of the Records Guide for Payroll.
16. To process the selected group of records, click Process Now.
17. Because you marked Create output query of records created on the Options tab, the Save Static Query screen appears so you can name and save the query. For more information about queries, see the Query Guide for Payroll.
18. The program processes the group assignment. When the processing finishes, a screen appears displaying the number of records processed, number successful, and number of exceptions.Click Close.
19. Because you marked Print a control report on on the Options tab, the control report appears and prints to the printer you selected.
20. Close the Group Assignment screen. You return to the Payroll Processing page.
Note: To rearrange the columns, click and drag a column heading to move it or right-click and select Columns from the submenu. On the Define Column Order screen, select the columns to appear and their order.
Note: To view the results of the processing, click View Results. The View Results screen appears so you can edit incorrect information in the $/% column. To delete an entire record from the process, mark the checkbox in the Delete column. Click OK to continue.

16 CH A PT E R
Assigning Deductions
When assigning deductions to employee records, you select predefined information, such as a health insurance plan or deductions for garnishments or charitable contributions. The deduction rate or amount and applicable tax settings that determine whether the deduction is a pre- or post-tax deduction are defined in Configuration. For more information, see the Configuration Guide for Payroll.
Assigning a deduction
1. On the Payroll Processing page, click Create Group Assignments. The Group Assignment screen opens on the Options tab.
2. In the What do you want to do? field, select “Assign new records to employees”.3. In the Assign new field, select “Deduction”.
Glossary: A deduction is a subtraction from an employee’s gross wages for a designated purpose, such as health insurance. Deductions are defined in Configuration. For more information, see the Configuration Guide for Payroll.
Warning: If an employee benefit is totally employer-paid, you assign a benefit to the employee records, not a deduction. For more information, see “Assigning Benefits” on page 12.
Scenario: Your organization has received a grant to pay for landscaping the grounds of a new affordable housing subdivision. The contract is for March 1, 2005, through September 30, 2005. The human resources department has hired 10 groundskeepers and added their employee records to Payroll. They are eligible for benefits. All have enrolled in health insurance, and their premium, taken by payroll deduction, is $10 per week. You need to assign the deduction for that benefit to the entire group of employees at once.
PAY RO L L P RO C ES S I N G B AS I C S 17
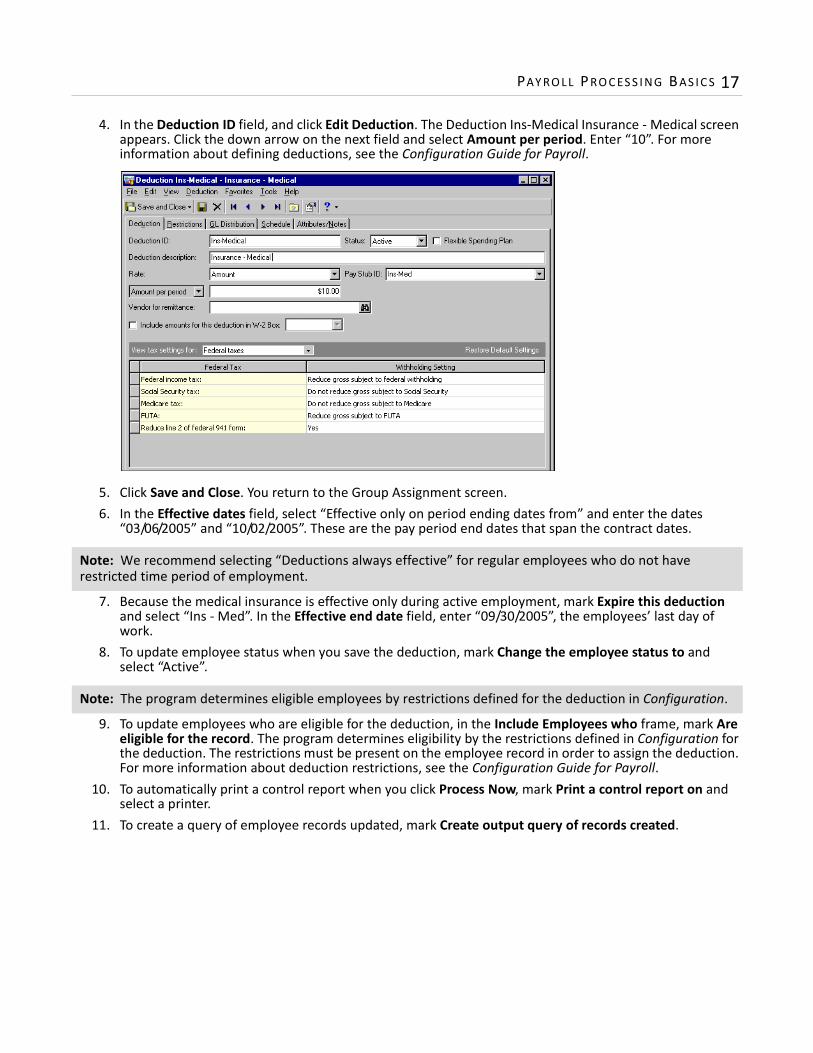
4. In the Deduction ID field, and click Edit Deduction. The Deduction Ins-Medical Insurance - Medical screen appears. Click the down arrow on the next field and select Amount per period. Enter “10”. For more information about defining deductions, see the Configuration Guide for Payroll.
5. Click Save and Close. You return to the Group Assignment screen.6. In the Effective dates field, select “Effective only on period ending dates from” and enter the dates
“03/06/2005” and “10/02/2005”. These are the pay period end dates that span the contract dates.
7. Because the medical insurance is effective only during active employment, mark Expire this deduction and select “Ins - Med”. In the Effective end date field, enter “09/30/2005”, the employees’ last day of work.
8. To update employee status when you save the deduction, mark Change the employee status to and select “Active”.
9. To update employees who are eligible for the deduction, in the Include Employees who frame, mark Are eligible for the record. The program determines eligibility by the restrictions defined in Configuration for the deduction. The restrictions must be present on the employee record in order to assign the deduction. For more information about deduction restrictions, see the Configuration Guide for Payroll.
10. To automatically print a control report when you click Process Now, mark Print a control report on and select a printer.
11. To create a query of employee records updated, mark Create output query of records created.
Note: We recommend selecting “Deductions always effective” for regular employees who do not have restricted time period of employment.
Note: The program determines eligible employees by restrictions defined for the deduction in Configuration.
18 CH A PT E R
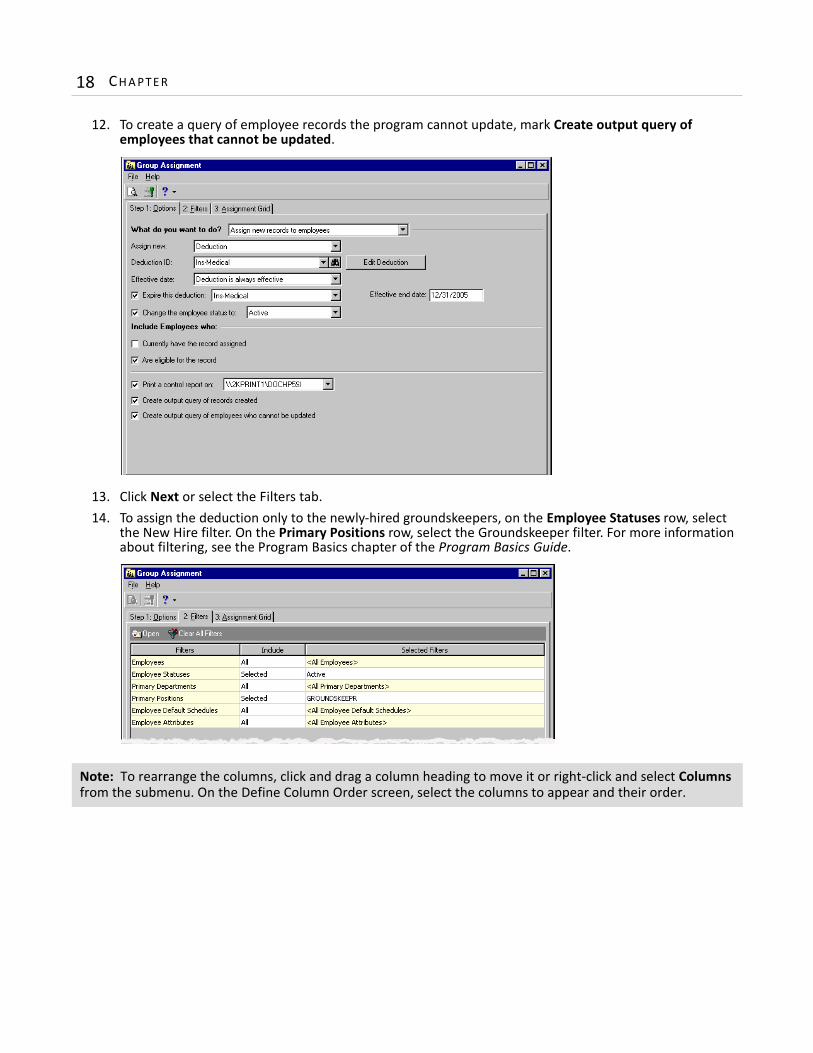
12. To create a query of employee records the program cannot update, mark Create output query of employees that cannot be updated.
13. Click Next or select the Filters tab.14. To assign the deduction only to the newly-hired groundskeepers, on the Employee Statuses row, select
the New Hire filter. On the Primary Positions row, select the Groundskeeper filter. For more information about filtering, see the Program Basics chapter of the Program Basics Guide.
Note: To rearrange the columns, click and drag a column heading to move it or right-click and select Columns from the submenu. On the Define Column Order screen, select the columns to appear and their order.
PAY RO L L P RO C ES S I N G B AS I C S 19
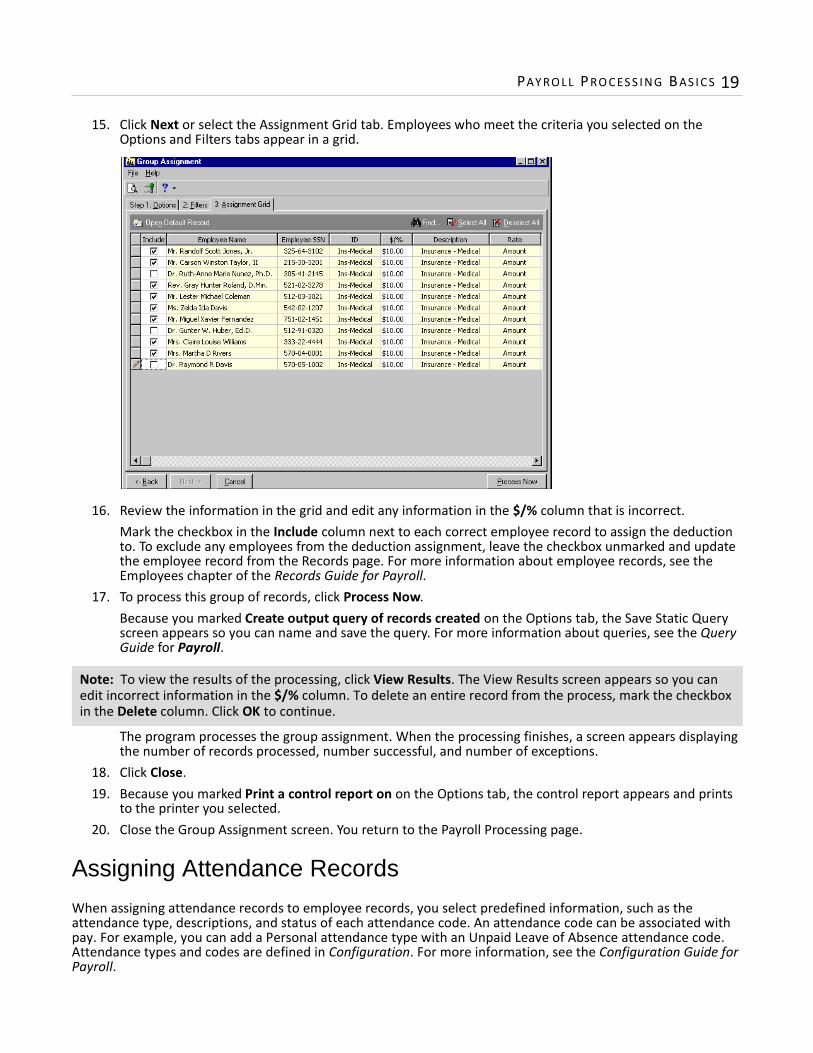
15. Click Next or select the Assignment Grid tab. Employees who meet the criteria you selected on the Options and Filters tabs appear in a grid.
16. Review the information in the grid and edit any information in the $/% column that is incorrect.Mark the checkbox in the Include column next to each correct employee record to assign the deduction to. To exclude any employees from the deduction assignment, leave the checkbox unmarked and update the employee record from the Records page. For more information about employee records, see the Employees chapter of the Records Guide for Payroll.
17. To process this group of records, click Process Now. Because you marked Create output query of records created on the Options tab, the Save Static Query screen appears so you can name and save the query. For more information about queries, see the Query Guide for Payroll.
The program processes the group assignment. When the processing finishes, a screen appears displaying the number of records processed, number successful, and number of exceptions.
18. Click Close.19. Because you marked Print a control report on on the Options tab, the control report appears and prints
to the printer you selected.20. Close the Group Assignment screen. You return to the Payroll Processing page.
Assigning Attendance Records
When assigning attendance records to employee records, you select predefined information, such as the attendance type, descriptions, and status of each attendance code. An attendance code can be associated with pay. For example, you can add a Personal attendance type with an Unpaid Leave of Absence attendance code. Attendance types and codes are defined in Configuration. For more information, see the Configuration Guide for Payroll.
Note: To view the results of the processing, click View Results. The View Results screen appears so you can edit incorrect information in the $/% column. To delete an entire record from the process, mark the checkbox in the Delete column. Click OK to continue.
20 CH A PT E R
Assigning an attendance record
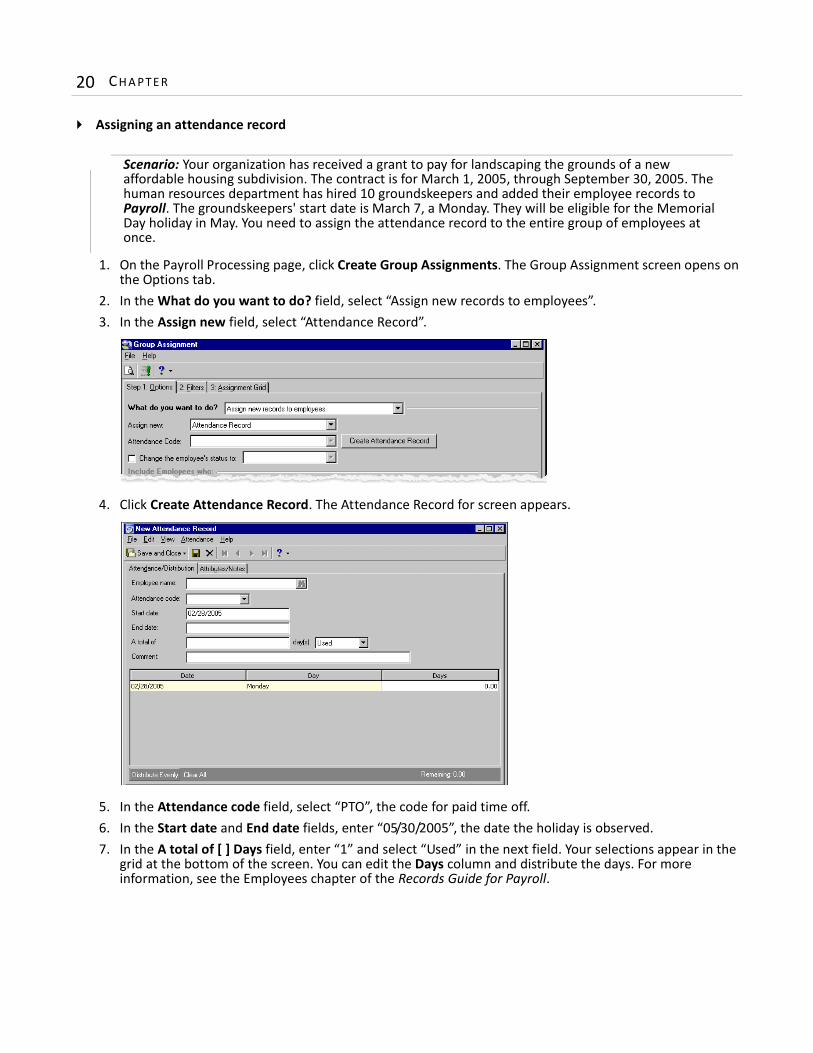
1. On the Payroll Processing page, click Create Group Assignments. The Group Assignment screen opens on the Options tab.
2. In the What do you want to do? field, select “Assign new records to employees”.3. In the Assign new field, select “Attendance Record”.
4. Click Create Attendance Record. The Attendance Record for screen appears.
5. In the Attendance code field, select “PTO”, the code for paid time off.6. In the Start date and End date fields, enter “05/30/2005”, the date the holiday is observed.7. In the A total of [ ] Days field, enter “1” and select “Used” in the next field. Your selections appear in the
grid at the bottom of the screen. You can edit the Days column and distribute the days. For more information, see the Employees chapter of the Records Guide for Payroll.
Scenario: Your organization has received a grant to pay for landscaping the grounds of a new affordable housing subdivision. The contract is for March 1, 2005, through September 30, 2005. The human resources department has hired 10 groundskeepers and added their employee records to Payroll. The groundskeepers' start date is March 7, a Monday. They will be eligible for the Memorial Day holiday in May. You need to assign the attendance record to the entire group of employees at once.

PAY RO L L P RO C ES S I N G B AS I C S 21
8. To add any other information about the attendance record, enter your comments in the Comment field, for example, “Memorial Day holiday - all employees eligible”.
9. To add attributes or notes to the attendance record, select the Attributes/Notes tab. With attributes defined, you can filter information to your specification — a useful feature for sorting or filtering attendance records for reports. For more information about attributes, see the Configuration Guide for Payroll.With notes, you can easily maintain helpful pieces of information about the attendance record. You can enter unlimited free-form text in the Notes text box.
10. Click Save and Close. You return to the Group Assignment screen, and “PTO” appears in the Attendance Code field. “PTO” is grayed out, indicating this is for your information only; you cannot edit the field.
11. To update the records to active employees when you process the group assignment, mark Change the employee’s status to and select “Active” in the field.
12. To automatically print a control report when you click Process Now, mark Print a control report on and select a printer.
13. To create a query of employee records updated, mark Create output query of records created.
Glossary: An attribute is a reporting tool you use to group information based on a common theme. Attributes are defined in Configuration. For more information about attributes, see the Configuration Guide for Payroll.
22 CH A PT E R
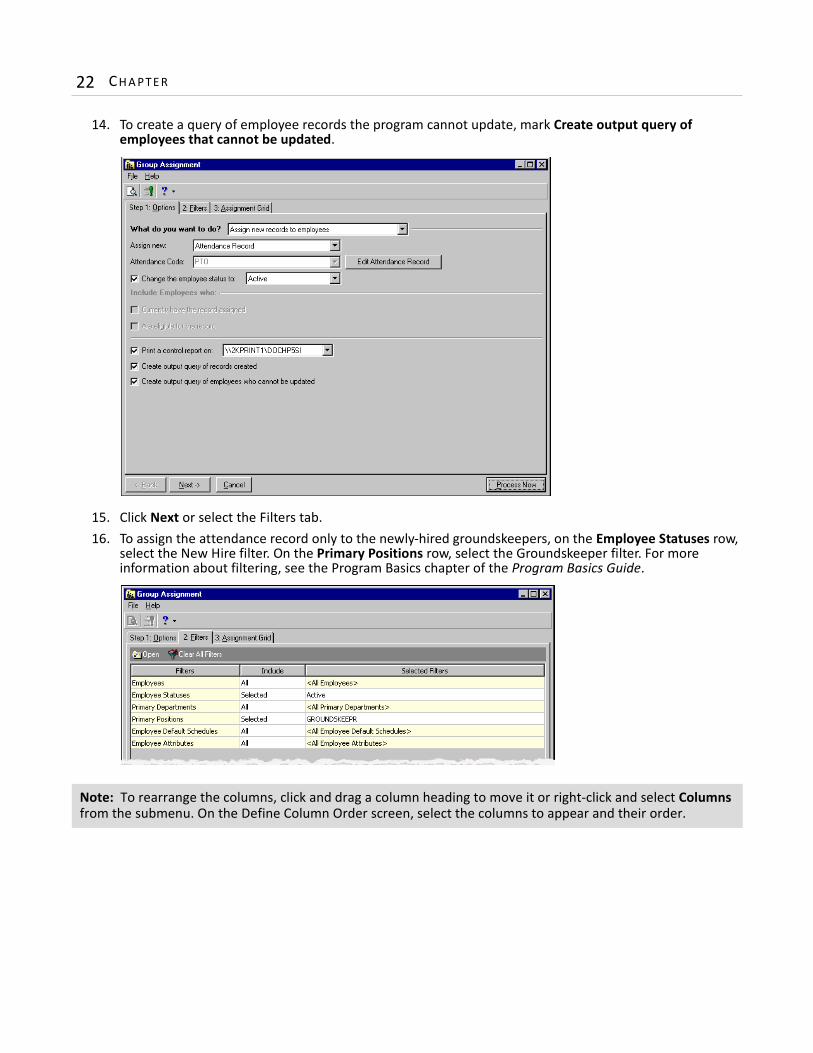
14. To create a query of employee records the program cannot update, mark Create output query of employees that cannot be updated.
15. Click Next or select the Filters tab.16. To assign the attendance record only to the newly-hired groundskeepers, on the Employee Statuses row,
select the New Hire filter. On the Primary Positions row, select the Groundskeeper filter. For more information about filtering, see the Program Basics chapter of the Program Basics Guide.
Note: To rearrange the columns, click and drag a column heading to move it or right-click and select Columns from the submenu. On the Define Column Order screen, select the columns to appear and their order.
PAY RO L L P RO C ES S I N G B AS I C S 23
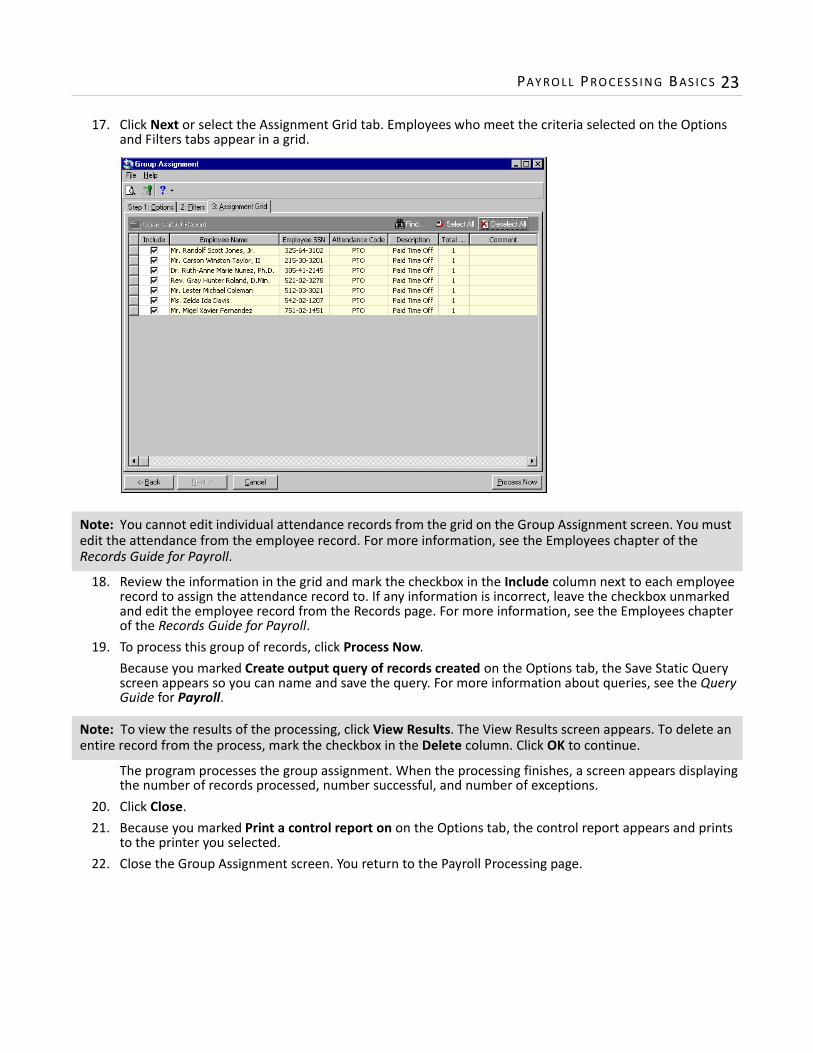
17. Click Next or select the Assignment Grid tab. Employees who meet the criteria selected on the Options and Filters tabs appear in a grid.
18. Review the information in the grid and mark the checkbox in the Include column next to each employee record to assign the attendance record to. If any information is incorrect, leave the checkbox unmarked and edit the employee record from the Records page. For more information, see the Employees chapter of the Records Guide for Payroll.
19. To process this group of records, click Process Now. Because you marked Create output query of records created on the Options tab, the Save Static Query screen appears so you can name and save the query. For more information about queries, see the Query Guide for Payroll.
The program processes the group assignment. When the processing finishes, a screen appears displaying the number of records processed, number successful, and number of exceptions.
20. Click Close.21. Because you marked Print a control report on on the Options tab, the control report appears and prints
to the printer you selected.22. Close the Group Assignment screen. You return to the Payroll Processing page.
Note: You cannot edit individual attendance records from the grid on the Group Assignment screen. You must edit the attendance from the employee record. For more information, see the Employees chapter of the Records Guide for Payroll.
Note: To view the results of the processing, click View Results. The View Results screen appears. To delete an entire record from the process, mark the checkbox in the Delete column. Click OK to continue.
24 CH A PT E R
Assigning Events
When assigning events to employee records, you select an occurrence in the employees’ career with your organization. You select an Event ID, such as HIRE (new hire), PROM (promotion), or SEP (separation), and enter effective dates and approvals. Event IDs are defined in Tables in Configuration. For more information, see the Configuration Guide for Payroll.
Assigning an event
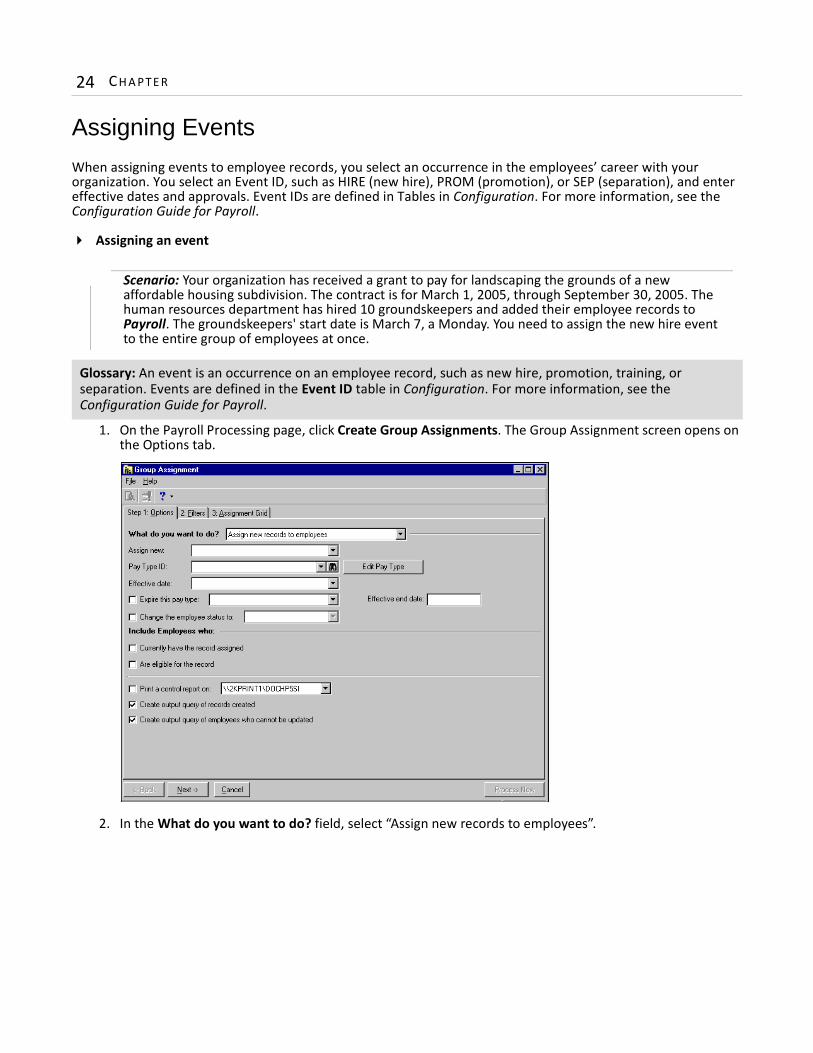
1. On the Payroll Processing page, click Create Group Assignments. The Group Assignment screen opens on the Options tab.
2. In the What do you want to do? field, select “Assign new records to employees”.
Glossary: An event is an occurrence on an employee record, such as new hire, promotion, training, or separation. Events are defined in the Event ID table in Configuration. For more information, see the Configuration Guide for Payroll.
Scenario: Your organization has received a grant to pay for landscaping the grounds of a new affordable housing subdivision. The contract is for March 1, 2005, through September 30, 2005. The human resources department has hired 10 groundskeepers and added their employee records to Payroll. The groundskeepers' start date is March 7, a Monday. You need to assign the new hire event to the entire group of employees at once.

PAY RO L L P RO C ES S I N G B AS I C S 25
3. In the Assign new field, select “Event”.
4. Click Create Event. The New Event for screen appears.
5. In the Event ID field, select “CONTS”. The long description, “Contract Start”, as defined in Event ID table in Configuration, appears to the right of the field.
6. In the Scheduled date field, enter “03/01/2005”, the date the contract begins.7. In the Actual date field, enter “03/07/2005”, the date the employees actually begin work.
8. In the Approved by field, click the binoculars and select “Mr. Lester Michael Coleman”, the person required to approve the hiring. Because Lester Coleman has an employee record, a link appears next to the field.
Note: When the employees complete the contract, you can assign the Contract End event to record the ending of the contract. Payroll keeps the historic information, so you do not lose the initial hiring data.
Note: If the person approving the event does not have a record in your database, a broken link appears next to the field.
26 CH A PT E R
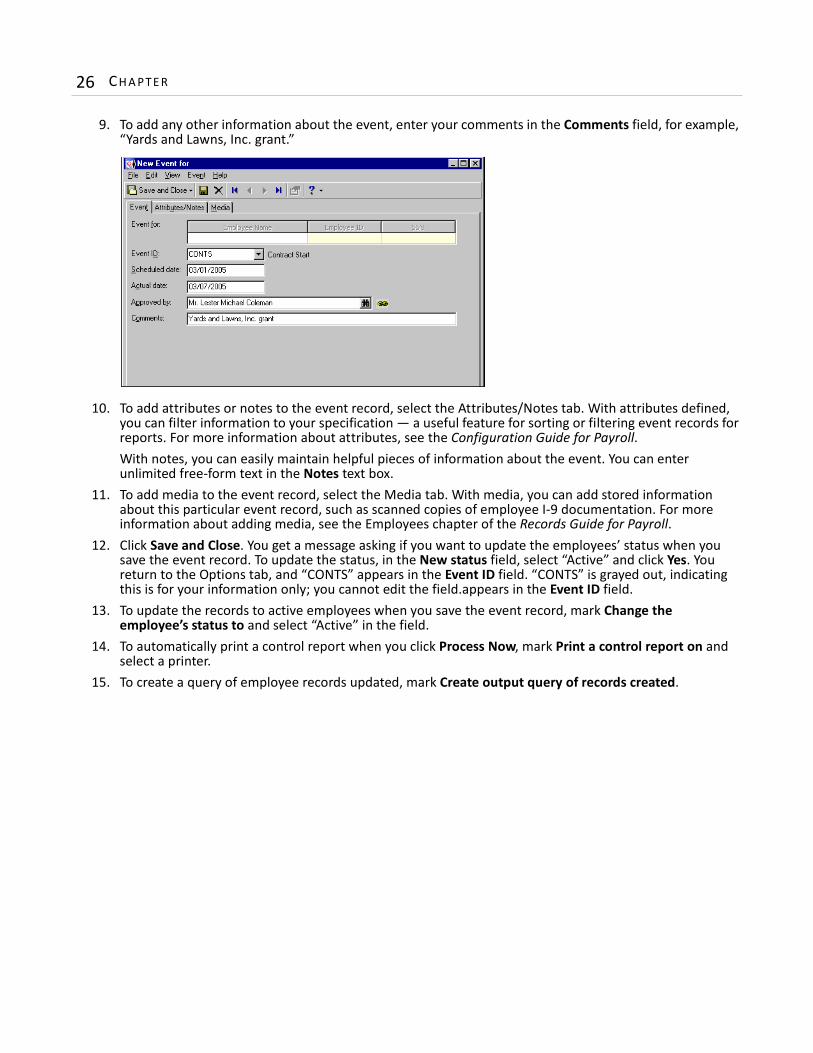
9. To add any other information about the event, enter your comments in the Comments field, for example, “Yards and Lawns, Inc. grant.”
10. To add attributes or notes to the event record, select the Attributes/Notes tab. With attributes defined, you can filter information to your specification — a useful feature for sorting or filtering event records for reports. For more information about attributes, see the Configuration Guide for Payroll.With notes, you can easily maintain helpful pieces of information about the event. You can enter unlimited free-form text in the Notes text box.
11. To add media to the event record, select the Media tab. With media, you can add stored information about this particular event record, such as scanned copies of employee I-9 documentation. For more information about adding media, see the Employees chapter of the Records Guide for Payroll.
12. Click Save and Close. You get a message asking if you want to update the employees’ status when you save the event record. To update the status, in the New status field, select “Active” and click Yes. You return to the Options tab, and “CONTS” appears in the Event ID field. “CONTS” is grayed out, indicating this is for your information only; you cannot edit the field.appears in the Event ID field.
13. To update the records to active employees when you save the event record, mark Change the employee’s status to and select “Active” in the field.
14. To automatically print a control report when you click Process Now, mark Print a control report on and select a printer.
15. To create a query of employee records updated, mark Create output query of records created.
PAY RO L L P RO C ES S I N G B AS I C S 27
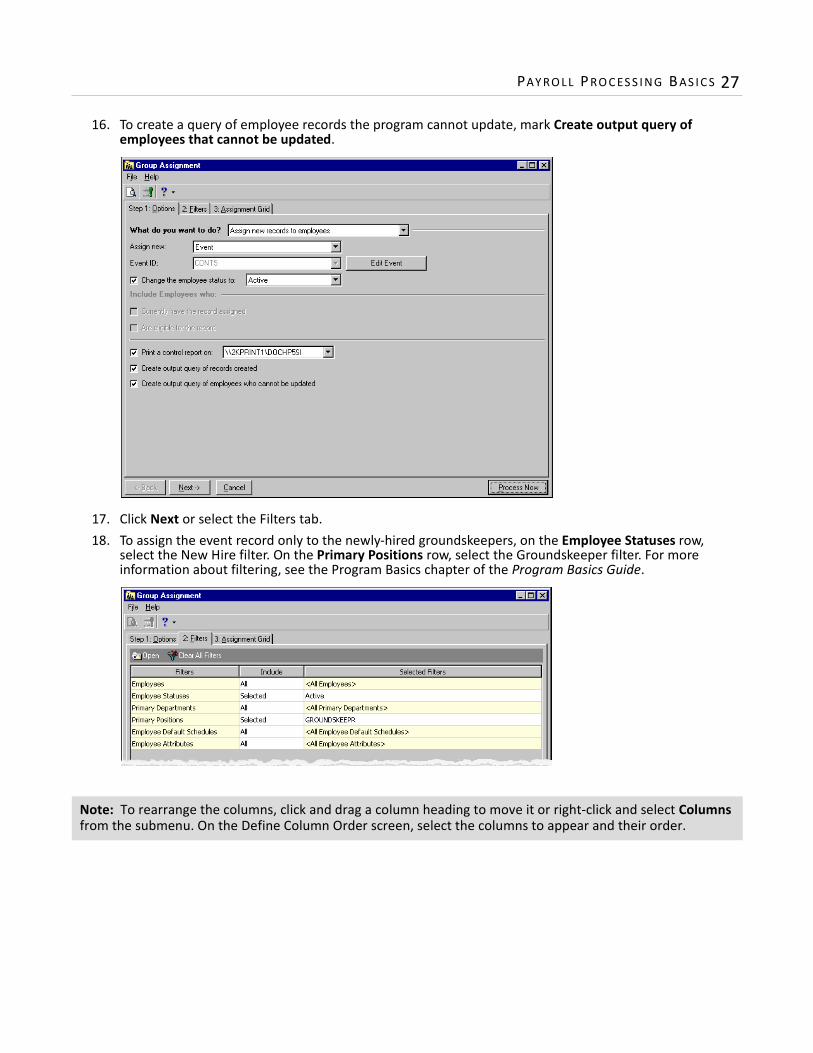
16. To create a query of employee records the program cannot update, mark Create output query of employees that cannot be updated.
17. Click Next or select the Filters tab.18. To assign the event record only to the newly-hired groundskeepers, on the Employee Statuses row,
select the New Hire filter. On the Primary Positions row, select the Groundskeeper filter. For more information about filtering, see the Program Basics chapter of the Program Basics Guide.
Note: To rearrange the columns, click and drag a column heading to move it or right-click and select Columns from the submenu. On the Define Column Order screen, select the columns to appear and their order.

28 CH A PT E R
19. Click Next or select the Assignment Grid tab. Employees who meet the criteria selected on the Options and Filters tabs appear in a grid.
20. Review the information in the grid and edit incorrect information in the Schedule Date, Actual Date, and Approved By columns.In the Include column next to each employee record, mark the checkbox to assign the event record. If other employee information is incorrect, leave the checkbox unmarked and update the employee record from the Records page. For more information, see the Employees chapter of the Records Guide for Payroll.
21. To process this group of records, click Process Now.Because you marked Create an output query of records created on the Options tab, the Save Static Query screen appears so you can name and save the query. For more information about queries, see the Query Guide for Payroll.
The program processes the group assignment. When the processing finishes, a screen appears displaying the number of records processed, number successful, and number of exceptions.
22. Click Close.23. Because you marked Print a control report on on the Options tab, the control report appears and prints
to the printer you selected.24. Close the Group Assignment screen. You return to the Payroll Processing page.
Warning: Employee pay schedules are calculated using the date in the Actual Date field. The Scheduled Date field for the event is not used when calculating employee pay and is simply used to note a scheduled start date, which can differ from the actual start date.
Note: To view the results of the processing, click View Results. The View Results screen appears. To delete an entire record from the process, mark the checkbox in the Delete column. Click OK to continue.
PAY RO L L P RO C ES S I N G B AS I C S 29
Assigning Attendance Plans
When assigning attendance plans to employee records, you select predefined information, such as hours and values that define the carryover levels for each attendance type. An attendance plan can be based on a fiscal year, calendar year, employee start date, or a date you select. Attendance plans are defined in hours, regardless of whether your organization records attendance by days or hours. Attendance plans are defined in Configuration. For more information, see the Configuration Guide for Payroll.
Assigning an attendance plan
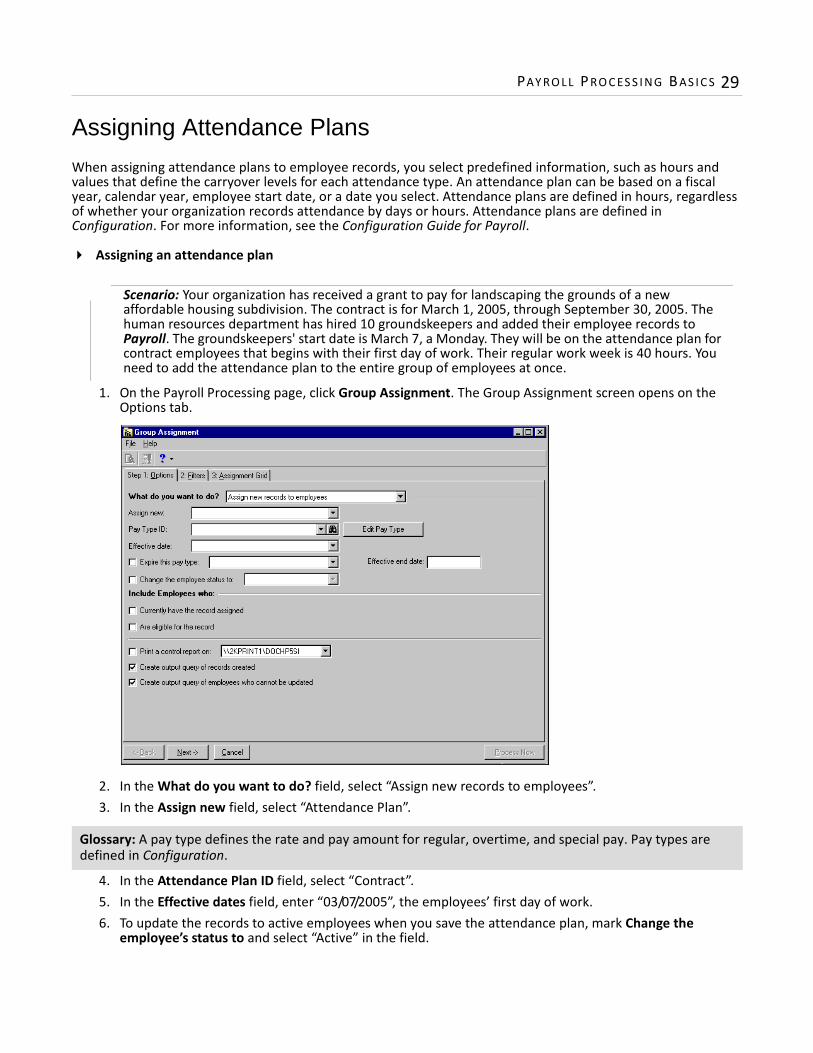
1. On the Payroll Processing page, click Group Assignment. The Group Assignment screen opens on the Options tab.
2. In the What do you want to do? field, select “Assign new records to employees”.3. In the Assign new field, select “Attendance Plan”.
4. In the Attendance Plan ID field, select “Contract”.5. In the Effective dates field, enter “03/07/2005”, the employees’ first day of work.6. To update the records to active employees when you save the attendance plan, mark Change the
employee’s status to and select “Active” in the field.
Glossary: A pay type defines the rate and pay amount for regular, overtime, and special pay. Pay types are defined in Configuration.
Scenario: Your organization has received a grant to pay for landscaping the grounds of a new affordable housing subdivision. The contract is for March 1, 2005, through September 30, 2005. The human resources department has hired 10 groundskeepers and added their employee records to Payroll. The groundskeepers' start date is March 7, a Monday. They will be on the attendance plan for contract employees that begins with their first day of work. Their regular work week is 40 hours. You need to add the attendance plan to the entire group of employees at once.
30 CH A PT E R
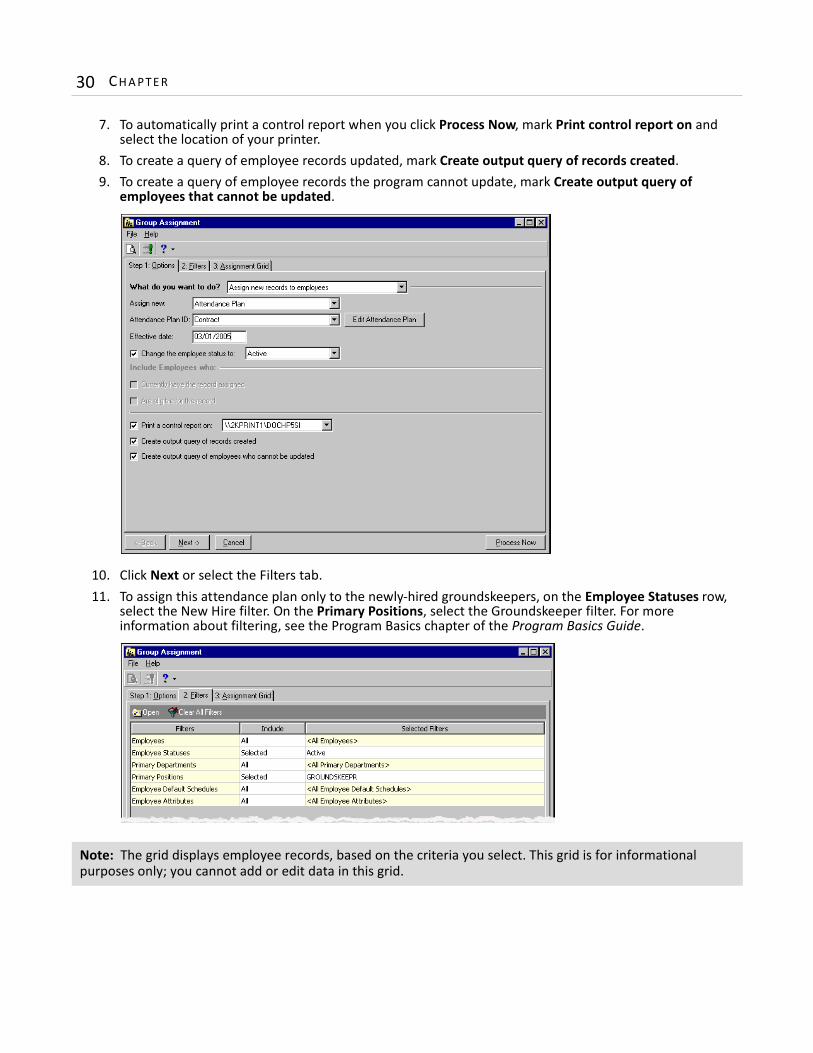
7. To automatically print a control report when you click Process Now, mark Print control report on and select the location of your printer.
8. To create a query of employee records updated, mark Create output query of records created.9. To create a query of employee records the program cannot update, mark Create output query of
employees that cannot be updated.
10. Click Next or select the Filters tab.11. To assign this attendance plan only to the newly-hired groundskeepers, on the Employee Statuses row,
select the New Hire filter. On the Primary Positions, select the Groundskeeper filter. For more information about filtering, see the Program Basics chapter of the Program Basics Guide.
Note: The grid displays employee records, based on the criteria you select. This grid is for informational purposes only; you cannot add or edit data in this grid.
PAY RO L L P RO C ES S I N G B AS I C S 31
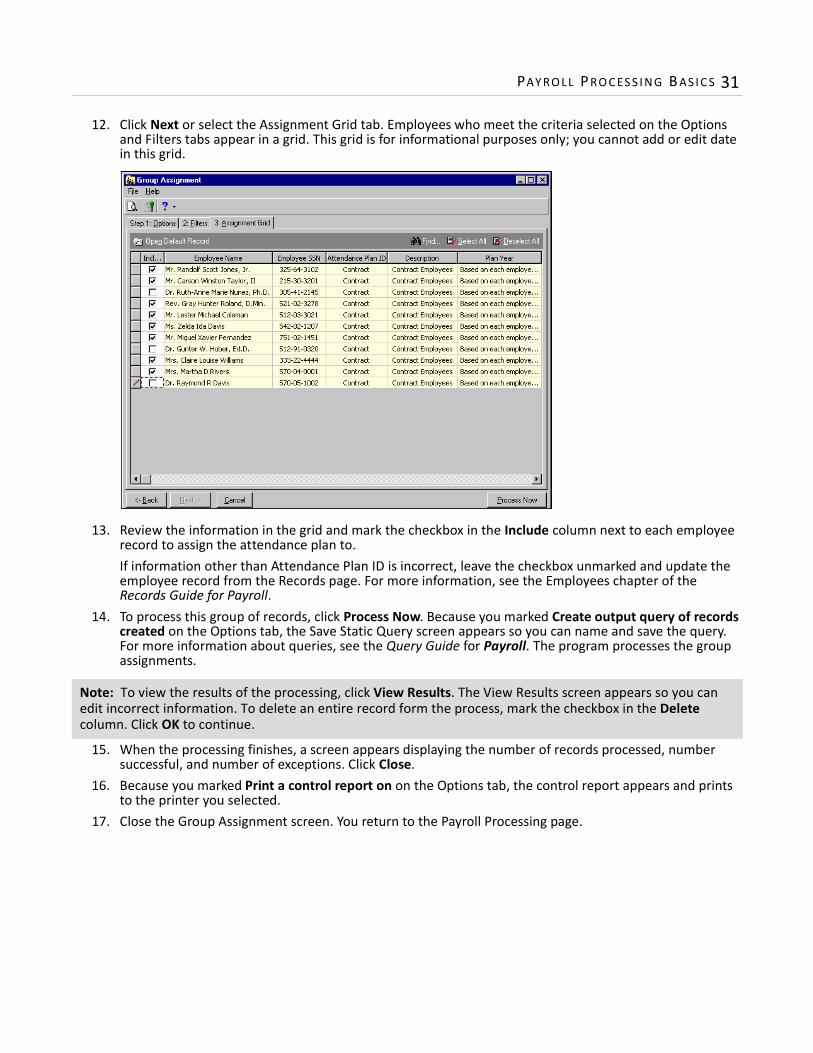
12. Click Next or select the Assignment Grid tab. Employees who meet the criteria selected on the Options and Filters tabs appear in a grid. This grid is for informational purposes only; you cannot add or edit date in this grid.
13. Review the information in the grid and mark the checkbox in the Include column next to each employee record to assign the attendance plan to.If information other than Attendance Plan ID is incorrect, leave the checkbox unmarked and update the employee record from the Records page. For more information, see the Employees chapter of the Records Guide for Payroll.
14. To process this group of records, click Process Now. Because you marked Create output query of records created on the Options tab, the Save Static Query screen appears so you can name and save the query. For more information about queries, see the Query Guide for Payroll. The program processes the group assignments.
15. When the processing finishes, a screen appears displaying the number of records processed, number successful, and number of exceptions. Click Close.
16. Because you marked Print a control report on on the Options tab, the control report appears and prints to the printer you selected.
17. Close the Group Assignment screen. You return to the Payroll Processing page.
Note: To view the results of the processing, click View Results. The View Results screen appears so you can edit incorrect information. To delete an entire record form the process, mark the checkbox in the Delete column. Click OK to continue.

32 CH A PT E R
2chapter
Managing Time and Attendance
Understanding the Enter Time Worked Process . . . . . . . . . . . . . . . . . . . . . . . . . . . . . . . . . . . . . . . . . . . . . . . . . . . 35Opening Batches . . . . . . . . . . . . . . . . . . . . . . . . . . . . . . . . . . . . . . . . . . . . . . . . . . . . . . . . . . . . . . . . . . . . . . . . . . . . . . . 35Entering Time and Attendance . . . . . . . . . . . . . . . . . . . . . . . . . . . . . . . . . . . . . . . . . . . . . . . . . . . . . . . . . . . . . . . . . 37Creating Time and Attendance Batches with the Wizard . . . . . . . . . . . . . . . . . . . . . . . . . . . . . . . . . . . . . . . . . . . . . . 38Creating Batches Manually. . . . . . . . . . . . . . . . . . . . . . . . . . . . . . . . . . . . . . . . . . . . . . . . . . . . . . . . . . . . . . . . . . . . . . . 44Copying Batches . . . . . . . . . . . . . . . . . . . . . . . . . . . . . . . . . . . . . . . . . . . . . . . . . . . . . . . . . . . . . . . . . . . . . . . . . . . . . . . 49Importing Batches . . . . . . . . . . . . . . . . . . . . . . . . . . . . . . . . . . . . . . . . . . . . . . . . . . . . . . . . . . . . . . . . . . . . . . . . . . . 51Importing Batches in Blackbaud File Format . . . . . . . . . . . . . . . . . . . . . . . . . . . . . . . . . . . . . . . . . . . . . . . . . . . . . . . . 51Importing Time and Attendance Batches from Unitime . . . . . . . . . . . . . . . . . . . . . . . . . . . . . . . . . . . . . . . . . . . . . . . 54Maintaining Time and Attendance Batches . . . . . . . . . . . . . . . . . . . . . . . . . . . . . . . . . . . . . . . . . . . . . . . . . . . . . . . 55Calculating Batches . . . . . . . . . . . . . . . . . . . . . . . . . . . . . . . . . . . . . . . . . . . . . . . . . . . . . . . . . . . . . . . . . . . . . . . . . . . . . 56Changing Batch Status . . . . . . . . . . . . . . . . . . . . . . . . . . . . . . . . . . . . . . . . . . . . . . . . . . . . . . . . . . . . . . . . . . . . . . . . . . 59
34 CH A PT E R
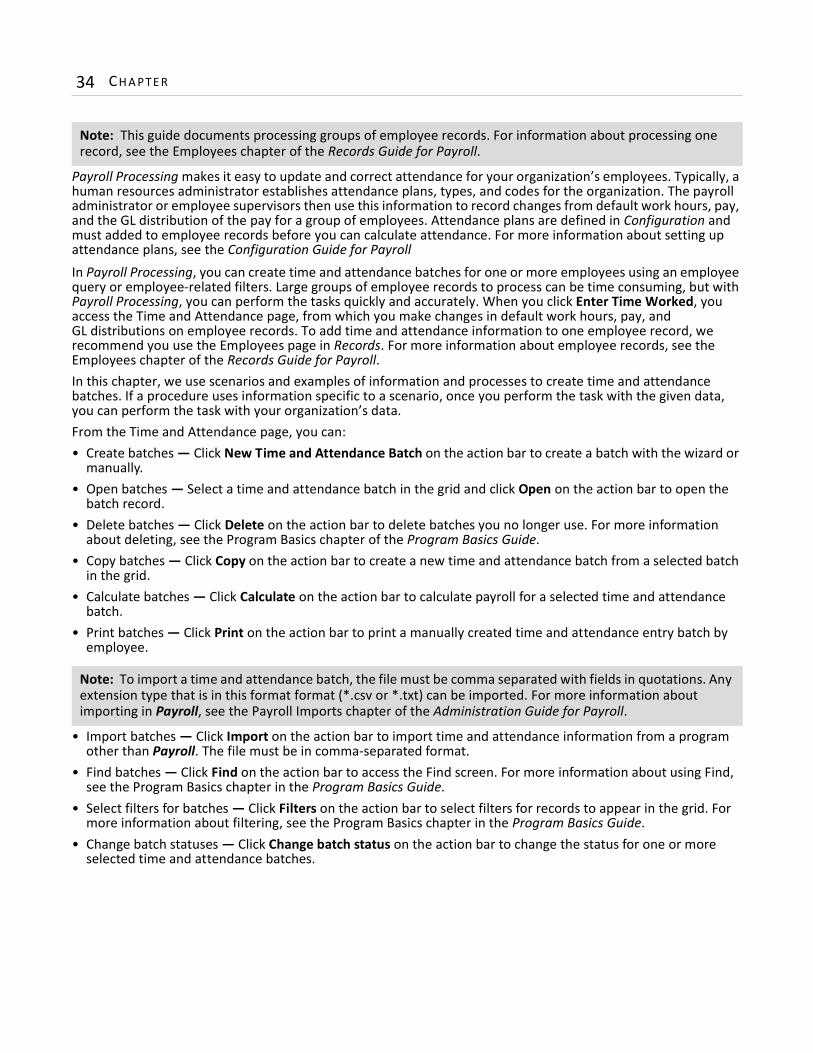
Payroll Processing makes it easy to update and correct attendance for your organization’s employees. Typically, a human resources administrator establishes attendance plans, types, and codes for the organization. The payroll administrator or employee supervisors then use this information to record changes from default work hours, pay, and the GL distribution of the pay for a group of employees. Attendance plans are defined in Configuration and must added to employee records before you can calculate attendance. For more information about setting up attendance plans, see the Configuration Guide for PayrollIn Payroll Processing, you can create time and attendance batches for one or more employees using an employee query or employee-related filters. Large groups of employee records to process can be time consuming, but with Payroll Processing, you can perform the tasks quickly and accurately. When you click Enter Time Worked, you access the Time and Attendance page, from which you make changes in default work hours, pay, and GL distributions on employee records. To add time and attendance information to one employee record, we recommend you use the Employees page in Records. For more information about employee records, see the Employees chapter of the Records Guide for Payroll.In this chapter, we use scenarios and examples of information and processes to create time and attendance batches. If a procedure uses information specific to a scenario, once you perform the task with the given data, you can perform the task with your organization’s data.From the Time and Attendance page, you can:• Create batches — Click New Time and Attendance Batch on the action bar to create a batch with the wizard or
manually.• Open batches — Select a time and attendance batch in the grid and click Open on the action bar to open the
batch record.• Delete batches — Click Delete on the action bar to delete batches you no longer use. For more information
about deleting, see the Program Basics chapter of the Program Basics Guide.• Copy batches — Click Copy on the action bar to create a new time and attendance batch from a selected batch
in the grid.• Calculate batches — Click Calculate on the action bar to calculate payroll for a selected time and attendance
batch.• Print batches — Click Print on the action bar to print a manually created time and attendance entry batch by
employee.
• Import batches — Click Import on the action bar to import time and attendance information from a program other than Payroll. The file must be in comma-separated format.
• Find batches — Click Find on the action bar to access the Find screen. For more information about using Find, see the Program Basics chapter in the Program Basics Guide.
• Select filters for batches — Click Filters on the action bar to select filters for records to appear in the grid. For more information about filtering, see the Program Basics chapter in the Program Basics Guide.
• Change batch statuses — Click Change batch status on the action bar to change the status for one or more selected time and attendance batches.
Note: This guide documents processing groups of employee records. For information about processing one record, see the Employees chapter of the Records Guide for Payroll.
Note: To import a time and attendance batch, the file must be comma separated with fields in quotations. Any extension type that is in this format format (*.csv or *.txt) can be imported. For more information about importing in Payroll, see the Payroll Imports chapter of the Administration Guide for Payroll.

M A N A G I N G T I M E A N D AT T E N D A N C E 35
Understanding the Enter Time Worked Process
To ensure success with your time entry, before you begin entering data into Payroll, confirm that your organization has properly set up the program, using the steps outlined on the Set up Payroll page of Administration. Through Enter Time Worked on the Payroll Processing page, you can create and manage time and attendance for all your organization’s employees. You enter a range of dates for the time worked and employee attendance.A critical step in payroll is recording the hours worked for employees and any deviations from their regularly scheduled time. For example, you may record and calculate hourly employees’ time via time sheets and maintain hours worked for salaried employees for reporting requirements. With Enter Time Worked, you can filter the batch to include selected pay schedules so that all employees’ work hours are included.You enter time and attendance on batch records, which use tabs to organize information. Depending on whether you use the wizard or enter the data manually, you use different tabs. For more information about the time and attendance batch wizard, see “Creating Time and Attendance Batches with the Wizard” on page 38. For more information about the manual time and attendance batch record, see “Creating Batches Manually” on page 44.
Opening Batches
Every time and attendance batch you create in Payroll Processing is saved as a batch record. Payroll creates a batch number, and you enter a description, dates, and status. You can open a time and attendance batch from the grid that appears when you click Enter Time Worked on the Payroll Processing page.If you have a large number of batches in the grid, you can filter them to make searching easier. On the action bar, click Filter to access the Batch Filters screen. You can filter by dates, batch number, and batch status. For more information about filtering, see the Program Basics chapter of the Program Basics Guide.
Opening a batch
Note: We recommend you familiarize yourself with basic program features, such as navigating in the program and filtering records, before entering time and attendance in Payroll. For more information about using the program, see the Program Basics Guide.
Note: Batch status can be Open, Pending Approval, Approved, Partially Calculated, or Calculated.
Note: To rearrange the columns, click and drag a column heading to move it or right-click and select Columns from the submenu. On the Define Column Order screen, select the columns to appear and their order.

36 CH A PT E R
1. On the Payroll Processing page, click Enter Time Worked. The Time and Attendance page appears with batches listed in a grid.
2. In the Batch status field, to narrow the list of batches appearing in the grid, select “Open and calculated batches”, “Open batches only”, or “Calculated batches only”.
Note: To show only the batches you have created, mark Only show my batches. Open batches include those with a status of Open, Pending Approval, and Approved; calculated batches, Calculated and Partially Calculated.
M A N A G I N G T I M E A N D AT T E N D A N C E 37
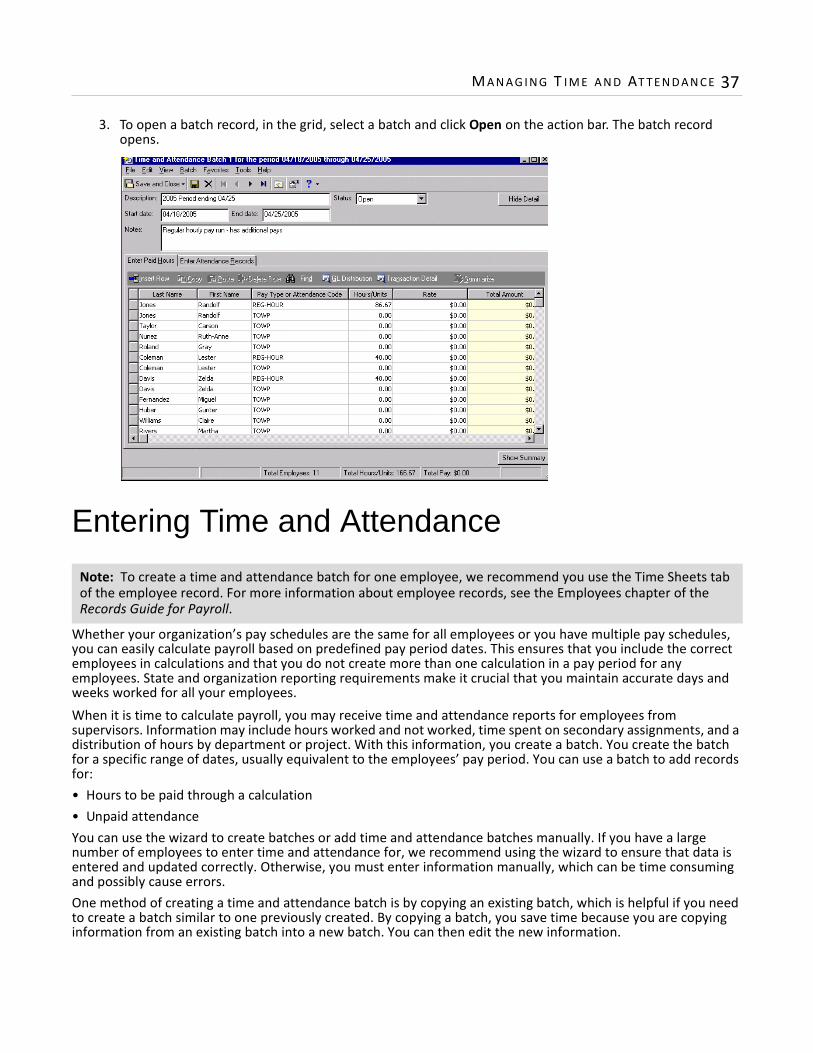
3. To open a batch record, in the grid, select a batch and click Open on the action bar. The batch record opens.
Entering Time and Attendance
Whether your organization’s pay schedules are the same for all employees or you have multiple pay schedules, you can easily calculate payroll based on predefined pay period dates. This ensures that you include the correct employees in calculations and that you do not create more than one calculation in a pay period for any employees. State and organization reporting requirements make it crucial that you maintain accurate days and weeks worked for all your employees.When it is time to calculate payroll, you may receive time and attendance reports for employees from supervisors. Information may include hours worked and not worked, time spent on secondary assignments, and a distribution of hours by department or project. With this information, you create a batch. You create the batch for a specific range of dates, usually equivalent to the employees’ pay period. You can use a batch to add records for:• Hours to be paid through a calculation• Unpaid attendanceYou can use the wizard to create batches or add time and attendance batches manually. If you have a large number of employees to enter time and attendance for, we recommend using the wizard to ensure that data is entered and updated correctly. Otherwise, you must enter information manually, which can be time consuming and possibly cause errors.One method of creating a time and attendance batch is by copying an existing batch, which is helpful if you need to create a batch similar to one previously created. By copying a batch, you save time because you are copying information from an existing batch into a new batch. You can then edit the new information.
Note: To create a time and attendance batch for one employee, we recommend you use the Time Sheets tab of the employee record. For more information about employee records, see the Employees chapter of the Records Guide for Payroll.
38 CH A PT E R
Creating Time and Attendance Batches with the Wizard
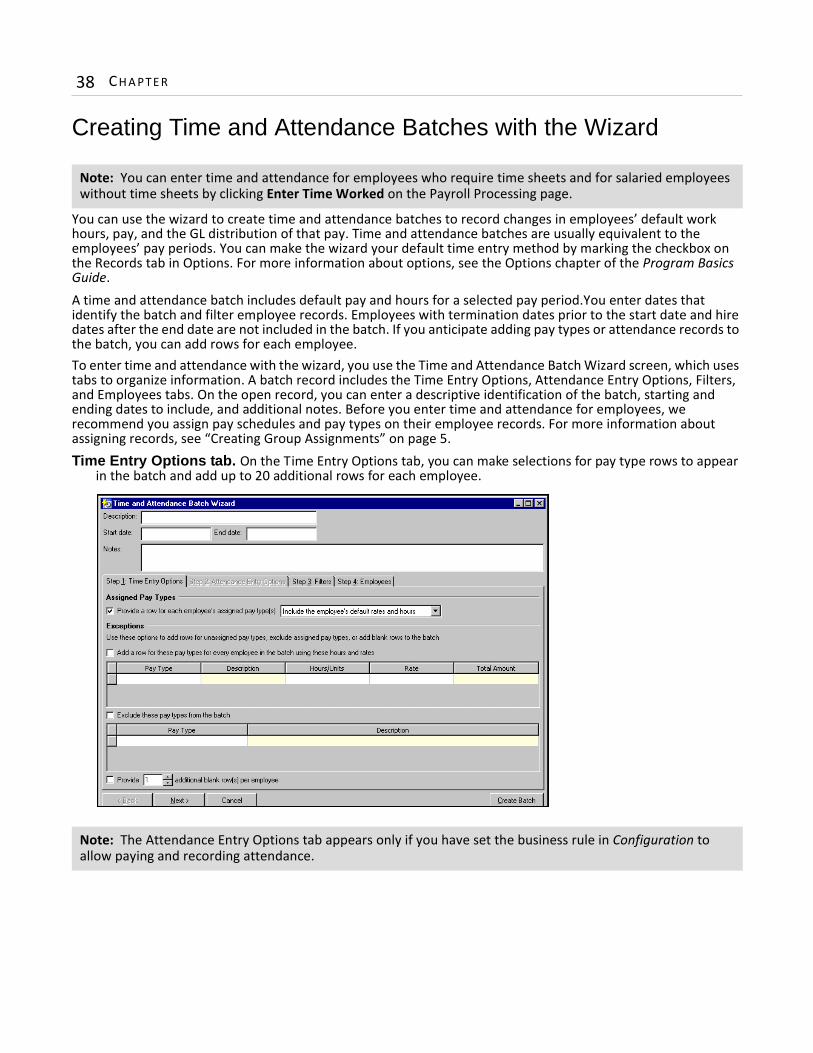
You can use the wizard to create time and attendance batches to record changes in employees’ default work hours, pay, and the GL distribution of that pay. Time and attendance batches are usually equivalent to the employees’ pay periods. You can make the wizard your default time entry method by marking the checkbox on the Records tab in Options. For more information about options, see the Options chapter of the Program Basics Guide.A time and attendance batch includes default pay and hours for a selected pay period.You enter dates that identify the batch and filter employee records. Employees with termination dates prior to the start date and hire dates after the end date are not included in the batch. If you anticipate adding pay types or attendance records to the batch, you can add rows for each employee. To enter time and attendance with the wizard, you use the Time and Attendance Batch Wizard screen, which uses tabs to organize information. A batch record includes the Time Entry Options, Attendance Entry Options, Filters, and Employees tabs. On the open record, you can enter a descriptive identification of the batch, starting and ending dates to include, and additional notes. Before you enter time and attendance for employees, we recommend you assign pay schedules and pay types on their employee records. For more information about assigning records, see “Creating Group Assignments” on page 5.Time Entry Options tab. On the Time Entry Options tab, you can make selections for pay type rows to appear
in the batch and add up to 20 additional rows for each employee.
Note: You can enter time and attendance for employees who require time sheets and for salaried employees without time sheets by clicking Enter Time Worked on the Payroll Processing page.
Note: The Attendance Entry Options tab appears only if you have set the business rule in Configuration to allow paying and recording attendance.

M A N A G I N G T I M E A N D AT T E N D A N C E 39
Attendance Entry Options tab. On the Attendance Entry Options tab, you can make selections for attendance entry rows to appear in the batch and add up to 20 additional rows for each employee. On this tab, you can distribute hours and add attributes and notes. For more information about distributing employee hours, and adding attributes or notes, see the Employees chapter of the Records Guide for Payroll.
Filters tab. On the Filters tab, you can select filters to determine the records to include in or exclude from the batch. You can filter employees records, statuses, attributes, departments, positions, default schedules, and pay types. For more information about filtering, see the Program Basics chapter of the Program Basics Guide.

40 CH A PT E R
Employees tab. On the Employees tab, you select the employee records to include in the batch by marking the checkbox in the Include? column.
Tip: Instead of having to enter employees’ time in and time out, with the time and attendance batch wizard, you need only enter the total hours for the entire pay period by pay type.
M A N A G I N G T I M E A N D AT T E N D A N C E 41
Creating a new batch with the wizard
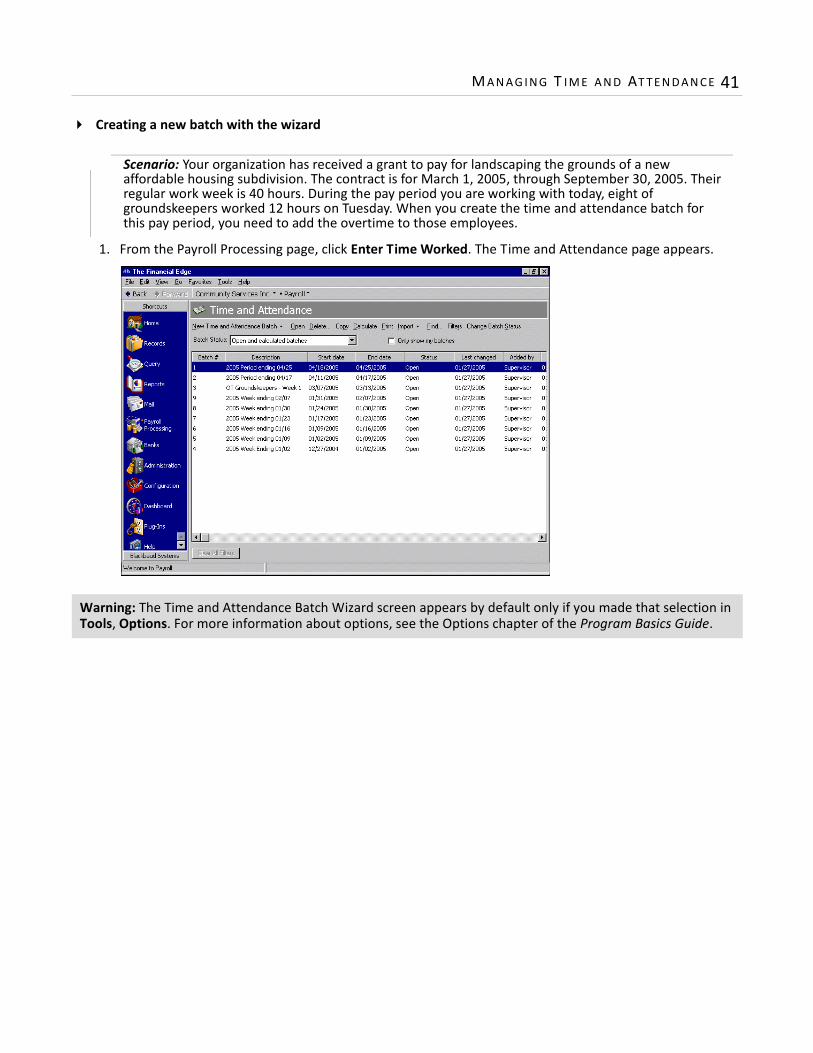
1. From the Payroll Processing page, click Enter Time Worked. The Time and Attendance page appears.
Warning: The Time and Attendance Batch Wizard screen appears by default only if you made that selection in Tools, Options. For more information about options, see the Options chapter of the Program Basics Guide.
Scenario: Your organization has received a grant to pay for landscaping the grounds of a new affordable housing subdivision. The contract is for March 1, 2005, through September 30, 2005. Their regular work week is 40 hours. During the pay period you are working with today, eight of groundskeepers worked 12 hours on Tuesday. When you create the time and attendance batch for this pay period, you need to add the overtime to those employees.

42 CH A PT E R
2. On the action bar, click New Time and Attendance Batch. The Time and Attendance Batch Wizard screen appears.
3. In the Description field, enter a description for this batch, for example, “2005 Period ending 04/17”.4. In the Start date and End date fields, enter the dates assigned to this batch, for example, “4/11/2005”
and “04/17/2005”.Start and end dates identify the batch and filter employee records. Creating the batch excludes employees with hire dates after the end date or termination dates prior to the start date. Once you create the batch, you can add rows to the batch and select any employee record from the batch.
5. In the Notes field, enter any notes to associate with this batch, for example, “Regular hourly pay run - has additional pays”.
6. On the Time Entry Options tab, in the Assigned Pay Types frame, mark Provide a row for each employee’s assigned pay type(s). In the field on the right, select “Include the employee’s default rates and hours”.
7. To add a row in the batch so you can enter overtime pay, in the Exceptions frame, mark Add a row for these pay types for every employee in the batch using these hours and rates. If the employee record already has the pay type you add, the program overwrites the default hours and rate with the information you enter; it does not add an additional row.
8. In the grid, in the Pay Type column, select “OT”. “OT-Half”, as defined in Configuration for the pay type, appears in the Description column.
9. To add four overtime hours, in the Hours/Units column, enter “4”.
Warning: If an employee record already has the pay type assigned, the program overwrites the default hours and rates with the hours and rates you select. The program adds a row in the batch for the pay type only if the employee does not already have the pay type assigned to his record.
Note: If you are entering additional pay types and hours, mark Provide [ ] additional blank row(s) per employee so you can manually select a pay type for each employee.
M A N A G I N G T I M E A N D AT T E N D A N C E 43
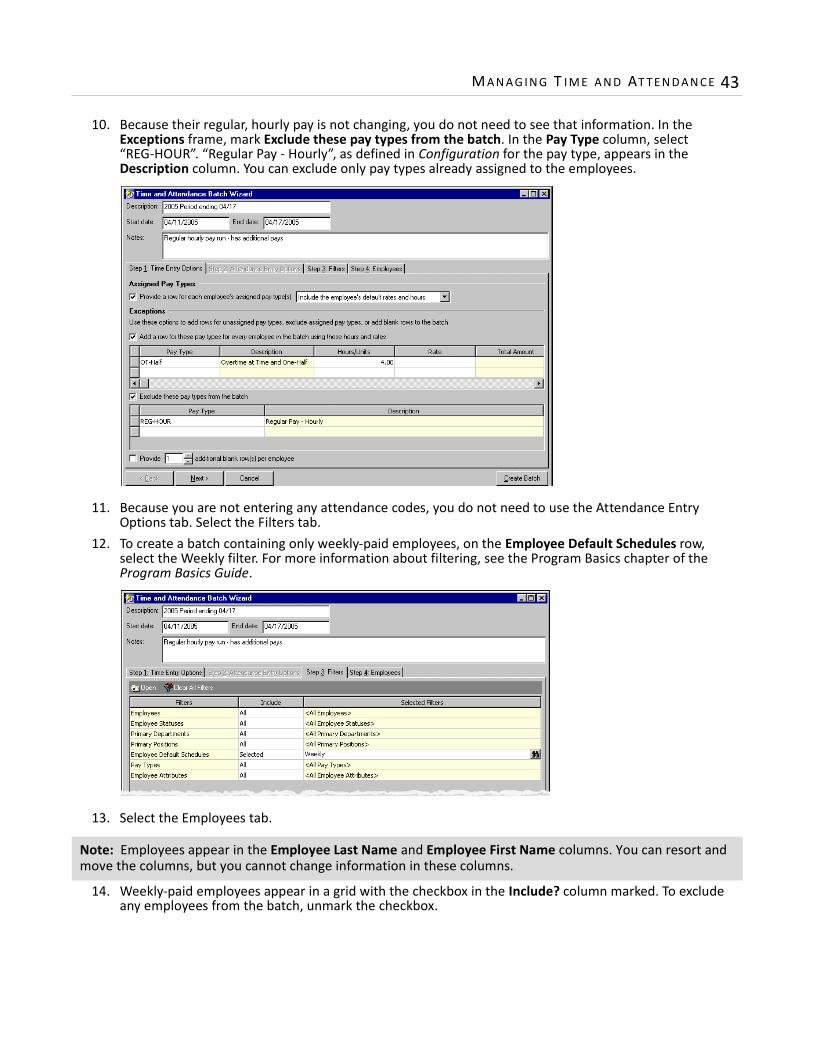
10. Because their regular, hourly pay is not changing, you do not need to see that information. In the Exceptions frame, mark Exclude these pay types from the batch. In the Pay Type column, select “REG-HOUR”. “Regular Pay - Hourly”, as defined in Configuration for the pay type, appears in the Description column. You can exclude only pay types already assigned to the employees.
11. Because you are not entering any attendance codes, you do not need to use the Attendance Entry Options tab. Select the Filters tab.
12. To create a batch containing only weekly-paid employees, on the Employee Default Schedules row, select the Weekly filter. For more information about filtering, see the Program Basics chapter of the Program Basics Guide.
13. Select the Employees tab.
14. Weekly-paid employees appear in a grid with the checkbox in the Include? column marked. To exclude any employees from the batch, unmark the checkbox.
Note: Employees appear in the Employee Last Name and Employee First Name columns. You can resort and move the columns, but you cannot change information in these columns.
44 CH A PT E R
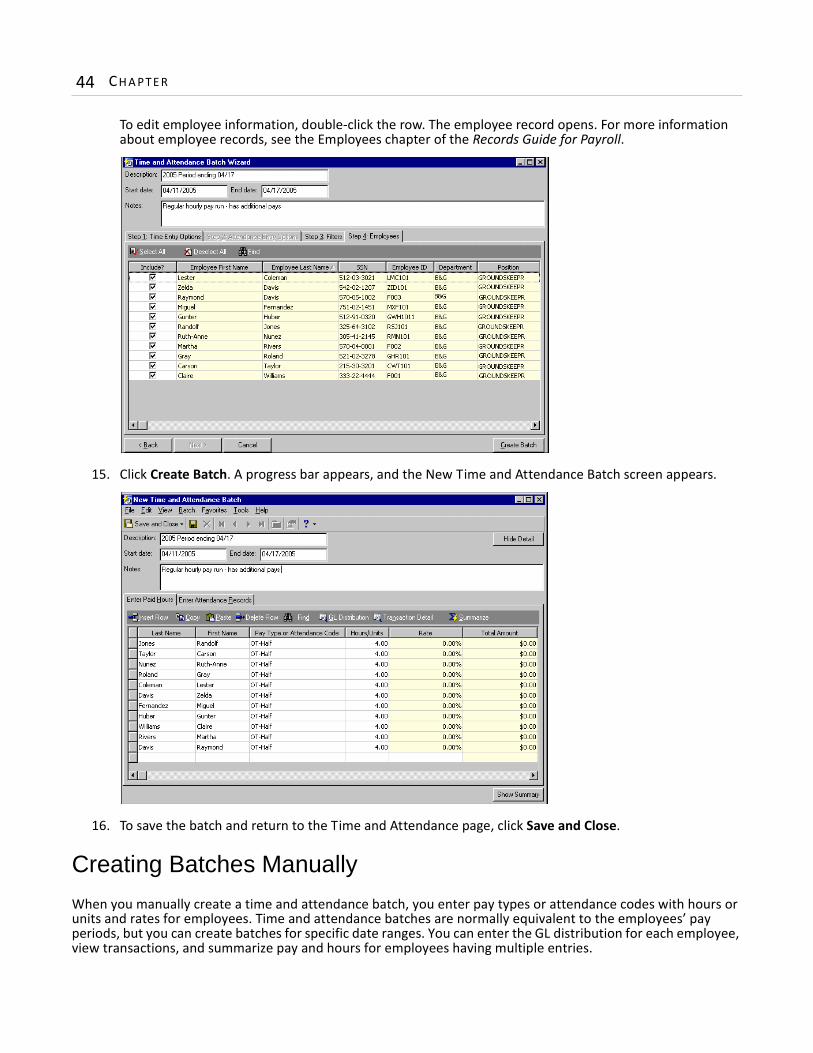
To edit employee information, double-click the row. The employee record opens. For more information about employee records, see the Employees chapter of the Records Guide for Payroll.
15. Click Create Batch. A progress bar appears, and the New Time and Attendance Batch screen appears.
16. To save the batch and return to the Time and Attendance page, click Save and Close.
Creating Batches Manually
When you manually create a time and attendance batch, you enter pay types or attendance codes with hours or units and rates for employees. Time and attendance batches are normally equivalent to the employees’ pay periods, but you can create batches for specific date ranges. You can enter the GL distribution for each employee, view transactions, and summarize pay and hours for employees having multiple entries.
M A N A G I N G T I M E A N D AT T E N D A N C E 45
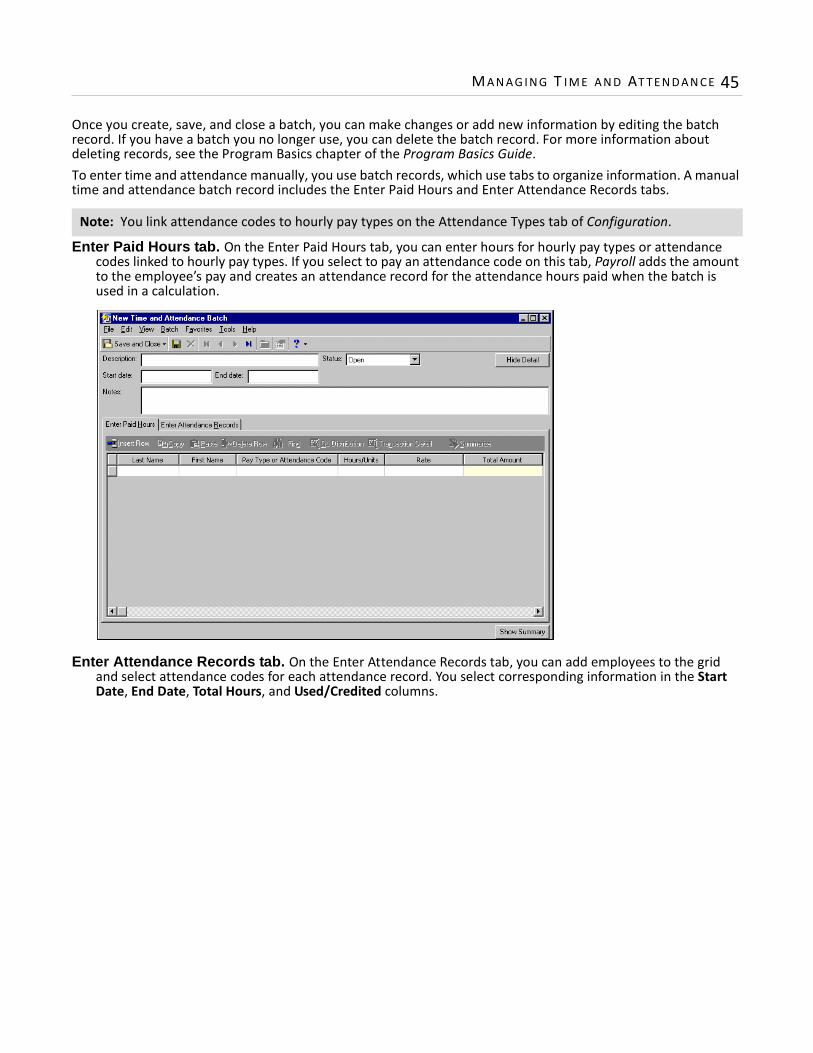
Once you create, save, and close a batch, you can make changes or add new information by editing the batch record. If you have a batch you no longer use, you can delete the batch record. For more information about deleting records, see the Program Basics chapter of the Program Basics Guide.To enter time and attendance manually, you use batch records, which use tabs to organize information. A manual time and attendance batch record includes the Enter Paid Hours and Enter Attendance Records tabs.
Enter Paid Hours tab. On the Enter Paid Hours tab, you can enter hours for hourly pay types or attendance codes linked to hourly pay types. If you select to pay an attendance code on this tab, Payroll adds the amount to the employee’s pay and creates an attendance record for the attendance hours paid when the batch is used in a calculation.
Enter Attendance Records tab. On the Enter Attendance Records tab, you can add employees to the grid and select attendance codes for each attendance record. You select corresponding information in the Start Date, End Date, Total Hours, and Used/Credited columns.
Note: You link attendance codes to hourly pay types on the Attendance Types tab of Configuration.
46 CH A PT E R
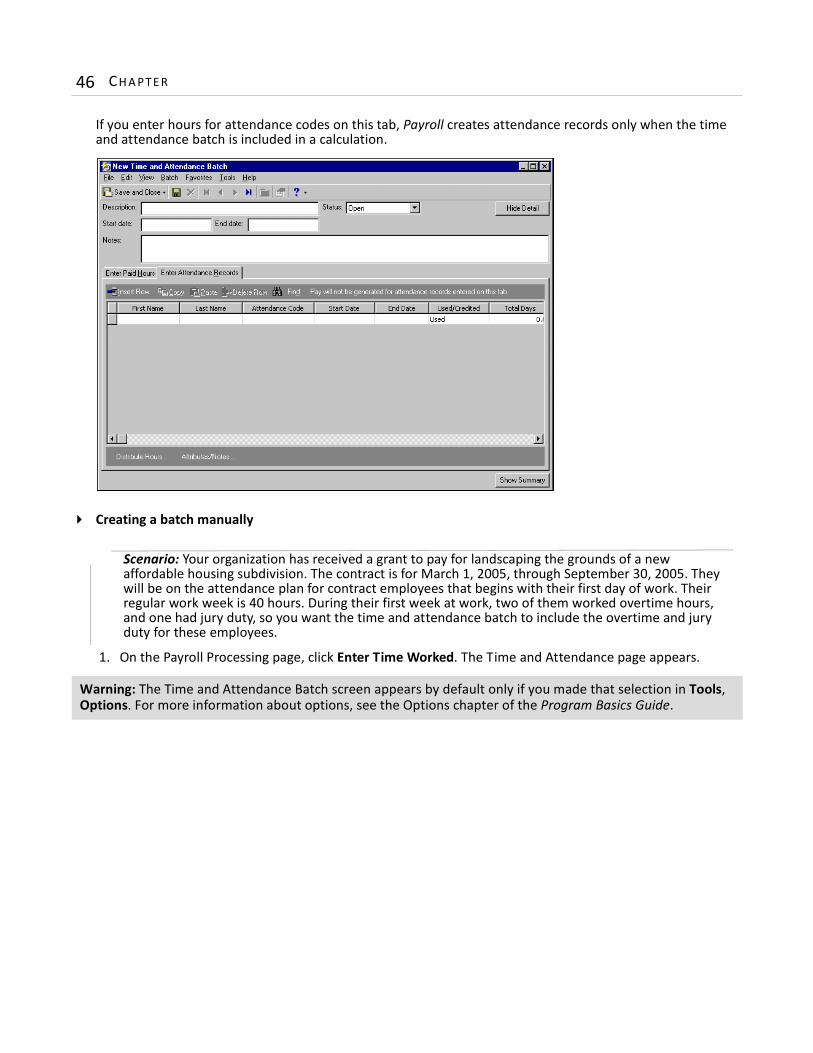
If you enter hours for attendance codes on this tab, Payroll creates attendance records only when the time and attendance batch is included in a calculation.
Creating a batch manually
1. On the Payroll Processing page, click Enter Time Worked. The Time and Attendance page appears.
Warning: The Time and Attendance Batch screen appears by default only if you made that selection in Tools, Options. For more information about options, see the Options chapter of the Program Basics Guide.
Scenario: Your organization has received a grant to pay for landscaping the grounds of a new affordable housing subdivision. The contract is for March 1, 2005, through September 30, 2005. They will be on the attendance plan for contract employees that begins with their first day of work. Their regular work week is 40 hours. During their first week at work, two of them worked overtime hours, and one had jury duty, so you want the time and attendance batch to include the overtime and jury duty for these employees.
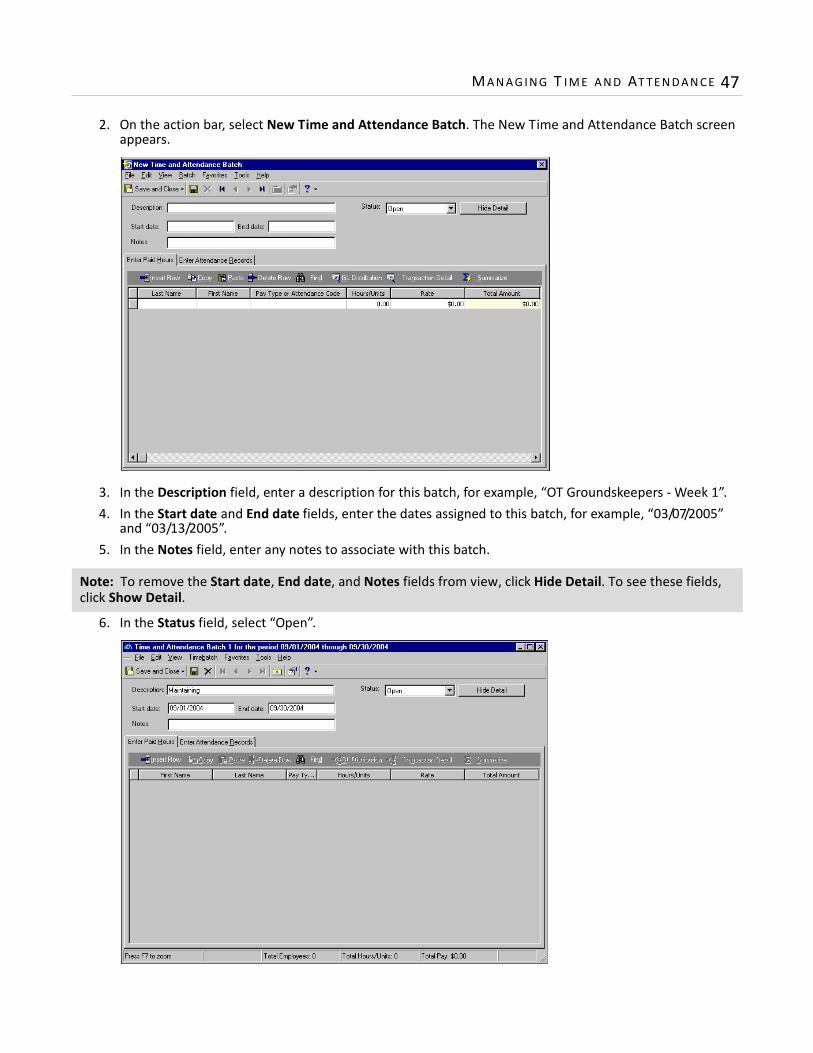
M A N A G I N G T I M E A N D AT T E N D A N C E 47
2. On the action bar, select New Time and Attendance Batch. The New Time and Attendance Batch screen appears.
3. In the Description field, enter a description for this batch, for example, “OT Groundskeepers - Week 1”.4. In the Start date and End date fields, enter the dates assigned to this batch, for example, “03/07/2005”
and “03/13/2005”.5. In the Notes field, enter any notes to associate with this batch.
6. In the Status field, select “Open”.
Note: To remove the Start date, End date, and Notes fields from view, click Hide Detail. To see these fields, click Show Detail.

48 CH A PT E R
7. To select employees for the batch, in the Last Name field, click the binoculars.8. To add an employee to the batch, on the action bar, click Insert Row.
9. In the grid, in the First Name or Last Name columns, enter the name of an employee you are entering paid time for. To search for an employee record, click the binoculars.
10. To add overtime pay, in the Pay Type or Attendance Code column, select “OT-PER”. Pay types and attendance codes are defined in Configuration.
11. To enter a value for the selected pay type or attendance code, in the Hours/Units column, enter “4”, the number of additional hours the selected employee worked.
12. To enter the jury duty absence, select the Enter Attendance Records tab.
Note: To rearrange the columns, click and drag a column heading to move it or right-click and select Columns from the submenu. On the Define Column Order screen, select the columns to appear and their order.
Note: To view a summary of an individual employee’s time and attendance information, select the employee in the grid. Pay type, attendance code and description, hours and equivalent days, and total amount appear in the grid at the bottom of the Enter Paid Hours tab. To hide the summary, click Hide Summary.
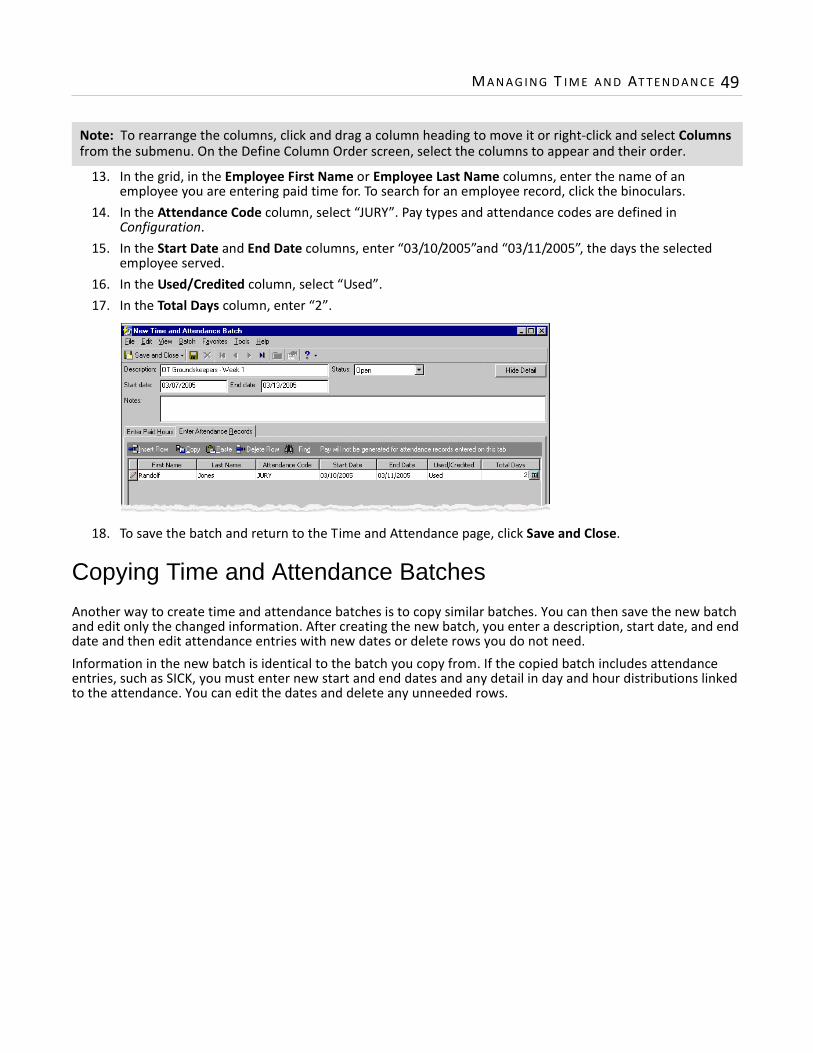
M A N A G I N G T I M E A N D AT T E N D A N C E 49
13. In the grid, in the Employee First Name or Employee Last Name columns, enter the name of an employee you are entering paid time for. To search for an employee record, click the binoculars.
14. In the Attendance Code column, select “JURY”. Pay types and attendance codes are defined in Configuration.
15. In the Start Date and End Date columns, enter “03/10/2005”and “03/11/2005”, the days the selected employee served.
16. In the Used/Credited column, select “Used”.17. In the Total Days column, enter “2”.
18. To save the batch and return to the Time and Attendance page, click Save and Close.
Copying Time and Attendance Batches
Another way to create time and attendance batches is to copy similar batches. You can then save the new batch and edit only the changed information. After creating the new batch, you enter a description, start date, and end date and then edit attendance entries with new dates or delete rows you do not need.Information in the new batch is identical to the batch you copy from. If the copied batch includes attendance entries, such as SICK, you must enter new start and end dates and any detail in day and hour distributions linked to the attendance. You can edit the dates and delete any unneeded rows.
Note: To rearrange the columns, click and drag a column heading to move it or right-click and select Columns from the submenu. On the Define Column Order screen, select the columns to appear and their order.

50 CH A PT E R
Copying a batchScenario: You want to create a batch for first-year employees who are on a different attendance plan from your organization’s regular, full-time employees. To save time, you will copy a full-time employees batch and edit the new batch to include first-year employees hired during the pay period.1. On the Payroll Processing page, click Enter Time Worked. The Time and Attendance page appears with
batches in a grid. In the grid, select a batch and click Copy on the action bar. The New Time and Attendance Batch screen appears.
2. In the Description field, enter a description for this batch, for example, “New Hires - Period 1”.3. In the Start date and End date fields, enter the dates assigned to the batch, for example, “03/07/2005”
and “03/13/2005”.
4. In the Notes field, enter any notes to associate with the batch.5. In the Status field, select “Open”.
6. To save the batch and return to the Time and Attendance page, click Save and Close.
Note: To remove the Start date, End date, and Notes fields from view, click Hide Detail. To see these fields, click Show Detail.
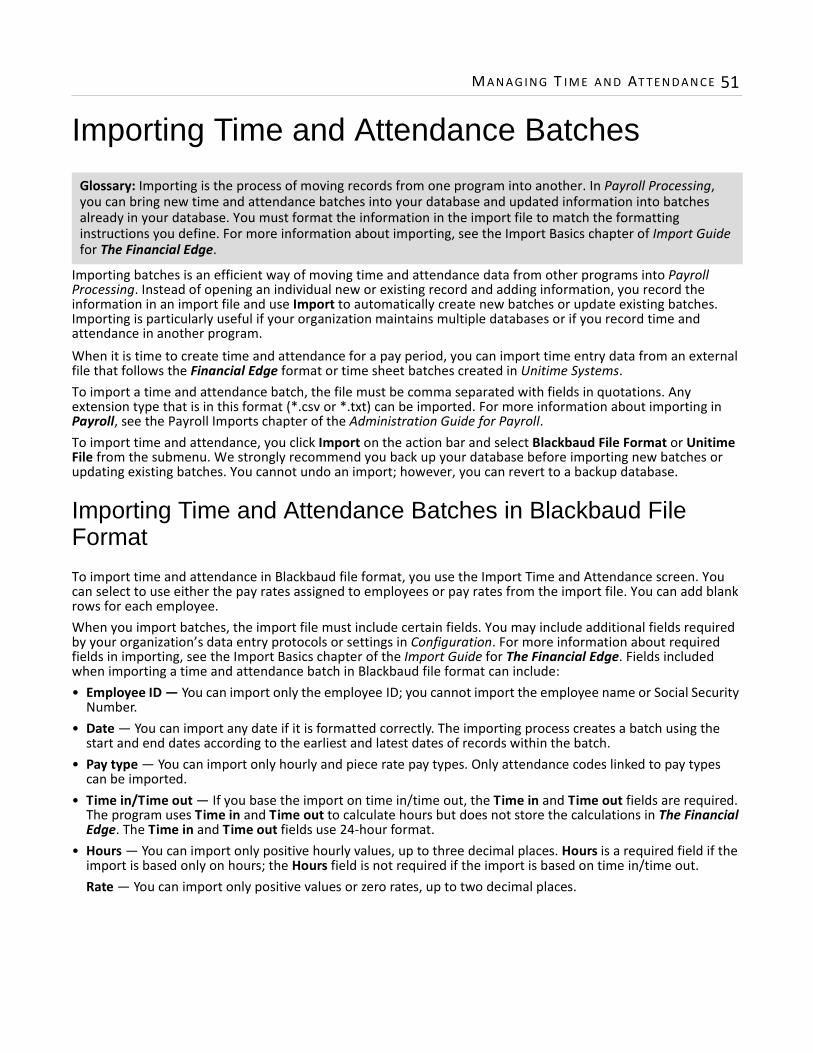
M A N A G I N G T I M E A N D AT T E N D A N C E 51
Importing Time and Attendance Batches
Importing batches is an efficient way of moving time and attendance data from other programs into Payroll Processing. Instead of opening an individual new or existing record and adding information, you record the information in an import file and use Import to automatically create new batches or update existing batches. Importing is particularly useful if your organization maintains multiple databases or if you record time and attendance in another program.When it is time to create time and attendance for a pay period, you can import time entry data from an external file that follows the Financial Edge format or time sheet batches created in Unitime Systems. To import a time and attendance batch, the file must be comma separated with fields in quotations. Any extension type that is in this format (*.csv or *.txt) can be imported. For more information about importing in Payroll, see the Payroll Imports chapter of the Administration Guide for Payroll.To import time and attendance, you click Import on the action bar and select Blackbaud File Format or Unitime File from the submenu. We strongly recommend you back up your database before importing new batches or updating existing batches. You cannot undo an import; however, you can revert to a backup database.
Importing Time and Attendance Batches in Blackbaud File Format
To import time and attendance in Blackbaud file format, you use the Import Time and Attendance screen. You can select to use either the pay rates assigned to employees or pay rates from the import file. You can add blank rows for each employee.When you import batches, the import file must include certain fields. You may include additional fields required by your organization’s data entry protocols or settings in Configuration. For more information about required fields in importing, see the Import Basics chapter of the Import Guide for The Financial Edge. Fields included when importing a time and attendance batch in Blackbaud file format can include:• Employee ID — You can import only the employee ID; you cannot import the employee name or Social Security
Number.• Date — You can import any date if it is formatted correctly. The importing process creates a batch using the
start and end dates according to the earliest and latest dates of records within the batch.• Pay type — You can import only hourly and piece rate pay types. Only attendance codes linked to pay types
can be imported.• Time in/Time out — If you base the import on time in/time out, the Time in and Time out fields are required.
The program uses Time in and Time out to calculate hours but does not store the calculations in The Financial Edge. The Time in and Time out fields use 24-hour format.
• Hours — You can import only positive hourly values, up to three decimal places. Hours is a required field if the import is based only on hours; the Hours field is not required if the import is based on time in/time out.Rate — You can import only positive values or zero rates, up to two decimal places.
Glossary: Importing is the process of moving records from one program into another. In Payroll Processing, you can bring new time and attendance batches into your database and updated information into batches already in your database. You must format the information in the import file to match the formatting instructions you define. For more information about importing, see the Import Basics chapter of Import Guide for The Financial Edge.
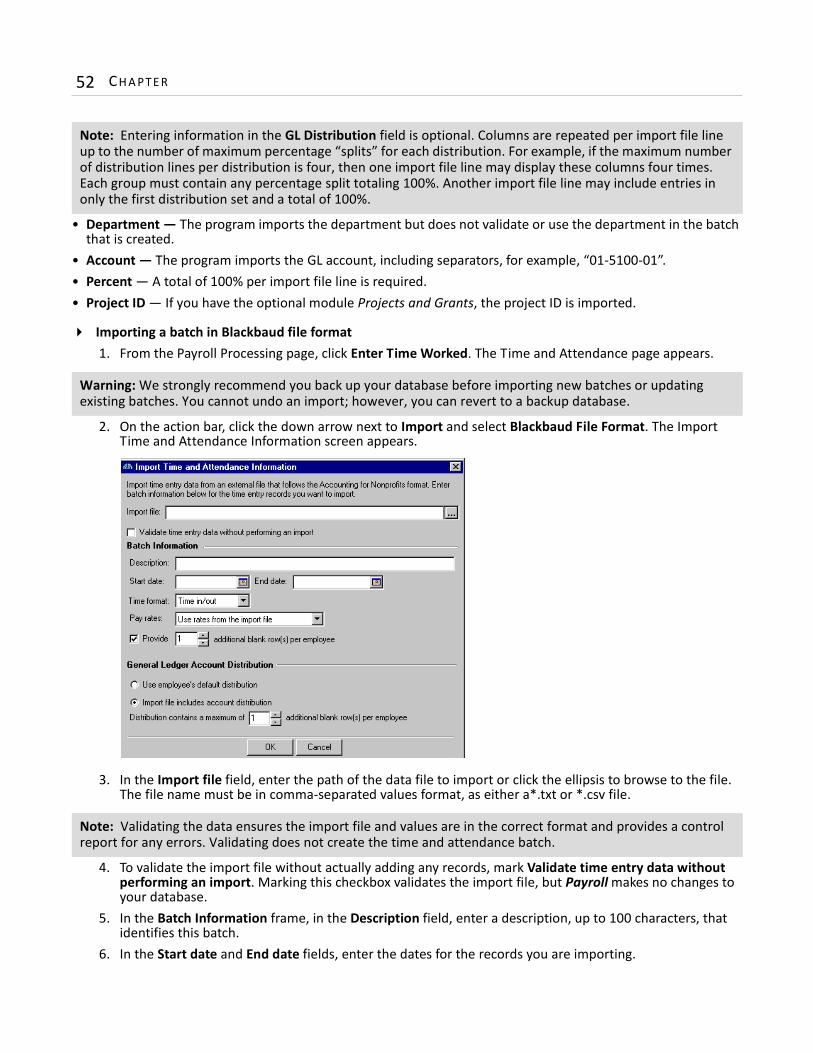
52 CH A PT E R
• Department — The program imports the department but does not validate or use the department in the batch that is created.
• Account — The program imports the GL account, including separators, for example, “01-5100-01”.• Percent — A total of 100% per import file line is required.• Project ID — If you have the optional module Projects and Grants, the project ID is imported.
Importing a batch in Blackbaud file format1. From the Payroll Processing page, click Enter Time Worked. The Time and Attendance page appears.
2. On the action bar, click the down arrow next to Import and select Blackbaud File Format. The Import Time and Attendance Information screen appears.
3. In the Import file field, enter the path of the data file to import or click the ellipsis to browse to the file. The file name must be in comma-separated values format, as either a*.txt or *.csv file.
4. To validate the import file without actually adding any records, mark Validate time entry data without performing an import. Marking this checkbox validates the import file, but Payroll makes no changes to your database.
5. In the Batch Information frame, in the Description field, enter a description, up to 100 characters, that identifies this batch.
6. In the Start date and End date fields, enter the dates for the records you are importing.
Note: Entering information in the GL Distribution field is optional. Columns are repeated per import file line up to the number of maximum percentage “splits” for each distribution. For example, if the maximum number of distribution lines per distribution is four, then one import file line may display these columns four times. Each group must contain any percentage split totaling 100%. Another import file line may include entries in only the first distribution set and a total of 100%.
Warning: We strongly recommend you back up your database before importing new batches or updating existing batches. You cannot undo an import; however, you can revert to a backup database.
Note: Validating the data ensures the import file and values are in the correct format and provides a control report for any errors. Validating does not create the time and attendance batch.
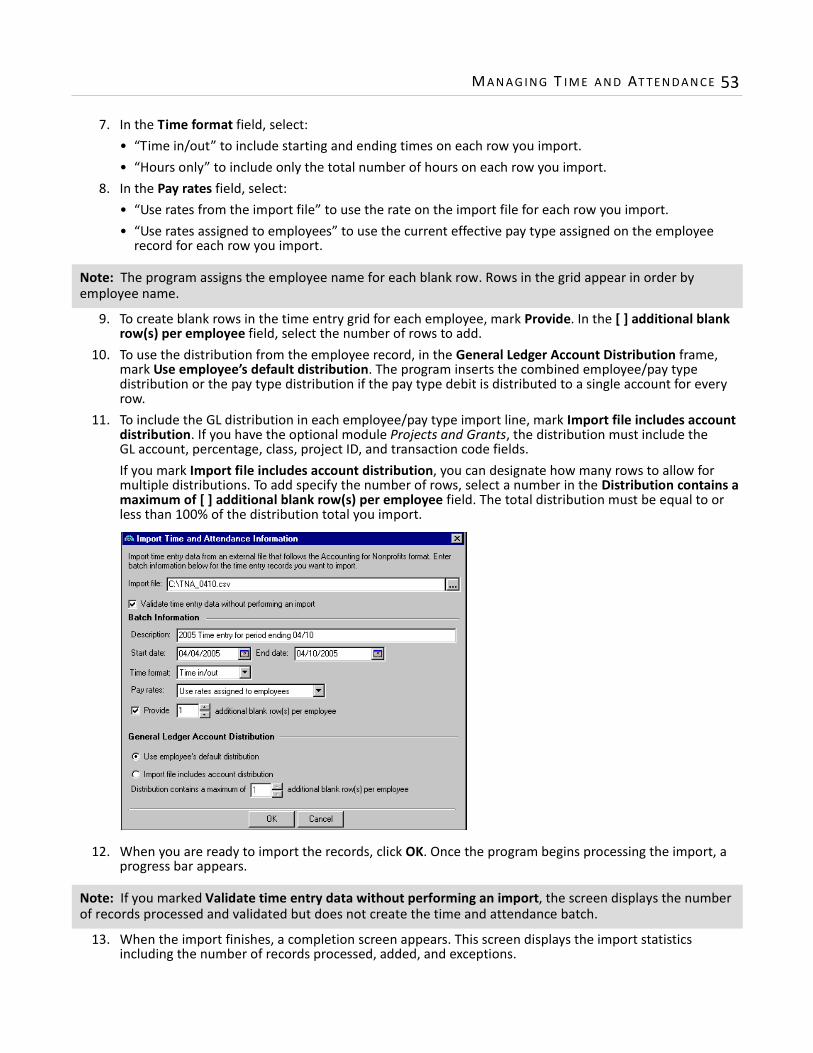
M A N A G I N G T I M E A N D AT T E N D A N C E 53
7. In the Time format field, select:• “Time in/out” to include starting and ending times on each row you import.• “Hours only” to include only the total number of hours on each row you import.
8. In the Pay rates field, select:• “Use rates from the import file” to use the rate on the import file for each row you import. • “Use rates assigned to employees” to use the current effective pay type assigned on the employee
record for each row you import.
9. To create blank rows in the time entry grid for each employee, mark Provide. In the [ ] additional blank row(s) per employee field, select the number of rows to add.
10. To use the distribution from the employee record, in the General Ledger Account Distribution frame, mark Use employee’s default distribution. The program inserts the combined employee/pay type distribution or the pay type distribution if the pay type debit is distributed to a single account for every row.
11. To include the GL distribution in each employee/pay type import line, mark Import file includes account distribution. If you have the optional module Projects and Grants, the distribution must include the GL account, percentage, class, project ID, and transaction code fields.If you mark Import file includes account distribution, you can designate how many rows to allow for multiple distributions. To add specify the number of rows, select a number in the Distribution contains a maximum of [ ] additional blank row(s) per employee field. The total distribution must be equal to or less than 100% of the distribution total you import.
12. When you are ready to import the records, click OK. Once the program begins processing the import, a progress bar appears.
13. When the import finishes, a completion screen appears. This screen displays the import statistics including the number of records processed, added, and exceptions.
Note: The program assigns the employee name for each blank row. Rows in the grid appear in order by employee name.
Note: If you marked Validate time entry data without performing an import, the screen displays the number of records processed and validated but does not create the time and attendance batch.

54 CH A PT E R
14. To view the control report, click View control report. The Import Time and Attendance control report appears. The report creates exceptions for employee time and attendance records:• If the employee hire date is after the time and attendance batch end date, or• The employee termination date is prior to the time and attendance batch start date.
15. When you finish viewing the report, close the report. The new imported time and attendance data appears in the grid on the Time and Attendance page.
Importing Time and Attendance Batches from Unitime
Payroll can use information from Unitime Systems to create time and attendance batches. Visit www.unitime.com for more information about Unitime Systems. From Unitime, you can import only hourly and piece rate pay types and attendance codes linked to pay types.When you import time and attendance batches from Unitime Systems, the import file must include certain fields. You may include additional fields required by your organization’s data entry protocols or settings in Configuration. For more information about required fields in importing, see the Import Basics chapter of the Import Guide for The Financial Edge. Fields included when importing a time and attendance batch from Unitime Systems include:• Employee ID — You can import only the employee ID, and not the name or Social Security number.• Date — You can import any date if it is formatted correctly. The importing process creates a batch using the
start and end dates according to the earliest and latest dates of records within the batch.• Pay type — You can import only hourly and piece rate pay types from Unitime. Only attendance codes linked
to pay types can be imported.• Hours — You can import only positive hourly values, up to three decimal places. Hours is a required field if the
import is based on hours only; the Hours field is not required if the import is based on time in/time out.• Rate — You can import only positive or zero rates, up to two decimal places.
Importing a time and attendance batch from Unitime Systems1. From the Payroll Processing page, click Enter Time Worked. The Time and Attendance page appears.
Warning: You can import a Unitime file only if you have the program Unitime Systems. Visit www.unitime.com for more information about Unitime Systems.
Warning: We strongly recommend you back up your database before importing new batches or updating existing batches. You cannot undo an import; however, you can revert to a backup database.
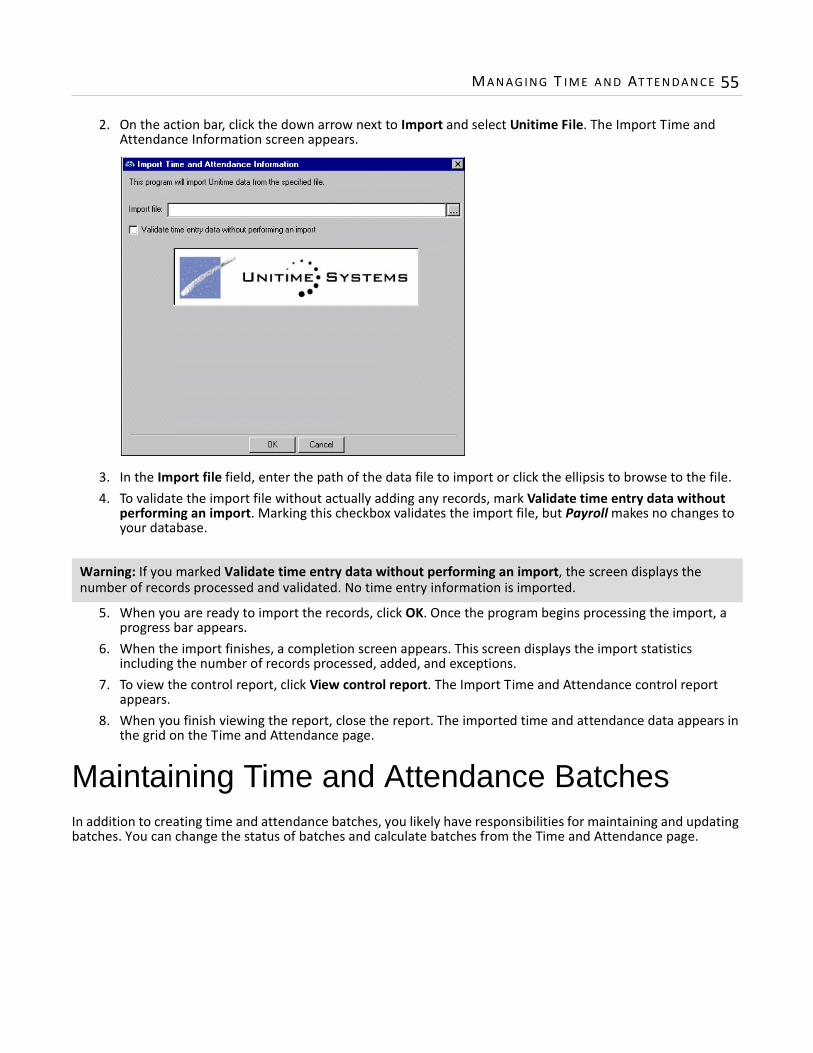
M A N A G I N G T I M E A N D AT T E N D A N C E 55
2. On the action bar, click the down arrow next to Import and select Unitime File. The Import Time and Attendance Information screen appears.
3. In the Import file field, enter the path of the data file to import or click the ellipsis to browse to the file.4. To validate the import file without actually adding any records, mark Validate time entry data without
performing an import. Marking this checkbox validates the import file, but Payroll makes no changes to your database.
5. When you are ready to import the records, click OK. Once the program begins processing the import, a progress bar appears.
6. When the import finishes, a completion screen appears. This screen displays the import statistics including the number of records processed, added, and exceptions.
7. To view the control report, click View control report. The Import Time and Attendance control report appears.
8. When you finish viewing the report, close the report. The imported time and attendance data appears in the grid on the Time and Attendance page.
Maintaining Time and Attendance BatchesIn addition to creating time and attendance batches, you likely have responsibilities for maintaining and updating batches. You can change the status of batches and calculate batches from the Time and Attendance page.
Warning: If you marked Validate time entry data without performing an import, the screen displays the number of records processed and validated. No time entry information is imported.

56 CH A PT E R
Calculating Time and Attendance Batches
Calculating a time and attendance batch uses date entered in the batch to determine the amount to pay to employees. Payroll calculates and marks as calculated the amount of the pay types, benefits, and deductions on the employee records. When creating payroll calculations, the program determines the employees’ hours worked as defined on the default pay schedule on the employee record. For more information about calculating payroll, see “Creating Calculations” on page 76.
Calculating a time and attendance batch from Time and Attendance1. On the Payroll Processing page, click Enter Time Worked. The Time and Attendance page appears with
batches in a grid.
2. Select the batch to calculate and click Calculate on the action bar. The Calculate Payroll screen appears.
3. In the Calculations batch description field, enter a description that identifies the batch. The program generates a unique ID for the batch.
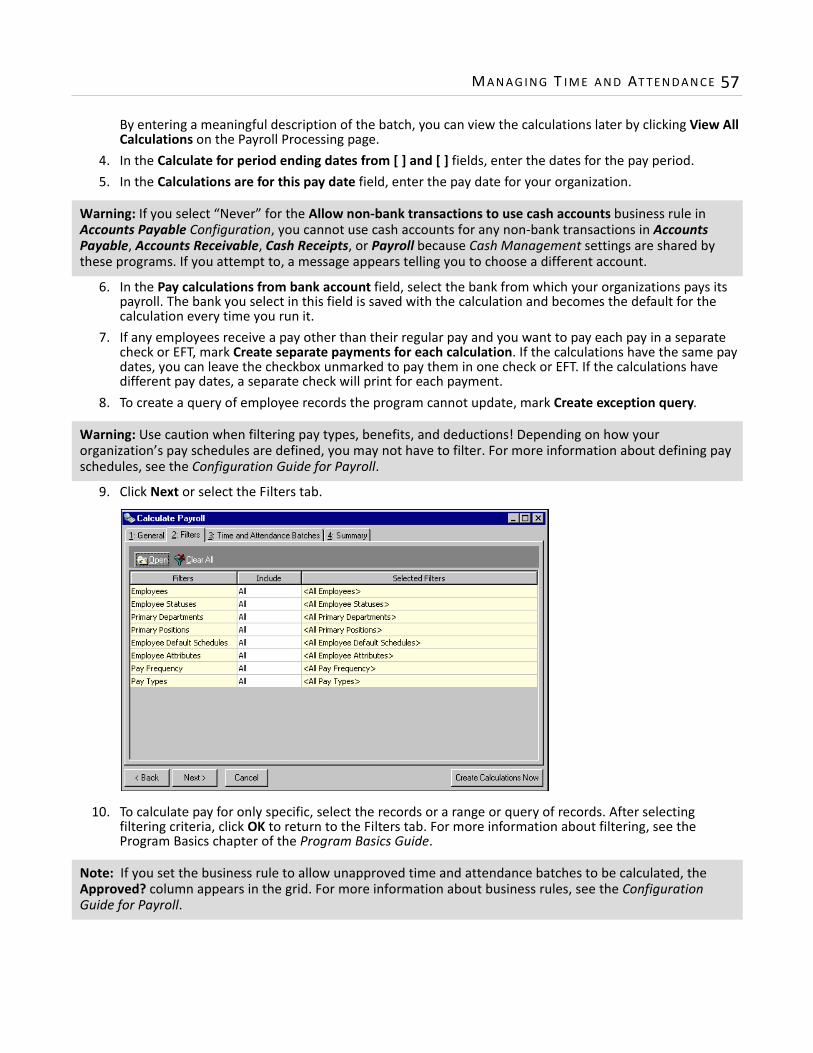
M A N A G I N G T I M E A N D AT T E N D A N C E 57
By entering a meaningful description of the batch, you can view the calculations later by clicking View All Calculations on the Payroll Processing page.
4. In the Calculate for period ending dates from [ ] and [ ] fields, enter the dates for the pay period.5. In the Calculations are for this pay date field, enter the pay date for your organization.
6. In the Pay calculations from bank account field, select the bank from which your organizations pays its payroll. The bank you select in this field is saved with the calculation and becomes the default for the calculation every time you run it.
7. If any employees receive a pay other than their regular pay and you want to pay each pay in a separate check or EFT, mark Create separate payments for each calculation. If the calculations have the same pay dates, you can leave the checkbox unmarked to pay them in one check or EFT. If the calculations have different pay dates, a separate check will print for each payment.
8. To create a query of employee records the program cannot update, mark Create exception query.
9. Click Next or select the Filters tab.
10. To calculate pay for only specific, select the records or a range or query of records. After selecting filtering criteria, click OK to return to the Filters tab. For more information about filtering, see the Program Basics chapter of the Program Basics Guide.
Warning: If you select “Never” for the Allow non-bank transactions to use cash accounts business rule in Accounts Payable Configuration, you cannot use cash accounts for any non-bank transactions in Accounts Payable, Accounts Receivable, Cash Receipts, or Payroll because Cash Management settings are shared by these programs. If you attempt to, a message appears telling you to choose a different account.
Warning: Use caution when filtering pay types, benefits, and deductions! Depending on how your organization’s pay schedules are defined, you may not have to filter. For more information about defining pay schedules, see the Configuration Guide for Payroll.
Note: If you set the business rule to allow unapproved time and attendance batches to be calculated, the Approved? column appears in the grid. For more information about business rules, see the Configuration Guide for Payroll.
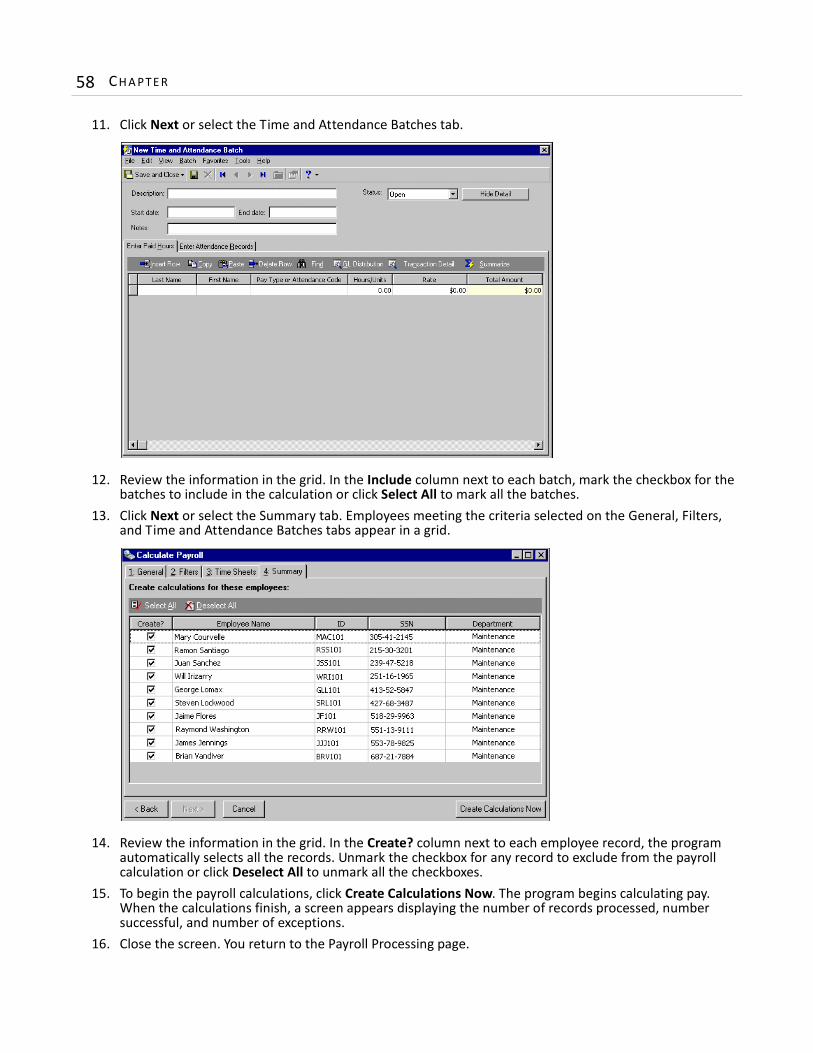
58 CH A PT E R
11. Click Next or select the Time and Attendance Batches tab.
12. Review the information in the grid. In the Include column next to each batch, mark the checkbox for the batches to include in the calculation or click Select All to mark all the batches.
13. Click Next or select the Summary tab. Employees meeting the criteria selected on the General, Filters, and Time and Attendance Batches tabs appear in a grid.
14. Review the information in the grid. In the Create? column next to each employee record, the program automatically selects all the records. Unmark the checkbox for any record to exclude from the payroll calculation or click Deselect All to unmark all the checkboxes.
15. To begin the payroll calculations, click Create Calculations Now. The program begins calculating pay. When the calculations finish, a screen appears displaying the number of records processed, number successful, and number of exceptions.
16. Close the screen. You return to the Payroll Processing page.
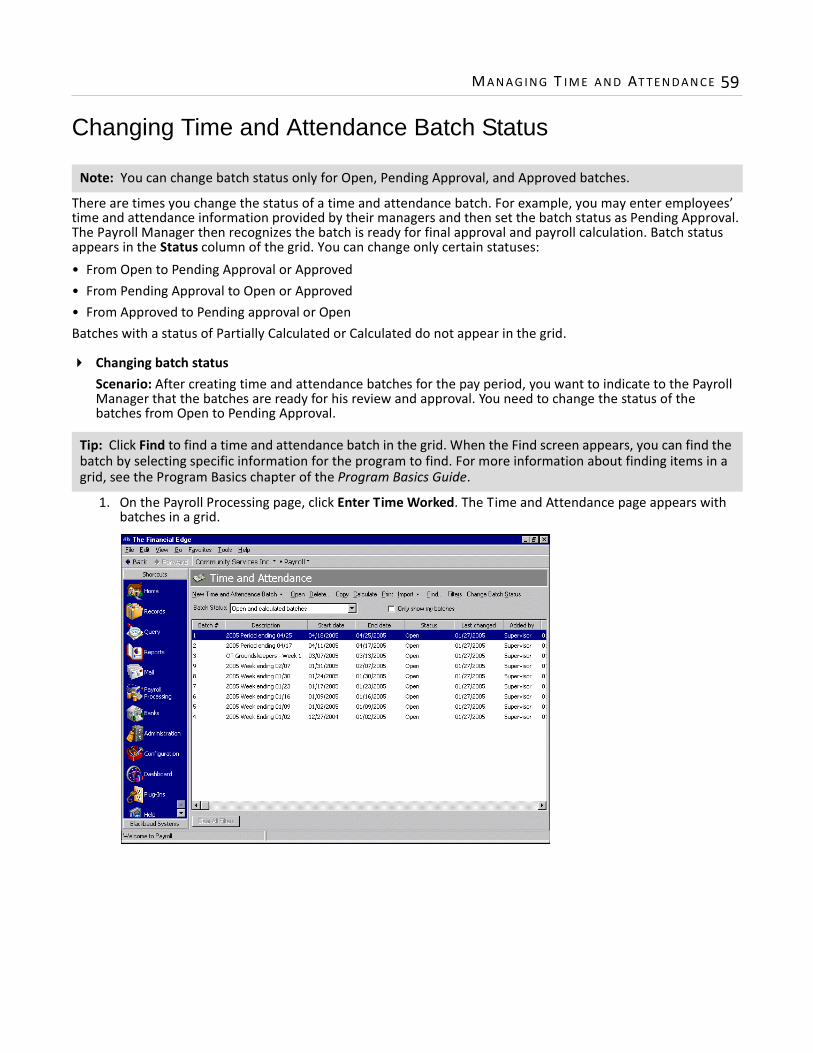
M A N A G I N G T I M E A N D AT T E N D A N C E 59
Changing Time and Attendance Batch Status
There are times you change the status of a time and attendance batch. For example, you may enter employees’ time and attendance information provided by their managers and then set the batch status as Pending Approval. The Payroll Manager then recognizes the batch is ready for final approval and payroll calculation. Batch status appears in the Status column of the grid. You can change only certain statuses:• From Open to Pending Approval or Approved• From Pending Approval to Open or Approved• From Approved to Pending approval or OpenBatches with a status of Partially Calculated or Calculated do not appear in the grid.
Changing batch statusScenario: After creating time and attendance batches for the pay period, you want to indicate to the Payroll Manager that the batches are ready for his review and approval. You need to change the status of the batches from Open to Pending Approval.
1. On the Payroll Processing page, click Enter Time Worked. The Time and Attendance page appears with batches in a grid.
Note: You can change batch status only for Open, Pending Approval, and Approved batches.
Tip: Click Find to find a time and attendance batch in the grid. When the Find screen appears, you can find the batch by selecting specific information for the program to find. For more information about finding items in a grid, see the Program Basics chapter of the Program Basics Guide.
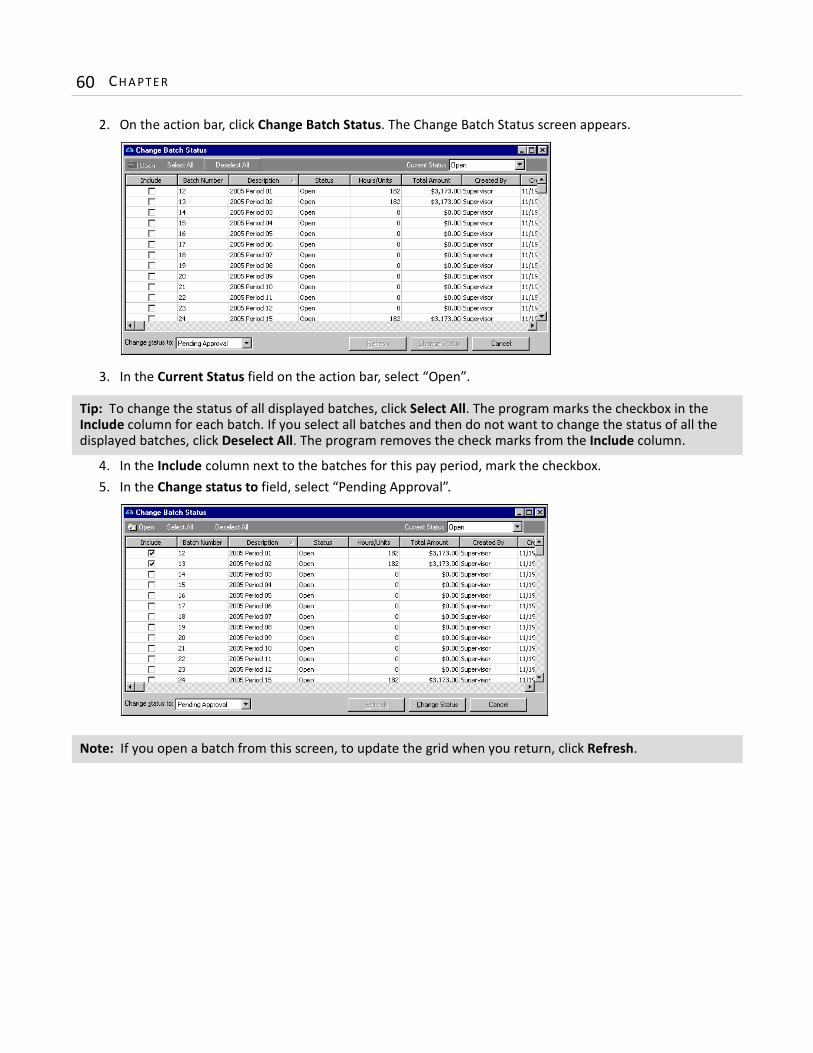
60 CH A PT E R
2. On the action bar, click Change Batch Status. The Change Batch Status screen appears.
3. In the Current Status field on the action bar, select “Open”.
4. In the Include column next to the batches for this pay period, mark the checkbox.5. In the Change status to field, select “Pending Approval”.
Tip: To change the status of all displayed batches, click Select All. The program marks the checkbox in the Include column for each batch. If you select all batches and then do not want to change the status of all the displayed batches, click Deselect All. The program removes the check marks from the Include column.
Note: If you open a batch from this screen, to update the grid when you return, click Refresh.

M A N A G I N G T I M E A N D AT T E N D A N C E 61
6. Once you mark the batches to change and select the new status, click Change Status. The program refreshes the grid, and the batches you changed no longer appear in the grid. Only open batches remain.
7. To return to the Time and Attendance page, close the Change Batch Status screen. “Pending Approval” now appears in the Status column for the batches you changed.

62 CH A PT E R
3chapter
Managing Payroll Expenses
Creating AP Invoices for Payroll Liabilities . . . . . . . . . . . . . . . . . . . . . . . . . . . . . . . . . . . . . . . . . . . . . . . . . . . . . . . . 64Accruing Attendance Expenses . . . . . . . . . . . . . . . . . . . . . . . . . . . . . . . . . . . . . . . . . . . . . . . . . . . . . . . . . . . . . . . . . 66
64 CH A PT E R
When you process employee payroll checks or EFTs, you have accounted for only part of the total payroll expense. Third-party expenses such as medical insurance, 401(k) deductions, and state and federal taxes remain unpaid. Although the money for these expenses was deducted from the employees’ gross pay, the liabilities still exist and your organization must pay the vendor or tax agency. In Payroll, you can click Create AP Invoices for Payroll Liabilities on the Payroll Processing page to create an accounts payable invoice for taxes, deductions, or employee benefits. Using Accrue Attendance Expenses on the Payroll Processing page, you can accrue expenses for unused attendance balances for your organization’s employees. The program calculates the balances and creates an open batch in Journal Entry.
Creating AP Invoices for Payroll Liabilities
In Payroll Processing, you can use invoices to ensure you complete the payroll cycle by paying benefit administrators and tax or other government agencies in a timely manner. Creating invoice records in Payroll helps your organization manage employee compensation, accurately pay payroll expenses, and contribute to maintaining an accurate picture of your organization’s financial standing. For more information about invoices, see the Invoices chapter of the Records Guide for Accounts Payable.When you create an accounts payable invoice for payroll liabilities, Payroll combines the amounts of benefit, deduction, or tax liabilities for each vendor and then creates an AP invoice for the vendor. The total liability amount for each vendor becomes the debit distribution on the invoice. If, in a rare case, you must reimburse an employee for overpayments or errors, the program creates AP credit memos with a credit distribution that reduces the vendor’s liability.
You can create an output query of invoices and credit memos (if any are created), or a query of the calculations used to compile benefits, taxes, and deduction liabilities. You can export the output query and send it to your benefits administrator or tax collection agency.
Creating AP invoices for payroll expenses1. On the Payroll Processing page, click Create AP Invoices for Payroll Liabilities. The Create AP Invoices for
Payroll Liabilities page appears.
Warning: You can create invoices only if you defined a vendor for remittance on the benefit, deduction, or tax record in Configuration. For more information about benefits, taxes, and deductions, see The Configuration Guide for Payroll.
Warning: To ensure success in processing, before you begin entering data into Payroll, confirm that your organization has properly set up the program using the steps outlined on the Set up Payroll page of Administration.

MA N A G I N G PAY RO L L EX P E N S ES 65
2. To create a new invoice, on the action bar, click New. The Create AP Invoices for Payroll Liabilities screen opens on the General tab.
3. In the Create invoices for liabilities in pay periods ending on these dates field, select a date or date range. If you select “<Specific range>”, enter a date in the to and from fields. The date you select includes calculated benefits, deductions, and taxes for each vendor with the pay period end date on the calculation within the date entered.
4. In the Invoice Defaults frame, in the Transaction date field, select the invoice date.5. In the Due date field, select the payment due date.
6. In the Post status field, select “Not yet posted” or “Do not post”.7. In the Invoice Defaults frame, in the Post date field, select the date invoices should be posted.8. In the Number transactions created sequentially starting with field, enter the number to use on the first
invoice. Any credit memos created share the numbering sequence with the invoices.
9. To create a query of calculations used to create invoices, mark Create an output query of calculations. The query is not filtered for the specific benefits, deductions, or taxes collected to create the invoices; however, you can open the query and filter it for the vendors and date range if you need to export the data to send with your invoice.
10. To create a query of invoices and credit memos created, mark Create an output query of invoices and any credit memos created. When the program processes the invoices, you get a message asking you to name the invoice query. If credit memos are created in the run, the program asks you to name the credit memo query also.
11. To automatically see a control report when you click Create Now, mark View control report.
Note: “Do not post” is typically used only for archived invoices or activity already posted in the general ledger.
Note: You can export the calculations output query and send it to your benefits administrator or tax collection agency.
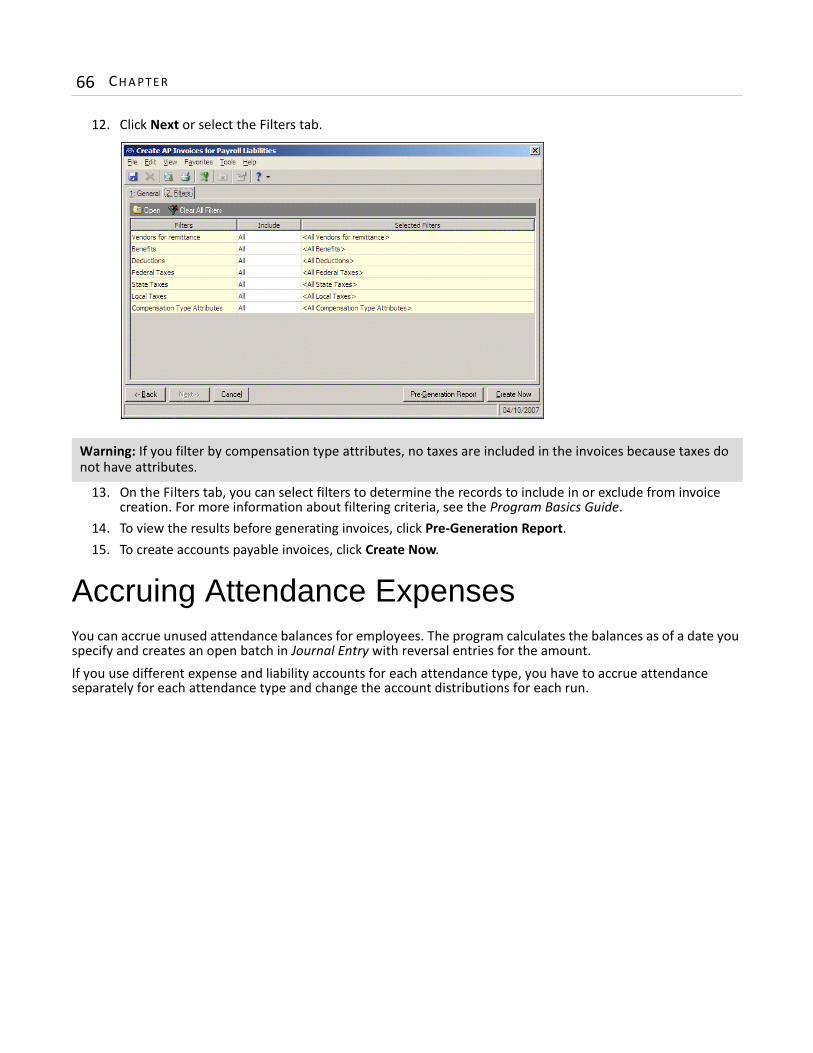
66 CH A PT E R
12. Click Next or select the Filters tab.
13. On the Filters tab, you can select filters to determine the records to include in or exclude from invoice creation. For more information about filtering criteria, see the Program Basics Guide.
14. To view the results before generating invoices, click Pre-Generation Report. 15. To create accounts payable invoices, click Create Now.
Accruing Attendance ExpensesYou can accrue unused attendance balances for employees. The program calculates the balances as of a date you specify and creates an open batch in Journal Entry with reversal entries for the amount. If you use different expense and liability accounts for each attendance type, you have to accrue attendance separately for each attendance type and change the account distributions for each run.
Warning: If you filter by compensation type attributes, no taxes are included in the invoices because taxes do not have attributes.
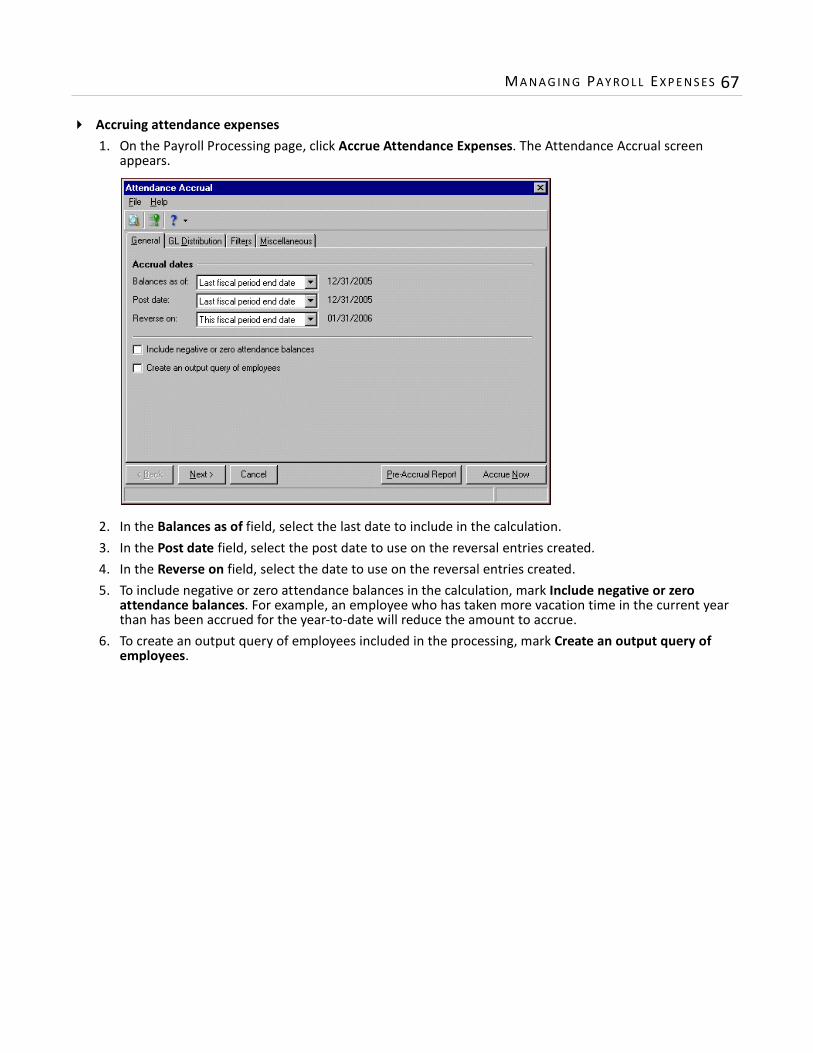
MA N A G I N G PAY RO L L EX P E N S ES 67
Accruing attendance expenses1. On the Payroll Processing page, click Accrue Attendance Expenses. The Attendance Accrual screen
appears.
2. In the Balances as of field, select the last date to include in the calculation.3. In the Post date field, select the post date to use on the reversal entries created.4. In the Reverse on field, select the date to use on the reversal entries created.5. To include negative or zero attendance balances in the calculation, mark Include negative or zero
attendance balances. For example, an employee who has taken more vacation time in the current year than has been accrued for the year-to-date will reduce the amount to accrue.
6. To create an output query of employees included in the processing, mark Create an output query of employees.

68 CH A PT E R
7. Click Next or select the GL Distribution tab.
8. You must define both a debit and credit distribution. In the Distribution field, select “Debit (DR) distribution”.
9. Select the account to use in the debit distribution. To associate an employee distribution with a specific account code, mark Combine employee distribution with this account code and enter the account code. You can click the binoculars to search for an account code. Or, mark Always debit this account and enter the account to use. You can click the binoculars to search for an account.
10. If you have the optional module Projects and Grants, you can associate a transaction distribution with the debit account. Mark Always use this transaction distribution. In the transaction distribution grid, you can enter transaction distribution information in one or more rows. You can split distributions among multiple projects, classes, or transaction codes if necessary.
• In the Project ID column, enter a project ID number or click the binoculars to search for a project ID. When you enter a valid project ID number, the description automatically appear in the Project Description column.
• In the Percent column, enter the percentage of the distribution. You can manually enter percents for each row or you can click Distribute Evenly to distribute percents equally among the rows.
• In the Class column, select a class for the distribution.• If you have defined transaction codes, additional columns appear based on the number of transaction
codes you have defined. You can select a value for each transaction code.11. To attach transaction attributes to the account in the debit distribution, click Attributes on the action bar
above the distribution grid. When you have finished entering information, click OK to return to the GL Distribution tab.
Note: If you use a cash account associated with Cash Management on a bank record, the program also creates a cash management adjustment.
Note: To load a default transaction distribution, click Load Distribution below the transaction distribution grid and select a distribution to use.
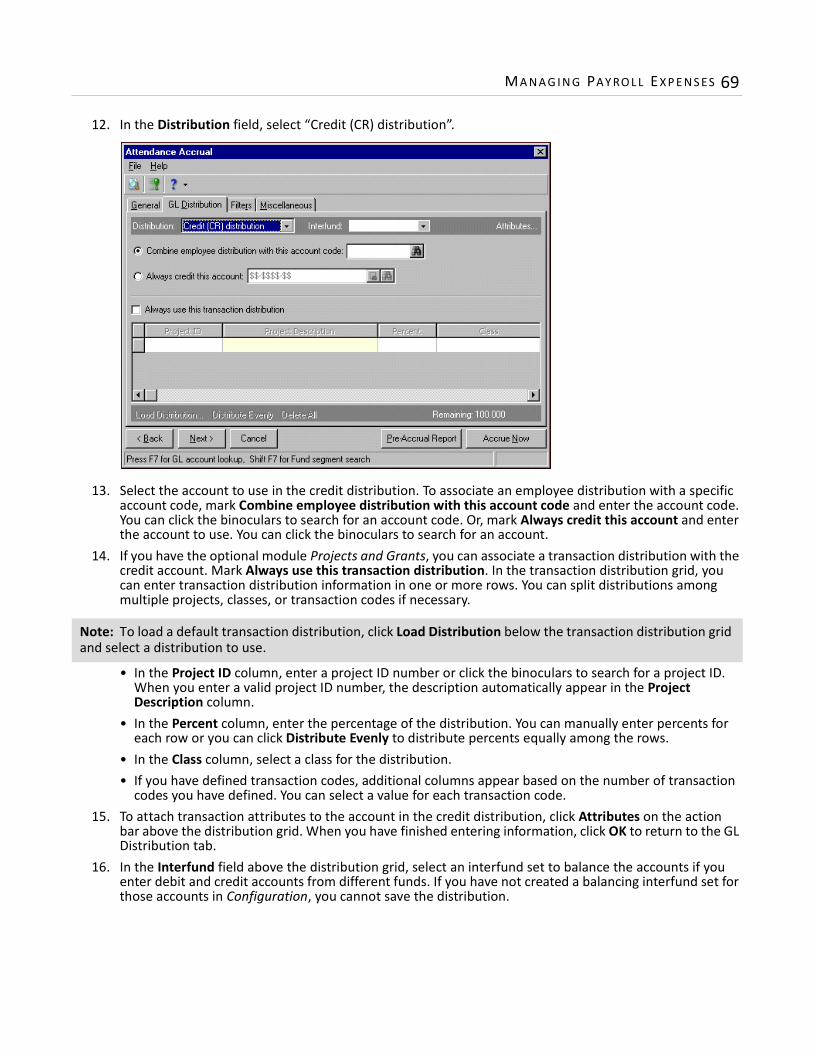
MA N A G I N G PAY RO L L EX P E N S ES 69
12. In the Distribution field, select “Credit (CR) distribution”.
13. Select the account to use in the credit distribution. To associate an employee distribution with a specific account code, mark Combine employee distribution with this account code and enter the account code. You can click the binoculars to search for an account code. Or, mark Always credit this account and enter the account to use. You can click the binoculars to search for an account.
14. If you have the optional module Projects and Grants, you can associate a transaction distribution with the credit account. Mark Always use this transaction distribution. In the transaction distribution grid, you can enter transaction distribution information in one or more rows. You can split distributions among multiple projects, classes, or transaction codes if necessary.
• In the Project ID column, enter a project ID number or click the binoculars to search for a project ID. When you enter a valid project ID number, the description automatically appear in the Project Description column.
• In the Percent column, enter the percentage of the distribution. You can manually enter percents for each row or you can click Distribute Evenly to distribute percents equally among the rows.
• In the Class column, select a class for the distribution.• If you have defined transaction codes, additional columns appear based on the number of transaction
codes you have defined. You can select a value for each transaction code.15. To attach transaction attributes to the account in the credit distribution, click Attributes on the action
bar above the distribution grid. When you have finished entering information, click OK to return to the GL Distribution tab.
16. In the Interfund field above the distribution grid, select an interfund set to balance the accounts if you enter debit and credit accounts from different funds. If you have not created a balancing interfund set for those accounts in Configuration, you cannot save the distribution.
Note: To load a default transaction distribution, click Load Distribution below the transaction distribution grid and select a distribution to use.
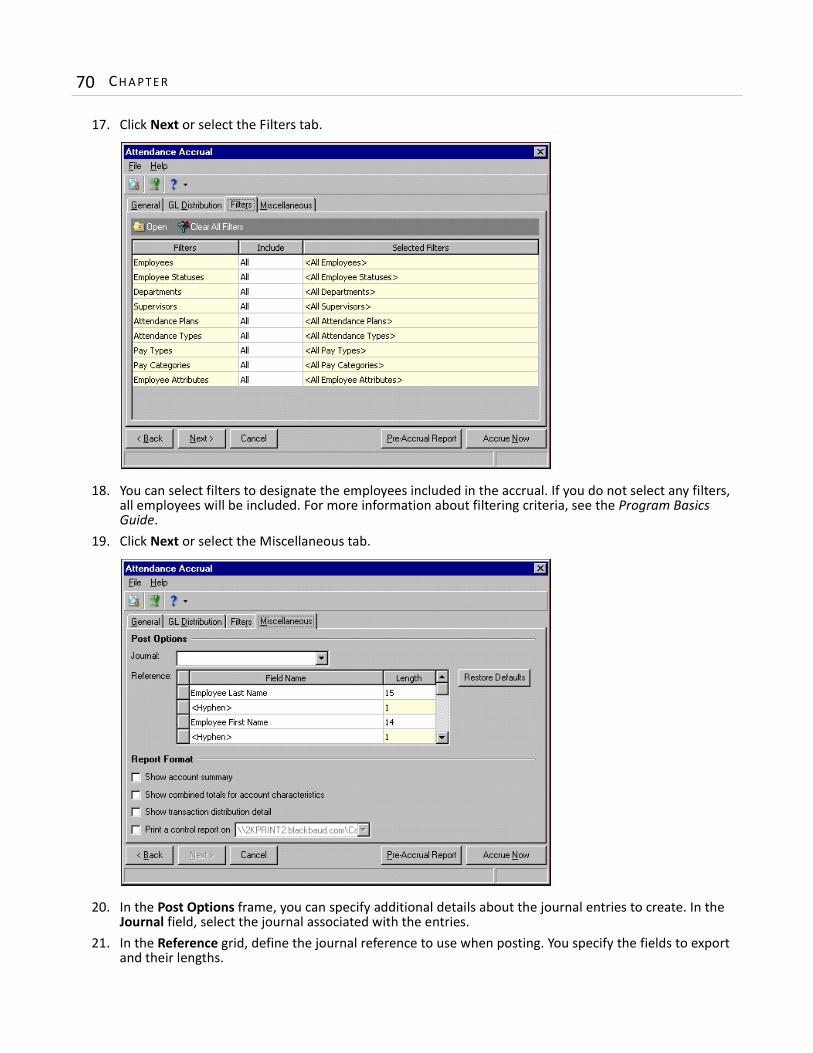
70 CH A PT E R
17. Click Next or select the Filters tab.
18. You can select filters to designate the employees included in the accrual. If you do not select any filters, all employees will be included. For more information about filtering criteria, see the Program Basics Guide.
19. Click Next or select the Miscellaneous tab.
20. In the Post Options frame, you can specify additional details about the journal entries to create. In the Journal field, select the journal associated with the entries.
21. In the Reference grid, define the journal reference to use when posting. You specify the fields to export and their lengths.
MA N A G I N G PAY RO L L EX P E N S ES 71
22. To restore the original default field settings, click Restore Defaults.23. In the Report Format frame, you can specify additional details to include in the pre-accrual and control
reports. To include a summary of debits and credits by account number, mark Show account summary.24. To include a summary of debits and credits by account characteristic, mark Show combined totals for
account characteristics.25. To include a summary of debits and credits by transaction characteristic, mark Show transaction
distribution detail.26. To print a control report, mark Print a control report on and select a printer.27. To run a report to review before beginning the accrual, click Pre-Accrual Report. The Attendance
Pre-Accrual Report appears.28. To begin the accrual, click Accrue Now. The program creates an open journal entry batch in General
Ledger. The Attendance Accrual Report appears.

72 CH A PT E R
4chapter
Running Payroll
Understanding the Create Calculations Process . . . . . . . . . . . . . . . . . . . . . . . . . . . . . . . . . . . . . . . . . . . . . . . . . . . 74Creating Calculations . . . . . . . . . . . . . . . . . . . . . . . . . . . . . . . . . . . . . . . . . . . . . . . . . . . . . . . . . . . . . . . . . . . . . . . . . 76Viewing Calculations . . . . . . . . . . . . . . . . . . . . . . . . . . . . . . . . . . . . . . . . . . . . . . . . . . . . . . . . . . . . . . . . . . . . . . . . . 80Printing Checks and EFT Notices . . . . . . . . . . . . . . . . . . . . . . . . . . . . . . . . . . . . . . . . . . . . . . . . . . . . . . . . . . . . . . . . 86
74 CH A PT E R
An important step in the payroll cycle is calculating payroll for the employees in your organization. When calculating payroll, you select the pay periods and pay dates for the calculations you create. The program uses information in the employee time and attendance records or the default pay settings from the employee records to calculate gross pay. Then Payroll calculates and expenses benefits, taxes, and deductions as designated on each compensation record.As part of the process, Payroll calculates taxable (adjusted gross) wages. It calculates separate adjusted gross amounts for federal income tax, Social Security, Medicare, FUTA, state income tax, SUTA, and local income tax. The program also calculates employer benefits and the employer portion of taxes.If you charge payroll expenses back to your organization’s department, Payroll creates the proper distributions for the pay types, benefits, deductions, and taxes calculated during the processing.For employees without time and attendance batches, Payroll:• Selects pay types, benefits, and deductions from the employees’ default compensation settings with the status
of Scheduled. • Calculates the days, hours, and weeks worked from the details in the pay schedules for the employees. If
employees work overtime, the program adds overtime hours to their scheduled and default hours to get the total hours for the period.
• Adds the selected pay types, noncash benefits, and cash benefit amounts from the employee records to obtain the gross pay.
For employees with time and attendance batches, Payroll:• Selects nonhourly pay types, benefits, and deductions from the employees’ default compensation settings and
with the status of Scheduled.• Calculates the pay amount for hours worked directly from the time and attendance batch.• Uses the total pay amount from the time and attendance batches and this pay in the total gross pay for the
period. It adds in any other non-hourly pay types or cash benefits from the employee records. • Creates attendance records from attendance entries in the time and attendance batches.
To view saved payroll calculations, you can click View All Calculations from the Payroll Processing page. For more information about viewing payroll calculations, see “Viewing Calculations” on page 80.
Understanding the Create Calculations Process
With Create Calculations, you can create and manage payroll for all your organization’s employees. You enter a range of pay period end dates for the calculations and dates to pay employees. You can select filters to include or exclude employees based on attributes, employee records, pay frequencies, and other filters. You can ensure that you include the correct employees in calculations so that the program does not calculate payroll more than once per pay period for any employee.A critical step in calculating payroll is recording the hours worked for employees. For example, you may record and calculate hourly employees’ time via time and attendance batches. However, you may need to maintain hours worked for salaried employees for organization and state reporting requirements. With Create Calculations, you can filter the calculations to include selected pay schedules so that all employees’ work hours are included.
Note: Visit our Web site at www.blackbaud.com for the latest documentation and information.
Warning: Before you can create payroll calculations for employees, the pay schedule, federal withholding status, and default bank must be defined on the employee record.
Warning: To ensure success with your processing, before you begin entering data into Payroll, confirm that your organization has properly set up the program, using the steps outlined on the Set up Payroll page of Administration.

RU N N I N G PAY RO L L 75
To create calculations and run payroll, you use the calculate payroll records, which uses tabs to organize information. A payroll calculation record includes the General, Filters, Time and Attendance Batches, and Summary tabs. Before you can create payroll calculations for employees, their pay schedules, federal withholding statuses, and default banks must be defined on their employee records. For more information about employee records, see the Employees chapter of the Records Guide for Payroll.
General tab. On the General tab, you can enter a descriptive identification of the batch. Payroll creates a unique batch ID number for the calculation. The program saves the bank you select, and it becomes the default bank for the calculation.
Filters tab. On the Filters tab, you can select filters to determine the records to include in or exclude from the calculation. Use caution when filtering pay types because filtering excludes the pay types from the calculation, even if the pay type was scheduled to be calculated. That is, everything in a selected time and attendance batch is calculated regardless of the pay type filters. For more information about filtering in Payroll, see the Program Basics chapter of the Program Basics Guide.
Time and Attendance Batches tab. On the Time and Attendance Batches tab, you can select the time and attendance batches to calculate in the payroll run. A grid displays the batch number, description, status, and dates for each batch. Only partially calculated or uncalculated time and attendance batches appear on the tab. Once Payroll calculates a time and attendance batch, it cannot be calculated again; you must create a new time and attendance batch to recalculate. For more information about creating time and attendance batches, see the Time and Attendance chapter of the Reports Guide for Payroll.You can view, but not edit, batches from the Time and Attendance Batches tab by clicking View Batch on the action bar.
Summary tab. On the Summary tab, you select the employee records to include in the calculation by marking the checkbox in the Create? column.
Warning: Use caution when filtering pay types, benefits, and deductions! For more information about defining pay schedules, see the Configuration Guide for Payroll.
Note: The Time and Attendance Batches tab appears only if partially calculated or uncalculated time and attendance batches exist.
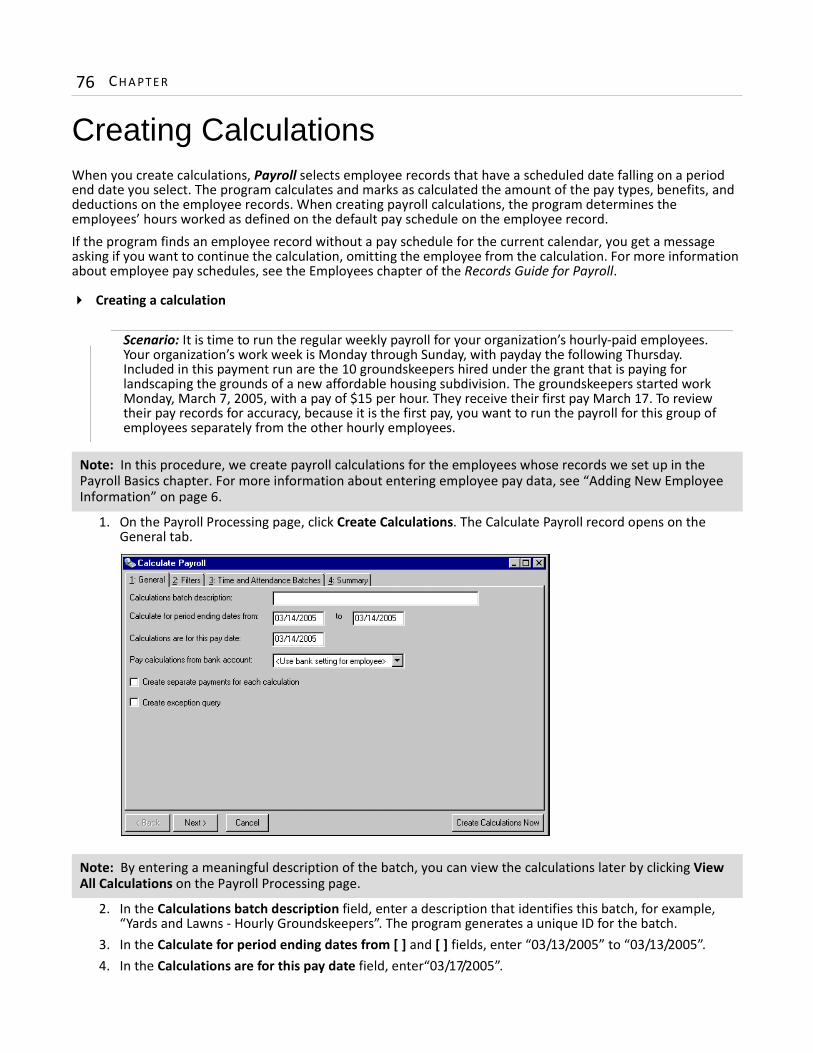
76 CH A PT E R
Creating CalculationsWhen you create calculations, Payroll selects employee records that have a scheduled date falling on a period end date you select. The program calculates and marks as calculated the amount of the pay types, benefits, and deductions on the employee records. When creating payroll calculations, the program determines the employees’ hours worked as defined on the default pay schedule on the employee record.If the program finds an employee record without a pay schedule for the current calendar, you get a message asking if you want to continue the calculation, omitting the employee from the calculation. For more information about employee pay schedules, see the Employees chapter of the Records Guide for Payroll.
Creating a calculation
1. On the Payroll Processing page, click Create Calculations. The Calculate Payroll record opens on the General tab.
2. In the Calculations batch description field, enter a description that identifies this batch, for example, “Yards and Lawns - Hourly Groundskeepers”. The program generates a unique ID for the batch.
3. In the Calculate for period ending dates from [ ] and [ ] fields, enter “03/13/2005” to “03/13/2005”.4. In the Calculations are for this pay date field, enter“03/17/2005”.
Note: In this procedure, we create payroll calculations for the employees whose records we set up in the Payroll Basics chapter. For more information about entering employee pay data, see “Adding New Employee Information” on page 6.
Note: By entering a meaningful description of the batch, you can view the calculations later by clicking View All Calculations on the Payroll Processing page.
Scenario: It is time to run the regular weekly payroll for your organization’s hourly-paid employees. Your organization’s work week is Monday through Sunday, with payday the following Thursday. Included in this payment run are the 10 groundskeepers hired under the grant that is paying for landscaping the grounds of a new affordable housing subdivision. The groundskeepers started work Monday, March 7, 2005, with a pay of $15 per hour. They receive their first pay March 17. To review their pay records for accuracy, because it is the first pay, you want to run the payroll for this group of employees separately from the other hourly employees.

RU N N I N G PAY RO L L 77
5. In the Pay calculations from bank account field, select “Payroll Account”. The bank you select in the Pay calculation from bank account field is saved with the calculation and becomes the default for the calculation every time you run it.
6. If any employees receive a pay other than their regular pay and you want to pay each pay in a separate check or EFT, mark Create separate payments for each calculation. If the calculations have the same pay dates, you can leave the checkbox unmarked to pay them in one check or EFT. If the calculations have different pay dates, a separate check will print for each payment.This is the only pay these employees are receiving in this payment run. If, however, any of them were receiving a payment other than their regular pay, and you wanted to create a separate check or EFT for that pay, mark Create separate payments for each calculation. To pay them in one check, leave the checkbox unmarked.
7. To create a query of employee records the program cannot update, mark Create exception query.
8. Click Next or select the Filters tab.
9. Because you created a time and attendance batch that included only the newly hired groundskeepers, you do not need to establish filtering criteria for this example.
Warning: If you select “Never” for the Allow non-bank transactions to use cash accounts business rule in Accounts Payable Configuration, you cannot use cash accounts for any non-bank transactions in Accounts Payable, Accounts Receivable, Cash Receipts, or Payroll because Cash Management settings are shared by these programs. If you attempt to, a message appears telling you to choose a different account.
Warning: Use caution when filtering pay types, benefits, and deductions! Depending on how your organization’s pay schedules are defined, you may not have to filter. For more information about defining pay schedules, see the Configuration Guide for Payroll.

78 CH A PT E R
To calculate pay for a specific subset of the newly hired groundskeepers, select the records, a range of records, or a query of records. After selecting filtering criteria, click OK to return to the Filters tab. For more information about filtering, see the Program Basics chapter of the Program Basics Guide.
10. Click Next or select the Time and Attendance Batches tab.
11. Review the information in the grid. In the Include column next to each batch, mark the checkbox for the batches to include in the calculation or click Select All to mark all the batches.
Note: If you set the business rule to allow unapproved time and attendance batches to be calculated, the Approved? column appears in the grid. For more information about business rules, see the Configuration Guide for Payroll.
Warning: The Time and Attendance Batches tab appears only if uncalculated time and attendance batches exist. Once Payroll calculates a selected time and attendance batch, it cannot be calculated again; you must create a new time and attendance batch to recalculate. For more information about time and attendance batches, see the Time and Attendance chapter of the Reports Guide for Payroll.
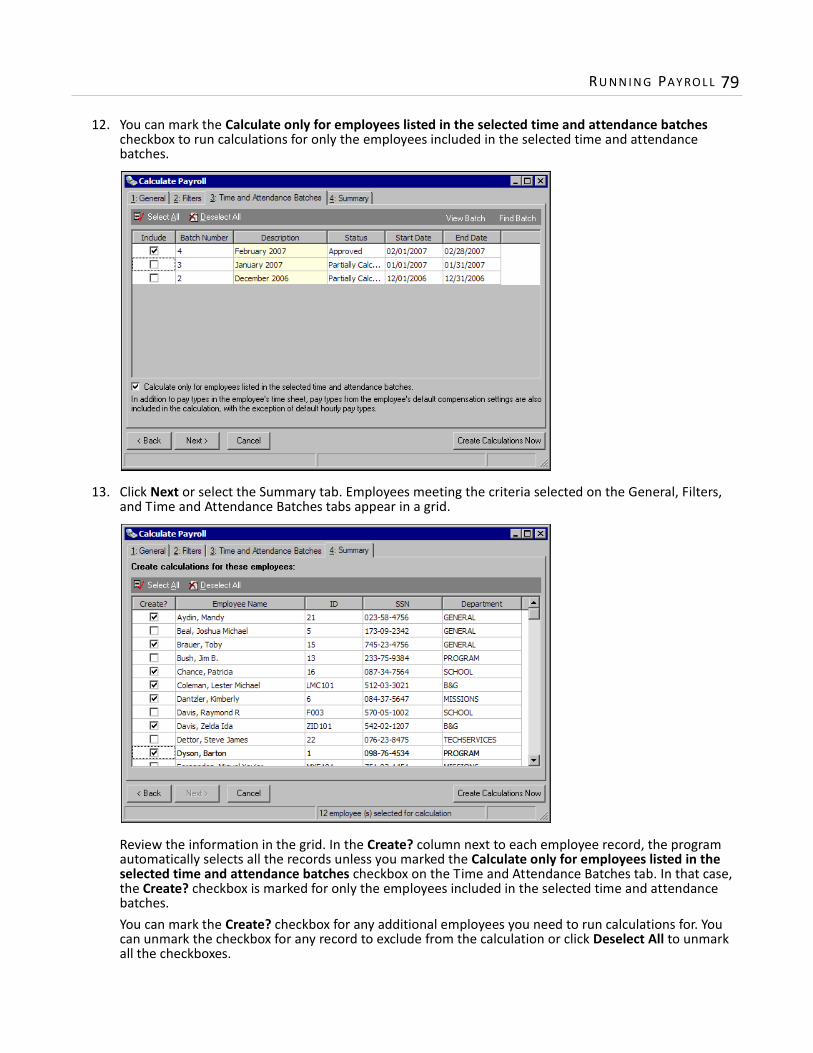
RU N N I N G PAY RO L L 79
12. You can mark the Calculate only for employees listed in the selected time and attendance batches checkbox to run calculations for only the employees included in the selected time and attendance batches.
13. Click Next or select the Summary tab. Employees meeting the criteria selected on the General, Filters, and Time and Attendance Batches tabs appear in a grid.
Review the information in the grid. In the Create? column next to each employee record, the program automatically selects all the records unless you marked the Calculate only for employees listed in the selected time and attendance batches checkbox on the Time and Attendance Batches tab. In that case, the Create? checkbox is marked for only the employees included in the selected time and attendance batches. You can mark the Create? checkbox for any additional employees you need to run calculations for. You can unmark the checkbox for any record to exclude from the calculation or click Deselect All to unmark all the checkboxes.
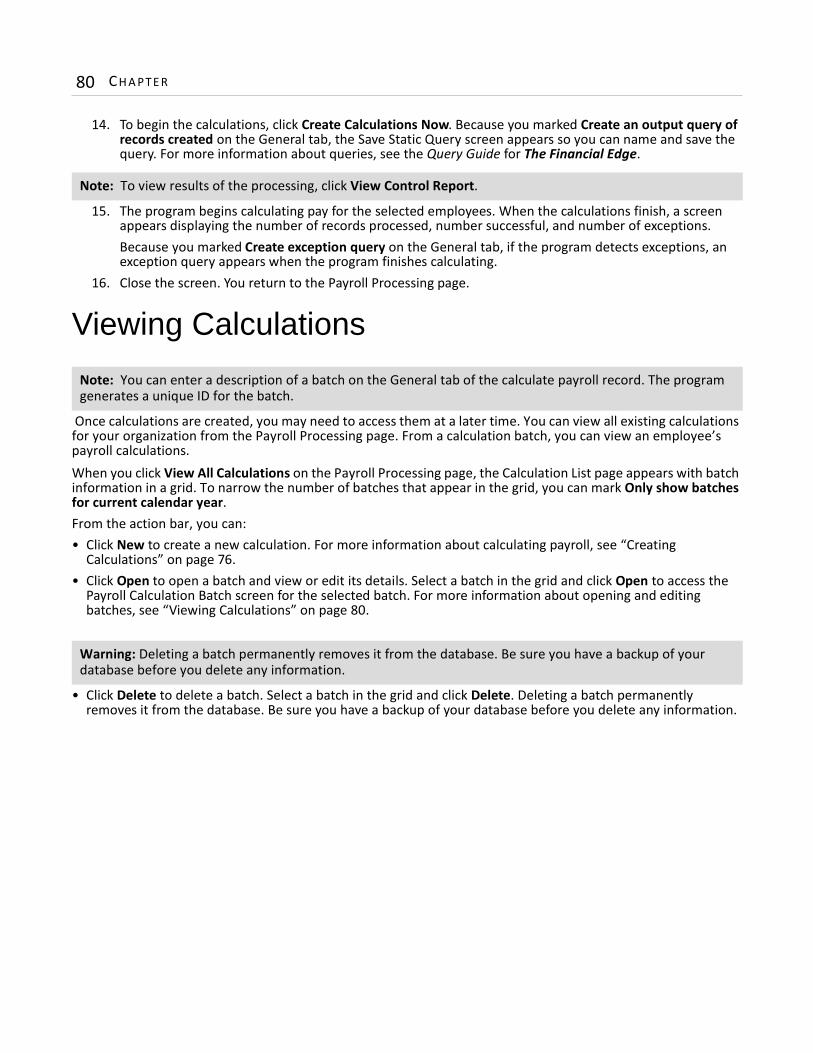
80 CH A PT E R
14. To begin the calculations, click Create Calculations Now. Because you marked Create an output query of records created on the General tab, the Save Static Query screen appears so you can name and save the query. For more information about queries, see the Query Guide for The Financial Edge.
15. The program begins calculating pay for the selected employees. When the calculations finish, a screen appears displaying the number of records processed, number successful, and number of exceptions.Because you marked Create exception query on the General tab, if the program detects exceptions, an exception query appears when the program finishes calculating.
16. Close the screen. You return to the Payroll Processing page.
Viewing Calculations
Once calculations are created, you may need to access them at a later time. You can view all existing calculations for your organization from the Payroll Processing page. From a calculation batch, you can view an employee’s payroll calculations.When you click View All Calculations on the Payroll Processing page, the Calculation List page appears with batch information in a grid. To narrow the number of batches that appear in the grid, you can mark Only show batches for current calendar year.From the action bar, you can:• Click New to create a new calculation. For more information about calculating payroll, see “Creating
Calculations” on page 76.• Click Open to open a batch and view or edit its details. Select a batch in the grid and click Open to access the
Payroll Calculation Batch screen for the selected batch. For more information about opening and editing batches, see “Viewing Calculations” on page 80.
• Click Delete to delete a batch. Select a batch in the grid and click Delete. Deleting a batch permanently removes it from the database. Be sure you have a backup of your database before you delete any information.
Note: To view results of the processing, click View Control Report.
Note: You can enter a description of a batch on the General tab of the calculate payroll record. The program generates a unique ID for the batch.
Warning: Deleting a batch permanently removes it from the database. Be sure you have a backup of your database before you delete any information.
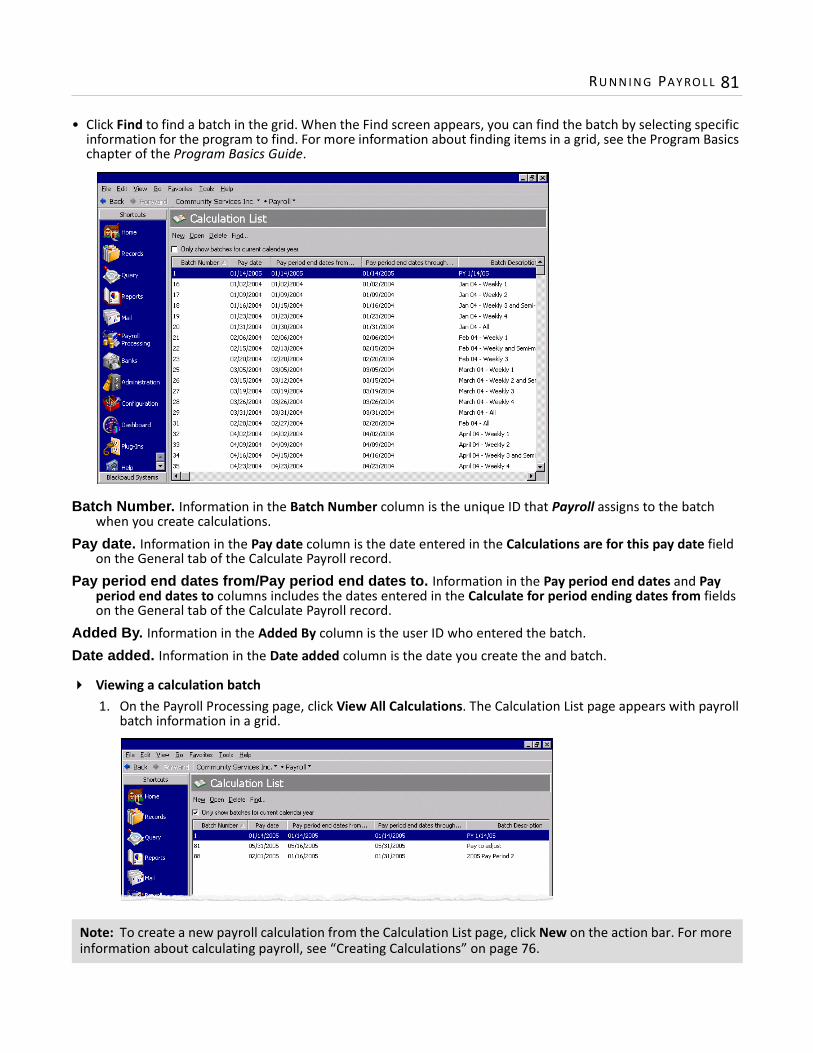
RU N N I N G PAY RO L L 81
• Click Find to find a batch in the grid. When the Find screen appears, you can find the batch by selecting specific information for the program to find. For more information about finding items in a grid, see the Program Basics chapter of the Program Basics Guide.
Batch Number. Information in the Batch Number column is the unique ID that Payroll assigns to the batch when you create calculations.
Pay date. Information in the Pay date column is the date entered in the Calculations are for this pay date field on the General tab of the Calculate Payroll record.
Pay period end dates from/Pay period end dates to. Information in the Pay period end dates and Pay period end dates to columns includes the dates entered in the Calculate for period ending dates from fields on the General tab of the Calculate Payroll record.
Added By. Information in the Added By column is the user ID who entered the batch.Date added. Information in the Date added column is the date you create the and batch.
Viewing a calculation batch1. On the Payroll Processing page, click View All Calculations. The Calculation List page appears with payroll
batch information in a grid.
Note: To create a new payroll calculation from the Calculation List page, click New on the action bar. For more information about calculating payroll, see “Creating Calculations” on page 76.
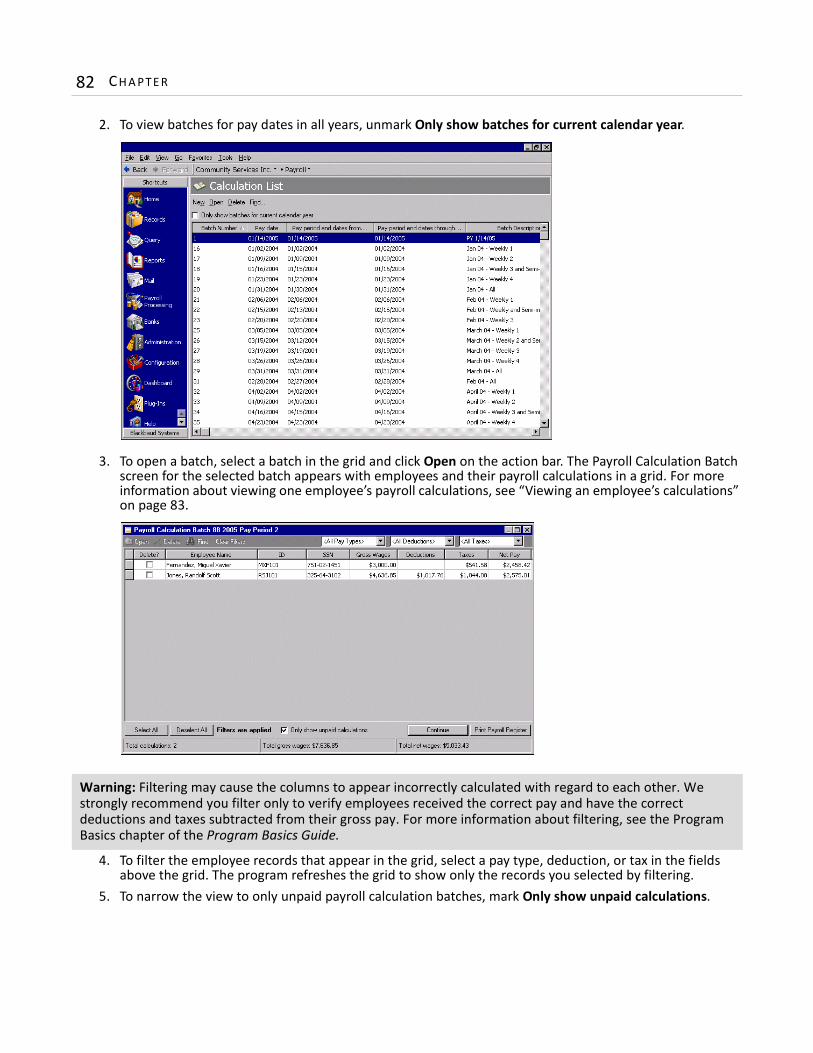
82 CH A PT E R
2. To view batches for pay dates in all years, unmark Only show batches for current calendar year.
3. To open a batch, select a batch in the grid and click Open on the action bar. The Payroll Calculation Batch screen for the selected batch appears with employees and their payroll calculations in a grid. For more information about viewing one employee’s payroll calculations, see “Viewing an employee’s calculations” on page 83.
4. To filter the employee records that appear in the grid, select a pay type, deduction, or tax in the fields above the grid. The program refreshes the grid to show only the records you selected by filtering.
5. To narrow the view to only unpaid payroll calculation batches, mark Only show unpaid calculations.
Warning: Filtering may cause the columns to appear incorrectly calculated with regard to each other. We strongly recommend you filter only to verify employees received the correct pay and have the correct deductions and taxes subtracted from their gross pay. For more information about filtering, see the Program Basics chapter of the Program Basics Guide.
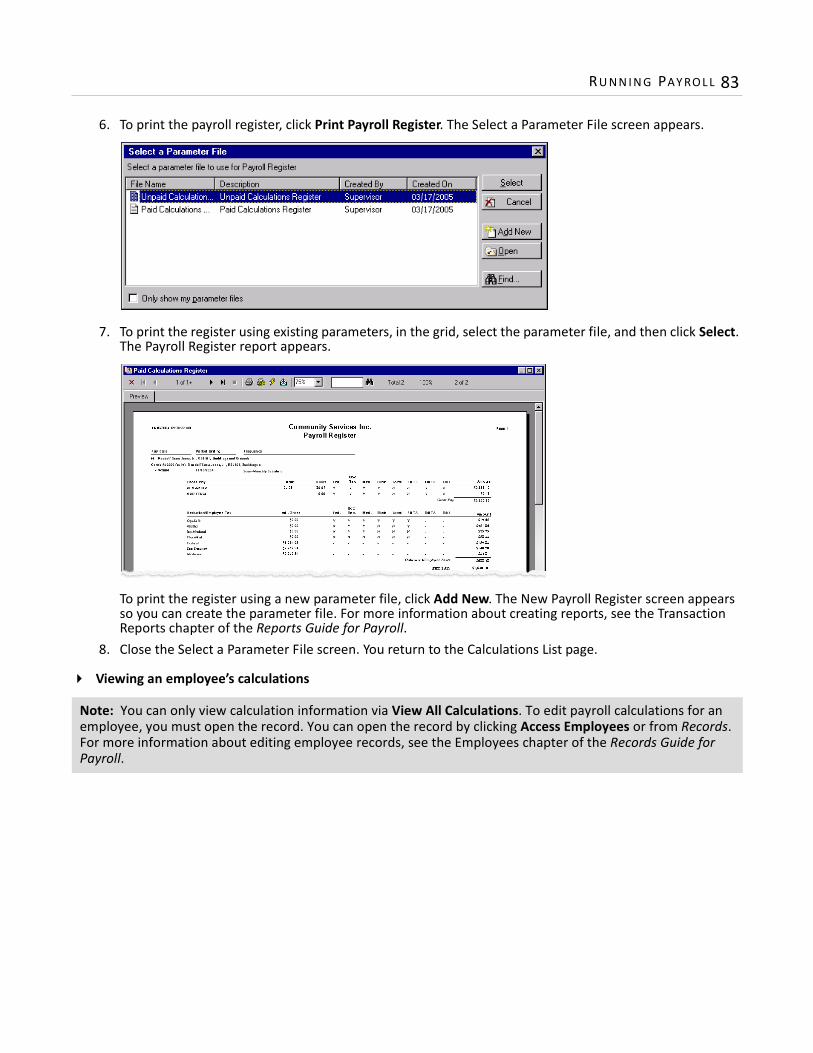
RU N N I N G PAY RO L L 83
6. To print the payroll register, click Print Payroll Register. The Select a Parameter File screen appears.
7. To print the register using existing parameters, in the grid, select the parameter file, and then click Select. The Payroll Register report appears.
To print the register using a new parameter file, click Add New. The New Payroll Register screen appears so you can create the parameter file. For more information about creating reports, see the Transaction Reports chapter of the Reports Guide for Payroll.
8. Close the Select a Parameter File screen. You return to the Calculations List page.
Viewing an employee’s calculations
Note: You can only view calculation information via View All Calculations. To edit payroll calculations for an employee, you must open the record. You can open the record by clicking Access Employees or from Records. For more information about editing employee records, see the Employees chapter of the Records Guide for Payroll.
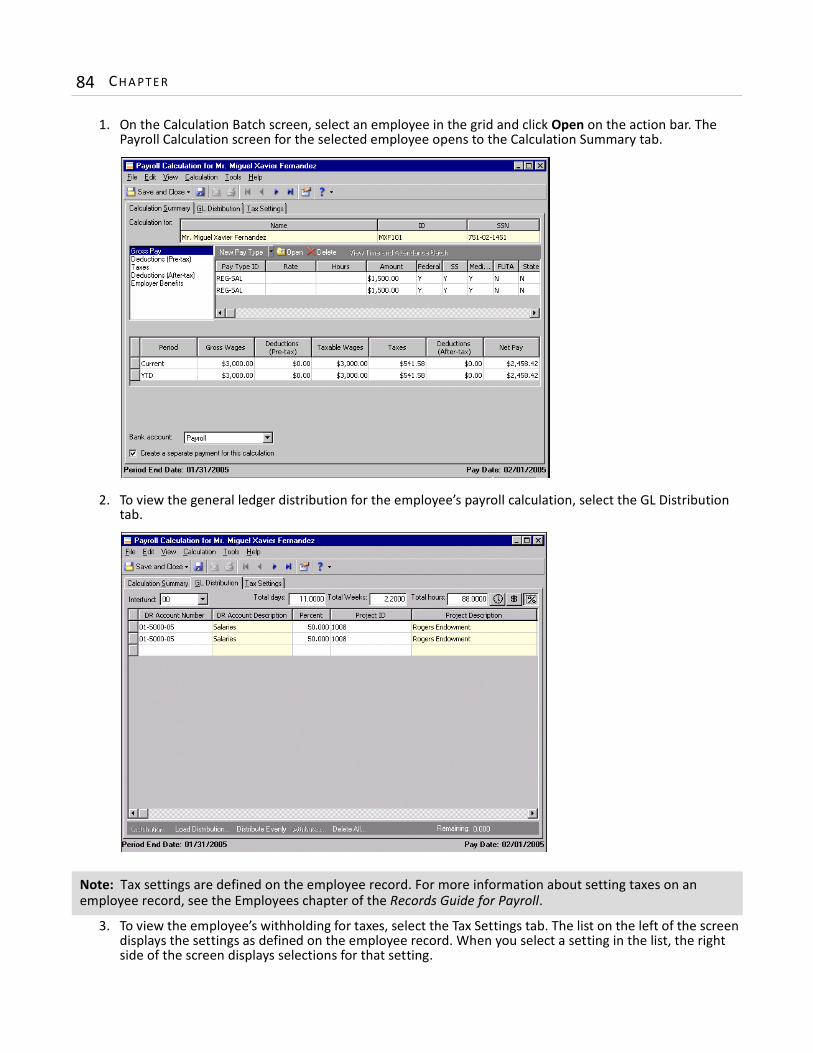
84 CH A PT E R
1. On the Calculation Batch screen, select an employee in the grid and click Open on the action bar. The Payroll Calculation screen for the selected employee opens to the Calculation Summary tab.
2. To view the general ledger distribution for the employee’s payroll calculation, select the GL Distribution tab.
3. To view the employee’s withholding for taxes, select the Tax Settings tab. The list on the left of the screen displays the settings as defined on the employee record. When you select a setting in the list, the right side of the screen displays selections for that setting.
Note: Tax settings are defined on the employee record. For more information about setting taxes on an employee record, see the Employees chapter of the Records Guide for Payroll.
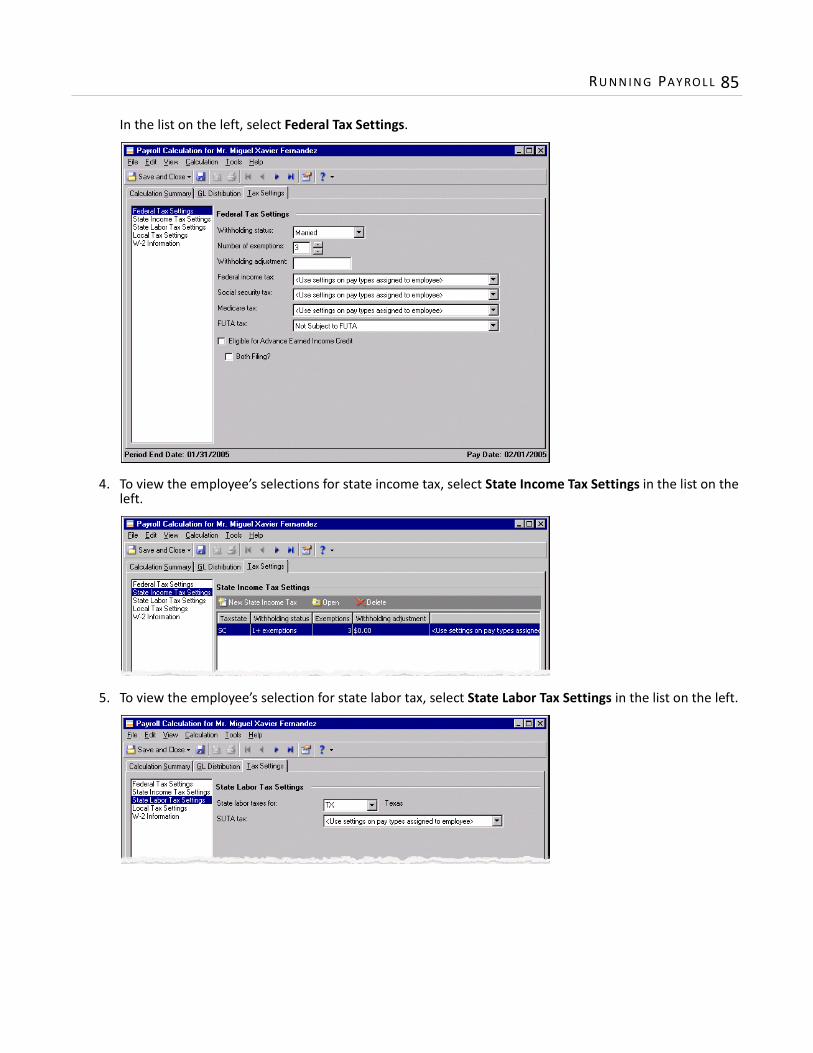
RU N N I N G PAY RO L L 85
In the list on the left, select Federal Tax Settings.
4. To view the employee’s selections for state income tax, select State Income Tax Settings in the list on the left.
5. To view the employee’s selection for state labor tax, select State Labor Tax Settings in the list on the left.

86 CH A PT E R
6. To view the employee’s selection for local income tax, select Local Tax Settings in the list on the left.
7. To view the employee’s selection for W-2 withholding, select W-2 Information in the list on the left.
8. When you finish viewing the employee’s calculations, close the record. You return to the Calculation Batch screen.
Printing Checks and EFT Notices
From the Payroll Processing page, you can print payroll checks, EFT notices, and record manual payroll checks. When you print payroll checks and EFT notices, you can record and generate them for a series of payments in one payment run.You can process payments using the default payment options selected for the bank account, or you can select new formatting options. For more information about default payment options, see the Payments chapter of the Banks Guide.
Glossary: EFT stands for Electronic Funds Transfer, a general banking system in which transactions, such as deposits and payments, are made through computer databases and electronic files. Money does not physically change hands; it transfers electronically from one account into another account. This is often referred to as “direct deposit”. You can use the optional module EFT to send electronic fund transfers for Payroll.
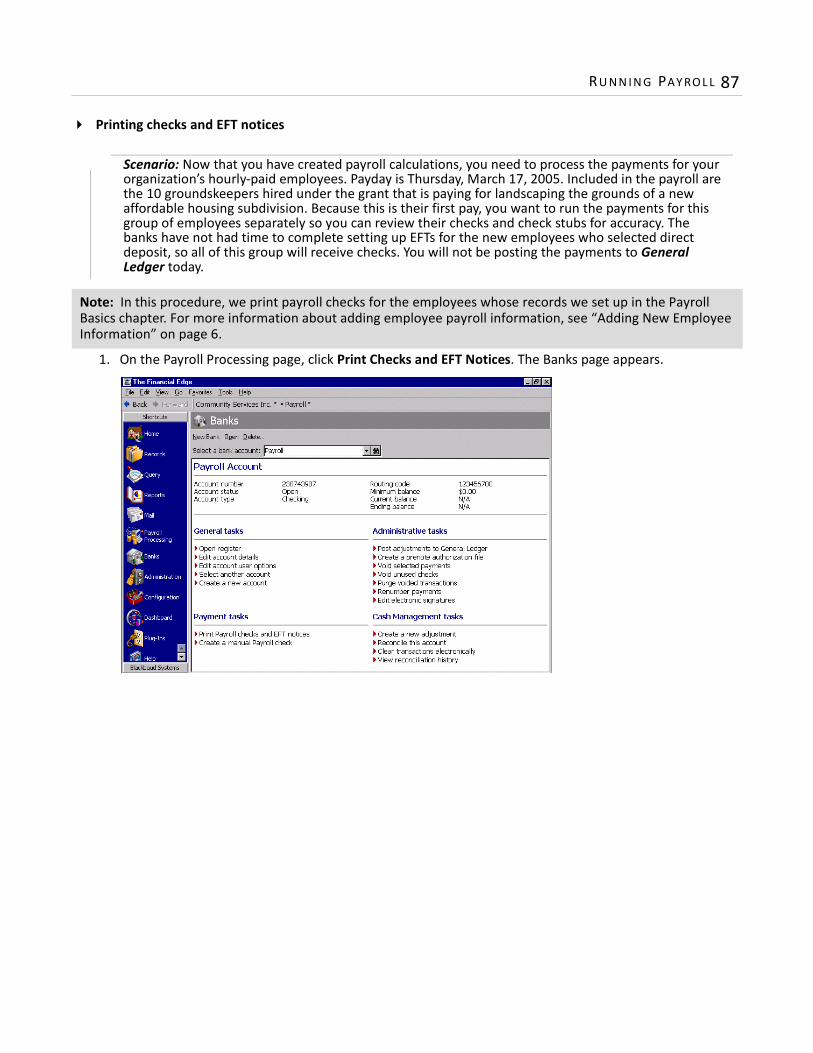
RU N N I N G PAY RO L L 87
Printing checks and EFT notices
1. On the Payroll Processing page, click Print Checks and EFT Notices. The Banks page appears.
Note: In this procedure, we print payroll checks for the employees whose records we set up in the Payroll Basics chapter. For more information about adding employee payroll information, see “Adding New Employee Information” on page 6.
Scenario: Now that you have created payroll calculations, you need to process the payments for your organization’s hourly-paid employees. Payday is Thursday, March 17, 2005. Included in the payroll are the 10 groundskeepers hired under the grant that is paying for landscaping the grounds of a new affordable housing subdivision. Because this is their first pay, you want to run the payments for this group of employees separately so you can review their checks and check stubs for accuracy. The banks have not had time to complete setting up EFTs for the new employees who selected direct deposit, so all of this group will receive checks. You will not be posting the payments to General Ledger today.
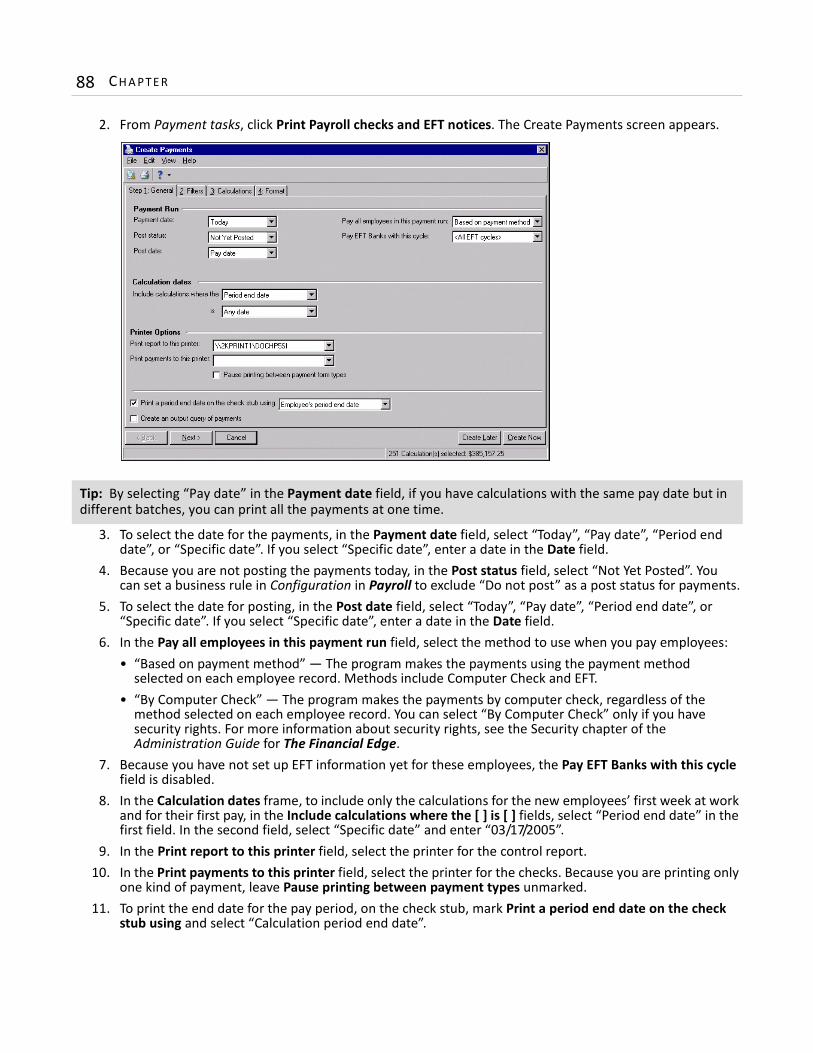
88 CH A PT E R
2. From Payment tasks, click Print Payroll checks and EFT notices. The Create Payments screen appears.
3. To select the date for the payments, in the Payment date field, select “Today”, “Pay date”, “Period end date”, or “Specific date”. If you select “Specific date”, enter a date in the Date field.
4. Because you are not posting the payments today, in the Post status field, select “Not Yet Posted”. You can set a business rule in Configuration in Payroll to exclude “Do not post” as a post status for payments.
5. To select the date for posting, in the Post date field, select “Today”, “Pay date”, “Period end date”, or “Specific date”. If you select “Specific date”, enter a date in the Date field.
6. In the Pay all employees in this payment run field, select the method to use when you pay employees:• “Based on payment method” — The program makes the payments using the payment method
selected on each employee record. Methods include Computer Check and EFT.• “By Computer Check” — The program makes the payments by computer check, regardless of the
method selected on each employee record. You can select “By Computer Check” only if you have security rights. For more information about security rights, see the Security chapter of the Administration Guide for The Financial Edge.
7. Because you have not set up EFT information yet for these employees, the Pay EFT Banks with this cycle field is disabled.
8. In the Calculation dates frame, to include only the calculations for the new employees’ first week at work and for their first pay, in the Include calculations where the [ ] is [ ] fields, select “Period end date” in the first field. In the second field, select “Specific date” and enter “03/17/2005”.
9. In the Print report to this printer field, select the printer for the control report.10. In the Print payments to this printer field, select the printer for the checks. Because you are printing only
one kind of payment, leave Pause printing between payment types unmarked.11. To print the end date for the pay period, on the check stub, mark Print a period end date on the check
stub using and select “Calculation period end date”.
Tip: By selecting “Pay date” in the Payment date field, if you have calculations with the same pay date but in different batches, you can print all the payments at one time.
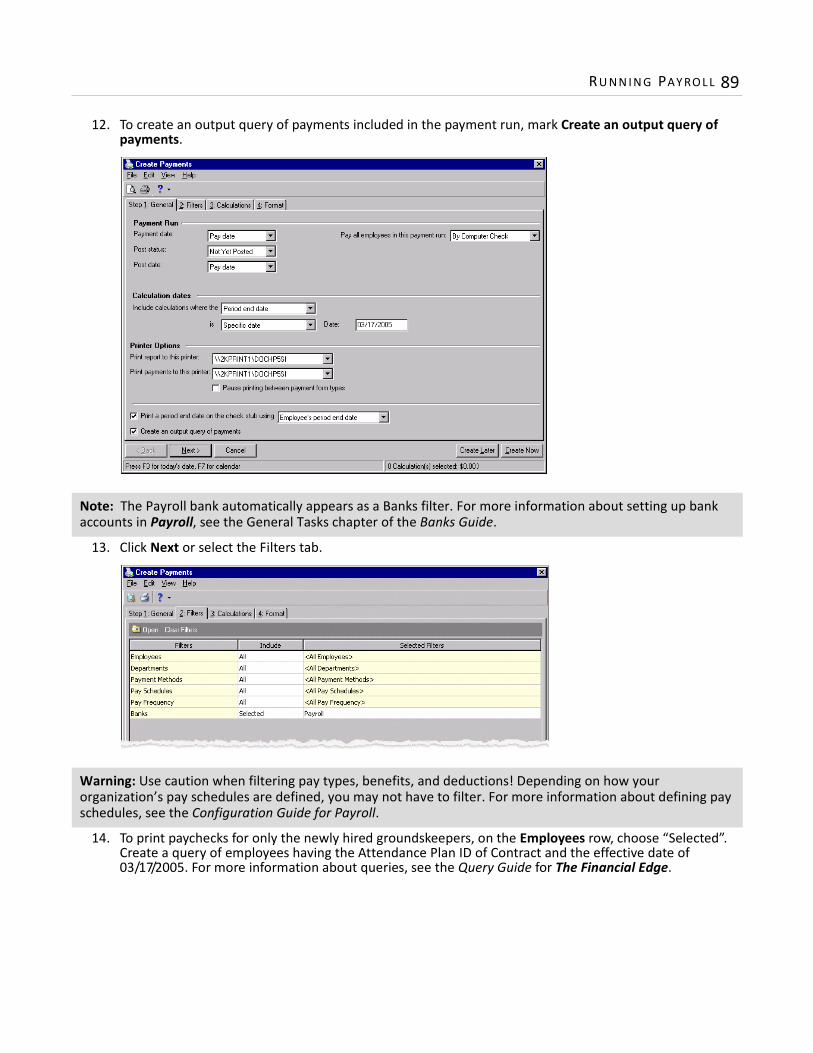
RU N N I N G PAY RO L L 89
12. To create an output query of payments included in the payment run, mark Create an output query of payments.
13. Click Next or select the Filters tab.
14. To print paychecks for only the newly hired groundskeepers, on the Employees row, choose “Selected”. Create a query of employees having the Attendance Plan ID of Contract and the effective date of 03/17/2005. For more information about queries, see the Query Guide for The Financial Edge.
Note: The Payroll bank automatically appears as a Banks filter. For more information about setting up bank accounts in Payroll, see the General Tasks chapter of the Banks Guide.
Warning: Use caution when filtering pay types, benefits, and deductions! Depending on how your organization’s pay schedules are defined, you may not have to filter. For more information about defining pay schedules, see the Configuration Guide for Payroll.

90 CH A PT E R
After creating the query and selecting it as the filter, click OK. You return to the Filters tab and the employee query you created appears in the Selected Filters column. For more information about filtering, see the Program Basics chapter of the Program Basics Guide.
15. Click Next or select the Calculations tab.
16. Review the information in the grid. In the Pay? column next to each employee record, the program automatically selects all the records. Unmark the checkbox for any record to exclude from the payment run or click Deselect All to unmark all the checkboxes.
Note: To rearrange the columns, click and drag a column heading to move it or right-click and select Columns from the submenu. On the Define Column Order screen, select the columns to appear in the order you want.
Warning: You can select a negative calculation for an employee only if you also select a positive calculation for the employee.
Note: You select default formatting on the Payments tab of the bank account record. For more information about bank accounts records, see the General Tasks chapter of the Banks Guide.
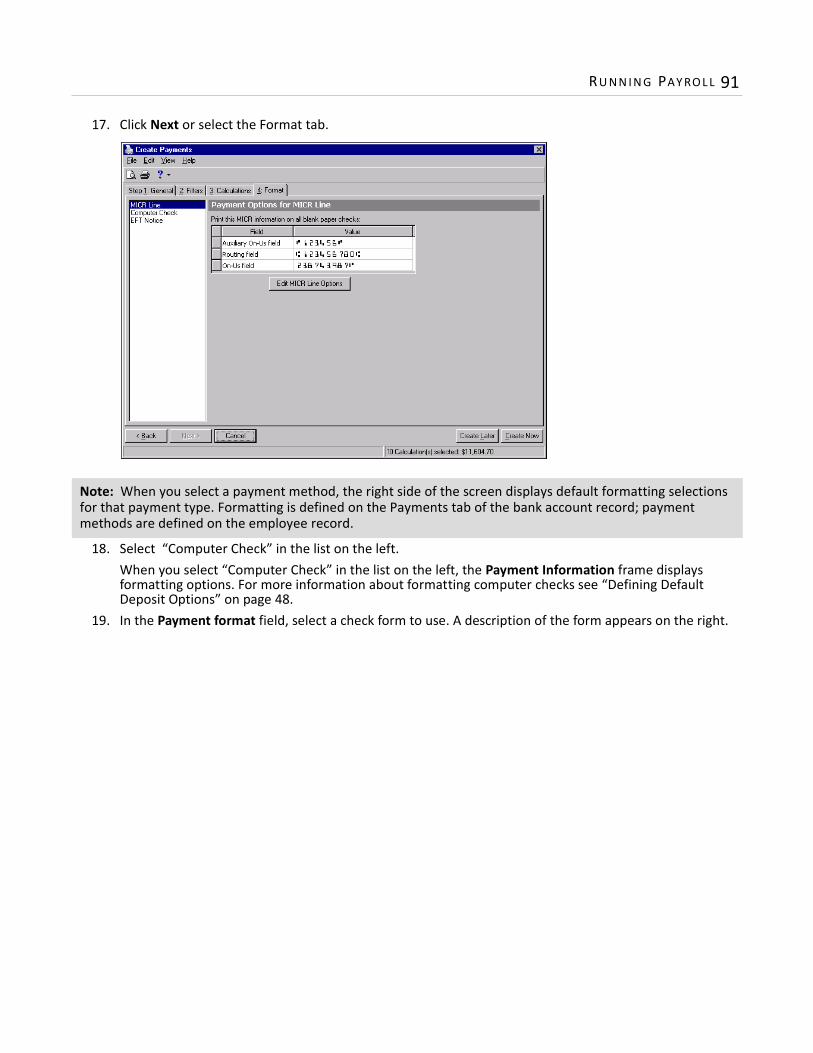
RU N N I N G PAY RO L L 91
17. Click Next or select the Format tab.
18. Select “Computer Check” in the list on the left. When you select “Computer Check” in the list on the left, the Payment Information frame displays formatting options. For more information about formatting computer checks see “Defining Default Deposit Options” on page 48.
19. In the Payment format field, select a check form to use. A description of the form appears on the right.
Note: When you select a payment method, the right side of the screen displays default formatting selections for that payment type. Formatting is defined on the Payments tab of the bank account record; payment methods are defined on the employee record.
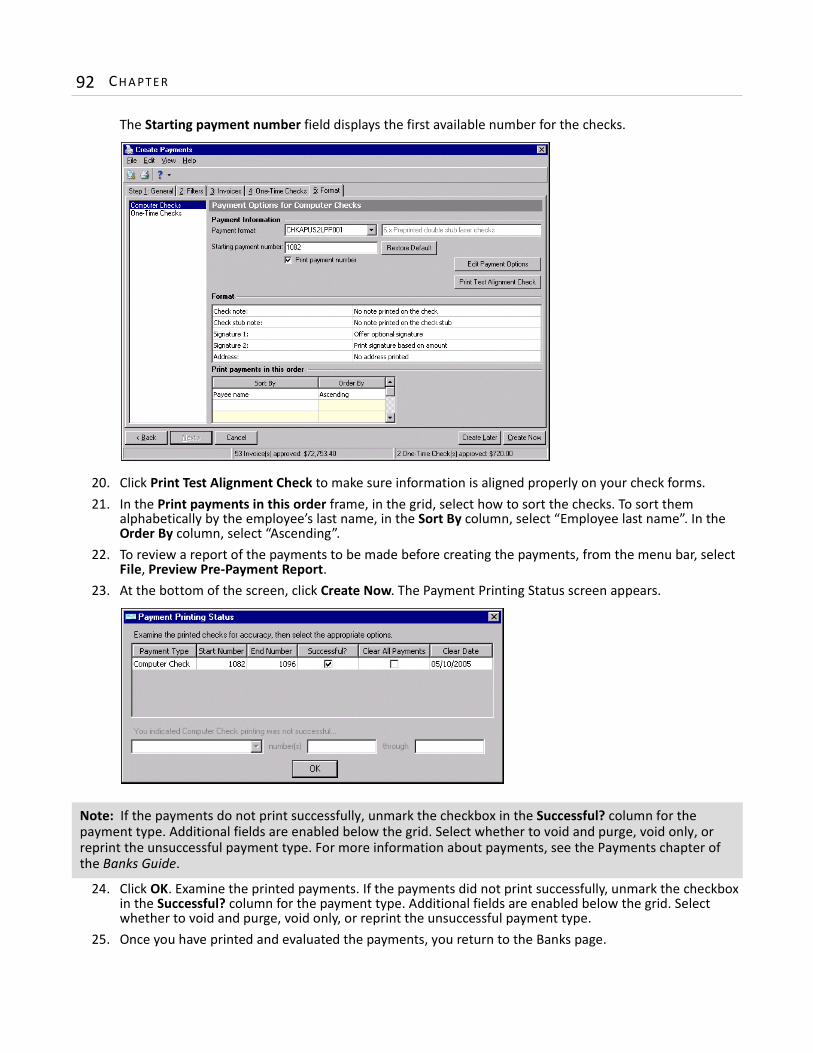
92 CH A PT E R
The Starting payment number field displays the first available number for the checks.
20. Click Print Test Alignment Check to make sure information is aligned properly on your check forms.21. In the Print payments in this order frame, in the grid, select how to sort the checks. To sort them
alphabetically by the employee’s last name, in the Sort By column, select “Employee last name”. In the Order By column, select “Ascending”.
22. To review a report of the payments to be made before creating the payments, from the menu bar, select File, Preview Pre-Payment Report.
23. At the bottom of the screen, click Create Now. The Payment Printing Status screen appears.
24. Click OK. Examine the printed payments. If the payments did not print successfully, unmark the checkbox in the Successful? column for the payment type. Additional fields are enabled below the grid. Select whether to void and purge, void only, or reprint the unsuccessful payment type.
25. Once you have printed and evaluated the payments, you return to the Banks page.
Note: If the payments do not print successfully, unmark the checkbox in the Successful? column for the payment type. Additional fields are enabled below the grid. Select whether to void and purge, void only, or reprint the unsuccessful payment type. For more information about payments, see the Payments chapter of the Banks Guide.
5chapter
Maintaining Payroll Records
Copying Payroll Records . . . . . . . . . . . . . . . . . . . . . . . . . . . . . . . . . . . . . . . . . . . . . . . . . . . . . . . . . . . . . . . . . . . . . . 94Copying Pay Types . . . . . . . . . . . . . . . . . . . . . . . . . . . . . . . . . . . . . . . . . . . . . . . . . . . . . . . . . . . . . . . . . . . . . . . . . . . . . . 94Copying Benefits . . . . . . . . . . . . . . . . . . . . . . . . . . . . . . . . . . . . . . . . . . . . . . . . . . . . . . . . . . . . . . . . . . . . . . . . . . . . . . . 98Copying Deductions . . . . . . . . . . . . . . . . . . . . . . . . . . . . . . . . . . . . . . . . . . . . . . . . . . . . . . . . . . . . . . . . . . . . . . . . . . . 101Creating a One-Time Calculation . . . . . . . . . . . . . . . . . . . . . . . . . . . . . . . . . . . . . . . . . . . . . . . . . . . . . . . . . . . . . . 105Promoting Employees . . . . . . . . . . . . . . . . . . . . . . . . . . . . . . . . . . . . . . . . . . . . . . . . . . . . . . . . . . . . . . . . . . . . . . . 108Terminating Employees . . . . . . . . . . . . . . . . . . . . . . . . . . . . . . . . . . . . . . . . . . . . . . . . . . . . . . . . . . . . . . . . . . . . . . 111Accessing Employee Records . . . . . . . . . . . . . . . . . . . . . . . . . . . . . . . . . . . . . . . . . . . . . . . . . . . . . . . . . . . . . . . . . 115

94 CH A PT E R
Part of the typical payroll cycle includes maintaining compensation or human resources information for employees. You may need to correct pay, deduction, benefit, and tax amounts to ensure payroll will be calculated and expensed correctly. You frequently process employee training information, promotions, and separations. With Payroll Processing, you can maintain employees’ entire “life cycles” with your organization. You use Group Assignment to make these changes to multiple employee records. Group assignments can speed up your processing by making changes to multiple employee records simultaneously instead of making changes to records one at a time. For more information about assigning records to groups of employee records, see “Creating Group Assignments” on page 5.For example, you can add an annual increase for a group of employees at one time by copying a pay type and increasing its amount. When you copy an existing record or assign a new record to employee records, you do not delete or overwrite the existing information. Instead, you expire the old record by setting an effective end date. The program saves the historic settings, thus maintaining an effective check-and-balance system. Here, we illustrate several common payroll changes for employees. We use scenarios and examples of information that can help you process similar information for your organization’s employee records. Once you perform a task with the given data, you can perform the task with your organization’s data.
Copying Payroll Records
You can copy pay types, benefits, and deductions to edit or update employee information for payroll purposes. When copying compensation records, you can increase or decrease the value by a percent or amount.For more information about settings for pay types, benefits, and deductions, see the Configuration Guide for Payroll.
Copying Pay Types
When copying pay types to employee records, you copy predefined information that establishes the rate and pay for regular time, overtime, and other employer compensation. A pay type can be a salary, fixed amount, hourly rate, piece rate, or percentage of gross pay, and an employee can have more than one pay type on his record. For example, an hourly-paid employee may have his regular hourly pay and additional overtime pay on his record. Once calculations are made using a pay type, you cannot edit the pay type. Pay types are defined in Configuration. For more information about defining pay types, see the Configuration Guide for Payroll.
Warning: To ensure success with your processing, before you begin entering data into Payroll, confirm that your organization has properly set up the program, using the steps outlined on the Set up Payroll page of Administration.
Glossary: A pay type is predefined information that establishes the rate and pay amount for regular time, overtime, and other employer compensation. A pay type can be a salary, fixed amount, hourly rate, piece rate, or percentage of gross pay. Pay types are defined in Configuration.
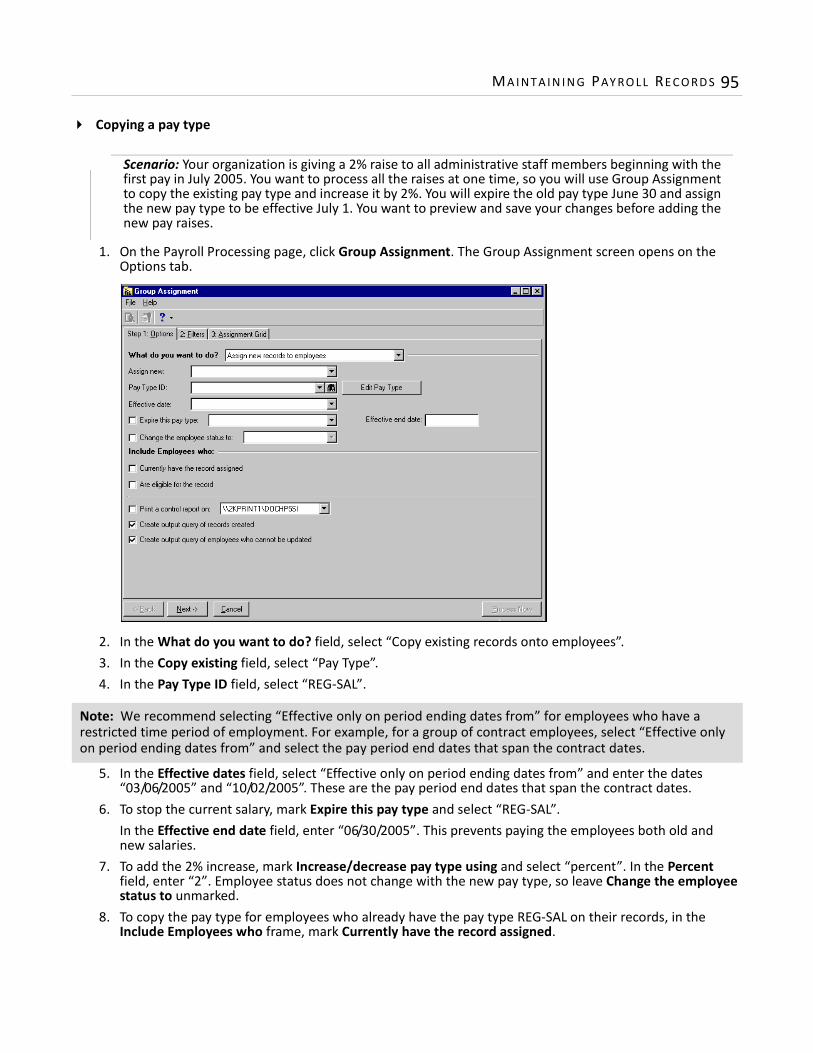
MA I N T A I N I N G PAY RO L L RE C O RD S 95
Copying a pay type
1. On the Payroll Processing page, click Group Assignment. The Group Assignment screen opens on the Options tab.
2. In the What do you want to do? field, select “Copy existing records onto employees”.3. In the Copy existing field, select “Pay Type”.4. In the Pay Type ID field, select “REG-SAL”.
5. In the Effective dates field, select “Effective only on period ending dates from” and enter the dates “03/06/2005” and “10/02/2005”. These are the pay period end dates that span the contract dates.
6. To stop the current salary, mark Expire this pay type and select “REG-SAL”.In the Effective end date field, enter “06/30/2005”. This prevents paying the employees both old and new salaries.
7. To add the 2% increase, mark Increase/decrease pay type using and select “percent”. In the Percent field, enter “2”. Employee status does not change with the new pay type, so leave Change the employee status to unmarked.
8. To copy the pay type for employees who already have the pay type REG-SAL on their records, in the Include Employees who frame, mark Currently have the record assigned.
Note: We recommend selecting “Effective only on period ending dates from” for employees who have a restricted time period of employment. For example, for a group of contract employees, select “Effective only on period ending dates from” and select the pay period end dates that span the contract dates.
Scenario: Your organization is giving a 2% raise to all administrative staff members beginning with the first pay in July 2005. You want to process all the raises at one time, so you will use Group Assignment to copy the existing pay type and increase it by 2%. You will expire the old pay type June 30 and assign the new pay type to be effective July 1. You want to preview and save your changes before adding the new pay raises.
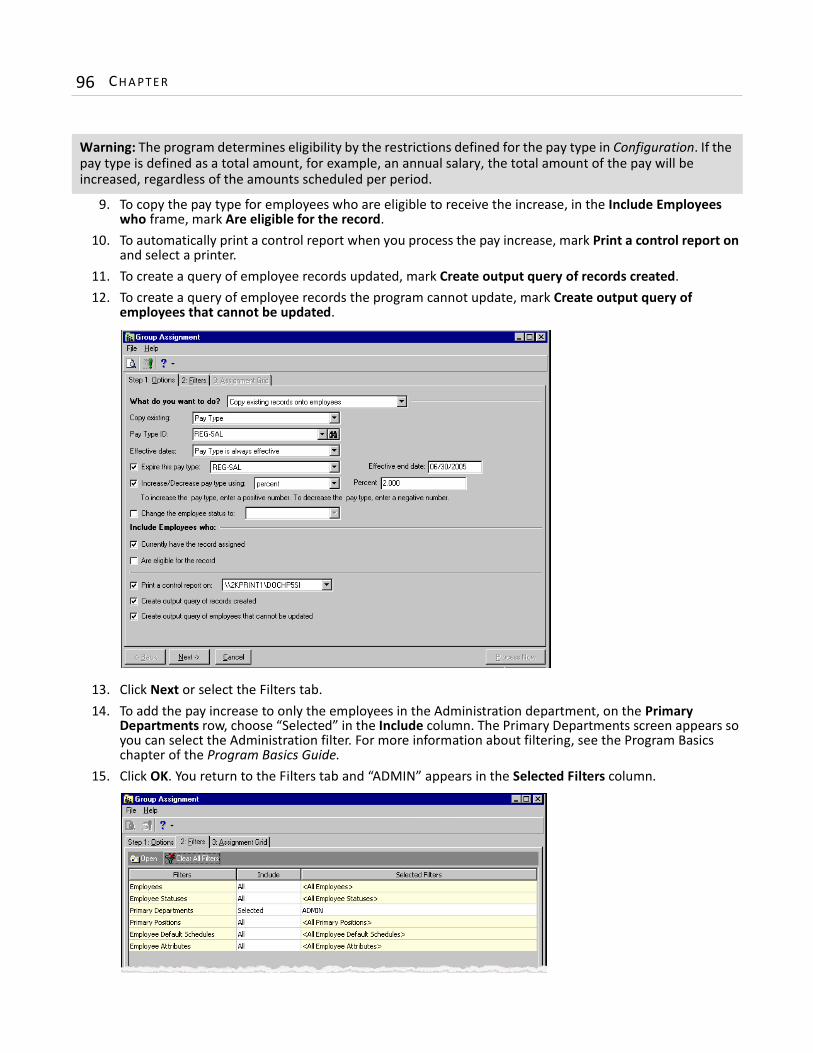
96 CH A PT E R
9. To copy the pay type for employees who are eligible to receive the increase, in the Include Employees who frame, mark Are eligible for the record.
10. To automatically print a control report when you process the pay increase, mark Print a control report on and select a printer.
11. To create a query of employee records updated, mark Create output query of records created.12. To create a query of employee records the program cannot update, mark Create output query of
employees that cannot be updated.
13. Click Next or select the Filters tab.14. To add the pay increase to only the employees in the Administration department, on the Primary
Departments row, choose “Selected” in the Include column. The Primary Departments screen appears so you can select the Administration filter. For more information about filtering, see the Program Basics chapter of the Program Basics Guide.
15. Click OK. You return to the Filters tab and “ADMIN” appears in the Selected Filters column.
Warning: The program determines eligibility by the restrictions defined for the pay type in Configuration. If the pay type is defined as a total amount, for example, an annual salary, the total amount of the pay will be increased, regardless of the amounts scheduled per period.
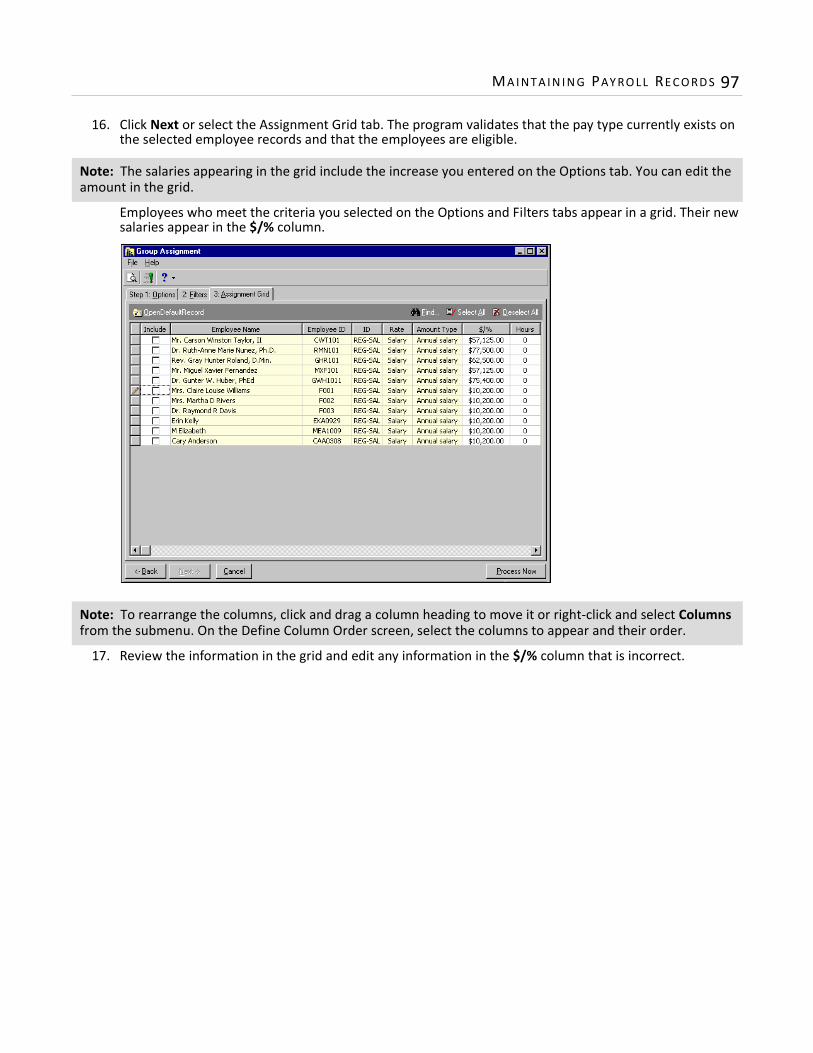
MA I N T A I N I N G PAY RO L L RE C O RD S 97
16. Click Next or select the Assignment Grid tab. The program validates that the pay type currently exists on the selected employee records and that the employees are eligible.
Employees who meet the criteria you selected on the Options and Filters tabs appear in a grid. Their new salaries appear in the $/% column.
17. Review the information in the grid and edit any information in the $/% column that is incorrect.
Note: The salaries appearing in the grid include the increase you entered on the Options tab. You can edit the amount in the grid.
Note: To rearrange the columns, click and drag a column heading to move it or right-click and select Columns from the submenu. On the Define Column Order screen, select the columns to appear and their order.
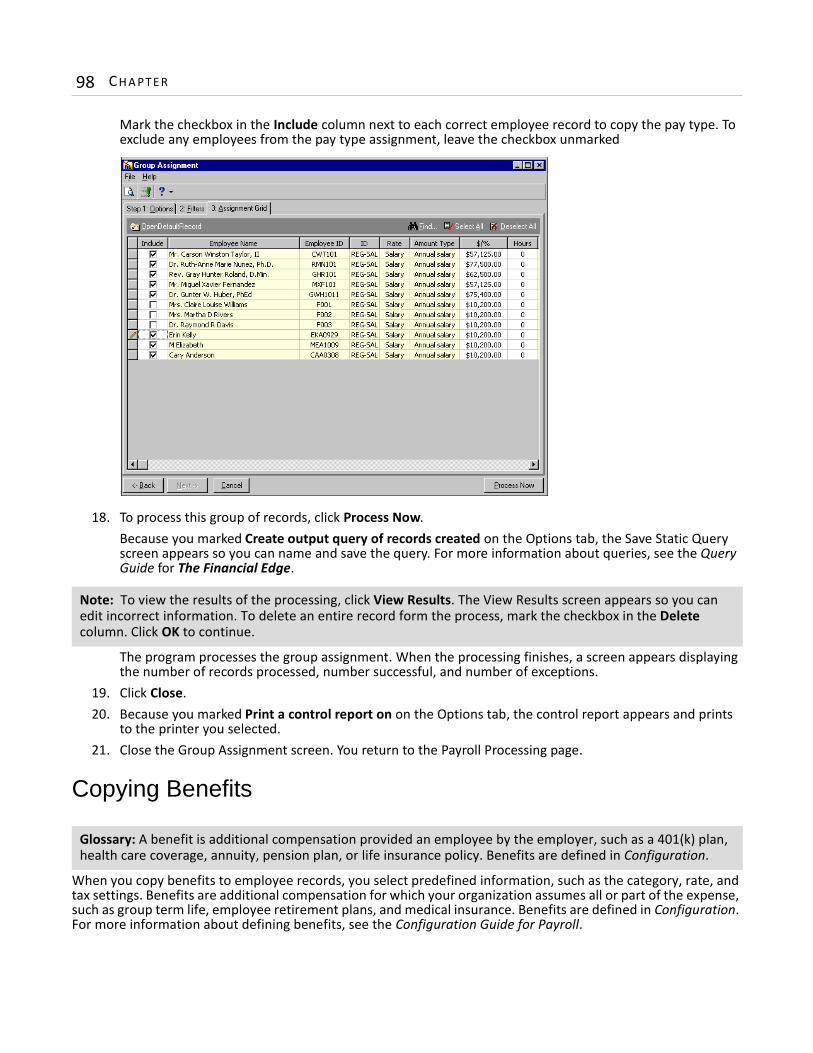
98 CH A PT E R
Mark the checkbox in the Include column next to each correct employee record to copy the pay type. To exclude any employees from the pay type assignment, leave the checkbox unmarked
18. To process this group of records, click Process Now.Because you marked Create output query of records created on the Options tab, the Save Static Query screen appears so you can name and save the query. For more information about queries, see the Query Guide for The Financial Edge.
The program processes the group assignment. When the processing finishes, a screen appears displaying the number of records processed, number successful, and number of exceptions.
19. Click Close.20. Because you marked Print a control report on on the Options tab, the control report appears and prints
to the printer you selected.21. Close the Group Assignment screen. You return to the Payroll Processing page.
Copying Benefits
When you copy benefits to employee records, you select predefined information, such as the category, rate, and tax settings. Benefits are additional compensation for which your organization assumes all or part of the expense, such as group term life, employee retirement plans, and medical insurance. Benefits are defined in Configuration. For more information about defining benefits, see the Configuration Guide for Payroll.
Note: To view the results of the processing, click View Results. The View Results screen appears so you can edit incorrect information. To delete an entire record form the process, mark the checkbox in the Delete column. Click OK to continue.
Glossary: A benefit is additional compensation provided an employee by the employer, such as a 401(k) plan, health care coverage, annuity, pension plan, or life insurance policy. Benefits are defined in Configuration.
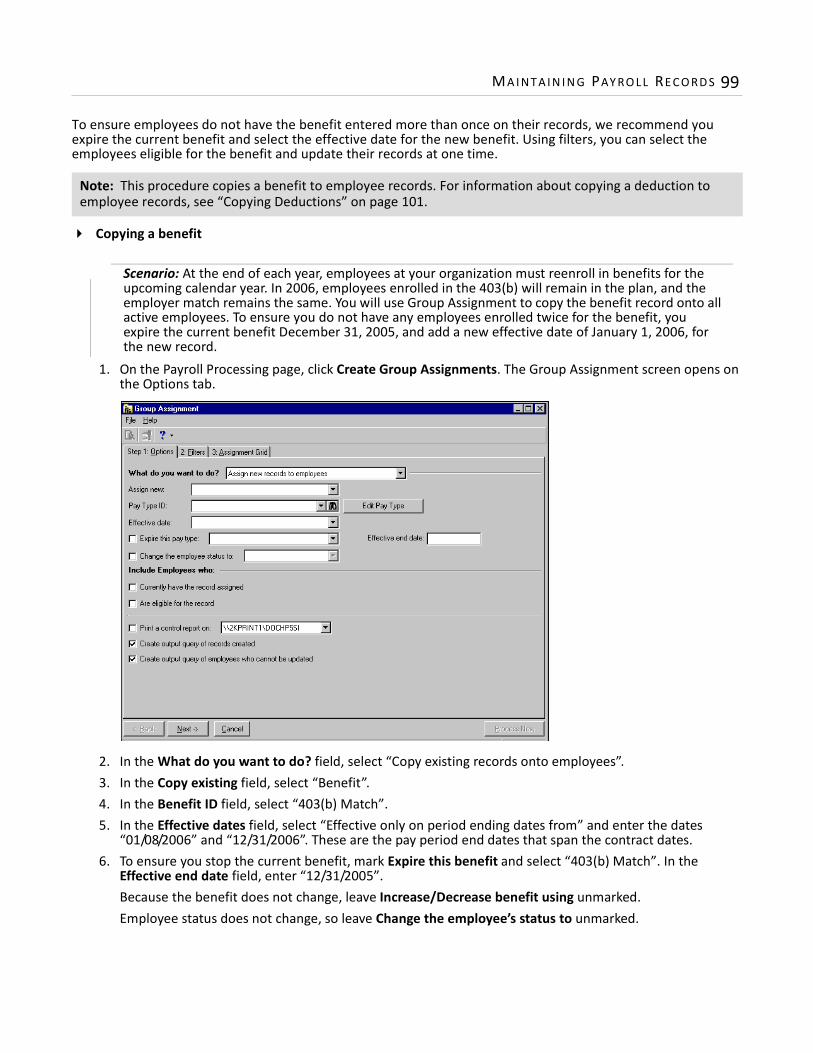
MA I N T A I N I N G PAY RO L L RE C O RD S 99
To ensure employees do not have the benefit entered more than once on their records, we recommend you expire the current benefit and select the effective date for the new benefit. Using filters, you can select the employees eligible for the benefit and update their records at one time.
Copying a benefit
1. On the Payroll Processing page, click Create Group Assignments. The Group Assignment screen opens on the Options tab.
2. In the What do you want to do? field, select “Copy existing records onto employees”.3. In the Copy existing field, select “Benefit”.4. In the Benefit ID field, select “403(b) Match”.5. In the Effective dates field, select “Effective only on period ending dates from” and enter the dates
“01/08/2006” and “12/31/2006”. These are the pay period end dates that span the contract dates.6. To ensure you stop the current benefit, mark Expire this benefit and select “403(b) Match”. In the
Effective end date field, enter “12/31/2005”.Because the benefit does not change, leave Increase/Decrease benefit using unmarked.Employee status does not change, so leave Change the employee’s status to unmarked.
Note: This procedure copies a benefit to employee records. For information about copying a deduction to employee records, see “Copying Deductions” on page 101.
Scenario: At the end of each year, employees at your organization must reenroll in benefits for the upcoming calendar year. In 2006, employees enrolled in the 403(b) will remain in the plan, and the employer match remains the same. You will use Group Assignment to copy the benefit record onto all active employees. To ensure you do not have any employees enrolled twice for the benefit, you expire the current benefit December 31, 2005, and add a new effective date of January 1, 2006, for the new record.

100 CH A PT E R
7. To assign the benefit to employees already enrolled in the plan, in the Include Employees who frame, mark Currently have the record assigned.
8. To automatically print a control report when you click Process Now, mark Print a control report on and select a printer.
9. To create a query of employee records updated, mark Create output query of records created.10. To create a query of employee records the program cannot update, mark Create output query of
employees that cannot be updated.
11. Click Next or select the Filters tab.12. To assign the benefit to all active employees, on the Employee Statuses row, select the Active filter. For
more information about filtering, see the Program Basics chapter of the Program Basics Guide.13. Click OK. You return to the Filters tab and “Active” appears in the Selected Filters column.
Warning: If you leave Currently have the record assigned unmarked, before you process the records, you get a message warning you that employees without the selected benefit on their records will not have the benefit assigned.

MA I N T A I N I N G PAY RO L L RE C O RD S 10
14. Click Next or select the Assignment Grid tab. Employees who meet the criteria selected on the Options and Filters tabs appear in a grid.
15. Review the information in the grid and mark the checkbox in the Include column next to each employee record to assign the benefit to.
16. If any information is incorrect, leave the checkbox unmarked.17. To process the selected group of records, click Process Now.18. Because you marked Create output query of records created on the Options tab, the Save Static Query
screen appears so you can name and save the query. For more information about queries, see the Query Guide for The Financial Edge.
19. To view the results of the processing, click View Results. The View Results screen appears so you can edit incorrect information in the $/% column or delete records from the processing. To delete a record from the process, mark the checkbox in the Delete column. Click OK to continue.
20. The program processes the group assignment. When the processing finishes, a screen appears displaying the number of records processed, number successful, and number of exceptions.
21. Click Close.22. Because you marked Print a control report on on the Options tab, the control report appears and prints
to the printer you selected.23. Close the Group Assignment screen. You return to the Payroll Processing page.
Copying Deductions
Note: To rearrange the columns, click and drag a column heading to move it or right-click and select Columns from the submenu. On the Define Column Order screen, select the columns to appear and their order.
Glossary: A deduction is a subtraction from an employee’s gross wages for a designated purpose, such as health insurance. Deductions are defined in Configuration.
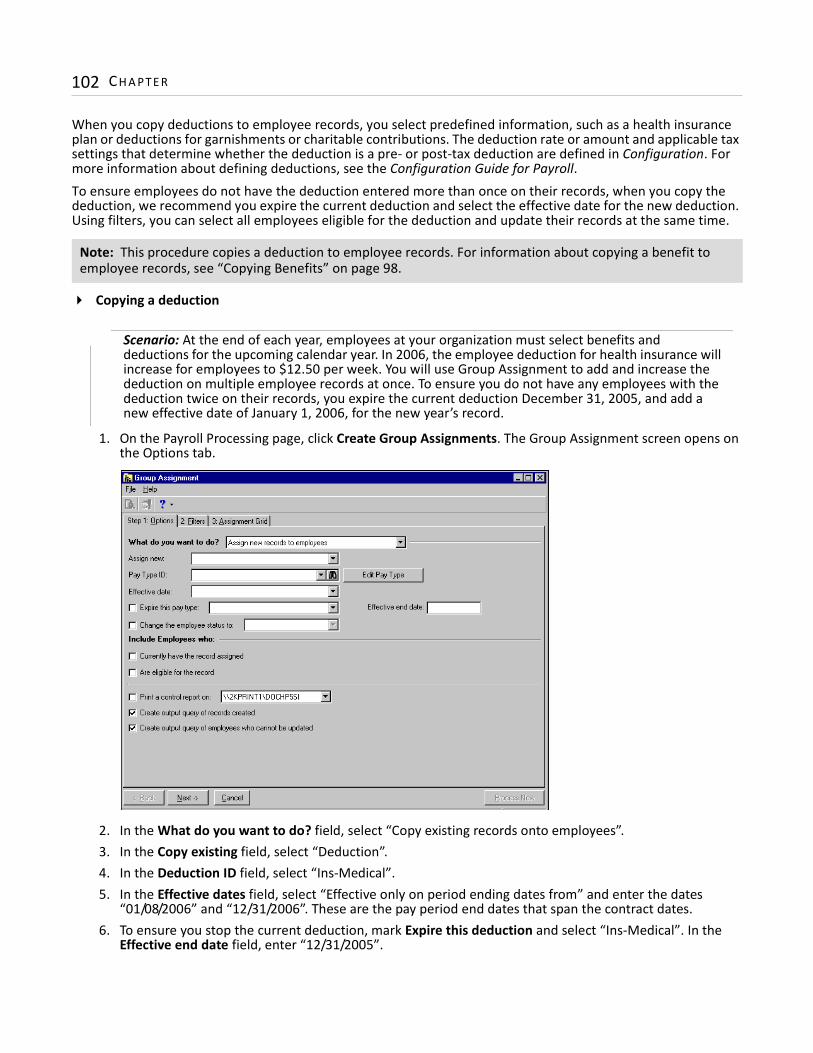
102 CH A PT E R
When you copy deductions to employee records, you select predefined information, such as a health insurance plan or deductions for garnishments or charitable contributions. The deduction rate or amount and applicable tax settings that determine whether the deduction is a pre- or post-tax deduction are defined in Configuration. For more information about defining deductions, see the Configuration Guide for Payroll.To ensure employees do not have the deduction entered more than once on their records, when you copy the deduction, we recommend you expire the current deduction and select the effective date for the new deduction. Using filters, you can select all employees eligible for the deduction and update their records at the same time.
Copying a deduction
1. On the Payroll Processing page, click Create Group Assignments. The Group Assignment screen opens on the Options tab.
2. In the What do you want to do? field, select “Copy existing records onto employees”.3. In the Copy existing field, select “Deduction”.4. In the Deduction ID field, select “Ins-Medical”.5. In the Effective dates field, select “Effective only on period ending dates from” and enter the dates
“01/08/2006” and “12/31/2006”. These are the pay period end dates that span the contract dates.6. To ensure you stop the current deduction, mark Expire this deduction and select “Ins-Medical”. In the
Effective end date field, enter “12/31/2005”.
Note: This procedure copies a deduction to employee records. For information about copying a benefit to employee records, see “Copying Benefits” on page 98.
Scenario: At the end of each year, employees at your organization must select benefits and deductions for the upcoming calendar year. In 2006, the employee deduction for health insurance will increase for employees to $12.50 per week. You will use Group Assignment to add and increase the deduction on multiple employee records at once. To ensure you do not have any employees with the deduction twice on their records, you expire the current deduction December 31, 2005, and add a new effective date of January 1, 2006, for the new year’s record.
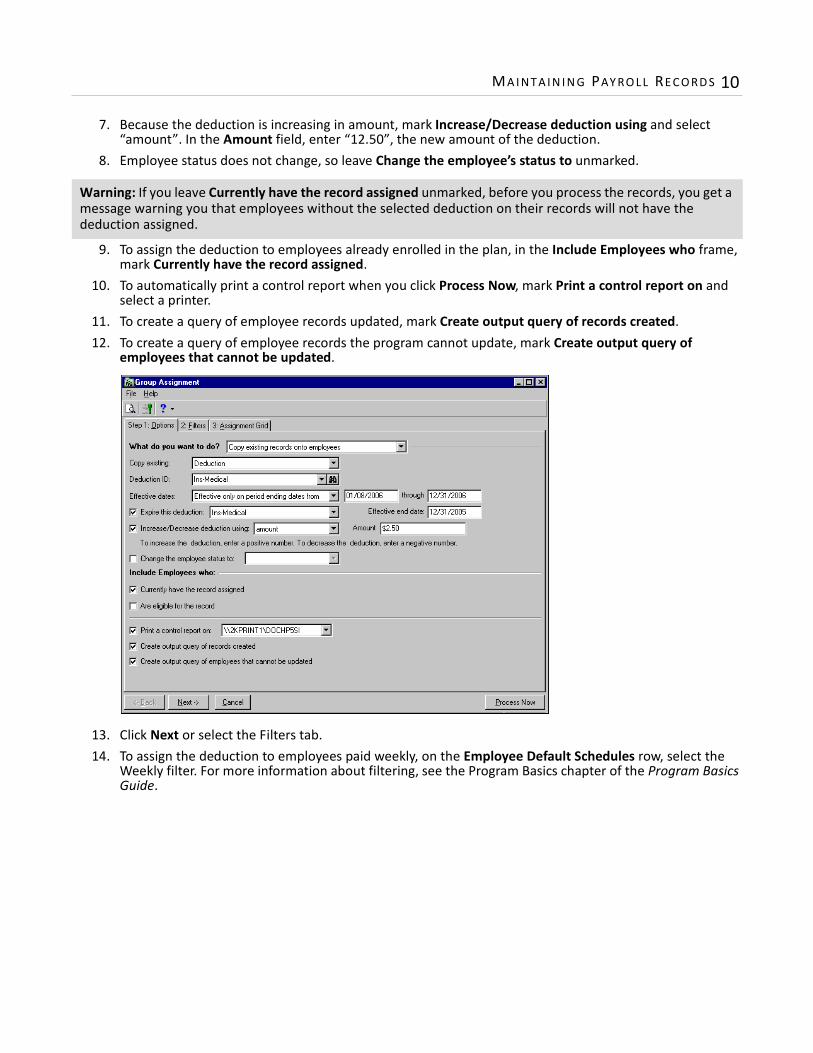
MA I N T A I N I N G PAY RO L L RE C O RD S 10
7. Because the deduction is increasing in amount, mark Increase/Decrease deduction using and select “amount”. In the Amount field, enter “12.50”, the new amount of the deduction.
8. Employee status does not change, so leave Change the employee’s status to unmarked.
9. To assign the deduction to employees already enrolled in the plan, in the Include Employees who frame, mark Currently have the record assigned.
10. To automatically print a control report when you click Process Now, mark Print a control report on and select a printer.
11. To create a query of employee records updated, mark Create output query of records created.12. To create a query of employee records the program cannot update, mark Create output query of
employees that cannot be updated.
13. Click Next or select the Filters tab.14. To assign the deduction to employees paid weekly, on the Employee Default Schedules row, select the
Weekly filter. For more information about filtering, see the Program Basics chapter of the Program Basics Guide.
Warning: If you leave Currently have the record assigned unmarked, before you process the records, you get a message warning you that employees without the selected deduction on their records will not have the deduction assigned.

104 CH A PT E R
15. Click OK. You return to the Filters tab and “Weekly” appears in the Selected Filters column.
16. Click Next or select the Assignment Grid tab. Employees who meet the criteria selected on the Options and Filters tabs appear in a grid.
17. Review the information in the grid and mark the checkbox in the Include column next to each employee record to assign the deduction to.
18. If any information is incorrect, leave the checkbox unmarked and update the employee record from the Records page. For more information about employee records, see the Employees chapter of the Records Guide for Payroll.
19. To process the selected group of records, click Process Now.20. Because you marked Create output query of records created on the Options tab, the Save Static Query
screen appears so you can name and save the query. For more information about queries, see the Query Guide for The Financial Edge.
Note: To rearrange the columns, click and drag a column heading to move it or right-click and select Columns from the submenu. On the Define Column Order screen, select the columns to appear and their order.
MA I N T A I N I N G PAY RO L L RE C O RD S 10
21. To view the results of the processing, click View Results. The View Results screen appears so you can edit incorrect information in the $/% column or delete records from the processing. To delete a record from the process, mark the checkbox in the Delete column. Click OK to continue.
22. The program processes the group assignment. When the processing finishes, a screen appears displaying the number of records processed, number successful, and number of exceptions.
23. Click Close.24. Because you marked Print a control report on on the Options tab, the control report appears and prints
to the printer you selected.25. Close the Group Assignment screen. You return to the Payroll Processing page.
Creating a One-Time Calculation
To create a one-time payroll calculation, a new pay type must first be defined in Configuration, and you must assign the pay type to the selected employees. This pay type must have a specific amount and end date. If other pay types exist on the employee records for the same pay date, the program combines the pay types in the calculation. For example, hourly-paid employees may have their regular hourly pay and a one-time bonus pay. For more information about defining pay types, see the Configuration Guide for Payroll.In this example, we create a one-time payroll calculation to pay a group of employees for a bonus. Before creating a one-time calculation:• A specific pay type for the calculation must be defined in Configuration.• You must assign the pay type to the employees.
Creating a one-time payroll calculation1. In Configuration, define the pay type to use in the one-time payroll calculation. For more information
about defining pay types, see the Configuration Guide for Payroll.2. On the Payroll Processing page, assign the pay type to the employees to receive the one-time type. For
more information about assigning pay types to employee records, see “Assigning Pay Types” on page 8.
Note: To create a one-time calculation, you must create a specific pay type in Configuration and then assign the pay type to employee records. For more information about defining pay types, see the Configuration Guide for Payroll. For more information about assigning pay types, see “Assigning Pay Types” on page 8.

106 CH A PT E R
3. On the Payroll Processing page, click Create Calculations. The Calculate Payroll record opens on the General tab.
4. In the Calculations batch description field, enter a description that identifies this batch, for example, “Hourly Bonus”. The program generates a unique ID for the batch.
5. In the Calculate for period ending dates from [ ] and to [ ] fields, enter the dates for the pay period.
6. In the Calculations are for this pay date field, enter the pay date for the one-time pay.7. Click Create Calculations Now. When the program finishes the calculations, close the screen to return to
the Payroll Processing page.
Note: If other pay calculations exist for the date you enter, the program calculates both the one-time pay and the other scheduled pays. If the other scheduled pays have already been calculated, the program calculates only the one-time pay.
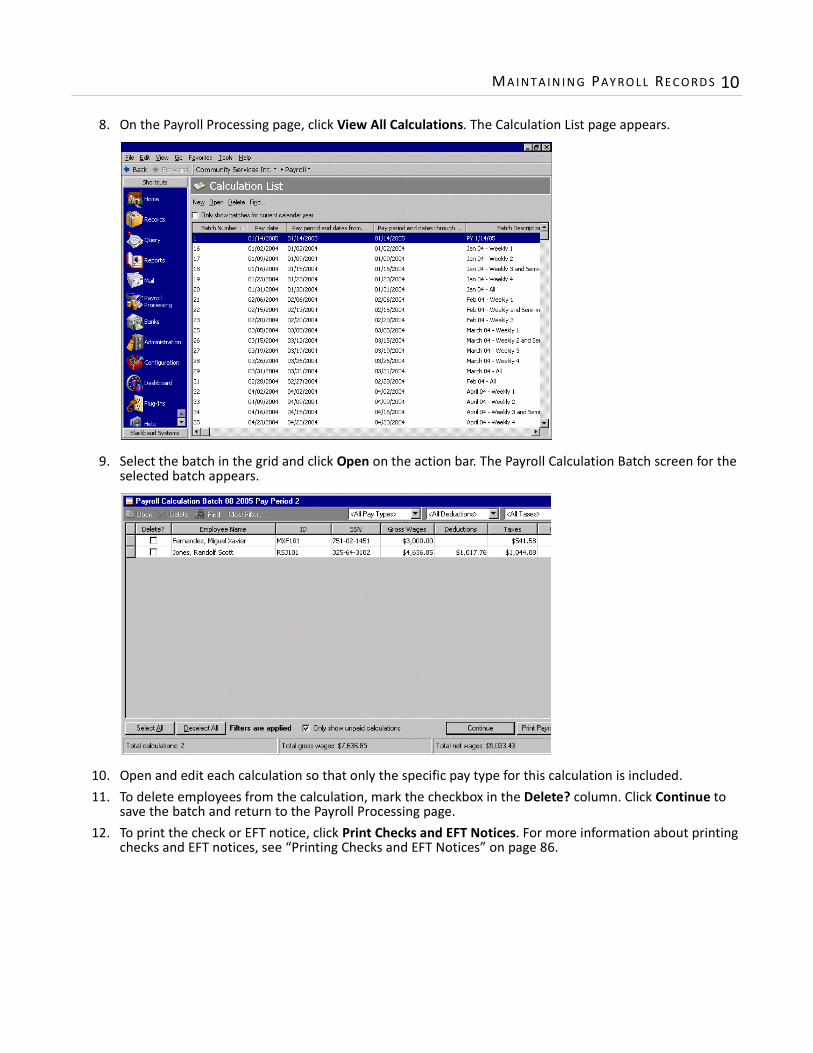
MA I N T A I N I N G PAY RO L L RE C O RD S 10
8. On the Payroll Processing page, click View All Calculations. The Calculation List page appears.
9. Select the batch in the grid and click Open on the action bar. The Payroll Calculation Batch screen for the selected batch appears.
10. Open and edit each calculation so that only the specific pay type for this calculation is included.11. To delete employees from the calculation, mark the checkbox in the Delete? column. Click Continue to
save the batch and return to the Payroll Processing page.12. To print the check or EFT notice, click Print Checks and EFT Notices. For more information about printing
checks and EFT notices, see “Printing Checks and EFT Notices” on page 86.
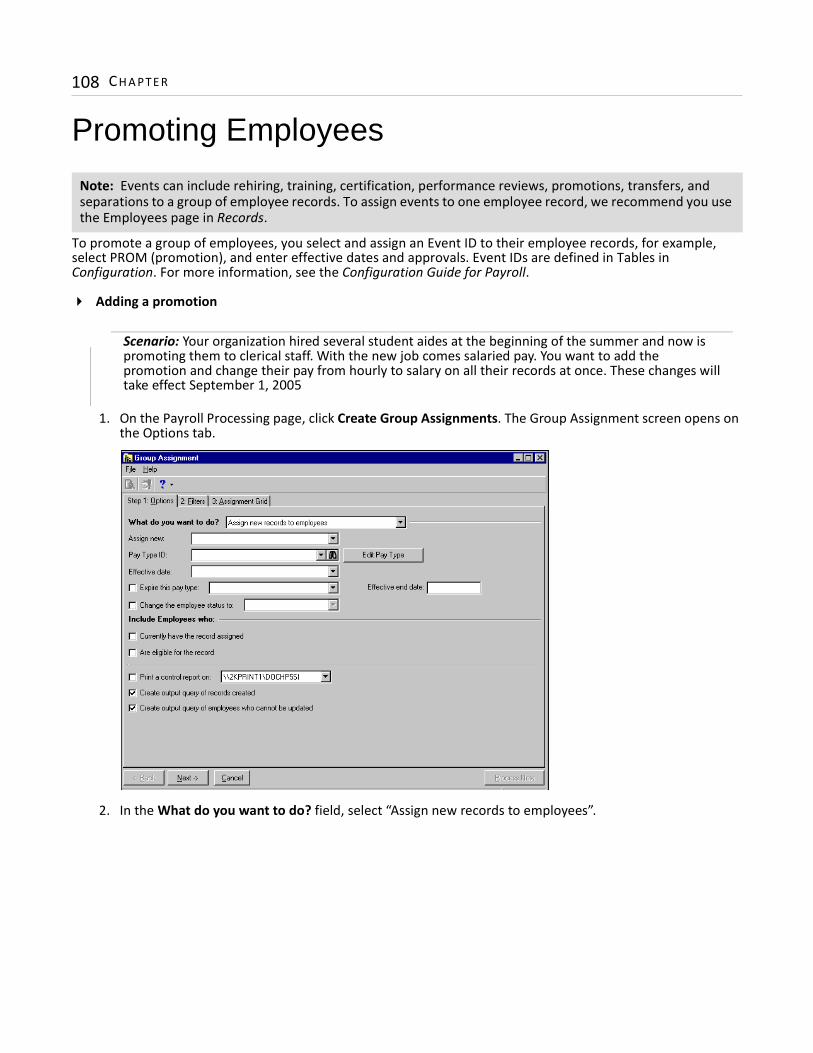
108 CH A PT E R
Promoting Employees
To promote a group of employees, you select and assign an Event ID to their employee records, for example, select PROM (promotion), and enter effective dates and approvals. Event IDs are defined in Tables in Configuration. For more information, see the Configuration Guide for Payroll.
Adding a promotion
1. On the Payroll Processing page, click Create Group Assignments. The Group Assignment screen opens on the Options tab.
2. In the What do you want to do? field, select “Assign new records to employees”.
Note: Events can include rehiring, training, certification, performance reviews, promotions, transfers, and separations to a group of employee records. To assign events to one employee record, we recommend you use the Employees page in Records.
Scenario: Your organization hired several student aides at the beginning of the summer and now is promoting them to clerical staff. With the new job comes salaried pay. You want to add the promotion and change their pay from hourly to salary on all their records at once. These changes will take effect September 1, 2005
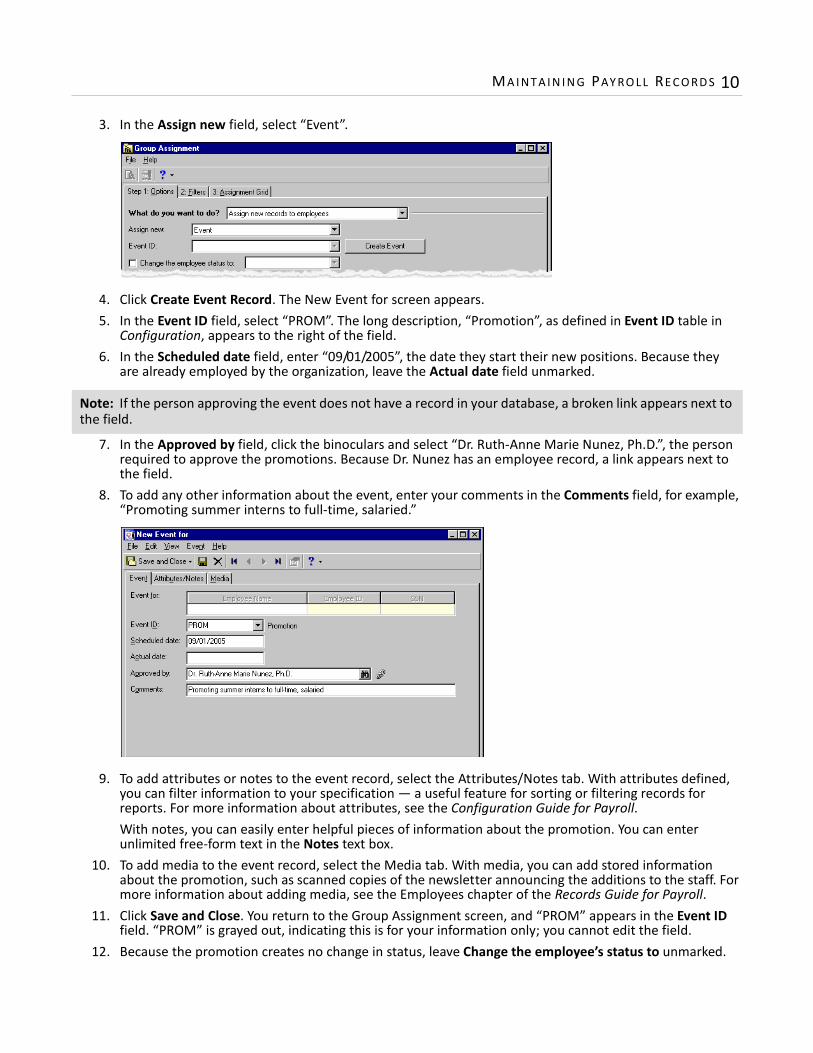
MA I N T A I N I N G PAY RO L L RE C O RD S 10
3. In the Assign new field, select “Event”.
4. Click Create Event Record. The New Event for screen appears.5. In the Event ID field, select “PROM”. The long description, “Promotion”, as defined in Event ID table in
Configuration, appears to the right of the field.6. In the Scheduled date field, enter “09/01/2005”, the date they start their new positions. Because they
are already employed by the organization, leave the Actual date field unmarked.
7. In the Approved by field, click the binoculars and select “Dr. Ruth-Anne Marie Nunez, Ph.D.”, the person required to approve the promotions. Because Dr. Nunez has an employee record, a link appears next to the field.
8. To add any other information about the event, enter your comments in the Comments field, for example, “Promoting summer interns to full-time, salaried.”
9. To add attributes or notes to the event record, select the Attributes/Notes tab. With attributes defined, you can filter information to your specification — a useful feature for sorting or filtering records for reports. For more information about attributes, see the Configuration Guide for Payroll.With notes, you can easily enter helpful pieces of information about the promotion. You can enter unlimited free-form text in the Notes text box.
10. To add media to the event record, select the Media tab. With media, you can add stored information about the promotion, such as scanned copies of the newsletter announcing the additions to the staff. For more information about adding media, see the Employees chapter of the Records Guide for Payroll.
11. Click Save and Close. You return to the Group Assignment screen, and “PROM” appears in the Event ID field. “PROM” is grayed out, indicating this is for your information only; you cannot edit the field.
12. Because the promotion creates no change in status, leave Change the employee’s status to unmarked.
Note: If the person approving the event does not have a record in your database, a broken link appears next to the field.

110 CH A PT E R
13. To automatically print a control report when you click Process Now, mark Print a control report on and select a printer.
14. To create a query of employee records updated, mark Create output query of records created.15. To create a query of employee records the program cannot update, mark Create output query of
employees that cannot be updated.
16. Click Next or select the Filters tab.17. To assign the event to only new staff, on the Primary Positions row, choose “Selected” in the Include
column. The Primary Positions screen appears so you can select the Student Aide filter. For more information about filtering, see the Program Basics chapter of the Program Basics Guide.
18. Click OK. You return to the Filters tab and “STUDENTAIDE” appears in the Selected Filters column.
Note: To rearrange the columns, click and drag a column heading to move it or right-click and select Columns from the submenu. On the Define Column Order screen, select the columns to appear and their order.

MA I N T A I N I N G PAY RO L L RE C O RD S 11
19. Click Next or select the Assignment Grid tab. Employees who meet the criteria you selected on the Options and Filters tabs appear in a grid.
20. Review the information in the grid.Mark the checkbox in the Include column next to each employee record to add the event. To exclude any employees from the pay type assignment, leave the checkbox unmarked.
21. To process this group of records, click Process Now.22. Because you marked Create output query of records created on the Options tab, the Save Static Query
screen appears so you can name and save the query. For more information about queries, see the Query Guide for The Financial Edge.
The program processes the group assignment. When the processing finishes, a screen appears displaying the number of records processed, number successful, and number of exceptions.
23. Click Close.24. Because you marked Print a control report on on the Options tab, the control report appears and prints
to the printer you selected.25. Close the Group Assignment screen. You return to the Payroll Processing page.
Terminating EmployeesTo terminate a group of employees, you assign an Event ID to their employee records, for example, SEP (separation), and enter effective dates and approvals. Event IDs are defined in the Event ID table in Configuration. For more information about setting up tables, see the Configuration Guide for Payroll.
Note: To view the results of the processing, click View Results. The View Results screen appears so you can edit incorrect information. To delete an employee record form the process, mark the checkbox in the Delete column. Click OK to continue.

112 CH A PT E R
If your organization has employees you separate and rehire, for example, seasonal employees or summer school teachers, you can create a separation event for these employees with Group Assignment instead of assigning the event to the records one at a time.If your organization uses tracks, you can use the checklist to guide you through the process and ensure all steps in a separation are complete, such as collecting property belonging to the organization, providing COBRA information, and completing an exit interview. For more information about tracks and checklists, see the Configuration Guide for Payroll.
Terminating a group of employees
1. On the Payroll Processing page, click Create Group Assignments. The Group Assignment screen opens on the Options tab.
2. In the What do you want to do? field, select “Assign new records to employees”.
3. In the Assign new field, select “Event”.4. Click Create Event. The New Event for screen appears.
Note: If your organization has created a separation track, you can use the checklist to guide you through the process and ensure all information is given to or collected from the employee. For more information about tracks and checklists, see the Configuration Guide for Payroll.
Glossary: An event is an occurrence on an employee record, such as new hire, promotion, training, or separation. Events are defined in the Event ID table in Configuration. For more information, see the Configuration Guide for Payroll.
Scenario: Your organization sponsors program every summer for the artistically gifted. Instructors come from colleges and other schools, and many of them return each summer to teach. Therefore, when the session is over, you terminate the group of instructors at once. You are preparing to do that today, July 29, the last day of the session. You will use Group Assignment to separate all the employees at the same time.

MA I N T A I N I N G PAY RO L L RE C O RD S 11
5. In the Event ID field, select “SEP”. The long description, “Separation”, as defined in Event ID table in Configuration, appears to the right of the field.
6. In the Scheduled date field, enter “07/29/2005”, the last day of the summer session.
7. To add any other information about the event, enter your comments in the Comments field, for example, “Terminating Summer 05 arts instructors”.
8. Click Save and Close. You get a message asking if you want to update the employees’ status when you save the event record. To update the status, in the New status field, select “Terminated” and click Yes.
9. You return to the Options tab.10. To automatically print a control report when you click Process Now, mark Print a control report on and
select a printer.11. To create a query of employee records updated, mark Create output query of records created.12. To create a query of employee records the program cannot update, mark Create output query of
employees that cannot be updated.
13. Click Next or select the Filters tab.
Note: To add attributes, notes, or media to the event record, select the Attributes/Notes or Media tab. For more information about attributes, notes, or media, see the Employees chapter of the Records Guide for Payroll.
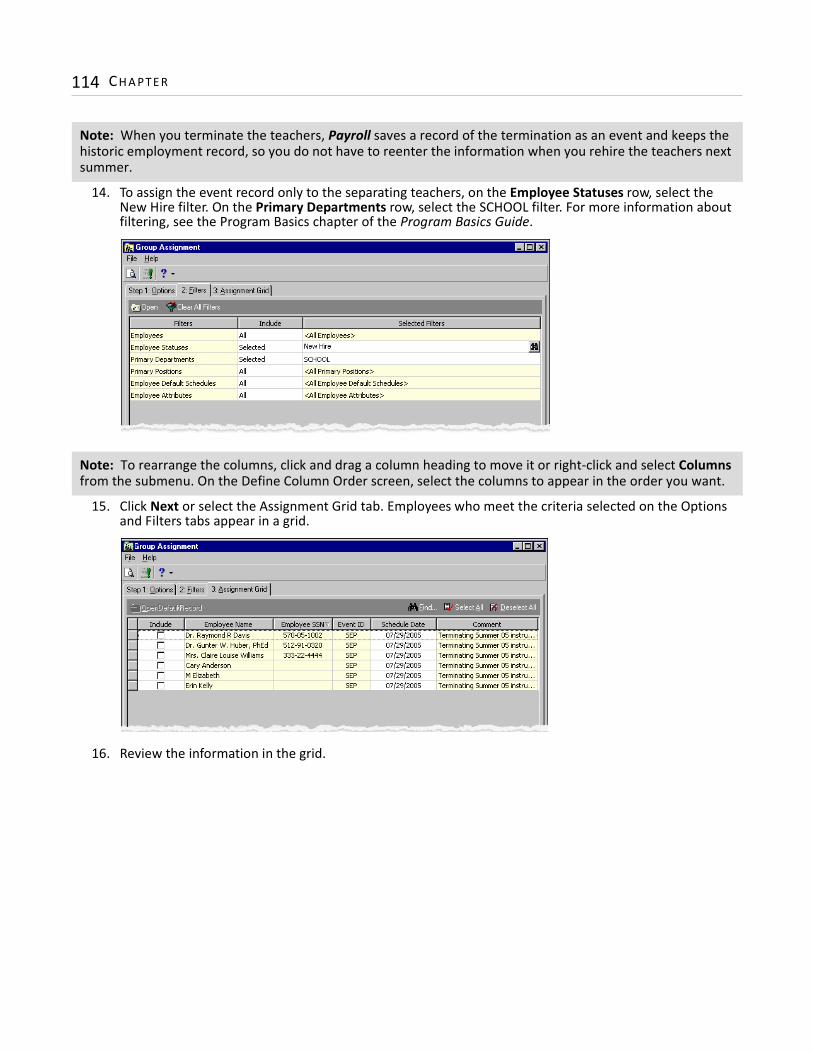
114 CH A PT E R
14. To assign the event record only to the separating teachers, on the Employee Statuses row, select the New Hire filter. On the Primary Departments row, select the SCHOOL filter. For more information about filtering, see the Program Basics chapter of the Program Basics Guide.
15. Click Next or select the Assignment Grid tab. Employees who meet the criteria selected on the Options and Filters tabs appear in a grid.
16. Review the information in the grid.
Note: When you terminate the teachers, Payroll saves a record of the termination as an event and keeps the historic employment record, so you do not have to reenter the information when you rehire the teachers next summer.
Note: To rearrange the columns, click and drag a column heading to move it or right-click and select Columns from the submenu. On the Define Column Order screen, select the columns to appear in the order you want.
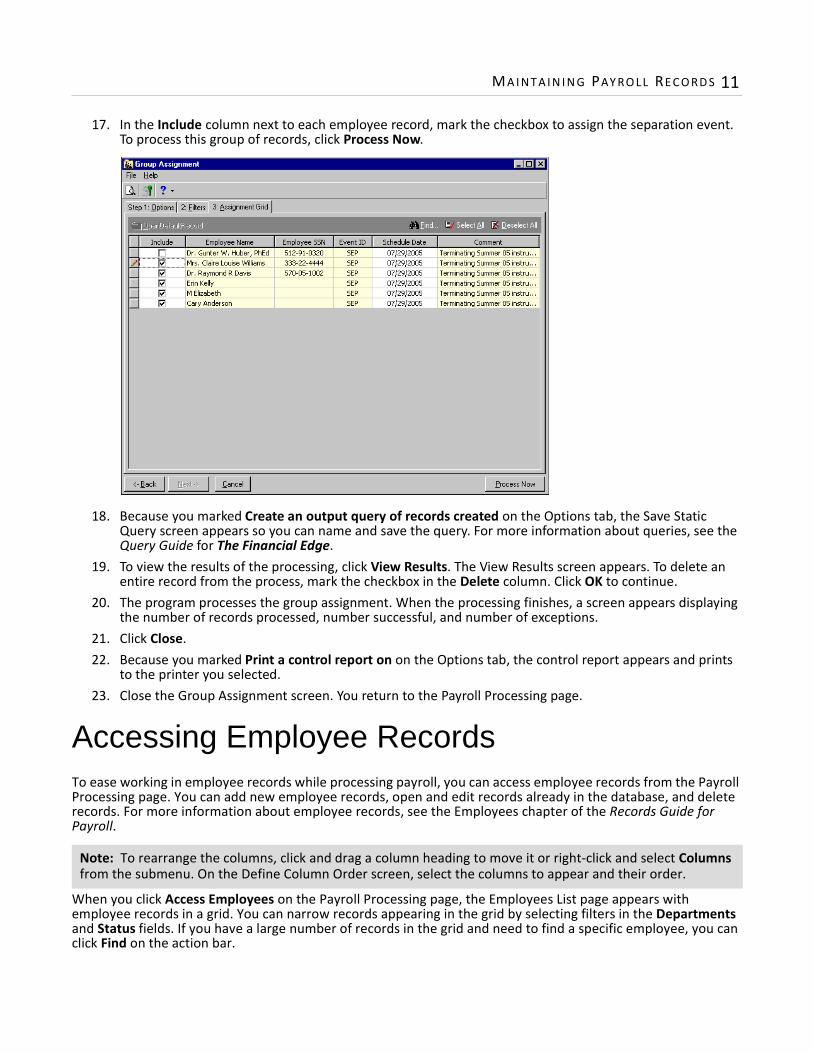
MA I N T A I N I N G PAY RO L L RE C O RD S 11
17. In the Include column next to each employee record, mark the checkbox to assign the separation event. To process this group of records, click Process Now.
18. Because you marked Create an output query of records created on the Options tab, the Save Static Query screen appears so you can name and save the query. For more information about queries, see the Query Guide for The Financial Edge.
19. To view the results of the processing, click View Results. The View Results screen appears. To delete an entire record from the process, mark the checkbox in the Delete column. Click OK to continue.
20. The program processes the group assignment. When the processing finishes, a screen appears displaying the number of records processed, number successful, and number of exceptions.
21. Click Close.22. Because you marked Print a control report on on the Options tab, the control report appears and prints
to the printer you selected.23. Close the Group Assignment screen. You return to the Payroll Processing page.
Accessing Employee RecordsTo ease working in employee records while processing payroll, you can access employee records from the Payroll Processing page. You can add new employee records, open and edit records already in the database, and delete records. For more information about employee records, see the Employees chapter of the Records Guide for Payroll.
When you click Access Employees on the Payroll Processing page, the Employees List page appears with employee records in a grid. You can narrow records appearing in the grid by selecting filters in the Departments and Status fields. If you have a large number of records in the grid and need to find a specific employee, you can click Find on the action bar.
Note: To rearrange the columns, click and drag a column heading to move it or right-click and select Columns from the submenu. On the Define Column Order screen, select the columns to appear and their order.

116 CH A PT E R
Accessing an employee record1. On the Payroll Processing page, click Access Employees. The Employee List page appears with employees
in a grid.
2. In the grid, select an employee record and click Open on the action bar. The employee record opens on the Employee tab.
3. Edit the employee record. To save your changes and return to the Employee List page, click Save and Close.
Tip: Click Find to find an employee record in the grid. When the Find screen appears, you can find the record by selecting specific information for the program to find. For more information about finding items in a grid, see the Program Basics chapter of the Program Basics Guide.

MA I N T A I N I N G PAY RO L L RE C O RD S 11

118 CH A PT E R
Index
Aaccessing
employee records 115, 116Payroll Processing 3
accruing attendance expenses 66adding
attendance plans 29attendance records 20benefits 13deductions 16employee promotions 108events 24pay increases 95pay types 9promotions 108
AP invoice, creating for payroll expenses 64attendance
addingattendance plans 29records 20
attendance plans 29attendance records 19entering 37
attendance record, defined 8attendance, accruing expenses 66
Bbatch
calculating time and attendance 56calculations, viewing 80importing time and attendance
from Unitime 54in Blackbaud file format 52
opening 35benefit record
adding new records 13copying 99overview 12
benefit, defined 7Blackbaud file format, importing time and
attendance 51
Ccalculating payroll
creating new batches 76for one-time pay 105overview 76tabs, calculate payroll screen
filters 75general 75summary 75time and attendance batches 75
time and attendance batches 56understanding the process 74
calculation batchviewing 81
calculation, one-time 105changing batch status 59check, printing 87compensation, see pay typecopying
benefits 98, 99deductions 101, 102pay types 94payroll records 94
create calculations 4create group assignments 4creating
AP invoices 64group assignments 5payroll calculations 74, 76time and attendance batches
manually 46with the wizard 41
cycle, payroll 2
Ddeduction record
adding 16copying 102overview 16
deduction, defined 8
EEFT notice
overview 86printing 87
employee payroll calculationviewing 83
120
employee recordaccessing 115, 116adding
attendance plans 29attendance records 20benefits 13deductions 16events 24pay types 9promotions 108time and attendance 37
attendance 19attendance plans 29benefits 12deductions 16events
overview 24promotions 108separating employees 112separations 111
new employee information 6pay types 8
employee separation 111enter time worked 4entering time and attendance 37event
addingpromotions 108separations 112to employee records 24
employee promotions 108employee separations 111overview 24separating employees 111, 112
Ggroup assignment
addingattendance plans 29attendance records 20benefits 13deductions 16events 24pay types 9promotions 108separations 112
attendance plans 29attendance records 19benefits 12creating 5deductions 16events
overview 24promotions 108separations 111
new employee information 6
pay types 8
Iimporting time and attendance batches
from Unitime 54in Blackbaud file format 52
increasing employee pay 95invoice
creating 64Payroll 64payroll expenses 64
Mmaintaining time and attendance batches 55manually creating time and attendance batches 44
Nnew employee information 6
Oone-time calculation, creating 105opening time and attendance batches 35
Ppay increase, adding 95pay type record
adding 9overview 8
pay type, defined 7payroll
calculating 76creating one-time calculations 105understanding the cycle 2viewing batches 80
payroll calculationviewing
batches 81employee records 83
payroll checkoverview 86printing 87
payroll expenseAP invoices 64creating invoices 64invoices 64
payroll process 74Payroll Processing
invoices 64

I N D EX 121
Payroll Processing, accessing 3payroll record, copying 94print checks and EFT notices 4print payroll journal report 4printing
checks 87EFT notices 87
promoting employees 108promotion
adding to employee records 108multiple employees 108
Rrecord
addingattendance 20benefits 13deductions 16events 24pay types 9
attendance 19benefits 12deductions 16employee 115pay types 8
Sseparation
employees 111terminating employees 112
Ttermination, see separationtime and attendance
batch status 59batches 56calculating 56changing batch status 59creating batches
manually 46with the wizard 41
entering 37importing batches
from Unitime 54in Blackbaud file format 52
maintaining batches 55manually creating batches 44opening batches 35tabs
attendance entry options 39employees 40enter attendance records 45
enter paid hours 45filters 39time entry options 38
wizards 38time and attendance batch
Blackbaud file format 51Unitime 54
time worked, entering 37
UUnitime, importing time and attendance 54
Vviewing payroll calculations
batches 81employee 83
Wwizard
creating time and attendance batches 41time and attendance batches 38

122