Embed Size (px)
Citation preview
Final Cut Pro X 10.3 Exam Preparation Guide
Final Cut Pro X 10.3 3
About This Guide 3 .............................................................................................................................................
Benefits of Apple Certification 4 ........................................................................................................................
Preparing for the Exam 5 ....................................................................................................................................
Lesson 1 Objectives 6 .........................................................................................................................................
Lesson 2 Objectives 7 .........................................................................................................................................
Lesson 3 Objectives 9 .........................................................................................................................................
Lesson 4 Objectives 10 .......................................................................................................................................
Lesson 5 Objectives 14 .......................................................................................................................................
Lesson 6 Objectives 16 .......................................................................................................................................
Lesson 7 Objectives 18 .......................................................................................................................................
Lesson 8 Objectives 20 ......................................................................................................................................
Lesson 9 Objectives 21 .......................................................................................................................................
Lesson 10 Objectives 22 .....................................................................................................................................
Appendices A and B 22.......................................................................................................................................
Final Cut Pro X 10.3 2017 Exam Preparation Guide
2
Contents
Final Cut Pro X 10.3
About This Guide This guide provides the information you need to prepare for the Apple Certified Professional - Final Cut Pro X 10.3 exam to earn Apple Certified Pro certification. Certification distinguishes you as a skilled user of Final Cut Pro X 10.3.
The Apple Certified Professional - Final Cut Pro X 10.3 exam (Exam no. 9L0-852) is a computer-based test offered at Apple Authorized Training Providers (AATPs) and online to eligible individuals who have a promotional code.
You may take up to 2 hours to complete the exam, which consists of 69 multiple-choice and interactive media questions. The questions are based on the objectives listed in this guide.
The score required to pass is 69 percent. To prepare for the exam, read through the objectives in this guide to determine which areas you need to review. The primary reference source for this exam is the Apple Pro Training Series book, Final Cut Pro X 10.3: Professional Post-Production by Brendan Boykin (ISBN 0-13-478445-8).
You may not access any resources or references during the exam, and you may not have Final Cut Pro open during the exam. Please note that although this guide divides the objectives into knowledge areas, questions are presented randomly on the exam.
Final Cut Pro X 10.3 2017 Exam Preparation Guide
3

Benefits of Apple Certification The Apple Training & Certification programs are designed to keep you at the forefront of Apple’s digital media technology. Certification creates a benchmark to assess your proficiency in a specific Apple Pro application. By passing an exam, you earn Apple Certified Pro status, which gives you a competitive edge in today’s ever-changing job market.
What is an Apple Certified Pro? An Apple Certified Pro is a user who has a good foundational understanding of how to use Apple Pro applications, as certified by Apple.
How do I become an Apple Certified Pro? To become an Apple Certified Pro, you must pass an online exam administered at an Apple Authorized Training Provider (AATP). Apple Certified Pro exams are administered at the end of specific courses at AATPs.
Although attending an Apple-authorized course is recommended, you can take the exam even if you didn’t attend the course. If you believe you already have the necessary skill set in your chosen application, you may register to take the Apple Certified Pro exam at an AATP for a fee.
What are the benefits of being an Apple Certified Pro? Certification distinguishes you among applicants to colleges or prospective employers. As an Apple Certified Pro, you’ll receive a certificate from Apple recognizing you as a skilled user of Final Cut Pro X 10.3, and you’ll have the right to use the Apple Certified Pro logo on your résumé, business cards, and website.
After you pass a certification exam, you’ll receive an email with a PDF certificate, along with instructions on how to order a printed or framed certificate. The email also includes LinkedIn, Facebook, and Twitter icons so you can easily share your certification news on social media.
You’ll also receive instructions on how to log in to the Apple Certification Records System, where you can take these steps:
• Update your profile information and opt in to display your Apple certification on the Apple Certified Professionals Registry.
• Review your certification progress.
• Download your certification logo to use on your business cards, résumé, website, and more.
• Allow access so employers can verify certifications.
• Access many resources.
Final Cut Pro X 10.3 2017 Exam Preparation Guide
4
Section Title Header

Preparing for the Exam When you prepare for a certification exam, you should have experience with the application, review the appropriate training materials—including the Apple Pro Training Series curriculum—and study this exam preparation guide. See “Reviewing the Apple Pro Training Series curriculum,” below, for objectives from the curriculum.
The following resources may also help you to prepare for your certification exam and expand your general knowledge:
• Review the tutorials, lesson review questions, and lesson files included in the Apple Pro Training Series book, Final Cut Pro X 10.3: Professional Post-Production.
• Review the appropriate sections of the Final Cut Pro manuals. The complete documentation is available at help.apple.com. The site is free, searchable, and linkable. You can also open the Final Cut Pro documentation by choosing Help > Final Cut Pro X Help when you open Final Cut Pro.
• Many online resources allow you to ask questions and learn tips and tricks. To access white papers, discussion forums, and learn about other online materials, go to http://www.apple.com/final-cut-pro/resources/.
• For information on the Apple Pro Training Program, go to training.apple.com/.
• To send Apple comments and feedback about Final Cut Pro, go to http://www.apple.com/feedback/finalcutpro.html.
• Read the product manuals at www.apple.com/support/manuals/.
• Many third-party manufacturers create reference, troubleshooting, and online tutorials for users of various levels, from novice to power user.
• If you have any questions, you can post them to the Final Cut Pro Discussion Forum, hosted by Apple.
Reviewing the Apple Pro Training Series curriculum The Apple Pro Training Series book Final Cut Pro X 10.3: Professional Post-Production by Brendan Boykin (ISBN 0-13-478445-8) is part of the official training series. It prepares you to pass the certification exam, so reviewing the book should be your first step in preparing for the exam.
If you’re self-taught or have taken courses that don’t use the Apple Pro Training Series curriculum, you can still prepare for the certification exam by making sure that you can complete the tasks that are described in the following sections. You should also make sure that you can answer the review questions in the book for each lesson.
Note that although this guide divides the objectives into lessons or knowledge areas, questions are drawn from the objectives listed below.
Final Cut Pro X 10.3 2017 Exam Preparation Guide
5
Lesson 1 Objectives After you complete Lesson 1, “Getting Started,” you should be able to perform the following tasks:
• Download and prepare lesson media files.
• Understand the basic Final Cut Pro workflow.
Lesson 1 review questions After you complete Lesson 1, you should be able to answer the following questions:
1. What are the three post-production workflow phases in Final Cut Pro?
2. What are the device recommendations for storing source media files?
3. What are the volume formatting and access recommendations for a media storage device?
Answers 1. Import: The process of taking in and storing your story’s source media files and organizing the clips that represent those
source files. Edit: The creative process of assembling, trimming, and effecting clips to tell a story. Share: The export process of outputting your completed story for various distribution platforms and formats.
2. Media files should be stored on a fast storage device, such as a 7200 RPM or greater hard disk or a solid-state disk.
3. A media storage volume should be formatted in a supported format like HFS+ and be read and write accessible.
Final Cut Pro X 10.3 2017 Exam Preparation Guide
6
Lesson 2 Objectives After you complete Lesson 2, “Importing Media,” you should be able to perform the following tasks:
• Define the clip, event, and library containers.
• Understand the differences between managed and external media files.
• Create a camera archive.
• Import files using Media Import and the Finder.
Lesson 2 review questions After you complete Lesson 2, you should be able to answer the following questions:
1. Which of these three is the largest container: clip, event, or library?
2. What are the possible organizational criteria for sorting clips and projects into events?
3. Name and describe the built-in command for backing up camera media files.
4. Where should you store camera archives?
5. What two views are available in the Media Import window, and when are they available?
6. What setting on the Zoom slider in filmstrip view allows you to see each clip as a single thumbnail?
7. What keyboard shortcuts or modified skimming keys can you use to mark multiple range selections within a clip?
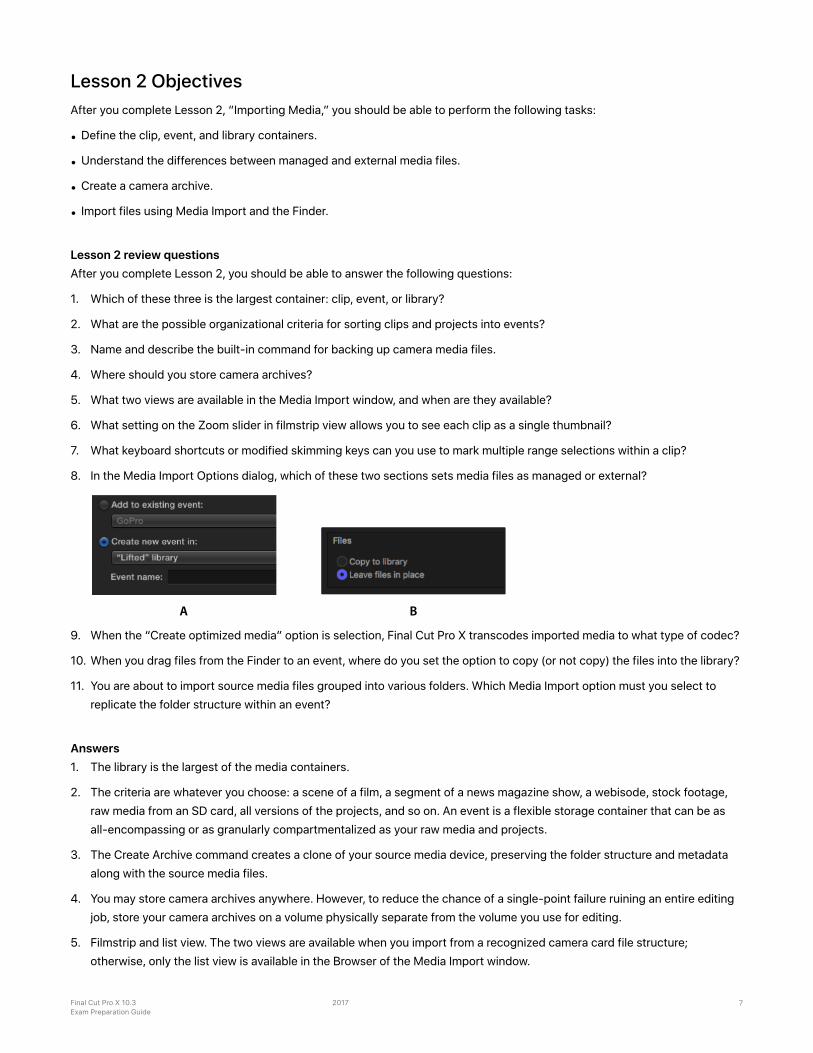
8. In the Media Import Options dialog, which of these two sections sets media files as managed or external?
9. When the “Create optimized media” option is selection, Final Cut Pro X transcodes imported media to what type of codec?
10. When you drag files from the Finder to an event, where do you set the option to copy (or not copy) the files into the library?
11. You are about to import source media files grouped into various folders. Which Media Import option must you select to replicate the folder structure within an event?
Answers 1. The library is the largest of the media containers.
2. The criteria are whatever you choose: a scene of a film, a segment of a news magazine show, a webisode, stock footage, raw media from an SD card, all versions of the projects, and so on. An event is a flexible storage container that can be as all-encompassing or as granularly compartmentalized as your raw media and projects.
3. The Create Archive command creates a clone of your source media device, preserving the folder structure and metadata along with the source media files.
4. You may store camera archives anywhere. However, to reduce the chance of a single-point failure ruining an entire editing job, store your camera archives on a volume physically separate from the volume you use for editing.
5. Filmstrip and list view. The two views are available when you import from a recognized camera card file structure; otherwise, only the list view is available in the Browser of the Media Import window.
A B
Final Cut Pro X 10.3 2017 Exam Preparation Guide
7

6. All. The setting defines the time length represented by each thumbnail of the clip.
7. The keyboard shortcuts are Command-Shift-I and Command-Shift-O. Pressing and holding Command while skimming a clip also marks additional ranges.
8. B. “Copy to library” creates managed media; “Leave files in place” creates externally referenced media.
9. Apple ProRes 422.
10. Choose Final Cut Pro > Preferences and select the Import pane.
11. “From folders.”
Final Cut Pro X 10.3 2017 Exam Preparation Guide
8
Lesson 3 Objectives After you complete Lesson 3, “Organizing Clips,” you should be able to perform the following tasks:
• Apply keywords to a clip and clip ranges.
• Search and filter clips by keywords.
• Add notes and ratings to a clip.
• Create Smart Collections.
• Detect people and composition within clips.
• Understand and assign roles.
Lesson 3 review questions After you complete Lesson 3, you should be able to answer the following questions:
1. When you apply keywords to a clip, may they overlap?
2. Which Inspector lets you add notes to a clip?
3. Clips start with which rating assigned?
4. What default filter setting prevents Rejected clip ranges from appearing in the Browser?
5. You’re trying to find a clip you imported into the library. How can you locate it?
6. How do you search for an event using combinations of keywords?
7. How do you edit the criteria rules for an existing Smart Collection?
8. At what point in the workflow may a clip be assigned a role?
Answers 1. Yes.
2. The Info inspector.
3. Unrated.
4. Hide Rejected.
5. In the Libraries pane, select the Library. From the Filter pop-up menu, choose All Clips. Clear the Browser’s search field.
6. Click the magnifying glass in the search field and use the Keywords criteria rule in the Filter HUD.
7. In the Libraries pane, double-click the Smart Collection.
8. Clips may be assigned a role at any time in the workflow. However, roles assigned to clips shortly after import are carried with the clip throughout the editing workflow.
Final Cut Pro X 10.3 2017 Exam Preparation Guide
9
Lesson 4 Objectives After you complete Lesson 4, “Making the First Edit,” you should be able to perform the following tasks:
• Create a project.
• Understand the attraction and repulsion behaviors of a storyline.
• Append, insert, and rearrange clips within a primary storyline.
• Batch edit a “storyboard” of clips.
• Ripple, Roll, and Slip edit clips.
• Use the Blade tool, replace with a gap clip, ripple delete, and join through edit.
• Perform connect edits.
• Create and edit in a connected storyline.
• Adjust audio levels.
• Share the project to a media file.
Lesson 4 review questions After you complete Lesson 4, you should be able to answer the following questions:
1. What do the Automatic Settings do when you create a new project?
2. Where are projects stored?
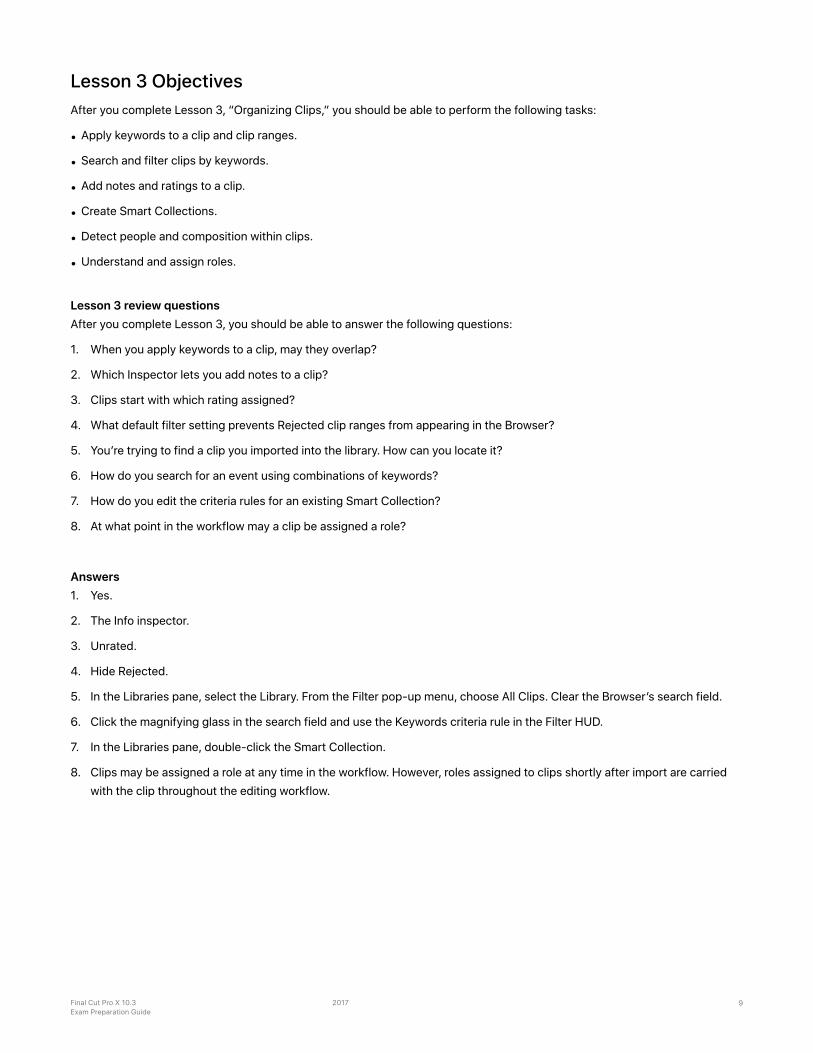
3. Which edit command is depicted in the image below?
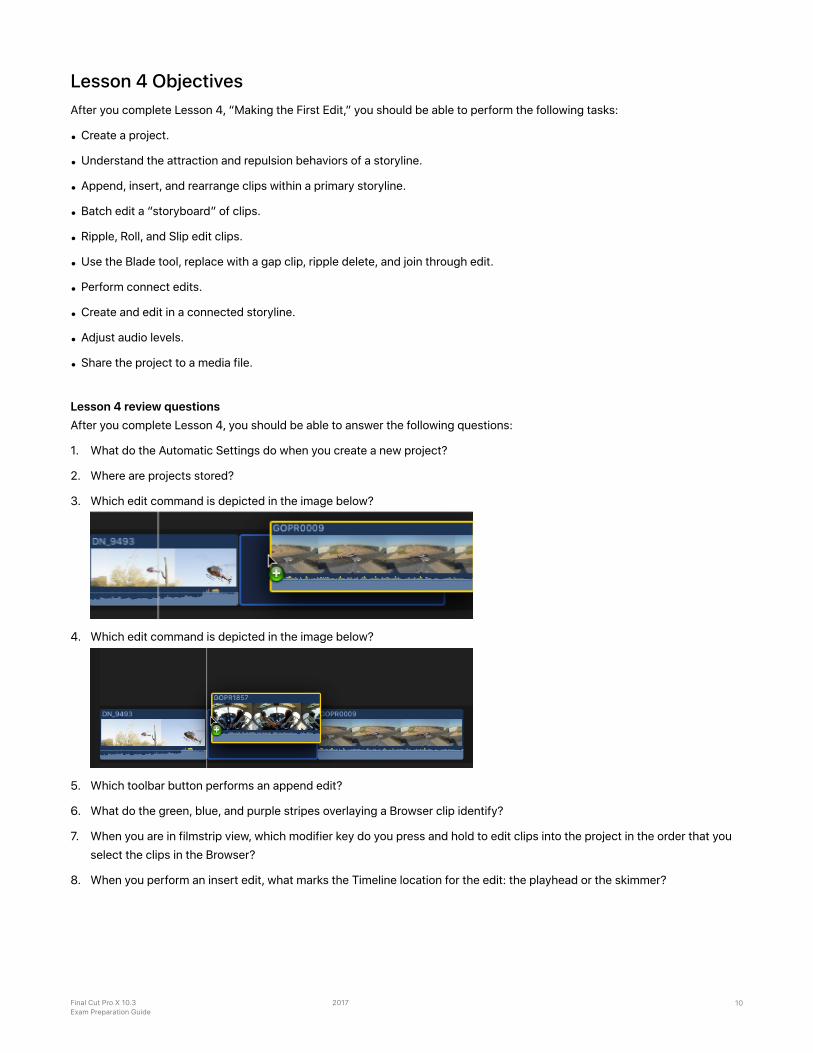
4. Which edit command is depicted in the image below?
5. Which toolbar button performs an append edit?
6. What do the green, blue, and purple stripes overlaying a Browser clip identify?
7. When you are in filmstrip view, which modifier key do you press and hold to edit clips into the project in the order that you select the clips in the Browser?
8. When you perform an insert edit, what marks the Timeline location for the edit: the playhead or the skimmer?
Final Cut Pro X 10.3 2017 Exam Preparation Guide
10
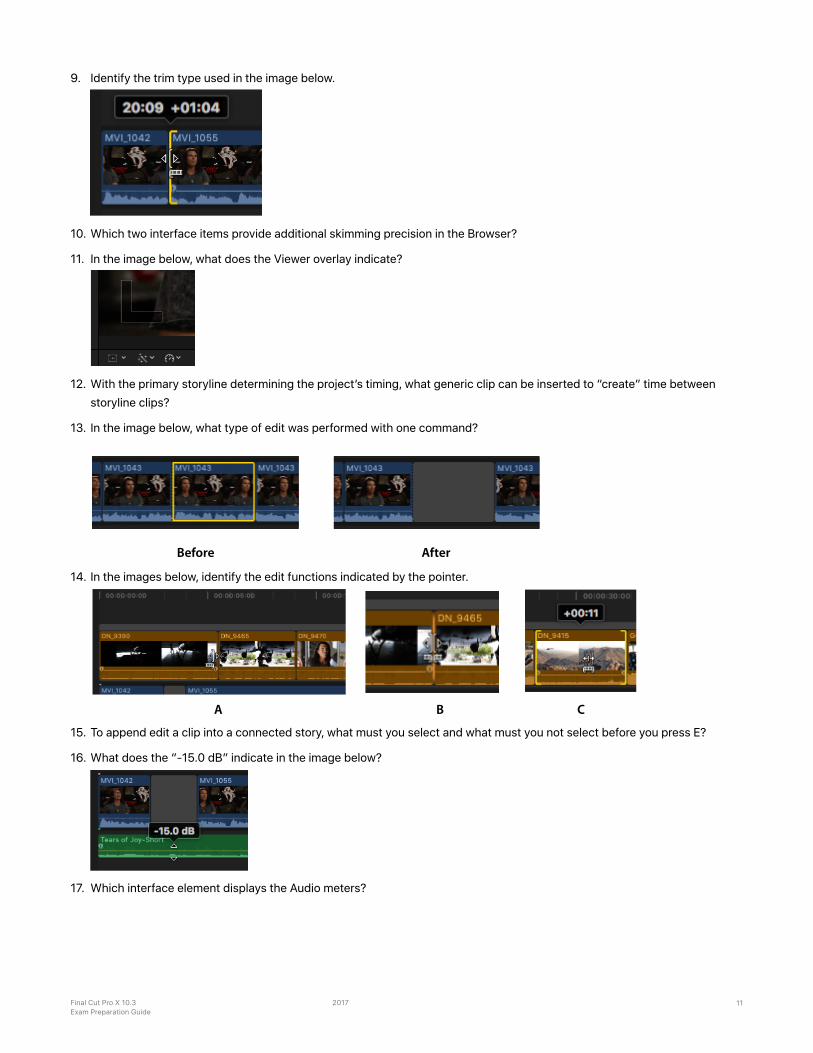
9. Identify the trim type used in the image below.
10. Which two interface items provide additional skimming precision in the Browser?
11. In the image below, what does the Viewer overlay indicate?
12. With the primary storyline determining the project’s timing, what generic clip can be inserted to “create” time between storyline clips?
13. In the image below, what type of edit was performed with one command?
14. In the images below, identify the edit functions indicated by the pointer.
15. To append edit a clip into a connected story, what must you select and what must you not select before you press E?
16. What does the “-15.0 dB” indicate in the image below?
17. Which interface element displays the Audio meters?
Before After
�
A B C
Final Cut Pro X 10.3 2017 Exam Preparation Guide
11
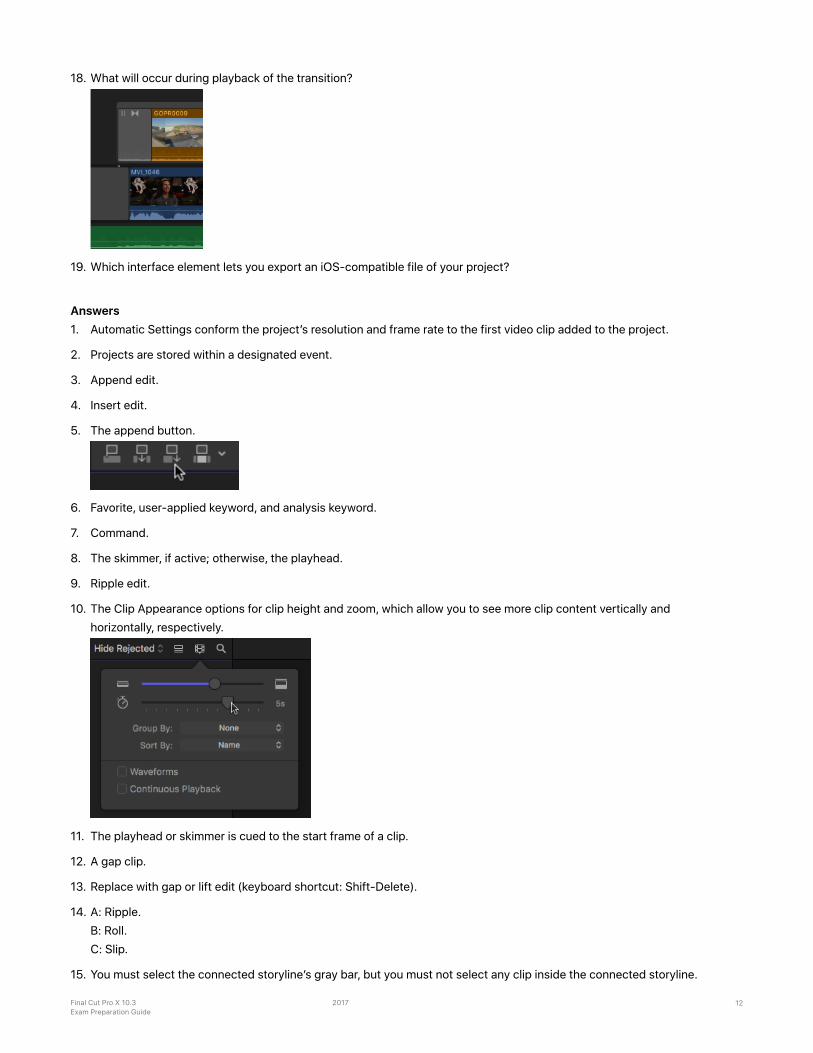
18. What will occur during playback of the transition?
19. Which interface element lets you export an iOS-compatible file of your project?
Answers 1. Automatic Settings conform the project’s resolution and frame rate to the first video clip added to the project.
2. Projects are stored within a designated event.
3. Append edit.
4. Insert edit.
5. The append button.
6. Favorite, user-applied keyword, and analysis keyword.
7. Command.
8. The skimmer, if active; otherwise, the playhead.
9. Ripple edit.
10. The Clip Appearance options for clip height and zoom, which allow you to see more clip content vertically and horizontally, respectively.
11. The playhead or skimmer is cued to the start frame of a clip.
12. A gap clip.
13. Replace with gap or lift edit (keyboard shortcut: Shift-Delete).
14. A: Ripple.B: Roll.C: Slip.
15. You must select the connected storyline’s gray bar, but you must not select any clip inside the connected storyline.
Final Cut Pro X 10.3 2017 Exam Preparation Guide
12

16. The audio volume control has been lowered to play the audio clip 15.0 dB quieter than the audio clip’s recorded level.
17. The Audio Meters button in the Dashboard.
18. The GOPR0009 clip will fade in from black, but halfway through the transition, Mitch’s interview will cut in and be visible until the GoPro clip becomes fully opaque.
19. The Share pop-up menu.
Final Cut Pro X 10.3 2017 Exam Preparation Guide
13
Lesson 5 Objectives After you complete Lesson 5, “Revising the Edit,” you should be able to perform the following tasks:
• Define and distinguish the two types of project duplication.
• Use the Lift from Storyline command.
• Harness Finder tags as Keyword Collections.
• Understand the replace edit options.
• Use markers for clip sync and task notes.
• Perform non-magnetic editing with the Overwrite command and Position tool.
• Create and edit with an audition clip.
• Understand the similarities and differences between skimming and clip skimming.
• Define and distinguish soloed clips and clips assigned a deactivated role.
• Refine clip duration using trim to playhead and trim to selection.
• Expand experience with the edit options available using the Select and Trim tools.
Lesson 5 review questions After you complete Lesson 5, you should be able to answer the following questions:
1. What are the results of using the following commands: “Duplicate Project as Snapshot” and “Duplicate Project?”
2. Which replace edit command replaces the project clip using the duration of the browser clip: “Replace,” “Replace from Start,” or “Replace from End”?
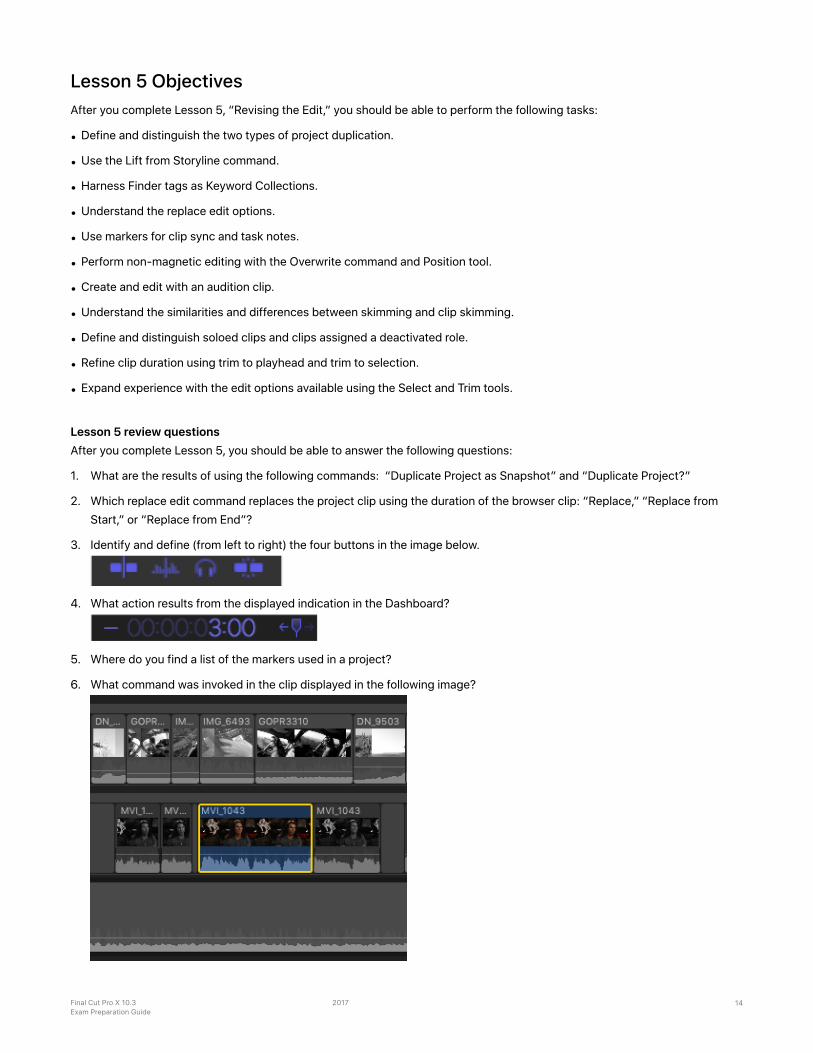
3. Identify and define (from left to right) the four buttons in the image below.
4. What action results from the displayed indication in the Dashboard?
5. Where do you find a list of the markers used in a project?
6. What command was invoked in the clip displayed in the following image?
Final Cut Pro X 10.3 2017 Exam Preparation Guide
14
7. Which tool repositions storyline clips relative to time, allowing a clip to overwrite other clips?
8. Where may you assign a role to a clip?
9. What types of clips may go into an audition?
10. What icon badge identifies an audition clip?
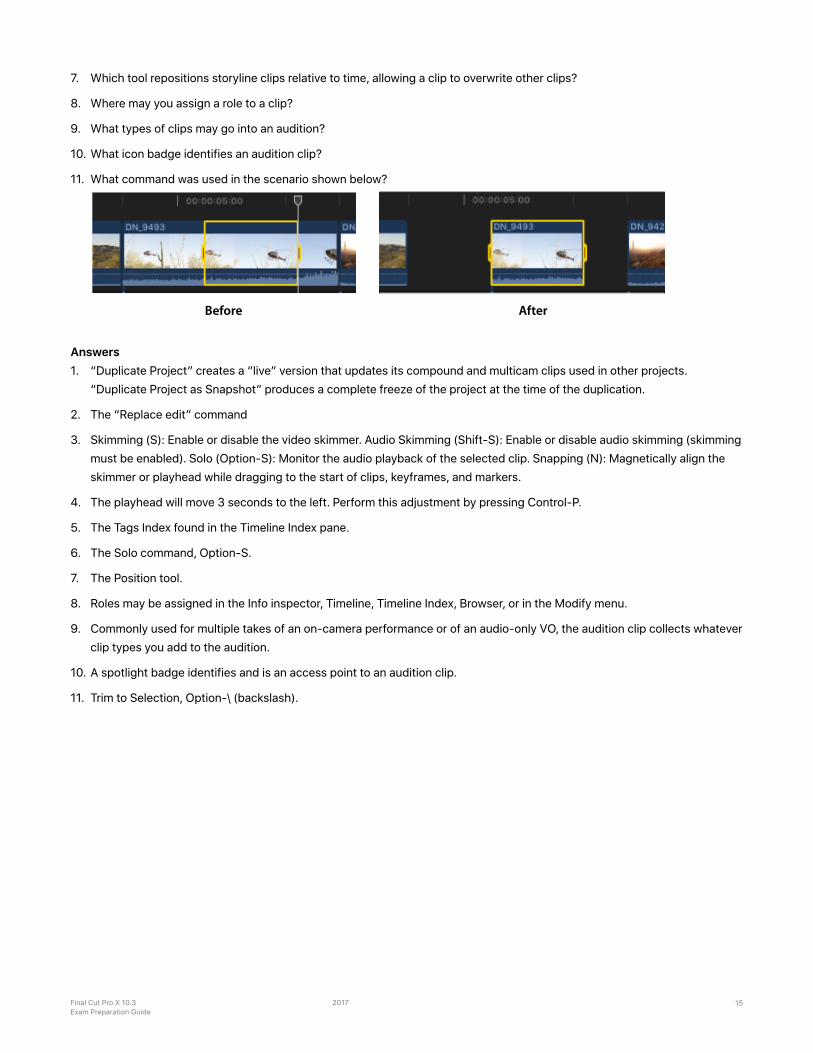
11. What command was used in the scenario shown below?
Answers 1. “Duplicate Project” creates a “live” version that updates its compound and multicam clips used in other projects.
“Duplicate Project as Snapshot” produces a complete freeze of the project at the time of the duplication.
2. The “Replace edit” command
3. Skimming (S): Enable or disable the video skimmer. Audio Skimming (Shift-S): Enable or disable audio skimming (skimming must be enabled). Solo (Option-S): Monitor the audio playback of the selected clip. Snapping (N): Magnetically align the skimmer or playhead while dragging to the start of clips, keyframes, and markers.
4. The playhead will move 3 seconds to the left. Perform this adjustment by pressing Control-P.
5. The Tags Index found in the Timeline Index pane.
6. The Solo command, Option-S.
7. The Position tool.
8. Roles may be assigned in the Info inspector, Timeline, Timeline Index, Browser, or in the Modify menu.
9. Commonly used for multiple takes of an on-camera performance or of an audio-only VO, the audition clip collects whatever clip types you add to the audition.
10. A spotlight badge identifies and is an access point to an audition clip.
11. Trim to Selection, Option-\ (backslash).
Before After
Final Cut Pro X 10.3 2017 Exam Preparation Guide
15
Lesson 6 Objectives After you complete Lesson 6, “Enhancing the Edit,” you should be able to perform the following tasks:
• Vary the playback speed of clips.
• Modify the look of clips with effects.
• Use transitions.
• Adjust transform and compositing controls.
• Create compound clips.
Lesson 6 review questions After you complete Lesson 6, you should be able to answer the following questions:
1. Which interface items allow access to the Custom Speed window?
2. You’ve manually set the retiming rate for a clip, but the rate of this clip is too long for the time slot in the project. Which interface item allows you to trim the clip without changing the playback speed?
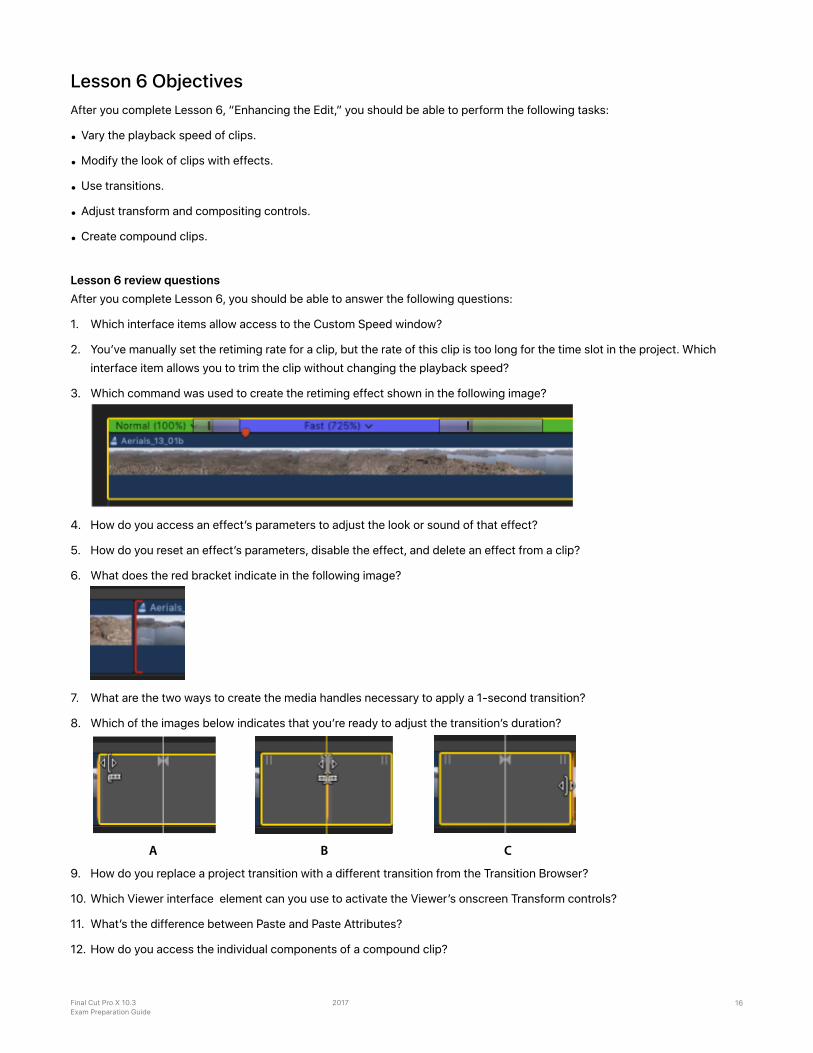
3. Which command was used to create the retiming effect shown in the following image?
4. How do you access an effect’s parameters to adjust the look or sound of that effect?
5. How do you reset an effect’s parameters, disable the effect, and delete an effect from a clip?
6. What does the red bracket indicate in the following image?
7. What are the two ways to create the media handles necessary to apply a 1-second transition?
8. Which of the images below indicates that you’re ready to adjust the transition’s duration?
9. How do you replace a project transition with a different transition from the Transition Browser?
10. Which Viewer interface element can you use to activate the Viewer’s onscreen Transform controls?
11. What’s the difference between Paste and Paste Attributes?
12. How do you access the individual components of a compound clip?
A B C
Final Cut Pro X 10.3 2017 Exam Preparation Guide
16
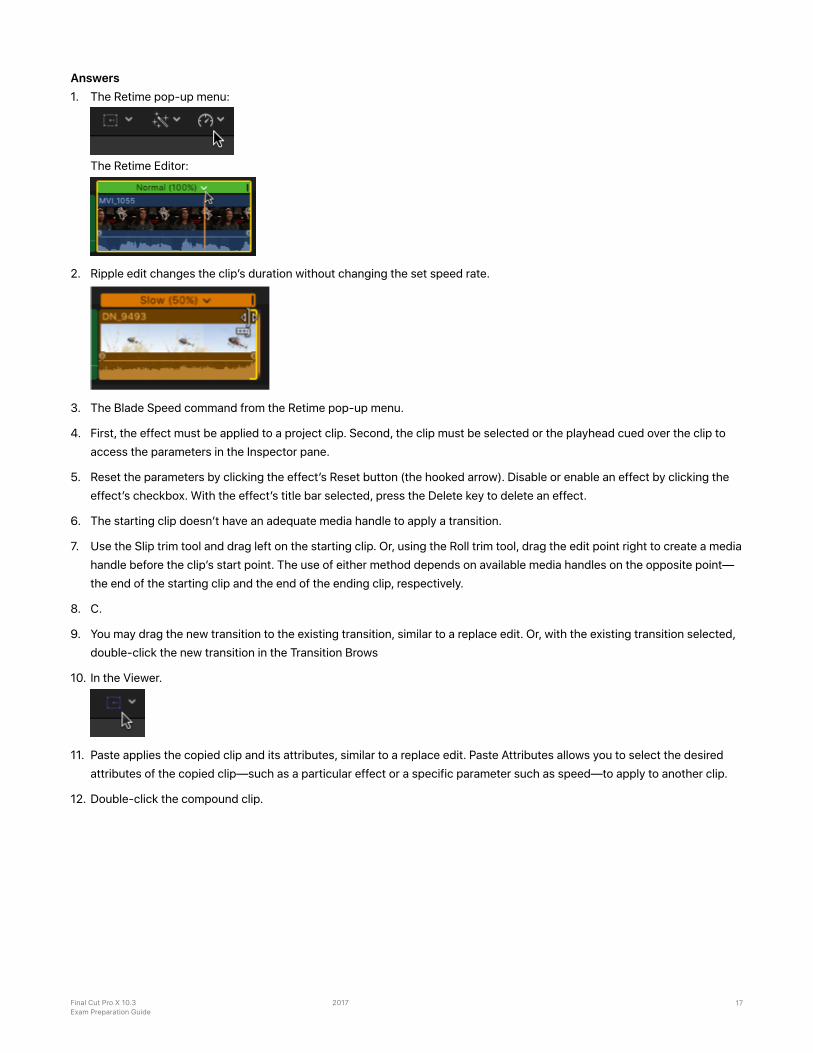
Answers 1. The Retime pop-up menu:
The Retime Editor:
2. Ripple edit changes the clip’s duration without changing the set speed rate.
3. The Blade Speed command from the Retime pop-up menu.
4. First, the effect must be applied to a project clip. Second, the clip must be selected or the playhead cued over the clip to access the parameters in the Inspector pane.
5. Reset the parameters by clicking the effect’s Reset button (the hooked arrow). Disable or enable an effect by clicking the effect’s checkbox. With the effect’s title bar selected, press the Delete key to delete an effect.
6. The starting clip doesn’t have an adequate media handle to apply a transition.
7. Use the Slip trim tool and drag left on the starting clip. Or, using the Roll trim tool, drag the edit point right to create a media handle before the clip’s start point. The use of either method depends on available media handles on the opposite point—the end of the starting clip and the end of the ending clip, respectively.
8. C.
9. You may drag the new transition to the existing transition, similar to a replace edit. Or, with the existing transition selected, double-click the new transition in the Transition Brows
10. In the Viewer.
11. Paste applies the copied clip and its attributes, similar to a replace edit. Paste Attributes allows you to select the desired attributes of the copied clip—such as a particular effect or a specific parameter such as speed—to apply to another clip.
12. Double-click the compound clip.
Final Cut Pro X 10.3 2017 Exam Preparation Guide
17
Lesson 7 Objectives After you complete Lesson 7, “Finishing the Edit,” you should be able to perform the following tasks:
• Add and modify a lower third.
• Add and modify a 3D title.
• Split-edit audio and video.
• Keyframe audio.
• Color-correct a clip.
Lesson 7 review questions After you complete Lesson 7, you should be able to answer the following questions:
1. What happens when you double-click a title in a project?
2. What key should you press to exit text entry in the Viewer?
3. What modifier key used with the Select tool will create audio keyframes?
4. What command creates a split edit without creating an accidental sync offset in the Timeline?
5. What function turns the skimmer into an “audio solo” skimmer?
6. Where can you switch a clip’s audio channels from stereo to dual mono?
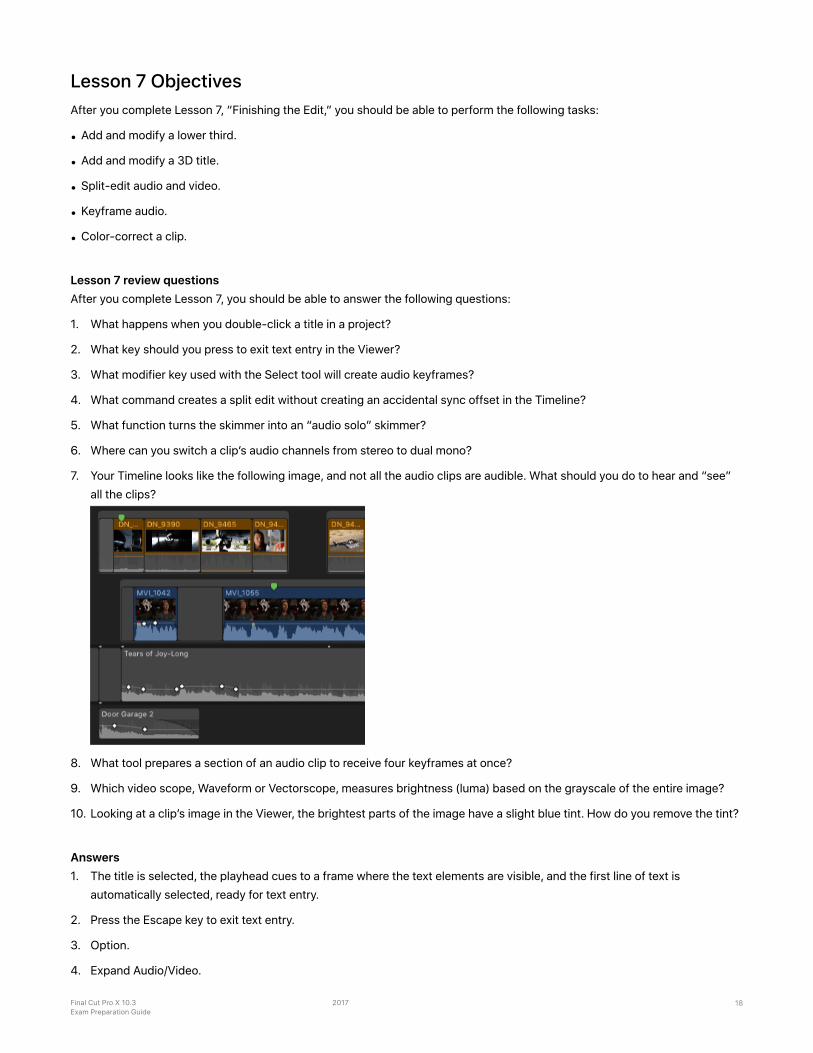
7. Your Timeline looks like the following image, and not all the audio clips are audible. What should you do to hear and “see” all the clips?
8. What tool prepares a section of an audio clip to receive four keyframes at once?
9. Which video scope, Waveform or Vectorscope, measures brightness (luma) based on the grayscale of the entire image?
10. Looking at a clip’s image in the Viewer, the brightest parts of the image have a slight blue tint. How do you remove the tint?
Answers 1. The title is selected, the playhead cues to a frame where the text elements are visible, and the first line of text is
automatically selected, ready for text entry.
2. Press the Escape key to exit text entry.
3. Option.
4. Expand Audio/Video.
Final Cut Pro X 10.3 2017 Exam Preparation Guide
18

5. Clip Skimming.
6. With the clip selected, the Channel Configuration section of the Audio inspector.
7. Look in the Timeline Index for roles that have been minimized and deselected (disabled).
8. Range Selection.
9. Waveform.
10. In the Color Board, drag the Highlights puck toward positive yellow, or drag it down toward negative blue.
Final Cut Pro X 10.3 2017 Exam Preparation Guide
19
Lesson 8 Objectives After you complete Lesson 8, “Sharing a Project,” you should be able to perform the following tasks:
• Export to a media file.
• Post media to an online host.
• Create a bundle for multiple platforms.
• Understand the XML workflow.
• Integrate Compressor export options.
Lesson 8 review questions After you complete Lesson 8, you should be able to answer the following questions:
1. Which Share window button do you click to display the compatible platforms for the current export settings?
2. When you share to an online host, which interface item displays details about the upload’s progress?
3. Where can you find a history of a project’s shared instances?
4. Which destination preset allows you to distribute to multiple platforms in a single share session?
5. Which Master File Settings parameter allows you to export audio stems from inside a QuickTime movie?
6. What export command outputs your project to a file format readable by several third-party applications?
7. Name two export methods that use Compressor custom settings.
8. Of the two export methods described in the previous answer, which one uses Compressor’s distribute processing capabilities?
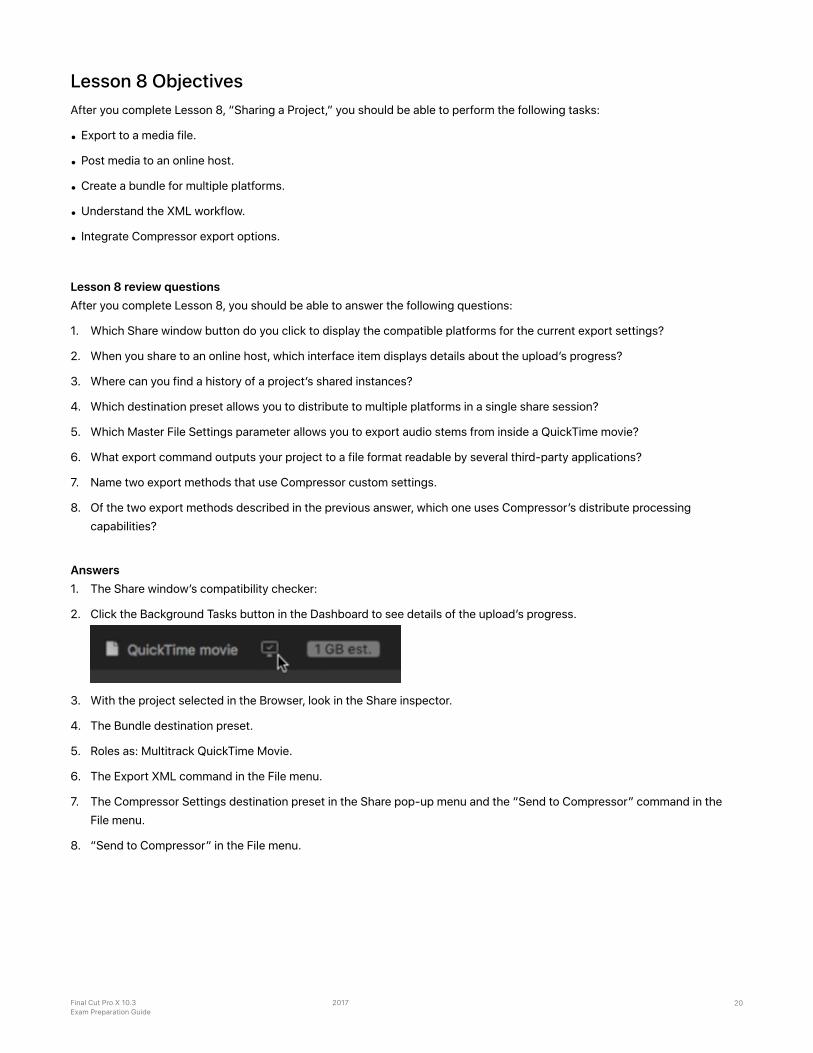
Answers 1. The Share window’s compatibility checker:
2. Click the Background Tasks button in the Dashboard to see details of the upload’s progress.
3. With the project selected in the Browser, look in the Share inspector.
4. The Bundle destination preset.
5. Roles as: Multitrack QuickTime Movie.
6. The Export XML command in the File menu.
7. The Compressor Settings destination preset in the Share pop-up menu and the “Send to Compressor” command in the File menu.
8. “Send to Compressor” in the File menu.
Final Cut Pro X 10.3 2017 Exam Preparation Guide
20
Lesson 9 Objectives After you complete Lesson 9, “Managing Libraries,” you should be able to perform the following tasks:
• Differentiate external and managed media.
• Import media as referenced and managed.
• Move and copy clips within and between libraries.
• Consolidate media files to one location.
Lesson 9 review questions After you complete Lesson 9, you should be able to answer the following questions:
1. What are “managed media” and “external media,” and how would you compare them?
2. How is external media referenced in a library?
3. What media storage selection do you choose to define media as external?
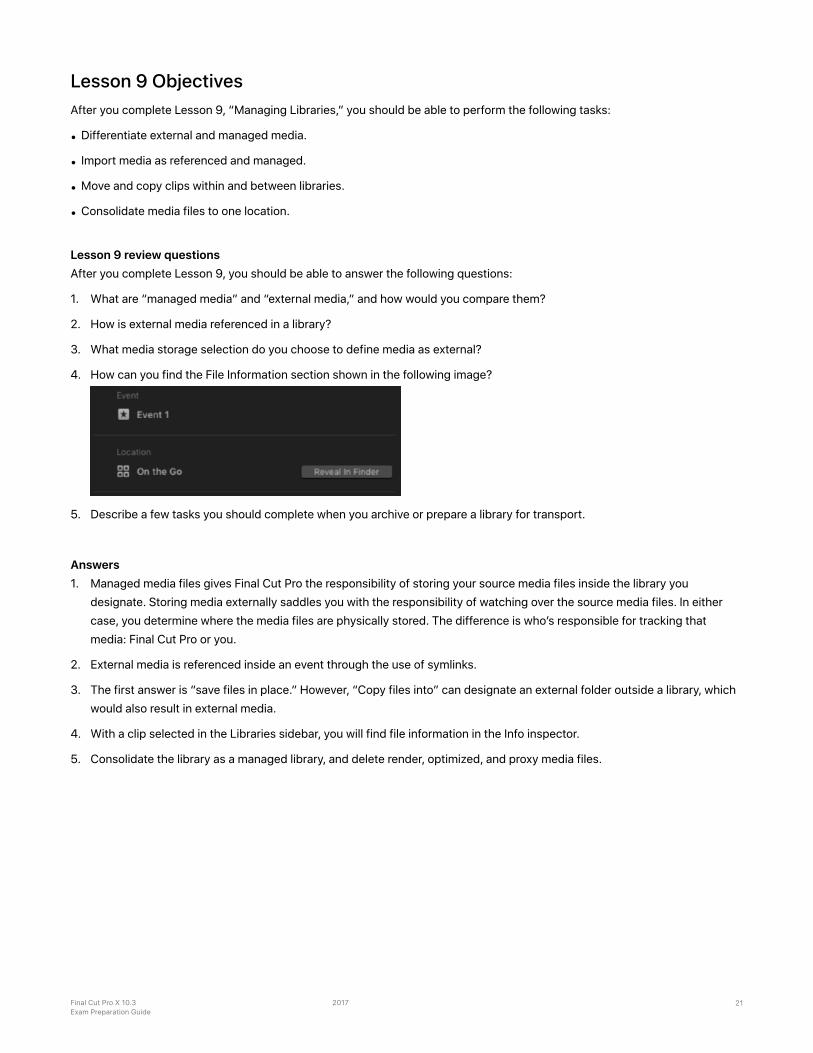
4. How can you find the File Information section shown in the following image?
5. Describe a few tasks you should complete when you archive or prepare a library for transport.
Answers 1. Managed media files gives Final Cut Pro the responsibility of storing your source media files inside the library you
designate. Storing media externally saddles you with the responsibility of watching over the source media files. In either case, you determine where the media files are physically stored. The difference is who’s responsible for tracking that media: Final Cut Pro or you.
2. External media is referenced inside an event through the use of symlinks.
3. The first answer is “save files in place.” However, “Copy files into” can designate an external folder outside a library, which would also result in external media.
4. With a clip selected in the Libraries sidebar, you will find file information in the Info inspector.
5. Consolidate the library as a managed library, and delete render, optimized, and proxy media files.
Final Cut Pro X 10.3 2017 Exam Preparation Guide
21
Lesson 10 Objectives After you complete Lesson 10, “Advancing Your Workflow,” you should be able to perform the following tasks:
• Identify manual options for new projects.
• Sync dual system recordings.
• Create a chroma key.
• Understand the multicam workflow.
Lesson 10 review questions After you complete Lesson 10, you should be able to answer the following questions:
1. Which project Video Properties parameter must be selected to edit in a nonnative video resolution?
2. What is the default render format in Final Cut Pro?
3. What command creates a compound clip that syncs a video clip and an audio clip recorded on separate devices?
4. What command allows you to manually adjust the sync of audio and video within a clip?
5. In what vertical order should clips be placed for compositing?
6. In the Keyer effect, what parameter should you set to disable the autokeyer and gain manual control over the settings?
7. What opens when you double-click a multicam clip?
8. What button do you click to display a multicam clip’s angles for monitoring and to choose the active angle during playback?
9. What do the three active angle colors indicate?
Answers 1. The Format parameter must be set to Custom.
2. Apple ProRes 422.
3. Synchronize Clips.
4. Open in Timeline.
5. The foreground clip should be placed in a lane above the background clip.
6. Set the Strength slider to 0.
7. Angle Editor.
8. Clicking Show Angles reveals the Angle Viewer.
9. Yellow indicates the active video and audio angle. Blue indicates the active video angle. Green indicates the active audio angle.
Appendices A and B Final Cut Pro X 10.3: Professional Post-Production includes 10 lessons and two appendices. The content in the appendices isn’t covered on the end-user version of the exam, but all lessons and appendices are included on the trainer version.
Final Cut Pro X 10.3 2017 Exam Preparation Guide
22
Use Legal Copy paragraph style. Legal copy is set SF Hello Regular 6/8 point. Copyright and trademark credit lines should be placed at the end of the document.
© 2017 Apple Inc. All rights reserved. Apple and the Apple logo are trademarks of Apple Inc., registered in the U.S. and other countries.