Embed Size (px)
Citation preview

Feature Analyst Quick Start Guide
�������������� ������������������������� ���������������
������������
Road Extraction
As with any extraction, setting up a good training set and narrowing your image focus to only the areas needed will gain better results. Follow the steps below to extract roads and road networks from your images. These instructions represent an end to end solution for extracting roads. To start this extraction, you must have your image layer displayed in a map document.
Road Extraction Work Flow
Create a new training set (shape file) highlighting repre-sentative river segments.
Setup the learning parame-ters and run the extraction.
Refine results as needed using Post Processing/Hierarchical Learning to obtain the final results or use the ArcGIS edit-ing tools to manually remove unwanted polygons.
If necessary, use the Convert to Line tool to convert the road polygon to a single line.
Apply object attribution and commit your data to your geodatabase.

Road Extraction
[ 2 ]
Feature Analyst Quick StartCreating the Training Set
To get a good representation of the target feature class, remember to create examples throughout the image.
1 Choose the Create New Feature Layer tool .
The Feature Analyst Save As dialog box opens, asking you to enter a name and a path for the new feature layer you are creating.
2 Select a path in the list box in the center of the dialog box.
3 Enter a name for the new layer in the Filename field.
4 At the bottom of the dialog box, select Polygon Shapefile.
Note: Thought Feature Analyst can work with Point and Line feature lay-ers, it works best with polygons.
5 Choose Save.
The new feature layer appears in the Table of Contents.
6 Choose Editor on the ArcGIS toolbar and select Start Edit-ing on the drop menu. This starts your editing session.
7 Choose the Sketch tool on the ArcGIS toolbar.
8 Using the zoom tools, zoom in on the image and draw a sam-ple polygon.
9 Repeat the previous step until you have adequate training examples. As a reference only, see the example below of a forested road extraction training set. The black shapes repre-sent the training polygons.

[ 3 ]
Road ExtractionFeature Analyst Quick Start10 Choose Editor on the ArcGIS toolbar and select Save Edits
on the drop menu.
11 Choose Editor again and select Stop Editing. This ends your editing session.
Setting Up Learning Parameters
1 Choose Setup Up Learning on the Feature Analyst tool-bar.
The Set Up Learning dialog box opens with the Feature Selector tab pre-selected.
In most cases you will use the Feature Analyst Feature Selector for your first extraction pass. The Feature Selector provides you with nine pre-defined extraction parameters based on the most common geographic features that may be extracted.
2 Select Wide Linear Feature on the Feature Selector list.
Note: Using the Feature Selector allows you to quickly and easier set up your learning parameters by using our default options. The default selections are created to the optimum settings for the geographic feature listed.
Feature Analyst detects the resolution closest to your actual image resolution and enters that in the Image Resolution field.
3 If the resolution detected is incorrect, enter the correct image resolution in the Resolution field.
4 Choose OK to close the dialog box.
5 Choose the One Button Learning tool on the toolbar to start the extraction pass.
The Feature Analyst Save As dialog box opens.
6 Enter a file name and path for the new layer.
7 Choose Save.
The Feature Analyst Training Phase dialog box opens, dis-playing the progress of the extraction pass. You can choose Pause to pause the process or Cancel to stop it. When the extraction pass is complete, the Pause button changes to OK.
8 Choose OK to close the Training Phase dialog box.

Road Extraction
[ 4 ]
Feature Analyst Quick StartThe result layer appears in the active data frame in the Table of Contents. For the example shown above, the results will appear similar to the image below.
In this case, the examples were very accurate and the results reflect that.
Removing Clutter Manually
If your results come back fairly clean with only a minimal amount of clutter, we recommend manually removing extra poly-gons using the editing tools available in ArcGIS.
Tip: You can also use the Polygon Reshape Deluxe Tool to clean up your results. See your online help for more information on this tool.
1 Choose Editor on the ArcGIS toolbar and select Start Edit-ing on the menu.
2 Choose the Edit tool on the ArcGIS toolbar and select Cut Polygon Features in the Task field.
3 Select your result layer in the Target field.
4 In the workspace, click on an incorrect polygon in the layer and press Delete on your keyboard.
Tip: If you accidentally delete a cor-rect polygon, choose Edit on the ArcGIS menu bar and select Undo. This reverses the previous deletion.
5 Continue highlighting and deleting polygons until you have removed all the incorrect polygons from the result layer.
[ 5 ]
Road ExtractionFeature Analyst Quick StartRemoving Clutter Automatically
If your results come back with a significant amount of clutter, use Feature Analyst’s Hierarchical Learning or Post Processing options to clean up the result layer. Removing clutter automati-cally adds the process to your “learning recipe”, allowing you to apply it to similar road images.
Feature Analyst provides several Hierarchical Learning tools for cleaning up polygons. For road extractions, we recommend trying Aggregate Features first to remove small polygons that are not part of the road network. We’ll also show you how to use the Removing Clutter by Shapes feature.
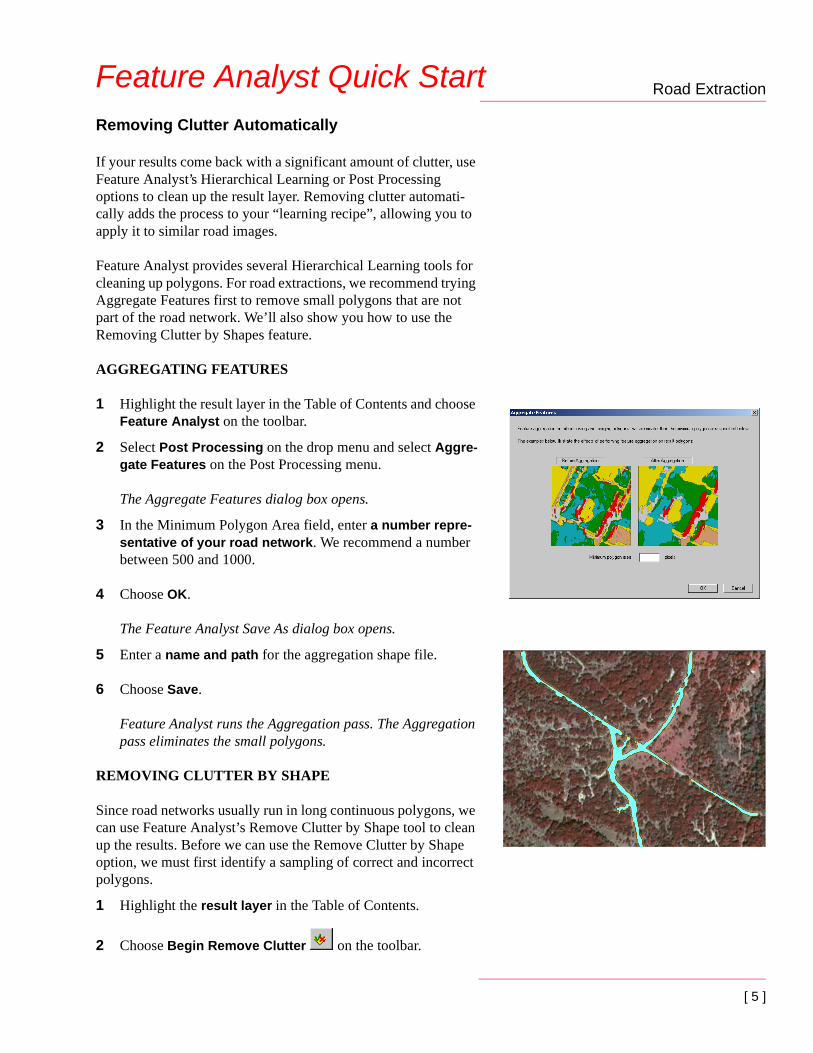
AGGREGATING FEATURES
1 Highlight the result layer in the Table of Contents and choose Feature Analyst on the toolbar.
2 Select Post Processing on the drop menu and select Aggre-gate Features on the Post Processing menu.
The Aggregate Features dialog box opens.
3 In the Minimum Polygon Area field, enter a number repre-sentative of your road network. We recommend a number between 500 and 1000.
4 Choose OK.
The Feature Analyst Save As dialog box opens.
5 Enter a name and path for the aggregation shape file.
6 Choose Save.
Feature Analyst runs the Aggregation pass. The Aggregation pass eliminates the small polygons.
REMOVING CLUTTER BY SHAPE
Since road networks usually run in long continuous polygons, we can use Feature Analyst’s Remove Clutter by Shape tool to clean up the results. Before we can use the Remove Clutter by Shape option, we must first identify a sampling of correct and incorrect polygons.
1 Highlight the result layer in the Table of Contents.
2 Choose Begin Remove Clutter on the toolbar.

Road Extraction
[ 6 ]
Feature Analyst Quick StartThe Feature Analyst Save As dialog box opens. Choosing Begin Remove Clutter also activates the Clutter Removal tools on the Feature Analyst toolbar.
• Use the Correct Shapes tool to label entire polygons as correct (positive) examples.
• Use the Incorrect Shapes tool to label entire poly-gons as incorrect (negative) examples.
• Use the Cut Out Correct Shapes tool to label regions (or parts of polygons) as correct.
• Use the Cut Out Incorrect Shapes tool to label regions (or parts of polygons) as incorrect.
3 Enter a name and path for the new layer and choose Save.
The new layer appears in the Table of Contents.
4 Choose the Select Correct Shapes tool on the toolbar.
5 Identify correct polygons in the result layer. Correct polygons are highlighted with green slashes.
6 Choose the Select Incorrect Shapes tool on the toolbar and identify incorrect polygons. Incorrect polygons are high-lighted with red slashes.
The example image shows correct and incorrect polygons in a result road extraction feature layer.
7 When you have finished identifying correct and incorrect polygons in the image, choose Feature Analyst on the tool-bar.
8 Select Hierarchical Learning from the drop menu and select Remove Clutter by Shape from the Hierarchical Learning menu.
The Remove Clutter by Shape dialog box opens, providing you with a number of options for remove clutter by shape.
9 For road extractions, we recommend selecting the following: Perimeter Area, Second Order of Moments, and Variance from the options.
[ 7 ]
Road ExtractionFeature Analyst Quick StartTip: For information on each of the Remove Clutter by Shape options, see your online help system.
10 Choose OK.
The Feature Analyst Save As dialog box opens, asking you to name the new layer.
11 Enter a name and path for the new layer and choose Save.
Feature Analyst runs the clutter removal pass and the result-ing layer appears in the Table of Contents.
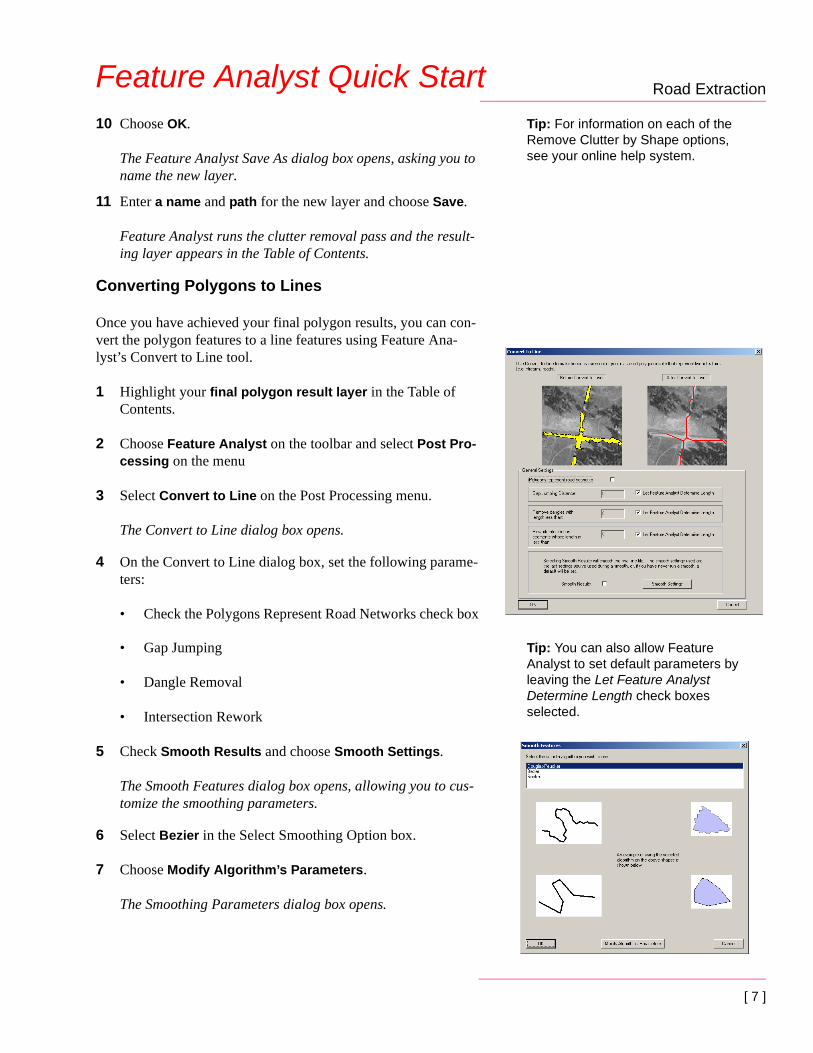
Converting Polygons to Lines
Once you have achieved your final polygon results, you can con-vert the polygon features to a line features using Feature Ana-lyst’s Convert to Line tool.
1 Highlight your final polygon result layer in the Table of Contents.
2 Choose Feature Analyst on the toolbar and select Post Pro-cessing on the menu
3 Select Convert to Line on the Post Processing menu.
The Convert to Line dialog box opens.
4 On the Convert to Line dialog box, set the following parame-ters:
• Check the Polygons Represent Road Networks check box
Tip: You can also allow Feature Analyst to set default parameters by leaving the Let Feature Analyst Determine Length check boxes selected.
• Gap Jumping
• Dangle Removal
• Intersection Rework
5 Check Smooth Results and choose Smooth Settings.
The Smooth Features dialog box opens, allowing you to cus-tomize the smoothing parameters.
6 Select Bezier in the Select Smoothing Option box.
7 Choose Modify Algorithm’s Parameters.
The Smoothing Parameters dialog box opens.

Road Extraction
[ 8 ]
Feature Analyst Quick Start8 In the Number of Vertices field, enter the number of verti-
ces you want the system to look at to create a straight line.
9 In the Max Distance field, enter the maximum distance you want the system to move any single vertex.
10 Choose OK three times to return to the ArcGIS work space.
The Feature Analyst Save As dialog box opens.
11 Name the new layer and set a path.
The system converts the polygon shapes to line features and displays the new layer in the Table of Contents.
Feature Analyst provides an additional tool for cleaning up line features. See your online help system for more information on the Deluxe Line Reshape Tool and the Intersection Repair Tool.
Create Shape File Metrics
The Shape File Metrics feature allows you to calculate a variety of metrics for the polygons in your result layers, on the fly. The calculations are entered into the Attributes table for the layer.
The feature works on points, lines, and polygons. With point results, you can only select the Mean Height option. To accom-plish this, you must have a DEM file for the active data frame. With line results, you will only have access to the Length option.
1 In the Table of Contents, highlight the result layer you want to calculate on.
2 Choose Feature Analyst on the toolbar and select Feature Tools on the drop menu.
3 Select Create Shape File Metrics on the Feature Tools menu.
The Create Shape File Metrics dialog box opens, allowing you to select the inputs to calculate for.
4 Select Length.
5 Choose OK on the dialog box.
The Feature Analyst Save As dialog box opens, asking you to name the new shape file created from this action.

[ 9 ]
Road ExtractionFeature Analyst Quick Start
6 Enter a name and path for the new file and choose Save.
Feature Analyst calculates the attributes you selected. The system enters the metrics into the Attributes Table.
Viewing Results
Once you have calculated your shape metrics, you can view the calculations in the Attribute Table.
1 Right-click on the layer you calculated the metrics for.
2 Select Open Attributes Table on the popup menu.
The Attributes table opens, displaying the metrics for the fea-tures in the selected shape file.
3 Click the close button (X) to close the dialog box.
Commit to Geodatabase
Now that you have acquired your complete results, you may want to commit the new geographic data to your geodatabase.
WARNING: Make sure that the coordinate systems for both your source and target match. If not, the Commit to Geodatabase tool might not produce the expected result.
1 Choose File on the menu bar and select Add Data from the drop menu.
The Add Data dialog box opens, allowing you to find your geodatabase and open the feature class file you want.

Road Extraction
[ 10 ]
Feature Analyst Quick Start2 Browse to the desired Geodatabase and select the appropri-
ate feature class and choose Add.
The selected feature class appears in the table of contents in the data frame.
3 Choose Editor on the ArcGIS toolbar and select Start Edit-ing.
The Start Editing dialog box opens, asking you to identify the layer to edit.
4 Select the geodatabase from the list and choose OK.
5 Choose ArcGIS Selection tool on the ArcGIS toolbar and draw a stretchy box around the features you want to include in your geodatabase. To select all available features right click on your results shape files, choose Selection, then choose Select All.
6 Highlight the shape file in the TOC that contains the results you want to commit to the geodatabase.
7 Choose Feature Analyst on the toolbar, select Post Pro-cessing from the drop menu, and select Commit to Geoda-tabase on the Post Processing menu.
The Commit Data dialog box opens. The feature class you selected previously is highlighted, along with any sub-types attached to the selected class.
8 Verify that the appropriate shape file is listed in the Selected Feature Layer box at the top of the Commit dialog and that the Count reflects the number of features that you want to write to the geodatabase.
9 In the Available Feature Classes box, select a feature class.
10 Choose OK.
The system applies the default attributes specified in the geo-database to the features selected in the workspace.
Setting Custom Attributes
You can use the Available Feature Classes to fill in the attributes for your features. You can also use them as a short cut to filling in the attributes. You can select a feature class in the list and then

[ 11 ]
Road ExtractionFeature Analyst Quick Startedit the attributes that are unique to the data you are working with.
1 Follow steps 1 to 5 above to assign default feature class attributes.
2 Choose Set Custom Attributes.
The Attribute Editor dialog box opens over the Commit to Geodatabase dialog box, allowing you to edit the individual data fields.
Some fields only allow you to select information already assigned to the field. These are called Domain fields and are limited to the assigned domain data.
3 In domain fields, select an option from the list provided. In non-domain fields, enter your required information. Non-domain fields allow you to enter any information you need.
4 Choose OK on the Commit to Geodatabase dialog box.
The dialog box closes and you return to the ArcGIS work-space.
Confirming Attribute Assignment
1 Right click the final result layer in the Table of Contents.
2 Select Open Attribute Table from the popup menu.
The attributes assigned from the feature class selection appear in the table cells.

Road Extraction
[ 12 ]
Feature Analyst Quick Start