Embed Size (px)
Citation preview
FLORIDA COURT REPORTERS ASSOCIATION “Fantastic Journey” 2016 Annual Convention June 17-19, 2016 Hilton Clearwater Beach
Workshop Topics: Manage Jobs Tips Case Management Tips Best Fit Move Manage Jobs Panes Tips for Users of Multiple Systems Split Screen Viewing Click/Drag to/from Manage Jobs/Windows Explorer Quickly Find What you Want Overwritten Files Go To Recycle Bin
Translation Feature Tips Brief It Tips Live Suggestions Tip Saved Translate Options Tips Apply E-defines During Translation Edit Tips Faster Title/Appearances Pages Right Click to Undo Global Make Exhibit Index Entries Bring Fields Include Option Check for missing By Line
Tips for Experienced Case CATalyst Users
June 17, 2016 Tips for Experienced Case CATalyst Users Page 2 of 21 1:30 p.m. – 3:00 p.m. 3:30 p.m. –5:00 p.m.
Table of Contents
Manage Jobs Tips Case Management: Less-Commonly Used Case-Specific Options .................... 3 Case Management: Keep Case Structure .................................................... 3 Case Management: Don’t Delete _Case Files ............................................... 4 Best Fit .................................................................................................. 4 Manage Jobs Panes Can Be Moved ............................................................. 5 Simple Job and File Management for Users of Multiple Systems ..................... 5 Overwritten Files Go To Recycle Bin ........................................................... 6 Click and Drag to/from Manage Jobs and Windows Explorer .......................... 7 Quickly Find What You Want: Reopen and Edit the Last File You Worked On .... 7 Quickly Find What You Want: Find a File by File Name .................................. 8 Quickly Find What You Want: Find a File by Content ..................................... 9 View Multiple Jobs or Portions of the Same Job Simultaneously .................... 10 Translation Feature Tips Brief It: Suggest a Brief ......................................................................... 11 Brief It: No Nag List .............................................................................. 11 Brief It: Transcript Brief it ...................................................................... 12 Brief It: How to Use Personal Briefs ......................................................... 13 Live Suggestions: Live Suggestions favor Quality, Balanced, Speed .............. 13 Saved Translate Options ........................................................................ 14 Apply E-defines During Translation .......................................................... 15 Edit Feature Tips Fastest Way to Create/Fill-In Titles, Appearances, Etc. for Ongoing Jobs ....... 15 Right Click to Undo Global or Undo Global Once ......................................... 16 Make Exhibit Index Entries ..................................................................... 17 Bring Fields Include Option ..................................................................... 20 Check for missing By Line ...................................................................... 20

June 17, 2016 Tips for Experienced Case CATalyst Users Page 3 of 21 1:30 p.m. – 3:00 p.m. 3:30 p.m. –5:00 p.m.
Manage Jobs Tips Case Management
Less-Commonly Used Case-Specific Options
Fill-in-Field List
If you have an ongoing case with a number of attorneys appearing on behalf of parties in this specific case, you can create a case-specific Fill-in-Field List file that lists only those attorneys. If you have an extensive Fill-in-Field List file with multiple addresses for firms, this can make it faster and easier to fill in details on appearance pages.
numberconversion.ini
You can copy the numberconversion.ini file from System Files to another case, modify the entries and Automatic Number Conversion will look to the case’s numberconversion.ini file rather than the numberconversion.ini file in the System Files case.
This can be very helpful if you have a series of jobs with unique number formatting requirements that do not apply to other jobs. For example, suppose you take a series of jobs in which a series of components named Drive I, Drive II, Drive III, etc. are discussed. In other jobs, you would expect the word “drive” to be part of an address, so in the numberconversion.ini file in your System Files case, “drive” would be entered with the {ADDRESS} rule. However, in this series of jobs, you would modify the keyword “drive” with the following rules and options: {DIGITAFTER}{CAPWITHNUM|{ROMAN}[I].
Keep Case Structure The Keep Case Structure option is available whenever you Restore, Move or Copy files. When you back up, move or copy files, Case CATalyst remembers (and with backup, stores the file in) the path for that file. For example, if you back up your Personal dictionary, the backup .ZIP contains the Personal Dictionary in the \System Files case. If you have a job named 06132016 that is in the JUNE folder inside the 2016 case, and you move or copy it, CATalyst remembers that the original path for that file is \2016\JUNE
When you choose to restore, move or copy one or more files you can select
June 17, 2016 Tips for Experienced Case CATalyst Users Page 4 of 21 1:30 p.m. – 3:00 p.m. 3:30 p.m. –5:00 p.m.
a location in the To: section. If you do not specify a location, the current User is selected by default.
Keep Case Structure causes the files to be restored, moved or copied to the same structure. If you do not want to specify a particular location (i.e. leave just the User name selected), then select Keep Case Structure to keep the current file structure. For example, if you want to restore a backed up Personal Dictionary, you can leave just your User name selected, select Keep Case Structure and the Personal Dictionary will be restored to the System Files case in your User. If you do want to specify a particular location (i.e. select a particular case where the file should be restored/copied/moved) you most likely do not want to add the current file structure to that location. Do not select Keep Case Structure. For example, let’s say you accidentally deleted a text file that you did not back up and it is no longer in the Recycle Bin because you emptied the Windows Recycle Bin. Because you use Auto-Recover, the last saved version of the file is in the AutoArchive case. You want to move the file back to its original location to continue to work on it. You could select the file inside the AutoArchive case, de-select Keep Case Structure and then select the location of the original file. The file will be moved to the location you specify, but will not carry the \AutoArchive structure with it.
Don’t delete _Case file(s) Many reporters don’t know what this file is and delete it because they figure if they don’t know what it is, they must not need it. You need it! This is a Case History file and it contains information for the following features set with a Case Scope (vs. a User scope or a Job scope): User-Defined Fields EZ Speaker Fields Seating Chart Cat Scratch Intuitive Replace
Best Fit
If you display your files in Detailed List order and information in any of the columns is cut off, rather than clicking and dragging the column header to widen the column, you can right click the column header and select Best Fit.
June 17, 2016 Tips for Experienced Case CATalyst Users Page 5 of 21 1:30 p.m. – 3:00 p.m. 3:30 p.m. –5:00 p.m.
Manage Jobs Panes Can Be Moved Like all panes in Edit, the Manage Jobs panes can be moved and docked at the top, bottom left or right side of the screen. Moving the pane from its default location may make it easier for you to see all the information you want to see. For example, the default position of the Job details pane is at the bottom of the screen. When the job is in progress and contains numerous subfiles, you would have to scroll to locate all of those files. Moving that pane from the bottom to either the left or right sides of the screen would enable you to see all of the subfile information for each file, or a complete list of jobs when a case is selected.
Simple Job and File Management for Users of Multiple Systems If you will be working on multiple computers and want to make sure that you are always using the most current version of every file, regardless of which computer you are using, consider using the following file organization and maintenance routine:
One time only: On one system, create a user named STORAGE.
1. Open Case CATalyst. If Case CATalyst opens to your user name, vs.
telling you to select a user, press Ctrl+u. If Case CATalyst opens to the Users level, proceed to the next step.
2. Click File, New, User (Alt+f, n, u). At the User Name prompt, type STORAGE, and press Enter (or click Open).
Periodic maintenance: After you have completed a transcript, delivered the job as requested and have been compensated, move the job into the STORAGE user.
1. Select the job and then do one of the following:
Click Tools, Move. Press Ctrl+m. Right click the file and select Move. Click the Move icon on the toolbar.
2. In the Move dialog, select the STORAGE user.
3. If the job is inside a case, do one of the following: If you want the job to be inside a folder with the same case name
June 17, 2016 Tips for Experienced Case CATalyst Users Page 6 of 21 1:30 p.m. – 3:00 p.m. 3:30 p.m. –5:00 p.m.
when it is moved to STORAGE, make sure Keep Case Structure is selected.
If you do not want the job to be inside a case folder when it is moved to STORAGE, make sure Keep Case Structure is not selected.
4. Click OK (or press Enter).
NOTE: Because you are moving completed work from one user to another, you will always have only uncompleted jobs in the user where you do the majority of your work; that keeps that user uncluttered, makes it easier to find files and faster to back up.
5. Use Back up User(s) to back up the STORAGE case to local media such as an external hard drive, or to an online storage service.
TIP: Check the Backup Options setting for whether or not audio
should be backed up. Remember, jobs that go into the STORAGE case are completed; they need no further editing. The jobs (and their subfiles) are stored for reference, to reuse resources (such as dictionaries and wordlists) or to reproduce as needed/requested. Unless you choose to archive all audio (which can take up a significant amount of storage space, depending on your selected recording codec), you may prefer to not include the audio subfile in your STORAGE backup.
Regular Maintenance
1. When you are finished working on your computer, use the Back Up Users
function to back up the user containing your current work, either to local media such as a flash drive, a portable external hard drive, or to an online storage service.
2. Before you begin working on a different computer, use the Restore User(s) function to restore the most current Backed Up User file. If you wish to have access to your old jobs on the other computer(s), restore the most current version of the backed up STORAGE user, as well.
Overwritten Files Go To Recycle Bin
When you Copy, Move or Restore files from Manage Jobs, if you select to overwrite an existing file, a copy of that file (and all associated overwritten subfiles) is sent to the Windows Recycle Bin.
June 17, 2016 Tips for Experienced Case CATalyst Users Page 7 of 21 1:30 p.m. – 3:00 p.m. 3:30 p.m. –5:00 p.m.
If you move or copy a file from Windows Explorer into Manage Jobs and confirm that you want to replace an existing file with the file you are moving or copying (thus overwriting the file), a copy of that file is sent to the Windows Recycle Bin.
NOTE: this feature is not available when copying, moving, restoring or
dragging files to a network drive or to a removable drive.
When you realize that you have overwritten a file accidentally, you can restore the copy of that file from the Windows Recycle Bin.
Click and Drag to/from Manage Jobs and Windows Explorer
Files can be copied from Manage Jobs to Windows Explorer and vice versa via click and drag.
For example, suppose you have Printed to PDF and saved the file in your CATalyst user, but you want the PDF file in your Documents folder. You can:
1. Open Case CATalyst and open Windows Explorer. Adjust the size of each
application if and as needed so that you can see both applications.
2. Click the subfile in the Job Details pane in Manage Jobs; drag it to the Documents folder in Explorer.
Find What You Want Quickly!
If you organize your jobs in cases, or have a lengthy list of jobs in your user, it can take several clicks before you find the file you want to open. Here are some tips to quickly find and open the file you want to edit:
Re-open and Edit the Last File You Worked On:
1. Click File (Alt+f) in Manage Jobs.
2. At the bottom of the File menu is a list of the four most recently opened
files. Click the file, or press the number of the file you want to open.
Find a File By File Name If the file you want to open and edit is not in the list of most recently opened files but you know the name (or a portion of the name) of the file:
June 17, 2016 Tips for Experienced Case CATalyst Users Page 8 of 21 1:30 p.m. – 3:00 p.m. 3:30 p.m. –5:00 p.m.
1. Click Tools, Search (Ctrl+f)
2. Type the name of the file.
TIP: If you are only sure about a portion of the file name, type an asterisk (*) to hold the place of any/all letters you’re not sure of. For example, if you are looking for a file for which part of the name is 2016-05-, you can type 2016-05-*. If you are looking for a file and all you remember is that it’s a name like Chandler or Shander or something like that, you can type *hand*.
3. If the file you want to find may be inside a case, select the Look in Cases option.
TIP: If you do not find the file and you would like to look for it in a
different user, you can select the user you want to search from the Search for Files dialog.
4. Click OK (Enter).
5. Files that match your search criteria are displayed in the Search pane. Double click the preferred file to open it.
Find a File by Content Suppose you want to re-use a particular dictionary to help translate your current job, but you have no idea of the file name or when you defined the steno inside it. Or, suppose you want to reference a spelling from a job you did a few months back, but you have no idea what the name of the file is or which case or user it is in. So long as you can remember some specific text in the transcript file, text or steno in a dictionary, you can very quickly locate the resource:
1. Click Tools, Search File Contents (Ctrl+Shift+f).
2. At File Type, select Dictionary or Transcript. 3. At Search For, select the category of information you’re looking for (e.g.
steno, text, entry type). If steno or text, type the unique steno or text that is in the file.
4. At Where, select All Users or Current User. 5. Click Search (Enter).
June 17, 2016 Tips for Experienced Case CATalyst Users Page 9 of 21 1:30 p.m. – 3:00 p.m. 3:30 p.m. –5:00 p.m.
Files that match your search criteria are displayed in the Search File Contents pane. Double click the preferred reference to open it, with the cursor positioned on the page and line number of the specific word or phrase for which you searched.
View Multiple Jobs or Portions of the Same Job Simultaneously If you need to look at two open Case CATalyst edit files at the same time:
1. Click Windows, Tile (Alt+w, t).
2. Adjust the display as desired.
NOTE: Each open file will have its own set of panes.
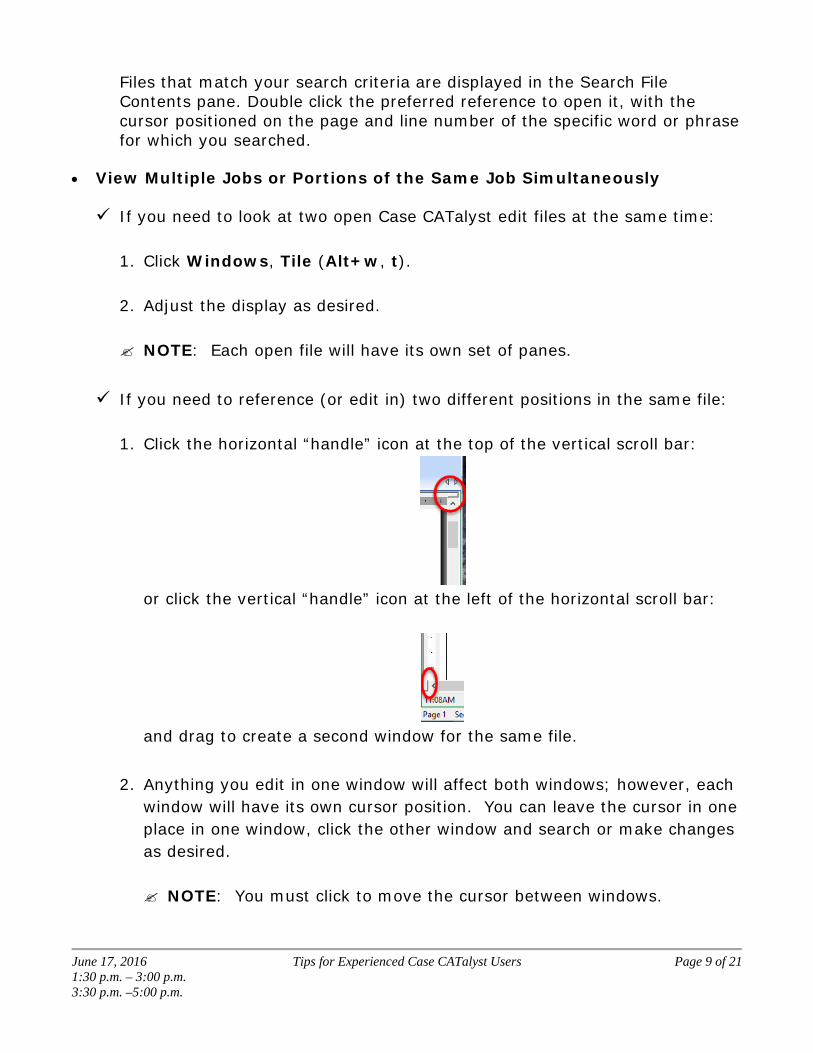
If you need to reference (or edit in) two different positions in the same file: 1. Click the horizontal “handle” icon at the top of the vertical scroll bar:
or click the vertical “handle” icon at the left of the horizontal scroll bar:
and drag to create a second window for the same file.
2. Anything you edit in one window will affect both windows; however, each window will have its own cursor position. You can leave the cursor in one place in one window, click the other window and search or make changes as desired. NOTE: You must click to move the cursor between windows.

June 17, 2016 Tips for Experienced Case CATalyst Users Page 10 of 21 1:30 p.m. – 3:00 p.m. 3:30 p.m. –5:00 p.m.
NOTE: As you are working in one file, you only have one set of panes, all pertaining to the same file. The information in the pane will be associated with the cursor position of the active window.
Translation Feature Tips Brief It Tips
Suggest a Brief
Make sure the Brief It pane is open. Then do either of the following: From the computer keyboard while editing, mark (highlight) the word or
phrase, then click Global, Suggest a Brief (Alt+g, s).
If you have restored the Extras.zip file from the Help, Exceptional Extras menu, and you are using the definitions from the Extras AccelerWriter Definitions dictionary to assist you with translation you can write:
/SW-PB - RT - Suggest Brief for Last Word /SWAO - RT - Suggest Brief for Last Two Words /SWAOE - RT - Suggest Brief for Last Three Words /SWOUR - RT - Suggest Brief for Last Four Words
No Nag List When you enter words or phrases into this list, Brief It will no longer offer suggestions, reminders or display briefs from the Personal Briefs file for that text. (In other words, it will not nag you to write a brief for that word or phrase.) This is helpful because along with the perfectly stroked entries in your dictionaries, you also likely have some mis-strokes for the same text, and it’s possible that Brief It will remind you of the mis-stroke rather than the correct steno. Putting text into the No Nag List will prevent Brief It from reminding you of a mis-stroke for that text. For example, you write associated with in three or more strokes, and Brief It reminds you of your dictionary entry /SOET/W-D which is a mis-stroke. You don't want to be reminded of that mis-stroke but you also don't want to delete if from your dictionary. You can add associated with to the No Nag List.
June 17, 2016 Tips for Experienced Case CATalyst Users Page 11 of 21 1:30 p.m. – 3:00 p.m. 3:30 p.m. –5:00 p.m.
Another example might be that you have /STAURPL defined in your dictionary as state your name and you usually write that stroke. But there are few times when you write each word out. You don't want to be reminded of your dictionary definition of /STAURPL because you know that steno outline and write it more often than not. You can add state your name to the No Nag List. To add text from a Brief to the No Nag List, do one of the following: Send entries from the Brief It pane:
1. Click the entry that you want to add to the No Nag List, or highlight
multiple entries.
2. Right click the selected entry/entries and select Send Text to No Nag List.
Type entries into the No Nag List file: 1. Click the Options button on the toolbar of the Brief It pane, and then
select No Nag List.
2. Type the text into the No Nag List file and press Enter. NOTE: If you are adding more than one text entry, each word or
phrase must be on a separate line.
Transcript Brief It (for non-realtime jobs) Transcript Brief It will analyze the transcript and suggest briefs based on your writing and Brief It options. Suggested briefs will be added to the Brief It dialog pane. Open any job that was not translated in realtime.
If it is not already open, click View, Panes, Brief It (Alt+v, e, t) to
open and view the Brief It pane.
Click Global, Transcript Brief It (or press Alt+g, b).
At the “This will fill your Brief It list after analyzing the whole transcript. Continue?” message, click Yes to proceed (or No to cancel).
June 17, 2016 Tips for Experienced Case CATalyst Users Page 12 of 21 1:30 p.m. – 3:00 p.m. 3:30 p.m. –5:00 p.m.
Review the suggestions. If the brief appears in green, the brief already exists in one of the dictionaries you used for translation. If it appears in orange or yellow, right click any you would like to incorporate and select J-define suggestion. When the define dialog box opens, you can change the global type to D-define if you prefer.
How to use Personal Briefs
What do you do when you hear or read about a brief that your colleague uses for a word or phrase? Some reporters keep a handwritten list or a file in Word; some use a computer “post-it-note” app, some just go ahead and put it in their dictionary whether or not they’re sure they want to use it. What you can do instead is put the entry into your Briefs file. Then, if/when you write the word or phrase in three or more strokes, Brief It will recommend that brief. The benefit of using this file is that all of the suggestions are in one printable/sharable file, but not in your Personal Dictionary. Writing the steno for that brief will not translate unexpectedly, nor will the steno be unavailable to be suggested as a brief for a different word or phrase.
Live Suggestions Option: Live Suggestions favor Quality, Balanced, Speed
When the Live Suggestions feature was first introduced, there were still quite a few reporters using older hardware with the Windows XP operating system who experienced realtime lagging because Live Suggestions required more resources than their hardware was able to provide. For this reason, many reporters disabled the feature and are still not taking advantage of it. However, regardless of hardware and operating system, everyone who translates in realtime can use Live Suggestions. The Live Suggestions favor… option was added to ensure this. Quality settings are designed for faster computers. Using this setting,
Live Suggestions will spend a little more time looking for a suggestion and will search more steno outlines for a longer match.
Balanced is the default setting. Live Suggestions takes less time and fewer steno outlines than the Quality option to look for suggestions.
Speed is designed for slower computers. Using this setting, Live Suggestions will take minimal time searching for a suggestion and

June 17, 2016 Tips for Experienced Case CATalyst Users Page 13 of 21 1:30 p.m. – 3:00 p.m. 3:30 p.m. –5:00 p.m.
minimal steno outlines for the longest match. If you are running Case CATalyst on older hardware and your realtime is a little sluggish and you want to use Live Suggestions, you may want to try this setting.
Saved Translate Options
Saved Translate Options allows you to save current translate options to a file which you can load for future translations. This can be extremely helpful if you do different types of work; e.g. depos, court, CART, captioning, etc., or if you do only one type of work, but do multi-day proceedings on non-consecutive days, and take/translate other work in between. The Settings that are saved include: all input, realtime, and output options; layout selection; writer, dictionaries and global tables used. NOTE: Input options include the selection of the EZ Speakers Dictionary to be used
and UserSettings for Edit.
Case CATalyst also remembers the settings used for the last translation session and stores them in the Lastusedsettings.ini file located in the Saved Translation Settings folder in the System Files case. Load Settings
Select this option to load a different set of Translate options for translation. The Saved Translation Settings dialog box displays where you can select a file to use. Choose the file and press Enter (Open) to load the settings.
NOTE: If you choose a Settings file for the layout is no longer available,
Case CATalyst uses the layout from the Lastusedsettings.ini file.
Save Settings
Saves the current Translate settings. The Save Translation Settings dialog displays. Type a name in the File name field and click Save (Enter).
Always Load Last Used Settings
Check this box to always translate with the last settings file used.
June 17, 2016 Tips for Experienced Case CATalyst Users Page 14 of 21 1:30 p.m. – 3:00 p.m. 3:30 p.m. –5:00 p.m.
Apply E-defines During Translation If you are working on multiple related jobs inside or outside of a case, and you have made E-defines, the easiest way to apply E-defines from one or more jobs to the job you are about to translate is to: After opening the Translate dialog, if it is not already selected, click
Show Global Tables.
Select the global table(s) from the related jobs that have been edited. TIP: If you are working with a scopist, make sure they return the global
table along with the text, job dictionary and other subfiles so that you can take advantage of applying those E-defines to the next translation. It can improve your accuracy and reduce the amount of work they have to do. Just as you should review returned job dictionary entries for future use, you should review returned global table entries for future use.
Edit Feature Tips Fastest Way to Create/Fill-In Titles, Appearances, Etc. for Ongoing Jobs
1. Make certain your titles, appearances, etc. standard pages are as efficient as possible; using fields as placeholders for text that is likely to be re-used in one or more future jobs (vs. conflicts or scanstops) wherever practical. If you are not certain that your files are efficient, contact one of your local certified independent training agents and arrange for file review and modification.
2. On the first job, include the blank titles, appearances, etc. and when convenient, fill in the fields, and select or replace other placeholder text.
3. On the next job, before translating, do the following: a. Click Define Fields in the Translate dialog.
b. Click Use Other… in the Insert Field dialog.
c. Select the previous related job, where the fields were already filled in.
June 17, 2016 Tips for Experienced Case CATalyst Users Page 15 of 21 1:30 p.m. – 3:00 p.m. 3:30 p.m. –5:00 p.m.
d. Hold down Ctrl and click to de-select fields that are job specific vs.
multi-job applicable, including Creation Day of Week, Creation Date, Creation Date in Words, Creation Date Ordinal and Creation Date Ordinal with Day, and any User-Defined fields that are job-specific, such as WITNESS (or similar). Then click OK to close the Insert Field dialog.
e. Select any other preferred Translate options and then click OK.
Whenever you include the title, appearances, etc., whether via auto-include while writing or via the computer keyboard in Edit, all fields will automatically fill in correctly, except for those which are job-specific. When you edit these pages, the only thing you should have to do is scan forward to and edit those specific fields and/or other jobs-specific placeholders.
Right click to Undo Global or Undo Global Once
When you make a global error and you want to fix it, you should use the Undo Global function. It is not necessary to open the Global table to undo globals. All you need to do is: 1. Right click the global you want to undo.
2. Select one of the following options:
Undo Global
Select Undo Global to “unapply” the global from the items to which it was applied, remove the entry from the global table, and remove the entry from any dictionary file to which it was sent.
Undo Global Once
Select Undo Global Once to undo the global in that one spot only.
Make Exhibit Index Entries
When you have a single exhibit being marked at a time, it is a simple matter to create a parenthetical with pre-inserted index format symbols surrounding the information that will be included in the index via Build Index. However, when

June 17, 2016 Tips for Experienced Case CATalyst Users Page 16 of 21 1:30 p.m. – 3:00 p.m. 3:30 p.m. –5:00 p.m.
you have multiple exhibits being marked at the same time, it can be a bit more difficult. For example, suppose you have the following parenthetical in your transcript on page 53: (Plaintiffs' 9, Photograph, Plaintiffs' 10, Document, and Plaintiffs’ 11, Photograph were marked for identification.) And suppose when you build your Index Page, these exhibits should be noted on the index page as: Number Description Page Plaintiffs’ 9 Photograph 53 Plaintiffs’ 10 Document 53 Plaintiffs’ 11 Photograph 53 It can be quite time consuming to surround each separate exhibit number and description with the appropriate Index Heading On/Off or Index On/Off format symbols, as you cannot pre-enter the on/off codes for each separate exhibit into a standard, generic parenthetical. It is not necessary to create separate parentheticals for marking the exact number of exhibit. One generic parenthetical is sufficient, because the Make Exhibit Index Entries feature is specifically designed to make the task of entering information required for each exhibit faster, with greater ease and efficiency. 1. Click Edit, Insert, Make Exhibit Index Entries (Alt+e, i, m).
TIP: If you frequently need to insert exhibit index symbols and
descriptions for one or more exhibits while editing, it’s a good idea to assign the Make Exhibit Index Entries function to a key in your keyboard map.
2. The Make Exhibit Index Entries dialog appears. a. At Exhibit Range:
If there is only one exhibit, type the exhibit number.
If there are multiple exhibits, type the exhibit numbers, range or a
combination. For example, if you are making entries for exhibits 1-5 and exhibits 8, 10 and 15, type 1-5, 8, 10, 14.
June 17, 2016 Tips for Experienced Case CATalyst Users Page 17 of 21 1:30 p.m. – 3:00 p.m. 3:30 p.m. –5:00 p.m.
b. At Index Category (A-Z, 1-9): Type the letter or number of the index
format symbol used in the table in the Index Template where these exhibits will be inserted when the index is built.
c. At Use Indexing Format Symbols, select : Index Heading Only
Select this option if you only want Index Heading On and Index Heading Off format symbols, and no Index On and Off format symbols around information you plan to enter (i.e. the Index On/Off format symbols will be added separately, via another function. For example, some reporters program EZ Text entries with common descriptions to speed up text entry.)
Index Heading and Index Select this option if you want both Index Heading On and Off and Index On and Off format symbols around the information you plan to enter.
Index Only
Select this option if you only want Index On and Index Off format symbols, and no Index Heading On and Off format symbols around information you plan to enter (for example, you are only indexing the Exhibit number and do not have to enter a description, or both the Exhibit number and description are all in the same table cell).
d. At Use Index Cell:
If you need to generate page numbers in multiple columns in the same table row (e.g. the locations in the transcript where the exhibit being offered, marked, admitted, received, etc.,) you are using <Index Cell n> format symbols rather than a single <Index Page> format symbol. Select For Index Heading, Use Index Cell(s) if you want the
<Index Cell #> format symbol included between the Index Heading On/Off format symbols (to generate a page number for the information between the Index Heading On/Off format symbols, vs. the information between the Index On/Off symbols).

June 17, 2016 Tips for Experienced Case CATalyst Users Page 18 of 21 1:30 p.m. – 3:00 p.m. 3:30 p.m. –5:00 p.m.
In the first column next to this option, type the Index Cell number that should be used. For example, if you use <Index Cell 1> when the exhibit is marked for identification, and you are currently entering information for a group of exhibits being marked for identification, you would type the number 1 in the field in first column next to this option. If you use <Index Cell 2> when the exhibit is admitted/received into evidence, and you are currently entering information for a group of exhibits being received into evidence, you would type 2 in the field in the first column next to this option.
Some reporters have parentheticals where they are performing two functions with one parenthetical – e.g. (Exhibits 1-15 were marked for identification and received into evidence). If that is the case and you need to generate two page number references, then you would type the first Index Cell number in the field in the first column next to this option, and the second Index Cell number in the field in the second column next to this option.
Select For Index, Use Index Cell(s) if you are using <Index Cell #>
format symbols to generate the page number(s) for each exhibit, and you want the <Index Cell #> format symbol included between the Index On/Off format symbols (to generate a page number for the information between the Index On/Off format symbols, vs. the information between the Index Heading On/Off symbols). Again, type the correct cell number for into the first column next to this option, to generate the page number in the correct column on your index page, and type a second cell number into the next column if the same page number should be generated for multiple columns.
If you are using <Index Page> to generate the page number for the referenced index, select Not using cells.
e. Review the Sample Text to make sure that the correct index format
symbols will be placed around the correct information.
f. Select the I want to customize Index Heading text option if you wish to be able to add text to the numbers and/or letters that you entered for the exhibit range.
June 17, 2016 Tips for Experienced Case CATalyst Users Page 19 of 21 1:30 p.m. – 3:00 p.m. 3:30 p.m. –5:00 p.m.
g. Select the I want to add description text option if you wish to be able to type (or paste) a description that will be inserted in the Hidden Text.
h. Click OK or press Enter.
i. The Enter Detail dialog displays. Do one of the following: If you selected I want to customize Index Heading text the cursor will
be active in the Index Heading Text field. Modify the text as desired. Then, do one of the following:
If you selected I want to add description text, click in the empty Text: box
for Index Text (Alt+x), and type the description. If the description will be repeated for the next exhibit, click Repeat description and then click Next (Alt+n).
If you did not select I want to add description text click Next (Alt+x).
If you did not select I want to customize Index Heading text, but you did select I want to add description text, the cursor will be active in the Index Text field. Type the exhibit description. If the description will be repeated for the next exhibit, click Repeat description and then click Next (Alt+n).
j. When you have entered all of the customized text and/or descriptions, click Done (Alt+d).
Entries for each exhibit are generated in a Hidden Text and the first item is displayed. Click the down arrow in the lower right corner of the Hidden Text dialog to view all of the entered symbols and text you just entered for each exhibit.
Bring Fields Include Option
Prior to Version 14 of Case CATalyst, if you included, appended or merged a file that had conflicting field values, you would be prompted to select the field value you wanted. To avoid being prompted to select the correct field values, you can deselect this
June 17, 2016 Tips for Experienced Case CATalyst Users Page 20 of 21 1:30 p.m. – 3:00 p.m. 3:30 p.m. –5:00 p.m.
option when you Include, Append or Merge and the field values will not be included, appended or merged with the file.
Check for missing By Line
If you use By Lines after a colloquy or parenthetical interruption, how do you know whether or not they’re present in every place they ought to be other than by proofing for them? Do you search for every occurrence of a close parenthesis symbol followed by a <Question>? There is a Spell Check option that will look for missing by lines, and enable you fix it by selecting and inserting the correct speaker in your By Line format. To use this feature, do the following four tasks (one time only):
1. (One time only) Check your layout and make sure that the Byline Paragraph
Style has the correct values.
2. (One time only) Check any dictionary entries (e.g. EZ Speaker Dictionary entries), include files or EZ Text entries you use to insert By Lines and make sure they make use of the <By-line> paragraph style to set up By Line formatting, and that they use EZ Speaker fields to identify the speaker.
3. (One time only) Set your preferred values in By Line Options: a. Click Tools, Options, By Line Options… (Alt+t, o, L).
b. Select the position for Place By Line (before Q or after Q).
c. Under Format, at Before: type text and/or format symbols that will
appear after the <By-line> format symbol and before the speaker name.
d. Under Format, at After: type text and/or format symbols that will appear
after the speaker name. e. Select locations where a missing by line should automatically be inserted
if using the Search Missing By Line function from the Special Search menu, or in Transcript Spell Check Options.
4. (One time only) Select Check for missing By Lines in Transcript Spell
Check Options:

June 17, 2016 Tips for Experienced Case CATalyst Users Page 21 of 21 1:30 p.m. – 3:00 p.m. 3:30 p.m. –5:00 p.m.
a. In Edit, click Tools, Options, Transcript Spell Check Options (Alt+t, o, t).
b. The Transcript Spell Check Options dialog displays. Under Options, select Check for missing By Lines.
c. Click OK (Enter).
From now on, whenever you run Spell Check, it will search for missing by lines. NOTE: If preferred, you can also search for missing by lines by clicking Special
Edit, Special Search, Search Next Missing By Line (Alt+s, p, b).
When Spell Check finds a missing by line, the Fix Missing By Line dialog displays, with a list of the speakers (from the current job’s Speaker List). Select the preferred speaker, and click Resume.
Post‐Session Questions about This Material? Contact Cindi Lynch, Stenograph’s Training Program Manager, via:
e-mail: [email protected] or [email protected] Friend me on Facebook: https://www.facebook.com/cindi.hartman.lynch
Need additional Case CATalyst training?
You can schedule individual, custom, in‐person or remote personal training! If you need guided assistance to create or modify custom layouts, include files, or index templates; modify your dictionary; adjust number conversion results; record, assign or define macros, or to learn any other aspect of Case CATalyst and apply what you learn to your individual work, a Stenograph Certified Independent Training Agent can help you! Your nearest local training agent(s) is/are: Jessica Donnelly Robin Merker Phone: (954) 553‐5275 Phone: (561) 553‐5275 Email: [email protected] Email: [email protected] Gayl Hardeman Donna Schenck Healy Phone: (727) 547‐0896 Phone: (904) 469‐0069 Email: [email protected] Email: [email protected] TIP: Need continuing education credit for your RPR or FPR? You can earn .1 CEU for each hour of training with a Stenograph Certified Independent Training Agent. Need a lot of continuing education credit before the next cycle ends? Talk to the training agent about scheduling multiple short sessions. Dedicate one hour a month for ten months and earn all the credit you need for an entire year; and it can all be submitted online to NCRA via a single application (with a single fee)!