Embed Size (px)
Citation preview

FastViewer for Microsoft Windows
Manual

Copyright © FastViewer GmbH 02/2018 Schwesterhausgasse 11, 92318 Neumarkt/Germany
All rights reserved.
The information provided in this document contains merely general descriptions or characteristics of performance which in case of actual use do not always apply as described or which may change as a result of further development of the products. An obligation to provide the respective characteristics shall only exist if expressly agreed in the terms of contract.
Availability and technical specifications are subject to change without notice.
www.fastviewer.com

Contents
Contents
History of Changes . . . . . . . . . . . . . . . . . . . . . . . . . . . . . . . . . . . . . . . . . . . . . . . . . . . . . . . . . . . . . . . . . . . . . . . 7
1 General. . . . . . . . . . . . . . . . . . . . . . . . . . . . . . . . . . . . . . . . . . . . . . . . . . . . . . . . . . . . . . . . . . . . . . . . . . . . . . . 91.1 Preface. . . . . . . . . . . . . . . . . . . . . . . . . . . . . . . . . . . . . . . . . . . . . . . . . . . . . . . . . . . . . . . . . . . . . . . . . . . . . . 91.2 Legal Notices . . . . . . . . . . . . . . . . . . . . . . . . . . . . . . . . . . . . . . . . . . . . . . . . . . . . . . . . . . . . . . . . . . . . . . . . . 91.3 Technical Assistance . . . . . . . . . . . . . . . . . . . . . . . . . . . . . . . . . . . . . . . . . . . . . . . . . . . . . . . . . . . . . . . . . . 101.4 Who should read this Manual? . . . . . . . . . . . . . . . . . . . . . . . . . . . . . . . . . . . . . . . . . . . . . . . . . . . . . . . . . . 101.5 Manual Contents . . . . . . . . . . . . . . . . . . . . . . . . . . . . . . . . . . . . . . . . . . . . . . . . . . . . . . . . . . . . . . . . . . . . . 101.6 Representation Conventions . . . . . . . . . . . . . . . . . . . . . . . . . . . . . . . . . . . . . . . . . . . . . . . . . . . . . . . . . . . . 11
1.6.1 Notations and Formats . . . . . . . . . . . . . . . . . . . . . . . . . . . . . . . . . . . . . . . . . . . . . . . . . . . . . . . . . . . . . 111.6.2 Hints . . . . . . . . . . . . . . . . . . . . . . . . . . . . . . . . . . . . . . . . . . . . . . . . . . . . . . . . . . . . . . . . . . . . . . . . . . . 121.6.3 Figures . . . . . . . . . . . . . . . . . . . . . . . . . . . . . . . . . . . . . . . . . . . . . . . . . . . . . . . . . . . . . . . . . . . . . . . . . 12
2 Minimum Requirements for the usage of FastViewer . . . . . . . . . . . . . . . . . . . . . . . . . . . . . . . . . . . . . . . . 13
3 First Steps . . . . . . . . . . . . . . . . . . . . . . . . . . . . . . . . . . . . . . . . . . . . . . . . . . . . . . . . . . . . . . . . . . . . . . . . . . . 153.1 Download of the modules via customer portal . . . . . . . . . . . . . . . . . . . . . . . . . . . . . . . . . . . . . . . . . . . . . . . 15
3.1.1 Log on to the FastViewer Customer Portal. . . . . . . . . . . . . . . . . . . . . . . . . . . . . . . . . . . . . . . . . . . . . . 173.1.2 Download the Master Module . . . . . . . . . . . . . . . . . . . . . . . . . . . . . . . . . . . . . . . . . . . . . . . . . . . . . . . . 173.1.3 Log off from the FastViewer Customer Portal. . . . . . . . . . . . . . . . . . . . . . . . . . . . . . . . . . . . . . . . . . . . 19
3.2 Starting a Session . . . . . . . . . . . . . . . . . . . . . . . . . . . . . . . . . . . . . . . . . . . . . . . . . . . . . . . . . . . . . . . . . . . . 193.2.1 Start the Master Module . . . . . . . . . . . . . . . . . . . . . . . . . . . . . . . . . . . . . . . . . . . . . . . . . . . . . . . . . . . . 223.2.2 Using Start Parameters . . . . . . . . . . . . . . . . . . . . . . . . . . . . . . . . . . . . . . . . . . . . . . . . . . . . . . . . . . . . 23
3.2.2.1 Start Modules with Parameters . . . . . . . . . . . . . . . . . . . . . . . . . . . . . . . . . . . . . . . . . . . . . . . . . . . 263.2.3 Start the Client Module . . . . . . . . . . . . . . . . . . . . . . . . . . . . . . . . . . . . . . . . . . . . . . . . . . . . . . . . . . . . . 273.2.4 Support . . . . . . . . . . . . . . . . . . . . . . . . . . . . . . . . . . . . . . . . . . . . . . . . . . . . . . . . . . . . . . . . . . . . . . . . . 29
3.2.4.1 Start Support Session . . . . . . . . . . . . . . . . . . . . . . . . . . . . . . . . . . . . . . . . . . . . . . . . . . . . . . . . . . 293.2.5 Presentation . . . . . . . . . . . . . . . . . . . . . . . . . . . . . . . . . . . . . . . . . . . . . . . . . . . . . . . . . . . . . . . . . . . . . 31
3.2.5.1 Start Presentation . . . . . . . . . . . . . . . . . . . . . . . . . . . . . . . . . . . . . . . . . . . . . . . . . . . . . . . . . . . . . 323.2.6 Conference . . . . . . . . . . . . . . . . . . . . . . . . . . . . . . . . . . . . . . . . . . . . . . . . . . . . . . . . . . . . . . . . . . . . . . 34
3.2.6.1 Start a Conference . . . . . . . . . . . . . . . . . . . . . . . . . . . . . . . . . . . . . . . . . . . . . . . . . . . . . . . . . . . . 353.2.6.2 Plan Conferences using the Master Module . . . . . . . . . . . . . . . . . . . . . . . . . . . . . . . . . . . . . . . . . 363.2.6.3 Start Scheduled Conferences . . . . . . . . . . . . . . . . . . . . . . . . . . . . . . . . . . . . . . . . . . . . . . . . . . . . 403.2.6.4 Planned Conferences - copy invitation texts . . . . . . . . . . . . . . . . . . . . . . . . . . . . . . . . . . . . . . . . . 433.2.6.5 Edit Scheduled Conferences. . . . . . . . . . . . . . . . . . . . . . . . . . . . . . . . . . . . . . . . . . . . . . . . . . . . . 443.2.6.6 Delete Scheduled Conferences. . . . . . . . . . . . . . . . . . . . . . . . . . . . . . . . . . . . . . . . . . . . . . . . . . . 47
3.3 Leaving a Session . . . . . . . . . . . . . . . . . . . . . . . . . . . . . . . . . . . . . . . . . . . . . . . . . . . . . . . . . . . . . . . . . . . . 49
4 GUI for FastViewer . . . . . . . . . . . . . . . . . . . . . . . . . . . . . . . . . . . . . . . . . . . . . . . . . . . . . . . . . . . . . . . . . . . . 504.1 Shortcut Bar of the moderator module. . . . . . . . . . . . . . . . . . . . . . . . . . . . . . . . . . . . . . . . . . . . . . . . . . . . . 52
4.1.1 Create several Sessions. . . . . . . . . . . . . . . . . . . . . . . . . . . . . . . . . . . . . . . . . . . . . . . . . . . . . . . . . . . . 534.1.2 File transfer. . . . . . . . . . . . . . . . . . . . . . . . . . . . . . . . . . . . . . . . . . . . . . . . . . . . . . . . . . . . . . . . . . . . . . 544.1.3 Functions of the Port Mapper . . . . . . . . . . . . . . . . . . . . . . . . . . . . . . . . . . . . . . . . . . . . . . . . . . . . . . . . 574.1.4 Change View Direction . . . . . . . . . . . . . . . . . . . . . . . . . . . . . . . . . . . . . . . . . . . . . . . . . . . . . . . . . . . . . 604.1.5 Toggle Zoom Mode. . . . . . . . . . . . . . . . . . . . . . . . . . . . . . . . . . . . . . . . . . . . . . . . . . . . . . . . . . . . . . . . 614.1.6 Change the Screen Transmission Quality . . . . . . . . . . . . . . . . . . . . . . . . . . . . . . . . . . . . . . . . . . . . . . 624.1.7 Whiteboard . . . . . . . . . . . . . . . . . . . . . . . . . . . . . . . . . . . . . . . . . . . . . . . . . . . . . . . . . . . . . . . . . . . . . . 62
4.1.7.1 Open Whiteboard . . . . . . . . . . . . . . . . . . . . . . . . . . . . . . . . . . . . . . . . . . . . . . . . . . . . . . . . . . . . . 644.1.7.2 Lines and Fonts on the Whiteboard . . . . . . . . . . . . . . . . . . . . . . . . . . . . . . . . . . . . . . . . . . . . . . . 65
FastViewer GmbH, 02/2018FastViewer for Microsoft Windows, Manual 3

Contents
4.1.7.3 Draw Graphic Objects on the Whiteboard . . . . . . . . . . . . . . . . . . . . . . . . . . . . . . . . . . . . . . . . . . . 664.1.7.4 Insert an Image on the Whiteboard . . . . . . . . . . . . . . . . . . . . . . . . . . . . . . . . . . . . . . . . . . . . . . . . 674.1.7.5 Enter Text on the Whiteboard. . . . . . . . . . . . . . . . . . . . . . . . . . . . . . . . . . . . . . . . . . . . . . . . . . . . . 684.1.7.6 Select Text on the Whiteboard . . . . . . . . . . . . . . . . . . . . . . . . . . . . . . . . . . . . . . . . . . . . . . . . . . . . 684.1.7.7 Make Corrections in the Whiteboard . . . . . . . . . . . . . . . . . . . . . . . . . . . . . . . . . . . . . . . . . . . . . . . 694.1.7.8 Save Contents of the Whiteboard's Drawing Area . . . . . . . . . . . . . . . . . . . . . . . . . . . . . . . . . . . . . 69
4.1.8 Interrupt the Remote Control . . . . . . . . . . . . . . . . . . . . . . . . . . . . . . . . . . . . . . . . . . . . . . . . . . . . . . . . . 694.1.9 Special Functions. . . . . . . . . . . . . . . . . . . . . . . . . . . . . . . . . . . . . . . . . . . . . . . . . . . . . . . . . . . . . . . . . . 704.1.10 How to Record a Session . . . . . . . . . . . . . . . . . . . . . . . . . . . . . . . . . . . . . . . . . . . . . . . . . . . . . . . . . . 71
4.1.10.1 Play Recorded Web Conferences . . . . . . . . . . . . . . . . . . . . . . . . . . . . . . . . . . . . . . . . . . . . . . . . 724.2 Sidebar . . . . . . . . . . . . . . . . . . . . . . . . . . . . . . . . . . . . . . . . . . . . . . . . . . . . . . . . . . . . . . . . . . . . . . . . . . . . . 73
4.2.1 Move the Sidebar. . . . . . . . . . . . . . . . . . . . . . . . . . . . . . . . . . . . . . . . . . . . . . . . . . . . . . . . . . . . . . . . . . 744.2.2 How to Collapse and Expand the Sidebar . . . . . . . . . . . . . . . . . . . . . . . . . . . . . . . . . . . . . . . . . . . . . . . 744.2.3 Undock/Reinsert Sidebar Elements . . . . . . . . . . . . . . . . . . . . . . . . . . . . . . . . . . . . . . . . . . . . . . . . . . . . 754.2.4 Interrupt Transmission of your Screen. . . . . . . . . . . . . . . . . . . . . . . . . . . . . . . . . . . . . . . . . . . . . . . . . . 764.2.5 Sidebar Functions . . . . . . . . . . . . . . . . . . . . . . . . . . . . . . . . . . . . . . . . . . . . . . . . . . . . . . . . . . . . . . . . . 77
4.2.5.1 Session. . . . . . . . . . . . . . . . . . . . . . . . . . . . . . . . . . . . . . . . . . . . . . . . . . . . . . . . . . . . . . . . . . . . . . 784.2.5.2 Session - Set or Change Session Password . . . . . . . . . . . . . . . . . . . . . . . . . . . . . . . . . . . . . . . . . 784.2.5.3 Session - Lock a Session . . . . . . . . . . . . . . . . . . . . . . . . . . . . . . . . . . . . . . . . . . . . . . . . . . . . . . . . 794.2.5.4 Participants. . . . . . . . . . . . . . . . . . . . . . . . . . . . . . . . . . . . . . . . . . . . . . . . . . . . . . . . . . . . . . . . . . . 794.2.5.5 Participant - Select Presenter. . . . . . . . . . . . . . . . . . . . . . . . . . . . . . . . . . . . . . . . . . . . . . . . . . . . . 804.2.5.6 Participant - Hand Over Remote Control . . . . . . . . . . . . . . . . . . . . . . . . . . . . . . . . . . . . . . . . . . . . 824.2.5.7 Participants - Configure Privileges of Participants . . . . . . . . . . . . . . . . . . . . . . . . . . . . . . . . . . . . . 834.2.5.8 Participants - How to rename Participants . . . . . . . . . . . . . . . . . . . . . . . . . . . . . . . . . . . . . . . . . . . 844.2.5.9 Participant - Change Group Membership of a Participant . . . . . . . . . . . . . . . . . . . . . . . . . . . . . . . 844.2.5.10 Participants - Group Membership of new Participants . . . . . . . . . . . . . . . . . . . . . . . . . . . . . . . . . 854.2.5.11 Participants - Invite Participants . . . . . . . . . . . . . . . . . . . . . . . . . . . . . . . . . . . . . . . . . . . . . . . . . . 864.2.5.12 Participant - Disconnect a Conference Participant . . . . . . . . . . . . . . . . . . . . . . . . . . . . . . . . . . . . 884.2.5.13 Application Filter . . . . . . . . . . . . . . . . . . . . . . . . . . . . . . . . . . . . . . . . . . . . . . . . . . . . . . . . . . . . . . 884.2.5.14 Monitor . . . . . . . . . . . . . . . . . . . . . . . . . . . . . . . . . . . . . . . . . . . . . . . . . . . . . . . . . . . . . . . . . . . . . 904.2.5.15 Monitor - Select Monitor for Transmission . . . . . . . . . . . . . . . . . . . . . . . . . . . . . . . . . . . . . . . . . . 904.2.5.16 Chat . . . . . . . . . . . . . . . . . . . . . . . . . . . . . . . . . . . . . . . . . . . . . . . . . . . . . . . . . . . . . . . . . . . . . . . 914.2.5.17 Fileboard. . . . . . . . . . . . . . . . . . . . . . . . . . . . . . . . . . . . . . . . . . . . . . . . . . . . . . . . . . . . . . . . . . . . 924.2.5.18 How to Upload a File . . . . . . . . . . . . . . . . . . . . . . . . . . . . . . . . . . . . . . . . . . . . . . . . . . . . . . . . . . 924.2.5.19 Fileboard - Download a File . . . . . . . . . . . . . . . . . . . . . . . . . . . . . . . . . . . . . . . . . . . . . . . . . . . . . 934.2.5.20 Fileboard - Delete a File . . . . . . . . . . . . . . . . . . . . . . . . . . . . . . . . . . . . . . . . . . . . . . . . . . . . . . . . 944.2.5.21 Video . . . . . . . . . . . . . . . . . . . . . . . . . . . . . . . . . . . . . . . . . . . . . . . . . . . . . . . . . . . . . . . . . . . . . . 954.2.5.22 My Video. . . . . . . . . . . . . . . . . . . . . . . . . . . . . . . . . . . . . . . . . . . . . . . . . . . . . . . . . . . . . . . . . . . . 954.2.5.23 My Video - Transmit Webcam Video . . . . . . . . . . . . . . . . . . . . . . . . . . . . . . . . . . . . . . . . . . . . . . 964.2.5.24 My video - Transmit your Still . . . . . . . . . . . . . . . . . . . . . . . . . . . . . . . . . . . . . . . . . . . . . . . . . . . . 974.2.5.25 Audio . . . . . . . . . . . . . . . . . . . . . . . . . . . . . . . . . . . . . . . . . . . . . . . . . . . . . . . . . . . . . . . . . . . . . . 984.2.5.26 Join an Audio Conference via Audio . . . . . . . . . . . . . . . . . . . . . . . . . . . . . . . . . . . . . . . . . . . . . . 994.2.5.27 Telephone Conference . . . . . . . . . . . . . . . . . . . . . . . . . . . . . . . . . . . . . . . . . . . . . . . . . . . . . . . . 1004.2.5.28 Telephone Conference - Join an Telephone Conferences . . . . . . . . . . . . . . . . . . . . . . . . . . . . 1014.2.5.29 International telephone conference . . . . . . . . . . . . . . . . . . . . . . . . . . . . . . . . . . . . . . . . . . . . . . 1024.2.5.30 International Telephon Conference - Join international Telephone Conferences . . . . . . . . . . . 1034.2.5.31 Log Messages . . . . . . . . . . . . . . . . . . . . . . . . . . . . . . . . . . . . . . . . . . . . . . . . . . . . . . . . . . . . . . 1054.2.5.32 Information . . . . . . . . . . . . . . . . . . . . . . . . . . . . . . . . . . . . . . . . . . . . . . . . . . . . . . . . . . . . . . . . . 105
4.3 Overview of all sessions - Terminate session . . . . . . . . . . . . . . . . . . . . . . . . . . . . . . . . . . . . . . . . . . . . . . . 106
5 FastViewer Remote Clients . . . . . . . . . . . . . . . . . . . . . . . . . . . . . . . . . . . . . . . . . . . . . . . . . . . . . . . . . . . . . 1085.1 Download of the modules via customer portal . . . . . . . . . . . . . . . . . . . . . . . . . . . . . . . . . . . . . . . . . . . . . . 108
FastViewer GmbH, 02/20184 FastViewer for Microsoft Windows, Manual

Contents
5.1.1 Log on to the FastViewer Customer Portal. . . . . . . . . . . . . . . . . . . . . . . . . . . . . . . . . . . . . . . . . . . . . 1105.1.2 Download the Master Module . . . . . . . . . . . . . . . . . . . . . . . . . . . . . . . . . . . . . . . . . . . . . . . . . . . . . . . 1105.1.3 Log off from the FastViewer Customer Portal. . . . . . . . . . . . . . . . . . . . . . . . . . . . . . . . . . . . . . . . . . . 112
5.2 Starting the Master Module . . . . . . . . . . . . . . . . . . . . . . . . . . . . . . . . . . . . . . . . . . . . . . . . . . . . . . . . . . . . 1125.2.1 Start the Modules . . . . . . . . . . . . . . . . . . . . . . . . . . . . . . . . . . . . . . . . . . . . . . . . . . . . . . . . . . . . . . . . 1145.2.2 Using Start Parameters . . . . . . . . . . . . . . . . . . . . . . . . . . . . . . . . . . . . . . . . . . . . . . . . . . . . . . . . . . . 116
5.2.2.1 How to Start the Master Module with Parameters. . . . . . . . . . . . . . . . . . . . . . . . . . . . . . . . . . . . 1205.3 Shortcut Bar of the master module . . . . . . . . . . . . . . . . . . . . . . . . . . . . . . . . . . . . . . . . . . . . . . . . . . . . . . 121
5.3.1 Installation of a remote client . . . . . . . . . . . . . . . . . . . . . . . . . . . . . . . . . . . . . . . . . . . . . . . . . . . . . . . 1225.3.2 Functions of the Remote Manager . . . . . . . . . . . . . . . . . . . . . . . . . . . . . . . . . . . . . . . . . . . . . . . . . . . 123
5.3.2.1 Remote Manager and Connection . . . . . . . . . . . . . . . . . . . . . . . . . . . . . . . . . . . . . . . . . . . . . . . 1255.3.2.2 Update Remote Manager . . . . . . . . . . . . . . . . . . . . . . . . . . . . . . . . . . . . . . . . . . . . . . . . . . . . . . 1265.3.2.3 Find Remote Client . . . . . . . . . . . . . . . . . . . . . . . . . . . . . . . . . . . . . . . . . . . . . . . . . . . . . . . . . . . 1275.3.2.4 Edit Remote Client . . . . . . . . . . . . . . . . . . . . . . . . . . . . . . . . . . . . . . . . . . . . . . . . . . . . . . . . . . . 1285.3.2.5 Delete Remote Client . . . . . . . . . . . . . . . . . . . . . . . . . . . . . . . . . . . . . . . . . . . . . . . . . . . . . . . . . 1305.3.2.6 Create new Folder. . . . . . . . . . . . . . . . . . . . . . . . . . . . . . . . . . . . . . . . . . . . . . . . . . . . . . . . . . . . 1315.3.2.7 Edit Folder . . . . . . . . . . . . . . . . . . . . . . . . . . . . . . . . . . . . . . . . . . . . . . . . . . . . . . . . . . . . . . . . . . 1335.3.2.8 Delete Folder. . . . . . . . . . . . . . . . . . . . . . . . . . . . . . . . . . . . . . . . . . . . . . . . . . . . . . . . . . . . . . . . 1345.3.2.9 Change Session Password . . . . . . . . . . . . . . . . . . . . . . . . . . . . . . . . . . . . . . . . . . . . . . . . . . . . . 1355.3.2.10 Filter Remote Clients by the Online Status . . . . . . . . . . . . . . . . . . . . . . . . . . . . . . . . . . . . . . . . 1365.3.2.11 How to Update all Remote Clients . . . . . . . . . . . . . . . . . . . . . . . . . . . . . . . . . . . . . . . . . . . . . . 1375.3.2.12 Stop Updating the Remote Clients . . . . . . . . . . . . . . . . . . . . . . . . . . . . . . . . . . . . . . . . . . . . . . 1385.3.2.13 Initiate Web Collaboration Session on a Remote Client . . . . . . . . . . . . . . . . . . . . . . . . . . . . . . 138
5.4 Connection Setup . . . . . . . . . . . . . . . . . . . . . . . . . . . . . . . . . . . . . . . . . . . . . . . . . . . . . . . . . . . . . . . . . . . 1395.4.1 Set Up an RPC Connection to a Remote Client . . . . . . . . . . . . . . . . . . . . . . . . . . . . . . . . . . . . . . . . . 1405.4.2 Set Up an RDP Connection to a Remote Client . . . . . . . . . . . . . . . . . . . . . . . . . . . . . . . . . . . . . . . . . 141
5.5 Functions with the Remote Client During the Connection . . . . . . . . . . . . . . . . . . . . . . . . . . . . . . . . . . . . . 1435.5.1 File Transfer . . . . . . . . . . . . . . . . . . . . . . . . . . . . . . . . . . . . . . . . . . . . . . . . . . . . . . . . . . . . . . . . . . . . 144
5.5.1.1 Open File Transfer . . . . . . . . . . . . . . . . . . . . . . . . . . . . . . . . . . . . . . . . . . . . . . . . . . . . . . . . . . . 1455.5.1.2 Update View . . . . . . . . . . . . . . . . . . . . . . . . . . . . . . . . . . . . . . . . . . . . . . . . . . . . . . . . . . . . . . . . 1465.5.1.3 Upload Files . . . . . . . . . . . . . . . . . . . . . . . . . . . . . . . . . . . . . . . . . . . . . . . . . . . . . . . . . . . . . . . . 1475.5.1.4 Download Files . . . . . . . . . . . . . . . . . . . . . . . . . . . . . . . . . . . . . . . . . . . . . . . . . . . . . . . . . . . . . . 1485.5.1.5 Synchronize contents inside folders . . . . . . . . . . . . . . . . . . . . . . . . . . . . . . . . . . . . . . . . . . . . . . 149
5.5.2 Portmapper . . . . . . . . . . . . . . . . . . . . . . . . . . . . . . . . . . . . . . . . . . . . . . . . . . . . . . . . . . . . . . . . . . . . . 1505.5.3 Toggle Zoom Mode. . . . . . . . . . . . . . . . . . . . . . . . . . . . . . . . . . . . . . . . . . . . . . . . . . . . . . . . . . . . . . . 1515.5.4 Session Recording . . . . . . . . . . . . . . . . . . . . . . . . . . . . . . . . . . . . . . . . . . . . . . . . . . . . . . . . . . . . . . . 152
5.5.4.1 Record Session . . . . . . . . . . . . . . . . . . . . . . . . . . . . . . . . . . . . . . . . . . . . . . . . . . . . . . . . . . . . . . 1525.5.4.2 Play Recorded Session . . . . . . . . . . . . . . . . . . . . . . . . . . . . . . . . . . . . . . . . . . . . . . . . . . . . . . . . 153
5.5.5 Transmit Keyboard Scancodes. . . . . . . . . . . . . . . . . . . . . . . . . . . . . . . . . . . . . . . . . . . . . . . . . . . . . . 1535.5.6 Open System Information . . . . . . . . . . . . . . . . . . . . . . . . . . . . . . . . . . . . . . . . . . . . . . . . . . . . . . . . . . 1535.5.7 Test Performance of a Connection . . . . . . . . . . . . . . . . . . . . . . . . . . . . . . . . . . . . . . . . . . . . . . . . . . . 1545.5.8 Lock Remote Screen . . . . . . . . . . . . . . . . . . . . . . . . . . . . . . . . . . . . . . . . . . . . . . . . . . . . . . . . . . . . . 1565.5.9 Blank Out the Remote Desktop . . . . . . . . . . . . . . . . . . . . . . . . . . . . . . . . . . . . . . . . . . . . . . . . . . . . . 1565.5.10 End Connection . . . . . . . . . . . . . . . . . . . . . . . . . . . . . . . . . . . . . . . . . . . . . . . . . . . . . . . . . . . . . . . . 1575.5.11 Send Hotkeys . . . . . . . . . . . . . . . . . . . . . . . . . . . . . . . . . . . . . . . . . . . . . . . . . . . . . . . . . . . . . . . . . . 1585.5.12 Restore RDP Connection . . . . . . . . . . . . . . . . . . . . . . . . . . . . . . . . . . . . . . . . . . . . . . . . . . . . . . . . . 1585.5.13 Start Remote Task Manager. . . . . . . . . . . . . . . . . . . . . . . . . . . . . . . . . . . . . . . . . . . . . . . . . . . . . . . 1595.5.14 Restart System and restore connection . . . . . . . . . . . . . . . . . . . . . . . . . . . . . . . . . . . . . . . . . . . . . . 1595.5.15 Change Screen Transmission Quality . . . . . . . . . . . . . . . . . . . . . . . . . . . . . . . . . . . . . . . . . . . . . . . 1595.5.16 Select a Remote Monitor . . . . . . . . . . . . . . . . . . . . . . . . . . . . . . . . . . . . . . . . . . . . . . . . . . . . . . . . . 1605.5.17 Activate/Disable the Full-Screen Mode. . . . . . . . . . . . . . . . . . . . . . . . . . . . . . . . . . . . . . . . . . . . . . . 160
FastViewer GmbH, 02/2018FastViewer for Microsoft Windows, Manual 5

Contents
6 User Manager . . . . . . . . . . . . . . . . . . . . . . . . . . . . . . . . . . . . . . . . . . . . . . . . . . . . . . . . . . . . . . . . . . . . . . . . 1616.1 Start the User Manager. . . . . . . . . . . . . . . . . . . . . . . . . . . . . . . . . . . . . . . . . . . . . . . . . . . . . . . . . . . . . . . . 1616.2 Users. . . . . . . . . . . . . . . . . . . . . . . . . . . . . . . . . . . . . . . . . . . . . . . . . . . . . . . . . . . . . . . . . . . . . . . . . . . . . . 163
6.2.1 Create new User . . . . . . . . . . . . . . . . . . . . . . . . . . . . . . . . . . . . . . . . . . . . . . . . . . . . . . . . . . . . . . . . . 1656.2.2 Edit User . . . . . . . . . . . . . . . . . . . . . . . . . . . . . . . . . . . . . . . . . . . . . . . . . . . . . . . . . . . . . . . . . . . . . . . 1666.2.3 Delete User . . . . . . . . . . . . . . . . . . . . . . . . . . . . . . . . . . . . . . . . . . . . . . . . . . . . . . . . . . . . . . . . . . . . . 1686.2.4 Import Users from CSV File . . . . . . . . . . . . . . . . . . . . . . . . . . . . . . . . . . . . . . . . . . . . . . . . . . . . . . . . . 1706.2.5 Import Users from an Active Directory . . . . . . . . . . . . . . . . . . . . . . . . . . . . . . . . . . . . . . . . . . . . . . . . . 172
6.3 Group . . . . . . . . . . . . . . . . . . . . . . . . . . . . . . . . . . . . . . . . . . . . . . . . . . . . . . . . . . . . . . . . . . . . . . . . . . . . . 1756.3.1 Add new Group . . . . . . . . . . . . . . . . . . . . . . . . . . . . . . . . . . . . . . . . . . . . . . . . . . . . . . . . . . . . . . . . . . 1766.3.2 Edit Group . . . . . . . . . . . . . . . . . . . . . . . . . . . . . . . . . . . . . . . . . . . . . . . . . . . . . . . . . . . . . . . . . . . . . . 1786.3.3 Delete Group . . . . . . . . . . . . . . . . . . . . . . . . . . . . . . . . . . . . . . . . . . . . . . . . . . . . . . . . . . . . . . . . . . . . 180
6.4 Role. . . . . . . . . . . . . . . . . . . . . . . . . . . . . . . . . . . . . . . . . . . . . . . . . . . . . . . . . . . . . . . . . . . . . . . . . . . . . . . 1826.4.1 Create new Role . . . . . . . . . . . . . . . . . . . . . . . . . . . . . . . . . . . . . . . . . . . . . . . . . . . . . . . . . . . . . . . . . 1846.4.2 Edit Role . . . . . . . . . . . . . . . . . . . . . . . . . . . . . . . . . . . . . . . . . . . . . . . . . . . . . . . . . . . . . . . . . . . . . . . 1856.4.3 Delete Role . . . . . . . . . . . . . . . . . . . . . . . . . . . . . . . . . . . . . . . . . . . . . . . . . . . . . . . . . . . . . . . . . . . . . 187
6.5 General Settings . . . . . . . . . . . . . . . . . . . . . . . . . . . . . . . . . . . . . . . . . . . . . . . . . . . . . . . . . . . . . . . . . . . . . 1896.5.1 General Settings . . . . . . . . . . . . . . . . . . . . . . . . . . . . . . . . . . . . . . . . . . . . . . . . . . . . . . . . . . . . . . . . . 189
7 Installing FastViewer Outlook Plugin. . . . . . . . . . . . . . . . . . . . . . . . . . . . . . . . . . . . . . . . . . . . . . . . . . . . . 1927.1 Installation Requirements . . . . . . . . . . . . . . . . . . . . . . . . . . . . . . . . . . . . . . . . . . . . . . . . . . . . . . . . . . . . . . 1927.2 Provide the Installation File . . . . . . . . . . . . . . . . . . . . . . . . . . . . . . . . . . . . . . . . . . . . . . . . . . . . . . . . . . . . . 1927.3 Installation of the Outlook Plugin. . . . . . . . . . . . . . . . . . . . . . . . . . . . . . . . . . . . . . . . . . . . . . . . . . . . . . . . . 1957.4 Funktionen des Outlook Plugins . . . . . . . . . . . . . . . . . . . . . . . . . . . . . . . . . . . . . . . . . . . . . . . . . . . . . . . . . 1997.5 Outlook Plugin Configuration on the FastViewer Server. . . . . . . . . . . . . . . . . . . . . . . . . . . . . . . . . . . . . . . 2017.6 How to Perform a Deployment . . . . . . . . . . . . . . . . . . . . . . . . . . . . . . . . . . . . . . . . . . . . . . . . . . . . . . . . . . 2027.7 How to Update or Repair the Plug-in . . . . . . . . . . . . . . . . . . . . . . . . . . . . . . . . . . . . . . . . . . . . . . . . . . . . . 2037.8 How to Uninstall the Plug-in . . . . . . . . . . . . . . . . . . . . . . . . . . . . . . . . . . . . . . . . . . . . . . . . . . . . . . . . . . . . 204
Index . . . . . . . . . . . . . . . . . . . . . . . . . . . . . . . . . . . . . . . . . . . . . . . . . . . . . . . . . . . . . . . . . . . . . . . . . . . . . . . . . 207
FastViewer GmbH, 02/20186 FastViewer for Microsoft Windows, Manual

FV_SecureAdvisor_BookHistory.fm
History of Changes
History of Changes 0
Date Changes Reason
2014-08-15 Document created
2014-09-11 Removed general program information, moved to system descripton.
2014-12-22 correction in section 2.5.4.1 - sreen must be shared
2015-03-05 Add user guide + update pictures
2015-04-02 add installation information
2015-04-17 add missing parameters to section 2.2.2
2015-04-24 minor corrections
2015-05-15 minor corrections
2015-05-28 internal review
2015-12-09 internal review / also make one document for Secure Advisor / Instant Meeting
2016-01-30 added changes from German manual (translation)
2016-04-19 review comments
2017-02-02 Overworking of the document new release
2017-03-02 minor changes review
2017-10-03 minior changes review
2018-02-23 minor changes new release
FastViewer GmbH, 02/2018FastViewer for Microsoft Windows, Manual 7

History of Changes
FastViewer GmbH, 02/20188 FastViewer for Microsoft Windows, Manual

GeneralPreface
1 General
The FastViewer enables you to set up a connection to a previously defined PC via the internet. During a connection, you can access files, perform installations, provide support and maintain this PC.
The remote PC to which you connect is called a remote client. On this remote PC, the remote client module must have been installed and started for integrating the remote PC in the user management - thereby enabling to set up a connection at all. Even if the remote PC is not occupied, it can still be connected. Depending on the number of licenses purchased, any number of remote PCs can be remotely controlled.
1.1 Preface
Dear customer or prospect,
Thank you for choosing FastViewer or for your interest. Whether for presenta-tions, coordination processes, training, support or maintenance:
Fast and perfect service is the key to being successful in business today. Achieving such success without FastViewer is often associated with high financial and time commitments. However, with FastViewer you have a module with which you can set up a secure connection to your customers at any time and anywhere in the world.
You can thus offer your customers a fast, secure and efficient communication platform as well as premium support, which is what every customer is looking for. With FastViewer you not only increase your productivity and customer satis-faction, but also create trust and loyalty.
FastViewer was designed for ease of use and can be operated quickly and easily by any user.
Many users deploy firewalls or proxy servers, which cause traditional systems to fail – FastViewer, by contrast, works even when firewalls and proxy servers are enabled.
1.2 Legal Notices
FastViewer GmbH assumes no liability for any damage, loss or destruction of software, data or programs resulting from the use of FastViewer.
The software and hardware designations used in this manual are mostly regis-tered trademarks and thus subject to the relevant provisions of copyright law. The documentation, as well as extracts from it, may be neither transmitted nor repro-duced by any mechanical or electronic means, photocopying or any other means without express permission in writing. All company names cited in examples and data are fictitious. Any similarities are therefore purely coincidental.
FastViewer GmbH, 02/2018FastViewer for Microsoft Windows, Manual 9

GeneralTechnical Assistance
The information contained in this document is based on the current software version used at press time. This may be changed at any time without notice and represents no commitment on the part of the seller. The descriptions herein do not guarantee the availability of any described features in a legal sense.
FastViewer GmbH has exercised the utmost care while preparing this guide, but does not warrant the completeness or accuracy of the information in it and disclaims all liabilities for any technical or printing error.
As far as possible, this document is gender neutral. In cases where the masculine form of address is used, this is done solely for simplicity, and the feminine form is always implicitly included.
If you have corrections or suggestions, please send us an e-mail.
Thank you for your efforts.
More information on the FastViewer products can be found on the Internet at
www.fastviewer.com
© Copyright FastViewer GmbH
1.3 Technical Assistance
If you require help with a technical problem, please contact our hotline:
Phone: +49 (9181) 509 56 -28
E-mail: [email protected]
1.4 Who should read this Manual?
This manual addresses:
• all users who deploy FastViewer ; in particular newcomers who require infor-mation about the program interface and the meaning of FastViewer.
This Guide contains important information for the safe and proper use of FastViewer. Please make sure that you follow these instructions carefully to avoid the incorrect operation of FastViewer and to derive the maximum benefits from this application.
1.5 Manual Contents
This manual describes how to configure and operate FastViewer.
The manual is structured as follows.
Chapter 1: General
This chapter contains introductory information on the structure and use of this User Guide.
FastViewer GmbH, 02/201810 FastViewer for Microsoft Windows, Manual

GeneralRepresentation Conventions
Chapter 2: First Steps
In this chapter the first step with FastViewer are described.
Chapter 3: GUI for FastViewer
This chapter describes session relevant issues like creation of a session.
Chapter 4: FastViewer Remote Client
In this chapter you are informed about the structure and usage of the Remote GUI of FastViewer.
Chapter 5: User Manager
In this chapter the general settings for roles, groups and users are described.
Chapter 6: Installing FastViewer Outlook Plugin
In this chapter the installation of the Outlook Plugin is described.
1.6 Representation Conventions
To highlight information in this manual we use the following mark-ups and repre-sentations.
1.6.1 Notations and Formats
The following format conventions apply in the manual on hand:
Purpose Representation Example
Special highlighting Bold Name must not be deleted.
GUI elements Bold Click on OK.
Menu sequence > File > Exit
Cross reference Italic You find further information in the Configura-tion and Administration manual.
Path and file names Fixed-width font, for example Courier
c:\Programs\... or example.txt
Specifications that may have an individ-ual content such as variables.
Italic in pointed brackets
Specify your <user name> and <password> for logging on to the system.
System in- and output Fixed-width font, for example Courier
Command not found.
Hotkey Bold [Ctrl]+[Alt]+[Esc]
FastViewer GmbH, 02/2018FastViewer for Microsoft Windows, Manual 11

GeneralRepresentation Conventions
1.6.2 Hints
Type of Notes
In this manual, we denote critical hints and supplementing information in the following way.
NOTICE: Denotes hints that contain information worth knowing or useful tips.
IMPORTANT: Denotes critical hints that contain high-priority information. Please definitely read such hints and follow given instructions to avoid malfunctions, loss of data or damage to devices.
1.6.3 Figures
This manual depicts all input dialogs important for operation and configuration. Their appearance may slightly vary subject to the operating system, the browser used, the screen resolution, the configuration settings of your PC or the interface style you select. However, this does not affect the described functionalities.
FastViewer GmbH, 02/201812 FastViewer for Microsoft Windows, Manual

Minimum Requirements for the usage of FastViewerRepresentation Conventions
2 Minimum Requirements for the usage of FastViewer
In the following the minimum requirements are listed, which must be fulfilled by the system on which FastViewer shall be used.
Mindestanforderung Module
Port releases
• The following Ports are used by FastViewer. All are outgoing connections:
– HTTP-Port: 80
– HTTPS-Port: 443
– TCP-Port: 5000The Port 5000 ensures sessions on highest performance level. This Port must be opened, if the Video function needs to be used (transmission/reception of the Webcam picture).
– Optional: Port 5005 for direct connectionsAs long as master and client module are in the same network, the connection can be established directly via TCP-Port 5005. For this the respective function must be activated in the FastViewer portal.
NOTICE: The HTTP-Protocol is being used to check the available servers at module start. When using your own FastViewer Server solution this check can be done via HTTPS instead of HTTP, the port number can be free selected (e.g. HTTPS 321). Thus it is possible to restrict the used protocols and the required ports to be opened in order to guarantee the own security standards. A description of the single configuration steps
Operating System Windows
since Windows Vista
Server Systems since Windows Server 2008
Maintenance only for
Windows 7 and onwards
Server Systems since Windows Server 2012 R2
Apple
Apple OS X Yosemite
System requirement Internet access
Recommended System Requirement Internet access with DSL 2000 kbit/s
FastViewer GmbH, 02/2018FastViewer for Microsoft Windows, Manual 13

Minimum Requirements for the usage of FastViewerRepresentation Conventions
can be found in then manual Installation and Configuration in chapter 6.5 Steps for exclusive usage of https.
Minimum requirements for Mobile App iOS/Android
• Apple iOS 8
• Android 4.1
Bandwidth requirements
• The bandwidth usage for a FastViewer-session depends on the connection type:
– Connections with Desktop-SharingSuch connections require an average of 15kbit/s.
– Connections with Video transmissionDepending on the settings for the quality of the picture up to 300kbit/s are required.
– Speech connectionsFor connections with speech transmission an average of 20kbit/s is required.
FastViewer GmbH, 02/201814 FastViewer for Microsoft Windows, Manual

First StepsDownload of the modules via customer portal
3 First Steps
The following chapter describes how to operate FastViewer on Windows systems.
3.1 Download of the modules via customer portal
Before you can use FastViewer you must execute some preparatory steps.
After having requested your FastViewer license/ test license, you receive an e-mail. This e-mail contains a license number as well as a password for accessing your private FastViewer customer portal.
FastViewer GmbH, 02/2018FastViewer for Microsoft Windows, Manual 15

First StepsDownload of the modules via customer portal
Log on to the customer portal and download the FastMaster.exe master module.
FastViewer GmbH, 02/201816 FastViewer for Microsoft Windows, Manual

First StepsDownload of the modules via customer portal
Next, you copy the master module to the storage location from where you wish to use it. An installation is not required.
3.1.1 Log on to the FastViewer Customer Portal
Your protected FastViewer customer portal requires a login.
Prerequisites
• You have a valid FastViewer license.
Step by Step
1) Open a web browser.
2) Enter the URL of the FastViewer customer portal in the address input line: www.fastviewer.com.
3) Click on Customer Portal.
The FastViewer customer portal opens:
4) Enter the license number from your e-mail in the Alias/Serial field.
5) Specify the password from your license e-mail in the Password field.
6) Click on the Login button.
You are logged in at the FastViewer customer portal.
NOTICE: Change your password after this initial login.
3.1.2 Download the Master Module
You receive your FastMaster.exe master module from the FastViewer customer portal.
FastViewer GmbH, 02/2018FastViewer for Microsoft Windows, Manual 17

First StepsDownload of the modules via customer portal
Prerequisites
• You have a valid FastViewer license.
• You are logged in at the FastViewer customer portal.
Step by Step
1) Click on the Start Session! button.
The FastMaster.exe master module is being downloaded.
2) Save the FastMaster.exe master module in a directory (locally or in the network).
NOTICE: The master module need not be installed.
You have downloaded the FastMaster.exe master module. You can now use it for starting a session.
IMPORTANT: The master module includes your license. Do not pass the module on.
FastViewer GmbH, 02/201818 FastViewer for Microsoft Windows, Manual

First StepsStarting a Session
3.1.3 Log off from the FastViewer Customer Portal
After performing the desired actions, you must log out of the FastViewer customer portal again.
Prerequisites
• You have a valid FastViewer license.
• You are logged in at the FastViewer customer portal.
Step by Step
› Click on the Logout button.
You are logged out of the FastViewer customer portal.
3.2 Starting a Session
FastViewer consists of the FastMaster.exe master module and a FastClient.exe client module.
FastViewer GmbH, 02/2018FastViewer for Microsoft Windows, Manual 19

First StepsStarting a Session
The master module includes your purchased licenses and must not be passed on to customers. This module represents the session initiator, which makes you the moderator of the web conference.
The client module may be distributed freely as often as required. For example, you could make the client module available to your customers and business partners via your Internet presence or send it to them by e-mail.
Both modules need not be installed.
As a moderator, you can invite new participants to the web conference via your master module. To do this, open the menu item Participants in the sidebar and click on the Invite button. Alternatively, click on Invite in the start dialog. Your e-mail program is opened with a preconfigured invitation.
To start a session, launch the master module by executing the FastMaster.exe file.
Once the connection to the corresponding communications server is established, the sidebar and the start dialog open:
FastViewer GmbH, 02/201820 FastViewer for Microsoft Windows, Manual

First StepsStarting a Session
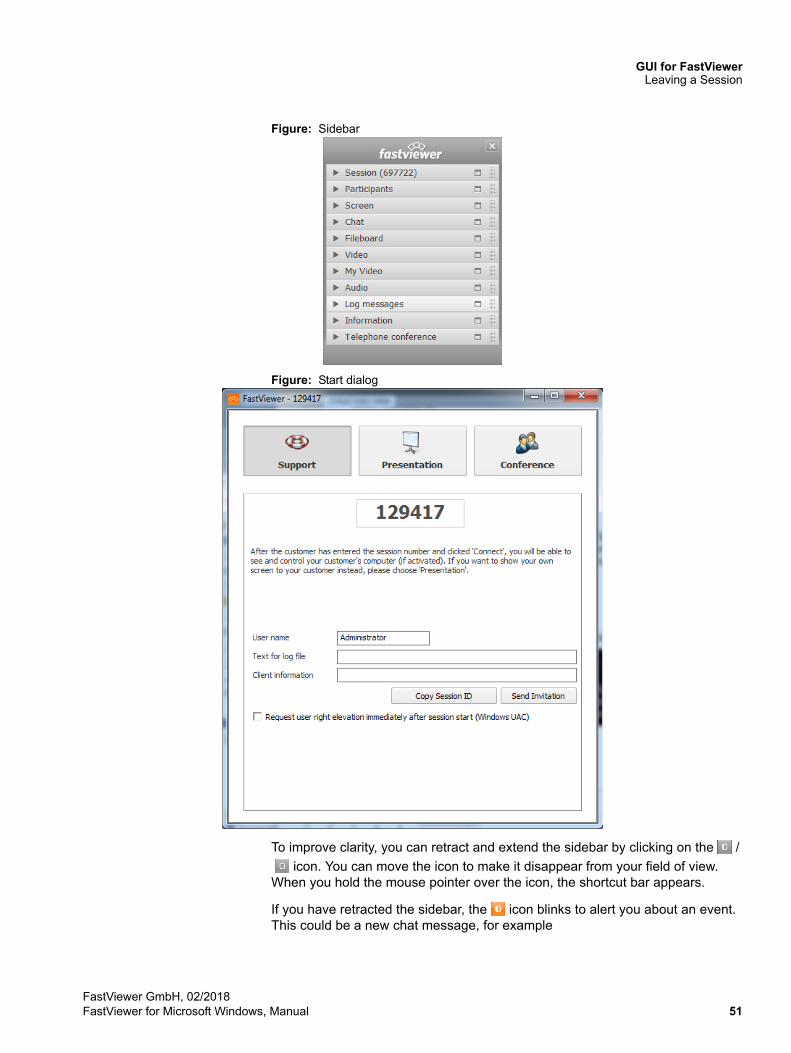
Figure: Sidebar
Figure: Start dialog
With one participant, the sidebar opens after entering the login data. Depending on which edition is being used, the participant is asked which applications he/she wants to release.
FastViewer GmbH, 02/2018FastViewer for Microsoft Windows, Manual 21

First StepsStarting a Session
3.2.1 Start the Master Module
You wish to establish a connection using the client module.
Prerequisites
• You have the master module.
Step by Step
1) Double-click the FastMaster.exe master module.
The run dialog opens.
2) Click on Run.
The connection to the corresponding communications server is established.
The sidebar and the startup dialog open.
FastViewer GmbH, 02/201822 FastViewer for Microsoft Windows, Manual

First StepsStarting a Session
3.2.2 Using Start Parameters
Executing the module application-specifically through use of start parameters.
When starting the master module, you can directly furnish it with parameters to configure pre-settings for the intended session.
The parameter(s) is/are provided via the customer portal. For the FastMaster.exe Settings > Functions > Tab General > Start parameters for master module. For FastClient.exe Settings > Functions > Tab Client module > Start parameters for client module. Alternatively you can add the parameters at the end of the start command.
The syntax of the start command for execution with start parameter reads:
FastMaster.exe /<parameter/option> FastClient /<parameter/option>
The following start parameters are available:
• /info:"<your text message>"When the session has ended, the text specified between inverted commas is transferred to the "Info/Start" column in the online log.
FastViewer GmbH, 02/2018FastViewer for Microsoft Windows, Manual 23

First StepsStarting a Session
• /infoend:"<your text message>"When the session has ended, the text specified between inverted commas is transferred to the "Info/End" column in the online log.
• /recordThe session is automatically recorded from the start. When it has ended, the moderator is automatically prompted to specify a storage location for the recording.
• /record:"<C:\Recordings\Recording 1>"The session is automatically recorded from the start. When the session has ended, the recording is automatically stored under the specified path and name. In the above case under "C:\Recordings\Recording 1". With a Config-uration, to save the recording automatically under a predefined path (e.g. network drive) the recording is first saved locally. Only after the session has been terminated the recording file will be stored at the given path. The FastViewer-Module stays in this case open until the transmission of the recording file has been finished. The transmission can’t be completed if the FastViewer-Module is terminated, e.g. via task manager, before the trans-mission has been completed.
• /playback:"<file name>"Starts playback of the recording specified under <file name>.
• /monitor:nSelects the monitor to be transmitted after the session start if several monitors are used in the session. To enable this you must specify for value "n" the respective monitor ID of the monitor to be transmitted.
NOTICE: The monitor ID is the consecutive monitor number displayed in the sidebar under Monitor when you click the corre-sponding monitor.
• /transport:httpSpecify the port via which the program communicates by default. In doing so you can select from fhttp fhttps http, https and tcp. You can specify several protocols "/transport:Protocol1, Protocol2,..."
• /lang:0x0407Specify the language for the program's interface. If you do not specify a parameter, the language is selected automatically. The following languages are supported:
FastViewer GmbH, 02/201824 FastViewer for Microsoft Windows, Manual

First StepsStarting a Session
• /sessionclientname:<user name>Starts the module under the specified user name.
• /reAutoconnect:<Guid>Enables a direct connection to a specific remote client /reAutoConnect: {GUID} (alternative hostname).
NOTICE: The GUID can be put out in the remote console with a right-click on the respective client.
• /reConnect:fvwHere you can specify which connection type is used. If you ommit this parameter then the default configured connection type specified in the customer portal is used. The parameter is explicitely functional with the parameter "reAutoconnect". "fvw" can take the following values: rdp, presen-tation, conference, support
fvw = Standard FastViewer Connectionrdp = Remote Desktopsupport = AdHoc Support with UIpresentation = AdHoc Presentation with UIconference = AdHoc Conference with UI
• /configprofile:<profile name>For multi profile modules only: Starts the master module under the profile specified here. Please note that texts and graphics which you have adapted in the respective profile, are not supported.
Language Hex Code
Portuguese (Brazil) 0x0416
Chinese (simplified) 0x0004
Dutch 0x0813
English 0x0409
French 0x040C
German 0x0407
Greek 0x0408
Italian 0x0410
Japanese 0x0411
Portuguese (Portugal) 0x0816
Romanian 0x0418
Russian 0x0419
Spanish 0x040A
Turkish 0x041F
FastViewer GmbH, 02/2018FastViewer for Microsoft Windows, Manual 25

First StepsStarting a Session
• /proxy:<proxy server name>:<port>/proxyuser:<user>/proxypass:<password>Overwrites the automatically detected proxy server./proxyfile:<path>Alternative: Passing an XML file by specifying the path.
• /proxyconfig:IESelect the browser from which the proxy settings are to be read independently from the default browser. IE is used for the Internet Explorer and FF for Firefox.
3.2.2.1 Start Modules with Parameters
Preconfiguring the module at the start via parameters.
Prerequisites
• You have stored the module (FastMaster.exe or FastClient.exe) on your desktop.
• You have created a link to the master module on the desktop.
Step by Step
1) Open the context menu of the master module link with a click of the right mouse button.
2) Select the Properties feature from the context menu.
The properties dialog of the master module opens.
3) In the FastMaster.exe or FastClient.exe - Shortcut with Parameter Properties dialog, attach the parameter or the parameter with option to the path displayed in the Target input line separated by a blank.
NOTICE: If you wish to attach several parameters, act in the same way by stringing together the parameters separated by a blank.
Examples:
Attaching a parameter with option (here: recording a session and storing it in the specified file):
FastMaster.exe /record:C:\Users\Admini-strator\Desktop\Recording
NOTICE: If you use blanks in the path or file name, you must put the entire option in inverted commas (FastMaster.exe /record:"C:\Users\Admini-strator\Desktop\Recording 1").
FastViewer GmbH, 02/201826 FastViewer for Microsoft Windows, Manual

First StepsStarting a Session
Attaching several parameters (here: selection monitor 1 and language selection for the module in French):
FastMaster.exe /monitor:1 /lang:0x040C
4) After you have specified the parameters, click on OK.
The setting is applied and the Fastmaster.exe or FastClient - Shortcut with Parameter Properties dialog closes.
When you execute the FastMaster.exe, the master module starts with the defaulted settings.
3.2.3 Start the Client Module
You wish to establish a connection using the client module.
Prerequisites
• You have the client module.
Step by Step
1) Double-click the FastClient.exe client module.
The run dialog opens.
2) Click on Run.
The login dialog opens:
3) Enter your session ID and your name in the login dialog. The name is free selectable.
NOTICE: If Single Sign-On has been enabled in the user management, the input line Your name: is already filled in.
4) Click on Connect.
FastViewer GmbH, 02/2018FastViewer for Microsoft Windows, Manual 27

First StepsStarting a Session
NOTICE: If the moderator has defined a password, an input prompt to enter the password will appear.
The connection to the corresponding communications server is established.
The sidebar is opened.
FastViewer GmbH, 02/201828 FastViewer for Microsoft Windows, Manual

First StepsStarting a Session
3.2.4 Support
As a moderator, you select the session type Support. After the participant has entered the session ID and clicked on Connect, you as a moderator can view and control his/her screen.
NOTICE: After the first participant has connected, the session type cannot be changed anymore.
You can enter your user name and a text for the log file and participant information here.
Click on Copy Session ID to paste the ID for example into an e-mail or click on Send Invitation to send an invitation with the session ID directly. Your default e-mail program with a pre-generated invitation is used for this purpose.
3.2.4.1 Start Support Session
You wish to start a support session.
FastViewer GmbH, 02/2018FastViewer for Microsoft Windows, Manual 29

First StepsStarting a Session
Prerequisites
• You have the master module.
Step by Step
1) Start the master module.
2) Select Support in the startup dialog.
3) Enter your user name under User name. The name can be free selected.
4) If required, enter a text for the log file in the text for log file field, e.g. the name of a customer.
5) If required, enter additional information for the participants under Client infor-mation.
6) To invite participants for a support session, use one of the following options:
• To invite participants for a support session directly, click on Send Invitation.
Your default e-mail program opens with a pre-generated invitation that you can send to the participants. The invitation contains a link via which the participants can download the FastClient.exe client module. For Ad-
FastViewer GmbH, 02/201830 FastViewer for Microsoft Windows, Manual
First StepsStarting a Session
Hoc Conferences it is additionally possible to pass the conference number in the invitation e-mail via parameter "%1".
• Alternatively, click on Copy Session ID to paste the ID for example into an e-mail.
In this case you must make the client module available to your participants in a different way; for example by sending it as an e-mail attachment.
NOTICE: Executable files (*.exe) are blocked in many e-mail programs. Add the executable file FastClient.exe therefore to a ZIP archive and send this archive as attachment.
7) To receive administrator privileges on the participant's system, select the Request user right elevation immediately after session start (Windows UAC) check box.
The support session starts when participants join in.
3.2.5 Presentation
FastViewer GmbH, 02/2018FastViewer for Microsoft Windows, Manual 31

First StepsStarting a Session
As a moderator, you select the session type Presentation. After the participant has entered the session ID and clicked on Connect, you as a moderator can present your screen or single applications to him/her.
Participants who join the session are automatically logged on as passive clients.
You can enter your user name and a text for the log file here.
Click on Copy Session ID to paste the ID for example into an e-mail or click on Send Invitation to send an invitation with the session ID directly. Your default e-mail program with a pre-generated invitation is used for this purpose.
3.2.5.1 Start Presentation
You wish to start a presentation.
Prerequisites
• You have the master module.
Step by Step
1) Start the master module.
2) Select Presentation in the startup dialog.
FastViewer GmbH, 02/201832 FastViewer for Microsoft Windows, Manual

First StepsStarting a Session
3) Enter your user name under User name. The name can be free selected.
4) If required, enter a text for the log file in the text for log file field.
5) To invite participants for a presentation, use one of the following options:
• To invite participants for a presentation directly, click on Send Invitation.
Your default e-mail program opens with a pre-generated invitation that you can send to the participants. The invitation contains a link via which the participants can download the FastClient.exe client module. For Ad-Hoc Conferences it is additionally possible to pass the conference number in the invitation e-mail via parameter "%1".
• Alternatively, click on Copy Session ID to paste the ID for example into an e-mail.
In this case you must make the client module available to your participants in a different way; for example by sending it as an e-mail attachment.
NOTICE: Executable files (*.exe) are blocked in many e-mail programs. Add the executable file FastClient.exe therefore to a ZIP archive and send this archive as attachment.
The presentation is started when participants join in.
FastViewer GmbH, 02/2018FastViewer for Microsoft Windows, Manual 33

First StepsStarting a Session
3.2.6 Conference
As a moderator, you select the session type Conference. After specifying the session ID and clicking on Connect, the participants can join the conference.
NOTICE: After the first participant has connected, the session type cannot be changed anymore.
You can optionally also determine a password for the conference. The password must then be entered by the participants in addition to the session ID.
You can enter your user name and a text for the log file here.
Click on Copy Session ID to paste the ID for example into an e-mail or click on Send Invitation to send an invitation with the session ID directly. Your default e-mail program with a pre-generated invitation is used for this purpose.
You can schedule your conferences and start scheduled conferences on the Conference Planner tab.
NOTICE: The created conference is not started automatically.
FastViewer GmbH, 02/201834 FastViewer for Microsoft Windows, Manual

First StepsStarting a Session
3.2.6.1 Start a Conference
You wish to schedule a conference.
Prerequisites
• You have the master module.
Step by Step
1) Start the master module.
2) Select Conference in the startup dialog.
3) Select the Spontaneous tab.
4) If required, specify under Password a password that participant must enter in addition to the session number.
5) Enter your user name under User name. The name can be free selected.
6) If required, enter a text for the log file in the text for log file field.
7) To invite participants for a conference, use one of the following options:
FastViewer GmbH, 02/2018FastViewer for Microsoft Windows, Manual 35

First StepsStarting a Session
• To invite participants for a conference directly, click on Send Invitation.
Your default e-mail program opens with a pre-generated invitation that you can send to the participants. The invitation contains a link via which the participants can download the FastClient.exe client module. For Ad-Hoc Conferences it is additionally possible to pass the conference number in the invitation e-mail via parameter "%1".
• Alternatively, click on Copy Session ID to paste the session ID for example into an e-mail.
In this case you must make the client module available to your participants in a different way; for example by sending it as an e-mail attachment.
NOTICE: Executable files (*.exe) are blocked in many e-mail programs. Add the executable file FastClient.exe therefore to a ZIP archive and send this archive as attachment.
The conference is started when your participants join in.
3.2.6.2 Plan Conferences using the Master Module
Planning a conference via the master module.
Prerequisites
• You have the master module.
Step by Step
1) Start the master module.
2) Select the Conference planner tab.
FastViewer GmbH, 02/201836 FastViewer for Microsoft Windows, Manual

First StepsStarting a Session
3) Click on New.
NOTICE: With a click on the label (e.g. "Duration") the displayed sessions can be sorted.
FastViewer GmbH, 02/2018FastViewer for Microsoft Windows, Manual 37

First StepsStarting a Session
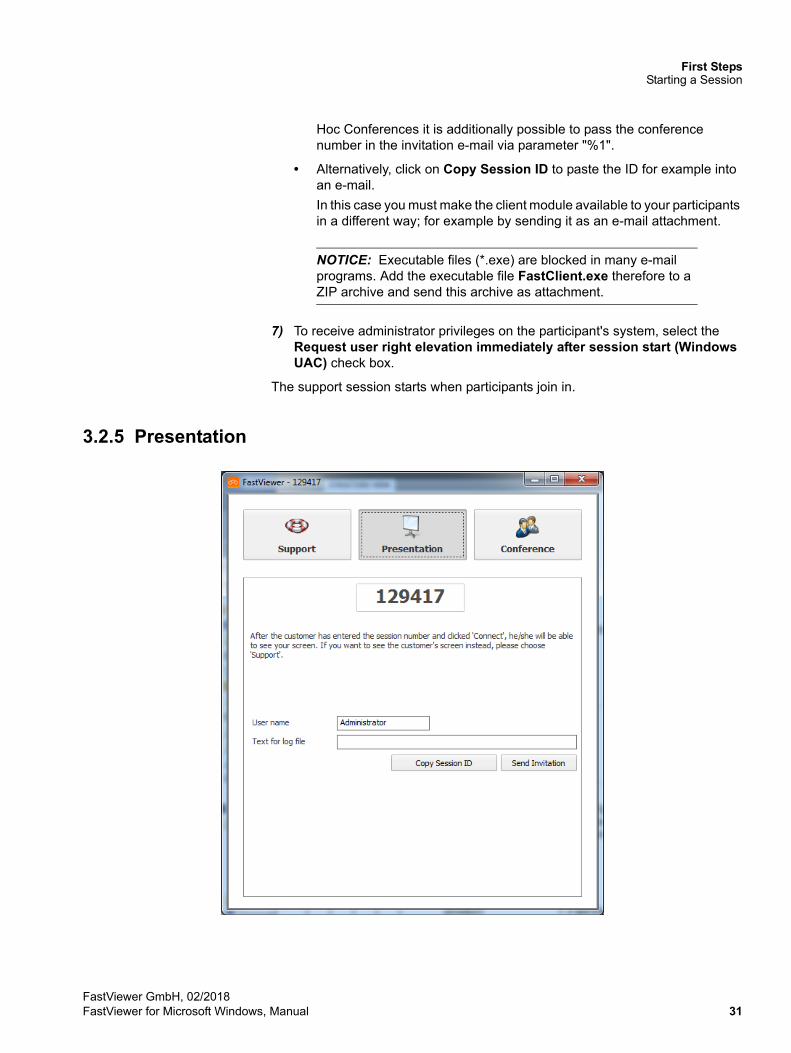
4) Enter a name for the conference in the Name field.
5) Select a date and time under Start.
FastViewer GmbH, 02/201838 FastViewer for Microsoft Windows, Manual

First StepsStarting a Session
6) Enter a duration in minutes in the Duration field.
7) You can optionally also set a password for the conference in the Password field.
8) If desired, you can enter a comment in the Comment field.
9) Click on Save.
Your scheduled conference is now created.
FastViewer GmbH, 02/2018FastViewer for Microsoft Windows, Manual 39

First StepsStarting a Session
NOTICE: The created conference is not started automatically.
3.2.6.3 Start Scheduled Conferences
You want to start a scheduled conference.
Prerequisites
• You have created a conference in the conference planner.
Step by Step
1) Start the master module.
2) Select the Conference planner tab.
FastViewer GmbH, 02/201840 FastViewer for Microsoft Windows, Manual

First StepsStarting a Session
3) If desired, you can optionally select the Show all planned conferences check box to display the conferences that lie in the past.
NOTICE: With a click on the label (e.g. "Duration") the displayed sessions can be sorted.
4) Select the conference you want to start.
FastViewer GmbH, 02/2018FastViewer for Microsoft Windows, Manual 41

First StepsStarting a Session
5) Click on Start.
The conference you selected is started.
FastViewer GmbH, 02/201842 FastViewer for Microsoft Windows, Manual

First StepsStarting a Session
Next steps
To invite participants to the conference, click on Invite. Your e-mail program opens with a pre-generated invitation that you can send to the participants. The invitation to scheduled conferences provides, besides the link which allows the participants to download the client module FastClient.exe, an iCal file containing the conference data. You can store this file in your calendar.
3.2.6.4 Planned Conferences - copy invitation texts
You wish to copy the invitation text of a planned conference to paste it, for example, into an individual e-mail.
Prerequisites
• You have created a conference in the conference planner.
Step by Step
1) Start the master module.
2) Select the Conference planner tab.
FastViewer GmbH, 02/2018FastViewer for Microsoft Windows, Manual 43

First StepsStarting a Session
3) If desired, you can optionally select the Show all planned conferences check box to display the conferences that lie in the past.
4) Rightclick on the conference the invitation text of which you would like to copy.
A context menu opens.
5) Click on Copy invitation to clipboard.
The invitation text is copied to your clipboard.
Next steps
In order to invite participants to the conference, paste the invitation text into an individual e-mail to the desired participants.
3.2.6.5 Edit Scheduled Conferences
You want to edit a scheduled conference.
Prerequisites
• You have created a conference in the conference planner.
FastViewer GmbH, 02/201844 FastViewer for Microsoft Windows, Manual

First StepsStarting a Session
Step by Step
1) Start the master module.
2) Select the Conference planner tab.
3) If desired, you can optionally select the Show all planned conferences check box to display the conferences that lie in the past.
4) Double-click on the conference you want to edit.
FastViewer GmbH, 02/2018FastViewer for Microsoft Windows, Manual 45
First StepsStarting a Session
5) Edit the conference as desired.
6) Click on Save.
You edited conference is now saved.
FastViewer GmbH, 02/201846 FastViewer for Microsoft Windows, Manual
First StepsStarting a Session
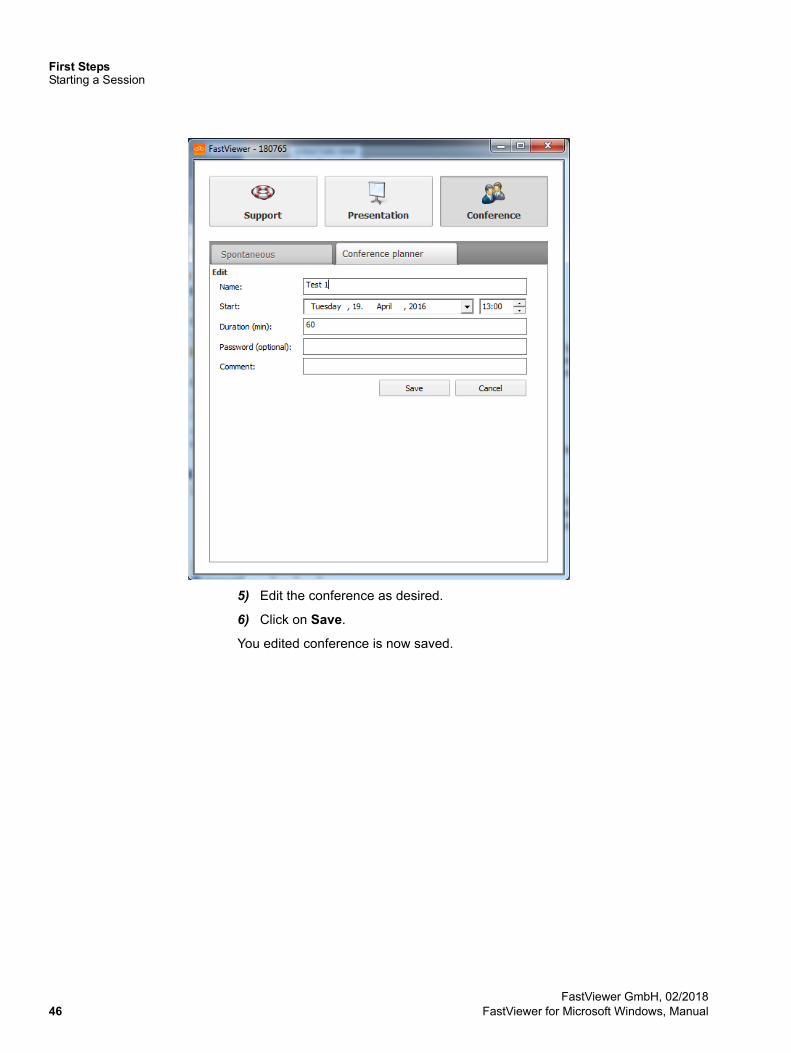
3.2.6.6 Delete Scheduled Conferences
You want to delete a scheduled conference.
Prerequisites
• You have created a conference in the conference planner.
Step by Step
1) Start the master module.
2) Select the Conference planner tab.
FastViewer GmbH, 02/2018FastViewer for Microsoft Windows, Manual 47

First StepsStarting a Session
3) If desired, you can optionally select the Show all planned conferences check box to display the conferences that lie in the past.
4) Click on for the conference you want to delete.
The following security prompt appears:
5) Click Yes.
This deletes the conference from the conference planner.
FastViewer GmbH, 02/201848 FastViewer for Microsoft Windows, Manual

First StepsLeaving a Session
3.3 Leaving a Session
You wish to leave a session.
You can leave a session via the sidebar, the shortcut bar or the special functions.
You have three ways in order to leave a session: via the sidebar, shortcutbar or special functions.
Step by Step
1) You can close a connection in the following manners:
• Click on in the sidebar.
• Click on the icon above the shortcut bar.
• Select End session.
The following window opens:
2) Click Close.
The connection is closed and you have left the session.
NOTICE: If you are the web conference moderator, this ends the session for all other participants as well.
Next steps
The exit dialog provides the following options:
For more information please visit
www.fastviewer.com
Opens the FastViewer web site.
Show log Displays the session log that logs the function sequences between client and server.
Restart Starts a new session.
Close Closes the exit dialog.
FastViewer GmbH, 02/2018FastViewer for Microsoft Windows, Manual 49

GUI for FastViewerLeaving a Session
4 GUI for FastViewer
The opened module consists of two main elements. The first is the sidebar, which provides the features and options, and the second is the Viewer window, which shows the functions started.
FastViewer GmbH, 02/201850 FastViewer for Microsoft Windows, Manual
GUI for FastViewerLeaving a Session
Figure: Sidebar
Figure: Start dialog
To improve clarity, you can retract and extend the sidebar by clicking on the /
icon. You can move the icon to make it disappear from your field of view. When you hold the mouse pointer over the icon, the shortcut bar appears.
If you have retracted the sidebar, the icon blinks to alert you about an event. This could be a new chat message, for example
FastViewer GmbH, 02/2018FastViewer for Microsoft Windows, Manual 51

GUI for FastViewerShortcut Bar of the moderator module
As you present your screen, the icon is displayed to the right of your sidebar. Click on this icon to pause the transmission of your screen. The viewer sees the
last image transmitted as still and the icon changes to . Click again on the icon to resume the screen transmission.
4.1 Shortcut Bar of the moderator module
On the side of the sidebar you find the / icon. When you hold the mouse pointer over the icon, the following menu appears:
Figure: Shortcut bar
NOTICE: The appearance of the buttons depends on the edition used and the purchased licenses. The options can also be configured in the customer portal. In the customer portal the administrator can set who can see which buttons and may execute which functions.
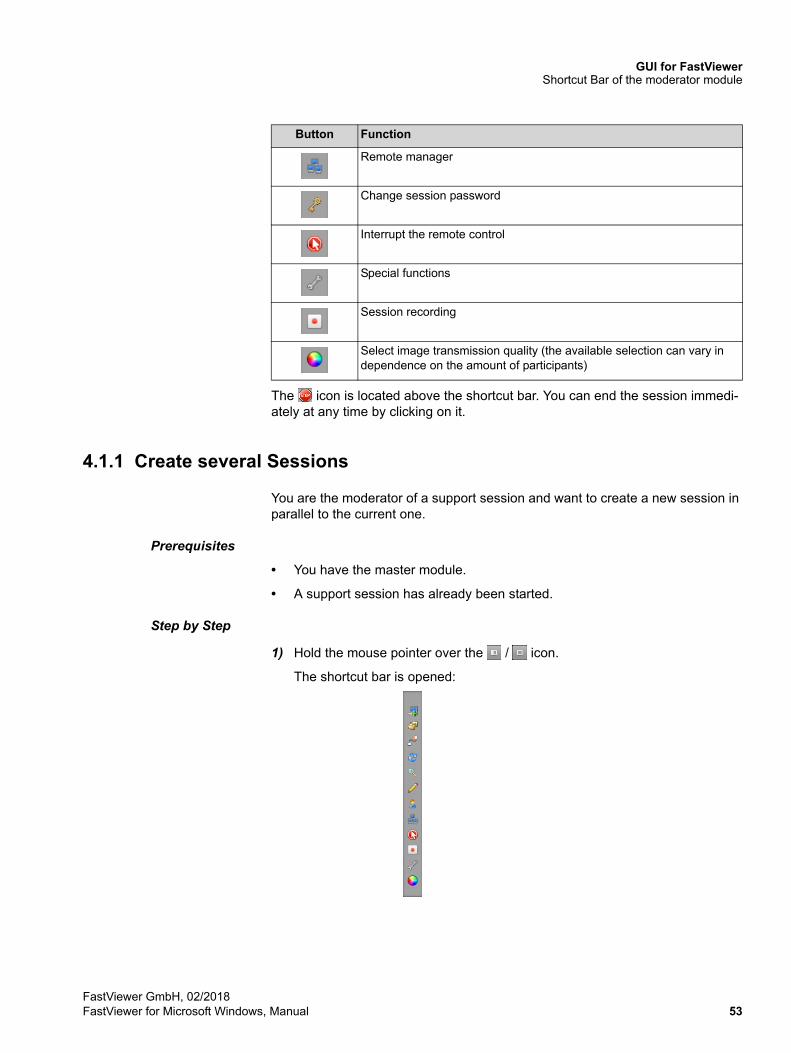
Button Function
Create a new session
File transfer
Port mapper
Change view direction
Toggle zoom mode
Whiteboard
User manager
FastViewer GmbH, 02/201852 FastViewer for Microsoft Windows, Manual
GUI for FastViewerShortcut Bar of the moderator module
The icon is located above the shortcut bar. You can end the session immedi-ately at any time by clicking on it.
4.1.1 Create several Sessions
You are the moderator of a support session and want to create a new session in parallel to the current one.
Prerequisites
• You have the master module.
• A support session has already been started.
Step by Step
1) Hold the mouse pointer over the / icon.
The shortcut bar is opened:
Remote manager
Change session password
Interrupt the remote control
Special functions
Session recording
Select image transmission quality (the available selection can vary in dependence on the amount of participants)
Button Function
FastViewer GmbH, 02/2018FastViewer for Microsoft Windows, Manual 53

GUI for FastViewerShortcut Bar of the moderator module
2) Click on .
A new session with a new session number is created in parallel to the current session. You can now switch back and forth between the sessions via the tabs in the startup dialog and also invite participants to the newly created session.
4.1.2 File transfer
The File Transfer feature enables files to be easily exchanged. For example, log or database files, installation files, and even entire directories can thus be trans-ferred between the moderator and participants.
NOTICE: The administrator can configure in the portal who may transfer files (only the moderator, only the participant, both or none). The default setting allows only the moderator to perform the file transfer.
As the moderator, you can open the file transfer by simply clicking on . The following appears in the viewer window:
FastViewer GmbH, 02/201854 FastViewer for Microsoft Windows, Manual

GUI for FastViewerShortcut Bar of the moderator module
The participant receives the following request:
Clicking on Share grants access to the file system for the entire duration of the current session. Clicking on Cancel blocks the access.
After the permission is granted, the moderator can access the file system of the participant. The upper area in the viewer window displays the remote computer (participant), and the lower portion shows the own workplace (moderator).
After the participant has allowed file system access, the moderator sees the following in the viewer window:
FastViewer GmbH, 02/2018FastViewer for Microsoft Windows, Manual 55

GUI for FastViewerShortcut Bar of the moderator module
Table: File transfer buttons
If required, you can toggle several sessions or functions in the startup dialog via tabs.
You can copy files or even subfolders present only on the remote or local system to the other side by simply clicking on .
If a file already exists on either side, the older file will be replaced by a newer version. This synchronizes the respective versions to the same status.
If you right-click on a file, you have the following choices:
Button Function
Refresh view
Upload
Download
Synchronize folders
Stop file transfer
FastViewer GmbH, 02/201856 FastViewer for Microsoft Windows, Manual
GUI for FastViewerShortcut Bar of the moderator module
These functions can also be applied to folders.
To create a new folder, click the right mouse button on the parent folder (or the appropriate partition) and select New Folder.
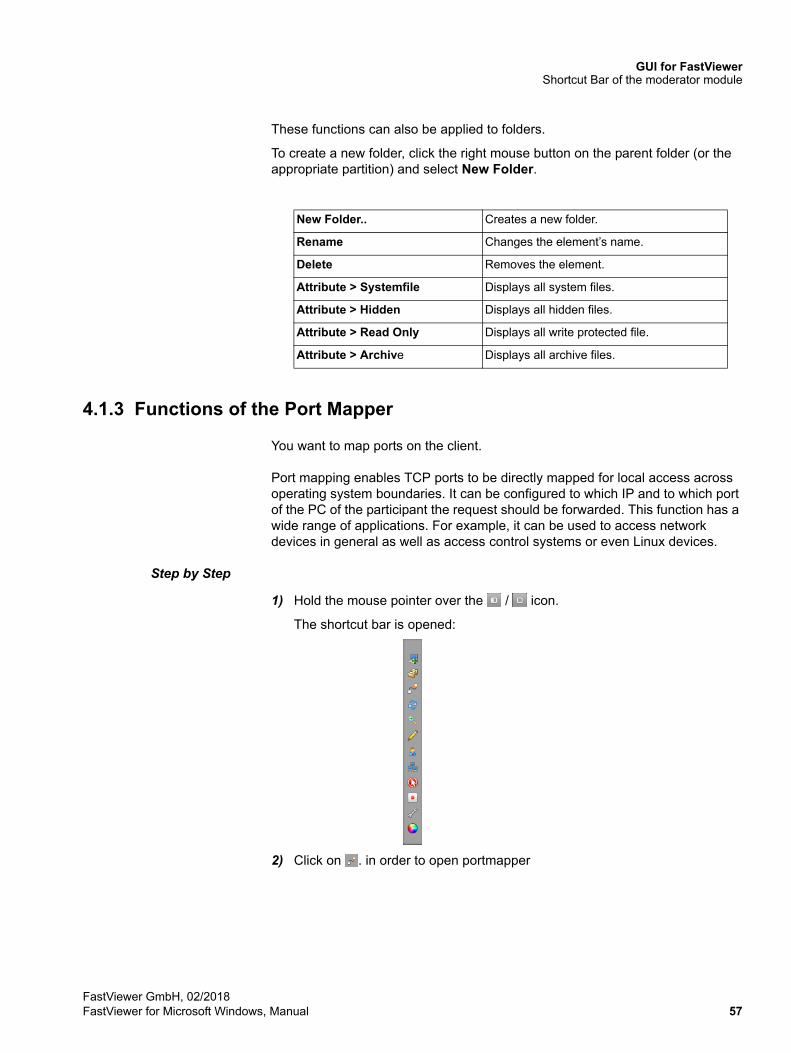
4.1.3 Functions of the Port Mapper
You want to map ports on the client.
Port mapping enables TCP ports to be directly mapped for local access across operating system boundaries. It can be configured to which IP and to which port of the PC of the participant the request should be forwarded. This function has a wide range of applications. For example, it can be used to access network devices in general as well as access control systems or even Linux devices.
Step by Step
1) Hold the mouse pointer over the / icon.
The shortcut bar is opened:
2) Click on . in order to open portmapper
New Folder.. Creates a new folder.
Rename Changes the element’s name.
Delete Removes the element.
Attribute > Systemfile Displays all system files.
Attribute > Hidden Displays all hidden files.
Attribute > Read Only Displays all write protected file.
Attribute > Archive Displays all archive files.
FastViewer GmbH, 02/2018FastViewer for Microsoft Windows, Manual 57

GUI for FastViewerShortcut Bar of the moderator module
NOTICE: The port mapper can only be activated only if it is released by a domain administrator or a local administrator.
As the moderator, you can open the port mapper by simply clicking on . The following appears in the viewer window:
On the upper part of the window with title Remote Mappings all configured port mappings are displayed. These ports can be removed with the button disconnect.
In the middle section add new Port mappings new mappings can be defined. Via the tabs it can be defined if a new portmapping (Local -> Remote) or a reverse port mapping (Remote -> Local) or a previously saved mapping should be created / loaded. (Saved Mappings)
The following information is available:
• Remote clientSelect here a participant via which the connection to the target host shall be established.
Client ID: Name of the PC
Server Port: Local port
Map to: IP or DNS name of the remote host
Port: Port of the remote host
FastViewer GmbH, 02/201858 FastViewer for Microsoft Windows, Manual

GUI for FastViewerShortcut Bar of the moderator module
• To remote service [host:port]The destination is defined by entering the IP address, DNS name or port. The host:port information that was already entered during the session can be retrieved again via the drop-down menu.
• Local portSpecify which local port is to be used for the connection here.
The Reverse-Port mapper is very similar in the configuration, but here the target to forward a port (on the system of the subscriber) to a port a local or internal IP (on the system of the master). The direction of the mapping is inverted.
When you have configured the settings, click on Connect to set up the connection to the specified host via the corresponding port.
The participant receives the following request:
Clicking on Share grants access to the port mapper for the entire duration of the current session. Clicking on Cancel blocks the access.
NOTICE: If you do not have Windows administration rights, you will be prompted for them.
The mapped ports are shown in the Active Connections section.
If a connection is no longer required, it can be selected under Remote Mappings and discarded by clicking on Disconnect.
Participant ID: From which client to which client
from IP: IP of the system where the request has been initiated
from Port: Port of the system, of which the port is forwarded
to Host: IP or DNS name to which the request has been forwarded
to Port:: Target port of the remote host to which the request is forwarded
FastViewer GmbH, 02/2018FastViewer for Microsoft Windows, Manual 59

GUI for FastViewerShortcut Bar of the moderator module
4.1.4 Change View Direction
When the view direction is changed, the viewer becomes the presenter, and vice versa.
Prerequisites
• You are the moderator of a session.
• A participant is presenting his or her screen.
Step by Step
1) Hold the mouse pointer over the / icon.
The shortcut bar is opened:
2) Click on .
You are now the presenter.
NOTICE: Changing the view direction terminates the remote control. Switching the view direction once more hands the remote control back to the moderator.
FastViewer GmbH, 02/201860 FastViewer for Microsoft Windows, Manual

GUI for FastViewerShortcut Bar of the moderator module
The new presentator has the possibilty with one click on Share all apps to share all applications or with one click on Select Applicationsto select appli-cations to be shared.
3) Click again on , so that the previous presentator is prompted to present his monitor.
if the viewer accepts, then he is the presentator again.
4.1.5 Toggle Zoom Mode
You are a moderator or participant in a session and wish to switch between the full screen view and the view of a section. As presenter you change the view for all viewers.
Prerequisites
• You are entitled to toggle the zoom mode.
Step by Step
1) Hold the mouse pointer over the / icon.
The shortcut bar is opened:
2) Click on .
FastViewer GmbH, 02/2018FastViewer for Microsoft Windows, Manual 61

GUI for FastViewerShortcut Bar of the moderator module
You will now see a section of the presented screen.
3) Click on again.
You now see the full screen view of the presented screen.
As presenter, you thus switch the view for all viewers.
4.1.6 Change the Screen Transmission Quality
You are the moderator of a session and want to select the quality of the screen to be transmitted.
Prerequisites
• You are the moderator of the session.
Step by Step
1) Hold the mouse pointer over the / icon.
The shortcut bar is opened:
2) Click on .
You have the following options:
3) Select the desired quality.
Your screen is now transmitted in the selected quality.
4.1.7 Whiteboard
Click on to open the Whiteboard. When the Whiteboard launches, a screenshot of the actual screen contents is used. Using this function, you can select, and thus highlight, graphics, texts or even statistics, for example. You can even draw during a session to clarify your presentations, for example.
FastViewer GmbH, 02/201862 FastViewer for Microsoft Windows, Manual

GUI for FastViewerShortcut Bar of the moderator module
NOTICE: This function is available in session type Conference only.
NOTICE: The Whiteboard can only be opened by the moderator.
NOTICE: The moderator can allow or prohibit using the White-board.
The Whiteboard is opened in the Viewer window.
If required, you can toggle several sessions or functions in the startup dialog via tabs.
Table: Buttons of the Whiteboard feature
Button Function
Create new Whiteboard on a new tab.1
Close single Whiteboard2
Reset whiteboard1
Clear whiteboard1
Save Whiteboard content as *.bmp file
Cancel last step
Exit whiteboard1
Pencil
Marker
Draw line
Draw rectangle
FastViewer GmbH, 02/2018FastViewer for Microsoft Windows, Manual 63

GUI for FastViewerShortcut Bar of the moderator module
4.1.7.1 Open Whiteboard
You are a moderator in a conference and wish to mark for example graphics, texts or statistics.
Prerequisites
• You are a moderator in a conference.
Step by Step
1) Hold the mouse pointer over the / icon.
The shortcut bar is opened:
2) Click on .
The Whiteboard opens in the Viewer window:
Draw ellipse
Draw filled rectangle
Write text
Insert image
Eraser
Font size/stroke width small
Font size/stroke width medium
Font size/stroke width large
Select color
Object preview
1 This function is available to the moderator only.2 The icon of the corresponding tab
Button Function
FastViewer GmbH, 02/201864 FastViewer for Microsoft Windows, Manual

GUI for FastViewerShortcut Bar of the moderator module
3) Click on the desired icon:
4.1.7.2 Lines and Fonts on the Whiteboard
You are a moderator or participant in a conference and wish to set the format of lines and font on the Whiteboard.
Create new Whiteboard on a new tab. Besides the size of the new
Whiteboard you can also select a graphic (*.bmp) as background.1
1 This function is available to the moderator only.
Close single Whiteboard2
2 The icon of the corresponding tab
Exit whiteboard1
FastViewer GmbH, 02/2018FastViewer for Microsoft Windows, Manual 65

GUI for FastViewerShortcut Bar of the moderator module
Step by Step
› Click on the icon that represents the desired format:
The set format is displayed in the object preview.
4.1.7.3 Draw Graphic Objects on the Whiteboard
You are a moderator or participant in a conference and wish to represent graphic objects such as lines, rectangles or ellipses on the Whiteboard for presentations.
Prerequisites
• You are a moderator or participant in a conference.
• You are entitled to use the Whiteboard.
Step by Step
1) Hold the mouse pointer over the / icon.
The shortcut bar is opened:
Font size/stroke width small
Font size/stroke width medium
Font size/stroke width large
Select color
FastViewer GmbH, 02/201866 FastViewer for Microsoft Windows, Manual

GUI for FastViewerShortcut Bar of the moderator module
2) Click on .
The Whiteboard opens in the Viewer window:
3) Click on the icon that represents the desired graphic object:
4) Draw the graphic object on the Whiteboard using the mouse.
The graphic object is represented on the Whiteboard.
4.1.7.4 Insert an Image on the Whiteboard
You are a moderator or participant in a conference and wish to insert an image on the Whiteboard.
Draw line
Draw rectangle
Draw ellipse
Draw filled rectangle
Pencil: Drawing free-hand
FastViewer GmbH, 02/2018FastViewer for Microsoft Windows, Manual 67

GUI for FastViewerShortcut Bar of the moderator module
Step by Step
1) Click on the icon for inserting the image:
2) Select an image file from the file system.
3) Click on the Whiteboard with the left mouse button and drag to create a window.
The image will be placed in the dragged-up window in the corresponding size.
NOTICE: Once the image is positioned on the Whiteboard, it cannot be changed anymore.
4.1.7.5 Enter Text on the Whiteboard
You are a moderator or participant in a conference and wish to enter text on the Whiteboard.
Step by Step
1) Click on the icon for entering text:
2) Click on the Whiteboard with the left mouse button and drag to create a text window.
3) Enter your text via keyboard.
The text appears in the text window.
4.1.7.6 Select Text on the Whiteboard
You are a moderator or participant in a conference and wish to select text on the Whiteboard.
Step by Step
1) Click on the icon for selecting text:
2) Select the desired text using the mouse.
The text appears highlighted.
Insert image
Write text
Marker
FastViewer GmbH, 02/201868 FastViewer for Microsoft Windows, Manual
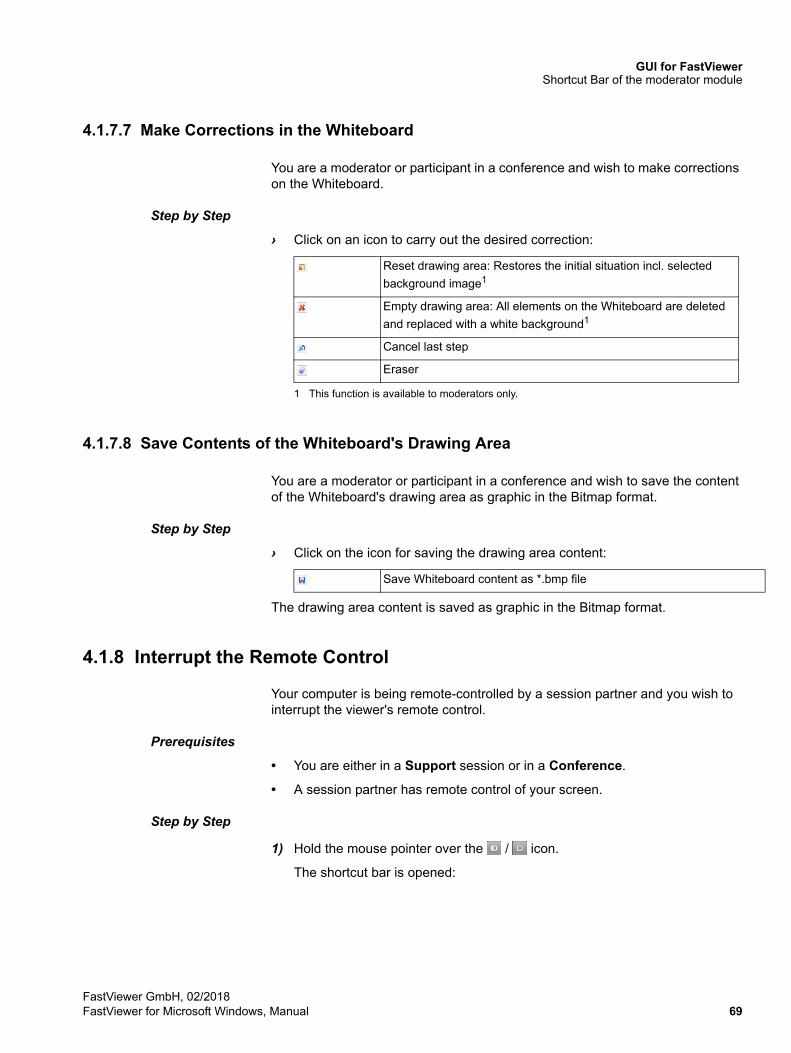
GUI for FastViewerShortcut Bar of the moderator module
4.1.7.7 Make Corrections in the Whiteboard
You are a moderator or participant in a conference and wish to make corrections on the Whiteboard.
Step by Step
› Click on an icon to carry out the desired correction:
4.1.7.8 Save Contents of the Whiteboard's Drawing Area
You are a moderator or participant in a conference and wish to save the content of the Whiteboard's drawing area as graphic in the Bitmap format.
Step by Step
› Click on the icon for saving the drawing area content:
The drawing area content is saved as graphic in the Bitmap format.
4.1.8 Interrupt the Remote Control
Your computer is being remote-controlled by a session partner and you wish to interrupt the viewer's remote control.
Prerequisites
• You are either in a Support session or in a Conference.
• A session partner has remote control of your screen.
Step by Step
1) Hold the mouse pointer over the / icon.
The shortcut bar is opened:
Reset drawing area: Restores the initial situation incl. selected
background image1
1 This function is available to moderators only.
Empty drawing area: All elements on the Whiteboard are deleted
and replaced with a white background1
Cancel last step
Eraser
Save Whiteboard content as *.bmp file
FastViewer GmbH, 02/2018FastViewer for Microsoft Windows, Manual 69

GUI for FastViewerShortcut Bar of the moderator module
2) Click on .
The remote control of the session partner is interrupted.
4.1.9 Special Functions
Click as moderator on to open the Special functions.
Prerequisites
• You are a moderator of a support session.
Step by Step
1) Hold the mouse pointer over the / icon.
The shortcut bar is opened:
2) Click on .
The special functions menu opens:
FastViewer GmbH, 02/201870 FastViewer for Microsoft Windows, Manual

GUI for FastViewerShortcut Bar of the moderator module
The following special functions are available:
• send hotkeysYou can execute the commands associated to the Alt-Tab and Ctrl-Esc hotkeys on the participant PC.
• Transmit Keyboard ScancodesUnder normal circumstances, virtual keycodes are transmitted for keyboard input. However, a key code can be assigned differently for different keyboard layouts. When you use the Transmit Keyboard Scancodes function, your keyboard layout is transmitted instead of the virtual keycodes.
• Start task managerThe Task Manager can be useful for troubleshooting.
• System information/Remote Task Manager.You can open the system information of the participant PC to view compre-hensive details and terminate processes.
• Test connection performanceThis function allows testing the connection between session partners or between the server and one of the session partners.
• Lock remote screenUsing this function you can lock the screen of the participant PC.
• Suppress desktop transmissionThis function lets you hide the remote desktop of the participant PC.
• End session
• Request user elevation (UAC)The User Account Control (UAC) is part of the Microsoft Windows security infrastructure. Certain actions require confirming the messages of the user account control. On the program's part, the authentication can be entered and transferred ad hoc during a session so that the UAC messages can be confirmed.
As a participant in a conference or presentation you merely have the End session option.
4.1.10 How to Record a Session
You are taking part in a session and wish to record it. The following has to be considered: With a Configuration, to save the recording automatically under a predefined path (e.g. network drive) the recording is first saved locally. Only after the session has been terminated the recording file will be stored at the given path. The FastViewer-Module stays in this case open until the transmission of the recording file has been finished. The transmission can’t be completed if the FastViewer-Module is terminated, e.g. via task manager, before the transmission has been completed.
FastViewer GmbH, 02/2018FastViewer for Microsoft Windows, Manual 71

GUI for FastViewerShortcut Bar of the moderator module
Prerequisites
• You are a moderator or participant in a session.
Step by Step
1) Hold the mouse pointer over the / icon.
The shortcut bar is opened:
2) Click on .
appears on the shortcut bar and the session is recorded.
3) Click on again.
Recording is finished and you are prompted to specify a storage location for the file.
4) Save the recording as an *.exe or a *.fvwrec file.
NOTICE: The recording is protected against manipulation and imitation.
The recording is stored in the specified location. By the help of the Record Converter these recordings can be converted to the format *.mp4. A Description for this can be found in the Manual of the FastViewer Record Converter, which you can access via the FastViewer Portal.
NOTICE: If the user retrieves log information after the session has ended, the session recording will be stopped immediately without waiting for the log information. The aim of this is to reduce the session recording size.
4.1.10.1 Play Recorded Web Conference
You have recorded a session and wish to play the recording.
FastViewer GmbH, 02/201872 FastViewer for Microsoft Windows, Manual

GUI for FastViewerSidebar
Prerequisites
• You have already recorded a session.
Step by Step
1) Find the desired session recording stored as *.exe or *.fvwrec file in the Explorer.
2) Double-click on the file to play the recording.
The video player is opened, and you can watch the recorded session.
3) If required, use the following operating options in the bottom section of the video player:
Furthermore, the current playback position and the total duration of the recording are displayed (in the HH:MM:SS format).
4.2 Sidebar
General information about the central operation and control of a Web Collabo-ration session, the sidebar.
After you have started the program and selected the operating mode, the sidebar opens. The functions that the sidebar provides depend on the previously selected operating mode (Support, Presentation, Conference) and the configuration in the customer portal. In the sidebar, you can access the central functions required for staging a Web Collaboration session.
Jump to Begin Stops the playback and jumps to the beginning of the recording.
Play/Pause Starts or pauses the playback.
+ / - Increase (up to 32x speed) or reduce the playback speed. The current playback speed is displayed between these buttons.
Fast Forward on/off Activate or deactivate fast forward (4x speed).
FastViewer GmbH, 02/2018FastViewer for Microsoft Windows, Manual 73

GUI for FastViewerSidebar
The individual menu items of the sidebar are buttons. You can open or close the respective windows of the menu items by clicking on these buttons.
4.2.1 Move the Sidebar
You can move the sidebar to the left or the right margin of your screen.
Prerequisites
• You have opened the sidebar.
How to move the sidebar on your screen:
Step by Step
1) Click on the upper section (FastViewer Logo) of the sidebar with the left mouse button and keep the left mouse button pressed.
The mouse pointer changes, and the possible sidebar positions are shown.
2) Drag the sidebar with your mouse to the desired position and keep the left mouse button pressed.
3) Release the left mouse button.
The sidebar is docked to its new position.
In the customer portal you can configure that the sidebar is automatically docked on the right side when the module starts up.
4.2.2 How to Collapse and Expand the Sidebar
Collapsing the sidebar to access elements hidden by it and expanding the sidebar again.
Prerequisites
• You have opened the sidebar.
FastViewer GmbH, 02/201874 FastViewer for Microsoft Windows, Manual

GUI for FastViewerSidebar
How to collapse and expand the sidebar:
Step by Step
1) Click on the icon to hide the sidebar.
The sidebar is moved into the edge of the monitor, only leaving
the and icon visible on top of each other.
2) Click on the icon to display the sidebar again.
NOTICE: You can configure in the customer portal that the sidebar is collapsed automatically after starting a session. This provides a better overview and also an easier usage for the partic-ipants e.g. for a presentation.
The sidebar reappears in its original dimension.
4.2.3 Undock/Reinsert Sidebar Elements
Undocking single sidebar elements and placing them as separate function windows on the desktop.
Prerequisites
• You have opened the sidebar.
FastViewer GmbH, 02/2018FastViewer for Microsoft Windows, Manual 75

GUI for FastViewerSidebar
How to undock sidebar elements and reinsert them:
Step by Step
1) To undock the elements, click on the icon or click on the icon of the function you wish to place on the desktop separately and keep the left mouse button pressed. Using the mouse, drag now the icon to the desired position on the desktop.
The function's icon is thus undocked from the sidebar. You can use the function in the same manner as if it was still integrated in the sidebar.
2) To reinsert the function, click on the icon or double-click the icon of the function you wish to reintegrate in the sidebar.
The function's icon is now integrated sidebar again.
4.2.4 Interrupt Transmission of your Screen
The transmission of your screen is interrupted.
FastViewer GmbH, 02/201876 FastViewer for Microsoft Windows, Manual

GUI for FastViewerSidebar
Prerequisites
• You have opened the sidebar.
How to interrupt the transmission of your screen:
Step by Step
1) Click on the icon to interrupt the transmission of your screen.
The transmission of your screen is interrupted. The viewer sees the last
image transmitted as still. The icon changes to .
2) Click on the icon to resume the transmission of your screen.
Your screen is transmitted again.
4.2.5 Sidebar Functions
The sidebar functions.
In the sidebar you find functions, which you can use during execution of a session.
Which functions are available depends on the configuration of the conference modules in the web portal, on the role you adopt in the web conference and on the selected operating mode (Support, Presentation or Conference).
The following functions are available:
• Session (<session ID>)
• Participants
• Application filter
• Monitor
• Chat
• Fileboard
• Video
• My Video
FastViewer GmbH, 02/2018FastViewer for Microsoft Windows, Manual 77

GUI for FastViewerSidebar
• Audio
• Log messages
• Information
• Telephone conference
4.2.5.1 Session
General information about the Session sidebar function.
The Session sidebar function provides information about the current session and options for performing a session:
• Display of the Session ID.
• The Client count (inclusive the moderator), thus the number of participants in a session.
• The Password input field for changing the password or specifying it during the session.
• The Session lock option to prevent further participants from joining the session. When you set the switch to on, other participants cannot join the web conference at a later point in time. If the switch is set to off (default), other participants can join the web conference at any time.
NOTICE: Apart from the Session ID, only the moderator can see these details.
4.2.5.2 Session - Set or Change Session Password
You are the moderator of a session and wish to use a session password or change the existing one.
Prerequisites
• You have opened the sidebar.
• You have already set a password.
Step by Step
1) Open the Session function in the sidebar.
The following window opens:
FastViewer GmbH, 02/201878 FastViewer for Microsoft Windows, Manual

GUI for FastViewerSidebar
2) Click with the mouse in the Password input field.
3) Change the session password as desired.
4) Notify the relevant participants about the new session password, for example by e-mail.
The password has been changed, thus preventing unwanted participants from joining the web conference in the future.
4.2.5.3 Session - Lock a Session
You are the moderator of a session and wish to lock a session.
Prerequisites
• You have opened the sidebar.
Step by Step
1) Open the Session function in the sidebar.
The following window opens:
If the switch is set to off (button dark gray), other participants can join the web conference at any time.
2) Click on the on button.
The on button gets red. Other participants are now no longer able to join the web conference retrospectively. If another participant tries to log on to the session, a dialog is displayed informing him/her that the session is locked.
4.2.5.4 Participants
General information about the Participants function.
With the Participants sidebar function all participants are displayed for the related session. Depending on the adopted role or on the device they use, you find the participants in different groups:
• ModeratorsThis group includes the session's initiator as well as all participants a moderator has promoted to moderators by moving them from other groups.
FastViewer GmbH, 02/2018FastViewer for Microsoft Windows, Manual 79

GUI for FastViewerSidebar
• Active clientsIn this group you find all participants who have joined the session and whose devices enable taking part in the session actively.
• Passive clientsThis group contains all participants who have joined the session but cannot take part actively because of device-induced restrictions.
As the moderator of a session, you can configure the privileges of the partici-pants here.
The presenter is determined via the Screen entry.
Under Remote control, a moderator can select a participant to receive control of the presented screen.
Functional privileges are controlled via two groups: active clients and passive clients. To customize a group privilege, click on for the respective group.
The following custom options are available:
In addition, you can determine the group membership of new participants. You can thus configure whether new session participants are to be added to the list of active clients or passive clients.
When you right-click a participant entry to open the associated context menu, you have the following options:
As the moderator, you can invite new participants for the session. To do this, click on the button. A send form of your default e-mail program opens with a preconfigured invitation. Enter the desired e-mail addresses of the participants you want to invite here. Then click on Send.
4.2.5.5 Participant - Select Presenter
You want to select a presenter.
FastViewer GmbH, 02/201880 FastViewer for Microsoft Windows, Manual

GUI for FastViewerSidebar
Prerequisites
• You are the moderator of the session.
Step by Step
1) Open the Participants function in the sidebar.
The following window opens:
2) Click on next to Screen and select the desired participant. If you select None here, the selection of the presenter is canceled.
The selected participant receives the following request:
3) The participant now has two options:
• Clicking on Share all apps to share all of his/her applications.
• Clicking on Select applications, which opens the following selection window:
FastViewer GmbH, 02/2018FastViewer for Microsoft Windows, Manual 81

GUI for FastViewerSidebar
The participant can then select the applications that he/she wants to transmit by selecting check boxes. If nothing is selected then no applica-tions or any other contents is transmitted.
The application selection is confirmed by clicking Share.
The selected participant may present his or her screen.
4.2.5.6 Participant - Hand Over Remote Control
You want a participant to remotely control the presenter's desktop.
Prerequisites
• You are the moderator of the session.
• A presenter has already been selected.
Step by Step
1) Open the Participants function in the sidebar.
The following window opens:
2) Click on next to Remote control and select the desired participant.
The selected presenter receives the following request to allow remote control of his or her desktop. This request must be confirmed.
FastViewer GmbH, 02/201882 FastViewer for Microsoft Windows, Manual

GUI for FastViewerSidebar
NOTICE: The presenter can stop the remote control at any time
during the presentation with a click on .
NOTICE: The moderator can take the remote control away from the participant at any time by selecting None.
4.2.5.7 Participants - Configure Privileges of Participants
You wish to assign or withdraw privileges to/from participants.
Prerequisites
• You are the moderator of the session.
Step by Step
1) Open the Participants function in the sidebar.
The following window opens:
2) To customize a privilege, click on for the respective group or the respective participant.
The following custom options are available:
FastViewer GmbH, 02/2018FastViewer for Microsoft Windows, Manual 83

GUI for FastViewerSidebar
3) Enable each option by adding check marks to grant the permission for that function or clear the check marks to revoke the permission.
The configurations are adjusted and immediately applied to the selected partici-pants.
4.2.5.8 Participants - How to rename Participants
You want to rename yourself or a participant.
Prerequisites
• You are the moderator of the session.
Step by Step
1) Open the Participants function in the sidebar.
The following window opens:
2) Click on for the participant who you want to rename.
3) In the now unfolded menu, click on Rename.
The participant name turns into an input window.
4) Specify the desired name and confirm the entry by pushing the Enter key.
The participant name has now been changed and is valid immediately.
NOTICE: A participant can only rename himself or herself.
Beside the participant to rename himself or herself only the moderator can rename a participant.
4.2.5.9 Participant - Change Group Membership of a Participant
You wish to change a participant's membership.
FastViewer GmbH, 02/201884 FastViewer for Microsoft Windows, Manual

GUI for FastViewerSidebar
Prerequisites
• You are the moderator of the session.
To change a session participant's privileges, you can assign him/her to the groups Active clients, Passive clients or Moderators.
Step by Step
1) Open the Participants function in the sidebar.
The following window opens:
2) Right-click on the participant whose group membership you want to change.
A context menu is opened.
3) Click on the desired group membership.
• Grant Moderator privileges
• Move to passive
• Move to active
The desired participant now belongs to the selected group.
NOTICE: You can also drag & drop participants into the desired group.
4.2.5.10 Participants - Group Membership of new Participants
You wish to pre-configure the group membership of newly added session partici-pants.
Prerequisites
• You are the moderator of the session.
You can determine the group membership of new participants. You can thus configure whether new session participants are to be added to the list of active participants or passive participants.
FastViewer GmbH, 02/2018FastViewer for Microsoft Windows, Manual 85
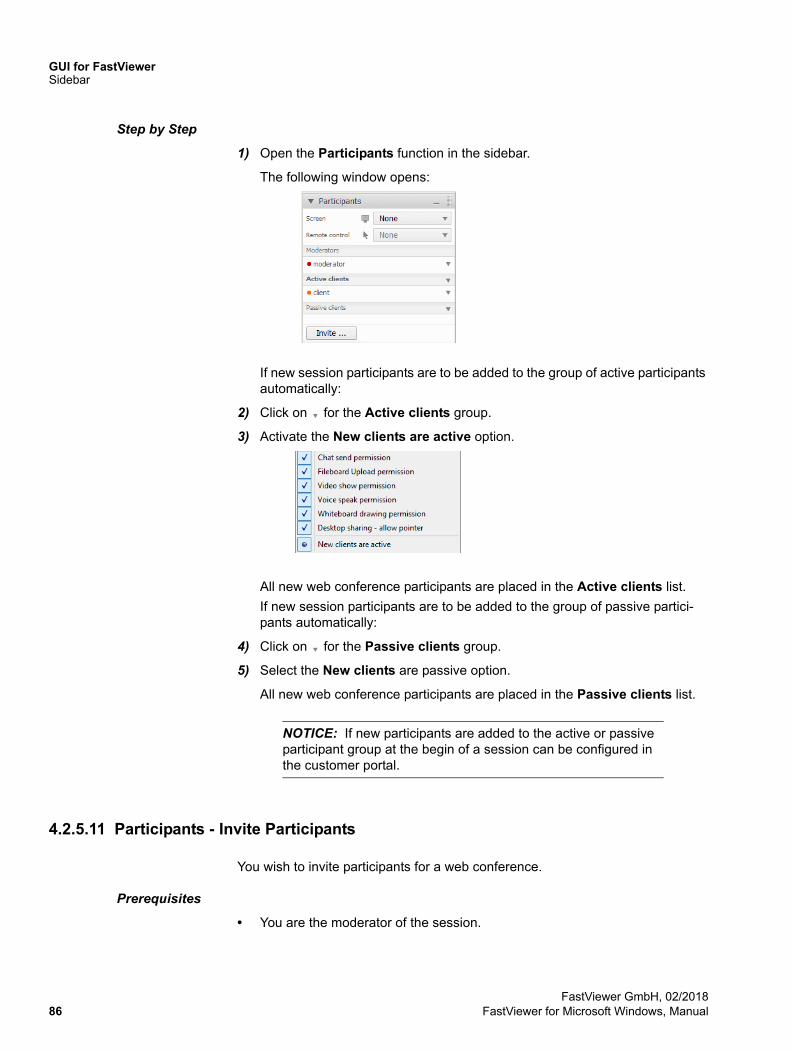
GUI for FastViewerSidebar
Step by Step
1) Open the Participants function in the sidebar.
The following window opens:
If new session participants are to be added to the group of active participants automatically:
2) Click on for the Active clients group.
3) Activate the New clients are active option.
All new web conference participants are placed in the Active clients list.
If new session participants are to be added to the group of passive partici-pants automatically:
4) Click on for the Passive clients group.
5) Select the New clients are passive option.
All new web conference participants are placed in the Passive clients list.
NOTICE: If new participants are added to the active or passive participant group at the begin of a session can be configured in the customer portal.
4.2.5.11 Participants - Invite Participants
You wish to invite participants for a web conference.
Prerequisites
• You are the moderator of the session.
FastViewer GmbH, 02/201886 FastViewer for Microsoft Windows, Manual

GUI for FastViewerSidebar
Step by Step
1) Open the Participants function in the sidebar.
The following window opens:
2) Click on .
Your default e-mail program opens with a preconfigured invitation:
NOTICE: The above figure exemplifies using the "Microsoft Outlook" e-mail program for the Invite function.
3) Enter the e-mail address of the desired participant in the e-mail program.
NOTICE: You can also specify the e-mail addresses of several participants in the address line.
4) Click on Send in your e-mail program.
The addressed participants will receive an invitation for the active session by e-mail.
FastViewer GmbH, 02/2018FastViewer for Microsoft Windows, Manual 87

GUI for FastViewerSidebar
4.2.5.12 Participant - Disconnect a Conference Participant
You want to disconnect a conference participant.
Prerequisites
• You are the moderator of the session.
Step by Step
1) Open the Participants function in the sidebar.
The following window opens:
2) Right-click on the participant you want to disconnect. Alternatively, you can click on in the respective line.
A context menu is opened.
3) Click on Disconnect.
The participant is immediately disconnected.
4.2.5.13 Application Filter
General information about the Application Filter function.
You can use the Application Filter sidebar function to select the desktop elements and their started applications you wish to transmit. You activate trans-mitting the applications by enabling check boxes. To deactivate them, clear the respective check boxes.
FastViewer GmbH, 02/201888 FastViewer for Microsoft Windows, Manual

GUI for FastViewerSidebar
NOTICE: You must be the presenter in a session in order to transmit applications.
You can select the following desktop elements for transmission in the top section of the Application Filter:
• Show SidebarSelect this check box if you want to transmit the viewer window and the sidebar.If the Show Sidebar option is disabled, the following behavior takes effect when the sidebar is shown:as long as there is no other configuration in the customer portal, the sidebar is transmitted transparent. In other words, desktop icons covered by the sidebar remain visible. If, however, a participant receives control, he/she cannot click on the covered elements in this area of the sidebar to access them. If such elements must accessed, the presenter must previously retract
the sidebar. This is done with a click on the icon on the right margin of the sidebar.
NOTICE: In case of a disabled Show Sidebar option the session is transmitted to Windows 8 (or newer) systems as black window. This restriction is system-related, because the window cannot be hidden with Windows 8.
• Show new applicationsEnable this check box if applications and windows started in the future are to be transmitted automatically.
• Show DesktopSelect the check box if you want to transmit your desktop.
• Show TaskbarSelect the check box if you want to transmit your taskbar.
The bottom section lists all opened windows and applications. A click on the expansion icon + lists the individual windows of the respective application. You can also control the transmission of these windows here by setting or clearing check boxes.
FastViewer GmbH, 02/2018FastViewer for Microsoft Windows, Manual 89

GUI for FastViewerSidebar
4.2.5.14 Monitor
General information about the Monitor sidebar function.
If you are the presenter of a session and have connected several monitors, you can use the Monitor sidebar function to select the monitor to be transmitted.
Click on the respective monitor to transmit it. With a click on Entire virtual desktop under the represented monitor you can transmit the entire virtual desktop.
NOTICE: Only moderators and the presenter can see the Monitor sidebar function.
4.2.5.15 Monitor - Select Monitor for Transmission
Multiple monitors are connected, and you want to select a single monitor which display is being transmitted.
Prerequisites
• You are the moderator or presenter of the session.
Step by Step
1) Open the Monitor sidebar function.
The following window opens:
2) You have the following setting options:
• If you click on the left-hand monitor, it will be shown to the participants.
Monitor 1 appears in the bottom section of the Monitor sidebar function.
• If you click on the right-hand monitor, it will be shown to the participants.
Monitor 2 appears in the bottom section of the Monitor sidebar function.
FastViewer GmbH, 02/201890 FastViewer for Microsoft Windows, Manual

GUI for FastViewerSidebar
• If you click on the bottom edge of the both monitors, both will be trans-mitted.
Entire virtual desktop appears in the bottom section of the Monitor sidebar function.
The participants can only see the monitor you have selected.
NOTICE: Only moderators and the presenter can see the Screen menu item.
4.2.5.16 Chat
You wish to send a chat message.
Prerequisites
• You are an active session member.
• Sending chat messages is not restricted.
You are a session member and wish to send a chat message to another member or to all session members. Proceed as follows:
Step by Step
1) Open the Chat sidebar function.
The following window opens:
2) Click on next to Receiver to select the session member to receive your chat message. Alternatively, you can also address the chat message to all session members here.
3) Click in the text input field.
4) Enter your text in there.
5) Push the return key on your keyboard to send the text.
FastViewer GmbH, 02/2018FastViewer for Microsoft Windows, Manual 91

GUI for FastViewerSidebar
NOTICE: The moderator can prevent with a permission change that other session participants exchange chats with each other.
Your chat message is sent.
4.2.5.17 Fileboard
General information on the Fileboard sidebar function.
The Fileboard sidebar function lets you transmit files.
NOTICE: These files provided for downloading are only available during the session and can thus no longer be accessed after the session has ended.
The file table lists the Available Files, the Client, the Status and the File Size.
Available Files informs you about the names of the uploaded files. The name of the user who has uploaded the file appears under Client. Status shows whether the file is currently being uploaded or already available for download. The file size is shown under Size.
Click on Upload to select a file that you want to make available to the participants. You can also drag and drop the desired file into the Fileboard. To download a file, click on Download. Click Cancel to stop uploading. With Delete, you can remove a file no longer required, for example.
NOTICE: The moderator can change the relevant privilege to prevent other session members from uploading files.
4.2.5.18 How to Upload a File
You want to make a file available to other participants.
FastViewer GmbH, 02/201892 FastViewer for Microsoft Windows, Manual

GUI for FastViewerSidebar
Prerequisites
• You are an active session member.
• Uploading a file is not restricted.
To upload a file, proceed as follows:
Step by Step
1) Open the Fileboard sidebar function.
The following window opens:
2) Click on Upload in the bottom section.
The Open File for Upload dialog opens.
3) Select the file you wish to provide.
4) Click on Open.
The file is now in the Fileboard from where other session members can download it.
NOTICE: You can stop uploading your file by clicking on Cancel in the bottom section during the upload.
4.2.5.19 Fileboard - Download a File
You want to download a file from the Fileboard.
Prerequisites
• At least one file is already available in the Fileboard.
To download a file, proceed as follows:
Step by Step
1) Open the Fileboard sidebar function.
The following window opens:
FastViewer GmbH, 02/2018FastViewer for Microsoft Windows, Manual 93
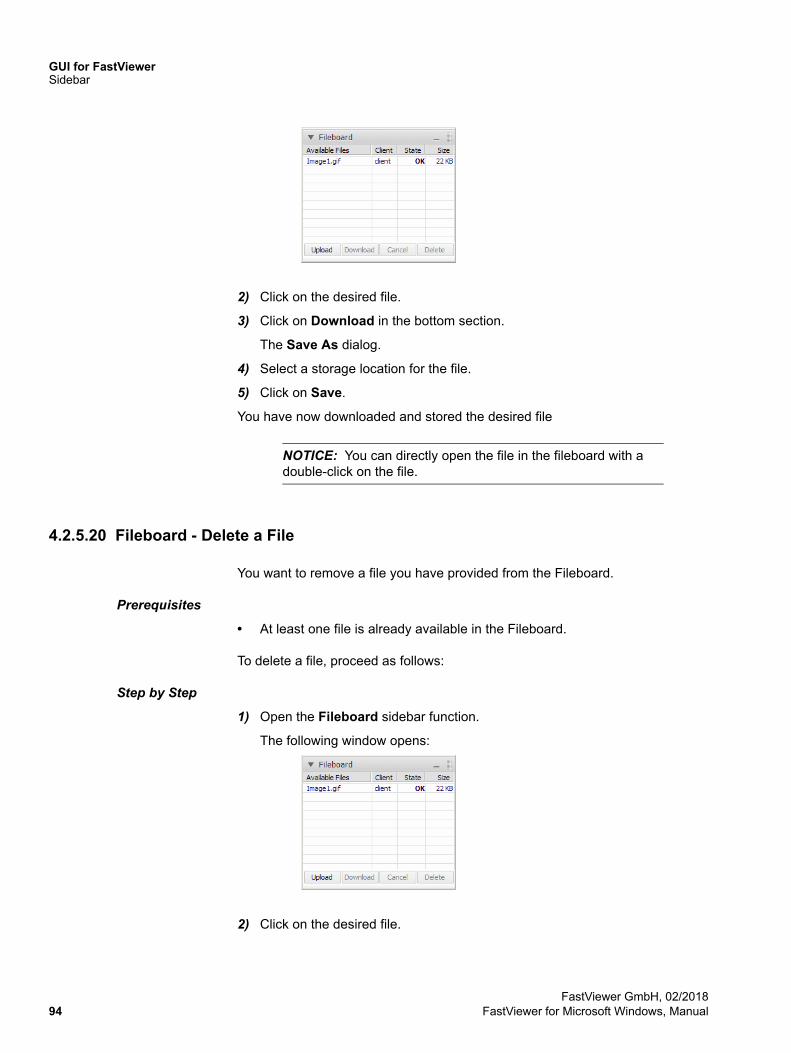
GUI for FastViewerSidebar
2) Click on the desired file.
3) Click on Download in the bottom section.
The Save As dialog.
4) Select a storage location for the file.
5) Click on Save.
You have now downloaded and stored the desired file
NOTICE: You can directly open the file in the fileboard with a double-click on the file.
4.2.5.20 Fileboard - Delete a File
You want to remove a file you have provided from the Fileboard.
Prerequisites
• At least one file is already available in the Fileboard.
To delete a file, proceed as follows:
Step by Step
1) Open the Fileboard sidebar function.
The following window opens:
2) Click on the desired file.
FastViewer GmbH, 02/201894 FastViewer for Microsoft Windows, Manual

GUI for FastViewerSidebar
3) Click on Delete in the bottom section.
You have now deleted the desired file, so it will no longer be available for downloading.
NOTICE: The moderator can delete all files contained in the Fileboard. A session member can only remove his/her own files from the Fileboard.
4.2.5.21 Video
Displaying the video/still of a session participant.
Using the Video sidebar function you can display the webcam video or a still of the session participants if available.
The session participant's name is displayed under the video/still.
NOTICE: The moderator can prohibit displaying the video/still.
4.2.5.22 My Video
Displaying your own video/still via the My Video sidebar function.
Using the My Video sidebar function you can display your own webcam video/still.
FastViewer GmbH, 02/2018FastViewer for Microsoft Windows, Manual 95

GUI for FastViewerSidebar
The video quality is restricted by the bandwidth of your network. The bandwidth may not be sufficient to play your video trouble-free and in best quality. In this case, reduce the quality level you have set.
NOTICE: The moderator can block playing your video.
4.2.5.23 My Video - Transmit Webcam Video
You wish to configure your webcam for video transmission in a session.
Prerequisites
• You are an active session member.
• Transmitting your webcam video is not restricted.
• for the connection one of the following ports is used: TCP 5000, FastHTTPS 443
Step by Step
1) Open the My Video sidebar function.
The following window opens:
2) Click on .
You have the following options:
3) Click on the entry of your installed webcam.
4) Click on on for to activate the video stream.
5) Click on to transmit the image recorded by your webcam as still.
6) To transmit the video again in real time, click on .
The webcam video is transmitted.
FastViewer GmbH, 02/201896 FastViewer for Microsoft Windows, Manual

GUI for FastViewerSidebar
appears in the bottom left corner of the webcam video. The sidebar window displays the webcam video that is transmitted to the participant.
NOTICE: Click off to stop the transmission.
NOTICE: The moderator can prohibit displaying your webcam video.
4.2.5.24 My video - Transmit your Still
You wish to configure a still for video transmission in a session.
Prerequisites
• You are an active session member.
• Transmitting a still is not restricted.
• For the connection one of the following ports is used: TCP 5000, FastHTTPS 443
Step by Step
1) Open the My Video sidebar function.
The following window opens:
2) Click on .
FastViewer GmbH, 02/2018FastViewer for Microsoft Windows, Manual 97

GUI for FastViewerSidebar
You have the following options:
3) Click on Choose picture file.
The file selection dialog opens.
4) Select the desired picture.
NOTICE: This picture must be available in the *.bmp, *.jpg, *.gif or *.png format.
5) Click on on for .
The picture is transmitted. appears in the bottom left corner of the picture. The sidebar window displays the picture that is transmitted to the participant.
NOTICE: Click on off to stop the transmission.
NOTICE: The moderator can block the display of the picture.
4.2.5.25 Audio
General information on the Audio sidebar function.
NOTICE: Taking part in an audio conference on the PC via Voice-over-IP requires a sound card and a microphone as well as a loudspeaker or headset.
Each session member can use the Audio sidebar function to join an audio conference staged parallel to the session via Voice-over-IP (VoIP). In addition, the option allows the session member to control his/her devices for audio input and audio output. The audio conference room made available via VoIP is exclusively reserved for users who take part in the audio conference via network (VoIP).
FastViewer GmbH, 02/201898 FastViewer for Microsoft Windows, Manual

GUI for FastViewerSidebar
Both options, Audio and Telephone conference, are elementary web conference components.
The following elements are available for controlling the audio conference:
NOTICE: If the network connection is insufficient, the audio connection will be closed automatically.
4.2.5.26 Join an Audio Conference via Audio
Taking part in an audio conference parallel to the session via the Audio sidebar function.
Prerequisites
• The Audio feature must have been enabled for the master and client module by configuration in the customer portal.
• You are an active or passive participant in the session with appropriate permission for usage of the audio function.
• Your PC has a soundcard and a microphone as well as a loudspeaker or a connected headset.
• For the connection one of the following ports is used: TCP 5000, FastHTTPS 443
Icon Function
Select device for audio output:
Opens a list for you to select a device for audio output from those connected to your PC.
Set volume on output device for audio signals:
Slide control for changing the volume of the output device.
Start audio output and input:
Click on to start the audio output and audio input. Click off to termi-nate the audio input and audio output.
Select device for audio input:
Opens a list for you to select a device for audio input from those connected to your PC.
Set volume on input device for audio signals:
Slide control for changing the volume of the input device.
Switch off audio input:
To switch off your microphone and thus the audio input, enable the Mute button. Another click on this button switches the microphone on again.
FastViewer GmbH, 02/2018FastViewer for Microsoft Windows, Manual 99

GUI for FastViewerSidebar
How to join the audio conference:
Step by Step
1) Open the Audio sidebar function.
The following window opens:
2) To select the output device, click on in the left-hand section.
The list of available output devices opens.
3) From this list, select the device you wish to use for the audio output.
4) To select the input device, click on in the left-hand section.
The list of available input devices opens.
5) From this list, select the device you wish to use for the audio input.
6) Click with on on to set up the connection to the audio conference.
The audio connection to the audio conference is set up.
7) Click on the slide control icons and drag them with the mouse to the right or left for optimizing the output and input device volume.
You can now join the audio conference.
Next steps
Click on the button to temporarily switch off your input device during the audio conference. Another click on this button switches the input device on again.
4.2.5.27 Telephone Conference
General information about the Telephone conference sidebar function.
NOTICE: the phone numbers are shown only as example.
FastViewer GmbH, 02/2018100 FastViewer for Microsoft Windows, Manual

GUI for FastViewerSidebar
NOTICE: The program offers two different telephone conference functions, Telephone Conference and International telephone conference, which can be found in the sidebar as Telephone conference and Phone conference. In practice, only one of these functions will be activated by your administrator.
With the help of the Telephone conference sidebar function, every session participant can retrieve the information he/she needs to dial into an audio conference conducted parallel to a session by phone. The conference room made available via phone is exclusively reserved for users who take part in the audio conference via phone.
NOTICE: Users who have joined an audio conference parallel to a web conference via phone and the Telephone conference feature do not have an audio connection to users who take part in the audio conference parallel to the web conference via VoIP and the Audio feature for technical reasons. Both access types are equipped with separate conference rooms that cannot be connected to each other for technical reasons.
Both functions, Audio and Telephone conference or International telephone conference, are elementary components of a Web Collaboration session.
The audio conference set up via the Telephone conference function is a pure Dial-In solution. In other words, the web conference participants must become active and dial into the telephone conference. No Dial-Out function is available.
NOTICE: We recommend using a headset in the telephone conference, because other communication devices may cause feedbacks that affect the communication.
4.2.5.28 Telephone Conference - Join an Telephone Conferences
Using the Telephone conference sidebar function to join an audio conference staged parallel to the Web Collaboration session.
Prerequisites
• The Telephone conference feature must have been enabled for the master and client module by configuration in the customer portal.
• You are an active or passive participant in the session.
• You have a landline-compatible phone or a mobile device.
Proceed as follows:
FastViewer GmbH, 02/2018FastViewer for Microsoft Windows, Manual 101

GUI for FastViewerSidebar
Step by Step
1) Open the Telephone conference sidebar function.
Here you see the usable bridge numbers as well as the required conference PIN:
2) Dial one of the displayed bridge numbers according to your country for the telephone conference on your phone.
NOTICE: The different bridge numbers will take you into the same conference room.
When the connection is up you are be prompted to enter the digit via telephone keypad.
3) Dial a on the telephone keypad.
You are prompted to enter the conference PIN via telephone keypad.
NOTICE: The PIN code corresponds to the conference's session number.
You can now take part in the audio conference via your phone.
Next steps
Terminate the active call to leave the telephone conference.
NOTICE: After you have left the conference room, you can join the telephone conference again anytime by dialing one of the bridge numbers.
4.2.5.29 International telephone conference
General information about the International telephone conference sidebar function.
FastViewer GmbH, 02/2018102 FastViewer for Microsoft Windows, Manual

GUI for FastViewerSidebar
NOTICE: The program offers two different telephone conference functions, Telephone Conference and International telephone conference, which can be found in the sidebar as Telephone conference and Phone conference. In practice, only one of these functions will be activated by your administrator.
With the help of the International telephone conference sidebar function, every session participant can retrieve the information he/she needs to dial into an audio conference conducted parallel to a session by phone. In contrast to the sidebar function Telephone conference, the user may choose here between several bridge numbers for the telephone conference, according to his/her country and language. The conference room made available via phone is exclusively reserved for users who take part in the audio conference via phone.
NOTICE: Users who have joined an audio conference parallel to a web conference via phone and the International telephone conference feature do not have an audio connection to users who take part in the audio conference parallel to the web conference via VoIP and the Audio feature for technical reasons. Both access types are equipped with separate conference rooms that cannot be connected to each other for technical reasons.
Both functions, Audio and Telephone conference or International telephone conference, are elementary components of a Web Collaboration session.
The audio conference set up via the International telephone conference function is a pure Dial-In solution. In other words, the web conference participants must become active and dial into the telephone conference. No Dial-Out function is available.
NOTICE: We recommend using a headset in the telephone conference, because other communication devices may cause feedbacks that affect the communication.
4.2.5.30 International Telephon Conference - Join international Telephone Conferences
Joining an audio conference via the International telephone conference sidebar function.
FastViewer GmbH, 02/2018FastViewer for Microsoft Windows, Manual 103

GUI for FastViewerSidebar
Prerequisites
• The International telephone conference feature must have been enabled for the master and client module by configuration in the customer portal.
• You are an active or passive participant in the session.
• You have a landline-compatible phone or a mobile device.
Proceed as follows:
Step by Step
1) Open the International telephone conference (Phone conference) sidebar function.
2) Use the combo box to select your country and your language.
The bridge numbers you can use for the country and the language selected as well as the required conference PIN are displayed:
3) Dial the displayed bridge number for the telephone conference on your phone.
NOTICE: The different bridge numbers will take you into the same conference room.
When the connection is up you are be prompted to enter the digit via telephone keypad.
4) Dial a on the telephone keypad.
You are prompted to enter the conference PIN via telephone keypad.
NOTICE: The PIN code corresponds to the conference's session number.
You can now take part in the audio conference via your phone.
Next steps
Terminate the active call to leave the telephone conference.
FastViewer GmbH, 02/2018104 FastViewer for Microsoft Windows, Manual

GUI for FastViewerSidebar
NOTICE: After you have left the conference room, you can join the telephone conference again anytime by dialing one of the bridge numbers.
4.2.5.31 Log Messages
The sidebar function Log messages.
The Log messages sidebar function displays all activities executed during a session. The log entries appear in chronological order.
Each new activity is additionally displayed in a separate message for three seconds:
4.2.5.32 Information
General information about the Information sidebar function.
The Information sidebar function displays technical details related to the current session.
You can obtain the following information from the displayed parameters:
• ServerThe name or the IP address of the server used for the connection.With a click on the name or IP-address of the server, the server response time is tested via "pings". Additionally to the used server all possible communi-cation servers and their response times are displayed in separate window.
FastViewer GmbH, 02/2018FastViewer for Microsoft Windows, Manual 105
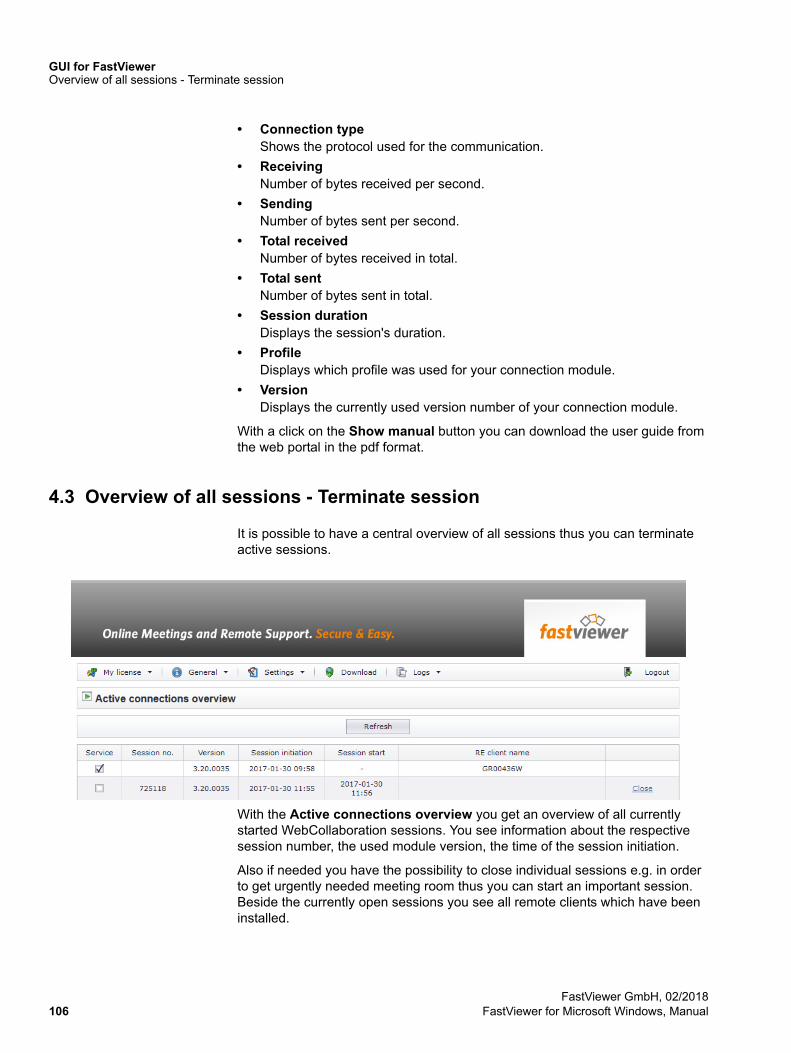
GUI for FastViewerOverview of all sessions - Terminate session
• Connection typeShows the protocol used for the communication.
• ReceivingNumber of bytes received per second.
• Sending Number of bytes sent per second.
• Total receivedNumber of bytes received in total.
• Total sentNumber of bytes sent in total.
• Session duration Displays the session's duration.
• Profile Displays which profile was used for your connection module.
• VersionDisplays the currently used version number of your connection module.
With a click on the Show manual button you can download the user guide from the web portal in the pdf format.
4.3 Overview of all sessions - Terminate session
It is possible to have a central overview of all sessions thus you can terminate active sessions.
With the Active connections overview you get an overview of all currently started WebCollaboration sessions. You see information about the respective session number, the used module version, the time of the session initiation.
Also if needed you have the possibility to close individual sessions e.g. in order to get urgently needed meeting room thus you can start an important session. Beside the currently open sessions you see all remote clients which have been installed.
FastViewer GmbH, 02/2018106 FastViewer for Microsoft Windows, Manual

GUI for FastViewerOverview of all sessions - Terminate session
Please note that a room is occupied as soon as a master module is started and you the session number has been provided. The session is active and thus the meeting room is occupied until the master module is closed. Please inform therefore your users to keep the master module closed if it is not required in order to ensure that new sessions can be started whenever required.
You find the overview in your personal customer portal under https://portal.fastviewer.com. After you have logged in with your credentials you can open the overview with "Logs > active sessions". The credentials for the FastViewer Customer portal have been sent to you per e-mail (license number and password) when you have purchased the FastViewer Licence.
NOTICE: For the usage of the hosted version this overview cannot be reached via the personal customer portal, but directly via the Webcollaboration server. Start the browser on the related server and enter localhost/admin into the URL bar. Now you can open the overview with the button "Current Sessions".
FastViewer GmbH, 02/2018FastViewer for Microsoft Windows, Manual 107

FastViewer Remote ClientsDownload of the modules via customer portal
5 FastViewer Remote Clients
The following chapter describes how to operate FastViewer Remote Clients. This functionality is part of the variant Secure Advisor. For the usage with Instant Meeting this functionality must be purchased seperatly.
5.1 Download of the modules via customer portal
Before you can use FastViewer you must execute some preparatory steps.
After having requested your FastViewer license/ test license, you receive an e-mail. This e-mail contains a license number as well as a password for accessing your private FastViewer customer portal.
FastViewer GmbH, 02/2018108 FastViewer for Microsoft Windows, Manual

FastViewer Remote ClientsDownload of the modules via customer portal
Log on to the customer portal and download the FastMaster.exe master module.
FastViewer GmbH, 02/2018FastViewer for Microsoft Windows, Manual 109

FastViewer Remote ClientsDownload of the modules via customer portal
Next, you copy the master module to the storage location from where you wish to use it. An installation is not required.
5.1.1 Log on to the FastViewer Customer Portal
Your protected FastViewer customer portal requires a login.
Prerequisites
• You have a valid FastViewer license.
Step by Step
1) Open a web browser.
2) Enter the URL of the FastViewer customer portal in the address input line: www.fastviewer.com.
3) Click on Customer Portal.
The FastViewer customer portal opens:
4) Enter the license number from your e-mail in the Alias/Serial field.
5) Specify the password from your license e-mail in the Password field.
6) Click on the Login button.
You are logged in at the FastViewer customer portal.
NOTICE: Change your password after this initial login.
5.1.2 Download the Master Module
You receive your FastMaster.exe master module from the FastViewer customer portal.
FastViewer GmbH, 02/2018110 FastViewer for Microsoft Windows, Manual

FastViewer Remote ClientsDownload of the modules via customer portal
Prerequisites
• You have a valid FastViewer license.
• You are logged in at the FastViewer customer portal.
Step by Step
1) Click on the Start Session! button.
The FastMaster.exe master module is being downloaded.
2) Save the FastMaster.exe master module in a directory (locally or in the network).
NOTICE: The master module need not be installed.
You have downloaded the FastMaster.exe master module. You can now use it for starting a session.
IMPORTANT: The master module includes your license. Do not pass the module on.
FastViewer GmbH, 02/2018FastViewer for Microsoft Windows, Manual 111

FastViewer Remote ClientsStarting the Master Module
5.1.3 Log off from the FastViewer Customer Portal
After performing the desired actions, you must log out of the FastViewer customer portal again.
Prerequisites
• You have a valid FastViewer license.
• You are logged in at the FastViewer customer portal.
Step by Step
› Click on the Logout button.
You are logged out of the FastViewer customer portal.
5.2 Starting the Master Module
FastViewer Secure Advisor consists of the FastMaster.exe master module and the remote client module.
FastViewer GmbH, 02/2018112 FastViewer for Microsoft Windows, Manual

FastViewer Remote ClientsStarting the Master Module
The master module includes your purchased licenses and must not be passed on to customers. This module represents the session initiator, which makes you the moderator of the web conference.
An installation is not required for the master module.
The remote client module must be set up on the remote PC.
To start a session, launch the master module by executing the FastMaster.exe file.
Once the connection to the corresponding communications server is established, the sidebar and the start dialog open:
FastViewer GmbH, 02/2018FastViewer for Microsoft Windows, Manual 113

FastViewer Remote ClientsStarting the Master Module
Figure: Sidebar
Figure: Start dialog
When using the remote client module, the start dialog is without significance.
5.2.1 Start the Modules
You wish to establish a connection using the client module.
FastViewer GmbH, 02/2018114 FastViewer for Microsoft Windows, Manual

FastViewer Remote ClientsStarting the Master Module
Prerequisites
• You have the master module.
Step by Step
1) Double-click the FastMaster.exe master module.
The run dialog opens.
2) Click on Run.
The connection to the corresponding communications server is established.
The sidebar and the startup dialog open.
FastViewer GmbH, 02/2018FastViewer for Microsoft Windows, Manual 115

FastViewer Remote ClientsStarting the Master Module
5.2.2 Using Start Parameters
Executing the master module specific to an application through use of start parameters.
When starting the master module, you can directly furnish it with parameters to configure pre-settings for the intended session.
The parameter(s) is/are then directly attached to the end of the start command. In the next chapter you find details about how to add the start parameter upon launching the master module.
The syntax of the start command for execution with start parameter reads:
<master module>.exe /<parameter/option>
The following start parameters are available:
• /configprofile:<profile name>For multi profile modules only: Starts the master module under the profile specified here. Please note that texts and graphics which you have adapted in the respective profile, are not supported.
FastViewer GmbH, 02/2018116 FastViewer for Microsoft Windows, Manual

FastViewer Remote ClientsStarting the Master Module
• /infoAfter the start of the Mastermodule you are asked about which info you want to enter that is saved in the logfile, e.g. Customer name, in order to indentify the session to be charged.
• /info:"<your text message>"When the session has ended, the text specified between inverted commas is transferred to the "Info/Start" column in the online log.
• /infoend:"<your text message>"When the session has ended, the text specified between inverted commas is transferred to the "Info/End" column in the online log.
• /lang:0x0407Specify the language for the program's interface. If you do not specify a parameter, the language is selected automatically. The following languages are supported:
• /monitor:nSelects the monitor to be transmitted after the session start if several monitors are used in the session. To enable this you must specify for value n the respective monitor ID of the monitor to be transmitted.
NOTICE: The monitor ID is the consecutive monitor number displayed in the sidebar under Monitor when you click the corre-sponding monitor.
• /playback:"<file name>"Starts playback of the recording specified under <file name>.
Language Hex Code
Portuguese (Brazil) 0x0416
Chinese (simplified) 0x0004
Dutch 0x0813
English 0x0409
French 0x040C
German 0x0407
Greek 0x0408
Italian 0x0410
Japanese 0x0411
Portuguese (Portugal) 0x0816
Romanian 0x0418
Russian 0x0419
Spanish 0x040A
Turkish 0x041F
FastViewer GmbH, 02/2018FastViewer for Microsoft Windows, Manual 117

FastViewer Remote ClientsStarting the Master Module
• /proxy:<proxy server name>:<port>Start parameter to overwrite an automatically detected proxy with a new proxy.
• /proxyuser:<user>Start parameter to pass the user name of the new proxy.
• /proxypass:<password>Start parameter to pass the user password of the new proxy.
• /proxyfile:<path>Start parameter to pass an XML file with the corresponding data to overwrite the proxy.
• /proxyconfig:IESelect the browser from which the proxy settings are to be read independently from the default browser. IE is used for the Internet Explorer and FF for Firefox.
• /reAutoconnect:<Guid>Enables a direct connection to a specific remote client. If the client name exists more than once, the client which is currently online is selected automat-ically.
NOTICE: The GUID can be put out in the remote console with a right-click on the respective client.
• /reConnect:fvwHere you can specify which connection type is used. If you ommit this parameter then the default configured connection type specified in the customer portal is used. The parameter is explicitely functional with the parameter "reAutoconnect". "fvw" can take the following values: rdp, presen-tation, conference, support
fvw = Standard FastViewer Connectionrdp = Remote Desktopsupport = AdHoc Support with UIpresentation = AdHoc Presentation with UIconference = AdHoc Conference with UI
• /recordThe session is automatically recorded from the start. When it has ended, the moderator is automatically prompted to specify a storage location for the recording.
• /record:"<C:\Recordings\Recording 1>"The session is automatically recorded from the start. When the session has ended, the recording is automatically stored under the specified path and name. In the above case under "C:\Recordings\Recording 1". With a Config-uration, to save the recording automatically under a predefined path (e.g. network drive) the recording is first saved locally. Only after the session has been terminated the recording file will be stored at the given path. The FastViewer-Module stays in this case open until the transmission of the recording file has been finished. The transmission can’t be completed if the
FastViewer GmbH, 02/2018118 FastViewer for Microsoft Windows, Manual

FastViewer Remote ClientsStarting the Master Module
FastViewer-Module is terminated, e.g. via task manager, before the trans-mission has been completed.
• /sessionclientname:<user name>Starts the master module under the user name specified here.
• /transport:httpSpecify the port via which the program communicates by default. In doing so you can select from http, https and tcp.
• /browser:xxIf you use a Proxyserver, FastViewer is reading the proxy-settings from your default browser automatically. If you only use Internet Explorer, but Mozilla Firefox is the default browser, then there can be complications. With this parameter it is possible to set from which browser the settings will be taken. "xx" should be replaced as follows:ie = Internet Explorer settings should be takenff = Mozilla Firefox settings should be taken
The Installation routine (fvwresetup.exe) from FastViewer Remoted, can be started with the following parameters:
• /folder=xxxfolder xxx is created in case the folder does not exist. In this specified folder the Remote Client will be installed.
• /silentThe setup is executed without any user interaction. The installation process is visible. The installation path is "C:\Programs\fastviewer\Remote-Service".
• /verysilentThe setup is executed without any user interaction. The installation process is not visible. The installation path is "C:\Programs\fastviewer\Remote Service"
• /namename = xxx xxx is replaced by the desired name, which is to appear later in the list, e.g. customer name or customer number. If /name is not specified then the computer name is used.
• /infoinfoZ=XXX, Z is replaced with 1 to 10, XXX with the desired text, which is to be located in the respective column. If blanks are used then the text should be within double quotes. The column headings for the console can be changed in the customer portal online. An example: /info3="This is an example"
• /replaceexisting=trueThe Remote-Client-Setup is capable to overtake a client which is still regis-tered at a tunnel server, when the Setup has been executed with this parameter. (The Client must have the same FQDN as in the previous instal-lation.)With this feature it is possible to keep the position in the related folder of the Remote-Client-Overview and the already entered information (e.g. at a new installation).
FastViewer GmbH, 02/2018FastViewer for Microsoft Windows, Manual 119

FastViewer Remote ClientsStarting the Master Module
5.2.2.1 How to Start the Master Module with Parameters
Preconfiguring the master module at the start via parameters.
Prerequisites
• You have stored the master module (FastMaster.exe) on your desktop.
• You have created a link to the master module on the desktop.
Step by Step
1) Open the context menu of the master module link with a click of the right mouse button.
2) Select the Properties feature from the context menu.
The properties dialog of the master module opens.
3) In the FastMaster.exe - Shortcut with Parameter Properties dialog, attach the parameter or the parameter with option to the path displayed in the Target input line separated by a blank.
NOTICE: If you wish to attach several parameters, act in the same way by stringing together the parameters separated by a blank.
Examples:
Attaching a parameter with option (here: recording a session and storing it in the specified file):
FastMaster.exe /record:C:\Users\Admini-strator\Desktop\Recording
NOTICE: If you use blanks in the path or file name, you must put the entire option in inverted commas (FastMaster.exe /record:"C:\Users\Admini-strator\Desktop\Recording 1").
Attaching several parameters (here: selection monitor 1 and language selection for the module in French):
FastMaster.exe /monitor:1 /lang:0x040C
4) After you have specified the parameters, click on OK.
The setting is applied and the Fastmaster.exe - Shortcut with Parameter Properties dialog closes.
When you execute the FastMaster.exe, the master module starts with the defaulted settings.
FastViewer GmbH, 02/2018120 FastViewer for Microsoft Windows, Manual

FastViewer Remote ClientsShortcut Bar of the master module
5.3 Shortcut Bar of the master module
On the side of the sidebar you find the / icon. When you hold the mouse pointer over the icon, the following menu appears:
Figure: Shortcut bar
NOTICE: The appearance of the buttons depends on the edition used and the purchased licenses. The options can also be configured in the customer portal. In the customer portal the administrator can set who can see which buttons and may execute which functions.
Button Function
Create a new session
File transfer
Port mapper
Change view direction
Toggle zoom mode
Whiteboard
User manager
Remote manager
Change session password
FastViewer GmbH, 02/2018FastViewer for Microsoft Windows, Manual 121

FastViewer Remote ClientsShortcut Bar of the master module
The icon is located above the shortcut bar. You can end the session immedi-ately at any time by clicking on it.
5.3.1 Installation of a remote client
The following chapter describes the installation of FastViewer.
The FastViewer consists of two modules:
• Master moduleThe master module "FastMaster.exe" contains your license. It is working place independent and thus can be used on various PCs. It must not be passed on to customers. Alternatively you can save the module on a data carrier (e.g. USB-Stick) in order to work with it anytime at any place worldwide. With the FastViewer customer portal you have the possibility to download anytime your master module.
• Remote SetupAfter the installation of the Remote Setup on the related PC/Mac the Remote-Client is embedded into the administration console of the master.
Interrupt remote control
Special functions
Session recording
Select image transmission quality (the available selection can vary in dependence on the amount of participants)
Button Function
FastViewer GmbH, 02/2018122 FastViewer for Microsoft Windows, Manual
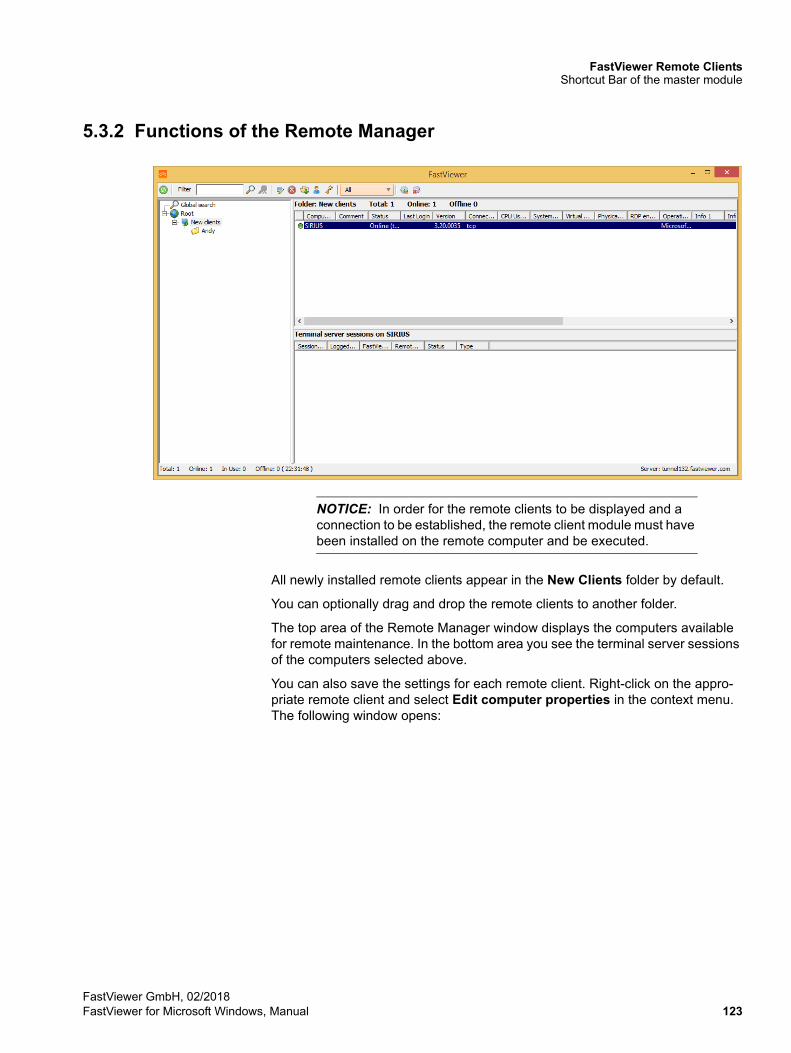
FastViewer Remote ClientsShortcut Bar of the master module
5.3.2 Functions of the Remote Manager
NOTICE: In order for the remote clients to be displayed and a connection to be established, the remote client module must have been installed on the remote computer and be executed.
All newly installed remote clients appear in the New Clients folder by default.
You can optionally drag and drop the remote clients to another folder.
The top area of the Remote Manager window displays the computers available for remote maintenance. In the bottom area you see the terminal server sessions of the computers selected above.
You can also save the settings for each remote client. Right-click on the appro-priate remote client and select Edit computer properties in the context menu. The following window opens:
FastViewer GmbH, 02/2018FastViewer for Microsoft Windows, Manual 123
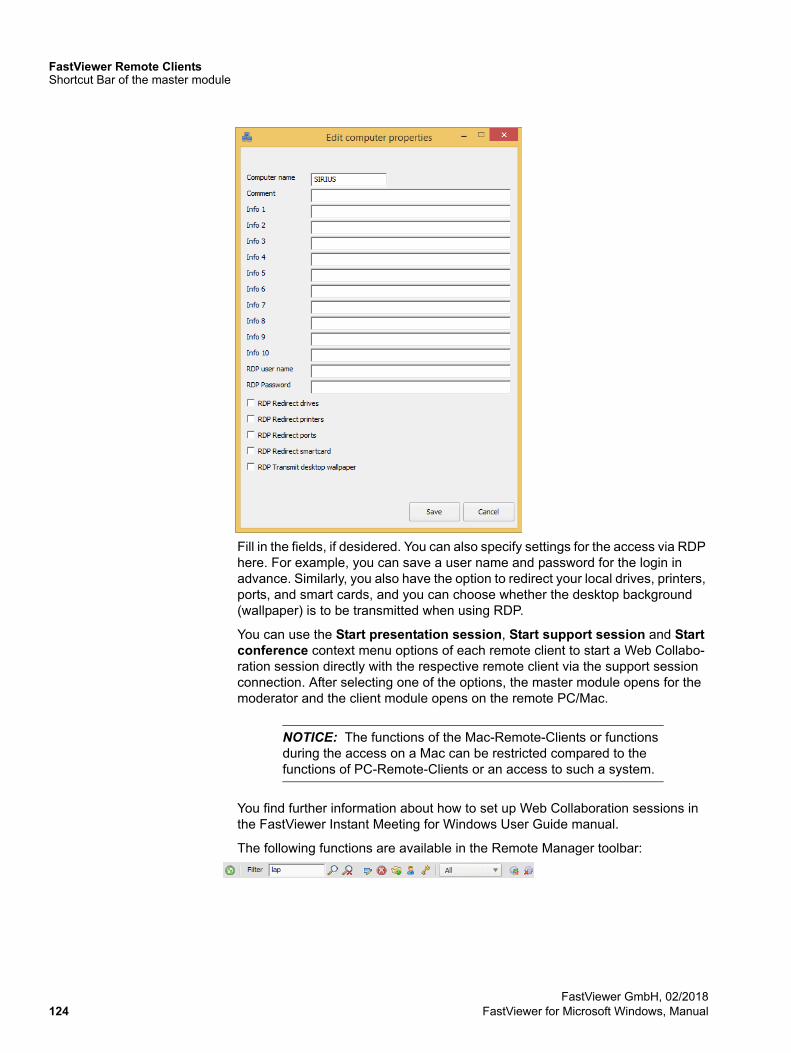
FastViewer Remote ClientsShortcut Bar of the master module
Fill in the fields, if desidered. You can also specify settings for the access via RDP here. For example, you can save a user name and password for the login in advance. Similarly, you also have the option to redirect your local drives, printers, ports, and smart cards, and you can choose whether the desktop background (wallpaper) is to be transmitted when using RDP.
You can use the Start presentation session, Start support session and Start conference context menu options of each remote client to start a Web Collabo-ration session directly with the respective remote client via the support session connection. After selecting one of the options, the master module opens for the moderator and the client module opens on the remote PC/Mac.
NOTICE: The functions of the Mac-Remote-Clients or functions during the access on a Mac can be restricted compared to the functions of PC-Remote-Clients or an access to such a system.
You find further information about how to set up Web Collaboration sessions in the FastViewer Instant Meeting for Windows User Guide manual.
The following functions are available in the Remote Manager toolbar:
FastViewer GmbH, 02/2018124 FastViewer for Microsoft Windows, Manual
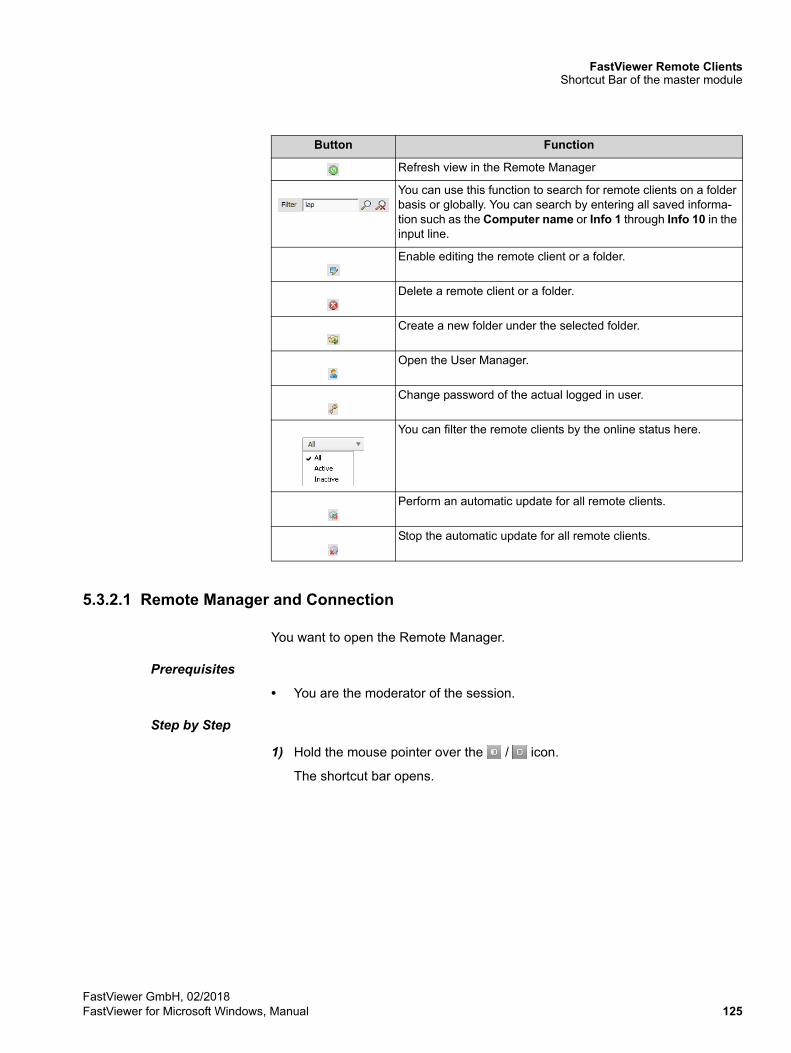
FastViewer Remote ClientsShortcut Bar of the master module
5.3.2.1 Remote Manager and Connection
You want to open the Remote Manager.
Prerequisites
• You are the moderator of the session.
Step by Step
1) Hold the mouse pointer over the / icon.
The shortcut bar opens.
Button Function
Refresh view in the Remote Manager
You can use this function to search for remote clients on a folder basis or globally. You can search by entering all saved informa-tion such as the Computer name or Info 1 through Info 10 in the input line.
Enable editing the remote client or a folder.
Delete a remote client or a folder.
Create a new folder under the selected folder.
Open the User Manager.
Change password of the actual logged in user.
You can filter the remote clients by the online status here.
Perform an automatic update for all remote clients.
Stop the automatic update for all remote clients.
FastViewer GmbH, 02/2018FastViewer for Microsoft Windows, Manual 125

FastViewer Remote ClientsShortcut Bar of the master module
2) Click on .
A login dialog opens.
3) Enter the following information in this login dialog:
a) Your name: Enter the serial number from the license notification.
b) Password: Enter the password from the license notification.
4) Click on the Login button.
The Remote Manager is opened:
The shortcut bar is closed:
5.3.2.2 Update Remote Manager
You want to update the Remote Manager.
FastViewer GmbH, 02/2018126 FastViewer for Microsoft Windows, Manual

FastViewer Remote ClientsShortcut Bar of the master module
Prerequisites
• You are the moderator of the session.
• The Remote Manager is open:
Step by Step
› Click on in the toolbar of the Remote Manager.
The view in the Remote Manager is refreshed.
5.3.2.3 Find Remote Client
You want to search for a remote client.
Prerequisites
• You are the moderator of the session.
• Remote clients are already present in your Remote Manager.
• The Remote Manager is open:
FastViewer GmbH, 02/2018FastViewer for Microsoft Windows, Manual 127

FastViewer Remote ClientsShortcut Bar of the master module
Step by Step
› Enter the search criteria in the input line in the Remote Manager toolbar.
You can use this function to search for remote clients on a folder basis or globally. You can search by entering all saved information such as the Computer name or Info 1 through Info 10 in the input line.
The results are displayed in the Remote Manager.
5.3.2.4 Edit Remote Client
You want to edit a remote client.
Prerequisites
• You are the moderator of the session.
• There is already a remote client present in your Remote Manager.
• The Remote Manager is open:
FastViewer GmbH, 02/2018128 FastViewer for Microsoft Windows, Manual

FastViewer Remote ClientsShortcut Bar of the master module
Step by Step
1) Mark the remote client to be edited in the Remote Manager.
2) Click on in the toolbar of the Remote Manager.
The following input window is opened:
FastViewer GmbH, 02/2018FastViewer for Microsoft Windows, Manual 129

FastViewer Remote ClientsShortcut Bar of the master module
3) Edit the data as desired.
You activate the respective functions by selecting check boxes. Clearing the check boxes disables the respective functions.
4) Click on Save.
The input window is closed, and all changes are saved.
5.3.2.5 Delete Remote Client
You want to delete a remote client.
Prerequisites
• You are the moderator of the session.
• There is already a remote client present in your Remote Manager.
• The Remote Manager is open:
FastViewer GmbH, 02/2018130 FastViewer for Microsoft Windows, Manual

FastViewer Remote ClientsShortcut Bar of the master module
Step by Step
1) Mark the remote client to be deleted in the Remote Manager.
2) Click on in the toolbar of the Remote Manager.
The following window opens:
3) Click Yes.
The remote client has now been deleted and will no longer appear in the Remote Manager.
5.3.2.6 Create new Folder
You want to create a new folder.
FastViewer GmbH, 02/2018FastViewer for Microsoft Windows, Manual 131

FastViewer Remote ClientsShortcut Bar of the master module
Prerequisites
• You are the moderator of the session.
• The Remote Manager is open:
Step by Step
1) Mark the folder under which the new folder is to be created in the Remote Manager.
2) Click on in the toolbar of the Remote Manager.
The following input window is opened:
3) Enter the data as desired.
4) Click on Save.
The input window is closed, and all changes are saved. The newly created folder will be under the folder marked earlier.
FastViewer GmbH, 02/2018132 FastViewer for Microsoft Windows, Manual
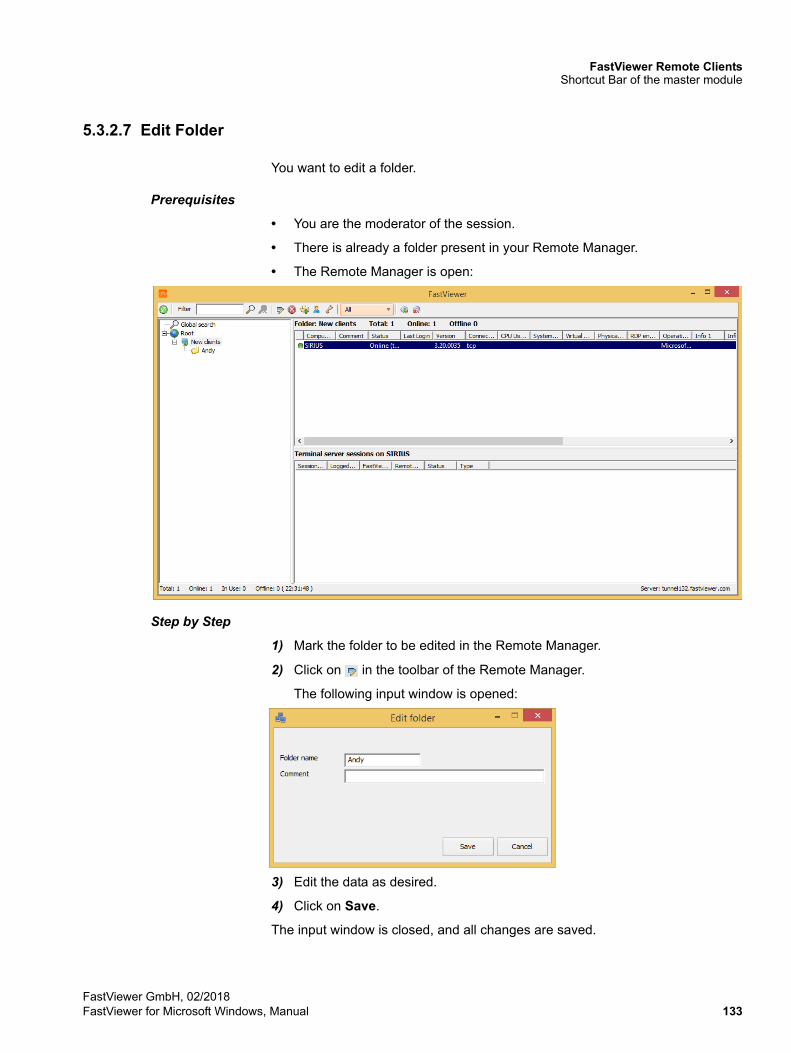
FastViewer Remote ClientsShortcut Bar of the master module
5.3.2.7 Edit Folder
You want to edit a folder.
Prerequisites
• You are the moderator of the session.
• There is already a folder present in your Remote Manager.
• The Remote Manager is open:
Step by Step
1) Mark the folder to be edited in the Remote Manager.
2) Click on in the toolbar of the Remote Manager.
The following input window is opened:
3) Edit the data as desired.
4) Click on Save.
The input window is closed, and all changes are saved.
FastViewer GmbH, 02/2018FastViewer for Microsoft Windows, Manual 133

FastViewer Remote ClientsShortcut Bar of the master module
5.3.2.8 Delete Folder
You want to delete a folder.
Prerequisites
• You are the moderator of the session.
• There is already a folder present in your Remote Manager.
• The Remote Manager is open:
Step by Step
1) Mark the folder to be deleted in the Remote Manager.
2) Click on in the toolbar of the Remote Manager.
The following window opens:
FastViewer GmbH, 02/2018134 FastViewer for Microsoft Windows, Manual

FastViewer Remote ClientsShortcut Bar of the master module
3) Click Yes.
The folder has now been deleted and will no longer appear in the Remote Manager.
5.3.2.9 Change Session Password
You wish to change the session password.
Prerequisites
• You are the moderator of the session.
• The Remote Manager is open:
Step by Step
1) Click on in the toolbar of the Remote Manager.
The following dialog opens:
FastViewer GmbH, 02/2018FastViewer for Microsoft Windows, Manual 135

FastViewer Remote ClientsShortcut Bar of the master module
2) Fill in the dialog.
3) Click on Change.
The session password has been changed successfully.
5.3.2.10 Filter Remote Clients by the Online Status
You want to filter your remote clients by the online status.
Prerequisites
• You are the moderator of the session.
• Multiple remote clients are present in the Remote Manager.
• The Remote Manager is open:
FastViewer GmbH, 02/2018136 FastViewer for Microsoft Windows, Manual

FastViewer Remote ClientsShortcut Bar of the master module
Step by Step
1) Click on in the toolbar of the Remote Manager.
A combo box opens:
2) Select the status by which you want to filter.
The Remote Manager shows the remote clients you filtered.
5.3.2.11 How to Update all Remote Clients
You want to update all remote clients.
Prerequisites
• You are the moderator of the session.
• Multiple remote clients are present in the Remote Manager.
• The Remote Manager is open:
Step by Step
› Click on in the toolbar of the Remote Manager.
All remote clients, which are online, will be updated automatically.
FastViewer GmbH, 02/2018FastViewer for Microsoft Windows, Manual 137

FastViewer Remote ClientsShortcut Bar of the master module
5.3.2.12 Stop Updating the Remote Clients
You want to stop the update of the remote client.
Prerequisites
• You are the moderator of the session.
• You have started the update of the remote client.
• The Remote Manager is open:
Step by Step
› Click on in the toolbar of the Remote Manager.
The update of the remote client is stopped.
5.3.2.13 Initiate Web Collaboration Session on a Remote Client
You wish to start a Web Collaboration session directly with the a remote client via the support session connection.
Prerequisites
• You are the moderator of the session.
• There is already a remote client present in your Remote Manager.
• The Remote Manager is open.
• An existing local session on the remote system.
FastViewer GmbH, 02/2018138 FastViewer for Microsoft Windows, Manual
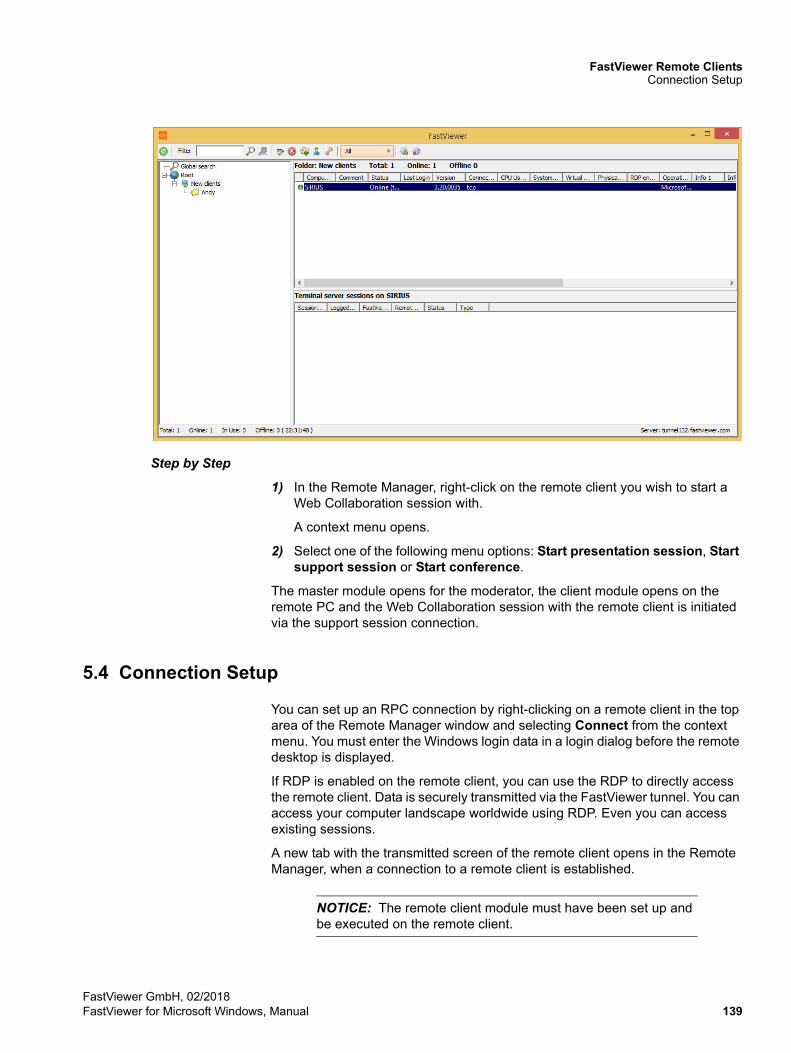
FastViewer Remote ClientsConnection Setup
Step by Step
1) In the Remote Manager, right-click on the remote client you wish to start a Web Collaboration session with.
A context menu opens.
2) Select one of the following menu options: Start presentation session, Start support session or Start conference.
The master module opens for the moderator, the client module opens on the remote PC and the Web Collaboration session with the remote client is initiated via the support session connection.
5.4 Connection Setup
You can set up an RPC connection by right-clicking on a remote client in the top area of the Remote Manager window and selecting Connect from the context menu. You must enter the Windows login data in a login dialog before the remote desktop is displayed.
If RDP is enabled on the remote client, you can use the RDP to directly access the remote client. Data is securely transmitted via the FastViewer tunnel. You can access your computer landscape worldwide using RDP. Even you can access existing sessions.
A new tab with the transmitted screen of the remote client opens in the Remote Manager, when a connection to a remote client is established.
NOTICE: The remote client module must have been set up and be executed on the remote client.
FastViewer GmbH, 02/2018FastViewer for Microsoft Windows, Manual 139

FastViewer Remote ClientsConnection Setup
5.4.1 Set Up an RPC Connection to a Remote Client
You wish to set up an RPC connection to a remote client.
Prerequisites
• You are the moderator of the session.
• A remote client with the status Online is present in the Remote Manager.
• The Remote Manager is open:
Step by Step
1) Right-click on the remote client and select Connect. Alternative: double click on the remote client.
A login dialog opens.
2) Enter the Windows login data of the remote client.
The connection is established.
A new tab with the transmitted screen of the remote client opens in the Remote Manager.
FastViewer GmbH, 02/2018140 FastViewer for Microsoft Windows, Manual

FastViewer Remote ClientsConnection Setup
Computer with an installed Remote-Client can be waked up or started via Remote-Console with Wake On LAN. It is required that at least one active Remote Client which is reachable is in the same network and is also in the same folder in the Remote Console. Please note that the hardware and software of the target computer must support the start via "Magic Packet". The required settings can be found in the device manager under network adapter in the extended properties of the network card under "Wake on Magic Packet". This value must correspond to "Enabled". Pay attention to the activation of the Wake On LAN function in the BIOS of the respective systems.
5.4.2 Set Up an RDP Connection to a Remote Client
You wish to set up an RDP connection to a remote client. Please consider that for the usage of the RDP protocol in opposite to the FastViewer connection, there are not all functions available.
Prerequisites
• You are the moderator of the session.
• A remote client with the status Online is present in the Remote Manager.
• RDP is active for the remote client.
• The Remote Manager is open:
FastViewer GmbH, 02/2018FastViewer for Microsoft Windows, Manual 141

FastViewer Remote ClientsConnection Setup
Step by Step
› Right-click on the remote client and select Connect with RDP.
The RDP connection is established.
A new tab with the transmitted screen of the remote client opens in the Remote Manager.
FastViewer GmbH, 02/2018142 FastViewer for Microsoft Windows, Manual

FastViewer Remote ClientsFunctions with the Remote Client During the Connection
5.5 Functions with the Remote Client During the Connection
As soon as you connect to a remote client, a new tab with the transmitted screen appears in the Remote Manager.
During the connection, the remote client tab provides the following functions:
NOTICE: The functions of the Mac-Remote-Clients or functions during the access on a Mac can be restricted compared to the functions of a PC-Remote-Client or an access to such a system.
Button Function
File transfer
Port mapper
Zoom mode of the transmitted screen (section or whole screen)
Session recording
FastViewer GmbH, 02/2018FastViewer for Microsoft Windows, Manual 143
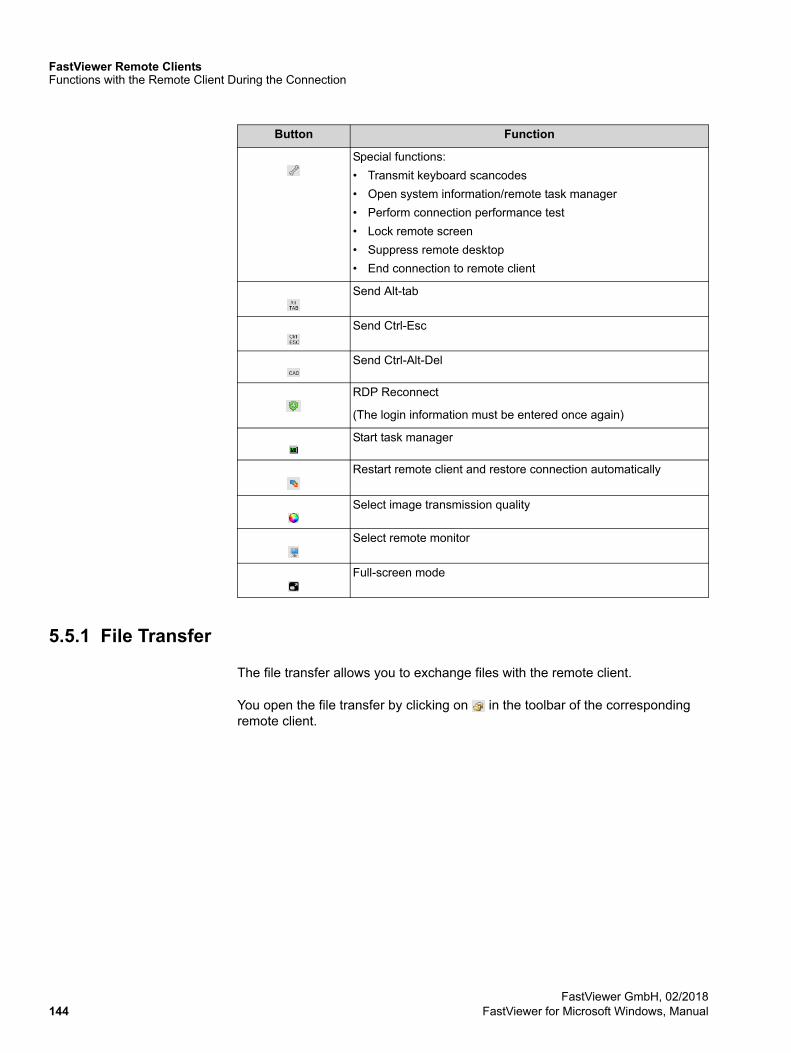
FastViewer Remote ClientsFunctions with the Remote Client During the Connection
5.5.1 File Transfer
The file transfer allows you to exchange files with the remote client.
You open the file transfer by clicking on in the toolbar of the corresponding remote client.
Special functions:
• Transmit keyboard scancodes
• Open system information/remote task manager
• Perform connection performance test
• Lock remote screen
• Suppress remote desktop
• End connection to remote client
Send Alt-tab
Send Ctrl-Esc
Send Ctrl-Alt-Del
RDP Reconnect
(The login information must be entered once again)
Start task manager
Restart remote client and restore connection automatically
Select image transmission quality
Select remote monitor
Full-screen mode
Button Function
FastViewer GmbH, 02/2018144 FastViewer for Microsoft Windows, Manual

FastViewer Remote ClientsFunctions with the Remote Client During the Connection
The file transfer buttons make available the following functions:
5.5.1.1 Open File Transfer
You wish to open the File Transfer.
Prerequisites
• You are the moderator of the session.
• You are connected to a remote client.
Step by Step
› Click on in the toolbar of the remote client tab.
The File Transfer window is opened.
Button Function
Refresh view
Upload file
Download file
Synchronize files
FastViewer GmbH, 02/2018FastViewer for Microsoft Windows, Manual 145

FastViewer Remote ClientsFunctions with the Remote Client During the Connection
5.5.1.2 Update View
You wish to update the view in the File Transfer.
Prerequisites
• You are the moderator of the session.
• You are connected to a remote client.
• The File Transfer is open.
FastViewer GmbH, 02/2018146 FastViewer for Microsoft Windows, Manual

FastViewer Remote ClientsFunctions with the Remote Client During the Connection
Step by Step
› Click on the button of the File Transfer.
The view in the file transfer window is refreshed.
5.5.1.3 Upload Files
You wish to upload a file in the File Transfer.
Prerequisites
• You are the moderator of the session.
• You are connected to a remote client.
• The File Transfer is open.
FastViewer GmbH, 02/2018FastViewer for Microsoft Windows, Manual 147

FastViewer Remote ClientsFunctions with the Remote Client During the Connection
Step by Step
1) Select the file you wish to upload in your file system.
2) open the directory on the remote (upper area) where the file should be copied.
3) Click on the button of the File Transfer.
The selected file is being uploaded.
5.5.1.4 Download Files
You wish to download a file in the File Transfer.
Prerequisites
• You are the moderator of the session.
• You are connected to a remote client.
• The File Transfer is open.
FastViewer GmbH, 02/2018148 FastViewer for Microsoft Windows, Manual

FastViewer Remote ClientsFunctions with the Remote Client During the Connection
Step by Step
1) Select the file you want to download in the file system of the remote client.
2) Open the directory on your system (bottom area) in which the file should be copied.
3) Click on the button of the File Transfer.
The selected file is being downloaded.
5.5.1.5 Synchronize contents inside folders
You wish to synchronize files in the File Transfer.
Prerequisites
• You are the moderator of the session.
• You are connected to a remote client.
• The File Transfer is open.
FastViewer GmbH, 02/2018FastViewer for Microsoft Windows, Manual 149

FastViewer Remote ClientsFunctions with the Remote Client During the Connection
Step by Step
1) Select the first file for synchronizing in your file system.
2) Select the second file for synchronizing in the file system of the remote client.
3) Click on the button of the File Transfer.
The selected files are synchronized.
5.5.2 Portmapper
The port mapper allows you for example to access machine controls or Linux devices, reroute any ports of a host to the master or query an SQL database on the host computer.
Prerequisites
• You are the moderator of the session.
• You are connected to a remote client.
FastViewer GmbH, 02/2018150 FastViewer for Microsoft Windows, Manual
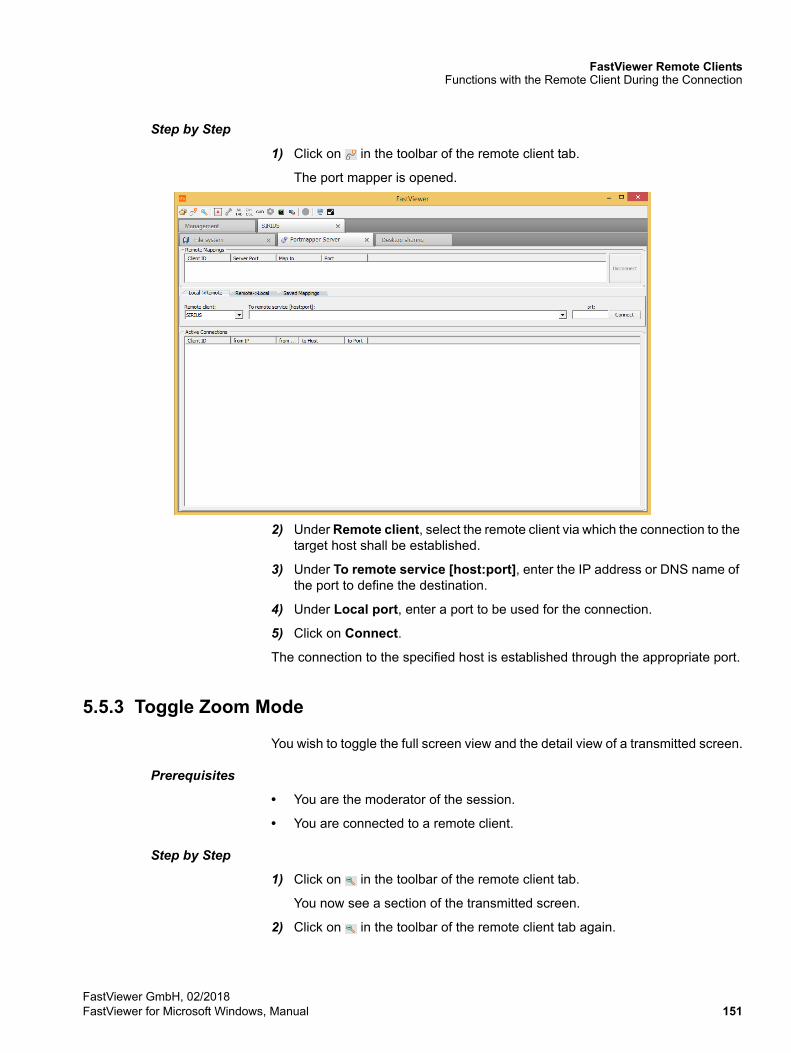
FastViewer Remote ClientsFunctions with the Remote Client During the Connection
Step by Step
1) Click on in the toolbar of the remote client tab.
The port mapper is opened.
2) Under Remote client, select the remote client via which the connection to the target host shall be established.
3) Under To remote service [host:port], enter the IP address or DNS name of the port to define the destination.
4) Under Local port, enter a port to be used for the connection.
5) Click on Connect.
The connection to the specified host is established through the appropriate port.
5.5.3 Toggle Zoom Mode
You wish to toggle the full screen view and the detail view of a transmitted screen.
Prerequisites
• You are the moderator of the session.
• You are connected to a remote client.
Step by Step
1) Click on in the toolbar of the remote client tab.
You now see a section of the transmitted screen.
2) Click on in the toolbar of the remote client tab again.
FastViewer GmbH, 02/2018FastViewer for Microsoft Windows, Manual 151

FastViewer Remote ClientsFunctions with the Remote Client During the Connection
You now see the full screen view of the transmitted screen.
5.5.4 Session Recording
The program allows you to record every session forgery-proof. Playing back a recording does not require any additional software.
NOTICE: It is not possible to record a session with RDP.
NOTICE: With a Configuration, to save the recording automati-cally under a predefined path (e.g. network drive) the recording is first saved locally. Only after the session has been terminated the recording file will be stored at the given path. The FastViewer-Module stays in this case open until the transmission of the recording file has been finished. The transmission can’t be completed if the FastViewer-Module is terminated, e.g. via task manager, before the transmission has been completed.
5.5.4.1 Record Session
You wish to record a session with the remote client.
Prerequisites
• You are the moderator of the session.
• You are connected to a remote client.
• You do not use RDP for the connection.
• You must share the screen.
Step by Step
1) Click on in the toolbar of the remote client tab.
The session is recorded.
2) Click on again.
Recording is finished and you are prompted to specify a storage location for the file.
3) Save the recording as an *.exe file.
The recording is stored in the specified location.
FastViewer GmbH, 02/2018152 FastViewer for Microsoft Windows, Manual

FastViewer Remote ClientsFunctions with the Remote Client During the Connection
5.5.4.2 Play Recorded Session
You have recorded a session with a remote client and want to play back the recording.
Prerequisites
• You have already recorded a session.
Step by Step
1) Search the Explorer for the session recording stored as an *.exe file.
2) Double-click on the storage location to play the file.
The video player opens, and you can watch the recorded session.
5.5.5 Transmit Keyboard Scancodes
Under normal circumstances, virtual keycodes are transmitted for keyboard input. However, a key code can be assigned differently for different keyboard layouts. When you use the Transmit Keyboard Scancodes function, your keyboard layout is transmitted instead of the virtual keycodes.
Prerequisites
• You are the moderator of the session.
• You are connected to a remote client.
Step by Step
1) Click on in the toolbar of the remote client tab.
2) Select Transmit Keyboard Scancodes.
Your keyboard scancodes are transmitted.
A tick next to Transmit Keyboard Scancodes indicates that this function is active.
NOTICE: Repeat the process to return to the transmission of virtual keycodes.
5.5.6 Open System Information
You want to open the system information of a remote client.
Prerequisites
• You are the moderator of the session.
• You are connected to a remote client.
FastViewer GmbH, 02/2018FastViewer for Microsoft Windows, Manual 153

FastViewer Remote ClientsFunctions with the Remote Client During the Connection
Step by Step
1) Click on in the toolbar of the remote client tab.
2) Select System information/Remote Task Manager.
The system information is opened.
5.5.7 Test Performance of a Connection
You wish to carry out a connection performance test to check the data throughput of the Internet connection to the FastViewer server.
Prerequisites
• You are the moderator of the session.
• You are connected to a remote client.
Step by Step
1) Click on in the toolbar of the remote client tab.
2) Select Test connection performance.
The following tab is opened:
FastViewer GmbH, 02/2018154 FastViewer for Microsoft Windows, Manual

FastViewer Remote ClientsFunctions with the Remote Client During the Connection
3) Select the source for the connection test in the topmost combo box. This can be a participant or the server.
4) Select the target for the connection test in the second combo box. This can be a participant or the server, provided the source and target are different.
5) Enable the options by selecting the Perform echo test and Perform connection throughput test check boxes.
6) Click on Start test.
When the Test connection performance job is accomplished, the results are displayed:
FastViewer GmbH, 02/2018FastViewer for Microsoft Windows, Manual 155

FastViewer Remote ClientsFunctions with the Remote Client During the Connection
5.5.8 Lock Remote Screen
You wish to lock the screen of a remote client.
Prerequisites
• You are the moderator of the session.
• You are connected to a remote client.
Step by Step
1) Click on in the toolbar of the remote client tab.
2) Select Lock remote screen.
The participant's screen is locked with the note This computer is being maintained remotely and locked.
A tick next to Lock remote screen indicates that this function is active.
NOTICE: Repeat the process to unlock the desktop again.
5.5.9 Blank Out the Remote Desktop
You want to suppress the remote desktop of a remote client.
FastViewer GmbH, 02/2018156 FastViewer for Microsoft Windows, Manual

FastViewer Remote ClientsFunctions with the Remote Client During the Connection
Prerequisites
• You are the moderator of the session.
• You are connected to a remote client.
Step by Step
1) Click on in the toolbar of the remote client tab.
2) Select Suppress desktop transmission.
The remote desktop is suppressed:
A tick next to Suppress desktop transmission indicates that this function is active.
NOTICE: Repeat the process to display the desktop again.
5.5.10 End Connection
You wish to end the connection to a remote client.
Prerequisites
• You are the moderator of the session.
• You are connected to a remote client.
FastViewer GmbH, 02/2018FastViewer for Microsoft Windows, Manual 157

FastViewer Remote ClientsFunctions with the Remote Client During the Connection
Step by Step
1) Click on in the toolbar of the remote client tab.
2) Select End session.
Alternatively you can close the connection by clicking on the X of the related tab.
The connection to the remote client is cleared, and the tab is closed.
5.5.11 Send Hotkeys
You want to execute key combinations on the remote client.
Prerequisites
• You are the moderator of the session.
• You are connected to a remote client.
Step by Step
› Click on one of the following buttons in the toolbar of the remote client tab:
5.5.12 Restore RDP Connection
You want to restore the RDP connection to a remote client. Please consider that for the usage of the RDP protocol in opposite to the FastViewer connection, there are not all functions available.
Prerequisites
• You are the moderator of the session.
• You are connected to a remote client via RDP.
Step by Step
› Click on in the toolbar of the remote client tab.
The connection to the remote client is restored.
Button Function
The Alt-Tab key combination is transmitted.
The Ctrl-Esc key combination is transmitted.
The Ctrl-Alt-Del key combina-tion is transmitted.
FastViewer GmbH, 02/2018158 FastViewer for Microsoft Windows, Manual

FastViewer Remote ClientsFunctions with the Remote Client During the Connection
5.5.13 Start Remote Task Manager
You wish to start the task manager of a remote client.
Prerequisites
• You are the moderator of the session.
• You are connected to a remote client.
Step by Step
› Click on in the toolbar of the remote client tab.
The task manager of the remote client starts.
5.5.14 Restart System and restore connection
You wish to restart the remote client and to restore the connection automatically.
Prerequisites
• You are the moderator of the session.
• You are connected to a remote client via RDP.
Step by Step
› Click on in the toolbar of the remote client tab.
The remote client is restarted and the connection is restored.
5.5.15 Change Screen Transmission Quality
You want to change the image transmission quality of the remote client.
Prerequisites
• You are the moderator of the session.
• You are connected to a remote client.
Step by Step
1) Click on in the toolbar of the remote client tab.
You have the following options:
2) Select the desired quality.
The screen is now transmitted in the selected quality.
FastViewer GmbH, 02/2018FastViewer for Microsoft Windows, Manual 159

FastViewer Remote ClientsFunctions with the Remote Client During the Connection
5.5.16 Select a Remote Monitor
You wish to select a monitor of the remote client for transmission.
Prerequisites
• You are the moderator of the session.
• You are connected to a remote client.
• Multiple monitors are being used at the remote client.
Step by Step
1) Click on in the toolbar of the remote client tab.
2) Select the desired monitor.
The selected monitor will be displayed.
5.5.17 Activate/Disable the Full-Screen Mode
You wish to transmit the screen as a full screen or leave the full-screen mode.
Prerequisites
• You are the moderator of the session.
• You are connected to a remote client.
Step by Step
1) Click on in the toolbar of the remote client tab.
You see the transmitted screen as a full screen now.
2) Click on in the toolbar of the full screen.
Now you see the transmitted screen on the remote client tab of the Remote Manager again.
FastViewer GmbH, 02/2018160 FastViewer for Microsoft Windows, Manual

User ManagerStart the User Manager
6 User Manager
The User Manager complies with the following requirements:
• Start of the User Manager via password-protected login and by the adminis-trator only.
• Comprehensive configuration options.
The User Manager provides the following options:
• User-dependent use of support, presentation and conference.
• Availability to login at specific times only.
• Grouping several users.
• Grouping privileges and roles.
NOTICE: The following applies for the last two points as a general principle: Each user may be a member of only one group and each group may execute only one role.
• Enforcing complex passwords.
• Determining a password minimum length.
• Importing users from the Active Directory (AD) or from a CSV (CSV = Comma Separated Values) file.
• Using Single Sign-On (SSO) after importing users from the Active Directory. Single Sign-On enables automatic login if you are already logged in at your workstation.
6.1 Start the User Manager
You wish to access the User Manager to edit settings there.
Prerequisites
• You are an administrator and can open the User Manager.
• You know the serial number and password for accessing the web portal from the license e-mail.
NOTICE: Note that several users may access the User Manager. The modification saved last will then take effect.
Step by Step
1) Hold the mouse pointer over the / icon.
The shortcut bar is opened:
FastViewer GmbH, 02/2018FastViewer for Microsoft Windows, Manual 161

User ManagerStart the User Manager
2) Click on the icon.
The logon mask for accessing the User Manager opens.
3) Enter the license number from the license e-mail in the Your name field.
4) Enter the password from the license e-mail in the Password field.
5) Click on the Login button in the logon mask.
The Usermanager dialog opens.
By selecting the appropriate tab in the header bar of the Usermanager you can access the configuration of the following properties. The configuration should be performed in the following sequence:
FastViewer GmbH, 02/2018162 FastViewer for Microsoft Windows, Manual

User ManagerUsers
• General settingsin oder to perform basic configuration and to activate user manager
• Rolecreation or selection of a role in order to set permissions
• Groupcreation or selection of a group. Previous created Roles can be assigned to the selected group. It is also possible to assign users if they are available.
• UserEach user is a part of a group. The configured permissions for the group are transferred to the user.
6.2 Users
This tab enables you to manage your users.
• All UsersThis list shows all users. The number of all existing users appears in paren-theses next to All Users.
• NameYou can enter a name for each user, which is then shown in the All Users list.
NOTICE: Every user must be in a group; otherwise, the user cannot be saved.
• User nameThe logon name of the user is shown here.
• PasswordThe password of the user is presented in an encrypted form and cannot be changed.
FastViewer GmbH, 02/2018FastViewer for Microsoft Windows, Manual 163

User ManagerUsers
• GroupYou can add the user to one of the existing groups. Select this group from the combo box.
• Select stand-in for session planner.The Select combo box allows you to select one of the other existing users as stand-in for planning your sessions.
• Valid untilBy selecting this check box and then setting a date, you can set whether a user account is to apply only for a certain time period. If you clear the check box, the user account is valid for an indefinite period.
• User may log inBy selecting or clearing this check box, you can set whether or not the user can log in. If you clear the check box, the user will no longer be able to log in.
• SMS authentication required for RemotedThis user must enter a logon code in order to access the remote console. This logon code is sent via SMS to the mobile phone number to be specified in the Mobile number field.
NOTICE: This function is currently only available for German and Austrian mobile phone numbers. Furthermore, it cannot be used for imported Active Directory Groups.
• User infoHere you can see when the user account was created and when the user last logged in.
• Import CSVClick on Import CSV to import users from an Excel list or a CSV file. The list must contain a header row, which will be skipped during the import. The values must be separated by a semicolon and be in the following order:Login name; Name; Password; Login allowedFor Login allowed, a value of 0 must be set for false and a value of 1 for true.
• Import LDAPImport LDAP can be used to import users from an Active Directory. The advantage here is that you can use the Single Sign On feature for these users. You have the option to import all users of your Active Directory or only users from organizational units. The password that the user has in the Active Directory is not imported. Consequently, when you import a new user, you should assign a default password. This password is valid only if Single Sign On is not used or if a login via the Active Directory is not possible.
NOTICE: Note that the LDAP import function for a large number of users ( > 1000) generates an increased load on your Active Directory Server, and the import may then take several minutes.
Already imported users are updated when the display name has changed, and new users have been added. The import can be performed as often as
FastViewer GmbH, 02/2018164 FastViewer for Microsoft Windows, Manual

User ManagerUsers
desired. Users who are no longer in the Active Directory are not deleted from the User Manager.
• Add UserTo create a new user, click on Add User and enter the appropriate user data.
• Delete UserSelect the user in the users list and click on Delete User.
NOTICE: The user ROOTUSER cannot be deleted or edited; only the password can be changed. The login name of the user is always your serial number, and the password is initially set to the password from your license e-mail.
6.2.1 Create new User
You want to create a new user.
Prerequisites
• You are an administrator and can open the User Manager.
• You have already created a group.
Step by Step
1) Hold the mouse pointer over the / icon.
The shortcut bar is opened:
2) Click on .
The User Manager is opened.
3) Select the User tab.
FastViewer GmbH, 02/2018FastViewer for Microsoft Windows, Manual 165

User ManagerUsers
4) Click on Add User.
5) Enter the name, user name and password for the new user.
6) Select a group.
7) If desired, appoint a deputy via the Select button.
8) Select the Valid until check box if required and then choose a date until which the user profile is valid.
9) Select the User may log in check box if required.
10) If desired, select the SMS authentication for Remoted option and enter the mobile phone number to which the short message shall be sent.
11) Click on Save.
The new user has now been created and appears in the Users list.
6.2.2 Edit User
You want to edit an user.
Prerequisites
• You are an administrator and can open the User Manager.
• You have already created a user.
FastViewer GmbH, 02/2018166 FastViewer for Microsoft Windows, Manual

User ManagerUsers
NOTICE: The user ROOTUSER cannot be edited; only the password can be adapted.
Step by Step
1) Hold the mouse pointer over the / icon.
The shortcut bar is opened:
2) Click on .
The User Manager is opened.
3) Select the User tab.
FastViewer GmbH, 02/2018FastViewer for Microsoft Windows, Manual 167

User ManagerUsers
4) Mark the user to be edited in the All Users list.
5) Enter the name, user name and password for the existing user as desired.
6) Select a group if required.
7) If desired, appoint a deputy via the Select button.
8) Select the Valid until check box if required and then choose a date until which the user profile is valid.
9) Select the User may log in check box if required.
10) If desired, select the SMS authentication for Remoted option and enter the mobile phone number to which the short message shall be sent.
11) Click on Save.
The user has now been edited and saved.
6.2.3 Delete User
You want to delete a user.
Prerequisites
• You are an administrator and can open the User Manager.
• You have already created a user.
FastViewer GmbH, 02/2018168 FastViewer for Microsoft Windows, Manual

User ManagerUsers
NOTICE: The user ROOTUSER cannot be deleted.
Step by Step
1) Hold the mouse pointer over the / icon.
The shortcut bar is opened:
2) Click on .
The User Manager is opened.
3) Select the User tab.
FastViewer GmbH, 02/2018FastViewer for Microsoft Windows, Manual 169

User ManagerUsers
4) Mark the user to be edited in the All Users list.
5) Click on Delete User.
The following security prompt appears:
6) Click Yes.
The user has now been deleted and will no longer appear in the All Users list.
6.2.4 Import Users from CSV File
You want to import users from a CSV file.
Prerequisites
• You are an administrator and can open the User Manager.
• You have created a CSV file.
NOTICE: The list must contain a headline or label row, which will be skipped during the import. The values are separated automat-ically with a semicolon as soon as it is saved as csv-file. Please note that Excel may not display the semicolon due to overview reasons, but displays the single values in columns. In order to check the correctness of the values the file can be opened with a windows editor The following sequence for the values has been defined: Login-name; Name; Password; Login allowed. For Login allowed a "0" must be used for deactivated and a "1" for actived.
Step by Step
1) Hold the mouse pointer over the / icon.
The shortcut bar is opened:
FastViewer GmbH, 02/2018170 FastViewer for Microsoft Windows, Manual

User ManagerUsers
2) Click on .
The User Manager is opened.
3) Select the User tab.
4) Click on Import CSV.
5) Select your existing CSV file from Windows Explorer.
6) Click on Open.
The following window opens:
FastViewer GmbH, 02/2018FastViewer for Microsoft Windows, Manual 171

User ManagerUsers
7) Set check marks for the contacts you want to import.
8) Select a group.
9) Click Import.
The imported users have been created and are displayed in the All Users list.
6.2.5 Import Users from an Active Directory
You want to import users from an Active Directory.
Prerequisites
• You are an administrator and can open the User Manager.
• An Active Directory is available to you.
• You have read privileges on the Active Directory.
FastViewer GmbH, 02/2018172 FastViewer for Microsoft Windows, Manual

User ManagerUsers
NOTICE: You have the option to import all users of your Active Directory or only users from organizational units. The password that the user has in the Active Directory is not imported. Conse-quently, when you import a new user, you should assign a default password. This password is valid only if Single Sign On is not used or if a login via the Active Directory is not possible.
Step by Step
1) Hold the mouse pointer over the / icon.
The shortcut bar is opened:
2) Click on .
The User Manager is opened.
3) Select the User tab.
FastViewer GmbH, 02/2018FastViewer for Microsoft Windows, Manual 173

User ManagerUsers
4) Click on Import LDAP.
The imported users have been created and are displayed in the All Users list.
NOTICE: Note that the LDAP import function for a large number of users ( > 1000) generates an increased load on your Active Directory Server, and the import may then take several minutes.
FastViewer GmbH, 02/2018174 FastViewer for Microsoft Windows, Manual

User ManagerGroup
6.3 Group
A group enables multiple users to be collectively managed as a group.
• GroupsAll existing groups are shown in this list. The number of groups is indicated in parentheses next to Groups.
• Group MembersThis list shows the users of the respective group. They are made visible on selecting a group in the Groups list.
• All usersThis list contains all existing users. The number of users appears in paren-theses next to All users. You can use the buttons here to determine which users are to be moved into the respective groups.
• NameYou can edit the group name here.
• RoleYou can set the group's role here.
NOTICE: The role must be configured in advance.
• Group can log inBy selecting or clearing this check box, you can set whether or not the group can log in. If you clear the check box, the group will no longer be able to log in.
NOTICE: In order for a user to log in, her or she must have login rights at the group level and user level.
FastViewer GmbH, 02/2018FastViewer for Microsoft Windows, Manual 175

User ManagerGroup
• Login time fromSelect this check box and then specify a time interval (from when to when) during which the group is allowed to remain logged in. If the check box is cleared, no time restriction applies.
• Select folder for RemoteClick on the plus sign to open the following window:
Here you can select a folder on the remote console that can be accessed.
• Add GroupTo create a new group, click on Add Group and enter the group data.
• Delete GroupTo delete a group, select the group in the Group list and click on Delete Group.
NOTICE: The group ROOTGROUP cannot be deleted or edited.
6.3.1 Add new Group
You want to create a new group.
Prerequisites
• You are an administrator and can open the User Manager.
• You have already created a role.
Step by Step
1) Hold the mouse pointer over the / icon.
The shortcut bar is opened:
FastViewer GmbH, 02/2018176 FastViewer for Microsoft Windows, Manual

User ManagerGroup
2) Click on .
The User Manager is opened.
3) Select the Group tab.
4) Click on Add Group.
5) Enter the name.
6) Select a role.
7) Select the Group can log in check box if required.
8) Select the Login time from / to check box if required and select a time interval to indicate until when the group may log in.
FastViewer GmbH, 02/2018FastViewer for Microsoft Windows, Manual 177

User ManagerGroup
9) Click on the Plus symbol under Select folder for Remoted.
The following window opens:
10) Select a folder for the Remoted edition.
11) Click on OK.
12) In the list of All Users, mark the users to be added to the group.
13) Click on the arrow keys to move the users to the Group Members list.
14) Click on Save.
The new group has now been created and appears in the Groups list.
6.3.2 Edit Group
You want to edit a group.
Prerequisites
• You are an administrator and can open the User Manager.
• You have already created a group.
NOTICE: The group ROOTGROUP cannot be edited.
Step by Step
1) Hold the mouse pointer over the / icon.
The shortcut bar is opened:
FastViewer GmbH, 02/2018178 FastViewer for Microsoft Windows, Manual

User ManagerGroup
2) Click on .
The User Manager is opened.
3) Select the Group tab.
4) Mark the group to be edited in the Groups list.
5) Edit the name as desired.
6) Select a role if required.
7) Select the Group can log in check box if required.
8) Select the Login time from / to check box if required and select a time interval to indicate until when the group may log in.
FastViewer GmbH, 02/2018FastViewer for Microsoft Windows, Manual 179

User ManagerGroup
9) If you want to change the folder for Remoted, click the plus sign at Select folder for Remoted.
The following window opens:
10) Select a folder for the Remoted edition if required.
11) Click on OK.
12) In the list of All Users, mark the users to be added to the group.
13) Click on the arrow keys to move the users to the Group Members list.
14) In the list of Group Members, mark the users that you want to remove from the group.
15) Click on the arrow keys to move the users into the Users list.
16) Click on Save.
The group has now been edited and saved.
6.3.3 Delete Group
You want to delete a group.
Prerequisites
• You are an administrator and can open the User Manager.
• You have already created a group.
NOTICE: The group ROOTGROUP cannot be deleted.
Step by Step
1) Hold the mouse pointer over the / icon.
The shortcut bar is opened:
FastViewer GmbH, 02/2018180 FastViewer for Microsoft Windows, Manual

User ManagerGroup
2) Click on .
The User Manager is opened.
3) Select the Group tab.
4) Mark the group to be deleted in the Groups list.
5) Click on Delete Group.
The group has now been deleted and will no longer appear in the Groups list.
FastViewer GmbH, 02/2018FastViewer for Microsoft Windows, Manual 181

User ManagerRole
6.4 Role
The purpose of roles is to combine certain rights and then assign them on the group level. This tab allows you to manage these roles.
• RolesAll existing roles are shown in this list. The number of roles is indicated in parentheses next to Roles.
• NameYou can edit the role name here.
• Use of profilesYou can select check boxes here to allow certain users the use of individual profiles. In addition, under Number of parallel sessions, you can also restrict the number of parallel sessions.
• Use User ManagerBy selecting this check box, you can choose whether certain users should be allowed to use the User Manager.
• Create objectsBy selecting this check box, you can choose whether certain users should be allowed to create new users, groups or roles.
• Edit ObjectsBy selecting this check box, you can choose whether certain users should be allowed to edit existing users, groups or roles.
• Delete ObjectBy selecting this check box, you can choose whether certain users should be allowed to delete existing users, groups or roles.
• Reset password of other usersBy selecting this check box, you can choose whether certain users should be allowed to reset the passwords of other users.
FastViewer GmbH, 02/2018182 FastViewer for Microsoft Windows, Manual

User ManagerRole
• General settingsBy selecting this check box, you can choose whether certain users should be allowed to edit the general settings.
• Show conferences of all usersBy selecting this check box, you can choose whether certain users should be allowed to show the conferences of other users.
• Move computersBy selecting this check box, you can choose whether certain users should be allowed to move existing computers to the remote console.
• Change computersBy selecting this check box, you can choose whether certain users should be allowed to edit the information of existing computers in the remote console.
• Delete computersBy selecting this check box, you can choose whether certain users should be allowed to edit existing computers in the remote console.
• Create FolderBy selecting this check box, you can choose whether certain users should be allowed to create new folders in the remote console.
• Move FolderBy selecting this check box, you can choose whether certain users should be allowed to move existing folders to the remote console.
• Edit FolderBy selecting this check box, you can choose whether certain users should be allowed to edit existing folders in the remote console.
• Delete FolderBy selecting this check box, you can choose whether certain users should be allowed to delete existing folders in the remote console.
• AutoupdateBy selecting this check box, you can choose whether certain users should be allowed to perform an auto-update of the computers.
• RDP access allowedBy selecting this check box, you can choose whether certain users should be allowed to access the remote console via RDP.
• Wake On LAN allowedComputers on which a remote client is installed can be started or woken via the remote console by using Wake On LAN. This requires at least one active remote client in the same network which is also to be found in the same folder of the remote console.
NOTICE: Please note that the hardware and software of the target computer must support the start via "Magic Packet". The settings can be found in the device manager under Network adapter in the extended properties of your network card under "Wake on Magic Packet". This value must correspond to "Enabled". Please consider also the activation of the Wake on LAN function in the BIOS of the respective system.
FastViewer GmbH, 02/2018FastViewer for Microsoft Windows, Manual 183

User ManagerRole
6.4.1 Create new Role
You want to create a new role.
Prerequisites
• You are an administrator and can open the User Manager.
Step by Step
1) Hold the mouse pointer over the / icon.
The shortcut bar is opened:
2) Click on .
The User Manager is opened.
3) Select the Role tab.
FastViewer GmbH, 02/2018184 FastViewer for Microsoft Windows, Manual
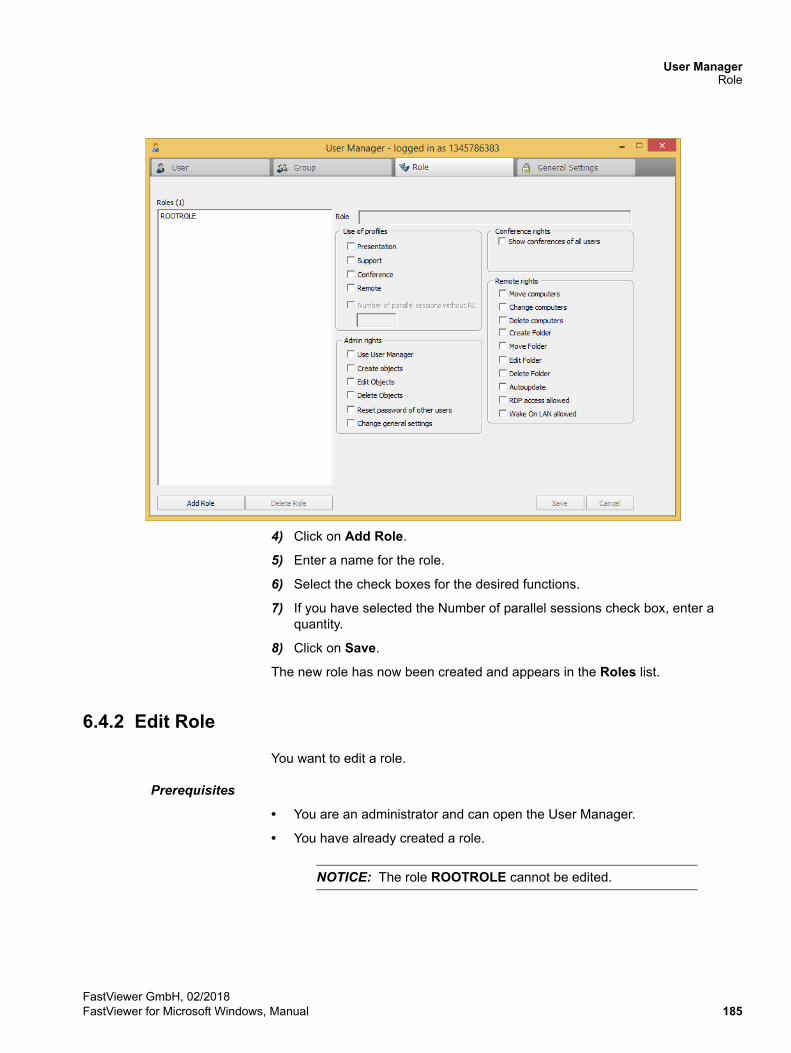
User ManagerRole
4) Click on Add Role.
5) Enter a name for the role.
6) Select the check boxes for the desired functions.
7) If you have selected the Number of parallel sessions check box, enter a quantity.
8) Click on Save.
The new role has now been created and appears in the Roles list.
6.4.2 Edit Role
You want to edit a role.
Prerequisites
• You are an administrator and can open the User Manager.
• You have already created a role.
NOTICE: The role ROOTROLE cannot be edited.
FastViewer GmbH, 02/2018FastViewer for Microsoft Windows, Manual 185

User ManagerRole
Step by Step
1) Hold the mouse pointer over the / icon.
The shortcut bar is opened:
2) Click on .
The User Manager is opened.
3) Select the Role tab.
4) Mark the role to be edited in the Roles list.
5) Edit the name of the role as desired.
FastViewer GmbH, 02/2018186 FastViewer for Microsoft Windows, Manual

User ManagerRole
6) Change the privileges:
a) Place a check mark into the empty check box by clicking it in order to enable the corresponding option.
b) Deactivate the option by clicking on the check mark displayed in the check box.
c) You can prohibit this option in general by double-clicking on the corre-sponding check box. A red cross in the check box indicates the corre-sponding status.
If a user is present in various groups, all privileges activated in the role profiles are added. With this option, a prohibited privilege from a role can be inherited by other roles assigned to this user.
7) Define the number of parallel sessions allowed.
a) Place a check mark into the empty check box Number of parallel sessions by clicking it in order to enable this option.
b) The input field is now active. Enter the desired number in the input field.
8) Click on Save.
The role has now been edited and saved.
6.4.3 Delete Role
You want to delete a role.
Prerequisites
• You are an administrator and can open the User Manager.
• You have already created a role.
NOTICE: The role ROOTROLE cannot be deleted.
Step by Step
1) Hold the mouse pointer over the / icon.
The shortcut bar is opened:
FastViewer GmbH, 02/2018FastViewer for Microsoft Windows, Manual 187

User ManagerRole
2) Click on .
The User Manager is opened.
3) Select the Role tab.
4) Mark the role to be deleted in the Roles list.
5) Click on Delete Role.
The role has now been deleted and will no longer appear in the Roles list.
FastViewer GmbH, 02/2018188 FastViewer for Microsoft Windows, Manual

User ManagerGeneral Settings
6.5 General Settings
You can specify your general preferences here:
• User Manager ON
• Use complex passwords
• Minimum password length
• Number of days before user-defined password expiry
• Use single sign on
6.5.1 General Settings
You want to change the general settings.
Prerequisites
• You are an administrator and can open the User Manager.
Step by Step
1) Hold the mouse pointer over the / icon.
The shortcut bar is opened:
FastViewer GmbH, 02/2018FastViewer for Microsoft Windows, Manual 189

User ManagerGeneral Settings
2) Click on .
The User Manager is opened.
3) Select the General Settings tab.
The settings are saved.
The following options are available:
• User Manager ONDurch Setzen des Hakens können Sie entscheiden, ob bei jedem Start des Moderatormoduls ein Login erforderlich ist. Wenn kein Haken gesetzt wird, wird der Login nur bei der Verwendung des Benutzermanagers oder der Remoted-Version angefordert. By clicking of the checkbox you can decide if
FastViewer GmbH, 02/2018190 FastViewer for Microsoft Windows, Manual

User ManagerGeneral Settings
for every start of the master module an authentication is required. If the checkbox is unchecked the authentication is prompted only at the usage of user manager or the remoted edition.
• Use complex passwordsBy clicking on this checkbox, complex passwords are forced. They must contain at least a lower case, an upper case, a digit and a special character.
• Minimum password lengthDefines the minimim number of characters a password must contain. The lowest minimal length is 1, empty passwords are not accepted.
• Number of days before user-defined password expiryAfter activating of this function the user will be reminded after the specified days to change his / her password. The last used password must not be used again. If the user changes his / her password before this time range, then the timer will be updated with X days. Please consider that this rule does not apply to the root user. Single Sign On is only affected at opening of the modules when a user opens the user administration.
• Use Single Sign OnIf you have imported users from an Active Directory then this users can use the Single Sign On. In this case it is checked at the startup of the master-module if the logged in windows user is in the user list and also has the permission to log in. If this is the case the user is logged in automatically as master.
FastViewer GmbH, 02/2018FastViewer for Microsoft Windows, Manual 191

Installing FastViewer Outlook PluginInstallation Requirements
7 Installing FastViewer Outlook Plugin
Installing FastViewer Outlook Plugin.
Using the FastViewer Outlook Plugin requires it to have been installed locally on the PC the Outlook of which shall serve for using this feature. With the aid of Outlook Plugin appointments can be scheduled which contain directly the link to the session. Furthermore it is possible to start the master module directly from Outlook to initiate an ad-hoc session.
7.1 Installation Requirements
The required SSL certificate with private key must have been deposited. You find further information about using a secure https connection in this manual.
The FastViewer Outlook Plugin is available for 32-bit and 64-bit versions of Microsoft Outlook.
The FastViewer Outlook Plugin is released for the following Microsoft Outlook versions:
• Microsoft Outlook 2003
• Microsoft Outlook 2007
• Microsoft Outlook 201032-bit version and 64-bit version
• Microsoft Outlook 201332-bit version and 64-bit version
• Microsoft Outlook 201632-bit version and 64-bit version
7.2 Provide the Installation File
To provide the setup file for the FastViewer Outlook Plugin proceed as follows:
Step by Step
1) Invoke the following Internet page:
https://portal.fastviewer.com
The portal page for downloading the FastViewer components opens.
FastViewer GmbH, 02/2018192 FastViewer for Microsoft Windows, Manual
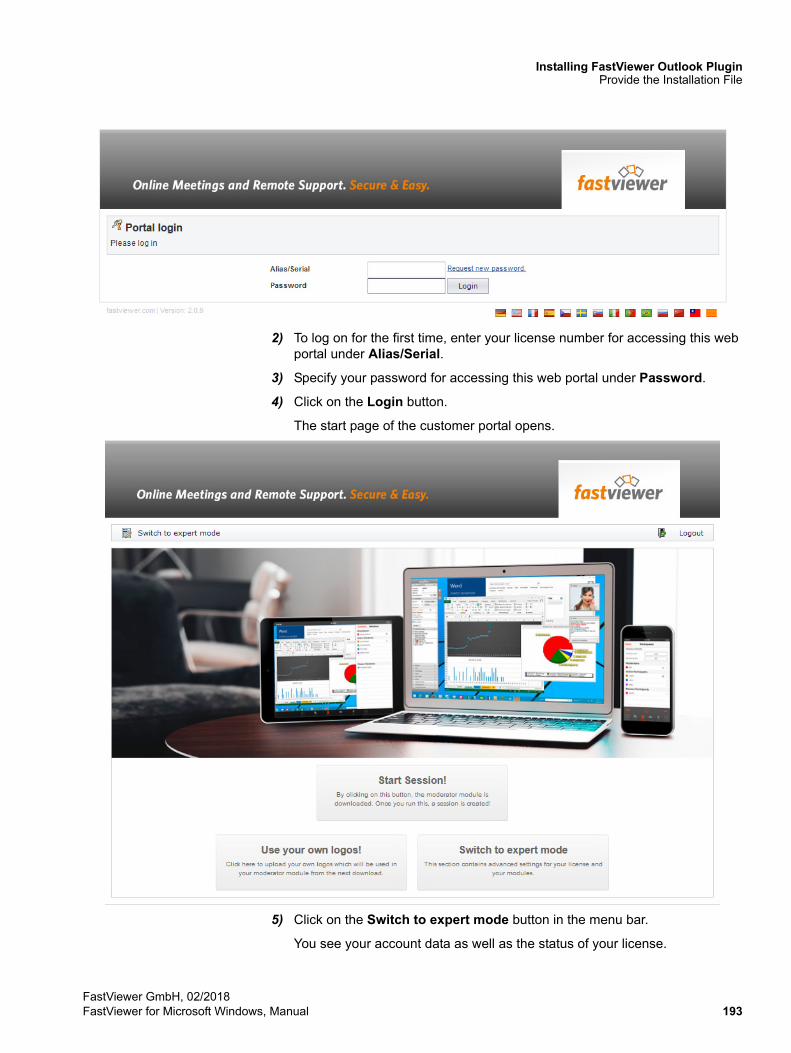
Installing FastViewer Outlook PluginProvide the Installation File
2) To log on for the first time, enter your license number for accessing this web portal under Alias/Serial.
3) Specify your password for accessing this web portal under Password.
4) Click on the Login button.
The start page of the customer portal opens.
5) Click on the Switch to expert mode button in the menu bar.
You see your account data as well as the status of your license.
FastViewer GmbH, 02/2018FastViewer for Microsoft Windows, Manual 193

Installing FastViewer Outlook PluginProvide the Installation File
6) Click on the Download button.
The following page is displayed:
FastViewer GmbH, 02/2018194 FastViewer for Microsoft Windows, Manual

Installing FastViewer Outlook PluginInstallation of the Outlook Plugin
7) In the Tools section click on the Download link next to the Outlook-AddIn <version number>.zip label.
The file download dialog opens.
8) Click on OK in the file download dialog.
The Outlook-AddIn <version number>.zip is being downloaded into your download directory.
Providing the setup files for the FastViewer Outlook Plugin is now complete.
7.3 Installation of the Outlook Plugin
Installation procedure for the FastViewer Outlook Plugin.
To install the FastViewer Outlook Plugin locally on the user computer proceed as follows:
Step by Step
1) Close Outlook
2) Start the WebConference Outlook Addin Setup.exe installation file.
FastViewer GmbH, 02/2018FastViewer for Microsoft Windows, Manual 195
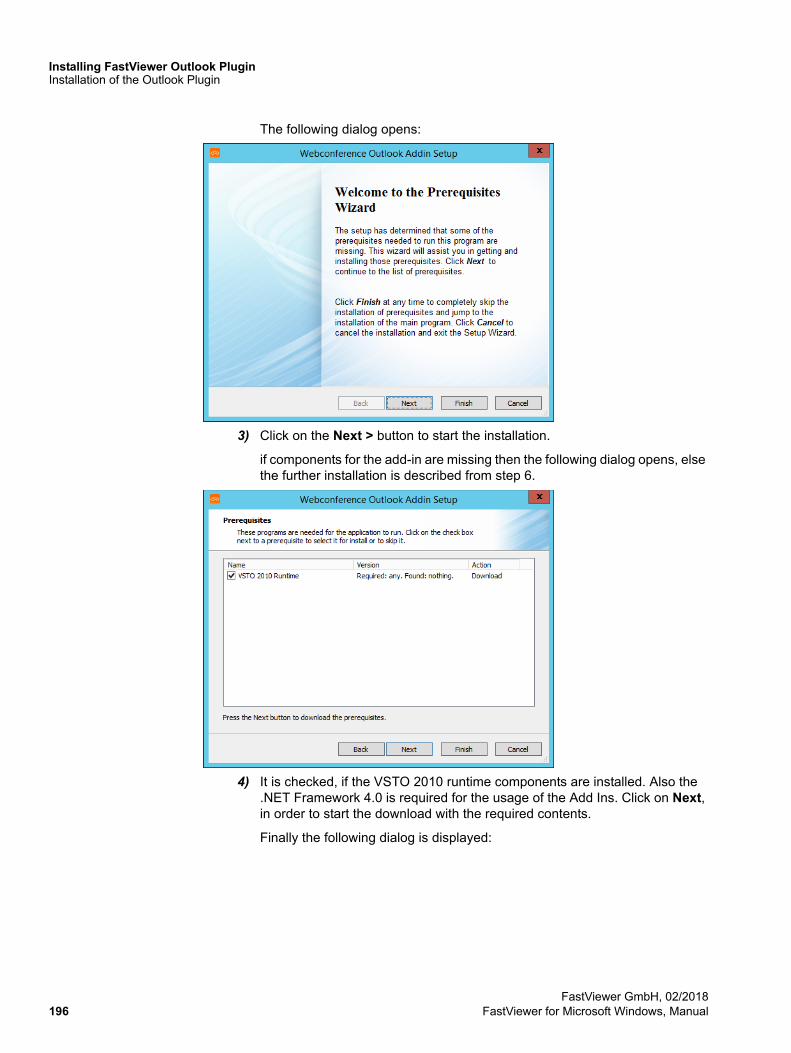
Installing FastViewer Outlook PluginInstallation of the Outlook Plugin
The following dialog opens:
3) Click on the Next > button to start the installation.
if components for the add-in are missing then the following dialog opens, else the further installation is described from step 6.
4) It is checked, if the VSTO 2010 runtime components are installed. Also the .NET Framework 4.0 is required for the usage of the Add Ins. Click on Next, in order to start the download with the required contents.
Finally the following dialog is displayed:
FastViewer GmbH, 02/2018196 FastViewer for Microsoft Windows, Manual

Installing FastViewer Outlook PluginInstallation of the Outlook Plugin
5) After confirmation of the license terms via Click on the checkbox "I have read and accept the license terms." and then a Click on Install installation process of the VSTO 2010 runtime components is started. Afterwards a dialog is displayed with the message "Installation is Complete", Please confirm with button Finish.
When all installation requirements are fulfilled the installation of the Add In is started. The following dialog opens:
6) Click on Next >.
The following dialog opens:
FastViewer GmbH, 02/2018FastViewer for Microsoft Windows, Manual 197

Installing FastViewer Outlook PluginInstallation of the Outlook Plugin
7) Check in this dialog the following installation settings:
a) Eventually select another installation directory. You can change the path or you can select via Browse another directory.
b) below of the installation path you can see the available and required memory. Also the remaining memory after installation of the Add Ins is displayed.
8) Click on Next >.
The following dialog is opened:
9) Click on Install >.
The following dialog for confirmation opens:
FastViewer GmbH, 02/2018198 FastViewer for Microsoft Windows, Manual

Installing FastViewer Outlook PluginFunktionen des Outlook Plugins
10) Click on Close.
You have now performed the FastViewer Outlook Plugin installation for the selected users.
After launching Microsoft Outlook you find an additional menu called Web Conference on the menu bar. Select this menu to reach the operating and settings dialogs.
7.4 Funktionen des Outlook Plugins
After the installation the FastViewer Outlook Plugin is in the menu bar Webcon-ference available:
Reserve Opens a new invitation e-mail which can be sent to the participants. The subject/location, as the standard text of the e-mail can be adapted directly in the Outlook Plugin under Settings/Standard-Meeting settings. Thus it is ensured that each user has the possibility to design individually the invitation e-mail. Ad-hoc-Conference opens the Fastmaster module.
Settings opens a window with possibility for extended settings.
FastViewer GmbH, 02/2018FastViewer for Microsoft Windows, Manual 199

Installing FastViewer Outlook PluginFunktionen des Outlook Plugins
• Autostart moderator moduleActivate this function in order to start the master module automatically at the point in time of the session. The scheduled session starts only after the master module has been opened.
• Autostart Moderatormodul X minutes before conference startBeside the Autostart Option the master module can be started even before the point in time of the scheduled session. Specify with this function how may minutes the master module opens before the scheduled session begins.
• Show Conference Button X minutes before conference startBeside the the Autostart Option the master module can be started even before the point of time of the scheduled session. Specify with this function when it is possible to start the master module (Specify in minutes). Thus in Outlook Plugin a selection area for conferences and also a "start conference" button is provided.
• LanguageSelect the language of the Outlook-Plugin. This setting is related only to the display of the Plugin and not on the scheduled sessions and linked modules. (Default: System Language)
• Participant limit"Invited participants only" limits the maximal possible participants to the invited participants of the session. When you select "None" then the number of the maximal possible participants is limited by the maximal allowed partic-ipants of your FastViewer license.
• License NumberPlease enter here your license number.
FastViewer GmbH, 02/2018200 FastViewer for Microsoft Windows, Manual
Installing FastViewer Outlook PluginOutlook Plugin Configuration on the FastViewer Server
• License passwortPlease enter here your license password. Please consider that this is the root password which has been assigned your root user in the user administration.
• Web Conference Registration ServerThe specification of the web conference registry server needs to be adapted exclusively at usage of the hosted server solution. Please consider that this is the root password which has been assigned to your ROOTUSER in the User Management.
• Meeting defaultsThe following information will be used as contents of the invitation e-mail for the participantsSubject: Enter here the subject of the sessionLocation: Enter the location of the session
• BodyIn this area you can put the e-mail text. Via the panel "Insert client link place-holder" and "Insert webclient link placeholder" direct links can be inserted for the FastViewer Client module and to the FastViewer WebClient. These links can be used by the participants after reception of the invitation mail in order to access the FastViewer session directly.
• ProxyFastViewer uses the settings of the standard configured browser. If you want to use different settings, you can specify via this button the name of the user, and the password of the proxy server.
7.5 Outlook Plugin Configuration on the FastViewer Server
Integrate the SSL certificate on the FastViewer server if this has not been done yet.
NOTICE: To enable the FastViewer Outlook Plugin communi-cating with the FastViewer server, an SSL certificate is required for using HTTPS on the server. Install the SSL certificate on the server and bind it to the FastViewer server with the supplied "Certificate Installer". The SSL certificate must be bound to the server via port 5100.
To configure the FastViewer server for using the FastViewer Outlook Plugin proceed as follows:
Step by Step
1) Update the FastViewer server to the latest version.
2) Start a suitable text editor (Wordpad).
3) Open the settings.ini file in the text editor in the path:
<drive>:\Program Files (x86)\WebConferenceServer
FastViewer GmbH, 02/2018FastViewer for Microsoft Windows, Manual 201

Installing FastViewer Outlook PluginHow to Perform a Deployment
4) In the header area, directly under the line ExternalAddress=
enter the following two commands in the settings.ini of the FastViewer server:
a) XMLRPCsecure=true
b) XMLRPCsecureFQDN=<host.yourdomain.com> (please enter the FQDN address of the FastViewer server for <host.yourdomain.com>).
5) Restart the "Webconferenceserver" service on the FastViewer server.
6) Release the TCP port 5100 at the FastViewer server inbound.
NOTICE: Ensure that port 5100 is also released outbound on all computers on which the FastViewer Outlook Plugin is installed.
7) If required, adjust the server address under Webconference Registration-Server in the settings dialog of the FastViewer Outlook Plugin.
Configuring the FastViewer server for using the FastViewer Outlook Plugin is now complete.
7.6 How to Perform a Deployment
Installing FastViewer Outlook Plugin via a group policy.
To perform the installation of FastViewer Outlook Plugin for several computers via a deployment (mass rollout) proceed as follows:
Step by Step
1) Install the FastViewer Outlook Plugin on a test system.
2) Perform the basic configuration of FastViewer Outlook Plugin for this instal-lation in the Settings dialog. This basic configuration contains the following data:
• The start options for the web conference.
• *The license number
• *The license password
• *The name of the web conference registration server
• A subject (for example: "Web conference")
• One conference location specification (for example: "Online")
• The invitation text. For example: "You have been invited for a web conference. Please click on the following link to take part in the conference:"
The settings indicated with * are mandatory for logging the FastViewer Outlook Plugin on to the web conference registration server. You can enter the remaining configuration data locally after the installation.
FastViewer GmbH, 02/2018202 FastViewer for Microsoft Windows, Manual

Installing FastViewer Outlook PluginHow to Update or Repair the Plug-in
3) Save the settings by closing the Settings dialog.
The settings are stored in the config.ini file in the AppData directory (%appdata%\FastViewer).
NOTICE: The settings indicated with * are stored in the config.ini encrypted.
Path: <drive>:\user\<user name>\AppData\Roaming\WebConfer-enceReservationOutlookAddIn
4) Now initiate the distribution of the installation files setup.exe and WebCon-ferenceReservationOutlookAddInSetup.msi among the single client computers via a group policy.
5) Now initiate the distribution of the config.ini configuration file to the local user directory AppData (%appdata%\FastViewer) via a group policy.
Path: <drive>:\user\<user name>\AppData\Roaming\WebCon-ferenceReservationOutlookAddIn
The deployment for the Microsoft Outlook clients is complete.
7.7 How to Update or Repair the Plug-in
Updating or repairing the FastViewer Outlook Plugin via the setup.
To install a more recent application version or to perform a fresh installation because errors occured in the application, proceed as follows:
NOTICE: Before an update or upgrade installation, the old version must be uninstalled manually.
Step by Step
1) Start the Setup.exe installation file.
The following maintenance dialog opens:
FastViewer GmbH, 02/2018FastViewer for Microsoft Windows, Manual 203

Installing FastViewer Outlook PluginHow to Uninstall the Plug-in
2) Select the Repair maintenance option.
3) Click on the Finish button to initiate the selected action.
The installation routine starts. In this process, the application is installed completely anew.
7.8 How to Uninstall the Plug-in
Uninstalling FastViewer Outlook Plugin via the setup.
NOTICE: The FastViewer Outlook Plugin should be uninstalled in the usual manner via Control Panel > Programs.
To remove the FastViewer Outlook Plugin completely from your workstation via the setup proceed as follows:
Step by Step
1) Start the Setup.exe installation file.
The following maintenance dialog opens:
FastViewer GmbH, 02/2018204 FastViewer for Microsoft Windows, Manual

Installing FastViewer Outlook PluginHow to Uninstall the Plug-in
2) Select the Remove maintenance option.
3) Click on the Finish button to initiate the selected action.
The uninstallation routine starts and the application is removed completely from your system.
FastViewer GmbH, 02/2018FastViewer for Microsoft Windows, Manual 205

Installing FastViewer Outlook PluginHow to Uninstall the Plug-in
FastViewer GmbH, 02/2018206 FastViewer for Microsoft Windows, Manual
Index
"Group" tab 175"Role" tab 182"User" tab 163
Aadding a group 176application filter 88audio 98, 99
BBedienung 122
Cchanging group membership 85changing the password 78Changing the screen transmission quality 62changing the screen transmission quality 159Changing the view direction 60changing your own password 135chat 91client module 27Collapsing/expanding the sidebar 74Conference 34configuring function privileges 83configuring picture 97configuring the group membership of new
participants 85connection performance, testing 154connection setup 139Copy invitation text 43creating a new folder 132Creating a new session 53creating a role 184creating a user 165Customer portal 192
Ddeleting 130deleting a file 94deleting a folder 134deleting a group 180deleting a role 187Deleting a scheduled conference 47deleting a user 168deployment 202disconnecting 88downloading a file 93
downloading the setup file 192
Eediting 128, 138editing a folder 133editing a group 178editing a role 185Editing a scheduled conference 44editing a user 167editing general settings 189ending connection to remote client 157
FFile transfer 54fileboard 92, 93, 94filtering by online status 136functions 143
Ggeneral settings 189
Hhanding over remote control 82
Iimporting a user from a CSV file 170importing a user from the active directory 172in general 161, 192information 105Installation procedure 199installation procedure 195International telephone conference 103, 104Interrupt transmission 77interrupting remote control 69inviting participants 86
Jjoining a telephone conference 101, 104joining an audio conference 99
LLeaving/ending the web conference 49Legal notices 9locking a session 79log messages 105Login 20, 22, 26, 27, 115, 120
Mmenu functions 77
FastViewer GmbH, 02/2018FastViewer for Microsoft Windows, Manual 207

Index
monitor 90Move sidebar 74my video 95, 96, 97
Oopening 125, 161Operation 15, 108Outlook Plugin 199Outlook plug-in 192, 195, 201, 202, 203, 204
Pparticipants 79, 81, 82, 83, 84, 85, 86Planning a conference via the master module 36Planning a conference, master module 36playing a recorded session 153Playing a recorded web conference 73port mapper 150Portmapper 58Preface 9Presentation 31providing the installation files 192
Rrecording a session 152Recording a web conference 72Remote client 128, 130, 136, 137, 138, 139Remote connection 143Remote control 69Remote manager 123, 125, 127, 132, 133, 134, 135Remoted functions 150, 151, 152, 153, 154, 156, 157,
158, 159, 160renaming 84restoring the RDP connection 158, 159
Ssearching for 128selecting a monitor for transmission 90selecting a presenter 81selecting the remote monitor 160sending a message 91sending key combinations 158server configuration 201session 78, 79Session recording 72, 73Shortcut bar 52, 121Sidebar 73, 77, 106Sidebar function 78, 79, 81, 82, 83, 84, 85, 86, 88, 90,
91, 92, 93, 94, 95, 96, 97, 98, 99, 101, 103, 104, 105Sidebar function participants 88Special functions 70staring the master module with parameters 26, 120Staring the master module with start parameters 23,
116
start remote task manager 159Starting a conference via the master module 35Starting a presentation via the master module 32Starting a scheduled conference 40Starting a support session via the master module 30Starting the master module 22starting the master module 115stopping the update 138Support 29Suppressing the remote desktop 157suppressing the remote desktop 156system information 153Systemvoraussetzungen 14
Ttelephone conference 101transmitting scancodes 153transmitting the webcam video 96Types of notes 12
UUndocking/reinserting sidebar elements 75uninstallation 204updating 127, 137updating/repairing 203uploading a file 93User interface 50User manager 161, 163, 165, 167, 168, 170, 172, 175,
176, 178, 180, 182, 184, 185, 187, 189using 70
Vvideo 95
WWhiteboard 62
Zzoom mode 151, 160
FastViewer GmbH, 02/2018208 FastViewer for Microsoft Windows, Manual


![[MS-QLPB]: Quality Windows Audio/Video …MS-QLPB]-150630.pdfQuality Windows Audio/Video Experience (qWave): ... interoperability guidelines to allow entertainment devices in the home](https://img.dokumen.tips/doc/110x75/5abf22897f8b9aa3088dc027/ms-qlpb-quality-windows-audiovideo-ms-qlpb-150630pdfquality-windows-audiovideo.jpg)


![[MS-QLPB]: Quality Windows Audio/Video … Windows Audio/Video Experience (qWave): ... 2.2.2 Messages ... Quality Windows Audio/Video Experience (qWave): Layer 3 Probing Protocol](https://img.dokumen.tips/doc/110x75/5ae6b24e7f8b9a6d4f8d0f80/ms-qlpb-quality-windows-audiovideo-windows-audiovideo-experience-qwave.jpg)