Embed Size (px)
Citation preview

FAQ SHEET
Resolve Bluetooth Wireless issues on Mac OS X These troubleshooting steps goe from easy to more advanced.
Please follow the steps in order and check if the device works after each step.
Make sure you have the latest version of Mac OS
Apple is regularly improving the way Mac OS handles Bluetooth devices.
Click here for instructions on how to update Mac OS.
Make sure you have the right Bluetooth parameters
1. Navigate to the Bluetooth preference pane in System Preferences:
o Go to Apple Menu > System Preferences > Bluetooth
2. Make sure that Bluetooth is turned On.

3. In the bottom-right corner of the Bluetooth Preference window, click Advanced.
4. Make sure all three options are checked:
o Open Bluetooth Setup Assistant at startup if no keyboard is detected
o Open Bluetooth Setup Assistant at startup if no mouse or trackpad is detected
o Allow Bluetooth devices to wake this computer

o NOTE: These options ensure that Bluetooth-enabled devices can wake your Mac
and that the OS X Bluetooth Setup Assistant will launch if a Bluetooth keyboard,
mouse or trackpad is not detected as connected to your Mac.
5. Click OK.
Restart the Mac Bluetooth Connection on your Mac
1. Navigate to the Bluetooth preference pane in System Preferences:
2. Go to Apple Menu > System Preferences > Bluetooth
3. Click Turn Bluetooth Off.

4. Wait a few seconds, and then click Turn Bluetooth On.
5. Check to see if the Logitech Bluetooth device is working. If not, go to the next steps.
Remove your Logitech device from the list of devices and try to pair again
1. Navigate to the Bluetooth preference pane in System Preferences:
o Go to Apple Menu > System Preferences > Bluetooth
2. Locate your device in the Devices list, and click on the “x” to remove it.

3. Re-pair your device by following the procedure described here.
Disable the hand-off feature In some cases, disabling the iCloud hand-off functionality can help.
1. Navigate to the General preference pane in System Preferences:
o Go to Apple Menu > System Preferences > General

2. Make sure Handoff is unchecked.

Reset the Mac’s Bluetooth settings
WARNING: This will reset your Mac, and cause it to forget all of the Bluetooth devices you
have ever used. You will need to re-configure each device.
1. Make sure Bluetooth is enabled and that you can see the Bluetooth icon in the Mac Menu
Bar at the top of the screen. (You'll need to check the box Show Bluetooth in menu bar
in the Bluetooth preferences).
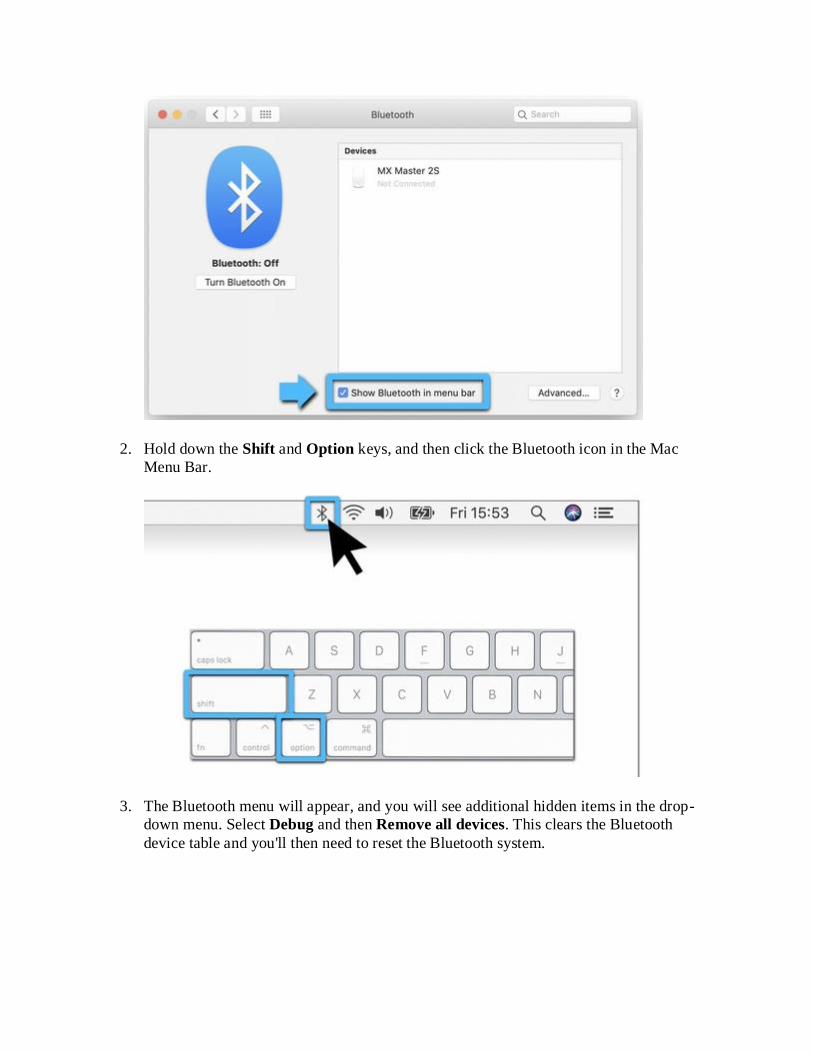
2. Hold down the Shift and Option keys, and then click the Bluetooth icon in the Mac
Menu Bar.
3. The Bluetooth menu will appear, and you will see additional hidden items in the drop-
down menu. Select Debug and then Remove all devices. This clears the Bluetooth
device table and you'll then need to reset the Bluetooth system.

4. Hold down the Shift and Option keys again, click on the Bluetooth menu and select
Debug > Reset the Bluetooth Module.
5. You will now need to repair all your Bluetooth devices following standard Bluetooth
pairing procedures.
To re-pair your Logitech Bluetooth device:
NOTE: Make sure all your Bluetooth devices are on and have enough battery life before you re-
pair them.
When the new Bluetooth Preference file is created, you'll need to re-pair all your Bluetooth
devices with your Mac. Here's how:
1. If the Bluetooth Assistant starts up, follow the onscreen instructions and you should be
ready to go. If the Assistant doesn’t appear, go to Step 3.
2. Click Apple > System Preferences, and select the Bluetooth Preference pane.
3. Your Bluetooth devices should be listed with a Pair button next to each unpaired device.
Click Pair to associate each Bluetooth device with your Mac.
4. Check to see if the Logitech Bluetooth device is working. If not, go to the next steps.
Delete your Mac’s Bluetooth Preference List
The Mac’s Bluetooth Preference List may be corrupted. This preference list stores all the
Bluetooth devices pairings and their current states. If the list is corrupted, you’ll need to remove
your Mac’s Bluetooth Preference List and re-pair your device.
NOTE: This will delete all pairing for your Bluetooth devices from your computer, not just
Logitech devices.
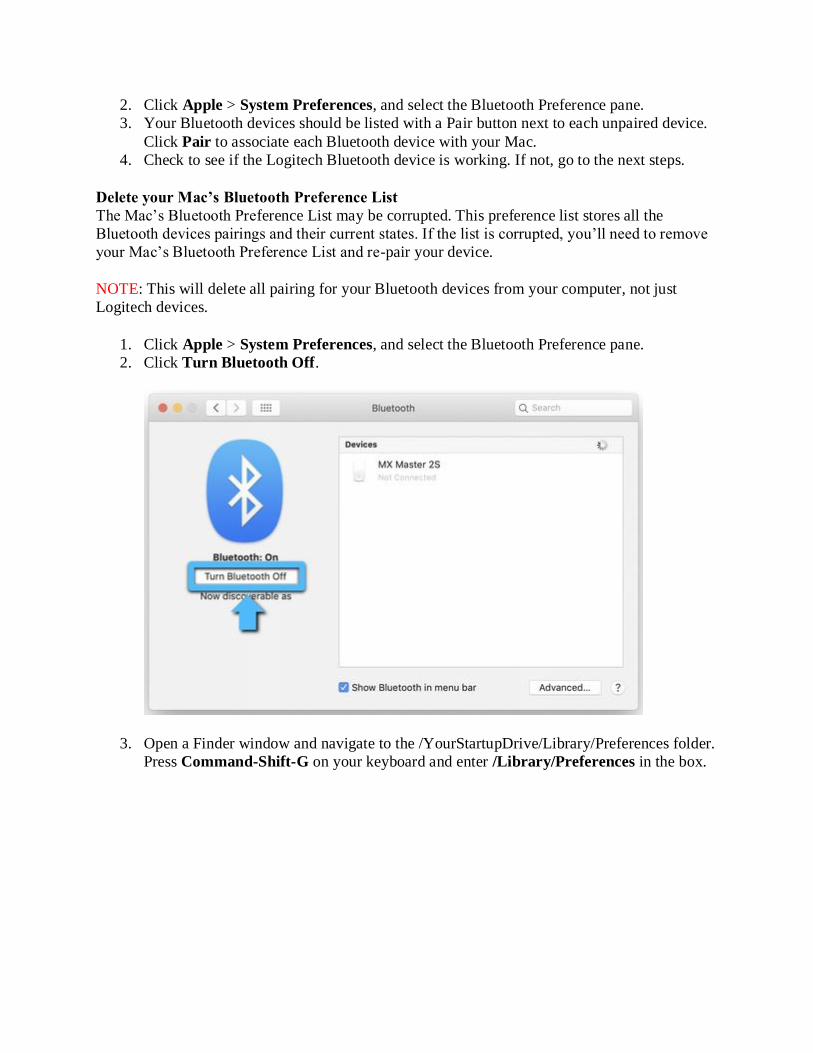
1. Click Apple > System Preferences, and select the Bluetooth Preference pane.
2. Click Turn Bluetooth Off.
3. Open a Finder window and navigate to the /YourStartupDrive/Library/Preferences folder.
Press Command-Shift-G on your keyboard and enter /Library/Preferences in the box.

Typically this will be in /Macintosh HD/Library/Preferences. If you changed the name
of your startup drive, then the first part of the pathname above will be that [Name]; for
example, [Name]/Library/Preferences.
4. With the Preferences folder open in the Finder, look for the file called
com.apple.Bluetooth.plist. This is your Bluetooth Preference List. This file could be
corrupted and cause problems with your Logitech Bluetooth device.
5. Select the com.apple.Bluetooth.plist file and drag it to the desktop.
NOTE: This will create a backup file on your desktop if you ever want to go back to the
original setup. At any point, you can drag this file back to the Preferences folder.

6. In the Finder window that is open to the /YourStartupDrive/Library/Preferences folder,
right-click the com.apple.Bluetooth.plist file and select Move to Trash from the pop-up
menu.
7. If you are asked for an administrator password to move the file to the trash, enter the
password and click OK.
8. Close any open applications, then restart your Mac.
9. Re-pair your Logitech Bluetooth device.
Close
Flow network setup check for Mac If you are having difficulty establishing a connection between two computers for Flow, follow
these steps:
1. Check both systems are connected to the internet:
o On each computer, open a web browser and check the internet connection by
navigating to a webpage.
2. Check that both computers are connected to the same network:
o Open the Terminal: For Mac, open your Applications folder, then open the
Utilities folder. Open the Terminal application.
o In the Terminal, type: Ifconfig
o Check and note the IP address and Subnet mask. Make sure that both systems are
in the same Subnet.
3. Ping the systems by IP address and make sure that ping works:
o Open the Terminal and type ping <IP address> [Where the <IP address is the IP
address of the other computer noted in Step 2 above]

4. Check that the Firewall and Ports are correct:
Ports used for Flow:
TCP 59866
UDP 59867,59868
1. Open the Terminal and type the following cmd to show the ports in use: > sudo
lsof +c15 | grep IPv4 2. This is the expected result when Flow is using the default ports:
NOTE: Normally Flow uses the default ports but if those ports are already in use
by another application Flow might use other ports.
3. Check that the Logitech Options Daemon is added automatically when Flow is
enabled:
Go to System Preferences > Security & Privacy
In Security & Privacy go to the Firewall tab. Make sure the Firewall is
on, then click on Firewall Options. (NOTE: You may have to click the
lock in the bottom left corner to make changes which will prompt you to
enter the account password.)
NOTE: On macOS, the firewall default settings automatically allow ports opened
by signed apps through the firewall. As Logi Options is signed it should be added
automatically without prompting the user.
4. This is the expected result: The two "Automatically allow" options are checked by
default. The "Logitech Options Daemon" in the list box is added automatically
when Flow is enabled.

5. If Logitech Options Daemon is not there, try the following:
Uninstall Logitech Options
Reboot your Mac
Install Logitech Options again
6. Disable Antivirus and reinstall:
Try disabling your Antivirus program first, then reinstall Logitech
Options.
Once Flow is working, re-enable your Antivirus program.
Compatible Antivirus Programs
Antivirus Program Flow discovery & Flow
Norton OK
McAfee OK
AVG OK
Kaspersky OK

Antivirus Program Flow discovery & Flow
Eset OK
Avast OK
ZoneAlarm Not Compatible
Close
Bluetooth device doesn’t work after computer wakes from sleep mode To begin troubleshooting, please select your operating system:
Windows
Mac
Windows
1. In the Device Manager, change the Bluetooth wireless adapter power settings:
o Go to Control Panel > System and Security > System > Device Manager
2. In Device Manager, expand Bluetooth Radios, right-click on the Bluetooth wireless
adapter (ex. Dell Wireless 370 adapter), and then click Properties.
3. In the Properties window, click the Power Management tab and uncheck Allow the
computer to turn off this device to save power.
4. Click OK.
5. Restart your computer to apply the change.
Macintosh
1. Navigate to the Bluetooth preference pane in System Preferences:
o Go to Apple Menu > System Preferences > Bluetooth
2. In the bottom-right corner of the Bluetooth preference window, click Advanced.
3. Make sure all three options are checked:
o Open Bluetooth Setup Assistant at startup if no keyboard is detected
o Open Bluetooth Setup Assistant at startup if no mouse or trackpad is detected
o Allow Bluetooth devices to wake this computer

NOTE: These options ensure that Bluetooth-enabled devices can wake your Mac,
and that the OS X Bluetooth Setup Assistant will launch if a Bluetooth
keyboard, mouse or trackpad is not detected as connected to your Mac.
4. Click OK.
Close
System Extension Blocked message when installing Logitech Options or LCC
Starting with macOS High Sierra (10.13), Apple has a new policy that requires user approval for
all KEXT (driver) loading. You may see a "System Extension Blocked" prompt (shown below)
during the installation of Logitech Options or Logitech Control Center (LCC).

If you see this message, you'll need to approve the loading of the KEXT manually so that your
device drivers can be loaded and you can continue to use its functionality with our software. To
allow KEXT loading, please open System Preferences and navigate to the Security & Privacy
section. On the General tab, you should see a message and an Allow button, as shown below. In
order to load the drivers, click Allow. You may need to reboot your system so the drivers are
properly loaded and the functionality of your mouse is restored.
NOTE: As set by the system, the Allow button is only available for 30 minutes. If it has been
longer than that since you installed LCC or Logitech Options, please restart your system to see
the Allow button under the Security & Privacy section of System Preferences.
NOTE: If you don’t allow KEXT loading, all devices supported by LCC will not be detected by
software. For Logitech Options, you need to perform this operation if you're using following
devices:
T651 Rechargeable trackpad
Solar Keyboard K760
K811 Bluetooth keyboard
T630/T631 Touch mouse
Bluetooth Mouse M557/M558

Close
Flow network setup check for Windows If you are having difficulty establishing a connection between two computers for Flow, follow
these steps:
1. Check both systems are connected to the internet:
o On each computer, open a web browser and check the internet connection by
navigating to a webpage.
2. Check both computers connected to the same network:
o Open a CMD prompt/Terminal: Press Win+R to open Run.
o Type cmd and click OK.
o In the CMD prompt type: ipconfig /all
o Check and note the IP address and Subnet mask. Make sure that both systems are
in the same Subnet.
3. Ping the systems by IP address and make sure that ping works:
o Open a CMD prompt and type: ping <IP address> [Where the <IP address is
the IP address of the other computer noted in step 2 above].
4. Check that the Firewall & Ports are correct:
Ports used for Flow:
TCP 59866
UDP 59867,59868
o Check the port is allowed: Press Win + R to open Run
o Type wf.msc and click OK. This should open “Windows Defender Firewall with
Advanced Security” window.
o Go to Inbound Rules and make sure LogiOptionsMgr.Exe is there and is
allowed
Example:
5. If you don't see the entry, it could be that one of your antivirus/firewall applications are
blocking the rule creation, or you were initially denied access. Try the following:
1. Disable the antivirus/firewall application temporarily.
2. Recreate the firewall inbound rule by:
Uninstalling Logitech Options

Reboot your computer
Make sure the antivirus/firewall app is still disabled
Install Logitech Options again
Re-enable your antivirus
Compatible Antivirus Programs
Antivirus Program Flow discovery & Flow
Norton OK
McAfee OK
AVG OK
Kaspersky OK
Eset OK
Avast OK
ZoneAlarm Not Compatible
Close
Backup device settings to the cloud in Logitech Options
INTRODUCTION
HOW IT WORKS
WHAT SETTINGS GET BACKED UP
CURRENT LIMITATIONS
INTRODUCTION
This feature on Logi Options allows you to backup the settings of your Options supported device
automatically to the cloud after creating an account. If you are planning to use your device on a
new computer or wish to go back to your old settings on the same computer, log into your
Options account on that computer and fetch the settings you want from a backup to setup your
device and get going.
HOW IT WORKS

When you are logged into Logitech Options with a verified account, your device settings are
automatically backed up to our cloud by default. You can manage the settings and the backups
from the Backups tab under More settings of your device (as shown in the screenshots below):
Manage settings and backups by clicking on More>Backups.

AUTOMATIC BACKUP OF SETTINGS - If the ‘Automatically create backups of
settings for all devices’ checkbox is enabled, any settings you have or modify for all of
your devices on that computer are backed up to the cloud automatically. The checkbox is
enabled by default. You can disable it if you don’t want the settings for your devices to
be backed up automatically.
‘CREATE A BACKUP NOW’ button - This button allows you to backup your current
device settings yourself, if you need to fetch them later.
‘RESTORE SETTINGS FROM BACKUP’ button - This button lets you view and
restore all the available backups you have for that device that are compatible with that
computer, as shown above.
The settings for a device are backed up for every computer that you have your device connected
to and have Logitech Options that you are logged into. Every time you make some modifications
to your device settings, they get backed up with that computer name. The backups can be
differentiated based on the following:
1. Name of the computer. (Eg. John’s Work Laptop)
2. Make and/or model of the computer. (Eg. Dell Inc., Macbook Pro (13-inch) etc.)
3. The time when the backup was made.
The desired settings can then be selected and restored accordingly.

WHAT SETTINGS GET BACKED UP
Configuration of all the buttons of your mouse
Configuration of all the keys of your keyboard
Point & Scroll settings of your mouse
Any application-specific settings of your device
WHAT SETTINGS ARE NOT BACKED UP
Flow settings
Options app settings
CURRENT LIMITATIONS

1. The device settings aren’t compatible between Windows and Mac operating systems. So,
the settings from Windows operating system cannot be applied to a computer with the
Mac operating system and vice versa.
2. There are some features that are available only on certain versions of Windows operating
system. For example, triggering Cortana through a mouse button press is a feature
available only on Windows 10 and not on Windows 7 and 8 as Cortana is not available
on those operating systems. In such cases, those features cannot be applied on the
unsupported operating systems.
Close
Bluetooth troubleshooting for Logitech Bluetooth Mice, Keyboards and Presentation
remotes
Bluetooth troubleshooting for Logitech Bluetooth Mice, Keyboards and Presentation
remotes
Try these steps to fix issues with your Logitech Bluetooth device:
My Logitech device doesn’t connect with my computer, tablet or phone
My Logitech device has already been connected, but frequently gets disconnected or
laggy
Other useful FAQs that may help to fix the issue:
Check for Bluetooth Low Energy Support
Lag and disconnections on Bluetooth devices can be due to WiFi interference
Resolve Bluetooth Wireless issues on Mac OS X
Resolve Bluetooth Wireless issues on Windows 10
Close
Device not displayed in Logitech Options If you don't see your Logitech device listed in Logitech Options, check the following:
Make sure your device is turned on.
Make sure you’re using the latest version of Logitech Options. To check the version:
1. Open Logitech Options.
2. On the bottom left of the Logitech Options, click More.
3. In the More settings window, click Software. The version of Logitech Options is
listed under About.

4. If you’re not sure if you’re using the latest version, click Check For Update.
NOTE: You can also enable the option to automatically check for updates, or visit
our download page to get the latest software.
Close
Logitech MX Ergo trackball battery and power management Your MX Ergo trackball is rechargeable. A full charge gives up to four months of battery life.
To charge your trackball:
Connect one end of the provided charging cable to the micro-USB port on the front of the
trackball, as shown below, and the other end to a USB power source.

A minimum of charging for one minute gives you enough power for a full day of use.
The battery LED pulses red when MX Ergo needs to be recharged. While charging, the LED will
blink green and then will steadily glow green when fully charged.
NOTE: You can also get on-screen notifications for your battery. See Check MX Ergo trackball
battery status for more information.
Close
Logitech MX Ergo trackball battery status LED
Your trackball has an LED to indicate battery status. When you turn your trackball on, the LED
lights up to let you know the battery status and then turns off to conserve battery power.
When the LED is:
Glowing green — Up to 100% battery life
Glowing red — 10% charge remaining
You can also use Logitech Options to receive battery status notifications, including low charge
warnings. If you don’t have Logitech Options, you can get it from the product’s Download page.
Close

Logitech MX Ergo Easy-Switch function Your MX Ergo trackball can connect to two devices at the same time. You can connect in both
channels using the Unifying receiver or Bluetooth. The Easy-Switch button on the top of the
mouse lets you to switch between two computers instantly with a single press.
To learn more about how to connect your MX Ergo using Bluetooth or Unifying receiver see
Connect the Logitech MX Ergo to a computer using Bluetooth or Unifying receiver.
The Easy-Switch channel numbers light up to provide information about the connection:
Blinking quickly: Discoverable — (The channel is discoverable and looking for a new
pairing.)
Blinking slowly: Connecting — (The channel is searching for a current connection.)
Glowing steadily: Connected.
Close
Logitech Flow status icons The status icon provides a lot of functionality and allows you to quickly know the status of your
Logitech Flow setup, including the active screen.
The Status icon can be found on the bottom right-hand of your computer screen as a small mouse
icon. The icons appear as follows, depending on your operating system:

Windows 7:
Windows 10:
Mac:
For more information on what the status icons mean, please see Determine if Logitech Flow is
enabled.
Close
Check for Bluetooth Low Energy support There are two ways to check if your computer supports Bluetooth Low Energy (also called
Bluetooth 4.0 or later):
Use Logitech Options Software to check
Check directly in the computer advanced settings (experienced users)
Use Logitech Options Software to check
You can use Logitech Options to find out if your computer supports Bluetooth Low Energy
technology. If you don’t have Logitech Options software installed, you can download it.
After you’ve installed Logitech Options, open it, and in the lower right corner, click Add
Devices. In the Add a device window, in the right pane under Set up a Bluetooth device, you
should see a message letting you know whether or not your computer supports Bluetooth Smart
devices.
If your computer doesn’t support Bluetooth Low Energy, you can still use your device using
Logitech’s Unifying technology. Click Add Unifying Device and follow the on-screen
instructions.
Check directly in the computer advanced settings
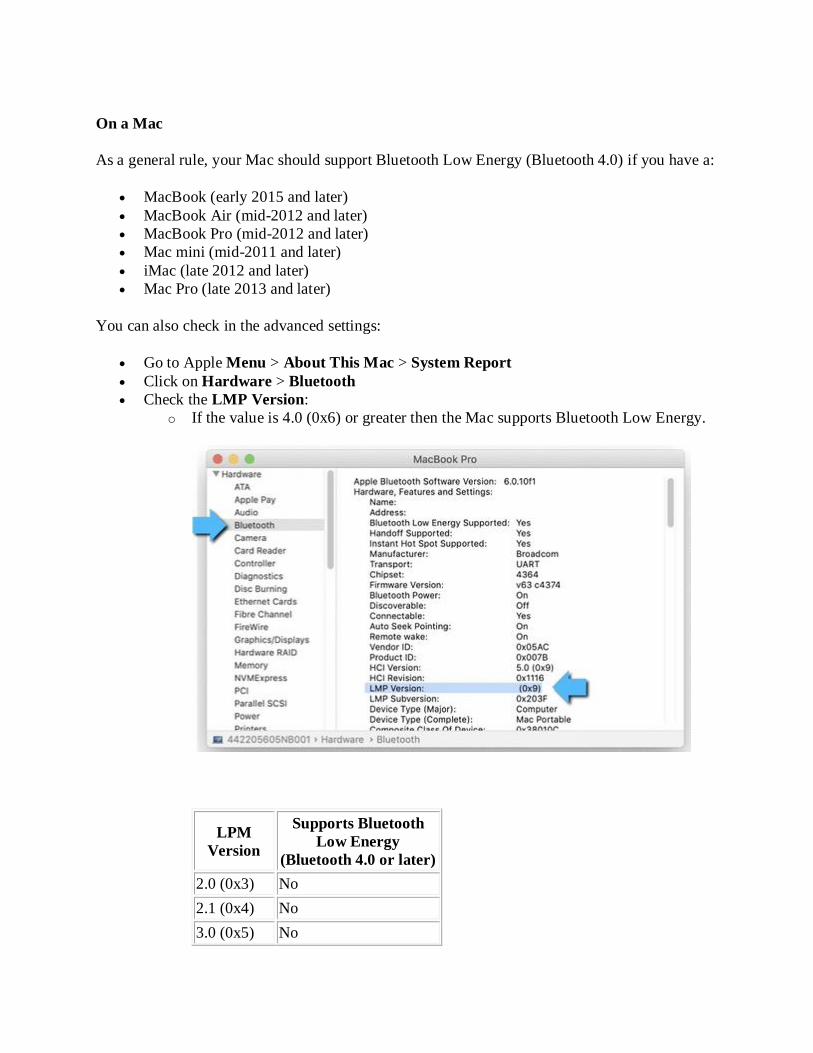
On a Mac
As a general rule, your Mac should support Bluetooth Low Energy (Bluetooth 4.0) if you have a:
MacBook (early 2015 and later)
MacBook Air (mid-2012 and later)
MacBook Pro (mid-2012 and later)
Mac mini (mid-2011 and later)
iMac (late 2012 and later)
Mac Pro (late 2013 and later)
You can also check in the advanced settings:
Go to Apple Menu > About This Mac > System Report
Click on Hardware > Bluetooth
Check the LMP Version:
o If the value is 4.0 (0x6) or greater then the Mac supports Bluetooth Low Energy.
LPM
Version
Supports Bluetooth
Low Energy
(Bluetooth 4.0 or later)
2.0 (0x3) No
2.1 (0x4) No
3.0 (0x5) No

LPM
Version
Supports Bluetooth
Low Energy
(Bluetooth 4.0 or later)
4.0 (0x6) Yes
4.1 (0x7) Yes
4.2 (0x8) Yes
5.0 (0x9) Yes
5.1 (0xa) Yes
On Windows
Go the search box on the taskbar, type Device Manager, then select from the menu. In
Device Manager, expand Bluetooth, right-click on the Bluetooth wireless adapter (ex.
“Qualcomm QCA61x4 Bluetooth” or “Intel(R) Wireless Bluetooth”), and then click
Properties.
In the Properties window, click the Advanced tab. In Firmware, if the LMP number is 6
or greater than 6 (ex. here 8) then the PC supports Bluetooth Low Energy.

Close
Logitech MX Ergo Precision Mode
When you press the Precision Mode button on your trackball, you can toggle between two
modes: Accuracy or Speed. When the Precision Mode button is switched on, the LED next to the
button will light up, to indicate Precision Mode is on. After five minutes, the LED will turn off to
conserve power.

Both modes can be customised in Logitech Options to suit your personal preferences.
Close
Unpair Logitech mouse or keyboard from a Unifying receiver
Check the battery status on the Logitech MX Ergo trackball You can use Logitech Options to check the battery level of your device. if you don’t have
Logitech Options, you can download it from the Download page.
You can also disable or enable the battery status notification in Logitech Options. This lets you
know when your battery level is critically low.
To enable the battery status notification:
1. Open Logitech Options, and in the lower left corner, click More.

2. In the More settings window, select This device, and under Notifications, check Device
battery becomes low to enable onscreen notification of your trackball's battery
status. Your change is automatically saved.
Uncheck the box to disable notification.
Close
Connect the Logitech MX Ergo to a computer using Bluetooth or Unifying receiver
MX Ergo gives you two choices of wireless connection:
Bluetooth
Unifying receiver
You will need to download and install the latest version of Logitech Options. If you don’t
already have the software, you can download it from this product’s Download page.
To connect with Bluetooth:

1. Open Logitech Options.
2. Click Add devices.
3. Make sure your trackball is turned on by sliding the button on the bottom to the right.
4. Turn the trackball over and press the Easy-Switch button to select a channel 1 or 2.
5. Press and hold the Easy-Switch button for three seconds to enter pairing mode. The LED
will start blinking quickly.

6. Find the MX ERGO in your computer’s list of Bluetooth devices and connect it.
To connect using the Unifying receiver:
1. Open Logitech Options.
2. Make sure your trackball is turned on by sliding the button on the bottom to the right.
3. Turn the trackball over and press the Easy-Switch button to select a channel 1 or 2.
4. Press and hold the Easy-Switch button for three seconds to enter pairing mode. The LED
will start blinking quickly.
5. Find the MX ERGO in your computer’s list of Bluetooth devices and connect it.
6. Open Logitech Options and click Add devices.

Close
Configure Logitech MX Ergo Application Specific settings with Logitech Options software You can use Logitech Options software to configure application-specific settings for your MX
Ergo trackball. Here's how:
1. Open Logitech Options.
NOTE: If you don’t have Logitech Options, you can download it from the product’s
Download page.
2. In the main Logitech Options window, select the MX Ergo trackball.

3. On the top right side of the window, click All Applications then slide the button to the
right to enable Application Specific settings.
4. Click Add application.

5. You will see a list of installed programs to choose from — select a program and then
customize your mouse specifically for that program.
Close
Logitech MX Ergo trackball gestures with Logitech Options The MX Ergo trackball uses a trackball for navigation instead of a traditional laser. You can use
Logitech Options software to customize the Gestures feature.
NOTE: If you don’t have Logitech Options, you can download the software from this product’s
Download page.
To customize gesture functionality:
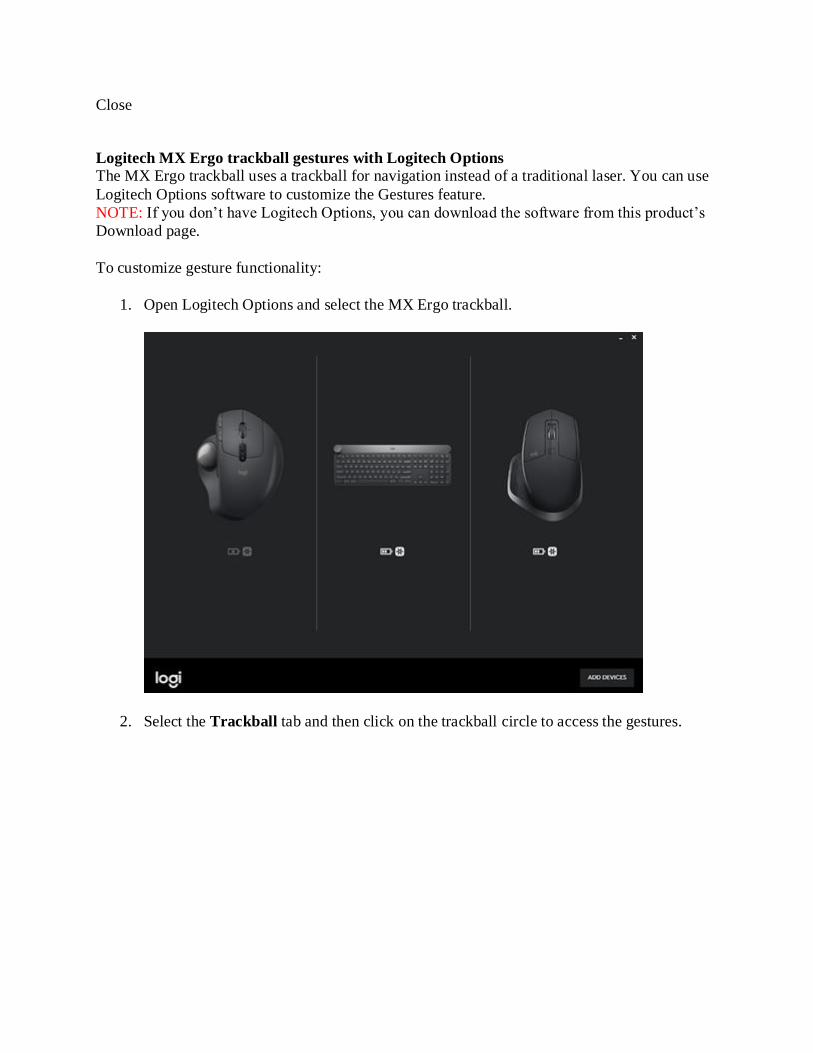
1. Open Logitech Options and select the MX Ergo trackball.
2. Select the Trackball tab and then click on the trackball circle to access the gestures.

3. The Precision Mode drop-down menu appears. Click More to display the Gesture
option and then select it.
4. The Gesture button window appears. Here you can customize the Gesture button. Your
changes are automatically saved.