Embed Size (px)
Citation preview

Installing DOS on a Windows XP Computer It is possible to run DOS on almost any computer that runs WindowsXP! You can add DOS to the computer (called “dual-booting”) without losing any of your data or having to install Windows. All you need is access to a high-speed internet connection to download CD and floppy disk images, a CD burner, and two or three blank CD’s! Your computer must be able to boot from a CD drive…almost all modern computers can. Your computer needs to be using an IDE or SATA hard disk drive. Almost all computers use one of these types of drives. If you are using a SCSI drive or a RAID array, this technique may not work for you. A floppy disk drive and a blank floppy will make this easier. I would welcome any comments, contributions, suggestions, etc., on this procedure or configuring DOS. You can contact me at [email protected]. You can use this procedure to install either FreeDOS or MSDOS 7.1. MSDOS 7.1 is the version of MS-DOS that came with Windows98SE and has several advantages over MSDOS 6.22, including support for FAT32 partitions.
FAQ (Frequently Asked Questions) 1. Why don't you just use the official Microsoft procedure for dual-booting Windows XP and DOS? For the Microsoft procedure, see: http://www.microsoft.com/windowsxp/using/setup/learnmore/multiboot.mspx The Microsoft procedure works fine. However, it requires destroying the existing Windows XP installation, installing DOS, and then reinstalling Windows XP. The computers I am dealing with have Windows XP pre-installed and I am not willing to destroy the existing installation. This procedure adds DOS without affecting the Windows XP installation. 2. Why don't you just use a commercial package to re-partition the disk and dual boot? I used to use Partition Magic for this. However, Partition Magic 8.02 did not successfully resized most of the NTFS partitions I tested it with so I sent it back. Also, Partition Magic's license agreement required buying a separate license for each computer I wanted to dual boot. The open source tools I am using, including ntfsresize, GParted, and the GAG boot loader, are stable and widely used by people who want to dual-boot Linux and Windows XP. They are also available free. I have no experience with other commercial packages. 3. How can I try this without having to download a large CD image?
The procedure calls for downloading a free bootable Linux CD. This is over 600 Megabytes. www.linuxcd.org sells copies of the CD for under $4.00 including shipping. You can order the CD from them if you would rather not mess with downloading it. There are similar resellers in Europe. You want the Mutagenix 2.6.14.2 - Freerock CD. 4. Mutagenix is Linux? Won’t I have to install Linux on my hard disk too? No. Mutagenix is a bootable CD. You just insert it in the CD-Drive and reboot. It runs strictly from the CD and memory and does not need the hard drive at all. You won't even know it's Linux except that it doesn’t look like Windows. There is a whole family of what are called "Linux Live" CD's that run strictly from CD. They allow you to run Linux without touching the hard disk AT ALL in ANY WAY. And, they are very cool! The only OS's the hard drive will contain are Windows XP and DOS. 5. My computer already dual boots Windows and another operating system (perhaps Windows XP and Windows 98). Should I use this procedure? Probably not. If your computer is currently configured to dual boot and is meeting your needs, there is no advantage to re-partitioning your disk drive using this procedure. Also, DOS requires a PRIMARY disk partition. There can only be three or four of these on a disk. Laptops often have a “maintenance” partition as the first primary partition and WindowsXP as the second primary partition. If you have another operating system, you may not be able to create a primary partition for DOS.
Technical Notes about Re-partitioning Disk I know of only one reliable way to re-size an NTFS disk partition. This is to use an open-source program called “ntfsresize.” There is a commercial product I have used called “Partition Magic.” Version 8.02 of this program DOES NOT work on the NTFS partitions I have tried. YMMV (Your Mileage May Vary). The easiest way to run ntfsresize is actually from a graphical program. There are two programs available, qtparted and GParted. We are going to use GParted running on a totally Free Linux CD called Mutagenix FreeRock. Even if you don’t know anything about Linux, you can use this CD and tool to shrink your existing NTFS partition, create a new FAT partition for DOS, and format the new partition. Note: Most desktop partitions delivered with Windows XP pre-installed have one NTFS partition which takes up the entire disk. Some desktop computers, and most laptop computers, have a small, often hidden, system partition on the disk before the NTFS partition. Do NOT, under any circumstances, modify, format, resize, relabel, or otherwise modify that partition! Do not reformat or relabel the NTFS partition either!

Installing DOS for Dual-Booting Caution!!! NOTE: This is tricky. You should DEFINITELY have a backup of the data on your computer BEFORE you perform this procedure. Your NTFS partition MUST be a primary partition, not part of an extended partition. We will confirm that this is the case later in the procedure. I am going to provide a very detailed procedure. However, if you are not comfortable with installing programs and rebooting your computer, you may want to get someone to help you with this. You will have to burn “ISO” file images to a CD. There are various ways to do this. If you do not know how to burn a “bootable” CD from an ISO image, see www.k1ea.com/hints, “Creating a Bootable DOS CD.” Downloading Mutagenix Go to www.mutagenix.org. On the left side, under “Releases”, click on 2.6.14.2-2.
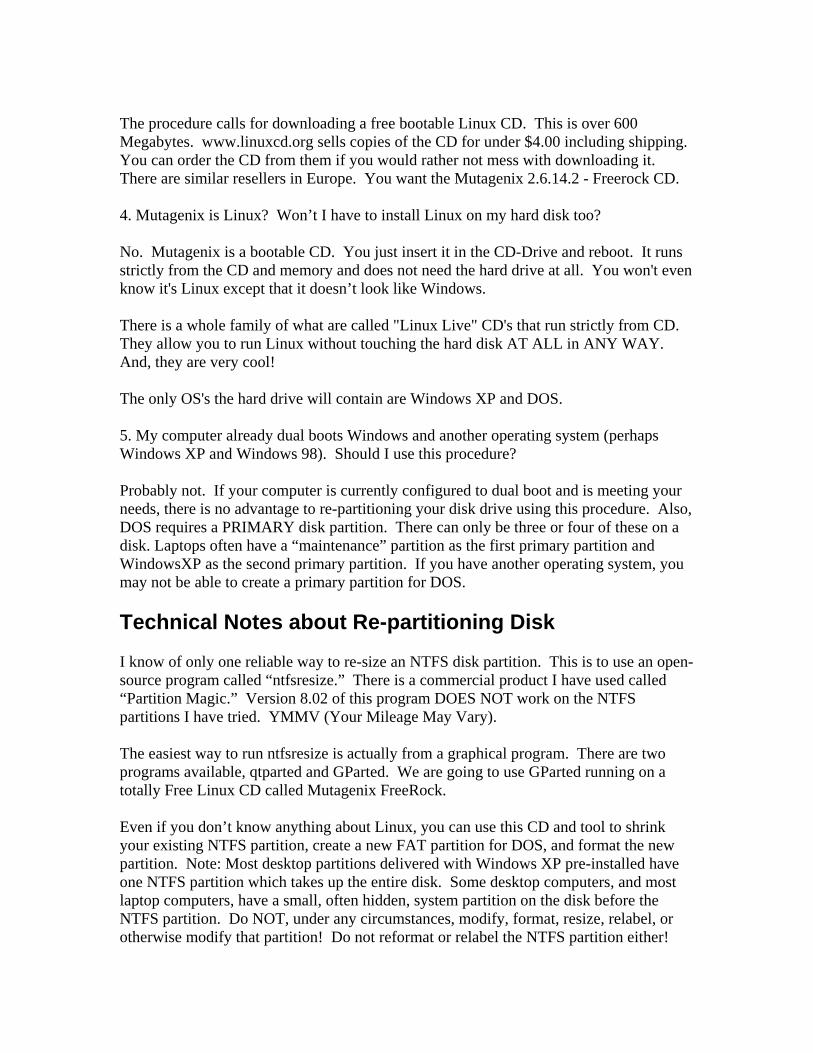
Click on “HTTP” next to Freerock Gnome 2.12.1 (Rescue CD base with FVWM alternate). Select “Save to disk” and “OK” to download the file. Save it to a convenient directory on your system…I used the Windows Desktop.
Burning the Mutagenix LiveCD You may have CD creation software on your computer that will burn an ISO image to CD and create a bootable CD. For example, Easy CD Creator (Roxio) will do this. If not, you can download the “Power Toy” from the Web and use that to burn the CD under Windows XP. For more information, see www.k1ea.com/hints, “Creating a Bootable DOS CD.” Label the CD “Mutagenix Freerock 2.6.14.2-i386-2.” Resizing your NTFS Partition Put the CD you just created in your computer’s CD drive and reboot. If a green screen instructing you to log in as “root” doesn’t appear, and Windows XP comes up instead, check your computer documentation for how to make your computer boot from CD. Enter “root” at the Mutagenix login screen. When it has finished booting, you should see the gnome desktop:

Repartitioning the Disk NOTE: This procedure should work fine for other types of Windows partitions, including FAT32, used by older Windows versions. If you have a FAT32 partition, first use the Windows XP utility “Disk Defragmenter” to defragment it. This is available under “Start->All Programs->Accessories->System Tools->Disk Defragmenter.” This step is not necessary if you have an NTFS partition. Thanks to Paul Erickson, VA7NT, for verifying that this works! NOTE: Ed Parish, K1EP, got the following error: “Filesystem check failed…” If you get this error, it indicates that the NTFS partition has at least one error. You can fix this by booting Windows XP, bringing up a “Command Prompt” (Start->All Programs->Accessories->Command Prompt) and entering “chkdsk /f c:” at the C:> prompt. You will have to reboot your computer. Now, let’s repartition your disk. There is a toolbar on the top of the Mutagenix screen. Left click on “Applications”, select “System Tools” and “GParted”. I will indicate this sort of menu selection using the following notation in this procedure: Applications->System Tools->GParted.

The main GParted screen will appear. GParted will start by scanning your system and identifying your hard disk (or disks) and finding the partitions. When it is done, you should see one or two partitions of the form /dev/hda1 and /dev/hda2. One of these will be a LARGE NTFS partition, like is shown below. Notice also that the “boot” flag is shown for the NTFS partition. This means that this partition will be booted when the computer is started and is thus your WindowsXP partition. Note that there is a smaller FAT32 partition on this hard drive. This is a recovery partition that HP put on this particular computer. Don’t do anything with this partition except unmount it (see below). If you DO NOT see one or two partitions, with the LAST partition being a large NTFS partition with the “boot” flag, do not continue with this procedure unless you are SURE that you know what you are doing.

NOTE: There is a small control in the upper right corner of the GParted application. This allows you to select multiple hard disk drives. It should not be necessary for you to use this control if you are installing DOS on a typical computer with one hard disk drive. This drive should show up as /dev/hda for a standard IDE disk drive.
Now, we may have to “unmount” the hard disk partitions. If either or both of the partitions has a white rectangle next to the partition identifier (/dev/hda1 or /dev/hda2), right click on the partition and select “unmount.” The white rectangles are shown on both partitions below, and the next figure shows the unmount menu option. Left click on the partition name (/dev/hda1 or /dev/hda2) to select it (it will be highlighted) and then right click and select “unmount.” Unmount any mounted partitions on the disk.

This shows both /dev/hda1 and /dev/hda2 as being mounted.
Next, we need to shrink the NTFS partition by 500 MB (Megabytes). This is an insignificant amount that you will never notice, but is plenty of room for a DOS installation! To shrink the partition, select it with the left mouse button (it will be highlighted) and then click the right mouse button. This must be the large NTFS partition with the “boot” flag. Select “Resize/Move”.

The resize dialog shown below will appear. Enter 500 in the “Free Space Following (MB):” block. NOTE: The partition /dev/hda2 needs to be the NTFS partition marked with the boot flag. It may be /dev/hda1 on your computer if there is not a rescue or recovery partition on your disk drive.
Press the “Resize” button in the panel above with the left mouse button. The GParted window will look like the one below, with the “Resize” operation listed and 500 Mbytes of “Unallocated” space.

Select the unallocated space with the left mouse button and with the right mouse button, select “New” to create a new partition.
Under “Filesystem”, select “fat32”. Verify that it will be created as a Primary Partition with a New Size (MB) of 500. Notice that the partition outline changed color from blue to green when the type was changed from ext2 to fat32.

Select “Add” in the Create new Partition panel. GParted should appear as shown below, with the new fat32 partition shown after the NTFS partition and two operations in the panel below the partitions.
You have not actually repartitioned the disk yet. You can select GParted->Quit and nothing will be done to the disks. Are you sure that you have a backup of any critical data from the hard disk? If so, go to the top menu and select the green check mark, labeled “Apply.” Select the Apply button in the dialog box.
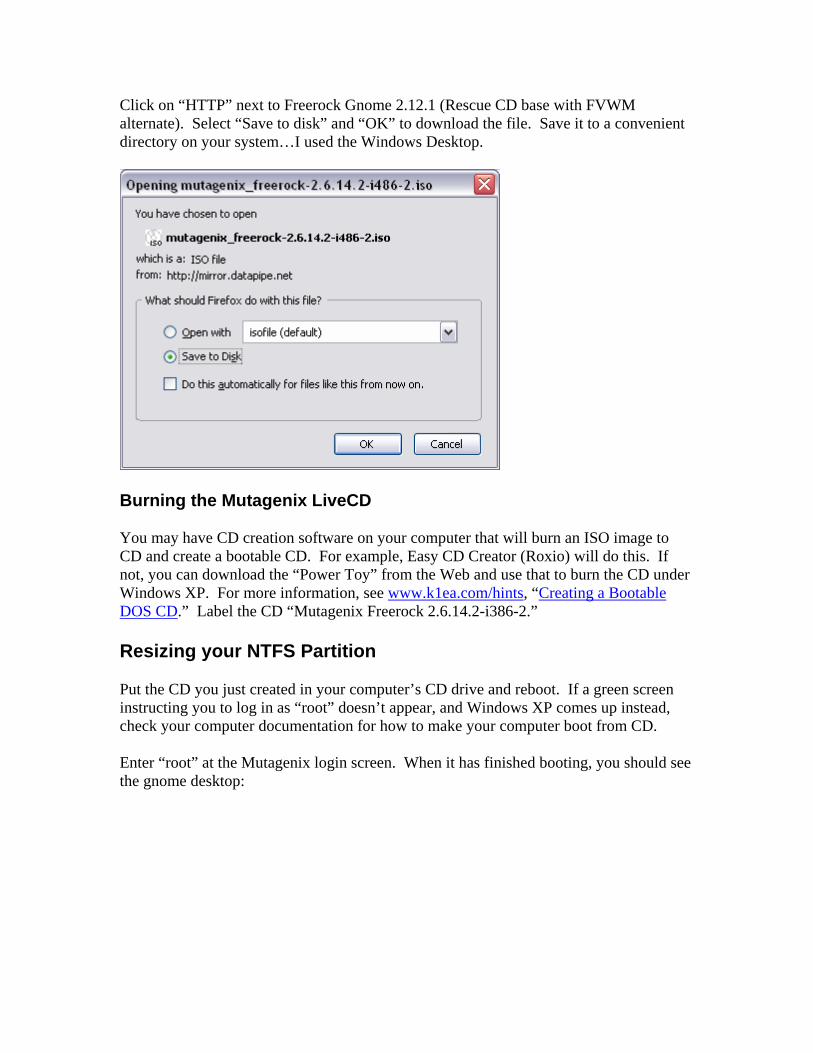
You will see a progress indication like the one below.
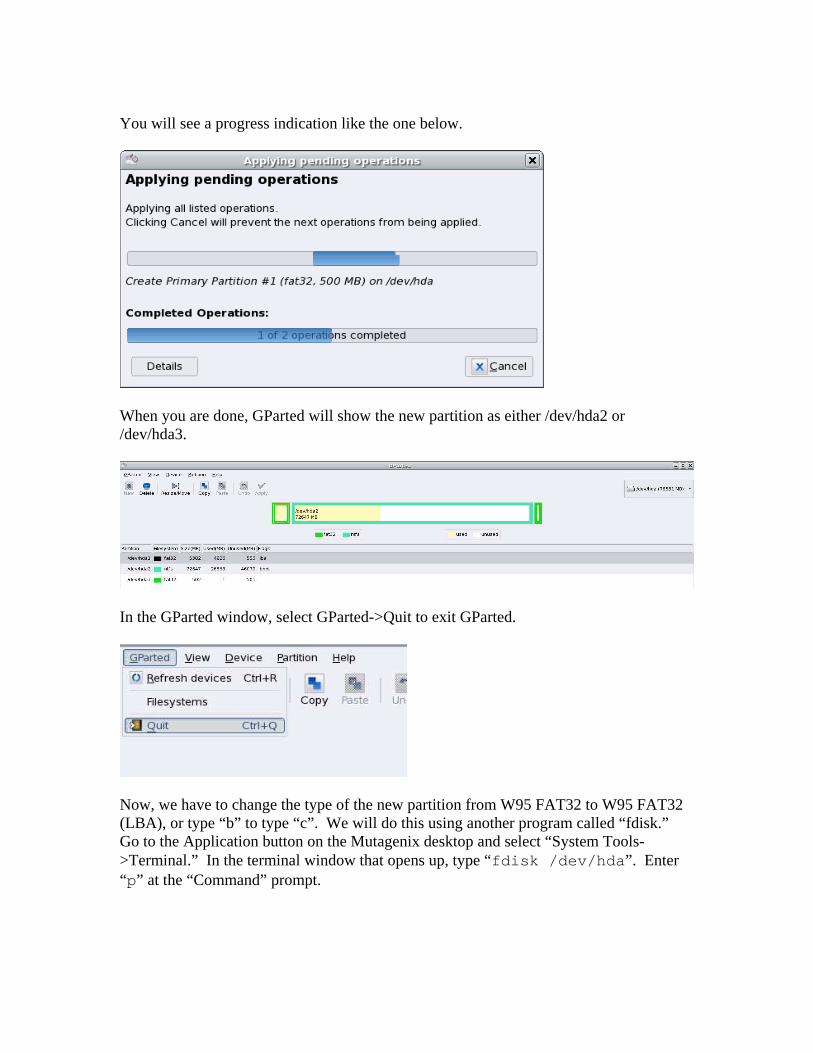
When you are done, GParted will show the new partition as either /dev/hda2 or /dev/hda3.
In the GParted window, select GParted->Quit to exit GParted.
Now, we have to change the type of the new partition from W95 FAT32 to W95 FAT32 (LBA), or type “b” to type “c”. We will do this using another program called “fdisk.” Go to the Application button on the Mutagenix desktop and select “System Tools->Terminal.” In the terminal window that opens up, type “fdisk /dev/hda”. Enter “p” at the “Command” prompt.

You should see a partition table as shown below. Note: This MUST match the partitions that GParted showed you. The last partition MUST be of type W95 FAT32 and have an “Id” of b. You must have an NTFS partition (either /dev/hda1 or /dev/hda2), with an asterisk under the “Boot” column.
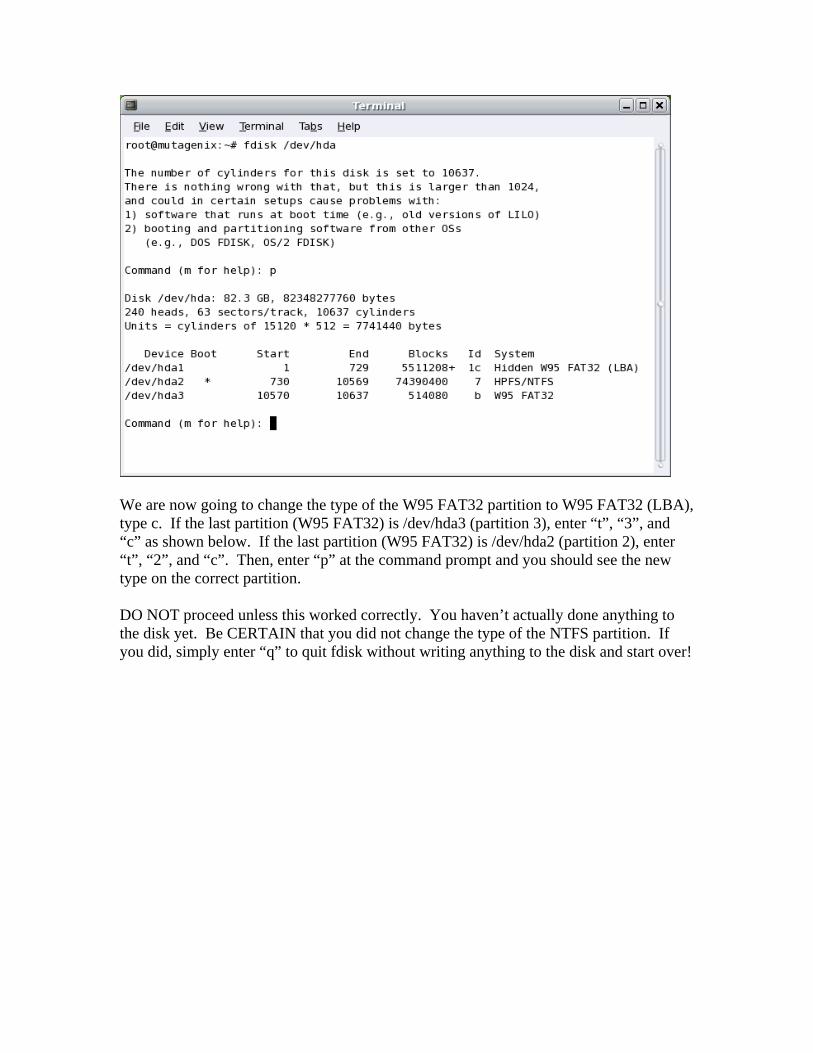
We are now going to change the type of the W95 FAT32 partition to W95 FAT32 (LBA), type c. If the last partition (W95 FAT32) is /dev/hda3 (partition 3), enter “t”, “3”, and “c” as shown below. If the last partition (W95 FAT32) is /dev/hda2 (partition 2), enter “t”, “2”, and “c”. Then, enter “p” at the command prompt and you should see the new type on the correct partition. DO NOT proceed unless this worked correctly. You haven’t actually done anything to the disk yet. Be CERTAIN that you did not change the type of the NTFS partition. If you did, simply enter “q” to quit fdisk without writing anything to the disk and start over!
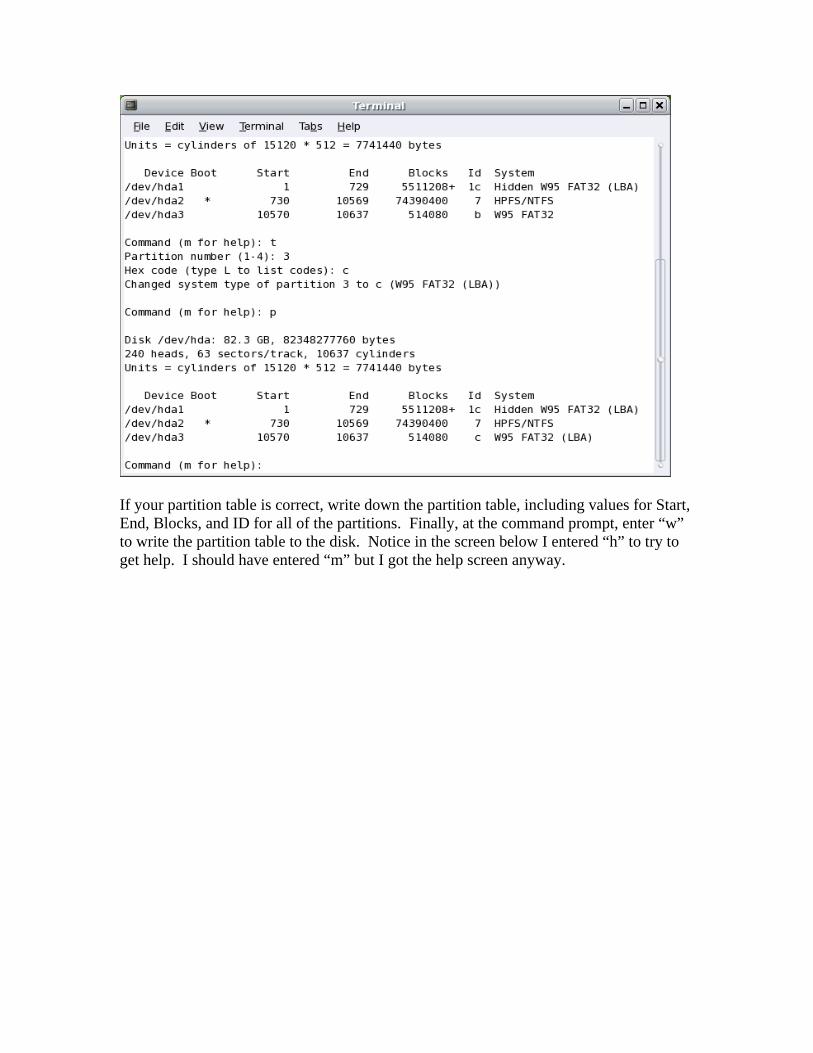
If your partition table is correct, write down the partition table, including values for Start, End, Blocks, and ID for all of the partitions. Finally, at the command prompt, enter “w” to write the partition table to the disk. Notice in the screen below I entered “h” to try to get help. I should have entered “m” but I got the help screen anyway.

Type “exit” at the ~#: prompt. Finally, exit Mutagenix and reboot. Select “Desktop->Logout” and select “Reboot your computer.” Remove the CD before the computer reboots. WindowsXP should boot.

WindowsXP is going to run a utility called “chkdisk” in a special screen when it boots. Let WindowsXP run this utility and complete a check on its NTFS partition. After Windows boots, if you select the “My Computer” icon, you will see a new disk drive. This drive will be of type FAT32 and about 500 Megabytes. (You can verify the type and size by right clicking on the new disk icon). Note that you can copy files to and from this new disk drive from WindowsXP, which is very cool! IMPORTANT: The drive letter (in this case “G:”) that Windows assigns to this partition is usually NOT the same drive letter that DOS will assign. Do NOT assume that DOS will use the same drive letters.

Install GAG Boot Loader We are going to install a simple multi-boot loader called GAG. Go to http://gag.sourceforge.net/, select “File Download” on the left side, and download GAG45D.ZIP.
You will have to select a mirror and press download.

Save the ZIP file to a convenient directory (I used the Windows Desktop). Double click on the ZIP file, then select the gag45 directory, and finally right click on the file gag.iso and select “Copy”. Paste the file to your desktop.
Burn a bootable CD from the ISO file gag.iso. Label the CD “GAG 45d Installation CD.” Put the CD in the CD drive of your computer and reboot. GAG should start. At this point, decide whether you want to install FreeDOS or MSDOS 7.1. Below, I will show your keystrokes, with the option you are selecting in parenthesis. You should see the following GAG screen:

Enter the following: 4 (Install GAG)
Space Bar (Press any key to continue)

1 (QWERTY Keyboard)
F (English)

S (Setup) At this point, you should see the main GAG screen:
A (Add a new Operating System) At this point, you will see the following options. Note that you may not have the B partition that I had on my laptop and B may be your Windows XP Partition.
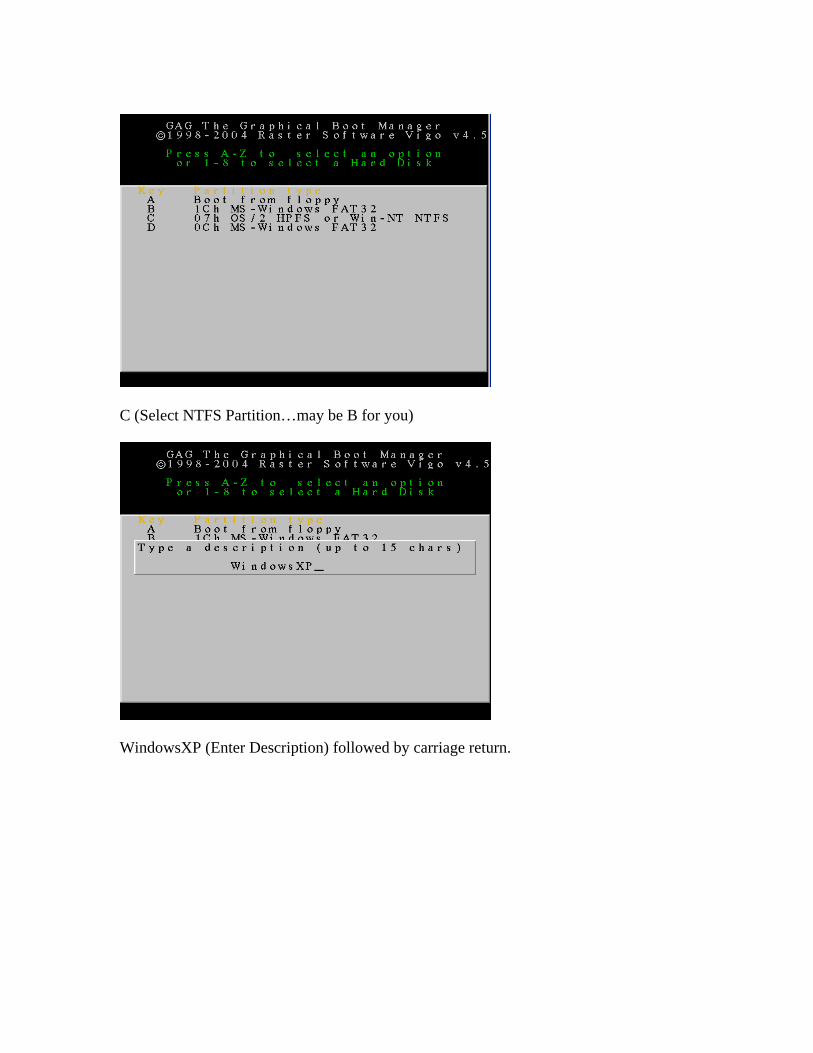
C (Select NTFS Partition…may be B for you)
WindowsXP (Enter Description) followed by carriage return.

Carriage Return Key (Password…don’t enter one) At this point, you can select the icon you want for your operating system:
C (Select Windows Icon) Now, add DOS to your menu. A (Add a new Operating System) D (Select MSDOS Partition…may be C for you) MSDOS7.1 (Enter Description) or FreeDOS (Enter Description) - depending on which you are installing

Carriage Return Key (No password) E (Select DOS Icon) H (Save in hard Disk) Carriage Return Key (Acknowledge message with OK) Remove the GAG CD and reboot. Enter the digit “2” to boot Windows XP. You will see the GAG boot loader introduction screen show below, with “Windows XP” and “MSDOS71” or “FreeDOS” shown as the operating systems.
NOTE: If you hit “S” for setup, you can add a timer and select an operating system to be automatically booted in some number of seconds if you don’t press a key. Press “2” and verify that WindowsXP boots normally. Installing MSDOS or FreeDOS At this point, you can install MSDOS 7.1 onto your new disk partition, if you have a valid license to run it on your computer. This may be an MSDOS license, a Windows98 license, or an EULA (End-User License Agreement) for another operating system with a “downgrade” or “upgrade” right. You can get all of the files you need easily from the web to do the installation, and you do not need any license or installation keys, but you

do need a license to run it legally. I have transferred several Windows98SE licenses from old, broken computers. Alternatively, you can install FreeDOS from www.freedos.org. Either way, you need to create a bootable floppy disk (or, if you don’t have a floppy drive, a bootable CD) from a disk image you can download from the internet. If you do not have a floppy drive, you will need to use this disk image to create a bootable DOS CD. See www.k1ea.com/hints, “Creating a Bootable DOS CD” for detailed directions on creating a bootable DOS CD from wbootess.exe or odin1440.img on a WindowsXP computer. Getting a bootable MSDOS 7.1 Floppy Disk Go to http://www.nerdlabs.org/bootdisks/ and click on wbootess.exe. Download this program to a convenient folder (I used the Windows Desktop). If you have a floppy drive, insert a floppy in the drive, double click on wbootess.exe and select OK in the WinImage Self Extractor. This will write the image to the disk.
Getting a Bootable FreeDOS Floppy Disk
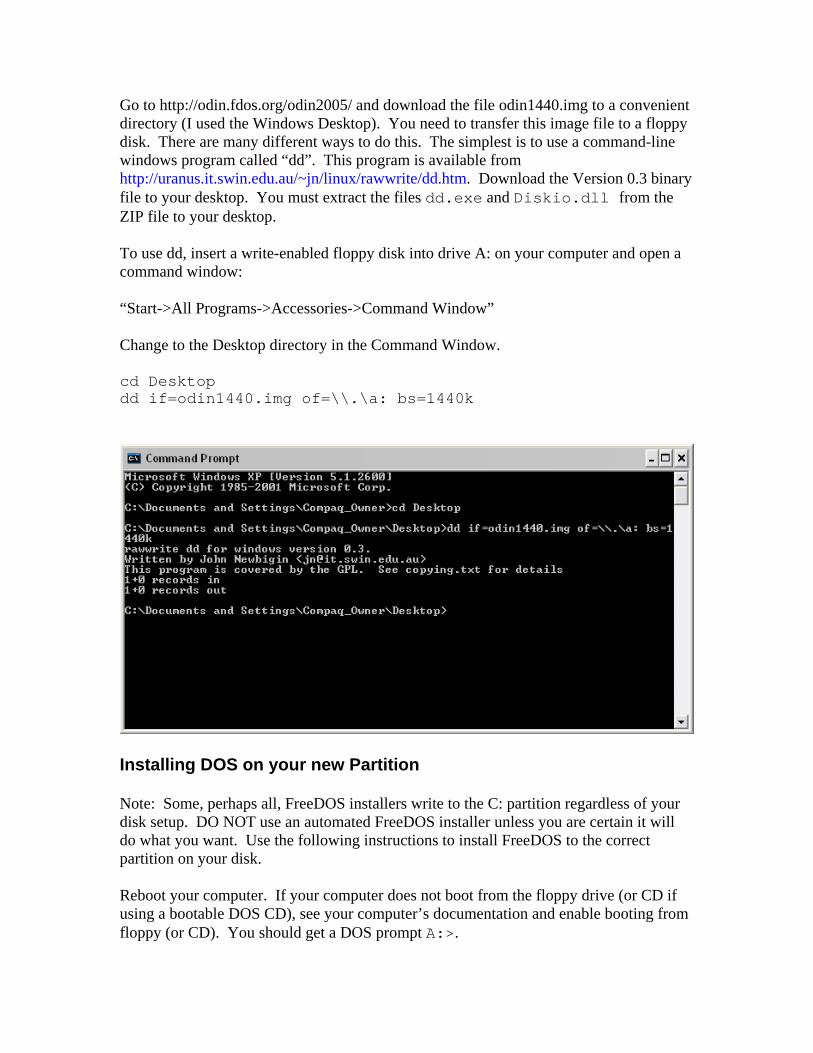
Go to http://odin.fdos.org/odin2005/ and download the file odin1440.img to a convenient directory (I used the Windows Desktop). You need to transfer this image file to a floppy disk. There are many different ways to do this. The simplest is to use a command-line windows program called “dd”. This program is available from http://uranus.it.swin.edu.au/~jn/linux/rawwrite/dd.htm. Download the Version 0.3 binary file to your desktop. You must extract the files dd.exe and Diskio.dll from the ZIP file to your desktop. To use dd, insert a write-enabled floppy disk into drive A: on your computer and open a command window: “Start->All Programs->Accessories->Command Window” Change to the Desktop directory in the Command Window. cd Desktop dd if=odin1440.img of=\\.\a: bs=1440k
Installing DOS on your new Partition Note: Some, perhaps all, FreeDOS installers write to the C: partition regardless of your disk setup. DO NOT use an automated FreeDOS installer unless you are certain it will do what you want. Use the following instructions to install FreeDOS to the correct partition on your disk. Reboot your computer. If your computer does not boot from the floppy drive (or CD if using a bootable DOS CD), see your computer’s documentation and enable booting from floppy (or CD). You should get a DOS prompt A:>.

Do a “DIR C:” to make sure that your new partition is correctly mounted. There should be no files or directories. Note that if you had a rescue partition, and your new partition was /dev/hda3, that you may see files on C:. In that case, do a “DIR D:”. You should see no files and a size of approximately 500 Mbytes. If this is not what you see, do NOT do the next step! To install DOS, enter “SYS C:” or “SYS D:”, depending on which partition had a size of approximately 500 Mbytes and no files. Remove the floppy disk and reboot. Select “3” from GAG to boot DOS. You should get a DOS prompt “C:>.” You can now install the rest of the DOS files necessary from a floppy disk or boot into Windows XP and copy them onto this partition. Installing FreeDOS Files (FreeDOS Installation) NOTE: If you have a floppy disk drive, you could use Windows to copy the files. You can also use Windows Notepad editor to create the autoexec.bat and config.sys files. The following procedure does this from DOS. Boot the computer from the FreeDOS CD or floppy disk. Copy the following files from the floppy disk (or CD) to the hard disk in the appropriate directories, using the following commands. You can use the following commands at the A:> prompt. Note: I am using D: in this example, since that is the drive that DOS assigned on my computer. If you did a “SYS C:”, substitute C: for D: in the commands below. A:> D: D:> mkdir FreeDOS D:> copy a:\himem.exe D:> copy a:\emm386.exe D:> cd FreeDOS D:> copy a:\mem.exe D:> copy a:\move.exe D:> copy a:\edit.* D:> copy a:\format.exe D:> copy a:\sys.com D:> copy a:\fdisk.* D:> copy a:\more.exe Finally, you need to create an autoexec.bat and config.sys file on the D: (or C:) drive.

D:> cd \ D:> edit autoexec.bat Now, type in the following lines. Then save the file (File->Save) and exit the editor (File->Quit). You can access the File menu using Alt-F. SET PATH=C:\;C:\FreeDOS SET PROMPT=$P$G Now, enter the following: D:> edit config.sys Enter the following lines in the config.sys file: dos=high dos=umb dosdata=umb device=himem.exe device=emm386.exe lastdrive=Z buffers=20 files=40 and save the file. Reboot and you should have a reasonable FreeDOS installation. You can customize the FreeDOS installation of course, and add whatever utility programs, CD-ROM drivers, etc., that you want. Installing MSDOS 7.1 Files (MSDOS Installation) NOTE: If you have a floppy disk drive, you could use Windows to copy the files. You can also use Windows Notepad editor to create the autoexec.bat and config.sys files. The following procedure does this from DOS. Boot the computer from the wbootess bootable CD or floppy disk. Copy the following files from the floppy disk (or CD) to the hard disk in the appropriate directories, using the following commands. You can use the following commands at the A:> prompt. Note: I am using D: in this example, since that is the drive that DOS assigned on my computer. If you did a “SYS C:”, substitute C: for D: in the commands below. A:> D: D:> mkdir DOS71 D:> copy a:\himem.sys D:> copy a:\emm386.exe D:> cd DOS71

D:> copy a:\mem.exe D:> copy a:\move.exe D:> copy a:\smartdrv.exe D:> copy a:\edit.* D:> copy a:\format.com D:> copy a:\sys.com D:> copy a:\fdisk.exe D:> copy a:\more.exe Finally, you need to create an autoexec.bat and config.sys file on the D: (or C:) drive. D:> cd \ D:> edit autoexec.bat Now, type in the following lines. Then save the file (File->Save) and exit the editor (File->Quit). You can access the File menu using Alt-F. path=C:\;C:\DOS71 smartdrv a+ c+ Now, enter the following: D:> edit config.sys Enter the following lines in the config.sys file: device=himem.sys /testmem:off device=emm386.exe noems dos=high,umb lastdrive=Z buffers=20 files=40 and save the file. Reboot and you should have a reasonable MS-DOS 7.1 installation. You can customize the MS-DOS installation of course, and add whatever utility programs, CD-ROM drivers, etc., that you want.


