Embed Size (px)
Citation preview
FTA FEDERAL TRANSIT ADMINISTRATION
FTA Access Control and Entry System (FACES)
User Guide
Version 1.0
NOVEMBER 2017
Federal Transit Administration FACES User Guide
November 17, 2017 1 Version 0.6 FACES User Guide_v1.0.docx Unclassified - For Official Use Only
TABLE OF CONTENTS 1 INTRODUCTION ...................................................................................................... 4
2 SYSTEM LAYOUT ..................................................................................................... 5
2.1 NAVIGATION AND VIEWS ........................................................................................................ 5
2.2 ACCOUNT INFORMATION ........................................................................................................ 6
2.3 NAVIGATION TABS................................................................................................................. 6
News .............................................................................................................................................. 6
Tasks .............................................................................................................................................. 8
Records ........................................................................................................................................ 11
Reports ........................................................................................................................................ 12
Actions ......................................................................................................................................... 14
3 USER RECORDS ..................................................................................................... 15
3.1 USER TYPES ....................................................................................................................... 15
3.2 USER ROLES ....................................................................................................................... 15
3.3 USER VISIBILITY .................................................................................................................. 17
3.4 USER RECORD CONTENT ....................................................................................................... 18
4 USER ACCESS ........................................................................................................ 20
4.1 ACCOUNT SETUP ................................................................................................................. 20
4.2 BROWSERS......................................................................................................................... 20
4.3 LOGGING IN ....................................................................................................................... 20
Standard Login (Non-FTA Employee) ........................................................................................... 21
FTA Employee Login ..................................................................................................................... 22
New User Login ............................................................................................................................ 22
Accessing Your Record ................................................................................................................. 26 4.4 ACCOUNT INFORMATION ...................................................................................................... 27
User Profile Contents ................................................................................................................... 27
Account Settings .......................................................................................................................... 28 4.5 PASSWORDS ....................................................................................................................... 29
User-Initiated Password Reset ..................................................................................................... 30
Required Password Changes ........................................................................................................ 31
Forgotten Passwords ................................................................................................................... 32
5 MANAGING THE USER’S OWN RECORD ................................................................. 35
5.1 CUSTOMIZING THE USER SUMMARY PAGE ............................................................................... 35
Federal Transit Administration FACES User Guide
November 17, 2017 2 Version 0.6 FACES User Guide_v1.0.docx Unclassified - For Official Use Only
Adding/Changing Profile Picture .................................................................................................. 35
Adding/Changing Profile Background .......................................................................................... 39 5.2 RELATED ACTIONS ............................................................................................................... 43
Related Action: Edit Profile .......................................................................................................... 43
Related Action: Set Security Questions/Answers ......................................................................... 46
Related Action: Manage Security Questions/Answers ................................................................ 48
Related Action: Creating a PIN .................................................................................................... 54
Related Action: Changing the PIN ................................................................................................ 55 5.3 A LOCKED ACCOUNT ............................................................................................................ 60
Answer Security Questions .......................................................................................................... 60
Submit Unlock Request ................................................................................................................ 63
6 INTERACTING WITH OTHER USERS ........................................................................ 66
6.1 LOCATING A USER PROFILE FROM THE RECORDS TAB.................................................................. 66
6.2 FOLLOWING ANOTHER USER ................................................................................................. 68
6.3 PROVIDE KUDOS TO ANOTHER USER ....................................................................................... 71
6.4 VIEWING USER DETAILS ........................................................................................................ 73
User Details Page ......................................................................................................................... 73
User Roles Page ........................................................................................................................... 74
History Page ................................................................................................................................ 75
7 USER MANAGEMENT ............................................................................................ 77
7.1 USER MANAGEMENT RESPONSIBILITIES ................................................................................... 77
7.2 USER CREATION .................................................................................................................. 77
Action: Create New User .............................................................................................................. 78 Organization and External Users ......................................................................................................... 79 FTA Users ............................................................................................................................................. 88
Action: Manage Role Documentation ......................................................................................... 96
Action: Create Multiple Users .................................................................................................... 103 7.3 MANAGING USER RECORDS ................................................................................................ 111
Related Action: Edit User Profile ................................................................................................ 113
Related Action: Manage User Roles .......................................................................................... 115 Add Role ............................................................................................................................................ 115 Delete a Role ...................................................................................................................................... 125 Update Role Documentation ............................................................................................................. 127
Related Action: Deactivate User ................................................................................................ 131
Related Action: Reactivate User ................................................................................................ 135
Action: Review Role Requests .................................................................................................... 140
Federal Transit Administration FACES User Guide
November 17, 2017 3 Version 0.6 FACES User Guide_v1.0.docx Unclassified - For Official Use Only
Action: Review Unlock Requests ................................................................................................ 144
Related Action: Unlock User ...................................................................................................... 148
8 APPENDIX A – ABBREVIATIONS, ACRONYMS, AND TERMS .................................. 150
9 APPENDIX B – USER ROLE RULES ......................................................................... 151
9.1 FTA PLATFORM RULES ....................................................................................................... 151
9.2 NTD RULES ..................................................................................................................... 151
9.3 TRAMS RULES ................................................................................................................. 151
10 APPENDIX C – FTA COST CENTERS ....................................................................... 153

Federal Transit Administration FACES User Guide
November 17, 2017 4 Version 0.6 FACES User Guide_v1.0.docx Unclassified - For Official Use Only
1 Introduction The Federal Transit Administration (FTA) maintains several web-based software systems that reside on the same FTA platform. The FTA platform is accessed via the website, https://faces.fta.dot.gov/suite/. The systems on this FTA platform include the Transit Award Management System (TrAMS), the National Transit Database (NTD), the Joint Procurement Clearinghouse (JPC), and the FTA Access Control and Entry System (FACES). TrAMS is FTA’s system for awarding and managing federal grants. NTD is FTA’s system for tracking transit statistics on American transit systems. The JPC is available to FTA grant recipients for communicating about procurement needs and soliciting partners for a joint purchase. FACES is the user creation and management system for each user on the FTA platform. All other software systems on the FTA platform rely on FACES for user management functions. Within FACES, each software system has its own set of user roles and access privileges.
FACES enables approved users to create user accounts, assign user roles, and manage those users. FACES authenticates users when they try to log in to the FTA platform and completes other user automated management actions such as locking accounts. FACES allows users to edit their profiles and to view relevant information about other users within their software system. Once users have logged in to the FTA platform through FACES, they can view their approved software systems. Users can belong to one or more systems.
This user guide describes how to access the FTA Platform; identifies the user roles, functions, and other features within FACES; describes how to manage a user’s profile; and describes the various user management activities associated with user accounts. FTA provides additional user guides covering topics specific to TrAMS and NTD.
The figure below shows the full scope of functionality within the FACES system: User Management actions, User Records, System Records, and Reports.
Figure 1 – FACES Functional Scope
Federal Transit Administration FACES User Guide
November 17, 2017 5 Version 0.6 FACES User Guide_v1.0.docx Unclassified - For Official Use Only
2 System Layout The software systems residing on the FTA Platform, https://faces.fta.dot.gov/suite/, all share a common layout. This section provides a high-level view of the system and how to navigate, find, and work with data.
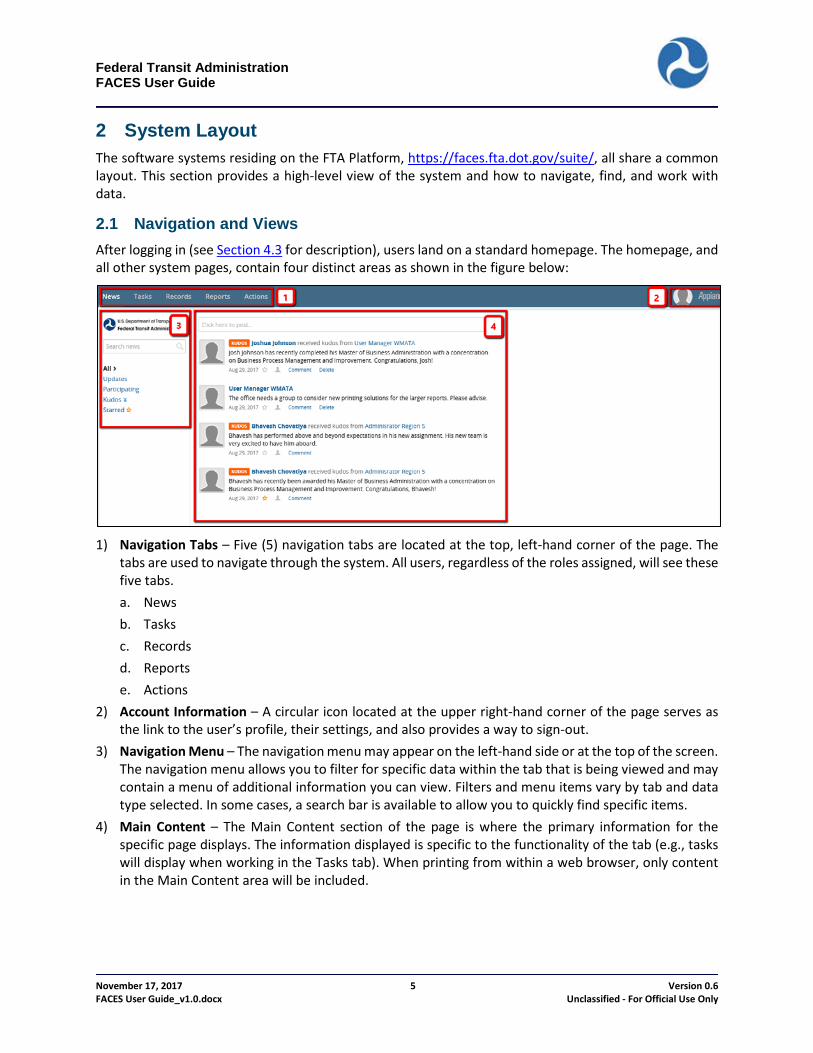
2.1 Navigation and Views After logging in (see Section 4.3 for description), users land on a standard homepage. The homepage, and all other system pages, contain four distinct areas as shown in the figure below:
1) Navigation Tabs – Five (5) navigation tabs are located at the top, left-hand corner of the page. The
tabs are used to navigate through the system. All users, regardless of the roles assigned, will see these five tabs. a. News b. Tasks c. Records d. Reports e. Actions
2) Account Information – A circular icon located at the upper right-hand corner of the page serves as the link to the user’s profile, their settings, and also provides a way to sign-out.
3) Navigation Menu – The navigation menu may appear on the left-hand side or at the top of the screen. The navigation menu allows you to filter for specific data within the tab that is being viewed and may contain a menu of additional information you can view. Filters and menu items vary by tab and data type selected. In some cases, a search bar is available to allow you to quickly find specific items.
4) Main Content – The Main Content section of the page is where the primary information for the specific page displays. The information displayed is specific to the functionality of the tab (e.g., tasks will display when working in the Tasks tab). When printing from within a web browser, only content in the Main Content area will be included.

Federal Transit Administration FACES User Guide
November 17, 2017 6 Version 0.6 FACES User Guide_v1.0.docx Unclassified - For Official Use Only
2.2 Account Information Account Information provides access to information specific to the user. It lists the user’s first and last name. By selecting the user name, the user will be presented with the following three options:
1) Profile – Provides a means for the user to view and update their individual profile information, and to set their Personnel Identification Number (PIN). Refer to Section 4, User Access for more details.
2) Settings – Opens the Settings Page where the user can select language and time zone and subscribe to news feeds. Non-FTA users can also change their password here.
3) Sign Out – Select Sign Out to log out and exit FACES.
2.3 Navigation Tabs The five navigation tabs provide the primary method of navigating within the FTA platform. Each tab represents a different data type. The exact information displayed on each tab will reflect the roles the user has been granted within each system. For example, TrAMS users will see information specific to TrAMS and NTD users will see information specific to NTD.
News
The News tab displays platform and software system-specific news to all users and allows the user to collaborate with other users through messaging. News feeds and messages may be targeted to specific users and/or groups, or to all system users. The News tab is the default tab displayed when a user initially logs into the platform (as shown in the preceding screenshot).
Some software systems on the FTA platform automatically post news feeds items when certain actions occur in the system (e.g. TrAMS and NTD). FACES does not post any automatic news feeds at this time.
Users may also use this tab to add their own comments to the news feeds, to communicate with other users or groups using the post or message options, to assign a social task, or to send kudos.
News feed information displays in chronological order with the most recent posting found at the top of the list. The left-hand navigation may be used to search for specific events or to filter down to a selected view. Users may manage their feeds further by following specific users or groups.
Federal Transit Administration FACES User Guide
November 17, 2017 7 Version 0.6 FACES User Guide_v1.0.docx Unclassified - For Official Use Only
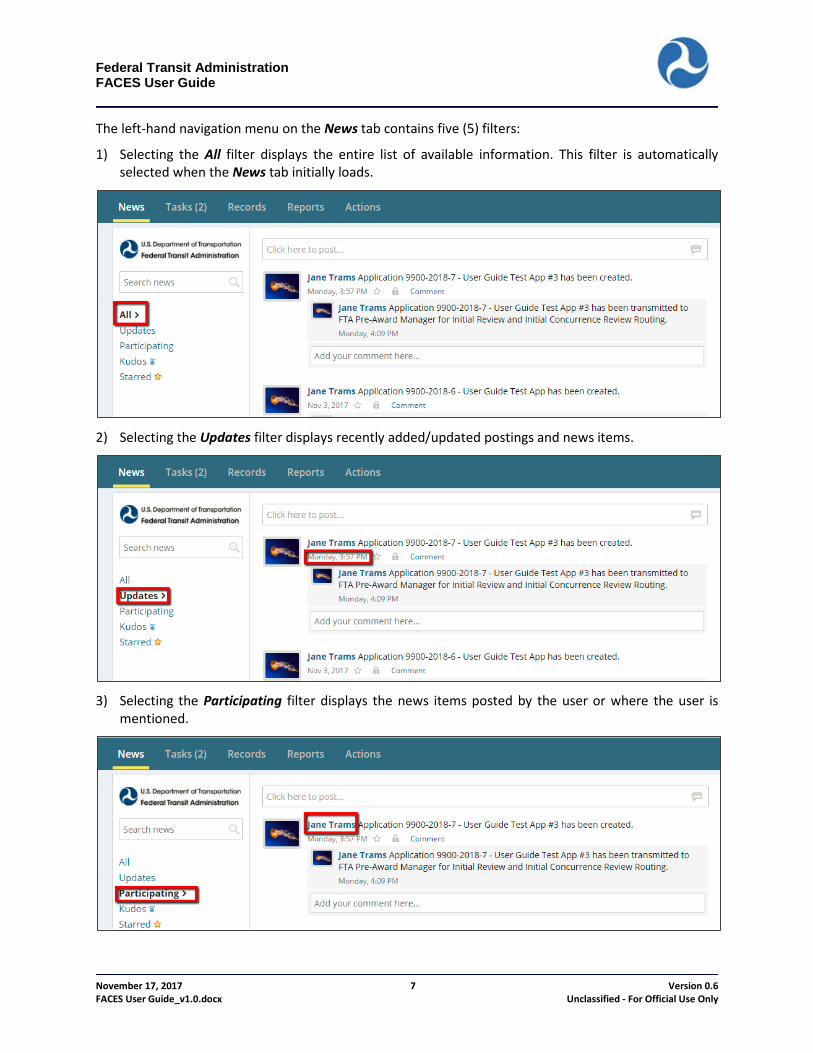
The left-hand navigation menu on the News tab contains five (5) filters:
1) Selecting the All filter displays the entire list of available information. This filter is automatically selected when the News tab initially loads.
2) Selecting the Updates filter displays recently added/updated postings and news items.
3) Selecting the Participating filter displays the news items posted by the user or where the user is
mentioned.
Federal Transit Administration FACES User Guide
November 17, 2017 8 Version 0.6 FACES User Guide_v1.0.docx Unclassified - For Official Use Only
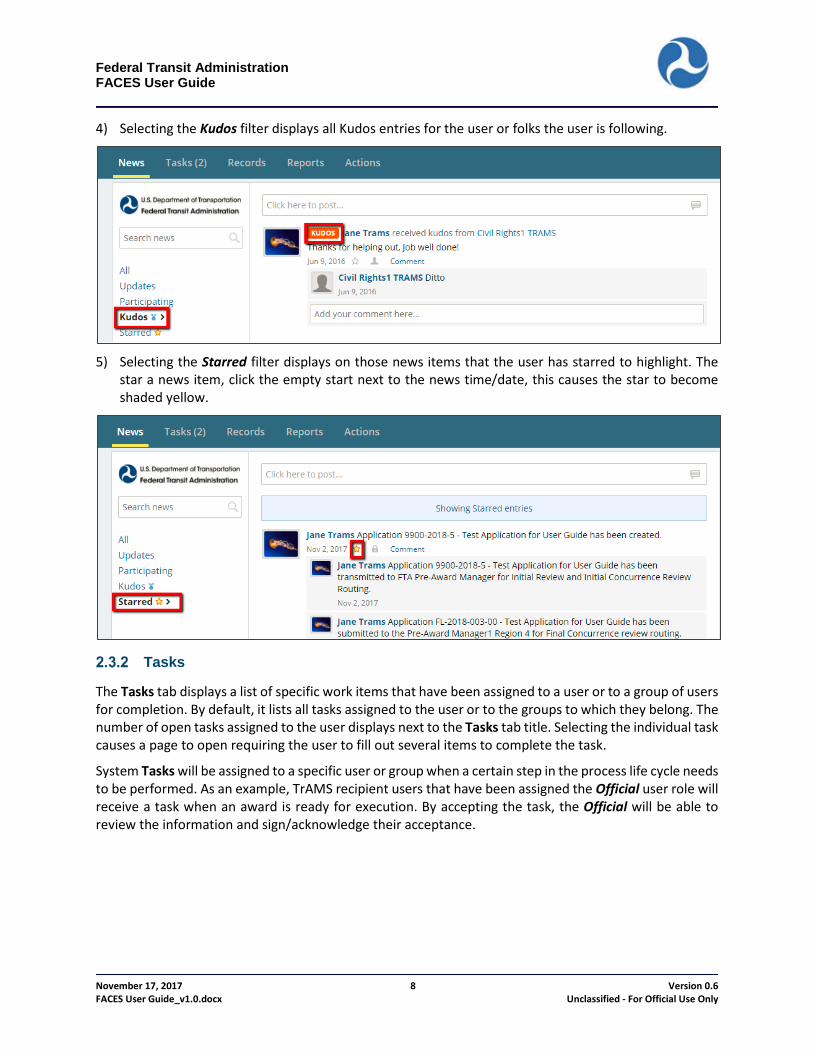
4) Selecting the Kudos filter displays all Kudos entries for the user or folks the user is following.
5) Selecting the Starred filter displays on those news items that the user has starred to highlight. The
star a news item, click the empty start next to the news time/date, this causes the star to become shaded yellow.
Tasks
The Tasks tab displays a list of specific work items that have been assigned to a user or to a group of users for completion. By default, it lists all tasks assigned to the user or to the groups to which they belong. The number of open tasks assigned to the user displays next to the Tasks tab title. Selecting the individual task causes a page to open requiring the user to fill out several items to complete the task.
System Tasks will be assigned to a specific user or group when a certain step in the process life cycle needs to be performed. As an example, TrAMS recipient users that have been assigned the Official user role will receive a task when an award is ready for execution. By accepting the task, the Official will be able to review the information and sign/acknowledge their acceptance.

Federal Transit Administration FACES User Guide
November 17, 2017 9 Version 0.6 FACES User Guide_v1.0.docx Unclassified - For Official Use Only
The screen defaults to the list of tasks Assigned to Me.
Selecting Sent by Me from the left-hand navigation menu limits the list of tasks to those the user sent to other users. These tasks can be managed by Commenting on them, Closing them, or Deleting them.
Selecting Starred from the left-hand navigation menu limits the list of tasks to those this user is following for resolution.

Federal Transit Administration FACES User Guide
November 17, 2017 10 Version 0.6 FACES User Guide_v1.0.docx Unclassified - For Official Use Only
Selecting both Sent by Me and Open from the left-hand navigation menu limits the list of tasks to those that are still in an open status.
Selecting both Sent by Me and Closed from the left-hand navigation menu limits the list of tasks to those that are still in a closed status. Any comments added to the Task are also captured/displayed.
Federal Transit Administration FACES User Guide
November 17, 2017 11 Version 0.6 FACES User Guide_v1.0.docx Unclassified - For Official Use Only
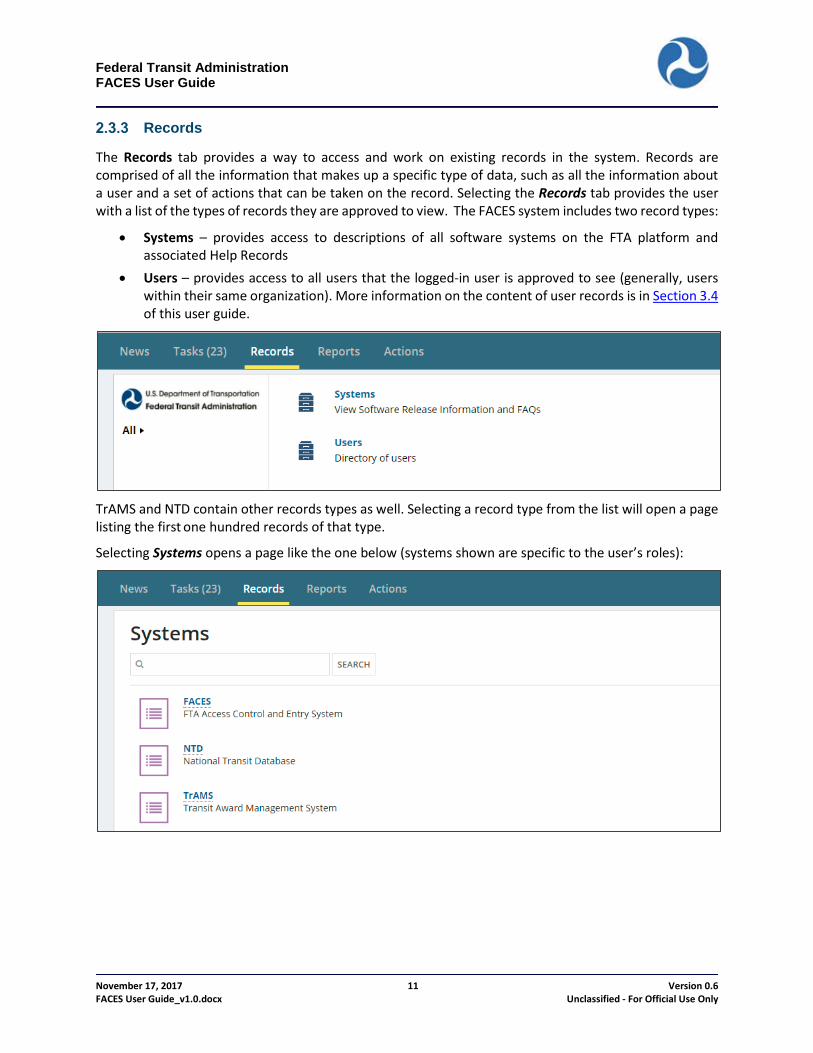
Records
The Records tab provides a way to access and work on existing records in the system. Records are comprised of all the information that makes up a specific type of data, such as all the information about a user and a set of actions that can be taken on the record. Selecting the Records tab provides the user with a list of the types of records they are approved to view. The FACES system includes two record types:
• Systems – provides access to descriptions of all software systems on the FTA platform and associated Help Records
• Users – provides access to all users that the logged-in user is approved to see (generally, users within their same organization). More information on the content of user records is in Section 3.4 of this user guide.
TrAMS and NTD contain other records types as well. Selecting a record type from the list will open a page listing the first one hundred records of that type.
Selecting Systems opens a page like the one below (systems shown are specific to the user’s roles):
Federal Transit Administration FACES User Guide
November 17, 2017 12 Version 0.6 FACES User Guide_v1.0.docx Unclassified - For Official Use Only
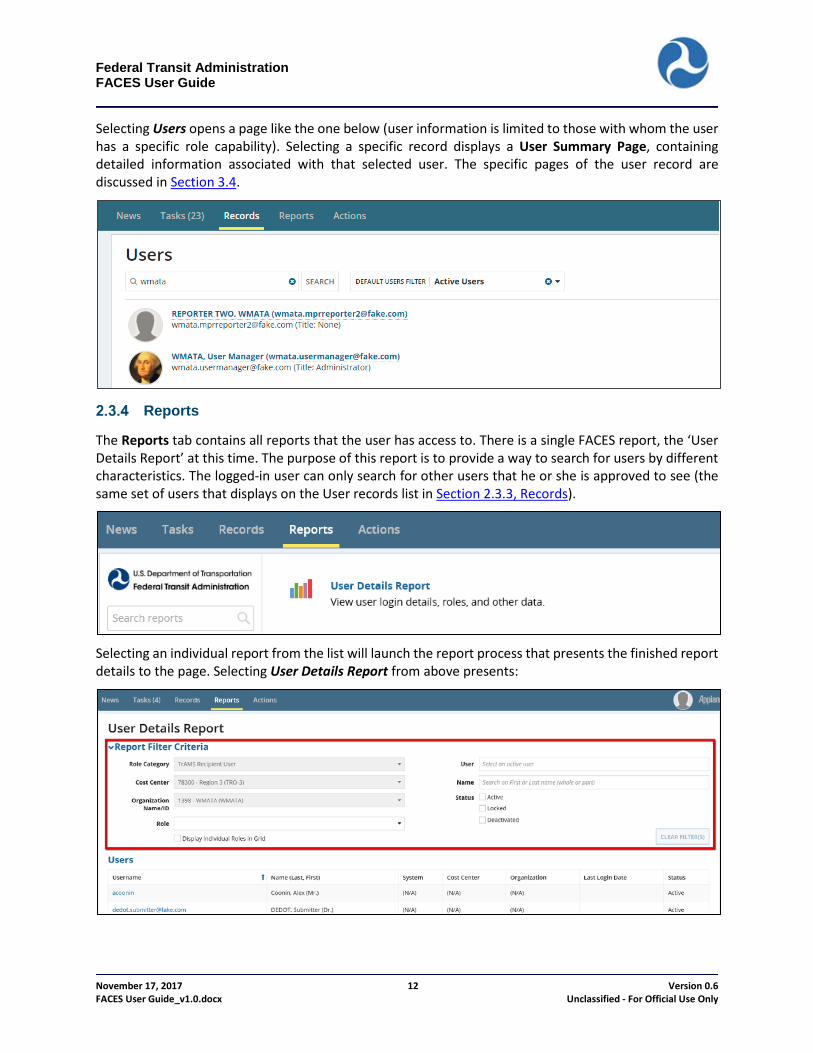
Selecting Users opens a page like the one below (user information is limited to those with whom the user has a specific role capability). Selecting a specific record displays a User Summary Page, containing detailed information associated with that selected user. The specific pages of the user record are discussed in Section 3.4.
Reports
The Reports tab contains all reports that the user has access to. There is a single FACES report, the ‘User Details Report’ at this time. The purpose of this report is to provide a way to search for users by different characteristics. The logged-in user can only search for other users that he or she is approved to see (the same set of users that displays on the User records list in Section 2.3.3, Records).
Selecting an individual report from the list will launch the report process that presents the finished report details to the page. Selecting User Details Report from above presents:
Federal Transit Administration FACES User Guide
November 17, 2017 13 Version 0.6 FACES User Guide_v1.0.docx Unclassified - For Official Use Only
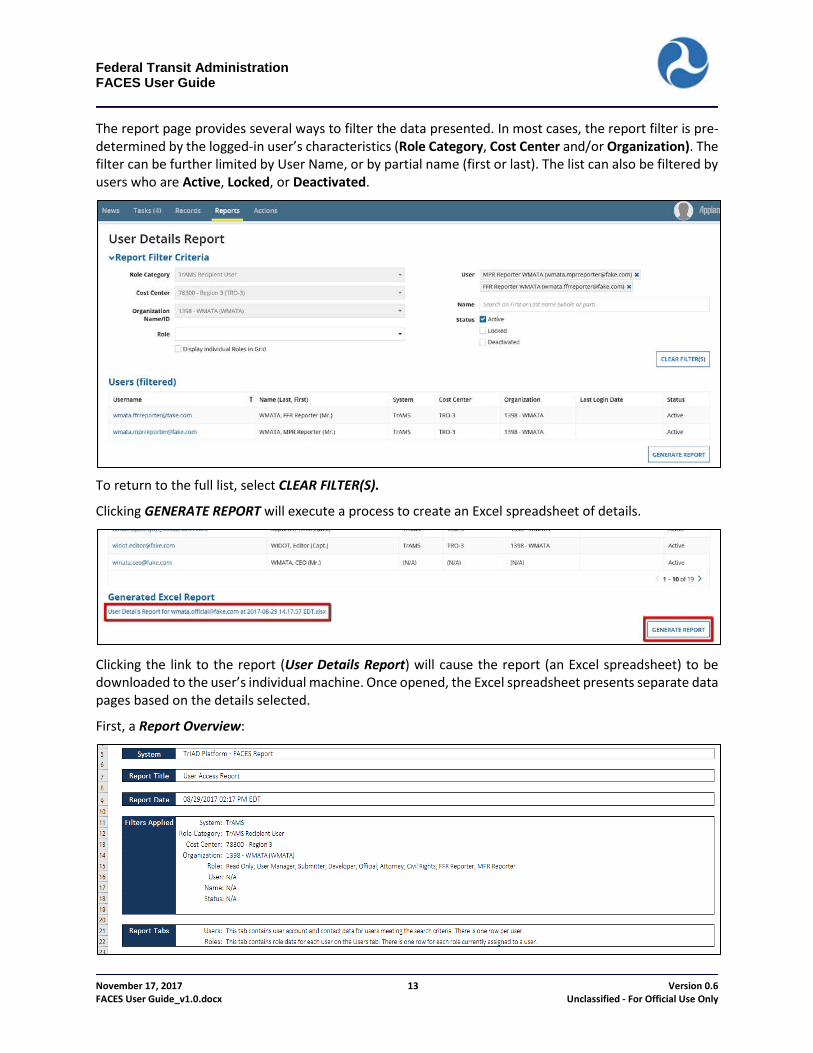
The report page provides several ways to filter the data presented. In most cases, the report filter is pre-determined by the logged-in user’s characteristics (Role Category, Cost Center and/or Organization). The filter can be further limited by User Name, or by partial name (first or last). The list can also be filtered by users who are Active, Locked, or Deactivated.
To return to the full list, select CLEAR FILTER(S).
Clicking GENERATE REPORT will execute a process to create an Excel spreadsheet of details.
Clicking the link to the report (User Details Report) will cause the report (an Excel spreadsheet) to be downloaded to the user’s individual machine. Once opened, the Excel spreadsheet presents separate data pages based on the details selected.
First, a Report Overview:
Federal Transit Administration FACES User Guide
November 17, 2017 14 Version 0.6 FACES User Guide_v1.0.docx Unclassified - For Official Use Only
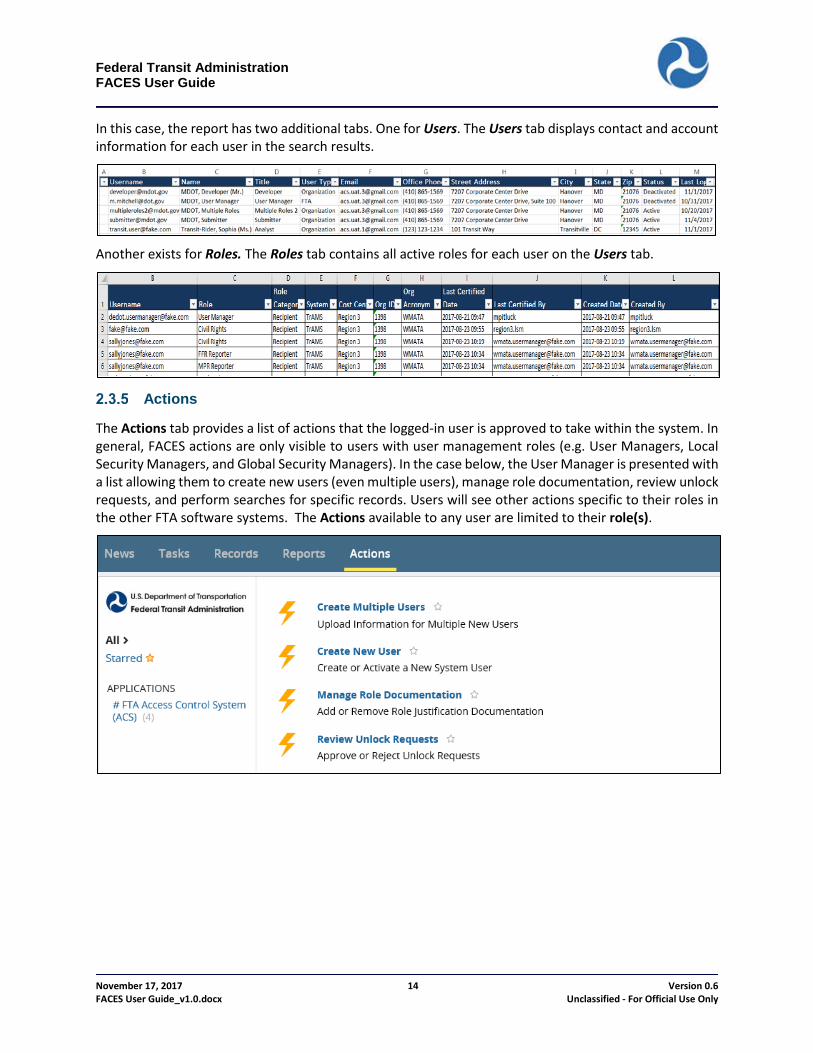
In this case, the report has two additional tabs. One for Users. The Users tab displays contact and account information for each user in the search results.
Another exists for Roles. The Roles tab contains all active roles for each user on the Users tab.
Actions
The Actions tab provides a list of actions that the logged-in user is approved to take within the system. In general, FACES actions are only visible to users with user management roles (e.g. User Managers, Local Security Managers, and Global Security Managers). In the case below, the User Manager is presented with a list allowing them to create new users (even multiple users), manage role documentation, review unlock requests, and perform searches for specific records. Users will see other actions specific to their roles in the other FTA software systems. The Actions available to any user are limited to their role(s).
Federal Transit Administration FACES User Guide
November 17, 2017 15 Version 0.6 FACES User Guide_v1.0.docx Unclassified - For Official Use Only
3 User Records A User Record includes all information directly related to the user’s Profile (e.g., name, address, title, and role(s), audit history). It also includes all news items specific to the user and any Kudos received. Users may see other staff members’ User Summary page and User Details within their organization.
Each user may manage their own Profile information. Some user information may be edited by the individual user. User roles are granted and managed by User Managers, Supervisors, Local Security Managers (LSMs), and Global Security Managers (GSMs).
3.1 User Types There are three account types used to classify each user on the FTA platform: FTA users, Organization users (e.g., TrAMS Recipient, NTD Reporter), and External users.
1) FTA Users: This user type includes FTA employees and federal contractors who directly support FTA. All FTA users have FTA email accounts ending in @dot.gov.
2) Organization Users: This user type includes individuals who are employed by or support an organization that uses an FTA platform software system. The users are grouped by their organization(s). This user type includes TrAMS Recipients and NTD Reporters.
3) External Users: This user type includes individuals external to FTA but provide support or oversight to one of the FTA platform software systems. External users have three sub-types: Auditors, Contractors, and Department of Labor (DOL) users.
The types of roles that a user can be granted are specific to the user’s account type. FACES defines standardized role types, role hierarchy, and security for the various software systems on the FTA platform. New roles and user categories may be incorporated as needed in the future to allow FACES to support additional software systems and to meet changing requirements.
3.2 User Roles Users roles on the FTA platform are grouped by role category (e.g. FTA Staff, TrAMS Recipient Users, TrAMS Reporters).
Each organization user has an assigned User Manager. The User Manager assigns roles to each user in their organization in accordance with the rules specific to their FTA software system (e.g. TrAMS, NTD, etc..). Users may be assigned one or multiple roles within their organization. Roles assigned to each user control the Actions available to a user and the Tasks assigned to the user.
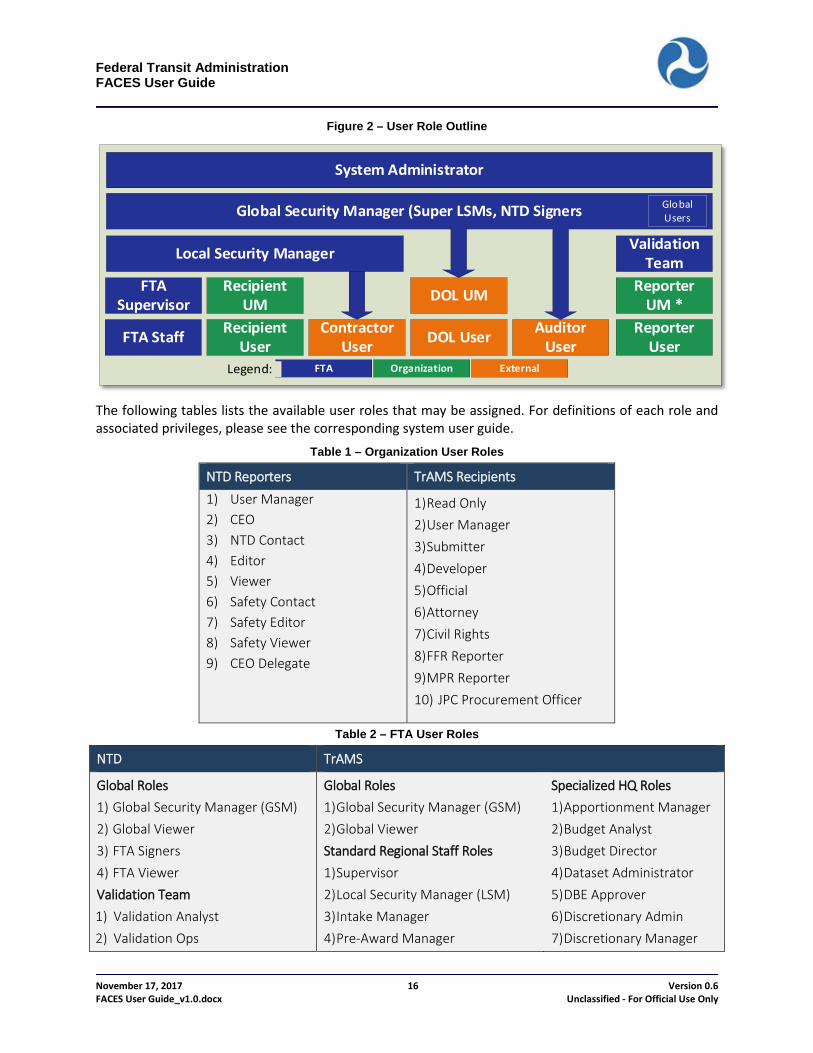
The figure below provides an outline of all user roles within the FACES landscape. Each will be further defined in subsequent paragraphs.
Federal Transit Administration FACES User Guide
November 17, 2017 16 Version 0.6 FACES User Guide_v1.0.docx Unclassified - For Official Use Only
Figure 2 – User Role Outline
Reporter User
Auditor UserDOL UserContractor
UserRecipient
UserFTA Staff
System Administrator
Local Security Manager Validation Team
FTA Supervisor
Recipient UM
Reporter UM *DOL UM
Global Security Manager (Super LSMs, NTD Signers Global Users
Organization ExternalFTALegend:
The following tables lists the available user roles that may be assigned. For definitions of each role and associated privileges, please see the corresponding system user guide.
Table 1 – Organization User Roles
NTD Reporters TrAMS Recipients
1) User Manager 2) CEO 3) NTD Contact 4) Editor 5) Viewer 6) Safety Contact 7) Safety Editor 8) Safety Viewer 9) CEO Delegate
1) Read Only 2) User Manager 3) Submitter 4) Developer 5) Official 6) Attorney 7) Civil Rights 8) FFR Reporter 9) MPR Reporter 10) JPC Procurement Officer
Table 2 – FTA User Roles
NTD TrAMS
Global Roles 1) Global Security Manager (GSM) 2) Global Viewer 3) FTA Signers 4) FTA Viewer Validation Team 1) Validation Analyst 2) Validation Ops
Global Roles 1) Global Security Manager (GSM) 2) Global Viewer Standard Regional Staff Roles 1) Supervisor 2) Local Security Manager (LSM) 3) Intake Manager 4) Pre-Award Manager
Specialized HQ Roles 1) Apportionment Manager 2) Budget Analyst 3) Budget Director 4) Dataset Administrator 5) DBE Approver 6) Discretionary Admin 7) Discretionary Manager

Federal Transit Administration FACES User Guide
November 17, 2017 17 Version 0.6 FACES User Guide_v1.0.docx Unclassified - For Official Use Only
NTD TrAMS
3) Validation PM 4) Validation QA 5) User Manager Supervisor
5) Post-Award Manager 6) Reservationist 7) Administrator 8) Director 9) Director of Operations 10) Initial Reviewer 11) Technical Reviewer 12) Environmental Reviewer 13) Civil Rights Officer 14) Legal Counsel 15) Read Only
8) TCA Record 9) Transit Director 10) Vendor Setup
Table 3 – External User Roles
NTD TrAMS
1) Auditor 2) FTA Contractor
1) Auditor 2) DOL User Manager 3) DOL User 4) FTA Contractor
3.3 User Visibility There are explicit rules controlling access to user records and user information within the system. The following rules independently to each FTA system (e.g. TrAMS, NTD):
1) Organization users can see all other users within their organization(s). For example, a user who belongs to ‘Transit Organization Blue’ will see all other users with roles in ‘Transit Organization Blue’.
2) Organization users cannot see FTA user records, external user records, or users outside their organizations.
3) FTA users can see all other FTA users within their system (e.g. TRAMS, NTD). 4) FTA users can see all organization users who belong to organizations within their FTA region or cost
center. Global FTA users can see all organization users within their system (e.g. TrAMS, NTD). 5) FTA users with specific roles (e.g. GSM, LSM) can view external user records. 6) External users can only see user records for other external users of the same subtype. For example,
TrAMS DOL users will only see other DOL users in TrAMS.
Table 4 summarizes these rules from the perspective of the logged-in users type:

Federal Transit Administration FACES User Guide
November 17, 2017 18 Version 0.6 FACES User Guide_v1.0.docx Unclassified - For Official Use Only
Table 4 – User Record Viewing Privileges
User Records I Can View
My User Type Organization FTA External
Organization All organization users within my own organization(s).
No FTA user records. No external user records.
FTA All users belonging to organizations within their FTA cost centers. A global user sees all organization users within his/her system (e.g. TrAMS).
All FTA users within the user’s system (e.g. NTD).
See some external user records depending on roles assigned.
External No organization user records. No FTA user records. All users of same external subtype (e.g. Auditor) in my approved systems (e.g. TrAMS).
3.4 User Record Content Each user’s record opens to a user Summary page.
Federal Transit Administration FACES User Guide
November 17, 2017 19 Version 0.6 FACES User Guide_v1.0.docx Unclassified - For Official Use Only
User record content is split between multiple pages. Each user’s record contains:
a) A User Details page visible to all users who have access to that user’s record. The User Details page contains the user’s account and contact information (e.g., first and last name, email, user type, and account status).
b) A User Roles page visible to all users who have access to that user’s record. The User Roles page contains a grid of the user’s active Roles and current User Managers.
c) A History page visible to each user and their management chain (User Managers, LSMs, GSMs). This History page contains an audit trail of changes to the user’s Profile and Roles.
d) The News tab shows a listing of user activity with the most recent news displayed first. e) The Related Action page contains any actions the viewing user is allowed to perform on the
record. On this page, the user can manage their Profile, Security Questions, and PIN.
For detailed information about these user record pages, please reference Section 6.4 Viewing User Details.

Federal Transit Administration FACES User Guide
November 17, 2017 20 Version 0.6 FACES User Guide_v1.0.docx Unclassified - For Official Use Only
4 User Access 4.1 Account Setup User access to each of the FTA software systems on the FTA platform, https://faces.fta.dot.gov/suite/, is granted by either an organizational User Manager (UM), Local Security Manager (LSM), or Global Security Manager (GSM) within the appropriate system. An individual with one of those roles can create user accounts and assign users an initial suite of roles. Once an account has been created, the user will receive an automated email notification containing their username, a temporary password, and access/login directions.
• Username – all usernames are initially set to the email address associated with the user’s account. The username is case sensitive and should be all lowercase. The username cannot be changed.
• Password – the initial password will be an auto-generated password. Passwords in FACES are case sensitive and should be updated every 60 days. Each new password must be different from the previously used 24 passwords. Passwords must be composed of: 12 characters At least one English uppercase character At least one English lowercase character At least one numeric character At least one non-alphanumeric character (e.g., !, $, #, %)
4.2 Browsers The FTA platform is accessed by using a web browser. The following web browsers are supported:
• Microsoft Edge • Microsoft Internet Explorer 11 • Mozilla Firefox • Google Chrome • Apple Safari
Although all listed browsers are compatible with the FTA platform, some items may look and/or behave differently in one browser or another.
Note: Instructions and screenshots in this guide have been created using Internet Explorer 11.
4.3 Logging In FACES manages user access to the FTA platform via the FACES login page, accessed via a web browser. Two login methods are available, but one is only accessible to FTA employees using FTA’s internal network. User access to software systems like TrAMS and NTD s is based on the user’s assigned Roles.
Federal Transit Administration FACES User Guide
November 17, 2017 21 Version 0.6 FACES User Guide_v1.0.docx Unclassified - For Official Use Only
Standard Login (Non-FTA Employee)
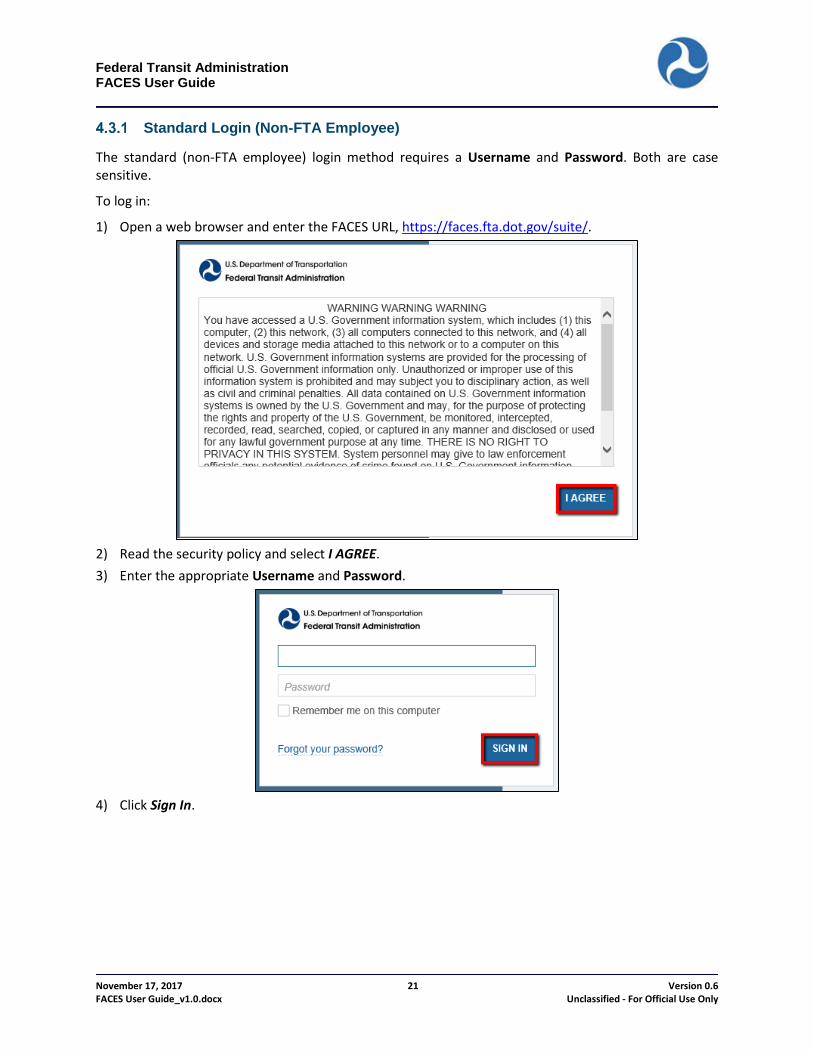
The standard (non-FTA employee) login method requires a Username and Password. Both are case sensitive.
To log in:
1) Open a web browser and enter the FACES URL, https://faces.fta.dot.gov/suite/.
2) Read the security policy and select I AGREE. 3) Enter the appropriate Username and Password.
4) Click Sign In.
Federal Transit Administration FACES User Guide
November 17, 2017 22 Version 0.6 FACES User Guide_v1.0.docx Unclassified - For Official Use Only
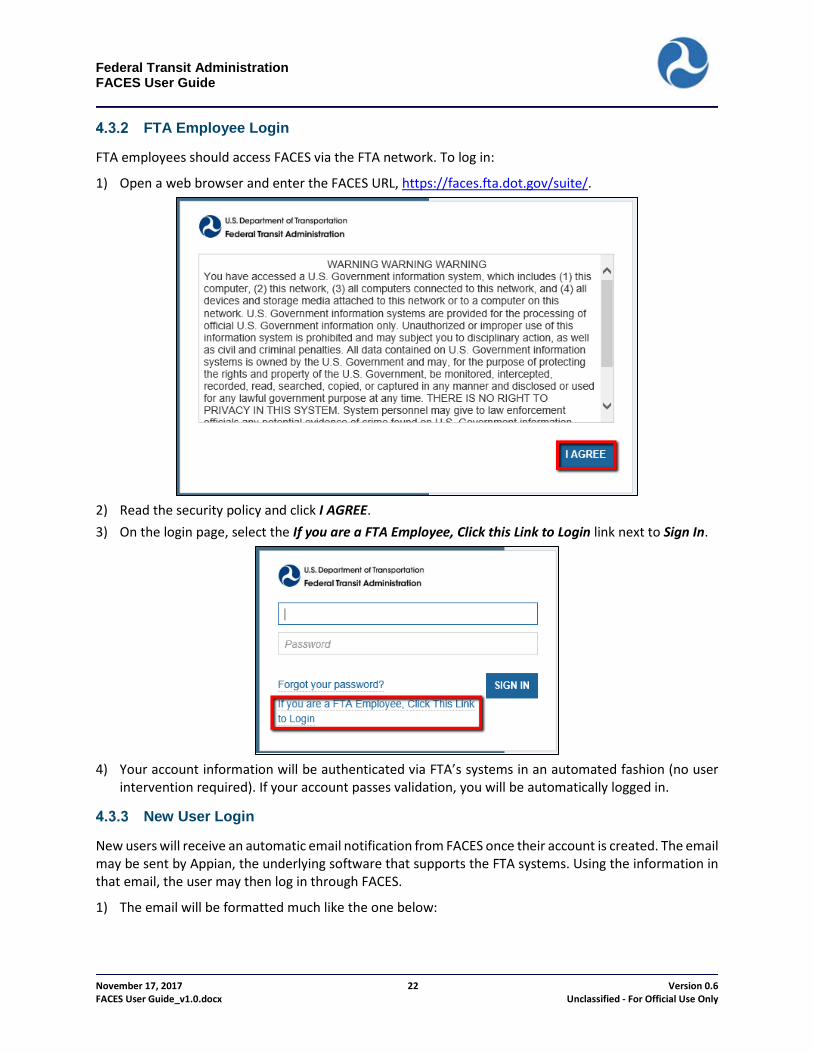
FTA Employee Login
FTA employees should access FACES via the FTA network. To log in:
1) Open a web browser and enter the FACES URL, https://faces.fta.dot.gov/suite/.
2) Read the security policy and click I AGREE. 3) On the login page, select the If you are a FTA Employee, Click this Link to Login link next to Sign In.
4) Your account information will be authenticated via FTA’s systems in an automated fashion (no user
intervention required). If your account passes validation, you will be automatically logged in.
New User Login
New users will receive an automatic email notification from FACES once their account is created. The email may be sent by Appian, the underlying software that supports the FTA systems. Using the information in that email, the user may then log in through FACES.
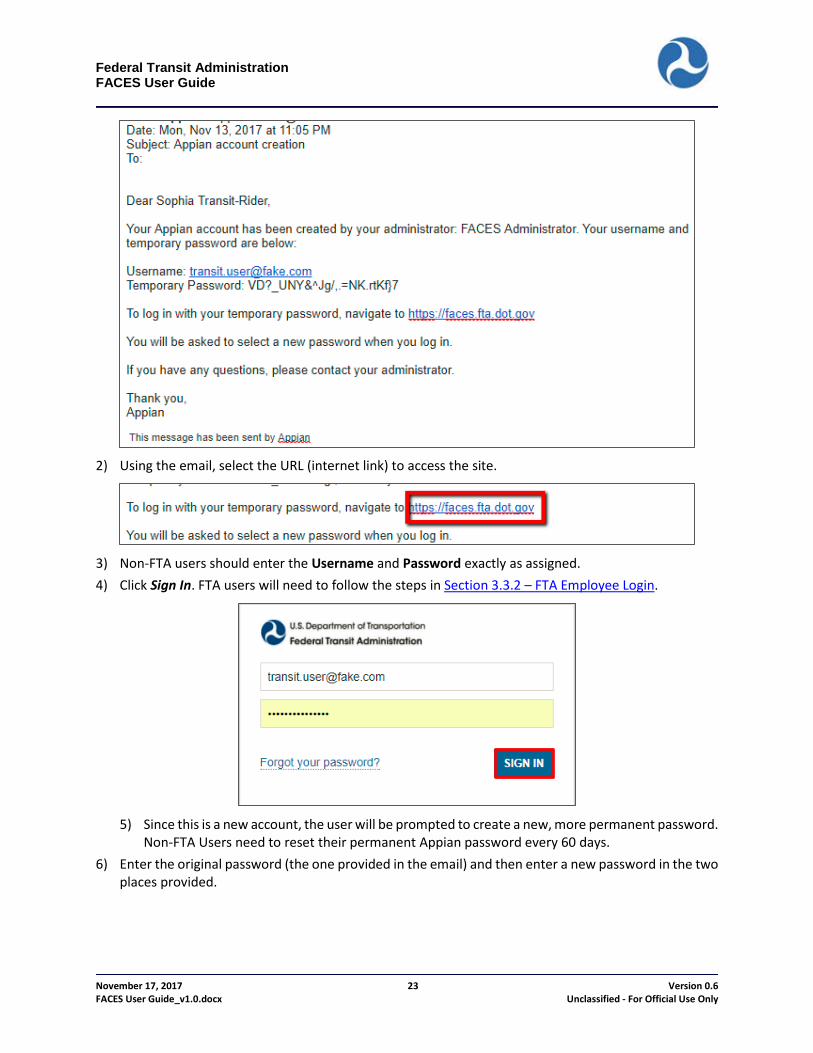
1) The email will be formatted much like the one below:
Federal Transit Administration FACES User Guide
November 17, 2017 23 Version 0.6 FACES User Guide_v1.0.docx Unclassified - For Official Use Only
2) Using the email, select the URL (internet link) to access the site.
3) Non-FTA users should enter the Username and Password exactly as assigned. 4) Click Sign In. FTA users will need to follow the steps in Section 3.3.2 – FTA Employee Login.
5) Since this is a new account, the user will be prompted to create a new, more permanent password.
Non-FTA Users need to reset their permanent Appian password every 60 days. 6) Enter the original password (the one provided in the email) and then enter a new password in the two
places provided.

Federal Transit Administration FACES User Guide
November 17, 2017 24 Version 0.6 FACES User Guide_v1.0.docx Unclassified - For Official Use Only
7) FACES passwords are case sensitive. Each new password must be different from the previous 24 passwords. Passwords must be composed of: 12 characters At least one English uppercase character At least one English lowercase character At least one numeric character At least one non-alphanumeric character (e.g., !, $, #, %)
8) Once the password is entered, click Submit.
9) The new password will be saved and the user will be directed to the News page.
10) Select the Tasks tab. All new users will have one FACES Task listed. New user accounts are
automatically assigned a Task to set up Security Questions and Answers (Q&As) to ensure the security of the account and to provide a mechanism to re-establish access when lost due to a lockout, etc. It is strongly recommended that all users set up account security questions.
Federal Transit Administration FACES User Guide
November 17, 2017 25 Version 0.6 FACES User Guide_v1.0.docx Unclassified - For Official Use Only
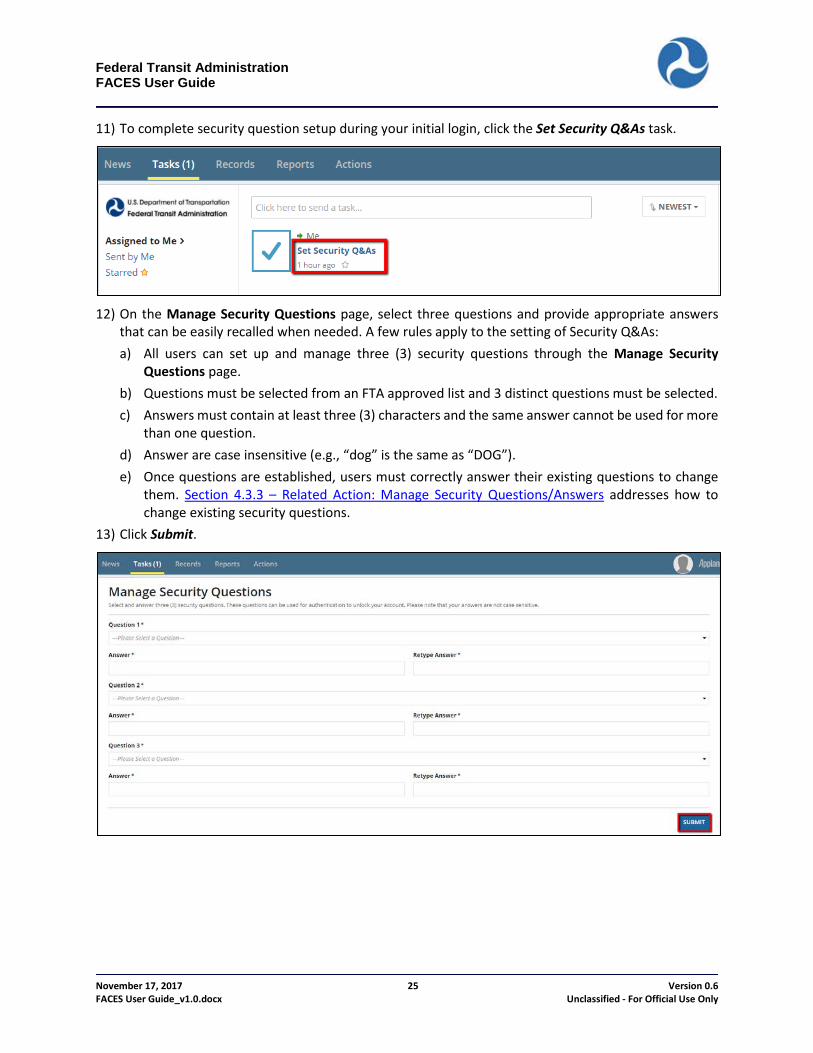
11) To complete security question setup during your initial login, click the Set Security Q&As task.
12) On the Manage Security Questions page, select three questions and provide appropriate answers
that can be easily recalled when needed. A few rules apply to the setting of Security Q&As: a) All users can set up and manage three (3) security questions through the Manage Security
Questions page. b) Questions must be selected from an FTA approved list and 3 distinct questions must be selected. c) Answers must contain at least three (3) characters and the same answer cannot be used for more
than one question. d) Answer are case insensitive (e.g., “dog” is the same as “DOG”). e) Once questions are established, users must correctly answer their existing questions to change
them. Section 4.3.3 – Related Action: Manage Security Questions/Answers addresses how to change existing security questions.
13) Click Submit.

Federal Transit Administration FACES User Guide
November 17, 2017 26 Version 0.6 FACES User Guide_v1.0.docx Unclassified - For Official Use Only
14) The Tasks screen will refresh and the Set Security Q&As task will be removed. Users will receive an automated email notification that their questions have been updated.
Accessing Your Record
A user can access their own profile in two different ways: from either the Account information area or through the Records tab.
To view yours own Profile from the Account information area:
1) Select the down arrow next to the user’s name to reveal the dropdown menu and click Profile.
2) The user record Summary Page displays.
To view your profile from the Records tab:
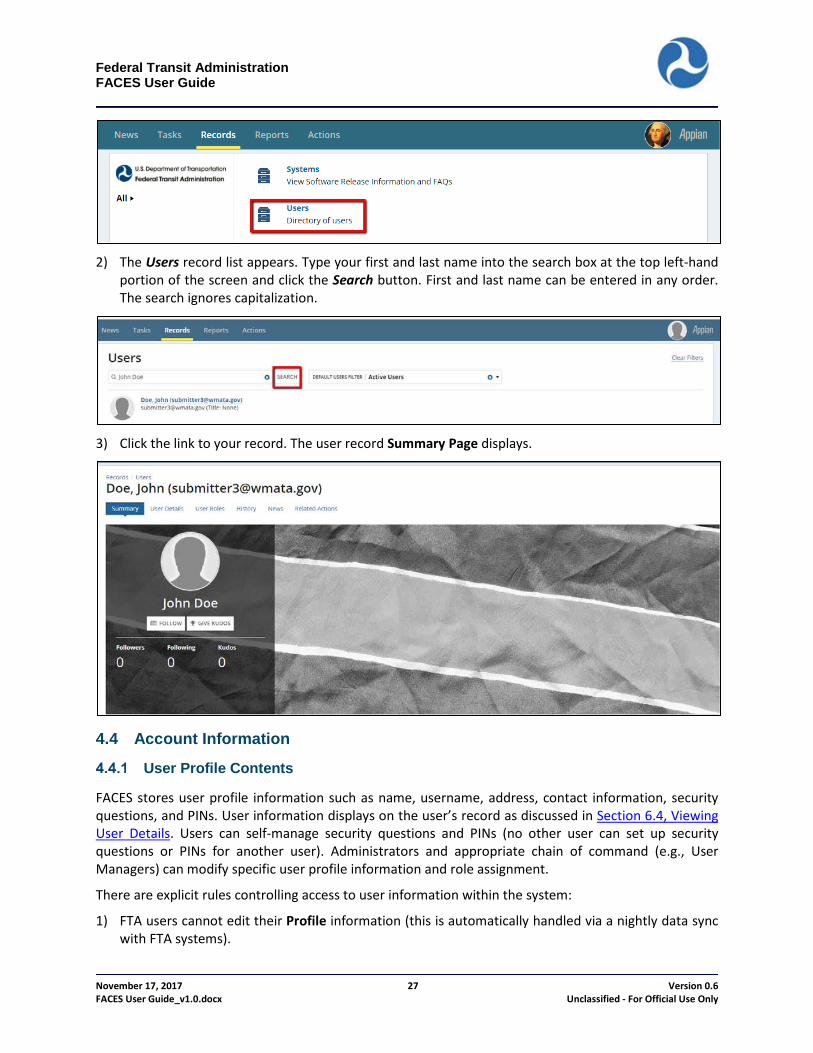
1) Go to the Records tab and click the Users record type.
Federal Transit Administration FACES User Guide
November 17, 2017 27 Version 0.6 FACES User Guide_v1.0.docx Unclassified - For Official Use Only
2) The Users record list appears. Type your first and last name into the search box at the top left-hand
portion of the screen and click the Search button. First and last name can be entered in any order. The search ignores capitalization.
3) Click the link to your record. The user record Summary Page displays.
4.4 Account Information
User Profile Contents
FACES stores user profile information such as name, username, address, contact information, security questions, and PINs. User information displays on the user’s record as discussed in Section 6.4, Viewing User Details. Users can self-manage security questions and PINs (no other user can set up security questions or PINs for another user). Administrators and appropriate chain of command (e.g., User Managers) can modify specific user profile information and role assignment.
There are explicit rules controlling access to user information within the system:
1) FTA users cannot edit their Profile information (this is automatically handled via a nightly data sync with FTA systems).

Federal Transit Administration FACES User Guide
November 17, 2017 28 Version 0.6 FACES User Guide_v1.0.docx Unclassified - For Official Use Only
2) Non-FTA users can edit all Profile information other than their username AND email address. 3) User Managers can edit Profile information for users in their particular organizations. 4) Local Security Managers (LSMs) can edit the user Profile of users in their FTA Regions/Cost Centers. 5) Global Security Managers (GSMs) can edit the user Profile of any non-FTA user in their system (e.g.
a TrAMS GSM can manage the profile of any non-FTA user in TrAMS). 6) All users can self-manage their security questions and, if applicable, their PINs.
Account Settings
The account settings page provides a way for the user to manage their own preferred localized settings for date/time formats, language, and time zone. Non-FTA users can also change their password via the settings page. The following settings can be adjusted:
• Language • Time Zone • Calendar Type • Password (non-FTA users only)
To access user account settings:
1) Select the icon (circular image) in the top right-corner of the screen to reveal a dropdown menu.
Federal Transit Administration FACES User Guide
November 17, 2017 29 Version 0.6 FACES User Guide_v1.0.docx Unclassified - For Official Use Only
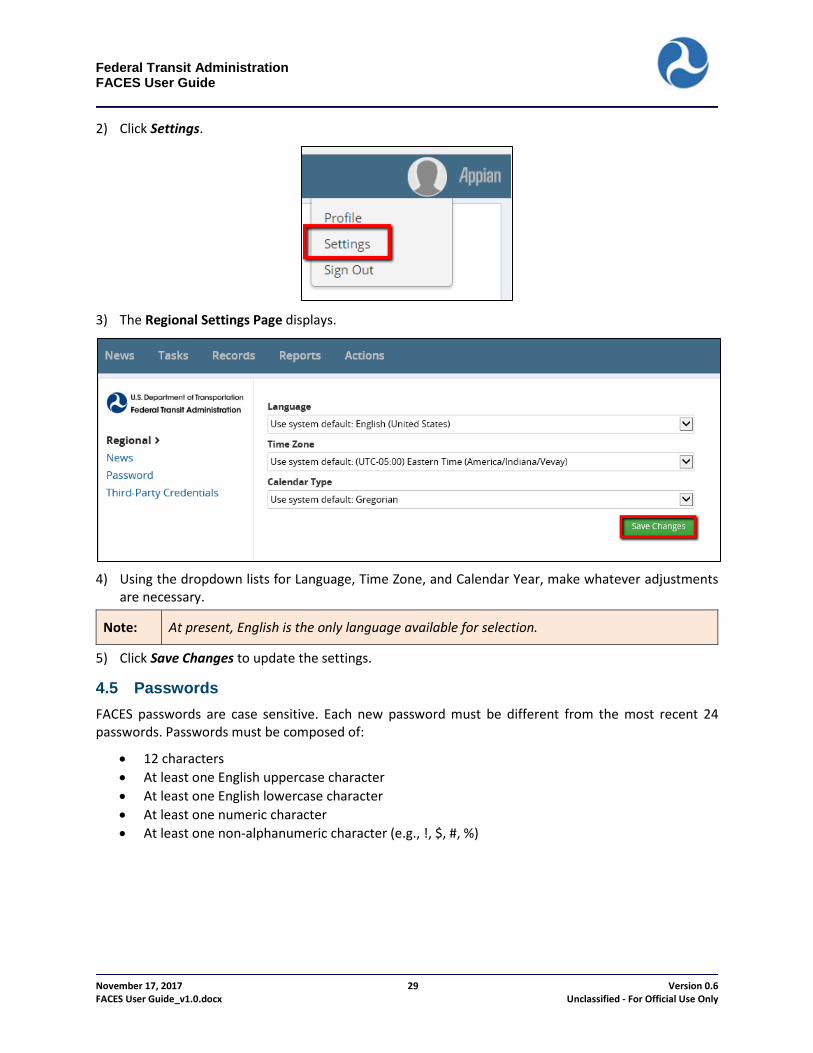
2) Click Settings.
3) The Regional Settings Page displays.
4) Using the dropdown lists for Language, Time Zone, and Calendar Year, make whatever adjustments
are necessary.
Note: At present, English is the only language available for selection.
5) Click Save Changes to update the settings.
4.5 Passwords FACES passwords are case sensitive. Each new password must be different from the most recent 24 passwords. Passwords must be composed of:
• 12 characters • At least one English uppercase character • At least one English lowercase character • At least one numeric character • At least one non-alphanumeric character (e.g., !, $, #, %)

Federal Transit Administration FACES User Guide
November 17, 2017 30 Version 0.6 FACES User Guide_v1.0.docx Unclassified - For Official Use Only
User-Initiated Password Reset
Non-FTA users should update their passwords every 60 days. To reset your password from a known password to a new password:
1) Select the icon (circular image) in the top right-corner of the screen to reveal a dropdown menu and then click Settings.
2) Click the Password link on the left-hand navigation pane.
3) Enter the current password and a new password and click Change Password.
Federal Transit Administration FACES User Guide
November 17, 2017 31 Version 0.6 FACES User Guide_v1.0.docx Unclassified - For Official Use Only
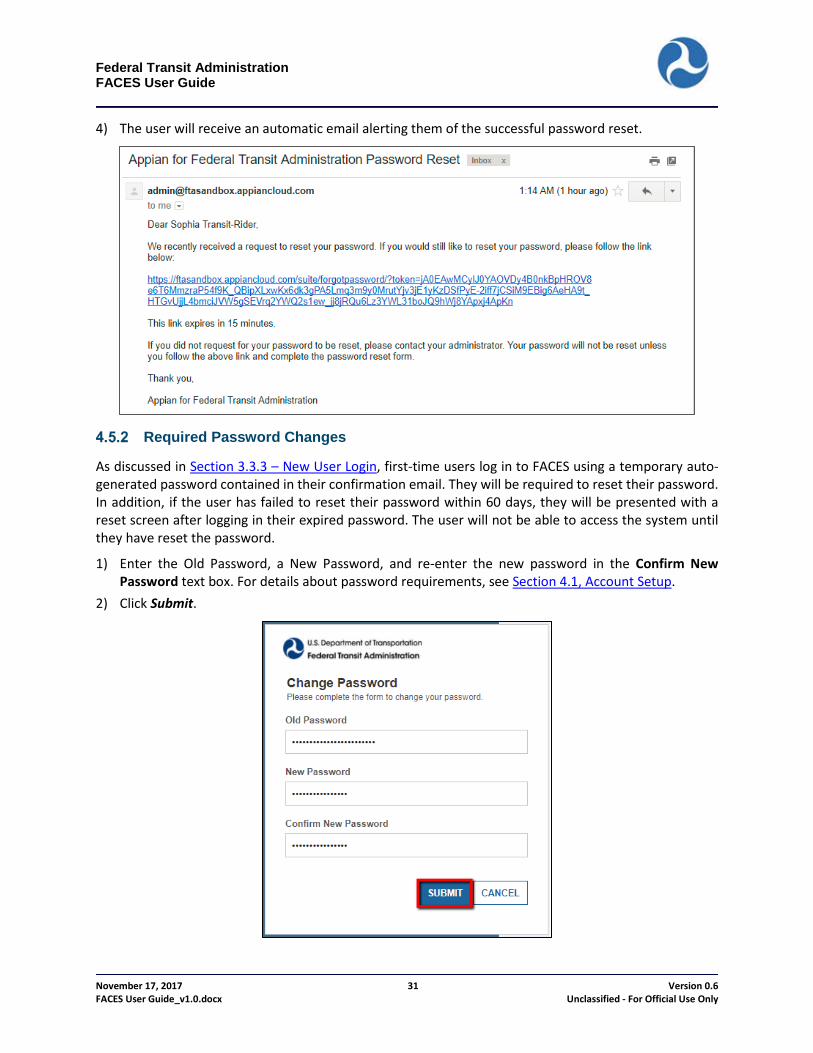
4) The user will receive an automatic email alerting them of the successful password reset.
Required Password Changes
As discussed in Section 3.3.3 – New User Login, first-time users log in to FACES using a temporary auto-generated password contained in their confirmation email. They will be required to reset their password. In addition, if the user has failed to reset their password within 60 days, they will be presented with a reset screen after logging in their expired password. The user will not be able to access the system until they have reset the password.
1) Enter the Old Password, a New Password, and re-enter the new password in the Confirm New Password text box. For details about password requirements, see Section 4.1, Account Setup.
2) Click Submit.
Federal Transit Administration FACES User Guide
November 17, 2017 32 Version 0.6 FACES User Guide_v1.0.docx Unclassified - For Official Use Only
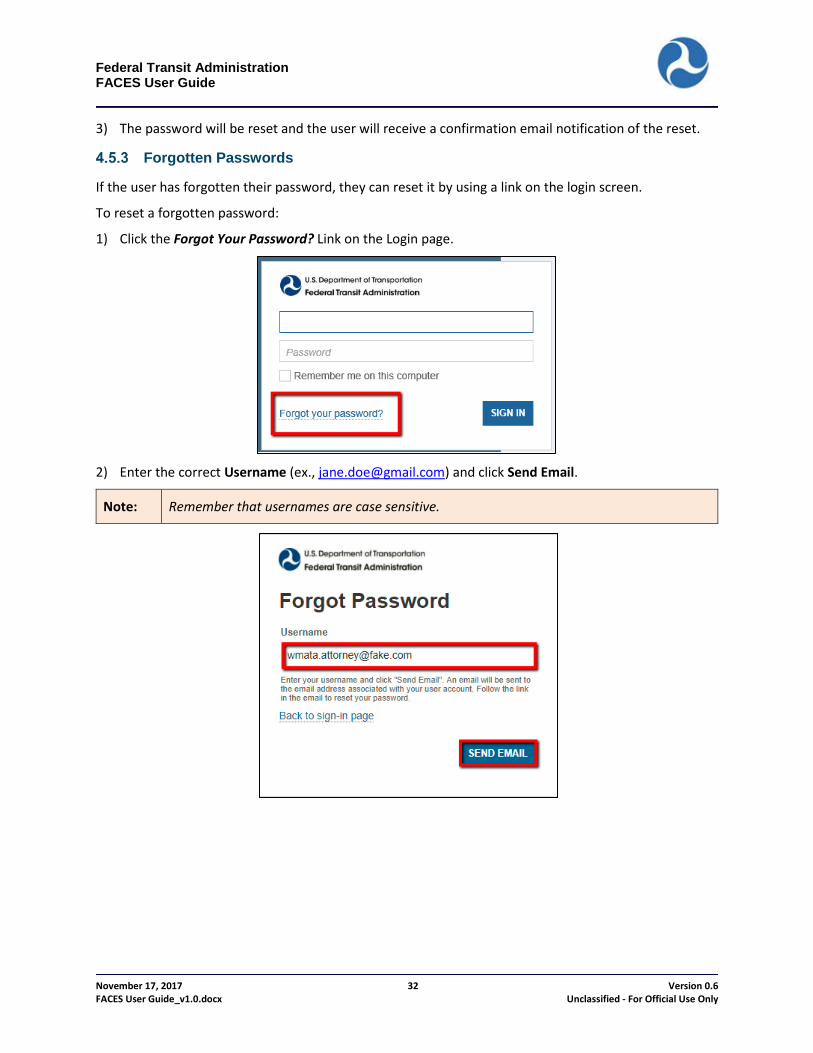
3) The password will be reset and the user will receive a confirmation email notification of the reset.
Forgotten Passwords
If the user has forgotten their password, they can reset it by using a link on the login screen.
To reset a forgotten password:
1) Click the Forgot Your Password? Link on the Login page.
2) Enter the correct Username (ex., [email protected]) and click Send Email.
Note: Remember that usernames are case sensitive.

Federal Transit Administration FACES User Guide
November 17, 2017 33 Version 0.6 FACES User Guide_v1.0.docx Unclassified - For Official Use Only
3) FACES will confirm that the username entered is valid and is associated with an active account. If so, an email with a password reset link will be sent to the email address entered.
4) After the email has been received, select the password reset link from within the email. The reset link
is only valid for 15 minutes from the time the email was sent.
Note: If you do not receive an email, contact the FACES Help Desk.
5) A new browser window will open to the Change Password page.
Federal Transit Administration FACES User Guide
November 17, 2017 34 Version 0.6 FACES User Guide_v1.0.docx Unclassified - For Official Use Only
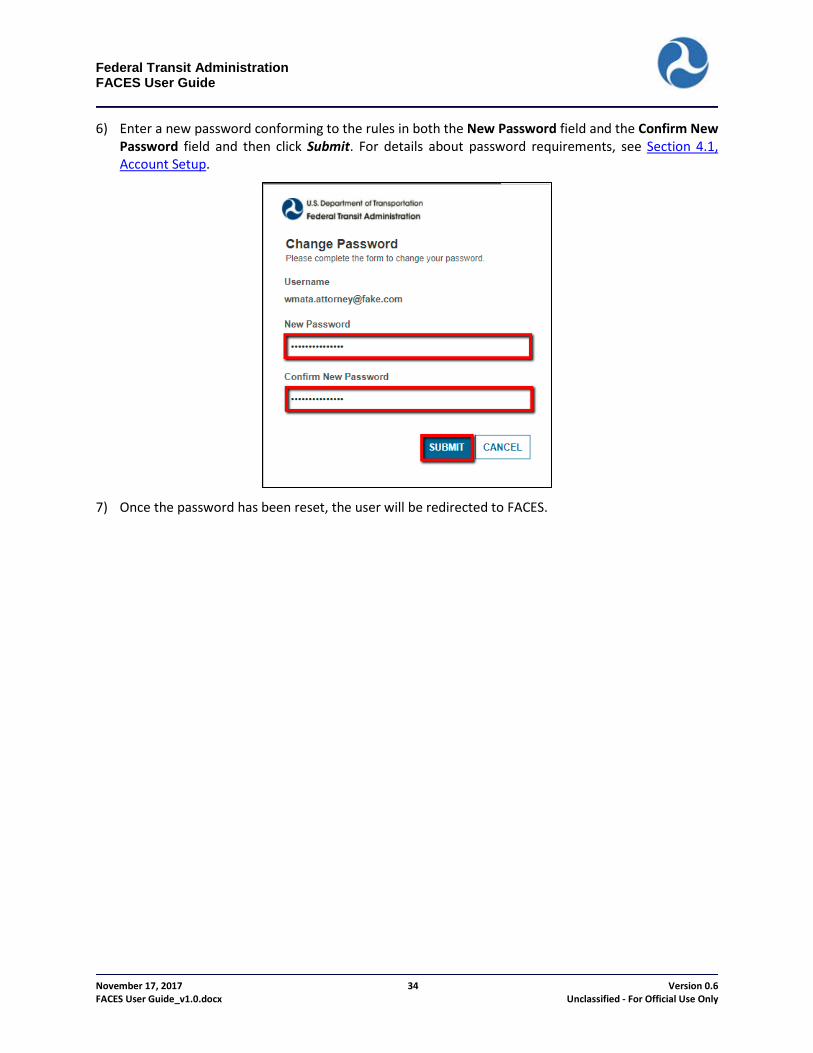
6) Enter a new password conforming to the rules in both the New Password field and the Confirm New Password field and then click Submit. For details about password requirements, see Section 4.1, Account Setup.
7) Once the password has been reset, the user will be redirected to FACES.

Federal Transit Administration FACES User Guide
November 17, 2017 35 Version 0.6 FACES User Guide_v1.0.docx Unclassified - For Official Use Only
5 Managing the User’s Own Record 5.1 Customizing the User Summary Page The Summary page is the landing page when a user has selected either the Profile option from their own account information at the upper right-hand corner or when they select themselves from the Records tab. This page consists of the user’s “business card” and any news items related to the user. Users may customize their own Summary page by adding a profile picture or by uploading a background. The sections below will provide step-by-step instructions for making those changes to the business card.
Adding/Changing Profile Picture
Users may add or update a profile picture. The profile picture is associated with the individual user and displays alongside any posts attributed to them.
To add or change a profile picture:
1) On the Summary page, click Photos to view the dropdown.

Federal Transit Administration FACES User Guide
November 17, 2017 36 Version 0.6 FACES User Guide_v1.0.docx Unclassified - For Official Use Only
2) Click Change Profile Photo.
3) A prompt displays that provides a mechanism for adding new photos to the account for use on the
Federal Transit Administration FACES User Guide
November 17, 2017 37 Version 0.6 FACES User Guide_v1.0.docx Unclassified - For Official Use Only
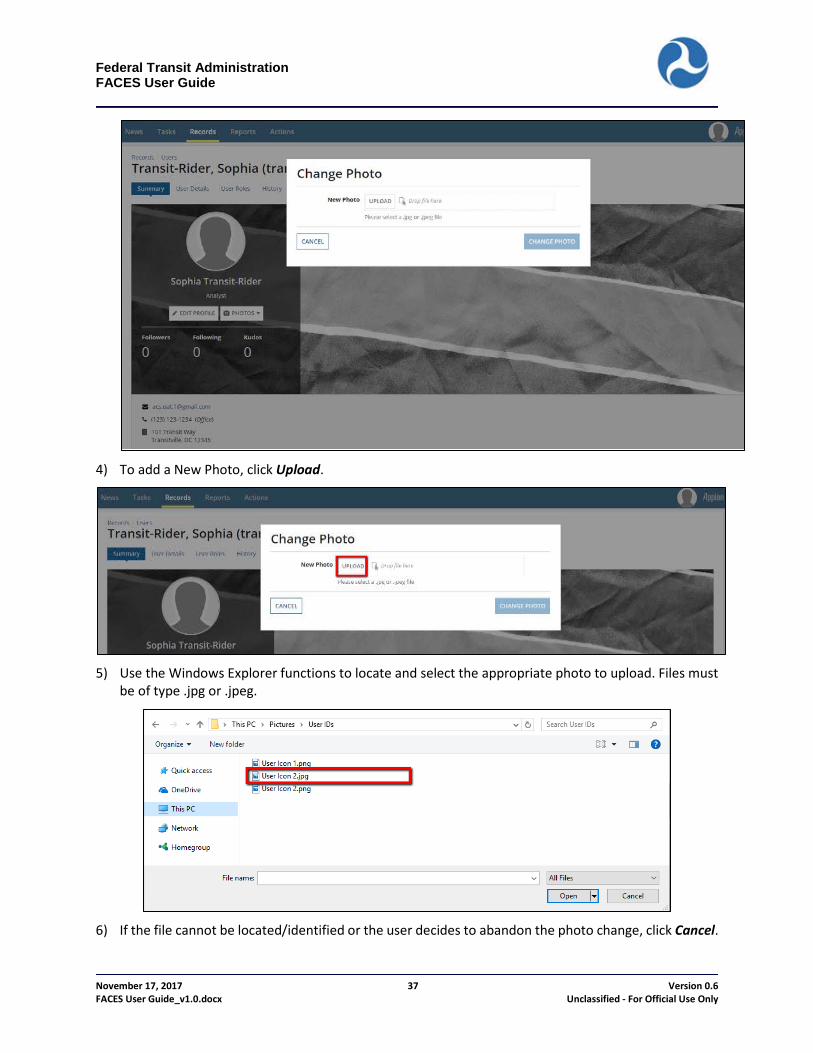
4) To add a New Photo, click Upload.
5) Use the Windows Explorer functions to locate and select the appropriate photo to upload. Files must
be of type .jpg or .jpeg.
6) If the file cannot be located/identified or the user decides to abandon the photo change, click Cancel.
Federal Transit Administration FACES User Guide
November 17, 2017 38 Version 0.6 FACES User Guide_v1.0.docx Unclassified - For Official Use Only
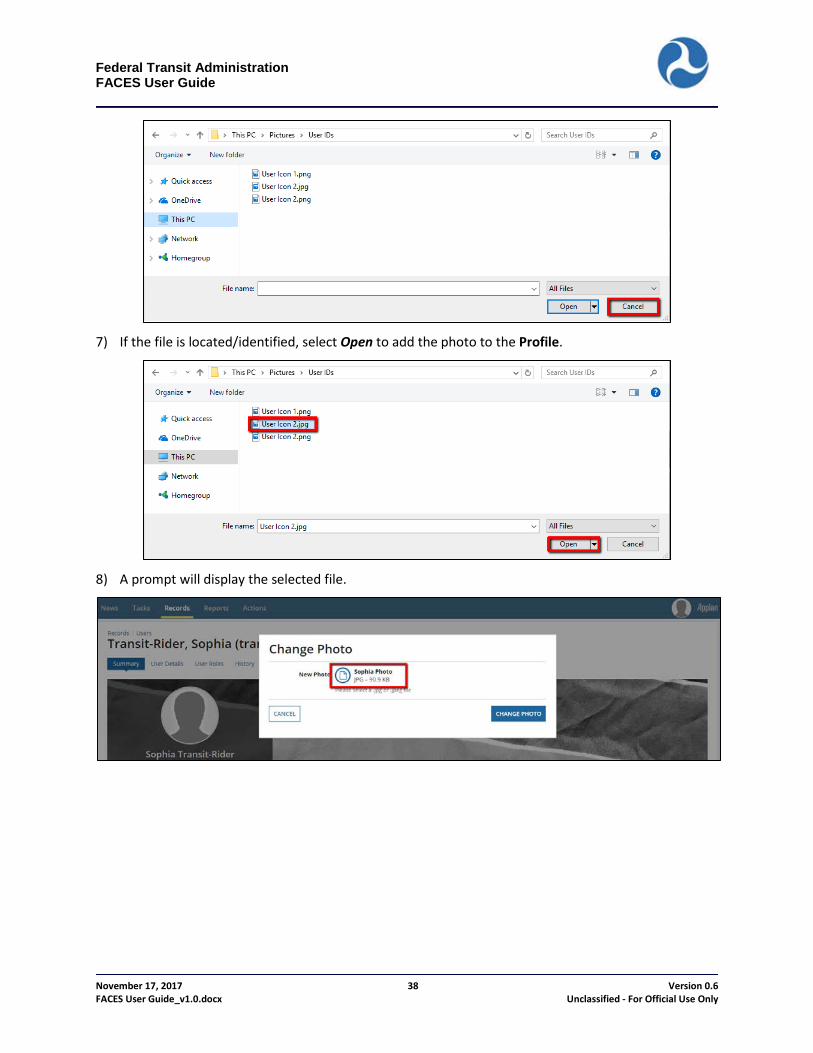
7) If the file is located/identified, select Open to add the photo to the Profile.
8) A prompt will display the selected file.
Federal Transit Administration FACES User Guide
November 17, 2017 39 Version 0.6 FACES User Guide_v1.0.docx Unclassified - For Official Use Only
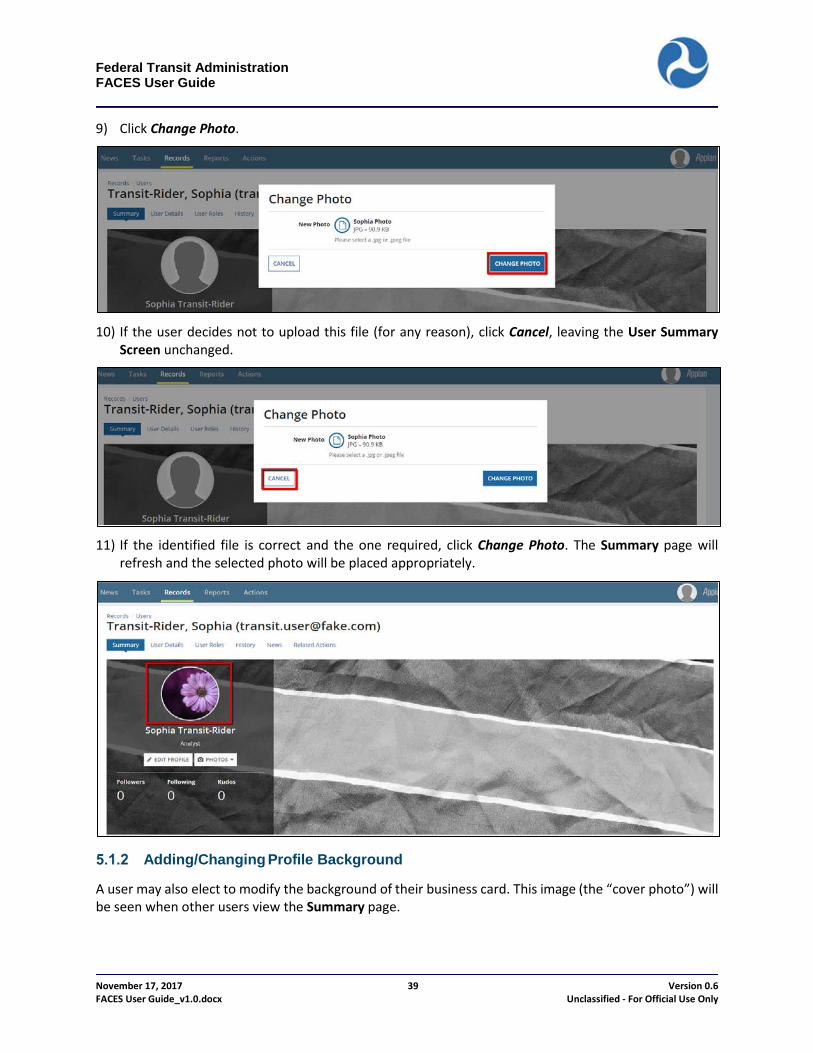
9) Click Change Photo.
10) If the user decides not to upload this file (for any reason), click Cancel, leaving the User Summary
Screen unchanged.
11) If the identified file is correct and the one required, click Change Photo. The Summary page will
refresh and the selected photo will be placed appropriately.
Adding/Changing Profile Background
A user may also elect to modify the background of their business card. This image (the “cover photo”) will be seen when other users view the Summary page.
Federal Transit Administration FACES User Guide
November 17, 2017 40 Version 0.6 FACES User Guide_v1.0.docx Unclassified - For Official Use Only
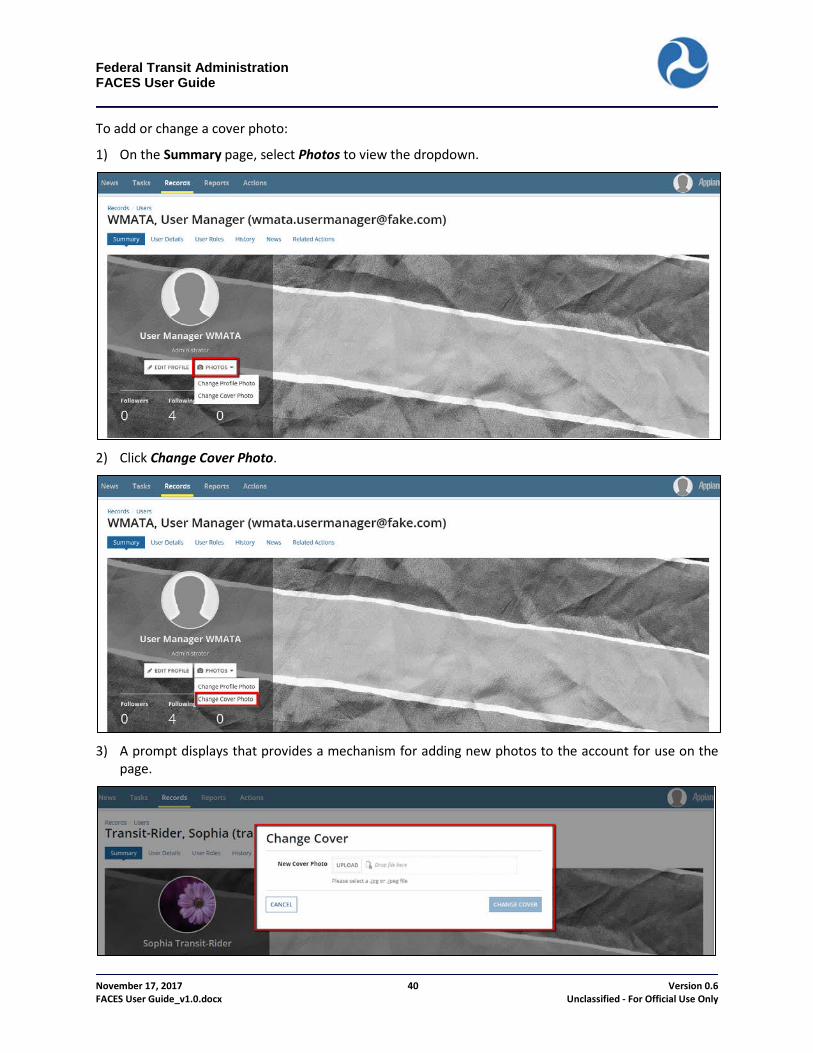
To add or change a cover photo:
1) On the Summary page, select Photos to view the dropdown.
2) Click Change Cover Photo.
3) A prompt displays that provides a mechanism for adding new photos to the account for use on the
page.

Federal Transit Administration FACES User Guide
November 17, 2017 41 Version 0.6 FACES User Guide_v1.0.docx Unclassified - For Official Use Only
4) To add a New Cover Photo, click Upload.
5) Use the Windows Explorer functions to locate and select the appropriate photo to upload.
6) If the file cannot be located/identified or the user decides to abandon the photo change, click Cancel.
Federal Transit Administration FACES User Guide
November 17, 2017 42 Version 0.6 FACES User Guide_v1.0.docx Unclassified - For Official Use Only
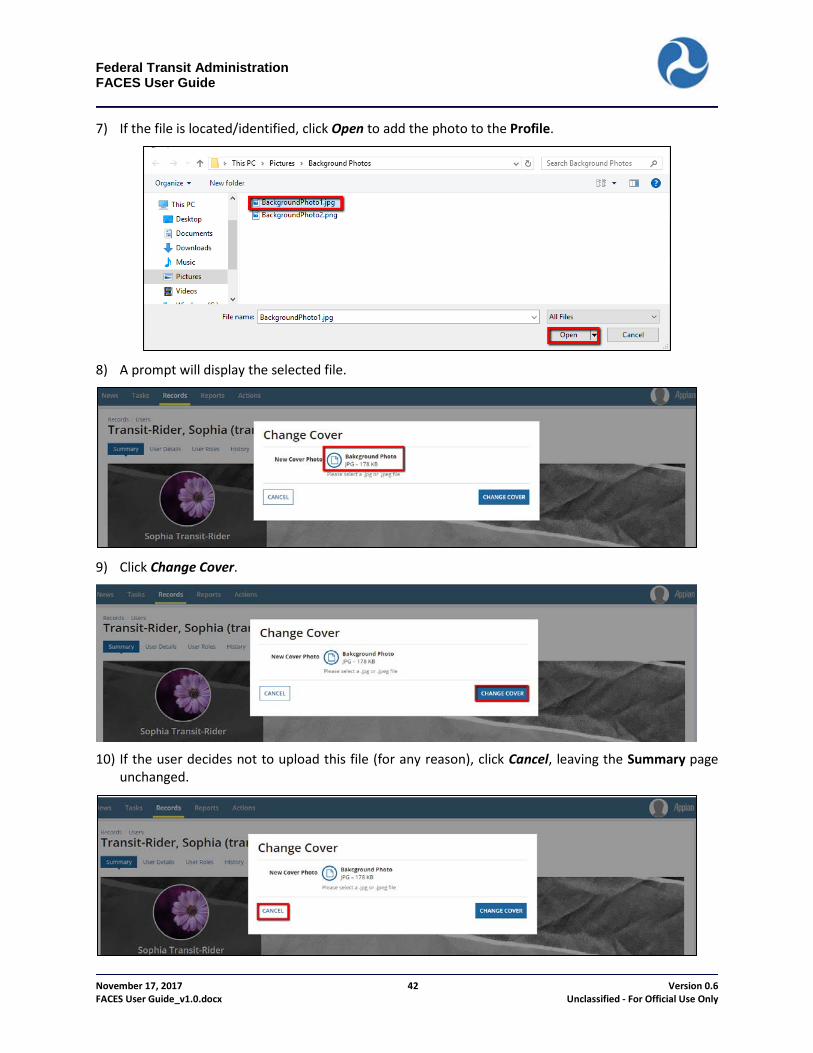
7) If the file is located/identified, click Open to add the photo to the Profile.
8) A prompt will display the selected file.
9) Click Change Cover.
10) If the user decides not to upload this file (for any reason), click Cancel, leaving the Summary page
unchanged.
Federal Transit Administration FACES User Guide
November 17, 2017 43 Version 0.6 FACES User Guide_v1.0.docx Unclassified - For Official Use Only
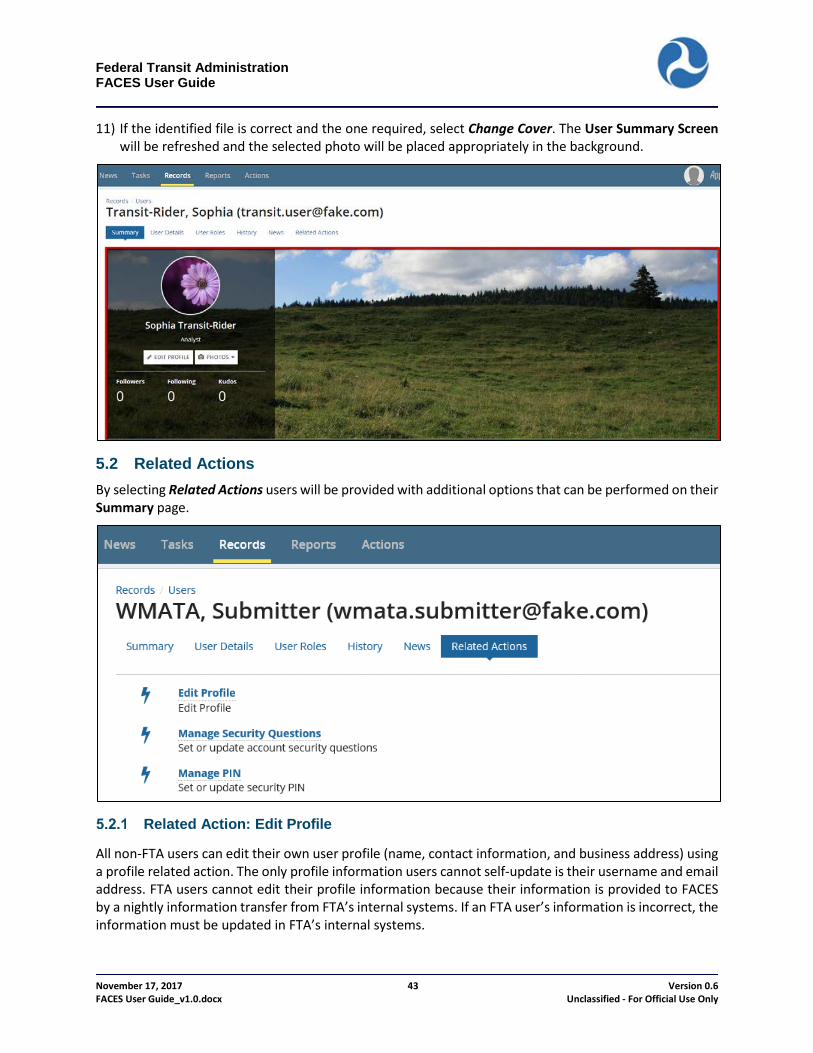
11) If the identified file is correct and the one required, select Change Cover. The User Summary Screen will be refreshed and the selected photo will be placed appropriately in the background.
5.2 Related Actions By selecting Related Actions users will be provided with additional options that can be performed on their Summary page.
Related Action: Edit Profile
All non-FTA users can edit their own user profile (name, contact information, and business address) using a profile related action. The only profile information users cannot self-update is their username and email address. FTA users cannot edit their profile information because their information is provided to FACES by a nightly information transfer from FTA’s internal systems. If an FTA user’s information is incorrect, the information must be updated in FTA’s internal systems.

Federal Transit Administration FACES User Guide
November 17, 2017 44 Version 0.6 FACES User Guide_v1.0.docx Unclassified - For Official Use Only
To edit the user’s profile:
1) Locate the User Profile through either the User Settings page or the Records page.
2) Select Related Actions.
3) Click Edit Profile.
4) The Edit User Profile page will display with all previously saved user-associated details in editable
fields.
5) Click Cancel to return to the Related Actions page without saving any changes.
Federal Transit Administration FACES User Guide
November 17, 2017 45 Version 0.6 FACES User Guide_v1.0.docx Unclassified - For Official Use Only
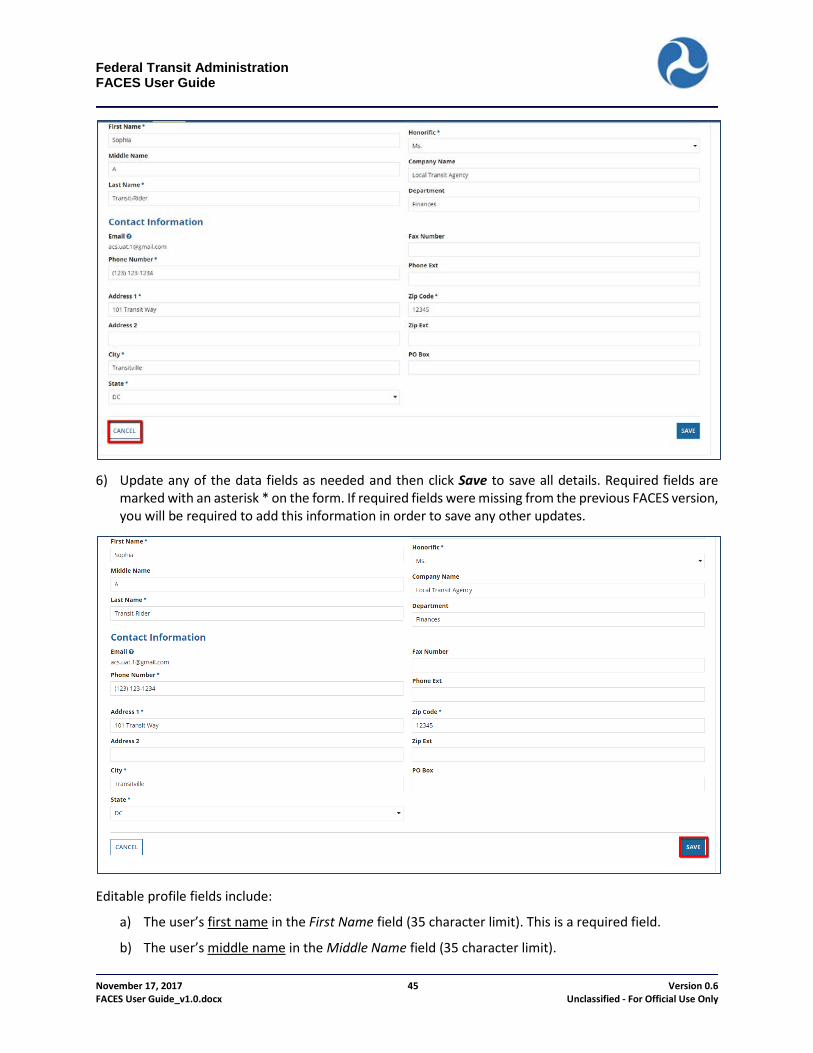
6) Update any of the data fields as needed and then click Save to save all details. Required fields are marked with an asterisk * on the form. If required fields were missing from the previous FACES version, you will be required to add this information in order to save any other updates.
Editable profile fields include:
a) The user’s first name in the First Name field (35 character limit). This is a required field.
b) The user’s middle name in the Middle Name field (35 character limit).

Federal Transit Administration FACES User Guide
November 17, 2017 46 Version 0.6 FACES User Guide_v1.0.docx Unclassified - For Official Use Only
c) The user’s last name in the Last Name field (35 character limit). This is a required field.
d) The user’s job title in the Title field. This is a required field.
e) The user’s honorific in the Honorific field. This is a required field (i.e., Mr., Ms.) and only values from the drop-down list can be selected.
f) The user’s company information in the Company Name field.
g) The user’s department in the Department field.
h) Email address is not editable by the user him or herself. FTA emails are never editable. If an organization or external user needs to edit their email, they should contact their User Manager, LSM, or GSM.
i) The user’s work business phone number in the Work Phone field. This is a required field (20 character limit).
j) The user’s business phone number extension in the Phone Number Extension field (10 character limit).
k) The user’s business fax number in the Fax Number field (20 character limit).
l) The first line of the user’s business address in the Address 1 field (60 character limit).
m) The second line of the user’s business address in the Address 2 field (60 character limit).
n) The city for the user’s business address in the City field (60 character limit; no numeric).
o) The state for the user’s business address from the dropdown menu provided under the State field.
p) The ZIP Code for the user’s business address in the ZIP Code field (5 character limit).
q) The ZIP Code Extension for the user’s business address in the ZIP Code Extension field (4 character limit).
r) As necessary, the associated Post Office Box in the PO Box field (35 character limit).
7) Selecting Save will execute a validation script to ensure that all data entered matches pre-determined rules (e.g., the PO Box field cannot contain any letters). Once the data is validated, the information is saved and the Related Actions page displays. The system will briefly display (within the header area of the Related Actions page) a message that the Action Completed Successfully, indicating that all of changes were accepted.
Related Action: Set Security Questions/Answers
New user accounts are automatically assigned a Task to set up an initial set of Security Questions and Answers (Q&As) to ensure the security of the account and to provide a mechanism to re-establish access when lost due to a lockout, etc. To begin that process, the user must be assigned a Task to Set Security Q&As.
A few rules apply to the setting of Security Q&As:
a) All users can set up and manage three (3) security questions through the Manage Security Questions page.
b) Questions must be selected from an FTA approved list and 3 distinct questions must be selected.

Federal Transit Administration FACES User Guide
November 17, 2017 47 Version 0.6 FACES User Guide_v1.0.docx Unclassified - For Official Use Only
c) Answers must contain at least three (3) characters and cannot be used for more than one question.
d) Users must correctly answer their existing questions to change them. e) Users have three (3) attempts within a calendar day to answer their security questions correctly
before they are locked out of the action. f) Users cannot see the Manage Security Questions page on any other user’s account. g) Users will receive an automated email notification any time their questions have been updated.
To being the process of setting one’s own security questions:
1) Locate the User Profile through either the User Settings page or the Records page.
2) Select Tasks.
3) Click Set Security Q&As.
4) The Manage Security Questions page displays, providing three areas for the user to select from a
dropdown of questions and to enter their own answers to those questions.
Federal Transit Administration FACES User Guide
November 17, 2017 48 Version 0.6 FACES User Guide_v1.0.docx Unclassified - For Official Use Only
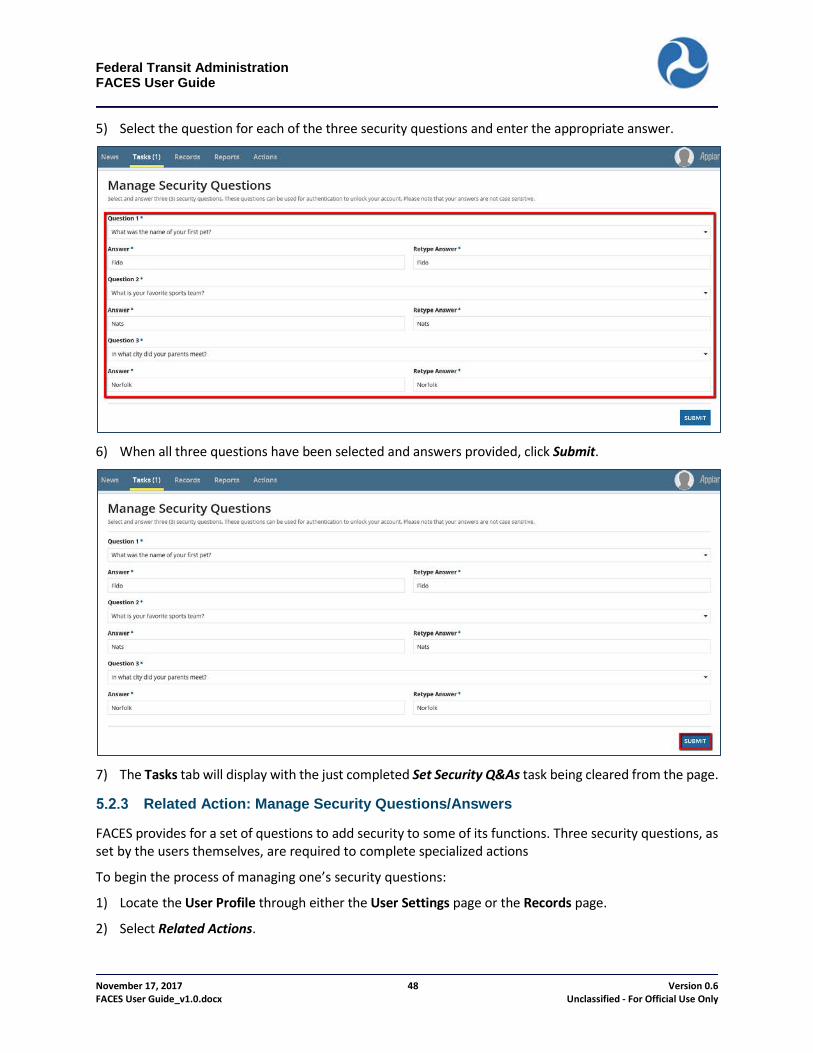
5) Select the question for each of the three security questions and enter the appropriate answer.
6) When all three questions have been selected and answers provided, click Submit.
7) The Tasks tab will display with the just completed Set Security Q&As task being cleared from the page.
Related Action: Manage Security Questions/Answers
FACES provides for a set of questions to add security to some of its functions. Three security questions, as set by the users themselves, are required to complete specialized actions
To begin the process of managing one’s security questions:
1) Locate the User Profile through either the User Settings page or the Records page.
2) Select Related Actions.

Federal Transit Administration FACES User Guide
November 17, 2017 49 Version 0.6 FACES User Guide_v1.0.docx Unclassified - For Official Use Only
3) Click Manage Security Questions from the Related Actions page.
4) If there are existing security questions associated with the user profile, the Answer Existing Security
Questions page displays. This page presents three questions and gives the user three attempts (within a 24-hour period) to answer them correctly.
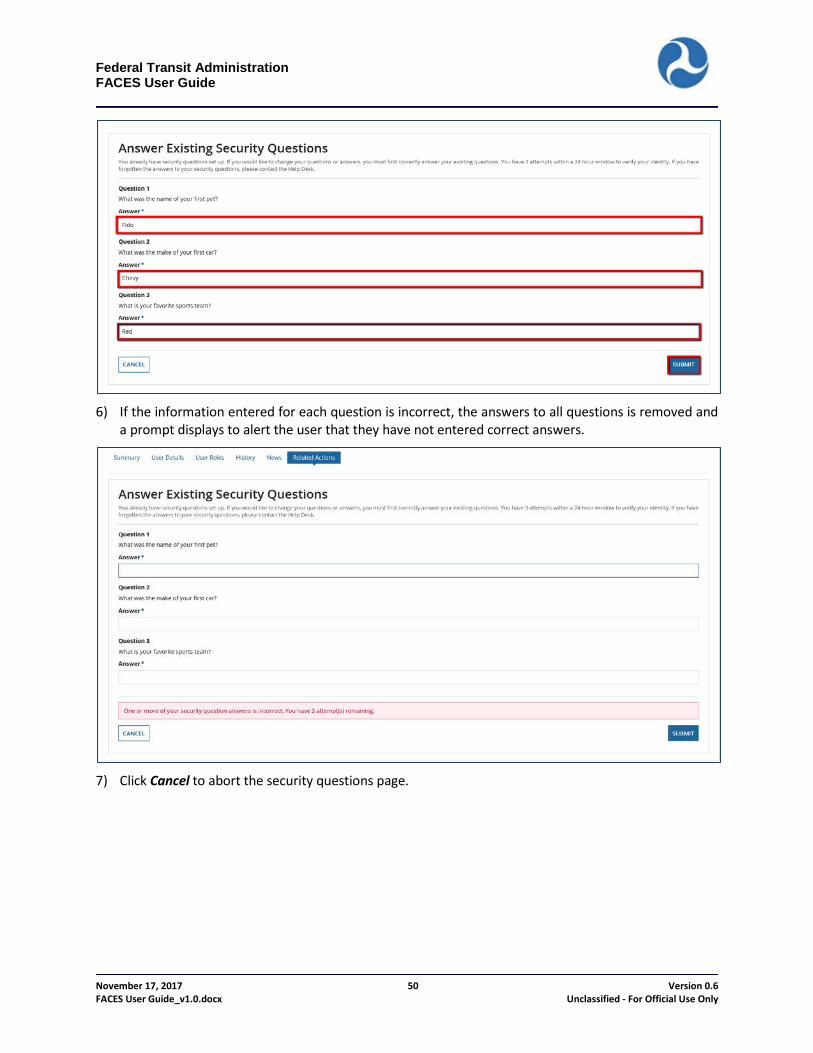
5) Enter the appropriate information and click Submit.
Federal Transit Administration FACES User Guide
November 17, 2017 50 Version 0.6 FACES User Guide_v1.0.docx Unclassified - For Official Use Only
6) If the information entered for each question is incorrect, the answers to all questions is removed and
a prompt displays to alert the user that they have not entered correct answers.
7) Click Cancel to abort the security questions page.
Federal Transit Administration FACES User Guide
November 17, 2017 51 Version 0.6 FACES User Guide_v1.0.docx Unclassified - For Official Use Only
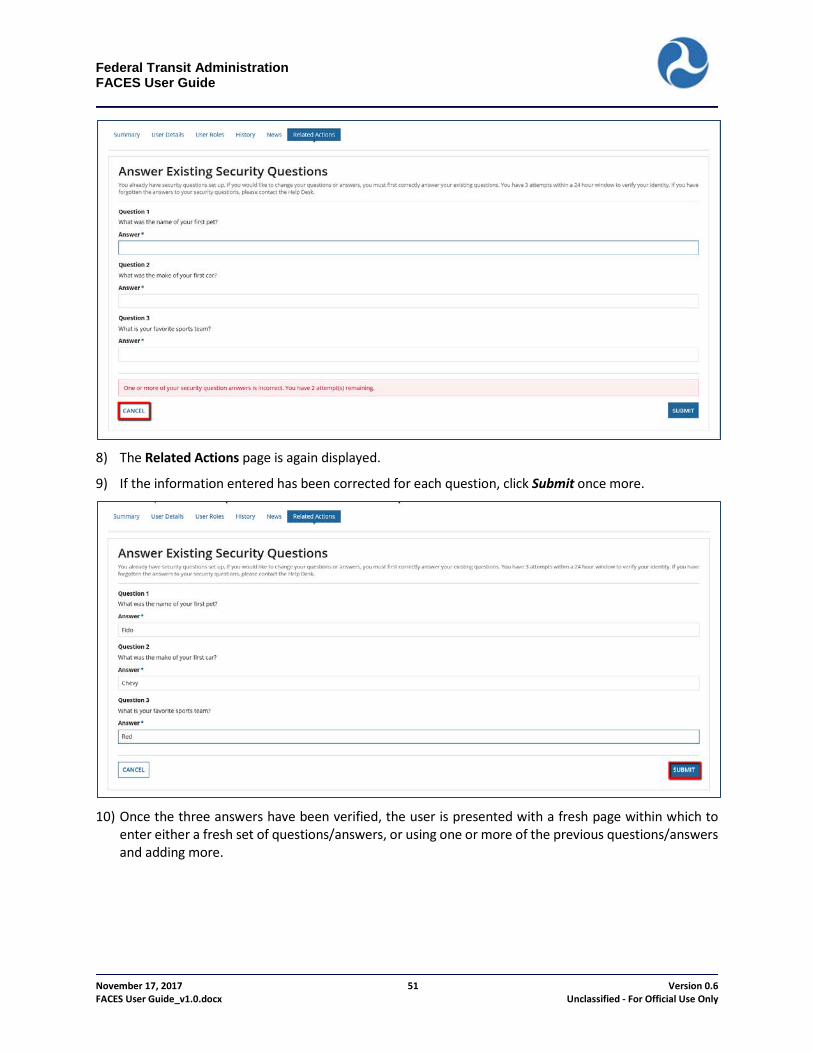
8) The Related Actions page is again displayed.
9) If the information entered has been corrected for each question, click Submit once more.
10) Once the three answers have been verified, the user is presented with a fresh page within which to
enter either a fresh set of questions/answers, or using one or more of the previous questions/answers and adding more.

Federal Transit Administration FACES User Guide
November 17, 2017 52 Version 0.6 FACES User Guide_v1.0.docx Unclassified - For Official Use Only
11) Click Cancel to abort the security questions page and return to the Related Actions page.
Federal Transit Administration FACES User Guide
November 17, 2017 53 Version 0.6 FACES User Guide_v1.0.docx Unclassified - For Official Use Only
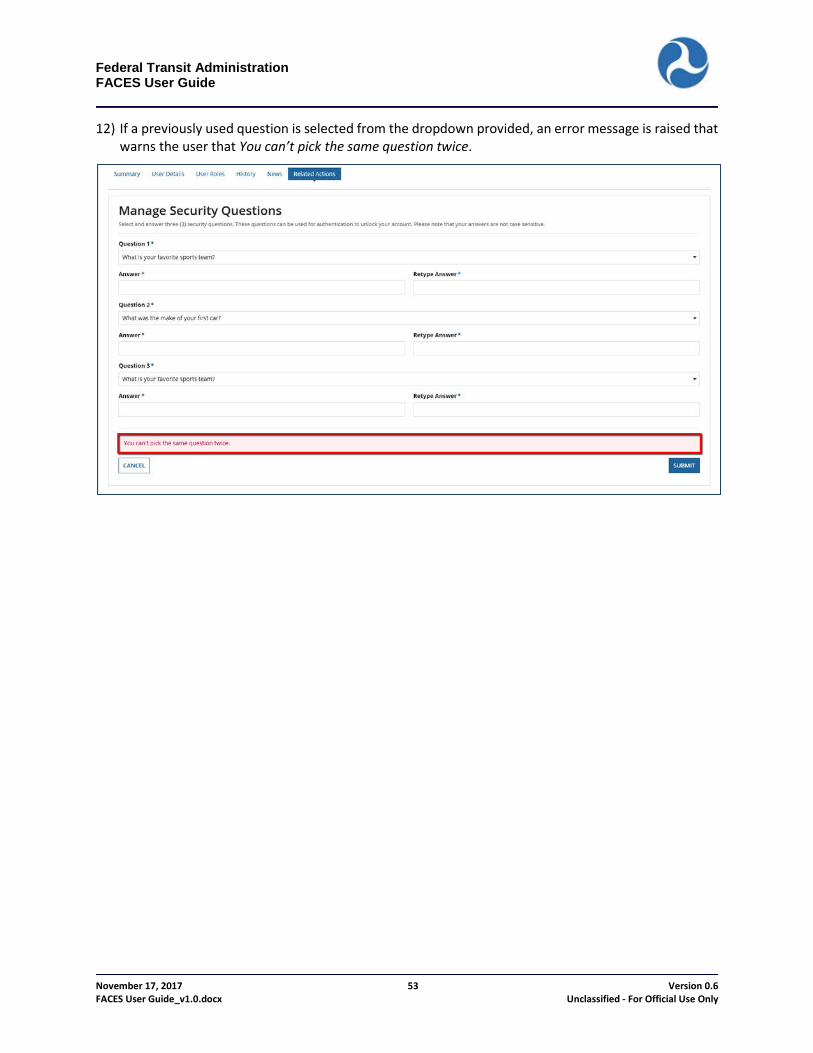
12) If a previously used question is selected from the dropdown provided, an error message is raised that warns the user that You can’t pick the same question twice.
Federal Transit Administration FACES User Guide
November 17, 2017 54 Version 0.6 FACES User Guide_v1.0.docx Unclassified - For Official Use Only
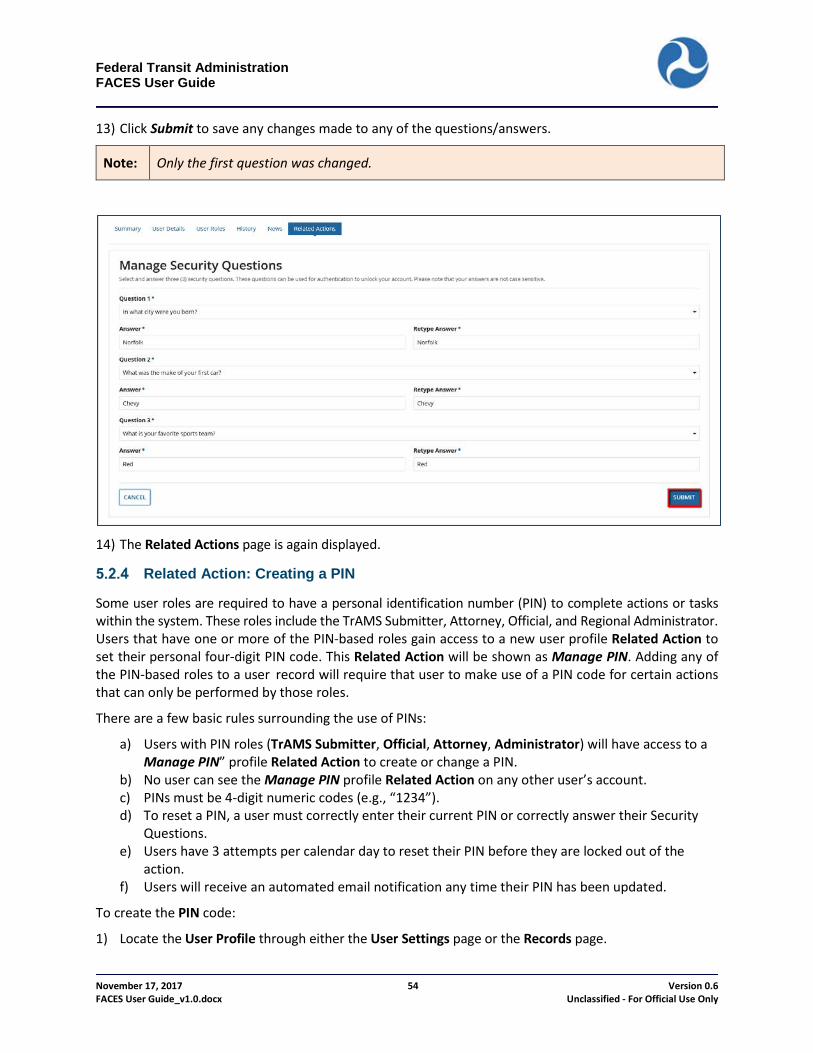
13) Click Submit to save any changes made to any of the questions/answers.
Note: Only the first question was changed.
14) The Related Actions page is again displayed.
Related Action: Creating a PIN
Some user roles are required to have a personal identification number (PIN) to complete actions or tasks within the system. These roles include the TrAMS Submitter, Attorney, Official, and Regional Administrator. Users that have one or more of the PIN-based roles gain access to a new user profile Related Action to set their personal four-digit PIN code. This Related Action will be shown as Manage PIN. Adding any of the PIN-based roles to a user record will require that user to make use of a PIN code for certain actions that can only be performed by those roles.
There are a few basic rules surrounding the use of PINs:
a) Users with PIN roles (TrAMS Submitter, Official, Attorney, Administrator) will have access to a Manage PIN” profile Related Action to create or change a PIN.
b) No user can see the Manage PIN profile Related Action on any other user’s account. c) PINs must be 4-digit numeric codes (e.g., “1234”). d) To reset a PIN, a user must correctly enter their current PIN or correctly answer their Security
Questions. e) Users have 3 attempts per calendar day to reset their PIN before they are locked out of the
action. f) Users will receive an automated email notification any time their PIN has been updated.
To create the PIN code:
1) Locate the User Profile through either the User Settings page or the Records page.
Federal Transit Administration FACES User Guide
November 17, 2017 55 Version 0.6 FACES User Guide_v1.0.docx Unclassified - For Official Use Only
2) Select Related Actions.
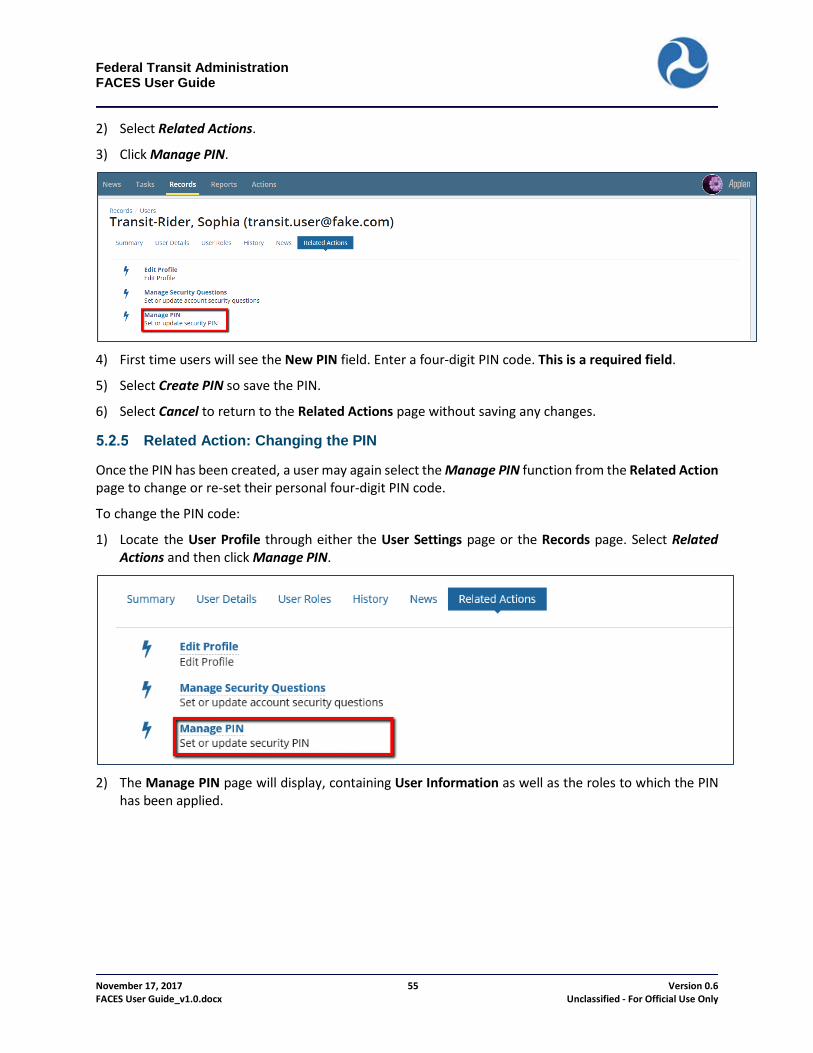
3) Click Manage PIN.
4) First time users will see the New PIN field. Enter a four-digit PIN code. This is a required field.
5) Select Create PIN so save the PIN.
6) Select Cancel to return to the Related Actions page without saving any changes.
Related Action: Changing the PIN
Once the PIN has been created, a user may again select the Manage PIN function from the Related Action page to change or re-set their personal four-digit PIN code.
To change the PIN code:
1) Locate the User Profile through either the User Settings page or the Records page. Select Related Actions and then click Manage PIN.
2) The Manage PIN page will display, containing User Information as well as the roles to which the PIN has been applied.

Federal Transit Administration FACES User Guide
November 17, 2017 56 Version 0.6 FACES User Guide_v1.0.docx Unclassified - For Official Use Only
Federal Transit Administration FACES User Guide
November 17, 2017 57 Version 0.6 FACES User Guide_v1.0.docx Unclassified - For Official Use Only
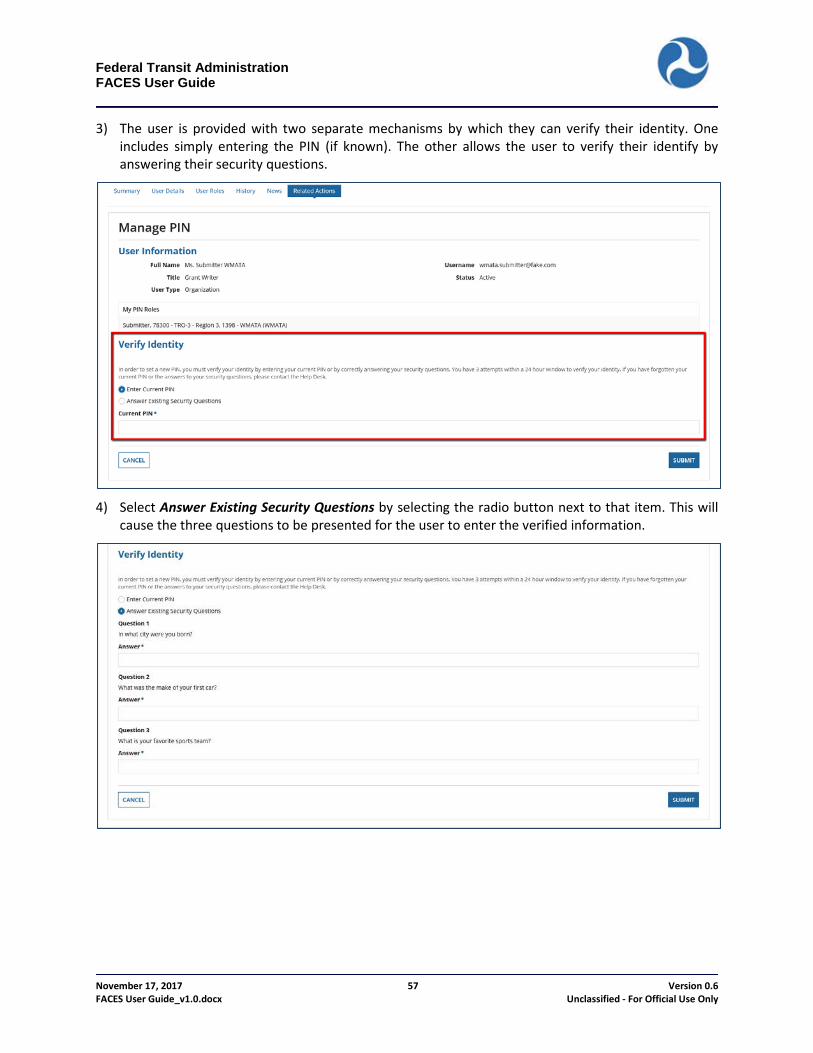
3) The user is provided with two separate mechanisms by which they can verify their identity. One includes simply entering the PIN (if known). The other allows the user to verify their identify by answering their security questions.
4) Select Answer Existing Security Questions by selecting the radio button next to that item. This will
cause the three questions to be presented for the user to enter the verified information.

Federal Transit Administration FACES User Guide
November 17, 2017 58 Version 0.6 FACES User Guide_v1.0.docx Unclassified - For Official Use Only
5) Click Cancel to abort the security questions page and return to the Related Actions page.
6) Complete the information and click Submit.
Federal Transit Administration FACES User Guide
November 17, 2017 59 Version 0.6 FACES User Guide_v1.0.docx Unclassified - For Official Use Only
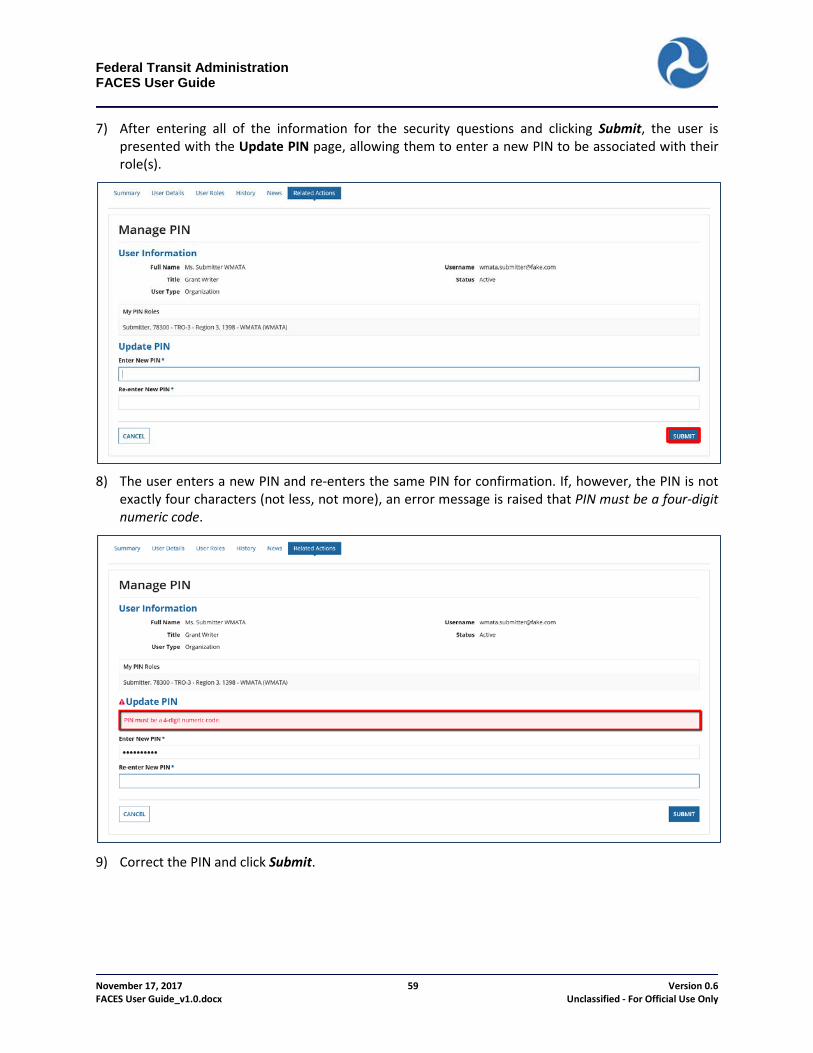
7) After entering all of the information for the security questions and clicking Submit, the user is presented with the Update PIN page, allowing them to enter a new PIN to be associated with their role(s).
8) The user enters a new PIN and re-enters the same PIN for confirmation. If, however, the PIN is not
exactly four characters (not less, not more), an error message is raised that PIN must be a four-digit numeric code.
9) Correct the PIN and click Submit.
Federal Transit Administration FACES User Guide
November 17, 2017 60 Version 0.6 FACES User Guide_v1.0.docx Unclassified - For Official Use Only
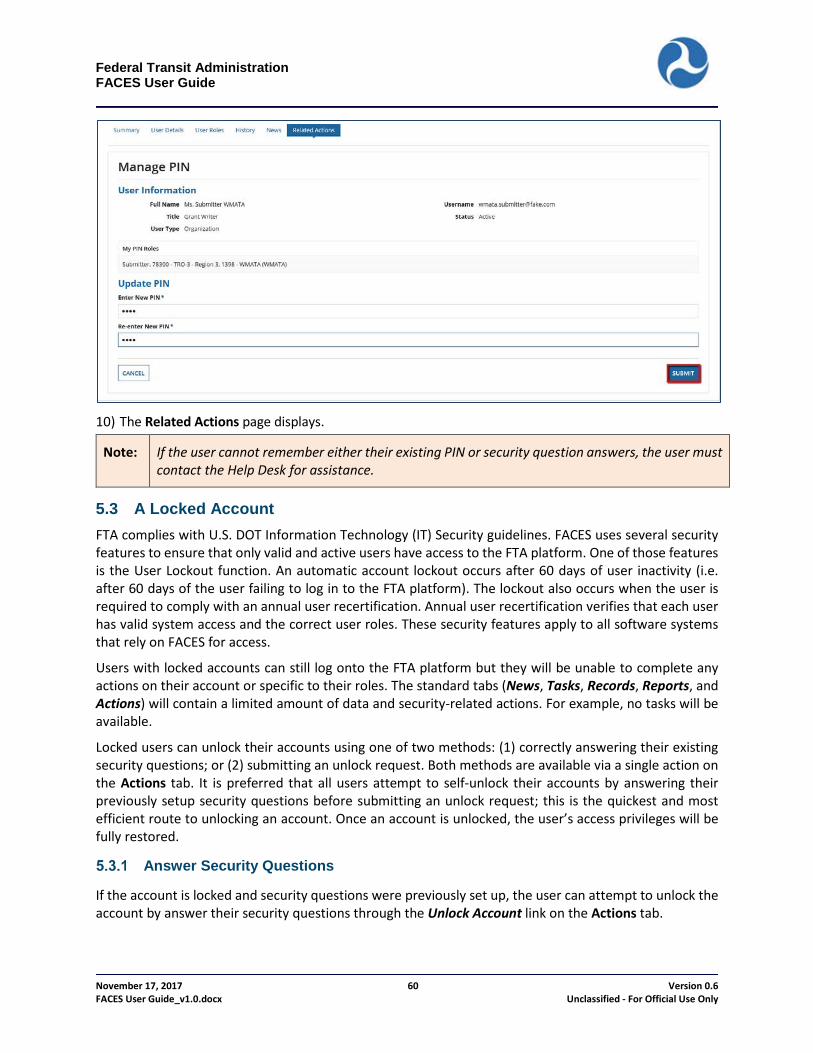
10) The Related Actions page displays.
Note: If the user cannot remember either their existing PIN or security question answers, the user must contact the Help Desk for assistance.
5.3 A Locked Account FTA complies with U.S. DOT Information Technology (IT) Security guidelines. FACES uses several security features to ensure that only valid and active users have access to the FTA platform. One of those features is the User Lockout function. An automatic account lockout occurs after 60 days of user inactivity (i.e. after 60 days of the user failing to log in to the FTA platform). The lockout also occurs when the user is required to comply with an annual user recertification. Annual user recertification verifies that each user has valid system access and the correct user roles. These security features apply to all software systems that rely on FACES for access.
Users with locked accounts can still log onto the FTA platform but they will be unable to complete any actions on their account or specific to their roles. The standard tabs (News, Tasks, Records, Reports, and Actions) will contain a limited amount of data and security-related actions. For example, no tasks will be available.
Locked users can unlock their accounts using one of two methods: (1) correctly answering their existing security questions; or (2) submitting an unlock request. Both methods are available via a single action on the Actions tab. It is preferred that all users attempt to self-unlock their accounts by answering their previously setup security questions before submitting an unlock request; this is the quickest and most efficient route to unlocking an account. Once an account is unlocked, the user’s access privileges will be fully restored.
Answer Security Questions
If the account is locked and security questions were previously set up, the user can attempt to unlock the account by answer their security questions through the Unlock Account link on the Actions tab.
Federal Transit Administration FACES User Guide
November 17, 2017 61 Version 0.6 FACES User Guide_v1.0.docx Unclassified - For Official Use Only
Note: See Related Action: Set Security Questions/Answers or Related Action: Manage Security Questions/Answers for instructions on setting up Security Questions. User Security Questions cannot be modified while the account is locked.
The user is allowed three (3) attempts per calendar day to correctly answer the security questions. Users who have not set up security questions or who cannot remember the correct answers to their questions must instead submit an unlock request.
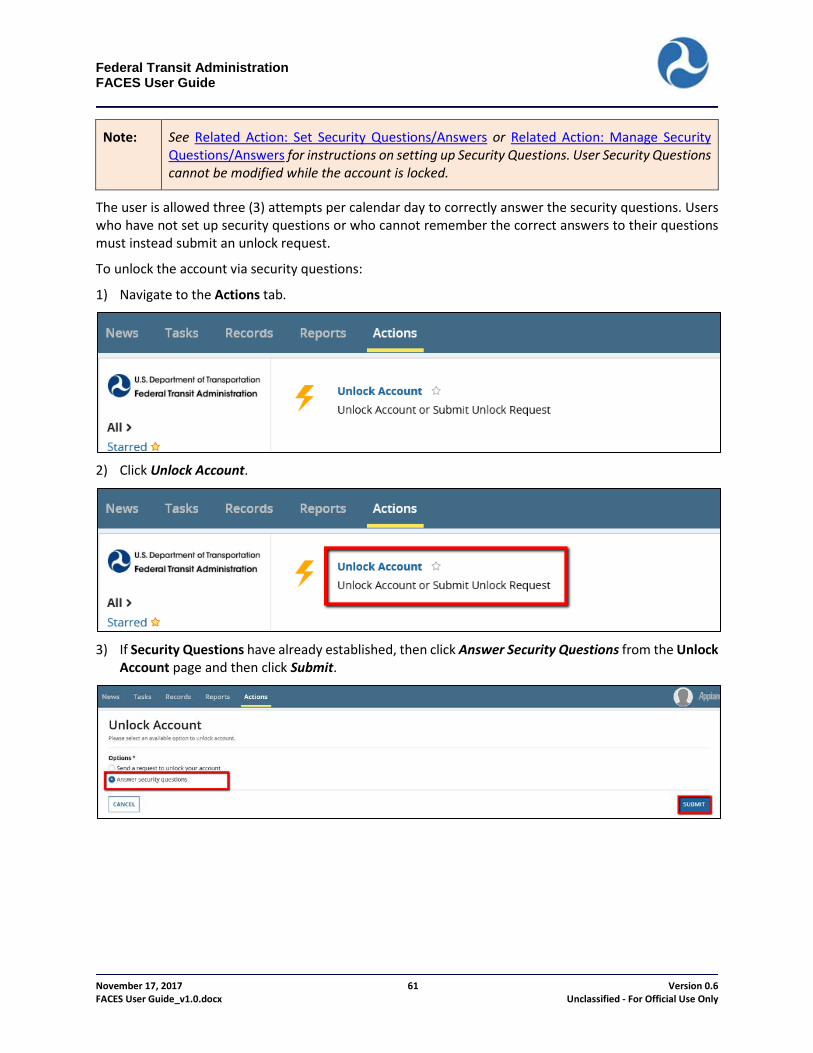
To unlock the account via security questions:
1) Navigate to the Actions tab.
2) Click Unlock Account.
3) If Security Questions have already established, then click Answer Security Questions from the Unlock
Account page and then click Submit.

Federal Transit Administration FACES User Guide
November 17, 2017 62 Version 0.6 FACES User Guide_v1.0.docx Unclassified - For Official Use Only
4) Provide the correct answers to the three previously established questions and click Submit.
Note: Answers are case insensitive.
5) If incorrect information was entered, a validation error message will display that indicates the number
of attempts remaining for the current calendar day. After three incorrect attempts, the user will be forced to wait until the next calendar day before another attempt.
6) If incorrect information was entered, all three answers will be erased regardless of which one of the
three answers was actually incorrect.

Federal Transit Administration FACES User Guide
November 17, 2017 63 Version 0.6 FACES User Guide_v1.0.docx Unclassified - For Official Use Only
7) Enter the correct information and click Submit.
8) A message indicating User Unlock Processing will display. 9) Click Refresh.
10) A message indicating Your Account is Successfully Unlocked will display. 11) Click Close.
12) An email will be auto-generated and sent to the user. 13) The Actions page will display with the Unlock User action removed.
Submit Unlock Request
If a user has not set up security questions or cannot remember their answers, they can submit an unlock request by selecting Unlock Account on the Actions tab. The unlock request is automatically routed to the appropriate approvers (User Managers, LSMs, or GSMs). If an organization does not have a User Manager or the locked user is the User Manager, the request will go to the next level approver. If the user belongs to multiple organizations, the request will go to each of organization’s user management chain.

Federal Transit Administration FACES User Guide
November 17, 2017 64 Version 0.6 FACES User Guide_v1.0.docx Unclassified - For Official Use Only
To submit an unlock request:
1) Log into FACES. 2) Navigate to the Actions tab.
3) Click Unlock Account.
4) Select the Send a Request to Unlock Your Account option, enter any comments pertinent to regaining
access, and then click Submit to finalize the action.
5) A message indicating Unlock Request Successfully Submitted will display. 6) Click Close.
7) The request for the account unlock will automatically be routed to the appropriate approver(s).

Federal Transit Administration FACES User Guide
November 17, 2017 65 Version 0.6 FACES User Guide_v1.0.docx Unclassified - For Official Use Only
After submitting the unlock request, the User Manager, LSM, or GSM (as appropriate) will receive an email notification to review the submitted request. They can either approve or deny the request. The user will be notified via email of either decision. This process may take 24-48 hours depending on User Manager, LSM, or GSM availability.
If the request is approved, the account will unlock and all previous permissions will be restored. If the request is denied, the account will remain locked. If the account remains locked, the user should call their appropriate User Manager, LSM, or GSM directly to resolve the issue. If the appropriate User Manager is not known, the user can call the FACES Help Desk. Once an unlock request has been submitted, the user cannot self-unlock their account via security questions or submit a new unlock request.
Federal Transit Administration FACES User Guide
November 17, 2017 66 Version 0.6 FACES User Guide_v1.0.docx Unclassified - For Official Use Only
6 Interacting with Other Users Users may view the profiles of other users within their specific organizations. To access other users’ information, that user’s record must first be located by searching within the list provided after selecting Users on the Records tab.
The User Summary Page is the landing page when a user has selected another user’s record from the Records tab. This page consists of the user’s basic contact information and any news items related to that user. When viewing another user’s User Summary Page, users will have the option of following them or providing them with kudos.
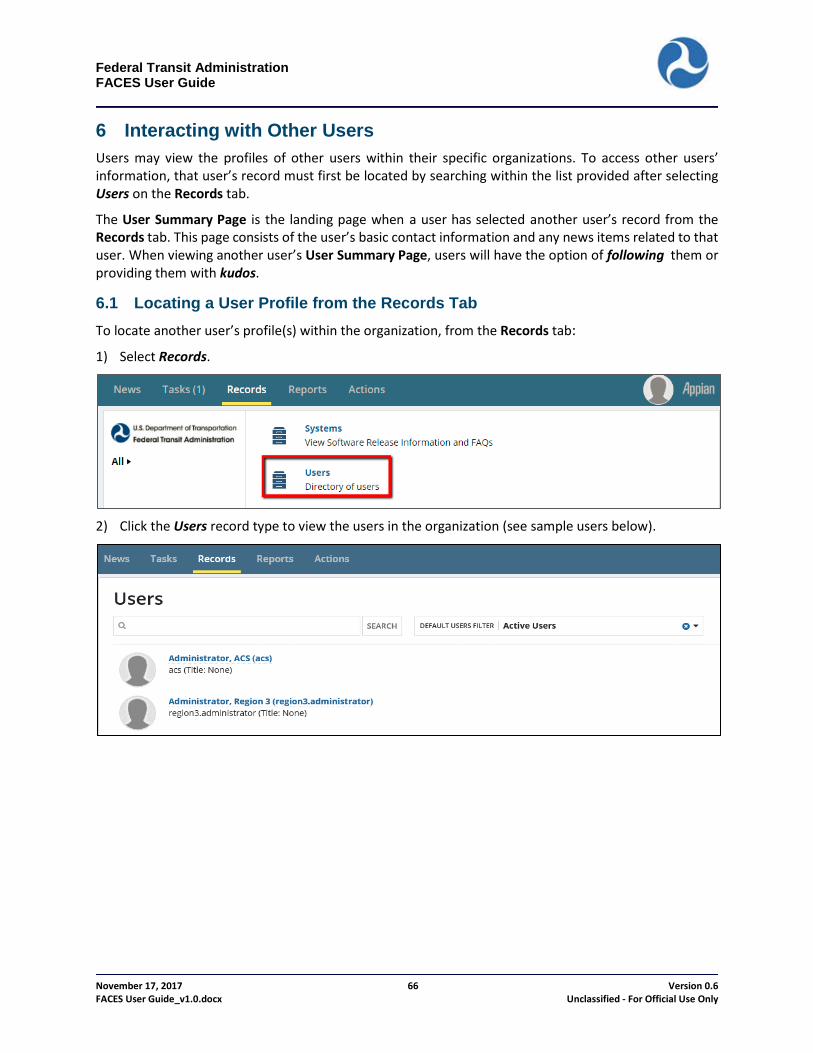
6.1 Locating a User Profile from the Records Tab To locate another user’s profile(s) within the organization, from the Records tab:
1) Select Records.
2) Click the Users record type to view the users in the organization (see sample users below).

Federal Transit Administration FACES User Guide
November 17, 2017 67 Version 0.6 FACES User Guide_v1.0.docx Unclassified - For Official Use Only
3) To limit the list of Users displayed, select the right-hand navigation arrow to narrow the list to either Active or Inactive users. Active users can log in to the system. Inactive users have deactivated accounts and cannot log in to the system.
4) Return to the full list of users by de-selecting the Active/Inactive Users listing:
5) To limit the list to a single user or a group of users with common characters in their name, enter the
name (or partial name) of the appropriate user or group in the Search box. Click Search.
6) Restricting the list to all users with a set of letters (e.g., Johnson) in their name provides a smaller list
of records to review as shown on the page below.
Federal Transit Administration FACES User Guide
November 17, 2017 68 Version 0.6 FACES User Guide_v1.0.docx Unclassified - For Official Use Only
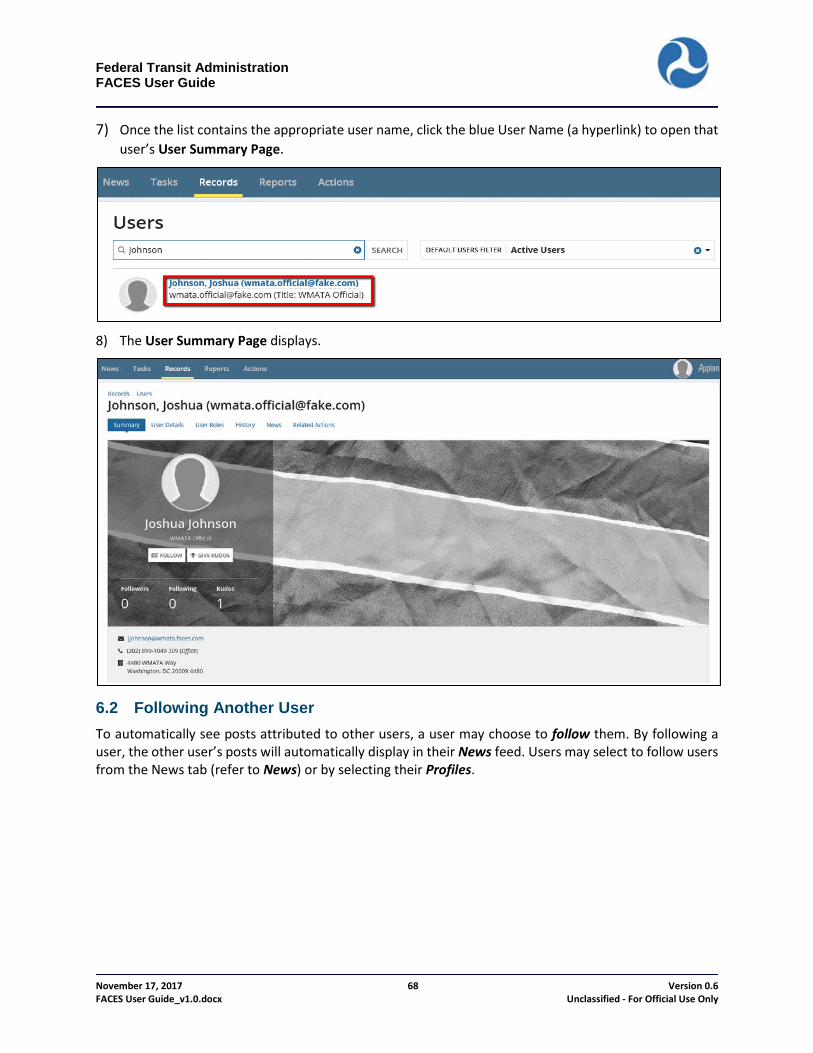
7) Once the list contains the appropriate user name, click the blue User Name (a hyperlink) to open that user’s User Summary Page.
8) The User Summary Page displays.
6.2 Following Another User To automatically see posts attributed to other users, a user may choose to follow them. By following a user, the other user’s posts will automatically display in their News feed. Users may select to follow users from the News tab (refer to News) or by selecting their Profiles.
Federal Transit Administration FACES User Guide
November 17, 2017 69 Version 0.6 FACES User Guide_v1.0.docx Unclassified - For Official Use Only
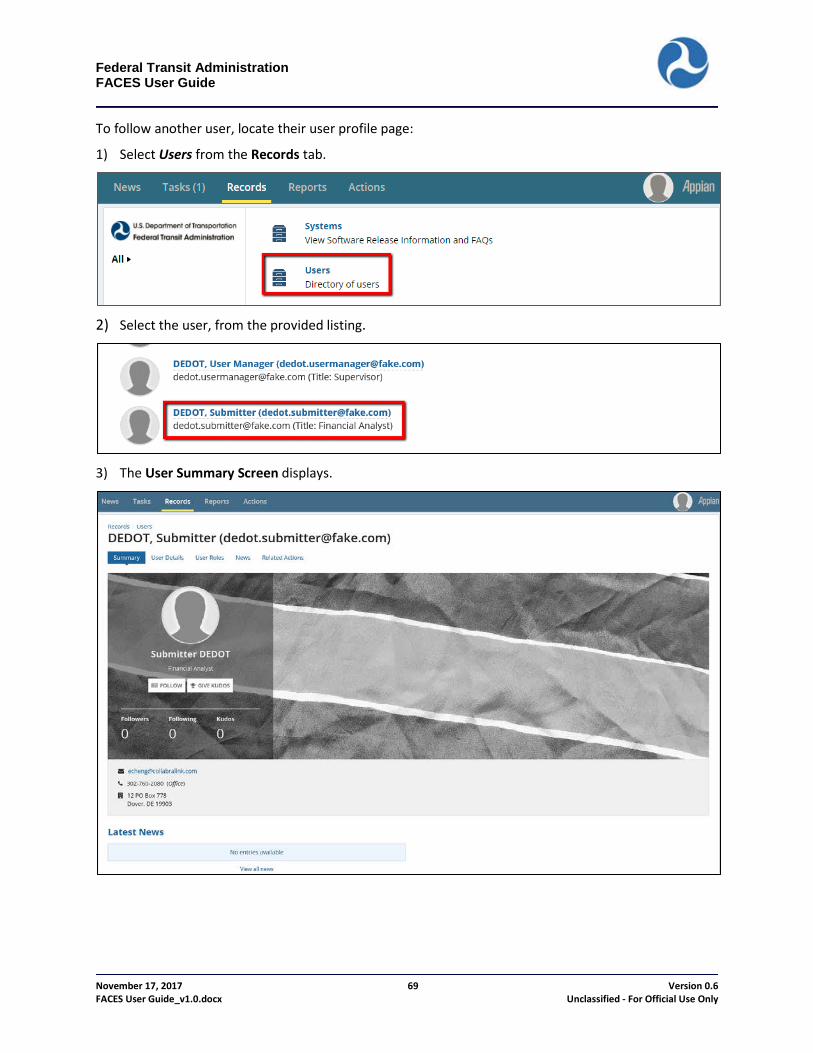
To follow another user, locate their user profile page:
1) Select Users from the Records tab.
2) Select the user, from the provided listing.
3) The User Summary Screen displays.

Federal Transit Administration FACES User Guide
November 17, 2017 70 Version 0.6 FACES User Guide_v1.0.docx Unclassified - For Official Use Only
4) Click Follow on the User Summary Page.
5) The Follow button will turn gray and change to Unfollow as the number of followers is updated.
Federal Transit Administration FACES User Guide
November 17, 2017 71 Version 0.6 FACES User Guide_v1.0.docx Unclassified - For Official Use Only
6) Click Unfollow to no longer receive post updates.
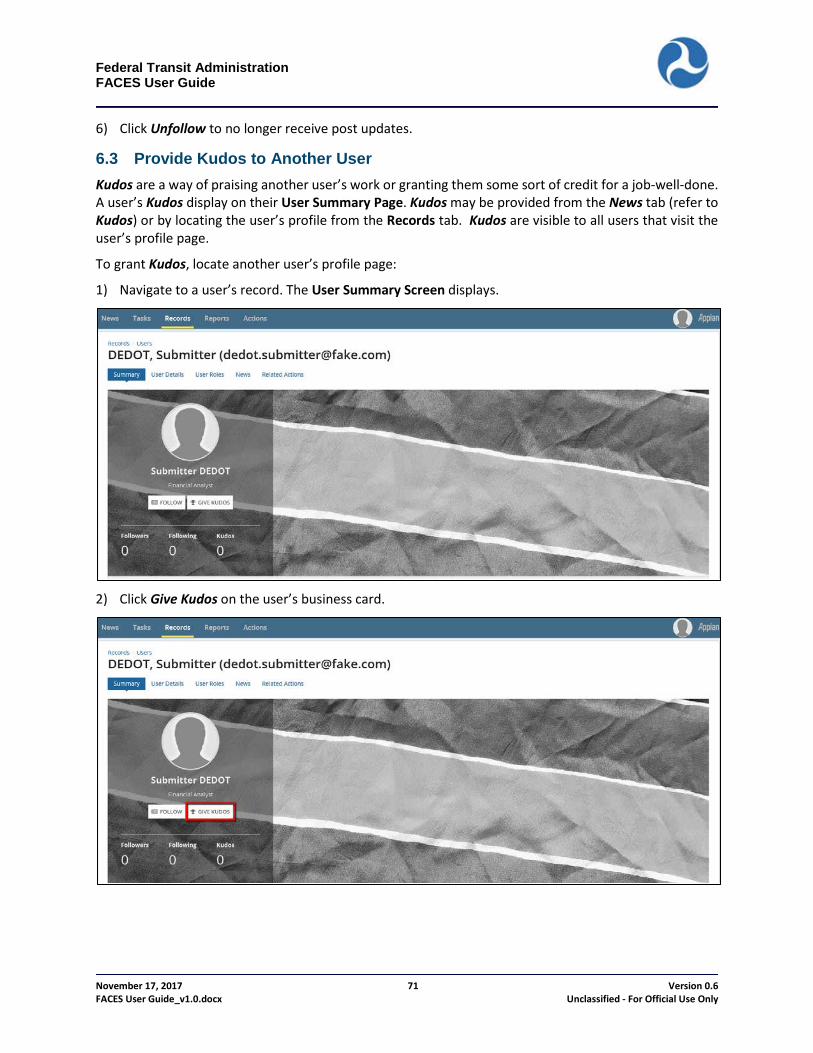
6.3 Provide Kudos to Another User Kudos are a way of praising another user’s work or granting them some sort of credit for a job-well-done. A user’s Kudos display on their User Summary Page. Kudos may be provided from the News tab (refer to Kudos) or by locating the user’s profile from the Records tab. Kudos are visible to all users that visit the user’s profile page.
To grant Kudos, locate another user’s profile page:
1) Navigate to a user’s record. The User Summary Screen displays.
2) Click Give Kudos on the user’s business card.

Federal Transit Administration FACES User Guide
November 17, 2017 72 Version 0.6 FACES User Guide_v1.0.docx Unclassified - For Official Use Only
3) Enter a comment (the text of the Kudo), and edit the text to ensure a correct attribution. Warning: Users should never enter personal information about themselves or others that falls under the definition of Personally Identifiable Information such as social security numbers, home address, telephone, family member information. When in any doubt do not enter personally identifiable information.
4) Click Give Kudos.
5) The number of Kudos will be updated and the text of the Kudo will display at the bottom of the page.
Kudos are sorted in reverse historical order (newest first).
Note: To see the kudo in the Latest News, select a screen refresh if necessary.
Federal Transit Administration FACES User Guide
November 17, 2017 73 Version 0.6 FACES User Guide_v1.0.docx Unclassified - For Official Use Only
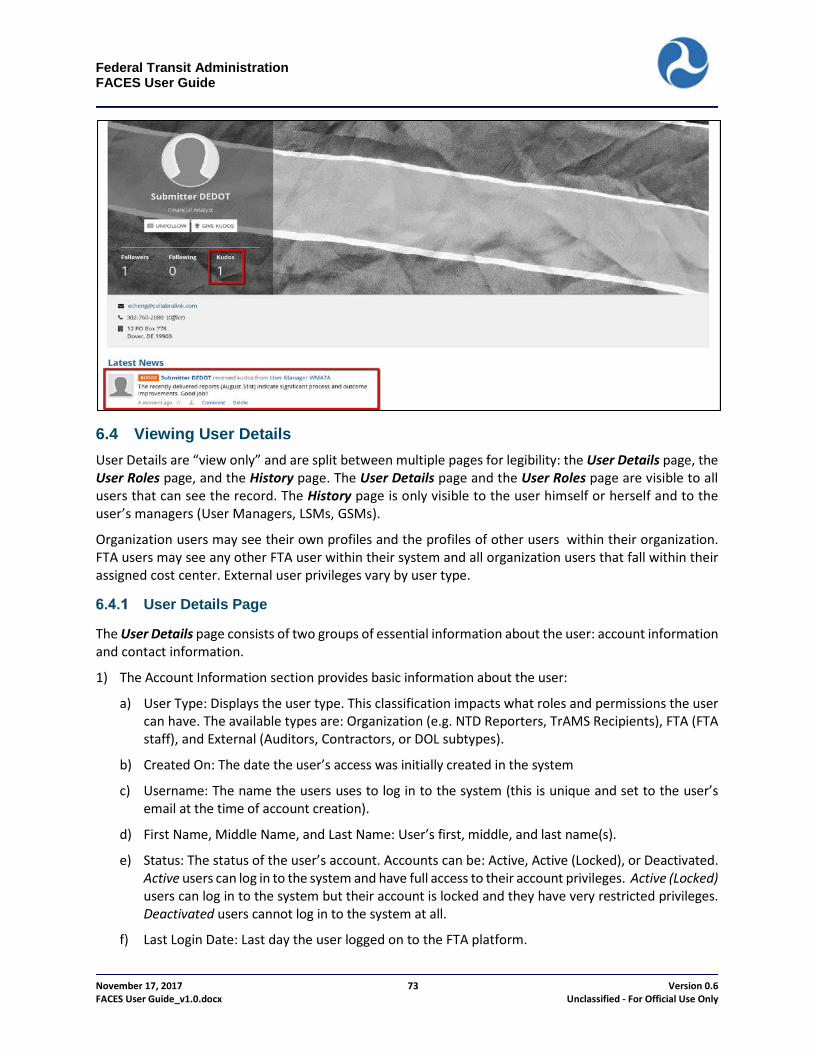
6.4 Viewing User Details User Details are “view only” and are split between multiple pages for legibility: the User Details page, the User Roles page, and the History page. The User Details page and the User Roles page are visible to all users that can see the record. The History page is only visible to the user himself or herself and to the user’s managers (User Managers, LSMs, GSMs).
Organization users may see their own profiles and the profiles of other users within their organization. FTA users may see any other FTA user within their system and all organization users that fall within their assigned cost center. External user privileges vary by user type.
User Details Page
The User Details page consists of two groups of essential information about the user: account information and contact information.
1) The Account Information section provides basic information about the user:
a) User Type: Displays the user type. This classification impacts what roles and permissions the user can have. The available types are: Organization (e.g. NTD Reporters, TrAMS Recipients), FTA (FTA staff), and External (Auditors, Contractors, or DOL subtypes).
b) Created On: The date the user’s access was initially created in the system
c) Username: The name the users uses to log in to the system (this is unique and set to the user’s email at the time of account creation).
d) First Name, Middle Name, and Last Name: User’s first, middle, and last name(s).
e) Status: The status of the user’s account. Accounts can be: Active, Active (Locked), or Deactivated. Active users can log in to the system and have full access to their account privileges. Active (Locked) users can log in to the system but their account is locked and they have very restricted privileges. Deactivated users cannot log in to the system at all.
f) Last Login Date: Last day the user logged on to the FTA platform.

Federal Transit Administration FACES User Guide
November 17, 2017 74 Version 0.6 FACES User Guide_v1.0.docx Unclassified - For Official Use Only
g) Title: User’s title. For FTA users, the title will match the user’s title in the FTA directory. For non-FTA users, this is optional and can be any text combination.
h) Honorific: Term used to address the user formally – options include Mr., Mrs., Ms., and Dr.
i) Company Name: The name of the company the user represents. This field may or may not be populated.
j) System: A comma separated list of FTA systems the user can access on the platform, e.g. NTD.
2) The contact information section provides more specific details with which to contact the user. This information generally represents the user’s business/office contact information:
a) Email: User’s business email address. The system will use this email address to send the user notifications.
b) Phone Number and Extension: The user’s phone number – only US formatted numbers are allowed within the system – and, if applicable, the phone extension.
c) Fax Number: User’s business FAX number, if available.
d) Physical Mailing Address (Street, City, State, Zip, Zip+4, and associated PO Box)
User Roles Page
The User Roles page also consists of two main parts: a Roles section, and, if applicable, a section listing User Managers for the selected user. The User Managers section is not visible for FTA users and most External users.
1) The Roles section provides basic information about the user’s assigned roles (or Approved or Pending roles will be included in this section). The information about each role includes:
a) Role: The title of the role assigned to the user.
b) Role Category: The category or grouping of roles to which the specific role belongs (e.g. Recipient, Reporter, FTA Staff).

Federal Transit Administration FACES User Guide
November 17, 2017 75 Version 0.6 FACES User Guide_v1.0.docx Unclassified - For Official Use Only
c) System: The platform system to which the role category is associated (e.g. TrAMS, NTD).
d) Cost Center: FTA cost centers are high-level divisions within FTA. All organizations are assigned to a cost center. Cost centers represent specialized headquarters functions or geographic regions. For FTA users, the cost center assignment indicates for which cost center the user can execute the role. For organization users (e.g. TrAMS Recipients or NTD Reporters), this is the cost center associated with the assigned organization. Note that some FTA systems use cost center assignments as part of their business processes while others do not.
e) Organization: This field is N/A for FTA and most external users. For organization users, this field lists the specific organization for which the role has been granted. The user can only perform that role for the specific organization.
f) Document: A hyperlink to any documentation justifying the role assignment. Documents are required for a small subset of roles but can be uploaded for any role.
g) Status: Indicates whether the role is active or has been requested. Users have all permissions associated with active roles. Users do not have permissions associated with Pending roles until the roles are approved.
2) The User Managers section provides details related to the user’s management. This section serves as a way for a user to quickly identify who they need to contact if they have account issues. Information about each user manager includes:
a) User Manager Name: Name of the user manager. This is hyperlink to the manager’s profile.
b) System: Lists the FTA system (e.g. TrAMS, NTD) in which the user has management privileges.
c) Cost Center: The FTA organization in which the user’s management privileges fall.
d) Organization: The name of the specific organization (ID, Name, and Acronym) that the user can manage.
History Page
The History page contains user audit information. It consists of three sections: Role History, Account History, and Profile History. The History page for each user is only visible by the user themselves and their
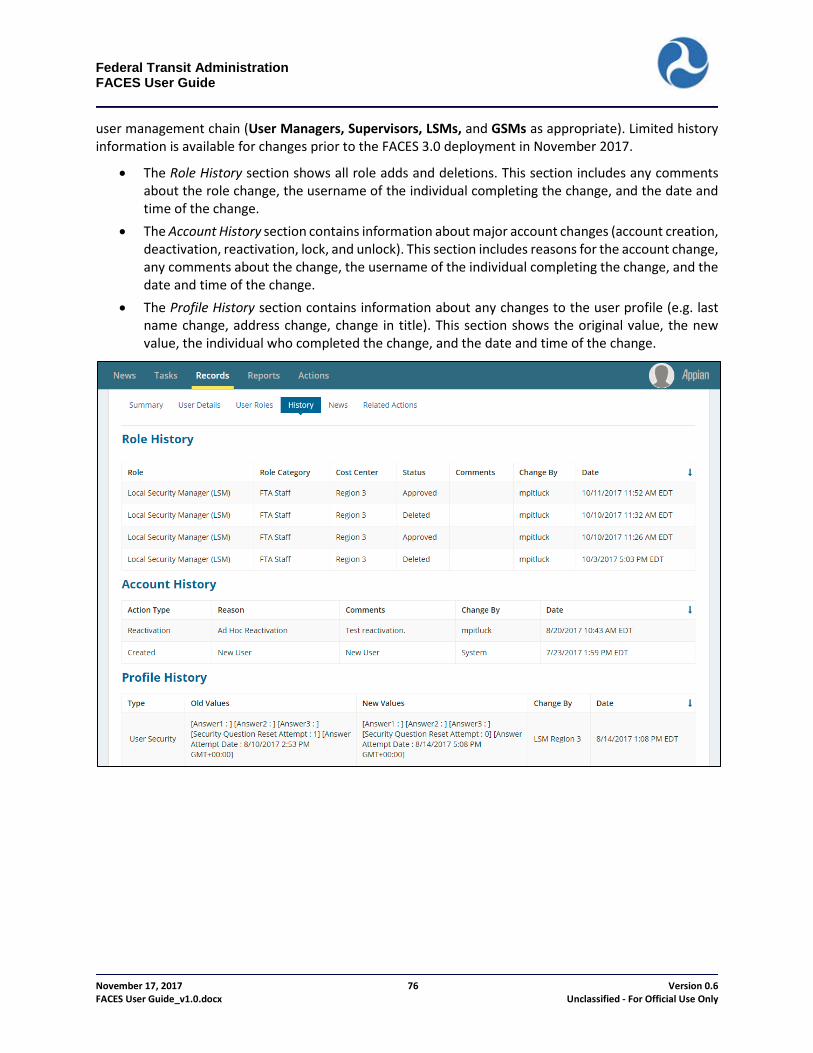
Federal Transit Administration FACES User Guide
November 17, 2017 76 Version 0.6 FACES User Guide_v1.0.docx Unclassified - For Official Use Only
user management chain (User Managers, Supervisors, LSMs, and GSMs as appropriate). Limited history information is available for changes prior to the FACES 3.0 deployment in November 2017.
• The Role History section shows all role adds and deletions. This section includes any comments about the role change, the username of the individual completing the change, and the date and time of the change.
• The Account History section contains information about major account changes (account creation, deactivation, reactivation, lock, and unlock). This section includes reasons for the account change, any comments about the change, the username of the individual completing the change, and the date and time of the change.
• The Profile History section contains information about any changes to the user profile (e.g. last name change, address change, change in title). This section shows the original value, the new value, the individual who completed the change, and the date and time of the change.

Federal Transit Administration FACES User Guide
November 17, 2017 77 Version 0.6 FACES User Guide_v1.0.docx Unclassified - For Official Use Only
7 User Management 7.1 User Management Responsibilities User management responsibilities include user creation, role assignments, deactivation, reactivation, and unlocking. Responsibilities vary somewhat by management level. At the lowest level, each organization will have one or more users assigned to the User Manager role. FTA approval is required to obtain or assign the User Manager role to any individual. The User Manager for an organization can perform the following actions for users within their organization:
• Create new users • Assign and remove user roles • Edit user profile information • Manage role documentation • Deactivate and Reactivate users • Unlock users
FTA Supervisors can perform the same actions as user managers but only for FTA users within their cost center.
FTA LSMs can manage all FTA users within their cost center, organization users within any organization that belongs to their cost center, and external contractors. FTA LSMs can also approve role requests from User Managers.
FTA GSMs can create and manage all other users within their system (e.g. TrAMS or NTD).
Privileges User Manager Supervisor LSM GSM
Users authorized to manage Users in same organization
FTA users in same Cost
Center
Organization, FTA, and contractor users in same Cost Center
All users in Platform System
Responsibility User Manager Supervisor LSM GSM Create New Users Yes Yes Yes Yes Assign and remove user roles Yes Yes Yes Yes Approve elevated roles No No Yes Yes Edit user profile Yes No Yes Yes Manage role documentation Yes Yes Yes Yes Deactivate and Reactivate users Yes Yes Yes Yes Unlock users Yes Yes Yes Yes
The remainder of this section presents an overview of each of the user management activities and responsibilities.
7.2 User Creation The following presents an overview of the six-step process required for creating a new user of any type:
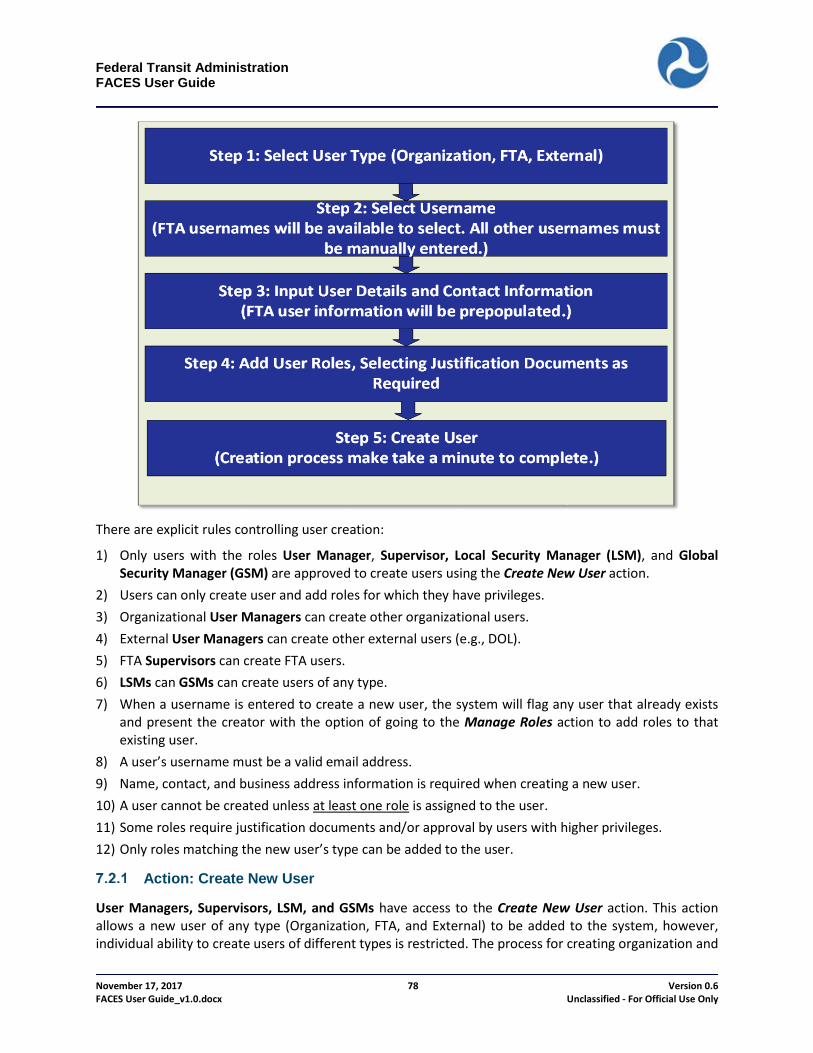
Federal Transit Administration FACES User Guide
November 17, 2017 78 Version 0.6 FACES User Guide_v1.0.docx Unclassified - For Official Use Only
There are explicit rules controlling user creation:
1) Only users with the roles User Manager, Supervisor, Local Security Manager (LSM), and Global Security Manager (GSM) are approved to create users using the Create New User action.
2) Users can only create user and add roles for which they have privileges. 3) Organizational User Managers can create other organizational users. 4) External User Managers can create other external users (e.g., DOL). 5) FTA Supervisors can create FTA users. 6) LSMs can GSMs can create users of any type. 7) When a username is entered to create a new user, the system will flag any user that already exists
and present the creator with the option of going to the Manage Roles action to add roles to that existing user.
8) A user’s username must be a valid email address. 9) Name, contact, and business address information is required when creating a new user. 10) A user cannot be created unless at least one role is assigned to the user. 11) Some roles require justification documents and/or approval by users with higher privileges. 12) Only roles matching the new user’s type can be added to the user.
Action: Create New User
User Managers, Supervisors, LSM, and GSMs have access to the Create New User action. This action allows a new user of any type (Organization, FTA, and External) to be added to the system, however, individual ability to create users of different types is restricted. The process for creating organization and

Federal Transit Administration FACES User Guide
November 17, 2017 79 Version 0.6 FACES User Guide_v1.0.docx Unclassified - For Official Use Only
external users is slightly different from the process to create FTA users. The two main processes will be described in separate subsections so that appropriate screenshots can be shown.
Organization and External Users
This section describes user creation for organization and external users. The steps are presented in generic terms but show screenshots for an organization user as this is the most common type of user creation. The term user manager in lower case letters is used to generically refer to any of the user management roles that can create organization or external users (User Managers, LSMs, and GSMs).
To add a new user:
2) Log in to the system as a user manager and click Create New User from the Actions tab.
3) The user manager is presented with a short list of user types from which to select. Each type has its
own set of role limitations. Depending on the user manager’s privileges, the user type may be preselected and locked. Organization User Managers will see the “Organization User” type preselected as shown in the following screenshot.
4) Select the appropriate user type (as applicable) and then click Next.
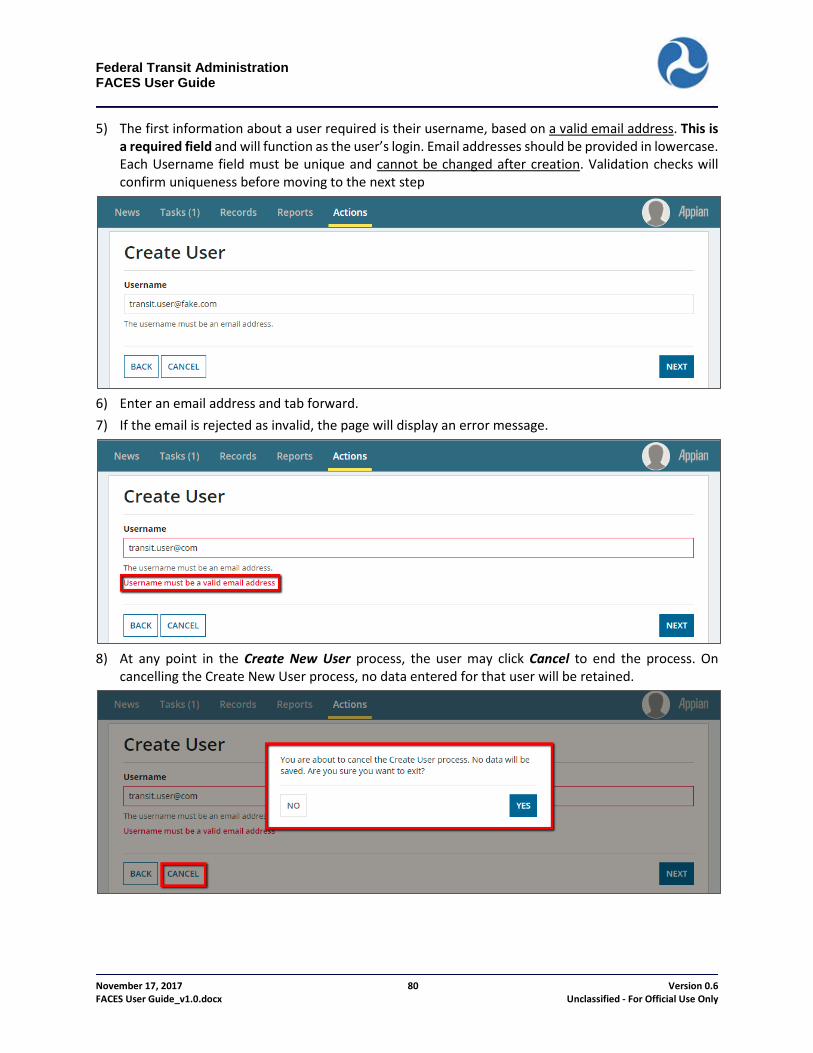
Federal Transit Administration FACES User Guide
November 17, 2017 80 Version 0.6 FACES User Guide_v1.0.docx Unclassified - For Official Use Only
5) The first information about a user required is their username, based on a valid email address. This is a required field and will function as the user’s login. Email addresses should be provided in lowercase. Each Username field must be unique and cannot be changed after creation. Validation checks will confirm uniqueness before moving to the next step
6) Enter an email address and tab forward. 7) If the email is rejected as invalid, the page will display an error message.
8) At any point in the Create New User process, the user may click Cancel to end the process. On
cancelling the Create New User process, no data entered for that user will be retained.
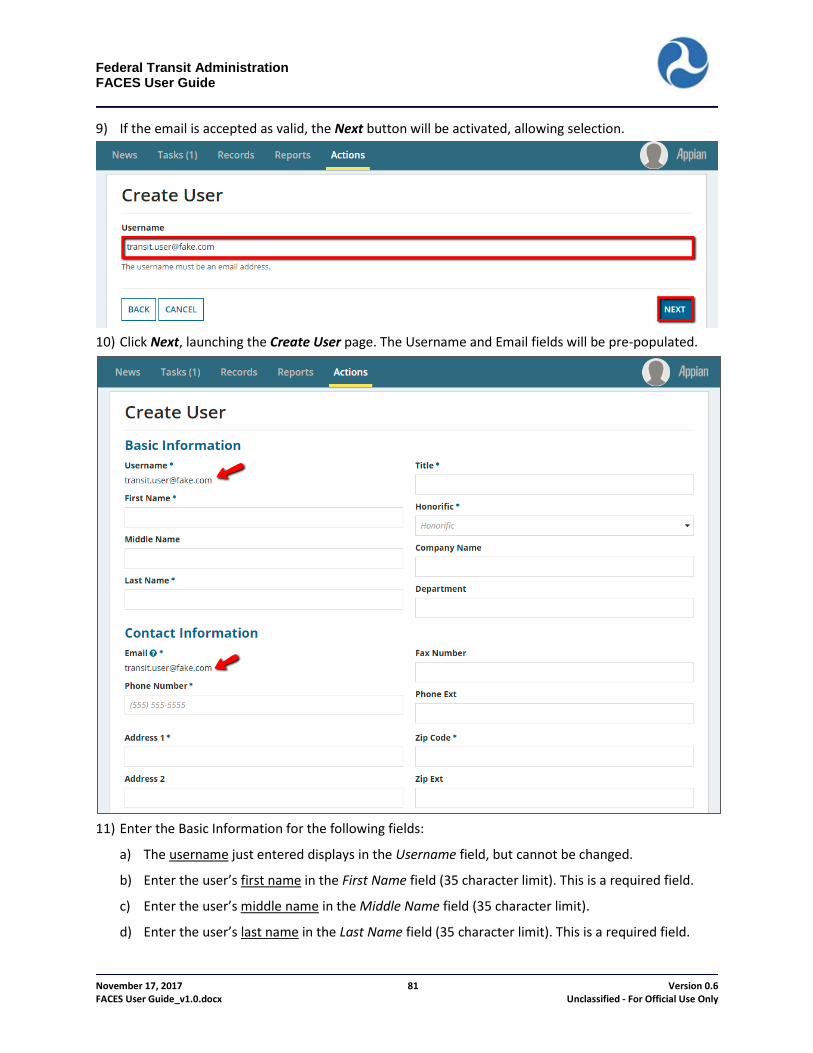
Federal Transit Administration FACES User Guide
November 17, 2017 81 Version 0.6 FACES User Guide_v1.0.docx Unclassified - For Official Use Only
9) If the email is accepted as valid, the Next button will be activated, allowing selection.
10) Click Next, launching the Create User page. The Username and Email fields will be pre-populated.
11) Enter the Basic Information for the following fields:
a) The username just entered displays in the Username field, but cannot be changed.
b) Enter the user’s first name in the First Name field (35 character limit). This is a required field.
c) Enter the user’s middle name in the Middle Name field (35 character limit).
d) Enter the user’s last name in the Last Name field (35 character limit). This is a required field.
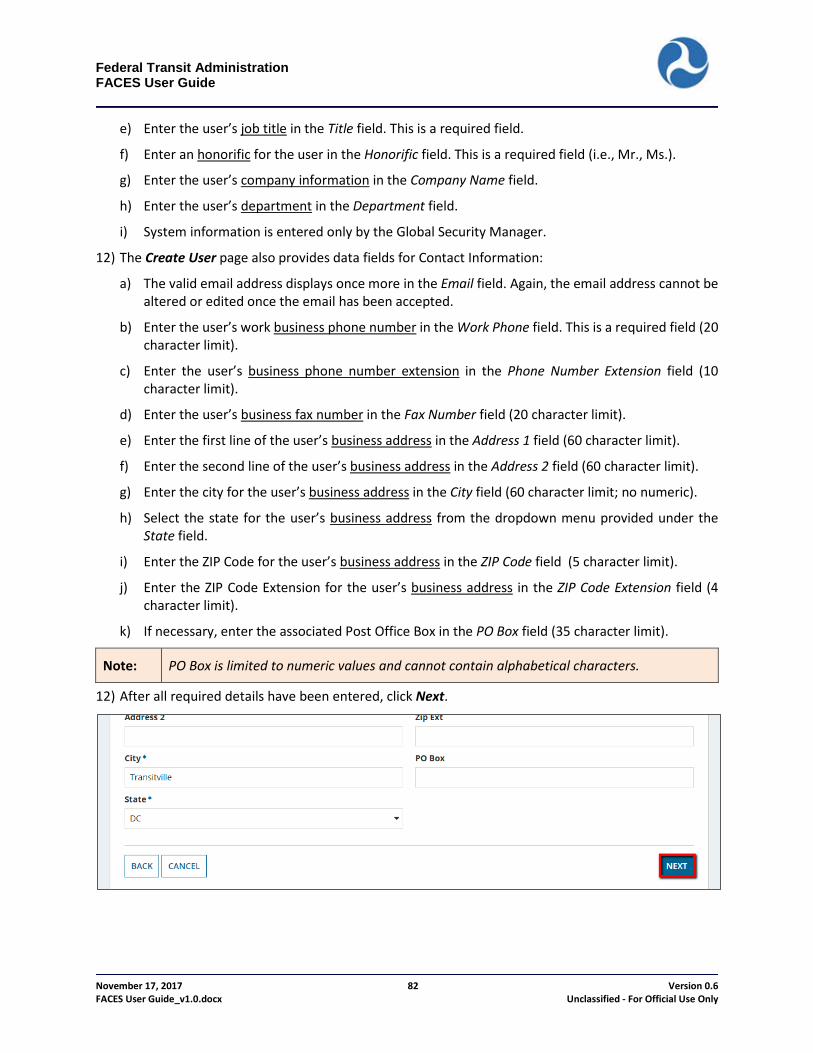
Federal Transit Administration FACES User Guide
November 17, 2017 82 Version 0.6 FACES User Guide_v1.0.docx Unclassified - For Official Use Only
e) Enter the user’s job title in the Title field. This is a required field.
f) Enter an honorific for the user in the Honorific field. This is a required field (i.e., Mr., Ms.).
g) Enter the user’s company information in the Company Name field.
h) Enter the user’s department in the Department field.
i) System information is entered only by the Global Security Manager.
12) The Create User page also provides data fields for Contact Information:
a) The valid email address displays once more in the Email field. Again, the email address cannot be altered or edited once the email has been accepted.
b) Enter the user’s work business phone number in the Work Phone field. This is a required field (20 character limit).
c) Enter the user’s business phone number extension in the Phone Number Extension field (10 character limit).
d) Enter the user’s business fax number in the Fax Number field (20 character limit).
e) Enter the first line of the user’s business address in the Address 1 field (60 character limit).
f) Enter the second line of the user’s business address in the Address 2 field (60 character limit).
g) Enter the city for the user’s business address in the City field (60 character limit; no numeric).
h) Select the state for the user’s business address from the dropdown menu provided under the State field.
i) Enter the ZIP Code for the user’s business address in the ZIP Code field (5 character limit).
j) Enter the ZIP Code Extension for the user’s business address in the ZIP Code Extension field (4 character limit).
k) If necessary, enter the associated Post Office Box in the PO Box field (35 character limit).
Note: PO Box is limited to numeric values and cannot contain alphabetical characters.
12) After all required details have been entered, click Next.

Federal Transit Administration FACES User Guide
November 17, 2017 83 Version 0.6 FACES User Guide_v1.0.docx Unclassified - For Official Use Only
13) The Manage Roles page displays. click Add.
14) The role filters (System, Role Category, Cost Center, Organization) must be populated for the available
roles to display. For most User Managers, these filters will automatically populate and the fields will be locked on the screen. LSMs and GSMs may need to select a Cost Center and Organization for the ‘Available Roles’ to display.
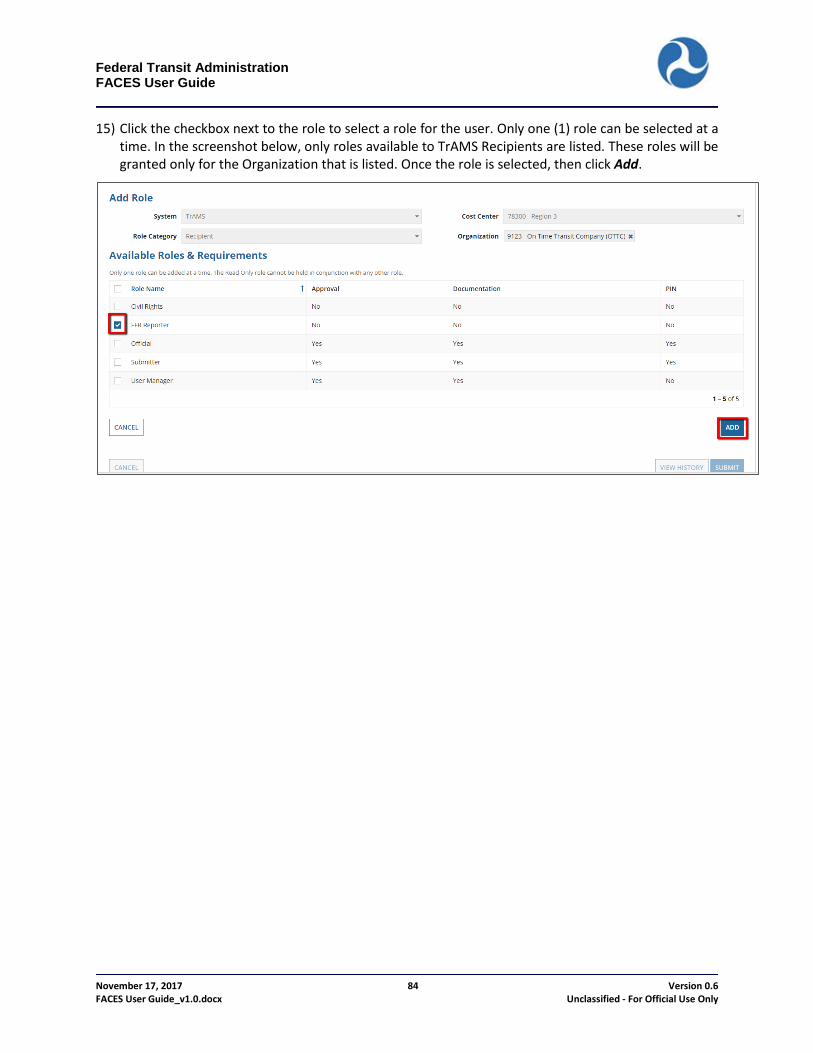
Federal Transit Administration FACES User Guide
November 17, 2017 84 Version 0.6 FACES User Guide_v1.0.docx Unclassified - For Official Use Only
15) Click the checkbox next to the role to select a role for the user. Only one (1) role can be selected at a time. In the screenshot below, only roles available to TrAMS Recipients are listed. These roles will be granted only for the Organization that is listed. Once the role is selected, then click Add.
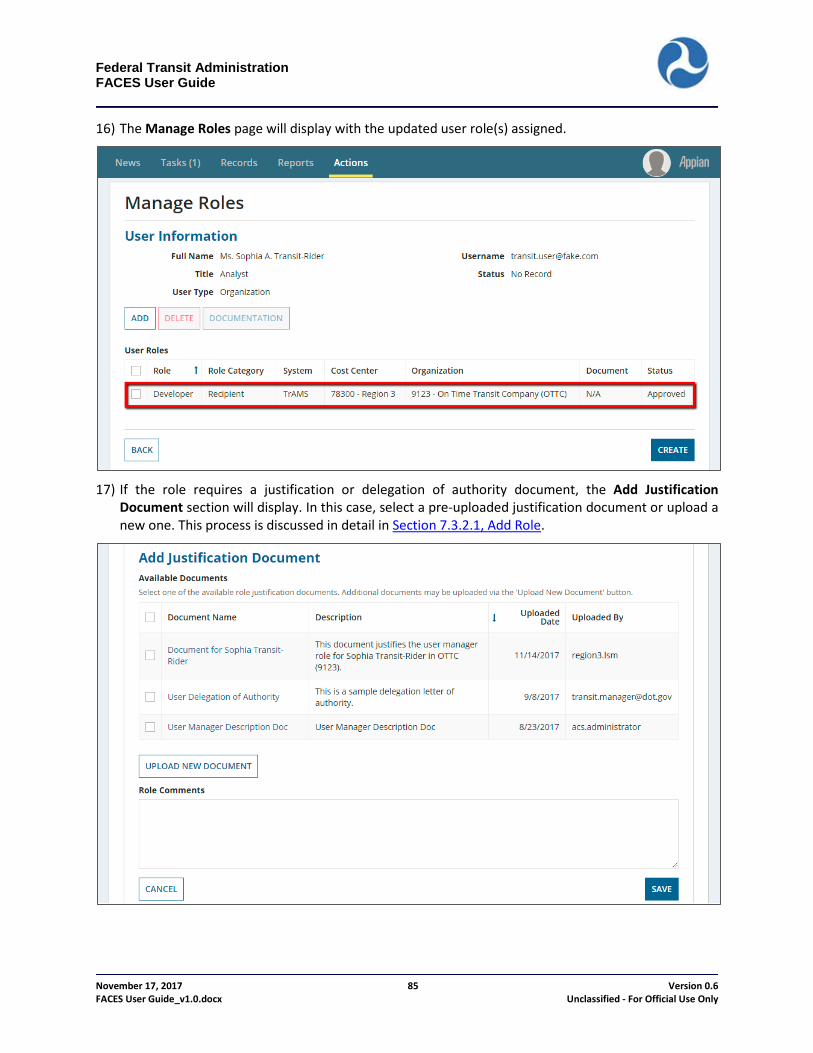
Federal Transit Administration FACES User Guide
November 17, 2017 85 Version 0.6 FACES User Guide_v1.0.docx Unclassified - For Official Use Only
16) The Manage Roles page will display with the updated user role(s) assigned.
17) If the role requires a justification or delegation of authority document, the Add Justification
Document section will display. In this case, select a pre-uploaded justification document or upload a new one. This process is discussed in detail in Section 7.3.2.1, Add Role.
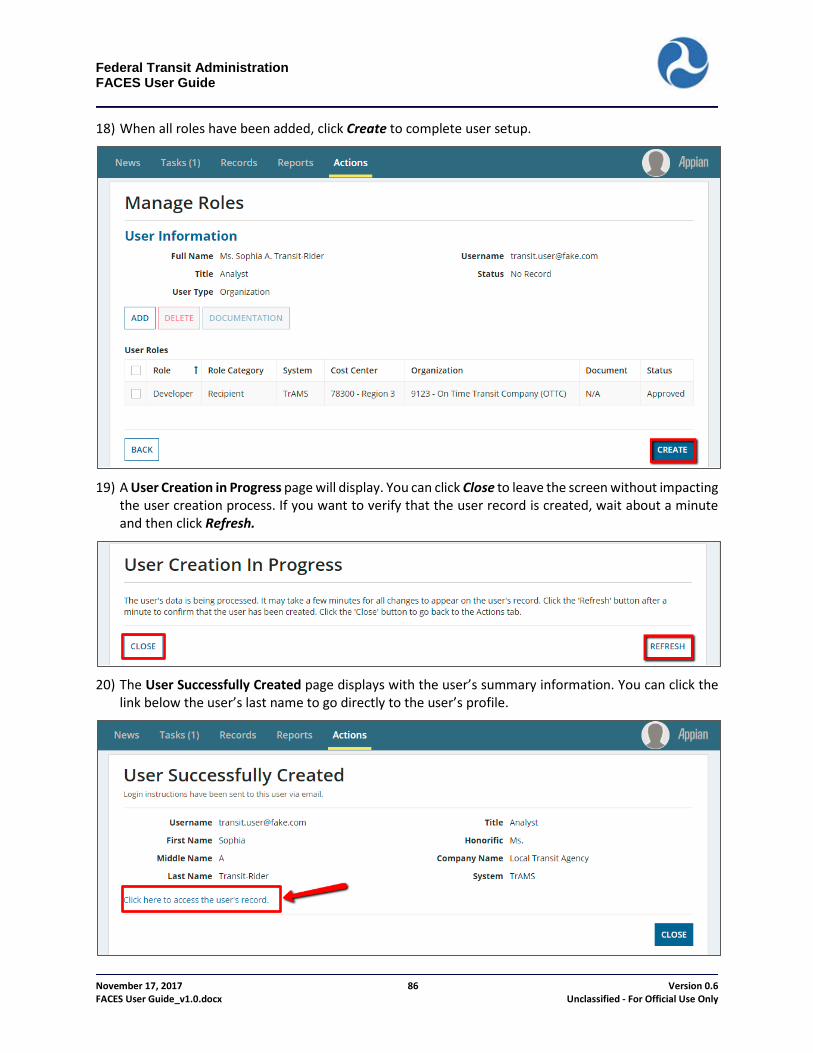
Federal Transit Administration FACES User Guide
November 17, 2017 86 Version 0.6 FACES User Guide_v1.0.docx Unclassified - For Official Use Only
18) When all roles have been added, click Create to complete user setup.
19) A User Creation in Progress page will display. You can click Close to leave the screen without impacting
the user creation process. If you want to verify that the user record is created, wait about a minute and then click Refresh.
20) The User Successfully Created page displays with the user’s summary information. You can click the
link below the user’s last name to go directly to the user’s profile.
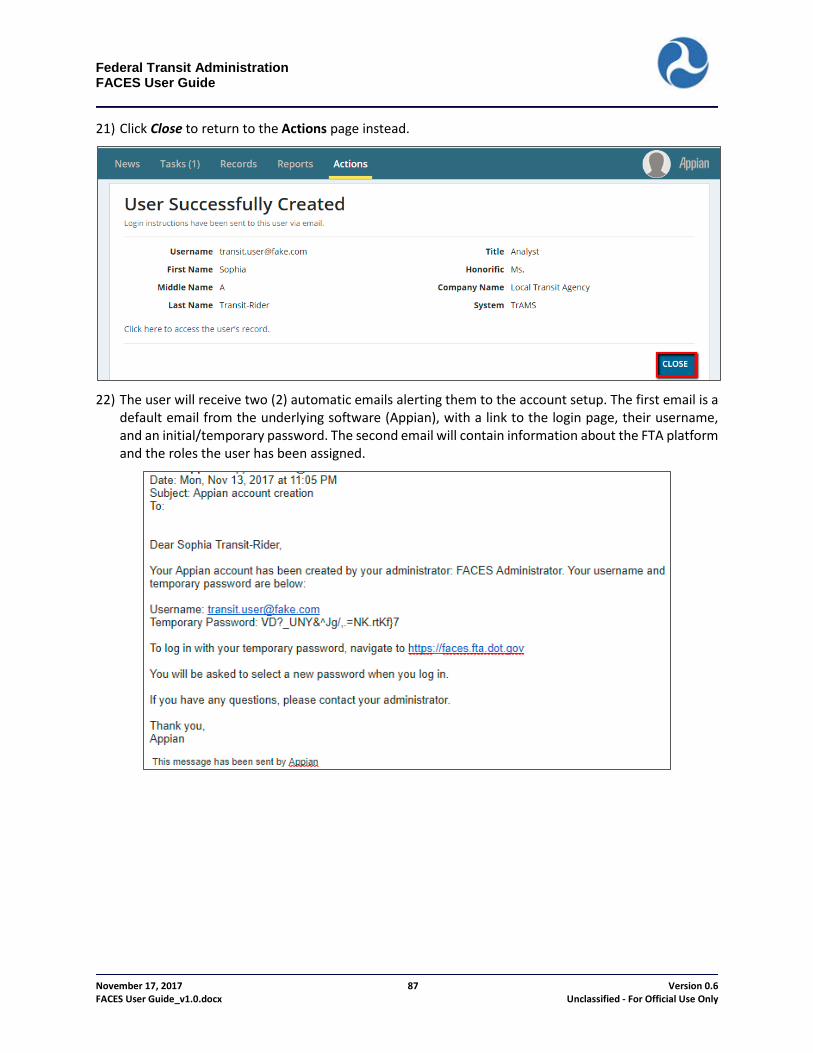
Federal Transit Administration FACES User Guide
November 17, 2017 87 Version 0.6 FACES User Guide_v1.0.docx Unclassified - For Official Use Only
21) Click Close to return to the Actions page instead.
22) The user will receive two (2) automatic emails alerting them to the account setup. The first email is a
default email from the underlying software (Appian), with a link to the login page, their username, and an initial/temporary password. The second email will contain information about the FTA platform and the roles the user has been assigned.
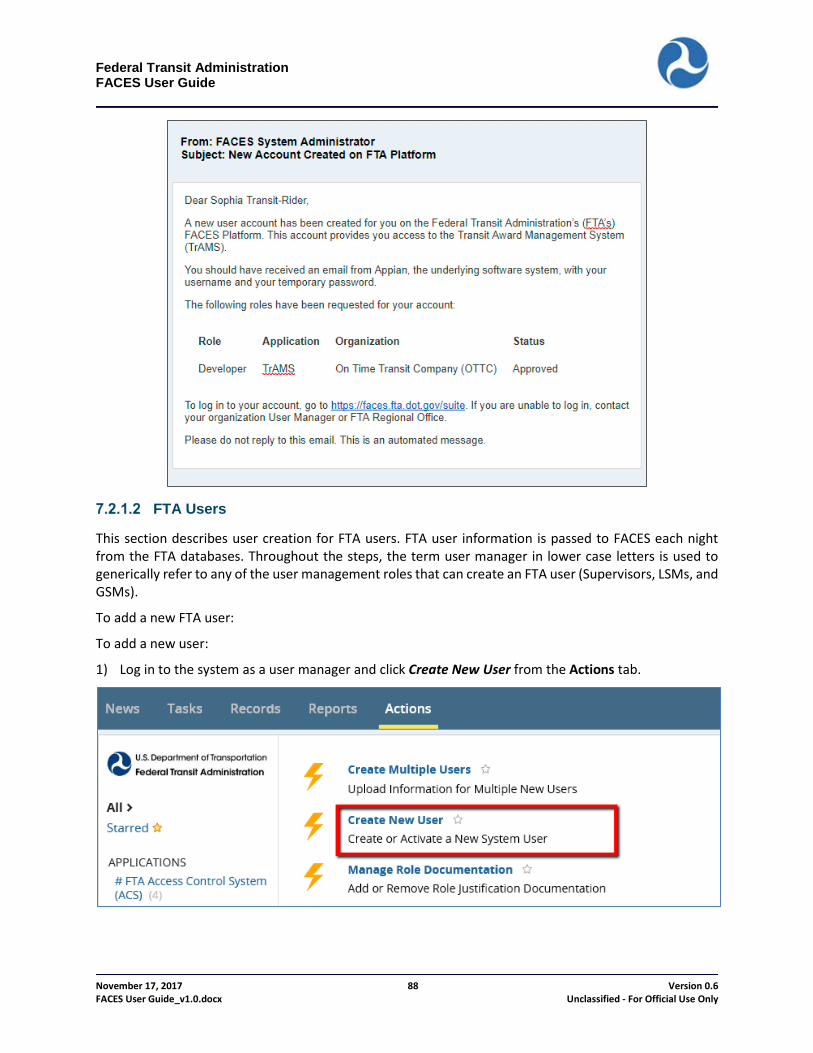
Federal Transit Administration FACES User Guide
November 17, 2017 88 Version 0.6 FACES User Guide_v1.0.docx Unclassified - For Official Use Only
FTA Users
This section describes user creation for FTA users. FTA user information is passed to FACES each night from the FTA databases. Throughout the steps, the term user manager in lower case letters is used to generically refer to any of the user management roles that can create an FTA user (Supervisors, LSMs, and GSMs).
To add a new FTA user:
To add a new user:
1) Log in to the system as a user manager and click Create New User from the Actions tab.
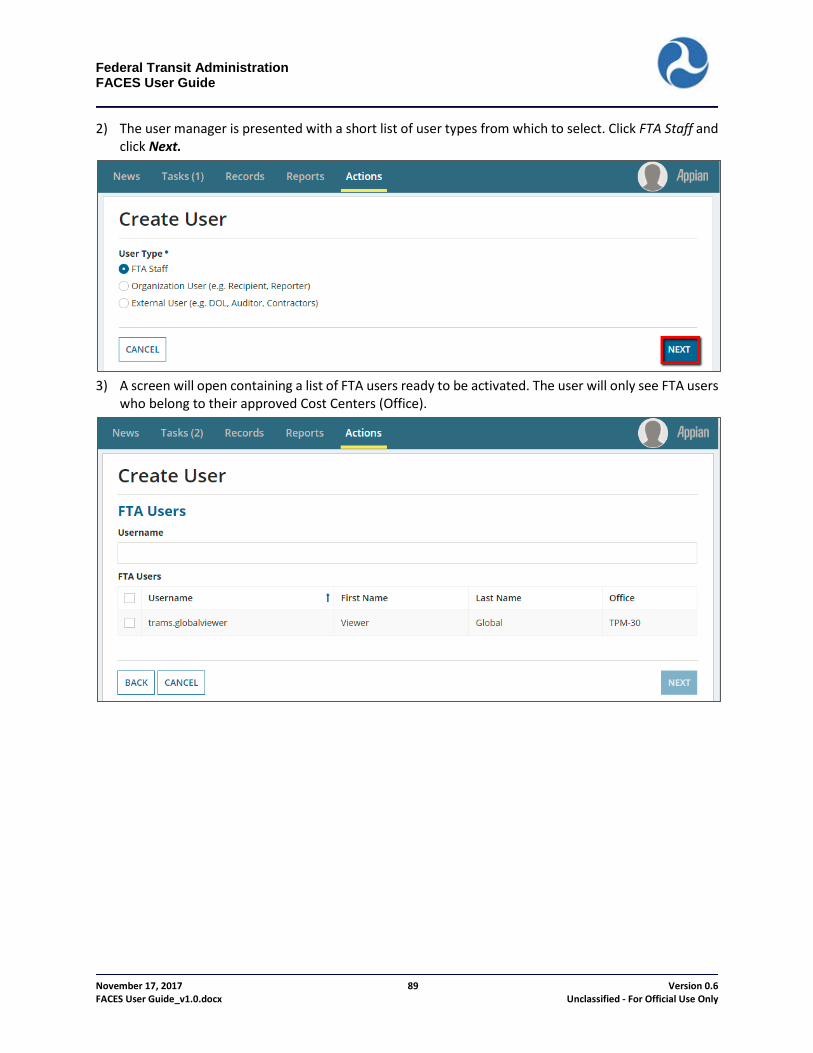
Federal Transit Administration FACES User Guide
November 17, 2017 89 Version 0.6 FACES User Guide_v1.0.docx Unclassified - For Official Use Only
2) The user manager is presented with a short list of user types from which to select. Click FTA Staff and click Next.
3) A screen will open containing a list of FTA users ready to be activated. The user will only see FTA users
who belong to their approved Cost Centers (Office).
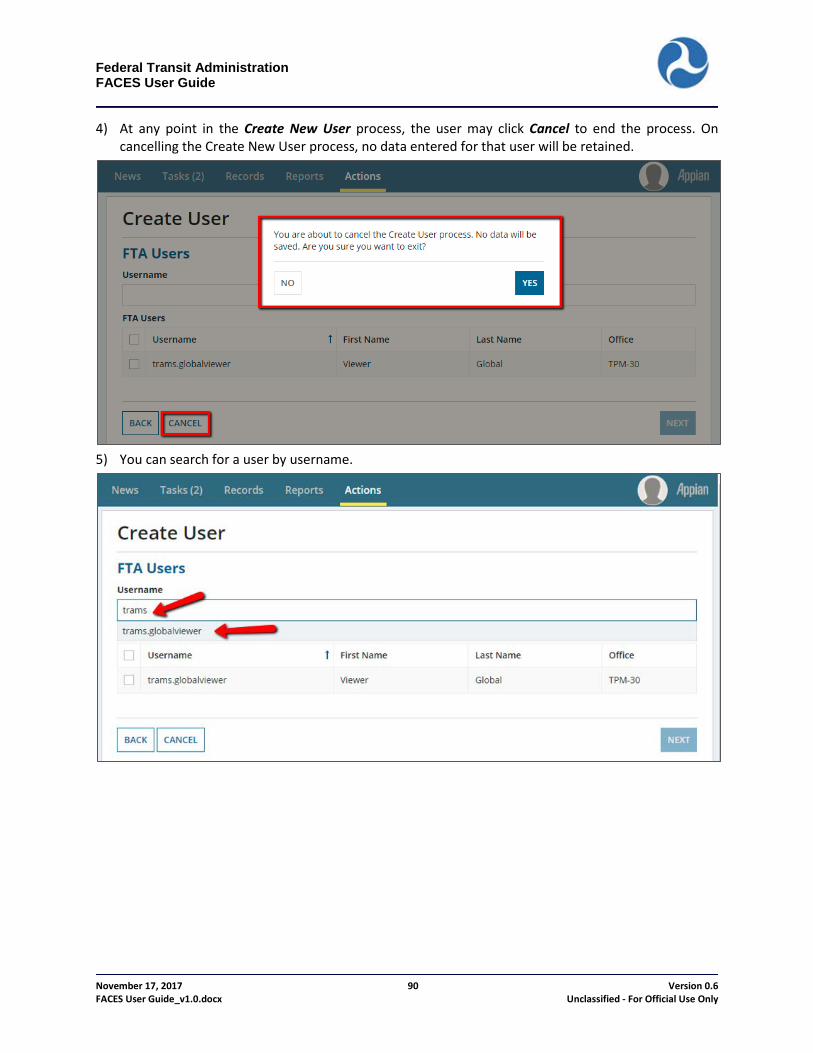
Federal Transit Administration FACES User Guide
November 17, 2017 90 Version 0.6 FACES User Guide_v1.0.docx Unclassified - For Official Use Only
4) At any point in the Create New User process, the user may click Cancel to end the process. On cancelling the Create New User process, no data entered for that user will be retained.
5) You can search for a user by username.

Federal Transit Administration FACES User Guide
November 17, 2017 91 Version 0.6 FACES User Guide_v1.0.docx Unclassified - For Official Use Only
6) Select the checkbox next to the desired user and click the Next button. Only one user can be selected at a time.
7) The Create User page will display the user’s information in a read-only format. Any changes must be
made through FTA’s internal systems. Review the user’s information to confirm the correct user was selected, then click Next.
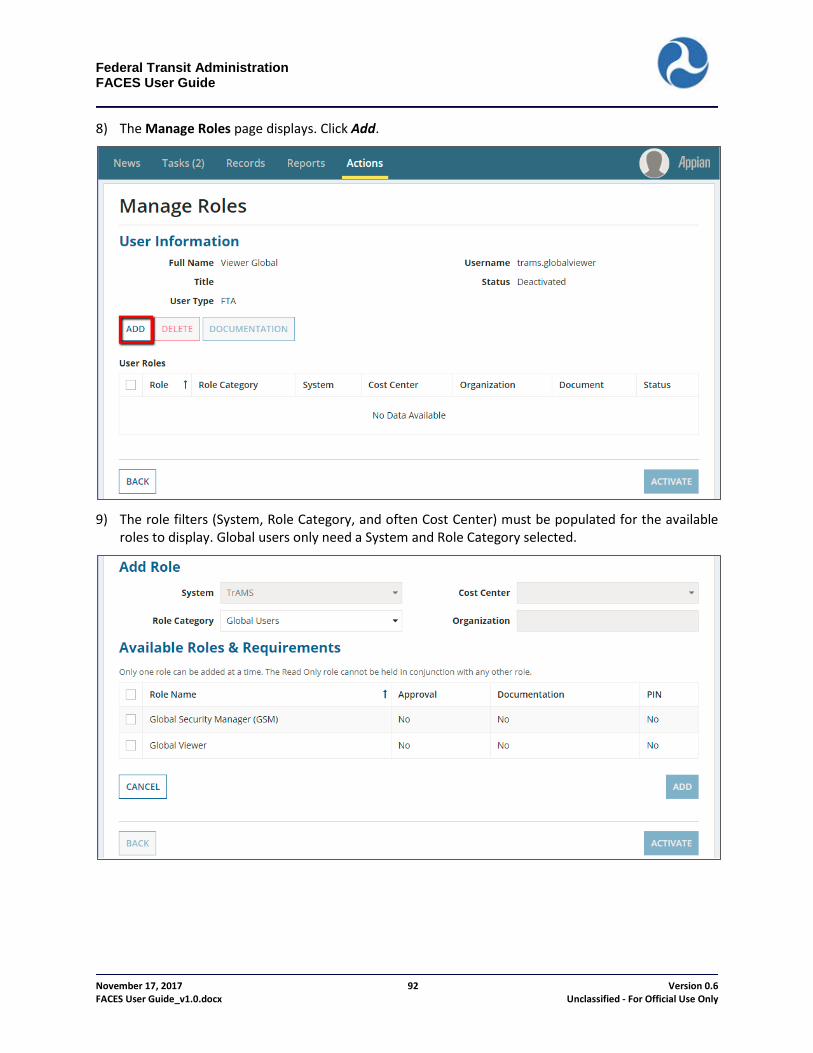
Federal Transit Administration FACES User Guide
November 17, 2017 92 Version 0.6 FACES User Guide_v1.0.docx Unclassified - For Official Use Only
8) The Manage Roles page displays. Click Add.
9) The role filters (System, Role Category, and often Cost Center) must be populated for the available
roles to display. Global users only need a System and Role Category selected.

Federal Transit Administration FACES User Guide
November 17, 2017 93 Version 0.6 FACES User Guide_v1.0.docx Unclassified - For Official Use Only
10) Click the checkbox next to the role to select a role for the user then click Add. Only one (1) role can be selected at a time. In the screenshot below, only roles available to TrAMS Global Users are listed. These roles will be granted only for the entire system.
11) The Manage Roles page will display with the updated user role(s) assigned. Add additional roles as
needed. When ready, click Activate to complete the user’s setup.
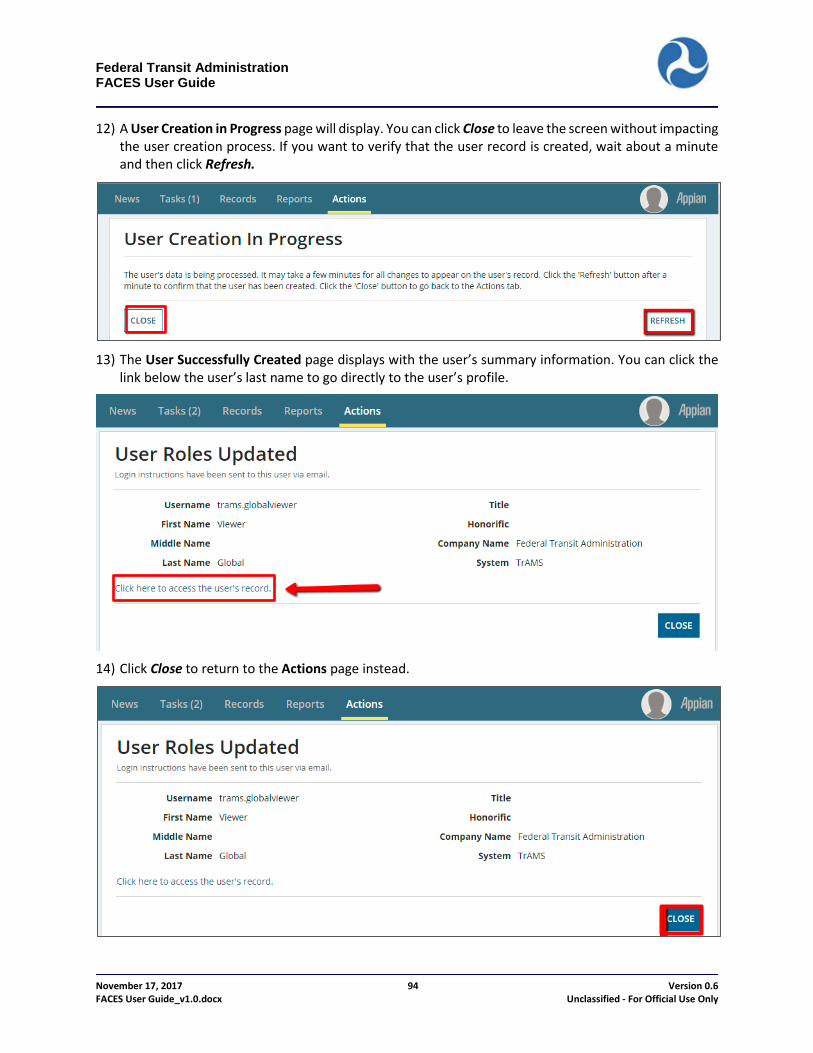
Federal Transit Administration FACES User Guide
November 17, 2017 94 Version 0.6 FACES User Guide_v1.0.docx Unclassified - For Official Use Only
12) A User Creation in Progress page will display. You can click Close to leave the screen without impacting the user creation process. If you want to verify that the user record is created, wait about a minute and then click Refresh.
13) The User Successfully Created page displays with the user’s summary information. You can click the
link below the user’s last name to go directly to the user’s profile.
14) Click Close to return to the Actions page instead.

Federal Transit Administration FACES User Guide
November 17, 2017 95 Version 0.6 FACES User Guide_v1.0.docx Unclassified - For Official Use Only
15) The user will receive two (2) automatic emails alerting them to the account setup. The first email is a default email from the underlying software (Appian), with a link to the login page, their username, and an initial/temporary password. The second email will contain information about the FTA platform and the roles the user has been assigned.
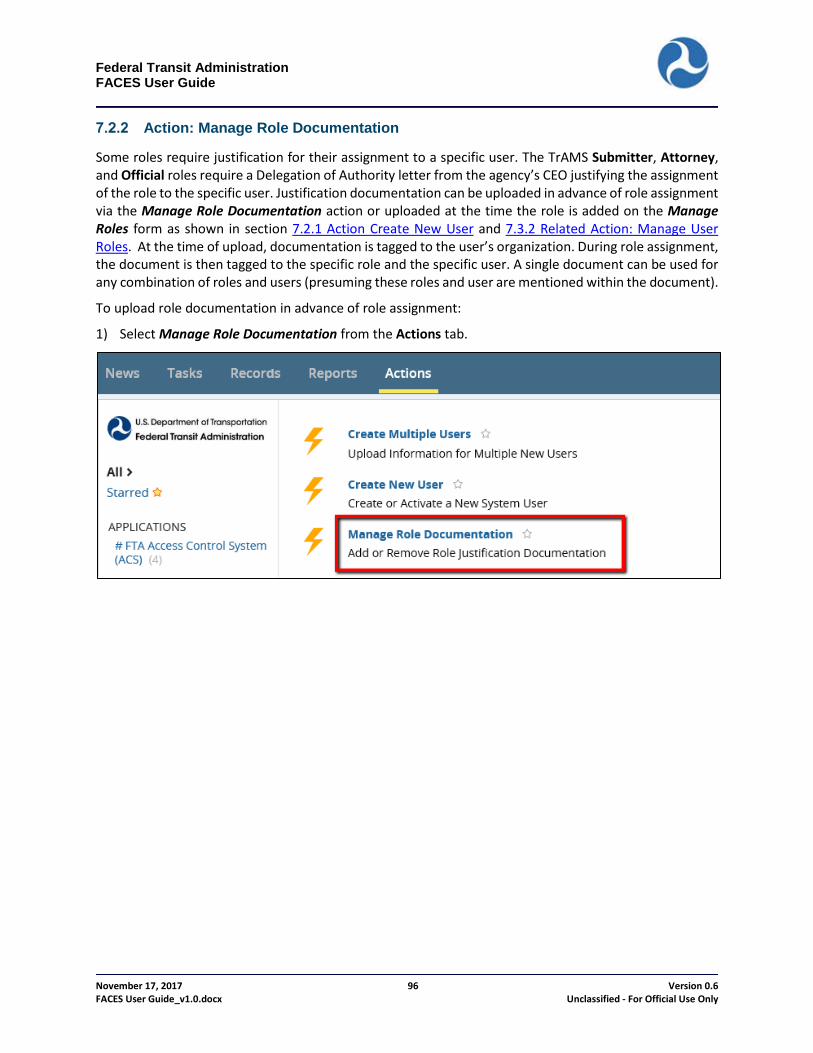
Federal Transit Administration FACES User Guide
November 17, 2017 96 Version 0.6 FACES User Guide_v1.0.docx Unclassified - For Official Use Only
Action: Manage Role Documentation
Some roles require justification for their assignment to a specific user. The TrAMS Submitter, Attorney, and Official roles require a Delegation of Authority letter from the agency’s CEO justifying the assignment of the role to the specific user. Justification documentation can be uploaded in advance of role assignment via the Manage Role Documentation action or uploaded at the time the role is added on the Manage Roles form as shown in section 7.2.1 Action Create New User and 7.3.2 Related Action: Manage User Roles. At the time of upload, documentation is tagged to the user’s organization. During role assignment, the document is then tagged to the specific role and the specific user. A single document can be used for any combination of roles and users (presuming these roles and user are mentioned within the document).
To upload role documentation in advance of role assignment:
1) Select Manage Role Documentation from the Actions tab.

Federal Transit Administration FACES User Guide
November 17, 2017 97 Version 0.6 FACES User Guide_v1.0.docx Unclassified - For Official Use Only
2) The Manage Role Documentation page displays showing available role documents. User Managers can view, add, or delete documents for their organization(s). LSMs can view, add or delete documents for their Cost Center(s) and any organization(s) within their Cost Center(s).
3) To download a copy of a document, simply click the document name link.
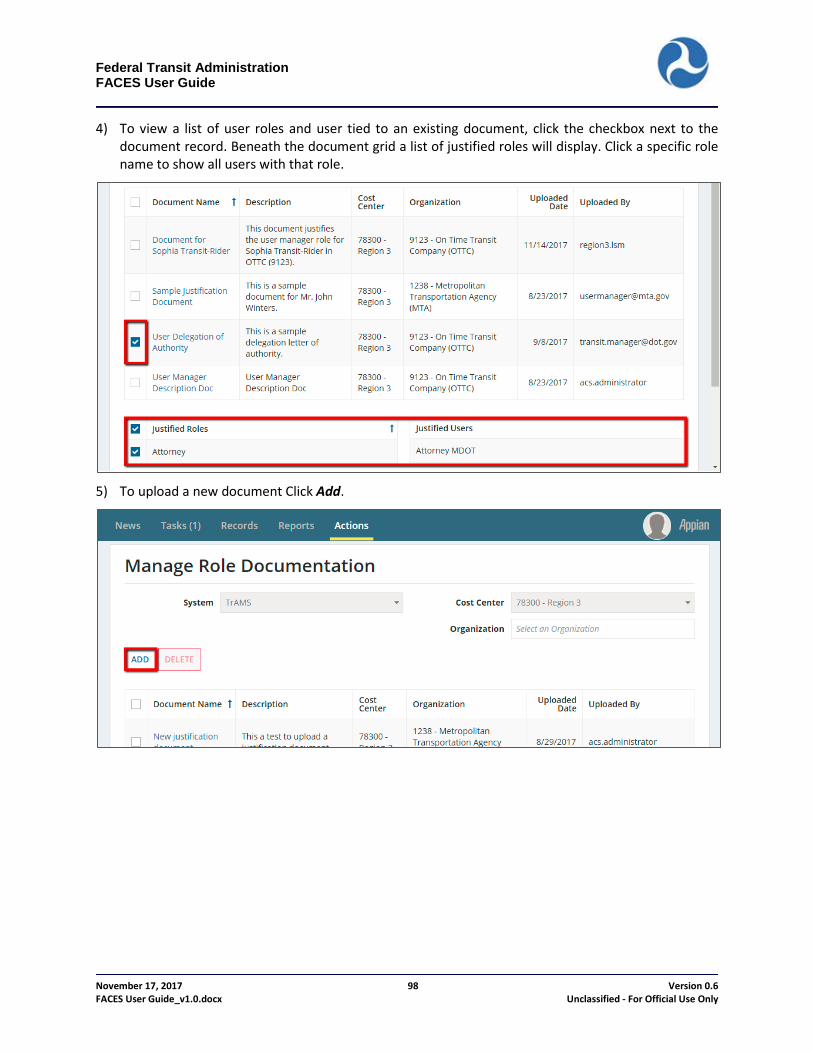
Federal Transit Administration FACES User Guide
November 17, 2017 98 Version 0.6 FACES User Guide_v1.0.docx Unclassified - For Official Use Only
4) To view a list of user roles and user tied to an existing document, click the checkbox next to the document record. Beneath the document grid a list of justified roles will display. Click a specific role name to show all users with that role.
5) To upload a new document Click Add.
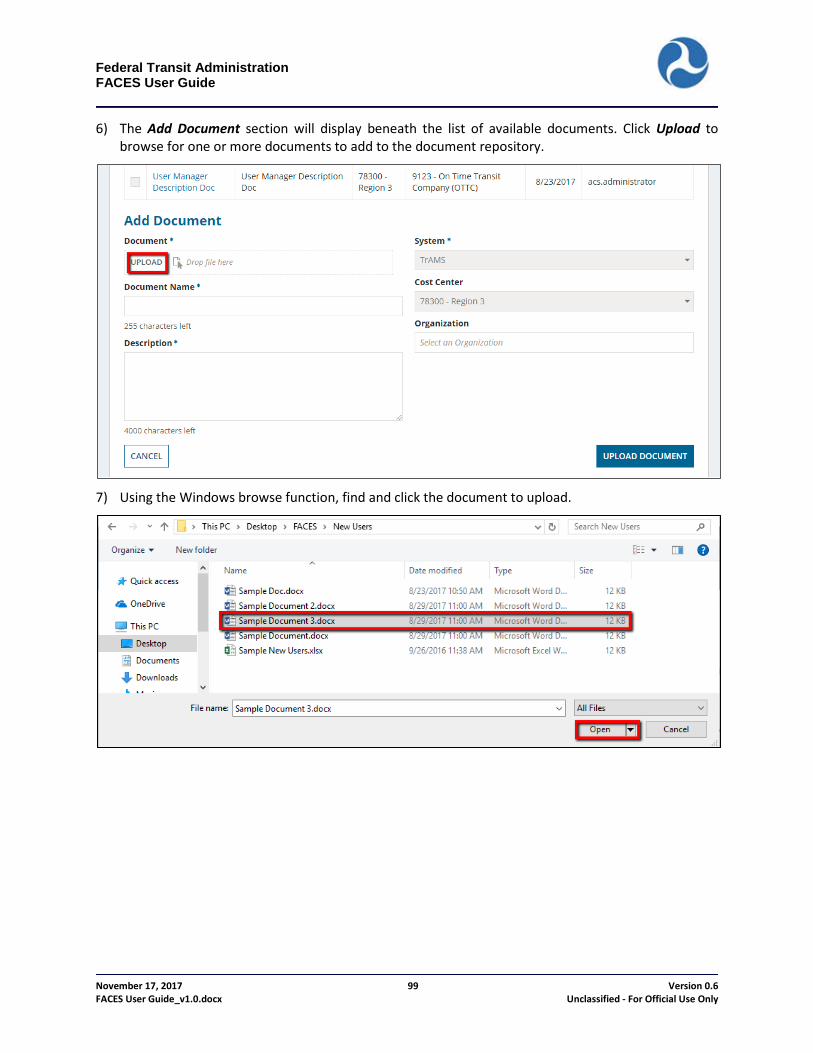
Federal Transit Administration FACES User Guide
November 17, 2017 99 Version 0.6 FACES User Guide_v1.0.docx Unclassified - For Official Use Only
6) The Add Document section will display beneath the list of available documents. Click Upload to browse for one or more documents to add to the document repository.
7) Using the Windows browse function, find and click the document to upload.
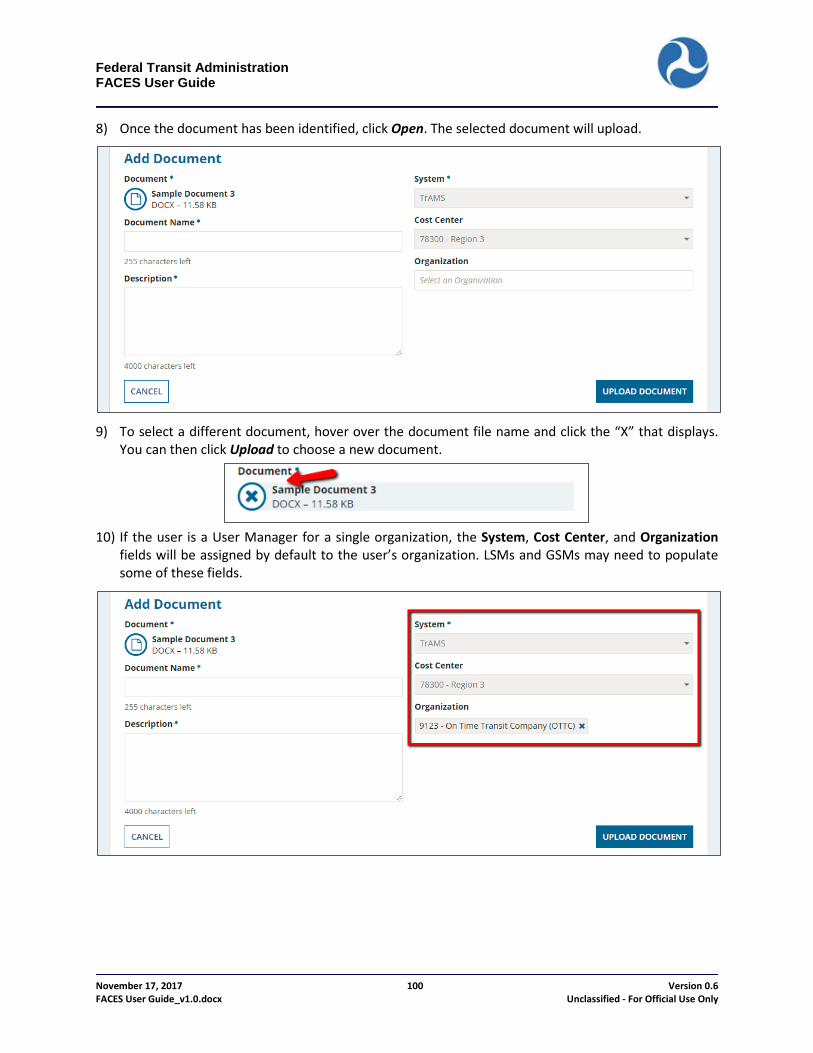
Federal Transit Administration FACES User Guide
November 17, 2017 100 Version 0.6 FACES User Guide_v1.0.docx Unclassified - For Official Use Only
8) Once the document has been identified, click Open. The selected document will upload.
9) To select a different document, hover over the document file name and click the “X” that displays.
You can then click Upload to choose a new document.
10) If the user is a User Manager for a single organization, the System, Cost Center, and Organization
fields will be assigned by default to the user’s organization. LSMs and GSMs may need to populate some of these fields.

Federal Transit Administration FACES User Guide
November 17, 2017 101 Version 0.6 FACES User Guide_v1.0.docx Unclassified - For Official Use Only
11) This page requires descriptive information to be entered to make the document accessible to other users and to explain the document contents.
i) Document Name: A clear document name is essential for other users to know what the document’s purpose and coverage. Document names cannot exceed 255 characters.
ii) A description that provides even more details about the document’s intent, content, etc., is also advisable. Descriptions cannot exceed 4000 characters.
Once the information for the document is finalized, click Upload Document.
12) The document is added to the list of available documents with its Document Name, Description, Cost
Center, Organization, Upload Date, and the UserID of the person who uploaded it.

Federal Transit Administration FACES User Guide
November 17, 2017 102 Version 0.6 FACES User Guide_v1.0.docx Unclassified - For Official Use Only
13) To remove a document from the system, the user simply highlights the document to be removed by selecting the check box associated with it and clicking Delete. Users can only delete documents that have not yet been selected to support user role assignment. Only one document can be deleted at a time.
14) A dialog box displays that requires the user to confirm the deletion.
15) Click Yes to delete the document. Click No to cancel.
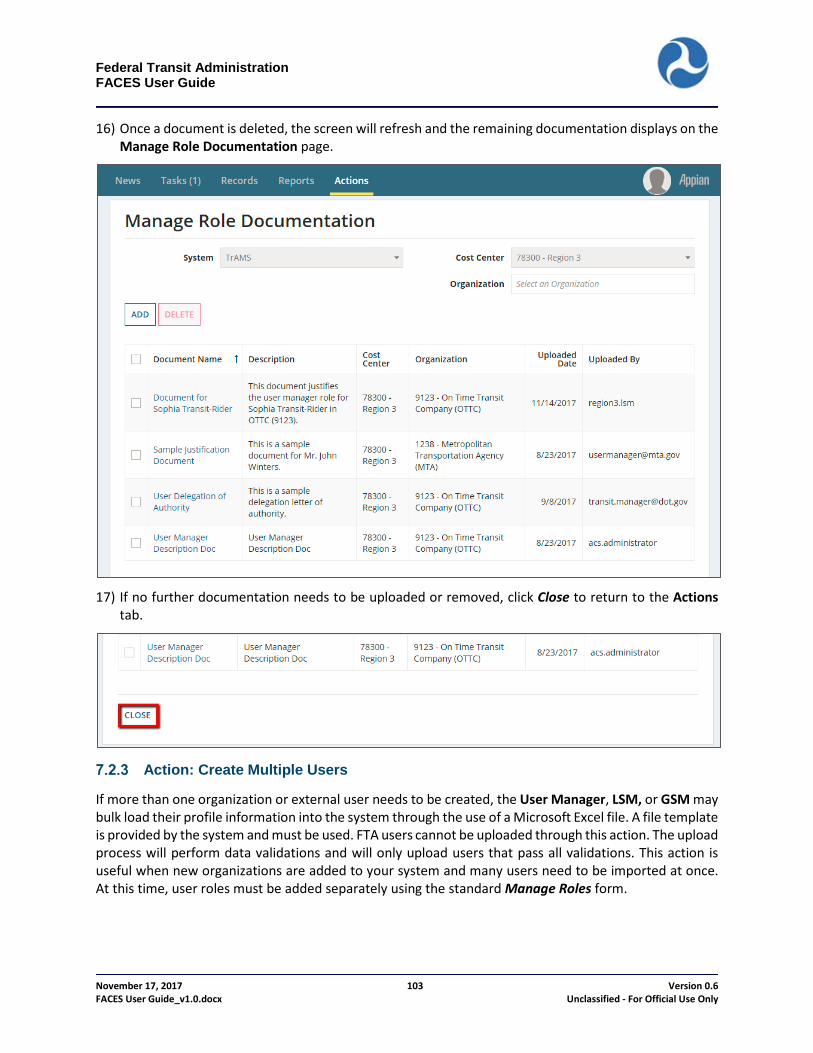
Federal Transit Administration FACES User Guide
November 17, 2017 103 Version 0.6 FACES User Guide_v1.0.docx Unclassified - For Official Use Only
16) Once a document is deleted, the screen will refresh and the remaining documentation displays on the Manage Role Documentation page.
17) If no further documentation needs to be uploaded or removed, click Close to return to the Actions
tab.
Action: Create Multiple Users
If more than one organization or external user needs to be created, the User Manager, LSM, or GSM may bulk load their profile information into the system through the use of a Microsoft Excel file. A file template is provided by the system and must be used. FTA users cannot be uploaded through this action. The upload process will perform data validations and will only upload users that pass all validations. This action is useful when new organizations are added to your system and many users need to be imported at once. At this time, user roles must be added separately using the standard Manage Roles form.
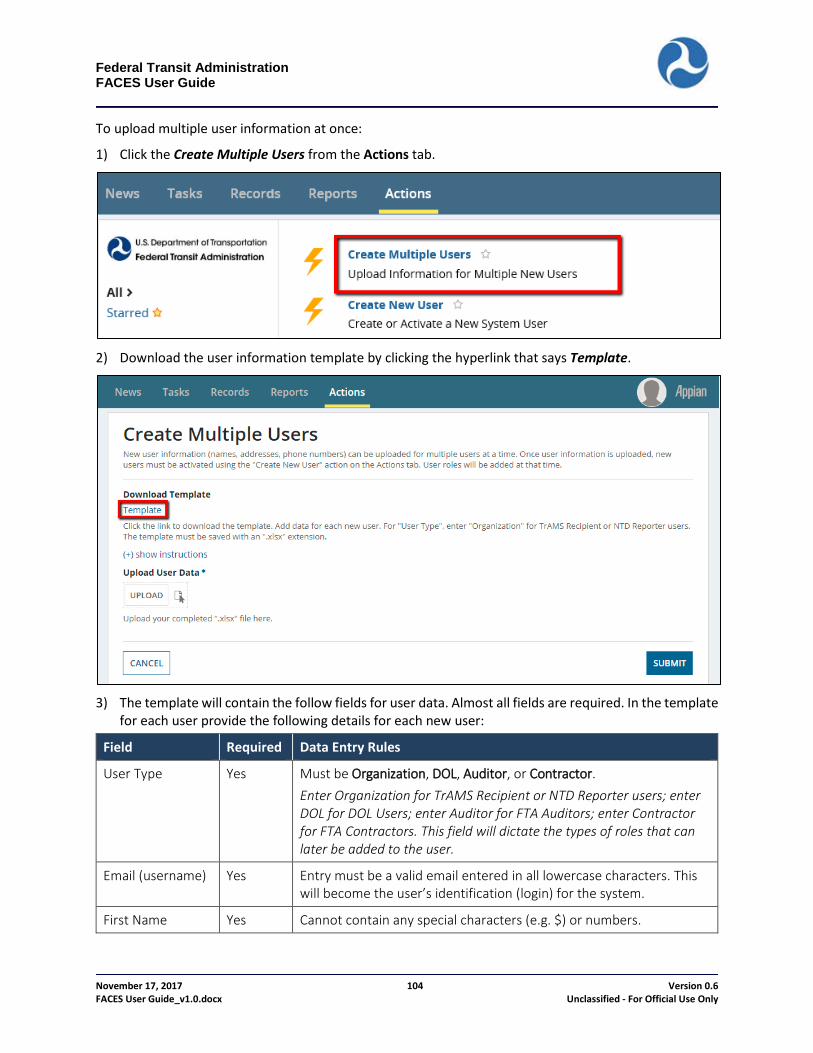
Federal Transit Administration FACES User Guide
November 17, 2017 104 Version 0.6 FACES User Guide_v1.0.docx Unclassified - For Official Use Only
To upload multiple user information at once:
1) Click the Create Multiple Users from the Actions tab.
2) Download the user information template by clicking the hyperlink that says Template.
3) The template will contain the follow fields for user data. Almost all fields are required. In the template
for each user provide the following details for each new user:
Field Required Data Entry Rules
User Type Yes Must be Organization, DOL, Auditor, or Contractor. Enter Organization for TrAMS Recipient or NTD Reporter users; enter DOL for DOL Users; enter Auditor for FTA Auditors; enter Contractor for FTA Contractors. This field will dictate the types of roles that can later be added to the user.
Email (username) Yes Entry must be a valid email entered in all lowercase characters. This will become the user’s identification (login) for the system.
First Name Yes Cannot contain any special characters (e.g. $) or numbers.
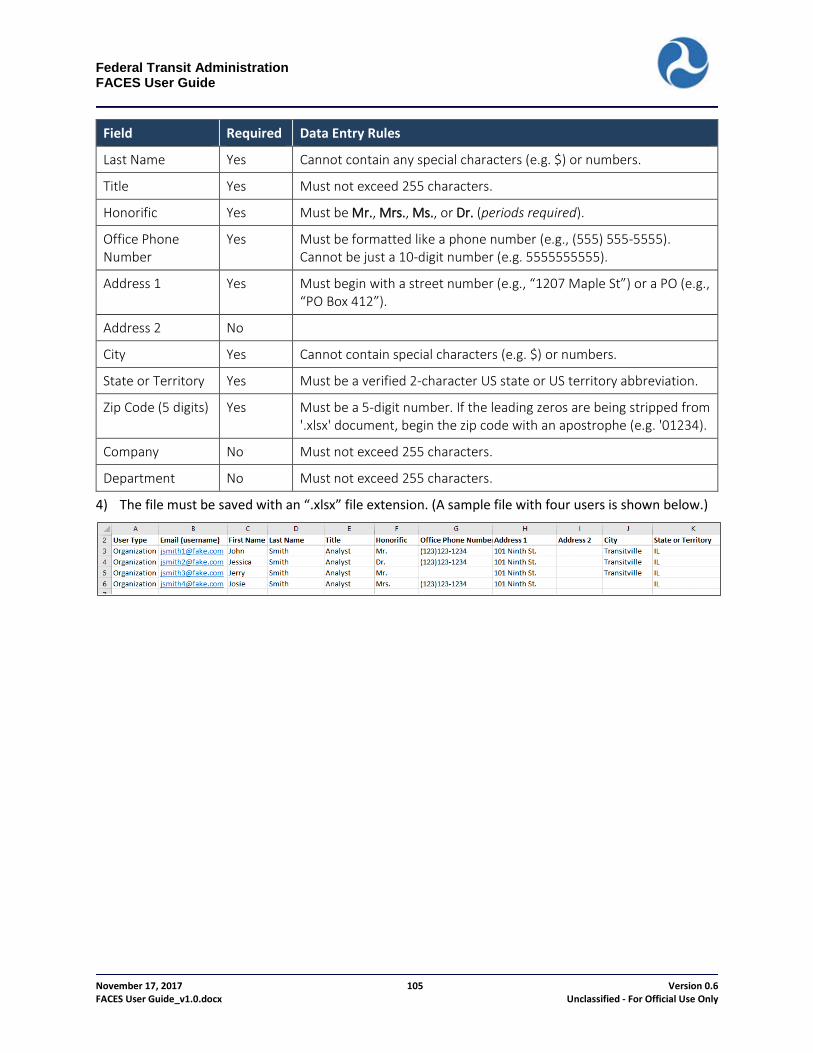
Federal Transit Administration FACES User Guide
November 17, 2017 105 Version 0.6 FACES User Guide_v1.0.docx Unclassified - For Official Use Only
Field Required Data Entry Rules
Last Name Yes Cannot contain any special characters (e.g. $) or numbers.
Title Yes Must not exceed 255 characters.
Honorific Yes Must be Mr., Mrs., Ms., or Dr. (periods required).
Office Phone Number
Yes Must be formatted like a phone number (e.g., (555) 555-5555). Cannot be just a 10-digit number (e.g. 5555555555).
Address 1 Yes Must begin with a street number (e.g., “1207 Maple St”) or a PO (e.g., “PO Box 412”).
Address 2 No
City Yes Cannot contain special characters (e.g. $) or numbers.
State or Territory Yes Must be a verified 2-character US state or US territory abbreviation.
Zip Code (5 digits) Yes Must be a 5-digit number. If the leading zeros are being stripped from '.xlsx' document, begin the zip code with an apostrophe (e.g. '01234).
Company No Must not exceed 255 characters.
Department No Must not exceed 255 characters.
4) The file must be saved with an “.xlsx” file extension. (A sample file with four users is shown below.)

Federal Transit Administration FACES User Guide
November 17, 2017 106 Version 0.6 FACES User Guide_v1.0.docx Unclassified - For Official Use Only
5) When the file ready to be uploaded, click Upload on the Create Multiple Users page to locate the Excel (.xlsx) file.
6) Use the Windows browser capabilities to locate the file to be uploaded. Click Open to add the file to
the system.
7) The file that was selected is listed on the upload page.
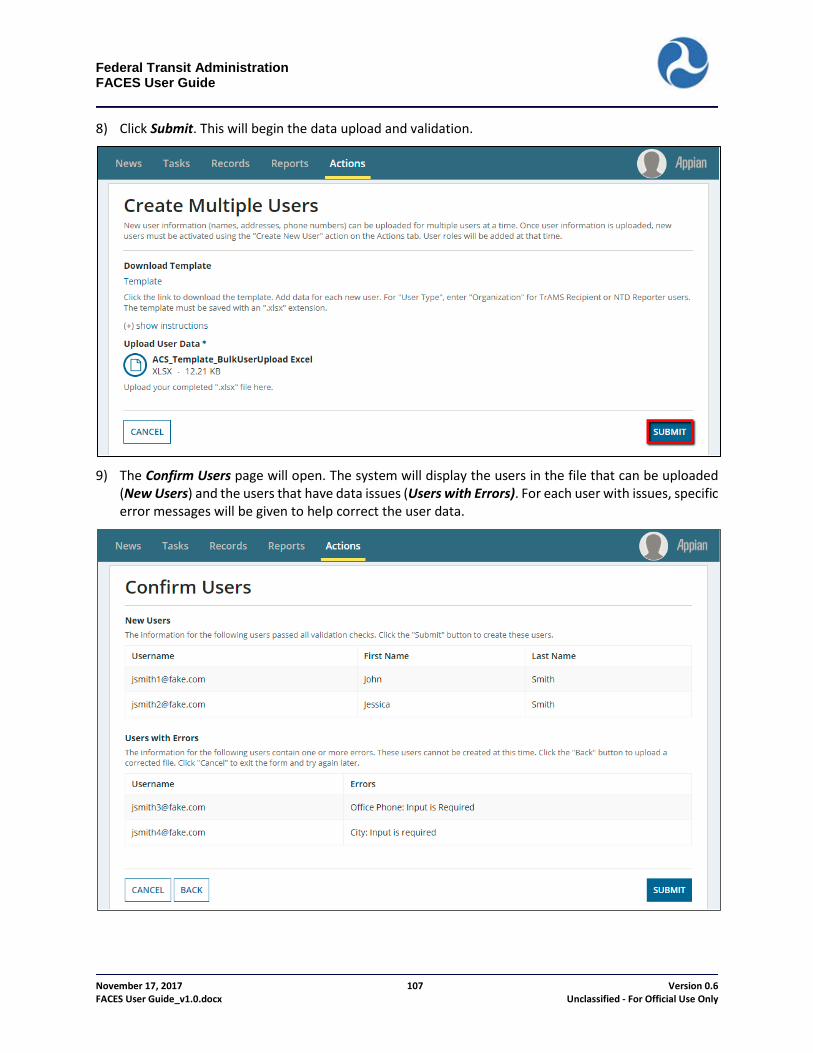
Federal Transit Administration FACES User Guide
November 17, 2017 107 Version 0.6 FACES User Guide_v1.0.docx Unclassified - For Official Use Only
8) Click Submit. This will begin the data upload and validation.
9) The Confirm Users page will open. The system will display the users in the file that can be uploaded
(New Users) and the users that have data issues (Users with Errors). For each user with issues, specific error messages will be given to help correct the user data.
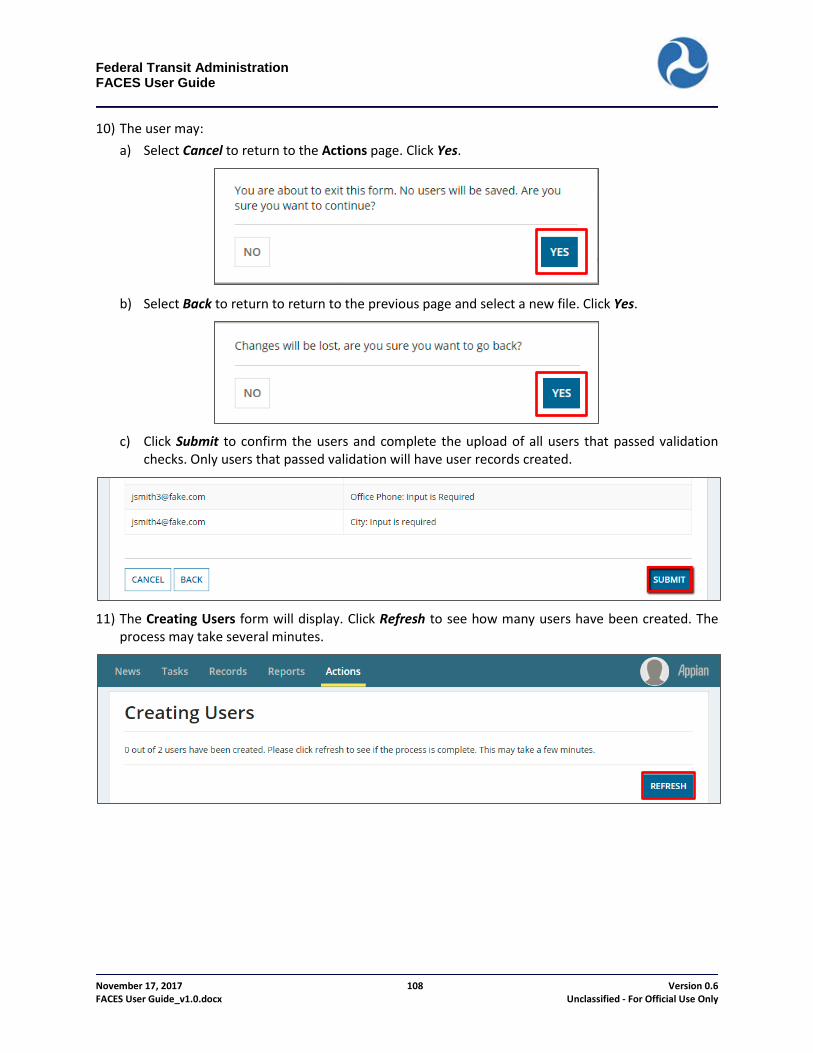
Federal Transit Administration FACES User Guide
November 17, 2017 108 Version 0.6 FACES User Guide_v1.0.docx Unclassified - For Official Use Only
10) The user may: a) Select Cancel to return to the Actions page. Click Yes.
b) Select Back to return to return to the previous page and select a new file. Click Yes.
c) Click Submit to confirm the users and complete the upload of all users that passed validation
checks. Only users that passed validation will have user records created.
11) The Creating Users form will display. Click Refresh to see how many users have been created. The
process may take several minutes.
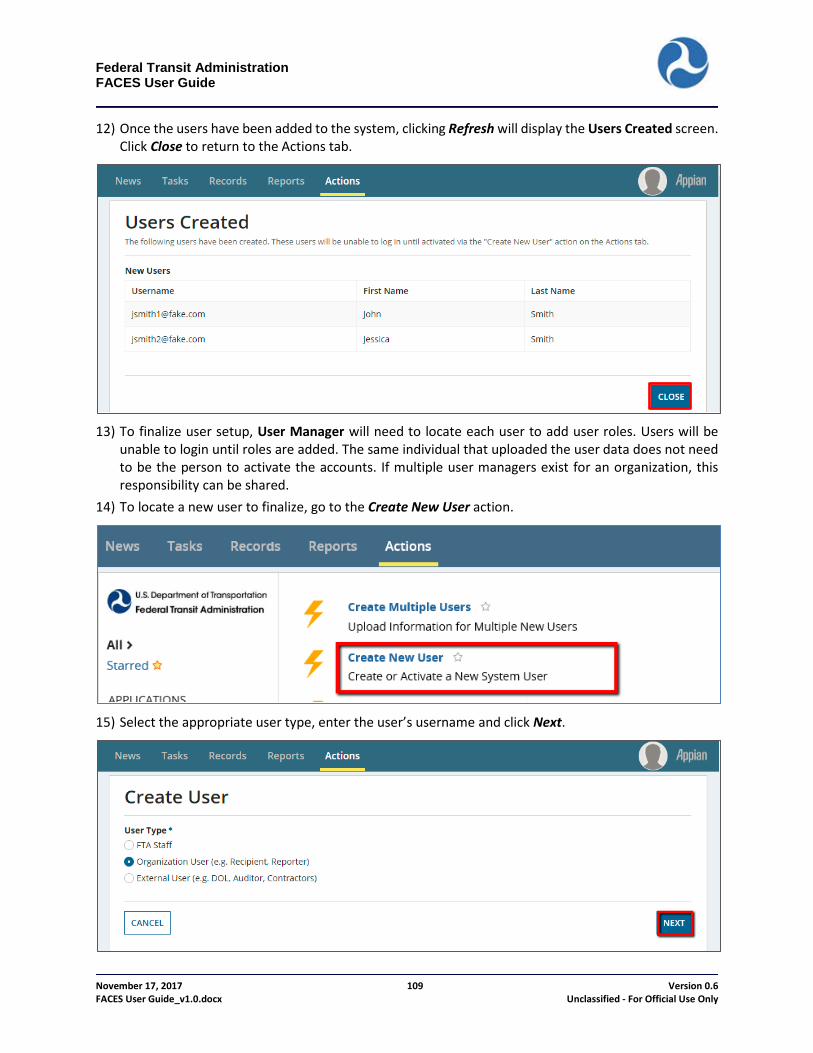
Federal Transit Administration FACES User Guide
November 17, 2017 109 Version 0.6 FACES User Guide_v1.0.docx Unclassified - For Official Use Only
12) Once the users have been added to the system, clicking Refresh will display the Users Created screen. Click Close to return to the Actions tab.
13) To finalize user setup, User Manager will need to locate each user to add user roles. Users will be
unable to login until roles are added. The same individual that uploaded the user data does not need to be the person to activate the accounts. If multiple user managers exist for an organization, this responsibility can be shared.
14) To locate a new user to finalize, go to the Create New User action.
15) Select the appropriate user type, enter the user’s username and click Next.
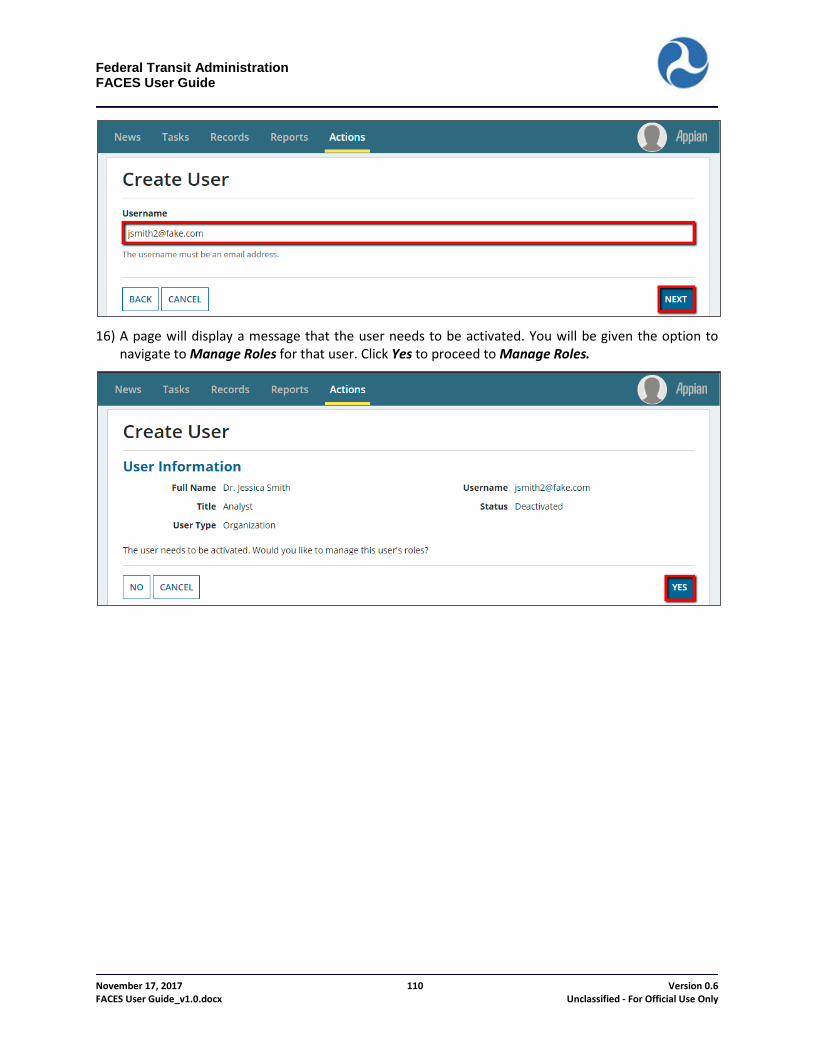
Federal Transit Administration FACES User Guide
November 17, 2017 110 Version 0.6 FACES User Guide_v1.0.docx Unclassified - For Official Use Only
16) A page will display a message that the user needs to be activated. You will be given the option to
navigate to Manage Roles for that user. Click Yes to proceed to Manage Roles.

Federal Transit Administration FACES User Guide
November 17, 2017 111 Version 0.6 FACES User Guide_v1.0.docx Unclassified - For Official Use Only
17) Follow the standard process for adding roles to the user and then click Activate. The user will be notified that their account has been established at this point.
7.3 Managing User Records Once a user has been created, the User Manager is able to manage details for existing users in their organization including: managing the users’ profiles, updating their roles/privileges, deactivating and reactivating users, and unlocking user accounts.
1) On the Records tab, click Users.
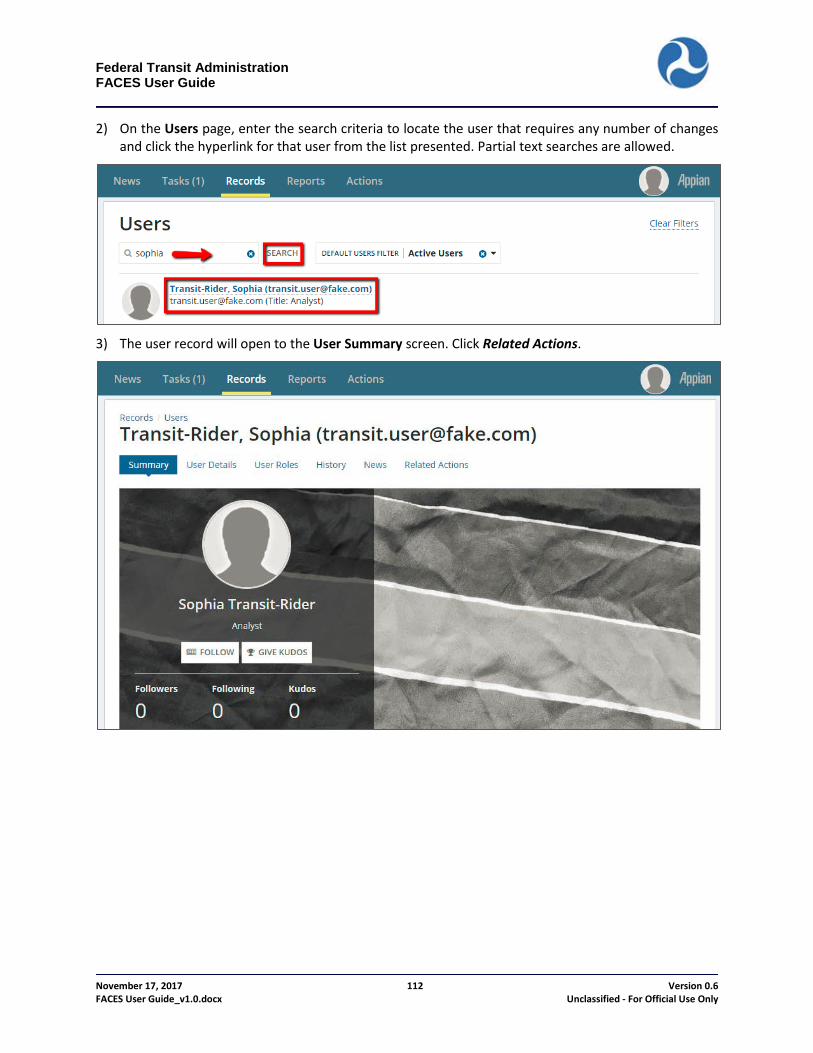
Federal Transit Administration FACES User Guide
November 17, 2017 112 Version 0.6 FACES User Guide_v1.0.docx Unclassified - For Official Use Only
2) On the Users page, enter the search criteria to locate the user that requires any number of changes and click the hyperlink for that user from the list presented. Partial text searches are allowed.
3) The user record will open to the User Summary screen. Click Related Actions.
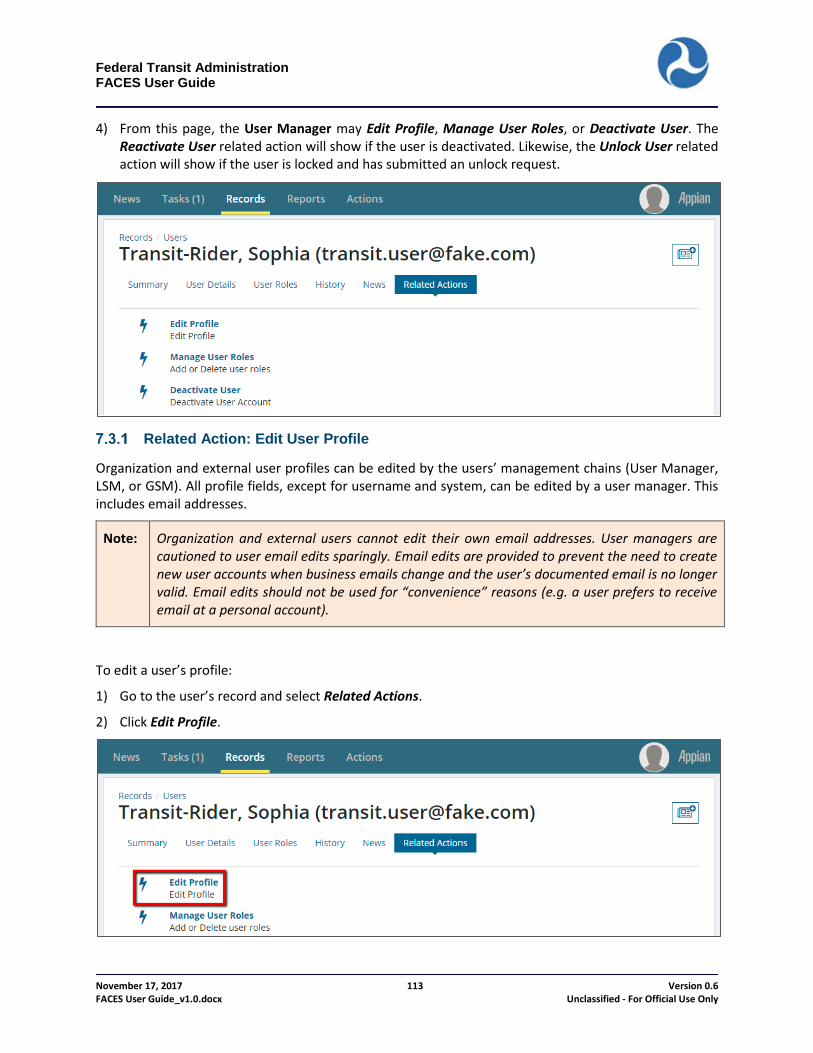
Federal Transit Administration FACES User Guide
November 17, 2017 113 Version 0.6 FACES User Guide_v1.0.docx Unclassified - For Official Use Only
4) From this page, the User Manager may Edit Profile, Manage User Roles, or Deactivate User. The Reactivate User related action will show if the user is deactivated. Likewise, the Unlock User related action will show if the user is locked and has submitted an unlock request.
Related Action: Edit User Profile
Organization and external user profiles can be edited by the users’ management chains (User Manager, LSM, or GSM). All profile fields, except for username and system, can be edited by a user manager. This includes email addresses.
Note: Organization and external users cannot edit their own email addresses. User managers are cautioned to user email edits sparingly. Email edits are provided to prevent the need to create new user accounts when business emails change and the user’s documented email is no longer valid. Email edits should not be used for “convenience” reasons (e.g. a user prefers to receive email at a personal account).
To edit a user’s profile:
1) Go to the user’s record and select Related Actions.
2) Click Edit Profile.

Federal Transit Administration FACES User Guide
November 17, 2017 114 Version 0.6 FACES User Guide_v1.0.docx Unclassified - For Official Use Only
The Edit User Profile page will display all previously saved user information details in editable fields.
3) Make any necessary changes. The same field validations that applied at the time of user creation will
still apply (e.g. checks for phone number format).
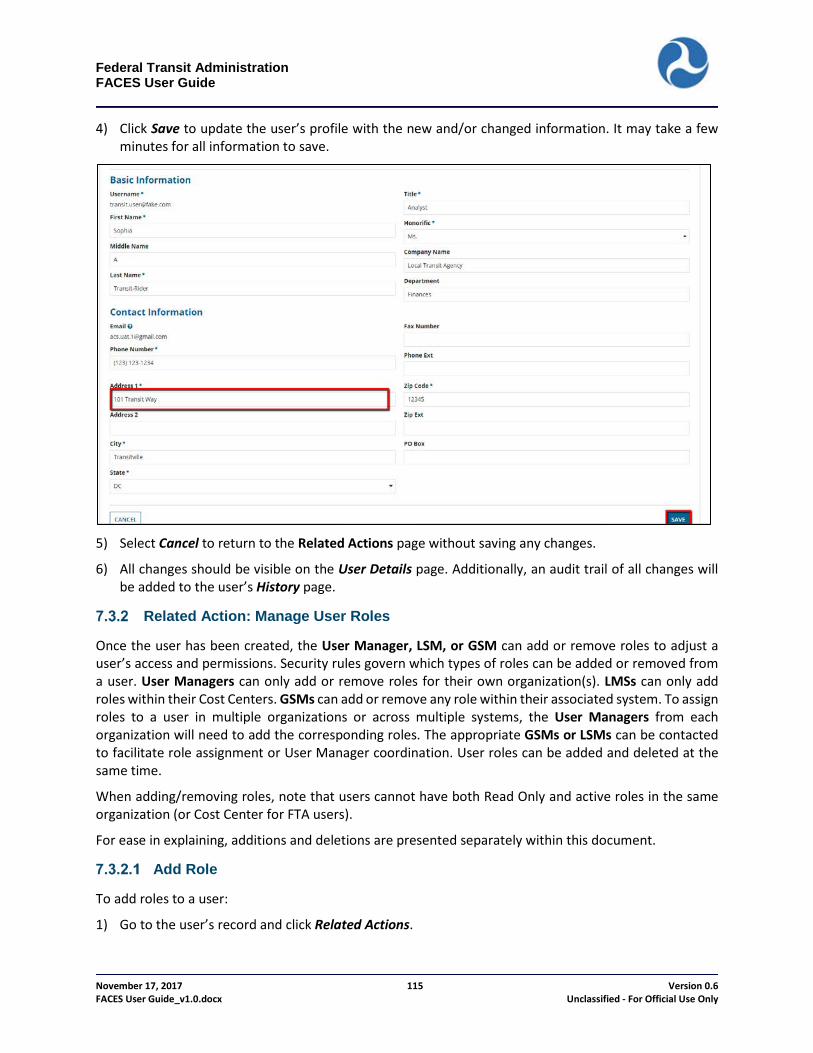
Federal Transit Administration FACES User Guide
November 17, 2017 115 Version 0.6 FACES User Guide_v1.0.docx Unclassified - For Official Use Only
4) Click Save to update the user’s profile with the new and/or changed information. It may take a few minutes for all information to save.
5) Select Cancel to return to the Related Actions page without saving any changes.
6) All changes should be visible on the User Details page. Additionally, an audit trail of all changes will be added to the user’s History page.
Related Action: Manage User Roles
Once the user has been created, the User Manager, LSM, or GSM can add or remove roles to adjust a user’s access and permissions. Security rules govern which types of roles can be added or removed from a user. User Managers can only add or remove roles for their own organization(s). LMSs can only add roles within their Cost Centers. GSMs can add or remove any role within their associated system. To assign roles to a user in multiple organizations or across multiple systems, the User Managers from each organization will need to add the corresponding roles. The appropriate GSMs or LSMs can be contacted to facilitate role assignment or User Manager coordination. User roles can be added and deleted at the same time.
When adding/removing roles, note that users cannot have both Read Only and active roles in the same organization (or Cost Center for FTA users).
For ease in explaining, additions and deletions are presented separately within this document.
Add Role
To add roles to a user:
1) Go to the user’s record and click Related Actions.
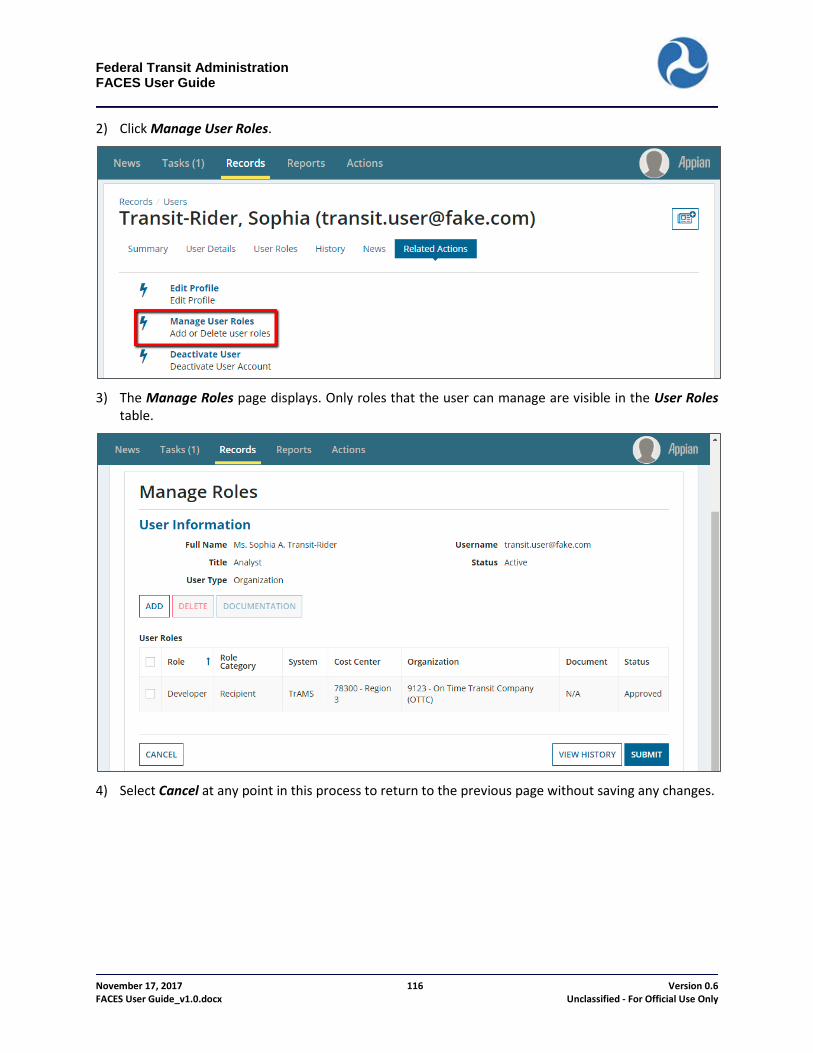
Federal Transit Administration FACES User Guide
November 17, 2017 116 Version 0.6 FACES User Guide_v1.0.docx Unclassified - For Official Use Only
2) Click Manage User Roles.
3) The Manage Roles page displays. Only roles that the user can manage are visible in the User Roles
table.
4) Select Cancel at any point in this process to return to the previous page without saving any changes.

Federal Transit Administration FACES User Guide
November 17, 2017 117 Version 0.6 FACES User Guide_v1.0.docx Unclassified - For Official Use Only
5) Click Add to add a new role to the user.
4) The role filters (System, Role Category, Cost Center, Organization) must be populated for the available
roles to display. For most User Managers, these filters will automatically populate and the fields will be locked on the screen. LSMs and GSMs may need to select a Cost Center and Organization for the ‘Available Roles’ to display.
5) Potential roles for the user are listed along with default information about the user’s system, role,
cost center, etc. In the screenshot below, only roles available to TrAMS Recipients are listed. These roles will be granted only for the Organization that is listed.
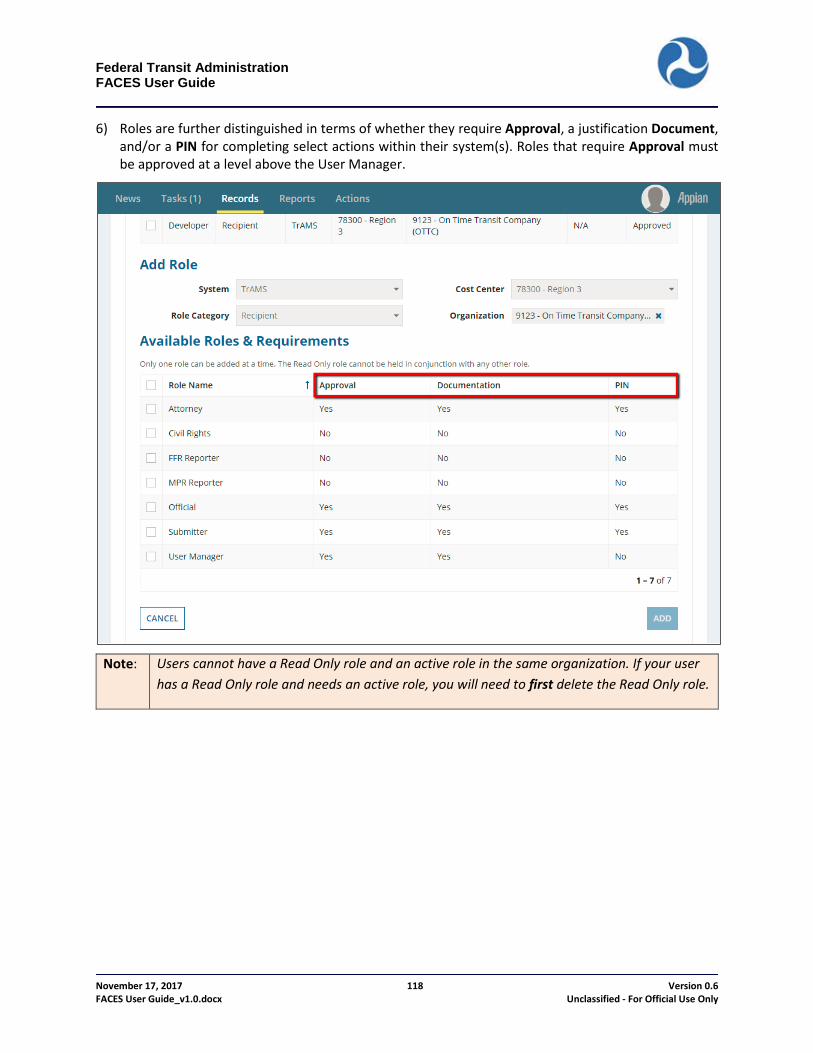
Federal Transit Administration FACES User Guide
November 17, 2017 118 Version 0.6 FACES User Guide_v1.0.docx Unclassified - For Official Use Only
6) Roles are further distinguished in terms of whether they require Approval, a justification Document, and/or a PIN for completing select actions within their system(s). Roles that require Approval must be approved at a level above the User Manager.
Note: Users cannot have a Read Only role and an active role in the same organization. If your user
has a Read Only role and needs an active role, you will need to first delete the Read Only role.
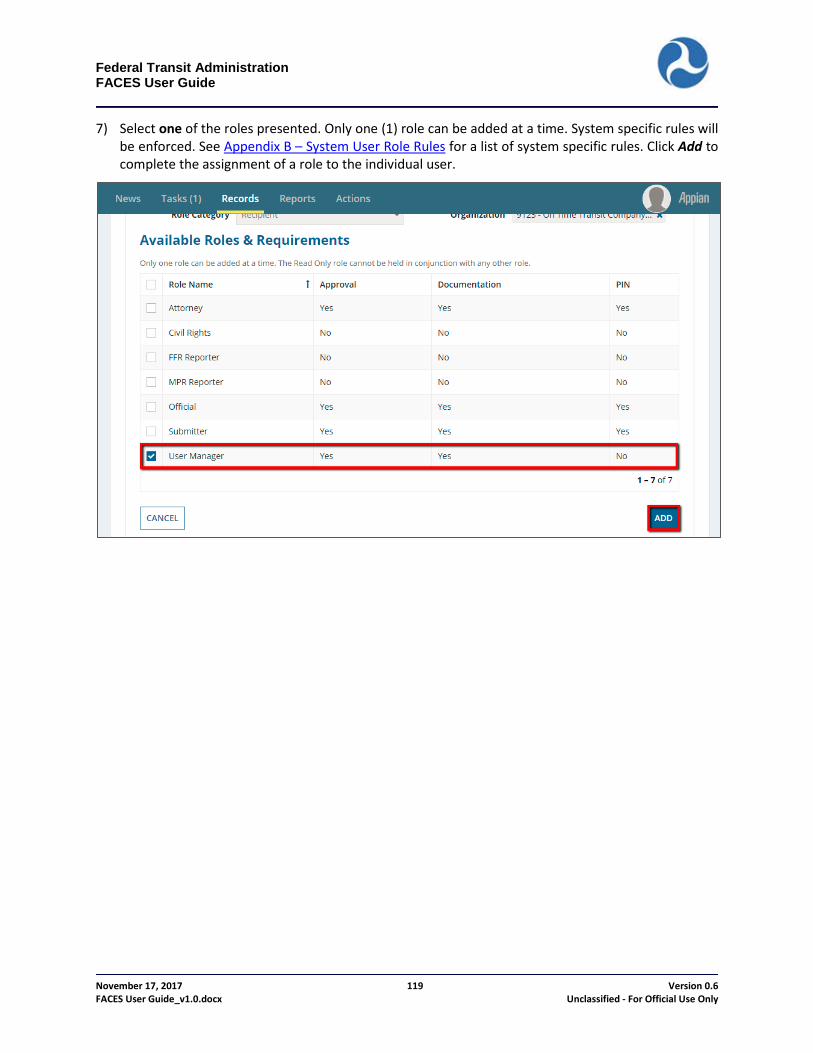
Federal Transit Administration FACES User Guide
November 17, 2017 119 Version 0.6 FACES User Guide_v1.0.docx Unclassified - For Official Use Only
7) Select one of the roles presented. Only one (1) role can be added at a time. System specific rules will be enforced. See Appendix B – System User Role Rules for a list of system specific rules. Click Add to complete the assignment of a role to the individual user.
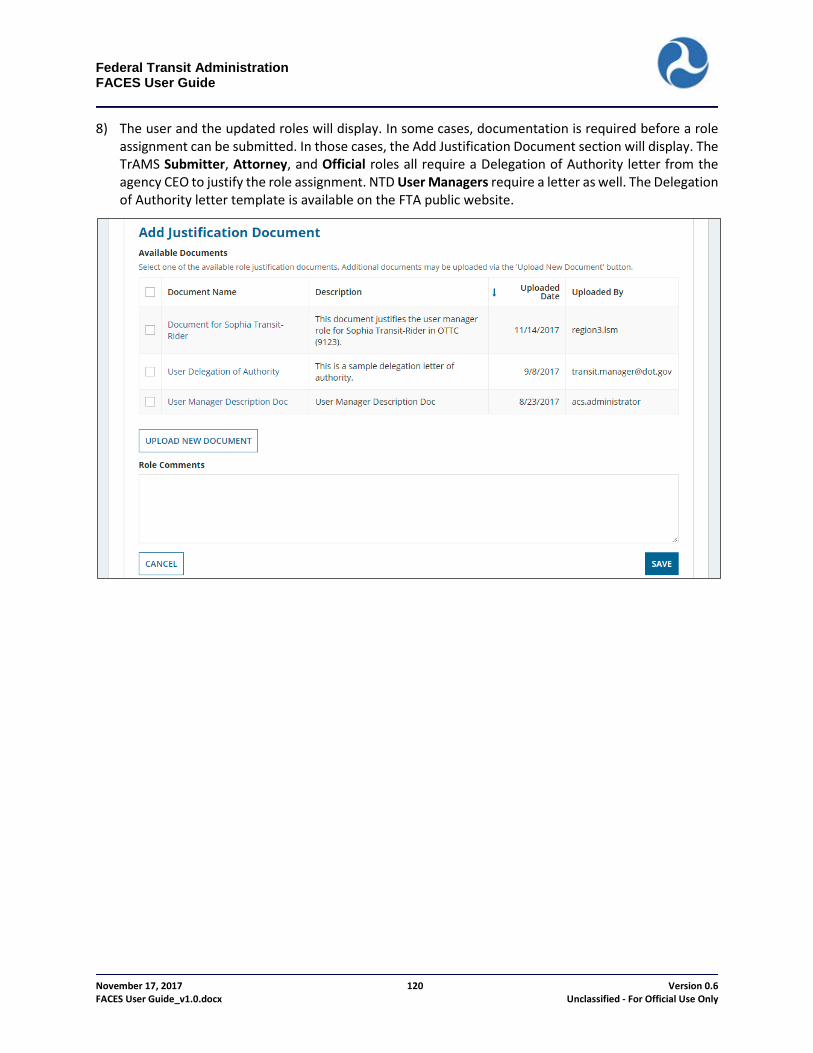
Federal Transit Administration FACES User Guide
November 17, 2017 120 Version 0.6 FACES User Guide_v1.0.docx Unclassified - For Official Use Only
8) The user and the updated roles will display. In some cases, documentation is required before a role assignment can be submitted. In those cases, the Add Justification Document section will display. The TrAMS Submitter, Attorney, and Official roles all require a Delegation of Authority letter from the agency CEO to justify the role assignment. NTD User Managers require a letter as well. The Delegation of Authority letter template is available on the FTA public website.

Federal Transit Administration FACES User Guide
November 17, 2017 121 Version 0.6 FACES User Guide_v1.0.docx Unclassified - For Official Use Only
9) To associate a document with the added role, select from the list of available documents by clicking on the box next to that Document Name.
10) If the proper document isn’t available, click the Upload New Document button.
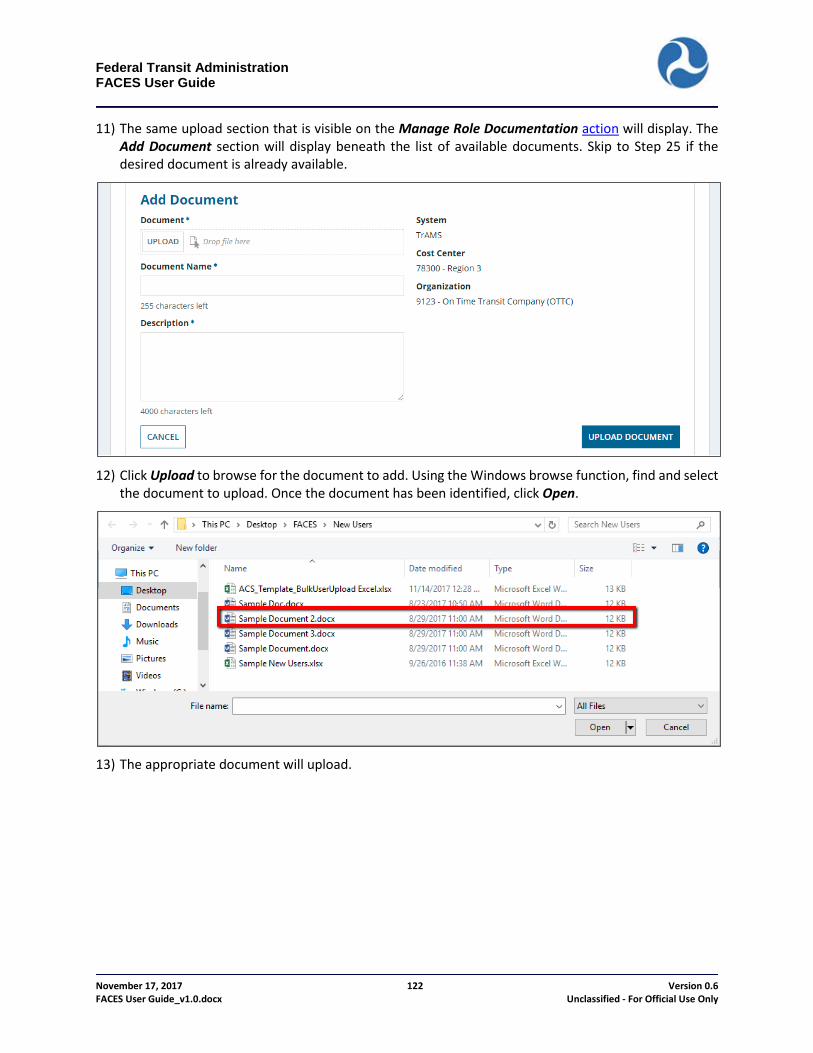
Federal Transit Administration FACES User Guide
November 17, 2017 122 Version 0.6 FACES User Guide_v1.0.docx Unclassified - For Official Use Only
11) The same upload section that is visible on the Manage Role Documentation action will display. The Add Document section will display beneath the list of available documents. Skip to Step 25 if the desired document is already available.
12) Click Upload to browse for the document to add. Using the Windows browse function, find and select
the document to upload. Once the document has been identified, click Open.
13) The appropriate document will upload.
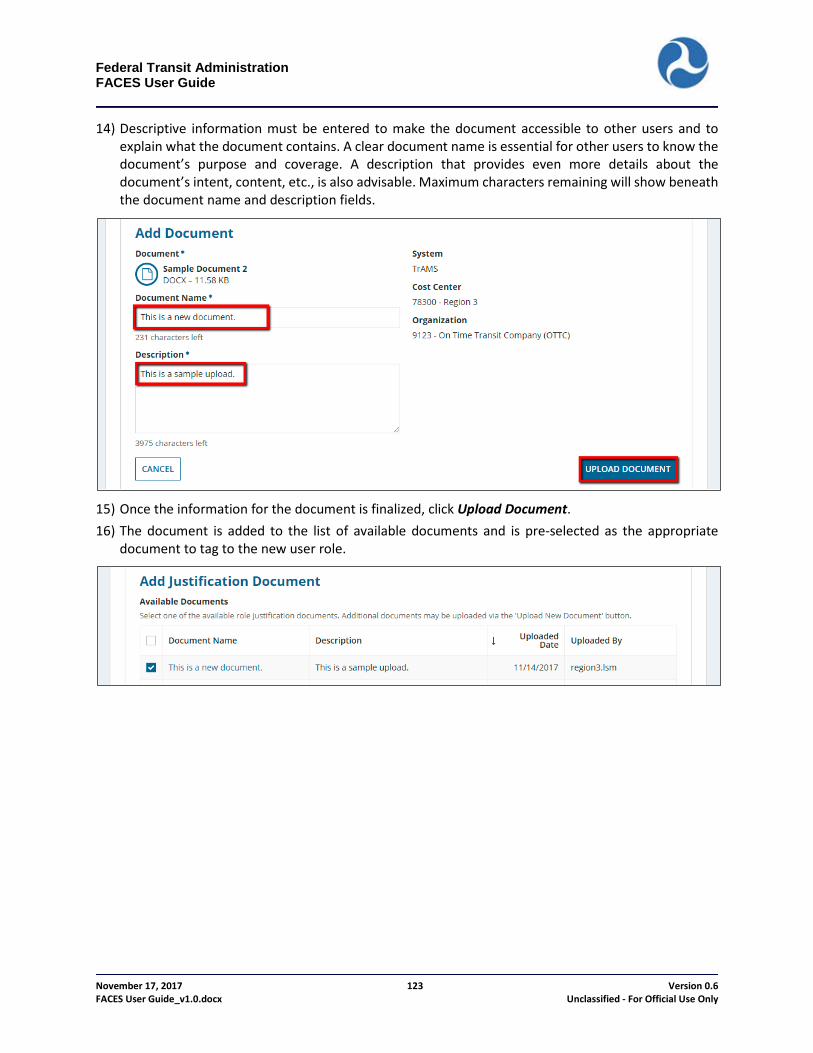
Federal Transit Administration FACES User Guide
November 17, 2017 123 Version 0.6 FACES User Guide_v1.0.docx Unclassified - For Official Use Only
14) Descriptive information must be entered to make the document accessible to other users and to explain what the document contains. A clear document name is essential for other users to know the document’s purpose and coverage. A description that provides even more details about the document’s intent, content, etc., is also advisable. Maximum characters remaining will show beneath the document name and description fields.
15) Once the information for the document is finalized, click Upload Document. 16) The document is added to the list of available documents and is pre-selected as the appropriate
document to tag to the new user role.
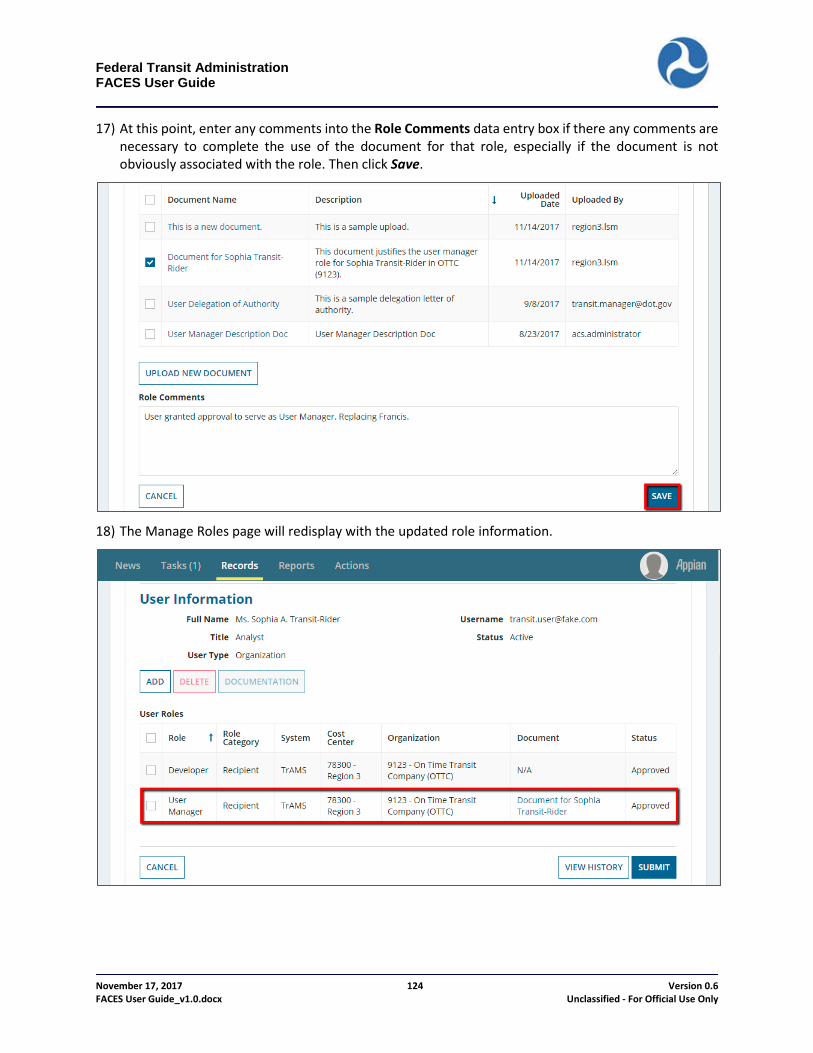
Federal Transit Administration FACES User Guide
November 17, 2017 124 Version 0.6 FACES User Guide_v1.0.docx Unclassified - For Official Use Only
17) At this point, enter any comments into the Role Comments data entry box if there any comments are necessary to complete the use of the document for that role, especially if the document is not obviously associated with the role. Then click Save.
18) The Manage Roles page will redisplay with the updated role information.
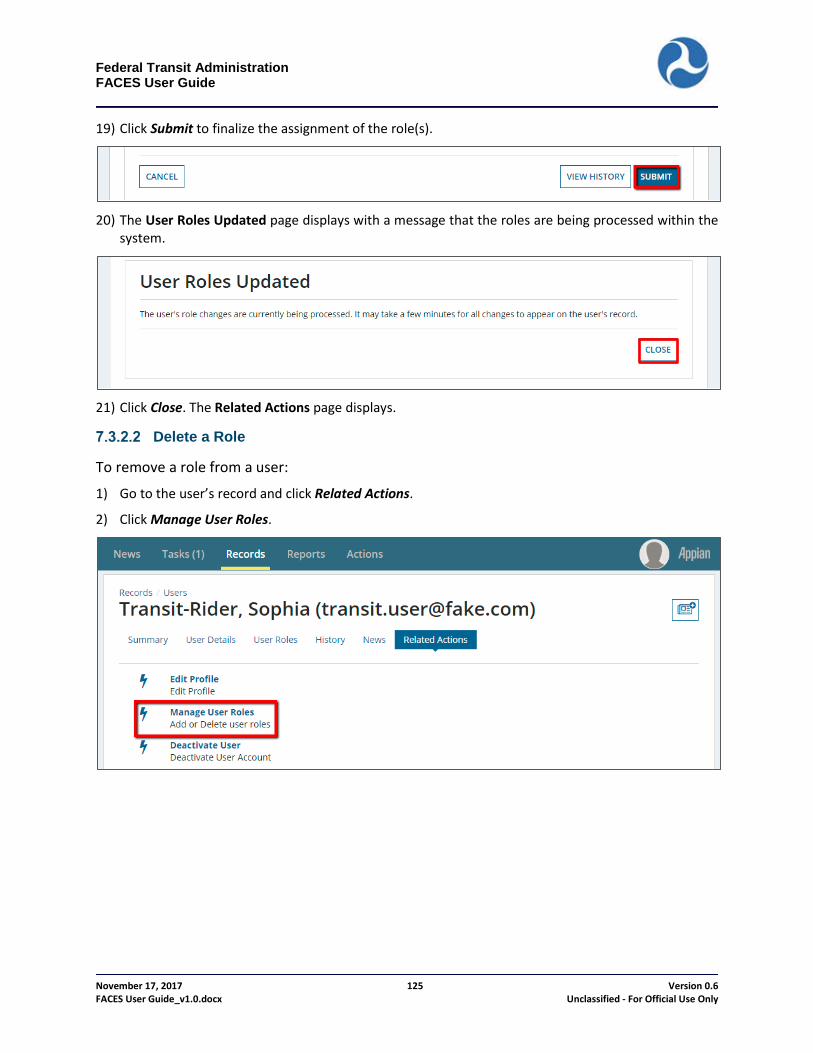
Federal Transit Administration FACES User Guide
November 17, 2017 125 Version 0.6 FACES User Guide_v1.0.docx Unclassified - For Official Use Only
19) Click Submit to finalize the assignment of the role(s).
20) The User Roles Updated page displays with a message that the roles are being processed within the
system.
21) Click Close. The Related Actions page displays.
Delete a Role
To remove a role from a user:
1) Go to the user’s record and click Related Actions.
2) Click Manage User Roles.

Federal Transit Administration FACES User Guide
November 17, 2017 126 Version 0.6 FACES User Guide_v1.0.docx Unclassified - For Official Use Only
3) Select the check box associated with the role(s) to remove and click Delete. Multiple roles can be removed at a time.
4) A prompt will display that indicates that deleting the role(s) will remove the user’s access to a key
functionality or process. Select No if the role should be maintained. Click Yes if the role should be removed.
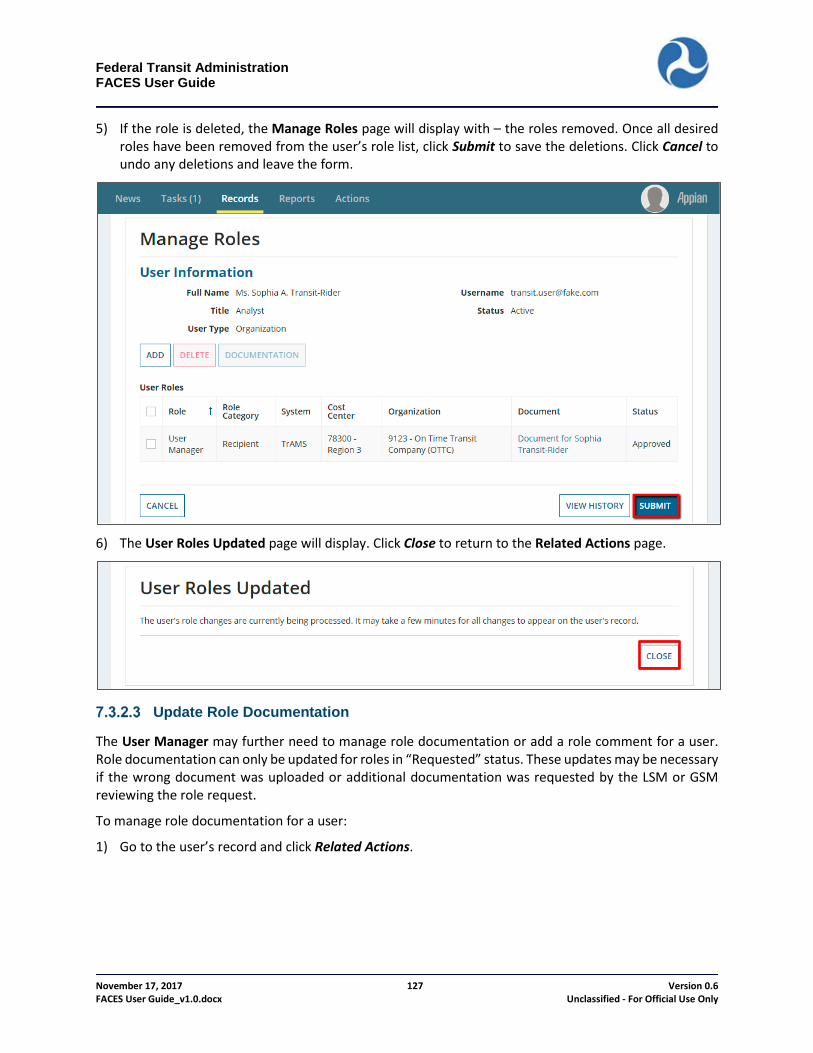
Federal Transit Administration FACES User Guide
November 17, 2017 127 Version 0.6 FACES User Guide_v1.0.docx Unclassified - For Official Use Only
5) If the role is deleted, the Manage Roles page will display with – the roles removed. Once all desired roles have been removed from the user’s role list, click Submit to save the deletions. Click Cancel to undo any deletions and leave the form.
6) The User Roles Updated page will display. Click Close to return to the Related Actions page.
Update Role Documentation
The User Manager may further need to manage role documentation or add a role comment for a user. Role documentation can only be updated for roles in “Requested” status. These updates may be necessary if the wrong document was uploaded or additional documentation was requested by the LSM or GSM reviewing the role request.
To manage role documentation for a user:
1) Go to the user’s record and click Related Actions.
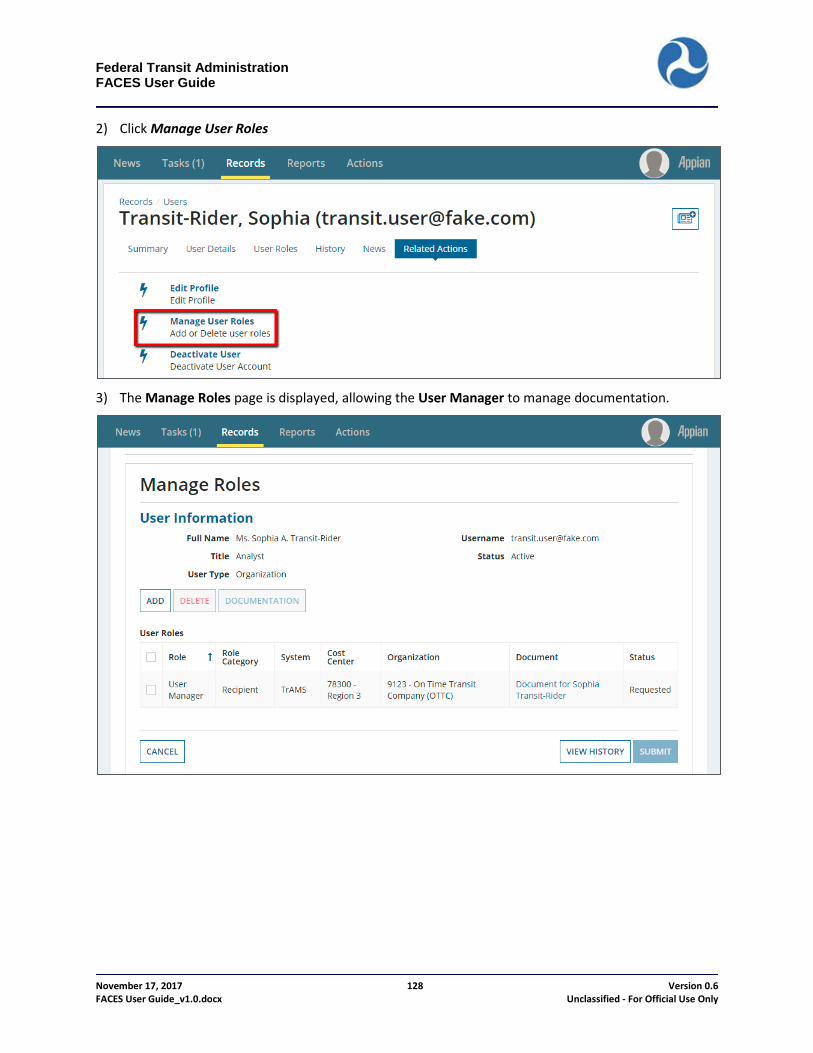
Federal Transit Administration FACES User Guide
November 17, 2017 128 Version 0.6 FACES User Guide_v1.0.docx Unclassified - For Official Use Only
2) Click Manage User Roles
3) The Manage Roles page is displayed, allowing the User Manager to manage documentation.

Federal Transit Administration FACES User Guide
November 17, 2017 129 Version 0.6 FACES User Guide_v1.0.docx Unclassified - For Official Use Only
4) The User Manager may select the hyperlink for any document to ascertain the contents. The associated document will open within the appropriate application for viewing. Selecting the hyperlink for the document will download the document for review.
5) To switch a justification document for a specific role, click the checkbox next to the appropriate role
and then click Documentation.
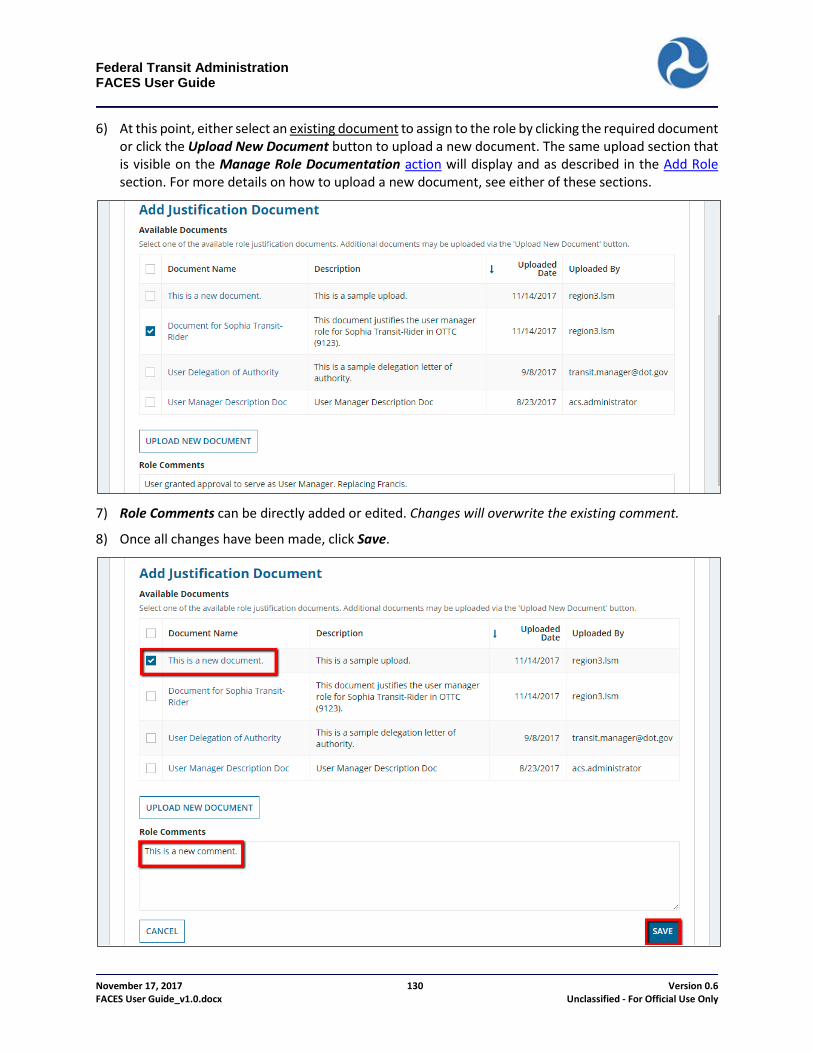
Federal Transit Administration FACES User Guide
November 17, 2017 130 Version 0.6 FACES User Guide_v1.0.docx Unclassified - For Official Use Only
6) At this point, either select an existing document to assign to the role by clicking the required document or click the Upload New Document button to upload a new document. The same upload section that is visible on the Manage Role Documentation action will display and as described in the Add Role section. For more details on how to upload a new document, see either of these sections.
7) Role Comments can be directly added or edited. Changes will overwrite the existing comment.
8) Once all changes have been made, click Save.
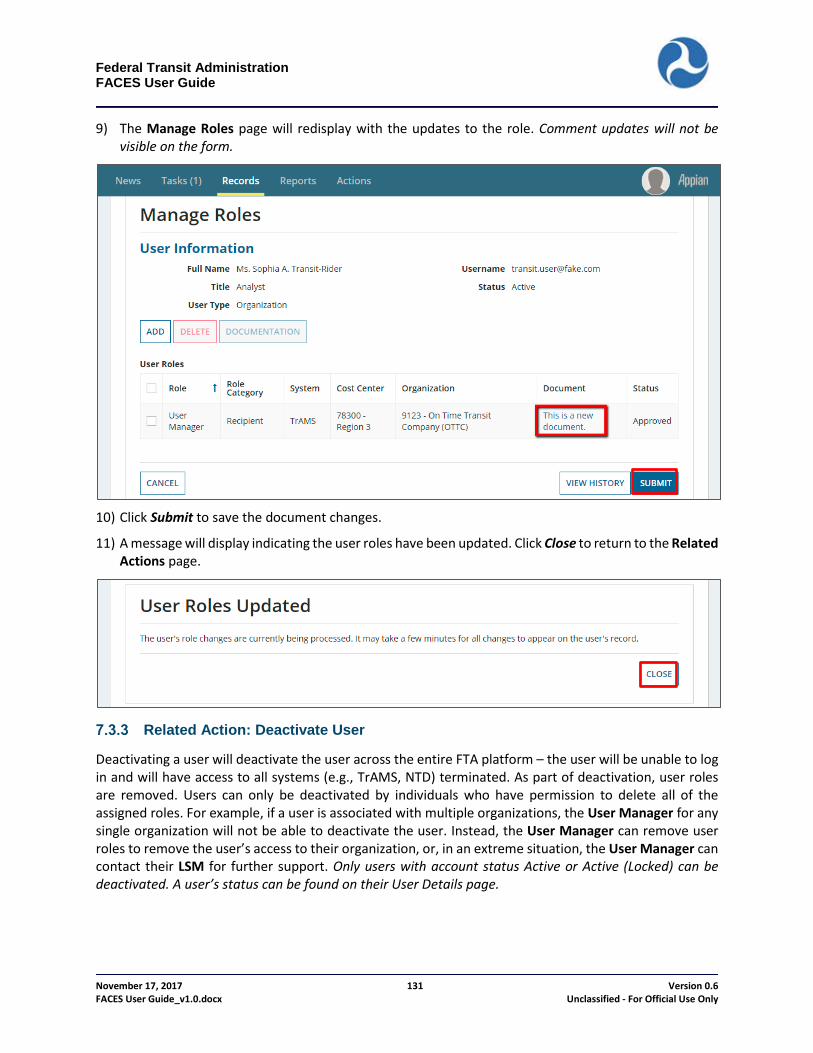
Federal Transit Administration FACES User Guide
November 17, 2017 131 Version 0.6 FACES User Guide_v1.0.docx Unclassified - For Official Use Only
9) The Manage Roles page will redisplay with the updates to the role. Comment updates will not be visible on the form.
10) Click Submit to save the document changes.
11) A message will display indicating the user roles have been updated. Click Close to return to the Related Actions page.
Related Action: Deactivate User
Deactivating a user will deactivate the user across the entire FTA platform – the user will be unable to log in and will have access to all systems (e.g., TrAMS, NTD) terminated. As part of deactivation, user roles are removed. Users can only be deactivated by individuals who have permission to delete all of the assigned roles. For example, if a user is associated with multiple organizations, the User Manager for any single organization will not be able to deactivate the user. Instead, the User Manager can remove user roles to remove the user’s access to their organization, or, in an extreme situation, the User Manager can contact their LSM for further support. Only users with account status Active or Active (Locked) can be deactivated. A user’s status can be found on their User Details page.
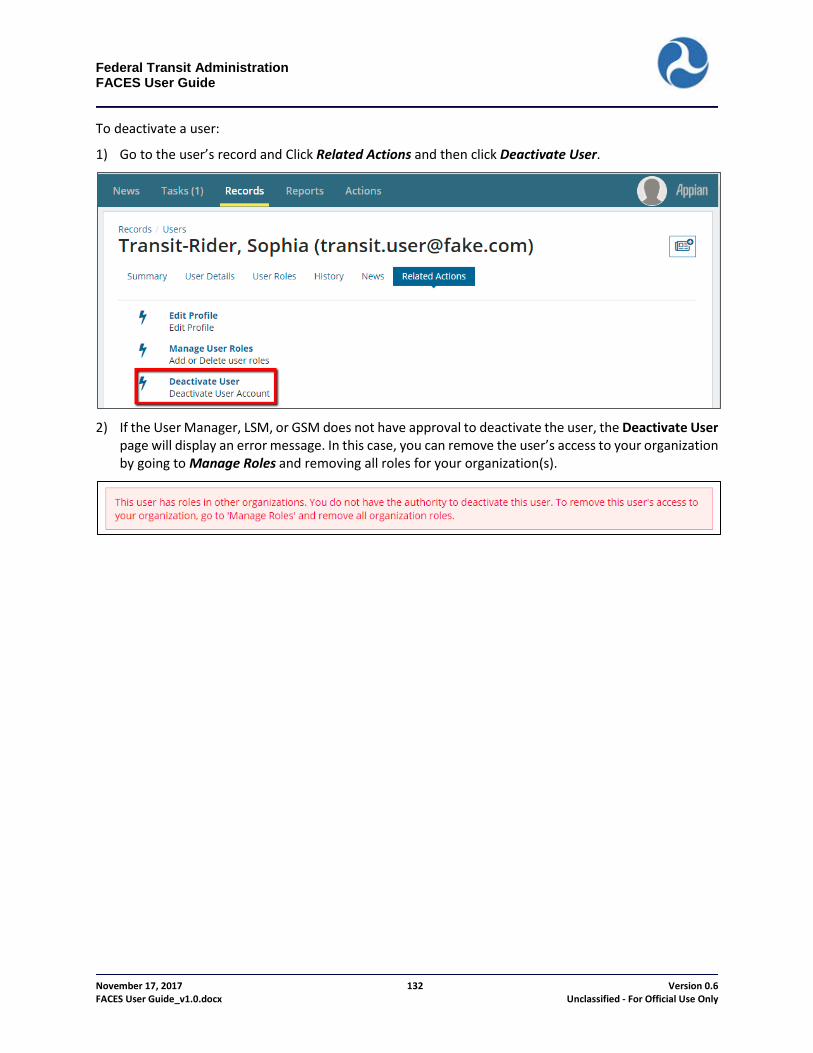
Federal Transit Administration FACES User Guide
November 17, 2017 132 Version 0.6 FACES User Guide_v1.0.docx Unclassified - For Official Use Only
To deactivate a user:
1) Go to the user’s record and Click Related Actions and then click Deactivate User.
2) If the User Manager, LSM, or GSM does not have approval to deactivate the user, the Deactivate User
page will display an error message. In this case, you can remove the user’s access to your organization by going to Manage Roles and removing all roles for your organization(s).

Federal Transit Administration FACES User Guide
November 17, 2017 133 Version 0.6 FACES User Guide_v1.0.docx Unclassified - For Official Use Only
3) Otherwise, the Deactivate User page will display with a presentation of basic User Information, the User’s Roles You Can Manage, and the Tasks Assigned Directly to the user.
6) Click Cancel to return to the Related Actions page without saving any changes.

Federal Transit Administration FACES User Guide
November 17, 2017 134 Version 0.6 FACES User Guide_v1.0.docx Unclassified - For Official Use Only
7) Enter any comments/justification for the deactivation and click Deactivate to proceed with the user deactivation. Comments are required.
8) If any open tasks are directly assigned to the user (not to the user’s role groups), the following prompt
will appear: “Warning: This user has been assigned one or more tasks. Deactivating this user will cause the tasks to be left unattended. Are you sure you want to deactivate this user?” Select Yes to proceed with user deactivation. Select No to cancel the deactivation.
9) The user also needs to confirm the deactivation in the case where there are no unattended tasks.
Select Yes when prompted with the question “Are you sure you want to deactivate this user?” to proceed with the user deactivation. Select No to cancel the deactivation:
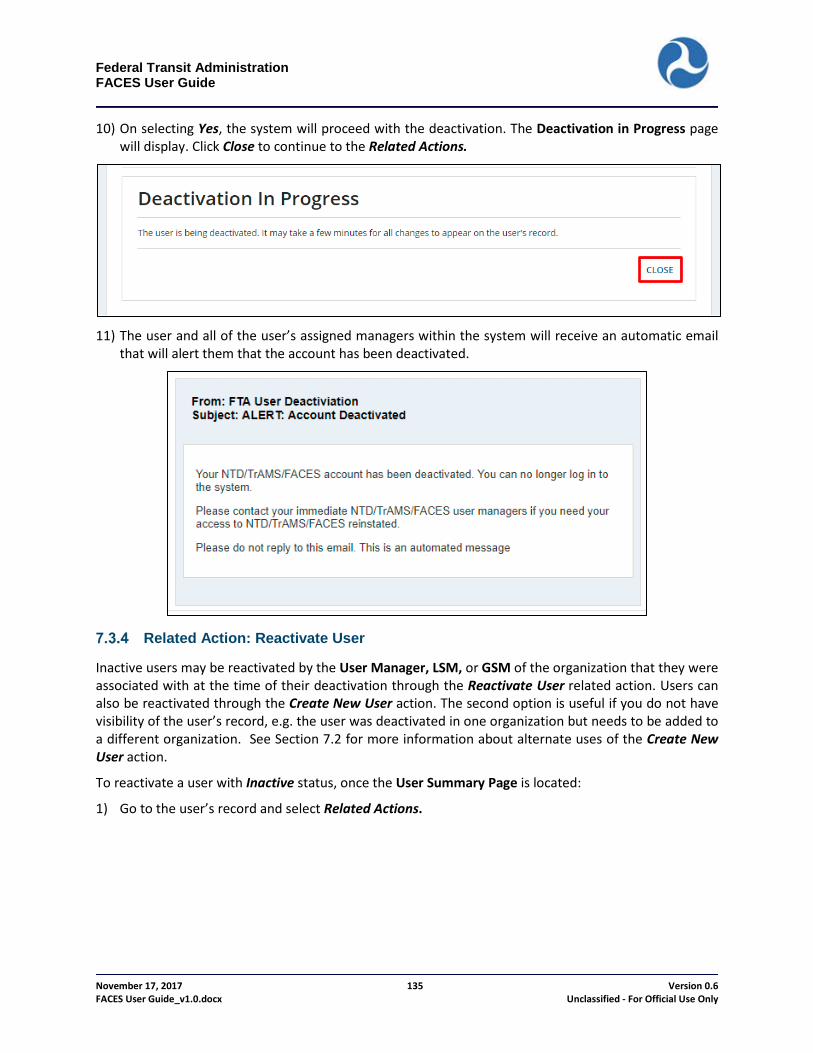
Federal Transit Administration FACES User Guide
November 17, 2017 135 Version 0.6 FACES User Guide_v1.0.docx Unclassified - For Official Use Only
10) On selecting Yes, the system will proceed with the deactivation. The Deactivation in Progress page will display. Click Close to continue to the Related Actions.
11) The user and all of the user’s assigned managers within the system will receive an automatic email
that will alert them that the account has been deactivated.
Related Action: Reactivate User
Inactive users may be reactivated by the User Manager, LSM, or GSM of the organization that they were associated with at the time of their deactivation through the Reactivate User related action. Users can also be reactivated through the Create New User action. The second option is useful if you do not have visibility of the user’s record, e.g. the user was deactivated in one organization but needs to be added to a different organization. See Section 7.2 for more information about alternate uses of the Create New User action.
To reactivate a user with Inactive status, once the User Summary Page is located:
1) Go to the user’s record and select Related Actions.

Federal Transit Administration FACES User Guide
November 17, 2017 136 Version 0.6 FACES User Guide_v1.0.docx Unclassified - For Official Use Only
2) Click Reactivate User.
3) The Reactivate Users page display with basic User Information, and showing the deactivation history.
Comments justifying the reactivation are requested but not mandatory.
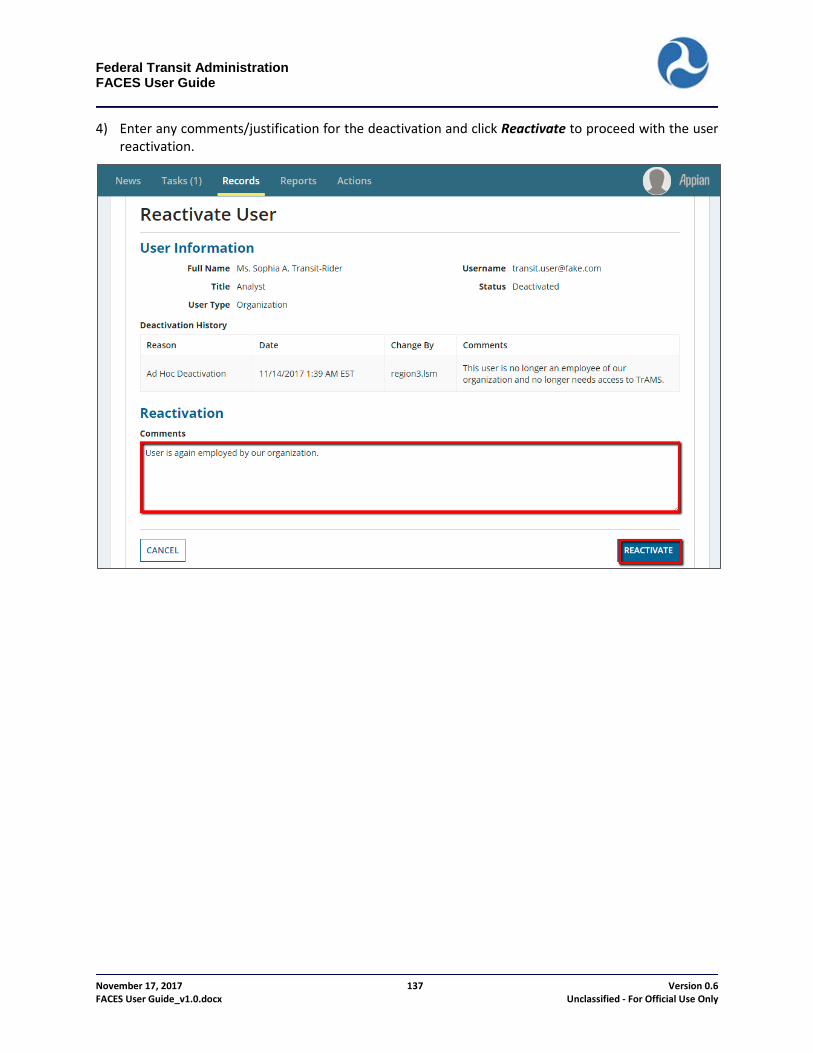
Federal Transit Administration FACES User Guide
November 17, 2017 137 Version 0.6 FACES User Guide_v1.0.docx Unclassified - For Official Use Only
4) Enter any comments/justification for the deactivation and click Reactivate to proceed with the user reactivation.
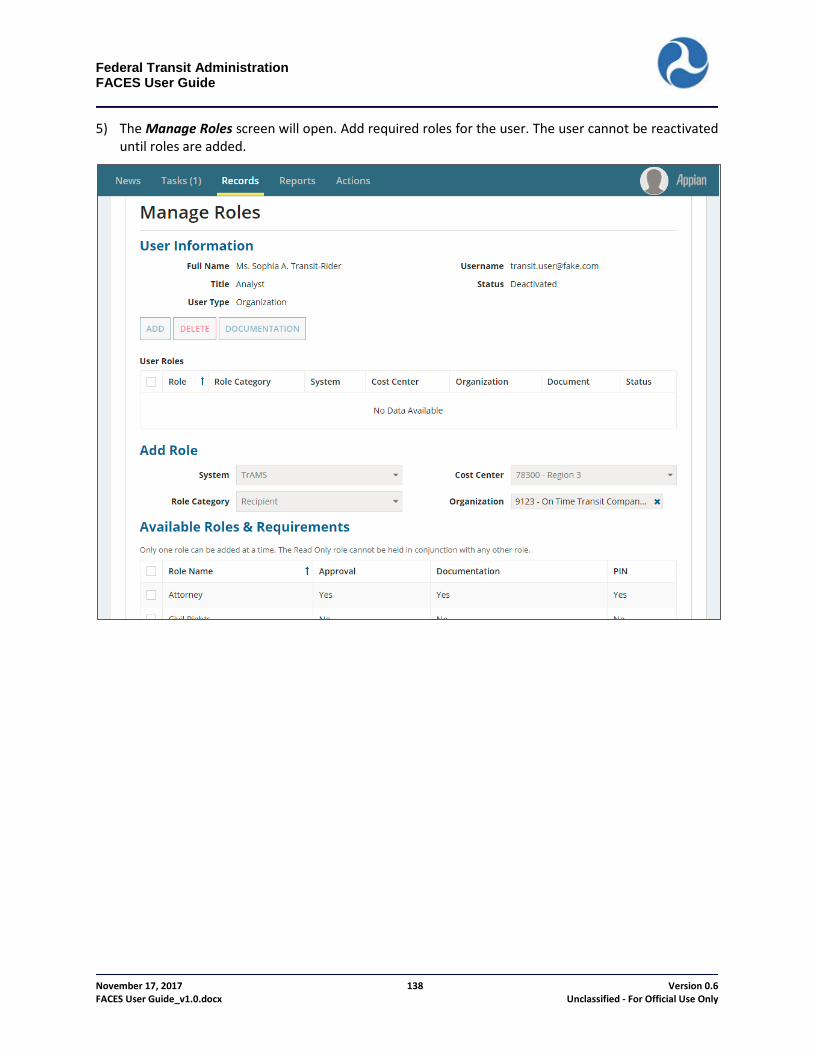
Federal Transit Administration FACES User Guide
November 17, 2017 138 Version 0.6 FACES User Guide_v1.0.docx Unclassified - For Official Use Only
5) The Manage Roles screen will open. Add required roles for the user. The user cannot be reactivated until roles are added.
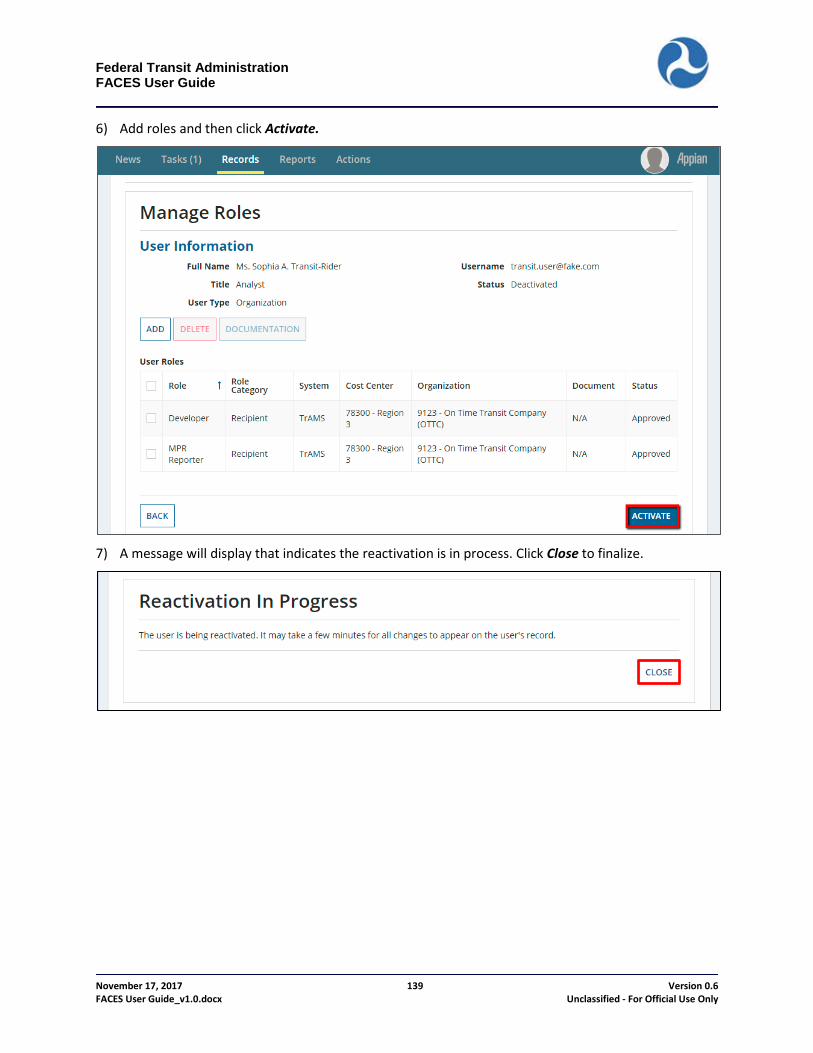
Federal Transit Administration FACES User Guide
November 17, 2017 139 Version 0.6 FACES User Guide_v1.0.docx Unclassified - For Official Use Only
6) Add roles and then click Activate.
7) A message will display that indicates the reactivation is in process. Click Close to finalize.
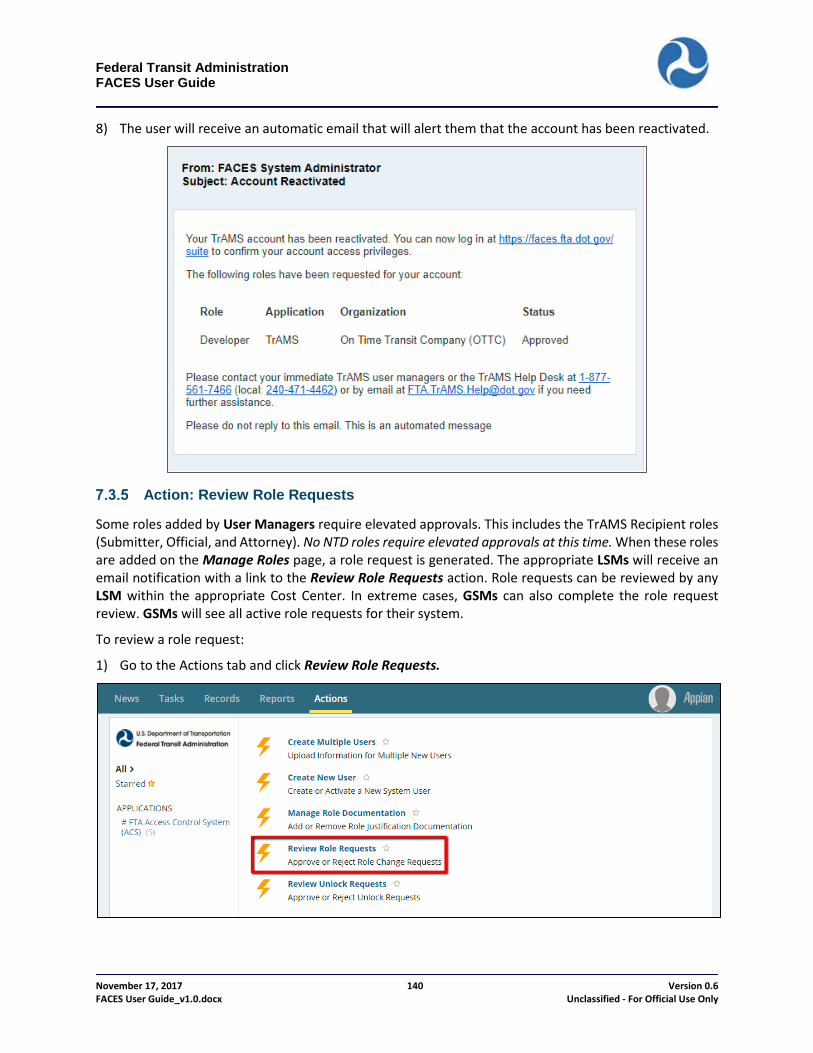
Federal Transit Administration FACES User Guide
November 17, 2017 140 Version 0.6 FACES User Guide_v1.0.docx Unclassified - For Official Use Only
8) The user will receive an automatic email that will alert them that the account has been reactivated.
Action: Review Role Requests
Some roles added by User Managers require elevated approvals. This includes the TrAMS Recipient roles (Submitter, Official, and Attorney). No NTD roles require elevated approvals at this time. When these roles are added on the Manage Roles page, a role request is generated. The appropriate LSMs will receive an email notification with a link to the Review Role Requests action. Role requests can be reviewed by any LSM within the appropriate Cost Center. In extreme cases, GSMs can also complete the role request review. GSMs will see all active role requests for their system.
To review a role request:
1) Go to the Actions tab and click Review Role Requests.
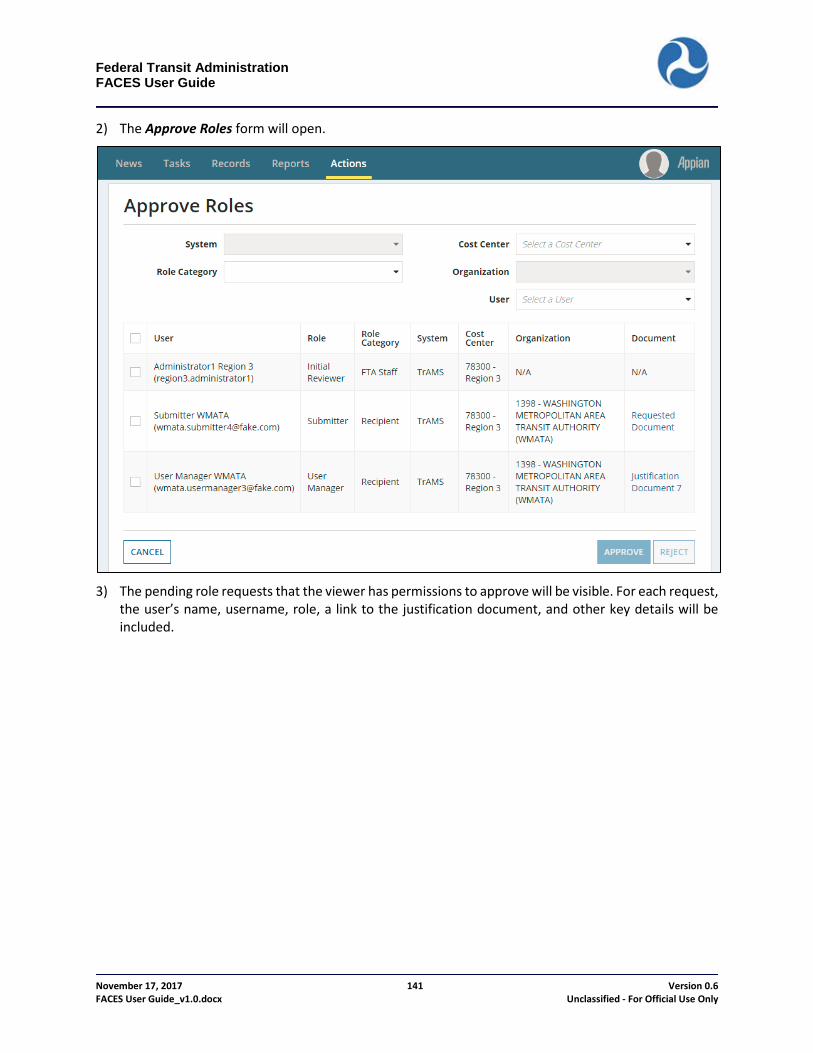
Federal Transit Administration FACES User Guide
November 17, 2017 141 Version 0.6 FACES User Guide_v1.0.docx Unclassified - For Official Use Only
2) The Approve Roles form will open.
3) The pending role requests that the viewer has permissions to approve will be visible. For each request,
the user’s name, username, role, a link to the justification document, and other key details will be included.

Federal Transit Administration FACES User Guide
November 17, 2017 142 Version 0.6 FACES User Guide_v1.0.docx Unclassified - For Official Use Only
4) To review a role request, click the checkbox next to the user’s name.
5) Additional details about the request will display beneath the table of requests. The reviewer can see
any comments made by the requestor. 6) To review the associated justification document, click the document hyperlink in the table. The
document will download.
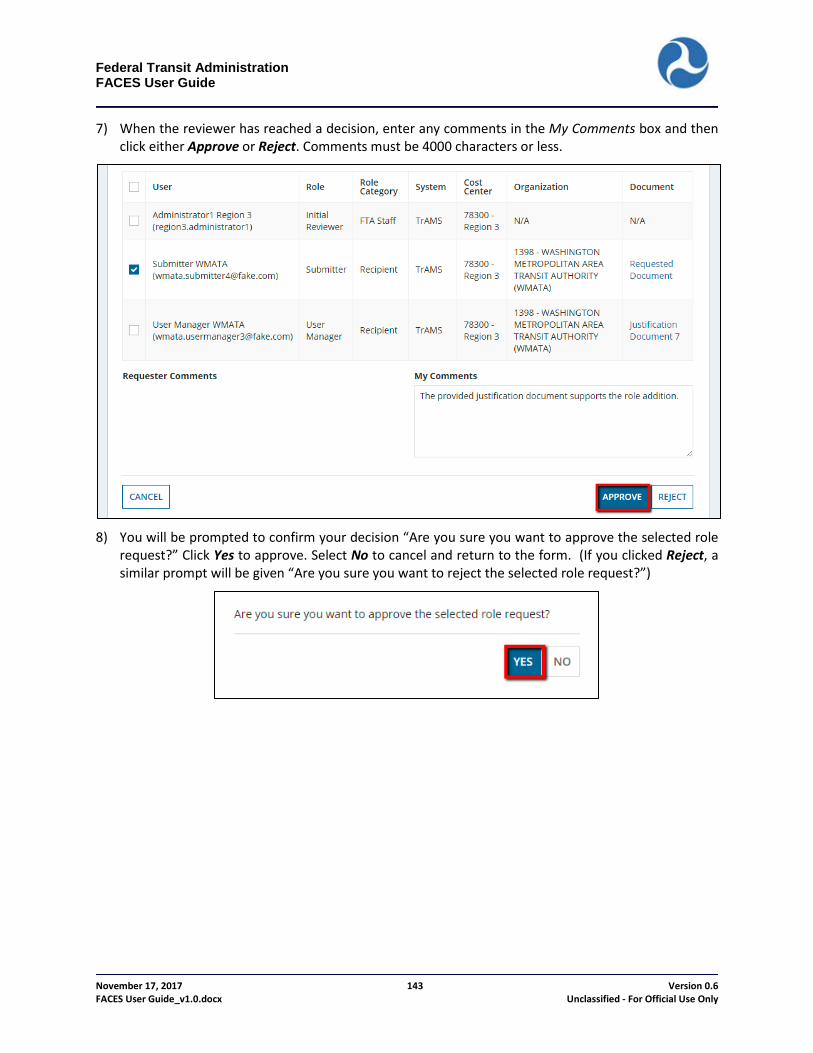
Federal Transit Administration FACES User Guide
November 17, 2017 143 Version 0.6 FACES User Guide_v1.0.docx Unclassified - For Official Use Only
7) When the reviewer has reached a decision, enter any comments in the My Comments box and then click either Approve or Reject. Comments must be 4000 characters or less.
8) You will be prompted to confirm your decision “Are you sure you want to approve the selected role
request?” Click Yes to approve. Select No to cancel and return to the form. (If you clicked Reject, a similar prompt will be given “Are you sure you want to reject the selected role request?”)

Federal Transit Administration FACES User Guide
November 17, 2017 144 Version 0.6 FACES User Guide_v1.0.docx Unclassified - For Official Use Only
9) Once a decision is submitted, the role request will disappear from the table. The User Manager and impacted user will be notified of the decision via email. If the role was approved, the role will be added to the user’s account.
Action: Review Unlock Requests
FTA is required to comply with U.S. DOT Information Technology (IT) Security guidelines. One key feature of this compliance includes automatic account locks after 60 days of user inactivity. Since the FTA systems all reside on the same software platform and use the common FACES access mechanism, this security feature applies to all software systems on the FTA platform.
FACES automatically locks user accounts if the user has not signed into their account within 60 days. The account lock prevents users from accessing any of the software systems on the FTA platform. Automated warning emails are issued to inactive users 15, 10, and 5 days prior to lockout.
Users are notified that their accounts have been locked via automated emails. Users who are locked out will still be able to log into their FACES account but their access will be severely restricted. The standard Appian tabs (News, Tasks, Records, Reports, and Actions) will contain a limited amount of data and security-related actions. For example, no tasks will be available.
Locked users can unlock their accounts via one of two methods: 1) correctly answer previously set up security questions; or 2) submit an unlock request. Both methods are available from the Actions tab. It is preferred that all users attempt to self-unlock their accounts by answering their previously setup security questions before submitting an unlock request; this is the quickest and most efficient route to unlocking an account. Once an account is unlocked, the user’s access will be fully restored.
If Security Questions were not previously set up or the answers could not be remembered, user will submit an Unlock Request by selecting Unlock Account from their Actions tab. An email for the Unlock Request is automatically routed to the appropriate User Manager.
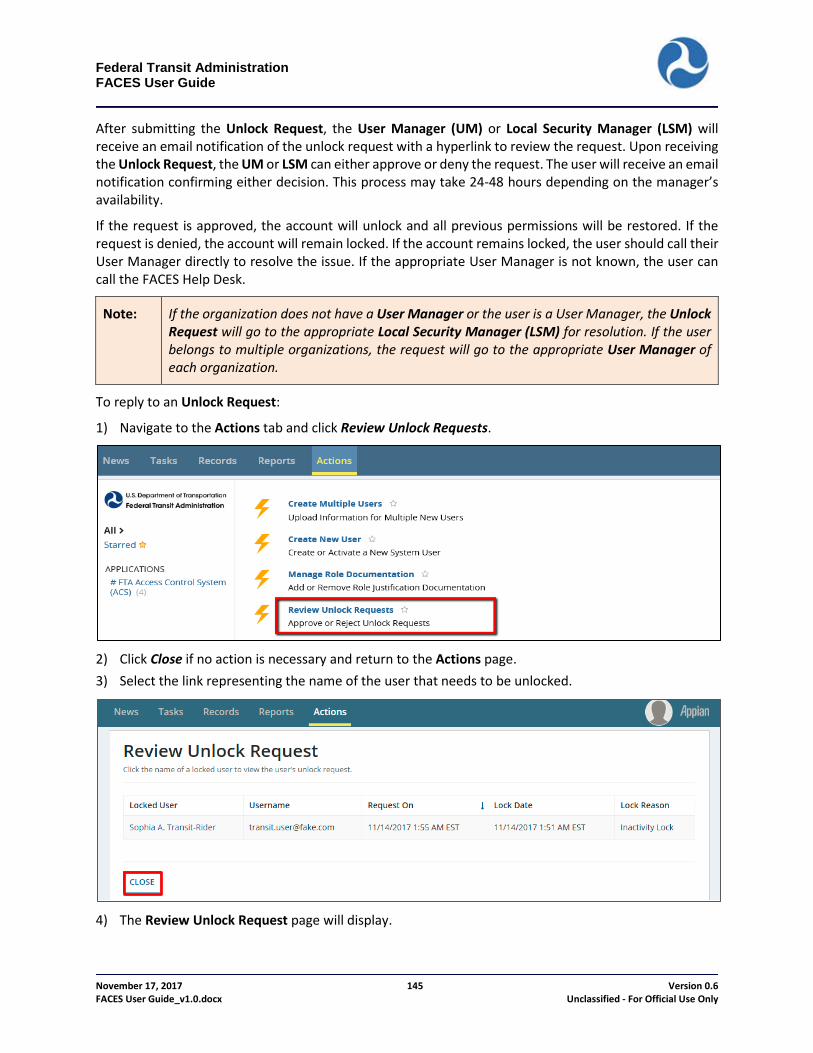
Federal Transit Administration FACES User Guide
November 17, 2017 145 Version 0.6 FACES User Guide_v1.0.docx Unclassified - For Official Use Only
After submitting the Unlock Request, the User Manager (UM) or Local Security Manager (LSM) will receive an email notification of the unlock request with a hyperlink to review the request. Upon receiving the Unlock Request, the UM or LSM can either approve or deny the request. The user will receive an email notification confirming either decision. This process may take 24-48 hours depending on the manager’s availability.
If the request is approved, the account will unlock and all previous permissions will be restored. If the request is denied, the account will remain locked. If the account remains locked, the user should call their User Manager directly to resolve the issue. If the appropriate User Manager is not known, the user can call the FACES Help Desk.
Note: If the organization does not have a User Manager or the user is a User Manager, the Unlock Request will go to the appropriate Local Security Manager (LSM) for resolution. If the user belongs to multiple organizations, the request will go to the appropriate User Manager of each organization.
To reply to an Unlock Request:
1) Navigate to the Actions tab and click Review Unlock Requests.
2) Click Close if no action is necessary and return to the Actions page. 3) Select the link representing the name of the user that needs to be unlocked.
4) The Review Unlock Request page will display.

Federal Transit Administration FACES User Guide
November 17, 2017 146 Version 0.6 FACES User Guide_v1.0.docx Unclassified - For Official Use Only
5) Validate the User Information and review the Request Comments section.
6) If no action is necessary or more information/justification is needed, select Back to return to the
Review Unlock Request page without acting on the Unlock Request. 7) Otherwise, enter any text pertinent to the unlock of this user in the Reviewer Comments window.
click Approve to approve the request and Reject to reject the unlock request.
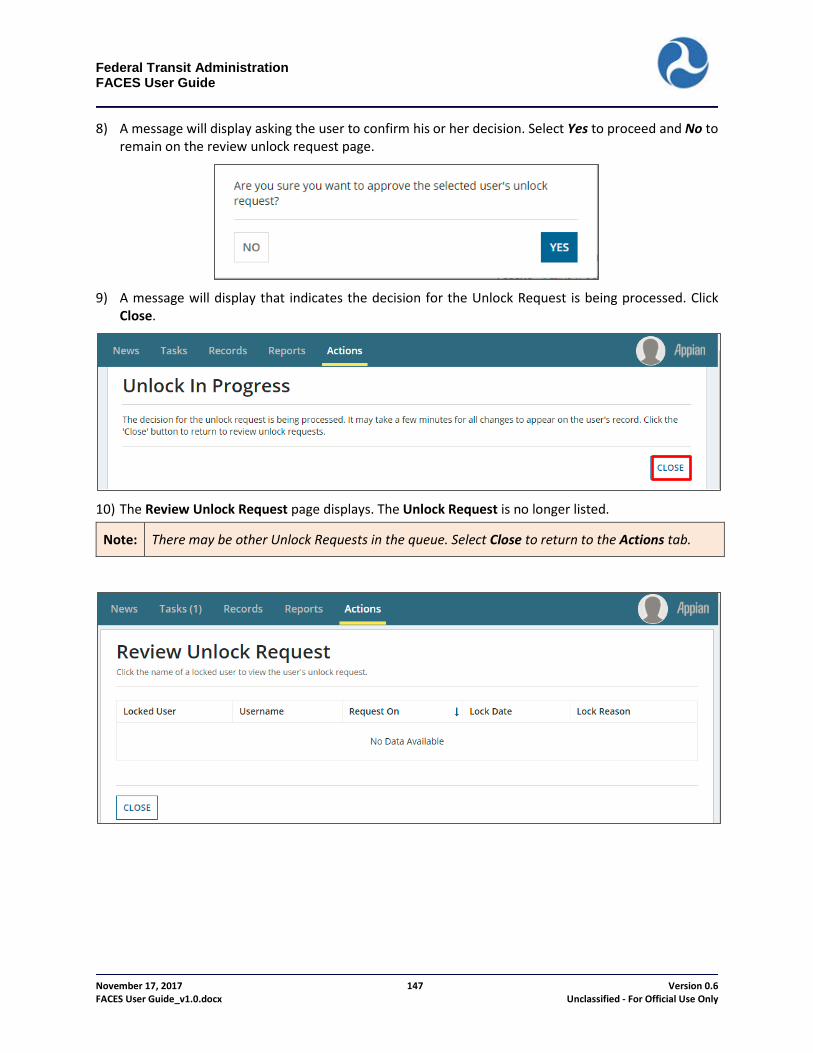
Federal Transit Administration FACES User Guide
November 17, 2017 147 Version 0.6 FACES User Guide_v1.0.docx Unclassified - For Official Use Only
8) A message will display asking the user to confirm his or her decision. Select Yes to proceed and No to remain on the review unlock request page.
9) A message will display that indicates the decision for the Unlock Request is being processed. Click
Close.
10) The Review Unlock Request page displays. The Unlock Request is no longer listed.
Note: There may be other Unlock Requests in the queue. Select Close to return to the Actions tab.
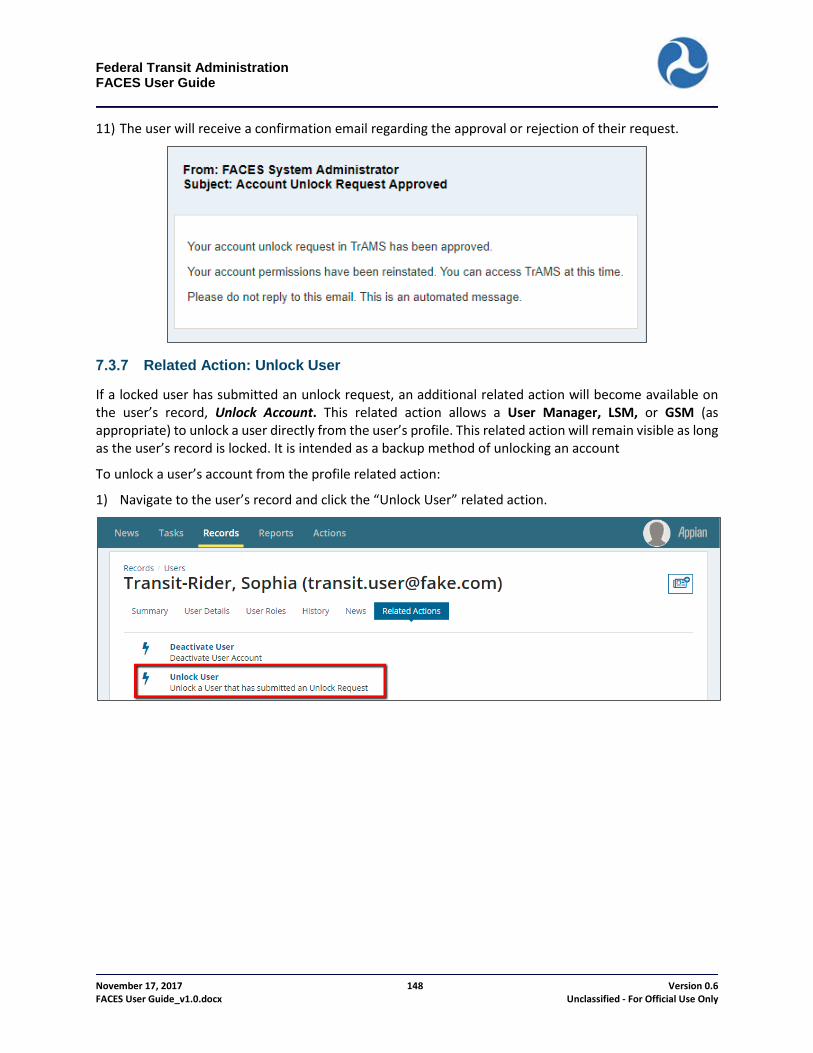
Federal Transit Administration FACES User Guide
November 17, 2017 148 Version 0.6 FACES User Guide_v1.0.docx Unclassified - For Official Use Only
11) The user will receive a confirmation email regarding the approval or rejection of their request.
Related Action: Unlock User
If a locked user has submitted an unlock request, an additional related action will become available on the user’s record, Unlock Account. This related action allows a User Manager, LSM, or GSM (as appropriate) to unlock a user directly from the user’s profile. This related action will remain visible as long as the user’s record is locked. It is intended as a backup method of unlocking an account
To unlock a user’s account from the profile related action:
1) Navigate to the user’s record and click the “Unlock User” related action.
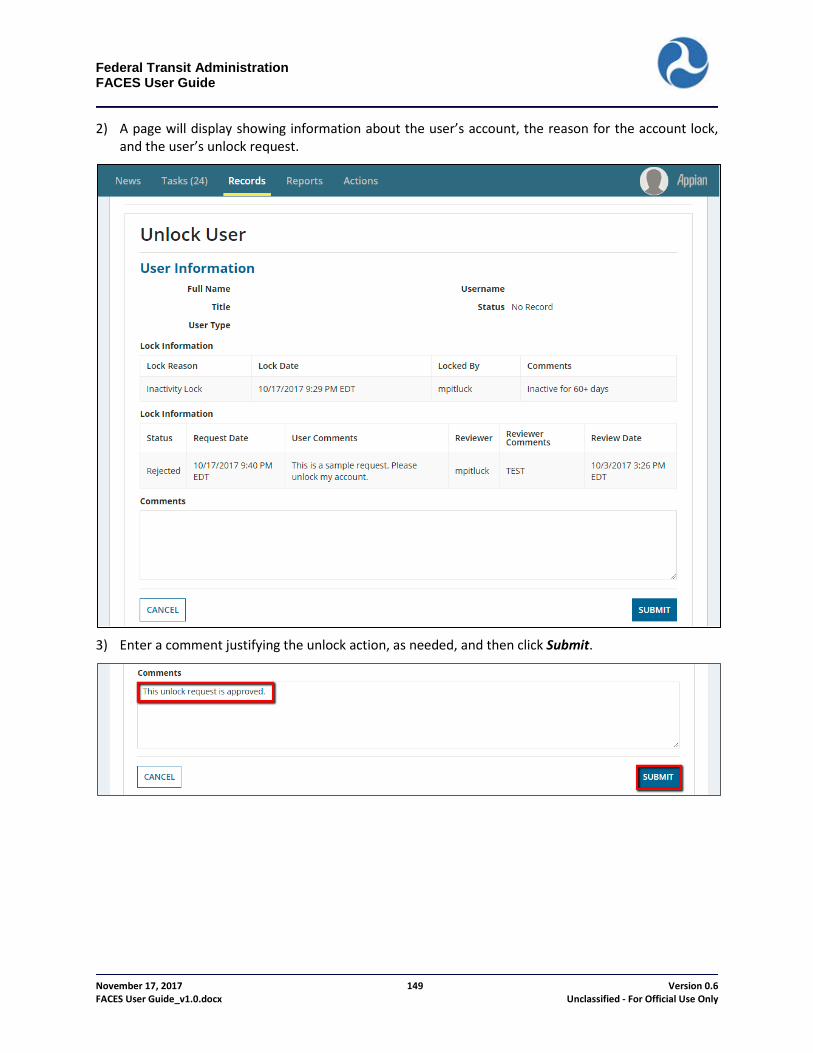
Federal Transit Administration FACES User Guide
November 17, 2017 149 Version 0.6 FACES User Guide_v1.0.docx Unclassified - For Official Use Only
2) A page will display showing information about the user’s account, the reason for the account lock, and the user’s unlock request.
3) Enter a comment justifying the unlock action, as needed, and then click Submit.

Federal Transit Administration FACES User Guide
November 17, 2017 150 Version 0.6 FACES User Guide_v1.0.docx Unclassified - For Official Use Only
8 Appendix A – Abbreviations, Acronyms, and Terms Acronym Definition
DOL Department of Labor
DOT Department of Transportation
FACES FTA Access Control and Entry System
FTA Federal Transit Administration
GSM Global Security Manager
LSM Local Security Manager
NTD National Transit Database
TrAMS Transit Award Management System
UM User Manager
URL Universal Resource Locator (i.e. web address)
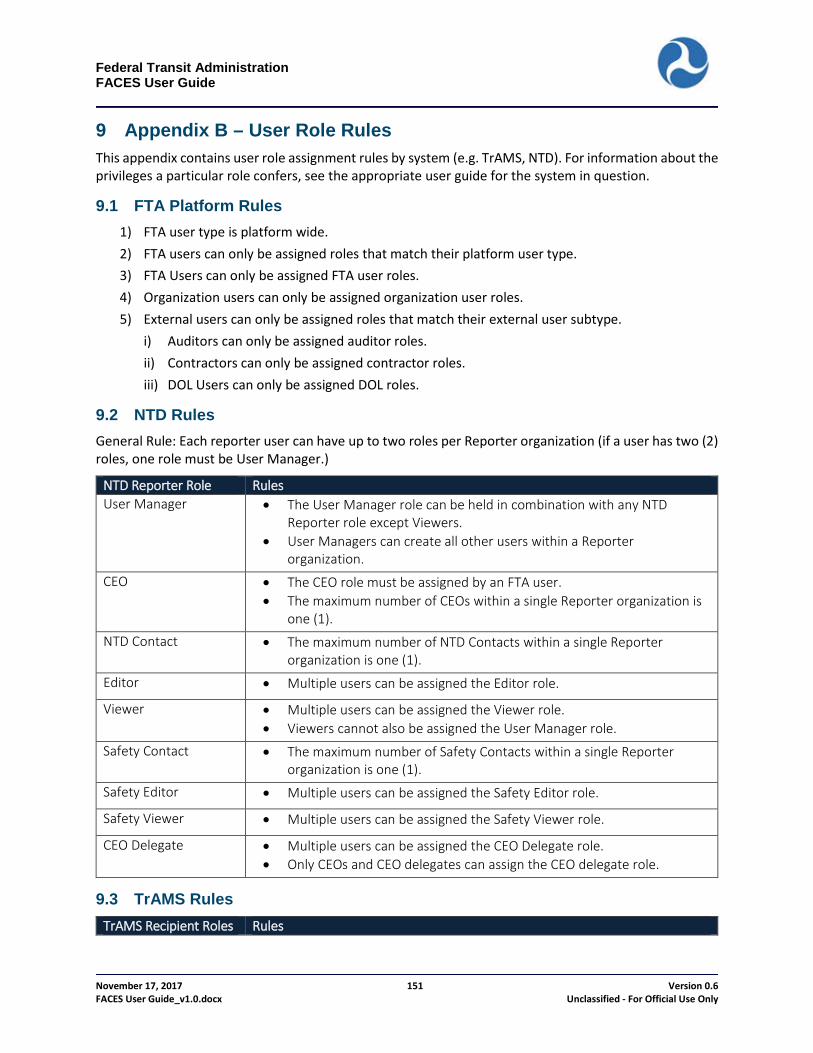
Federal Transit Administration FACES User Guide
November 17, 2017 151 Version 0.6 FACES User Guide_v1.0.docx Unclassified - For Official Use Only
9 Appendix B – User Role Rules This appendix contains user role assignment rules by system (e.g. TrAMS, NTD). For information about the privileges a particular role confers, see the appropriate user guide for the system in question.
9.1 FTA Platform Rules 1) FTA user type is platform wide. 2) FTA users can only be assigned roles that match their platform user type. 3) FTA Users can only be assigned FTA user roles. 4) Organization users can only be assigned organization user roles. 5) External users can only be assigned roles that match their external user subtype.
i) Auditors can only be assigned auditor roles. ii) Contractors can only be assigned contractor roles. iii) DOL Users can only be assigned DOL roles.
9.2 NTD Rules General Rule: Each reporter user can have up to two roles per Reporter organization (if a user has two (2) roles, one role must be User Manager.)
NTD Reporter Role Rules User Manager • The User Manager role can be held in combination with any NTD
Reporter role except Viewers. • User Managers can create all other users within a Reporter
organization.
CEO • The CEO role must be assigned by an FTA user. • The maximum number of CEOs within a single Reporter organization is
one (1).
NTD Contact • The maximum number of NTD Contacts within a single Reporter organization is one (1).
Editor • Multiple users can be assigned the Editor role.
Viewer • Multiple users can be assigned the Viewer role. • Viewers cannot also be assigned the User Manager role.
Safety Contact • The maximum number of Safety Contacts within a single Reporter organization is one (1).
Safety Editor • Multiple users can be assigned the Safety Editor role.
Safety Viewer • Multiple users can be assigned the Safety Viewer role.
CEO Delegate • Multiple users can be assigned the CEO Delegate role. • Only CEOs and CEO delegates can assign the CEO delegate role.
9.3 TrAMS Rules TrAMS Recipient Roles Rules
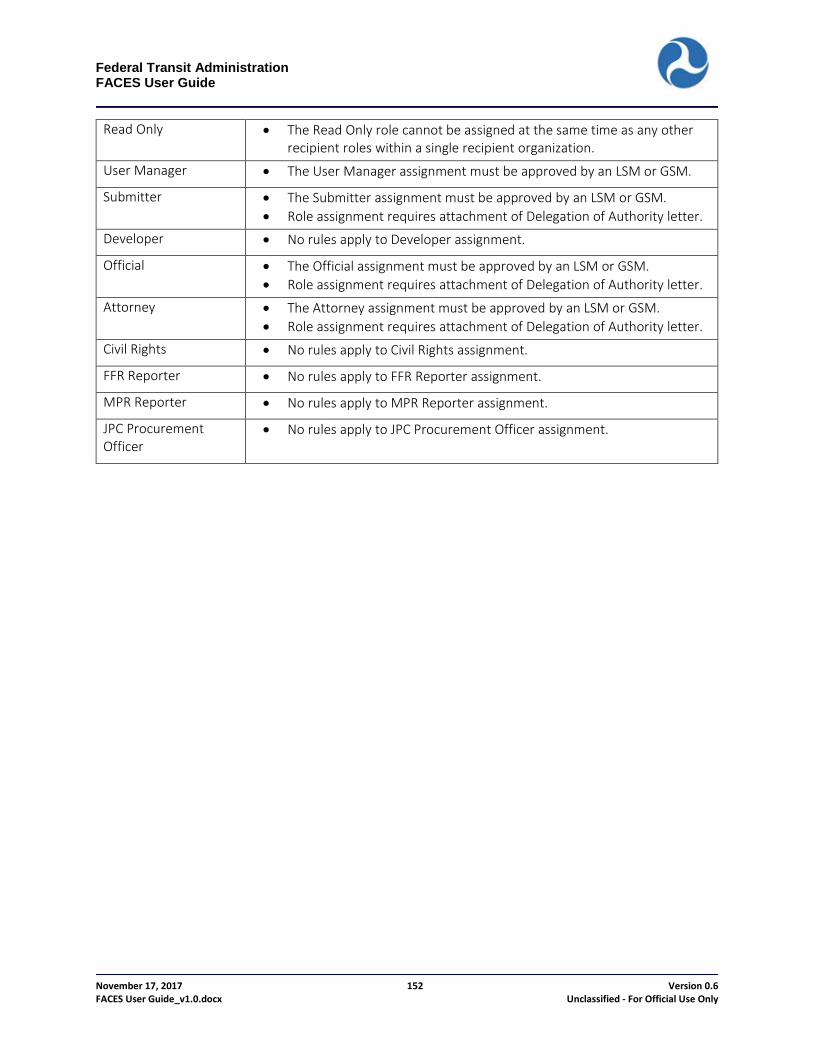
Federal Transit Administration FACES User Guide
November 17, 2017 152 Version 0.6 FACES User Guide_v1.0.docx Unclassified - For Official Use Only
Read Only • The Read Only role cannot be assigned at the same time as any other recipient roles within a single recipient organization.
User Manager • The User Manager assignment must be approved by an LSM or GSM.
Submitter • The Submitter assignment must be approved by an LSM or GSM. • Role assignment requires attachment of Delegation of Authority letter.
Developer • No rules apply to Developer assignment.
Official • The Official assignment must be approved by an LSM or GSM. • Role assignment requires attachment of Delegation of Authority letter.
Attorney • The Attorney assignment must be approved by an LSM or GSM. • Role assignment requires attachment of Delegation of Authority letter.
Civil Rights • No rules apply to Civil Rights assignment.
FFR Reporter • No rules apply to FFR Reporter assignment.
MPR Reporter • No rules apply to MPR Reporter assignment.
JPC Procurement Officer
• No rules apply to JPC Procurement Officer assignment.
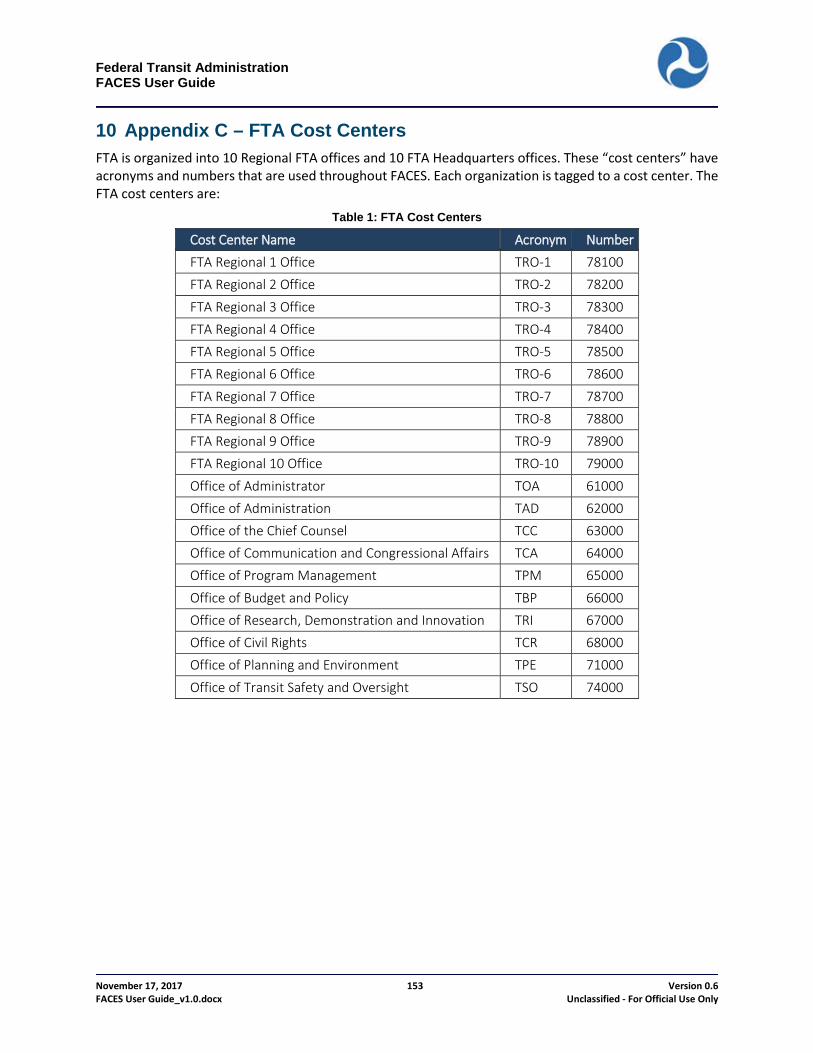
Federal Transit Administration FACES User Guide
November 17, 2017 153 Version 0.6 FACES User Guide_v1.0.docx Unclassified - For Official Use Only
10 Appendix C – FTA Cost Centers FTA is organized into 10 Regional FTA offices and 10 FTA Headquarters offices. These “cost centers” have acronyms and numbers that are used throughout FACES. Each organization is tagged to a cost center. The FTA cost centers are:
Table 1: FTA Cost Centers
Cost Center Name Acronym Number FTA Regional 1 Office TRO-1 78100 FTA Regional 2 Office TRO-2 78200
FTA Regional 3 Office TRO-3 78300 FTA Regional 4 Office TRO-4 78400 FTA Regional 5 Office TRO-5 78500 FTA Regional 6 Office TRO-6 78600
FTA Regional 7 Office TRO-7 78700 FTA Regional 8 Office TRO-8 78800 FTA Regional 9 Office TRO-9 78900 FTA Regional 10 Office TRO-10 79000
Office of Administrator TOA 61000 Office of Administration TAD 62000 Office of the Chief Counsel TCC 63000 Office of Communication and Congressional Affairs TCA 64000 Office of Program Management TPM 65000
Office of Budget and Policy TBP 66000 Office of Research, Demonstration and Innovation TRI 67000 Office of Civil Rights TCR 68000 Office of Planning and Environment TPE 71000
Office of Transit Safety and Oversight TSO 74000