Embed Size (px)
Citation preview

Exporting Repository Records with Item Records Automatically Attached into Millennium (III)
Method created by Hsiu-Ling Lin [email protected] created by Chris Haupt [email protected]
I.Overview The Oregon State Library provides MARC bibliographic records in the Repository Library. In the public mode of the Summit Catalog, there are various ways these records can be displayed. If the record in Millennium does not have an item record attached, the location of “No local information available” will display before the link information (Example 1). If an item is attached to the bib record, the link for the library will display first and then give the item information (see OIT’s record in Example 1). Example 1
Hsiu-Ling Lin, Serials Manager from OIT, has set up a quick and easy method to create items, update holdings and export the records all in OCLC Connexion. Chris Haupt, Technical Services III from OIT, created these instructions. Instead of having to attach the items one by one in Millennium (III), follow these easy steps and item records are automatically created. By inserting a 949 1 field with a string of commands in the bib record in OCLC Connexion, an item will automatically be created once the record is exported.
1

2
Below is a quick outline of the process: 1. Go to the Oregon Repository (OR Repository) website and save the MARC
records. 2. Open Connexion and import the records then go offline. 3. Apply a “constant data” that was previously created. 4. Apply an “update holdings” and “export” action. 5. Process the batch. Done!
II. OIT’s Constant Data Example to Automatically Add Items The constant data is the most important part of the process and only needs to be created once and then just applied to the batch.
The following is an example of a constant data used to create one item record attached to an e-only OR Repository bib record for OIT. Creating item records while in OCLC is very simple. Each item to be added to a single record is created using a separate 949 1 tag. If one has a single item, add one 949 1. If one has ten items, add ten 949 1 tags.
Complete instruction for creating a constant data can be found in Appendix A. A complete list of 949 1 subfield codes and their definitions can be found in Appendix B. Detailed explanations of 949 Codes for OIT can be found in Appendix C. Oregon Repository (electronic only) –OIT example with local codes: 049 OITS (OIT’s local holding code for Or-Docs)
949 *recs=b;b3=-; (bib overlay and unsupression) 949 1 ǂl mloon; ǂs e; ǂt 23; ǂr O; ǂa Internet (creates an
item, note the 1 is placed in the second indicator position)

III. Detailed Instructions
A. Oregon State Web Site.
1. Go to the Oregon Documents Repository web page: http://oregon.gov/OSL/GRES/REPOS/index.shtml .
2. Click on MARC records. 3. Click on the file to download. 4. Right click on the e-only file (Example 2). 5. Click on Save Target As… in the new window. Example 2
3

6. Save as a Text Document not a MARC document. This is a very important step, if in the “Save as type” box, “Text Document” does not show, one must type .txt after the file name (e.g. File Name e_only_05.mrc.txt). Save this file in any folder. OIT has a folder named “Repository” (Example 3).
7. Close the window. Example 3
4

B. OCLC Connexion
1. Open OCLC Connexion, move cursor to File—Log On. 2. Click on File—Import Records. 3. One must click on Browse to find the file to import (this is the text document
saved in Example 3). 4. Import to Local Save File should be marked (Example 4). 5. Notice the Bibliographic section. If a Local Save File was previously created
and appears in this section, click on OK. If another file is to be used, find and replace the file shown or create a new file. To create a new file click on the Local File Manager button. Instructions for creating a new Local File are in Appendix E.
6. Click Yes, when asked to delete the original import file. This may not appear until importing another file of Repository records.
7. Click on File—Log Off on the toolbar. Example 4
5

8. Click on Cataloging—Search—Local Save File (Example 5). 9. Select the file into which the records were imported. 10. Click OK.
Example 5
6
At this point highlight all the records, apply the correct Constant Data, Update Holdings, and Export. [Before these steps can be done the Constant Data must be created. This only needs to be done once (see Appendix A)]. The following steps are a continuation from number (10.) assuming the Constant Data has previously been created.
11. Highlight all of the records. 12. Click on Edit—Constant Data—Local—Apply from list—OK.
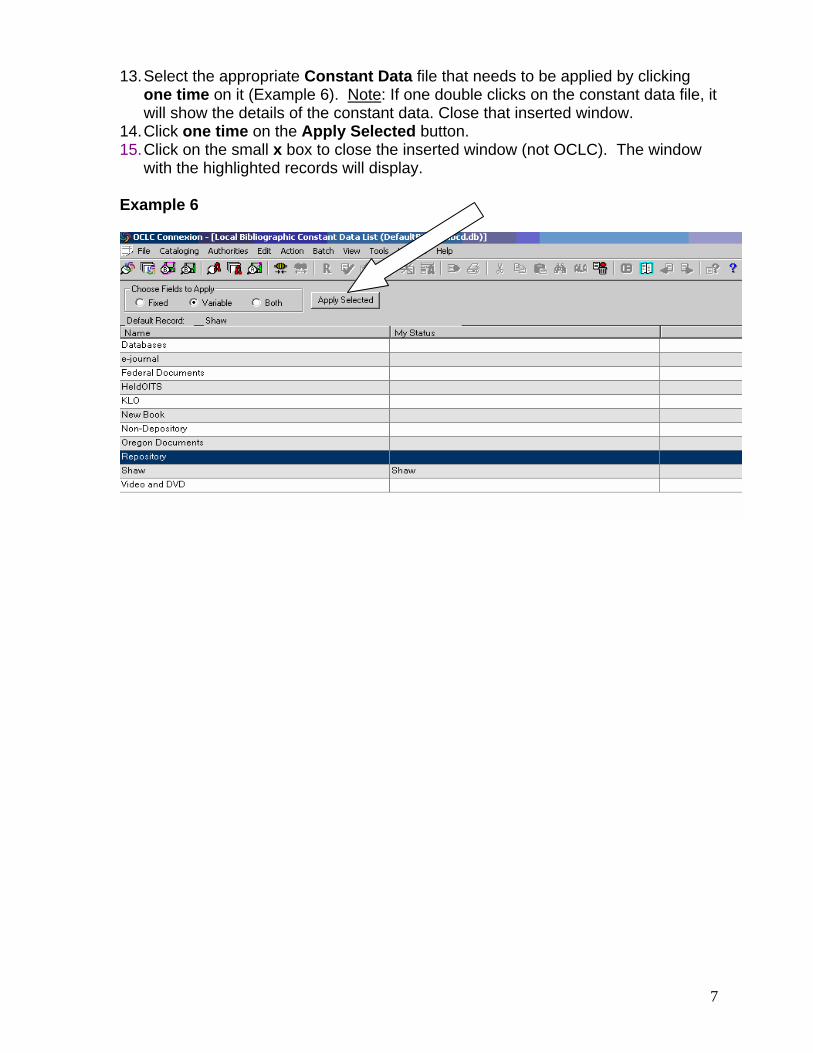
13. Select the appropriate Constant Data file that needs to be applied by clicking one time on it (Example 6). Note: If one double clicks on the constant data file, it will show the details of the constant data. Close that inserted window.
14. Click one time on the Apply Selected button. 15. Click on the small x box to close the inserted window (not OCLC). The window
with the highlighted records will display. Example 6
7

16. With the records still highlighted click Action—Update Holdings. 17. Click the Action—Export (Example 7).
8
Example 7

The records are now ready to be exported into Millennium (III).
18. Click on Batch—process Batch (Example 8). 19. Click on the file used to import the records. 20. Click the Online Record Actions and Exports boxes. 21. Click OK.
9
Example 8
As the titles are exported there is a button that reads Cancel then immediately changes to Close. Click on the Close button as it pops up. Do not click on it before it reads “Close” or the record will not be exported. Click on the Close button for as many records that are exported. Two Batch Process Reports will automatically display in a new window. To close these windows, click on the small x in the inserted window. These reports will show how many records were exported and how many holdings were updated. DONE!!

Appendix A. Creating a Constant Data in OCLC Connexion
A. Multiple Constant Data files may be created to apply to records such as a repository
constant data, a non-depository constant data, and so forth. Below are the steps for creating the OIT “Repository” constant data using OIT’s local codes (i-type, location, etc.). 1. Click on Cataloging—Create—Constant Data (Example 9). 2. Select Book under Workform Type. 3. Click on OK.
Example 9
10

4. Create 3 new MARC tags by typing over the first 3 fields (Example 10). Note: The 1 in the 949 1 is in the second indicator position. 049 OITS (OIT’s local holding code for Or-Docs) 949 *recs=b;b3-; (bib overlay and unsupression) 949 1 ǂl mloon; ǂs e; ǂt 23; ǂr O; ǂa Internet (creates an item) 5. Delete the rest of the MARC tags. To delete a field click on the tag and hold
down ALT + delete.
Example 10
11

12
6. Click on the x box to close the inserted window (not OCLC) and click Yes. 7. Name the constant data and leave the status blank. Click OK. 8. Done! Now, apply the constant data created to the e-only Repository records
(Complete instructions for applying a constant data can be found on page 6, number 11).
See Appendix C for 949 Code Translations for OIT.
Appendix B. Complete list of 949 1 Subfield Codes
949 1 Subfield Codes
ǂa, ǂb Item level call no.
ǂc Free text volume/part info.
ǂd, ǂe Repeatable volume/part info.
ǂg Copy number
ǂi Barcode
ǂk Call number post-stamp
ǂl Location
ǂn Note
ǂp Price
ǂq icode1
ǂr icode2
ǂs status
ǂt item type
ǂu Item message
ǂz MARC tag for call no. Cataloging Department University Libraries @ the University of Akron http://www3.uakron.edu/ul/depts/cataloging/marc949.html

13
Appendix C. 949 Code Translations for OIT: Tag: 949 = bib record 949 *recs=b;b3-; First Indicator: Blank Second Indicator: Blank Fields are separated by a semicolon. The field must begin with an asterisk and end with a semicolon. *recs = b (overlays existing bib if one exists in III) b3 = - (unsuppresses the bib record) Tag: 949 1 item record (1 is in the second indicator position) 949 1 ǂl mloon; ǂs e; ǂt 23; ǂr O; ǂa Internet First Indicator: Blank Second Indicator: 1 ǂ = Use a CTRL d to type a delimiter. Subfield l = local institutions’ location code mloon = OIT location code Subfield s = status e = Avail Online Subfield t = i-type 23 = Non-Circulating Subfield r = icode2 O = OR State Document Subfield a = call no. Internet = Call no. A complete list of 949 1 subfield codes can be found in Appendix B. More examples of creating Item records using the 949 1 tag for different collections can be found in Appendix D.

14
Appendix D. Constant Data Examples and Information
• After applying a constant data that requires a price and/or a barcode one must open each bib record and insert the information after the appropriate subfield code. (949 1ǂl slstk; ǂp $50.00 ;ǂs o; ǂt 0; ǂr -;ǂi 3 5114 00160 206 7)
• When adding a ǂi (barcode) to the constant data string one must add numbers such as 123 after the ǂi, to prevent the ǂi from disappearing after the application of the constant data. For example: delete the 123 before scanning the barcode.
• If it is desired to create more than one item record for a single bib record, each item to be added to a single record is created using a separate 949 1 tag. If there is a single item, add one 949 1. If there are ten items, add ten 949 1 tags (see example of multiple copies of Shaw Library Books Purchased).
Multiple copies of Shaw Library Books Purchased 049 OITF 949 *recs=b;b3=-; 949 1 ǂl slstk; ǂp ;ǂs o; ǂt 0; ǂr -;ǂi 123 949 1 ǂl slstk; ǂp ;ǂs o; ǂt 0; ǂr -;ǂg 2;ǂi 123 (insert price & scan barcode after applied) Multiple volumes of Shaw Library Books Purchased 049 OITF 949 *recs=b;b3=-; 949 1 ǂl slstk; ǂp ;ǂs o; ǂt 0; ǂr -;ǂd v.1;ǂi 123 949 1 ǂl slstk; ǂp ;ǂs o; ǂt 0; ǂr -;ǂd v.2;ǂi 123 949 1 ǂl slstk; ǂp ;ǂs o; ǂt 0; ǂr -;ǂd v.3;ǂi 123 (insert price & scan barcode after applied) Oregon Non-Depository (electronic only) 049 OITS 949 *recs=b;b3=-; 949 1 ǂl mloon; ǂs e; ǂt 23; ǂr x; ǂa Internet

Appendix E. Creating a New Local File While Importing Records.
1. Click on the Local File Manager button (Example 12). Example 12
2. Click on the Create File button (Example 13) Example 13
15

3. Name the file and click Open (Example 14).
Example 14
4. Select the File created by double clicking on it (Example 15 & 16). 5. Click on the Close button.
Example 15
16
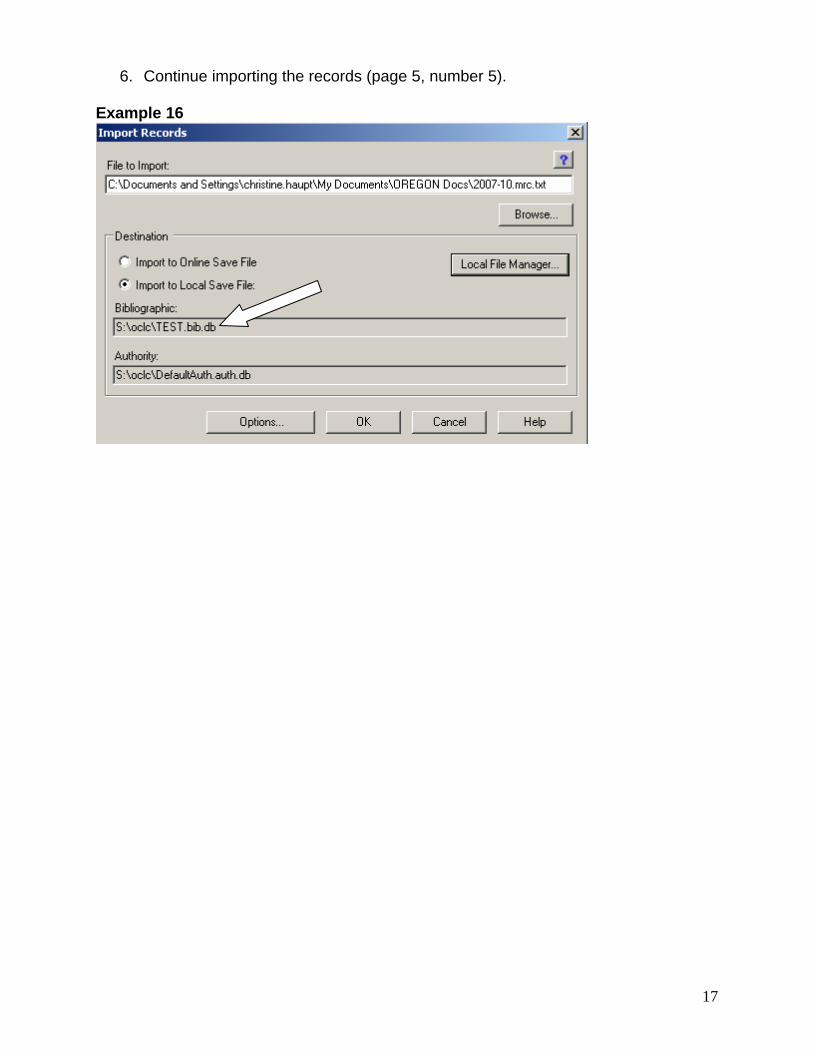
6. Continue importing the records (page 5, number 5). Example 16
17