Embed Size (px)
Citation preview
1
EXPOBAR
BREWTUS IV Supplemental Instructions for all Expobar Brewtus IV machines
Rotary Pump (IV-R), Vibration Pump(IV), Plumbable Vibration Pump (IV-P)
www.wholelattelove.com
888.411.5282

2
Congratulations on the purchase of your new Brewtus IV. The Expobar Brewtus is a
very unique machine that is designed to provide you with the ultimate in brewing
temperature control and, therefore, the best coffee extraction.
Please read both the manufacturer’s instructions as well as these supplemental
instructions thoroughly before you start brewing.
Note: Do not plug in the machine or perform any other start-up procedures until
you’ve read the instructions.
Both boilers must be primed upon start up or the heating element in the brew boiler
may be damaged. Upon startup, make sure the brew-group lever is raised to the up
position until water comes out of the brew group. The steam boiler will fill on its own
using the machine’s controls.
Index
1. Unpacking the Machine
2. Controls and Programming
3. Water and Drain Line Connections
4. Incoming Water Pressure
5. Brew Pressure Adjustments
6. Accessories
7. Initial Start-Up Instructions
8. Water Softener Instructions
9. Coffee Preparation
10. Advanced Brewing and Operational Techniques
11. Steaming and Frothing
12. Dispensing Hot Water
13. Cleaning the Brewing Components
14. Cleaning the Housing
15. Trouble Shooting Guide
16. Recipes
17. Coffee Education
18. Cautions

3
1. Unpacking the machine.
The Brewtus IV is a very heavy machine (over 60lbs), so please use caution when
unpacking the unit. To remove the Brewtus, turn the box upside down, open the bottom
four flaps, then turn the box right-side-up and lift the box straight up. Then, lay the
machine down on its side and remove the top layer of foam. Carefully remove the
machine from the bottom layer of foam. It is easier to have a second person helping you
with the removal process, as the machine is heavy and the bottom layer of foam may
stick to the machine.
2. Controls and Programming
Control Lever
Main Power Switch
PID Control Panel
Steam Boiler Light
Hot-Water Knob
Hot Water Wand
Steam Boiler
Pressure Gauge
No-Burn Steam Wand
Steam Boiler On/Off
Switch
E61 Brew Group
Cup Warmer and Reservoir Access for
Brewtus Models Equipped with a
Water Reservoir.
Removable Drip
Tray
Portafilter handle
Brew Pressure
Gauge
Steam Knob

4
Control Lever
The lever on the front of the machine controls a valve inside of the brew group and it
also controls the pump for brewing. The lever has three positions: raised, mid-level
and lowered.
1. Raised: When in the up position, the pump turns on for brewing and the valve
inside the brew group opens and allows water to flow over the coffee.
2. Mid-Level: This position is only used for coffee pre-infusion. Do not leave the
lever in the middle position when the machine is not in use or idle. When the
lever is in the middle position, the pump is off but the pressure in the brew
group has not been released, so do not remove the portafilter.
3. Lowered: When the lever is lowered, the pump is off and any water pressure
left on the coffee is released and deposited into the drip tray through the tube
at the bottom of the brew group. Always set the lever to the down position
before removing the portafilter from the brew group.
Main Power Switch
The main power switch is located on the top left side of the front of the machine.
When turned on, the Brewtus will automatically start heating up and the water level
control system will ensure that the steam boiler is full of water. Note: When the main
power switch is turned on, the pump may activate for a few seconds, even if the steam
boiler is full.
Steam Boiler Switch
When in the OFF position, the steam boiler will be inactive. Only the brew boiler will
heat up. This will allow for a quicker warm up for when you only want to brew.
Steam Boiler Light
This light goes on whenever the heating element in the steam boiler is on. It is
perfectly normal for this light to go on and off with or without any discernable pattern
when the machine is in use.
Steam Pressure Gauge
This pressure gauge shows the pressure inside the steam boiler. The pressure comes
set from the factory at 1.3 to 1.4 Bars. This is the proper boiler pressure and there
should be no need to make any adjustments. The needle on the pressure gauge will go
down during steaming and quickly rise up as the steam boiler heating element is
activated.
Brew Pressure Gauge
This pressure gauge displays the current brew pressure.

5
Steam Knob (Left Side of Machine)
When this knob is turned counter clockwise, the steam valve is opened and high-
pressure steam will be dispensed through the steam wand.
Hot Water Knob (Right Side of Machine)
When this knob is turned counter clockwise, hot water and some steam will be
dispensed through the hot water wand. Note: Exercise caution when using this
function; boiling water exiting from the hot water wand can cause severe burns.
Steam Wand
Use this wand for frothing and steaming your milk. The no-burn wand has been
insulated to remain cool to the touch.
E61 Brew Group
The brew group will become very hot. Always use caution while working with the
machine.
Optional Bottomless Portafilter with a triple shot basket.
(Not included with machine)

6
Control Panel with PID Temperature Control
The PID controller was designed and programmed exclusively
for the Expobar Brewtus. Fahrenheit temperatures are
adjustable in one-degree increments.
The PID control displays the brewing temperature and can be used to adjust brew-boiler
temperature. It does not affect the steam boiler, which is controlled by a pressure stat.
Display functions:
1. Upon startup, the digital display will show the current brew boiler
temperature, minus an offset factor.
2. The small LED light will blink, as it sends power to the brew boiler.
Note: The steam boiler heats up first, which will take about 8 to 10 minutes.
Afterwards, the brew boiler will turn on. Both boilers will not operate at the same
time.
Changing the Brewing Boiler Temperature
1. Push and release the “Down Arrow” (left button), the display will show
“PRG.”
2. Push the “Up Arrow” and release. Then, press the UP and DOWN arrows to
set to your desired temperature. It may take up to 5 or 10 minutes before the
new temperature is achieved.
To Turn off the Brew Boiler (the only reason to do this is if you just want to steam milk
or dispense hot water without brewing)
Press the UP arrow for 2 seconds; the display will show “Off.” To turn the brew boiler
back on, push and hold the UP arrow for 3 seconds.
Steam boiler adjustments: We do not recommend making any adjustments to the
steam-boiler pressure. It is set to cycle between 1.2 and 1.4 Bars.
Down Arrow for Temperature Control Adjustment
Boiler Temperature Display
Up Arrow for Temperature Control
Boiler Operation Light

7
3. Water and Drain Line Connections
Water Line Connections for Brewtus-IV Models Equipped with a Rotary pump or
Vibration Pump with Plumb Kit
The water line supplied with the machine is 3/8” braided stainless steel line that measures
52.” It will include a 3/8” flair fitting. Depending on your water quality, you may want a
good water filter to condition your water, which will help with machine longevity. The
taste of the coffee is affected by your water. If you like your water it, may not be
necessary to have a taste and odour filter.
Drain Line Connection (On Brewtus-IV with Drain Line)
The drain line measures 57” long from the drain pan. It has an inside diameter of 3/4”
and an outside diameter of 7/8”. You will want to have an open drain line stand pipe
for it to drop into. The end of the drain line should not be below the surface of the
water in the stand pipe or it may back up. The drain pan supplied does not have a hole
it because many customers do not want to hook up the drain line. If you hook up a
drain line, drill a 1/4” hole in the center of the drain pan.
Water line Adapter: The machine comes equipped with a braided stainless steel water line. Included is a brass
adapter that has a 3/8” male flair fitting. You will need to use a 3/8” female flair fitting to
hook up to it.
8
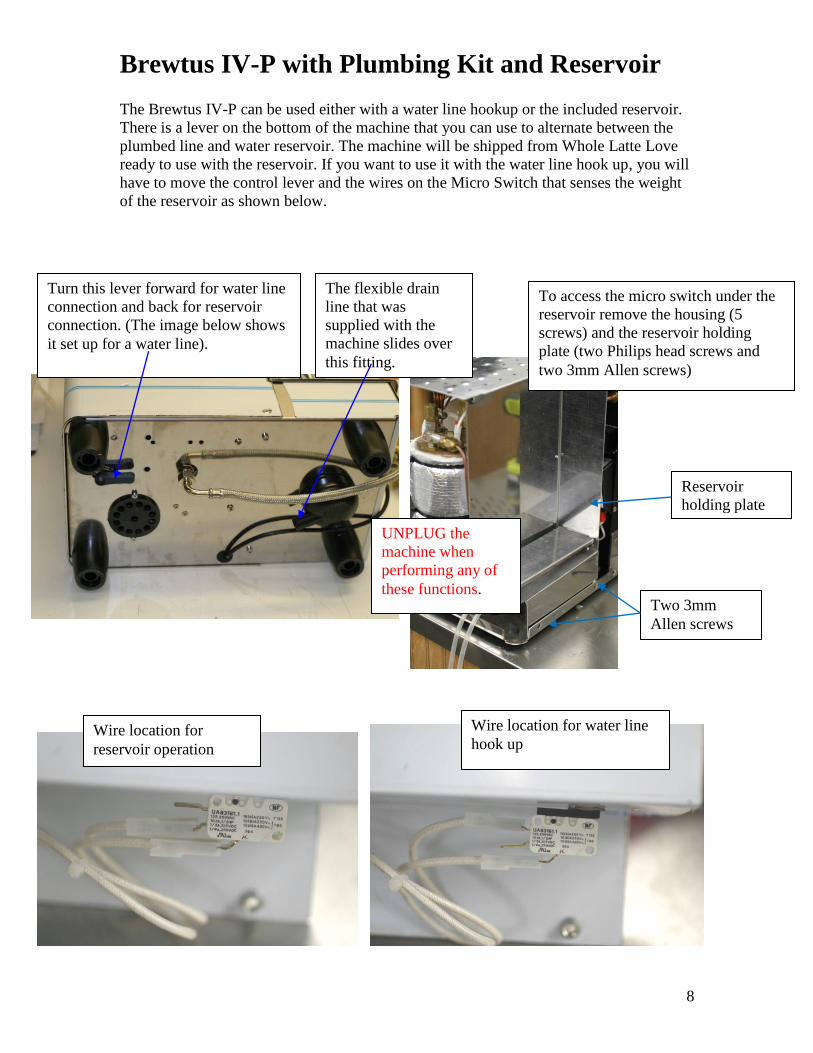
Brewtus IV-P with Plumbing Kit and Reservoir The Brewtus IV-P can be used either with a water line hookup or the included reservoir.
There is a lever on the bottom of the machine that you can use to alternate between the
plumbed line and water reservoir. The machine will be shipped from Whole Latte Love
ready to use with the reservoir. If you want to use it with the water line hook up, you will
have to move the control lever and the wires on the Micro Switch that senses the weight
of the reservoir as shown below.
Turn this lever forward for water line
connection and back for reservoir
connection. (The image below shows
it set up for a water line).
The flexible drain
line that was
supplied with the
machine slides over
this fitting.
To access the micro switch under the
reservoir remove the housing (5
screws) and the reservoir holding
plate (two Philips head screws and
two 3mm Allen screws)
UNPLUG the
machine when
performing any of
these functions.
Wire location for
reservoir operation
Wire location for water line
hook up
Two 3mm
Allen screws
Reservoir
holding plate

9
4. Incoming Water Pressure
Rotary Pump Machines The Brewtus IV-R is designed to be used with a water line connection. The pump will
work fine off any standard incoming water pressure. The water line can be dropped into a
water container, if you like, but you must be careful not to let it run dry as it could
damage the pump. Before we ship the machines, we set the brew pressure to 9 Bars at an
incoming pressure of 40 PISG. If the incoming pressure is higher than 40 PSIG, the brew
pressure may have to be adjusted down; if it is lower, the pressure may have to be
adjusted up.
Note: When using the water line connection, we highly recommend that you also hook up
a drain line.
Vibration Pump Machines: When using a vibration pump machine with a water line connection, we recommend
installing a pressure reducer. The machines will run on incoming water pressure from 5
PSI to 50 PSI. The incoming water pressure will have an effect on the brew pressure. We
set the brewing pressure to be at 9 Bars. To do this, we set the OPV to maintain 10 Bar of
pressure when the backflush disc in place. If you have higher incoming water pressure
you, may have to adjust the brew pressure down. See below for instructions. Also the
higher the incoming water pressure the more water will be diverted into the drip tray via
the brew pressure control (OPV) valve. The higher the incoming water pressure, the more
you will have to empty the drip tray if you are not using the drain line connection. When
using the water line connection, we highly recommend that you also hook a drain line to
guard against the drip tray overflowing.
5. Brew Pressure Adjustments
Your Brewtus IV has been tested and adjusted. The following instructions are here for
your information and only should be performed by qualified individuals.
Rotary Pump
CAUTION: Adjusting the pump pressure can be time consuming and since it is very
close to the electrical connection on the boiler, we recommend that all adjustment are
done when the machine is not plugged in.
Note: We recommend that the Rotary pump be set to 9 Bars with the back flush disc
in place. The OPV should be set to open at 11 Bars.
Adjusting the Pump Pressure: Adjust the pump pressure by loosening the lock nut then
turning the adjustment screw. Turn the adjustment screw clockwise to raise the pressure
and counter clockwise to lower the pressure.

10
Setting the OPV: We set this before your machine has shipped. To set the OPV, you
will have to run the machine with the backflush disc in place. First, raise the brew
pressure to 11 Bars. Then, with the pump running, turn the adjustment screw on the OPV
so that it just starts to let water flow out of the overflow tube. It is now set to open at 11
Bars.
Setting the Brew Pressure: Turn the adjustment screw counter clockwise to lower the
pressure and clockwise to raise it. Between adjustments, lower the lever on the brew
group to release the pressure. Make your adjustment with the machine unplugged and
then plug it in and test your setting. When you have the pressure adjusted, tighten the
lock while holding the adjustment screw in place or it may turn and change the setting.
View of Rotary Pump
OPV (Over Pressure Valve)
Adjustment Screw

11
Vibration Pump Machines
Note: Set the brew pressure when the machine is cold to prevent
accidental burns.
We set up the pump to obtain a brew pressure of 9 Bars, with a flow of
approximately 2 ounces in 25 seconds. To set the brew pressure, insert a
backflush disc into the portafilter and place it into the brew group. Then,
raise the lever on the brew group to turn on the pump. You can now adjust
the OPV to obtain 10 Bars on the gauge. Turn the adjustment screw
clockwise to raise the pressure and counter clockwise to lower the pressure.
The OPV is located through the ½” hole, behind the drip tray. Make sure
you put the drip tray back in place before you lower the lever on the brew
group or water will blow out onto your counter.
See Image below on the next page
Adjustment Screw
Lock Nut

12
6. Accessories
The following accessories are included with the machine:
A double-spout portafilter
A single-shot filter basket
A double-shot filter basket
Tamper
Rubber back flush disc
Coffee scoop
Look in the hole and locate the brass
adjustment screw before you insert the
screw driver.

13
Initial Start-Up Instructions for machines that use
a water reservoir. For machines connected to a water line, see the next
page.
After the machine has been removed from the packaging, place it on a level surface.
1. Remove the white protective covering from the all parts of the
machine.
2. Remove the reservoir from the top of the machine and rinse it out. Fill
the reservoir with water and place it back into the machine. Make sure
both rubber tubes are placed back into the reservoir. (Vibration pump
machines with water line options will not have the second tube)
3. NOTE: Do not use water that has had all of the minerals
removed. Minerals are necessary for the sensors in the boiler to
work properly. Notice that the water inlet line has a water softener
on it. Make sure that it fills with water and is not floating. 4. Plug the machine into a wall socket that matches the three-pronged
plug on the machine. It is important that the machine is grounded. If
you have any questions, please call Whole Latte Love at 888-411-5282
and ask to talk to a representative in our technical department.
5. Turn on the main power switch and move the brew-group lever to the
UP position. The pump will go on and fill both the steam boiler and
the brew boiler. Leave the lever in the UP position until there is a
steady stream of water coming out of the brew group. Move the lever
to the DOWN position and let them machine heat up. Always leave the
empty portafilter in the brew group so that it will be hot when you’re
ready to brew.
Note: When the water in the reservoir gets low, the machine will turn
itself off.
It will take around 18 minutes for both the brew boiler and steam boiler to reach
operating temperatures. Please see the brewing tips section for information on how to
get the best results out of your new Brewtus IV.
Initial Start-Up Instructions Brewtus IV-R
After the machine has been removed from the packaging, place it on a level surface.
1. Remove the white protective covering from the all parts of the machine.
2. Attach the water line from the machine to your water line connection and turn on
the water supply to the machine. Run the line from the bottom of the machine to
your drain line.
3. Plug the machine into a wall socket that matches the three-pronged plug on the
machine. It is important that the machine is grounded. If you have any questions
regarding this please give Whole Latte Love a call at 888-411-5282 and ask to
talk to a representative in our technical department.

14
4. Turn on the main power switch and move the brew group lever to the UP position.
The pump will go on and fill both the steam boiler and the brew boiler. Leave the
lever in the UP position until there is a steady stream of water coming out of the
brew group. If the pump runs for more than 1 minute and water does not come out
of the brew group, please turn off the machine and call Whole Latte Love
Technical Support.
5. Move the lever to the DOWN position and let them machine heat up.
6. Always leave the empty portafilter in the brew group so that it will be hot when
you’re ready to brew.
Note: It will take around 18 minutes for both the brew boiler and steam boiler to
reach operating temperatures. Please see the brewing tips section for information on
how to get the best results out of your new Brewtus IV.
8. Water Softener Instructions (Brewtus IV
Machines with Reservoir Only)
The Brewtus IV comes with a water softener that will help keep damaging minerals out
of the boilers. There is nothing that has to be done at initial start up stage to get the water
softener ready for use.
See the chart below for recommendation how to recharge the water softener. Use the
following recharging instructions:
Water softener filter Water reservoir
a) Fill a container with water (same amount as the reservoir)
b) Add 3 tablespoons of salt to the water container.
c) Stir the salt into the water.
d) Insert the water softener filter inside the reservoir.
e) Drain the water from the reservoir through the water softener filter.
To drain the water from the reservoir:
Place the plastic tube as it is indicated.
Suck in the tube until it fills with water.
Press your finger over the inlet from the tube.
With your finger over the tube, place the inlet from the tube downwards
(as indicated). Wait until the reservoir is completely empty.
Once the water reservoir is empty, fill it again with water (do not add salt) and
repeat the process in order to clean the water softener filter.

15
Plastic tube
Drain the water from the tank
this way
Water tank filled with salty water
Water softener filter
Salty water outlet
Litres of softened water, depending on its harness (In French Degrees °TH)
Salt
Water
Hardness
20 30 40 60
80
Grams
Maximum
Volume of water
softened by filter
11 9 8 7 5 300

16
9. Coffee Preparation
What is crema? Crema is creamy foam that is on top of your espresso and is the essence of what espresso
is all about. The crema houses the multitude of aromas and flavors that are extracted from
the beans. The color will vary with the beans that are used and can range from a medium
golden brown to a dark golden brown
Golden Rule The Golden Rule is a simple formula that if you read it, understand it and follow it you
will be brewing commercial quality espresso in no time.
A double shot of espresso should equal 2 to 2.5 fluid ounces, have approximately 14
grams of ground coffee in the filter basket, and take approximately 25 seconds from
the moment you start the pump until you reach the appointed liquid volume. A single
shot of espresso should have 1 to 1.5 fluid ounces and approximately 7 grams of
ground coffee in the filter basket and take approximately 20 seconds.
Your best shots are always double shots, due to the chemistry involved in extracting the
flavors and aromas from the coffee. Use the double-shot filter basket. Loosely fill the
filter basket with coffee and tamp with approximately 30 pounds of pressure. Put the
portafilter into the machine; turn on the brew switch to start the pump and time how long
it takes to dispense 2 to 2.5 ounces of espresso into your cup.
If the coffee comes through too fast, grind your coffee a little finer and try it again. If it
comes through too slow, grind your coffee a little more coarse and try again. The tamp
pressure and the coffee volume stay the same, the only thing that changes is your grind
setting.
If you don’t have your own grinder and you can’t vary how fine or coarse the coffee is
ground, you will have to vary your tamp pressure according to the shot timing. If the
water runs through the coffee too fast, tamp a little harder. If the shot is too slow, tamp a
little lighter.

17
10. Advanced Brewing and Operational Techniques
1. It will take about 18 minutes for the digital display and pressure gauge to
show that both boilers are up to the set temperature. If you want to brew right
away, we recommend doing 3 separate 4-ounce blank shots to preheat the
brew group and portafilter. To pull a blank shot, place your portafilter into the
brew group and raise the control lever to the UP position and run 4 ounces of
water through it. If the temperature falls below the set point, wait for it to heat
back up and then repeat this procedure.
2. After the machine has been on for over 35 minutes, it is recommended that
you run 2 ounces of water through the brew group if the machine has been
idle 5 minutes or more.
3. After the programming the machine to brew at a different temperature, it may
take 5 to 10 minutes for the boiler temperature to balance out.
4. The Brewtus has two 1.7-liter boilers, one for brewing and one for steaming
and dispensing hot water. When the Brewtus is turned on, the steam boiler
will automatically fill with water. The brewing boiler must first be filled by
lifting the control lever and leaving it in the UP position until the water is
flowing out of the brew group in a steady stream. When the steam boiler is
full, the heating element in the steam boiler will be energized and the steam
boiler will start to heat up. Once the steam boiler reaches operating pressure,
which is around 1.3 Bars on the gauge, the heating element in the steam boiler
will turn off and the heating element in the brewing boiler will turn on. As the
brew boiler heats, the small LED on the digital display will flash and will
display the current temperature of the boiler. The steam boiler will heat in
around 8 minutes and the brew boiler will heat in another 8 minutes.
11. Steaming and Frothing
Put the steam arm above the tray and open the steam knob a little so that water residue is
removed from the arm. Close the steam knob. Put the steam arm into the liquid you’d like
heated and open the steam knob.
When you finish steaming or frothing, put the steam arm over the tray and open the knob
to clean inside the steam arm. Close the knob and wipe the steam arm with a soft, damp
cloth.

18
FROTHING TECHNIQUES
What is frothed milk?
When you froth milk, you inject air into it while steaming. The thickness and texture of
the froth will vary with the technique used. Frothing is always done when the milk is at
its coldest. Keep the tip near the surface of the milk, so that you will hear a hiss hiss
sound as the air is being injected into the milk. The longer you froth the thicker the froth
will be. If you want creamy froth (micro foam), froth until you are at around 110°F and
then steam the rest of the way. Never steam or froth over 160°F. Skim milk will froth
very easy and create a thick froth. The higher the fat content of the milk, the more this
technique is necessary and the creamier and sweeter the froth will be.
What is steamed milk? Steamed milk is heated but not frothed. In other words, you don’t inject any air into the
milk while heating it. The key to this is to keep the tip of the wand submerged in the
milk, so that it does not let in any air. Never steam or froth over 160°F.
12. Dispensing Hot Water
Place cup under the hot water outlet; open the water knob and then close it when you
have the required quantity of water. You can use the hot water for pre-heating cups
before brewing as well as for tea and Americano.
NOTE: Use caution as some steam will come out with the water and may splash or spray.
13. Cleaning Brewing Components
Cleaning the brew head on the lever-style machines is necessary for optimal flavor and
brewing pleasure. Three different processes are involved with cleaning the brew head:
backflushing with water only, backflushing with cleaner and removing the shower screen
for cleaning by hand. Under normal household conditions, we recommend that you
backflush your machine with water about every 10 to 14 days. You should backflush with
cleaner about 6 times a year. It is also recommended that you remove the shower screen,
inspect and clean it as well as the brew group behind the shower screen as often as
necessary. When you remove the brew group for inspection, you will be able to judge
how often you want to clean it by how dirty it is.
To prepare for a backflush cycle, your machine must be up to brew temperature and
pressure.
Backflushing with Water Only:
1. Place the single-shot filter basket into the portafilter and insert the rubber
backflush disc into the filter basket with the nipple side facing up or use a
stainless steel blind filter basket.

19
2. Raise the control lever for 5-10 seconds or until the pressure builds up. Then,
move the lever to the down position to release the pressure.
3. You will notice a pressurized stream of water released into the drip tray a moment
after you turn the lever to the DOWN position. This is the backpressure release, or
the backflush. Check the water in the drip tray. Is it dirty? If so, then repeat the
process until the released water is clean.
Backflush with Cleaner: You should backflush with a detergent 6 times a year. We recommend using Urnex
Cafiza, which delivers excellent results. Add 1 tablespoon of the espresso machine
cleaner to the blind filer basket/backflush disc and follow the procedure above. It may
take 5 cycles or more to completely clean the machine. Rinse the brew group thoroughly
and backflush 4 times without cleaner to make sure that there is no cleaner left.
Cleaning the Brewing Components by Hand: Cleaning the brewing surfaces is done as follows:
Note: The cleaning of the brew head should be done while the machine is cold to avoid
burns.
1. Remove the shower screen. The shower screen is located at the same place the
portafilter installs into the machine. Using a flat-head screwdriver, wiggle the screen
out. The screen and gasket will come out together.
2. Separate the screen from the gasket as the solution can damage plastic and rubber
parts. Note: Remember which side of the gasket faces up.
3. Mix a solution of Urnex Cafiza and very hot water in a container. Use two
tablespoons of the cleaner and fill the container halfway, as the solution will foam.
4. Soak the shower screen, shot baskets and portafilter head in the solution for about 10
minutes. Take care not to soak the portafilter handle; as the solution may damage the
plastic.
5. After a thorough cleaning, rinse all parts with fresh clean water.
6. Reassemble in reverse order.
14. Cleaning the Housing
Use a non-abrasive cleaner and a soft cloth. Do not forget to disconnect the machine from
the electrical supply before cleaning.
15. Trouble Shooting Guide
The Machine Does Not Turn On: Make sure the power is on and the machine is plugged in.
Make sure that there is power to the outlet in the wall.
Make sure there is water in the reservoir

20
Coffee Comes Out Too Quickly:
See the Golden Rule. The coffee probably has to be ground finer and or purchase fresher
coffee.
Coffee Comes Out Too Slowly. See the Golden Rule, coffee may be ground too fine.
Clean the brew group as described in the cleaning instructions. (Make sure the reservoir
is full of water Brewtus III V only).
Coffee Is Not Hot Enough:
Make sure that the cup and all the brewing components are pre-heated by doing a blank
shot, as explained in the “Advanced Brewing and Operational Techniques” section.
Pump Runs But Water Is Not Being Sucked Into The Machine.
The pump needs to be primed or the machine needs service. Call Whole Latte Love for
instructions.
Water Leaks Around The Portafilter:
Make sure group gasket is clean. The gasket may be old and need to be replaced. There
could be too much coffee in the filter basket.
16. Recipes
Espresso Espresso is pressure-brewed coffee. A properly brewed espresso, with fresh coffee, will
have a thick golden crema on top and not taste bitter or sour.
A single shot consist of approximately 7 grams of ground coffee and 1 to 1.5
ounces of liquid.
A Double shot of espresso contains 14 grams of ground coffee and 2 to 2.5 ounces
of liquid.
Café Latte A café latte is made of 2/3 steamed milk and 1/3 espresso.
1. Steam a pitcher of milk.
2. Fill 2/3 of your cup with steamed milk.
3. Add a couple spoonfuls of froth.
4. Brew your espresso and it with the milk.
Cappuccino
A cappuccino is traditionally served in a 7oz cup. The drink is comprised of equal
amounts of espresso, steamed milk and frothed milk.
1. Steam and froth a pitcher of milk.
2. Brew your espresso into your cappuccino cup.
3. Add the steamed milk while holding back the froth with a spoon.
4. Spoon the froth on top.
Ristretto Also known as the “little one,” the ristretto is the strongest espresso of the family. The
Ristretto uses the same amount of ground coffee as a regular espresso but uses less water.

21
1. Prepare to brew an espresso using the normal amounts of ground coffee.
2. Stop the extraction just short of the “Golden Rule.”
Café Mocha Add some hot chocolate milk to an espresso and you’ve got Mocha!
1. Steam some milk.
2. Add a squirt of chocolate syrup to the milk and mix it well.
3. Brew your espresso and pour it into a larger glass or mug.
4. Add the hot chocolate milk.
5. Top it off with some whipped cream or chocolate shavings.
Café Crema
A café crema is a long espresso. Instead of stopping the shot as you normally would for a
single or double shot, let the pump run longer until you have a cup of coffee.
Café Americano
Brew a proper espresso and add hot water.
Espresso Macchiato
This is an espresso with a little bit of froth on top.
17. Coffee Education
What is Espresso? Espresso is “pressure-brewed coffee.” The pressure can be created by a pump, piston or
through steam pressure. Your Expobar is a pump-style of espresso machine, which is the
best type available. The pressure is necessary to create the crema.
What is Crema? Crema is the golden layer of foam that you will find on top of your espresso. The crema
is what holds many of unique flavor characteristics of your espresso.
SCAA’s (Specialty Coffee Association of America) Definition of Espresso Single shot: 7 Grams of ground coffee and 1 to 1.5 ounces of liquid espresso
Double shot: 14 grams of ground coffee and 2 to 2.5 ounces of liquid espresso.
Basic Bean Info
There is no such thing as an espresso roast. There is no such thing as an espresso bean.
The beans used for brewing espresso can be a blend or a single-origin coffee that has
good flavor characteristics for espresso.
Some people like a dark roast and others like a light or medium roast. The color of the
roasted beans has nothing to do with the brewing equipment used. A dark roast coffee can
be used for drip or espresso but what will make it taste good is the blend of beans used.
The blend used for espresso will be different than the blend from drip coffee.

22
Arabica and Robusta Beans
Arabica Arabica is grown at higher elevations and is more expensive since it is harder to cultivate.
It is generally agreed that the Arabica is the higher quality bean.
Robusta Robusta is grown at the lower elevations and is a bean with higher acidity. Some roasters
may add in some Robusta beans to give the espresso an edge so that it brews well for
milk-based drinks. The Robusta may also be used to help give the coffee a thicker crema.
Steaming and Frothing There is a difference between steamed and frothed milk. Steamed milk is milk heated
with steam from a steam wand. Frothed milk is also heated but air is injected into the
milk to create froth. Different techniques can be used to create either a creamy or foamy
froth. Low-fat milk froths easier and creates a more airy froth. Milk with a higher fat
content requires more technique to create froth and will create a creamier and sweeter
froth.
Basic Terms
Filter Basket: The stainless steel basket that holds the ground coffee. Most machines
come with a single and a double-shot filter.
Portafilter: The handle on that holds the filter basket.
Shower Screen: The part of the machine where the water exits the brew group. It
distributes the hot brewing water onto the coffee.
Brew Group: The part of the machine that holds the shower screen. The portafilter goes
into the brew group.
Drip Grate: The area you put the cups on when brewing.
Drip Tray: Catches any spilled coffee and is underneath the drip grate.
Extraction: When you brew coffee or espresso, you extract the flavors out of the coffee.
Flavor Characteristics: These are the many unique flavors that you can taste in a cup of
espresso or coffee.
Five Basic drinks
1. Espresso: Please refer to the SCAA definition.
2. Café Crema: This is a long espresso. Instead of turning off the pump when you
get to a proper single or double shot, keep the pump ruining until you get a full
cup of coffee. The actual volume of the café crema is up to you. The more water
you use, the weaker the coffee will be. A café crema would be classified as an
over extraction.
3. Café Americano: Brew a proper single or double shot and add hot water. This is
the best full cup of coffee that you can make.
4. Café Latte: Consists of 1/3 espresso and 2/3 steamed milk.
5. Cappuccino: Equal amount of espresso, steamed milk and frothed milk.

23
Extraction Information
Your Expobar machine is designed to brew a proper single or double shot according to
the Specialty Coffee Association of America’s (SCAA) definition. With a proper shot of
espresso, you extract the flavors out of the coffee that the roaster intended. If you run
more water through than a proper shot calls for, you will extract some undesirable
flavors, which will make the resulting espresso bitter.
When brewing a shot, you will notice that at the end of the extraction the flow gets lighter
in color. This lighter color is the sign of an over extraction and will cause the bitter
flavor. For this reason, a Cafe Americano will taste better than a Café Crema. A Café
Americano is a proper shot of espresso mixed with hot water. The coffee is not over
extracted. There are three types of coffee you can make with the Expobar Brewtus:
espresso, Café Crema and Café Americano. You may find that you will not ever need a
drip machine again.
18. Cautions
- THERE ARE NO USER SERVICEABLE PARTS INSIDE THE MACHINE.
YOUR EXPOBAR SHOULD BE SERVICED BY A QUALIFIED
TECHNICIAN.
- DO NOT TRY TO PUT ANYTHING INSIDE THE MACHINE THROUGH
THE VENTS.
- PLEASE CHECK THE WATER LEVEL IN THE TANK FREQUENTLY.
- DO NOT LET CHILDREN TOUCH OR OPERATE THE MACHINE, IT IS
VERY DANGEROUS AND COULD CAUSE INJURY.
- DO NOT USE THE MACHINE WITH WET HANDS.
- TO DISCONNECT FROM THE ELECTRICAL SUPPLY, PLEASE PULL
THE PLUG AND NOT THE POWER CORD.
- PLEASE REFER TO QUALIFIED TECHNICIAN FOR ANY PROBLEMS OR
QUESTIONS.
The manufacturer reserves the right to make any changes to the machine for improved
performance without prior notice.