Embed Size (px)
Citation preview

Exinda How To Guide:
Identify Users on the Network
Exinda User Client 1.1.0
© 2014 Exinda Networks, Inc.

2
Copyright© 2014 Exinda Networks, Inc. All rights reserved. No parts of this work may be reproduced in any form or by anymeans - graphic, electronic, or mechanical, including photocopying, recording, taping, or information storage andretrieval systems - without the written permission of the publisher.
Products that are referred to in this document may be either trademarks and/or registered trademarks of therespective owners. The publisher and the author make no claim to these trademarks.
While every precaution has been taken in the preparation of this document, the publisher and the author assumeno responsibility for errors or omissions, or for damages resulting from the use of information contained in thisdocument or from the use of programs and source code that may accompany it. In no event shall the publisher andthe author be liable for any loss of profit or any other commercial damage caused or alleged to have been causeddirectly or indirectly by this document.
Document Built on Monday, June 23, 2014 at 11:11 AM
Using this guideBefore using this guide, become familiar with the Exinda documentation system.
n "Documentation conventions" on page 2
n "Notes, Tips, Examples, and Cautions" on page 2
Documentation conventions
n bold - Interface element such as buttons or menus. For example: Select theEnable checkbox.
n italics - Reference to other documents. For example: Refer to theExinda Application List.
n > - Separates navigation elements. For example: Select File > Save.
n monospace text - Command line text.
n <variable> - Command line arguments.
n [x] - An optional CLI keyword or argument.
n {x} - A required CLI element.
n | - Separates choices within an optional or required element.
Notes, Tips, Examples, and Cautions
Throughout themanual the following text styles are used to highlight important points:
n Notes include useful features, important issues. They are identified by a light blue background.
Note: Text
n Tips include hints and shortcuts. They are identified by a light blue box.
© 2014 Exinda Networks, Inc.

3
Tip Tip text
n Examples are presented throughout themanual for deeper understanding of specific concepts.Examples are identified by a light gray background.
E X A M P L E
Text
n Cautions and warnings that can cause damage to the device are included when necessary, and arehighlighted in yellow.
Caution: Text
© 2014 Exinda Networks, Inc.

4
Table of ContentsChapter 1: Integrate The Exinda Appliance With Active Directory 6
Install the Exinda Active Directory Connector 6
Add Exinda appliances to the Active Directory Connector 9
Change the Active Directory Connector port number 10
Select the information sent between the Exinda appliance and the Active Directory server 11
Configure the connection to the Active Directory server 11
Verify communication between the Active Directory server and the Exinda Appliance 12
Request updated user and group information from the Active Directory server 13
Exclude specific usernames from reports 13
Chapter 2: Identify Users Using Applications On A Citrix XenApp Server 14
Install the Exinda Citrix XenApp Plugin 15
Add the Exinda Active Directory Connector to the Exinda Citrix XenApp Plugin 15
Capture the Exinda Citrix XenApp Plugin activity in a log file 16
Change the Exinda Citrix XenApp Plugin port number 16
Request updated user information from the Exinda Citrix XenApp Plugin 17
Change the state of the Exinda Active Directory Connector 17
Chapter 3: Report On Network Activity By User 18
Users Report 18
Set the Time Period Reflected in the Report 20
Application Report 21
Top Internal and External Users on the Network 22
Hosts/Users in Real Time 23
Conversations in Real Time 24
Understanding the Conversation Report 27
Chapter 4: Controlling Traffic Based On Users 28
Configure Network User Objects 28
© 2014 Exinda Networks, Inc.

5
Configure Network User Groups 29
Optimize Traffic Based on Users andGroups 29
Chapter 5: Troubleshoot Issues With Active Directory Configuration 31
The Exinda appliance reboots every night 31
WMI Service is not running 31
System account showing in traffic reports 32
No communication between the Exinda Active Directory Connector and the Exinda appliance 32
The IP addresses are not beingmapped to the AD users and groups 32
Exinda Active Directory Connector stops running 34
Excluded users still appear on the Exinda appliance 34
Changes to the Exinda Active Directory Controller have no effect 35
© 2014 Exinda Networks, Inc.

© 2014 Exinda Networks, Inc.
Chapter 1: Integrate the ExindaAppliance with Active DirectoryUsing the Exinda Active Directory Connector, customers can:
n Expose Active Directory usernames inmonitoring and reporting, no longer having to view users as IPaddresses.
n Use Active Directory groups and usernames in optimization policies, thereby implementing QoS andOptimization Polices based on individual users or entire groups.
The Exinda Active Directory Connector needs to be installed onto a server in the network that has access tothe Active Directory server. Each install of the Exinda Active Directory Connector can talk to up to 20Exinda appliances.
Complete the following tasks to connect the Exinda Active Directory Connector to the Active Directoryserver, and view user names inmonitoring reports.
1. "Install the Exinda Active Directory Connector" on page 6
a. "Add Exinda appliances to the Active Directory Connector" on page 9
b. (Optional) "Configure the connection to the Active Directory server" on page 11
c. "Select the information sent between the Exinda appliance and the Active Directory server" onpage 11
d. "Change the Active Directory Connector port number" on page 10
2. "Identify users using applications on a Citrix XenApp server" on page 14
3. "Verify communication between the Active Directory server and the Exinda Appliance" on page 12
4. "Report on Network Activity by User" on page 18
5. "Controlling Traffic based on Users" on page 28
Note If you encounter any issues, see "Troubleshoot issues with Active Directoryconfiguration" on page 31
Install the Exinda Active Directory ConnectorThe Exinda Active Directory Connector needs to be installed onto aWindows server that can connect to theActive Directory server. Each Exinda Active Directory Connector can talk to up to 20 Exinda appliances. Whenyou first install the Exinda Active Directory Connector, it may take 24 hours or longer to get all user to IP addressmappings as users progressively login.
Identify Users on the Network

7 Chapter 1: Integrate the Exinda Appliance with Active Directory
Notes n The Exinda Active Directory Connector is supported on the following platforms:
n Windows Server 2003 SP2
When the Active Directory server is runningWindows Server 2003 R2, the ExindaActive Directory Connector must be installed on the Active Directory server andcannot be installed on a remote server.
n Windows Server 2008 SP2
n Windows Server 2008 R2
n Windows Server 2012
n The Exinda Active Directory Connector requires .NET Framework 4.0.
n The Logon Auditingmust be enabled on the Active Directory server to install the Exinda Act-ive Directory Connector.
n TheWMI servicemust be started on the Active Directory server and on the server where theExinda Active Directory Connector is installed.
n The Active Directory server and the server where the Exinda Active Directory Connector isinstalled require the RPC Endpoint Mapper and LDAP ports open in your firewall. These portsare open by default. To verify your settings, see http://support.microsoft.com/kb/179442.
1. Download the installer the Exinda appliance.
a. Click System > Network, and switch to theActive Directory tab.
b. Download theMicrosoft Installer Executable.
2. Save the Exinda Active Directory Connector install to a location that can be accessed by all Windows serv-ers in the network.
3. On the server where the Exinda Active Directory Connector should be installed, locate and double-clickinstallation file.
4. On theWelcome dialog, click Next.
5. Read the End-User License Agreement. Select the I accept... checkbox and click Next.
6. Specify the directory where the Exinda Active Directory Connector should be installed.
7. Select whether the Active Directory server is on this server or another server.
If the connector is not installed on the server with Active Directory, type the IP address or hostname of theActive Directory server, and type the username and password of the Administrator account on theActive Directory server.
CautionWhen the Active Directory server is runningWindows Server 2003 R2, the Exinda ActiveDirectory Connector must be installed on the Active Directory server and cannot beinstalled on a remote server.
CautionWhen installing the Exinda AD Connector on a server that is not a domain controller, ensurethat the account in charge of running the service is an Active Directory domain adminaccount. See To ensure the Exinda AD service has the appropriate permissions below.
© 2014 Exinda Networks, Inc.

Chapter 1: Integrate the Exinda Appliance with Active Directory 8
8. Click Next.
9. (Optional) Type the Exinda appliance IP address or hostname, port number, and administrator password.
Adding an Exinda appliance can be completed after the Exinda Active Directory Connector is installed.
10. In the Include log entries newer than the specified age field, specify themaximum age of log entries (inseconds) to be analyzed and sent to the Exinda appliance when the Exinda Active Directory Connectorservice starts.
11. Click Next.
12. On the Check for Required Services dialog, click Next.
If any warnings are displayed on the page, resolve the issues as specified in the dialog.
13. Click Install.
14. Ensure Launch Exinda Active Directory Connector is selected, and click Finish.
After the installation is finished, the Exinda Active Directory Connector starts automatically and attemptsto communicate with the configured Exinda appliance.
To ensure the Exinda AD service has the appropriate permissions
When installing the Exinda AD Connector on a server that is not a domain controller, ensure that the account incharge of running the service is an Active Directory domain admin account.
1. Run Services.msc as an Administrator.
© 2014 Exinda Networks, Inc.

9 Chapter 1: Integrate the Exinda Appliance with Active Directory
2. FindExinda AD service and right click on it and select Properties.
3. On the Log On tab, select the Administrative account of the domain with its password.
Note that the domain and slash (\) is required.
4. Press OK or Apply to save the changes.
5. Restart the service.
Add Exinda appliances to the Active Directory ConnectorIdentify the Exinda appliance using this Active Directory Connector to retrieve user and group information.
Note Each installation of the Active Directory Connector can have amaximum of 20 Exindaappliances connected to it.
If there aremore than 20 Exinda appliances, install the connector onmultipleWindowsservers and divide the appliances across multiple instances of the Active DirectoryConnector.
1. In theStartmenu click All Programs > Exinda Networks > Exinda AD Configuration Utility.
2. Switch to theExinda Appliances tab.
3. To add the Exinda appliances that communicate with this Active Directory Connector, type theIP Address or Hostname into an empty row, and type the Admin password for the appliance.
4. Modify the port number as needed. The default port number of the Active Directory Client is 8015.
© 2014 Exinda Networks, Inc.

Chapter 1: Integrate the Exinda Appliance with Active Directory 10
When changing the port number, all Exinda appliances using the Exinda Active Directory Connectormust use the same port number. See "Change the Active Directory Connector port number" on page10.
5. In theSync interval field, identify how frequently the Exinda Active Directory Connector contacts theExinda appliances to synchronize Active Directory user and group information. The default is 5minutes.
6. Click OK.
Change the Active Directory Connector port numberIdentify the port on which the Exinda Active Directory Connector is communicating to the connected Exindaappliances. Changing the port number is optional, and the default port 8015 automatically communicateswith the Exinda Active Directory Connector and Exinda appliances.
Note The port numbermust be the same on all installed Exinda Active Directory Connectorinstances, and all Exinda appliances using the Exinda Active Directory Connector.
Ensure firewall on the server running the Exinda Active Directory Connector isconfigured to allow inbound and outbound traffic on configured port.
1. Change the port number on the Exinda Active Directory Connector.
a. In theStartmenu click All Programs > Exinda Networks > Exinda AD ConfigurationUtility.
b. Switch to theExinda Appliances tab.
c. Type the port number in the field.
The default port number is 8015.
d. Click OK.
2. Change the port number on the Exinda appliances.
Note The port numbermust be changed on each Exinda appliance using to the ExindaActive Directory Connector.
a. Launch ExindaWebUI.
a. In a browser, enter https://Exinda_IP_address.
b. Enter the applianceUser Name andPassword. Click Login.
The ExindaWebUI is displayed.
c. Ensure you are inAdvancedmode.
b. Click System > Network, and switch to theActive Directory tab.
c. In theActive Directory area, type the port number of the Exinda Active Directory Connector.
The default port number is 8015.
d. Click Apply Changes.
© 2014 Exinda Networks, Inc.

11 Chapter 1: Integrate the Exinda Appliance with Active Directory
When the Exinda appliance successfully communicates with the Exinda Active DirectoryConnector, the following information is displayed in the table:
n Agent Name—The Exinda Active Directory Connector name.
n IP Address—The IP address of the server running the Exinda Active Directory Con-nector.
n Version—The Exinda Active Directory Connector version.
n Windows Version—The version of Windows on the Active Directory server.
n Last Contact—The last time the Active Directory server was contacted.
Select the information sent between the Exinda appliance and theActive Directory serverSpecify what information is sent between the Active Directory server and the Exinda appliance. When youfirst install the Exinda Active Directory Connector, it may take up to 24 hours (or longer) to get all user to IPaddress mappings as users progressively login.
Note User accounts that have been disabled on the Active Directory server are not included inthe data sent to the Exinda appliances.
1. In the Exinda Active Directory Connector, switch to theAD Server tab.
2. To send a list of users and groups to Exinda appliances when the service starts, select Send ActiveDirectory user and group information to Exinda appliances. The list of users and groups that issent to the appliance can be used to create user or group-based policy.
If this is not selected, only logged on users will be available to your Exinda appliances. Informationabout groups will not be available. This information is obtained through an LDAP query against theActive Directory server.
Caution If there aremultiple domain controllers, Send users/groups to Exinda appliances onstartup should only be selected on one of the domain controllers.
3. To include user names inmonitoring reports, allow the login history to be analyzed.
a. To enable this option, select Analyze login history and send to Exinda appliances.
This information is obtained through aWindows Event Log query against the Active Directoryserver.
b. In the Include log entries newer than the specified age field, specify themaximum age oflog entries (in seconds) to be analyzed and sent to the Exinda appliance when the ExindaActive Directory Connector service starts.
4. Click OK.
Configure the connection to the Active Directory serverThe Exinda Active Directory Connector can be installed on any server in the network that has access to the
© 2014 Exinda Networks, Inc.

Chapter 1: Integrate the Exinda Appliance with Active Directory 12
Active Directory server. If the connector is installed somewhere other than on the Active Directory server,specify the location and authentication credentials of the Active Directory server.
1. In theStartmenu click All Programs > Exinda Networks > Exinda AD Configuration Utility.
2. Switch to theAD Server tab.
3. In the Active Directory Server area, select whether the Active Directory server is this server oranother server.
4. Type the IP address or hostname of the Active Directory server.
5. Type the username and password of the Administrator account on the Active Directory server.
6. Click OK.
Verify communication between the Active Directory server and theExinda ApplianceEnsure the communication between the Active Directory server and the Exinda appliance is active.
Note User accounts that have been disabled on the Active Directory server are not included inthe data sent to the Exinda appliances.
1. Click System > Network, and switch to theActive Directory tab.
2. Verify the Active Directory server is listed, and that the service is Running.
When the Exinda appliance successfully communicates with the Active Directory Client, thefollowing information is displayed in the table:
n Agent Name—The Active Directory server name.
n IP Address—The IP address of the Active Directory server.
n Version—The Exinda Active Directory Windows client version.
n Windows Version—The Active Directory serverWindows version.
n Last Contact—The last time the Active Directory server was contacted.
3. If the service is not visible on the list, run the Event Viewer program on your Active Directory server,and examineWindows logs.
a. In the Start menu select Control Panel > Administrative Tools.
b. Double-click Services, and verify the status of theExinda AD service. If the service isstopped, restart the service.
c. In theWindows Logs > Application area, the “Service started successfully” messageshould be displayed from Exinda Networks Active Directory Connector.
If the communication between the Active Director and the Exinda appliance is failing, an errormessage from the Exinda Networks Active Directory Connector appears in these logs.
© 2014 Exinda Networks, Inc.

13 Chapter 1: Integrate the Exinda Appliance with Active Directory
Request updated user and group information from theActive Directory serverIf the list of users and groups using the Active Directory client appears to be out of date, erase all usernameto IP address mappings and refresh the list sent from the Active Directory server.
1. Click System > Network, and switch to theActive Directory tab.
2. To clear user, group, and login data from the appliance and requests an update from the ActiveDirectory clients click Renumerate.
Exclude specific usernames from reportsYoumay have user accounts that should not be linked to IP addresses when reporting on the Exindaappliance,such as the account used for signing SMB traffic. SMB signing was introduced with the 6.4.1release. Configure the Exinda Active Directory Connector to prevent the IP address to usernamemappingbeing sent to the Exinda appliance.
1. In theStartmenu click All Programs > Exinda Networks > Exinda AD Configuration Utility.
2. Switch to theExcluded Users tab.
3. Click in the Ignored Users area, type the full username of each user to ignore.
The username is case sensitive. If the Active Directory has the user Domain/Test.User, and theexcluded list has the user as Domain/test.user, the traffic is not excluded.
Note Regardless of the case of usernames in Active Directory, the Exinda appliancedisplays the usernames with the first name capitalized and the surname in lower case;for example Domain/Test.user. Do not use the value in the Exinda appliance whenadding a username to the Excluded list.
4. Click Apply.
5. "Request updated user and group information from the Active Directory server" on page 13.
6. Restart the Active Directory service. See "Change the state of the Exinda Active Directory Connector"on page 17.
© 2014 Exinda Networks, Inc.
© 2014 Exinda Networks, Inc.
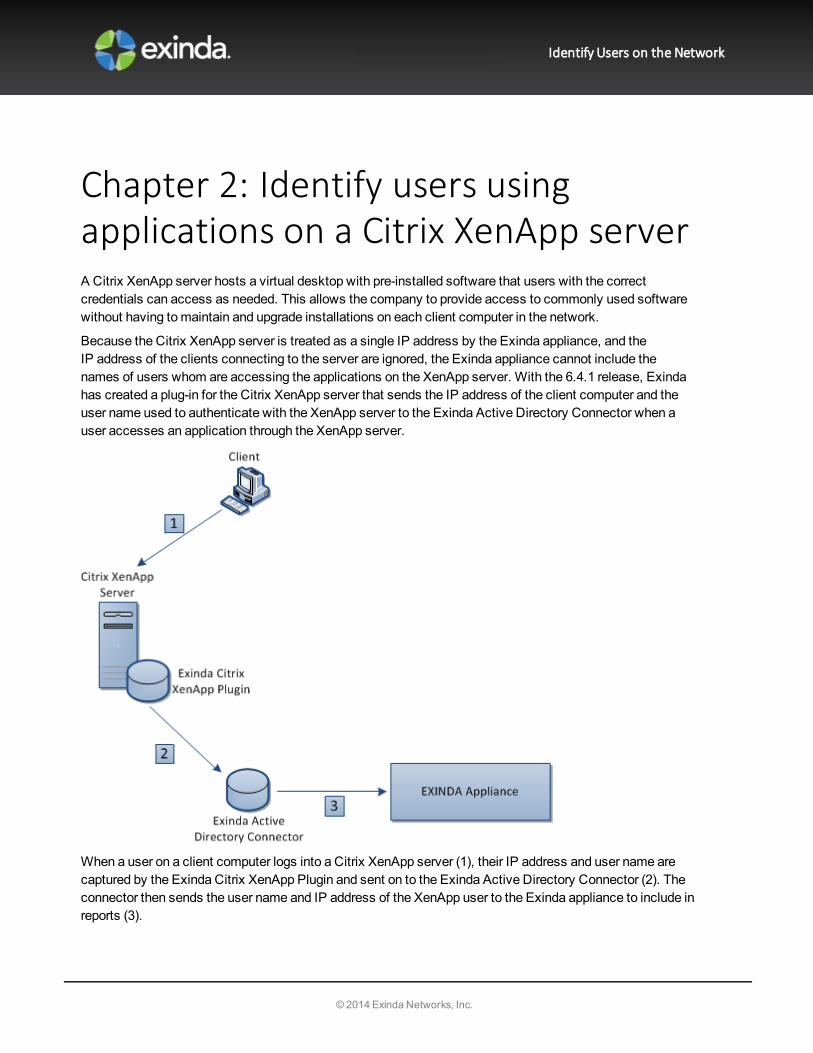
Chapter 2: Identify users usingapplications on a Citrix XenApp serverA Citrix XenApp server hosts a virtual desktop with pre-installed software that users with the correctcredentials can access as needed. This allows the company to provide access to commonly used softwarewithout having tomaintain and upgrade installations on each client computer in the network.
Because the Citrix XenApp server is treated as a single IP address by the Exinda appliance, and theIP address of the clients connecting to the server are ignored, the Exinda appliance cannot include thenames of users whom are accessing the applications on the XenApp server. With the 6.4.1 release, Exindahas created a plug-in for the Citrix XenApp server that sends the IP address of the client computer and theuser name used to authenticate with the XenApp server to the Exinda Active Directory Connector when auser accesses an application through the XenApp server.
When a user on a client computer logs into a Citrix XenApp server (1), their IP address and user name arecaptured by the Exinda Citrix XenApp Plugin and sent on to the Exinda Active Directory Connector (2). Theconnector then sends the user name and IP address of the XenApp user to the Exinda appliance to include inreports (3).
Identify Users on the Network
15 Chapter 2: Identify users using applications on a Citrix XenApp server
Install and configure the Exinda Citrix XenApp Plugin to identify activity by specific users on the XenAppserver.
1. "Install the Exinda Citrix XenApp Plugin" on page 15
2. "Add the Exinda Active Directory Connector to the Exinda Citrix XenApp Plugin" on page 15
3. "Capture the Exinda Citrix XenApp Plugin activity in a log file" on page 16
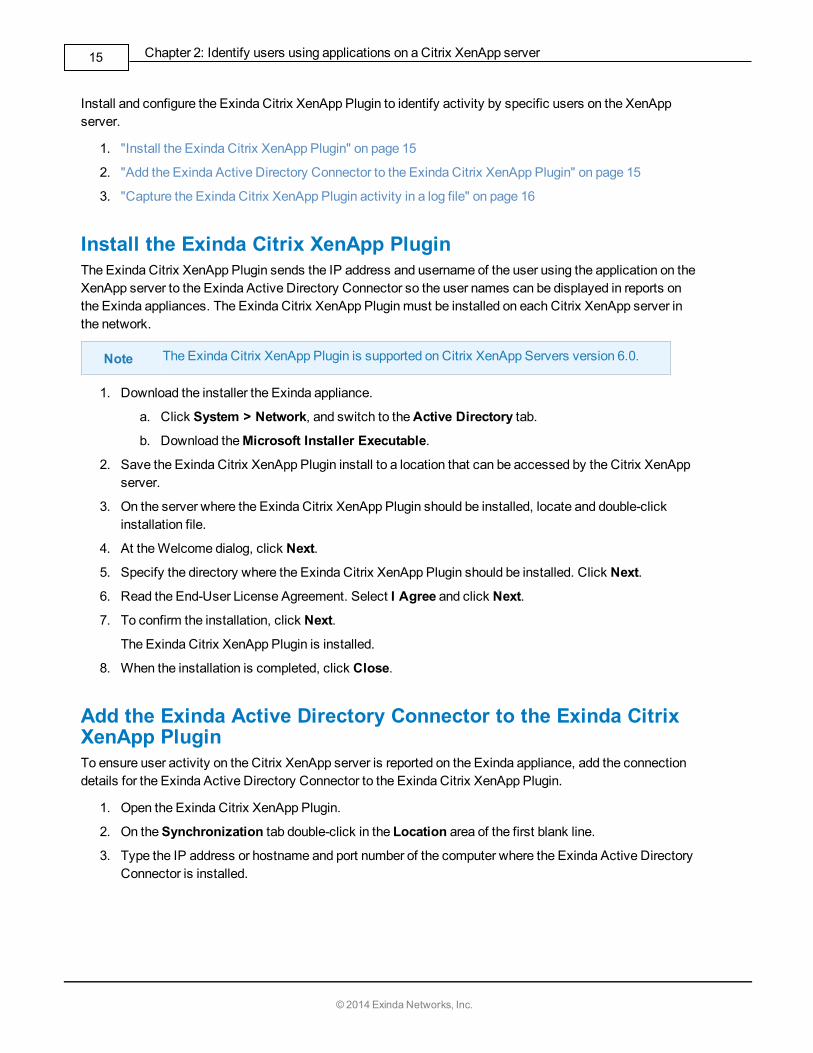
Install the Exinda Citrix XenApp PluginThe Exinda Citrix XenApp Plugin sends the IP address and username of the user using the application on theXenApp server to the Exinda Active Directory Connector so the user names can be displayed in reports onthe Exinda appliances. The Exinda Citrix XenApp Plugin must be installed on each Citrix XenApp server inthe network.
Note The Exinda Citrix XenApp Plugin is supported on Citrix XenApp Servers version 6.0.
1. Download the installer the Exinda appliance.
a. Click System > Network, and switch to theActive Directory tab.
b. Download theMicrosoft Installer Executable.
2. Save the Exinda Citrix XenApp Plugin install to a location that can be accessed by the Citrix XenAppserver.
3. On the server where the Exinda Citrix XenApp Plugin should be installed, locate and double-clickinstallation file.
4. At theWelcome dialog, click Next.
5. Specify the directory where the Exinda Citrix XenApp Plugin should be installed. Click Next.
6. Read the End-User License Agreement. Select I Agree and click Next.
7. To confirm the installation, click Next.
The Exinda Citrix XenApp Plugin is installed.
8. When the installation is completed, click Close.
Add the Exinda Active Directory Connector to the Exinda CitrixXenApp PluginTo ensure user activity on the Citrix XenApp server is reported on the Exinda appliance, add the connectiondetails for the Exinda Active Directory Connector to the Exinda Citrix XenApp Plugin.
1. Open the Exinda Citrix XenApp Plugin.
2. On theSynchronization tab double-click in the Location area of the first blank line.
3. Type the IP address or hostname and port number of the computer where the Exinda Active DirectoryConnector is installed.
© 2014 Exinda Networks, Inc.

Chapter 2: Identify users using applications on a Citrix XenApp server 16
Note The port number used to communicate between the Exinda ActiveDirectory Connector and the Exinda Citrix XenApp Plugin cannot be the same as theport number used to communicate between the Exinda Active Directory Connectorand the Exinda appliances.
4. In theSync Interval field, identify how frequently the Exinda Active Directory Connector sendsXenApp server user information to the Exinda Active Directory Connector. The default is 1minute.
5. Click Apply.
Capture the Exinda Citrix XenApp Plugin activity in a log fileDepending on the logging level selected, the Exinda Citrix XenApp Plugin records various types of data in alog file. The available log levels include Error, Warning, Info, and Verbose. By default, the log sensitivity isWarning. The location of the log file and the level of detail recorded in the log file are configurable.
1. Open the Exinda Citrix XenApp Plugin.
2. On theAD Server tab, specify the location where log files should be stored.
3. Switch to theConsole tab and select the level of messages that are recorded in the log file from theLog Sensitivity list.
4. Click Apply.
5. To view the contents of the log, on theConsole tab click Open Log.
Change the Exinda Citrix XenApp Plugin port numberIdentify the port on which the Exinda Active Directory Connector is communicating to the connected ExindaCitrix XenApp Plugins. The default port number is 8016.
1. Change the port number on the Exinda Citrix XenApp Plugin.
a. In theStartmenu click All Programs > Exinda Networks > Exinda Citrix XenApp PluginConfiguration.
b. Switch to theSynchronization tab.
c. Double-click the port number for the appropriate Exinda Active Directory Connector and typethe new port number in the field.
d. Click OK.
2. Change the port number on the Exinda Active Directory Connector.
a. In theStartmenu click All Programs > Exinda Networks > Exinda AD ConfigurationUtility.
b. Switch to theXenApp tab.
c. Type the port number in the field.
d. Click OK.
© 2014 Exinda Networks, Inc.

17 Chapter 2: Identify users using applications on a Citrix XenApp server
Request updated user information from the Exinda Citrix XenAppPluginIf the synchronizations of the user data between the Exinda Citrix XenApp Plugin and the Exinda ActiveDirectory Connector is infrequent, trigger the Exinda Citrix XenApp Plugin to send the data to the ExindaActive Directory Connector immediately.
1. In theStartmenu click All Programs > Exinda Networks > Exinda AD Configuration Utility.
2. Switch to theXenApp tab.
3. Click Renumerate.
The latest data is sent from the Exinda Citrix XenApp Plugin to the Exinda Active DirectoryConnector.
Change the state of the Exinda Active Directory ConnectorTemporarily stop or disable the Active Directory integration to help with troubleshooting and to avoid errorswhenmodifying the Exinda Active Directory Connector settings.
1. Click System > Network, and switch to theActive Directory tab.
2. Modify the state of the Active Directory service.
n To temporarily stop the Exinda Active Directory Connector, click Stop.
n If you are experiencing issues with the Exinda Active Directory Connector, Restart the service.
n If you no longer need the Exinda Active Directory Connector running, click Disable.
n If the service has been disabled, to start it again click Enable.
© 2014 Exinda Networks, Inc.

© 2014 Exinda Networks, Inc.
Chapter 3: Report on Network Activityby UserUse the information in reports to determine how the policies on your Exinda can improve the quality ofservice and the experience of your network users.
The following reports identify user activity on the network:
n "Application Report" on page 21
n "Users Report" on page 18
n "Top Internal and External Users on the Network" on page 22
n "Hosts/Users in Real Time" on page 23
n "Conversations in Real Time" on page 24
Users ReportThe users report shows the top users by data volume for the selected time period. Traffic inbound into your LAN isreported separately from the outbound traffic.You can choose to view either the internal users or the external userson the users report. These charts can answer questions such as, “What internal users are the top talkers and toplisteners?Which external users are top talkers from which internal hosts are retrieving information and whichexternal users are top listeners from which internal hosts are sending information to? Could one user be chokingout my network?" Using this information you can determine if you need to create policies for these high datavolume users. Youmay want to create protection policies for your important users, like your CEO or financedepartment, or create control policies to limit users who are abusing the network.
Users are associated with an IP address. During a flow, traffic flows from one host to another. Typically, one hostis considered internal to your network; the other is external. Hosts that fall into a network object that was definedas internal are considered internal to your network; Hosts that fall into a network object that was defined asexternal are considered external to your network. Keep inmind that the traffic is inbound and outbound relative toyour LAN – not relative to the host or user. Therefore, inbound traffic for an external user means that user wassending data inbound into your network.
You can drill into the user by clicking on the user name in the tables below the charts. This will show theApplications Report for the user that you drilled into. You can then use the selector on the Applications Reportpage to show URLs or conversations or hosts that involved the user.
Identify Users on the Network

19 Chapter 3: Report on Network Activity by User
The tables at the bottom of the report shows for each of the top users, the total amount of data, and themaximumand average throughput rates, the number of packets, and the number of flows for the selected time period. Morenetwork metrics, such as, round-trip time (RTT), network and server delays, and TCP efficiency can be shown byclicking on theShow Details link in the tables.
Where do I find this report?
Go toMonitor > Users.
To show only internal users or external users
Use theSelect Users to View selector at the top of the page.
© 2014 Exinda Networks, Inc.

Chapter 3: Report on Network Activity by User 20
How do I interact with the pie-based reports?
You can hover over the pie slices to view the amount of data transferred as well as view the percentage of thepie. Note that the pie is showing only the top items, so the proportion is relative to the top items - not relative toall the traffic through the appliance. That is, if one wedge showed 50% of the traffic, that means it is 50% of thetop items, not 50% through the appliance.
To understand how to set the desired time range for a chart, see Setting the TimeRange.
To understand how to drill into the data to find particular filtered data, see Drilling into the Data.
To understand how to print the report or schedule the report, see Printing and Scheduling Reports.
Set the Time Period Reflected in the Report
The data displayed in the reports can be focused on specific periods of time. Date ranges are available on allreports except the Real Time reports.
1. Select a report from theMonitor list.
2. Beside the title of the report, select the desired date range from the drop down list.
3. To specify a custom date range, in the drop down list select Custom. Select the start and end dateand time to include in the report.
After the date range is select, the graphs and charts are immediately updated.
Data Granularity
The Exinda appliance stores data for the following amount of time:
n 2 years of data - this year, previous year & last 12months
n 2months of data - this month, previous month & last 30 days
n 2 weeks of data - this week, previous week & last 7 days
n 2 days of data - today, yesterday & last 24 hours
n 1 day of data - this hour, last hour & last 60minutes, last 5minutes
For the Applications, URLs, Users, Hosts, Conversations and Subnets Reports, the data is stored at:
n Hourly granularity for up to 2 days (today, yesterday, this hour, previous hour)
n Daily granularity for up to 2months (this week, last week, this month and last month)
n Monthly granularity for up to 2 years (this year, last year)
For the Interface, Network, Reduction, Optimizer, Service Levels, System the data is stored at:
n 10 second granularity for 1 day (except Network)
n 5minute granularity for 2 weeks
© 2014 Exinda Networks, Inc.

21 Chapter 3: Report on Network Activity by User
n 30minute granularity for 2months
n 60minute granularity for 6months
n 24 hour granularity for 2 years
Application ReportThe applications groups report shows the top applications by data volume for the selected time period. Theapplications report shows inbound traffic separately from outbound application traffic. These charts can answerquestions such as, “Which applications may be overrunningmy network? Is the proportion of traffic for a particularapplication what I am expecting?” Using this information you can determine if you need to create policies to controlor protect these high data volume applications.
You can drill into the application by clicking on the application name in the tables below the charts. This will showthe Hosts Report filtered for the selected application group.
The tables at the bottom of the report shows for each of the top applications, the total amount of data, and themaximum and average throughput rates, the number of packets, and the number of flows for the selected timeperiod. More network metrics, such as, round-trip time (RTT), network and server delays, and TCP efficiency canbe shown by clicking on theShow Details link in the tables.
© 2014 Exinda Networks, Inc.

Chapter 3: Report on Network Activity by User 22
Where do I find this report?Go toMonitor > Applications > Applications.
To show more applications or fewer applications in the top applications chart and the throughput chartThe number of applications shown are configurable by using theChart Items setting on the System > Setup >
Monitoring page. Note: that this configuration applies to all charts on the appliance. SeeMonitoring Configuration.How do I interact with the pie-based reports?
You can hover over the pie slices to view the amount of data transferred as well as view the percentage of thepie. Note that the pie is showing only the top items, so the proportion is relative to the top items - not relative toall the traffic through the appliance. That is, if one wedge showed 50% of the traffic, that means it is 50% of thetop items, not 50% through the appliance.
To understand how to set the desired time range for a chart, see Setting the TimeRange.
To understand how to drill into the data to find particular filtered data, see Drilling into the Data.
To understand how to print the report or schedule the report, see Printing and Scheduling Reports.
Top Internal and External Users on the NetworkThe Network - Users (Internal) and Users (External) reports displays the top users sending traffic through thenetwork.
1. Click Monitor > Network.
2. In the Select Graph to Display list, select Users - Internal orUsers - External.
3. "Set the Time Period Reflected in the Report" on page 20.
After the date range is select, the graphs and charts are immediately updated.
4. Remove specific types of traffic from the graph by deselecting their checkbox in the legend below thegraph.
5. To determine what the size of yourWAN link should be configured to, from theSelect Percentile
© 2014 Exinda Networks, Inc.

23 Chapter 3: Report on Network Activity by User
Marker to Display select 95th.
Use the 95th percentile mark for throughput speed to configure yourWAN link.
Hosts/Users in Real TimeThe Hosts in Real Timemonitor shows the top internal hosts by bandwidth consumption observed by the Exindaappliance during the last 10 seconds. This report can answer questions such as, “My link is congested; Whichhosts are onmy network right now?”
The Hosts in Real Timemonitor shows inbound host traffic separately from outbound host traffic. The traffic issorted by transfer rate. The packet rate and number of flows for each application in that 10 second period is alsoshown and optionally the user name of the internal hosts. The Distribution percentage shows the proportion ofbandwidth consumption of each host relative to all hosts. You can set the chart to refresh frequently or infrequentlyor not at all. Each refresh shows 10 seconds of data.
© 2014 Exinda Networks, Inc.

Chapter 3: Report on Network Activity by User 24
Where do I find this report?
Go toMonitor > Real Time > Hosts/Users.
To show the user associated with the internal hosts
Check theShow Users checkbox.
Note Active Directory must be configured on the Exinda appliances before user names can bedisplayed in reports. See "Integrate the Exinda Appliance with Active Directory" on page 6.
Conversations in Real TimeThe Conversations in Real Timemonitor shows the top conversations by throughput observed by the Exindaappliance during the last 10 seconds. This report can answer questions such as, “My link is congested; who'sdoing what onmy network right now? I think I have a problem with a particular host or subnet; what is that host orsubnet doing right now? Is the traffic being accelerated or processed by Edge Cache properly? Is the trafficpassing throughmy High Availability or Cluster correctly?"
The Conversations in Real Timemonitor shows inbound conversation traffic separately from outboundconversation traffic.The conversations are represented as external IP, internal IP, and application. Some traffictypes will show extra information, such as the URL for example, in square brackets following the application. Thetraffic is sorted by transfer rate. The packet rate and number of flows for each conversation in that 10 secondperiod is also shown. You can set the chart to refresh frequently or infrequently or not at all. Each refresh shows 10seconds of data.
© 2014 Exinda Networks, Inc.
25 Chapter 3: Report on Network Activity by User
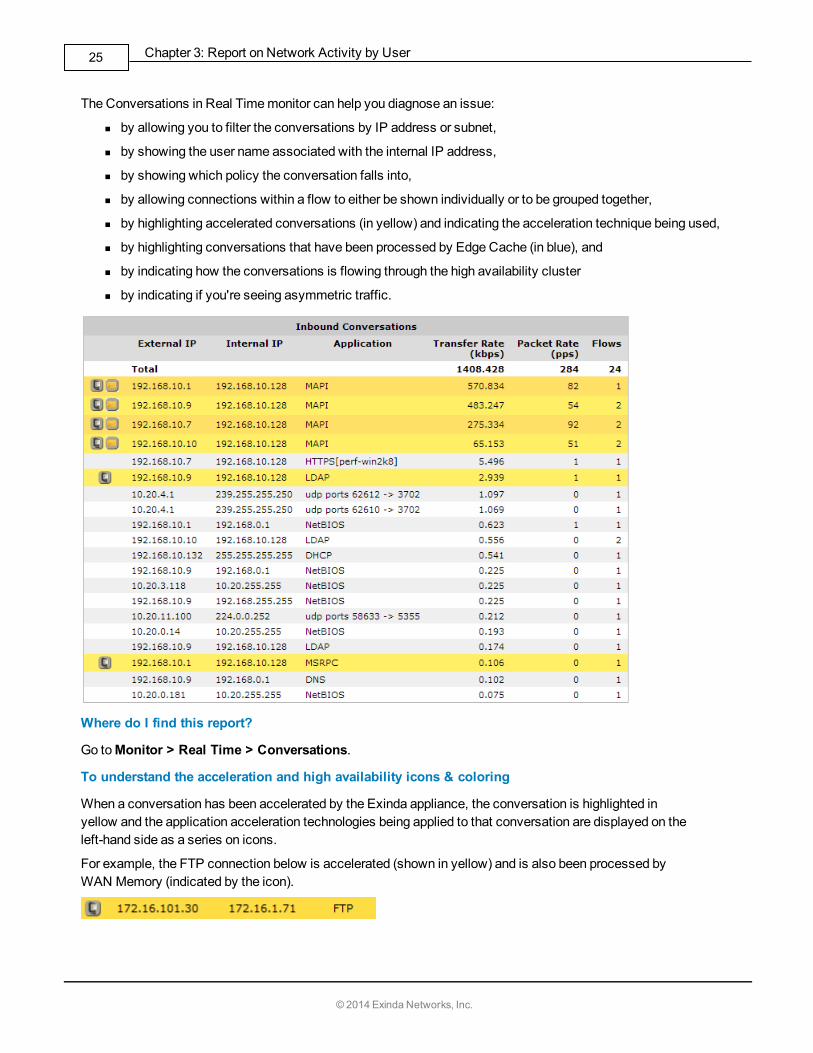
The Conversations in Real Timemonitor can help you diagnose an issue:
n by allowing you to filter the conversations by IP address or subnet,
n by showing the user name associated with the internal IP address,
n by showing which policy the conversation falls into,
n by allowing connections within a flow to either be shown individually or to be grouped together,
n by highlighting accelerated conversations (in yellow) and indicating the acceleration technique being used,
n by highlighting conversations that have been processed by Edge Cache (in blue), and
n by indicating how the conversations is flowing through the high availability cluster
n by indicating if you're seeing asymmetric traffic.
Where do I find this report?
Go toMonitor > Real Time > Conversations.
To understand the acceleration and high availability icons & coloring
When a conversation has been accelerated by the Exinda appliance, the conversation is highlighted inyellow and the application acceleration technologies being applied to that conversation are displayed on theleft-hand side as a series on icons.
For example, the FTP connection below is accelerated (shown in yellow) and is also been processed byWAN Memory (indicated by the icon).
© 2014 Exinda Networks, Inc.

Chapter 3: Report on Network Activity by User 26
When a conversation has been processed by Edge Cache, it is highlighted in blue.
The following legend describes themeaning of each acceleration icon.
WAN Memory: The connection is been processed by WAN Memory.
CIFS Acceleration: The connection is been processed by CIFS Acceleration.
SSL Acceleration: The connection is been processed by SSL Acceleration.
NCP Acceleration: The connection is been processed by NCP Acceleration.
MAPI Acceleration: The connection is been processed by MAPI Acceleration.
When an appliance is deployed in a High Availability (HA) or Clusteringmode, the following icons may alsoappear next to each conversation.
Asymmetric: The traffic is asymmetric, and is not being accelerated.
Local: The connection is passing through this appliance in the cluster.
Remote: The connection is passing through another appliance in the cluster.
Local/Remote: The connection is passing though both this and other appliances in thecluster.
To filter by IP address or subnet
Simply type the IP address or subnet in the IP/Subnet Filter field at the top of the screen and click Apply. Theconversations can be filtered by IPv4 or IPv6 addresses.
To show the user associated with the internal hosts
Check theShow Users checkbox.
To group individual connections within a flow as a single line item or to show each connection as a sep-
arate line item
Toggle on or off theGroup checkbox at the top of the screen.
To display the policy the conversation falls into
Select Show Policies checkbox at the top of the screen.
Trouble-shooting virtual circuits and policiesIf you are unsure whether traffic is being processed properly by the virtual circuit or the policies within your virtual cir-
cuit, it is best to use real time monitoring to determine if traffic is hitting your virtual circuit as you would expect.
© 2014 Exinda Networks, Inc.

27 Chapter 3: Report on Network Activity by User
1. On the Real Time Conversations screen.
2. Select Show Policies checkbox at the top of the screen to group the conversations by virtual circuit andpolicy.
3. Look at the traffic falling under your virtual circuit to decide if the correct traffic is in there.
4. If there is traffic that you were expecting that is not there, look in other virtual circuit groups to see where youexpected traffic is.
5. If your traffic is falling into the wrong virtual circuit, check the definition of the affected virtual circuits andensure themost specific virtual circuit is higher in the policy tree.
Understanding the Conversation Report
When a conversation has been accelerated by the Exinda appliance, the Conversation are highlighted inyellow and the Application Acceleration technologies being applied to that conversation are displayed on theleft-hand side as a series on icons. For example, the FTP connection below is accelerated and is also beenprocess by WAN Memory.
When a conversation has been processed by Edge Cache it is highlighted in blue.
The following legend describes themeaning of each icon.
WAN Memory: The connection is been processed by WAN Memory.
CIFS Acceleration: The connection is been processed by CIFS Acceleration.
SSL Acceleration: The connection is been processed by SSL Acceleration.
NCP Acceleration: The connection is been processed by NCP Acceleration.
MAPI Acceleration: The connection is been processed by MAPI Acceleration.
When an appliance is deployed in a High Availability (HA) or Clusteringmode, the following icons may alsoappear next to each conversation.
Asymmetric: The traffic is asymmetric, and is not being accelerated.
Local: The connection is passing through this appliance in the cluster.
Remote: The connection is passing through another appliance in the cluster.
Local/Remote: The connection is passing though both this and other appliances in thecluster.
© 2014 Exinda Networks, Inc.

© 2014 Exinda Networks, Inc.
Chapter 4: Controlling Traffic based onUsersAfter reviewing the traffic patterns of the users, it may be necessary to implement optimization policies toensure a positive user experience for key applications or traffic types. By limiting the traffic usage for aspecific group of users, network availability can be increased for other user groups.
Note Active Directory must be configured before optimization policies can target specificusers and groups. See "Integrate the Exinda Appliance with Active Directory" on page 6.
1. "Configure Network User Objects" on page 28 and "Configure Network User Groups" on page 29.
2. "Optimize Traffic Based on Users andGroups" on page 29
Configure Network User ObjectsThe Network Users page displays a pre-populated list of users (and their associated IP addresses) from either theExinda Active Directory Connector, or from static users entered using the CLI. Select which individual users youwant to define as dynamic network objects. Once a user is defined as a dynamic network object, it can be used inthe Optimizer policies.
Where do I find this configuration?
Go to Objects > Users & Groups > Network Users.
Identify Users on the Network

29 Chapter 4: Controlling Traffic based on Users
To define a user as a dynamic network object
1. Select the checkbox for the user.
2. Click Add Network Object.
The Network Status icon for the user changes to , indicating it is a network object.
To stop identifying a user as a dynamic network object
1. Select the checkbox for the user.
2. Click Remove Network Object.
The Network Status icon for the user changes to , indicating it is no longer a network object.
Configure Network User GroupsThe Network Groups page displays a pre-populated list of groups from either the Exinda Active DirectoryConnector, or from static groups entered using the CLI. This page allows you to select which groups you want todefine as dynamic network objects. Once a group is defined as a dynamic network object, it can be used in theOptimizer policies.
Where do I find this configuration?
Go toObjects > Users & Groups > Network Groups.
To define a group as a dynamic network object
1. Locate the group in the list, and click Edit.
2. Tomap all users within the selected network group to the network object, selectMap to Network Object.
3. Select Ignore Domain to exclude the domain prefix.
4. Click Apply.
The Network Status icon for the group changes to , indicating it is a network object.
If the dynamic network object is created frommultiple groups, the groups are combined into a single entryand each domain is identified after the group name.
To stop identifying a group as a dynamic network object
1. Locate the group in the list, and click Delete.
The Network Status icon for the user changes to , indicating it is no longer a network object.
If the dynamic network object was created frommultiple groups, each group is again listed individually inthe list.
Optimize Traffic Based on Users and GroupsCreate policies that affect the traffic based on the source or destination host.
© 2014 Exinda Networks, Inc.

Chapter 4: Controlling Traffic based on Users 30
Note Active Directory must be configured before optimization policies can target specificusers and groups. See "Integrate the Exinda Appliance with Active Directory" on page 6.
1. Click Optimizer > Policies.
2. Type a name for the policy.
3. Set the required bandwidth and acceleration parameters.
4. In the Filter Rules area, select the network user or network group object in the Host source and des-tination fields, and specify the ToS/DSCP or Application traffic to be affected.
5. Click Create New Policy.
6. Once the desired policies are in place on all Exinda appliances, restart the Optimizer. In the appliancestatus bar, click Restart.
© 2014 Exinda Networks, Inc.

© 2014 Exinda Networks, Inc.
Chapter 5: Troubleshoot issues withActive Directory configurationIf you are experiencing issues with the Active Directory integration, these troubleshooting topics may helpresolve the issue.
n "The Exinda appliance reboots every night" on page 31
n "WMI Service is not running" on page 31
n "No communication between the Exinda Active Directory Connector and the Exinda appliance" onpage 32
n "The IP addresses are not beingmapped to the AD users and groups" on page 32
n "Changes to the Exinda Active Directory Controller have no effect" on page 35
n "Excluded users still appear on the Exinda appliance" on page 34
n "Exinda Active Directory Connector stops running" on page 34
The Exinda appliance reboots every nightProblem
Whenmultiple installations of the Exinda Active Directory Connector have theSend Active Directory userand group information to Exinda appliance(s) at startup option selected, the Exinda appliance isoverwhelmed with duplicate data from the connectors and causes the appliance to shut down.
Resolution
1. On each instance of the Exinda Active Directory Connector, check whether theSend Active Dir-ectory user and group information to Exinda appliance(s) at startup option is selected.
2. If the option is selected onmore than one instance, deselect the option on all Exinda Active DirectoryConnectors.
3. Choose one instance of the Exinda Active Directory Connector, and select theSend Active Dir-ectory user and group information to Exinda appliance(s) at startup checkbox, and click OK.
WMI Service is not runningProblem
When I try to access the Exinda Active Directory Connector, themessage “The installer has detected thatWMI Service is not running. Consult Windows Help files to find information on how to start WMI Service.” is
Identify Users on the Network

32 Chapter 5: Troubleshoot issues with Active Directory configuration
displayed.
Resolution
This message indicates that Windows Management Information (WMI) service is disabled. The ExindaActive Directory Connector will not be able run correctly until theWMI service is started.
To start theWMI service, at a command prompt type the following command: net start winmgmt
System account showing in traffic reportsProblem
When viewing conversations, the IP address and username of an account created for signing SMB traffic isbeing displayed as generating traffic rather than the actual user generating the traffic.
Resolution
When SMB signing is configured and enabled, the SMB signing account is the last user account registeredas using an IP address, the Exinda Active Directory Connector transfers the SMB signing account as theusername that is generating the traffic. To ignore the SMB signing account and report the traffic as beinggenerated by the actual user, configure the Exinda Active Directory Connector to ignore the SMB signingaccount. See "Exclude specific usernames from reports" on page 13.
No communication between the Exinda Active Directory Connectorand the Exinda applianceProblem
You see one of the following symptoms:
n A connection cannot be established between the Exinda Active Directory Connector and the Exindaappliance.
n The Last Contact status on theSystem > Network > Active Directory tab is blank or red.
Resolution
1. Ensure your firewall allows incoming and outgoing traffic on the port configured for the Exinda appli-ance to communicate with the Exinda Active Directory Connector
The IP addresses are not being mapped to the AD users and groupsProblem
When integrating the AD client with the Exinda appliance, the IP addresses are not beingmapped to the users andgroups on the Exinda appliance.
© 2014 Exinda Networks, Inc.

Chapter 5: Troubleshoot issues with Active Directory configuration 33
Resolution
Logon auditingmust be enabled for IP address to bemapped to the users.
You can investigate by verifying whether the domain controller is logging particular event IDs. If these events areabsent then you will need to enable logon auditing.
1. In the Domain Controller, go toEvent Viewer > Windows Logs > Security Logs.
ForWindows Server 2008, 2008 R2, 2012, and 2012 R2, you should see Event ID #4624
ForWindows Server 2003, 2003 R2, you should see Event ID #528 and 540.
If the Domain Controller is not logging these events, then you need to enable logon auditing on the domaincontroller and renumerate the AD client on the Exinda appliance.
1. In the Domain Controller, go toStart menu > Administrative Tools > Group Policy Management Snap-in.
2. In the Group Policy Management tree, go to your domain, expand theGroup Policy Objects node, andselect Default Domain Controllers Policy.
3. Right click onDefault Domain Controllers Policy and select Edit from the context menu.
4. In theGroup Policy Management Editor dialog, in the tree control, go toComputer Configuration >Policies > Windows Settings > Security Settings > Local Policies > Audit Policy.
5. In the policy list on the right, click onAudit logon events and ensure that Success is checked.
© 2014 Exinda Networks, Inc.

34 Chapter 5: Troubleshoot issues with Active Directory configuration
6. On the Exinda appliance,go toSystem > Network > Active Directory.
7. Click theRenumerate button.
8. Apply the changes by executing the following command via a CMD console in the Domain Controller:
gpupdate /force
Exinda Active Directory Connector stops runningProblem
Even after restarting the Exinda Active Directory Connector or the Exinda AD service the Exinda ActiveDirectory Connector does not continue running, and requires constant restarts.
Resolution
1. The Exinda Active Directory Connector requires .NET version 4.0 for it to run successfully on a serverother than the Active Directory server. Ensure .NET 4.0 or later is installed on the server running theExinda Active Directory Connector.
2. If the Active Directory server is runningWindows 2003 R2, ensure the Exinda Active Directory Con-nector is installed directly on the Active Directory server.
3. Review your event logs for .NET Run Time errors, and attempt to resolve those errors. The .NETinstallationmay need to be reinstalled and the .NET 4.0 services and other environmental servicessuch as WMI may need to be updated.
Excluded users still appear on the Exinda applianceProblem
Even though a user name has been added to the Excluded list on the Exinda Active Directory Connector, theusername continues to appear associated with traffic on the Exinda appliance.
Resolution
1. Verify that the username on the Excluded tab of the Exinda Active Directory Connector matches theusername in Active Directory.
The username is case sensitive. If the Active Directory has the user Domain/Test.User, and theexcluded list has the user as Domain/test.user, the traffic is not excluded.
Note Regardless of the case of usernames in Active Directory, the Exinda appliancedisplays the usernames with the first name capitalized and the surname in lower case;for example Domain/Test.user. Do not use the value in the Exinda appliance whenadding a username to the Excluded list.
© 2014 Exinda Networks, Inc.

Chapter 5: Troubleshoot issues with Active Directory configuration 35
2. If the casematches on the usernames, restart the AD Client Service and renumerate the Exinda appli-ance. See "Change the state of the Exinda Active Directory Connector" on page 17 and "Requestupdated user and group information from the Active Directory server" on page 13.
Changes to the Exinda Active Directory Controller have no effectProblem
After making changes to the configuration of the Exinda Active Directory Controller, the information reportedon the Exinda appliance appears to be the same as before the changes.
Resolution
1. To ensure the latest configuration is being used, restart the AD Client Service and renumerate theExinda appliance. See "Change the state of the Exinda Active Directory Connector" on page 17 and"Request updated user and group information from the Active Directory server" on page 13.
© 2014 Exinda Networks, Inc.