Embed Size (px)
Citation preview

s4h26 – Unit 4 / Exercise 3
s4h26 openSAP: Production Planning with Demand
Simulation and Detailed Scheduling
Exercise 3: Production Planning and Finite Scheduling
PUBLIC

s4h26 – Exercise 3
2
Contents BEFORE YOU START ........................................................................................................................... 3
Prerequisites for this exercise ........................................................................................................ 3
Logon Data .................................................................................................................................... 3
Logon to system (SAP S/4HANA) .................................................................................................... 3
Used Master data: ......................................................................................................................... 3
Exercise 3: Production Planning and Detailed Scheduling................................................................... 4
Overview ....................................................................................................................................... 4
Objective ................................................................................................................................... 4
Exercise Description ................................................................................................................... 4
Step 1: Execute multilevel MRP Live .............................................................................................. 5
Step 2: App Monitor Capacity Utilization ....................................................................................... 7
Step 3: Detailed Scheduling ......................................................................................................... 10

s4h26 – Exercise 3
3
BEFORE YOU START
Prerequisites for this exercise
You must have created your own instance “SAP S/4HANA CAL system”. Details are provided on the webpages of the course and in the Exercises of Unit01 of this course.
Execute Exercise 1 (“Maintain Planned Independent Requirements”) and Exercise 2 (“Predictive MRP”) of Unit 4.
Logon Data
User: S4H_PPS
Password: Welcome1
Logon to system (SAP S/4HANA)
Logon to the SAP FIORI Launchpad.
You will need to access the system using the Windows Remote Desktop connection.
Use the following URL to access the SAP Fiori Launchpad –
https://vhcals4hcs.dummy.nodomain:44301/sap/bc/ui2/flp?sap-client=100&sap-language=EN
The URL is available on the Welcome page of the system.
Logon to the SAP FIORI Launchpad.
Used Master data:
Product Group: R-FIN
Materials: R-FIN-10
R-FIN-20
R-FIN-30
R-FIN-40
R-FIN-50
R-FIN-60

s4h26 – Exercise 3
4
Exercise 3: Production Planning and Detailed
Scheduling
Overview
Estimated time: 20 mins
Objective In this exercise you execute a multilevel Material Requirements Planning (MRP) to check the material availability across all BOM Levels. In case of shortage the
MRP creates planned orders and purchase requisitions. After the MRP you check the capacity load and execute a detailed scheduling in the graphical board.
Exercise Description
In the previous exercise you’ve created the requirements for the finished products. To cover these demands you will run the material requirements planning to create
the replenishment elements. The MRP calculates procurement quantities, dates as well as plans the corresponding procurement elements. The procurement element in the planning run for inhouse production is the planned
order or, for external procurement, the purchase requisition. In this exercise we are using the planned order.
In the SAP Fiori app Monitor Capacity Utilization, you evaluate the resource load in your area of responsibility. The app provides you with an overview of which resources are already being fully
utilized, have a capacity overload or underload or whose utilization is in normal range. You than execute a detailed scheduling in the graphical planning board to plan the
resource schedule and the order dates and times in detail by taking resource availability into account. The result of this step is a feasible production plan for two weeks.
Eventually, you check the result of the detailed finite scheduling in the app Monitor Capacity Utilization and notice that there is no more capacity overload on the resources.
Depending on the SAP GUI settings, your screen layout or navigation can vary in some details. However, all mentioned functions are available in the system.

s4h26 – Exercise 3
5
Step 1: Execute multilevel MRP Live In this process step, you execute the MRP Live. What to Do What You Will See
1. Access SAP GUI. Select Folder PP_Plan. Click on MD01N_MRP Live.
2. Click on “Get Variant”. Select the variant OPENSAP_MRP_N.
3. Click on Execute to trigger the MRP run.
According to the pre-defined planning scope of the template the MRP will be executed for
the materials MRP Controller RIG and the plant 1710. The flag Changed BOM Components triggers a multilevel BOM.

s4h26 – Exercise 3
6
4. The MRP is executed for all BOM levels and some information is provided about the progress of the MRP run.
5. After the MRP run has finished, some information about the run is displayed. Select the first line and click on Material List.
On this screen the log for the MRP run is displayed with several options to analyze the
MRP run. In the screen above information on runtime and number of planned materials is
displayed. The MRP level displays all BOM levels and the number of materials planned per BOM level. You can also check whether there are any materials with MRP exception
messages.
Optionial: Select the first line and click on MRP Level or Materials with Messages.
6. Click on “Go Back” after you have checked the list of planned materials.
In this view a list of all planned materials is displayed. The finished goods R-FIN-10 to R-
FIN-60 of the forecast scenario and the semi-finished goods and raw materials across all BOM levels of the finished goods have been planned.

s4h26 – Exercise 3
7
Step 2: App Monitor Capacity Utilization In this step, you check the capacity utilization after the MRP run. What to Do What You Will See
1. Access the SAP FIORI Launchpad. Navigate to Advanced Planning. Select the App Monitor Capacity Utilization in the area of Advanced Planning.
2. Click on the utilization chart of the first work center displayed.
With this app, you can monitor the utilization of resources. The list provides a quick overview of which resources are already being fully utilized or have a capacity overload so
you can react quickly to critical situations. Furthermore, you can easily check which
resources have a capacity underload and whose utilization is in the normal range.
The utilization chart shows the capacity utilization on a bucket level, in our example per day. Days with an overload are colored in red.
3. Check the capacity utilization. Click on the navigation button to the right of the utilization chart.

s4h26 – Exercise 3
8
In some periods there is a large overload, in other periods there are no capacity requirements at all. That is a quite common situation after the release of a forecast. Usually
the planned independent requirements are created on the beginning of a period such as week. This may result on peaks on certain resources. These peaks can be levelled in
detailed planning (see Step 3 of this exercise).
4. Click on the dropdown menu “Utilization” and select the option Material.
In the detailed view of the work center utilization, different options for the utilzation analyses
are provided such as analyses considering material, order type or activity type (set up ime or processing time).
5. Select the tab “LIST OF OPERATIONS”.
In this screen the capacity requirements in hours per material are displayed.

s4h26 – Exercise 3
9
6. Click on SAP to navigate to the Home Screen.
A list of the operations scheduled on this work center is displayed. The planer would have the option to navigate to more detailed information of the operation.

s4h26 – Exercise 3
10
Step 3: Detailed Scheduling In this process step, you execute a detailed scheduling in the graphical planning board to create a feasible production plan for two weeks. Finally, you check the capacity load in the App Monitor Capacity Utilization. What to Do What You Will See
1. Access SAP GUI. Open the folder favorites and the folder PPDS_Plan. Click on Detailed Scheduling Planning Board – Variable View.
2. In the field “Overall Profile” maintain OPENSAP_01. Alternatively, you can select this entry from the input help. Maintain the value 000 in the field Plng Version. Click on the button “Execute” or press F8 to access the detailed scheduling planning board.
The overall profile of the detailed scheduling planning board controls many settings of the
planning board such as available buttons, functionalities, screens displayed and colouring of the graphical objects. For the openSAP course the overall profi OPENSAP_01 is pre-
defined displaying the view for work center and resource utilization and providing some
colouring for different set up keys (product groups).
The planning version 000 is the productive planning version in PP/DS and is integrated to SAP S/4HANA. In PP/DS it would also be possible to create simulative planning versions.
(planning versions is a ten-digit alphanumeric- field – CHAR10)

s4h26 – Exercise 3
11
3. On the left-hand table chart of the ‘Resource Chart’ in the upper screen select the resource Painting (Resource WR-PAINT_1710_001) Click on resource WR-PAINT_1710_001 and execute a right mouse click.
The Detailed Scheduling Planning Board for the overall profile OPENSAP_01 displays the
Resources Chart on the upper part and the Resource Utilization in the lower part. For each resource there is a separate line. One resource corresponds to a work center capacity in
SAP S/4HANA (e.g. labour capacity, machine capacity).
Above the charts there are many buttons and menus available - to execute different planning functionalities
- to change settings for scheduling or the displayed information of the planning
board - to navigate to further information such as detailed information on operation and
resources or the alert monitor
The overall profile controls also the functionalities / buttons available in the planning board.
4. A list of functionalities is displayed. Select the first entry “Begin with first graphical object” to navigate to the first operations.
In PP/DS many functionalities can be triggered by the right-mouse click.
5. Execute a right mouse click on the resource “Painting”.
s4h26 – Exercise 3
12
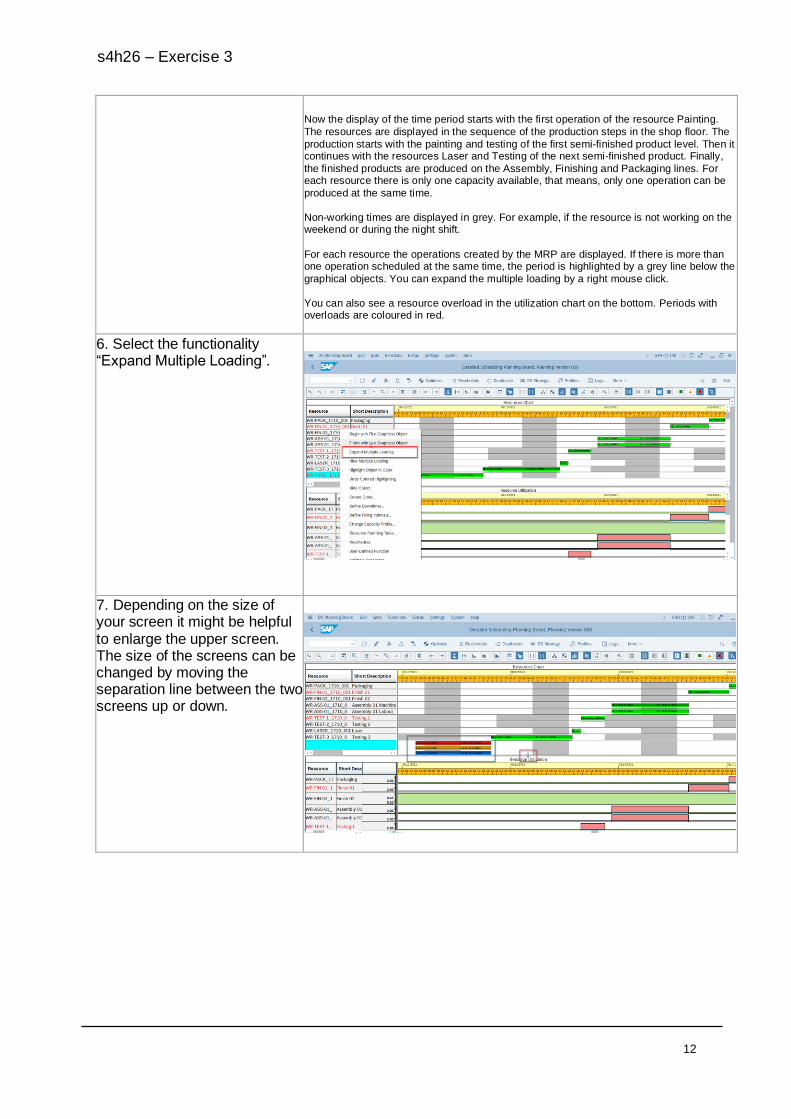
Now the display of the time period starts with the first operation of the resource Painting.
The resources are displayed in the sequence of the production steps in the shop floor. The
production starts with the painting and testing of the first semi-finished product level. Then it continues with the resources Laser and Testing of the next semi-finished product. Finally,
the finished products are produced on the Assembly, Finishing and Packaging lines. For each resource there is only one capacity available, that means, only one operation can be
produced at the same time.
Non-working times are displayed in grey. For example, if the resource is not working on the weekend or during the night shift.
For each resource the operations created by the MRP are displayed. If there is more than one operation scheduled at the same time, the period is highlighted by a grey line below the
graphical objects. You can expand the multiple loading by a right mouse click.
You can also see a resource overload in the utilization chart on the bottom. Periods with overloads are coloured in red.
6. Select the functionality “Expand Multiple Loading”.
7. Depending on the size of your screen it might be helpful to enlarge the upper screen. The size of the screens can be changed by moving the separation line between the two screens up or down.

s4h26 – Exercise 3
13
8. Click on “Reschedule”.
There are five operations scheduled at the same time. In our exercise the operations are
colored according the set up key in the routing for all BOM levels to make it easier to identify the BOM structures for the different finished products.
The resource Painting is a bottleneck resource and therefore you should reschedule the
operations to solve the overload situation on this resource. A simple planning functionality is “Rescheduling”. The orders are scheduled according to the settings in the strategy profile.
In our exercise the system executes a backwards scheduling and tries to find a slot for the
order in the planning direction backwards from the current date of the operation. If operations are at the same time, they are sequenced according to the setup key (colour).
9. Right-click on the Resource “Testing 1” and select “Expand Multiple Loading”.
The operations for the Resource Painting have been rescheduled.
Now we would like to check the operations scheduled on the Resource Testing 1.
10. Click on “Settings” to change the time scale of the planning board. (If you don’t find the function “Settings” on your screen, please navigate via “More”)

s4h26 – Exercise 3
14
The multiple loading for the resource Testing 1 has been expanded. Again there are five
operations scheduled at the same time.
11. Click on “Time Scale” and then on “Week” to display a larger period in the planning board. If you don’t see the resource “Testing 1” after you’ve changed the time scale change again the size of your screen chart (see step 6) or scroll within the screen-chart till testing is displayed again.
12. Click on the Click on the resource “Testing 1” to select the resource. Click on “Reschedule” to reschedule the operations for the resource Testing 1.
After changing the time scale you get an overview on some weeks.
13. Click on the resource “Finish 01”. Execute a right-mouse click on the resource “Finish 01” and select “Expand Multiple Loading”.
For the resource Testing 1 there is the alternative resource Testing 2 maintained in the
routing. Since the strategy profile allows the use of alternative resources, the operations
have been rescheduled to both resources Testing 1 and Testing 2.

s4h26 – Exercise 3
15
14. Click on “Reschedule” to reschedule the operations of the resource “Finish 01”.
The multiple loading for the resource Finishing 1 has been expanded. Again, there are five operations scheduled at the same time.
15. Click on “DS Strategy” to change strategy settings for detailed scheduling.
There is the resource Finish 2 maintained as an alternative resource for the resource Finish 1 in the master data. Therefore, the operations have been rescheduled to both resources.
However, in the last planning meeting we have decided that we will not run resource Finish 02 for the next weeks. Therefore, the strategy settings should be changed and the last
rescheduling should be reset.
16. In the field “Current Modes” select the value “Retain” to forbid the switch to alternative resources.
In the strategy settings the setting “Current Modes” controls whether the switch to alternative resources should be allowed.
If the operations were not scheduled to alternative resources in step 14. Set value to
“Select any Mode” and repeat step 14.

s4h26 – Exercise 3
16
17. Click on Undo to reset the last rescheduling.
In the planning board there is the possibility to undo most of the planning functionalities you
have executed just before.
18. Click on “Reschedule” .
After executing the “Undo” functionality, the situation is as before the last rescheduling. All
operations are scheduled on resource Finish 01 causing an overload situation there. After changing the strategy profile we reschedule now the operations again without allowing
alternative resources.
19. Select the operations for the resource “Painting” for the first complete two weeks with scheduled operations. You select them directly in the graphic. It is important that the graphic object is selected completely.
The operations on resource Finish 01 have been rescheduled.
Now we have resolved the overload of the bottleneck resources. Now we would like to
create a consistent production schedule across all BOM levels. Therefore, the operations of all BOM levels should be scheduled according to the bottleneck resources.

s4h26 – Exercise 3
17
20. Click on “Functions” and then on Heuristics. Select “Stable Forward Scheduling Earliest”. (Navigate to “Functions” via “More” if not available on your screen)
The selected operations are highlighted in light blue.
Now we execute the heuristic “Stable forward scheduling Earliest” for the selected
operations. .
21. Select the first or second operation of the resource and execute a right mouse click.
The operations for the selected period are rescheduled multi-level. The heuristics considers
the pegging relationships between the different BOM levels. That means, that the planned orders for the semi-finished and finished products are scheduled in the correct sequence.
Furthermore, the heuristics tries to avoid gaps within the operations of one resource – if possible.
You can check the relationship within orders and between orders by displaying the
relationship directly in the planning board.
22. Select “Display Relationships/Pegging Relationships”.

s4h26 – Exercise 3
18
23. Click on Save.
The relationship is displayed by blue arrows between the operations across all BOM levels. In our example, the colouring also supports you to identify the operations of the same BOM
structure.
24. Click on Adopt to save your changes in the productive environment.
You have three options. You can save the data to a simulation version and call it later to
work on it. In this case the changes are not saved in the productive environment. You can cancel your changes. Or you can adopt the changes you have done in the planning board
to the productive environment.
25. Access the SAP FIORI Launchpad. In Advanced Planning select the App Monitor Capacity Utilization.

s4h26 – Exercise 3
19
The overload situation for the next three weeks has been resolved and the production for
the bottleneck resources has been levelled. Of course, there is still some capacity left for further production. This was the start for planning of new products and new resources.
Now you have finished all Exercises (1-3) of unit 4 and completed the “Production Planning
with Demand Simulation and Detailed Scheduling” scenario in SAP S/4HANA.

s4h26 – Exercise 3
20
© 2021 SAP SE or an SAP affiliate company. All rights reserved. No part of this publication may be reproduced or transmitted in any form or for any purpose without the express permission of SAP SE or an SAP affiliate company. The information contained herein may be changed without prior notice. Some software products marketed by SAP SE and its distributors contain proprietar y software components of other software vendors. National product specifications may vary. These materials are provided by SAP SE or an SAP affiliate company for informational purposes only, without representation or warranty of any kind, and SAP or its affiliated companies shall not be liable for errors or omissions with respect to the materials. The only warranties for SAP or SAP affiliate company products and services are those that are set forth in the express warranty statements accompanying such products and services, if any. Nothing herein should be construed as constituting an additional warranty. In particular, SAP SE or its affiliated companies have no obligation to pursue any course of business outlined in this document or any related presentat ion, or to develop or release any functionality mentioned therein. This document, or any related presentation, and SAP SE’s or its affiliated companies’ strategy and possible future developments, products, and/or platform directions and functionality are all subject to change and may be changed by SAP SE or its affiliated companies at any time for any reason without notice. The information in this document is not a commitment, promise, or legal obligation to deliver any material, code, or functionality. All forward-looking statements are subject to various risks and uncertainties that could cause actual results to differ materially from expectations. Readers are cautioned not to place undue reliance on these forward-looking statements, and they should not be relied upon in making purchasing decisions. SAP and other SAP products and services mentioned herein as well as their respective logos are trademarks or registered trademarks of SAP SE (or an SAP affiliate company) in Germany and other countries. All other product and service names mentioned are the trademarks of their respective companies. See www.sap.com/copyright for additional trademark information and notices.
www.sap.com/contactsap
Coding Samples Any software coding or code lines/strings (“Code”) provided in this documentation are only examples and are not intended for use in a production system environment. The Code is only intended to better explain and visualize the syntax and phrasing rules for certain SAP coding. SAP does not warrant the correctness or completen ess of the Code provided herein and SAP shall not be liable for errors or damages cause by use of the Code, except where such damages were caused by SAP with intent or with gross negligence.