Embed Size (px)
Citation preview
EX36N Day/Night CameraCommercial Type Number
en Installation Manual

EX36 Series Corner-mount No-grip Table of Contents | en 3
Bosch Security Systems, Inc. Instruction Manual F.01U.172.707 | V2 | 2011.02
Table of Contents
1 Safety 41.2 Bosch Contact Information 6
2 Description 82.1 Unpacking 82.2 Parts List 82.2.1 Parts Included with the Product 82.2.2 User-Supplied Parts 9
3 Installation 103.1 Initial Preparations 103.2 Faceplate Removal 103.3 Input Power Connections 123.4 Mounting the Camera Housing 133.5 Camera - Directional Adjustment 153.6 LED Adjustments (EX36N only) 163.6.1 Directional Adjustments 163.6.1 Power Adjustments 163.7 Lens Replacement 163.8 Camera Re-assembly 17
4 Technical Information 194.1 Troubleshooting - Camera 194.2 Troubleshooting - LEDs 204.3 General Specifications 21
4 en | Safety EX36 Series Corner-mount No-grip
F.01U.172.707 | V2 | 2011.02 Instruction Manual Bosch Security Systems, Inc.
1 Safety
1.1 Important Safety Instructions– Read and follow all instructions.– Keep these instructions.– Heed all warnings.– Do not use this apparatus near water.– Clean with a dry cloth only.– Do not block any ventilation openings. Install in
accordance with manufacturer instructions.– Do not install near any heat sources such as radiators, heat
registers, stoves or other apparatus (including amplifiers) that produces heat.
– Do not defeat the safety purpose of the polarized or grounding-type plug. A polarized plug has two blades with one wider than the other. A grounding type plug has two blades and a third grounding prong. The wide blade or the third prong is provided for your safety. If the provided plug does not fit into your outlet, consult an electrician for replacement of the obsolete outlet.
– Protect the power cord from being walked on or pinched particularly at plugs, convenience receptacles, and where the power exits from the unit.
– Only use attachments and accessories specified by the manufacturer.
– Use only with the manufacturer specified cart, stand, tripod, bracket or table. If moving the cart and apparatus combination, use caution to avoid injury from tip overs.
– Unplug this apparatus during lightning storms or when unused for long periods of time.
– Refer all servicing to qualified service personnel. Servicing is required when the apparatus has been damaged in any way, such as power supply cord or plug is damaged, liquid has been spilled or objects have fallen onto or into the apparatus, the apparatus has been exposed to rain or moisture, does not operate normally, or has been dropped.
EX36 Series Corner-mount No-grip Safety | en 5
Bosch Security Systems, Inc. Instruction Manual F.01U.172.707 | V2 | 2011.02
FCC InformationThis equipment has been tested and found to comply with the limits for a digital device, pursuant to part 15 of the FCC rules. These limits are designed to provide reasonable protection against harmful interference in a residential installation. As part of its normal operation, this device can generate radio frequency energy and if not installed and used in accordance with the installation manual may cause interference to radio communications. However, there is no guarantee that interference will not occur on a particular installation. If the device does cause interference to radio or television reception,
NOTICE! For best results, please read this Instruction Booklet prior to installing the EX36(N) camera.
WARNING! CSA Certified/UL Listed CLASS 2 power adaptors must be used in order to comply with electrical safety standards.
NOTICE! This product has been certified by CSA International to include the healthcare facility requirements of UL 2044.
EU Directives covered by this declaration:72/9/EC Low Voltage Directives89/336/EEC Electromagnetic Compatibility Directive
WARNING! This installation should be made by a qualified service person and conform to all local codes. Bosch Security Systems, Inc., will not be responsible for injuries or damages resulting from the improper installation or use of any camera sold by Bosch, its agents, distributors, or dealers.
6 en | Safety EX36 Series Corner-mount No-grip
F.01U.172.707 | V2 | 2011.02 Instruction Manual Bosch Security Systems, Inc.
the user is encouraged to try to correct the problem by one or more of the following measures:– Fit Ferrite beads on all cable to and from the power supply
box, within the box walls.– Route the composite cable between the camera and the
power supply in steel conduit piping over the entire run of the cable up to and including connection to a deep conduit base fitted under the camera and a conduit fitting adaptor in the wall of the PSU box.
– Contact a Bosch Service Center for further advice.
1.2 Bosch Contact InformationIf this unit needs service, contact the nearest Bosch Security Systems Service Center for authorization to return and for shipping instructions.USARepair CenterTelephone: 800-566-2283Fax: 800-366-1329E-mail: [email protected] ServiceTelephone: 888-289-0096Fax: 585-223-9180E-mail: [email protected] SupportTelephone: 800-326-1450Fax: 585-223-3508 or 717-735-6560 E-mail: [email protected]: 514-738-2434 Fax: 514-738-8480 Europe, Middle East, Africa RegionRepair CenterTelephone: 31 (0) 76-5721500Fax: 31 (0) 76-5721413E-mail: [email protected]

EX36 Series Corner-mount No-grip Safety | en 7
Bosch Security Systems, Inc. Instruction Manual F.01U.172.707 | V2 | 2011.02
Asia RegionRepair CenterTelephone: 65 63522776Fax: 65 63521776E-mail: [email protected] ServiceTelephone: 86 (0) 756 7633117 or 86 (0) 756 7633121Fax: 86 (0) 756 7631710E-mail: [email protected]
Warranty and additional informationFor additional information and warranty queries, please contact your Bosch Security Systems representative or visit our website at www.boschsecurity.com.
8 en | Description EX36 Series Corner-mount No-grip
F.01U.172.707 | V2 | 2011.02 Instruction Manual Bosch Security Systems, Inc.
2 DescriptionThe EX36(N) Night Vision Camera has been designed with tilt on its faceplate to allow corner mounting and to provide better angle views in small rooms. The housing and faceplate consist of tough materials to withstand damage in hostile environments such as prison cells and psychiatric wards.The smooth compact housing allows for tight installations without exposed wiring or mounting screws, while separate windows for the camera lens and LEDs result in a perfect picture without light rebound.A photocell circuit is used to provide automatic on/off infrared operation.The voltage regulator circuit allows for 12 VDC or 24 VAC operation, and a range in between. This regulator also provides protection from voltage surges, transient spikes, and reverse voltage.
2.1 UnpackingThis electronic equipment should be unpacked and handled with care. Check the parts list below and confirm that all items are included. Inspect the equipment thoroughly to ensure that nothing was damaged in transit.Contact a Bosch Service Center if a problem is noted. Please refer to Section 1.2 Bosch Contact Information, page 6 for contact information in your area.
2.2 Parts List
2.2.1 Parts Included with the ProductThe following items are supplied with the unit:– EX36(N) camera assembly– installation instruction booklet– Plastic bag containing one hex key for removal of faceplate
mounting screws

EX36 Series Corner-mount No-grip Description | en 9
Bosch Security Systems, Inc. Instruction Manual F.01U.172.707 | V2 | 2011.02
2.2.2 User-Supplied PartsThe following items are required for installation but are not supplied:– mounting hardware– mounting tools

10 en | Installation EX36 Series Corner-mount No-grip
F.01U.172.707 | V2 | 2011.02 Instruction Manual Bosch Security Systems, Inc.
3 Installation
3.1 Initial Preparations
WARNING! Important Mounting InstructionsThis apparatus must be securely attached to the wall in accordance with the installation instructions.Failure to follow installation instructions may result in injury.
WARNING! This installation should be made by a qualified service person and conform to all local codes.
WARNING!
The camera has been evaluated for corner wall mounting, through the mounting holes in the junction box using the following hardware:– Four (4) screws #8, 10TPI, Ø0.17", L:11/8"– Four (4) plastic anchors #8The camera has not been evaluated for safety requirements using other mounting kits..
AVERTISSEMENT !
INSTRUCTIONS DE MONTAGE IMPORTANTESCet appareil doit être solidement fixé sur le mur conformément à ces instructions d'installation. Le non-respect des instructions d'installation peut entraîner des blessures graves, voire mortelles.
AVERTISSEMENT !
L'installation doit exclusivement être réalisée par un personnel qualifié, conformément à toutes les règles locales en vigueur.
EX36 Series Corner-mount No-grip Installation | en 11
Bosch Security Systems, Inc. Instruction Manual F.01U.172.707 | V2 | 2011.02
– Determine the operating voltage at the installation site.– Determine the optimum location for the camera. Refer to
Section 3.4 Mounting the Camera Housing.– All units have been tested prior to shipment. After the
wiring has been reconnected, check the unit’s operation before installation.
– Follow these installation steps in sequence:
3.2 Faceplate RemovalYou must remove the faceplate prior to installation in order to reach the mounting holes. You may need to change the directional angle of the lens. Refer to Figure 3.1. 1. Place the camera housing on a flat surface.2. Use the supplied hex key to remove the six screws holding
the faceplate into the housing.3. Remove the square foam cushion attached to the camera
lens.4. Ensure that the polycarbonate windows in the faceplate
are not scratched.
AVERTISSEMENT ! La caméra a été testée dans le cadre d'un montage mural avec le matériel suivant :– Quatre (4) vis #8, 10TPI, Ø0.17", L:11/8"– Quatre (4) cheville en plastique #8
La conformité de la caméra aux exigences de sécurité n'a pas été testée avec d'autres kits demontage.
Installation Step PAGE
Faceplate Removal Page 10
Input Power Connections Page 12
Mounting the Camera Housing Page 13
Camera - Directional Adjustment Page 15
LED Adjustments Page 16
Camera Re-Assembly Page 17
12 en | Installation EX36 Series Corner-mount No-grip
F.01U.172.707 | V2 | 2011.02 Instruction Manual Bosch Security Systems, Inc.
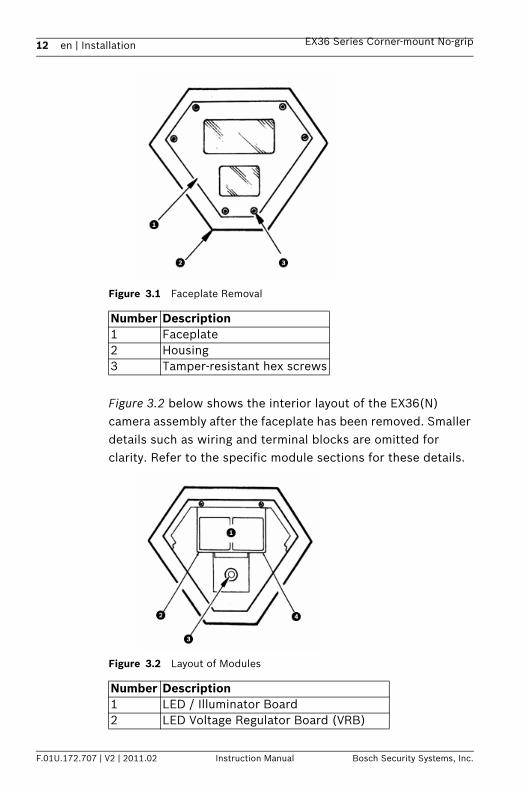
Figure 3.1 Faceplate Removal
Figure 3.2 below shows the interior layout of the EX36(N) camera assembly after the faceplate has been removed. Smaller details such as wiring and terminal blocks are omitted for clarity. Refer to the specific module sections for these details.
Figure 3.2 Layout of Modules
Number Description1 Faceplate2 Housing3 Tamper-resistant hex screws
Number Description1 LED / Illuminator Board2 LED Voltage Regulator Board (VRB)
EX36 Series Corner-mount No-grip Installation | en 13
Bosch Security Systems, Inc. Instruction Manual F.01U.172.707 | V2 | 2011.02
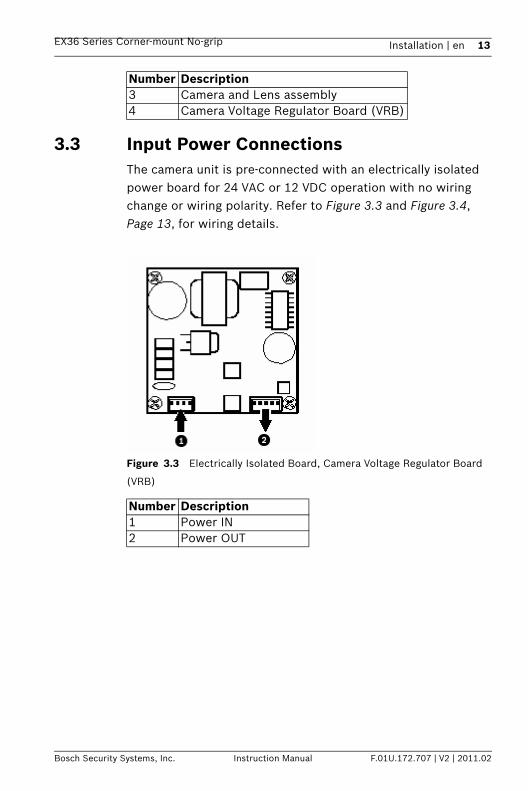
3.3 Input Power ConnectionsThe camera unit is pre-connected with an electrically isolated power board for 24 VAC or 12 VDC operation with no wiring change or wiring polarity. Refer to Figure 3.3 and Figure 3.4, Page 13, for wiring details.
Figure 3.3 Electrically Isolated Board, Camera Voltage Regulator Board
(VRB)
3 Camera and Lens assembly4 Camera Voltage Regulator Board (VRB)
Number Description
Number Description1 Power IN2 Power OUT

14 en | Installation EX36 Series Corner-mount No-grip
F.01U.172.707 | V2 | 2011.02 Instruction Manual Bosch Security Systems, Inc.
Figure 3.4 Board Connections, LED Voltage Regulator Board (VRB)
3.4 Mounting the Camera Housing1. Select a suitable location that is protected from accidental
damage, tampering, and environmental conditions exceeding the unit’s specifications.
2. Locate the unit so that it cannot be easily interfered with, either intentionally or accidentally.
3. Select a mounting surface capable of supporting the combined weight of the unit and mounting hardware to
Number Description1 LED Power Output2 Voltage Regulator Board (VRB) Power Input
CAUTION! The selected mounting location should not place the unit in a situation where its environmental specifications could be exceeded. Ensure that the location is protected from falling objects, accidental contact with moving objects, and unintentional interference from personnel. Follow all applicable building codes.
EX36 Series Corner-mount No-grip Installation | en 15
Bosch Security Systems, Inc. Instruction Manual F.01U.172.707 | V2 | 2011.02
anticipate all expected conditions of both temperature and vibration.
4. Secure all cabling.
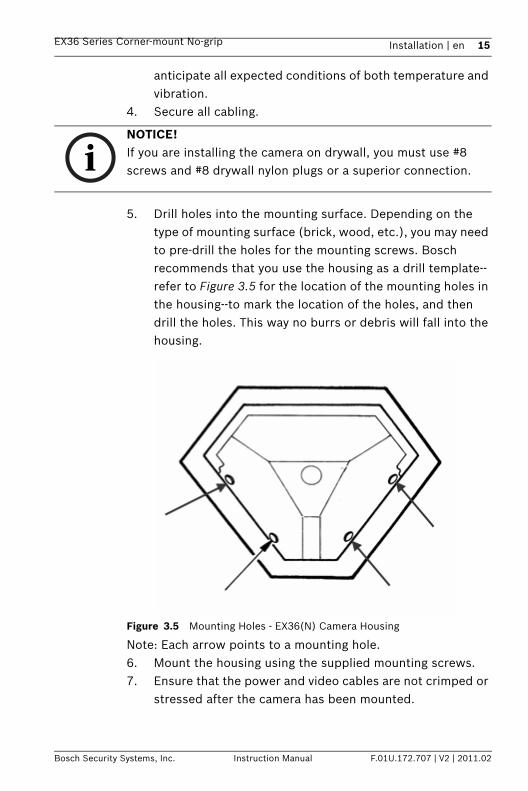
5. Drill holes into the mounting surface. Depending on the type of mounting surface (brick, wood, etc.), you may need to pre-drill the holes for the mounting screws. Bosch recommends that you use the housing as a drill template--refer to Figure 3.5 for the location of the mounting holes in the housing--to mark the location of the holes, and then drill the holes. This way no burrs or debris will fall into the housing.
Figure 3.5 Mounting Holes - EX36(N) Camera Housing
Note: Each arrow points to a mounting hole.6. Mount the housing using the supplied mounting screws.7. Ensure that the power and video cables are not crimped or
stressed after the camera has been mounted.
NOTICE! If you are installing the camera on drywall, you must use #8 screws and #8 drywall nylon plugs or a superior connection.

16 en | Installation EX36 Series Corner-mount No-grip
F.01U.172.707 | V2 | 2011.02 Instruction Manual Bosch Security Systems, Inc.
3.5 Camera - Directional AdjustmentBoth the camera and the LED array can be adjusted for optimum picture quality. The camera lens can be tilted on its axis via two adjustment screws on the mounting bracket. It can also be moved closer to or farther from the viewing window.
1. Mount the Camera/LED Array Assembly into the housing.2. Connect the video and power wires. 3. Check the picture for quality and directional alignment.4. If you must adjust the camera’s viewing angle or picture
quality, remove the Camera/LED Array Assembly. Refer to Figure 3.6.
Figure 3.6 Camera Directional Alignment
5. Loosen both adjustment screws for tilt or horizontal directional alignment.
6. Once optimal position is obtained, tighten the screws.
Number Description1 LED Array2 Tilt Adjustment3 Horizontal Adjustment4 Camera/Lens Assembly5 Adjustment screw
EX36 Series Corner-mount No-grip Installation | en 17
Bosch Security Systems, Inc. Instruction Manual F.01U.172.707 | V2 | 2011.02
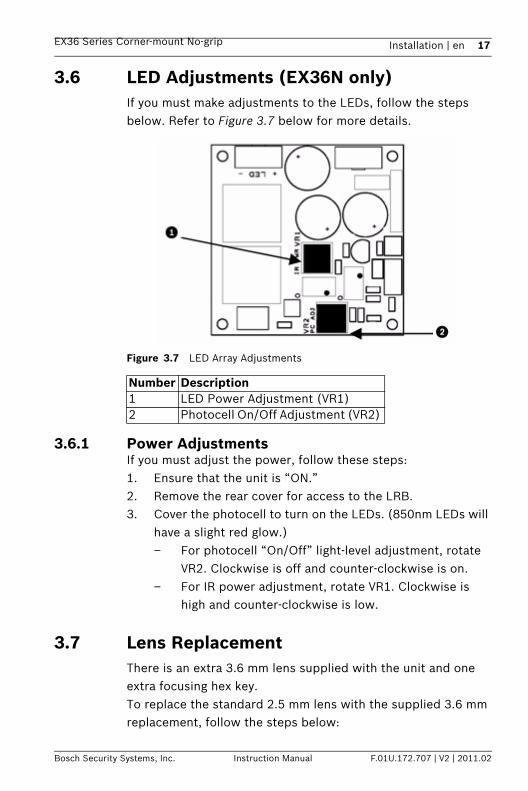
3.6 LED Adjustments (EX36N only)If you must make adjustments to the LEDs, follow the steps below. Refer to Figure 3.7 below for more details.
Figure 3.7 LED Array Adjustments
3.6.1 Power AdjustmentsIf you must adjust the power, follow these steps:1. Ensure that the unit is “ON.”2. Remove the rear cover for access to the LRB.3. Cover the photocell to turn on the LEDs. (850nm LEDs will
have a slight red glow.)– For photocell “On/Off” light-level adjustment, rotate
VR2. Clockwise is off and counter-clockwise is on. – For IR power adjustment, rotate VR1. Clockwise is
high and counter-clockwise is low.
3.7 Lens ReplacementThere is an extra 3.6 mm lens supplied with the unit and one extra focusing hex key.To replace the standard 2.5 mm lens with the supplied 3.6 mm replacement, follow the steps below:
Number Description1 LED Power Adjustment (VR1) 2 Photocell On/Off Adjustment (VR2)
18 en | Installation EX36 Series Corner-mount No-grip
F.01U.172.707 | V2 | 2011.02 Instruction Manual Bosch Security Systems, Inc.
1. Open the front facia using the supplied hex key.2. Remove the camera sub-assembly from the housing.
– For EX36MNXxxx models, use the supplied hex key to loosen the set screw that fixes the lens to its holder.
– For EX36C7xxx models, use a Phillips screw driver to loosen the screw that fixes the lens to its holder.
3. Thread the 2.5mm lens out. Thread the 3.6mm lens in.4. Power up the whole sub-assembly. 5. Connect video to a monitor.6. Adjust the back focus. Ensure that the focus is balanced on
both day and night mode. The camera can be forced to night-mode by covering the photocell.
7. Tighten the lens.8. Disconnect the power.9. Mount the whole camera sub-assembly back into the
housing.10. Adjust the camera sub-assembly mounting position so that
when you mount the sub-assembly to the housing, the lens will not touch the window.
11. Close the front facia.
3.8 Camera Re-assembly1. Ensure that all wires are properly connected, that all holes
are sealed against moisture penetration, and that all mounting screws are tight.
2. Slide the square foam pad over the camera’s lens. Ensure that the pad is as close to the faceplate viewing window as possible and the photocell is not covered by the foam pad. The foam pad is not symmetrical. Ensure that the LEDs are not covered when installing the pad.
3. Re-attach the faceplate with the six tamper-resistant screws. Tighten screws carefully, but do not overtighten.
4. Power up the camera and check its operation. Refer to Figure 3.8 below.

EX36 Series Corner-mount No-grip Installation | en 19
Bosch Security Systems, Inc. Instruction Manual F.01U.172.707 | V2 | 2011.02
Figure 3.8 Camera Re-assembly
Number Description1 Photocell2 Foam pad
EX36 Series Corner-mount No-grip Technical Information | en 19
Bosch Security Systems, Inc. Instruction Manual F.01U.172.707 | V2 | 2011.02
4 Technical Information
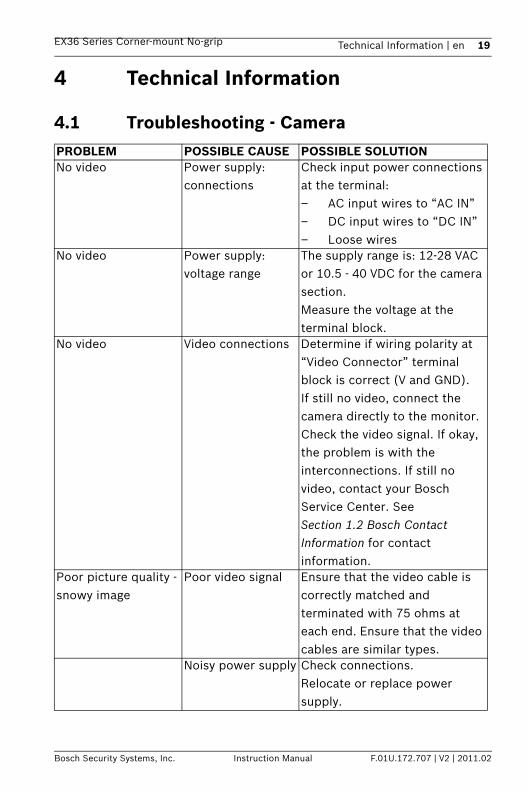
4.1 Troubleshooting - CameraPROBLEM POSSIBLE CAUSE POSSIBLE SOLUTIONNo video Power supply:
connectionsCheck input power connections at the terminal: – AC input wires to “AC IN”– DC input wires to “DC IN”– Loose wires
No video Power supply: voltage range
The supply range is: 12-28 VAC or 10.5 - 40 VDC for the camera section. Measure the voltage at the terminal block.
No video Video connections Determine if wiring polarity at “Video Connector” terminal block is correct (V and GND).If still no video, connect the camera directly to the monitor. Check the video signal. If okay, the problem is with the interconnections. If still no video, contact your Bosch Service Center. See Section 1.2 Bosch Contact Information for contact information.
Poor picture quality -snowy image
Poor video signal Ensure that the video cable is correctly matched and terminated with 75 ohms at each end. Ensure that the video cables are similar types.
Noisy power supply Check connections. Relocate or replace power supply.

20 en | Technical Information EX36 Series Corner-mount No-grip
F.01U.172.707 | V2 | 2011.02 Instruction Manual Bosch Security Systems, Inc.
4.2 Troubleshooting - LEDs
Horizontal scan lines,rolling up or down
Ground looping on video cable
Check the coax cable shield is not touching ground (for example, at couplings).
Reversed video orfaded image
Low voltage Check voltage at input power cable. Must be >10.5 VDC or >12 VAC for camera section.Check video leads for reversed connections.
PROBLEM POSSIBLE CAUSE POSSIBLE SOLUTION
PROBLEM POSSIBLE SOLUTIONFuse blows – Check fuse rating.
– Check for shorting between the enclosure and the input power.
Unsure if LEDs are “On” 850nm LEDs will have a faint red glow when “On”. 940nm LEDs are covert. Aim the LEDs directly at an IR-sensitive camera to see the lights or wait for the LEDs to warm up (two minutes).
EX36 Series Corner-mount No-grip Technical Information | en 21
Bosch Security Systems, Inc. Instruction Manual F.01U.172.707 | V2 | 2011.02
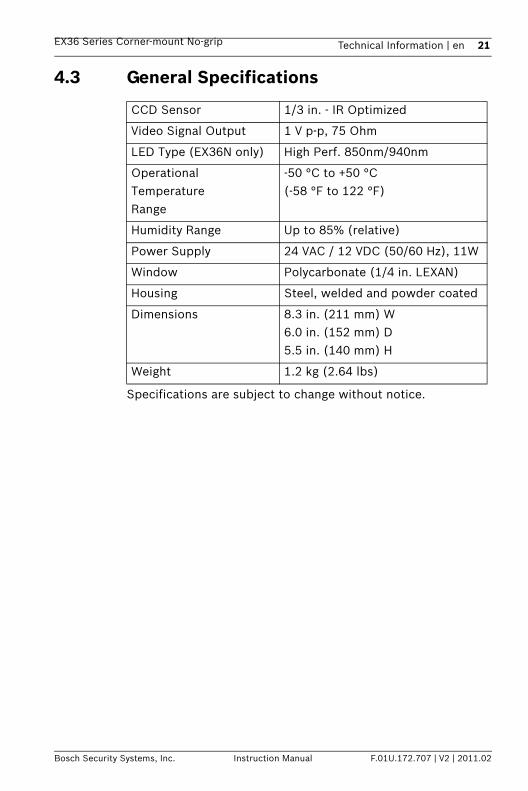
4.3 General Specifications
Specifications are subject to change without notice.
CCD Sensor 1/3 in. - IR Optimized
Video Signal Output 1 V p-p, 75 Ohm
LED Type (EX36N only) High Perf. 850nm/940nm
Operational Temperature Range
-50 °C to +50 °C(-58 °F to 122 °F)
Humidity Range Up to 85% (relative)
Power Supply 24 VAC / 12 VDC (50/60 Hz), 11W
Window Polycarbonate (1/4 in. LEXAN)
Housing Steel, welded and powder coated
Dimensions 8.3 in. (211 mm) W6.0 in. (152 mm) D5.5 in. (140 mm) H
Weight 1.2 kg (2.64 lbs)
22 en | Technical Information EX36 Series Corner-mount No-grip
F.01U.172.707 | V2 | 2011.02 Instruction Manual Bosch Security Systems, Inc.

Bosch Security Systems, Inc.850 Greenfield RoadLancaster, PA 17601USAwww.boschsecurity.us© Bosch Security Systems, Inc., 2011