Embed Size (px)
Citation preview

EvErything you nEEd to know to start taking your EnErgy back today

wELcoME to consErvationSince you’re reading this, you probably don’t need to be convinced that saving energy just makes sense. In fact, you’re probably eager to take advantage of all of the clever energy-saving tools that we’ve included in your Power Smart Energy Saving Kit.
Fortunately, it doesn’t matter whether you rent or own, whether you live in a house or an apartment. If you follow the instructions in this installation guide, you’ll be well on your way to discovering that life in a Power Smart home can be more affordable, more comfortable, and a little easier on the planet.
takE back your PowEr Fridge and freezer thermometers 2 Compact fluorescent lightbulbs 3 Efficient night light 4
takE back your hEat Foam weatherstrip 4 V-seal weatherstrip 5 Window insulator film 6 Outlet and switch sealer 8
takE back your watEr Hot water gauge 9 Tap aerator 10 Bathroom tap aerator 11 Water-flow measuring bag 11 Low-flow shower-head 12 Foam pipe wrap 13

saFEty First! Proper installation of the items in this kit is very important, both for maximum energy savings and for safe operation. Most of the items are very simple to install. Even for the more complicated items, if the instructions are carefully followed, you shouldn’t encounter any problems.
If you’re uncertain about the installation procedures, or if you suspect that the fittings in your home might not be in compliance with safety and building codes, please consult an electrician or other trade professional before proceeding. If you rent, check with your landlord before installing the items in the kit.
We want everyone’s conservation journey to get off on the right foot, so here are a few things to keep in mind while putting your new energy-saving tools to work for you:
• Makesureyouunplugelectricaldevicesorappliancesbeforeworkingwiththem. In the case of outlets and light switches, you should turn the electricity off completely from your circuit breaker panel.
• Pleasebemindfulofthetemperatureofpipes,waterheaters, and other plumbing fixtures before you work on them.
• Ifyouneedtogetupintoahighplacetoreachalightbulborwindow, always use an approved ladder, and maintain three points of contact (both feet and one hand in contact with the ladder) at all times while you work.
• Forenergysavingtoolsthatyoudonotuse,passthemontosomeone you know that can use them. Make sure you give them the installation
instructions as well.
Questions about the installation or use of any of the products in this kit? Call our energy partners at Annron Services for assistance over the phone. 1 877 ECO FITT (326 3488)

-15 to -18ºC
1 to 4ºC
takE back your PowErSome electrical devices you just take for granted—things like lightbulbs and fridges. Sure, they go about their day-to-day business pretty quietly. But if you look at the big picture, you realize that keeping the lights on and the drinks cold can add up to hundreds of dollars in energy costs every year. Here are a few tools for taking a bit of that power back.
FridgE and FrEEZEr thErMoMEtErs Refrigerators and freezers are two of the largest energy users in your home. The good news is that their electricity needs can be kept to a minimum if they are set within their ideal temperature ranges. That’s exactly what these fridge-friendly thermometers help you do.
stEP 1 Remove the backing material and attach the card to a visible spot inside the fridge or freezer.
stEP 3 Check the reading. The ideal temperature range is between 1 to 4°C for the refrigerator and -15 to -18°C for the freezer. If your appliance is outside of this range, adjust the temperature dial and then recheck the following day.
2
stEP 2 Allow 15 minutes for the thermometer to adjust.
15

coMPact FLuorEscEnt LightbuLbsCFLs use up to 75 per cent less energy than old-style incandescent lightbulbs and can last up to 10 years before needing to be replaced. Your kit includes two 13 watt CFLs, equivalent to 60 watt incandescent bulbs. There’s also one 20 watt CFL that can be used as a porch light, putting out the same amount of light as a 75 watt incandescent bulb.
To maximize your savings, start by replacing the bulbs that you use most often and that are on for long periods of time (15 min or longer). You don’t have to worry about waiting for your old bulbs to burn out—start using your new CFLs today for immediate savings.
The CFLs provided in this kit are not intended for use with dimmers or lights that are fully enclosed; specialized CFLs are required for these types of fixtures.
CFLs can be recycled at designated recycling facilities. A list of facilities can be found at bchydro.com.
13 WATT 20 WATT
3
FrEQuEntLy askEd QuEstionsQ: Do CFLs contain mercury? Should I be concerned?A: Most CFLs contain less than 4mg of mercury (about one-fifth of what’s in an
average watch battery and less than one-hundredth that found in a typical amalgam dental filling). The mercury in CFLs can be released in to the environment if the glass is broken. In the unlikely event the glass is broken, it is important to dispose of CFLs properly. If you break a CFL, ventilate the area, and wipe up any fragments with a wet cloth. Place the broken CFL and glass in a sealed bag and bring it to your local recycling centre.
Q: Do CFLs cause skin disorders or headaches?A: There is no scientific evidence that CFL usage causes skin disorders or headaches.
Fluorescent lights (such as CFLs) do emit a small amount of UV (Ultraviolet Light), but the exposure from a CFL is a fraction of what you can be exposed to when walking outside on a sunny day. UV exposure from CFLs should not be a concern for most people under normal use, but those with light sensitivities or lupus may want to refrain from direct exposure to CFLs for extended periods of time.

takE back your hEatLike most British Columbians, keeping your home warm is probably your single biggest energy expense. That’s why it stings to realize that, unless your home is properly draftproofed, up to a third of that hard-earned heat is escaping through windows, doors, and other invisible pathways to the chilly outdoors.
The Energy Saving Kit includes a number of tools to help you keep your home’s heat where it belongs. Here’s how to put them to work for you.
4
FoaM wEathErstriP Foam weatherstrip creates a barrier against drafts around doors and openable windows. For the best results, completely remove any old weatherstripping, thoroughly clean the area, and then allow it to dry.
Installation tools: scissors.
EFFiciEnt night Light Your new slim-profile night light uses only 26¢ worth of electricity a year and will last up to 100,000 hours! Go ahead and plug it into any electrical outlet, wherever the extra light will come in handy.

stEP 3 Close the door or window to check that the strip compresses slightly for a snug fit.
Additional information about installing the v-seal strip can be found on the product packaging.
stEP 1 You’ll be applying the strip to the inside of the frame, facing the outside edges of the window or door. Measure these lengths before you cut the v-seal. Fold the v-seal in a line down the middle, creating a “V” shape with the adhesive side on the outside.
v-sEaL wEathErstriP This type of weatherstripping is perfect for stopping drafts from sneaking in around doors and openable windows. It’s flexible and compressible, so it won’t get in the way if it’s properly installed. For best results, apply the v-seal only to clean, dry surfaces when outdoor temperature is above -7°C.
Installation tools: scissors.
stEP 2 Peel off the protective backing as you apply the strip, then press into place. (When you are standing inside your home, the folded edge of the “V” should point toward you.)
5
You’ll be applying the foam tape to the part of the frame that touches the exterior side of your door or window. Measure these edges and then cut the tape to the desired length. Peel away the paper backing and press the foam tape into place. If you are standing inside your home, the non-sticky side of the tape should be directly facing you.

window insuLator FiLMMuch like a second pane of glass, this plastic film creates an insulating air space against your windows to help prevent heat loss. It’s a great solution for keeping out those chills during the winter months. Just remember to clean the window and the frame before putting the film up, since you won’t be able to clean it again until the film comes down in the spring!
Installation tools: scissors or a utility knife and a hair dryer.
stEP 1 Apply the double-sided tape all around the clean and dry window frame. Edges that face into the room are the best choice for easy installation. Measure the height and width of the window frame, allowing fora few extra inches of overlap on every side. Then cut the plastic film to size.
stEP 2 Remove the paper backing from the strip of tapeon the top of the window frame.
stEP 3 Pull the film across the top of the frame, just enough to straighten it out without stretching it. Press the film onto the tape. Repeat steps 3 and 4 for the bottom and two sides of the frame.
6

7
stEP 4 With your hair dryer on the hot setting, slowly make your way back and forth across the plastic without getting too close or staying in one spot for too long. The film will begin to shrink and tighten, leaving you with a clear and relatively wrinkle-free surface.
stEP 5 Carefully trim the excess film from around the edges of the frame.
Additional information about installing the window film can be found on the product packaging.
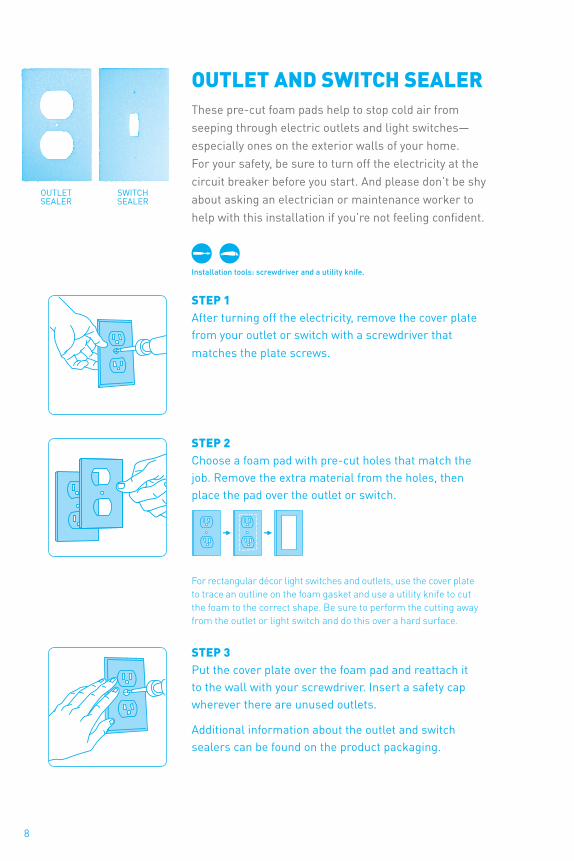
stEP 3 Put the cover plate over the foam pad and reattach it to the wall with your screwdriver. Insert a safety cap wherever there are unused outlets.
Additional information about the outlet and switch sealers can be found on the product packaging.
outLEt and switch sEaLErThese pre-cut foam pads help to stop cold air from seeping through electric outlets and light switches—especially ones on the exterior walls of your home. For your safety, be sure to turn off the electricity at the circuit breaker before you start. And please don’t be shy about asking an electrician or maintenance worker to help with this installation if you’re not feeling confident.
Installation tools: screwdriver and a utility knife.
stEP 1 After turning off the electricity, remove the cover plate from your outlet or switch with a screwdriver that matches the plate screws.
OUTLET SEALER
SWITCH SEALER
stEP 2 Choose a foam pad with pre-cut holes that match the job. Remove the extra material from the holes, then place the pad over the outlet or switch.
For rectangular décor light switches and outlets, use the cover plate to trace an outline on the foam gasket and use a utility knife to cut the foam to the correct shape. Be sure to perform the cutting away from the outlet or light switch and do this over a hard surface.
8

takE back your watErHot water waste means bad news for your water bill, and even more bad news for your energy bills. Although the cost varies depending on whether gas or electric heating is used, the average British Columbian house, duplex, or townhouse requires nearly $250 worth of energy every year to keep the hot water flowing.
The good news is that hot water is a snap to save. That’s exactly what the following tools are all about.
Put your watEr to thE tEstThey say that knowledge is power, and we agree. That’s why we’ve included three water testing tools to let you find out exactly how well your home is performing. Depending on what you discover, there may be some easy steps you can take for immediate energy savings.
hot watEr gaugE This gauge will tell you if your water heater is set too high. Heaters have an ideal temperature range within which they offer the most amount of hot water with the least amount of energy waste. In this case, saving money may be as simple as turning a dial. Just follow the instructions on the card provided.
9
10
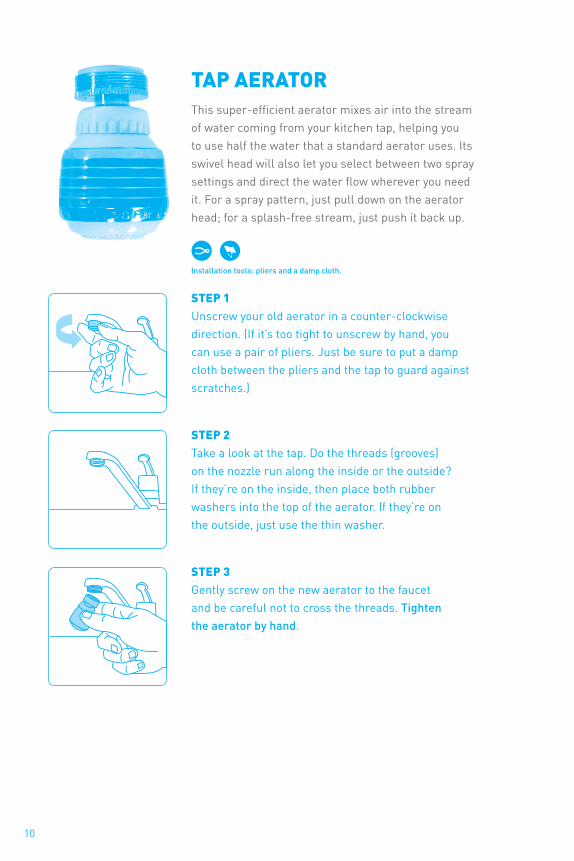
taP aEratorThis super-efficient aerator mixes air into the stream of water coming from your kitchen tap, helping you to use half the water that a standard aerator uses. Its swivel head will also let you select between two spray settings and direct the water flow wherever you need it. For a spray pattern, just pull down on the aerator head; for a splash-free stream, just push it back up.
Installation tools: pliers and a damp cloth.
stEP 1 Unscrew your old aerator in a counter-clockwise direction. (If it’s too tight to unscrew by hand, you can use a pair of pliers. Just be sure to put a damp cloth between the pliers and the tap to guard against scratches.)
stEP 2 Take a look at the tap. Do the threads (grooves) on the nozzle run along the inside or the outside? If they’re on the inside, then place both rubber washers into the top of the aerator. If they’re on the outside, just use the thin washer.
stEP 3 Gently screw on the new aerator to the faucetand be careful not to cross the threads. Tightenthe aerator by hand.
Installation tools: pliers and a damp cloth.
11
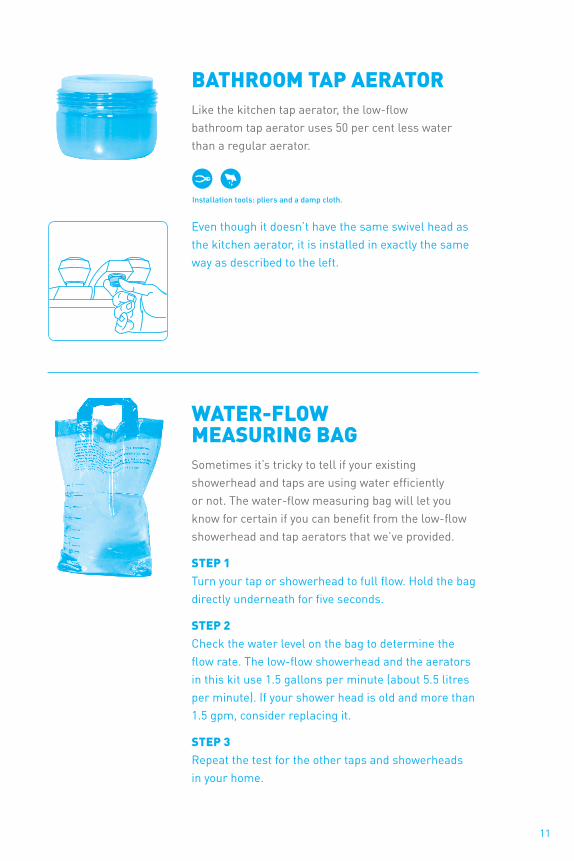
watEr-FLow MEasuring bag Sometimes it’s tricky to tell if your existing showerhead and taps are using water efficiently or not. The water-flow measuring bag will let you know for certain if you can benefit from the low-flow showerhead and tap aerators that we’ve provided.
stEP 1 Turn your tap or showerhead to full flow. Hold the bag directly underneath for five seconds.
stEP 2 Check the water level on the bag to determine the flow rate. The low-flow showerhead and the aerators in this kit use 1.5 gallons per minute (about 5.5 litres per minute). If your shower head is old and more than 1.5 gpm, consider replacing it.
stEP 3 Repeat the test for the other taps and showerheads in your home.
bathrooM taP aErator Like the kitchen tap aerator, the low-flow bathroom tap aerator uses 50 per cent less water than a regular aerator.
Even though it doesn’t have the same swivel head as the kitchen aerator, it is installed in exactly the same way as described to the left.
12
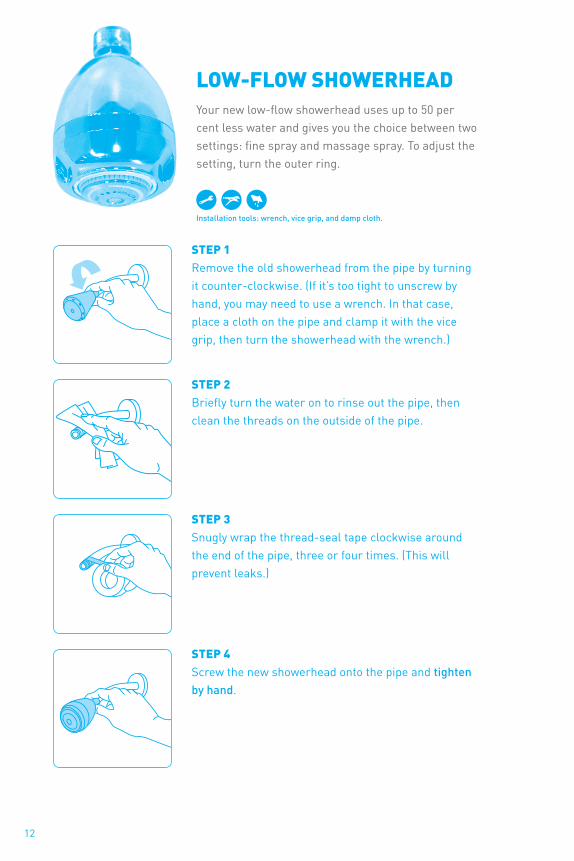
Low-FLow showErhEad Your new low-flow showerhead uses up to 50 per cent less water and gives you the choice between two settings: fine spray and massage spray. To adjust the setting, turn the outer ring.
Installation tools: wrench, vice grip, and damp cloth.
stEP 1 Remove the old showerhead from the pipe by turning it counter-clockwise. (If it’s too tight to unscrew by hand, you may need to use a wrench. In that case, place a cloth on the pipe and clamp it with the vice grip, then turn the showerhead with the wrench.)
stEP 2 Briefly turn the water on to rinse out the pipe, then clean the threads on the outside of the pipe.
stEP 3 Snugly wrap the thread-seal tape clockwise around the end of the pipe, three or four times. (This will prevent leaks.)
stEP 4 Screw the new showerhead onto the pipe and tighten by hand.
13
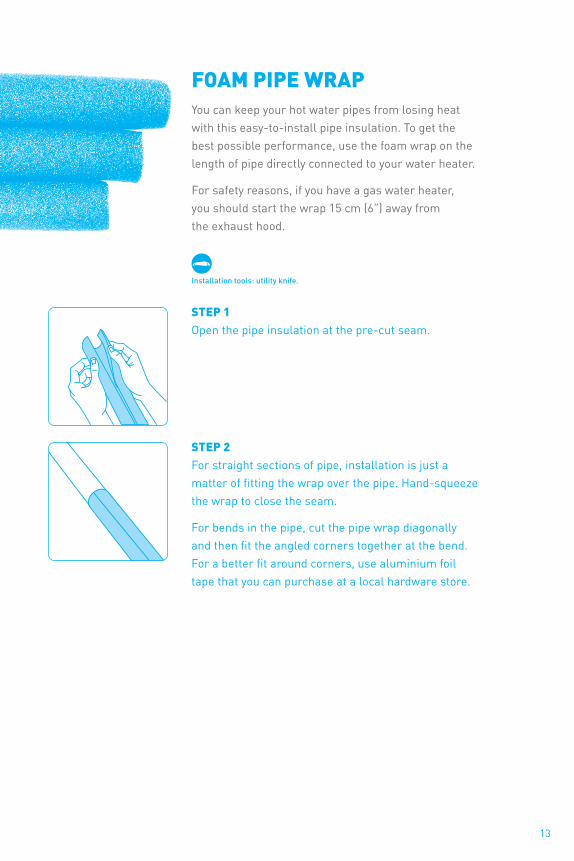
FoaM PiPE wraP You can keep your hot water pipes from losing heat with this easy-to-install pipe insulation. To get the best possible performance, use the foam wrap on the length of pipe directly connected to your water heater.
For safety reasons, if you have a gas water heater, you should start the wrap 15 cm (6”) away from the exhaust hood.
Installation tools: utility knife.
stEP 1 Open the pipe insulation at the pre-cut seam.
stEP 2 For straight sections of pipe, installation is just a matter of fitting the wrap over the pipe. Hand-squeeze the wrap to close the seam.
For bends in the pipe, cut the pipe wrap diagonally and then fit the angled corners together at the bend. For a better fit around corners, use aluminium foil tape that you can purchase at a local hardware store.

Looking for more ways to save energy and money around your home? We have lots of great ideas, so get in touch today.
604 431 9463 Lower Mainland 1 877 431 9463 elsewhere in BC bchydro.com/powersmart
Printed with vegetable-based inks on paper made with 100% post-consumer waste. Please recycle. A09-162