Embed Size (px)
Citation preview

eStore Solution Stack User’s Guide
Version 4.0 SP1
March, 2012

CONFIDENTIALITY NOTICE - The information contained in this document is confidential and proprietary. This document is to be used with the
understanding that it will be held in strict confidence and not used for reasons unrelated directly to the specific purpose of this document. No part of the
document may be circulated or reproduced for distribution outside the Client organization without prior written permission from Nodus Technologies,
eStore Solution Stack™ v4.0 User’s Guide
2
Copyright
Copyright © 2012 Nodus Technologies, Inc. All rights reserved.
Your right to copy this documentation is limited by copyright law and the terms of the software license
agreement. As the software licensee, you may make a reasonable number of copies or printouts for your
own use. Making unauthorized copies, adaptations, compilations, or derivative works for commercial
distribution is prohibited and constitutes a punishable violation of the law.
Trademarks Nodus eStore Solution Stack, Scheduled Payments, ePay Advantage, Credit Card Advantage,
eStore Advantage, and Retail Advantage are either registered trademarks or trademarks of Nodus
Technologies, Inc. in the United States.
The names of actual companies and products mentioned herein may be trademarks or registered marks
- in the United States and/or other countries - of their respective owners.
The names of companies, products, people, and/or data used in window illustrations and sample output
are fictitious and are in no way intended to represent any real individual, company, product, or event,
unless otherwise noted.
Warranty disclaimer Nodus Technologies, Inc. disclaims any warranty regarding the sample code
contained in this documentation, including the warranties of merchantability and fitness for a particular
purpose.
Limitation of liability The content of this manual is furnished for informational use only, is subject to
change without notice, and should not be construed as a commitment by Nodus Technologies, Inc.
Nodus Technologies, Inc. assumes no responsibility or liability for any errors or inaccuracies that may
appear in this manual. Neither Nodus Technologies, Inc. nor anyone else who has been involved in the
creation, production or delivery of this documentation shall be liable for any indirect, incidental, special,
exemplary or consequential damages, including but not limited to any loss of anticipated profit or
benefits, resulting from the use of this documentation or sample code.
License agreement Use of this product is covered by a license agreement provided with the software
product. If you have any questions, please call the Nodus Technologies Support at 909-482-4701
CONFIDENTIALITY NOTICE - The information contained in this document is confidential and proprietary. This document is to be used with the
understanding that it will be held in strict confidence and not used for reasons unrelated directly to the specific purpose of this document. No part of the
document may be circulated or reproduced for distribution outside the Client organization without prior written permission from Nodus Technologies,
eStore Solution Stack™ v4.0 User’s Guide
3
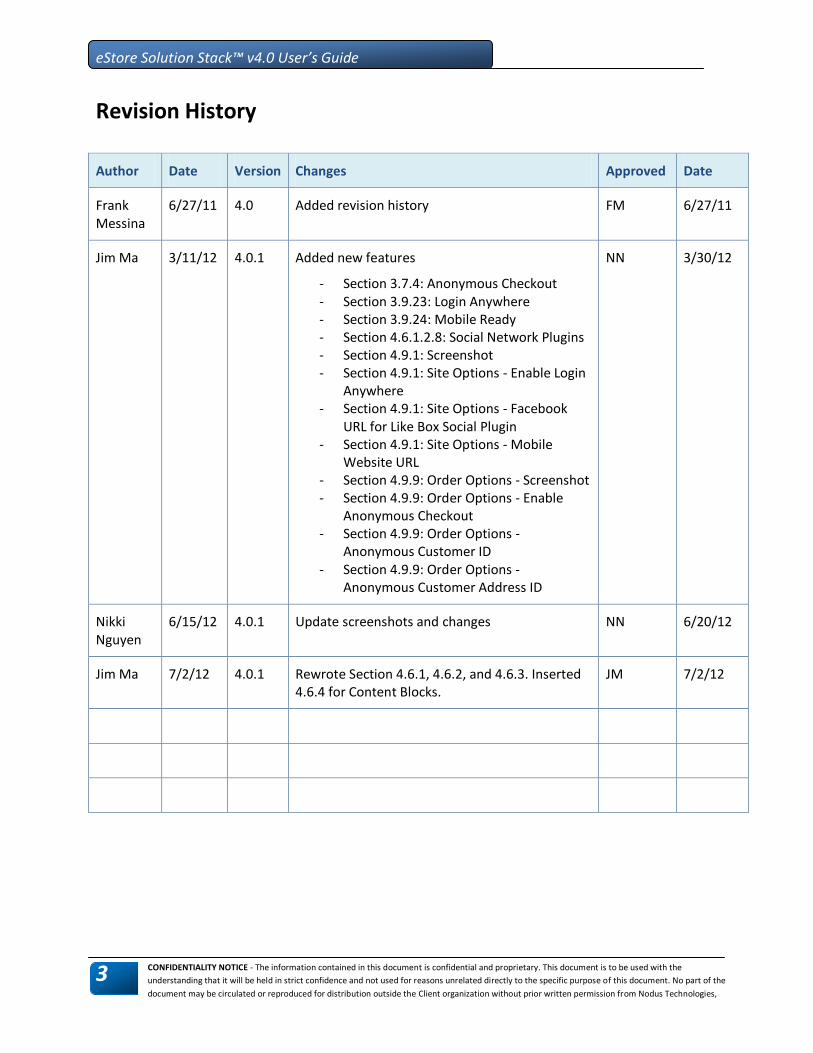
Revision History
Author Date Version Changes Approved Date
Frank Messina
6/27/11 4.0 Added revision history FM 6/27/11
Jim Ma 3/11/12 4.0.1 Added new features
- Section 3.7.4: Anonymous Checkout - Section 3.9.23: Login Anywhere - Section 3.9.24: Mobile Ready - Section 4.6.1.2.8: Social Network Plugins - Section 4.9.1: Screenshot - Section 4.9.1: Site Options - Enable Login
Anywhere - Section 4.9.1: Site Options - Facebook
URL for Like Box Social Plugin - Section 4.9.1: Site Options - Mobile
Website URL - Section 4.9.9: Order Options - Screenshot - Section 4.9.9: Order Options - Enable
Anonymous Checkout - Section 4.9.9: Order Options -
Anonymous Customer ID - Section 4.9.9: Order Options -
Anonymous Customer Address ID
NN 3/30/12
Nikki Nguyen
6/15/12 4.0.1 Update screenshots and changes NN 6/20/12
Jim Ma 7/2/12 4.0.1 Rewrote Section 4.6.1, 4.6.2, and 4.6.3. Inserted 4.6.4 for Content Blocks.
JM 7/2/12

CONFIDENTIALITY NOTICE - The information contained in this document is confidential and proprietary. This document is to be used with the
understanding that it will be held in strict confidence and not used for reasons unrelated directly to the specific purpose of this document. No part of the
document may be circulated or reproduced for distribution outside the Client organization without prior written permission from Nodus Technologies,
eStore Solution Stack™ v4.0 User’s Guide
4
Table of Contents
Table of Contents .......................................................................................... 4
1. Introduction ............................................................................................ 13
1.1. New Features in eSSS ............................................................................................ 14
1.2. Additional Resources ............................................................................................ 14
2. Installation .............................................................................................. 16
3. Feature List ............................................................................................. 17
3.1. Integration ............................................................................................................ 18
3.1.1. Setup ..................................................................................................................... 18
3.1.1.1. GP Pricelist Setup ........................................................................................................ 18
3.1.1.2. Customer Import Options ........................................................................................... 18
3.1.1.3. Order Options ............................................................................................................. 18
3.1.1.4. Item Import Options ................................................................................................... 18
3.1.2. Record Synchronization .......................................................................................... 18
3.1.2.1. Nodus Synchronizer .................................................................................................... 18
3.1.2.2. Manual Customer Record Import ................................................................................ 19
3.1.2.3. Manual Item Record Import ........................................................................................ 19
3.1.2.4. Manual Tax Detail Import ........................................................................................... 19
3.1.2.5. Manual Site Information Import ................................................................................. 19
3.1.2.6. Order Manager ........................................................................................................... 19
3.1.2.7. Customer Information ................................................................................................ 19
3.2. Product Catalog ..................................................................................................... 20
3.2.1. General Product Properties .................................................................................... 20
3.2.2. Categories ............................................................................................................. 20
3.2.2.1. Category Properties .................................................................................................... 20
3.2.3. Product Images ...................................................................................................... 20
3.2.3.1. Product Image Options ............................................................................................... 20
3.2.3.2. Specify Image Paths .................................................................................................... 20
3.2.3.3. Automatically Determine Image Paths by File Name ................................................... 20
3.2.4. Product Pricing ...................................................................................................... 21
3.2.4.1. GP Pricelist and Promotion Price Sheet Setup Options ................................................ 21
3.2.4.2. Edit Product > General Info ......................................................................................... 21
3.2.4.3. Edit Product > Volume Discounts ................................................................................ 21
3.2.5. Item Inventory ....................................................................................................... 21
3.2.5.1. Standard/Single Distribution Site Inventory ................................................................ 21

CONFIDENTIALITY NOTICE - The information contained in this document is confidential and proprietary. This document is to be used with the
understanding that it will be held in strict confidence and not used for reasons unrelated directly to the specific purpose of this document. No part of the
document may be circulated or reproduced for distribution outside the Client organization without prior written permission from Nodus Technologies,
eStore Solution Stack™ v4.0 User’s Guide
5
3.2.5.2. Multi-Distribution Site Inventory (optional module) ................................................... 21
3.2.6. Promotions ............................................................................................................ 22
3.2.6.1. Sales ........................................................................................................................... 22
3.2.6.2. Discounts .................................................................................................................... 22
3.2.7. Related Items ........................................................................................................ 22
3.2.7.1. Edit Product > Related Items ....................................................................................... 22
3.2.8. Customer Choices ................................................................................................... 22
3.2.8.1. Customer Choices ....................................................................................................... 22
3.2.9. Digital Goods File Downloads ................................................................................. 22
3.2.9.1. Digital Goods File Downloads ...................................................................................... 22
3.2.10. Purchase Restrictions ........................................................................................... 23
3.2.10.1. General Purchase Restrictions .................................................................................. 23
3.2.10.2. Customer Specific Catalog (optional module)............................................................ 23
3.3. Store Presentation ................................................................................................ 24
3.3.1. Themes .................................................................................................................. 24
3.3.2. Site Terms .............................................................................................................. 24
3.3.3. Resource Messages ................................................................................................ 24
3.3.4. Quick Order Entry .................................................................................................. 24
3.3.5. Home Page Layout ................................................................................................. 24
3.3.6. Category Page Layout ............................................................................................ 24
3.3.7. Store Information .................................................................................................. 25
3.3.8. Store Logo ............................................................................................................. 25
3.3.9. Multiple Language Support .................................................................................... 25
3.3.9.1. Download the Content Spreadsheet ........................................................................... 25
3.3.9.2. Change to Import Option Settings ............................................................................... 26
3.3.9.3. Change Site Terms ...................................................................................................... 26
3.3.9.4. Update System Messages ........................................................................................... 27
3.3.9.5. Update Theme ............................................................................................................ 27
3.4. Shipping/Freight ................................................................................................... 28
3.4.1. Matrix Freight Table .............................................................................................. 28
3.4.2. Real-time Shipping Calculation ............................................................................... 28
3.4.3. Other Shipping Configurations ............................................................................... 28
3.4.3.1. Shipping Policy ............................................................................................................ 28
3.4.3.2. Shipping Options for Individual Items ......................................................................... 28
3.5. Taxes ..................................................................................................................... 29
3.5.1. Standard GP Tax .................................................................................................... 29
3.5.2. Avalara AvaTax ..................................................................................................... 29
3.5.3. Sabrix Managed Tax Service ................................................................................... 29
3.5.4. CCH Sales Tax Office ............................................................................................... 29
3.6. Payment Methods ................................................................................................. 30
3.6.1. Credit Cards and eChecks ....................................................................................... 30

CONFIDENTIALITY NOTICE - The information contained in this document is confidential and proprietary. This document is to be used with the
understanding that it will be held in strict confidence and not used for reasons unrelated directly to the specific purpose of this document. No part of the
document may be circulated or reproduced for distribution outside the Client organization without prior written permission from Nodus Technologies,
eStore Solution Stack™ v4.0 User’s Guide
6
3.6.1.1. General Setup ............................................................................................................. 30
3.6.1.2. Credit Card Wallet ...................................................................................................... 30
3.6.1.3. Tokenization (optional module) .................................................................................. 30
3.6.2. PayPal ................................................................................................................... 31
3.6.3. Other Payment Methods ........................................................................................ 31
3.7. Customer Record Management ............................................................................. 32
3.7.1. CSR/Salesperson Functionality ............................................................................... 32
3.7.2. Customer Record Management .............................................................................. 32
3.7.3. My Account Options ............................................................................................... 32
3.7.4. Anonymous Checkout............................................................................................. 32
3.8. National Account Support ..................................................................................... 33
3.8.1. National Account Settings ...................................................................................... 33
3.8.2. Workflow .............................................................................................................. 33
3.9. Shopping Cart Functionality .................................................................................. 34
3.9.1. Gift Certificates ...................................................................................................... 34
3.9.2. Mailing Lists .......................................................................................................... 34
3.9.3. Affiliates ................................................................................................................ 34
3.9.4. Drop Ship ............................................................................................................... 34
3.9.5. Search Engine Optimization ................................................................................... 34
3.9.5.1. Edit Product > Meta Tags ............................................................................................ 34
3.9.5.2. Edit Category > Meta Tags .......................................................................................... 34
3.9.5.3. Store Meta Tags .......................................................................................................... 35
3.9.5.4. URL Re-write ............................................................................................................... 35
3.9.6. Help/FAQ .............................................................................................................. 35
3.9.7. Privacy Policy ......................................................................................................... 35
3.9.8. Returns .................................................................................................................. 35
3.9.9. Site Terms and Conditions ...................................................................................... 35
3.9.10. E-mail Messages .................................................................................................. 35
3.9.10.1. Settings > Mail Server ............................................................................................... 35
3.9.10.2. E-Mail Messages ....................................................................................................... 35
3.9.11. Custom Pages ...................................................................................................... 36
3.9.12. Open/Close Store ................................................................................................. 36
3.9.13. Google Analytics .................................................................................................. 36
3.9.14. reCAPTCHA .......................................................................................................... 36
3.9.15. Search Orders ...................................................................................................... 36
3.9.16. Reports ................................................................................................................ 36
3.9.17. Gift Wrap............................................................................................................. 37
3.9.18. Site Options ......................................................................................................... 37
3.9.19. Region Control ..................................................................................................... 37
3.9.19.1. Currency ................................................................................................................... 37
3.9.19.2. Countries .................................................................................................................. 37

CONFIDENTIALITY NOTICE - The information contained in this document is confidential and proprietary. This document is to be used with the
understanding that it will be held in strict confidence and not used for reasons unrelated directly to the specific purpose of this document. No part of the
document may be circulated or reproduced for distribution outside the Client organization without prior written permission from Nodus Technologies,
eStore Solution Stack™ v4.0 User’s Guide
7
3.9.20. Product Reviews .................................................................................................. 37
3.9.21. Fraud Checks ........................................................................................................ 37
3.9.22. Repeat Order ....................................................................................................... 38
3.9.23. Login Anywhere ................................................................................................... 38
3.9.24. Mobile Ready ....................................................................................................... 38
3.10. Single Sign-On ..................................................................................................... 40
3.11. Troubleshooting .................................................................................................. 41
3.10.1. Version Information ............................................................................................. 41
3.10.2. Error Log .............................................................................................................. 41
3.10.3. Current Application Settings ................................................................................. 41
3.10.4. Debug Logs .......................................................................................................... 41
4. Administration Areas ............................................................................... 42
4.1. Home Page ............................................................................................................ 42
4.2. To Do/Alerts ......................................................................................................... 43
4.3. Resources .............................................................................................................. 44
4.3.1. Getting Started Checklist ........................................................................................ 45
4.3.1.1. Change Admin User Name and Password from Default ............................................... 46
4.3.1.2. Set-up Contact Information ........................................................................................ 46
4.3.1.3. Upload Logo................................................................................................................ 46
4.3.1.4. Select a Theme ........................................................................................................... 46
4.3.1.5. Set-up Home Page ...................................................................................................... 47
4.3.1.6. Turn on SSL ................................................................................................................. 47
4.3.1.7. Setup Payment Methods ............................................................................................ 47
4.3.1.8. Setup Shipping Methods ............................................................................................. 47
4.3.1.9. Add Categories ........................................................................................................... 47
4.3.1.10. Add Products ............................................................................................................ 48
4.3.1.10.1. Extended Great Plains/Myridas Pricing ..................................................... 48
4.3.1.10.2. Import and Edit Products .......................................................................... 48
4.3.1.11. Privacy Policies ......................................................................................................... 48
4.3.1.12. Change Terms and Conditions ................................................................................... 48
4.3.1.13. Change Return Policy ................................................................................................ 48
4.3.1.14. Change Shipping Policy ............................................................................................. 48
4.3.1.15. Setup Meta Tags ....................................................................................................... 48
4.3.1.16. Setup Email Templates.............................................................................................. 49
4.3.1.17. More Settings and Options ....................................................................................... 49
4.4. Catalog .................................................................................................................. 50
4.4.1. Categories ............................................................................................................. 51
4.4.1.1. Add a New Parent Group ............................................................................................ 53
4.4.1.2. Delete Category .......................................................................................................... 53
4.4.1.3. Add Sub-Categories .................................................................................................... 53

CONFIDENTIALITY NOTICE - The information contained in this document is confidential and proprietary. This document is to be used with the
understanding that it will be held in strict confidence and not used for reasons unrelated directly to the specific purpose of this document. No part of the
document may be circulated or reproduced for distribution outside the Client organization without prior written permission from Nodus Technologies,
eStore Solution Stack™ v4.0 User’s Guide
8
4.4.1.4. Additional Level of Sub-Category ................................................................................ 53
4.4.1.5. Edit Category .............................................................................................................. 54
4.4.2. Products ................................................................................................................ 60
4.4.2.1. Editing Products .......................................................................................................... 61
4.4.2.1.1. General Information ................................................................................... 62
4.4.2.1.2. Customer Choices ....................................................................................... 68
4.4.2.1.3. Images ........................................................................................................ 73
4.4.2.1.4. Related Items .............................................................................................. 77
4.4.2.1.5. Categories .................................................................................................. 79
4.4.2.1.6. Inventory .................................................................................................... 80
4.4.2.1.7. File Downloads ........................................................................................... 82
4.4.2.1.8. Customer Reviews ....................................................................................... 83
4.4.2.1.9. Volume Discounts ....................................................................................... 84
4.4.2.1.10. Extended Pricing/Myridas ......................................................................... 85
4.4.3. Catalogs ................................................................................................................ 86
4.4.3.1. Setting up the Catalog................................................................................................. 86
4.4.3.2. Setting Up Products in the Catalog .............................................................................. 87
4.4.3.3. Assigning Users to the Catalog .................................................................................... 87
4.4.3.4. Deleting a User or Product from the Catalog ............................................................... 88
4.4.3.5. Deleting a Catalog ....................................................................................................... 88
4.4.4. Shared Choices....................................................................................................... 89
4.4.4.1. Creating a Shared Choice option ................................................................................. 89
4.4.4.2. Edit or Delete a Shared Choice .................................................................................... 91
4.4.4.3. Cloning a Shared Choice.............................................................................................. 92
4.4.5. Sales ...................................................................................................................... 93
4.4.5.1. Store Wide Sale .......................................................................................................... 93
4.4.5.2. Sale by Product ........................................................................................................... 95
4.4.6. Discounts ............................................................................................................... 97
4.4.6.1. Order Total ................................................................................................................. 97
4.4.6.2. Product(s) ................................................................................................................... 99
4.4.6.3. Shipping Method ...................................................................................................... 101
4.4.6.4. Product Shipping Discount ........................................................................................ 103
4.4.6.5. Products with Free Shipping ..................................................................................... 105
4.4.7. Update Inventory ................................................................................................. 107
4.4.8. Product Types ...................................................................................................... 108
4.4.9. Type Properties .................................................................................................... 110
4.4.9.1. Text .......................................................................................................................... 111
4.4.9.2. Multiple Choice......................................................................................................... 112
4.4.9.3. Currency ................................................................................................................... 112
4.4.9.4. Date .......................................................................................................................... 113
4.4.10. Manage Files ..................................................................................................... 114
4.4.11. Quick Order Product Suggestions ........................................................................ 115
4.4.11.1. Quick Order Entry Web Page Store ......................................................................... 116
4.4.12. Item Updater ..................................................................................................... 117
4.4.13. Customer Specific Sites ....................................................................................... 118

CONFIDENTIALITY NOTICE - The information contained in this document is confidential and proprietary. This document is to be used with the
understanding that it will be held in strict confidence and not used for reasons unrelated directly to the specific purpose of this document. No part of the
document may be circulated or reproduced for distribution outside the Client organization without prior written permission from Nodus Technologies,
eStore Solution Stack™ v4.0 User’s Guide
9
4.4.13.1. Setting up a New Group Site ................................................................................... 119
4.4.13.2. Setting up Inventory Locations for a Site Group ...................................................... 120
4.4.13.3. Setting up Users/Class IDs for a Group Site ............................................................. 121
4.4.14. Product Tax Code ............................................................................................... 121
4.5. People ................................................................................................................. 122
4.5.1. Users ................................................................................................................... 122
4.5.1.1. Create a New User .................................................................................................... 123
4.5.1.2. Assign Rights to a New User ...................................................................................... 123
4.5.1.3. Allow a CSR/Salesperson to Use a Customer Account ............................................... 124
4.5.1.4. Assign Pricing Levels to Users.................................................................................... 124
4.5.1.5. Restrict Salesperson Account Access ......................................................................... 124
4.5.1.6. Editing and Deleting Users ........................................................................................ 125
4.5.1.7. Adding and Editing User Addresses ........................................................................... 126
4.5.2. Roles ................................................................................................................... 128
4.5.2.1. Creating a User Role ................................................................................................. 128
4.5.2.2. Assigning Permissions to the Role ............................................................................. 128
4.5.2.3. Assigning Users to the Role ....................................................................................... 128
4.5.3. Manufacturers ..................................................................................................... 130
4.5.4. Vendors ............................................................................................................... 131
4.5.5. Affiliates .............................................................................................................. 132
4.5.5.1. Configuring a New Affiliate ....................................................................................... 133
4.5.6. Mailing Lists ........................................................................................................ 134
4.5.6.1. Private and Public Mailing Lists ................................................................................. 134
4.5.6.2. Adding a New Mailing List Entry ................................................................................ 134
4.5.6.4. Sending E-mails to the Mailing List: ........................................................................... 135
4.5.7. Gift Certificate Search .......................................................................................... 137
4.6. Content ............................................................................................................... 138
4.6.1. Home Page Content ............................................................................................. 138
4.6.2. Category Page ..................................................................................................... 139
4.6.3. Product Page ....................................................................................................... 140
4.6.4. Content Blocks ..................................................................................................... 141
4.6.1.1. Category Grid ............................................................................................................ 142
4.6.1.2. Category Lists ........................................................................................................... 144
4.6.1.3. Category Rotator ...................................................................................................... 145
4.6.1.4. HTML Rotator ........................................................................................................... 147
4.6.1.5. Mailing List Signup .................................................................................................... 149
4.6.1.6. Product Grid ............................................................................................................. 150
4.6.1.7. Product Rotator ........................................................................................................ 152
4.6.1.8. Search Box ................................................................................................................ 153
4.6.1.9. Social Network Plugins .............................................................................................. 154
4.6.5. Store Information ................................................................................................ 156
4.6.6. Store Logo ........................................................................................................... 158
4.6.7. Store Meta Tags .................................................................................................. 159

CONFIDENTIALITY NOTICE - The information contained in this document is confidential and proprietary. This document is to be used with the
understanding that it will be held in strict confidence and not used for reasons unrelated directly to the specific purpose of this document. No part of the
document may be circulated or reproduced for distribution outside the Client organization without prior written permission from Nodus Technologies,
eStore Solution Stack™ v4.0 User’s Guide
10
4.6.8. Help/FAQ ............................................................................................................ 160
4.6.9. Privacy Policy ....................................................................................................... 162
4.6.10. Return Request Form ......................................................................................... 164
4.6.11. Shipping Policy ................................................................................................... 166
4.6.12. Terms and Conditions ......................................................................................... 167
4.6.13. E-mail Message Templates ................................................................................. 168
4.6.14. Custom Pages .................................................................................................... 170
4.6.15. Open/Close Store ............................................................................................... 171
4.7. Orders ................................................................................................................. 173
4.7.1. Order Manager .................................................................................................... 173
4.7.1.1. Order XML ................................................................................................................ 176
4.7.2. Search Orders ...................................................................................................... 177
4.7.3. Customer Information .......................................................................................... 178
4.8. Reports ............................................................................................................... 180
4.8.1. Monthly Sales ...................................................................................................... 181
4.8.2. Daily Sales ........................................................................................................... 182
4.8.3. Sales by Coupon Code .......................................................................................... 183
4.8.4. Sales by Affiliate .................................................................................................. 184
4.8.5. Top Products ........................................................................................................ 185
4.8.6. Top Customers ..................................................................................................... 186
4.8.7. WPPReporting ..................................................................................................... 187
4.8.7.1. Daily Activity ............................................................................................................. 187
4.8.7.2. Transaction Summary ............................................................................................... 188
4.8.7.3. Settlement Report .................................................................................................... 189
4.9. Settings ............................................................................................................... 190
4.9.1. General Options ................................................................................................... 190
4.9.2. Addresses ............................................................................................................ 198
4.9.3. Affiliates .............................................................................................................. 199
4.9.4. Category and Search ............................................................................................ 201
4.9.4.1. Category and Search Options .................................................................................... 202
4.9.5. Countries ............................................................................................................. 204
4.9.5.1. Edit a Region ............................................................................................................. 205
4.9.5.2. Add a Region............................................................................................................. 205
4.9.6. Gift Certificates .................................................................................................... 206
4.9.6.1. Setting Up Gift Certificates in CCA ............................................................................. 206
4.9.6.2. Purchase a Gift Certificate from the Webstore .......................................................... 208
4.9.6.3. Redeeming a Gift Certificate ..................................................................................... 209
4.9.7. Inventory Settings ................................................................................................ 210
4.9.7.1. Global Inventory Settings .......................................................................................... 210
4.9.7.2. Multi-Distribution Site Settings ................................................................................. 212
4.9.8. Mail Server .......................................................................................................... 214

CONFIDENTIALITY NOTICE - The information contained in this document is confidential and proprietary. This document is to be used with the
understanding that it will be held in strict confidence and not used for reasons unrelated directly to the specific purpose of this document. No part of the
document may be circulated or reproduced for distribution outside the Client organization without prior written permission from Nodus Technologies,
eStore Solution Stack™ v4.0 User’s Guide
11
4.9.9. Order Options ...................................................................................................... 215
4.9.10. Payment ............................................................................................................ 220
4.9.10.1. Credit Card Payments ............................................................................................. 220
4.9.10.1.1. Setting up the Payment Gateway ............................................................ 221
4.9.10.2. PayPal Payments ..................................................................................................... 223
4.9.10.2.1. Activating PayPal .................................................................................... 224
4.9.10.3. PayPal Express Checkout via Website Payments Pro ............................................... 224
4.9.10.4. Other Payment Options .......................................................................................... 226
4.9.11. Product Reviews ................................................................................................ 228
4.9.11.1. Product Review Options.......................................................................................... 228
4.9.12. Returns .............................................................................................................. 230
4.9.13. Shipping ............................................................................................................ 231
4.9.13.1. Configure Shipping Carriers..................................................................................... 231
4.9.13.1.1. Fedex Settings ......................................................................................... 231
4.9.13.1.2. UPS Settings............................................................................................ 233
4.9.13.1.3. US Postal Settings ................................................................................... 235
4.9.13.2. Configure Shipping Methods ................................................................................... 236
4.9.13.2.1. Customer Specific setting ........................................................................ 238
4.9.13.3. Handling Fees ......................................................................................................... 238
4.9.14. Site Terms .......................................................................................................... 239
4.9.15. Resource Messages ............................................................................................ 240
4.9.16. SSL ..................................................................................................................... 241
4.9.17. Tax Classes ........................................................................................................ 242
4.9.18. Tax Details ......................................................................................................... 243
4.9.19. Taxes ................................................................................................................. 244
4.9.19.1. Configuring Taxes ................................................................................................... 244
4.9.19.2. Creating a New Tax ................................................................................................. 245
4.9.19.3. Standard GP Tax Setup ............................................................................................ 247
4.9.19.4. Integrated Tax Tools ............................................................................................... 248
4.9.19.4.1. Setting up Avalara AvaTax ...................................................................... 250
4.9.19.4.2. Setting up Sabrix ..................................................................................... 252
4.9.19.4.3. Setting up CCH-STO ................................................................................. 253
4.9.20. Themes .............................................................................................................. 255
4.9.21. Version Information ........................................................................................... 256
4.9.22. Error Log ............................................................................................................ 257
4.9.23. Current Application Settings ............................................................................... 258
4.9.24. Fraud Checks ...................................................................................................... 259
4.9.25. Nodus/Great Plains Settings ............................................................................... 260
4.9.25.1. Order Options ......................................................................................................... 261
4.9.25.2. Customer Options ................................................................................................... 263
4.9.25.3. Item Import Options ............................................................................................... 266
4.9.25.4. Feature Management ............................................................................................. 268
4.9.26. Debug Logs ........................................................................................................ 270
CONFIDENTIALITY NOTICE - The information contained in this document is confidential and proprietary. This document is to be used with the
understanding that it will be held in strict confidence and not used for reasons unrelated directly to the specific purpose of this document. No part of the
document may be circulated or reproduced for distribution outside the Client organization without prior written permission from Nodus Technologies,
eStore Solution Stack™ v4.0 User’s Guide
12
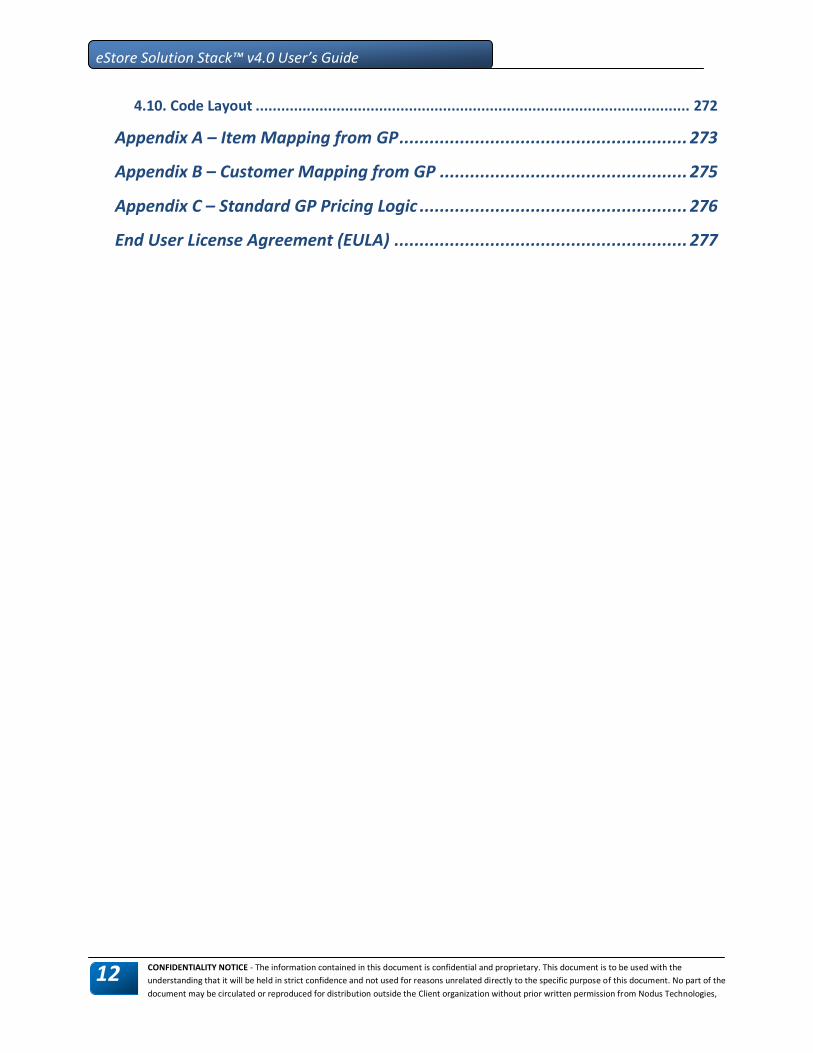
4.10. Code Layout ...................................................................................................... 272
Appendix A – Item Mapping from GP ......................................................... 273
Appendix B – Customer Mapping from GP ................................................. 275
Appendix C – Standard GP Pricing Logic ..................................................... 276
End User License Agreement (EULA) .......................................................... 277

CONFIDENTIALITY NOTICE - The information contained in this document is confidential and proprietary. This document is to be used with the
understanding that it will be held in strict confidence and not used for reasons unrelated directly to the specific purpose of this document. No part of the
document may be circulated or reproduced for distribution outside the Client organization without prior written permission from Nodus Technologies,
eStore Solution Stack™ v4.0 User’s Guide
13
1. Introduction
For many companies, eCommerce can be a complex and difficult undertaking. Nodus eStore Solution
Stack (eSSS) is an end-to-end eCommerce solution for Microsoft Dynamics GP merchants that will
automate the complexity and streamline the transactions. Nodus eStore Advantage and Credit Card
Advantage are also components, for integration and payment processing respectively.
This introduction section covers the following:
New Features in eSSS
Additional Resources
The next section, Feature List, is a feature-driven content list. The Feature List offers a look-up view of
individual eSSS features and provides clickable links to the detailed instructions on Section 3, the
administrative area of this document. This is useful for setting up a particular feature, and the section
will provide the pointers to where they can be set up.
Section 3, the administration area, reviews the detailed instructions for each administrative setting
page. It serves as an easy-to-look up tool when instructions are needed regarding functionalities on a
particular page. Breadcrumb-style navigation on each heading directs the user to the correct page on
the administration area for each functionality.

CONFIDENTIALITY NOTICE - The information contained in this document is confidential and proprietary. This document is to be used with the
understanding that it will be held in strict confidence and not used for reasons unrelated directly to the specific purpose of this document. No part of the
document may be circulated or reproduced for distribution outside the Client organization without prior written permission from Nodus Technologies,
eStore Solution Stack™ v4.0 User’s Guide
14
1.1. New Features in eSSS
Several features have been added to this release for eSSS. These features are outlined in the
accompanying table.
NEW FEATURE DESCRIPTION
Anonymous Checkout
Allow customer to submit an order without registering for an account.
Social Network Plugins
Click and add Twitter button, Facebook Like Button, and/or Facebook Like Box to the homepage, category pages, and/or product detail pages.
Application Programming Interface (API)
API is made available for developers to integrate with eSSS, such as building a separate mobile version of the site.
Category Properties: Custom links to support all URIs
In addition to HTTP: and HTTPS:, the Custom Links on Category properties now supports all URIs, such as “mailto:”
Shipping Origin Origin of shipping calculation was based on the store address, and has been changed to use the “Default Order Site ID”. This will also require the Site ID information to be imported from GP. Make sure the “Default Order Site ID” is configured under Settings Nodus/Great Plains, and click the Run Now button next to it to import the Site ID information (site address).
Login Anywhere User now can login to the eCommerce website on any page of the shopping cart. User no longer has to go to the login.aspx page in order to login.
1.2. Additional Resources
This Desktop Reference Guide gives you information you need on how to use the application. If you are
still having trouble, there are support options. Contact the reseller or call Nodus Technologies to
purchase support packages.
CONTACT METHOD CONTACT INFORMATION
E-mail [email protected]
Website http://www.nodus .com

CONFIDENTIALITY NOTICE - The information contained in this document is confidential and proprietary. This document is to be used with the
understanding that it will be held in strict confidence and not used for reasons unrelated directly to the specific purpose of this document. No part of the
document may be circulated or reproduced for distribution outside the Client organization without prior written permission from Nodus Technologies,
eStore Solution Stack™ v4.0 User’s Guide
15
Telephone (909) 482-4701
Fax (909) 482-4705
Mail 2099 S. State College Suite 250 Anaheim, California 92806

CONFIDENTIALITY NOTICE - The information contained in this document is confidential and proprietary. This document is to be used with the
understanding that it will be held in strict confidence and not used for reasons unrelated directly to the specific purpose of this document. No part of the
document may be circulated or reproduced for distribution outside the Client organization without prior written permission from Nodus Technologies,
eStore Solution Stack™ v4.0 User’s Guide
16
2. Installation
Instructions regarding the components needed to install eStore Solution Stack are detailed in the eSSS
Installation Guide. Please contact Nodus Technical Care for this manual.

CONFIDENTIALITY NOTICE - The information contained in this document is confidential and proprietary. This document is to be used with the
understanding that it will be held in strict confidence and not used for reasons unrelated directly to the specific purpose of this document. No part of the
document may be circulated or reproduced for distribution outside the Client organization without prior written permission from Nodus Technologies,
eStore Solution Stack™ v4.0 User’s Guide
17
3. Feature List
This section is designed to be a feature guide for the site administrator and other users. The list helps
quickly access eSSS settings by displaying the feature, a short description, and then providing a link to
where the feature is located in the administration section of this user’s guide. Product details and
configuration instructions are explained in the administration section.
The main features are categorized are as follows:
Integration
Product Catalog
Store Presentation
Shipping/Freight
Taxes
Payment Methods
Customer Record Management
National Account Support
Shopping Cart Functionality
Single Sign-on
Troubleshooting
CONFIDENTIALITY NOTICE - The information contained in this document is confidential and proprietary. This document is to be used with the
understanding that it will be held in strict confidence and not used for reasons unrelated directly to the specific purpose of this document. No part of the
document may be circulated or reproduced for distribution outside the Client organization without prior written permission from Nodus Technologies,
eStore Solution Stack™ v4.0 User’s Guide
18
3.1. Integration
This section covers how data is set up and integrated between MS Dynamics Great Plains and eSSS.
3.1.1. Setup
3.1.1.1. GP Pricelist Setup
Use this option to specify how pricing is configured in GP, so the item pricing can be imported correctly.
Link to detailed instructions
3.1.1.2. Customer Import Options
This set of options controls the customer information used for integration of the shopping cart.
Link to detailed instructions
3.1.1.3. Order Options
This section lists the processing options available for order items on the website. Among the options available are quantity settings, special instructions, and shipping and sales configuration.
Link to detailed instructions
3.1.1.4. Item Import Options
This section lists the options specific to the item import. Link to detailed instructions
3.1.2. Record Synchronization
Record synchronization is normally done through the Nodus Synchronizer tool. However, the ability to
import records manually from eSSS is also built into the eSSS admin site. The following sections discuss
how to perform the record synchronization and importation as well as managing the information sent
back to GP.
3.1.2.1. Nodus Synchronizer
Starting when eSSS is installed, the Nodus Synchronizer automatically moves data back and forth between GP and the website. Set up information for the Nodus Synchronizer is
Refer to the Nodus Synchronizer section of the eSSS Installation

CONFIDENTIALITY NOTICE - The information contained in this document is confidential and proprietary. This document is to be used with the
understanding that it will be held in strict confidence and not used for reasons unrelated directly to the specific purpose of this document. No part of the
document may be circulated or reproduced for distribution outside the Client organization without prior written permission from Nodus Technologies,
eStore Solution Stack™ v4.0 User’s Guide
19
located in the eSSS Installation Guide. Guide for more details
3.1.2.2. Manual Customer Record Import
Customer records are individually imported from GP using this tool. Link to detailed instructions
3.1.2.3. Manual Item Record Import
Product items can be individually imported from GP using this tool. Link to detailed instructions
3.1.2.4. Manual Tax Detail Import
Tax Detail records and its association with Tax Schedules can be manually imported from GP using this tool.
Link to detailed instructions
3.1.2.5. Manual Site Information Import
Site information including address information can be manually imported from GP using this tool.
Link to detailed instructions
3.1.2.6. Order Manager
The Order Manager provides order status at-a-glance and allows you to resubmit orders that failed to integrate into GP.
Link to detailed instructions
3.1.2.7. Customer Information
This page lists customer records that failed to integrate into GP and provides the ability to adjust the record and resubmit into GP.
Link to detailed instructions

CONFIDENTIALITY NOTICE - The information contained in this document is confidential and proprietary. This document is to be used with the
understanding that it will be held in strict confidence and not used for reasons unrelated directly to the specific purpose of this document. No part of the
document may be circulated or reproduced for distribution outside the Client organization without prior written permission from Nodus Technologies,
eStore Solution Stack™ v4.0 User’s Guide
20
3.2. Product Catalog
3.2.1. General Product Properties
This page allows product properties from item images to inventory to be configured.
Link to detailed instructions
3.2.2. Categories
3.2.2.1. Category Properties
Creating/editing a category along with tools for building and changing the category structure – how the categories are presented on the website – are available in this location.
Link to detailed instructions
Category properties such as meta tags and category content can be created and edited here.
Link to detailed instructions
Configuration for the category search tool and other category options are available in this location.
Link to detailed instructions
3.2.3. Product Images
3.2.3.1. Product Image Options
Configure the product images that will fit the layout of the site. Link to detailed instructions
3.2.3.2. Specify Image Paths
Associate product images to products on the website. Link to detailed instructions
3.2.3.3. Automatically Determine Image Paths by File Name
By using auto recognition of files through naming conventions, this feature eliminates the need to manually associate image paths with products. However, it can be overridden with the path manually specified.
Link to detailed instructions

CONFIDENTIALITY NOTICE - The information contained in this document is confidential and proprietary. This document is to be used with the
understanding that it will be held in strict confidence and not used for reasons unrelated directly to the specific purpose of this document. No part of the
document may be circulated or reproduced for distribution outside the Client organization without prior written permission from Nodus Technologies,
eStore Solution Stack™ v4.0 User’s Guide
21
3.2.4. Product Pricing
3.2.4.1. GP Pricelist and Promotion Price Sheet Setup Options
GP Price List Settings, which can be enabled or disabled, displays the pricing offered for each item based on customer preference
Promotion Price Sheet Settings enables accepting, rejecting or accepting with conditions.
Link to detailed instructions Link to detailed instructions
3.2.4.2. Edit Product > General Info
Category properties such as site cost, list cost and site price are created and edited here.
Link to detailed instructions
3.2.4.3. Edit Product > Volume Discounts
Volume discounts for items for website customers. Link to detailed instructions
3.2.5. Item Inventory
3.2.5.1. Standard/Single Distribution Site Inventory
This is where settings for a standard site inventory using a single distribution location can be found in the admin section under Global Inventory Settings. The Allow Back Orders option in GP setting is located in the Item Imports section Optionally, additional inventory settings on the product item level can be found in the Products section
Link to detailed instructions Link to detailed instructions Link to detailed instructions
3.2.5.2. Multi-Distribution Site Inventory (optional module)
The Multi-Distribution feature allows inventory to be selected by site location. Other settings for multi-site inventory are located in the Global Inventory Settings section
Link to detailed instructions Link to detailed instructions

CONFIDENTIALITY NOTICE - The information contained in this document is confidential and proprietary. This document is to be used with the
understanding that it will be held in strict confidence and not used for reasons unrelated directly to the specific purpose of this document. No part of the
document may be circulated or reproduced for distribution outside the Client organization without prior written permission from Nodus Technologies,
eStore Solution Stack™ v4.0 User’s Guide
22
The Allow Back Orders option in GP setting is located in the Item Imports section Optionally, additional settings on the item level can be found in the Products section
Link to detailed instructions Link to detailed instructions
Site groups for customers that allow inventory to be chosen from different locations can be set up in the Customer Specific Site section
Link to detailed instructions
3.2.6. Promotions
3.2.6.1. Sales
Two types of sales can be set up here; storewide sales and sales for individual product items.
Link to detailed instructions
3.2.6.2. Discounts
Sets product item discounts by order, product, shipping, product shipping, and for free product shipping
Link to detailed instructions
3.2.7. Related Items
3.2.7.1. Edit Product > Related Items
Enables Related Items to be displayed when a customer is viewing a product.
Link to detailed instructions
3.2.8. Customer Choices
3.2.8.1. Customer Choices
Allows the customer to choose from a list of product options, such as color and size.
Link to detailed instructions
3.2.9. Digital Goods File Downloads
3.2.9.1. Digital Goods File Downloads
This feature gives the option of selling downloads for eligible products like digital books or music.
Link to detailed instructions

CONFIDENTIALITY NOTICE - The information contained in this document is confidential and proprietary. This document is to be used with the
understanding that it will be held in strict confidence and not used for reasons unrelated directly to the specific purpose of this document. No part of the
document may be circulated or reproduced for distribution outside the Client organization without prior written permission from Nodus Technologies,
eStore Solution Stack™ v4.0 User’s Guide
23
3.2.10. Purchase Restrictions
3.2.10.1. General Purchase Restrictions
These purchase restrictions control s minimum and maximum amount and quantities of an item that can be purchased on the website. To implement price restrictions for a product item:
Link to detailed instructions Link to detailed instructions
3.2.10.2. Customer Specific Catalog (optional module)
Enables a catalog of products to be established for specific customers.
Link to detailed instructions

CONFIDENTIALITY NOTICE - The information contained in this document is confidential and proprietary. This document is to be used with the
understanding that it will be held in strict confidence and not used for reasons unrelated directly to the specific purpose of this document. No part of the
document may be circulated or reproduced for distribution outside the Client organization without prior written permission from Nodus Technologies,
eStore Solution Stack™ v4.0 User’s Guide
24
3.3. Store Presentation
3.3.1. Themes
Enables a new color theme to be selected for the website Link to detailed instructions
3.3.2. Site Terms
Allows site values (terms) to be customized Link to detailed instructions
3.3.3. Resource Messages
Allows eSSS resource file access. Link to detailed instructions
3.3.4. Quick Order Entry
This section sets up quick order entry suggestions for the eSSS home page.
Link to detailed instructions
3.3.5. Home Page Layout
Allows modular design of the home page using text and graphics as well as user controls such as a search box tool.
Link to detailed instructions
3.3.6. Category Page Layout
Similar to the home page, category pages can be designed from this location on the administration site. Display options such as showing products in column grid or detail list can be accessed in this location. Settings for search functionality in the category section can be accessed in the Category and Search location, along with additional category options.
Link to the Admin section Link to detailed instructions Link to detailed instructions

CONFIDENTIALITY NOTICE - The information contained in this document is confidential and proprietary. This document is to be used with the
understanding that it will be held in strict confidence and not used for reasons unrelated directly to the specific purpose of this document. No part of the
document may be circulated or reproduced for distribution outside the Client organization without prior written permission from Nodus Technologies,
eStore Solution Stack™ v4.0 User’s Guide
25
3.3.7. Store Information
Sets up basic store information such as location and sales id Link to detailed instructions
3.3.8. Store Logo
Allows a custom store logo to be loaded. Link to detailed instructions
3.3.9. Multiple Language Support
Multi-lingual support enables most languages to be displayed on the eSSS store website. Once
implemented, several different languages can be changed on-the-fly through a language options droplist
located on the header of each page on the website. Other features include:
In addition to the static text on the page and action buttons, conditional pop-up messages will also
be displayed in the chosen language.
Multiple eSSS sites can be created for additional languages
Content management through exporting data via uploadable template spreadsheets. Updates are
accomplished through additional spreadsheet downloads. The spreadsheets contain product
information including data such as description, images, metadata, item number and category or
categories.
To enable the eSSS language feature use the instructions in the following sections.
3.3.9.1. Download the Content Spreadsheet
Once the products to be downloaded to the website are identified, the first step is to update item
descriptions to the desired language. For this purpose, the Item Updater helps update item properties
on the website.
1. Navigate to Catalog > Item Updater
2. Choose export options
3. Click Export
4. Download and save the spreadsheet file
5. Follow the normal import process. In the products file, make any needed changes
6. Save the file to a local drive
7. Browse and the file and click Import

CONFIDENTIALITY NOTICE - The information contained in this document is confidential and proprietary. This document is to be used with the
understanding that it will be held in strict confidence and not used for reasons unrelated directly to the specific purpose of this document. No part of the
document may be circulated or reproduced for distribution outside the Client organization without prior written permission from Nodus Technologies,
eStore Solution Stack™ v4.0 User’s Guide
26
Figure 3-1 Item Updater
3.3.9.2. Change to Import Option Settings
1. Navigate to Settings > Nodus/Great Plains
2. Navigate to the Item Import Options settings section
3. Unmark the checkbox to disable the following settings:
Update Item Name on Re-import
Update Short Description on Re-Import
Update Long Description on Re-import
Copy Short Desc to Long Desc if Long Desc is empty upon import
4. Return to the Item Updater
5. Change the item description in spreadsheet to the desired new language
6. Use the updater to import the spreadsheet to eSSS
3.3.9.3. Change Site Terms
1. Navigate to Settings > Site Terms
2. Update ALL site values. To do this:
3. For each displayed site term click the Edit button
4. Change the value by translating the term to the new language
5. Click the Update button
6. Repeat for all site terms

CONFIDENTIALITY NOTICE - The information contained in this document is confidential and proprietary. This document is to be used with the
understanding that it will be held in strict confidence and not used for reasons unrelated directly to the specific purpose of this document. No part of the
document may be circulated or reproduced for distribution outside the Client organization without prior written permission from Nodus Technologies,
eStore Solution Stack™ v4.0 User’s Guide
27
3.3.9.4. Update System Messages
1. Open the App_LocalResources folder
2. Edit the local resource files
3. Use the text editor to translate the content to the new language
4. Look for the values for each data name
3.3.9.5. Update Theme
Make sure new images are created for buttons and other images with text that needs to be translated to
the new language. Once the new images have been created, add the new contents to the App_Themes
folder.

CONFIDENTIALITY NOTICE - The information contained in this document is confidential and proprietary. This document is to be used with the
understanding that it will be held in strict confidence and not used for reasons unrelated directly to the specific purpose of this document. No part of the
document may be circulated or reproduced for distribution outside the Client organization without prior written permission from Nodus Technologies,
eStore Solution Stack™ v4.0 User’s Guide
28
3.4. Shipping/Freight
3.4.1. Matrix Freight Table
This table displays the shipping methods that have been set up for the website. Setup method setup information is included.
Link to detailed instructions
3.4.2. Real-time Shipping Calculation
Setup for calculating shipping fees in real-time for major shippers such as UPS, FedEx and USPS.
Link to detailed instructions
3.4.3. Other Shipping Configurations
3.4.3.1. Shipping Policy
Enables entry of the store shipping policy for display on the website.
Link to detailed instructions
3.4.3.2. Shipping Options for Individual Items
Configuring shipping options for specific items can be carried out in this location.
Link to detailed instructions

CONFIDENTIALITY NOTICE - The information contained in this document is confidential and proprietary. This document is to be used with the
understanding that it will be held in strict confidence and not used for reasons unrelated directly to the specific purpose of this document. No part of the
document may be circulated or reproduced for distribution outside the Client organization without prior written permission from Nodus Technologies,
eStore Solution Stack™ v4.0 User’s Guide
29
3.5. Taxes
Tax information can be either handled by GP or through one of the tax data services listed below that is
supported by eSSS. This third party software communicates directly to eSSS and supplies the tax during
the check out process.
Except for certain usability options, most configuration information is gathered from the third party firm
and entered into a setup form in the eSSS administration section.
3.5.1. Standard GP Tax
This section lists the processing options available for order items on the website. Among the options available are quantity settings, special instructions, and shipping and sales configuration.
Link to detailed instructions
3.5.2. Avalara AvaTax
This is where required information for setting up Avalara tax service information is located.
Link to detailed instructions
3.5.3. Sabrix Managed Tax Service
This is where required information for setting up Sabrix Managed Tax Service information is located.
Link to detailed instructions
3.5.4. CCH Sales Tax Office
This is where required information for setting up CCH - STO tax service information is located.
Link to detailed instructions

CONFIDENTIALITY NOTICE - The information contained in this document is confidential and proprietary. This document is to be used with the
understanding that it will be held in strict confidence and not used for reasons unrelated directly to the specific purpose of this document. No part of the
document may be circulated or reproduced for distribution outside the Client organization without prior written permission from Nodus Technologies,
eStore Solution Stack™ v4.0 User’s Guide
30
3.6. Payment Methods
3.6.1. Credit Cards and eChecks
3.6.1.1. General Setup
This section is required for credit cards and eChecks to be used on the website.
Link to detailed instructions
3.6.1.2. Credit Card Wallet
Although credit cards are not stored directly in eSSS, cards can be saved for later use by enabling a setting that will store them in GP. Credit Card information can also be viewed in the following location on the store website: Your Account > Credit Card Maintenance
Link to detailed instructions
3.6.1.3. Tokenization (optional module)
Tokenization is a simplified method for providing credit card security, requiring less hardware. With
tokenization, credit card information is sent to the payment gateway, where the gateway issues a token.
This token is returned to eSSS and saved to the CCA wallet so it can be used for future transactions with
the associated credit card.
To configure Tokenization:
1. Payment Gateway account information should be configured with Setup IDs, including the flag to utilize Tokenization. Refer to the eSSS Installation Guide for Setup ID configurations.
2. Once the Setup ID is configured, the Admin should then navigate to the following location on the admin website:
3. Settings > Payments > (Select CC & eCheck Processor) > (Edit Nodus Transaction Server)
4. Choose the desired Setup ID that holds the Payment Gateway account to be used for processing credit cards
NOTE: Tokenization is an optional module, and is controlled by a Nodus product registration key. Only
when the proper product registration key is in place, will the administrator be able to select
Tokenization enabled Setup IDs.
CONFIDENTIALITY NOTICE - The information contained in this document is confidential and proprietary. This document is to be used with the
understanding that it will be held in strict confidence and not used for reasons unrelated directly to the specific purpose of this document. No part of the
document may be circulated or reproduced for distribution outside the Client organization without prior written permission from Nodus Technologies,
eStore Solution Stack™ v4.0 User’s Guide
31
3.6.2. PayPal
This section covers how to setup and configure PayPal for use as a payment type during website check out.
Link to detailed instructions
3.6.3. Other Payment Methods
These payment types include:
Purchase Order
Telephone
Fax
Check by Mail
On Account
Link to detailed instructions

CONFIDENTIALITY NOTICE - The information contained in this document is confidential and proprietary. This document is to be used with the
understanding that it will be held in strict confidence and not used for reasons unrelated directly to the specific purpose of this document. No part of the
document may be circulated or reproduced for distribution outside the Client organization without prior written permission from Nodus Technologies,
eStore Solution Stack™ v4.0 User’s Guide
32
3.7. Customer Record Management
3.7.1. CSR/Salesperson Functionality
CSR and Salesperson functionality is set up from this location. Functionalities include setting up the ability to log onto the site and place orders on behalf of the customer. These settings can also restrict a salesperson from managing accounts not assigned to the Sales ID.
Link to detailed instructions
3.7.2. Customer Record Management
Customer information can be viewed and managed from this location using the Edit User form.
Link to detailed instructions
3.7.3. My Account Options
The location of account settings such as e-mail address, password, single sign-on for ePay options and multiple user log-ins.
Link to detailed instructions
3.7.4. Anonymous Checkout
Allows customer to place order without registering for an account. All orders placed using anonymous checkout will are sent to GP under one single customer record.
Link to detailed instructions

CONFIDENTIALITY NOTICE - The information contained in this document is confidential and proprietary. This document is to be used with the
understanding that it will be held in strict confidence and not used for reasons unrelated directly to the specific purpose of this document. No part of the
document may be circulated or reproduced for distribution outside the Client organization without prior written permission from Nodus Technologies,
eStore Solution Stack™ v4.0 User’s Guide
33
3.8. National Account Support
3.8.1. National Account Settings
National Account settings can be configured from this location. Link to detailed instructions
3.8.2. Workflow
This National Account page allows the user to view and choose from a list of accounts associated with
the primary account. Functions available from this page include:
The address book of the selected account that is used during checkout
The order is sent to GP under the account’s GP Customer ID
When a parent account places an order on behalf of the child account, confirming e-mails are sent
to both accounts.
Figure 3-2 National Account page
When this feature is enabled and a parent-child account relationship is established in Great Plains, the
initial log-in page will open to the National Account selection page as shown above. The user then
chooses the account to be worked with by marking the checkbox and clicking the Select button.
Browsing to pages other than the Customer Service section is not allowed. The customer is required to
select an account before any other actions can be taken.

CONFIDENTIALITY NOTICE - The information contained in this document is confidential and proprietary. This document is to be used with the
understanding that it will be held in strict confidence and not used for reasons unrelated directly to the specific purpose of this document. No part of the
document may be circulated or reproduced for distribution outside the Client organization without prior written permission from Nodus Technologies,
eStore Solution Stack™ v4.0 User’s Guide
34
3.9. Shopping Cart Functionality
3.9.1. Gift Certificates
Enables the ability to purchase and redeem electronic gift certificates on the website.
Link to detailed instructions
3.9.2. Mailing Lists
Customer private and public mailings can be created in this location.
Link to detailed instructions
3.9.3. Affiliates
Sets up an affiliate referral program, if desired. Link to detailed instructions
3.9.4. Drop Ship
Drop ship e-mail notices can be enabled from the following location on the administration site. This settings will send notices for both the authorization and charge stages of the order
Link to detailed instructions
3.9.5. Search Engine Optimization
3.9.5.1. Edit Product > Meta Tags
This is where meta tags are entered for website product items. The following meta data types are allowed:
Meta Title
Meta Keywords
Meta Description
Link to detailed instructions
3.9.5.2. Edit Category > Meta Tags
Meta tags can be added when a category is created or edited from this location.
Link to detailed instructions
CONFIDENTIALITY NOTICE - The information contained in this document is confidential and proprietary. This document is to be used with the
understanding that it will be held in strict confidence and not used for reasons unrelated directly to the specific purpose of this document. No part of the
document may be circulated or reproduced for distribution outside the Client organization without prior written permission from Nodus Technologies,
eStore Solution Stack™ v4.0 User’s Guide
35
3.9.5.3. Store Meta Tags
Store-level meta tags can be added from this location. Link to detailed instructions
3.9.5.4. URL Re-write
Allows the user to choose between ProductID and ProductName to re-write the URL when needed.
Link to detailed instructions
3.9.6. Help/FAQ
The Help/FAQ page for the website is created and edited from t6his location.
Link to detailed instructions
3.9.7. Privacy Policy
The website privacy policy can be created or edited from this location.
Link to detailed instructions
3.9.8. Returns
Enables creation of a product Return form for use by website customers.
Link to detailed instructions
3.9.9. Site Terms and Conditions
Allows site values (terms) to be customized. Link to detailed instructions
3.9.10. E-mail Messages
3.9.10.1.Settings > Mail Server
This is where SMTP mail server is specified to enable site e-mail. Link to detailed instructions
3.9.10.2.E-Mail Messages
E-mail templates are available to facilitate several different types of e-mail notices such as forgotten passwords, new orders and drop shipments.
Link to detailed instructions

CONFIDENTIALITY NOTICE - The information contained in this document is confidential and proprietary. This document is to be used with the
understanding that it will be held in strict confidence and not used for reasons unrelated directly to the specific purpose of this document. No part of the
document may be circulated or reproduced for distribution outside the Client organization without prior written permission from Nodus Technologies,
eStore Solution Stack™ v4.0 User’s Guide
36
3.9.11. Custom Pages
New web pages can be added to the store using this tool. Link to detailed instructions
3.9.12. Open/Close Store
I f it is necessary to shut down the website for system upgrades or other reasons, this option posts a notice informing customers of the website status.
Link to detailed instructions
3.9.13. Google Analytics
Allows script procedure from Google to be added in order to enable Google Analytics, a tool that allows analysis of traffic on the website.
Link to detailed instructions
3.9.14. reCAPTCHA
Enables reCAPTCHA, an anti-spam feature. Link to detailed instructions
3.9.15. Search Orders
This is search feature that allows website orders to be filtered and searched to create a custom list of orders
Link to detailed instructions
3.9.16. Reports
Displays a variety of customer, sales and product reports, including:
Monthly Sales
Daily Sales
Sales By Coupon
Sales By Affiliate
Top Products
Top Customers
Website Payments Pro Payflow Edition Reporting
Link to detailed instructions

CONFIDENTIALITY NOTICE - The information contained in this document is confidential and proprietary. This document is to be used with the
understanding that it will be held in strict confidence and not used for reasons unrelated directly to the specific purpose of this document. No part of the
document may be circulated or reproduced for distribution outside the Client organization without prior written permission from Nodus Technologies,
eStore Solution Stack™ v4.0 User’s Guide
37
3.9.17. Gift Wrap
This option enables item gift wrapping to be ordered by the customer.
Link to detailed instructions
3.9.18. Site Options
A variety of global settings for the site are configured from this location. Major settings include:
Currency display
Initial Landing page
Site cookie name
National Account support
Link to detailed instructions
3.9.19. Region Control
3.9.19.1.Currency
Sets the website default currency. Link to detailed instructions
3.9.19.2.Countries
List countries from where orders can be accepted. Link to detailed instructions
3.9.20. Product Reviews
These settings will set up and maintain a product review feature for each product item that allows customers to rate products available on the website.
Link to detailed instructions
3.9.21. Fraud Checks
Provides the option of banning e-mails, IP addresses and domain names for customers who pass bad checks or behave in an inappropriate manner.
Link to detailed instructions

CONFIDENTIALITY NOTICE - The information contained in this document is confidential and proprietary. This document is to be used with the
understanding that it will be held in strict confidence and not used for reasons unrelated directly to the specific purpose of this document. No part of the
document may be circulated or reproduced for distribution outside the Client organization without prior written permission from Nodus Technologies,
eStore Solution Stack™ v4.0 User’s Guide
38
3.9.22. Repeat Order
There is no administrative control to enable or disable this feature, which is available from the Order
History page on the website. Once a previous order is opened from the history list, the Repeat Order
button is available.
Clicking Repeat Order loads data from the original order onto a new checkout page. From there, the
user can add and delete items as needed and complete the checkout process.
Figure 3-3 Repeat Order
3.9.23. Login Anywhere
Login Anywhere provides on-screen prompt for the customer to enter their credentials anywhere on the site when clicking “Sign In”, without leaving the page they were viewing.
Link to detailed instructions
3.9.24. Mobile Ready
eSSS provides Application Program Interface (API) for your mobile site developers to integrate eSSS data and functionalities with your
Link to detailed instructions

CONFIDENTIALITY NOTICE - The information contained in this document is confidential and proprietary. This document is to be used with the
understanding that it will be held in strict confidence and not used for reasons unrelated directly to the specific purpose of this document. No part of the
document may be circulated or reproduced for distribution outside the Client organization without prior written permission from Nodus Technologies,
eStore Solution Stack™ v4.0 User’s Guide
39
mobile site. eSSS will also detect when users are browsing using a mobile device and redirect the user to your mobile site. Please see the eSSS API Developer Guide for technical details.

CONFIDENTIALITY NOTICE - The information contained in this document is confidential and proprietary. This document is to be used with the
understanding that it will be held in strict confidence and not used for reasons unrelated directly to the specific purpose of this document. No part of the
document may be circulated or reproduced for distribution outside the Client organization without prior written permission from Nodus Technologies,
eStore Solution Stack™ v4.0 User’s Guide
40
3.10. Single Sign-On
eSSS supports single sign-on, which will allow a third party application/website to authenticate the users
and handle the logins, then redirect the user back eSSS with pre-established session under the user’s
account.
The third party application/website will need to be customized to handle such communications with
eSSS. For the technical details, please refer to the eSSS SSO Developer Guide.
CONFIDENTIALITY NOTICE - The information contained in this document is confidential and proprietary. This document is to be used with the
understanding that it will be held in strict confidence and not used for reasons unrelated directly to the specific purpose of this document. No part of the
document may be circulated or reproduced for distribution outside the Client organization without prior written permission from Nodus Technologies,
eStore Solution Stack™ v4.0 User’s Guide
41
3.11. Troubleshooting
3.10.1. Version Information
This list of file names and file versions helps identify the source of problems to Nodus.
Link to detailed instructions
3.10.2. Error Log
Error log management system built into eSSS Link to detailed instructions
3.10.3. Current Application Settings
Read-only list of store settings. Link to detailed instructions
3.10.4. Debug Logs
Aids in troubleshooting website error issues by accessing a debug log table.
Link to detailed instructions

CONFIDENTIALITY NOTICE - The information contained in this document is confidential and proprietary. This document is to be used with the
understanding that it will be held in strict confidence and not used for reasons unrelated directly to the specific purpose of this document. No part of the
document may be circulated or reproduced for distribution outside the Client organization without prior written permission from Nodus Technologies,
eStore Solution Stack™ v4.0 User’s Guide
42
4. Administration Areas
4.1. Home Page
Administration website location: Home
To access the Merchant Admin area, navigate to the site and click the Sign-In link on the top menu. If
logging in with an account with permissions to access the admin area, the Go To Admin button appears
as shown.
NOTE: If the Go To Admin button does not appear due to theme customizations, etc., log-in to the
Admin area by going to the root domain URL/BVAdmin/Default.aspx. When first viewing the
Administration home page, the content appears as shown in the accompanying figure.
Figure 4-1 Admin Home Page

CONFIDENTIALITY NOTICE - The information contained in this document is confidential and proprietary. This document is to be used with the
understanding that it will be held in strict confidence and not used for reasons unrelated directly to the specific purpose of this document. No part of the
document may be circulated or reproduced for distribution outside the Client organization without prior written permission from Nodus Technologies,
eStore Solution Stack™ v4.0 User’s Guide
43
4.2. To Do/Alerts
Administration website location: Home > To Do/Alerts
Critical information will be listed in this section for immediate action. When creating a new site – as
demonstrated in the above home page screen shot – information such as the default log-in credentials
should be changed and content added to the new store such as Categories and Products.
The accompanying screenshot is an example of the To Do/Alerts list.
Figure 4-2 To Do/Alerts

CONFIDENTIALITY NOTICE - The information contained in this document is confidential and proprietary. This document is to be used with the
understanding that it will be held in strict confidence and not used for reasons unrelated directly to the specific purpose of this document. No part of the
document may be circulated or reproduced for distribution outside the Client organization without prior written permission from Nodus Technologies,
eStore Solution Stack™ v4.0 User’s Guide
44
4.3. Resources
Administration website location: Home > Resources
Several helpful resources are also available on the Administration home page. The links to these
resources are described in the following table.
NEW FEATURE DESCRIPTION
Getting Started Checklist
Opens a pop-up window with a series of links that guides the user through the process of setting up the most critical webstore features.
Nodus.com This is a link to Nodus Technologies’ main website.
Nodus Support This link connects directly to the Support Center page of the Nodus main website.
Nodus Knowledge Base
This link connects directly to the Knowledge Base page of the Nodus main website.
eSSS User’s Guide Opens a window where a PDF can be downloaded...

CONFIDENTIALITY NOTICE - The information contained in this document is confidential and proprietary. This document is to be used with the
understanding that it will be held in strict confidence and not used for reasons unrelated directly to the specific purpose of this document. No part of the
document may be circulated or reproduced for distribution outside the Client organization without prior written permission from Nodus Technologies,
eStore Solution Stack™ v4.0 User’s Guide
45
4.3.1. Getting Started Checklist
The first steps in setting up the new eStore are
listed in the Getting Started Checklist. These are
the most critical items needed to set up the
store. This process involves setting important
settings such as:
Administrator account user name and
password
Contact and business information
Payment and shipping options
Store product catalog
Webstore display can be configured using the
included home page content builder and other
HTML editors such as Microsoft FrontPage,
Macromedia Dreamweaver and MS Visual
Studio.
The Getting Started Checklist organizes the
critical elements to configuring the new store.
Follow this desktop reference to ensure the default
settings for the webstore are configured prior to
going live with the store.
NOTE: this portion of the reference is meant to be an overview of the critical set-up steps. You must
refer to specific topics noted in each section for the most complete content. Links to this content in the
eSSS User’s Guide are provided in the following sections.
Figure 4-3 Getting Started Checklist

CONFIDENTIALITY NOTICE - The information contained in this document is confidential and proprietary. This document is to be used with the
understanding that it will be held in strict confidence and not used for reasons unrelated directly to the specific purpose of this document. No part of the
document may be circulated or reproduced for distribution outside the Client organization without prior written permission from Nodus Technologies,
eStore Solution Stack™ v4.0 User’s Guide
46
4.3.1.1. Change Admin User Name and Password from Default
When building a new store, the default log-in credentials are ‘[email protected]’ and ‘password’.
These are the default credentials for all eStore Solution Stack stores.
1. Click the link in this first checklist item and the accompanying figure appears.
2. Enter a default admin e-mail address for the website, then a new password.
3. Confirm the password
NOTE: It is highly recommended to use a ‘strong’ password containing upper and lower case letters,
numbers, and at least one special character such as those in the upper case number keys. Password
length should be at least six characters in length.
4. Click the OK button
Figure 4-4 Change Default Admin Username
4.3.1.2. Set-up Contact Information
Personalize the site with information specific to the webstore. This information is displayed as a link in the Customer Service area of the store in the window footer.
Link to detailed instructions
4.3.1.3. Upload Logo
This section describes how to set up a logo image is displayed on the eStore home page.
Link to detailed instructions
4.3.1.4. Select a Theme
Nodus eStore Solution Stack ships with several themes that can be selected in the administration section.
Link to detailed instructions
CONFIDENTIALITY NOTICE - The information contained in this document is confidential and proprietary. This document is to be used with the
understanding that it will be held in strict confidence and not used for reasons unrelated directly to the specific purpose of this document. No part of the
document may be circulated or reproduced for distribution outside the Client organization without prior written permission from Nodus Technologies,
eStore Solution Stack™ v4.0 User’s Guide
47
4.3.1.5. Set-up Home Page
The home page can be easily customized using the home page content editor.
Link to detailed instructions
4.3.1.6. Turn on SSL
This describes how to set up SSL for the webstore. Link to detailed instructions
4.3.1.7. Setup Payment Methods
Nodus eStore Solution Stack offers several methods of handling payments. These payment methods are set up in the following locations.
Credit Card and Check Processing Link to detailed instructions
Set up PayPal Link to detailed instructions
Other Forms of Payment
Purchase Order
Telephone
Fax
Check by E-mail
On Account
Link to detailed instructions
4.3.1.8. Setup Shipping Methods
If shippable products are provided, this section describes how to configure the shipping options.
Link to detailed instructions
4.3.1.9. Add Categories
The main focus of the store is the content for sale. This section shows how to organize content (products) in categories and sub-categories.
Link to detailed instructions

CONFIDENTIALITY NOTICE - The information contained in this document is confidential and proprietary. This document is to be used with the
understanding that it will be held in strict confidence and not used for reasons unrelated directly to the specific purpose of this document. No part of the
document may be circulated or reproduced for distribution outside the Client organization without prior written permission from Nodus Technologies,
eStore Solution Stack™ v4.0 User’s Guide
48
4.3.1.10. Add Products
4.3.1.10.1. Extended Great Plains/Myridas Pricing
Extended Pricing is a Great Plains feature that allows special conditions to be set for pricing items, such as establishing a percentage discount and date range for a President’s Day sale. Myridas is a similar add-on program with specialized features.
Link to detailed instructions
4.3.1.10.2. Import and Edit Products
This is a tool that can import a single product item from GP. The entire item set is automatically imported to eSSS by the Nodus Synchronizer after installation, but there occasionally be a need to import a single item.
Link to detailed instructions
4.3.1.11. Privacy Policies
Prior to going live, customize policy information to meet your on-line business requirements.
Link to detailed instructions
4.3.1.12. Change Terms and Conditions
The rules of the website are displayed in the webstore’s Terms and Conditions area of the Customer Service page.
Link to detailed instructions
4.3.1.13. Change Return Policy
This area of the website establishes the webstore policies for accepting returns.
Link to detailed instructions
4.3.1.14. Change Shipping Policy
Text for the established shipping policy of the website can be created or edited in this section.
Link to detailed instructions
4.3.1.15. Setup Meta Tags
Each product can contain Meta tags such as Title, Keywords, and Description, as well as Meta tags at the store level. This provides excellent control and customization for search engine optimization.
Link to detailed instructions

CONFIDENTIALITY NOTICE - The information contained in this document is confidential and proprietary. This document is to be used with the
understanding that it will be held in strict confidence and not used for reasons unrelated directly to the specific purpose of this document. No part of the
document may be circulated or reproduced for distribution outside the Client organization without prior written permission from Nodus Technologies,
eStore Solution Stack™ v4.0 User’s Guide
49
4.3.1.16. Setup Email Templates
There are several e-mail templates available that can be customized as needed. This section allows the templates to be customized as needed.
Link to detailed instructions
4.3.1.17. More Settings and Options
This link takes the user to the Settings section where most configurable options for the website are
available. For details on these features, refer to the Settings section of this user’s guide.

CONFIDENTIALITY NOTICE - The information contained in this document is confidential and proprietary. This document is to be used with the
understanding that it will be held in strict confidence and not used for reasons unrelated directly to the specific purpose of this document. No part of the
document may be circulated or reproduced for distribution outside the Client organization without prior written permission from Nodus Technologies,
eStore Solution Stack™ v4.0 User’s Guide
50
4.4. Catalog
Products are the core of any store. Prior to creating products, it is important to have good
understanding of all related areas in the admin area that contribute to the presentation and sale of your
business products. Familiarize yourself with the available fields and features involved in product creation
and other lists that need to be populated prior to creating products. Prior to creating products, it is
recommended to build the category structure of the store.
Careful planning is a key to minimizing excessive categories and complicated navigation for shoppers.
After organizing the categories, configure the manufacturers and vendors associated with inventory.
New products are assigned a Product Type. Once created, they cannot be changed, so it is imperative to
configure product types prior to building new products. A product type is essentially a ‘description
template’ that contains information describing the product. These elements of the product type
template are called properties, which can be configured by clicking the Type Properties menu option.
Configurable options in the Catalog section include:
Products
Catalogs
Categories
Shared Choices
Sales
Discounts
Update Inventory
Product Types
Type Properties
Manage Files
Quick Order Product Suggestions
Item Updater
Customer Specific Site

CONFIDENTIALITY NOTICE - The information contained in this document is confidential and proprietary. This document is to be used with the
understanding that it will be held in strict confidence and not used for reasons unrelated directly to the specific purpose of this document. No part of the
document may be circulated or reproduced for distribution outside the Client organization without prior written permission from Nodus Technologies,
eStore Solution Stack™ v4.0 User’s Guide
51
4.4.1. Categories
Administration website location: Catalog > Categories
The main focus of most stores is the content for sale. Content should be organized into well-considered
categories. However, careful use of categories should be exercised so they don’t clutter the store. Each
category contains products. Categories can have nested sub-categories for further organization. Here,
Item Classes can be imported from Great Plains. This is useful if the items are already laid out in a
logical way in Great Plains and it is desired to maintain the Item Class layout for shopping cart
categories.
NOTE: It is advised to import the Item Classes before importing the Items. Updating (re-importing)
previously imported items does not update them with new category information.
Figure 4-5 Add Categories
The skeleton of any store is comprised of categories or "groups." Each category group contains products
and/or sub-categories assignments. When a category is viewed, the products you associated with the
group are displayed to the shopper as well as any sub-categories. Prior to building categories, carefully
plan the site to let a shopper easily know where to find the product they are looking for.
Category organization suggestions:
Write out a category and sub-category structure outline prior to adding them to the store so the
store design is well thought out prior to implementation.
Make sure any category names are named properly and provide the proper detail as to what the
category contains.

CONFIDENTIALITY NOTICE - The information contained in this document is confidential and proprietary. This document is to be used with the
understanding that it will be held in strict confidence and not used for reasons unrelated directly to the specific purpose of this document. No part of the
document may be circulated or reproduced for distribution outside the Client organization without prior written permission from Nodus Technologies,
eStore Solution Stack™ v4.0 User’s Guide
52
Break down each category "group" into sub-categories and associate the products to the sub-
categories as well.
Another option is to NOT associate products to a parent category, only sub-categories.
Another alternative: organize categories in the website. Top sellers could be associated to a parent
category only, and the remaining products could be associated with sub-categories.
Caution: Do not overuse categories.
Building a clear, well-considered category structure is critical to shoppers finding what they need as well
as guiding them to other areas of interest during their shopping experience.
NOTE: When imported, GP Item Classes only create parent categories.
Figure 4-6 Loading Parent Categories
The parent categories are loaded as shown in the following figure, and then selecting one of the parent
categories displays the assigned sub-categories.
Figure 4-7 New Parent Groups

CONFIDENTIALITY NOTICE - The information contained in this document is confidential and proprietary. This document is to be used with the
understanding that it will be held in strict confidence and not used for reasons unrelated directly to the specific purpose of this document. No part of the
document may be circulated or reproduced for distribution outside the Client organization without prior written permission from Nodus Technologies,
eStore Solution Stack™ v4.0 User’s Guide
53
4.4.1.1. Add a New Parent Group
1. Enter the name of the new category in the left window under the New Category heading
2. After entering the name, click the New button. The name appears in the right window
4.4.1.2. Delete Category
Select the category and click the Delete button
4.4.1.3. Add Sub-Categories
Select a parent category in the left window then replace "New Category" on the right side list with the
name of the desired sub-category.
4.4.1.4. Additional Level of Sub-Category
Click the sub-category on the right-side list that will be the parent of the next level of sub-categories.
Upon doing so, as shown in the accompanying figure, the selected sub-category is loaded into the list on
the left and sub-categories can be defined in the list on the right
Figure 4-8 Additional Level Sub-Category

CONFIDENTIALITY NOTICE - The information contained in this document is confidential and proprietary. This document is to be used with the
understanding that it will be held in strict confidence and not used for reasons unrelated directly to the specific purpose of this document. No part of the
document may be circulated or reproduced for distribution outside the Client organization without prior written permission from Nodus Technologies,
eStore Solution Stack™ v4.0 User’s Guide
54
4.4.1.5. Edit Category
Administration website location: Catalog > Categories > (choose a category and edit) > Edit Category
Categories can have unique features such as meta tags, image assignments, product assignments, and
control of how category content is displayed. The following figure shows the top portion of the Edit
Category area allowing the definition of the category name and description.
Figure 4-9 Edit Category – top portion
The accompanying figure shows the control of what content a category will display. When viewing a
category with sub-categories associated, a grid will show the sub-categories with images whereas the
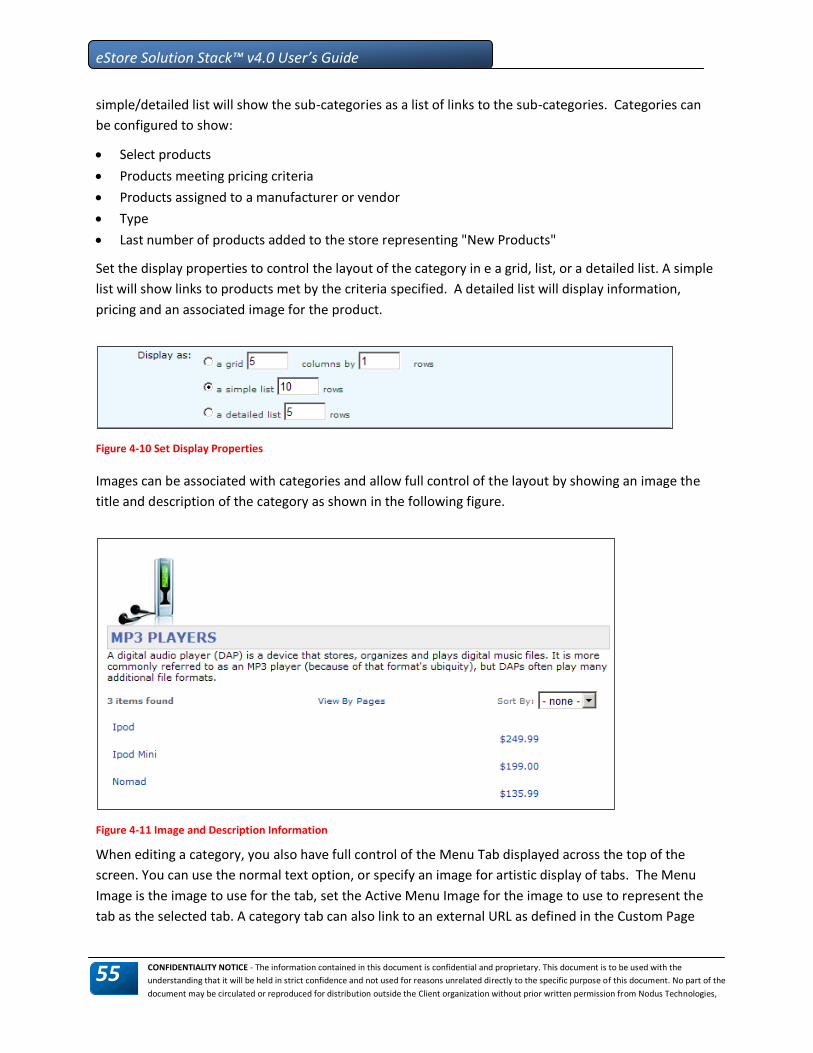
CONFIDENTIALITY NOTICE - The information contained in this document is confidential and proprietary. This document is to be used with the
understanding that it will be held in strict confidence and not used for reasons unrelated directly to the specific purpose of this document. No part of the
document may be circulated or reproduced for distribution outside the Client organization without prior written permission from Nodus Technologies,
eStore Solution Stack™ v4.0 User’s Guide
55
simple/detailed list will show the sub-categories as a list of links to the sub-categories. Categories can
be configured to show:
Select products
Products meeting pricing criteria
Products assigned to a manufacturer or vendor
Type
Last number of products added to the store representing "New Products"
Set the display properties to control the layout of the category in e a grid, list, or a detailed list. A simple
list will show links to products met by the criteria specified. A detailed list will display information,
pricing and an associated image for the product.
Figure 4-10 Set Display Properties
Images can be associated with categories and allow full control of the layout by showing an image the
title and description of the category as shown in the following figure.
Figure 4-11 Image and Description Information
When editing a category, you also have full control of the Menu Tab displayed across the top of the
screen. You can use the normal text option, or specify an image for artistic display of tabs. The Menu
Image is the image to use for the tab, set the Active Menu Image for the image to use to represent the
tab as the selected tab. A category tab can also link to an external URL as defined in the Custom Page

CONFIDENTIALITY NOTICE - The information contained in this document is confidential and proprietary. This document is to be used with the
understanding that it will be held in strict confidence and not used for reasons unrelated directly to the specific purpose of this document. No part of the
document may be circulated or reproduced for distribution outside the Client organization without prior written permission from Nodus Technologies,
eStore Solution Stack™ v4.0 User’s Guide
56
URL option. If you would like the external URL to display in a new window, check the "Open link in a new
window" option.
As shown in the accompanying figure, you can set where the category is displayed. If a top menu
category strip is active, you can set whether or not this category is displayed in the list. If this category is
hidden, links can be established to the category, but the category itself will not appear in a top or side
menu.
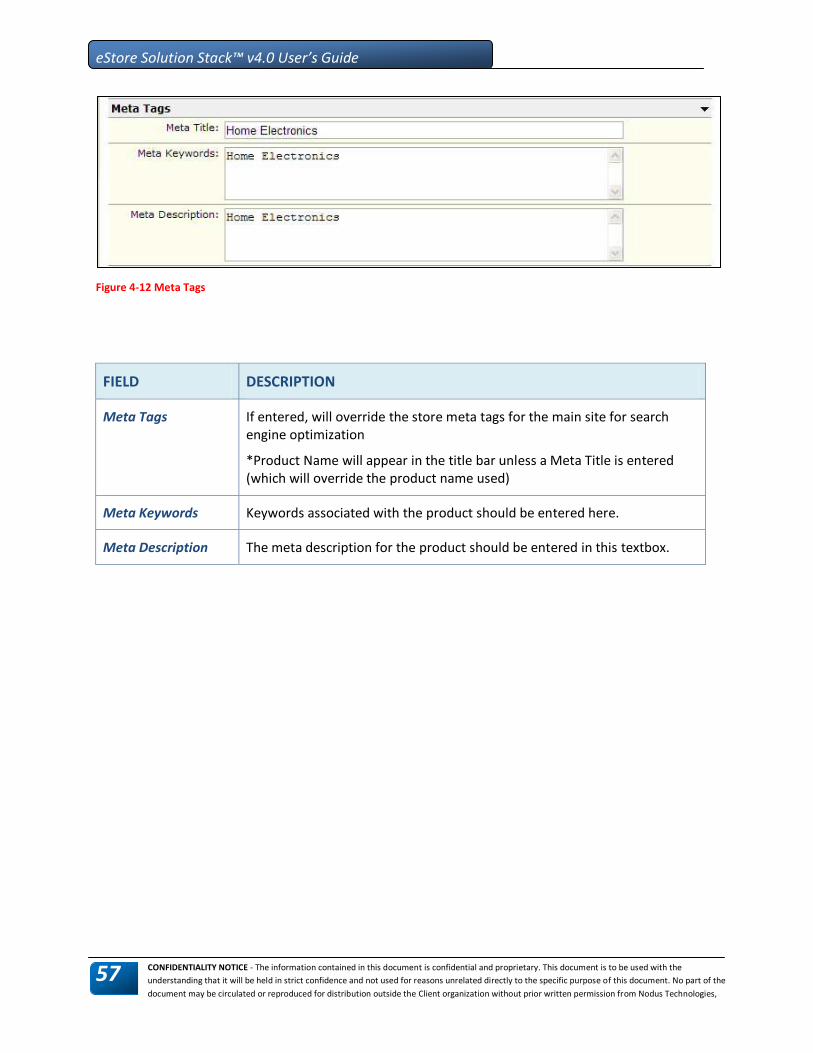
CONFIDENTIALITY NOTICE - The information contained in this document is confidential and proprietary. This document is to be used with the
understanding that it will be held in strict confidence and not used for reasons unrelated directly to the specific purpose of this document. No part of the
document may be circulated or reproduced for distribution outside the Client organization without prior written permission from Nodus Technologies,
eStore Solution Stack™ v4.0 User’s Guide
57
Figure 4-12 Meta Tags
FIELD DESCRIPTION
Meta Tags If entered, will override the store meta tags for the main site for search engine optimization
*Product Name will appear in the title bar unless a Meta Title is entered (which will override the product name used)
Meta Keywords Keywords associated with the product should be entered here.
Meta Description The meta description for the product should be entered in this textbox.

CONFIDENTIALITY NOTICE - The information contained in this document is confidential and proprietary. This document is to be used with the
understanding that it will be held in strict confidence and not used for reasons unrelated directly to the specific purpose of this document. No part of the
document may be circulated or reproduced for distribution outside the Client organization without prior written permission from Nodus Technologies,
eStore Solution Stack™ v4.0 User’s Guide
58
Figure 4-13 Category Image and Menu Tab Properties
FIELD DESCRIPTION
Show Title Disabling this option will hide the image title
Show Description Disabling this option will hide the description
Icon Image URL A URL location link to an icon image can be set here
Banner Image URL A URL location link to an icon image can be set here
Menu Image This option displays an image for the on the top menu
Active Menu Image When a category is selected and browsed, this option will display an image on the top menu
Use Custom Link? When enabled, displays an image from another location
Custom Page URL When Use Custom Link? has been enabled, this field is where the URL of the image location is entered
Open link in new window?
Create a pop-up window to display the link

CONFIDENTIALITY NOTICE - The information contained in this document is confidential and proprietary. This document is to be used with the
understanding that it will be held in strict confidence and not used for reasons unrelated directly to the specific purpose of this document. No part of the
document may be circulated or reproduced for distribution outside the Client organization without prior written permission from Nodus Technologies,
eStore Solution Stack™ v4.0 User’s Guide
59
Figure 4-14 Advanced View
FIELD DESCRIPTION
Show this category in the top menu
If a top menu is being used, the category is displayed in that area
Hide this category from Category lists
When category lists are displayed, this category will be hidden
Hide this category This option will hide the category on the website

CONFIDENTIALITY NOTICE - The information contained in this document is confidential and proprietary. This document is to be used with the
understanding that it will be held in strict confidence and not used for reasons unrelated directly to the specific purpose of this document. No part of the
document may be circulated or reproduced for distribution outside the Client organization without prior written permission from Nodus Technologies,
eStore Solution Stack™ v4.0 User’s Guide
60
4.4.2. Products
Administration website location: Catalog > Products
The core of any store is the products. Prior to importing product items from Great Plains, it is important
to have a good understanding of all related areas in the admin area that contribute to the presentation
and sale of your business products.
When eSSS is installed along with the Nodus Synchronizer, the synchronizer will continuous send item
updates made in Great Plains to the eSSS site.
NOTES:
Single items can be imported by using the Import options feature on the Products page. This import
feature is often used to verify that the integration to GP is running properly.
Once items are imported to eSSS, the Products page allows you to search and refine the product
properties.
Figure 4-15 Import Products
Figure 4-16 Products Page

CONFIDENTIALITY NOTICE - The information contained in this document is confidential and proprietary. This document is to be used with the
understanding that it will be held in strict confidence and not used for reasons unrelated directly to the specific purpose of this document. No part of the
document may be circulated or reproduced for distribution outside the Client organization without prior written permission from Nodus Technologies,
eStore Solution Stack™ v4.0 User’s Guide
61
4.4.2.1. Editing Products
Administration website location: Catalog > Products > (select an item and choose edit) > General Info
To edit a product, begin by selecting an item from the Products page and clicking the Edit button. The
General Information page will open and a unique menu is now available on the left side of the page. The
following sections displayed on the menu describe editing options for each product item.
General Information
Customer Choices
Images
Related Items
Categories
Inventory
File Downloads
Customer Reviews
Volume Discounts
IMPORTANT: Customer and inventory deletions in Great Plains are not automatically synchronized with
the store site, and must be manually removed using the website’s Administration User interface.

CONFIDENTIALITY NOTICE - The information contained in this document is confidential and proprietary. This document is to be used with the
understanding that it will be held in strict confidence and not used for reasons unrelated directly to the specific purpose of this document. No part of the
document may be circulated or reproduced for distribution outside the Client organization without prior written permission from Nodus Technologies,
eStore Solution Stack™ v4.0 User’s Guide
62
4.4.2.1.1. General Information
Administration website location: Catalog > Products > (select item and choose edit) > General Info
This section contains multiple settings that control features from how the product is displayed on the
website to configuring how taxes are charged for the item. Review the settings detailed in the following
tables for each section of General Information.
Figure 4-17 General Information (top category)
The accompanying figure shows the top portion of the general information page. Fill out the fields as
completely as possible as described in the following table.

CONFIDENTIALITY NOTICE - The information contained in this document is confidential and proprietary. This document is to be used with the
understanding that it will be held in strict confidence and not used for reasons unrelated directly to the specific purpose of this document. No part of the
document may be circulated or reproduced for distribution outside the Client organization without prior written permission from Nodus Technologies,
eStore Solution Stack™ v4.0 User’s Guide
63
SETTING DESCRIPTION
Active The product appears in the store view when this box is checked
Hide from Users When this checkbox is marked, the item will be hidden
Name The title of the product as it should appear in the catalog
Site Cost User cost for the item
List Price Retail price for the item
Site Price Cost to the customer
Product Type This feature allows admin users to manually change the product type of the item. Click the drop list to view product type options. New product types for an item can be created at Catalog > Product Types (see the related section)
Short Description There is a 255 maximum character description of product
Long Description Full description of product with no character limit
Other Properties Allows selection of a property type to be associated with the product item. To add a property type, go to Catalog > Type Properties.

CONFIDENTIALITY NOTICE - The information contained in this document is confidential and proprietary. This document is to be used with the
understanding that it will be held in strict confidence and not used for reasons unrelated directly to the specific purpose of this document. No part of the
document may be circulated or reproduced for distribution outside the Client organization without prior written permission from Nodus Technologies,
eStore Solution Stack™ v4.0 User’s Guide
64
Figure 4-18 Advanced Options
FIELD DESCRIPTION
Item Class GP Item Class
Default UOM The default Unit of Measure in GP.
Default Price Level The default price level in GP.
Default SiteID Lists the default site ID stored in Great Plains.
Qty Decimal Places Sets the default number of decimal places used for inventory quantity.
Minimum Qty The minimum quantity that may be purchased in an order.
Maximum Qty The maximum quantity that may be purchased in an order.
Display Customer Choices As
When a product has Customer Choices associated, the choices can be displayed in either a grid layout or individual fields. Not all types of choices will work with a grid display type - test products carefully to ensure choices are displayed as desired.
Gift Wrap Allowed Enables an optional gift wrap fee to be charged.
Manufacturer Select the manufacturer from the drop down list, if not listed can be added in the People > Manufacturers section. May be used for drop ships or product categories.
Vendor Select the vendor from the drop down list, if not listed, can be added in the People > Vendors area. May be used for drop ships or product categories.

CONFIDENTIALITY NOTICE - The information contained in this document is confidential and proprietary. This document is to be used with the
understanding that it will be held in strict confidence and not used for reasons unrelated directly to the specific purpose of this document. No part of the
document may be circulated or reproduced for distribution outside the Client organization without prior written permission from Nodus Technologies,
eStore Solution Stack™ v4.0 User’s Guide
65
Figure 4-19 Meta Tags
FIELD DESCRIPTION
Meta Tags If entered, will override the store meta tags for the main site to facilitate search engine optimization.
*Product Name will appear in the title bar unless a Meta Title is entered (which will override the product name used).
Meta Keywords Keywords associated with the product should be entered here.
Meta Description The meta description for the product should be entered in this textbox.

CONFIDENTIALITY NOTICE - The information contained in this document is confidential and proprietary. This document is to be used with the
understanding that it will be held in strict confidence and not used for reasons unrelated directly to the specific purpose of this document. No part of the
document may be circulated or reproduced for distribution outside the Client organization without prior written permission from Nodus Technologies,
eStore Solution Stack™ v4.0 User’s Guide
66
Figure 4-20 Taxes
FIELD DESCRIPTION
Tax Exempt Mark the checkbox if this product is tax exempt. If marked, the system will not check for tax data.
Tax Option Display will indicate the item’s Tax Option status. This configuration is stored in GP.
Item Tax Schedule ID Displays the Item Tax Schedule ID stored in GP that is associated with the product item.
Tax Class Select the appropriate tax class for the product item. Tax classes are set up in the administration section of eSSS in Settings > Tax Classes.

CONFIDENTIALITY NOTICE - The information contained in this document is confidential and proprietary. This document is to be used with the
understanding that it will be held in strict confidence and not used for reasons unrelated directly to the specific purpose of this document. No part of the
document may be circulated or reproduced for distribution outside the Client organization without prior written permission from Nodus Technologies,
eStore Solution Stack™ v4.0 User’s Guide
67
Figure 4-21 Shipping
FIELD DESCRIPTION
Non-Shipping Item If this product is non-shippable, i.e. electronic download or a service, check this checkbox to prevent collection of shipping information.
Ship in Separate Packages
If checked shipping charges will be applied individually.
Ship From Identify where the package will be shipped from for shipping calculations.
Weight/Dimensions Weight is in pounds or kilos (may be imported from Great Plains, if stored on item card), dimensions are inches or centimeters.
Extra Ship Fee Adds a shipping surcharge to the product during checkout.

CONFIDENTIALITY NOTICE - The information contained in this document is confidential and proprietary. This document is to be used with the
understanding that it will be held in strict confidence and not used for reasons unrelated directly to the specific purpose of this document. No part of the
document may be circulated or reproduced for distribution outside the Client organization without prior written permission from Nodus Technologies,
eStore Solution Stack™ v4.0 User’s Guide
68
4.4.2.1.2. Customer Choices
Administration website location: Catalog > Products > (select item and choose edit) > Customer Choices
Customer choices are customizations/choices that a customer specifies when purchasing a product. For
example, if selling t-shirts, the customer needs to specify the size of the shirt. The range of shirt size
selections are the customer choices. When creating a new customer choice, there are several options to
control the display of the choices to the shopper as shown in the accompanying table.
SETTING DESCRIPTION
Text Input Provides a textbox for customer entry.
Drop Down List Creates a droplist for customer options.
Radio Button List Sets up a radio button list for item options.
HTML area Allows HTML code to be added for special display effects.
NOTE: JavaScript is not supported in Design Mode.
Please avoid going into Design Mode if you have JavaScript in the content
Accessory Checkboxes Provides checkboxes to for the customer to choose an additional sub-level of choice options. For example, in addition to shirt color choices, an additional level of options for special embroidery could be added.
Accessory Radio Button List Creates a radio button list for accessory options.
Accessory Drop Down List Creates a droplist for accessory options.
To create Customer Choice options:
1. Use the search function to create a product list. Leaving the search field blank will show all items.
2. Select an item in the Products list and click the Edit button
3. Select Customer Choices from the menu on the left
NOTE: At this point, it is recommended to decide whether to create a Shared Choice. A shared choice is
similar to a customer choice, but more generic and can be applied to several products.
EXAMPLE: If a shirt is being set up for customer choices with standard accessory options, such as sizes
(S, M, L, XL), that could be used for other products, it is recommended to additionally set up this product
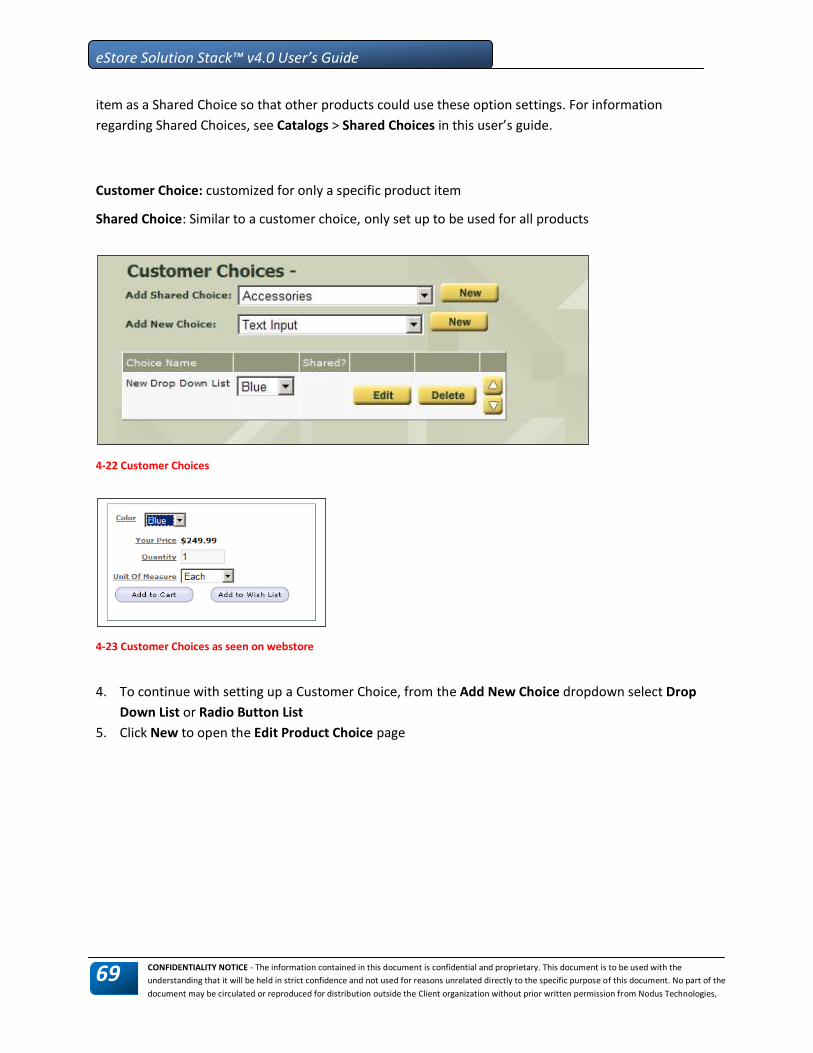
CONFIDENTIALITY NOTICE - The information contained in this document is confidential and proprietary. This document is to be used with the
understanding that it will be held in strict confidence and not used for reasons unrelated directly to the specific purpose of this document. No part of the
document may be circulated or reproduced for distribution outside the Client organization without prior written permission from Nodus Technologies,
eStore Solution Stack™ v4.0 User’s Guide
69
item as a Shared Choice so that other products could use these option settings. For information
regarding Shared Choices, see Catalogs > Shared Choices in this user’s guide.
Customer Choice: customized for only a specific product item
Shared Choice: Similar to a customer choice, only set up to be used for all products
4-22 Customer Choices
4-23 Customer Choices as seen on webstore
4. To continue with setting up a Customer Choice, from the Add New Choice dropdown select Drop
Down List or Radio Button List
5. Click New to open the Edit Product Choice page

CONFIDENTIALITY NOTICE - The information contained in this document is confidential and proprietary. This document is to be used with the
understanding that it will be held in strict confidence and not used for reasons unrelated directly to the specific purpose of this document. No part of the
document may be circulated or reproduced for distribution outside the Client organization without prior written permission from Nodus Technologies,
eStore Solution Stack™ v4.0 User’s Guide
70
Figure 4-24 Add Property Name and Display Name
6. Enter a property name and a display name for the item, For example, if setting up color options for a
shirt, the property name could be ‘Color’ and the display name for the website could be ‘Choose
Your Color.’
NOTE: Other options are available at this point, such as making the product choice a required field
and options affecting the display, such as the ability to wrap text and change text box size
Figure 4-25 Edit Choice Items
7. By the Items field, click New to open the Edit Choice Item page. Here a description for the specific
option is selected
8. In the Display Name field, enter an option description. For example, if setting up color options for a
shirt, one option could be the color ‘Blue’
9. In the Value field, enter a value that will be displayed in the shopping cart under the cart item
description. ‘Blue,’ or an abbreviation for Blue, such as ‘B’ could be used

CONFIDENTIALITY NOTICE - The information contained in this document is confidential and proprietary. This document is to be used with the
understanding that it will be held in strict confidence and not used for reasons unrelated directly to the specific purpose of this document. No part of the
document may be circulated or reproduced for distribution outside the Client organization without prior written permission from Nodus Technologies,
eStore Solution Stack™ v4.0 User’s Guide
71
10. Several other functional options are available for the item in the Edit Choice Item page, including:
SETTING DESCRIPTION
Null Item Indicates whether this selection has a value of zero or has an actual value. Often used when an option is intended to describe other variables (such as a Customer Choice directing users to “Choose from this list of colors”), null items have no value.
Set as Default Item? Allows the configuration for the customer choice selected to be displayed by default.
Image URL Permits an image for the product to be pulled from another location.
Price Adjustment Enter an amount for any configuration selected that adds extra cost charged to the customer for an item. For example, an embroidered shirt that has an option for gold thread that increases the cost of the item.
Cost Adjustment Sets an amount a configuration chosen by the customer that results in an increase to the base cost of the item.
Weight Adjustment If an option results in an option that increases the weight of an item, the cost can be increased with this setting.
Shipping Cost Adjustment If an option results in higher shipping costs, a price adjustment can be made with this setting.
11. Click OK and the display returns to the Edit Product Choice screen
12. Click OK again
13. From the menu on the left select Inventory
14. Enter the quantity and the SKU
NOTE: The SKU entered here will be used as the Great Plains Item Code when the item is submitted
with an order. The Item Code must exist in Great Plains for this to work.
15. Enter additional information on the Inventory page as needed
16. Click OK

CONFIDENTIALITY NOTICE - The information contained in this document is confidential and proprietary. This document is to be used with the
understanding that it will be held in strict confidence and not used for reasons unrelated directly to the specific purpose of this document. No part of the
document may be circulated or reproduced for distribution outside the Client organization without prior written permission from Nodus Technologies,
eStore Solution Stack™ v4.0 User’s Guide
72
4-26 Item Numbers Setup
To complete the customer choice setup, the accessory options created in eSSS must be linked to their
SKU in GP for each customer choice option.
1. Navigate to Products > Edit > Inventory
2. Each customer choice option (ex: blue, green, red) set up for an item will appear in the item’s
Inventory page as shown in the accompanying figure.
3. Enter the SKU created for the item in GP into the textbox in the SKU column
4. When finished, click the OK button

CONFIDENTIALITY NOTICE - The information contained in this document is confidential and proprietary. This document is to be used with the
understanding that it will be held in strict confidence and not used for reasons unrelated directly to the specific purpose of this document. No part of the
document may be circulated or reproduced for distribution outside the Client organization without prior written permission from Nodus Technologies,
eStore Solution Stack™ v4.0 User’s Guide
73
4.4.2.1.3. Images
Administration website location: Catalog > Products > (select an item and choose Edit) > Images
Each product can be displayed with unlimited images. Depends on the layout of the theme used,
typically only the "Small" and "Medium” images are needed. Sizing options can be set in the Settings >
General Options area, which also provide the sizing for “Tiny” size images. The “Tiny” sized images are
using the “Small” size image files, but displayed in a different size using HTML. While the sizing options
controls the sizes for “Tiny”, “Small”, and “Medium” images, unlimited number of “Additional Images”
can be assigned to products and they would appear in its actual physical size as it was uploaded.
The “Small” size images are used in some category page layouts, and “Medium” size images are
displayed on the product detail page. “Tiny” size images are displayed on the cart page if the option is
enabled under Settings > Orders: Cart Page Options, and are displayed on the product detail page if the
Show Additional Image Thumbnails on Product Detail Page option is enabled under Settings > General
Options: Product Page Options.
New products also have the option of a "New" image overlaid to identify new products added to the
store within a set time criteria. Control of the “New” image is handled in the theme style sheet. Settings
for the time criteria this "New" image is displayed is controlled in the Settings > Category and Search
area.
File path to the “Small” and “Medium” sized images are integrated from GP’s INET4 field, which is
labeled Image by default. The value from the Image field will populate the “Small” and “Medium” image
paths when the item is imported from GP.

CONFIDENTIALITY NOTICE - The information contained in this document is confidential and proprietary. This document is to be used with the
understanding that it will be held in strict confidence and not used for reasons unrelated directly to the specific purpose of this document. No part of the
document may be circulated or reproduced for distribution outside the Client organization without prior written permission from Nodus Technologies,
eStore Solution Stack™ v4.0 User’s Guide
74
4-27 GP Image Settings
If there’s a need to specify different image paths, the image paths can be managed on eSSS instead of
GP. To turn off the image path integration:
1. Navigate to Settings > Nodus/Great Plains > Item Import Options
2. Un-check the Update Item image links on Re-import checkbox option to avoid GP overwriting any
manual assignment
3. Use the following instructions to manually assign image paths for the small and medium images.
To Manually Specify an Image Path:
1. Navigate to Catalog > Products
2. Filter for the desired product item to be associated with the image
3. Mark the checkbox for the product item and click the Edit button
4. The product General Information page loads. From the left side menu, click Images
5. When the Edit Product Images page opens, populate the image paths by clicking the Select button
to the right of the Small or Medium image area. Another option is to manually type-in the path to
the file (relevant to the website root folder on the web server).

CONFIDENTIALITY NOTICE - The information contained in this document is confidential and proprietary. This document is to be used with the
understanding that it will be held in strict confidence and not used for reasons unrelated directly to the specific purpose of this document. No part of the
document may be circulated or reproduced for distribution outside the Client organization without prior written permission from Nodus Technologies,
eStore Solution Stack™ v4.0 User’s Guide
75
4-28 Edit Product Images
6. Locate the image in the Browse Images window and click the Choose This Image button
7. The Edit Product Images page returns. Add additional images to be displayed with the product item
by clicking the Add Additional Image button or repeat the process described in the preceding steps
Figure 4-29 Image Upload Utility

CONFIDENTIALITY NOTICE - The information contained in this document is confidential and proprietary. This document is to be used with the
understanding that it will be held in strict confidence and not used for reasons unrelated directly to the specific purpose of this document. No part of the
document may be circulated or reproduced for distribution outside the Client organization without prior written permission from Nodus Technologies,
eStore Solution Stack™ v4.0 User’s Guide
76
To Resize or Optimize the Image:
1. After clicking the Select button, the page to upload images will show as in the accompanying figure.
Click the Browse button to select an image from your local drive.
2. Choose the appropriate settings in the Upload Images box. If you would like the image to display in
the source file size, click the Upload button. Options are available to automatically resize and
optimize the image for you, making it easy to create consistently sized images. Depending on the
setting in the Settings > General Options area, images will be forced to the defined sizes or
displayed in the source file size.
Careful planning will help keep the store organized. It is recommended to rename files such as
"book_small.jpg" "book_main.jpg" etc. When the properties have been set, click the Upload button.
The image will be displayed in the right side preview window, click the Choose this Image button to use
this image.
View images from the folder browser by clicking on a folder (bottom center of the accompanying figure).
Select the image in the list and then the Choose this Image button to select this image for use.

CONFIDENTIALITY NOTICE - The information contained in this document is confidential and proprietary. This document is to be used with the
understanding that it will be held in strict confidence and not used for reasons unrelated directly to the specific purpose of this document. No part of the
document may be circulated or reproduced for distribution outside the Client organization without prior written permission from Nodus Technologies,
eStore Solution Stack™ v4.0 User’s Guide
77
4.4.2.1.4. Related Items
Administration website location: Catalog > Products > (select an item and choose Edit) > Related Items
Related items are similar products that you would like to display when the main product is viewed. For
example, in the case above when the "Computing for Dummies" book is viewed by a shopper, the
Related item "Dell Powerhouse" will be displayed in a small list below the main product image as shown
in the accompanying figure.
Figure 4-30 Related Items

CONFIDENTIALITY NOTICE - The information contained in this document is confidential and proprietary. This document is to be used with the
understanding that it will be held in strict confidence and not used for reasons unrelated directly to the specific purpose of this document. No part of the
document may be circulated or reproduced for distribution outside the Client organization without prior written permission from Nodus Technologies,
eStore Solution Stack™ v4.0 User’s Guide
78
Figure 4-31 Related Item in Store

CONFIDENTIALITY NOTICE - The information contained in this document is confidential and proprietary. This document is to be used with the
understanding that it will be held in strict confidence and not used for reasons unrelated directly to the specific purpose of this document. No part of the
document may be circulated or reproduced for distribution outside the Client organization without prior written permission from Nodus Technologies,
eStore Solution Stack™ v4.0 User’s Guide
79
4.4.2.1.5. Categories
Administration website location: Catalog > Products > (select an item and choose Edit) > Categories
Assuming categories have been created prior to creating/editing the product, the categories list shown
in accompanying figure makes it easy to select where the product will appear. To associate the product
with one or multiple categories:
1. Check the checkbox corresponding to each category name as shown in the following figure.
2. Click the Save Changes button
Figure 4-32 Assigning Categories
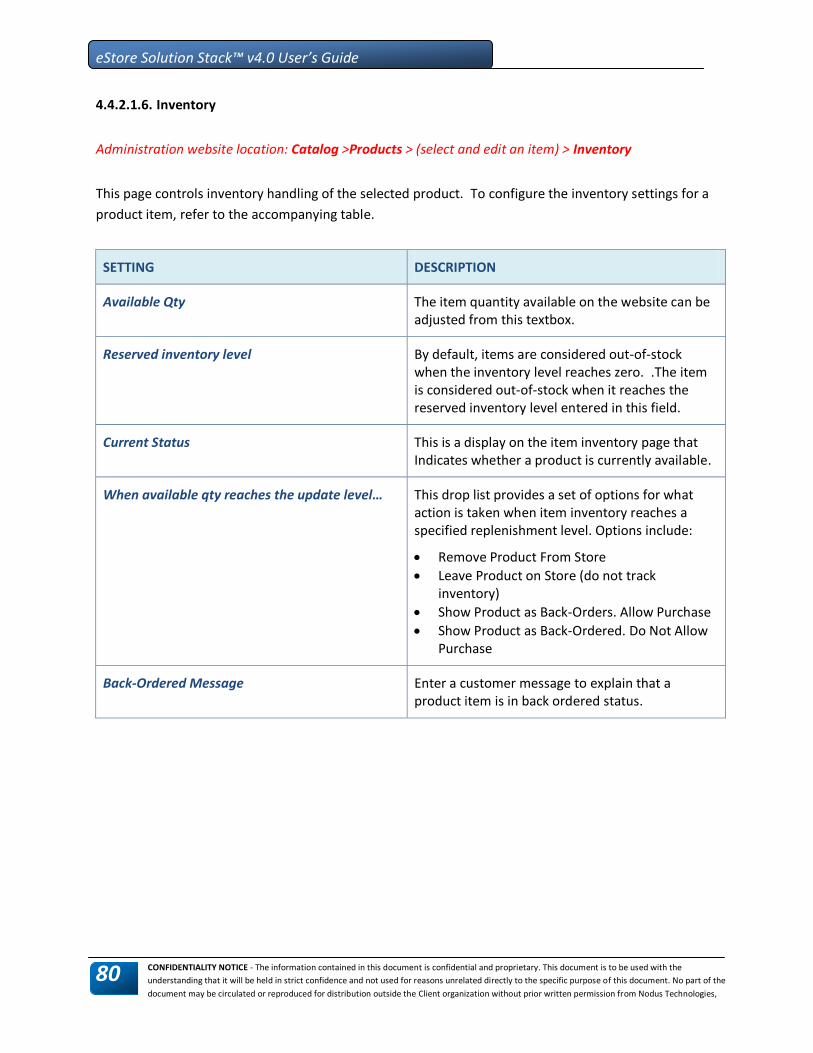
CONFIDENTIALITY NOTICE - The information contained in this document is confidential and proprietary. This document is to be used with the
understanding that it will be held in strict confidence and not used for reasons unrelated directly to the specific purpose of this document. No part of the
document may be circulated or reproduced for distribution outside the Client organization without prior written permission from Nodus Technologies,
eStore Solution Stack™ v4.0 User’s Guide
80
4.4.2.1.6. Inventory
Administration website location: Catalog >Products > (select and edit an item) > Inventory
This page controls inventory handling of the selected product. To configure the inventory settings for a
product item, refer to the accompanying table.
SETTING DESCRIPTION
Available Qty The item quantity available on the website can be adjusted from this textbox.
Reserved inventory level By default, items are considered out-of-stock when the inventory level reaches zero. .The item is considered out-of-stock when it reaches the reserved inventory level entered in this field.
Current Status This is a display on the item inventory page that Indicates whether a product is currently available.
When available qty reaches the update level… This drop list provides a set of options for what action is taken when item inventory reaches a specified replenishment level. Options include:
Remove Product From Store
Leave Product on Store (do not track inventory)
Show Product as Back-Orders. Allow Purchase
Show Product as Back-Ordered. Do Not Allow Purchase
Back-Ordered Message Enter a customer message to explain that a product item is in back ordered status.

CONFIDENTIALITY NOTICE - The information contained in this document is confidential and proprietary. This document is to be used with the
understanding that it will be held in strict confidence and not used for reasons unrelated directly to the specific purpose of this document. No part of the
document may be circulated or reproduced for distribution outside the Client organization without prior written permission from Nodus Technologies,
eStore Solution Stack™ v4.0 User’s Guide
81
Figure 4-33 Product Inventory

CONFIDENTIALITY NOTICE - The information contained in this document is confidential and proprietary. This document is to be used with the
understanding that it will be held in strict confidence and not used for reasons unrelated directly to the specific purpose of this document. No part of the
document may be circulated or reproduced for distribution outside the Client organization without prior written permission from Nodus Technologies,
eStore Solution Stack™ v4.0 User’s Guide
82
4.4.2.1.7. File Downloads
Administration website location: Catalog > Products > (select an item and choose Edit) > File Downloads
Downloadable digital files, such as music, books or software can be sold on the website. To set up
download file sales:
1. Enter the information in the File Download area of the Edit Product configuration
2. You can either upload a file using the Browse button, or if the file is too large and risks timing out
the upload process the file can be sent via FTP into the Files folder
3. Enter the file name located in the Files folder if it was manually sent by FTP
4. Enter the name you would like displayed to the customer in the Friendly Title field
5. Select the options for availability of the download after it has been purchased and the number of
times it can be downloaded. If the Available for field is set to unlimited, the quantity is bypassed.
6. Click the Add File button
NOTE: For unlimited downloads without a quantity limit, set the Available for setting to Unlimited and
Can be Downloaded quantity to zero (0).
Figure 4-34 File Downloads

CONFIDENTIALITY NOTICE - The information contained in this document is confidential and proprietary. This document is to be used with the
understanding that it will be held in strict confidence and not used for reasons unrelated directly to the specific purpose of this document. No part of the
document may be circulated or reproduced for distribution outside the Client organization without prior written permission from Nodus Technologies,
eStore Solution Stack™ v4.0 User’s Guide
83
4.4.2.1.8. Customer Reviews
Administration website location: Catalog > Products > (select an item and choose Edit) > Customer
Reviews
If configured in the Settings > Product Reviews area, product reviews may be created or edited in the
Product Reviews area of the Edit Product option (Navigate to Catalog > Products > (choose product and
click Edit > Inventory). You can create new product reviews manually if collecting via e-mail or another
source not directly from within the store. From this area you can also moderate the reviews for each
particular product.
Figure 4-35 Customer Reviews
4-36 Edit Customer Reviews

CONFIDENTIALITY NOTICE - The information contained in this document is confidential and proprietary. This document is to be used with the
understanding that it will be held in strict confidence and not used for reasons unrelated directly to the specific purpose of this document. No part of the
document may be circulated or reproduced for distribution outside the Client organization without prior written permission from Nodus Technologies,
eStore Solution Stack™ v4.0 User’s Guide
84
4.4.2.1.9. Volume Discounts
Administration website location: Catalog > Products > (select an item and choose edit) > Volume Discounts
You may offer volume discounts to eStore customers. The discounts must be set up in the Great Plains
pricelist. When you import items from Great Plains, all pricing data including volume discounts are
imported. You can also set volume discount levels for each item in eSSS.
Figure 4-37 Volume Discounts
To set up volume discounts:
1. Navigate to the Volume Discount page for the desired item
2. To set the first volume pricing level, enter a required quantity for the discount to take effect
3. In the Price textbox, enter the item price to be applied when the required quantity is reached
4. Click the New Level button
5. Repeat for each level
NOTE: Each level can be edited or deleted by clicking the corresponding links as shown in the
accompanying figure.

CONFIDENTIALITY NOTICE - The information contained in this document is confidential and proprietary. This document is to be used with the
understanding that it will be held in strict confidence and not used for reasons unrelated directly to the specific purpose of this document. No part of the
document may be circulated or reproduced for distribution outside the Client organization without prior written permission from Nodus Technologies,
eStore Solution Stack™ v4.0 User’s Guide
85
4.4.2.1.10. Extended Pricing/Myridas
If used, this feature should be activated before importing items from Great Plains.
Extended Pricing is a Great Plains feature that allows special conditions to be set for pricing items, such
as establishing a percentage discount and date range for a President’s Day sale. Myridas is a similar add-
on program with specialized features.
NOTE: Great Plains Extended Pricing and Myridas cannot be used at the same time. Either of these
features must first be configured in Nodus Synchronizer.
1. Navigate to Start > All Programs > Nodus Technologies > Nodus Synchronizer > Configuration to
open the Nodus Synchronizer Configuration window and click Store Setup
2. When the Store Setup window opens, select the store where extended pricing is to be activated and
click Synchronizers
3. When the Synchronizers window opens, choose the inventory items under the Synchronizer class
and click More Options
4. When the Item Settings window opens, check the Synchronizer Extended Pricing box.
5. In the Extended Pricing Type drop list, chose either Myridas or Extended
6. Close the Synchronizer window
The choice must now be activated in eSSS.
1. From the eSSS home page, navigate to the Settings tab > Nodus/Great Plains from the vertical
Settings menu
2. In the Feature Management section at the bottom of the page, from the GP Pricelist Setup drop list,
choose either Use Extended GP Pricing or Use Myridas AG Pricing
3. Click the Save Changes button
Figure 4-38 Extended Pricing

CONFIDENTIALITY NOTICE - The information contained in this document is confidential and proprietary. This document is to be used with the
understanding that it will be held in strict confidence and not used for reasons unrelated directly to the specific purpose of this document. No part of the
document may be circulated or reproduced for distribution outside the Client organization without prior written permission from Nodus Technologies,
eStore Solution Stack™ v4.0 User’s Guide
86
4.4.3. Catalogs
Administration website location: Catalog > Catalogs
The Customer Specific Catalog is an optional module that permits the administration to assign a
product(s) to a catalog for specific customers.
Figure 4-39 Customer Specific Catalog
4.4.3.1. Setting up the Catalog
1. Unmark the Disable Customer Specific Catalog checkbox to enable the Customer Specific Catalog
NOTE: Once enabled by default, all users will not see any products until permissions have been
assigned to them.
2. In the Catalog Name: box, enter a name that describes the new category
3. Click the New button and the catalog name appears in the display box

CONFIDENTIALITY NOTICE - The information contained in this document is confidential and proprietary. This document is to be used with the
understanding that it will be held in strict confidence and not used for reasons unrelated directly to the specific purpose of this document. No part of the
document may be circulated or reproduced for distribution outside the Client organization without prior written permission from Nodus Technologies,
eStore Solution Stack™ v4.0 User’s Guide
87
4.4.3.2. Setting Up Products in the Catalog
1. Use the Search feature to locate a catalog that requires product set-up
2. In the display box, mark the checkbox by the catalog
3. Click the Edit button in the CatalogxProducts box to open the Edit Catalog Products page
4. Use the search function to look up products by keyword or SKU number
5. Mark the checkbox by the product to be added to the catalog. Multiple products can be chosen as
needed, or the whole page of product selected by marking the checkbox in the header row
6. Click the Add button to populate the Selected Products window
7. Click the OK button
Figure 4-40 Edit Catalog - Products
4.4.3.3. Assigning Users to the Catalog
1. Use the Search feature to display a list of catalogs
2. Mark the checkbox by the catalog where users are to be assigned
3. Click the Edit button in the CatalogxUsers box
4. Use the Search feature to locate the user(s) to be assigned to the catalog
5. Mark the checkbox by the user to be assigned to the catalog
6. Click the Add button to populate the Selected Users/Classes window
7. Click the OK button

CONFIDENTIALITY NOTICE - The information contained in this document is confidential and proprietary. This document is to be used with the
understanding that it will be held in strict confidence and not used for reasons unrelated directly to the specific purpose of this document. No part of the
document may be circulated or reproduced for distribution outside the Client organization without prior written permission from Nodus Technologies,
eStore Solution Stack™ v4.0 User’s Guide
88
NOTE: This page gives the option of assigning viewing rights to customers and/or to GP Class IDs. If all
users are to be granted viewing rights, the Everyone checkbox is marked.
Figure 4-41 Edit Catalog - Users
4.4.3.4. Deleting a User or Product from the Catalog
1. Mark the checkbox by an existing catalog
2. Click the Edit button in either the CatalogxProducts or CatalogxUsers, depending on whether a user
or product is to be added
3. The Edit page opens
4. Delete a product or user by highlighting the entry in the Selected Products or Selected Users window
5. Click the Remove button
6. Click the OK button
4.4.3.5. Deleting a Catalog
1. User the Search feature to populate the display window
2. Mark the checkbox by the catalog to be deleted
3. Click the Delete button
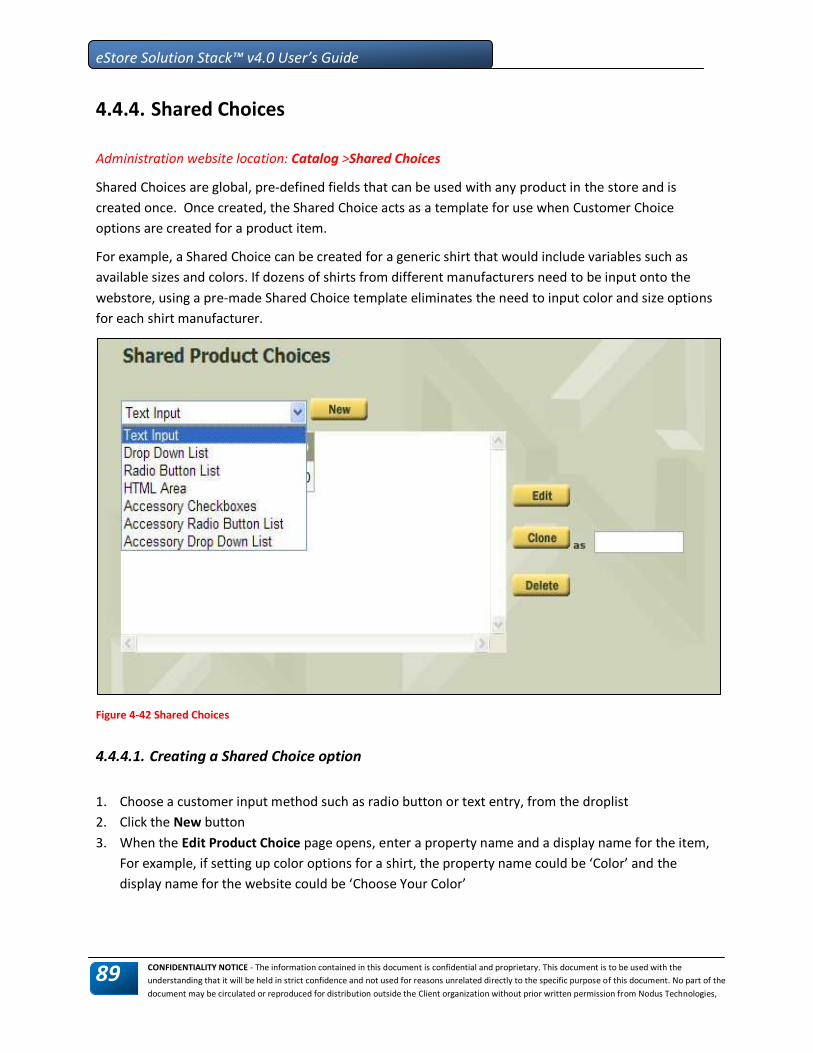
CONFIDENTIALITY NOTICE - The information contained in this document is confidential and proprietary. This document is to be used with the
understanding that it will be held in strict confidence and not used for reasons unrelated directly to the specific purpose of this document. No part of the
document may be circulated or reproduced for distribution outside the Client organization without prior written permission from Nodus Technologies,
eStore Solution Stack™ v4.0 User’s Guide
89
4.4.4. Shared Choices
Administration website location: Catalog >Shared Choices
Shared Choices are global, pre-defined fields that can be used with any product in the store and is
created once. Once created, the Shared Choice acts as a template for use when Customer Choice
options are created for a product item.
For example, a Shared Choice can be created for a generic shirt that would include variables such as
available sizes and colors. If dozens of shirts from different manufacturers need to be input onto the
webstore, using a pre-made Shared Choice template eliminates the need to input color and size options
for each shirt manufacturer.
Figure 4-42 Shared Choices
4.4.4.1. Creating a Shared Choice option
1. Choose a customer input method such as radio button or text entry, from the droplist
2. Click the New button
3. When the Edit Product Choice page opens, enter a property name and a display name for the item,
For example, if setting up color options for a shirt, the property name could be ‘Color’ and the
display name for the website could be ‘Choose Your Color’
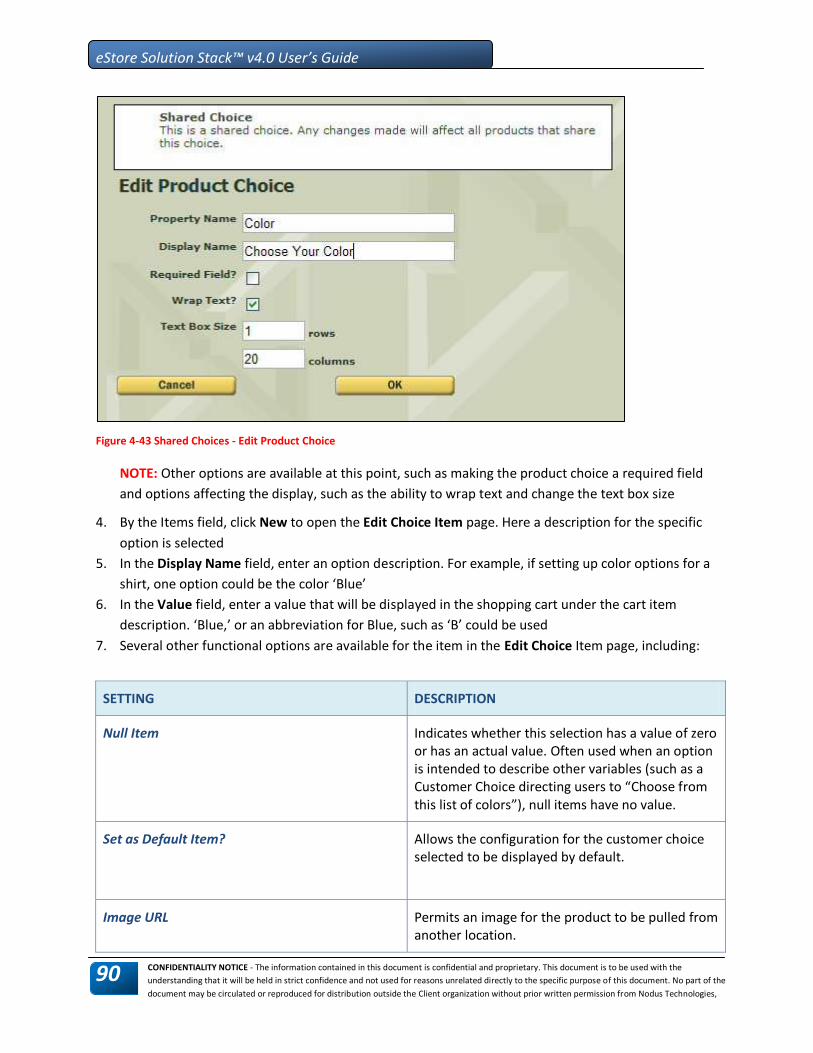
CONFIDENTIALITY NOTICE - The information contained in this document is confidential and proprietary. This document is to be used with the
understanding that it will be held in strict confidence and not used for reasons unrelated directly to the specific purpose of this document. No part of the
document may be circulated or reproduced for distribution outside the Client organization without prior written permission from Nodus Technologies,
eStore Solution Stack™ v4.0 User’s Guide
90
Figure 4-43 Shared Choices - Edit Product Choice
NOTE: Other options are available at this point, such as making the product choice a required field
and options affecting the display, such as the ability to wrap text and change the text box size
4. By the Items field, click New to open the Edit Choice Item page. Here a description for the specific
option is selected
5. In the Display Name field, enter an option description. For example, if setting up color options for a
shirt, one option could be the color ‘Blue’
6. In the Value field, enter a value that will be displayed in the shopping cart under the cart item
description. ‘Blue,’ or an abbreviation for Blue, such as ‘B’ could be used
7. Several other functional options are available for the item in the Edit Choice Item page, including:
SETTING DESCRIPTION
Null Item Indicates whether this selection has a value of zero or has an actual value. Often used when an option is intended to describe other variables (such as a Customer Choice directing users to “Choose from this list of colors”), null items have no value.
Set as Default Item? Allows the configuration for the customer choice selected to be displayed by default.
Image URL Permits an image for the product to be pulled from another location.

CONFIDENTIALITY NOTICE - The information contained in this document is confidential and proprietary. This document is to be used with the
understanding that it will be held in strict confidence and not used for reasons unrelated directly to the specific purpose of this document. No part of the
document may be circulated or reproduced for distribution outside the Client organization without prior written permission from Nodus Technologies,
eStore Solution Stack™ v4.0 User’s Guide
91
Price Adjustment Sets an amount for any configuration selected that adds extra cost charged to the customer for an item. For example, if an embroidered shirt has an option for gold thread that increases the cost of the item.
Cost Adjustment Sets an amount a configuration chosen by the customer that results in an increase to the base cost of the item.
Weight Adjustment If an option results in an option that increases the weight of an item, the cost can be increased with this setting.
Shipping Cost Adjustment If an option results in higher shipping costs, a price adjustment can be made with this setting.
8. Click OK and the display returns to the Edit Product Choice screen
9. Click OK again. The Shared Choice is now ready for use when a new Customer Choice is create
10. To use a Shared Choice, choose a product item and open the Customer Choices page
11. From the Add Shared Choice drop list, choose a Share Choice option for the product
12. Click the New button
13. Continue to add the Customer Choice option as described in the Customer Choices section of this
document as needed
4.4.4.2. Edit or Delete a Shared Choice
1. Navigate to the Shared Product Choices page and select a template by marking the checkbox next
to the Shared Choice
2. To delete the Shared Choice, click the Delete button and the template is removed from the list of
Shared Choices
3. To edit the Shared Choice, after marking the checkbox, click the Edit button
4. Make any edits needed for the Property Name and/or Display Name and click OK
5. If other options need to be changed, click the Edit button in the display list and make further edits
from the Edit Choice Item page

CONFIDENTIALITY NOTICE - The information contained in this document is confidential and proprietary. This document is to be used with the
understanding that it will be held in strict confidence and not used for reasons unrelated directly to the specific purpose of this document. No part of the
document may be circulated or reproduced for distribution outside the Client organization without prior written permission from Nodus Technologies,
eStore Solution Stack™ v4.0 User’s Guide
92
4.4.4.3. Cloning a Shared Choice
If a Shared Choice template needs to be changed and then re-used for other items, the cloning feature
can be used.
Cloning allows the Shared Choice template to be copied and renamed. At that point any changes needed
can be made. The result is a new template that is easier to create than starting from scratch. To clone a
Shared Choice template:
1. In the Shared Product Choices page, mark the checkbox by the original Shared Choice to be
duplicated
2. In the Clone as textbox, enter a new name for the template
3. Click the Clone button and the new template will be added to the Shared Choices list
4. Mark the checkbox for the new template and click the Edit button to make any changes needed
Figure 4-44 - Cloning feature
.

CONFIDENTIALITY NOTICE - The information contained in this document is confidential and proprietary. This document is to be used with the
understanding that it will be held in strict confidence and not used for reasons unrelated directly to the specific purpose of this document. No part of the
document may be circulated or reproduced for distribution outside the Client organization without prior written permission from Nodus Technologies,
eStore Solution Stack™ v4.0 User’s Guide
93
4.4.5. Sales
Admin .website location: Catalog >Sales
Merchants can create two types of sales in Nodus eStore Solution Stack; storewide sales and sales by
individual product item.
4.4.5.1. Store Wide Sale
To create a new sale, navigate to Catalog > Sales and click the click the New button. Do not change
Store Wide Sale default setting. Configure the discount type per the options as shown in the
accompanying figure.
Figure 4-45 Store-Wide Sale Configuration

CONFIDENTIALITY NOTICE - The information contained in this document is confidential and proprietary. This document is to be used with the
understanding that it will be held in strict confidence and not used for reasons unrelated directly to the specific purpose of this document. No part of the
document may be circulated or reproduced for distribution outside the Client organization without prior written permission from Nodus Technologies,
eStore Solution Stack™ v4.0 User’s Guide
94
Figure 4-46 Store-wide Sale Configuration when GP pricing is enabled
1. Click the Storewide radio button
2. Select a discount type, which is one of three types:
NOTE: The discount can be one of two methods: Percentage off or Dollar off.
SETTING DESCRIPTION
Site Cost (your cost) Unavailable when GP pricing is enabled
List Price Unavailable when GP pricing is enabled
Site Price (normal sale price)
Display as GP pricing when GP pricing is enabled
3. Set the start date and end date for the term of the sale
NOTE: To make the sale open-ended, set the ending date several years in the future.
4. When done, click Save Changes to commit the sale to the store.

CONFIDENTIALITY NOTICE - The information contained in this document is confidential and proprietary. This document is to be used with the
understanding that it will be held in strict confidence and not used for reasons unrelated directly to the specific purpose of this document. No part of the
document may be circulated or reproduced for distribution outside the Client organization without prior written permission from Nodus Technologies,
eStore Solution Stack™ v4.0 User’s Guide
95
4.4.5.2. Sale by Product
Creating a Sale by Product is similar to that of a Store Wide Sale with the added task of selecting the sale
product items.
1. From the Sale page, mark the Sale by Product radio button
2. When the product selector list opens, filter and choose one or more product items
3. Click the Add button to move these items to the Products Apply To list
4. Select a discount option from the Discount Type list
5. Unless Get 1 FREE when you buy is chosen, enter a discount amount in the percentage/currency
textbox
6. Choose a start and end date for the product sale
NOTE: To make the sale open-ended, set the ending date several years in the future.
7. Click the Save Changes button
Figure 4-47 Sale by Product Configuration

CONFIDENTIALITY NOTICE - The information contained in this document is confidential and proprietary. This document is to be used with the
understanding that it will be held in strict confidence and not used for reasons unrelated directly to the specific purpose of this document. No part of the
document may be circulated or reproduced for distribution outside the Client organization without prior written permission from Nodus Technologies,
eStore Solution Stack™ v4.0 User’s Guide
96
Figure 4-48 Sale by Product Configuration #2
Figure 4-49 Sale by Product Configuration #3 when GP Pricing is enabled

CONFIDENTIALITY NOTICE - The information contained in this document is confidential and proprietary. This document is to be used with the
understanding that it will be held in strict confidence and not used for reasons unrelated directly to the specific purpose of this document. No part of the
document may be circulated or reproduced for distribution outside the Client organization without prior written permission from Nodus Technologies,
eStore Solution Stack™ v4.0 User’s Guide
97
4.4.6. Discounts
Administration website location: Catalog > Discounts
A discount is similar to a sale with more granular control of when a discount may be applied, such as a quantity ordered or a price level minimum, as well as control of the sale by use of a "promotional code" to apply a discount to a purchase. Creating discounts can be used as rewards for frequent shoppers, marketing efforts, or focused merchant sale efforts.
To create a new discount, click the Discount menu item on the left side of the Catalog admin area. Four types of discounts can be created, and based on trade discounts and order totals.
4.4.6.1. Order Total
The order total discount is based on the final price of the order. To set up this discount:
1. From the Discounts page, click New
2. When the Edit Discount page opens, choose Order Total from the Discount Type order page
3. Enter a description of the discount in the Discount Description textbox
4. Choose permissions for either the Everyone group, or just GP Customer Classes and/or users
selected in the following steps
5. Choose a users group by clicking the tab for:
Users
User GP Class ID - Pulls from the Great Plains users class list
6. Use search to filter a list of users
7. Mark the checkbox by the users or user classes that are eligible for the discount
8. Click the Add button to populate the Selected Users/Classes list
9. In the By field, enter a discount amount and choose a discount type
Amount: monetary discount. For example, $20 off
Percent: a percentage discount of the total
10. Enter a start and end date for the discount period
NOTE: To make the discount open-ended, choose an end date many years in the future
11. Set a quantity start and end point for the discount by entering a number in the If quantity is textbox.
For example, if a shopper needed to purchase three items to be eligible for the discount, then ‘3’
would be entered here.
12. Set an amount start and end point for the discount by entering a monetary amount in the and the
total is textbox
13. If requiring a promotional code (entered during the checkout process), mark the This discount
requires a promotional code of checkbox
14. Enter the name of the promotional code in the adjacent textbox
15. If there is a limit to the number of times the promotional code can be used for the discount, enter
the amount in the and can be used X times per customer textbox
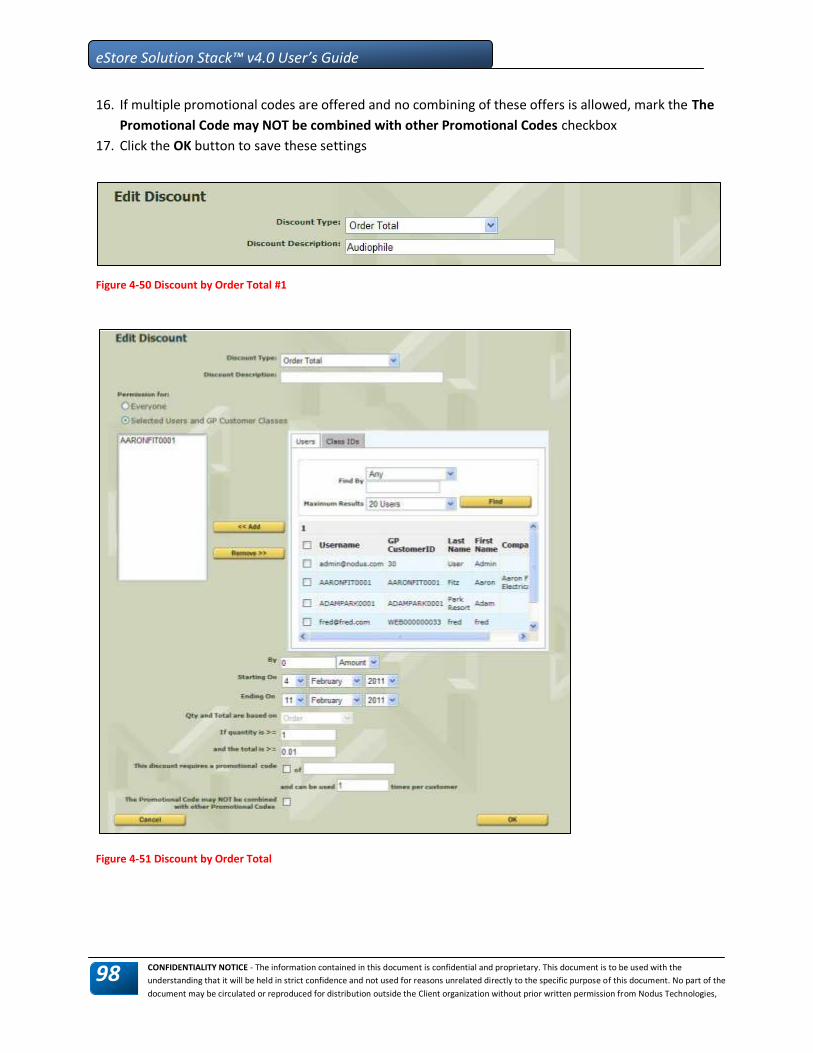
CONFIDENTIALITY NOTICE - The information contained in this document is confidential and proprietary. This document is to be used with the
understanding that it will be held in strict confidence and not used for reasons unrelated directly to the specific purpose of this document. No part of the
document may be circulated or reproduced for distribution outside the Client organization without prior written permission from Nodus Technologies,
eStore Solution Stack™ v4.0 User’s Guide
98
16. If multiple promotional codes are offered and no combining of these offers is allowed, mark the The
Promotional Code may NOT be combined with other Promotional Codes checkbox
17. Click the OK button to save these settings
Figure 4-50 Discount by Order Total #1
Figure 4-51 Discount by Order Total

CONFIDENTIALITY NOTICE - The information contained in this document is confidential and proprietary. This document is to be used with the
understanding that it will be held in strict confidence and not used for reasons unrelated directly to the specific purpose of this document. No part of the
document may be circulated or reproduced for distribution outside the Client organization without prior written permission from Nodus Technologies,
eStore Solution Stack™ v4.0 User’s Guide
99
4.4.6.2. Product(s)
The parameters for creating the discount are the same as discussed in the Discount by Order Total
above. The only difference is the option to specify the product(s) the discount may be used for. Use the
standard product filter system to locate the desired products then click the Add button to load the
desired products that apply to the discount. To create product discounts:
1. From the Discounts page, click New
2. When the Edit Discount page opens, choose Product(s) from the Discount Type order page
3. Enter a description of the discount in the Discount Description textbox
4. Use search to filter a list of products
5. Mark the checkbox by the product items that are eligible for the discount
6. Click the Add button to populate the Apply To list
7. Choose permissions for either the Everyone group, or just GP Customer Classes and/or users
selected in the following steps
8. Choose a users group by clicking the tab for:
Users
User GP Class ID - pulls from the Great Plains users class list
9. Use search to filter a list of users
10. Mark the checkbox by the users or user classes that are eligible for the discount
11. Click the Add button to populate the Selected Users/Classes list
12. In the By field, enter a discount amount and choose a discount type
Amount - monetary discount. For example, $20 off
Percent - a percentage discount of the total
13. Enter a start and end date for the discount period
NOTE: To make the discount open-ended, choose an end date many years in the future
14. Set a quantity start and end point for the discount by entering a number in the If quantity is textbox.
For example, if a shopper needed to purchase three items to be eligible for the discount, then ‘3’
would be entered here.
15. Set an amount start and end point for the discount by entering a monetary amount in the and the
total is textbox
16. If requiring a promotional code (entered during the checkout process), mark the This discount
requires a promotional code of checkbox
17. Enter the name of the promotional code in the adjacent textbox
18. If there is a limit to the number of times the promotional code can be used for the discount, enter
the amount in the and can be used X times per customer textbox
19. If multiple promotional codes are offered and no combining of these offers is allowed, mark the The
Promotional Code may NOT be combined with other Promotional Codes checkbox
20. Click the OK button to save these settings

CONFIDENTIALITY NOTICE - The information contained in this document is confidential and proprietary. This document is to be used with the
understanding that it will be held in strict confidence and not used for reasons unrelated directly to the specific purpose of this document. No part of the
document may be circulated or reproduced for distribution outside the Client organization without prior written permission from Nodus Technologies,
eStore Solution Stack™ v4.0 User’s Guide
100
Figure 4-52 Discount by Product
Figure 4-53 Discount by Product - bottom of page

CONFIDENTIALITY NOTICE - The information contained in this document is confidential and proprietary. This document is to be used with the
understanding that it will be held in strict confidence and not used for reasons unrelated directly to the specific purpose of this document. No part of the
document may be circulated or reproduced for distribution outside the Client organization without prior written permission from Nodus Technologies,
eStore Solution Stack™ v4.0 User’s Guide
101
4.4.6.3. Shipping Method
A discount may be applied to reduce the shipping cost for orders meeting select parameters. The
parameters for configuring a discount are the same as above. The key difference is that only the
shipping charges are discounted.
1. From the Discounts page, click New
2. When the Edit Discount page opens, choose Order Total from the Discount Type order page
3. Enter a description of the discount in the Discount Description textbox
4. Choose permissions for either the Everyone group, or just GP Customer Classes and/or users
selected in the following steps
5. Choose a users group by clicking the tab for:
Users
User GP Class ID - Pulls from the Great Plains users class list
6. Use search to filter a list of users
7. Mark the checkbox by the users or user classes that are eligible for the discount
8. Click the Add button to populate the Selected Users/Classes list
9. In the By field, enter a discount amount and choose a discount type
Amount - monetary discount. For example: $20 off
Percent - a percentage discount of the total
10. Enter a start and end date for the discount period
NOTE: To make the discount open-ended, choose an end date many years in the future
11. Set a quantity start and end point for the discount by entering a number in the If quantity is textbox.
For example, if a shopper needed to purchase three items to be eligible for the discount, then ‘3’
would be entered here
12. Set an amount start and end point for the discount by entering a monetary amount in the and the
total is textbox
13. If requiring a promotional code (entered during the checkout process), mark the This discount
requires a promotional code of checkbox
14. Enter the name of the promotional code in the adjacent textbox
15. If there is a limit to the number of times the promotional code can be used for the discount, enter
the amount in the and can be used X times per customer textbox
16. If multiple promotional codes are offered and no combining of these offers is allowed, mark the The
Promotional Code may NOT be combined with other Promotional Codes checkbox
17. Click the OK button to save these settings

CONFIDENTIALITY NOTICE - The information contained in this document is confidential and proprietary. This document is to be used with the
understanding that it will be held in strict confidence and not used for reasons unrelated directly to the specific purpose of this document. No part of the
document may be circulated or reproduced for distribution outside the Client organization without prior written permission from Nodus Technologies,
eStore Solution Stack™ v4.0 User’s Guide
102
Figure 4-54 Discount by Shipping Method

CONFIDENTIALITY NOTICE - The information contained in this document is confidential and proprietary. This document is to be used with the
understanding that it will be held in strict confidence and not used for reasons unrelated directly to the specific purpose of this document. No part of the
document may be circulated or reproduced for distribution outside the Client organization without prior written permission from Nodus Technologies,
eStore Solution Stack™ v4.0 User’s Guide
103
4.4.6.4. Product Shipping Discount
This option allows a discount to be subtracted from the shipping cost for a specific product. The process
for creating the discount is the same as discussed in the previous sections except that both a product
item and a user/user group must be selected.
1. From the Discounts page, click New
2. When the Edit Discount page opens, choose Order Total from the Discount Type order page
3. Enter a description of the discount in the Discount Description textbox
4. Use search to filter a list of products
5. Mark the checkbox by the product items that are eligible for the discount
6. Click the Add button to populate the Apply To list
7. Choose permissions for either the Everyone group, or just GP Customer Classes and/or users
selected in the following steps
8. Choose a users group by clicking the tab for:
Users
User GP Class ID - pulls from the Great Plains users class list
9. Use search to filter a list of users
10. Mark the checkbox by the users or user classes that are eligible for the discount
11. Click the Add button to populate the Selected Users/Classes list
12. In the By field, enter a discount amount and choose a discount type
Amount - monetary discount
Percent - percentage discount
13. Enter a start and end date for the discount period
NOTE: To make the discount open-ended, choose an end date several years in the future.
14. Set a quantity start and end point for the discount by entering a number in the If quantity is textbox.
For example, if a shopper needed to purchase three items to be eligible for the discount, then ‘3’
would be entered here.
15. Set an amount start and end point for the discount by entering a monetary amount in the and the
total is textbox
16. If requiring a promotional code (entered during the checkout process), mark the This discount
requires a promotional code of checkbox
17. Enter the name of the promotional code in the adjacent textbox
18. If there is a limit to the number of times the promotional code can be used for the discount, enter
the amount in the and can be used X times per customer textbox
19. If multiple promotional codes are offered and no combining of these offers is allowed, mark the The
Promotional Code may NOT be combined with other Promotional Codes checkbox
20. Click the OK button to save these settings
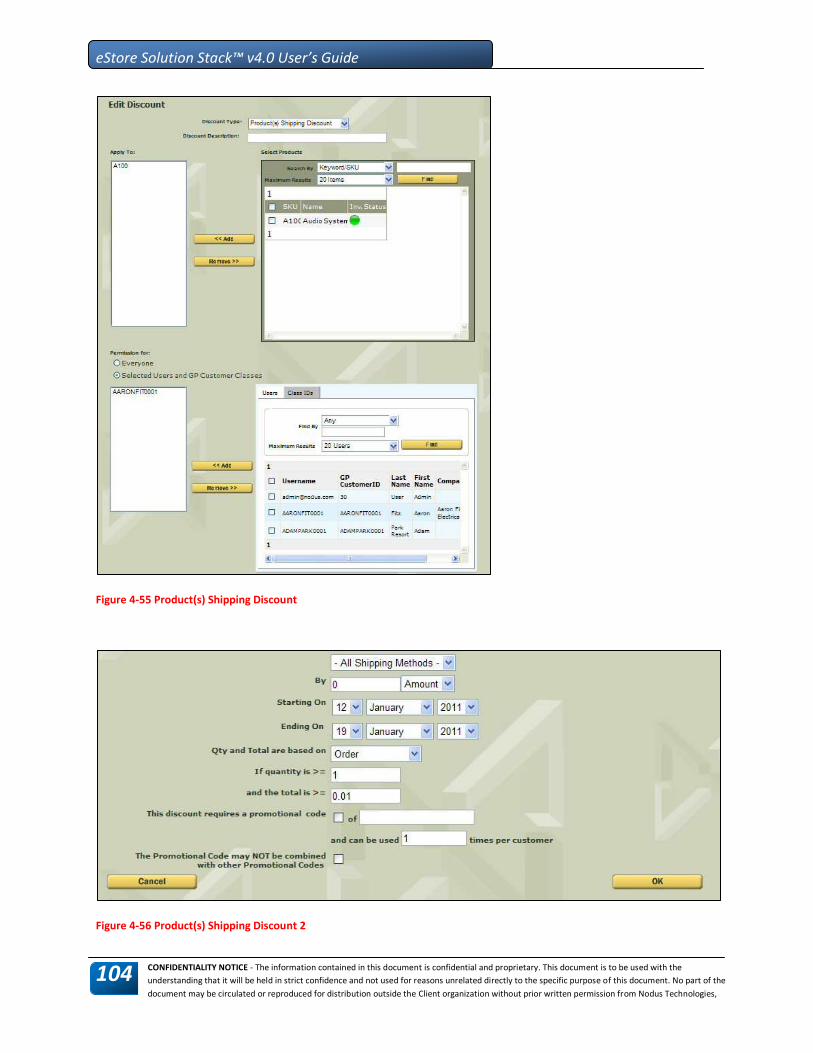
CONFIDENTIALITY NOTICE - The information contained in this document is confidential and proprietary. This document is to be used with the
understanding that it will be held in strict confidence and not used for reasons unrelated directly to the specific purpose of this document. No part of the
document may be circulated or reproduced for distribution outside the Client organization without prior written permission from Nodus Technologies,
eStore Solution Stack™ v4.0 User’s Guide
104
Figure 4-55 Product(s) Shipping Discount
Figure 4-56 Product(s) Shipping Discount 2

CONFIDENTIALITY NOTICE - The information contained in this document is confidential and proprietary. This document is to be used with the
understanding that it will be held in strict confidence and not used for reasons unrelated directly to the specific purpose of this document. No part of the
document may be circulated or reproduced for distribution outside the Client organization without prior written permission from Nodus Technologies,
eStore Solution Stack™ v4.0 User’s Guide
105
4.4.6.5. Products with Free Shipping
This option allows free shipping for a specific product item. The process for creating the discount is the
same as discussed in the previous sections except that both a product item and a user/user group must
be selected.
1. From the Discounts page, click New
2. When the Edit Discount page opens, choose Order Total from the Discount Type order page
3. Enter a description of the discount in the Discount Description textbox
4. Use search to filter a list of products
5. Mark the checkbox by the product items that are eligible for the discount
6. Click the Add button to populate the Apply To list
7. Choose permissions for either the Everyone group, or just GP Customer Classes and/or users
selected in the following steps
8. Choose a users group by clicking the tab for:
Users:
User GP Class ID: Pulls from the Great Plains users class list
9. Use search to filter a list of users
10. Mark the checkbox by the users or user classes that are eligible for the discount
11. Click the Add button to populate the Selected Users/Classes list
12. In the By field, enter a discount amount and choose a discount type
Amount: monetary discount. For example, $20 off
Percent: a percentage discount of the total
13. Enter a start and end date for the discount period
NOTE: To make the discount open-ended, choose an end date many years in the future
14. Set a quantity start and end point for the discount by entering a number in the If quantity is
textbox. For example, if a shopper needed to purchase three items to be eligible for the
discount, then ‘3’ would be entered here.
15. Set an amount start and end point for the discount by entering a monetary amount in the and
the total is textbox
16. If requiring a promotional code (entered during the checkout process), mark the This discount
requires a promotional code of checkbox
17. Enter the name of the promotional code in the adjacent textbox
18. If there is a limit to the number of times the promotional code can be used for the discount,
enter the amount in the and can be used X times per customer textbox
19. If multiple promotional codes are offered and no combining of these offers is allowed, mark the
The Promotional Code may NOT be combined with other Promotional Codes checkbox
20. Click the OK button to save these settings

CONFIDENTIALITY NOTICE - The information contained in this document is confidential and proprietary. This document is to be used with the
understanding that it will be held in strict confidence and not used for reasons unrelated directly to the specific purpose of this document. No part of the
document may be circulated or reproduced for distribution outside the Client organization without prior written permission from Nodus Technologies,
eStore Solution Stack™ v4.0 User’s Guide
106
Figure 4-57 Products with Free Shipping
Figure 4-58 Products with Free Shipping 2

CONFIDENTIALITY NOTICE - The information contained in this document is confidential and proprietary. This document is to be used with the
understanding that it will be held in strict confidence and not used for reasons unrelated directly to the specific purpose of this document. No part of the
document may be circulated or reproduced for distribution outside the Client organization without prior written permission from Nodus Technologies,
eStore Solution Stack™ v4.0 User’s Guide
107
4.4.7. Update Inventory
Administration website location: Catalog > Update Inventory
Typically, inventory quantities are maintained and synchronized with Great Plains. For any reason, if the eSSS admin has been set up not to use Great Plains for inventory level reference, then the admin can use the Update Inventory page to quickly maintain the item’s available quantities. To utilize this feature:
1. Filter and search to create an inventory list
2. In the Action column, click the droplist arrow and choose the inventory action:
Add
Subtract
Set To
3. In the Quantity column, enter an amount in the textbox
4. Click the Submit button
NOTE: Clicking Edit on the product item allows the user to change details such as automatically updating
Inventory Status when a certain quantity level is reached. See section Catalog > (Choose Product) >
Inventory in this user’s guide for more details.
Figure 4-59 Update Inventory

CONFIDENTIALITY NOTICE - The information contained in this document is confidential and proprietary. This document is to be used with the
understanding that it will be held in strict confidence and not used for reasons unrelated directly to the specific purpose of this document. No part of the
document may be circulated or reproduced for distribution outside the Client organization without prior written permission from Nodus Technologies,
eStore Solution Stack™ v4.0 User’s Guide
108
4.4.8. Product Types
Administration website location: Catalog > Product Types
In addition to the default product properties, such as short description and long description, the Product
Types feature provides the ability to assign additional product properties.
A Product Type is a “template” defining the additional product properties for products. Each product is
assigned with a Product Type, and inherits the product properties defined under the Product Type
template. Each new product property is defined by a Type Property. Additional information on Type
Properties is discussed in the next section.
Changing a product’s Product Type can be done on the Edit Product page -Catalog > Products > (select
the product) > click Edit button.
To create a new product type:
Figure 4-60 Product Type page
1. From the Product Type page, click the New button and the Edit Product Type page opens
2. In the Product Type Name field, enter a name for the new product type
3. Select any associate type properties from the Available Properties list and click the << Add button
NOTE: Populating the Available Properties list is discussed in the Catalog > Type Properties section
of this document
4. Click the Save Changes button and the new product type will appear on the Product Type list
Figure 4-61 Product Type Builder

CONFIDENTIALITY NOTICE - The information contained in this document is confidential and proprietary. This document is to be used with the
understanding that it will be held in strict confidence and not used for reasons unrelated directly to the specific purpose of this document. No part of the
document may be circulated or reproduced for distribution outside the Client organization without prior written permission from Nodus Technologies,
eStore Solution Stack™ v4.0 User’s Guide
109
In above figure, the product type "Book" is defined by selecting from available properties as defined in
the Type Properties area (additional information on Type Properties is discussed in the next section).
Select the available properties from the list on the right and click the << Add button to select a property
for the template. As shown in below figure, the types are included in the Other Properties area of the
product’s General Info page. This system makes it easy to keep a consistent product creation scheme
such as in an online book store providing consistent information across all products of the same type.
Figure 4-62 Property Types - Other Properties
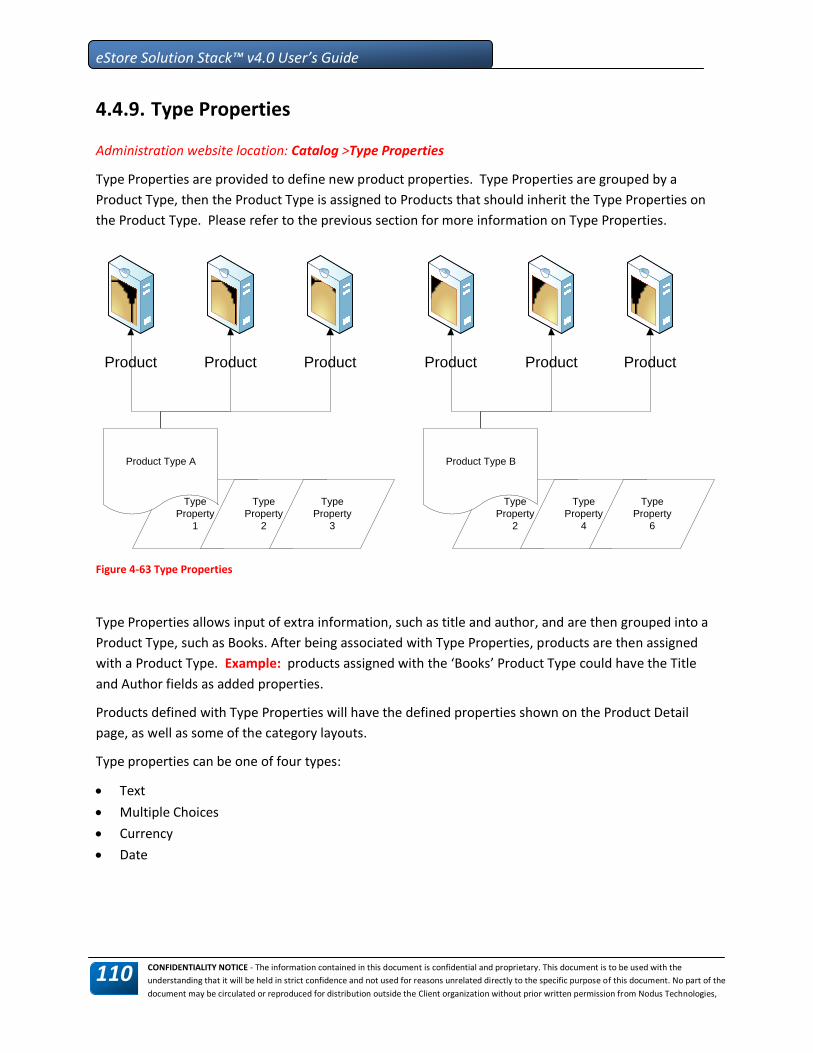
CONFIDENTIALITY NOTICE - The information contained in this document is confidential and proprietary. This document is to be used with the
understanding that it will be held in strict confidence and not used for reasons unrelated directly to the specific purpose of this document. No part of the
document may be circulated or reproduced for distribution outside the Client organization without prior written permission from Nodus Technologies,
eStore Solution Stack™ v4.0 User’s Guide
110
4.4.9. Type Properties
Administration website location: Catalog >Type Properties
Type Properties are provided to define new product properties. Type Properties are grouped by a
Product Type, then the Product Type is assigned to Products that should inherit the Type Properties on
the Product Type. Please refer to the previous section for more information on Type Properties.
Type
Property
2
Type
Property
4
Type
Property
6
Type
Property
1
Type
Property
2
Type
Property
3
Product Product Product Product Product Product
Product Type A Product Type B
Figure 4-63 Type Properties
Type Properties allows input of extra information, such as title and author, and are then grouped into a
Product Type, such as Books. After being associated with Type Properties, products are then assigned
with a Product Type. Example: products assigned with the ‘Books’ Product Type could have the Title
and Author fields as added properties.
Products defined with Type Properties will have the defined properties shown on the Product Detail
page, as well as some of the category layouts.
Type properties can be one of four types:
Text
Multiple Choices
Currency
Date

CONFIDENTIALITY NOTICE - The information contained in this document is confidential and proprietary. This document is to be used with the
understanding that it will be held in strict confidence and not used for reasons unrelated directly to the specific purpose of this document. No part of the
document may be circulated or reproduced for distribution outside the Client organization without prior written permission from Nodus Technologies,
eStore Solution Stack™ v4.0 User’s Guide
111
4.4.9.1. Text
The Text property type provides the ability to enter text associated with this field in the Other
Properties section as discussed in the Product Type topic. As shown in the accompanying figure, in the
other properties section of creating a new product, a textbox allows the input of data. The label for the
textbox will be as displayed under Display Name in the Edit Type Property page and the contents of the
text box, if provided, will be populated with the Default Value. This information can be for merchant
use only if clearing the Display on Site checkbox and this information can also be used to provide
information to the drop shipper when this product is purchased.
Figure 4-64 Text Property Type

CONFIDENTIALITY NOTICE - The information contained in this document is confidential and proprietary. This document is to be used with the
understanding that it will be held in strict confidence and not used for reasons unrelated directly to the specific purpose of this document. No part of the
document may be circulated or reproduced for distribution outside the Client organization without prior written permission from Nodus Technologies,
eStore Solution Stack™ v4.0 User’s Guide
112
4.4.9.2. Multiple Choice
A multiple choice property type will provide a drop down selector in the other properties configuration of
a new product. In the case below, the person configuring a new product will see a drop down containing
shirt sizes X-Large to Small. This will not provide a selection system to the shopper; this is only for
merchant configuration of a new product.
Figure 4-65 Multiple Choice Property Type
4.4.9.3. Currency
A currency property type is a field that will contain data in the type "currency" or money. In the
example shown in the accompanying figure, a bonus is provided to a vendor for all orders of this
particular product. The merchant can specify the bonus amount per product by using this template that
will appear in the Other Properties area of a new product configuration. In the figure we cleared the
checkbox so that this information is not displayed to the public but only provided in the information to
the drop shipper and for internal use only.
Figure 4-66 Currency Property Type

CONFIDENTIALITY NOTICE - The information contained in this document is confidential and proprietary. This document is to be used with the
understanding that it will be held in strict confidence and not used for reasons unrelated directly to the specific purpose of this document. No part of the
document may be circulated or reproduced for distribution outside the Client organization without prior written permission from Nodus Technologies,
eStore Solution Stack™ v4.0 User’s Guide
113
4.4.9.4. Date
A date field can be used for information such as expiration date in the sample displayed in the
accompanying figure. In this case we are configuring a field that will be set in a product type including
this type property assigned to a new product. A default value is set however can be changed when
configuring the new product.
Figure 4-67 Date Property Type

CONFIDENTIALITY NOTICE - The information contained in this document is confidential and proprietary. This document is to be used with the
understanding that it will be held in strict confidence and not used for reasons unrelated directly to the specific purpose of this document. No part of the
document may be circulated or reproduced for distribution outside the Client organization without prior written permission from Nodus Technologies,
eStore Solution Stack™ v4.0 User’s Guide
114
4.4.10. Manage Files
Administration website location: Catalog > Manage Files
If you have a product that offers downloads, enter the information in the File Download area of the Edit
Product configuration. You can either upload a file using the Browse button, or if the file is too large
that it may time out during the upload process, the file can be uploaded using FTP into the "Files" folder.
Choose a pre-loaded file from the droplist.
Figure 4-68 Manage Files
Enter the name you would like displayed to the customer in the "Friendly Title" field. Select the options
for availability of the download after it has been purchased and the number of times it can be
downloaded. If the "Available for" is set to unlimited, the quantity is bypassed.
1. Choose an item from the Product drop-down list
2. If already checked, unmark the Disable Customer File Downloading feature checkbox
3. Choose a length of time the download will be available from the Available for drop-down list
4. Enter a maximum quantity for downloads. Leave blank if unlimited downloads are allowed
5. Click the Browse button to locate a CSV data file
6. Click the Add File button
7. Create a title by one of three methods:
Mark the Use name as title checkbox
Choose a name from the File name drop-down list
Enter a working title in the Friendly Title textbox
8. Click the Add File button to make the download available on the website

CONFIDENTIALITY NOTICE - The information contained in this document is confidential and proprietary. This document is to be used with the
understanding that it will be held in strict confidence and not used for reasons unrelated directly to the specific purpose of this document. No part of the
document may be circulated or reproduced for distribution outside the Client organization without prior written permission from Nodus Technologies,
eStore Solution Stack™ v4.0 User’s Guide
115
4.4.11. Quick Order Product Suggestions
Administration website location: Catalog > Quick Order’s Product Suggestions
Quick Order gives the ability to group products and allow them to be easily added to the shopping cart.
Items can be grouped in three ways. These grouping options can be accessed in the admin section by
navigating to Catalog > Quick Order’s Product Suggestions.
Items from Order History – Add the number of Order History Items in the Quick Order Entry section of
the webpage.
Blank Item Entry - Add the number of Blank Item Entry Items in the Quick Order Entry section of the
webpage.
Product Suggestions – Search and filter items to find the products to be displayed. Choose one or more
product suggestions by marking the adjacent checkbox. When finished adding products, click the Save
Changes button.
Figure 4-69 Quick Order Admin Page

CONFIDENTIALITY NOTICE - The information contained in this document is confidential and proprietary. This document is to be used with the
understanding that it will be held in strict confidence and not used for reasons unrelated directly to the specific purpose of this document. No part of the
document may be circulated or reproduced for distribution outside the Client organization without prior written permission from Nodus Technologies,
eStore Solution Stack™ v4.0 User’s Guide
116
4.4.11.1. Quick Order Entry Web Page Store
1. Navigate to the store home page
2. Click the Quick Order Entry menu link and the Quick Order page loads.
3. To order a product, enter the amount in the Qty box and click the Add to Cart button
4. In the Blank Order Entry page, enter a product ID or SKU number and quantity and click the Add to
Cart button
5. Click the Shopping Cart link at the top of the page to view and/or order the items in the cart
NOTE: Quick Entry can also be utilized in the shopping cart. Enter the Product ID or SKU in the Product:
box and type a quantity in the adjoining box, then click the Add to Cart button to add the product to the
shopping cart.
Figure 4-70 Quick Order Entry Page

CONFIDENTIALITY NOTICE - The information contained in this document is confidential and proprietary. This document is to be used with the
understanding that it will be held in strict confidence and not used for reasons unrelated directly to the specific purpose of this document. No part of the
document may be circulated or reproduced for distribution outside the Client organization without prior written permission from Nodus Technologies,
eStore Solution Stack™ v4.0 User’s Guide
117
4.4.12. Item Updater
Administration website location: Catalog > Item Updater
The item updater provides a simple method for making item updates to Great Plains and the webstore.
This tool exports items from Great Plains onto a spreadsheet where changes can be made and
submitted to Great Plains where the changes are shared between GP and the webstore.
1. Start by choosing an export option, such as all products or refine the export by choosing a
category or catalog option
Figure 4-71 Import - Export Products
2. When the page loads with the selected option, as shown in the above figure, click the Export button
to create a spreadsheet.
NOTE: If a file mismatch message appears, ignore the message and continue opening the file
3. Save the spreadsheet, make any needed item updates and re-save the document
4. Browse to find the saved spreadsheet and click the Import button
5. If there are any errors, such as record conflicts between Great Plains and the spreadsheet, warning
messages are displayed on the Item Updater page

CONFIDENTIALITY NOTICE - The information contained in this document is confidential and proprietary. This document is to be used with the
understanding that it will be held in strict confidence and not used for reasons unrelated directly to the specific purpose of this document. No part of the
document may be circulated or reproduced for distribution outside the Client organization without prior written permission from Nodus Technologies,
eStore Solution Stack™ v4.0 User’s Guide
118
4.4.13. Customer Specific Sites
Administration website location: Catalog > Customer Specific Sites
This feature is an added functionality to the optional Multi-Site Distribution module to allow
administrator to setup site restrictions by user groups. Administrators can create site groups that are
linked with customers and inventory sites that determines which sites customers can purchase from.
While this page provides the methods to set up site restrictions, the setting to enable the functionality is
located at Settings > Inventory Settings > Multi-Site Distribution, and must be enabled before the setup
starts taking effect.
Group of Sites
Site A
Site B
Site C
Group of Sites
Site D
Customer 1
Customer Class X
Customer Class Y
SETUP OVERVIEW: Group sites into Site Groups, then utilize the Site Groups to assign permissions to
customers. The assignment can be a mix of Customer records and Customer Classes – example:
“Customer Class X” as well as “Customer 1” can be assigned to allow purchase from a Group. Each
Customer record and Customer Class can be granted permissions to multiple Site Groups. Site Groups
can be assigned to “Everyone” to allow all customers to place orders against sites within the Site Group.
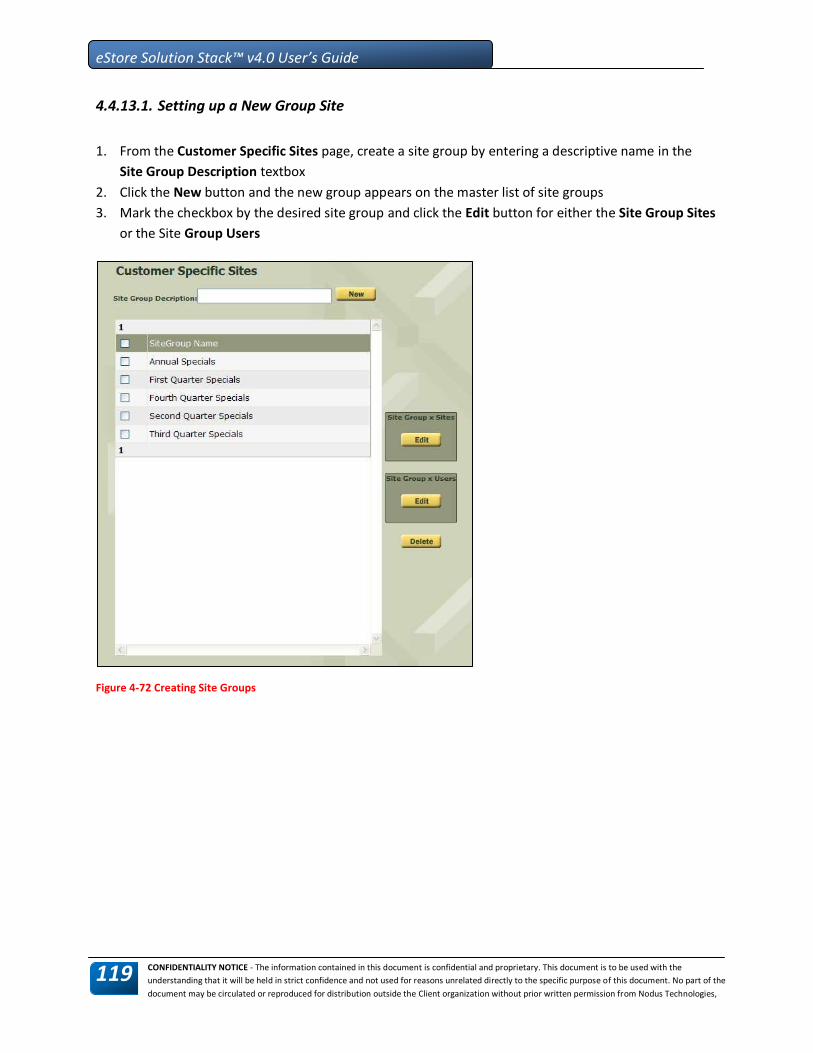
CONFIDENTIALITY NOTICE - The information contained in this document is confidential and proprietary. This document is to be used with the
understanding that it will be held in strict confidence and not used for reasons unrelated directly to the specific purpose of this document. No part of the
document may be circulated or reproduced for distribution outside the Client organization without prior written permission from Nodus Technologies,
eStore Solution Stack™ v4.0 User’s Guide
119
4.4.13.1. Setting up a New Group Site
1. From the Customer Specific Sites page, create a site group by entering a descriptive name in the
Site Group Description textbox
2. Click the New button and the new group appears on the master list of site groups
3. Mark the checkbox by the desired site group and click the Edit button for either the Site Group Sites
or the Site Group Users
Figure 4-72 Creating Site Groups

CONFIDENTIALITY NOTICE - The information contained in this document is confidential and proprietary. This document is to be used with the
understanding that it will be held in strict confidence and not used for reasons unrelated directly to the specific purpose of this document. No part of the
document may be circulated or reproduced for distribution outside the Client organization without prior written permission from Nodus Technologies,
eStore Solution Stack™ v4.0 User’s Guide
120
4.4.13.2. Setting up Inventory Locations for a Site Group
1. Click the Edit button in the Site Group Sites box to specify the sites for the group.
2. When the Edit Site Group Sites page opens, mark the checkboxes by the sites to be linked with the
site group.
NOTE: Sites are imported from GP onto this list by navigating to Settings > Nodus/Great Plains >
Order Options > Import site information and clicking the Run Now button.
3. Mark the checkbox(es) for as many sites as needed and click the Add button
4. Click the OK button to save the selections and return to the Customer Specific Sites page
Figure 4-73 Edit Site Group Sites
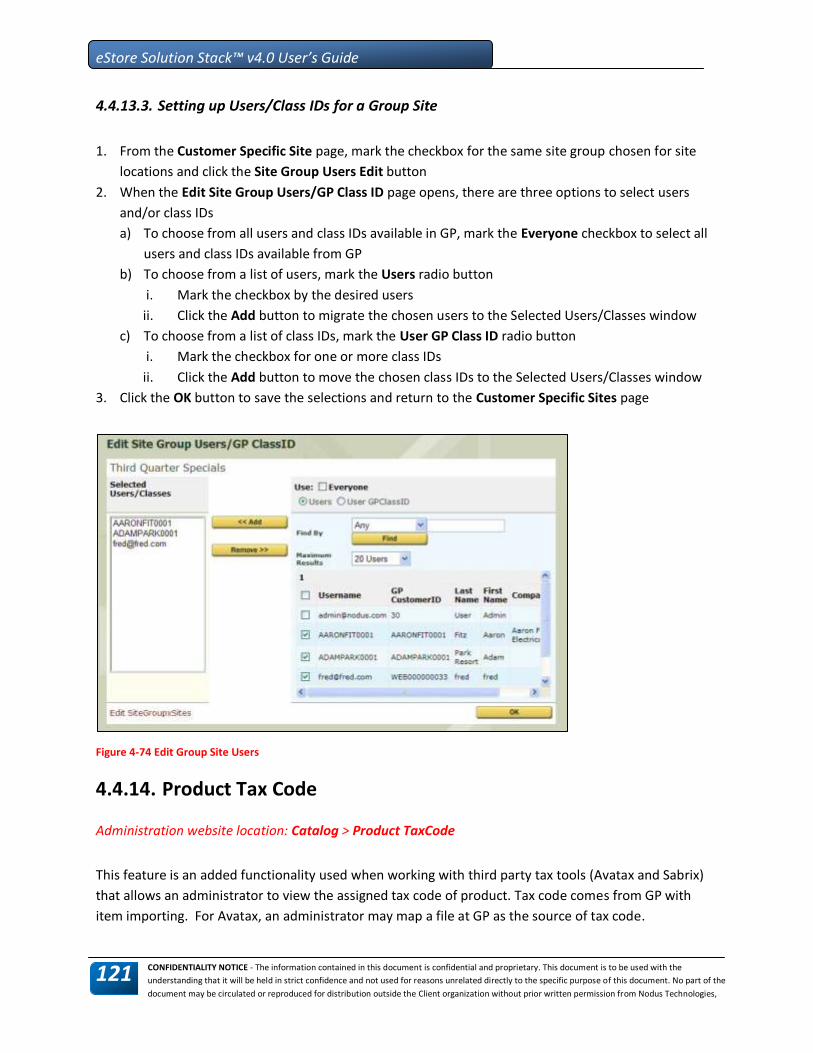
CONFIDENTIALITY NOTICE - The information contained in this document is confidential and proprietary. This document is to be used with the
understanding that it will be held in strict confidence and not used for reasons unrelated directly to the specific purpose of this document. No part of the
document may be circulated or reproduced for distribution outside the Client organization without prior written permission from Nodus Technologies,
eStore Solution Stack™ v4.0 User’s Guide
121
4.4.13.3. Setting up Users/Class IDs for a Group Site
1. From the Customer Specific Site page, mark the checkbox for the same site group chosen for site
locations and click the Site Group Users Edit button
2. When the Edit Site Group Users/GP Class ID page opens, there are three options to select users
and/or class IDs
a) To choose from all users and class IDs available in GP, mark the Everyone checkbox to select all
users and class IDs available from GP
b) To choose from a list of users, mark the Users radio button
i. Mark the checkbox by the desired users
ii. Click the Add button to migrate the chosen users to the Selected Users/Classes window
c) To choose from a list of class IDs, mark the User GP Class ID radio button
i. Mark the checkbox for one or more class IDs
ii. Click the Add button to move the chosen class IDs to the Selected Users/Classes window
3. Click the OK button to save the selections and return to the Customer Specific Sites page
Figure 4-74 Edit Group Site Users
4.4.14. Product Tax Code
Administration website location: Catalog > Product TaxCode
This feature is an added functionality used when working with third party tax tools (Avatax and Sabrix)
that allows an administrator to view the assigned tax code of product. Tax code comes from GP with
item importing. For Avatax, an administrator may map a file at GP as the source of tax code.

CONFIDENTIALITY NOTICE - The information contained in this document is confidential and proprietary. This document is to be used with the
understanding that it will be held in strict confidence and not used for reasons unrelated directly to the specific purpose of this document. No part of the
document may be circulated or reproduced for distribution outside the Client organization without prior written permission from Nodus Technologies,
eStore Solution Stack™ v4.0 User’s Guide
122
4.5. People
4.5.1. Users
Administration website location: People > Users
This section will explain settings related to eSSS users. An eSSS user can be either:
An imported customer from Customer List in GP
A customer created directly from the website
NOTE: A user can also be a role-assigned administration user on the Web Store.
Users are "people" that have rights to assigned areas of eSSS just like Windows accounts. A user can
have rights to view/access selected areas and can be used to limit employee access to select areas to
perform their duties and disallow access to areas they are not permitted to view.
Figure 4-75 List of User Accounts

CONFIDENTIALITY NOTICE - The information contained in this document is confidential and proprietary. This document is to be used with the
understanding that it will be held in strict confidence and not used for reasons unrelated directly to the specific purpose of this document. No part of the
document may be circulated or reproduced for distribution outside the Client organization without prior written permission from Nodus Technologies,
eStore Solution Stack™ v4.0 User’s Guide
123
NOTE: You may also use the import feature on the user’s page to import individual customers from
Great Plains into the shopping cart. This is primarily used as a test to verify that the Nodus Synchronizer
is working. The Synchronizer’s job is to automatically send data back and forth between Great Plains and
eSSS.
IMPORTANT: Customer and inventory deletions in Great Plains are not automatically synchronized with
the store site, and must be manually removed using the website’s Admin User interface.
4.5.1.1. Create a New User
1. Click the New button from the Users page to create a new user
2. When the Create New User page opens, enter the contact and password information
3. Click OK. The new user account will appear on a list of users on the Users page
4.5.1.2. Assign Rights to a New User
1. After creating a new user, assign their "rights" by assigning roles to each user.
2. In the list of user accounts, mark the checkbox for the user to be assigned roles
3. Click the Edit button
4. The Edit User page opens. If created in GP, the user may have certain information displayed
depending on how rights were assigned in GP.
5. In the Roles section, highlight a pre-defined role (role creation is discussed in the following section)
in the Not A Member Of box
6. Click the Add button and the role will be assigned to the user
NOTE: Roles can be deleted by highlighting a role in the Member Of box and clicking Remove
7. Click Save Changes to make the new role(s) permanent
Figure 4-76 Edit User - Assigning Roles #2

CONFIDENTIALITY NOTICE - The information contained in this document is confidential and proprietary. This document is to be used with the
understanding that it will be held in strict confidence and not used for reasons unrelated directly to the specific purpose of this document. No part of the
document may be circulated or reproduced for distribution outside the Client organization without prior written permission from Nodus Technologies,
eStore Solution Stack™ v4.0 User’s Guide
124
4.5.1.3. Allow a CSR/Salesperson to Use a Customer Account
This feature allows an employee to work on behalf of a customer by granting them use of the customer
account. When authorized, the employee can place orders on behalf of the customer. To enable this
feature:
1. From the main user list, mark the checkbox by the designated employee
2. Click the Select button
3. A message box opens on the Users page indicating that the user can now place orders for the
customer
4.5.1.4. Assign Pricing Levels to Users
Users can also be edited to assign pricing levels. Pricing levels are brought in from Great Plains when the
first product is imported. A sales person can also be assigned to each user, when that user places an
order the sales person will be notified by e-mail.
4.5.1.5. Restrict Salesperson Account Access
When implemented, this feature will only allow a Salesperson to see and manage only the accounts
assigned to their Sales ID. To activate this function:
1. From the main user list on the Users page, mark the checkbox by the designated salesperson
2. Click the Edit button
3. Just above the Roles section, enter the user’s GP Salesperson ID in the I’m a salesperson with GP
Salesperson ID textbox
4. Click the Save Changes button

CONFIDENTIALITY NOTICE - The information contained in this document is confidential and proprietary. This document is to be used with the
understanding that it will be held in strict confidence and not used for reasons unrelated directly to the specific purpose of this document. No part of the
document may be circulated or reproduced for distribution outside the Client organization without prior written permission from Nodus Technologies,
eStore Solution Stack™ v4.0 User’s Guide
125
4.5.1.6. Editing and Deleting Users
When editing a user, contact information can be modified, e-mail addresses added, pricing levels set and
roles assigned. To edit a user:
1. From the Users page, filter the list to show the desired user
2. Mark the checkbox for the user
3. Click the Edit button and the Edit User page opens
4. Make any changes needed
5. Mark the Save Changes button to make the changes permanent
NOTE: To delete a user; from the master user list, mark the checkbox by the desired user and click the
Delete button.
Figure 4-77 Editing User Information

CONFIDENTIALITY NOTICE - The information contained in this document is confidential and proprietary. This document is to be used with the
understanding that it will be held in strict confidence and not used for reasons unrelated directly to the specific purpose of this document. No part of the
document may be circulated or reproduced for distribution outside the Client organization without prior written permission from Nodus Technologies,
eStore Solution Stack™ v4.0 User’s Guide
126
4.5.1.7. Adding and Editing User Addresses
Often, users and customers will have multiple addresses for satellite offices, warehouses, etc. These
addresses are added and edited from the Addresses section at the bottom of the User page.
To add an address:
1. Navigate to Users > (select and edit a user from main list) > Edit User
2. In the Addresses section, click the New button
3. When the Edit User Address page opens, add information to the address form as needed
4. Click the OK button
5. Repeat for as many additional addresses needed for the user account
To edit an address:
1. Navigate to Users > (select and edit a user from main list) > Edit User
2. In the Addresses section, click the Edit button
3. When the Edit User Address page opens, change information as needed
4. Click the OK button
To delete an address:
The primary address is located in GP and cannot be deleted. Other addresses created in eSSS must be
manually deleted from the appropriate GP database.
NOTE: Additional information that is related to the user account, such as tax and shipping information is
displayed. This additional information can be edited from GP.

CONFIDENTIALITY NOTICE - The information contained in this document is confidential and proprietary. This document is to be used with the
understanding that it will be held in strict confidence and not used for reasons unrelated directly to the specific purpose of this document. No part of the
document may be circulated or reproduced for distribution outside the Client organization without prior written permission from Nodus Technologies,
eStore Solution Stack™ v4.0 User’s Guide
127
Figure 4-78 Add and Edit User Addresses

CONFIDENTIALITY NOTICE - The information contained in this document is confidential and proprietary. This document is to be used with the
understanding that it will be held in strict confidence and not used for reasons unrelated directly to the specific purpose of this document. No part of the
document may be circulated or reproduced for distribution outside the Client organization without prior written permission from Nodus Technologies,
eStore Solution Stack™ v4.0 User’s Guide
128
4.5.2. Roles
Administration website location: People > Roles
eSSS allows specific roles to be created and assigned to users. A list of these users is maintained and can
be edited from the master list.
4.5.2.1. Creating a User Role
1. Enter the role designation in the New Role Name textbox
2. Click the New button
3. The new user role appears in the role list as shown in the accompanying figure
Figure 4-79 Roles
4.5.2.2. Assigning Permissions to the Role
1. Highlight the user role from the role list
2. Click the Edit button
3. When the Edit Role page opens, mark the checkboxes by the permissions to be assigned to the role
as shown in the accompanying figure below
4. Click the Save Changes button
4.5.2.3. Assigning Users to the Role
1. Highlight the user role from the role list
2. Click the Edit button
3. When the Edit Role page opens, use the search function to create a user list
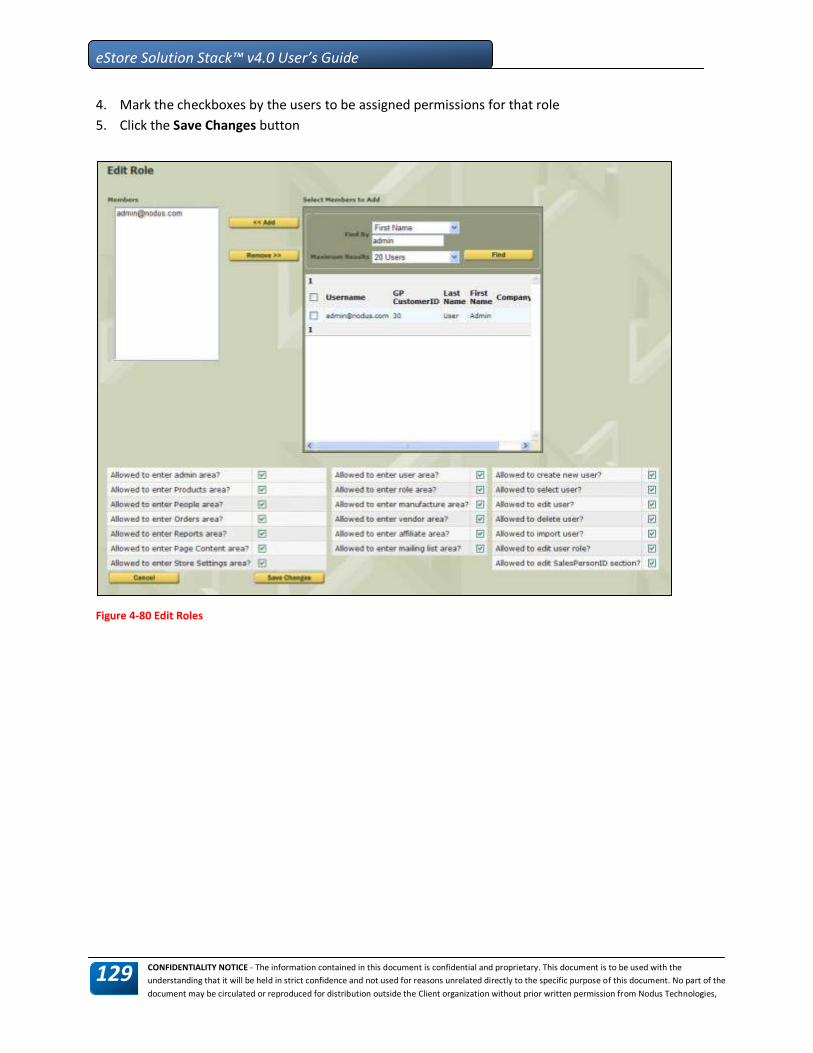
CONFIDENTIALITY NOTICE - The information contained in this document is confidential and proprietary. This document is to be used with the
understanding that it will be held in strict confidence and not used for reasons unrelated directly to the specific purpose of this document. No part of the
document may be circulated or reproduced for distribution outside the Client organization without prior written permission from Nodus Technologies,
eStore Solution Stack™ v4.0 User’s Guide
129
4. Mark the checkboxes by the users to be assigned permissions for that role
5. Click the Save Changes button
Figure 4-80 Edit Roles

CONFIDENTIALITY NOTICE - The information contained in this document is confidential and proprietary. This document is to be used with the
understanding that it will be held in strict confidence and not used for reasons unrelated directly to the specific purpose of this document. No part of the
document may be circulated or reproduced for distribution outside the Client organization without prior written permission from Nodus Technologies,
eStore Solution Stack™ v4.0 User’s Guide
130
4.5.3. Manufacturers
Administration website location: People >Manufacturers
By clicking the Manufacturers menu item on the left side of the People area, you can view a list of
available manufacturers. Click the Edit next to the manufacturer listed to view their information as
shown in the figure shown below, or click New to add new manufacturers.
Figure 4-81 List of Manufacturers
Manufacturers are assigned to a product along with Section “Vendors” to track sales data and provide e-
mail order notifications to products in which they are assigned.
Figure 4-82 Manufacturers

CONFIDENTIALITY NOTICE - The information contained in this document is confidential and proprietary. This document is to be used with the
understanding that it will be held in strict confidence and not used for reasons unrelated directly to the specific purpose of this document. No part of the
document may be circulated or reproduced for distribution outside the Client organization without prior written permission from Nodus Technologies,
eStore Solution Stack™ v4.0 User’s Guide
131
4.5.4. Vendors
Administration website location: People > Vendors
Vendors, like the manufacturers section, are associated as a distributor for a product and will receive
notifications of orders for products sold in which the vendor is assigned. Click the filter row to filter
vendors by the first letter of the vendor name, in the example above; clicking the letter N would filter to
the single vendor listed.
NOTES:
Click the Edit button to make changes to Vendor information
To import vendors from Great Plains, click the Import Vendors button
Figure 4-83 Vendor List
Figure 4-84 Add/Edit Vendor Screen
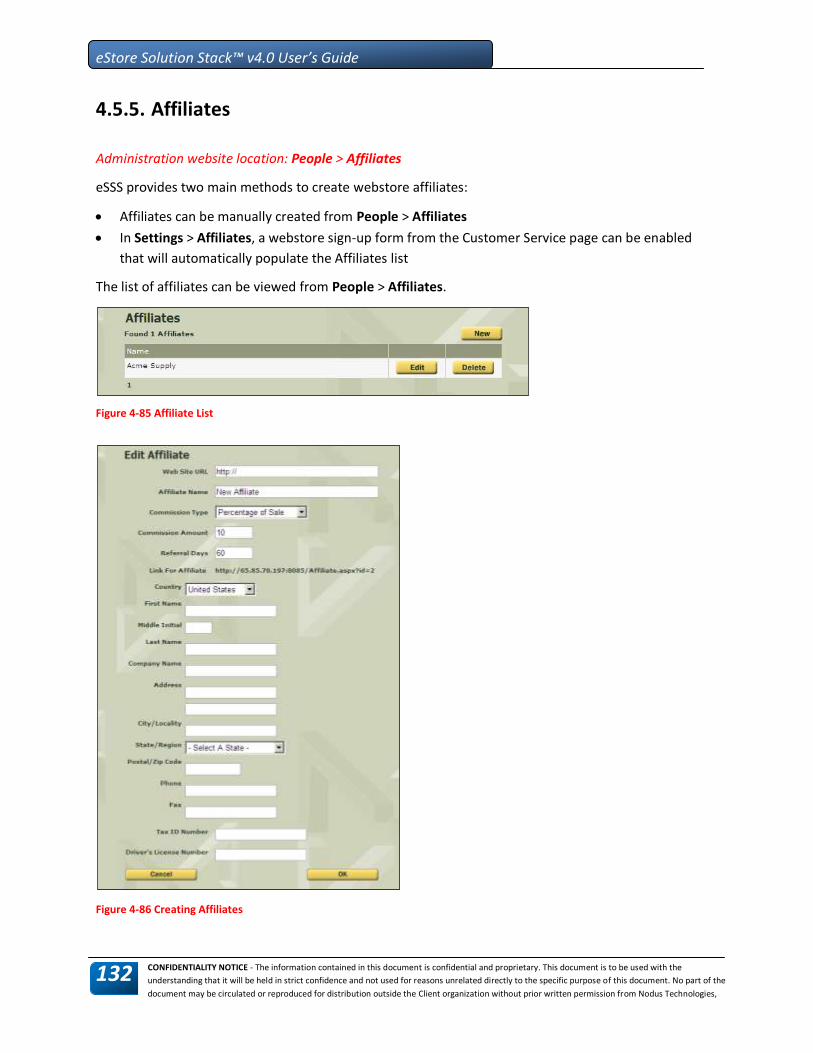
CONFIDENTIALITY NOTICE - The information contained in this document is confidential and proprietary. This document is to be used with the
understanding that it will be held in strict confidence and not used for reasons unrelated directly to the specific purpose of this document. No part of the
document may be circulated or reproduced for distribution outside the Client organization without prior written permission from Nodus Technologies,
eStore Solution Stack™ v4.0 User’s Guide
132
4.5.5. Affiliates
Administration website location: People > Affiliates
eSSS provides two main methods to create webstore affiliates:
Affiliates can be manually created from People > Affiliates
In Settings > Affiliates, a webstore sign-up form from the Customer Service page can be enabled
that will automatically populate the Affiliates list
The list of affiliates can be viewed from People > Affiliates.
Figure 4-85 Affiliate List
Figure 4-86 Creating Affiliates

CONFIDENTIALITY NOTICE - The information contained in this document is confidential and proprietary. This document is to be used with the
understanding that it will be held in strict confidence and not used for reasons unrelated directly to the specific purpose of this document. No part of the
document may be circulated or reproduced for distribution outside the Client organization without prior written permission from Nodus Technologies,
eStore Solution Stack™ v4.0 User’s Guide
133
4.5.5.1. Configuring a New Affiliate
1. Enter a website URL for the affiliate
NOTE: The affiliate can use any URL to the store that contains the parameter as specified in Settings...Affiliates under "Affiliate ID QueryString name". The default is "affid" therefore the affiliate could provide a link to the site such as http://www.yourstore.com/default.aspx?affid=yourid (replace ‘your id’ with the affiliate ID. In the accompanying figure it is shown as “1"). Another way to pass in a query string parameter without specifying a page: http://www.yourstore.com/?affid+youraffid.
2. Set the commission type; percentage of sale or flat rate commission
3. Enter the referral days - this value is the number of days a cookie will persist such that a shopper that uses the affiliate link to visit the store can return to the store at a later time without using the affiliate link and the affiliate will still get credit for the sale.
NOTE: Refer to Settings > Affiliate to set how to resolve the conflict when shoppers use more than one affiliate link to visit the store. The Affiliate Conflict Resolution droplist on this page establishes two choices for which affiliate gets for the referral:
Favor old affiliate:
Favor new affiliate:
4. Enter affiliate information as needed. The following fields are required:
Address Name
First Name
Last Name
Address
City
Postal Code
Phone Number
5. Click the OK button

CONFIDENTIALITY NOTICE - The information contained in this document is confidential and proprietary. This document is to be used with the
understanding that it will be held in strict confidence and not used for reasons unrelated directly to the specific purpose of this document. No part of the
document may be circulated or reproduced for distribution outside the Client organization without prior written permission from Nodus Technologies,
eStore Solution Stack™ v4.0 User’s Guide
134
4.5.6. Mailing Lists
Administration website location: People > Mailing Lists
Mailing lists help the user keep in touch with customers using promotions such as discounts,
newsletters, etc.
4.5.6.1. Private and Public Mailing Lists
eSSS also can make mailing lists private so that merchants can control subscription lists such as public
shopper versus a VIP customer list. A shopper must be signed in to subscribe to a mailing list. When
signed in, a shopper can visit their My Account section of the store and click the Mailing Lists link to
subscribe as shown in webstore screenshot.
To view available mailing lists for the store, navigate to People > Mailing Lists as shown below in the
figure:
Figure 4-87 Mailing Lists Available
4.5.6.2. Adding a New Mailing List Entry
To create a new mailing list, enter the name for the mailing list then click New. If the mailing list is for
internal use only, mark the Private checkbox.

CONFIDENTIALITY NOTICE - The information contained in this document is confidential and proprietary. This document is to be used with the
understanding that it will be held in strict confidence and not used for reasons unrelated directly to the specific purpose of this document. No part of the
document may be circulated or reproduced for distribution outside the Client organization without prior written permission from Nodus Technologies,
eStore Solution Stack™ v4.0 User’s Guide
135
4.5.6.3. Adding to/Editing the Mailing List:
Users can easily subscribe to Public mailing lists as shown in the figure below by clicking the Subscribe
button. Subscribers can be viewed or members added/removed by clicking the Edit button. When
clicking Edit, the Edit Mailing List screen appears as shown in the accompanying figure.
In the accompanying figure, the new "Store Mailing List" doesn't have any subscribers as the store isn't
open yet. Users listed in the search dialog in the lower right can be added as needed in other admin
areas. Check the checkboxes to the left of each user to add then click the Add button to instantly add
the selected users to the mailing list. No further commands are needed.
Figure 4-88 Mailing Lists as shown on webstore
Figure 4-89 Edit Mailing List
4.5.6.4. Sending E-mails to the Mailing List:
1. When ready to send a message return to the Mailing Lists screen
2. Click the Email button adjacent to the desired user/mailing list name
3. When the Send Email to List page opens, specify if the message will be a Text or HTML e-mail
message
4. Add a subject and enter a message
5. Click the Email button to send the e-mail

CONFIDENTIALITY NOTICE - The information contained in this document is confidential and proprietary. This document is to be used with the
understanding that it will be held in strict confidence and not used for reasons unrelated directly to the specific purpose of this document. No part of the
document may be circulated or reproduced for distribution outside the Client organization without prior written permission from Nodus Technologies,
eStore Solution Stack™ v4.0 User’s Guide
136
4-90 Select a Mailing List name for E-mailing
Figure 4-91 Send E-Mail to List

CONFIDENTIALITY NOTICE - The information contained in this document is confidential and proprietary. This document is to be used with the
understanding that it will be held in strict confidence and not used for reasons unrelated directly to the specific purpose of this document. No part of the
document may be circulated or reproduced for distribution outside the Client organization without prior written permission from Nodus Technologies,
eStore Solution Stack™ v4.0 User’s Guide
137
4.5.7. Gift Certificate Search
Administration website location: People > Gift Certificate Search
Setting up Gift Certificates:
There are two ways to enable the Gift Certificate feature. The method used depends on the inventory
policy preferred by the user.
Enter gift certificates into Great Plains as an inventory item. If this is the procedure being used, then
the Send in Gift Certificate as a Non-Inventory Item? checkbox located in Settings > Gift
Certificates must be marked
If gift certificates are not registered in Great Plains as an inventory item, the Send in Gift Certificate
as a Non-Inventory Item? checkbox must be unmarked.
NOTE: If gift certificates are tracked in Great Plains and the Send in Gift Certificate as a Non-Inventory
Item checkbox is unmarked, the gift certificate option can be viewed, but not successfully processed.
Figure 4-92 Gift Certificate Search

CONFIDENTIALITY NOTICE - The information contained in this document is confidential and proprietary. This document is to be used with the
understanding that it will be held in strict confidence and not used for reasons unrelated directly to the specific purpose of this document. No part of the
document may be circulated or reproduced for distribution outside the Client organization without prior written permission from Nodus Technologies,
eStore Solution Stack™ v4.0 User’s Guide
138
4.6. Content
4.6.1. Home Page Content
Administration website location: Content > Homepage
The Homepage Content designer is a runtime designer to build content blocks for display on the home
page. Using this runtime designer allows for making updates to the content without any need to edit
physical files of the website.
As shown in the figure below, the home page consists of three columns where content block elements
can be placed.
Figure 4-93 Homepage Content Sample Layout
Figure 4-94 Homepage Content as Viewed on Store
Please refer to chapter 4.6.4 below for details on each of the content blocks.

CONFIDENTIALITY NOTICE - The information contained in this document is confidential and proprietary. This document is to be used with the
understanding that it will be held in strict confidence and not used for reasons unrelated directly to the specific purpose of this document. No part of the
document may be circulated or reproduced for distribution outside the Client organization without prior written permission from Nodus Technologies,
eStore Solution Stack™ v4.0 User’s Guide
139
4.6.2. Category Page
Administration website location: Content > Category Page
The Category Page content designer is a runtime designer to build content blocks for display on the
category page. Using this runtime designer allows for making updates to the content without any need
to edit physical files of the website.
The content designer is used to build the left side column of a category page, while the main body (right
side column) of the page is controlled by the category properties.
As shown in the figure below, the content designer allows placing content block elements on the left
column of the page.
Figure 4-95Category Page Side Content Sample Layout
Figure 4-96 Category Page Content as Viewed on Store
Please refer to chapter 4.6.4 below for details on each of the content blocks.

CONFIDENTIALITY NOTICE - The information contained in this document is confidential and proprietary. This document is to be used with the
understanding that it will be held in strict confidence and not used for reasons unrelated directly to the specific purpose of this document. No part of the
document may be circulated or reproduced for distribution outside the Client organization without prior written permission from Nodus Technologies,
eStore Solution Stack™ v4.0 User’s Guide
140
4.6.3. Product Page
Administration website location: Content > Product Page
The Product Page Side Content designer is a runtime designer to build content blocks for display on the
product details page. Using this runtime designer allows for making updates to the content without any
need to edit physical files of the website.
The content designer is used to build the left side column of a product details page, while the main body
(right side column) of the page is controlled by the product properties.
As shown in the figure below, the content designer allows placing content block elements on the left
column of the page.
4-97 Product Page Side Content Designer
4-98 Product View on Store
Please refer to chapter 4.6.4 below for details on each of the content blocks.
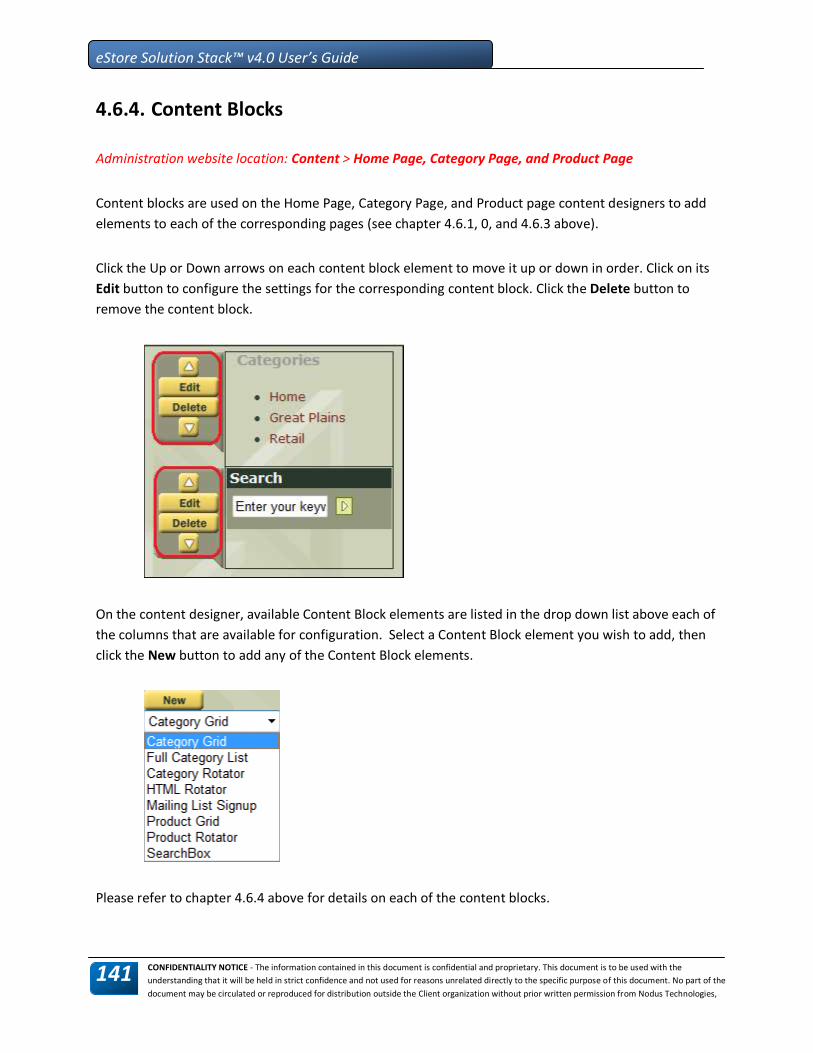
CONFIDENTIALITY NOTICE - The information contained in this document is confidential and proprietary. This document is to be used with the
understanding that it will be held in strict confidence and not used for reasons unrelated directly to the specific purpose of this document. No part of the
document may be circulated or reproduced for distribution outside the Client organization without prior written permission from Nodus Technologies,
eStore Solution Stack™ v4.0 User’s Guide
141
4.6.4. Content Blocks
Administration website location: Content > Home Page, Category Page, and Product Page
Content blocks are used on the Home Page, Category Page, and Product page content designers to add
elements to each of the corresponding pages (see chapter 4.6.1, 0, and 4.6.3 above).
Click the Up or Down arrows on each content block element to move it up or down in order. Click on its
Edit button to configure the settings for the corresponding content block. Click the Delete button to
remove the content block.
On the content designer, available Content Block elements are listed in the drop down list above each of
the columns that are available for configuration. Select a Content Block element you wish to add, then
click the New button to add any of the Content Block elements.
Please refer to chapter 4.6.4 above for details on each of the content blocks.

CONFIDENTIALITY NOTICE - The information contained in this document is confidential and proprietary. This document is to be used with the
understanding that it will be held in strict confidence and not used for reasons unrelated directly to the specific purpose of this document. No part of the
document may be circulated or reproduced for distribution outside the Client organization without prior written permission from Nodus Technologies,
eStore Solution Stack™ v4.0 User’s Guide
142
4.6.1.1. Category Grid
Administration website location: Content > Home Page, Category Page, and Product Page
The Category Grid content block element will display links to the selected category in a grid based off
the number of columns assigned to the content block. If the category is assigned with an Icon Image,
the category’s icon image is also displayed with the link.
To add a new Category Grid content block element, follow the steps below:
1. Select Category Grid from the drop down list above the column where the content should be placed
2. Click the New button
3. Set the number of columns to display the categories. Number of categories exceeding the Grid
Columns would wrap to the next row and continue to display in additional rows until all categories
are displayed.
Figure 4-99 New Category Grid
4. Click the OK button to save the new Category Grid content block
The figure “Category Grid Element” below shows the new category list we just created in the center
column of our homepage content.

CONFIDENTIALITY NOTICE - The information contained in this document is confidential and proprietary. This document is to be used with the
understanding that it will be held in strict confidence and not used for reasons unrelated directly to the specific purpose of this document. No part of the
document may be circulated or reproduced for distribution outside the Client organization without prior written permission from Nodus Technologies,
eStore Solution Stack™ v4.0 User’s Guide
143
Figure 4-100 Category Grid Element
To configure a Category Grid content block element and set the categories you wish to display, follow
the steps below:
1. From the content designer page, click the Edit button next to the Category Grid content block
2. Click the New button to add a new category to the Category Grid
3. Select a category from the drop down list
4. Click the OK button to confirm
5. Click the Edit button next to the category if you’ve made a mistake to go back to category selection
6. Repeat above steps until all desired categories to display in the category grid are added. The figure
“Configure Category Grid” below shows example of three categories configured to be displayed in
the category grid.
Figure 4-101 Configure Category Grid

CONFIDENTIALITY NOTICE - The information contained in this document is confidential and proprietary. This document is to be used with the
understanding that it will be held in strict confidence and not used for reasons unrelated directly to the specific purpose of this document. No part of the
document may be circulated or reproduced for distribution outside the Client organization without prior written permission from Nodus Technologies,
eStore Solution Stack™ v4.0 User’s Guide
144
NOTE: Images can be added to the category display. These category Icon Images are part of Category Properties. Go to the Category Edit page to administrate Category properties and add an icon image.
7. Clicking the up and down arrows next to each category to move them up and down to the order you
wish for them to be displayed
8. Click the OK button and complete the configuration
Figure “Category Grid on Home Page” below shows an example of the category grid displayed on the
homepage. The category grid is configured to be a maximum of three columns in this example.
Figure 4-102 Category Grid on Home Page
4.6.1.2. Category Lists
Administration website location: Content > Home Page, Category Page, and Product Page
The category lists displays a vertical list of links to categories. It dynamically expands and displays lower
level categories depends as the user lands on one of the category pages.
The Full Category List will enable the category list to fully expand in order to show all sub-categories.
With the Category List and Category List 2 options, subcategories are filtered to present a shorter list to
keep the customer’s focus on the current category as well as preventing display of excessive long list on
the screen (see Figure Category Lists Comparison).

CONFIDENTIALITY NOTICE - The information contained in this document is confidential and proprietary. This document is to be used with the
understanding that it will be held in strict confidence and not used for reasons unrelated directly to the specific purpose of this document. No part of the
document may be circulated or reproduced for distribution outside the Client organization without prior written permission from Nodus Technologies,
eStore Solution Stack™ v4.0 User’s Guide
145
FULL CATEGORY LIST CATEGORY LIST CATEGORY LIST 2
Figure Category Lists Comparison – Full Category List, Category List, & Category List 2
To add a new category list content block element, follow the steps below:
1. Select Full Category List, Category List, or Category List 2 from the drop down list above the column
where the content should be placed
2. Click the New button
3. Click the OK button to save the new content block
4.6.1.3. Category Rotator
Administration website location: Content > Home Page, Category Page, and Product Page
A category rotator will randomly display a link of a category with each visit to the page. The link can also
be accompanied by an icon image for the category. To learn about assigning images to display in a
category rotator, read the Edit Category topic.
The figure “Category Rotator Live” below shows the category rotator in action on home page.

CONFIDENTIALITY NOTICE - The information contained in this document is confidential and proprietary. This document is to be used with the
understanding that it will be held in strict confidence and not used for reasons unrelated directly to the specific purpose of this document. No part of the
document may be circulated or reproduced for distribution outside the Client organization without prior written permission from Nodus Technologies,
eStore Solution Stack™ v4.0 User’s Guide
146
Figure 4-103 Category Rotator Live
To add a new Category Rotator content block element, follow the steps below:
1. Select Category Rotator from the drop down list above the column where the content should be
placed
2. Click the New button
Figure 4-104 Creating a New Category Rotator
3. Click the OK button to save the new Category Rotator content block
To configure a Category Rotator content block element and set the categories you wish to display,
follow the steps below:
1. From the content designer page, click the Edit button next to the Category Rotator content block
2. Click the New button to add a new category to the Category Rotator
3. Select a category from the drop down list
4. Click the OK button to confirm
5. Click the Edit button next to the category if you’ve made a mistake to go back to category selection
6. Repeat above steps until all desired categories to display in the category rotator are added. The
figure “Configure Category Rotator” below shows example of three categories configured to be
displayed in the category rotator.

CONFIDENTIALITY NOTICE - The information contained in this document is confidential and proprietary. This document is to be used with the
understanding that it will be held in strict confidence and not used for reasons unrelated directly to the specific purpose of this document. No part of the
document may be circulated or reproduced for distribution outside the Client organization without prior written permission from Nodus Technologies,
eStore Solution Stack™ v4.0 User’s Guide
147
Figure 4-105 Configure Category Rotator
NOTE: Images can be added to the category display. These category Icon Images are part of Category Properties. Go to the Category Edit page to administrate Category properties and add an icon image.
7. Clicking the up and down arrows next to each category to move them up and down to the order you
wish for them to be displayed
8. Click the OK button and complete the configuration
4.6.1.4. HTML Rotator
Administration website location: Content > Home Page, Category Page, and Product Page
The HTML Rotator will randomly display a HTML items with each visit to the page.
To add a new HTML Rotator content block element, follow the steps below:
1. Select HTML Rotator from the drop down list above the column where the content should be placed
2. Click the New button

CONFIDENTIALITY NOTICE - The information contained in this document is confidential and proprietary. This document is to be used with the
understanding that it will be held in strict confidence and not used for reasons unrelated directly to the specific purpose of this document. No part of the
document may be circulated or reproduced for distribution outside the Client organization without prior written permission from Nodus Technologies,
eStore Solution Stack™ v4.0 User’s Guide
148
Figure 4-106 Creating new HTML Rotator
3. Click the OK button to save the new HTML Rotator content block
To configure a HTML Rotator content block element, follow the steps below:
1. From the content designer page, click the Edit button next to the HTML Rotator content block
2. Click the New button to add a new HTML Item to the HTML Rotator
3. Make edits to the HTML content you wish to publish
Figure 4-107 Editing a HTML item
4. Click the OK button to confirm
5. Click the Edit button next to the HTML item if you’ve made a mistake to go back to HTML editor
6. Repeat above steps until all desired HTML items you wish to display are added. The figure “Two
HTML Elements to be Rotated” below shows example of two HTML items configured that will be
randomly selected to be displayed on the page
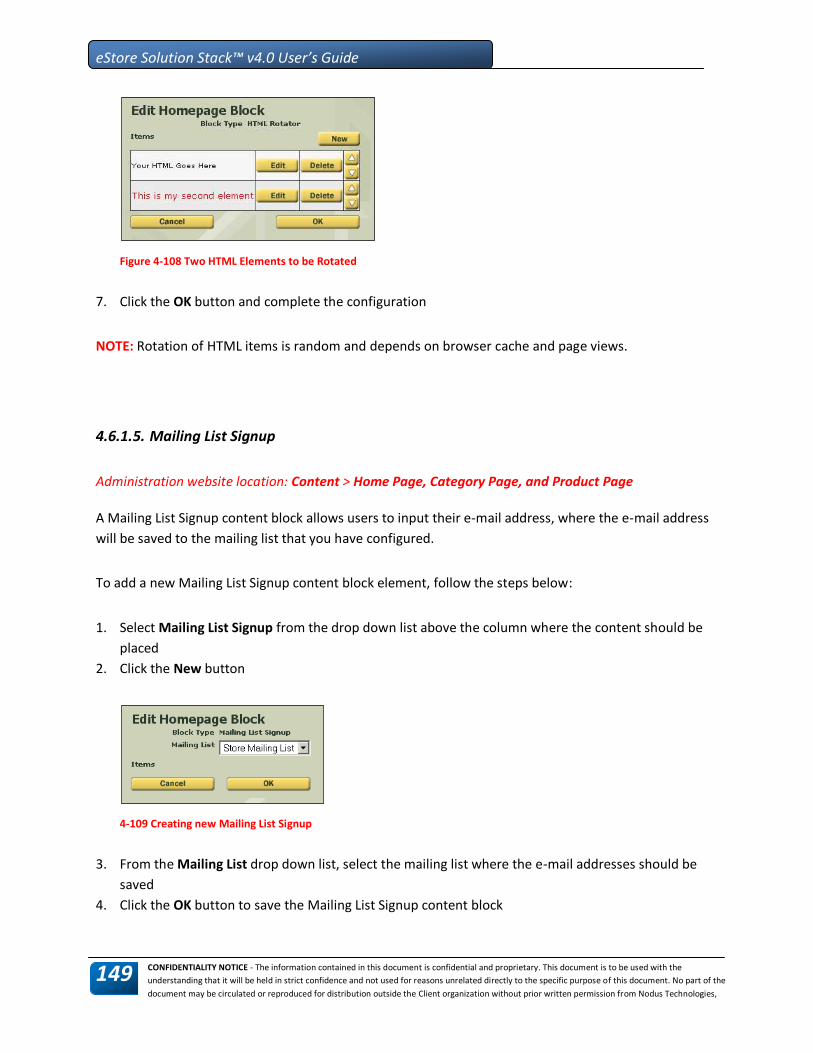
CONFIDENTIALITY NOTICE - The information contained in this document is confidential and proprietary. This document is to be used with the
understanding that it will be held in strict confidence and not used for reasons unrelated directly to the specific purpose of this document. No part of the
document may be circulated or reproduced for distribution outside the Client organization without prior written permission from Nodus Technologies,
eStore Solution Stack™ v4.0 User’s Guide
149
Figure 4-108 Two HTML Elements to be Rotated
7. Click the OK button and complete the configuration
NOTE: Rotation of HTML items is random and depends on browser cache and page views.
4.6.1.5. Mailing List Signup
Administration website location: Content > Home Page, Category Page, and Product Page
A Mailing List Signup content block allows users to input their e-mail address, where the e-mail address
will be saved to the mailing list that you have configured.
To add a new Mailing List Signup content block element, follow the steps below:
1. Select Mailing List Signup from the drop down list above the column where the content should be
placed
2. Click the New button
4-109 Creating new Mailing List Signup
3. From the Mailing List drop down list, select the mailing list where the e-mail addresses should be
saved
4. Click the OK button to save the Mailing List Signup content block
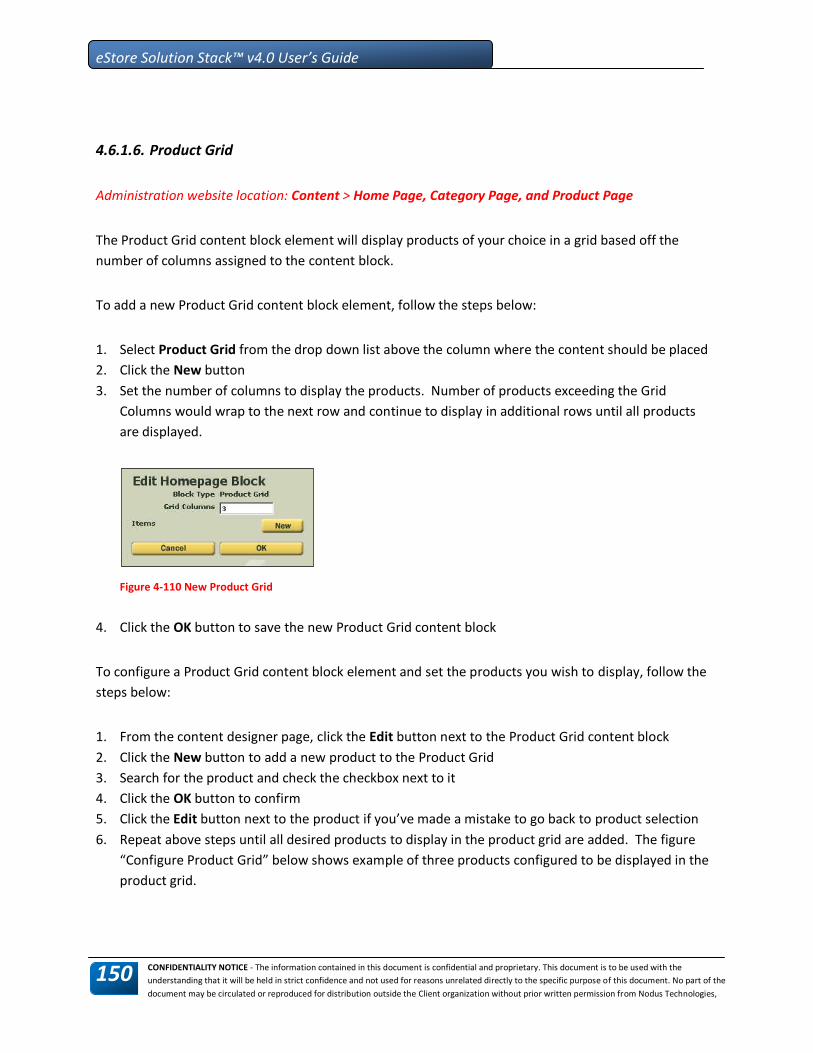
CONFIDENTIALITY NOTICE - The information contained in this document is confidential and proprietary. This document is to be used with the
understanding that it will be held in strict confidence and not used for reasons unrelated directly to the specific purpose of this document. No part of the
document may be circulated or reproduced for distribution outside the Client organization without prior written permission from Nodus Technologies,
eStore Solution Stack™ v4.0 User’s Guide
150
4.6.1.6. Product Grid
Administration website location: Content > Home Page, Category Page, and Product Page
The Product Grid content block element will display products of your choice in a grid based off the
number of columns assigned to the content block.
To add a new Product Grid content block element, follow the steps below:
1. Select Product Grid from the drop down list above the column where the content should be placed
2. Click the New button
3. Set the number of columns to display the products. Number of products exceeding the Grid
Columns would wrap to the next row and continue to display in additional rows until all products
are displayed.
Figure 4-110 New Product Grid
4. Click the OK button to save the new Product Grid content block
To configure a Product Grid content block element and set the products you wish to display, follow the
steps below:
1. From the content designer page, click the Edit button next to the Product Grid content block
2. Click the New button to add a new product to the Product Grid
3. Search for the product and check the checkbox next to it
4. Click the OK button to confirm
5. Click the Edit button next to the product if you’ve made a mistake to go back to product selection
6. Repeat above steps until all desired products to display in the product grid are added. The figure
“Configure Product Grid” below shows example of three products configured to be displayed in the
product grid.

CONFIDENTIALITY NOTICE - The information contained in this document is confidential and proprietary. This document is to be used with the
understanding that it will be held in strict confidence and not used for reasons unrelated directly to the specific purpose of this document. No part of the
document may be circulated or reproduced for distribution outside the Client organization without prior written permission from Nodus Technologies,
eStore Solution Stack™ v4.0 User’s Guide
151
Figure 4-111 Configure Product Grid
7. Clicking the up and down arrows next to each product to move them up and down to the order you
wish for them to be displayed
8. Click the OK button and complete the configuration
Figure “Product Grid on Home Page” below shows an example of the product grid displayed on the
home page. The product grid is configured to be a maximum of three columns in this example.
4-112 Product Grid on Home Page
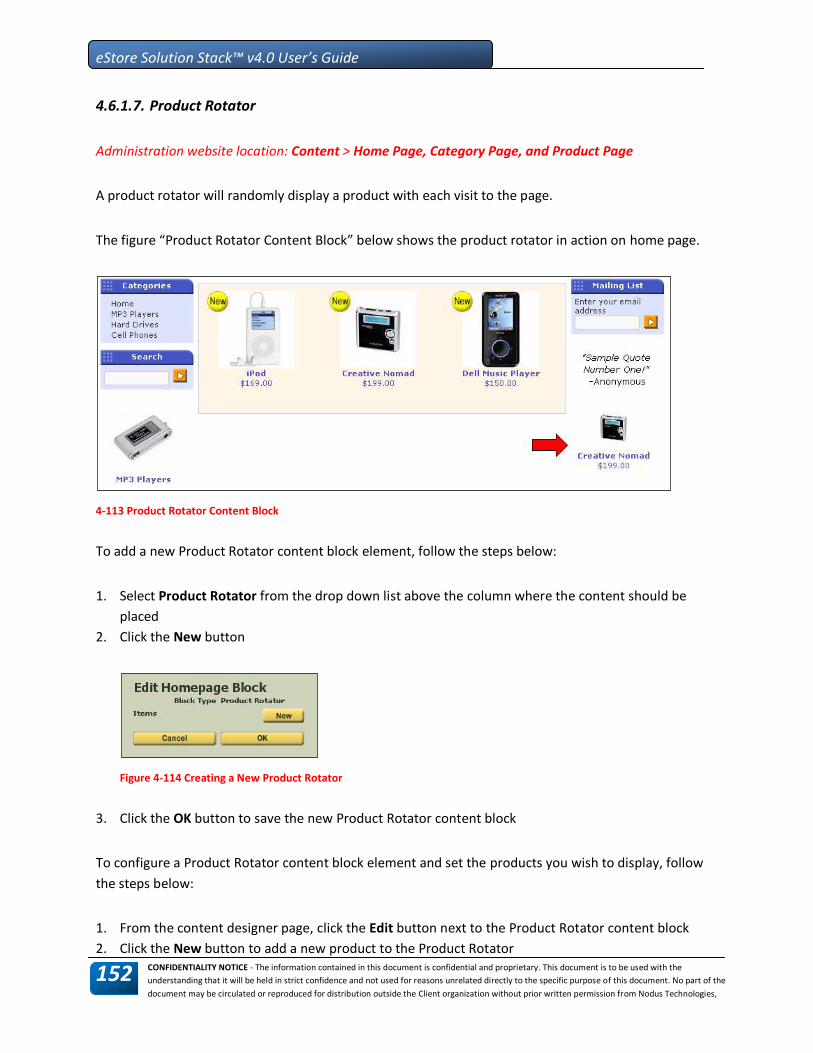
CONFIDENTIALITY NOTICE - The information contained in this document is confidential and proprietary. This document is to be used with the
understanding that it will be held in strict confidence and not used for reasons unrelated directly to the specific purpose of this document. No part of the
document may be circulated or reproduced for distribution outside the Client organization without prior written permission from Nodus Technologies,
eStore Solution Stack™ v4.0 User’s Guide
152
4.6.1.7. Product Rotator
Administration website location: Content > Home Page, Category Page, and Product Page
A product rotator will randomly display a product with each visit to the page.
The figure “Product Rotator Content Block” below shows the product rotator in action on home page.
4-113 Product Rotator Content Block
To add a new Product Rotator content block element, follow the steps below:
1. Select Product Rotator from the drop down list above the column where the content should be
placed
2. Click the New button
Figure 4-114 Creating a New Product Rotator
3. Click the OK button to save the new Product Rotator content block
To configure a Product Rotator content block element and set the products you wish to display, follow
the steps below:
1. From the content designer page, click the Edit button next to the Product Rotator content block
2. Click the New button to add a new product to the Product Rotator

CONFIDENTIALITY NOTICE - The information contained in this document is confidential and proprietary. This document is to be used with the
understanding that it will be held in strict confidence and not used for reasons unrelated directly to the specific purpose of this document. No part of the
document may be circulated or reproduced for distribution outside the Client organization without prior written permission from Nodus Technologies,
eStore Solution Stack™ v4.0 User’s Guide
153
3. Search for the product and check the checkbox next to it
4. Click the OK button to confirm
5. Click the Edit button next to the product if you’ve made a mistake to go back to product selection
6. Repeat above steps until all desired products to display in the product rotator are added. The figure
“Configure Product Rotator” below shows example of three products configured to be displayed in
the product rotator.
Figure 4-115 Configure Product Rotator
7. Clicking the up and down arrows next to each product to move them up and down to the order you
wish for them to be displayed
8. Click the OK button and complete the configuration
4.6.1.8. Search Box
Administration website location: Content > Home Page, Category Page, and Product Page
The Search Box content block element adds a textbox that will allow users to input keywords to search
for products.

CONFIDENTIALITY NOTICE - The information contained in this document is confidential and proprietary. This document is to be used with the
understanding that it will be held in strict confidence and not used for reasons unrelated directly to the specific purpose of this document. No part of the
document may be circulated or reproduced for distribution outside the Client organization without prior written permission from Nodus Technologies,
eStore Solution Stack™ v4.0 User’s Guide
154
To add a new Search Box content block element, follow the steps below:
1. Select Search Box from the drop down list above the column where the content should be placed
2. Click the New button
3. Click the OK button to save the new content block
The figure “Search Box Content Block” below shows placement of a search box on the first column of the
Homepage.
4-116 Search Box Content Block
4.6.1.9. Social Network Plugins
Administration website location: Content > Home Page, Category Page, and Product Page
The Social Network Plugins element will allow you to add the Twitter Button and/or with the
combination of Facebook’s Like Button and Like Box.
To add a new Social Network Plugins content block element, follow the steps below:
1. Select Social Network Plugins from the drop down list above the column where the content should
be placed
2. Click the New button

CONFIDENTIALITY NOTICE - The information contained in this document is confidential and proprietary. This document is to be used with the
understanding that it will be held in strict confidence and not used for reasons unrelated directly to the specific purpose of this document. No part of the
document may be circulated or reproduced for distribution outside the Client organization without prior written permission from Nodus Technologies,
eStore Solution Stack™ v4.0 User’s Guide
155
3. Checkmark each of the options you wish to enable:
Twitter Button – Add Twitter Buttons to the site to help your visitors share content and
connect with you on Twitter.
Like Button – The Like button lets users share pages back to their Facebook profile with one
click.
Like Box – The Like Box enables users to like your Facebook Page and view its stream
directly from the homepage. The URL to your Facebook Page must be entered under
Settings General Options: Site Options, in order for this feature to work properly.
4. Click the OK button to save the new content block

CONFIDENTIALITY NOTICE - The information contained in this document is confidential and proprietary. This document is to be used with the
understanding that it will be held in strict confidence and not used for reasons unrelated directly to the specific purpose of this document. No part of the
document may be circulated or reproduced for distribution outside the Client organization without prior written permission from Nodus Technologies,
eStore Solution Stack™ v4.0 User’s Guide
156
4.6.5. Store Information
Administration website location: Content > Store information
This area reflects basic information regarding the store. The store information is edited in this location in
the administration settings and is displayed in the customer service area of the store. The copyright line
will be displayed in the footer of the site. Do not prefix with a © symbol as one will be prefixed
automatically.
4-117 Store Information

CONFIDENTIALITY NOTICE - The information contained in this document is confidential and proprietary. This document is to be used with the
understanding that it will be held in strict confidence and not used for reasons unrelated directly to the specific purpose of this document. No part of the
document may be circulated or reproduced for distribution outside the Client organization without prior written permission from Nodus Technologies,
eStore Solution Stack™ v4.0 User’s Guide
157
4-118 Customer Service Information as Displayed on Store
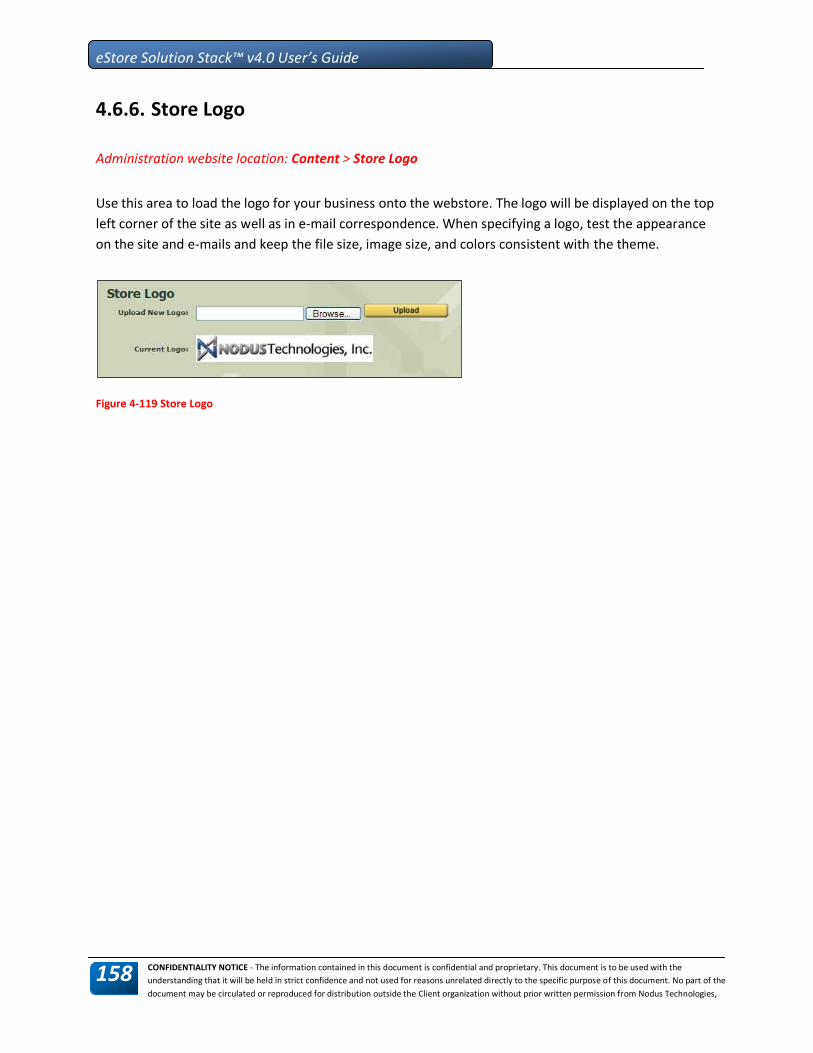
CONFIDENTIALITY NOTICE - The information contained in this document is confidential and proprietary. This document is to be used with the
understanding that it will be held in strict confidence and not used for reasons unrelated directly to the specific purpose of this document. No part of the
document may be circulated or reproduced for distribution outside the Client organization without prior written permission from Nodus Technologies,
eStore Solution Stack™ v4.0 User’s Guide
158
4.6.6. Store Logo
Administration website location: Content > Store Logo
Use this area to load the logo for your business onto the webstore. The logo will be displayed on the top
left corner of the site as well as in e-mail correspondence. When specifying a logo, test the appearance
on the site and e-mails and keep the file size, image size, and colors consistent with the theme.
Figure 4-119 Store Logo

CONFIDENTIALITY NOTICE - The information contained in this document is confidential and proprietary. This document is to be used with the
understanding that it will be held in strict confidence and not used for reasons unrelated directly to the specific purpose of this document. No part of the
document may be circulated or reproduced for distribution outside the Client organization without prior written permission from Nodus Technologies,
eStore Solution Stack™ v4.0 User’s Guide
159
4.6.7. Store Meta Tags
Administration website location: Content >Store Meta Tags
Meta tags can be assigned at the Store level, Category level, and for each individual product. Enter Meta
keywords and description for the store in the editor as shown in the figure “Store Meta Tag Editor”
above. Meta tags will be displayed and updated in a descending order of available meta tags. If the main
page is displayed, the Store Meta Tags are used, if a category is displayed, and the category contains
meta tag information, the categories meta tags will be used. Subsequently, if the Meta tag information
has been defined for a product and a product detail is being viewed (e.g. crawled by search engines); the
meta tags for the target product will be used.
4-120 Store Meta Tag Editor
This system provides flexibility for search engine optimization of the store.

CONFIDENTIALITY NOTICE - The information contained in this document is confidential and proprietary. This document is to be used with the
understanding that it will be held in strict confidence and not used for reasons unrelated directly to the specific purpose of this document. No part of the
document may be circulated or reproduced for distribution outside the Client organization without prior written permission from Nodus Technologies,
eStore Solution Stack™ v4.0 User’s Guide
160
4.6.8. Help/FAQ
Administration website location: Content > Help/FAQ
This resource allows the user to build a Help and/or Frequently Asked Questions (FAQ) section. The
interface asks for a question-answer combination that appears in the Customer Service > Help page of
the webstore.
When the shopper clicks on the customer service link, a menu of available resources are displayed on
the left side of the screen.
A shopper can click the Help link and a list of Frequently Asked Questions is displayed as configured in
this merchant area. Create as many questions that shoppers may have then enter the answer to the
question. The questions will appear as links. When clicked, the answer displays as shown in the figure
“Sample FAQ Question with Answer Displayed” below.
4-121 Sample FAQ Question with Answer Displayed
4-122 Admin List of FAQ
To create or edit a Question/Answer pair:
1. The Edit Help Section page is used to create New question/answer pairs or edit existing FAQs.
2. Click New to open a blank Edit Help Section page or click the Edit button to update or change and
existing FAQ
3. Click OK to save the new FAQ or make any changes permanent
4. The new information will be displayed in the webstore FAQ page

CONFIDENTIALITY NOTICE - The information contained in this document is confidential and proprietary. This document is to be used with the
understanding that it will be held in strict confidence and not used for reasons unrelated directly to the specific purpose of this document. No part of the
document may be circulated or reproduced for distribution outside the Client organization without prior written permission from Nodus Technologies,
eStore Solution Stack™ v4.0 User’s Guide
161
4-123 Help Question Editor

CONFIDENTIALITY NOTICE - The information contained in this document is confidential and proprietary. This document is to be used with the
understanding that it will be held in strict confidence and not used for reasons unrelated directly to the specific purpose of this document. No part of the
document may be circulated or reproduced for distribution outside the Client organization without prior written permission from Nodus Technologies,
eStore Solution Stack™ v4.0 User’s Guide
162
4.6.9. Privacy Policy
Administration website location: Content > Privacy Policy
The Privacy Policy area allows content pertinent to the business privacy policy. Each section of the
privacy policy is a separate unique section with a title header and content below. The figure “Sample
Privacy Policy” below shows the sample privacy policy that ships as an example only for use with a new
store. Be sure to replace this with the businesses approved privacy policy.
4-124 Sample Privacy Policy
To create a new Privacy Policy section, click the New button in the lower left.
To edit an existing section, click the Edit button for that section
Click Delete to delete the section

CONFIDENTIALITY NOTICE - The information contained in this document is confidential and proprietary. This document is to be used with the
understanding that it will be held in strict confidence and not used for reasons unrelated directly to the specific purpose of this document. No part of the
document may be circulated or reproduced for distribution outside the Client organization without prior written permission from Nodus Technologies,
eStore Solution Stack™ v4.0 User’s Guide
163
Click the up/down arrows in the far right to modify the section order. If you do not wish to have a
section header (bold text in example above), leave the header field blank. The figure “Privacy Section
Designer” shows the simple section editor to add/edit sections.
4-125 Privacy Section Designer
The privacy policy link is presented to the shopper from Customer Service > Privacy Policy.
4-126 Privacy Policy in Customer Service Area

CONFIDENTIALITY NOTICE - The information contained in this document is confidential and proprietary. This document is to be used with the
understanding that it will be held in strict confidence and not used for reasons unrelated directly to the specific purpose of this document. No part of the
document may be circulated or reproduced for distribution outside the Client organization without prior written permission from Nodus Technologies,
eStore Solution Stack™ v4.0 User’s Guide
164
4.6.10. Return Request Form
Administration website location: Content > Return Request Form
The customer service link provides policy and customer service related information. The link at the
bottom of the list in the accompanying figure will present the shopper with return policy information,
and if a return form is enabled in the Section “Returns” area, a return form will be provided to process
the return as shown in the figure “Return Request Form” below.
4-127 Return Request Form
In the merchant area, you can control whether or not the return form is displayed, and edit the header
text, policy items (as shown in the figure “Return Policy Items at Bottom of Page” below) and the
message returned to the shopper after a request form is submitted.

CONFIDENTIALITY NOTICE - The information contained in this document is confidential and proprietary. This document is to be used with the
understanding that it will be held in strict confidence and not used for reasons unrelated directly to the specific purpose of this document. No part of the
document may be circulated or reproduced for distribution outside the Client organization without prior written permission from Nodus Technologies,
eStore Solution Stack™ v4.0 User’s Guide
165
4-128 Return Policy Editor
4-129 Return Policy Items at Bottom of Page

CONFIDENTIALITY NOTICE - The information contained in this document is confidential and proprietary. This document is to be used with the
understanding that it will be held in strict confidence and not used for reasons unrelated directly to the specific purpose of this document. No part of the
document may be circulated or reproduced for distribution outside the Client organization without prior written permission from Nodus Technologies,
eStore Solution Stack™ v4.0 User’s Guide
166
4.6.11. Shipping Policy
Administration website location: Content >Shipping Policy
When a shippable product is ordered, the store will present estimated shipping charges to the customer.
A link to the company shipping policy is provided on that checkout page.
The shipping policy can be changed or edited as shown in the Shipping Policy page displayed below. Add
or change the information and click the Save Changes button and the new/updated shipping policy will
be displayed on the webstore during the checkout process.
4-130 Edit Shipping Policy

CONFIDENTIALITY NOTICE - The information contained in this document is confidential and proprietary. This document is to be used with the
understanding that it will be held in strict confidence and not used for reasons unrelated directly to the specific purpose of this document. No part of the
document may be circulated or reproduced for distribution outside the Client organization without prior written permission from Nodus Technologies,
eStore Solution Stack™ v4.0 User’s Guide
167
4.6.12. Terms and Conditions
Administration website location: Content >Terms and Conditions
Terms and conditions can be edited to be viewed when a shopper clicks the Terms and Conditions link
in the Customer Service page.
You can also set a requirement that the shopper must mark a checkbox, as shown in the figure “Terms
and Conditions Link at Checkout (highlighted)” below, stating they have read and agree to the terms and
conditions. A link will also be provided to view the terms and conditions opened in a new window.
Edit the terms and conditions as shown below in the Terms and Conditions editor. Check the checkbox
to Require Agreement at checkout.
4-131 Terms and Conditions Editor

CONFIDENTIALITY NOTICE - The information contained in this document is confidential and proprietary. This document is to be used with the
understanding that it will be held in strict confidence and not used for reasons unrelated directly to the specific purpose of this document. No part of the
document may be circulated or reproduced for distribution outside the Client organization without prior written permission from Nodus Technologies,
eStore Solution Stack™ v4.0 User’s Guide
168
4.6.13. E-mail Message Templates
Administration website location: Content > E-Mail Messages
The Email Message link in the content manager area allows customization of the template messages
that are sent in response to different events with the store. You can edit any of several e-mail templates
by clicking the edit button as shown in the accompanying figure, which shows the e-mail template editor
when clicking the New Order Receipt E-mail Edit button. Any of these e-mail types can be easily
disabled by marking the adjacent checkbox and clicking Save Changes.
4-132 E-mail Message Templates

CONFIDENTIALITY NOTICE - The information contained in this document is confidential and proprietary. This document is to be used with the
understanding that it will be held in strict confidence and not used for reasons unrelated directly to the specific purpose of this document. No part of the
document may be circulated or reproduced for distribution outside the Client organization without prior written permission from Nodus Technologies,
eStore Solution Stack™ v4.0 User’s Guide
169
4-133 E-Mail Template Editor
Depending on the e-mail template, different sections are available for edit. At the top of each template
editor, choose the sending format of the message, HTML or Text. HTML e-mails can be richer in content
and take advantage of HTML formatting, however, some clients using older e-mail software may not be
able to read the message. If concerned about e-mail compatibility, you may want to consider using text
messages; however, most users can accept HTML e-mail messages now.
Enter the HTML sections as shown above. Do not include HTML or BODY tags, NODUS ESTORE SOLUTION
STACK will create the HTML formatting template for you. Only include the sections as if you were
building the content inside a BODY tag of a web page, as demonstrated in Figure “E-mail Template
Editor” above.
eSSS uses "replacement variables" as indicated at the bottom of the template. Each replacement
variable such as [[logo]] will be replaced with the information as described to the right of the indicated
replacement variable, your company's logo that was uploaded earlier. Notice the subject line has the
following text "Order receipt for order [[ordernumber]]". When the e-mail is sent, the replacement
variable will be changed from [[ordernumber]] to the actual order number of the processing order.
The ability to construct e-mail templates with replacement variables gives you, the merchant, full
flexibility in personalizing the theme of messages sent in response to actions of the store. Providing the
merchant the tools to create a professional and customized image is our focus with the system provided
here.

CONFIDENTIALITY NOTICE - The information contained in this document is confidential and proprietary. This document is to be used with the
understanding that it will be held in strict confidence and not used for reasons unrelated directly to the specific purpose of this document. No part of the
document may be circulated or reproduced for distribution outside the Client organization without prior written permission from Nodus Technologies,
eStore Solution Stack™ v4.0 User’s Guide
170
4.6.14. Custom Pages
Administration website location: Content > Custom Pages
Customer pages provide the powerful capability of adding web pages to the store using the included
content editor. Custom pages can automatically show links in the footer menu and navigate to the new
web page showing the content as provided in the editor such as in Figure “Example of a Custom Page”
below. When clicking the Custom Pages menu item in the Content side menu, a list will appear of
custom pages you created. Click the Edit button to edit the selected custom page, delete to remove it,
or New to add a new custom page.
4-134 Custom Page List
4-135 Custom Page Example
In the example above, we created a new link for the footer so our shoppers can view newsletters. The
link will appear in the bottom (footer) menu as indicated by placing a checkbox in Show in Bottom
Menu. The accompanying figure shows the link as it will appear in the footer and the page is displayed
once clicked.

CONFIDENTIALITY NOTICE - The information contained in this document is confidential and proprietary. This document is to be used with the
understanding that it will be held in strict confidence and not used for reasons unrelated directly to the specific purpose of this document. No part of the
document may be circulated or reproduced for distribution outside the Client organization without prior written permission from Nodus Technologies,
eStore Solution Stack™ v4.0 User’s Guide
171
4.6.15. Open/Close Store
Administration website location: Content > Open/Close Store
From time to time, there may be a reason to close the store, whether for system upgrades, inventory
updates, product configuration changes, etc. To prevent customers from shopping during an upgrade
process, such as server maintenance, graphics changes, you can close the store and inform the shoppers
that the store is temporarily closed and when to return. Having a friendly "closed sign" will help
shoppers understand that your business is reliable and you are simply performing required upgrades.
4-136 Closed Store View
To close the store and control the message displayed to shoppers, click the Open/Close Store menu link
in the Content area. Enter a HTML formatted message (HTML and BODY tags not required) as shown in
the default example in Figure “Store Closed Message”. To close the store, check the "Close Store"
checkbox. To reopen the store, clear the checkbox and click Save Changes to commit the changes.

CONFIDENTIALITY NOTICE - The information contained in this document is confidential and proprietary. This document is to be used with the
understanding that it will be held in strict confidence and not used for reasons unrelated directly to the specific purpose of this document. No part of the
document may be circulated or reproduced for distribution outside the Client organization without prior written permission from Nodus Technologies,
eStore Solution Stack™ v4.0 User’s Guide
172
4-137 Closed Store Message
NOTE: If you close the browser and return, go to http://yourstoredomain/bvadmin/login.aspx to login
and update the store status.
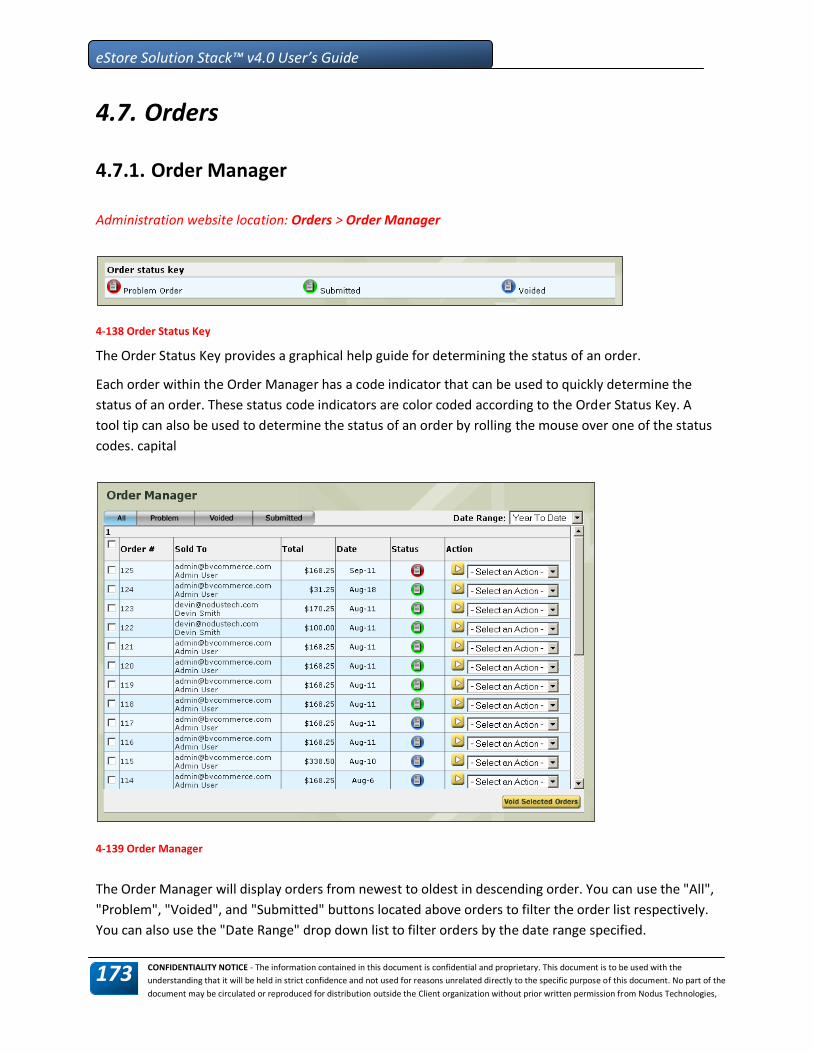
CONFIDENTIALITY NOTICE - The information contained in this document is confidential and proprietary. This document is to be used with the
understanding that it will be held in strict confidence and not used for reasons unrelated directly to the specific purpose of this document. No part of the
document may be circulated or reproduced for distribution outside the Client organization without prior written permission from Nodus Technologies,
eStore Solution Stack™ v4.0 User’s Guide
173
4.7. Orders
4.7.1. Order Manager
Administration website location: Orders > Order Manager
4-138 Order Status Key
The Order Status Key provides a graphical help guide for determining the status of an order.
Each order within the Order Manager has a code indicator that can be used to quickly determine the
status of an order. These status code indicators are color coded according to the Order Status Key. A
tool tip can also be used to determine the status of an order by rolling the mouse over one of the status
codes. capital
4-139 Order Manager
The Order Manager will display orders from newest to oldest in descending order. You can use the "All",
"Problem", "Voided", and "Submitted" buttons located above orders to filter the order list respectively.
You can also use the "Date Range" drop down list to filter orders by the date range specified.
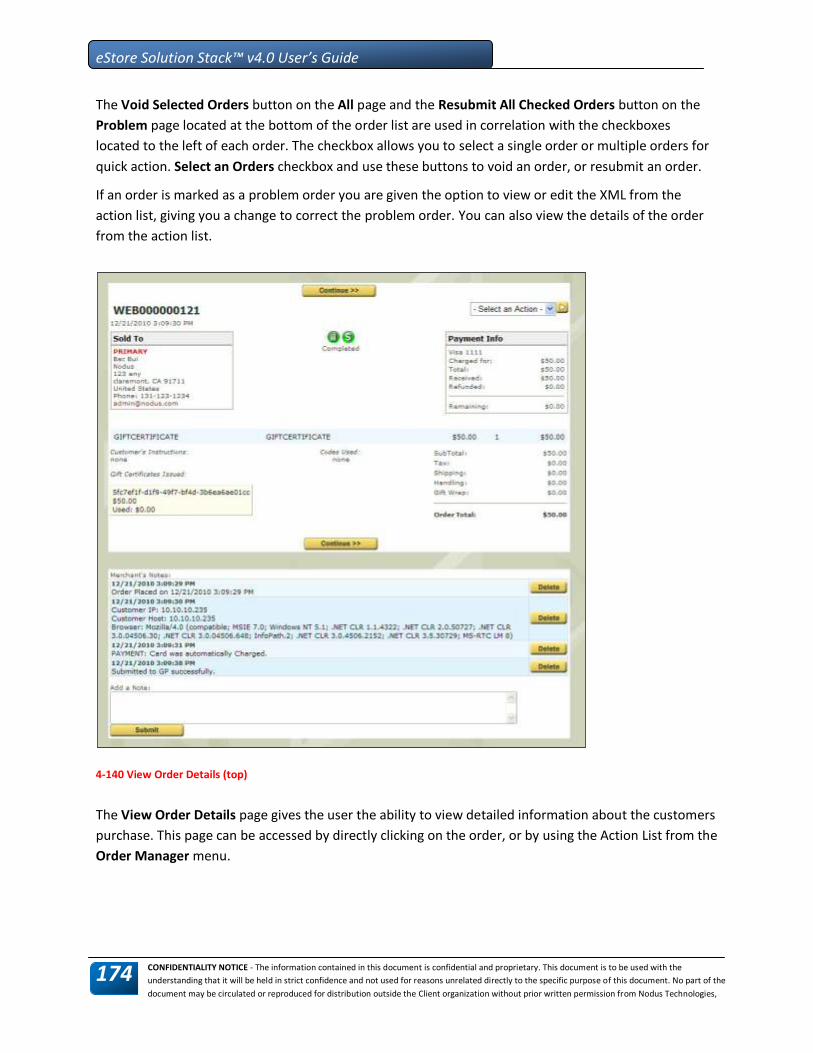
CONFIDENTIALITY NOTICE - The information contained in this document is confidential and proprietary. This document is to be used with the
understanding that it will be held in strict confidence and not used for reasons unrelated directly to the specific purpose of this document. No part of the
document may be circulated or reproduced for distribution outside the Client organization without prior written permission from Nodus Technologies,
eStore Solution Stack™ v4.0 User’s Guide
174
The Void Selected Orders button on the All page and the Resubmit All Checked Orders button on the
Problem page located at the bottom of the order list are used in correlation with the checkboxes
located to the left of each order. The checkbox allows you to select a single order or multiple orders for
quick action. Select an Orders checkbox and use these buttons to void an order, or resubmit an order.
If an order is marked as a problem order you are given the option to view or edit the XML from the
action list, giving you a change to correct the problem order. You can also view the details of the order
from the action list.
4-140 View Order Details (top)
The View Order Details page gives the user the ability to view detailed information about the customers
purchase. This page can be accessed by directly clicking on the order, or by using the Action List from the
Order Manager menu.

CONFIDENTIALITY NOTICE - The information contained in this document is confidential and proprietary. This document is to be used with the
understanding that it will be held in strict confidence and not used for reasons unrelated directly to the specific purpose of this document. No part of the
document may be circulated or reproduced for distribution outside the Client organization without prior written permission from Nodus Technologies,
eStore Solution Stack™ v4.0 User’s Guide
175
1. Navigate to Orders > Order Manager
2. Use the drop list to select a date range for orders to be viewed
3. When the Order Manager list populates with orders, select the tab that gives the view to be utilized
4. Filter the list as needed by clicking on a list menu header such as Date or Order #
5. If needed, choose from the Selection in Action drop-down list and click the Action button to engage
functions such as viewing order details
NOTE: Voided and Processed orders can be viewed in detail or marked as a problem. Problem orders
can be seen in an XML view and/or marked as completed
6. If needed, orders can be resubmitted or voided: choose a tab and mark one or more checkboxes by
the order number(s)
7. Click the appropriate button to process the order
4-141 View Order Details (bottom)
NOTES:
The bottom portion of the Order Details page provides detailed information about a user, and the
user's transaction.
You can view the customers IP address, Host IP address, or the user's browser information. Credit
Card authorization notes or responses from the payment gateway on authorization statuses such as
declines will also appear in this area.
Admin notes can be added and viewed immediately by other admin users.
From the action list, you have the option of editing or viewing the XML of the order, marking the
order as completed or ‘as shipped.’

CONFIDENTIALITY NOTICE - The information contained in this document is confidential and proprietary. This document is to be used with the
understanding that it will be held in strict confidence and not used for reasons unrelated directly to the specific purpose of this document. No part of the
document may be circulated or reproduced for distribution outside the Client organization without prior written permission from Nodus Technologies,
eStore Solution Stack™ v4.0 User’s Guide
176
4.7.1.1. Order XML
When an order fails to submit to Great Plains, it is marked as a problem order. Once it is a problem
order, eSSS gives you the opportunity to edit or view the XML of the order. Sometimes an order can
become a problem order if the back office server fails to respond. In this case, you should use the button
on the main order manager screen to resubmit a large number of orders.
4-142 XML View
To see the error message, try resubmitting, and based on the error message returned, edit the XML to
try to resolve the problem. If the order has been successfully edited, a message appears confirming that
the order is now in Great Plains.
Usually, you will not have to go to this screen. After the store has become integrated, orders should flow
directly to Great Plains.
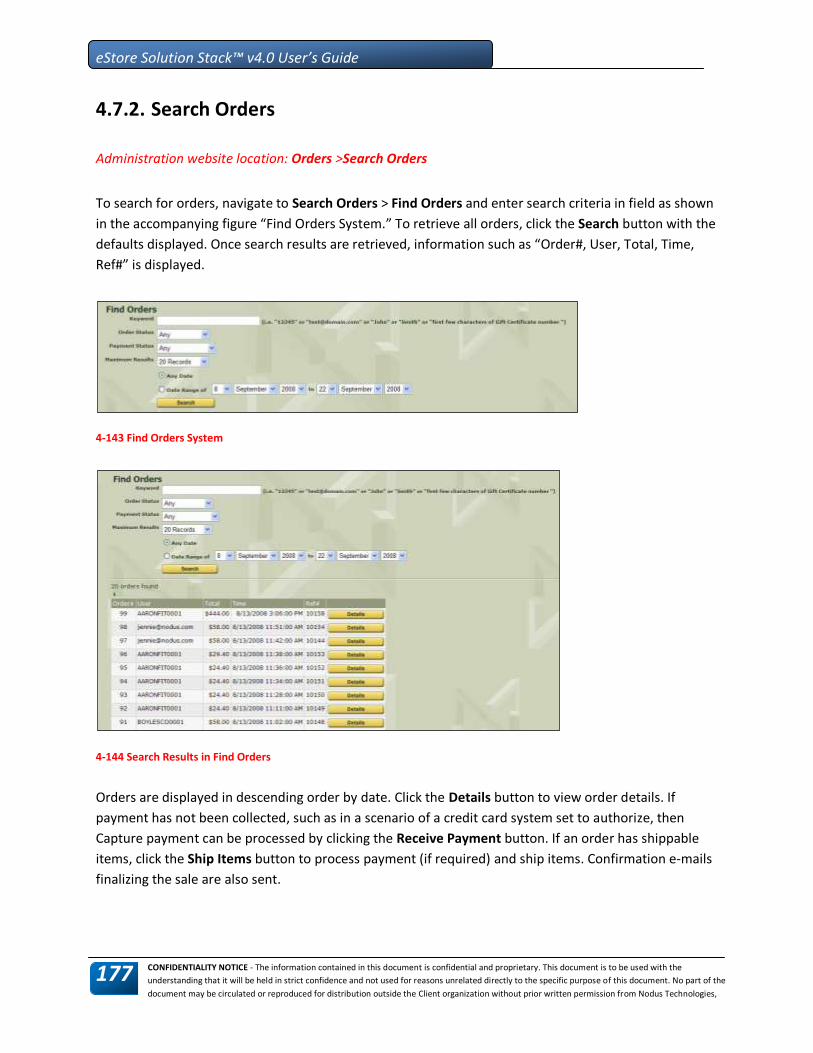
CONFIDENTIALITY NOTICE - The information contained in this document is confidential and proprietary. This document is to be used with the
understanding that it will be held in strict confidence and not used for reasons unrelated directly to the specific purpose of this document. No part of the
document may be circulated or reproduced for distribution outside the Client organization without prior written permission from Nodus Technologies,
eStore Solution Stack™ v4.0 User’s Guide
177
4.7.2. Search Orders
Administration website location: Orders >Search Orders
To search for orders, navigate to Search Orders > Find Orders and enter search criteria in field as shown
in the accompanying figure “Find Orders System.” To retrieve all orders, click the Search button with the
defaults displayed. Once search results are retrieved, information such as “Order#, User, Total, Time,
Ref#” is displayed.
4-143 Find Orders System
4-144 Search Results in Find Orders
Orders are displayed in descending order by date. Click the Details button to view order details. If
payment has not been collected, such as in a scenario of a credit card system set to authorize, then
Capture payment can be processed by clicking the Receive Payment button. If an order has shippable
items, click the Ship Items button to process payment (if required) and ship items. Confirmation e-mails
finalizing the sale are also sent.

CONFIDENTIALITY NOTICE - The information contained in this document is confidential and proprietary. This document is to be used with the
understanding that it will be held in strict confidence and not used for reasons unrelated directly to the specific purpose of this document. No part of the
document may be circulated or reproduced for distribution outside the Client organization without prior written permission from Nodus Technologies,
eStore Solution Stack™ v4.0 User’s Guide
178
4.7.3. Customer Information
Administration website location: Orders > Customer Info
Figure 4-145 Customer Information
Customer records failed to synchronize to the back office is listed on this page. These failed
synchronization records are in XML format, and this page provides the ability to view and edit the XML
data, as well as resubmitting the record to the back office.
If any XML data needs to be changed, choose View or Edit XML from the dropdown list and click on the
adjacent arrow. To delete the customer XML data permanently without resubmitting, choose Delete
from the dropdown list and click on the adjacent arrow.
Select the checkboxes (multiple selections allowed) then click Resubmit Selected button to resubmit the
records.

CONFIDENTIALITY NOTICE - The information contained in this document is confidential and proprietary. This document is to be used with the
understanding that it will be held in strict confidence and not used for reasons unrelated directly to the specific purpose of this document. No part of the
document may be circulated or reproduced for distribution outside the Client organization without prior written permission from Nodus Technologies,
eStore Solution Stack™ v4.0 User’s Guide
179
Figure 4-146 Customer Information Edit
If View or Edit XML is chosen, the XML data can be updated. Click the OK button to save the changes.
Click the Resubmit button to submit the XML data to back office. The Output box will display the
response message to show if the data has been successfully sent to the Dynamics GP database. If
unsuccessful, an error message explaining the nature of the problem is displayed.

CONFIDENTIALITY NOTICE - The information contained in this document is confidential and proprietary. This document is to be used with the
understanding that it will be held in strict confidence and not used for reasons unrelated directly to the specific purpose of this document. No part of the
document may be circulated or reproduced for distribution outside the Client organization without prior written permission from Nodus Technologies,
eStore Solution Stack™ v4.0 User’s Guide
180
4.8. Reports
The EStore Solution Stack shopping cart comes with several different reporting functions. This section
describes how to use each reporting function.
After reading this section, you will know:
How to view monthly and daily sales
How to view sales by promotion, or affiliate
How to view top products, and/or customer
Order Details
For each report, a details page for individual transactions can be reviewed by clicking the Details button.
A sample Order Details page is shown below.
Figure 4-147 Order Details page

CONFIDENTIALITY NOTICE - The information contained in this document is confidential and proprietary. This document is to be used with the
understanding that it will be held in strict confidence and not used for reasons unrelated directly to the specific purpose of this document. No part of the
document may be circulated or reproduced for distribution outside the Client organization without prior written permission from Nodus Technologies,
eStore Solution Stack™ v4.0 User’s Guide
181
4.8.1. Monthly Sales
Administration website location: Reports > Monthly Sales
The Monthly sales report shows a graphical display of orders for the selected month as well as a detailed
day-by-day list of sales on an everyday basis containing the number of orders and daily total. Click the
Details button to display the order details by "drilling down" into the selected day. Select the month and
year value at the top of the area to set the target data, click the Next button to advance to the next
month, or click the Previous button to move to the prior month.
Figure 4-148 Monthly Sales Reports

CONFIDENTIALITY NOTICE - The information contained in this document is confidential and proprietary. This document is to be used with the
understanding that it will be held in strict confidence and not used for reasons unrelated directly to the specific purpose of this document. No part of the
document may be circulated or reproduced for distribution outside the Client organization without prior written permission from Nodus Technologies,
eStore Solution Stack™ v4.0 User’s Guide
182
4.8.2. Daily Sales
Administration location: Reports > Daily Sales
Daily sales reports are similar to monthly reports with the exception that only one day at a time is
viewed. The details button shows information regarding the corresponding order. The Order Details
screen displays all information for the corresponding order and allows operations such as:
Printing
Marking the order as Not Paid
Sending status e-mails to the customer
Figure 4-149 Daily Sales Report

CONFIDENTIALITY NOTICE - The information contained in this document is confidential and proprietary. This document is to be used with the
understanding that it will be held in strict confidence and not used for reasons unrelated directly to the specific purpose of this document. No part of the
document may be circulated or reproduced for distribution outside the Client organization without prior written permission from Nodus Technologies,
eStore Solution Stack™ v4.0 User’s Guide
183
4.8.3. Sales by Coupon Code
Administration website location: Reports > Sales by Coupon Code
This report tracks any sales that are received when a coupon is redeemed on the webstore. Additional
information for individual coupon transactions can be viewed by clicking the Details button for the
individual order shown on this page.
For information on creating and redeeming coupons refer to the Catalogs > Discounts section of this
document.
Figure 4-150 Sales by Coupon Code Report

CONFIDENTIALITY NOTICE - The information contained in this document is confidential and proprietary. This document is to be used with the
understanding that it will be held in strict confidence and not used for reasons unrelated directly to the specific purpose of this document. No part of the
document may be circulated or reproduced for distribution outside the Client organization without prior written permission from Nodus Technologies,
eStore Solution Stack™ v4.0 User’s Guide
184
4.8.4. Sales by Affiliate
Administration website location: Reports > Sales by Affiliate
Select the affiliate from the drop down list and the appropriate date filter then click Refresh to display
orders associated with the selected affiliate.
Clicking the Next or Previous button will display the next or previous month’s report.
4-151 Monthly Affiliate Report

CONFIDENTIALITY NOTICE - The information contained in this document is confidential and proprietary. This document is to be used with the
understanding that it will be held in strict confidence and not used for reasons unrelated directly to the specific purpose of this document. No part of the
document may be circulated or reproduced for distribution outside the Client organization without prior written permission from Nodus Technologies,
eStore Solution Stack™ v4.0 User’s Guide
185
4.8.5. Top Products
Administration website location: Reports > Top Products
Click the Today, This Month, or This Year button to display top selling products for the quick filtered
time frame. If you would like to narrow the date filter criteria, select a start and end date then click OK
to show the top products for the manually entered date filter.
4-152 Top Selling Products

CONFIDENTIALITY NOTICE - The information contained in this document is confidential and proprietary. This document is to be used with the
understanding that it will be held in strict confidence and not used for reasons unrelated directly to the specific purpose of this document. No part of the
document may be circulated or reproduced for distribution outside the Client organization without prior written permission from Nodus Technologies,
eStore Solution Stack™ v4.0 User’s Guide
186
4.8.6. Top Customers
Administration website location: Reports > Top Customers
Top Customers are displayed in the same manner as Top Products. Click the Today, This Month, or This
Year button at the top for quick date filter settings, or set a start and ending date then click OK to
manually filter data on top customers.
NOTE: Clicking on the Details button opens the Edit User page, where customer details can be updated.
Figure 4-153 Top Customers Report

CONFIDENTIALITY NOTICE - The information contained in this document is confidential and proprietary. This document is to be used with the
understanding that it will be held in strict confidence and not used for reasons unrelated directly to the specific purpose of this document. No part of the
document may be circulated or reproduced for distribution outside the Client organization without prior written permission from Nodus Technologies,
eStore Solution Stack™ v4.0 User’s Guide
187
4.8.7. WPPReporting
Administration website location: Reports > Daily Sales Report
This group of reports tracks payment activities for Payflow Pro transactions. Three types of reports are
available:
Daily Activity Report
Transaction Summary Report
Settlement Report
4.8.7.1. Daily Activity
This report provides details on all successful transactions completed during a specified single date.
Useful data in the report includes:
Amount
Transaction type
Transaction ID
Figure 4-154 WPP Reporting – Daily Activity Report

CONFIDENTIALITY NOTICE - The information contained in this document is confidential and proprietary. This document is to be used with the
understanding that it will be held in strict confidence and not used for reasons unrelated directly to the specific purpose of this document. No part of the
document may be circulated or reproduced for distribution outside the Client organization without prior written permission from Nodus Technologies,
eStore Solution Stack™ v4.0 User’s Guide
188
4.8.7.2. Transaction Summary
Admin website location: Reports > WPPReporting
This report provides details on all successful transactions completed during a specified period. Useful data in the report includes:
Transaction type
Specifies what processor was used
Authorization transaction counts by processor
Amount range for transactions, including an amount average
Figure 4-155 WPP Report - Transaction Summary

CONFIDENTIALITY NOTICE - The information contained in this document is confidential and proprietary. This document is to be used with the
understanding that it will be held in strict confidence and not used for reasons unrelated directly to the specific purpose of this document. No part of the
document may be circulated or reproduced for distribution outside the Client organization without prior written permission from Nodus Technologies,
eStore Solution Stack™ v4.0 User’s Guide
189
4.8.7.3. Settlement Report
This report offers details on settled payment transactions for Payflow Pro. Useful fields include:
Transaction and PayPal transaction IDs
PayPal fees charged
Transaction amount
Batch ID
Figure 4-156 WPP Report - Settlement

CONFIDENTIALITY NOTICE - The information contained in this document is confidential and proprietary. This document is to be used with the
understanding that it will be held in strict confidence and not used for reasons unrelated directly to the specific purpose of this document. No part of the
document may be circulated or reproduced for distribution outside the Client organization without prior written permission from Nodus Technologies,
eStore Solution Stack™ v4.0 User’s Guide
190
4.9. Settings
There are a number of settings that can be set to control or define the eSSS shopping cart. Many of the
settings here only need to be configured once, during the initial setup of the shopping cart. After
reading this section you will understand what functionalities can be changed in the shopping cart.
4.9.1. General Options
Administration website location: Settings > General Options
The general options area allows for configuration of overall store specific settings. The following outlines
the description of each setting.
Figure 4-157 General Options page

CONFIDENTIALITY NOTICE - The information contained in this document is confidential and proprietary. This document is to be used with the
understanding that it will be held in strict confidence and not used for reasons unrelated directly to the specific purpose of this document. No part of the
document may be circulated or reproduced for distribution outside the Client organization without prior written permission from Nodus Technologies,
eStore Solution Stack™ v4.0 User’s Guide
191
Administration website location: Settings > General Options
SETTING DESCRIPTION
Site Options
Currency Sample Display
Allows the notation identifying the currency used on the website to be changed for currencies such as the euro, dollar, and English pound.
Setting the currency default:
1. Use Item Import via Synchronizer (data from Great Plains), which
updates automatically between Great Plains and eSSS
2. Import prices for all currencies from GP.
3. Manual Item Import (data from GP) Import prices for all currencies
from GP
4. Parsing the Imported Item Pricing Data (data into eSSS). Only save item
pricings for the default Item Price Currency.
5. UI Changes
a) The "Home Country" drop-down list on the General Options page
('configuration_display_options.aspx') is relabeled as "Currency
Display"
b) Under "Item Import Options" section on the "Nodus / Great Plains" page ('configuration_nodus.aspx'), add new text input box "GP Currency ID." This configuration should control the currency imported for item pricing as well as the currency on the orders submitted to GP.
Default Landing Page After Log-in
Allows commonly used pages to be established as the default opening website for eSSS. For example, if the customer usually starts working with orders, the Order History page can be the first page displayed after log-in.
URL Re-write With This droplist allows the user to choose between ProductID and ProductName to re-write the URL when needed.
Google Analytics Allows script procedure from Google to be added in order to enable Google Analytics, a tool that allows analysis of traffic on the website.
Facebook URL for LikeBox Social Plugin
When adding a Social Network Plugin element for Facebook’s Like Box on your homepage, category page , or product detail page, you must enter your Facebook Page URL here.
Site Cookie Name Establishes a cookie to identify the eSSS website. Enter a cookie name specific to your website in the textbox.

CONFIDENTIALITY NOTICE - The information contained in this document is confidential and proprietary. This document is to be used with the
understanding that it will be held in strict confidence and not used for reasons unrelated directly to the specific purpose of this document. No part of the
document may be circulated or reproduced for distribution outside the Client organization without prior written permission from Nodus Technologies,
eStore Solution Stack™ v4.0 User’s Guide
192
Administration website location: Settings > General Options
SETTING DESCRIPTION
Use Point System This enables a Great Plains feature that distributes point awards. When this feature is active, ONLY points can be used to pay for products. No credit cards or ECheck payment is accepted.
Disable Product Caching?
To improve performance, products are "cached" or stored in memory on the web server for a short time. When a customer views a cached product the information is pulled from the memory on the web server instead of having to go retrieve it from the database which is much slower. Disabling the product caching allows you to quickly change prices and product information but is not recommended for most stores.
Disable Welcome Message on header
This setting allows the welcome message on the header of the webstore to be disabled.
Disable New User registration?
If checked, new user registration is inactivated
Enable National Account Support?
Mark this checkbox to enable the National Account support feature.
The National Account – Child Account relationship is imported into eSSS
from Great Plains, allowing for easier management of national/child
accounts.
This feature includes a new child account selection page in eSSS that is
viewable at log-in.
Ignore New User Registration Form
When it is not desired for new webstore users to register from the website, the New User Registration form can be disabled from this setting.
Show Cart Totals in Header
If checked, keeps a running total of the items the shopper added to the shopping cart.
Show Powered By icon in footer
If checked, the "Powered by Nodus” logo will appear in the footer of all pages.
Require Sign-in Before Browsing Store?
This feature will require a log-in before the customer is able to browse the e-store.
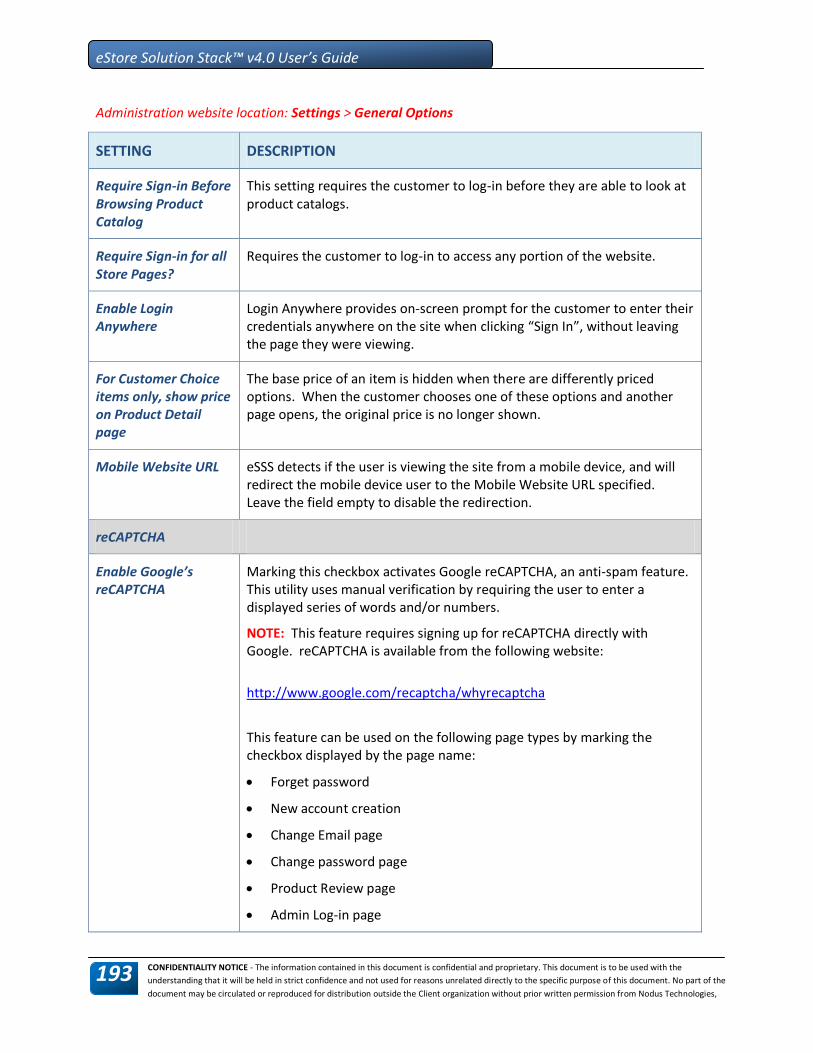
CONFIDENTIALITY NOTICE - The information contained in this document is confidential and proprietary. This document is to be used with the
understanding that it will be held in strict confidence and not used for reasons unrelated directly to the specific purpose of this document. No part of the
document may be circulated or reproduced for distribution outside the Client organization without prior written permission from Nodus Technologies,
eStore Solution Stack™ v4.0 User’s Guide
193
Administration website location: Settings > General Options
SETTING DESCRIPTION
Require Sign-in Before Browsing Product Catalog
This setting requires the customer to log-in before they are able to look at product catalogs.
Require Sign-in for all Store Pages?
Requires the customer to log-in to access any portion of the website.
Enable Login Anywhere
Login Anywhere provides on-screen prompt for the customer to enter their credentials anywhere on the site when clicking “Sign In”, without leaving the page they were viewing.
For Customer Choice items only, show price on Product Detail page
The base price of an item is hidden when there are differently priced options. When the customer chooses one of these options and another page opens, the original price is no longer shown.
Mobile Website URL eSSS detects if the user is viewing the site from a mobile device, and will redirect the mobile device user to the Mobile Website URL specified. Leave the field empty to disable the redirection.
reCAPTCHA
Enable Google’s reCAPTCHA
Marking this checkbox activates Google reCAPTCHA, an anti-spam feature. This utility uses manual verification by requiring the user to enter a displayed series of words and/or numbers.
NOTE: This feature requires signing up for reCAPTCHA directly with Google. reCAPTCHA is available from the following website:
http://www.google.com/recaptcha/whyrecaptcha
This feature can be used on the following page types by marking the checkbox displayed by the page name:
Forget password
New account creation
Change Email page
Change password page
Product Review page
Admin Log-in page

CONFIDENTIALITY NOTICE - The information contained in this document is confidential and proprietary. This document is to be used with the
understanding that it will be held in strict confidence and not used for reasons unrelated directly to the specific purpose of this document. No part of the
document may be circulated or reproduced for distribution outside the Client organization without prior written permission from Nodus Technologies,
eStore Solution Stack™ v4.0 User’s Guide
194
Administration website location: Settings > General Options
SETTING DESCRIPTION
reCAPTCHA Public Key Enter the Google Public Key in this textbox. This is key is acquired from Google after signing up with Google for reCAPTCHA.
reCAPTCHA Private Key
Enter the Google Private Key in this textbox. This is key is acquired from Google after signing up with Google for reCAPTCHA.
reCAPTCHA Theme This feature allows several options for the display of the reCAPTCHA interface, including:
Blackglass
Clean
Red
White
reCAPTCHA Test A reCAPTCHA interface is provided in order that the tool’s functionality can be verified. This interface reproduces what the customer will experience on the website.
To run a test:
1. Type the symbols displayed in the reCAPTCHA interface into the accompanying textbox
2. Click the Test button
3. A message will appear just above the interface to indicate whether the test was successful. If unsuccessful, a new set of symbols is supplied and the test can be redone.
NOTE: If symbols cannot be easily read, a new set is supplied by clicking the Tester/Refresh button
Product Images
Force Image Product Sizes
If checked, eSSS will automatically handle re-sizing of the source image to comply with the Product Image sizes that are set.
Small Product Image Size
Sets the default size for small images. If the “Force Image Product Sizes” is checked, this size will be used to display small image placeholders. The system automatically re-sizes small image assignments to this size.
Medium Product Image Size
The default size for medium product images. If “Force Image Product Sizes” is checked, product images will be re-sized automatically
Tiny Product Image The default size for cart images. Product images will automatically be re-

CONFIDENTIALITY NOTICE - The information contained in this document is confidential and proprietary. This document is to be used with the
understanding that it will be held in strict confidence and not used for reasons unrelated directly to the specific purpose of this document. No part of the
document may be circulated or reproduced for distribution outside the Client organization without prior written permission from Nodus Technologies,
eStore Solution Stack™ v4.0 User’s Guide
195
Administration website location: Settings > General Options
SETTING DESCRIPTION
Size sized to this size for use in the cart display, if “Show Product Image in Cart” is enabled.
Default Image File Extension
Select a file extension of the image files that will be searched against by the system. Image formats available from a dropdown list includes:
JPG
GIF
PNG eSSS will search for files with above selected file extension from the \images\Products\ folder on the site root. The files are recognized through naming convention and associated with the corresponding products. The image file naming convention is as follows:
File name is started with the Item Number.
“_S” postfix is recognized as small sized images.
“_M” postfix is recognized as medium sized images.
“_L” postfix is recognized as an additional image.
“_L#” postfix is recognized as additional images, where “#” at the end of the filename can be any alphanumeric values (can be more than 1 digit), therefore supports unlimited number of additional images.
EXAMPLE:
1. Set the global file extension option to “jpg” in the eSSS administration
section.
2. Drop a file named “A100_S.jpg” into the <root>\images\products
folder.
This allows the system to recognize the file to be used as: A small image (as
indicated by the “_S” postfix of the file name) for the “A100” item number.
NOTE: The automatically determine image paths by file name feature does
not support products with GP Item Number containing the following
characters:
\ / : * ? " < > |
My Account Options
Allow Change E-mail Permits the account e-mail address to be changed as needed.
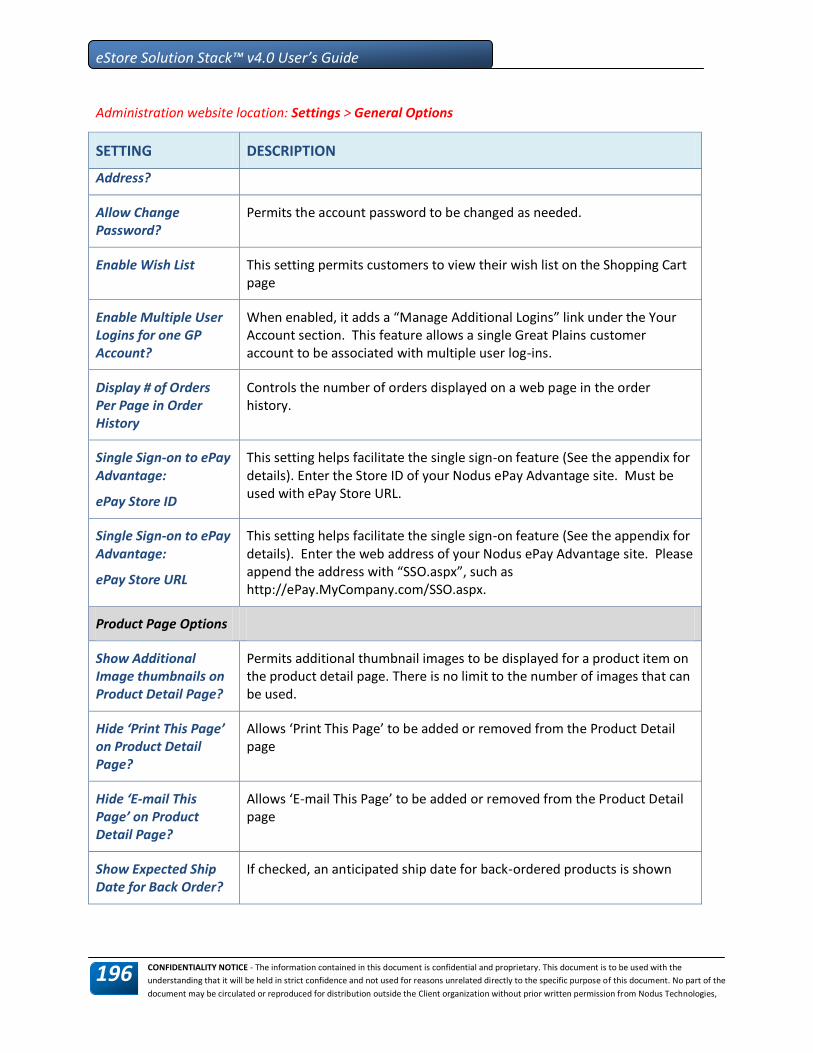
CONFIDENTIALITY NOTICE - The information contained in this document is confidential and proprietary. This document is to be used with the
understanding that it will be held in strict confidence and not used for reasons unrelated directly to the specific purpose of this document. No part of the
document may be circulated or reproduced for distribution outside the Client organization without prior written permission from Nodus Technologies,
eStore Solution Stack™ v4.0 User’s Guide
196
Administration website location: Settings > General Options
SETTING DESCRIPTION
Address?
Allow Change Password?
Permits the account password to be changed as needed.
Enable Wish List This setting permits customers to view their wish list on the Shopping Cart page
Enable Multiple User Logins for one GP Account?
When enabled, it adds a “Manage Additional Logins” link under the Your Account section. This feature allows a single Great Plains customer account to be associated with multiple user log-ins.
Display # of Orders Per Page in Order History
Controls the number of orders displayed on a web page in the order history.
Single Sign-on to ePay Advantage:
ePay Store ID
This setting helps facilitate the single sign-on feature (See the appendix for details). Enter the Store ID of your Nodus ePay Advantage site. Must be used with ePay Store URL.
Single Sign-on to ePay Advantage:
ePay Store URL
This setting helps facilitate the single sign-on feature (See the appendix for details). Enter the web address of your Nodus ePay Advantage site. Please append the address with “SSO.aspx”, such as http://ePay.MyCompany.com/SSO.aspx.
Product Page Options
Show Additional Image thumbnails on Product Detail Page?
Permits additional thumbnail images to be displayed for a product item on the product detail page. There is no limit to the number of images that can be used.
Hide ‘Print This Page’ on Product Detail Page?
Allows ‘Print This Page’ to be added or removed from the Product Detail page
Hide ‘E-mail This Page’ on Product Detail Page?
Allows ‘E-mail This Page’ to be added or removed from the Product Detail page
Show Expected Ship Date for Back Order?
If checked, an anticipated ship date for back-ordered products is shown

CONFIDENTIALITY NOTICE - The information contained in this document is confidential and proprietary. This document is to be used with the
understanding that it will be held in strict confidence and not used for reasons unrelated directly to the specific purpose of this document. No part of the
document may be circulated or reproduced for distribution outside the Client organization without prior written permission from Nodus Technologies,
eStore Solution Stack™ v4.0 User’s Guide
197

CONFIDENTIALITY NOTICE - The information contained in this document is confidential and proprietary. This document is to be used with the
understanding that it will be held in strict confidence and not used for reasons unrelated directly to the specific purpose of this document. No part of the
document may be circulated or reproduced for distribution outside the Client organization without prior written permission from Nodus Technologies,
eStore Solution Stack™ v4.0 User’s Guide
198
4.9.2. Addresses
Administration website location: Settings > Addresses
During the checkout process, EStore Solution Stack will present fields to the shopper to be filled out to
complete the order. Use the configuration settings as shown above in Figure “Address Options” to
determine which fields are displayed, and the fields that are required to continue with the checkout
process.
Marking the Show? textbox displays the field option (such as First Name) to the customer
Marking the Required? checkbox makes the corresponding address field a required entry for the
customer
4-158 Address Options
SETTING DESCRIPTION
Force Upper-Case for Addresses?
When enabled, all text entries in the billing and shipping address forms are displayed in upper case, regardless of how they were originally entered.
Allow shipping to PO Box/APO/FPO address?
Enables products to be shipping to PO Box, APO and APO addresses

CONFIDENTIALITY NOTICE - The information contained in this document is confidential and proprietary. This document is to be used with the
understanding that it will be held in strict confidence and not used for reasons unrelated directly to the specific purpose of this document. No part of the
document may be circulated or reproduced for distribution outside the Client organization without prior written permission from Nodus Technologies,
eStore Solution Stack™ v4.0 User’s Guide
199
4.9.3. Affiliates
Administration website location: Settings > Affiliates
Extend rewards to affiliates by offering commissions for referring business to the store. Allows multiple
affiliates to be created under the People > Affiliates setup page, and tracked under Reports > Sales By
Affiliate. Refer to the following table for details on the available options.
4-159 Affiliate Options

CONFIDENTIALITY NOTICE - The information contained in this document is confidential and proprietary. This document is to be used with the
understanding that it will be held in strict confidence and not used for reasons unrelated directly to the specific purpose of this document. No part of the
document may be circulated or reproduced for distribution outside the Client organization without prior written permission from Nodus Technologies,
eStore Solution Stack™ v4.0 User’s Guide
200
SETTING DESCRIPTION
Enable Sign-up Form If enabled, the Affiliate Program link will appear in customer service form as shown in the Affiliate Options accompanying figure.
Affiliate Commission Type
Choose between Flat Rate or Percentage of Sale commission to be offered to affiliates.
Your Affiliate Commission
Enter the value of the Sales commission to be offered to affiliates.
Affiliate Referral Days The number of days a cookie will persist on the shopper’s computer. Should a shopper use an affiliate link to visit the store, leave, come back another day and enter the store via the normal site URL (non-affiliate link), the cookie will be recognized and the associated affiliate will still receive affiliate commission if within this time period.
Affiliate Conflict Resolution
This feature handles referral conflicts.
If a shopper visits the store via two different affiliate links, the first affiliate will be recognized as the referral source if Favor Old Affiliate is set. Vice versa, the second affiliate will be favored instead of Favor New Affiliate is set.
Typically, this feature will assist in resolving conflicts over commissions except when affiliates are set up without commissions.
Affiliate ID Query String Name
This setting specifies the variable to be used on a URL to pass in the affiliate ID, used by the affiliate to redirect shoppers and the affiliate recognized as the referral source. The default is "affid" and can be modified. Examples of URLs with affiliate ID: http://www.MyCompany.com/default.aspx?affid=12, http://www.MyCompany.com/custom.aspx?affid=27.
Affiliate Introduction Text
When a shopper clicks the "Affiliate Program" link in the left side menu of the Customer Service area, a welcome message is displayed above the "Join the Affiliate Program" link as shown in the accompanying figure. This will be the place to display any messages to the affiliate program.
Affiliate Terms Enter the terms and conditions relative to your affiliate program. A link will appear as shown in the bottom of the “Affiliate Program Sign-up form” below to allow prospective affiliates the option to read prior to joining.

CONFIDENTIALITY NOTICE - The information contained in this document is confidential and proprietary. This document is to be used with the
understanding that it will be held in strict confidence and not used for reasons unrelated directly to the specific purpose of this document. No part of the
document may be circulated or reproduced for distribution outside the Client organization without prior written permission from Nodus Technologies,
eStore Solution Stack™ v4.0 User’s Guide
201
4.9.4. Category and Search
Administration website location: Settings > Category and Search
The above options allow you to define how categories are displayed and searching occurs on the store.
Each option is described in the following table.
4-160 Category and Search Option

CONFIDENTIALITY NOTICE - The information contained in this document is confidential and proprietary. This document is to be used with the
understanding that it will be held in strict confidence and not used for reasons unrelated directly to the specific purpose of this document. No part of the
document may be circulated or reproduced for distribution outside the Client organization without prior written permission from Nodus Technologies,
eStore Solution Stack™ v4.0 User’s Guide
202
4.9.4.1. Category and Search Options
SETTING DESCRIPTION
Show Sub Categories in product grids?
If checked, sub-categories will be listed above the products on the category page.
Show home link in category tree
If checked, Home is the as top category link to return to the store's home page.
Show Categories Tabs in Header?
If checked, on the Category Edit page, you can specify any root categories to be listed as tabs across the top of pages. If the checkbox is cleared, tabs will be suppressed.
Enable Wild Card Search?
If checked, allows the use of an asterisk (*) as a single or multiple character wild card search term or a question mark (?) as a single character wild card term on the keyword search box.
Tabs per row Controls the number of category tabs displayed per row before tabs are wrapped to the next row. Rows are filled from the bottom up.
Pager Prefix For items such as search results, a paging line, as shown below, may appear if needed. Enter a value for the prefix to the pager line.
Pager Spacer Same as above, except this value is used to create a text item such as a | to separate paging values. EXAMPLE: 1 | 2 | 3 | 4, or if entering a comma "," it would be 1, 2, 3, 4.
Pager Suffix Similar to the Pager Prefix except this is the trailing text such as "Results found".
Next Page Text Indicator to navigate to the next set of results.
Last Page Text Indicator to move to previous set of results available.
Show Next/Last Links? If checked, the Next Page and Last Page indicators are displayed.
Show Search Results as Determines the page layout of the search query results.
Search Results Grid Size
Defines the number of products in the search results and how they are listed.

CONFIDENTIALITY NOTICE - The information contained in this document is confidential and proprietary. This document is to be used with the
understanding that it will be held in strict confidence and not used for reasons unrelated directly to the specific purpose of this document. No part of the
document may be circulated or reproduced for distribution outside the Client organization without prior written permission from Nodus Technologies,
eStore Solution Stack™ v4.0 User’s Guide
203
SETTING DESCRIPTION
Flag products as "new" New products created within a defined number of days (default of 60) will have a "NewProduct.gif" image super-imposed on the upper left of the product image. This is useful to present shoppers items are new to your catalog. If setting up a new store, it is recommended that this option is unchecked; otherwise all inventory items are listed as new. You may want to turn this feature back on after the initial product line is no longer flagged as new.

CONFIDENTIALITY NOTICE - The information contained in this document is confidential and proprietary. This document is to be used with the
understanding that it will be held in strict confidence and not used for reasons unrelated directly to the specific purpose of this document. No part of the
document may be circulated or reproduced for distribution outside the Client organization without prior written permission from Nodus Technologies,
eStore Solution Stack™ v4.0 User’s Guide
204
4.9.5. Countries
Administration website location: Settings > Countries
By default, the four enabled countries are: United States, United Kingdom, Canada, and Spain. Other
countries that the store can accept orders for may be enabled by marking the checkbox for the
corresponding country. This also controls which addresses are accepted as shipping and billing
addresses. Customers will not be able to create addresses with the disabled countries.
Click the States/Regions button to view or edit items for the corresponding country.
Figure 4-161 Country Settings (Image is cropped. Full list is not displayed).

CONFIDENTIALITY NOTICE - The information contained in this document is confidential and proprietary. This document is to be used with the
understanding that it will be held in strict confidence and not used for reasons unrelated directly to the specific purpose of this document. No part of the
document may be circulated or reproduced for distribution outside the Client organization without prior written permission from Nodus Technologies,
eStore Solution Stack™ v4.0 User’s Guide
205
4-162 Country/States/Regions Configuration
4.9.5.1. Edit a Region
To edit a region:
1. Click the Edit button for the region where changes are to be made
2. Input the changes in the textbox
3. The Edit button has turned into an Update button. Click the Update button to save the changes
4.9.5.2. Add a Region
1. To add a region, enter the region name in the Name textbox
2. Add an abbreviation, if needed, in the Abbr. text box
3. Click the New button
NOTE: To change regions on-the-fly, choose a new region from the Regions for droplist and click the
Reload button

CONFIDENTIALITY NOTICE - The information contained in this document is confidential and proprietary. This document is to be used with the
understanding that it will be held in strict confidence and not used for reasons unrelated directly to the specific purpose of this document. No part of the
document may be circulated or reproduced for distribution outside the Client organization without prior written permission from Nodus Technologies,
eStore Solution Stack™ v4.0 User’s Guide
206
4.9.6. Gift Certificates
Administration website location: Settings > Gift Certificates
eSSS offers the ability to purchase and redeem electronic gift certificates on the webstore. After
purchasing, the gift certificate is automatically e-mailed to the recipient. To activate this feature, mark
the checkbox next to "Gift Certificates Available?" which is marked (enabled) by default.
Marking the Send in Gift Certificate as Non-inventory Item checkbox is used when gift certificates are
not tracked in Great Plains as inventory.
4-163 Gift Certificate Settings
4.9.6.1. Setting Up Gift Certificates in CCA
In Great Plains, we will need to have a “GIFTCERTIFICATE” Credit Card Name and a “GIFTCERTIFICATE”
Inventory Item set up under the same account number. This account number could be a newly-created
account or an existing account. A single unique account will allow for easy reconciliation. The
“GIFTCERTIFICATE” inventory item allows customers to purchase gift certificates, and the
“GIFTCERTIFICATE” credit card allows the customer to use a gift certificate. The “GIFTCERTIFICATE” item
is NOT required to be imported from GP to the store.
For the Credit Card name, go to Tools > Setup > Company > Credit Cards and set up the
“GIFTCERTIFICATE” Card Name as a Charge Card using the created/selected account number.

CONFIDENTIALITY NOTICE - The information contained in this document is confidential and proprietary. This document is to be used with the
understanding that it will be held in strict confidence and not used for reasons unrelated directly to the specific purpose of this document. No part of the
document may be circulated or reproduced for distribution outside the Client organization without prior written permission from Nodus Technologies,
eStore Solution Stack™ v4.0 User’s Guide
207
4-164 Gift Certificate Credit Card Setup in GP
Figure 4-165 Gift Certificate Item Setup in GP
For the Inventory Item, go to Cards > Inventory > Item and set up an Inventory Item for
“GIFTCERTIFICATE” and under Accounts, change the account in Sales with the selected/created account
number. This Inventory Item must also set up all the available Price Levels and Unit of Measure (Cards >
Inventory > Price List) set up to allow Great Plains order entry.
To ensure that the recipient receives their gift certificate e-mail the “From:” field on the Gift Certificate
Message page must contain an email address.
NOTE: In addition, automated e-mail notification of how to redeem a gift certificate can be completed
by navigating to Content > Email Messages. Additional information on this feature can be found at
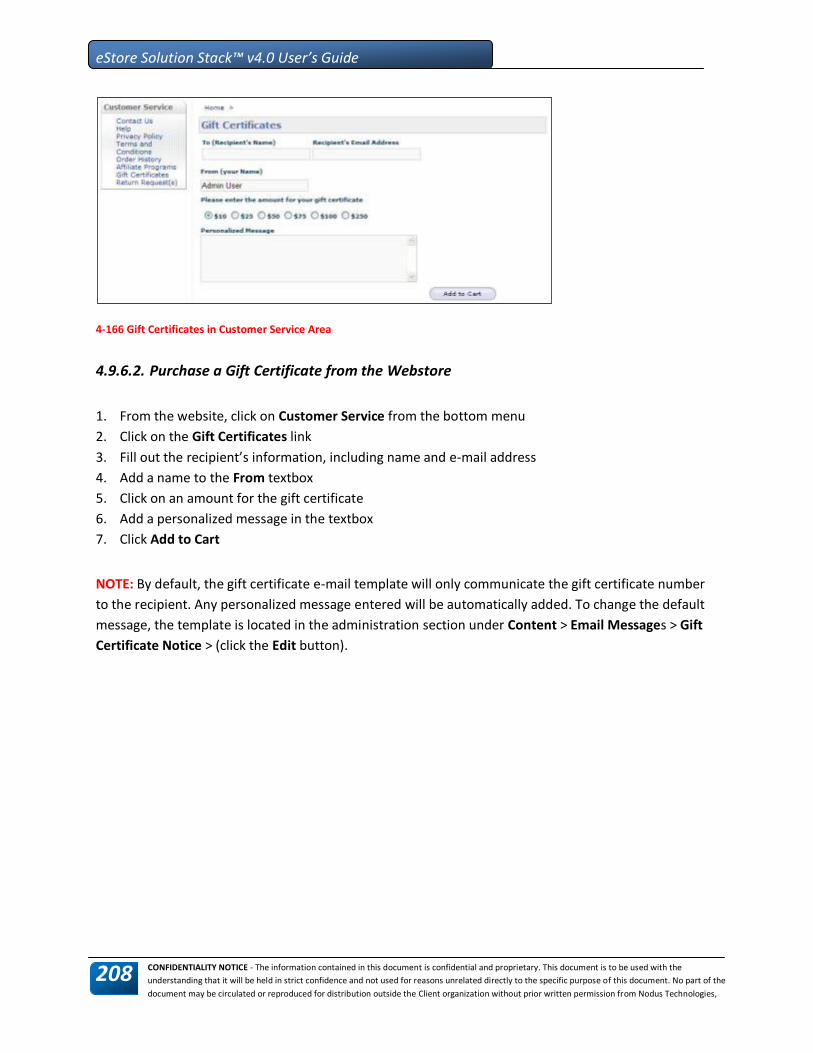
CONFIDENTIALITY NOTICE - The information contained in this document is confidential and proprietary. This document is to be used with the
understanding that it will be held in strict confidence and not used for reasons unrelated directly to the specific purpose of this document. No part of the
document may be circulated or reproduced for distribution outside the Client organization without prior written permission from Nodus Technologies,
eStore Solution Stack™ v4.0 User’s Guide
208
4-166 Gift Certificates in Customer Service Area
4.9.6.2. Purchase a Gift Certificate from the Webstore
1. From the website, click on Customer Service from the bottom menu
2. Click on the Gift Certificates link
3. Fill out the recipient’s information, including name and e-mail address
4. Add a name to the From textbox
5. Click on an amount for the gift certificate
6. Add a personalized message in the textbox
7. Click Add to Cart
NOTE: By default, the gift certificate e-mail template will only communicate the gift certificate number
to the recipient. Any personalized message entered will be automatically added. To change the default
message, the template is located in the administration section under Content > Email Messages > Gift
Certificate Notice > (click the Edit button).

CONFIDENTIALITY NOTICE - The information contained in this document is confidential and proprietary. This document is to be used with the
understanding that it will be held in strict confidence and not used for reasons unrelated directly to the specific purpose of this document. No part of the
document may be circulated or reproduced for distribution outside the Client organization without prior written permission from Nodus Technologies,
eStore Solution Stack™ v4.0 User’s Guide
209
4.9.6.3. Redeeming a Gift Certificate
After checkout, a gift certificate code will be issued and emailed to the user’s registered email that can
be presented as a gift and used on the store for subsequent visits of any shopper holding the certificate
code.
During the checkout process, the customer will be able to enter the certificate code on a payment page.
eSSS will deduct the amount of the gift certificate from the cart total.
4-167 Gift Certificate Code Entry for Redemption at Checkout

CONFIDENTIALITY NOTICE - The information contained in this document is confidential and proprietary. This document is to be used with the
understanding that it will be held in strict confidence and not used for reasons unrelated directly to the specific purpose of this document. No part of the
document may be circulated or reproduced for distribution outside the Client organization without prior written permission from Nodus Technologies,
eStore Solution Stack™ v4.0 User’s Guide
210
4.9.7. Inventory Settings
Administration website location: Settings > Inventory Settings
This is where settings for tracking inventory are located. eSSS provides the ability to set up both a single
distribution site inventory as well as enable multi-site controls. Settings for each inventory methods are
described in the following sections. Features include:
Low stock notices
Inventory tracking
Multiple site support
Back order messaging
4.9.7.1. Global Inventory Settings
Administration website location: Settings > Inventory Settings > (Global Inventory Settings)
This location is where the single distribution site settings are located. Use the accompanying table to
configure the inventory settings.
4-168 Inventory Settings

CONFIDENTIALITY NOTICE - The information contained in this document is confidential and proprietary. This document is to be used with the
understanding that it will be held in strict confidence and not used for reasons unrelated directly to the specific purpose of this document. No part of the
document may be circulated or reproduced for distribution outside the Client organization without prior written permission from Nodus Technologies,
eStore Solution Stack™ v4.0 User’s Guide
211
SETTING DESCRIPTION
Low stock report sent at Located at the top of the window, this one line update refers to the last date and time a low stock report was issued.
Send Low Stock Notice Every < > hours Enter a time in hours for a low stock report to be generated.
E-mail report to Enter a recipient e-mail address for the low stock report. Click the Send Report Now button to send a report immediately.
Global Back-Ordered Message Enter a custom message to be displayed on the store with items that are out-of-stock.
Disable Inventory Tracking System will always assume items are in stock when inventory tracking is disabled. Inventory quantity will no longer be synchronized with GP. Re-enabling inventory tracking will require manual import of all items to import the correct inventory count.
Disable Strict Inventory Strict Inventory allows the store to remove items from inventory when a user/customer adds an item to the cart. Optionally, you may disable this feature by clicking the Disable Strict Inventory, in which case items will only be removed from inventory when orders are saved. Additionally:
If checked, items are removed from inventory when orders are saved.
If unchecked, items are removed from inventory when added to the Shopping Cart.
Display Item’s Inventory and Back Order Qty to the Customer?
Marking this checkbox allows the customer to view inventory and back ordered quantities for all inventory locations on the product detail page.

CONFIDENTIALITY NOTICE - The information contained in this document is confidential and proprietary. This document is to be used with the
understanding that it will be held in strict confidence and not used for reasons unrelated directly to the specific purpose of this document. No part of the
document may be circulated or reproduced for distribution outside the Client organization without prior written permission from Nodus Technologies,
eStore Solution Stack™ v4.0 User’s Guide
212
4.9.7.2. Multi-Distribution Site Settings
Administration website location: Settings > Inventory Settings > (Multi-Distribution Site Settings)
Options under this section are only available with Multi-Distribution Sites Support add-on module.
This feature provides inventory support on multiple GP distribution sites. Several configurable options
can be set in the Admin section which includes:
Displaying available product quantities from all sites
Allowing customers to pull products from a specific site
The ability to control whether certain products can or cannot be pulled from a site
SETTING DESCRIPTION
Enable Multi-Distribution Site Support This option allows customers to select site-specific inventory for line items from a drop list where needed. The inventory site drop list is located in the:
Quick Order Entry page
Shopping cart
Product detail page
Category page
Search page
NOTE: When disabled, the site default site ID is used on the order line item.
Disable Mixed Sites on the Same Order Checkmark this option to enforce a policy prohibiting two line-items from different distribution sites from being entered on the same order.
Allow Customers to Choose from Secondary Site?
Check marking this option displays a site selection dropdown list to the customer, allowing the customer to order from available distribution sites.
Enable Customer Specific Sites Checkmark this option to enable restrictions on customer specific sites. This restricts the customer’s ability to purchase only from the sites allowed by setup.
NOTE: Click the Setup link and properly configure the site restrictions prior to enabling this feature. Refer to section under Catalog > Customer Specific Sites for detailed information.
Available Qty Based On? This option allows you to select what inventory criteria is used to determine the product available quantity. It controls how the system should determine the
CONFIDENTIALITY NOTICE - The information contained in this document is confidential and proprietary. This document is to be used with the
understanding that it will be held in strict confidence and not used for reasons unrelated directly to the specific purpose of this document. No part of the
document may be circulated or reproduced for distribution outside the Client organization without prior written permission from Nodus Technologies,
eStore Solution Stack™ v4.0 User’s Guide
213
backorder status for products.
Selecting Total Available Qty sets the system to use the sum of available quantities from all sites. Example: “Site A” contains available quantity of 30, and “Site B” contains available quantity of 20 – the total available quantity of 50 can be purchased before the product goes into backorder.
Selecting Individual Site Qty sets the system to check the available quantity against the Site ID on the line-item. Example: “Site A” contains available quantity of 30, and “Site B” contains available quantity of 20 –the available quantity of 30 can be purchased against “Site A” before backordering from “Site A” starts, and the quantity of 20 can be purchased against “Site B” before backordering from “Site A” starts.

CONFIDENTIALITY NOTICE - The information contained in this document is confidential and proprietary. This document is to be used with the
understanding that it will be held in strict confidence and not used for reasons unrelated directly to the specific purpose of this document. No part of the
document may be circulated or reproduced for distribution outside the Client organization without prior written permission from Nodus Technologies,
eStore Solution Stack™ v4.0 User’s Guide
214
4.9.8. Mail Server
Administration website location: Settings > Mail Server
Specify the SMTP mail server that eSSS should utilize for relaying e-mail messages. This must be
properly configured in order for eSSS to send any e-mail messages.
Mail Server Administrator’s assistance required – The mail server will needs to be setup to either
permit relay from the web server, or through Basic SMTP user authentication.
Leave Use Basic SMTP Authentication unchecked if the mail server is setup to grant the web server
relay permission via IP, otherwise checkmark the option and input the proper username and
password setup by the mail server administrator.
To send a test message, enter an e-mail address in the To field and click the OK button
4-169 Mail Settings

CONFIDENTIALITY NOTICE - The information contained in this document is confidential and proprietary. This document is to be used with the
understanding that it will be held in strict confidence and not used for reasons unrelated directly to the specific purpose of this document. No part of the
document may be circulated or reproduced for distribution outside the Client organization without prior written permission from Nodus Technologies,
eStore Solution Stack™ v4.0 User’s Guide
215
4.9.9. Order Options
Admin Site Location: Settings > Orders
Order options allow settings to be configured for orders on the shopping cart. Each option is described
in the accompanying table and graphic.
Figure 4-170 Order Options

CONFIDENTIALITY NOTICE - The information contained in this document is confidential and proprietary. This document is to be used with the
understanding that it will be held in strict confidence and not used for reasons unrelated directly to the specific purpose of this document. No part of the
document may be circulated or reproduced for distribution outside the Client organization without prior written permission from Nodus Technologies,
eStore Solution Stack™ v4.0 User’s Guide
216
SETTING DESCRIPTION
Cart Page Options
Show Product Image in Cart?
Marking this option allows the customer to see the product image associated with the line item in the Shopping Cart
Allow Gift Wrapping in Cart?
Allows a Gift Wrapping option to be displayed in the Shopping Cart
Gift Wrap Charge Per Item
Permits the webstore administrator to set a per item charge for gift wrapping through entering a price in the gift wrap textbox.
Disable Quick Add Function on Cart page?
This option will hide the Quick Add feature on the Shopping Cart page
Remember Carts for Anonymous Users?
This feature uses cookies to retain cart information for customers who do not log onto the website. Cart information is retrieved through the cookie when the website is browsed from the same computer again. (This feature should be considered independent from the Anonymous checkout feature.)
Enable Anonymous Checkout
Anonymous Checkout Feature. Checkmark to enable the feature. When enabled, customer will be offered to checkout as guest on the Login page during the checkout process.
Anonymous Customer ID
Anonymous Checkout Feature. Value entered in this textbox will be used as the Customer ID for all orders placed from Anonymous Checkout. This record will not be stored on the website, and changes in GP against this record will not be synchronized back to the website.
Display Item’s Unit of Measure on Cart?
Enabling this function will display the line item’s unit of measure – single, case, etc. on the Shopping Cart.
Show Mark-Down from the List Price on Cart, Order Receipt and Order History pages
This option permits any item markdown amount to be displayed on the Shopping Cart, Order Receipt and Order History pages.
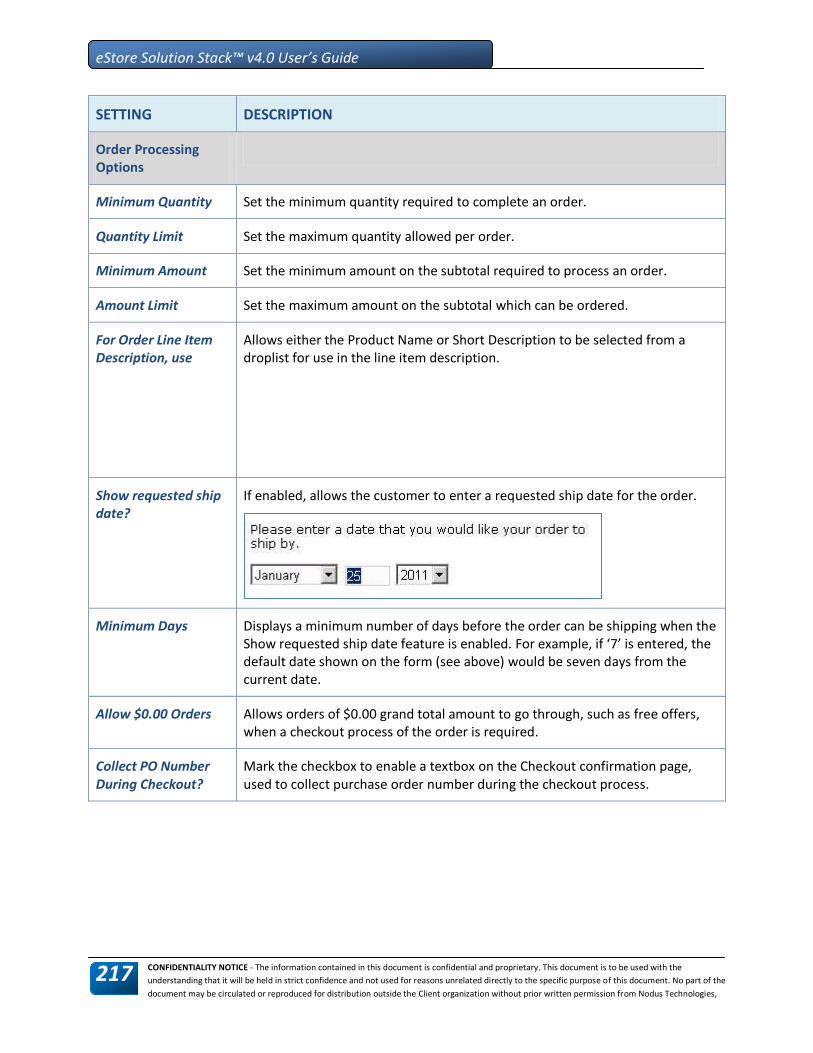
CONFIDENTIALITY NOTICE - The information contained in this document is confidential and proprietary. This document is to be used with the
understanding that it will be held in strict confidence and not used for reasons unrelated directly to the specific purpose of this document. No part of the
document may be circulated or reproduced for distribution outside the Client organization without prior written permission from Nodus Technologies,
eStore Solution Stack™ v4.0 User’s Guide
217
SETTING DESCRIPTION
Order Processing Options
Minimum Quantity Set the minimum quantity required to complete an order.
Quantity Limit Set the maximum quantity allowed per order.
Minimum Amount Set the minimum amount on the subtotal required to process an order.
Amount Limit Set the maximum amount on the subtotal which can be ordered.
For Order Line Item Description, use
Allows either the Product Name or Short Description to be selected from a droplist for use in the line item description.
Show requested ship date?
If enabled, allows the customer to enter a requested ship date for the order.
Minimum Days Displays a minimum number of days before the order can be shipping when the Show requested ship date feature is enabled. For example, if ‘7’ is entered, the default date shown on the form (see above) would be seven days from the current date.
Allow $0.00 Orders Allows orders of $0.00 grand total amount to go through, such as free offers, when a checkout process of the order is required.
Collect PO Number During Checkout?
Mark the checkbox to enable a textbox on the Checkout confirmation page, used to collect purchase order number during the checkout process.

CONFIDENTIALITY NOTICE - The information contained in this document is confidential and proprietary. This document is to be used with the
understanding that it will be held in strict confidence and not used for reasons unrelated directly to the specific purpose of this document. No part of the
document may be circulated or reproduced for distribution outside the Client organization without prior written permission from Nodus Technologies,
eStore Solution Stack™ v4.0 User’s Guide
218
SETTING DESCRIPTION
NOTE: There is a 20 character limit for the purchase order textbox.
Always Required? If this option is enabled, a purchase order number will always be required to complete checkout.
Required for Purchase Order Payments?
If this option is enabled, a purchase order number will be required to complete checkout for customers selected to use Purchase Order as their payment method. The purchase order number input textbox will be optional for customers selected other payment methods for their order.
NOTE: If the Always Required option is enabled, this setting will be deactivated and grayed out; If the Collect PO Number During Checkout option is not enabled, this setting will be deactivated and grayed out.
Send Order Confirmation to Customer’s Salesperson
Mark to enable e-mailing to the customer’s designated salesperson. Salesperson ID and its e-mail address are collected from setup in GP.
Send E-mail When New Orders Arrive
If checked, the recipient address that was set here will receive an order notification. Multiple addresses can be separated by a comma
Send drop shipper notices on Authorization and on
Enables the drop shipper email notice. Currently only supports orders paid by credit card. The drop shipper notice is sent to the manufacturer or vendor

CONFIDENTIALITY NOTICE - The information contained in this document is confidential and proprietary. This document is to be used with the
understanding that it will be held in strict confidence and not used for reasons unrelated directly to the specific purpose of this document. No part of the
document may be circulated or reproduced for distribution outside the Client organization without prior written permission from Nodus Technologies,
eStore Solution Stack™ v4.0 User’s Guide
219
SETTING DESCRIPTION
Charge specified on the item when order is placed on eSSS.
Show Special Instructions Field at Checkout
If checked, displays a multi-row entry box for shoppers to enter special instructions, if any during checkout. The value entered will be sent to Great Plain’s SOP Comments field.
Allow Multiple Shipping Addresses?
If checked, gives the customer the ability to specify a different shipping address for each line-item.
Run order clean up every:
Sets how often the Order Cleanup process should run. If cleanup is desired right away, click the Run Now button.
Clean up incomplete orders older than
For shoppers that added items to their cart, the cart contents will attempt to be restored when the shopper signs in the next visit. A shopper may not return and therefore a cleanup process is run every X days to purge the old data. This value sets the number of days a cleanup is run to purge old cart data. During the order cleanup process, orders older than the date specified will be purged.
Default Order Manager Date Range
This drop down list gives you nine different date range options for displaying orders in the order manager.
Number of Addresses are shown on checkout_Address page by default
Allows the user to set the number of addresses shown on the Address page during checkout.

CONFIDENTIALITY NOTICE - The information contained in this document is confidential and proprietary. This document is to be used with the
understanding that it will be held in strict confidence and not used for reasons unrelated directly to the specific purpose of this document. No part of the
document may be circulated or reproduced for distribution outside the Client organization without prior written permission from Nodus Technologies,
eStore Solution Stack™ v4.0 User’s Guide
220
4.9.10. Payment
Administration website location: Settings > Payment
The eSSS shopping cart offers many payment options such as online and offline credit card processing,
PayPal payments, Purchase Orders, Telephone/Email, Fax, e-mail, and check by mail options. Configure
the payment settings as described in this section providing description and instruction information as
required.
4.9.10.1. Credit Card Payments
The following details explain how to configure eStore Solution Stack to accept credit card and electronic
check payments.
Figure 4-171 Setting up electronic payments

CONFIDENTIALITY NOTICE - The information contained in this document is confidential and proprietary. This document is to be used with the
understanding that it will be held in strict confidence and not used for reasons unrelated directly to the specific purpose of this document. No part of the
document may be circulated or reproduced for distribution outside the Client organization without prior written permission from Nodus Technologies,
eStore Solution Stack™ v4.0 User’s Guide
221
4.9.10.1.1. Setting up the Payment Gateway
This portion of the setup identifies the processor Setup ID used to process electronic payments.
1. Start by marking the checkbox(s) for credit cards and/or eChecks
2. Click the Select CC & eCheck Process button
3. Click (Edit) for either the Offline/Test Processor if working in a test environment or Nodus
Transaction Server if preparing to go into live production
4-172 Credit Card Processors
4. The Edit Credit Card and eCheck Process page opens
5. Enter the Setup ID for credit cards and/or eCheck payments
6. Mark the Use AVS checkbox to have the account address verified by the payment processor. If the
address stored in Great Plains does not match the payment processor’s records, the payment will be
declined.
7. Click the Save Settings button
8. When the Credit Card & eCheck Processors page opens, mark the test or live product option and
click the Continue button to return to the main Payment page
SETTING DESCRIPTION
Pre-authorize Cards at Checkout
Book transactions are processed and sent to back office with the SOP document.
Credit card provided at time of checkout will have the fund authorized and reserved for a limited amount of time (based on the card’s issuing bank). The fund can be captured later using CCA from GP once the record is submitted to the back office. Refer to the CCA User’s Guide for additional details on CCA operations.
Charge Full Amount to Cards at Checkout
Sale transactions are processed and sent to back office with the SOP document. Payment line is also inserted on the SOP document.

CONFIDENTIALITY NOTICE - The information contained in this document is confidential and proprietary. This document is to be used with the
understanding that it will be held in strict confidence and not used for reasons unrelated directly to the specific purpose of this document. No part of the
document may be circulated or reproduced for distribution outside the Client organization without prior written permission from Nodus Technologies,
eStore Solution Stack™ v4.0 User’s Guide
222
Credit card provided at time of checkout will be charged the full amount. Referenced transactions can be done through CCA from GP once the record is submitted to the back office. Refer to the CCA User’s Guide for additional details on CCA operations.
Require CVV Code during Checkout Requires verification of the account’s CVV security code. If the CVV code stored in Great Plains does not match the payment processor’s records, the payment will be declined.
Accepted Cards Mark the checkbox by the credit cards accepted by the website:
American Express
Diner’s Club
Discover
JCB
MasterCard
Visa
Instructions Add any instructions or acknowledgements to be displayed. These instructions are displayed on the Checkout receipt page
Allow customers to use credit cards on file in GP
Marking this checkbox permits customers to select credit cards stored in Great Plains.
Allow customers to decide if new credit card will be saved on file in GP
Conditional on allowing use of GP-stored credit cards, this feature gives customers the ability to save new credit cards in Great Plains
Allow customers to create new credit card Conditional on allowing use of GP-stored credit cards, this option allows customers to enter a new credit card to pay for the order.
Existing Card Display’s error message at Credit Card Maintenance
This error message is displayed when there is a technical communication problem; for example, if eSSS is unable to communicate with Great Plains. This error message would be displayed after an unsuccessful credit card processing attempt.
Existing Card Display’s error message at Checkout Enter an error message to be used if customer credit card is not successfully processed.

CONFIDENTIALITY NOTICE - The information contained in this document is confidential and proprietary. This document is to be used with the
understanding that it will be held in strict confidence and not used for reasons unrelated directly to the specific purpose of this document. No part of the
document may be circulated or reproduced for distribution outside the Client organization without prior written permission from Nodus Technologies,
eStore Solution Stack™ v4.0 User’s Guide
223
4.9.10.2. PayPal Payments
If accepting PayPal payments, fill up the PayPal username field with your receiving account’s user name
and mark the SandBox (test) mode: checkbox to enable the test mode.
Figure 4-173 PayPal Payments
Other initial setup requirements are listed below:
In Great Plains, a “PayPal” Credit Card Name must be set up to accommodate the PayPal payments as
credit card payments from the store. Go to Tools > Setup > Company > Credit Cards and set up the
“PayPal” Card Name as a Bank Card under a desired Checkbook name.
4-174 PayPal Credit Card Name

CONFIDENTIALITY NOTICE - The information contained in this document is confidential and proprietary. This document is to be used with the
understanding that it will be held in strict confidence and not used for reasons unrelated directly to the specific purpose of this document. No part of the
document may be circulated or reproduced for distribution outside the Client organization without prior written permission from Nodus Technologies,
eStore Solution Stack™ v4.0 User’s Guide
224
The receiving PayPal account’s Instant Payment Notification also needs to be activated for the Store
Site. This would be for PayPal to notify the Store that the payment has been made for your account.
4.9.10.2.1. Activating PayPal
1. Log-in to your PayPal account
2. Click the Profile sub-tab
3. Click the Instant Payment Notification Preferences link in the Selling Preferences column
4. Click Edit
5. Click the checkbox and enter the store’s URL as follows: http://www.mydomain.com/PayPal.aspx
where www.mydomain.com is the store’s URL
6. Click Save
NOTE: If you are unable to find the Receipt Transaction ID on a PayPal Order, the IPN is not set up
correctly.
To accept an active, non-Sandbox PayPal account, you will need to disable the Sandbox (Testing) tag in
the Web.config file located at the Store’s root directory on the web server. Just open the file and locate
this tag: <add key="PaypalSandbox" value="Off"/>. Set the value to “On” if you are still using a
Sandbox account and set the value to “Off” if you are using a Live PayPal account.
4.9.10.3. PayPal Express Checkout via Website Payments Pro
To use this option, first sign up for PayPal Express Checkout via Website Payments Pro. The standard
PayPal payment process is not supported. NOTE: If upgrading and Payflow Pro is already used, a new
tender type must be added.
Once the service is activated, check the PayPal Express Checkout via Payflow Pro box. Fill out the
following boxes with information provided by PayPal
Website Payments Pro Partner
Website Payments Pro Vendor
Website Payments Pro Username
Website Payments Password
PayPal Currency Code

CONFIDENTIALITY NOTICE - The information contained in this document is confidential and proprietary. This document is to be used with the
understanding that it will be held in strict confidence and not used for reasons unrelated directly to the specific purpose of this document. No part of the
document may be circulated or reproduced for distribution outside the Client organization without prior written permission from Nodus Technologies,
eStore Solution Stack™ v4.0 User’s Guide
225
PayPal Processing Options:
Mark the Pre-authorize button to run a book transaction (authorization of the funds) against the
PayPal account. Delayed capture can be shipped using Credit Card Advantage in GP once the
record is submitted to GP.
Mark the Charge Full Amount at checkout to request a sale transaction to capture the fund at
the time of checkout.
Test Mode
Check the PayPal Sandbox (test) mode box to enable testing, which allows PayPal transactions to be
tested without sending money to PayPal.
NOTE: Although no money will be transferred while this function is enabled, actual data will be sent to
the Great Plains server. It is suggested that a sample customer account be set up for testing purposes.
As an alternative, any test transactions could be voided in Great Plains.

CONFIDENTIALITY NOTICE - The information contained in this document is confidential and proprietary. This document is to be used with the
understanding that it will be held in strict confidence and not used for reasons unrelated directly to the specific purpose of this document. No part of the
document may be circulated or reproduced for distribution outside the Client organization without prior written permission from Nodus Technologies,
eStore Solution Stack™ v4.0 User’s Guide
226
4.9.10.4. Other Payment Options
This section describes the other forms of payments that can be used on the eSSS webstore. Details are
discussed in the following table.
SETTING DESCRIPTION
Allow Payment by Purchase Order Checking this box allows customized information to be added to the Purchase Order payment option.
The Description information is added as a line item in the check out page.
The Instructions information appears as a confirmation page.
Purchase Order payment options also allow certain payment terms to be specified for a customer. To enable this feature:
1. Click the Payment Term Restriction droplist 2. Choose a payment term restriction option 3. Enter the payment term to be allowed or prevented in the
textbox below the Payment Term Restriction droplist. If multiple payment terms are entered, separate them with a comma.
EXAMPLE: NET 30, NET 60
4. Click the Save Changes button
Allow Payment by Telephone Checking this box allows customized information to be added to the Telephone payment option.
The Description information is added as a line item in the Check Out page.
The Instructions information appears as a confirmation page
Allow Payment by Fax Checking this box allows customized information to be added to the Fax payment option.
The Description information is added as a line item in the Check Out page.
The Instructions information appears as a confirmation page.
Allow Payment by Email Checking this box allows customized information to be added to the E-Mail payment option.
The Description information is added as a line item in the Check Out page.
The Instructions information appears as a confirmation page.
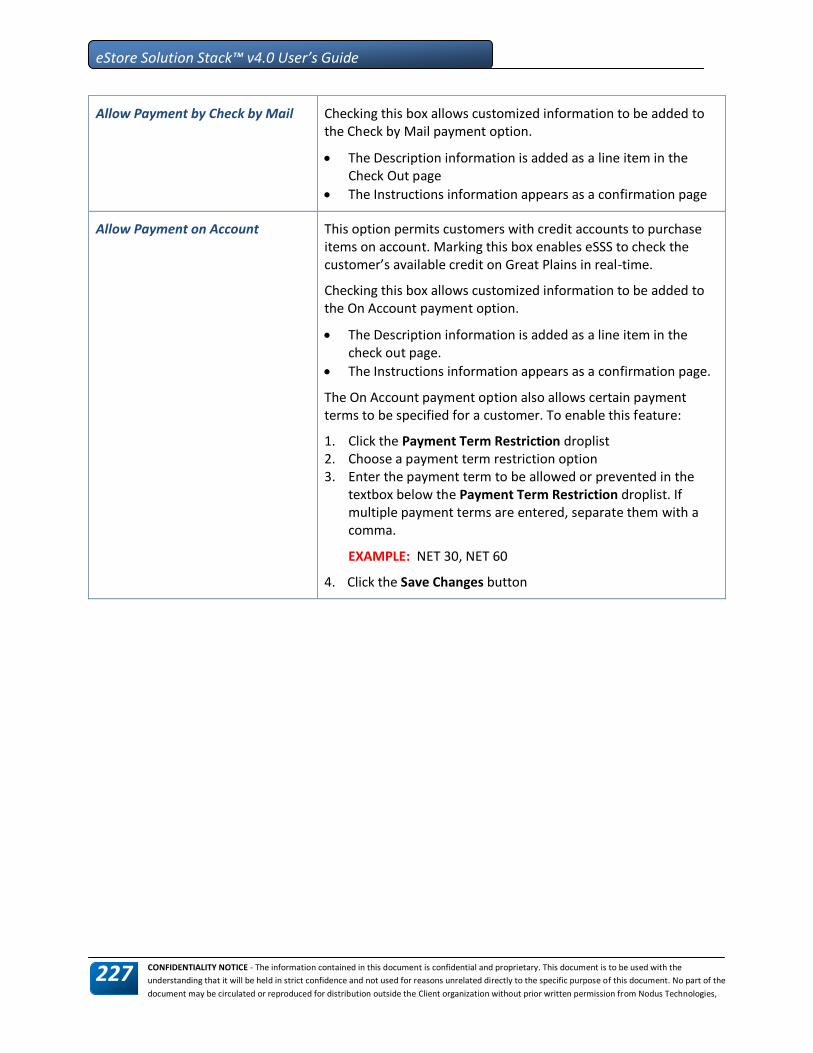
CONFIDENTIALITY NOTICE - The information contained in this document is confidential and proprietary. This document is to be used with the
understanding that it will be held in strict confidence and not used for reasons unrelated directly to the specific purpose of this document. No part of the
document may be circulated or reproduced for distribution outside the Client organization without prior written permission from Nodus Technologies,
eStore Solution Stack™ v4.0 User’s Guide
227
Allow Payment by Check by Mail Checking this box allows customized information to be added to the Check by Mail payment option.
The Description information is added as a line item in the Check Out page
The Instructions information appears as a confirmation page
Allow Payment on Account This option permits customers with credit accounts to purchase items on account. Marking this box enables eSSS to check the customer’s available credit on Great Plains in real-time.
Checking this box allows customized information to be added to the On Account payment option.
The Description information is added as a line item in the check out page.
The Instructions information appears as a confirmation page.
The On Account payment option also allows certain payment terms to be specified for a customer. To enable this feature:
1. Click the Payment Term Restriction droplist 2. Choose a payment term restriction option 3. Enter the payment term to be allowed or prevented in the
textbox below the Payment Term Restriction droplist. If multiple payment terms are entered, separate them with a comma.
EXAMPLE: NET 30, NET 60
4. Click the Save Changes button

CONFIDENTIALITY NOTICE - The information contained in this document is confidential and proprietary. This document is to be used with the
understanding that it will be held in strict confidence and not used for reasons unrelated directly to the specific purpose of this document. No part of the
document may be circulated or reproduced for distribution outside the Client organization without prior written permission from Nodus Technologies,
eStore Solution Stack™ v4.0 User’s Guide
228
4.9.11. Product Reviews
Administration website location: Settings > Product Reviews
Product reviews provide a method for shoppers to provide their feedback on a particular product.
Product reviews can also be manually added in the Customer Reviews area of the Catalog admin section
as in the case of accepting feedback via e-mail. Product reviews are configured as shown in the figure
shown below.
4-175 Product Reviews
4.9.11.1. Product Review Options
The following options can be set from the review screen
SETTING DESCRIPTION
Show Product Reviews? Specifies whether or not customer reviews are displayed.
Allow Customer to Create Product Reviews
Gives the option whether to allow product reviews on the website
Moderate Product Reviews
Enables the ability to edit customer reviews if desired
Allow Product Rating Establishes a “star” system for rating products
Allow Karma scores Enables a ‘Was This Helpful’ system for rating the review
Show How Many Reviews at First?
The initial number of reviews shown with the product
Show how many reviews on customer
Controls the number of reviews seen on the customer review page for the product.

CONFIDENTIALITY NOTICE - The information contained in this document is confidential and proprietary. This document is to be used with the
understanding that it will be held in strict confidence and not used for reasons unrelated directly to the specific purpose of this document. No part of the
document may be circulated or reproduced for distribution outside the Client organization without prior written permission from Nodus Technologies,
eStore Solution Stack™ v4.0 User’s Guide
229
SETTING DESCRIPTION
review page
The following is the store web site page that a customer can use to write a review.
4-176 Review Input
Moderation Notices
After a user writes a review, you'll notice a link similar to the following on the To-Do’s/Alerts section on
the opening page of the Administration area. Clicking on the link will allow you to approve or deny
reviews if you have moderation enabled.
4-177 Moderate Link

CONFIDENTIALITY NOTICE - The information contained in this document is confidential and proprietary. This document is to be used with the
understanding that it will be held in strict confidence and not used for reasons unrelated directly to the specific purpose of this document. No part of the
document may be circulated or reproduced for distribution outside the Client organization without prior written permission from Nodus Technologies,
eStore Solution Stack™ v4.0 User’s Guide
230
4.9.12. Returns
Administration website location: Settings > Returns
If Enable Return Form is checked, a link will appear in the Customer Service Area to allow a shopper to
request a return. Enter the e-mail for the account to receive the e-mail of the request data in the Email
Return Request to textbox.
4-178 Return Request Form

CONFIDENTIALITY NOTICE - The information contained in this document is confidential and proprietary. This document is to be used with the
understanding that it will be held in strict confidence and not used for reasons unrelated directly to the specific purpose of this document. No part of the
document may be circulated or reproduced for distribution outside the Client organization without prior written permission from Nodus Technologies,
eStore Solution Stack™ v4.0 User’s Guide
231
4.9.13. Shipping
Administration website location: Settings > Shipping
This area is to configure the shipping and handling configuration of the store. There are two main areas
to be configured:
Configure Shipping Carrier – Setting up options and required data for carriers such as FedEx
Configure Shipping Methods – Customizing how and how much your website charges for shipping
4.9.13.1. Configure Shipping Carriers
To configure account settings for shipping carriers:
Click the button for the desired carrier (as displayed in the accompanying figure) and a page for that
carrier’s settings is displayed.
4-179 Shipping carrier Accounts
4.9.13.1.1. Fedex Settings
Enter the Fedex Settings as detailed in the following table.

CONFIDENTIALITY NOTICE - The information contained in this document is confidential and proprietary. This document is to be used with the
understanding that it will be held in strict confidence and not used for reasons unrelated directly to the specific purpose of this document. No part of the
document may be circulated or reproduced for distribution outside the Client organization without prior written permission from Nodus Technologies,
eStore Solution Stack™ v4.0 User’s Guide
232
Figure 4-180 Fedex Settings
SETTING DESCRIPTION
Tracking URL Enter the Fedex tracking URL in this textbox
Meter Number Meter numbers are used by Fedex to calculate an account’s rates and track rate requests. Click the Need a Meter Number link to generate a Fedex meter number.
FedEx Account Number Enter the FedEx account number in this textbox
Service URL This is the address to the FedEx server that eSSS contacts to obtain real-time freight calculations. The value is pre-populated. However, this interface allows the administrator to change the value if FedEx changes their server address.
Drop Off Type Allows the user to specify the type of drop-off used to hand shipping over to Fedex, including station, request courier, etc.
Always use Residential Delivery Prices Marking this checkbox enables residential delivery charges to be used for all Fedex shipping orders. Residential delivery prices are the fees charged by Fedex to deliver to a residential unit.
Saturday Pickup Enables pickup on Saturdays
Saturday Delivery Enable Saturday delivery.

CONFIDENTIALITY NOTICE - The information contained in this document is confidential and proprietary. This document is to be used with the
understanding that it will be held in strict confidence and not used for reasons unrelated directly to the specific purpose of this document. No part of the
document may be circulated or reproduced for distribution outside the Client organization without prior written permission from Nodus Technologies,
eStore Solution Stack™ v4.0 User’s Guide
233
4.9.13.1.2. UPS Settings
Enter the UPS Settings as detailed in the following table.
Figure 4-181 UPS Settings

CONFIDENTIALITY NOTICE - The information contained in this document is confidential and proprietary. This document is to be used with the
understanding that it will be held in strict confidence and not used for reasons unrelated directly to the specific purpose of this document. No part of the
document may be circulated or reproduced for distribution outside the Client organization without prior written permission from Nodus Technologies,
eStore Solution Stack™ v4.0 User’s Guide
234
SETTING DESCRIPTION
Registration Information
Registration Status Verification of UPS license. Click on the Get UPS License button to apply for the license.
Tracking URL Enter the UPS tracking URL in this textbox
UPS Account Number Enter the UPS account number in this textbox
Shipping Rate Settings
Pickup Type Specify a pickup type from the droplist
Always use residential rates Marking this checkbox enables residential delivery charges to be used for all Fedex shipping orders. Residential delivery prices are the fees charged by Fedex to deliver to a residential unit.
Saturday pickup Enables pickup on Saturdays
Saturday delivery Enable Saturday delivery.
Package Type Choose a package type from the droplist
Shipping Preferences
Service Select the type of UPS shipping
Packaging Specify the type of packaging used
Payment Method Choose a payment method
UPS Account Number Enter the UPS Account number

CONFIDENTIALITY NOTICE - The information contained in this document is confidential and proprietary. This document is to be used with the
understanding that it will be held in strict confidence and not used for reasons unrelated directly to the specific purpose of this document. No part of the
document may be circulated or reproduced for distribution outside the Client organization without prior written permission from Nodus Technologies,
eStore Solution Stack™ v4.0 User’s Guide
235
4.9.13.1.3. US Postal Settings
Enter the US Postal Settings as detailed in the following table.
Figure 4-182 US Postal Settings
These settings require a US Postal account. To open a new account, click on the registration link
provided on the US Postal Service Settings page.
SETTING DESCRIPTION
User Name Enter the USPS account user name
Password Enter the USPS account password
Server Add the USPS server location in this textbox
Tracking URL Insert the USPS tracking URL in this textbox

CONFIDENTIALITY NOTICE - The information contained in this document is confidential and proprietary. This document is to be used with the
understanding that it will be held in strict confidence and not used for reasons unrelated directly to the specific purpose of this document. No part of the
document may be circulated or reproduced for distribution outside the Client organization without prior written permission from Nodus Technologies,
eStore Solution Stack™ v4.0 User’s Guide
236
4.9.13.2. Configure Shipping Methods
Shipping methods can be set up that support real-time shipping calculation (with the common carriers),
or will allow admin to setup their own Matrix Freight Table – such as all of the “BV” type of shipping
methods. Shipping Methods help customize how products are shipped from the website. These options
control:
Specific shipping methods – Can set by price, weight, per item or use shipping types associated with
individual carriers, such as USPS Express Mail or FedEx Ground
Establishment of shipping price levels for increasing order totals. For example, setting an increasing
shipping charge for orders of 1 or more, 99 and more and 1,000 and more.
Choose a country list where items can be shipping
To set a new shipping method:
1. For each new shipping method, click the New button
2. Enter the settings as shown in the table below
3. Repeat for as many shipping methods as needed
4. Click the Save Changes button
NOTE: To edit a shipping method, from the list of shipping method, click the Edit button for the shipping
method to be changed and the Edit Shipping Method window opens. Edit as needed and click the Save
Changes button.
SETTING DESCRIPTION
Name Create a name for the shipping method, such as Per Item
Great Plains Shipping ID Enter the Shipping ID used by Great Plains
Type Enter the type of shipping – per item, price, weight or a shipping type used by a specific carrier, such as FedEx first overnight
New Level Sets the increasing shipping costs associated with multiple item orders or by weight.
1. Click New Level to set a shipping cost according to the shipping type designated in the Type droplist
2. Continue click New Level to add as many pricing levels as needed
NOTES:

CONFIDENTIALITY NOTICE - The information contained in this document is confidential and proprietary. This document is to be used with the
understanding that it will be held in strict confidence and not used for reasons unrelated directly to the specific purpose of this document. No part of the
document may be circulated or reproduced for distribution outside the Client organization without prior written permission from Nodus Technologies,
eStore Solution Stack™ v4.0 User’s Guide
237
New pricing levels inserted between already established price levels will be automatically filtered according to amount. For example, if levels are set for packages at 5 and 20 pounds, a new 10 pound level entry would be automatically inserted on the list between 5 and 20 pounds.
For carrier specific shipping types, shipping prices by level is not available
Adjust Price by Allows the cost of a shipping type to be adjusted by a set amount. The droplist allows the adjusted cost to be set by dollar amount or percentage.
Customer Specific settings Allow specify shipping method is only available for assigned customers
Ship to Countries/Regions Creates a list of countries/regions. The list can be changed by clicking the Add and Remove buttons to shift countries/regions to a Not Available list.
Figure 4-183 Shipping Methods

CONFIDENTIALITY NOTICE - The information contained in this document is confidential and proprietary. This document is to be used with the
understanding that it will be held in strict confidence and not used for reasons unrelated directly to the specific purpose of this document. No part of the
document may be circulated or reproduced for distribution outside the Client organization without prior written permission from Nodus Technologies,
eStore Solution Stack™ v4.0 User’s Guide
238
4.9.13.2.1. Customer Specific setting
1. Use the Search feature to locate the user(s) to be assigned to the shipping method
2. Mark the checkbox by the user to be assigned to the shipping method
3. Click the Add button to populate the Selected Users/Classes window
NOTE: This page gives the option of assigning viewing rights to customers and/or to GP Class IDs. If all
users are to be granted viewing rights, the Everyone radio button is marked.
4.9.13.3. Handling Fees
On the Shipping page, handling charges can be established. To set the handling charge:
1. Enter an amount in the Handling fee amount textbox
2. Mark the radio button for the item type:
Per Order
Per Item
Per Package
3. Add a message if a valid shipping method cannot be located
4. Choose a carrier from the Real Time Rate Provider droplist
5. Click Save Changes
4-184 Shipping Processing Options

CONFIDENTIALITY NOTICE - The information contained in this document is confidential and proprietary. This document is to be used with the
understanding that it will be held in strict confidence and not used for reasons unrelated directly to the specific purpose of this document. No part of the
document may be circulated or reproduced for distribution outside the Client organization without prior written permission from Nodus Technologies,
eStore Solution Stack™ v4.0 User’s Guide
239
4.9.14. Site Terms
Administration website location: Settings > Site Terms
eStore Solution Stack provides a powerful system for localization and customization with a term/value
system. Terms are values used internal to eStore Solution Stack and the value is used as the output for
the store. Edit term values to control the output displayed to the shopper when terms interpreted for
publishing to the web page. For example, if you were to change "AddressBook" to have a value of "Your
Address Book", anytime you now see "Address Book" would now be "Your Address Book." Click the Edit
button to edit term values.
For those coding their own modifications, Site Terms can be called in code such as:
lblTest.Text = Content.SiteTerms.GetTerm (“AddressBook”)
In this case, the lblTest would show as an “Address Book”
NOTE: It is strongly recommended NOT to delete a factory default term. Only user-defined terms should
be deleted if no longer used.
4-185 Site Terms Configuration

CONFIDENTIALITY NOTICE - The information contained in this document is confidential and proprietary. This document is to be used with the
understanding that it will be held in strict confidence and not used for reasons unrelated directly to the specific purpose of this document. No part of the
document may be circulated or reproduced for distribution outside the Client organization without prior written permission from Nodus Technologies,
eStore Solution Stack™ v4.0 User’s Guide
240
4.9.15. Resource Messages
Administration website location: Settings > Resource Messages
The General Resources Messages page provides access to resource files used by eStore Solution Stack.
Resource files are stored in a local folder and can be selected for editing from this page. To set up and
use General Resource Messages:
1. Click the Clone button to copy all resource files to a temporary folder
2. To edit a resource file, select a local folder where the files are stored from the Resource Location
droplist
3. Selecting the location will populate the Resource File list
4. Highlight a file and a table detailing the file attributes opens
5. Click the Edit button and the key value and comments will become editable
6. If changes are made to the key, click the Update button and the changes will be saved in the
temporary folder
7. When changes are complete, click the Update button at the bottom of the page. All changes will be
made permanent in the public folder where the files reside.
NOTE: The final step will cause IIS’s application pool to be recycled. All users will lose their current session
and be required to log-in again.
Figure 4-186 Resource Message Settings

CONFIDENTIALITY NOTICE - The information contained in this document is confidential and proprietary. This document is to be used with the
understanding that it will be held in strict confidence and not used for reasons unrelated directly to the specific purpose of this document. No part of the
document may be circulated or reproduced for distribution outside the Client organization without prior written permission from Nodus Technologies,
eStore Solution Stack™ v4.0 User’s Guide
241
4.9.16. SSL
Administration website location: Settings > SSL
Configure the Standard Site URL for the store and the URL for SSL mode to be used during encrypted
page views. The Secure Site Root URL will be used when the "Use SSL for Checkout" is checked and a
shopper enters the checkout process requiring encrypted protection. Be sure to check the SSL checkbox
prior to handling credit card orders or any operation requiring SSL operations. If you are handling
manual transactions or phone/fax orders, etc. SSL may not be required.
You also have the option of using SSL for checkout and credit card pages. In addition, you can also use
SSL for all of admin pages.
NOTE: Turning the SSL option on for Admin pages and not having a properly configured SSL Certificate
can lock you out of the administration section of the website. Make sure the SSL Certificate is set up
properly before turning this option on.
4-187 SSL Settings

CONFIDENTIALITY NOTICE - The information contained in this document is confidential and proprietary. This document is to be used with the
understanding that it will be held in strict confidence and not used for reasons unrelated directly to the specific purpose of this document. No part of the
document may be circulated or reproduced for distribution outside the Client organization without prior written permission from Nodus Technologies,
eStore Solution Stack™ v4.0 User’s Guide
242
4.9.17. Tax Classes
Administration website location: Settings > Tax Classes
Tax classes are group classifications of products which can be easily created and edited from the Tax
Classes page as described below. These classes can be assigned to products as needed (described under
Catalog > Products > Editing Products > General Information) and then be used to setup tax calculation
based on the Tax Class (described under Settings > Taxes > Creating a New Tax).
4-188 List of Tax Classes
1. Enter name for the tax class in the New Tax Class Name textbox
2. Click the New button
3. Click the Edit button to change the name of a Tax Class

CONFIDENTIALITY NOTICE - The information contained in this document is confidential and proprietary. This document is to be used with the
understanding that it will be held in strict confidence and not used for reasons unrelated directly to the specific purpose of this document. No part of the
document may be circulated or reproduced for distribution outside the Client organization without prior written permission from Nodus Technologies,
eStore Solution Stack™ v4.0 User’s Guide
243
4.9.18. Tax Details
Administration website location: Settings > Tax Details
Tax details are imported from Great Plains. Click the Import Tax Details from GP button and the Tax
Details will be imported from Great Plains and refresh the tax details list.
To locate a specific set of Tax Detail information, enter the Tax Schedule ID in the Tax Schedule ID box
and click the Submit button.
Figure 4-189 Tax Details

CONFIDENTIALITY NOTICE - The information contained in this document is confidential and proprietary. This document is to be used with the
understanding that it will be held in strict confidence and not used for reasons unrelated directly to the specific purpose of this document. No part of the
document may be circulated or reproduced for distribution outside the Client organization without prior written permission from Nodus Technologies,
eStore Solution Stack™ v4.0 User’s Guide
244
4.9.19. Taxes
Administration website location: Settings > Taxes
The Tax section allows an unlimited number of tax setup records to be configured and listed. Click New
to add a tax record, Edit or Delete for existing tax records.
4-190 List of Configured Taxes
4.9.19.1. Configuring Taxes
SETTING DESCRIPTION

CONFIDENTIALITY NOTICE - The information contained in this document is confidential and proprietary. This document is to be used with the
understanding that it will be held in strict confidence and not used for reasons unrelated directly to the specific purpose of this document. No part of the
document may be circulated or reproduced for distribution outside the Client organization without prior written permission from Nodus Technologies,
eStore Solution Stack™ v4.0 User’s Guide
245
Charge Tax on Gift Wrapping Mark the checkbox to enable this option, where gift wrap charges will be taxed based on customer.
Charge Tax on Non-Shipping Items? Enables taxes to be charged on items that are not shipped, such as services or file downloads.
Tax Setup Options Select the method of tax calculation. Options include third party tax tools as described in the Integrated Tax Tools section.
Freight Setup Droplist gives a set of tax options for freight, such as taxable and non-taxable.
NOTE: This is only for the Standard GP Tax Setup
Enables taxable and non-taxable options to be configured for miscellaneous items sold on the website.
NOTE: This is only for the Standard GP Tax Setup
4.9.19.2. Creating a New Tax
Click the New button to open the Edit Tax window and enter the tax information according to the
accompanying table.
SETTING DESCRIPTION
Type of Tax Choose a tax type from the droplist
Country Select the country where the tax will be charged from the droplist
State Region Select the state/region where the tax will be charged from the droplist
Postal/Zip Code or US City Name Enter postal/zip code information or enter the name of a city where the tax will be charged
Apply to Items of Type Choose from a list of item tax types that was set up from the Tax Classes page
Tax Schedule ID This droplist contains a list of filters that can be used to refine results when looking up Tax Details

CONFIDENTIALITY NOTICE - The information contained in this document is confidential and proprietary. This document is to be used with the
understanding that it will be held in strict confidence and not used for reasons unrelated directly to the specific purpose of this document. No part of the
document may be circulated or reproduced for distribution outside the Client organization without prior written permission from Nodus Technologies,
eStore Solution Stack™ v4.0 User’s Guide
246
4-191 Tax Configuration

CONFIDENTIALITY NOTICE - The information contained in this document is confidential and proprietary. This document is to be used with the
understanding that it will be held in strict confidence and not used for reasons unrelated directly to the specific purpose of this document. No part of the
document may be circulated or reproduced for distribution outside the Client organization without prior written permission from Nodus Technologies,
eStore Solution Stack™ v4.0 User’s Guide
247
4.9.19.3. Standard GP Tax Setup
Website taxes can be set up through Great Plains or several on-line tax services as described in the
following section. To set up taxes through Great Plains:
1. Import tax schedules from Great Plains
2. Go to the Tax Details page (Settings > Tax Details) and click the Import Tax Details from GP button.
The tax schedules will load on a table
3. Start setting up the relationship between the address and tax schedule by navigating to the Taxes
page (Settings > Taxes)
4. Select a Freight and Miscellaneous tax option from the appropriate droplist
5. Initiate tax set up by clicking the New button
6. When the Edit Tax page opens, choose a tax type from the droplist
7. Specify a tax location from the Country and State/Region droplists
8. If a smaller, more specific local area needs to be specified, enter a zip code or US city name in the
textbox
9. Select what type of item to apply the tax from the droplist
10. Select a specific tax schedule or choose All Details to apply all tax details from available tax
schedules
11. Click the Save Changes button
12. The new sales tax will appear in table on the Taxes page
NOTE: Taxes appearing on this table can be edited or deleted by clicking the appropriate button located
in the tax type row.

CONFIDENTIALITY NOTICE - The information contained in this document is confidential and proprietary. This document is to be used with the
understanding that it will be held in strict confidence and not used for reasons unrelated directly to the specific purpose of this document. No part of the
document may be circulated or reproduced for distribution outside the Client organization without prior written permission from Nodus Technologies,
eStore Solution Stack™ v4.0 User’s Guide
248
Figure 4-192 Standard GP Tax Setup
4.9.19.4. Integrated Tax Tools
eSSS supports the use of third party applications that provide specialized accounting tax assistance. This
enhancement is supported through purchasing an additional module. The modules currently available
for third party tax application integrations are:
Sabrix
Avalara
CCH Group
To locate this setup option, navigate to the Taxes page and click on the Tax Setup Options droplist

CONFIDENTIALITY NOTICE - The information contained in this document is confidential and proprietary. This document is to be used with the
understanding that it will be held in strict confidence and not used for reasons unrelated directly to the specific purpose of this document. No part of the
document may be circulated or reproduced for distribution outside the Client organization without prior written permission from Nodus Technologies,
eStore Solution Stack™ v4.0 User’s Guide
249
Figure 4-193 Third Party Tax Applications
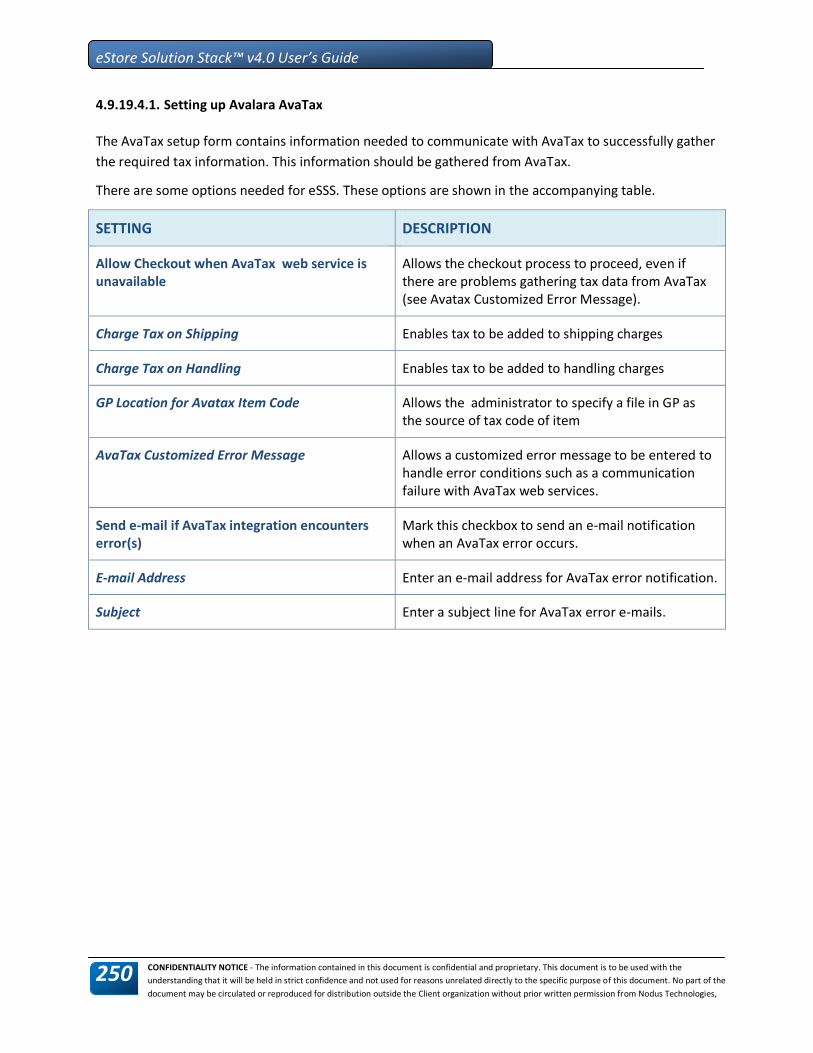
CONFIDENTIALITY NOTICE - The information contained in this document is confidential and proprietary. This document is to be used with the
understanding that it will be held in strict confidence and not used for reasons unrelated directly to the specific purpose of this document. No part of the
document may be circulated or reproduced for distribution outside the Client organization without prior written permission from Nodus Technologies,
eStore Solution Stack™ v4.0 User’s Guide
250
4.9.19.4.1. Setting up Avalara AvaTax
The AvaTax setup form contains information needed to communicate with AvaTax to successfully gather
the required tax information. This information should be gathered from AvaTax.
There are some options needed for eSSS. These options are shown in the accompanying table.
SETTING DESCRIPTION
Allow Checkout when AvaTax web service is unavailable
Allows the checkout process to proceed, even if there are problems gathering tax data from AvaTax (see Avatax Customized Error Message).
Charge Tax on Shipping Enables tax to be added to shipping charges
Charge Tax on Handling Enables tax to be added to handling charges
GP Location for Avatax Item Code Allows the administrator to specify a file in GP as the source of tax code of item
AvaTax Customized Error Message Allows a customized error message to be entered to handle error conditions such as a communication failure with AvaTax web services.
Send e-mail if AvaTax integration encounters error(s)
Mark this checkbox to send an e-mail notification when an AvaTax error occurs.
E-mail Address Enter an e-mail address for AvaTax error notification.
Subject Enter a subject line for AvaTax error e-mails.

CONFIDENTIALITY NOTICE - The information contained in this document is confidential and proprietary. This document is to be used with the
understanding that it will be held in strict confidence and not used for reasons unrelated directly to the specific purpose of this document. No part of the
document may be circulated or reproduced for distribution outside the Client organization without prior written permission from Nodus Technologies,
eStore Solution Stack™ v4.0 User’s Guide
251
Figure 4-194 AvaTax Account Information

CONFIDENTIALITY NOTICE - The information contained in this document is confidential and proprietary. This document is to be used with the
understanding that it will be held in strict confidence and not used for reasons unrelated directly to the specific purpose of this document. No part of the
document may be circulated or reproduced for distribution outside the Client organization without prior written permission from Nodus Technologies,
eStore Solution Stack™ v4.0 User’s Guide
252
4.9.19.4.2. Setting up Sabrix
The Sabrix setup form contains information needed to communicate with Sabrix to successfully gather
the required tax information. This information should be gathered from Sabrix.
There are some options needed for eSSS. These options are shown in the accompanying table.
SETTING DESCRIPTION
Allow Checkout when Sabrix web service is unavailable
Allows the checkout process to proceed, even if there are problems gathering tax data from Sabrix (see Sabrix Customized Error Message).
Charge Tax on Shipping Enables tax to be added to shipping charges
Charge Tax on Handling Enables tax to be added to handling charges
Sabrix Customized Error Message Allows a customized error message to be entered to handle error conditions such as a communication failure with Sabrix web services.
Send e-mail if Sabrix integration encounters error(s)
Mark this checkbox to send an e-mail notification when a Sabrix error occurs.
E-mail Address Enter an e-mail address for Sabrix error notification.
Subject Enter a subject line for Sabrix error e-mails.

CONFIDENTIALITY NOTICE - The information contained in this document is confidential and proprietary. This document is to be used with the
understanding that it will be held in strict confidence and not used for reasons unrelated directly to the specific purpose of this document. No part of the
document may be circulated or reproduced for distribution outside the Client organization without prior written permission from Nodus Technologies,
eStore Solution Stack™ v4.0 User’s Guide
253
4.9.19.4.3. Setting up CCH-STO
SETTING DESCRIPTION
Test Transactions This option puts eSSS into a test mode where test orders and transactions can be processed through CCH-STO that are not applied to the accounting system.
Allow Checkout when CCH-STO web service is unavailable
Allows the checkout process to proceed, even if there are problems gathering tax data from CCH-STO (see CCH-STO Customized Error Message).
Charge Tax on Shipping Enables tax to be added to shipping charges
Charge Tax on Handling Enables tax to be added to handling charges
Use Situs Information Mark to enable shipping details from Situs
Can Reject Delivery Choose from the following options:
Yes/No
Not Applicable
Delivery by Choose from the following options:
Common Carrier
Vendor Vehicle
Not Applicable
FOB (Freight on Board) Choose from the following options:
Origin
Destination
Unspecified
Not Applicable
Mail Order Choose from the following options:
Yes/No
Not Applicable
Solicited outside Choose from the following options:
Yes/No
Not Applicable
Ship from POB Choose from the following options:
Yes/No

CONFIDENTIALITY NOTICE - The information contained in this document is confidential and proprietary. This document is to be used with the
understanding that it will be held in strict confidence and not used for reasons unrelated directly to the specific purpose of this document. No part of the
document may be circulated or reproduced for distribution outside the Client organization without prior written permission from Nodus Technologies,
eStore Solution Stack™ v4.0 User’s Guide
254
Not Applicable
Customized Error Message Allows a customized error message to be entered to handle error conditions such as a communication failure with CCH-STO web services.
Send e-mail if CCH-STO integration encounters error(s)
Mark this checkbox to send an e-mail notification when a CCH-STO error occurs.
E-mail Address Enter an e-mail address for CCH-STO error notification.
Subject Enter a subject line for CCH-STO error e-mails.

CONFIDENTIALITY NOTICE - The information contained in this document is confidential and proprietary. This document is to be used with the
understanding that it will be held in strict confidence and not used for reasons unrelated directly to the specific purpose of this document. No part of the
document may be circulated or reproduced for distribution outside the Client organization without prior written permission from Nodus Technologies,
eStore Solution Stack™ v4.0 User’s Guide
255
4.9.20. Themes
Administration website location: Settings > Themes
eStore Solution Stack allows new themes to be created for the entire store. Currently two themes ship
as examples for theme creation. To add themes, create a new folder under "BVThemes." After creating
the new folder it will appear as a new theme available in the Settings...Themes section. Follow the
existing themes as a guide to creating new themes.
In addition to using the default website themes, there are two options for using themes.
SETTING DESCRIPTION
Allow Personalized Themes? When this option is enabled, customers can select a graphic theme for the website from Your Account.
The options are the same as shown in the accompanying figure.
Allow Affiliate Themes? When this option is enabled, the site administrator can choose a new graphic theme for affiliates for the website.
The options are the same as shown in the accompanying figure.
4-195 Theme Selector

CONFIDENTIALITY NOTICE - The information contained in this document is confidential and proprietary. This document is to be used with the
understanding that it will be held in strict confidence and not used for reasons unrelated directly to the specific purpose of this document. No part of the
document may be circulated or reproduced for distribution outside the Client organization without prior written permission from Nodus Technologies,
eStore Solution Stack™ v4.0 User’s Guide
256
4.9.21. Version Information
Administration website location: Settings > Version Information
To aid in troubleshooting, use this area to send error information to Nodus Technical Care. Be sure to
include as detailed information as you can provide in the Notes section. Click the Email button to send
the information to support.
4-196 Version Information

CONFIDENTIALITY NOTICE - The information contained in this document is confidential and proprietary. This document is to be used with the
understanding that it will be held in strict confidence and not used for reasons unrelated directly to the specific purpose of this document. No part of the
document may be circulated or reproduced for distribution outside the Client organization without prior written permission from Nodus Technologies,
eStore Solution Stack™ v4.0 User’s Guide
257
4.9.22. Error Log
Administration website location: Settings > Error Log
The error log record errors are triggered during use of the store and captured with the advanced
exception management system built into the store software. Click the Clear All button to clear the
message log to see if an error continues or was a one-time glitch. Information from the error log can be
copied and pasted into an e-mail and sent to the support staff. The Delete button will clear a single error
from the log.
4-197 Error Log

CONFIDENTIALITY NOTICE - The information contained in this document is confidential and proprietary. This document is to be used with the
understanding that it will be held in strict confidence and not used for reasons unrelated directly to the specific purpose of this document. No part of the
document may be circulated or reproduced for distribution outside the Client organization without prior written permission from Nodus Technologies,
eStore Solution Stack™ v4.0 User’s Guide
258
4.9.23. Current Application Settings
Administration website location: Settings > Current Application Settings
This area provides a read-only list view of the store's settings. To automatically update security settings,
mark the Update SSL and Non-SSL on Settings Changes checkbox.
NOTE: Click the Reload button to refresh the Application Settings list.
4-198 Current Application Settings

CONFIDENTIALITY NOTICE - The information contained in this document is confidential and proprietary. This document is to be used with the
understanding that it will be held in strict confidence and not used for reasons unrelated directly to the specific purpose of this document. No part of the
document may be circulated or reproduced for distribution outside the Client organization without prior written permission from Nodus Technologies,
eStore Solution Stack™ v4.0 User’s Guide
259
4.9.24. Fraud Checks
Administration website location: Settings > Fraud Checks
If a customer tries to pass fraudulent checks or behaves in some other improper fashion, eSSS gives
store administrators a security feature that allows banning of e-mails, IP addresses, and domain names.
IP addresses can be obtained from the "Merchant Notes" on the "Order Details" screen. Likewise, the e-
mail address/domain name can also be obtained from this screen.
Figure 4-199 Fraud Check Settings

CONFIDENTIALITY NOTICE - The information contained in this document is confidential and proprietary. This document is to be used with the
understanding that it will be held in strict confidence and not used for reasons unrelated directly to the specific purpose of this document. No part of the
document may be circulated or reproduced for distribution outside the Client organization without prior written permission from Nodus Technologies,
eStore Solution Stack™ v4.0 User’s Guide
260
4.9.25. Nodus/Great Plains Settings
Administration website location: Settings > Nodus/Great Plains
These options allow you to define some of the Nodus integration options. Each option is described in
the tables below. The first set of options is generally specific to each web order placed on the store.
General Options: All notifications that are not covered in this manual will sent to the address listed in
this text box.
Figure 4-200 General Options
Synchronizer Options: This display is useful to verify the Store ID of what may be one of many store web
sites.
IMPORTANT: Clicking the Reset link is mandatory if the Store ID has been changed or deleted in Nodus
Synchronizer.
Figure 4-201 Synchronizer Options
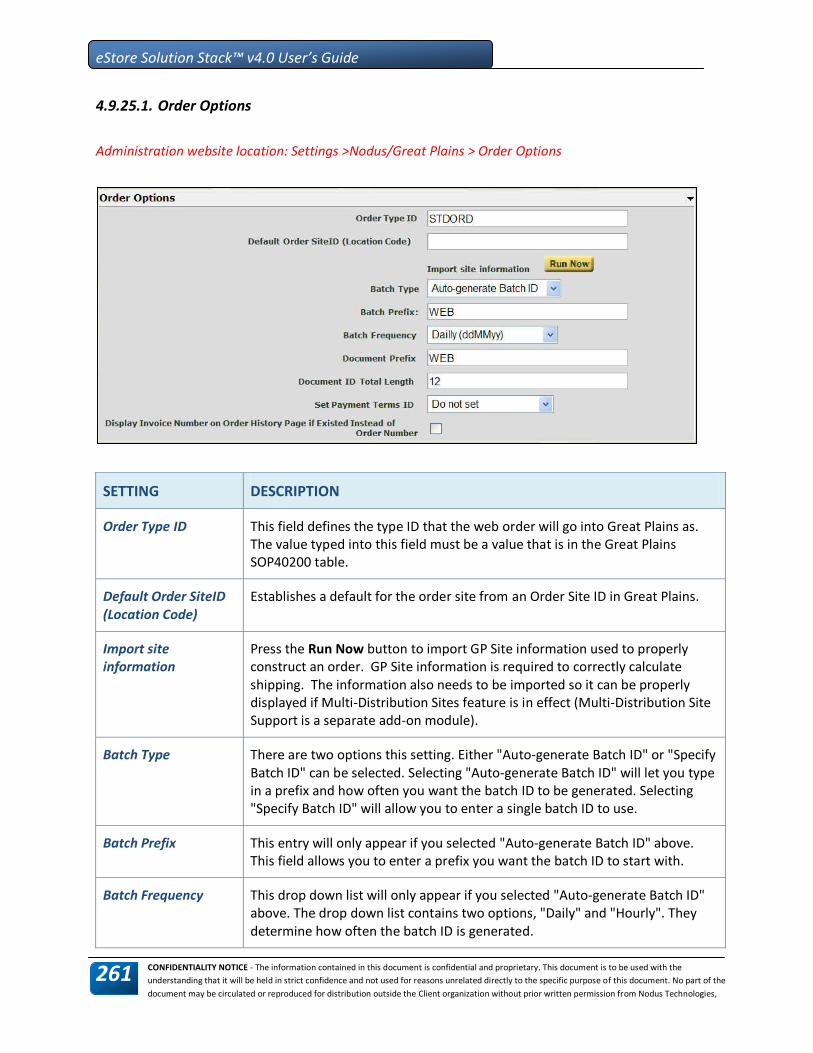
CONFIDENTIALITY NOTICE - The information contained in this document is confidential and proprietary. This document is to be used with the
understanding that it will be held in strict confidence and not used for reasons unrelated directly to the specific purpose of this document. No part of the
document may be circulated or reproduced for distribution outside the Client organization without prior written permission from Nodus Technologies,
eStore Solution Stack™ v4.0 User’s Guide
261
4.9.25.1. Order Options
Administration website location: Settings >Nodus/Great Plains > Order Options
SETTING DESCRIPTION
Order Type ID This field defines the type ID that the web order will go into Great Plains as. The value typed into this field must be a value that is in the Great Plains SOP40200 table.
Default Order SiteID (Location Code)
Establishes a default for the order site from an Order Site ID in Great Plains.
Import site information
Press the Run Now button to import GP Site information used to properly construct an order. GP Site information is required to correctly calculate shipping. The information also needs to be imported so it can be properly displayed if Multi-Distribution Sites feature is in effect (Multi-Distribution Site Support is a separate add-on module).
Batch Type There are two options this setting. Either "Auto-generate Batch ID" or "Specify Batch ID" can be selected. Selecting "Auto-generate Batch ID" will let you type in a prefix and how often you want the batch ID to be generated. Selecting "Specify Batch ID" will allow you to enter a single batch ID to use.
Batch Prefix This entry will only appear if you selected "Auto-generate Batch ID" above. This field allows you to enter a prefix you want the batch ID to start with.
Batch Frequency This drop down list will only appear if you selected "Auto-generate Batch ID" above. The drop down list contains two options, "Daily" and "Hourly". They determine how often the batch ID is generated.
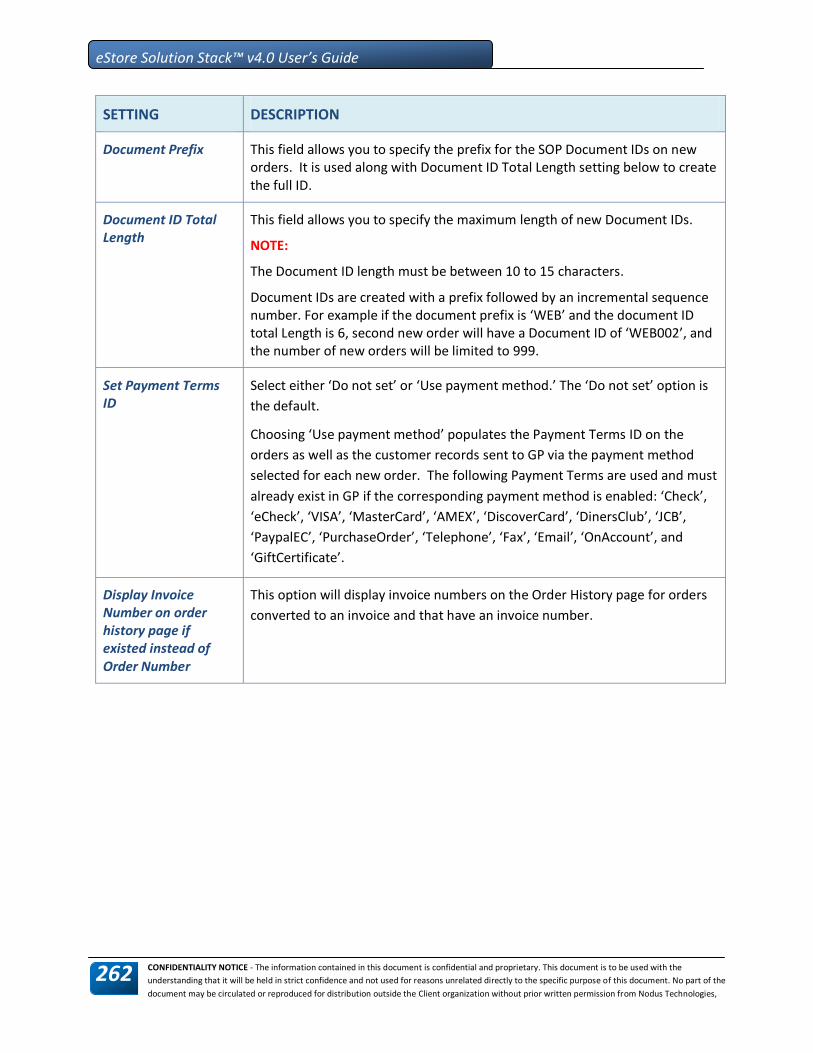
CONFIDENTIALITY NOTICE - The information contained in this document is confidential and proprietary. This document is to be used with the
understanding that it will be held in strict confidence and not used for reasons unrelated directly to the specific purpose of this document. No part of the
document may be circulated or reproduced for distribution outside the Client organization without prior written permission from Nodus Technologies,
eStore Solution Stack™ v4.0 User’s Guide
262
SETTING DESCRIPTION
Document Prefix This field allows you to specify the prefix for the SOP Document IDs on new orders. It is used along with Document ID Total Length setting below to create the full ID.
Document ID Total Length
This field allows you to specify the maximum length of new Document IDs.
NOTE:
The Document ID length must be between 10 to 15 characters.
Document IDs are created with a prefix followed by an incremental sequence number. For example if the document prefix is ‘WEB’ and the document ID total Length is 6, second new order will have a Document ID of ‘WEB002’, and the number of new orders will be limited to 999.
Set Payment Terms ID
Select either ‘Do not set’ or ‘Use payment method.’ The ‘Do not set’ option is
the default.
Choosing ‘Use payment method’ populates the Payment Terms ID on the
orders as well as the customer records sent to GP via the payment method
selected for each new order. The following Payment Terms are used and must
already exist in GP if the corresponding payment method is enabled: ‘Check’,
‘eCheck’, ‘VISA’, ‘MasterCard’, ‘AMEX’, ‘DiscoverCard’, ‘DinersClub’, ‘JCB’,
‘PaypalEC’, ‘PurchaseOrder’, ‘Telephone’, ‘Fax’, ‘Email’, ‘OnAccount’, and
‘GiftCertificate’.
Display Invoice Number on order history page if existed instead of Order Number
This option will display invoice numbers on the Order History page for orders
converted to an invoice and that have an invoice number.

CONFIDENTIALITY NOTICE - The information contained in this document is confidential and proprietary. This document is to be used with the
understanding that it will be held in strict confidence and not used for reasons unrelated directly to the specific purpose of this document. No part of the
document may be circulated or reproduced for distribution outside the Client organization without prior written permission from Nodus Technologies,
eStore Solution Stack™ v4.0 User’s Guide
263
4.9.25.2. Customer Options
Admin Site Location: Settings > Nodus/Great Plains > Customer Options
This set of options is specific to the customer integration of the shopping cart.
SETTING DESCRIPTION
Customer Prefix This field allows you to specify the prefix for the Customer IDs on new customers. It is used along with Customer ID Total Length setting below to create the full ID.
Customer ID Total Length
This field allows you to specify the maximum length of new customer IDs.
Customer IDs are created with a prefix followed by an incremental sequence number. For example if the customer prefix is ‘WEB’ and the customer ID total Length is 6, second new customer will have a Customer ID of ‘WEB002’, and the number of new customers will be limited to 999.
NOTE: The Customer ID length must be between 5 to 15 characters.
User Name Field (New Customer Import Only)
Intended for New Customer Imports, this drop down list determines which Great Plains field the customer import should use for the user name. The default setting is "Email" and uses the email address specified in the email field in the internet information card for the Great Plains customer. Other options include "Login" and "Customer ID". The "Login" name is specified in the internet information card of the Great Plains customer. The "Customer ID" setting allows you to import customer IDs as the user name.

CONFIDENTIALITY NOTICE - The information contained in this document is confidential and proprietary. This document is to be used with the
understanding that it will be held in strict confidence and not used for reasons unrelated directly to the specific purpose of this document. No part of the
document may be circulated or reproduced for distribution outside the Client organization without prior written permission from Nodus Technologies,
eStore Solution Stack™ v4.0 User’s Guide
264
SETTING DESCRIPTION
Customer Name Format
The Customer Name format gives options for how the customer name is displayed, including by:
FirstName LastName
LastName First Name
CompanyName
Address Contact Format
Drop list gives options for how address contact information is presented
Use value from Contact field if Customer Name field is empty and vice versa
Check box gives the option to automatically fill in a value if either the Customer Name or Contact field is empty
Default Customer Class
Sets the default customer class for all customers to be sent in to Great Plains.
GP State Display This drop down list determines whether the state will go in as the full state name or the abbreviation. The two options are "State Name" or "State Abbreviation".
Default Great Plains Price Level/Price Book
This field allows you to enter the default Great Plains price level that is used when the user is not logged in or the user has the "None" price level set. This field should almost always be filled in unless you are not using price levels. If this field is not used and the customer does not have a price list set the product's list price will be used which may not be the desired result.
Only Send Customer updates to GP after the customer places an order
Mark this checkbox to enable this feature.
Update Customer Card in Great Plains
If enabled, the customer profile in Great Plains will automatically update when an order is submitted with new customer information.
Allow Customer to update Registered Name
Allows the registered name to be updated in Great Plains.
Enable Trade Discount This feature enables a preferred customer to receive a set discount on
anything in the store web site. This discount amount is established in the

CONFIDENTIALITY NOTICE - The information contained in this document is confidential and proprietary. This document is to be used with the
understanding that it will be held in strict confidence and not used for reasons unrelated directly to the specific purpose of this document. No part of the
document may be circulated or reproduced for distribution outside the Client organization without prior written permission from Nodus Technologies,
eStore Solution Stack™ v4.0 User’s Guide
265
SETTING DESCRIPTION
Great Plains database.
Disable Address Creation/Modification on Store
Disables the ability to create or edit an address on the store web site.
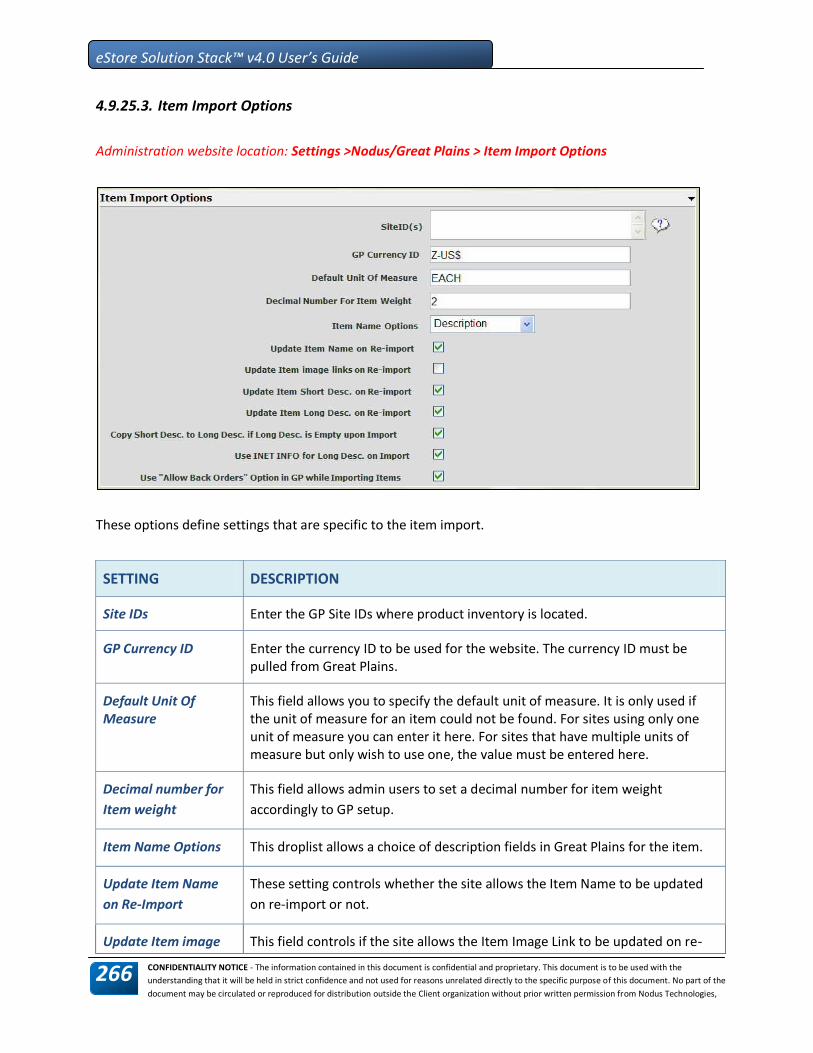
CONFIDENTIALITY NOTICE - The information contained in this document is confidential and proprietary. This document is to be used with the
understanding that it will be held in strict confidence and not used for reasons unrelated directly to the specific purpose of this document. No part of the
document may be circulated or reproduced for distribution outside the Client organization without prior written permission from Nodus Technologies,
eStore Solution Stack™ v4.0 User’s Guide
266
4.9.25.3. Item Import Options
Administration website location: Settings >Nodus/Great Plains > Item Import Options
These options define settings that are specific to the item import.
SETTING DESCRIPTION
Site IDs Enter the GP Site IDs where product inventory is located.
GP Currency ID Enter the currency ID to be used for the website. The currency ID must be pulled from Great Plains.
Default Unit Of Measure
This field allows you to specify the default unit of measure. It is only used if the unit of measure for an item could not be found. For sites using only one unit of measure you can enter it here. For sites that have multiple units of measure but only wish to use one, the value must be entered here.
Decimal number for
Item weight
This field allows admin users to set a decimal number for item weight
accordingly to GP setup.
Item Name Options This droplist allows a choice of description fields in Great Plains for the item.
Update Item Name
on Re-Import
These setting controls whether the site allows the Item Name to be updated
on re-import or not.
Update Item image This field controls if the site allows the Item Image Link to be updated on re-

CONFIDENTIALITY NOTICE - The information contained in this document is confidential and proprietary. This document is to be used with the
understanding that it will be held in strict confidence and not used for reasons unrelated directly to the specific purpose of this document. No part of the
document may be circulated or reproduced for distribution outside the Client organization without prior written permission from Nodus Technologies,
eStore Solution Stack™ v4.0 User’s Guide
267
SETTING DESCRIPTION
links on Re-Import import or not.
Update Item Short
Desc. on Re-Import
This setting gives the option to allow the Item Short Description on the site to
be updated on re-import or not.
Update Item Long
Desc. on Re-Import
This field controls whether the site allows the Item Long Description to be
updated on re-import or not.
Copy Short Desc. to
Long Desc. if Long
Desc. is empty on
import
This setting controls whether to use the short description for Long Description
upon importing item - when the long description is empty.
Use INET INFO for
Long Desc. on Import
This option allows an item to use the INET INFO field in GP for its long
description while being imported to site.
Use “Allow Back
Orders” option in GP
while importing
items
This option allows the site to use the “Allow back Orders” option in GP to
control inventory setting on Products’ inventory.

CONFIDENTIALITY NOTICE - The information contained in this document is confidential and proprietary. This document is to be used with the
understanding that it will be held in strict confidence and not used for reasons unrelated directly to the specific purpose of this document. No part of the
document may be circulated or reproduced for distribution outside the Client organization without prior written permission from Nodus Technologies,
eStore Solution Stack™ v4.0 User’s Guide
268
4.9.25.4. Feature Management
Administration website location: Settings >Nodus/Great Plains > Feature Management
This set of options defines settings that are specific to whole features on the shopping cart.
SETTING DESCRIPTION
GP Pricelist Setup – Extended Pricing
This option effects how pricing from GP is stored when item records are
imported from GP.
Use Standard GP Pricing* – This will import the GP Price Lists
Use Extended GP Pricing – This will import Extended Pricing setup from GP
Use Myridas GP Pricing – In addition to GP Extended Pricing setup, family
pricing setup using Myridas is also imported from GP
Disable All GP Pricing – No additional pricing setup will be imported – “List
Price” on the item record will still be imported. Additional “Volume
Pricing” can be setup and maintained on eSSS directly.
*Please see Appendix C on this document for detailed diagram explaining the
business logic around the Price List data imported from GP.
Make Unit of Measure Selectable
This drop down list allows you to specify whether customers will be able to select the unit of measure they are purchasing with. The values are "Allow Selectable Unit of Measure" and "Disable Unit of Measure Selection". If you have multiple units of measure you can enable this setting to give customers a choice. If you have multiple units of measure and don’t want to give customers a choice you must set the default unit of measure setting above. If you have or plan to use only a single unit of measure you can disable the selection and specify the default unit of measure above.
GP Promotional Price Sheet Options
This feature sets up the Great Plains promotional pricing to automatically reject or accept higher/lower promotional pricing by choosing an option from the Promotion Price Sheet Options droplist.
Show credit This check box allows you to turn off the display and lookup of the credit

CONFIDENTIALITY NOTICE - The information contained in this document is confidential and proprietary. This document is to be used with the
understanding that it will be held in strict confidence and not used for reasons unrelated directly to the specific purpose of this document. No part of the
document may be circulated or reproduced for distribution outside the Client organization without prior written permission from Nodus Technologies,
eStore Solution Stack™ v4.0 User’s Guide
269
SETTING DESCRIPTION
information to customer
information. Credit limits and credit amounts will only be displayed to the customer if this option is checked.

CONFIDENTIALITY NOTICE - The information contained in this document is confidential and proprietary. This document is to be used with the
understanding that it will be held in strict confidence and not used for reasons unrelated directly to the specific purpose of this document. No part of the
document may be circulated or reproduced for distribution outside the Client organization without prior written permission from Nodus Technologies,
eStore Solution Stack™ v4.0 User’s Guide
270
4.9.26. Debug Logs
Administration website location: Settings > Debug Logs
eSSS provides debug logs to help fix problems that might occur. To create a debug lob, mark the file(s)
that requires work from the list displayed on the Debug Logs page. Click the Details button to open the
log as shown in the “Debug Log Detail” figure.
Figure 4-202 Debug Logs page
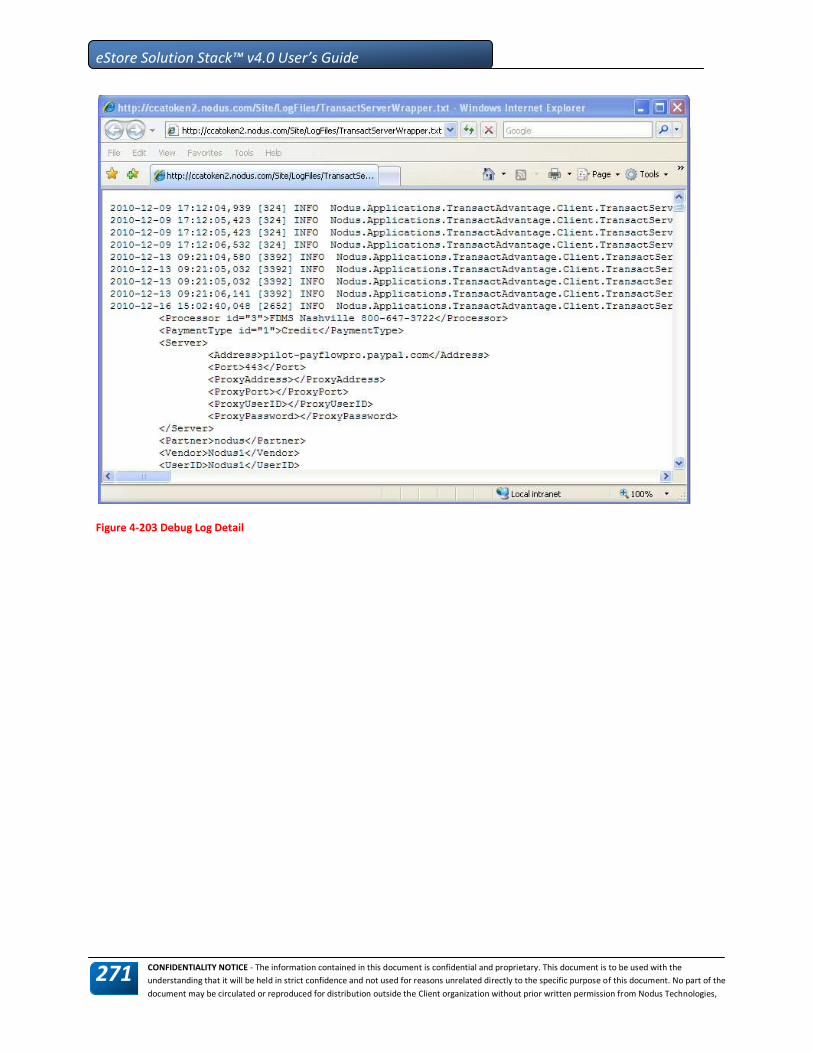
CONFIDENTIALITY NOTICE - The information contained in this document is confidential and proprietary. This document is to be used with the
understanding that it will be held in strict confidence and not used for reasons unrelated directly to the specific purpose of this document. No part of the
document may be circulated or reproduced for distribution outside the Client organization without prior written permission from Nodus Technologies,
eStore Solution Stack™ v4.0 User’s Guide
271
Figure 4-203 Debug Log Detail

CONFIDENTIALITY NOTICE - The information contained in this document is confidential and proprietary. This document is to be used with the
understanding that it will be held in strict confidence and not used for reasons unrelated directly to the specific purpose of this document. No part of the
document may be circulated or reproduced for distribution outside the Client organization without prior written permission from Nodus Technologies,
eStore Solution Stack™ v4.0 User’s Guide
272
4.10. Code Layout
There are three major layers to the eStore Solution Stack shopping cart.
The first layer, the Presentation Layer, is part of the eSSS site. It consists all of the ASP.NET code
behind. Under .NET 3.5, it compiles into BVC2004.DLL.
The next layer is the Business Logic Layer. It all belongs in the BVSoftware BVC Core namespace.
The final layer is the Data Access Layer. It all belongs in the BVSoftware.BVC.DataLayer namespace.
This layer contains static methods that you can call to run the stored procedures.
4-204 Code Layout
Presentation Layer
Business Logic Layer
Data Access Layer

CONFIDENTIALITY NOTICE - The information contained in this document is confidential and proprietary. This document is to be used with the
understanding that it will be held in strict confidence and not used for reasons unrelated directly to the specific purpose of this document. No part of the
document may be circulated or reproduced for distribution outside the Client organization without prior written permission from Nodus Technologies,
eStore Solution Stack™ v4.0 User’s Guide
273
Appendix A – Item Mapping from GP
GP OBJECT GP FIELD eStore OBJECT eStore FIELD
IV00101 ITEMNMBR Catalog/Product ID
IV00101 ITMSHNAM Catalog/Product ProductName
168 Catalog/Product ProductTypeID
IV00105 LISTPRCE 2 Catalog/Product ListPrice
IV00105 LISTPRCE 2 Catalog/Product SitePrice
Catalog/Product MetaKeywords
Catalog/Product MetaDescription
Catalog/Product MetaTitle
IV00101 TAXOPTNS Catalog/Product TaxExempt
0 Catalog/Product TaxClass
FALSE Catalog/Product NonShipping
FALSE Catalog/Product ShipSeparately
ShipFromSite Catalog/Product DropShipMode
IV00101 ITEMSHWT 3 Catalog/Product ShippingWeight
0 Catalog/Product ShippingLength
0 Catalog/Product ShippingLength
0 Catalog/Product ShippingWidth
0 Catalog/Product ShippingHeight
IV00101 ITEMTYPE != 2 Catalog/Product Status = Active
ITEMTYPE == 2 Status = Disabled
SY01200 INET4 Catalog/Product ImageFileSmall

CONFIDENTIALITY NOTICE - The information contained in this document is confidential and proprietary. This document is to be used with the
understanding that it will be held in strict confidence and not used for reasons unrelated directly to the specific purpose of this document. No part of the
document may be circulated or reproduced for distribution outside the Client organization without prior written permission from Nodus Technologies,
eStore Solution Stack™ v4.0 User’s Guide
274
GP OBJECT GP FIELD eStore OBJECT eStore FIELD
SY01200 INET4 Catalog/Product ImageFileMedium
IV00101 CREATDDT Catalog/Product CreationDate
1 Catalog/Product MinimumQty
-1 (none) Catalog/Product ParentID
IndividualFields Catalog/Product VariantDisplayMode
IV00102 QTYONHND - ATYALLOC
Catalog/Product InventoryAvailableQty
0 Catalog/Product InventoryLowStockNotice
Available for purchase Catalog/Product InventoryStatus
IV00101 ITEMTYPE == 5 Catalog/Product InventoryNotAvailableStatus = Available
ITEMTYPE != 5 InventoryNotAvailableStatus = BackOrderedDoNotAllowPurchase
Catalog/Product InventoryNotAvailableMessage
IV00101 ITEMDESC Catalog/Product ShortDescription
SY01200 INETINFO Catalog/Product LongDescription
0 Catalog/Product ManufacturerID
0 Catalog/Product VendorID
1 Catalog/Product GiftWrapAllowed
IV00101 PRICMTHD Catalog/Product PriceMethod
NOTES:
168 is the code for a generic product, it is hard coded in the import routine.
Not all customers use the LISTPRCE as the ListPrice. Some customers have chosen to use a price
level's UOMPRICE (IV00108) as the ListPrice.
For ITEMSHWT the shipping weight is divided by 100 during the import process. A 1 lb. item is stored
as 100 in Great Plains.
For QTYONHND - ATYALLOC, by default the import takes the quantities from all locations/sites.
Some customers wish to only import from one location code.

CONFIDENTIALITY NOTICE - The information contained in this document is confidential and proprietary. This document is to be used with the
understanding that it will be held in strict confidence and not used for reasons unrelated directly to the specific purpose of this document. No part of the
document may be circulated or reproduced for distribution outside the Client organization without prior written permission from Nodus Technologies,
eStore Solution Stack™ v4.0 User’s Guide
275
Appendix B – Customer Mapping from GP
GP OBJECT GP FIELD eStore OBJECT eStore FIELD NOTES
Customer CustomerID UserAccount GPCustomerID
Customer Email OR UserID UserAccount UserName Config setting for which field to use as username
Customer Password UserAccount Password
Default Password from config used if password is invalid
Customer Name UserAccount FirstName Name field split into first name and last name
Customer Name UserAccount LastName Name field split into first name and last name
Customer PriceLevel UserAccount GPPriceLevel
Customer Address/Contact Contacts.Address FirstName Contact split into first name and last name
Customer Address/Contact Contacts.Address LastName Contact split into first name and last name
Contacts.Address CompanyName
Customer Address/Address1 Contacts.Address StreetLine1
Customer Address/Address2 Contacts.Address StreetLine2
Customer Address/City Contacts.Address City
Customer Address/State Contacts.Address StateCode
State needed to be converted to 2 digit state code
Customer Address/Zip Contacts.Address Zip
Customer Address/PhoneNumber1 Contacts.Address
PhoneNumber1
Customer Address/FaxNumber Contacts.Address FaxNumber

CONFIDENTIALITY NOTICE - The information contained in this document is confidential and proprietary. This document is to be used with the
understanding that it will be held in strict confidence and not used for reasons unrelated directly to the specific purpose of this document. No part of the
document may be circulated or reproduced for distribution outside the Client organization without prior written permission from Nodus Technologies,
eStore Solution Stack™ v4.0 User’s Guide
276
Appendix C – Standard GP Pricing Logic
View Items
Log in?
Obtain Default
Item PriceLevel
Assign Default Site
PriceLevel to Customer
Check Item’s
Volume Pricing
Return available Price and update it to
eSSS Site Price
Return GP List
Price
(eSSS’s Site Price)
YesNo
No
Display Price to
user
Load item’s
volume Pricings
Yes
New User? Yes
No
Retrieve Customer
PriceLevel
Add Item to order
While adding item to order,
we must save the GP Price
Level which current item’s
price belong to. This
OrderItem’s Price Level will
be sent to GP within the line
item node.
Check Item’s
Volume PricingNo
Load item’s
volume Pricings
Yes

CONFIDENTIALITY NOTICE - The information contained in this document is confidential and proprietary. This document is to be used with the
understanding that it will be held in strict confidence and not used for reasons unrelated directly to the specific purpose of this document. No part of the
document may be circulated or reproduced for distribution outside the Client organization without prior written permission from Nodus Technologies,
eStore Solution Stack™ v4.0 User’s Guide
277
End User License Agreement (EULA)
Important – Read Carefully. This Nodus End-User License Agreement (“Agreement”) is a legal
agreement between you (on the one hand) and Nodus, Technologies, Inc. (“Nodus”) and its OEM
partner(s). (“OEM”) (on the other hand), for the software product identified above (the “Product”), which
includes computer software and may include associated media, printed materials, and online or electronic
documentation. By installing, copying, other otherwise using this Product, you agree to be bound by the
terms of this Agreement. If you, the End-User, do not agree to the terms of this Agreement, do not install
or use this Product; may, however, return it to your place of purchase for a refund.
This license is not a sale. Title and copyrights to the Product remain with Nodus and its OEM partner (s).
Unauthorized copying of the data, or failure to comply with the provisions of this License Agreement,
will result in automatic termination of this license and will make available to Nodus and its OEM
partner(s), other legal remedies. IN THE EVENT OF LICENSE TERMINATION, ALL MATERIALS,
DATABASES, AND DOCUMENTATION MUST BE IMMEDIATELY RETURNED TO NODUS
TECHNOLOGIES, INC. WITH THE ADDRESS LISTED AT THE END OF THIS AGREEMENT.
1. End-User represents and warrants that it is authorized and empowered to enter into this Agreement.
Nodus represents and warrants that it is authorized and empowered to grant the rights hereinafter set
forth.
2. Nodus and its OEM partner(s) hereby grants End-User a non-exclusive, non-transferable right to use
the Product, subject to the use restrictions and limitations set forth in Section 5 and Section 6 below.
3. Nodus shall provide End-User with one (1) machine-readable copy of the Product.
4. End-User acknowledges that the Product is confidential, proprietary material owned and copyrighted
by Nodus. End-User agrees that Nodus and its OEM partner(s) shall retain exclusive ownership of the
Product, including all literary property rights, patents, copyrights, trademarks, trade secrets, trade names,
or service marks, including goodwill and that Nodus may enforce such rights directly against End-User in
the event the terms of this Agreement are violated.
5. The Product is intended for use solely by End-User for their own internal purposes as an alternative
electronic information source of data. The Product may only be used at the location(s) licensed and paid
for by End-User to the Nodus. End-User agrees not to copy, modify, sub-license, assign, transfer or resell
the Product, in whole or in part. End-User agrees not to translate, reverse engineer, decompile,
disassemble, or make any attempt to discover the source code of the Product (except and only to the
extent applicable law prohibits such restrictions). End-User further agrees not to download/upload the
Product, in whole or in part, or to establish a network, place data on the Internet, or offer a service bureau
utilizing the Product. End-User agrees to restrict access to the Product to designated employees and to
use its best efforts to prevent violation of these restrictions by agents, employees and others, taking such
steps and reasonable security precautions as may be necessary. End-User shall permit Nodus and/or its
representative access to its premises during normal business hours to verify compliance with the
provisions of this Agreement.
6. This license authorizes use of the Product at a single location, which shall mean a single location
which uses or accesses the Product either from a computer or terminal on site or through a computer or

CONFIDENTIALITY NOTICE - The information contained in this document is confidential and proprietary. This document is to be used with the
understanding that it will be held in strict confidence and not used for reasons unrelated directly to the specific purpose of this document. No part of the
document may be circulated or reproduced for distribution outside the Client organization without prior written permission from Nodus Technologies,
eStore Solution Stack™ v4.0 User’s Guide
278
terminal at a supporting location.
7. This Agreement shall remain in force as long as the End-User using the Product is paying the periodic
maintenance fee. Failure to pay the periodic maintenance fee shall cause this agreement to expire. Nodus
or End-User may terminate use of the Product and this Agreement by written notice, at least thirty (30)
days prior to the termination. Within thirty (30) days after expiration or notice of termination of the
Agreement, End-User shall return to Nodus, postage prepaid, all copies of the Product. Continued use of
the Product or any information contained therein or supplied under this Agreement after termination, or
expiration of this Agreement is expressly prohibited.
8. All UPDATES provided by Nodus and its affiliates shall be considered part of the Product and subject
to the terms and conditions of this Agreement. Additional license terms may accompany UPDATES. By
installing, copying, or otherwise using any UPDATE, End-User agrees to be bound by this Agreement
and any terms accompanying each such UPDATE. If End-User does not agree to the additional license
terms accompanying such UPDATES, do not install, copy, or otherwise use such UPDATES.
9. End-User agrees that Nodus and its affiliates may collect and use technical information End-User
provide as a part of support services related to the Product.
10. End-User acknowledges that the Product is of U.S. origin and agrees to comply with all applicable
international and national laws that apply to the Product, including the U.S. Export Administration
Regulations, as well as end-user, end-use and destination restrictions issued by U.S. and other
governments.
11. NODUS REPRESENTS THAT THE PRODUCT DOES NOT VIOLATE OR INFRINGE ANY
PATENT, TRADEMARK, TRADE SECRET, COPYRIGHT, OR SIMILAR RIGHT. IN THE EVENT
THE PRODUCT IS HELD TO INFRINGE THE RIGHTS OF ANY THIRD PARTY, NODUS SHALL
HAVE THE OPTION EITHER TO PROCURE THE RIGHT FOR THE END-USER TO CONTINUE
USING THE PRODUCT OR AT NODUS'S EXPENSE, TO REPLACE OR MODIFY THE PRODUCT
SO THAT IT BECOMES NON-INFRINGING. NODUS AND ITS OEM PARTNER(S) MAKE NO
OTHER WARRANTY, EXPRESS OR IMPLIED, INCLUDING, BUT NOT LIMITED TO, THE
ACCURACY OF THE PRODUCT, THE MERCHANTABILITY AND FITNESS OF THE PRODUCT
FOR A PARTICULAR PURPOSE. FURTHER, NODUS DOES NOT WARRANT THE
COMPATIBILITY OF THE PRODUCT WITH END-USER'S COMPUTER HARDWARE AND/OR
SOFTWARE SYSTEM.
12. End-User's sole and exclusive remedy for any damage or loss in any way connected with the Product
furnished herein, whether by breach of warranty, negligence, or any breach of any other duty, shall be, at
Nodus’ option, replacement of the Product or return or credit of an appropriate portion of any payment
made by End-User with respect to such Product. Under no circumstances shall Nodus or its OEM
Partner(s) be liable to End-User or any other person for any indirect, special or consequential damages of
any kind, including, without limitation, damages for loss of goodwill, work stoppage, computer failure or
malfunction or any and all other commercial damages or losses. Additionally, Nodus assumes no liability
for damages caused by incorrect parts usage and has no responsibility to verify that the parts are correct
for a customer's vehicle in accordance with the manufacturers' specifications.
13. Nodus may cancel this license at any time if End-User fails to comply with the terms and conditions
of this Agreement; and Nodus may obtain injunctive relief and may enforce any other rights and remedies

CONFIDENTIALITY NOTICE - The information contained in this document is confidential and proprietary. This document is to be used with the
understanding that it will be held in strict confidence and not used for reasons unrelated directly to the specific purpose of this document. No part of the
document may be circulated or reproduced for distribution outside the Client organization without prior written permission from Nodus Technologies,
eStore Solution Stack™ v4.0 User’s Guide
279
to which it may be entitled in order to protect and preserve its proprietary rights.
14. This Agreement is the complete and exclusive statement of the understanding between the parties,
with respect to the subject matter, superseding all prior agreements, representations, statements and
proposals, oral or written.
15. No term or provision hereof shall be deemed waived and no breach excused, unless such waiver or
consent shall be in writing and signed by the party claimed to have waived or consented. Any consent by
any party to, or waiver of, a breach by the other, whether express or implied, shall not constitute consent
to, waiver of, or excuse for any other different or subsequent breach.
Limitation of Liability
IN NO EVENT WILL NODUS OR ITS OEM PARTNER(S) BE LIABLE FOR ANY DAMAGES,
INCLUDING LOSS OF DATA, LOST PROFITS, COST OF COVER, OR OTHER SPECIAL,
INCIDENTAL, CONSEQUENTIAL, OR INDIRECT DAMAGES ARISING FROM THE USE OF THE
PROGRAM OR ACCOMPANYING DOCUMENTATION, HOWEVER CAUSED AND ON ANY
THEORY OF LIABILITY. THIS LIMITATION WILL APPLY EVEN IF NODUS HAS BEEN
ADVISED OF THE POSSIBILITY OF SUCH DAMAGE. YOU ACKNOWLEDGE THAT THE
LICENSE FEE REFLECTS THIS ALLOCATION OF RISK.
General
The laws of the State of California shall govern this Agreement. This Agreement is the entire agreement
between Nodus and End-User concerning the Product and supersedes any other communications or
advertising with respect to the program and accompanying documentation. If any provision of the
Agreement is held invalid, the remainder of the Agreement shall continue in full force and effect. If you
have any questions, please contact in writing:
Nodus Technologies, Inc., 2099 S. State College, Suite 250, Anaheim, CA 92806, Tel: (909) 482-4701