Embed Size (px)
Citation preview

1
EstiNet11 Develpement Manual of Protocol
Module
Release Date: April 15, 2020
Produced and maintained by EstiNet Technologies Inc.

2
Some requirements for reading this manual:
Experience of EstiNet GUI manipulation and simulation
Source code is already acquired
Familiar with C++
Basic knowledge of network
Who want to read this manual?
To develop your own module on EstiNet
To modify existed module
Content of this manual
This manual is divided into 9 chapters: the former two chapters focus on the
development interface of GUI, and the latter seven chapters focus on common API of
internal modules as well as the data structure.

3
TABLE OF CONTENTS
CHAPTER 1 MDF AND PROTOCOL STACK 4
CHAPTER 2 MDF AND RUN TIME QUERY 34
CHAPTER 3 INTER-MODULE COMMUNICATION 54
CHAPTER 4 RUN TIME MESSAGE 61
CHAPTER 5 RUN A SIMULATION CASE WITHOUT THE USE OF THE GUI 66
CHAPTER 6 TIMER 71
CHAPTER 7 EVENT 82
CHAPTER 8 PACKET 88
CHAPTER 9 OTHER APIS 99
APPENDIX 105
4
Chapter 1 MDF and Protocol Stack
Download Exercises:
Chapter1.tar.bz2
EstiNet simulation engine provides a simulator platform with several modules, each
module has different mechanism, for example, the modules simulate wired IEEE
802.3, the modules simulate wireless IEEE 802.11 series, and so on.
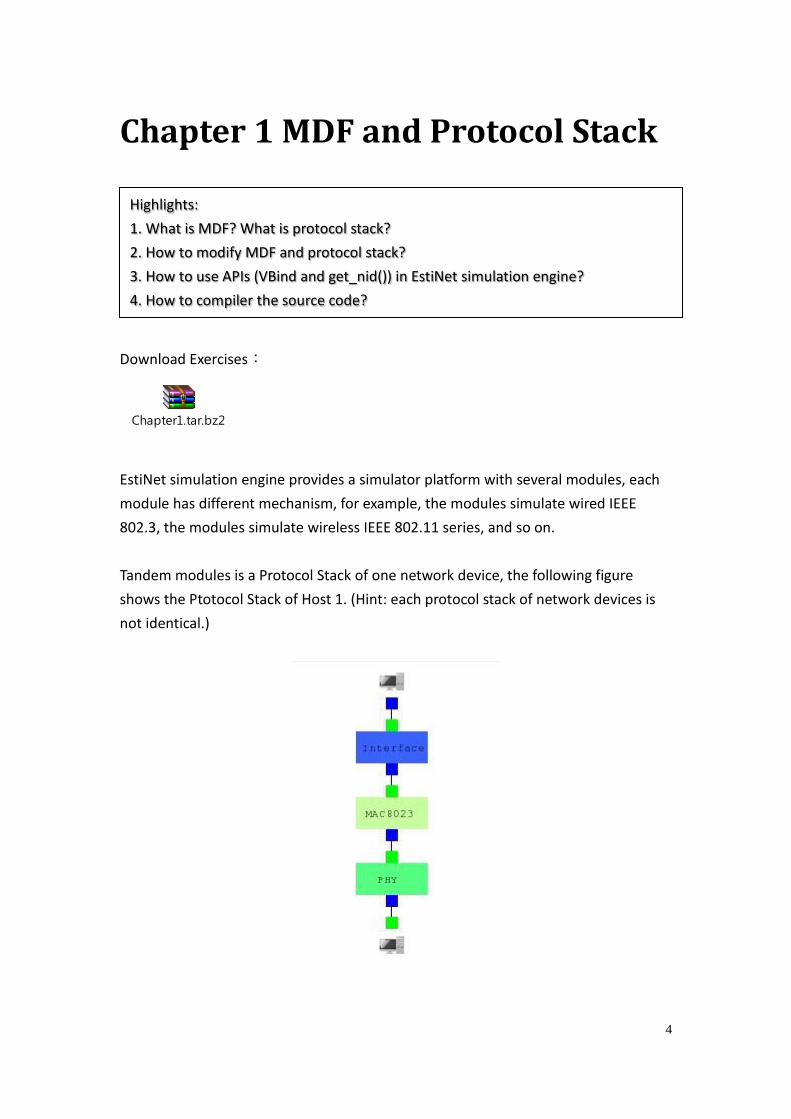
Tandem modules is a Protocol Stack of one network device, the following figure
shows the Ptotocol Stack of Host 1. (Hint: each protocol stack of network devices is
not identical.)
Highlights:
1. What is MDF? What is protocol stack?
2. How to modify MDF and protocol stack?
3. How to use APIs (VBind and get_nid()) in EstiNet simulation engine?
4. How to compiler the source code?

5
Each module has its own default, which is open for user’s additional setting. A file of
module describing and platform are needed for open GUI interface for users, this file
is so-called ‘MDF’ file.
MDF is abbreviation of Module Description File, which could be used to set the
factors of module via screen of GUI layout. After setting the factors by user, GUI will
be switched to G mode by the user, and write the setting into the
if_and_medium_conf file in the directory of
sim/interface_and_medium_setting/general/.
Therefore, MDF is very important for module developer. It is easy to set user’s own
layouts and factors with MDF assistence. There are some common events for layout
such as RADIOBOX, TEXTLINE, CHECKBOX, and LABLE, etc..
Exercise 1-1. Modify MDF and Modify Protocol Stack with GUI
Build a demo topoloy
Build a topology as the following figure in the D Mode of GUI, this example
topology is the conection of Host 1 and Host 2, then transfer to the E Mode
of GUI and save the file as user_defined01.

6
Double clicks on Host 1 in the E Mode, and select “Module Editor,” you will
see the Protocol Stack of this node.
First, add a customized module in which user’ code could be added, and
add this module into Protocol Stack. On the left, there is a drop-down
menu, “Module Group.” GUI is responsible for management and
categorization of these modules, for example, in the first option of 80211P,
there is a module of WME.

7
Please choose the module group, "USER_DEFINED."

8
After choosing module group “USER_DEFINED,” you will see 25
UserModules, which are waiting for user’s definition. The 25 modules are
free of charge. Now, select the first free module, "UserModule01."
Click the icon of "UserModule01," drag it to the central white space, and
insert it between Interface and MAC8023. Click the “X” button below to
delete the link between Interface and MAC8023, and click the arrow
botton below to connect the green end of "UserModule01" to the blue end
of Interface, also, connect the blue end of "UserModule01" to the green
end of MAC8023. Now, you have just finished adding UserModule01 into
the Protocol Stack of Host 1. (After the insertion, you could refresh the
Protocol Stack by clicking “ReDraw.”)
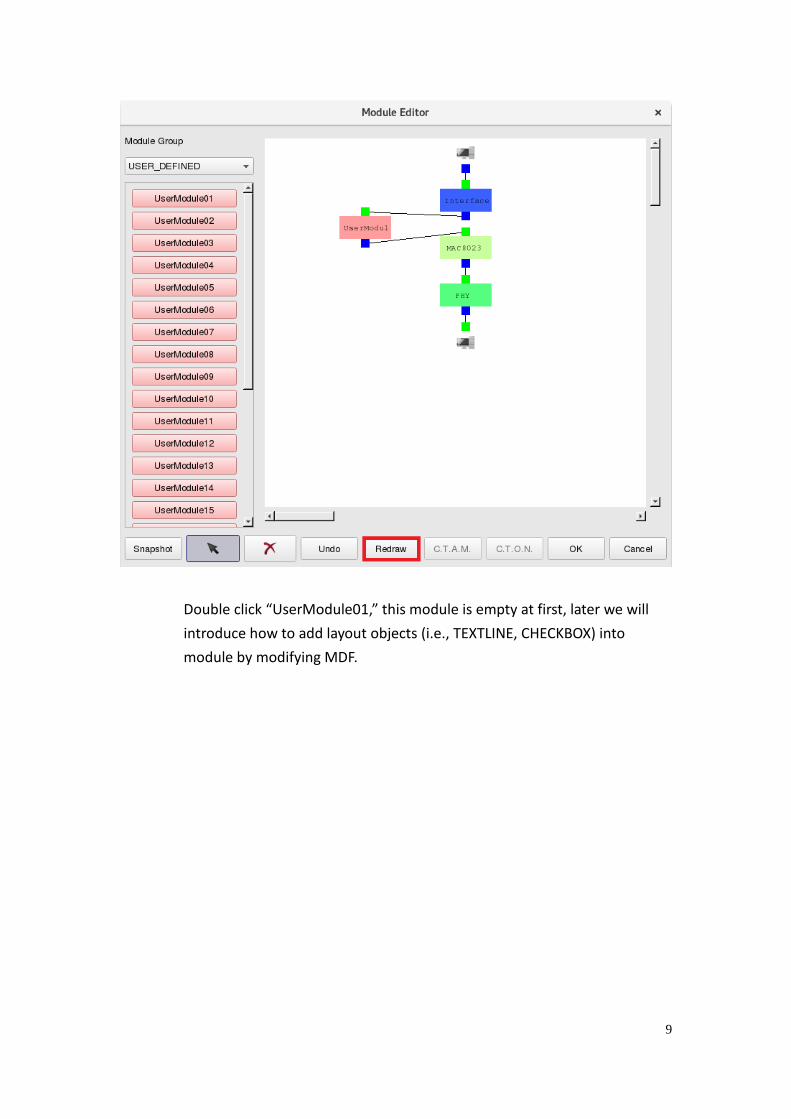
9
Double click “UserModule01,” this module is empty at first, later we will
introduce how to add layout objects (i.e., TEXTLINE, CHECKBOX) into
module by modifying MDF.

10
Similarly, if you want Host 2 with same Protocol Stack, just push “OK”
button below, turn back to setting screen of Host 1, then push the button
“C.P. T.O.N.” (Copy the Node's Protocol Stack to Other Nodes with the Same
Type) to copy Protocol Stack of Host 1 to another Host, in this topology,
Host 2.

11
Topology setting is finished. Following topology in this manual are also
based on this setting just mentioned above. Whole Protocol Stack is shown
as follows:

12
Where is MDF?
Next, we want to write the MDF file of UserModule01 by adding TEXTLINE
to fill two parameters, one is "My Number" and the other is "My String." As
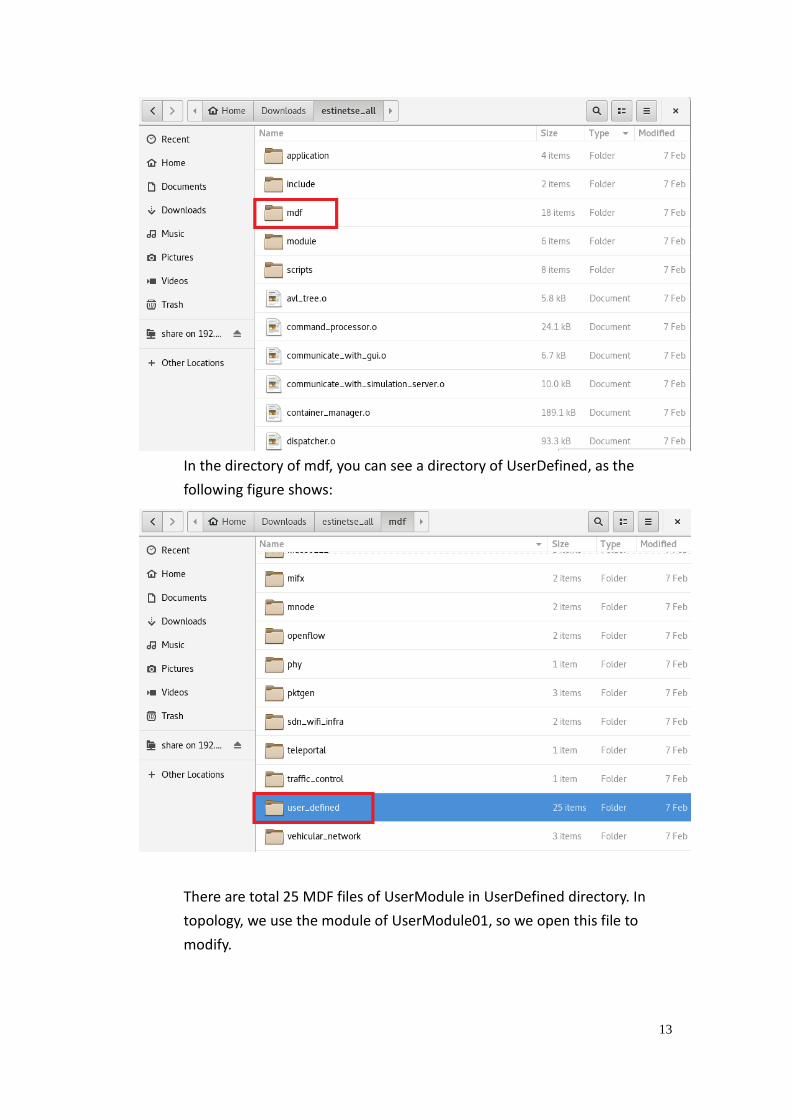
such, we have to modify MDF file. First, open the directory of source code
(check the position of your own source code to ensure the file path is
correct), there is a directory of mdf shown as the following figure.
13
In the directory of mdf, you can see a directory of UserDefined, as the
following figure shows:
There are total 25 MDF files of UserModule in UserDefined directory. In
topology, we use the module of UserModule01, so we open this file to
modify.

14
After opening MDF file, as the following figure shows, displayed
programming language has different grammer as common ones, because
MDF is designed for GUI’s configuration. When opening the Module
Edoitor, GUI reads and categorizes all the MDF files in the order of Group
Name (in a column of MDF file) in the left side; meanwhile, when one
module is opened, GUI follows the grammer of MDF file in this module to
execute the order.
Basic Framework of MDF:
A module description block starts with the “ModuleSection” keyword and
ends with the “EndModuleSection” keyword. A module description block is
divided into three parts – the HeaderSection, InitVariableSection, and
ExportSection, respectively. Similarly, these sections start with the
“HeaderSection,” “InitVariableSection,” and the “ExportSection” keywords,
respectively, and end with the “EndHeaderSection,”
“EndInitVariableSection,” and the “EndExportSection” keywords,
respectively.
HeaderSection block are the name of defined module, the group of module
(for GUI sorting), class of network, the declaration of parameter, and so on.

15
InitVariableSection block is display of defined GUI object, for exemple,
button, TEXTLINE, RADIOBOX, CHECKBOX, and GROUP objects, etc..
ExportSection block is that, when simulation is running, GUI gets and sets
data from simulated engine via IPC (inter-process communication) by two
defined objects. In next chapter, we will tell you the usage of this block.
In this example, we hope to add two parameters. So, declare two
parameters in HeaderSection, one is "MyNumber", and the other is
"MyString," as shown as the red words in the following figure:
ModuleSection
HeaderSection
ModuleName UserModule01
GroupName User_Defined

16
Introduction "This is a user-defined module."
Parameter myNumber 300 local
Parameter myString 111.111.111.111 local
EndHeaderSection
InitVariableSection
Caption "Parameters Setting"
FrameSize 320 90
Begin BUTTON b_ok
Caption "OK"
Scale 250 17 60 30
ActiveOn ALL_MODE
Action ok
Comment "OK Button"
End
Begin BUTTON b_cancel
Caption "Cancel"
Scale 250 49 60 30
ActiveOn ALL_MODE
Action cancel
Comment "Cancel Button"
End
EndInitVariableSection
ExportSection
Caption ""
FrameSize 0 0
EndExportSection
EndModuleSection
Identifier of new parameter is shown as “parameter,” with a space behind
and name of parameter; then enter the defalt value of parameter, the last
identifier is “local.” By the way, the last identifier is for GUI only, you can
get more details from appendex A.
You have just finished new parameters setting of MDF file.

17
Then we are about to set the defult of reading MDF manipulation by USER
MODULE01 in the simulated engine. Every module has its own head file
and cc file. The location of “user_module_01.h” is under the directory of
sorce code: include/module/user-defined/user_module_01.h. That is to
say, the location of “user_module_01.cc” is under the directoty of
“module/user-defined/user_module_01.cc” shown in the following two
figures:

18
Declare two parameters in the file, user_module_01.h, and read two
parameters of MDF with if_and_medium_conf file. Then declare an
integer(Number) and a char pointer(String), as the following red words:
#ifndef __user_module_01_h__
#define __user_module_01_h__
#include <event.h>
#include <object.h>
class UserModule01 : public NslObject {
private:
int Number;
char *String;
public:
UserModule01(u_int32_t type, u_int32_t id, struct plist* pl, const char *name);
~UserModule01();
int init();
int command(int argc, const char *argv[]);
int recv(ePacket_ *pkt);
int send(ePacket_ *pkt);
};
#endif /* __user_module_01_h__ */
In the constructor of UserModule01, we are about to connect the variable
of module to the variable of MDF via “vBind_int” and “vBind_char_str”,
two APIs that EstiNet offered. The first parameter is the name of defined
parameter in MDF, the second is C++ variable used to connect MDF
variable in the module. The method is shown as red words in the following
figure. And in the function of init, print out these two variables (add ANSI
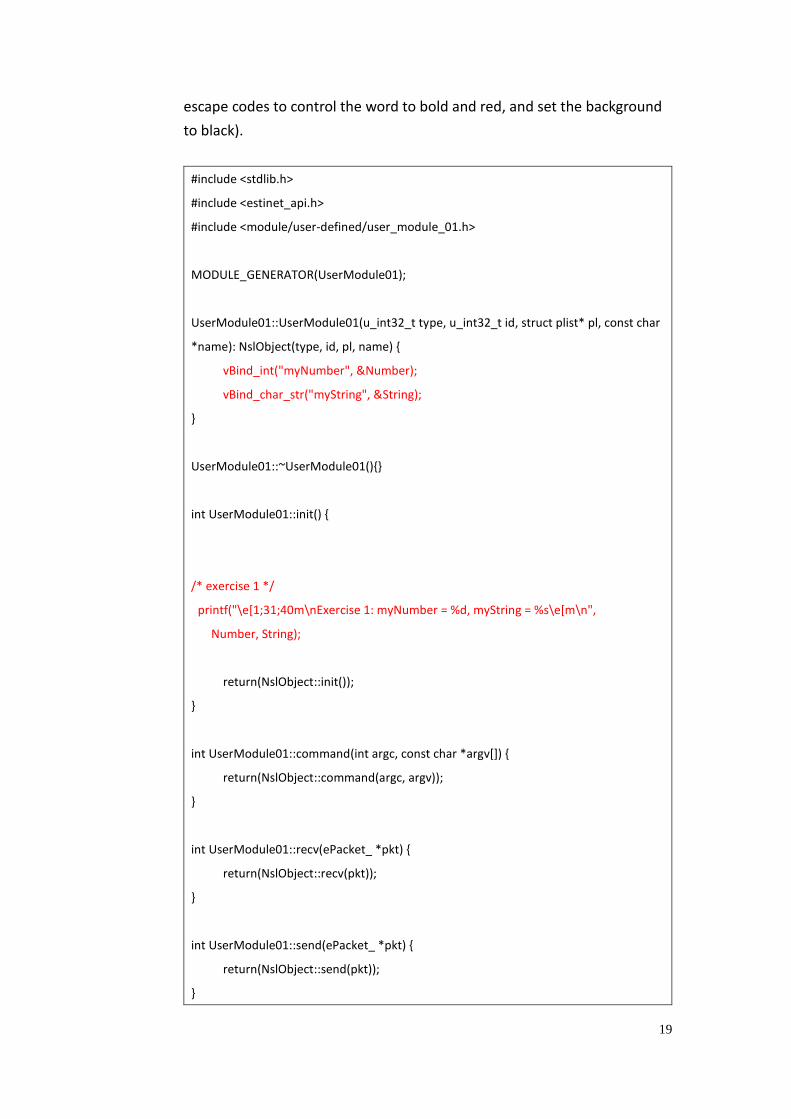
19
escape codes to control the word to bold and red, and set the background
to black).
#include <stdlib.h>
#include <estinet_api.h>
#include <module/user-defined/user_module_01.h>
MODULE_GENERATOR(UserModule01);
UserModule01::UserModule01(u_int32_t type, u_int32_t id, struct plist* pl, const char
*name): NslObject(type, id, pl, name) {
vBind_int("myNumber", &Number);
vBind_char_str("myString", &String);
}
UserModule01::~UserModule01(){}
int UserModule01::init() {
/* exercise 1 */
printf("\e[1;31;40m\nExercise 1: myNumber = %d, myString = %s\e[m\n",
Number, String);
return(NslObject::init());
}
int UserModule01::command(int argc, const char *argv[]) {
return(NslObject::command(argc, argv));
}
int UserModule01::recv(ePacket_ *pkt) {
return(NslObject::recv(pkt));
}
int UserModule01::send(ePacket_ *pkt) {
return(NslObject::send(pkt));
}

20
Open the terminal to the directory of the sorce code, execute make to
compile all the sorce code.
Then execute make install, this will copy the binary file of simulated engine
(estinetse) and just finished mdf file to the GUI designated path (bin file
will copy to the directory, /usr/local/estinet/bin; mdf file will copy to the
directory, /usr/local/estinet/etc/mdf) as shown in the following figure:
Attention: Before executing make install, GUI have to be closed. Because
GUI will read all the MDF parameters while GUI is initiating. If you add
parameter under activating GUI, you have to close GUI and restart it;
however, if you just want to set the width and height of layout and add
objects, GUI dosen’t need to be restart, just click module in GUI again, you
can see the result of width and height change.
After completing the steps mentioned above, compiling and install are
finished.
Then open three terminals.
First terminal executes estinetjd, as shown in the following figure:

21
Second terminal executes “estinetss” command.
Third terminal executes “estinetgui” command.
First, save GUI with Protocol Stack just set, and close it.
reopen GUI, enter estinetgui at terminal, open the topology,
“user_defined01.tpl,” switch to mode G to execute simulation.
Pay attention to the result shown in the window of terminal.

22
Because there are two nodes of the topology, which are both put in the module,
“User module01,” the init function of this module prints out parameters with
two resultes as shown in the following figure:
Modify Layout
The above result on estinetss displays default value of declared parameters
in MDF. While you want to input parameter value via GUI objects, you have
to use GUI objects like TEXTLINE and LABEL in MDF.
ModuleSection
HeaderSection
ModuleName UserModule01
GroupName User_Defined
Introduction "This is a user-defined module."
Parameter myNumber 300 local
Parameter myString 111.111.111.111 local
EndHeaderSection
InitVariableSection
Caption "Parameters Setting"
FrameSize 320 90
Begin TEXTLINE myNumber
Caption "My Number "

23
Scale 10 18 220 30
ActiveOn MODE_EDIT
Enabled TRUE
Type INT
Comment "An Integer"
End
Begin TEXTLINE myString
Caption "My String "
Scale 10 48 220 30
ActiveOn MODE_EDIT
Enabled TRUE
Type IP
Comment "An IP string"
End
Begin BUTTON b_ok
Caption "OK"
Scale 250 17 60 30
ActiveOn ALL_MODE
Action ok
Comment "OK Button"
End
Begin BUTTON b_cancel
Caption "Cancel"
Scale 250 49 60 30
ActiveOn ALL_MODE
Action cancel
Comment "Cancel Button"
End
EndInitVariableSection
ExportSection
Caption ""
FrameSize 0 0
EndExportSection
EndModuleSection
24
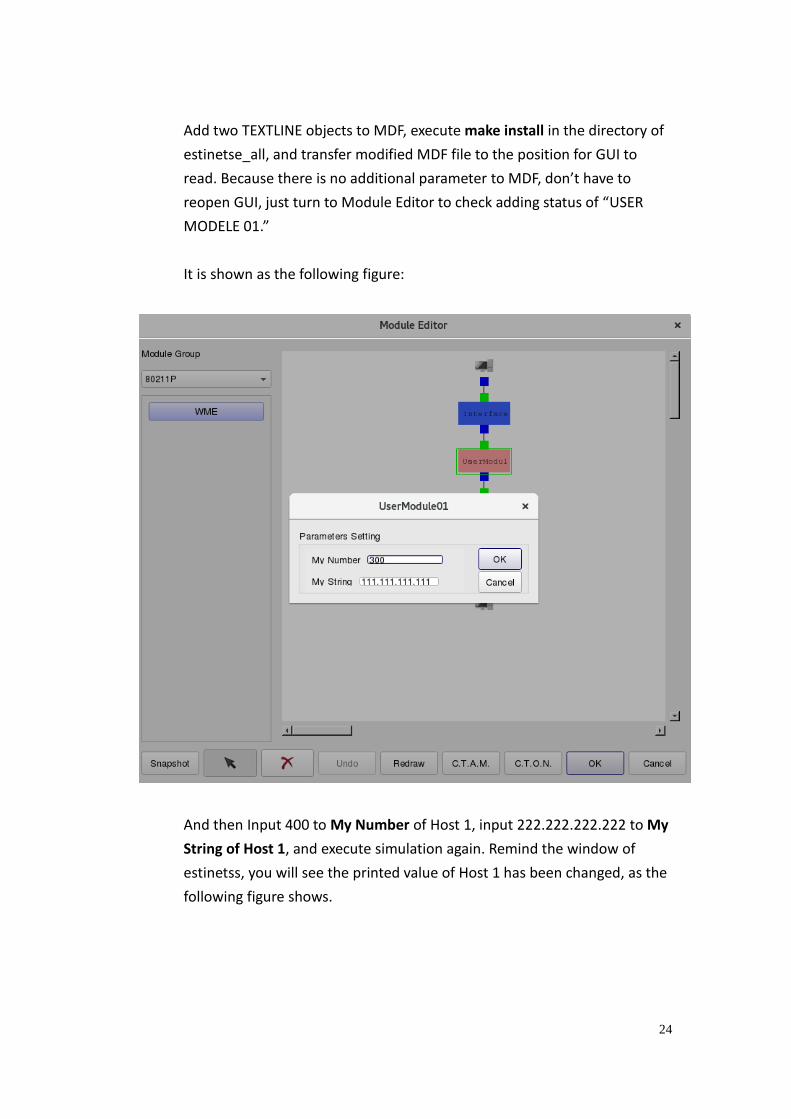
Add two TEXTLINE objects to MDF, execute make install in the directory of
estinetse_all, and transfer modified MDF file to the position for GUI to
read. Because there is no additional parameter to MDF, don’t have to
reopen GUI, just turn to Module Editor to check adding status of “USER
MODELE 01.”
It is shown as the following figure:
And then Input 400 to My Number of Host 1, input 222.222.222.222 to My
String of Host 1, and execute simulation again. Remind the window of
estinetss, you will see the printed value of Host 1 has been changed, as the
following figure shows.

25

26
So the developer could arrange GUI with MDF to set parameters for
simulated engine.
Use get_nid()
From print result, we cannot recognize which node has printed this result.
At this moment, we can use the API, “get_nid(),” to arrange print.
printf("\e[1;31;40m\nExercise 1: Node ID = %d, myNumber = %d,
myString = %s\e[m\n", get_nid(), Number, String);
The print-out result is shown as follow:
Detail of TEXTLINE
TEXTLINE has a lot of parameters for additional setting; please turn to
appendix B for all introductions of parameters. Here, we introduce
common part of them in brief.
Caption:
Title of the TEXTLINE

27
Scale
Here is an example as mentioned above, in"Scale 10 48 220 30," four
figures represent X, Y, width, and hight respectively. X, Y on the
upper left corner are 0, 0.
ActiveOn
The setting has three values: MODE_EDIT, MODE_SIMULATION, and
ALL_MODE. These values are mainly used to set user-designated
TEXTLINE to active state in GUI mode. When the setting is
MODE_EDIT, the TEXTLINE is enabled in Edit mode; when the setting is
MODE_SIMULATION, the TEXTLINE is enabled in G mode; when the
setting is ALL_MODE, the TEXTLINE is enabled in every mode
Enabled
If this parameter is OFF, this TEXTLINE is not enabled (greyscale), user
could not use it. If this parameter is “ON” or the TEXTLINE is actived in
other modes, the TEXTLINE is enabled for user to use.
Supplement: vBind() API
In above-mentioned exercises, simulated engine uses function of vBind(),
and turns GUI-produced if_and_medium_conf module variable into
MODULE of simulated engine. In exercise 1-1, after finishing MDF setting,
we run simulation in GUI, if_and_medium_conf file will be transferred to
simulated engine. The parameter values of UserModule01 in
if_and_medium_conf are shown bellow:

28
As such, the module read if_and_medium_conf parameter via vBind() c++
function. In order to use vBind(), we need to know the data type of the mdf
parameter. Current estinetse support ten data type for vBind (int, uint8,
uint16, bool, float, double, char_str, ip, ipv6, mac). The first parameter of
vBind() is parameter of MDF, and the second parameter is c++ varible of
module in simulation. Here is the following example for vBind_int, an API:
vBind_int("myNumber", &Number);
Exercise 1-2
RADIOBOX & GROUP
Here is the exercise of Layout with the object, RADIOBOX.
Attention! While using RADIOBOX, outer layer has to cooperate with
GROUP object, because the length, width and height of RADIOBOX
must coordinate with GROUP object.
MDF design is shown below:
ModuleSection
HeaderSection

29
ModuleName UserModule01
GroupName User_Defined
Introduction "This is a user-defined module."
Parameter myNumber 300 local
Parameter myString string1 local
EndHeaderSection
InitVariableSection
Caption "Parameters Setting"
FrameSize 350 170
Begin Group g_radio
Caption "Mode"
Scale 10 15 260 135
ActiveOn MODE_EDIT
Enabled TRUE
Begin RADIOBOX myString
Option "op1"
Enable myNumber
Enable lable1
OptValue "string1"
VSpace 5
EndOption
Option "op2"
Disable myNumber
Disable lable1
OptValue "string2"
VSpace 40
EndOption
Type STRING
Comment "radiobox test"
End
Begin TEXTLINE myNumber
Caption "input Number"

30
Scale 35 35 180 35
ActiveOn MODE_EDIT
Enabled FALSE
Type INT
Comment "for test"
End
Begin LABEL lable1
Caption "(INT)"
Scale 220 35 35 35
ActiveOn MODE_EDIT
Enabled FALSE
End
End
Begin BUTTON b_ok
Caption "OK"
Scale 280 17 60 30
ActiveOn ALL_MODE
Action ok
Comment "OK Button"
End
Begin BUTTON b_cancel
Caption "Cancel"
Scale 280 49 60 30
ActiveOn ALL_MODE
Action cancel
Comment "Cancel Button"
End
EndInitVariableSection
ExportSection
Caption ""
FrameSize 0 0
EndExportSection
EndModuleSection
31
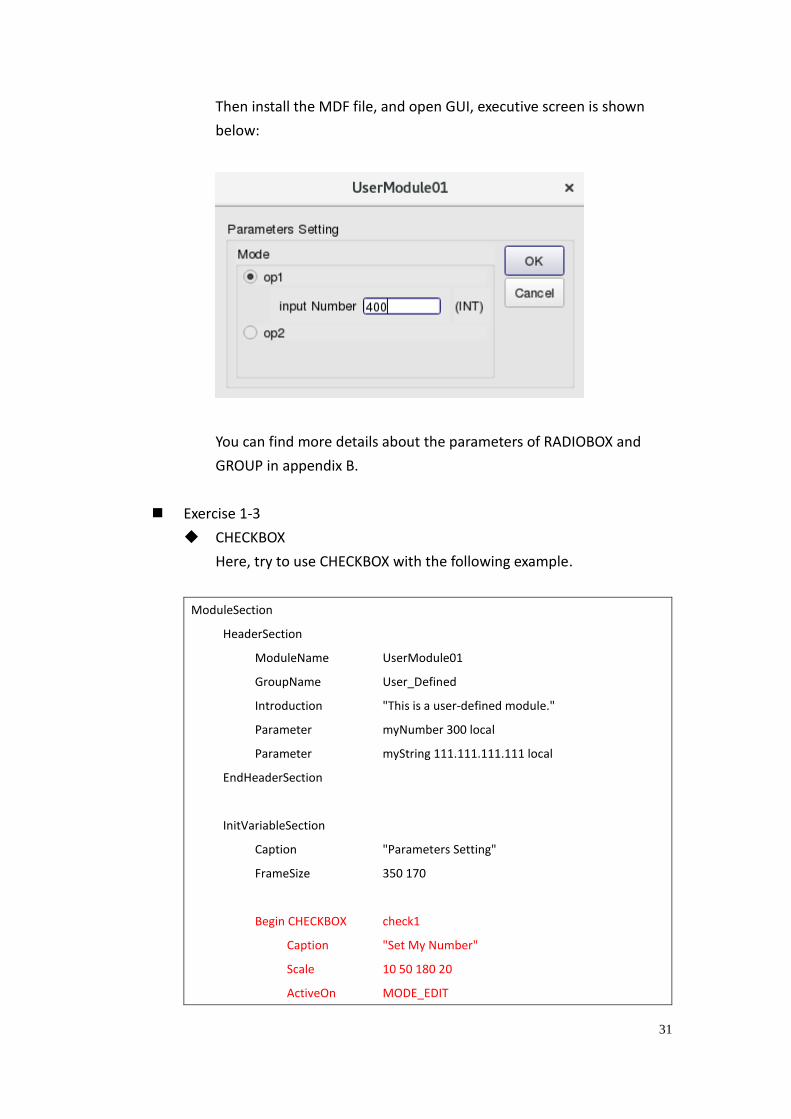
Then install the MDF file, and open GUI, executive screen is shown
below:
You can find more details about the parameters of RADIOBOX and
GROUP in appendix B.
Exercise 1-3
CHECKBOX
Here, try to use CHECKBOX with the following example.
ModuleSection
HeaderSection
ModuleName UserModule01
GroupName User_Defined
Introduction "This is a user-defined module."
Parameter myNumber 300 local
Parameter myString 111.111.111.111 local
EndHeaderSection
InitVariableSection
Caption "Parameters Setting"
FrameSize 350 170
Begin CHECKBOX check1
Caption "Set My Number"
Scale 10 50 180 20
ActiveOn MODE_EDIT

32
Enabled TRUE
Option "TRUE"
OptValue "on"
Enable myNumber
EndOption
Option "FALSE"
OptValue "off"
Disable myNumber
EndOption
Comment ""
End
Begin TEXTLINE myNumber
Caption "My Number "
Scale 10 70 220 30
ActiveOn MODE_EDIT
Enabled FALSE
Type INT
Comment "An Integer"
End
Begin BUTTON b_ok
Caption "OK"
Scale 280 17 60 30
ActiveOn ALL_MODE
Action ok
Comment "OK Button"
End
Begin BUTTON b_cancel
Caption "Cancel"
Scale 280 49 60 30
ActiveOn ALL_MODE
Action cancel
Comment "Cancel Button"

33
End
EndInitVariableSection
ExportSection
Caption ""
FrameSize 0 0
EndExportSection
EndModuleSection
Then install the MDF file, and then open GUI, executive screen is
shown below:
You can find more details about the parameters of CHECKBOX in
appendix B.

34
Chapter 2 MDF and Run Time
Query
Download Exercises:
Chapter2.tar.bz2
In MDF, there are two objects for variable inquiry during simulation, one is
ACCESSBUTTON, and the other is INTERACTIONVIEW. Both objects have to
collaborate with function COMMAND() and EXPORT().
Topology Setting
In this chapter, we will use the same topology (user_module01.xtpl) model as in
chapter 1, and collaborate with user_module_01 module. Also, we will
introduce the function of reading and setting variables of module during
simulating in this chapter.
First, add traffic command to topology model: add into “stcp -4 1.0.1.2” under
APPLICATION tag of HOST 1, and add into “rtcp -4” under APPLICATION tag of
HOST 2, as shown in the following figure:
Highlights:
1. How to use “Run Time Query”?
2. The first kind object of EXPORT SECTION --ACCESSBUTTON
3. The second kind object of EXPORT SECTION --INTERACTIONVIEW
4. Introduction of APIs -- EXPORT() and COMMAND().

35

36
In order to avoid the simulation finishing too fast to observe the change of values,
click “E-Tools→Configure Simulation Processes→Simulation→Set the Progressing→
Try to Synchronize the Real-World Clock”. The option makes virtual time in consistent
with real time.
Then switch to G mode to execute simulation. During simulating, select Host 1 with
right click, choose Module Editor, and double clicks at Interface module. You will see
Export section at the bottom, which can get and set some queue parameters. After
clicking, you will get current simulated data from module, as shown in following
figure:

37
So, in exercise 2-1, we need to add the function of Run Time Query in User
module01.
Exercise 2-1:modify mdf
First open mdf in “usermodule01” (procedures of opening this module is
described in Chapter 1), then modify the bottom Export Section as red
words in the following figure:
ModuleSection
HeaderSection
ModuleName UserModule01
GroupName User_Defined
Introduction "This is a user-defined module."
Parameter myNumber 300 local
Parameter myString 111.111.111.111 local
EndHeaderSection
InitVariableSection
Caption "Parameters Setting"
FrameSize 380 100
Begin TEXTLINE myNumber
Caption "My Number "
38
Scale 10 18 220 30
ActiveOn MODE_EDIT
Enabled TRUE
Type INT
Comment "An Integer"
End
Begin TEXTLINE myString
Caption "My String "
Scale 10 48 220 30
ActiveOn MODE_EDIT
Enabled TRUE
Type IP
Comment "An IP string"
End
Begin BUTTON b_ok
Caption "OK"
Scale 250 17 60 30
ActiveOn ALL_MODE
Action ok
Comment "OK Button"
End
Begin BUTTON b_cancel
Caption "Cancel"
Scale 250 49 60 30
ActiveOn ALL_MODE
Action cancel
Comment "Cancel Button"
End
EndInitVariableSection
ExportSection
Caption ""
FrameSize 380 120
Begin TEXTLINE text_query_mynum

39
Caption "My Number "
Scale 10 15 200 35
ActiveOn MODE_SIMULATION
Enabled TRUE
Type INT
Comment ""
End
Begin TEXTLINE text_query_mystr
Caption "My String "
Scale 10 55 200 35
ActiveOn MODE_SIMULATION
Enabled TRUE
Type INT
Comment ""
End
Begin ACCESSBUTTON ab_get_mynum
Caption "Get"
Scale 215 20 70 25
ActiveOn MODE_SIMULATION
Enabled TRUE
Action GET
ActionObj "export-my-number"
Reference text_query_mynum
Comment "get"
End
Begin ACCESSBUTTON ab_get_mystr
Caption "Get"
Scale 215 55 70 25
ActiveOn MODE_SIMULATION
Enabled TRUE
Action GET

40
ActionObj "export-my-string"
Reference text_query_mystr
Comment "get"
End
Begin ACCESSBUTTON ab_set_mynum
Caption "Set"
Scale 290 20 70 25
ActiveOn MODE_SIMULATION
Enabled TRUE
Action SET
ActionObj "export-my-number"
Reference text_query_mynum
Comment "set"
End
EndExportSection
EndModuleSection
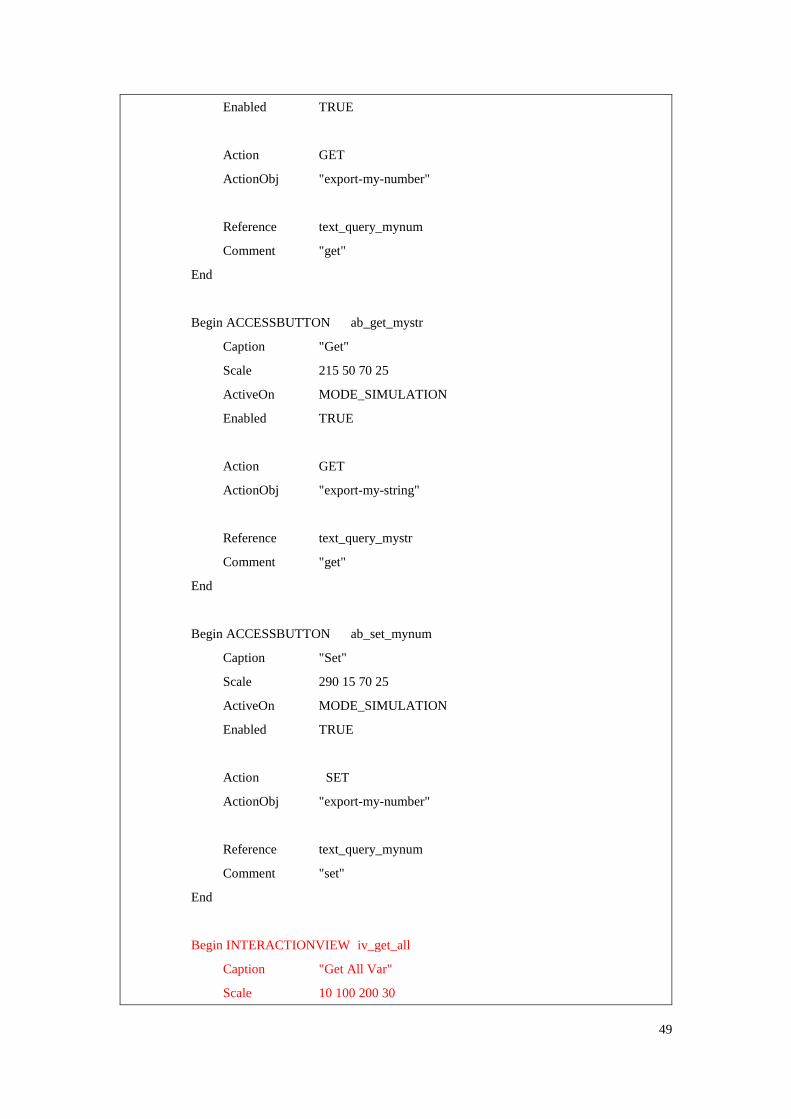
In the bottom of EXPORT SECTION, alter CAPTION into “RUN TIME QUERY,” alter
FRAMSIZE from 0 0 into 380 120 (width height), and add three objects of
ACCESSBUTTON. Two of objects are “ab_get_mynum,” “ab_get_mystr,” and the other
is “ab_set_mystr.”
After altering, use “make install” in the directory of source code, install mdf for GUI,
and open GUI to see modified Layout.
User could check appendix C for the details of parameters in Export section.
Modified objects can be enabled in G MODE after opening GUI, as shown in the
following figure:

41
Modify user_module01.cc file:
Return to directory of source code to modify “user_module01.cc” with APIs, like
VBIND mentioned in the exercise 1-1, with EXPORT API and add codes into the
function command() to parsing the command form GUI.
The first parameter of EXPORT API is user-defined string from “ActionObj” of MDF of
GUI. The second parameter is permission mode. The permission has
E_RONLY(readonly) 、E_WONLY(writeonly) and E_RONLY|E_E_WONLY(can
read/write). For example, string “export-my-number” like as below:
EXPORT("export-my-number", E_RONLY|E_WONLY);
Here, try to modify function of command(). This function is available in every
module, which could read some orders from GUI during run time. When receiving an
orede form GUI, the first is checking the order belongs to GET or SET type of
command. Then the second is get value to or set value from “ActionObj” according to
the kind type of receiving order as red words in the following figure:
#include <stdlib.h>
#include <estinet_api.h>
#include <module/user-defined/user_module_01.h>

42
MODULE_GENERATOR(UserModule01);
UserModule01::UserModule01(u_int32_t type, u_int32_t id, struct plist* pl, const char *name)
: NslObject(type, id, pl, name) {
vBind_int("myNumber", &Number);
vBind_char_str("myString", &String);
}
UserModule01::~UserModule01(){}
int UserModule01::init() {
EXPORT("export-my-number", E_RONLY|E_WONLY);
EXPORT("export-my-string", E_RONLY|E_WONLY);
/* exercise 1 */
printf("\e[1;31;40m\nExercise 1: Node ID = %d, myNumber = %d, myString = %s\e[m\n",
get_nid(), Number, String);
return(NslObject::init());
}
int UserModule01::command(int argc, const char *argv[]) {
char tmpBuf[10];
struct ExportStr *ExpStr;
u_int32_t row,column;
/* The Get implementation of Exported Variable "export-my-number" */
if (!strcmp(argv[0], "Get")&&(argc==2)) {
if (!strcmp(argv[1], "export-my-number")) {
ExpStr = new ExportStr(1);
row = ExpStr->Add_row();
column = 1;
bzero(tmpBuf, sizeof(tmpBuf));
sprintf(tmpBuf, "%d", Number);
ExpStr->Insert_cell(row, column, tmpBuf, "\n");
EXPORT_GET_SUCCESS(ExpStr);
return 1;

43
}
}
/* The Get implementation of Exported Variable "export-my-string" */
if (!strcmp(argv[0], "Get")&&(argc==2)) {
if (!strcmp(argv[1], "export-my-string")) {
ExpStr = new ExportStr(1);
row = ExpStr->Add_row();
column = 1;
bzero(tmpBuf, sizeof(tmpBuf));
sprintf(tmpBuf, "%s", String);
ExpStr->Insert_cell(row, column, tmpBuf, "\n");
EXPORT_GET_SUCCESS(ExpStr);
return 1;
}
}
/* The Set implementation of Exported Variable "export-my-number" */
if (!strcmp(argv[0], "Set")&&(argc==3)) {
if (!strcmp(argv[1], "export-my-number")) {
Number = atoi(argv[2]);
EXPORT_SET_SUCCESS();
return 1 ;
}
}
return(NslObject::command(argc, argv));
}
int UserModule01::recv(ePacket_ *pkt) {
return(NslObject::recv(pkt));
}
int UserModule01::send(ePacket_ *pkt) {
return(NslObject::send(pkt));
}

44
NOTE: Difference between function VBIND and EXPORT
VBIND reads MDF parameter value from if_and_medium_conf file at beginning of simulation.
EXPORT reads and writes MDF parameter value in COMMAND function of the module via IPC.
Every module has function of COMMAND().
After finishing, execute “make” and “make install” in the directory of source code.
Then execute simulation, right click on “Module Editor” in HOST 1, and double click
on user module01. You can get the “Number” values of current simulating engine and
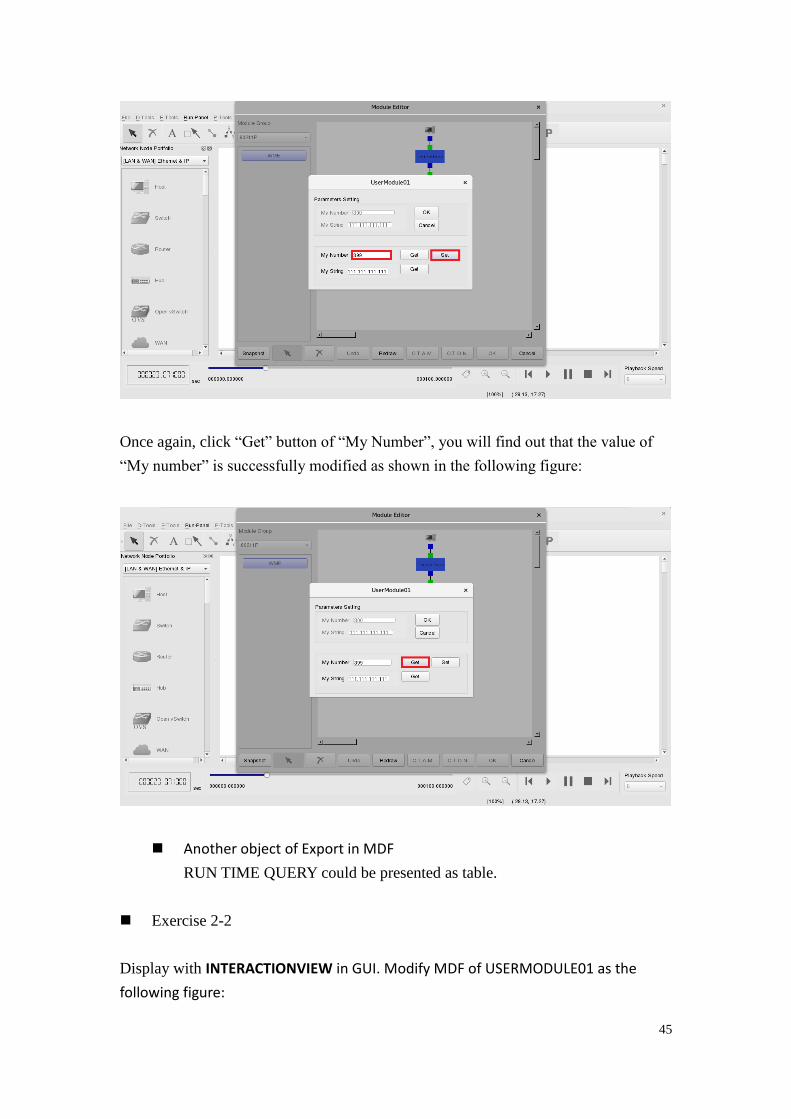
values of “String” in module by click “Get” button, as shown in the following figure:
Change “My number” from 300 to 399, and click “Set” button, as the following figure
shows:
45
Once again, click “Get” button of “My Number”, you will find out that the value of
“My number” is successfully modified as shown in the following figure:
Another object of Export in MDF
RUN TIME QUERY could be presented as table.
Exercise 2-2
Display with INTERACTIONVIEW in GUI. Modify MDF of USERMODULE01 as the
following figure:

46
Rewrite the block of EXPORT SECTION as follows:

47
ModuleSection
HeaderSection
ModuleName UserModule01
GroupName User_Defined
Introduction "This is a user-defined module."
Parameter myNumber 300 local
Parameter myString 111.111.111.111 local
EndHeaderSection
InitVariableSection
Caption "Parameters Setting"
FrameSize 380 100
Begin TEXTLINE myNumber
Caption "My Number "
Scale 10 18 220 30
ActiveOn MODE_EDIT
Enabled TRUE
Type INT
Comment "An Integer"
End
Begin TEXTLINE myString
Caption "My String "
Scale 10 48 220 30
ActiveOn MODE_EDIT
Enabled TRUE
Type IP
Comment "An IP string"
End
Begin BUTTON b_ok
Caption "OK"
Scale 250 17 60 30
ActiveOn ALL_MODE
Action ok
Comment "OK Button"
End

48
Begin BUTTON b_cancel
Caption "Cancel"
Scale 250 49 60 30
ActiveOn ALL_MODE
Action cancel
Comment "Cancel Button"
End
EndInitVariableSection
ExportSection
Caption "Run Time Query"
FrameSize 380 150
Begin TEXTLINE text_query_mynum
Caption "My Number "
Scale 10 10 200 35
ActiveOn MODE_SIMULATION
Enabled TRUE
Type INT
Comment ""
End
Begin TEXTLINE text_query_mystr
Caption "My String "
Scale 10 50 200 35
ActiveOn MODE_SIMULATION
Enabled TRUE
Type INT
Comment ""
End
Begin ACCESSBUTTON ab_get_mynum
Caption "Get"
Scale 215 15 70 25
ActiveOn MODE_SIMULATION
49
Enabled TRUE
Action GET
ActionObj "export-my-number"
Reference text_query_mynum
Comment "get"
End
Begin ACCESSBUTTON ab_get_mystr
Caption "Get"
Scale 215 50 70 25
ActiveOn MODE_SIMULATION
Enabled TRUE
Action GET
ActionObj "export-my-string"
Reference text_query_mystr
Comment "get"
End
Begin ACCESSBUTTON ab_set_mynum
Caption "Set"
Scale 290 15 70 25
ActiveOn MODE_SIMULATION
Enabled TRUE
Action SET
ActionObj "export-my-number"
Reference text_query_mynum
Comment "set"
End
Begin INTERACTIONVIEW iv_get_all
Caption "Get All Var"
Scale 10 100 200 30

50
ActiveOn MODE_SIMULATION
Enabled TRUE
Action GET
ActionObj "export-all-data"
Fields "My String" "My Number"
Comment "All Data"
End
EndExportSection
EndModuleSection
Modify user_module01.cc:
#include <stdlib.h>
#include <estinet_api.h>
#include <module/user-defined/user_module_01.h>
MODULE_GENERATOR(UserModule01);
UserModule01::UserModule01(u_int32_t type, u_int32_t id, struct plist* pl, const char *name)
: NslObject(type, id, pl, name) {
vBind_int("myNumber", &Number);
vBind_char_str("myString", &String);
}
UserModule01::~UserModule01(){}
int UserModule01::init() {
EXPORT("export-my-number", E_RONLY|E_WONLY);
EXPORT("export-my-string", E_RONLY|E_WONLY);
EXPORT("export-all-data", E_RONLY|E_WONLY);
/* exercise 1 */
printf("\e[1;31;40m\nExercise 1: Node ID = %d, myNumber = %d, myString = %s\e[m\n",
get_nid(), Number, String);
return(NslObject::init());
}

51
int UserModule01::command(int argc, const char *argv[]) {
char tmpBuf[10];
struct ExportStr *ExpStr;
u_int32_t row,column;
u_long *mytunidp;
/* The Get implementation of Exported Variable "export-my-number" */
if (!strcmp(argv[0], "Get")&&(argc==2)) {
if (!strcmp(argv[1], "export-my-number")) {
ExpStr = new ExportStr(1);
row = ExpStr->Add_row();
column = 1;
bzero(tmpBuf, sizeof(tmpBuf));
sprintf(tmpBuf, "%d", Number);
ExpStr->Insert_cell(row, column, tmpBuf, "\n");
EXPORT_GET_SUCCESS(ExpStr);
return 1;
}
}
/* The Get implementation of Exported Variable "export-my-string" */
if (!strcmp(argv[0], "Get")&&(argc==2)) {
if (!strcmp(argv[1], "export-my-string")) {
ExpStr = new ExportStr(1);
row = ExpStr->Add_row();
column = 1;
bzero(tmpBuf, sizeof(tmpBuf));
sprintf(tmpBuf, "%s", String);
ExpStr->Insert_cell(row, column, tmpBuf, "\n");
EXPORT_GET_SUCCESS(ExpStr);
return 1;
}
}
/* The Set implementation of Exported Variable "export-my-number" */

52
if (!strcmp(argv[0], "Set")&&(argc==3)) {
if (!strcmp(argv[1], "export-my-number")) {
Number = atoi(argv[2]);
EXPORT_SET_SUCCESS();
return 1 ;
}
}
/* The Set implementation of Exported Variable "export-all-data" */
if (!strcmp(argv[0], "Get")&&(argc==2)) {
if (!strcmp(argv[1], "export-all-data")) {
ExpStr = new ExportStr(2);
bzero(tmpBuf, sizeof(tmpBuf));
sprintf(tmpBuf, "String\t\tNumber\n");
ExpStr->Insert_comment(tmpBuf);
row = ExpStr->Add_row();
column = 1;
bzero(tmpBuf, sizeof(tmpBuf));
sprintf(tmpBuf, "%s", String);
ExpStr->Insert_cell(row, column++, tmpBuf, "\t\t");
bzero(tmpBuf, sizeof(tmpBuf));
sprintf(tmpBuf, "%d", Number);
ExpStr->Insert_cell(row, column, tmpBuf, "\n");
EXPORT_GET_SUCCESS(ExpStr);
return 1 ;
}
}
return(NslObject::command(argc, argv));
}
int UserModule01::recv(ePacket_ *pkt) {
return(NslObject::recv(pkt));

53
}
int UserModule01::send(ePacket_ *pkt) {
return(NslObject::send(pkt));
}
After modifying, execute “make,” “make install,” and run simulation, you will see the
result shown in the figure above.

54
Chapter 3 Inter-Module
Communication
Download Exercises:
Chapter3.tar.bz2
This chapter describes how to share variables and functions to the other module, for
example, a module need to get data from phy module (i.e. bandwidth etc.). In
module-based platform of simulator, each node has its own protocol stack, hence,
many module operate in one node. And simulated engine provide a global structrue,
“var-register-table,” in node structure. Each module can register its own variables to
this public structure, and other module can get these registered variables.
Register Varibles
REG_VAR() registers a variable of module to a common structure of every node,
“var-register-table.” It can be accessed by protocol stack of all modules in this
node.
For example, in this exercise, we will get a registed variable from phy module.
Usage: REG_VAR(vname, var)
The first parameter is a variable name to be registered, and the second
parameter is pointer to a variable to be registered.
Get registered varibles from other modules
GET_REG_VAR() accesses a variable which has been registered from other
modules.
Highlights:
1. APIs and related demo cases: REG_VAR() and GET_REG_VAR()
2. API and related demo case: InstanceLookup()

55
Usage: GET_REG_VAR(interface id, vname, type)
The first parameter is interface id, which indicates interface id of the protocol
stack. We can use get_ifid() API to get the interface id, so the parameter points
to the shared variable of specified module more precisely.
Usage of get_ifid()
get_ifid() will return interface id which is connected to.
Exercise 3-1: REG_VAR() and GET_REG_VAR()
First step, use the same topology model as in chapter 1, and collaborate with
USERMODULE01 module. Modify the user_module01.cc file. Like the red words
in the following figure, register the “Number” variable to other modules in
constructor.
Modify user_module01.cc:
#include <stdlib.h>
#include <estinet_api.h>
#include <module/user-defined/user_module_01.h>
MODULE_GENERATOR(UserModule01);
UserModule01::UserModule01(u_int32_t type, u_int32_t id, struct iflist* ifl, const char
*name): NslObject(type, id, ifl, name) {
vBind_int("myNumber", &Number);
vBind_char_str("myString", &String);
REG_VAR("shared-number", &Number);
}
UserModule01::~UserModule01(){}
int UserModule01::init() {
return(NslObject::init());
}
int UserModule01::command(int argc, const char *argv[]) {
return(NslObject::command(argc, argv));
}
int UserModule01::recv(ePacket_ *pkt) {
return(NslObject::recv(pkt));

56
}
int UserModule01::send(ePacket_ *pkt) {
return(NslObject::send(pkt));
}
Next, in phy module of protocol stack, get the shared variable in UserModule01
module. Modify init() in “module/8023/phy/phy.cc” in source code’s directory.
Print the shared variable value of UserModule01 as the red words shown in the
following table.
int phy::init() {
NslObject::init();
int *get_share_data = GET_REG_VAR(get_ifid(), "shared-number", int *);
if (get_share_data)
{
printf("\e[1;36;46m\nExercise3-1: Get Shared Number in UserModule01=
%d\e[m\n", *get_share_data);
}
}
Execution result is shown as the following figure:
In phy module, you can get registered variable from UserModule01 module via
GET_REG_VAR() API.

57
Exercise 3-2:REG_VAR() and GET_REG_VAR()
In phy module, there are some register variables shared with other module, for
example:
REG_VAR("DataRate", &bw_);
This shared variable is data of bandwidth. Try to get the “DataRate” from phy
module in UserModule01 module.
Reference Answers:
int UserModule01::send(ePacket_ *pkt) {
printf("\e[1;33;43m\nExercise 3-2: Get Shared BW in Phy Module = %f\e[m\n",
*(GET_REG_VAR(get_ifid(), "DataRate", double *)));
return(NslObject::send(pkt));
}
Hint: if you execute the above red words with the init() of UserModule01, the
data you get is zero, because the init() of phy module executes later than init()
of UserModule01. So select the case print message in send() of UserModule01
module; remember there must be a traffic, like ipv6 broadcast packet, or
58
stcp/rtcp, for successfully executing send().
Moreover, there is a way for a module to use another module’s function: using
the API, InstanceLookup().
Usage of InstanceLookup:
The first parameter is Node ID, you can use get_nid() API to get current Node ID.
The second parameter is current interface id in the protocol stack, you can use
the get_ifid() to get the interface id. And the third parameter places phy module
name registered in whole simulated engine, so we can point to the object via
the name, and we can follow c++ grammer to use the object’s member and
member function. For example:
((phy *)InstanceLookup(get_nid(), get_ifid(), "Phy"))->Debugger();
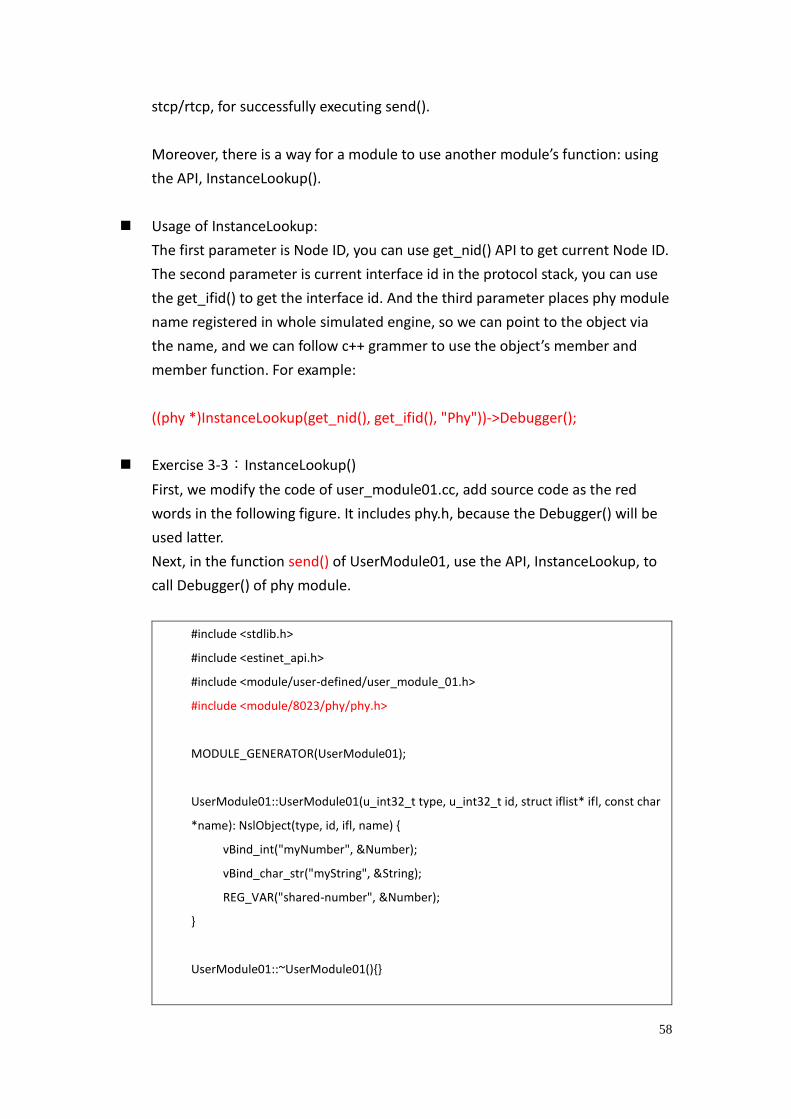
Exercise 3-3:InstanceLookup()
First, we modify the code of user_module01.cc, add source code as the red
words in the following figure. It includes phy.h, because the Debugger() will be
used latter.
Next, in the function send() of UserModule01, use the API, InstanceLookup, to
call Debugger() of phy module.
#include <stdlib.h>
#include <estinet_api.h>
#include <module/user-defined/user_module_01.h>
#include <module/8023/phy/phy.h>
MODULE_GENERATOR(UserModule01);
UserModule01::UserModule01(u_int32_t type, u_int32_t id, struct iflist* ifl, const char
*name): NslObject(type, id, ifl, name) {
vBind_int("myNumber", &Number);
vBind_char_str("myString", &String);
REG_VAR("shared-number", &Number);
}
UserModule01::~UserModule01(){}

59
int UserModule01::init() {
return(NslObject::init());
}
int UserModule01::command(int argc, const char *argv[]) {
return(NslObject::command(argc, argv));
}
int UserModule01::recv(ePacket_ *pkt) {
return(NslObject::recv(pkt));
}
int UserModule01::send(ePacket_ *pkt) {
((phy *)InstanceLookup(get_nid(), get_ifid(), "PHY"))->Debugger();
return(NslObject::send(pkt));
}
Next, add ascii color display effect (green background and yellow word) in
Debugger() of phy module, it is much more obvious for print message on the
screen.
int phy::Debugger() {
printf("\e[1;33;42mExercise 2 Start:\n");
NslObject::Debugger();
printf(" Data Rate: %13.3lf\n", bw_);
printf("Exercise 2 End\e[m\n\n");
return(1);
}
Execute “make” and “make install” in the directory of the source code, and then
run the simulation, we can see as the following green block.

60
Therefore, through this API, perform the functions of other modules.

61
Chapter 4 RUN TIME MESSAGE
Download Exercises:
Chapter4.tar.bz2
Run Time Message can be arranged with some error tips, warning tips or some
information tips in the form of sourece code. During simulating, execute these source
codes will send the message to GUI via IPC, GUI will pop the interactive window.
Run Time Message could be divided into three types in simulation engine.
INFORMATION
WARNING
FATAL ERROR
Use three sample codes to show.
We use the demo topology (user_module01.xtpl).
Then, as scheduled, add one line code in "send()” function of
user_module01.cc.
Hint: The packet enter the module via send(). When the packet process is
finished, the packet is then transfered to send() of next module, so on and so
forth, the packet is sent to the lowest module, and switch to other nodes. When
module receives other node’s packet, it will trigger the recv() function to handle
the packet from the bottom module to upper modules gradually. Finally, the
packet will be sent to kernel via interface module. As the following figure:
Highlights:
1. Exercise for RUN TIME MESSAGE -- WARNING
2. Exercise for RUN TIME MESSAGE -- INFOMATION
3. Exercise for RUN TIME MESSAGE – FATAL ERROR
4. send() and recv() architecture in EstiNet module

62
send()
send()
send()
send()
recv()
recv()
recv()
recv()
Hence, we use traffic flow to trigger "send()” function of USERMODULE01
module. Here, we take three types of run time messages for demostration:
Exercise 4-1:INFORMATION
The API, sendRuntimeMsg, is used to demo RUN TIME MESSAGE in simulation
engine. The first parameter is type of RUN TIME MESSAGE. For example, in
exercise 4-1, we use“RTMSG_INFORMATION”type.
The second parameter is node id, and the third parameter is module name. We
can use get_name () to get module name. And the fourth parameter is a string
that we want to display on GUI, as shown in the following red words.
int UserModule01::send(ePacket_ *pkt) {
sendRuntimeMsg(RTMSG_INFORMATION, get_nid(), get_name(), "In UserModule01::send,
Exercise 4-1 Information Messages Demo");
return(NslObject::send(pkt));
}
After modifying code, we need to make and make install to compiler and install.
Then we run the simulation, a window will pop out continously with print message,

63
as the traffic always send packt constantly. Each packet enters send(), which will
trigger this kind of function again. GUI will gather all the information into the same
window.
Exercise 4-2:WARNING
Next, modify the send() function in user_module01.cc. Modify the first
paramerer of sendRuntimeMsg in exercise 4-1 to “RTMSG_WARNING”, and
change the fourth parameter as red words in he following figure:
int UserModule01::send(ePacket_ *pkt) {
sendRuntimeMsg(RTMSG_WARNING, get_nid(), get_name(), "In UserModule01::send,
Exercise 4-2 Warning Messages Demo");
return(NslObject::send(pkt));
}
After modifying code, execute "make" and "make install" to finish compilation and
installation. Then run the simulation, an interactive window will pop out, and ask
user to“Continue” or “Stop”. If you press “Stop”, it will stop the simulation; however,
if you press “Continue”, it will continue the simulation, but next packet arrived will
also trigger the WARNING message soon. User can decide this type message in what
timing to appear.

64
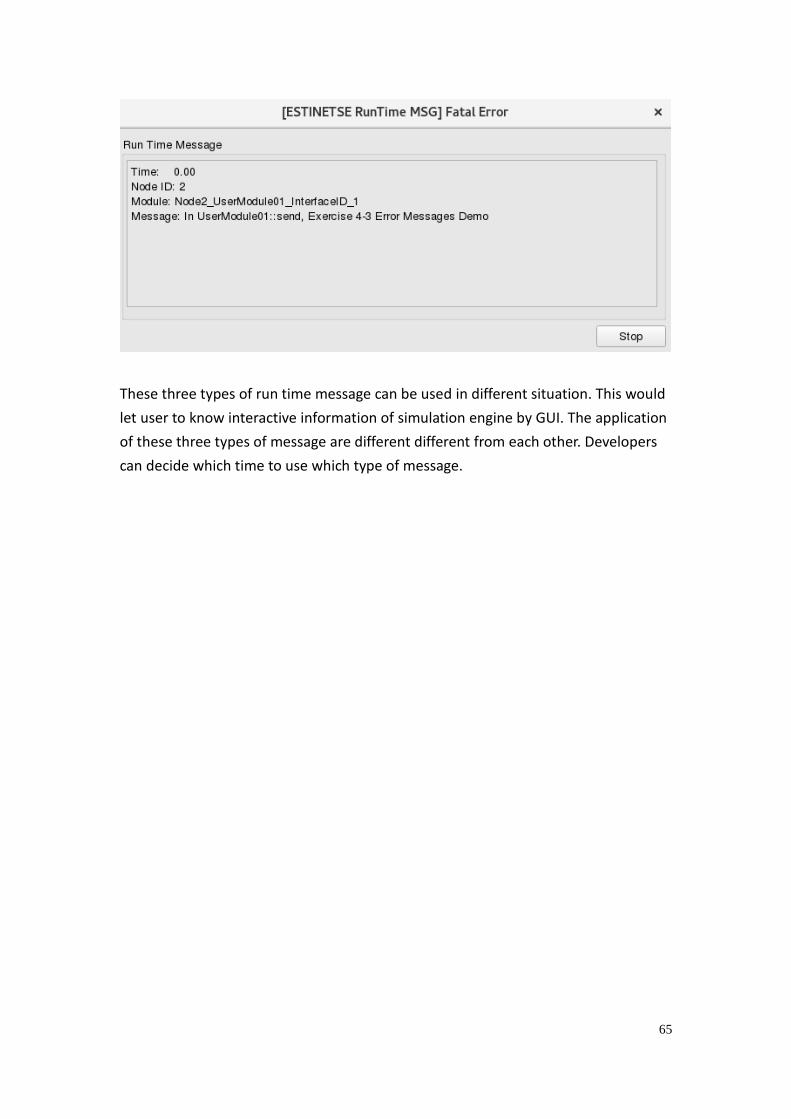
Exercise 4-3:FATAL ERROR
Next, modify the send() function in user_module01.cc. The first parameter of
the sendRuntimeMsg is “RTMSG_FATAL_ERROR”, change the message sting in
the fourth parameter as the red words shown in the following figure.
int UserModule01::send(ePacket_ *pkt) {
sendRuntimeMsg(RTMSG_FATAL_ERROR, get_nid(), get_name(), "In UserModule01::send,
Exercise 4-3 Error Messages Demo");
return(NslObject::send(pkt));
}
After modifying code, execute "make" and "make install" to finish compilation and
installation. Then run the simulation, an interactive window will pop out, and ask
user to“Stop”. If press “Stop”, it will stop the simulation. This type of message is used
when some error happen. Developer can use this message to stop the simulation.
65
These three types of run time message can be used in different situation. This would
let user to know interactive information of simulation engine by GUI. The application
of these three types of message are different different from each other. Developers
can decide which time to use which type of message.

66
Chapter 5 Run a Simulation Case
without the Use of the GUI
Download Exercises:
Chapter5.tar.bz2
In some developing situations, developer wants a simpler enviroment to execute
simulation without using the GUI via IPC. And this chapter will introduce how to
simulate without GUI.
Normal single computer architecture for simulation is shown in the following figure:
(EstiNet simulation is also a distruibuted architechure, see appendix D)
It is same as chapter 1, to execute “estinetjd”, “estinetss”, and “estinetgui” in the
same computer before simulation. GUI responses to export the simulated setting
files and send them to estinetjd, which assigns job. The estinetjd finds idle simulation
engine with estinetss to read those files to execute the simulation.
Highlights:
1. Simulation Architecture
2. How to turn off IPC
3. How to check Frame Trace File

67
In such developing process, GUI cannot support all types of new node developing.
Developer wants a more simple simulation environment, he or she can choose to turn
off the IPC with remaining active simulated engine (estinetse).
If turn off IPC, the architecture is shown as the following figure:
SimulatorEngine
Developer designs new protocol module or debugs in this architechure. It is more
convenient to develop a new protocol module.
Take the demo topology (user_module01.xtpl) for example.
Generally, three directories and one file will be generated after simulation with GUI.
The file(user_module01.xtpl) and gui_data folder(user_module01.gui_data) are only
for GUI, , they store up GUI’s object information, for GUI use.
Directory, user_module01.sim, will send files such as if_and_medium_conf setting
file to simulation engine for simulation. Finally, the simulation engine will return the
result of directory, user_module01.result.
The key step is to send setting files of the directory sim to simulated engine.
The procedures of executing simulation without GUI are described as follows:
First, set the environment variable, “ESTINET_WORKDIR,” to the directory sim, as
shown in the following figure:

68
Next, execute “estinetse -d"; in addition, the “-d” denotes estinetse disable the GUI
via the IPC. Then add “$ESTINET_WORKDIR/.for_se_direct_access/” and
if_and_medium_conf file name.
estinetse -d $ESTINET_WORKDIR/.for_se_direct_access/user_module01.if_and_medium_conf
Press “enter”, initiate the simulation.
After simulation without IPC, we can see the frame trace file in $ESTINET_WORKDIR
shown in the following figure. Because $ESTINET_WORKDIR is in sim folder, so the
frame_trace_file file is stored sim/.for_se_direct_access forder. (Normal GUI will
store in result folder, but store in $ESTINET_WORKDIR without IPC.)
The frame trace file in siumulation engine mainly logs packet record in mac layer.
View the frame trace file via GUI, press the command “P_Tools→View the Frame
Transmission and Reception Log→Open the Frame Trace File” as shown in the
following figure.
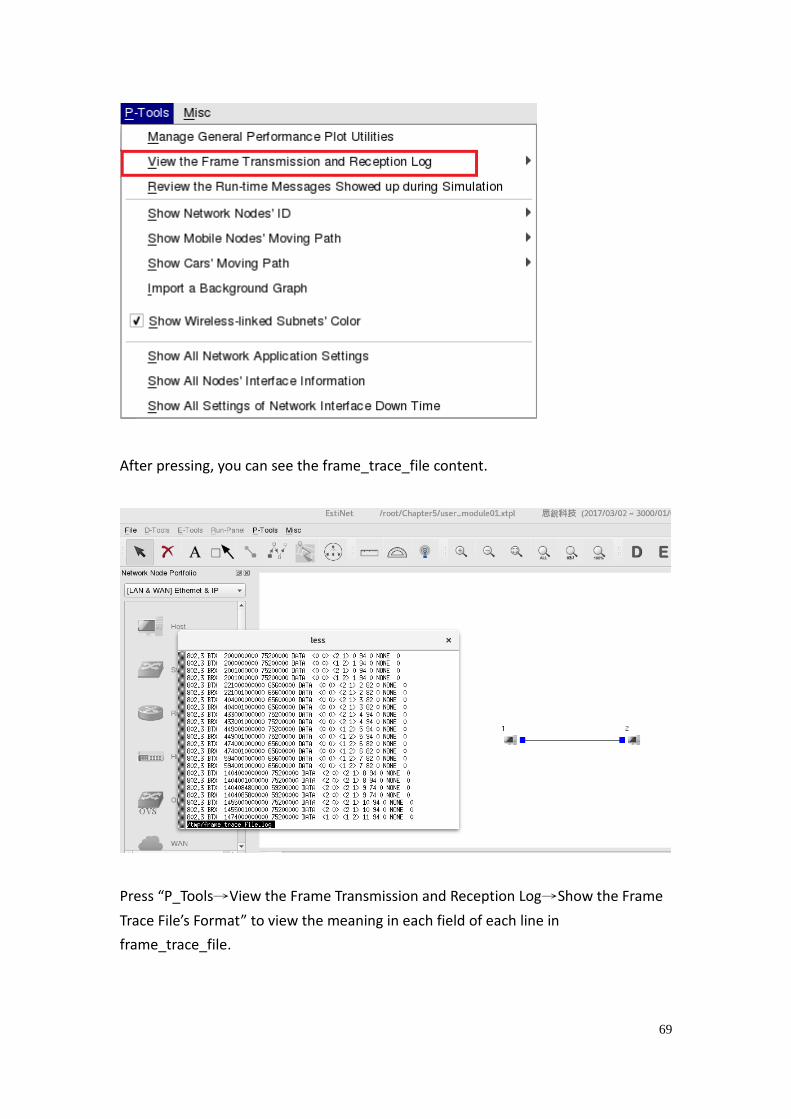
69
After pressing, you can see the frame_trace_file content.
Press “P_Tools→View the Frame Transmission and Reception Log→Show the Frame
Trace File’s Format” to view the meaning in each field of each line in
frame_trace_file.

70
Press the option, you can see the meaning of each field.
If you don’t want to view frame_trace_file file via GUI, you can execute
“estinet_printftr” in console to view and export, as shown in the following two
figures.
estinet_printftr /root/Chapter5/user_module01.sim/.for_se_direct_access/user_module01.frame_trace_file

71
Chapter 6 TIMER
Download Exercises:
Chapter6.tar.bz2
Timer is an important object in simulation, to tigger or initiates some special function
in desired time. Timer object offers functions to control, like init(), start(), cancel(),
expire() and so on. Here is a simple example:
Exercise 6-1
We use the demo topology (user_module01.xtpl) similarly.
Next, Declare a “myTimer” timer object in “user_module01.h,” just make sure
“include timer.h” is included. And declare a “timeout” function in public block in
UserModule01 Class, this function is called expectedly when the “myTimer” expires.
The modified part of "user_module01.h" is shown as following red word.
#ifndef __user_module_01_h__
#define __user_module_01_h__
#include <event.h>
#include <object.h>
#include <timer.h>
class UserModule01 : public NslObject {
private:
Highlights:
1. Introduction to Timer
2. Exercises of TIMER
3. Introduce APIs: GETCURRENTTIME, GETNODETIME, SEC_TO_TICK,
MILLI_TO_TICK, BASE_OBJTYPE, POINTER_TO_MEMBER etc..

72
int Number;
char *String;
timerObj myTimer;
public:
UserModule01(u_int32_t type, u_int32_t id, struct plist* pl, const char *name);
~UserModule01();
int init();
int command(int argc, const char *argv[]);
int recv(ePacket_ *pkt);
int send(ePacket_ *pkt);
void timeout();
};
#endif /* __user_module_01_h__ */
In file “user_module01.cc,” during executing the function of timeout, we can print
some information of current virtual time as well as virtual time of every node.
GetCurrentTime is used for getting global virtual time of every node in simulator.
Time Unit here is 1 tick for 1 picoosecond(10-12). Yet in simulator, every node has its
own time, you can get individual time by using API, GetNodeCurrentTime().
Meanwhile in the function, init(), add definition of myTimer timer object.
First, declare two variables: one is “first_timeout_in_tick,” which is time point of first
execution; the other is “subsequent_timeout_in_tick,” which is interval between
execution and timeout.
The modified part of "user_module01.cc" is shown as following red word.
#include <stdlib.h>
#include <estinet_api.h>
#include <module/user-defined/user_module_01.h>
MODULE_GENERATOR(UserModule01);
UserModule01::UserModule01(u_int32_t type, u_int32_t id, struct plist* pl, const char *name)
: NslObject(type, id, pl, name) {

73
vBind_int("myNumber", &Number);
vBind_char_str("myString", &String);
REG_VAR("shared-number", &Number);
}
UserModule01::~UserModule01(){}
int UserModule01::init() {
u_int64_t first_timeout_in_tick;
u_int64_t subsequent_timeout_in_tick;
BASE_OBJTYPE(mem_func);
SEC_TO_TICK(first_timeout_in_tick, 3);
MILLI_TO_TICK(subsequent_timeout_in_tick, 500);
mem_func = POINTER_TO_MEMBER(UserModule01, timeout);
myTimer.setCallOutObj(this, mem_func);
myTimer.start(first_timeout_in_tick, subsequent_timeout_in_tick);
return(NslObject::init());
}
int UserModule01::command(int argc, const char *argv[]) {
return(NslObject::command(argc, argv));
}
int UserModule01::recv(ePacket_ *pkt) {
return(NslObject::recv(pkt));
}
int UserModule01::send(ePacket_ *pkt) {
return(NslObject::send(pkt));
}
void UserModule01::timeout() {
printf("\e[1;33;40mExercise 6-1: Timeout (%llu) (%llu)\e[m\n",
GetCurrentTime(), GetNodeCurrentTime(get_nid()));
74
return;
}
BASE_OBJTYPE(mem_func);
This line declares a pointer to a basic object, which is used to point some function of
module later.
SEC_TO_TICK(first_timeout_in_tick, 3);
SEC_TO_TICK() converts second to tick as time unit, in this example, 3 seconds was
converted to 3000000000000 tick, and braught the value to the variable,
first_timeout_in_tick.
MILLI_TO_TICK(subsequent_timeout_in_tick, 500);
MILLI_TO_TICK is similar to SEC_TO_TICK, but converts millisecond to tick as time
unit. In this example, 500 millisecond (0.5 second) is converted to 500000000000
tick, and braught the value to the variable, subsequent_timeout_in_tick.
mem_func = POINTER_TO_MEMBER(UserModule01, timeout);
Let the object variable, mem_func, use the API, POINTER_TO_MEMBER, to point the
timeout() address of UserModule01.
myTimer.setCallOutObj(this, mem_func);
Define myTimer the object to call the pointed function, mem_func, at desired time.
myTimer.start(first_timeout_in_tick, subsequent_timeout_in_tick);
Set initiation time of myTimer and interval of restart. First parameter is first initiated
time point, and the second parameter is repeat duration in time unit.
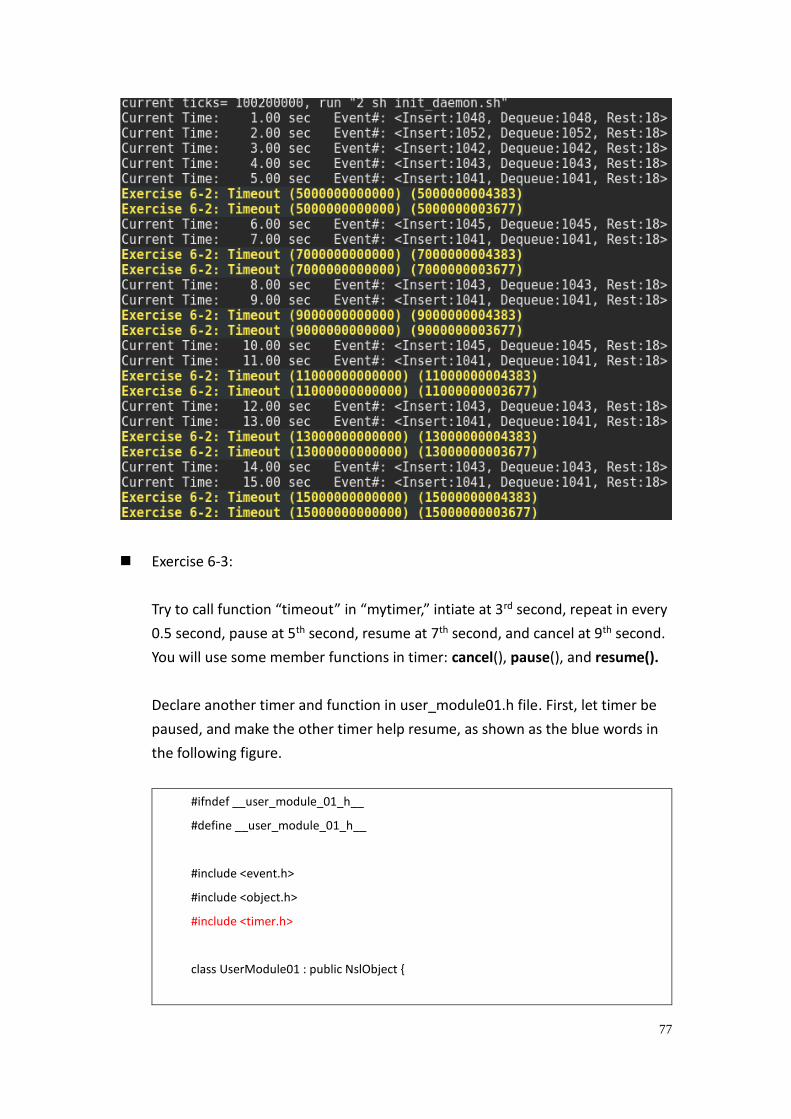
So we can kown that this timer will initiate at 3rd second, and repeat every 0.5
second, as shown in the following figure.
Execution result is shown as the following figure:

75
Exercise 6-2:
Try to call function “timeout” in “mytimer,” intiate at 3rd second, repeat in every
2 second.
The modified part of "user_module01.cc" is shown as following red word.
#include <stdlib.h>
#include <estinet_api.h>
#include <module/user-defined/user_module_01.h>
MODULE_GENERATOR(UserModule01);
UserModule01::UserModule01(u_int32_t type, u_int32_t id, struct iflist* ifl, const char
*name): NslObject(type, id, ifl, name) {
vBind_int("myNumber", &Number);
vBind_char_str("myString", &String);
REG_VAR("shared-number", &Number);
}

76
UserModule01::~UserModule01(){}
int UserModule01::init() {
u_int64_t first_timeout_in_tick;
u_int64_t subsequent_timeout_in_tick;
BASE_OBJTYPE(mem_func);
SEC_TO_TICK(first_timeout_in_tick, 5);
SEC_TO_TICK(subsequent_timeout_in_tick, 2);
mem_func = POINTER_TO_MEMBER(UserModule01, timeout);
myTimer.setCallOutObj(this, mem_func);
myTimer.start(first_timeout_in_tick, subsequent_timeout_in_tick);
return(NslObject::init());
}
int UserModule01::command(int argc, const char *argv[]) {
return(NslObject::command(argc, argv));
}
int UserModule01::recv(ePacket_ *pkt) {
return(NslObject::recv(pkt));
}
int UserModule01::send(ePacket_ *pkt) {
return(NslObject::send(pkt));
}
void UserModule01::timeout() {
printf("\e[1;33;40mExercise 6-2: Timeout (%llu) (%llu)\e[m\n",
GetCurrentTime(), GetNodeCurrentTime(get_nid()));
return;
}
77
Exercise 6-3:
Try to call function “timeout” in “mytimer,” intiate at 3rd second, repeat in every
0.5 second, pause at 5th second, resume at 7th second, and cancel at 9th second.
You will use some member functions in timer: cancel(), pause(), and resume().
Declare another timer and function in user_module01.h file. First, let timer be
paused, and make the other timer help resume, as shown as the blue words in
the following figure.
#ifndef __user_module_01_h__
#define __user_module_01_h__
#include <event.h>
#include <object.h>
#include <timer.h>
class UserModule01 : public NslObject {

78
private:
int Number;
char *String;
timerObj myTimer, resumeTimer;
public:
UserModule01(u_int32_t type, u_int32_t id, struct plist* pl, const char *name);
~UserModule01();
int init();
int command(int argc, const char *argv[]);
int recv(ePacket_ *pkt);
int send(ePacket_ *pkt);
void timeout();
void resumetimer();
};
#endif /* __user_module_01_h__ */
The modified part of "user_module01.cc" is shown as following red word.
#include <stdlib.h>
#include <estinet_api.h>
#include <module/user-defined/user_module_01.h>
MODULE_GENERATOR(UserModule01);
UserModule01::UserModule01(u_int32_t type, u_int32_t id, struct plist* pl, const char
*name)
: NslObject(type, id, pl, name) {}
UserModule01::~UserModule01(){}
int UserModule01::init() {
u_int64_t first_timeout_in_tick;
u_int64_t subsequent_timeout_in_tick;
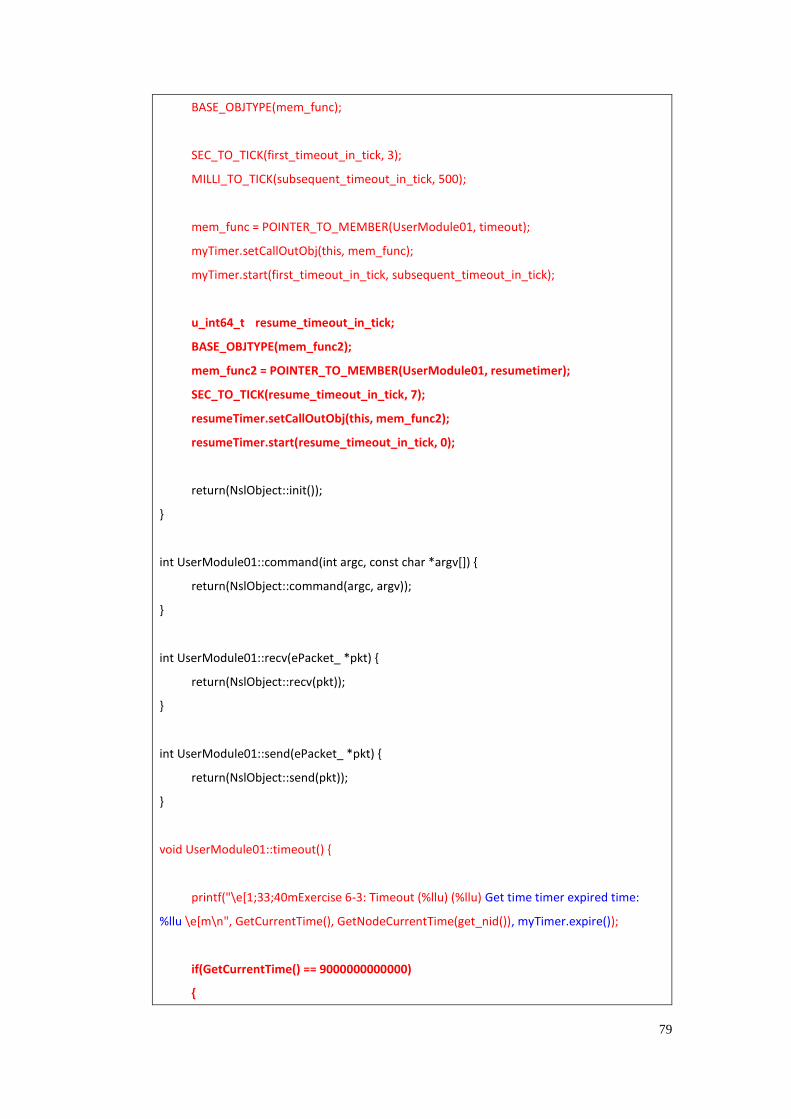
79
BASE_OBJTYPE(mem_func);
SEC_TO_TICK(first_timeout_in_tick, 3);
MILLI_TO_TICK(subsequent_timeout_in_tick, 500);
mem_func = POINTER_TO_MEMBER(UserModule01, timeout);
myTimer.setCallOutObj(this, mem_func);
myTimer.start(first_timeout_in_tick, subsequent_timeout_in_tick);
u_int64_t resume_timeout_in_tick;
BASE_OBJTYPE(mem_func2);
mem_func2 = POINTER_TO_MEMBER(UserModule01, resumetimer);
SEC_TO_TICK(resume_timeout_in_tick, 7);
resumeTimer.setCallOutObj(this, mem_func2);
resumeTimer.start(resume_timeout_in_tick, 0);
return(NslObject::init());
}
int UserModule01::command(int argc, const char *argv[]) {
return(NslObject::command(argc, argv));
}
int UserModule01::recv(ePacket_ *pkt) {
return(NslObject::recv(pkt));
}
int UserModule01::send(ePacket_ *pkt) {
return(NslObject::send(pkt));
}
void UserModule01::timeout() {
printf("\e[1;33;40mExercise 6-3: Timeout (%llu) (%llu) Get time timer expired time:
%llu \e[m\n", GetCurrentTime(), GetNodeCurrentTime(get_nid()), myTimer.expire());
if(GetCurrentTime() == 9000000000000)
{

80
myTimer.cancel();
}
else if(GetCurrentTime() == 5000000000000)
{
myTimer.pause();
}
return;
}
void UserModule01::resumetimer() {
myTimer.resume();
return;
}
Modify function timeout(), pause mytimer while acquired virtual time is 5th
second, and cancel mytimer while simulator time is 9th second.
Add function expire() into myTimer(), you can see next expired time of myTimer.
Define the function resumetimer() to resume mytimer.
Add blue section in init(), and define resumeTimer to initiate the function
resumetimer() to resume myTimer() at 7th second.
It is noteworthy that zero behind resumeTimer indicates this Timer executes
only once.
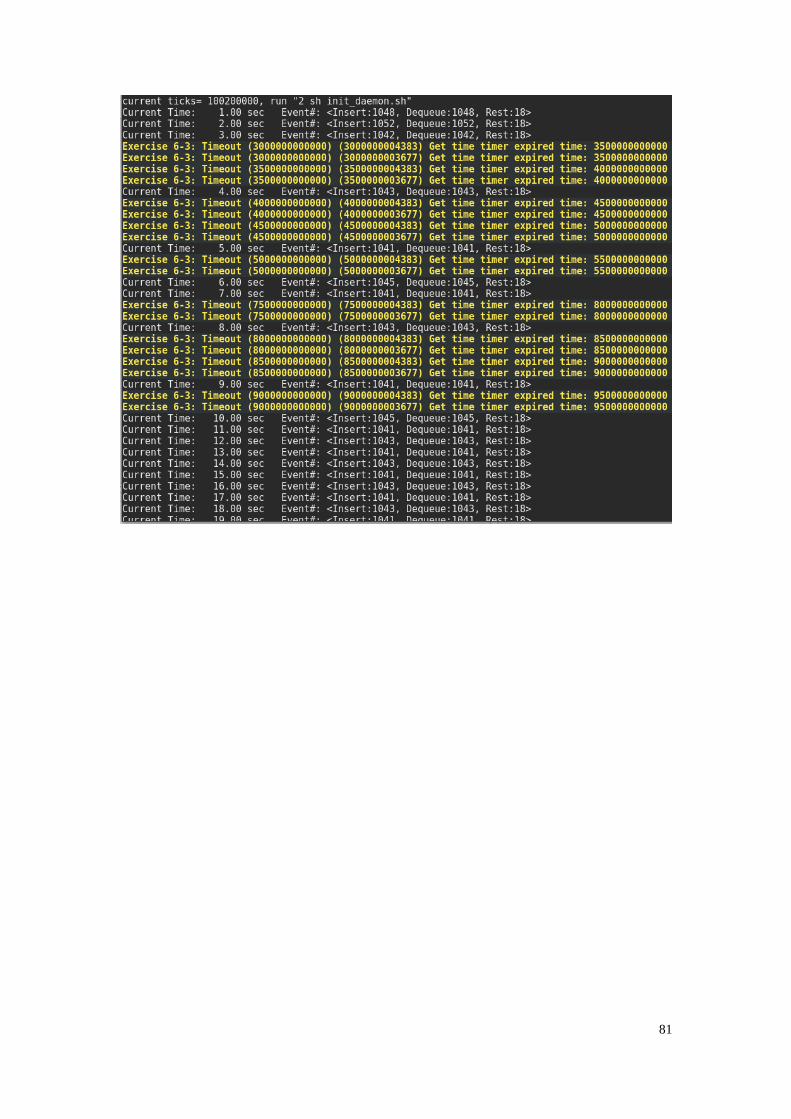
From the result down under, you can see: at 5th second, timeout and execute
print time, and then myTimer is paused; at 7th second, resumeTimer resume
myTimer object, and call timeout() function to print again; at 9th second,
timeout() function print and cancel myTimer directly.
81

82
Chapter 7 EVENT
Download Exercises:
Chapter7.tar.bz2
We can use an event structure to trigger a function in simulatior. Essentially, many
components in simulator are event, like ePacket. A packet is encapsulated by event
structure as an ePacket. And timer also is an extension event, but it has lots of
designed functions for it.
In this chapter, we introduce how to create an event instance and use it to trigger a
function to execute. And then, we use an event API to release the event.
Here is an exercise to explain the event usage. We create an event and declare a
print_event() function, and then set the event in the first second to trigger the
print_event() function.
Exercise 7-1
We use the demo topology (user_module01.xtpl) as same as chapter one does.
The modified part of "user_module01.h" is shown as following red word.
#ifndef __user_module_01_h__
#define __user_module_01_h__
#include <event.h>
#include <object.h>
class UserModule01 : public NslObject {
private:
Highlights:
1. Introduction to EVENT
2. Exercises of EVENT

83
int Number;
char *String;
public:
UserModule01(u_int32_t type, u_int32_t id, struct plist* pl, const char *name);
~UserModule01();
int init();
int command(int argc, const char *argv[]);
int recv(ePacket_ *pkt);
int send(ePacket_ *pkt);
void print_event(Event_ *ep);
};
#endif /* __user_module_01_h__ */
The modified part of "user_module01.cc" is shown as following red word.
#include <stdlib.h>
#include <estinet_api.h>
#include <module/user-defined/user_module_01.h>
MODULE_GENERATOR(UserModule01);
UserModule01::UserModule01(u_int32_t type, u_int32_t id, struct plist* pl, const char
*name): NslObject(type, id, pl, name) {
vBind_int("myNumber", &Number);
vBind_char_str("myString", &String);
REG_VAR("shared-number", &Number);
}
UserModule01::~UserModule01(){}
int UserModule01::init() {
Event_ *ep;
ep = createEvent();
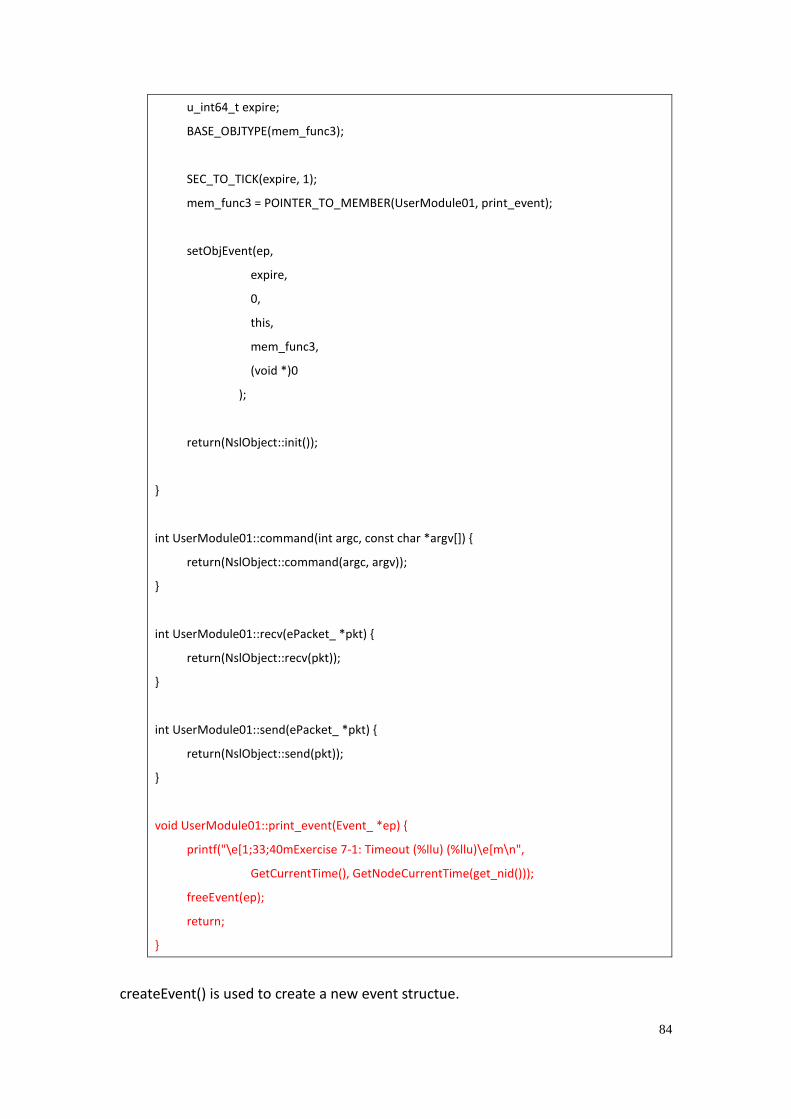
84
u_int64_t expire;
BASE_OBJTYPE(mem_func3);
SEC_TO_TICK(expire, 1);
mem_func3 = POINTER_TO_MEMBER(UserModule01, print_event);
setObjEvent(ep,
expire,
0,
this,
mem_func3,
(void *)0
);
return(NslObject::init());
}
int UserModule01::command(int argc, const char *argv[]) {
return(NslObject::command(argc, argv));
}
int UserModule01::recv(ePacket_ *pkt) {
return(NslObject::recv(pkt));
}
int UserModule01::send(ePacket_ *pkt) {
return(NslObject::send(pkt));
}
void UserModule01::print_event(Event_ *ep) {
printf("\e[1;33;40mExercise 7-1: Timeout (%llu) (%llu)\e[m\n",
GetCurrentTime(), GetNodeCurrentTime(get_nid()));
freeEvent(ep);
return;
}
createEvent() is used to create a new event structue.

85
freeEvent() is be used to release memory of a event structure.
setObjEvent () is used to set detail of an event. The first parameter is a pointer to the
event. The second parameter is execution timestamp of the event. The third
parameter is periodical execution interval time, if it is zero indicated that this event
executes only once. The fourth is object to execute the event. And the fifth is a
function that is a trigger by the event. The sixth is additional data of event, like
packet.
Execution result is shown as the following figure:
The event in the first second to trigger the print_event() function. We can see
execution has been done only once, because a zero is braught in the third parameter
of setObjEvent.
Exercise 7-2:
If we want the event can periodically exection, we can use the modified
user_module01.cc as the following red words:
#include <stdlib.h>
#include <estinet_api.h>
#include <module/user-defined/user_module_01.h>
MODULE_GENERATOR(UserModule01);

86
UserModule01::UserModule01(u_int32_t type, u_int32_t id, struct iflist* ifl, const char
*name): NslObject(type, id, ifl, name) {
vBind_int("myNumber", &Number);
vBind_char_str("myString", &String);
REG_VAR("shared-number", &Number);
}
UserModule01::~UserModule01(){}
int UserModule01::init() {
Event_ *ep;
ep = createEvent();
u_int64_t expire;
BASE_OBJTYPE(mem_func3);
SEC_TO_TICK(expire, 1);
mem_func3 = POINTER_TO_MEMBER(UserModule01, print_event);
setObjEvent(ep,
expire,
expire,
this,
mem_func3,
(void *)0
);
return(NslObject::init());
}
int UserModule01::command(int argc, const char *argv[]) {
return(NslObject::command(argc, argv));
}
int UserModule01::recv(ePacket_ *pkt) {
return(NslObject::recv(pkt));

87
}
int UserModule01::send(ePacket_ *pkt) {
return(NslObject::send(pkt));
}
void UserModule01::print_event(Event_ *ep) {
printf("\e[1;33;40mExercise 7-2: Timeout (%llu) (%llu)\e[m\n",
GetCurrentTime(), GetNodeCurrentTime(get_nid()));
//freeEvent(ep);
setEventReuse(ep);
return;
}
Execution result is shown as the following figure:
Except the event needs to set the third parameter, it also collaborates with an API,
setEventReuse(). Hence, we suggest timer object is better for periodical execution.
About the event structure of packet, we will introduce in next chapter.
88
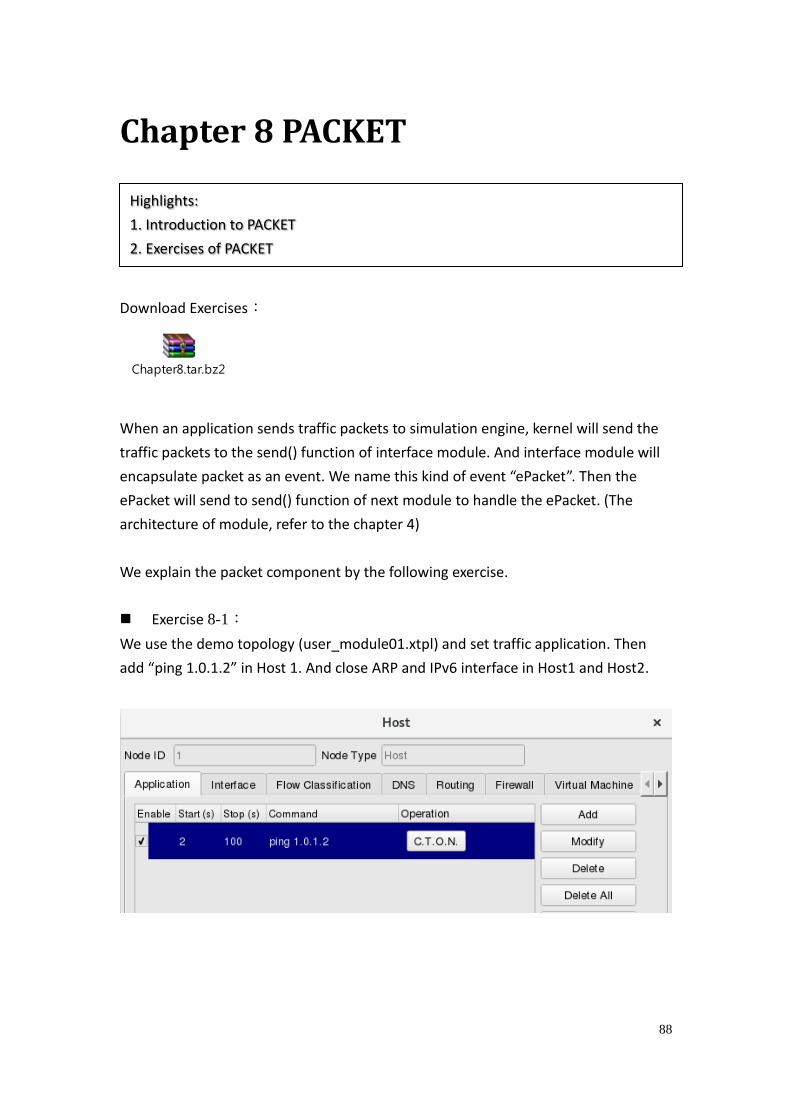
Chapter 8 PACKET
Download Exercises:
Chapter8.tar.bz2
When an application sends traffic packets to simulation engine, kernel will send the
traffic packets to the send() function of interface module. And interface module will
encapsulate packet as an event. We name this kind of event “ePacket”. Then the
ePacket will send to send() function of next module to handle the ePacket. (The
architecture of module, refer to the chapter 4)
We explain the packet component by the following exercise.
Exercise 8-1:
We use the demo topology (user_module01.xtpl) and set traffic application. Then
add “ping 1.0.1.2” in Host 1. And close ARP and IPv6 interface in Host1 and Host2.
Highlights:
1. Introduction to PACKET
2. Exercises of PACKET

89

90
Next, we declare a pkt_delay() function in user_module01.h. It is shown as following
red word.
#ifndef __user_module_01_h__
#define __user_module_01_h__
#include <event.h>
#include <object.h>
class UserModule01 : public NslObject {
private:
int Number;
char *String;
public:
UserModule01(u_int32_t type, u_int32_t id, struct plist* pl, const char *name);
~UserModule01();
int init();
int command(int argc, const char *argv[]);
int recv(ePacket_ *pkt);
int send(ePacket_ *pkt);
void pkt_delay(ePacket_ *pkt);
};
#endif /* __user_module_01_h__ */
The modified part of "user_module01.cc" is shown as following red word.
#include <stdlib.h>
#include <estinet_api.h>
#include <module/user-defined/user_module_01.h>
#include <packet.h>
#include <ethernet.h>
#include <ip.h>
MODULE_GENERATOR(UserModule01);

91
UserModule01::UserModule01(u_int32_t type, u_int32_t id, struct plist* pl, const char *name)
: NslObject(type, id, pl, name) {
vBind_int("myNumber", &Number);
vBind_char_str("myString", &String);
REG_VAR("shared-number", &Number);
}
UserModule01::~UserModule01(){}
int UserModule01::init() {
return(NslObject::init());
}
int UserModule01::command(int argc, const char *argv[]) {
return(NslObject::command(argc, argv));
}
int UserModule01::recv(ePacket_ *pkt) {
return(NslObject::recv(pkt));
}
int UserModule01::send(ePacket_ *pkt) {
u_int64_t current_time_in_tick;
u_int64_t delay_time_in_tick;
BASE_OBJTYPE(mem_func);
current_time_in_tick = GetCurrentTime();
SEC_TO_TICK(delay_time_in_tick, 1);
mem_func = POINTER_TO_MEMBER(UserModule01, pkt_delay);
setObjEvent(pkt, current_time_in_tick + delay_time_in_tick,
0, this, mem_func, (void *)pkt->DataInfo_);
return(1);
}
void UserModule01::pkt_delay(ePacket_ *pkt) {
Packet *packet;

92
struct ether_header *eh;
char src_mac_str[18];
char dst_mac_str[18];
struct ip *iph;
char src_ip_str[16];
char dst_ip_str[16];
if(pkt != NULL && pkt->DataInfo_ != NULL) {
packet = (Packet *)pkt->DataInfo_;
eh = (struct ether_header *)packet->pkt_get();
macaddr_to_str(eh->ether_shost, src_mac_str);
macaddr_to_str(eh->ether_dhost, dst_mac_str);
printf("\e[1;36;40mExercise 8-1: Src Mac: %s, Dst Mac: %s\e[m\n",
src_mac_str, dst_mac_str);
iph = (struct ip *)packet->pkt_sget();
if(iph != NULL) {
ipv4addr_to_str(iph->ip_src, src_ip_str);
ipv4addr_to_str(iph->ip_dst, dst_ip_str);
printf("\e[1;36;40mExercise 8-1: Src IP: %s, Dst IP: %s\e[m\n",
src_ip_str, dst_ip_str);
}
}
NslObject::send(pkt);
}
In send function, we want to apply“packet delay” effect, so we set the packet
after one second to trigger the“pkt_delay()”. The pkt_delay() function will put the
packet to next module.
By doing so, the packet will delay one second, and you can find out that the packet in
the module is actually event structure.
By the way, the traffic packet will be stored in DataInfo_ of ePacket structure.

93
When we use the pkt_get() to the packet, it can get the ether header address from
the packet.
eh = (struct ether_header *)packet->pkt_get();
Next, we will transfer the source mac address of ether header to string by
“macaddr_to_str” API.
macaddr_to_str(eh->ether_shost, src_mac_str);
macaddr_to_str(eh->ether_dhost, dst_mac_str);
If we want to get the IP header from a packet, we can use the “pkt_sget()” API.
iph = (struct ip *)packet->pkt_sget();
Next, we can transfer the ip source address to string by “ipv4addr_to_str” API.
ipv4addr_to_str(iph->ip_src, src_ip_str);
ipv4addr_to_str(iph->ip_dst, dst_ip_str);
After modifying the source code, we execute “make” and “make install”, and then
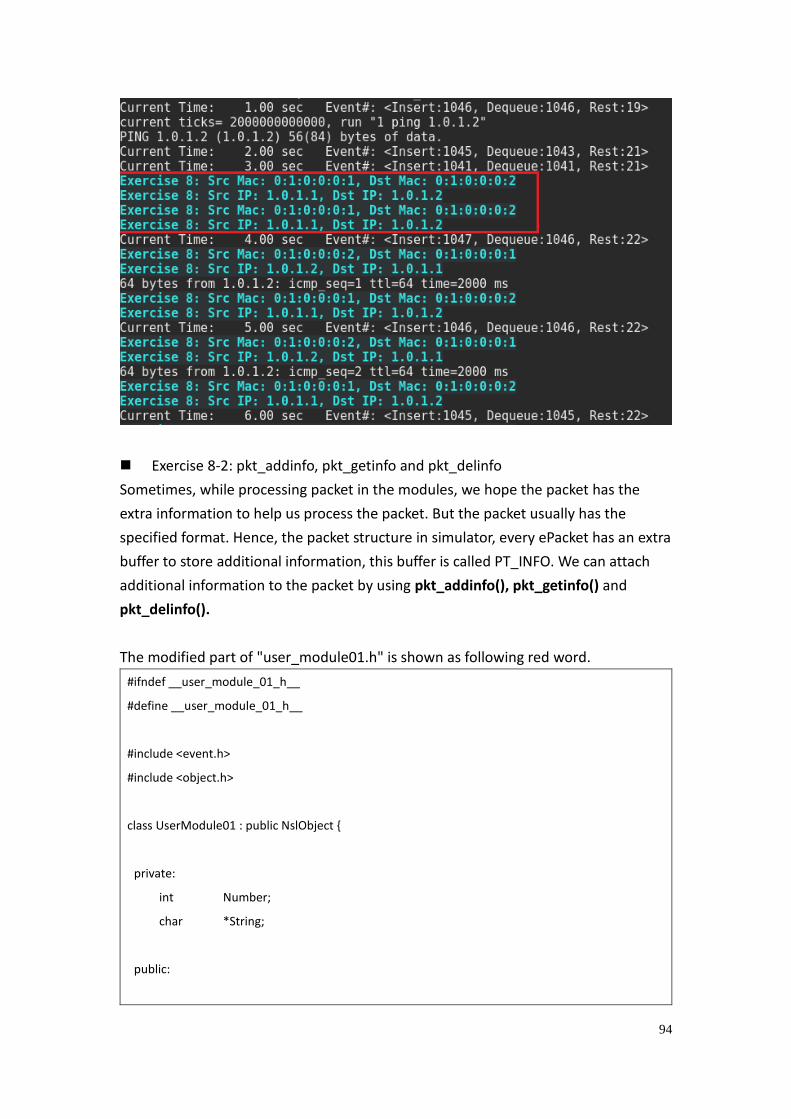
run the simulation, the simulation result as shown in following figure.
We can see the packet send by the first second will be logged by second second,
which is what we want, delaying the package.
Next, see the estinetss window, the printed result of using ipv4addr_to_str() and
macaddr_to_str() is shown in the following figure. Developer can use this
information to debug or check related information.
94
Exercise 8-2: pkt_addinfo, pkt_getinfo and pkt_delinfo
Sometimes, while processing packet in the modules, we hope the packet has the
extra information to help us process the packet. But the packet usually has the
specified format. Hence, the packet structure in simulator, every ePacket has an extra
buffer to store additional information, this buffer is called PT_INFO. We can attach
additional information to the packet by using pkt_addinfo(), pkt_getinfo() and
pkt_delinfo().
The modified part of "user_module01.h" is shown as following red word.
#ifndef __user_module_01_h__
#define __user_module_01_h__
#include <event.h>
#include <object.h>
class UserModule01 : public NslObject {
private:
int Number;
char *String;
public:

95
UserModule01(u_int32_t type, u_int32_t id, struct plist* pl, const char *name);
~UserModule01();
int init();
int command(int argc, const char *argv[]);
int recv(ePacket_ *pkt);
int send(ePacket_ *pkt);
void pkt_delay(ePacket_ *pkt);
};
#endif /* __user_module_01_h__ */
The following red words are same as the 8-1 case, with blue words about this case.
user_module01.cc
#include <stdlib.h>
#include <estinet_api.h>
#include <module/user-defined/user_module_01.h>
#include <packet.h>
#include <ethernet.h>
#include <ip.h>
MODULE_GENERATOR(UserModule01);
UserModule01::UserModule01(u_int32_t type, u_int32_t id, struct plist* pl, const char *name)
: NslObject(type, id, pl, name) {
}
UserModule01::~UserModule01(){}
int UserModule01::init() {
return(NslObject::init());
}
int UserModule01::command(int argc, const char *argv[]) {
return(NslObject::command(argc, argv));
}
int UserModule01::recv(ePacket_ *pkt) {

96
return(NslObject::recv(pkt));
}
int UserModule01::send(ePacket_ *pkt) {
u_int64_t current_time_in_tick;
u_int64_t delay_time_in_tick;
BASE_OBJTYPE(mem_func);
current_time_in_tick = GetCurrentTime();
SEC_TO_TICK(delay_time_in_tick, 1);
mem_func = POINTER_TO_MEMBER(UserModule01, pkt_delay);
setObjEvent(pkt, current_time_in_tick + delay_time_in_tick,
0, this, mem_func, (void *)pkt->DataInfo_);
return(1);
}
void UserModule01::pkt_delay(ePacket_ *pkt) {
Packet *packet;
struct ether_header *eh;
char src_mac_str[18];
char dst_mac_str[18];
struct ip *iph;
char src_ip_str[16];
char dst_ip_str[16];
if(pkt != NULL && pkt->DataInfo_ != NULL) {
packet = (Packet *)pkt->DataInfo_;
eh = (struct ether_header *)packet->pkt_get();
macaddr_to_str(eh->ether_shost, src_mac_str);
macaddr_to_str(eh->ether_dhost, dst_mac_str);
printf("\e[1;36;40mExercise 8: Src Mac: %s, Dst Mac: %s\e[m\n",
src_mac_str, dst_mac_str);

97
iph = (struct ip *)packet->pkt_sget();
if(iph != NULL) {
ipv4addr_to_str(iph->ip_src, src_ip_str);
ipv4addr_to_str(iph->ip_dst, dst_ip_str);
printf("\e[1;36;40mExercise 8: Src IP: %s, Dst IP: %s\e[m\n",
src_ip_str, dst_ip_str);
}
}
int NodeColor=random()%3;
packet->pkt_addinfo("NodeColor", (char *)&NodeColor, sizeof(NodeColor));
NslObject::send(pkt);
}
In the exercise, we add a packet information before the UserModule01 module put
the packet to next module. The packet information is node color with three random
values (color).
Usage of the pkt_addinfo():
The pkt_addinfo() API has three parameters. First parameter is the packet
information identifier (no more than 15 characters), the second is c++ variable,
and the third is the size of the c++ variable.
The modified part of "phy.cc" is shown as following blue words.
int phy::send(ePacket_ *pkt) {
struct con_list *cl;
Packet *p;
struct phyInfo *phyinfo;
assert(pkt&&(p=(Packet *)pkt->DataInfo_));
if ( LinkFailFlag > 0 ) {
freePacket(pkt);
return(1);
}
int *nodecolor = (int *)p->pkt_getinfo("NodeColor");
if(*nodecolor == 1)
printf("\e[1;33;42mExercise 8: Node Color : %d\e[m\n", *nodecolor);
else if(*nodecolor == 2)
printf("\033[1;35;45mExercise 8: Node Color : %d\033[m\n", *nodecolor);

98
else
printf("\e[1;31;41mExercise 8: Node Color : %d\e[m\n", *nodecolor);
p->pkt_delinfo("NodeColor");
In phy module, we use "pkt_getinfo()" to get the “NodeColor” information of the
packet, and print different ascii color for different value of “NodeColor”.
After printing, we use the pkt_definfo() to delete “NodeColor” information of the
packet.
Usage of pkt_getinfo() and pkt_delinfo():
Bring identifier of packet information into the parameter of pkt_getinfo() will
return the value of identifier; however, bring identifier of packet information
into the parameter of pkt_delinfo will delete the packet information.
Execution result is shown as the following figure:

99
Chapter 9 Other APIs
Download Exercises:
Chapter9.tar.bz2
In this chapter, we introduce some common APIs.
Exercise 9-1
We use the demo topology (user_module01.xtpl) and set traffic application. Then
add “ping 1.0.1.2” in Host 1. And close ARP and IPv6 interface in Host1 and Host2.
Highlights:
1. Introduce GetNodeLoc, GetTotalNumOfNodes, GetConFilePathAndName, and
getConnectNode etc.

100

101
The modified part of "user_module01.h" is shown as following red words.
#ifndef __user_module_01_h__
#define __user_module_01_h__
#include <event.h>
#include <object.h>
class UserModule01 : public NslObject {
private:
int Number;
char *String;
public:
UserModule01(u_int32_t type, u_int32_t id, struct plist* pl, const char *name);
~UserModule01();
int init();
int command(int argc, const char *argv[]);
int recv(ePacket_ *pkt);
int send(ePacket_ *pkt);
void pkt_delay(ePacket_ *pkt);
};
#endif /* __user_module_01_h__ */
The following red words are same as the 8-1 case in chapter 8, with blue words about
this chapter.
user_module01.cc
#include <stdlib.h>
#include <estinet_api.h>
#include <module/user-defined/user_module_01.h>
#include <packet.h>
#include <ethernet.h>
#include <ip.h>

102
MODULE_GENERATOR(UserModule01);
UserModule01::UserModule01(u_int32_t type, u_int32_t id, struct plist* pl, const char *name)
: NslObject(type, id, pl, name) {
vBind_int("myNumber", &Number);
vBind_char_str("myString", &String);
REG_VAR("shared-number", &Number);
}
UserModule01::~UserModule01(){}
int UserModule01::init() {
return(NslObject::init());
}
int UserModule01::command(int argc, const char *argv[]) {
return(NslObject::command(argc, argv));
}
int UserModule01::recv(ePacket_ *pkt) {
return(NslObject::recv(pkt));
}
int UserModule01::send(ePacket_ *pkt) {
u_int64_t current_time_in_tick;
u_int64_t delay_time_in_tick;
BASE_OBJTYPE(mem_func);
current_time_in_tick = GetCurrentTime();
SEC_TO_TICK(delay_time_in_tick, 1);
mem_func = POINTER_TO_MEMBER(UserModule01, pkt_delay);
setObjEvent(pkt, current_time_in_tick + delay_time_in_tick,
0, this, mem_func, (void *)pkt->DataInfo_);
return(1);
}
void UserModule01::pkt_delay(ePacket_ *pkt) {
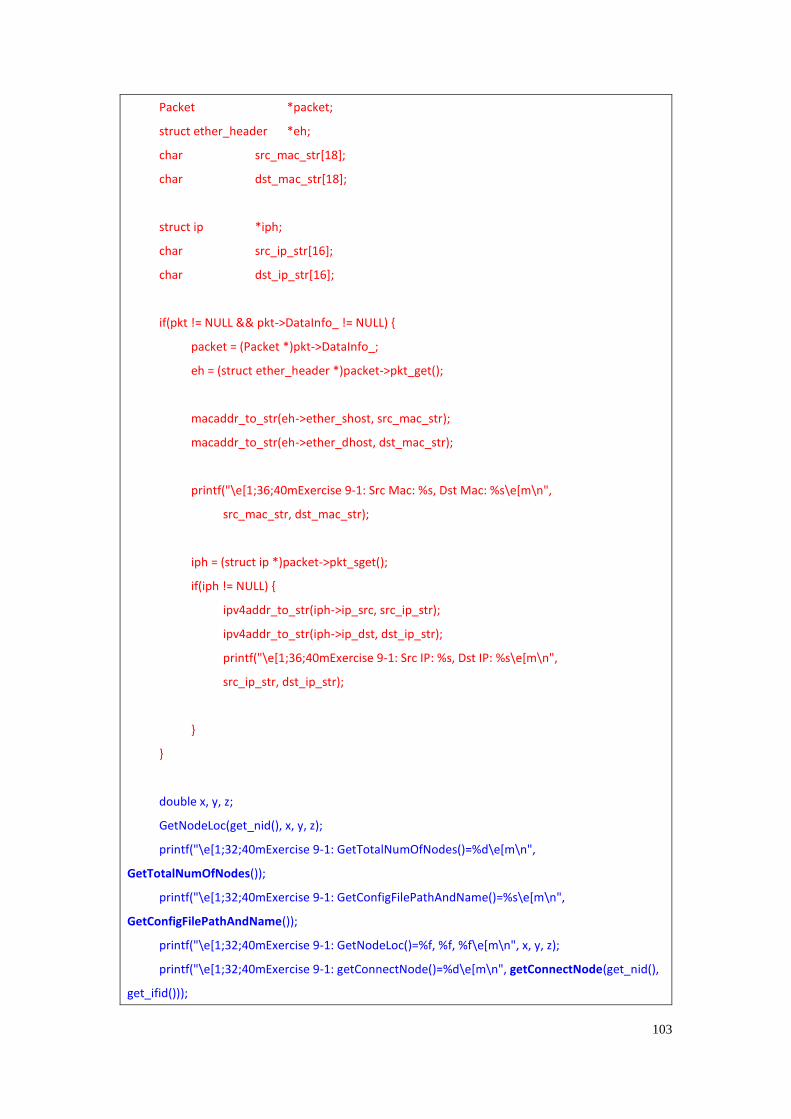
103
Packet *packet;
struct ether_header *eh;
char src_mac_str[18];
char dst_mac_str[18];
struct ip *iph;
char src_ip_str[16];
char dst_ip_str[16];
if(pkt != NULL && pkt->DataInfo_ != NULL) {
packet = (Packet *)pkt->DataInfo_;
eh = (struct ether_header *)packet->pkt_get();
macaddr_to_str(eh->ether_shost, src_mac_str);
macaddr_to_str(eh->ether_dhost, dst_mac_str);
printf("\e[1;36;40mExercise 9-1: Src Mac: %s, Dst Mac: %s\e[m\n",
src_mac_str, dst_mac_str);
iph = (struct ip *)packet->pkt_sget();
if(iph != NULL) {
ipv4addr_to_str(iph->ip_src, src_ip_str);
ipv4addr_to_str(iph->ip_dst, dst_ip_str);
printf("\e[1;36;40mExercise 9-1: Src IP: %s, Dst IP: %s\e[m\n",
src_ip_str, dst_ip_str);
}
}
double x, y, z;
GetNodeLoc(get_nid(), x, y, z);
printf("\e[1;32;40mExercise 9-1: GetTotalNumOfNodes()=%d\e[m\n",
GetTotalNumOfNodes());
printf("\e[1;32;40mExercise 9-1: GetConfigFilePathAndName()=%s\e[m\n",
GetConfigFilePathAndName());
printf("\e[1;32;40mExercise 9-1: GetNodeLoc()=%f, %f, %f\e[m\n", x, y, z);
printf("\e[1;32;40mExercise 9-1: getConnectNode()=%d\e[m\n", getConnectNode(get_nid(),
get_ifid()));
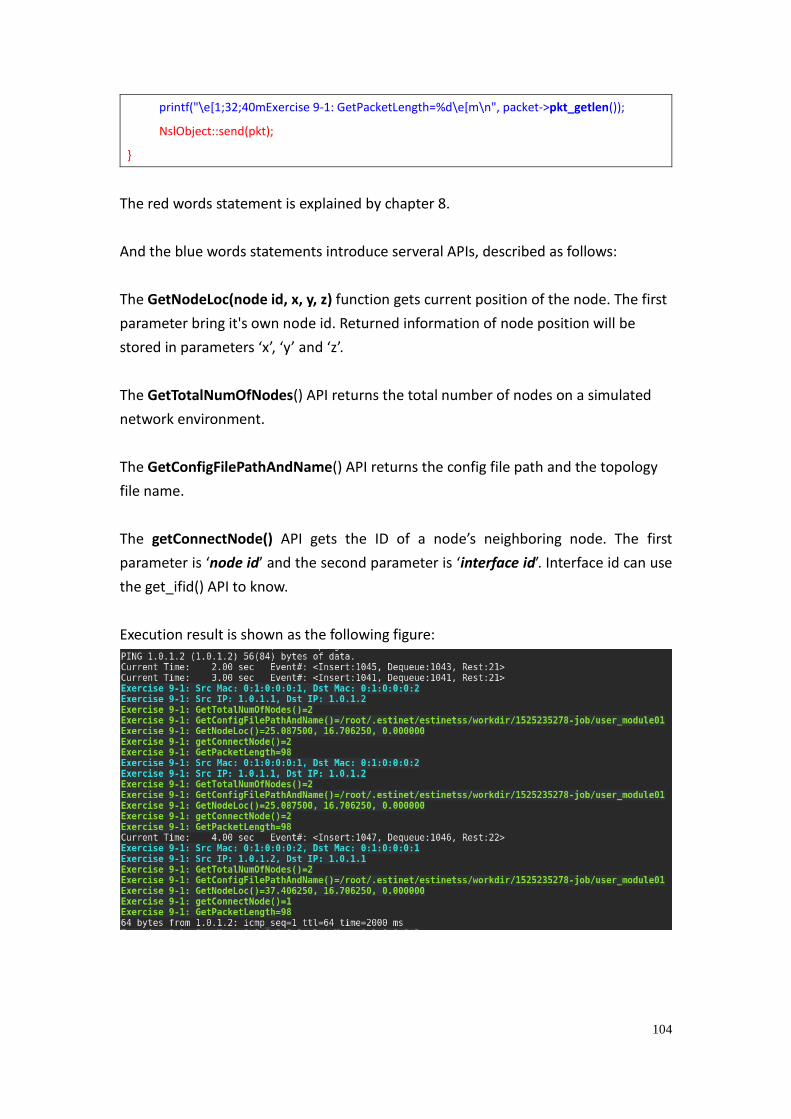
104
printf("\e[1;32;40mExercise 9-1: GetPacketLength=%d\e[m\n", packet->pkt_getlen());
NslObject::send(pkt);
}
The red words statement is explained by chapter 8.
And the blue words statements introduce serveral APIs, described as follows:
The GetNodeLoc(node id, x, y, z) function gets current position of the node. The first
parameter bring it's own node id. Returned information of node position will be
stored in parameters ‘x’, ‘y’ and ‘z’.
The GetTotalNumOfNodes() API returns the total number of nodes on a simulated
network environment.
The GetConfigFilePathAndName() API returns the config file path and the topology
file name.
The getConnectNode() API gets the ID of a node’s neighboring node. The first
parameter is ‘node id’ and the second parameter is ‘interface id’. Interface id can use
the get_ifid() API to know.
Execution result is shown as the following figure:

105
Appendix
Appendix A. About detail of HeaderSection in MDF
The first table collects the relevant variables and their meanings. The second table lists
the set of possible values for each variable.
Field Name Meaning
ModuleName The name of this module
GroupName
The name of the group this module belongs to. And GUI will
list GroupName in Module Editor to classify mdf file by
GroupName.
Introduction A short description or comment about this module
Parameter
A start-time parameter variable. The GUI program reads this
part to know what parameters will be used at start-time.
With this information, it will export these start-time
parameters in the generated .if_and_medium_conf file.
TABLE THE MEANINGS OF THE VARIABLES USED IN THE HEADERSECTION
Field Name Possible Values
ModuleName Any user-specified string
GroupName
80211p, classification, interface, mac8023, mnode, phy,
sdn_wifi_infra, traffic_control, vehicular_network, ap, hub,
mac80211, mifx, openflow, pktgen, teleportal, user_defined,
wphy (A user can create a new module group)
Introduction Any user specified comment description string
Parameter
The format of a parameter statement is explained as follows:
Parameter Name Value Attribute
The possible attributes are listed below:
“local,” “gui_autogen,” “gui_autoassign,” and “local_only”.
“local” means that this parameter is used only in this module
and if its value is updated, it will not be copied to other
modules. Unless press "C.T.O.N." button, it can be copied to all
modules on all nodes with the same node type.
”gui_autogen” means that the value of this parameter will be
106
automatically generated by the GUI program. However, a user
can not replace/change the auto-generated value with his
(her) value. If a user press "C.T.O.N." button, the auto-
generated value will be not copied to any module.
Normally, a possible value of an gui_autogen parameter is a
formula consisting of the three predefined variables: $CASE$,
$NID$, and $PID$.
$CASE$ represents the main file name of a simulation case’s
topology file. It will be replaced by the main file name when
this variable is accessed. For example, if a simulation case’s
topology file is saved with the filename “test.xtpl”, $CASE$ will
be replaced by “test.” $NID$ represents the ID of the node to
which this module is attached. Analogously, $PID$ represents
the ID of the interface to which this module is attached.
“gui_autoassign” is similar to “gui_autogen” However, a user
can not replace/change its value. No matter how a user
replaces/changes the auto-generated value with his (her)
desired one, the final value is still determined by a pre-defined
formula. ex. ip address, mac address, interface id...etc..
”local_only” means that the value of this parameter can be
replace/change the value with his (her) value. If a user press
"C.T.O.N." button, the value will be not copied to any module.
Because the parameter must be set respectively.
TABLE THE POSSIBLE VALUES FOR THE VARIABLES USED IN THE HEADERSECTION
Appendix B. About detail of InitVariable in MDF
Normally, a user should specify the caption and the size of the diabox. The key word
“Caption” indicates the caption of the dialog box, and “FrameSize width height”
indicates the size of the dialog box. For example,
Caption "Parameters Setting"
FrameSize 340 80
These statements will generate a dialog box of 340x80 pixels with a caption of
“Parameters Setting.” After specifying the caption and the size of the dialog box, a user
can arrange the layout inside the dialog box. A dialog box would contain a number of

107
GUI objects, such as an OK button, a Cancel button, a textline, etc. Each GUI object
corresponds to a description block in “InitVariableSection” and always starts with
“Begin” and ends with “End.” The following shows an example:
Begin BUTTON b_ok
Caption "OK"
Scale 270 12 60 30
ActiveOn MODE_EDIT
Enabled TRUE
Action ok
Comment "OK Button"
End
The description blocks for different objects share several common and basic attributes.
For example, the caption and scale commands are used commonly. A “BUTTON”-like
object is an example of an object consisting of only basic attributes. Let’s take the
simple “BUTTON” object as an example. More specific attributes will be discussed later.
For a “BUTTON” object, the keyword “BUTTON” follows the keyword “Begin” and it is
followed by the object name “b_ok”. The following table lists its attributes:
Attribute name Possible values Comment
Caption User-specified The caption of this object
Scale User-specified The four numbers represent (x, y, width,
height).
ActiveOn
MODE_EDIT,
MODE_SIMULATION,
ALL_MODE
An option to specify in which mode this
object should is active. The
“MODE_EDIT” stand for the object is
enabled at Edit Mode. The
“MODE_SIMULATION” stand for the
object is enabled at GUI G Mode.
ALL_MODE indicates that the object will
be activated whatever the Mode is.
Enabled TRUE, FALSE
If an object is not enabled, it will be
dimly displayed. That is, a user cannot
operate this object.
Action ok , cancel An attribute used by button-like objects,
such as the OK button and cancel
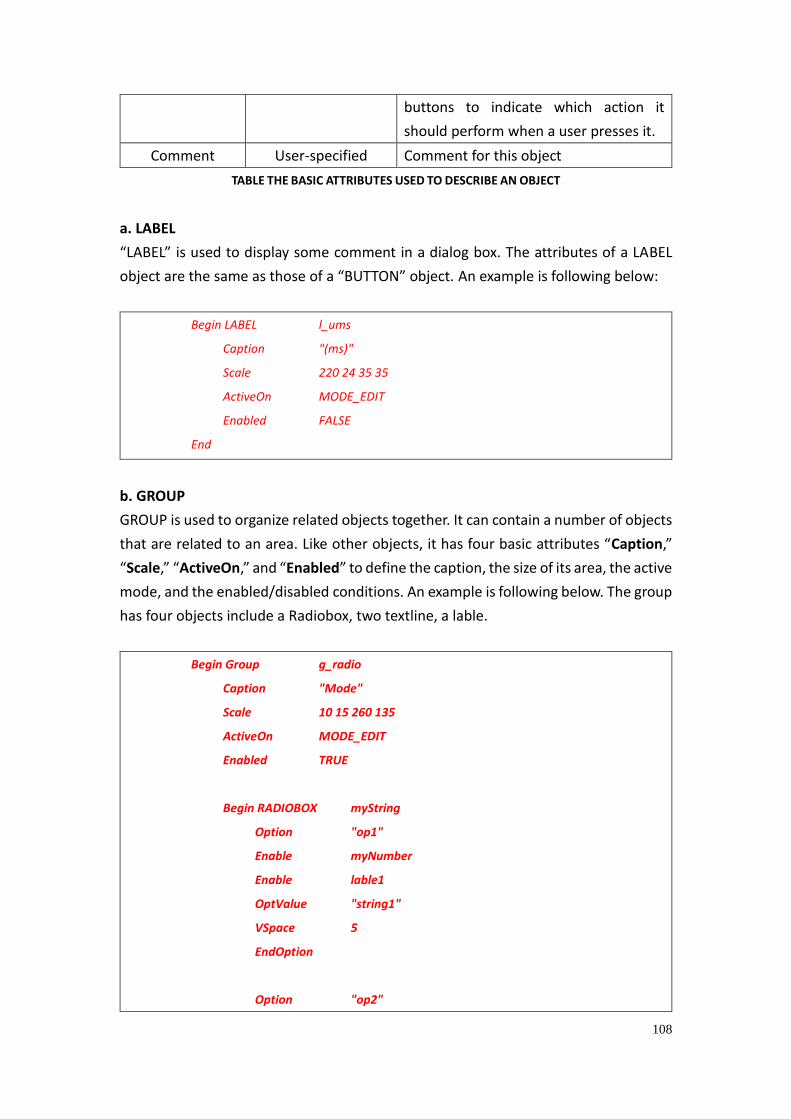
108
buttons to indicate which action it
should perform when a user presses it.
Comment User-specified Comment for this object
TABLE THE BASIC ATTRIBUTES USED TO DESCRIBE AN OBJECT
a. LABEL
“LABEL” is used to display some comment in a dialog box. The attributes of a LABEL
object are the same as those of a “BUTTON” object. An example is following below:
Begin LABEL l_ums
Caption "(ms)"
Scale 220 24 35 35
ActiveOn MODE_EDIT
Enabled FALSE
End
b. GROUP
GROUP is used to organize related objects together. It can contain a number of objects
that are related to an area. Like other objects, it has four basic attributes “Caption,”
“Scale,” “ActiveOn,” and “Enabled” to define the caption, the size of its area, the active
mode, and the enabled/disabled conditions. An example is following below. The group
has four objects include a Radiobox, two textline, a lable.
Begin Group g_radio
Caption "Mode"
Scale 10 15 260 135
ActiveOn MODE_EDIT
Enabled TRUE
Begin RADIOBOX myString
Option "op1"
Enable myNumber
Enable lable1
OptValue "string1"
VSpace 5
EndOption
Option "op2"

109
Disable myNumber
Disable lable1
OptValue "string2"
VSpace 40
EndOption
Type STRING
Comment "radiobox test"
End
Begin TEXTLINE myNumber
Caption "input Number"
Scale 35 35 180 35
ActiveOn MODE_EDIT
Enabled FALSE
Type INT
Comment "for test"
End
Begin LABEL lable1
Caption "(INT)"
Scale 220 35 35 35
ActiveOn MODE_EDIT
Enabled FALSE
End
End
c. RADIOBOX/CHECKBOX
In RADIOBOX/CHECKBOX, there are some new attributes. (Note: Outside of a radiobox
must be a group object) Let’s take the following example to explain:
Begin Group g_radio
Caption "Mode"
Scale 10 15 260 135
ActiveOn MODE_EDIT
Enabled TRUE
Begin RADIOBOX myString

110
Option "op1"
Enable myNumber
Enable lable1
OptValue "string1"
VSpace 5
EndOption
Option "op2"
Disable myNumber
Disable lable1
OptValue "string2"
VSpace 40
EndOption
Type STRING
Comment "radiobox test"
End
Begin TEXTLINE myNumber
Caption "input Number"
Scale 35 35 180 35
ActiveOn MODE_EDIT
Enabled FALSE
Type INT
Comment "for test"
End
Begin LABEL lable1
Caption "(INT)"
Scale 220 35 35 35
ActiveOn MODE_EDIT
Enabled FALSE
End
End
It is a RADIOBOX block whose name is “myString.” The two option blocks follow, each
of which starts with the “Option” keyword and ends with the “EndOption” keyword.
The string following the “Option” keyword specifies the string that should be shown in

111
the dialog box for this option. The “OptValue” specifies the value that will be assigned
to the radiobox option variable “arpMode” if this option is selected. The “Enable” and
“Disable” statements inside an “Option” block specify that, when a user selects this
option, the variable objects following these statements should be enabled or disabled
(When an object is enabled, its input field is enabled in the parameter dialog box,
otherwise, its input field is disabled). The term “VSpace” is used to specify the vertical
height of the area used for outside group's y location(only using for Radiobox). The
term “Comment” is used to specify comment for this object.
The following is a checkbox block whose name is “check1.” Like other objects, it has
four basic attributes “Caption,” “Scale,” “ActiveOn,” and “Enabled” to define the
caption, the size of its area, the active mode, and the enabled/disabled conditions.
And then, the two option blocks follow, each of which starts with the “Option”
keyword and ends with the “EndOption” keyword. The string following the “Option”
keyword specifies the string that should be shown in the dialog box for this option. The
“OptValue” specifies the value that will be assigned to the checkbox option variable
“check1” if this option is selected. The “Enable” and “Disable” statements inside an
“Option” block specify that, when a user selects this option, the variable objects
following these statements should be enabled or disabled (When an object is enabled,
its input field is enabled in the parameter dialog box, otherwise, its input field is
Begin CHECKBOX check1
Caption "Set My Number"
Scale 10 50 180 20
ActiveOn MODE_EDIT
Enabled TRUE
Option "TRUE"
OptValue "on"
Enable myNumber
EndOption
Option "FALSE"
OptValue "off"
Disable myNumber
EndOption
Comment ""
End

112
disabled). The term “Comment” is used to specify comment for this object.
d. TEXTLINE
TEXTLINE provides a text field for inputting or outputting data. Like other objects, it
has four basic attributes “Caption,” “Scale,” “ActiveOn,” and “Enabled” to define the
caption, the size of its area, the active mode, and the enabled/disabled conditions. A
module developer can indicate the type of the data to be read from a textline. The
data will be interpreted as a value of the type indicated by the “TYPE” key word. But
now we only support “STRING” for “TYPE”, other data type not yet. The term
“Comment” is used to specify comment for this object. An example is following below.
Begin TEXTLINE myNumber
Caption "My Number "
Scale 10 70 220 30
ActiveOn MODE_EDIT
Enabled FALSE
Type INT
Comment "An Integer"
End
Appendix C. About detail of Export Section in MDF
“ExportSection” provides an area in a dialog box in which a user can get/set the current
value of a variable at run-time. “Caption”, “FrameSize” are the two basic attributes for
this section. If a module doesn’t have any variable that can be accessed during
simulation, “Caption” should be set to “”, a null string, and “FrameSize” should be set
to 0 0. Or the ExportSection does not be added.
ExportSection
Caption ""
FrameSize 0 0
EndExportSection
In addition to the objects discussed above, there are two useful objects that are new
in this section. They are the “INTERACTIONVIEW” and “ACCESSBUTTON.” The formats
of these two objects are shown in the following examples:
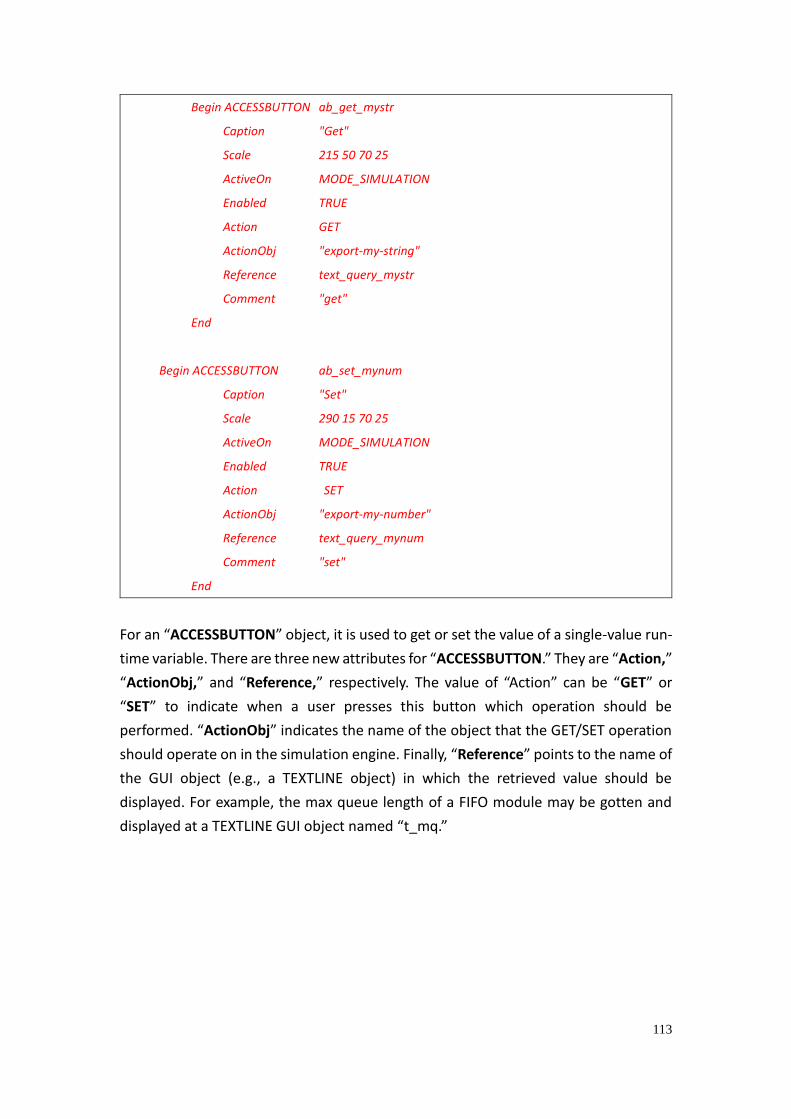
113
Begin ACCESSBUTTON ab_get_mystr
Caption "Get"
Scale 215 50 70 25
ActiveOn MODE_SIMULATION
Enabled TRUE
Action GET
ActionObj "export-my-string"
Reference text_query_mystr
Comment "get"
End
Begin ACCESSBUTTON ab_set_mynum
Caption "Set"
Scale 290 15 70 25
ActiveOn MODE_SIMULATION
Enabled TRUE
Action SET
ActionObj "export-my-number"
Reference text_query_mynum
Comment "set"
End
For an “ACCESSBUTTON” object, it is used to get or set the value of a single-value run-
time variable. There are three new attributes for “ACCESSBUTTON.” They are “Action,”
“ActionObj,” and “Reference,” respectively. The value of “Action” can be “GET” or
“SET” to indicate when a user presses this button which operation should be
performed. “ActionObj” indicates the name of the object that the GET/SET operation
should operate on in the simulation engine. Finally, “Reference” points to the name of
the GUI object (e.g., a TEXTLINE object) in which the retrieved value should be
displayed. For example, the max queue length of a FIFO module may be gotten and
displayed at a TEXTLINE GUI object named “t_mq.”

114
Begin INTERACTIONVIEW iv_get_all
Caption "Get All Var"
Scale 10 100 200 30
ActiveOn MODE_SIMULATION
Enabled TRUE
Action GET
ActionObj "export-all-data"
Fields "My String" "My Number"
Comment "All Data"
End
For an “INTERACTIONVIEW” object, it is used to display the content of a multi-column
table at run-time. Normally, it is used to get a switch table, an ARP table, or an AP’s
association table. Besides “Action” and “ActionObj,” there is a new attribute called
“Fields” to specify the names of the fields (columns) of the table. Several quoted
strings, each of which represents the name of a field, follow the “Fields” attribute.
Appendix D. Distributed architecture of EstiNet
EstiNet uses a distributed architecture to support remote simulations and concurrent
simulations. The estinetjd is used to do this task. It should be executed and remain
alive all the time to manage multiple simulation machines. On every simulation
machine, the estinetss needs to be executed and remain alive to let the estinetjd
know whether currently this machine is busy running a simulation case or not. The
following figure depicts the distributed architecture of EstiNet.
For example, the estinetjd in the simulation service center can accept simulation jobs
from the whole world. When a user submits a simulation job to the estinetjd, the
estinetjd selects an available simulation machine to service the job. If there is no
available simulation machine, the job will be put into the job queue of the estinetjd.
Every simulation machine always has a running estinetss to communicate with the GUI
program and the estinetjd. The estinetss will notify the estinetjd whether the
simulation machine managed by itself is available or not. When the estinetss receives
a simulation job from the estinetjd, it forks (executes) a simulation engine process to
simulate the specified network and protocols. When the simulation engine process is
running, the estinetss will communicate with the estinetjd and the GUI program. For
example, periodically the simulation engine process will send the current virtual time
115
of the simulation network to the estinetss. Then the estinetss will relay the
information to the GUI program. This enables the GUI user to know the progress of
the simulation. During a simulation, the user can also on-line set or get a protocol
module’s value (e.g. to query a switch’s switch table). Message exchanges happening
between the simulation engine process and the GUI program are all done via the
estinetss.