Embed Size (px)
Citation preview

E S S B A S E ® A D M I N I S T R A T I O N S E R V I C E S
R E L E A S E 9 . 3 . 1
I N S T A L L A T I O N G U I D E F O R W I N D O W S

Administration Services Installation Guide for Windows, 9.3.1
Copyright © 2001, 2008, Oracle and/or its affiliates. All rights reserved.
Authors: Loren Davidson
The Programs (which include both the software and documentation) contain proprietary information; they are providedunder a license agreement containing restrictions on use and disclosure and are also protected by copyright, patent, andother intellectual and industrial property laws. Reverse engineering, disassembly, or decompilation of the Programs, exceptto the extent required to obtain interoperability with other independently created software or as specified by law, isprohibited.
The information contained in this document is subject to change without notice. If you find any problems in thedocumentation, please report them to us in writing. This document is not warranted to be error-free. Except as may beexpressly permitted in your license agreement for these Programs, no part of these Programs may be reproduced ortransmitted in any form or by any means, electronic or mechanical, for any purpose.
If the Programs are delivered to the United States Government or anyone licensing or using the Programs on behalf of theUnited States Government, the following notice is applicable:
U.S. GOVERNMENT RIGHTS Programs, software, databases, and related documentation and technical data delivered toU.S. Government customers are "commercial computer software" or "commercial technical data" pursuant to theapplicable Federal Acquisition Regulation and agency-specific supplemental regulations. As such, use, duplication,disclosure, modification, and adaptation of the Programs, including documentation and technical data, shall be subjectto the licensing restrictions set forth in the applicable Oracle license agreement, and, to the extent applicable, the additionalrights set forth in FAR 52.227-19, Commercial Computer Software--Restricted Rights (June 1987). Oracle USA, Inc., 500Oracle Parkway, Redwood City, CA 94065.
The Programs are not intended for use in any nuclear, aviation, mass transit, medical, or other inherently dangerousapplications. It shall be the licensee's responsibility to take all appropriate fail-safe, backup, redundancy and other measuresto ensure the safe use of such applications if the Programs are used for such purposes, and we disclaim liability for anydamages caused by such use of the Programs.
Oracle is a registered trademark of Oracle Corporation and/or its affiliates. Other names may be trademarks of theirrespective owners.
The Programs may provide links to Web sites and access to content, products, and services from third parties. Oracle isnot responsible for the availability of, or any content provided on, third-party Web sites. You bear all risks associated withthe use of such content. If you choose to purchase any products or services from a third party, the relationship is directlybetween you and the third party. Oracle is not responsible for: (a) the quality of third-party products or services; or (b)fulfilling any of the terms of the agreement with the third party, including delivery of products or services and warrantyobligations related to purchased products or services. Oracle is not responsible for any loss or damage of any sort that youmay incur from dealing with any third party.

Contents
Chapter 1. Installing Administration Services . . . . . . . . . . . . . . . . . . . . . . . . . . . . . . . . . . . . . . . . . . . . . . . 7
Upgrading . . . . . . . . . . . . . . . . . . . . . . . . . . . . . . . . . . . . . . . . . . . . . . . . . . . . . . . . . . . 7
Launching Installers . . . . . . . . . . . . . . . . . . . . . . . . . . . . . . . . . . . . . . . . . . . . . . . . . . . . 7
Installing Administration Services Software . . . . . . . . . . . . . . . . . . . . . . . . . . . . . . . . . . . 8
What Happens During Installation . . . . . . . . . . . . . . . . . . . . . . . . . . . . . . . . . . . . . . . . . 9
Files Installed in the EASPATH Directory . . . . . . . . . . . . . . . . . . . . . . . . . . . . . . . . . . 9
Accessing Documentation . . . . . . . . . . . . . . . . . . . . . . . . . . . . . . . . . . . . . . . . . . . . 10
About Hyperion Home . . . . . . . . . . . . . . . . . . . . . . . . . . . . . . . . . . . . . . . . . . . . . . . . . 10
Hyperion Home Location . . . . . . . . . . . . . . . . . . . . . . . . . . . . . . . . . . . . . . . . . . . . 10
Files Installed in the HYPERION_HOME Directory . . . . . . . . . . . . . . . . . . . . . . . . . 11
Changing the Hyperion Home Location . . . . . . . . . . . . . . . . . . . . . . . . . . . . . . . . . . 12
Selecting the ESSLANG Value . . . . . . . . . . . . . . . . . . . . . . . . . . . . . . . . . . . . . . . . . . . . 13
Specifying Ports for Apache Tomcat . . . . . . . . . . . . . . . . . . . . . . . . . . . . . . . . . . . . . . . . 13
Enabling SAP R/3 Connectivity . . . . . . . . . . . . . . . . . . . . . . . . . . . . . . . . . . . . . . . . . . . 14
Setting Up and Running Silent Installations . . . . . . . . . . . . . . . . . . . . . . . . . . . . . . . . . . 14
Chapter 2. Configuring and Setting Up Administration Services . . . . . . . . . . . . . . . . . . . . . . . . . . . . . . . . . . 17
Hyperion Configuration Utility . . . . . . . . . . . . . . . . . . . . . . . . . . . . . . . . . . . . . . . . . . . 17
Task Sequence . . . . . . . . . . . . . . . . . . . . . . . . . . . . . . . . . . . . . . . . . . . . . . . . . . . . 18
Restricted Characters . . . . . . . . . . . . . . . . . . . . . . . . . . . . . . . . . . . . . . . . . . . . . . . 18
Troubleshooting . . . . . . . . . . . . . . . . . . . . . . . . . . . . . . . . . . . . . . . . . . . . . . . . . . 18
Satisfying Initial Requirements . . . . . . . . . . . . . . . . . . . . . . . . . . . . . . . . . . . . . . . . . . . 18
Task Sequence . . . . . . . . . . . . . . . . . . . . . . . . . . . . . . . . . . . . . . . . . . . . . . . . . . . . . . . 18
Configuring Product Upgrades . . . . . . . . . . . . . . . . . . . . . . . . . . . . . . . . . . . . . . . . . . . 19
Configuring Administration Services . . . . . . . . . . . . . . . . . . . . . . . . . . . . . . . . . . . . . . . 19
Configuring Databases . . . . . . . . . . . . . . . . . . . . . . . . . . . . . . . . . . . . . . . . . . . . . . 21
Deploying to the Application Server . . . . . . . . . . . . . . . . . . . . . . . . . . . . . . . . . . . . 22
What Happens During Deployment . . . . . . . . . . . . . . . . . . . . . . . . . . . . . . . . . . . . 23
Reconfiguring Products . . . . . . . . . . . . . . . . . . . . . . . . . . . . . . . . . . . . . . . . . . . . . . . . 24
Verifying Startup Dependencies . . . . . . . . . . . . . . . . . . . . . . . . . . . . . . . . . . . . . . . . . . . 24
Starting and Stopping Shared Services . . . . . . . . . . . . . . . . . . . . . . . . . . . . . . . . . . . . . . 24
Starting Shared Services . . . . . . . . . . . . . . . . . . . . . . . . . . . . . . . . . . . . . . . . . . . . . . 24
Contents iii
Verifying Successful Startup of Shared Services . . . . . . . . . . . . . . . . . . . . . . . . . . . . . 25
Stopping Shared Services . . . . . . . . . . . . . . . . . . . . . . . . . . . . . . . . . . . . . . . . . . . . . 26
Completing Advanced Installation Tasks . . . . . . . . . . . . . . . . . . . . . . . . . . . . . . . . . . . . 27
Starting Administration Services . . . . . . . . . . . . . . . . . . . . . . . . . . . . . . . . . . . . . . . 27
Shutting Down Administration Services Console and Essbase AdministrationServer . . . . . . . . . . . . . . . . . . . . . . . . . . . . . . . . . . . . . . . . . . . . . . . . . . . . . . . . . . 31
Running Essbase Administration Server as a Windows Service . . . . . . . . . . . . . . . . . . 32
Setting Up Administration Services Users . . . . . . . . . . . . . . . . . . . . . . . . . . . . . . . . . 35
Setting Up Business Rules Users . . . . . . . . . . . . . . . . . . . . . . . . . . . . . . . . . . . . . . . . 36
Backing Up and Restoring User Information . . . . . . . . . . . . . . . . . . . . . . . . . . . . . . 36
Setting Up an SMTP Server . . . . . . . . . . . . . . . . . . . . . . . . . . . . . . . . . . . . . . . . . . . 36
Changing the Temporary Directory . . . . . . . . . . . . . . . . . . . . . . . . . . . . . . . . . . . . . 37
Chapter 3. Uninstalling Administration Services . . . . . . . . . . . . . . . . . . . . . . . . . . . . . . . . . . . . . . . . . . . . . 39
Chapter 4. Upgrading Administration Services . . . . . . . . . . . . . . . . . . . . . . . . . . . . . . . . . . . . . . . . . . . . . . 41
Upgrading from Previous Releases . . . . . . . . . . . . . . . . . . . . . . . . . . . . . . . . . . . . . . . . . 41
Uninstalling Previous Releases . . . . . . . . . . . . . . . . . . . . . . . . . . . . . . . . . . . . . . . . . . . . 42
Appendix A. Manually Configuring Web Application Servers . . . . . . . . . . . . . . . . . . . . . . . . . . . . . . . . . . . . . 43
Configuring BEA WebLogic 9.1 Application Servers Manually . . . . . . . . . . . . . . . . . . . . . 43
Preparing to Configure WebLogic 9.1 . . . . . . . . . . . . . . . . . . . . . . . . . . . . . . . . . . . . 43
Deploying EAS to WebLogic 9.1 . . . . . . . . . . . . . . . . . . . . . . . . . . . . . . . . . . . . . . . . 44
Configuring BEA WebLogic 8.1.6 Application Servers Manually . . . . . . . . . . . . . . . . . . . 45
Preparing to Configure WebLogic 8.1.6 . . . . . . . . . . . . . . . . . . . . . . . . . . . . . . . . . . 45
Creating a Domain . . . . . . . . . . . . . . . . . . . . . . . . . . . . . . . . . . . . . . . . . . . . . . . . . 45
Modifying and Executing the Startup Script . . . . . . . . . . . . . . . . . . . . . . . . . . . . . . . 45
Deploying to WebLogic . . . . . . . . . . . . . . . . . . . . . . . . . . . . . . . . . . . . . . . . . . . . . . 46
Logging On Administration Services Console . . . . . . . . . . . . . . . . . . . . . . . . . . . . . . 47
Deploying Administration Server on WebLogic Server with JRockit JVM . . . . . . . . . . 48
Configuring IBM WebSphere 6.x Application Servers . . . . . . . . . . . . . . . . . . . . . . . . . . . 48
Preparing to Configure Websphere 6.x . . . . . . . . . . . . . . . . . . . . . . . . . . . . . . . . . . . 48
Deploying Administration Services . . . . . . . . . . . . . . . . . . . . . . . . . . . . . . . . . . . . . 48
Configuring Oracle 10g Release 3 (10.1.3.1.0) Application Servers Manually . . . . . . . . . . . 49
Preparing to Configure Oracle 10g Release 3 (10.1.3.1.0) Application Servers . . . . . . . 49
Creating an OC4J Instance and Setting Properties and Variables . . . . . . . . . . . . . . . . 50
Deploying to Oracle 10g Release 3 . . . . . . . . . . . . . . . . . . . . . . . . . . . . . . . . . . . . . . 51
Verifying the Connection . . . . . . . . . . . . . . . . . . . . . . . . . . . . . . . . . . . . . . . . . . . . 52
Configuring Oracle 10g Release 2 (10.1.2.0.2) Application Servers . . . . . . . . . . . . . . . . . . 52
Preparing to Configure Oracle 10g Release 2 Application Servers . . . . . . . . . . . . . . . . 52
iv Contents

Creating an OC4J Instance and Setting Properties and Variables . . . . . . . . . . . . . . . . 52
Deploying to Oracle 10g Release 2 . . . . . . . . . . . . . . . . . . . . . . . . . . . . . . . . . . . . . . 53
Verifying the Connection . . . . . . . . . . . . . . . . . . . . . . . . . . . . . . . . . . . . . . . . . . . . 54
Index . . . . . . . . . . . . . . . . . . . . . . . . . . . . . . . . . . . . . . . . . . . . . . . . . . . . . . . . . . . . . . 55
Contents v

vi Contents
1Installing Administration
Services
In This Chapter
Upgrading... . . . . . . . . . . . . . . . . . . . . . . . . . . . . . . . . . . . . . . . . . . . . . . . . . . . . . . . . . . . . . . . . . . . . . . . . . . . . . . . . . . . . . . . . . . . . . . . . . . . . . . . . . . . . . . . . . . . . . . . . . 7
Launching Installers .. . . . . . . . . . . . . . . . . . . . . . . . . . . . . . . . . . . . . . . . . . . . . . . . . . . . . . . . . . . . . . . . . . . . . . . . . . . . . . . . . . . . . . . . . . . . . . . . . . . . . . . . . . . . . . . 7
Installing Administration Services Software ... . . . . . . . . . . . . . . . . . . . . . . . . . . . . . . . . . . . . . . . . . . . . . . . . . . . . . . . . . . . . . . . . . . . . . . . . . . . . . . . . . . . 8
What Happens During Installation... . . . . . . . . . . . . . . . . . . . . . . . . . . . . . . . . . . . . . . . . . . . . . . . . . . . . . . . . . . . . . . . . . . . . . . . . . . . . . . . . . . . . . . . . . . . . . . 9
About Hyperion Home ... . . . . . . . . . . . . . . . . . . . . . . . . . . . . . . . . . . . . . . . . . . . . . . . . . . . . . . . . . . . . . . . . . . . . . . . . . . . . . . . . . . . . . . . . . . . . . . . . . . . . . . . . . .10
Selecting the ESSLANG Value ... . . . . . . . . . . . . . . . . . . . . . . . . . . . . . . . . . . . . . . . . . . . . . . . . . . . . . . . . . . . . . . . . . . . . . . . . . . . . . . . . . . . . . . . . . . . . . . . . .13
Specifying Ports for Apache Tomcat.. . . . . . . . . . . . . . . . . . . . . . . . . . . . . . . . . . . . . . . . . . . . . . . . . . . . . . . . . . . . . . . . . . . . . . . . . . . . . . . . . . . . . . . . . . . . .13
Enabling SAP R/3 Connectivity .. . . . . . . . . . . . . . . . . . . . . . . . . . . . . . . . . . . . . . . . . . . . . . . . . . . . . . . . . . . . . . . . . . . . . . . . . . . . . . . . . . . . . . . . . . . . . . . . . .14
Setting Up and Running Silent Installations... . . . . . . . . . . . . . . . . . . . . . . . . . . . . . . . . . . . . . . . . . . . . . . . . . . . . . . . . . . . . . . . . . . . . . . . . . . . . . . . . . .14
UpgradingIf you are upgrading from a previous release of Oracle's Essbase® Administration Services, seeChapter 4, “Upgrading Administration Services.”
Launching InstallersYou can install Administration Services from files downloaded from Oracle E-Delivery or fromthe installation CD/DVD. For users who cannot access Oracle E-Delivery or the CD/DVD, youcan download the installation program to a network.
Hyperion no longer ships or requires Oracle's Hyperion® License Server™ (or standalone licensefiles) for use with Hyperion products.
To ensure compliance with your license agreement, Hyperion recommends that you implementan auditing process. In addition, during product configuration with Oracle's Hyperion®Configuration Utility™, you activate only the features you purchased. For more information,see “Hyperion License Compliance” in Hyperion Installation Start Here.
Upgrading 7

Installing Administration Services Software
Note:
Essbase Server can run during installation of Administration Services.
➤ To install Administration Services:
1 Verify that all prerequisites and system requirements are met.
See Hyperion System 9 Installation Start Here
2 Launch the installation program.
See “Launching Installers” on page 7 .
3 Follow the installation prompts, remembering the following:
● You cannot install Administration Services to a directory containing a space in the directoryname (for example, not to c:\Program Files ). The default directory isHYPERION_HOME\EASPATH.
● Hyperion common components are installed to a location called HYPERION HOME(HYPERION_HOME\common). See “About Hyperion Home” on page 10.
● A typical installation installs Essbase Administration Server, Administration ServicesConsole components, and documentation. A custom installation enables you to installEssbase Administration Server and Administration Services Console componentsseparately, to select whether or not to install SAP R/3 connectivity.
Note:
If you wish to access data from an SAP R/3 application, you must use the Custom installationand select SAP R/3 as an option. See “Enabling SAP R/3 Connectivity” on page 14 for moreinformation about SAP R/3 functionality.
If you do not want to install Administration Services Console on client computers, you canlaunch it from a Web browser on a client computer. See “Starting Administration ServicesConsole from a Web Browser” on page 29.
● The installer prompts you to select a value for the ESSLANG variable. The default value forthe ESSLANG variable is English – United Stated Latin@Binary. See “Selecting the ESSLANGValue” on page 13.
● After installation, install additional Hyperion products, if applicable.
● After installation, see “Completing Advanced Installation Tasks” on page 27.
4 When you finish installation, run Configuration Utility to configure Administration Services.
See Chapter 2, “Configuring and Setting Up Administration Services.”
8 Installing Administration Services

What Happens During InstallationOperations performed by the Administration Services installer:
● Create directories and subdirectories under the location that you specify in the installer
The documentation refers to the directory where you install Administration Services asEASPATH. For a listing of directories created during installation, see “Files Installed in theEASPATH Directory” on page 9.
● Install Hyperion common components to HYPERION_HOME\common
● Install and configure Apache Tomcat application server during the Essbase AdministrationServer installation
Apache Tomcat is installed to EASPATH\deployments. For information about deployingto third-party application servers other than Apache Tomcat, see Chapter 2, “Configuringand Setting Up Administration Services.”
● Install documentation files to the Essbase Administration Server computer
Documentation is installed in
EASPATH\deployments\Tomcat\5.0.28\webapps
If you deploy Essbase Administration Server on a third-party application server, thedocumentation is deployed on that application server.
For a documentation list, see “Accessing Documentation” on page 10.
● Add shortcuts to the Start menu
● Install an uninstaller program in EASPATH\uninstall
● Install Oracle's Hyperion® Business Rules software and documentation
Files Installed in the EASPATH DirectoryThe directory where you install Administration Services is referred to as EASPATH. The defaultfor EASPATH is c:\hyperion\AdminServices .
Table 1 : Directories Created for a Typical Server and Console Software Installation
Directory Contents
EASPATH Documentation launch files and other miscellaneous files
\AppServer \InstallableApps—Files required by Hyperion Configuration Utility for auto-deployment
\InstalledApps—Files and directories created by Configuration Utility during auto-deployment
\console Administration Services Console executable files, Java class files, Business Rules plug-in files, and temporary files created by the console installation
\deployments Default application server files, documentation files, and files to support administrationof Deployment Servers
What Happens During Installation 9
Directory Contents
\migrationutility A utility needed to change the Hyperion Home location
\server Essbase Administration Server executable files, default relational database files, Javaclass files, Business Rules server files, and server locale files
\uninstall Files for uninstalling Administration Services
Accessing DocumentationDocumentation files are installed to Essbase Administration Server so that all console users canaccess documentation without installing it locally. If you deployed Essbase AdministrationServer on a third-party application server, the documentation is deployed to that server.
Administration Services documentation can be launched from the Administration ServicesInformation Map. Business Rules documentation can be launched from theBusiness RulesInformation Map.
Launching Information MapsTo launch the Administration Services information map, open Administration Services Console,and from Help, select Information Map. To launch the Business Rules information map, selectStart > Programs > Hyperion > Administration Services > Business Rules Information Map
Browser RecommendationsFor best results, Hyperion recommends viewing Essbase Administration Services Online Help inInternet Explorer version 6.0 or later.
On UNIX platforms, you must launch an HTML information map.
About Hyperion HomeWhen multiple Hyperion products are installed on one computer, common internal and third-party components are installed to a central location, called Hyperion Home. The Hyperion Homelocation is defined in the system environment variable called HYPERION_HOME.
Hyperion Home LocationThe default location for Hyperion Home is C:\Hyperion. When you install, the installersearches for the HYPERION_HOME environment variable on the computer to which you areinstalling.
If the Hyperion Home location was previously defined for another Hyperion product, theinstallation uses the previously defined location. The location cannot be changed through theinstaller.
10 Installing Administration Services
If the current installation is the first Hyperion installation on the computer, you can specify thelocation during installation.
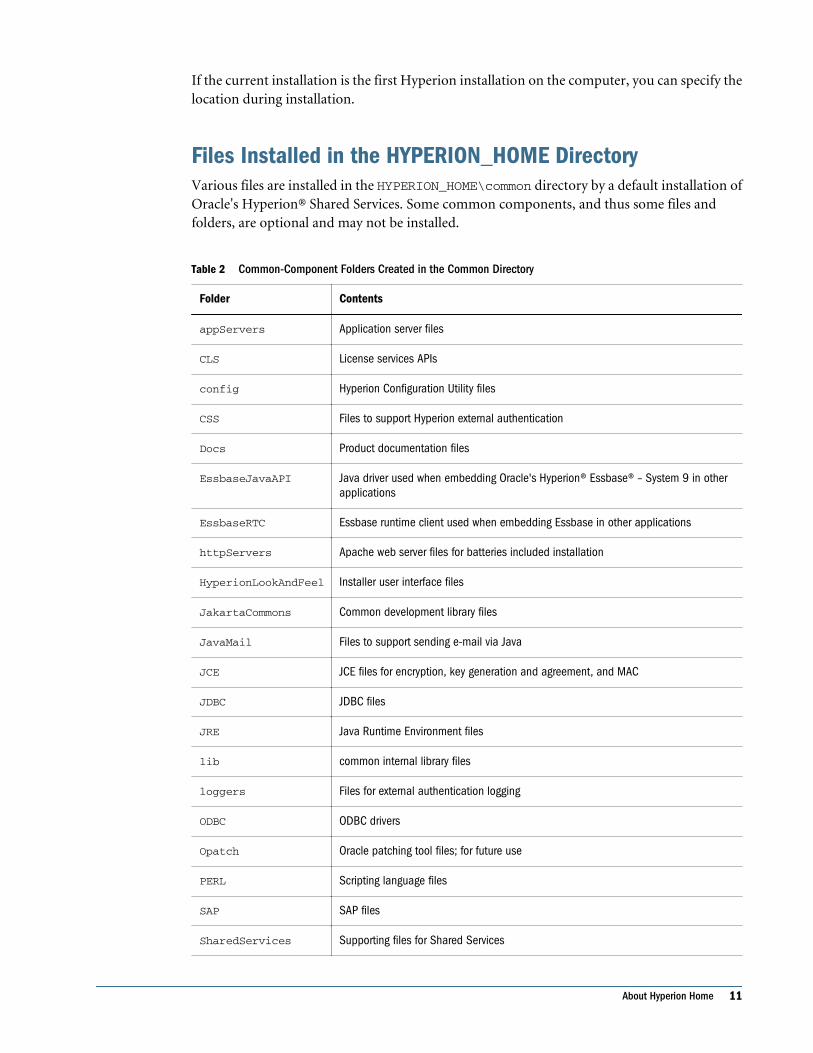
Files Installed in the HYPERION_HOME DirectoryVarious files are installed in the HYPERION_HOME\common directory by a default installation ofOracle's Hyperion® Shared Services. Some common components, and thus some files andfolders, are optional and may not be installed.
Table 2 Common-Component Folders Created in the Common Directory
Folder Contents
appServers Application server files
CLS License services APIs
config Hyperion Configuration Utility files
CSS Files to support Hyperion external authentication
Docs Product documentation files
EssbaseJavaAPI Java driver used when embedding Oracle's Hyperion® Essbase® – System 9 in otherapplications
EssbaseRTC Essbase runtime client used when embedding Essbase in other applications
httpServers Apache web server files for batteries included installation
HyperionLookAndFeel Installer user interface files
JakartaCommons Common development library files
JavaMail Files to support sending e-mail via Java
JCE JCE files for encryption, key generation and agreement, and MAC
JDBC JDBC files
JRE Java Runtime Environment files
lib common internal library files
loggers Files for external authentication logging
ODBC ODBC drivers
Opatch Oracle patching tool files; for future use
PERL Scripting language files
SAP SAP files
SharedServices Supporting files for Shared Services
About Hyperion Home 11
Folder Contents
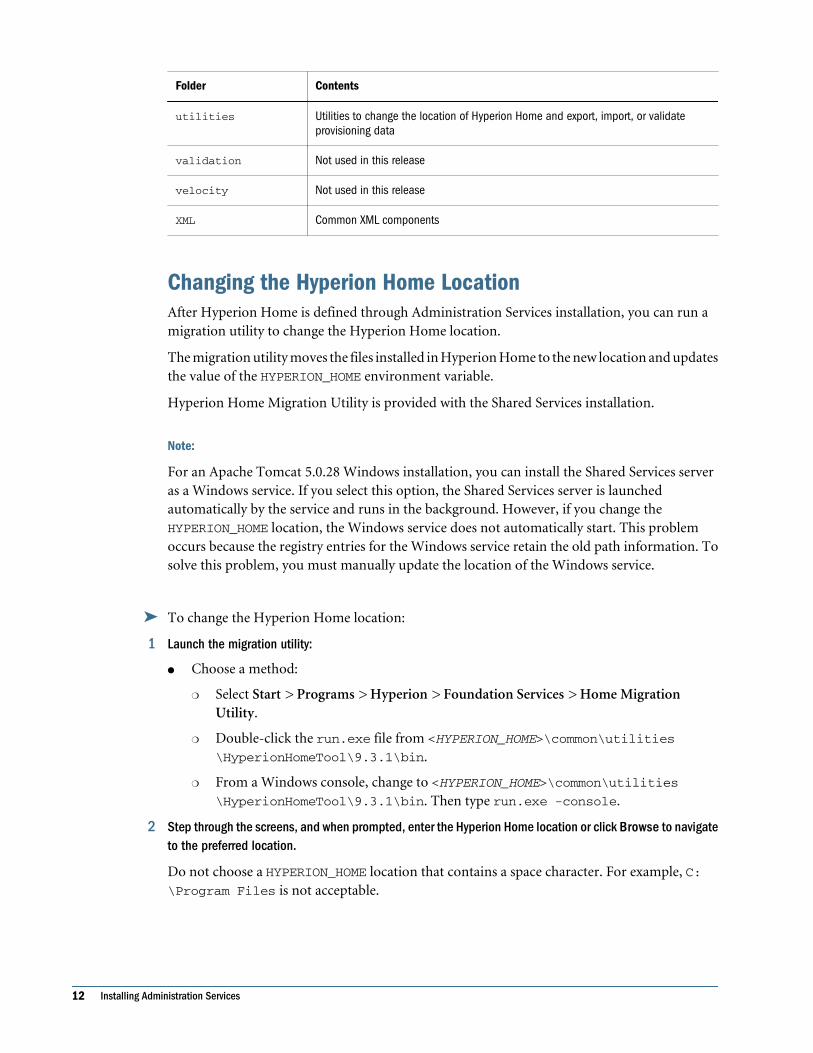
utilities Utilities to change the location of Hyperion Home and export, import, or validateprovisioning data
validation Not used in this release
velocity Not used in this release
XML Common XML components
Changing the Hyperion Home LocationAfter Hyperion Home is defined through Administration Services installation, you can run amigration utility to change the Hyperion Home location.
The migration utility moves the files installed in Hyperion Home to the new location and updatesthe value of the HYPERION_HOME environment variable.
Hyperion Home Migration Utility is provided with the Shared Services installation.
Note:
For an Apache Tomcat 5.0.28 Windows installation, you can install the Shared Services serveras a Windows service. If you select this option, the Shared Services server is launchedautomatically by the service and runs in the background. However, if you change theHYPERION_HOME location, the Windows service does not automatically start. This problemoccurs because the registry entries for the Windows service retain the old path information. Tosolve this problem, you must manually update the location of the Windows service.
➤ To change the Hyperion Home location:
1 Launch the migration utility:
● Choose a method:
❍ Select Start > Programs > Hyperion > Foundation Services > Home MigrationUtility.
❍ Double-click the run.exe file from <HYPERION_HOME>\common\utilities\HyperionHomeTool\9.3.1\bin.
❍ From a Windows console, change to <HYPERION_HOME>\common\utilities\HyperionHomeTool\9.3.1\bin. Then type run.exe -console.
2 Step through the screens, and when prompted, enter the Hyperion Home location or click Browse to navigateto the preferred location.
Do not choose a HYPERION_HOME location that contains a space character. For example, C:\Program Files is not acceptable.
12 Installing Administration Services
Selecting the ESSLANG ValueThe Administration Services installer prompts you to select a value for the ESSLANG variable.ESSLANG points Essbase Administration Server to the correct Global C code page (installed inthe EASPATH\server\locale directory). The default value for ESSLANG is English(Latin1).
The Administration Services installer provides a list of supported locales, displayed inabbreviated format: Language (code page), for example, English (Latin1). Once set,the ESSLANG environment variable value contains the full value for the locale (for example,English_UnitedStates.Latin1@Binary).
ESSLANG must match on the Essbase Server computer and on the Essbase Administration Servercomputer. The ESSLANG value for a computer must agree with the encoding of the operatingsystem of that computer.
Note:
For important information about ESSLANG and Unicode applications on Essbase Server, see theHyperion Essbase - System 9 Installation Guide.
The ESSLANG value selected during installation is stored in EASPATH/server/olapadmin.properties.
On Windows, if ESSLANG is set on the computer to which you are installing EssbaseAdministration Server, the current value is selected by default in the installer. On UNIX, theinstaller always defaults to English (Latin1), even if ESSLANG is set to another value. Whenthe installer prompts you, you must select the value of the existing ESSLANG setting; otherwise,your applications may fail to start.
For the full list of supported ESSLANG values, see Hyperion Essbase - System 9 DatabaseAdministrator's Guide.
ESSLANG does not need to be set on the computer where Administration Services Console isinstalled, unless it shares a computer with Essbase Administration Server. If you are installingonly the console, the installer does not prompt you to set ESSLANG.
Specifying Ports for Apache TomcatThe Administration Services installer automatically installs and deploys the Apache Tomcatapplication server using default port numbers. If you want to change the default port numbers,you can run the Configuration Utility. For a list of default ports, see Hyperion System 9 InstallationStart Here.
Selecting the ESSLANG Value 13

Enabling SAP R/3 ConnectivityIn a custom installation of Administration Services, you can select an adapter to allow SAP R/3connectivity as a node in Enterprise View. To connect with an SAP R/3 instance, you must alsomodify several configuration files and obtain and install several files from SAP.
➤ To enable SAP R/3 connectivity in Administration Services, perform the following:
1 In EASPATH\console, open components.xml in a text editor.
2 Under <PluginList>, enter <Plugin archiveName="SAP"packageName="com.essbase.eas.sap.ui"/> before the closing </PlugIn> tag.
3 Save and close the file.
4 In EASPATH\console\bin, open admincon.lax in a text editor.
5 search for lax.class.path= and append ;..\lib\sap_client.jar;..\lib\sap_common.jar to the entry. Save and close the file.
6 In EASPATH\server\bin, open adminsvr.lax in a text editor.
7 Search for lax.nl.java.option.additional, and append -DRFC_INI=EASPATH\server\saprfc.ini. Save and close the file.
8 Create a new environment variable, RFC_INI, with a value of EASPATH\server\saprfc.ini
9 Copy librfc.dll andsapjcorfc.dll to EASPATH\server\bin. You may need to obtain thesefiles from SAP.
Setting Up and Running Silent InstallationsTo install Administration Services on multiple computers and use identical installation optionsfor each installation, you can record installation settings and run a “silent” installation from thecommand line. Silent installations automate the installation process for multiple computers.
To record installation settings, create a “response” file and run the regular installation to recordyour settings in the response file. When you run the silent installation from the command line,the response file is used to select the installation options of the regular (nonsilent) installation.
➤ To record installation settings and run a silent installation:
1 Navigate to the directory that contains Administration Services installer.
2 From a command line prompt, run setup.exe —options—record <responsefilename>
The <responsefilename> can include an absolute path and/or file name for the response file.
The regular (nonsilent) product installer is launched.
3 As you step through the installer, specify the settings to be recorded.
The installation options are recorded in the response file. You can modify this file if you wantto change installation options.
You are now ready to run the installation in silent mode.
14 Installing Administration Services

4 From the command line, enter setup.exe —options <responsefilename> —silent
The installation runs in the background.
Setting Up and Running Silent Installations 15

16 Installing Administration Services

2Configuring and Setting Up
Administration Services
In This Chapter
Hyperion Configuration Utility . . . . . . . . . . . . . . . . . . . . . . . . . . . . . . . . . . . . . . . . . . . . . . . . . . . . . . . . . . . . . . . . . . . . . . . . . . . . . . . . . . . . . . . . . . . . . . . . . . . . .17
Satisfying Initial Requirements ... . . . . . . . . . . . . . . . . . . . . . . . . . . . . . . . . . . . . . . . . . . . . . . . . . . . . . . . . . . . . . . . . . . . . . . . . . . . . . . . . . . . . . . . . . . . . . . . .18
Task Sequence ... . . . . . . . . . . . . . . . . . . . . . . . . . . . . . . . . . . . . . . . . . . . . . . . . . . . . . . . . . . . . . . . . . . . . . . . . . . . . . . . . . . . . . . . . . . . . . . . . . . . . . . . . . . . . . . . . . .18
Configuring Product Upgrades ... . . . . . . . . . . . . . . . . . . . . . . . . . . . . . . . . . . . . . . . . . . . . . . . . . . . . . . . . . . . . . . . . . . . . . . . . . . . . . . . . . . . . . . . . . . . . . . . . .19
Configuring Administration Services... . . . . . . . . . . . . . . . . . . . . . . . . . . . . . . . . . . . . . . . . . . . . . . . . . . . . . . . . . . . . . . . . . . . . . . . . . . . . . . . . . . . . . . . . . . .19
Reconfiguring Products .. . . . . . . . . . . . . . . . . . . . . . . . . . . . . . . . . . . . . . . . . . . . . . . . . . . . . . . . . . . . . . . . . . . . . . . . . . . . . . . . . . . . . . . . . . . . . . . . . . . . . . . . . .24
Verifying Startup Dependencies ... . . . . . . . . . . . . . . . . . . . . . . . . . . . . . . . . . . . . . . . . . . . . . . . . . . . . . . . . . . . . . . . . . . . . . . . . . . . . . . . . . . . . . . . . . . . . . . .24
Starting and Stopping Shared Services... . . . . . . . . . . . . . . . . . . . . . . . . . . . . . . . . . . . . . . . . . . . . . . . . . . . . . . . . . . . . . . . . . . . . . . . . . . . . . . . . . . . . . . .24
Completing Advanced Installation Tasks ... . . . . . . . . . . . . . . . . . . . . . . . . . . . . . . . . . . . . . . . . . . . . . . . . . . . . . . . . . . . . . . . . . . . . . . . . . . . . . . . . . . . . .27
Hyperion Configuration UtilityHyperion Configuration Utility is a common tool that installs automatically with Hyperionproducts. Although you must use it to set up new products that you install, it also enables youto reconfigure existing products and upgraded products. Configuration involves these tasks:
● Product option activation — To comply with your license agreement, select the productfeatures that you are authorized to use.
● Relational database configuration—To store and retrieve application data in a databaserepository.
● Application server deployment—To deploy the application automatically, or partially, toan application server.
For information about the order of configuration tasks, acceptable characters, and resolvingconfiguration issues, see:
● “Task Sequence ” on page 18
● “Restricted Characters ” on page 18
● “Troubleshooting ” on page 18
Hyperion Configuration Utility 17
Task Sequence Hyperion recommends that you configure products separately and perform all configurationtasks. However, you can configure products simultaneously performing all, or specific,configuration tasks.
Restricted Characters Only enter alphanumeric, dash (-), dot (.) , underscores (_), and tildes (~) during configuration.Tildes are only supported on Microsoft Windows. All other characters are not supported.
Troubleshooting Terminating configuration for one product does not stop the configuration of other products.All configuration warnings and errors are logged as follows:
Microsoft Windows — <HYPERION_HOME>\logs\config
If you encounter errors, perform these tasks:
● Configure products individually.
● See the Hyperion Installation and Configuration Troubleshooting Guide for information aboutconfiguration checks, debugging using logs, troubleshooting methodology, and solutionsto common configuration issues.
Satisfying Initial RequirementsIf you are using Hyperion Configuration Utility for the first time, perform these tasks:
Table 3 Configuration Requirements
Task Reference
Satisfy system and product-specific requirements. “System Requirements” and “Planning HyperionInstallations” in the Hyperion Installation Start Here
Gather the information you need to configure products. “Hyperion Configuration Utility Worksheets” in the HyperionInstallation Start Here
Install, configure, and start the Shared Services server. Hyperion Shared Services Installation Guide
Task SequenceHyperion Configuration Utility enables you to perform multiple configuration tasks in onesession. Hyperion Configuration Utility performs tasks in this order:
● Database configuration
● Application server deployment
18 Configuring and Setting Up Administration Services
Important: After you configure each product, you must open registry.properties—in<Hyperion_Home>\common\config on the server on which you ran Hyperion ConfigurationUtility—to review and edit the product options. You must complete this step to ensure youcomply with your license agreement and to activate features you are licensed to use. See“Hyperion License Compliance” in Hyperion Installation Start Here.
All input for database configuration and application server deployment is gathered by HyperionConfiguration Utility and configuration for these tasks occurs once at the end.
You can use Hyperion Configuration Utility to perform configuration tasks in many ways:
● Tasks can be performed sequentially for multiple products in one session
● Individual tasks can be performed across multiple products
● Tasks can be performed sequentially or individually for a single product
As a troubleshooting measure, perform configuration tasks individually for one product at atime.
Configuring Product UpgradesYou can use Hyperion Configuration Utility to configure and reconfigure supported productupgrades. Note the following:
● If you upgraded Shared Services, configure it before configuring other products.
● Configure upgraded products individually.
● Deploy to the same database you used when you configured the previous product release.
If you do not want to use Shared Services with the products you are upgrading, select SharedServices Deregistration during configuration.
Configuring Administration ServicesRun Hyperion Configuration Utility on the computer hosting the products to configure orreconfigure.
➤ To configure Administration Services:
1 Launch Hyperion Configuration Utility as follows:
● At the end of installation by selecting Launch Hyperion Configuration Utility on the lastpanel.
● Using a method:
On Microsoft Windows:
❍ Select Start > Programs > Hyperion > Foundation Services > Configuration Utility.
❍ Double-click configtool.bat in: <HYPERION_HOME>\common\config.
Configuring Product Upgrades 19

❍ Change to <HYPERION_HOME>\common\config and type startconfigtool.bat— console.
2 Select the language in which to configure and click Next.
3 On the Welcome page, click Next.
4 Select the products and the tasks to perform, then click Next.
5 Based on your selection, perform the following tasks, clicking Next between tasks.
Table 4 Configuration Tasks
Selection Task
Product Options Select the product features that you are authorized to use based on your purchaseand licensing agreement. See “Hyperion License Compliance” in the HyperionInstallation Start Here.
During product configuration, Hyperion Configuration Utility copiesregistry.properties to <Hyperion_Home>\common\config on theserver on which you ran Hyperion Configuration Utility. After configuration, openthis file in any text editor to confirm and specify which product options are activated.See “Hyperion License Compliance” in the Hyperion Installation Start Here.
Activate Product Select the product features that you are authorized to use based on your purchaseand licensing agreement. See “Hyperion License Compliance” in the HyperionInstallation Start Here.
Configure Database a. Start the database.
b. Select the database type.
c. Enter the information in “Configuring Databases ” on page 21.
Tip: For simplicity, Hyperion recommends that you use the same, or the default,database name (hypdb), username (hypuser), and password for all productsthat you install.
Deploy to Application Server a. Optional: Start the application server, if deploying manually.
If deploying automatically, Hyperion Configuration Utility will start theapplication server.
b. Select the application server, then an option:
● Automatic— Hyperion Configuration Utility deploys all files to theapplication server, resulting in no or minimal post-deployment tasks:
❍ WebLogic: If disk space is inadequate, specify another location for theWAR file and redeploy.
❍ WebSphere: If disk space is inadequate, Hyperion Configuration Utilityplaces java.io.tempdir in <HYPERION_HOME>\temp. Afterdeployment, the temp folder is deleted.
● Manual— The EAR or WAR file is placed in this directory, enabling you tomanually deploy after configuration:
<ProductHome>\<AppServer>\InstallableApps\common
WebLogic 8.1.x — <ProductHome>\<AppServer>\InstallableApps
For more information on manual deployment of application servers, seeAppendix A, “Manually Configuring Web Application Servers.”
20 Configuring and Setting Up Administration Services