Embed Size (px)
Citation preview

!
!
Version 2.0
Copyright © 2017
ESP8266 SSL User Manual

About This Guide This document is a Secure Sockets Layer (SSL) user manual based on ESP8266_NONOS_SDK. The document is structured as follows.
Release Notes
Documentation Change Notification Espressif provides email notifications to keep customers updated on changes to technical documentation. Please subscribe here.
Certificates Please download the product certificate(s) here.
Chapter Title Content
Chapter 1 Overview An overview of the SSL function.
Chapter 2 Setting Up the Environment How to set up the environment for compiling.
Chapter 3 ESP8266 working as an SSL server Instructions on how to configure the ESP8266 to work as an SSL server.
Chapter 4 ESP8266 working as an SSL client Instructions on how to configure the ESP8266 to work as an SSL client.
Chapter 5 Application Interfaces Lists ESP8266_NONOS_SDK SSL-related APIs.
Date Version Release notes
2016.11 V1.0 First release.
2018.01 V2.0 Major revision.

Table of Contents 1. Overview 1 ................................................................................................................................
2. Setting Up the Environment 2 ..................................................................................................
3. ESP8266 Works as an SSL Server 4 ........................................................................................3.1. Generating a Certificate 4.............................................................................................................
3.1.1. Having No Certificate from the CA 4...............................................................................3.1.2. Having Both a Private Key And Certificates from the CA 5.............................................
3.2. Programming Guide 6...................................................................................................................
4. ESP8266 Works as an SSL Client 7 .........................................................................................4.1. Generating a Certificate 7.............................................................................................................
4.1.1. Having No Certificate from the CA 7...............................................................................4.1.2. Having Only the Certificate from the CA 8.......................................................................4.1.3. Having Both a Private Key And a Certificate from the CA 9............................................
4.2. Programming Guide 10.................................................................................................................
5. API Reference 11 ......................................................................................................................5.1. espconn_secure_accept 11..........................................................................................................5.2. espconn_secure_delete 12...........................................................................................................
5.3. espconn_secure_set_size 12........................................................................................................5.4. espconn_secure_get_size 12........................................................................................................5.5. espconn_secure_connect 13........................................................................................................5.6. espconn_secure_send 13.............................................................................................................5.7. espconn_secure_disconnect 14...................................................................................................5.8. espconn_secure_ca_enable 14.....................................................................................................
5.9. espconn_secure_ca_disable 15....................................................................................................5.10. espconn_secure_cert_req_enable 15...........................................................................................5.11. espconn_secure_cert_req_disable 15...........................................................................................5.12. espconn_secure_set_default_certificate 16..................................................................................5.13. espconn_secure_set_default_private_key 16...............................................................................
!
1. Overview
1. Overview Transport Layer Security (TLS) is a cryptographic protocols that provides communication security and prevents session hijacking over a network. TLS has been based on the Secure Sockets Layer protocol, which is also known as SSL. TLS (or SSL) runs on top of a reliable transport protocol, e.g., the Transmission Control Protocol (TCP), and provides encryption to higher layers. For example, the HTTPS (HTTP Secure), is an adaptation of the Hypertext Transfer Protocol (HTTP) for secure communication, where HTTP operates on top of TLS (or SSL). In this document, we use SSL to represent both TLS and SSL. • When establishing SSL-based encrypted commutation channels, the authentication is
optional. • In general, the SSL client needs to authenticate the SSL server, which is called
"unidirectional authentication” in this document. • When both the SSL client and the SSL server need to authenticate each other, this is a
process we call "bidirectional authentication” in this document. • Certification authority (CA) is a third party that is trusted by both the SSL client and the
SSL server. It will issue digital certificates to reliable clients and servers, as well as manage these certificates. Then the SSL client and the SSL server can authenticate each other with the certificates issued by the CA.
In this document we offer guidance on how to use ESP8266 as an SSL server, and how to use ESP8266 as an SSL client for the SSL encryption based on ESP8266_NONOS_SDK. • If the ESP8266 works as an SSL server,
- Unidirectional Authentication: the ESP8266 will send its certificate to the SSL client, and the client will decide whether to verify the server’s certificate or not;
- Bidirectional Authentication: both the ESP8266 and the client will authenticate each other by verifying each other’s certificates.
• If the ESP8266 works as an SSL client, - Unidirectional Authentication: the ESP8266 will receive SSL server's certificate and
decide whether to verify it or not; - Bidirectional Authentication: both the ESP8266 and the SSL server authenticate each
other by verifying each other’s certificates.
📖 Notes:
• For more information, please visit: http://blog.csdn.net/ustccw/article/details/76691248.
• Terms:
- Unidirectional Authentication: only the client will verify the SSL server's certificate.
- Bidirectional Authentication: both the SSL client and the SSL server will mutually verify each other’s certificates.
Espressif ! /!1 17 2018.01

!
2. Setting Up the Environment
2. Setting Up the Environment If you use Windows OS on your PC, please refer to the steps below to set up a Linux compiling environment.
Steps Results
1. Start Windows OS and install the lubuntu virtual machine.
• More details about setting up the environment can be found in the ESP8266 SDK Getting Started Guide.
2. Mount the shared folder.
• Open LXTerminal on the virtual desktop.
• Input command: ./mount.sh • Then input password: espressif
!
Espressif ! /!2 17 2018.01

!
2. Setting Up the Environment
The generating tools of SSL certificates are provided in the ESP8266_NONOS_SDK/tools, which are displayed below:
! • makefile.sh: converts the formats of SSL certificates, and generates scripts.
- make_cacert.py and make_cert.py are used for the format conversion and generation of SLL certificate.
• rmfile.sh: deletes all of the generated files.
• Copy the script ESP8266_NONOS_SDK into the shared folder of lubantu;
• Open the shared folder in lubantu, where finding the makefile.sh means that mounting has been successful.
Espressif ! /!3 17 2018.01

!
3. ESP8266 Works as an SSL Server
3. ESP8266 Works as an SSL Server
To make the ESP8266 work as an SSL server, the steps below must be followed: • cert.h and private_key.h, which are the header files for SSL encryption, must be
generated and included. • CA Authentication is disabled by default, but the user can enable it with
espconn_secure_ca_enable. If the CA Authentication is enabled, the esp_ca_cert.bin must be generated by converting the CA certificates, and downloaded into flash.
An example of creating an SSL server is provided in the ESP8266_NONOS_SDK/examples/IoT_Demo, marked with #defineSERVER_SSL_ENABLE.
3.1. Generating a Certificate Please choose one of the methods below according to your actual use case, to generate the cert.h and private_key.h for the general SSL server, and also to generate the esp_ca_cert.bin for the CA authentication, if needed.
3.1.1. Having No Certificate from the CA
If you do not have any certificate issued by the CA, the makefile.sh in ESP8266_NONOS_SDK/tools can generate a self-issued certificate for testing only. The necessary steps for this process are given below:
1. Change the value of CN in the makefile.sh, from 192.168.111.100 to the actual IP address of the ESP8266.
2. Run makefile.sh to generate certificates.
./makefile.sh
Results:
! - The cert.h and private_key.h are in the include folder. - The esp_ca_cert.bin is in the bin folder.
Espressif ! /!4 17 2018.01
!
3. ESP8266 Works as an SSL Server
3.1.2. Having Both a Private Key And Certificates from the CA
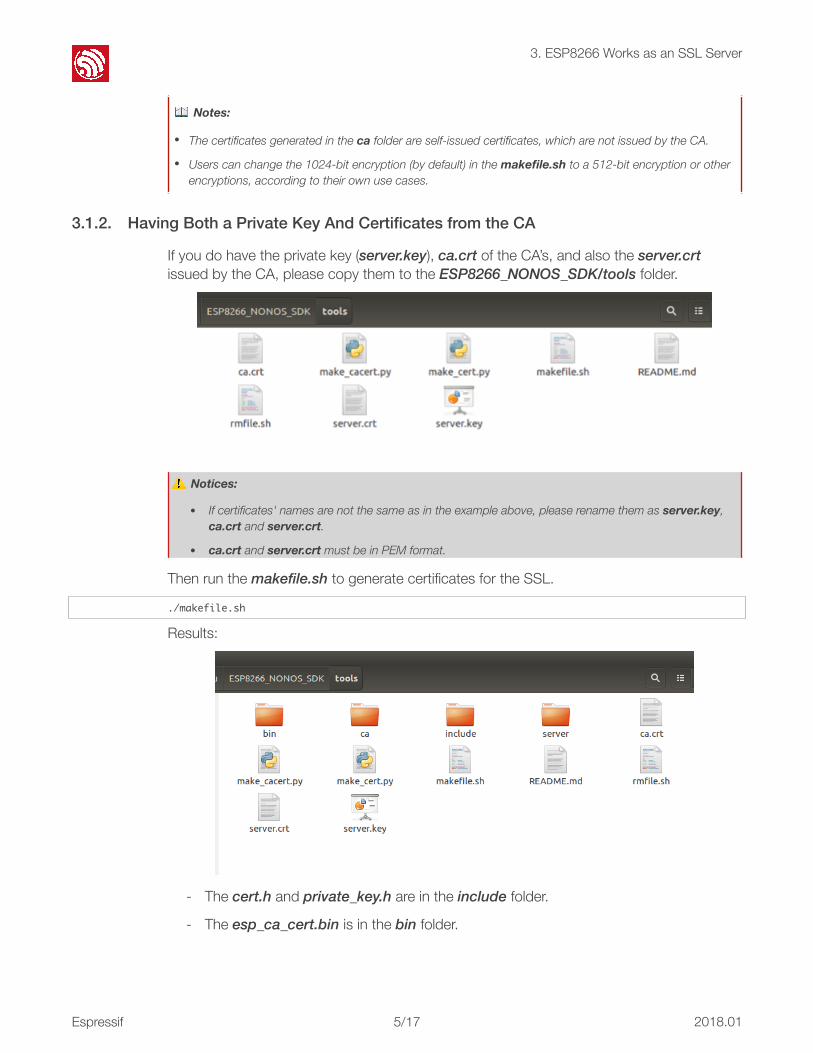
If you do have the private key (server.key), ca.crt of the CA’s, and also the server.crt issued by the CA, please copy them to the ESP8266_NONOS_SDK/tools folder.
!
Then run the makefile.sh to generate certificates for the SSL.
./makefile.sh
Results:
! - The cert.h and private_key.h are in the include folder.
- The esp_ca_cert.bin is in the bin folder.
📖 Notes:
• The certificates generated in the ca folder are self-issued certificates, which are not issued by the CA.
• Users can change the 1024-bit encryption (by default) in the makefile.sh to a 512-bit encryption or other encryptions, according to their own use cases.
⚠ Notices:
• If certificates' names are not the same as in the example above, please rename them as server.key, ca.crt and server.crt.
• ca.crt and server.crt must be in PEM format.
Espressif ! /!5 17 2018.01

!
3. ESP8266 Works as an SSL Server
3.2. Programming Guide An example of creating an SSL server is provided in the ESP8266_NONOS_SDK/examples/IoT_Demo, marked with #defineSERVER_SSL_ENABLE.
Notes: • espconn_secure_set_default_certificate has to be called to input cert.h. • espconn_secure_set_default_private_key has to be called to input private_key.h. • If the user wants to enable the CA authentication, the steps below must be followed:
- espconn_secure_ca_enable should be called to specify the address of the certificate. More details can be found in Chapter 5.
- esp_ca_cert.bin has to be downloaded into the flash at the address specified by espconn_secure_ca_enable.
• The SSL function requires a lot of RAM memory; therefore, users need to make sure that there is enough space before running the application. - If the SSL buffer is 8 KB (set by espconn_secure_set_size), then at least 22 KB of
memory size are required to run the SSL function.
- The specific memory size required varies from the actual size of the certificates used by the SSL server.
- If there is not enough memory, the SSL handshake will fail. • If the SSL bidirectional authentication is enabled, due to memory limitations, the SSL
buffer size allowed to be set by espconn_secure_set_size is 3,072 bytes at most. If there is not enough memory, the SSL memory size must be set to the minimum.
Espressif ! /!6 17 2018.01

!
4. ESP8266 Works as an SSL Client
4. ESP8266 Works as an SSL Client
When the ESP8266 works as an SSL client, certificates should be generated according to the actual use case. • Unidirectional Authentication: only ESP8266, which works as an SSL client, will
authenticate the SSL server. - CA authentication is disabled by default. espconn_secure_ca_enable can be called
to enable the CA authentication. - esp_ca_cert.bin needs to be downloaded into the flash at the address set by
espconn_secure_ca_enable. • Bidirectional Authentication: both ESP8266 and the SSL server will authenticate each
other. - esp_ca_cert.bin and esp_cert_private_key.bin need to be downloaded into flash.
An example of an SSL client is provided in the esp_mqtt_demo, marked with #defineMQTT_SSL_ENABLE.
4.1. Generating a Certificate Please choose one of the methods below, according to your actual use case, to generate certificates required for the SSL encryption.
4.1.1. Having No Certificate from the CA
If you do not have any certificate issued by the CA, the makefile.sh in ESP8266_NONOS_SDK/tools will generate a self-issued certificate (ca.crt + ca.key) for testing.
! The steps in this process are outlined below:
1. Change the value of CN in the makefile.sh from 192.168.111.100 to the actual IP address of the SSL server.
Espressif ! /!7 17 2018.01

!
4. ESP8266 Works as an SSL Client
2. Run the makefile.sh to generate certificates.
./makefile.sh
Results:
! The CA certificate esp_ca_cert.bin, and the private key esp_cert_private_key.bin will be generated in the bin folder.
4.1.2. Having Only the Certificate from the CA
If you do have the certificate ca.crt from the CA, please copy it to the ESP8266_NONOS_SDK/tools.
!
Then run the makefile.sh to generate certificates for SSL.
./makefile.sh
📖 Notes:
• The certificates generated in the ca folder are self-issued certificates, which are not issued by the CA.
• Users can change the 1024-bit encryption (by default) in the makefile.sh to a 512-bit encryption or other encryptions, according to their own use cases.
⚠ Notice:
• If the certificate name is not the same as in the example above, please rename it as ca.crt.
• ca.crt has to be in PEM format.
Espressif ! /!8 17 2018.01
!
4. ESP8266 Works as an SSL Client
Results:
! The CA certificate esp_ca_cert.bin will be generated in the bin folder.
4.1.3. Having Both a Private Key And a Certificate from the CA
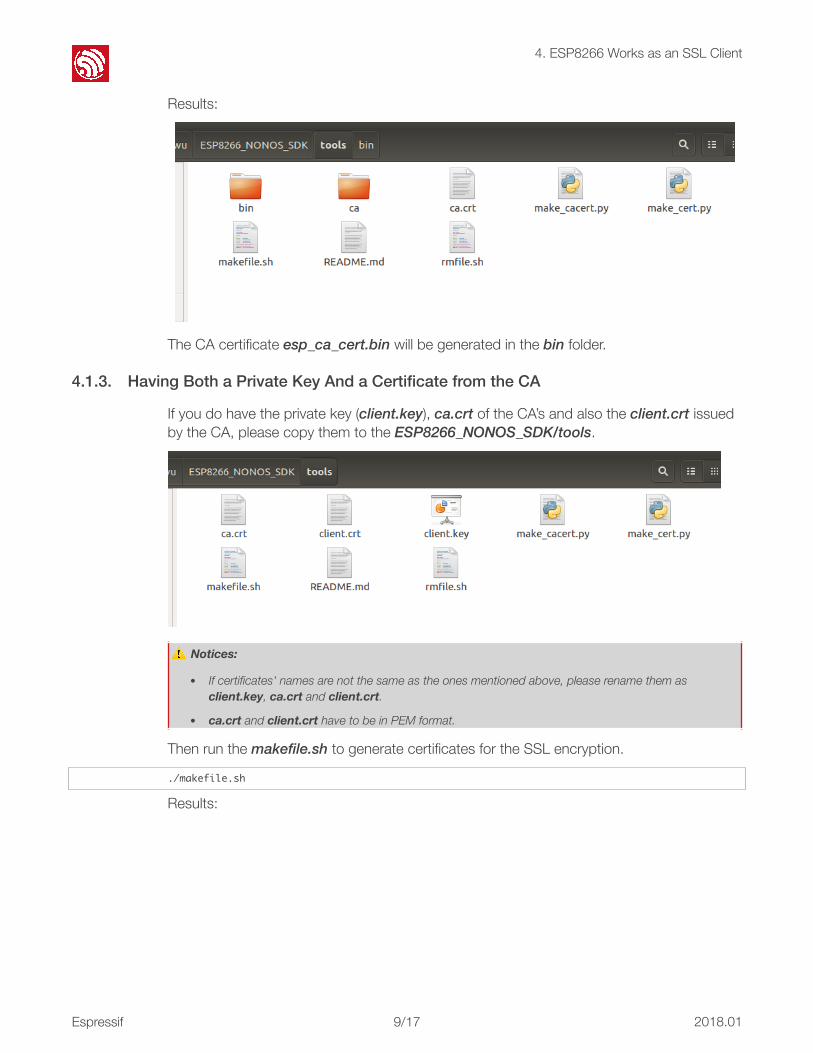
If you do have the private key (client.key), ca.crt of the CA’s and also the client.crt issued by the CA, please copy them to the ESP8266_NONOS_SDK/tools.
!
Then run the makefile.sh to generate certificates for the SSL encryption.
./makefile.sh
Results:
⚠ Notices:
• If certificates' names are not the same as the ones mentioned above, please rename them as client.key, ca.crt and client.crt.
• ca.crt and client.crt have to be in PEM format.
Espressif ! /!9 17 2018.01

!
4. ESP8266 Works as an SSL Client
!
The CA certificate esp_ca_cert.bin and the private key esp_cert_private_key.bin will be generated in the bin folder.
4.2. Programming Guide An example of an SSL client is provided in ESP8266_NONOS_SDK/examples/esp_mqtt_proj, marked with #defineMQTT_SSL_ENABLE.
Notes: • To enable unidirectional authentication, where only the ESP8266 authenticates the SSL
server, - espconn_secure_ca_enable should be called to enable the CA authentication; - esp_ca_cert.bin has to be downloaded into the flash at the address specified by the
second parameter of espconn_secure_ca_enable. • To enable bidirectional authentication, where both ESP8266 and the SSL server will
authenticate each other, - not only espconn_secure_ca_enable, but also espconn_secure_cert_req_enable
should be called to enable bidirectional authentication; - esp_ca_cert.bin has to be downloaded into the flash at the address specified by the
second parameter of espconn_secure_ca_enable. - esp_cert_private_key.bin needs to be downloaded into the flash at the address
specified by the second parameter of espconn_secure_cert_req_enable. • The SSL function requires a lot of RAM memory; therefore, users need to make sure that
there is enough space before running the application. - If the SSL buffer is 8 KB set by espconn_secure_set_size, then at least 22 KB of
memory size are required to run the SSL function. - The specific memory size required varies from the actual size of the certificates used
by the SSL server. - If there is not enough memory, the SSL handshake will fail.
• If the SSL bidirectional authentication is enabled, due to memory limitations, the SSL buffer size allowed to be set by espconn_secure_set_size is 3,072 bytes at most. If there is not enough memory, the SSL handshake will fail.
Espressif ! /!10 17 2018.01

!
5. API Reference
5. API Reference The SSL connection is processed differently from the normal TCP connection in the ESP8266 system. So, please make sure you use the following APIs appropriately. In SSL connection, only the APIs below can be used: • espconn_secure_XXX APIs, which are SSL-related; • espconn_regist_XXX APIs to register callbacks, except for
espconn_regist_write_finish; • espconn_port to get an available port. In this manual, only espconn_secure_XXX APIs are introduced in detail. For more information about other software APIs, please consult the ESP8266 Non-OS SDK API Reference.
5.1. espconn_secure_accept Function Creates an SSL TCP server, and monitors SSL handshakes
Prototype sint8 espconn_secure_accept(struct espconn *espconn)
Parameter struct espconn *espconn: A structural body that corresponds to the network connection.
Return
• 0: Success
• Others: Errors
- ESPCONN_MEM: Out of memory.
- ESPCONN_ISCONN: Connected already.
- ESPCONN_ARG: illegal parameter; cannot find any TCP connection according to structure espconn.
Notes
• This API can be called only once. Only one SSL server is allowed to be created, and only one SSL client can be connected.
• If the SSL encrypted packet size is larger than ESP8266’s SSL buffer size (default 2 KB, set by espconn_secure_set_size), the SSL connection will fail, and ESP8266 will call espconn_reconnect_callback.
• SSL-related APIs, i.e. espconn_secure_XXX, are different from common TCP APIs, and must not be used inappropriately. In an SSL connection, only espconn_secure_XXX APIs, espconn_regist_XXXcb APIs (register callback functions) and espconn_port (obtain an available port) can be used.
• Users should call APIs espconn_secure_set_default_certificate and espconn_secure_set_default_private_key to input an SSL certificate and private key first.
Espressif ! /!11 17 2018.01
!
5. API Reference
5.2. espconn_secure_delete
5.3. espconn_secure_set_size
5.4. espconn_secure_get_size
Function Deletes the SSL connection when ESP8266 works as an SSL server.
Prototype sint8 espconn_secure_delete(struct espconn *espconn)
Parameter struct espconn *espconn: A structural body that corresponds to the network connection.
Return
• 0: Success;
• Others: Errors
- ESPCONN_ARG: illegal parameter; cannot find any TCP connection according to structure espconn.
- ESPCONN_INPROGRESS: the SSL connection is still in progress, please call espconn_secure_disconnect to disconnect before deleting this connection.
Function Sets the buffer size of encrypted data (SSL).
Prototype bool espconn_secure_set_size (uint8 level, uint16 size)
Parameter
• uint8 level: sets buffer for ESP8266 SSL server/client:
- 0x01: SSL client;
- 0x02: SSL server;
- 0x03: both SSL client and SSL server
• uint16 size: buffer size, 2,048 byte by default, ranging from 1 ~ 8,192 byte.
Return• true: Success
• false: Failure
Note
The default buffer size is 2 KB.
To change the buffer size, please call this API before calling:
• espconn_secure_accept (when ESP8266 is configured as an SSL server)
• espconn_secure_connect (when ESP8266 is configured as an SSL client).
Function Gets the buffer size of the encrypted data (SSL).
Prototype sint16 espconn_secure_get_size (uint8 level)
Parameter
uint8 level: specifies the buffer is effective when ESP8266 works as a server, client or both.
• 0x01: SSL client;
• 0x02: SSL server;
• 0x03: both SSL client and SSL server
Return The buffer size of the encrypted data (SSL)
Espressif ! /!12 17 2018.01

!
5. API Reference
5.5. espconn_secure_connect
5.6. espconn_secure_send
Function Securely connects (SSL) to an SSL server (ESP8266 acts as an SSL client).
Prototype sint8 espconn_secure_connect (struct espconn *espconn)
Parameter struct espconn *espconn: A structural body that corresponds to the network connection.
Return
• 0: Success
• Others: Errors
- ESPCONN_MEM: Out of memory.
- ESPCONN_ISCONN: Connected already.
- ESPCONN_ARG: illegal parameter; cannot find any TCP connection according to structure espconn.
Notes
• If espconn_secure_connectfails, an error code will be returned. Since the connection fails, ESP8266 will not call any espconn callback.
• Only one connection is allowed when the ESP8266 acts as a SSL client. This API can be called only once. Users can call espconn_secure_disconnect to disconnect the connection, before calling this API to create another SSL connection.
• If the SSL encrypted packet size is larger than the ESP8266 SSL buffer size (2 KB by default, set by espconn_secure_set_size), the SSL connection will fail, and the ESP8266 will call espconn_reconnect_callback.
• SSL-related APIs, i.e. espconn_secure_XXX, are different from common TCP APIs, and must not be used inappropriately. In an SSL connection, only espconn_secure_XXX APIs, espconn_regist_XXXcb APIs (register callback functions) and espconn_port (obtain an available port) can be used.
Function Sends encrypted data (SSL).
Prototype
sint8 espconn_secure_send ( struct espconn *espconn, uint8 *psent, uint16 length )
Parameter
struct espconn *espconn: A structural body that corresponds to the network connection.
uint8 *psent: sents data pointer.
uint16 length: sents data length.
Return0: Success
ESPCONN_ARG: illegal parameter; cannot find any connection according to structure espconn.
Notes
• Please only call this API when the previous packet has been sent successfully, i.e. espconn_sent_callback is called.
• The unencrypted data can be 1,024 bytes per packet at most; the encrypted data can be 1,460 bytes per packet at most.
Espressif ! /!13 17 2018.01

!
5. API Reference
5.7. espconn_secure_disconnect
5.8. espconn_secure_ca_enable
Function Ends an SSL connection.
Prototype sint8 espconn_secure_disconnect(struct espconn *espconn)
Parameter struct espconn *espconn: A structural body that corresponds to the network connection.
Return• 0: Success
• ESPCONN_ARG: illegal parameter; cannot find any connection according to structure espconn.
Note Do not call this API in any espconn callback to end a connection. If needed, please call system_os_task and system_os_post to trigger espconn_secure_disconnect.
Function Enables the SSL CA authentication.
Prototype bool espconn_secure_ca_enable (uint8 level, uint32 flash_sector)
Parameter
• uint8 level: specifies the buffer is effective when ESP8266 works as a server, client or both.
- 0x01: SSL client;
- 0x02: SSL server;
- 0x03: both SSL client and SSL server
• uint32 flash_sector: sets the flash sector in which the CA (esp_ca_cert.bin) is downloaded. For example, if the flash_sector is 0x7B, then esp_ca_cert.bin must be downloaded to flash at 0x7B000.
Return• true: Success
• false: Failure
Notes
• CA function is disabled by default.
• This API must be called before calling:
- espconn_secure_accept(when the ESP8266 acts as an SSL server)
- espconn_secure_connect (when the ESP8266 acts as an SSL client).
Espressif ! /!14 17 2018.01

!
5. API Reference
5.9. espconn_secure_ca_disable
5.10. espconn_secure_cert_req_enable
5.11. espconn_secure_cert_req_disable
Function Disables the SSL CA authentication.
Prototype bool espconn_secure_ca_disable (uint8 level)
Parameter
uint8 level: specifies the buffer is effective when ESP8266 works as a server, client or both.
• 0x01: SSL client;
• 0x02: SSL server;
• 0x03: both SSL client and SSL server
Return• true: Success
• false: Failure
Notes
• CA function is disabled by default.
• This API must be called before calling:
- espconn_secure_accept(when the ESP8266 acts as an SSL server)
- espconn_secure_connect (when the ESP8266 acts as an SSL client).
Function Enables the authentication when ESP8266 works as an SSL client.
Prototype bool espconn_secure_cert_req_enable (uint8 level, uint32 flash_sector)
Parameter
uint8 level: can only be set as 0x01 when ESP8266 works as SSL client;
uint32 flash_sector: sets the address where the private key esp_cert_private_key.bin will be downloaded in the flash. For example, parameters 0x7A should be written into the flash at the address 0x7A000. Please note that the private key written into flash must not overlap with code binaries or system parameter binaries in the flash memory.
Return• true: Success
• false: Failure
Notes• Authentication is disabled by default. If the SSL server does not require to verify certificate,
it is not necessary to call this API.
• This API must be called before calling espconn_secure_connect.
Function Disables the authentication when ESP8266 works as an SSL client.
Prototype bool espconn_secure_ca_disable (uint8 level)
Parameter uint8 level: can only be set as 0x01 when ESP8266 works as an SSL client.
Return• true: Success
• false: Failure
Note The certification's verification function is disabled by default.
Espressif ! /!15 17 2018.01

!
5. API Reference
5.12. espconn_secure_set_default_certificate
5.13. espconn_secure_set_default_private_key
Function Sets the certificate when ESP8266 runs as an SSL server.
Prototype bool espconn_secure_set_default_certificate (const uint8_t* certificate, uint16_t length)
Parameter• const uint8_t* certificate: pointer to the certificate;
• uint16_t length: length of the certificate.
Return• true: Success
• false: Failure
Notes• Demos can be found in ESP8266_NONOS_SDK/examples/IoT_Demo;
• This API has to be called before espconn_secure_accept to input the certificate.
Function Sets the private key when ESP8266 works as an SSL server.
Prototype bool espconn_secure_set_default_private_key (const uint8_t* key, uint16_t length)
Parameter• const uint8_t* key: pointer to the private keys;
• uint16_t length: length of the private keys.
Return• true: Success
• false: Failure
Notes• Demos can be found in ESP8266_NONOS_SDK/examples/IoT_Demo;
• This API has to be called before espconn_secure_accept to input the private key.
Espressif ! /!16 17 2018.01

Disclaimer and Copyright Notice Information in this document, including URL references, is subject to change without notice. THIS DOCUMENT IS PROVIDED AS IS WITH NO WARRANTIES WHATSOEVER, INCLUDING ANY WARRANTY OF MERCHANTABILITY, NON-INFRINGEMENT, FITNESS FOR ANY PARTICULAR PURPOSE, OR ANY WARRANTY OTHERWISE ARISING OUT OF ANY PROPOSAL, SPECIFICATION OR SAMPLE. All liability, including liability for infringement of any proprietary rights, relating to use of information in this document is disclaimed. No licenses express or implied, by estoppel or otherwise, to any intellectual property rights are granted herein. The Wi-Fi Alliance Member logo is a trademark of the Wi-Fi Alliance. The Bluetooth logo is a registered trademark of Bluetooth SIG. All trade names, trademarks and registered trademarks mentioned in this document are property of their respective owners, and are hereby acknowledged. Copyright © 2017 Espressif Inc. All rights reserved.
Espressif IoT Team
www.espressif.com
�


![ESP8266 SSL ÒB µ Y - AI-thinkerwiki.ai-thinker.com/_media/esp8266/docs/5a-esp8266_sdk_ssl_user... · " "Espressif Systems " ESP8266 SSL User Manual 1. ¹ z \ È ] U h - ESP8266_NONOS_SDK](https://img.dokumen.tips/doc/110x75/5a832d2e7f8b9aa24f8e98c1/esp8266-ssl-b-y-ai-espressif-systems-esp8266-ssl-user-manual-1-z-u-h.jpg)