Embed Size (px)
Citation preview
1
User Manual
2
Table of Contents Introduction ................................................................................................................... 4
Logging In ..................................................................................................................... 4
Accessing your Products ............................................................................................... 5
Accessing ESP Updates ................................................................................................ 5
Manage My Data Options ............................................................................................. 6
Accessing from the Summary View ......................................................................... 6
Accessing from the Product Detail View.................................................................. 8
Other Ways to Access ............................................................................................. 10
Quick Links ................................................................................................................. 11
Top Toolbar ............................................................................................................ 11
Training ............................................................................................................... 11
Tools ................................................................................................................... 11
Help ..................................................................................................................... 11
Quick Links ............................................................................................................. 11
Product Description Area ........................................................................................ 11
Product Image ..................................................................................................... 12
Catalog Name...................................................................................................... 13
Catalog Page ....................................................................................................... 13
Product Name...................................................................................................... 14
Product Number .................................................................................................. 14
Summary ............................................................................................................. 15
Description .......................................................................................................... 15
Pricing ..................................................................................................................... 15
Product Price ....................................................................................................... 16
Quantity............................................................................................................... 16
List Price ............................................................................................................. 17
Net Cost .............................................................................................................. 17
Discount Code ..................................................................................................... 17
Price Code ........................................................................................................... 17
Price Includes ...................................................................................................... 17
Product Attributes ................................................................................................... 18
Category .............................................................................................................. 18
Suggest A Different Category ............................................................................. 19
Product Options .................................................................................................. 21
General Information ................................................................................................ 23
Production Time.................................................................................................. 23
Rush Time ........................................................................................................... 24
Rush Service ....................................................................................................... 25
Country of Origin ................................................................................................ 26
Trade Name ......................................................................................................... 26
Line Name ........................................................................................................... 27
Safety Warnings .................................................................................................. 27
Imprinting Information ........................................................................................... 27
Imprint Method ................................................................................................... 27

3
Imprint Color ...................................................................................................... 28
Imprint Size ......................................................................................................... 29
Additional Colors/Locations ............................................................................... 29
Imprint Option .................................................................................................... 30
Full Color Process, Sold As Blanks, Personalization ......................................... 31
Imprint Charges - Miscellaneous ........................................................................ 32
Packaging and Shipping .......................................................................................... 33
Packaging ............................................................................................................ 33
FOB/Shipping Point ............................................................................................ 34
Shipping Weight ................................................................................................. 34
Dependencies .......................................................................................................... 34
Adding dependencies to attribute values ................................................................ 34
Adding Pricing to Values .................................................................................... 36
Adding Images to Attribute Values .................................................................... 38
Adding Dependencies to Product Option Values ............................................... 38
Additional Buttons ...................................................................................................... 40
Submit Update .................................................................................................... 40
Cancel Update ..................................................................................................... 41
Preview Update ................................................................................................... 41
View Prior Product ............................................................................................. 41
Validation errors ......................................................................................................... 41
Appendix A – Glossary of Terms ............................................................................... 41
Appendix B – Calculating the List Price .................................................................... 43
4
Introduction
ESP Updates is the latest application for suppliers to update their products, delete products, add new products, copy a product and/or replace or remove a product image within ESP. Most product updates will be auto accepted, overnight. Exceptions are adding a new product and replacing images.
Logging In
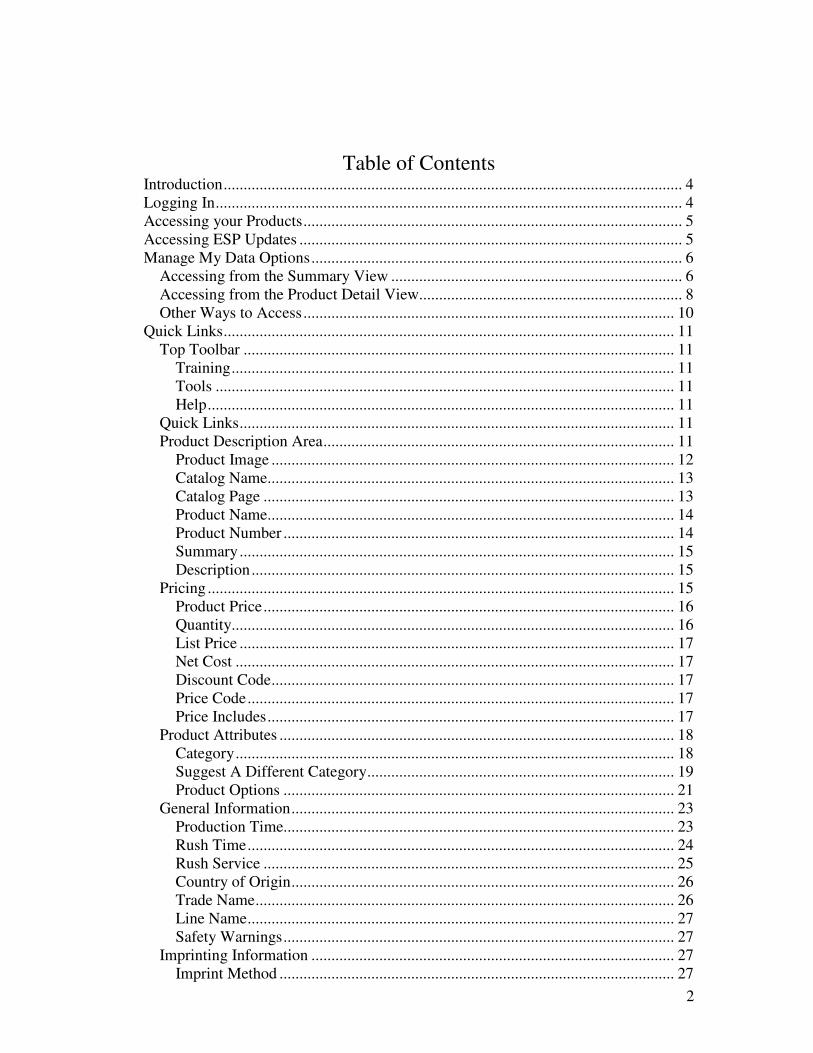
To begin, log into ESP Web with your supplier ASI number, email and password.
ESP Updates Login Screen
You will be brought to a dashboard page, which will help you navigate through the ESP Updates program.
ESP Updates Dashboard
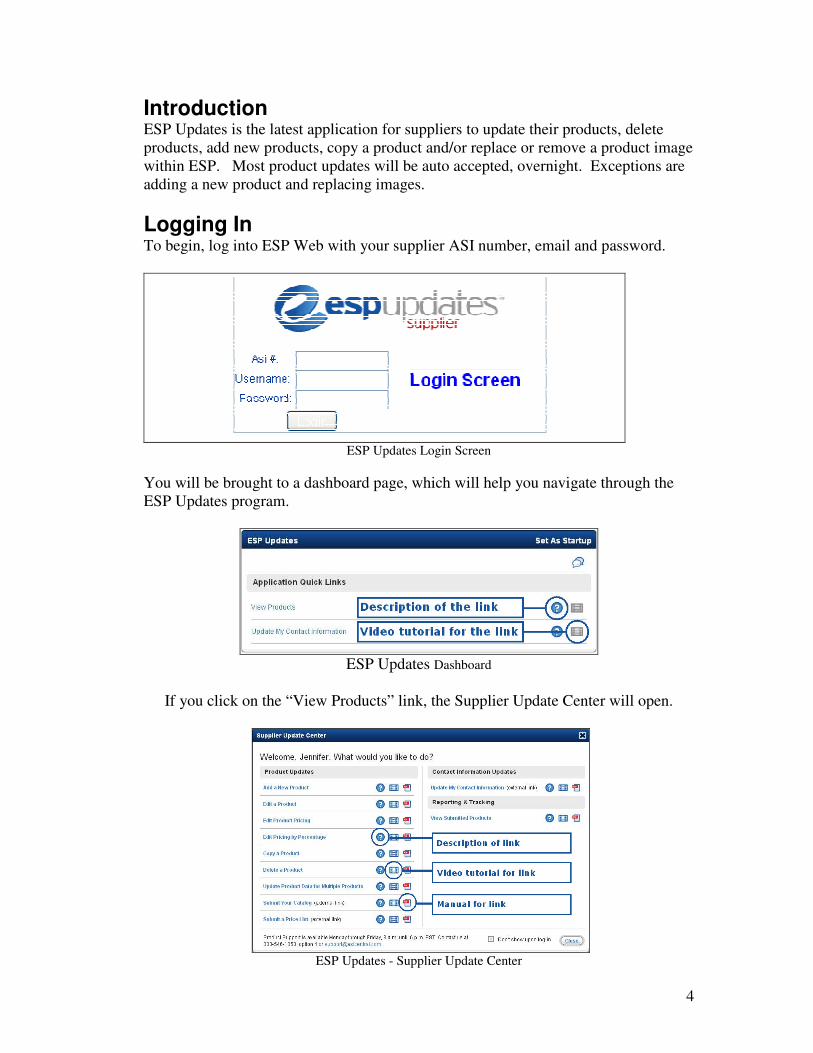
If you click on the “View Products” link, the Supplier Update Center will open.
ESP Updates - Supplier Update Center

5
The Supplier Update Center is an optional navigation feature. By clicking on any link in the Supplier Update Center, you will be brought to the desired feature. If you do not want to be prompted by this feature every time you log in, there is a checkbox in the lower left corner which reads “Don’t show upon log-in”, just check this box. If you do not have the Supplier Update Center opening on log in and would like to access it, you can always go to Tools and then select Supplier Update Center from the dropdown. If you close the Supplier Update Center, you will be brought to the summary view of your products. We recommend that you edit your products one at a time and submit it for updating.
Accessing your Products There are several ways to access the product(s) for updating from ESP Web.
o From the Summary view, you can use the Narrow Results area on the left to find the product(s) that you would like to edit. For example, click on Category to open your category list. Select the category of products that you would like to edit.
o You can Search from the Quick Search area. Type in your product name, keyword, or product number to find the item that you wish to edit.
ESP Updates – Summary View
Accessing ESP Updates There are several ways to access the ESP Updates application. Once you have your product(s) displayed that you would like to edit, click on the Manage My Data button located at the top of the screen to make your selection.

6
Summary View Page – Manage My Data
TIP: We suggest editing one at a time which can be done from the Details page. Click View Details.
Manage My Data Options The following are the ways to access the Editing mode.
Accessing from the Summary View
Click Manage My Data from the Summary View. Edit all Products in this search When this selection is made, you will be taken to the modified Multi-Edit state screen. This should be used to make “across the board” edits to your selected products. This edit will be emailed to our ESP Online Information team.
Manage My Data window
Edit all Products When this selection is made, you will be taken to the modified Multi-Edit state screen. This should be used to make “across the board” edits to all of your products such as a change in FOB point. This edit will be emailed to our ESP Online Information team.
Manage My Data window
7
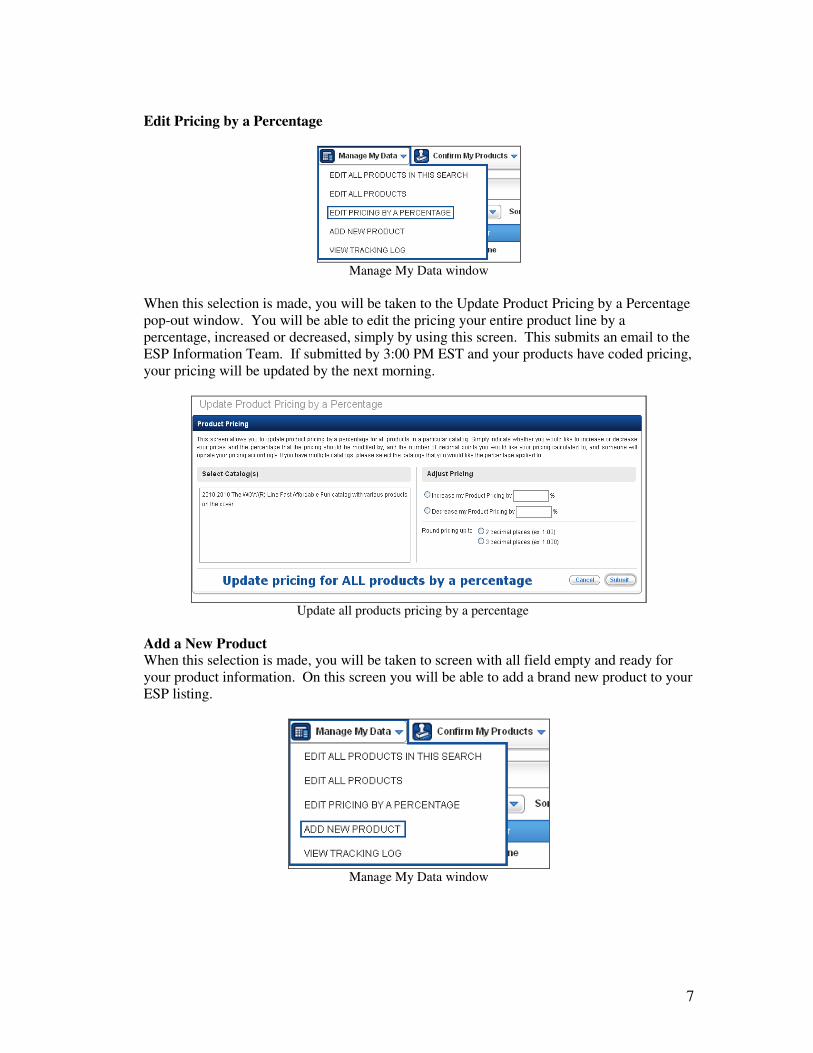
Edit Pricing by a Percentage
Manage My Data window
When this selection is made, you will be taken to the Update Product Pricing by a Percentage pop-out window. You will be able to edit the pricing your entire product line by a percentage, increased or decreased, simply by using this screen. This submits an email to the ESP Information Team. If submitted by 3:00 PM EST and your products have coded pricing, your pricing will be updated by the next morning.
Update all products pricing by a percentage
Add a New Product When this selection is made, you will be taken to screen with all field empty and ready for your product information. On this screen you will be able to add a brand new product to your ESP listing.
Manage My Data window
8
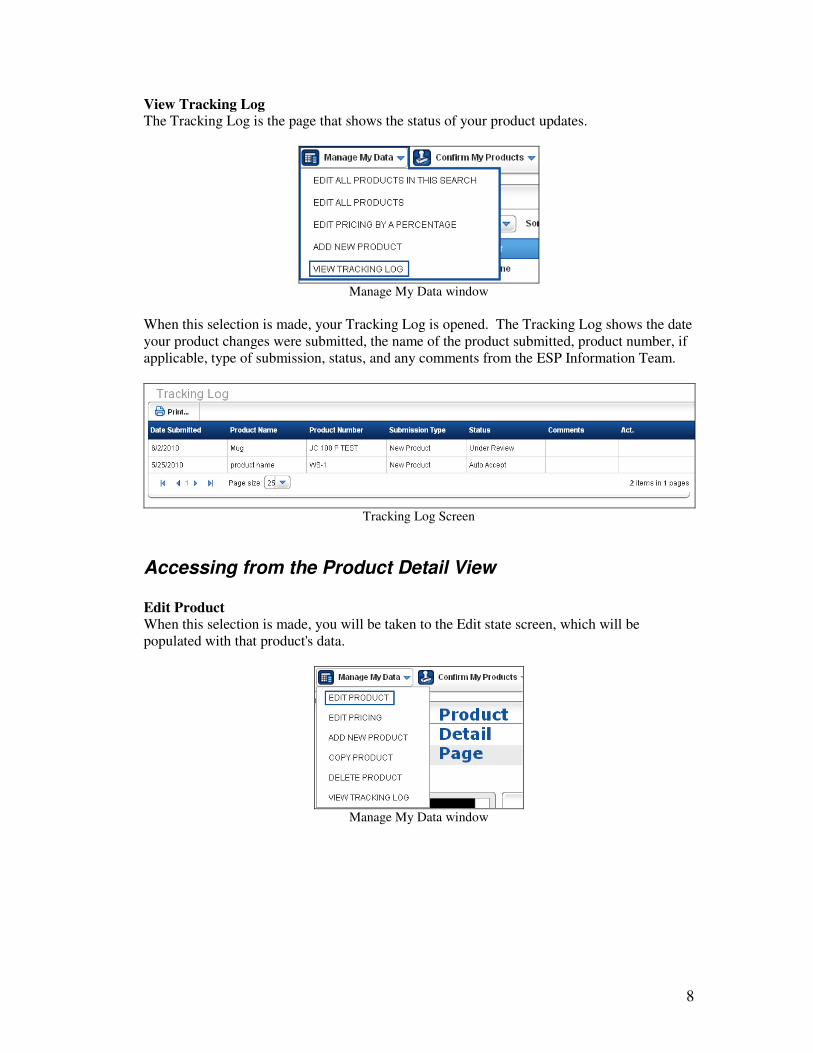
View Tracking Log The Tracking Log is the page that shows the status of your product updates.
Manage My Data window
When this selection is made, your Tracking Log is opened. The Tracking Log shows the date your product changes were submitted, the name of the product submitted, product number, if applicable, type of submission, status, and any comments from the ESP Information Team.
Tracking Log Screen
Accessing from the Product Detail View Edit Product When this selection is made, you will be taken to the Edit state screen, which will be populated with that product's data.
Manage My Data window
9
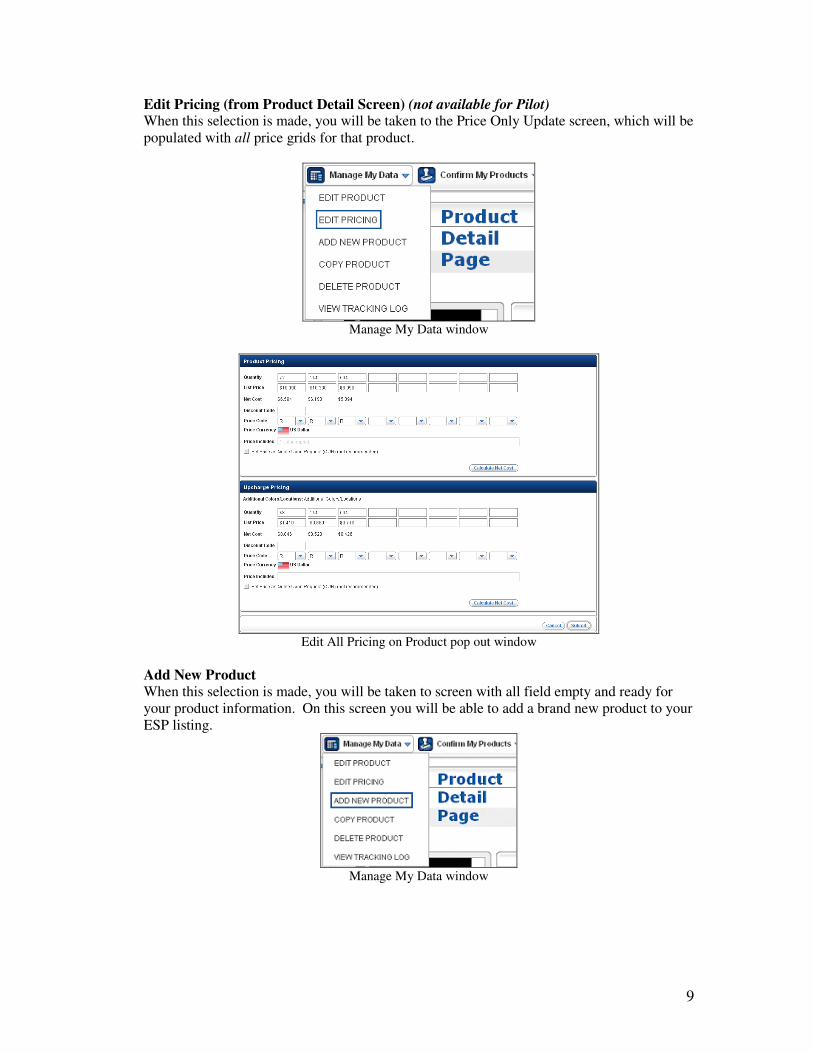
Edit Pricing (from Product Detail Screen) (not available for Pilot) When this selection is made, you will be taken to the Price Only Update screen, which will be populated with all price grids for that product.
Manage My Data window
Edit All Pricing on Product pop out window
Add New Product When this selection is made, you will be taken to screen with all field empty and ready for your product information. On this screen you will be able to add a brand new product to your ESP listing.
Manage My Data window

10
Copy Product When this selection is made, you will be taken to the Edit state screen, which will be populated with that product's data. We recommend using this screen to create new products that may be similar to some of your current product.
Manage My Data window
Delete Product When this selection is made, you will be shown a Product Deletion confirmation alert.
Manage My Data window
Other Ways to Access
There are two buttons on each Product that will allow you to either edit your product or edit your product’s pricing.
ESP Updates – Summary View

11
Quick Links/Editable Fields
Once you have selected your product(s) and selected your edit option, the ESP Updates site will open.
Top Toolbar
Top Toolbar
Training Includes videos of how to do updates, based on sections within the application. Calendar is a link to our training schedule.
Tools Contain the Tracking Log which will keep a record of all products submitted through ESP Updates.
Help Contains a link to our FAQ and knowledge base. If you have a question, you can submit it through the knowledge base and get a response. NOTE: this is a knowledge base, not a chat system), Links to Supplier ESP Online page. The buttons to the left will take you to other applications for which you are licensed. If they are grayed out, you are not licensed for the application.
Quick Links
To access and view an area, click on the blue triangle. The Quick Links area will move with you, as you open areas and edit your product(s).
ESP Updates – Product Description
Product Description Area
The product description area contains several fields. These include product name, product number, a summary of the product and the description of the product.
12
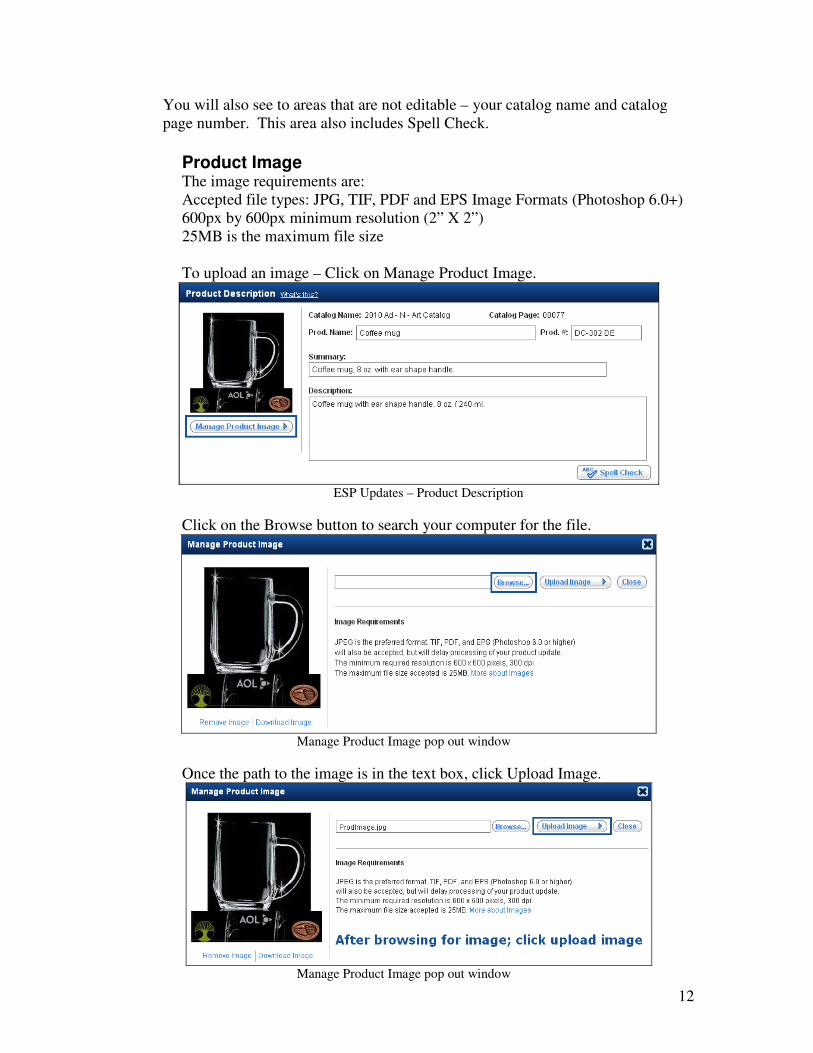
You will also see to areas that are not editable – your catalog name and catalog page number. This area also includes Spell Check.
Product Image The image requirements are: Accepted file types: JPG, TIF, PDF and EPS Image Formats (Photoshop 6.0+) 600px by 600px minimum resolution (2” X 2”) 25MB is the maximum file size To upload an image – Click on Manage Product Image.
ESP Updates – Product Description
Click on the Browse button to search your computer for the file.
Manage Product Image pop out window
Once the path to the image is in the text box, click Upload Image.
Manage Product Image pop out window
13
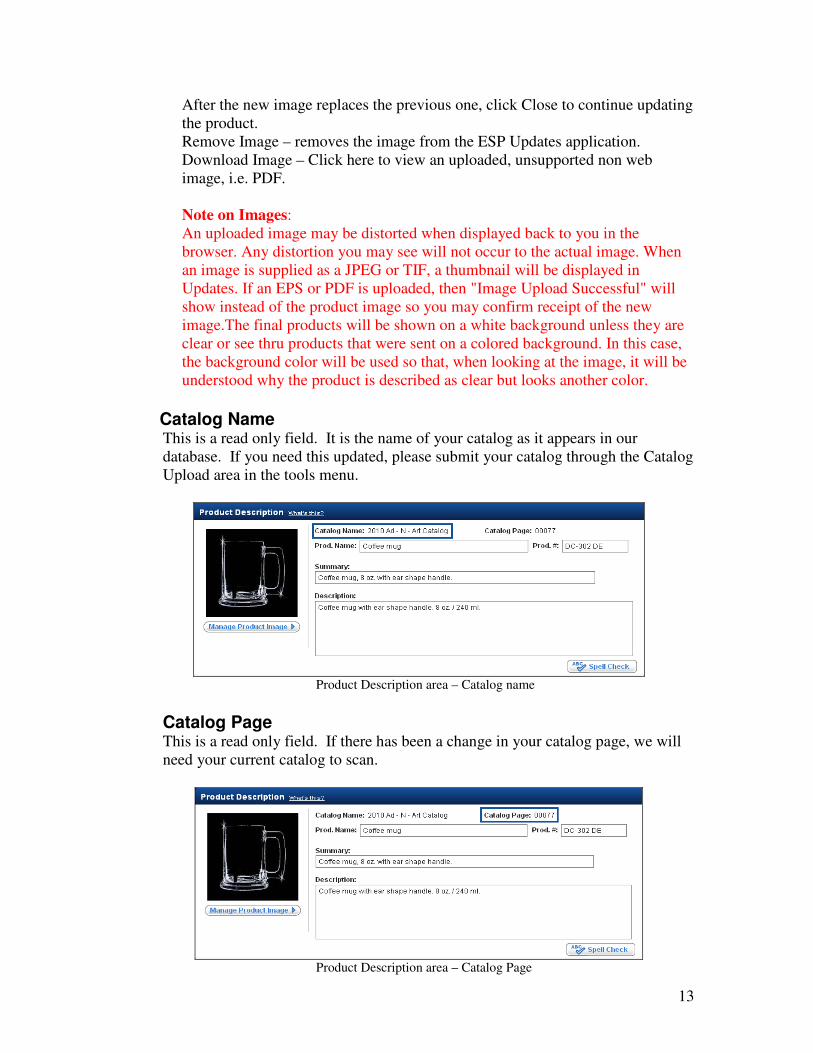
After the new image replaces the previous one, click Close to continue updating the product. Remove Image – removes the image from the ESP Updates application. Download Image – Click here to view an uploaded, unsupported non web image, i.e. PDF. Note on Images: An uploaded image may be distorted when displayed back to you in the browser. Any distortion you may see will not occur to the actual image. When an image is supplied as a JPEG or TIF, a thumbnail will be displayed in Updates. If an EPS or PDF is uploaded, then "Image Upload Successful" will show instead of the product image so you may confirm receipt of the new image.The final products will be shown on a white background unless they are clear or see thru products that were sent on a colored background. In this case, the background color will be used so that, when looking at the image, it will be understood why the product is described as clear but looks another color.
Catalog Name This is a read only field. It is the name of your catalog as it appears in our database. If you need this updated, please submit your catalog through the Catalog Upload area in the tools menu.
Product Description area – Catalog name
Catalog Page This is a read only field. If there has been a change in your catalog page, we will need your current catalog to scan.
Product Description area – Catalog Page
14
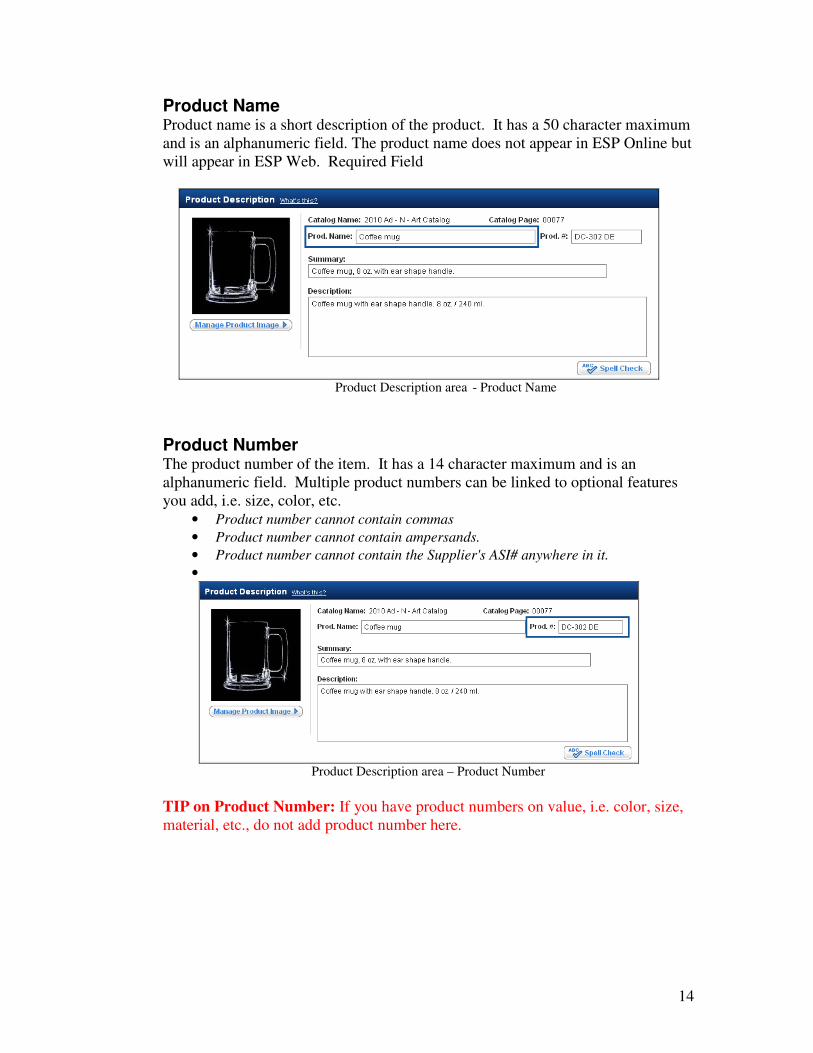
Product Name Product name is a short description of the product. It has a 50 character maximum and is an alphanumeric field. The product name does not appear in ESP Online but will appear in ESP Web. Required Field
Product Description area - Product Name
Product Number The product number of the item. It has a 14 character maximum and is an alphanumeric field. Multiple product numbers can be linked to optional features you add, i.e. size, color, etc.
• Product number cannot contain commas
• Product number cannot contain ampersands.
• Product number cannot contain the Supplier's ASI# anywhere in it.
•
Product Description area – Product Number
TIP on Product Number: If you have product numbers on value, i.e. color, size, material, etc., do not add product number here.
15
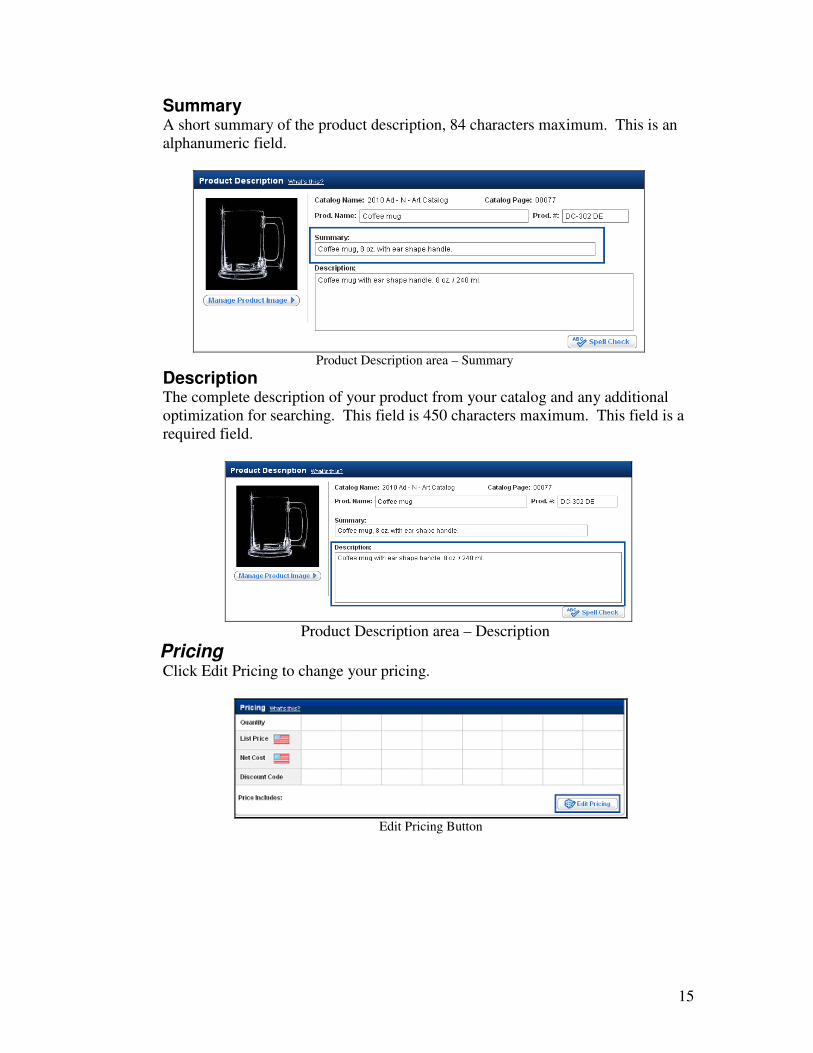
Summary A short summary of the product description, 84 characters maximum. This is an alphanumeric field.
Product Description area – Summary
Description The complete description of your product from your catalog and any additional optimization for searching. This field is 450 characters maximum. This field is a required field.
Product Description area – Description
Pricing Click Edit Pricing to change your pricing.
Edit Pricing Button
16
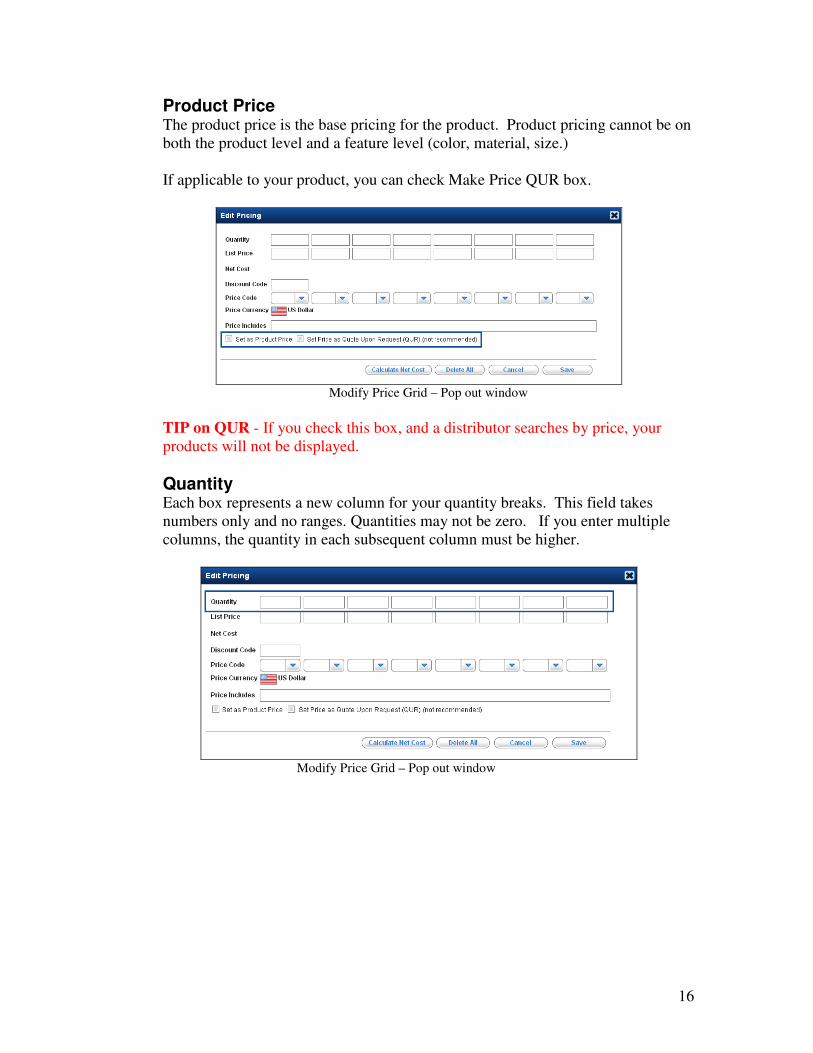
Product Price The product price is the base pricing for the product. Product pricing cannot be on both the product level and a feature level (color, material, size.) If applicable to your product, you can check Make Price QUR box.
Modify Price Grid – Pop out window
TIP on QUR - If you check this box, and a distributor searches by price, your products will not be displayed.
Quantity Each box represents a new column for your quantity breaks. This field takes numbers only and no ranges. Quantities may not be zero. If you enter multiple columns, the quantity in each subsequent column must be higher.
Modify Price Grid – Pop out window

17
List Price The list price fields display the suggested retail price for the above quantity. This field does not take dollar signs. Prices may not be zero dollars. If there is multiple column pricing, the list price in each subsequent column must be the same as the last column or lower.
Modify Price Grid – Pop out window
Net Cost Net cost is a read only field and will be displayed once you click Calculate. If there is multiple column pricing, the net cost in each subsequent column must be the same as the last column or lower. If you need assistance determining the list price, please refer to Appendix B – Calculating the List Price for assistance.
Discount Code To add your codes, type in the box as shown in your catalog. Some examples are: 4P, 3R2QS, etc. You can use the ABC or PQR codes. See Appendix A – Glossary of Terms for codes/percentages. The Price Code field will then display your codes under each column.
Price Code As an alternative method to the Discount Code field, you can manually select your price codes in this area. One code per column.
Price Currency is pulling from our internal system and is not editable.
Price Includes 100 characters or less. Typically refers to what is included in the price of the product. To add a price includes statement, such as one color/one location imprint, paper proof, full color printing, etc. type it in the text area.

18
Modify Price Grid – Pop out window
Note on Price Includes: do not include any up charges in the price includes area. Buttons Calculate – mathematically calculates your net cost based on Price and Discount Code
Delete – removes the entire price grid Save – Save your pricing Cancel – cancels any changes you have made
Product Attributes Attributes are descriptive features you assign to your products. This area contains your product’s category, colors, material(s), size(s), shape and additional product options. Many of these selections have drop down menus from which to choose. Once you assign the features to your product, you can then assign specific options to each feature. Once you learn how to update one attribute/feature, you will be able to update any of them.
Category ASI assigns this field to classify your products into a category or categories. This field is read only.
Product Attributes area - Category
19
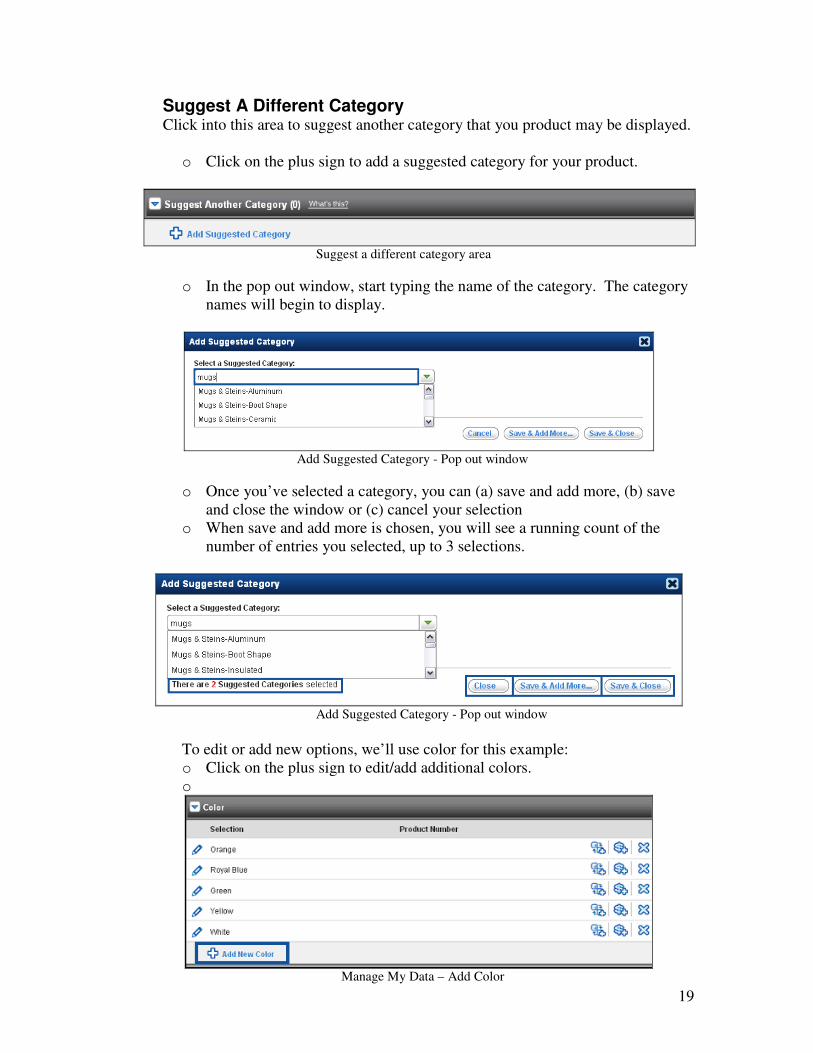
Suggest A Different Category Click into this area to suggest another category that you product may be displayed. o Click on the plus sign to add a suggested category for your product.
Suggest a different category area
o In the pop out window, start typing the name of the category. The category names will begin to display.
Add Suggested Category - Pop out window
o Once you’ve selected a category, you can (a) save and add more, (b) save and close the window or (c) cancel your selection
o When save and add more is chosen, you will see a running count of the number of entries you selected, up to 3 selections.
Add Suggested Category - Pop out window
To edit or add new options, we’ll use color for this example: o Click on the plus sign to edit/add additional colors. o
Manage My Data – Add Color

20
o On the pop out window “Add Color”, under Select Color, there is a drop down menu with thousands of colors. We suggest starting by typing in your color to see if it’s available. You will also get similar options when you start typing in a color, i.e. blue brings up light blue, navy blue, royal blue, etc.
Add Color - Pop out window
TIP on Selection area: If you wait for the list to populate with all color options, the load time will be affected.
o You can add a new color that is not currently displayed in our selection list.
Add Color Pop Out Window
TIP on add new color value: If you add a new value, it will be reviewed by the ESP Online Information team and not be auto accepted.
o Product Number – if your product number is based on the color of your item, place the product number in the field.
o An example of this would be if you have a t-shirt that comes in a variety of colors. Your white t-shirt would have its own item number (due to it being the least expensive), the grey t-shirts would have its own item number (due to it being slightly more expensive) and the colored t-shirts would have its own product number (due to it being the most expensive) in the group.
Add Color - Pop out window

21
o There are three options to save your changes. o The Close button will close the window without saving your
changes. o The Save & Add More button will save your current selection and
allow you to continue to add options. o The Save & Close button will save your selection and close the
window.
Each area in Product Attributes works the same as the Color field.
TIP on Entering Sizes – when entering/selecting dimensional size, always enter width x length x height, for example, 10” x 12” x 3”.
Product Options
Product Options are values that apply to your product. These could include options such as stock shapes, stock art designs, attachments like magnets, bulldog clips or key chains, union label, insertions, Prop 65 surcharge, custom work, etc. Description field holds up to 500 characters and is required. The value field holds 150 characters. Product Options have multiple scenarios:
o Description only
Manage My Data – Product Options
o Description only with a price grid attached o For up-charges only.
Manage My Data – Product Options
22
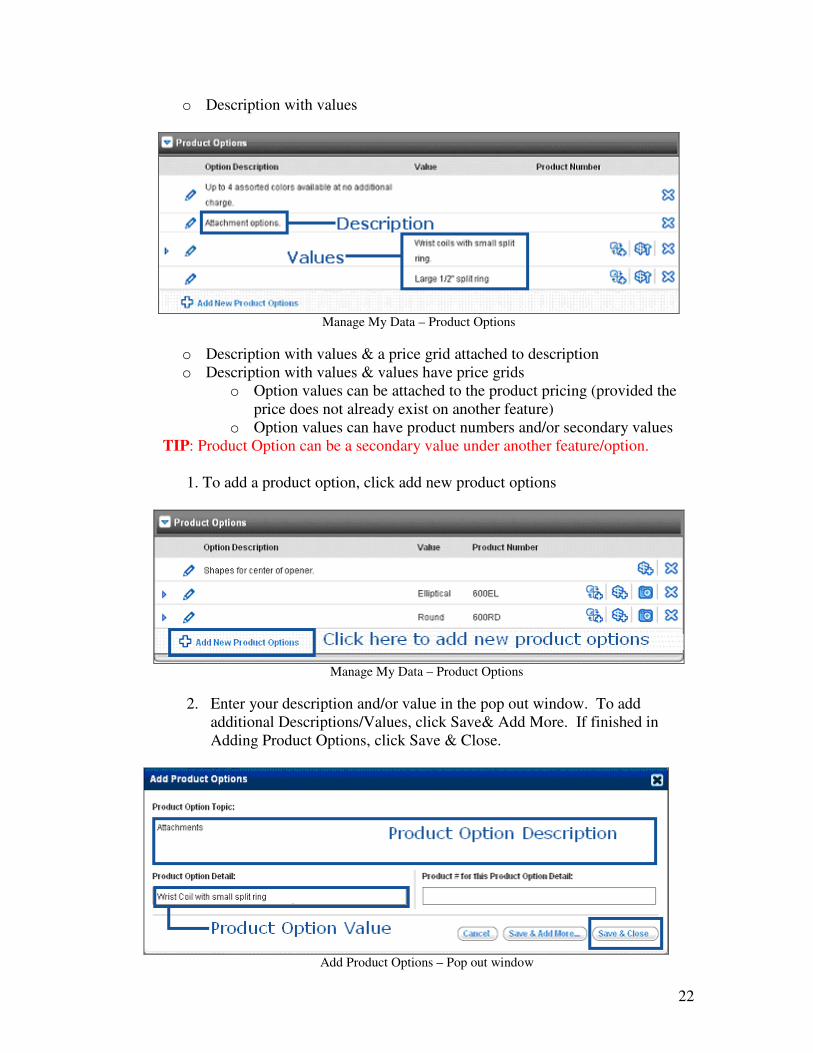
o Description with values
Manage My Data – Product Options
o Description with values & a price grid attached to description o Description with values & values have price grids
o Option values can be attached to the product pricing (provided the price does not already exist on another feature)
o Option values can have product numbers and/or secondary values TIP: Product Option can be a secondary value under another feature/option.
1. To add a product option, click add new product options
Manage My Data – Product Options
2. Enter your description and/or value in the pop out window. To add additional Descriptions/Values, click Save& Add More. If finished in Adding Product Options, click Save & Close.
Add Product Options – Pop out window
23
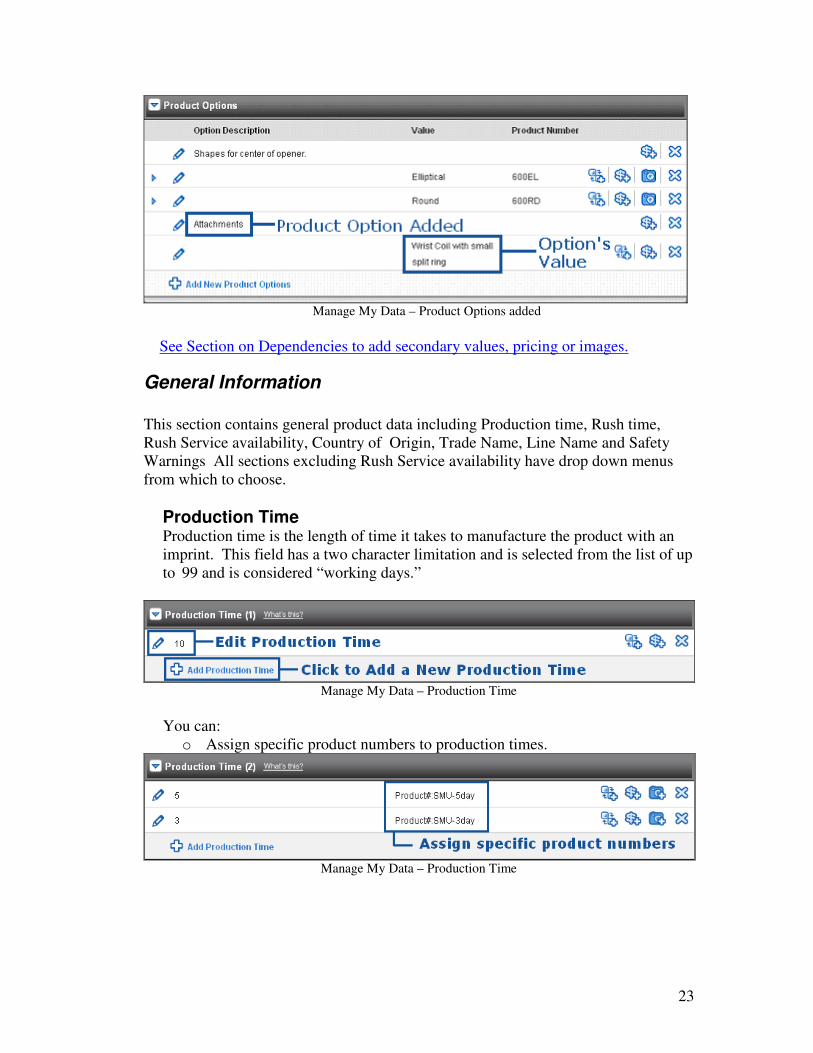
Manage My Data – Product Options added
See Section on Dependencies to add secondary values, pricing or images.
General Information
This section contains general product data including Production time, Rush time, Rush Service availability, Country of Origin, Trade Name, Line Name and Safety Warnings All sections excluding Rush Service availability have drop down menus from which to choose.
Production Time Production time is the length of time it takes to manufacture the product with an imprint. This field has a two character limitation and is selected from the list of up to 99 and is considered “working days.”
Manage My Data – Production Time
You can: o Assign specific product numbers to production times.
Manage My Data – Production Time

24
o Make production time the product price provided the product price does not already exist on another option.
Manage My Data – Production Time
o Assign multiple production times (2 or more) only if those times include a product price, i.e. each new production time must have a price attached to it.
Add Price Grid – Pop out window
o Attach secondary values to production time.
Manage My Data – Production Time
TIP: Production time can be a secondary value under another feature/option.
Rush Time
Rush Time is added here is it is available for the product. This field has a two character limitation and is selected from the list of up to 98 and is considered “working days.”
Manage My Data – Rush Time

25
Add Rush Time – Pop out window
You can: o Add an up-charge price grid to the rush time value.
Add Up-Charge – Pop out window
Manage My Data – Rush Time
You cannot:
o Attach product pricing, product number or secondary values to rush time. o Add a rush time that is greater than or equal to production time.
TIP: Rush time can be a secondary value under another feature/option.
Rush Service
This is a general yes/no question. Select yes from the drop down menu if you provide Rush Service for this product.
Manage My Data – Rush Service Button
TIP on Rush Service: If you provide rush service, but have no specific amount of days listed, select yes here.

26
Country of Origin
Country of origin is the place where the product is made. Click on Add New County of Origin, type in the county and select. The maximum number of selections is 10 values.
Manage My Data – County of Origin
You can: o Add product pricing and secondary values, if applicable.
Manage My Data – County of Origin
You cannot:
o Add a new value to country of origin. o Attach up-charges and product numbers to county of origin.
Trade Name
Trade Name is sometimes referred to as the Brand Name. You can choose your Trade Name(s) from the Selection List or submit a new Trade Name. You can:
o Attach product pricing to the Trade Name. o Attach product numbers to the Trade Name. o Attach secondary values to Trade Name, if applicable.
Manage My Data – Trade Name
TIP on Trade Name: The Trade Name selection cannot match your Line Name.

27
Line Name The Line Name selection list will display only the Line Names available to you.
You can only select one Line Name per product. You will be able to delete a Line Name from an edited product.
Manage My Data – Line Name
Safety Warnings
If you product contains a potential choking hazard – marble, small ball, balloon or small parts, add a safety warning. You can select up to 6 values. No other features can be attached to the safety warnings.
Manage My Data – Safety Warnings
Add Safety Warnings – Pop out window
Imprinting Information
This section contains all information relating to the imprint or decoration of the product. It contains imprint method, imprint color, imprint size, additional colors/location field, imprint options and several secondary values including imprint/set up charges.
Imprint Method This field takes all imprint methods for the product. You have a maximum of 250 selections. You can add a new Imprint Method, if it is not in our selection list.
Manage My Data – Imprint Method

28
You can: o Make imprint method the product price; provided the product price does
not already exist on another feature and if the Imprint Method determines the price.
Manage My Data – Imprint Method
o Tie a product number to the Imprint Method
Add Imprint Method– Pop out window
o Add Dependency/Secondary value to Imprint Method o Add Up-charge Price grid
TIP: Imprint Method can be a secondary value under another feature/option
Imprint Color
Imprint color field holds available colors in which your product can be decorated. You have a maximum of 250 selections. You can submit a new Imprint Color, if it is not in our selection list.
Manage My Data – Add Imprint Color
You cannot: o Tie product numbers to the imprint colors value. o Tie dependencies to the imprint colors value. o Attach product pricing or up-charge to the imprint color values.
TIP: Typically, Imprint Color will be a large list.

29
Imprint Size
The imprint size field is the area available for the decoration. The field has a maximum of 250 selections. You can submit a new imprint size, if it is not in our selection list.
Manage My Data – Add Imprint Size
You can:
o Make imprint size the product price provided the product price does not already exist on another option.
o Tie a product number to the imprint size. o Add up-charge price grid and secondary values, like an imprint charge, if
applicable.
Add Imprint Size – Pop out window
TIP: Imprint Size can be a secondary value under another feature/option
Additional Colors/Locations
This field contains information about additional colors and/or locations a product can have a decoration. This section has two areas – description text field (500 characters) and value text field (150 characters.).
Manage My Data – Additional Colors/Locations

30
You can: o Enter a description field (1), value field or both.
Additional Colors/Locations – Pop out window
o Have multiple values tied to the description.
Additional Colors/Locations – Pop out window
o Attach an up-charge price grid to either the description or the value.
Additional Colors/Locations Up-charge price grid – Pop out window
o Attach a dependency to the value.
Imprint Option
Imprint Option are values that apply only to the Imprint. Some examples are fluorescent imprints, options for monogramming, PMS match, puff ink, colorfill, etc. Description field holds up to 500 characters and is required and value field holds 150 characters.

31
Imprint options have multiple scenarios: o Description only o Description only with a price grid attached o Description with values
Manage My Data – Imprint Options
Imprint Options – Pop out window
o Description with values & a price grid attached to description o Description with values & values have price grids.
o Option values can be attached to the product pricing (provided the price does not already exist on another criterion.)
o You can attach an up-charge price grid to either the description or the value.
o Option values can have product numbers and/or dependencies. TIP: Imprint Option can be a secondary value under another feature/option.
Full Color Process, Sold As Blanks, Personalization
These are general yes/no questions.
Manage My Data – Imprint Information
32
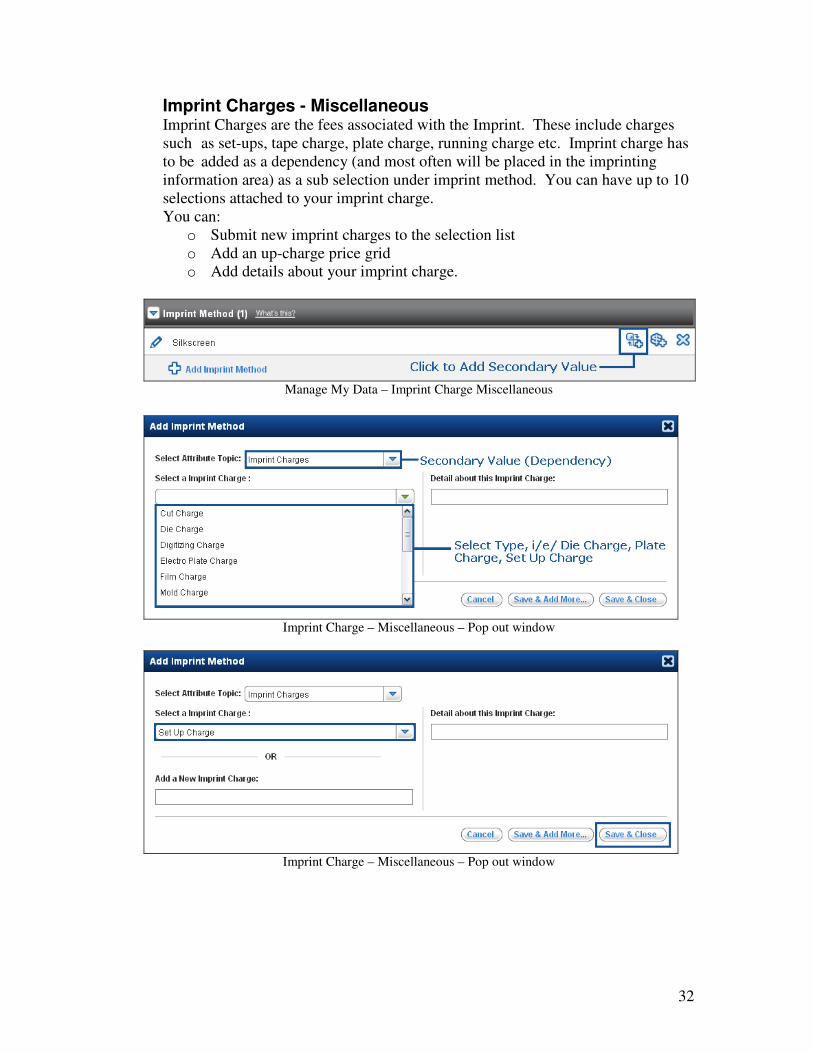
Imprint Charges - Miscellaneous Imprint Charges are the fees associated with the Imprint. These include charges such as set-ups, tape charge, plate charge, running charge etc. Imprint charge has to be added as a dependency (and most often will be placed in the imprinting information area) as a sub selection under imprint method. You can have up to 10 selections attached to your imprint charge. You can:
o Submit new imprint charges to the selection list o Add an up-charge price grid o Add details about your imprint charge.
Manage My Data – Imprint Charge Miscellaneous
Imprint Charge – Miscellaneous – Pop out window
Imprint Charge – Miscellaneous – Pop out window

33
Manage My Data – Imprint Charge Miscellaneous
Packaging and Shipping
Packaging
This field holds the packaging method(s)/options for the product. This section has two areas – description text field (500 characters) and value text field (150 characters.) The description area is for the actual packaging and the value defines the packaging. You can:
o Enter a description field (1), value field or both. o Tie a product number to the value.
Add Packaging – Pop out window
o Have multiple values tied to the description. o Attach an up-charge price grid to either the description or the value.
Add Packaging – Pop out window
o Attach a dependency to the value.

34
FOB/Shipping Point
The FOB/Shipping Point field is the area available for the product’s shipping point. You will choose your FOB/Shipping Point form the selection list. You can submit a new Shipping Point. We will only accept states, provinces and countries to this list. You can:
o Attach product pricing to the FOB point if FOB point determines the product’s price.
o Attach an up-charge price grid to FOB point. o Attach a product number to FOB point.
Manage My Data – FOB/Shipping Point
o Attach dependencies to FOB point. o
TIP: FOB/Shipping Point can be in an area as a dependency to a criterion.
Shipping Weight
The shipping weight field is the actual weight of the product as it will be shipped. This field assists the distributor in determining the costs associated with shipping the product(s). This is a 150 character text field.
Manage My Data – Shipping Weight
Manage My Data – Shipping Weight
You cannot:
o Attach price, up-charge price grid, product number nor dependencies to this field.
TIP: Shipping Weight can be in an area as a dependency to a criterion.
Dependencies
Adding dependencies to attribute values
Dependencies are secondary values to the product feature. The secondary value is dependent upon the product feature attached to your product. For example, if you
35
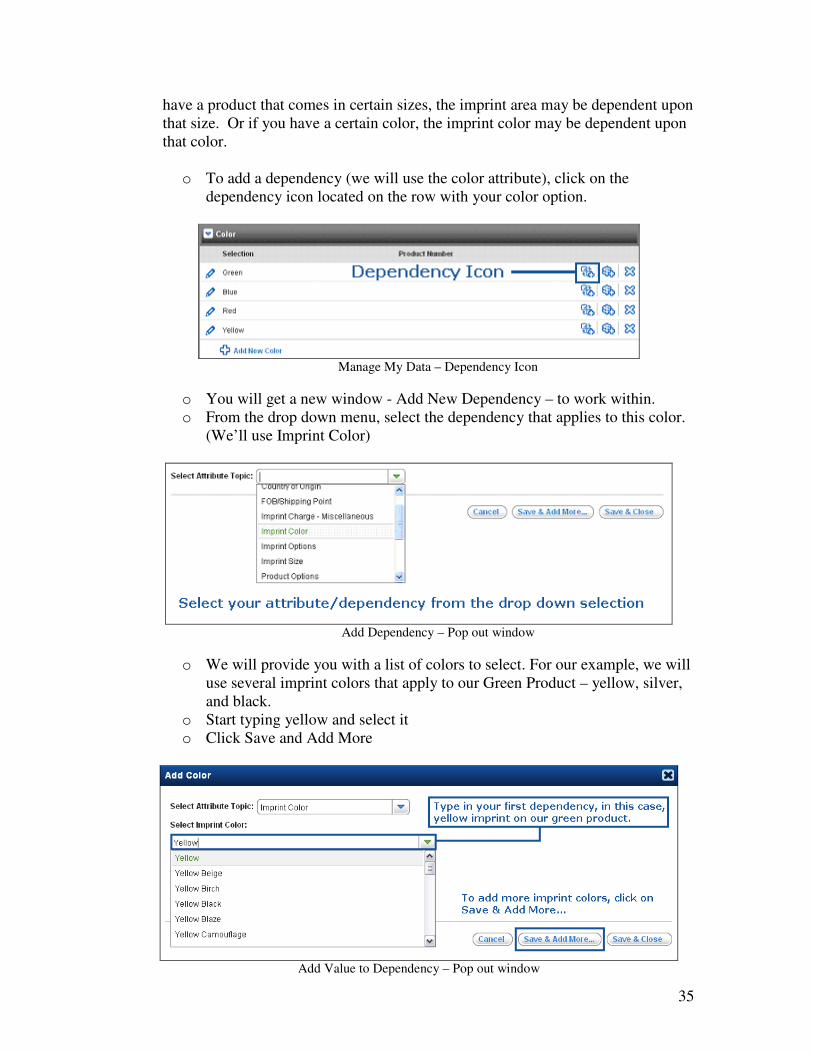
have a product that comes in certain sizes, the imprint area may be dependent upon that size. Or if you have a certain color, the imprint color may be dependent upon that color.
o To add a dependency (we will use the color attribute), click on the dependency icon located on the row with your color option.
Manage My Data – Dependency Icon
o You will get a new window - Add New Dependency – to work within. o From the drop down menu, select the dependency that applies to this color.
(We’ll use Imprint Color)
Add Dependency – Pop out window
o We will provide you with a list of colors to select. For our example, we will use several imprint colors that apply to our Green Product – yellow, silver, and black.
o Start typing yellow and select it o Click Save and Add More
Add Value to Dependency – Pop out window
36
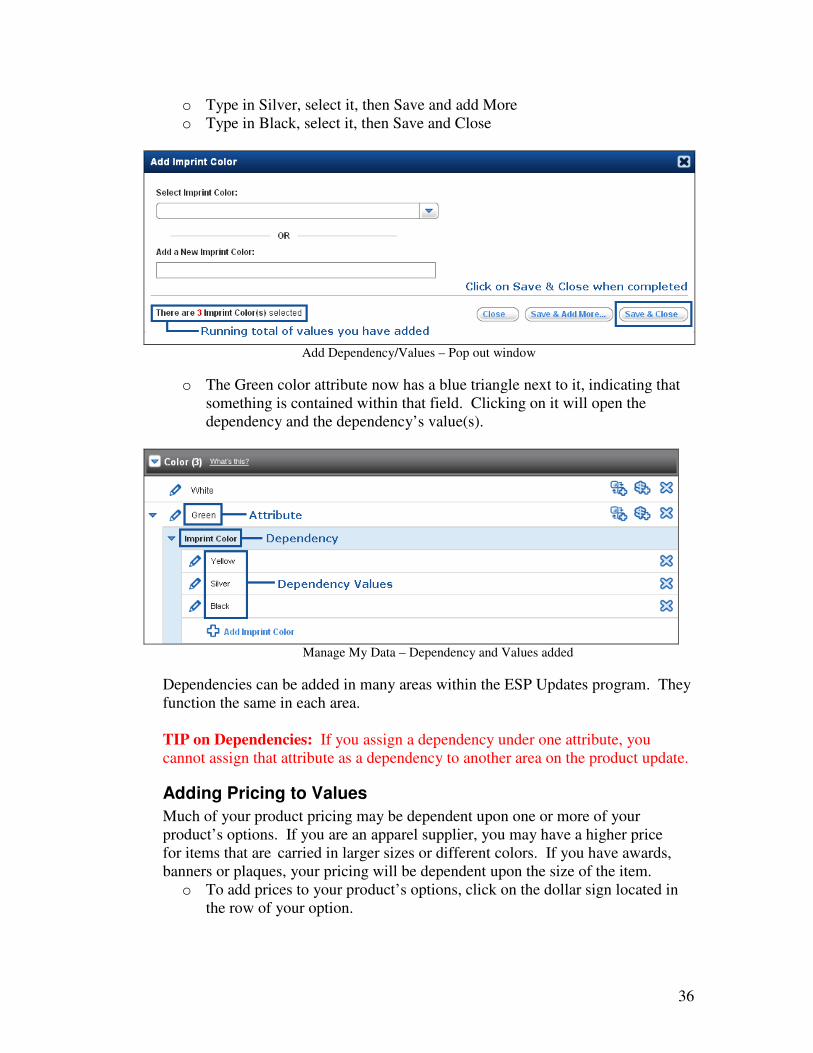
o Type in Silver, select it, then Save and add More o Type in Black, select it, then Save and Close
Add Dependency/Values – Pop out window
o The Green color attribute now has a blue triangle next to it, indicating that something is contained within that field. Clicking on it will open the dependency and the dependency’s value(s).
Manage My Data – Dependency and Values added
Dependencies can be added in many areas within the ESP Updates program. They function the same in each area. TIP on Dependencies: If you assign a dependency under one attribute, you cannot assign that attribute as a dependency to another area on the product update.
Adding Pricing to Values
Much of your product pricing may be dependent upon one or more of your product’s options. If you are an apparel supplier, you may have a higher price for items that are carried in larger sizes or different colors. If you have awards, banners or plaques, your pricing will be dependent upon the size of the item.
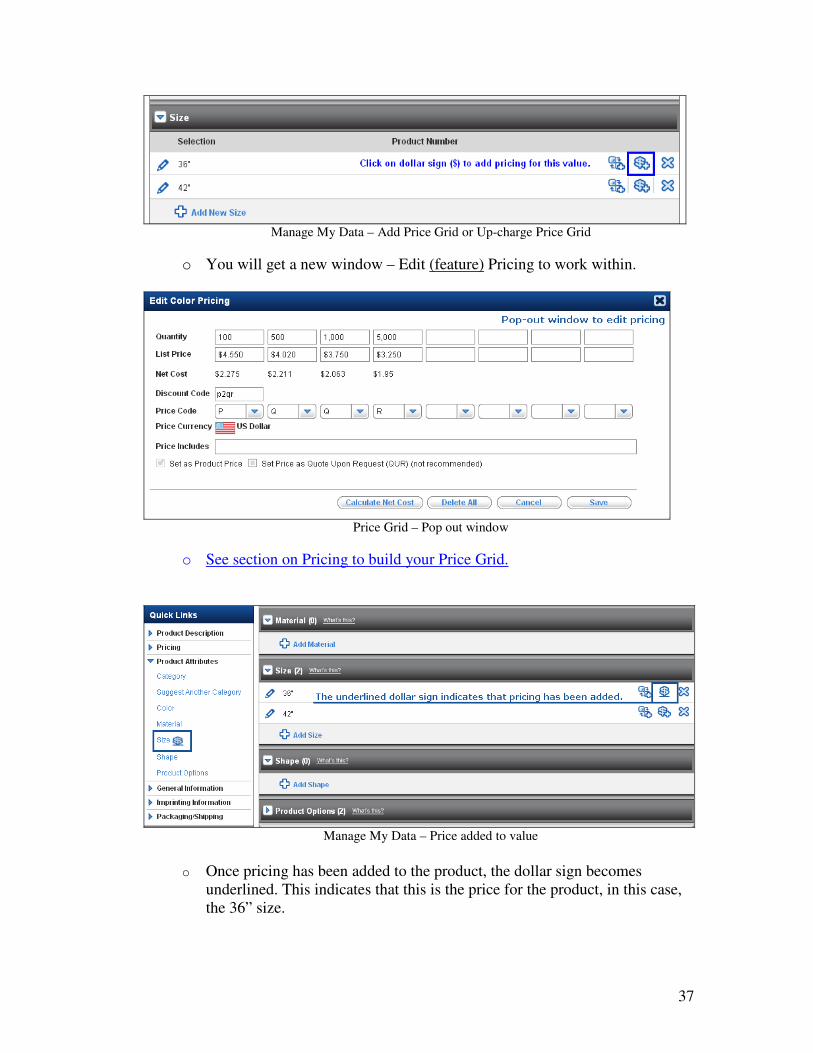
o To add prices to your product’s options, click on the dollar sign located in the row of your option.
37
Manage My Data – Add Price Grid or Up-charge Price Grid
o You will get a new window – Edit (feature) Pricing to work within.
Price Grid – Pop out window
o See section on Pricing to build your Price Grid.
Manage My Data – Price added to value
o Once pricing has been added to the product, the dollar sign becomes
underlined. This indicates that this is the price for the product, in this case, the 36” size.

38
Adding Images to Attribute Values
To add an image to your product that has a specific value, like a particular color or size, click on the camera icon and follow the directions from the adding images section. See Section on Adding Images TIP: This is only available if you have assigned a product number in the option section.
Adding Dependencies to Product Option Values
Dependencies are secondary values to the product option. The secondary value is dependent upon the product option attached to your product. For example, a lip balm that comes in a choice of flavors, your dependencies would be the flavors or a key holder that has an option for a wrist coil in multiple colors. o To add a dependency, click on the dependency icon located on the row with
your Product Option.
Manage My Data – Product Options – Adding a dependency
o From the drop down menu, select the dependency that applies to this value. (We’ll use Product Option).
o Type in a description of your dependency/secondary value. o Type in your first value o If only one value, click Save & Close. If more than one value, click Save &
Add More.
Add Dependency on a Product Option – Pop out window

39
o As you add dependencies, there will be a running total of the number you add. When you are finished adding, click Save & Close.
Add Dependency on a Product Option – Pop out window
Add Pricing to Product Options
Manage My Data – Product options – add pricing
Price Grid – Pop out window
Manage My Data - Product Options with price grid
Dependencies can be added in many areas within the ESP Updates program. They function the same in each area

40
Additional Buttons
ESP Updates - Buttons
Submit Update
The Submit Update button will send your product update for processing. Once you click Submit Update, you cannot stop it from being processed. At 11:00 PM EST the application will become unavailable to process the day’s updates. The application will start notifying you that the site is going to become unavailable staring one hour prior.
Warnings will be displayed every 15 minutes starting at 10:00 PM EST. If you do not submit your update prior to 11:00 PM EST, your update will not be processed by the next day.
ESP Updates – Warning message

41
Cancel Update
The Cancel Update will close out the ESP Updates program and cancel any work you have done of your product.
Preview Update
The Preview Update will preview the product as it appears in ESP Web.
View Prior Product
The View Prior Product will allow you to view product which was modified prior to the product you are currently working on.
Validation errors Validation errors can occur when data is not entered properly. The ESP Updates program will generate a validation error after you click on the submit button if you are missing vital data, like product pricing or is data has been entered incorrectly. The validation error will describe itself and you can reach the problem area by clicking on the error text.
Appendix A – Glossary of Terms Add a New Option to your features (not in ASI’s current database) Add a new option gives you the ability to submit new values for a feature that is not currently in the ASI database, for consideration. If you add a new option, your product update will not be auto accepted overnight. ASI’s ESP Information Team will review the newly submitted option for inclusion to the selection list. You will be notified through the Tracking Log of the status of the update. Cancel (button) This button will cancel the current data you entered and close out the window. Dependencies Dependencies are secondary values to the product feature. The secondary value is dependent upon the product feature attached to your product. . For example, if you have a product that comes in certain sizes, the imprint area may be dependent upon that size. Or if you have a certain color, the imprint color may be dependent upon that color. ESP Updates ESP Updates is the latest tool for suppliers to update their product information in ASI Products. Locked Products/Unavailable for Edit Your product is currently being updated by either the ESP Information Team or has already been submitted for update. Manage my Data
42
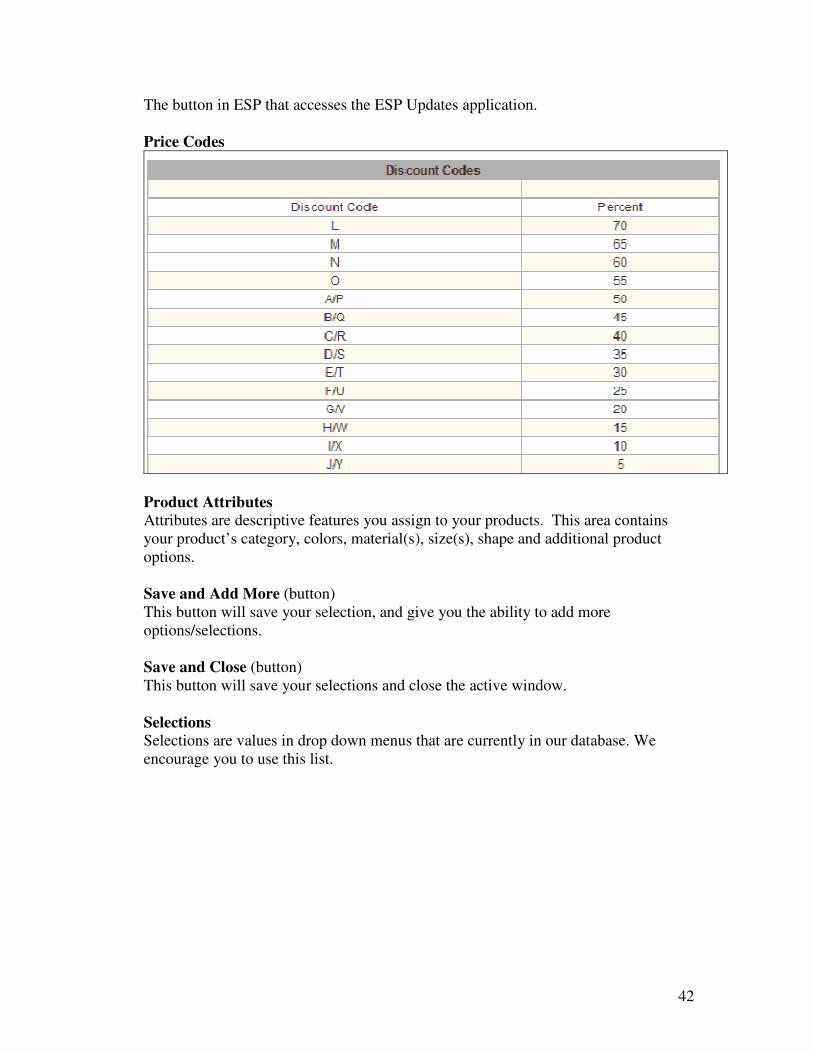
The button in ESP that accesses the ESP Updates application. Price Codes
Product Attributes Attributes are descriptive features you assign to your products. This area contains your product’s category, colors, material(s), size(s), shape and additional product options. Save and Add More (button) This button will save your selection, and give you the ability to add more options/selections. Save and Close (button) This button will save your selections and close the active window. Selections Selections are values in drop down menus that are currently in our database. We encourage you to use this list.
43
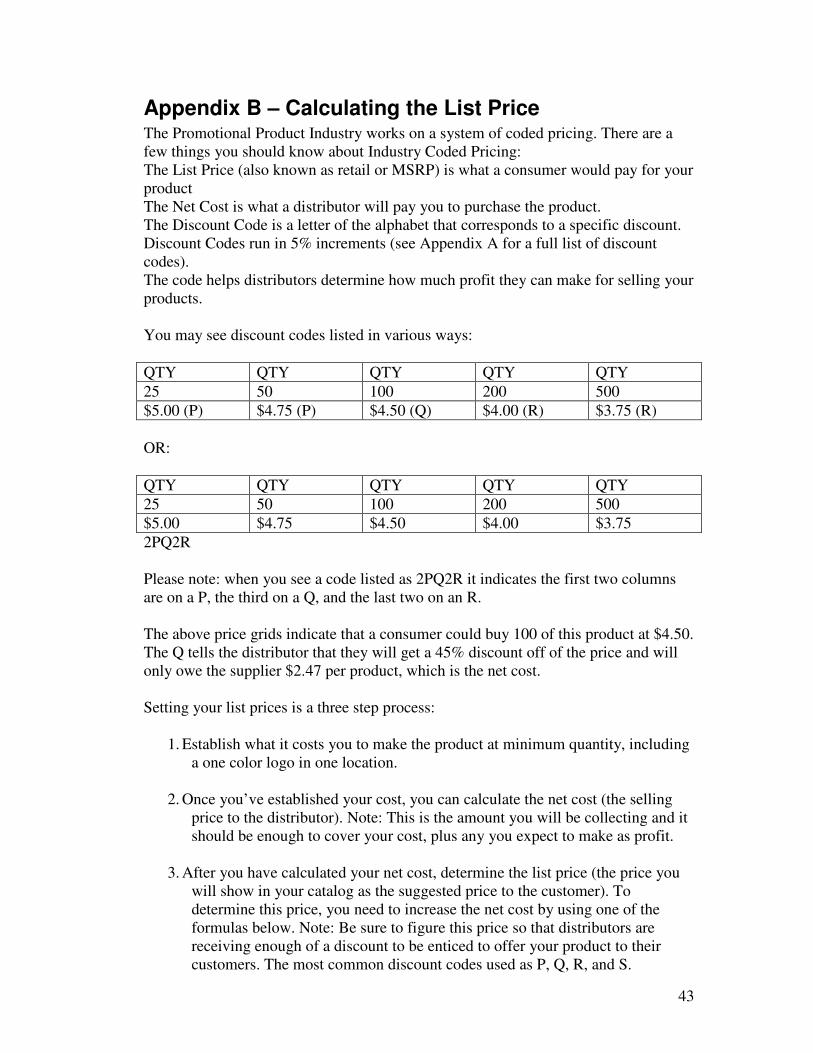
Appendix B – Calculating the List Price The Promotional Product Industry works on a system of coded pricing. There are a few things you should know about Industry Coded Pricing: The List Price (also known as retail or MSRP) is what a consumer would pay for your product The Net Cost is what a distributor will pay you to purchase the product. The Discount Code is a letter of the alphabet that corresponds to a specific discount. Discount Codes run in 5% increments (see Appendix A for a full list of discount codes). The code helps distributors determine how much profit they can make for selling your products. You may see discount codes listed in various ways:
QTY QTY QTY QTY QTY
25 50 100 200 500
$5.00 (P) $4.75 (P) $4.50 (Q) $4.00 (R) $3.75 (R)
OR:
QTY QTY QTY QTY QTY
25 50 100 200 500
$5.00 $4.75 $4.50 $4.00 $3.75
2PQ2R Please note: when you see a code listed as 2PQ2R it indicates the first two columns are on a P, the third on a Q, and the last two on an R. The above price grids indicate that a consumer could buy 100 of this product at $4.50. The Q tells the distributor that they will get a 45% discount off of the price and will only owe the supplier $2.47 per product, which is the net cost. Setting your list prices is a three step process:
1. Establish what it costs you to make the product at minimum quantity, including a one color logo in one location.
2. Once you’ve established your cost, you can calculate the net cost (the selling price to the distributor). Note: This is the amount you will be collecting and it should be enough to cover your cost, plus any you expect to make as profit.
3. After you have calculated your net cost, determine the list price (the price you will show in your catalog as the suggested price to the customer). To determine this price, you need to increase the net cost by using one of the formulas below. Note: Be sure to figure this price so that distributors are receiving enough of a discount to be enticed to offer your product to their customers. The most common discount codes used as P, Q, R, and S.
44
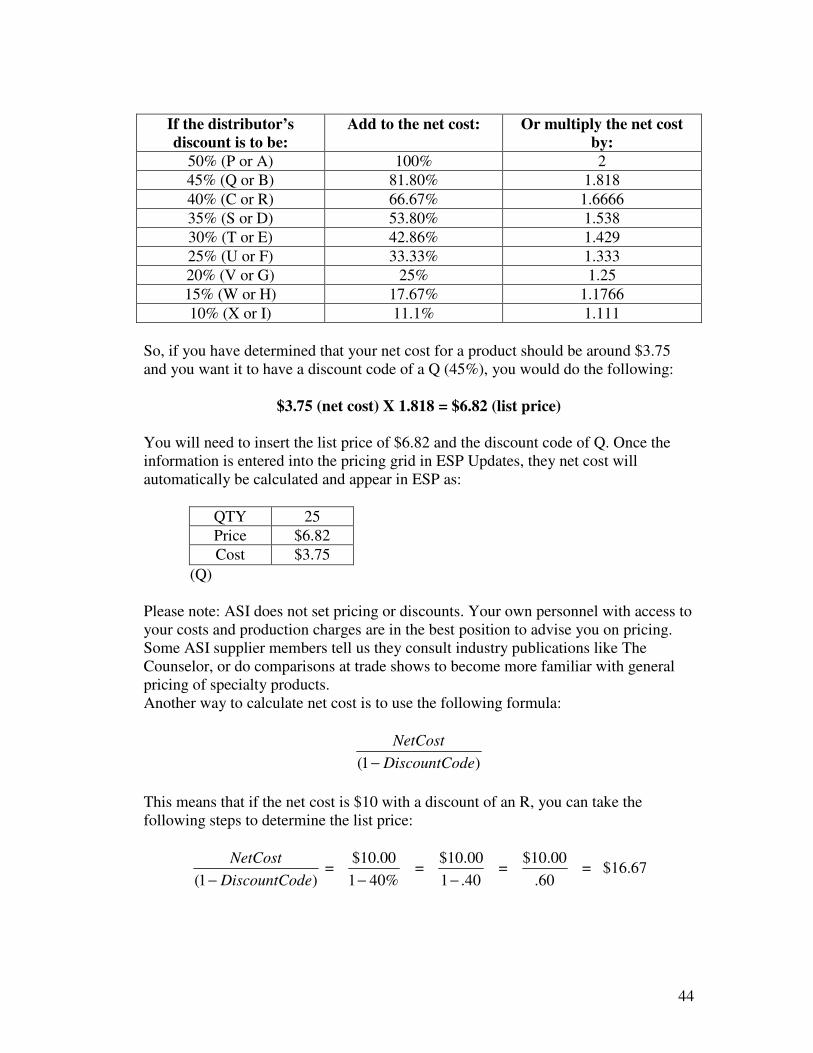
If the distributor’s discount is to be:
Add to the net cost: Or multiply the net cost by:
50% (P or A) 100% 2
45% (Q or B) 81.80% 1.818
40% (C or R) 66.67% 1.6666
35% (S or D) 53.80% 1.538
30% (T or E) 42.86% 1.429
25% (U or F) 33.33% 1.333
20% (V or G) 25% 1.25
15% (W or H) 17.67% 1.1766
10% (X or I) 11.1% 1.111
So, if you have determined that your net cost for a product should be around $3.75 and you want it to have a discount code of a Q (45%), you would do the following:
$3.75 (net cost) X 1.818 = $6.82 (list price) You will need to insert the list price of $6.82 and the discount code of Q. Once the information is entered into the pricing grid in ESP Updates, they net cost will automatically be calculated and appear in ESP as:
QTY 25
Price $6.82
Cost $3.75
(Q) Please note: ASI does not set pricing or discounts. Your own personnel with access to your costs and production charges are in the best position to advise you on pricing. Some ASI supplier members tell us they consult industry publications like The Counselor, or do comparisons at trade shows to become more familiar with general pricing of specialty products. Another way to calculate net cost is to use the following formula:
)1( deDiscountCo
NetCost
−
This means that if the net cost is $10 with a discount of an R, you can take the following steps to determine the list price:
)1( deDiscountCo
NetCost
−
= %401
00.10$
−
= 40.1
00.10$
−
= 60.
00.10$ = $16.67