Embed Size (px)
Citation preview

eScan for Linux File Server User Guide MicroWorld Technologies Inc. - Anti-Virus & Content Security

User Guide - eScan for Linux File Server

Table of Contents
INTRODUCTION ...................................................................................................................................................................... 4
FEATURES OF eScan FOR LINUX FILE SERVERS (SAMBA SERVER)............................................................................. 5
SYSTEM REQUIREMENTS ..................................................................................................................................................... 5
PACKAGES OF eScan FOR LINUX FILE SERVERS (SAMBA) - RPMS / DEBIAN ............................................................ 6
INSTALLATION........................................................................................................................................................................ 6
MANAGING eScan FOR LINUX USING THE WEB ADMINISTRATOR ................................................................................ 7
FEATURES AND OPTIONS IN eScan AV (WEB-ADMINISTRATION) .................................................................................. 9
FEATURES AND OPTIONS IN eScan AV [eScan GRAPHICAL USER INTERFACE (GUI)] ............................................. 18
COMMAND-LINE HELP / MANUAL ...................................................................................................................................... 29
CONTACT US ........................................................................................................................................................................ 30

Introduction
About MicroWorld
MicroWorld is the developer of advanced Information Security solutions that provide comprehensive protection against
evolving computer security threats. MicroWorld's product portfolio includes eScan and MailScan that encompass Anti-Virus, Anti-Spyware, Content Security, Anti-Spam, and Network Intrusion Prevention solutions. Incorporated in the USA, MicroWorld has its offices worldwide and is internationally represented by a widespread network of partners in more than 90 countries.
MicroWorld began its operations in the year 1993. Since then, it has been a pioneer in the development of advanced.
Information Security solutions and has been an active contributor to the Information Security industry in combating complex and evolving IT threats.
MicroWorld's range of products covers the entire spectrum of the Information Security sphere making it a one-stop shop
for protecting all Information Security assets. Over the years, it has been redefining the Information Security landscape by developing innovative technologies and solutions. MicroWorld's continued endeavor is to provide Futuristic Security Intelligence to computers—be it in an Enterprise, SMB or Home.
Our Vision
About eScan for Linux
The increasing use of Linux as an alternate operating system has increased the number of viruses targeting machines. eScan for linux is a reliable virus scanning software for workstations and servers running on Linux. It offers a complete and secure anti-virus security solution that detects and removes viruses, Trojans and other malware threats.
eScan for Linux is also designed to understand different file types, data-streams and compression formats. It can look
inside date-streams and identify complex file architecture. It has a user-friendly interface and automatically downloads updates from our download site.
Features of eScan for Linux File Servers (SAMBA Server)
Real Time Monitoring - eScan detects viruses, trojans and other malwares on real-time monitoring basis of
shared files / directory mounted on a SAMBA shared server.
Web-Based Administration - Easy and convenient web-based administration of configurations and settings.
eScan Graphical User Interface (GUI) - The graphical user interface of eScan (for a GNOME / KDE environment) has been designed to suit the needs of a normal and an expert user for On-Demand Scanning task / Schedule scanning task of the system or specific files / directories.
eScan Command-line scanner - eScan Command-line scanner for non-GNOME / non-KDE environment i.e. executing a manual On-Demand scanning / Schedule scanning task of the system or specific files / directories from a SSH Terminal.
Automated / Scheduled download of Virus Definitions - Anti-virus updates are automatically updated, with also an option to manually downloading the updates.
Extensive Logs / Reports - Provides extensive logs of the eScan activity.
System Requirements
IntelTM
PentiumTM
200 MHz or higher processor
256 MB RAM or more (512 MB recommended for file servers)
500 MB disk space
Linux Distributions:
Debian
Fedora
RHEL
SuSE
Ubuntu

I. Packages of eScan for Linux File Servers (SAMBA) - RPMS / Debian RPM Modules Package / File name
mwadmin mwadmin-<ver>.<linux distro-release>.<arch>.rpm mwav mwav-<ver>.<linux distro-release>.<arch>.rpm escan escan-<ver>.<linux distro-release>.<arch>.rpm escan-rtm escan-rtm-<ver>.<linux distro-release>.<arch>.rpm Debian Modules Package / File name mwadmin mwadmin-<ver>.<linux distro><release>.<arch>.deb mwav mwav-<ver>.<linux distro><release>.<arch>.deb escan escan-<ver>.<linux distro><release>.<arch>.deb escan-rtm escan-rtm-<ver>.<linux distro><release>.<arch>.deb
II. Installation
Step 1:- NOTE: The packages should be installed as per the order given below Command Line Installation: For RPM based Linux distro’s: # rpm -ivh mwadmin-<ver>.<linux distro-release>.<arch>.rpm
# rpm -ivh mwav-<ver>.<linux distro-release>.<arch>.rpm
# rpm -ivh escan-<ver>.<linux distro-release>.<arch>.rpm
# rpm -ivh escan-rtm-<ver>.<linux distro-release>.<arch>.rpm
For Debian based Linux distro’s:
# dpkg -i mwadmin-x.x-x.deb.<linux distro><release>.<arch>.deb
# dpkg -i mwav-x.x-x. deb.<linux distro><release>.<arch>.deb
# dpkg -i escan-x.x-x. deb.<linux distro><release>.<arch>.deb
# dpkg -i escan-rtm-x.x-x. deb.<linux distro><release>.<arch>.deb Step 2:- After the installation is complete, a) Add following entries in [global] section of /etc/samba/smb.conf file
[global] max mux = 1
b) Add following entries under the shared folder section [share_name] in /etc/samba/smb.conf file
vfs object = vscan-mwav vscan-mwav: config-file = /opt/MicroWorld/etc/escan/vscan-mwav.conf
(NOTE: This [share_name] folder will be scanned by eScan) c) Restart the samba server. This completes the Installation procedure for eScan for Linux File Server.

III. Managing eScan for Linux using the Web Administrator
a) Login to the Web Administration using the Hypertext Transfer Protocol Secure (HTTPS) using a web-browser:
https://<eScan_Server_IP_address>:10443
b) On first time login, a super user account has to be created either using the CheckPass Authentication or the LDAP Authentication.
CheckPass Authentication – Select this option to create a Super User in eScan‘s user database. (Refer Fig. 1). Username should be in the EMAIL-ID format i.e. [email protected]
Fig.1
LDAP Authentication: Selecting this option for logging to the Web-Administration of the eScan using the LDAP server in the network for authentication. Enter the required LDAP settings applicable for the LDAP authentication.
Fig.2

c) After creating the Super user, login to Web-administration by clicking on the Back to login option. To access the settings, select eScan from the list of Product Name drop down box. Enter the Username and Password to login to the Web Administrator.
Fig.3
d) This will open the License Key and the EULA page. Enter and apply the eScan License key provided to you. For evaluation, select the ―Click here to register and get a license key‖. This will take to the official website of eScan. Fill-up the registration form and an evaluation license key will be emailed. Apply the same in the space provided.
Fig.4
e) The Welcome Screen is displayed after applying the eScan License Key.

IV. Features and Options in eScan AV (Web-Administration): 1) Control ►►► Services Displays the status of the Anti-virus Service, Samba Service and the date of the current AV database.
Services running is indicated with a Green Flag. Services stopped is indicated with a Red Flag. Services can be Restarted / Stopped using the respective buttons View Log will display the logs of the services It also displays: the current action by eScan AV on the infected files accessed on the Samba shared folder/s, total number of infected files which has been Quarantined, status of the AV update date.
Fig.5
2) Control ►►► Preferences This section contains the various settings for changing the password of the logged in user, adding a new users for the eScan Web-administrator console. The authentication type used is the CheckPass Authentication or the LDAP Authentication.
Fig.6
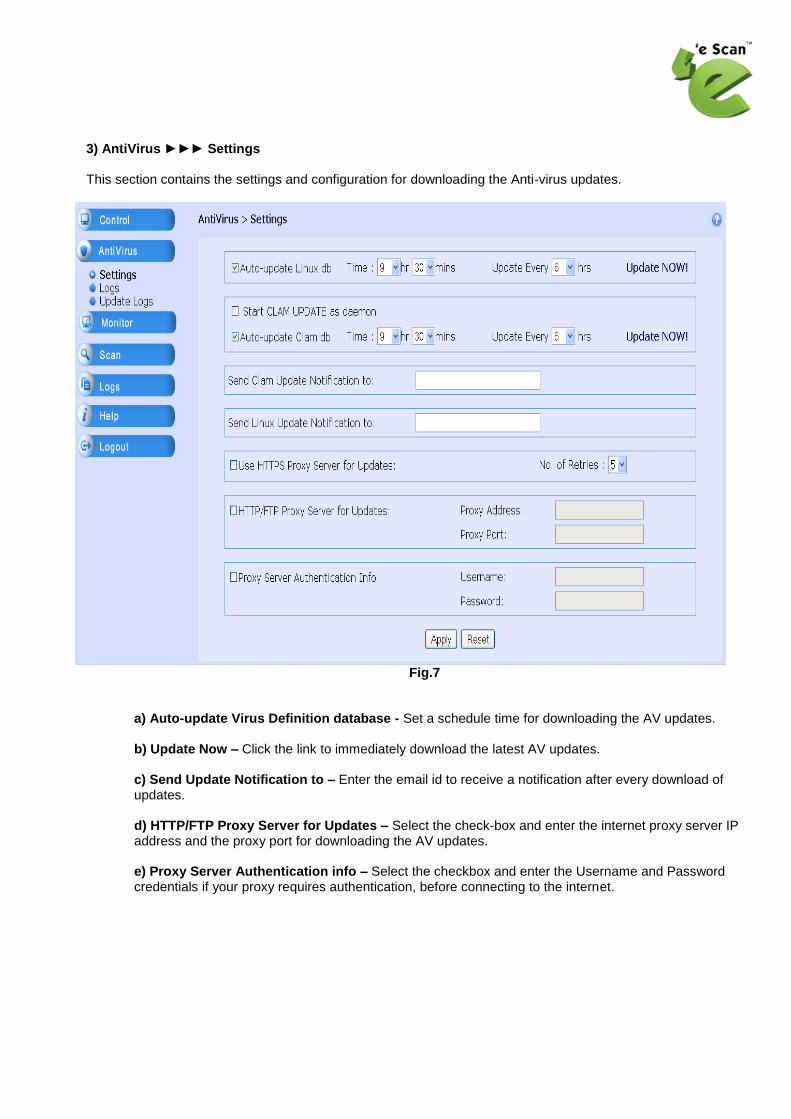
3) AntiVirus ►►► Settings This section contains the settings and configuration for downloading the Anti-virus updates.
Fig.7
a) Auto-update Virus Definition database - Set a schedule time for downloading the AV updates. b) Update Now – Click the link to immediately download the latest AV updates. c) Send Update Notification to – Enter the email id to receive a notification after every download of updates. d) HTTP/FTP Proxy Server for Updates – Select the check-box and enter the internet proxy server IP address and the proxy port for downloading the AV updates. e) Proxy Server Authentication info – Select the checkbox and enter the Username and Password credentials if your proxy requires authentication, before connecting to the internet.

4) AntiVirus ►►► Logs This section will display the logs of the AV services.
Fig.8
a) Anti-Virus Log File Size – Set the maximum size for the anti-virus log. b) Anti-Virus Logs – Displays the AV Logs.
5) AntiVirus ►►► Update Logs This section will display the logs of the AV update database.
Fig.9

a) Update Log file size – Set the maximum size for update logs. b) Update Logs – Displays the update logs.
5) Monitor ►►► Scan & Actions (NOTE:-The Monitor section contains the settings to be configured for the real time monitoring and the AV action on the [shared_name] folder on a Samba server). This section contains the settings for monitoring, scanning and actions to be taken by eScan on real-time basis on the shared folders / files on the Samba server.
Fig.10
a) Scan on file open – Files will be scanned on Open event. b) Scan on file close – Files will be scanned on Close event. c) Deny access on scan error – This will deny access to the file if there was any error during scanning of the file. d) Send warning message – This will send a warning message to client via Windows Messenger service when a virus is detected. The Messenger service should be ON on the Client system for this feature. e) Try to Disinfect infected if Possible – eScan will try to disinfect the infected file first and if it is not possible it will take the alternate actions:
i) Do nothing - will take no action on the infected file. ii) Delete - will delete the infected file from the server. iii) Quarantine – will quarantine the file to the /opt/MicroWorld/var/quarantine/escan/ directory.

6) Monitor ►►► Excludes Set the Maximum file size to scan by eScan. File exceeding the size limit will be excluded from scanning. Also, set the file type that has to be excluded from real-time scanning.
Fig.11
a) Maximum file size to scan – Set the maximum file size limit for eScan to scan. Files above the set limit will be excluded from scanning. On setting the value to ‗0‘, eScan shall scan all files. Size can be set in Bytes, KB and MB. b) Exclude Using File Types – Select this option to exclude certain types of files from being scanned by eScan. Select from the pre-listed file types and click on the ―Add‖ button.

7) Monitor ►►► Client Policies Set policies on the basis of IP addresses / Machine names.
Fig.12
a) White List Policies: Files accessed or saved from the listed IP(s) / Machine Name(s) will not be scanned by eScan. b) Black List Policies: The listed IP(s) / Machine Name(s) will not be allowed to access the Samba shared folder(s) c) Suspected List Policies: All files accessed or saved from these listed IP(s) / Machine Name(s) will be scanned by eScan regardless of any exclude criteria i.e. Files of all size and types will be scanned irrespective of whether it is above the Maximum File size scanning or file being accessed is one of the excluded type.
NOTE: A generalized form IP is allowed to be added to any of the above policies except (*.*.*.*) but no
generalized form of Machine name is acceptable. Eg. 192.168.0.* (IP in generalized form is allowed) Comp11* (Machine in generalized form is not allowed)
White listing policy has greater preference than that of back listing policy which in turn has greater preference than that of suspected listing policy. So if a client's IP or Machine Name is in suspected or black list and also in White list, Client will be considered as white listed. Similarly, if a client's IP or Machine Name is both in suspected list and black list, client will be treated as a black listed client. This rule also applies for generalized form IP entries.

8) Monitor ►►► Logs This section configures the path for vscan-mwav.log and vscan-report.log and set the type of log level.
Fig.13
3) Scan ►►► Options In this section you can set the default settings for the On Demand Scanner of eScan. The same settings can be set from the eScan Graphical User Interface (GUI) in GNOME or KDE environment of the Linux Distribution.
Fig.14
Virus Checks: Set any one of the below action to be taken in case of an infected file.
In Case Of Infection – a) Log Only
b) Disinfect (if not possible, log) c) Disinfect (if not possible, delete) d) Disinfect (if not possible, rename) e) Disinfect (if not possible, quarantine)

f) Disinfect (if not possible, prompt) g) Delete infected h) Rename i) Quarantine j) Prompt
Settings: Set the type of objects / files to be scanned a) Plain Mail Files b) Recursive c) Heuristic d) Packed File(s) e) Archived File(s) f) Cross File System(s) g) Symbolic Links
Alert, if virus definition are ____ Days old – Set an alert notification when the AV updates are old. An alert will pop-up whenever the eScan GUI is accessed for On Demand Scanning. The alert will also be displayed when using the command line for On-Demand scanning. Scan Memory at startup – All the running process will be scanned when ever the On-Demand scanner starts.
4) Scan ►►► Schedule In this section, a schedule can be set for auto-scan of the system at a specified date and time. This ensures a periodic scanning of a desired folder or the entire system is carried out. Schedule task can also be set from the eScan Graphical User Interface (GUI) in GNOME or KDE environment of the Linux Distribution.
Fig.15
This section will display the list of already created scheduled task and its details. This can be edited / deleted.

A Scheduled Task can be executed a) Once b) Hourly c) Daily d) Weekly
9) Logs ►►► eScan Logs In this section, you can set the log levels and view the logs of the On-Demand Scanner
Fig.16
10) Logs ►►► Reports This section will display the Reports of the eScan Real Time monitoring on the Samba share.
Fig.17

V. Features and Options in eScan AV [eScan Graphical User Interface (GUI)]:
In a GNOME or KDE Desktop environment,
a) eScan administrator - Desktop Icon – This will be with limited permission i.e. Normal user. Download of Updates & settings, scheduling of task will not be available in this mode (refer Fig.18). b) eScan administrator - Application menu – This is similar to eScan administrator – Desktop Icon (refer Fig.19). c) eScan administrator (root) - Application menu – This will be with ROOT user / SUDO user permission. When accessing the eScan GUI in ROOT user / SUDO user mode, it will be prompted for the password (refer Fig.19).. d) eScan command-line help - Application menu – Provides command-line help for executing escan on-demand scanner from a SSH Terminal (refer Fig.19). e) eScan web administrator - Application menu – This will invoke the Web-admin from a browser using the https://127.0.0.1:10443 url (refer Fig.19).
Aternatively, eScan GUI can also be accessed from a SSH Terminal # escangui - NORMAL USER MODE # sudo escangui - ROOT USER MODE
Fig.18

Fig.19
Normal User:
Fig.20 will be displayed when in Normal User login.
Fig.20

Root User:
Fig.21 will be displayed when in Root User login with additional option of Update and Scheduler.
Fig.21
Clicking on this button will display the various options to execute the On-Demand scanning
Fig.22

Custom Scan - Click on this button to scan a specific directories/files. Select the directories / files
and the click on the Scan button, which will begin the scanning of the selected directories / files (refer. Fig.23)
Fig.23
Scan home directories – Click on this button to scan the Home directories and files of the logged in user.
Scan Computer - Click on this button to scan the entire computer.
Scan running processes – Click on this button to scan the processes running in the memory.

Clicking on the Options link, the eScan setting for the On-demand scanning will be displayed.Settings configured in this section will be the default action by the On-Demand Scanner whenever it is being executed:
Fig. 24
Action in case of virus detection – The selected action, from the drop-down list, will be taken
during the eScan On-Demand scanning.
i. Log Only – This will only log the information of the infected object.
ii. Disinfect (if not possible Log) – This will try to disinfect and if disinfection is not possible it will only log the information of the infected object.
iii. Disinfect (if not possible Delete) - This will try to disinfect and if disinfection is not possible it will delete the infected object.
iv. Disinfect (if not possible quarantine) – This will try to disinfect and if disinfection is not
possible it will quarantine the infected object.
v. Disinfect (if not possible Rename) - This will try to disinfect and if disinfection is not possible it will rename the infected object.
vi. Disinfect (if not possible prompt action) - This will try to disinfect and if disinfection is not
possible it will prompt the user for an action to be taken on the infected object.
vii. Delete Infected – This will directly delete the infected object.
viii. Quarantine – This will directly quarantine the infected object.
ix. Rename – This will directly rename the infected object.
x. Prompt for an action (no disinfect) – This will prompt the user for an action to be taken on the infected object.

Settings – The selected objects will be scanned by default during On-Demand Scanning.
i. Archive(s) - This option will specify the On-Demand Scanner to scan the archived files like zip, tar etc.
ii. Mail(s) - This option will specify the On-Demand Scanner to scan mail files.
iii. Follow Symbolic Links - Symbolic links allows to access one file from another through
links. This option specifies the On-Demand scanner whether to resolve the symbolic link before actually scanning the object or to skip any such links.
iv. Include Sub-directory - This option spcifies the On-Demand scanner to scan the sub-driectories while scanning the directory object.
v. Packed File(s) - This option specifies whether to scan compressed executables.
vi. Heuristic - Selecting this option allows eScan to check for unusual sequence(s), pattern(s) or content.
vii. Cross File System(s) - In Linux, different file systems can be mounted at different location. Crossing the file systems means checking files on different partitions and/or network mounted file systems. This option specifies to On-Demand scanner whether to cross file system in scan path.
Log Options
i. Log Location – This option specifies the location of the eScan log.
ii. Log Level – This option specifies the type of logs to be created.
(a) All – This option will specify a detailed eScan log.
(b) Infected – This option will specify only details of the infected objects in the eScan
log.
(c) Minimum – This option will specify only a minimum detail of the objects scanned in the eScan log.
Scan All Running Process(es) at Startup – This option specifies the On-Demand scanner to scan
all processes that are running are checked for any memory resident and other viruses.
Restore global settings – This option is available only for Normal user. Clicking on this option will restore the settings made by the ROOT user.

Clicking on the Logs links, displays the scanned logs:
Fig.25
Clicking on the Quarantined linl, displays the infected objects which has been quarantined:
Fig.26

Only in case of root user login, the Settings link and the Update now link will be activated. This section contains the internet settings for downloading of virus signature updates.
Fig. 27
Clicking on the Settings link, will display the settings for downloading of AV updates.
Fig.28
C

Connection Settings – This specifies in case of :
i. Connection Time Out – It will disconnect after a specified time in seconds, if it is unable to
connect to the internet. ii. Connection Retry – It will try to reconnect the specified number of times in case of internet
connection timed out.
Proxy Settings – Select Use Proxy, to configure the Proxy settings for connecting to the internet to download the AV updates.
i. IP – Enter the IP address of the Internet proxy server.
ii. Port – Enter the Port of the internet proxy server.
iii. Proxy Authentication: Enter the credentials in case the Proxy requires authentication.
Name – Enter the user name for the proxy server.
Password – Enter the password.
Automatic Update – Select this option for eScan to download the AV updates automatically at specified time.
Alert if Virus Definitions are ___ days old – This will Alert the user when AV updates are more than the specified number of days.
Clicking on this View Log will display updates.log.
Fig. 29

Clicking on the Update now link will begin the downloading of latest eScan AV updates. (NOTE- This button is available for root user login only).
Fig.30
Fig. 31
Once the download completes, ―Virus Database updated successfully‖ alert message is displayed.
Clicking on this button, will display the list of On-Demand scanning scheduled to be executed at a specified time.
Fig.32

BUTTONS:
1) Add – Click on this button to add a new job for scanning. 2) Edit - Click on this button to modify an existing job. 3) Delete – Click on this button to delete an existing job. 4) Purge – Click on this button to delete outdated jobs i.e. jobs already have been completed.
Settings for Schedule Task:
Schedule tab:
Fig.33
a) Name - Enter the name of the task. b) Objects - Select the objects which should be scanned c) Schedule – Set the Frequency, Date and time for the task to be executed.

Options tab:
Fig.34
a) Actions in case of virus detection – Set the action when a virus is detected b) Settings – Set the type of objects to be scanned.
VI. Command-Line to run eScan from Terminal for scanning of viruses and other malwares
For Command-line help to run eScan for scanning of viruses and other malwares, refer to the manual page
# man escan eScan Command-line help can also be accessed from the Application Menu in a GNOME / KDE environment (refer fig.19).

Contact Us:
USA
MicroWorld Technologies Inc. 31700 W 13 Mile Rd, Ste 98 Farmington Hills, MI 48334 USA
Tel: +1 248 855 2020 / 2021 Fax: +1 248 855 2024 Toll-Free Number: 1 877 EZ VIRUS or 1 877 398 4787 (Only within US) Support: +1 248 432 1397 Sales: [email protected] Support: [email protected] Website: www.escanav.com Forums: http://forums.escanav.com
Germany
MicroWorld Technologies GmbH Drosselweg 1, 76327 Pfinztal, Germany
Tel: +49 7240-944909-20 Fax: +49 7240-944909-92 Sales: [email protected] Website: www.escanav.de Support in German language / in deutscher Sprache: Tel: +49 (7240) 944909-30 Email: [email protected]
Malaysia
MicroWorld Technologies Sdn Bhd (722338-A) E-8-6, Megan Avenue 1 189, Jalan Tun Razak 50400 Kuala Lumpur Malaysia
Tel: +603 2333 8909/8910 Fax: +603 2333 8911 Sales: [email protected] Website: www.escanav.com Support: Tel: +6013 244 2574 Email: [email protected]

South Africa
MicroWorld Technologies South Africa (PTY) LTD 376 Oak Avenue Block C ( Entrance at 372 Oak Ave ) Ferndale Randburg, Gauteng South Africa
Tel: Local 08610 eScan (37226) International: +27 11 781 4235 Fax: 086 502 0482 Sales: [email protected], [email protected] Web: www.microworld.co.za
India (Asia Pacific Office)
MicroWorld Software Services Pvt. Ltd. Plot No. 80, Road No. 15, MIDC, Marol, Andheri (E), Mumbai - 400 093 India Tel: +91 22 2826 5701 - 05 Fax: +91 22 2830 4750 Website: www.escanav.com
Sales: Email: [email protected] Support: Tel: +91 22 3256 4578 Mobile: +91 93223 59065 Email: [email protected] Forums: http://forums.escanav.com