Embed Size (px)
Citation preview

i
Brush Painting Algorithms ERIKA JANSSON Examensarbete Civil ingenjörsprogrammet för Datateknik CHALMERS TEKNISKA HÖGSKOLA Institut ionen för datorteknik Göteborg 2004

ii
Innehållet i detta häfte är skyddat enligt Lagen om upphovsrätt, 1960:729, och får inte reproduceras eller spridas i någon form utan medgivande av författaren. Förbudet gäller hela verket såväl som delar av verket och inkluderar lagring i elektroniska och magnetiska media, visning på bildskärm samt bandupptagning. Erika Jansson, Göteborg 2004.

i
i. Abstract Brush Painting Algorithms
Modern image editing applications offer the user a wide range of brushes. With digital brushes a whole new dimension of different brushes has become possible since a digital brush is not limited by the physics of ordinary brushes and paints. At the same time as a digital brush can provide the user with opportunities which are not even to think of using traditional painting a digital brush can only with great difficulty try to simulate the behavior of traditional painting such as for example water color and oil painting. However a lot of work has been done to try to simulate real world brushes in a computer program. Some achievements have been made but these brushes still tend to give an unsatisfying result, be difficult to use and be computationally expensive.
The objective of this project has been to investigate the possibilities provided by
digital brushes. As a result of this investigation a set of digital brushes will be developed, implemented and optimized. In addition to the technological aspect one important aspect has also been to think about what kind of brushes will be useful and to design a graphical user interface that gives the user access to the developed brushes.
In the area of realistic brushes the oil painting brush is worth mentioning. The oil
painting brush simulates how the brush not only uniformly applies a single color on the canvas but also smears around the wet paint on the canvas. Blur, sharpen, dodge, burn and smudge are a couple of special effects brushes that have been implemented, all running at interactive frame rates. Blur and sharpen will simply blur or sharpen the area that the brush crosses while smudge will smear out the colors similarity to if a finger were dragged over a painting while the paints are still wet. The dodge and burn tools are taken from traditional photography and will lighten or darken the image.
These are the most important achievements among the developed brushes, and together with the more simple standard brushes they provide the user with a large set of opportunities.

ii
ii. Sammanfattning Penseltekniker
Dagens bildediteringsprogram tillhandahåller användaren ett stort antal penslar. Med digitala penslar blir en helt ny dimension av penslar möjlig eftersom digitala penslar inte är begränsade av fysiken hos vanliga penslar och färger. På samma gång som en digital pensel ger möjligheter som inte ens är att tänka på för traditionella penslar så har den stora svårigheter att efterlikna de traditionella målarteknikernas beteende, tex för vattenfärg eller vid oljemålning. En hel del arbete har gjorts inom området för att försöka skapa en digital pensel som så väl som möjligt efterliknar traditionella målartekniker. Framsteg har gjorts, men inte ens de mest välutvecklade realistiska digitala penslarna förmår att fullt ut efterlikna den riktiga penseln och dessa penselar är dessutom ofta svåranvända och kräver mycket datorkraft.
Målet med det här projektet har varit att utveckla, implementera och optimera ett
antal digitala penslar. Förutom själva tekniken bakom penslarna har en viktig aspekt även varit att utvärdera vilka olika penslar som kan vara användbara och att utveckla ett användargränssnitt som ger användaren tillgång till penslarna. Följande penseltyper har utvecklats:
1) En vanlig digitalpensel där form, färg och genomskinlighet kan ändras för att ändra penselns egenskaper.
2) Specialpenslar med olika färg i mitten respektive på kanten på penseldraget. 3) Mönsterpenslar. 4) En pensel som simulerar beteendet hos en olje- eller acrylpensel. 5) Specialeffektspenslar som kan användas för att göra bilden suddigare,
skarpare, ljusare eller mörkare. 6) ”Smudge” som kan användas för att smeta omkring färgen på pappret.
Tillsammans tillhandahålls ett stort antal penslar med olika egenskaper och med
hög konfigurerbarhet vilket möjliggör skapandet av penslar med nya egenskaper genom omkonfigurering av de redan existerande.

iii
iii. Acknowledgements The author would sincerely like to thank: Marcus Hoverby Ulf Assarsson Anders Green
iv. Preface This Master’s project has been done as the concluding part of the four and a half
year long Master of Engineering program in Computer Science and Engineering at Chalmers University of Technology, Gothenburg, Sweden.
The project gives 20 Swedish university credits which are equal to 20 weeks full time work.
The project has been assigned by Révolte Development AB, a company with focus
on image applications based in Stockholm, Sweden. The project supervisor has been Marcus Hoverby from Révolte Development AB
and the examiner from Chalmers University of Technology has been Ulf Assarsson at the department of Computer Engineering.
Erika Jansson, September 2004
iv
Table of Contents i. Abstract .................................................................................................................. i ii. Sammanfattning .................................................................................................... ii iii. Acknowledgements .......................................................................................... iii iv. Preface.............................................................................................................. iii Table of Contents ......................................................................................................... iv Table of Figures ........................................................................................................... vi 1 Introduction ........................................................................................................... 1
1.1 Background ................................................................................................... 1 1.2 Introduction to Digital Brushes ..................................................................... 1 1.3 The Problem of the Master’s Project............................................................. 2 1.4 Method .......................................................................................................... 2 1.5 Results ........................................................................................................... 2 1.6 The Outline of the Master’s Thesis ............................................................... 2
2 Previous Work....................................................................................................... 4 2.1 Realistic Brushes ........................................................................................... 4
2.1.1 Oil Painting ........................................................................................... 4 2.1.2 Watercolor and Ink Painting ................................................................. 5
2.2 User Interface ................................................................................................ 6 3 Usability Aspects................................................................................................... 7 4 Algorithms, Implementation and Optimization .................................................. 10
4.1 Digital Color Representation....................................................................... 10 4.2 Color Blending ............................................................................................ 10 4.3 A Simple Digital Brush ............................................................................... 16
4.3.1 Undo Functionality.............................................................................. 17 4.3.2 Opacity and Flow ................................................................................ 18
4.4 Dodge and Burn .......................................................................................... 18 4.5 Smudge........................................................................................................ 21 4.6 Painting Brush ............................................................................................. 23 4.7 Neon Brush.................................................................................................. 25 4.8 Winding Brush ............................................................................................ 26 4.9 Pattern Brush ............................................................................................... 27 4.10 Figure Brushes and Colored Brushes .......................................................... 27 4.11 Color and Shape Dynamics ......................................................................... 28
4.11.1 Color Jitter........................................................................................... 28 4.11.2 Color Fade ........................................................................................... 29 4.11.3 Size Jitter ............................................................................................. 29 4.11.4 Roundness Jitter .................................................................................. 29 4.11.5 Flow Fade............................................................................................ 29
4.12 Blur Brush ................................................................................................... 30 4.13 Sharpen Brush ............................................................................................. 31
5 Results ................................................................................................................. 34 5.1 Basic Brushes .............................................................................................. 34
5.1.1 Normal Brush ...................................................................................... 34 5.1.2 Colored Brush ..................................................................................... 34 5.1.3 Figure Brush........................................................................................ 34 5.1.4 Pattern Brush ....................................................................................... 34 5.1.5 Color and Shape Dynamics ................................................................. 35 5.1.6 Color Blending .................................................................................... 35

v
5.2 Smearing Brushes........................................................................................ 35 5.2.1 Smudge................................................................................................ 35 5.2.2 Painting Brush ..................................................................................... 35
5.3 Photographic Brushes.................................................................................. 36 5.3.1 Blur...................................................................................................... 36 5.3.2 Sharpen................................................................................................ 37 5.3.3 Burn..................................................................................................... 38 5.3.4 Dodge .................................................................................................. 38
6 Conclusion and Future Work .............................................................................. 39 7 References ........................................................................................................... 40

vi
Table of Figures Figure 1.1 Dual brush.................................................................................................... 1 Figure 1.2 Winding brush.............................................................................................. 2 Figure 4.2.1. The normal blending mode, paining with pure red (255,0,0). ............... 10 Figure 4.2.2 The dissolve blending mode, painting with pure red (255,0,0). ............. 11 Figure 4.2.3 The color dodge blending mode, paintaing with pure red (255,0,0). ..... 11 Figure 4.2.4 The color burn blending mode, painting with pure red (255,0,0)........... 12 Figure 4.2.5 The darken blending mode, painting with pure red (255,0,0). ............... 12 Figure 4.2.6 The lighten bending mode, painting with pure red (255,0,0). ................ 12 Figure 4.2.7 The multiply bending mode, painting with pure red (255,0,0)............... 13 Figure 4.2.8 The screen blending mode, painting with pure red (255,0,0). ................ 13 Figure 4.2.9 The overlay blending mode, painting with pure red (255,0,0). .............. 14 Figure 4.2.10 The color blending mode, painting with pure red (255,0,0). ................ 14 Figure 4.2.11 The hue blending mode, painting with pure red (255,0,0) ................... 15 Figure 4.2.12 The saturation blending mode, painting with pure red (255,0,0). ........ 15 Figure 4.2.13 The luminosity blending mode, painting with pure red (255,0,0). ....... 15 Figure 4.2.14 The difference blending mode, painting with pure red (255,0,0). ........ 16 Figure 4.2.15 The sum blending mode, painting with pure red (255,0,0)................... 16 Figure 4.2.16 Highlights created by applying the sum blending mode repeatedly. .... 16 Figure 4.3.1 Spacing.................................................................................................... 17
a) Circular brush tip shape, 200% spacing. ............................................................. 17 b) Circular brush tip shape, 25% spacing................................................................ 17 c) Circular brush tip shape, 1% spacing. ................................................................. 17 d) Filled circular brush tip shape, 200% spacing. ................................................... 17 e) Filled circular brush tip shape, 25% spacing. ..................................................... 17 f) Filled circular brush tip shape, 1% spacing......................................................... 17
Figure 4.3.2. A blue stroke painted on a pink background using the difference blending mode. ............................................................................................................ 18
a) Pink background.................................................................................................. 18 b)A blue stroke painted on the temporary layer. ..................................................... 18 c) The temporary layer blended with the original layer using the difference blending mode. ........................................................................................................ 18
Figure 4.3.3 The difference between opacity and flow............................................... 18 a) A stroke painted with 50%opacity. ..................................................................... 18 b) A stroke painted with 25% flow. ........................................................................ 18
Figure 4.4.1 The dodge and burn tools........................................................................ 21 a) The original. The hue ranges from 0 to 360 degrees from right to left and the luminosity ranges from 0 to 100 % from top to bottom.......................................... 20 b) Dodge highlights. The more luminous the color was from the beginning, the more is it affected by the dodge highlights brush. .................................................. 20 c) Dodge Midtones. Dodge midtones lightens the midtones of the image while the darkest and lightest tones are left almost unchanged. ............................................. 20 d) Dodge Shadows. The darkest colors of the image are made more luminous. .... 20 e) Burn highlights. The most luminous colors of the image are darkened.............. 20 f) Burn Midtones. The midtones of the image are darkened................................... 20 g) Burn Shadows. The darkest colors of the image are darkened. .......................... 21
Figure 4.5.1 The smudge brush turns gray.................................................................. 22

vii
Figure 4.5.2 The smudge brush using 50% spacing, the resulting stroke looks jagged...................................................................................................................................... 22 Figure 4.5.3 The improved smudge brush................................................................... 22 Figure 4.5.4 Smudge. .................................................................................................. 23
a) Gaussian brush tip, week smudge. ...................................................................... 23 b) Gaussian brush tip, medium smudge. ................................................................. 23 c) Gaussian brush tip, strong smudge...................................................................... 23 d) Dotty brush tip, week smudge. ........................................................................... 23 e) Dotty brush tip, medium smudge. ....................................................................... 23 f)Dotty brush tip, strong smudge............................................................................. 23 g) Hard edge brush tip, week smudge. .................................................................... 23 h) Hard edge brush tip, medium smudge. ............................................................... 23 i) Hard edge brush tip, strong smudge. ................................................................... 23
Figure 4.6.1 Painting brush ......................................................................................... 25 a) A wet brush with a lot of color............................................................................ 25 b) A wet brush with only a little bit of color........................................................... 25 c) A dry brush with a lot of color ............................................................................ 25 d) A dry brush with only a little bit of color ........................................................... 25
Figure 4.7.1 Neon brush.............................................................................................. 25 Figure 4.7.2 Alpha channel in temporary layer, Neon brush ...................................... 25 Figure 4.8.1 To continue the brush stroke a rectangular piece of texture has to be fit in between the four blue spots. The red spots are the drawing points............................. 26 Figure 4.8.2 If a 90 degrees angle would occur one point is removed........................ 27
a) If a 90degrees angle would occur there is no good solution for how to draw the next section.............................................................................................................. 27 b) One point is removed to avoid a 90 degrees angle if one would occur. ............. 27
Figure 4.9.1 Pattern brush. .......................................................................................... 27 a) 100% opacity....................................................................................................... 27 b) 25% opacity. ....................................................................................................... 27
Figure 4.10.1 Tube brush tip. ...................................................................................... 28 Figure 4.10.2 Tube brush stroke.................................................................................. 28 Figure 4.10.3 Realistic brush tip. ................................................................................ 28 Figure 4.10.4 Realistic brush stroke............................................................................ 28 Figure 4.10.5 Leaf brush stroke. ................................................................................. 28 Figure 4.11.1 A gradient. ............................................................................................ 28 Figure 4.11.2 Color jitter............................................................................................. 29 Figure 4.11.3 Color fade. ............................................................................................ 29 Figure 4.11.4 Size jitter. .............................................................................................. 29 Figure 4.11.5 Roundness jitter. ................................................................................... 29 Figure 4.11.6 Flow fade. ............................................................................................. 30 Figure 4.12.1. A blur brush with uniform radius used next to an edge between white and black. .................................................................................................................... 31 Figure 4.12.2 Blur radius 5.......................................................................................... 31 Figure 4.12.3 Blur radius 15........................................................................................ 31 Figure 4.13.1 Artifacts due to sharpening of an already sharp edge. Blur radius 20 pixels, amount 5 and threshold 0................................................................................. 32 Figure 4.13.2 The blurry edges are sharpened by the sharpen brush. Blur radius 20 pixels, amount 5 and threshold 0................................................................................. 32 Figure 4.13.3. The unsharp mask filter applied repeatedly. ........................................ 33
a) The original image. ............................................................................................. 32

viii
b) The image sharpened once.................................................................................. 32 c) The image sharpened twice. ................................................................................ 33 d) The image sharpened three times........................................................................ 33 e) The image sharpened four times. ........................................................................ 33 f) The image sharpened once using an increased amount....................................... 33
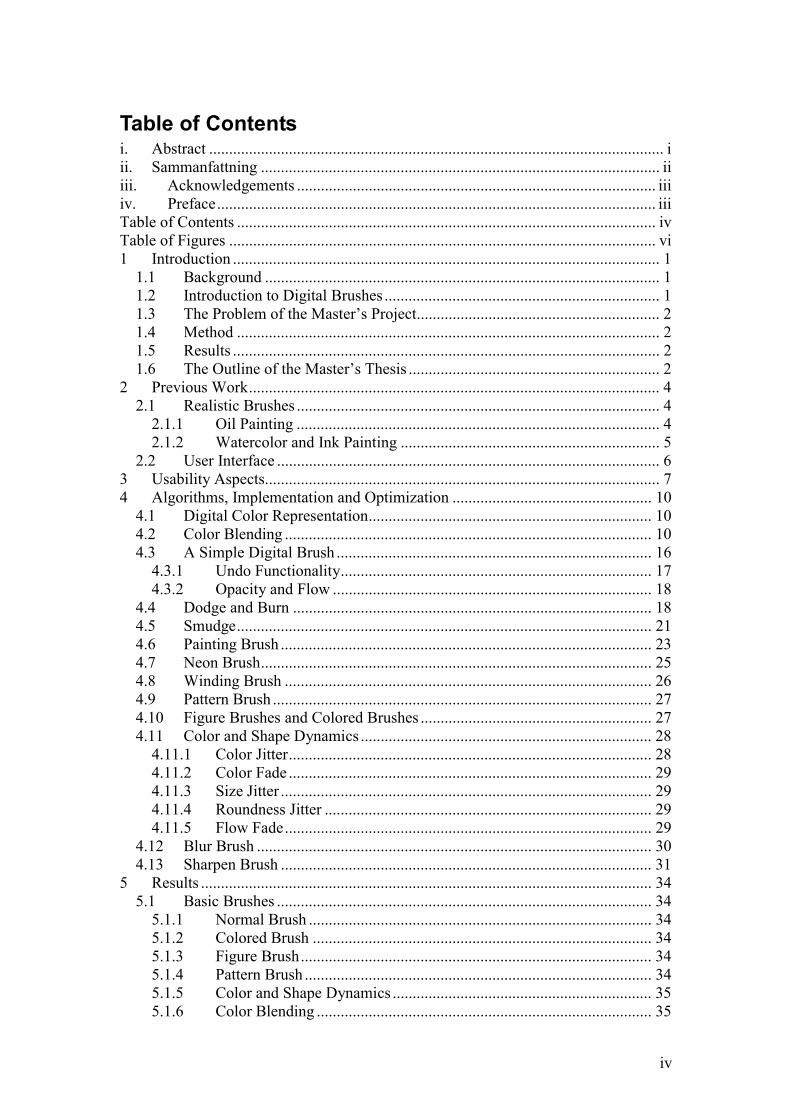
Figure 5.3.1 Blur brush. .............................................................................................. 37 Figure 5.3.2 Sharpen brush. ........................................................................................ 38
a) Blur radius 10. .....................................................................................................38 b) Blur radius 50. .....................................................................................................38

1
1 Introduction
1.1 Background Révolte Development is creating a new image editing application. One feature of
the image editing application will be the opportunity to use different brushes. The goal of this master’s project will be to investigate how different brushes can be implemented and to implement a set of brushes for use in the new application. Anders Green will also be working on a master’s project to help investigate different brush painting algorithms but he will concentrate mainly on the shape and dynamics of the brush while the author will look deeper into how to mix colors and how to apply one color on top of another.
1.2 Introduction to Digital Brushes In an image editing application the user can use brushes for painting in a similar
way as how an artist uses his painting brush. Some digital brushes can simulate real painting while others make use of the new possibilities that the computer provides. To illustrate this I will give some examples from the market-leading image editing application Adobe Photoshop [ADOBE].
For simulating real brushes Adobe Photoshop provides dual-brushes that can simulate a brush stroke with marks from individual bristles. An example of this is illustrated in figure 1.1. Another example is the Smudge tool that simulates how the color can be smeared by dragging a finger through wet painting on an image.
Figure 1.1 Dual brush.
A brush can also simulate photographic properties. Two examples are the dodge and burn brushes. Dodge and burn simulates how an area of a photograph can be made darker or lighter by controlling the amount of light reaching the photographic paper during exposure [DODGEBURN].
We have now seen how a digital brush can be used to simulate different effects
from painting and photo finishing, but the digital brush isn’t limited to recreate effects from the real world. Some examples of this from Adobe Photoshop are the blending techniques dissolve and difference. A blending technique describes how one color is applied on another. The color of the image that is being painted is called the base color and the color we are applying is called the blend color. Dissolve will randomly paint or leave pixels unchanged with some user defined probability, while difference will paint with a color that is the difference between the base and the blend color. Examples of strokes drawn using the dissolve and difference blending mode are shown in figures 4.2.2 and 4.2.14.
An example of a brush that would be impossible to find in the real world taken from Corel Painter [COREL] is the winding brush. Figure 1.2 shows an example of a stroke drawn by this brush.

2
Figure 1.2 Winding brush.
1.3 The Problem of the Master’s Project The goal of the Master’s Project is to develop a set of brushes to be used in a new
image editing application. The first task is to investigate the possibilities there are to create different kind of brushes and how these can be used. After having investigated in the possibilities an evaluation over which of these brushes could be useful in an image editing application will be done.
Once a set of brushes is designed the author is to develop, implement and optimize algorithms for these brushes.
The emphasis for this project will be how to look at the color mixing and blending aspects of brushes while the shape and dynamics of the brush will not be investigated in this work.
1.4 Method To investigate the area of digital brushes, a number of brushes has been
implemented and tested. In some cases several implementations has been tried before finding the optimal solution.
1.5 Results A number of brushes found useful for different purposes have been developed.
Brushes useful for photo editing are sharpen, blur, dodge and burn. Using these brushes an area of a photograph can be made sharper blurrier, lighter or darker.
For painting and drawing a brush that can be configured to have different characteristics has been developed.
The brush can either have a fixed color, have a random color chosen from a gradient or use a texture. The brush color can be applied on the original using a number of different blending modes creating different effects.
Two additional brush tools are the smudge tool and the painting brush. Both of these brushes will smear out the color on the paper, the smudge similar to dragging a clean brush or finger across wet paint and the painting brush similar to using oil colors on wet paint.
1.6 The Outline of the Master’s Thesis In section two a review of previous work in the area of realistic brushes is done.
Section three continues with some notes on the usability aspects of digital brushes. Section four discusses the different brush techniques and algorithms. The result obtained during this project is discussed in section five. Section six finishes by giving some conclusions and some ideas about interesting work that is still to be done in the area.

3

4
2 Previous Work
2.1 Realistic Brushes Realistic brushes try to simulate the behavior of a real painting brush. Examples of
painting techniques that digital brushes attempt to simulate are ink painting, oil painting and watercolor.
Adobe Photoshop has a small set of features that tries to simulate these brushes. In
the case of ink and oil painting, Adobe Photoshop uses dual brushes that can simulate a brush stroke with visible marks from individual bristles. Figure 1.1 shows an example of a brush stroke, created by the dual brush technology, where marks from the individual bristles can be seen. Painting with water color on a dry paper the dried stroke will appear darker close to the edges of the stroke. This phenomenon depends on the color diffusing towards the boundary of the stroke but being stopped by the surface tension. Adobe Photoshop allows the user to add this feature to any brush by selecting the wet edges option.
Corel Painter has a broad set of brushes simulating real brushes in a much more
convincing way than Adobe Photoshop does. For oil painting Corel Painter uses a two-way paint transfer system. A two-way
paint transfer system refers to the behavior that, in the same time as color from the brush stains to the paper, wet color from the paper will be transferred to the brush.
For ink painting and watercolor, Corel Painter has simulated how the color actually diffuses over the paper when painting with a wet brush on a wet paper.
There has also been some research and publications in the area of realistic digital
brushes [HAIRY][DAB][WATERCOLOR][INK][3D][CALLIGRAPHY]. Many researchers try to get a more realistic touch of the brush by simulating the actual three dimensional shape and dynamics of the brush [DAB][3D]. This, together with sophisticated methods for simulating how the paint is transferred from the brush to the paper, creates much better results than the commercialized brushes discussed above. The drawback is that the three dimensional brush model is difficult for the user to control using only keyboard and mouse.
For paint transferal algorithms there are basically two kinds that different researchers try to simulate [DAB][WATERCOLOR][INK]. First we have the thick paints such as oil and acrylics. Here a bi-directional transfer model is important to create a good result [DAB].
The latter kind is diffusing paints such as watercolor and ink. Here it is important to model how the paint diffuses over the paper to get a realistic touch [WATERCOLOR][INK].
2.1.1 Oil Painting For thick paints [DAB] has developed a model. They have developed a system for
bi-directional paint transfer and also a two-layer paint model. The bi-directional paint transfer let some of the wet color of the paper add on to the brush along the stroke. The color in the brush is represented by two textures. The surface layer texture represents the color closest to the tip of the brush, while the deep layer represents the

5
reservoir of paint which is contained within the bristles. Color is transferred from the deep layer to the surface layer as soon as the surface layer is not fully saturated.
There is also a two-layer paint model for representing the color on the paper. Here the deep layer represents the color that is completely dry and can therefore not be affected by the bi-directional transfer model. The surface layer of the paper is the color that is completely wet; paint is transferred from the surface layer to the deep layer (dried) at a fixed time interval or at user request. Variable wetness can be modeled by gradually transferring paint from the wet to the dry layer.
2.1.2 Watercolor and Ink Painting The diffusion that takes place when painting with a wet brush on a wet paper is
only one of the many characteristics of watercolor. Other effects are: • Dry brush: An almost dry brush is applied on a dry paper; the paint will be
applied only to the raised areas of the rough paper. • Edge darkening: Edge darkening appears when painting with a wet brush on a
dry paper. The color will try to diffuse but the surface tension will stop the color from diffusing past the stroke border. The result of the color flowing outwards towards the border of the stroke is that the stroke will be darker closer to the edges.
• Back runs: Water in the paper will flow from saturated areas to dryer areas. When this happens the water will try to push the pigments along and branching shapes with darkened edges will appear.
• Granulation: Granulation appears when the paper is very wet and is a result of denser pigments settling earlier than lighter ones.
• Glazing: When painting a thin layer of paint on top of another completely dry layer the paints will not mix but will form different layer on top of each other.
All these effect together with the fundamental diffusing mechanism are simulated by [WATERCOLOR].
[WATERCOLOR] tries to imitate the real behavior of watercolors by modeling the actual physical properties of the pigments. This results in a very complex simulation being able to simulate all the different characteristics of watercolor described above. The drawback is that the complexity makes it difficult to achieve real-time frame rates.
[VIRTUALBRUSH] is also using differential equations to describe the diffusion of paint. Just like [WATERCOLOR] they use the solutions to these equations to model how the color diffuses on the paper, but they also model the diffusion of paint inside the brush.
[INK] has adopted a totally different approach to modeling the diffusion of pigments across the paper. Here no equations over how the actual colors behave are used but a simpler model is used to approximately model the behavior.
Here the paper is modeled as a set of nodes (pixels) and a set of edges connecting the nodes. For every time step in the diffusion process color is moved from a node to all nodes it connects to. The more edges that connect the nodes, the more color will be transferred. For nodes with a big difference in color density a lot of color will diffuse from one node to another, while if there is no difference if density no diffusion will take place regardless of the number of edges connecting the nodes.
One of the difficulties in achieving real-time frame rates with both these simulation approaches is that the movement of pigments across the whole paper has to be animated. Corel Painter goes around this problem by only animating the paint in a rectangular area around the last drawn stroke and does in this way achieve real-time

6
frame rates. In Corel Painter the color will also not start to diffuse until the stroke is finished. In this way the diffusion process can be modeled once over a small area instead of continuously over the whole painting.
2.2 User Interface Corel Painter and Adobe Photoshop have two different user interfaces both with
their advantages and drawbacks. Corel Painter’s user interface is oriented around the real brushes the digital brushes
are trying to simulate. The brushes are also divided into different subcategories. One drawback with Corel Painters user interface is that it may be difficult to find a brush not knowing what subcategory to look in and what the brush is called. The large number of subcategories and brushes to chose between in Corel Painter risks to confuse the user and adds on to the difficulties in finding a suitable brush. The advantage is that there is no need to know how to configure the digital brush to get the desired characteristics.
Adobe Photoshop has a different system where a brush can either be chosen from a list of predefined brushes or freely configured. In both cases brushes will not be identified by names but by a short test stroke illustrating the behavior of the brush.
The fact that Adobe Photoshop does not have any subcategories and identifies the brushes by a picture of a test stroke instead of by a name makes it much easier to use for the beginner than Corel Painter. The drawback with Adobe Photoshop’s system is that there are only a small number of predefined brushes to choose between. Many of the features available through Adobe Photoshop’s brushes are only available after reconfiguration of the presets, doing this requires more knowledge about how the digital brush works. Another weakness with Photoshop’s system is that the list of predefined brushes contains a number of copies of the same brush with different sizes. This makes the list long and troublesome to browse through at the same time as it does not contain brushes with so many different characteristics.
Painting using mouse and keyboard is not always an easy task. Corel Painter supports pen-based input through sophisticated tablet devices. [DAB] has added one more degree of freedom, where the user paints with a force feedback brush. Using a tablet device or a force feedback brush makes the drawing easier and more natural to the user, and also allows the virtual brush to be controlled by more than just the position of the mouse. Using the brush developed by [DAB], pressure, tilt and twist can be used to control the stroke. However, all users of image editing applications does not have these advanced devices and therefore the brushes have to be as easy to use as possible using only keyboard and mouse.

7
3 Usability Aspects A very important aspect when developing a set of brushes for a new image editing
application is to give a good thought about what kind of brushes the user needs and how the user interface should look like.
While developing a set of brushes for use in a new image editing application, a
user interface has been designed to facilitate the availability of the brushes to the user. The user interface has been designed to be easy to understand for first time users and at the same time provide as much flexibility as possible to the experienced user.
When the user chooses the brush tool he will be given a list of brushes to choose
from. This list will contain a set of predefined brushes, which will be enough to cover the needs of most users. For each item the list will show the shape a short test stroke to show what the strokes created by the brush looks like.
The extended list with test strokes will be shown while the user is browsing the list
of brushes, that is, while the mouse cursor is inside the list of brush tips. When the user has chosen a brush, a basic configuration panel for the chosen brush exchanges the extended list of test strokes. These settings will be very basic and a first time user should have no problems understanding how they work. There will also be a button switching the settings panel from basic to advanced mode. In the advanced mode the user will have full control over all parameters affecting the brush.
When viewing the settings panel the user can go back to the extended brush list panel by moving the mouse cursor inside the brush list. To change the current brush the user can click on the new brush and to return to the current brush the user has just to move the mouse cursor outside the brush list.
When the settings have changed for a brush the user will be given the option to save the current brush as a preset. This is done by clicking on a button under advanced settings.
The following brushes will be in the list of preset brushes: • Pencil, a one pixel thick not anti-aliased brush. • Thin brush, a one pixel thick anti-aliased brush. • Hard edge brush. • Soft edge brush. • A couple of simple brushes with different brush tip shapes. • Painting brush. • Pattern brushes (for example the chess board brush from Donald Duck’s
Christmas). • Figure brushes (see the leaf brush in figure 4.10.5 for an example). • A couple of simple brushes with differently colored brush tips. (see figure
4.10.2 and 4.10.4 for examples).

8
In addition to the brush tool there will be a special effects brush tool. The configuration of the special effects brush panel will be the same as for the brushes panel and it will include the following brushes:
• Smudge • Blur • Sharpen • Dodge • Burn
All these brushes and special effects brushes will have different basic and
advanced settings that can be configured. A list of these settings follows: Pencil/Thin brush/Hard edge brush/Soft edge brush mm. Basic settings:
• Color. • Size. • Opacity.
Advanced settings: • Color. • Brush tip shape. • Size. • Blend method. • Flow. • Opacity. • Color jitter/color fade. • Flow jitter/flow fade. • Spacing. • Scattering. • Size jitter. • Roundness jitter. • Rotation jitter. • Speed sensitivity
Pattern brush/Colored brush/Figure brush Basic settings:
• Pattern. • Size. • Opacity.
Advanced settings: • Pattern texture (import bitmap
from file or chose texture from list possible).
• Brush tip shape. • Size. • Blend method. • Flow. • Opacity. • Flow jitter/flow fade. • Spacing. • Scattering. • Size jitter. • Roundness jitter. • Rotation jitter. • Speed sensitivity

9
Painting brush Basic settings:
• Color. • Size. • Wetness.
Advanced settings: • Brush tip shape. • Brush tip color bitmap, (import
bitmap from file or chose from list possible).
• How much color does the brush absorb from the canvas?
• How much color does the canvas absorb from the brush?
• How much color is transferred from the core of the brush to the outer layer that creates the brush tip impressions?
Smudge: Basic settings:
• Brush size. • Strength.
Advanced settings: • Brush tip shape. • Brush size. • Strength.
Blur: Basic settings:
• Brush size. • Strength.
Advanced settings: • Brush tip shape. • Brush size. • Blur radius. • Spacing. • Scattering.
Sharpen: Basic settings:
• Brush size. • Strength.
Advanced settings: • Brush tip shape. • Brush size. • Blur radius. • Sharpen amount. • Sharpen threshold. • Spacing. • Scattering.
Dodge/Burn: Basic settings:
• Brush size. • Shadows/midtones/highlights. • Exposure/strength.
Advanced settings: • Brush tip shape. • Brush size. • Shadows/midtones/highlights. • Exposure.

10
4 Algorithms, Implementation and Optimization
4.1 Digital Color Representation There are a number of different color models for computer representation of colors.
A commonly used model is the RGB model. The RGB model has three components, red, green and blue. Using the RGB model all colors are represented as a mix of these colors. Far from all colors can be represented in this way. But the RGB model manages well to create a true color effect. This is because the eye cannot distinguish between all colors anyway.
A more accurate way of representing a color would be to look on the actual wavelength of the color. A color of a certain wavelength has a certain color tone or hue. A color can than be more or less saturated, or more or less light. This all together gives the three parameters hue, saturation and luminosity for describing a color. This is also called the HSL color model.
A similar model is the HSB model representing a color by its hue, saturation and brightness. The difference between the two last parameters luminosity and brightness is that the brightness tells us how bright the color appears to be. If red, green and blue has the same luminosity, then green will appear to the brightest color.
4.2 Color Blending Color blending is about how one color is applied on another color. Let’s call the
color of the paper we are painting on the base color and the color we want to apply the blend color.
Different blending modes can be used when the color of a brush is applied on an image but also for blending two layers.
• Normal The easiest and most straightforward way to apply one color on another is
simply to set the base color to the blend color. Using an opacity value between 0.0 and 1.0 the following formula is applied to each RGB channel to get the resulting color:
base * (1-opacity) + blend*opacity
Figure 4.2.1 shows an example of a stroke painted using the normal blending mode.
Figure 4.2.1. The normal blending mode, paining with pure red (255,0,0). • Dissolve
Dissolve randomly paints or does not paint a pixel. The probability for a pixel being painted depends on the opacity value used. A random number in the interval 0.0 to 1.0 is generated and if this number is smaller than the opacity value the resulting color will be the blend color and if this number is greater than the opacity value the resulting color will be the base color.

11
Figure 4.2.2 shows an example of a brush stroke painted using the dissolve blending mode.
Figure 4.2.2 The dissolve blending mode, painting with pure red (255,0,0).
• Color Dodge Color dodge brightens the base color to reflect the blend color. The lighter the
blend color is the more the blend color will be brightened. The following operation is performed on each channel to get the resulting color:
base * ( 1+254*blend/255) where base and blend are given in the range 0 to 255. If overflow occurs the value is clamped to the maximum color value, in this case 255. An opacity value can be used also together with the color dodge blending mode. To do this the color resulting from the formula above is inserted as the blend color in the formula for the normal blending mode.
Figure 4.2.3 shows the effect of painting with the color dodge blending mode using red. The colors of the image will turn lighter and redder.
Figure 4.2.3 The color dodge blending mode, painting with pure red (255,0,0). • Color burn
Color burn darkens the base color to reflect the blend color. The darker the blend color is the more the base color will be darkened. The implementation of color burn is to perform color dodge on the inverse of base and blend, as follows:
255 - (255-base) * (1+254*(255-blend)/255) where the base and blend color values are defined in the range (0 … 255) in each RGB channel. Resulting negative values are clamped to zero. Similar to the color dodge blending mode, an opacity value can be used also for the color burn blending mode.
In each channel, the color is darkened more the darker the blend color is, and left unchanged if the blend color value is 255. The strength of the darkening also depends on the base color. The darker the base color is, the more it will be darkened by the color burn operation. If the base color value is 255 in a channel, this channel will be left unchanged. This can be seen in figure 4.2.4, where the white region is left untouched by the color burn brush. In the light blue region, the result varies between pink and red. This is due to irregularities in the original color, which become visible after the color burn operation. Some of the pixels in

12
the light blue area have a color value of 255 in the blue channel, while others have a color value smaller than but close to 255. Since we are painting with pure red the darkening effect will be very strong in the green and blue channels, but still left unchanged if the base value is 255. The conclusion is, that the blue value will sometimes be clamped to zero, and sometimes left unchanged at 255. This behavior results in a color variation between red and pink.
Just like the color dodge blending mode results in a lighter and redder color painting with red the color burn blending mode painting with red results in a darker and redder color.
Figure 4.2.4 The color burn blending mode, painting with pure red (255,0,0).
• Darken
Darkens the color by choosing the darkest value of the base and blend colors in each channel. Figure 4.2.5 shows an example of a brush stroke painted using the darken blending mode. Painting with pure red the color value will always be left unchanged in the red channel and set to zero in the green and blue channels. Thus, the resulting color is red with varying lightness. The result is similar to the result of the color burn blending mode also using red color in that the color is made darker and redder. The difference is that the result of the color burn blending mode in this case depends more on the base color. An opacity value can be used also with the darken blending mode. To do this the resulting color from the darken blending mode is inserted in the formula given above for the normal blending mode.
Figure 4.2.5 The darken blending mode, painting with pure red (255,0,0). • Lighten
Lightens the color by choosing the lightest value of the base and blend colors in each channel. Figure 4.2.6 shown an example of a brush stroke painted with the lighten blending mode. Painting with pure red the color value will be left unchanged in the green and blue channels and set to 255 in the red channel. A red color with small variations in the color tone and lightness results in figure 4.2.6. The lighten blending mode is similar to the color dodge blending mode in that it in this case painting with red results in a lighter and redder color. An opacity value can be used similar as described above.
Figure 4.2.6 The lighten bending mode, painting with pure red (255,0,0).

13
• Multiply
Multiply darkens the base color by multiplying the color value in each RGB channel with the corresponding value from the blend color. If the multiplication results in overflow the resulting value is clamped. Figure 4.2.7 shows an example of a brush stroke painted with the multiply blending mode. Painting with pure red results in a multiplication by zero in the green and blue channels, thus, the resulting color is red with varying lightness. The multiply blending mode is very closely related to the color burn and darken blending mode in that it in this case painting with red results in a darker and redder color. An opacity value can be used as described above.
Figure 4.2.7 The multiply bending mode, painting with pure red (255,0,0). • Screen
Screen brightens the base color by multiplying the inverse of the color value in each RGB channel with the inverse of the corresponding value from the blend color. As follows:
255-(255-base)*(255-blend) If the resulting value if negative it is clamped to zero. To use an opacity value
together with the screen blending mode the result from the above formula is inserted in the formula given earlier for the normal blending mode.
Figure 4.2.8 shows an example of a brush stroke painted with the screen blending mode. Painting with pure red the green and blue channels will be left unchanged and the color value in the red channel will be set to 255. Thus, the resulting color is red with varying saturation and lightness. The screen blending mode is closely related to the color dodge and lighten blending modes as it is also lightening the base color to reflect the blend color. Painting with red all three blending modes result in a lighter and redder color.
Figure 4.2.8 The screen blending mode, painting with pure red (255,0,0).
• Overlay
Overlay enhances the contrast and boosts the saturation of an image. Darker parts of the image are made darker and lighter parts lighter.
It looks on the color value in each channel. If the base color is lighter than 50% (has a color value higher than 128) the color values are multiplied. If it is darker than 50% the color values are screened.
As follows:
if (base > 128) 255-(255-base)*(255-blend)/128 else base*blend/128

14
Overflows are clamped to zero or 255. An opacity value can be used also for the
overlay blending mode if the result from the above formula is inserted in the formula given for the normal blending mode.
In figure 4.2.9 it can be seen how the overlay bending mode turns the darker part of the image darker and the lighter parts lighter. Painting with red has resulted in a darker red on darker areas and pink on light areas. The contrast between the dark and lights parts of the image has been increased at the same time as the colors are made redder and the saturation is increased.
Figure 4.2.9 The overlay blending mode, painting with pure red (255,0,0). • Color
The color is changed while the luminosity is kept. In HLS mode this means taking the luminosity from the base color and the hue and saturation from the blend color. Converting the base and blend colors to HLS from RGB color mode is a relatively expensive operation. Changing the luminosity can be done easily without converting the color to HLS mode. This opens up the opportunity to apply the color blending mode by changing the luminosity of the blend color to the luminosity of the base color. The resulting color will be the blend color with changed luminosity. How to set the luminosity of one color to the luminosity of another color is discussed under the luminosity bending mode.
Using an opacity value together with the color blending mode the resulting color will be inserted in the formula given for the normal blending mode.
Figure 4.2.10 shows how the color blending mode combines the color tone and saturation from the blend color with the luminosity from the base color. The result after painting with fully saturated red will be fully saturated red with varying luminosity. A light surface painted with red will turn light red while a dark surface would turn dark red.
Figure 4.2.10 The color blending mode, painting with pure red (255,0,0). • Hue
Only the color tone is affected. The hue of the resulting color will be the hue of the blend color while the saturation and luminosity channels will take the values from the base color. To perform the hue blending mode on two colors in RGB mode both colors has to be converted to the HLS mode, then the hue of the base color is set to the hue of the blend color. The resulting color is then converted back to RGB mode. Because so many conversions have to be done between the RGB and HLS color modes the hue blending mode together with the saturation blending mode is the computationally most expensive of the blending mode described in this section.

15
Figure 4.2.11 shows how the hue blending mode changes the color tone while preserving the saturation and luminosity.
Figure 4.2.11 The hue blending mode, painting with pure red (255,0,0) • Saturation
Only the saturation is affected. The saturation of the resulting color will be the saturation of the blend color while the hue and luminosity channels will take the values from the base color. The saturation is changed in the same way as the hue is changed in the hue blending mode.
Figure 4.2.12 shows how painting with fully saturated red will increase the saturation of the image. Here poorly saturated violet and orange is turned fully saturated by the saturation brush. The opposite effect can be achieved by painting on saturated colors using gray.
Figure 4.2.12 The saturation blending mode, painting with pure red (255,0,0). • Luminosity
Only the luminosity is affected. The luminosity of the resulting color will be the luminosity of the blend color while the saturation and hue channels will take the values from the base color. Since it is very easy to compute the luminosity from the RGB values there is no need to convert both the base and the blend color to HLS mode to perform this operation. The luminosity is simply the sum of the values in the RGB channels divided by three. In this way we can compute the current luminosity of the base color and the desired luminosity of the blend color.
To change the luminosity of the base color without changing the saturation or the color tone, each RGB value will be multiplied by a factor of the desired luminosity divided by the current luminosity. An opacity value can also be used together with the luminosity blending mode similar as described above.
Figure 4.2.13 shows how the luminosity blending mode changes the luminosity of the base color. Colors lighter than the blend color will turn darker and colors darker than the blend color will turn lighter.
Figure 4.2.13 The luminosity blending mode, painting with pure red (255,0,0).
• Difference

16
In the difference blending mode the resulting color will be the difference between the blend color and the base color or the inverse depending on which color value is greater.
The following formula is applied in each RGB channel to get the resulting color:
|base–blend| * opacity + base * (1-opacity)
An opacity value can also be used together with the difference blending mode similar as described above.
Figure 4.2.14 shows the result of the difference blending mode. Painting with red blue turns pink and white turns turquoise.
Figure 4.2.14 The difference blending mode, painting with pure red (255,0,0). • Sum
In the sum blending mode the resulting color will be the sum of the blend color and the base color. Values greater than the maximum color value will be clamped. An opacity value can also be used together with the sum blending mode similar as described above.
Figure 4.2.15 shows a stroke painted using the sum blending mode.
Figure 4.2.15 The sum blending mode, painting with pure red (255,0,0).
The sum blending mode is useful for adding highlights to an image. An example is the shining stars in figure 4.2.16. These are painted with red on black using the sum blending mode. If the color values in the green and blue channels of the red color are not zero the color will turn lighter and lighter if the sum blending mode is applied repeatedly.
Figure 4.2.16 Highlights created by applying the sum blending mode repeatedly.
4.3 A Simple Digital Brush The concept of a digital brush stroke is very simple. A digital brush stroke is made
up of a number of brush tip impressions painted at a number of points. Typically these brush tips are painted at a fixed interval from each other along the stroke. This interval is called spacing. If the spacing is very small the brush implementation will

17
be inefficient. If the spacing is too large it will be visible that the stroke is made up by individual brush tip impressions. It is desirable to set the spacing as large as possible but small enough to avoid the individual brush tips to become visible to the eye. A commonly used spacing that fit this condition at most times is 25 percent of the brush tip diameter. The spacing is commonly measured in percentage of the brush tip diameter.
Figures 4.3.1 a) – c) demonstrate a digital brush of circular shape using different spacing. In figure 4.3.1 d) – f) the same strokes are demonstrated but here a filled brush tip is used. If the strokes in figure 4.3.1 e) and f) are compared no difference will be found. This illustrates the observation commented above that using a too small spacing will only result in an inefficient implementation and no improved characteristics. In figure 4.3.1 e) the spacing is 25% and the individual brush tips can not be distinguished, decreasing the spacing to 1% as in figure 3.4.1 f) is useless since it does not result in an improved result.
a) Circular brush tip shape, 200% spacing.
b) Circular brush tip shape, 25% spacing.
c) Circular brush tip shape, 1% spacing.
d) Filled circular brush tip shape, 200% spacing.
e) Filled circular brush tip shape, 25% spacing.
f) Filled circular brush tip shape, 1% spacing.
Figure 4.3.1 Spacing
4.3.1 Undo Functionality In an image editing application it is desirable to be able to undo all operations. To
enable undoing of brush strokes a temporary layer is introduced. The original layer is left untouched during the painting of a stroke and all painting is done to the temporary layer. The animation engine will when handle the blending of the original layer and the temporary layer at rendering time. The temporary layer will be merged with the original layer when the stroke is finished.
Figure 4.7 shows how a brush stroke is first painted on a temporary layer and when
blended with the original layer.

18
a) Pink background.
b)A blue stroke painted on the temporary layer.
c) The temporary layer blended with the original layer using the difference blending mode.
Figure 4.3.2. A blue stroke painted on a pink background using the difference blending mode.
4.3.2 Opacity and Flow A simple digital brush as described above is represented by a grayscale bitmap
describing the brush tip shape and a color. In the grayscale bitmap an opacity value is stored for each pixel to tell how much the original color and the brush color should be mixed at this point. To be able to change the flow of the brush these opacity values are always multiplied by the flow value before blending. The flow can be set to between 0% and 100%, where a smaller flow creates a more transparent flow. Figure 4.3.3 b) shows an example of a stroke painted with 25 % flow. The opacity values stored in the grayscale bitmap should be normalized so that the highest value is 100%. If the highest opacity value from the bitmap is lower than 100%, a 100% flow will in reality look like less than 100%.
In addition to the flow the user is also allowed to define the opacity. The opacity is the opacity used to blend the original layer with the temporary layer at rendering as described in the previous section about undo functionality. An example of a stroke painted with 50% opacity is shown in figure 4.3.3 a).
Using a flow value of less than 100% results in a darker color where the stroke overlaps itself, while using an opacity value of less than 100% results in a uniform color also where the stroke overlaps itself.
a) A stroke painted with 50%opacity.
b) A stroke painted with 25% flow.
Figure 4.3.3 The difference between opacity and flow.
4.4 Dodge and Burn The dodge and burn tools are taken from traditional film exposure technique and
are used to lighten or darken a portion of the image [DODGEBURN]. Using the traditional film exposure technique a piece of paper fasten on a stick is
held over the photographic paper to cast a shadow and thereby lighten the exposure. To do this is called to dodge and the dodge tool lightens the image in the same way as the traditional dodge.
To burn is to hold hand over the photographic paper in such a way that the light is focused on a small area of the image. Doing this will darken the exposure in this area and the same effect is achieved by using the burn tool.

19
The dodge and burn tools that are developed for this project allows the user to
choose whether he or she wants the highlights, the midtones or the shadows to be the most affected by the operation. To decide how strong the effect of dodge or burn should be the user can define the exposure to be between zero and 100 percent where full exposure gives a stronger effect than partial exposure. Setting the exposure to zero would leave the image unchanged.
To dodge the highlights of an image the value in each channel is simply multiplied by a factor of (1+exposure/3) where the exposure is given as a value between 0.0 and 1.0. When overflow occurs the color value will simply be clamped to the maximum color value.
Naturally the resulting color will be lighter and the effect will be stronger on lighter colors since a color is lighter the higher the values in the RGB channels are.
Burning the highlights is the same as dodging the highlights but with a negative exposure.
To dodge the midtones of an image the value in each channel is taken to the power of the exponent 1 / (1 + exposure). Since this factor will be smaller than one this is actually taking the root of the value. For full exposure the square root will be used. The exposure can be chosen in the interval 0.0 to 1.0.
The difference between the original value and the result will be bigger for values close to 0.5 and smaller for values close to 0.0 or 1.0. Therefore, the midtones will be most affected using this formula.
The same operation is performed to burn the midtones but using an exponent of (1+ exposure/3).
To dodge the shadows of an image the following calculations are done on the values in each channel:
value = factor + value –factor * value
where factor is the exposure divided by three. This will have the strongest effect on low values.
To burn the shadows the following formula is used:
value = (value – factor)/(1-factor) where factor is the exposure divided by three. Negative values will be clamped to 0.0.
The result of dodging or burning the image in figure 4.4.1 a) is shown in figures 4.4.1 b) – g). In figure 4.4.1 b) the highlights are dodged, the result is that the light colors at the bottom of the image have become even lighter. In figure 4.4.1 c) the midtones have been dodged, resulting in the average light colors in the middle of the image being lighter. The shadows has been dodged in figure 4.4.1 d), here the dark colors at the top of the image have become lighter.

20
In figure 4.4.1 e) the highlights have been burned, resulting in the light colors at the bottom of the image turning darker. The midtones have been burned and the average light colors in the middle of the image are now darker in figure 4.4.1 f). In figure 4.4.1 g) the dark colors at the top of the image have become even darker after the shadows have been burned.
a) The original. The hue ranges from 0 to 360 degrees from right to left and the luminosity ranges from 0 to 100 % from top to bottom.
b) Dodge highlights. The more luminous the color was from the beginning, the more is it affected by the dodge highlights brush.
c) Dodge Midtones. Dodge midtones lightens the midtones of the image while the darkest and lightest tones are left almost unchanged.
d) Dodge Shadows. The darkest colors of the image are made more luminous.
e) Burn highlights. The most luminous colors of the image are darkened.
f) Burn Midtones. The midtones of the image are darkened.

21
g) Burn Shadows. The darkest colors of the image are darkened.
Figure 4.4.1 The dodge and burn tools.
4.5 Smudge The smudge tool is made for mixing the colors on the paper. Smudge is similar to
smearing the colors on a painting by dragging a finger across the paper. The basic principle of the smudge algorithm developed is that you have a texture
with the shape of the brush tip. When you move the brush along the paper the color in the texture of the brush and the color on the paper will mix. The color of the brush texture and the paper will be updated blending the new color with the old using a configurable alpha value for opacity.
The less of the new color mixed in every time updating the color of the brush texture, the stronger the smudge will be.
To achieve the effect that the smudge is stronger in the middle of the stroke it is possible to let the alpha value for updating the brush texture depend on how far away from the middle of the stroke the pixel is. The easiest way to do this is to store the alpha value in the brush shape texture.
The alpha values in the brush tip shape texture can then be multiplied to create a stronger or a weaker smudge.
To avoid artifacts the brush spacing has to be kept at one pixel. In figure 4.5.1 the smudge brush is dragged from a blue and brown area to a white area. The color of the brush will never turn completely white but turn gray. This is an unwanted effect that occurs due to the one pixel spacing. If the spacing is increased to 50% of the brush size this problem will disappear. A smudge brush using 50% spacing is shown in figure 4.5.2, here another problem appears, the increased brush spacing results in a jagged stroke. In 4.5.3 we can see a smudge stroke which neither stays gray nor looks jagged. To achieve this result a modification of the approach described above is employed.

22
Figure 4.5.1 The smudge brush turns gray.
Figure 4.5.2 The smudge brush using 50% spacing, the resulting stroke looks jagged.
Figure 4.5.3 The improved smudge brush.
To avoid the grayish look of the smudge brush the method described above is
employed at 50% spacing. To avoid the jagged look a mix of the previous and next brush tip impression will be drawn at a number of points between the previous and next drawing point. A description of the implementation follows.
One brush tip bitmap represents the brush tip that would have been drawn the last
time using a 50% spacing smudge and one represents the brush tip that would be drawn the next time using a 50% spacing.
A buffer stores a number points and a counter is keeping track of how many points are stored in the buffer. The number of points depends on how many more brush tip impression that has to be drawn using a one pixel spacing compared to a 50% spacing.
Before starting the smudge stroke the buffer is emptied, the counter is reset and the
bitmaps are filled with the color from the original at the start of the smudge stroke. A spacing of one pixel is used and the following operation is performed at each
drawing point: If the counter has not yet reached its maximum value:
• Store the current drawing point in the buffer. • Increase the counter.
If the counter has reached its maximum value: • Calculate the bitmap that would have been used by the 50% spacing smudge. • Traverse the buffer of points and for each point draw a blend of the previous
and next brush tip bitmaps. • Draw the next brush tip bitmap on this point. • Reset the counter.
The resulting smudge strokes using this implementation will be smooth and will
not stay grey. The smudge brush gives a result similar to smearing out the wet colors on a painting using a finger. Taking this into consideration the first implementation where the color in the brush is never completely exchanged and therefore turns grayish after a while would be more realistic since this is what happens dragging a

23
finger across a wet painting. The second improved implementation where this behavior is removed is still preferable since it gives a nicer looking result.
The result using the smudge algorithm described above can be seen in figure 4.5.4.
All these figures show smooth stokes that does not turn grayish. Figures 4.5.4 a) – c) show smudge strokes using a faded brush tip to achieve a stronger smudge in the middle of the stroke. Figures 4.5.4 d) – f) show smudge strokes using a dotty brush tip. Using a dotty brush tip gives the impression that the smearing is done rather by a clean brush than by a finger. Figures 4.5.4 g) – i) show smudge strokes using a round hard edge brush tip. In figure 4.5.4 i) the color in the brush tip is not changed at all since a 100% smudge is used and the brush is either fully opaque or fully transparent.
a) Gaussian brush tip, week smudge.
b) Gaussian brush tip, medium smudge.
c) Gaussian brush tip, strong smudge.
d) Dotty brush tip, week smudge.
e) Dotty brush tip, medium smudge.
f)Dotty brush tip, strong smudge.
g) Hard edge brush tip, week smudge.
h) Hard edge brush tip, medium smudge.
i) Hard edge brush tip, strong smudge.
Figure 4.5.4 Smudge.
4.6 Painting Brush The painting brush is simulating ordinary oil or acrylics painting brushes. The
implementation is similar to the smudge implementation. The difference between an ordinary brush and a painting brush is that when the painting brush moves along the paper it will absorb some color from the paper. The painting brush will therefore paint with a mix of its original color and the colors it has absorbed along its way across the paper.
Simply using a brush with this behavior would give the result that after a while the original brush color is not at all there any more and the brush is just smearing the

24
colors around the paper. This is also what eventually happens when painting with an ordinary oil brush, but as long as there is still some color left in the brush, some color will all the time be transferred from the inner core of the brush to the outer layer. To prevent the digital oil brush from loosing its original color too fast this behavior can be implemented. This means that as the brush moves along the paper the brush tip will absorb some color not only from the paper but also from the brush core.
To be able to implement the absorbing of colors to the brush the brush tip is represented by a bitmap where each pixel represents the current color at that specific location in the brush.
Thus, the painting brush works similar to the simple digital brush with the difference that when painting a pixel the following operations are performed:
• Paint the pixel from the original image with the color currently in the brush tip bitmap using a predefined opacity value.
• Paint the pixel in the brush tip bitmap with the color at the pixel from the original image using a predefined opacity value. A higher opacity value means that the brush absorbs more of the colors from the original image and is equivalent to using a wetter brush.
• Paint the brush tip bitmap with its original color using a predefined opacity value. A higher opacity value means that a lot of color is transferred from the inner to the outer layers of the brush; this is equivalent to more color in the brush.
To avoid artifacts the brush spacing has to be kept at one pixel.
The painting brush can be either dry or wet and can contain either a lot of or a little color. To adjust the wetness and the amount of color in the brush the three predefined opacity values described above can be changed. To change the wetness of a brush the second opacity value is changed. A wet brush will absorb more color from the canvas. Therefore the parameter controlling how much color the brush absorbs from the canvas should be increased to increase the wetness of the brush, and decreased to reduce the wetness.
The first opacity value is used to control the amount of color in the brush. To get a brush with a lot of color a high opacity value should be used to paint the original with the color from the brush. To decrease the amount of color in the brush this opacity value should be decreased.
The last opacity value, controlling how much of the color the brush tip absorbs from the brush core, should at all times be kept low. If this opacity value is set too high, changing the second opacity value to change the wetness of the brush produces no change. The reason is that the color absorbed from the brush core dominates too much.
Figure 4.6.1 illustrates the result of configuring the wetness and amount of color in the brush by changing these opacity values. In figure 4.6.1 a) and b) it is seen how a wet painting brush have a smearing effect. The brush tip from figure 4.10.3 has been used to paint the strokes in figure 4.6.1.

25
a) A wet brush with a lot of color
b) A wet brush with only a little bit of color
c) A dry brush with a lot of color
d) A dry brush with only a little bit of color
Figure 4.6.1 Painting brush
4.7 Neon Brush A quite interesting effect is to let the brush have different colors along the border
and in the center of the stroke. Figure 4.7.1 gives an example.
Figure 4.7.1 Neon brush
The temporary layer can be used to easily create this effect. Figure 4.7.2 shows the alpha channel of the temporary layer. The almost transparent pixels close to the stroke boarder are painted pink; the almost opaque pixels in the center of the stroke are painted green; and the pixels in between are painted with a mix of pink and green. If the alpha value is greater than an upper threshold the pixel is painted with pure green, if it is lower than a lower threshold it is painted with pure pink. And if it falls between the upper and lower value, a mix between green and pink is used. The opacity (alpha – lower threshold)/(upper threshold – lower threshold), where all values are given in the range (0..1), are used to blend the green and pink colors.
Figure 4.7.2 Alpha channel in temporary layer, Neon brush
Neon brushes are provided by Corel Painting, but these brushes use another more sophisticated technique described in the following section about the winding brush. To use this technique is to take in more complexity than needed to create the desired effect. The result will also not look as good since the winding brush technique tends to create artifacts in many situations. The technique described here is actually available in Photoshop, if a new layer is created and the blending of the layer set to inner glow exactly the same effect as shown above will be seen. Since the effect is rather interesting it could be interesting to provide a brush having this behavior.

26
4.8 Winding Brush An interesting brush that is available in Corel Painter is the winding brush. The
winding brush can paint for example a rope that follows the brush stroke along the paper. The drawback with Corel Painters implementation of the winding brush is that it doesn’t look good if the stroke is not very smooth with too sharp angles between drawing points. Typically the result will look better if the mouse is moved fast across the screen since this minimizes the risk for shaky movements of the hand creating unnecessary sharp angles.
To implement the winding brush, a rectangular piece of texture has to be fitted in-
between four points as illustrated in figure 4.8.1. To allow interactive frame rates this should preferably be done in real time. The solution to this is common knowledge in computer graphics, texture mapping.
It is important that a small enough spacing is used to make the chain of individual textures look round. Another important thing to take into consideration is to use a sufficiently good anti-aliasing technique to ensure that the border between the textures can not be seen and does not create any unwanted artifacts.
Figure 4.8.1 To continue the brush stroke a rectangular piece of texture has to be fit in between the four blue spots. The red spots are the drawing points.
If the direction of the stroke changes with 90 degrees there is no good solution to
how the next texture should be drawn, and if it changes with more than 90 degrees the stroke will look folded. To avoid the problems that this can create if the user moves the mouse slightly shaky, the mouse movement points should be taken only at a fixed interval. This interval should be sufficiently large to remove the shakiness of the mouse movement and at the same time small enough to well enough follow the desired mouse movement. If necessary, the distance between the drawing points can be partitioned into smaller distances, and thus, additional drawing points can be inserted between them to achieve a smooth stroke.
If a more than 90 degrees angle would still occur a folded stroke would probably be desired. If the 90 degrees angle would occur it would be a good idea to go back one mouse position and recount the spacing across the two intervals. This is illustrated in figure 4.8.2.

27
a) If a 90degrees angle would occur there is no good solution for how to draw the next section.
b) One point is removed to avoid a 90 degrees angle if one would occur.
Figure 4.8.2 If a 90 degrees angle would occur one point is removed
4.9 Pattern Brush A pattern brush is a brush that can paint a chessboard or any other pattern in the
same way as is seen in Donald Duck’s Christmas show. This may seam like something physically impossible to do in real life but in a
computer application this is very easy to implement. A small texture representing the pattern can be tiled so that it covers the whole image. Painting with the pattern brush the color found in the corresponding position will be used instead of the brush color. Examples of stroke drawn using the pattern brush are found in figure 4.9.1 where a rock texture has been used.
a) 100% opacity.
b) 25% opacity.
Figure 4.9.1 Pattern brush.
4.10 Figure Brushes and Colored Brushes The above discussed smudge and painting brushes use a bitmap to represent the
color of the brush. This can be a fun and useful asset also to an ordinary brush. The colored brush is simply a normal brush where the color of the brush is a
pattern stored in a texture. In this way the brush will look different depending on the direction of the stroke. If a brush tip as in figure 4.10.1 is used a tube like effect seen in figure 4.10.2 will be created.
The brush tip in figure 4.10.3 can be used to create a brush stroke there the marks from individual bristles are visible and there some variations in color creates a more irregular realistic shape. A stroke drawn using the brush tip in figure 4.10.3 is shown in figure 4.10.4. To achieve these effects a spacing of one pixel has to be used. For the tube brush it is also important that the round brush tip shape has a hard edge.

28
A brush can be used for more than painting. It can also be used for splattering out figures on the paper. The effect of for example stones or leaves can be useful for creating different effects. For example splattering out leaves can be used to draw a tree. An example of a simple brush stroke is shown in figure 4.10.5. Scattering and various jitters described in the next section can be very useful to create an interesting brush using this kind of brush tip.
The implementation of this is simply a brush as described above with a figure painted on the brush bitmap and the shape of the brush being the shape of the figure. The spacing in increased so that each individual brush tip will be visible.
Figure 4.10.1 Tube brush tip.
Figure 4.10.2 Tube brush stroke.
Figure 4.10.3 Realistic brush tip.
Figure 4.10.4 Realistic brush stroke.
Figure 4.10.5 Leaf brush stroke.
4.11 Color and Shape Dynamics
4.11.1 Color Jitter The color jitter will randomly choose the color from a gradient. An example of a
gradient fading from green to blue is shown in figure 4.11.1. Using the color jitter the brush tip color will at each impression be chosen from a random location at the gradient. An example where the gradient in figure 4.11.1 is used is shown in figure 4.11.2.
Figure 4.11.1 A gradient.

29
Figure 4.11.2 Color jitter.
The color jitter can also be used for the colored brush and the figure brush. In these cases a filter will be used for drawing the brush tip bitmap on the original. The filter can for example change the luminosity, saturation or color tone of the bitmap.
4.11.2 Color Fade Color fade starts painting with the color at the beginning of the gradient and steps
one step to the right for each brush tip impression. Using the gradient in figure 4.11.1 a stroke fading from green to blue, seen in figure 4.11.3, will result. It is possible to configure how fast the color will fade by setting the length of the step.
Figure 4.11.3 Color fade.
4.11.3 Size Jitter The size jitter will randomly vary the size of the brush tip within some predefined
range. Figure 4.11.4 shows an example of a figure brush using a size jitter where the size of the brush tip is allowed to be up to 50% bigger or smaller than the predefined size. The result in this case is a duck family.
Figure 4.11.4 Size jitter.
4.11.4 Roundness Jitter The roundness jitter will randomly vary the size of the brush tip along a predefined
ax. Figure 4.11.5 shows an example of a figure brush using a roundness jitter where the size along the x-axis is allowed to be 50% bigger or smaller then the predefined size along the x-axis. The result looks like if the leaves were positioned at different angles in the three dimensional space.
Figure 4.11.5 Roundness jitter.
4.11.5 Flow Fade Flow fade will at each step reduce the flow with a predefined amount. The result
will be a stroke like in figure 4.11.6 where the stroke is fading. Similar to if the color in the brush runs out. The speed at how fast the stroke is fading can be configured by setting the amount at which the flow is reduced at each step.

30
Figure 4.11.6 Flow fade.
4.12 Blur Brush Just as a Blur filter can be used on the whole image to smooth sharp edges it can be
used on a smaller user defined area by a brush. The blur brush applies a blur filter instead of a color.
A simple blur algorithm is chosen instead of the Gaussian blur for simplicity and speed.
This simple blurring algorithm works as follows. It starts by blurring the image vertically by traversing all the pixels from top to bottom and the blurred pixel value will be the average of the pixel values of this pixel and the surrounding pixels. How many pixels are included in this average depends on the blur radius used.
The image is now vertically blurred and to achieve the desired result it also has to be horizontally blurred. To blur it horizontally the same operation is performed again but now traversing all pixels from the left to the right instead.
The speed of this blurring algorithm depends only on the size of the image being blurred and not on the blur radius. This is achieved because we do not have to fully recalculate the average for every pixel. When traversing a row of pixels from left to right we will start with calculating the average for the first pixel. For the next pixel there is now only one pixel in this average that should not be apart of the average for this pixel, there is also only one pixel missing. Therefore the average of the previous pixel can be easily changed into the average of the current pixel by simply removing the value of the first pixel from the average at the same time as the value of the new pixel is added to the average.
If pixels outside the brush tip impression is used to calculate the average as
mentioned above the effect shown in figure 4.12.1 will appear. To avoid this undesired artifact it is desirable to start with a blur radius of one pixel at the edge of the brush tip impression and increase the blur radius successively until it reaches the desired level. Additionally the horizontal and vertical blur radius should be equal, meaning that the horizontal blur radius should be smaller also along the upper and lower boarder of the brush tip impression, and the vertical blur radius should be smaller also along the right and left boarder of the brush tip impression. The increasing and decreasing of the blur radius will affect the speed of the algorithm only when the blur radius is large compared to the brush size.
Examples of strokes drawn using the blur brush are shown in figures 4.12.2 and
4.12.3.

31
Figure 4.12.1. A blur brush with uniform radius used next to an edge between white and black.
Figure 4.12.2 Blur radius 5
Figure 4.12.3 Blur radius 15
4.13 Sharpen Brush Another filter that can be a useful brush tool is the sharpen filter. There are several
different implementations of the sharpen filter that can be used for different purposes on different images.
A problem with the sharpness filter is that it is often introducing noise and artifacts at the same time as it is creating a sharper image.
A sharpness filter that can be used for many purposes and that introduces a minimum amount of noise is the unsharp mask [UNSHARP1][UNSHARP2]. The unsharp mask first blurs the image and then looks on the difference in color between the blurred image and the original. If the difference in color is big this means that the pixel is close to an edge and the pixel should be turned darker if it is on the lighter side of the edge and lighter if it is on the darker side of the edge.
To change the strength of the sharpness filter, the radius of the blur filter can be changed. A larger radius creates a sharper result but does also tend to undercut details in the picture. The result can sometimes look more like a strongly increased contrast than a sharpening.
Another way to change the strength of the filter is to change how much the color is changed in comparison to how big the difference is between the blurred image and the original. This ratio is called the amount of the sharpness filter. This is better than changing the blur radius since it preserves details in the original image and works to locally sharpen edges rather than globally increasing the contrast in the image.
It is also possible to set a threshold for how large the difference between the original and the blurred image should be to result in any difference at all.
There is no good general solution for how to adjust the unsharpen mask filter to achieve a satisfying result since this strongly depends on the picture being sharpened. It is true that increasing the blur radius will undercut details smaller than the blur radius. But the advantage using a large blur radius together with a strong amount is that very blurry edges can be made sharp.
A problem that will occur mainly when using a very strong amount is that sharp edges will also be affected. Figure 4.13.1 illustrates how the unsharp mask filter has changed the color close to the edge to increase the contrast between the two sides of the edge. However, there is no real reason why somebody would like to sharpen an already sharp image and therefore the best solution to this problem is to refrain from

32
sharpening already sharp images or parts of images. An example of how the unsharp mask can make a blurry edge sharp is shown in figure 4.13.2.
A good guideline to use when configuring the unsharp mask filter is to choose a blur radius of about the same size as the details in the image.
Figure 4.13.1 Artifacts due to sharpening of an already sharp edge. Blur radius 20 pixels, amount 5 and threshold 0.
Figure 4.13.2 The blurry edges are sharpened by the sharpen brush. Blur radius 20 pixels, amount 5 and threshold 0.
Applying the sharpness filter repeatedly may result in artifacts and noise. Figure
4.13.3 c) – e) shows an image that has been sharpened several times. This is why this should be avoided when using the sharpness filter as a brush. It is still desirable that applying the brush several times to the same area on the picture produces an increased sharpness in this area compared to applying the brush only once, but reapplying the filter is not the best way for achieving this.
A better way would be to increase the amount of the sharpness filter already applied in that area. Figure 4.13.3 f) shows the image from figure 4.13.3 a) sharpened using an increased amount. Since the amount is increased when the brush is applied repeatedly to an area it is a good idea to chose a relatively low amount when using the sharpen brush. A high amount can still be achieved by applying the brush repeatedly, and the low amount makes it easier to control the resulting amount.
a) The original image.
b) The image sharpened once.

33
c) The image sharpened twice.
d) The image sharpened three times.
e) The image sharpened four times.
f) The image sharpened once using an increased amount.
Figure 4.13.3. The unsharp mask filter applied repeatedly.
This suggests the following implementation of the sharpen brush:
Before starting painting with the sharpen brush a copy of the image is blurred. The original image is left untouched and the sharpening is done on a temporary layer. The original image is copied to the temporary layer before the sharpening starts. For each pixel that is to be sharpened the following is done:
• Compute the difference between the blurred copy and the original at this pixel • Add the difference multiplied by the amount to the pixel value stored in the
temporary layer. Clamp the value if it goes out of range.

34
5 Results This section describes the brushes and features developed for the new image
editing application. To make the set of brushes easy to use some techniques described in the previous section have been removed. This choice has been made since the usability of these brushes has been considered to be too limited. The brushes and features described in this section together provide the user with an easy to use, highly configurable and powerful set of brushes.
5.1 Basic Brushes Four simple brushes has been developed all using the basic technique of drawing a
number of brush tip impressions on the original image. The greatest advantage of these brushes is the simplicity of the implementation. This makes the brush computationally cheap and it is possible to use large brushes and still achieve interactive frame rates. Since the brush itself does not demand a lot of computations it is also possible to add features such as color and shape dynamics, described later in this section, without seeing any slow down of the brush.
Using these features and the four different variations of the simple digital brush a lot can still be achieved. These four variations and the features that can be added to them are described in this section.
5.1.1 Normal Brush The most elementary brush painting brush tip impressions of one uniform color. Its
greatest advantage is its simplicity.
5.1.2 Colored Brush Painting brush tips of a non uniform color. Different effects can be created using
this kind of brush, examples of a tube brush and a realistic brush are shown in figures 4.10.2 and 4.10.4.
5.1.3 Figure Brush The figure brush uses the same implementation as the colored brush. The
difference is that here the brush is set to be a figure and the spacing is increased so that each individual figure can be distinguished. Simpler uniformly colored figure brushes can also be created using the normal brush. The brush tip shape of the normal brush is set to be the shape of the figure. The advantage of this kind of figure brush is that the color can be easily changed. The advantage of the figure brush built on the colored brush is that it is possible to create very realistic figures. The disadvantage is that it is not possible to arbitrary change the color of the brush but only to use a filter to change the color. The filter can be used to change the color tone, saturation or luminosity, to mention some examples. This can for example be very useful in creating lightness variations in the figures.
5.1.4 Pattern Brush The pattern brush paints a pattern on the image. In this case a small texture is tiled
over the whole image and painting with the pattern brush will result in the texture being applied on top of the image. Example of the pattern brush being used with varying opacity is shown in figure 4.9.1.

35
5.1.5 Color and Shape Dynamics To be able to let the color and shape of the brush tip vary along the stroke is a
useful feature that has been developed. These features can be used together with all of the above described basic brushes. Using color dynamics for the colored brush, figure brush and pattern brush will require using a filter on the bitmap describing the color of the brush tip, examples of filters what will be available for using color jitter on the colored brush is filters modifying the saturation, color tone and lightness of the brush.
The color and shape dynamics developed within this project are: color jitter, color
fade, size jitter, roundness jitter and flow fade. Other features that will be made available in the resulting application are: spacing, scattering, angle jitter and rotating brushes. Used together with these features the color and shape dynamics developed within this project provide the opportunity to create a lot of interesting effects.
For some examples of how these jitters can be used, see figure 4.11.2 – 4.11.6.
5.1.6 Color Blending Different blending modes can be used together with all these brushes. The blending
mode describes how the brush color is mixed with the color of the original. Changing the blending mode can be particularly useful together with the normal brush and the pattern brush. An overview of the different blending modes developed during this project is found in section 4.2.
5.2 Smearing Brushes For modeling real world brushes, the brushes described in the previous section
have one serious drawback. They can model only how color is transferred from the brush to the painting. For real world brushes, color from the painting will also be transferred to the brush. To model this behavior, two different brush tools have been developed for this project, the smudge tool and the painting brush.
5.2.1 Smudge The smudge tool models how a finger is dragged across a painting while the colors
are still wet. The strength of the smudge can be configured and different brushes can be used to
let the smudge strength vary across the brush tip. Examples of smudge strokes drawn using different brush tips and different shapes are shown in figure 4.5.4.
Dragging a finger across the paper the finger will eventually start to paint with a gray color at the same time as its smudging the color across the paper. Since this is an unwanted feature it has been removed from the smudge tool developed during this project. Removing the grayness of the smudge tool makes it even more interesting than the finger smearing it is simulating. Comparing with commercial software on the market today it can be said that some applications use about the same method as developed by this project [COREL] [PHOTOSHOP] while others have not removed the grayness of the smudge [GIMP].
5.2.2 Painting Brush The painting brush tool models how a brush is dragged across a painting while the
colors are still wet. While painting with the painting brush some color will be absorbed from the painting by the brush.

36
The painting brush is a simulation of an ordinary oil or acrylics brush. Commercial software providers and some researchers, see section 2.1.1, have done some work in trying to simulate these kind of brushes [DAB][COREL]. The brushes they provide are all very far from actually resembling to a real brush. The painting brush developed during this project uses a very simple technique for paint transferal and does not model how the color on the paper dries successively. Instead of modeling how the color on the paper dries the user is allowed to define the wetness of the brush. Using the wetness setting the user can define how much color will be absorbed by the brush. The draw back of not letting the color on the paper dry successively will instead be that it will not be possible to let some dry color on the paper remain untouched by the brush while the wet colors will be absorbed. To model this it would be required to use one wet and one dry layer for the paper [DAB]. Doing this would be suitable in a pure painting application, but since this brush is developed for a general image editing application it is better to skip this feature since it makes the brush more difficult to use and complicates the integration with other features in the application. The work done by some researchers [DAB] include this feature and they have also developed painting applications there these features are used. However, commercial software on the market today [COREL] does not use this feature. The difference in quality is minimal since the user in Corel Painter can choose a brush which is more or less dry and in this way controls how much of the colors from the underlying canvas are absorbed by the brush. The user of the brush developed during this project will instead be able to define the wetness of the brush. This is superior to the approach chosen by Corel Painter since it increases the user’s opportunities at the same time as it decreases the number of predefined brushes. It will be easier for the user to choose a brush at the same time as the user will be able to use the brushes in a more flexible way. The user of the painting brush will also be able to define the amount of color in the brush. For an illustration of how the brush characteristics are changed when changing the wetness and amount of color settings, see figure 4.6.1.
5.3 Photographic Brushes A number of brushes useful for modifying photographs have also been developed.
A photograph or a part of a photograph can be made blurrier, sharper, darker or lighter using these brushes. These brushes are primary used to enhance photographs but especially the blur, dodge and burn tools can also with advantages be used for creating and editing other kinds of images.
5.3.1 Blur The blur brush will blur the area under the brush tip. The blur brush developed
during this project is much more powerful than the blur brushes seen in image editing application on the market today. The main reason is that the brush is able to repeatedly apply a blur filter with configurable radius on the image.
The blur brush is the computationally most expensive of all the brushes developed. To achieve an acceptable performance the spacing of the blur brush tool is increased as much as possible. Because of the characteristics of the blur brush it will be possible to increase the brush spacing to more than 50% of the brush size without seeing any disturbing effects as in figure 4.3.1.
After some optimizations of the code and using the increased spacing the blur brush will be able to run at interactive frame rates for reasonable brush sizes. The performance of the blur brush will depend almost only on the brush size, therefore a user of an older computer experiencing that the blur brush runs too slow can just

37
choose to use a smaller brush and will in this way be able to use a configurable blur radius without experiencing any performance problems. The only limitation in using a large blur radius with a small brush is that the blur radius will be smaller closer to the brush boarders since no pixels outside the brush tip is allowed to be included in the averages calculated for the blur algorithm and for the blur brush in this project it has been chosen to use only averages with a uniform number of pixels on each side of the pixel. If the blur radius is large compared to the brush size it will also start to affect the performance of the brush more, but the impact on the performance will still be small compared to that of the brush size.
The result of using the blur brush can be seen in figure 5.3.1. A blur radius of only
two is used but a strong blurring effect can still be achieved by applying the brush repeatedly. The uppermost flower is left untouched for reference and the flower to the right is blurred a little while the flower to the bottom left is blurred a lot. The difference in how much the flowers are blurred is achieved only by applying the brush several times on the same area to achieve a stronger effect.
Figure 5.3.1 Blur brush.
5.3.2 Sharpen The sharpen brush will sharpen the area under the brush tip. None of the market
leading image editing application can today offer a sharpen brush that gives a satisfying result [PHOTOSHOP][COREL]. The difficulty in designing a good sharpen brush lies in choosing a good sharpen filter. This is difficult because there are a large number of sharpen filter available and they are all used for different purposes and different images. The nature of the image to be sharpened will changed the choice of the sharpen filter, this makes it difficult to chose a sharpen filter that will suite in al situations.
The most powerful sharpen filter in most situations is the unsharp mask [UNSHARP1][UNSHARP2]. The unsharp mask can be configured to suite a large number of situations. This is why this is the sharpen filter chosen in this project. The user will be able to configure the sharpen filter so that it gives a satisfying result. This is something that would not have been possible using a simpler non configurable sharpen filter.
If a sharpen filter is applied repeatedly on the same area artifacts will start to appear. This problem is solved by increasing the amount instead of reapplying the filter if the brush is applied more than once on the same region. The filter will not be reapplied for as long as the user is using only the sharpen tool and no other tools. The filter will also be reapplied if the blur radius of the unsharp mask filter is changed.
To achieve this result it has been unavoidable to increase the complexity. Before
starting painting with the sharpen brush a copy of the whole image has to be blurred.
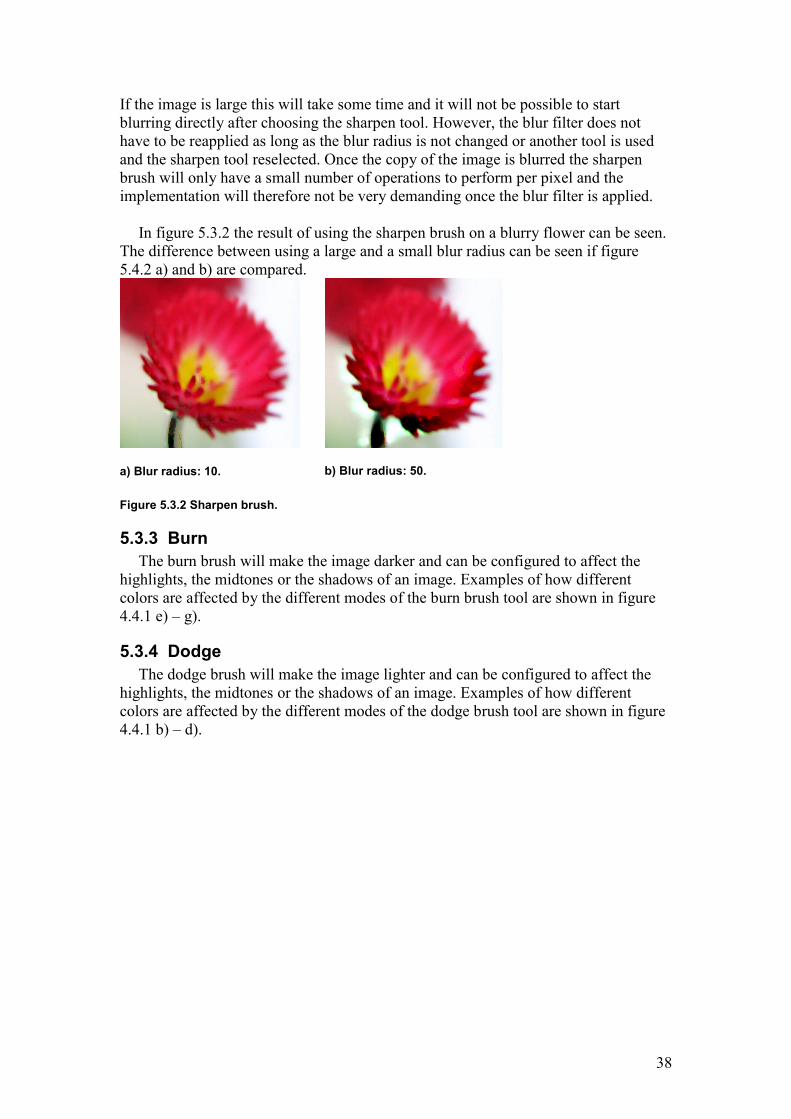
38
If the image is large this will take some time and it will not be possible to start blurring directly after choosing the sharpen tool. However, the blur filter does not have to be reapplied as long as the blur radius is not changed or another tool is used and the sharpen tool reselected. Once the copy of the image is blurred the sharpen brush will only have a small number of operations to perform per pixel and the implementation will therefore not be very demanding once the blur filter is applied.
In figure 5.3.2 the result of using the sharpen brush on a blurry flower can be seen.
The difference between using a large and a small blur radius can be seen if figure 5.4.2 a) and b) are compared.
a) Blur radius: 10.
b) Blur radius: 50.
Figure 5.3.2 Sharpen brush.
5.3.3 Burn The burn brush will make the image darker and can be configured to affect the
highlights, the midtones or the shadows of an image. Examples of how different colors are affected by the different modes of the burn brush tool are shown in figure 4.4.1 e) – g).
5.3.4 Dodge The dodge brush will make the image lighter and can be configured to affect the
highlights, the midtones or the shadows of an image. Examples of how different colors are affected by the different modes of the dodge brush tool are shown in figure 4.4.1 b) – d).

39
6 Conclusion and Future Work The task has been to develop a set of brushes to use in a new image editing
application. Four kinds of basic brushes simply painting brush tip impression on the underlying image have been developed. These brushes can be used together with a number of color and shape dynamics features such as color jitter, color fade, size jitter, roundness jitter and flow fade. Other features that will be made available together with these brushes are spacing, scattering, rotation jitter and speed sensitivity. Developing these features has lain outside the scope of this project but the features have been integrated to function together with the features developed during this project.
Other brushes to mention are the painting brush and the smudge tool. Simulating how some color is absorbed from the underlying canvas by the brush. These brushes can be used to create realistic looking strokes and to mix the colors in an image.
Four different brushes have been developed primary to use for modifying photographs. These are the blur, sharpen, dodge and burn brushes. These brushes can be used to make a photograph or any other image blurrier, sharper, lighter or darker.
All together a very powerful set of brushes has been developed but the
investigations about different techniques have showed that even more is possible. An area where a lot of work remains to be done is realistic brushes. Here a very simple implementation of an oil or acrylics brush has been made but no effort has been made to implement watercolor or other diffusing brushes. As discussed in section 2.1.2, there are several possibilities for simple implementations of this kind of pigment behavior.
The oil brush developed here is very basic and does not in a very good way simulate the real behavior of oil brushes; a future task would be to develop this brush further. An idea of something that could possibly improve the behavior of the painting brush is to add some randomness to its behavior.
Another interesting brush that the author has worked on during this project but
never actually implemented is the winding brush described in section 4.8. The design is finished and the opportunity exists to implement and test this brush. The high complexity and the limited usability resulted in the decision not to include this brush in the set of brushes developed during this project.
A difficult task has been to chose an accurate filter for the sharpen brush. To chose
the unsharp mask filter has been considered to be the best available option. But it can be observed that the developed sharpen brush still have severe shortcomings in sharpening complex images and photographs in an accurate way. A lot more work could be done in the area of creating good sharpen filters and choosing different filters for different purposes.

40
7 References All of the given URL’s has been tested and confirmed working as of October 15th, 2004. [ADOBE] Abobe Photoshop, by Adobe systems incorporated, http://www.adobe.com/products/photoshop/main.html [COREL] Corel Painter, by Corel Corporation, http://www.corel.com/servlet/Satellite?pagename=Corel2/Products/Home&pid=1047022702185 [GIMP] the GIMP, by Spencer Kimball, Peter Mattis et al, http://www.gimp.org/ [Z-BRUH] Zbrush, by Pixologic, http://pixologic.com/home/home.shtml [DEEP] Deep paint, by Right Hemisphere, http://www.righthemisphere.com/products/dpaint/ [WAFFLE] Dogwaffle, by Dan Ritchie, http://www.squirreldome.com/cyberop.htm [JASC] Jasc Paintshop Pro, by Jasc Software, http://www.jasc.com/products/paintshoppro/? [DAB] DAB: Interactive Haptic Painting with 3D Virtual Brushes, Bill Baxter, Vincent Scheib, Ming C. Lin, Dinesh Manocha, In ACM SIGGRAPH 2001. [WATERCOLOR] Computer Genereted Watercolor, Cassidy J. Curtis, Sean E. Anderson, Joshua E. Seims, Kurt W. Fleisher, David H. Salesin, In ACM SIGGRAPH 1997. [VIRTUALBRUSH] Advanced Design for a Realistic Virtual Brush, Songhua Xu, Francis C.M. Lau, Feng Tang, Yunhe Pan, In EUROGRAPHICS 2003. [INK] Diffusion rendering of black ink paintings using new paper and ink models, Jintae Lee, In Computers & Graphics 25 (2001). [INK99] Simulating Oriental Black-Ink Painting, Jintae Lee, In IEEE Computer Graphics and Applications 1999. [HAIRY] Hairy Brushes, Steve Strassmann, In ACM SIGGRAPH 1986. [CALLIGRAPHY] Virtual Brush: A Model-Based Synthesis of Chinese Calligraphy, Helena T.F. Wong, Horace H.S. Ip, In Computer and Graphics 24 (2000). [ORIENTAL] A Model Based Technique for Realistic Oriental Painting, Young Jung Yu, Young Bok Lee, Hwan Gue Cho, Do Hoon Lee, Pacific Conference on Computer Graphics 2002.

41
[INTERACTIVE] Interactive Rendering Technique for Realistic Oriental Painting, Young Jung Yu, Do Hoon Lee, Young Bok Lee, Hwan Gue Cho, In Journal of WSCG, Vol. 11 (2003). [3DPAINTING] An Efficient Brush Model for Physically-Based 3D Painting, Nelson S.-H. Chu, Chiew-Lan Tai, In Pacific Conference on Computer Graphics 2002. [LEARNING] On Realistic Ink Diffusion Synthesis for a Calligraphic Learning System, Chung-Ming Wang, Jiunn-Shyan Lee, Ren-Jie Wang, In International Journal of Computer Processing of Oriental Languages Vol 16, No. 2 (2003). [3DPHYSICALLY] 3D Physically Based Brush Model for Painting, S. Saito, M Nakajima, In ACM SIGGRAPH 1999. [DODGEBURN] Student Curriculum in Photography, Dodge and Burn Project, by Keith Wills, http://www.scphoto.com/html/dodge_burn.html [UNSHARP1] A few scanning tips, Sharpening –Unsharp mask, by Wayne Fulton http://www.scantips.com/simple6.html [UNSHARP2] The Luminous Landscape, Understanding the Digital Unsharp Mask, by Dale Cotton and Brian D. Buck, http://www.luminous-landscape.com/tutorials/understanding-series/understanding-usm.shtml