Embed Size (px)
Citation preview

DIRECTV FIELD SERVICES TRAININGDIRECTV FIELD SERVICES TRAININGEquipment Mounting

Produced by DIRECTV Field Services Training. Not for publication or customer distribution.
Version 1.0.0October 26, 2012 9:34 AM
mounting_options
Control Log
Page# Action Page# Action
Pre-Class Preparation
• Estimated Time of Training: 1 hour.
Materials
The materials include:• Participant Guide• Facilitator Guide

3Equipment Mounting
Mountable Equipment Overview 5Overview � � � � � � � � � � � � � � � � � � � � � � � � � � � � � � � � � � � � � � � � � � � � � � � � � � � � � � � � � � � 6Cable Routing � � � � � � � � � � � � � � � � � � � � � � � � � � � � � � � � � � � � � � � � � � � � � � � � � � � � � � 7
Mounting Equipment 9Procedures � � � � � � � � � � � � � � � � � � � � � � � � � � � � � � � � � � � � � � � � � � � � � � � � � � � � � � � � 10Product-Specific Procedures � � � � � � � � � � � � � � � � � � � � � � � � � � � � � � � � � � � � � � 11Wall Mounting Brackets � � � � � � � � � � � � � � � � � � � � � � � � � � � � � � � � � � � � � � � � � � � 12Power Supplies � � � � � � � � � � � � � � � � � � � � � � � � � � � � � � � � � � � � � � � � � � � � � � � � � � � 16Wireless Cinema Connection Kit � � � � � � � � � � � � � � � � � � � � � � � � � � � � � � � � � � 17VESA Mounting � � � � � � � � � � � � � � � � � � � � � � � � � � � � � � � � � � � � � � � � � � � � � � � � � � � 19Cable Routing � � � � � � � � � � � � � � � � � � � � � � � � � � � � � � � � � � � � � � � � � � � � � � � � � � � � � 23
Module Review 27
Glossary 28
Agenda / Table of Contents

4Equipment Mounting
Module Objectives
Module Introduction
• Beabletoidentifywhichequipmentcanbemounted.
• Workwithacustomerinordertodecidethebestsetupandmountingsolutions.
• Understandanddemonstratehowtoinstallequipmentthatismountable.
Today’s consumer is demanding.DIRECTV is number one, and because of this, we need to always make sure our installations are also the best. To stay number one, and enhance the customer experience, we are expanding our installation standards.
For all of our customers, we need the ability to install and hide equipment as much as possible, and provide customers with a clean and professional installation.
Several pieces of our equipment, including the H25 and the Genie Clients (such as the C31), have mounting brackets which allow these pieces of hardware to be mounted to a wall. Some items have VESA screws, which can be mounted to televisions with VESA mounts.
This module will help you to identify which pieces of equipment can be mounted, along with a guide of how to work with a customer to determine the best installation solution for their home!
Cover the module objectives with the class, and ask if they have any additional expectations of this course� Also, use this time to cover any ground rules, such as cell phones, time, breaks, etc�
Once all lingering questions have been addressed, begin the course�

5Equipment Mounting
Objectives • IdentifywhichpiecesofDIRECTV
equipmentaremountable,andhowyoucanhideotherpiecesofequipment.
Mountable Equipment OverviewBeforewelearnhowtomountequipment,wefirstmustlearnalittlebitmoreaboutDIRECTVequipment.
In this section, we will take a look at some of the different mountable equipment that DIRECTV offers, including the H25 and HMC client (referred to as the “client” throughout the rest of the training).
Additionally, we will look at and talk about how to mount or hide some of the accessories, such as the Wireless Cinema Connection Kit and power supplies.
Ready to get started?

6Equipment Mounting Overview
Mountable Equipment Overview
Let’s take a look at the different pieces of mountable equipment in a customer’s home.
Receivers/ClientsBoth the H25 and the client, due to their size, are able to be mounted in a way which allows them to stay somewhat or entirely out of sight.
Figure 1. H25 Receiver
Both of these boxes have available mounting brackets, which are available from a technician while onsite at no charge, or can be ordered from customer care for a fee.
Figure 2. HMC Client
AccessoriesTwo frequently used accessories which can be mounted are the EPS10 power supply, and the Wireless Cinema Connection Kit.
Figure 3. W-DCCK
Figure 4. EPS10
Are there any additional devices that could be mounted in a customer’s home? Some H24 receivers have keyhole mounts on their base� Also, SWiM power supply/EPS21/29

7Equipment Mounting
Mountable Equipment Overview
One thing to keep in mind when attempting to mount equipment out of sight is cable routing.
It’s one thing to have done an excellent job in mounting a client out of sight, but you need to then worry about how to run the cabling.
Figure 5. Installation with wires hidden. Figure 6. Installation with exposed wires.
As with routing cable on the outside of a customer’s home, we should take some of the same considerations when routing cables inside homes.
The zip-ties that you are provided are excellent for assisting in keeping installations looking clean and professional.
Cable Routing

8Equipment Mounting Checkpoint
Summary• IdentifywhichpiecesofDIRECTV
equipmentaremountable,andhowyoucanhideotherpiecesofequipment.
Review1. What are the different pieces of mountable equipment that DIRECTV has to offer?
2. Why would customers want their equipment mounted to a television or wall?
Mountable Equipment Overview
Have the trainees answer the questions as a group, and review any issues before continuing on�

9Equipment Mounting
Objectives Now that we’ve had a look at some of the items that can be mounted, let’s learn how to mount equipment in a customer’s home.You, the technician, are the expert, and every customer’s home is different! Not every customer will require an installation such as this, but completing good and clean cable runs is always important, regardless of the installation.
This training isn’t meant to teach you how to mount every piece of equipment that DIRECTV has to offer. While this guide will assist you in mounting several pieces of equipment, your knowledge and experience in the field will help you to complete installations that live up to the DIRECTV name!
Mounting Equipment
• Mountthecustomer’shardwareonawallortotheirtelevision
• Completecablerunsthatareaestheticallypleasing.

10Equipment Mounting
Here are some general procedures for mounting equipment.
∎ Mounting brackets and options for any DIRECTV product should be discussed with the customer before proceeding with any work to ensure the best option is provided to the customer.
∎ The technician is approved to, though not required to, leave a mounting bracket with the customer (if there is one available for a DIRECTV product) and it is not requested during the current visit.
∎ Never remove any of the customer’s equipment from its existing mount or stand; this includes televisions on non-articulating mounts. If the television must be removed to mount a piece of equipment behind it, you cannot remove the television even if this means we will be unable to mount the bracket behind the TV.
∎ Every effort should be made to not damage the customer’s equipment or property.
∎ All cabling associated with the DIRECTV product should be routed and secured in the most aesthetically pleasing and least obtrusive manner.
∎ The installation of all DIRECTV products must be in compliance with the product’s specifications.
∎ Use only approved installation materials when mounting DIRECTV products or securing wiring.
∎ Any wall fishing required to accommodate the chosen mounting option should be in alignment with custom labor guidelines.
Mounting EquipmentProcedures
Figure 7. HMC Client mounted behind an articulating mount.

11Equipment Mounting
IRD / Client1. The order of preference for installing an IRD or
Client will be as follows: ∎ 1st Choice: Stand/Cabinet – Located
on top of stand or cabinet should be first option. If DIRECTV device is located inside of a cabinet then proper accommodation for adequate air flow should be maintained that is within the guidelines for the device.
∎ 2nd Choice: Behind TV* - Bracket attached directly to TV using VESA holes.
∎ 3rd Choice: Behind TV* - Tie wrap bracket to TV mount utilizing holes in bracket for placement of tie wraps.
∎ 4th Choice: Behind TV* - Mount bracket to wall behind TV
∎ 5th Choice: Wall - Mount bracket to wall below TV
2. A RF remote must be used whenever the IRD/Client is not in line of sight or hidden from remote commands and must be programmed by the technician. Also, the customer must be educated on how to program an RF remote in the event they must replace it.
3. The H25 IRD must be placed in a bracket whenever a RF remote is used to allow for the RF adapter to be properly secured, when when not installed on a wall or television.
4. DIRECTV products can only be attached directly to the back of a television using the VESA (Video Electronics Standards Association) mounting holes and only with screws provided by the customer. If this cannot be accommodated then another mounting option must be selected.
*Mounting the device behind the TV will be dependent on the profile of the TV and ability to get behind the TV without removing it from its bracket.
Power Supplies1. Any power supply (EPS10, PI21, PI29, etc)
used with DIRECTV products should be located in the most inconspicuous location where it is at the least risk of being unplugged.
2. If the power supply has mounting holes or tabs it should be attached to a wall or other stable location. Laying the power supply on the floor should only be chosen as the last option.
3. If the IRD/Client is mounted to the back of the television, either directly or attached to the television mount, the power supply such as the EPS10 should also be attached to the television in the same manner if the television is plugged into an electrical outlet directly behind the television. If the television is plugged into an electrical outlet lower on the wall then the power supply should also be mounted close to this electrical outlet.
Other Devices1. Includes: W-CCK, CCK2. Most of these devices offer the option of either
a wall mount or stand mount.3. Discuss all options with the customer and
utilize the best option based upon their preferences.
4. Device must be mounted in alignment with product specifications including requirements regarding cabling distances and separation from other devices.
Mounting EquipmentProduct-Specific Procedures
Let’s take a look at some of the product-specific mounting procedures...
Figure 8. W-DCCK with keyhole mounting points exposed.

12Equipment Mounting
To learn how to use the wall mounting brackets, let’s take a look at the H25 and client brackets. Remember: every job is different and this is just an example, so you will have to decide the best way to mount equipment in a customer’s home. Note: these brackets are not included with the H25 or client, but should be stocked on all technician vans, and used as needed.
Mounting EquipmentWall Mounting Brackets
Before You DrillTake care before drilling, and drill only once! Take the time to measure out your drill points before you measure, especially when mounting devices that use the keyhole-style mounting points. Some of these devices, including the 21 and 29 power supply, have the measurements for mounting on the green label.
Attaching the Mounting Bracket to a WallThe wall mount bracket should be mounted using 3 screws.
∎ Use #6 wood-screw that is at least 3/8” long ∎ Use three points (A,C,D) or (B,C,D) to attach the mounting bracket to the wall
(shown in Figure 1)
To install the wall mount bracket on a wall, follow these instructions:
1. Ensure that the target location is free from hazards (electricity cables/pipes etc).2. Drill two pilot holes 1 inch (1.0”) deep using a 1/8th inch (0.125”) drill bit.
∎ The two pilot holes should be level and spaced apart horizontally. ∎ For using point [A,C], orientation spacing is 3.937 inches (100mm). ∎ For using point [B,C], orientation spacing is 2.9527 inches (75mm).
∎ At least one of the screws should be anchored to a wooden stud when mounting to a stud partition wall
∎ Use suitable dry wall anchors when attaching the mounting bracket to dry wall ∎ Use suitable masonry plugs when attaching the mounting bracket to stone/
brick wall ∎ Use extreme care when drilling in to stone or brick, as it cannot be repaired as easily as dry wall.
Figure 1
A B
D
C
13Equipment Mounting
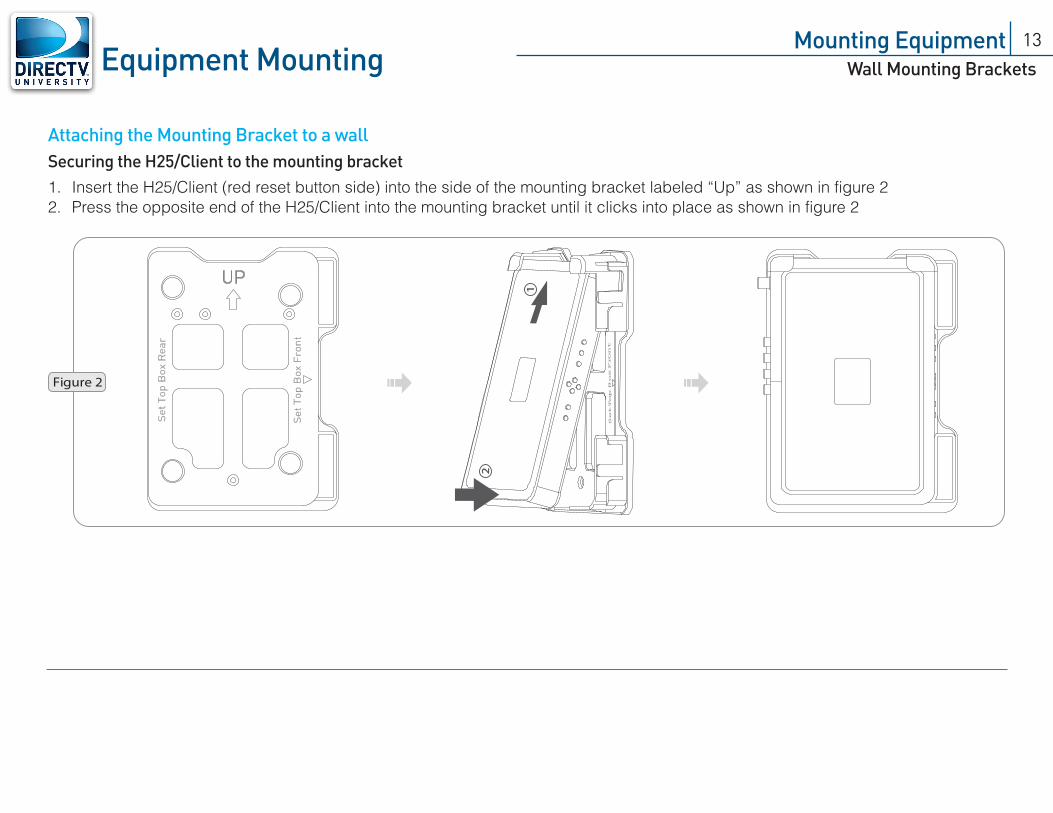
Attaching the Mounting Bracket to a wallSecuring the H25/Client to the mounting bracket1. Insert the H25/Client (red reset button side) into the side of the mounting bracket labeled “Up” as shown in figure 22. Press the opposite end of the H25/Client into the mounting bracket until it clicks into place as shown in figure 2
Mounting EquipmentWall Mounting Brackets
tnorF xo
B poT teS
1
2
Figure 2

14Equipment Mounting
Attaching the Mounting Bracket to a wallAttaching the RF AdapterIf an H25 is mounted behind a television, you will need to attach an RF adapter and setup the receiver to use an RF remote. There are four different mounting options for the RF Remote Adapter (shown in figure 3). All four options provide the same level of functionality.
1. Attach the RF Adapter by placing the body of the adapter (DIRECTV logo facing out) into one of the 2 clips built into the mounting bracket
2. Insert the 3.5mm phono plug from the RF Adapter into the “external remote” jack on the back of the H25 receiver.
Figure 3
Setting up RF Remote Functionality1. The H25 or client must be in line of site in order to set up RF capability. Once RF capability is enabled, they can be controlled
without line of site (ex: behind the TV)2. Turn on the TV and the H25 or client3. Press ‘Menu’, then select ‘Parental, Fav’s & Setup’. ‘System Setup’, ‘Remote Control’, and then ‘IR/RF Setup’ and follow the
onscreen instructions
Mounting EquipmentWall Mounting Brackets
Stress that the remote must be setup in RF mode whenever the H25 or client is hidden� If possible, have one of the trainees change a remote and receiver in the classroom to RF�

15Equipment Mounting
Attaching the Mounting Bracket to a wallConnecting Cables1. Connect the feed from the ODU2. Connect the Client to the television (using the best possible video/audio quality)
a. For high definition televisions with an available HDMI input, use an HDMI cable.b. If the customer’s television does not have an available HDMI port, verify with the customer if you can change an input to use an
existing HDMI input. If that is not possible, or if the television does not have HDMI, use the 10-pin component (YPbPr) cable.c. If the Client or H25 is being connected to a standard definition television, use the 10-pin composite (RCA) cable.
Mounting EquipmentWall Mounting Brackets
Figure 9. Client mounted on wall with satellite feed connected. Figure 10. Client mounted on wall with satellite feed
and HDMI connected.
Figure 11. H25 mounted on wall behind a television
Remind the trainees that these installations are only for example; every installation will be different, and it’s important to work with the customer to determine the best mounting and install locations�

16Equipment Mounting
Attaching/Mounting the Power SupplyNext, you need to find a way to mount the EPS10 power supply, and it’s important to install the power supply in a manner so that the power cord will not fall out. Remember: every job is different, so use your best judgement on how to install the power supply; an example is provided below.
Using a zip-tie, this EPS10 was secured to the top of the client. In an option such as this, it is important to make sure there is no additional weight on the power supply input; this prevents the weight of the cable or body of the EPS10 from pulling the power cable out.
Another possible solution on a wall mount would be to zip-tie the EPS10 to the wallmount.
Figure 12. HMC Client with EPS10 zip-tied to the top of the device.
Mounting EquipmentPower Supplies
Figure 13. HMC Client with EPS10 zip-tied to the top of the device.

17Equipment Mounting
Attaching/Mounting a Wireless Cinema Connection KitThe Wireless Cinema Connection Kit can also be mounted to a wall through the use of the keyhole mounting points on the back of the device. Note: remember that the Wireless Cinema Connection kit has antennas along the top of the unit, so it should always be mounted in an upright position.
Mounting EquipmentWireless Cinema Connection Kit
To mount the Wireless Cinema Connection Kit to a wall, use the provided screws and drywall anchors, and mount the device on the wall. Try to mount it in a location that makes sense, either behind a television, near outlets, or somewhere around other cabling to assist in keeping the installation looking clean.
Figure 14. W-DCCK with keyholes outlined. Figure 15. W-DCCK antenna locations.
Figure 16. W-DCCK installed next to the outlet.Figure 17. W-DCCK installed behind TV

18Equipment Mounting
Attaching/Mounting a Wireless Cinema Connection KitWall Mount Installation OptionsWhen mounting the W-DCCK to a wall, you have two options:
∎ Wall mount the unit with the base plate. ∎ Wall mount the unit directly on the screws.
We recommend the first option, as you can use the base plate as a template.
Two M4 x 20mm pan head screws (thread type: tapping) and expansion anchors are included for wall mounting.
∎ Suitable masonry screw expansion anchors may be required if attaching to a stone/brick wall.
To mount the unit on a wall:
1. Ensure the mounting location is free from hazards (electricity cables, pipes, etc.)2. Drill two pilot holes 26mm (about 1”) deep using a 3.6mm (about .14 inch) drill bit.
∎ The two pilot holes must be level and spaced 70mm (about 2.76 inches) apart horizontally ∎ When mounting on a stud partition wall, at least one of the mounting screws must be attached to a wooden stud.
3. Decide wall mount method: ∎ With Baseplate: Place the screw expansion anchors into the drilled holes. Drive the screws through the baseplate and fasten to the wall. Mount the unit to the baseplate.
∎ Without Baseplate: Place the screw expansion anchors into the drilled holes. Drive the screws into the wall. Adjust the screws to expose enough of the screw to mount the unit properly.
Mounting EquipmentWireless Cinema Connection Kit
Figure 18. Diagrams for W-DCCK Installation.
Figure 19. W-DCCK mounting options.Even if you are not mounting the device using the base, you can still use it as a drill template�

19Equipment Mounting
Mounting a Receiver Using VESA ScrewsOn many flat-panel televisions, there are mounting screws which can be used for either mounting to wall stands, or to attach equipment; this mounting technology is called VESA, or Video Electronics Standards Association.
There are several different types and configurations of VESA mounting screw-holes, and on many televisions, the DIRECTV mounting brackets will align with the holes on the back of the television; on some of the newer televisions, due to screen size, the mounting screw patterns may be larger and will not work with all DIRECTV mounts.
On the next few pages, we will learn how to install a client or H25 using the VESA holes on a television; if the customer’s television is on a wall mount, then the screw holes will most likely be used to mount the TV to the wall mount.
Mounting EquipmentVESA Mounting
VESA Screw Holes
As mentioned earlier, it is important to only use VESA-specific screws if mounting on the back of a television to avoid any damage to the customer’s television�

20Equipment Mounting
Mounting EquipmentVESA Mounting
Mounting a Receiver Using VESA ScrewsMounting the ClientThe first step when attempting to use the VESA mounting points is to verify that the television has VESA mounting holes, and they align with our wall mounts; the screw holes for the wall mount will mate up with the VESA holes on many televisions.
Asseeninthisscreenshot,therearefourholeswhichareusedforVESAmounting.Whenusingthesescrewsholes,itisimportanttousethescrewsthatcamewiththetelevision,orthatthecustomerhasprovided.
PositiontheclientmountingbracketwiththeUParrowpointedtowardsthetop.Usingthescrewkeyholesonthemountingbracket,attachtheC31mounttothetelevision.Donotovertightenthesescrewstopreventcausinganydamagetothetelevision.

21Equipment Mounting
Mounting Equipment
Mounting a Receiver Using VESA ScrewsMounting the ClientFirmly attach both screws to the VESA screw holes, and make sure that the mounting bracket is secure and does not move.
Note: make sure that the mount is attached with the UP arrow pointed in an upward direction. The keyhole mounts on the bracket will not work properly when mounted upsidedown.
Figure 20. Client Bracket Mounted with VESA Screws.
VESA Mounting
Once the mount is firmly attached, snap in the client. As labeled on the mount, the face of the receiver should face the right (as demonstrated in the picture).
Connect your cabling to the client and television.
Figure 21. Connecting cables from client to television. Figure 22. Client installed using mounting bracked on VESA mount.

22Equipment Mounting
Mounting a Receiver Using VESA ScrewsMounting the H25Since the steps are similar, let’s take a look at mounting the H25 using the VESA screws and mounting bracket.
Install the mounting bracket on the back of the television. Because of the size of the H25, and the alignment of the mounting holes, the two top center VESA holes must be used to mount the bracket. One additional difference with the H25 bracket is that the screw holes are not keyhole style brackets.
Clip the H25 in to the mounting bracket, and connect the cables. Remember that the H25 will require the external RF antenna to be connected to get the remote to work, and the remote will then have to be setup to work in RF mode.
Figure 23. H25 bracket installed. Figure 24. H25 installed on bracket. Figure 25. H25 on bracket connected.
Mounting EquipmentVESA Mounting

23Equipment Mounting
Cable RoutingOne thing that must be taken in to consideration when mounting products on walls, or on the back of a television, is how you run the cabling. We’ve all seen, and many in our own homes, the mess that a lot of cables can turn in to.
In wall mounted-type installations, this is especially important to consider.
Do any of you have a television that looks like this picture to the right? While that may be how we, or our customer’s, currently have the wiring on the TV done, we have to remember that we are DIRECTV, and providing our customers with the best television experience in the world includes providing them with the cleanest installation possible!
Through the use of something as simple as a zip-tie, you can dramatically clean up how an installation looks.
Let’s take a look at some ways to run cables, or use zip-ties, to place some finishing touches on an installation.
Mounting EquipmentCable Routing

24Equipment Mounting
Cable RoutingOn all types of installations, using simple zip-ties to keep cables together can really clean up a DIRECTV install. In the two pictures below, you can see the difference between a non-tied and a tied installation. Which would you rather have at your home? What are some advantages to the customer when their equipment is zip-tied?
Figure 26. Client installed without zip-ties. Figure 27. Client installed with zip-ties.
By spending a few extra minutes ensuring that they customer has a clean installation, you can increase customer satisfaction, which is crucial during the installation!
Mounting EquipmentCable Routing

25Equipment Mounting
Cable RoutingAnother example of using zip-ties is on this wall mount, which can prevent a unique challenge due to where the television and different accessories are located.
Figure 28. Client mounted without zip-ties. Figure 29. Client mounted with zip-ties.
Many custom wall installations will have pillars or boxes to run cables down to outlets or entertainment centers, so you will be able to make a determination of what works best based on the job you are on.
If a customer wants any custom work, such as wallfishing extra cables, refer to your rules about custom installation.
Mounting EquipmentCable Routing

26Equipment Mounting Checkpoint
Summary
Mounting Equipment
• Mountthecustomer’shardwareonawallortotheirtelevision
• Completecablerunsthatareaestheticallypleasing.
Review1. True or False: You can use lag screws for mounting a receiver to the VESA mounting
location.
2. What is the order of preference of where you should mount or install a receiver in a customer’s home?

27Equipment Mounting
Module SummaryKey Tips and TakeawaysA big part of your job as a DIRECTV technician is to start the customer relationship off on the right foot. The quality of your installation can sometimes make or break a customer, so take the time to do a professional install and provide proper customer education.
As mentioned before, the examples in this module are just that: examples. Every installation will be a little bit different, so use your knowledge as a technician to figure out what works best.
Some Key Takeaways ∎ It is not required that you mount customer’s DIRECTV equipment on a wall; work with
the customer to determine the best installation location. ∎ Do not remove a television or any of the customer’s equipment from existing wall
mounts! ∎ Follow the Installation Preference checklist to decide the best way to install the
customer’s equipment. ∎ Take extreme care when you drill; no one wants a damage claim! ∎ Install the brackets in the correct position, with the UP arrow pointing in the up
direction. ∎ Zip-ties are your friend when running cables. ∎ Treat every installation like it was your own, and do a good job!
Thanks for all of your hard work, and stay safe.
• Beabletoidentifywhichequipmentcanbemounted.
• Workwithacustomerinordertodecidethebestsetupandmountingsolutions.
• Understandanddemonstratehowtoinstallequipmentthatismountable.
Module Review
Address any lingering questions with the group� I
f you have any questions to follow up on, let the class know that you will get back to them when you have the answer�

28Equipment Mounting
GlossaryGlossary - VESA
Glossary Definition
VESA Video Electronics Standards Association. Refers to mounting points on the back of many televisions in which one can attach a wall mount, or different consumer electronic devices.