Embed Size (px)
Citation preview

User’s ManualT-Jet2™
SDT-1200w
Version 1.7

Equipment Zone17-20 Willow StreetFair Lawn,NJ 07410 USAOffice +1 201-797-1504Fax +1 201-797-1505Toll Free +1 800-408-0040Technical Support http://support.equipmentzone.comEmail: [email protected] in the U.S.A.

3
Table of ContentsSafety Instructions……………………………………………………………………...6Chapter One: Introduction to T-Jet2…………………………………………………. 9
About the T-Jet2……………………………………………………………………...9T-Jet2 Important Points…………………………………………………………….. 10About the Garment Decorating Business………………………………………….12A Word of Advice……………………………………………………………………..14
Chapter Two: Unpacking and Setup.………………………………………………… 15Unpacking Your T-Jet2………………………………………………………………16Installing the Bulk Ink System…………………………………………………….....21
Chapter Three: Software Installation and Setup.…………………………………. 29Software Overview……………………………………………………………………29Installing Epson Drivers……………………………………………………………...30Installing FastRIP and FastARTIST………………………………………………...32
Chapter Four: Computer Graphic Software.………………………………………... 35Computer Graphics Overview.………………………………………………………35FastARTIST/Photoshop - Editing Bitmap/Pixel Based Artwork………………….37Removing Backgrounds with Photoshop…………………………………………..45Preparing Images with Gradient Backgrounds…………………………………….46Fixing Bad Line-Art in Photoshop and FastARTIST………………………………52
Chapter Five: Printing with the T-Jet2.………..……………………………………...55Control Panel Buttons and Lights.…………………………………………………..55Basic Steps for Printing a White Shirt………………………………………………57Print Modes and FastRIP…………………………………………………………….62How to use the Print Pass Counter…………………………………………………69Canceling a Print Job………………………………………………………………...70Printing From Various Graphic Programs.…………………………………………72Production Rates and Ink Costs.……………………………………………………78
Chapter Six: Printing White Ink.……………………………………………………… 75White Ink Overview.…………………………………………………………………..75Applying Pretreatment.……………………………………………………………….77Printing White Ink….………………………………………………………………….78White Ink Troubleshooting…………………………………………………………...85
Chapter Seven: Printing Other Items..…………………………….………………… 87Printing on General Items..…………………………………………………………..87Printing on Baseball Caps.…………………………………………………………..90Non-Textile Printing…………………………………………………………………..91Printing Golf Balls…………………………………………………………………….100
Chapter Eight: Simple Maintenance and Utilities..……………………………….. 107Running Head Cleaning Utilities..…………………………………………………..107Aligning the Print Head……………………………………………………………… 109Emptying the External Waste Bottle.……………………………………………….111Resetting Ink Counter………………………………………………………………..112

4
Print Head Replacement……………………………………………………………..112Chapter Nine: Preventative Maintenance and Problem Solving………………...113Keep your Encoder Strip Clean……………………………………………………..113Removing the Capping Station……………………………………………………...117Humidity and Environmental Control……………………………………………….124Preparing your T-Jet for Down Time………………………………………………..125Eliminating Ink Drops on Shirts……………………………………………………..128Clean/Adjust Drive Roller and Belt………………………………………………….130Five Minute Daily Maintenance……………………………………………………..133Weekly or Monthly Maintenance…………………………………………………… 134Daily/Weekly Maintenance Schedule Check Lists………………………………..135
Chapter Ten: Troubleshooting………………………………………………………...137Print Head Hitting the Print Bed……………………………………………………..153
Chapter Eleven: Transporting Printer………………………………………………..155Chapter Twelve: Product Support………………………………………………….....161Appendix A–Printing with Seven Color Standard T-Jet………………………......165Creating Special Print Modes……………………………………………………….167
Requirements and Notices…………………………………………………………….177T-Jet2 SDT-1200w Specifications……………………………………………………..178FCC Compliance Notice………………………………………………………………... 179Declaration of Conformity…………………………………………………………….. 180

6
Read the Safety InstructionsBefore you start printing read the safety instructions
Make sure to follow all the warnings on the printer. Use the type of power source that is indicated on the printer’s label. Connect all equipment to grounded outlets. Do not use the same outlet for
any other system such as a copy machine or an air control unit that turns onand off.
Put the printer where the power outlet is easily seen. Do not let the power cord be damaged. If you are using an extension cord make sure the power ampere rate does not
exceed the cords ampere rate of the printer. Keep electromagnetic devices and other potential sources with magnetic
fields away from your printer. Keep away from locations that have high humidity, shocks, vibrations, debris
or dust. Leave enough space around the printer for proper ventilation. Do not leave the printer near heat sources such as radiators, heat vent, or
direct sunlight. Place the printer on a flat table or on a stable surface that extends around the
printer. The printer will not work properly if it is tilted or leaning. When packing and moving the printer do not set the printer on its side or
upside down this may cause the ink to spill. Turn off the printer before cleaning. Clean with a damp cloth. Do not spill any
liquid on the printer.
Caution: Do not unplug the printer to shut it off. Use the power button instead. Do not unplug the printer until the green power light is off. Do not block any of the printer’s vents or insert anything foreign in its slots. Unless explained by this manual, don’t try and service the printer yourself. Turn off the printer, unplug and take it to a qualified service personnel. Keep the machine level.

7
Safety Instructions for Ink Cartridges Always keep ink cartridges out of the reach of children. While handling ink be careful not to spill it on your skin. If ink does get on your
skin wash it thoroughly with soap and water. If it gets on your eyes flush themout immediately with water.
Do not put your hand in the printer or touch the cartridges once printing. Do not move the printer head by hand; doing so may damage the printer. Store the ink cartridges in a cool dark place. If you store the cartridge in a cold environment and are ready to use them set
them on a table at room temperature before you use them. Do not dismantle the ink cartridge. This could damage the print head. Do not touch the IC chip on the ink cartridges. This will effect the normal
printing operations. If you remove the ink cartridges make sure to place them in a bag individually
to keep them away from dust, dirt, and debris.

Chapter 1 –Introduction to the T-Jet2/Garment Decorating Industry
9
Chapter 1
Introduction to the T-Jet2 and theGarment Decorating Industry
About the T-Jet2The T-Jet2 is an inkjet printer that has beenmade to print on almost any type of garment,fabric material, and even non-textiles such asgolf balls, keyboards, tennis balls, etc. (Currentlynylon and certain synthetic materials are nonprintable items). In the past this was difficult if notimpossible because there was not an ink thatwould work on 100% cotton and 50/50 cotton/polyester blends that would stand up to washing.That has all changed with FastINK Textile Ink designed specifically for cotton andcotton blend materials as well as a multitude of other materials and non-textile items.FastINK Textile Ink is also used when printing on Non-Textiles by simply applyingFastT-Jet Non-Textile Series Pre/Post Treatment to the item allowing the ink toadhere to the surface.
T-Jet2 prints on 100% cotton the best. It will print on 50% cotton/50% polyesterblends, 100% polyester and many other natural and synthetic materials but you willnot have the print brightness. And, when printing on any dark garment with polyesterfibers you can get dye bleeding into your ink. A white print on a 50/50 red garmentmay turn pink when you heat the garment to set the ink.
Since T-Jet2 is based on standard inkjet technology (the Epson 2200 printer is theheart of the system). You can print from any graphic application such as AdobeIllustrator, Adobe Photoshop, Adobe InDesign, CorelDRAW, Macromedia Freehand,QuarkXPress, and FastARTIST (included with your T-Jet2).
The T-Jet2 prints on items in one to two minutes for a standard T-Shirt size image.Besides T-Shirts and non-textiles items, the T-Jet2 can print on mouse pads,thongs, ladies tops, towels, tote bags, bibs, caps, leather and more. Use yourimagination the possibilities are endless.
Note: The T-Jet2 works ONLY on a Windows system.
Your new T-Jet2 includes the latest versions of both FastARTIST and FastRIP.FastARTIST is a Windows only graphic application that will help make preparing animage for print a mere click or two of the mouse. With One click wonder underbasingand simple clipping features, FastARTIST can help ease the transition if you are not

T-Jet2™User’sManual
10
familiar with other graphic applications. For avidusers of Photoshop, CorelDraw, Illustrator, etc.,you may choose to work within your graphicapplication of choice and still setup the imageproperly for printing. There is also the option ofimporting an image into FastARTIST from othergraphic applications in order to take advantage ofthe one click Underbase Wizard. Either way, allimages must print to FastRIP for final output.
FastRIP works as the T-Jet2’s print queue and print manager, allowing you to not only selectdifferent print modes and other print attributes,but archive print jobs for future reprints. You mustuse FastRIP when printing a white underbase.
Macintosh Users–Images may be createdusing your Mac then transferred to a PC for printing.
If you have a Standard Red T-Jet that uses seven colors of ink (no white) you canprint from a Windows or Macintosh based computer. See Appendix A.
Two ModelsThere are two basic models of the T-Jet: SDT-1000 and SDT-1200. The StandardT-Jet SDT-1000 (discontinued) has a red case and prints on light colored shirtsonly without the White Ink Option kit. The T-Jet2 SDT-1200 has a chrome cover,slightly larger bed and includes the White Ink Option. This manual covers the T-Jet2,but many items covered here apply to the SDT-1000 red machine as well.For more specific details about the T-Jet Standard (red machine) refer toAppendix A.
T-Jet2 Important PointsMaintenance
Although the T-Jet2 is “simply” an inkjet printer, the number one problem we encounter when providing support is the lack of maintenance to the machine.Printing on T-shirts is not the same as printing on paper using the inkjet printerbehind your desk. A shirt gives off more lint and the amount of ink deposited is muchgreater than for paper. Plus, when printing on dark shirts you need to spray apretreatment on the shirt. This pretreatment can get inside the printer and causeproblems so we recommend you pretreat shirts as far away as possible or in anotherroom. If you take ownership of the required maintenance, printing with the T-Jet2 willbe a joy. If you decide that a few minutes each day is too much time to spendto maintain your investment then you will have more ruined shirts and somefrustration. See chapters 8 and 9 for more details.

Chapter 1 –Introduction to the T-Jet2/Garment Decorating Industry
11
Poor ArtworkWith graphic programs readily available, everyone is an artist. Poor quality artworkwill be one of your biggest concerns. There is no magic that will make a lowresolution, low quality piece of artwork look great on a shirt. It is important that youtake time to learn as much as you can about graphic art programs and some of thesimple methods used to improve the quality of customer supplied artwork.
Support
Technical Support +http://support.equipmentzone.comCorp. Office +1 201-797-1504Fax +1 201-797-1505Email: [email protected]
Support hours: 9:00am to 8:00pm EST Monday through Friday
There are dozens of videos online showing how to use and maintain your T-Jet2.
For best results read this entire manual first before using the T-Jet2.

T-Jet2™User’sManual
14
A Word of AdviceWhen starting a business it is often easy to think nothing will go wrong. You need tobe positive about your venture but in the beginning, expect the worse. If you takeorders for printed shirts before you even received your machine, you might find thatdeadlines are hard to meet because of the learning curve and unexpected problems.The garment business is one of deadlines, event shirts, shirts for special occasionsand shirts with “dates” on them. You must always give yourself room for error. Shirtsuppliers might not ship on time. You might not have checked your ink inventory andrun out of a color. Yes, you will ruin a few shirts and you need to accept this as a factof life in the garment decorating industry. To have the most success, allow extra timeto fill orders and don’t make commitments that might be hard to make.
There is nothing more rewarding than seeing someone wearing one of yourcreations but nothing more disturbing than working all night to meet a deadline.Anyone who has been in this industry has had the joy and sorrow of both. Planahead and always have a cushion to make sure you meet deadlines.

Chapter 2–Unpacking and Setup
15
Chapter 2
Unpacking and Setup
Save the box and all the packingPlease retain all shipping materials, bags, boxes and directions. If you everneed to return the unit for repair or to transport your T-Jet2 you will needthese items. If you return or ship a T-Jet2 without using the original shippingcarton you may void the warranty.Please read all of the unpacking and setup directions FIRST before attempting tosetup or use your printer. DO NOT plug your T-Jet2 into AC Power until you are toldto do so in this manual.

T-Jet2™ User’sManual
16
Unpacking Your T-Jet2If the instructions on the outside ofthe box were followed, you havealready checked the outside of thebox for any shipping damage. If yousee obvious damage please contactthe freight carrier immediately so youcan schedule a freight inspection.Along with this guide, you will findseparate instructions for propermethods in unpacking as well as aseparate box with accessories foryour T-JET. Remove side protectorpanels and accessories.
NOTE: Save all packing materialsand bags as well as the box forfuture shipping needs.
Main Box Contents Software/Training T-Jet2 Manual Waste Ink Pads Power Cable USB Cable Height Jig Maintenance Kit Adjustable Shelf Bracket
Box 2 FastARTIST Package Shirt Boards and Hoop EZ Pro Bulk Ink System Cleaning System Inks Pretreatment Sprayer Parchment Paper
Industrial Bulk Ink System Parts 7 - Easy-fill bottles. Four 8oz.bottles for CMYK and four bottles for
white ink. 7–Ink Cartridges

Chapter 2–Unpacking and Setup
17
. 1–Syringe 1 - set of cartridge chips 1 - Latex gloves
Waste Bottle Waste Ink Bottle Secure Nut and Ink Line Fitting Waste Bottle Shelf Bracket
Lift the T-Jet unit from the boxWith an assistant, lift the T-JET out of thebox and place it on a firm, level surface.
Lift from CHROME SIDES ONLY
DO NOT lift alone. Lift with your legs, notyour back! Place the printer on a solid tableor work surface that will not shake orvibrate during printing. The table must belevel! For best results place the unit on a tablewith extra room for a computer,replacement ink and work space.
Preparations1. Remove Hold Down Clamps
With a Phillips-head screwdriver, loosen the fourbed holder brackets located towards the bottom ofeach side of the bed. Push them out of the way ofthe bed and tighten. Move the Print Bed back andforth to ensure smooth movement. Return the PrintBed back to its' eject position.

T-Jet2™ User’sManual
18
2. Remove all Packing Materialsa) Remove all packaging tape from the printer and Print Head.
b) Remove "Pull" tabs from the Cleaning Cartridges and place them back inthe printer.
3. Check the Print Bed HeightUsing the Print Bed Adjustment knob located onthe front of the eject side of the Print Bed, lowerthe bed enough so that the Print Head does nothit anything while traveling back and forth. Turncounter-clockwise until it is low enough. Makesure the Print Head does not hit anything beforecontinuing to the next step.
Open the rest of the boxes that contain a variety of accessories and products.
Location, location, locationThe T-Jet2 should not be indirect sunlight, direct airflow(may dry out and clog printingheads), dusty areas, close to astrong magnetic force, or inareas of excessively highhumidity (it likes not to be toodry or too moist with a level of35% to 80% relative humidity).Since you will be handling wetink to refill the bulk system inkbottles you should protect any carpet or floor covering with mats.
This is an expensive and delicate inkjet printerthat does NOT like being in a hot or cold shop orgarage without proper air-conditioning controls. Ifleft unattended for days or weeks in a hot dryenvironment you will have clogged print heads. Ifyou are going to leave your printer for more thantwo to three days without use, consult ChapterNine (Preventative Maintenance and ProblemSolving) for installing refillable cleaning cartridgesduring long down times.Place the T-Jet2 close to a heat transfer press or small conveyor dryer to cure theink. If you have two or three T-Jet2s as a production work station, place themaround or near the heat source.At night and when the T-Jet2 is not in use, cover the machine to keep it protected.

Chapter 2–Unpacking and Setup
19
Important Point!When printing white ink you must spray apretreatment on the shirts before printing. DO NOTspray this pretreatment near your T-Jet2. In fact, ifpossible, pretreat shirts in a different room or make asimple cardboard enclosure to use for applyingpretreatment. The pretreatment is sticky and can geton the “magic” of the printer called the Encoder Strip. The Encoder Strip is a thin piece of clear plastic withdata that is read by the print head as the unitoperates. The Encoder Strip tells the head exactlywhere to print an image. If the Encoder Strip getsdirty, the printing head gets confused and will printmultiple images, strips of solid ink, and many otherirregular printing patterns.
Check for Printing Headmovement
There is a READ ME sheet on theplastic. Please read it now. Removethe tape holding the top plastic lidclosed. Remove the tape and bracketholding the inkjet printing head in place.Follow the directions on the Read Meabout checking to see if the printinghead hits the shirt bed. In order to havesharp printed images during inkjet printing the head must move very close to the topof the shirt. During shipping or removing from the shipping box, the bed of the T-Jet2may have shifted slightly. If the head does NOT hit the side of the printing bed youcan proceed. If the printing head hits the side of the bed when moving it by hand,refer to Chapter 10–Troubleshooting for details on how to adjust the head height.

T-Jet2™ User’sManual
20
Plug unit into AC powerDO NOT TURN THE PRINTER ON YET! YOU MUST CHECK TO SEEIF THE PRINT HEAD MOVES FREELY. YOU CAN TURN THEPRINTER ON AFTER YOU INSTALL THE BULK SYSTEM.Insert AC cord in unit and plug into a power strip with asurge protector. Avoid plugging multiple items into theT-Jet2 power strip. The T-Jet2 has a dual voltagepower converter and will work on 50 or 60 cycle currentthat ranges from 110 volts to 220 volt.For more reliable results plug the unit into a UPS(Universal Power Supply) to help prevent ruinedshirts during power fluctuations.Do NOT plug other high power items into the same circuit such as a heattransfer press. The heat transfer press will cycle on and off causing powerfluctuations, potentially ruining shirts. This is VERY IMPORTANT!Important Note: NEVER shut off your T-Jet2 at the power strip; use the PowerSwitch on the actual unit. During Power Off of any inkjet printer, the printer goesthrough a shut down cyclethat seats the head so you won’t get head clogs. If you shut the unit off at a power strip it does not go through a normal shut down.
Connecting your T-Jet2 to the computerYou can connect the T-Jet2 to a computer with anormal parallel cable, USB cable, or even an IEEE1394 Firewire cable. The machine came with aspecial gold tip USB cable; use this cable for bestresults.In any situation take care to not use a cable that isexcessively long and do not use a switch box, which can often cause communicationproblems.Your computer needs to be a PC/Windows computer ifyou will be printing with white ink. For best results youshould use a very fast computer with at least 512mb ofRam. Ram is inexpensive and if you can put 1 GB ormore on your computer it will prevent problems whenprinting large files.The Universal Serial Bus–USB–method ofcommunication is standard on all newer computers,but what is not commonly known is that there is only acertain amount of power supplied to the entire “bus.” This means that if you have a number of itemsplugged into different USB ports on your computer, itmight cause communication issues with the T-Jet2.

Chapter 2–Unpacking and Setup
21
If possible and for the best performance use a dedicated computer to controlyour T-Jet2 and do not plug anything else into extra USB ports when printingto your printer.
It is very important to note that if you do not follow the recommendedenvironment, power, maintenance, and operating conditions, you can void thewarranty of your T-Jet. The T-Jet does NOT like to be in a hot, dry shop withexcess dust, as well as being plugged into outlets with a lot of other items.Please read and understand the operating conditions and maintenancerequirements for your money making investment.

Chapter 3–Software Installation and Setup
29
Chapter 3
Software Installation and SetupSoftware overview
About Your ComputerThe T-Jet2 is a high performance inkjet printer. Graphic files can be large, and thedata sent from FastRIP to the printer is sent at a very high speed (high data rate). Inorder to get the fastest speed and have fewer communication problems with theprinter, you need a fast computer. You can use a standard desktop computer oreven a laptop with the T-Jet2, but for the best performance, the computer shouldhave at least 512mb of RAM (1 GB to 2 GB of RAM is better).If you want to continue working and creating artwork while the T-Jet2 is printing,having a higher amount of RAM on board your computer is essential. Ideally youshould have a computer that is ONLY used to power the T-Jet2.While sending data to the T-Jet2 with a USB cable (preferred), do not have anythingelse plugged into a USB port (other than a mouse). USB ports do not have a lot ofpower and the more devices plugged in the more power drain that will occur. Inorder to run FastARTIST you MUST have a PC/Windows based machine - MACusers, create the artwork in your favorite program and simply network or copy thefiles over to the PC “workstation.”
Graphic and RIP softwareYour new T-Jet2 includes the latest versions of bothFastARTIST and FastRIP. FastARTIST is a Windows onlygraphic application that will help make preparing an imagefor print a mere click or two of the mouse. With One clickwonder underbasing and simple clipping features,FastARTIST can help ease the transition if you are notfamiliar with graphic applications. For avid users ofPhotoshop, CorelDraw, Illustrator, etc., you may choose towork within your graphic application of choice and stillsetup the image properly for printing. There is also theoption of importing an image into FastARTIST from other graphic applications inorder to take advantage of the one click Underbase Wizard. Either way, all imagesrequiring a white underbase must print to FastRIP for final output. Seven color printsmay print directly to the printer.
Once a graphic file is ready to print, it needs to be sent to special software called aRIP (Raster Image Processor) that tells the machine what image resolution to use,how many passes to make of the colors, when and how to print the underbase andhighlight and how much ink to lay down. RIP is the magic of high-end printers in anygraphic application and we have our own very special rip program called FastRIP.

T-Jet2™ User’sManual
30
You can now print directly to FastRIP from any standard graphics program likeAdobe Photoshop, Adobe Illustrator, Corel Draw or Macromedia Freehand and stilltake advantage of the white underbase option.
For information about installing and using FastARTIST and FastRIP consult theindividual programs User Manual.For best results turn OFF all Screen Savers when printing to your T-Jet2.
Installing Epson drivers
Epson driversEven though you will be printing to FastRIP, there are manytimes you will need to use the standard Epson software todo nozzle checks, head cleanings and standard inkjetmaintenance. The Driver CD you received with the unitcontains the Windows and Mac drivers for the Epson 2200.Since drivers change and improve, you can download themost current driver for the Epson 2200 by simply going tohttp://support.Epson.com and follow the links to the Drivers section.
Windows InstallationTo install the Epson driver, insert the CD inyour computer. Go to My Computer and selectthe CD drive. There will be two Printer Driversfolders accessible; one is for Windows XP and2000 (the preferred operating system) and theother for Windows ME operating system.
For Windows XP, double click on the foldercalled Printer Driver v5.5bs, then double clickon the sub-folder called XP 2000. Locate theSetup folder and double click to open. Double-click on a file called Setup and follow the on-screen prompts.Note: Some newer Windows XP computersautomatically install the Epson printer drivers.
Windows will install the Epson 2200 driver onyour computer and diver functions will beaccessible from the Printers and Faxes folderlocated within the Control Panel as well as fromyour favorite graphic application.

Chapter 3–Software Installation and Setup
31
If you have any problems installing the driver or getting your program to find theprinter driver, call our support department and we will gladly walk you through theprocess.Toll Free +1 888-MYTJETS (698-5387)Technical Support +1 480-929-2937Corp. Office +1 480-929-0640Fax +1 480-929-0766Email: [email protected]: www.ScreenPrinters.Net Click on SupportSupport hours: 7:00am to 8:00pm Monday through Friday
9:00am to 3:00pm Saturday(Mountain Standard Time) USA
Note: Arizona does not observe “Daylight Savings” in the US.In the summer months, Arizona is on the same time as California.
Macintosh Installation (for printing 7 color only)To install the Epson drivers, insert the CD inyour computer. The CD will show up on yourDesktop. Double-click on the CD icon on theDesktop.The CD will show you drivers for both Mac OSXand Mac OS 8.6 - 9.x. Double-click on theappropriate operating system and then on theappropriate driver.Follow the on-screen prompts. Macintosh willinstall the Epson 2200 driver on your computer.
Mac OS 8.6 to 9.x: (for printing 7 color only)
Open the Chooser and then select thefollowing options:
SP 2200Your USB or FireWire portBackground printing (on or off)Then close the Chooser.

T-Jet2™ User’sManual
32
Mac OS X 10.2.8 - 10.4.x: (for printing 7 color only)After doing a normal installation and thecomputer restarts, go to MacintoshHD/Applications/Utilities. Select Print Center(Jaguar) or Printer Setup Utility (Panther).If the Stylus Photo 2200 appears in thePrinter List, select it and click Add.
If the Stylus Photo 2200doesn’t appear, make sure your printer is turned on andconnected. Restart the computer and tryagain.Select the following options on the next screen:
EPSON USB or EPSON FireWire at the top of the screen
Stylus Photo 2200 below
Open Page Setup menu at the bottom of the screen and select the Standard. Thenclick Add. When printing with T-Jet2 you will be accessing this driver from withinyour favorite graphic application.If you have any problems installing the driver or getting your program to findthe printer driver, call our support department and we will gladly walk youthrough the process.
Installing FastRIP and FastARTISTThe magic that makes the T-Jet2 sopowerful is not only the printer and ink, butthe software that drives it. As mentionedearlier, the T-Jet2 comes with two verypowerful programs–FastARTIST andFastRIP. FastARTIST is a completegraphic program much like Corel Drawand Adobe Photoshop. You can useFastARTIST for all of your graphic imagecreation or you can simply create imagesin Corel Draw or Adobe Photoshop andimport them into FastARTIST to take advantage of one click Underbase Wizard orsimple clipping options.
Note:For details on installing FastARTIST, consult the FastARTIST User’s Manual.

Chapter 3–Software Installation and Setup
33
FastRIPFastRIP is a printer driver that is speciallydesigned to power your T-Jet2. A RIPconverts the data from a graphics programto computer code called Postscript. This isa powerful language that allows muchmore control over a printer than you wouldget with a regular driver. FastRIP nowmakes the following possible:
Preview of printable images
Control over the amount of ink used
Faster print speeds than with a normal print driverFastRIP is extremely easy to use and is almost transparent when working with the T-Jet2.
For details on installing FastRIP, consult theFastARTIST User’s Manual.
It is important to have a brief knowledge of bothFastARTIST and FastRIP. The manuals may seemvery large but don’t be concerned by the size. You do not have to know everything aboutFastARTIST and FastRIP.

Chapter 4–Computer Graphic Software
35
Chapter 4
Computer Graphic SoftwareComputer Graphics Overview
In order to print a good-looking image on a shirt, you will first need a good/greatpiece of artwork. The customer typically has no idea about the type or quality ofartwork needed so you are often stuck with inferior artwork. If you don’t have computer graphic experience, you might print this bad artwork and then blame yourT-Jet2 for the poor quality image.There are a number of great computer graphics programs designed for creating andmanipulating images. If you have never used computer graphic programs before,you might be inclined to use applications such as Microsoft Word or other wordprocessing programs that are designed for text and are NOT strong graphicprograms. Recommended graphic programs for this purpose are FastARTIST(included with T-Jet2), Corel Draw (any version), Adobe Photoshop (version 5.5 orhigher), Adobe Illustrator (version 7.0 or higher), and Macromedia Freehand (anyversion).Contrary to popular debates, great images can be created and manipulated onWindows/PC as well as the Mac platform. The T-Jet2’s FastARTIST graphicapplication is designed for Windows/PC’sonly. Mac users wanting to take advantageof the FastARTIST Underbase Wizard and other convenient setup options will simplyneed to transfer the file onto the T-Jet2 PC loaded with FastARTIST and import theimage.We often hear from first time T-Jet2 users that did not think they would need to knowabout graphics software. This is not the same as taking your digital camera’s memory card to the drug store and getting pictures made. Yes it would seem thatsimple and it CAN be, but in the world of T-Shirt printing there are many variables.The first variable is that the customer will often bring artwork that is substandard andcould often times be an image that their web designer gave them. Web graphics arecommonly very low resolution (not sharp) and may need to be enlarged for a full-sizeT-Shirt image. When you have an image that is of low resolution at a small size,enlarging the image will only blur the image more. So for this, you will need to learnhow to make the file the correct size plus how to improve the quality of the file.
Vector programsCurrently there are two main types of graphicprograms–Vector and Bitmap. FastARTIST, CorelDraw, Adobe Illustrator, and MacromediaFreehand are called vector programs. Vectorprograms create images based on shapessomewhat like a coloring book. They typically havehundreds or even thousands of typefaces and

T-Jet2™ User’sManual
36
manyhave extensive “coloring book” type stock clip art that you can use to createartwork.Vector programs are generally used for images with a hard edge like racecardesigns, school mascots, corporate logos, etc.
Pixel based bitmap programsPrograms like FastARTIST and Adobe Photoshopare called pixel or raster based programs and liketo work with photographic type images. Yes,FastARTIST is both a bitmap and vector graphicprogram. Bitmap applications can lighten, darken,sharpen, and create images. Photoshop is acommon graphic program used by many formanipulating images but FastARTIST also contains similar editing tools. Images withlots of gradations or that are photorealistic are generally created and manipulated inprograms such as FastARTIST and Photoshop.
Both File TypesIf you intend to create your own artwork then you will need a vector and bitmapprogram. The vector program will be used for working with shapes, text, and edges,while the bitmap program will be used for any photographic or detailed image. TheFastARTIST program will work with both types of images.The following section gives tips and suggestions for creating artwork suitable forprinting on your T-Jet2. Remember, if you are proficient in a graphics program otherthan the new FastARTIST; simply create the images where you are comfortable. Foradvanced users of programs such as Photoshop and CorelDraw; the entire image cansetup to print directly to FastRIP including images that need a white underbase.Please note that highlight white (not to be confused with the white underbase) is notavailable when printing from another program other than FastARTIST.FastARTIST can be used to create the entire image if needed. With Corel andPhotoshop type tools, FastARTIST is a quick learn for those already familiar withother graphic programs.

Chapter 4–Computer Graphic Software
37
FastARTIST/Photoshop - Editing Bitmap/Pixel Based ArtworkBesides FastARTIST’s ability to work with vector based images such as hard edgegraphics, clipart, and font manipulation, it will do a lot of basic pixel editing functionsnecessary when the customer gives you a pixel/bitmap files such as: JPG, GIF,TIF, or PSD.One of the main T-Jet2 strengths is the ability to print short runs of photorealisticimages. If your customer wants a picture of the entire team on a shirt, no problembecause you can’t do a short run of photorealistic images profitably with screenprinting!The problem in the T-Shirt business is that customers need high resolution artimages and often all they have to work with is small artwork that is low resolution. Itis MANDATORY that you learn how to make the artwork the correct size andresolution, besides knowing how to make the image brighter (most images are dull)with good color saturation. This may be the ONLY time you utilize the FastARTISTor Photoshop image editing tools.A quick note about PhotoshopAs you begin to work with different kinds ofimages in different formats and resolutions,it is very important to have the proper toolsnecessary to clean up and make imagesprint ready. As FastARTIST is a verypowerful graphics program, there may becircumstances when a program such asPhotoshop is required based on specificediting functions. Photoshop works hand-in-hand with FastARTIST making it a verycomplimentary program to have whenworking with bitmap images.The goal here is to get you up to speed with basic image editing, so that you mayprint the best looking images possible. When first learning graphic programs such asFastARTIST and Photoshop, the process mayseem a bit overwhelming. Don’t be; just keep in mind the age old 80/20 rule as it applies. You use 20% of the program80% of the time but in this case it’s actually more like the 90/10 rule.
You might be asking why you need Photoshop if you have FastARTIST. Actually,you can do almost everything you need with FastARTIST but Photoshop is muchmore powerful when creating an image with lots of photographic components. Plus,Photoshop is much more powerful when fixing and cleaning up poor quality artwork.Note: The techniques shown below will be performed using FastARTIST as the keygraphic program. When appropriate we will show you Photoshop steps as well. Formore detailed FastARTIST information, please consult the FastARTIST UsersGuide.

T-Jet2™ User’sManual
38
Where to get PhotoshopPhotoshop is the flagship product of Adobe Systems at www.adobe.com. Theprogram retails for around $650 and as of this writing, version 9.0 CS2 is the mostcurrent version. It is always nice to have the latest and greatest version, but frankly,you can do everything we show here with version 5.5 or higher. If you are a student,teacher, or work for a school, you may be eligible for an “educator version” from places like www.academicsuperstore.com.
File Types and ResolutionsFastARTIST and Photoshop will let you“Open” a wide variety of files including, TIF, JPG, GIF, EPS, PSD, AI and others. If youopen a file that is vector based like onefrom Adobe Illustrator, Photoshop willconvert the file from mathematical vectorsto small pixels. This is called Rasterizing afile.The important point here is to keep the fileresolution high enough for the image toremain sharp. It is generally taught that afile needs to be at 300 dpi at the final size inorder for it to remain crisp. In T-Shirtprinting, you can get away with fileresolutions of 150 to 200 dpi at the finalsize. The default setting for opening vector files in Photoshop is 72 dpi. The pictureat the right shows a magnified view of a file that is 300 dpi (bottom) and one that is72 dpi (top). Obviously, the 72 dpi file will be softer.
Check File ModeThis is step that most new users will over look when opening a file. It is veryimportant to learn about the file attributes when first opening a file as well asdetermining the file mode: CMYK or RGB. File should be in RGB as the T-Jet2 doesnot print spot color.In FastARTIST, even if the file is CMYK from another application, FastARTIST willopen/import it as RGB, but FastARTIST will open the file at a larger resolution thannormal. For best results convert the file to RGB (if you can) before you import it intoFastARTIST.Yes, Photoshop will do process color separations called CMYK, but for filemanipulation and adjustment you should work in RGB mode. In Photoshop, to seethe Mode of the file go to Image/Mode. If CMYK is checked, click on RGB.

Chapter 4–Computer Graphic Software
39
Check File Size and ResolutionNext, you MUST know the actual resolution andsize of the image. Otherwise you could be workingon a very small file and not know it. InFastARTIST, import a photorealistic file and clickon the Bitmap main drop down menu and thenImage Size. You will see the actual size of theimage. If the resolution is too small, change thesize and click on Apply. Remember that anappropriate image size should be 150 to 200 dpi.If the images physical size is too small, resize theimage before changing the resolution. After theimage size is adjusted, click on the Bitmap maindrop down menu and then Image Size. Changethe resolution and select Bicubic (as shown below), click Apply.
In Photoshop, go to Image > Image Size. If it says pixels per CM, change this toinches and then enter the images intended final print size. Re-adjust the Resolutionand make sure that Bicubic is selected as shown below. The physical size should bethe final print size.

T-Jet2™ User’sManual
40
If you have an image that is very low resolution, your only real choice is to changethe image size and resolution referred to as Upsampling. Photoshop “Upsamples” the image, but in doing so, has to guess at where to place all the extra pixels andwhat color to make the pixels. Images may have softer edges when upsampled, butwill be less pixilated! If you can get a higher resolution file from the client, by allmeans do so If a small resolution image is all you have to work with then so be it..Corel Draw and Adobe Illustrator have similar Image Size functions.
Important Point!If the original file is low resolution and not
the final size, you need to upsample the fileto the final print size and 150 to 200dpi (150is OK for photos and images without hardedges. 200 to 250 is better where there istype or hard sharp edges). Now, you canwork on the file and add additional type orother elements. The reason to upsample theimage first is so any additional elements youadd will be at the higher resolution. If youaren’t sure if the image issharp enough,simply zoom in on the file. It might lookgreat zoomed out but very soft or jagged when you zoom in. It will print the way yousee it zoomed in.
Check file SaturationQuite oftencustomers’images will be flat and need a color boost. Always check thefile to see if it needs a saturation boost by going to Bitmap > CMYK ColorAdjustments > Hue Saturation (FastARTIST) or Image > Adjustments > HueSaturation (Photoshop).

Chapter 4–Computer Graphic Software
41
Sharpening ImagesTypically, an image can be made sharper. Even if the file came from an agency orlarge licensed job, don’t assume that their artist knew your needs. Imagesthat areprinted not only get darker, but also get softer. You MUST make them as sharp aspossible.Go to Bitmap > Filters > Sharpen > Unsharp Mask (FastARTIST) or Filter > Sharpen> Unsharp Masking (Photoshop).Don’t let the “Unsharp” term fool you, this termcame from the old process camera days and basically means it only sharpens areasof high contrast. The reality is, it sharpens but keeps it less apparent that you havesharpened the image.Move the Amount slider to 150%. Set the Pixel Radius to 1 and the Threshold to 8.How does the image look? To compare the original to the sharpened version,uncheck the Preview check box (Photoshop). Click it on and off and compare theresults. If you can't see much difference, move the Amount slider higher. Go all theway to 500% if you need. Don't make the image too grainy.
Set the Amount slider to 200, the Radius to 1

T-Jet2™ User’sManual
42
Using the Tone CurveWhen screen printing, heat transfer printing, or direct-printing on garments, imagestend to get a little muddy. If you have a file with lots of detail in the shadow areas,this will probably be lost when printed so you need to adjustthe “density levels” of the image. In FastARTIST go to the Bitmap main drop down menu, and then toCMYK Color Adjustments > Curves. In Photoshop go to the Image main drop downmenu, and then to Adjustments/Curves. The Tone Curve is a very powerful tool thatwill allow you to adjust specific tonal areas from the lightest “highlights” to the darkest “Shadows.” By placing your cursor in the middle of the “Midtones” curve anddragging the mouse up or down, you can lighten/darken the medium or midtones inan image. By clicking on the very top corner and dragging the mouse in, you canmake the highlights lighter (Photoshop). Play around with the Tone Curve and seewhat happens. A good curve for flat images is a slight “S” where you lighten the highlight 25% area and darken the 75% shadow area.
Bitmap Editing in FastARTISTPhotoshop is always in bitmap editing modebecause it is a pixel-based bitmap-editingprogram. FastARTIST is in vector editingmode when you launch the program (so isCorel Draw and Adobe Illustrator). You needto find the bitmap editing tools in otherprograms. In the case of FastARTIST,simply double click on the image. Thatchanges the top tool icons to standardbitmap editing tools (very similar icons toPhotoshop).

Chapter 4–Computer Graphic Software
43
Selecting AreasIf you want to apply a Tone Curve adjustment or apply Unsharp Masking to selectareas, in FastARTIST you simply double-click on the object to have the bitmap toolsavailable and then click on the Lasso tool (looks like a lasso). Now, simply hold themouse button down and draw around an area you want to change. When yourelease the mouse, you will have a yellow outline identifying the selected area. Nowanything you do ONLY happens to this area.Using Photoshop, you can choose an area with one of the Selection Tools on theToolbar. Click on the tool that looks like a Lassoand draw around the object while holding downthe left mouse button. When the left mouse buttonis released the selected area will be identified bywhat is called “Marching Ants” –small movinglines around the selected area. While the area isselected, any changes made with regards to ToneCurve or Unsharp Mask will only apply to thisarea. To remove the marching ants, go to theSelect pull down menu and to De-Select. If youwant to select square or round areas, use theMarquee Tool (top left tool) as this will do thesame as the Lasso tool.
Channels and LayersWhat really separates Photoshop fromFastARTIST and Corel Draw is the ability to workin Layers to build images. In Photoshop, if yousetup the working space the way we showed, youshould have the Channels Palette and LayersPalette open. People always get these confused.Here are the rules. The Channels Palette is usedto create output. Channels print. The LayersPalette is used to create or build the image. Youuse the Layers Palette to put various componentstogether including adding Type to an image.Layers don’t print. Simple….
You will notice that your Channels Palette showsfour channels: RGB, Red, Green, and Blue. Your test file probably shows only oneLayer called Background.For more details on using the Layers Palette in Photoshop consult the Photoshopmanual.

T-Jet2™ User’sManual
44
Setting Transparent Images in FastARTIST
To set transparent backgrounds in FastARTIST double click on the image toenter the bitmap edit state.This is done simply by double clicking onthe image in the workspace.
Using the Eyedropper tool, click on thered background and then click on theAdd Color button in the Color Selectiondialog box. This will make the selectedRed the current color.
Note: The background color can be anysolid color, not just red. For example itcan be white, black, yellow, green, etc.Please also note that FastARTIST will only remove one color only and if your imagehas a multicolor or gradient back ground, Photoshop would be necessary to makethe image print ready.
To make the red transparent click on the Eyeicon next to the selected color (this acts as atoggle switch so selecting it again will de activeany transparent color).
Note: It is only possible to have one color set as transparent.

Chapter 4–Computer Graphic Software
45
Removing Backgrounds with PhotoshopIn order to make removing backgrounds as easy as possible, try to maintain aconsistent/neutral background if possible. For example, if photographing themotorcycle as shown below, park in front of a wall or a background that contains amuch lighter color than the bike. This will help Photoshop determine the differencebetween the selected background and the intended object (such as the motorcycle)to keep.
Using the Magic Wand - Click and DeleteWith the Magic Wand you simply click on theneutral areas around the image. It works bestif the background color is slightly differentthan any of the edges of your image. Justclick and watch the Magic Wand make aselection around the image. If the “marching ants” selection goes into the main design, change the Tolerance on the Property Bar.The default is 32 pixels.Photoshop and FastARTIST both haveMagic Wand tools (it looks like a wand with a
sparkler on the end).
Using Extract FilterPhotoshop also has a Filter calledExtract where you draw around animage and then fill the center with colorand Photoshop removes all the areasaround the image leaving you with atransparent background. Extract worksOK but the magic wand is preferred.
Note: The Magic Wand and Extract filter perform best when the background is a solidcolor and not gradient. For gradient images, please see the following–PreparingImages with Gradient Backgrounds.
Making Your Selection a New LayerIn Photoshop you need to get your mainimage on a layer with a transparentbackground (this will show as checks allaround the image). With a transparentbackground you can add additional elementsto the image including type, drop shadows,glows, and more.

T-Jet2™ User’sManual
46
Preparing Images with Gradient BackgroundsOccasionally you may need to prepare an image to print that contains a gradientbackground. As this will not be an issue when printing on white/light coloredgarments that do not require an underbase; however, setting up a gradient image toprint on dark colored garments that require an underbase can sometimes be a trickyprocess. In order to process a gradient image within FastARTIST, you will need tocreate two versions of the same image–one with a white background and the otherwith a black background.
If the customer supplies you with a Photoshop PSD file that has been created inlayers, then the process of changing the background color can be very simple. But ifthe image is a flattened image such as a jpg or tiff, the process of changing thebackground color can be much more involved especially if the edges of the imagefade into the background such as the example above. For the purpose of thismanual we will assume that the customer supplied a flattened jpg.
The ability to maintain the gradient look (for dark garments only) will require the useof both Photoshop and FastARTIST combined in a two part process. The first partwill be to setup the image within Photoshop, then create the underbasing withinFastARTIST for the second part.
The image that that we will be working with contains awhite background that will need to be changed to black inPhotoshop in order to have the same image both in awhite and black background. Make sure to duplicate theimage creating a safe working copy.
Steps for changing background colorThere are many ways to change the background of animage when using Photoshop. Earlier in this chapter wediscussed using the Magic Wand or the Extract filter. Inthis case we will be using the Magic Wand in combination with the Replace Colorfilter to change the background color.

Chapter 4–Computer Graphic Software
47
Note: It is very important to understand before continuing that not all images createdon a white back ground will look the same on a black background. Through hours ofPhotoshop experience you will learn to use the tools mentioned below to get thebest representation possible.
1. Open the safe working copy of the image inPhotoshop.
2. Once the file is open, select the Magic Wand tooland set the tolerance to 55 as a starting point.Please note that the higher the tolerance is set,the tighter the selection will be to the image.
3. Make sure that the Anti-alias and Contiguousboxes are selected to the right of the Tolerancesetting.
4. With the Magic Wand tool, left click the whitearea around the image. The selected white areawill now be identified by the marching ants.
5. Next, from the top main menuselect Image > Adjustments >Replace Color. The ReplaceColor filter window will nowdisplay as follows:

T-Jet2™ User’sManual
48
6. Change the default settings for the ReplaceColor filter:
Black will be selected as the color–Move themouse over the white selected area of theimage and left click. You will notice that thecolor box within the Replace Color windowwill now show white.
Within the Replacement Box move the Lightness slider all the way tothe left (-100) watching the result box change from white to black. Yourimage should also reflect the change as you move the slider. If you donot see the image change, make sure that the preview box is selected.

Chapter 4–Computer Graphic Software
49
Adjust the Fuzziness slider to change the softness of the selectededge. Adjust at your own discretion.
When the finished adjusting the Replace Color setting, click OK.
7. With the Magic Wand tool still selected, right click on the image andchoose Deselect from the drop down menu.
8. Save the image with the “Save As” option as a jpg. Be sure to use adifferent file name as not to overwrite the original image with the whitebackground.
At this point you now have the two files necessary for FastARTIST to create agradient underbase–One image with a white background and the other with a blackbackground as shown below.
Creating a Gradient Underbase with FastARTIST1. Open FastARTIST and import the two images onto your workspace.
2. Select Edit from the top menu bar, then Select All.

T-Jet2™ User’sManual
50
When both images are selected they will be boxed in as identified above.
3. Click on the Underbase/Highlight Wizard icon from the tool bar and selectthe wizard option.
First option - Underbase/Highlight Wizard will manually take youthrough the underbase/highlight setup process.
Second option–Heavy Underbase. This is a one click wonder buttonthat will automatically complete the underbase process for you.
Third option–Normal Underbase. This is a one click wonder buttonthat will automatically complete the underbase process for you.
Forth option–Last Setting. Performs the underbasing process with thelast used setting from the manual Underbase/Highlight Wizard.
4. After selecting one of the four Underbase Wizard options, the UnderbaseWizard window will open identifying the two images selected. Within thiswindow it is important that the image with the white background is on theleft and the black background is on the right. If the images are reversed,click on the down arrow in the lower right hand corner of the image toselect the proper image. Please see the following example:

Chapter 4–Computer Graphic Software
51
5. After images are properly orientated as shown above, click Finish.
For more in-depth information regarding Photoshop/FastARTIST and any of thesteps listed above, please consult the individual user manuals.

T-Jet2™ User’sManual
52
Fixing Bad Line-Art in Photoshop and FastARTISTYou can also use a bitmap editingprogram to improve the quality of badartwork. We talked earlier about the fileresolution. A low resolution file will havevery jagged edges. By simply upsamplinga file to a much higher resolution you willhave less of a jagged effect, but a softeredge. For black and white images you canupsample and then apply a Tone Curve tomake edges black and white without any“gray” areas. This process is available in FastARTIST, Photoshop, Corel Draw, andAdobe Illustrator.
Full-color images set to 200dpi.
Black and white set to 500dpi.
Artwork for Light and Dark GarmentsTo properly setup artwork, it is imperative to know first what color garment the imageis to be printed on. This will then determine if the image background needs to betransparent, white, black, or is some cases both black and white.For light colored garments, the T-Jet2 will print the image just as it appears but doesnot print the white. If you require white in the image it will be necessary to underbasethe image. Printing in color without an underbase is the easiest form of garmentprinting.

Chapter 4–Computer Graphic Software
53
Dark colored garments will always require an underbase that allows the colors tostand off the garment. You may setup the underbase using FastARTIST or thegraphics program of your choice. When printing a graphic that contains gradients ona dark colored garment, you must the have to versions of the same image: one witha white background and the other with a black background. The two images will thenneed to be processed in FastARTIST to achieve the desired result.
Important Point!You must take ownership of fixing bad artwork. If the file is provided as a pixel basedformat like TIF, PSD, JPG, GIF, etc., you can’t assume it is bright, sharp, high resolution and ready to print. You must - check the resolution and upsample the fileif necessary, see if it needs sharpness or boost color saturation if the file is dull, andlighten the file if it seems too dark. Image may print darker!

T-Jet2™ User’sManual
54

Chapter 5–Printing with the T-Jet2™
55
Chapter 5
Printing with the T-Jet2Your T-Jet2 is very easy to use. Simply create an image in your favorite graphicsprogram, load a shirt on the printer, choose the appropriate Print Mode (printerresolution, number of passes and how much white ink to deposit), and press thePrint button. Instant shirt! By now you know many of the basic parts of the printer;the following chapter is more of an in-depth look at the T-Jet2.
Control Panel Buttons and Lights
51

T-Jet2™ User’sManual
56
Power ButtonThis button turns the printer on and off. The button also flashes while the printerinitiates movements such as: self-cleaning, ink cartridges changing, data processing,and printing. When the printer is ready to print, the button will stop flashing and staysa solid color green.
Error Eject ButtonThis button ejects the printer tray when there is an error in the print data.Note: The Error Eject button is rarely used - only press this button when the printeris in the loaded position.
Ink ButtonPress this button to move the print carriage to the ink cartridge changing position(The Power button flashes while the printer heads move to this position). Afterchanging the Ink cartridges press the Ink button again and the print carriage will goback to its original position. Press and hold this button for 3 seconds to begin a headcleaning.
Load ButtonAfter the T-Jet has powered up the load button will light up, pressing this button willmove the print bed into position to start printing. When the Load button turns onagain the printer is ready to print.
Eject ButtonThis button ejects the printer tray. After the tray is ejected the button will light up.
Ink Lights (1-7)Each red ink light indicates the status of thecorresponding ink cartridge. Flashing lightsindicate the ink cartridge is low on ink. Ascovered in the Bulk Ink System section ofthis manual, you should never be out of ink.If any of these lights stay on, shut the printeroff for 60 seconds. When you turn the printerback on the lights should all be off.Note: If All Lights start to flash fast, it meansthat there is an error in the printer’s mechanism. If this happens, you can try thefollowing: The flashing lights can indicate themaintenance tank needs to be emptiedbut it also can mean the printer’s head can’t find “home.” The print head is basically lost. This can happen if the capping station has moved out of place and blocks the head from finding home or if the thin strip(encoder strip) that the head reads for location is dirty. The speed of the flashing(fast or slow) means different things.

Chapter 5–Printing with the T-Jet2™
57
Turn off the printer. Open the printer cover and check the inside for any objectsblocking the printer head, see if the encoder strip is dirty, etc. If the error continuescall our support department.Note: If the lights alternately flash the printer needs special adjustments. If thishappens you can try the following.
Turn the printer off and on again. If the error continues call our support department.Please refer to Trouble Chapter (pg. 144) of this manual for other solutions toblinking red lights.
Basic Steps for Printing a White ShirtOK, the time has come. You should have installed the bulk system and performed 3to 4 head cleanings by pressing the ink button for three seconds (each cleaning).You should have created a simple image in your favorite graphics program andshould be prepared to ruin a few shirts. Yes, it is ONLY a shirt and you must getover the fact that they get ruined. It is a fact of life in the garment decoratingindustry. For less frustration you should perform nozzle checks to guarantee that allthe heads are firing and there are no clogs.There is a slight learning curve to printing a shirt. In the beginning you will worryabout the print placement and getting the image in the graphics program coordinatedto the correct location on the shirt. You should start off by using clean rag shirts, orjust accept the fact that you will ruin a few new shirts and buy some extras. Yourprinter will also need to be “broken in” a little. When you first install the bulk system,there is a chance not all the inksare flowing yet. You won’t reallyknow this until youhave done a print or two, or a nozzle check. Your first print may NOT be a winner,but after you have printed a few shirts you will be like an old pro. This is not exactlyplug-and-play.1. Press the Power button to turn T-Jet2 on. The printing bed should be fully
ejected to the Eject end of the machine. The Eject end is the side of the machinewith the chrome T-Jet2 emblem on it. Although you can move the printing bed byhand (you will feel a little drag on it), try to ONLY use the buttons to move thebed.
2. Shirts can be full of lint. Some shirtshave more lint than others. Lint is NOTyour friend. It can get on keycomponents inside the T-Jet2. For bestresults grab a blank shirt by theshoulder seams and give it a little shakebefore you lay it on the shirtboard. Thiswill actually help pull out wrinkles aswell.

T-Jet2™ User’sManual
58
Lay the garment on the Shirtboard. Place the metal Holding Ring over thegarment and flatten out the printing surface. Stuff any excess garment into thespace between the top and bottom of the shirtboard. If the garment is overlylarge or a thick material like fleece, you can eliminate using the holding ring andjust lay the garment on the shirtboard and push the excess material into thespace between the shirtboard.The bottom of the shirtboard is 1” (2.54cm) longer than the topon one side. Thislonger end is where the TOP/Collar of the shirt it loaded. The longer bottom piecehelps allow room to reach your fingers in and pull the holder out when doneprinting.
For best results DO NOT let the collar or seams set on top of the shirtboard, thehead may strike them when printing. Make sure that the collar is far enough overthe shirtboard and out of the way.
3. Press the Eject button on the Control Panel. The bed needs to be completelyejected out towards the front of the printer before loading.

Chapter 5–Printing with the T-Jet2™
59
4. Place the shirtboard in the Printing Bed. Make sure there are no parts of thegarment keeping the shirtboard from laying flat.
Important Point!When creating graphics in your graphics program using a standard page setup, theupper left part of the image is the “zero” point for the printing bed. When you arefacing the T-Jet2, the lower right corner of the bed is the same as “zero” in your graphics program. You should always create artwork using the same “page” size as the shirtboard. The standard shirtboard is 13” x 18” (33 x 46cm). Remember to allow for the extra 1” (2.54cm)of garment holder border when designing images.
When creating images in FastARTIST, you can choose the actual shirtboard sizeand FastARTIST allows for the size of the holder ring. In that case the lower rightinside corner of the holder ring is the zero point as identified below.

T-Jet2™ User’sManual
60
5. Use the Height Clearance Guide to makesure the printed object sits just below thetop of the printing bed. Adjust the printingbed height with the Up/Down dial on thefront of printing bed to make sure thereare no wrinkles or seams setting higherthan the top of the printing bed. The bedshould be set so the garment is about1/16” (.16cm) below the HeightClearance Guide. If the garment is toolow, or the shirtboard not level the imagewill appear out of focus.It is VERY IMPORTANT that the printinghead DOES NOT hit the garment or thegarment holding ring.If the head hits the holding ring you may have to do a head alignment. A moreserious “crash” of the head may require a head replacement. If the head brushesacross a garment you will need to do a head cleaning cycle before the next print.Earlier models of the T-Jet2 had rulers attached to the printing bed. These havebeen removed on newer models to theheight fixture making it easy to measureprint locations. If your height fixture doesnot have a ruler, keep one close to theT-Jet.
When printing white ink on shirts thathave been pretreated, it is VERYIMPORTANT that the print head doesNOT hit or even brush across apretreated garment. The pretreatment causes a reaction to the pigment in theink and the ink will permanently clog the head!
6. To move the bed into the printingposition, press the Load button. Theprinting bed will move into the unit.

Chapter 5–Printing with the T-Jet2™
61
The T-Jet2 has a light beam sensor that will stop the machine if the light beam isbroken by a shirt or the holding ring. If the Load button is flashing there issomething in the way. If you are printing, lower the bed slightly or remove or fixthe obstruction and press the flashing load light.
The sensor light turns from green to amber when there is an obstruction.
7. Create or choose the artwork to print. Youcan print to the T-Jet2 in a variety of ways.You can print direct to FastRIP from yourfavorite graphic application or fromFastARTIST (preferred). Consult theFastARTIST User’s Manual for easy-to-followdirections.Make sure the image is the correct physicalsize and that you have placed it in yourgraphics program on a “page” that is the same size as the printing bed.The easiest way to get the correct print placement is to work on a 13” x 18” (33 x 46cm) printing page for your layout. Keep in mind that inkjet printers need a slightmargin and the metal holding ring takes up some of the page size. Make sure theimage is not larger than 12” x 17” (30.5 x 43cm) and center the image on thepage. If you need to print an image that is wider than 12” (30.5cm) you can rotate the image in the graphics program and load the shirt side-ways on the shirtboard.You can print up to 12.5” (31.75cm) without using the holding ring.

T-Jet2™ User’sManual
62
8. Select the appropriate Print Mode. There is a wide variety of Print Modes in theFastRIP software. Print Modes give you the advantage of printing higher qualityimages (slower speed) when needed or to print low quality simple spot colorimages (faster speed) when needed. Ready to print! Now select the Printcommand from your favorite program. Choose the T-Jet2 as your printer. Ifprinting from FastARTIST, consult the FastARTIST manual.
A Word about Resolutions, Speed and QualityYou will notice that each Print Mode has various resolutions. The resolution that youchoose will not only determine the print quality but the print speed as well. If you aregoing to use a low print resolution such as 360dpi you will achieve a much fasterprint speed. This is due the fact that lower resolutions apply less ink dots per inch(dpi) which allows the print head to move much faster, but may not offer the qualityneeded for printing photo images. The print heads must also be perfectly aligned atthis resolution or you will start to see banding in your print. Banding is smallhorizontal lines that run across the entire image. For most images 306dpi will be finebut depending on the graphic image you may want to increase the resolution.
If you intend to use higher print resolutions such as 720 or 1440, you will notice adecrease in speed but an improvement in print quality. Print quality and the amountof ink dispensed directly relates to the dpi (dots per inch). A higher dpi will increaseprint quality and amount of ink but at the same time slow down the print speed. Wesuggest a lower resolution for cartoon images and a higher resolution for photoimages.
Print modes that contain “HS” (CMYK Cartoon 360 2 pass Standard HS) at theend are bi-directional print modes. This means that the print head will now print inboth directions as compared to the standard unidirectional print mode that just printsin a single direction. Bi-directional print modes are twice as fast as unidirectional andwill increase your print speed especially if using a higher resolution. You must becareful nevertheless, to watch for banding/shadowing when using any bi-directionalprint mode as it absolutely necessary that the print heads are perfectly aligned.
Print Modes and FastRIPIn the beginning the number of Print Modes may seem like too many choices. Onceyou start to print jobs you will see that they are not that hard to use and you willquickly find the Print Modes that work best for you.We have three basic types of Print Modes–Cartoon, Photo, and Underbase.
CMYK Cartoon and Photo Print ModesThe Cartoon and Photo Print Modes will print the image in color when printing fromFastARTIST or any other graphic program. Two print mode options have beencreated to adjust the print characteristics based on the image to be printed. If youare printing vectored graphics with spot color then use the Cartoon Print Modes, butif you are printing photo type bitmap images, use the Photo Print Modes.

Chapter 5–Printing with the T-Jet2™
63
The difference is, Cartoon Print Modes are design to lay down more ink with goodcolor saturation, whereas Photo Print Modes are design to lay down less ink withaccurate colors. Cartoon Modes should be used for non-critical images and as sucha lower dpi can be selected. Photographs, because of the image detail, need to betreated differently. When using Photo Print Modes, select a higher dpi to insure agood print quality.
CMYK Print modesCartoon
CMYK Cartoon 360 2 pass StandardCMYK Cartoon 360 2 pass Standard HSCMYK Cartoon 360 StandardCMYK Cartoon 360 Standard HSCMYK Cartoon 720 2 pass StandardCMYK Cartoon 720 2 pass Standard HSCMYK Cartoon 720 StandardCMYK Cartoon 720 Standard HSCMYK Cartoon 1440 StandardCMYK Cartoon 1440 Standard HS (Bi-directional)
PhotoCMYK Photo 360 2 pass StandardCMYK Photo 360 2 pass Standard HS (Bi-directional)CMYK Photo 360 StandardCMYK Photo 360 Standard HS (Bi-directional)CMYK Photo 720 2 pass StandardCMYK Photo 720 2 pass Standard HS (Bi-directional)CMYK Photo 720 StandardCMYK Photo 720 Standard HS (Bi-directional)CMYK Photo 1440 StandardCMYK Photo 1440 Standard HS (Bi-directional)
Underbase Print ModesUnderbase Print Modes are selected when printing from the FastARTIST programonly. With Cartoon and Photo Print Modes in three different resolutions, you havethe ability to select the proper print mode to match your graphic image. For darkshirts try using the 1440dpi print mode to achieve a stronger more consistentunderbase. This is due to the fact that the 1440 dpi resolution will dispense more inkat a slower speed creating an extremely even coverage. If you are printing lightercolored shirts it may not be necessary to print such a strong underbase so the720dpi or 360dpi mode may work better.
UnderbaseUnderbase Cartoon 360Underbase Cartoon 360 HS (Bi-directional)Underbase Cartoon 720

T-Jet2™ User’sManual
64
Underbase Cartoon 720 HS (Bi-directional)Underbase Cartoon 1440Underbase Cartoon 1440 HS (Bi-directional)Underbase Photo 360Underbase Photo 360 HS (Bi-directional)Underbase Photo 720Underbase Photo 720 HS (Bi-directional)Underbase Photo 1440Underbase Photo 1440 HS (Bi-directional)
Windows UnderbaseThe following Windows Underbase print modes are selected when printing fromgraphic programs such as Adobe Photoshop, Corel Draw, or Adobe Illustrator. Thereare four print mode options: Image Heavy, Image Normal, Vector Heavy, andVector Normal each with different resolutions. Bi-directional is also offeredfor each print mode as well.
Select the Image mode when printing a bitmap/raster or gradient images. This alsoapplies when printing a gradient image in a Vector program. Anytime you have somesort of a gradient in any image regardless if the image is mainly spot color, theImage mode must be used.
The Vector mode is to be selected when printing solid vector images. With theVector mode you will be able to print the white areas as a Highlight white on thecolor pass. This only happens if you use named spot colors and apply the namedcolor white. The spot color white image area with a print white and is only availablewith vectors solid spot colors only.
Heavy and Normal Underbase change the intensity of the underbase. The HeavyUnderbase modes use a preset heavy underbase applying more ink in dark and lightareas then the Normal Underbase that applies less ink. Because underbasing issuch a curtail part of the image quality, we recommend trying out the different printmodes to get a general understanding of the difference between each one.
Windows Underbase360dpi Image Heavy underbase360dpi Image Heavy underbase HS (Bi-directional)360dpi Image Normal underbase360dpi Image Normal underbase HS (Bi-directional)360dpi Vector Heavy underbase360dpi Vector Heavy underbase HS (Bi-directional)360dpi Vector Normal underbase360dpi Vector Normal underbase HS (Bi-directional)720dpi Image Heavy underbase720dpi Image Heavy underbase HS (Bi-directional)720dpi Image Normal underbase

Chapter 5–Printing with the T-Jet2™
65
720dpi Image Normal underbase HS (Bi-directional)720dpi Vector Heavy underbase720dpi Vector Heavy underbase HS (Bi-directional)720dpi Vector Normal underbase720dpi Vector Normal underbase HS1440dpi Image Heavy underbase1440dpi Image Heavy underbase HS1440dpi Image Normal underbase1440dpi Image Normal underbase HS1440dpi Vector Heavy underbase1440dpi Vector Heavy underbase HS1440dpi Vector Normal underbase1440dpi Vector Normal underbase HS
If you are printing to a standard seven color (cyan, light cyan, magenta, lightmagenta, yellow, black, light black) Red T-Jet or a T-Jet2 that DOES NOT HAVEWHITE INK CAPABILITY, you will be using the standard EPSON printer driver andyou will NOT be using these Print Modes. Consult Appendix A.
Ink bleeding can be a problem when printing on absorbent material. If you lay downtoo much ink in one pass, you will get great color saturation but there might be slightbleeding between colors and into the surrounding shirt.Note: You can minimize bleeding by preheating the shirts in a heat press for a fewseconds to dry them out.In some cases you will need to do TWO print passes to get good color saturationand minimize bleeding by choosing a 2 Pass Print Mode. The 2 Pass Mode doesnot lay down twice the amount of ink but allows the first pass to dry slightly beforethe second pass is printed–for less bleeding and brighter colors.At higher resolution, the printer prints at a slower speed.

T-Jet2™ User’sManual
66
1. After T-Jet2™ finishes printing, theprinting bed will eject from the unit.For brighter prints, double print theimage by pressing the Load buttonand printing from the application asecond time. For higher productionyou can set the number of “pages” to print from the application to ahigh quantity or you can choose a2-pass print mode.
Remember that if you tell theapplication to print dozens ofcopies, the program might build a very large print file that will slow down yourcomputer.
Newer T-Jet2 printers have an automatic Print Pass Counter that can be set forthe number of print passes. This is very helpful when printing on dark shirtswhere two or three passes are necessary. You can set the counter and walkaway and come back to a finished shirt. See the Print Pass Counter Directionslater in this chapter.
2. Remove the holding ring by slipping yourfingers in the gap at the front of theshirtboard and pull out of the bed. Carefullyremove the holding ring and remove thegarment from the shirtboard.
3. Finished prints must be heat cured to fully set the ink.Prints should be cured through a conveyor dryer orwith a heat transfer press with the following settings:
Light Garments(With or without using FastBRIGHT)Cure Time: about 60 seconds with light pressure(enough pressure to where the curing paper is snugunder the press and can’t be pulled out) Cure Temp: 330°F (166°C)

Chapter 5–Printing with the T-Jet2™
67
Dark Garments(using FastBRIGHT or the normal pretreat solution)Cure Time: about 180 seconds with light pressure (enough pressure to where thecuring paper is snug under the press and can’t be pulled out) Cure Temp: 330°F (166°C)
Some shirts may scorch if cured too long. A heat press will give more a moreeven cure and when printing with white ink, you will see less shirt fibers stickingup through the ink.
4. You must perform a headcleaning if you experience one ofthe following conditions: If streaksappear in the print, small drops ofink get on the garment during aprinting cycle, if the unit has beensetting for a few days, or theprinting head hits the garment.Press the Ink button for threeseconds to have T-Jet2™ gothrough a head cleaning cycle. If you experience severe head clogs you can do anumber of head cleanings back-to-back. You can perform a head cleaning whilethe unit is printing a job by simply holding down the Ink button for three seconds.
If you have any problems printing, consult Chapter 8 or Chapter 9 to solveprint issues.
The best way to check the print quality is to doa Nozzle Check from the Epson 2200Maintenance window.
1. Right click on the printer icon locatedin the system tray.

T-Jet2™ User’sManual
68
2. Left click on Nozzle Checkwithin the popup menu.Follow the instructions forperforming a nozzle check.
If you have been printing a lot ofshirts and if some of these shirtshave been set so high that theprinting head brushes against thegarment, you may have to actuallywipe the bottom of the head toremove cotton lint.
It is hard to see the white ink when doing a standard nozzle check on a light shirt orpiece of paper. Conversely it is hard to see the colors on a dark background. Raisethe printing bed all the way to the top position and use a piece of clear overheadtransparency film or our FastPOSITIVE Waterproof inkjet film (used to make screensin the screen printing process) to do nozzle checks.
Important Point!Before doing your first production run it is important that you do a testwashing for proper cure. Climate can affect cure times while excess humidity canlengthen cure times and certain garments may require more time. You shouldALWAYS do periodic wash tests as well as test the temperature of your dryer orheat press using an infrared head gun. Aim the gun at a shirt leaving a conveyortunnel and read the final temperature. Infrared heat guns are less than $100 andavailable from most screen printing supply companies or industrial suppliers. YouMUST not ignore proper curing.
If using a conveyor dryer, run the belt speed very slow and make sure the garmentlays flat on the belt. If using a heat transfer press, set the pressure to fairly hard. Youshould clamp the heat element down directly onto the print with a piece of paper or aTeflon pad over the print. You can use a baking pan liner for this purpose.
You will probably scorch a shirt doing temperature tests. This is normal in thegarment decorating business.
Some shirts might have a slight discoloration if you use a heat transfer press to curethe print (reds and medium to dark colors other than black). This discoloration willusually go away when the shirt cools or when the shirt is washed.

Chapter 5–Printing with the T-Jet2™
69
5. Spots or ink stains must be removed BEFOREthe print is cured using a standard SpotRemoval gun. Make sure to NOT spray the wetprint. Once the ink is cured it is almostimpossible to remove spots or smudges.Prints can be laundered as normal. If possible,give the customer washing instructions of: Turnprint inside out before washing or drying,Cold Water Only, Medium DryerTemperature.
You can expect a little fading with the first washing. This is normal and verysimilar to what you would get from a screen printed shirt. If you experience a lotof fading make sure to check your dryer temperature. If the shirts are damp fromexcess humidity, you should put them under the heat press for a few seconds todry out before printing.
How to use the Print Pass CounterThe Print Pass Counter makes it easier to double print an image when printing onblack shirts. Without the counter you would need to stay by the machine and pressthe Load button each time a print pass is completed. With the counter you can set itfor the number of passes and walk away.When printing light garments you must use a second pass print mode such as“CMYK Photo 720 2 pass Standard”, in combination with the print pass counter.
We have used two different brands of counters on the T-Jet2 printers. Here are thedirections for each.
Gray Keyence BrandThere are two display windows on the face of thecounter. The top display window shows the totalnumber of passes the printer has made. The bottomdisplay window shows how many passes you'veselected for that print job.Press the RST (Reset) button to zero everything out.Press only the "1" button on the counter until itindicates the number of passes you need.You will then need to hit the Load button to start thejob. If you are doing a quantity of shirts with the same design, set the number ofcopies you will need in FastRIP. Set the counter to the number of passes you aredoing in the design. Put the first shirt in. Press the Load button. The shirt willcomplete itself. Take out the first shirt and put in the next shirt. Press the Loadbutton again. The next shirt will complete itself. Continue this way until your order is

T-Jet2™ User’sManual
70
finished. You can then hit "Reset" on the counter to zero out the number of passes(top number) the printer has made.Note: for this counter only - with a single pass, since you do not need the bed toreload again, you can leave the counter set at zero.
Black CounterThere are 4 buttons on the counter.The RST button is for a reset. The counter will resetwhenever you press the Load button or the RSTbutton. If the counter is Reset the top number willdisplay“0”.The bottom number is the number of passes youwant. The up arrow button is for increasing the countand the down is for decreasing the count.When you wish to change your counter to a differentsetting just press the up arrow or the down arrow button until you get to the totalnumber of passes needed. To set the count - press the button that has the ovalinsignia (the second button from the left).Note: for this counter only, if you only need 1 pass set the counter at 1 if it is set at 0the bed will reload.
Things to Watch forIf you trip the laser sensor during printing (by something obstructing the print path)the counter will become confused. After adjusting the bed height or removing theobject that is tripping the laser sensor, you need to press the Load button which willreset the counter.Ignore any out of papererrors you may get when printing multiple “pages.”
Canceling a Print JobOccasionally a print job will just not print. This could be caused by a problem withthe file, the printer not being in the Load position when the print command is sent, ared Ink Light flashing showing a color out of ink, or other issues. If you have everowned an inkjet printer you know that it is sometimes hard to “kill” a print job.
Canceling a Print Job - WindowsWhen you send a print command from your graphics application, the Epson driverworks for a few seconds and then sends the job to Windows Print Manager. It isalmost impossible to stop a print job within the Epson driver if the job is still inWindows Print Manager.To open Print Manager, simply double-click on the small printer icon on the lowerright bottom of your computer screen (This section is called the Task Bar). When theWindows Print Manager opens it shows the status of the print job. A job that is NOT

Chapter 5–Printing with the T-Jet2™
71
printing might still show as printing (print turned off, thinking it is out of ink, etc.).To cancel a print job simply click on the actual job file and then go to the File pulldown menu and select Cancel All Documents. In some cases it may also benecessary to power down your computer and printer.
Canceling a Print Job –Macintosh (7 color printing only)Macintosh OS 9Open the Print Manager. Click and highlight the job. Click the Trash icon. Close thePrint Manager.
Macintosh OSXOpen the Print Center or Printer Setup Utility. Double click on Stylus Photo 2200 orSP 2200. Click and highlight the Print job. Click Delete. Close the Print Center orPrinter Setup Utility.
Canceling a Print Job in FastRIPIf there are printing problems when using FastRIP and you have to cancel the print command, right click onthe file and abort the print command. If you get a partial image on a shirt from the previous job, you have notfully canceled the print command in FastRIP.

T-Jet2™ User’sManual
72
Printing From Various Graphic ProgramsPrinting from Adobe Photoshop - Design Setup
When designing in PhotoShop, pure white areas will not print an underbase (RGB255,255,255 or CMYK 0,0,0,0). To print white, set areas to a slight tint off white(RGB 254,254,254 or CMYK 1,1,1,1). If you want to knock a color out to the shirtthen color the areas as pure white (RGB 255,255,255 or CMYK 1,1,1,1).The arrows in the following picture identifies that the “N” in California has been set toRGB 254,254,254, meaning that it will print white.
The arrows in the following example identifies that the background is set to RGB255,255,255, making the background transparent when printing to FastRIP.

Chapter 5–Printing with the T-Jet2™
73
Note: Color management needs tobe turned off before sending theimage to print. Color Managementis found in the Print with Previewwindow. Go to the File menu thento Print with Preview.
Printing - Adobe PhotoshopGo to the File menu - Print with Preview. Click Page Setup. Click Printer. In the PageSetup menu select the Fast T-Jet 2 printer. Click Properties. Click Advanced. Set thePage Size. Go the Printer Features section. Bring the Print Mode menu down toselect the Color Print Mode. Bring the Underbase Mode menu down to select theUnderbase Print Mode. Set the number of ink passes for underbase and color.Click OK in Advanced Options. In Document Properties set to Landscape or Portraitfor Orientation. Click OK. Click Print.
The Underbase Print Mode to selectwill be Image Heavy or NormalUnderbase. Refer to the Print Modesection for more details on the differentPrint Modes.

T-Jet2™ User’sManual
74
Printing from Corel Draw –Design SetupWhen designing in Corel Draw, create areas not to print underbase with pure white(RGB 255,255,255 or CMYK 0,0,0,0). To print white, set the white areas to a slighttint of off white (RGB 254,254,254 or CMYK 1,1,1,1). If you want to knock a color outto the shirt then set the color areas as pure white (RGB 255,255,255 or CMYK0,0,0,0).In the following example, the selected area is set to CMYK 1,1,1,1, which isrecognized as white areas to print in FastRIP.
Note: When working with vectors solid spot colors, if you use named spot colors anduse the spot color white. FastRIP will create a highlight white when it prints the colorpass. This means that not only will an underbase be applied but on the second pass(the color pass), white will be printed along with the color. In the example below thearrow is identifying the use of spot white.

Chapter 5–Printing with the T-Jet2™
75
Solid Spot Colors - No GradientsGo to File - Print. On the General tab select the Fast T-Jet 2 printer. Click Properties.Click Advanced. Set the Page Size. Go the Printer Features section. Bring the PrintMode menu down to select the Color Print Mode. Bring the Underbase Mode menudown to select the Underbase Print Mode. Set the number of ink passes forunderbase and color. Click OK in Advanced Options. In Document Properties set toLandscape or Portrait for Orientation. Click OK. Click Print.
Note: Use the Underbase Print Mode to select how the underbase will be printed -Vector Heavy or Normal Underbase. Refer to the Print Mode section for moredetails on the different Print Modes.
Gradients, Gradients with Solid Spot Colors, Bitmap with VectorsObjects
Go to File - Print. On the General tab select the Fast T-Jet 2 printer. ClickProperties. Click Advanced. Set the Page Size. Go the Printer Features section.Bring the Print Mode menu down to select the Color Print Mode. Bring theUnderbase Mode menu down to select the Underbase Print Mode. Set the numberof ink passes for underbase and color. Click OK in Advanced Options. In DocumentProperties set to Landscape or Portrait for Orientation. Click OK. Click Print.
Note: Use the Underbase Print Modeto select how the underbase will beprinted - Image Heavy or NormalUnderbase. Refer to the Print Modesection for more details on the differentPrint Modes.

T-Jet2™ User’sManual
76
Printing from Adobe Illustrator –Design SetupWhen designing in Adobe Illustrator, create the areas that are not to print underbasewith pure white (RGB 255,255,255 or CMYK 0,0,0,0). To print white, set the whiteareas to a slight tint of off white (RGB 254,254,254 or CMYK 1,1,1,1). If you want toknock a color out to the shirt then color the areas as pure white (RGB 255,255,255or CMYK 1,1,1,1).The example below is identifying that the selected home plate is not a pure white(RGB 254,254,254), meaning that the image will print white.
Note: When working with vectors solid spot colors, if you use named spot colors anduse the spot color white. FastRIP will create a highlight white when it prints the colorpass. This means that not only will an underbase be applied but on the second pass(the color pass), white will be printed along with the color. In the example below thearrow is identifying the use of spot white.

Chapter 5–Printing with the T-Jet2™
77
Solid Spot Colors - No GradientsGo to File - Print. Select the Fast T-Jet 2 printer under Printer menu. Click Setup.Click and highlight the Fast T-Jet 2 printer. Click Preferences. Click Advanced. Setthe Page Size. Go the Printer Features section. Bring the Print Mode menu down toselect the Color Print Mode. Bring the Underbase Mode menu down to select theUnderbase Print Mode. Set the number of ink passes for underbase and color.Click OK in Advanced Options. Set to Landscape or Portrait for Orientation. ClickPrint in the Print window. Click Print in Illustrator Print window.
Note: Use the Underbase Print Mode to select how the underbase will be printed -Vector Heavy or Normal Underbase. Refer to the Print Mode section for moredetails on the different Print Modes.
Gradients, Gradients with Solid Spot Colors, Bitmap with VectorsObjects
Go to File - Print. Select the Fast T-Jet2 printer under Printer menu. ClickSetup. Click and highlight the Fast T-Jet 2 printer. Click Preferences. ClickAdvanced. Set the Page Size. Go thePrinter Features section. Bring thePrint Mode menu down to select theColor Print Mode. Bring theUnderbase Mode menu down to selectthe Underbase Print Mode. Set thenumber of ink passes for underbaseand color. Click OK in AdvancedOptions. Set to Landscape or Portraitfor Orientation. Click Print in the Printwindow. Click Print in Illustrator Printwindow.
Note: Use the Underbase Print Mode to select how the underbase will be printed -Image Heavy or Normal Underbase. Refer to the Print Mode section for moredetails on the different Print Modes.

T-Jet2™ User’sManual
78
Production Rates and Ink costsThe following chart shows the average production rates and ink costs you canexpect from your Fast T-Jet. Each image is different and the Print Mode andresolution you choose will have an effect on these figures. Ink costs might vary fromthis chart.The ink prices are based on the current prices the summer of 2006 and are in USDollars.

Chapter 6–Printing White Ink
75
Chapter 6Printing White Ink
White Ink OverviewPrinting white ink onto a dark garment was not an easy process to develop becausethe openings in the print head are so small thatyou can’t print thick ink likestandardscreen print plastisol. What makes T-Jet2 white ink printing possible is thecombination of a very special ink that took over one year to develop, a software printdriver called FastRIP that allows the printer to print more ink than it was designedfor, a software package called FastARTIST that creates special underbase andhighlight white files, and a revolutionary pretreatment that allows the ink to set on topof the garment and remain white. It is magic!
Warnings and CautionsThere are a few rules you MUST follow toget this to work. First, the ink contains whitepigment that can settle over time. The goodnews is that your T-Jet2 printer will shakeslightly when it prints causing the ink toremain in motion. But, if you leave your T -jet for a few days, you should lift theindividual bulk ink bottles shaking lightlythen run three or four head cleaning cycles. In fact, it is a good idea to do a headcleaning each morning and two or three times during the day.You should also get in the habit of lightly shaking the bulk ink bottles every day aswell as the refill bottles before topping off the ink.

T-Jet2™ User’sManual
76
Caution about PretreatmentThe pretreatment is a milky colored liquid that is odorless and nontoxic. It creates achemical reaction to the white ink that causes the pigment to stay on top of thegarment. It is CRITICAL that your printing head does not touch a pretreated garment- even one that has been dried! You should also have good ventilation when usingthe pretreatment and if possible pretreat garments in another room.
Important Point!Yourprinter has a standard “auto reset” chip on each ink cartridge. These chips count the number of drops of ink so the printer will tell you when it thinks thecartridge is empty. In a normal situation you should never run out of ink before thechip“thinks” you are out because when you turn on and off the printer, it resets the chip so it “reads full” again. When printing with white ink it does not take much ink usage before the chip tells the printer it is out. If this happens DURING a printingpass, the printer may stop printing and the red lights one or all of the three whitecolors will be ON. If you turn the printer off during a routine you will lose the job andruin a shirt. If you need to “reset” the chips during a print run, press the Ink buttonand release it. This pauses the routine and moves the carriage over. Unsnap and lifteach cartridge with a red light out of the slot and then press it back in to reseatcartridge (you will hear a click when properly seated). Even if only one whitecartridge has a red light on, you may want to go ahead and reset all three whitecartridges. Next, press the Ink button as the cartridges are now reset–the printerwill resume printing.
Another option is to turn the printer off and back on between jobs so the chipsalways read as full as possible.
Due to the nature of the pigment settlingand the pretreatment reaction, there is agood chance you will go through moreprint heads than normal. If you feel a fewhundred dollars every few months is aprice too steep to pay then we recommendyou do not use the white ink. The payoff ofis vibrant prints on black shirts without anyscreen making, press setup, or colorseparations that far outweighs the minorrules to follow.

Chapter 6–Printing White Ink
77
Applying PretreatmentIt is essential that the pretreatment be applied in aneven coat as to insure a proper looking print on a blacktee (free from light and dark spots). You can use manualspray pumps, weed sprayers or other methods forapplying a uniform coating of FastINK Pretreatment butthe best method is to use a Control Spray gun(commonly used to paint broad areas like a porch deckor furniture). Your T-Jet2 includes a Wagner ControlSpray gun. If you bought a T-Jet2 out of the USA, your machine may NOT includethe control sprayer. These guns are fairly inexpensive ($70USD at homeimprovement stores) and not designed for high volume work. You should keep anextra gun handy.Cleaning the gun on a regular basis simply by filling up and operating the gun withwater in the storage bottle. This will keep replacement down to a minimum.FastBRIGHT pretreatment can be utilized on white/light shirts to make prints standout further while FastINK White Pretreatment is used on dark color or light colorgarments with a white underbase. Please note that neither product can be mixedtogether at anytime. The result will be ruined shirts. If you plan on printing lightershirts with a white underbase then make two mixtures of pretreatment. One shouldbe 100% and the other should be 50% water and 50% pretreatment. The 50/50mixture is designed for light shirts but will also work on black shirts where brightwhite is not necessary.You MUST NOT spray pretreatment near the printer. In fact, you shouldpretreat shirts in a separate room to prevent any sticky overspray from gettinginside the T-Jet2. A simple large cardboard box enclosure is ideal for applyingpretreatment.
Proper Pretreatment Application is Critical!The two pretreatments (FastBRIGHT andFastINK White) are magical liquids that keepthe white ink pigments setting on top of thegarment. Do not saturate the garment, movethe spray gun back and forth in even strokes.You don’t want the shirt to be soaking wet. On light shirts only require a misting back andforth, but black and other dark colors will needa heavier application. The proper amountneeded is something that you will get the hangof with repetition. Please note, if you miss aspot or spit the pretreatment out in uneven spray, it will be noticeable in the finalprint.

T-Jet2™ User’sManual
78
Dry the pretreatment using a hair dryer, heat transfer press, or conveyor dryer.When using a heat transfer press DO NOT use a Teflon sheet or silicone treatedparchment paper to protect the garment when drying the pretreatment. The siliconein the paper will seal the pretreatment on the shirt surface and the white ink may notstick well enough.You can use a Quillon treated baking panliner to dry the pretreatment. If the papersticks to the pretreatment after you aredone pretreating the shirt, you may haveapplied too much pretreatment or the heatpress is set for too much pressure!Standard “butcher paper” or “brown Kraft paper”, can also be used as a heat press protector when drying the pretreatment.Clamp the press down with mediumpressure when drying pretreatment at 330°Ffor 8 to 10 seconds.Important note–As stated earlier, non-diluted pretreatment can leave a stain onlight colored shirts and it is very important to always test shirt color first! It may takea few tries to find the proper mixture of pretreatment and level of application but thatis all apart of the learning process. Just keep in mind that too much pretreatmentmay cause poor washability.
In inkjet printing, the ink will tend to hang onto any loose fibers sticking up from theshirt. When printing a white underbase it is possible for these fibers to becomesaturated and show through the color that has been applied on top. This is why werecommend the use of a heat press with light pressure as to flatten to fibers properlybefore the print. A conveyor dryer or similar method of drying the pretreatment willnot flatten the fibers resulting in a lower quality print.Some users have reported slightly better washability if you spray the shirt with waterBEFORE spraying it with pretreatment.
Printing White InkIf the printer has been setting for a few days, perform two or three head cleaningcycles to get the white ink moving. You should also get in the habit of lightly shakingthe ink bottle to keep the white ink from settling.
1. Setup the file correctly in FastARTIST. Consult theFastARTIST manual for detailed directions. Whenunderbasing solid spot color type images, yougenerally print solid white ink and then follow thatprint with the colors. Underbasing spot color vectorimages is as simple as one click of the mouse inFastARTIST. If the image has white as part of the

Chapter 6–Printing White Ink
79
design, a second pass of white is made at the same time as the other colors.This second pass of white is called a Highlight and it boosts the brightness of thewhite.
When printing photorealistic images you will need to run a special routine called theUnderbase Wizard. This special feature of FastARTIST will create a separate pieceof artwork that FastRIP will use to print an underbase of white ink. Whenunderbasing a photorealistic image, the underbase is NOT solid white but isgrayscale. It has light and dark areas to give the image dimensionality on a shirt.This is the magic to printing bright and soft prints on dark shirts.

T-Jet2™ User’sManual
80
Important Point! How to Create a Simple Underbase for Dark Shirts.FastARTIST’s Underbase Wizard has four options to choose from when creating an underbase:
First option - Underbase/Highlight Wizard will manually take youthrough the underbase/highlight setup process.
Second option–Heavy Underbase. This is a one click wonder buttonthat will automatically complete the underbase process for you.
Third option–Normal Underbase. This is a one click wonder buttonthat will automatically complete the underbase process for you.
Forth option–Last Setting. Performs the underbasing process with thelast used setting from the manual Underbase/Highlight Wizard.
When working with the first option “Underbase/Highlight Wizard”, you must manuallyset the parameters for the underbase process. Below we have listed the parametersettings that will help you get started.
Underbase: whiteUnderbase strength: 100Light areas: 80-90Dark Areas: 5 at the most - but more often 0
NO Clipping Path (if using two versions of artwork).Check Overlap HighlightHighlight: whiteStrength: 0Regions: 100 most of the time(drop to around 80 for bold white text with a black outline)
Light Areas: 0Dark Areas: 0
For best results when printing gradient images with white ink, you should have twoversions of the artwork to start with. One version has a white background and theother has a black background. These two files can be created in Photoshop, AdobeIllustrator, Corel Draw or even in FastARTIST. If you use another program, simplysave or export the files as a JPG file at 150dpi resolution for the final print size.Import these files into FastARTIST.
There is an excellent video tutorial on Underbasing with Two Versions of theArtwork on the T-Jet Support page.

Chapter 6–Printing White Ink
81
2. You must tell FastRIP what Print Modes to use and choose a Print Mode for boththe white ink and colors. Once you have made the selections, the two can beused over and over for other jobs. For dark shirts you can get very good “screen print” quality white ink if you select the1440dpi Print Mode for the white inkunderbase. For the top colors of Cyan, Magenta, Yellow and Black and thehighlight white, choose 360 or 720dpi Print Modes.For medium colored shirts use the 720dpi Print Mode (faster than 1440dpi) forthe white ink underbase. In some cases, very light colored shirts may not evenneed a white underbase so images can print using just CMYK and highlight whiteto save printing time. Highlight white will print at the same time as the color pass.
If possible DO NOT mix print modes. You will notice that certain print modescontain a ‘HS” and “HS (Bi-Directional)” while the standard print modes contain neither. DO NOT use standard print modes in conjunction with HS print modes. Theresult may lead to registration issues and miss prints. Please note that this is notreferring to the print resolution i.e. 360, 720, or 1440. Print resolutions can be mixedand matched as needed. If you are not sure how different print modes work together,do a test print before doing a production run.
Note: For more information on print modes, refer back to chapter 5 - A Word aboutResolutions, Speed and Quality
Important Point!Problem with Underbase and Colors lining up.If you print the 1440dpi HS Print Mode for the white and the colors at 360dpi, there isa chance you might see white peeking around the colors. This is due to a techniquecalled Micro-Weave that eliminates banding. It is almost impossible to have theunderbase and top colors line up perfectly in register when mixing Printing Moderesolutions. For the best results keep the printing resolution either the same, or atleast use 720dpi Print Mode for the colors on top of the 1440dpi white one-pass PrintMode.

T-Jet2™ User’sManual
82
3. Pretreat the shirt and load it in the printer.DO NOT let the printing head touch thepretreated shirt. If the pretreatment comesin contact with the white ink in the printinghead, the head may become permanentlyclogged.Again, this is really part of the magic and itmay take a few test shirts to get a feel forhow much pretreatment to apply.
4. Set the print pass counter for the number of passes.When using the 1440dpi Print Mode for white inkfollowed by the 720dpi Print Mode for the CMYKcolors and highlight, TWO passes are all that youwill need.
5. Print the job. Send the Print command in FastARTIST. FastRIP will open andshow the progress of the print job.

Chapter 6–Printing White Ink
83
Note: If you are not sure how well youdid in creating the underbase, you canview the actual “Raw Data” in FastRIP to see a sample of the different“Layers” of each print pass. If youchose the 1440dpi one pass whiteprint mode you will not be able toview the raw data.
Within FastRIP, right click on thefile loaded in the queue andselect Spool Only. After the filefinishes spooling right click onthe file again and select View Raw Data.
6. Cure the print. Carefully remove the shirt from the holder and cure the print. Thewhite ink will need to be cured longer than standard colors. Cure in a conveyordryer or heat transfer press at 330°F for at least three MINUTES.If using a heat transfer press, place a silicone treated piece of parchment paper(a common baking pan liner) over the print and close the press with medium toheavy pressure. When you open the press, peel the paper immediately. Thepaper can be used a number of times before it becomes too wrinkled to use.
If you want a glossy print, use a standard Teflon pad rather than silicone treatedparchment when curing the print in a heat press. Teflon pads are available from heatpress manufacturers.

T-Jet2™ User’sManual
84
Washing DirectionsFor the longest lasting print, the shirt should be turned inside out and washed inCOLD water and dried on the delicate cycle. If possible, include washing directionswith the print.
When you apply the pretreatment correctly and choose the correct PrintModes you should get very detailed bright prints like these!

Chapter 6–Printing White Ink
85
White Ink TroubleshootingProblem: White prints seem dull.
Solution: You may not be applying enoughpretreatment or not using the 1440 print moderesolution. But, if you had white prints beforeand they now seem dull, you probably haveclogged heads. Due to the nature of the whitepigment, you may experience more headclogs than normal. These can easily becleared by doing two or three head cleanings.
Solution: The Highlight setting in FastARTIST may be wrong and you are actuallyprinting white ink ON TOP of the CMYK colors–Reload the image into FastARTISTand redo the Underbase/Highlight Wizard this time either not applying a highlight orsimply toning the highlight down.
Solution: Again, due to the nature of the white pigment, it will build up faster on thecapping station and on the wiper blade. The dry white ink around the rim of thecapping station will cause the print head to NOT seal properly when the printer triesto pull ink out of the cartridge during a head cleaning cycle. Use a sponge foam tipswab and water or window cleaner to clean the following areas as shown below.
Print Head
Capping Station &Wiper Blade

T-Jet2™ User’sManual
86
Also, the small wiping pad on the far side of the printer can get fuzzy and depositfuzz on the bottom of the head. Change this pad when it gets covered with excessink.
You should perform DAILYcleaning of these items.
Very Dirty Capping Station!

Chapter 7 - Printing Other Items
87
Chapter 7Printing Other Items
Printing on General Items
The T-Jet2 can print on almost any garment type material that can be held in placeor that can lay flat and you don’t need a clamping device. Mouse pads, wood and other rigid non-textile items can simply lay on the Garment Holder. The mostimportant thing is to remember to check the head clearance.FastINK for your T-Jet2 is a water-based textile ink designed to work on naturalfabric materials. It will also work on non-textile items such as unfinished wood,mouse pads, golf balls, keyboards, light switch covers and much more with the helpof FastT-Jet Non-Textile Series Pre/Post Treatment. This pre/post non-textiletreatment allows the FastINK to adhere to almost any type of surface.
Smaller items can be placed on smaller GarmentHolders available as accessories for your T-Jet2 or youcan make your own fixtures. Spray adhesive or stickytable tack can be placed on these special holders tokeep the items from moving. Again, make sure to checkthe head clearance with the HeightAdjustment Guide.

T-Jet2™ User’sManual
88
Location PlacementThe hardest part of printing on odd size items is determining the print location.Remember, if you are facing your T-Jet2, the outer right edge is “zero” in your graphics program. You can simply make a template or custom page size to matchthe size of your shirt holder.
FastARTIST allows you to choose the correct size holder accessories for yourT-Jet2 in the Page Setup window. You must also set the correct “page size” in FastRIP setup.
FastARTIST Page Size–Go to Layout > Page Size FastRIP Setup–Go to File > FastRIP Setup

Chapter 7 - Printing Other Items
89
Adjust Bed HeightFor the best prints, the printing surface should set just below the printing head. If theitem has a seam or excess fabric, these areas should set lower than the printingsurface.
Use Spray Glue, Table Tack or Double-Sided Tape to Hold Items inPlace
It may be necessary to design a special cutout from foam core or other thin materialthat is the same size as the printing area. You can simply spray glue this to yournormal Garment Holder and use spreadable Table Tackto hold the item in place. Table Tack stays sticky for dozens and evenhundreds of prints and can be “renewed” by simply wiping it down with a wet rag.
Special double-sided tape available is also availablefrom us for this purpose.

T-Jet2™ User’sManual
90
Printing Baseball CapsBaseball caps with and without seams are easy to print on the T-Jet2 using theoptional Baseball Cap Holder. Simply pull the sweatband out of the way, push thecap against the spring guides, use your finger to press the point in the crown downaround the point on the cap holder, stuff the excess cap under the holder, lower theclamp and make a print. Some caps require a little more loading technique.Always be sure to check and double check for head clearance. This will minimizeprint head replacement as well as insure better images.Since a cap may not fit in a conveyor dryer or heat press for ink curing, a simple hairdryer or industrial heat gun is all you need to cure the final print. You can also simplyremove the holder with the cap in place and lay it under a standard heat transferpress.

Chapter 7 - Printing Other Items
91
NON-TEXTILE PRINTINGRequired Items
You should have the following in order to print on Non-Textiles.
1. Non-Textile Pretreatment2. Non-Textile Post-Treatment3. Fine Bristle Brush
Optional materials may be required.
1. Non-Textile Primer Treatment2. Holder for object (i.e. Golf Ball Holder)3. Non-Textile Print Modes (Located on CD or online @
http://screenprinters.net/non-textile_home.php?)
CAUTION: WEAR GLOVES WHEN APPLYING AND USE WITH ADEQUATEVENTILATION. HANDLE WITH CARE AND PROTECT EYES WITH SAFETYGLASSES WHEN APPLYING AS A SPRAY. BEFORE USE, CONSULT THEMATERIAL DATA SAFETY SHEET (MSDS) THAT IS INCLUDED WITH THESEPRODUCTS OR AT WWW.SCREENPRINTERS.NETKEEP OUT OF REACH OF CHILDREN
Getting StartedBefore printing it will be necessary to determine if the surface intended for printingwill allow the pretreatment to stick. This is due to the fact that certain surfaces willwork with applying the Non-Textile Pretreatment directly while others will requireNon-Textile Primer Treatment first. Generally, smooth surfaces such as lightswitches, keyboards, and gloss tiles will require Non-Textile Primer Treatment beapplied before the Non-Textile Pretreatment.
To Test: Apply a very small thin amount of Non-Textile Pretreatment to the intendedprinting surface. If the pretreatment does not sick to the surface but instead runs off,then it will be necessary to use the Non-Textile Primer Treatment.
Important Note: If this is your first time using the Non-Textile Pretreatment, it isrecommended pre-treating small quantities in the beginning to familiarize yourselfwith the process.

T-Jet2™ User’sManual
92
Fast T-Jet™ Non-Textile Primer TreatmentFast T-Jet™ Non-Textile Primer is designed to be used on high glossnon-porous surfaces as a primer coat prior to the application of ourstandard Fast T-Jet™ Brand Non-Textile Pretreatment.
This Primer is designed as an undercoat for our Fast T-Jet™ Brand Non-Textile Pretreatment. DO NOT inkjet directly on this product.
DIRECTIONS: Dip the fine bristle brush in the Primerwiping off any excess on the side of the bottle. Gentlybrush Primer over the surface of the non-textile itemmaking sure there are no uneven areas. Please notethat it is very important that the Primer is applied in athin even layer to insure best print quality.
FOR BEST RESULTS: Apply this product with a fine paint brush. After application iscomplete, clean brush thoroughly with hot water to remove all Primer Treatment.
This product can be sprayed on, but the application may not be as smooth asnecessary for good print reproduction. If applying with an airbrush, spray bottle orpaint sprayer you may need to dilute solution slightly with water. Apply in smooth,thin, even layers. Two coats may be necessary.
Clean up spills and brushes with soap and water immediately after use.
Allow primer to thoroughly dry before applying the Non-Textile Pretreatment. Drytime will vary but can take up to one hour or more. To speed up the drying processuse a hair dryer, heat lamp, or heat gun set on a low temperature setting. Protectwork surface with newspaper.
A heat press can also be used by simply setting the non-textile item under the pressheating element. Be careful to not let the heating element touch the non-textile item.

Chapter 7 - Printing Other Items
93
Fast T-Jet™ Non-Textile PretreatmentFast T-Jet™ Non-Textile Pretreatment is designed for use as an inkjetink receptive base coat when printing directly onto non-textilematerials such as plastic, metal, and wood using your standard FastT-Jet™ Garment Printer and FastINK™ Textile ink. For increased durability of the final print use our Fast T-Jet™ Post-Treatment on topof the final print. Certain high gloss material may need to be preparedwith our Non-Textile Primer Treatment BEFORE using thepretreatment. You do NOT need to change inks when using thisproduct.
DIRECTIONS: If working on smooth, glossy surfaceswhere good adhesion is important, apply the Fast T-Jet™ Non-Textile PRIMER before using this product. PrimerTreatment must be thoroughly dry before applying thispretreatment.
Dip the fine bristle brush in the pretreatment wiping off any excess on the side of thebottle. Gently brush pretreatment over the surface of the non-textile item makingsure there are no uneven areas. If Primer was applied, then Primer treated surfacemust be covered with pretreatment. Please note that it is very important that thepretreatment is applied in a thin even layer to insure best print quality.
FOR BEST RESULTS: apply this product with a fine paint brush. After application iscomplete, clean brush thoroughly with hot water to remove all pretreatment.
This product can be sprayed on but the application may not be as smooth asnecessary for good print reproduction. If applying with an airbrush, spray bottle orpaint sprayer you may need to dilute solution slightly with water. Apply in smooth,thin, even layers. Two coats may be necessary.
Clean up spills and brushes with soap and water immediately after use.
Allow pretreatment to thoroughly dry before inkjet printing on it. Dry time will vary butcan take up to one hour or more. To speed up the drying process use a hair dryer,heat lamp, or heat gun set on a low temperature setting. Protect work surface withnewspaper.
A heat press can also be used by simply setting the non-textile item under the pressheating element. Be careful to not let the heating element touch the non-textile item.

T-Jet2™ User’sManual
94
Since the pretreatment process can take some time to dry, it is recommended thatyou pre-treat as much of the production run as possible to avoid delays due to dryingtime (Do this only after becoming proficient with the Non-TextilePrimer/Pretreatment).
Setting up an Image for PrintTo setup an image for print, you must use a graphic application such asFastARTIST, Photoshop, or CorelDraw. Anyone of the three applications arecapable of printing to FastRIP, but for this manual we are going to setup the imageusing FastARTIST. The steps in the other graphic applications will be very similar;please consult your applications owner’s manual if needed.
1. Setup the printing area in which you will be printing on. Todo this you will need a measuring tape and will need tomeasure the width and height of the Non-Textile item. Nowin FastARTIST select File > FastRIP Setup.
2. From the Setup window, selectPage Setup Tab. In the Page SetupTab select Custom under the pageoption. Now enter the height/widthof the Non-textile item youmeasured. When you are doneentering in the values click OK toreturn to back to the workspace.

Chapter 7 - Printing Other Items
95
3. Next select Layout > Page Size. In thePage Size enter the height/width of theNon-textile item you measured. When youare done entering in the values click OK toreturn to back to the workspace. The non-textile item dimensions will now berepresented by a black box located withinthe workspace. If this is not displayed clickView > Show Page Size to view black box.
4. Import your image for print, positioning the image as you would on the non-textileitem. For further FastARTIST help, please reference the user manual.
5. Once you are done setting up in FastARTIST, Photoshop, or Corel, you will needto print to FastRIP.
Printing to FastRIP - FastARTIST Click File > Print to FastRIP > Positionthe image then click the printer icon located in the printer tool box tocomplete sending the image to FastRIP.
Printing to FastRIP - Adobe Photoshop
Go to the File menu - Print with Preview. Click Page Setup. Click Printer.In the Page Setup menu select the Fast T-Jet 2 printer. Click Properties.Click Advanced. Set the Page Size. Go the Printer Features section. Bringthe Print Mode menu down to select the Color Print Mode. Bring theUnderbase Mode menu down to select the Underbase Print Mode. Setthe number of ink passes for underbase and color. Click OK in AdvancedOptions. In Document Properties set to Landscape or Portrait forOrientation. Click OK. Click Print.
Printing to FastRIP–CorelDraw
Go to File - Print. On the General tab select the Fast T-Jet 2 printer. ClickProperties. Click Advanced. Set the Page Size. Go the Printer Featuressection. Bring the Print Mode menu down to select the Color Print Mode.Bring the Underbase Mode menu down to select the Underbase Print

T-Jet2™ User’sManual
96
Mode. Set the number of ink passes for underbase and color. Click OK inAdvanced Options. In Document Properties set to Landscape or Portraitfor Orientation. Click OK. Click Print.
Printing Multiple Items on the Print BedWhen printing multiple items on the print bed at the same time you must configurethe FastARTIST or graphic application so that each individual image is applied in theproper location.
1. The total print area must first be set to incorporate all the items on the print bed.Measure the total length and height of all the items on the print bed.
2. From the FastRIP Setup window, selectPage Setup Tab. In the Page Setup Tabselect Custom under the page option. Nowenter the height/width of the Non-textileitems you measured. When you are doneentering in the values click OK to return toback to the workspace.

Chapter 7 - Printing Other Items
97
3. Next select Layout > Page Size. In the PageSize enter the height/width of the Non-textileitems you measured. When you are doneentering in the values click OK to return toback to the workspace. The non-textile itemscollective dimensions will now berepresented by a black box located within theworkspace. If this is not displayed click View> Show Page Size to view black box.
Now that the total print area has been set, you must now determine the location thateach individual image is to be applied.
1. On the first non-textile item that isclosest to the upper left hand cornerof the print bed, measure from the leftside of the print bed to the centerpoint where the image is to belocated (X axis). 1 ¼” - 1.25”
Logo
Upper Left-hand Corner
Upper Left-handCorner

T-Jet2™ User’sManual
98
2. Next using the same item, measurefrom the top of the print bed down tothe bottom point where the imageshould stop on the non-textile item (Yaxis). The red doted line identifies themeasurement taken for the bottom ofthe logo. 1 7/8” – 1.88”
3. Steps 1 and 2 will give you the location in which to position the first image. Usingthe rulers positioned around the FastARTIST workspace place the image in thedesired location or with the image selected on the workspace, you can type in thedesired location in the x/y boxes.
4. Repeat steps 1, 2, and 3 for remaining items in the print bed. For youconvenience, we suggest measuring the items starting in the upper left handcorner then moving left to right from top to bottom.
Setting up FastRIPOnce an image is printed to FastRIP,FastRIP will open and proceed to spool theprint job.
1. Double click on the file in the Queuewindow.
2. This will now bring up the Job TicketProperties window. Under the GeneralTab select the Max Ink Tab. Checkthe Overwrite Print Mode Max InkData box and change the Max InkLevel from 400 to 300, click OK.
Logo
Upper Left-handCorner

Chapter 7 - Printing Other Items
99
Positioning for Printing1. Set the item in the upper left-hand corner
of the print bed without a shirt boardloaded in. Raise the bed and use theheight adjustment bar to make sure it is atthe right height. (See T-Jet manual formore details). For odd shaped items,create a holder or fixture to hold the itemsin place during printing. Print using thestandard Photo Print Mode settings for white T-Shirts. Sample prints may benecessary to determine the correct Print Mode settings.
2. If all the previous setup instructions have been completed above, withinFastRIP - right-click on the job and select Print.
Fast T-JET™ Brand Non-Textile Post-TreatmentFast T-JET™ Brand Non-Textile Post-Treatment is a protective coatingused for printing on non-textile surfaces to achieve a long life to yourprints while waterproofing and preventing the ink colors from fading aswell as acting as a UV protectant. Use this product with our other non-textile treatments such as Fast T-JET™ Brand Non-TextilePretreatment.
DIRECTIONS FOR USE: Shake can beforeeach use. Spray onto non-textile, printedsurfaces after drying has been completed. Applya thin coat, 4 to 8 inches from surface. Use aswift motion to prevent over spray andunwanted buildup. If build up occurs, uselacquer thinner to reduce. A second coat maybe applied after approximately two minutes ofdry time. Let surface dry for 30 minutes to onehour. Let dry in a clean, dust free area toprevent debris from sticking to the surface.Clean valve after use. Turn can upside down and spray a short burst until cleared. Ifnozzle is clogged or sprays irregularly, check for coating in opening. Scrape off withsoft object and twist valve one half turn. Allow 24 hours cure time prior to placingcoated graphics into service.
Upper Left-handCorner

T-Jet2™ User’sManual
100
Printing Golf BallsBefore printing golf balls you must first install special print modes designedspecifically for printing small prints found on items such as golf balls.
Installing GOLF BALL Print Modes;
1. Locate the FastJet2.pmz file within the Non-Textile Print Modes Folder on theNon-Textile Printing CD or download from the following web address:http://screenprinters.net/non-textile_home.php?
a. When downloading the print modes, open the downloaded zip file andsave to your desktop.
b. Double click on the zip file on your desktop, then drag and dropFastJet2.pmz file onto the desktop.
2. After locating the FastJet2.pmz file open FastRIP.
3. From FastRIP select Printers > Manage PrintModes.
4. Use the drop down menu and select fast T-Jet2.

Chapter 7 - Printing Other Items
101
5. A list of print modes now be displayed andthe icons located at the top of the windowwill become available.
6. Select import print mode package identified below.
7. Locate the CD folder Non-Textile Print Modes to access the FastTjet2.pmz file(or on the desktop if downloaded) and click Open.

T-Jet2™ User’sManual
102
8. A list of four print modes should appear below, Select all, and then select import.
9. There will be a new folder called Non-Textile Print Modes in the Print ModeManager Window. Expand the folders contents by clicking on the black triangle tothe left of the folder. Place a check in the box to the left of the folder and for allthe proceeding print modes.

Chapter 7 - Printing Other Items
103
10.Select Import Selected Print Modes to Control Panel which has the icon of ablue clip board with a red check on it.
11.Close the window and you now have Non-Textile1440 print modes for golf balls.
Pre-Treating the Golf BallsFor printing golf balls you will need to use optional GolfBall Holder, Fast T-Jet™ Non-Textile Pretreatment, andFast T-JET™ Brand Non-Textile Post-Treatment. FastT-Jet™ Non-Textile Primer is not necessary for golf ballprinting as the balls surface works perfectly with justthe pretreatment.
1. Load the Golf Balls in to the holder and place the guard on top of the balls. Theguard will protect the area not being Pre-Treated as well as any overspray fromprinting.
2. Dip the fine bristle brush in the pretreatmentwiping off any excess on the side of the bottle.Gently brush pretreatment over the exposed golfball surface making sure there are no unevenareas.
3. Allow pretreatment to thoroughly dry before inkjet printing on it. Dry time will varybut can take up to one hour or more. To speed up the drying process use a hairdryer, heat lamp, or heat gun set on a low temperature setting.

T-Jet2™ User’sManual
104
Loading Golf Ball Template (FastARTIST Only)1. Go to File > Open and double click on the Golf Ball Holder Template to open
template.
2. Import the images or text you wish to print and place them inside of the lines.
3. Choose one of the following print modes:Non-Textile Photo 1440 StandardNon-Textile Photo 1440 Standard HSNon-Textile Cartoon 1440 StandardNon-Textile Cartoon 1440 Standard HS
4. Print to FastRIP.
Golf Ball Holder PlacementPosition the Golf Ball Holder in the top-left corner of theprint bed without a shirt board loaded in. Holder will bepositioned from left to right within the print bed. Raisethe bed and use the height adjustment bar to makesure it is at the right height (see T-Jet manual for moredetails).
If all the previous setup instructions have been completed above, withinFastRIP - right-click on the job and select Print.
Upper Left-handCorner

Chapter 7 - Printing Other Items
105
Finish with Fast T-JET™ Brand Non-Textile Post-Treatment
DIRECTIONS FOR USE: Shake can before each use. Spray onto non-textile,printed surfaces after drying has been completed. Apply a thin coat, 4 to 8 inchesfrom surface. Use a swift motion to prevent over spray and unwanted buildup. Ifbuild up occurs, use lacquer thinner to reduce. A second coat may be applied afterapproximately two minutes of dry time. Let surface dry for 30 minutes to one hour.Let dry in a clean, dust free area to prevent debris from sticking to the surface.
Non-Textile Printing Tips When brushing on any of the treatments make sure it is placed on smoothly and
evenly in thin layers. Having two brushes can make the job easier one for the Non-Textile Primer
Treatment and one for the Non-Textile Pretreatment. Cleaning the brushes when done with hot water and letting dry will prevent them
from drying out and ruining the brushes. When printing on the Non-Textile items use a piece of film that covers the whole
item and print on the film to see if it aligns and prints right. The Print Bed area is 13” X 18” on a T-JET Standard and 13” x 22” on a
T-JET 2. To maximize production you can line up multiple items next to eachother and print more then one at a time.
If you have a heat press in which you can place the items under, do so withoutmaking contact to dry the Non-textile items faster.

T-Jet2™ User’sManual
106

Chapter 8 - Simple Maintenance and Utilities to Improve Print Quality
107
Chapter 8Simple Maintenance and
Utilities to Improve Print QualityThere are a number of simple Maintenance procedures that will have to beperformed periodically requiring the use of the Epson Printer Driver MaintenanceUtility. The following procedures are necessary to maintain a high print quality andto avoid reoccurring problems.One specific problem that can occur during printing is lines missing in the printedimage called banding. The two most common reasons for banding is a dirty orclogged printing head, or a head that is misaligned.If your prints are unexpectedly light, or dots or lines are missing, you may need toclean the print head. This unclogs the nozzles so they can deliver ink properly.Print head cleaning uses a lot of ink, but we recommend doing at least onecleaning cycle each day. Print head cleaning may be necessary if you let one ofthe ink bottles on the bulk ink system run dry or if your printer has been setting fora few days without use.To clean the print head simply hold down the Ink button on the T-Jet2 ControlPanel for three seconds or use the Epson Maintenance Software for moreadvanced options with regards to Head Cleaning and Nozzle Checks.When your T-Jet is not in use make sure that the power is off so that the print headdocks on the capping station to avoid drying up and clogging. Then when theprinter is powered back on the T-Jet will then proceed with its normal start upcycle.
Running the Head Cleaning Utilities1. Make sure your printer is ON but not printing and
all of the red ink lights are off.
2. Windows: Right-click the printer icon on thebottom right hand corner of your screen (Task Bar)and select Head Cleaning. If there is no printericon, go through the normal steps to print from anapplication and when at the Epson Menu, selectthe Maintenance tab.

T-Jet2™ User’sManual
108
MacintoshOS 8.6to 9.x: Choose File> Page Setup orPrint. Click the utility button, then click the HeadCleaning button.MacintoshOS X: Open the Applications/Utilities.Select Printer Setup Utility or Print Center. Click andHighlight SP 2200 or Stylus Photo 2200. Click on Utilitybutton. Select Head Cleaning.
3. Follow the on-screen instructions. Cleaningwill take about 45 seconds during which timethe printer makes noise and the green Powerlight and the red Ink lights will flash.You should never turn off the printer whilethe power light is flashing, this may damagethe printer. You can do head cleanings atany time even when the printer is printing. Itwill stop and clean the heads and resumeright where it left off. Since the HeadCleaning cycle also wipes the bottom of thehead, it is recommend to do headcleanings if you start to see drops of ink ongarments or if the head comes in contactwith a garment.
4. When both the power light and the inklights stop flashing perform a NozzleCheck. You will need a few sheets of lettersize paper OR clear inkjet film for thispurpose. It is hard to see the white ink onwhite paper when doing a nozzle check sothe film is a better choice.Lay the paper or film on the top of theGarment Holder butting up against the zeropoint of the bed.Next, click Print Nozzle Check Pattern inthe Head Cleaning dialog box and followthe on-screen prompts.

Chapter 8 - Simple Maintenance and Utilities to Improve Print Quality
109
5. After the Nozzle Check Pattern has printed out check to see if the lines have anygaps or lines in them. If the Nozzle Check Pattern has no gaps or lines clickFinish.
If the Nozzle Check Pattern does have gaps and lines click the Clean button toclean the heads again.
For serious clogs you can run this routine DOZENS of times. Doing this will usea lot of ink but will generally eventually clear badly cloged heads. You can also turnoff the printer and place a few drops of glass cleaner or cleaning fluid on the cappingstation pad and wait overnight to let the ink soften and try doing head cleaningsagain the next day.
Aligning the Print HeadThe print head can become out of alignment through normal use, during shipping,or if the print headhits or “crashes” into a garment or the metal holding ring. Thefollowing procedure shows how to do basic print head alignment. If the head hashad a hard crash into a solid surface, it may be permanently damaged orpermanently out of alignment and will need to be replaced.If your prints contain vertical or misaligned lines, or you see banding of any kind, youmay need to align the print head.1. Turn the printer ON
2. Lay letter-size paper (8.5 X 11) or clear inkjet film on top of the Garment Holderthe same as for the Nozzle Check. If the paper curls it may be necessary totape it in place.
3. Windows: Right click on the printer icon (bottom right hand corner of yourtaskbar) and select Print Head Alignment. If the printer icon is not showing,open your graphic application and go through the print routine. When you are atthe Epson Driver menu, select the Maintenance tab and Print Head Alignment.

T-Jet2™ User’sManual
110
Macintoshes 8.6or 9.x: Choose File>Page Setup or Print. Click the utility button,and then click the Print Head Alignment button.Macintoshes X: Open the Applications/Utilities. Select Printer Setup Utility or PrintCenter. Click and highlight SP 2200 or Stylus Photo 2200. Click on Utility button.Select Print HeadAlignment.
4. Follow the steps on the next screen toprint the next test page.
5. Once the test page has printed outchoose the set with the least bandingbetween the two lines.
If rows #1 and #2 line up the best on number 8 clickNext and continue to step 7.
If rows #1 and #2 do not line correct onnumber 8 continue to step 6.
6. Select the pattern from each row # 1 and 2 thatlines up the best and enter the number in thePrint Head Alignment window where prompted.Click Realignment. Continue this step untilrows #1 and #2 lines are correctly aligned onnumber 8. Click Next.
7. Reload printer with new sheet of paper of clear film and click next to print secondtest pattern.
8. Repeat steps 5 - 7 until you have a third test pattern.

Chapter 8 - Simple Maintenance and Utilities to Improve Print Quality
111
In the third test pattern, if box 3 is the least grainy in all the rows click Finish. If box 3is the best one in one or two rows, but you still need to adjust other rows, clear thecheckbox(s) for the good rows and click on Realignment. This will print out anothertest page for the rows that were left checked.
Emptying the External Waste BottleAs your T-Jet2 goes through headcleaning cycles it forces ink through theprint head. This excess ink goes intothe External Waste Bottle located at theback of the T-Jet2 on the control panelside.To empty the waste bottle simplyunscrew the top of thebottle and remove, carefully placing thewaste bottle top with waste inkline attached on a rag or old t-shirt. Empty waste bottle andreplace waste bottle top.
In the rare instance that your printer thinks that you have used enough ink to fill theentire Waste Bottle, all of the ink lights will blink without an obvious way to reset thecounters. This can happen if you have printed anywhere from 10,000 to 15,000pages. At this point you are not able to run the printer until you re-set the InkCounter in the printer. Please see the following section.

T-Jet2™ User’sManual
112
Resetting Ink CounterIf you need to reset the ink counter, please visit http://support.equipmentzone.comThere are two ways to reset the counter. The hardest wayis to remove the covers from the machine and press a few internal buttons. There isalso an easy “softwaresolution”that can be used. Our friendly support staff willgladly walk you through the steps.
Print Head ReplacementIn the event that you damage theprinting head by hitting it against themetal holding ring, the head willprobably need to be replaced. If youcan’t get the headto print in alignmentafter numerous alignment routinesthere may be permanently damaged.Replacing the head is actually not toodifficult and will take less than 30minutes. Replacement heads arereadily availableand come with complete written and DVDreplacement instructions.If you are dependent on your T-Jet2 and cannot afford to be down for a few days werecommend keeping a replacement head in stock.There is a short video online at T-Jet Support on how to replace the print head.

Chapter 9–Preventative Maintenance and Problem Solving
113
Chapter 9Preventative Maintenance
and Problem SolvingYour T-Jet should work trouble free if you take time to understand and perform thenecessary machine maintenance. 95% of our technical support calls come frompeople who have not maintained their machines properly. While the T-Jet’smayappear to be just an inkjet printer, it is a VERY SPECIAL inkjet printer. Whenprinting onto garments, the printer must print A LOT more ink than when printing onpaper. This can and will cause excess ink to get on internal parts if the machine isnot maintained on a regular basis.When printing dark shirts with white ink, the pretreatment is sticky and if sprayednear a machine can get on the internal working parts of the printer. Inkjet printersin general do not like hot dry room conditions or to be in a dusty, dirty shop. Youhave made an expensive investment and in order to get the most out of it, pleasetake time to learn about the simple steps that will keep your T-Jet happy andmaking money.
Keep your Encoder Strip CleanOne of the main support issues is the printergetting confused on how to print an image. Themagic that tells an inkjet printer printing headwhere to print is a thin strip called the EncoderStrip. A dirty encoder strip can cause everythingfrom images printing in the wrong location, largeblocks of ink spraying on the shirt, double-images, dark bands across the print, thinhorizontal lines and much more. The printerhead reads this clear strip (containingdata) when the head is moving. If the stripgets dirty with lint from shirts, or ink overspray it can confuse the printer. Pleasedo daily and weekly maintenance on theunit as required in this chapter.

T-Jet2™ User’sManual
114
Daily - Clean the Encoder Strip
1. Turn the Printer off and unplugged thePower cord. Make sure that the Print Headis parked in Home position (over thecapping station).
2. You can use foam tipped swabs but for bestresults use Alcohol Pads that are IsopropylAlcohol. Do NOT use Rubbing Alcoholpads. Wrap the Alcohol Pad around bothsides of the Encoder strip. Move the Pad inboth directions. If the pad becomes blackthen use a new pad and clean the Encoder strip again. Now move the Print Headfrom Home position. Clean this section.
3. Let the Encoder strip AIR DRY.
Weekly - Clean the Encoder Strip by Removing from the Printer
1. Turn the Printer off and unplugged the Power cord.
2. Remove the side panel on the opposite side from theControl Panel (Power/Ink buttons).
3. With Needle Nose pliers gently unhook the metalspring tensioner from the metal bracket. This is on theopposite side from the Control Panel.
4. Move the print carriage (away from the control panel)towards the center of the print bed and unhook theEncoder Strip from the metal hook securing theEncoder Strip.
5. Pull the Encoder strip out from behind the carriage.
6. Rotate the Encoder strip 90 degrees up and Gently Pull the Encoder strip off thehook located to the right of the spring tensioner (opposite the control panel side).
7. Use Alcohol Pads that are Isopropyl Alcohol. Do NOTuse Rubbing Alcohol pads. Rap the Alcohol Padaround both sides of the Encoder strip. If the pad getsblack then use a new pad and clean the Encoder stripagain.

Chapter 9–Preventative Maintenance and Problem Solving
115
8. Let the Encoder strip AIR DRY.
9. Take Pipe Cleaner and run it through the sensorreader slot on the back side of the carriage. This isthe slot the Encoder strip runs through.
Do NOT remove the print headcarriage from the printer to clean theencoder sensor on the back. The twophotos on the right show the carriageoff of the printer so you can see thesensor better.
10. Reposition the Encoder Strip in the properdirection with the T-Jet (Spring on theopposite side of the control panel).
11. Place the Encoder strip at the 90 degreeangle then twist the Encoder strip back ahorizontal position to the printer.
12. Slide the Encoder strip through the reader slot on the back side of the carriage.
13. Hook the Encoder strip on the metal hook on the side with the Power\Inkbuttons.
14. Hook the spring tensioner back on the metal hook (opposite side from thecontrol panel).
15. Slide the carriage back and forth. Look for binding or twisting of the Encoderstrip.
There are two helpful videos on cleaning the encoder strip on our T-Jetsupport page at screenprinters.net/supporttjet.php.
Note: The Encoder Strip is actually CLEAR with small marks on it. Be carefulto NOT scratch it or the sensor will not read it correctly. Only use FOAM TIPcleaning swabs when doing any maintenance or cleaning inside your T-Jet.

T-Jet2™ User’sManual
116
Turn your T-Jet OFF at nightTurn OFF the machine at night using the Power Button only. This will ensure that theprint head is properly seated on the capping station. DO NOT use a power strip toturn off your printer.
Don’t top off the bulk ink bottlesWhen refilling the bulk ink bottles STOP at the FULL LINE marked on the side of thebottle. This will prevent excess pressure which can cause ink to drip out of thebottom of the print head.
Clean Capping Station and Wiper DailyThe capping station is the rectangular piece that the inkjetprinter head seats onto. There is a sponge in the cappingstation and a wiper (small squeegee) next to it. Make sureboth are free of dried ink and garment fibers. Use a foamswab and distilled water, glass cleaner or isopropyl alcohol tokeep this clean.
The pictures on the right show two very dirty cappingstations. The capping station seals the print headwhen it is not in use. Ink residue around the edge ofthe capping station keeps thehead from seating and sealingproperly which can cause headclogs. White ink will buildup alittle more than normal colors.
EJECT LOAD INK ERROREJECT
POWER

Chapter 9–Preventative Maintenance and Problem Solving
117
Note: When cleaning the capping station, be careful to NOT dislodge it out ofposition or the print head will not seat properly. If you push down on it too hard it willmove off of the mount.For better cleaning you can remove the entire capping station assembly.
Removing the Capping Station1. Remove the side panel from the control panel side. The side panel contains 5
silver screws holding the panel on, four are located on the bottom of the paneland the fifth is on the back side of the T-Jet2. When all the screws are removed,remove the panel.
Note: There is a counter that is attached to the panel, so be careful not to pull outthe panel too far from the T-Jet2.
2. Remove the square panel that is blocking the access to the capping station.There are two screws holding this in place. As show below.
3. Remove the screws as identifiedon the right that are currentlysecuring the capping station/pumpassembly in place.

T-Jet2™ User’sManual
118
4. Both capping station/pump assembly can now be removed and to do so, thereare two different methods in which you can follow–Removal from the top orremoval from the side.
Top Removal Step Pull the capping/pump assembly out the side then tilt upwards. This will allow
for easy removal from the top.
Side Removal Step The capping/assembly station will need to be turned to the side in order to
comfortably remove with out damaging the clear plastic pump hose.

Chapter 9–Preventative Maintenance and Problem Solving
119
5. Next, remove the capping station assembly from the silver plate that holds thepump assembly. Start by moving the wiper blade as far to the right as possiblethen simply disconnect the capping station.
6. Remove the black line with the white coupler from the clear pump assembly inktube.

T-Jet2™ User’sManual
120
7. Make sure that the arm for the pumping station is properly attached to the wiperblade assembly. If the arm is not attached during a head cleaning, the pumpassembly will make a grinding sound. Using a small flat head screw driver orpen, simply move the arm back into the grove on the wiper blade assembly.
8. Next look at the capping station to make surethat nothing is blocking the ink from flowingthrough the black hose into the clear one. Away to test this is to pour some cleaningsolution into the top of the capping station andsee if it comes out of the black hoseunderneath.
9. Next, take a foam swab and clean the rubber seal with cleaning solution andwash the capping station in hot water to remove all of the ink build up.
10.Flush the pumping station simply byinserting a syringe with cleaning solution intothe clear pump assembly tube where thewhite coupler was removed. Push thecleaning solution through the pump.
11. Clean the wiper with a foam swab.

Chapter 9–Preventative Maintenance and Problem Solving
121
Reinstalling the Capping Station
1. Make sure you have allthe pieces shownbelow: one pumpassembly, one capassembly, one rubberwiper blade, and onecloth wiper blade.
2. First install the wiperblades as shown in thepicture on the right.Position the rubber bladebehind the cloth one sothat the curve on therubber faces away formthe gear. The cloth isclosest to the gear.
3. Use a small flat head screw driver to help mount the wiper blades onto thecapping station. Make sure that the two openings at the bottom of the wiperblades fits securely over the two plastic grommets.

T-Jet2™ User’sManual
122
4. Now that the wiper blades are in place, connect the cap assembly to the pumpassembly. Do this by connecting the black hose to the white coupler and then thewhite coupler to the clear hose with the green line coming out of the side of thepump assembly.
5. Make sure that the arm for the pumping station is properly attached to the wiperblade assembly. If the arm is not attached during a head cleaning, the pumpassembly will make a grinding sound. Using a small flat head screw driver orpen, simply move the arm back into the grove on the wiper blade assembly.
Capping Station

Chapter 9–Preventative Maintenance and Problem Solving
123
6. Once the wiper blade arm is in place,finish installing the cap assembly. Thereare two holes located on the silver platethat the capping assembly fits into. Movethe wiper blade assembly all the way tothe right for this step. When positioningthe capping assembly in the silver plate,make sure that the white pin from thewiper blade assembly fits within thecapping assembly as shown.
7. Once the assembly is put back together, place it back in the machine. This isdone by turning the assembly sideway to fit in the opening as show below. Makesure that the hose does not get caught on the side of the machine.
8. Position the capping/pump assembly carefullyback into the machine and secure the silverplate with two screws. Check the top view tomake sure everything is in place as shown onthe right.

T-Jet2™ User’sManual
124
9. The final step is to put the screws back into the Capping/Pump assembly. Pleasenote that the Capping assembly is on the outside of the machine when screwingit back in, as shown below.
10. Replace square cover and chrome panel at this time.
Humidity and Environmental Control is a MUSTDuring the cold winter months dry heat is often pumped into theroom. Inkjet printers like humidity levels of 35% to 80%. If yourroom is dry, place a humidifier in the room and buy aninexpensive hygrometer from Radio Shack to measure thehumidity level. In the summer months if the humidity is too high,use a dehumidifier. Try very hard to NOT place this machine ina dusty, dirty or non-controlled environment (like a screenprinting shop). For best results, place the T-Jet in a dust freeroom with air-conditioning control.Important Note: Do not allow fans to blow air across the print heads as they coulddry up and clog, seriously effecting T-Jet performance.

Chapter 9–Preventative Maintenance and Problem Solving
125
Print with lid closedDue to the airborne nature of the white ink pretreatment, you should try to pretreatshirts in a different room or far away from the machine. If pretreating in a differentroom is not an option, then make sure that the lid on the T-Jet is kept closed at alltimes and especially during the print process. The pretreatment will immediately clogthe print heads if put into direct contact. We strongly suggest making an enclosedarea to pretreat the shirts such as a large box or something of that nature to keepoverspray down to a minimum. This is to not only protect the print heads but insuresthat the encoder remains clean as well.
Some users feel they have fewer problems with a dirty encoder strip if the lidis left open; this is possible as long as pretreatment is not sprayed near thatmachine.
Preparing your T-Jet for Down TimeIn the event that your T-Jet2 is going to sit for more than 3 days without use, it willbe necessary to prep the machine for the down time. The preparation processshould only take about 10 minutes and if you have any questions regarding any ofthe steps, please call our support department during regular business hours asfollows:
Toll Free +1 888-MYTJETS (698-5387)Technical Support +1 480-929-2937Email: [email protected] hours: 7:00am to 8:00pm Monday through Friday
9:00am to 3:00pm Saturday(Mountain Standard Time) USA
Note: Arizona does not observe “Daylight Savings” in the US.In the summer months, Arizona is on the same time as California.
Installing the T-Jet2 Cleaning System
The first step of the preparation process will be to install the refillable cleaningcartridges as follows.
1. Remove ink line from ink cartridges and capthe end of each ink line with a red ink line cap.Be sure to remove and cap each lineindividually to avoid ink siphoning out onto thecartridges.

T-Jet2™ User’sManual
126
2. Using the white ink cartridge caps, now cap each bulksystem ink cartridge as shown.
3. At this time you can remove the ink cartridges simplyby pushing cartridge tabs inward as shown in theexample on the right. This will then release the inkcartridge from the print carriage.
Important note about storage of ink cartridges: When the ink cartridges areremoved make sure to place them upside down as this will prevent ink from leakingout. We also recommend that the bottom of the ink cartridge be taped and placed inan individual plastic zip lock bag.
4. Tie loose ink lines to cable chain with zip tie. This will keep the ink lines frommoving around and possibly damaging the encoder strip when performing thenecessary head cleanings. Make sure to allow for a natural bend in the ink line;DO NOT kink the ink lines.

Chapter 9–Preventative Maintenance and Problem Solving
127
5. Install the Refillable Cleaning Cartridgesand perform 3 to 4 head cleanings. Whenperforming a head cleaning with thecleaning cartridges the bottom rubber plugmust be removed.
If the rubber plug is notremoved during a headcleaning–damage can becaused to the print head.
IMPORTANT NOTE: DO NOT RUN A NOZZLE CHECK WITH CLEANINGCARTRIDGES. Cleaning solution will leak out into T-Jet causing seriousdamage.
To purchase Refillable Cleaning Cartridges contact:Equipment Zone Sales:Monday - Friday 8:30a.m. -6:00 p.m. (EST)Main Line and Sales (201) 797-1504Toll Free Order Line 1 (800) [email protected]
1 2 3

T-Jet2™ User’sManual
128
6. Place rubber plugs back into the bottom of therefillable ink cartridges.
7. Turn the printer OFF by pressing the Power button only. As the printer powersdown the print carriage will move onto the docking station. The docking station islocated on the control panel side of the printer.
8. Close the Waste Bottle Valve - Anytime thatthe T-Jet2 is powered off make sure to close thewaste bottle valve to prevent cleaning solutionfrom siphoning through the capping station.
The preparation process is now complete and the T-Jet2 should now becovered for the duration of the down time.
Eliminating Ink Drops on ShirtsWhen you perform a head cleaning, the head itself is cleanedand wiped by the printer. On occasion, this may not clean awaysmall pieces of shirt lint that collect around the bottom of thehead. This excess lint can create an Ink build up under theprint head causing ink to drip on the garment. The easiest wayto see this debris is to remove the shirtboard and shine aflashlight onto the chrome base of the print bed looking intothe reflection to view the print head as shown below. Cleanany lint and ink residue off with a Foam tip swap and cleaningfluid or glass cleaner. BE CAREFUL to not rub the bottom ofthe head too hard where the actual nozzles are located.
EJECT LOAD INK ERROREJECT
POWER

Chapter 9–Preventative Maintenance and Problem Solving
129
External FuseAs of August 1, 2006, all T-Jets are shipped with an external fuse on the rear of themachine. If there is a short involving the ribbon cables connection between either theprint head or the mother board the fuse will blow. A blown fuse can easily beidentified by the printer head moving without dispensing ink. The T-Jet ships with asecond (600ma) fuse, but before replacing, contact technical support to solve theproblem that caused the first fuse to fault. Otherwise you will have two blown fuses.
For powerful head cleaning use the Epson Utility and not the inkbutton
Holding down the Ink button on the T-Jet control panel forthree seconds with perform a head cleaning, but theEpson Head Cleaning Utility is much better. If a Cleaningand Nozzle check is executed multiple times, eachadditional cleaning is more powerful than the previous. Toget the benefit of the more powerful cleaning, you MUSTalternate between Head Cleaning and then NozzleChecks within the Epson Utility.You can perform up to FOUR nozzle checks/headcleaning cycles in a row as the strength of each will increase.
IMPORTANT NOTE: DO NOT RUN A NOZZLE CHECK WITH CLEANINGCARTRIDGES. Cleaning solution will leak out into T-Jet causing seriousdamage.
Ink Hose ClipBetween early December 2005 and mid-January 2006, we shipped T-Jet2 printerswith a metal ink tube clip that only useddouble-stick tape to hold the tubes in place.This is no longer a supported item as you willneed to upgrade to the new cable chainsystem if applicable.

T-Jet2™ User’sManual
130
Clean Bulk System computer chipsThe small computer chips on the back of the ink cartridge can get dirty and not makegood contact. If you get erratic red lights on certain colors, clean the chips with afoam tipped swab and isopropyl alcohol. A pencil eraser works for this as well.
Have a lot of RAM for your computerRAM is the temporary memory that your computer uses when processing complexdata. Ram is NOT expensive. Most computers ship with 256mb of RAM. This isnot enough, especially when using FastARTIST and FastRIP. Your computer shouldhave a minimum of 512mb and preferably 1 to 2 GB of RAM.
When in doubt–unplug everythingSometimes inkjet printers get confused especially if you stop them in the middle of aprint run. If the T-Jet is suddenly acting abnormally, turn everything off AND unplugthe power. Make sure to unplug the USB cable between your T-Jet and thecomputer as there is often data still being sent that might be corrupt. Leaveeverything unplugged for a few minutes and then plug items in and start over.You MUST cancel all print jobs for this to be effective or they may start backup when you turn the computer and T-Jet back on.
Clean/Adjust Drive Roller and BeltDuring normal operating conditions, lint that is coatedwith pretreatment can get caught in the Print HeadBelt Gear located in the right rear inside of themachine. This lint will start to clog the belt gears andthe belt will slip causing the bed to jerk and notcomplete print jobs. Periodically check this gear andif necessary, clean it with a brush or computervacuum. Make sure to avoid any contact with theencoder strip as it is fragile and could getdamaged. You may need to remove theEncoder Strip to get a good cleaning.

Chapter 9–Preventative Maintenance and Problem Solving
131
Adjusting Belt TensionOver time the T-Jet may develop some play in the belt tensioner which couldpossibly cause printing problems. This is easy to check on your machine and adjustif necessary.Follow the basic steps below to not only check for play but to adjust tension ifnecessary:
1. UNPLUG the printer.
2. Take the far side cover off yourmachine (the one not holding the bulkink system). You will see what lookslike a black square plastic button.Push in on the button. You shouldNOT be able to push it in and if thereis any give there, you need to adjustthe pivot lever (continue to step 3).
3. Remove the cover on the other side (where the bulk ink system is located).
4. Remove the 4 screws holding the top cover that faces the rear of the printer.

T-Jet2™ User’sManual
132
5. Loosen the screw holding thepivot lever.
6. Push the pivot lever from thebottom so that it contacts theblack plastic tensioner piece.
7. Tighten the pivot lever screw andcheck button again. Replacecovers. Finished..
Shake shirts or Preheat to Minimize LintT-Shirts generate a lot of lint and it is important to minimize the amount of lint insidethe machine. Try to get in the habit of shaking a shirt before loading it. If you feel theshirts you are using generate excess lint, use a Pet Hair pickup to quickly roll theshirt after it is on the shirtboard. You can also preheat them in a heat transfer press(just a few seconds) to flatten down the fibers.
Do NOT do a power purge of the print headIf the print head becomes so clogged that you can’t print a good nozzle check after doing numerous head cleanings, it may be necessary to replace the head. In thepast we recommend removing the print head and performing a power purge byforcing cleaning fluid through the head. This was only marginally successful but alsocaused other problems. When the head is removed the gray ribbon cable wouldoften not get replaced properly and would short out causing the main motherboard toshort out. Now we DO NOT recommend removing the head and doing a PowerPurge. If you do so, it is at your own risk and we will not warranty themotherboard.

Chapter 9–Preventative Maintenance and Problem Solving
133
Keep excess ink from the ribbon cableIf excess ink leaks from the print head carriage assembly to the ribbon cable it mayshort out the main motherboard. When changing cartridges you should ALWAYSwipe any excess ink from the inside bottom of the carriage around the print headinputs with the foam tipped swab.
Five Minute Daily MaintenanceSince the introduction of white ink for dark shirts and the spraying of pretreatmentaround the shop, daily maintenance has become a very critical part of your T-Jet’sperformance. By not following the required daily maintenance described below youwill void your T-Jet2 warranty as well as damage the machine.
Many of these items have been covered earlier in this manual, but the following listwill help you prioritize what key maintenance items should be done on a regularbasis.
Turn the machine off at nightTurn OFF the machine at night to make sure the print head is capped properly onthe capping station.
Perform head cleanings every morning and at the end of the shiftAfter turning on the machine at the start of the day perform 3 to 4 head cleanings.Press the Ink button for three seconds as a fast way. The preferred method is to usethe Epson Cleaning Utility in the Epson driver. Perform head cleanings at the end ofthe shirt run or end of each day.
Clean Capping Station and WiperThe capping station is the rectangular piece that the inkjet head seats onto. There isa sponge in the capping station and a wiper (small squeegee) next to it. Make sureboth are free of dried ink and garment fibers. Use a foam tipped swab, distilledwater, glass cleaner and or isopropyl alcohol.
Clean Belt and Drive GearClean carriage motor drive gear and belt with a small computer vacuum or smallbrush. Over time shirt fibers get caught in the drive gear causing the belt to skip.Make sure to avoid any contact with the encoder strip as it is fragile and could getdamaged. Care also needs to be taken to not contaminate the encoder strip.
Clean Print HeadClean any accumulated ink or garment fibers from around the sides on the bottomside of the print head with a swab and glass cleaner.

T-Jet2™ User’sManual
134
Clean Encoder StripDuring printing and head cleanings the clear plastic Encoder Strip that the headreads can get dirty. The Encoder Strip is essentially the “brains” of the printer and if the head can’t properly read the data on the strip, the head will get confused and print in the wrong location dumping ink where it should not be. Clean encoder stripwith a swab and glass cleaner or isopropyl alcohol pad.
Shake up the inkGently shake the bulk ink bottles in the morning and night to avoid separation ofwhite ink pigment.
Check ink levelsVisually check the ink levels of the bulk ink bottles for the following conditions:
Ink levels are past the full line - ink might start to drip from the print head
Ink levels are too low - the ink tubes will run dry. .
Weekly or Monthly Maintenance(depending on amount of production)
Clean Encoder StripRemove encoder strip and clean thoroughly with a clean lint free cloth and glasscleaner or isopropyl alcohol.
Clean print head guide railsThe long round guide rails that the printing head moves back and forth on can getdirty and in some cases dry. Wipe this weekly if dirty and use the machine oilsupplied with your printer (sewing machine oil). Give it a few drops every otherweek.
Clean Belt and Drive GearRemove drive belt and clean with clean cloth and glass cleaner or isopropyl alcohol.You may have to use a sharp object such as a needle or small wire brush to "Pick"the garment fibers from the drive gear. Adjust the belt tension.

Chapter 9–Preventative Maintenance and Problem Solving
135
Daily and Weekly Maintenance Schedule Check listsThe following two check lists can be used as a guide to insure critical maintenance isperformed on a regular basis. The check lists can be downloaded fromwww.screenprinters.net–Click Support > T-Jet2 > Downloads

T-Jet2™ User’sManual
136

Chapter 10 - Troubleshooting
137
Chapter 10Troubleshooting
The following chapter is designed to help you find quick solutions to commonproblems or questions. Remember, most of these problems can be eliminated bydaily simple maintenance like cleaning the Encoder Strip as well as the CappingStation.
Videos are available for these procedures at screenprinters.net.
Problem:After you print the image the color looks great, but after you cure it, the print looksdull.Causes and Solutions:
The temperature is set too high on the heat press.Make sure you test the temperature using touch less infrared thermometer orheat testing strips. If the temperature is too hot, it could scorch the shirts andthe ink.
There is too much pressure being applied to the shirt during curing.When heat pressing your shirts, make sure you do not apply too muchpressure. You should not have to put a lot of pressure to clamp the heat pressdown.
Wrong type of paper used to protect the shirt when using a Heat Pressfor final cure.Make sure the paper that is used for curing is either a Teflon pad or Siliconetreated paper.
Prevention:Get to know your heat press or dryer as there are different makes and models.Frequently test the output temperature to make sure that what it is set to is actuallythe heat temperature.

T-Jet2™ User’s Manual
138
Problem:The print head is leaking ink and dripping ink all over the garments.
Causes and Solutions:
The print head was damaged by crashing into shirt board, print bed etc.Order replacement print head.
The capping station is dirty and either not cleaning the print headcompletely or adding more debris to the print head causing fibers anddebris to collect ink and ooze or drip ink.Thoroughly clean capping station -See the video online on how to clean the capping station.
Debris or shirt fibers collected on print head as well as print headcarriage.Using the reflection from the print bed, gently clean the bottom of the printhead to remove any debris, dried ink and fibers.
Bulk system is at wrong height.The bulk ink system is sitting too high and gravity is drawing the ink down andout through the print head.
Too much ink in the bulk system tanks.If you filled the bulk ink bottles past the Full Line there could be too muchpressure in the bulk system ink lines and the ink is forced out of the printhead.
Altitude can have an effect.High altitudes can also have an effect on the “pressure” in the system. If you are having an unusual amount of problems and are at high altitudes, don’t fill the ink bottles too full and or try adjusting the height of the adjustable shelfbracket. Reference Chapter 2 Installing Ink System
Faulty bulk system, call technical support.
Prevention: Always check height of print head prior to printing. Clean capping station on a regular basis. Clean debris from print head daily. Don’t over fill ink bottles.

Chapter 10 - Troubleshooting
139
Problem:The printed image is wiping off, washing out, fading badly, or bleeding.Causes and Solutions:
Garment was improperly cured.Inks need to be brought up to approx. 330-345 degrees F. for 45 - 60 secondsfor white garments; 120-180 seconds for darker garments
Too much or too little pressure applied when heat pressing.When pressing the garment the top of the heat press should gently rest overthe silicone paper. This allows the moisture of the inks to escape and properlycure.
Temperature of heat press is not correct (Either to hot or too cold).Make sure the heat press is heating up evenly or correctly (Should be 330-350 degrees F). You can test this with a touch less infrared thermometer orheat testing strips.
Pretreatment improperly applied.Pretreatment may still be wet, simply cure longer.
Poorly pretreated.Apply more pretreatment on successive shirts and cure again.
Too much pretreatment.Use less pretreatment in future.
Type of fabric being printed.For best results print onto 100% cotton! With 100% colors will look their best.For 50/50 blends of cotton and polyester ink needs to be cured quickly toreduce possible bleeding.
How the garment is being washed.Wash in cold water and dry with delicate dryer settings.
Prevention:
Make sure heat press is heating up evenly and correctly. Heat press should lightly press garment. Pretreat evenly and away from printer. Cure Pretreat properly.

T-Jet2™ User’s Manual
140
Problem:The printed colors donot look correct. They don’t look like what you see on thecomputer monitor prior to printing.
Causes and Solutions:
Your print head nozzles could be clogged.o Run a nozzle check on a piece of clear film to see how the nozzles are
firing.o Clean the capping station, wiper assembly and the bottom of the print
head.o Check the clear tube with a green stripe and make sure the end is not
clogged.o Run a head cleaning and a nozzle check in repetition to see
improvement.o Use the refillable cleaning cartridges to run head cleanings in repetition
to see improvement.
The image has an attached ICC Profile.FastARTIST uses its own ICC Profile; make sure you do not apply one outyour preferred graphic program. Refer to your graphic program’s user manual on ICC profiles.
You have an ICC profile checked in Corel Draw.Go to File/Print and select the Masc. Tab. Uncheck Apply ICC Profile.
The capping station is not working properly.o Clean the capping station, wiper assembly and the bottom of the print
head.o Check the clear tube with a green stripe and make sure the end is not
clogged.o Inspect the clear tube with a green stripe and make sure it is
dispensing ink correctly.Prevention:Usually when a color prints out wrong it is because a nozzle is clogged. If you aretrying to print out an orange image but all that prints out is yellow, that means themagenta is clogged and the pigment can’t mix to produce the orange. The biggest part of your T-JET to check for is the capping station. Make sure thisALWAYS stays clean. The print head uses this to dock when the printer is not in useto ensure the print heads do not dry out. This is also used during a head cleaningand if the capping station is dirty, the printer can not do a head cleaning properly,thus not working out the nozzle clog.

Chapter 10 - Troubleshooting
141
Note: When building any image inside any software program, make sure you alwaysuse an RGB color mode because this is how your monitor views colors. Never applyan ICC profile.
Problem:The prints are out of register or there are large gaps inthe print.
Causes and Solutions:
Different print modes are being used.Double-check settings in FastRIP setup and makesure all print modes are of same type. If using anHS print mode for the color then the same must be used for the underbase(i.e. Photo 720 Standard HS print mode and 1440dpi Image Normalunderbase HS).
Encoder strip is dirty and needs to be cleaned.Clean encoder strip.
If underbasing and using the underbase wizard the black and whiteversions of images are different sizes.Double check the image height and width to make sure they are same size.
Print bed not moving at same pace as print head.Call technical support.
Print head carriage jumping around and causing it to misread encoderstrip.Clean belt drive and drive belt gear.
There is a communication error between your T-Jet and your computer.Make sure you don't have any jobs in the FastRIP or Epson Queue's, if youdo delete them. Then power down your T Jet & unplug the power & let it setunplugged for about 30 seconds. Power back on and try again.You can also make sure you are set to use the correct port within FastRIP.Open up FastRIP, select Printers/Manage Printers, make sure that you areusing the Epson Stylus port and that the control panel box has a check markin it.Another possibility is the type of cable you are using. We highly recommendusing a USB cable as the best connection, DO NOT use a long cable, switchboxes, or hubs.

T-Jet2™ User’s Manual
142
Earlier versions of FastRIP would sometimes create a new port calledPS Passthrough.
You may need to delete this port:1. Make sure the port is set to Epson Stylus... in the Manage Printers
menu in FastRIP.2. Open the Printers & Faxes menu from the Start button in Windows and
open the PS Passthrough Queue, delete any pending jobs.3. Right-click on the PS Passthrough, select delete to remove it.4. Power down the T-Jet and unplug it for 10 seconds.
Tip: As long as the Epson Stylus port is selected Windows will not install the PSPassthrough.
Prevention:
Always double check settings for FastRIP prior to sending a print job toactually print.
Clean the Encoder Strip weekly or as needed depending on your productionrate.
Always make sure that images are the same size when using the UnderbaseWizard in FastARTIST.
Keep T-Jet as clean as possible and perform normal maintenance. Check the communication between the computer and printer.
Problem:The Fonts are not printing correctly on the garment as they do on the computerscreen.
Causes and Solutions:
Sometimes Fonts, especially script Fonts, may not print correctly orprint at all. This tends to happen in Vector Programs.The T-Jet2 driver may not download the Font correctly causing the image toprint incorrectly. Simply change the Font to a graphic image. Depending onthe graphic program, it may be called Convert to Curves or Create Outlines.You may also need to do this if you are printing vector fonts along with abitmap image.Try importing or printing a different file to see if the problem remains.

Chapter 10 - Troubleshooting
143
Problem:When you print a white underbase you get a white box over the entire image.
Causes and Solutions:
Check your underbase setup withinFastARTIST.Within FastARTIST go to File >FastRIP Setup > Underbase Setup tab.Make sure the top checkbox thatsays Underbase all items with thisunderbase color is checked and thebottom check box that says Highlightall objects with this color is NOTchecked.
Make sure to view the image in theFastRIP View Raw Data viewer to seeif it looks correct BEFORE printing.
Please note: If you chose the 1440dpi onepass white print mode you will not be able toview the raw data.
Problem:When printing white ink, no white ink prints or there are no Underbase settingsavailable.
Causes and Solutions:
You do not have the correctprinter selected in FastRIP.Open up FastRIP. Go toPrinters/Manage Printers andmake sure your printer is setup asa T-Jet2. If it is NOT setup as a T-Jet2, FastRIP doesn't know that itneeds to use the white ink.

T-Jet2™ User’s Manual
144
Problem:Individual ink lights are flashing.
Cause and Solutions:
The printer thinks you are out of aspecific color.The ink cartridges have auto reset chipson them but if you have been printing a lotof shirts the chips have not had a chanceto reset.You can turn the printer off for 30 secondsand then back on BUT if you are in themiddle of a job, you will lose a shirt.You can also push the Ink button once.The carriage will move out so you can remove the cartridges. Lift the cartridgethat has a light flashing just enough so it disconnects from the contacts on theprint head. Wait about three seconds and push the cartridge back down.Press the Ink button again and the carriage will return to home position. Thelights should go out and the printer will start to print again.
Prevention:Get in the habit of turning the printer on and off between print jobs that use a lot ofink or need a large number of prints.
Problem:When you send a print job to the printer nothing happens.Cause and Solutions:
The computer is notcommunicating with the printer.Check the port settings in FastRIP.In the FastRIP window go toPrinters/Manage Printers. The portshould be set to Epson stylusphoto 2200_usb00*. Check theControl Panel box on the right.Make sure there are no other jobsalready in the print queue.

Chapter 10 - Troubleshooting
145
Is the green power light flashing? If not, the job did not make it to theprinter.Check your printer cable connections.
The printer is not ready to print the job.o Make sure the bed is in the load position. Press the Load button.o Check and see if any of the ink cartridges are showing empty.o A shirt may be blocking the sensor. If the Load light is flashing, check
the shirt height and see if anything is obstructing the sensor. The smallsensor light is Amber when blocked and Green when ready to print.
PhotoScript PS Passthrough is causing problems.Remove the PS Passthrough port.
Problem:The color of the shirt is showing through the under base.
Causes and Solutions:
There is not enough pretreatment on the shirt.o Use a good spray gun such as the Wagner Control Spray to lay down
an even coat of pretreatment.o Press the shirt in a heat press before pretreating; this will press the
fibers down allowing the pretreatment to stick to the shirt better.o Make sure you are applying the pretreatment in nice smooth, slow and
even strokes.o Be sure to cover the entire printable area.o Use 100% pretreatment. Try not diluting it with water to see if prints
improve. The white nozzles are clogged.
o Run a nozzle check on a piece of clear film to see how the nozzles arefiring.
o Clean the capping station, wiper assembly and the bottom of the printhead.
o Run a head cleaning and a nozzle check in repetition to seeimprovement.
o Use the refillable cleaning cartridges to run head cleanings in repetitionto see improvement.
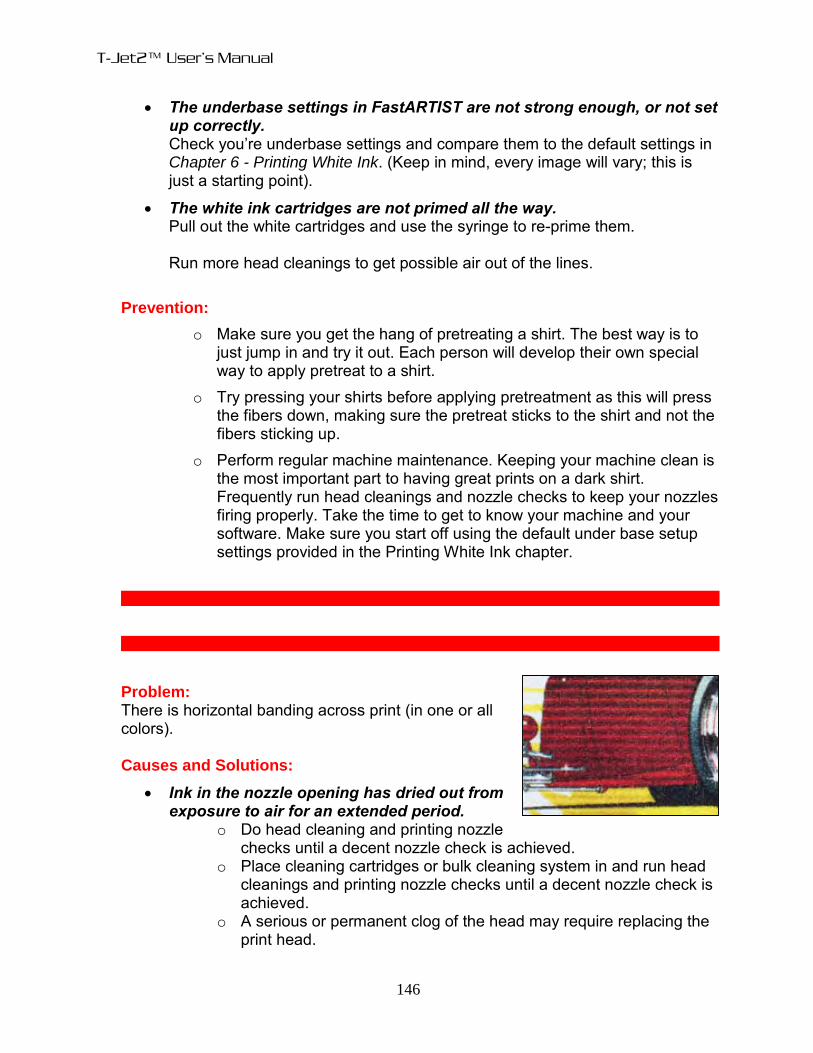
T-Jet2™ User’s Manual
146
The underbase settings in FastARTIST are not strong enough, or not setup correctly.Check you’re underbase settings and compare them to the default settings inChapter 6 - Printing White Ink. (Keep in mind, every image will vary; this isjust a starting point).
The white ink cartridges are not primed all the way.Pull out the white cartridges and use the syringe to re-prime them.
Run more head cleanings to get possible air out of the lines.
Prevention:
o Make sure you get the hang of pretreating a shirt. The best way is tojust jump in and try it out. Each person will develop their own specialway to apply pretreat to a shirt.
o Try pressing your shirts before applying pretreatment as this will pressthe fibers down, making sure the pretreat sticks to the shirt and not thefibers sticking up.
o Perform regular machine maintenance. Keeping your machine clean isthe most important part to having great prints on a dark shirt.Frequently run head cleanings and nozzle checks to keep your nozzlesfiring properly. Take the time to get to know your machine and yoursoftware. Make sure you start off using the default under base setupsettings provided in the Printing White Ink chapter.
Problem:There is horizontal banding across print (in one or allcolors).
Causes and Solutions:
Ink in the nozzle opening has dried out fromexposure to air for an extended period.
o Do head cleaning and printing nozzlechecks until a decent nozzle check is achieved.
o Place cleaning cartridges or bulk cleaning system in and run headcleanings and printing nozzle checks until a decent nozzle check isachieved.
o A serious or permanent clog of the head may require replacing theprint head.

Chapter 10 - Troubleshooting
147
The capping station is dirty and is notcleaning the print head completely. Thiswill just adding more debris to the printhead causing print head to becomeclogged.Thoroughly clean capping station. It can becleaned with swabs included in maintenancekit and glass cleaner. Be sure to clean the rubber seal around the cappingstation as well as the rubber wiper blade.
Air bubbles in bulk system tubing causing small amounts of ink to dryinside print head/nozzles.Re-prime bulk system using syringe. Once system is re-primed run headcleanings and print nozzle checks till a decent nozzle check is achieve.
You are using a 360 dpi Print Mode or a high speed (HS) Print Mode andthe heads are not in perfect alignment.Align the heads or use a 720dpi Print Mode. A 360 dpi Print Mode is thefastest but lowest quality where head clogs or misalignment will show asbanding.
Prevention:o Clean capping station daily!o Run head cleanings before printing in the morning as well as printing a
nozzle checks to gauge status of print head prior to printing ontogarments.
o Ensure breather caps are free of ink prior to printing or remove breathercaps while printing.
o Make sure bulk system tubes don’t have any air in them prior to printing.o Perform a Head Alignment.
Problem:Printer stops in the middle of a print routine and stops communicating with thecomputer.Causes and Solutions:
Print drivers may need to be re-installed.Print drivers are prone to occasionally lose communication with Windows XPoperating system. The simple solution is to re-install the driver.
Too many items in USB port.If you have too many items in the USB port unplug everything but the mouseand the T-Jet. This is due to a limited USB power generated from the ports.

T-Jet2™ User’s Manual
148
Image file may be corrupt.The file being printed may be corrupt. Try another file.
USB cable may be too long.Your USB cable should not be MORE than six feet in length.
Prevention:
o Keep it simple. Do not overload the printer port.o When in doubt first try turning everything off and unplugging such as the
USB cable from the computer to the printer.
Problem:Files take a long time to print.
Causes and Solutions:
Printing from Corel Draw is causing large spool files.Printing from Corel Draw, any version, can create extremely large of spoolfiles. This happens when one or more copies are sent to print when you aretrying to print a number of prints that are making a second pass. It can alsohappen if bitmap images are placed in the document. If the spool files arelarger than your physical memory, the file may not print or take a long timeprocessing. Ways to reduce this is to export the file as a JPG file format, thenbring the file back into Corel Draw using the Import function. If the bitmap wascreated in Adobe Photoshop, open it in Photoshop. Reduce the resolution toaround 200dpi. Save this file and Import it back into Corel Draw.Try to print from a different program like Adobe Photoshop, Acrobat Reader,or Adobe Illustrator. These graphic programs do not create as large spoolfiles as Corel Draw.
File resolution is too high.Resolutions of 150 to 225 dpi (at the final print size) are all that is necessaryfor direct printing to garments. If you receive larger file resolutions, resamplethem down to a lower resolution to speed up ripping and printing times.
Prevention:Keep file sizes small if possible and don’t send a lot of print commands from Corel at the same time.

Chapter 10 - Troubleshooting
149
Problem:The printer is printing large bands of color, vertical colored lines, or printing partialimages.
Causes and Solutions:
You have a dirty Encoder Strip or Encoder Sensor behind the printhead.The Encoder Strip is the heart of the machine. It has information on it that theEncoder Strip sensor behind the print head reads as the print head movesback and forth. If there is ANY contamination, pretreatment, dirt, ink or debrison the Encoder Strip or on the Encoder Strip Sensor Eye, the printer will beVERY CONFUSED. This is the #1 cause of abnormal printing problems.Clean the Encoder Strip with Glass Cleaner. It may be necessary to remove itfrom the machine. You may need to clean the Encoder Strip Sensor behindthe print head with a pipe cleaner or swab.
The second Encoder Wheel and Readerinside the printer has moved out ofposition.As you face the front of the T-Jet, removethe left hand cover (opposite the ControlPanel). There is a clear plastic wheel with aReader Sensor. If you transported theprinter or bumped it hard, there is a chancethe Reader Sensor is out of place or off theguide holds. Reposition the Reader.
When the Reader is out of place the printer will skip areas of an imageand then start to print again.
The drive gear for the belt may be filled with link and slipping.Clean the gear.
Prevention:
o Keep the printing area clean, the machine lid closed, and pretreat shirtsaway from the printer.
o Shake shirts before you print them to remove excess lint that may get onthe Encoder Strip.
o When printing non-stop in heavy production, clean the Encoder Strip oftento prevent the machine from spoiling shirts during a printing cycle.

T-Jet2™ User’s Manual
150
Problem:Red ink lights are flashing or solid and the printer will not print.
Causes and Solutions:
If all the lights are flashing, the T-Jet may be having communicationissues with the computer.Turn the printer off and unplug it fromthe wall and the USB cable for a fewminutes.
The Maintenance Tank Countermay need to be reset.If the printer thinks that you havedone about 10, 000 to 15, 000“pages” you will need to reset theMaintenance Tank Counter. Contact Technical Support for reset directions.There is an excellent software program that will automatically reset the printerwithout having to take off a cover or get inside of the machine. Call TechSupport for details.
The printing head may have hit an object as the carriage moves acrossthe garment.If the head does not find home when it tries to print, it can get confused.Check for obstructions and make sure that the capping station has not comeout of place causing the head to not find home.
Ink cartridges may not be seated all the way or they could have a badchip.The chip on the ink cartridge is not connecting properly to the prong inside theprint carriage. Press the Ink button on the printer. This slides the Printcarriage over. Take the ink cartridge out slightly and snap it back into place.Press the Ink button again. If the ink light(s) are solid red then turn the printeroff. Take the ink cartridge completely out and snap it back in. Turn the printerback on. If the T-Jet printer still has a solid red ink light(s) then replace thechip on the ink cartridge with the extra chips sent with bulk ink system. Youcan also clean the contacts on the chip with a pencil eraser.
Ink cartridge holder has bent prongs that do not make good contactwith the chip.When you insert an ink cartridge, the small chip on the back makes contactwith gold prongs. These prongs can be pulled out of place if the chip is notinstalled correctly on the cartridge (sticking out of the slot) or if the pronghangs on the cartridge as it is being removed.

Chapter 10 - Troubleshooting
151
NEVER insert a cartridge without a chip or you will pull the prongs loosewhen you remove the cartridge.
Prevention:There are a number of reasons the printer may have red lights flashing or solid.Keep the Encoder Strip clean, make sure the printing head finds home, and that thecartridges do not have bad chips or poor chip connections.
Problem:The quality of the printed output is unacceptable when printing bitmap images. Theimages seem soft and are not clean and sharp.
The resolution at the final size in 72dpi.
Causes and Solutions:
The resolution of the image is too low.Resolution at 72dpi is for viewing the image on a computer monitor only.Images intended for printing need to be between 150 and 225dpi to maintaina clean and sharp image. You can try upsampling the image to a largerresolution but the image still will be “soft” when printed.
Problem:When sending a print command to the T-Jet2 printer the Print Head moves like it isprinting but no ink sprays out.
Causes and Solutions:
Ink is not flowing from the Bulk System.This is caused by a vacuum being created in the bulk system. Unscrew thetop of each bottle then reseal.
Ribbon cable to the print head is burnt or not connected.If you accidentally splash/drip ink or cleaning fluid on the gray ribbon cablethat connects to the print heat, it can short out. Check for burn marks on theribbon cable connectors and that the cable is connected properly. This can

T-Jet2™ User’s Manual
152
happen if you replaced a print head and did not make sure the cable wasattached properly.
Main Computer Board is bad.There is a chance the main board in the printer is bad. The board could havea defect or might have had ink or cleaning fluid spilled on it. If ink or cleaningfluid runs down the ribbon cable or drips into the bed it can short out the mainboard (or boards). In this case the safety fuse would fault.
Capping Station Clogged.The capping station may need cleaning. If the printing head did not seatproperly, ALL of the print heads could be clogged as well as the hose with thegreen stripe that drains the excess ink into the waste bottle. This wouldprevent the capping station from draining properly.
Problem:Lights are flashing on the Control Panel
Causes and Solutions:
Green Power button and Ink lights are flashing.The Maintenance Tank Counter may need to be reset. If the printer thinks thatyou have done about 10, 000 to 15, 000 “pages” you will need to reset the Maintenance Tank Counter. Contact Technical Support for reset directions.
Green power light flashes.The printer is receiving data, replacing an ink cartridge, charging ink, orcleaning the printer head. This is a normal function.
Error Eject button light is on.The printer has received an error in the data if there is no media loaded or ifthere is a wrong size sheet fed. Only press the Error Eject button at theloading position instead of the Load button. The Error Eject button may alsobe lit if the printer is waiting for the Load button to be pressed when doingmultiple print passes.
Green power button, Error Eject button flashing.The printer is being jammed or blocked by foreign object that must beremoved before continuing.
The Green Load button is flashing.The printing bed sensor is being blocked by a shirt or obstruction. Removethe obstruction and press the Load button to continue printing.

Chapter 10 - Troubleshooting
153
Problem:The image is printing off of the shirtboard or in the wrong location.
Causes and Problems:
You have a mismatch in the software settings.Make sure you have the working “page size” set the same as the final printedpage size. You can work on one page size in a graphics program but print toa different page size causing the image not to print in the correct location.Select Standard Board in FastARTIST/FastRIP.
Printing Head Hitting the Print BedWhen the T-Jet2 printer is shipped or transporting the printer bed may have shifted orthe bed carriage may have moved a little. This will cause the printing head to hit thebed.On both sides of the T-Jet2 are 2 screws that can be undone and the lever moved tolower and raise the Print Head. Take off both side covers. Loosen the 2 screws.Move the Print Head across the bed. If the Print Head hits the bed, STOP. Move thewhite lever to the left or right. You will notice the Print Head move up or down. Movethe lever until Print Head does not hit the bed. Move the bed to the front, middle, andback when moving the Print Head across. Once a point is reached when the PrintHead does not hit, tighten the 2 screws. Put the covers back on.

T-Jet2™ User’s Manual
154

Chapter 11 - Transporting Printer
155
Chapter 11Transporting Printer
If you plan on transporting your T-Jet2 from one location to another, it is essentialthat you following the steps below. Failure to do so could not only cause seriousdamage to your T-Jet2 but possibly void your warranty. The preparation processshould only take about 10 minutes and if you have any questions regarding any ofthe steps, please call our support department during regular business hours asfollows:
Toll Free +1 888-MYTJETS (698-5387)Technical Support +1 480-929-2937Corp. Office +1 480-929-0640Fax +1 480-929-0766Email: [email protected]: www.ScreenPrinters.Net Click on SupportSupport hours: 7:00am to 8:00pm Monday through Friday
9:00am to 3:00pm Saturday(Mountain Standard Time) USA
Note: Arizona does not observe “Daylight Savings” in the US. In the summer months, Arizona is on the same time as California.
Installing the T-Jet Cleaning System
Every T-Jet is shipped with 28 Ink Line Caps. All 28 Ink Line Caps may be used tocomplete this process so when they are not being used be sure to store the Ink LineCaps in a safe place. You should have 14 Red Ink Line Caps and 14 White Ink LineCaps.
1. Remove ink line from cartridges and cap theend of each ink line with a red ink line cap. Besure to remove and cap each line individually toavoid ink siphoning out onto the cartridges.

T-Jet2™ User’sManual
156
2. With the white ink line caps, now cap each bulk systemink cartridge.
3. At this time you can remove the ink cartridges simplyby pushing cartridge tabs inward as shown in thisexample. This will then release the cartridge from theprint carriage.
Important note about storage of ink cartridges: When the ink cartridges areremoved make sure to place them upside down as this will prevent ink from leakingout. We also recommend that the bottom of the ink cartridge be taped and placed inan individual plastic zip lock bag.

Chapter 11 - Transporting Printer
157
4. Leave the ink bottles on the adjustable shelf andsimply place a piece of tape across the bottles tosecure to the T-Jet2. There is no need todisconnect and cap the ink lines and bottles.If you are using the Ink System Holder, removebottles and holder from the side and place in abox for transportation. The waste bottle will beplaced on the print bed and secured to the T-Jetwith adhesive packing tape in an upright position.
5. Tie loose ink lines to cable chain with zip tie. This will keep the ink lines frommoving around and possibly damaging the encoder strip. Make sure to allow fora natural bend in the ink line; DO NOT kink the ink lines.
Important Note: There is no need to remove the Cable Chain when transporting theT-Jet2.
6. Install the Refillable Cleaning Cartridgesand perform 5 to 6 head cleanings. Whenperforming a head cleaning with thecleaning cartridges the bottom rubber plugmust be removed. If the rubber plug is notremoved during a headcleaning –damage can becaused to the print head.
1
2
2
3
33

T-Jet2™ User’sManual
158
IMPORTANT NOTE: DO NOT RUN A NOZZLE CHECK WITHCLEANING CARTRIDGES.Cleaning solution will leak out into T-Jet causing serious damage.
To purchase Refillable Cleaning Cartridges contact:Equipment Zone Sales:Monday - Friday 8:30a.m. -6:00 p.m. (EST)Main Line and Sales (201) 797-1504Toll Free Order Line 1 (800) [email protected]
7. Place rubber plugs back into the bottom of therefillable ink cartridges to keep cleaning fluid fromleaking out during transportation.
8. Turn the printer OFF by pressing the Power button only. As the printer powersdown the print carriage will move onto the docking station. The docking station islocated on the control panel side of the printer.
EJECT LOAD INK ERROREJECT
POWER

Chapter 11 - Transporting Printer
159
Securing the Print Head
1. Place print carriage shipping bracket on printer using adhesive packing tape toproperly secure. If the print head is not properly secured during transportation,damage may occur to the print head.
Note:If you do not have the carriage shipping bracket then tape the print carriage tothe control panel side of the T-Jet using adhesive packing tape.
2. Raise the printing bed until the metal surface is to thetop lip of the printing bed.
Place Tape Here Place Tape Here

T-Jet2™ User’sManual
160
Securing the Print Bed
1. Move the printing bed to the middle of the track on the printer. Usinga Phillips head screwdriver install the bed brackets and tighten for allfour corners.
2. Close the Waste Bottle Valve - Anytime thatthe T-Jet2 is powered off make sure to close thewaste bottle valve to prevent cleaning solutionfrom siphoning through the capping station.
3. Place the waste bottle in an upright position onthe print bed and secure to the T-Jet2 with apiece of adhesive packing tape.
4. Pack the T-Jet2 back into its original box for transportation. Failure to do sowill void your warranty.
The T-Jet2 is now safe for transportation, just make sure when picking up the T-Jet2to do so with 2 people and observe the following holding points.
Do Not lift your T-Jet2 by the print bed.Lift underneath the side panels. Liftingby the print bead alone may causeserious damage.

Chapter 12 - Product Support
161
Chapter 12Product Support
Support PolicySupport for T-Jet2 is free. The machine is very easy to use and intuitive. Mostsupport questions have to do with using FastARTIST, FastRIP, or printing fromspecific graphic applications.For the quickest support, email your question to [email protected]. Be veryspecific and include your serial number.If you bought the printer from a dealer in the USA, you DO NOT have to goback to the dealer for support. Simply call or email our support lines. If youbought the printer from a dealer outside the USA, you need to contact yourdealer for support and then if necessary, contact us. Remember, we havedozens of short videos online about many of the items covered in this manual.
Support HoursToll Free +1 888-MYTJETS (698-5387)Technical Support +1 480-929-2937Corp. Office +1 480-929-0640Fax +1 480-929-0766Email: [email protected]: www.ScreenPrinters.Net Click on SupportSupport hours: 7:00am to 8:00pm Monday through Friday
9:00am to 3:00pm Saturday(Mountain Standard Time) USA
Note: Arizona does not observe “Daylight Savings” in the US. In the summer months, Arizona is on the same time as California.
Phone SupportT-Jet2 support is not toll free. We have a very competent staff of support specialistswho will gladly walk you through procedures. When calling for support, please haveyour serial number and a detail of the problem at hand. If you have received an errormessage, please include the error number. It is often easier if you fax or email asupport question before calling for help.
16

T-Jet2™ User’sManual
162
E-mail SupportEmail support is available at [email protected]. Keep in mind that eventhough you can email 24 hours per day, the support department is only availableduring the above hours. For email support, please include your full company name,contact name, phone, address, serial number and a detailed description of theproblem.
We now have Web CAM video support!You can purchase an inexpensive web cam for your computer and talk LIVE to oneof our support technicians. More information about how to use this amazing supporttechnology is on the T-Jet Support page at www.ScreenPrinters.Net.
Free Internet Web SupportAccess support documents on the internet at www.ScreenPrinters.com. Simplyclick the Support link located on the home page. The Support area is designed tokeep you up to date on current changes and upgrades.
Epson SupportT-Jet2 is a highly modified version of an Epson 2200 with hundreds of additionalparts not provided by Epson. The T-Jet2 is NOT supported by Epson. We providethe Epson 2200 Printer Driver as a convenience with Epson’s approval, butEpsonwill not support this driver.

Chapter 12 - Product Support
163
Third Party Software SupportWe will make every attempt to help with printing from programs like Corel Draw,Photoshop, Illustrator, etc., but we do not offer free support or training on theseprograms.
Training Classes for the T-Jet2We now offer one day hands-on trainingclasses for the T-Jet2 in our Tempe(Phoenix) location and at Equipment Zonein New Jersey. We get rave reviews abouthow these classes really give studentsconfidence on how to use and maintaintheir T-Jets.For more details check out the Fast T-Jetwebsite at www.ScreenPrinters.Net.
Show off your workIf you want to brag about the thingsyou’ve printed on your T-Jet. Wehave a new ScreenPrinters.NetGallery where you can uploadpictures of jobs you have done.Check it out atwww.ScreenPrinters.Net.

T-Jet2™ User’sManual
164

Appendix A - Printing with a Seven Color T-Jet without White Ink Capabilities
165
Appendix APrinting with a Seven Color T-Jet Without
White Ink CapabilitiesEarlier models of the T-Jet did NOT havewhite ink capabilities. From November2004 and October 2005, the red T-Jetwith seven ink colors (cyan, light cyan,magenta, light magenta, yellow, blackand light black) was the current model.In late October of 2005 the red machinewas phased out and the new T-Jet2 wasintroduced with white ink capabilities -four colors of cyan, magenta, yellow andblack plus white in three of the colorslots.If you have a red machine or a T-Jet2 without white ink capabilities, this section willhelp you print from your T-jet. 85% of this manual will work with the red T-Jet. Thebase print engine is still the Epson 2200 printer. The buttons are the same and thebasic working of the machine is the same.The main difference between the T-Jet and the T-Jet2 is that the T-Jet2 has adeeper and longer printing bed, obstruction sensors, print pass counter (somemodels), different bulk ink system, white ink capabilities, and the FastRIP andFastARTIST software.
Red T-Jet SetupThe two main differences between the T-Jet and T-Jet2 are how the printing bedattaches and how the bulk system attaches.
Printing Bed Track Setup1. Remove the two temporary holding braces for
transportation placed on the front and back of theprinting bed. You will have to remove the HeightAdjustment Dial on the Ejecting end of the unit toremove the bracket. Replace this dial after thebracket is removed. Retain these braces for futureshipping or transporting of the unit. You can move or slide the Printing Bed togain easier access when attaching the Tracks.
16

T-Jet2™ User’sManual
166
2. Place “Tracks” where brackets were located and use the same screws to fasten tracks on each end.
3. Adjust the leg on each track so the track is flat. Ifthe tracks on both sides are not flat and level to thetrack on the unit, the printing bed tray might bind upduring movement. If the printing bed tray stops(during the loading process) and the motor hums orseems to still be trying to move the bed, the track isnot level. You can use the Height Adjustment Guideto make sure the track is level and straight whenattached.
Bulk Ink SystemThe bulk system sets on a support traythat will prevent it from ever falling off oraccidentally getting knocked off. You willneed to attach the tray to the side of theprinter. The tray is not shipped installedbecause its location and size might causedamage to the unit if the machine isdropped or the box rolled. The trayscrews onto the side of the printer andVelcro is used to hold the bulk system inplace.Note: The seven containers need to befilled with ink.

Appendix A - Printing with a Seven Color T-Jet without White Ink Capabilities
167
Creating Special Print ModesStandard T-Jet Only without White capability
When printing to a chrome T-Jet2 you MUST use FastARTIST and FastRIP becauseyou have white ink in three of the “color” slots on the bulk system. When printing to a red T-Jet, you can print with the standard Epson 2200 Printer Driver and your owncustom Print Modes designed for printing on garments.Even though the standard Epson printing modes designed for paper could be used,the prints may not be as bright as you want. In the Epson driver you can changesettings that tell the printer to lay down a “denser” deposit of ink and to increase thecolor saturation in order to get more vivid prints with good coverage on textilefabrics. As you build up more experience with Fast T-Jet, you may want to build yourown custom Printing Modes.You will need to build six new Print Modes called Advanced Custom Settings, in theEpson driver. The final Print Modes are very similar on both Mac and PC but theyare built differently on each platform. Making Print Modes is a one time effort. Oncebuilt, you will simply print to the Epson driver and “load” your favorite Print Modedepending on the type of image being printed (cartoon, non-critical, photorealistic,etc.).
Getting started creating Custom Print Modes - WindowsOpen the Epson printer driver. The simplest way is to open your favorite graphicapplication, create a small graphic and act as if you were going to print it out bychoosing the Epson 2200 as the printer. Once at the choose printer menu in yourprogram, simply select Properties.
Work from the Advanced MenuThe process of building your Printing Modes starts from the Main Epson DriverMenu. Ignore the settings on the Main Page and select the Advanced button. Thischanges the Basic page to a page with more Advanced controls.

T-Jet2™ User’sManual
168
Note: The Adobe Illustrator CS, Adobe InDesign, and Macromedia Freehandprinting window may look different. Refer to your individual graphic programs User’s Manual.
Setting the printing “page” sizeIn the Advanced Main Menu of the Epson 2200 printer driver, drop down the LetterSize menu and select User Defined. Your Fast T-Jet printer has a Printing Bed Sizeof 13” x 18” (33 x 48cm). Because we are printing to an inkjet printer, we need to tell the printer driver what our standard paper/shirt image size is.
You can also make your own “paper” sizes for odd size items, or simply work on a13” x 18” (33 x 48cm) page size and make a printing Template to work from. Keep in mind that the upper left corner of the “page” is the same as Zero on the rulers that are mounted on your printer. Type in the correct size (13” = 1300) and give the page a name. Press the Save button and the page size will now be available when you goto print.
Creating Custom Print Modes - MAC OS XIn Macintosh OSX, go to File/Print. Selectthe Stylus Photo 2200 printer. Bring Copiesand Pages down and select Print Settings.Work from the Print Settings Menu (Mac OSX). You need to start to build your PrintingModes from the Main Epson Driver Menu.There are three main menus to use duringsetup; Print Settings, Color Management,and Ink Configuration. Go to File/Print.Select the Stylus Photo 2200 printer driver. Bring Copies and Pages menu down.Select Print Settings.

Appendix A - Printing with a Seven Color T-Jet without White Ink Capabilities
169
Print SettingsAllows you to choose your Media Type, Advanced settings, and High Speed.
Color ManagementSet your Color Controls.
Ink ConfigurationSet the Color Density of the image.
Setting the printing "Page" size - Mac OS XGo to Page Setup or Print Setup. Under Format selectthe Stylus Photo 2200 printer driver. Bring the PaperSize menu down and select the desired page size.Your Fast T-Jet printer has a Printing Bed Size of 13" x18" (33 x 48cm). Because we are printing to an inkjetprinter, we need to tell the printer driver what ourstandard "paper" size is.
You can also make your own "paper" sizes for odd size items or you can simplywork on a 13" x 18" (33 x 48cm) page size and make a printing Template to workfrom. Keep in mind that the upper left corner of the "page" is the same as Zero onthe rulers that are mounted on your printer. Bring Page Attributes menu down.Select Custom Paper Size. Click New. Name the Paper Size. Below enter theHeight, Width, and Margins. Click Save. Bring the Custom Paper Size menu down,select Page Attributes. Bring Paper Size menu down. Select the new Paper Size.

T-Jet2™ User’sManual
170
Getting started creating Custom Print Modes - Mac OS 8.6 - 9.2.2In Macintosh 8.6 - 9.2.2, go to Applemenu/Chooser. Click and highlight SP 2200.Close the Chooser. From the graphic program, goto File/Print. From here you will need to start tobuild your Printing Modes from the Main Epsondriver menu using the Custom/Advanced options.
Setting the printing "Page" size (Mac OS 8.6 - 9.2.2)In the Page Setup/Print Setup menu ofthe Epson 2200 printer driver, bring thePaper Size menu down and selecteddesired page size. Your Fast T-Jet has aprinting Bed size of 13" x 18" (33 x48cm). Because we are printing to aninkjet printer, we need to tell the printerdriver what our standard "paper" size is.You can also make your own "paper"size for odd items or you can simplywork a 13" x 18" (33 x 48cm) page sizeand make a printing Template to work from. Keep in mind that the upper left cornerof the "page" size is the Zero point for the printing bed. Click on the Customizebutton. Click New. Name the paper size, Width, Height and margins. Click Ok.
Special Fast T-Jet Printing Modes - Windows
Cartoon 360dpi (Windows)Typically, a cartoon or simple spot color imageneeds to be printed as bright as possible. Bydoing extra ink color saturation the colors arericher. Over saturating a full-color photograph cancause muddying of the image so these settingsshould be used for non-critical spot color orcartoon type images.1. Choose the Advanced button from the Epsonprinter driver Main Menu.2. Leave the paper set to Plain Paper.3. The top grouping of selections should be setfor Sheet, Plain Paper, Normal - 360dpi and 13” x 18.”4. All buttons on the left side should be unchecked andOrientation set to Portrait.(Note: High Speed is checked but is not available.)5. Color Management should be set for Color Controlsand Gamma 1.8.

Appendix A - Printing with a Seven Color T-Jet without White Ink Capabilities
171
6. Color Mode should be set for Epson VIVID Color.7. Saturation should be set to +25%. Magenta and Yellow to +5%.8. Click on Ink Config and set Color Density to +20%.9. Save this setting as TJ-Cartoon-360.
Cartoon 720dpi (Windows)1. Choose the Advanced button from theEpson printer driver Main Menu.2. Set the paper to Enhanced Matte Paper.3. The resolution to Photo 720dpi and thepaper size to 13” x 18.”4. All buttons on the left side should beunchecked and Orientation set to Portrait.5. Color Management should be set for ColorControls and Gamma of 1.8.6. Color Mode should be set for Epson VIVIDColor.7. Saturation should be set to +25%.Magenta and Yellow to +5%.8. Click on Ink Config and set Color Density to+20%.9. Save this setting as TJ-Cartoon-720.
Cartoon 720dpi High Speed (Windows)Follow the exact steps for Cartoon 720dpi but check High Speed.Save this setting as TJ-Cartoon-720HS.
Photo 360dpi (Windows)For images that are photorealistic or have skin tones and reference colors, you needto create Print Modes that are more accurate with less color saturation. These will becalled the Photo modes.1. Choose the Advanced button from the Epsonprinter driver Main Menu.2. Set the paper to Plain Paper.3. The resolution to Normal - 360dpi and the papersize to13” x 18.”4. All buttons on the left side should be uncheckedand Orientation set to Portrait.5. Color Management should be set forPhotoEnhance.6. Set Tone to Hard and Effect to Sharpness.7. Click on Ink Config and set Color Density to+20%.8. Save this setting as TJ-Photo360.

T-Jet2™ User’sManual
172
Photo 720dpi (Windows)1. Choose the Advanced button from theEpson printer driver Main Menu.2. Set the paper to Enhanced MattePaper.3. The resolution to Photo - 720dpi andthe paper size to13” x 18.”4. All buttons on the left side should beunchecked and Orientation set to Portrait.5. Color Management should be set forPhotoEnhance.6. Set Tone to Hard and Effect toSharpness.7. Click on Ink Config and set ColorDensity to +20%.8. Save this setting as TJ-Photo720.
Photo 720dpi High Speed (Windows)Follow the exact steps above but check High Speed.
Save this setting as TJ-Photo-720HS.
Special Fast T-Jet Printing Modes–MAC OS X(If creating Print Modes for Mac OS 8.6–9.x contact technical support for details.)
Cartoon 360dpi (Mac OS X)Typically, a cartoon or simple spot color image needs to be printed as bright aspossible. By doing extra ink color saturation the colors are richer. Over saturating afull-color photograph can cause muddying of the image to so these settings shouldbe used for non-critical spot color or cartoon type images.
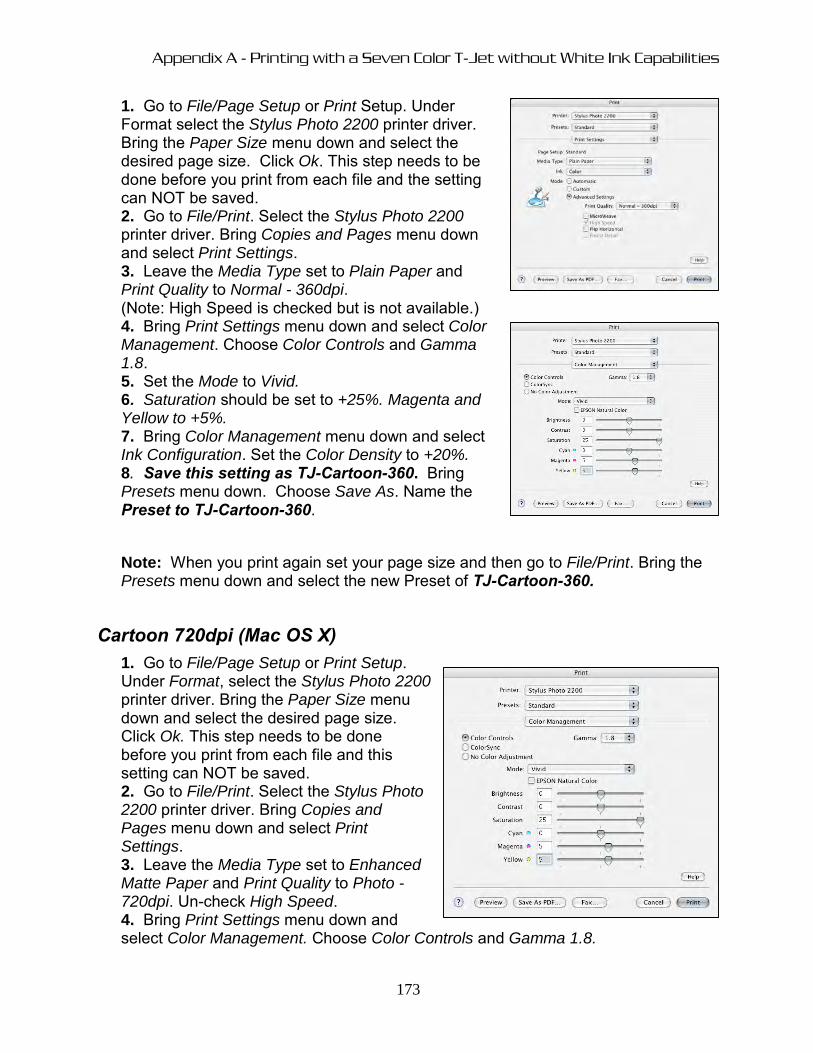
Appendix A - Printing with a Seven Color T-Jet without White Ink Capabilities
173
1. Go to File/Page Setup or Print Setup. UnderFormat select the Stylus Photo 2200 printer driver.Bring the Paper Size menu down and select thedesired page size. Click Ok. This step needs to bedone before you print from each file and the settingcan NOT be saved.2. Go to File/Print. Select the Stylus Photo 2200printer driver. Bring Copies and Pages menu downand select Print Settings.3. Leave the Media Type set to Plain Paper andPrint Quality to Normal - 360dpi.(Note: High Speed is checked but is not available.)4. Bring Print Settings menu down and select ColorManagement. Choose Color Controls and Gamma1.8.5. Set the Mode to Vivid.6. Saturation should be set to +25%. Magenta andYellow to +5%.7. Bring Color Management menu down and selectInk Configuration. Set the Color Density to +20%.8. Save this setting as TJ-Cartoon-360. BringPresets menu down. Choose Save As. Name thePreset to TJ-Cartoon-360.
Note: When you print again set your page size and then go to File/Print. Bring thePresets menu down and select the new Preset of TJ-Cartoon-360.
Cartoon 720dpi (Mac OS X)1. Go to File/Page Setup or Print Setup.Under Format, select the Stylus Photo 2200printer driver. Bring the Paper Size menudown and select the desired page size.Click Ok. This step needs to be donebefore you print from each file and thissetting can NOT be saved.2. Go to File/Print. Select the Stylus Photo2200 printer driver. Bring Copies andPages menu down and select PrintSettings.3. Leave the Media Type set to EnhancedMatte Paper and Print Quality to Photo -720dpi. Un-check High Speed.4. Bring Print Settings menu down andselect Color Management. Choose Color Controls and Gamma 1.8.

T-Jet2™ User’sManual
174
5. Set the Mode to Vivid.6. Saturation should be set to +25%. Magenta and Yellow to +5%.7. Bring Color Management menu down and select Ink Configuration. Set the ColorDensity to +20%.8. Save this setting as TJ-Cartoon-720. Bring Presets menu down. Choose SaveAs. Name the Preset to TJ-Cartoon-720.Note: When you go to print again set your page size and then go to File/Print. Bringthe Presets menu down and select the new Preset of TJ-Cartoon-720.
Cartoon 720dpi - High Speed (Mac OS X)Follow the exact steps for Cartoon 720dpi but check High Speed.Save this setting as TJ-Cartoon-720HS.
Photo 360dpi Mac OS XFor images that are photorealistic or have skin tones and reference colors, youshould create Print Modes that are more accurate with less color saturation. Thesewill be called the Photo modes.1. Go to File/Page Setup or Print Setup.Under Format for select the Stylus Photo 2200printer driver. Bring the Paper Size menudown and select the desired page size. ClickOk. This step needs to be done before youprint from each file and this setting can NOTbe saved.2. Go to File/Print. Select the Stylus Photo2200 printer driver. Bring Copies and Pagesmenu down and select Print Settings.3. Leave the Media Type set to Plain Paperand Print Quality to Normal - 360dpi.4. Bring Print Settings menu down and selectColor Management. Choose Color Controls.5. Set the Mode to Photo-realistic.6. Bring Color Management menu down and select Ink Configuration. Set the ColorDensity to +20%.7. Save this setting as TJ-Photo-360. Bring Presets menu down. Choose SaveAs. Name the Preset to TJ-Photo-360.Note: When you go to print again set your page size. Then go to File/Print. Bringthe Presets menu down and select the new Preset of TJ-Photo-360.

Appendix A - Printing with a Seven Color T-Jet without White Ink Capabilities
175
Photo 720dpi Mac OS X1. Go to File/Page Setup or Print Setup. Under Format, select the Stylus Photo2200 printer driver. Bring the Paper Size menu down and select the desired pagesize. Click Ok. This step needs to be done before you print from each file and thissetting can NOT be saved.2. Go to File/Print. Select the Stylus Photo 2200 printer driver. Bring Copies andPages menu down and select Print Settings.3. Leave the Media Type set to Enhanced Matte Paper and Print Quality to Photo -720dpi. Un-check High Speed.4. Bring Print Settings menu down and select Color Management. Choose ColorControls.5. Set the Mode to Photo-realistic.6. Bring Color Management menu down and select Ink Configuration. Set the ColorDensity to +20%.7. Save this setting as TJ-Photo-720. Bring Presets menu down. Choose SaveAs. Name the Preset to TJ-Photo-720.Note: When you go to print again set your page size. Then go to File/Print. Bringthe Presets menu down and select the new Preset of TJ-Photo-720.
Photo 720dpi - High Speed (Mac OSX)Follow the exact steps for Photo 720dpi but check High Speed.Save this setting as TJ-Photo-720HS.

177
Requirements and NoticesRequirements for PC and MacMinimum Requirements for Windows
Macintosh Minimum System Requirements(This is ONLY for the SDT 1000 Standard T-Jet with the seven color ink system andno white capabilities.)
Microsoft Windows compatible PC with a Pentium II 266 MHz (Windows 98 orMe) or 350 MHz (Windows 2000 or XP) or (Pentium III 500 MHz recommended).
A minimum of 512MB of RAM is recommended. 1 GB to 2 GB is preferred.
A minimum of 1 GB of free disk space on your hard disk.
A display monitor with high resolution.
CD-ROM or DVD drives for installing the software.
USB connection: a USB that complies with Windows (USB 2.0 port isrecommend).
Parallel connection: an IEEE-1284 with D-SUB, 21-pins, (computer end) and a36-pin Printer.
IEEE 1394 (Firewire) Connection: an OHCI- compliant IEEE-1394 port andinterface card and an IEEE-1394 cable.
An Apple, or iMac series, Power Macintosh G3 or G4, PowerBook, or iBook.
Mac OS 8.6 through 9.2, OSX 10.2.8 through 10.4.X (Mac OS 9.2 or higheris recommended).
512MB of RAM or higher recommended. 1 GB to 2 GB is preferred.
A minimum of 1 GB of free disk space on your hard disk.
Monitor with good resolution.
CD-ROM or DVD drives for installing the software.
USB connection: a USB that complies with Windows.
IEEE 1394 (Firewire) Connection: an OHCI- compliant IEEE-1394 port andinterface card and an IEEE-1394 cable.

178
T-Jet2 SDT-1200 SpecificationsMethod of Printing: I n k-JetPrint Resolutions: 2880 X 1440dpi
1440 X 720dpi720 X 720dpi Recommended for photographic detailedimages.360 X 360dpi Recommended for non-critical images.
Max. Printable Width: 12.5” (31.75cm) Without metal holding ring. 12” (30.5cm) with metal holding ring.
Max. Printable Length:19” (48.26cm) Without metal holding ring. 18.5” (47cm) with metal holding ring.
Interface Ports: Parallel Interface, USB, IEEE1394 AC110v+-10% with powertrans. pre-installed
Power: AC 110v–230v. 35watts (Approx. 1 amp.)External Dimensions: Width: 28” (71cm) With bulk ink system.
Length: 47” (119cm) Height: 17” (40cm)
Weight: 90 pounds (40KG) Unboxed120 pounds (54KG) Boxed for shipping
Recommended Environment
For Operations & Storage: Temperature: 50F ~ 95F 10c~35cHumidity: 35~80% (non condensation)
These specs are for the machine only.For ink and pretreatment consult the container labels for proper storage anddisposal.

179
FCC ComplianceThis equipment has been tested and found to comply with the limits for a Class Bdigital device, pursuant to Part 15 of the FCC Rules. These limits are designed toprovide reasonable protection against harmful interference in a residentialinstallation. This equipment generates, uses and can radiate radio frequency energy,and if not installed and used in accordance with the instructions, may cause harmfulinterference to radio communications. However, there is no guarantee thatinterference will not occur in a particular installation. If this equipment does causeharmful interference to radio or television reception, which can be determined byturning the equipment off and on, the user is encouraged to try to correct theinterference by one or more of the following measures:Reorient or relocate the receiving antenna.Increase the separation between the equipment and receiver.Connect the equipment into an outlet on a circuit different from that to which thereceiver is connected.
Consult the dealer or an experienced radio/TV technician for help.WARNING: The connection of a non-shielded equipment interface cable to thisequipment will invalidate the FCC Certification of this device and may causeinterface levels which exceeds the limits established by the FCC for this equipment.It is the responsibility of the user to obtain and use a shielded equipment interfacecable with this device. If this equipment has more than one interface connector, donot leave cables connected to unused interfaces. Changes or modifications notexpressly approved by the manufacturer could void the authority to operate theequipment.For Canadian Users
This Class B digital apparatus complies with Canadian ICES-003.

180
Declaration of ConformityAccording to 47CFR, Part 15 for Class B Personal Computers and Peripherals; andor CPU Boards and Power Supplies used with Class B Personal Computers:We: U.S. Screen Print & Inkjet Technology a division of U.S. Graphic Arts, Inc.Located at: 1901 East 5th Street Tempe, AZ 85043 Telephone: (480) 929-2937Declare under sole responsibility that the product identified herein, complies with47CFR Part 2 and 15 of the FCC rules as a Class B digital device. Each productmarketed is identical to the representative unit tested and found to be compliant withthe standards. Records maintained continue to reflect the equipment being producedcan be expected to be within the variation accepted, due to quantity production andtesting on a statistical basis as required by 47CFR 2.909. Operation is subject to thefollowing two conditions: (1) this device may not cause harmful interference, and (2)this device must accept any interference received, including interference that maycause undesired operation.Trade Name:U.S. Screen Print & Inkjet Technology Home of the U.S Screen Printing Institute
Type of Product: Ink Jet Printer
Model: T-Jet2 SDT-1000 and SDT-1200
European Union Declaration of Conformity - CE
A sample of this equipment has been tested against the Essential Health andSafety Requirements of the Machinery Directive. Based on conformity with theMachinery Directive, the Equipment Under Test - T-Jet2 from U.S. Graphic Arts,Inc., dba U.S. Screen Print & Inkjet Technology in Tempe, Arizona USA is deemedin compliance with the Machinery Directive (98/37/EC) and the Council Directivesamending the Machinery Directive (91/368/EEC) and 93/44/EEC). In addition, theEquipment Under Test complies with the requirements of the Low VoltageDirective (73/23/EEC) and the EMC Directive (89/336/EEC).
1