Embed Size (px)
Citation preview

Doc # WI-PCM01 Quality System Documentation Release # A Revision # 1
EPICOR PART CLASS MAINTENANCE
Being a detailed Work Instruction level documentation of the Wacom Quartz implementation of the ANSI/ISO/ASQ Q9001-2008
Standard, paragraph 7.5
Approved By: James Roeger John H. Smalling VP-Phoenix Quality Manager Tracy Rieth Randy Wombacher Senior Buyer/Planner Production Manager Tim Fitzgerald Tony Cortese Sales Manager Buyer
Released: 12/3/2014

Doc # WI-PCM01 Release # A Revision # 1
Red Text on Electronic view is a Controlled Copy. Printed copies are non-controlled; for information purposes only, and will NOT be updated with new revisions.
Page 2 of 10
Table of Contents
Changes in This Revision: ________________________________________________________ 3
1.0 Purpose and Scope __________________________________________________________ 4
2.0 Definitions _________________________________________________________________ 4
3.0 Procedure _________________________________________________________________ 4
3.1 Setting up a New Part Class _________________________________________________ 4
3.2 Establish Approved Suppliers for the Part Class _______________________________ 6
3.3 Add a New Part Class/Plant Record __________________________________________ 7
4.0 Quality Records & References ________________________________________________ 10
4.1 Quality Records __________________________________________________________ 10 Part Class (Electronic Records) _______________________________________________ 10
4.2 References ______________________________________________________________ 10

Doc # WI-PCM01 Release # A Revision # 1
Red Text on Electronic view is a Controlled Copy. Printed copies are non-controlled; for information purposes only, and will NOT be updated with new revisions.
Page 3 of 10
Changes in This Revision:
Paragraph Prior Text or Intent
All Release A, Revision 1 – Initial Release

Doc # WI-PCM01 Release # A Revision # 1
Red Text on Electronic view is a Controlled Copy. Printed copies are non-controlled; for information purposes only, and will NOT be updated with new revisions.
Page 4 of 10
1.0 Purpose and Scope This document gives step-by-step instructions on creating and managing Part Classes in Epicor ERP at Wacom Quartz Corp. Part classes are used to classify any inventory materials for reporting purposes. Part classes are required on every purchase order and used to group like parts into categories.
2.0 Definitions
None
3.0 Procedure
3.1 Setting up a New Part Class
3.1.1 Open Material Management, Inventory Management, Setup and Double-click on Part Class icon. OR Open Material Management, Purchase Management, Setup and Double-click on Part Class icon.
3.1.2 From the main menu select New Part Class:

Doc # WI-PCM01 Release # A Revision # 1
Red Text on Electronic view is a Controlled Copy. Printed copies are non-controlled; for information purposes only, and will NOT be updated with new revisions.
Page 5 of 10
3.1.3 Input the following fields: Part Class Enter an identifying code that uniquely identifies the part class. Use a meaningful ID, certain reports where space is limited, you may see only the ID, rather than the full description. For example:
RM (Raw Materials) TC (Thermocouples)
Description Enter a brief description of the part class. Buyer Select the buyer responsible for purchasing parts in this class, Purchase orders for parts in this class will, by default, be assigned to this buyer. Accounts Input 9999 for each account. (see example below) Inspection Required If you select this check box parts assigned to this class must be inspected when they are received. If you select this check box, when you enter a receipt for any part in this class, you will automatically receive it to inspection. Example: You select the Inspection Required check box for your Sheet Metal part class. You then create a purchase order for a sheet metal part. When you enter the receipt of this part from this purchase order, the Inspection option is marked as the Receive to option, and it cannot be changed. Negative Quantity Action Select STOP. If transactions against parts in this part class will cause the on-hand quantity of any of those parts to go negative, an error message displays, and processing cannot continue. Requisitions Select this check box. Checking this box allows this part class to be available to be requisitioned through Requisition Entry. When you requisition a part, you can assign any class to it that has this check box selected.
3.1.4 SAVE frequently by selecting the disk ICON.
Example:
3.1.5 To Edit an existing Part Class record: Enter the ID of the part class you wish to edit in the Part Class field, or click Part Class or Search to bring up the Part Class Search window where you can browse for the correct part class.
Doc # WI-PCM01 Release # A Revision # 1
Red Text on Electronic view is a Controlled Copy. Printed copies are non-controlled; for information purposes only, and will NOT be updated with new revisions.
Page 6 of 10
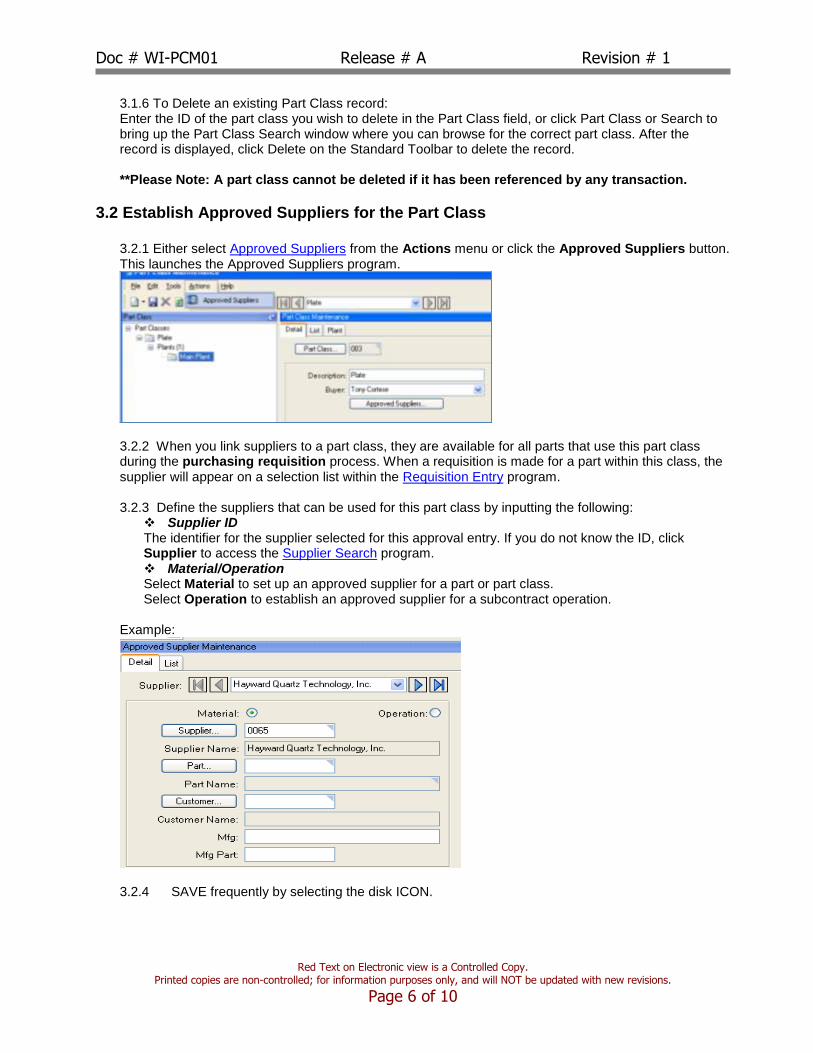
3.1.6 To Delete an existing Part Class record: Enter the ID of the part class you wish to delete in the Part Class field, or click Part Class or Search to bring up the Part Class Search window where you can browse for the correct part class. After the record is displayed, click Delete on the Standard Toolbar to delete the record. **Please Note: A part class cannot be deleted if it has been referenced by any transaction.
3.2 Establish Approved Suppliers for the Part Class
3.2.1 Either select Approved Suppliers from the Actions menu or click the Approved Suppliers button. This launches the Approved Suppliers program.
3.2.2 When you link suppliers to a part class, they are available for all parts that use this part class during the purchasing requisition process. When a requisition is made for a part within this class, the supplier will appear on a selection list within the Requisition Entry program. 3.2.3 Define the suppliers that can be used for this part class by inputting the following:
Supplier ID The identifier for the supplier selected for this approval entry. If you do not know the ID, click Supplier to access the Supplier Search program. Material/Operation Select Material to set up an approved supplier for a part or part class. Select Operation to establish an approved supplier for a subcontract operation.
Example:
3.2.4 SAVE frequently by selecting the disk ICON.

Doc # WI-PCM01 Release # A Revision # 1
Red Text on Electronic view is a Controlled Copy. Printed copies are non-controlled; for information purposes only, and will NOT be updated with new revisions.
Page 7 of 10
3.2.5 To Edit an existing Approved Supplier record: Select the appropriate record from the Approved Supplier tree. Make your changes, and then click Save on the Standard Toolbar. 3.2.6 To Delete an existing Approved Supplier record: Select the appropriate record from the Approved Supplier tree. Click Delete on the Standard Toolbar to delete the record. **Note: When you delete the supplier approval entry, you do not remove the supplier record from the system. This only removes the approval for the part, part class, or subcontract operation.
3.3 Add a New Part Class/Plant Record
3.3.1 The purpose of linking a Plant to a Part Class is to establish planning parameters. These parameters apply to all parts to which the specified part class has been assigned; unless a parameter is overridden at the part/plant level in Part Maintenance. 3.3.2 Click the down arrow next to New, and select Plant from the menu.
3.3.3 Input the following fields:
Owner Plant Select MAIN PLANT Receive Time Input a number depending on knowledge of the Part Class being set up. In the case of a part class for manufactured items, this is the number of days that are required to move the assembly either to stock or to the next job. For manufactured parts this buffer is added to the due date of the job. In the case of a part class for purchased or transferred parts, this is the time required to receive and inspect the part. This time would be deducted from the calculated demand date to give the suppliers the correct supply date. Planning Time Fence Input a number depending on knowledge of the Part Class being set up. This field defines a time limit for supply/demand changes within this part class. This value is the number of days from the current system date that demands requiring supply changes will not be considered by the system. All demands outside of this time limit, however, will be processed as normal. Reschedule Out Time Delta Input a number depending on knowledge of the Part Class being set up. This field lets you control when MRP will provide messages to Reschedule Out orders. The value you enter defines a number of days. Any reschedule out message that is either less than or equal to this value will not generate a change suggestion. This value prevents messages from appearing that cannot be acted upon. Reschedule In Time Delta Input a number depending on knowledge of the Part Class being set up.

Doc # WI-PCM01 Release # A Revision # 1
Red Text on Electronic view is a Controlled Copy. Printed copies are non-controlled; for information purposes only, and will NOT be updated with new revisions.
Page 8 of 10
This field lets you control when MRP will provide messages to Reschedule In orders. The value you enter defines a number of days. Any reschedule in message that is either less than or equal to this value will not generate a change suggestion. This value prevents messages from appearing that cannot be acted upon.
3.3.4 SAVE frequently by selecting the disk ICON. Example:
3.3.5 To Edit an existing Part Class/Plant record: Select the plant whose parameters you wish to edit from the program's Tree View. The program will advance to this sheet with that plant record displayed. Make any necessary edits, and then click Save in the Standard Toolbar. 3.3.6 To Delete an existing Part Class/Plant record: Select the plant whose record you wish to delete from the program's Tree View. The program will advance to this sheet with that plant record displayed. Click Delete on the Standard Toolbar. Example of Completed Set-up of Part Class/Plant record:

Doc # WI-PCM01 Release # A Revision # 1
Red Text on Electronic view is a Controlled Copy. Printed copies are non-controlled; for information purposes only, and will NOT be updated with new revisions.
Page 9 of 10

Doc # WI-PCM01 Release # A Revision # 1
Red Text on Electronic view is a Controlled Copy. Printed copies are non-controlled; for information purposes only, and will NOT be updated with new revisions.
Page 10 of 10
4.0 Quality Records & References
4.1 Quality Records
The following table lists records generated and maintained during the Procedures section of this controlled document. Next to each record is show the paragraph number of this or other controlled document where the specific procedures for Identification (I), Collection (C), Indexing (X), Access (A), Filing (F), Storage (S), Maintenance (M), and Disposition (D) of said record can be found.
Record Name I C X A F S M D
Part Class (Electronic Records)
3.1.1 3.1.1 3.1.1 3.1.1 3.1.1 3.1.1 3.1.5 3.1.6
4.2 References
The following table lists reference materials mentioned in this controlled document along with their probable accessibility. Unless otherwise noted, these are documents NOT controlled by Wacom Quartz. Note* All references listed with the name in the format “FORM #xxx” are controlled forms; a complete list of which can be found in the Control of Quality Records Procedure, document # SOP #CQR01. *None


![[Type Document Title] - Wacom Quartz · password having the correct rights assigned within the system. 2.0 Definitions Epicor Vista Enterprise ... Buyer / Agent of ... how to navigate](https://img.dokumen.tips/doc/110x75/5b1ed4d57f8b9a853a8bfe9f/type-document-title-wacom-quartz-password-having-the-correct-rights-assigned.jpg)


![[Type Document Title] - Wacom Quartz · Quality System Documentation Release ... This procedure describes the process for Part Creation and Maintenance in Epicor ... (The revision](https://img.dokumen.tips/doc/110x75/5b3566907f8b9abc218d3a8d/type-document-title-wacom-quartz-quality-system-documentation-release-.jpg)