Embed Size (px)
Citation preview

ePCT User Guide for Applicants and Third
Parties
A guide to using WIPO’s ePCT System
June 9, 2016
ePCT Version 3.3
CONTENTS
About the Guide .......................................................................................................................... 6
Help files and FAQ ................................................................................................................... 6
Book conventions and Glossary ............................................................................................... 7
Overview of ePCT private and public services ............................................................................ 8
Supported internet browsers .................................................................................................... 8
Supported digital certificates .................................................................................................... 8
Part 1 – WIPO Accounts ............................................................................................... ………. 9
Create an account .................................................................................................................... 9
Managing my WIPO user account .......................................................................................... 13
Forgotten username ............................................................................................................... 16
Recovery of a forgotten password .......................................................................................... 17
Change password .................................................................................................................. 19
Change e-mail address .......................................................................................................... 21
PCT Functions menu ............................................................................................................. 23
My certificates ........................................................................................................................ 27
Where is my digital certificate located? .................................................................................. 27
How to obtain a digital certificate ............................................................................................ 30
Important notice on digital certificates .................................................................................... 31
How to upload your digital certificate to your ePCT user account ........................................... 32
How to upload your EPO smart card certificate to your ePCT user account ........................... 34
How to make a backup copy of your WIPO CA customer digital certificate ............................ 34
WIPO CA digital certificate backup for Internet Explorer ........................................................ 35
WIPO CA digital certificate backup for Mozilla Firefox ............................................................ 43
Accessing ePCT from a different computer ............................................................................ 46
Revoked WIPO CA digital certificates .................................................................................... 47
WIPO certificate and EPO smart card renewal ....................................................................... 47
My eHandshakes…………………………………………………………………………………….49

Where can I find my Customer ID? ........................................................................................ 49
How to request an eHandshake ............................................................................................. 50
How to accept an eHandshake request .................................................................................. 52
Part 2 – ePCT: Assigning and Managing Access Rights…………………………… ................... .54
eOwner, eEditor and eViewer………………………………………………………………………54
ePCT private services for certified account holders (with a digital certificate)…………………55
eOwnership Overview……………………………………………………………………………….57
Requesting eOwnership of an IA at the time of filing .............................................................. 57
How to confirm eOwnership of an IA after filing ...................................................................... 58
How to confirm eOwnership of multiple IAs after filing ............................................................ 60
Taking eOwnership of published IAs and IAs with PCT Rule 92bis request ........................... 63
Taking eOwnership of unpublished IAs filed without a digital certificate, IAs filed with a non-
supported digital certificate, IAs where the certificate used for filing does not match the
certificate associated with the WIPO user account ................................................................. 65
Taking eOwnership of IAs filed with a digital certificate that has since expired ....................... 67
Assigning or removing access rights to IA(s) (from the Workbench) ....................................... 68
Setting up default access rights options ................................................................................. 72
Removing all ePCT access rights for an eHandshake user ....................................................... 73
Part 3 – ePCT: Overview of Features and Functionalities ......................................................... 74
IA Number tab ........................................................................................................................... 75
IA Number tab – File View sub-tab ......................................................................................... 76
Documents on file at the International Bureau - Icons and functions ...................................... 79
Indications regarding communication rules for documents ..................................................... 81
Downloading certified copies of documents from ePCT ......................................................... 81
PDF previewing issues ........................................................................................................... 83
IA Number tab - Upload Documents sub-tab .......................................................................... 84
IA Number tab – Timeline sub-tab .......................................................................................... 88
IA Number tab – Access Rights sub-tab ................................................................................. 90
IA Number tab - History sub-tab ............................................................................................. 93
IA Number tab – Bibliographic Data sub-tab .......................................................................... 94
IA Number tab – Actions sub-tab ........................................................................................... 95
Actions – Amendments Under Article 19 (text format only) .................................................... 97
Actions – Create Power of Attorney ....................................................................................... 99
Actions – Declaration of inventorship ................................................................................... 104
Actions – Licensing availability request ................................................................................ 106
Actions – Make International Application available to DAS ................................................... 109
Actions – Observations on close prior art ............................................................................. 111
Entering Observations .......................................................................................................... 111
Details concerning the observation ...................................................................................... 112
Adding citations .................................................................................................................... 113
After the observation is submitted ........................................................................................ 116
Actions – Obtain priority document from DAS ...................................................................... 118
Actions – Rule 92bis change request ................................................................................... 125
Rule 92bis request – Add a new party, edit or delete an existing party ................................. 125
Rule 92bis processing at the IB ............................................................................................ 131
Actions – Submit Chapter II Demand ................................................................................... 132
Actions – Withdraw Chapter II Demand................................................................................ 136
Actions – Withdraw designation(s) ....................................................................................... 139
Actions – Withdraw election(s) ............................................................................................. 142
Actions – Withdraw IA .......................................................................................................... 145
Actions – Withdraw priority claim(s) ..................................................................................... 148
Workbench tab ..................................................................................................................... 150
IA status – Access suspended ............................................................................................. 153
Workbench icons and functions ........................................................................................... 154
Workbench Filters ................................................................................................................ 156
Notification tab ..................................................................................................................... 158
Clearing Notifications ........................................................................................................... 159

Search notifications and notification preferences ................................................................. 160
Portfolios tab ........................................................................................................................ 162
Creating a portfolio ............................................................................................................... 162
Removing an IA from a portfolio ........................................................................................... 165
Portfolios tab icons ............................................................................................................... 165
Attaching an IA to a portfolio ................................................................................................ 167
My History tab ...................................................................................................................... 168
Search My History ................................................................................................................ 169
ePCT tab .............................................................................................................................. 170
The ePCT tab in ePCT private services ............................................................................... 170
Search IA and upload documents in ePCT public services .................................................. 171
Whom to contact .................................................................................................................. 173

ePCT User Guide - June 9, 2016
6
ABOUT THE GUIDE
This guide is intended for users of WIPO’s ePCT service and is divided into three main parts:
Part 1 – WIPO ACCOUNTS: explains how to create and manage online user accounts, which are required to access many of WIPO’s online services;
Part 2 – ePCT - Assigning and Managing Access Rights;
Part 3 – ePCT - Overview of Features and Functionality.
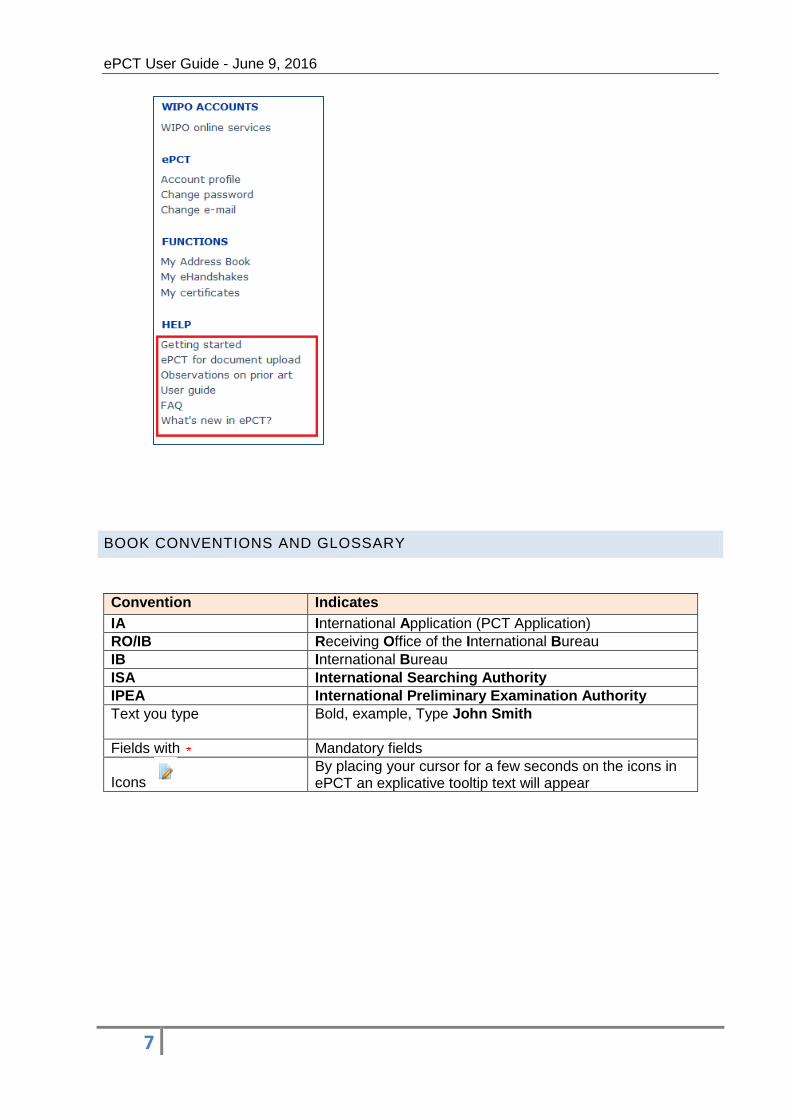
HELP FILES AND FAQ
The ePCT User Guide, Frequently Asked Questions (FAQ) and other supporting documents
(currently available in English only) are available via the ePCT login page (see screenshot
below) and also via links from your WIPO ePCT user account. Shortcuts to the ePCT
documentation can also be found on the ePCT tab within both ePCT private and public
services.
If you are a new user of ePCT, the ‘Getting started’ instructions available on the login page will
help you create your account and upload your digital certificate to your WIPO ePCT user
account.
If you want to know which features are new to the current version of ePCT and what is planned
for future releases, click on “What’s New for Applicants?” on the ePCT login page.
ePCT User Guide - June 9, 2016
7
BOOK CONVENTIONS AND GLOSSARY
Convention Indicates
IA International Application (PCT Application)
RO/IB Receiving Office of the International Bureau
IB International Bureau
ISA International Searching Authority
IPEA International Preliminary Examination Authority
Text you type Bold, example, Type John Smith
Fields with Mandatory fields
Icons By placing your cursor for a few seconds on the icons in ePCT an explicative tooltip text will appear

ePCT User Guide - June 9, 2016
8
OVERVIEW OF ePCT PRIVATE AND PUBLIC SERVICES
The ePCT graphical user interface is available in all 10 languages of international publication (Arabic, Chinese, English, French, German, Japanese, Korean, Portuguese, Russian and Spanish). You can choose your preferred language in the header:
The ePCT system offers two distinct types of online services:
ePCT public services, requiring only the creation of a standard WIPO user account. Via ePCT public services, users can upload documents to the electronic dossier held at the IB, however, they do not have access to any other confidential documents or data, with the exception of documents that they themselves uploaded.
ePCT private services, requiring the creation of a standard WIPO user account, plus additional authentication by uploading a digital certificate or smart card. Via ePCT private services, users can perform all the functions that are included in ePCT public services and, in addition, can file new applications and access securely online international applications filed as of January 1, 2009, that are owned or managed by them, including prior to publication.
Note: The same WIPO Account is used for accessing both ePCT private services and ePCT public services (no need to create separate accounts). Additional authentication of the WIPO Account is required to be able to log in to private services, as mentioned above.
SUPPORTED INTERNET BROWSERS
The supported browsers for WIPO Accounts and the ePCT system are:
Mozilla Firefox (strongly recommended)
Internet Explorer
The list of supported browsers also appears on the log-in page:
SUPPORTED DIGITAL CERTIFICATES
The supported digital certificates are:
WIPO Customer digital certificates
Digital certificates issued by EPO which are stored in smart cards
Digital certificates issued by SECOM, Japan.
ePCT User Guide - June 9, 2016
9
PART 1 – WIPO ACCOUNTS
The WIPO Accounts portal enables users to create and manage their WIPO user account,
which is required in order to access many of WIPO’s online services.
Users wishing to set up a user account specifically for access to ePCT should do so via the
ePCT home page at https://pct.wipo.int/ePCT.
IMPORTANT: User accounts are personal and NOT generic – please provide your own personal details and an individual e-mail address when creating an account, noting that the same e-mail address cannot be used with more than one user account.
CREATE AN ACCOUNT
To be able to access the ePCT service, the first step is to create a WIPO user account.
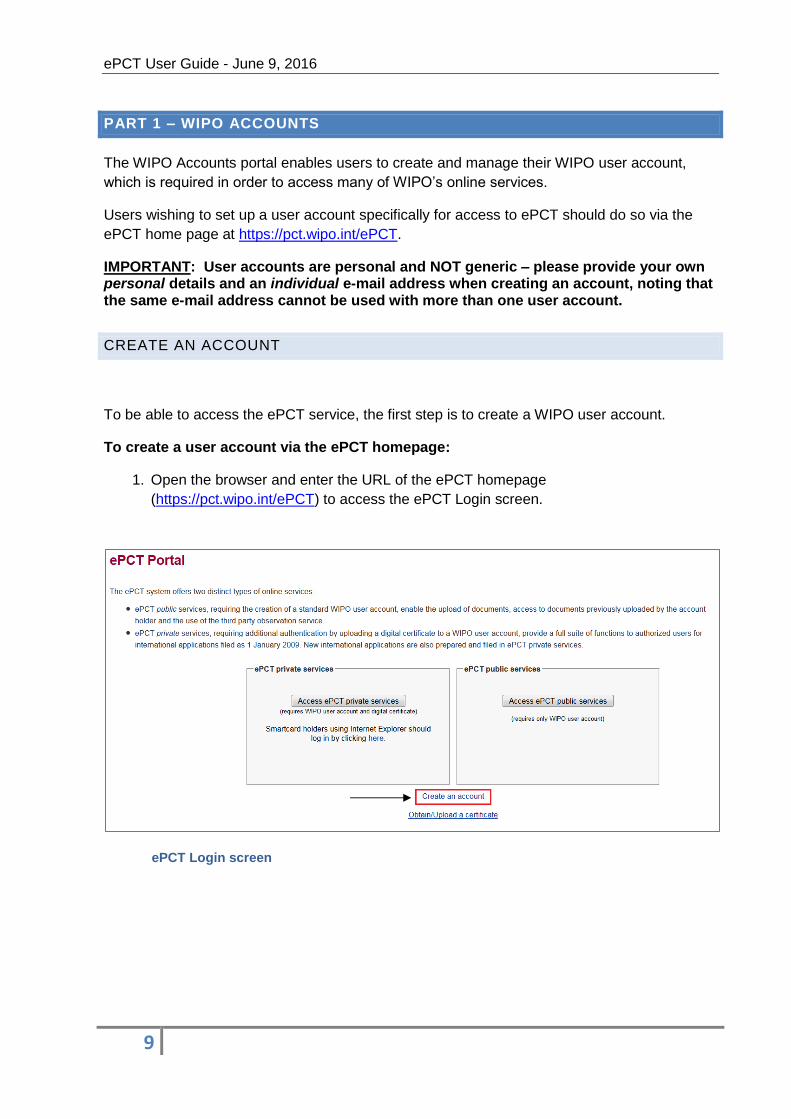
To create a user account via the ePCT homepage:
1. Open the browser and enter the URL of the ePCT homepage
(https://pct.wipo.int/ePCT) to access the ePCT Login screen.
ePCT Login screen
ePCT User Guide - June 9, 2016
10
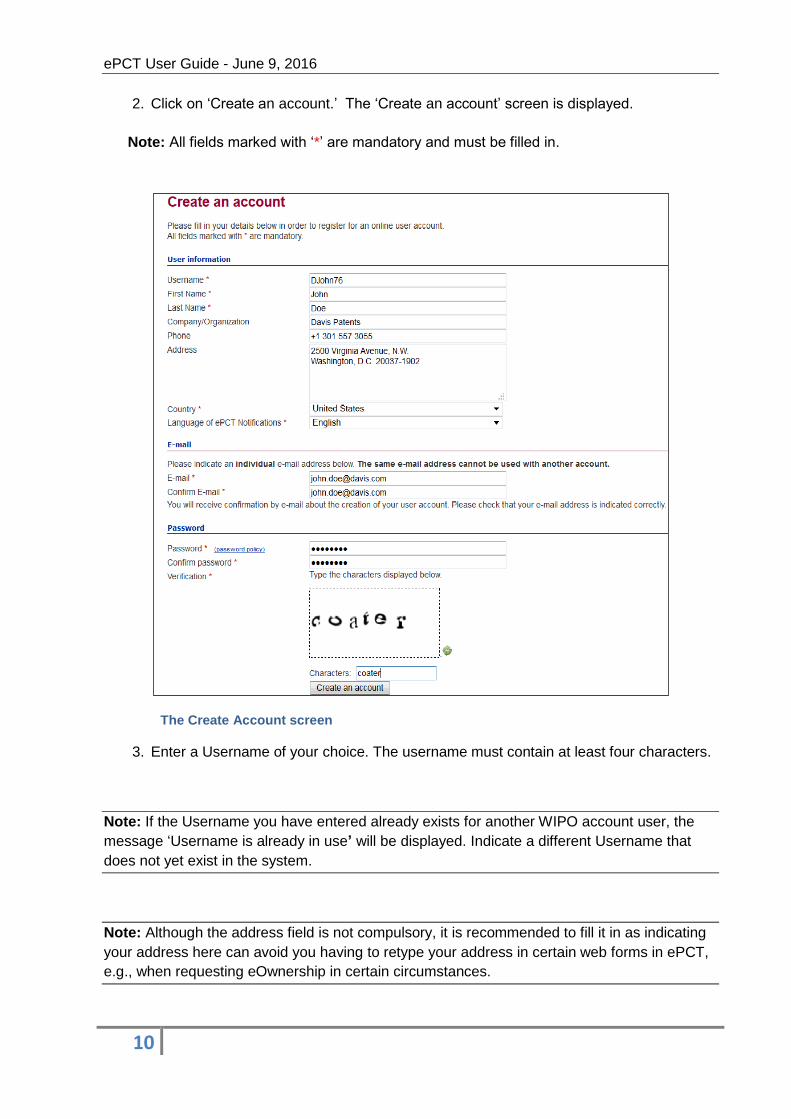
2. Click on ‘Create an account.’ The ‘Create an account’ screen is displayed.
Note: All fields marked with ‘*’ are mandatory and must be filled in.
The Create Account screen
3. Enter a Username of your choice. The username must contain at least four characters.
Note: If the Username you have entered already exists for another WIPO account user, the
message ‘Username is already in use’ will be displayed. Indicate a different Username that
does not yet exist in the system.
Note: Although the address field is not compulsory, it is recommended to fill it in as indicating
your address here can avoid you having to retype your address in certain web forms in ePCT,
e.g., when requesting eOwnership in certain circumstances.

ePCT User Guide - June 9, 2016
11
4. Enter the e-mail address to which you want all ePCT notifications to be sent in the ‘E-
mail’ field and confirm it by typing it again in the ‘Confirm e-mail’ field.
Note: It is extremely important to type your e-mail address correctly, since, in order to validate
the creation of your user account, an e-mail will be sent from ‘[email protected]’ containing a
web link that you will need to click on to validate your account. Please check your spam/junk
filters if you do not receive the e-mail in your mailbox.
5. Enter a password of your choice in the ‘Password’ field and confirm it in the ‘Confirm
Password’ field.
Note: The password must be at least eight characters long and must contain at least one
numerical character. When choosing your password, please bear in mind that the password
field in the ePCT login screen is case sensitive.
6. Enter the Verification characters that appear in the text box in the Characters field
below.
7. Once all required fields have been completed click on ‘Create account’.
8. The ‘Validate user account’ screen is displayed.
9. In order to validate the creation of your user account, an e-mail will be instantly sent
from ‘[email protected]’ containing a web link. This e-mail will be sent to the e-mail
address provided during the account creation process; therefore it is important to
indicate a valid e-mail address. The account will be validated once you have clicked on
the URL.

ePCT User Guide - June 9, 2016
12
The account validation e-mail
10. Click the link in the e-mail to validate the creation of your user account.
User account confirmation screen
11. Your account has now been activated. Click on the link ‘obtain/upload a digital
certificate’ in order to authenticate your WIPO account for access to ePCT private
services.
ePCT User Guide - June 9, 2016
13
MANAGING MY WIPO USER ACCOUNT
This section describes how to manage your account profile, including changing your password
and e-mail address. It also explains how to manage ePCT “eHandshakes” and digital
certificates.
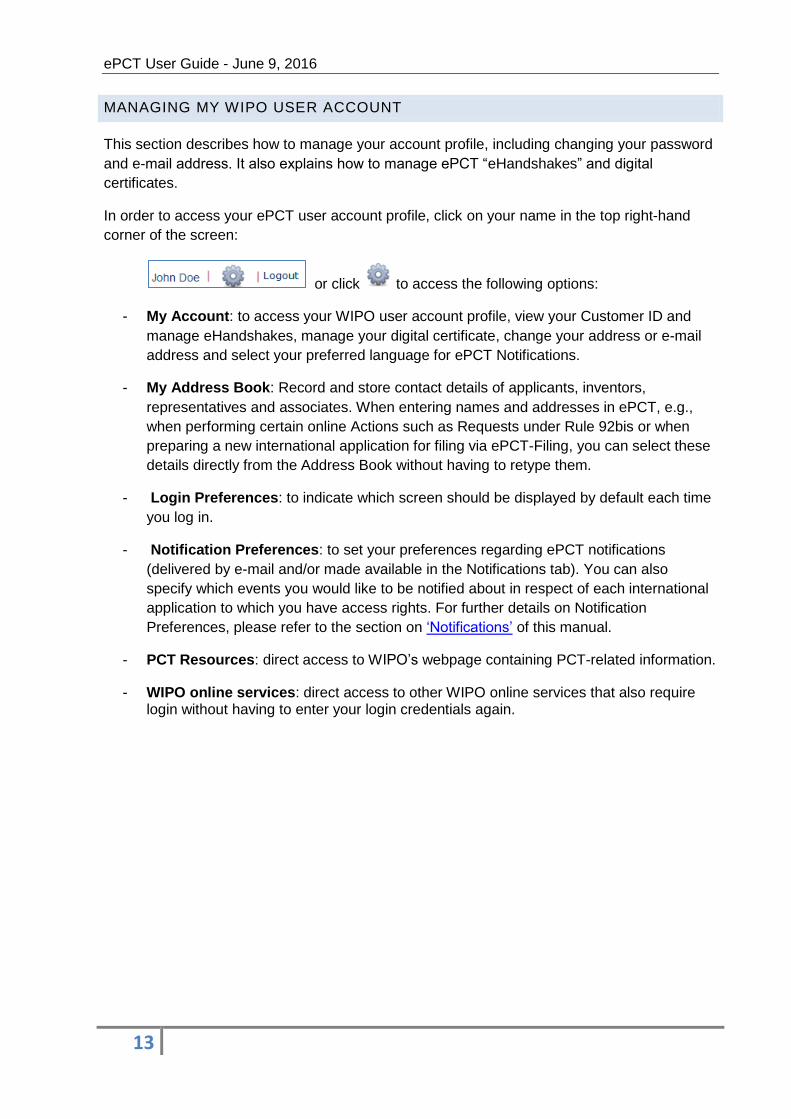
In order to access your ePCT user account profile, click on your name in the top right-hand
corner of the screen:
or click to access the following options:
- My Account: to access your WIPO user account profile, view your Customer ID and
manage eHandshakes, manage your digital certificate, change your address or e-mail
address and select your preferred language for ePCT Notifications.
- My Address Book: Record and store contact details of applicants, inventors,
representatives and associates. When entering names and addresses in ePCT, e.g.,
when performing certain online Actions such as Requests under Rule 92bis or when
preparing a new international application for filing via ePCT-Filing, you can select these
details directly from the Address Book without having to retype them.
- Login Preferences: to indicate which screen should be displayed by default each time
you log in.
- Notification Preferences: to set your preferences regarding ePCT notifications
(delivered by e-mail and/or made available in the Notifications tab). You can also
specify which events you would like to be notified about in respect of each international
application to which you have access rights. For further details on Notification
Preferences, please refer to the section on ‘Notifications’ of this manual.
- PCT Resources: direct access to WIPO’s webpage containing PCT-related information.
- WIPO online services: direct access to other WIPO online services that also require login without having to enter your login credentials again.
ePCT User Guide - June 9, 2016
14
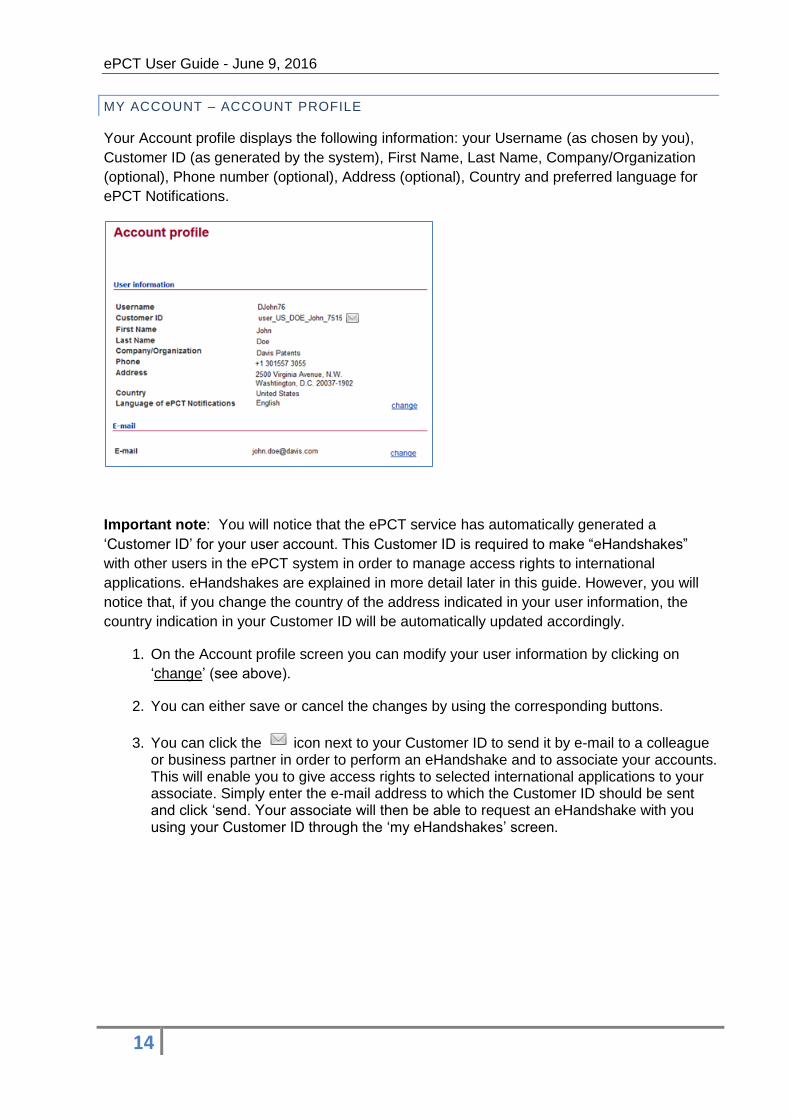
MY ACCOUNT – ACCOUNT PROFILE
Your Account profile displays the following information: your Username (as chosen by you),
Customer ID (as generated by the system), First Name, Last Name, Company/Organization
(optional), Phone number (optional), Address (optional), Country and preferred language for
ePCT Notifications.
Important note: You will notice that the ePCT service has automatically generated a
‘Customer ID’ for your user account. This Customer ID is required to make “eHandshakes”
with other users in the ePCT system in order to manage access rights to international
applications. eHandshakes are explained in more detail later in this guide. However, you will
notice that, if you change the country of the address indicated in your user information, the
country indication in your Customer ID will be automatically updated accordingly.
1. On the Account profile screen you can modify your user information by clicking on
‘change’ (see above).
2. You can either save or cancel the changes by using the corresponding buttons.
3. You can click the icon next to your Customer ID to send it by e-mail to a colleague or business partner in order to perform an eHandshake and to associate your accounts. This will enable you to give access rights to selected international applications to your associate. Simply enter the e-mail address to which the Customer ID should be sent and click ‘send. Your associate will then be able to request an eHandshake with you using your Customer ID through the ‘my eHandshakes’ screen.

ePCT User Guide - June 9, 2016
15
Changing the language of ePCT Notifications:
In your Account Profile screen, to change the language of ePCT notifications:
1. Click ‘Change’ next to the ‘Language of ePCT Notifications’.
2. Select the preferred language.
3. Click ‘Save’ on the right-hand side of the screen to confirm the change or click ‘Cancel’ to
keep the existing language setting.
Note: When logged in to ePCT private services, in the Notification Preferences on the
Notifications tab, you can choose to receive notifications about IAs according to your
access rights or other criteria and also select the type of event for which you want to be
notified and the means of communication (e-mail or Notifications tab). For further information,
please see the chapter on ‘Search notifications and notification preferences’.

ePCT User Guide - June 9, 2016
16
FORGOTTEN USERNAME
If you have forgotten your username:
1. Click on the ‘Forgotten username?’ link on the ePCT Login screen.
2. You will be redirected to the ‘Forgotten username’ screen.
3. Enter your e-mail address in the corresponding field, making sure to type the e-mail
address correctly.
4. Enter the ‘Verification’ characters in the text box displayed below the characters.
5. Click ‘Resend Username’. An e-mail will be sent to you with your username.

ePCT User Guide - June 9, 2016
17
RECOVERY OF A FORGOTTEN PASSWORD
If you have forgotten your password you can recover it by clicking on ‘Forgotten password?’ on
the ePCT Login screen.
To recover your password:
1. Click ‘Access ePCT private services’ or ‘Access ePCT public services’ on the ePCT login page.
2. On the ePCT Authentication screen click on ‘Forgotten password?’
3. Enter your Username, e-mail address and the verification characters in the
corresponding fields.
First Reset Password screen
4. Click on ‘Reset Password.’
5. An automatic e-mail from [email protected] is instantly sent to the e-mail address
indicated in your account profile containing web link that will allow you to reset your
password.
ePCT User Guide - June 9, 2016
18
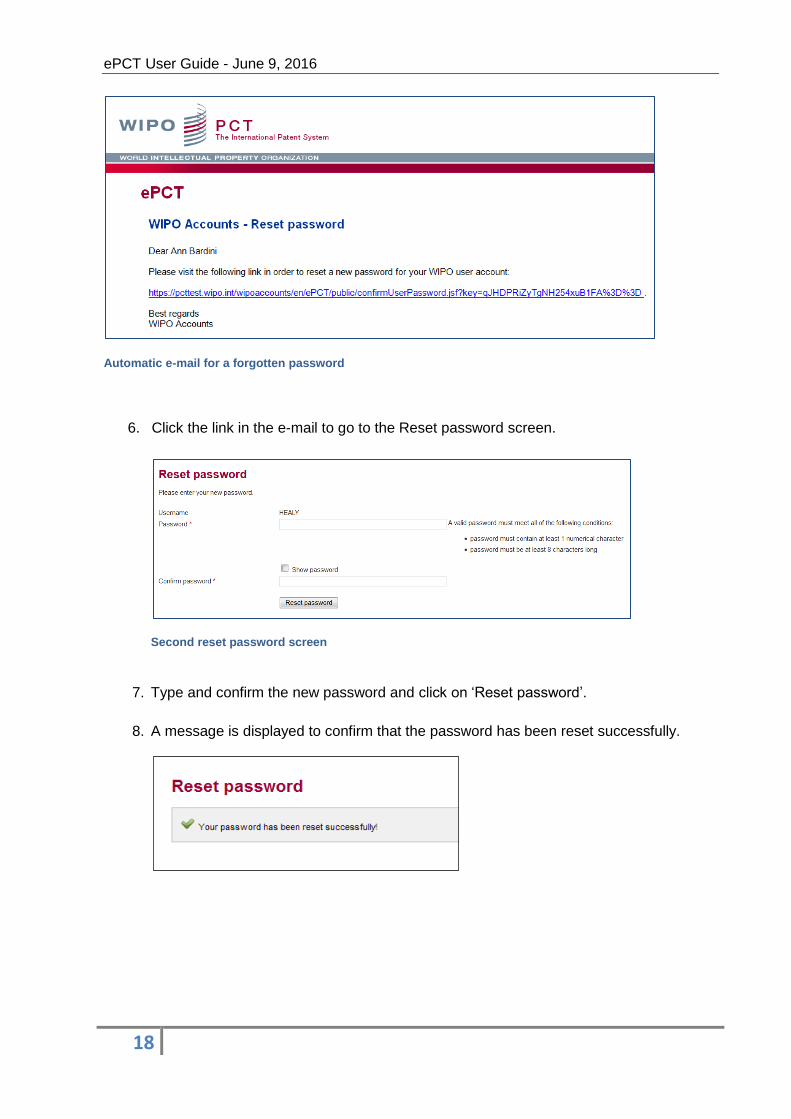
Automatic e-mail for a forgotten password
6. Click the link in the e-mail to go to the Reset password screen.
Second reset password screen
7. Type and confirm the new password and click on ‘Reset password’.
8. A message is displayed to confirm that the password has been reset successfully.
ePCT User Guide - June 9, 2016
19
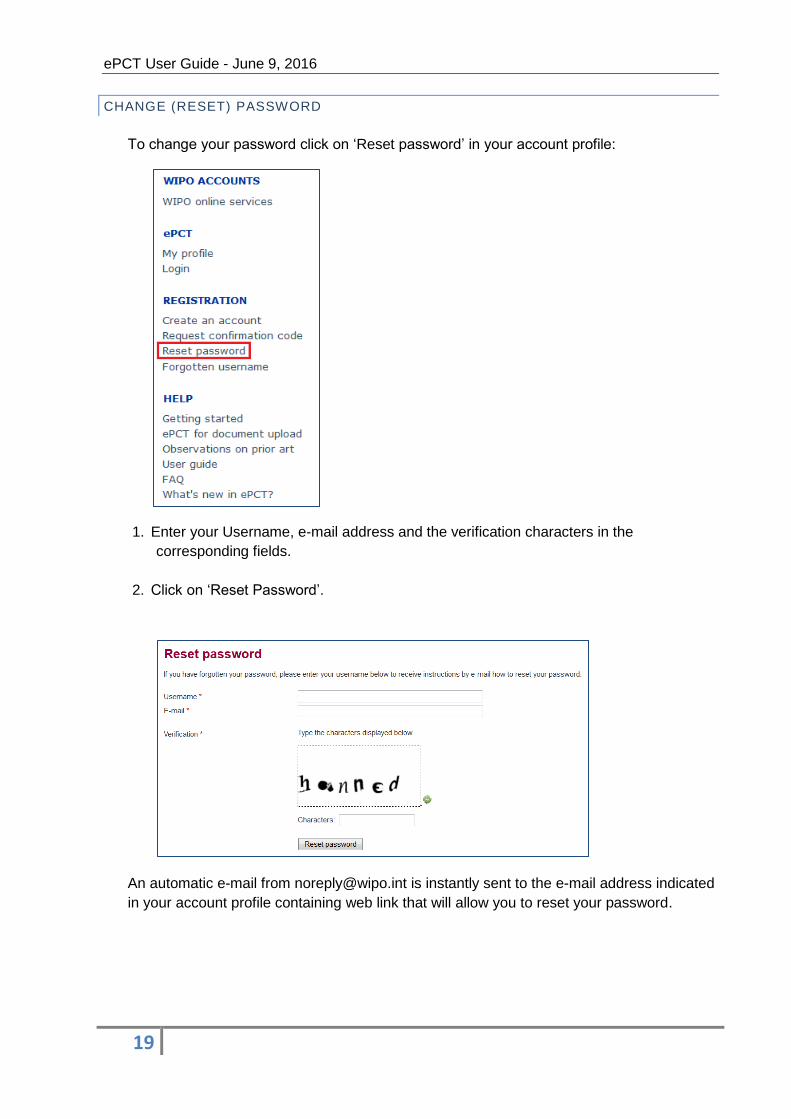
CHANGE (RESET) PASSWORD
To change your password click on ‘Reset password’ in your account profile:
1. Enter your Username, e-mail address and the verification characters in the
corresponding fields.
2. Click on ‘Reset Password’.
An automatic e-mail from [email protected] is instantly sent to the e-mail address indicated
in your account profile containing web link that will allow you to reset your password.

ePCT User Guide - June 9, 2016
20
Click the link in the e-mail to go to the Reset password screen.
Type and confirm the new password and click on ‘Reset password’.
A message is displayed to confirm that the password has been reset successfully.

ePCT User Guide - June 9, 2016
21
CHANGE E-MAIL ADDRESS
To change the e-mail address associated with your account click on ‘Change e-mail’ in your
account profile
1. Your current e-mail address is displayed. Type your new e-mail address in the
corresponding field and confirm it by re-typing it in the ‘Confirm new e-mail’ field.
2. Click on ‘Change e-mail’.
3. An e-mail is sent to your “old” e-mail address confirming that your e-mail address is
going to be changed (this will alert you to any change of your e-mail address that is
attempted to be recorded without your permission; please contact us if this happens).

ePCT User Guide - June 9, 2016
22
4. An e-mail is also sent to your new e-mail address containing a confirmation code
that is required to confirm the change of e-mail.
5. Cut&paste the confirmation code contained in the e-mail into the ‘Confirm e-mail’
screen. As long as you do not enter this confirmation code, the e-mail address will
remain unchanged.
6. Once the new e-mail address has been confirmed, a notification is also sent to both
former and new e-mail accounts to confirm the change.
Note: the e-mail address can also be changed in the Account profile screen simply by clicking
on ‘change’ next to the e-mail address.
ePCT User Guide - June 9, 2016
23
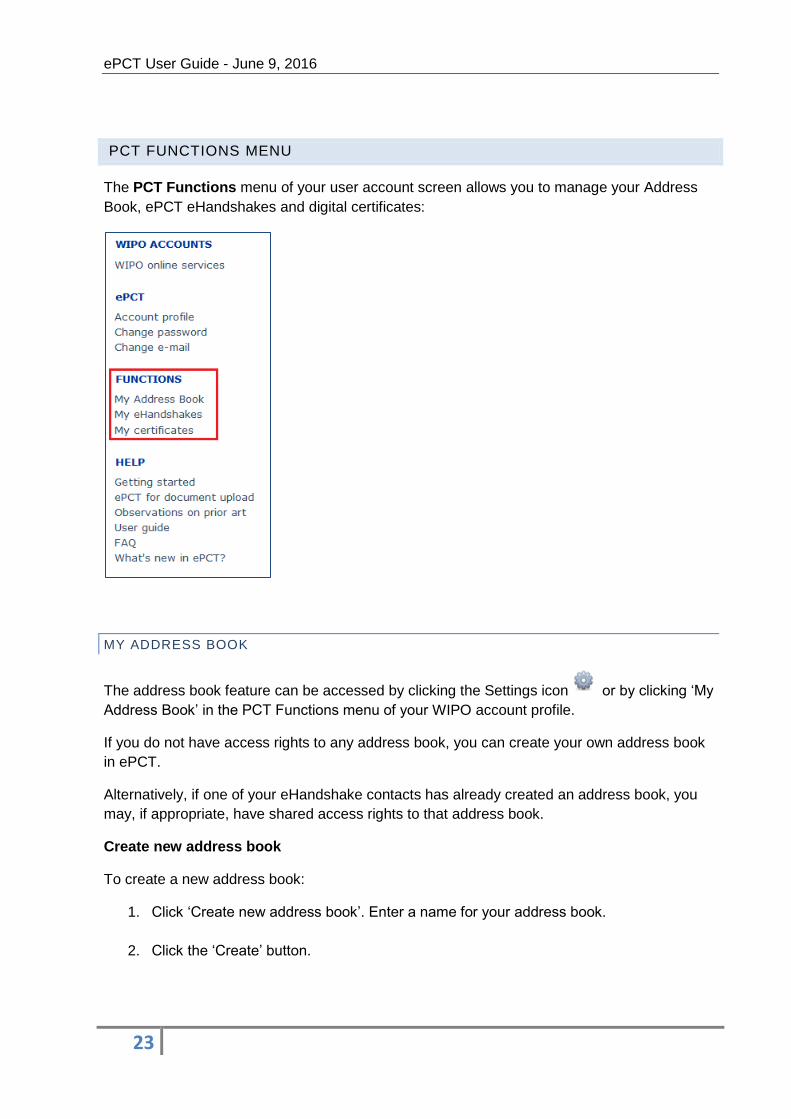
PCT FUNCTIONS MENU
The PCT Functions menu of your user account screen allows you to manage your Address
Book, ePCT eHandshakes and digital certificates:
MY ADDRESS BOOK
The address book feature can be accessed by clicking the Settings icon or by clicking ‘My
Address Book’ in the PCT Functions menu of your WIPO account profile.
If you do not have access rights to any address book, you can create your own address book
in ePCT.
Alternatively, if one of your eHandshake contacts has already created an address book, you
may, if appropriate, have shared access rights to that address book.
Create new address book
To create a new address book:
1. Click ‘Create new address book’. Enter a name for your address book.
2. Click the ‘Create’ button.
ePCT User Guide - June 9, 2016
24
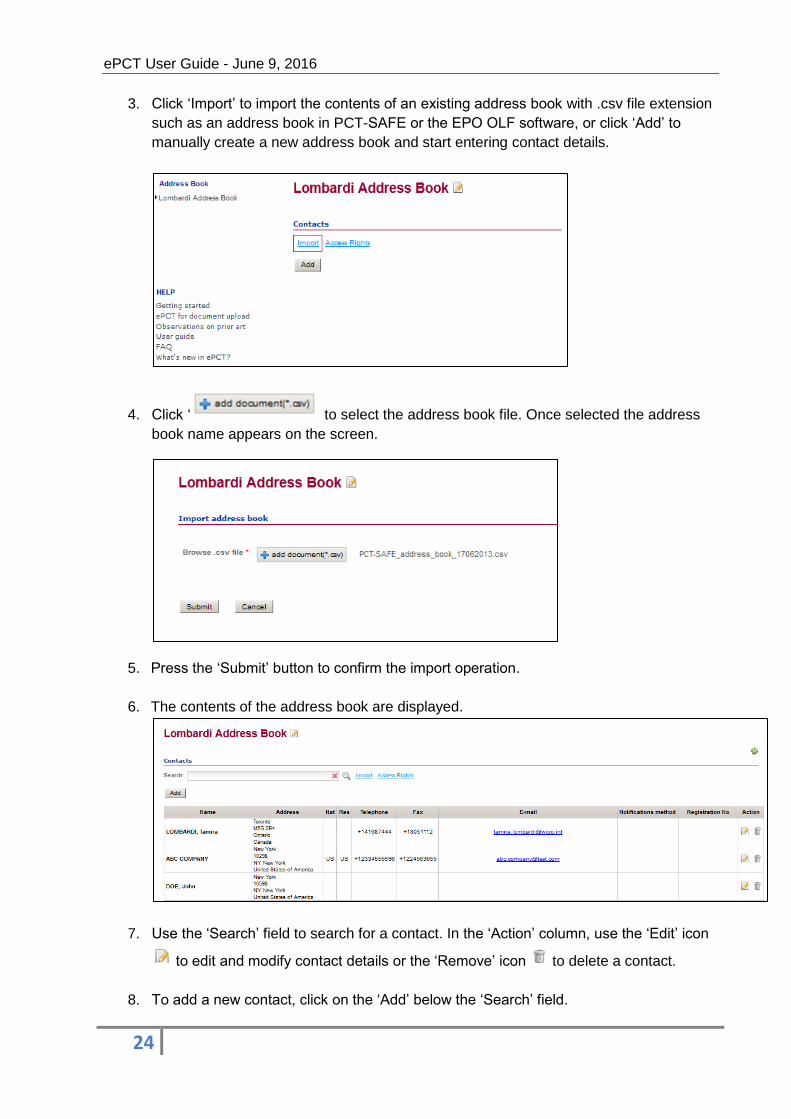
3. Click ‘Import’ to import the contents of an existing address book with .csv file extension
such as an address book in PCT-SAFE or the EPO OLF software, or click ‘Add’ to
manually create a new address book and start entering contact details.
4. Click ‘ to select the address book file. Once selected the address
book name appears on the screen.
5. Press the ‘Submit’ button to confirm the import operation.
6. The contents of the address book are displayed.
7. Use the ‘Search’ field to search for a contact. In the ‘Action’ column, use the ‘Edit’ icon
to edit and modify contact details or the ‘Remove’ icon to delete a contact.
8. To add a new contact, click on the ‘Add’ below the ‘Search’ field.
ePCT User Guide - June 9, 2016
25
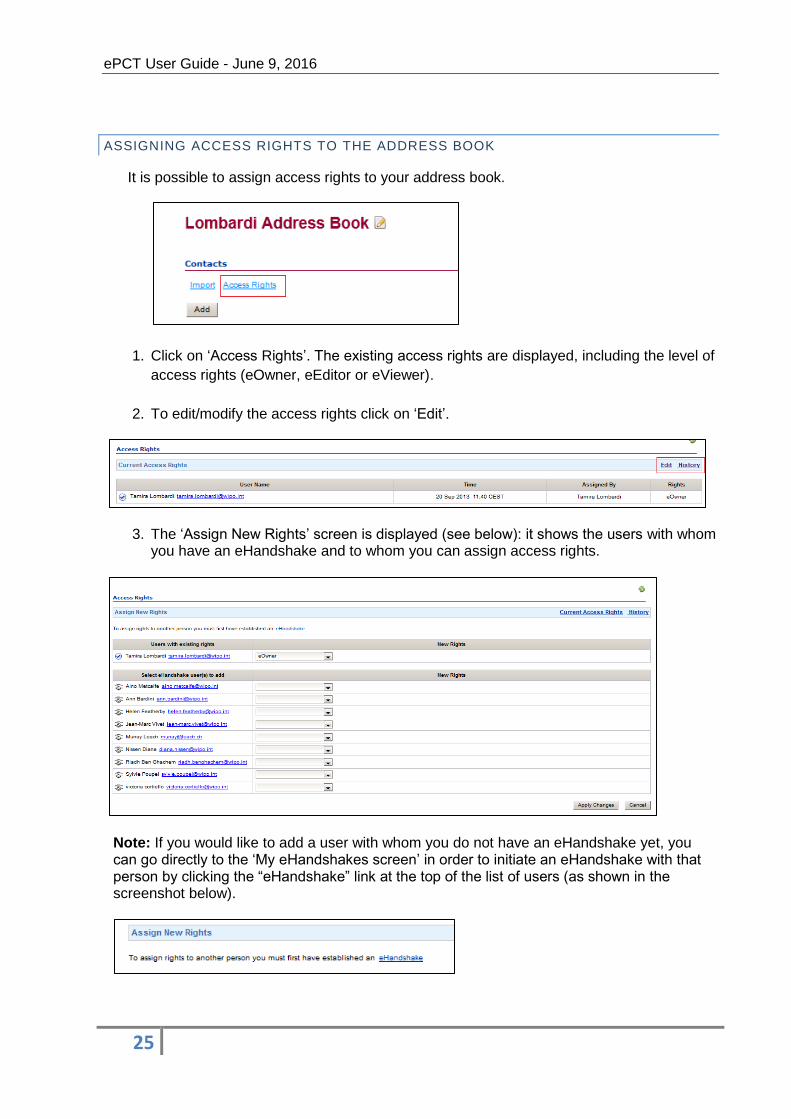
ASSIGNING ACCESS RIGHTS TO THE ADDRESS BOOK
It is possible to assign access rights to your address book.
1. Click on ‘Access Rights’. The existing access rights are displayed, including the level of
access rights (eOwner, eEditor or eViewer).
2. To edit/modify the access rights click on ‘Edit’.
3. The ‘Assign New Rights’ screen is displayed (see below): it shows the users with whom you have an eHandshake and to whom you can assign access rights.
Note: If you would like to add a user with whom you do not have an eHandshake yet, you can go directly to the ‘My eHandshakes screen’ in order to initiate an eHandshake with that person by clicking the “eHandshake” link at the top of the list of users (as shown in the screenshot below).

ePCT User Guide - June 9, 2016
26
4. Next to each user a drop-down list is displayed which allows you to select the level of access rights that you would like to assign to each eHandshake user (eOwner, eEditor, eViewer). Only eOwners can assign or remove access rights to the Address Book, although eOwners, eEditors and eViewers can remove their own access rights.
The icon next to a user’s name shows that you have an eHandshake with that person. Users without this icon have been given access rights by another eOwner.
The icon next to a user’s name means that this user originally created the Address Book.
5. To modify the access rights for users that already have access rights to an address
book, select the level of access rights from the scroll-down list under ‘Users with existing rights’ (as shown above). Note that, as eOwner, you can update the access rights also for users with whom you have not concluded an eHandshake.
6. Once the appropriate access rights have been selected for each user, click
to confirm or Cancel.
7. The current access rights table is displayed to reflect the changes. Click on ‘Edit’ to
make additional modifications.
8. Use the ‘History’ link’ next to the ‘Edit’ button to view the history of all access rights
changes.
9. To exit the Address Book function, click your name link at the top of the screen
or the icon to go back to your account profile.
ePCT User Guide - June 9, 2016
27
MY CERTIFICATES
If you already have a valid digital certificate that is supported by the system (currently, a WIPO
certificate, an EPO Smart card or a certificate issued by SECOM, Japan) you will need to
upload it to your ePCT user account. This will enable you to access the ePCT private services
and perform most of the ePCT functions, such as file an international application or confirm in
the system that you are the ‘eOwner’ of international applications, giving you the authority to
assign access rights to those IAs to your eHandshake contacts. In this section you will also
find instructions on how to request a digital certificate if you do not already have one.
WHERE IS MY DIGITAL CERTIFICATE LOCATED?
Assuming that you already have a supported digital certificate or an EPO Smart card, you
must first make sure that it is installed in your browser. To do this:
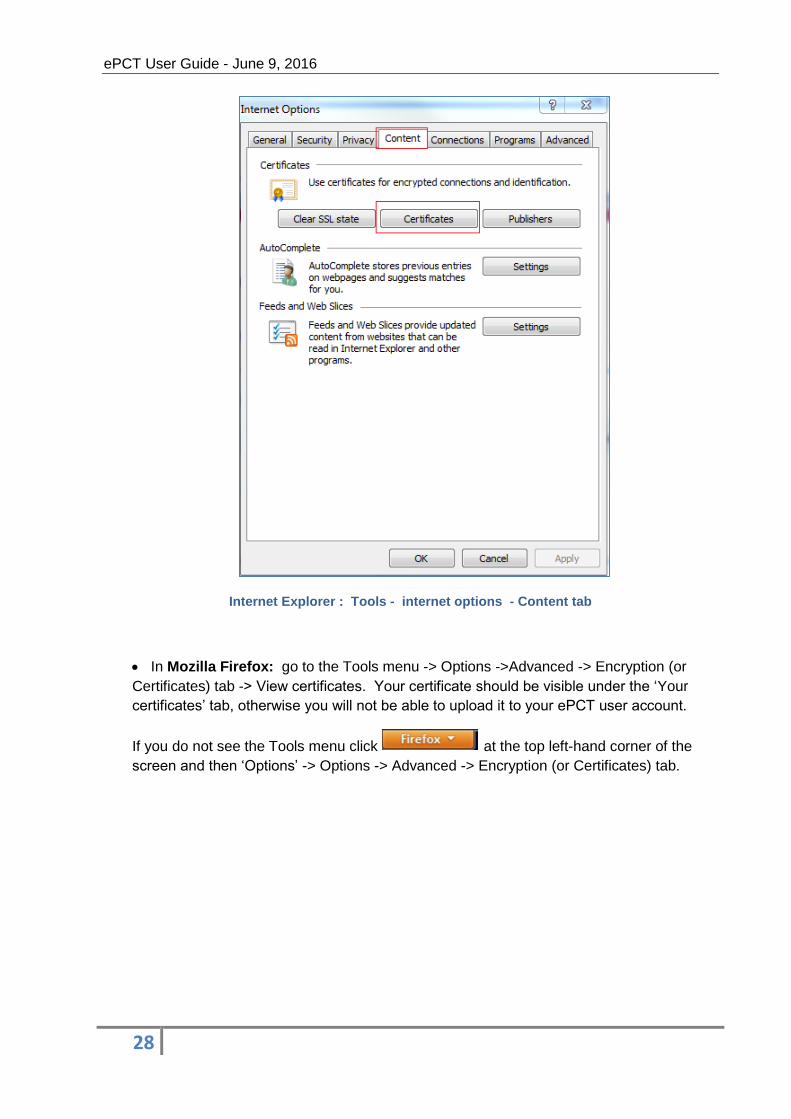
In Internet Explorer go to the Tools menu or click the icon -> Internet options (or
simply Options) -> Content tab -> Certificates. Your certificate should be visible under the
‘Personal’ tab, otherwise you will not be able to upload it to your ePCT user account.
ePCT User Guide - June 9, 2016
28
Internet Explorer : Tools - internet options - Content tab
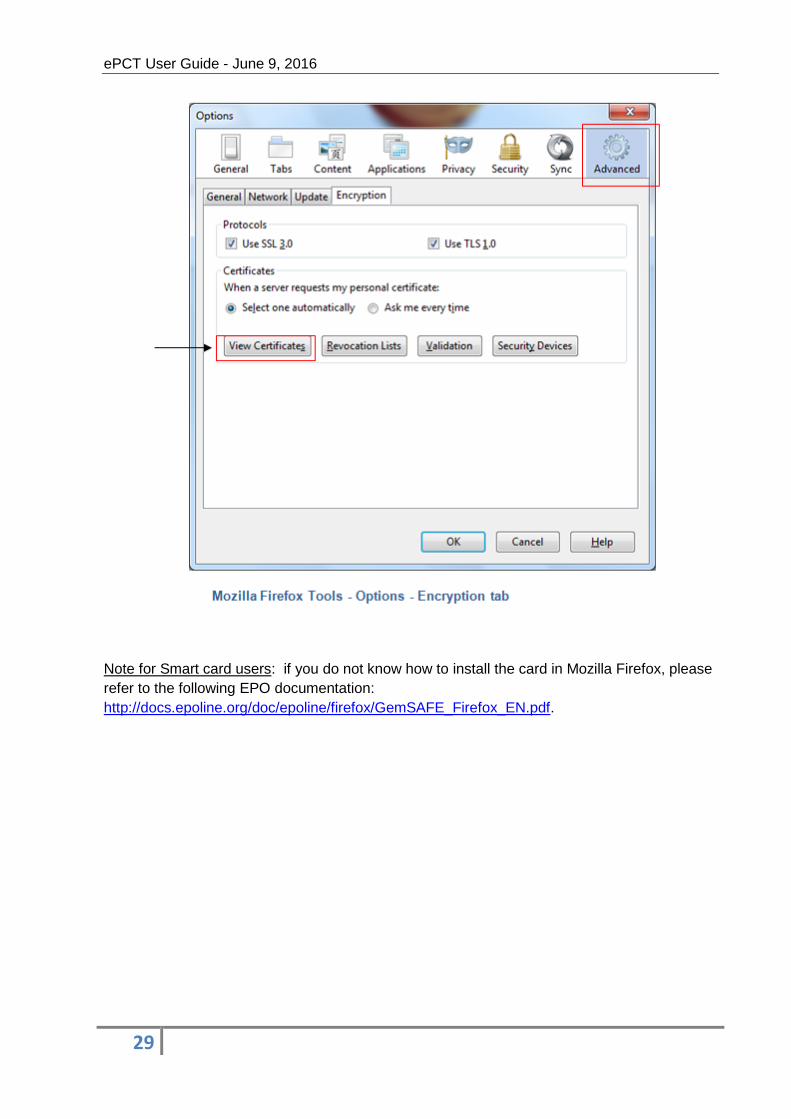
In Mozilla Firefox: go to the Tools menu -> Options ->Advanced -> Encryption (or
Certificates) tab -> View certificates. Your certificate should be visible under the ‘Your
certificates’ tab, otherwise you will not be able to upload it to your ePCT user account.
If you do not see the Tools menu click at the top left-hand corner of the
screen and then ‘Options’ -> Options -> Advanced -> Encryption (or Certificates) tab.
ePCT User Guide - June 9, 2016
29
Note for Smart card users: if you do not know how to install the card in Mozilla Firefox, please
refer to the following EPO documentation:
http://docs.epoline.org/doc/epoline/firefox/GemSAFE_Firefox_EN.pdf.

ePCT User Guide - June 9, 2016
30
HOW TO OBTAIN A DIGITAL CERTIFICATE
A digital certificate is required to access ePCT private services and perform most ePCT
functions. If you do not already have a digital certificate, you can enroll for a WIPO CA digital
certificate:
1. Click on the ‘Obtain/Upload a certificate’ link on the ePCT homepage.
2. Enter your Username and Password.
3. In the Digital Certificates screen, under the ‘Request new Digital Certificate’ heading, click
the dedicated link ‘WIPO Digital Certificate’ (see below) and follow the instructions. If needed,
please refer to the step-by-step guide on how to obtain your digital ID at:
http://www.wipo.int/pct-safe/en/support/cert_enroll_ff.html (for Mozilla Firefox) and
http://www.wipo.int/pct-safe/en/support/cert_enroll_ie.html (for Internet Explorer).
Your attention is drawn to the IMPORTANT notice in the screenshot above relating to the use
of a particular computer and/or browser.
Note: When a request for a WIPO digital certificate is made, the approval of the request
requires manual intervention from the PCT eServices Unit during WIPO business hours
(Monday to Friday from 9 am to 6 pm Central European Time). You will receive an e-mail
notification when your digital certificate request has been approved.

ePCT User Guide - June 9, 2016
31
IMPORTANT NOTICE ON DIGITAL CERTIFICATES
WIPO CA Customer Digital Certificates
As a general rule, users should have only one valid digital certificate issued in their name at any time. Each WIPO digital certificate has a validity period of two years and is renewable. Three weeks prior to the expiration date an e-mail notification will be sent to you to remind you to renew it.
WIPO digital certificates can only be issued to individuals and not to companies. They are
most notably used to sign and transmit international applications electronically to the receiving
Office and correspond to a digital signature. The two supported browsers for WIPO digital
certificate enrollment and retrieval are Internet Explorer and Mozilla Firefox.
Once your request for a digital certificate has been approved by the PCT eServices Unit, you
receive an e-mail notification giving you a PIN code and instructions for the retrieval of your
digital certificate. IMPORTANT: Please use the same computer and the same browser for
the enrollment and retrieval of your digital certificate otherwise you will not be able to use
it.
For further information on digital certificates, please visit: http://www.wipo.int/pct-
safe/en/certificates.html where you will find step-by-step guides on how to obtain a digital
certificate, remove it from your browser and how to renew it. There are also How-to videos on
how to back up a WIPO digital certificate available on that page.
EPO Smart Card
For further information on Smart cards issued by the European Patent Office please visit: http://www.epo.org/applying/onlineServices/security/smart-cards.html.
Secom Digital certificates
For further information on digital certificates issued by SECOM, Japan please visit:
https://repository.secomtrust.net/PassportFor/G-ID/ (website in Japanese).
ePCT User Guide - June 9, 2016
32
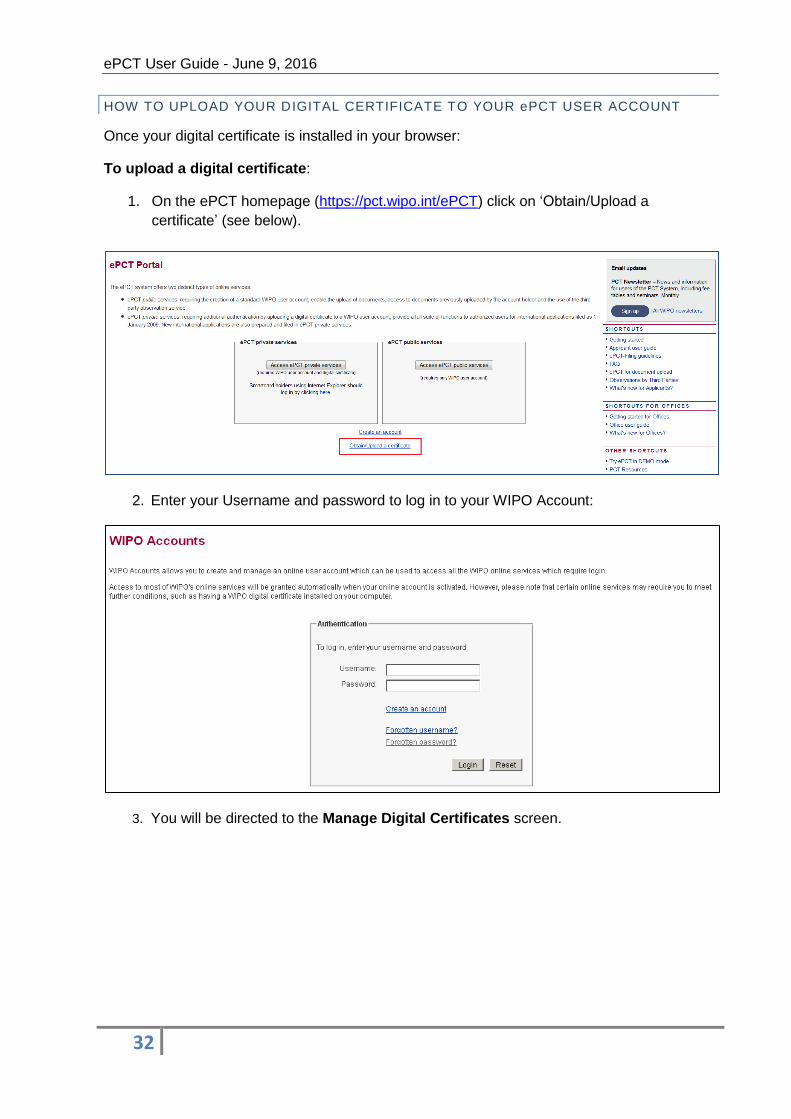
HOW TO UPLOAD YOUR DIGITAL CERTIFICATE TO YOUR ePCT USER ACCOUNT
Once your digital certificate is installed in your browser:
To upload a digital certificate:
1. On the ePCT homepage (https://pct.wipo.int/ePCT) click on ‘Obtain/Upload a
certificate’ (see below).
2. Enter your Username and password to log in to your WIPO Account:
3. You will be directed to the Manage Digital Certificates screen.
ePCT User Guide - June 9, 2016
33
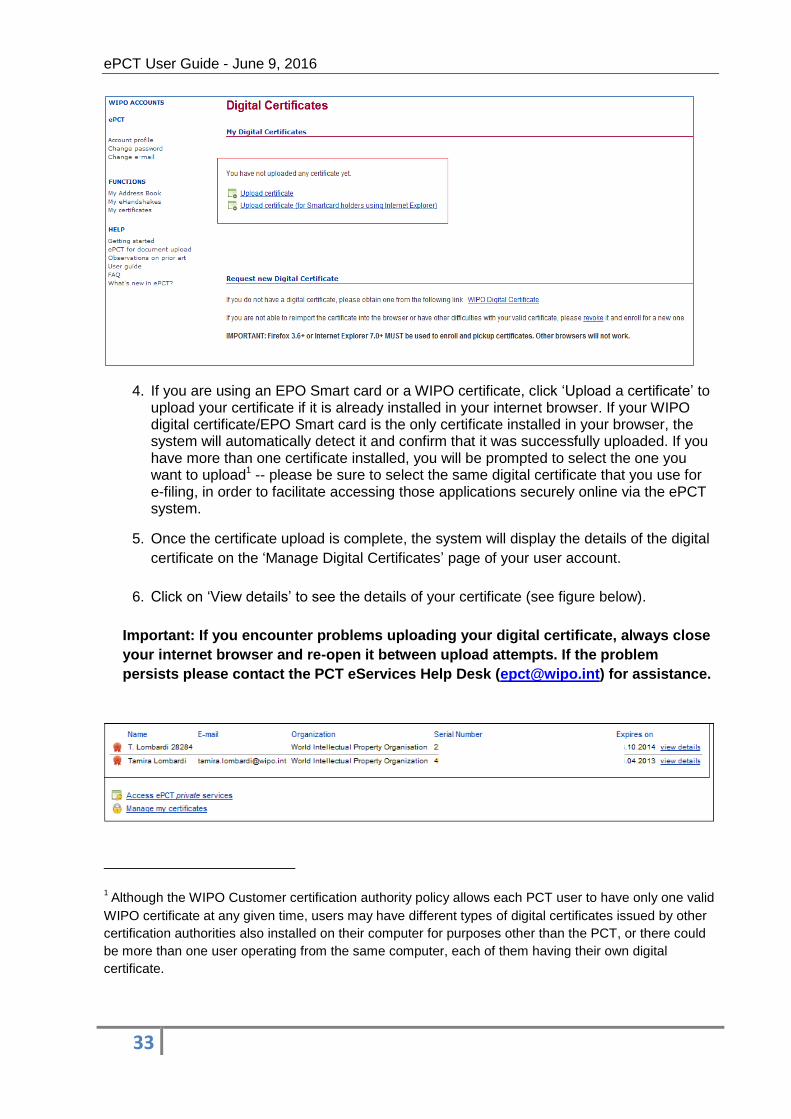
4. If you are using an EPO Smart card or a WIPO certificate, click ‘Upload a certificate’ to upload your certificate if it is already installed in your internet browser. If your WIPO digital certificate/EPO Smart card is the only certificate installed in your browser, the system will automatically detect it and confirm that it was successfully uploaded. If you have more than one certificate installed, you will be prompted to select the one you want to upload1 -- please be sure to select the same digital certificate that you use for e-filing, in order to facilitate accessing those applications securely online via the ePCT system.
5. Once the certificate upload is complete, the system will display the details of the digital
certificate on the ‘Manage Digital Certificates’ page of your user account.
6. Click on ‘View details’ to see the details of your certificate (see figure below).
Important: If you encounter problems uploading your digital certificate, always close
your internet browser and re-open it between upload attempts. If the problem
persists please contact the PCT eServices Help Desk ([email protected]) for assistance.
1 Although the WIPO Customer certification authority policy allows each PCT user to have only one valid
WIPO certificate at any given time, users may have different types of digital certificates issued by other
certification authorities also installed on their computer for purposes other than the PCT, or there could
be more than one user operating from the same computer, each of them having their own digital
certificate.
ePCT User Guide - June 9, 2016
34
Note: By clicking on ‘Manage my certificates’ you will be able to upload an additional
certificate in case your current certificate is about to expire and you need to upload a new one
(this is not possible for EPO Smart cards where the new one can only be uploaded after expiry
of the current one). In this case, please do not remove your old certificate from your account
as it will be used by ePCT as part of the eOwnership process to verify that the certificate
matches the applications you have submitted with it.
HOW TO UPLOAD YOUR EPO SMART CARD CERTIFICATE TO YOUR ePCT USER
ACCOUNT
In order to upload your smart card certificate to your ePCT user account, you first need to log
in to your Smart card:
1. Plug in your Smart card and open the Gemalto (or Gemsafe) software from the ‘Start’ menu of your PC,
2. Select Classic Client Tool box 3. In the next window click ‘Certificates’ and log in to your Smart card by typing your PIN
code in the corresponding field. 4. Click on “Obtain/Upload a Certificate” on the ePCT homepage
(https://pct.wipo.int/ePCT ) 5. Enter your credentials 6. Select “Upload certificate” if you are using Mozilla Firefox or
Select “Upload certificate (for Smartcard holders using Internet Explorer)” 7. Click “Accept” 8. You are prompted to select your valid smart card 9. Enter the PIN code for your smart card
(For Mozilla Firefox, the User Identification Request window appears, click OK) 10. The smart card certificate details are displayed along with any other certificates under
“My Digital Certificates” After that, log into ePCT and proceed as above - select your EPO smart card certificate when prompted. If you are using Internet Explorer, it is possible that you will get a pop-up window asking you to grant or deny permission to use the certificate’s key, in this case, please select ‘Grant permission’.
HOW TO MAKE A BACK-UP COPY OF YOUR WIPO DIGITAL CERTIFICATE
It is highly recommended that you make a back-up copy of your digital certificate as soon as
you obtain it. Having a back-up copy of this certificate will enable you to re-import it into a
browser later on, if it’s no longer visible in the browser for example after an upgrade. Re-
importing the back-up copy will ensure that you are able to continue accessing ePCT private
services as the system is able to authenticate you.

ePCT User Guide - June 9, 2016
35
By making a copy of your WIPO digital certificate, you will also be able to use it on another
computer and browser. If you need to access ePCT from a different computer, your digital
certificate will first have to be uploaded in the internet browser of that device. How to connect
to ePCT from another computer is covered in a later chapter of this manual.
To make a back-up copy of your WIPO digital certificate, a copy of the certificate needs to be
exported from the internet browser to a location on your computer or to a portable memory
device such as a USB stick/Flash drive.
WIPO CA DIGITAL CERTIFICATE BACK-UP FOR INTERNET EXPLORER
1. Open Internet Explorer.
2. Go to the Tools menu and select ‘internet Options’
or click the icon and select ‘Options’
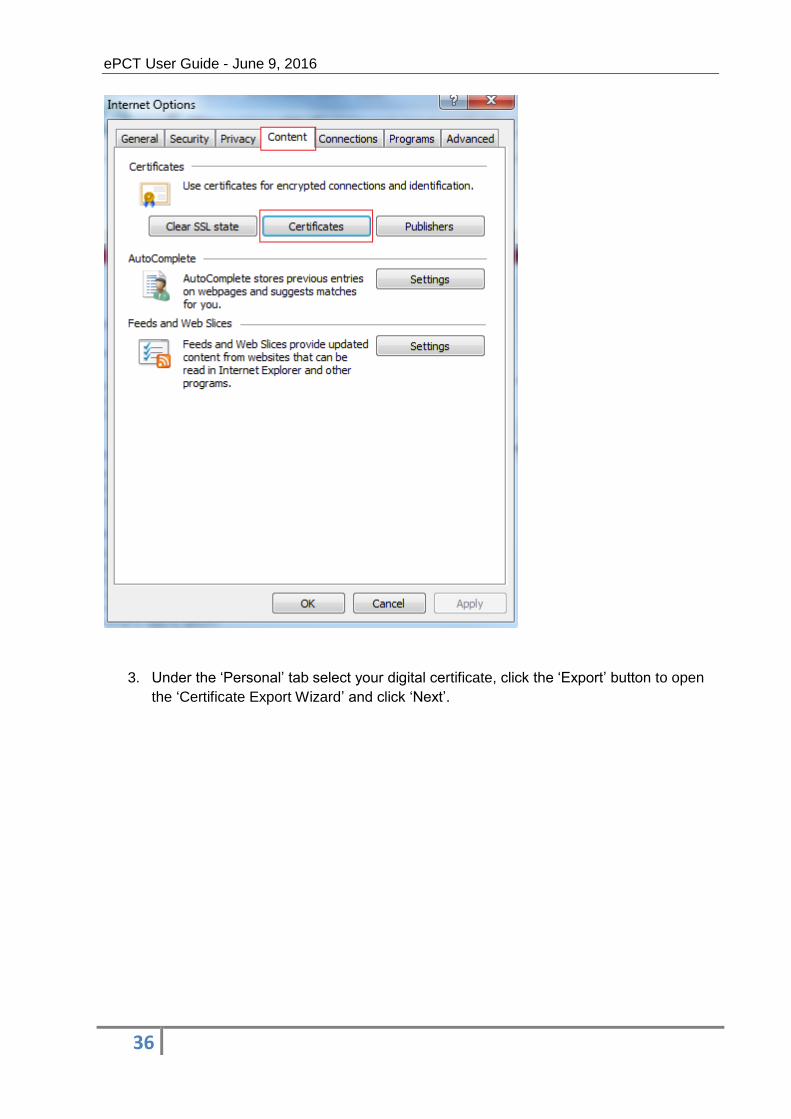
Go to the ‘Content’ tab -> click ‘Certificates’. Your certificate should be visible under the ‘Personal’ tab.
Note: If your digital certificate appears under a different tab, please contact the PCT eServices
Help Desk at [email protected].
ePCT User Guide - June 9, 2016
36
3. Under the ‘Personal’ tab select your digital certificate, click the ‘Export’ button to open
the ‘Certificate Export Wizard’ and click ‘Next’.

ePCT User Guide - June 9, 2016
37
4. In the next window select ‘Yes, export the private key’ and click ‘Next’.
Note: if the option ‘Yes, export the private key’ is greyed out, you will not be able to use your
digital certificate once exported. In this case, please contact the PCT eServices Help Desk at

ePCT User Guide - June 9, 2016
38
5. Under ‘Personal Information Exchange’ – PKCS #12 (.PFX) check the boxes:
- Include all certificates in the certification path if possible.
- Export all extended properties
- Enable strong protection (if this option is available)
And Click ‘Next’ (see screenshot below).
6. Type a password of your choice for your WIPO digital certificate and re-type it to
confirm, then click ‘Next’. Please take note of this password as it will be required if you
need to import the certificate copy to another internet browser.

ePCT User Guide - June 9, 2016
39
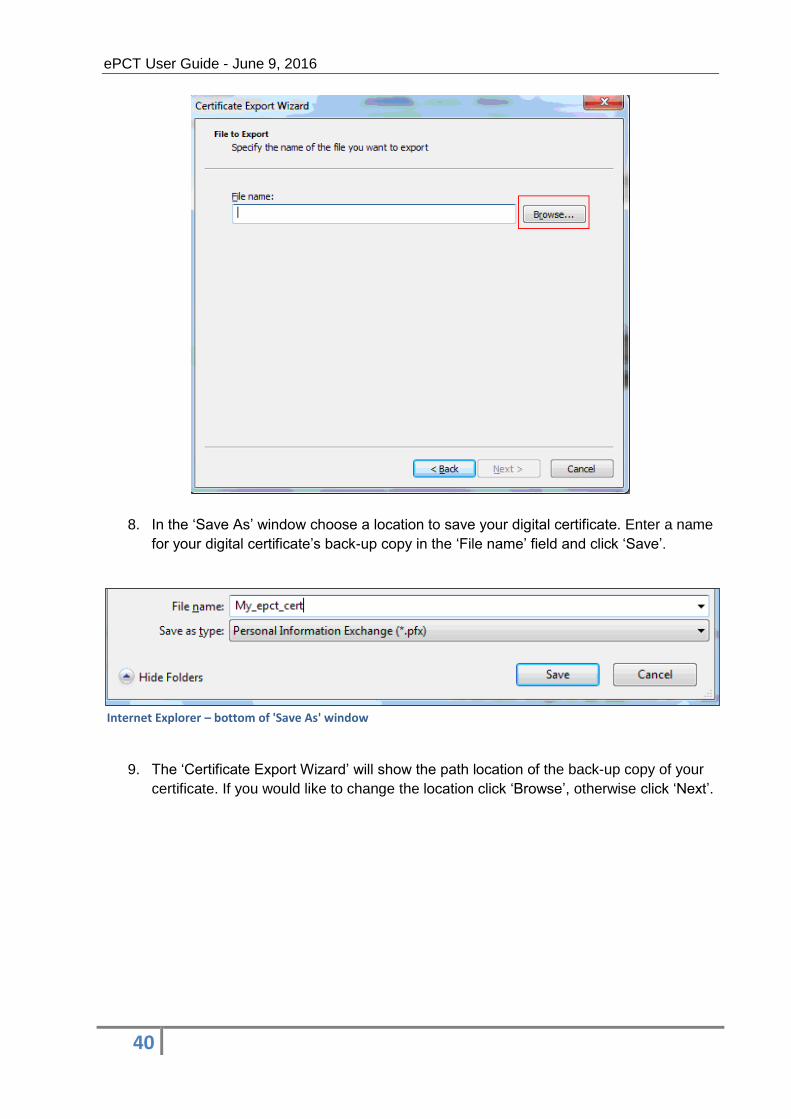
7. Click the ‘Browse’ button to choose a location on your PC or on a portable memory
device to export the copy of your digital certificate.
ePCT User Guide - June 9, 2016
40
8. In the ‘Save As’ window choose a location to save your digital certificate. Enter a name
for your digital certificate’s back-up copy in the ‘File name’ field and click ‘Save’.
Internet Explorer – bottom of 'Save As' window
9. The ‘Certificate Export Wizard’ will show the path location of the back-up copy of your
certificate. If you would like to change the location click ‘Browse’, otherwise click ‘Next’.

ePCT User Guide - June 9, 2016
41
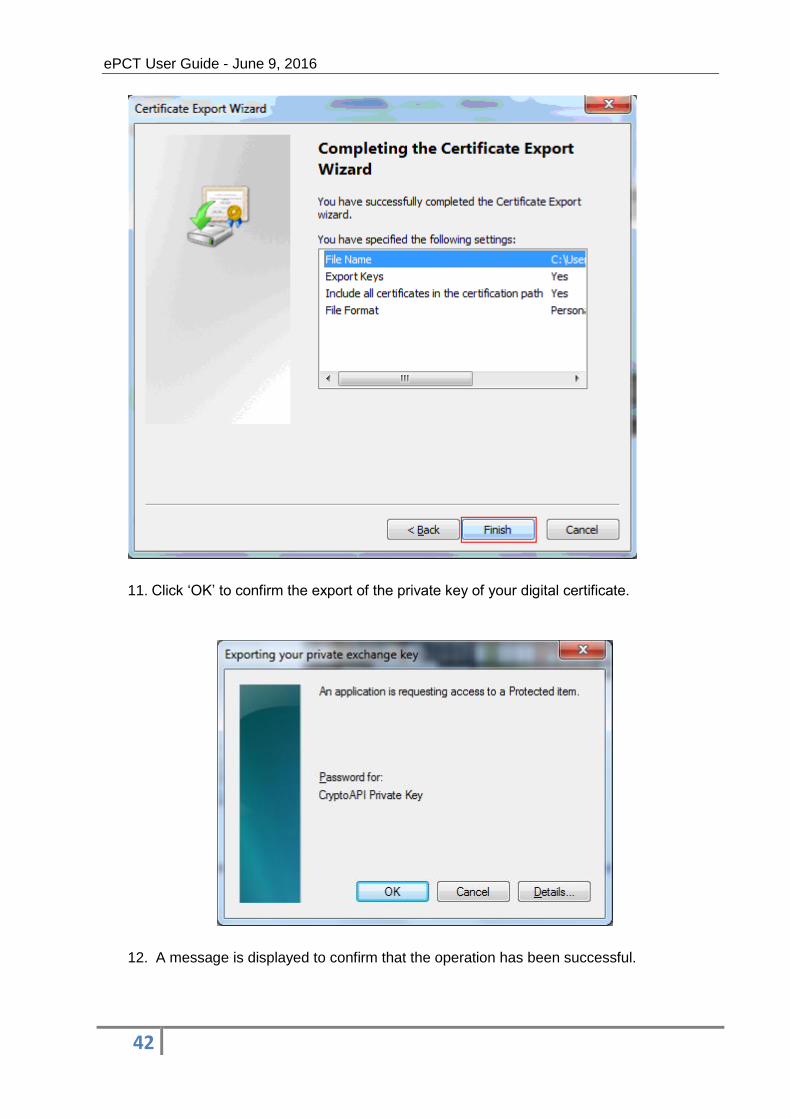
10. Click ‘Finish’ to confirm the Export operation.
ePCT User Guide - June 9, 2016
42
11. Click ‘OK’ to confirm the export of the private key of your digital certificate.
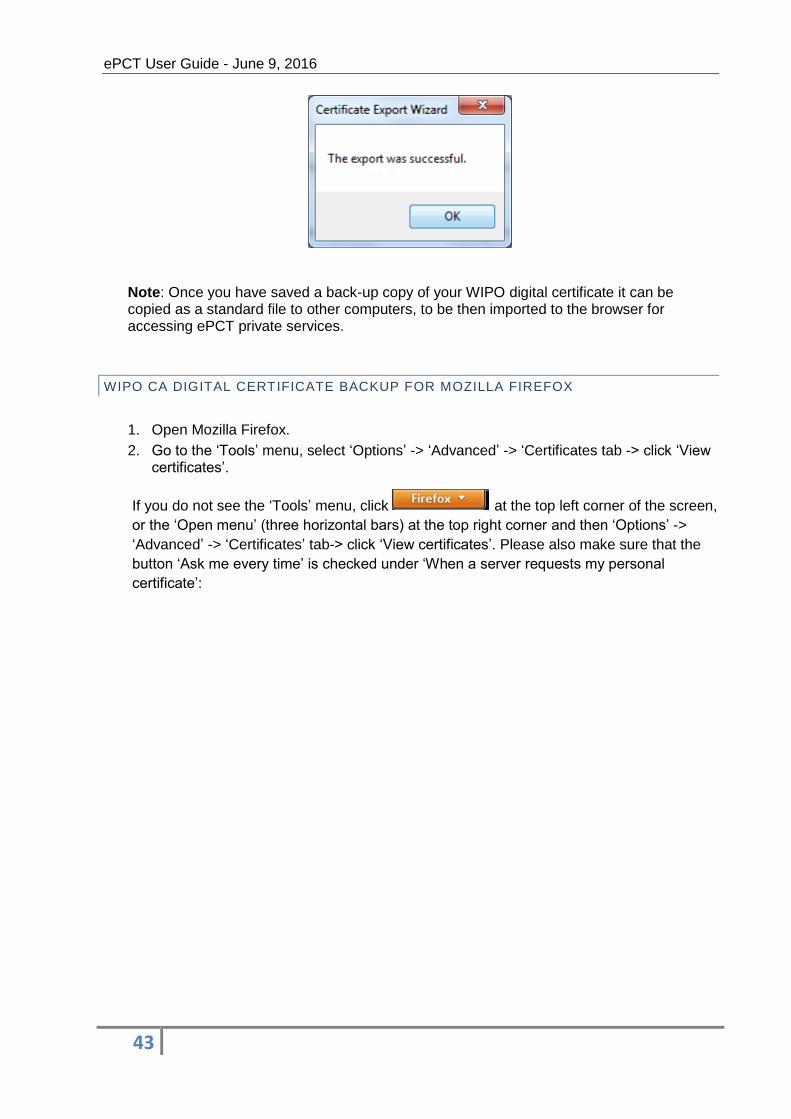
12. A message is displayed to confirm that the operation has been successful.
ePCT User Guide - June 9, 2016
43
Note: Once you have saved a back-up copy of your WIPO digital certificate it can be copied as a standard file to other computers, to be then imported to the browser for accessing ePCT private services.
WIPO CA DIGITAL CERTIFICATE BACKUP FOR MOZILLA FIREFOX
1. Open Mozilla Firefox.
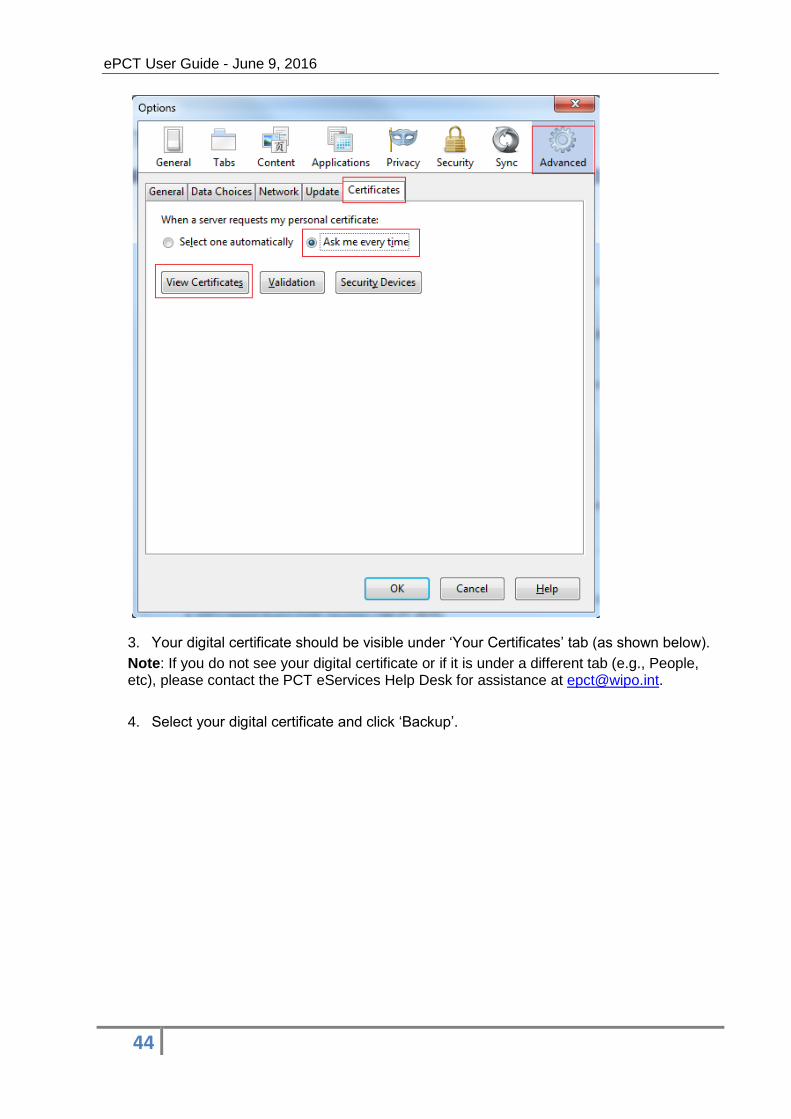
2. Go to the ‘Tools’ menu, select ‘Options’ -> ‘Advanced’ -> ‘Certificates tab -> click ‘View certificates’.
If you do not see the ‘Tools’ menu, click at the top left corner of the screen,
or the ‘Open menu’ (three horizontal bars) at the top right corner and then ‘Options’ ->
‘Advanced’ -> ‘Certificates’ tab-> click ‘View certificates’. Please also make sure that the
button ‘Ask me every time’ is checked under ‘When a server requests my personal
certificate’:
ePCT User Guide - June 9, 2016
44
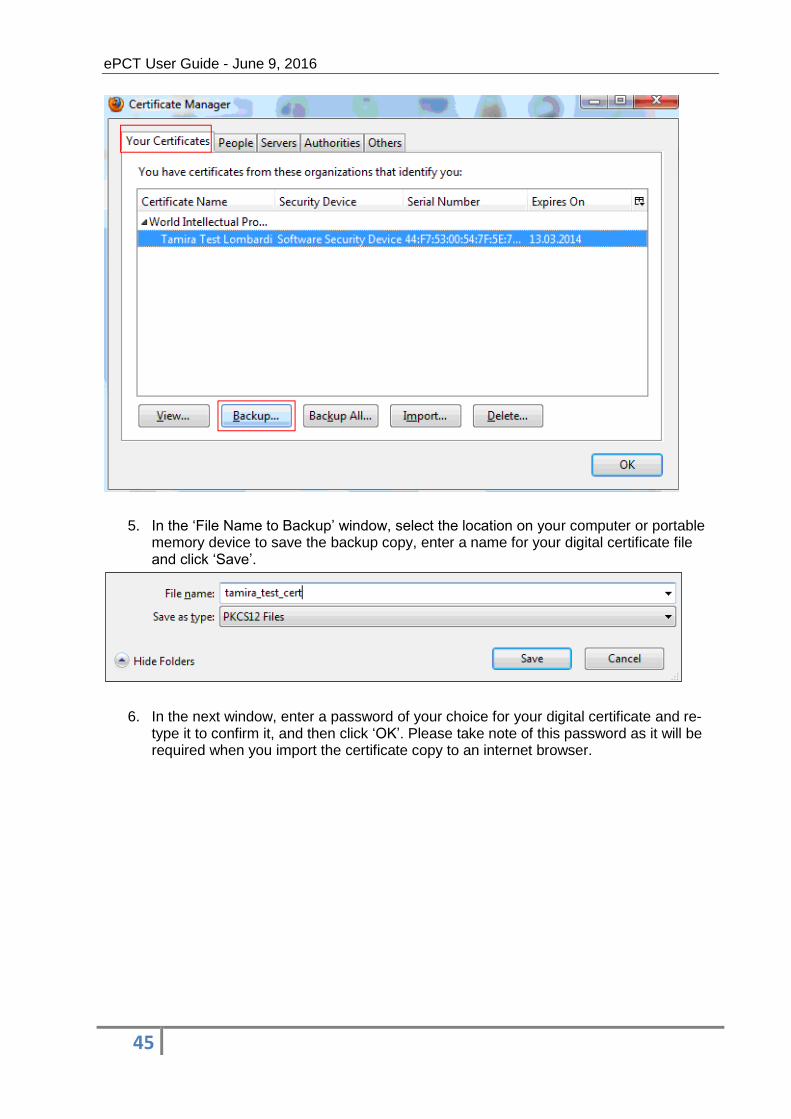
3. Your digital certificate should be visible under ‘Your Certificates’ tab (as shown below).
Note: If you do not see your digital certificate or if it is under a different tab (e.g., People, etc), please contact the PCT eServices Help Desk for assistance at [email protected].
4. Select your digital certificate and click ‘Backup’.
ePCT User Guide - June 9, 2016
45
5. In the ‘File Name to Backup’ window, select the location on your computer or portable memory device to save the backup copy, enter a name for your digital certificate file and click ‘Save’.
6. In the next window, enter a password of your choice for your digital certificate and re-type it to confirm it, and then click ‘OK’. Please take note of this password as it will be required when you import the certificate copy to an internet browser.

ePCT User Guide - June 9, 2016
46
7. A message is displayed to confirm the successful backup of your digital certificate.
Note: Once you have saved a backup copy of your WIPO CA digital certificate it can be copied as a standard file for use on another computer to connect to ePCT.
ACCESSING ePCT FROM A DIFFERENT COMPUTER
In order to log into ePCT private services your digital certificate needs to be available in the
internet browser of the computer that you are using. To log into ePCT private services from a
different computer, your digital certificate needs to be imported into the internet browser in
order for ePCT to detect it.
To do so, you will first need to make a backup copy of your WIPO CA digital certificate, i.e.
export it from your internet browser and save it to a portable memory device such as a USB
stick (please see the previous chapter of this manual on how to make a backup copy of your
WIPO CA digital certificate).
Once you have saved a backup copy of your digital certificate on a portable memory device for
use on another computer, please see the following step-by-step user guides on how to import
a digital certificate into an internet browser:
For Mozilla Firefox: http://www.wipo.int/pct-safe/en/support/cert_import_ff.html
For Internet Explorer: http://www.wipo.int/pct-safe/en/support/cert_import_ie.html .

ePCT User Guide - June 9, 2016
47
For Smart card holders:
In order to log into ePCT from a different PC you will need to install the Gemsafe (or Gemalto) software on the computer on which you will be working in order to be able to upload your Smart card certificate to the internet browser of that PC.
Once you have installed your EPO Smart card on another computer simply log into ePCT as usual; the system will detect and authenticate your Smart card certificate.
REVOKED WIPO CA DIGITAL CERTIFICATES
If the digital certificate that is installed in your ePCT user account has been revoked and you
have now obtained a new digital certificate that you would like to upload to your ePCT account
to replace the revoked one, please contact the PCT eServices Help Desk at [email protected]
(indicating your ePCT Username and the name and e-mail address associated with the new
certificate) and ask them to upload your new certificate to your ePCT account. Once the new
certificate is installed in your user account, you will be notified via e-mail that your user
account is accessible again.
Note: If your digital certificate has simply expired (and has not been revoked), do not remove it
from your ePCT account since for authentication purposes as part of the eOwnership process
the system will still match the digital certificate used to file an international application to the
one uploaded in ePCT, even if the digital certificate has expired. For further information,
please see the chapter of this user guide on ‘Taking eOwnership of IAs filed with a digital
certificate that has since expired’.
WIPO CERTIFICATE AND EPO SMART CARD RENEWAL
WIPO digital certificates
Once your WIPO digital certificate has expired and you have renewed it or obtained a new
one, go to the ePCT login page and click ‘Obtain/Upload a certificate’ and follow the prompts
to upload your new certificate. If you have multiple certificates installed in your browser, you
will be prompted to select the one you now wish to upload.
If your digital certificate associated with your ePCT account is still valid but is about to expire and you do not wish to wait for the expiry date to upload your new certificate, please proceed as follows to upload an additional certificate to your ePCT account:
Note: Uploading additional certificates requires Java to be installed and Java applet to be
trusted.
1. Open the browser and enter the URL of the ePCT homepage (https://pct.wipo.int/ePCT);
2. Click on “Obtain/Upload a certificate” (you are directed to the WIPO Accounts login page);
3. Enter your Username and password (you are directed to the “Digital Certificates” page);
ePCT User Guide - June 9, 2016
48
4. Click on the link “Manage my certificates” 5. If you have multiple certificates installed in your browser, please select the one
currently associated with your account, i.e. you login with your current certificate. 6. Enter your Username and Password (you are directed to the “Manage my certificates”
page); 7. Click on the link “Upload additional certificate”; 8. Click to “Accept” the conditions (you are directed to the “Upload certificate page”); 9. Please ensure that Java is installed and enabled and when prompted please confirm
that the applet can be trusted. 10. It is now possible to upload a certificate from a local file by clicking the “Upload
certificate” button. 11. Select the new certificate file (with extension .p12 or .pfx) that you created via the
“Export” or “Backup” function in the internet browser after picking up the certificate. 12. Enter the password for the certificate file when prompted. 13. The certificate will then be uploaded to your account along with any existing
certificates.
Having uploaded multiple certificates to your WIPO Account, it is now possible to connect to ePCT private services with any valid certificate associated with your account.
EPO Smart cards
If your EPO Smart card is about to expire and you need to upload the new one to your ePCT
account, the system does not allow the installation of two Smart card certificates in ePCT. You
should therefore wait until the current Smart card expires and then upload the new one.
In order to upload your new Smart card certificate to your ePCT user account:
1. Plug in your new Smart card and open the Gemalto (or Gemsafe) software from the ‘Start’ menu of your PC.
2. Select Classic Client Tool box.
3. In the next window click ‘Certificates’ and log in to your Smart card by typing your PIN code in the corresponding field.
4. Do not try to log in to ePCT. Instead click “Obtain/Upload a Certificate” on the ePCT homepage.
5. Login to WIPO Accounts.
6. Select “Manage My certificates”. On this screen you will see your expired certificate, do not remove it.
7. Click ‘Upload a certificate’.
8. Your new Smart card certificate details are displayed below the details of the expired certificate.

ePCT User Guide - June 9, 2016
49
MY eHANDSHAKES
The ePCT eHandshake functionality allows you to associate your ePCT user account with another known user’s account. Completing an eHandshake with another user is a pre-requisite for assigning access rights to international applications to that person. To request an eHandshake with an associate, that person needs to have created an ePCT user account allocated with a digital certificate and informed you of their Customer ID.
WHERE CAN I FIND MY CUSTOMER ID?
Your Customer ID can be found in your WIPO Account profile:
Account Profile screen
Click the icon next to your Customer ID to send it by e-mail to one of your associates
in order to initiate an eHandshake and to associate your accounts. Simply enter the e-
mail address to which the Customer ID should be sent and click ‘send’. Your associate
will receive an e-mail notification with instructions to request an eHandshake using the
‘My eHandshakes’ screen.
Note: making an eHandshake with another user does not mean that the person
automatically has access rights to your IAs, it just means that your two accounts are
associated in the ePCT system. It is for you to decide if you do want to give access rights to
the IAs owned by you or not, and if so, which ones. Assigning access rights is covered later
in this guide.

ePCT User Guide - June 9, 2016
50
HOW TO REQUEST AN eHANDSHAKE
1. Once you have received your associate’s Customer ID, go to the ‘My eHandshakes’
screen in your WIPO Account.
Request new eHandshake screen
2. Paste your associate’s Customer ID in the corresponding field, and click on’ Request
eHandshake’ to send the request.
Note: If you do not know the Customer ID of your associate(s), the icon next to your
Customer ID can be used to e-mail your Customer ID to a colleague in order to initiate the
process. The eHandshake request is displayed on the ‘My eHandshakes’ screen with the
icon to show that the request is pending.
3. If you wish to, you can also select ‘withdraw request’ next to the pending eHandshake
in order to cancel your eHandshake request, provided that the recipient of the
eHandshake request has not yet accepted or declined it.
ePCT User Guide - June 9, 2016
51
eHandshakes screen: eHandshake request pending approval
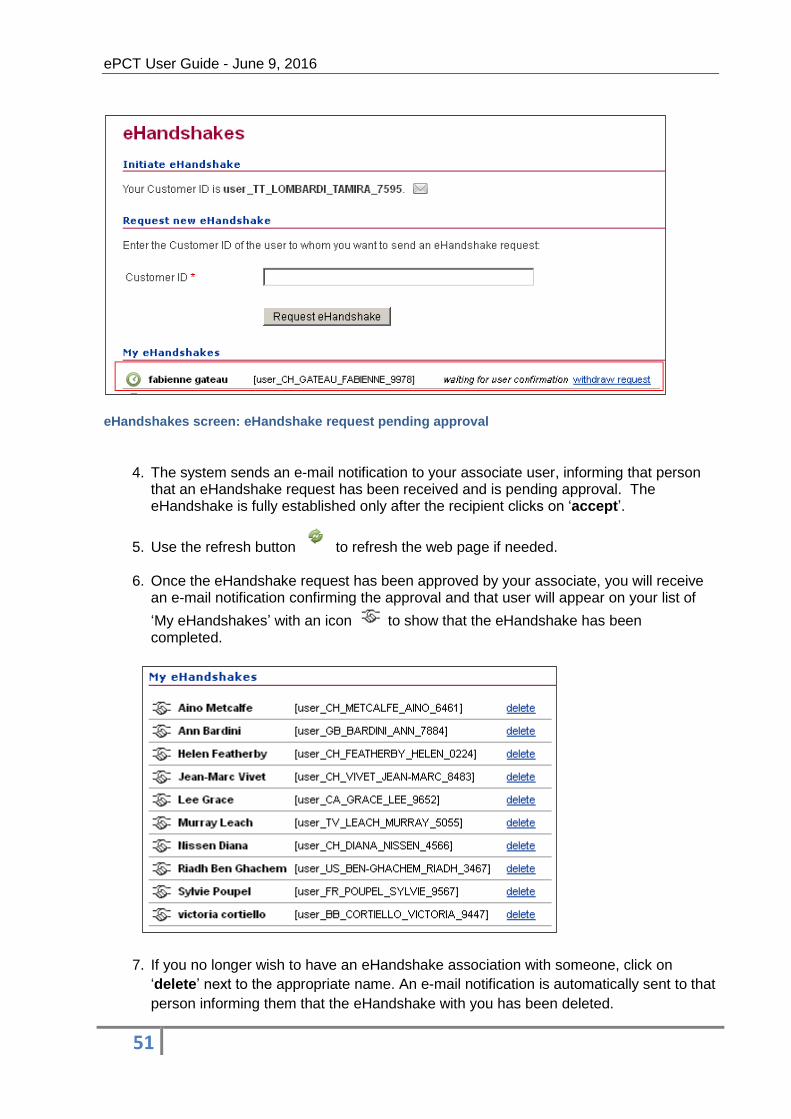
4. The system sends an e-mail notification to your associate user, informing that person that an eHandshake request has been received and is pending approval. The eHandshake is fully established only after the recipient clicks on ‘accept’.
5. Use the refresh button to refresh the web page if needed. 6. Once the eHandshake request has been approved by your associate, you will receive
an e-mail notification confirming the approval and that user will appear on your list of
‘My eHandshakes’ with an icon to show that the eHandshake has been completed.
7. If you no longer wish to have an eHandshake association with someone, click on
‘delete’ next to the appropriate name. An e-mail notification is automatically sent to that
person informing them that the eHandshake with you has been deleted.

ePCT User Guide - June 9, 2016
52
HOW TO ACCEPT AN eHANDSHAKE REQUEST
You can either send an eHandshake request or receive one from another user. If someone
requests an eHandshake from you, you will receive an e-mail notification and this usually
means that you have communicated your Customer ID to this person and are expecting this
request. If you wish to approve the request:
1. Go to your WIPO ePCT account profile by clicking on your name at the top of the ePCT
screen and in the ‘Functions’ menu (see screenshot below), click on ‘My eHandshakes‘
to access the ‘eHandshakes’ screen. When an eHandshake request is pending the link
becomes red with the number of pending requests indicated between brackets.
2. To accept the request click ‘accept’ next to the corresponding name. Once you accept
the eHandshake request, your associate will receive an e-mail notification.
Important note: Deleting eHandshakes with other users does not remove any access
rights to international applications that you may have already given them. To remove
access rights you will have to select the international applications in question and
remove those rights using the Assign Rights function, which is explained later in this
guide.

ePCT User Guide - June 9, 2016
53
If you do NOT want to establish an eHandshake with the person making the request, e.g., you
do not know who the person is or you suspect that they have obtained your Customer ID by
another means, click on ‘decline.’ If you decline the eHandshake request, the other user will
also receive a notification of this fact by e-mail.
IMPORTANT: AN eHANDSHAKE ALLOWS YOU TO POTENTIALLY SHARE ACCESS TO
CONFIDENTIAL INFORMATION THROUGH THE ePCT SERVICE. YOU ARE STRONGLY
ADVISED TO DECLINE eHANDSHAKE REQUESTS FROM USERS THAT YOU DO NOT
KNOW OR FROM WHOM YOU DO NOT EXPECT TO RECEIVE AN eHANDSHAKE REQUEST.
ePCT User Guide - June 9, 2016
54
PART 2 – ePCT: ASSIGNING AND MANAGING ACCESS RIGHTS
The ePCT private services portal allows users with the appropriate access rights to an IA to
view the contents (documents and most up-to-date bibliographic data) in a secure online
environment, even before publication. It is also possible to upload post-filing electronic
documents and make online requests for certain actions related to a specific IA (e.g.,
withdrawal of an IA, withdrawal of a priority claim etc.). Note that, although secure online file
inspection is only possible for IAs that were filed on or after January 1, 2009, electronic
documents may be uploaded for any IA regardless of the international filing date via the public
services portal.
Having access to ePCT private services also enables users to prepare and file new
applications via ePCT-Filing (‘ePCT-Filing guidelines’ is available on the ePCT portal).
ePCT also provides the required functionality to delegate and manage access rights to IAs by
other users. However, to be able to manage access rights to an IA, you must have the role of
eOwner (see below).
eOWNER, eEDITOR AND eVIEWER
A user can be the eOwner, eEditor or eViewer for an IA.
eOwner: The original eOwner of an IA is the person:
who filed the international application using ePCT-Filing; or
whose ePCT Customer ID and corresponding eOwnership code was indicated in the
signature box of an international application filed using e-filing software that is
compatible with ePCT (PCT-SAFE, eOLF and EPO’s online filing CMS (Case
Management System)); or
confirmed eOwnership of the IA by entering into ePCT the confirmation code appearing
on Form PCT/IB/301 relating to that IA and whose user account contains the same
certificate that was used to submit the IA electronically to the RO at the time of filing; or
submitted an eOwnership request via the ePCT system that was approved by the
International Bureau (this process relates, for example, to international applications that
were filed without any certificate, such as paper filings, as explained later in this guide).
An eOwner can give access rights to other users whereas an eEditor or eViewer cannot. There
can be more than one eOwner for an IA and each eOwner is entitled to give eOwner, eEditor
or eViewer access rights to other users with whom they have an eHandshake.
eEditor: eEditor rights are assigned by an eOwner of the IA. An eEditor can view the contents
of the IA but cannot grant or remove access rights with respect to other users. eEditors can
only remove their own access rights.
eViewer: eViewer rights are assigned by an eOwner of the IA. In ePCT private services,
eViewers do not have access to the following tabs: Upload documents and Actions. Within
the Access Rights tab, they can only view current access rights and view the History, but do
not have ‘editing’ rights apart from the possibility to remove their own access rights. eViewers
can add and/or edit their own “My Comments” but cannot add or edit an IA Warning.
ePCT User Guide - June 9, 2016
55
Note: In ePCT public services, there is no concept of access rights and therefore a user who is eViewer for an IA in ePCT private services can upload documents in ePCT public services.
ePCT PRIVATE SERVICES FOR USER ACCOUNTS ASSOCIATED WITH A DIGITAL CERTIFICATE
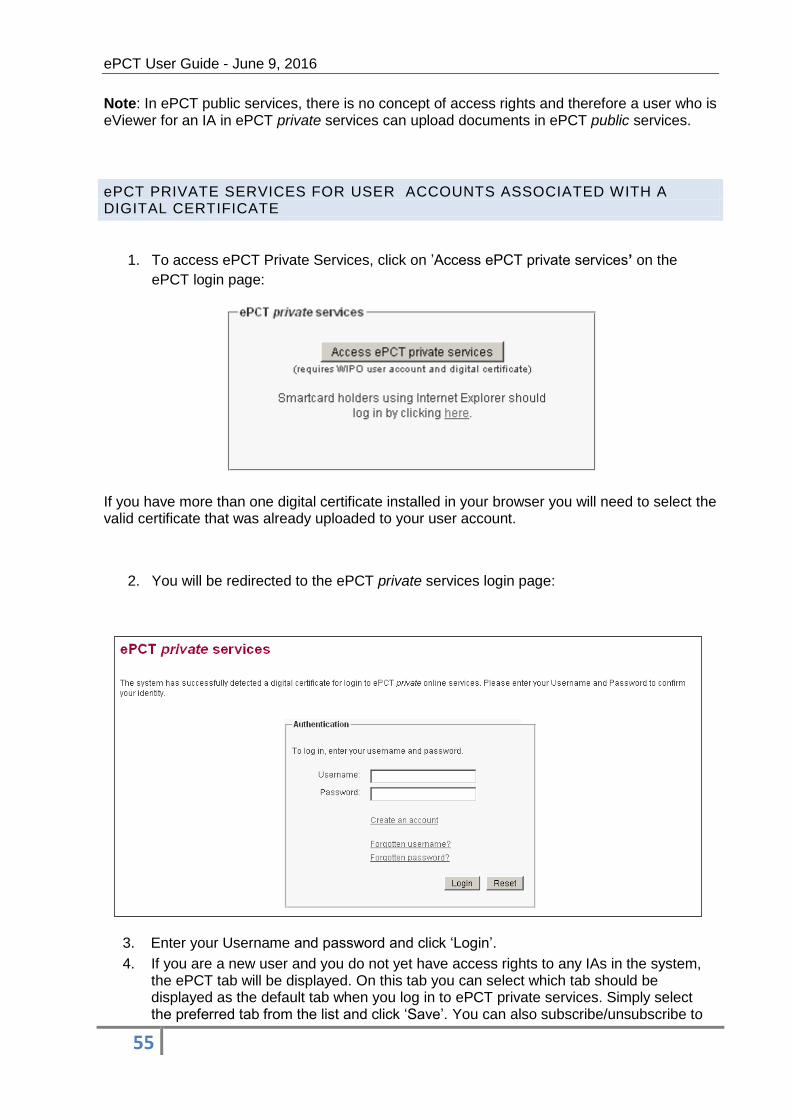
1. To access ePCT Private Services, click on ’Access ePCT private services’ on the
ePCT login page:
If you have more than one digital certificate installed in your browser you will need to select the valid certificate that was already uploaded to your user account.
2. You will be redirected to the ePCT private services login page:
3. Enter your Username and password and click ‘Login’.
4. If you are a new user and you do not yet have access rights to any IAs in the system, the ePCT tab will be displayed. On this tab you can select which tab should be displayed as the default tab when you log in to ePCT private services. Simply select the preferred tab from the list and click ‘Save’. You can also subscribe/unsubscribe to
ePCT User Guide - June 9, 2016
56
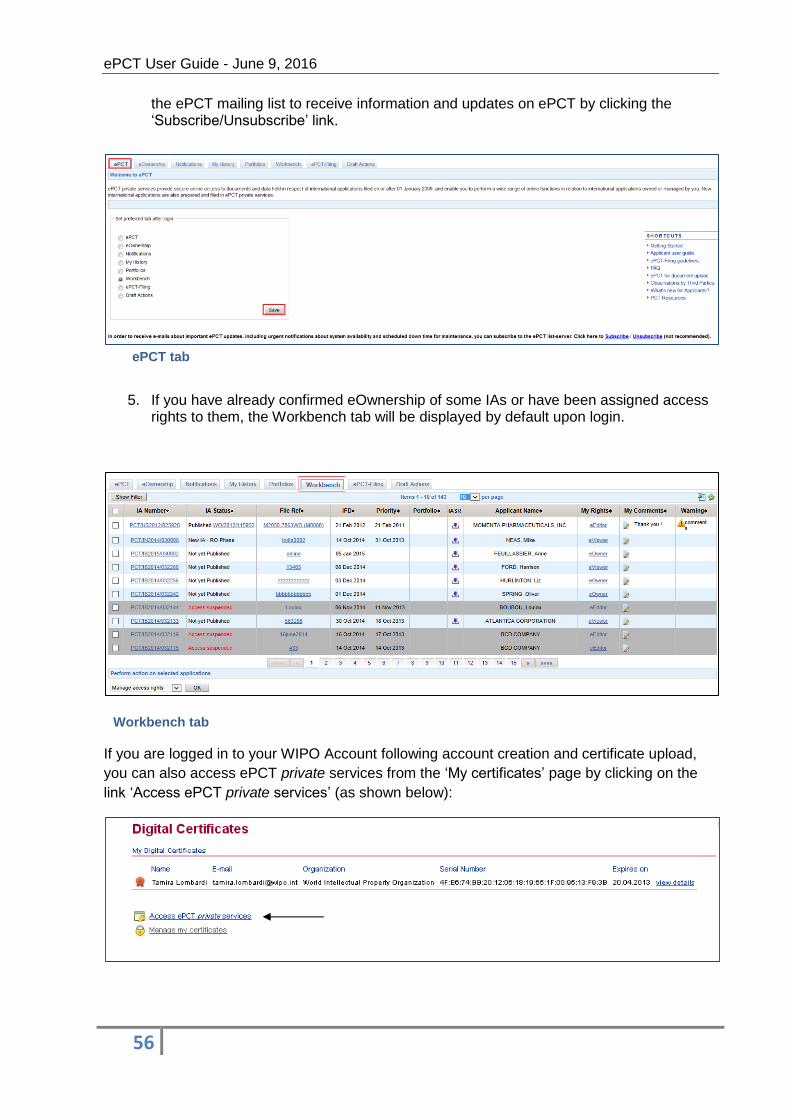
the ePCT mailing list to receive information and updates on ePCT by clicking the ‘Subscribe/Unsubscribe’ link.
ePCT tab
5. If you have already confirmed eOwnership of some IAs or have been assigned access rights to them, the Workbench tab will be displayed by default upon login.
Workbench tab
If you are logged in to your WIPO Account following account creation and certificate upload,
you can also access ePCT private services from the ‘My certificates’ page by clicking on the
link ‘Access ePCT private services’ (as shown below):

ePCT User Guide - June 9, 2016
57
eOWNERSHIP OVERVIEW
In order to view the contents of an IA, you must prove that you have the right to access the IA
by taking “eOwnership.”
The original eOwner of an IA is the person who either:
filed the international application using ePCT-Filing;
filed an international application using e-filing software that is compatible with ePCT
(PCT-SAFE, eOLF and EPO’s online filing CMS (Case Management System)) and
indicated the ePCT Customer ID and corresponding eOwnership code in the signature
box;
confirmed eOwnership of the IA by entering into ePCT the confirmation code appearing
on Form PCT/IB/301 relating to that IA and whose user account contains the same
certificate that was used to submit the IA electronically to the RO at the time of filing;
submitted an eOwnership request via the ePCT system that was approved by the
International Bureau (this process relates, for example, to international applications that
were filed without any certificate, such as paper filings, as explained later in this guide).
The eOwner of an IA can subsequently assign access rights to this IA to other users with
whom he has associated his user account by way of an “eHandshake”. This procedure is
explained in the Section on ‘Request eHandshake’.
REQUESTING eOWNERSHIP OF AN IA AT THE TIME OF FILING
It is possible to request eOwnership of an international application to be filed electronically at
the time of preparation of the application using compatible e-filing software that provides for
the ePCT Customer ID and eOwnership code in the signature box. This feature is available in
the latest versions of PCT-SAFE, eOLF and EPO’s online filing CMS (Case Management
System).
Note: When filing electronically using ePCT-Filing, eOwnership is set automatically and the
process described below is not required.
In order to confirm eOwnership of your international application in PCT-SAFE, eOLF and
EPO’s online filing CMS (Case Management System), when signing the request form, you will
need to copy / paste your Customer ID and an ‘eOwnership code’ generated via the
‘eOwnership’ tab in ePCT (as shown below). When the application is received at the
International Bureau, either at the time of filing (if the receiving Office is RO/IB) or upon receipt
of the record copy (if the international application is filed at another receiving Office), if the
indications provided at the time of filing match the record in ePCT, eOwnership of the IA will be
automatically assigned to the ePCT account holder corresponding to the Customer ID and who
also generated the confirmation code in ePCT. This feature also allows applicants filing at
RO/US via EFS-Web to have easier access to their applications in ePCT.
ePCT User Guide - June 9, 2016
58
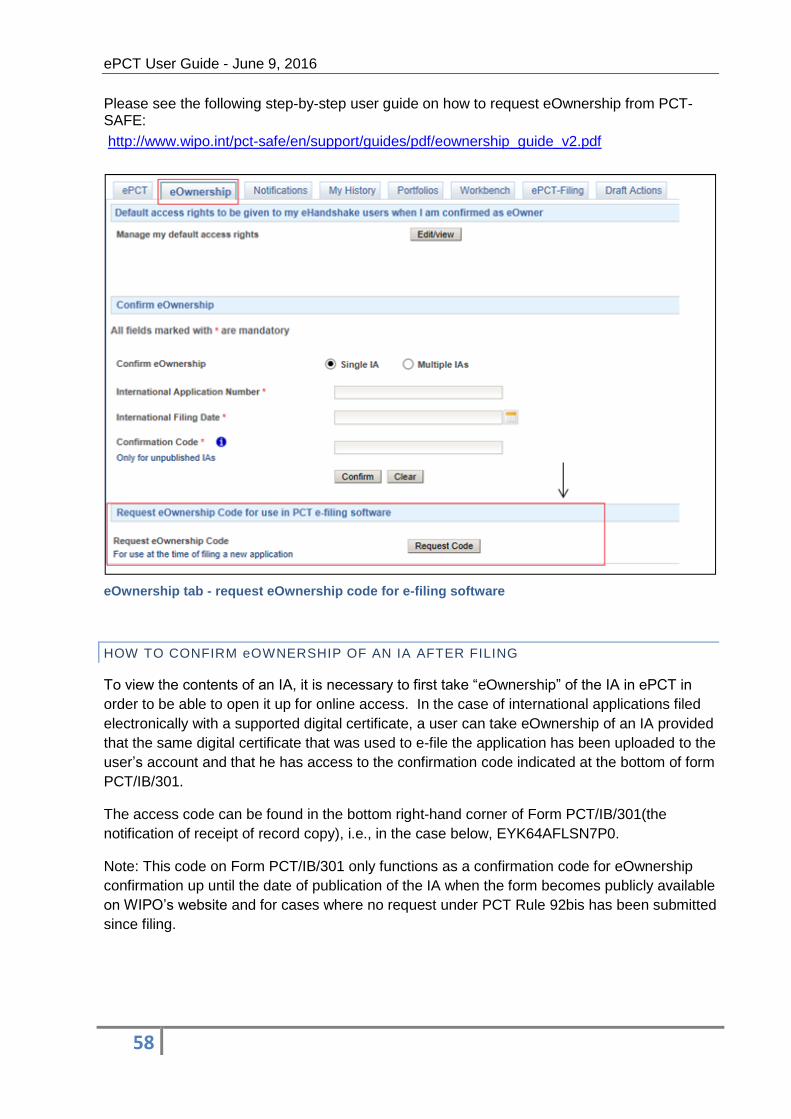
Please see the following step-by-step user guide on how to request eOwnership from PCT-SAFE:
http://www.wipo.int/pct-safe/en/support/guides/pdf/eownership_guide_v2.pdf
eOwnership tab - request eOwnership code for e-filing software
HOW TO CONFIRM eOWNERSHIP OF AN IA AFTER FILING
To view the contents of an IA, it is necessary to first take “eOwnership” of the IA in ePCT in
order to be able to open it up for online access. In the case of international applications filed
electronically with a supported digital certificate, a user can take eOwnership of an IA provided
that the same digital certificate that was used to e-file the application has been uploaded to the
user’s account and that he has access to the confirmation code indicated at the bottom of form
PCT/IB/301.
The access code can be found in the bottom right-hand corner of Form PCT/IB/301(the
notification of receipt of record copy), i.e., in the case below, EYK64AFLSN7P0.
Note: This code on Form PCT/IB/301 only functions as a confirmation code for eOwnership
confirmation up until the date of publication of the IA when the form becomes publicly available
on WIPO’s website and for cases where no request under PCT Rule 92bis has been submitted
since filing.

ePCT User Guide - June 9, 2016
59
Bottom of Form PCT/IB/301
To confirm eOwnership of a single IA:
1. Log in to ePCT private services and click on the ‘eOwnership’ tab.
2. Enter the IA Number and the confirmation code as appearing on Form PCT/IB/301 in
the corresponding field. The IA number can be entered in various formats, e.g.,
IB2010/068500, PCT/IB2010/068500, IB10/68500 or simply IB1068500.
Note: It is not compulsory to indicate a Confirmation Code in the case of an international
application that you know has already been published, as the code on Form PCT/IB/301 is no
longer valid after publication. Instead, the system will prompt you to complete an online form to
request a new confirmation code from the International Bureau.
3. Click on ‘Confirm’ to confirm the operation (or ‘clear’ to clear both fields).
ePCT User Guide - June 9, 2016
60
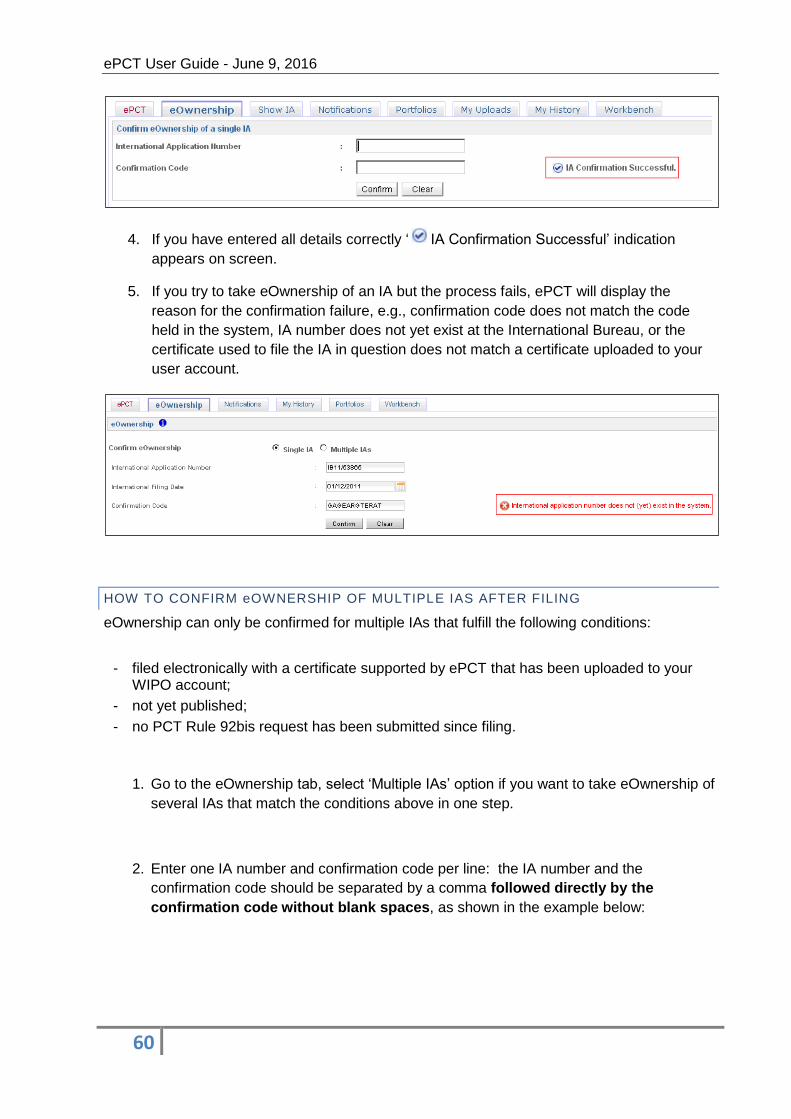
4. If you have entered all details correctly ‘ IA Confirmation Successful’ indication
appears on screen.
5. If you try to take eOwnership of an IA but the process fails, ePCT will display the
reason for the confirmation failure, e.g., confirmation code does not match the code
held in the system, IA number does not yet exist at the International Bureau, or the
certificate used to file the IA in question does not match a certificate uploaded to your
user account.
HOW TO CONFIRM eOWNERSHIP OF MULTIPLE IAS AFTER FILING
eOwnership can only be confirmed for multiple IAs that fulfill the following conditions:
- filed electronically with a certificate supported by ePCT that has been uploaded to your WIPO account;
- not yet published;
- no PCT Rule 92bis request has been submitted since filing.
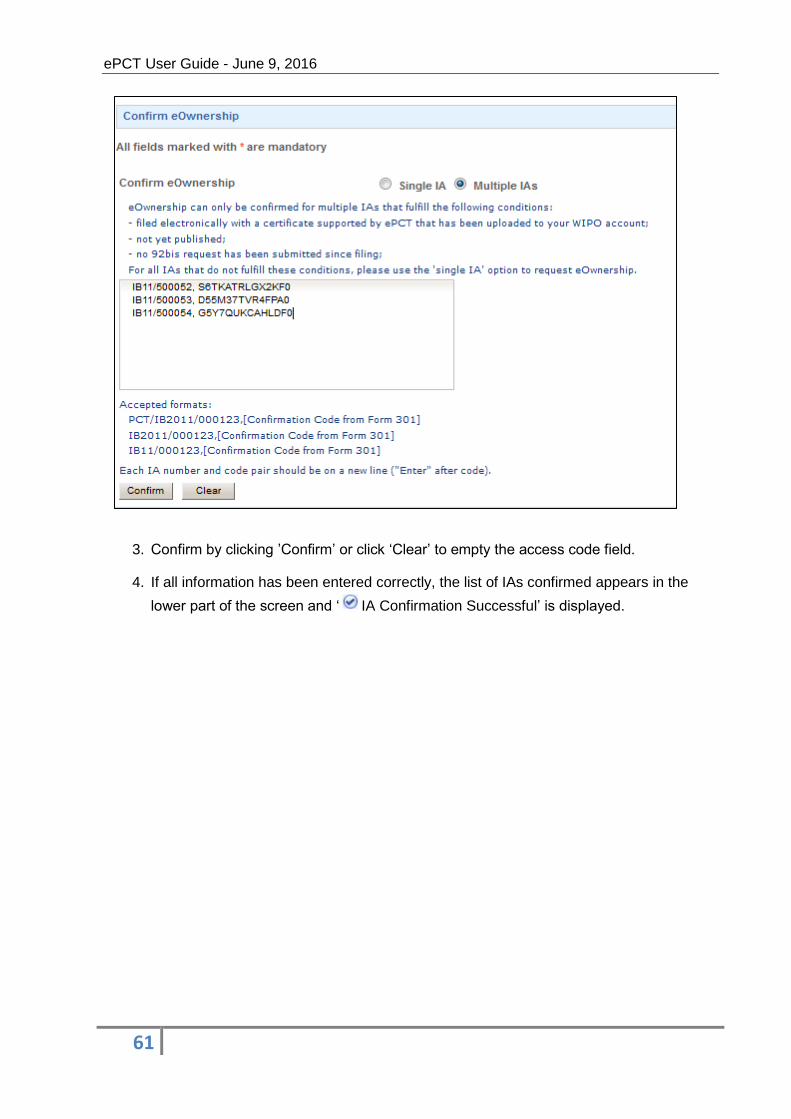
1. Go to the eOwnership tab, select ‘Multiple IAs’ option if you want to take eOwnership of
several IAs that match the conditions above in one step.
2. Enter one IA number and confirmation code per line: the IA number and the
confirmation code should be separated by a comma followed directly by the
confirmation code without blank spaces, as shown in the example below:
ePCT User Guide - June 9, 2016
61
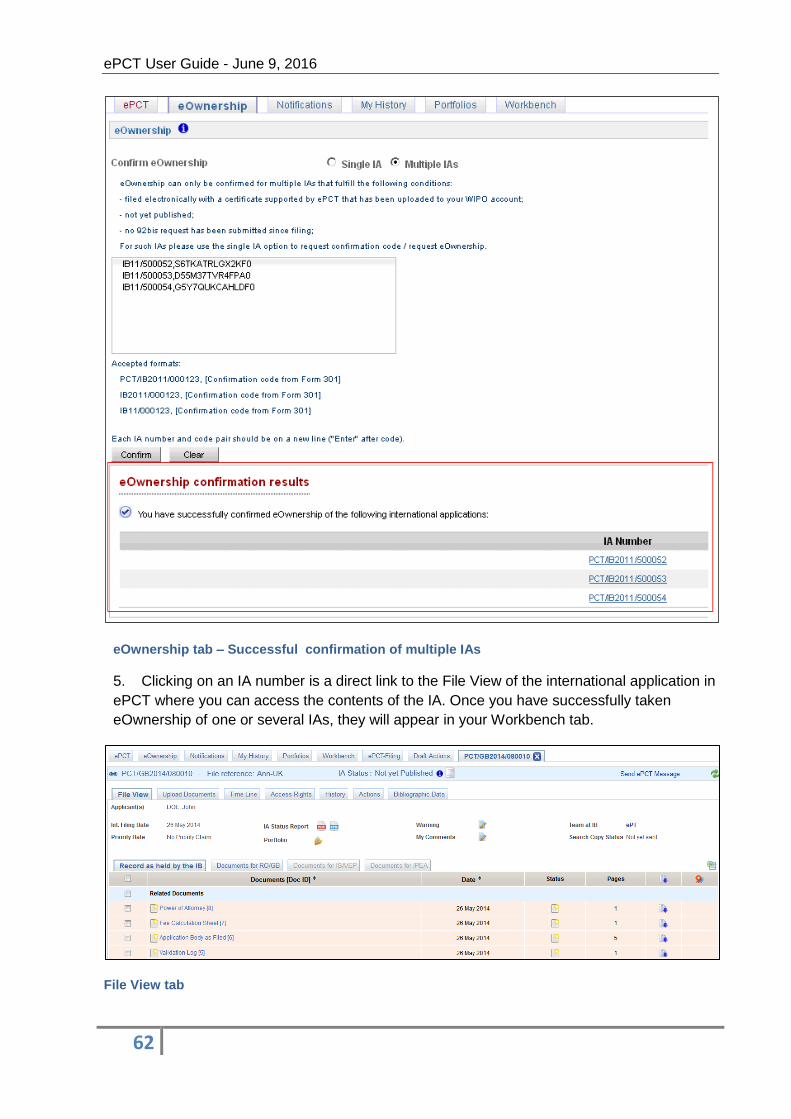
3. Confirm by clicking ’Confirm’ or click ‘Clear’ to empty the access code field.
4. If all information has been entered correctly, the list of IAs confirmed appears in the
lower part of the screen and ‘ IA Confirmation Successful’ is displayed.
ePCT User Guide - June 9, 2016
62
eOwnership tab – Successful confirmation of multiple IAs
5. Clicking on an IA number is a direct link to the File View of the international application in
ePCT where you can access the contents of the IA. Once you have successfully taken
eOwnership of one or several IAs, they will appear in your Workbench tab.
File View tab

ePCT User Guide - June 9, 2016
63
TAKING eOWNERSHIP OF PUBLISHED IAS AND IAS WITH PCT RULE 92BIS REQUEST
For published IAs You will be prompted to fill in an online form in ePCT in order to request a
new confirmation code because Form PCT/IB/301 appears on the PATENTSCOPE website
after publication and is therefore no longer confidential as a confirmation code.
For IAs where there was a PCT Rule 92bis request since filing (either published or
unpublished)
In case of a PCT Rule 92bis change there might have been a change of agent or the person
who received the original Form PCT/IB/301, hence a 92bis change invalidates any IB/301
codes for the IA, whether published or not. For further information on Rule 92bis changes,
please see the chapter of this manual on Actions – Rule 92bis request.
Taking eOwnership of a published IA or of an IA where a request under PCT Rule 92bis
has been filed (IB/301 code no longer confidential):
1. Open the eOwnership tab (Single IA option) and enter in the corresponding fields the IA
number and the International Filing Date of the IA and click ‘Confirm’ (as shown below). The
system will automatically detect that the IA has been published or that the IB/301 code may
have been sent to someone who no longer has any rights to the IA following a request under
PCT Rule 92bis. You will be prompted to fill in an online form to request a new confirmation
code (as shown below).
eOwnership screen for an IA where a 92bis request was filed
2. Complete the form (as shown below) and click the ‘Request confirmation code’ button or
click ‘Cancel’ to go back to the eOwnership screen.

ePCT User Guide - June 9, 2016
64
Form to request a new confirmation code to take eOwnership of a published IA or of an IA with
92bis request
If you have already indicated an address under your WIPO Account profile information, that
address will be shown here by default, but it is possible to overtype that address in this form
should you wish to specify a different address that corresponds to what was indicated for this
particular application, e.g., on the request form PCT/RO/101.
Note: The IB can only approve requests for eOwnership and requests for new eOwnership
confirmation codes from persons who appear on file for an international application in the
capacity as applicant, agent, person appointed as address for correspondence or from a
person named on the transmittal receipt for e-filed applications (taking into account any
Rule 92bis requests made since filing). Therefore, if any such requests are received from
someone other than one of the above, for security and confidentiality reasons the IB cannot
approve such requests directly, but instead will send notification PCT/IB/345 containing the
confirmation code required to the address for service on record for the international
application. The notification also contains the contact details of the requestor, so that the
person at the address for service can pass on the confirmation code if appropriate.

ePCT User Guide - June 9, 2016
65
TAKING eOWNERSHIP AFTER FILING OF UNPUBLISHED IAS FILED WITHOUT A
DIGITAL CERTIFICATE, IAS FILED WITH A NON-SUPPORTED DIGITAL CERTIFICATE,
IAS WHERE THE CERTIFICATE USED FOR FILING DOES NOT MATCH THE
CERTIFICATE ASSOCIATED WITH THE WIPO USER ACCOUNT
For unpublished IAs that were filed without any certificate (e.g. paper filings or filings with the
RO/US via the EFS-Web) or with a non-supported certificate, or where the certificate used for
filing does not match a certificate in the WIPO user account of the current user, you will be
prompted to fill in an online form to request eOwnership from the IB who will process the form
and give you access to the application, if appropriate.
1. Go to the eOwnership tab (‘Single IA’ option) and enter the IA number, International
Filing date and confirmation code appearing on Form PCT/IB/301 in the corresponding
fields. The system will automatically detect that no certificate was used for filing the IA
that can be matched to a digital certificate in your user account and will prompt you to
fill in an online form to request eOwnership from the IB. Click ‘Confirm’ (as shown
below) in order to access the online form.
eOwnership tab – taking eOwnership of an unpublished IA filed on paper
2. Complete the form (as shown below) and click the ‘Request eOwnership’ button or click
‘Cancel’ to go back to the eOwnership screen.
Note: If you have already indicated an address under your WIPO Accounts profile
information, that address will be shown here by default, but it is possible to overtype it in this
form should you wish to specify a different address that corresponds to what was indicated for
this particular application, e.g., on the request form PCT/RO/101.

ePCT User Guide - June 9, 2016
66
Form to request eOwnership of an unpublished IA without a digital certificate
On the form to request eOwnership of an unpublished IA filed without a digital certificate you
will also need to indicate the number of claims of the IA as an additional security check (to
prove that you do indeed have knowledge of the contents of the IA).
Note: The IB can only approve requests for eOwnership and requests for new eOwnership confirmation codes from persons who appear on file for an international application in the capacity as applicant, agent, person appointed as address for correspondence or from a person named on the transmittal receipt for e-filed applications (taking into account any subsequent Rule 92bis requests made since filing). Therefore, if any such requests are received from someone other than one of the above, for security and confidentiality reasons the IB cannot approve such requests directly, but instead will send notification PCT/IB/345 containing the confirmation code required to the address for service on record for the international application. The notification also contains the contact details of the requestor, so that the person at the address for service can pass on the confirmation code if appropriate.
Useful advice: If you are preparing an international application with PCT-SAFE that will not be
signed with a digital certificate, for example filing on physical medium, or if you are filing with
the RO/US via the EFS-Web, you will be able to request eOwnership of your international
application at the time of filing. For further information please see the chapter of this manual on
requesting eOwnership of an IA at the time of filing.
ePCT User Guide - June 9, 2016
67
TAKING eOWNERSHIP OF IAS FILED WITH A DIGITAL CERTIFICATE THAT HAS
SINCE EXPIRED
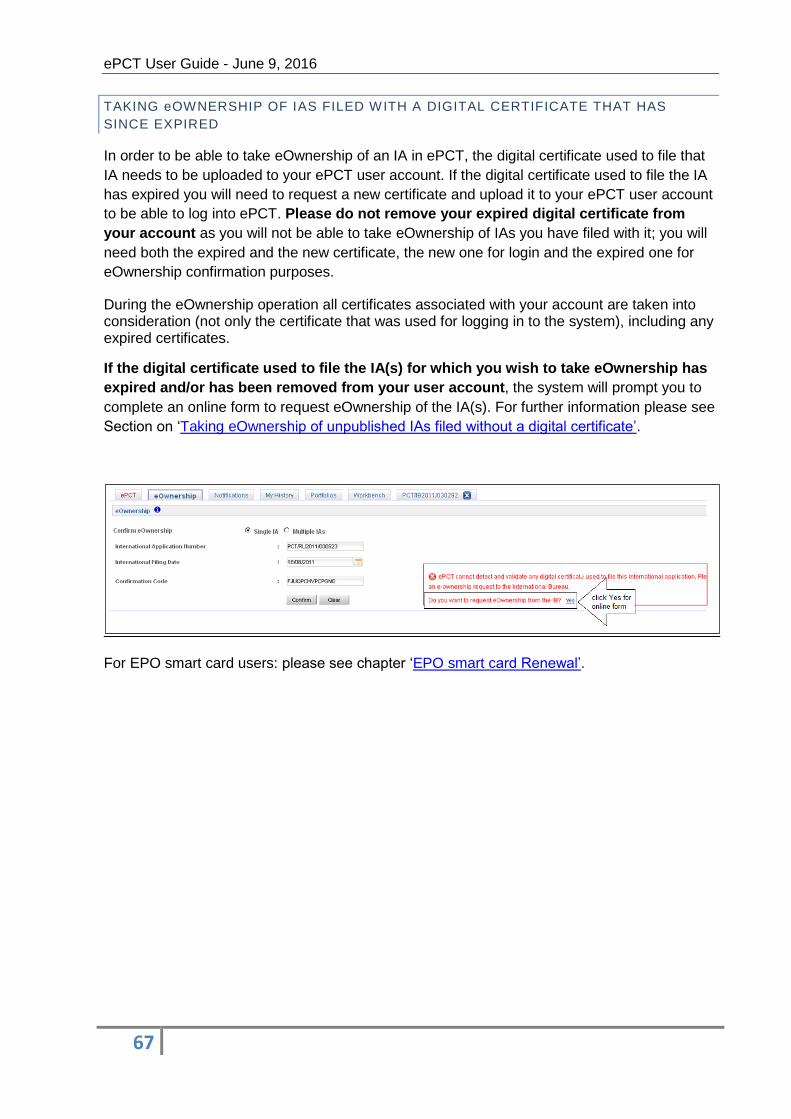
In order to be able to take eOwnership of an IA in ePCT, the digital certificate used to file that
IA needs to be uploaded to your ePCT user account. If the digital certificate used to file the IA
has expired you will need to request a new certificate and upload it to your ePCT user account
to be able to log into ePCT. Please do not remove your expired digital certificate from
your account as you will not be able to take eOwnership of IAs you have filed with it; you will
need both the expired and the new certificate, the new one for login and the expired one for
eOwnership confirmation purposes.
During the eOwnership operation all certificates associated with your account are taken into consideration (not only the certificate that was used for logging in to the system), including any expired certificates.
If the digital certificate used to file the IA(s) for which you wish to take eOwnership has
expired and/or has been removed from your user account, the system will prompt you to
complete an online form to request eOwnership of the IA(s). For further information please see
Section on ‘Taking eOwnership of unpublished IAs filed without a digital certificate’.
For EPO smart card users: please see chapter ‘EPO smart card Renewal’.
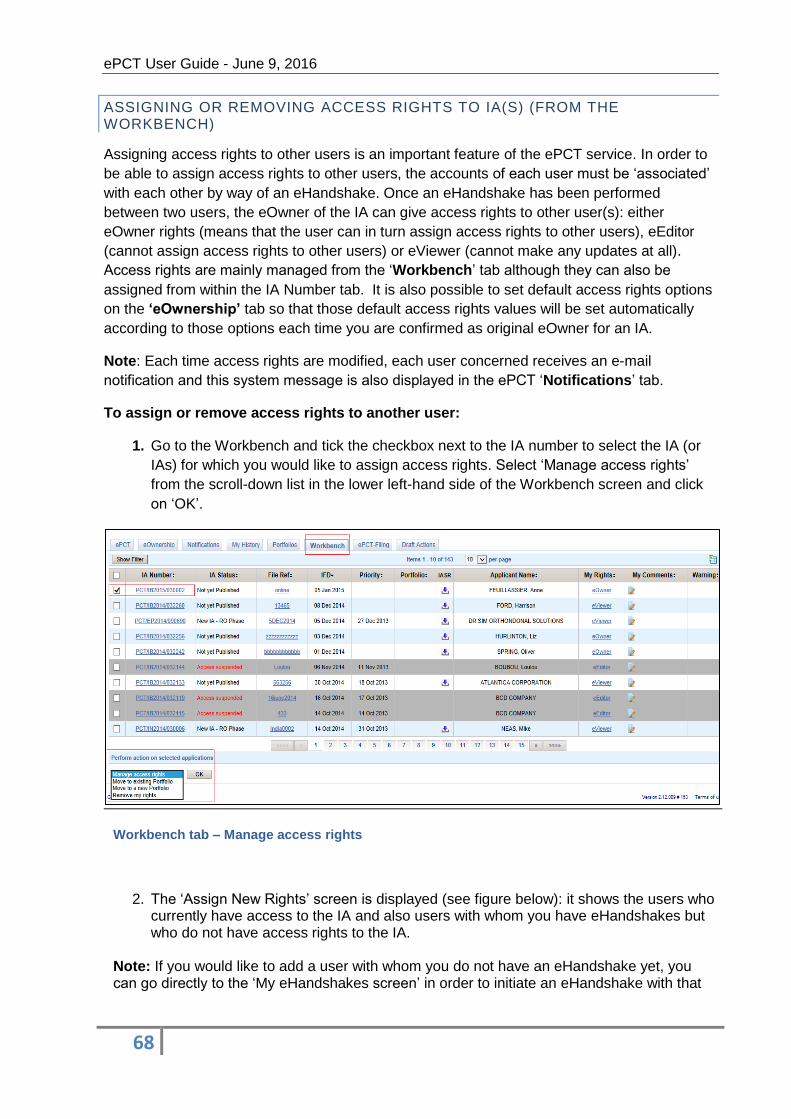
ePCT User Guide - June 9, 2016
68
ASSIGNING OR REMOVING ACCESS RIGHTS TO IA(S) (FROM THE WORKBENCH)
Assigning access rights to other users is an important feature of the ePCT service. In order to
be able to assign access rights to other users, the accounts of each user must be ‘associated’
with each other by way of an eHandshake. Once an eHandshake has been performed
between two users, the eOwner of the IA can give access rights to other user(s): either
eOwner rights (means that the user can in turn assign access rights to other users), eEditor
(cannot assign access rights to other users) or eViewer (cannot make any updates at all).
Access rights are mainly managed from the ‘Workbench’ tab although they can also be
assigned from within the IA Number tab. It is also possible to set default access rights options
on the ‘eOwnership’ tab so that those default access rights values will be set automatically
according to those options each time you are confirmed as original eOwner for an IA.
Note: Each time access rights are modified, each user concerned receives an e-mail
notification and this system message is also displayed in the ePCT ‘Notifications’ tab.
To assign or remove access rights to another user:
1. Go to the Workbench and tick the checkbox next to the IA number to select the IA (or
IAs) for which you would like to assign access rights. Select ‘Manage access rights’
from the scroll-down list in the lower left-hand side of the Workbench screen and click
on ‘OK’.
Workbench tab – Manage access rights
2. The ‘Assign New Rights’ screen is displayed (see figure below): it shows the users who currently have access to the IA and also users with whom you have eHandshakes but who do not have access rights to the IA.
Note: If you would like to add a user with whom you do not have an eHandshake yet, you can go directly to the ‘My eHandshakes screen’ in order to initiate an eHandshake with that
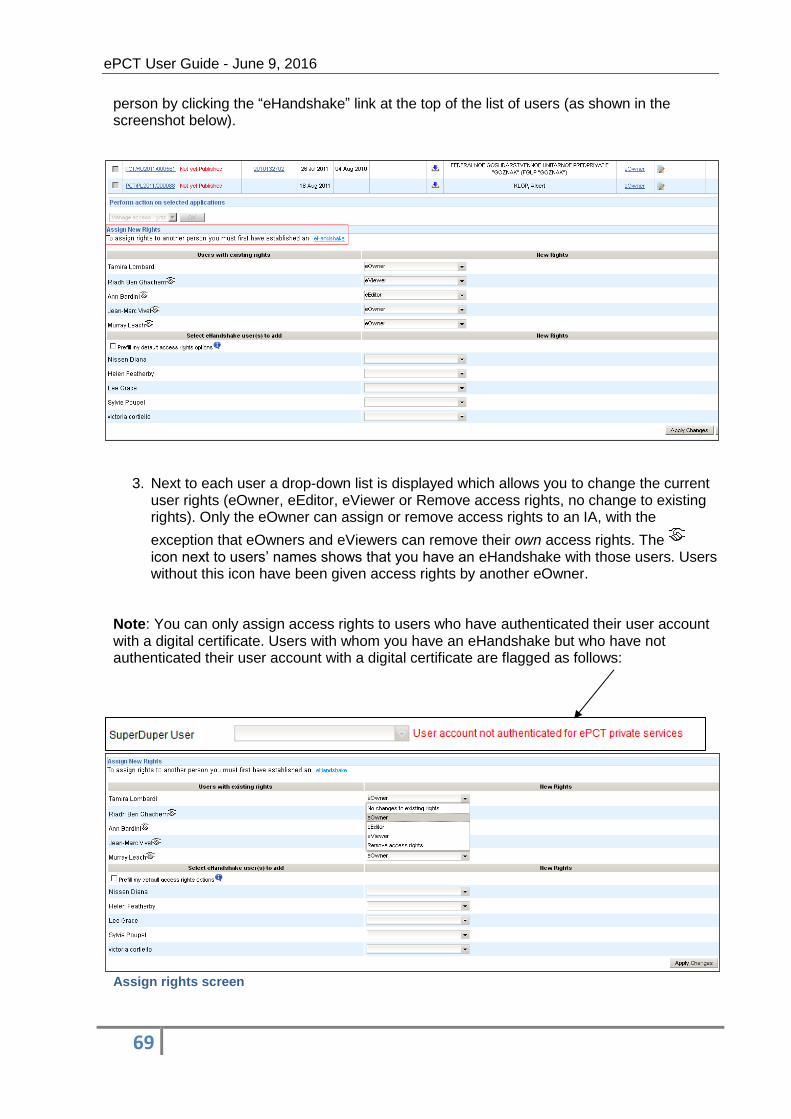
ePCT User Guide - June 9, 2016
69
person by clicking the “eHandshake” link at the top of the list of users (as shown in the screenshot below).
3. Next to each user a drop-down list is displayed which allows you to change the current
user rights (eOwner, eEditor, eViewer or Remove access rights, no change to existing rights). Only the eOwner can assign or remove access rights to an IA, with the
exception that eOwners and eViewers can remove their own access rights. The icon next to users’ names shows that you have an eHandshake with those users. Users without this icon have been given access rights by another eOwner.
Note: You can only assign access rights to users who have authenticated their user account with a digital certificate. Users with whom you have an eHandshake but who have not authenticated their user account with a digital certificate are flagged as follows:
Assign rights screen

ePCT User Guide - June 9, 2016
70
4. To assign access rights to additional users select the type of access rights from the scroll-down list of the ‘Select eHandshake user(s) to add’ part of the screen (as shown below). A list is displayed of the users with whom you have concluded an eHandshake. If you have already set up a list of eHandshake users to whom you would like default access rights to be automatically assigned whenever you are confirmed as original eOwner for an IA (the next Section of this Guide explains how to do this), you can click on the option ‘Prefill my default access rights options.’
5. Once the appropriate access rights have been selected for each new user, click
to confirm the operation or on to go back to the Workbench.
6. A message will appear to confirm that the access rights for that particular IA have been
updated.
Confirm the access rights for this IA? Access rights change confirmed for this IA
Note: Every time you change the access rights to an IA, an e-mail notification is sent to the users concerned (see below):

ePCT User Guide - June 9, 2016
71
Part of the automatic e-mail notification for access rights update
Note on ‘Removing an IA’ from the Workbench: The Workbench lists applications to which you have access rights. If you no longer wish to have visibility of an IA on your Workbench, please remove your own access rights from that application, proceeding as follows:
1. Select the IA or IAs in the Workbench, select ‘Remove my rights’ from the scroll-down list and confirm with ‘OK’.
2. A message will be displayed asking you to confirm that you want to remove your own
rights, click ‘yes’.
3. A message is displayed to confirm the removal of your access rights.
The same operation can be performed by selecting "Manage access rights" in the drop-down list at the bottom of the Workbench screen and select ‘OK’. This will open a list of users who have access rights. Next to your own name, select the option "Remove access rights" from the drop-down list and click "Apply changes".
Note: If you do not have eOwner rights to the IA, you can still remove your own eEditor or eViewer access rights by selecting the IAs concerned on your Workbench and then selecting the option “Remove my rights.”
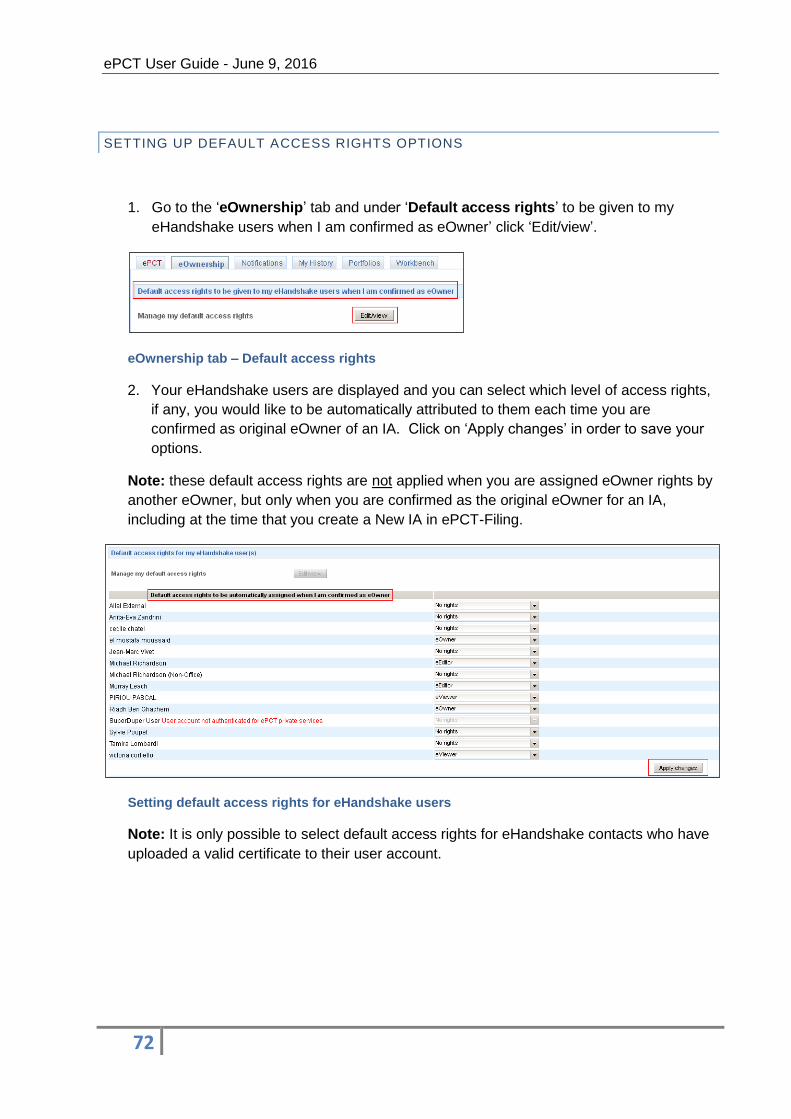
ePCT User Guide - June 9, 2016
72
SETTING UP DEFAULT ACCESS RIGHTS OPTIONS
1. Go to the ‘eOwnership’ tab and under ‘Default access rights’ to be given to my
eHandshake users when I am confirmed as eOwner’ click ‘Edit/view’.
eOwnership tab – Default access rights
2. Your eHandshake users are displayed and you can select which level of access rights,
if any, you would like to be automatically attributed to them each time you are
confirmed as original eOwner of an IA. Click on ‘Apply changes’ in order to save your
options.
Note: these default access rights are not applied when you are assigned eOwner rights by
another eOwner, but only when you are confirmed as the original eOwner for an IA,
including at the time that you create a New IA in ePCT-Filing.
Setting default access rights for eHandshake users
Note: It is only possible to select default access rights for eHandshake contacts who have
uploaded a valid certificate to their user account.
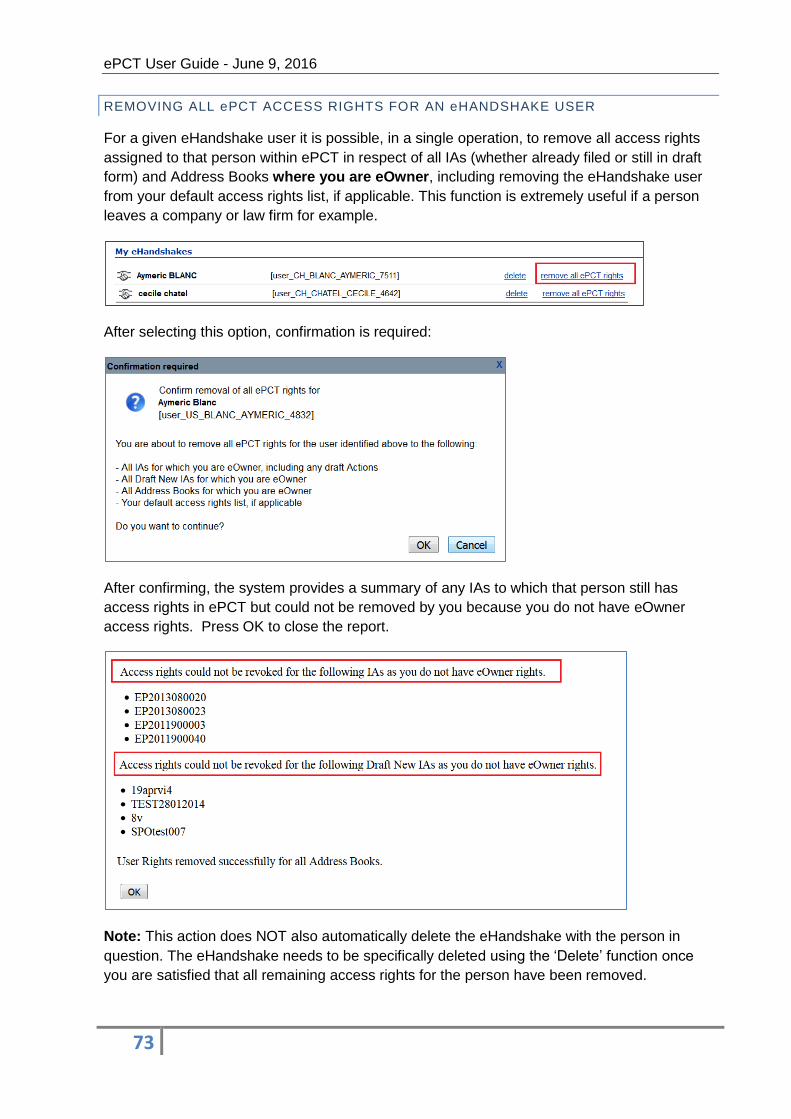
ePCT User Guide - June 9, 2016
73
REMOVING ALL ePCT ACCESS RIGHTS FOR AN eHANDSHAKE USER
For a given eHandshake user it is possible, in a single operation, to remove all access rights
assigned to that person within ePCT in respect of all IAs (whether already filed or still in draft
form) and Address Books where you are eOwner, including removing the eHandshake user
from your default access rights list, if applicable. This function is extremely useful if a person
leaves a company or law firm for example.
After selecting this option, confirmation is required:
After confirming, the system provides a summary of any IAs to which that person still has
access rights in ePCT but could not be removed by you because you do not have eOwner
access rights. Press OK to close the report.
Note: This action does NOT also automatically delete the eHandshake with the person in
question. The eHandshake needs to be specifically deleted using the ‘Delete’ function once
you are satisfied that all remaining access rights for the person have been removed.

ePCT User Guide - June 9, 2016
74
PART 3 – ePCT: OVERVIEW OF FEATURES AND FUNCTIONALITIES
When you log into the ePCT system, the current date and time in Geneva, Switzerland, is always displayed in order to facilitate awareness of time limits that expire based on the date and time at the International Bureau.
The ‘Search by File Ref. or IA Number’ field is available at the top right-hand corner of the ePCT private services screen to search for a particular IA to which you may or may not have access rights. Simply enter the File Reference or IA number in the Search IA field and click ‘Search’ and the corresponding IA will open in a new tab. Note that, even if you do not have access rights to a particular IA in ePCT, you can nevertheless upload documents to that IA if required.
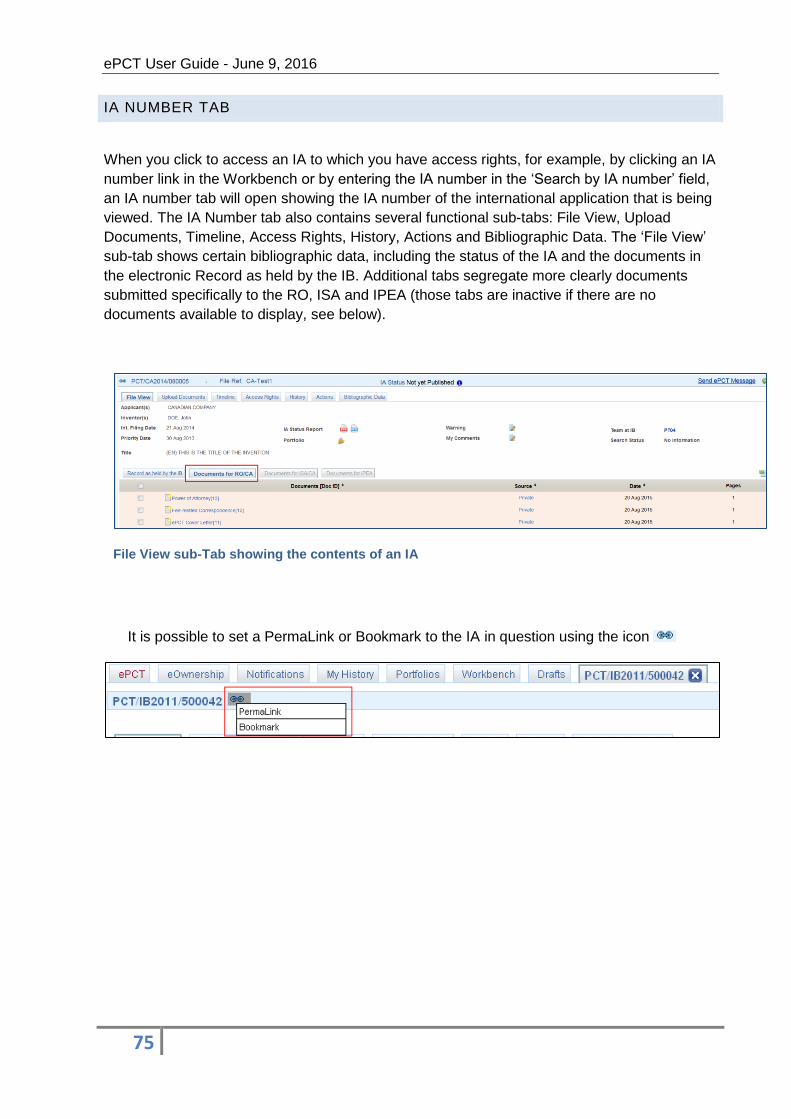
ePCT User Guide - June 9, 2016
75
IA NUMBER TAB
When you click to access an IA to which you have access rights, for example, by clicking an IA
number link in the Workbench or by entering the IA number in the ‘Search by IA number’ field,
an IA number tab will open showing the IA number of the international application that is being
viewed. The IA Number tab also contains several functional sub-tabs: File View, Upload
Documents, Timeline, Access Rights, History, Actions and Bibliographic Data. The ‘File View’
sub-tab shows certain bibliographic data, including the status of the IA and the documents in
the electronic Record as held by the IB. Additional tabs segregate more clearly documents
submitted specifically to the RO, ISA and IPEA (those tabs are inactive if there are no
documents available to display, see below).
File View sub-Tab showing the contents of an IA
It is possible to set a PermaLink or Bookmark to the IA in question using the icon

ePCT User Guide - June 9, 2016
76
IA NUMBER TAB – FILE VIEW SUB-TAB ‘RECORD AS HELD BY THE IB’
The Record as held by the IB is divided in two parts: the upper part of the screen displays bibliographic data information for the IA and the lower part of the screen displays the documents on file at the International Bureau.
The File View sub-tab shows the following information regarding the relevant Processing Team at the IB that is in charge of the IA and can be contacted for any questions:
Click on ‘Send ePCT Message’ to contact the relevant processing team:
If you use the ePCT Message service the signature of the applicant or agent must be indicated as a text string signature (of the type /John Doe/).
: click on “IA Status Report” (IASR) to view a selection of the most up-to-date bibliographic data as on file at the IB. The scope of the bibliographic data in the IASR corresponds to the bibliographic data that is made available in PATENTSCOPE at the time of international publication.
The data can be viewed in either PDF or XML format, depending on which icon you click.
Note: A more complete view of the up-to-date bibliographic data on file at the IB is available on the Bibliographic Data tab.
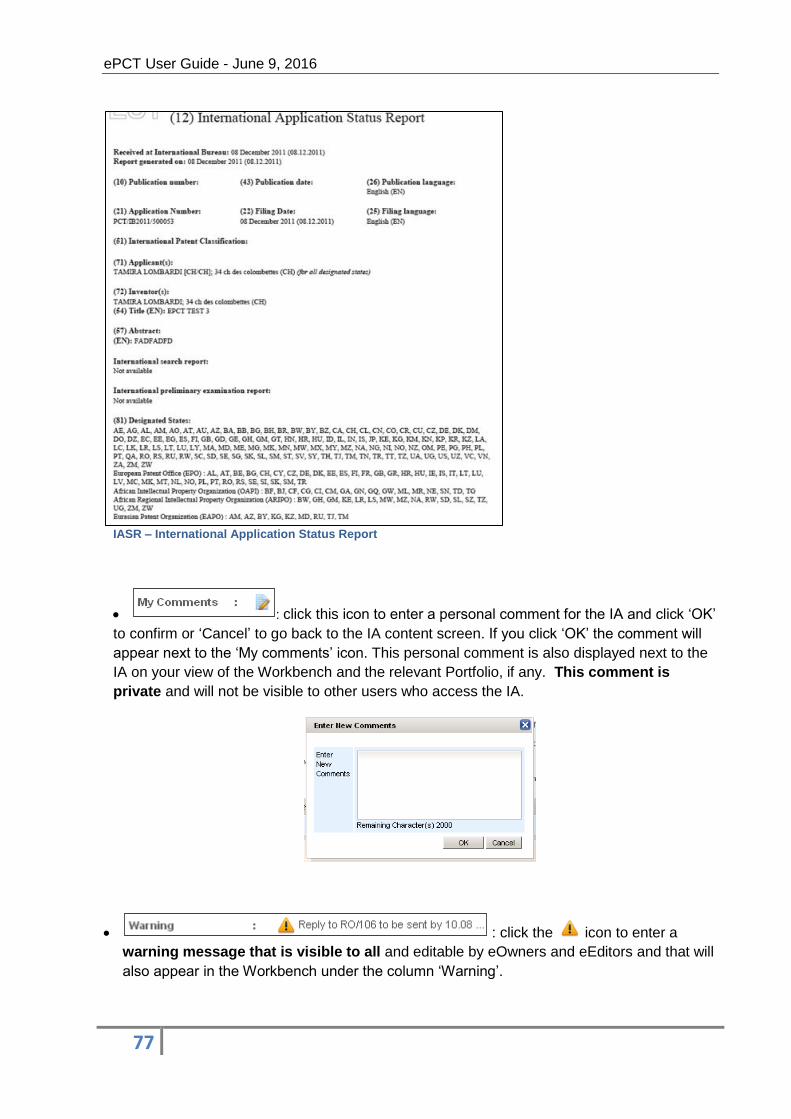
ePCT User Guide - June 9, 2016
77
IASR – International Application Status Report
: click this icon to enter a personal comment for the IA and click ‘OK’
to confirm or ‘Cancel’ to go back to the IA content screen. If you click ‘OK’ the comment will
appear next to the ‘My comments’ icon. This personal comment is also displayed next to the
IA on your view of the Workbench and the relevant Portfolio, if any. This comment is
private and will not be visible to other users who access the IA.
: click the icon to enter a
warning message that is visible to all and editable by eOwners and eEditors and that will
also appear in the Workbench under the column ‘Warning’.
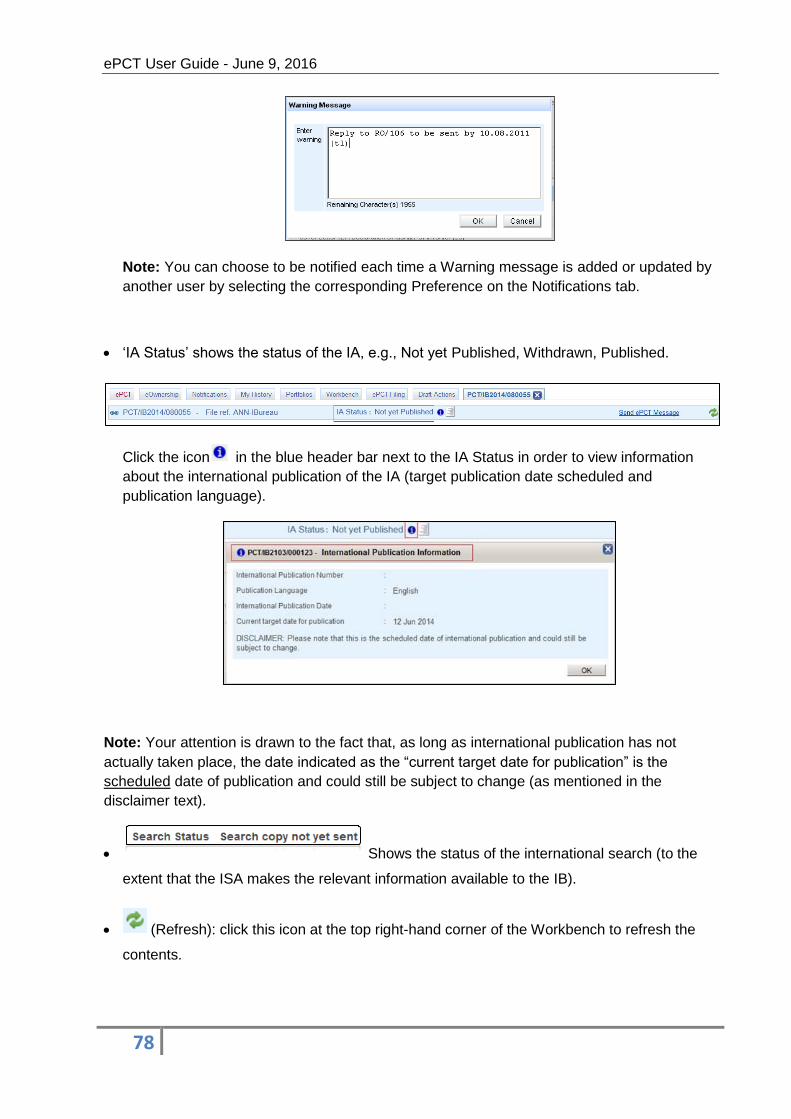
ePCT User Guide - June 9, 2016
78
Note: You can choose to be notified each time a Warning message is added or updated by
another user by selecting the corresponding Preference on the Notifications tab.
‘IA Status’ shows the status of the IA, e.g., Not yet Published, Withdrawn, Published.
Click the icon in the blue header bar next to the IA Status in order to view information
about the international publication of the IA (target publication date scheduled and
publication language).
Note: Your attention is drawn to the fact that, as long as international publication has not
actually taken place, the date indicated as the “current target date for publication” is the
scheduled date of publication and could still be subject to change (as mentioned in the
disclaimer text).
Shows the status of the international search (to the
extent that the ISA makes the relevant information available to the IB).
(Refresh): click this icon at the top right-hand corner of the Workbench to refresh the
contents.
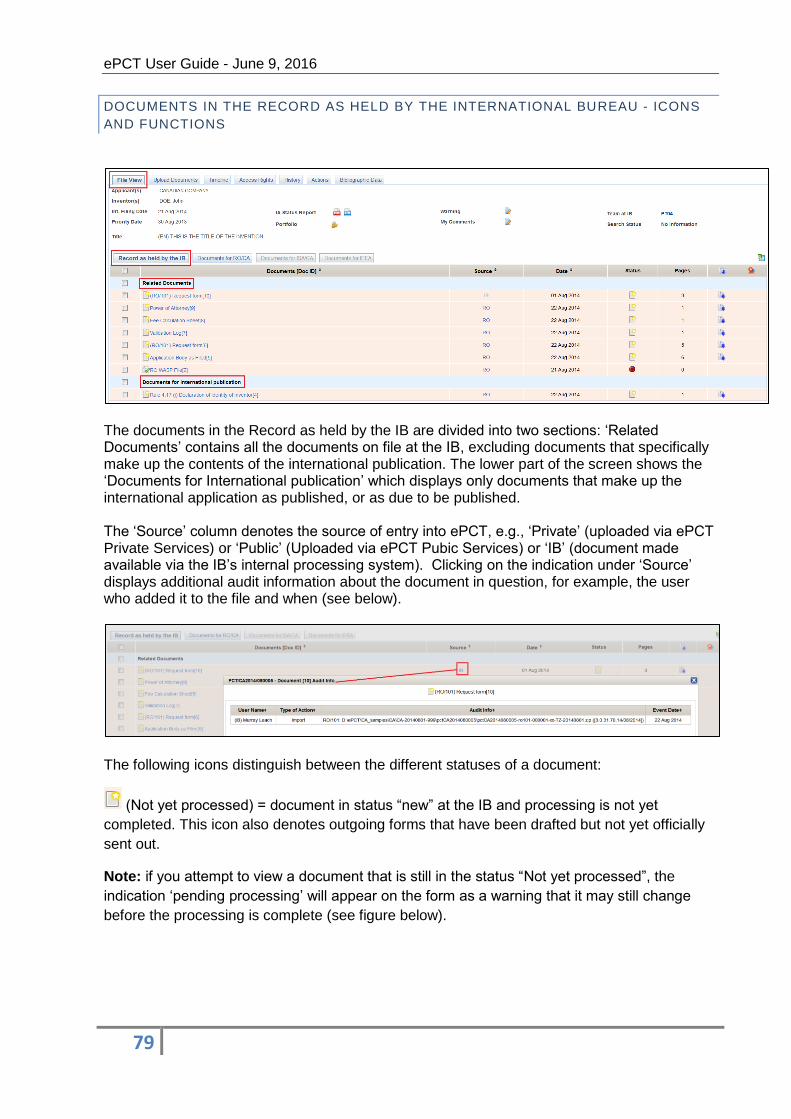
ePCT User Guide - June 9, 2016
79
DOCUMENTS IN THE RECORD AS HELD BY THE INTERNATIONAL BUREAU - ICONS
AND FUNCTIONS
The documents in the Record as held by the IB are divided into two sections: ‘Related Documents’ contains all the documents on file at the IB, excluding documents that specifically make up the contents of the international publication. The lower part of the screen shows the ‘Documents for International publication’ which displays only documents that make up the international application as published, or as due to be published. The ‘Source’ column denotes the source of entry into ePCT, e.g., ‘Private’ (uploaded via ePCT Private Services) or ‘Public’ (Uploaded via ePCT Pubic Services) or ‘IB’ (document made available via the IB’s internal processing system). Clicking on the indication under ‘Source’ displays additional audit information about the document in question, for example, the user who added it to the file and when (see below).
The following icons distinguish between the different statuses of a document:
(Not yet processed) = document in status “new” at the IB and processing is not yet
completed. This icon also denotes outgoing forms that have been drafted but not yet officially
sent out.
Note: if you attempt to view a document that is still in the status “Not yet processed”, the
indication ‘pending processing’ will appear on the form as a warning that it may still change
before the processing is complete (see figure below).

ePCT User Guide - June 9, 2016
80
Pending processing indication on a PCT/IB form
(Not taken into account by IB) Document processed, but a business error has been
detected (documents in such a status are not communicated by the IB and are not made
publicly available on PATENTSCOPE).
(Processed) Document successfully processed by the IB and now part of the record; may
be communicated by the IB and may be made publicly available on PATENTSCOPE
depending on the document type. This icon also denotes outgoing forms that have been
finalized and sent out.
(Copy as received) Denotes the original “as received” copy of a document in the form in
which it was submitted and prior to its modification at the time of processing.
(IB outgoing notification): this icon means that a PCT/IB Form has been issued and sent
out related to that IA. A certified copy of the form can be downloaded by clicking the icon.
In the case of international applications that were filed at RO/IB, a similar icon will appear next
to RO type forms that were issued by RO/IB.
(Download File View data as an Excel Spreadsheet): use this icon to download the list of
documents in the Record as held by the IB as an Excel table.
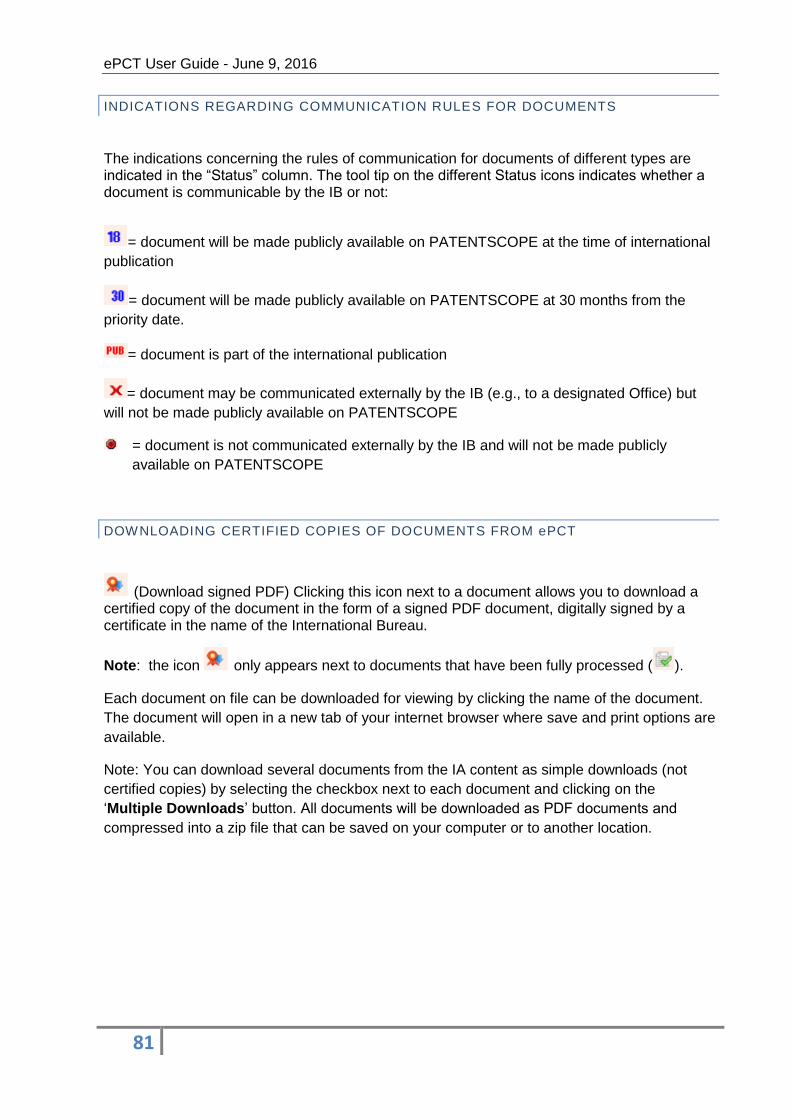
ePCT User Guide - June 9, 2016
81
INDICATIONS REGARDING COMMUNICATION RULES FOR DOCUMENTS
The indications concerning the rules of communication for documents of different types are indicated in the “Status” column. The tool tip on the different Status icons indicates whether a document is communicable by the IB or not:
= document will be made publicly available on PATENTSCOPE at the time of international
publication
= document will be made publicly available on PATENTSCOPE at 30 months from the
priority date.
= document is part of the international publication
= document may be communicated externally by the IB (e.g., to a designated Office) but
will not be made publicly available on PATENTSCOPE
= document is not communicated externally by the IB and will not be made publicly
available on PATENTSCOPE
DOWNLOADING CERTIFIED COPIES OF DOCUMENTS FROM ePCT
(Download signed PDF) Clicking this icon next to a document allows you to download a certified copy of the document in the form of a signed PDF document, digitally signed by a certificate in the name of the International Bureau.
Note: the icon only appears next to documents that have been fully processed ( ).
Each document on file can be downloaded for viewing by clicking the name of the document.
The document will open in a new tab of your internet browser where save and print options are
available.
Note: You can download several documents from the IA content as simple downloads (not
certified copies) by selecting the checkbox next to each document and clicking on the
‘Multiple Downloads’ button. All documents will be downloaded as PDF documents and
compressed into a zip file that can be saved on your computer or to another location.
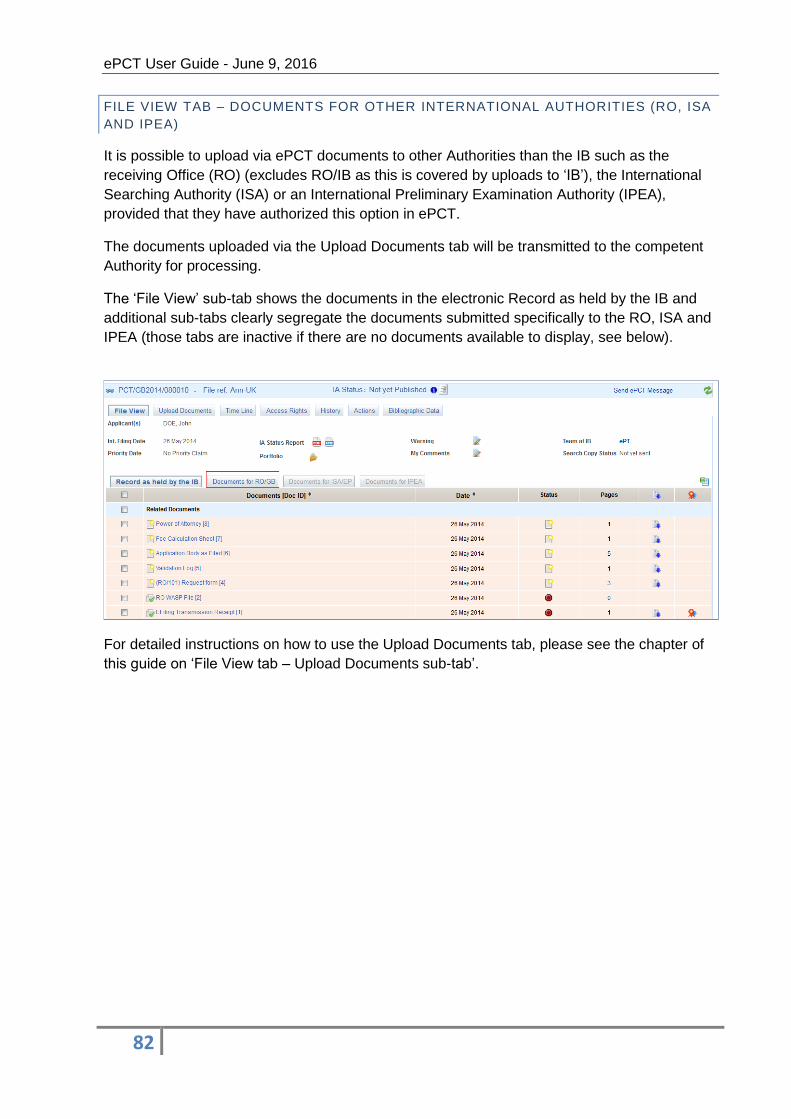
ePCT User Guide - June 9, 2016
82
FILE VIEW TAB – DOCUMENTS FOR OTHER INTERNATIONAL AUTHORITIES (RO, ISA
AND IPEA)
It is possible to upload via ePCT documents to other Authorities than the IB such as the
receiving Office (RO) (excludes RO/IB as this is covered by uploads to ‘IB’), the International
Searching Authority (ISA) or an International Preliminary Examination Authority (IPEA),
provided that they have authorized this option in ePCT.
The documents uploaded via the Upload Documents tab will be transmitted to the competent
Authority for processing.
The ‘File View’ sub-tab shows the documents in the electronic Record as held by the IB and
additional sub-tabs clearly segregate the documents submitted specifically to the RO, ISA and
IPEA (those tabs are inactive if there are no documents available to display, see below).
For detailed instructions on how to use the Upload Documents tab, please see the chapter of
this guide on ‘File View tab – Upload Documents sub-tab’.
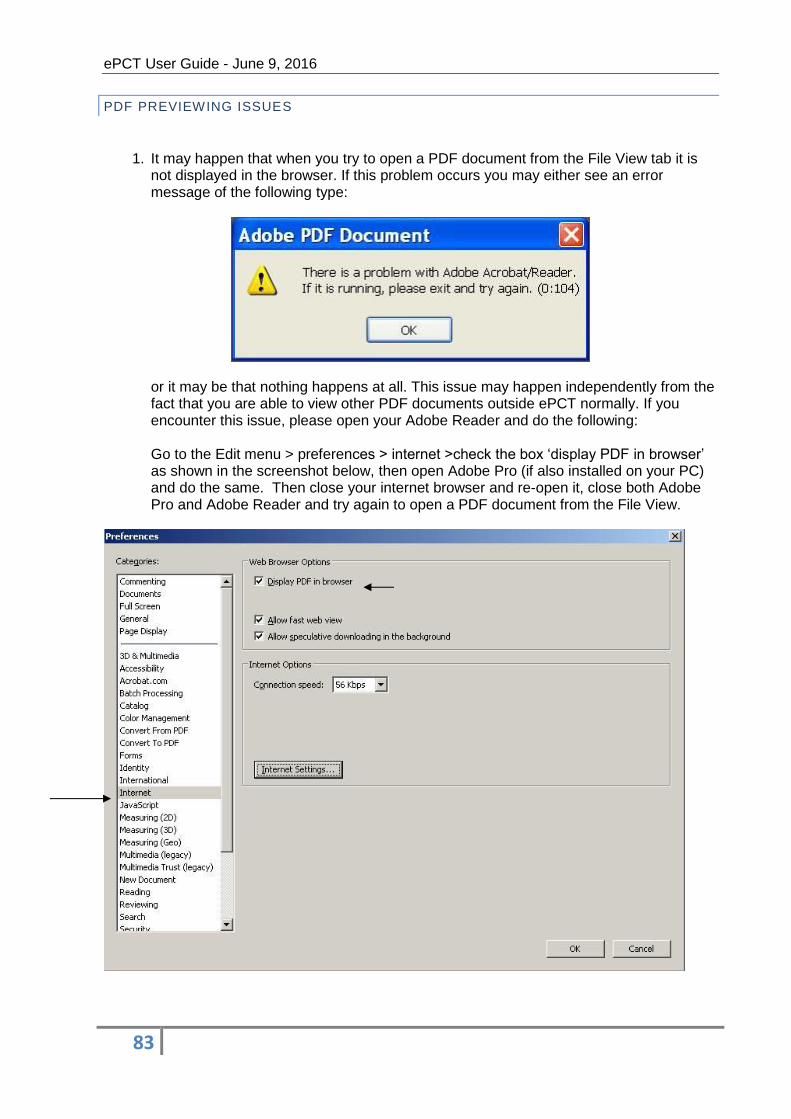
ePCT User Guide - June 9, 2016
83
PDF PREVIEWING ISSUES
1. It may happen that when you try to open a PDF document from the File View tab it is not displayed in the browser. If this problem occurs you may either see an error message of the following type:
or it may be that nothing happens at all. This issue may happen independently from the fact that you are able to view other PDF documents outside ePCT normally. If you encounter this issue, please open your Adobe Reader and do the following:
Go to the Edit menu > preferences > internet >check the box ‘display PDF in browser’ as shown in the screenshot below, then open Adobe Pro (if also installed on your PC) and do the same. Then close your internet browser and re-open it, close both Adobe Pro and Adobe Reader and try again to open a PDF document from the File View.

ePCT User Guide - June 9, 2016
84
2. If you cannot preview a PDF Document in ePCT and you checked your Adobe Reader/Adobe Pro Preferences and the box ‘display PDF in browser’ (as explained above) is already checked, then it may be that some plug-ins installed in your internet browser are preventing ePCT from opening the PDF document. In this case, please check in the internet options of your internet browser if one of the plug-ins is interfering with ePCT and needs to be deactivated.
Where to find plug-in/Add-ons settings in your internet browser: Mozilla Firefox
Open Firefox and go to the Tools menu > Add-ons. If you do not see the ‘Tools’ menu click
at the top left-hand corner of the screen and then ‘Options’ -> ‘Options’ ->
‘General’ tab-> ‘Manage Add-ons’ button > Plugins.
Internet Explorer
Open Internet Explorer and go to the Tool menu and select ‘Internet Options’. If you do not see
the Tools menu click the icon, and select ‘Options’ > ‘Programs’ tab > ‘Manage Add-ons’
button.
IA NUMBER TAB - UPLOAD DOCUMENTS SUB-TAB
Click this tab to upload an electronic document online to the IB (includes RO/IB) or to another Authority (RO, ISA or IPEA) for this IA. A history of all the documents uploaded by the current user is available under the tab “My History’’ and the ‘History’ tab of the IA shows a history of all actions taken in ePCT by you and any other ePCT user.
Note: the icon appears next to document types for which there is an equivalent ‘Action’ as a more efficient alternative to uploading PDF documents (the pop-up contains a direct link to the corresponding ePCT Action):
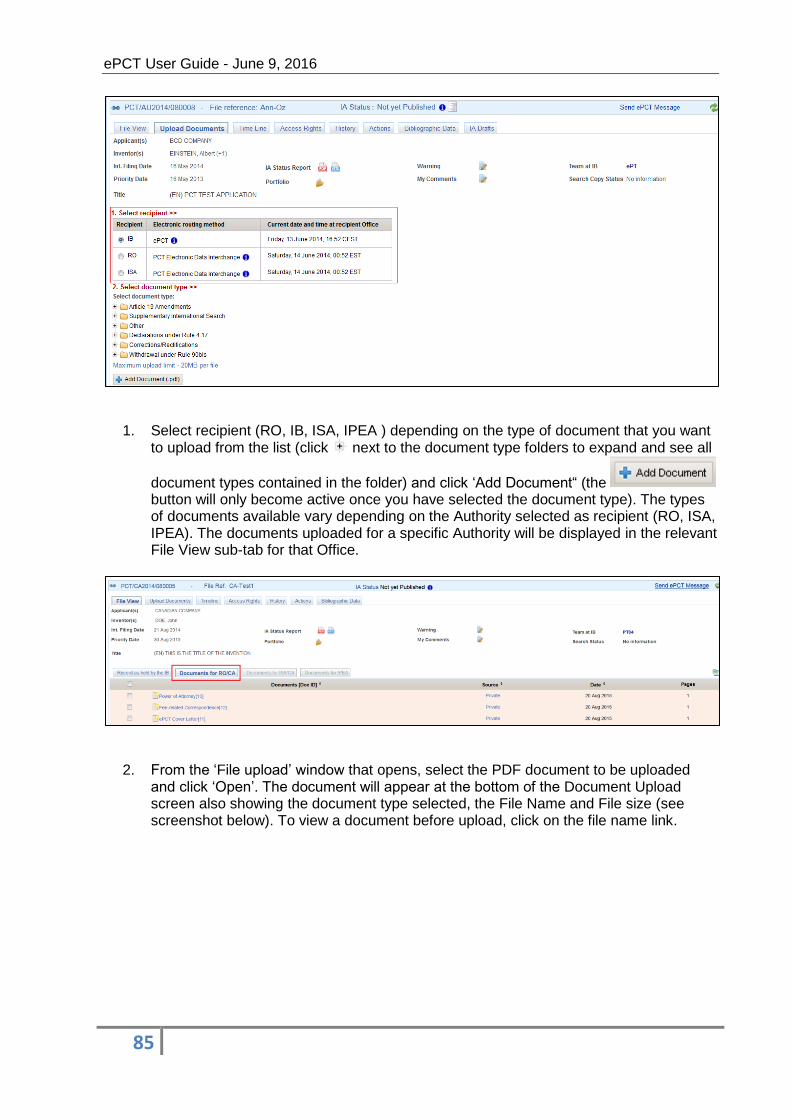
ePCT User Guide - June 9, 2016
85
1. Select recipient (RO, IB, ISA, IPEA ) depending on the type of document that you want
to upload from the list (click next to the document type folders to expand and see all
document types contained in the folder) and click ‘Add Document“ (the button will only become active once you have selected the document type). The types of documents available vary depending on the Authority selected as recipient (RO, ISA, IPEA). The documents uploaded for a specific Authority will be displayed in the relevant File View sub-tab for that Office.
2. From the ‘File upload’ window that opens, select the PDF document to be uploaded
and click ‘Open’. The document will appear at the bottom of the Document Upload screen also showing the document type selected, the File Name and File size (see screenshot below). To view a document before upload, click on the file name link.

ePCT User Guide - June 9, 2016
86
To remove a document that is not to be uploaded, click on the ‘Remove’ icon
3. Select the relevant signature option and type an informal message (optional) for the attention of the recipient.
4. Click the ‘Upload’ button to upload the document(s). Alternatively the documents
prepared for upload can be saved as a Draft for later upload.
5. A message will appear to confirm the successful upload of the document(s).
6. Once the upload is complete, the documents uploaded for a specific Authority are displayed in the relevant File View sub-tab for that Office.

ePCT User Guide - June 9, 2016
87
Under the ‘Other’ folder (see below) you will notice that the document type ‘Priority Document’
can be selected for upload to the IB. However, please note, as per the ‘Important Information’
pop-up, that it is possible to upload to the IB only electronic priority documents that are digitally
signed with the certificate of one of the following issuing Offices, since only these three Offices
have informed the IB that they issue certified copies of priority documents in electronic form:
- National Institute of Industrial Property (Brazil)
- National Institute of Industrial Property (Portugal)
- United States Patent and Trademark Office.
Note: Uploading a ‘Request for change under Rule 92bis’ document will temporarily suspend online access to the IA pending processing of the change by the IB. This is due to the fact that there might have been a change of agent or the person who received the original Form PCT/IB/301, hence a 92bis change invalidates any IB/301 codes for the IA, whether published or not. For further information on Rule 92bis changes, please see the chapter of this manual on Actions – Rule 92bis request.
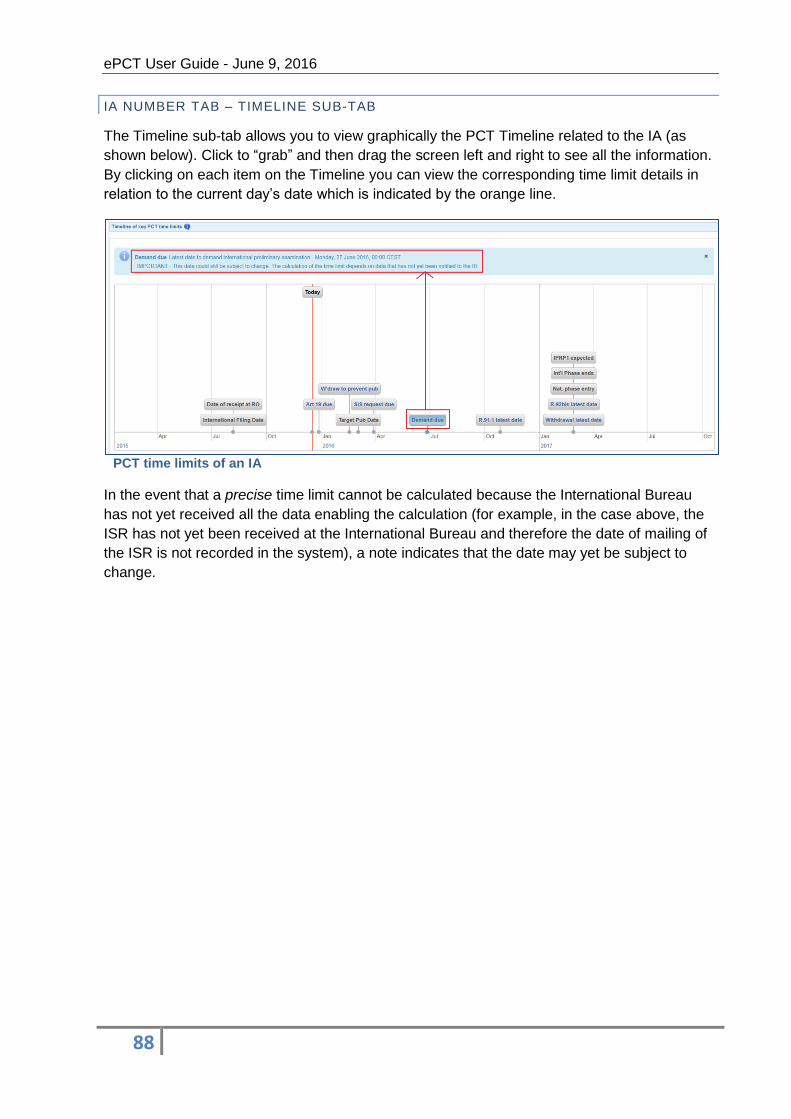
ePCT User Guide - June 9, 2016
88
IA NUMBER TAB – TIMELINE SUB-TAB
The Timeline sub-tab allows you to view graphically the PCT Timeline related to the IA (as
shown below). Click to “grab” and then drag the screen left and right to see all the information.
By clicking on each item on the Timeline you can view the corresponding time limit details in
relation to the current day’s date which is indicated by the orange line.
PCT time limits of an IA
In the event that a precise time limit cannot be calculated because the International Bureau
has not yet received all the data enabling the calculation (for example, in the case above, the
ISR has not yet been received at the International Bureau and therefore the date of mailing of
the ISR is not recorded in the system), a note indicates that the date may yet be subject to
change.

ePCT User Guide - June 9, 2016
89
A text summary of the Timeline information is displayed under the Timeline graphic.
Lower part of the Timeline screen

ePCT User Guide - June 9, 2016
90
IA NUMBER TAB – ACCESS RIGHTS SUB-TAB
This tab allows you to view the list of all users who currently have access rights to this IA and their level of access rights or ‘Role’ (eOwner, eEditor or eViewer rights), including by whom the access rights were assigned and the Time and date of assignment. It is also possible to view which designated Offices, if any, have specifically accessed the File View following the receipt of a national phase entry.
Note: the icon next to a user’s name means that you have an eHandshake with this
person. The icon next to a user’s name means that this user originally took eOwnership of the IA.
To view the Access Rights history of the IA click the ‘History’ link in the right-hand corner of the screen or you can use the Edit link in order to modify the current access rights (provided that you have eOwner rights):
Click this link in the right-hand corner of the Current Access Rights screen to view the history of the access rights given to users for a specific IA. The IA Rights History screen (see below) shows:
The first and last name of each user
Rights (column): the type of access rights (eOwner, eEditor, eViewer)
‘Granted by’ (column): shows the name of the user who assigned the access rights
‘Granted On’ (column): the date on which the access rights were given
‘Revoked By’: if access rights to the IA have been removed, the user who made the revocation
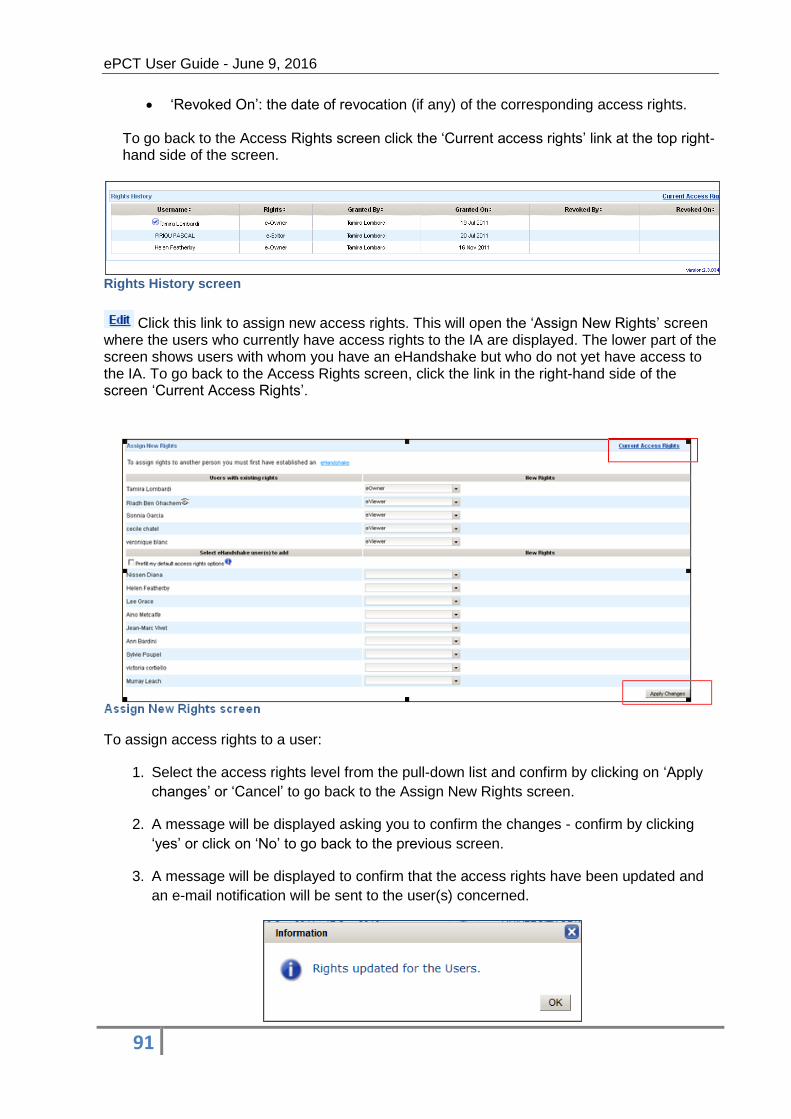
ePCT User Guide - June 9, 2016
91
‘Revoked On’: the date of revocation (if any) of the corresponding access rights. To go back to the Access Rights screen click the ‘Current access rights’ link at the top right-hand side of the screen.
Rights History screen
Click this link to assign new access rights. This will open the ‘Assign New Rights’ screen where the users who currently have access rights to the IA are displayed. The lower part of the screen shows users with whom you have an eHandshake but who do not yet have access to the IA. To go back to the Access Rights screen, click the link in the right-hand side of the screen ‘Current Access Rights’.
To assign access rights to a user:
1. Select the access rights level from the pull-down list and confirm by clicking on ‘Apply
changes’ or ‘Cancel’ to go back to the Assign New Rights screen.
2. A message will be displayed asking you to confirm the changes - confirm by clicking
‘yes’ or click on ‘No’ to go back to the previous screen.
3. A message will be displayed to confirm that the access rights have been updated and
an e-mail notification will be sent to the user(s) concerned.
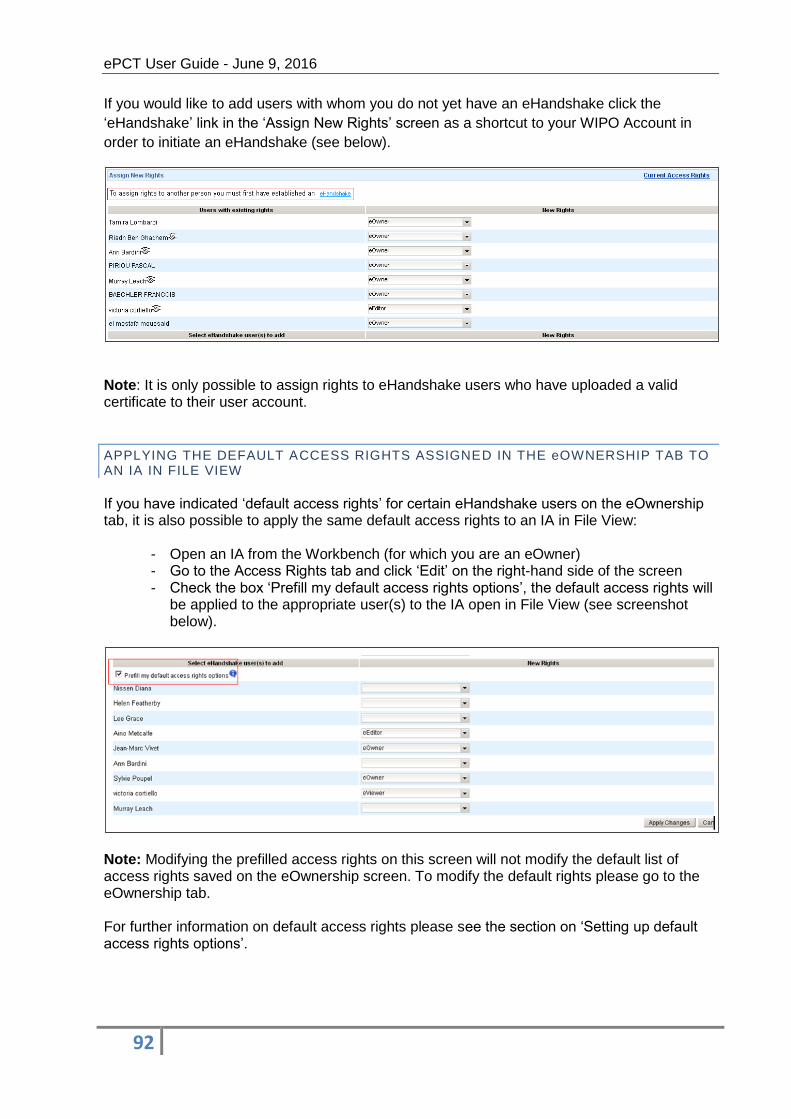
ePCT User Guide - June 9, 2016
92
If you would like to add users with whom you do not yet have an eHandshake click the
‘eHandshake’ link in the ‘Assign New Rights’ screen as a shortcut to your WIPO Account in
order to initiate an eHandshake (see below).
Note: It is only possible to assign rights to eHandshake users who have uploaded a valid certificate to their user account.
APPLYING THE DEFAULT ACCESS RIGHTS ASSIGNED IN THE eOWNERSHIP TAB TO AN IA IN FILE VIEW
If you have indicated ‘default access rights’ for certain eHandshake users on the eOwnership tab, it is also possible to apply the same default access rights to an IA in File View:
- Open an IA from the Workbench (for which you are an eOwner) - Go to the Access Rights tab and click ‘Edit’ on the right-hand side of the screen - Check the box ‘Prefill my default access rights options’, the default access rights will
be applied to the appropriate user(s) to the IA open in File View (see screenshot below).
Note: Modifying the prefilled access rights on this screen will not modify the default list of access rights saved on the eOwnership screen. To modify the default rights please go to the eOwnership tab. For further information on default access rights please see the section on ‘Setting up default access rights options’.

ePCT User Guide - June 9, 2016
93
IA NUMBER TAB - HISTORY SUB-TAB
This sub-tab shows the IA history with regard to any action performed on the IA: eOwnership confirmation, access rights modifications, documents that have been uploaded, portfolio management, etc.
IA History
The IA History table shows:
first and last name of the user who performed an action. By pointing the cursor at the name, a tool tip will appear showing the Customer ID of that user.
type of Action taken, e.g., granted user access to an IA, uploaded a document, etc.
audit info: gives details of the action performed, e.g., to whom the access rights have been given.
event date: the date on which the action took place.
It is also possible to narrow the search by entering a specific ‘Start date’ and ‘End date’ and by
clicking the ‘Search’ button. To reset the search, click ‘Reset’. Use the arrows at the top of
each column name to sort the column entries.

ePCT User Guide - June 9, 2016
94
IA NUMBER TAB – BIBLIOGRAPHIC DATA SUB-TAB
When you open an IA in the Workbench, this sub-tab shows up-to-date bibliographic data
information related to that IA, as on file at the IB.
Use the ‘ ’ icon to expand the sections or the ‘ ’ icon to collapse them. At the top of the
screen two other view options are available: expand all sections ‘ ’ and collapse all
sections ‘ ’.
Click on the printer icon for a printable version of the bibliographic data (can also be
printed to PDF if required).
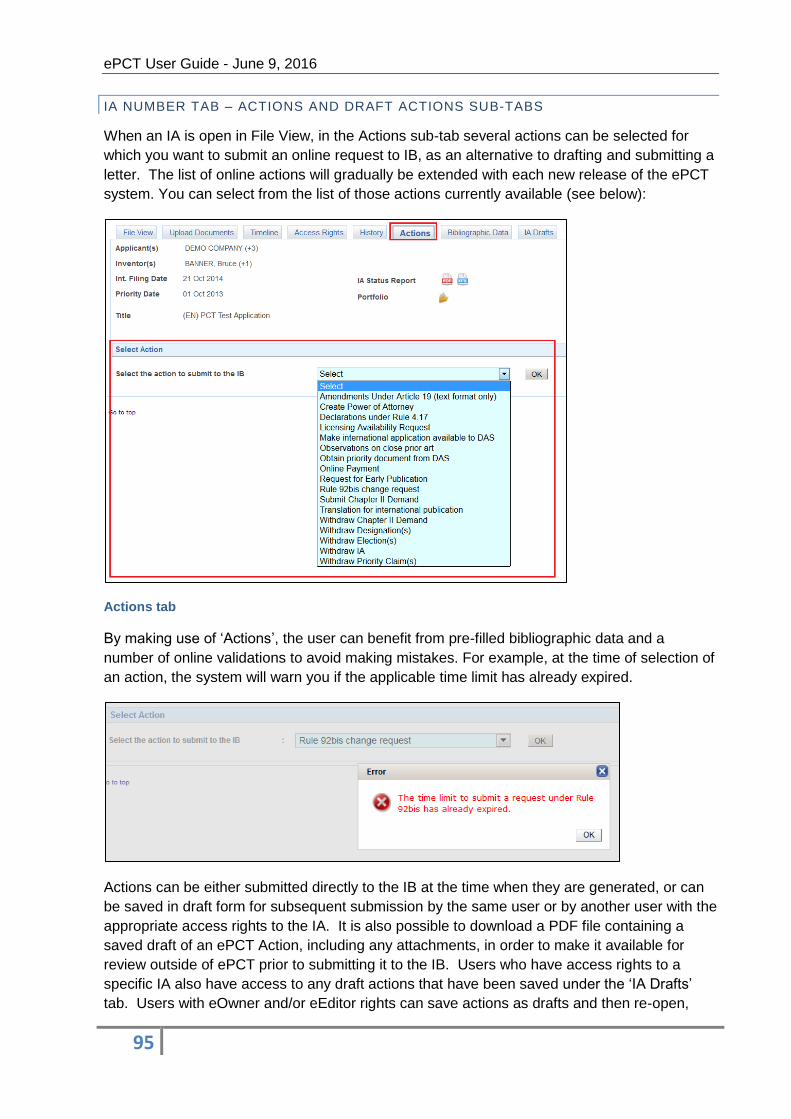
ePCT User Guide - June 9, 2016
95
IA NUMBER TAB – ACTIONS AND DRAFT ACTIONS SUB-TABS
When an IA is open in File View, in the Actions sub-tab several actions can be selected for
which you want to submit an online request to IB, as an alternative to drafting and submitting a
letter. The list of online actions will gradually be extended with each new release of the ePCT
system. You can select from the list of those actions currently available (see below):
Actions tab
By making use of ‘Actions’, the user can benefit from pre-filled bibliographic data and a
number of online validations to avoid making mistakes. For example, at the time of selection of
an action, the system will warn you if the applicable time limit has already expired.
Actions can be either submitted directly to the IB at the time when they are generated, or can
be saved in draft form for subsequent submission by the same user or by another user with the
appropriate access rights to the IA. It is also possible to download a PDF file containing a
saved draft of an ePCT Action, including any attachments, in order to make it available for
review outside of ePCT prior to submitting it to the IB. Users who have access rights to a
specific IA also have access to any draft actions that have been saved under the ‘IA Drafts’
tab. Users with eOwner and/or eEditor rights can save actions as drafts and then re-open,
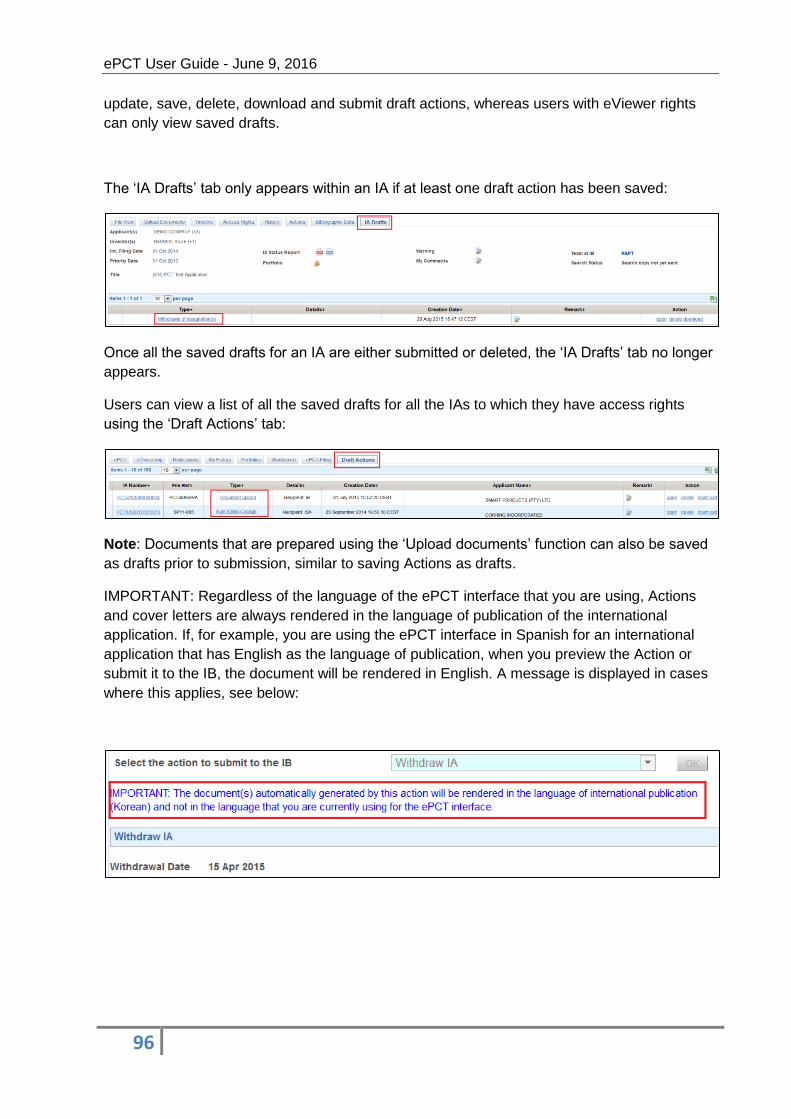
ePCT User Guide - June 9, 2016
96
update, save, delete, download and submit draft actions, whereas users with eViewer rights
can only view saved drafts.
The ‘IA Drafts’ tab only appears within an IA if at least one draft action has been saved:
Once all the saved drafts for an IA are either submitted or deleted, the ‘IA Drafts’ tab no longer
appears.
Users can view a list of all the saved drafts for all the IAs to which they have access rights
using the ‘Draft Actions’ tab:
Note: Documents that are prepared using the ‘Upload documents’ function can also be saved
as drafts prior to submission, similar to saving Actions as drafts.
IMPORTANT: Regardless of the language of the ePCT interface that you are using, Actions
and cover letters are always rendered in the language of publication of the international
application. If, for example, you are using the ePCT interface in Spanish for an international
application that has English as the language of publication, when you preview the Action or
submit it to the IB, the document will be rendered in English. A message is displayed in cases
where this applies, see below:

ePCT User Guide - June 9, 2016
97
ACTIONS – AMENDMENTS UNDER ARTICLE 19 (TEXT FORMAT ONLY)
This action enables you to submit to the IB amendments to the claims under Article 19 in text
format (DOCX or text-based PDF files). For Article 19 amendments that are not in text format,
the Document Upload function is to be used, however, applicants are encouraged to submit
Article 19 amendments in text format order to facilitate processing by the IB in preparation for
international publication.
1. Open the IA and go to the ‘Actions’ tab.
2. Select from the pull-down list the action ‘Amendments Under Article 19 (text format
only)’ and click ‘Ok’.
3. The system will prevent you from proceeding if Article 19 Amendments cannot be
submitted (e.g., ISR not yet issued or not yet received at the IB or amendments already
received and processed by the IB), or if the time limit has already expired:
4. The system will warn you if Article 19 Amendments have already been submitted to the
IB but are not yet processed by the IB:
5. It is mandatory to attach a complete set of claims as amended in either DOCX or PDF
text-based format and to indicate the ‘Total number of claims as amended.’ In the case
of a DOCX file, the system extracts the total number of claims and, if possible, will also
do so if a text-based PDF file is attached. Failing that, the user can manually indicate
the total number of claims as amended. Links to sample files and templates are
available in all PCT publication languages (see below).
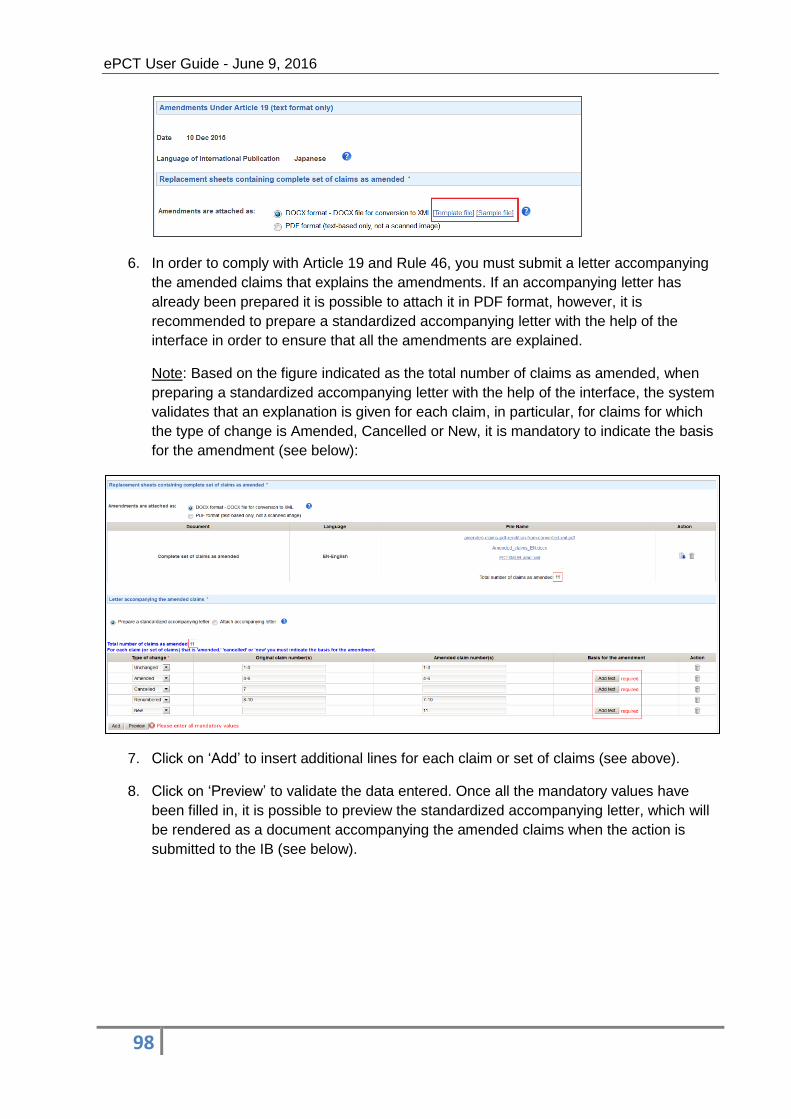
ePCT User Guide - June 9, 2016
98
6. In order to comply with Article 19 and Rule 46, you must submit a letter accompanying
the amended claims that explains the amendments. If an accompanying letter has
already been prepared it is possible to attach it in PDF format, however, it is
recommended to prepare a standardized accompanying letter with the help of the
interface in order to ensure that all the amendments are explained.
Note: Based on the figure indicated as the total number of claims as amended, when
preparing a standardized accompanying letter with the help of the interface, the system
validates that an explanation is given for each claim, in particular, for claims for which
the type of change is Amended, Cancelled or New, it is mandatory to indicate the basis
for the amendment (see below):
7. Click on ‘Add’ to insert additional lines for each claim or set of claims (see above).
8. Click on ‘Preview’ to validate the data entered. Once all the mandatory values have
been filled in, it is possible to preview the standardized accompanying letter, which will
be rendered as a document accompanying the amended claims when the action is
submitted to the IB (see below).
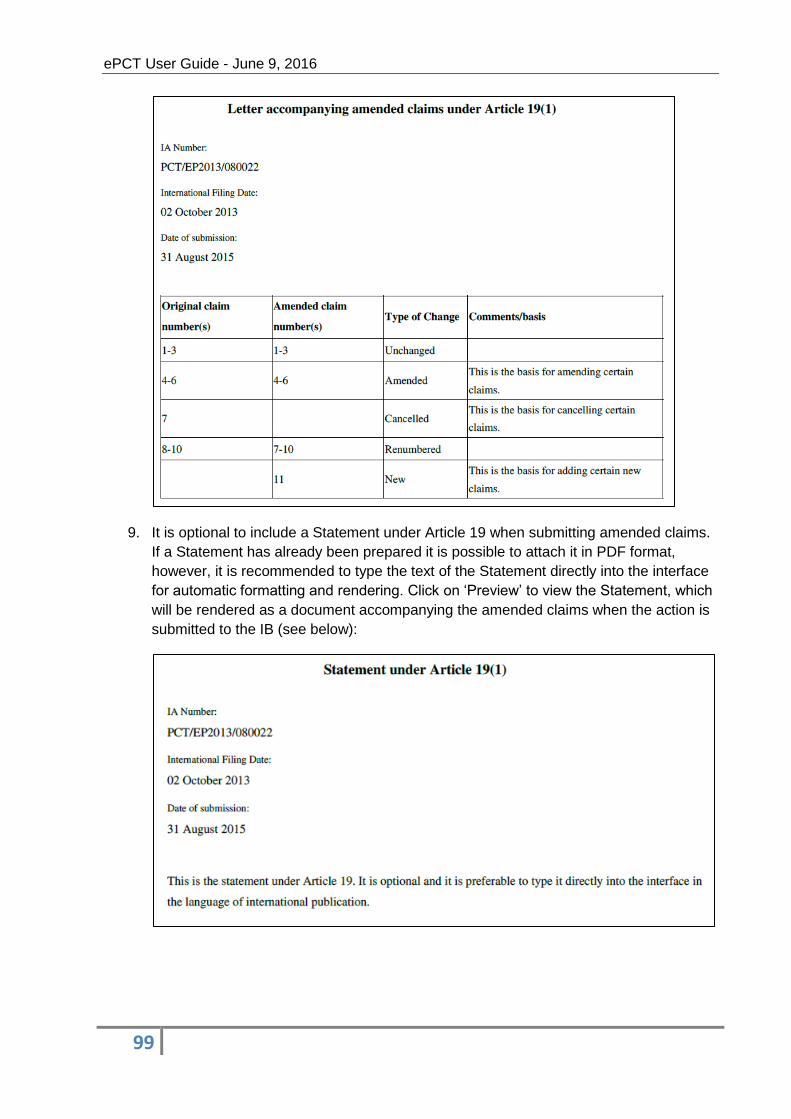
ePCT User Guide - June 9, 2016
99
9. It is optional to include a Statement under Article 19 when submitting amended claims.
If a Statement has already been prepared it is possible to attach it in PDF format,
however, it is recommended to type the text of the Statement directly into the interface
for automatic formatting and rendering. Click on ‘Preview’ to view the Statement, which
will be rendered as a document accompanying the amended claims when the action is
submitted to the IB (see below):

ePCT User Guide - June 9, 2016
100
Note: The complete set of claims as amended, the accompanying letter and any
Statement must be furnished in the language of international publication of the
application which is indicated immediately under the date field.
10. It is compulsory to sign the action by selecting a signature option.
11. Prior to ‘Submit’ it is possible save a draft copy of the draft for subsequent submission
using the ‘Save Draft’ button.
12. After pressing ‘Submit,’ a message is displayed to confirm that the ePCT Action has
been successfully submitted to the IB for processing.
13. Documents entitled ePCT Cover Letter, Amended Claims, Letter accompanying
Amended claims and Amended Claims Statement are transmitted to the IB for
processing. You may consult these documents in the contents of the IA under the File
View.
ACTIONS – CREATE POWER OF ATTORNEY
In order to create a power of attorney and submit it to the IB:
1. Open the IA and go to the ‘Actions’ tab.
2. Select from the pull-down list the action ‘Create Power of Attorney’ and click ‘Ok’.
3. Provided that there is at least one Agent or a Common Representative for the IA, a
Power of Attorney can be prepared online using the bibliographic data on record at the
IB (see below).

ePCT User Guide - June 9, 2016
101
4. Select the name of the Agent(s) to be appointed and select to add the Applicant(s)
appointing the selected Agent.
5. The signature of each applicant must be indicated (either by typing a text string
signature which can be done by sharing access rights to the Action with the
Applicant(s) concerned or by attaching an image signature):
6. Click on ‘Create power of attorney’ in order to render the power of attorney which can
be previewed by clicking on the ‘Power of Attorney’ link under the File Name column
(see below):
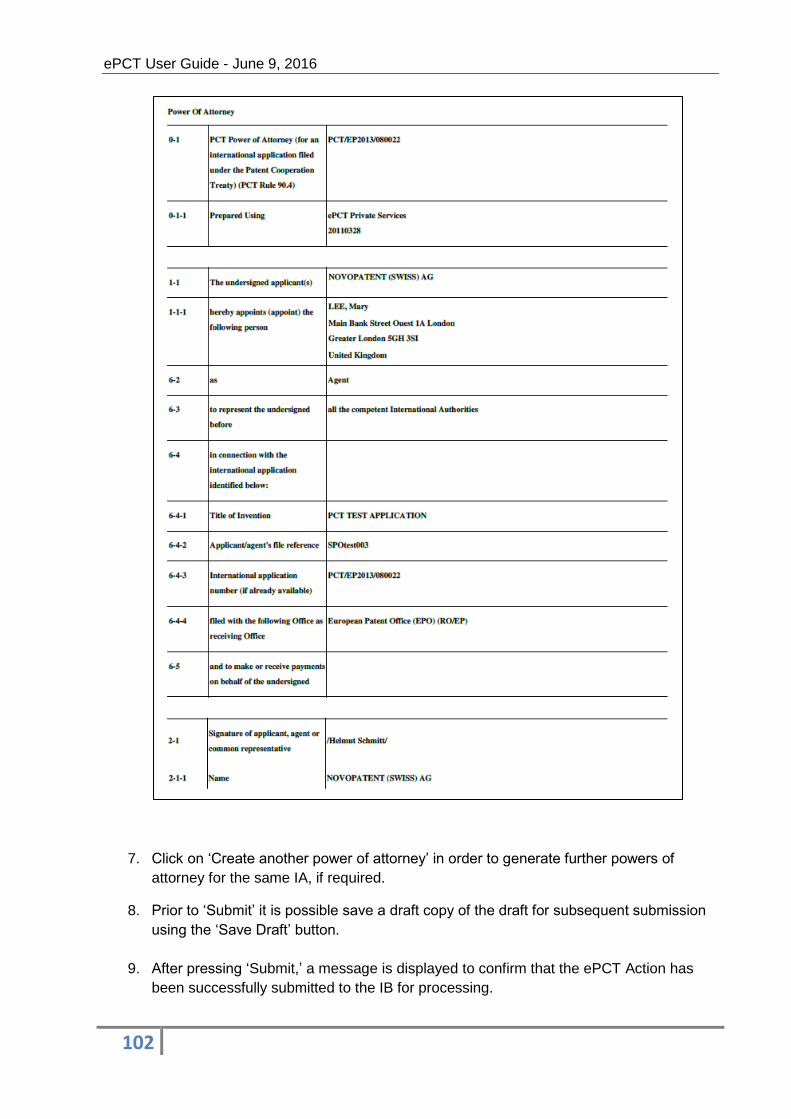
ePCT User Guide - June 9, 2016
102
7. Click on ‘Create another power of attorney’ in order to generate further powers of
attorney for the same IA, if required.
8. Prior to ‘Submit’ it is possible save a draft copy of the draft for subsequent submission
using the ‘Save Draft’ button.
9. After pressing ‘Submit,’ a message is displayed to confirm that the ePCT Action has
been successfully submitted to the IB for processing.
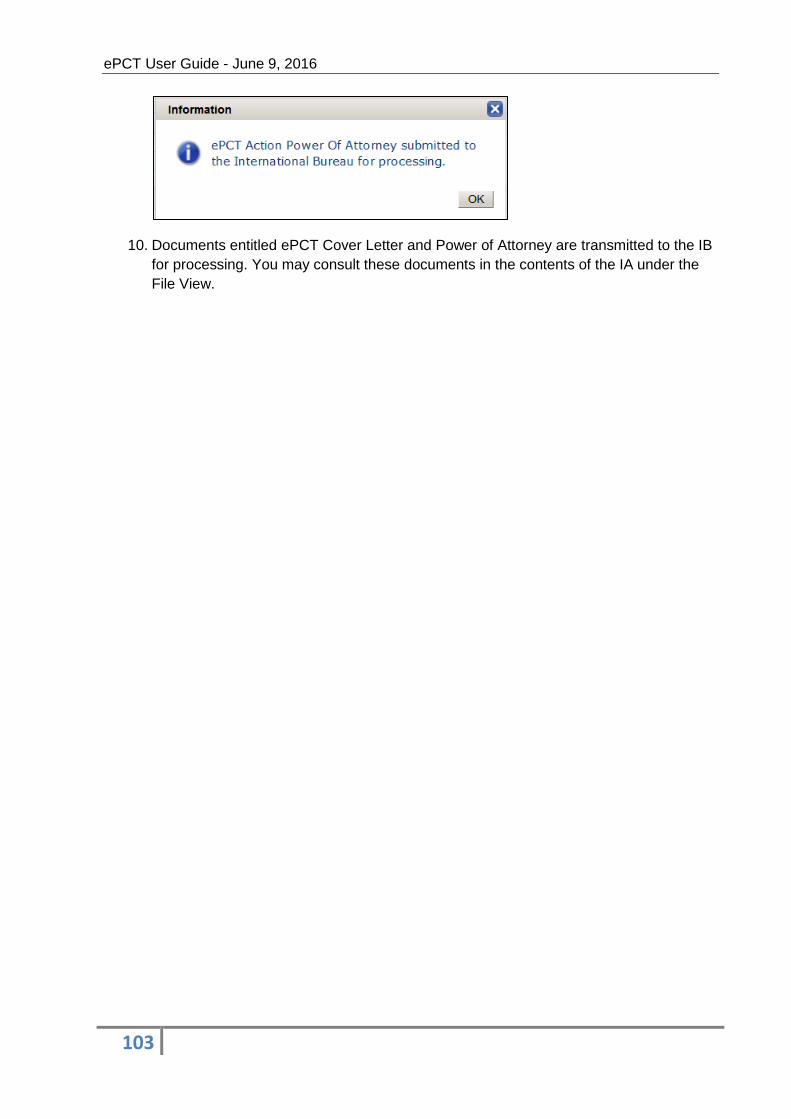
ePCT User Guide - June 9, 2016
103
10. Documents entitled ePCT Cover Letter and Power of Attorney are transmitted to the IB
for processing. You may consult these documents in the contents of the IA under the
File View.
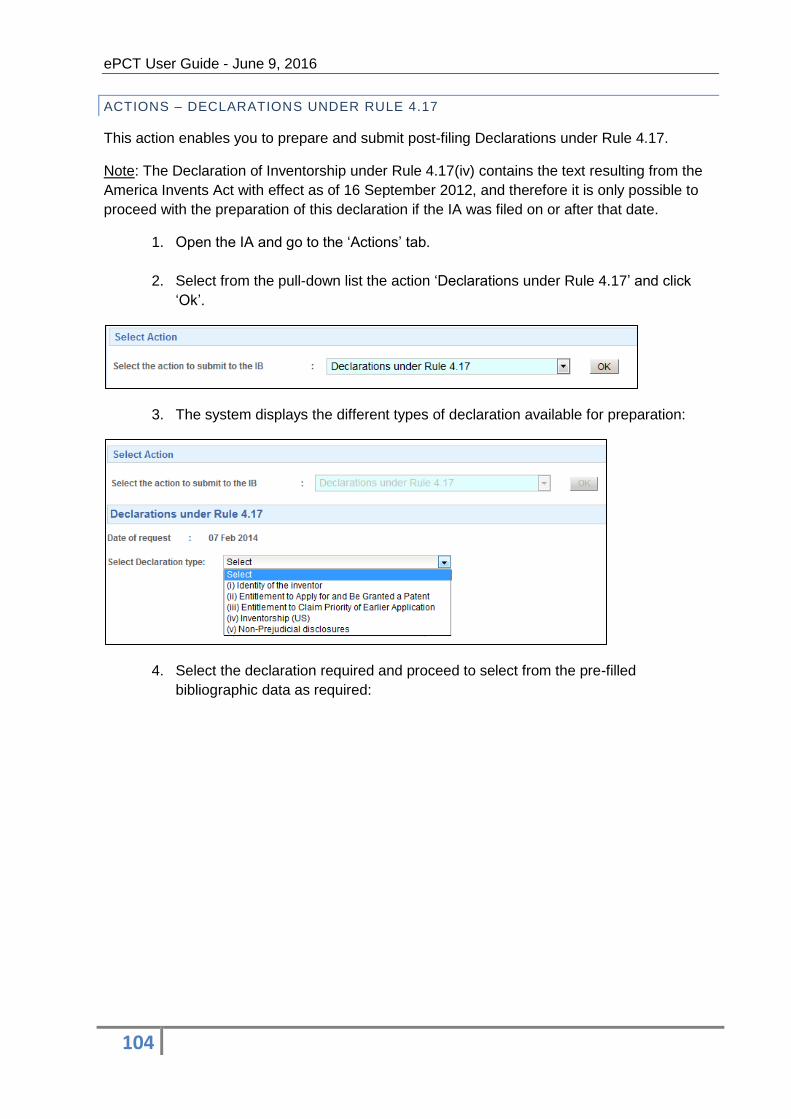
ePCT User Guide - June 9, 2016
104
ACTIONS – DECLARATIONS UNDER RULE 4.17
This action enables you to prepare and submit post-filing Declarations under Rule 4.17.
Note: The Declaration of Inventorship under Rule 4.17(iv) contains the text resulting from the
America Invents Act with effect as of 16 September 2012, and therefore it is only possible to
proceed with the preparation of this declaration if the IA was filed on or after that date.
1. Open the IA and go to the ‘Actions’ tab.
2. Select from the pull-down list the action ‘Declarations under Rule 4.17’ and click
‘Ok’.
3. The system displays the different types of declaration available for preparation:
4. Select the declaration required and proceed to select from the pre-filled
bibliographic data as required:
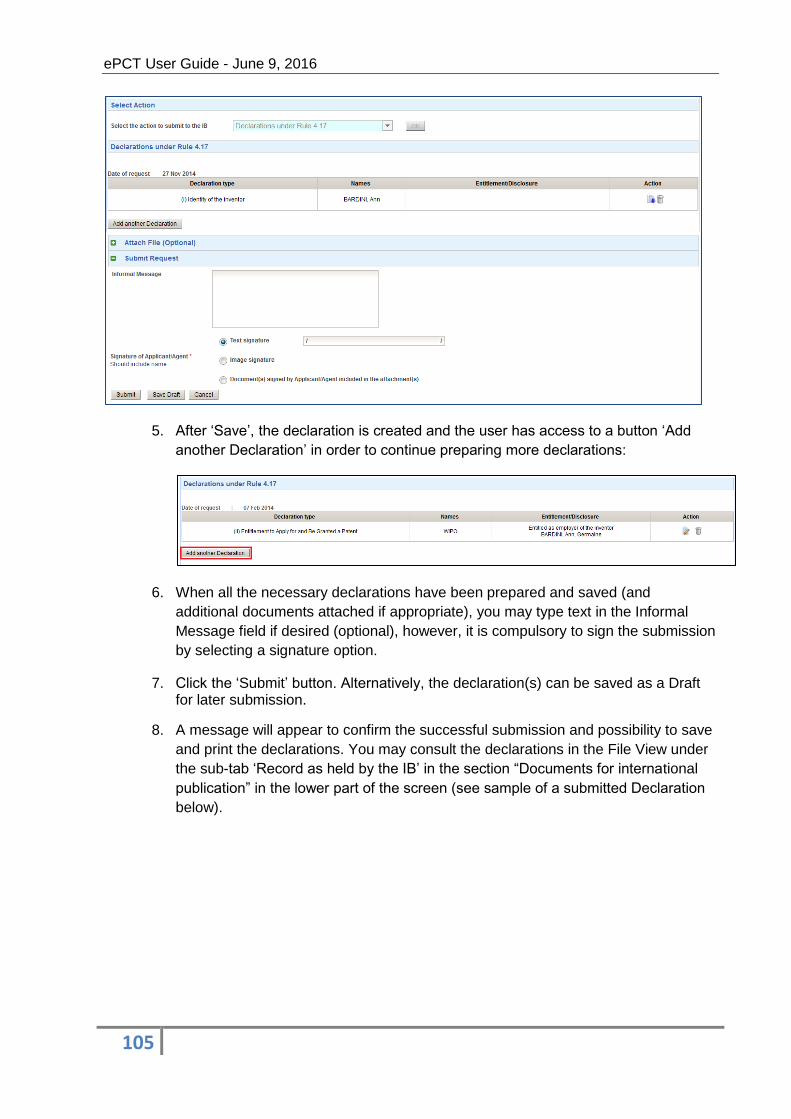
ePCT User Guide - June 9, 2016
105
5. After ‘Save’, the declaration is created and the user has access to a button ‘Add
another Declaration’ in order to continue preparing more declarations:
6. When all the necessary declarations have been prepared and saved (and
additional documents attached if appropriate), you may type text in the Informal
Message field if desired (optional), however, it is compulsory to sign the submission
by selecting a signature option.
7. Click the ‘Submit’ button. Alternatively, the declaration(s) can be saved as a Draft for later submission.
8. A message will appear to confirm the successful submission and possibility to save
and print the declarations. You may consult the declarations in the File View under
the sub-tab ‘Record as held by the IB’ in the section “Documents for international
publication” in the lower part of the screen (see sample of a submitted Declaration
below).

ePCT User Guide - June 9, 2016
106
ACTIONS – LICENSING AVAILABILITY REQUEST
In order to submit an online request to the IB to indicate availability for licensing purposes on
the PATENTSCOPE website:
1. Open the IA and go to the ‘Actions’ tab.
2. Select from the pull-down list the action ‘Licensing Availability Request’ and click ‘Ok’.
3. Indicate the PCT Contracting States in which the applicant is willing to license the
claimed invention(s), if already known.
4. Indicate whether use by the licensee would be exclusive or non-exclusive, if already
known.
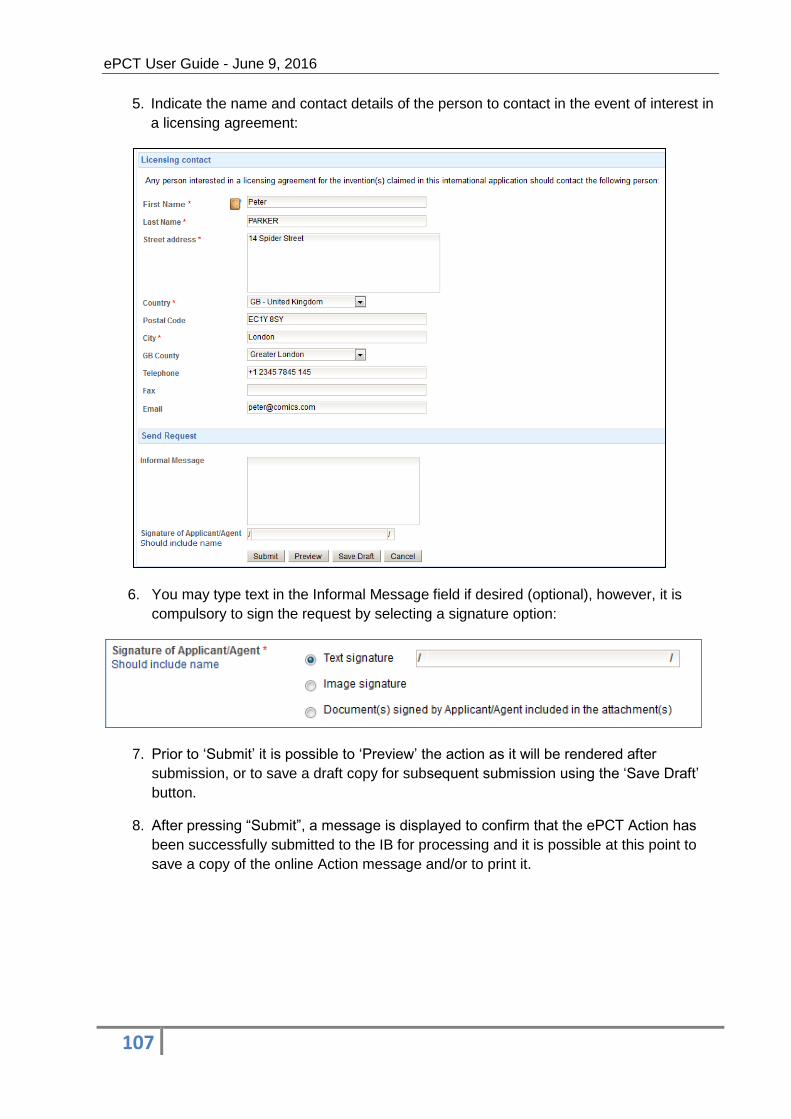
ePCT User Guide - June 9, 2016
107
5. Indicate the name and contact details of the person to contact in the event of interest in
a licensing agreement:
6. You may type text in the Informal Message field if desired (optional), however, it is
compulsory to sign the request by selecting a signature option:
7. Prior to ‘Submit’ it is possible to ‘Preview’ the action as it will be rendered after
submission, or to save a draft copy for subsequent submission using the ‘Save Draft’
button.
8. After pressing “Submit”, a message is displayed to confirm that the ePCT Action has
been successfully submitted to the IB for processing and it is possible at this point to
save a copy of the online Action message and/or to print it.

ePCT User Guide - June 9, 2016
108
IMPORTANT: The usual time limit applies for the submission of licensing availability
requests. The system will not allow you to proceed with this action if the applicable time
limit has expired.
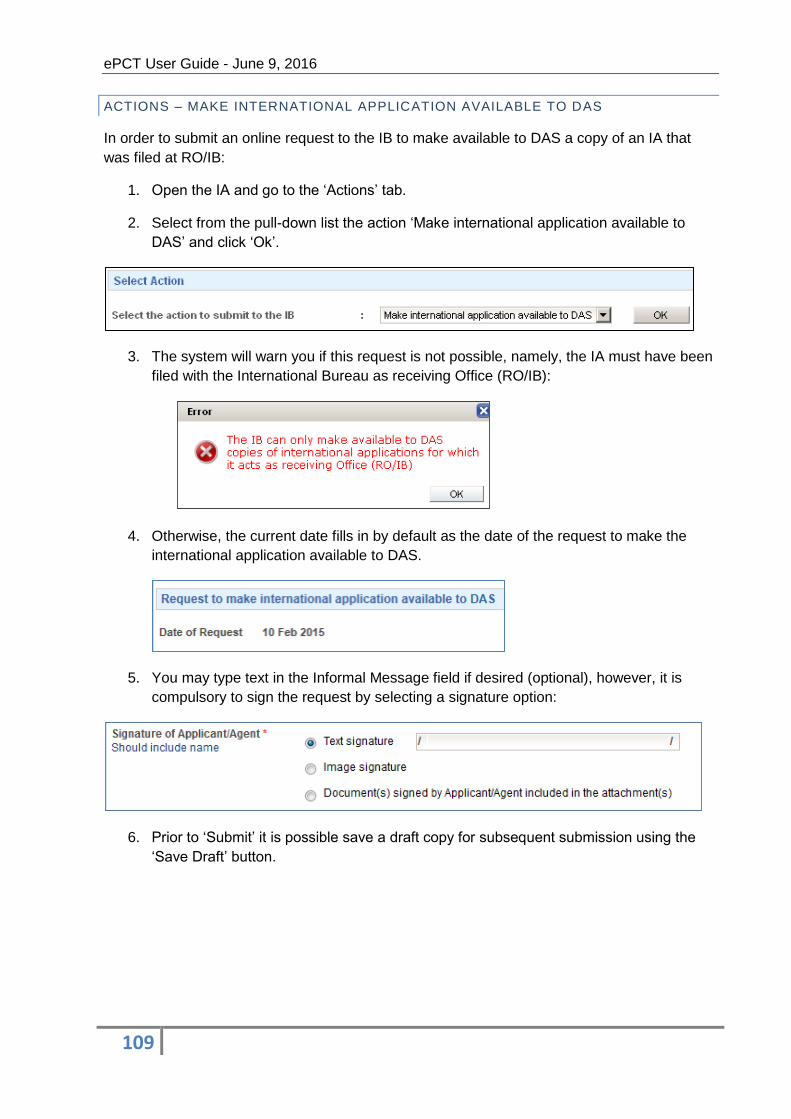
ePCT User Guide - June 9, 2016
109
ACTIONS – MAKE INTERNATIONAL APPLICATION AVAILABLE TO DAS
In order to submit an online request to the IB to make available to DAS a copy of an IA that
was filed at RO/IB:
1. Open the IA and go to the ‘Actions’ tab.
2. Select from the pull-down list the action ‘Make international application available to
DAS’ and click ‘Ok’.
3. The system will warn you if this request is not possible, namely, the IA must have been
filed with the International Bureau as receiving Office (RO/IB):
4. Otherwise, the current date fills in by default as the date of the request to make the
international application available to DAS.
5. You may type text in the Informal Message field if desired (optional), however, it is
compulsory to sign the request by selecting a signature option:
6. Prior to ‘Submit’ it is possible save a draft copy for subsequent submission using the
‘Save Draft’ button.
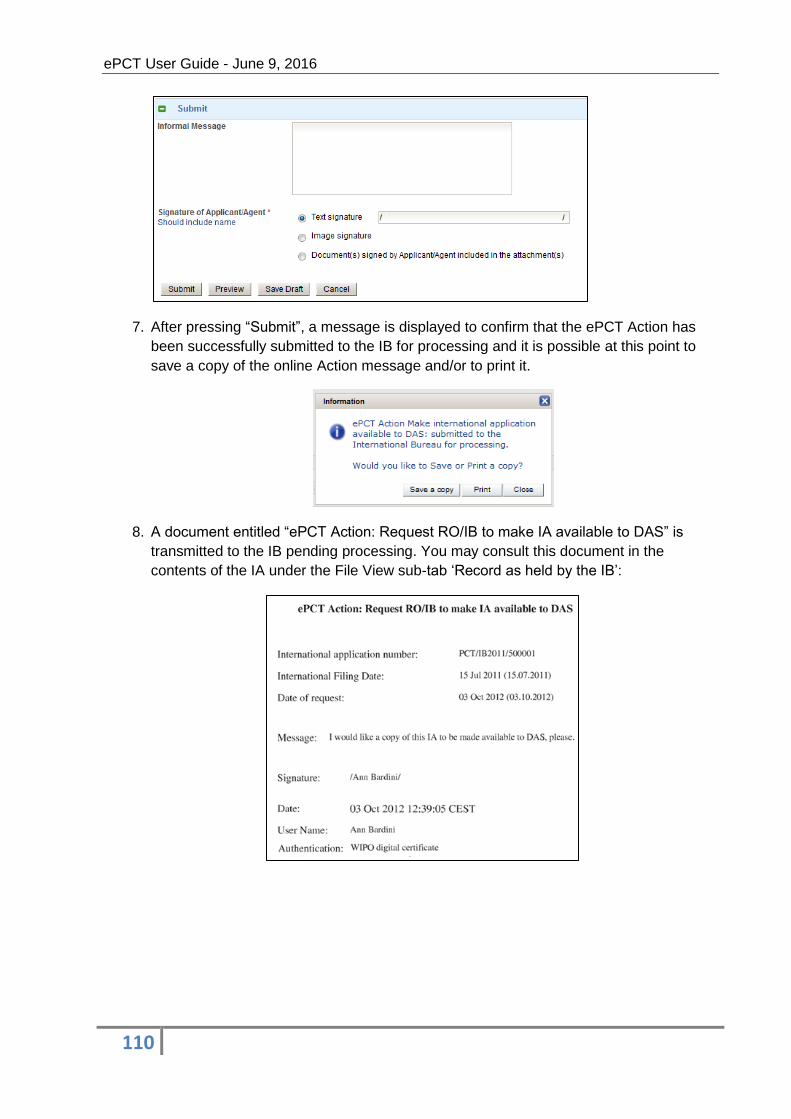
ePCT User Guide - June 9, 2016
110
7. After pressing “Submit”, a message is displayed to confirm that the ePCT Action has
been successfully submitted to the IB for processing and it is possible at this point to
save a copy of the online Action message and/or to print it.
8. A document entitled “ePCT Action: Request RO/IB to make IA available to DAS” is
transmitted to the IB pending processing. You may consult this document in the
contents of the IA under the File View sub-tab ‘Record as held by the IB’:
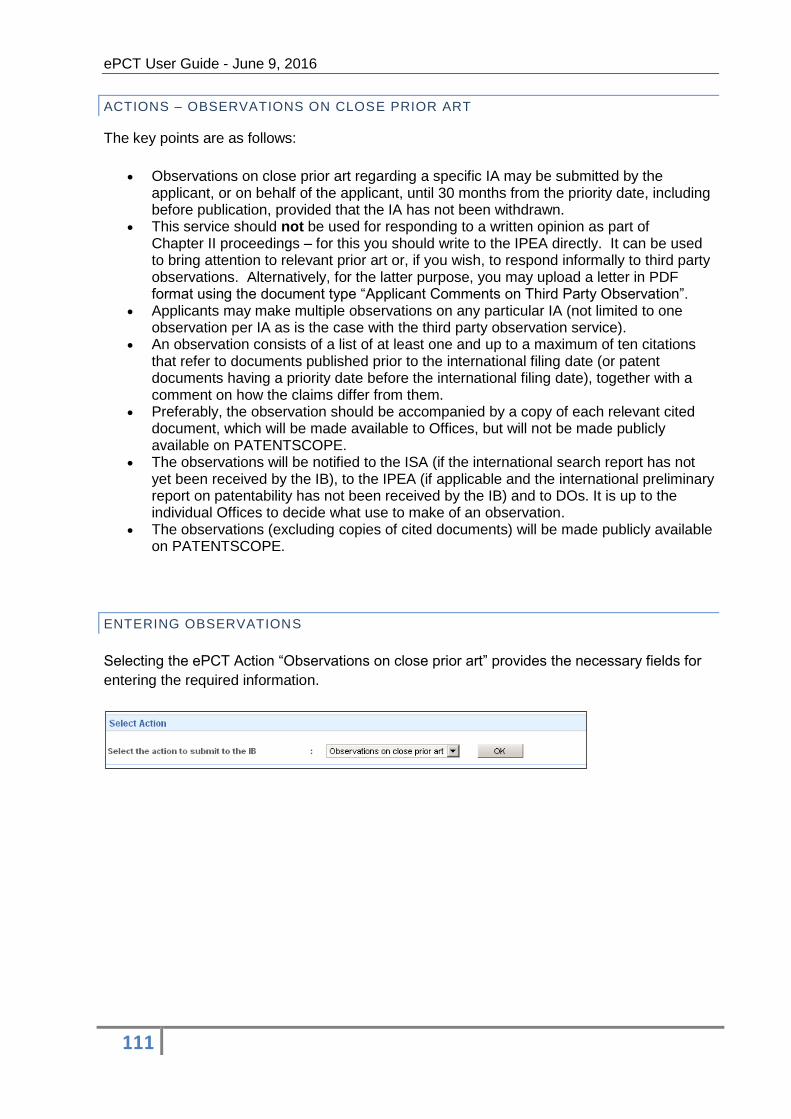
ePCT User Guide - June 9, 2016
111
ACTIONS – OBSERVATIONS ON CLOSE PRIOR ART
The key points are as follows:
Observations on close prior art regarding a specific IA may be submitted by the applicant, or on behalf of the applicant, until 30 months from the priority date, including before publication, provided that the IA has not been withdrawn.
This service should not be used for responding to a written opinion as part of Chapter II proceedings – for this you should write to the IPEA directly. It can be used to bring attention to relevant prior art or, if you wish, to respond informally to third party observations. Alternatively, for the latter purpose, you may upload a letter in PDF format using the document type “Applicant Comments on Third Party Observation”.
Applicants may make multiple observations on any particular IA (not limited to one observation per IA as is the case with the third party observation service).
An observation consists of a list of at least one and up to a maximum of ten citations that refer to documents published prior to the international filing date (or patent documents having a priority date before the international filing date), together with a comment on how the claims differ from them.
Preferably, the observation should be accompanied by a copy of each relevant cited document, which will be made available to Offices, but will not be made publicly available on PATENTSCOPE.
The observations will be notified to the ISA (if the international search report has not yet been received by the IB), to the IPEA (if applicable and the international preliminary report on patentability has not been received by the IB) and to DOs. It is up to the individual Offices to decide what use to make of an observation.
The observations (excluding copies of cited documents) will be made publicly available on PATENTSCOPE.
ENTERING OBSERVATIONS
Selecting the ePCT Action “Observations on close prior art” provides the necessary fields for
entering the required information.
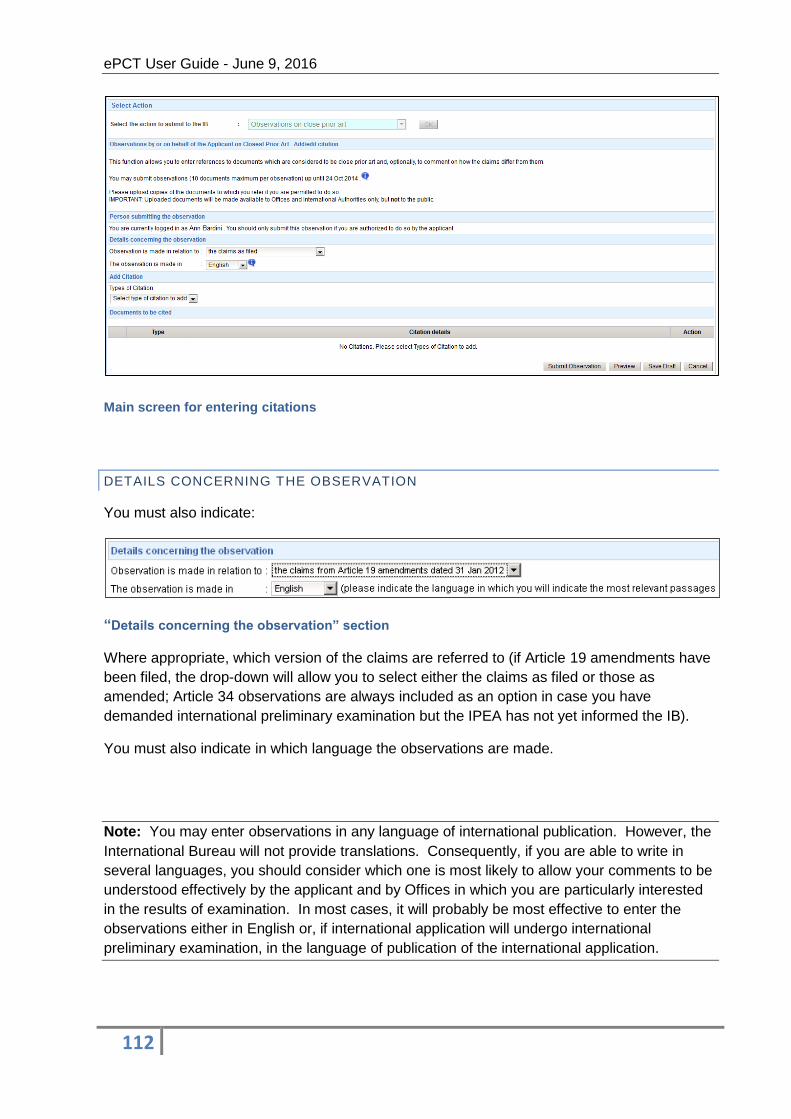
ePCT User Guide - June 9, 2016
112
Main screen for entering citations
DETAILS CONCERNING THE OBSERVATION
You must also indicate:
“Details concerning the observation” section
Where appropriate, which version of the claims are referred to (if Article 19 amendments have
been filed, the drop-down will allow you to select either the claims as filed or those as
amended; Article 34 observations are always included as an option in case you have
demanded international preliminary examination but the IPEA has not yet informed the IB).
You must also indicate in which language the observations are made.
Note: You may enter observations in any language of international publication. However, the
International Bureau will not provide translations. Consequently, if you are able to write in
several languages, you should consider which one is most likely to allow your comments to be
understood effectively by the applicant and by Offices in which you are particularly interested
in the results of examination. In most cases, it will probably be most effective to enter the
observations either in English or, if international application will undergo international
preliminary examination, in the language of publication of the international application.

ePCT User Guide - June 9, 2016
113
ADDING CITATIONS
At the bottom of the screen is a list of cited documents which make up the observation. The
list is initially empty and you must add at least one citation before you can submit the
observation. Click on the “add citation” dropdown and select the relevant type of document.
Empty list of cited documents
Types of citation which can be added
Select the type of citation which best describes the particular publication which you wish to
refer to.
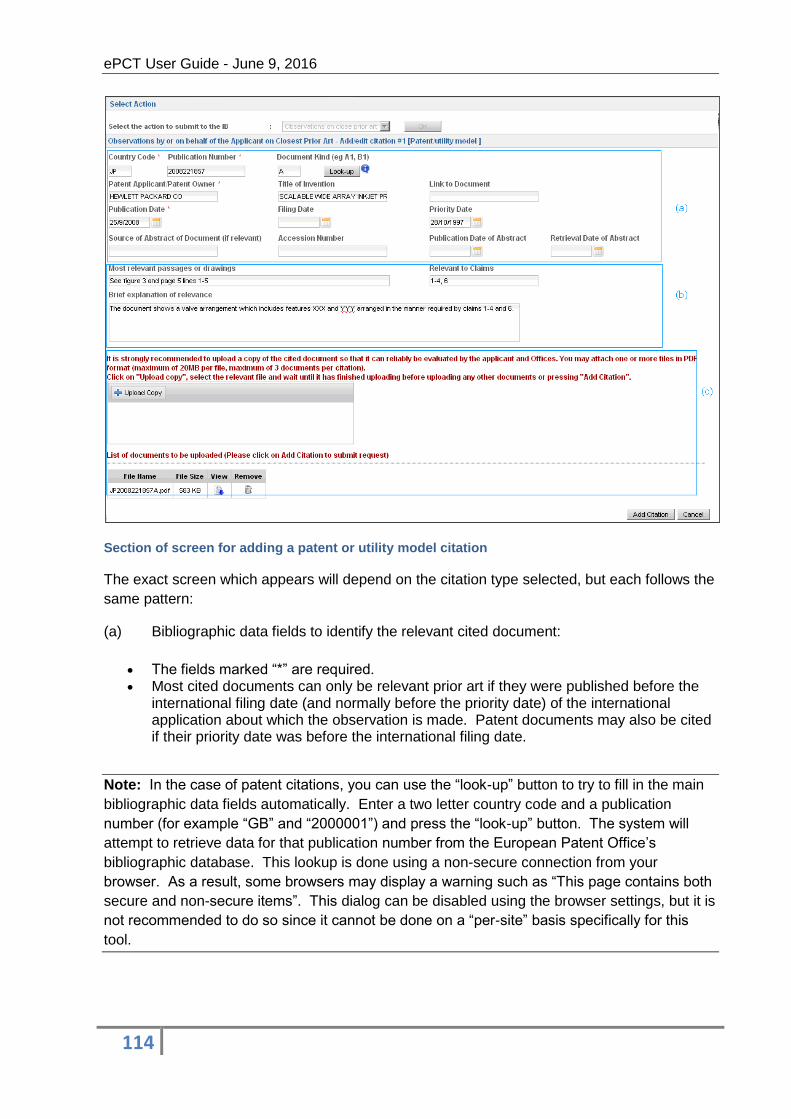
ePCT User Guide - June 9, 2016
114
Section of screen for adding a patent or utility model citation
The exact screen which appears will depend on the citation type selected, but each follows the
same pattern:
(a) Bibliographic data fields to identify the relevant cited document:
The fields marked “*” are required. Most cited documents can only be relevant prior art if they were published before the
international filing date (and normally before the priority date) of the international application about which the observation is made. Patent documents may also be cited if their priority date was before the international filing date.
Note: In the case of patent citations, you can use the “look-up” button to try to fill in the main
bibliographic data fields automatically. Enter a two letter country code and a publication
number (for example “GB” and “2000001”) and press the “look-up” button. The system will
attempt to retrieve data for that publication number from the European Patent Office’s
bibliographic database. This lookup is done using a non-secure connection from your
browser. As a result, some browsers may display a warning such as “This page contains both
secure and non-secure items”. This dialog can be disabled using the browser settings, but it is
not recommended to do so since it cannot be done on a “per-site” basis specifically for this
tool.
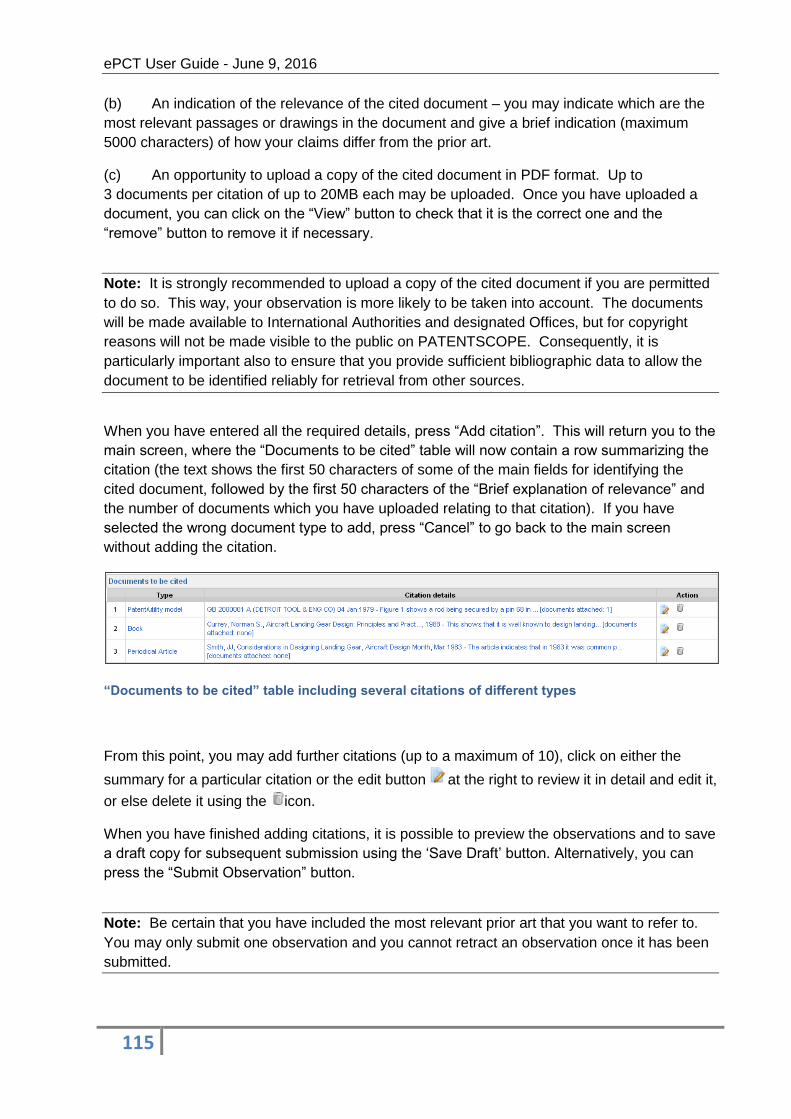
ePCT User Guide - June 9, 2016
115
(b) An indication of the relevance of the cited document – you may indicate which are the
most relevant passages or drawings in the document and give a brief indication (maximum
5000 characters) of how your claims differ from the prior art.
(c) An opportunity to upload a copy of the cited document in PDF format. Up to
3 documents per citation of up to 20MB each may be uploaded. Once you have uploaded a
document, you can click on the “View” button to check that it is the correct one and the
“remove” button to remove it if necessary.
Note: It is strongly recommended to upload a copy of the cited document if you are permitted
to do so. This way, your observation is more likely to be taken into account. The documents
will be made available to International Authorities and designated Offices, but for copyright
reasons will not be made visible to the public on PATENTSCOPE. Consequently, it is
particularly important also to ensure that you provide sufficient bibliographic data to allow the
document to be identified reliably for retrieval from other sources.
When you have entered all the required details, press “Add citation”. This will return you to the
main screen, where the “Documents to be cited” table will now contain a row summarizing the
citation (the text shows the first 50 characters of some of the main fields for identifying the
cited document, followed by the first 50 characters of the “Brief explanation of relevance” and
the number of documents which you have uploaded relating to that citation). If you have
selected the wrong document type to add, press “Cancel” to go back to the main screen
without adding the citation.
“Documents to be cited” table including several citations of different types
From this point, you may add further citations (up to a maximum of 10), click on either the
summary for a particular citation or the edit button at the right to review it in detail and edit it,
or else delete it using the icon.
When you have finished adding citations, it is possible to preview the observations and to save
a draft copy for subsequent submission using the ‘Save Draft’ button. Alternatively, you can
press the “Submit Observation” button.
Note: Be certain that you have included the most relevant prior art that you want to refer to.
You may only submit one observation and you cannot retract an observation once it has been
submitted.

ePCT User Guide - June 9, 2016
116
AFTER THE OBSERVATION IS SUBMITTED
After pressing “Submit Observation”, you will see a dialog box stating “Observations on close
prior art have been submitted to the International Bureau for review” and you will be redirected
to the File View tab, where you can see a copy of the observation and any accompanying
documents which you have uploaded.
The observation will be reviewed by the International Bureau to check that it appears to be a
valid observation and does not include unrelated matter.
If you wish to track the processing of your observation, you can determine its status from the
status icons in the File View tab of the international application in ePCT private services.
When you first submit the observation, the status icon for each item is , indicating a document “Not yet processed by the IB”.
Once the observation has been accepted by the International Bureau, the icon next to
the document name will change to show a green tick indicating “Processed by the IB” and the icon in the Status column will change to “18” to indicate that it is confirmed as a document type which should be visible on PATENTSCOPE after international
publication. The icon next to the cited patent document indicates that this document will not be made publicly available on PATENTSCOPE.
If the observation is rejected, it will disappear from the list entirely. You will receive an email message from the International Bureau explaining why it was rejected.
File View showing observation with two uploaded documents before processing by IB
Once the observation has been accepted by the International Bureau:
The applicant will be notified. If the international search report has not yet been received by the IB, the ISA will be
notified. If a demand has been filed and the international preliminary examination report has not
been received by the IB, the IPEA will be notified. The observation (but not the copies of cited documents) will appear on
PATENTSCOPE the next day. The observation (together with any other observations received and any responses by
the applicant) will be notified to designated Offices which have asked to receive such information after 30 months from the priority date or on specific request in relation to an national phase entry.

ePCT User Guide - June 9, 2016
117
Sample Observation by the Applicant on Close Prior Art
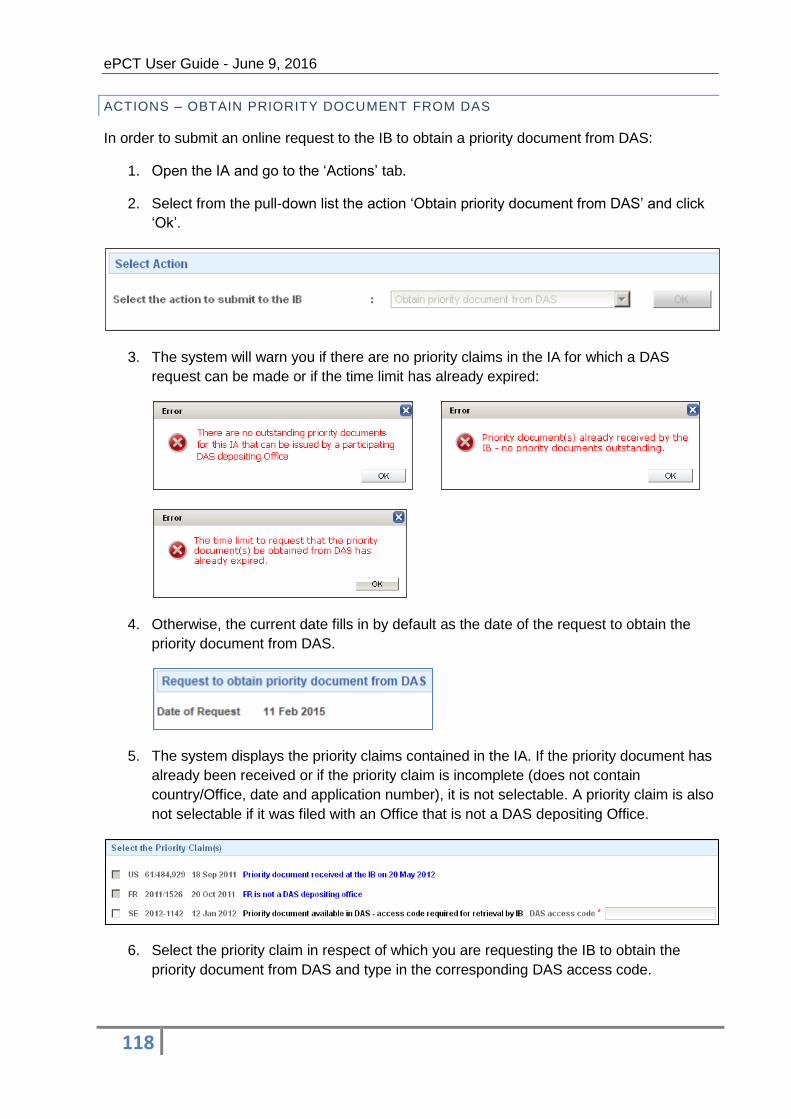
ePCT User Guide - June 9, 2016
118
ACTIONS – OBTAIN PRIORITY DOCUMENT FROM DAS
In order to submit an online request to the IB to obtain a priority document from DAS:
1. Open the IA and go to the ‘Actions’ tab.
2. Select from the pull-down list the action ‘Obtain priority document from DAS’ and click
‘Ok’.
3. The system will warn you if there are no priority claims in the IA for which a DAS
request can be made or if the time limit has already expired:
4. Otherwise, the current date fills in by default as the date of the request to obtain the
priority document from DAS.
5. The system displays the priority claims contained in the IA. If the priority document has
already been received or if the priority claim is incomplete (does not contain
country/Office, date and application number), it is not selectable. A priority claim is also
not selectable if it was filed with an Office that is not a DAS depositing Office.
6. Select the priority claim in respect of which you are requesting the IB to obtain the
priority document from DAS and type in the corresponding DAS access code.
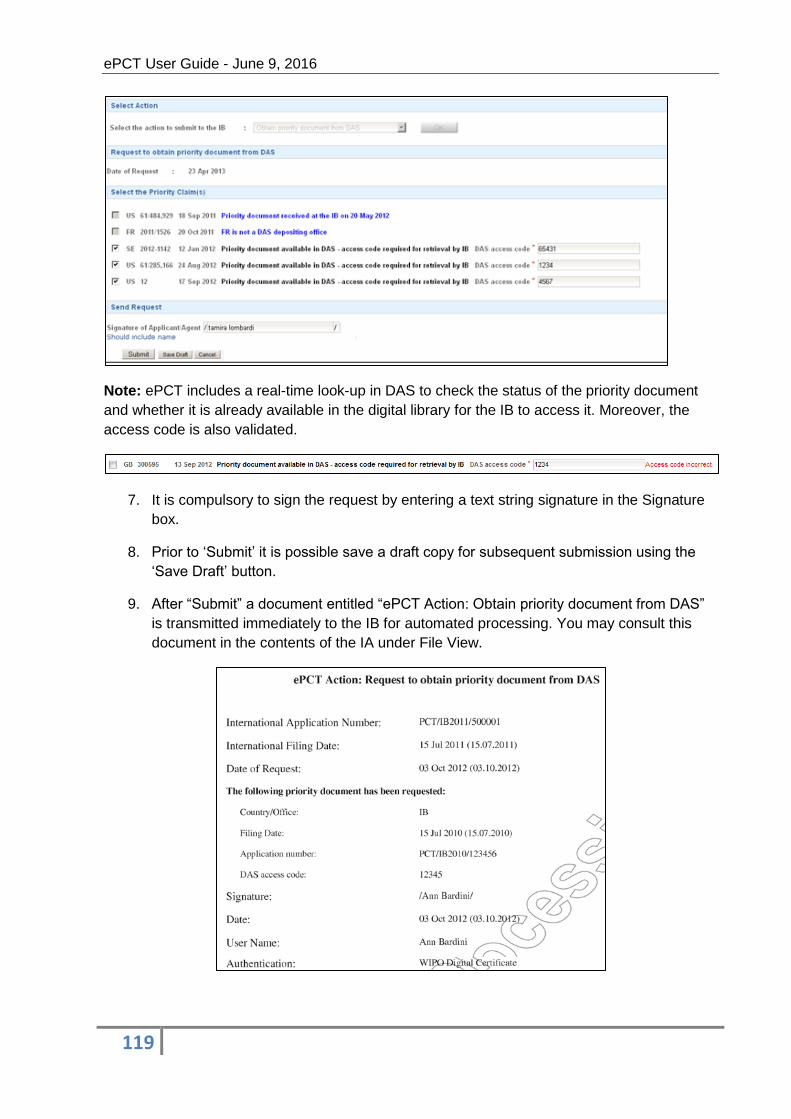
ePCT User Guide - June 9, 2016
119
Note: ePCT includes a real-time look-up in DAS to check the status of the priority document
and whether it is already available in the digital library for the IB to access it. Moreover, the
access code is also validated.
7. It is compulsory to sign the request by entering a text string signature in the Signature
box.
8. Prior to ‘Submit’ it is possible save a draft copy for subsequent submission using the
‘Save Draft’ button.
9. After “Submit” a document entitled “ePCT Action: Obtain priority document from DAS”
is transmitted immediately to the IB for automated processing. You may consult this
document in the contents of the IA under File View.

ePCT User Guide - June 9, 2016
120
ACTIONS – ONLINE PAYMENT
This action may be used after filing a new international application to make an online transaction to pay the fees due for filing to RO/IB by credit card or by debiting a WIPO current account.
In order to pay after filing online the fees for filing an international application to RO/IB:
1. Open the IA and go to the ‘Actions’ tab.
2. Select from the pull-down list the action ‘Online Payment’ and click ‘Ok’.
3. The system will display the Payment number, the total amount due, the status of
payment (Unpaid) and the payment due date.
4. Click the e-mail icon next to the Payment number to enter an e-mail address and send
the payment invitation to an associate (if required).
If you have received an e-mail notification from an Associate inviting you to pay the fees,
click the Payment number indicated in the e-mail to access the Invoice page and proceed
with payment.
5. Click on ‘Pay fees now with ePCT online payment’ to go to the ‘Invoice’ page and
complete the payment operation.
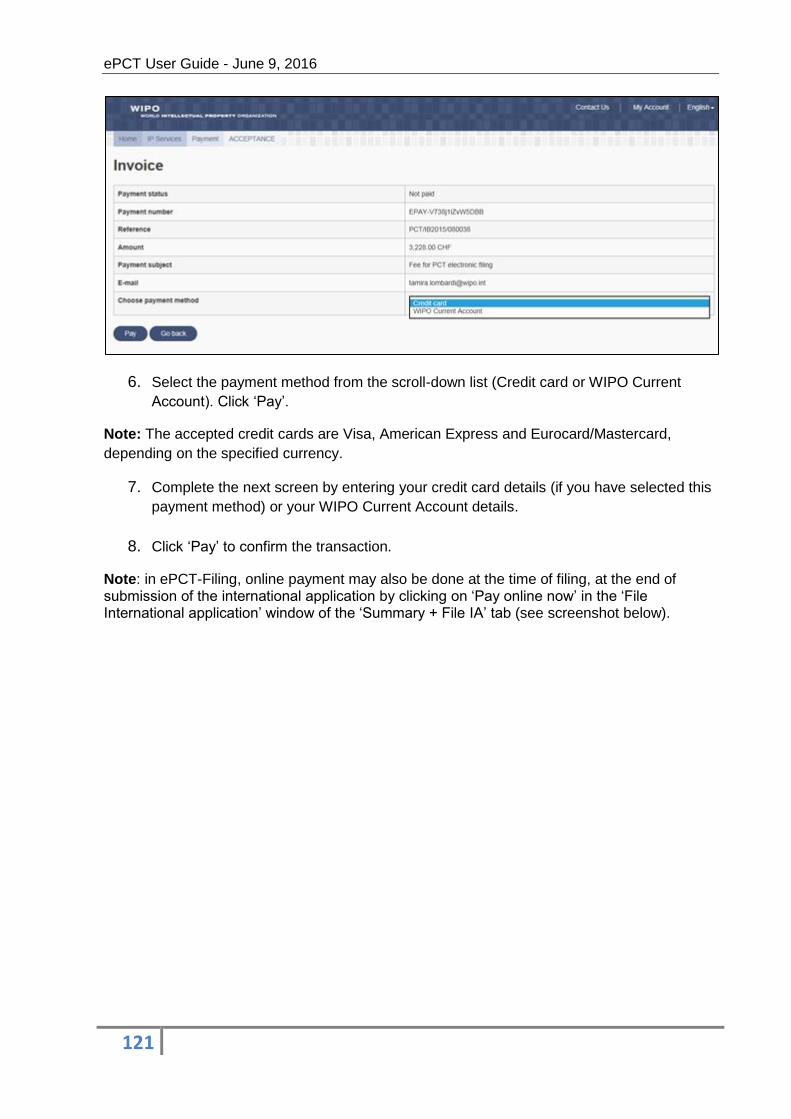
ePCT User Guide - June 9, 2016
121
6. Select the payment method from the scroll-down list (Credit card or WIPO Current
Account). Click ‘Pay’.
Note: The accepted credit cards are Visa, American Express and Eurocard/Mastercard,
depending on the specified currency.
7. Complete the next screen by entering your credit card details (if you have selected this
payment method) or your WIPO Current Account details.
8. Click ‘Pay’ to confirm the transaction.
Note: in ePCT-Filing, online payment may also be done at the time of filing, at the end of submission of the international application by clicking on ‘Pay online now’ in the ‘File International application’ window of the ‘Summary + File IA’ tab (see screenshot below).
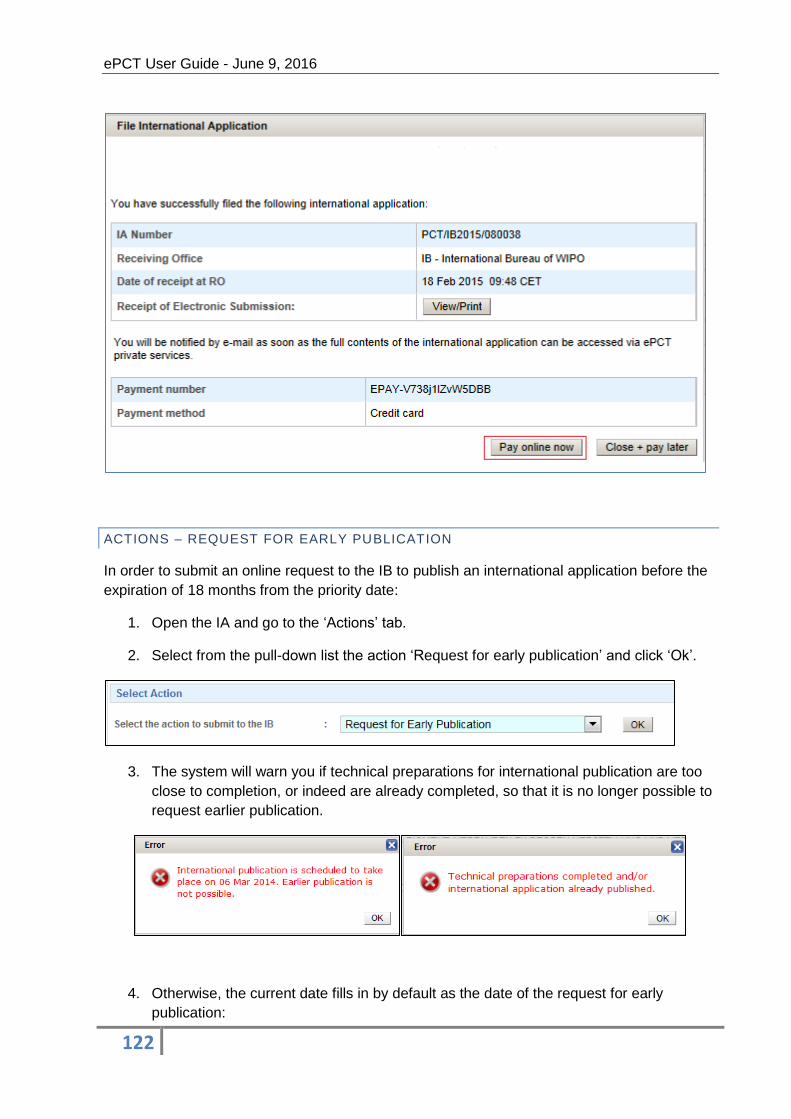
ePCT User Guide - June 9, 2016
122
ACTIONS – REQUEST FOR EARLY PUBLICATION
In order to submit an online request to the IB to publish an international application before the
expiration of 18 months from the priority date:
1. Open the IA and go to the ‘Actions’ tab.
2. Select from the pull-down list the action ‘Request for early publication’ and click ‘Ok’.
3. The system will warn you if technical preparations for international publication are too
close to completion, or indeed are already completed, so that it is no longer possible to
request earlier publication.
4. Otherwise, the current date fills in by default as the date of the request for early
publication:
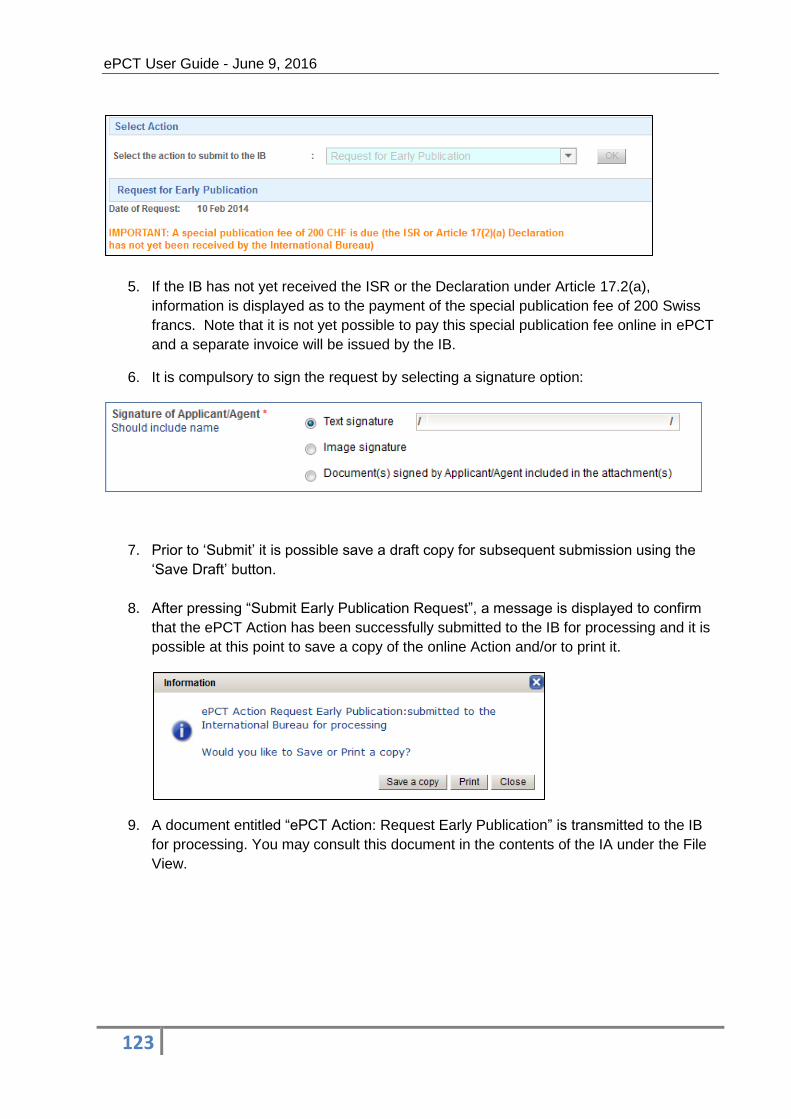
ePCT User Guide - June 9, 2016
123
5. If the IB has not yet received the ISR or the Declaration under Article 17.2(a),
information is displayed as to the payment of the special publication fee of 200 Swiss
francs. Note that it is not yet possible to pay this special publication fee online in ePCT
and a separate invoice will be issued by the IB.
6. It is compulsory to sign the request by selecting a signature option:
7. Prior to ‘Submit’ it is possible save a draft copy for subsequent submission using the
‘Save Draft’ button.
8. After pressing “Submit Early Publication Request”, a message is displayed to confirm
that the ePCT Action has been successfully submitted to the IB for processing and it is
possible at this point to save a copy of the online Action and/or to print it.
9. A document entitled “ePCT Action: Request Early Publication” is transmitted to the IB
for processing. You may consult this document in the contents of the IA under the File
View.
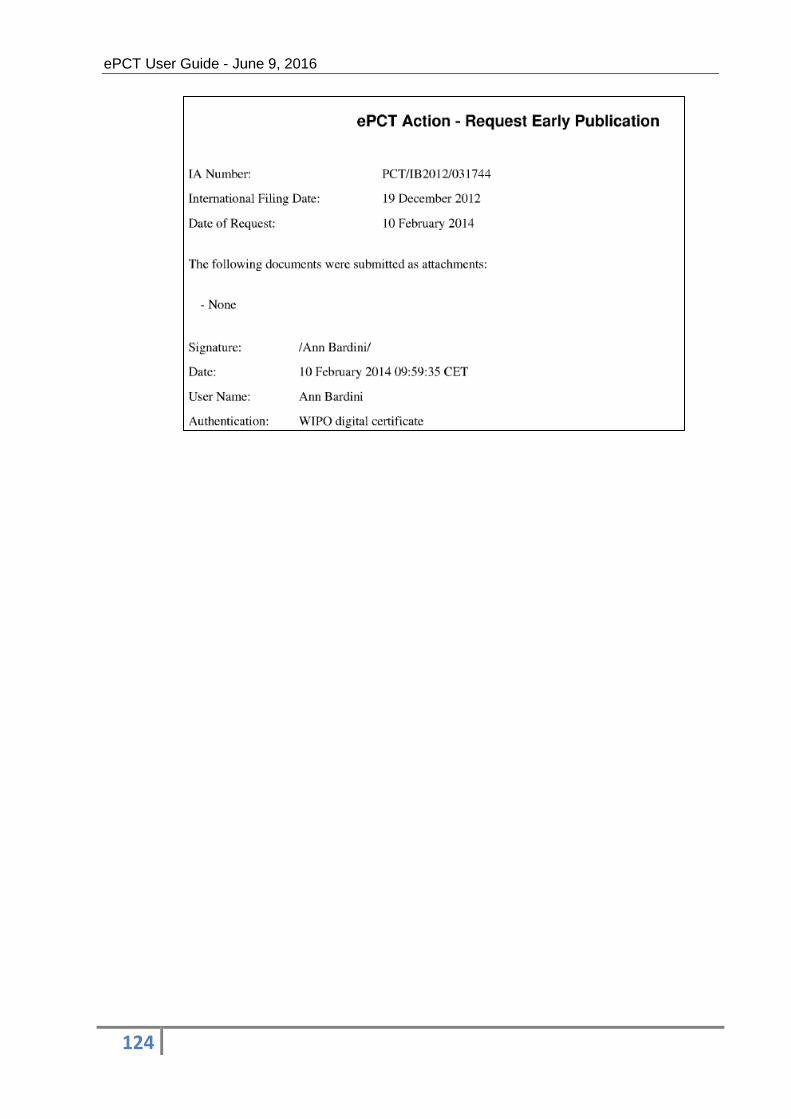
ePCT User Guide - June 9, 2016
124
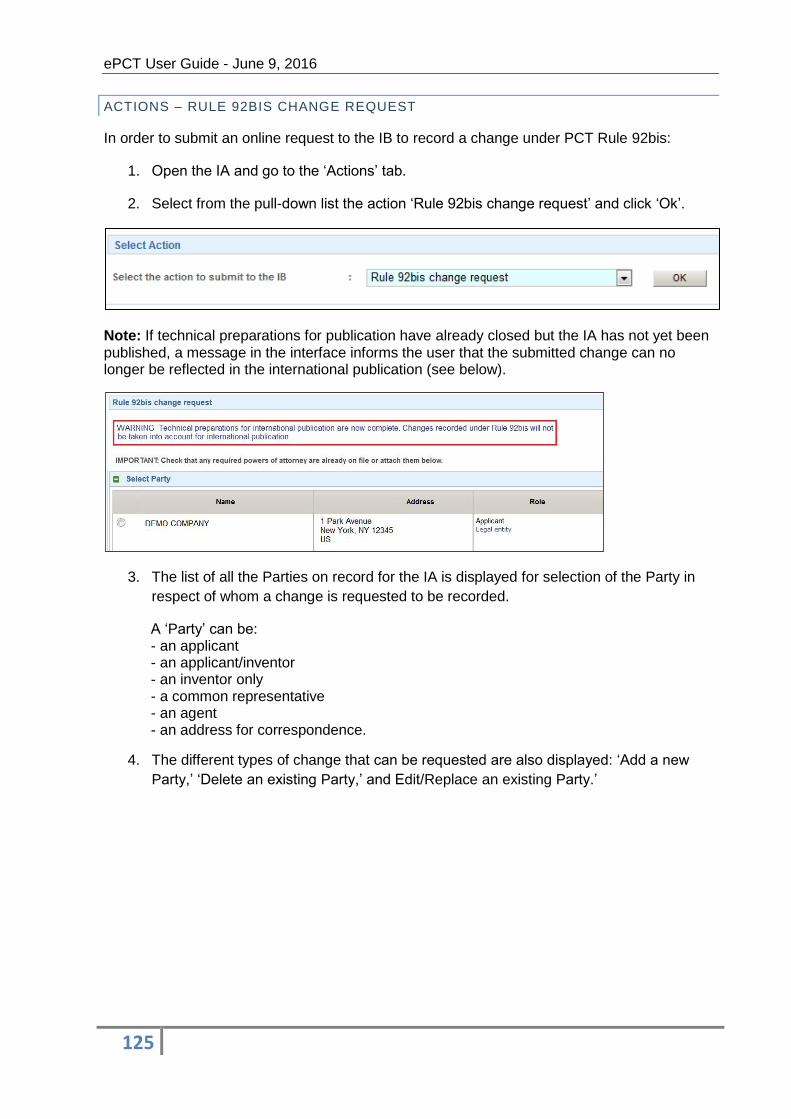
ePCT User Guide - June 9, 2016
125
ACTIONS – RULE 92BIS CHANGE REQUEST
In order to submit an online request to the IB to record a change under PCT Rule 92bis:
1. Open the IA and go to the ‘Actions’ tab.
2. Select from the pull-down list the action ‘Rule 92bis change request’ and click ‘Ok’.
Note: If technical preparations for publication have already closed but the IA has not yet been published, a message in the interface informs the user that the submitted change can no longer be reflected in the international publication (see below).
3. The list of all the Parties on record for the IA is displayed for selection of the Party in
respect of whom a change is requested to be recorded.
A ‘Party’ can be: - an applicant - an applicant/inventor - an inventor only - a common representative - an agent - an address for correspondence.
4. The different types of change that can be requested are also displayed: ‘Add a new
Party,’ ‘Delete an existing Party,’ and Edit/Replace an existing Party.’
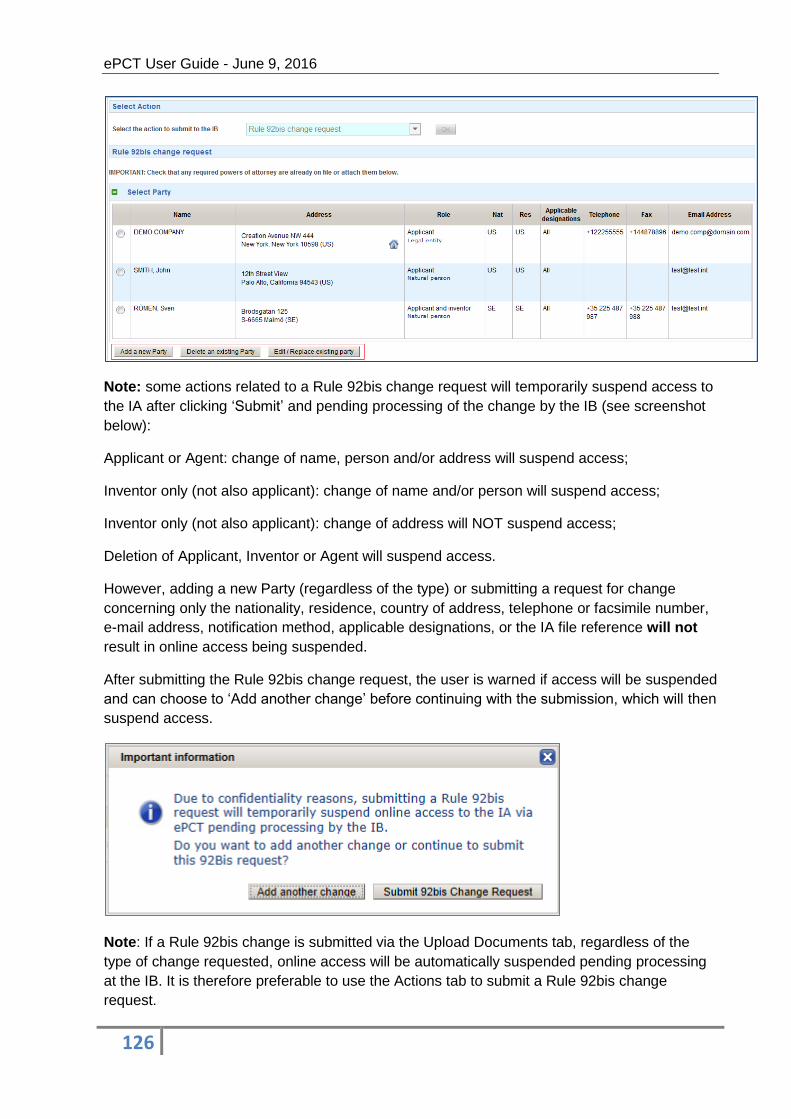
ePCT User Guide - June 9, 2016
126
Note: some actions related to a Rule 92bis change request will temporarily suspend access to
the IA after clicking ‘Submit’ and pending processing of the change by the IB (see screenshot
below):
Applicant or Agent: change of name, person and/or address will suspend access;
Inventor only (not also applicant): change of name and/or person will suspend access;
Inventor only (not also applicant): change of address will NOT suspend access;
Deletion of Applicant, Inventor or Agent will suspend access.
However, adding a new Party (regardless of the type) or submitting a request for change
concerning only the nationality, residence, country of address, telephone or facsimile number,
e-mail address, notification method, applicable designations, or the IA file reference will not
result in online access being suspended.
After submitting the Rule 92bis change request, the user is warned if access will be suspended
and can choose to ‘Add another change’ before continuing with the submission, which will then
suspend access.
Note: If a Rule 92bis change is submitted via the Upload Documents tab, regardless of the
type of change requested, online access will be automatically suspended pending processing
at the IB. It is therefore preferable to use the Actions tab to submit a Rule 92bis change
request.
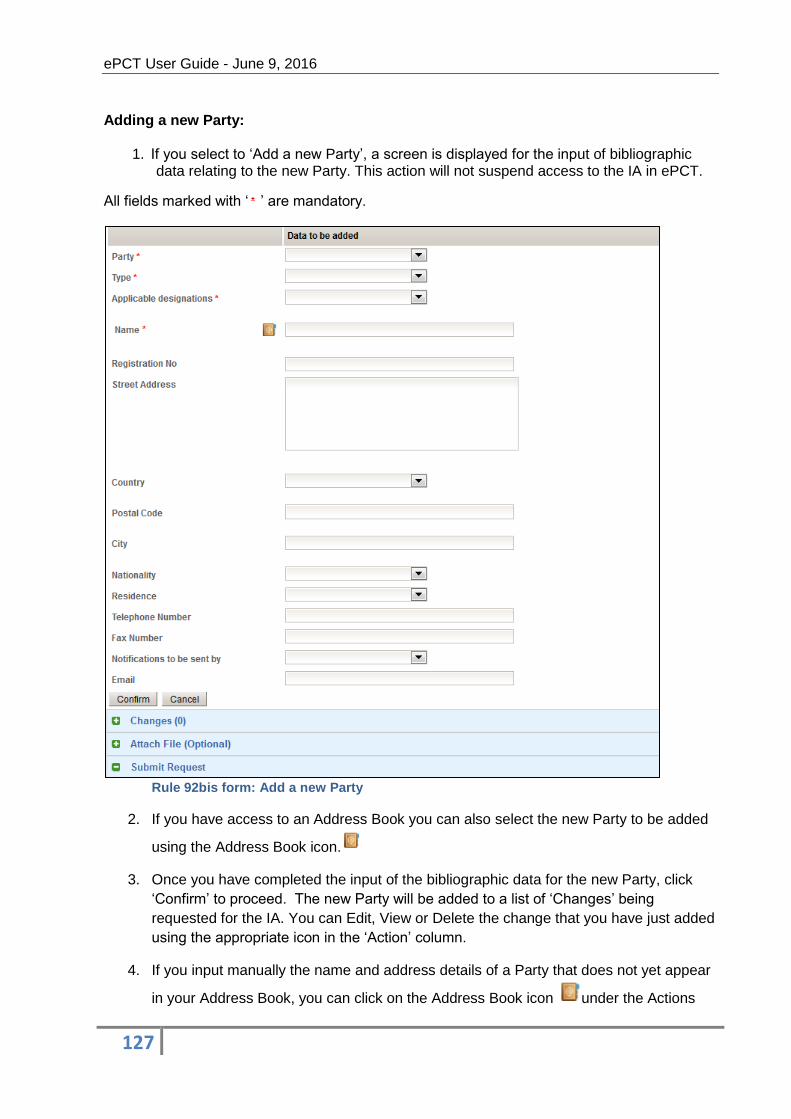
ePCT User Guide - June 9, 2016
127
Adding a new Party:
1. If you select to ‘Add a new Party’, a screen is displayed for the input of bibliographic
data relating to the new Party. This action will not suspend access to the IA in ePCT.
All fields marked with ‘ ’ are mandatory.
Rule 92bis form: Add a new Party
2. If you have access to an Address Book you can also select the new Party to be added
using the Address Book icon.
3. Once you have completed the input of the bibliographic data for the new Party, click
‘Confirm’ to proceed. The new Party will be added to a list of ‘Changes’ being
requested for the IA. You can Edit, View or Delete the change that you have just added
using the appropriate icon in the ‘Action’ column.
4. If you input manually the name and address details of a Party that does not yet appear
in your Address Book, you can click on the Address Book icon under the Actions
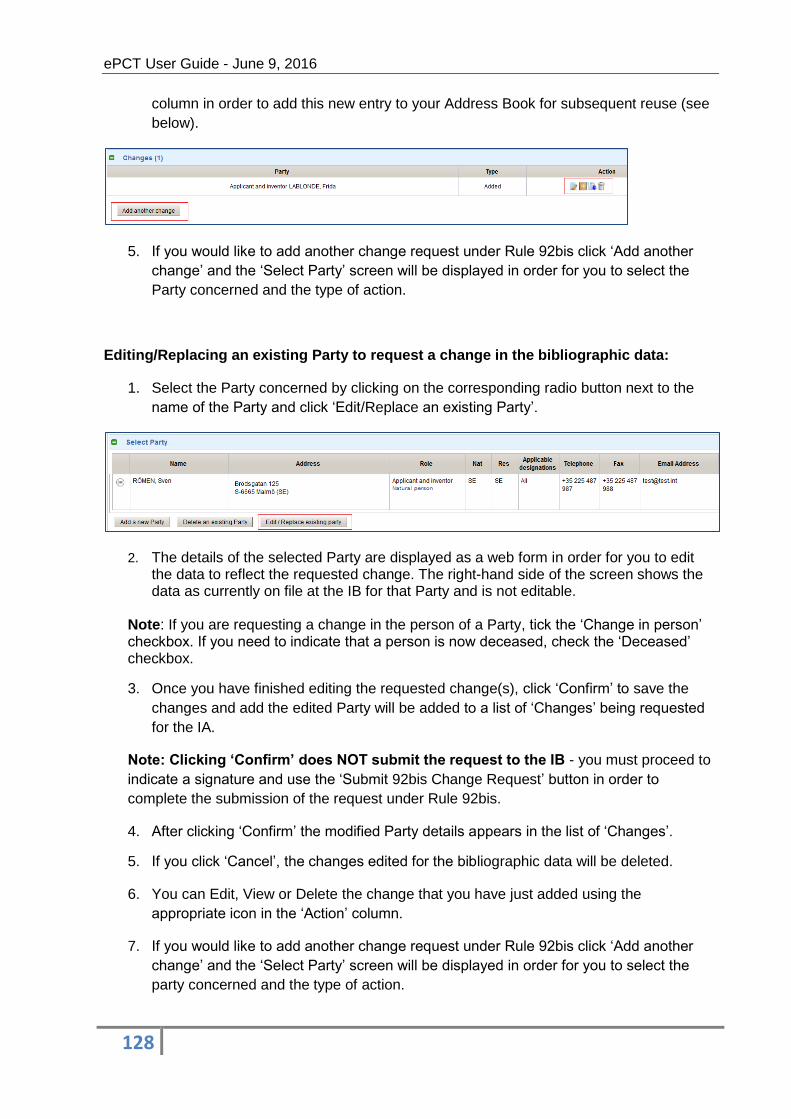
ePCT User Guide - June 9, 2016
128
column in order to add this new entry to your Address Book for subsequent reuse (see
below).
5. If you would like to add another change request under Rule 92bis click ‘Add another
change’ and the ‘Select Party’ screen will be displayed in order for you to select the
Party concerned and the type of action.
Editing/Replacing an existing Party to request a change in the bibliographic data:
1. Select the Party concerned by clicking on the corresponding radio button next to the
name of the Party and click ‘Edit/Replace an existing Party’.
2. The details of the selected Party are displayed as a web form in order for you to edit the data to reflect the requested change. The right-hand side of the screen shows the data as currently on file at the IB for that Party and is not editable.
Note: If you are requesting a change in the person of a Party, tick the ‘Change in person’ checkbox. If you need to indicate that a person is now deceased, check the ‘Deceased’ checkbox.
3. Once you have finished editing the requested change(s), click ‘Confirm’ to save the
changes and add the edited Party will be added to a list of ‘Changes’ being requested
for the IA.
Note: Clicking ‘Confirm’ does NOT submit the request to the IB - you must proceed to
indicate a signature and use the ‘Submit 92bis Change Request’ button in order to
complete the submission of the request under Rule 92bis.
4. After clicking ‘Confirm’ the modified Party details appears in the list of ‘Changes’.
5. If you click ‘Cancel’, the changes edited for the bibliographic data will be deleted.
6. You can Edit, View or Delete the change that you have just added using the
appropriate icon in the ‘Action’ column.
7. If you would like to add another change request under Rule 92bis click ‘Add another
change’ and the ‘Select Party’ screen will be displayed in order for you to select the
party concerned and the type of action.

ePCT User Guide - June 9, 2016
129
To request the deletion of a party from the record:
1. Select the Party concerned by clicking on the corresponding radio button next to the
name of the Party and click ‘Delete an existing Party’.
2. A warning message appears asking you to confirm the deletion of the Party concerned. Click ‘yes’ to confirm or ‘No’ to go back to the Rule 92bis screen.
3. The deleted party appears in the ‘Changes’ part of the screen.
4. You can View or Delete the change that you have just added using the appropriate icon
in the ‘Action’ column.
5. If you would like to add another change request under Rule 92bis click ‘Add another
change’ and the ‘Select Party’ screen will be displayed in order for you to select the
party concerned and the type of action.
Attaching a file and Submitting the Rule 92bis request:
1. Once you have entered all the changes required, you can optionally attach a document
(in PDF format) to support your request, e.g., a power of attorney. To do this, click on
to open the Document Upload function.
Note: For further information on how to use the Upload Document function, please see the
Upload Documents chapter of this guide.
2. You may type text in the Message field if desired (optional), however, it is compulsory
to sign the request by selecting a signature option:

ePCT User Guide - June 9, 2016
130
3. Prior to submitting the request it is possible save a draft copy for subsequent
submission using the ‘Save Draft’ button. Click ‘Submit 92bis Change Request’ to send
your request to the IB for processing or select ‘Cancel’ to go back to the Rule 92bis
screen.
4. Before submitting the Rule 92bis change request, depending on the nature of the
change requested, the user may be warned that access will be suspended and can
choose to ‘Add another change’ before continuing with the submission, which will
suspend access.
Note: If a Rule 92bis change is submitted via the Upload Documents tab, regardless of the
type of change requested, online access will be automatically suspended pending processing
at the IB. It is therefore preferable to use the Actions tab to submit a Rule 92bis change
request as online access will only be suspended in certain circumstances.
5. A document entitled “ePCT Action: Rule 92bis change request” is transmitted to the IB
for processing. You may consult this document in the contents of the IA under File
View, even though access to the full IA contents may now be suspended pending the
processing of the Rule 92bis change request by the IB.

ePCT User Guide - June 9, 2016
131
Note: In the case of international applications that have already been published, it is possible
to access the action to submit a Rule 92bis request via a dedicated tab within ePCT public
services (see below):
RULE 92BIS PROCESSING AT THE IB
As soon as your request for recording a change has been submitted, depending on the type of
change requested, all online access in ePCT to that international application, including to
anyone who already had ePCT access rights, is automatically suspended by the system until
the 92bis change has actually been processed by the IB.
This suspension in certain cases, e.g., regarding a change of person with respect to the
applicant or agent, removes any potential problem which may arise, for example, where the
appointment of an agent has been revoked by the applicant or his/her new agent, but that
agent might still have online access rights to the international application via ePCT. As long as
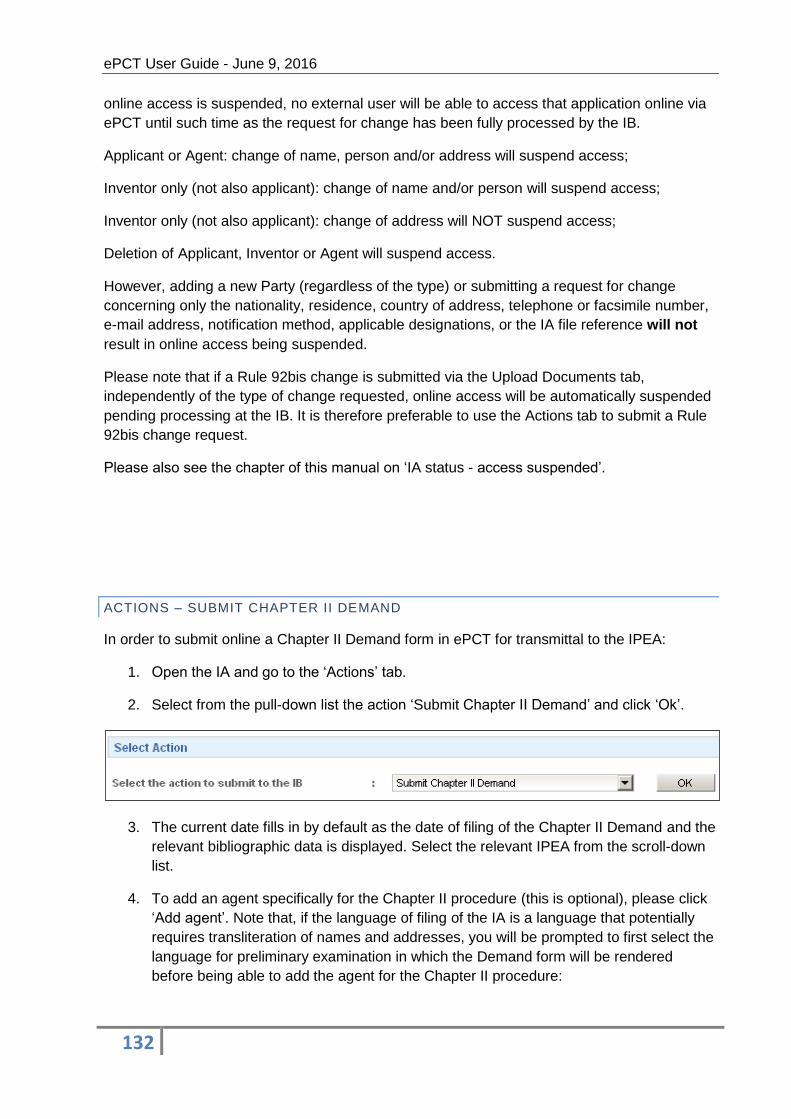
ePCT User Guide - June 9, 2016
132
online access is suspended, no external user will be able to access that application online via
ePCT until such time as the request for change has been fully processed by the IB.
Applicant or Agent: change of name, person and/or address will suspend access;
Inventor only (not also applicant): change of name and/or person will suspend access;
Inventor only (not also applicant): change of address will NOT suspend access;
Deletion of Applicant, Inventor or Agent will suspend access.
However, adding a new Party (regardless of the type) or submitting a request for change
concerning only the nationality, residence, country of address, telephone or facsimile number,
e-mail address, notification method, applicable designations, or the IA file reference will not
result in online access being suspended.
Please note that if a Rule 92bis change is submitted via the Upload Documents tab,
independently of the type of change requested, online access will be automatically suspended
pending processing at the IB. It is therefore preferable to use the Actions tab to submit a Rule
92bis change request.
Please also see the chapter of this manual on ‘IA status - access suspended’.
ACTIONS – SUBMIT CHAPTER II DEMAND
In order to submit online a Chapter II Demand form in ePCT for transmittal to the IPEA:
1. Open the IA and go to the ‘Actions’ tab.
2. Select from the pull-down list the action ‘Submit Chapter II Demand’ and click ‘Ok’.
3. The current date fills in by default as the date of filing of the Chapter II Demand and the
relevant bibliographic data is displayed. Select the relevant IPEA from the scroll-down
list.
4. To add an agent specifically for the Chapter II procedure (this is optional), please click
‘Add agent’. Note that, if the language of filing of the IA is a language that potentially
requires transliteration of names and addresses, you will be prompted to first select the
language for preliminary examination in which the Demand form will be rendered
before being able to add the agent for the Chapter II procedure:
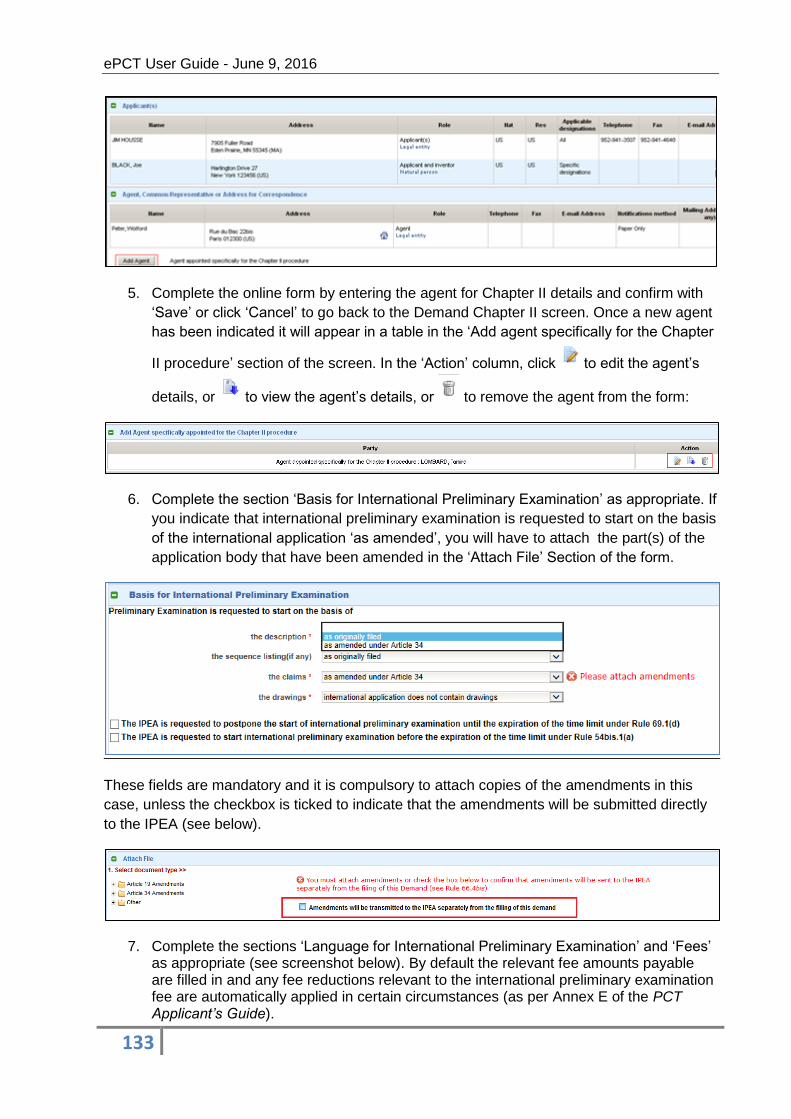
ePCT User Guide - June 9, 2016
133
5. Complete the online form by entering the agent for Chapter II details and confirm with
‘Save’ or click ‘Cancel’ to go back to the Demand Chapter II screen. Once a new agent
has been indicated it will appear in a table in the ‘Add agent specifically for the Chapter
II procedure’ section of the screen. In the ‘Action’ column, click to edit the agent’s
details, or to view the agent’s details, or to remove the agent from the form:
6. Complete the section ‘Basis for International Preliminary Examination’ as appropriate. If
you indicate that international preliminary examination is requested to start on the basis
of the international application ‘as amended’, you will have to attach the part(s) of the
application body that have been amended in the ‘Attach File’ Section of the form.
These fields are mandatory and it is compulsory to attach copies of the amendments in this
case, unless the checkbox is ticked to indicate that the amendments will be submitted directly
to the IPEA (see below).
7. Complete the sections ‘Language for International Preliminary Examination’ and ‘Fees’ as appropriate (see screenshot below). By default the relevant fee amounts payable are filled in and any fee reductions relevant to the international preliminary examination fee are automatically applied in certain circumstances (as per Annex E of the PCT Applicant’s Guide).

ePCT User Guide - June 9, 2016
134
Note: In the case of certain IPEAs, it is possible to indicate entitlement by the applicants to a
fee reduction, e.g., for IPEA/US a reduction as a ‘small entity’ or ‘micro entity’, in which case
the preliminary examination fee will be adjusted accordingly.
1. Sign the form in the ‘Signature of Demand Form’ section by clicking ‘Add’:
2. Select the name of the signatory from the ‘Name’ scroll-down list and check the box to
indicate the type of signature that will be applied to the form and sign:
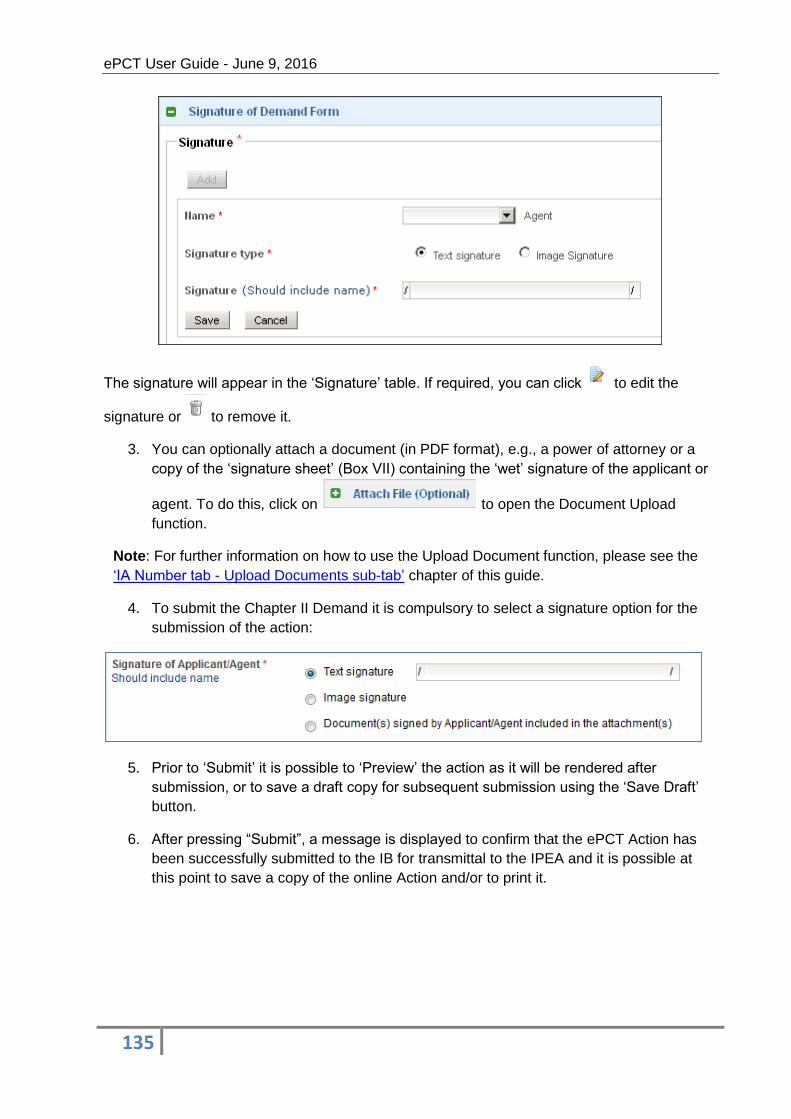
ePCT User Guide - June 9, 2016
135
The signature will appear in the ‘Signature’ table. If required, you can click to edit the
signature or to remove it.
3. You can optionally attach a document (in PDF format), e.g., a power of attorney or a
copy of the ‘signature sheet’ (Box VII) containing the ‘wet’ signature of the applicant or
agent. To do this, click on to open the Document Upload
function.
Note: For further information on how to use the Upload Document function, please see the
‘IA Number tab - Upload Documents sub-tab’ chapter of this guide.
4. To submit the Chapter II Demand it is compulsory to select a signature option for the
submission of the action:
5. Prior to ‘Submit’ it is possible to ‘Preview’ the action as it will be rendered after
submission, or to save a draft copy for subsequent submission using the ‘Save Draft’
button.
6. After pressing “Submit”, a message is displayed to confirm that the ePCT Action has
been successfully submitted to the IB for transmittal to the IPEA and it is possible at
this point to save a copy of the online Action and/or to print it.

ePCT User Guide - June 9, 2016
136
IMPORTANT: The usual time limits apply for submitting a Chapter II Demand form. The
system will not allow you to proceed with this action if the applicable time limit has expired.
Note: In order to avoid this error, you can choose to be notified 2 weeks in advance of the
expiry of the time limit to file a Chapter II Demand for all the applications to which you have
access rights by selecting the corresponding Preference on the Notifications tab. For further
information, please see the chapter of this manual on ‘Search Notifications and notification
preferences’.
The system will not allow you to proceed with this action if a Chapter II Demand has already
been filed and processed by the IB.
ACTIONS – WITHDRAW CHAPTER II DEMAND
In order to submit an online request to the IB for withdrawal of a Chapter II Demand, the
Demand must have already been transmitted by the IPEA to the IB, otherwise the system will
not allow you to proceed and you should address your notice of withdrawal to the IPEA:

ePCT User Guide - June 9, 2016
137
1. Open the IA and go to the ‘Actions’ tab.
2. Select from the pull-down list the action ‘Withdraw Chapter II Demand’ and click ‘Ok’.
3. The current date fills in by default as the date of the request for withdrawal.
4. You can optionally attach a document (in PDF format) to support your request, e.g., a
power of attorney. To do this, click on to open the Document
Upload function.
Note: For further information on how to use the Upload Document function, please see the ‘IA
Number tab - Upload Documents sub-tab’ chapter of this guide.
5. You may type text in the Informal Message field if desired (optional), however, it is
compulsory to sign the withdrawal request by selecting a signature option:
6. Prior to ‘Submit’ it is possible to save a draft copy of the action for subsequent
submission using the ‘Save Draft’ button.
7. After pressing “Submit”, a message is displayed to confirm that the ePCT Action has
been successfully submitted to the IB for processing and it is possible at this point to
save a copy of the online Action and/or to print it.
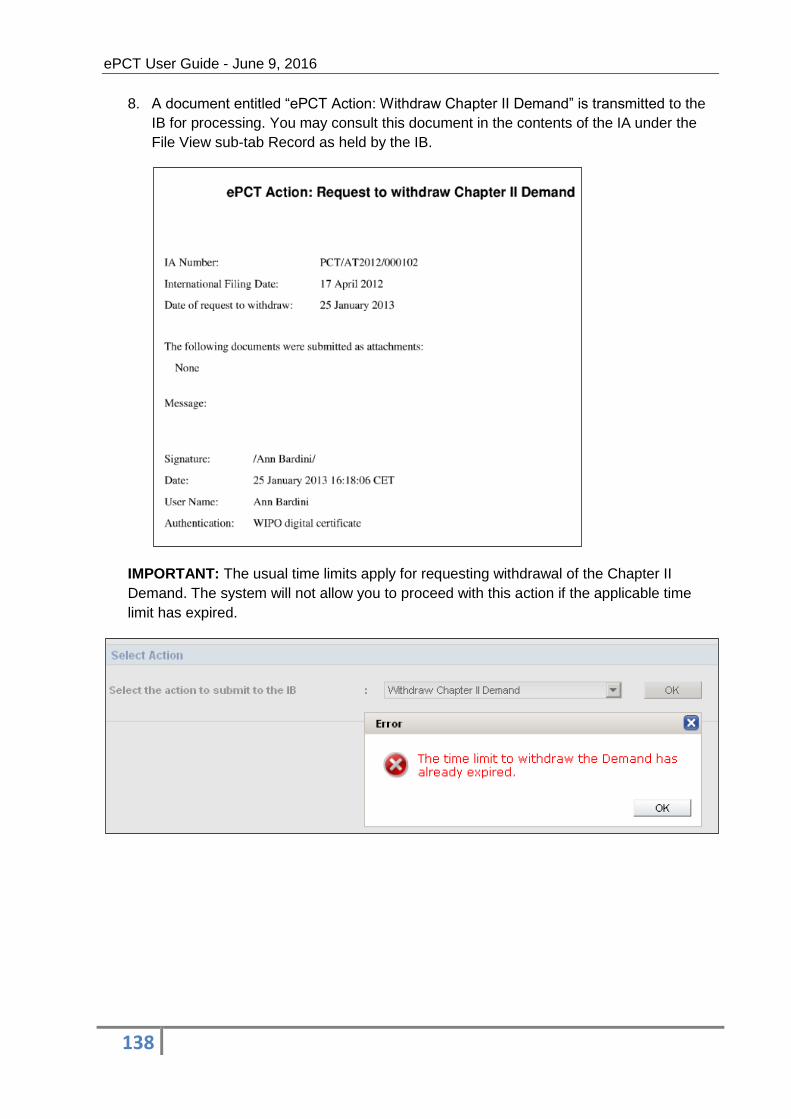
ePCT User Guide - June 9, 2016
138
8. A document entitled “ePCT Action: Withdraw Chapter II Demand” is transmitted to the
IB for processing. You may consult this document in the contents of the IA under the
File View sub-tab Record as held by the IB.
IMPORTANT: The usual time limits apply for requesting withdrawal of the Chapter II
Demand. The system will not allow you to proceed with this action if the applicable time
limit has expired.
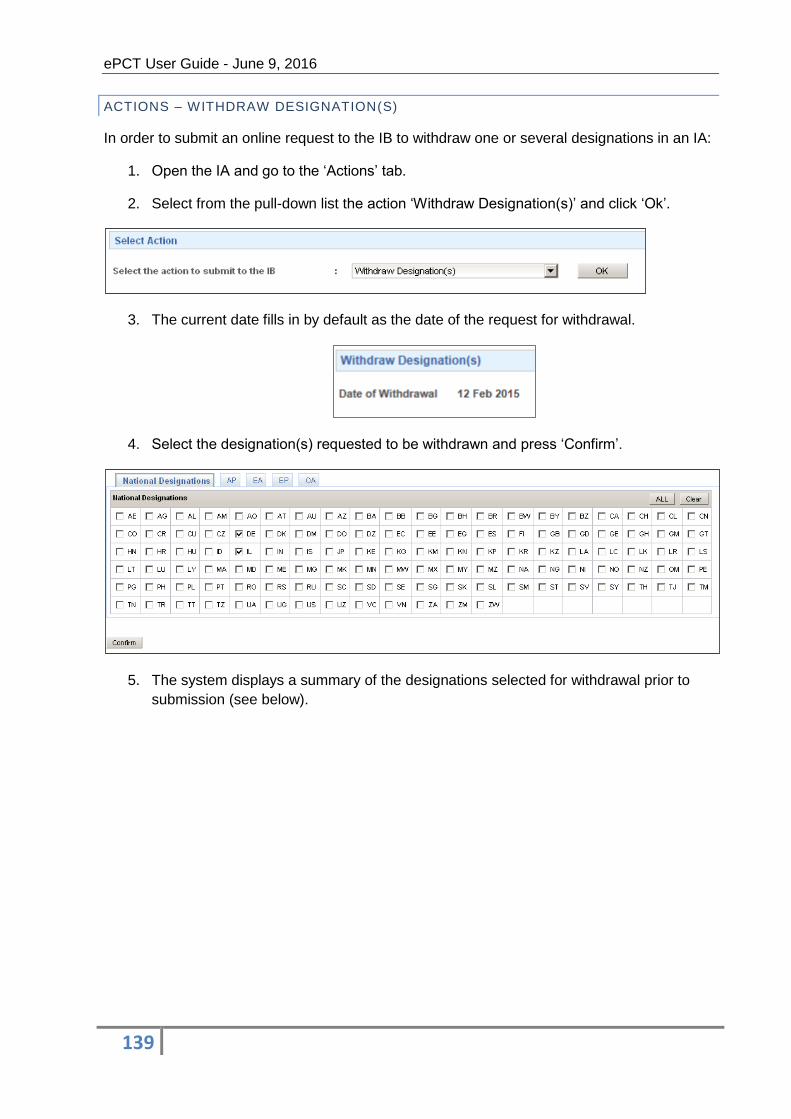
ePCT User Guide - June 9, 2016
139
ACTIONS – WITHDRAW DESIGNATION(S)
In order to submit an online request to the IB to withdraw one or several designations in an IA:
1. Open the IA and go to the ‘Actions’ tab.
2. Select from the pull-down list the action ‘Withdraw Designation(s)’ and click ‘Ok’.
3. The current date fills in by default as the date of the request for withdrawal.
4. Select the designation(s) requested to be withdrawn and press ‘Confirm’.
5. The system displays a summary of the designations selected for withdrawal prior to
submission (see below).

ePCT User Guide - June 9, 2016
140
6. You can optionally attach a document (in PDF format) to support your request, e.g., a
power of attorney. To do this, click on to open the Document
Upload function.
Note: For further information on how to use the Upload Document function, please see the
‘IA Number tab - Upload Documents sub-tab’ chapter of this guide.
7. You may type text in the Message field if desired (optional), however, it is compulsory
to sign the withdrawal request by selecting a signature option.
8. Prior to ‘Submit’ it is possible save a draft copy for subsequent submission using the
‘Save Draft’ button.
9. After “Submit”, a message is displayed to confirm that the ePCT Action has been
successfully submitted to the IB for processing and it is possible at this point to save a
copy of the online Action and/or to print it.
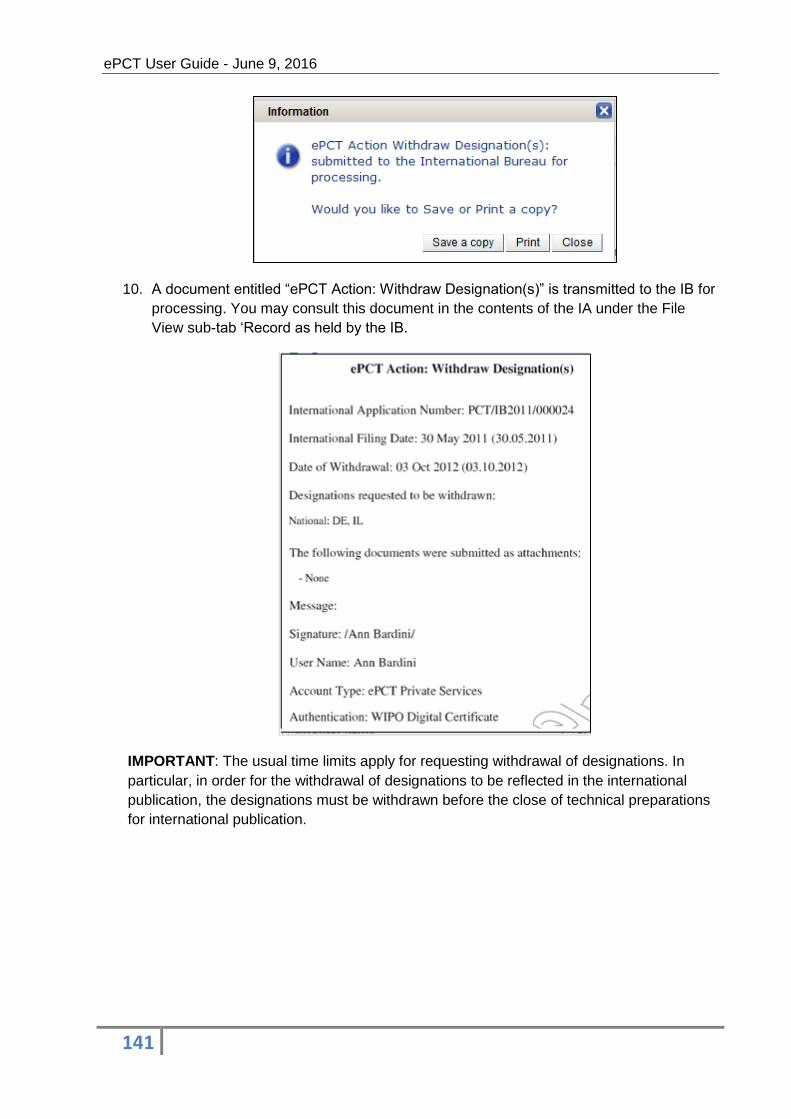
ePCT User Guide - June 9, 2016
141
10. A document entitled “ePCT Action: Withdraw Designation(s)” is transmitted to the IB for
processing. You may consult this document in the contents of the IA under the File
View sub-tab ‘Record as held by the IB.
IMPORTANT: The usual time limits apply for requesting withdrawal of designations. In
particular, in order for the withdrawal of designations to be reflected in the international
publication, the designations must be withdrawn before the close of technical preparations
for international publication.
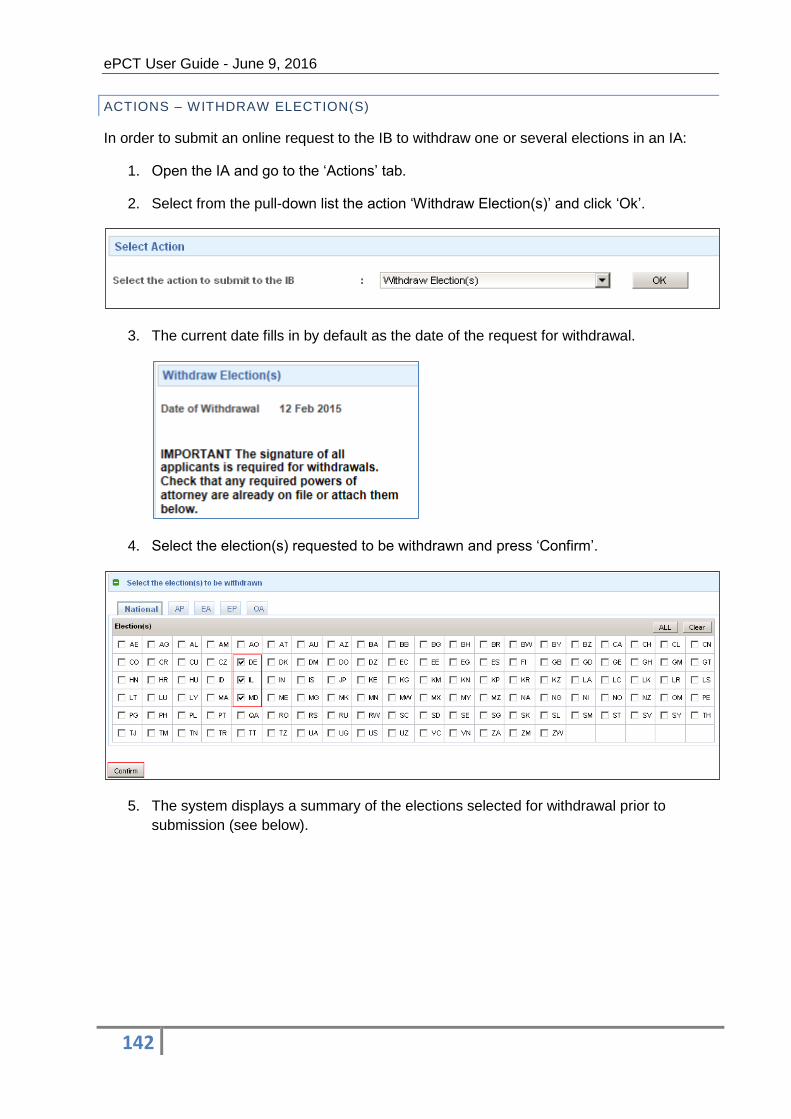
ePCT User Guide - June 9, 2016
142
ACTIONS – WITHDRAW ELECTION(S)
In order to submit an online request to the IB to withdraw one or several elections in an IA:
1. Open the IA and go to the ‘Actions’ tab.
2. Select from the pull-down list the action ‘Withdraw Election(s)’ and click ‘Ok’.
3. The current date fills in by default as the date of the request for withdrawal.
4. Select the election(s) requested to be withdrawn and press ‘Confirm’.
5. The system displays a summary of the elections selected for withdrawal prior to
submission (see below).
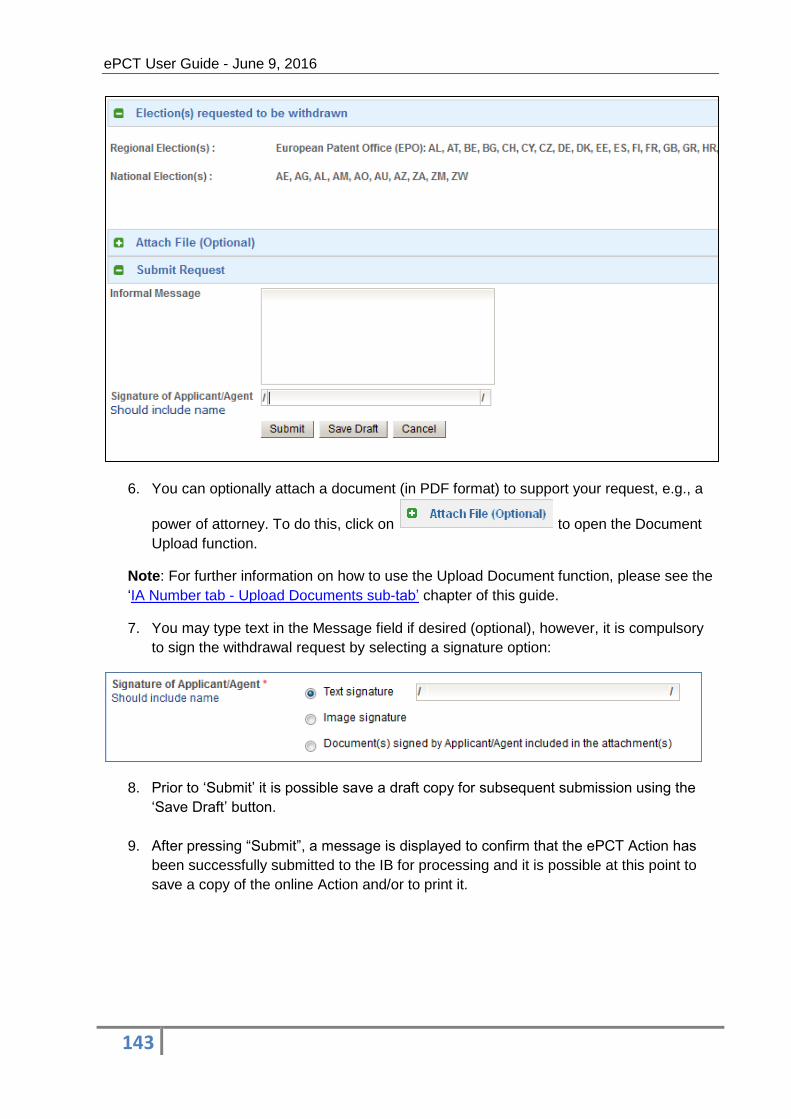
ePCT User Guide - June 9, 2016
143
6. You can optionally attach a document (in PDF format) to support your request, e.g., a
power of attorney. To do this, click on to open the Document
Upload function.
Note: For further information on how to use the Upload Document function, please see the
‘IA Number tab - Upload Documents sub-tab’ chapter of this guide.
7. You may type text in the Message field if desired (optional), however, it is compulsory
to sign the withdrawal request by selecting a signature option:
8. Prior to ‘Submit’ it is possible save a draft copy for subsequent submission using the
‘Save Draft’ button.
9. After pressing “Submit”, a message is displayed to confirm that the ePCT Action has
been successfully submitted to the IB for processing and it is possible at this point to
save a copy of the online Action and/or to print it.
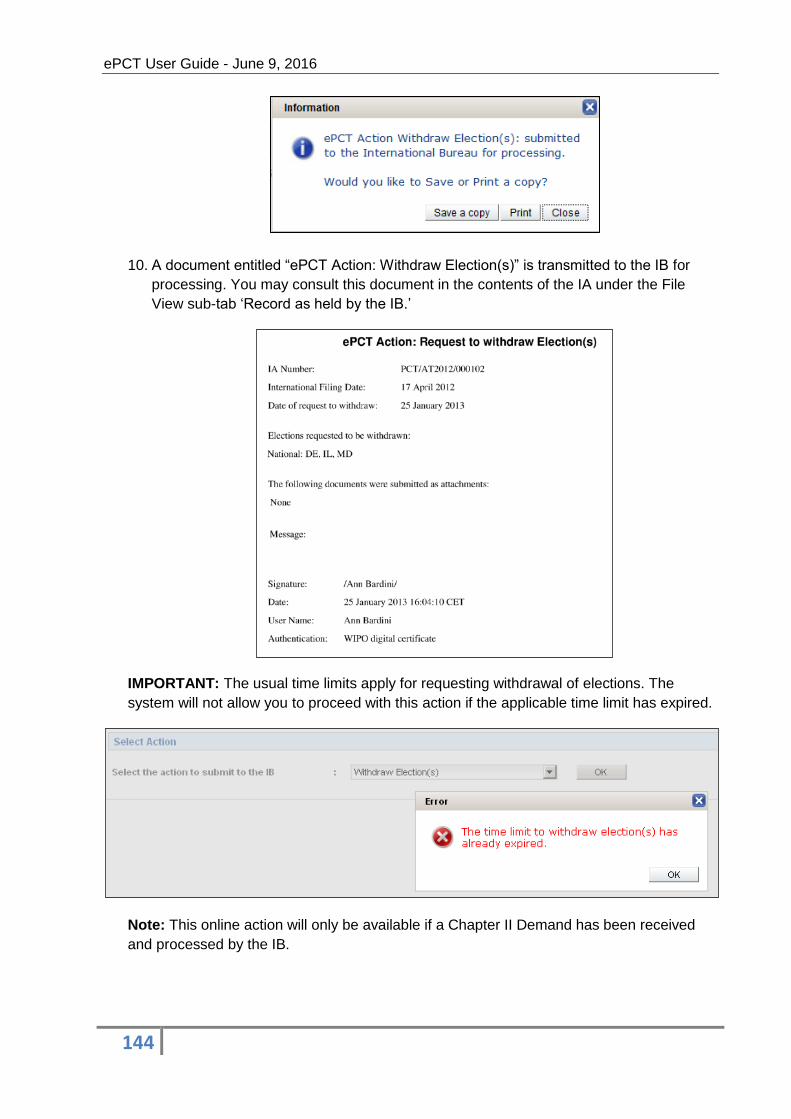
ePCT User Guide - June 9, 2016
144
10. A document entitled “ePCT Action: Withdraw Election(s)” is transmitted to the IB for
processing. You may consult this document in the contents of the IA under the File
View sub-tab ‘Record as held by the IB.’
IMPORTANT: The usual time limits apply for requesting withdrawal of elections. The
system will not allow you to proceed with this action if the applicable time limit has expired.
Note: This online action will only be available if a Chapter II Demand has been received
and processed by the IB.
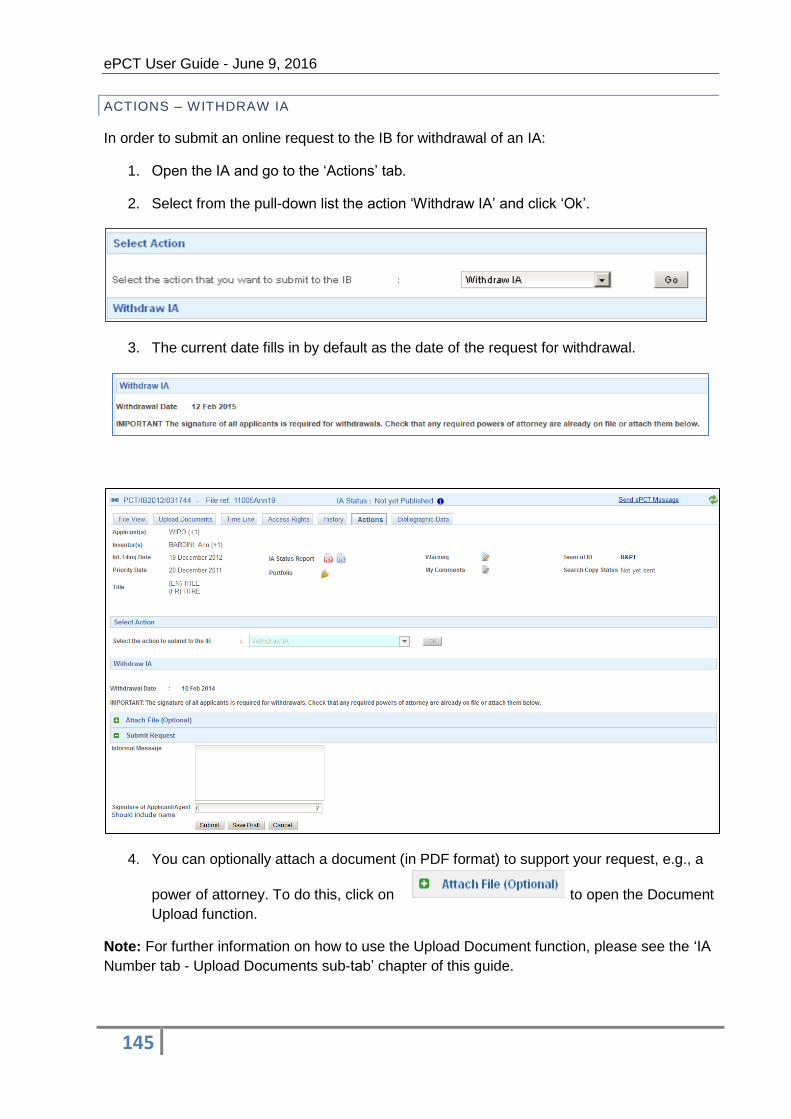
ePCT User Guide - June 9, 2016
145
ACTIONS – WITHDRAW IA
In order to submit an online request to the IB for withdrawal of an IA:
1. Open the IA and go to the ‘Actions’ tab.
2. Select from the pull-down list the action ‘Withdraw IA’ and click ‘Ok’.
3. The current date fills in by default as the date of the request for withdrawal.
4. You can optionally attach a document (in PDF format) to support your request, e.g., a
power of attorney. To do this, click on to open the Document
Upload function.
Note: For further information on how to use the Upload Document function, please see the ‘IA
Number tab - Upload Documents sub-tab’ chapter of this guide.
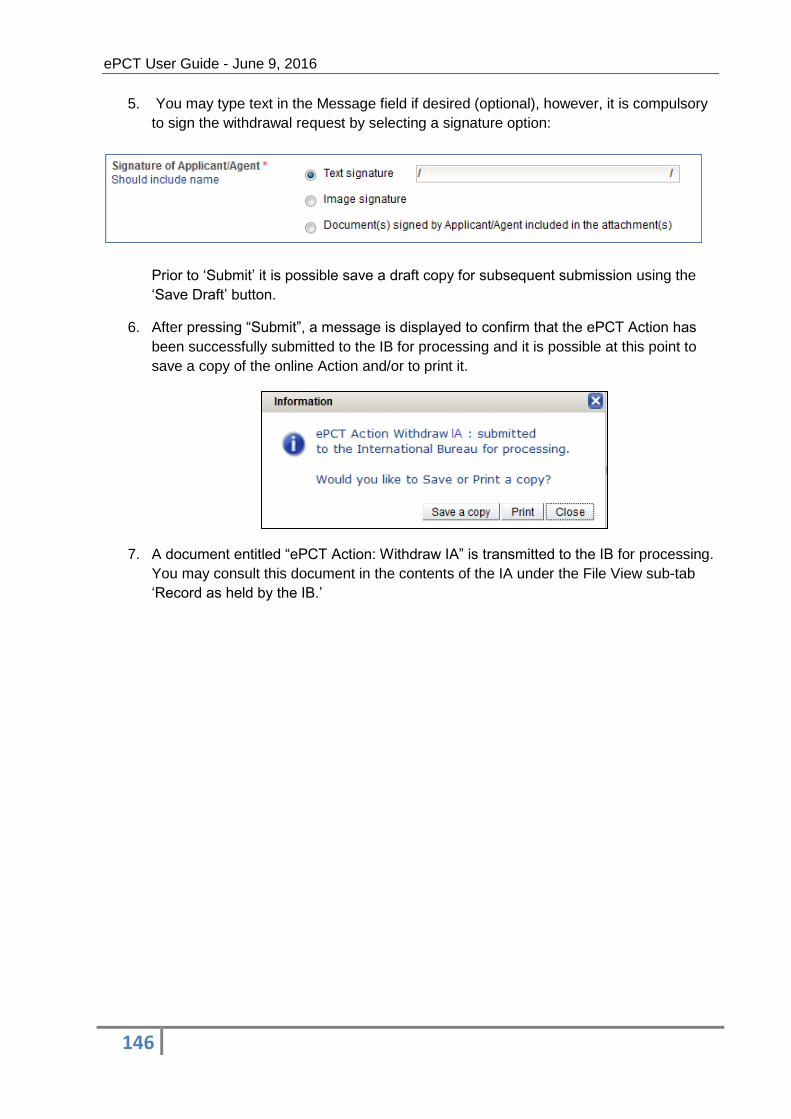
ePCT User Guide - June 9, 2016
146
5. You may type text in the Message field if desired (optional), however, it is compulsory
to sign the withdrawal request by selecting a signature option:
Prior to ‘Submit’ it is possible save a draft copy for subsequent submission using the
‘Save Draft’ button.
6. After pressing “Submit”, a message is displayed to confirm that the ePCT Action has
been successfully submitted to the IB for processing and it is possible at this point to
save a copy of the online Action and/or to print it.
7. A document entitled “ePCT Action: Withdraw IA” is transmitted to the IB for processing.
You may consult this document in the contents of the IA under the File View sub-tab
‘Record as held by the IB.’
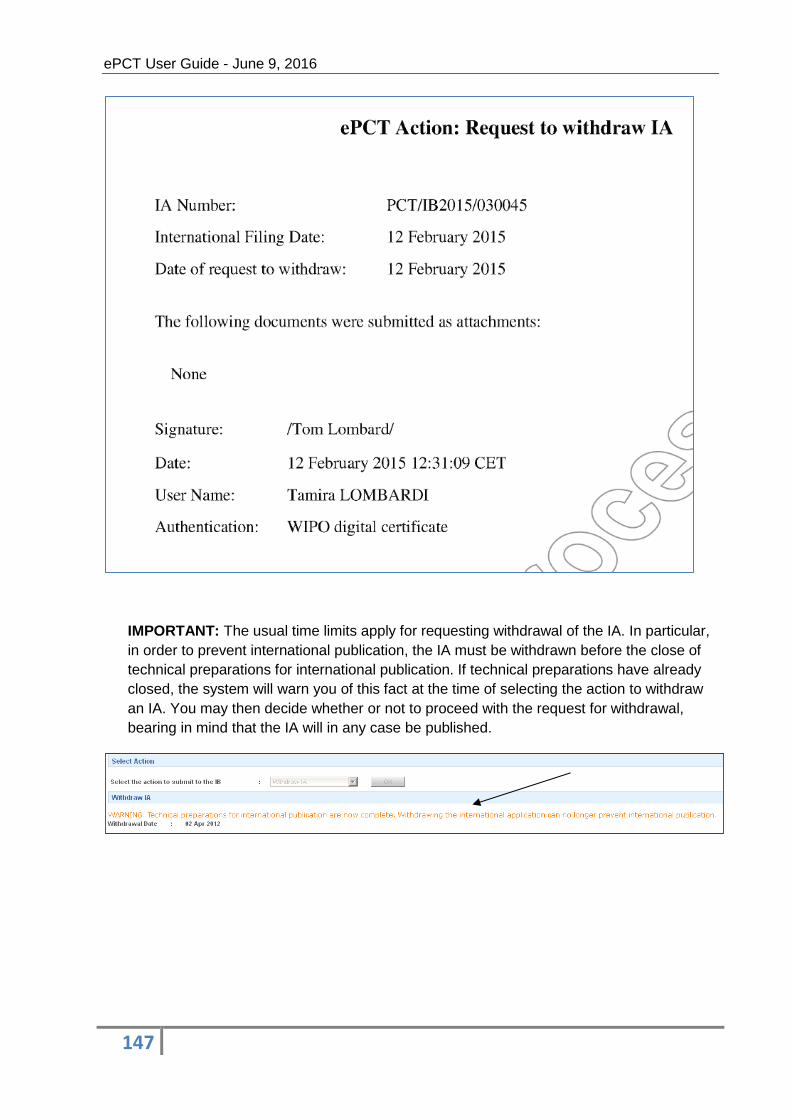
ePCT User Guide - June 9, 2016
147
IMPORTANT: The usual time limits apply for requesting withdrawal of the IA. In particular,
in order to prevent international publication, the IA must be withdrawn before the close of
technical preparations for international publication. If technical preparations have already
closed, the system will warn you of this fact at the time of selecting the action to withdraw
an IA. You may then decide whether or not to proceed with the request for withdrawal,
bearing in mind that the IA will in any case be published.
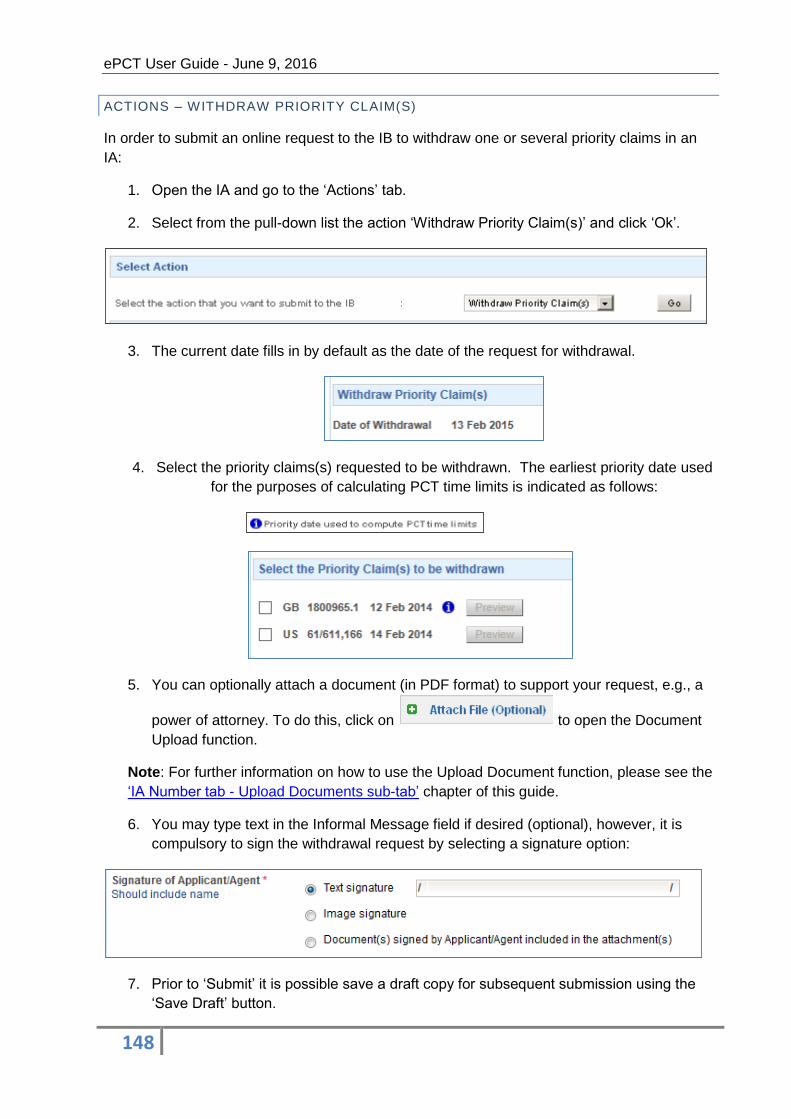
ePCT User Guide - June 9, 2016
148
ACTIONS – WITHDRAW PRIORITY CLAIM(S)
In order to submit an online request to the IB to withdraw one or several priority claims in an
IA:
1. Open the IA and go to the ‘Actions’ tab.
2. Select from the pull-down list the action ‘Withdraw Priority Claim(s)’ and click ‘Ok’.
3. The current date fills in by default as the date of the request for withdrawal.
4. Select the priority claims(s) requested to be withdrawn. The earliest priority date used
for the purposes of calculating PCT time limits is indicated as follows:
5. You can optionally attach a document (in PDF format) to support your request, e.g., a
power of attorney. To do this, click on to open the Document
Upload function.
Note: For further information on how to use the Upload Document function, please see the
‘IA Number tab - Upload Documents sub-tab’ chapter of this guide.
6. You may type text in the Informal Message field if desired (optional), however, it is
compulsory to sign the withdrawal request by selecting a signature option:
7. Prior to ‘Submit’ it is possible save a draft copy for subsequent submission using the
‘Save Draft’ button.
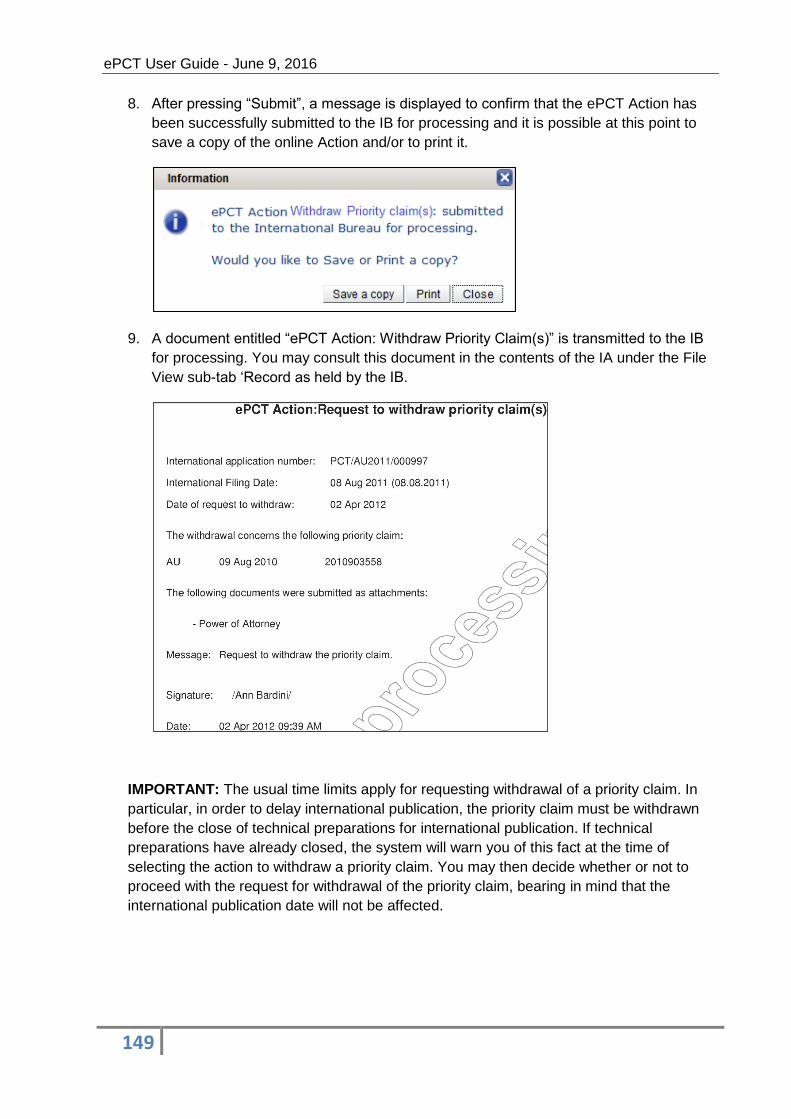
ePCT User Guide - June 9, 2016
149
8. After pressing “Submit”, a message is displayed to confirm that the ePCT Action has
been successfully submitted to the IB for processing and it is possible at this point to
save a copy of the online Action and/or to print it.
9. A document entitled “ePCT Action: Withdraw Priority Claim(s)” is transmitted to the IB
for processing. You may consult this document in the contents of the IA under the File
View sub-tab ‘Record as held by the IB.
IMPORTANT: The usual time limits apply for requesting withdrawal of a priority claim. In
particular, in order to delay international publication, the priority claim must be withdrawn
before the close of technical preparations for international publication. If technical
preparations have already closed, the system will warn you of this fact at the time of
selecting the action to withdraw a priority claim. You may then decide whether or not to
proceed with the request for withdrawal of the priority claim, bearing in mind that the
international publication date will not be affected.
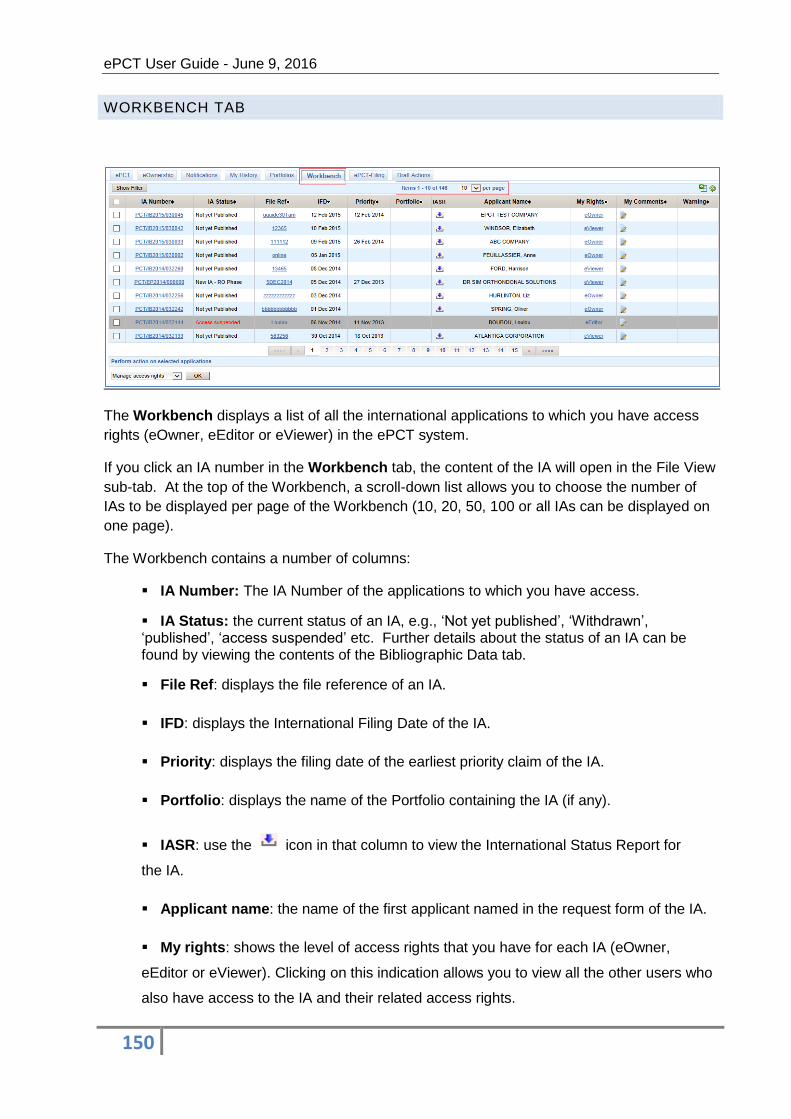
ePCT User Guide - June 9, 2016
150
WORKBENCH TAB
The Workbench displays a list of all the international applications to which you have access
rights (eOwner, eEditor or eViewer) in the ePCT system.
If you click an IA number in the Workbench tab, the content of the IA will open in the File View
sub-tab. At the top of the Workbench, a scroll-down list allows you to choose the number of
IAs to be displayed per page of the Workbench (10, 20, 50, 100 or all IAs can be displayed on
one page).
The Workbench contains a number of columns:
IA Number: The IA Number of the applications to which you have access.
IA Status: the current status of an IA, e.g., ‘Not yet published’, ‘Withdrawn’, ‘published’, ‘access suspended’ etc. Further details about the status of an IA can be found by viewing the contents of the Bibliographic Data tab.
File Ref: displays the file reference of an IA.
IFD: displays the International Filing Date of the IA.
Priority: displays the filing date of the earliest priority claim of the IA.
Portfolio: displays the name of the Portfolio containing the IA (if any).
IASR: use the icon in that column to view the International Status Report for
the IA.
Applicant name: the name of the first applicant named in the request form of the IA.
My rights: shows the level of access rights that you have for each IA (eOwner,
eEditor or eViewer). Clicking on this indication allows you to view all the other users who
also have access to the IA and their related access rights.

ePCT User Guide - June 9, 2016
151
My Comments: this column will show the comments you have entered for a
particular IA, if any (these comments are only visible to you). Click the icon to edit
and modify a comment or to add a new one.
Warning: this column shows the warning message that you or other associates
have entered for an IA. All the users who have access rights to the IA can see the
warning message.
(Refresh): click this icon at the top right-hand corner of the Workbench to refresh the
contents.
Note: From the Workbench you can select the IA (or IAs) for which you would like to assign
access rights by selecting ‘Manage access rights’ in lower left-hand side of the Workbench
screen under the list of actions that can be performed. For further details on assigning and
managing access rights, please refer to Part 2 of this guide.
Workbench tab – Manage access rights
Move to existing Portfolio:
The list of actions that can be performed from the workbench includes also the possibility to select one or several IAs and move them either to a new Portfolio (includes creation of a new Portfolio as part of the same operation) or to an existing Portfolio.
Select one or more IAs in the Workbench, select ‘Move to existing Portfolio’ and click the ‘OK’
button. A window will open to select the destination portfolio. Confirm the operation by clicking
‘Move’.

ePCT User Guide - June 9, 2016
152
Note: Moving an IA to a portfolio does not mean that the IA is removed from the Workbench -
it means that a link to the IA has been placed in the selected portfolio. The IAs placed in a
portfolio are still visible in the Workbench with the difference that the name of the portfolio
appears in the ‘Portfolio Name’ column of the Workbench.
Move to a new Portfolio:
Select one or more IAs in the Workbench, select ‘Move to a new Portfolio’ and click the ‘OK’
button - a window will open to type the name of the new portfolio. Confirm the operation by
clicking ‘Create’. A new Portfolio is created in the Portfolios tab containing a link to the
selected IA(s).
Remove from Portfolio:
Select one or more IAs in the Workbench, select ‘Remove from Portfolio’ and click the ‘OK’
button.
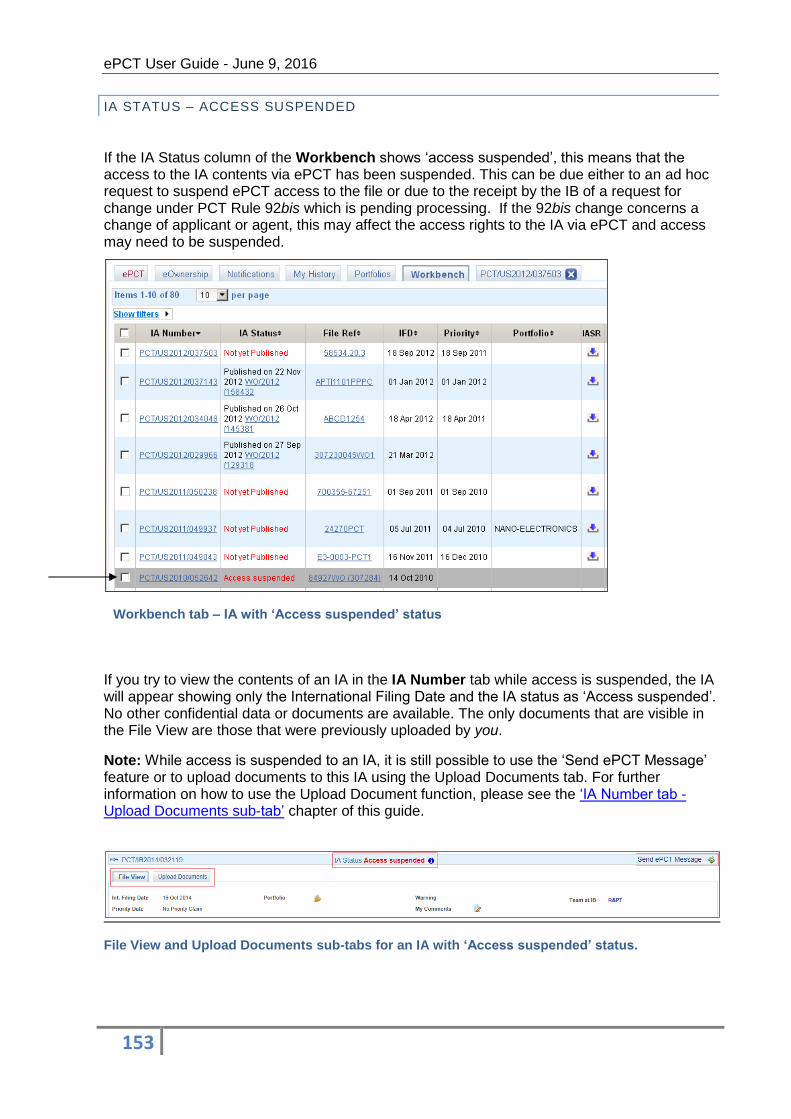
ePCT User Guide - June 9, 2016
153
IA STATUS – ACCESS SUSPENDED
If the IA Status column of the Workbench shows ‘access suspended’, this means that the access to the IA contents via ePCT has been suspended. This can be due either to an ad hoc request to suspend ePCT access to the file or due to the receipt by the IB of a request for change under PCT Rule 92bis which is pending processing. If the 92bis change concerns a change of applicant or agent, this may affect the access rights to the IA via ePCT and access may need to be suspended.
Workbench tab – IA with ‘Access suspended’ status
If you try to view the contents of an IA in the IA Number tab while access is suspended, the IA will appear showing only the International Filing Date and the IA status as ‘Access suspended’. No other confidential data or documents are available. The only documents that are visible in the File View are those that were previously uploaded by you.
Note: While access is suspended to an IA, it is still possible to use the ‘Send ePCT Message’ feature or to upload documents to this IA using the Upload Documents tab. For further information on how to use the Upload Document function, please see the ‘IA Number tab - Upload Documents sub-tab’ chapter of this guide.
File View and Upload Documents sub-tabs for an IA with ‘Access suspended’ status.

ePCT User Guide - June 9, 2016
154
WORKBENCH ICONS AND FUNCTIONS
In the Workbench – My Rights column, if you click on the eEditor, eOwner or eViewer link,
the access rights to this IA will be displayed.
View Access Rights window
Note: the icon shows that you have made an eHandshake with this user. If rights have
been given to someone with whom you have not made an eHandshake, e.g. those rights were
granted by another eOwner, this icon will not be displayed next to the name of the user in your
view of the list.
(Edit comment): click this icon to enter or edit a personal comment for the IA selected
which is then displayed in the ‘My Comments’ column of the Workbench. The comment is
also displayed in the IA Number – File view tab when the IA contents are viewed. This
comment will not be visible to other users.
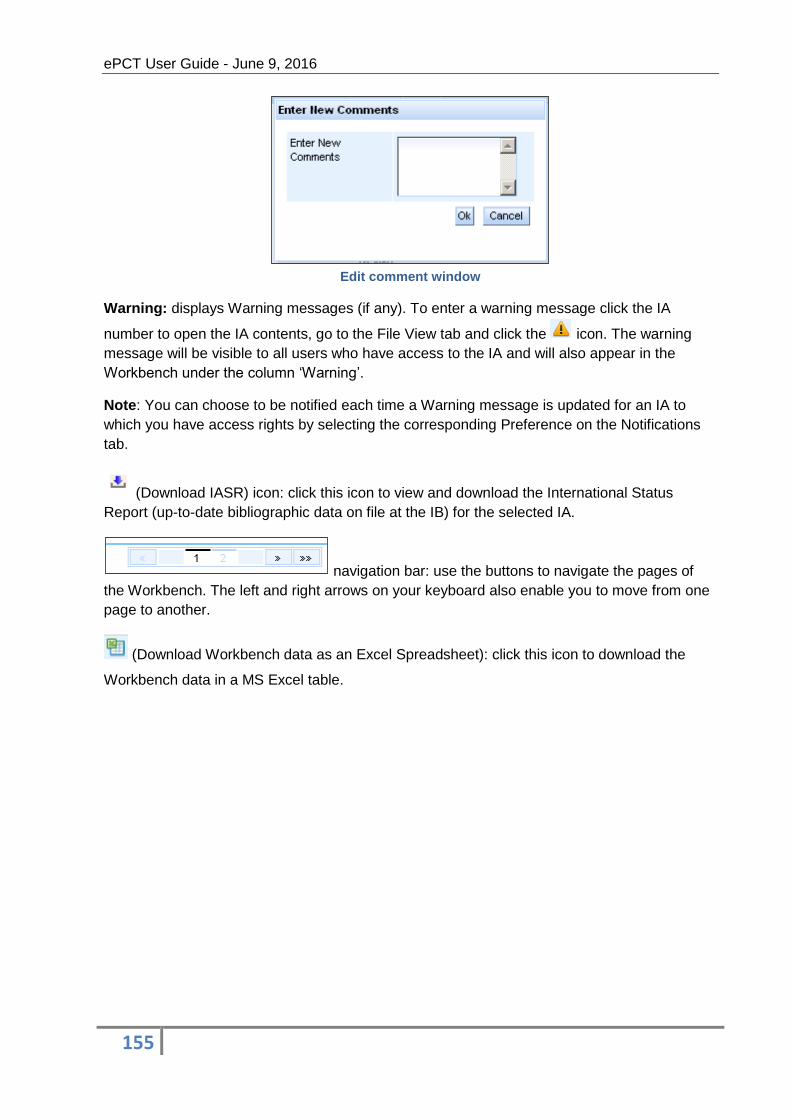
ePCT User Guide - June 9, 2016
155
Edit comment window
Warning: displays Warning messages (if any). To enter a warning message click the IA
number to open the IA contents, go to the File View tab and click the icon. The warning
message will be visible to all users who have access to the IA and will also appear in the
Workbench under the column ‘Warning’.
Note: You can choose to be notified each time a Warning message is updated for an IA to
which you have access rights by selecting the corresponding Preference on the Notifications
tab.
(Download IASR) icon: click this icon to view and download the International Status
Report (up-to-date bibliographic data on file at the IB) for the selected IA.
navigation bar: use the buttons to navigate the pages of
the Workbench. The left and right arrows on your keyboard also enable you to move from one
page to another.
(Download Workbench data as an Excel Spreadsheet): click this icon to download the
Workbench data in a MS Excel table.
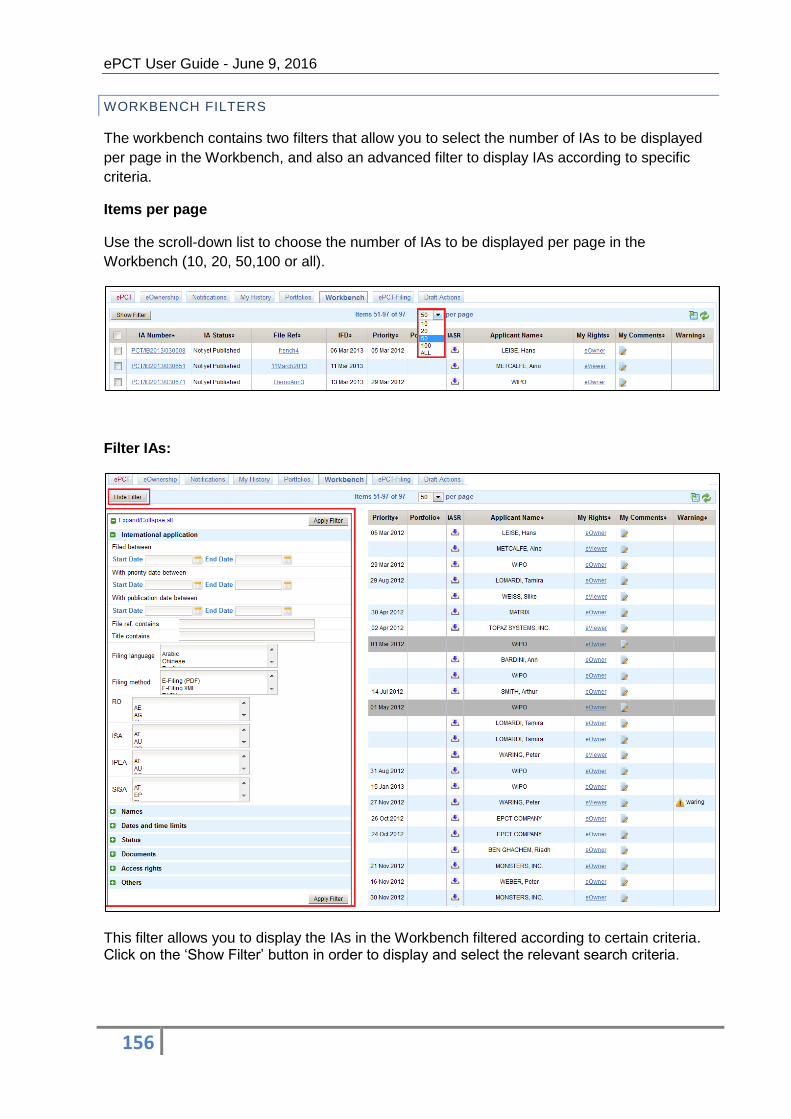
ePCT User Guide - June 9, 2016
156
WORKBENCH FILTERS
The workbench contains two filters that allow you to select the number of IAs to be displayed
per page in the Workbench, and also an advanced filter to display IAs according to specific
criteria.
Items per page
Use the scroll-down list to choose the number of IAs to be displayed per page in the
Workbench (10, 20, 50,100 or all).
Filter IAs:
This filter allows you to display the IAs in the Workbench filtered according to certain criteria. Click on the ‘Show Filter’ button in order to display and select the relevant search criteria.
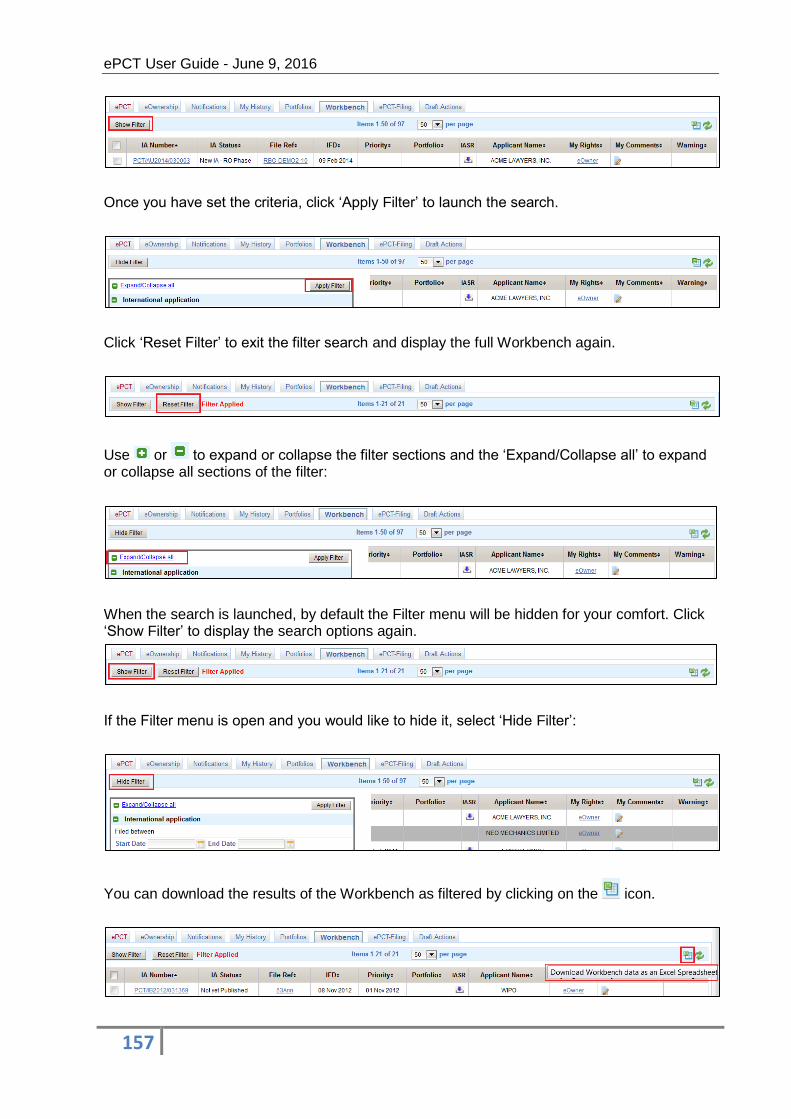
ePCT User Guide - June 9, 2016
157
Once you have set the criteria, click ‘Apply Filter’ to launch the search.
Click ‘Reset Filter’ to exit the filter search and display the full Workbench again.
Use or to expand or collapse the filter sections and the ‘Expand/Collapse all’ to expand or collapse all sections of the filter:
When the search is launched, by default the Filter menu will be hidden for your comfort. Click ‘Show Filter’ to display the search options again.
If the Filter menu is open and you would like to hide it, select ‘Hide Filter’:
You can download the results of the Workbench as filtered by clicking on the icon.
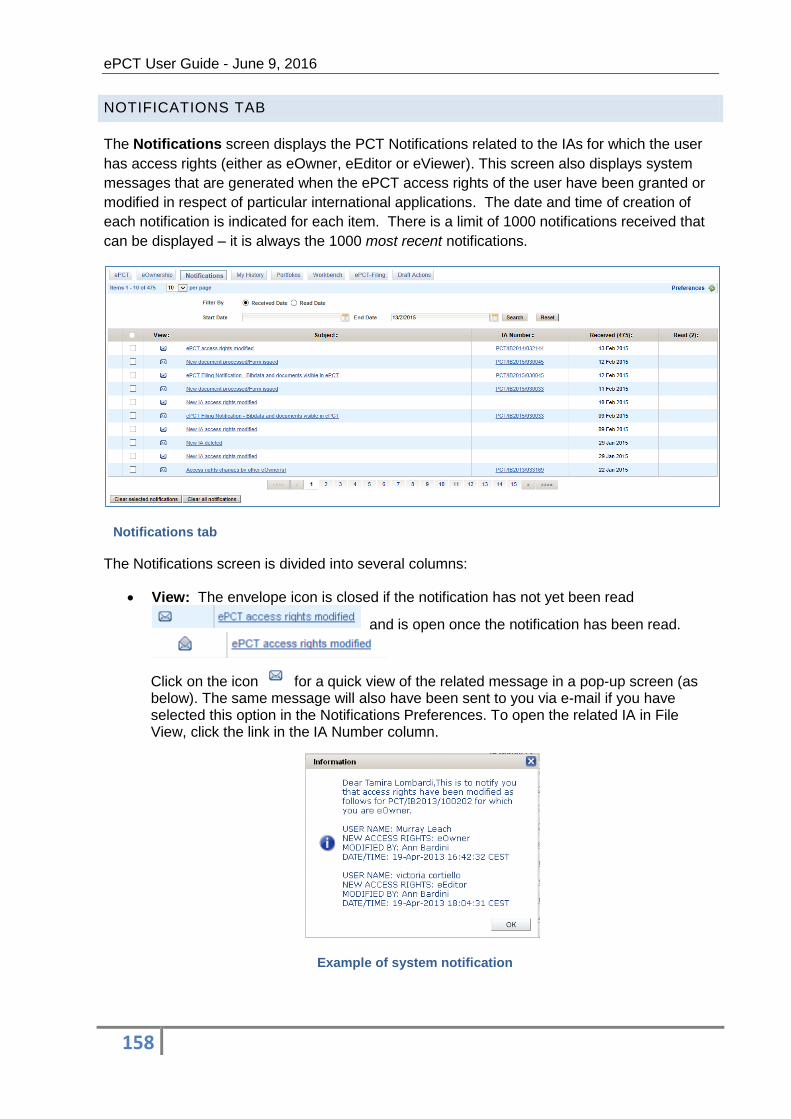
ePCT User Guide - June 9, 2016
158
NOTIFICATIONS TAB
The Notifications screen displays the PCT Notifications related to the IAs for which the user
has access rights (either as eOwner, eEditor or eViewer). This screen also displays system
messages that are generated when the ePCT access rights of the user have been granted or
modified in respect of particular international applications. The date and time of creation of
each notification is indicated for each item. There is a limit of 1000 notifications received that
can be displayed – it is always the 1000 most recent notifications.
Notifications tab
The Notifications screen is divided into several columns:
View: The envelope icon is closed if the notification has not yet been read
and is open once the notification has been read.
Click on the icon for a quick view of the related message in a pop-up screen (as below). The same message will also have been sent to you via e-mail if you have selected this option in the Notifications Preferences. To open the related IA in File View, click the link in the IA Number column.
Example of system notification
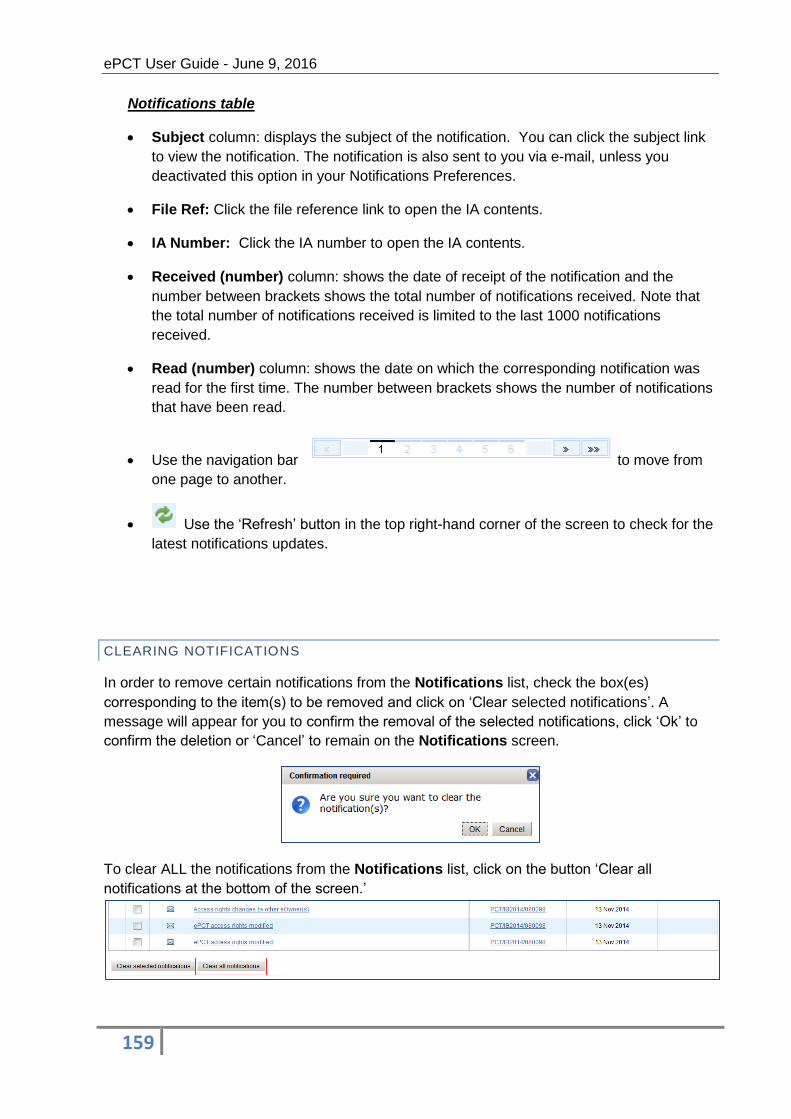
ePCT User Guide - June 9, 2016
159
Notifications table
Subject column: displays the subject of the notification. You can click the subject link
to view the notification. The notification is also sent to you via e-mail, unless you
deactivated this option in your Notifications Preferences.
File Ref: Click the file reference link to open the IA contents.
IA Number: Click the IA number to open the IA contents.
Received (number) column: shows the date of receipt of the notification and the
number between brackets shows the total number of notifications received. Note that
the total number of notifications received is limited to the last 1000 notifications
received.
Read (number) column: shows the date on which the corresponding notification was
read for the first time. The number between brackets shows the number of notifications
that have been read.
Use the navigation bar to move from
one page to another.
Use the ‘Refresh’ button in the top right-hand corner of the screen to check for the
latest notifications updates.
CLEARING NOTIFICATIONS
In order to remove certain notifications from the Notifications list, check the box(es)
corresponding to the item(s) to be removed and click on ‘Clear selected notifications’. A
message will appear for you to confirm the removal of the selected notifications, click ‘Ok’ to
confirm the deletion or ‘Cancel’ to remain on the Notifications screen.
To clear ALL the notifications from the Notifications list, click on the button ‘Clear all
notifications at the bottom of the screen.’
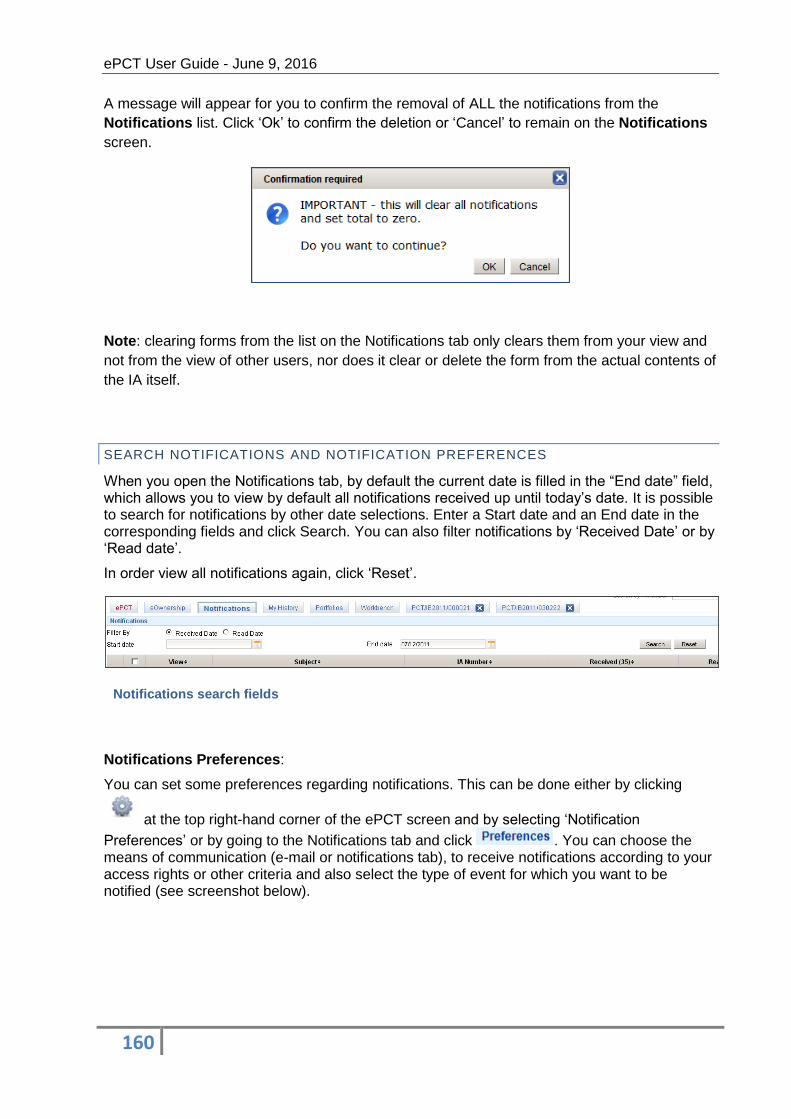
ePCT User Guide - June 9, 2016
160
A message will appear for you to confirm the removal of ALL the notifications from the
Notifications list. Click ‘Ok’ to confirm the deletion or ‘Cancel’ to remain on the Notifications
screen.
Note: clearing forms from the list on the Notifications tab only clears them from your view and
not from the view of other users, nor does it clear or delete the form from the actual contents of
the IA itself.
SEARCH NOTIFICATIONS AND NOTIFICATION PREFERENCES
When you open the Notifications tab, by default the current date is filled in the “End date” field, which allows you to view by default all notifications received up until today’s date. It is possible to search for notifications by other date selections. Enter a Start date and an End date in the corresponding fields and click Search. You can also filter notifications by ‘Received Date’ or by ‘Read date’.
In order view all notifications again, click ‘Reset’.
Notifications search fields
Notifications Preferences:
You can set some preferences regarding notifications. This can be done either by clicking
at the top right-hand corner of the ePCT screen and by selecting ‘Notification
Preferences’ or by going to the Notifications tab and click . You can choose the means of communication (e-mail or notifications tab), to receive notifications according to your access rights or other criteria and also select the type of event for which you want to be notified (see screenshot below).

ePCT User Guide - June 9, 2016
161
Notifications preferences window
The screen includes the following sections:
Notify me about events in IAs where my access rights are: this allows you to receive
ePCT notifications according to your access rights.
Method of notification: the means of communication of ePCT notifications (e-mail or
Notifications tab or both)
Notify me about the following events for all IAs in my workbench: to choose the events for which you would like to receive notifications:
Click the ‘OK’ button to confirm your preferences.

ePCT User Guide - June 9, 2016
162
PORTFOLIOS TAB
The Portfolios tab allows users to manage their international applications by organizing them into personal portfolios or folders if they wish to.
Portfolios tab
This tab displays the portfolios you have created (if any) and their contents.
CREATING A PORTFOLIO
1. In the Portfolios tab click on in the top right-hand corner of the
Portfolios screen to display the ‘New Portfolio’ window.
New Portfolio window
2. Enter the Name of the Portfolio that you wish to create in the ‘Portfolio Name’ field and
click on ‘Create’ (click ‘Cancel’ if you do not wish to create a portfolio). Note that the
portfolio name is always converted to upper case and is restricted to a single character
string of 20 characters maximum.
Once a portfolio has been created, the Portfolio tab displays the following information:
The number of portfolios created
The Portfolio name
Last accessed: that date of the last access to that portfolio
No of IAs: the number of IAs in each portfolio
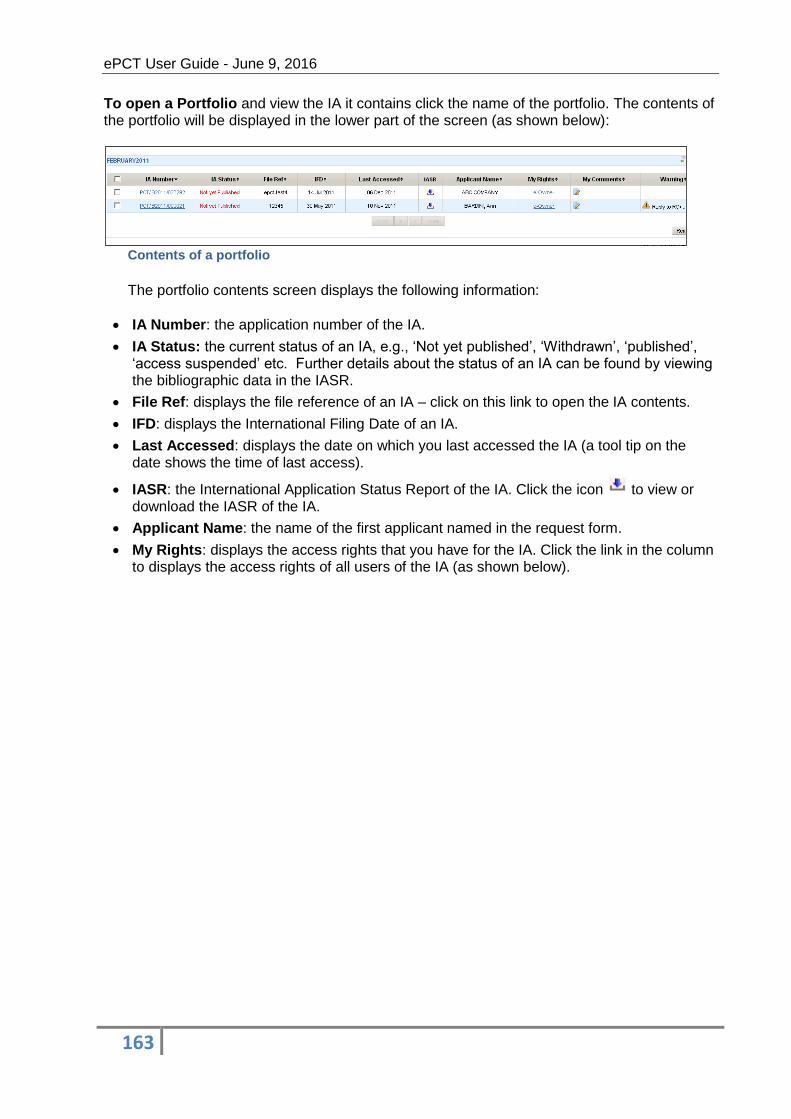
ePCT User Guide - June 9, 2016
163
To open a Portfolio and view the IA it contains click the name of the portfolio. The contents of the portfolio will be displayed in the lower part of the screen (as shown below):
Contents of a portfolio
The portfolio contents screen displays the following information:
IA Number: the application number of the IA.
IA Status: the current status of an IA, e.g., ‘Not yet published’, ‘Withdrawn’, ‘published’, ‘access suspended’ etc. Further details about the status of an IA can be found by viewing the bibliographic data in the IASR.
File Ref: displays the file reference of an IA – click on this link to open the IA contents.
IFD: displays the International Filing Date of an IA.
Last Accessed: displays the date on which you last accessed the IA (a tool tip on the date shows the time of last access).
IASR: the International Application Status Report of the IA. Click the icon to view or download the IASR of the IA.
Applicant Name: the name of the first applicant named in the request form.
My Rights: displays the access rights that you have for the IA. Click the link in the column to displays the access rights of all users of the IA (as shown below).
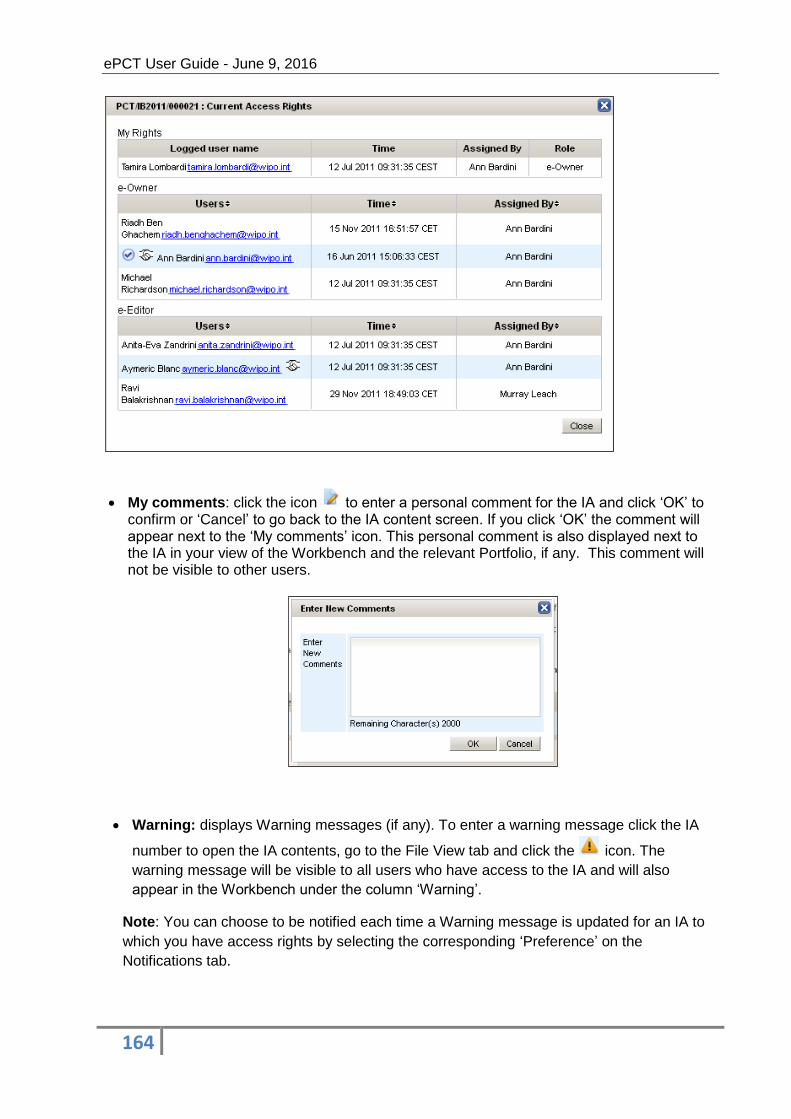
ePCT User Guide - June 9, 2016
164
My comments: click the icon to enter a personal comment for the IA and click ‘OK’ to confirm or ‘Cancel’ to go back to the IA content screen. If you click ‘OK’ the comment will appear next to the ‘My comments’ icon. This personal comment is also displayed next to the IA in your view of the Workbench and the relevant Portfolio, if any. This comment will not be visible to other users.
Warning: displays Warning messages (if any). To enter a warning message click the IA
number to open the IA contents, go to the File View tab and click the icon. The
warning message will be visible to all users who have access to the IA and will also
appear in the Workbench under the column ‘Warning’.
Note: You can choose to be notified each time a Warning message is updated for an IA to
which you have access rights by selecting the corresponding ‘Preference’ on the
Notifications tab.
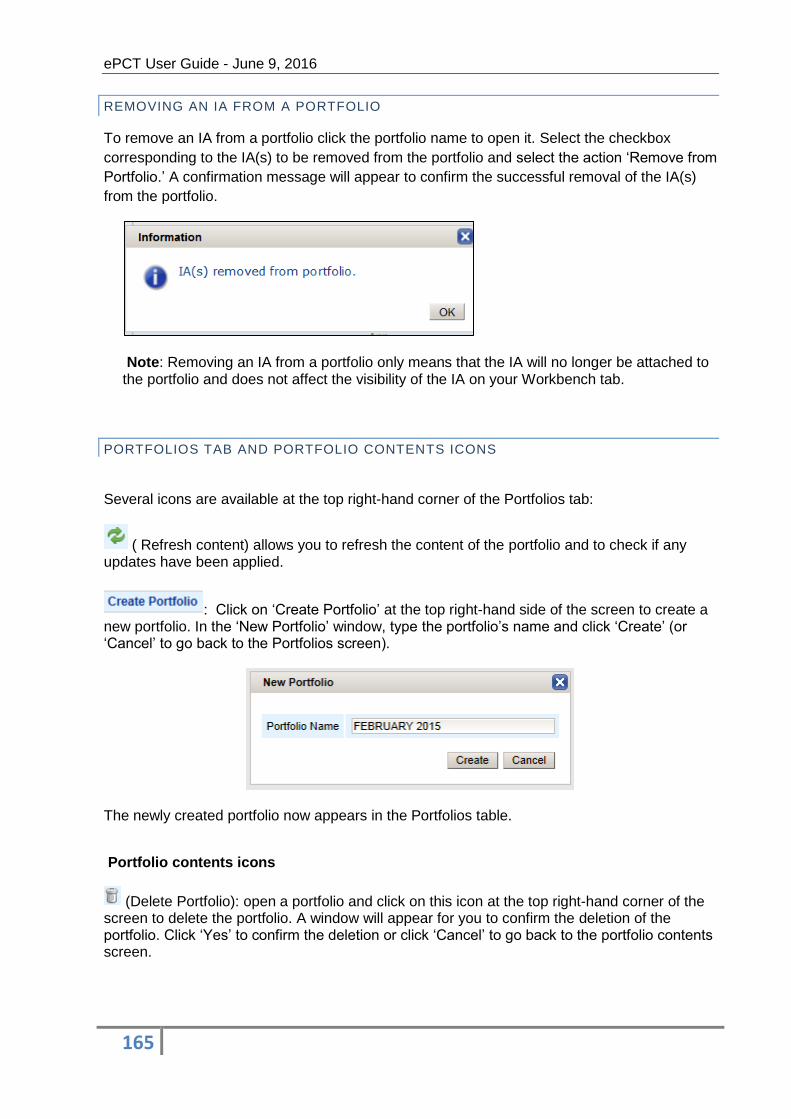
ePCT User Guide - June 9, 2016
165
REMOVING AN IA FROM A PORTFOLIO
To remove an IA from a portfolio click the portfolio name to open it. Select the checkbox
corresponding to the IA(s) to be removed from the portfolio and select the action ‘Remove from
Portfolio.’ A confirmation message will appear to confirm the successful removal of the IA(s)
from the portfolio.
Note: Removing an IA from a portfolio only means that the IA will no longer be attached to the portfolio and does not affect the visibility of the IA on your Workbench tab.
PORTFOLIOS TAB AND PORTFOLIO CONTENTS ICONS
Several icons are available at the top right-hand corner of the Portfolios tab:
( Refresh content) allows you to refresh the content of the portfolio and to check if any updates have been applied.
: Click on ‘Create Portfolio’ at the top right-hand side of the screen to create a new portfolio. In the ‘New Portfolio’ window, type the portfolio’s name and click ‘Create’ (or ‘Cancel’ to go back to the Portfolios screen).
The newly created portfolio now appears in the Portfolios table.
Portfolio contents icons
(Delete Portfolio): open a portfolio and click on this icon at the top right-hand corner of the screen to delete the portfolio. A window will appear for you to confirm the deletion of the portfolio. Click ‘Yes’ to confirm the deletion or click ‘Cancel’ to go back to the portfolio contents screen.

ePCT User Guide - June 9, 2016
166
Portfolios tab – confirm portfolio removal window
If you select ‘Yes’ a confirmation message is displayed for the portfolio removal.
Note: Even though a portfolio is deleted, the IAs that were contained in it are not deleted and
are still visible in the Workbench.
(Rename Portfolio icon): open a portfolio and click this icon to rename it. The ‘Rename
Portfolio’ window is displayed. Enter the new name of the portfolio and click ‘Rename’ to
confirm the operation or click ‘Cancel’ to go back to the portfolio contents screen.
Rename Portfolio window
(Back to Portfolio list): When looking at the contents of a portfolio, click this icon to close the Portfolio and go back to the Portfolios list.
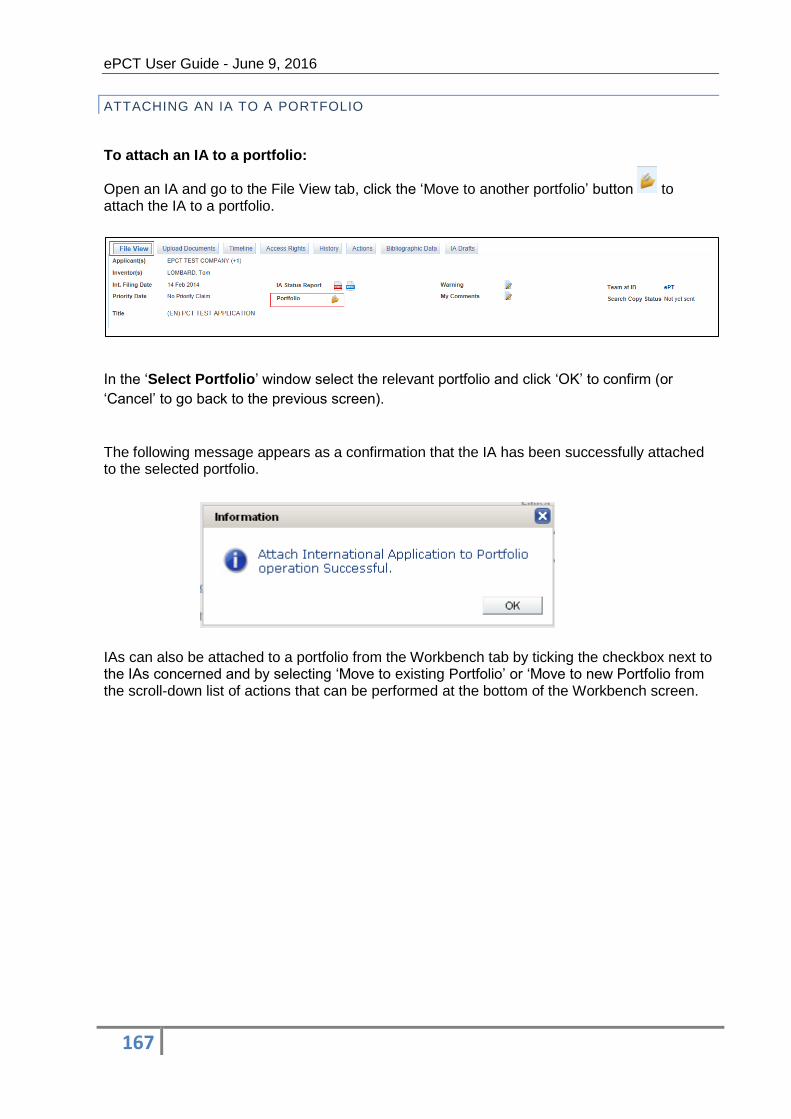
ePCT User Guide - June 9, 2016
167
ATTACHING AN IA TO A PORTFOLIO
To attach an IA to a portfolio:
Open an IA and go to the File View tab, click the ‘Move to another portfolio’ button to attach the IA to a portfolio.
In the ‘Select Portfolio’ window select the relevant portfolio and click ‘OK’ to confirm (or
‘Cancel’ to go back to the previous screen).
The following message appears as a confirmation that the IA has been successfully attached to the selected portfolio.
IAs can also be attached to a portfolio from the Workbench tab by ticking the checkbox next to the IAs concerned and by selecting ‘Move to existing Portfolio’ or ‘Move to new Portfolio from the scroll-down list of actions that can be performed at the bottom of the Workbench screen.
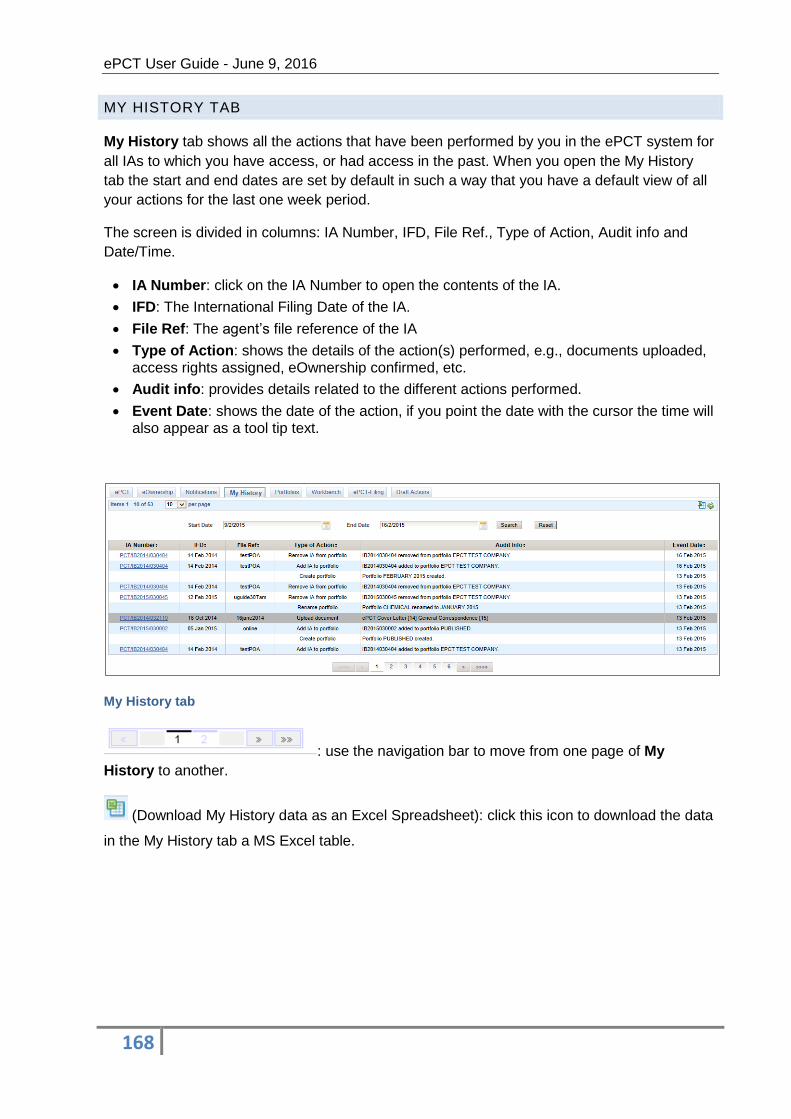
ePCT User Guide - June 9, 2016
168
MY HISTORY TAB
My History tab shows all the actions that have been performed by you in the ePCT system for
all IAs to which you have access, or had access in the past. When you open the My History
tab the start and end dates are set by default in such a way that you have a default view of all
your actions for the last one week period.
The screen is divided in columns: IA Number, IFD, File Ref., Type of Action, Audit info and
Date/Time.
IA Number: click on the IA Number to open the contents of the IA.
IFD: The International Filing Date of the IA.
File Ref: The agent’s file reference of the IA
Type of Action: shows the details of the action(s) performed, e.g., documents uploaded, access rights assigned, eOwnership confirmed, etc.
Audit info: provides details related to the different actions performed.
Event Date: shows the date of the action, if you point the date with the cursor the time will also appear as a tool tip text.
My History tab
: use the navigation bar to move from one page of My
History to another.
(Download My History data as an Excel Spreadsheet): click this icon to download the data
in the My History tab a MS Excel table.
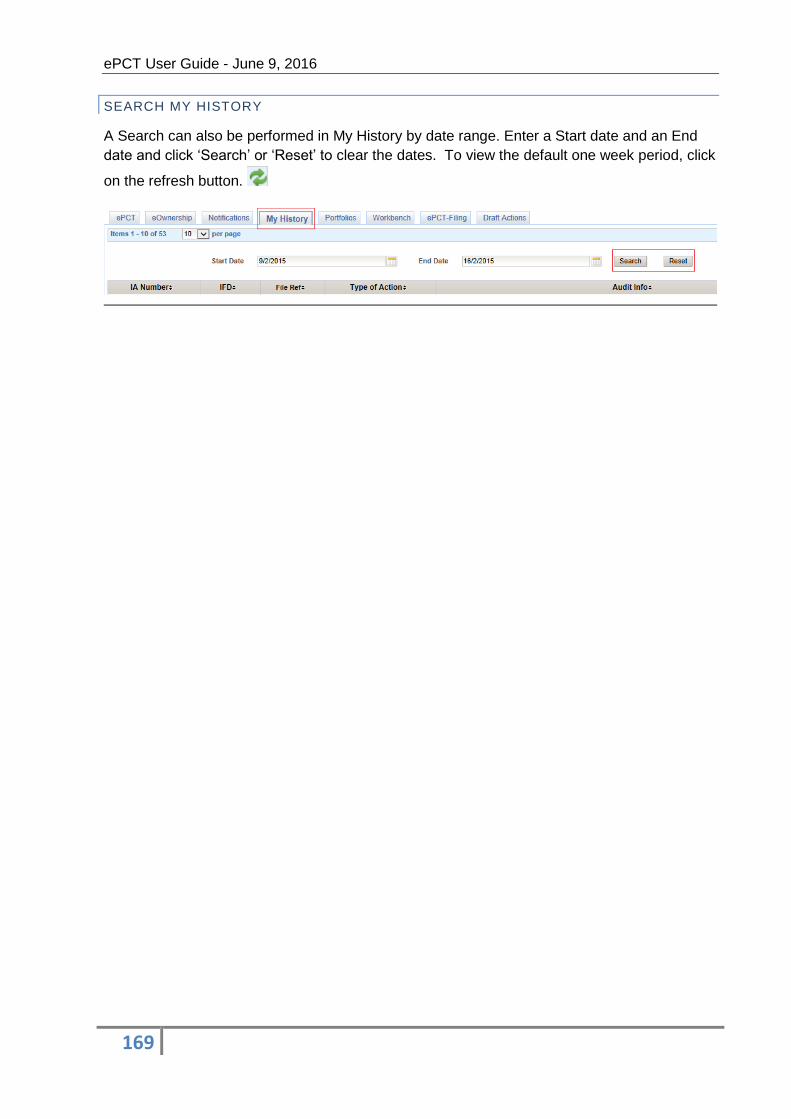
ePCT User Guide - June 9, 2016
169
SEARCH MY HISTORY
A Search can also be performed in My History by date range. Enter a Start date and an End
date and click ‘Search’ or ‘Reset’ to clear the dates. To view the default one week period, click
on the refresh button.
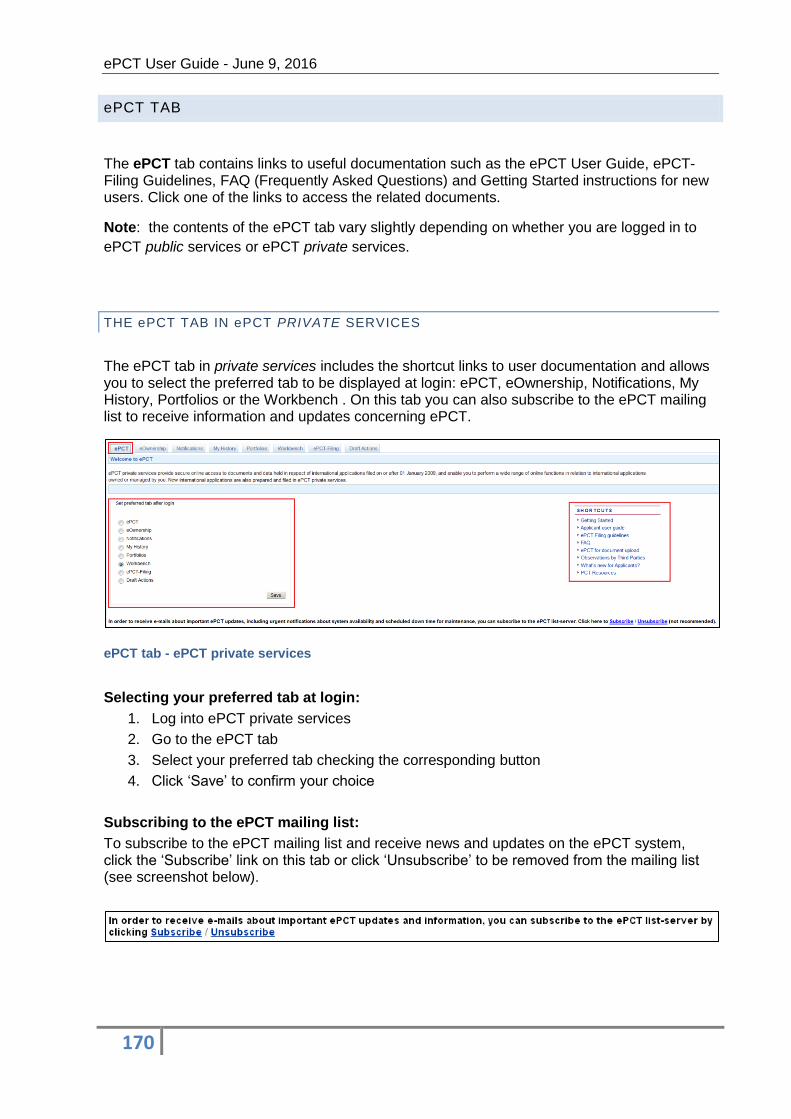
ePCT User Guide - June 9, 2016
170
ePCT TAB
The ePCT tab contains links to useful documentation such as the ePCT User Guide, ePCT-Filing Guidelines, FAQ (Frequently Asked Questions) and Getting Started instructions for new users. Click one of the links to access the related documents.
Note: the contents of the ePCT tab vary slightly depending on whether you are logged in to
ePCT public services or ePCT private services.
THE ePCT TAB IN ePCT PRIVATE SERVICES
The ePCT tab in private services includes the shortcut links to user documentation and allows you to select the preferred tab to be displayed at login: ePCT, eOwnership, Notifications, My History, Portfolios or the Workbench . On this tab you can also subscribe to the ePCT mailing list to receive information and updates concerning ePCT.
ePCT tab - ePCT private services
Selecting your preferred tab at login:
1. Log into ePCT private services
2. Go to the ePCT tab
3. Select your preferred tab checking the corresponding button
4. Click ‘Save’ to confirm your choice
Subscribing to the ePCT mailing list:
To subscribe to the ePCT mailing list and receive news and updates on the ePCT system, click the ‘Subscribe’ link on this tab or click ‘Unsubscribe’ to be removed from the mailing list (see screenshot below).
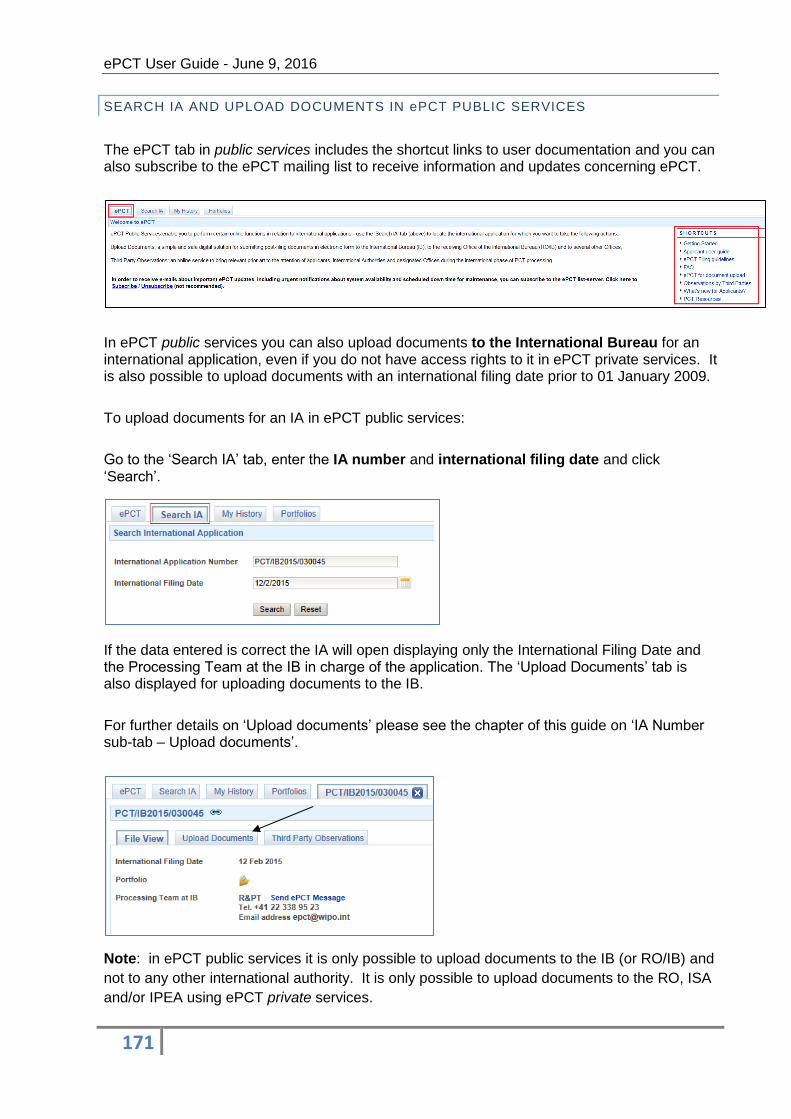
ePCT User Guide - June 9, 2016
171
SEARCH IA AND UPLOAD DOCUMENTS IN ePCT PUBLIC SERVICES
The ePCT tab in public services includes the shortcut links to user documentation and you can also subscribe to the ePCT mailing list to receive information and updates concerning ePCT.
In ePCT public services you can also upload documents to the International Bureau for an international application, even if you do not have access rights to it in ePCT private services. It is also possible to upload documents with an international filing date prior to 01 January 2009.
To upload documents for an IA in ePCT public services:
Go to the ‘Search IA’ tab, enter the IA number and international filing date and click ‘Search’.
If the data entered is correct the IA will open displaying only the International Filing Date and the Processing Team at the IB in charge of the application. The ‘Upload Documents’ tab is also displayed for uploading documents to the IB.
For further details on ‘Upload documents’ please see the chapter of this guide on ‘IA Number sub-tab – Upload documents’.
Note: in ePCT public services it is only possible to upload documents to the IB (or RO/IB) and
not to any other international authority. It is only possible to upload documents to the RO, ISA
and/or IPEA using ePCT private services.
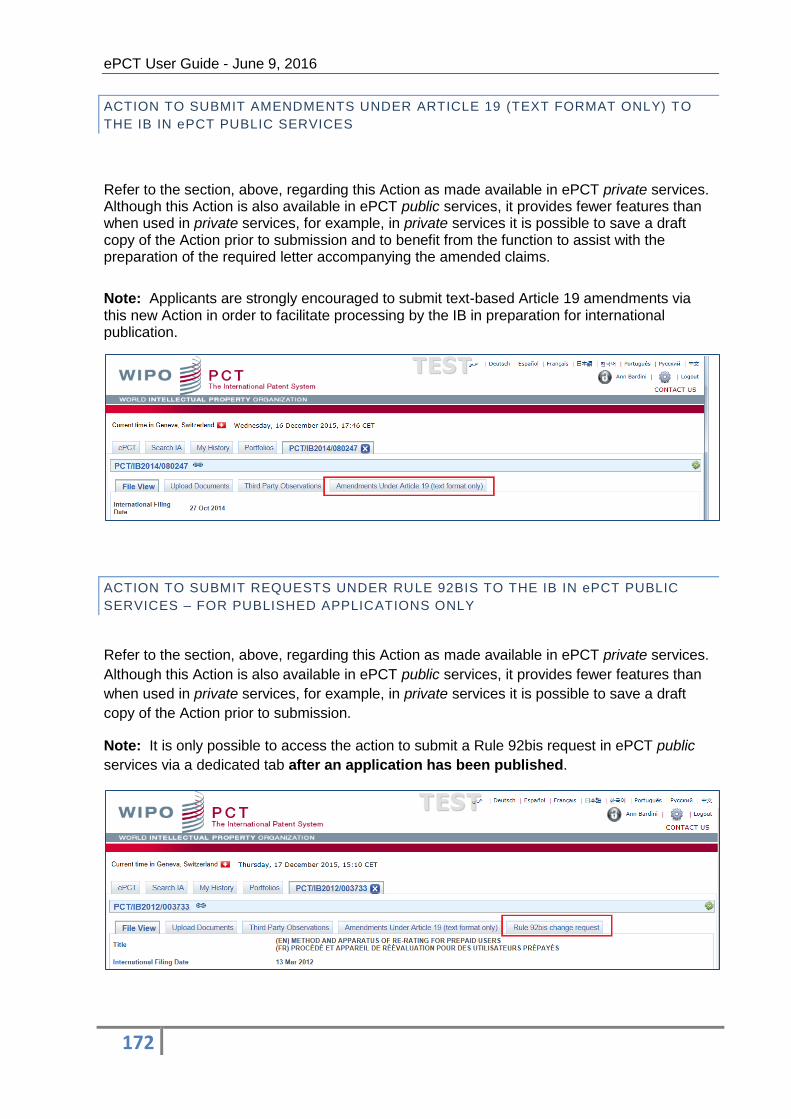
ePCT User Guide - June 9, 2016
172
ACTION TO SUBMIT AMENDMENTS UNDER ARTICLE 19 (TEXT FORMAT ONLY) TO
THE IB IN ePCT PUBLIC SERVICES
Refer to the section, above, regarding this Action as made available in ePCT private services. Although this Action is also available in ePCT public services, it provides fewer features than when used in private services, for example, in private services it is possible to save a draft copy of the Action prior to submission and to benefit from the function to assist with the preparation of the required letter accompanying the amended claims.
Note: Applicants are strongly encouraged to submit text-based Article 19 amendments via this new Action in order to facilitate processing by the IB in preparation for international publication.
ACTION TO SUBMIT REQUESTS UNDER RULE 92BIS TO THE IB IN ePCT PUBLIC
SERVICES – FOR PUBLISHED APPLICATIONS ONLY
Refer to the section, above, regarding this Action as made available in ePCT private services.
Although this Action is also available in ePCT public services, it provides fewer features than
when used in private services, for example, in private services it is possible to save a draft
copy of the Action prior to submission.
Note: It is only possible to access the action to submit a Rule 92bis request in ePCT public
services via a dedicated tab after an application has been published.

ePCT User Guide - June 9, 2016
173
WHOM TO CONTACT
For any questions, queries or comments about ePCT, please contact the PCT eServices Help Desk by clicking on the “Contact Us” link which appears in the top right-hand corner of each screen in ePCT. This will take you to our frequently asked questions page where you may able to find the answer to your question. Every FAQ item also has a “Contact” link for submitting further queries to the Help Desk, as well as “Chat” option when a member of staff is available for online Chat. Should you need to submit a screenshot relating to a particular issue, please send it by e-mail to [email protected] Telephone support is also available on +41 22 338 9523. The PCT eServices Help Desk is available from Monday to Friday, from 9:00 until 18:00 Central European time. Every attempt is made to respond to questions within one business day. Please note that the PCT eServices Help Desk is closed on Saturdays and Sundays, as well as on non-working days at WIPO which are available at: www.wipo.int/contact/en/holidays.html
Back to top of the document
[End of document]