Embed Size (px)
Citation preview

Enhancing TurboCAD Renders
Page 1
28
www.textualcreations.ca
Many new TurboCAD users are under the impression that they should not use other software to enhance their CAD renders, that to do so somehow diminishes its purity.
Truth be told - this is simply just old thinking. A user can and should use whatever means they have at their disposal to produce output that makes their work stand out.
Granted, rendered output from TurboCAD is pretty awesome all on its own but some enhancements made with additional software, such as Photoshop, can mean a whole new level of awesome is achieved.
Within this tip the reader will be exposed to some of the methods that Don Cheke uses to achieve enhanced results.
TurboCAD users are not limited to one tool when it comes to creative rendered output.
This TurboCAD render has been enhanced with Photoshop to
resemble an illustration.

Enhancing TurboCAD Renders
Page 2
28
www.textualcreations.ca
For virtually all TurboCAD renders that end up in a composition, such as on a tutorial book cover, Don Cheke follows the following procedures.
From within TurboCAD
1. Render final scene as desired.2. Render copy of scene without shadow catcher/ground plane and without lights (or rendered with a easily selectable
background). This is not always necessary, especially if the background is already easily selectable in Photoshop.
1. Final render (with reflective ground plane in this case). 2. Rendered without ground plane or lights.
Enhancing TurboCAD Renders
Page 3
28
www.textualcreations.ca
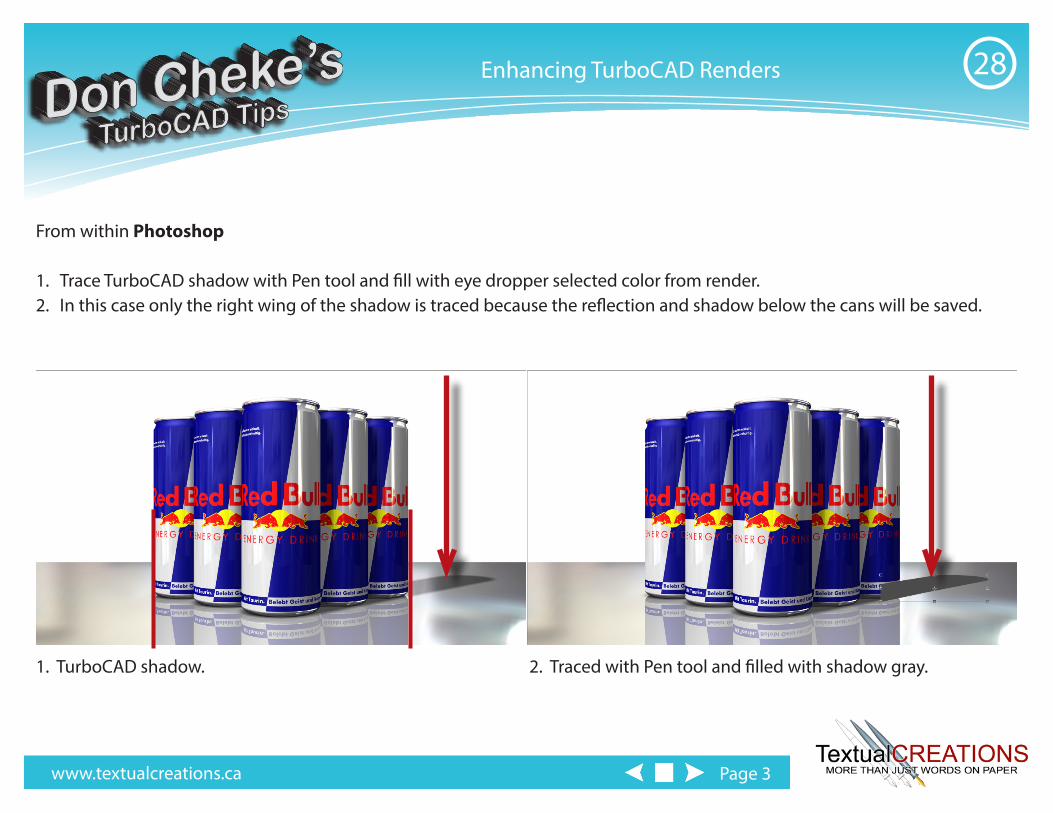
From within Photoshop
1. Trace TurboCAD shadow with Pen tool and fill with eye dropper selected color from render.2. In this case only the right wing of the shadow is traced because the reflection and shadow below the cans will be saved.
1. TurboCAD shadow. 2. Traced with Pen tool and filled with shadow gray.

Enhancing TurboCAD Renders
Page 4
28
www.textualcreations.ca
From within Photoshop
3. Using the mask render as a selection aid, and the 'add to selection' tools, the area outside and below the cans is selected.4. The selection is then deleted and in this case the traced shadow is turned off for now.
3. Dashed selection has been traced in red in this image. 4. Background is deleted and the pen fill shadow is hidden.

Enhancing TurboCAD Renders
Page 5
28
www.textualcreations.ca
From within Photoshop
5. A copy of the rendered layer is made. The original layer is hidden (kept for future use if a need arises).6. The Unsharpen Mask filter is applied, just enough to crisp up the image a bit.
5. A copy is made. 6. Unsharpen Mask applied.
Enhancing TurboCAD Renders
Page 6
28
www.textualcreations.ca
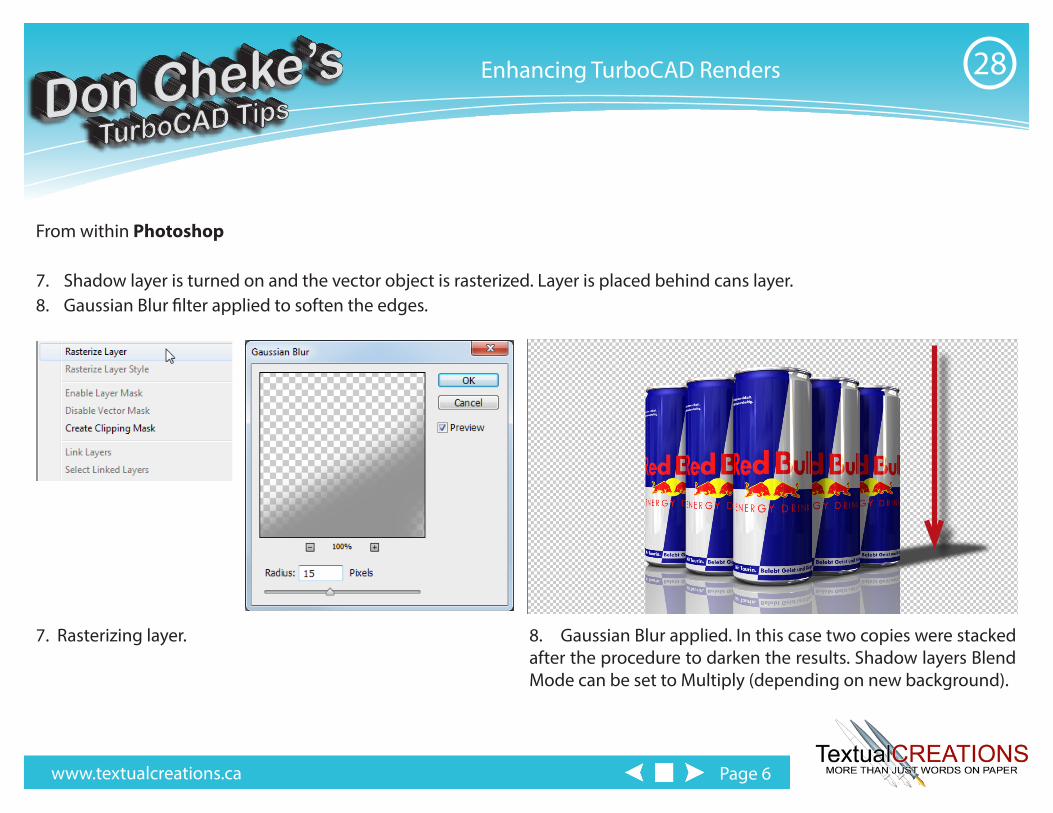
From within Photoshop
7. Shadow layer is turned on and the vector object is rasterized. Layer is placed behind cans layer.8. Gaussian Blur filter applied to soften the edges.
7. Rasterizing layer. 8. Gaussian Blur applied. In this case two copies were stackedafter the procedure to darken the results. Shadow layers Blend Mode can be set to Multiply (depending on new background).

Enhancing TurboCAD Renders
Page 7
28
www.textualcreations.ca
From within Photoshop
9. A background layer is create (gradient fill in this case) and a signature placed.

Enhancing TurboCAD Renders
Page 8
28
www.textualcreations.ca
From within TurboCAD
1. Render final scene as desired.2. Render copy of scene with easily selectable background.
1. Background is a Render Scene Environment (RSE). It isstretched and not at a very good scale. It is used so it may reflect in the store windows - which is something that is desirable.
2. Rendered with RSE blue background.
The next few images will show how a different colored background can be rendered for easy selection in Photoshop and additional processes made for a better outcome.

Enhancing TurboCAD Renders
Page 9
28
www.textualcreations.ca
From within Photoshop
1. Images (as layers) are stacked in Photoshop.2. Blue background is selected with Magic Wand tool.3. Image with blue background is hidden, image with scene background is activated and Delete is pressed to remove selection
from that layer.
2. Background is selected.
1. Stacked layers.
3. Background scene is deleted.

Enhancing TurboCAD Renders
Page 10
28
www.textualcreations.ca
From within Photoshop
4. Image used as background in TurboCAD render is inserted into Photoshop as a layer and placed where desired. It is now at a decent scale (hopefully) and is no longer stretched.
5. Levels are adjusted (if need be) and the Unsharpen Mask is used on a copy of the rendered image. Original is kept for future use if the need arises.
4. Background is inserted. 5. Scene lightened with Levels and sharpened slightly.

Enhancing TurboCAD Renders
Page 11
28
www.textualcreations.ca
5. Scene lightened with Levels and sharpened slightly.
From within Photoshop
6. A signature is placed.

Enhancing TurboCAD Renders
Page 12
28
www.textualcreations.ca
From within TurboCAD
1. Render final scene as desired.2. Render copy of scene with easily selectable background.
1. Background is a Ray Cubed Render Scene Environment. It uses an HDR image for reflections. A Shadow Catcher is also used beneath the gate valve.
2. Rendered with blue background. Shadow Catcher is turned off.
The next few images will show how the image on the first page was made to look like an illustration.

Enhancing TurboCAD Renders
Page 13
28
www.textualcreations.ca
From within Photoshop
1. Images (as layers) are stacked in Photoshop.2. Blue background image layer is hidden.3. TurboCAD shadow is traced with Pen tool and filled with eye dropper selected color from render.
2. Shadow scene is visible.
1. Stacked layers.
3. Traced with Pen tool and filled with shadow gray.

Enhancing TurboCAD Renders
Page 14
28
www.textualcreations.ca
From within Photoshop
4. Shadow layer is hidden. With the mask render visible, selection of the blue background is made with the Magic Wand tool.5. Mask layer is hidden and the shadow scene layer is activated. The selection is then deleted.
4. Dashed selection is not too easy to see in this image. 5. Background is deleted. Feathering the edge is often done at this point (in Photoshop CC press Shift + F6. Click OK. Press Delete 3-5 times).

Enhancing TurboCAD Renders
Page 15
28
www.textualcreations.ca
From within Photoshop
6. A copy of the rendered layer is made. The original layer is hidden (kept for future use if a need arises).7. The Unsharpen Mask filter is applied, just enough to crisp up the image a bit.
6. Image layer is duplicated. 7. Unsharpen Mask applied.

Enhancing TurboCAD Renders
Page 16
28
www.textualcreations.ca
From within Photoshop
8. Shadow layer is turned on and the vector object is rasterized. Layer is placed behind gate valve.9. Gaussian Blur filter applied to soften the edges.
8. Rasterizing layer. 9. Gaussian Blur applied.

Enhancing TurboCAD Renders
Page 17
28
www.textualcreations.ca
From within Photoshop
10. A copy of the sharpened layer is made.11. Find Edges filter is applied to the copied layer.12. Copied layer Blend Mode is set to Multiply.
11. Find Edges filter applied.
11. Find Edges filter applied.
10. Copy made.
12. Blend Mode - Multiply.Turn opacity down to lessen the effect if desired.
12. Blend Mode set.

Enhancing TurboCAD Renders
Page 18
28
www.textualcreations.ca
From within Photoshop
13. A background layer is create (gradient fill in this case). Text, additional elements and a signature are placed.
If you found this TurboCAD tip helpful, please consider purchasing a full Textual Creations TurboCAD project tutorial that will lead you through an entire project, keystroke by keystroke. You won’t be disappointed! Visit the Textual Creations Shopping Page