Embed Size (px)
Citation preview
English
Español
Nederlands
Owner s Manual,
CLASSIK MOVIE


Important Safety Information
Explanation of symbols used in this manual or on the rear/underside of theapparatus:
This symbol is intended to alert the user to the presence ofuninsulated dangerous voltages within the enclosure of sufficientmagnitude to cause electric shock.
This symbol is intended to alert the user to the presence of importantoperation, maintenance and servicing information in the instructionand service manuals.
For apparatus connected to the mains electricity supply
CAUTIONTO REDUCE THE RISK OF ELECTRIC SHOCK DO NOT REMOVE THE COVER. NO USER SERVICEABLE PARTS INSIDE.REFER SERVICING TO QUALIFIED SERVICE PERSONNEL.REPLACE THE MAINS FUSE IN THE PLUG WITH ONE OF THE SAME TYPEAND RATING.DISCONNECT SUPPLY CORD BEFORE CHANGING FUSE.
WARNINGTO REDUCE THE RISK OF FIRE OR ELECTRIC SHOCK DO NOT EXPOSE THISAPPARATUS TO RAIN OR MOISTURE. SHOCK HAZARD - DO NOT OPEN.
MAINS PLUGGS This apparatus is supplied with a non-rewireable mains plug for the intendedcountry.Replacement mains leads can be obtained from your Linn retailer. Should youneed to change the plug please dispose of it carefully. A plug with baredconductors is dangerous if engaged in a live socket.
The Brown wire must be connected to the Live (Line) supply pin.The Blue wire must be connected to the Neutral supply pin.The Green/Yellow wire must be connected to the Earth (Ground) supply pin.
Please contact your retailer or a competent electrician if you are in anydoubt.
Refer to the rear or underside of the product for fuse and powerconsumption information.
General Safety Instructions
1. Read these instructions. 2. Keep these instructions.3. Heed all warnings.4. Follow all instrucctions.5. Do not use the apparatus near water, for example near a bathtub,
washbowl, kitchen sink, laundry tub, in a wet basement, near a swimming pool etc.
6. Clean only with dry cloth.7. Do not block any veentilation openings. Install in accordance with the
manufacturer’s instructions. Site the apparatus so that its location or position does not interfere with its proper ventilation. For example, the apparatus should not be situated on a bed, sofa, rug, or similar surface thatmay block the ventilation openings, or placed in a built-in installation such as a bookcase or cabinet that may impede the flow of air through the ventilation openings.
8. Do not installl near any heat sources such as radiators, heat registers, stoves, or other apparatus (including ammplifiers) that produce heat.
9. Do not defeat the safety purpose of the polarised or grounding type plug. A polarised plug has two blades with one wider than the other. A grounding type plug has two blades and a third grounding prong. The wide blade or the third prong is provided for your safety. If the provided plug does not fit into your outlet, consult an electrician for replacement of the obsolete outlet.
10. Protect the power cord from being walked on or pinched particularly at plugs, conveniennce receptacles, and at the point where they exit from the apparatus.
11. Only use attachments/accesssories specified by the manufacturer.12. Use only with the stand, tripod, bracket, or table specifieed by the
manufacturer, or sold with the apparatus.13. Unplug this apparatus during lightning stormms or when unused for long periods
of time.14. Refer all servicing to qualified service personnel. Servicing is required when
the apparatus has been damaged in any way, such as power-supply cord or plug has been damaged, liquid has been spilled or objects have fallen into the apparatus, the apparatus has been exposed to rain or moisture, does not operate normally, or has been dropped.
15. Wall or ceiling mounting. Mount the apparatus to a wall or ceiling only as recommended by the manufacturer.
16. Power sources. Connect the apparatus to a power supply only of the type described in the operating instructions or marked on the apparatus.
17. Mains plug. Use the mains plug to disconnect the apparatus from the mainssupply. The mains plug must be accessible at all times. Use the mains switch (if applicable) when the apparatus is not in use.
i CLASSIK MOVIEOwner’s Manual
Important Safety Instructions English
18. Power lines. An outdoor antenna should be located away from power lines.
19. Outdoor antenna grounding. If an outdoor antenna is connected to the apparatus, ensure that the antenna system is grounded to provide some protection against voltage surges and static build up. In the USA see article 810 of the National Electrical Code ANSI/NFPA 70 concerning installation requirements.
20. Telephone line. Do not connect the apparatus to a telephone line except where specifically instructed to do so.
21. Objects and liquid enntry. Do not let objects or liquids fall into the apparatus. Do not expose the apparatus to dripping or splashing. Do not place a vessel containing liquid on top of the apparatus.
22. No naked flame sources, such as lighted candles, should be placed on theapparatus.
23. TThe apparatus has been designed for use in moderate and tropical climates.
iiCLASSIK MOVIEOwner’s Manual
Important Safety InstructionsEnglish
UK USERS PLEASE READ THIS IMPORTANT SAFETYINFORMATION
Fuse replacementThis appliance is fitted with a non-rewireable 13 amp mains plug. The plugcontains a 5 amp fuse. If the fuse has blown it can be replaced as follows:
a) Pull out the red fuse cover/carrier.b) Remove and dispose of the blown fuse.c) Fit a new 5 amp BS1362 approved fuse into the carrier and push the
carrier back into the plug.
Always ensure the fuse cover is fitted. If the fuse cover is missing do not usethe plug. Contact your Linn retailer to obtain a replacement fuse cover.
Fuses are for fire protection and do not protect against electric shock.
Mains plug replacementShould your mains plug need replacing and you are competent to do thisproceed as follows. If you are in doubt contact your Linn retailer or acompetent electrician.
a) Disconnect the plug from the mains supply.b) Cut off the plug and dispose of it safely. A plug with bared conductors
is dangerous if engaged in a live socket.c) Only fit a 13 amp BS1363A approved plug with a 5 amp fuse.d) The cable wire colours or a letter will be marked at the connection
points of mostquality plugs.
Attach the wires securely to their respective points. The Brown wire must goto the Live pin, the Blue wire must go to the Neutral pin, and theGreen/Yellow wire must go to the Earth pin.
e) Before replacing the plug top ensure that the cable restraint is holdingthe outer sheath of the cable firmly and that the wires are correctly connected.
WARNINGTHIS APPLIANCE MUST BE EARTHED.
CE Declaration of ConformityLinn Products Ltd declare that this product is in conformance with the Low Voltage Directive73/23/EEC and Electromagnetic Compatibility 89/336/EEC as amended by 92/31/EEC and93/68/EEC.
The conformity of the designated product with the provisions of Directive number 73/23/EEC(LVD) is proved by full compliance with the following standards:
Standard number Date of issue Test type EN60065 2002 General requirements
MarkingHazardous radiationHeating under normal conditionsShock hazards under normaloperating conditionsInsulation requirementsFault conditionsMechanical strengthParts connected to the mains supplyComponentsTerminal devicesExternal flexible cordsElectrical connections and mechanical fixingsProtection against electric shockStability and mechanical hazardsResistance to fire
The conformity of the designated product with the provisions of Directive number89/336/EEC (EMC) is proved by full compliance with the following standards:
Standard number Date of issue Test typeEN55013 2001 Conducted emissionsEN55013 2001 Absorbed emissionsEN55020 2002 Immunity
FCC notice
NOTE:This equipment has been tested and found to comply with the limits for a Class B digitaldevice, pursuant to Part 15 of the FCC Rules. These limits are designed to provide reasonableprotection against harmful interference in a residential installation. This equipmentgenerates, uses and can radiate radio frequency energy and, if not installed and used inaccordance with the instructions, may cause harmful interference to radio communications.However, there is no guarantee that interference will not occur in a particular installation.If this equipment does cause harmful interference to radio or television reception, which canbe determined by turning the equipment off and on, the user is encouraged to try to correctthe interference by one or more of the following measures:
● Reorient or relocate the receiving antenna.● Increase the separation between the equipment and receiver.● Connect the equipment into an outlet on a circuit different from that to which the receiver is
connected.● Consult the dealer or an experienced radio/TV technician for help.
iii CLASSIK MOVIEOwner’s Manual
Important Safety Instructions English
Waste Electrical and Electronic Equipment(WEEE) DirectiveDirective 2002/96/EC of the European Parliament and of the Council
The symbol (right) is shown on this product. It indicates thatthe product should not be disposed of with regular householdwaste, but should be disposed of separately.
Electrical and electronic equipment can contain materialsthat are hazardous to the environment and human health andtherefore should be disposed of at a designated waste facilityor returned to your retailer for the appropriate recycling totake place (see www.linn.co.uk for further information).
If you wish to dispose of this product and the product still functions, please consider recycling/reusing it by donating it to a charity shop, selling it orpart-exchanging it with your retailer.
Copyright and AcknowledgementsCopyright © 2005 Linn Products Ltd. First edition August 2005.
Linn Products Limited, Glasgow Road, Waterfoot, Eaglesham, Glasgow,G76 OEQ, Scotland, United Kingdom
All rights reserved. No part of this publication may be reproduced, stored in aretrieval system, or transmitted, in any form or by any means, electronic,mechanical, photocopying, recording, or otherwise, without the prior writtenpermission of the publisher.
Printed in the United Kingdom.
Linn and the Linn logo are registered trade marks of Linn Products Limited.CLASSIK Movie, KOMPONENT and KNEKT are trade marks of Linn ProductsLimited.
UK Registered Design No 3021659
“DTS” and “DTS Digital Surround” are registered trade marks of DigitalTheater Systems, Inc.
Manufactured under license from Dolby Laboratories. “Dolby”, “Pro Logic”and the double-D symbol are trade marks of Dolby Laboratories.
This product incorporates copyright protection technology that is protectedby method claims of certain U.S. patents and other intellectual propertyrights owned by Macrovision Corporation and other rights owners. Use of thiscopyright protection technology must be authorized by MacrovisionCorporation, and is intended for home and other limited viewing uses onlyunless authorized by Macrovision Corporation. Reverse engineering ordisassembly is prohibited.
The information in this manual is furnished for information use only, issubject to change without notice, and should not be construed as acommitment by Linn Products Limited. Linn Products Limited assumes noresponsibility or liability for any errors or inaccuracies that may appear inthis manual.
Linn Products Limited disclaims any proprietary interest in trade marks andtrade names other than its own.
Supply of this product does not convey a license nor imply any right todistribute content created with this product in revenue-generating broadcastsystems (terrestrial, satellite, cable and/or other distribution channels),streaming applications (via Internet, intranets and/or other networks), othercontent distribution systems (pay-audio or audio-on-demand applications andthe like) or on physical media (compact discs, digital versatile discs,semiconductor chips, hard drives, memory cards and the like). Anindependent license for such use is required. For details, please visithttp:mp3licensing.com
MPEG Layer-3 audio coding technology licensed from Fraunhofer IIS andThomson.
ivCLASSIK MOVIEOwner’s Manual
Copyright and AcknowledgementsEnglish

ContentsIntroduction 1
Discs 1Surround sound 2Cleaning 2
Notes on the Quick Setup Sheet 3
Connecting 4Unpacking 4Voltage selection, fuses and mains lead 4Positioning 4Back panel - SCART version 5Back panel - Phono version 6Connecting the CLASSIK Movie 7
Front Panel and Handset 13Front panel 13Handset 14Handset modes 16
Video Output 17
Setup Menus 18About the setup menus 18General setup 19Speaker setup 21Video Source setup 23Audio setup 24Preferences 27
Source Selection 29
Playing Discs 29First of all 29Front panel display 30Basic operation 31Locating titles/chapters/tracks on a disc 32
Next and previous chapter/track selection 32
Direct title selection 32
Direct chapter selection 33
Direect track selection 33
Locating a particular point on a disc 33Fast search forwards and backwards 33
Fast scan forwards and backwards 33
Slow search forwards and backkwards 34
Slow scan forwards and backwards 34
Direct time selection 34
Replay track 35
Using program modes to control playback 35Repeat disc 35
Repeat chapter/track 35
Repeat section 36
Shuffle program 36
Include program 36
Exclude proogram 37
Using DVD menus 37Title/DVD menu 37
CLASSIK MOVIEOwner’s Manual
Contents English

Further playback options for DVDs 38Language selection 38
Subtitles 38
Angle selection 38
Zoom and pan 39
Additional file formats 39
Tuner 40About RDS 40Setup 40First of all 40Tuning functions 41
AM and FM band selection 41
Frequency selection 41
Signal searching 41
Signal scanning 41
RDS tuning funnction 42
Preset functions 42Automatic preset storage 42
Manual preset storage 43
Preset selection 43
Preset deletion 44
Surround Sound and Audio Modes 45Midnight Movie mode 46
Pre-amplifier 47Volume and muting 47Trim adjustment 48Balance adjustment 48Tone adjustment 49
Recording a Source 50Record lock 50
User Options 51Changing the user options’ settings 51Table of user options 52
Guarantee and Service 54
CLASSIK MOVIEOwner’s Manual
ContentsEnglish
IntroductionLinn's CLASSIK products are designed to deliver the performanceyou might expect of traditional component-based systems, but in acompact, discreet and stylish package. The CLASSIK Movie is anoutstanding total entertainment solution which allows you torecreate the unique cinema experience in your own home withexceptional audio and video.
At Linn, our philosophy is to build products which are modular,expandable and upgradeable. With the CLASSIK Movie you haveinvested in a product which gives outstanding audio and videoperformance and offers flexibility to adapt to your changingrequirements. The performance of your CLASSIK Movie can beupgraded in the future and it can even be integrated into aprofessionally installed Linn multi-room system. To experience thefull performance of your CLASSIK Movie we recommend partneringit with Linn loudspeakers, such as the KOMPONENT loudspeakersystem.
To find out more about Linn visit www.linn.co.uk.
The Connecting, Video Output and Setup Menus chapters in themanual concern setting up your CLASSIK Movie. If you want to getyour CLASSIK Movie up and running quickly, please refer to thesupplied Quick Setup sheet and the notes on page 3.
Note:In this manual ‘TV’ refers to plasma and LCD screens, projectionTVs and monitors as well as televisions.
Discs
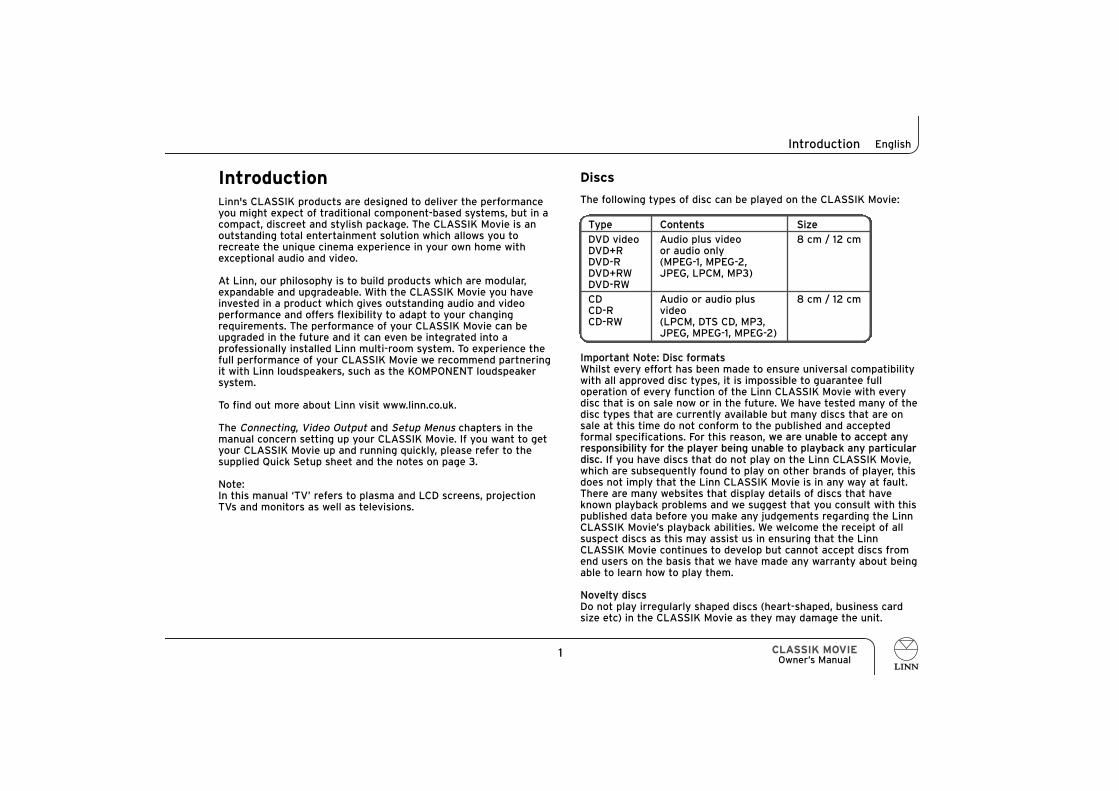
The following types of disc can be played on the CLASSIK Movie:
Important Note: Disc formatsWhilst every effort has been made to ensure universal compatibilitywith all approved disc types, it is impossible to guarantee fulloperation of every function of the Linn CLASSIK Movie with everydisc that is on sale now or in the future. We have tested many of thedisc types that are currently available but many discs that are onsale at this time do not conform to the published and acceptedformal specifications. For this reason, we are unable to accept anyresponsibility for the player being unabble to playback any particulardisc. If you have discs that do not play on the Linn CLASSIK Movie,which are subsequently found to play on other brands of player, thisdoes not imply that the Linn CLASSIK Movie is in any way at fault.There are many websites that display details of discs that haveknown playback problems and we suggest that you consult with thispublished data before you make any judgements regarding the LinnCLASSIK Movie’s playback abilities. We welcome the receipt of allsuspect discs as this may assist us in ensuring that the LinnCLASSIK Movie continues to develop but cannot accept discs fromend users on the basis that we have made any warranty about beingable to learn how to play them.
Novelty discsDo not play irregularly shaped discs (heart-shaped, business cardsize etc) in the CLASSIK Movie as they may damage the unit.
1 CLASSIK MOVIEOwner’s Manual
Introduction English
Type Contents Size
DVD video Audio plus video 8 cm / 12 cmDVD+R or audio onlyDVD-R (MPEG-1, MPEG-2, DVD+RW JPEG, LPCM, MP3)DVD-RWCD Audio or audio plus 8 cm / 12 cmCD-R videoCD-RW (LPCM, DTS CD, MP3,
JPEG, MPEG-1, MPEG-2)

Surround soundThe CLASSIK Movie will process the audio signal on discs markedwith the following logos:
The unit can also process the audio signal from auxiliary sourcesconnected to the digital inputs.
For details on the surround sound modes, see Surround Sound andAudio Modes, page 45.
CleaningDisconnect the CLASSIK Movie from the power supply beforecleaning. Remove dust and fingerprints with a soft, dry cloth. Avoidusing domestic cleaning products on the unit.
2CLASSIK MOVIEOwner’s Manual
IntroductionEnglish

Notes on the Quick Setup Sheet1. Connect your loudspeakers to the speaker outputs on the rear
panel of the CLASSIK Movie. The minimum number of speakers required is two - FRONT L (front left) and FRONT R (front right), the maximum is six - FRONT L (front left), FRONT R (front right),CENTRE, SURR L (surround left), SURR R (surround right) and SUB (subwoofer). Be careful to match the positive (red) and negative (black) outputs from the CLASSIK Movie to the positiveand negative inputs on your loudspeakers.* Experiment with the position of the loudspeakers to achieve the best sound. For the best performance from a subwoofer, place it close to either the front left or front right loudspeaker.
(The speakers shown are Linn KOMPONENT loudspeakers which arethe ideal partner to the CLASSIK Movie. If you are using otherspeakers, consult the speakers’ owner’s manual if you are unsurehow to connect to them.)
2. Connect your TV as shown. If you have the Phono version of the CLASSIK Movie and are also connecting a set-top box (e.g. cable-channel receiver, satellite receiver, freeview box etc.), you do notneed to connect the audio cables shown (R TV, L TV) as the audio signal will be sent from the set-top box to the CLASSIK Movie.
(The examples shown on the Quick Setup sheet are for the mostcommon type of connection. If you wish to use better qualityconnectors that may be available on your TV, see page 8.)
3. Connect your set-top box (e.g. cable-channel receiver, satellite receiver, freeview box etc.) as shown. If you do not have a set-top box you can also use these inputs for connecting a games console, VCR or other audio/video source.
(The examples shown on the Quick Setup sheet are for the mostcommon type of connection. If you wish to use better qualityconnectors that may be available on your set-top box, see pages10 & 11.)
* Doesn’t apply to a subwoofer.
(If you want to connect more than one auxiliary source, see pages 10& 11.)
4. Connect the supplied AM and FM tuner aerials. The end of the FM aerial should be connected to a wall as high as the length of the aerial will allow. If you do not wish to use the CLASSIK Movie’s tuner at this time you can fit the aerials later.
5. Connect the CLASSIK Movie to the mains supply using the lead provided. If no mains earth is available, connect the EARTH GROUND to an earthing terminal. Note: The CLASSIK Movie will operate from any mains AC power supply.
6. Bring the CLASSIK Movie out of standby mode by pressing the key on the front panel.
7. Insert the supplied batteries into the handset.
8. The video signal output by the CLASSIK Movie must be set correctly for your TV. Follow the instructions on page 17.
9. The CLASSIK Movie has to be setup to match the number of loudspeakers in your system, the aspect ratio of your TV and other functionality. Please follow the instructions for configuringthe General setup and Speaker setup menus on pages 19 to 23.
10. The CLASSIK Movie’s tuner has to be set for the correct radio frequency range for your country. Please follow the instructions in the tuner setup section on page 40. If you do not wish to use the CLASSIK Movie’s tuner at this time you can complete tuner setup later.
For more detailed setup information, see the Connecting and SetupMenus chapters.
3 CLASSIK MOVIEOwner’s Manual
Notes on the Quick Setup Sheet English

ConnectingThis chapter explains how to install your CLASSIK Movie and how toconnect it to loudspeakers, TV etc.
UnpackingThe CLASSIK Movie is supplied with the following accessories:
● luminous handset
● 2 x AAA size batteries for the handset
● pack of safety compliant speaker plugs
● AM aerial
● FM aerial
● mains lead
● quick setup sheet
● this manual
We recommend that you retain all packaging in case you need totransport the CLASSIK Movie at a later date.
Voltage selection, fuses and mains leadManual voltage selection on the CLASSIK Movie is not required asthe CLASSIK Movie will operate from any mains AC power. Thereare no user-replaceable fuses inside the unit. The mains leadsupplied may be fitted with a fused plug according to localregulations. If this is the case, always replace this fuse with anotherof the same type and rating. The CLASSIK Movie must always beearthed when connected to the mains supply. Use the earthedmoulded mains lead supplied. Never use an unearthed plug oradapter with this unit.
PositioningYou can position your CLASSIK Movie almost anywhere you findconvenient, but please consider the following points:
● Allow at least 10 cm of space to the sides, rear and above the CLASSIK Movie for air circulation.
● Never block the ventilation slots on the sides of the unit.
● The infra-red (IR) sensor that receives the handset signals is quite sensitive, so the unit should be kept out of direct sunlightto avoid false operation. The IR beam from the handset will pass through semi-opaque glass so operation behind, for example, smoked-glass cabinet doors is possible.
Important:Do not open the CLASSIK Movie’s disc drawer if the unit is behindglass doors as this can damage the drawer’s mechanism.
Note regarding plasma and LCD screensPlasma and large LCD screens emit IR frequencies that caninterfere with the IR remote operation of the CLASSIK Movie if the emitted IR hits the product’s display. Take care not to place the CLASSIK Movie in a position where it faces the plasma / LCD screen or otherwise allows the emitted IR to shine directly on to it. A position below or directly adjacent to the screen will normally avoid such interference.
4CLASSIK MOVIEOwner’s Manual
ConnectingEnglish

Back panel -SCART version
5 CLASSIK MOVIEOwner’s Manual
Connecting English
S-VIDEO OUT For connecting to the S-video input on a TV
S-VIDEO IN For connecting to the S-video output on a set-to box, VCR or other video source
MAINS INPUT
Speaker output connectors Amplified output for direct connection to loudspeakers
PRE- AMP OUTPre-amplifier line output connectors. For connecting to a power amplifier andsubwoofer
LINE OUT For connecting to an analogue recording device
AUX IN 1 & 2 Analogue audio inputs for auxiliary sources
DIGITAL IN 1 & 2 One digital electrical (coaxial) and one digital optical input for connectingauxiliary sources
DIGITAL OUT For connecting to a device with a digital optical input
EARTH GROUNDFor connecting the unit to an earthing terminal if no mains earth is available
1 2 3 5 6 7 8 9 10
2016 18 191514
11 12 134
17
UPLOAD
LR
2
1
LSEE UNDERSIDE FOR SAFETY DETAILS
MAINS INPUT
RCENTRE
AUTO RANGING100-120 V 50-60 Hz220-240 V 50-60 HzREPLACE FUSE WITH
T6.3 AL 250 VRATED POWER 120 W
APPROX.
THIS APPARATUS MUST BE EARTHED.WARNING
TV SCARTFM AERIAL GND AM
OUT
S-VIDEO
IN
ROOM 4MAIN INACC
Rx Tx Rx TxROOM 2 ROOM 1
ROOM 3
FRONTSURR
L
R
CENTRE
IR OUT
R
L
EARTHGROUND
AUX AV SCART
AUX1 2FRONT SUBSURR
PRE-AMP OUT
L
R
OPTICALDIG OUT
COAXIAL1
OPTICAL2DIG IN
AUDIO IN
MAIN ROOM
LINEOUT
IR OUT 1 & 2 Infrared flasher connectors. Allow the control via the handset of auxiliarydevices that accept infra-red signals
MAIN RX TX KNEKT LED indicators. Indicate signals being transmitted between units in aKNEKT multi-room system
ACCAccessory socket. For installing the unit in a KNEKT multi-room system or foradding an infra-red repeater
ROOM 1 - 4, MAIN IN KNEKT connectors. For linking to other units in a KNEKT multi-room system
ROOM RX TX KNEKT LED indicators. Indicate signals being transmitted between units in aKNEKT multi-room system
UPLOADRS232 connection. For uploading the unit with software updates that might beavailable
FM AERIAL FM aerial connector
GND, AMM AM aerial connectors
TV SCART For connecting to the SCART socket input on a TV
AUX AV SCART For connecting to the SCART socket output on a set-top box, VCR or other videosource
The CLASSIK Movie shouldbe put into standby modethen disconnected from themains supply beforeconnecting or disconnectingany of the plugs on the backpanel. If this is not done youmay generate surges whichcould damage the CLASSIKMovie or other componentsin your AV system.

6CLASSIK MOVIEOwner’s Manual
ConnectingEnglish
Back panel -Phono version
S-VIDEO OUT S-video output. For connecting to the video input on a TV if component inputs arenot available
S-VIDEO IN S-video input. For connecting to the video output from a set-to box or other videosource
MAINS INPUT
Speaker output connectorsAmplified output for direct connection to loudspeakers
PRE-AMP OUTPre-amplifier line output connectors. For connecting to a power amplifier andsubwoofer
LINE OUT For connecting to an analogue recording device
AUX INN 1 & 2 Analogue audio inputs for auxiliary sources
DIGITAL IN 1 & 2 One digital electrical (coaxial) and one digital optical input for connectingauxiliary sources
DIGITAL OUT For connecting to a device with a digital optical input
AUX AV AUDIO INAudio inputs from an auxiliary AV source
TV AUDIO IN Audio inputs from TV
EARTH GROUNDFor connecting the unit to an earthing terminal if no mains earth is available
The CLASSIK Movie should be putinto standby mode thendisconnected from the mainssupply before connecting ordisconnecting any of the plugs onthe back panel. If this is not doneyou may generate surges whichcould damage the CLASSIK Movieor other components in your AVsystem.
AUDIO IN
UPLOAD2
AUTO RANGING100-120 V 50-60 Hz220-240 V 50-60 HzREPLACE FUSE WITH
T6.3 AL 250 VRATED POWER 120 W
APPROX.
THIS APPARATUS MUST BE EARTHED.WARNING
TV
FM AERIAL GND AM
OUT
S-VIDEO
IN
ROOM 4MAIN INACC
Rx Tx
MAIN ROOM
Rx TxROOM 2 ROOM 1
ROOM 3CVBS
TVCVBSAUXPr
Y
Pb
TV
Pr
Y
Pb
AUX
LR
IR OUT
EARTHGROUND
AUX AV
OPTICALDIG OUT
COAXIAL1
OPTICAL2DIG IN
1 2 3 4 5 6 7 8 9 10 11 12
2422 2318 19 20 211716
13 14 15
1
SEE UNDERSIDE FOR SAFETY DETAILS
MAINS INPUT
LR L RCENTRE FRONTSURR
L
R
CENTRE
R
L
AUX1 2
LINEOUT
FRONT SUBSURR
PRE-AMP OUT
L
R
AUDIO IN
IR OUT 1 & 2 Infrared flasher connectors. Allow the control via the handset of auxiliary devicesthat accept infra-red signals
& MAIN & ROOM RX TX KNEKT LED indicators. Indicate signals being transmitted between units in aKNEKT multi-room system
ACCAccessory socket. For installing unit in a KNEKT multi-room system or for addingan infra-red repeater
ROOM 1 - 4, MAIN IN KNEKT connectors. For linking to other units in a KNEKT multi-room system
UPLOADRS232 connection. For uploading the unit with software updates that might beavailableFM AERIAL FM aerial connector
GND, AM AM aerial connectors
YPrrPb TV For connecting to the component video inputs on a TV
YPrPb AUXFor connecting to the component video outputs on a set-top box, HDTV decoderor other video source
CVBS TVComposite video output. For connecting to the video input on a TV if componentor S-video inputs are not available
CVBS AUXComposite video input. For connecting to the video output from a set-top box orother video source
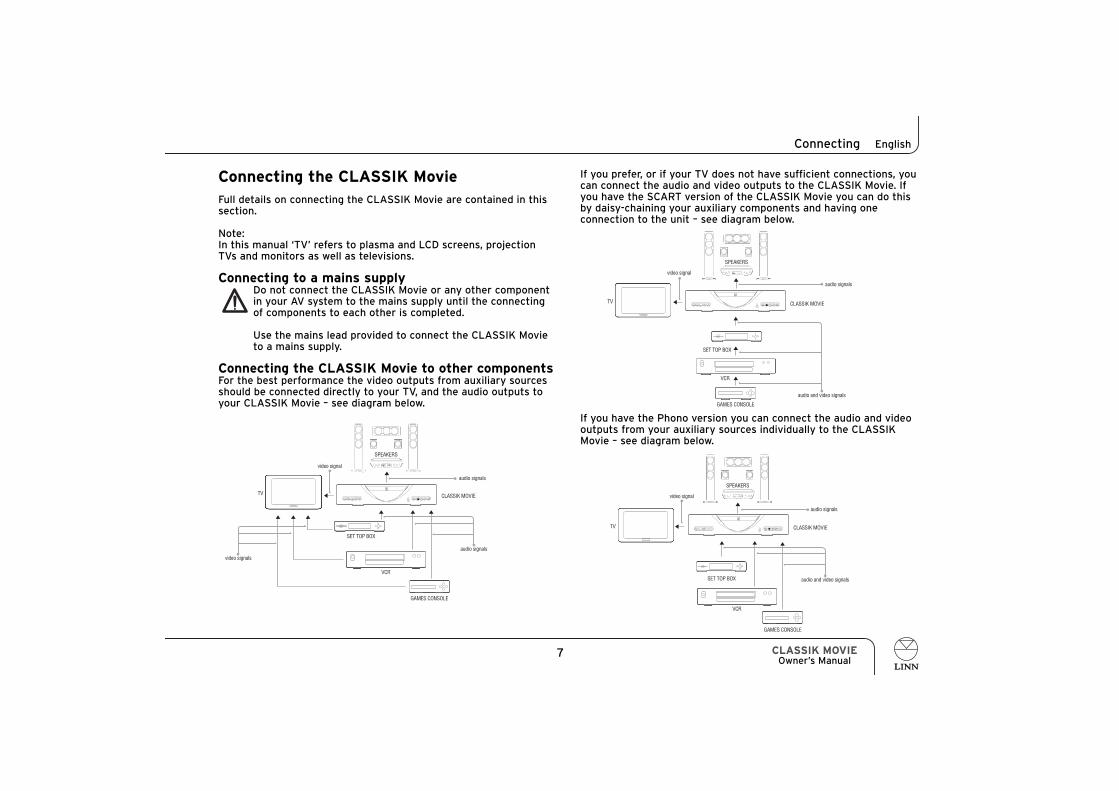
Connecting the CLASSIK MovieFull details on connecting the CLASSIK Movie are contained in thissection.
Note: In this manual ‘TV’ refers to plasma and LCD screens, projectionTVs and monitors as well as televisions.
Connecting to a mains supplyDo not connect the CLASSIK Movie or any other componentin your AV system to the mains supply until the connectingof components to each other is completed.
Use the mains lead provided to connect the CLASSIK Movieto a mains supply.
Connecting the CLASSIK Movie to other componentsFor the best performance the video outputs from auxiliary sourcesshould be connected directly to your TV, and the audio outputs toyour CLASSIK Movie – see diagram below.
CLASSIK MOVIEOwner’s Manual
Connecting English
GAMES CONSOLE
SET TOP BOX
VCR
CLASSIK MOVIE
video signals
audio signals
video signal
TV
audio signals
SPEAKERS
GAMES CONSOLE
SET TOP BOX
VCR
audio and video signals
audio signals
video signal
CLASSIK MOVIETV
SPEAKERS
CLASSIK MOVIE
GAMES CONSOLE
SET TOP BOX
VCR
audio and video signals
audio signals
video signal
TV
SPEAKERS
If you prefer, or if your TV does not have sufficient connections, youcan connect the audio and video outputs to the CLASSIK Movie. Ifyou have the SCART version of the CLASSIK Movie you can do thisby daisy-chaining your auxiliary components and having oneconnection to the unit – see diagram below.
If you have the Phono version you can connect the audio and videooutputs from your auxiliary sources individually to the CLASSIKMovie – see diagram below.
7

8CLASSIK MOVIEOwner’s Manual
ConnectingEnglish
FM AERIAL GND AM
SCART version Phono version
Highest RGB - via TV n/a*SCART output
YPrPb (YUV) -via YPrPbTV SCART outputS-video S-video
Lowest Composite - via CompositeTV SCART output
Connecting the tuner aerialsConnect the supplied AM and FM aerials as shown.
You may have to experiment with the position of the AM aerial toobtain the best reception. The end of the FM aerial should beconnected to a wall as high as the length of the aerial will allow.As with the AM aerial, you may have to experiment with itspositioning to obtain the best reception.
Connecting to a TVMost modern TVs accept a variety of video signals via differentconnectors. The difference between them is reflected in thequality of the picture achievable. The type of video signal availablefrom the CLASSIK Movie from highest quality to lowest, are:
* Due to regulations RGB is not available on the Phono version of the unit.
TO SCART SOCKET INPUT ON TV
TV SCART
TO S-VIDEO INPUT ON TV
OUT
S-VIDEO
IN
SCART version
RGB/YPrPbIf your TV accepts an RGB or YPrPb (YUV) signal via a SCARTcable, connect as shown.
S-videoIf your TV is fitted with an S-video input, connect as shown.
CompositeIf your TV accepts a composite signal only, connect as shown abovefor RGB/YPrPb.
Note:If you have connected your CLASSIK Movie and TV by S-video andwish to hear the audio output from your TV through your CLASSIKMovie and speakers, connect the audio outputs from your TV to theAUDIO IN-AUX 1 or 2 inputs on the CLASSIK Movie using RCA phonocables. If you have connected your CLASSIK Movie and TV bySCART you do not need to connect audio cables as the audio signalis carried through the SCART cable.
9 CLASSIK MOVIEOwner’s Manual
Connecting English
TO COMPONENT
VIDEO INPUTS
ON TV
Pr
Y
Pb
TV
Pr
Y
Pb
AUX
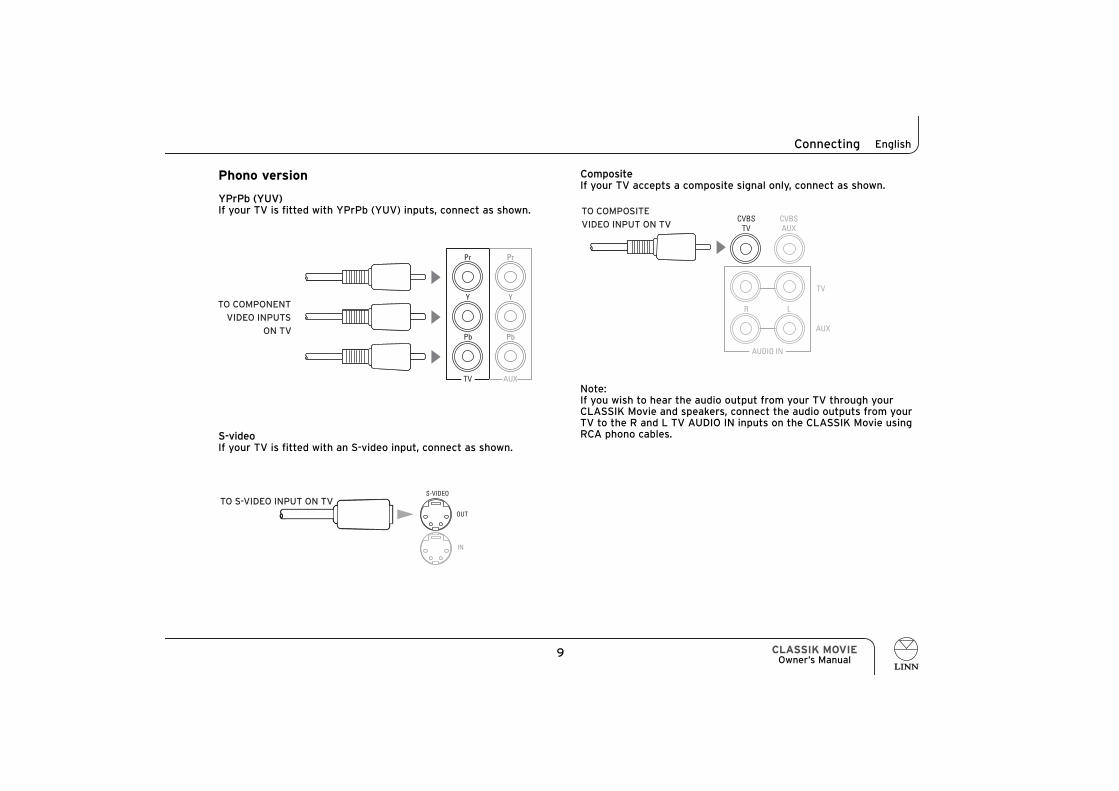
Phono version
YPrPb (YUV)If your TV is fitted with YPrPb (YUV) inputs, connect as shown.
S-videoIf your TV is fitted with an S-video input, connect as shown.
CompositeIf your TV accepts a composite signal only, connect as shown.
Note:If you wish to hear the audio output from your TV through yourCLASSIK Movie and speakers, connect the audio outputs from yourTV to the R and L TV AUDIO IN inputs on the CLASSIK Movie usingRCA phono cables.
TO S-VIDEO INPUT ON TVOUT
S-VIDEO
IN
TO COMPOSITE
VIDEO INPUT ON TV
AUDIO IN
TV
CVBSTV
CVBSAUX
LR
AUX
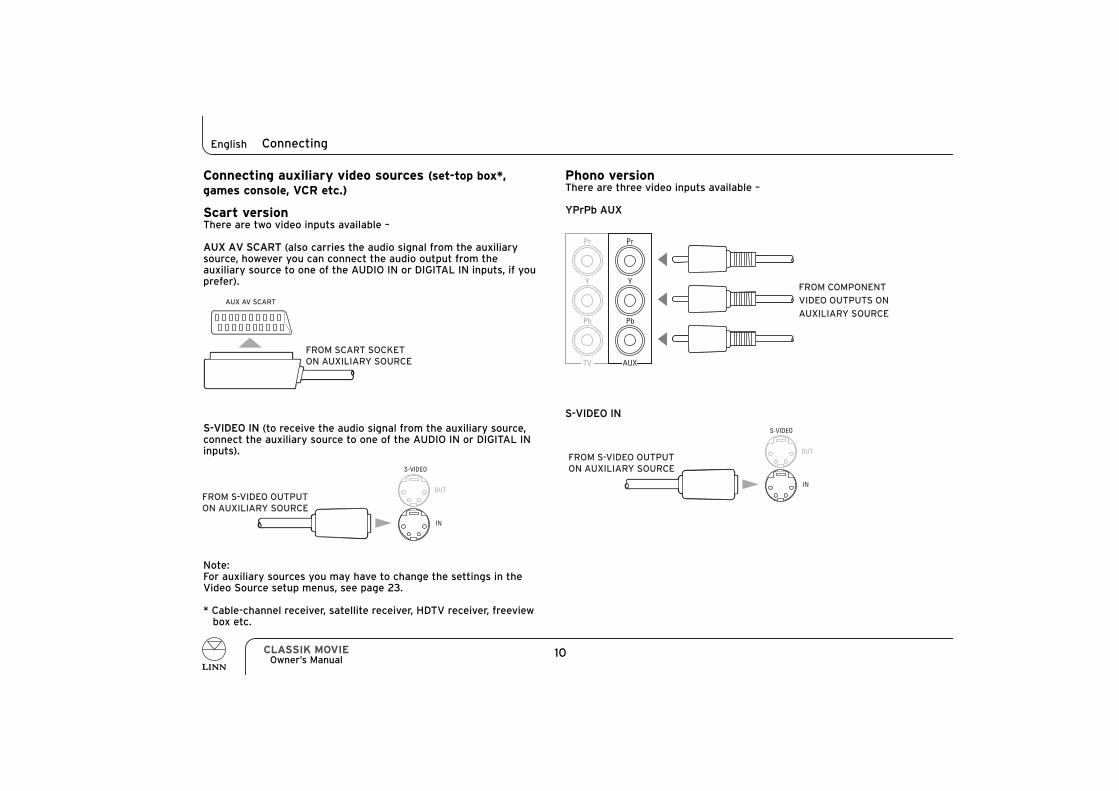
Phono versionThere are three video inputs available –
YPrPb AUX
S-VIDEO IN
10CLASSIK MOVIEOwner’s Manual
ConnectingEnglish
Connecting auxiliary video sources (set-top box*,games console, VCR etc.)
Scart version There are two video inputs available –
AUX AV SCART (also carries the audio signal from the auxiliarysource, however you can connect the audio output from theauxiliary source to one of the AUDIO IN or DIGITAL IN inputs, if youprefer).
S-VIDEO IN (to receive the audio signal from the auxiliary source,connect the auxiliary source to one of the AUDIO IN or DIGITAL INinputs).
Note:For auxiliary sources you may have to change the settings in theVideo Source setup menus, see page 23.
* Cable-channel receiver, satellite receiver, HDTV receiver, freeviewbox etc.
FROM SCART SOCKETON AUXILIARY SOURCE
AUX AV SCART
OUT
S-VIDEO
IN
FROM S-VIDEO OUTPUTON AUXILIARY SOURCE
FROM COMPONENT
VIDEO OUTPUTS ON
AUXILIARY SOURCE
Pr
Y
Pb
TV
Pr
Y
Pb
AUX
OUT
S-VIDEO
IN
FROM S-VIDEO OUTPUTON AUXILIARY SOURCE
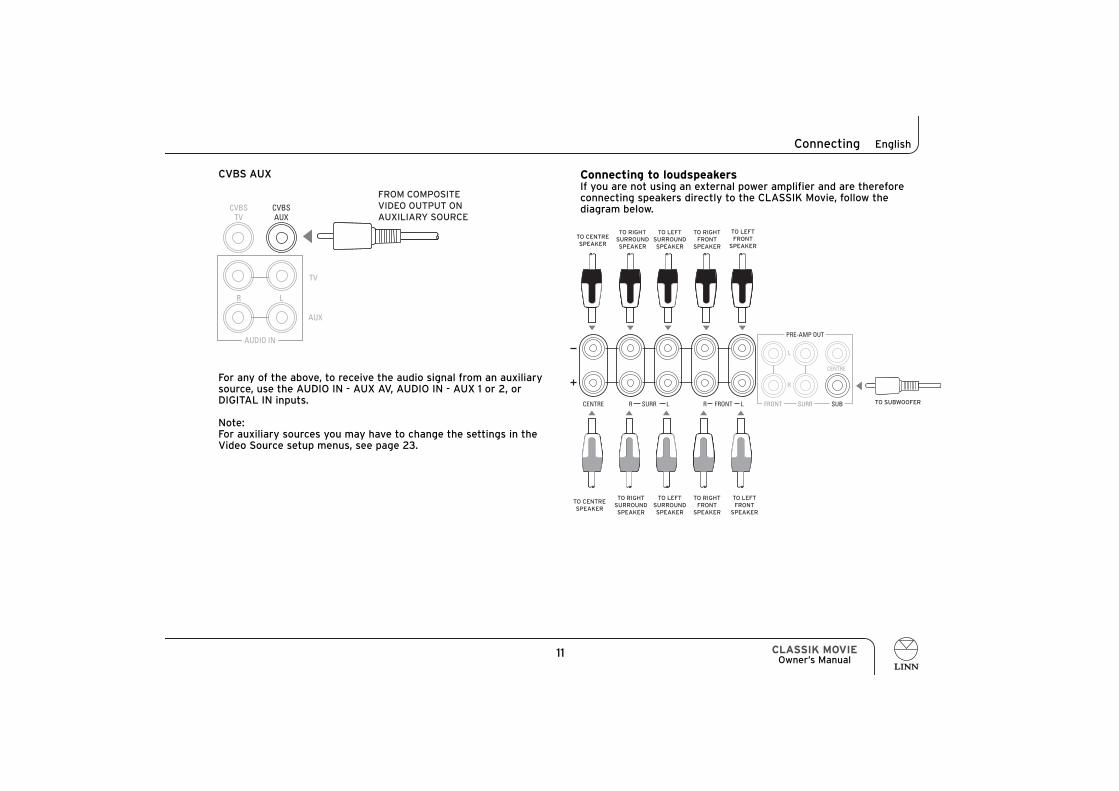
CVBS AUX
For any of the above, to receive the audio signal from an auxiliarysource, use the AUDIO IN - AUX AV, AUDIO IN - AUX 1 or 2, orDIGITAL IN inputs.
Note:For auxiliary sources you may have to change the settings in theVideo Source setup menus, see page 23.
Connecting to loudspeakersIf you are not using an external power amplifier and are thereforeconnecting speakers directly to the CLASSIK Movie, follow thediagram below.
11 CLASSIK MOVIEOwner’s Manual
Connecting English
FROM COMPOSITEVIDEO OUTPUT ONAUXILIARY SOURCE
AUDIO IN
TV
CVBSTV
CVBSAUX
LR
AUX
TO CENTRESPEAKER
TO RIGHTSURROUNDSPEAKER
TO LEFTSURROUNDSPEAKER
TO RIGHTFRONT
SPEAKER
TO LEFTFRONT
SPEAKER
TO CENTRESPEAKER
TO RIGHTSURROUNDSPEAKER
TO LEFTSURROUNDSPEAKER
TO RIGHTFRONT
SPEAKER
TO LEFTFRONT
SPEAKER
TO SUBWOOFERLR L RCENTRE FRONTSURR
CENTRE
R
L
FRONT SUBSURR
PRE-AMP OUT
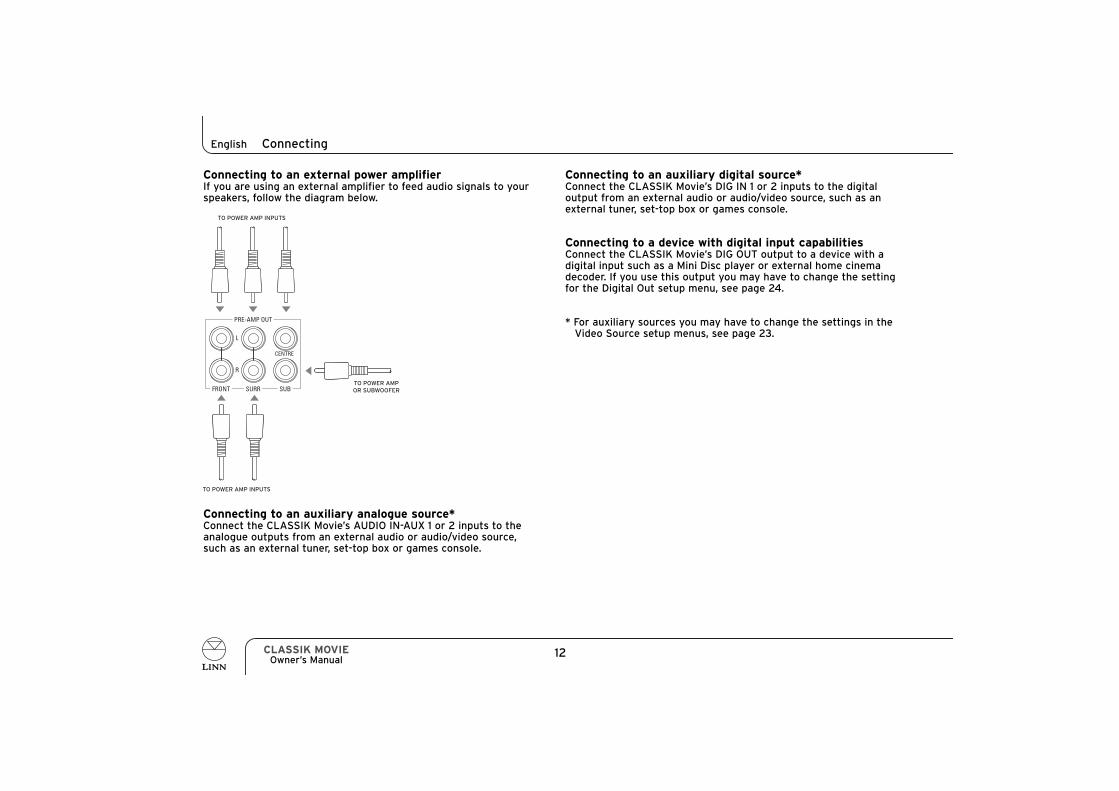
Connecting to an external power amplifierIf you are using an external amplifier to feed audio signals to yourspeakers, follow the diagram below.
Connecting to an auxiliary analogue source*Connect the CLASSIK Movie’s AUDIO IN-AUX 1 or 2 inputs to theanalogue outputs from an external audio or audio/video source,such as an external tuner, set-top box or games console.
Connecting to an auxiliary digital source*Connect the CLASSIK Movie’s DIG IN 1 or 2 inputs to the digitaloutput from an external audio or audio/video source, such as anexternal tuner, set-top box or games console.
Connecting to a device with digital input capabilitiesConnect the CLASSIK Movie’s DIG OUT output to a device with adigital input such as a Mini Disc player or external home cinemadecoder. If you use this output you may have to change the settingfor the Digital Out setup menu, see page 24.
* For auxiliary sources you may have to change the settings in theVideo Source setup menus, see page 23.
12CLASSIK MOVIEOwner’s Manual
ConnectingEnglish
TO POWER AMPOR SUBWOOFER
TO POWER AMP INPUTS
TO POWER AMP INPUTS
CENTRE
R
L
FRONT SUBSURR
PRE-AMP OUT

Front Panel and HandsetFront panel
13 CLASSIK MOVIEOwner’s Manual
Front Panel and Handset English
1
3 6 7 8 9 10 114
2
5
Disc drawer
Front panel display
Mutes/unmutes the audio to the loudspeakers andheadphones
, Adjust the volume level
, Change source
Headphones socket
Stops a disc. Opens or closes the disc drawer
Plays or pauses a disc
Previous chapter/track selection
Next chapter/track selection
Brings the CLASSIK Movie out of, or puts into, standby mode
/
/

HandsetLEDs Indicate the mode of the handset when a key is pressed
DVD, CD Puts handset into Disc mode. Allows operation of an auxiliary Linn CD player
AMP Puts handset into Amp mode (functions marked in blue)
SHIFT Allows access to functions marked in red
STORE Stores disc playback and tuner information
Mutes/unmutes the audio to the loudspeakers and headphones
, Adjust the volume level
SCAN For scanning for tuner signals
PRESET For selecting tuner presets
SRC-, SRC+ (source -, source +) Change source
, AUDIO ADDJUST Plays a disc. Accesses adjustable audio features
, WHERE* Pauses a disc
, WHAT* Stops a disc
, * Fast search backwards
, * Fast search forwards
DISP (display) Changes the time display on the front panel when playing a disc
AUDIO, DVD** For selecting audio languages on DVDs
SUB-T, CD** Switches DVD subtitles on or off
TITLE,, TV** Accesses the title menu on a DVD
MENU, DIGITAL** Accesses the main menu on a DVD
, OFF Brings the CLASSIK Movie out of, or puts into, standby mode. Sends ‘off’ (i.e.puts into standby) command to all available Linn equipment
14CLASSIK MOVIEOwner’s Manual
Front Panel and HandsetEnglish
STORE
SHIFT
AMP
DVD
SURR
LIP SYNC MONO
AUX TUNERDVD CD
PHONO SATTV DIGITAL
DO CLOCKWHERE WHAT
OFF
CD
DVD CD
AMP
AUDIOADJUST
VIDEOADJUST
PRESET
SRC +
+--
SRC -
BANDSCAN TUNE
DISP MORE SETUP HELP
AUDIO SUB-T ANGLE ZOOM
TITLE MENU GOTO
1 21
25
26
27
23
30
35
36
37
28
29
32
33
34
31
24
2
3
4
9
12
13
14
16
15
17
18
19
20
11
7
8
10
5
6
221 2 3
4 5 6
7 8 9SIGNALRECORDLISTEN
EXCLUDEINCLUDESHUFFLE
A-BTRACKDISC
0

Digits 0-9, shifted functions Numeric keys. Access to functions marked in red
SURR (surround) Cycles through sound formats
TUNE For selecting a tuner frequency
BAND Changes tuner band
/ / / For navigating setup menus and adjusting various features
(‘select’) For selecting settings
, VIDEO ADJUST Opens/closes the disc drawer. For selecting the type of output video signal
, DO* Previous chapter/track selection
Next chapter/track selection
Fast scan backwards
Fast scan forwards
SETUP Enters/exits on-screen setup menus
ANGLE, AUX** Selects available viewing angles on DVDs
ZOOM, TUNER** Magnifies screen image
GOTO For jumping to a particular title, chapter or time on a disc
(return) For moving back through multi-level menus on DVDs
Keys and functions not listed above do not function with the CLASSIK Movie but may with other Linn products.
* Used if the CLASSIK Movie is installed in a KNEKT system.** Direct source keys for selecting auxiliary sources.
15 CLASSIK MOVIEOwner’s Manual
Front Panel and Handset English

Handset modes
The CLASSIK Movie’s handset has two operating modes, Disc modeand Amp mode. When watching DVDs or listening to CDs thehandset should be in Disc mode (to allow operation of the play,pause etc. keys).*
● To put the handset in Disc mode, press DVD.
To access any of the commands marked in blue (e.g. Audio Adjust,Video Adjust), the handset must be in Amp mode.
● To put the handset in Amp mode, press AMP.
You may find that on occasion when using the handset that theCLASSIK Movie does not respond as expected. The likely reason isthat the handset is in the wrong operating mode. To correct this,simply press either the DVD key for Disc mode, or the AMP key forAmp mode.
If you have an auxiliary Linn CD player or tuner connected to, or inthe same room as, the CLASSIK Movie, both the auxiliary unit andthe CLASSIK Movie may respond to key presses from the handset.
* The tuner keys (PRESET, SCAN etc.) are always available, regardless of the mode the handset is in.
To prevent this and to operate an auxiliary Linn CD player:
● Enter User Options on the CLASSIK Movie and set CD Commands Accepted to No (see User Options, page 51).
● On the CLASSIK Movie handset, press SHIFT then DVD.
You will now be able to operate the CD player via the handset,without affecting the CLASSIK Movie.
To prevent this and to operate an auxiliary Linn tuner:
● Enter User Options on the CLASSIK Movie and set Enable Auto Selection: Tuner to Off (see User Options, page 51).
You will now be able to operate the tuner via the handset, withoutaffecting the CLASSIK Movie.
To return to operating the CLASSIK Movie using the handset, youmust put the handset in Disc mode (to play CDs or DVDs) bypressing the DVD key, or use SRC – or SRC + to select the tunersource (to operate the tuner).
16CLASSIK MOVIEOwner’s Manual
Front Panel and HandsetEnglish
1 2 3
4 5 6
7 8 9
STORE
SHIFT
AMP
DVD
SURR
SIGNALRECORDLISTEN
EXCLUDEINCLUDESHUFFLE
A-B
OFF
TRACKDISCCD
DVD CD
AMP
PRESS FOR DISC MODE
PRESS FOR AMP MODE
0
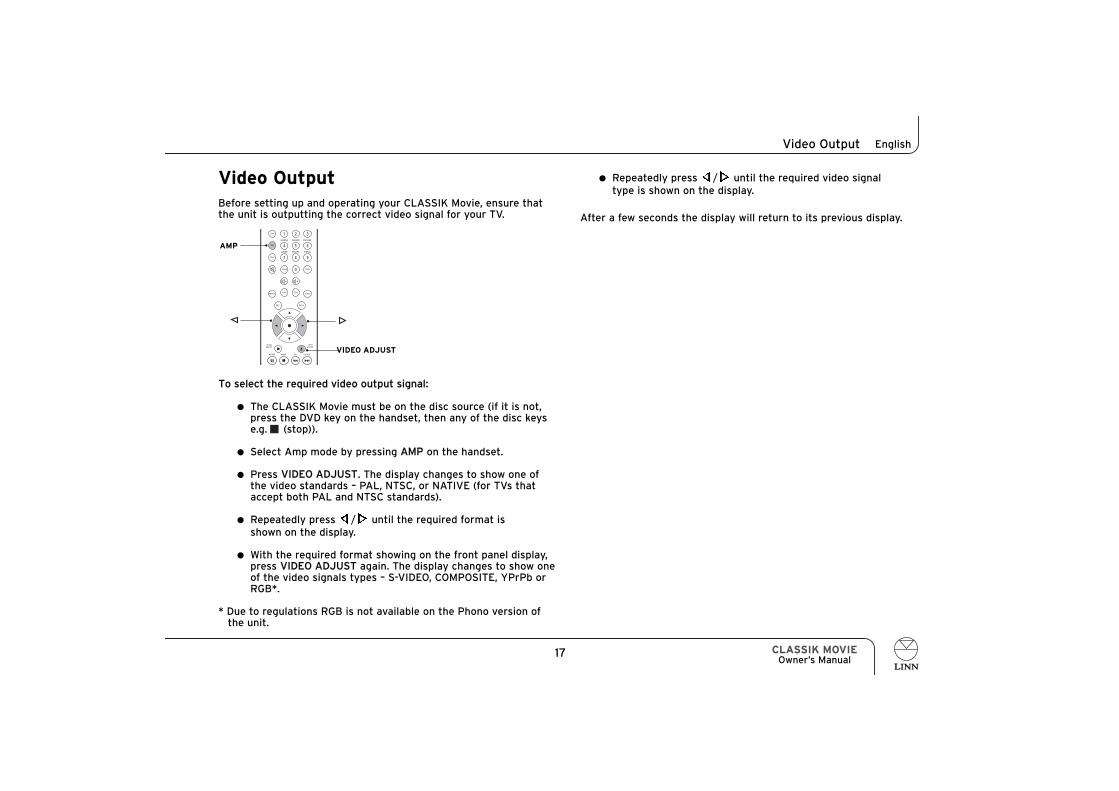
● Repeatedly press / until the required video signal type is shown on the display.
After a few seconds the display will return to its previous display.
17 CLASSIK MOVIEOwner’s Manual
Video Output English
1 2 3
4 5 6
7 8 9
STORE
SHIFT
AMP
DVD
SURR
SIGNALRECORDLISTEN
DO CLOCKWHERE WHAT
EXCLUDEINCLUDESHUFFLE
AUDIOADJUST
VIDEOADJUST
PRESET
SRC +
+--
SRC -
BAND
0
SCAN TUNE
AMP
VIDEO ADJUST
TU
Video OutputBefore setting up and operating your CLASSIK Movie, ensure thatthe unit is outputting the correct video signal for your TV.
To select the required video output signal:
● The CLASSIK Movie must be on the disc source (if it is not, press the DVD key on the handset, then any of the disc keys e.g. (stop)).
● Select Amp mode by pressing AMP on the handset.
● Press VIDEO ADJUST. The display changes to show one of the video standards – PAL, NTSC, or NATIVE (for TVs that accept both PAL and NTSC standards).
● Repeatedly press / until the required format is shown on the display.
● With the required format showing on the front panel display, press VIDEO ADJUST again. The display changes to show oneof the video signals types – S-VIDEO, COMPOSITE, YPrPb or RGB*.
* Due to regulations RGB is not available on the Phono version ofthe unit.

Setup MenusAbout the setup menus
The on-screen setup menus enable you to configure your CLASSIKMovie to suit the number of loudspeakers in your system, thepicture format of your TV and much more. For full enjoyment ofyour system, please take the time to configure your CLASSIK Moviecorrectly.
The menus are divided into five categories:
General setupFor adjusting the general audio and video setup of the unit.
Speaker setupFor configuring the unit to the number, size and position of yourloudspeakers.
Video Source setupFor configuring the video output of the unit for use with auxiliarysources.
Audio setupFor configuring the audio output of the unit.
PreferencesFor setting up additional features such as subtitles and parentalcontrol. (This category cannot be accessed if there is a disc playingin the unit.)
To access the setuup menus:Ensure your TV is on and tuned to the CLASSIK Movie’s outputvideo signal.
● Press DVD on the handset. (Not required if handset is alreadyin Disc mode, see page 16.)
● Press SETUP on the handset. Your TV screen shows the Setup Menu - Main Page.
To navigate the setup menus and make a selection:
● Use the / / / keys on the handset to move around the menus.
● Press ‘select’ on the handset to select an option.
To exit from the setup menus:
● Press SETUP on the handset.
or
1. Use the / keys on the handset to highlight the Main Pageoption at the bottom of each sub-menu list.
2. Press ‘select’ to return to the Setup Menu – Main Page.
3. Use the key to highlight the Exit Setup option. Press ‘select’.
Some changes made in the setup menus will be implementedimmediately, others will be implemented after exiting setup.
18CLASSIK MOVIEOwner’s Manual
Setup MenusEnglish

General setup
Setup LanguageDefault setting: English
Select the language you want thesetup menus and on-screeninformation displayed in.
Video StandardDefault setting: Native
If you have already selected thevideo standard for your TV (seeVideo Output, page 17), skip thisitem.
Choose the option that matches the video standard accepted byyour TV. Set to Native if your TV accepts both NTSC and PALformats.
Notes:If Video Standard is set to Native you may notice the screen flickerwhen a DVD begins to play. This happens when the CLASSIK Movieswitches from one video standard to the other.
If your TV only accepts either NTSC or PAL, you may not be able toview DVDs that have been recorded in the other format.
NTSC Type (black level) Default setting: North America(For TVs that accept the NTSC videostandard.)
This setting for this option controlsthe level of black in the video signal.
If your TV is from a North Americanmanufacturer, set to North America.If your TV is not from a North American manufacturer, set to World.
Video TypeDefault setting: S-video
If you have already selected the videosignal type for your TV (see VideoOutput, page 17), skip this item.
Select the required video signal foryour TV. Options shown are fromhighest picture quality to lowest.
If your TV accepts an RGB signal and you have connected yourCLASSIK Movie to your TV accordingly, set to RGB.*
If your TV accepts a YPrPb or YUV signal and you have connectedyour CLASSIK Movie to your TV accordingly, set to YPrPb.
If your TV accepts an S-video signal and you have connected yourCLASSIK Movie to your TV accordingly, set to S-video.
If your TV does not accept an S-video, RGB or YPrPb/YUV signal,set to Composite.
* Due to regulations the RGB option is not available on the Phonoversion of the unit.
19 CLASSIK MOVIEOwner’s Manual
Setup Menus English
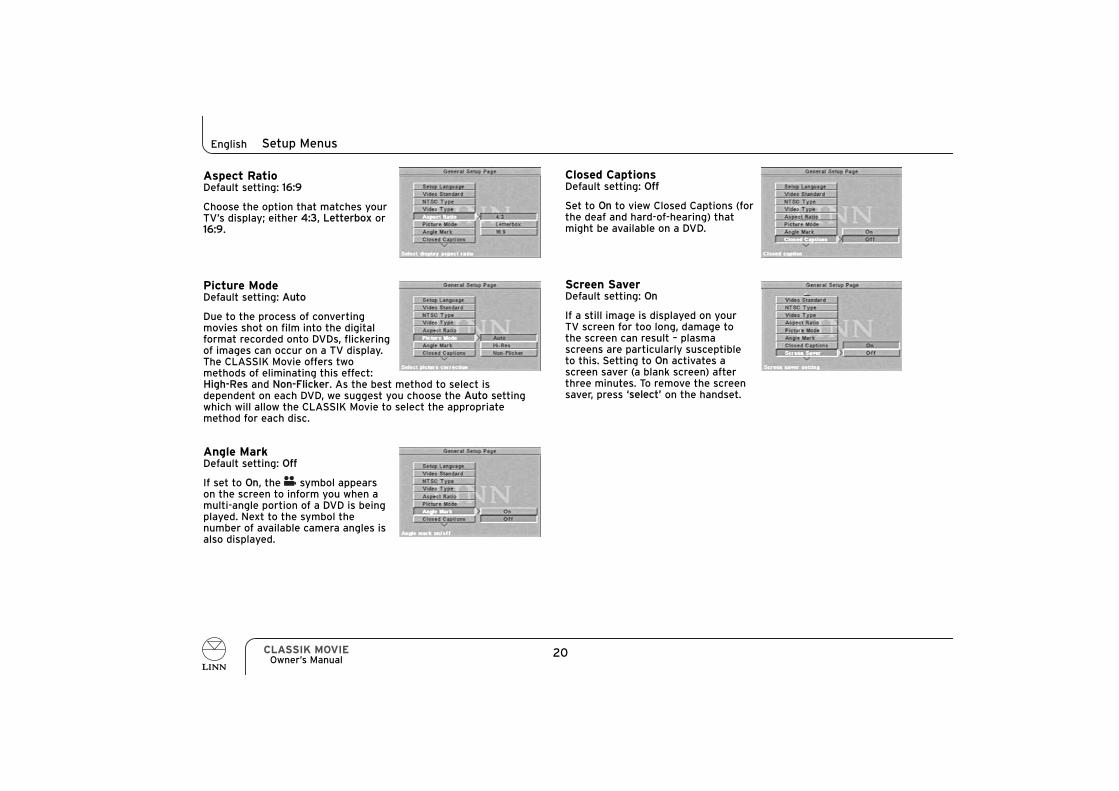
Aspect RatioDefault setting: 16:9
Choose the option that matches yourTV’s display; either 4:3, Letterbox or16:9.
Picture ModeDefault setting: Auto
Due to the process of convertingmovies shot on film into the digitalformat recorded onto DVDs, flickeringof images can occur on a TV display.The CLASSIK Movie offers twomethods of eliminating this effect:High-Res and Non-Flicker. As the best method to select isdependent on each DVD, we suggest you choose the Auto settingwhich will allow the CLASSIK Movie to select the appropriatemethod for each disc.
Angle MarkDefault setting: Off
If set to On, the symbol appearson the screen to inform you when amulti-angle portion of a DVD is beingplayed. Next to the symbol thenumber of available camera angles isalso displayed.
Closed CaptionsDefault setting: Off
Set to On to view Closed Captions (forthe deaf and hard-of-hearing) thatmight be available on a DVD.
Screen SaverDefault setting: On
If a still image is displayed on yourTV screen for too long, damage tothe screen can result – plasmascreens are particularly susceptibleto this. Setting to On activates ascreen saver (a blank screen) afterthree minutes. To remove the screensaver, press ‘select’ on the handset.
20CLASSIK MOVIEOwner’s Manual
Setup MenusEnglish

Speaker setup
For all loudspeakers in your system, except a subwoofer, you mustinform the CLASSIK Movie whether the speakers are Large orSmall. These settings refer to the frequency response of theloudspeakers, not to their physical size. A Large speaker is one witha full-range frequency response (i.e. it can reproduce frequenciesfrom low bass to high treble). A Small speaker is one with limitedbass response (i.e. it cannot reproduce low bass frequencies). Lowbass frequencies that cannot be reproduced by Small speakers willbe sent to a subwoofer if one is present, or any Large speakers.
FrontDefault setting: Large
Choose the option that best suitsthe speakers in your system:
Full-range front speakers - set toLargeLimited bass response frontspeakers - set to Small
Note:The setting you choose for your front speakers determines theoptions available for other speakers.
CentreDefault setting: Large
Choose the option that best suitsthe speaker in your system:
Full-range centre speaker - set toLargeLimited bass response centrespeaker - set to SmallNo centre speaker - set to Off
SurroundDefault setting: Large
Choose the option that best suitsthe speakers in your system:
Full-range surround speakers - set toLargeLimited bass response surroundspeakers - set to SmallNo surround speakers - set to Off
SubwooferDefault setting: On
If you have connected a subwoofer - set to OnIf you have not connected a subwoofer - set to Off
The next menus allow speaker positions to be described to theCLASSIK Movie so that the unit can add time delays to certainspeakers if required. This ensures that the sound from all thespeakers reaches your seating position at the same time.
21 CLASSIK MOVIEOwner’s Manual
Setup Menus English
LEFT FRONTSPEAKER
RIGHT FRONTSPEAKER
CENTRE SPEAKER
LEFT SURROUNDSPEAKER
RIGHT SURROUNDSPEAKER
SUBWOOFER

Front Posn (position)Default setting: 1.5 m/5 ft
Measure the average distancebetween your seating position andyour front speakers.
Highlight the 1.5 m/5 ft option, thenuse the key on the handset toincrease the distance shown (up to9.2 m/30 ft).
Select the required setting by pressing ‘select’ on the handset.
Centre Posn (position)Default setting: 1.5 m/5 ft
Measure the distance between yourseating position and your centrespeaker.
Highlight the 1.5 m/5 ft option, thenuse the key on the handset toincrease the distance shown (up to9.2 m/30 ft).
Select the required setting by pressing ‘select’ on the handset.
Surround Posn (position)Default setting: 1.5 m/5 ft
Measure the average distancebetween your seating position andyour surround speakers.
Highlight the 1.5 m/5 ft option, thenuse the key on the handset toincrease the distance shown (up to9.2 m/30 ft).
Select the required setting by pressing ‘select’ on the handset.
Note:It is not necessary to add a time delay to a subwoofer.
Test ToneDefault setting: Off
When set to On, a tone signal is sentto your speakers one at a time(except a subwoofer), starting withthe front left speaker and moving ina clockwise direction.
The test tone feature has twofunctions:
1. Testing speaker connectionsIf a speaker has not been connected correctly, the tone will either not be heard or will jump to a speaker out of the clockwise sequence (meaning a speaker has been connected to the wrong outputs on the CLASSIK Movie).
2. Speaker volume trimThe test tone can be used to ensure that the volume level that reaches your seating position is the same for each speaker (for subwoofer volume trim adjustment see Subwoofer and centre speaker trim, page 48).
To perform speaker volume trim:
● Set Test Tone to On. The test tone display appears on the CLASSIK Movie’s front panel.
22CLASSIK MOVIEOwner’s Manual
Setup MenusEnglish
3

● Wait for the test tone to reach the speaker you wish to adjust.
● Repeatedly press or hold / on the handset to trim the volume as required.*
Volume trim range is -10 to +10, with neutral trim being 0.
A few seconds after the / key has been released, the testtone will continue its clockwise direction.
* You can do this by ear or by using a Sound Pressure Level meter.
Video Source setup
The following menus allow you to select the video signal output bythe CLASSIK Movie for various sources. This is useful if, forexample, you want to listen to a concert on the tuner source whichis simultaneously being broadcast on TV. In this case you wouldwant to set Tuner Video to Off as this would stop the CLASSIKMovie from outputting a video signal. As another example, if youhad a set-top box’s S-video output connected to the CLASSIKMovie’s S-VIDEO IN, and the set-top box’s digital audio outputconnected to the CLASSIK Movie’s DIG 1 input, you would want toset Dig 1 Video to S-video In.
Aux 1 Video and Aux 2 Video Default setting: Internal
Off - When either the AUX 1 orAUX 2 source is selected, novideo signal is routed throughthe CLASSIK Movie.
Internal - When either the AUX 1 or AUX 2 source is selected, theinternal video signal (the Linn name screen) is output by theCLASSIK Movie.
Composite In - SCART version: When either the AUX 1 or AUX 2source is selected, any video source connected to the CLASSIKMovie’s AUX AV SCART socket will be output through the unit’s TVSCART socket. Phono version: When either the AUX 1 or AUX 2source is selected, any video source connected to the CLASSIKMovie’s CVBS AUX socket will be routed to the unit’s CVBS TVsocket.
S-video In - SCART and Phoono versions: When either the AUX 1 orAUX 2 source is selected, any video source connected to theCLASSIK Movie’s S-VIDEO IN socket will be output through theunit’s S-VIDEO OUT socket.
RGB / YPrPb In - SCART version: When either the AUX 1 or AUX 2source is selected, any video source connected to the CLASSIKMovie’s AUX AV SCART socket will be output through the unit’s TVSCART socket. Phono version: When either the AUX 1 or AUX 2source is selected, any video source connected to the CLASSIKMovie’s YPrPb AUX sockets will be output through the unit’s YPrPbTV sockets.
Tuner VideoDefault setting: Internal
Same as for the Aux 1 Video andAux 2 Video sources.
23 CLASSIK MOVIEOwner’s Manual
Setup Menus English
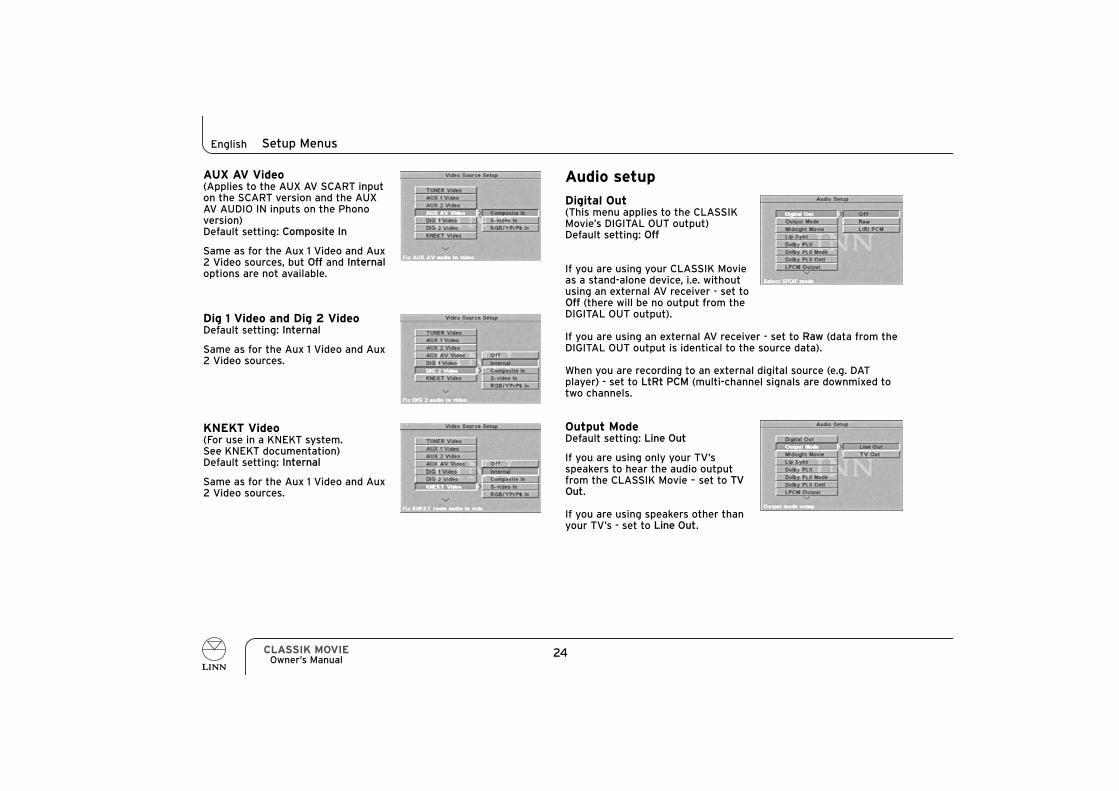
AUX AV Video(Applies to the AUX AV SCART inputon the SCART version and the AUXAV AUDIO IN inputs on the Phonoversion)Default setting: Composite In
Same as for the Aux 1 Video and Aux2 Video sources, but Off and Internaloptions are not available.
Dig 1 Video and Dig 2 VideoDefault setting: Internal
Same as for the Aux 1 Video and Aux2 Video sources.
KNEKT Video(For use in a KNEKT system.See KNEKT documentation)Default setting: Internal
Same as for the Aux 1 Video and Aux2 Video sources.
Audio setup
Digital Out(This menu applies to the CLASSIKMovie’s DIGITAL OUT output)Default setting: Off
If you are using your CLASSIK Movieas a stand-alone device, i.e. withoutusing an external AV receiver - set toOff (there will be no output from theDIGITAL OUT output).
If you are using an external AV receiver - set to Raw (data from theDIGITAL OUT output is identical to the source data).
When you are recording to an external digital source (e.g. DATplayer) - set to LtRt PCM (multi-channel signals are downmixed totwo channels.
Output ModeDefault setting: Line Out
If you are using only your TV’sspeakers to hear the audio outputfrom the CLASSIK Movie – set to TVOut.
If you are using speakers other thanyour TV’s - set to Line Out.
24CLASSIK MOVIEOwner’s Manual
Setup MenusEnglish

Midnight MovieDefault setting: Off
This feature allows you to addcompression to the Dolby Digitalaudio signal on DVDs. Addingcompression reduces suddenincreases in volume, such as thesound of an explosion, so you mayfind it suitable when watching DVDsat night. To add compression, set to On.
Lip SyncDefault setting: Disabled
This feature allows you to slightlydelay or advance the audio output ofthe CLASSIK Movie. Using thisfeature may be required if, whenwatching a video source, you findthat the movement of the actors’lips and the sound are notsynchronized.
If you are using a line doubler in your AV system, set to AudioDelay.
If you are applying Dolby Pro Logic II decoding to an external videosource, set to Audio Advance.
Dolby Pro Logic IIDefault setting: Auto
This menu is suitable for use if yourCLASSIK Movie is connected tofront, centre and surround speakers.
Dolby Pro Logic II is a form of audio processing that creates fiveoutput channels from any internal or auxiliary two-channel source,such as an audio CD, stereo tuner signal or TV audio signal. This isachieved using an advanced surround decoder that extracts thespatial qualities of the original signal without adding any newsounds.
Select the setting you require:
25 CLASSIK MOVIEOwner’s Manual
Setup Menus English
DVDs Other sources
Off
On
Auto
Stereo tracks will playas stereo
Stereo tracks can beplayed as stereo ordecoded to up to 5channels (depending onthe audio mode selected– see Surround Soundand Audio Modes, page45)
The CLASSIK Movie willread the codeembedded on the DVDand automaticallychoose the audio format
Stereo sources will alwaysplay as stereo
Stereo sources can beplayed as stereo ordecoded to up to 5channels (depending onthe audio mode selected –see Surround Sound andAudio Modes, page 45)
Same as above

Dolby Pro Logic II ModeDefault setting: Movie
This menu is suitable for use if yourCLASSIK Movie is connected tofront, centre and surround speakers.
The Dolby Pro Logic II Mode menuprovides access to various types ofDolby Pro Logic II.The option you select for Dolby Pro Logic II Mode will be used whenthe Dolby Pro Logic II menu (above) is set to On or Auto.When watching a DVD, listening to a CD etc., if you wish to changethe setting for Dolby Pro Logic II Mode, you do not need to return tothis menu as the setting can be adjusted using the SURR key on thehandset (see Surround Sound and Audio Modes, page 45).
Dolby Pro LogicThis mode recreates the surround processing offered by originalDolby Pro Logic. The Dolby Pro Logic setting is suitable if the source material is notof the best quality (e.g., a worn VCR tape).
MusicAs its name suggests, this mode is recommended when listening tomusic. If you select Music mode you can adjust certain Dolby ProLogic II parameters in the Dolby Pro Logic II Control menu (seebelow).
MovieThis mode is recommended for when watching DVDs.
MatrixMatrix mode can be used to enhance mono signals (e.g. AM radiobroadcasts) by making them seem “larger”.
Dolby Pro Logic II ControlIf you have selected Music in the Dolby Pro Logic II Mode menu,then you are able to enter the Dolby Pro Logic II Control menu.Highlighting Dolby Pro Logic II Control and pressing ‘select’ revealsthe Dolby Pro Logic II Control screen.
DimensionDefault setting: 0
The Dimension control allows you toshift the balance between the frontand surround speakers. Positivevalues move the sound towards thefront, negative values towards therear. If a recording is too spacious orstrong from the surround speakersit can be shifted “forward” to get a better balance. A stereorecording can be shifted “backward” to make the sound moreenveloping.
PanoramaDefault setting: Off
If set to On, the Panorama controlextends the audio signal from thefront left and right speakers, toinclude the surround left and rightspeakers. This will add a“wraparound” effect to the sound.
26CLASSIK MOVIEOwner’s Manual
Setup MenusEnglish
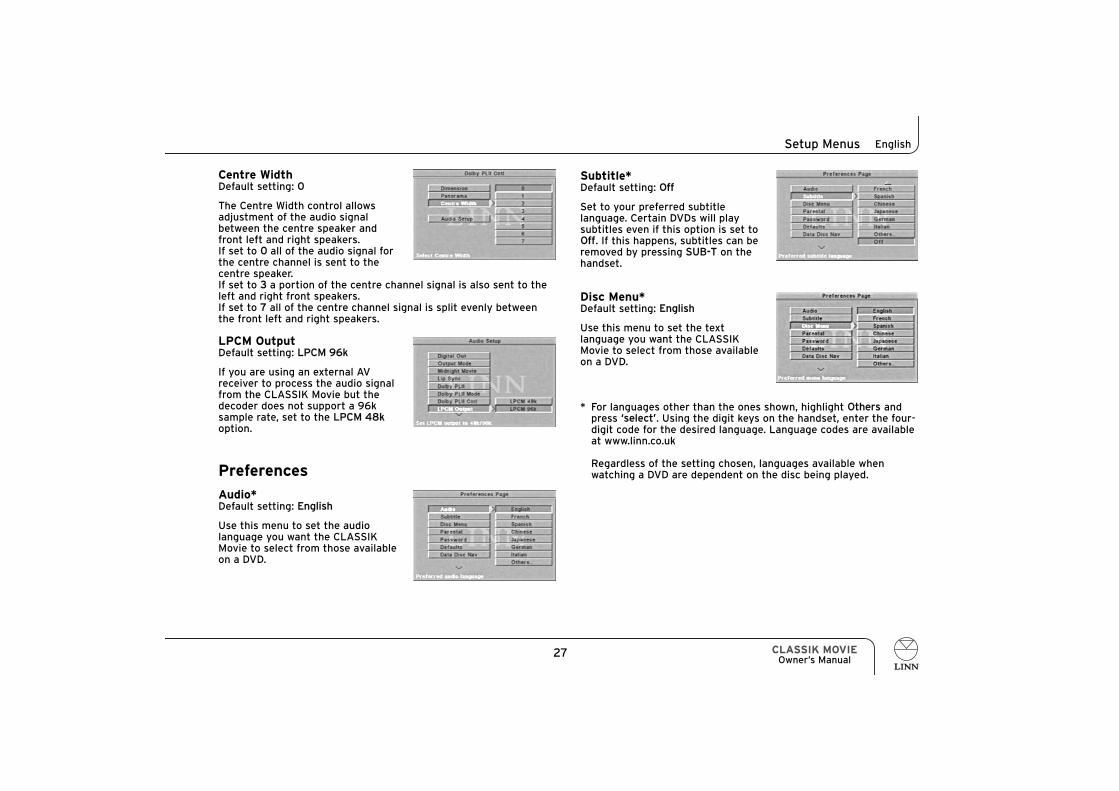
Centre WidthDefault setting: 0
The Centre Width control allowsadjustment of the audio signalbetween the centre speaker andfront left and right speakers.If set to 0 all of the audio signal forthe centre channel is sent to thecentre speaker.If set to 3 a portion of the centre channel signal is also sent to theleft and right front speakers.If set to 7 all of the centre channel signal is split evenly betweenthe front left and right speakers.
LPCM OutputDefault setting: LPCM 96k
If you are using an external AVreceiver to process the audio signalfrom the CLASSIK Movie but thedecoder does not support a 96ksample rate, set to the LPCM 48koption.
Preferences
Audio*Default setting: English
Use this menu to set the audiolanguage you want the CLASSIKMovie to select from those availableon a DVD.
Subtitle*Default setting: Off
Set to your preferred subtitlelanguage. Certain DVDs will playsubtitles even if this option is set toOff. If this happens, subtitles can beremoved by pressing SUB-T on thehandset.
Disc Menu*Default setting: English
Use this menu to set the textlanguage you want the CLASSIKMovie to select from those availableon a DVD.
* For languages other than the ones shown, highlight Others and press ‘select’. Using the digit keys on the handset, enter the four-digit code for the desired language. Language codes are available at www.linn.co.uk
Regardless of the setting chosen, languages available when watching a DVD are dependent on the disc being played.
27 CLASSIK MOVIEOwner’s Manual
Setup Menus English
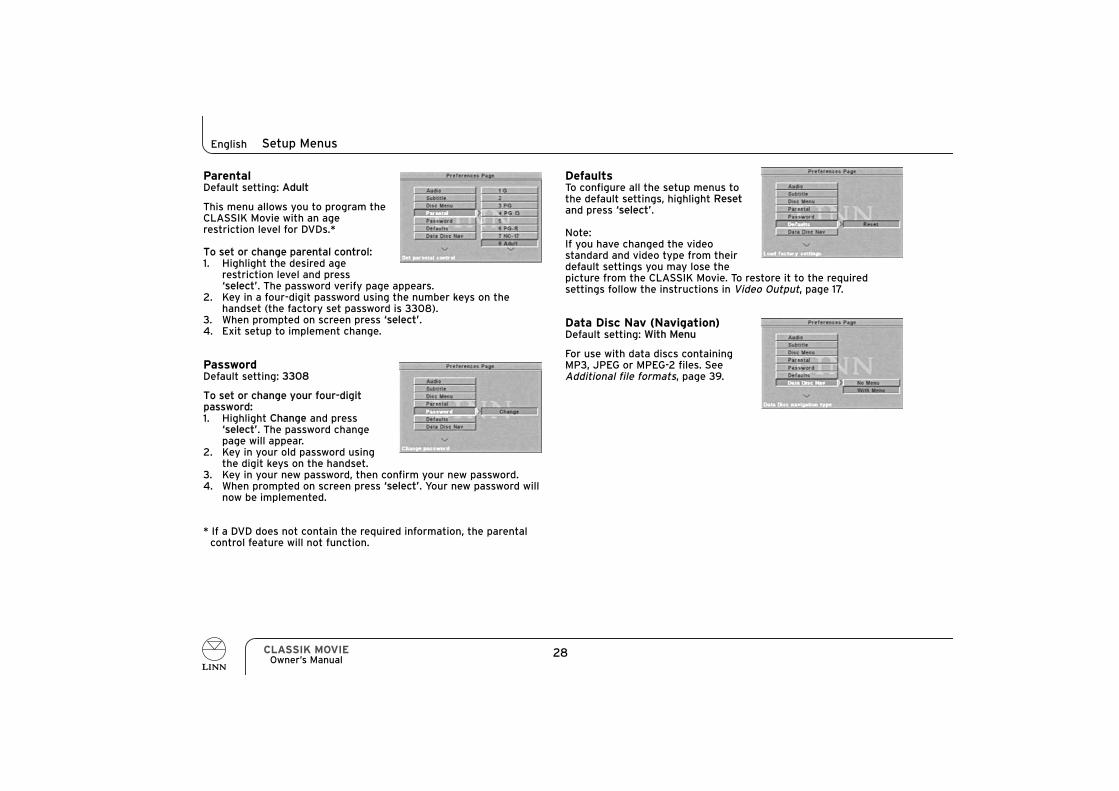
ParentalDefault setting: Adult
This menu allows you to program theCLASSIK Movie with an agerestriction level for DVDs.*
To set or change parental control:1. Highlight the desired age
restriction level and press‘select’. The password verify page appears.
2. Key in a four-digit password using the number keys on the handset (the factory set password is 3308).
3. When prompted on screen press ‘select’.4. Exit setup to implement change.
PasswordDefault setting: 3308
To set or change your four-digitpassword:1. Highlight Change and press
‘select’. The password change page will appear.
2. Key in your old password using the digit keys on the handset.
3. Key in your new password, then confirm your new password.4. When prompted on screen press ‘select’. Your new password will
now be implemented.
* If a DVD does not contain the required information, the parental control feature will not function.
DefaultsTo configure all the setup menus tothe default settings, highlight Resetand press ‘select’.
Note:If you have changed the videostandard and video type from theirdefault settings you may lose thepicture from the CLASSIK Movie. To restore it to the requiredsettings follow the instructions in Video Output, page 17.
Data Disc Nav (Navigation)Default setting: With Menu
For use with data discs containingMP3, JPEG or MPEG-2 files. SeeAdditional file formats, page 39.
28CLASSIK MOVIEOwner’s Manual
Setup MenusEnglish
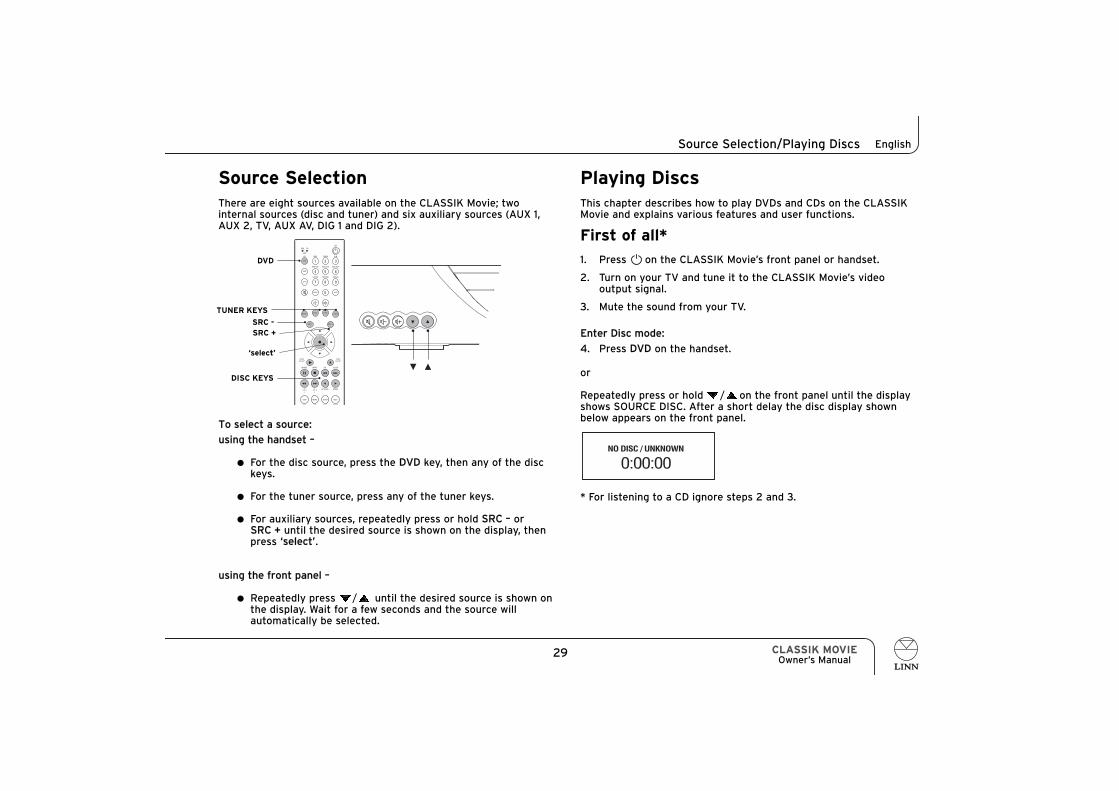
Source SelectionThere are eight sources available on the CLASSIK Movie; twointernal sources (disc and tuner) and six auxiliary sources (AUX 1,AUX 2, TV, AUX AV, DIG 1 and DIG 2).
To select a source:
using the handset –
● For the disc source, press the DVD key, then any of the disc keys.
● For the tuner source, press any of the tuner keys.
● For auxiliary sources, repeatedly press or hold SRC – or SRC + until the desired source is shown on the display, then press ‘select’.
using the front panel –
● Repeatedly press / until the desired source is shown on the display. Wait for a few seconds and the source will automatically be selected.
Playing DiscsThis chapter describes how to play DVDs and CDs on the CLASSIKMovie and explains various features and user functions.
First of all*
1. Press on the CLASSIK Movie’s front panel or handset.
2. Turn on your TV and tune it to the CLASSIK Movie’s video output signal.
3. Mute the sound from your TV.
Enter Disc mode:
4. Press DVD on the handset.
or
Repeatedly press or hold / on the front panel until the displayshows SOURCE DISC. After a short delay the disc display shownbelow appears on the front panel.
* For listening to a CD ignore steps 2 and 3.
29 CLASSIK MOVIEOwner’s Manual
Source Selection/Playing Discs English
ST
1 2 3
4 5 6
7 8 9
STORE
SHIFT
AMP
DVD
SURR
SIGNALRECORDLISTEN
LIP SYNC MONO
AUX TUNERDVD CD
DO CLOCKWHERE WHAT
EXCLUDEINCLUDESHUFFLE
A-B
OFF
TRACKDISCCD
DVD CD
AMP
AUDIOADJUST
VIDEOADJUST
PRESET
SRC +
+--
SRC -
BAND
0
SCAN TUNE
DISP MORE SETUP HELP
DVD
SRC -
DISC KEYS
TUNER KEYS
‘select’
SRC +
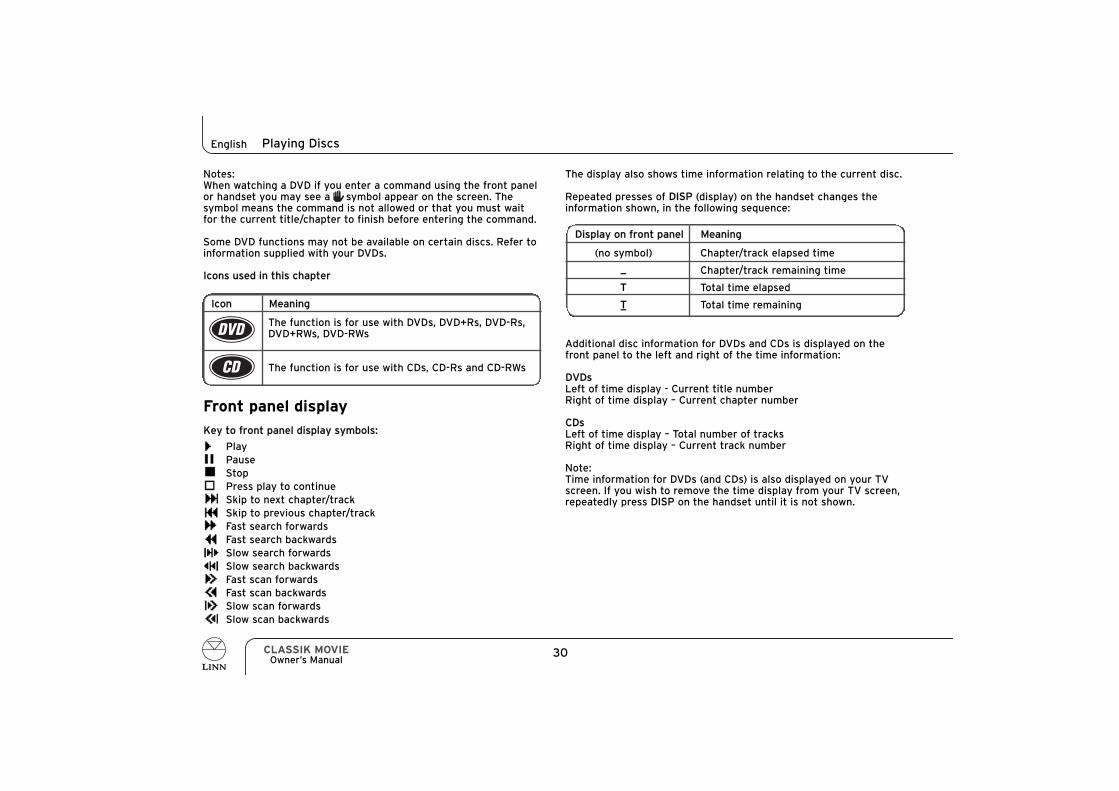
The display also shows time information relating to the current disc.
Repeated presses of DISP (display) on the handset changes theinformation shown, in the following sequence:
Additional disc information for DVDs and CDs is displayed on thefront panel to the left and right of the time information:
DVDsLeft of time display - Current title number Right of time display – Current chapter number
CDsLeft of time display – Total number of tracksRight of time display – Current track number
Note:Time information for DVDs (and CDs) is also displayed on your TVscreen. If you wish to remove the time display from your TV screen,repeatedly press DISP on the handset until it is not shown.
30CLASSIK MOVIEOwner’s Manual
Playing DiscsEnglish
Icon Meaning
The function is for use with DVDs, DVD+Rs, DVD-Rs,DVD+RWs, DVD-RWs
The function is for use with CDs, CD-Rs and CD-RWs
Notes:When watching a DVD if you enter a command using the front panelor handset you may see a symbol appear on the screen. Thesymbol means the command is not allowed or that you must waitfor the current title/chapter to finish before entering the command.
Some DVD functions may not be available on certain discs. Refer toinformation supplied with your DVDs.
Icons used in this chapter
Front panel display
Key to front panel display symbols:
PlayPauseStopPress play to continueSkip to next chapter/trackSkip to previous chapter/trackFast search forwardsFast search backwardsSlow search forwardsSlow search backwardsFast scan forwardsFast scan backwardsSlow scan forwardsSlow scan backwards
Display on front panel Meaning
(no symbol) Chapter/track elapsed time
Chapter/track remaining time
T Total time elapsed
T Total time remaining
_
_

Basic operation
Ensure the CLASSIK Movie is in Disc mode (see First of all, page 29).
To play a disc:
● Press on the handset or / on the front panel to open the disc drawer.
● Insert a disc with the playback side facing down.
● Press or / or nudge the disc drawer to close.
● If the disc is a DVD playback begins automatically. If the disc is a CD press on the handset or / on the front panel to begin playback.
Notes:Be careful not to scratch your discs as this can affect theirperformance. Be particularly careful with DVDs.
DVDs may take up to 10 seconds before playback begins.
To pause a disc:
● Press on the handset or / on the front panel.
To resume playback:
● Press on the handset or / on the front panel.
To stop playback:
● Press on the handset or / on the front panel.
To remove a disc:
● Press on the handset or press and hold / on thefront panel until the disc drawer opens.
● Remove the disc then close the disc drawer.
Note:In the case of DVDs if you press or / once, you are able tocontinue playback from the point where you stopped the disc bypressing or / . Press or / again to fully stop the disc.
31 CLASSIK MOVIEOwner’s Manual
1 2 3
4 5 6
7 8 9
STORE
SHIFT
AMP
DVD
SURR
SIGNALRECORDLISTEN
DO CLOCKWHERE WHAT
EXCLUDEINCLUDESHUFFLE
A-B
OFF
TRACKDISCCD
DVD CD
AMP
AUDIOADJUST
VIDEOADJUST
PRESET
SRC +
+--
SRC -
BAND
0
SCAN TUNE
Playing Discs English

Locating titles/chapters/tracks on a disc
Note:DVDs are usually divided into one or more titles. Titles are usuallydivided into chapters. CDs are divided into tracks.
Next and previous chapter/track selection
To skip forwards or backwards through the chapters/tracks on adisc:
using the front panel or handseet –
● To skip forwards, hold or repeatedly press .
● To skip backwards, hold or repeatedly press .
Direct title selection
To directly access a title on a DVD while the menu page is showing:
using the handset –
● Press GOTO.
On your TV the digits showing the current title are highlighted.
● Enter the number of the title to be selected using the digit keys.
● Press ‘select’.
To directly access a title on a DVD while a title is playing:
using the handset –
● Press GOTO, then press .
On your TV the digits showing the current title are highlighted.
● Enter the number of the title to be selected using the digit keys.
● Press ‘select’.
32CLASSIK MOVIEOwner’s Manual
Playing DiscsEnglish
‘select’
1 2 3
4 5 6
7 8 9
STORE
SHIFT
AMP
DVD
SURR
SIGNALRECORDLISTEN
LIP SYNC MONO
AUX TUNERDVD CD
PHONO SATTV DIGITAL
DO CLOCKWHERE WHAT
EXCLUDEINCLUDESHUFFLE
A-B
OFF
TRACKDISCCD
DVD CD
AMP
AUDIOADJUST
VIDEOADJUST
PRESET
SRC +
+--
SRC -
BAND
0
SCAN TUNE
DISP MORE SETUP HELP
AUDIO SUB-T ANGLE ZOOM
TITLE MENU GOTO
DIGIT KEYS
GOTO
STORE

Direct chapter selection
To directly access a specific chapter on a DVD while a title isplaying:
using the handset –
● Press GOTO.
On your TV the digits showing the current chapter are highlighted.
● Enter the number of the chapter to be selected using the digit keys.
● Press ‘select’.
Direct track selection
To play a particular track:
using the handset –
● Enter the track number using the digit keys.
● Press STORE, or wait for a few seconds and the track will be selected automatically.
Note:A track cannot be selected if a program mode is active and thetrack is not included in the program (see Include program andExclude program, pages 36 & 37).
Locating a particular point on a disc
Fast search forwards and backwards
To perform fast search forwards or fast search reverse playbackwhile a disc is playing:
using the hhandset –
● To fast search forwards, hold .
● To fast search backwards, hold .
Fast scan forwards and backwards
To perform fast scan forwards or fast scan reverse playback whilea disc is playing:
33 CLASSIK MOVIEOwner’s Manual
Playing Discs English
‘select’
DIGIT KEYS1 2 3
4 5 6
7 8 9
STORE
SHIFT
AMP
DVD
SURR
SIGNALRECORDLISTEN
LIP SYNC MONO
AUX TUNERDVD CD
PHONO SATTV DIGITAL
DO CLOCKWHERE WHAT
EXCLUDEINCLUDESHUFFLE
A-BTRACKDISCCD
AUDIOADJUST
VIDEOADJUST
PRESET
SRC +
+--
SRC -
BAND
0
SCAN TUNE
DISP MORE SETUP HELP
AUDIO SUB-T ANGLE ZOOM
TITLE MENU GOTO GOTO

using the handset –
● To fast scan forwards at 2x normal speed, press .
Further presses of increases the speed of forwards playback: 4x, 6x, 8x normal speed.Another press of returns playback to normal.
● To fast scan backwards at 2x normal speed, press .
Further presses of increases the speed of reverse playback: 4x, 6x, 8x normal speed.Another press of returns playback to normal
Slow search forwards and backwards
To perform forwards or reverse playback one frame at a time whilea DVD is playing:
using the handseet –
● Pause playback by pressing .
● To slow search forwards, repeatedly press or hold .
● To slow search backwards, repeatedly press or hold .
● To return to normal playback, press (play).
Slow scan forwards and backwards
To perform slow scan forwards or slow scan reverse playback whilea DVD is playing:
using the handset –
● To slow scan forwards at 1/2 normal speed, press , then .
Further presses of decreases the speed of forwards playback: 1/4, 1/6, 1/8 normal speed.Another press of returns playback to normal.
● To slow scan backwards at 1/2 normal speed, press , then .
Further presses of decreases the speed of reverse playback: 1/4, 1/6, 1/8 normal speed.Another press of returns playback to normal.
Direct time selection
To directly access a specific point on a DVD while a title is playing:
using the handset –
● Press GOTO.
On your TV the digits showing the current chapter are highlighted.
● Press GOTO again.
● Enter the desired time using the digit keys. The time must be input as a six-figure number.
Example:To access the point 1 hour 15 minutes and 32 seconds into playback on a DVD title, press 0, 1, 1, 5, 3, 2.
The entered time is displayed on the TV.
● Press ‘select’.
34CLASSIK MOVIEOwner’s Manual
Playing DiscsEnglish

Replay track
To replay the current track:
using the handset –
● Press (play).
Using program modes to control playback
Repeat disc
To repeat an entire CD or DVD title:
using the handset –
● While the disc is playing, press SHIFT then press DISC (1 key) within two seconds.
The front panel display shows ALL.
When the CD/title is finished playing it will automatically play repeatedly.
To cancel repeat disc mode and continue with normal playback:
● Press SHIFT then press DISC within two seconds.
Repeat chapter/track
To repeat a specific chapter/track:
using the handset –
● While the chosen chapter/track is playing, press SHIFT then press TRACK (2 key) within two seconds.
The front panel display shows ONE.
When the chosen chapter/track is finished playing it will automatically play repeatedly.
To cancel repeat chapter/track mode and continue with normalplayback:
● Press SHIFT then press TRACK within two seconds.
35 CLASSIK MOVIEOwner’s Manual
Playing Discs English
DIGIT KEYS
1 2 3
4 5 6
7 8 9
STORE
SHIFT
AMP
DVD
SURR
SIGNALRECORDLISTEN
LIP SYNC MONO
AUX TUNERDVD CD
DO CLOCKWHERE WHAT
EXCLUDEINCLUDESHUFFLE
A-B
OFF
TRACKDISCCD
DVD CD
AMP
AUDIOADJUST
VIDEOADJUST
PRESET
SRC +
+--
SRC -
BAND
0
SCAN TUNE
DISP MORE SETUP HELP
EXCLUDESHUFFLEA/B
TRACKDISC
INCLUDESHIFT
STORE

Repeat section
To repeat a specific section of a disc:
using the handset –
While the disc is playing, select the start of the section to repeat -
● Press SHIFT, then press A-B (3 key) within two seconds.
Continue playback until you reach the end of the section to repeat –
● Press SHIFT, then A-B within two seconds.
When A-B has been pressed for the second time, the chosen section automatically plays repeatedly.
To cancel repeat section mode and continue with normal playback:
● Press SHIFT, then press A-B within two seconds.
Tip: (DVDs only)For extra control over marking the start and end of a section torepeat, pause playback before pressing SHIFT, A-B.
Shuffle program
Disc must be stopped before this function can be accessed.
To shuffle the order in which tracks are played:
using the handset –
● Press SHIFT, then press SHUFFLE (4 key) within two seconds.
The front panel display shows SHF.
● Press to start playback.
To cancel shuffle mode:
● Press ■.
● Press SHIFT, then press SHUFFLE within two seconds.
Include program
This program mode allows you to select which tracks you wish tolisten to from those available on a disc.
Disc must be stopped before this function can be accessed.
To select which tracks are to be played:
using the handset –
36CLASSIK MOVIEOwner’s Manual
Playing DiscsEnglish
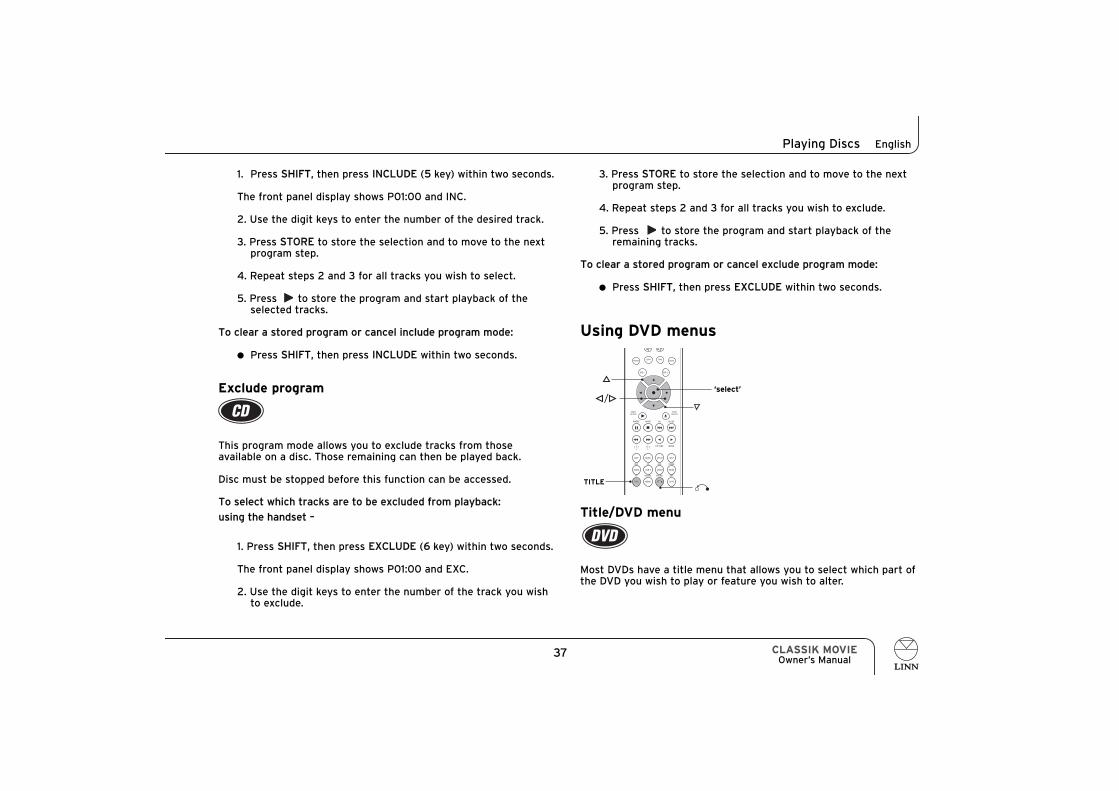
1. Press SHIFT, then press INCLUDE (5 key) within two seconds.
The front panel display shows P01:00 and INC.
2. Use the digit keys to enter the number of the desired track.
3. Press STORE to store the selection and to move to the next program step.
4. Repeat steps 2 and 3 for all tracks you wish to select.
5. Press to store the program and start playback of the selected tracks.
To clear a stored program or cancel include program mode:
● Press SHIFT, then press INCLUDE within two seconds.
Exclude program
This program mode allows you to exclude tracks from thoseavailable on a disc. Those remaining can then be played back.
Disc must be stopped before this function can be accessed.
To select which tracks are to be excluded from playback:
using the handset –
1. Press SHIFT, then press EXCLUDE (6 key) within two seconds.
The front panel display shows P01:00 and EXC.
2. Use the digit keys to enter the number of the track you wish to exclude.
37 CLASSIK MOVIEOwner’s Manual
Playing Discs English
‘select’
LIP SYNC MONO
AUX TUNERDVD CD
PHONO SATTV DIGITAL
DO CLOCKWHERE WHAT
AUDIOADJUST
VIDEOADJUST
PRESET
SRC +
+--
SRC -
BANDSCAN TUNE
DISP MORE SETUP HELP
AUDIO SUB-T ANGLE ZOOM
TITLE MENU GOTOTITLE
3. Press STORE to store the selection and to move to the next program step.
4. Repeat steps 2 and 3 for all tracks you wish to exclude.
5. Press to store the program and start playback of the remaining tracks.
To clear a stored program or cancel exclude program mode:
● Press SHIFT, then press EXCLUDE within two seconds.
Using DVD menus
Title/DVD menu
Most DVDs have a title menu that allows you to select which part ofthe DVD you wish to play or feature you wish to alter.

To view the title/DVD menu:
● Press TITLE on the handset.
The title/DVD menu appears on your TV screen.
● Use / / / to select the desired title/feature.
● Press ‘select’.
On some DVDs you may be able to select more than one menuscreen.
To return to the previously displayed menu:
● Press .
Further playback options for DVDs
Language selection
To cycle through the available language options on a DVD:
using the handset –
● Repeatedly press AUDIO.
Note:This function may not operate with all DVDs as it is dependent onthe content of each disc.
Subtitles
To access available subtitles:
using the handset –
● Press SUB-T.
Angle selection
Certain DVDs allow you to view the same scene from more than oneviewpoint
To perform angle selection:
using the handset
● Press ANGLE.
The next available angle will be selected.
Further presses of ANGLE selects subsequent angles.
38CLASSIK MOVIEOwner’s Manual
Playing DiscsEnglish
LIP SYNC MONO
AUX TUNERDVD CD
PHONO SATTV DIGITAL
DO CLOCKWHERE WHAT
AUDIOADJUST
VIDEOADJUST
PRESET
SRC +SRC -
BANDSCAN TUNE
DISP MORE SETUP HELP
AUDIO SUB-T ANGLE ZOOM
TITLE MENU GOTO
AUDIOZOOMSUB-T
ANGLE
Zoom and pan
Zoom allows you to view a DVD picture at different levels ofmagnification. Pan allows you to move left and right or up and downacross a zoomed DVD picture.
To perform zoom while a DVD is playing or paused:
using the handset –
● Press ZOOM.
The picture changes to the next level of magnification (1.5x normal view) and ZOOM 1.5 is displayed on the TV.
Further presses of ZOOM selects greater levels of magnification: 2x, 3x normal view.Another press of ZOOM returns the picture to normal view.
To perform pan on a zoomed picture:
● Repeatedly press / / / on the handset.
Additional file formats
The following file formats are also playable/viewable on theCLASSIK Movie: MP3, JPEG, MPEG-2 on data discs (CD+R, CD+RW,DVD+R, DVD-R, DVD+RW, DVD-RW).
To play/view such files:
1. Turn on your TV and tune it to the CLASSIK Movie’s video output signal.
2. Mute the sound from your TV.3. If the CLASSIK Movie is not in Disc mode, press DVD on the
handset.
4. Insert the disc into the unit. After a few seconds the Disc Navigation screen appears on your TV, which shows the folder structure of the disc.
Note:To view the contents of the disc, Data Disc Nav in the Preferencessection of the setup menus must be set to With Menu (see page 28).
5. Follow the instructions below.
using the handset -
To navigate between folders/items, use / .
To view the contents of a folder, highlight the folder then press ‘select’.
To play/view an item, highlight the item then press ‘select’.
To skip forwards/backwards through items, press / .
To fast search forwards/backwards while an MP3 or MPEG-2 fileis playing, press / .
To stop playing/viewing an item, press ■.
Notes:If Data Disc Nav in the setup menus is set to No Menu, a discinserted into the CLASSIK Movie will play from the first item of thefirst folder when you press ‘select’. The / / / / ■ keyswill function as above.
The CLASSIK Movie features additional functionality forplaying/viewing MP3, JPEG and MPEG-2 files. A PDF documentdetailing this functionality is available at www.linn.co.uk
39 CLASSIK MOVIEOwner’s Manual
Playing Discs English
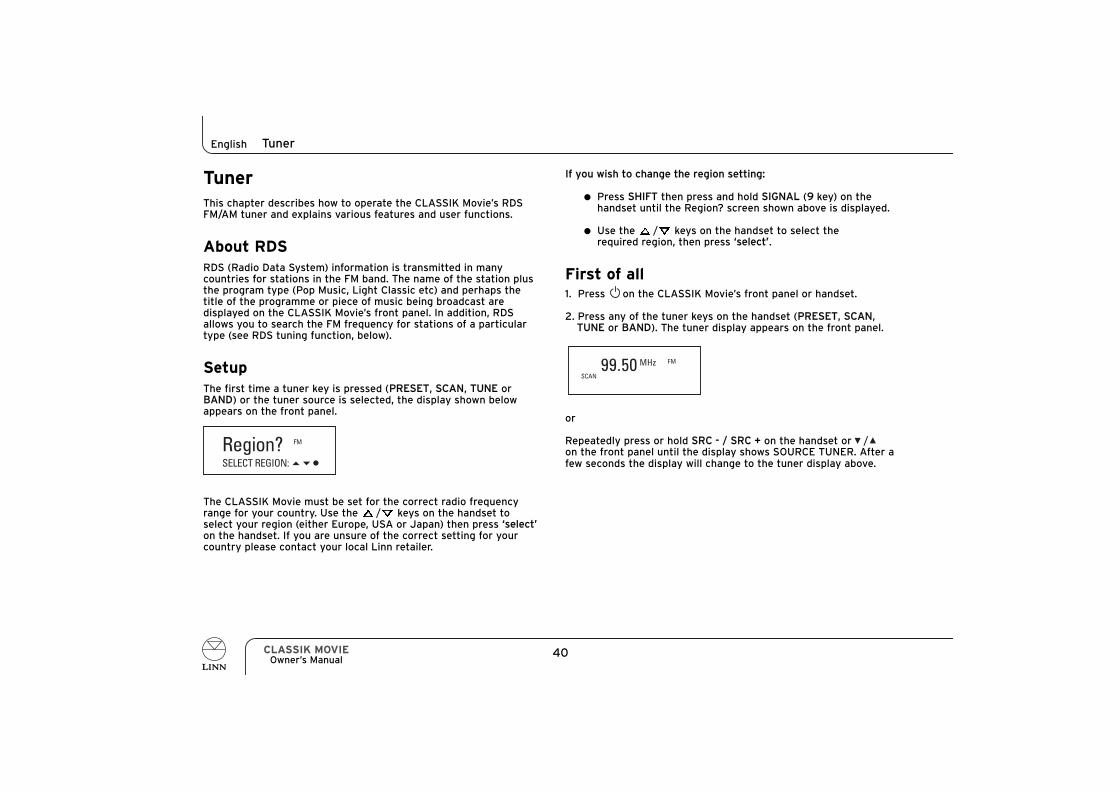
TunerThis chapter describes how to operate the CLASSIK Movie’s RDSFM/AM tuner and explains various features and user functions.
About RDSRDS (Radio Data System) information is transmitted in manycountries for stations in the FM band. The name of the station plusthe program type (Pop Music, Light Classic etc) and perhaps thetitle of the programme or piece of music being broadcast aredisplayed on the CLASSIK Movie’s front panel. In addition, RDSallows you to search the FM frequency for stations of a particulartype (see RDS tuning function, below).
SetupThe first time a tuner key is pressed (PRESET, SCAN, TUNE orBAND) or the tuner source is selected, the display shown belowappears on the front panel.
The CLASSIK Movie must be set for the correct radio frequencyrange for your country. Use the / keys on the handset toselect your region (either Europe, USA or Japan) then press ‘select’on the handset. If you are unsure of the correct setting for yourcountry please contact your local Linn retailer.
If you wish to change the region setting:
● Press SHIFT then press and hold SIGNAL (9 key) on the handset until the Region? screen shown above is displayed.
● Use the / keys on the handset to select the required region, then press ‘select’.
First of all1. Press on the CLASSIK Movie’s front panel or handset.
2. Press any of the tuner keys on the handset (PRESET, SCAN,TUNE or BAND). The tuner display appears on the front panel.
or
Repeatedly press or hold SRC - / SRC + on the handset or /on the front panel until the display shows SOURCE TUNER. After afew seconds the display will change to the tuner display above.
40CLASSIK MOVIEOwner’s Manual
TunerEnglish
Region?SELECT REGION:
FM
SCAN
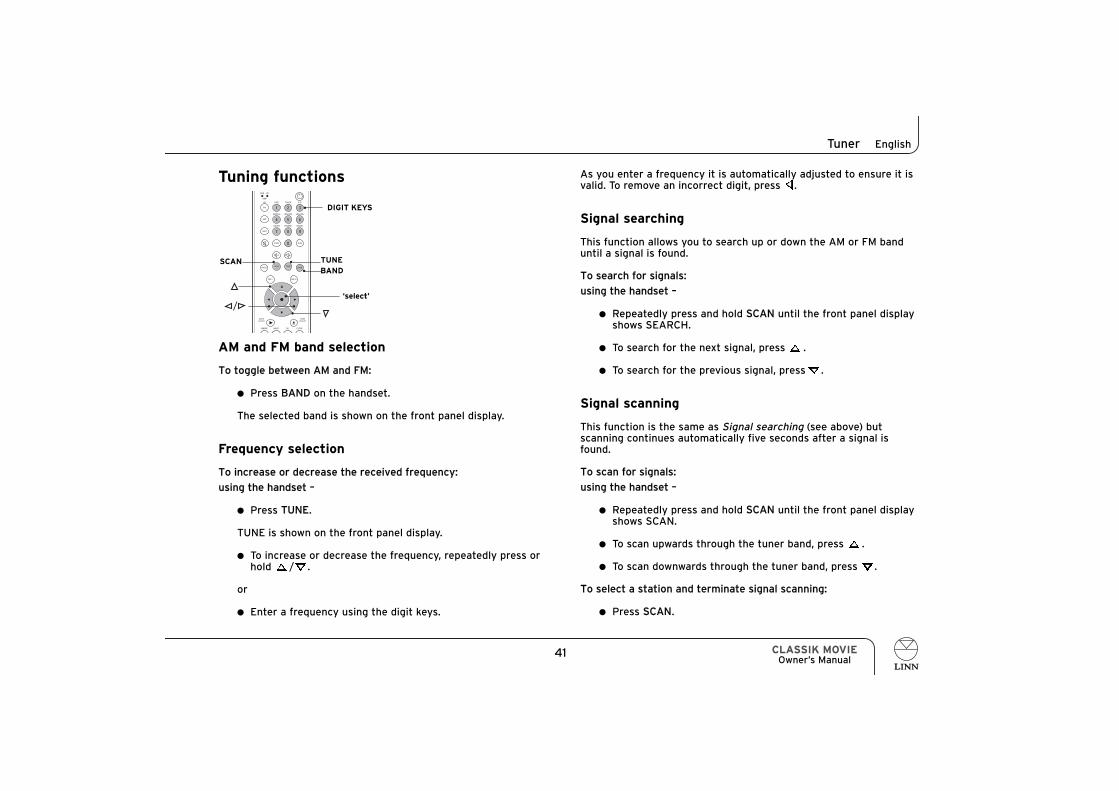
Tuning functions
AM and FM band selection
To toggle between AM and FM:
● Press BAND on the handset.
The selected band is shown on the front panel display.
Frequency selection
To increase or decrease the received frequency:
using the handset –
● Press TUNE.
TUNE is shown on the front panel display.
● To increase or decrease the frequency, repeatedly press or hold / .
or
● Enter a frequency using the digit keys.
As you enter a frequency it is automatically adjusted to ensure it isvalid. To remove an incorrect digit, press .
Signal searching
This function allows you to search up or down the AM or FM banduntil a signal is found.
To search for signals:
using the handset –
● Repeatedly press and hold SCAN until the front panel display shows SEARCH.
● To search for the next signal, press .
● To search for the previous signal, press .
Signal scanning
This function is the same as Signal searching (see above) butscanning continues automatically five seconds after a signal isfound.
To scan for signals:
using the handset –
● Repeatedly press and hold SCAN until the front panel display shows SCAN.
● To scan upwards through the tuner band, press .
● To scan downwards through the tuner band, press .
To select a station and terminate signal scanning:
● Press SCAN.
41 CLASSIK MOVIEOwner’s Manual
Tuner English
‘select’
1 2 3
4 5 6
7 8 9
STORE
SHIFT
AMP
DVD
SURR
SIGNALRECORDLISTEN
DO CLOCKWHERE WHAT
EXCLUDEINCLUDESHUFFLE
A-B
OFF
TRACKDISCCD
DVD CD
AMP
AUDIOADJUST
VIDEOADJUST
PRESET
SRC +
+--
SRC -
BAND
0
SCAN TUNE
DIGIT KEYS
BANDTUNESCAN
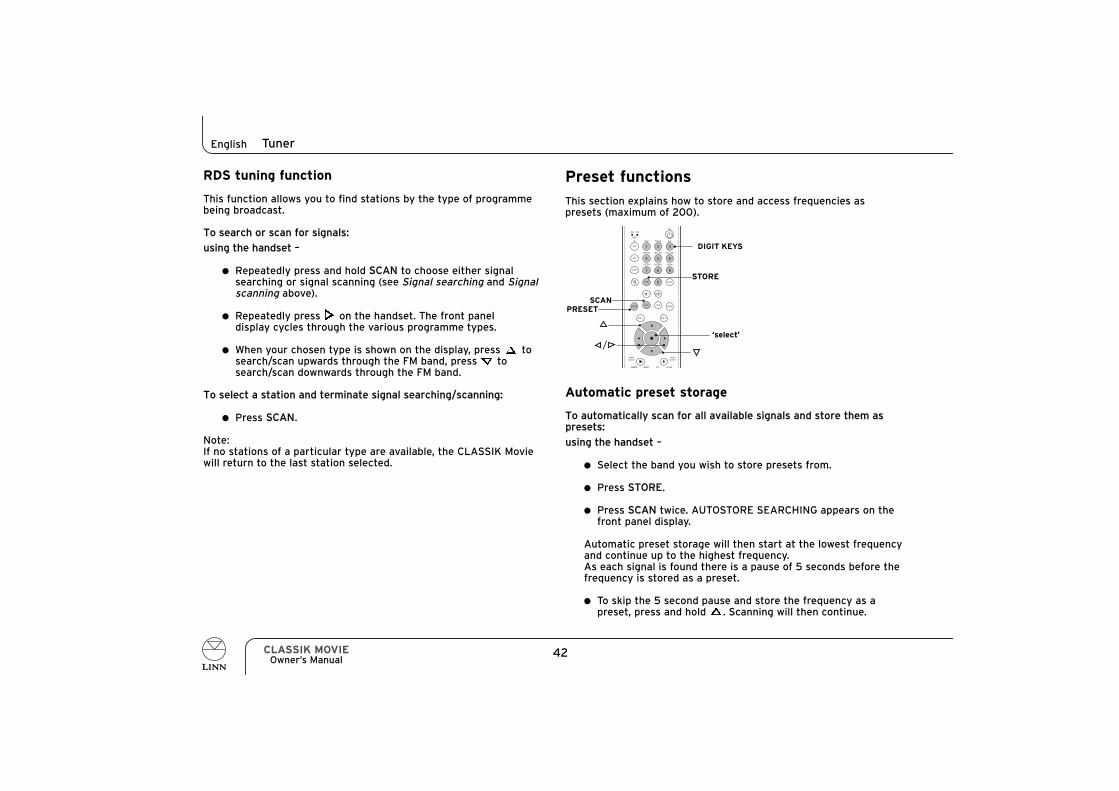
RDS tuning function
This function allows you to find stations by the type of programmebeing broadcast.
To search or scan for signals:
using the handset –
● Repeatedly press and hold SCAN to choose either signal searching or signal scanning (see Signal searching and Signalscanning above).
● Repeatedly press on the handset. The front panel display cycles through the various programme types.
● When your chosen type is shown on the display, press to search/scan upwards through the FM band, press to search/scan downwards through the FM band.
To select a station and terminate signal searching/scanning:
● Press SCAN.
Note:If no stations of a particular type are available, the CLASSIK Moviewill return to the last station selected.
Preset functions
This section explains how to store and access frequencies aspresets (maximum of 200).
Automatic preset storage
To automatically scan for all available signals and store them aspresets:
using the handset –
● Select the band you wish to store presets from.
● Press STORE.
● Press SCAN twice. AUTOSTORE SEARCHING appears on the front panel display.
Automatic preset storage will then start at the lowest frequencyand continue up to the highest frequency.As each signal is found there is a pause of 5 seconds before thefrequency is stored as a preset.
● To skip the 5 second pause and store the frequency as a preset, press and hold . Scanning will then continue.
42CLASSIK MOVIEOwner’s Manual
TunerEnglish
‘select’
1 2 3
4 5 6
7 8 9
STORE
SHIFT
AMP
DVD
SURR
SIGNALRECORDLISTEN
DO CLOCKWHERE WHAT
EXCLUDEINCLUDESHUFFLE
A-B
OFF
TRACKDISCCD
DVD CD
AMP
AUDIOADJUST
VIDEOADJUST
PRESET
SRC +
+--
SRC -
BAND
0
SCAN TUNE
DIGIT KEYS
STORE
SCANPRESET

● To skip the 5 second pause and not store the frequency as a preset, press . Scanning will then continue.
Scanning will stop automatically when the tuner reaches thehighest frequency.
Notes:In countries that transmit RDS, frequencies are stored using thestation name. In other countries stored frequencies areautomatically named by radio band and the order in which they arestored (FM1, FM2 etc).
You are able to give a preset a different name if you prefer (seeManual preset storage, this page).
Automatic preset storage must be carried out separately for AMand FM bands.
Previously stored frequencies will not be stored again.
Manual preset storage
To manually store a frequency as a preset:
using the handset -
1. Set the tuner to the frequency you wish to store.
2. Press STORE.The front panel display shows a flashing bar, below which is the following: STORE: ● 0..9 TO EDIT
3. You are able to give each preset a name of up to 10 characters.
Enter a name using the following handset keys -
/ Cycle through A-Z, 0-9 and commonly used symbols.
‘select’ Switches between capital and non-capital letters.
digit keys Can be used to quickly access numbers andA-Z in the same manner as a telephone key pad, e.g. repeatedly press 2 to access A/B/C/2, or 3 to access D/E/F/3 etc.
● When you have selected the desired letter/digit/symbol press to move to the next space.
● To change or delete a character use the / keys until the character flashes, then enter the new character, or press and hold to delete it.
● To insert a character use the / keys to reach the position at which you wish to insert the new character. Press and hold . The flashing character and all others that follow it move one space to the right. Add the new character.
4. When you have finished entering the name for the preset, press STORE.
Preset selection
To select a preset:
using the handset -
● Press PRESET.
The front panel display shows PRESET.
● Repeatedly press or hold / . (Pressing cycles through the presets numerically then alphabetically. Pressing
reverses the order of the cycle.)
or
● Press / to select the last/first preset of each letter of the alphabet.
or
43 CLASSIK MOVIEOwner’s Manual
Tuner English
● Enter the first character of the preset’s name using the digit keys on the handset, remembering that digit 2 accesses any preset that begins with either A, B, C or 2, digit 3 accesses presets that begin with D, E, F or 3 etc.
The front panel display shows the preset’s name.
Preset deletion
To delete a preset:
using the handset -
● Press PRESET.
● Use / to select the preset you wish to delete.
● Hold PRESET.
PRESS ● TO CLEAR appears on the front panel display.
● Press ‘select’.
The display shows PRESET CLEARED.
To delete all presets:
using the handset –
● Press then release PRESET.
● Hold PRESET until PRESS ● TO CLEAR appears on the front panel display.
● Hold ‘select’ until the display shows ALL PRESETS CLEARED.
44CLASSIK MOVIEOwner’s Manual
TunerEnglish
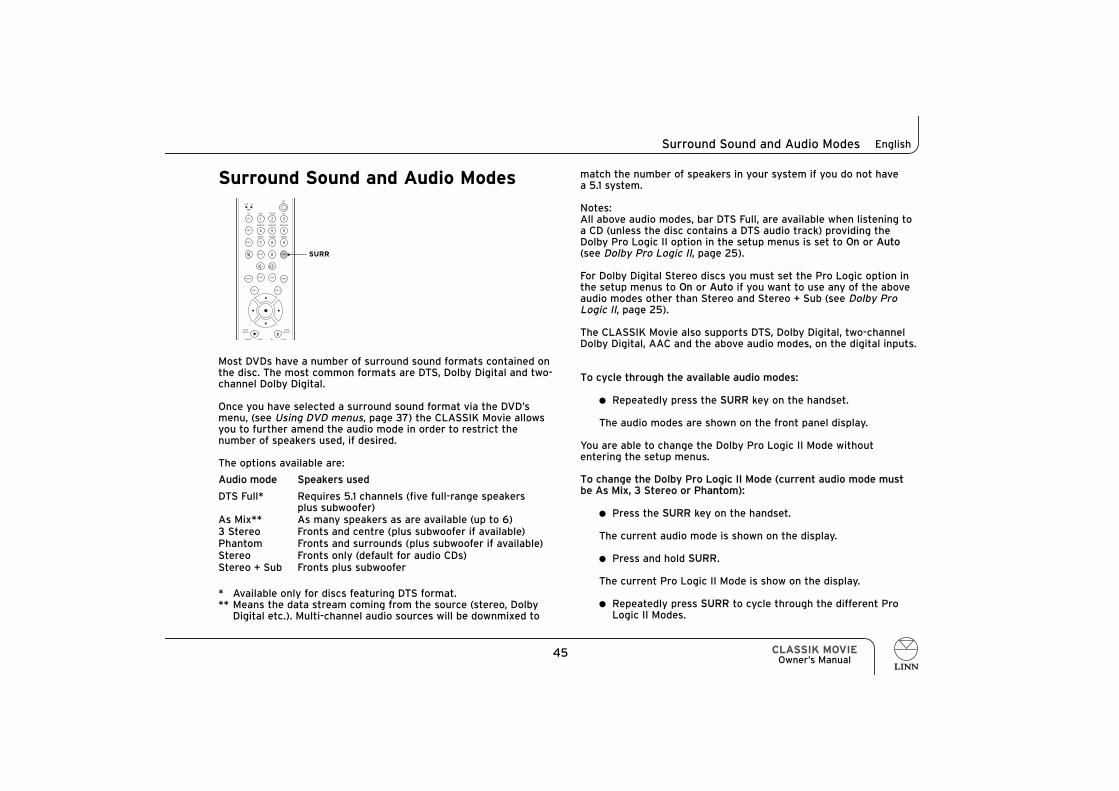
Surround Sound and Audio Modes
Most DVDs have a number of surround sound formats contained onthe disc. The most common formats are DTS, Dolby Digital and two-channel Dolby Digital.
Once you have selected a surround sound format via the DVD’smenu, (see Using DVD menus, page 37) the CLASSIK Movie allowsyou to further amend the audio mode in order to restrict thenumber of speakers used, if desired.
The options available are:
Audio mode Speakers used
DTS Full* Requires 5.1 channels (five full-range speakers plus subwoofer)
As Mix** As many speakers as are available (up to 6)3 Stereo Fronts and centre (plus subwoofer if available)Phantom Fronts and surrounds (plus subwoofer if available)Stereo Fronts only (default for audio CDs)Stereo + Sub Fronts plus subwoofer
* Available only for discs featuring DTS format.** Means the data stream coming from the source (stereo, Dolby
Digital etc.). Multi-channel audio sources will be downmixed to
45 CLASSIK MOVIEOwner’s Manual
Surround Sound and Audio Modes English
1 2 3
4 5 6
7 8 9
STORE
SHIFT
AMP
DVD
SURR
SIGNALRECORDLISTEN
DO CLOCKWHERE WHAT
EXCLUDEINCLUDESHUFFLE
A-B
OFF
TRACKDISCCD
DVD CD
AMP
AUDIOADJUST
VIDEOADJUST
PRESET
SRC +
+--
SRC -
BAND
0
SCAN TUNE
SURR
match the number of speakers in your system if you do not have a 5.1 system.
Notes:All above audio modes, bar DTS Full, are available when listening toa CD (unless the disc contains a DTS audio track) providing theDolby Pro Logic II option in the setup menus is set to On or Auto(see Dolby Pro Logic II, page 25).
For Dolby Digital Stereo discs you must set the Pro Logic option inthe setup menus to On or Auto if you want to use any of the aboveaudio modes other than Stereo and Stereo + Sub (see Dolby ProLogic II, page 25).
The CLASSIK Movie also supports DTS, Dolby Digital, two-channelDolby Digital, AAC and the above audio modes, on the digital inputs.
To cycle through the available audio modes:
● Repeatedly press the SURR key on the handset.
The audio modes are shown on the front panel display.
You are able to change the Dolby Pro Logic II Mode withoutentering the setup menus.
To change the Dolby Pro Logic II Mode (current audio mode mustbe As Mix, 3 Stereo or Phanntom):
● Press the SURR key on the handset.
The current audio mode is shown on the display.
● Press and hold SURR.
The current Pro Logic II Mode is show on the display.
● Repeatedly press SURR to cycle through the different Pro Logic II Modes.

Midnight Movie mode
This feature allows you to add compression to the Dolby Digitalaudio signal on DVDs. Adding compression reduces suddenincreases in volume, such as the sound of an explosion.
To switch Midnight Movie mode on or off:
● Press and hold the SURR key on the handset.
The current setting for Midnight Movie is shown on the display.
● To change the setting, press SURR.
Note:Midnight Movie mode can also be accessed via the setup menus(see Midnight Movie, page 25).
46CLASSIK MOVIEOwner’s Manual
Surround Sound and Audio ModesEnglish
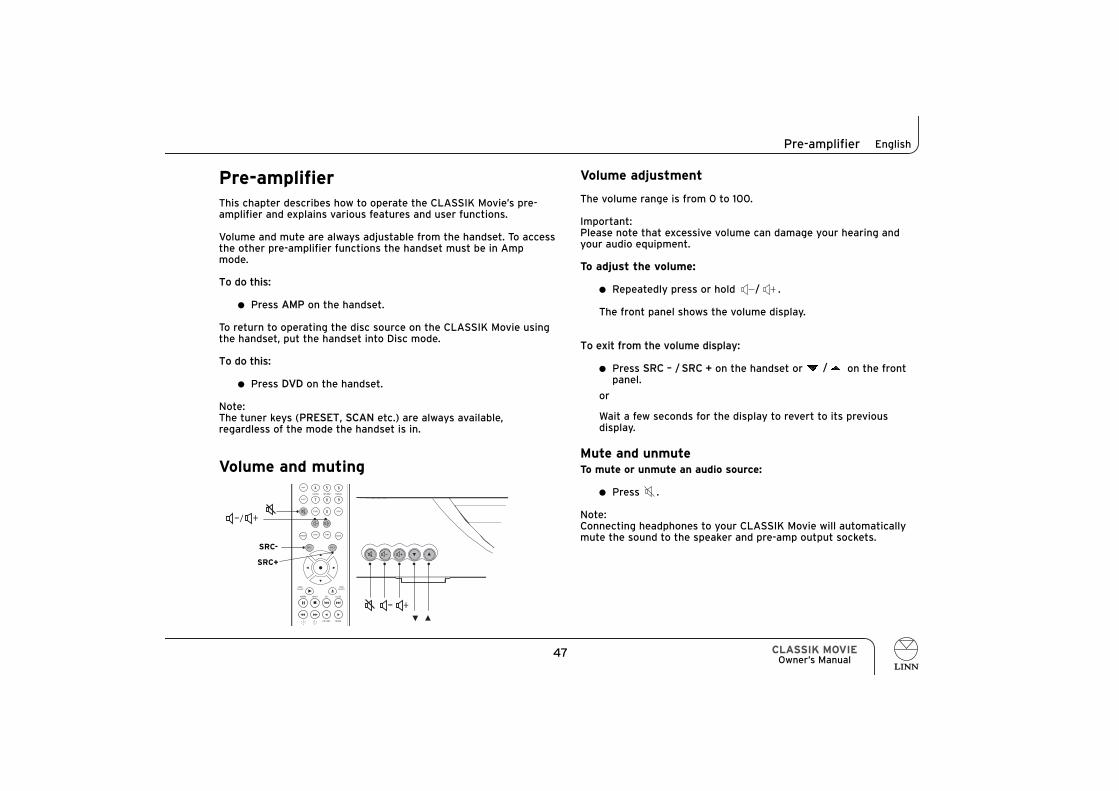
Pre-amplifierThis chapter describes how to operate the CLASSIK Movie’s pre-amplifier and explains various features and user functions.
Volume and mute are always adjustable from the handset. To accessthe other pre-amplifier functions the handset must be in Ampmode.
To do this:
● Press AMP on the handset.
To return to operating the disc source on the CLASSIK Movie usingthe handset, put the handset into Disc mode.
To do this:
● Press DVD on the handset.
Note:The tuner keys (PRESET, SCAN etc.) are always available, regardless of the mode the handset is in.
Volume and muting
Volume adjustment
The volume range is from 0 to 100.
Important:Please note that excessive volume can damage your hearing andyour audio equipment.
To adjust the volume:
● Repeatedly press or hold / .
The front panel shows the volume display.
To exit from the volume display:
● Press SRC – / SRC + on the handset or / on the front panel.
or
Wait a few seconds for the display to revert to its previous display.
Mute and unmuteTo mute or unmute an audio source:
● Press .
Note:Connecting headphones to your CLASSIK Movie will automaticallymute the sound to the speaker and pre-amp output sockets.
47 CLASSIK MOVIEOwner’s Manual
Pre-amplifier English
4 5 6
7 8 9
STORE
SHIFT
AMP
SURR
SIGNALRECORDLISTEN
LIP SYNC MONO
DO CLOCKWHERE WHAT
AUDIOADJUST
VIDEOADJUST
PRESET
SRC +
+--
SRC -
BAND
0
SCAN TUNE
-- +
SRC+
SRC-
-- +
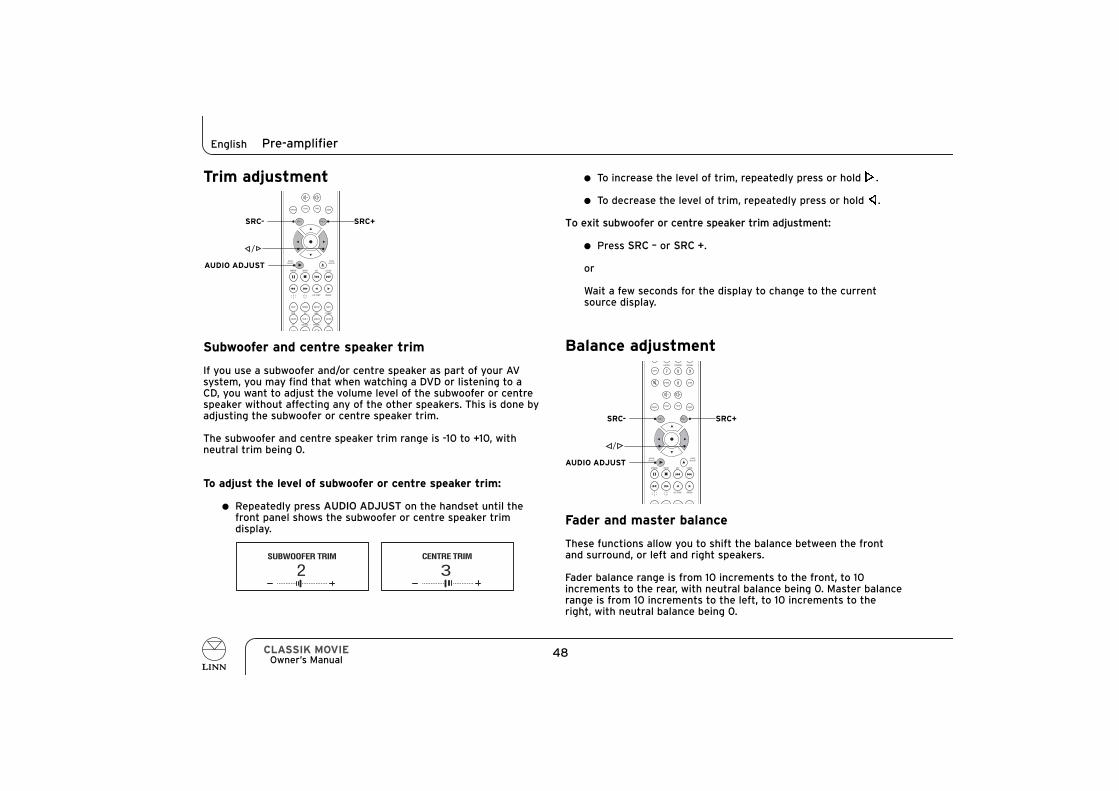
Trim adjustment
Subwoofer and centre speaker trim
If you use a subwoofer and/or centre speaker as part of your AVsystem, you may find that when watching a DVD or listening to aCD, you want to adjust the volume level of the subwoofer or centrespeaker without affecting any of the other speakers. This is done byadjusting the subwoofer or centre speaker trim.
The subwoofer and centre speaker trim range is -10 to +10, withneutral trim being 0.
To adjust the level of subwoofer or centre speaker trim:
● Repeatedly press AUDIO ADJUST on the handset until thefront panel shows the subwoofer or centre speaker trim display.
● To increase the level of trim, repeatedly press or hold .
● To decrease the level of trim, repeatedly press or hold .
To exit subwoofer or centre speaker trim adjustment:
● Press SRC – or SRC +.
or
Wait a few seconds for the display to change to the current source display.
Balance adjustment
Fader and master balance
These functions allow you to shift the balance between the frontand surround, or left and right speakers.
Fader balance range is from 10 increments to the front, to 10increments to the rear, with neutral balance being 0. Master balancerange is from 10 increments to the left, to 10 increments to theright, with neutral balance being 0.
48CLASSIK MOVIEOwner’s Manual
Pre-amplifierEnglish
3
7 8 9
STORE
SHIFT
SURR
SIGNALRECORDLISTEN
LIP SYNC MONO
DO CLOCKWHERE WHAT
AUDIOADJUST
VIDEOADJUST
PRESET
SRC +
+--
SRC -
BAND
0
SCAN TUNE
DISP MORE SETUP HELP
AUDIO ADJUST
SRC+SRC-
LIP SYNC MONO
AUX TUNERDVD CD
PHONO SATTV DIGITAL
DO CLOCKWHERE WHAT
AUDIOADJUST
VIDEOADJUST
PRESET
SRC +
+--
SRC -
BANDSCAN TUNE
DISP MORE SETUP HELP
AUDIO SUB-T ANGLE ZOOM
TITLE MENU GOTO
AUDIO ADJUST
SRC+SRC-

To shift the fader or master balance:
● Repeatedly press AUDIO ADJUST on the handset until the front panel shows the fader or master balance display.
● To shift the fader/master balance to the front/right, repeatedly press or hold on the handset.
● To shift the fader/master balance to the rear/left, repeatedly press or hold on the handset.
To exit fader or master balance adjustment:
● Press SRC – or SRC +.
or
Wait a few seconds for the display to change to the current source display.
Notes:Shifting the fader balance will affect a centre speaker but will notaffect a subwoofer.
Shifting the master balance will not affect a centre speaker orsubwoofer.
Tone adjustment
Bass and treble
The adjustment range for bass and treble is -7 to +7, with neutralbeing 0.
To adjust the level of bass or treble:
● Repeatedly press AUDIO ADJUST on the handset until the front panel shows the bass or treble display.
● To increase the level of bass/treble, repeatedly press or hold on the handset.
● To decrease the level of bass/treble, repeatedly press or hold on the handset.
To exit bass or treble adjustment:
● Press SRC – or SRC +.
or
Wait a few seconds for the display to change to the current source display.
49 CLASSIK MOVIEOwner’s Manual
Pre-amplifier English
STORE SURR
DO CLOCKWHERE WHAT
AUDIOADJUST
VIDEOADJUST
PRESET
SRC +
+--
SRC -
BAND
0
SCAN TUNE
AUDIO ADJUST
SRC+SRC-
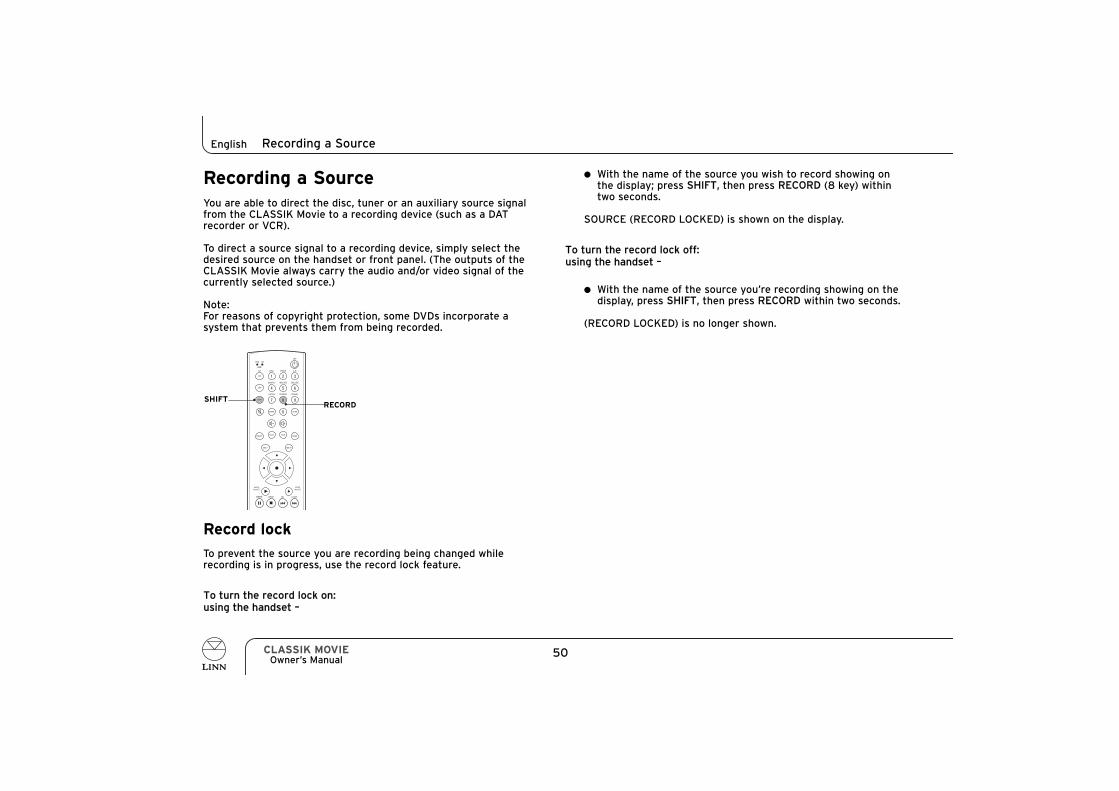
Recording a SourceYou are able to direct the disc, tuner or an auxiliary source signalfrom the CLASSIK Movie to a recording device (such as a DATrecorder or VCR).
To direct a source signal to a recording device, simply select thedesired source on the handset or front panel. (The outputs of theCLASSIK Movie always carry the audio and/or video signal of thecurrently selected source.)
Note:For reasons of copyright protection, some DVDs incorporate asystem that prevents them from being recorded.
Record lock
To prevent the source you are recording being changed whilerecording is in progress, use the record lock feature.
To turn the record lock on:using the handset –
● With the name of the source you wish to record showing on the display; press SHIFT, then press RECORD (8 key) within two seconds.
SOURCE (RECORD LOCKED) is shown on the display.
To turn the record lock off:using the handset –
● With the name of the source you’re recording showing on the display, press SHIFT, then press RECORD within two seconds.
(RECORD LOCKED) is no longer shown.
50CLASSIK MOVIEOwner’s Manual
Recording a SourceEnglish
SHIFTRECORD
1 2 3
4 5 6
7 8 9
STORE
SHIFT
AMP
DVD
SURR
SIGNALRECORDLISTEN
DO CLOCKWHERE WHAT
EXCLUDEINCLUDESHUFFLE
A-B
OFF
TRACKDISCCD
DVD CD
AMP
AUDIOADJUST
VIDEOADJUST
PRESET
SRC +
+--
SRC -
BAND
0
SCAN TUNE

User OptionsThis chapter explains how you can configure certain functions ofthe CLASSIK Movie (see table on pages 52 & 53) to suit your ownrequirements.
Changing the user options’ settingsTo change the user options’ settings:using the handset –
● Put unit into standby mode, by pressing .
● Hold until the display shows User Options.
● Repeatedly press or hold or to select therequired user option.
● Repeatedly press or hold or to change the setting of the user option.
To restore a user option to its default value:
● Select the required user option.
● Press ‘select’.
To exit user options mode:
● Press .
The user settings are saved and the CLASSIK Movie turns on.
51 CLASSIK MOVIEOwner’s Manual
User Options English
1 2 3
4 5 6
7 8 9
STORE
SHIFT
AMP
DVD
SURR
SIGNALRECORDLISTEN
LIP SYNC MONO
DO CLOCKWHERE WHAT
EXCLUDEINCLUDESHUFFLE
A-B
OFF
TRACKDISCCD
DVD CD
AMP
AUDIOADJUST
VIDEOADJUST
PRESET
SRC +
+--
SRC -
BAND
0
SCAN TUNE
‘select’

Table of user options
The following table shows the user options that are available, briefly describes them and shows the available settings for each.Default settings are shown below in bold and on the front panel display are indicated with a *.
52CLASSIK MOVIEOwner’s Manual
User OptionsEnglish
User option
Set displaybrightness
Enable sourcememory
Enable IR sensor
Set IR modulation: IRout 1
Description
Allows adjustment tobrightness of front paneldisplay. When set to Autothe unit will select abrightness level based onthe ambient light level inthe room (the brighterthe room, the brighterthe display will be).
On: Each source has itsown volume, bass, treble,balance and fadersettings. Off: All the sources usethe same volume, bass,treble, balance and fadersettings.
Enables/disables controlof the CLASSIK Moviefrom the handset.
Modulation frequency forinfrared flasher 1. Ifdefault is not used thenthe frequency is in therange 1 to 576 kHz (non-linear).
Settings
Auto2% - 100%
OnOff
OnOff
36 kHz1 to 576 kHz
User option
Set IRmodulation: IRout 2
Configure ACCsocket
Configure KNEKTmode
CD commandsaccepted
Description
Modulation frequency forinfrared flasher 2. Ifdefault is not used thenthe frequency is in therange 10 to 2304 kHz(non-linear).
Defines the use of theaccessory socket (ACC).IR = infrared repeater RCU = KNEKT remotecontrol unit
Auto: Determineswhether the unit is beingused in a KNEKT system. Main: See KNEKTdocumentation. Room: See KNEKTdocumentation.
If an external CD playeris connected to, or is inthe same room as, theCLASSIK Movie and youwant the CLASSIK Movieto ignore CD handsetcommands, set to No.
Settings
56 kHz10 to 2304 kHz
IR RCU
AutoMain Room
YesNo
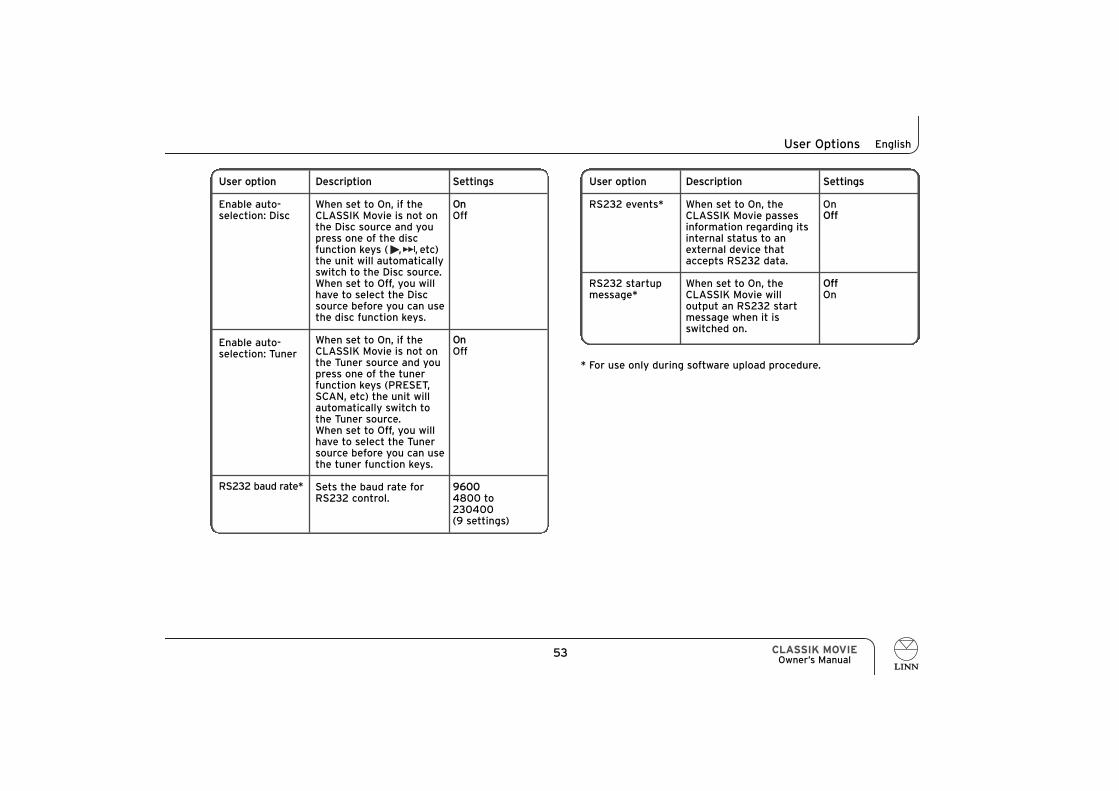
53 CLASSIK MOVIEOwner’s Manual
User Options English
User option
Enable auto-selection: Disc
Enable auto-selection: Tuner
RS232 baud rate*
Description
When set to On, if theCLASSIK Movie is not onthe Disc source and youpress one of the discfunction keys ( , , etc)the unit will automaticallyswitch to the Disc source.When set to Off, you willhave to select the Discsource before you can usethe disc function keys.
When set to On, if theCLASSIK Movie is not onthe Tuner source and youpress one of the tunerfunction keys (PRESET,SCAN, etc) the unit willautomatically switch tothe Tuner source.When set to Off, you willhave to select the Tunersource before you can usethe tuner function keys.
Sets the baud rate forRS232 control.
Settings
OnOff
OnOff
96004800 to230400(9 settings)
User option
RS232 events*
RS232 startupmessage*
Description
When set to On, theCLASSIK Movie passesinformation regarding itsinternal status to anexternal device thataccepts RS232 data.
When set to On, theCLASSIK Movie willoutput an RS232 startmessage when it isswitched on.
Settings
OnOff
OffOn
* For use only during software upload procedure.
Guarantee and ServiceThis product is guaranteed under the conditions which apply in thecountry of purchase and your statutory rights are not limited. Inaddition to any statutory rights you may have, Linn undertake toreplace any parts which have failed due to faulty manufacture. Tohelp us, please ask your Linn retailer about the Linn warrantyscheme in operation in your country.
In parts of Europe, the United States of America and some othermarkets, extended warranty may be available to customers whoregister their purchase with Linn. A warranty registration card isincluded with the product and should be stamped by your retailerand returned to Linn as soon as possible. Alternatively, you canregister your warranty online at www.linn.co.uk
WarningUnauthorised servicing or dismantling of the product invalidates themanufacturer’s warranty. There are no user serviceable parts insidethe product and all enquiries relating to product servicing should bereferred to authorised retailers only.
Technical support and informationFor technical support, product queries and information, pleasecontact either your local retailer or one of the Linn offices opposite.
Full details of your local retailer/distributor can be found on the Linnweb site: www.linn.co.uk
Important
● Please keep a copy of the sales receipt to establish the purchase date of the product.
● Please ensure that your equipment is insured by you during any transit or shipment for repair.
Linn Products LimitedGlasgow RoadWaterfootEagleshamGlasgow G76 0EQScotland, UK
Phone: +44 (0)141 307 7777Fax: +44 (0)141 644 4262Helpline: 0500 888909Email: [email protected]: www.linn.co.uk
Linn Incorporated8787 Perimeter Park BoulevardJacksonvilleFL 32216USA
Phone: +1 (904) 645 5242Fax: +1 (904) 645 7275Helpline: 888-671-LINNEmail: [email protected]: www.linninc.com
Linn Deutschland GmbHHühnerposten 1d D-20097 Hamburg Germany
Phone: +49-(0) 40-890 660-0 Fax: +49-(0) 40-890 660-29 Email: [email protected] Website: www.linn.co.uk
54CLASSIK MOVIEOwner’s Manual
Guarantee and ServiceEnglish