Embed Size (px)
Citation preview
EnfuseFusing Multiple Images
with Enfuse version 4.1.4, 7 August 2015
Andrew Mihal

This manual is for Enfuse (version 4.1.4, 7 August 2015), a program to merge differentexposures of the same scene to produce an image that looks much like a tonemapped image.
Copyright c© 2004–2015 Andrew Mihal.
Permission is granted to copy, distribute and/or modify this document underthe terms of the GNU Free Documentation License, Version 1.2 or any laterversion published by the Free Software Foundation; with no Invariant Sections,no Front-Cover Texts and no Back-Cover Texts. A copy of the license is includedin the section entitled “GNU Free Documentation License”.

i
Short Contents
List of Tables . . . . . . . . . . . . . . . . . . . . . . . . . . . . . . . . . . . . . . . . . . . iv
List of Figures . . . . . . . . . . . . . . . . . . . . . . . . . . . . . . . . . . . . . . . . . . . v
1 Overview . . . . . . . . . . . . . . . . . . . . . . . . . . . . . . . . . . . . . . . . . . . . 1
2 Workflow . . . . . . . . . . . . . . . . . . . . . . . . . . . . . . . . . . . . . . . . . . . . 3
3 Invocation . . . . . . . . . . . . . . . . . . . . . . . . . . . . . . . . . . . . . . . . . . . 6
4 Color Profiles . . . . . . . . . . . . . . . . . . . . . . . . . . . . . . . . . . . . . . . 27
5 Weighting Functions . . . . . . . . . . . . . . . . . . . . . . . . . . . . . . . . . . 28
6 Understanding Masks . . . . . . . . . . . . . . . . . . . . . . . . . . . . . . . . . 39
7 Tuning Memory Usage . . . . . . . . . . . . . . . . . . . . . . . . . . . . . . . . 41
8 Applications of Enfuse . . . . . . . . . . . . . . . . . . . . . . . . . . . . . . . . 43
9 Helpful Additional Programs . . . . . . . . . . . . . . . . . . . . . . . . . . . 55
A Bug Reports . . . . . . . . . . . . . . . . . . . . . . . . . . . . . . . . . . . . . . . . 57
B Authors . . . . . . . . . . . . . . . . . . . . . . . . . . . . . . . . . . . . . . . . . . . . 59
C GNU Free Documentation License . . . . . . . . . . . . . . . . . . . . . . . 60Program Index . . . . . . . . . . . . . . . . . . . . . . . . . . . . . . . . . . . . . . . . . . 66
Syntactic-Comment Index . . . . . . . . . . . . . . . . . . . . . . . . . . . . . . . . . 67
Option Index . . . . . . . . . . . . . . . . . . . . . . . . . . . . . . . . . . . . . . . . . . . 68
General Index . . . . . . . . . . . . . . . . . . . . . . . . . . . . . . . . . . . . . . . . . . . 69

ii
Table of Contents
List of Tables . . . . . . . . . . . . . . . . . . . . . . . . . . . . . . . . . . . . . . . iv
List of Figures . . . . . . . . . . . . . . . . . . . . . . . . . . . . . . . . . . . . . . v
1 Overview . . . . . . . . . . . . . . . . . . . . . . . . . . . . . . . . . . . . . . . . 1
2 Workflow . . . . . . . . . . . . . . . . . . . . . . . . . . . . . . . . . . . . . . . . 32.1 Standard Workflow . . . . . . . . . . . . . . . . . . . . . . . . . . . . . . . . . . . . . . . . . . . . . 32.2 External Mask Manipulation . . . . . . . . . . . . . . . . . . . . . . . . . . . . . . . . . . . 4
3 Invocation . . . . . . . . . . . . . . . . . . . . . . . . . . . . . . . . . . . . . . . 63.1 Image Requirements . . . . . . . . . . . . . . . . . . . . . . . . . . . . . . . . . . . . . . . . . . . . 63.2 Response Files . . . . . . . . . . . . . . . . . . . . . . . . . . . . . . . . . . . . . . . . . . . . . . . . . 6
3.2.1 Response File Format . . . . . . . . . . . . . . . . . . . . . . . . . . . . . . . . . . . . . 73.2.2 Syntactic Comments . . . . . . . . . . . . . . . . . . . . . . . . . . . . . . . . . . . . . . . 83.2.3 Globbing Algorithms . . . . . . . . . . . . . . . . . . . . . . . . . . . . . . . . . . . . . . 93.2.4 Default Layer Selection . . . . . . . . . . . . . . . . . . . . . . . . . . . . . . . . . . . 10
3.3 Common Options . . . . . . . . . . . . . . . . . . . . . . . . . . . . . . . . . . . . . . . . . . . . . 103.4 Extended Options . . . . . . . . . . . . . . . . . . . . . . . . . . . . . . . . . . . . . . . . . . . . . 143.5 Fusion Options . . . . . . . . . . . . . . . . . . . . . . . . . . . . . . . . . . . . . . . . . . . . . . . . 173.6 Expert Options . . . . . . . . . . . . . . . . . . . . . . . . . . . . . . . . . . . . . . . . . . . . . . . 183.7 Option Delimiters . . . . . . . . . . . . . . . . . . . . . . . . . . . . . . . . . . . . . . . . . . . . . 26
4 Color Profiles . . . . . . . . . . . . . . . . . . . . . . . . . . . . . . . . . . 27
5 Weighting Functions . . . . . . . . . . . . . . . . . . . . . . . . . . 285.1 Weighting Pixels . . . . . . . . . . . . . . . . . . . . . . . . . . . . . . . . . . . . . . . . . . . . . . 28
5.1.1 Weighted Average . . . . . . . . . . . . . . . . . . . . . . . . . . . . . . . . . . . . . . . . 285.1.2 Disabling Averaging: Option --hard-mask . . . . . . . . . . . . . . . . 295.1.3 Single Criterion Fusing . . . . . . . . . . . . . . . . . . . . . . . . . . . . . . . . . . . 29
5.2 Exposure Weighting . . . . . . . . . . . . . . . . . . . . . . . . . . . . . . . . . . . . . . . . . . . 295.3 Saturation Weighting . . . . . . . . . . . . . . . . . . . . . . . . . . . . . . . . . . . . . . . . . 315.4 Local Contrast Weighting . . . . . . . . . . . . . . . . . . . . . . . . . . . . . . . . . . . . . 31
5.4.1 Standard Deviation . . . . . . . . . . . . . . . . . . . . . . . . . . . . . . . . . . . . . . 325.4.1.1 Statistical Moments . . . . . . . . . . . . . . . . . . . . . . . . . . . . . . . . . 335.4.1.2 Estimators . . . . . . . . . . . . . . . . . . . . . . . . . . . . . . . . . . . . . . . . . . 33
5.4.2 Laplacian of Gaussian . . . . . . . . . . . . . . . . . . . . . . . . . . . . . . . . . . . . 335.4.3 Blend Standard Deviation and Laplacian of Gaussian . . . . . 355.4.4 Scaling and Choice of Mode . . . . . . . . . . . . . . . . . . . . . . . . . . . . . . 36
5.5 Local Entropy Weighting . . . . . . . . . . . . . . . . . . . . . . . . . . . . . . . . . . . . . . 36

iii
6 Understanding Masks . . . . . . . . . . . . . . . . . . . . . . . . . 396.1 Masks in Input Files . . . . . . . . . . . . . . . . . . . . . . . . . . . . . . . . . . . . . . . . . . 396.2 Weight Mask Files . . . . . . . . . . . . . . . . . . . . . . . . . . . . . . . . . . . . . . . . . . . . 40
7 Tuning Memory Usage . . . . . . . . . . . . . . . . . . . . . . . . 41
8 Applications of Enfuse . . . . . . . . . . . . . . . . . . . . . . . . 438.1 What Makes Images Fusable? . . . . . . . . . . . . . . . . . . . . . . . . . . . . . . . . . 438.2 Repetition – Noise Reduction . . . . . . . . . . . . . . . . . . . . . . . . . . . . . . . . . 448.3 Exposure Series – Dynamic Range Increase . . . . . . . . . . . . . . . . . . . . 44
8.3.1 Tips For Beginners . . . . . . . . . . . . . . . . . . . . . . . . . . . . . . . . . . . . . . . 458.3.2 Common Misconceptions . . . . . . . . . . . . . . . . . . . . . . . . . . . . . . . . . 45
8.4 Flash Exposure Series – Directed Lighting . . . . . . . . . . . . . . . . . . . . . 468.5 Polarization Series – Saturation Enhancement . . . . . . . . . . . . . . . . . 468.6 Focus Stacks – Depth-of-Field Increase . . . . . . . . . . . . . . . . . . . . . . . . 46
8.6.1 Why create focus stacks? . . . . . . . . . . . . . . . . . . . . . . . . . . . . . . . . . 468.6.2 Preparing Focus Stacks . . . . . . . . . . . . . . . . . . . . . . . . . . . . . . . . . . . 478.6.3 Local Contrast Based Fusing . . . . . . . . . . . . . . . . . . . . . . . . . . . . . 478.6.4 Basic Focus Stacking . . . . . . . . . . . . . . . . . . . . . . . . . . . . . . . . . . . . . 478.6.5 Advanced Focus Stacking . . . . . . . . . . . . . . . . . . . . . . . . . . . . . . . . . 48
8.6.5.1 A Detailed Look at the Problem . . . . . . . . . . . . . . . . . . . . . 488.6.5.2 Laplacian Edge Detection . . . . . . . . . . . . . . . . . . . . . . . . . . . 508.6.5.3 Local Contrast Enhancement . . . . . . . . . . . . . . . . . . . . . . . . 518.6.5.4 Suppressing Noise or Recognizing Faint Edges . . . . . . . 518.6.5.5 Focus Stacking Decision Tree . . . . . . . . . . . . . . . . . . . . . . . . 53
8.6.6 Tips For Focus Stacking Experts . . . . . . . . . . . . . . . . . . . . . . . . . 54
9 Helpful Additional Programs . . . . . . . . . . . . . . . . . 55
Appendix A Bug Reports . . . . . . . . . . . . . . . . . . . . . . 57A.1 Have You Really Found a Bug? . . . . . . . . . . . . . . . . . . . . . . . . . . . . . . . 57A.2 How to Report Bugs . . . . . . . . . . . . . . . . . . . . . . . . . . . . . . . . . . . . . . . . . . 57A.3 Sending Patches for Enblend or Enfuse . . . . . . . . . . . . . . . . . . . . . . . . 58
Appendix B Authors . . . . . . . . . . . . . . . . . . . . . . . . . . . 59
Appendix C GNU Free Documentation License. . . . . . . . . . . . . . . . . . . . . . . . . . . . . . . . . . . . . . . . . . . . . . . . 60
Program Index . . . . . . . . . . . . . . . . . . . . . . . . . . . . . . . . . . . . 66
Syntactic-Comment Index . . . . . . . . . . . . . . . . . . . . . . . . 67
Option Index . . . . . . . . . . . . . . . . . . . . . . . . . . . . . . . . . . . . . . 68
General Index . . . . . . . . . . . . . . . . . . . . . . . . . . . . . . . . . . . . . 69

List of Tables iv
List of Tables
Table 1.1: Weighting criteria . . . . . . . . . . . . . . . . . . . . . . . . . . . . . . . . . . . . . . . . . . . . . . . . . . . . . . . 1Table 3.1: Grammar of response files . . . . . . . . . . . . . . . . . . . . . . . . . . . . . . . . . . . . . . . . . . . . . . . 7Table 3.2: Grammar of syntactic comments . . . . . . . . . . . . . . . . . . . . . . . . . . . . . . . . . . . . . . . . . 9Table 3.3: Globbing algorithms . . . . . . . . . . . . . . . . . . . . . . . . . . . . . . . . . . . . . . . . . . . . . . . . . . . . . 9Table 3.4: Mask template characters . . . . . . . . . . . . . . . . . . . . . . . . . . . . . . . . . . . . . . . . . . . . . . 25Table 5.1: Default weights . . . . . . . . . . . . . . . . . . . . . . . . . . . . . . . . . . . . . . . . . . . . . . . . . . . . . . . . . 29Table 7.1: Suggested cache-size settings . . . . . . . . . . . . . . . . . . . . . . . . . . . . . . . . . . . . . . . . . . . 41
List of Figures v
List of Figures
Figure 2.1: Photographic workflow . . . . . . . . . . . . . . . . . . . . . . . . . . . . . . . . . . . . . . . . . . . . . . . . . 3Figure 2.2: External masks workflow . . . . . . . . . . . . . . . . . . . . . . . . . . . . . . . . . . . . . . . . . . . . . . . 5Figure 3.1: Entropy cutoff function . . . . . . . . . . . . . . . . . . . . . . . . . . . . . . . . . . . . . . . . . . . . . . . . 19Figure 3.2: Exposure cutoff function . . . . . . . . . . . . . . . . . . . . . . . . . . . . . . . . . . . . . . . . . . . . . . . 21Figure 5.1: Gaussian function . . . . . . . . . . . . . . . . . . . . . . . . . . . . . . . . . . . . . . . . . . . . . . . . . . . . . 30Figure 5.2: Local analysis window . . . . . . . . . . . . . . . . . . . . . . . . . . . . . . . . . . . . . . . . . . . . . . . . . 32Figure 5.3: Laplacian-of-Gaussian . . . . . . . . . . . . . . . . . . . . . . . . . . . . . . . . . . . . . . . . . . . . . . . . . 34Figure 5.4: Entropy function . . . . . . . . . . . . . . . . . . . . . . . . . . . . . . . . . . . . . . . . . . . . . . . . . . . . . . 37Figure 8.1: Sharp edge . . . . . . . . . . . . . . . . . . . . . . . . . . . . . . . . . . . . . . . . . . . . . . . . . . . . . . . . . . . . 49Figure 8.2: Smooth edge . . . . . . . . . . . . . . . . . . . . . . . . . . . . . . . . . . . . . . . . . . . . . . . . . . . . . . . . . . 50Figure 8.3: Focus stacking decision tree . . . . . . . . . . . . . . . . . . . . . . . . . . . . . . . . . . . . . . . . . . . . 53

Chapter 1: Overview 1
1 Overview
Enfuse merges overlapping images using the Mertens-Kautz-Van Reeth exposure fusionalgorithm.1 This is a quick way for example to blend differently exposed images into a niceoutput image, without producing intermediate high-dynamic range (HDR) images that arethen tonemapped to a viewable image. This simplified process often works much betterthan tonemapping algorithms.
Enfuse can also be used to build extended depth-of-field (DOF) images by blending afocus stack.
The idea is that pixels in the input images are weighted according to qualities such as, forexample, proper exposure, good local contrast, or high saturation. These weights determinehow much a given pixel will contribute to the final image.
A Burt-Adelson multiresolution spline blender2 is used to combine the images accord-ing to the weights. The multiresolution blending ensures that transitions between regionswhere different images contribute are difficult to spot.
Enfuse uses up to four criteria to judge the quality of a pixel, which Table 1.1 brieflydescribes.
Exposure The exposure criteria favors pixels with luminance close to the middle of therange. These pixels are considered better exposed than those with high or lowluminance levels.
Saturation The saturation criteria favors highly-saturated pixels. (Note that saturation isonly defined for color pixels.)
Local ContrastThe contrast criteria favors pixels inside a high-contrast neighborhood. Enfusecan use standard deviation, Laplacian magnitude, or a blend of both as localcontrast measure.
Local EntropyThe entropy criteria prefers pixels inside a high-entropy neighborhood. In ad-dition, Enfuse allows the user to mitigate the problem of noisy images whenusing entropy weighting by setting a black threshold.
Table 1.1: Enfuse’s four weighting criteria. (Also see Table 5.1 for the default weightsof these criteria.)
For the concept of pixel weighting, and details on the different weighting functions, seeChapter 5 [Weighting Functions], page 28.
Adjust how much importance is given to each criterion by setting the weightparameters on the command line. For example, if you set ‘--exposure-weight=1.0’ and‘--saturation-weight=0.5’, Enfuse will favor well-exposed pixels over highly-saturatedpixels when blending the source images. The effect of these parameters on the final result
1 Tom Mertens, Jan Kautz, and Frank van Reeth, “Exposure Fusion”, Proceedings of the 15th PacificConference on Computer Graphics and Applications, pages 382–390.
2 Peter J. Burt and Edward H. Adelson, “A Multiresolution Spline With Application to Image Mosaics”,ACM Transactions on Graphics, Vol. 2, No. 4, October 1983, pages 217–236.
Chapter 1: Overview 2
will not always be clear in advance. The quality of the result is subject to your artisticinterpretation. Playing with the weights may or may not give a more pleasing result. Theauthors encourage you to experiment, perhaps using down-sized3 or cropped images forspeed.
Enfuse expects but does not require each input image to have an alpha channel. Bysetting the alpha values of pixels to zero, users can manually remove those pixels fromconsideration when blending. If an input image lacks an alpha channel, Enfuse will issue awarning and continue assuming all pixels should contribute to the final output. Any alphavalue other than zero is interpreted as “this pixel should contribute to the final image”.
Enfuse reads all layers of multi-layer images, like, for example, multi-directory TIFF
images4. The input images are processed in the order they appear on the command line.Multi-layer images are processed from the first layer to the last before Enfuse considers thenext image on the command line.
Find out more about Enfuse on its SourceForge web page.
3 Downsampling with a good interpolator reduces noise, which might not desired to judge the image qualityof the original-size image. Cropping might be an alternative, though.
4 Use utilities like, e.g., tiffcopy and tiffsplit of LibTIFF to manipulate multi-directory TIFF images.See Chapter 9 [Helpful Programs], page 55.

Chapter 2: Workflow 3
2 Workflow
Enfuse is a part of a chain of tools to assemble images. It merges photos of the same subjectat the same location and same direction, but taken with varying exposure parameters.
2.1 Standard Workflow
Figure 2.1 shows where Enblend and Enfuse sit in the tool chain of the standard workflow.
Take Images
Postprocess
Combine Images
Align Images
Convert Images
[else] [raw]
The Gimp, et al.
Enblend, Enfuse
Hugin, PanoTools
DCRaw, UFRaw, etc.
Figure 2.1: Photographic workflow with Enblend and Enfuse.
Take ImagesTake multiple images to form a panorama, an exposure series, a focus stack,etc.
There is one exception with Enfuse when a single raw image is converted mul-tiple times to get several – typically differently “exposed” – images.
Exemplary Benefits
• Many pictures taken from the same vantage point but showing differentviewing directions. – Panorama

Chapter 2: Workflow 4
• Pictures of the same subject exposed with different shutter speeds. – Ex-posure series
• Images of the same subject focussed at differing distances. – Focus stack
Remaining Problem: The “overlayed” images may not fit together, that is theoverlay regions may not match exactly.
Convert ImagesConvert the raw data exploiting the full dynamic range of the camera andcapitalize on a high-quality conversion.
Align ImagesAlign the images so as to make them match as well as possible.
Again there is one exception and this is when images naturally align. For ex-ample, a series of images taken from a rock solid tripod with a cable releasewithout touching the camera, or images taken with a shift lens, can align with-out further user intervention.
This step submits the images to affine transformations. If necessary, it rectifiesthe lens’ distortions (e.g. barrel or pincushion), too. Sometimes even luminanceor color differences between pairs of overlaying images are corrected (“photo-metric alignment”).
Benefit: The overlay areas of images match as closely as possible given thequality if the input images and the lens model used in the transformation.
Remaining Problem: The images may still not align perfectly, for example,because of parallax errors, or blur produced by camera shake.
Combine ImagesEnblend and Enfuse combine the aligned images into one.
Benefit: The overlay areas become imperceptible for all but the most mal-aligned images.
Remaining Problem: Enblend and Enfuse write images with an alpha channel.(For more information on alpha channels see Chapter 6 [Understanding Masks],page 39.) Furthermore, the final image rarely is rectangular.
PostprocessPostprocess the combined image with your favorite tool. Often the user willwant to crop the image and simultaneously throw away the alpha channel.
View
Enjoy
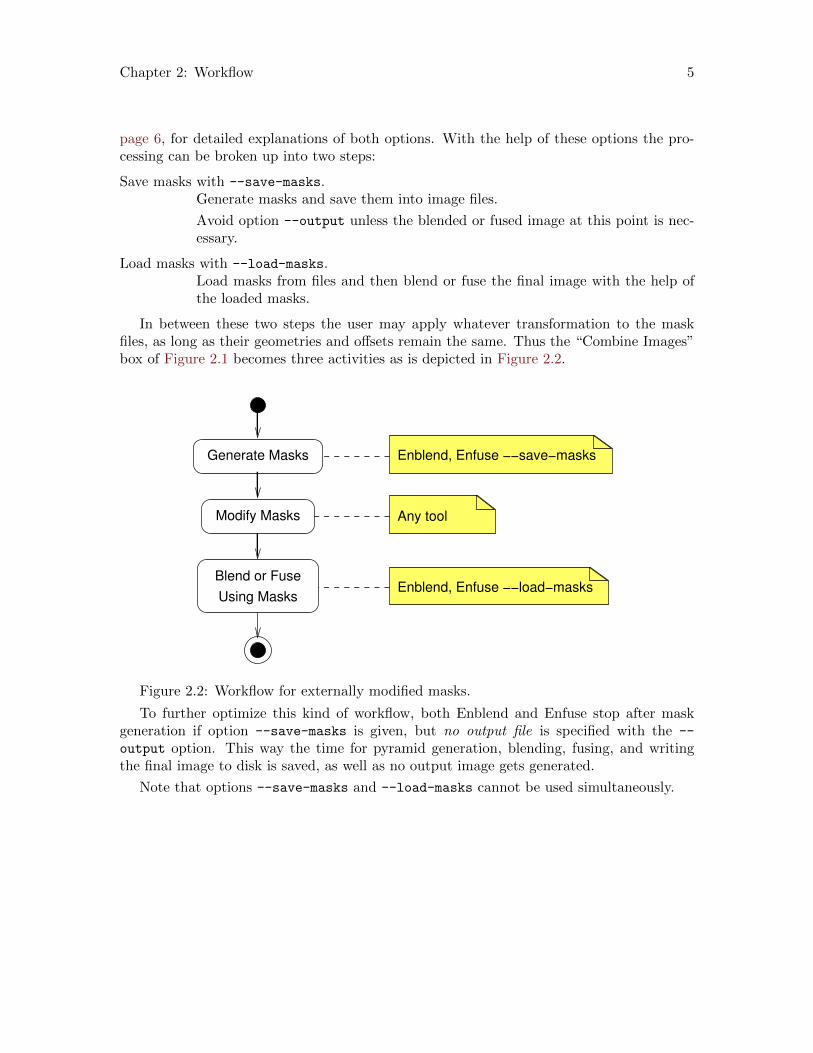
2.2 External Mask Manipulation
In the usual workflow Enblend and Enfuse generate the blending and fusing masks accordingto the command-line options and the input images and then they immediately use thesemasks for blending or fusing the output image.
Sometimes more control over the masks is needed or wanted. To this end, both applica-tions provide the option pair --load-masks and --save-masks. See Chapter 3 [Invocation],
Chapter 2: Workflow 5
page 6, for detailed explanations of both options. With the help of these options the pro-cessing can be broken up into two steps:
Save masks with --save-masks.Generate masks and save them into image files.
Avoid option --output unless the blended or fused image at this point is nec-essary.
Load masks with --load-masks.Load masks from files and then blend or fuse the final image with the help ofthe loaded masks.
In between these two steps the user may apply whatever transformation to the maskfiles, as long as their geometries and offsets remain the same. Thus the “Combine Images”box of Figure 2.1 becomes three activities as is depicted in Figure 2.2.
Any tool
Enblend, Enfuse −−save−masksGenerate Masks
Modify Masks
Blend or Fuse
Using MasksEnblend, Enfuse −−load−masks
Figure 2.2: Workflow for externally modified masks.
To further optimize this kind of workflow, both Enblend and Enfuse stop after maskgeneration if option --save-masks is given, but no output file is specified with the --
output option. This way the time for pyramid generation, blending, fusing, and writingthe final image to disk is saved, as well as no output image gets generated.
Note that options --save-masks and --load-masks cannot be used simultaneously.

Chapter 3: Invocation 6
3 Invocation
enfuse [OPTIONS] [--output=IMAGE] INPUT . . .
Fuse the sequence of images INPUT . . . into a single IMAGE.
Input images are either specified literally or via so-called response files (see below). Thelatter are an alternative to specifying image filenames on the command line.
3.1 Image Requirements
All input images must comply with the following requirements.
• The images overlap.
• The images agree on their number of bits-per-channel, this is, their “depth”:
– UINT8,
– UINT16,
– FLOAT,
– etc.
See option --depth below for an explanation of different (output) depths.
• Enfuse understands the images’ filename extensions as well as their file formats.
You can check the supported extensions and formats by calling Enfuse with the optionpair --version --verbose and scan the output for ‘Supported image formats’ or‘Supported file extensions’.
Moreover, there are some “good practices”, which are not enforced by the application,but almost certainly deliver superior results.
• Either all files lack an ICC profile, or all images are supplied with the same ICC profile.
• If the images’ meta-data contains resolution information (“DPI”), it is the same for allpictures.
3.2 Response Files
A response file contains names of images or other response filenames. Introduce responsefile names with an at-character (‘@’).
Enblend and Enfuse process the list INPUT strictly from left to right, expanding re-sponse files in depth-first order. (Multi-layer files are processed from first layer to the last.)The following examples only show Enblend, but Enfuse works exactly the same.
Solely image filenames.Example:
enblend image-1.tif image-2.tif image-3.tif
The ultimate order in which the images are processed is: image-1.tif, image-2.tif, image-3.tif.
Single response file.Example:
enblend @list
where file list contains

Chapter 3: Invocation 7
img1.exr
img2.exr
img3.exr
img4.exr
Ultimate order: img1.exr, img2.exr, img3.exr, img4.exr.
Mixed literal names and response files.Example:
enblend @master.list image-09.png image-10.png
where file master.list comprises of
image-01.png
@first.list
image-04.png
@second.list
image-08.png
first.list is
image-02.png
image-03.png
and second.list contains
image-05.png
image-06.png
image-07.png
Ultimate order: image-01.png, image-02.png, image-03.png, image-04.png,image-05.png, image-06.png, image-07.png, image-08.png, image-09.png,image-10.png,
3.2.1 Response File Format
Response files contain one filename per line. Blank lines or lines beginning with a sharpsign (‘#’) are ignored; the latter can serve as comments. Filenames that begin with an at-character (‘@’) denote other response files. Table 3.1 states a formal grammar of responsefiles in EBNF.
response-file ::= line*line ::= (comment | file-spec) [‘\r’] ‘\n’comment ::= space* ‘#’ textfile-spec ::= space* ‘@’ filename space*space ::= ‘ ’ | ‘\t’
where text is an arbitrary string and filename is any filename.
Table 3.1: EBNF definition of the grammar of response files.
In a response file relative filenames are used relative the response file itself, not relativeto the current-working directory of the application.
The above grammar might unpleasantly surprise the user in the some ways.

Chapter 3: Invocation 8
Whitespace trimmed at both line endsFor convenience, whitespace at the beginning and at the end of each line isignored. However, this implies that response files cannot represent filenamesthat start or end with whitespace, as there is no quoting syntax. Filenameswith embedded whitespace cause no problems, though.
Only whole-line commentsComments in response files always occupy a complete line. There are no “line-ending comments”. Thus, in
# exposure series
img-0.33ev.tif # "middle" EV
img-1.33ev.tif
img+0.67ev.tif
only the first line contains a comment, whereas the second line includes none.Rather, it refers to a file called ‘img-0.33ev.tif # "middle" EV’.
Image filenames cannot start with ‘@’An at-sign invariably introduces a response file, even if the filename’s extensionhints towards an image.
If Enblend or Enfuse do not recognize a response file, they will skip the file and issue awarning. To force a file being recognized as a response file add one of the following syntacticcomments to the first line of the file.
response-file: true
enblend-response-file: true
enfuse-response-file: true
Finally, here is an example of a valid response file.
# 4\pi panorama!
# These pictures were taken with the panorama head.
@round-shots.list
# Freehand sky shot.
zenith.tif
# "Legs, will you go away?" images.
nadir-2.tif
nadir-5.tif
nadir.tif
3.2.2 Syntactic Comments
Comments that follow the format described in Table 3.2 are treated as instructions how tointerpret the rest of the response file. A syntactic comment is effective immediately and itseffect persists to the end of the response file, unless another syntactic comment undoes it.
Chapter 3: Invocation 9
syntactic-comment ::= space* ‘#’ space* key space* ‘:’ space* valuekey ::= (‘A’ .. ‘Z’ | ‘a’ .. ‘z’ | ‘-’)+
where value is an arbitrary string.
Table 3.2: EBNF definition of the grammar of syntactic comments in response files.
Unknown syntactic comments are silently ignored.
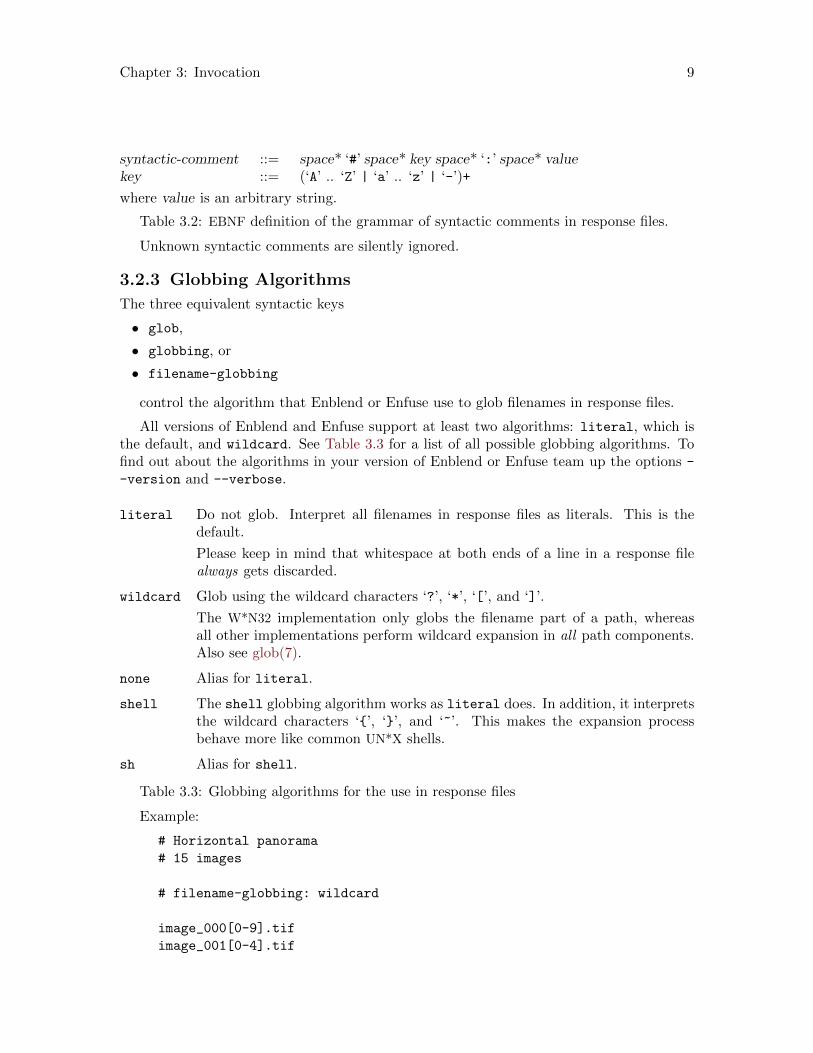
3.2.3 Globbing Algorithms
The three equivalent syntactic keys
• glob,
• globbing, or
• filename-globbing
control the algorithm that Enblend or Enfuse use to glob filenames in response files.
All versions of Enblend and Enfuse support at least two algorithms: literal, which isthe default, and wildcard. See Table 3.3 for a list of all possible globbing algorithms. Tofind out about the algorithms in your version of Enblend or Enfuse team up the options --version and --verbose.
literal Do not glob. Interpret all filenames in response files as literals. This is thedefault.
Please keep in mind that whitespace at both ends of a line in a response filealways gets discarded.
wildcard Glob using the wildcard characters ‘?’, ‘*’, ‘[’, and ‘]’.
The W*N32 implementation only globs the filename part of a path, whereasall other implementations perform wildcard expansion in all path components.Also see glob(7).
none Alias for literal.
shell The shell globbing algorithm works as literal does. In addition, it interpretsthe wildcard characters ‘{’, ‘}’, and ‘~’. This makes the expansion processbehave more like common UN*X shells.
sh Alias for shell.
Table 3.3: Globbing algorithms for the use in response files
Example:
# Horizontal panorama
# 15 images
# filename-globbing: wildcard
image_000[0-9].tif
image_001[0-4].tif

Chapter 3: Invocation 10
3.2.4 Default Layer Selection
The key layer-selector provides the same functionality as does the command-line option -
-layer-selector, but on a per response-file basis. See Section 3.3 [Common Options],page 10.
This syntactic comment affects the layer selection of all images listed after it includingthose in included response files until another layer-selector overrides it.
3.3 Common Options
Common options control some overall features of Enfuse.
Enfuse accepts arguments to any option in uppercase as well as in lowercase letters. Forexample, ‘deflate’, ‘Deflate’ and ‘DEFLATE’ as arguments to the --compression optiondescribed below, all instruct Enfuse to use the Deflate compression scheme. This manualdenotes all arguments in lowercase for consistency.
--compression=COMPRESSION
Write a compressed output file.
Depending on the output file format, Enfuse accepts different values forCOMPRESSION.
JPEG format.The compression either is a literal integer or a keyword-option com-bination.
LEVEL Set JPEG quality LEVEL, where LEVEL is an integerthat ranges from 0–100.
jpeg[:LEVEL]
Same as above; without the optional argument justswitch on (standard) JPEG compression.
jpeg-arith[:LEVEL]
Switch on arithmetic JPEG compression. Withoptional argument set the arithmetic compres-sion LEVEL, where LEVEL is an integer that rangesfrom 0–100.
TIF format.Here, COMPRESSION is one of the keywords:
none Do not compress. This is the default.
deflate Use the Deflate compression scheme also called ZIP-in-TIFF. Deflate is a lossless data compression algo-rithm that uses a combination of the LZ77 algorithmand Huffman coding.
jpeg[:LEVEL]
Use JPEG compression. With optional argument setthe compression LEVEL, where LEVEL is an integerthat ranges from 0–100.

Chapter 3: Invocation 11
lzw Use Lempel-Ziv-Welch (LZW) adaptive compressionscheme. LZW compression is lossless.
packbits Use PackBits compression scheme. PackBits is aparticular variant of run-length compression; it is loss-less.
Any other format.Other formats do not accept a COMPRESSION setting.
However, VIGRA automatically compresses png-files with the De-flate method.
--layer-selector=ALGORITHM
Override the standard layer selector algorithm, which is ‘all-layers’.
This version of Enfuse offers the following algorithms:
all-layers
Select all layers in all images.
first-layer
Select only first layer in each multi-layer image. For single-layerimages this is the same as ‘all-layers’.
largest-layer
Select largest layer in each multi-layer image, where the “largeness”,this is the size is defined by the product of the layer width and itsheight. The channel width of the layer is ignored. For single-layerimages this is the same as ‘all-layers’.
no-layer Do not select any layer in any image.
This algorithm is useful to temporarily exclude some images inresponse files.
-h
--help Print information on the available options and exit.
-l LEVELS
--levels=LEVELS
Use at most this many LEVELS for pyramid1 blending if LEVELS is positive,or reduce the maximum number of levels used by −LEVELS if LEVELS isnegative; ‘auto’ or ‘automatic’ restore the default, which is to use the maximumpossible number of levels for each overlapping region.
The number of levels used in a pyramid controls the balance between local andglobal image features (contrast, saturation, . . . ) in the blended region. Fewerlevels emphasize local features and suppress global ones. The more levels apyramid has, the more global features will be taken into account.
As a guideline, remember that each new level works on a linear scale twice aslarge as the previous one. So, the zeroth layer, the original image, obviouslydefines the image at single-pixel scale, the first level works at two-pixel scale,
1 As Dr. Daniel Jackson correctly noted, actually, it is not a pyramid: “Ziggaurat, it’s a Ziggaurat.”

Chapter 3: Invocation 12
and generally, the n-th level contains image data at 2^n-pixel scale. This isthe reason why an image of widthxheightpixels cannot be deconstructed intoa pyramid of more than blog2(min(width, height))c levels.If too few levels are used, “halos” around regions of strong local feature variationcan show up. On the other hand, if too many levels are used, the image mightcontain too much global features. Usually, the latter is not a problem, but ishighly desired. This is the reason, why the default is to use as many levels asis possible given the size of the overlap regions. Enfuse may still use a smallernumber of levels if the geometry of the overlap region demands.
Positive values of LEVELS limit the maximum number of pyramid levels. De-pending on the size and geometry of the overlap regions this may or may notinfluence any pyramid. Negative values of LEVELS reduce the number of pyra-mid levels below the maximum no matter what the actual maximum is and thusalways influence all pyramids. Use ‘auto’ or ‘automatic’ as LEVELS to restorethe automatic calculation of the maximum number of levels.
The valid range of the absolute value of LEVELS is 1 to 29.
-o
--output=FILE
Place output in FILE.
If --output is not specified, the default is to put the resulting image in a.tif.
--parameter=KEY[=VALUE]:...
Set a KEY-VALUE pair, where VALUE is optional. This option is cumulative.Separate multiple pairs with the usual numeric delimiters.
This option has the negated form --no-parameter, which takes one or moreKEY s and removes them from the list of defined parameters. The special key ‘*’deletes all parameters at once.
Parameters allow the developers to change the internal workings of Enfuse with-out the need to recompile.
-v
--verbose[=LEVEL]
Without an argument, increase the verbosity of progress reporting. Giving more--verbose options will make Enfuse more verbose. Directly set a verbosity levelwith a non-negative integral LEVEL.
Each level includes all messages of the lower levels.
Level Messages
0 only warnings and errors
1 reading and writing of images
2 mask generation, pyramid, and blending
3 reading of response files, color conversions
4 image sizes, bounding boxes and intersection sizes
5 detailed information on the optimizer runs (Enblend only)

Chapter 3: Invocation 13
6 estimations of required memory in selected processing steps
The default verbosity level of Enfuse is 1.
-V
--version
Output information on the Enfuse version.
Team this option with --verbose to show configuration details, like the extrafeatures that have been compiled in.
-w
--wrap=MODE
Blend around the boundaries of the panorama.
As this option significantly increases memory usage and computation time onlyuse it, if the panorama will be
• consulted for any kind measurement, this is, all boundaries must match asaccurately as possible, or
• printed out and the boundaries glued together, or
• fed into a virtual reality (VR) generator, which creates a seamless environ-ment.
Otherwise, always avoid this option!
With this option, Enfuse treats the panorama of width w and height h as aninfinite data structure, where each pixel P (x, y) of the input images representsthe set of pixels SP (x, y)
2.
MODE takes the following values:
‘none’‘open’ This is a “no-op”; it has the same effect as not giving --wrap at
all. The set of input images is considered open at its boundaries.
‘horizontal’Wrap around horizontally:
SP (x, y) = {P (x+mw, y) : m ∈ Z}.
This is useful for 360◦ horizontal panoramas as it eliminates theleft and right borders.
‘vertical’Wrap around vertically:
SP (x, y) = {P (x, y + nh) : n ∈ Z}.
This is useful for 360◦ vertical panoramas, as it eliminates the topand bottom borders.
2 Solid-state physicists will be reminded of the Born-von Karman boundary condition.

Chapter 3: Invocation 14
‘both’‘horizontal+vertical’‘vertical+horizontal’
Wrap around both horizontally and vertically:
SP (x, y) = {P (x+mw, y + nh) : m,n ∈ Z}.
In this mode, both left and right borders, as well as top and bottomborders, are eliminated.
Specifying --wrap without MODE selects horizontal wrapping.
3.4 Extended Options
Extended options control the image cache, the color model, and the cropping of the outputimage.
-b BLOCKSIZE
Set the BLOCKSIZE in kilobytes (KB) of Enfuse’s image cache.
This is the amount of data that Enfuse will move to and from the disk atone time. The default is 2048KB, which should be ok for most systems. SeeChapter 7 [Tuning Memory Usage], page 41 for details.
Note that Enfuse must have been compiled with the image-cache feature for thisoption to be effective. Find out about extra features with enfuse --version
--verbose.
--blend-colorspace=COLORSPACE
Force blending in selected COLORSPACE. For well matched images this optionshould not change the output image much. However, if Enfuse must blendvastly different colors (as e.g. anti-colors) the result image heavily depends onthe COLORSPACE.
Usually, Enfuse chooses defaults depending on the input images:
• For input images with ICC profiles the default is to use CIECAM colorspace.
• Images without color profiles and floating-point images are blended in theRGB-color cube by default.
Enfuse supports two blend colorspaces:
‘IDENTITY’, ‘ID’, ‘UNIT’Naively compute blended colors in the luminance interval (grayscaleimages) or RGB-cube (RGB images) spanned by the input ICC pro-file or sRGB if no profiles are present. Consider option --fallback-
profile to force a different profile than sRGB on all input images.
‘CIECAM’, ‘CIECAM02’, ‘JCH’Blend pixels in the CIECAM02 colorspace.
-c
--ciecam Use ‘--blend-colorspace=CIECAM’ instead. To mimic the negated option --
no-ciecam use ‘--blend-colorspace=IDENTITY’.

Chapter 3: Invocation 15
-d
--depth=DEPTH
Force the number of bits per channel and the numeric format of the outputimage.
Enfuse always uses a smart way to change the channel depth, to assure highestimage quality (at the expense of memory), whether requantization is implicitbecause of the output format or explicit with option --depth.
• If the output-channel width is larger than the input-channel width of theinput images, the input images’ channels are widened to the output chan-nel width immediately after loading, that is, as soon as possible. Enfusethen performs all blending operations at the output-channel width, therebypreserving minute color details which can appear in the blending areas.
• If the output-channel width is smaller than the input-channel width of theinput images, the output image’s channels are narrowed only right beforeit is written to disk, that is, as late as possible. Thus the data benefitsfrom the wider input channels for the longest time.
All DEPTH specifications are valid in lowercase as well as uppercase letters.For integer format, use
8, uint8 Unsigned 8 bit; range: 0..255
int16 Signed 16 bit; range: −32768..32767
16, uint16Unsigned 16 bit; range: 0..65535
int32 Signed 32 bit; range: −2147483648..2147483647
32, uint32Unsigned 32 bit; range: 0..4294967295
For floating-point format, use
r32, real32, floatIEEE754 single precision floating-point, 32 bit wide, 24 bit signifi-cant
• Minimum normalized value: 1.2e-38
• Epsilon: 1.2e-7
• Maximum finite value: 3.4e38
r64, real64, doubleIEEE754 double precision floating-point, 64 bit wide, 53 bit signifi-cant
• Minimum normalized value: 2.2e-308
• Epsilon: 2.2e-16
• Maximum finite value: 1.8e308
If the requested DEPTH is not supported by the output file format, Enfusewarns and chooses the DEPTH that matches best.

Chapter 3: Invocation 16
The OpenEXR data format is treated as IEEE754 float internally. Externally, ondisk, OpenEXR data is represented by “half” precision floating-point numbers.
OpenEXR half precision floating-point, 16 bit wide, 10 bit significant
• Minimum normalized value: 9.3e-10
• Epsilon: 2.0e-3
• Maximum finite value: 4.3e9
-f WIDTHxHEIGHT
-f WIDTHxHEIGHT+xXOFFSET+yYOFFSET
Ensure that the minimum “canvas” size of the output image is at leastWIDTHxHEIGHT. Optionally specify the XOFFSET and YOFFSET, too.
This option only is useful when the input images are cropped TIFF files, suchas those produced by nona3.
Note that option -f neither rescales the output image, nor shrinks the canvassize below the minimum size occupied by the union of all input images.
--fallback-profile=PROFILE-FILENAME
Use the ICC profile in PROFILE-FILENAME instead of the default sRGB. Seeoption --blend-colorspace and Chapter 4 [Color Profiles], page 27.
This option only is effective if the input images come without color profiles andblending is performed in CIECAM02 color appearance model.
-g Save alpha channel as “associated”. See the TIFF documentation for an expla-nation.
Gimp (before version 2.0) and CinePaint (see Chapter 9 [Helpful Programs],page 55) exhibit unusual behavior when loading images with unassociated alphachannels. Use option -g to work around this problem. With this flag Enfusewill create the output image with the associated alpha tag set, even though theimage is really unassociated alpha.
-m CACHESIZE
Set the CACHESIZE in megabytes (MB) of Enfuse’s image cache.
This is the amount of memory Enfuse will use for storing image data beforeswapping to disk. The default is 1024MB, which is good for systems with 3–4 gigabytes (GB) of RAM. See Chapter 7 [Tuning Memory Usage], page 41 fordetails.
Note that Enfuse must have been compiled with the image-cache feature for thisoption to be effective. Find out about extra features with enfuse --version
--verbose.
--no-ciecam
Use ‘--blend-colorspace=IDENTITY’ instead.
See option --blend-colorspace for details. Also see Chapter 4 [Color Profiles],page 27.
3 The stitcher nona is part of Hugin. See Chapter 9 [Helpful Programs], page 55.

Chapter 3: Invocation 17
3.5 Fusion Options
Fusion options define the proportion to which each input image’s pixel contributes to theoutput image.
--contrast-weight=WEIGHT
Sets the relative WEIGHT of high local-contrast pixels.
Valid range: 0 ≤ WEIGHT ≤ 1.
Default: 0.0.
See Section 5.4 [Local Contrast Weighting], page 31 and Section 3.6 [ExpertOptions], page 18.
--entropy-weight=WEIGHT
Sets the relative WEIGHT of high local entropy pixels.
Valid range: 0 ≤ WEIGHT ≤ 1.
Default: 0.0.
See Section 5.5 [Local Entropy Weighting], page 36 and Section 3.6 [ExpertOptions], page 18.
--exposure-weight=WEIGHT
Sets the relative WEIGHT of the well-exposedness criterion. Increasing thisweight relative to the others will make well-exposed pixels contribute more tothe final output.
Valid range: 0 ≤ WEIGHT ≤ 1.
Default: 1.0.
See Section 5.2 [Exposure Weighting], page 29.
--exposure-mu=MEAN
Set the MEAN (this is, the center) of the Gaussian exposure weight curve.
Valid range: 0 ≤ MEAN ≤ 1.
Default: 0.5.
Use this option to fine-tune exposure weighting (see Section 5.2 [ExposureWeighting], page 29).
--exposure-sigma=STD-DEV
Standard deviation STD-DEV of the Gaussian exposure weight curve. Lownumbers give less weight to pixels that are far from --wMu and vice versa.
Valid range: STD-DEV ≥ 0.
Default: 0.2.
Use this option to fine-tune exposure weighting (see Section 5.2 [ExposureWeighting], page 29).
--saturation-weight=WEIGHT
Sets the relative WEIGHT of high-saturation pixels. Increasing this weightmakes pixels with high saturation contribute more to the final output.
Valid range: 0 ≤ WEIGHT ≤ 1.
Default: 0.2.

Chapter 3: Invocation 18
Saturation weighting is only defined for color images. See Section 5.3 [Satura-tion Weighting], page 31.
3.6 Expert Options
Expert options influence the workings of Enfuse that require the user to read the manualbefore applying them successfully.
--contrast-edge-scale=EDGE-SCALE
--contrast-edge-scale=EDGE-SCALE:LCE-SCALE:LCE-FACTOR
A non-zero value for EDGE-SCALE switches on the Laplacian-of-Gaussian(LoG) edge detection algorithm. EDGE-SCALE is the radius of the Gaussianused in the search for edges. Default: 0.0 pixels.
A positive LCE-SCALE turns on local contrast enhancement (LCE) before theLoG edge detection. LCE-SCALE is the radius of the Gaussian used in theenhancement step, LCE-FACTOR is the weight factor (“strength”).
enhanced = (1 + LCE-FACTOR) x original − LCE-FACTOR x GaussianSmooth(original, LCE-SCALE).
LCE-SCALE defaults to 0.0 pixels and LCE-FACTOR defaults to 0.0. Append‘%’ to LCE-SCALE to specify the radius as a percentage of EDGE-SCALE.Append ‘%’ to LCE-FACTOR to specify the weight as a percentage.
--contrast-min-curvature=CURVATURE
Define the minimum CURVATURE for the LoG edge detection. Default: 0.Append a ‘%’ to specify the minimum curvature relative to maximum pixelvalue in the source image (for example 255 or 65535).
A positive value makes Enfuse use the local contrast data (controlled with --
contrast-window-size) for curvatures less than CURVATURE and LoG datafor values above it.
A negative value truncates all curvatures less than −CURVATURE to zero.Values above CURVATURE are left unchanged. This effectively suppressesweak edges.
--contrast-window-size=SIZE
Set the window SIZE for local contrast analysis. The window will be a squareof SIZExSIZE pixels. If given an even SIZE, Enfuse will automatically use thenext odd number.
For contrast analysis SIZE values larger than 5 might result in a blurry com-posite image. Values of 3 and 5 have given good results on focus stacks.
Valid range: SIZE ≥ 3.
Default: 5 pixels.
See also Section 3.5 [Fusion Options], page 17 and --hard-mask below.
--entropy-cutoff=LOWER-CUTOFF
--entropy-cutoff=LOWER-CUTOFF:UPPER-CUTOFF
The first form defines the lower cutoff value below which pixels are treated aspure black when calculating the local entropy. The second form also defines theupper cutoff value above which pixels are treated as pure white.

Chapter 3: Invocation 19
For color images LOWER-CUTOFF and UPPER-CUTOFF are applied sepa-rately and independently to each channel.
Defaults: 0% for LOWER-CUTOFF and 100% for UPPER-CUTOFF, thatis, all pixels’ values are taken into account. Append a ‘%’ to specify the cutoffrelative to maximum pixel value in the source image (for example 255 or 65535).Figure 3.1 shows an example.
0
0.2
0.4
0.6
0.8
1
0 0.2 0.4 0.6 0.8 1
EC
Y
Y + OffsetEntropyCutoff(Y, Lower, Upper) - Offset
Figure 3.1: Linear lightness Y in comparison with an entropy-cutoff functionfor LOWER-CUTOFF = 5% and UPPER-CUTOFF = 90%, which are ratherextreme values. Please note that we have shifted the original lightness curveup and the cut-off curve down by a very small Offset to emphasize that theproportional part of Y remains unaltered under the cut-off operation.
Note that a high LOWER-CUTOFF value lightens the resulting image, asdark (and presumably noisy) pixels are averaged with equal weights. With‘--entropy-cutoff=0’, the default, on the other hand, “noise” might be in-terpreted as high entropy and the noisy pixels get a high weight, which inturn renders the resulting image darker. Analogously, a low UPPER-CUTOFFdarkens the output image.
--entropy-window-size=SIZE
Window SIZE for local entropy analysis. The window will be a square of SIZExSIZE pixels.

Chapter 3: Invocation 20
In the entropy calculation SIZE values of 3 to 7 yield an acceptable compromiseof the locality of the information and the significance of the local entropy valueitself.
Valid range: SIZE ≥ 3.
Default: 3 pixels.
If given an even SIZE Enfuse will automatically use the next odd number.
--exposure-cutoff=LOWER-CUTOFF
--exposure-cutoff=LOWER-CUTOFF:UPPER-CUTOFF
--exposure-cutoff=LOWER-CUTOFF:UPPER-CUTOFF:LOWER-PROJECTOR:UPPER-PROJECTOR
The first form sets the weight for all pixels below the lower cutoff to zero. Thesecond form sets the lower cutoff and the upper cutoff at the same time. Forcolor images the values of LOWER-CUTOFF and UPPER-CUTOFF refer tothe gray-scale projection as selected with the option --gray-projector.
The impact of this option is similar, but not identical to transforming all in-put images with ImageMagick’s convert (see Chapter 9 [Helpful Programs],page 55) prior to fusing with the following commands.
# First form
convert IMAGE \
\( +clone -threshold LOWER-CUTOFF \) \
-compose copy_opacity -composite \
MASKED-IMAGE
# Second form
convert IMAGE \
\( \
\( IMAGE -threshold LOWER-CUTOFF \) \
\( IMAGE -threshold UPPER-CUTOFF -negate \) \
-compose multiply -composite \
\) \
-compose copy_opacity -composite \
MASKED-IMAGE
(Transforming some or all input images as shown in the above examples givesthe user more flexibility because the thresholds can be chosen for each imageindividually.)
The third form specifies projection operators as in option --gray-projector
for the LOWER-CUTOFF and UPPER-CUTOFF thresholds.
This option can be helpful if the user wants to exclude underexposed or over-exposed pixels from the fusing process in all of the input images. The values ofLOWER-CUTOFF and UPPER-CUTOFF as well as the gray-scale projectordetermine which pixels are considered “underexposed” or “overexposed”. Asany change of the exposure-weight curve this option changes the brightness ofthe resulting image: increasing LOWER-CUTOFF lightens the final image andlowering UPPER-CUTOFF darkens it.
Defaults: 0% for LOWER-CUTOFF and 100% for UPPER-CUTOFF, that is,all pixels’ values are weighted according to the “uncut” exposure-weight curve.

Chapter 3: Invocation 21
Append a ‘%’ to specify the cutoff relative to the maximum pixel value in thesource image (for example 255 or 65535).
Figure 3.2 shows an example.
The gray-scale projectors LOWER-PROJECTOR and UPPER-PROJECTORdefault to ‘anti-value’ and ‘value’, which are usually the best choices foreffective cutoff operations on the respective ends.
0
0.2
0.4
0.6
0.8
1
0 0.2 0.4 0.6 0.8 1
Y
ExposureCutoff(Y, Lower, Upper)
Figure 3.2: Exposure weight, a Gaussian with Mu = 0.5 and Sigma = 0.2submitted to an exposure-cutoff of LOWER-CUTOFF = 5% and UPPER-CUTOFF = 97%.
Note that the application of the respective cutoffs is completely independent ofthe actual shape of the exposure weight function.
If a set of images stubbornly refuses to “react” to this option, look at theirhistograms to verify the cutoff actually falls into populated ranges of the his-tograms. In the absence of an image manipulation program like The Gimp,ImageMagick (see Chapter 9 [Helpful Programs], page 55) can be used to gen-erate histograms, like, for example,
convert -define histogram:unique-colors=false \
IMAGE histogram:- | \
display
--gray-projector=PROJECTOR
Use gray projector PROJECTOR for conversion of RGB images to grayscale:(R,G,B)→ Y.
Chapter 3: Invocation 22
In version 4.1.4 of Enfuse, the option is effective for exposure weighting andlocal contrast weighting. Default: ‘average’.
Valid values for PROJECTOR are:
anti-value
Do the opposite of the ‘value’ projector: take the minimum of allcolor channels.
Y = min(R,G,B)
This projector can be useful when exposure weighing while employ-ing a lower cutoff (see option --exposure-cutoff) to reduce thenoise in the fused image.
average Average red, green, and blue channel with equal weights. This isthe default, and it often is a good projector for gamma = 1 data.
Y =R+G+B
3
channel-mixer:RED-WEIGHT:GREEN-WEIGHT:BLUE-WEIGHT
Weight the channels as given.
Y = RED-WEIGHT×R +
GREEN-WEIGHT×G +
BLUE-WEIGHT×B
The weights are automatically normalized to one, so
--gray-projector=channel-mixer:0.25:0.5:0.25
--gray-projector=channel-mixer:1:2:1
--gray-projector=channel-mixer:25:50:25
all define the same mixer configuration.
The three weights RED-WEIGHT, GREEN-WEIGHT, and BLUE-WEIGHT define the relative weight of the respective color channel.The sum of all weights is normalized to one.
l-star Use the L-channel of the L*a*b*-conversion of the image as itsgrayscale representation. This is a useful projector for gamma =1 data. It reveals minute contrast variations even in the shadowsand the highlights. This projector is computationally expensive.Compare with ‘pl-star’, which is intended for gamma-correctedimages.
See Wikipedia for a detailed description of the Lab color space.
lightness
Compute the lightness of each RGB pixel as in an Hue-Saturation-Lightness (HSL) conversion of the image.
Y =max(R,G,B) + min(R,G,B)
2

Chapter 3: Invocation 23
luminance
Use the weighted average of the RGB pixel’s channels as defined byCIE (“Commission Internationale de l’Eclairage”) and the JPEG
standard.
Y = 0.30×R+ 0.59×G+ 0.11×B
pl-star Use the L-channel of the L*a*b*-conversion of the image as itsgrayscale representation. This is a useful projector for gamma-corrected data. It reveals minute contrast variations even in theshadows and the highlights. This projector is computationally ex-pensive. Compare with ‘l-star’, which is intended for gamma =1 images.
See Wikipedia for a detailed description of the Lab color space.
value Take the Value-channel of the Hue-Saturation-Value (HSV) conver-sion of the image.
Y = max(R,G,B)
--hard-mask
Force hard blend masks on the finest scale. This is the opposite flag of --soft-mask.
This blending mode avoids averaging of fine details (only) at the expense ofincreasing the noise. However it considerably improves the sharpness of focusstacks. Blending with hard masks has only proven useful with focus stacks.
See also Section 3.5 [Fusion Options], page 17 and --contrast-window-size
above.
--load-masks
--load-masks=SOFT-MASK-TEMPLATE
--load-masks=SOFT-MASK-TEMPLATE:HARD-MASK-TEMPLATE
Load masks from images instead of computing them.
The masks have to be a grayscale images.
First form: Load all soft-weight masks from files that were previously saved withoption --save-masks. If option --hard-mask is effective only load hard masks.The defaults are softmask-%n.tif and hardmask-%n.tif. In the second form,SOFT-MASK-TEMPLATE defines the names of the soft-mask files. In thethird form, HARD-MASK-TEMPLATE additionally defines the names of thehard-mask files. See option --save-masks below for the description of masktemplates.
Options --load-masks and --save-masks are mutually exclusive.
--save-masks
--save-masks=SOFT-MASK-TEMPLATE
--save-masks=SOFT-MASK-TEMPLATE:HARD-MASK-TEMPLATE
Save the generated weight masks to image files.
Chapter 3: Invocation 24
First form: Save all soft-weight masks in files. If option --hard-mask is ef-fective also save the hard masks. The defaults are softmask-%n.tif andhardmask-%n.tif. In the second form, SOFT-MASK-TEMPLATE defines thenames of the soft-mask files. In the third form, HARD-MASK-TEMPLATEadditionally defines the names of the hard-mask files.
Enfuse will stop after saving all masks unless option --output is given, too.With both options given, this is, --save-masks and --output, Enfuse saves allmasks and then proceeds to fuse the output image.
Both SOFT-MASK-TEMPLATE and HARD-MASK-TEMPLATE define tem-plates that are expanded for each mask file. In a template a percent sign (‘%’)introduces a variable part. All other characters are copied literally. Lowercaseletters refer to the name of the respective input file, whereas uppercase ones re-fer to the name of the output file (see Section 3.3 [Common Options], page 10).Table 3.4 lists all variables.
A fancy mask filename template could look like this:
%D/soft-mask-%02n-%f.viff
It puts the mask files into the same directory as the output file (‘%D’), generatesa two-digit index (‘%02n’) to keep the mask files nicely sorted, and decoratesthe mask filename with the name of the associated input file (‘%f’) for easyrecognition.
--soft-mask
Consider all masks when fusing. This is the default.
Options --save-masks and --load-masks are mutually exclusive.

Chapter 3: Invocation 25
%% Produces a literal ‘%’-sign.
%i Expands to the index of the mask file starting at zero.
‘%i’ supports setting a pad character or a width specification:
% PAD WIDTH i
PAD is either ‘0’ or any punctuation character; the default pad character is‘0’. WIDTH is an integer specifying the minimum width of the number. Thedefault is the smallest width given the number of input images, this is 1 for 2–9images, 2 for 10–99 images, 3 for 100–999 images, and so on.
Examples: ‘%i’, ‘%02i’, or ‘%_4i’.
%n Expands to the number of the mask file starting at one. Otherwise it behavesidentically to ‘%i’, including pad character and width specification.
%p This is the full name (path, filename, and extension) of the input file associatedwith the mask.
Example: If the input file is called /home/luser/snap/img.jpg, ‘%p’ expands to/home/luser/snap/img.jpg, or shorter: ‘%p’ ⇒ /home/luser/snap/img.jpg.
%P This is the full name of the output file.
%d Is replaced with the directory part of the associated input file. See Info filecoreutils.info, node ‘dirname invocation’.
Example (cont.): ‘%d’ ⇒ /home/luser/snap.
%D Is replaced with the directory part of the output file.
%b Is replaced with the non-directory part (often called “basename”) of the asso-ciated input file. See Info file coreutils.info, node ‘basename invocation’.
Example (cont.): ‘%b’ ⇒ img.jpg.
%B Is replaced with the non-directory part of the output file.
%f Is replaced with the filename without path and extension of the associated inputfile.
Example (cont.): ‘%f’ ⇒ img.
%F Is replaced with the filename without path and extension of the output file.
%e Is replaced with the extension (including the leading dot) of the associatedinput file.
Example (cont.): ‘%e’ ⇒ .jpg.
%E Is replaced with the extension of the output file.
Table 3.4: Special characters to control the generation of mask filenames.
Chapter 3: Invocation 26
3.7 Option Delimiters
Enfuse allows the arguments supplied to the program’s options to be separated by differentseparators. The online documentation and this manual, however, exclusively use the colon‘:’ in every syntax definition and in all examples.
Numeric Arguments
Valid delimiters are the the semicolon ‘;’, the colon ‘:’, and the slash ‘/’. All delimitersmay be mixed within any option that takes numeric arguments.
Examples:
‘--contrast-edge-scale=0.667:6.67:3.5’Separate all arguments with colons.
‘--contrast-edge-scale=0.667;6.67;3.5’Use semi-colons.
‘--contrast-edge-scale=0.667;6.67/3.5’Mix semicolon and slash in weird ways.
‘--entropy-cutoff=3%/99%’All delimiters also work in conjunction with percentages.
‘--gray-projector=channel-mixer:3/6/1’Separate arguments with a colon and two slashes.
‘--gray-projector=channel-mixer/30;60:10’Go wild and Enfuse will understand.
Filename Arguments
Here, the accepted delimiters are ‘,’, ‘;’, and ‘:’. Again, all delimiters may be mixedwithin any option that has filename arguments.
Examples:
‘--save-masks=soft-mask-%03i.tif:hard-mask-03%i.tif’Separate all arguments with colons.
‘--save-masks=%d/soft-%n.tif,%d/hard-%n.tif’Use a comma.
Chapter 4: Color Profiles 27
4 Color Profiles
Enblend and Enfuse expect that either
1. no input image has a color profile or
2. all come with the same ICC profile.
In case 1 the applications blend or fuse in the RGB-cube, whereas in case 2 the images firstare transformed to CIECAM02 color space – respecting the input color profile – then theyare blended or fused, and finally the data transformed back to RGB color space. Moreover,in case 2, Enblend and Enfuse assign the input color profile to the output image.
Mixing different ICC profiles or alternating between images with profiles and withoutthem generates warnings as it generally leads to unpredictable results.
The options --ciecam (see Section 3.4 [Extended Options], page 14) and its opposite--no-ciecam (see Section 3.4 [Extended Options], page 14) overrule the default profileselection procedure described above. Use option --ciecam on a set of input images withoutcolor profiles to assign a profile to them and perform the blending or fusing process inCIECAM02 color space.
The default profile is sRGB. Override this setting with option --fallback-profile (seeSection 3.4 [Extended Options], page 14).
On the other hand, suppress the utilization of CIECAM02 blending or fusing of a setof input images with color profiles with option --no-ciecam. The only reason for thelatter is to shorten the blending- or fusing-time, because transforming to and back from theCIECAM02 color space are computationally expensive operations.
Option --ciecam as well as --fallback-profile have no effect on images with attachedcolor profiles, just as option --no-ciecam has no effect on images without profiles.
The impact of blending in CIECAM02 color space as opposed to the RGB cube varywith the contents of the input images. Generally colors lying close together in RGB spaceexperience less change when switching the blending spaces. However, colors close the borderof any color space can see marked changes.
For color geeks: The transformations to CIECAM02 color space and back use
• perceptual rendering intent,
• the D50 white point,
• 500 lumen surrounding light (“average” in CIECAM02 parlance), and
• assume complete adaption.

Chapter 5: Weighting Functions 28
5 Weighting Functions
As has been noted in the Overview (see Chapter 1 [Overview], page 1), Enfuse supports fourdifferent types of weighting. The following subsections describe the concept of weightingand all weighting functions in detail.
5.1 Weighting Pixels
Image fusion maps each pixel P (i, x, y) of every input image i to a single pixel Q(x, y) inthe output image:
P (i, x, y)→ Q(x, y),
where x runs from 1 to the common width of the images, y from 1 to the common height,and i from 1 to the number of input images n.
Enfuse allows for weighting the contribution of each P (i, x, y) to the final Q(x, y):
w(P (1, x, y))P (1, x, y) + . . .+ w(P (n, x, y))P (n, x, y)→ Q(x, y)
where
• each w is non-negative to yield a physical intensity and
• the sum of all w is one to leave the total intensity unchanged.
The pixel weights w themselves are weighted sums with the same constraints
w(P ) = wexp fexp(P )+
wsat fsat(P )+
wcont fcont(P, rcont)+
went fent(P, rent),
where we have abbreviated P (i, x, y) to P for simplicity. The user defines the constants wexp,wsat, wcont, and went with the options ‘--exposure-weight’, ‘--saturation-weight’,‘--contrast-weight’, and ‘--entropy-weight’ respectively. The functions fexp, fsat,fcont, and fent along with the window sizes rcont and rent are explained in the next sections.
5.1.1 Weighted Average
By default, Enfuse uses a weighted average, where each pixel contributes as much as itsweight demands. Of course the weights can be extreme, favoring only a few pixels or evenonly one pixel in the input stack. Extremes are not typical, however.
Equal weights are another extreme that turns the equation into an arithmetic average.This is why we sometimes speak of the “averaging property” of this weighting algorithm,like smoothing out noise.

Chapter 5: Weighting Functions 29
5.1.2 Disabling Averaging: Option --hard-mask
The weighted average computation as described above has proven to be widely success-ful with the exception of one special case: focus stacking (see Section 8.6 [Focus Stacks],page 46), where the averaging noticeably softens the final image.
Use --hard-mask to switch Enfuse into a different (“Super Trouper”) weighting mode,where the pixel with the highest weight wins, this is, gets weight one, and all other pixels getthe weight of zero (“The Winner Takes It All.”). With --hard-mask the equation becomes
P (i, x, y)→ Q(x, y), where w(P (i, x, y)) ≥ w(P (j, x, y)) for all 1 ≤ j ≤ n.
Note that this “averaging” scheme lacks the nice noise-reduction property of the weightedaverage, because only a single input pixel contributes to the output.
5.1.3 Single Criterion Fusing
Enfuse allows the user to weight each pixel of an input image by up to four different criteria(see Chapter 1 [Overview], page 1). However, it does not force the user to do so. For someapplications and more often simply to gain further insight into the weighting and fusingprocess, looking at only a single criterion is the preferred way to work.
The version of Enfuse for which this documentation was prepared, uses the defaultweights as stated in Table 5.1. Notice that by default more than one weight is larger thanzero, which means they are active.
Criterion WeightExposure 1.0Saturation 0.2Local Contrast 0.0Local Entropy 0.0
Table 5.1: Enfuse’s default weights as compiled into version 4.1.4.
To disable a particular criterion set its weight to zero as for example
enfuse \
--exposure-weight=1 --saturation-weight=0 \
--contrast-weight=0 --entropy-weight=0 \
img_[1-3].png
instructs Enfuse to consider only the exposure weight. Combine this with option --
save-masks and it will become clearer how Enfuse computes the exposure weight for theset of images.
Another problem that can be inspected by fusing with just a single active criterion andsaving the masks is if the weights of one criterion completely overpower all others.
5.2 Exposure Weighting
Exposure weighting prefers pixels with a luminance Y close to the center of the normalized,real-valued luminance interval [0, 1].

Chapter 5: Weighting Functions 30
RGB-pixels get converted to luminance using the grayscale projector given by --gray-
projector, which defaults to average. Grayscale pixels are identified with luminance.
In the normalized luminance interval 0.0 represents pure black and 1.0 represents purewhite independently of the data type of the input image. This is, for a JPEG image theluminance 255 maps to 1.0 in the normalized interval and for a 32 bit TIFF picture thehighest luminance value 4294967295 also maps to 1.0. The middle of the luminance interval,0.5, is where a neutral gray tone ends up with every camera that had no exposure correctiondialed in, for example the image of a gray- or white-card.
The exposure weighting algorithm only looks at a single pixel at a time; the pixel’sneighborhood is not taken into account.
The weighting function is the Gaussian
wexp(Y ) = exp
(−1
2
(Y −Mu
Sigma
)2),
whose center Mu and width Sigma are controlled by the command line options --
exposure-mu and --exposure-sigma respectively. Mu defaults to 0.5 and Sigma defaultsto 0.2. Figure 5.1 shows a Gaussian.
0
0.2
0.4
0.6
0.8
1
0 0.2 0.4 0.6 0.8 1
Y
Gaussian(Y)
Figure 5.1: Gaussian function with the parameters Mu = 0.5 and Sigma = 0.2.
The options --exposure-mu and --exposure-sigma are for fine-tuning the final resultwithout changing the set of input images. Option --exposure-mu sets the point Mu of opti-mum exposure. Increasing Mu makes Enfuse prefer lighter pixels, rendering the final imagelighter, and vice versa. Option --exposure-sigma defines the range Sigma of acceptable

Chapter 5: Weighting Functions 31
exposures. Small values of Sigma penalize exposures that deviate from Mu more, and viceversa.
Summary of influential options
--exposure-weight
Section 3.5 [Fusion Options], page 17
--exposure-mu
Section 3.5 [Fusion Options], page 17
--exposure-sigma
Section 3.5 [Fusion Options], page 17
--gray-projector
Section 3.6 [Expert Options], page 18
5.3 Saturation Weighting
Saturation weighting prefers pixels with a high saturation.
Enfuse computes the saturation of a pixel according to the following algorithm.
max := maximum(R, G, B)
min := minimum(R, G, B)
if max = min thensaturation := 0
elsesum := max + min
difference := max - min
if sum ≤ 1 thensaturation := difference / sum
elsesaturation := difference / (2 - sum)
end ifend if
Obviously, saturation weighting can only be defined for RGB images, not for grayscale ones!If you need something similar, check out Section 5.5 [Local Entropy Weighting], page 36;entropy weighting works for both RGB and grayscale pictures.
The saturation weighting algorithm only looks at a single pixel at a time; the pixel’sneighborhood is not taken into account.
Summary of influential options
--saturation-weight
Section 3.5 [Fusion Options], page 17
5.4 Local Contrast Weighting
Local contrast weighting favors pixels inside a high contrast neighborhood. The notion of“high contrast” is defined either by two different criteria or by a blend of both:
• The standard deviation (SDev) of all the pixels in the local analysis window is large.See Section 5.4.1 [Standard Deviation], page 32.
Chapter 5: Weighting Functions 32
• The Laplacian-of-Gaussian (LoG) has a large magnitude. See Section 5.4.2 [Laplacianof Gaussian], page 33.
• If the LoG magnitude is below a given threshold, use SDev data, otherwise stick withLoG. See Section 5.4.3 [Blend SDev and LoG], page 35.
Enfuse converts every RGB image to grayscale before it determines its contrast. Op-tion --gray-projector (see Section 3.6 [Expert Options], page 18) controls the projectorfunction. Depending on the subject, one of several grayscale projectors may yield the bestblack-and-white contrast for image fusion.
In the following sections we describe each algorithm in detail.
5.4.1 Standard Deviation
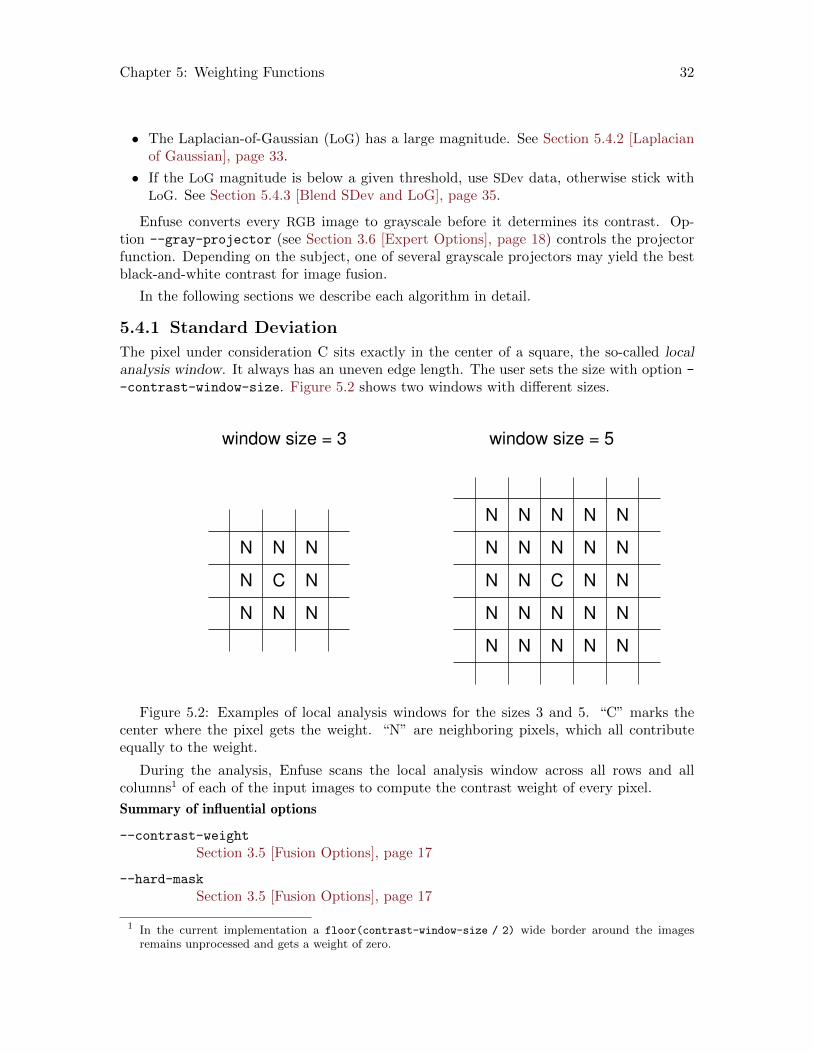
The pixel under consideration C sits exactly in the center of a square, the so-called localanalysis window. It always has an uneven edge length. The user sets the size with option -
-contrast-window-size. Figure 5.2 shows two windows with different sizes.
N
N
N
N
N
N
N
N
N
N
N
N
N
N
N
N
N
N
N
N
N
N
N
N
N
N
N
N
C
window size = 3 window size = 5
N
N
C
N
N
Figure 5.2: Examples of local analysis windows for the sizes 3 and 5. “C” marks thecenter where the pixel gets the weight. “N” are neighboring pixels, which all contributeequally to the weight.
During the analysis, Enfuse scans the local analysis window across all rows and allcolumns1 of each of the input images to compute the contrast weight of every pixel.
Summary of influential options
--contrast-weight
Section 3.5 [Fusion Options], page 17
--hard-mask
Section 3.5 [Fusion Options], page 17
1 In the current implementation a floor(contrast-window-size / 2) wide border around the imagesremains unprocessed and gets a weight of zero.

Chapter 5: Weighting Functions 33
--contrast-window-size
Section 3.6 [Expert Options], page 18
--gray-projector
Section 3.6 [Expert Options], page 18
5.4.1.1 Statistical Moments
We start with the probability function w of the random variable X:
w : x→ p({ω : X(ω) = x}).
It associates a probability p with each of the n different possible outcomes omega of therandom variable X. Based on w, we define the expectation value or “First Moment” of therandom variable X:
Ex X :=n∑
i=1
xiw(xi).
Using the definition of the expectation value, we define the variance, or “Second Moment”as
Var X := Ex((X − Ex X)2
),
and the standard deviation asσX :=
√Var X.
Obviously, the variance of X is the expectation value of the squared deviation from theexpectation value of X itself. Note that the variance’s dimension is X’s dimension squared;the standard deviation rectifies the dimension to make it comparable with X itself again.
5.4.1.2 Estimators
In Enfuse, we assume that X follows a uniform probability function w(x) = const. That is,all pixel values in the local analysis window are considered to be equally probable. Thus,the expectation value and the variance can be estimated from the pixel values like this
Ex X :=1
n
n∑i=1
xi.
In other words: the expectation value is the arithmetic mean of the lightness of all pixelsin the local analysis window. Analogously, the variance becomes
Var X :=1
n− 1Ex((X − Ex X)2
).
5.4.2 Laplacian of Gaussian
The Laplacian of Gaussian (LoG) is an operator to detect edges in an image. Sometimes theLoG-operator is also called Marr-Hildreth operator. A Laplacian-of-Gaussian operator,vigra::laplacianOfGaussian is part of the package VIGRA that Enfuse is built upon andis used for edge detection if option --contrast-edge-scale is non-zero and --contrast-
min-curvature equal to or less than zero.

Chapter 5: Weighting Functions 34
Let the Gaussian function be
g(x, y) =1
2πσ2exp
(−x
2 + y2
2σ2
)
The parameter sigma, the argument of option --contrast-edge-scale, is the length scaleon which edges are detected by g(x, y). We apply the Laplacian operator in Cartesiancoordinates
4 ≡ ∇ · ∇ =∂2
∂x2+
∂2
∂y2
to g(x, y), to arrive at a continuous representation of the two-dimensional filter kernel
k(x, y) =ξ2 − 1
πσ4exp(−ξ2),
where we have used the dimensionless distance xi from the origin
ξ2 =x2 + y2
2σ2.
Enfuse uses a discrete approximation of k in the convolution with the image. The operatoris radially symmetric with respect to the origin, which is why we can easily plot it inFigure 5.3, setting R =
√x2 + y2.
-6
-5
-4
-3
-2
-1
0
1
0 0.5 1 1.5 2
k(R
)
R
LaplacianOfGaussian(R, Sigma)
Figure 5.3: Laplacian-of-Gaussian function for sigma = 0.5.

Chapter 5: Weighting Functions 35
See also HIPR2: Laplacian of Gaussian.
Sometimes the LoG is plagued by noise in the input images. After all, it is a numericalapproximation of the second derivative and deriving always “roughens” a function. The(normalized) mask files relentlessly disclose such problems. Use option --contrast-min-
curvature with a negative argument CURVATURE to suppress all edges with a curvaturebelow −CURVATURE (which is a positive value). Check the effects with the mask filesand particularly the hard-mask files (hardmask-%n.tif) if using option --hard-mask.
To indicate the CURVATURE in relative terms, which is particularly comprehensiblefor humans, append a percent sign (‘%’). Try minimum curvatures starting from −0.5% to−3%.
Summary of influential options
--contrast-weight
Section 3.5 [Fusion Options], page 17
--hard-mask
Section 3.5 [Fusion Options], page 17
--contrast-edge-scale
Section 3.6 [Expert Options], page 18
--contrast-min-curvature
Section 3.6 [Expert Options], page 18
5.4.3 Blend Standard Deviation and Laplacian of Gaussian
Enfuse can team the standard deviation computation and Laplacian of Gaussian to deliverthe best of both methods. Use a positive argument CURVATURE with option --contrast-
min-curvature to combine both algorithms. In this mode of operation Enfuse computesthe SDev-weight and the LoG-weight, then uses the LoG to decide whether to go with thatvalue or prefer the SDev data. If the LoG is greater than CURVATURE Enfuse uses theweight delivered by the LoG, otherwise the SDev-weight is rescaled such that its maximumis equal to CURVATURE, and the scaled SDev is used as weight.
This technique merges the two edge detection methods where they are best. The LoG
excels with clear edges and cannot be fooled by strong but smooth gradients. However, itis bad at detecting faint edges and it is susceptible to noise. The SDev on the other handshines with even the most marginal edges, and resists noise quite well. Its weakness is thatis is easily deceived by strong and smooth gradients. Tuning CURVATURE the user canpick the best threshold for a given set of images.
Summary of influential options
--contrast-weight
Section 3.5 [Fusion Options], page 17
--hard-mask
Section 3.5 [Fusion Options], page 17
--contrast-window-size
Section 3.6 [Expert Options], page 18
--gray-projector
Section 3.6 [Expert Options], page 18

Chapter 5: Weighting Functions 36
--contrast-edge-scale
Section 3.6 [Expert Options], page 18
--contrast-min-curvature
Section 3.6 [Expert Options], page 18
5.4.4 Scaling and Choice of Mode
Experience has shown that neither the parameters EDGESCALE and CURVATURE northe mode of operation (SDev-only, LoG-only, or a blend of both) scales to different imagesizes. In practice, this means that if you start with a set of reduced size images, say2808x1872 pixels, carefully optimize EDGESCALE, CURVATURE and so on, and findLoG-only the best mode, and then switch to the original resolution of 5616x3744 pixels,multiplying (or dividing) the parameters by four and sticking to LoG-only might not resultin the best fused image. For best quality, perform the parameter optimization and thesearch for the most appropriate mode at the final resolution.
5.5 Local Entropy Weighting
Entropy weighting prefers pixels inside a high entropy neighborhood.
Let S be an n-ary source. Watching the output of S an observer on average gains theinformation
Ha(n) :=∑x∈S
p(x) loga(1/p(x))
per emitted message, where we assume the knowledge of the probability function p(S). Theexpectation valueHa(n) is called entropy of the source S. Entropy measures our uncertaintyif we are to guess which message gets chosen by the source in the future. The unit of theentropy depends on the choice of the constant a > 1. Obviously
Hb(n) = Ha(n)/ loga(b)
holds for all b > 1. We use a = 2 for entropy weighting and set the entropy of the “impossiblemessage” to zero according to
limp→0
p loga(1/p) = 0.
Figure 5.4 shows an entropy function.
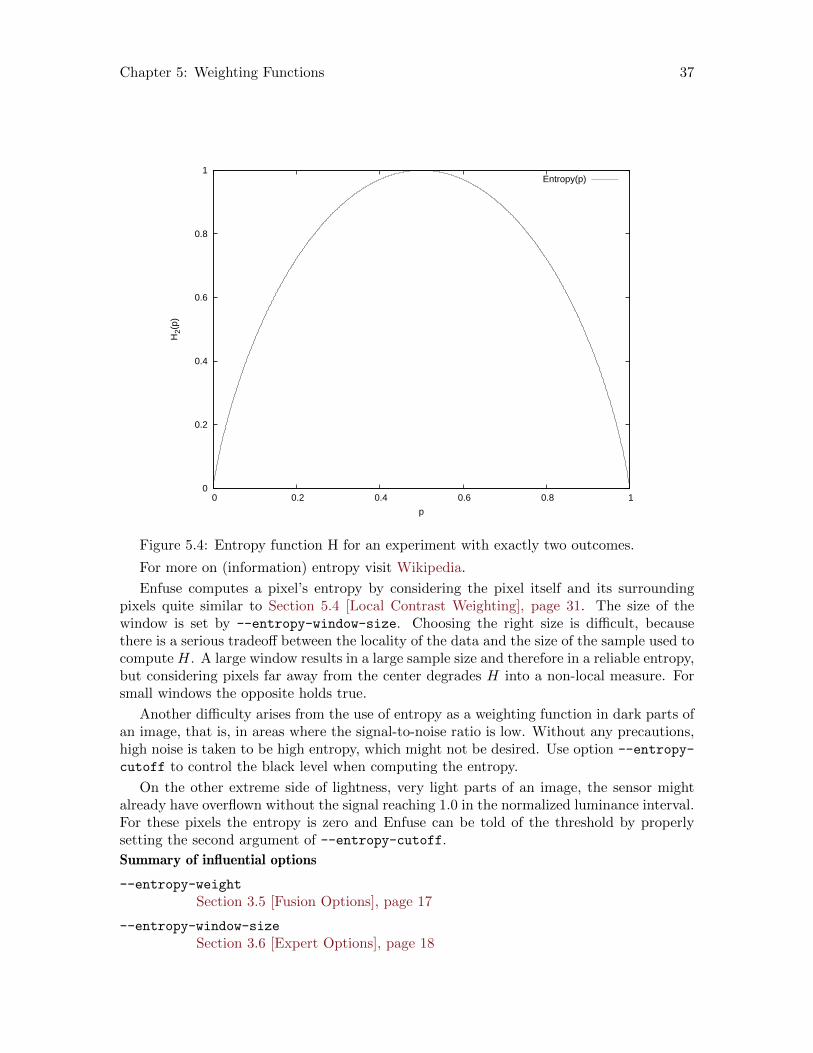
Chapter 5: Weighting Functions 37
0
0.2
0.4
0.6
0.8
1
0 0.2 0.4 0.6 0.8 1
H2(
p)
p
Entropy(p)
Figure 5.4: Entropy function H for an experiment with exactly two outcomes.
For more on (information) entropy visit Wikipedia.
Enfuse computes a pixel’s entropy by considering the pixel itself and its surroundingpixels quite similar to Section 5.4 [Local Contrast Weighting], page 31. The size of thewindow is set by --entropy-window-size. Choosing the right size is difficult, becausethere is a serious tradeoff between the locality of the data and the size of the sample used tocompute H. A large window results in a large sample size and therefore in a reliable entropy,but considering pixels far away from the center degrades H into a non-local measure. Forsmall windows the opposite holds true.
Another difficulty arises from the use of entropy as a weighting function in dark parts ofan image, that is, in areas where the signal-to-noise ratio is low. Without any precautions,high noise is taken to be high entropy, which might not be desired. Use option --entropy-
cutoff to control the black level when computing the entropy.
On the other extreme side of lightness, very light parts of an image, the sensor mightalready have overflown without the signal reaching 1.0 in the normalized luminance interval.For these pixels the entropy is zero and Enfuse can be told of the threshold by properlysetting the second argument of --entropy-cutoff.
Summary of influential options
--entropy-weight
Section 3.5 [Fusion Options], page 17
--entropy-window-size
Section 3.6 [Expert Options], page 18

Chapter 5: Weighting Functions 38
--entropy-cutoff
Section 3.6 [Expert Options], page 18

Chapter 6: Understanding Masks 39
6 Understanding Masks
A binary mask indicates for every pixel of an image if this pixel must be considered infurther processing, or ignored. For a weight mask, the value of the mask determines howmuch the pixel contributes, zero again meaning “no contribution”.
Masks arise in two places: as part of the input files and as separate files, showing theactual pixel weights prior to image blendung or fusion. We shall explore both occurrencesin the next sections.
6.1 Masks in Input Files
Each of the input files for Enfuse and Enblend can contain its own mask. Both applicationsinterpret them as binary masks no matter how many bits per image pixel they contain.
Use ImageMagick’s identify or, for TIFF files, tiffinfo to inquire quickly whethera file contains a mask. Chapter 9 [Helpful Programs], page 55 shows where to find theseprograms on the web.
$ identify -format "%f %m %wx%h %r %q-bit" remapped-0000.tif
remapped-0000.tif TIFF 800x533 DirectClassRGBMatte 8-bit
^^^^^ mask
$ tiffinfo remapped-0000.tif
TIFF Directory at offset 0x1a398a (1718666)
Subfile Type: (0 = 0x0)
Image Width: 800 Image Length: 533
Resolution: 150, 150 pixels/inch
Position: 0, 0
Bits/Sample: 8
Sample Format: unsigned integer
Compression Scheme: PackBits
Photometric Interpretation: RGB color
Extra Samples: 1<unassoc-alpha> <<<<< mask
Orientation: row 0 top, col 0 lhs
Samples/Pixel: 4 <<<<< R, G, B, and mask
Rows/Strip: 327
Planar Configuration: single image plane
The “Matte” part of the image class and the “Extra Samples” line tell us that the filefeatures a mask. Also, many interactive image manipulation programs show the mask as aseparate channel, sometimes called “Alpha”. There, the white (high mask value) parts ofthe mask enable pixels and black (low mask value) parts suppress them.
The multitude of terms all describing the concept of a mask is confusing.
Mask A mask defines a selection of pixels. A value of zero represents an unselectedpixel. The maximum value (“white”) represents a selected pixel and the valuesbetween zero and the maximum are partially selected pixels. See Gimp-Savy.
Alpha ChannelThe alpha channel stores the transpacency value for each pixel, typically inthe range from zero to one. A value of zero means the pixel is completely

Chapter 6: Understanding Masks 40
transparent, thus does not contribute to the image. A value of one on the otherhand means the pixel is completely opaque.
Matte The notion “matte” as used by ImageMagick refers to an inverted alpha channel,more precisely: 1 - alpha. See ImageMagick for further explanations.
Enblend and Enfuse only consider pixels that have an associated mask value other thanzero. If an input image does not have an alpha channel, Enblend warns and assumes a maskof all non-zero values, that is, it will use every pixel of the input image for fusion.
Stitchers like nona add a mask to their output images.
Sometimes it is helpful to manually modify a mask before fusion. For example to suppressunwanted objects (insects and cars come into mind) that moved across the scene duringthe exposures. If the masks of all input images are black at a certain position, the outputimage will have a hole in that position.
6.2 Weight Mask Files
...
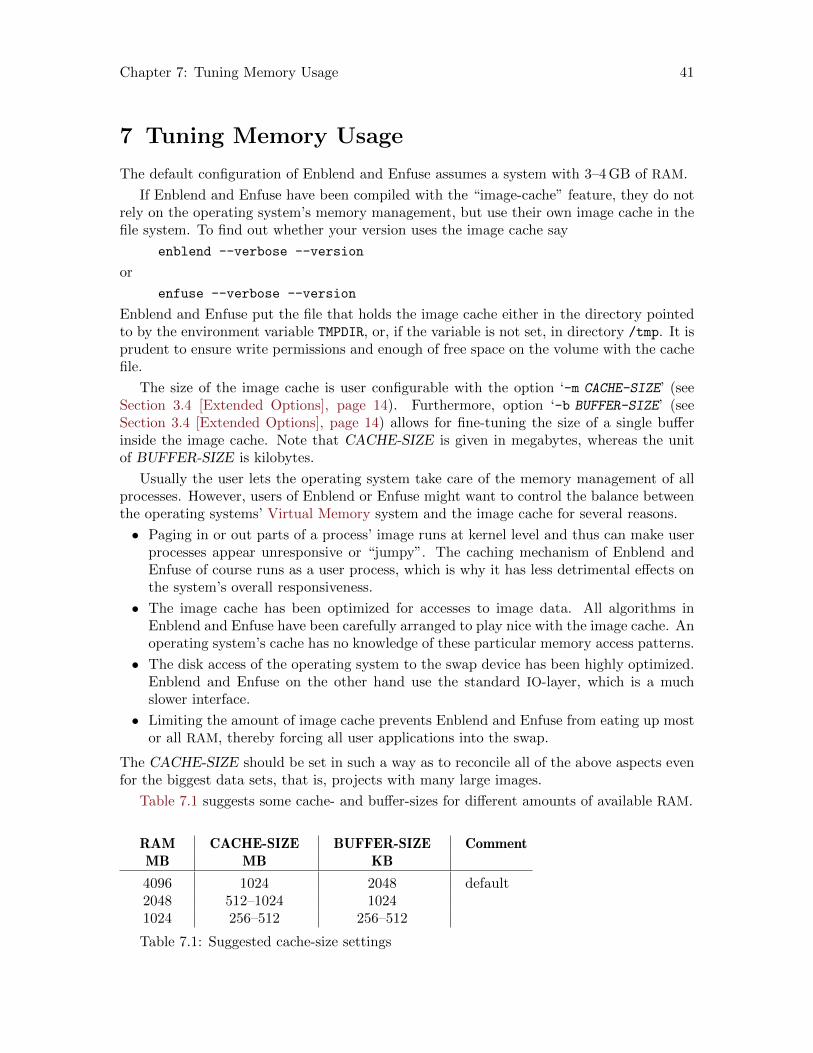
Chapter 7: Tuning Memory Usage 41
7 Tuning Memory Usage
The default configuration of Enblend and Enfuse assumes a system with 3–4GB of RAM.
If Enblend and Enfuse have been compiled with the “image-cache” feature, they do notrely on the operating system’s memory management, but use their own image cache in thefile system. To find out whether your version uses the image cache say
enblend --verbose --version
or
enfuse --verbose --version
Enblend and Enfuse put the file that holds the image cache either in the directory pointedto by the environment variable TMPDIR, or, if the variable is not set, in directory /tmp. It isprudent to ensure write permissions and enough of free space on the volume with the cachefile.
The size of the image cache is user configurable with the option ‘-m CACHE-SIZE’ (seeSection 3.4 [Extended Options], page 14). Furthermore, option ‘-b BUFFER-SIZE’ (seeSection 3.4 [Extended Options], page 14) allows for fine-tuning the size of a single bufferinside the image cache. Note that CACHE-SIZE is given in megabytes, whereas the unitof BUFFER-SIZE is kilobytes.
Usually the user lets the operating system take care of the memory management of allprocesses. However, users of Enblend or Enfuse might want to control the balance betweenthe operating systems’ Virtual Memory system and the image cache for several reasons.
• Paging in or out parts of a process’ image runs at kernel level and thus can make userprocesses appear unresponsive or “jumpy”. The caching mechanism of Enblend andEnfuse of course runs as a user process, which is why it has less detrimental effects onthe system’s overall responsiveness.
• The image cache has been optimized for accesses to image data. All algorithms inEnblend and Enfuse have been carefully arranged to play nice with the image cache. Anoperating system’s cache has no knowledge of these particular memory access patterns.
• The disk access of the operating system to the swap device has been highly optimized.Enblend and Enfuse on the other hand use the standard IO-layer, which is a muchslower interface.
• Limiting the amount of image cache prevents Enblend and Enfuse from eating up mostor all RAM, thereby forcing all user applications into the swap.
The CACHE-SIZE should be set in such a way as to reconcile all of the above aspects evenfor the biggest data sets, that is, projects with many large images.
Table 7.1 suggests some cache- and buffer-sizes for different amounts of available RAM.
RAM CACHE-SIZE BUFFER-SIZE CommentMB MB KB
4096 1024 2048 default2048 512–1024 10241024 256–512 256–512
Table 7.1: Suggested cache-size settings

Chapter 7: Tuning Memory Usage 42
On systems with considerably more than 4GB of RAM it is recommended to run Enblendor Enfuse versions without image cache.

Chapter 8: Applications of Enfuse 43
8 Applications of Enfuse
This section describes some of the novel possibilities that Enfuse offers the photographer.In contrast to the previous chapters, it centers around the image effects.
8.1 What Makes Images Fusable?
Images should align well to be suitable for fusion. However, there is no hard mathematicalrule what “well” means. The alignment requirements for 16MPixel images to yield a sharp4"x6" print at 300 dpi (“dpi” means dots per inch) or even for web presentation are relativelylow, whereas the alignment of 8MPixel images for a 12"x18" print ought to be tight.
If the input images need to be aligned, Hugin (see Chapter 9 [Helpful Programs], page 55)is the tool of choice. It produces images exactly in the format that Enfuse expects.
Sometimes images naturally align extremely well so that no re-alignment is required.An image series with preprogrammed exposure steps taken in rapid succession where thecamera is mounted on a heavy tripod and a humongous ball head, mirror lockup, and acable release are used, comes to mind.
When in doubt about what will work, try it, and judge for yourself.
Useful ideas for a good alignment:
• Fix all camera parameters that are not explicitly varied.
Aperture Engage full manual (M) or aperture-priority (A) mode.
Auto-focusDisable “Auto Focus”. Be aware that the auto-focus function could belinked to shutter-release button position “half pressed” or to the shutterrelease in insidious ways.
Closed eyepiece(This applies only to single lens reflex cameras.) Close the eyepiece whenusing a cable release to suppress variations in stray light.
Exposure time/Shutter speedUse the shortest possible exposure time or, in other words, use the fastestshutter speed to avoid blur caused by camera shake or motion blur.
Flash powerExplicitly control the flash power of all flashes. This is sometimes called“flash exposure lock”.
Sensitivity Disable “Auto ISO”.
White balanceDisable “Auto White Balance”. Instead, use the most suitable fixed whitebalance or take the white balance off a white card. When in doubt, usethe setting “Daylight” or equivalent.
• Steady the camera by any means.
• Apply your best camera bracing technique combined with controlled breathing.
• Prefer a monopod, or better, a rigid tripod with a heavy head.

Chapter 8: Applications of Enfuse 44
• Use a cable release if possible.
• (This applies to cameras with a moving mirror only.) Engage “mirror lockup”.
• Consider automatic bracketing when applicable.
• Activate camera- or lens-based image stabilization if you are sure that it improvesthe image quality in your particular case; otherwise disengage the feature.
For some lens-based image stabilization systems, it is known that they “lock” intodifferent positions every time they are activated. Moreover, some stabilizationsystems decrease the image quality when the lens is mounted on a tripod.
• Fire in rapid succession.
8.2 Repetition – Noise Reduction
Main Purpose: Reduce noise
With the default settings, Enfuse computes a weighted average of the input pixels. Fora series of images, repeated with identical settings, this results in a reduction of (photonshot) noise. In other words, the dynamic range increases slightly, because the higher signal-to-noise ratio makes darker shades usable. Furthermore, smooth or glossy surfaces get a“cleaner” look, and edges become visually sharper. The nitty-gritty reportage look thatsometimes stems from a high sensitivity setting disappears.
Averaged images, and therefore low-noise images, are the base for a multitude of tech-niques like, for example, differences. The most prominent method in this class is dark-framesubtraction.
The defaults set ‘--exposure-weight=1.0’ and ‘--saturation-weight=0.2’. Elimi-nating the saturation component with ‘--saturation-weight=0.0’ can be worth an extrarun.
8.3 Exposure Series – Dynamic Range Increase
Main Purpose: Increase manageable dynamic range
An exposure series is a set of images taken with identical parameters except for the exposuretime. Some cameras even provide special functions to automate recording exposure series.See the instruction manual of your model for details.
Enfuse’s defaults, ‘--exposure-weight=1.0’ and ‘--saturation-weight=0.2’ are wellsuited for fusion of color images. Remember that saturation weighting only works for RGB
data. Option --saturation-weight helps to control burnt-out highlights, as these areheavily desaturated. Alternatively, use option --exposure-cutoff to suppress noise orblown-out highlights without altering the overall brightness too much. If no image suffersfrom troublesome highlights, the relative saturation weight can be reduced and even be setto zero.
For black and white images --entropy-weight can be an alternative to --saturation-
weight because it suppresses overexposed pixels, as these contain little information. How-ever, entropy weighting is not limited to gray-scale data; it has been successfully appliedto RGB images, too. Note that entropy weighting considers each color channel of an RGB
image separately and chooses the channel with the minimum entropy as representative forthe whole pixel.

Chapter 8: Applications of Enfuse 45
Enfuse offers the photographer tremendous flexibility in fusing differently exposed im-ages. Whether you combine only two pictures or a series of 21, Enfuse imposes no limitson you. Accordingly, the photographic effects achieved range from subtle to surreal, likethe late 1980s “Max Headroom” TV-Series, to really unreal. Like some time ago in thechemical days of photography, when a new developer opened unseen possibilities for artists,exposure fusion extends a photographer’s expressive space in the digital age. Whether theresults look good or bad, whether the images are dull or exciting, is entirely up the artist.
In the next sections we give assistance to starters, and rectify several misconceptionsabout Enfuse.
8.3.1 Tips For Beginners
Here are some tips to get you in business quickly.
Include the best single exposure.Include the exposure you would have taken if you did not use Enfuse in yourseries. It gives you a solid starting point. Think of the other images as aug-menting this best single exposure to bring out the light and dark features youwould like to see.
Begin with as small a number of images as possible.Pre-visualizing the results of Enfuse is difficult. The more images put intothe fusion process and the wider their EV-spacing is, the more challengingvisualizing the output image becomes. Therefore, start off with as few imagesas possible.
You can take a larger series of images and only use part of it.
Start with a moderate EV-spacing.As has been pointed out in the previous item, a wide EV-spacing makes pre-visualization harder. So start out with a spacing of 2/3EV to 1+1/3EV.
8.3.2 Common Misconceptions
Here are some surprisingly common misconceptions about exposure series.
A single image cannot be the source of an exposure series.Raw-files in particular lend themselves to be converted multiple times and theresults being fused together. The technique is simpler, faster, and usually evenlooks better than digital blending (as opposed to using a graduated neutral den-sity filter) or blending exposures in an image manipulation program. Moreover,perfect alignment comes free of charge!
An exposure series must feature symmetrically-spaced exposures.Twice wrong! Neither do the exposures have to be “symmetric” like {0EV,−2/3EV, +2/3EV}, nor does the number of exposures have to be odd. Serieslike {−1−1/3EV, −1/3EV, +1/3EV} or {−1EV, 1EV} might be just right.By the way, the order in which the images were taken does not matter either.
Chapter 8: Applications of Enfuse 46
An exposure series must cover the whole dynamic range of the scene.If you do not want to cover the whole range, you do not have to. Some HDR
programs require the user to take a light probe,1 whereas Enfuse offers the usercomplete freedom of exposure.
All exposure values must be different.You can repeat any exposure as often as you like. That way you combine anexposure series with parts of Section 8.2 [Repetition], page 44, emphasizing themultiply occuring exposures and reducing noise.
8.4 Flash Exposure Series – Directed Lighting
Main Purpose: ???
...
8.5 Polarization Series – Saturation Enhancement
Main Purpose: Reflection suppression, saturation enhancement
In the current implementation of Enfuse, it is not possible in general to fuse a polarizationseries. Naively abusing --saturation-weight will not work.
8.6 Focus Stacks – Depth-of-Field Increase
Main Purpose: Synthetic Depth-of-Field Increase
A focus stack is a series of images where the distance of the focal plane from the sensorvaries. Sloppily speaking, the images were focussed at different distances. Fusing such astack increases the depth-of-field (DOF) beyond the physical limits of diffraction.
8.6.1 Why create focus stacks?
Given
• a fixed sensor or film size,
• a lens’ particular focal length, and
• a notion about “sharpness”, technically speaking the size of the circle-of-confusion(CoC)
the photographer controls the depth-of-field with the aperture. Smaller apertures – this islarger aperture numbers – increase the DOF and vice versa. However, smaller aperturesincrease diffraction which in turn renders the image unsharp. So, there is an optimumaperture where the photographer gets maximum DOF. Sadly, for some purposes like macroshots it is not enough. One way out is to combine the sharp parts of images focused atdifferent distances, thereby artificially increasing the total DOF. This is exactly what Enfusecan do.
All lenses have a so called “sweet spot” aperture, where their resolution is best. Tak-ing pictures at this aperture, the photographer squeezes the maximum quality out of thelens. But: the “sweet spot” aperture often is only one or two stops away from wide open.
1 Paul E. Debevec defines: “A light probe image is an omnidirectional, high dynamic range image thatrecords the incident illumination conditions at a particular point in space.”
Chapter 8: Applications of Enfuse 47
Wouldn’t it be great to be able combine these best-possible images to form one high-quality,sufficient-DOF image? Welcome to Enfuse’s local-contrast selection abilities.
8.6.2 Preparing Focus Stacks
We are going to combine images with limited DOF to increase their in-focus parts. Thewhole process is about image sharpness. Therefore, the input images must align very well,not just well, but very well. For optimum results the maximum control point distancein Hugin (see Chapter 9 [Helpful Programs], page 55) should not exceed 0.3–0.5 pixels toensure perfect blending.
As in all image fusion operations it is preferable to use 16 bit linear (gamma = 1) imagesthroughout, but 8 bit gamma encoded images will do. Naturally, high SNR input dataalways is welcome.
8.6.3 Local Contrast Based Fusing
A bare bones call to Enfuse for focus stacking could look like this.
enfuse \
--exposure-weight=0 \
--saturation-weight=0 \
--contrast-weight=1 \
--hard-mask \
... \
--output=output.tif \
input-<0000-9999>.tif
Here is what each option causes:
--exposure-weight=0
Switch off exposure based pixel selection. The default weight is 1.0.
--saturation-weight=0
Switch off saturation based pixel selection. The default weight is 0.2.
--contrast-weight=1
Switch on pixel selection based on local contrast.
--hard-mask
Select the best pixel from the image stack and ignore all others. Without thisoption, Enfuse uses all pixels in the stack and weights them according to theirrespective quality, which in our case is local contrast. Without --hard-mask,the result will always look a bit soft. See Section 5.4 [Local Contrast Weighting],page 31.
If you want to see some entertaining progress messages – local-contrast weighting takes awhile –, also pass the --verbose option for a verbose progress report.
8.6.4 Basic Focus Stacking
For a large class of image stacks Enfuse’s default algorithm, as selected in Section 8.6.3[Local Contrast Based Fusing], page 47, to determine the sharpness produces nice results.The algorithm uses a moving square window, the so-called contrast window. It computesthe standard deviation of the pixels inside of the window. The program then selects the

Chapter 8: Applications of Enfuse 48
window’s center pixel of the image in the stack where the standard deviation is largest, thatis, the local contrast reaches the maximum.
However, the algorithm fails to deliver good masks for images which exhibit high contrastedges on the scale of the contrast window size. The typical artifacts that show up are
• faint dark seams on the light side of the high contrast edges and
• extremely soft, slightly lighter seams on the dark side of the high contrast edges,
where the distance of the seams from the middle of the edge is comparable to the contrastwindow size.
If your results do not show any of these artifacts, stick with the basic algorithm. Ad-vanced focus stacking, as described in the next sections, delivers superior results in case ofartifacts, though requires manually tuning several parameters.
8.6.5 Advanced Focus Stacking
If your fused image shows any of the defects described in the previous section, you cantry a more difficult-to-use algorithm that effectively works around the seam artifacts. It isdescribed in the next section.
8.6.5.1 A Detailed Look at the Problem
Let us use an example to illustrate the problem of relating the sharpness with the localcontrast variations. Say we use a 5x5 contrast window. Moreover, let sharp_edge andsmooth_edge be two specific configurations:
sharp_edge = [ 0, 0, 200, 0, 0;
0, 225, 0, 0, 0;
0, 255, 0, 0, 0;
215, 0, 0, 0, 0;
200, 0, 0, 0, 0]
smooth_edge = [ 0, 62, 125, 187, 250;
1, 63, 126, 188, 251;
2, 65, 127, 190, 252;
3, 66, 128, 191, 253;
5, 67, 130, 192, 255]
where ‘;’ separates the rows and ‘,’ separates the columns. This is in fact Octave syntax.
Figure 8.1 and Figure 8.2 show plots of the matrices sharp_edge and smooth_edge.
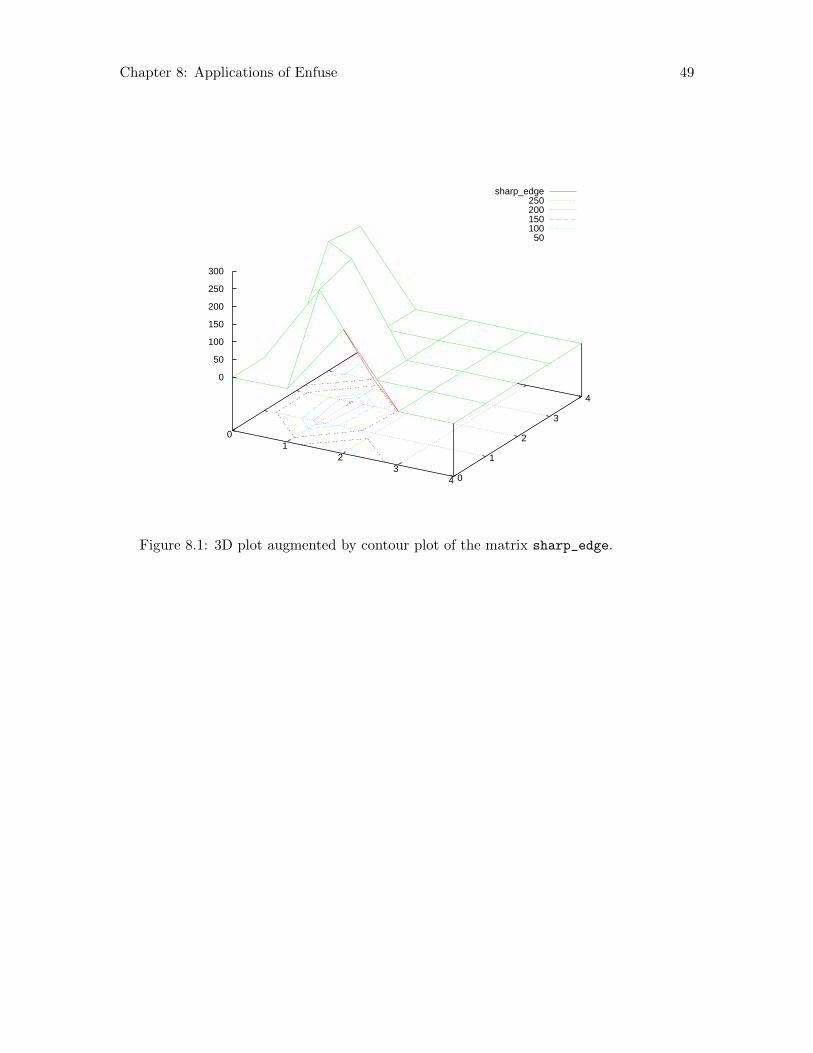
Chapter 8: Applications of Enfuse 49
sharp_edge 250 200 150 100 50
0 1
2 3
4 0
1
2
3
4
0
50
100
150
200
250
300
Figure 8.1: 3D plot augmented by contour plot of the matrix sharp_edge.

Chapter 8: Applications of Enfuse 50
smooth_edge 250 200 150 100 50
0 1
2 3
4 0
1
2
3
4
0
50
100
150
200
250
300
Figure 8.2: 3D plot augmented by contour plot of the matrix smooth_edge.
Our intuition lets us “see” an extremely sharp edge in the first matrix, whereas the sec-ond one describes an extraordinarily smooth diagonal intensity ramp. Which one will beselected? Well, sharp_edge has a standard deviation of 88.07 and smooth_edge has 88.41.Thus, smooth_edge wins, contradicting our intuition, and even worse, our intention!
Sadly, configurations like smooth_edge occur more often with high-quality, good bokehlenses. In fact, they are the very manifestation of “good bokeh”. Therefore, Laplacian edgedetection plays an important role when working with high-quality lenses.
8.6.5.2 Laplacian Edge Detection
Enfuse provides a Laplacian-based algorithm that can help in situations where weightingbased on the standard deviation fails. It is activated with a positive value for SCALE in--contrast-edge-scale=SCALE. The Laplacian will detect two-dimensional curvatureon the scale of SCALE. Here and in the following we simply speak of “curvature” wherewe mean “magnitude of curvature”. That is, we shall not distinguish between convex andconcave edges. Enfuse always use the magnitude of curvature for weighting.
Typically, SCALE ranges between 0.1 pixels and 0.5 pixels, where 0.3 pixels is a goodstarting point. To find the best value for SCALE though, usually some experimentationwill be necessary. Use --save-masks to get all soft-mask (default: softmask-%n.tif) andhard-mask files (default: hardmask-%n.tif). Check how different scales affect the artifacts.Also see Chapter 6 [Understanding Masks], page 39.

Chapter 8: Applications of Enfuse 51
8.6.5.3 Local Contrast Enhancement
Sometimes Enfuse misses smoother edges with --contrast-edge-scale and a little localcontrast enhancement (LCE) helps. Set --contrast-edge-scale=SCALE:LCE-SCALE:LCE-FACTOR. where LCE-SCALE and LCE-FACTOR work like the unsharp mask filtersin various image manipulation programs. Start with LCE-SCALE ten times the value ofSCALE and a LCE-FACTOR of 2–5.
LCE-SCALE can be specified as a percentage of SCALE. LCE-FACTOR also can bespecified as a percentage. Examples:
--contrast-edge-scale=0.3:3.0:3
--contrast-edge-scale=0.3:1000%:3.0
--contrast-edge-scale=0.3:3:300%
--contrast-edge-scale=0.3:1000%:300%
By default LCE is turned off.
8.6.5.4 Suppressing Noise or Recognizing Faint Edges
The Laplacian-based algorithm is much better at resisting the seam problem than the local-contrast algorithm, but it has two shortcomings:
1. The Laplacian is very susceptible to noise and
2. it fails to recognize faint edges.
The --contrast-min-curvature option helps to mitigate both flaws.
The argument to --contrast-min-curvature=CURVATURE either is an absolutelightness value, for example 0..255 for 8 bit data and 0..65535 for 16 bit data, or, whengiven with a ‘%’-sign it is a relative lightness value ranging from 0% to 100%.
To suppress unreal edges or counter excessive noise, use the --contrast-min-curvatureoption with a negative curvature measure CURVATURE. This forces all curvatures less than−CURVATURE to zero.
A positive curvature measure CURVATURE makes Enfuse merge the LoG data withthe local-contrast data. Every curvature larger than or equal to CURVATURE is leftunchanged, and every curvature less than CURVATURE gets replaced with the rescaledlocal-contrast data, such that the largest local contrast is just below CURVATURE. Thiscombines the best parts of both techniques and ensures a precise edge detection over thewhole range of edge curvatures.
Summary
--contrast-edge-scale=0.3
Use LoG to detect edges on a scale of 0.3 pixels. Apply the default grayscaleprojector: average.
--contrast-edge-scale=0.3 --gray-projector=l-star
Use LoG to detect edges on a scale of 0.3 pixels. Apply the L*-grayscale pro-jector.
--contrast-edge-scale=0.3:3:300%
Use LoG to detect edges on a scale of 0.3 pixels, pre-sharpen the input imagesby 300% on a scale of 3 pixels. Apply the default grayscale projector: average.

Chapter 8: Applications of Enfuse 52
--contrast-edge-scale=0.3 --contrast-min-curvature=−0.5%Use LoG to detect edges on a scale of 0.3 pixels. Apply the default grayscaleprojector: average and throw away all edges with a curvature of less than 0.5%.
--contrast-edge-scale=0.3 --contrast-min-curvature=0.5% -
-contrast-window-size=7
Use LoG to detect edges on a scale of 0.3 pixels. Apply the default grayscaleprojector: average and throw away all edges with a curvature of less than 0.5%and replace the LoG data between 0% and 0.5% with SDev data. Use a windowof 7x7 pixel window to compute the SDev.

Chapter 8: Applications of Enfuse 53
8.6.5.5 Focus Stacking Decision Tree
Figure 8.3 helps the user to arrive at a well-fused focus stack with as few steps as possible.
Use Laplacian−of−Gaussian
Apply positive MinCurvature
Use local contrast enhancement
Apply negative MinCurvature
Use local contrast window
[else]
[else]
[mild loss of detail]
[else]
[visible seams]
[still visible seams]
[loss of fine detail]
[else]
Figure 8.3: Focus stacking decision tree.
Always start with the default, contrast weighting with a local contrast window. Only ifseams appear as described in Section 8.6.5 [Advanced Focus Stacking], page 48 switch toLaplacian-of-Gaussian contrast detection.
If some seams remain even in LoG-mode, decrease the sensitivity of the edge detec-tion with a positive --contrast-min-curvature. A too high value of --contrast-min-
Chapter 8: Applications of Enfuse 54
curvature suppresses fine detail though. Part of the detail can be brought back with pre-sharpening, that is, Section 8.6.5.3 [Local Contrast Enhancement], page 51 or combiningLoG with local-contrast-window mode by using a negative --contrast-min-curvature.
Carefully examining the masks (option --save-masks) that Enfuse uses helps to judgethe effects of the parameters.
8.6.6 Tips For Focus Stacking Experts
We have collected some advice with which even focus-stacking adepts can benefit.
• Ensure that the sensor is clean.
Aligning focus stacks requires varying the viewing angle, which corresponds to a chang-ing focal length. Hence, the same pixel on the sensor gets mapped onto different posi-tions in the final image. Dirt spots will occur not only once but as many times as thereare images in the stack – something that is no fun to correct in postprocessing.
Along the same lines, the photographer may want to consider to prepare dark framesbefore, and possibly also after, the shoot of the focus stack, to subtract hot pixelsbefore fusion.
• Prefer a low-sensitivity setting (“ISO”) on the camera to get low-noise images.
Fusing with --hard-mask does not average, and thus does not suppress any noise inthe input images.
• If the transition of in-focus to out-of-focus areas is too abrupt, record the images withclosest and farthest focusing distances twice: first with the intended working aperture,and a second time with a small aperture (large aperture number).
The small aperture will give the fused image a more natural in-focus to out-of-focustransition and the working-aperture shots supply the detail in the in-focus regions.
Chapter 9: Helpful Additional Programs 55
9 Helpful Additional Programs
Several programs and libraries have proven helpful when working with Enfuse and Enblend.
Raw Image Conversion• DCRaw is a universal raw-converter written by David Coffin.
• UFRaw, a raw converter written by Udi Fuchs and based on DCRaw,adds a GUI (ufraw), versatile batch processing (ufraw-batch), and someadditional features such as cropping, noise reduction with wavelets, andautomatic lens error correction.
Image Alignment and Rendering• ALE, David Hilvert’s anti-lamenessing engine for the real die-hard
command-line users aligns, filters, and renders images.
• Hugin is a GUI that aligns and stitches images.
It comes with several command line tools, like nona to stitch panoramaimages, align_image_stack to align overlapping images for HDR or createfocus stacks, and fulla to correct lens errors.
• PanoTools the successor of Helmut Dersch’s original PanoTools offers aset of command-line driven applications to create panoramas. Most notableare PTOptimizer and PTmender.
Image Manipulation• CinePaint is a branch of an early Gimp forked off at version 1.0.4. It sports
much less features than the current Gimp, but offers 8 bit, 16 bit and 32 bitcolor channels, HDR (for example floating-point TIFF, and OpenEXR), anda tightly integrated color management system.
• The Gimp is a general purpose image manipulation program. At the timeof this writing it is still limited to images with only 8 bits per channel.
• ImageMagick and its clone GraphicsMagick are general purpose command-line driven image manipulation programs, for example, convert, display,identify, and montage.
High Dynamic Range• OpenEXR offers libraries and some programs to work with the EXR HDR
format.
• PFSTools create, modify, and tonemap high-dynamic range images.
Libraries
• LibJPEG is a library for handling the JPEG (JFIF) image format.
• LibPNG is a library that handles the Portable Network Graphics (PNG)image format.
• LibTIFF offers a library and utility programs to manipulate the ubiquitousTagged Image File Format, TIFF.
The nifty tiffinfo command quickly inquires the properties of TIFF files.
Meta-Data Handling• EXIFTool reads and writes EXIF meta data. In particular it copies meta
data from one image to another.

Chapter 9: Helpful Additional Programs 56
• LittleCMS is the color management library used by Hugin, DCRaw,UFRaw, Enblend, and Enfuse. It supplies some binaries, too. tifficc,an ICC color profile applier, is of particular interest.

Appendix A: Bug Reports 57
Appendix A Bug ReportsMost of this appendix was taken from theOctave documentation.
Bug reports play an important role in making Enblend and Enfuse reliable and enjoyable.
When you encounter a problem, the first thing to do is to see if it is already known. Tothis end visit the package’s LaunchPad bug database. Search it for your particular problem.If it is not known, please report it.
In order for a bug report to serve its purpose, you must include the information thatmakes it possible to fix the bug.
A.1 Have You Really Found a Bug?
If you are not sure whether you have found a bug, here are some guidelines:
• If Enblend or Enfuse get a fatal signal, for any options or input images, that is a bug.
• If Enblend or Enfuse produce incorrect results, for any input whatever, that is a bug.
• If Enblend or Enfuse produce an error message for valid input, that is a bug.
• If Enblend or Enfuse do not produce an error message for invalid input, that is a bug.
A.2 How to Report Bugs
The fundamental principle of reporting bugs usefully is this: report all the facts. If you arenot sure whether to state a fact or leave it out, state it. Often people omit facts becausethey think they know what causes the problem and they conclude that some details do notmatter. Play it safe and give a specific, complete example.
Keep in mind that the purpose of a bug report is to enable someone to fix the bug if itis not known. Always write your bug reports on the assumption that the bug is not known.
Try to make your bug report self-contained. If we have to ask you for more information, itis best if you include all the previous information in your response, as well as the informationthat was missing.
To enable someone to investigate the bug, you should include all these things:
• The exact version and configuration of Enblend or Enfuse. You can get this by runningit with the options --version and --verbose.
• A complete set of input images that will reproduce the bug. Strive for a minimal setof small1 images.
• The type of machine you are using, and the operating system name and its versionnumber.
• A complete list of any modifications you have made to the source. Be precise aboutthese changes. Show a diff for them.
• Details of any other deviations from the standard procedure for installing Enblend andEnfuse.
• The exact command line you use to call Enblend or Enfuse, which then triggers thebug.
Examples:
1 Images of a size less than 1500x1000 pixels qualify as small.

Appendix A: Bug Reports 58
~/local/bin/enblend -v \
--fine-mask \
--optimizer-weights=3:2 --mask-vectorize=12.5% \
image-1.png image-2.png
or:
/local/bin/enfuse \
--verbose \
--exposure-weight=0 --saturation-weight=0 --entropy-weight=1 \
--gray-projector=l-star \
--entropy-cutoff=1.667% \
layer-01.ppm layer-02.ppm layer-03.ppm
If you call Enblend or Enfuse from within a GUI like, for example, Hugin orKImageFuser by Harry van der Wolf, copy&paste or write down the commandline that launches Enblend or Enfuse.
• A description of what behavior you observe that you believe is incorrect. For example,“The application gets a fatal signal,” or, “The output image contains black holes.”
Of course, if the bug is that the application gets a fatal signal, then one cannot missit. But if the bug is incorrect output, we might not notice unless it is glaringly wrong.
A.3 Sending Patches for Enblend or Enfuse
If you would like to write bug fixes or improvements for Enblend or Enfuse, that is veryhelpful. When you send your changes, please follow these guidelines to avoid causing extrawork for us in studying the patches. If you do not follow these guidelines, your informationmight still be useful, but using it will take extra work.
• Send an explanation with your changes of what problem they fix or what improvementthey bring about. For a bug fix, just include a copy of the bug report, and explain whythe change fixes the bug.
• Always include a proper bug report for the problem you think you have fixed. We needto convince ourselves that the change is right before installing it. Even if it is right, wemight have trouble judging it if we do not have a way to reproduce the problem.
• Include all the comments that are appropriate to help people reading the source in thefuture understand why this change was needed.
• Do not mix together changes made for different reasons. Send them individually.
If you make two changes for separate reasons, then we might not want to install themboth. We might want to install just one.
• Use the version control system to make your diffs. Prefer the unified diff format: hg
diff --unified 4.
• You can increase the probability that your patch gets applied by basing it on a recentrevision of the sources.

Appendix B: Authors 59
Appendix B Authors
Andrew Mihal ([email protected]) has written Enblend and Enfuse.
Contributors
• Pablo d’Angelo ([email protected]) added the contrast criteria.
• Joe Beda: Win32 porting up to version 3.2.
• Kornel Benko, [email protected]: CMake support for ver-sion 4.0.
• Roger Goodman: Proofreading of the manuals.
• Max Lyons.
• Mark aka mjz: Win32 porting up to version 3.2.
• Thomas Modes, [email protected]: Win32 porting of version 4.0.
• Ryan Sleevi, [email protected]: Win32 porting of version 4.0.
• Christoph Spiel ([email protected]) added the gray projectors, theLoG-based edge detection, an O(n)-algorithm for the calculation of local contrast, en-tropy weighting, and various other features.
• Brent Townshend, [email protected]: HDR support.
Thanks to Simon Andriot and Pablo Joubert for suggesting theMertens-Kautz-VanReeth technique and the name “Enfuse”.

Appendix C: GNU Free Documentation License 60
Appendix C GNU Free Documentation License
Version 1.2, November 2002
Copyright c© 2000, 2001, 2002 Free Software Foundation, Inc.51 Franklin St, Fifth Floor, Boston, MA 02110-1301, USA
Everyone is permitted to copy and distribute verbatim copiesof this license document, but changing it is not allowed.
0. PREAMBLE
The purpose of this License is to make a manual, textbook, or other functional anduseful document free in the sense of freedom: to assure everyone the effective freedomto copy and redistribute it, with or without modifying it, either commercially or non-commercially. Secondarily, this License preserves for the author and publisher a wayto get credit for their work, while not being considered responsible for modificationsmade by others.
This License is a kind of “copyleft”, which means that derivative works of the documentmust themselves be free in the same sense. It complements the GNU General PublicLicense, which is a copyleft license designed for free software.
We have designed this License in order to use it for manuals for free software, becausefree software needs free documentation: a free program should come with manualsproviding the same freedoms that the software does. But this License is not limited tosoftware manuals; it can be used for any textual work, regardless of subject matter orwhether it is published as a printed book. We recommend this License principally forworks whose purpose is instruction or reference.
1. APPLICABILITY AND DEFINITIONS
This License applies to any manual or other work, in any medium, that contains anotice placed by the copyright holder saying it can be distributed under the termsof this License. Such a notice grants a world-wide, royalty-free license, unlimited induration, to use that work under the conditions stated herein. The “Document”,below, refers to any such manual or work. Any member of the public is a licensee, andis addressed as “you”. You accept the license if you copy, modify or distribute the workin a way requiring permission under copyright law.
A “Modified Version” of the Document means any work containing the Document ora portion of it, either copied verbatim, or with modifications and/or translated intoanother language.
A “Secondary Section” is a named appendix or a front-matter section of the Documentthat deals exclusively with the relationship of the publishers or authors of the Documentto the Document’s overall subject (or to related matters) and contains nothing thatcould fall directly within that overall subject. (Thus, if the Document is in part atextbook of mathematics, a Secondary Section may not explain any mathematics.) Therelationship could be a matter of historical connection with the subject or with relatedmatters, or of legal, commercial, philosophical, ethical or political position regardingthem.
The “Invariant Sections” are certain Secondary Sections whose titles are designated, asbeing those of Invariant Sections, in the notice that says that the Document is released

Appendix C: GNU Free Documentation License 61
under this License. If a section does not fit the above definition of Secondary then it isnot allowed to be designated as Invariant. The Document may contain zero InvariantSections. If the Document does not identify any Invariant Sections then there are none.
The “Cover Texts” are certain short passages of text that are listed, as Front-CoverTexts or Back-Cover Texts, in the notice that says that the Document is released underthis License. A Front-Cover Text may be at most 5 words, and a Back-Cover Text maybe at most 25 words.
A “Transparent” copy of the Document means a machine-readable copy, representedin a format whose specification is available to the general public, that is suitable forrevising the document straightforwardly with generic text editors or (for images com-posed of pixels) generic paint programs or (for drawings) some widely available drawingeditor, and that is suitable for input to text formatters or for automatic translation toa variety of formats suitable for input to text formatters. A copy made in an otherwiseTransparent file format whose markup, or absence of markup, has been arranged tothwart or discourage subsequent modification by readers is not Transparent. An imageformat is not Transparent if used for any substantial amount of text. A copy that isnot “Transparent” is called “Opaque”.
Examples of suitable formats for Transparent copies include plain ascii withoutmarkup, Texinfo input format, LaTEX input format, SGML or XML using a publiclyavailable DTD, and standard-conforming simple HTML, PostScript or PDF designedfor human modification. Examples of transparent image formats include PNG, XCF
and JPG. Opaque formats include proprietary formats that can be read and editedonly by proprietary word processors, SGML or XML for which the DTD and/orprocessing tools are not generally available, and the machine-generated HTML,PostScript or PDF produced by some word processors for output purposes only.
The “Title Page” means, for a printed book, the title page itself, plus such followingpages as are needed to hold, legibly, the material this License requires to appear in thetitle page. For works in formats which do not have any title page as such, “Title Page”means the text near the most prominent appearance of the work’s title, preceding thebeginning of the body of the text.
A section “Entitled XYZ” means a named subunit of the Document whose title eitheris precisely XYZ or contains XYZ in parentheses following text that translates XYZ inanother language. (Here XYZ stands for a specific section name mentioned below, suchas “Acknowledgements”, “Dedications”, “Endorsements”, or “History”.) To “Preservethe Title” of such a section when you modify the Document means that it remains asection “Entitled XYZ” according to this definition.
The Document may include Warranty Disclaimers next to the notice which states thatthis License applies to the Document. These Warranty Disclaimers are considered tobe included by reference in this License, but only as regards disclaiming warranties:any other implication that these Warranty Disclaimers may have is void and has noeffect on the meaning of this License.
2. VERBATIM COPYING
You may copy and distribute the Document in any medium, either commercially ornoncommercially, provided that this License, the copyright notices, and the licensenotice saying this License applies to the Document are reproduced in all copies, and

Appendix C: GNU Free Documentation License 62
that you add no other conditions whatsoever to those of this License. You may not usetechnical measures to obstruct or control the reading or further copying of the copiesyou make or distribute. However, you may accept compensation in exchange for copies.If you distribute a large enough number of copies you must also follow the conditionsin section 3.
You may also lend copies, under the same conditions stated above, and you may publiclydisplay copies.
3. COPYING IN QUANTITY
If you publish printed copies (or copies in media that commonly have printed covers) ofthe Document, numbering more than 100, and the Document’s license notice requiresCover Texts, you must enclose the copies in covers that carry, clearly and legibly, allthese Cover Texts: Front-Cover Texts on the front cover, and Back-Cover Texts onthe back cover. Both covers must also clearly and legibly identify you as the publisherof these copies. The front cover must present the full title with all words of the titleequally prominent and visible. You may add other material on the covers in addition.Copying with changes limited to the covers, as long as they preserve the title of theDocument and satisfy these conditions, can be treated as verbatim copying in otherrespects.
If the required texts for either cover are too voluminous to fit legibly, you should putthe first ones listed (as many as fit reasonably) on the actual cover, and continue therest onto adjacent pages.
If you publish or distribute Opaque copies of the Document numbering more than 100,you must either include a machine-readable Transparent copy along with each Opaquecopy, or state in or with each Opaque copy a computer-network location from whichthe general network-using public has access to download using public-standard networkprotocols a complete Transparent copy of the Document, free of added material. Ifyou use the latter option, you must take reasonably prudent steps, when you begindistribution of Opaque copies in quantity, to ensure that this Transparent copy willremain thus accessible at the stated location until at least one year after the last timeyou distribute an Opaque copy (directly or through your agents or retailers) of thatedition to the public.
It is requested, but not required, that you contact the authors of the Document wellbefore redistributing any large number of copies, to give them a chance to provide youwith an updated version of the Document.
4. MODIFICATIONS
You may copy and distribute a Modified Version of the Document under the conditionsof sections 2 and 3 above, provided that you release the Modified Version under preciselythis License, with the Modified Version filling the role of the Document, thus licensingdistribution and modification of the Modified Version to whoever possesses a copy ofit. In addition, you must do these things in the Modified Version:
A. Use in the Title Page (and on the covers, if any) a title distinct from that of theDocument, and from those of previous versions (which should, if there were any,be listed in the History section of the Document). You may use the same title asa previous version if the original publisher of that version gives permission.

Appendix C: GNU Free Documentation License 63
B. List on the Title Page, as authors, one or more persons or entities responsible forauthorship of the modifications in the Modified Version, together with at least fiveof the principal authors of the Document (all of its principal authors, if it has fewerthan five), unless they release you from this requirement.
C. State on the Title page the name of the publisher of the Modified Version, as thepublisher.
D. Preserve all the copyright notices of the Document.
E. Add an appropriate copyright notice for your modifications adjacent to the othercopyright notices.
F. Include, immediately after the copyright notices, a license notice giving the publicpermission to use the Modified Version under the terms of this License, in the formshown in the Addendum below.
G. Preserve in that license notice the full lists of Invariant Sections and required CoverTexts given in the Document’s license notice.
H. Include an unaltered copy of this License.
I. Preserve the section Entitled “History”, Preserve its Title, and add to it an itemstating at least the title, year, new authors, and publisher of the Modified Versionas given on the Title Page. If there is no section Entitled “History” in the Docu-ment, create one stating the title, year, authors, and publisher of the Documentas given on its Title Page, then add an item describing the Modified Version asstated in the previous sentence.
J. Preserve the network location, if any, given in the Document for public access toa Transparent copy of the Document, and likewise the network locations given inthe Document for previous versions it was based on. These may be placed in the“History” section. You may omit a network location for a work that was publishedat least four years before the Document itself, or if the original publisher of theversion it refers to gives permission.
K. For any section Entitled “Acknowledgements” or “Dedications”, Preserve the Titleof the section, and preserve in the section all the substance and tone of each of thecontributor acknowledgements and/or dedications given therein.
L. Preserve all the Invariant Sections of the Document, unaltered in their text andin their titles. Section numbers or the equivalent are not considered part of thesection titles.
M. Delete any section Entitled “Endorsements”. Such a section may not be includedin the Modified Version.
N. Do not retitle any existing section to be Entitled “Endorsements” or to conflict intitle with any Invariant Section.
O. Preserve any Warranty Disclaimers.
If the Modified Version includes new front-matter sections or appendices that qualifyas Secondary Sections and contain no material copied from the Document, you may atyour option designate some or all of these sections as invariant. To do this, add theirtitles to the list of Invariant Sections in the Modified Version’s license notice. Thesetitles must be distinct from any other section titles.

Appendix C: GNU Free Documentation License 64
You may add a section Entitled “Endorsements”, provided it contains nothing butendorsements of your Modified Version by various parties—for example, statements ofpeer review or that the text has been approved by an organization as the authoritativedefinition of a standard.
You may add a passage of up to five words as a Front-Cover Text, and a passage of upto 25 words as a Back-Cover Text, to the end of the list of Cover Texts in the ModifiedVersion. Only one passage of Front-Cover Text and one of Back-Cover Text may beadded by (or through arrangements made by) any one entity. If the Document alreadyincludes a cover text for the same cover, previously added by you or by arrangementmade by the same entity you are acting on behalf of, you may not add another; butyou may replace the old one, on explicit permission from the previous publisher thatadded the old one.
The author(s) and publisher(s) of the Document do not by this License give permissionto use their names for publicity for or to assert or imply endorsement of any ModifiedVersion.
5. COMBINING DOCUMENTS
You may combine the Document with other documents released under this License,under the terms defined in section 4 above for modified versions, provided that youinclude in the combination all of the Invariant Sections of all of the original documents,unmodified, and list them all as Invariant Sections of your combined work in its licensenotice, and that you preserve all their Warranty Disclaimers.
The combined work need only contain one copy of this License, and multiple identicalInvariant Sections may be replaced with a single copy. If there are multiple InvariantSections with the same name but different contents, make the title of each such sectionunique by adding at the end of it, in parentheses, the name of the original author orpublisher of that section if known, or else a unique number. Make the same adjustmentto the section titles in the list of Invariant Sections in the license notice of the combinedwork.
In the combination, you must combine any sections Entitled “History” in the vari-ous original documents, forming one section Entitled “History”; likewise combine anysections Entitled “Acknowledgements”, and any sections Entitled “Dedications”. Youmust delete all sections Entitled “Endorsements.”
6. COLLECTIONS OF DOCUMENTS
You may make a collection consisting of the Document and other documents releasedunder this License, and replace the individual copies of this License in the variousdocuments with a single copy that is included in the collection, provided that youfollow the rules of this License for verbatim copying of each of the documents in allother respects.
You may extract a single document from such a collection, and distribute it individu-ally under this License, provided you insert a copy of this License into the extracteddocument, and follow this License in all other respects regarding verbatim copying ofthat document.
7. AGGREGATION WITH INDEPENDENT WORKS
A compilation of the Document or its derivatives with other separate and independentdocuments or works, in or on a volume of a storage or distribution medium, is called

Appendix C: GNU Free Documentation License 65
an “aggregate” if the copyright resulting from the compilation is not used to limit thelegal rights of the compilation’s users beyond what the individual works permit. Whenthe Document is included in an aggregate, this License does not apply to the otherworks in the aggregate which are not themselves derivative works of the Document.
If the Cover Text requirement of section 3 is applicable to these copies of the Document,then if the Document is less than one half of the entire aggregate, the Document’s CoverTexts may be placed on covers that bracket the Document within the aggregate, or theelectronic equivalent of covers if the Document is in electronic form. Otherwise theymust appear on printed covers that bracket the whole aggregate.
8. TRANSLATION
Translation is considered a kind of modification, so you may distribute translationsof the Document under the terms of section 4. Replacing Invariant Sections withtranslations requires special permission from their copyright holders, but you mayinclude translations of some or all Invariant Sections in addition to the original versionsof these Invariant Sections. You may include a translation of this License, and all thelicense notices in the Document, and any Warranty Disclaimers, provided that youalso include the original English version of this License and the original versions ofthose notices and disclaimers. In case of a disagreement between the translation andthe original version of this License or a notice or disclaimer, the original version willprevail.
If a section in the Document is Entitled “Acknowledgements”, “Dedications”, or “His-tory”, the requirement (section 4) to Preserve its Title (section 1) will typically requirechanging the actual title.
9. TERMINATION
You may not copy, modify, sublicense, or distribute the Document except as expresslyprovided for under this License. Any other attempt to copy, modify, sublicense ordistribute the Document is void, and will automatically terminate your rights underthis License. However, parties who have received copies, or rights, from you under thisLicense will not have their licenses terminated so long as such parties remain in fullcompliance.
10. FUTURE REVISIONS OF THIS LICENSE
The Free Software Foundation may publish new, revised versions of the GNU FreeDocumentation License from time to time. Such new versions will be similar in spiritto the present version, but may differ in detail to address new problems or concerns.See http://www.gnu.org/copyleft/.
Each version of the License is given a distinguishing version number. If the Documentspecifies that a particular numbered version of this License “or any later version”applies to it, you have the option of following the terms and conditions either of thatspecified version or of any later version that has been published (not as a draft) bythe Free Software Foundation. If the Document does not specify a version number ofthis License, you may choose any version ever published (not as a draft) by the FreeSoftware Foundation.

Program Index 66
Program Index
Aale . . . . . . . . . . . . . . . . . . . . . . . . . . . . . . . . . . . . . . . . . . . . 55align_image_stack (Hugin) . . . . . . . . . . . . . . . . . . . 55
Ccinepaint . . . . . . . . . . . . . . . . . . . . . . . . . . . . . . . . . 16, 55convert (ImageMagick) . . . . . . . . . . . . . . . . . . . . . . . . 55
Ddcraw . . . . . . . . . . . . . . . . . . . . . . . . . . . . . . . . . . . . . . . 3, 55display (ImageMagick) . . . . . . . . . . . . . . . . . . . . . . . . 55
Eexiftool . . . . . . . . . . . . . . . . . . . . . . . . . . . . . . . . . . . . . . 55exrdisplay (OpenEXR) . . . . . . . . . . . . . . . . . . . . . . . 55
Ffulla (Hugin) . . . . . . . . . . . . . . . . . . . . . . . . . . . . . . . . . 55
Ggimp . . . . . . . . . . . . . . . . . . . . . . . . . . . . . . . . . . . . 3, 16, 55gm (GraphicsMagick) . . . . . . . . . . . . . . . . . . . . . . . . . . 55
Hhugin . . . . . . . . . . . . . . . . . . . . . . . . . . . . . . . . 3, 16, 43, 55
Iidentify (ImageMagick) . . . . . . . . . . . . . . . . . . . 39, 55
Mmontage (ImageMagick) . . . . . . . . . . . . . . . . . . . . . . . . 55
Nnona (Hugin) . . . . . . . . . . . . . . . . . . . . . . . . . . . . . . 16, 55
PPanoTools . . . . . . . . . . . . . . . . . . . . . . . . . . . . . . . . . . . . . . 3pfshdrcalibrate (PFScalibration) . . . . . . . . . . . . . 55pfsin (PFSTools) . . . . . . . . . . . . . . . . . . . . . . . . . . . . . 55pfsout (PFSTools) . . . . . . . . . . . . . . . . . . . . . . . . . . . . 55pfstmo_* (PFStmo) . . . . . . . . . . . . . . . . . . . . . . . . . . . 55pfsview (PFSTools) . . . . . . . . . . . . . . . . . . . . . . . . . . . 55PTmender (PanoTools) . . . . . . . . . . . . . . . . . . . . . . . . . 55PTOptimizer (PanoTools) . . . . . . . . . . . . . . . . . . . . . . 55
Ttifficc (LittleCMS) . . . . . . . . . . . . . . . . . . . . . . . . . . 56tiffinfo (libtiff) . . . . . . . . . . . . . . . . . . . . . . . . . . 39, 55
Uufraw . . . . . . . . . . . . . . . . . . . . . . . . . . . . . . . . . . . . . . . 3, 55ufraw-batch . . . . . . . . . . . . . . . . . . . . . . . . . . . . . . . . . . 55

Syntactic-Comment Index 67
Syntactic-Comment Index
Eenblend-response-file . . . . . . . . . . . . . . . . . . . . . . . . 8enfuse-response-file . . . . . . . . . . . . . . . . . . . . . . . . . 8
Ffilename-globbing . . . . . . . . . . . . . . . . . . . . . . . . . . . . . 9
Gglob . . . . . . . . . . . . . . . . . . . . . . . . . . . . . . . . . . . . . . . . . . . . 9
globbing . . . . . . . . . . . . . . . . . . . . . . . . . . . . . . . . . . . . . . . 9
Llayer-selector . . . . . . . . . . . . . . . . . . . . . . . . . . . . . . . 10
Rresponse-file . . . . . . . . . . . . . . . . . . . . . . . . . . . . . . . . . 8

Option Index 68
Option Index
--blend-colorspace . . . . . . . . . . . . . . . . . . . . . . . . . . 14--ciecam . . . . . . . . . . . . . . . . . . . . . . . . . . . . . . . . . . . . . . 14--compression . . . . . . . . . . . . . . . . . . . . . . . . . . . . . . . . 10--contrast-edge-scale . . . . . . . . . . . . . . . . . . . . . . . 18--contrast-min-curvature . . . . . . . . . . . . . . . . . . . 18--contrast-weight . . . . . . . . . . . . . . . . . . . . . . . . . . . . 17--contrast-window-size . . . . . . . . . . . . . . . . . . . . . . 18--depth . . . . . . . . . . . . . . . . . . . . . . . . . . . . . . . . . . . . . . . 15--entropy-cutoff . . . . . . . . . . . . . . . . . . . . . . . . . . . . . 18--entropy-weight . . . . . . . . . . . . . . . . . . . . . . . . . . . . . 17--entropy-window-size . . . . . . . . . . . . . . . . . . . . . . . 19--exposure-cutoff . . . . . . . . . . . . . . . . . . . . . . . . . . . . 20--exposure-mu . . . . . . . . . . . . . . . . . . . . . . . . . . . . . . . . 17--exposure-sigma . . . . . . . . . . . . . . . . . . . . . . . . . . . . . 17--exposure-weight . . . . . . . . . . . . . . . . . . . . . . . . . . . . 17--fallback-profile . . . . . . . . . . . . . . . . . . . . . . . . . . 16--gray-projector . . . . . . . . . . . . . . . . . . . . . . . . . . . . . 21--hard-mask . . . . . . . . . . . . . . . . . . . . . . . . . . . 23, 29, 54--help . . . . . . . . . . . . . . . . . . . . . . . . . . . . . . . . . . . . . . . . 11--layer-selector . . . . . . . . . . . . . . . . . . . . . . . . . . . . . 11--levels . . . . . . . . . . . . . . . . . . . . . . . . . . . . . . . . . . . . . . 11--load-masks . . . . . . . . . . . . . . . . . . . . . . . . . . . . . . . . . 23
--no-ciecam . . . . . . . . . . . . . . . . . . . . . . . . . . . . . . . . . . 16--no-parameter . . . . . . . . . . . . . . . . . . . . . . . . . . . . . . . 12--output . . . . . . . . . . . . . . . . . . . . . . . . . . . . . . . . . . . . . . 12--saturation-weight . . . . . . . . . . . . . . . . . . . . . . . . . 17--save-masks . . . . . . . . . . . . . . . . . . . . . . . . . . . . . . . . . 23--soft-mask . . . . . . . . . . . . . . . . . . . . . . . . . . . . . . . . . . 24--verbose . . . . . . . . . . . . . . . . . . . . . . . . . . . . . . . . . . . . . 12--version . . . . . . . . . . . . . . . . . . . . . . . . . . . . . . . . . . . . . 13--wrap . . . . . . . . . . . . . . . . . . . . . . . . . . . . . . . . . . . . . . . . 13-b . . . . . . . . . . . . . . . . . . . . . . . . . . . . . . . . . . . . . . . . . 14, 41-c . . . . . . . . . . . . . . . . . . . . . . . . . . . . . . . . . . . . . . . . . . . . . 14-d . . . . . . . . . . . . . . . . . . . . . . . . . . . . . . . . . . . . . . . . . . . . . 15-f . . . . . . . . . . . . . . . . . . . . . . . . . . . . . . . . . . . . . . . . . . . . . 16-g . . . . . . . . . . . . . . . . . . . . . . . . . . . . . . . . . . . . . . . . . . . . . 16-h . . . . . . . . . . . . . . . . . . . . . . . . . . . . . . . . . . . . . . . . . . . . . 11-l . . . . . . . . . . . . . . . . . . . . . . . . . . . . . . . . . . . . . . . . . . . . . 11-m . . . . . . . . . . . . . . . . . . . . . . . . . . . . . . . . . . . . . . . . . 16, 41-o . . . . . . . . . . . . . . . . . . . . . . . . . . . . . . . . . . . . . . . . . . . . . 12-v . . . . . . . . . . . . . . . . . . . . . . . . . . . . . . . . . . . . . . . . . . . . . 12-V . . . . . . . . . . . . . . . . . . . . . . . . . . . . . . . . . . . . . . . . . . . . . 13-w . . . . . . . . . . . . . . . . . . . . . . . . . . . . . . . . . . . . . . . . . . . . . 13

General Index 69
General Index
#‘#’ (response file comment) . . . . . . . . . . . . . . . . . . . . . . 7
@‘@’ (response file prefix) . . . . . . . . . . . . . . . . . . . . . . . . . 6
3360◦ panoramas . . . . . . . . . . . . . . . . . . . . . . . . . . . . . . . 13
Aa.tif . . . . . . . . . . . . . . . . . . . . . . . . . . . . . . . . . . . . . . . . . 12active criterion . . . . . . . . . . . . . . . . . . . . . . . . . . . . . . . . 29advanced focus stacking . . . . . . . . . . . . . . . . . . . . . . . 48advanced focus stacking, recognizing faint edges
. . . . . . . . . . . . . . . . . . . . . . . . . . . . . . . . . . . . . . . . . . . 51advanced focus stacking, suppressing noise . . . . . 51affine transformation . . . . . . . . . . . . . . . . . . . . . . . . . . . . 4algorithms, globbing . . . . . . . . . . . . . . . . . . . . . . . . . . . . 9alpha channel . . . . . . . . . . . . . . . . . . . . . . . . . . . . . . . . 2, 4alpha channel, associated . . . . . . . . . . . . . . . . . . . . . . 16‘anti-value’ gray projector . . . . . . . . . . . . . . . . . . . . 22aperture, sweet spot . . . . . . . . . . . . . . . . . . . . . . . . . . . 46applications of enfuse . . . . . . . . . . . . . . . . . . . . . . . . . . 43arithmetic JPEG compression . . . . . . . . . . . . . . . . . . 10authors, list of . . . . . . . . . . . . . . . . . . . . . . . . . . . . . . . . . 59‘average’ gray projector . . . . . . . . . . . . . . . . . . . . . . . 22average, disabling . . . . . . . . . . . . . . . . . . . . . . . . . . . . . . 29average, weighted . . . . . . . . . . . . . . . . . . . . . . . . . . . . . . 28
Bbasic focus stacking . . . . . . . . . . . . . . . . . . . . . . . . . . . . 47binary mask . . . . . . . . . . . . . . . . . . . . . . . . . . . . . . . . . . . 39bits per channel . . . . . . . . . . . . . . . . . . . . . . . . . . . . . . . 15blend colorspace . . . . . . . . . . . . . . . . . . . . . . . . . . . . . . . 14blending exposures . . . . . . . . . . . . . . . . . . . . . . . . . . . . 45bug database, LaunchPad . . . . . . . . . . . . . . . . . . . . . . 57bug reports . . . . . . . . . . . . . . . . . . . . . . . . . . . . . . . . . . . . 57Burt-Adelson multiresolution spline . . . . . . . . . . . . . 1
Ccanvas size . . . . . . . . . . . . . . . . . . . . . . . . . . . . . . . . . . . . 16channel width . . . . . . . . . . . . . . . . . . . . . . . . . . . . . . . . . 15channel, alpha . . . . . . . . . . . . . . . . . . . . . . . . . . . . . . . . . . 2‘channel-mixer’ gray projector . . . . . . . . . . . . . . . . 22CIECAM02 . . . . . . . . . . . . . . . . . . . . . . . . . . . . . 14, 16, 27CIECAM02 colorspace . . . . . . . . . . . . . . . . . . . . . . . . . . 14circle-of-confusion . . . . . . . . . . . . . . . . . . . . . . . . . . . . . 46color appearance model . . . . . . . . . . . . . . . . . 14, 16, 27
color cube, RGB . . . . . . . . . . . . . . . . . . . . . . . . . . . . . . . 27color profile . . . . . . . . . . . . . . . . . . . . . . . . . . . . . . . . . . . 27color space, sRGB . . . . . . . . . . . . . . . . . . . . . . . . . . . . . . 27colorspace, blend . . . . . . . . . . . . . . . . . . . . . . . . . . . . . . 14compression . . . . . . . . . . . . . . . . . . . . . . . . . . . . . . . . . . . 10compression, arithmetic JPEG . . . . . . . . . . . . . . . . . 10compression, deflate . . . . . . . . . . . . . . . . . . . . . . . . . . . 10compression, JPEG . . . . . . . . . . . . . . . . . . . . . . . . . . . . 10compression, LZW . . . . . . . . . . . . . . . . . . . . . . . . . . . . . 11compression, packbits . . . . . . . . . . . . . . . . . . . . . . . . . . 11contrast enhancement, local . . . . . . . . . . . . . . . . . . . . 51contrast weighting using a blend of methods . . . 35contrast weighting using laplacian-of–gaussian . . 33contrast weighting using standard deviation . . . . 32conversion, raw . . . . . . . . . . . . . . . . . . . . . . . . . . . . . . . . . 4conversion, RGB’-L*a*b* . . . . . . . . . . . . . . . . . . . . . . 23conversion, RGB-L*a*b* . . . . . . . . . . . . . . . . . . . . . . . 22criteria, overpowering one another . . . . . . . . . . . . . 29criterion, active . . . . . . . . . . . . . . . . . . . . . . . . . . . . . . . . 29
DD50 white point . . . . . . . . . . . . . . . . . . . . . . . . . . . . . . . 27dark frame . . . . . . . . . . . . . . . . . . . . . . . . . . . . . . . . . . . . 54decision tree, focus stacking . . . . . . . . . . . . . . . . . . . . 53default layer selection . . . . . . . . . . . . . . . . . . . . . . . . . . 10default output filename . . . . . . . . . . . . . . . . . . . . . . . . 12default weights . . . . . . . . . . . . . . . . . . . . . . . . . . . . . . . . 29deflate compression . . . . . . . . . . . . . . . . . . . . . . . . . . . . 10delimiters, option . . . . . . . . . . . . . . . . . . . . . . . . . . . . . . 26depth-of-field . . . . . . . . . . . . . . . . . . . . . . . . . . . . . . . . . . 46depth-of-focus increase . . . . . . . . . . . . . . . . . . . . . . . . . 46digital blending . . . . . . . . . . . . . . . . . . . . . . . . . . . . . . . . 45disabling average . . . . . . . . . . . . . . . . . . . . . . . . . . . . . . 29double precision float, IEEE754 . . . . . . . . . . . . . . . . . 15dynamic range increase . . . . . . . . . . . . . . . . . . . . 44, 46
Eedge detection, laplacian . . . . . . . . . . . . . . . . . . . . . . . 50entropy . . . . . . . . . . . . . . . . . . . . . . . . . . . . . . . . . . . . . . . . 36entropy, definition . . . . . . . . . . . . . . . . . . . . . . . . . . . . . 36estimators . . . . . . . . . . . . . . . . . . . . . . . . . . . . . . . . . . . . . 33expectation value . . . . . . . . . . . . . . . . . . . . . . . . . . . . . . 33expert focus stacking tips . . . . . . . . . . . . . . . . . . . . . . 54exposure series . . . . . . . . . . . . . . . . . . . . . . . . . . . . . . . . 44exposure series, common misconceptions . . . . . . . 45exposure series, tips for beginners . . . . . . . . . . . . . . 45
Ffallback profile . . . . . . . . . . . . . . . . . . . . . . . . . . . . . . . . . 16filename template . . . . . . . . . . . . . . . . . . . . . . . . . . 23, 24filename, literal . . . . . . . . . . . . . . . . . . . . . . . . . . . . . . . . . 6

General Index 70
flash exposure series . . . . . . . . . . . . . . . . . . . . . . . . . . . 46focus stacking decision tree . . . . . . . . . . . . . . . . . . . . 53focus stacking, advanced . . . . . . . . . . . . . . . . . . . . . . . 48focus stacking, basic . . . . . . . . . . . . . . . . . . . . . . . . . . . 47focus stacks . . . . . . . . . . . . . . . . . . . . . . . . . . . . . . . . . . . 46focus stacks, fusing . . . . . . . . . . . . . . . . . . . . . . . . . . . . 47focus stacks, preparation . . . . . . . . . . . . . . . . . . . . . . . 47focus stacks, why create them . . . . . . . . . . . . . . . . . . 46format of response file . . . . . . . . . . . . . . . . . . . . . . . . . . 7free documentation license (FDL) . . . . . . . . . . . . . . 60fusing, local-contrast-based . . . . . . . . . . . . . . . . . . . . 47fusing, single criterion . . . . . . . . . . . . . . . . . . . . . . . . . 29
Ggeneral index . . . . . . . . . . . . . . . . . . . . . . . . . . . . . . . . . . 69glob(7) . . . . . . . . . . . . . . . . . . . . . . . . . . . . . . . . . . . . . . . . . 9globbing algorithm ‘literal’ . . . . . . . . . . . . . . . . . . . 9globbing algorithm ‘none’ . . . . . . . . . . . . . . . . . . . . . . . 9globbing algorithm ‘sh’ . . . . . . . . . . . . . . . . . . . . . . . . . 9globbing algorithm ‘shell’ . . . . . . . . . . . . . . . . . . . . . . 9globbing algorithm ‘wildcard’ . . . . . . . . . . . . . . . . . . 9globbing algorithms . . . . . . . . . . . . . . . . . . . . . . . . . . . . . 9GNU free documentation license . . . . . . . . . . . . . . . 60grammar, response file . . . . . . . . . . . . . . . . . . . . . . . . . . 7grammar, syntactic comment . . . . . . . . . . . . . . . . . . . 9gray projector . . . . . . . . . . . . . . . . . . . . . . . . . . . . . . . . . 21gray projector, ‘anti-value’ . . . . . . . . . . . . . . . . . . . 22gray projector, ‘average’ . . . . . . . . . . . . . . . . . . . . . . 22gray projector, ‘channel-mixer’ . . . . . . . . . . . . . . . . 22gray projector, ‘l-star’ . . . . . . . . . . . . . . . . . . . . . . . . 22gray projector, ‘lightness’ . . . . . . . . . . . . . . . . . . . . 22gray projector, ‘luminance’ . . . . . . . . . . . . . . . . . . . . 23gray projector, ‘pl-star’ . . . . . . . . . . . . . . . . . . . . . . 23gray projector, ‘value’ . . . . . . . . . . . . . . . . . . . . . . . . . 23
Hhalf precision float, OpenEXR . . . . . . . . . . . . . . . . . . 16helpful programs . . . . . . . . . . . . . . . . . . . . . . . . . . . . . . 55hot pixels . . . . . . . . . . . . . . . . . . . . . . . . . . . . . . . . . . . . . 54Hugin . . . . . . . . . . . . . . . . . . . . . . . . . . . . . . . . . . . . . . . . . 58
IICC profile . . . . . . . . . . . . . . . . . . . . . . . . . . . . . . . . . 14, 27IEEE754 double precision float . . . . . . . . . . . . . . . . . 15IEEE754 single precision float . . . . . . . . . . . . . . . . . . 15image cache . . . . . . . . . . . . . . . . . . . . . . . . . . . . . . . . . . . 41image cache, block size . . . . . . . . . . . . . . . . . . . . . . . . 14image cache, cache size . . . . . . . . . . . . . . . . . . . . . . . . 16image cache, location . . . . . . . . . . . . . . . . . . . . . . . . . . 41image, multi-layer . . . . . . . . . . . . . . . . . . . . . . . . . . . . . . 2images, fusable . . . . . . . . . . . . . . . . . . . . . . . . . . . . . . . . 43index, general . . . . . . . . . . . . . . . . . . . . . . . . . . . . . . . . . 69index, option . . . . . . . . . . . . . . . . . . . . . . . . . . . . . . . . . . 68index, program . . . . . . . . . . . . . . . . . . . . . . . . . . . . . . . . 66index, syntactic-comment . . . . . . . . . . . . . . . . . . . . . . 67
input image requirements . . . . . . . . . . . . . . . . . . . . . . . 6input mask . . . . . . . . . . . . . . . . . . . . . . . . . . . . . . . . . . . . 39invocation . . . . . . . . . . . . . . . . . . . . . . . . . . . . . . . . . . . . . . 6
JJPEG compression . . . . . . . . . . . . . . . . . . . . . . . . . . . . . 10
KKImageFuser . . . . . . . . . . . . . . . . . . . . . . . . . . . . . . . . . . 58
L‘l-star’ gray projector . . . . . . . . . . . . . . . . . . . . . . . . 22laplacian edge detection . . . . . . . . . . . . . . . . . . . . . . . 50Laplacian of Gaussian (LoG) . . . . . . . . . . . . . . . . . . . 33Laplacian-of-Gaussian . . . . . . . . . . . . . . . . . . . . . . . . . 18LaunchPad . . . . . . . . . . . . . . . . . . . . . . . . . . . . . . . . . . . . 57LaunchPad, bug database . . . . . . . . . . . . . . . . . . . . . . 57layer selection . . . . . . . . . . . . . . . . . . . . . . . . . . . . . . . . . 11layer selection, all-layers . . . . . . . . . . . . . . . . . . . . . . . 11layer selection, default . . . . . . . . . . . . . . . . . . . . . . . . . 10layer selection, first-layer . . . . . . . . . . . . . . . . . . . . . . . 11layer selection, largest-layer . . . . . . . . . . . . . . . . . . . . 11layer selection, no layer . . . . . . . . . . . . . . . . . . . . . . . . 11lens distortion, correction of . . . . . . . . . . . . . . . . . . . . 4levels, pyramid . . . . . . . . . . . . . . . . . . . . . . . . . . . . . . . . 11LibJPEG . . . . . . . . . . . . . . . . . . . . . . . . . . . . . . . . . . . . . . 55LibPNG . . . . . . . . . . . . . . . . . . . . . . . . . . . . . . . . . . . . . . . 55LibTiff . . . . . . . . . . . . . . . . . . . . . . . . . . . . . . . . . . . . . . . . 55light probe . . . . . . . . . . . . . . . . . . . . . . . . . . . . . . . . . . . . 46‘lightness’ gray projector . . . . . . . . . . . . . . . . . . . . . 22literal filename . . . . . . . . . . . . . . . . . . . . . . . . . . . . . . . . . . 6local analysis window . . . . . . . . . . . . . . . . . . . . . . . . . . 32local contrast enhancement . . . . . . . . . . . . . . . . . . . . 51local contrast problem . . . . . . . . . . . . . . . . . . . . . . . . . 48local-contrast-based fusing . . . . . . . . . . . . . . . . . . . . . 47‘luminance’ gray projector . . . . . . . . . . . . . . . . . . . . . 23LZW compression . . . . . . . . . . . . . . . . . . . . . . . . . . . . . . 11
Mmask template character, ‘%’ . . . . . . . . . . . . . . . . . . . 25mask template character, ‘b’ . . . . . . . . . . . . . . . . . . . 25mask template character, ‘B’ . . . . . . . . . . . . . . . . . . . 25mask template character, ‘d’ . . . . . . . . . . . . . . . . . . . 25mask template character, ‘D’ . . . . . . . . . . . . . . . . . . . 25mask template character, ‘e’ . . . . . . . . . . . . . . . . . . . 25mask template character, ‘E’ . . . . . . . . . . . . . . . . . . . 25mask template character, ‘f’ . . . . . . . . . . . . . . . . . . . 25mask template character, ‘F’ . . . . . . . . . . . . . . . . . . . 25mask template character, ‘i’ . . . . . . . . . . . . . . . . . . . 25mask template character, ‘n’ . . . . . . . . . . . . . . . . . . . 25mask template character, ‘p’ . . . . . . . . . . . . . . . . . . . 25mask template character, ‘P’ . . . . . . . . . . . . . . . . . . . 25mask template characters, table of . . . . . . . . . . . . . 25mask, binary . . . . . . . . . . . . . . . . . . . . . . . . . . . . . . . . . . 39

General Index 71
mask, filename template . . . . . . . . . . . . . . . . . . . 23, 24mask, input files . . . . . . . . . . . . . . . . . . . . . . . . . . . . . . . 39mask, loading . . . . . . . . . . . . . . . . . . . . . . . . . . . . . . . . . 23mask, save . . . . . . . . . . . . . . . . . . . . . . . . . . . . . . . . . . . . . 23mask, weight . . . . . . . . . . . . . . . . . . . . . . . . . . . . . . . 39, 40masks, understanding . . . . . . . . . . . . . . . . . . . . . . . . . . 39memory, tuning usage of . . . . . . . . . . . . . . . . . . . . . . . 41Mertens-Kautz-Van Reeth exposure fusion . . . . . . 1mode of operation (SDev, LoG, . . . ) . . . . . . . . . . . . 36multi-directory TIFF . . . . . . . . . . . . . . . . . . . . . . . . . . . . 2multi-layer image . . . . . . . . . . . . . . . . . . . . . . . . . . . . . . . 2
Nnatural sharp-unsharp transition . . . . . . . . . . . . . . . 54noise reduction . . . . . . . . . . . . . . . . . . . . . . . . . . . . . . . . 44
OOctave . . . . . . . . . . . . . . . . . . . . . . . . . . . . . . . . . . . . . . . . 57only save mask . . . . . . . . . . . . . . . . . . . . . . . . . . . . . . . . 24OpenEXR, data format . . . . . . . . . . . . . . . . . . . . . . . . . 15OpenEXR, half precision float . . . . . . . . . . . . . . . . . . 16option delimiters . . . . . . . . . . . . . . . . . . . . . . . . . . . . . . 26option index . . . . . . . . . . . . . . . . . . . . . . . . . . . . . . . . . . . 68options, common . . . . . . . . . . . . . . . . . . . . . . . . . . . . . . 10options, expert . . . . . . . . . . . . . . . . . . . . . . . . . . . . . . . . 18options, extended . . . . . . . . . . . . . . . . . . . . . . . . . . . . . . 14options, fusion . . . . . . . . . . . . . . . . . . . . . . . . . . . . . . . . . 17order, of processing . . . . . . . . . . . . . . . . . . . . . . . . . . . . . 6output file compression . . . . . . . . . . . . . . . . . . . . . . . . 10output filename, default . . . . . . . . . . . . . . . . . . . . . . . 12output image, set size of . . . . . . . . . . . . . . . . . . . . . . . 16overpowering criteria . . . . . . . . . . . . . . . . . . . . . . . . . . 29overview . . . . . . . . . . . . . . . . . . . . . . . . . . . . . . . . . . . . . . . . 1
Ppackbits compression . . . . . . . . . . . . . . . . . . . . . . . . . . 11parallax error . . . . . . . . . . . . . . . . . . . . . . . . . . . . . . . . . . . 4perceptual rendering intent . . . . . . . . . . . . . . . . . . . . 27photometric alignment . . . . . . . . . . . . . . . . . . . . . . . . . . 4pixels, hot . . . . . . . . . . . . . . . . . . . . . . . . . . . . . . . . . . . . . 54‘pl-star’ gray projector . . . . . . . . . . . . . . . . . . . . . . . 23polarization series . . . . . . . . . . . . . . . . . . . . . . . . . . . . . 46probability function . . . . . . . . . . . . . . . . . . . . . . . . . . . 33problem reports . . . . . . . . . . . . . . . . . . . . . . . . . . . . . . . 57problem, local contrast . . . . . . . . . . . . . . . . . . . . . . . . 48processing order . . . . . . . . . . . . . . . . . . . . . . . . . . . . . . . . 6profile, fallback . . . . . . . . . . . . . . . . . . . . . . . . . . . . . . . . 16profile, ICC . . . . . . . . . . . . . . . . . . . . . . . . . . . . . . . . 14, 27program index . . . . . . . . . . . . . . . . . . . . . . . . . . . . . . . . . 66programs, helpful additional . . . . . . . . . . . . . . . . . . . 55pyramid levels . . . . . . . . . . . . . . . . . . . . . . . . . . . . . . . . . 11
Rraw conversion . . . . . . . . . . . . . . . . . . . . . . . . . . . . . . . . . . 4
rendering intent, perceptual . . . . . . . . . . . . . . . . . . . . 27response file . . . . . . . . . . . . . . . . . . . . . . . . . . . . . . . . . . . . 6response file, comment (‘#’) . . . . . . . . . . . . . . . . . . . . . 7response file, force recognition of . . . . . . . . . . . . . . . . 8response file, format . . . . . . . . . . . . . . . . . . . . . . . . . . . . 7response file, grammar . . . . . . . . . . . . . . . . . . . . . . . . . . 7response file, syntactic comment . . . . . . . . . . . . . . . . 8RGB color cube . . . . . . . . . . . . . . . . . . . . . . . . . . . . . . . . 27RGB’-L*a*b* conversion . . . . . . . . . . . . . . . . . . . . . . . 23RGB-cube . . . . . . . . . . . . . . . . . . . . . . . . . . . . . . . . . . . . . 14RGB-L*a*b* conversion . . . . . . . . . . . . . . . . . . . . . . . 22
Ssaturation enhancement . . . . . . . . . . . . . . . . . . . . . . . 46save mask . . . . . . . . . . . . . . . . . . . . . . . . . . . . . . . . . . . . . 23save mask, only . . . . . . . . . . . . . . . . . . . . . . . . . . . . . . . . 24scaling of parameters . . . . . . . . . . . . . . . . . . . . . . . . . . 36sensor, use of clean . . . . . . . . . . . . . . . . . . . . . . . . . . . . 54series, exposure . . . . . . . . . . . . . . . . . . . . . . . . . . . . . . . . 44series, flash exposure . . . . . . . . . . . . . . . . . . . . . . . . . . 46series, polarization . . . . . . . . . . . . . . . . . . . . . . . . . . . . . 46series, simple . . . . . . . . . . . . . . . . . . . . . . . . . . . . . . . . . . 44simple series . . . . . . . . . . . . . . . . . . . . . . . . . . . . . . . . . . . 44single criterion fusing . . . . . . . . . . . . . . . . . . . . . . . . . . 29single precision float, IEEE754 . . . . . . . . . . . . . . . . . . 15size, canvas . . . . . . . . . . . . . . . . . . . . . . . . . . . . . . . . . . . . 16SourceForge . . . . . . . . . . . . . . . . . . . . . . . . . . . . . . . . . . . . 2sRGB . . . . . . . . . . . . . . . . . . . . . . . . . . . . . . . . . . . . . . . . . . 14sRGB color space . . . . . . . . . . . . . . . . . . . . . . . . . . . . . . 27standard deviation . . . . . . . . . . . . . . . . . . . . . . . . . . . . . 33statistical moments . . . . . . . . . . . . . . . . . . . . . . . . . . . . 33subtraction of dark frame . . . . . . . . . . . . . . . . . . . . . . 54sweet spot aperture . . . . . . . . . . . . . . . . . . . . . . . . . . . . 46syntactic comment, grammar . . . . . . . . . . . . . . . . . . . 9syntactic comment, response file . . . . . . . . . . . . . . . . 8syntactic-comment index . . . . . . . . . . . . . . . . . . . . . . . 67
TTIFF, multi-directory . . . . . . . . . . . . . . . . . . . . . . . . . . . 2tiffcopy . . . . . . . . . . . . . . . . . . . . . . . . . . . . . . . . . . . . . . . 2tiffsplit . . . . . . . . . . . . . . . . . . . . . . . . . . . . . . . . . . . . . . 2tips, focus stacking experts . . . . . . . . . . . . . . . . . . . . 54TMPDIR . . . . . . . . . . . . . . . . . . . . . . . . . . . . . . . . . . . . . . . . 41transformation, affine . . . . . . . . . . . . . . . . . . . . . . . . . . . 4transition, natural sharp-unsharp . . . . . . . . . . . . . . 54
Uunderstanding masks . . . . . . . . . . . . . . . . . . . . . . . . . . 39
V‘value’ gray projector . . . . . . . . . . . . . . . . . . . . . . . . . 23variance . . . . . . . . . . . . . . . . . . . . . . . . . . . . . . . . . . . . . . . 33virtual reality . . . . . . . . . . . . . . . . . . . . . . . . . . . . . . . . . 13
General Index 72
Wweight mask . . . . . . . . . . . . . . . . . . . . . . . . . . . . . . . 39, 40weight, entropy . . . . . . . . . . . . . . . . . . . . . . . . . . . . . . . . 17weight, exposure . . . . . . . . . . . . . . . . . . . . . . . . . . . . . . . 17weight, local contrast . . . . . . . . . . . . . . . . . . . . . . . . . . 17weighted average . . . . . . . . . . . . . . . . . . . . . . . . . . . . . . 28weighting functions . . . . . . . . . . . . . . . . . . . . . . . . . . . . 28weighting, contrast using a blend of methods . . . 35weighting, contrast using laplacian-of–gaussian
. . . . . . . . . . . . . . . . . . . . . . . . . . . . . . . . . . . . . . . . . . . 33weighting, contrast using standard deviation . . . 32weighting, exposure . . . . . . . . . . . . . . . . . . . . . . . . . 1, 29weighting, general concept of . . . . . . . . . . . . . . . . . . 28
weighting, local contrast . . . . . . . . . . . . . . . . . . . . . 1, 31weighting, local entropy . . . . . . . . . . . . . . . . . . . . . 1, 36weighting, saturation . . . . . . . . . . . . . . . . . . . . . . . . 1, 31weights, default . . . . . . . . . . . . . . . . . . . . . . . . . . . . . . . . 29white point, D50 . . . . . . . . . . . . . . . . . . . . . . . . . . . . . . . 27window, local-analysis . . . . . . . . . . . . . . . . . . . . . . . . . 32workflow . . . . . . . . . . . . . . . . . . . . . . . . . . . . . . . . . . . . . . . 3workflow with Enblend . . . . . . . . . . . . . . . . . . . . . . . . . . 3workflow with Enfuse . . . . . . . . . . . . . . . . . . . . . . . . . . . 3workflow, external mask manipulation . . . . . . . . . . . 4workflow, external masks . . . . . . . . . . . . . . . . . . . . . . . 5workflow, standard . . . . . . . . . . . . . . . . . . . . . . . . . . . . . 3wrap around . . . . . . . . . . . . . . . . . . . . . . . . . . . . . . . . . . . 13