Embed Size (px)
Citation preview

Gateway Integration Guide
Endpoint Security
R72
July 21, 2009


© 2008 Check Point Software Technologies Ltd.
All rights reserved. This product and related documentation are protected by copyright and distributed under licensing restricting their use, copying, distribution, and decompilation. No part of this product or related documentation may be reproduced in any form or by any means without prior written authorization of Check Point. While every precaution has been taken in the preparation of this book, Check Point assumes no responsibility for errors or omissions. This publication and features described herein are subject to change without notice.
©2003–2008 Check Point Software Technologies Ltd. All rights reserved. Check Point, AlertAdvisor, Application Intelligence, Check Point Endpoint Security, Check Point Express, Check Point Express CI, the Check Point logo, ClusterXL, Confidence Indexing, ConnectControl, Connectra, Connectra Accelerator Card, Cooperative Enforcement, Cooperative Security Alliance, CoreXL, CoSa, DefenseNet, Dynamic Shielding Architecture, Eventia, Eventia Analyzer, Eventia Reporter, Eventia Suite, FireWall-1, FireWall-1 GX, FireWall-1 SecureServer, FloodGate-1, Hacker ID, Hybrid Detection Engine, IMsecure, INSPECT, INSPECT XL, Integrity, Integrity Clientless Security, Integrity SecureClient, InterSpect, IPS-1, IQ Engine, MailSafe, NG, NGX, Open Security Extension, OPSEC, OSFirewall, Pointsec, Pointsec Mobile, Pointsec PC, Pointsec Protector, Policy Lifecycle Management, Provider-1, PureAdvantage, PURE Security, the puresecurity logo, Safe@Home, Safe@Office, SecureClient, SecureClient Mobile, SecureKnowledge, SecurePlatform, SecurePlatform Pro, SecuRemote, SecureServer, SecureUpdate, SecureXL, SecureXL Turbocard, Security Management Portal, Sentivist, SiteManager-1, SmartCenter, SmartCenter Express, SmartCenter Power, SmartCenter Pro, SmartCenter UTM, SmartConsole, SmartDashboard, SmartDefense, SmartDefense Advisor, Smarter Security, SmartLSM, SmartMap, SmartPortal, SmartUpdate, SmartView, SmartView Monitor, SmartView Reporter, SmartView Status, SmartViewTracker, SMP, SMP On-Demand, SofaWare, SSL Network Extender, Stateful Clustering, TrueVector, Turbocard, UAM, UserAuthority, User-to-Address Mapping, UTM-1, UTM-1 Edge, UTM-1 Edge Industrial, UTM-1 Total Security, VPN-1, VPN-1 Accelerator Card, VPN-1 Edge, VPN-1 Express, VPN-1 Express CI, VPN-1 Power, VPN-1 Power Multi-core, VPN-1 Power VSX, VPN-1 Pro, VPN-1 SecureClient, VPN-1 SecuRemote, VPN-1 SecureServer, VPN-1 UTM, VPN-1 UTM Edge, VPN-1 VSX, Web Intelligence, ZoneAlarm, ZoneAlarm Anti-Spyware, ZoneAlarm Antivirus, ZoneAlarm ForceField, ZoneAlarm Internet Security Suite, ZoneAlarm Pro, ZoneAlarm Secure Wireless Router, Zone Labs, and the Zone Labs logo are trademarks or registered trademarks of Check Point Software Technologies Ltd. or its affiliates. ZoneAlarm is a Check Point Software Technologies, Inc. Company. All other product names mentioned herein are trademarks or registered trademarks of their respective owners. The products described in this document are protected by U.S. Patent No. 5,606,668, 5,835,726, 5,987,611, 6,496,935, 6,873,988, 6,850,943, and 7,165,076 and may be protected by other U.S. Patents, foreign patents, or pending applications.


Endpoint Security Gateway Integration Guide 5
ContentsPreface
About this Guide .................................................................... 10About the Endpoint Security Documentation Set ....................... 10
Documentation for Administrators ...............................................10Documentation for Endpoint Users ..............................................11
Feedback ............................................................................... 12
Chapter 1 Gateway Integration OverviewPrerequisites .......................................................................... 13System Requirements ............................................................. 13
Chapter 2 Network Access Server IntegrationUnderstanding Cooperative Enforcement Architecture ................ 15Configuration Overview ............................................................ 17
Before You Begin .......................................................................17Configuring Cooperative Enforcement ..........................................17
Configuring the RADIUS Server ................................................ 18Configuring the NAS as a RADIUS Client .....................................18Configuring Endpoint Security as a RADIUS Client .......................19Configuring Endpoint Security Access to the RADIUS Server .........20
Configuring Endpoint Security ................................................. 23Enabling 802.1x Communication ................................................23Creating a Catalog for the Gateway ..............................................23Assigning a Policy to the Gateway Catalog ....................................23
Configuring the NAS ............................................................... 25Configuring Endpoint Computers .............................................. 26
Configuring Endpoints for Use with Wireless Access Points ............26Configuring Endpoints for Use with Wired Connections ..................31
Supported Enforcement Behaviors ........................................... 34Troubleshooting Your Installation ............................................. 35
General ....................................................................................35Internet Authentication Service ...................................................35Endpoint Security ......................................................................35Endpoint Security client .............................................................35Network Access Server ...............................................................35
Chapter 3 Check Point VPN-1 IntegrationCooperative Enforcement Using SecureClient and SCV ............... 37
Cooperative Enforcement Workflow ..............................................37Understanding the SecureClient/Endpoint Security client Unified In-staller .......................................................................................38

Endpoint Security Gateway Integration Guide Contents 6
System Requirements ............................................................. 39Configuring VPN-1 to Allow Access to Endpoint Security ............ 40Integrating the Endpoint Security client with SecureClient ......... 41
Integrating with an Existing SecureClient .....................................41Integrating with an Existing Endpoint Security client ....................41Creating a localized unified installation package ...........................42Configuring your VPN-1Installation ..............................................43Configuring the SecureClient Installation .....................................46Checking that the Computer is Securely Configured ......................47Installing an Endpoint Security client after SecureClient ...............47Installing SecureClient after the Endpoint Security client ..............48Checking the Connection ............................................................48Configuring the SCV Policy ........................................................48Installing the SCV Policy on Policy Servers ...................................52Configuring an Endpoint Security client for Use with SecureClient .53Packaging the Policy File ...........................................................54
Chapter 4 VPN-1 UTM/Power Gateway IntegrationBenefits of VPN-1 UTM or Power Gateway Integration ................ 57System Requirements ............................................................. 57Configuring the Gateway and Server for Cooperative Enforcement 57
Configuring the Gateway on Endpoint Security Server ....................58Configuring the Gateway to Use the Endpoint Security Server ........58
Chapter 5 Cisco VPN Concentrator IntegrationSystem Requirements ............................................................. 61Integrating Cisco VPN 3000 Series Concentrator ....................... 62
Configuring the Cisco Concentrator ..............................................62Configuring the Endpoint Security client ................................... 65
Overview of client communications ..............................................65Configuring the Enterprise Policy ................................................66
Packaging the Policy File with Flex or Agent .............................. 70Troubleshooting ...................................................................... 71
Checking connection to the Endpoint Security Server ....................71Checking the Log files ................................................................72Checking the SSL Certificate Exchange .......................................72Checking the SSL Certificate Validity ...........................................72Checking the Encryption Type .....................................................73Checking Port Settings ...............................................................73
Chapter 6 Configuring the Cisco Catalyst 2950Requirements ........................................................................ 76
Server Requirements ..................................................................76Client Requirements ..................................................................76
Configuring Cisco Catalyst 2950 G Switch ................................ 77Configuring the Endpoint Computers ........................................ 80

Endpoint Security Gateway Integration Guide Contents 7
Troubleshooting ...................................................................... 81
Chapter 7 Configuring the Cisco Aironet 1100 Series Wireless Access PointSystem Requirements ............................................................. 83
Server Requirements ..................................................................83Client Requirements ..................................................................83
Configuring Cisco Aironet 1100 Series Wireless Access Point ..... 84Creating a Cooperative Enforcement SSID ....................................84Defining a Wired Equivalent Privacy (WEP) Key ............................85Defining Endpoint Security as the RADIUS Server on the NAS .......85Setting the Reauthentication Interval ..........................................86
Configuring Endpoint Computers .............................................. 87Troubleshooting ...................................................................... 88
Chapter 8 Cisco ASASystem Requirements ............................................................. 90Cooperative Enforcement with ASA .......................................... 91Workflow ............................................................................... 92Basic Configuration Tasks ....................................................... 93
Naming and Configuring the Interface .........................................93Configuring the Server Address ...................................................94Configuring the Port ...................................................................95Configuring the Interface Location ..............................................95Configuring the Timeout Interval .................................................95Setting the Fail State .................................................................95Setting the Secure Socket Layer Certificate Options ......................96Setting the Client Firewall ..........................................................96Saving ......................................................................................97
Additional Command Line Parameter Reference ........................ 98clear configure zonelabs-integrity ................................................98show running-config zonelabs-integrity ........................................98zonelabs-integrity interface .........................................................99
Chapter 9 Nortel Contivity VPN Switch IntegrationConfiguring the Nortel Contivity VPN Switch ........................... 101
Enabling Tunnel Filter and Tunnel Management Filter ................101Creating an Endpoint Security client Software Definition and Tunnel-Guard Rule .............................................................................103Creating a Nortel Restricted Access Tunnel Filter to the Endpoint Secu-rity server Sandbox ..................................................................109
Configuring the Endpoint Security clients ............................... 113
Chapter 10 Configuring the Enterasys RoamAbout R2System Requirements ........................................................... 117
Server Requirements ................................................................117Client Requirements ................................................................117

Endpoint Security Gateway Integration Guide Contents 8
Configuring Enterasys RoamAbout R2 .................................... 118Defining a Wired Equivalent Privacy (WEP) Key ..........................118Defining Endpoint Security as the RADIUS Server on the NAS .....119
Configuring Endpoint Computers ............................................ 121
Chapter 11 Configuring the Check Point Safe@Office 425WSystem Requirements ........................................................... 123
Server Requirements ................................................................123Client Requirements ................................................................123
Configuring the Safe@Office 425W ........................................ 124Configuring the Wireless Settings ..............................................124Defining Endpoint Security as the RADIUS Server on the NAS .....125
Configuring Endpoint Computers ............................................ 127

Endpoint Security Gateway Integration Guide 9
PrefaceIn This Preface
About this Guide page 10
About the Endpoint Security Documentation Set page 10
Feedback page 12

About this Guide
Endpoint Security Gateway Integration Guide 10
About this GuideThis guide describes the steps necessary to integrate your gateway device with Endpoint Security. Integrating your gateway with Endpoint Security enables you to use the Cooperative Enforcement™ feature for remote access protection. Please make sure you have the most up-to-date version available for the version of Endpoint Security that you are using.
Before using this document, you should read and understand the information in the Endpoint Security Administrator Guide in order to familiarize yourself with the Cooperative Enforcement feature.
About the Endpoint Security Documentation SetA comprehensive set of documentation is available for Endpoint Security, including the documentation for the Endpoint Security clients. This includes:
“Documentation for Administrators,” on page 10
“Documentation for Endpoint Users,” on page 11
Documentation for AdministratorsThe following documentation is intended for use by Endpoint Security administrators.
Table 4-1: Server Documentation for Administrators
Title Description
Endpoint Security Installation Guide
Contains detailed instructions for installing, configuring, and maintaining Endpoint Security. This document is intended for global administrators.
Endpoint Security Administrator Guide
Provides background and task-oriented information about using Endpoint Security. It is available in both a Multi and Single Domain version.
Endpoint Security Administrator Online Help
Contains descriptions of user interface elements for each Endpoint Security Administrator Console page, with cross-references to the associated tasks in the Endpoint Security Administrator Guide.
Endpoint Security System Requirements
Contains information on client and server requirements and supported third party devices and applications.
Endpoint Security Gateway Integration Guide
Contains information on integrating your gateway device with Endpoint Security.

Documentation for Endpoint Users
Endpoint Security Gateway Integration Guide 11
Documentation for Endpoint UsersAlthough this documentation is written for endpoint users, Administrators should be familiar with it to help them to understand the Endpoint Security clients and how the policies they create impact the user experience.
Client Management Guide Contains detailed information on the use of third party distribution methods and command line parameters.
Endpoint Security Agent for Linux Installation and Configuration Guide
Contains information on how to install and configure Endpoint Security Agent for Linux.
Table 4-1: Server Documentation for Administrators
Title Description
Table 4-2: Client documentation for endpoint users
Title Description
User Guide for Endpoint Security Client Software
Provides task-oriented information about the clients (Agent and Flex) as well as information about the user interface.
Introduction to Flex Provides basic information to familiarize new users with Flex. This document is intended to be customized by an Administrator before distribution. See the Endpoint Security Implementation Guide for more information.
Introduction to Agent Provides basic information to familiarize new users with Agent. This document is intended to be customized by an Administrator before distribution. See the Endpoint Security Implementation Guide for more information.

Feedback
Endpoint Security Gateway Integration Guide 12
FeedbackCheck Point is engaged in a continuous effort to improve its documentation. Please help us by sending your comments to:

Chapter
Endpoint Security Gateway Integration Guide 13
1Gateway Integration Overview
In This Chapter
This book describes the steps necessary to integrate your gateway device with Endpoint Security. Integrating your gateway with Endpoint Security enables you to use the Cooperative Enforcement™ feature for remote access protection.
PrerequisitesThis book only describes the integration steps specific to each gateway device. You must also perform the steps for configuring the Cooperative Enforcement feature as described in the Endpoint Security Administrator Guide. You should read the chapter on Cooperative Enforcement in the Endpoint Security Administrator Guide before proceeding with any of the steps in this guide. You will also need to have a general understanding of networking concepts. It is recommended that you have your gateway already configured to work with your network before beginning and that you have tested your setup.
System RequirementsFor all system requirements and version information for supported gateways, see the Endpoint Security System Requirements document.
Prerequisites page 13
System Requirements page 13

Chapter
Endpoint Security Gateway Integration Guide 14
2Network Access Server Integration
In This Chapter
This chapter describes how to set up Endpoint Security’s Cooperative Enforcement feature for an 802.1x-compatible network access server (NAS). To enable Cooperative Enforcement, you must configure the:
RADIUS server
Endpoint Security
802.1x-compatible NAS
endpoint computer
This chapter covers configuration of the RADIUS server, the Endpoint Security server, and the endpoint computer. For information about configuring your NAS, see the appropriate vendor-specific chapter. (Vendor-specific chapters are listed in “Configuring the NAS,” on page 25.)
The instructions in this chapter assume you have already installed and performed the initial configuration on a supported NAS and a supported RADIUS server.
Understanding Cooperative Enforcement Architecture page 15
Configuration Overview page 17
Configuring the RADIUS Server page 18
Configuring Endpoint Security page 23
Configuring the NAS page 25
Configuring Endpoint Computers page 26
Supported Enforcement Behaviors page 34
Troubleshooting Your Installation page 35

Understanding Cooperative Enforcement Architecture
Endpoint Security Gateway Integration Guide 15
Understanding Cooperative Enforcement Architecture
The Cooperative Enforcement system architecture allows for a variety of different configurations. This section describes how the components interact to provide cooperative enforcement.
1 A user opens a connection to the NAS.
2 The NAS directs the connection to Endpoint Security.
3 Endpoint Security forwards the authentication request to the RADIUS server.
4 If authentication
a succeeds, Endpoint Security can communicate with the endpoint computer.
b fails, the connection terminates.
5 Endpoint Security checks the endpoint computer’s compliance. If the client is
NAS Endpoint Se-curity server
User initiates connection
RADIUS authenticates
Endpoint Se-curity
validates
User allowed into network User restricted
Connection terminatesAuthentication succeeds
Authentication
Validation succeeds
Validation fails

Understanding Cooperative Enforcement Architecture
Endpoint Security Gateway Integration Guide 16
a compliant, the client is granted access to the corporate network.
b not compliant, the client is restricted to an isolated Virtual Local Area Network (VLAN) or to the Sandbox, or traffic is limited to specific destination IP addresses, ports, and protocols. You can also configure Endpoint Security to reject connections for non-compliant endpoints that attempt to connect to the network through a wireless access point (as opposed to a switch). (For information about rejecting the connection, see the sections on gateway catalogs in the Endpoint Security Administrator Guide and the associated online help. For more information about the Sandbox, see the Installation and Configuration Guide.)
Endpoints may not have enough time, when restricted, to download the client package over an 802.11B wireless access point. If you are using an 802.11B wireless access point, your endpoints may need to be attached to a wired LAN to download the client package file.
Use an 802.11G device or have endpoints connect using a wired LAN to get the client package.

Configuration Overview
Endpoint Security Gateway Integration Guide 17
Configuration OverviewThis section discusses the information you will need before starting the configuration, and it lists the necessary configuration procedures.
Before You BeginBefore you begin, gather the following information for each NAS-type / RADIUS combination in your system:
Port and IP Address for:
Endpoint Security
RADIUS server or distributed RADIUS proxy server
RADIUS shared secret
NAS shared secret
NAS IP address
VLAN ID and Filter name (depending on NAS support)
Any vendor-specific attributes (VSAs) for your NAS
Configuring Cooperative EnforcementThis section lists the procedures you must perform to enable Cooperative Enforcement. The individual procedures are covered in the sections that follow.
To configure Cooperative Enforcement with an 802.1x-compatible NAS:
1 Configure the RADIUS server. See page 18.
a Configure the NAS as a RADIUS client. See page 18.
b Configure Endpoint Security as a RADIUS client. See page 19.
c Configure Endpoint Security access to the RADIUS server. See page 20.
2 Configure Endpoint Security. See page 23.
a Enable 802.1x communication. See page 23.
b Create a catalog for the gateway. See page 23.
c Assign a policy to the gateway catalog. See page 23.
3 Configure the NAS. See page 25.
4 Configure the endpoint computer. See page 26.
Configuring the RADIUS Server
Endpoint Security Gateway Integration Guide 18
Configuring the RADIUS ServerThis section explains how to configure the RADIUS server. Perform these steps for each NAS that proxies authentication to the RADIUS server.
To configure the Internet Authentication Service:
1 Configure the NAS as a RADIUS client. See page 18.
2 Configure Endpoint Security as a RADIUS client. See page 19.
3 Configure Endpoint Security access to the RADIUS server. See page 20.
Configuring the NAS as a RADIUS ClientOn the RADIUS server, configure the NAS as a RADIUS client.
The examples in this section use Microsoft’s Internet Authentication Service. If you are using a RADIUS server other than the Internet Authentication Service, consult your product documentation for instructions on adding a RADIUS client.

Configuring Endpoint Security as a RADIUS Client
Endpoint Security Gateway Integration Guide 19
To add the NAS as a RADIUS client:
1 Open Internet Authentication Service, expand RADIUS clients, and choose New RADIUS Client.
The New RADIUS Client window opens. Enter the new RADIUS client information as follows:
a In the Friendly name field, enter the friendly name for the NAS.
b In the Client address (IP or DNS) field, enter the IP address of the NAS.
2 Click Next.
The Additional Information window opens.
3 Enter the RADIUS shared secret, re-enter the secret in the confirmation box, and click Finish.
The NAS appears in the RADIUS client list.
4 Verify the configuration by right-clicking the NAS RADIUS client entry and choosing Properties.
Configuring Endpoint Security as a RADIUS Client
Endpoint Security handles authentication requests to the RADIUS server.

Configuring Endpoint Security Access to the RADIUS
Endpoint Security Gateway Integration Guide 20
To add Endpoint Security as a RADIUS client:
1 Open Internet Authentication Service, expand RADIUS clients, and choose New RADIUS Client.
The New RADIUS Client window opens.
2 Enter the client information as follows:
a In the Friendly name field, enter Integrity Advanced Server.
b In the Client address (IP or DNS) field, enter the IP address of Endpoint Security.
3 Click Next.
The Additional Information window opens.
4 Enter the RADIUS shared secret, re-enter the secret in the confirmation box, and click Finish.
Endpoint Security appears in the RADIUS client list.
5 Verify the configuration by right-clicking the Endpoint Security RADIUS client entry and choosing Properties.
Configuring Endpoint Security Access to the RADIUS Server
To configure Endpoint Security access to the RADIUS server:
1 In the Internet Authentication Service left panel, select Remote Access Policies.
The Remote Access Policies appear in the right panel.
Make note of the RADIUS secret you enter for the client, as you must enter the same secret when configuring the gateway on the Endpoint Security server.

Configuring Endpoint Security Access to the RADIUS
Endpoint Security Gateway Integration Guide 21
2 Right-click Connections to Microsoft Routing and Remote Access server and choose Properties.
The Wireless Properties window appears.
3 In the Policy Conditions area, set the conditions that are appropriate for your organization. (The example above shows the default setting.)
4 Select Grant remote access permission and click Edit Profile.
The Edit Dial-in Profile window opens.
5 Select the following settings from the Authentication tab:
Microsoft Encrypted Authentication version 2 (802.1x)
User can change password after it has expired
Microsoft Encrypted Authentication (MS-CHAP)
User can change password after it has expired

Configuring Endpoint Security Access to the RADIUS
Endpoint Security Gateway Integration Guide 22
6 Click EAP Methods.
A list of the EAP types that are configured with the policy appears.
7 Remove all EAP types except the one you plan to use. (You can only specify one EAP type per NAS.)
8 Click OK to save your changes. Click OK in each window to close all except the main Internet Authentication Service window.
9 Restart the Internet Authentication Service to register the new configuration. To do so, right-click Internet Authentication Service (in the left panel) and choose stop, and then right-click it again and choose start.
10Right-click Internet Authentication Service (local) and select Register Server in Active Directory. IAS can now authenticate users from your AD domain.

Configuring Endpoint Security
Endpoint Security Gateway Integration Guide 23
Configuring Endpoint SecurityThis section describes how to configure Endpoint Security to work with an 802.1x-compatible NAS.
To configure theEndpoint Security server:
1 Enable 802.1x communication. See page 23.
2 Create a catalog for the gateway. See page 23.
3 Assign a policy to the gateway catalog. See page 23.
Enabling 802.1x Communication
To enable 802.1x communication:
1 In the Endpoint Security administration console, go to System Configuration | Server Settings | Edit. (If your Endpoint Security installation has multiple domains, do this in the System Domain.)
2 Under 802.1x Settings, select Configure Settings for Enabling 802.1x.
3 Type the RADIUS authentication port number and the RADIUS secret.
4 Click Save.
Creating a Catalog for the GatewayCreate a gateway catalog for your NAS. This lets you apply a specific policy to all users who access the network through that NAS. For information about creating a gateway catalog, see the Endpoint Security Administrator Guide and the associated online help.
Assigning a Policy to the Gateway CatalogAssign a policy to your new gateway catalog. Users who log in through the relevant NAS will receive the assigned policy. For information about creating and assigning policies, see the Endpoint Security Administrator Guide.

Assigning a Policy to the Gateway Catalog
Endpoint Security Gateway Integration Guide 24
If you are using Cooperative Enforcement, it is recommended that you not set any Restriction Firewall Rules in the Enforcement Rules of you policy. Using Cooperative Enforcement and Restriction Firewall Rules simultaneously makes it difficult to troubleshoot your configuration. If you must use Restriction Firewall Rules in your policy, it is recommended that you begin with a policy that has no Restriction firewall rules and then, with each successive policy, add only one rule. After you deploy each policy you should carefully observe the results before adding another rule.For more information about Restriction Firewall Rules, see the Endpoint Security Administrator Guide.

Configuring the NAS
Endpoint Security Gateway Integration Guide 25
Configuring the NASAfter configuring the RADIUS server and Endpoint Security according to the instructions in this chapter, you must configure the NAS and the endpoint computers. To configure the NAS, see the appropriate vendor-specific chapter:
“Configuring the Cisco Aironet 1100 Series Wireless Access Point,” on page 82
“Configuring the Cisco Catalyst 2950,” on page 75
“Configuring the Enterasys RoamAbout R2,” on page 116
“Configuring the Check Point Safe@Office 425W,” on page 122
After you configure the NAS, return to this chapter and configure the endpoint computers as described in the next section.
Be sure to set the reauthentication intervals on all switches and wireless access points to five minutes or more.

Configuring Endpoint Computers
Endpoint Security Gateway Integration Guide 26
Configuring Endpoint ComputersEndpoint configuration varies, depending on whether the endpoint will connect to the network through a wireless access point or through a wired connection. Perform the configuration that is appropriate for your setup:
“Configuring Endpoints for Use with Wireless Access Points,” on page 26
“Configuring Endpoints for Use with Wired Connections,” on page 31
Configuring Endpoints for Use with Wireless Access Points
This section explains how to configure endpoint computers for Cooperative Enforcement when you are using a wireless access point.
To configure the connection:
1 “Select the Service Set Identifier (SSID),” on page 26
2 “Set the Association Properties,” on page 27
3 “Set the Authentication Properties,” on page 29
Select the Service Set Identifier (SSID)
To set the SSID:
1 Insert the wireless networking card.
The connection automatically opens.
2 Open the Network Connection manager.
3 Right-click the wireless network connection and choose Properties.
The Wireless Network Connection Properties window appears.
These instructions assume that the user-based certificate and an Endpoint Security client are installed on the endpoint computer. For information on deploying the Endpoint Security client to endpoint computers see the Endpoint Security Client Management Guide. Be sure to reboot the endpoint computer after installing the Endpoint Security client. If you do not restart the computer, you will not be able to configure the connection.

Configuring Endpoints for Use with Wireless Access
Endpoint Security Gateway Integration Guide 27
4 Click the Wireless Networks tab.
A list of the available connection SSIDs appears.
5 Select the SSID you created on the gateway and click Configure.
The Wireless Network Properties window appears.
Set the Association Properties
To set the association properties:
1 Go to the Association tab.
If the desired SSID is not listed, click Advanced, enter the SSID, and click OK. The SSID now appears in the list.

Configuring Endpoints for Use with Wireless Access
Endpoint Security Gateway Integration Guide 28
2 In the Network Authentication dropdown list, select Open.
3 In the Data Encryption dropdown list, select WEP.
4 In the Network Key field, enter the WEP network key you created on the gateway. Type the WEP network key a second time in the Confirm Network Key field.

Configuring Endpoints for Use with Wireless Access
Endpoint Security Gateway Integration Guide 29
Set the Authentication Properties
To set the authentication properties:
1 Go to the Authentication tab.
2 Select the Enable IEEE 802.1x authentication for this network checkbox.
3 In the EAP type dropdown list, select Zone Labs Cooperative Enforcement and then click Properties.
The Zone Labs Cooperative Enforcement appears in the EAP type drop-down list only if Endpoint Security client version 6.0 is installed on the endpoint computer.

Configuring Endpoints for Use with Wireless Access
Endpoint Security Gateway Integration Guide 30
The Zone Labs Cooperative Enforcement properties window appears.
4 In the Choose an EAP Type to Use for Authenticating the User dropdown list, do one of the following:
Select Smart Card or other Certificate and click Properties. Go to step 5.
Select Protected EAP (PEAP) and click Properties. Go to step 6.
5 If you chose Smart Card or other Certificate, the Smart Card or Other Certificate Properties window appears.
In the When Connecting area of the properties window, make sure to uncheck the Validate server certificate checkbox. Then select Use a certificate on this computer. Go to step 8.
6 If you chose Protected EAP (PEAP), the Protected EAP Properties window appears. Do the following:
In the When Connecting area, make sure to uncheck the Validate server certificate checkbox.
In the Select Authentication Method dropdown list, choose the appropriate authentication method (Secured password or Smart Card or other Certificate) and click Configure.
The appropriate configuration dialog box appears.
7 Do one of the following:
If you chose Secured password (EAP-MSCHAP v2), select the appropriate setting for Automatically use my Windows login name and password... (Generally, this checkbox should remain selected. If you do not plan to log in to the domain,
Do not choose Secured Password from the dropdown list, as that option is not supported. If you wish to use a secured password, choose Protected EAP (PEAP) and then, in step 6, select Secured password as the authentication method.

Configuring Endpoints for Use with Wired Connections
Endpoint Security Gateway Integration Guide 31
however, uncheck this checkbox. This causes Endpoint Security to prompt you for your domain credentials when you log in to the endpoint.)
If you chose Smart Card or other Certificate, make sure to uncheck the Validate server certificate checkbox (in the When Connecting area), and then select Use a certificate on this computer.
8 Click OK in all relevant windows to save your changes and close the Network Connection manager.
The endpoint computer can now connect using Cooperative Enforcement.
Configuring Endpoints for Use with Wired Connections
If the endpoint computer connects to the network through a wired connection, perform the configuration steps in this section.
To configure the connection:
1 In the Network Connections manager, right-click on the desired local area connection, select Properties, and click the Authentication tab.

Configuring Endpoints for Use with Wired Connections
Endpoint Security Gateway Integration Guide 32
2 Select the Enable IEEE 802.1x authentication for this network checkbox.
3 In the EAP type dropdown list, select Zone Labs Cooperative Enforcement and then click Properties.
The Zone Labs Cooperative Enforcement properties window appears.
4 In the Choose an EAP Type to Use for Authenticating the User dropdown list, do one of the following:
Select None. Go to step 8.
Select Smart Card or other Certificate and click Properties. Go to step 5.
Select Protected EAP (PEAP) and click Properties. Go to step 6.
5 If you chose Smart Card or other Certificate, the Smart Card or Other Certificate Properties window appears.
In the When Connecting area of the properties window, make sure to uncheck the Validate server certificate checkbox. Then select Use a certificate on this computer. Go to step 8.
6 If you chose Protected EAP (PEAP), the Protected EAP Properties window appears. Do the following:
In the When Connecting area, make sure to uncheck the Validate server certificate checkbox.
The Zone Labs Cooperative Enforcement appears in the EAP type drop-down list only if Endpoint Security client version 6.0 is installed on the endpoint computer.
Do not choose Secured Password from the dropdown list, as that option is not supported. If you wish to use a secured password, choose Protected EAP (PEAP) and then, in step 6, select Secured password as the authentication method.

Configuring Endpoints for Use with Wired Connections
Endpoint Security Gateway Integration Guide 33
In the Select Authentication Method dropdown list, choose the appropriate authentication method (Secured password or Smart Card or other Certificate) and click Configure.
The appropriate configuration dialog box appears.
7 Do one of the following:
If you chose Secured password (EAP-MSCHAP v2), select the appropriate setting for Automatically use my Windows login name and password... (Generally, this checkbox should remain selected. If you do not plan to log in to the domain, however, uncheck this checkbox. This causes Endpoint Security to prompt you for your domain credentials when you log in to the endpoint.)
If you chose Smart Card or other Certificate, make sure to uncheck the Validate server certificate checkbox (in the When Connecting area), and then select Use a certificate on this computer.
8 Click OK in all relevant windows to save your changes and close the Network Connection manager.
The endpoint computer can now connect using Cooperative Enforcement.

Supported Enforcement Behaviors
Endpoint Security Gateway Integration Guide 34
Supported Enforcement BehaviorsWhen Cooperative Enforcement is configured, Endpoint Security supports the following enforcement behaviors:
VLAN switching
filter enabling and disabling
vendor-specific attributes (VSAs)
reject the connection for non-compliance
Your particular gateway may not support all these enforcement options. For information about the options your gateway supports, see the vendor’s product documentation.

Troubleshooting Your Installation
Endpoint Security Gateway Integration Guide 35
Troubleshooting Your InstallationUse the tools described in this section to troubleshoot the components of your installation.
GeneralUse the netsh command to enable logging for the component you want. For gateway integration troubleshooting, the most useful logs are EAPOL, RASTLS, PPP, and RASEAP.
The command is: netsh ras set tracing <component> enabled
Internet Authentication ServiceUse the Event Viewer to troubleshoot the Internet Authentication Service.
Endpoint SecuritySet the Endpoint Security server Logs in the XML file to trace to troubleshoot Endpoint Security.
Endpoint Security clientUse the registry settings to troubleshoot the Endpoint Security client.
To turn logging on in the registry (no restart necessary):
hkey_local_machine\system\CurrentControlSet\Services\RasMan\PPP\EAP\255
The log is stored in Program Files\Zone Labs\Integrity Client\zlxeap.log.
Network Access ServerFor troubleshooting information about your NAS, see the configuration guide for that NAS.
Setting Meaning
Logging=0 Off (default)
Logging=1 Human readable
Logging=2 Human readable and binary

Chapter
Endpoint Security Gateway Integration Guide 36
3Check Point VPN-1 Integration
In This Chapter
This chapter describes how to integrate a Check Point Endpoint Security client (Agent or Flex) with the Check Point Software Technologies VPN-1 SecureClient. Integration allows the Endpoint Security client and SecureClient to coexist on endpoint computers and perform Cooperative Enforcement.
Cooperative Enforcement Using SecureClient and SCV page 37
System Requirements page 39
Configuring VPN-1 to Allow Access to Endpoint Security page 40
Integrating the Endpoint Security client with SecureClient page 41
You can achieve enforcement goals similar to those described in this chapter by using a Check Point VPN-1 gateway with the new VPN capability of the Endpoint Security client and enforcement rules and program control. (Note the following exception: There is no enforcement rule that you can use to run a specified script or executable.) Endpoint Security provides a faster, simplified method of configuring and deploying VPN with client packages, and provides endpoint users with a unified interface for Endpoint Security client and VPN.
You can still use the Endpoint Security client and SecureClient separately, and you can still integrate them as described in this chapter, but doing so does not take advantage of the simplified client management and unified end-user interface. For information on configuring VPN packages that use enforcement at the VPN gateway, see the Endpoint Security Administrator Guide.
The information provided here assumes you have already installed VPN-1. For details about VPN-1 installation, see the Check Point VPN-1 documentation. This chapter also assumes you have performed the steps for configuring Cooperative Enforcement described in the Endpoint Security Administrator Guide.

Cooperative Enforcement Using SecureClient and SCV
Endpoint Security Gateway Integration Guide 37
Cooperative Enforcement Using SecureClient and SCV
You can use the Check Status model of Cooperative Enforcement to ensure that all endpoint computers logging in to your network using SecureClient are compliant with your security policies. For more information see the Cooperative Enforcement chapter of the Endpoint Security Administrator Guide.
SecureClient uses SCV checks to determine the overall security configuration of the computer. These security checks are performed at regular intervals, to ensure that only securely configured systems are allowed to connect and remain connected to the corporate VPN Gateway.
Each SCV check reports whether or not a security requirement has been satisfied. If any one of the requirements is not satisfied, the endpoint computer is disconnected or restricted, and the end user receives an error message.
See “Configuring the SCV Policy ,” on page 48 for more information about the requirements you can set in an SCV policy. For information about configuring SCV exceptions, see the Check Point Virtual Private Networks Administration Guide.
Cooperative Enforcement WorkflowThe following describes the Cooperative Enforcement process using SecureClient.
1 SecureClient connects to the VPN-1 gateway.
SecureClient initiates the connection to your system.
2 SecureClient connects to the Check Point policy server and receives the local.iguring .
The local.scv file (Secure Configuration Verification) contains the parameters you configure for the scan. See “Configuring the SCV Policy ,” on page 48 for more information.
3 The parameters are passed to the Zlscv.dll.
The parameters contained in the local.scv file are passed by SecureClient to the Zlscv.dll.
4 The Zlscv.dll performs the check at the interval you set.
The ZLscv.dll checks for compliance with all the parameters in the local.scv file and with the Endpoint Security security policies. It scans for compliance at the frequency you set in the local.scv file and updates the global status accordingly. If the compliance check fails, the user receives a failure message, the event is logged, and the gateway is notified.
5 SecureClient checks the global status.
SecureClient performs the global status check at the frequency you set on the checkpoint gateway, and permits, restricts, or denies access accordingly. The default frequency is 15 seconds.

Understanding the SecureClient/Endpoint Security
Endpoint Security Gateway Integration Guide 38
Understanding the SecureClient/Endpoint Security client Unified Installer
The unified installer allows you to install SecureClient and Endpoint Security Client along with the necessary policy file at the same time.
If an Endpoint Security client is downloading a new policy at the same time as Secure Client does an SCV check, Secure Client will give a spurious message to the user informing them that their host has not passed verification. This only happens when both processes run at the same time.

System Requirements
Endpoint Security Gateway Integration Guide 39
System RequirementsThese requirements are in addition to the regular requirements for Endpoint Security. For information about the system requirements, and supported versions, see the Endpoint Security System Requirements Document.
Check Point ® FireWall-1 NG with Application Intelligence R55W
VPN-1® SecureClient™ with Application Intelligence R56
A Check Point Endpoint Security client version 6.0 or later
Check Point Endpoint Security server version 6.0 or later
Windows XP hotfix version Q329623 (unified installer only)
All Check Point software must include the latest HOTFIX updates.

Configuring VPN-1 to Allow Access to Endpoint Secu-
Endpoint Security Gateway Integration Guide 40
Configuring VPN-1 to Allow Access to Endpoint Security
In order to use Endpoint Security with VPN-1, you must be sure that VPN-1 is not blocking traffic to and from the Endpoint Security server.
Configure your VPN-1 Firewall to allow the following traffic:
Table 3-1: Outbound Traffic
Table 3-2: Inbound Traffic
Table 3-3: Optional Outbound Traffic (Allow as Needed)
For more information about how the Endpoint Security server communicates with other products and devices, see the Endpoint Security Installation guide. If you change these ports, you must allow traffic on the new ports.
Port Protocol
443 HTTPS
Port Protocol
80
443
4433
6054
8009
8010
TCP
TCP
TCP
UDP
TCP
TCP
Use Port Protocol
LDAP
RADIUS
ZSP
NetBIOS
SQLServer
Oracle
DB2
NTP
389
1812
5054
137 - 139
1433
7777
50000
123
TCP
UDP
TCP
TCP
TCP
TCP
TCP
TCP

Integrating the Endpoint Security client with Secure-
Endpoint Security Gateway Integration Guide 41
Integrating the Endpoint Security client with SecureClient
You can integrate an Endpoint Security client with SecureClient in the following ways:
Integrate with an existing SecureClient. See “Integrating with an Existing SecureClient,” on page 41.
Integrate with an existing Endpoint Security client. See “Integrating with an Existing Endpoint Security client,” on page 41.
Integrating with an Existing SecureClientUse this integration method when a configured Check Point SecureClient already exists on the endpoint computer, and you are now installing an Endpoint Security client.
To integrate with an Existing SecureClient:
1 Configure your VPN-1 installation. See “Configuring your VPN-1Installation,” on page 43.
2 Configure the SecureClient. See “Configuring the SecureClient Installation,” on page 46.
3 Check that the computer is securely configured. See “Checking that the Computer is Securely Configured,” on page 47.
4 Install an Endpoint Security client with your existing SecureClient. See “Installing an Endpoint Security client after SecureClient,” on page 47.
5 Check the connection. See “Checking the Connection,” on page 48.
6 Configure the SCV policy. See “Configuring the SCV Policy ,” on page 48.
7 Install the new SCV policy. See “Installing the SCV Policy on Policy Servers,” on page 52.
8 Configure the Endpoint Security client for use with SecureClient. See “Configuring an Endpoint Security client for Use with SecureClient,” on page 53.
a Observe the SecureClient programs using Endpoint Security.
b Configure an enterprise policy.
9 Create an installation package. See “Packaging the Policy File,” on page 54.
Integrating with an Existing Endpoint Security client
Use this integration method when an Endpoint Security client already exists on the endpoint computer, and you are now installing a Check Point SecureClient.

Creating a localized unified installation package
Endpoint Security Gateway Integration Guide 42
To integrate with an existing Endpoint Security client:
1 Configure your VPN-1 installation. See “Configuring your VPN-1Installation,” on page 43.
2 Install the Check Point SecureClient. See “Installing SecureClient after the Endpoint Security client,” on page 48.
3 Configure the SecureClient. See “Configuring the SecureClient Installation,” on page 46.
4 Check that the computer is securely configured. See “Checking that the Computer is Securely Configured,” on page 47.
5 Check the connection. See “Checking the Connection,” on page 48.
6 Configure the SCV policy. See “Configuring the SCV Policy ,” on page 48.
7 Install the new SCV policy. See “Installing the SCV Policy on Policy Servers,” on page 52.
8 Configure the Endpoint Security client for use with SecureClient. See “Configuring an Endpoint Security client for Use with SecureClient,” on page 53.
a Observe the SecureClient programs using the Endpoint Security server.
b Configure an enterprise policy.
9 Deploy the enterprise policy. See the Chapter 2 of the Endpoint Security Administrator Guide, “Policy Studio Overview,” for more information about deploying an enterprise policy.
Creating a localized unified installation packageUse the following steps to create a unified installation package for a language other than English.
To create a localized unified installation package:
1 Obtain a localized SecureClient executable.
See the Check Point documentation for more information about obtaining a localized SecureClient executable.
2 Follow the instructions in “Packaging the Policy File,” on page 54 to create the unified installation package.
a In the Product Information area, include the localized SecureClient executable.
b In the Product Information area, include the localized Endpoint Security client executable.

Configuring your VPN-1Installation
Endpoint Security Gateway Integration Guide 43
Configuring your VPN-1InstallationPerform the following steps to enable your VPN-1 installation to work with Checkpoint Endpoint Security client.
To configure your VPN-1 installation:
1 In the Check Point SmartDashboard window, select Network Objects | Check Point then right-click your firewall and choose Edit.
The General Properties window appears.
2 Select the SecureClient Policy Server check box.
This enables the SecureClient policy server on the VPN-1 gateway.
If you are using the NGX R60 version of VPN-1, refer to your VPN-1 documentation for configuration information.

Configuring your VPN-1Installation
Endpoint Security Gateway Integration Guide 44
3 Configure the firewall installation as specified in the Check Point documentation.
These steps include:
Defining the Topology
Defining Authentication
Defining a Policy Server User
Giving a User Group Firewall Access
Define Desktop Security Rules
Defining Policies
4 Select Policy | Global Properties | VPN.
The Global Properties VPN window appears.
5 Select the Simplified mode to all new Security Policies radio button.
Configuring your VPN-1Installation
Endpoint Security Gateway Integration Guide 45
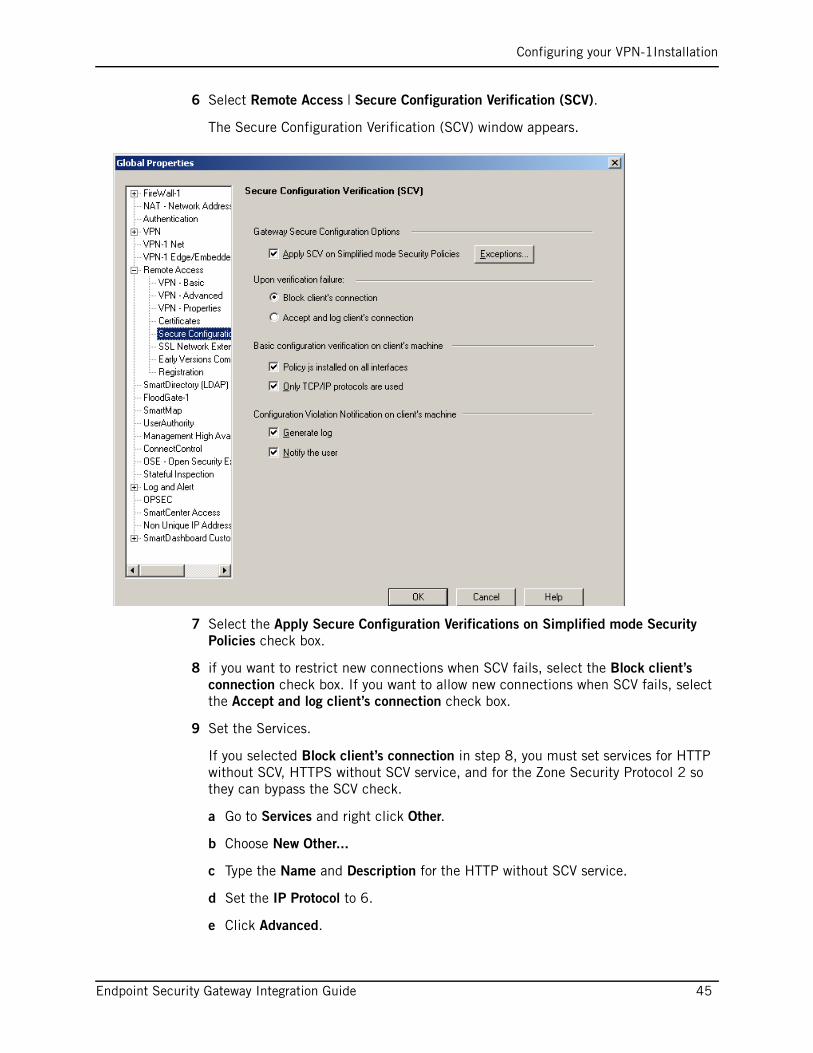
6 Select Remote Access | Secure Configuration Verification (SCV).
The Secure Configuration Verification (SCV) window appears.
7 Select the Apply Secure Configuration Verifications on Simplified mode Security Policies check box.
8 if you want to restrict new connections when SCV fails, select the Block client’s connection check box. If you want to allow new connections when SCV fails, select the Accept and log client’s connection check box.
9 Set the Services.
If you selected Block client’s connection in step 8, you must set services for HTTP without SCV, HTTPS without SCV service, and for the Zone Security Protocol 2 so they can bypass the SCV check.
a Go to Services and right click Other.
b Choose New Other...
c Type the Name and Description for the HTTP without SCV service.
d Set the IP Protocol to 6.
e Click Advanced.

Configuring the SecureClient Installation
Endpoint Security Gateway Integration Guide 46
f In the Match field, set the dport to the destination port on which the service is running and set SCV to not verify.
dport=<destination port>, r_scvres=SCV_DONT_VERIFY
g Click OK.
h Click OK.
i Repeat steps a-g for HTTPS without SCV service and the Zone Security Protocol 2.
For Zone Security Protocol 2 set the IP Protocol to 17 and dport to 6054.
10If you selected Block client’s connection in step 8, you must create firewall rules for the services you defined in step 9.
In order to allow the Endpoint Security client to communicate with the Endpoint Security server, create firewall rules accepting the services. For example:
For more information on creating firewall rules, see your Check Point documentation.
11Select Policy | Install and click OK.
The policy deploys.
Configuring the SecureClient InstallationConfigure the SecureClient as described in the Check Point documentation.
If the Endpoint Security server is behind the gateway the VPN address must not be in NAT format.

Checking that the Computer is Securely Configured
Endpoint Security Gateway Integration Guide 47
Checking that the Computer is Securely Configured
To check that the computer is securely configured:
1 Launch SecureClient Diagnostics.
The Check Point VPN-1 SecureClient Diagnostics window appears.
2 Verify that the Machine is Securely Configured check mark is green.
3 Close SecureClient Diagnostics.
Installing an Endpoint Security client after SecureClient
Install an Endpoint Security client by running the Endpoint Security client installer, and proceed through the installation screens.
The Check Point VPN-1 SecureClient Diagnostics window
If your computer is not securely configured refer to Check Point documentation in order to resolve the problem.
The Endpoint Security client installation restarts your SecureClient. Therefore, expect to lose your VPN connection. After the installation, you must re-enter your credentials.

Installing SecureClient after the Endpoint Security cli-
Endpoint Security Gateway Integration Guide 48
Installing SecureClient after the Endpoint Security client
If you install the Endpoint Security client on a computer which does not have a Check Point SecureClient, the Endpoint Security client installer installs all the files necessary for later integration, but does not configureEndpoint Security client for SCV checks. After installing the Check Point secure client, you must manually run the Check Point SCV Plug-In installer in order to configure the Endpoint Security client for Check Point SCV checks.
To install Check Point SecureClient after an Endpoint Security client:
1 Perform the Check Point SecureClient installation as described in the Check Point documentation.
2 Browse to the Zone Labs directory.
3 Run the Check Point SCV Plug-In installer file (zlscvins.exe).
Checking the ConnectionPerform the following steps to check the connection to the Endpoint Security client.
To check the connection:
1 Access the errorlog.txt file in the c:winnt\internet directory.
2 Check the log for the message “The registration of the zlscv.dll was successful”.
Configuring the SCV Policy Configure your SCV (Secure Configuration Verification) policy. When endpoint computers connect to your network, SecureClient downloads the policy file (local.scv) and runs the SCV check to ensure that the endpoint computer is securely configured. The SCV check is repeated at intervals defined in the policy itself.
The SCV check will fail under the following conditions:
There is no SCV policy (local.scv file) on the computer. This will occur if the endpoint user never logged on to a Policy Server, or if the file was erased.
The local.scv file is either corrupted or not configured correctly. If SecureClient is configured to revert to a backup copy of local.scv and the local.bak file is corrupted as well, the computer is not securely configured.
One or more of the checks that are enabled in the SCV policy reported failure.
The Check Point plugin installation restarts your SecureClient. Therefore, you lose your VPN connection. After the installation, you must re-enter your credentials.

Configuring the SCV Policy
Endpoint Security Gateway Integration Guide 49
The endpoint user selected either Disable Policy from the Policy menu or Delete from the Site menu.
The SCV policy has timed out, and the endpoint user has not logged on to a policy server.
One or more SCV checks specified by the SCV policy are missing or not configured correctly on the endpoint computer.
To configure the SCV policy file:
1 With a text editor, open $FWDIR\conf\local.scv on the Smart Center (management) server. This may be the same server as your enforcement server. You can also use the SCV Editor available from Check Point to edit the SCV file. See “Sample Configured SCV Policy,” on page 50.
2 Insert the appropriate Check Point SCV policy parameters into the SCVNames section of the file. See “Check Point SCV Policy Parameters,” on page 50, for policy parameter definitions.
The SCVEditor
Check Point provides a tool for editing SCV files. You can download it from www.checkpoint.com. For information about how to use SCVEditor and local.scv, refer to Check Point documentation.
The Check Point SCV plugin name is ZoneLabs.
Be sure to select Enforce from the Zone Labs directory item, on the left side of the SCV Editor window. This enforces the running of the corresponding SCV dll on the endpoint computer.
The SCV Editor window
Configuring the SCV Policy
Endpoint Security Gateway Integration Guide 50
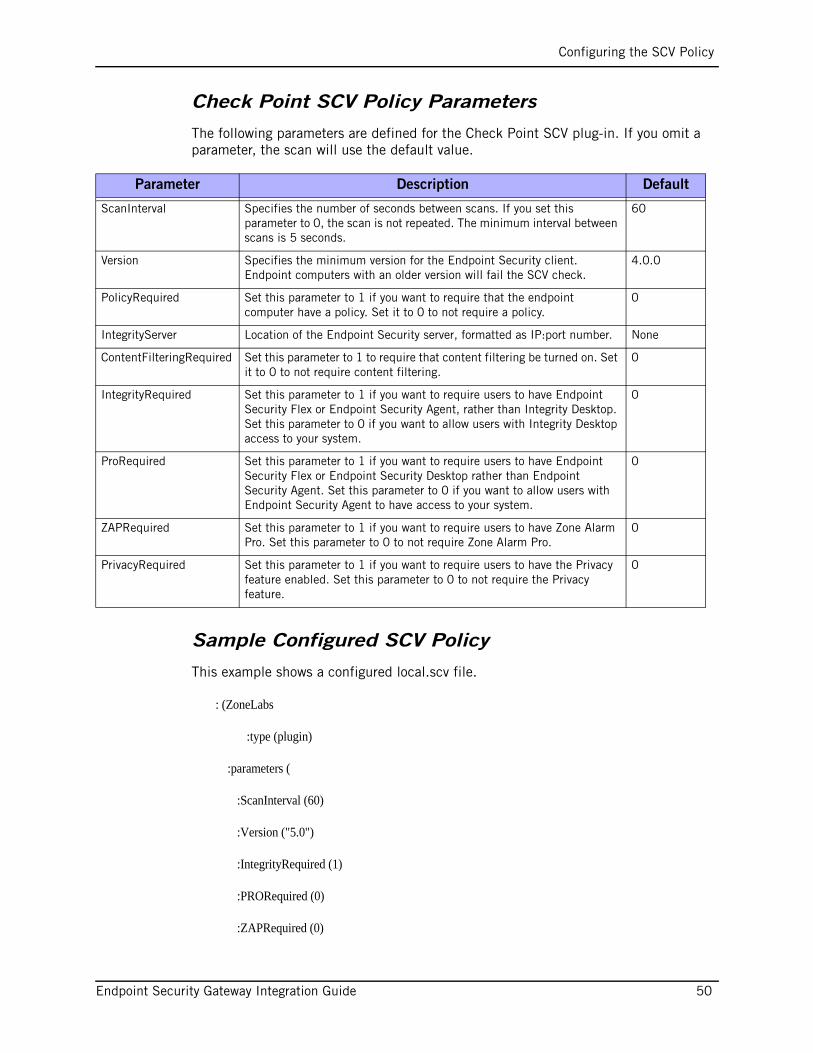
Check Point SCV Policy Parameters
The following parameters are defined for the Check Point SCV plug-in. If you omit a parameter, the scan will use the default value.
Sample Configured SCV Policy
This example shows a configured local.scv file.
: (ZoneLabs
:type (plugin)
:parameters (
:ScanInterval (60)
:Version ("5.0")
:IntegrityRequired (1)
:PRORequired (0)
:ZAPRequired (0)
Parameter Description Default
ScanInterval Specifies the number of seconds between scans. If you set this parameter to 0, the scan is not repeated. The minimum interval between scans is 5 seconds.
60
Version Specifies the minimum version for the Endpoint Security client. Endpoint computers with an older version will fail the SCV check.
4.0.0
PolicyRequired Set this parameter to 1 if you want to require that the endpoint computer have a policy. Set it to 0 to not require a policy.
0
IntegrityServer Location of the Endpoint Security server, formatted as IP:port number. None
ContentFilteringRequired Set this parameter to 1 to require that content filtering be turned on. Set it to 0 to not require content filtering.
0
IntegrityRequired Set this parameter to 1 if you want to require users to have Endpoint Security Flex or Endpoint Security Agent, rather than Integrity Desktop. Set this parameter to 0 if you want to allow users with Integrity Desktop access to your system.
0
ProRequired Set this parameter to 1 if you want to require users to have Endpoint Security Flex or Endpoint Security Desktop rather than Endpoint Security Agent. Set this parameter to 0 if you want to allow users with Endpoint Security Agent to have access to your system.
0
ZAPRequired Set this parameter to 1 if you want to require users to have Zone Alarm Pro. Set this parameter to 0 to not require Zone Alarm Pro.
0
PrivacyRequired Set this parameter to 1 if you want to require users to have the Privacy feature enabled. Set this parameter to 0 to not require the Privacy feature.
0

Configuring the SCV Policy
Endpoint Security Gateway Integration Guide 51
:PrivacyRequired (0)
:ContentFilteringRequired (0)
:PolicyRequired (1)
:IntegrityServer ("172.18.1.31:443")
)
)
)
:SCVPolicy (
: (ProcessMonitor)
: (ZoneLabs)
)
:SCVGlobalParams (
:enable_status_notifications (true)
:status_notifications_timeout (10)
:disconnect_when_not_verified (false)
:block_connections_on_unverified (false)
:block_scv_client_connections (false)
:scv_policy_timeout_hours (168)
:enforce_ip_forwarding (false)
:not_verified_script ("")
:not_verified_script_run_show (false)
:not_verified_script_run_admin (false)
:not_verified_script_run_always (false)
:allow_non_scv_clients (false)
)
)

Installing the SCV Policy on Policy Servers
Endpoint Security Gateway Integration Guide 52
Installing the SCV Policy on Policy ServersAfter creating your Check Point SCV policy, you must install it on the Policy Servers on your network. Once installed on the servers, the policy is downloaded and implemented by SecureClients.
To install the new SCV policy on Policy Servers:
1 Launch the Check Point SmartDashboard.
The Check Point SmartDashboard window appears.
2 Select Install from the Policy menu at the top of the window.
The Install Policy window appears.
The Check Point SmartDashboard window
The Install Policy window

Configuring an Endpoint Security client for Use with
Endpoint Security Gateway Integration Guide 53
3 Install the policy as necessary, to Security and/or Desktop Security, and click OK.
The Installation Process window appears.
4 Verify that the policy installs correctly via the installation process window and click Close.
The Check Point SmartDashboard window returns.
When the endpoint user logs in and authenticates on VPN-1 SecurRemote/SecureClient, The SCV Plug-In automatically reads the relevant configuration information into memory from the Check Point VPN Gateway located in the local.scv file.
Troubleshooting the Check Point SCV Configuration
If the SCV Plug-In encounters an improperly formatted line in local.scv, the default Zone Labs parameters settings will be restored and the following entry appears in the SecureClient log:
Zone Labs SCV Plug-In encountered an input error restoring default parameters.
If you encounter this error message, do the following:
1 Edit the local.scv file and fix the necessary line(s).
2 Reinstall the policy.
3 Reconnect via SecureClient.
Configuring an Endpoint Security client for Use with SecureClient
To configure Agent or Flex for use with Check Point SecureClient, the SecureClient executables need to be given network access permission in the Check Point Endpoint Security security policy. You will first run SecureClient on a secure computer that is already connected to Endpoint Security server, in order to allow the program observation feature to capture the Smart Checksums of the SecureClient executables. You will then create an enterprise policy giving the proper permissions to those
The Installation Process window

Packaging the Policy File
Endpoint Security Gateway Integration Guide 54
executables. In the same policy, you must add your Check Point VPN, your Office Mode IP addresses and all gateway and policy servers to the Trusted Zone to allow SecureClient to communicate with your VPN servers.
To configure your Endpoint Security client:
1 Observe the SecureClient programs using Endpoint Security server.
2 Configure an enterprise policy.
Required Rules Summary
Use the table as a guide to creating the needed rules and then add the Check Point VPN to the Trusted Zone.
Program Rules
Packaging the Policy File Now that you have configured your policy, you can add that policy to a Flex or Agent installation package. When SecureClient users install an Endpoint Security client, the policy will automatically allow SecureClient to connect to your Check Point VPN.
To package the configuration file with Flex or Agent:
1 In the directory for the installer package with which you want to bundle the policy, create a directory called extras. For example:
c:\Program Files\Zone Labs\Integrity\jakarta-tomcat-4.0.1\webapps\integrity\package\Integrity_Flex_US_5_0_556_026\extras
2 From the Endpoint Security Administrator Console, export the enterprise policy you just created to the extras directory.
a Go to Policies.
b Select the policy you just created.
Application Act as Client(Trusted)
Act as Client(Internet)
Act as Server(Trusted)
Act as Server(Internet)
SR_SERVICE.EXE Allow Allow Allow Block
SR_GUI.EXE Allow Allow Allow Block
SCC.EXE Allow Allow Allow Block
SR_SDS.EXE Allow Allow Block Block
SR_DIAGNOSTICS.EXE Allow Allow Block Block
Before including the policy in a Flex installer package, make sure “Enforce enterprise policies only” is selected in the Client Settings tab of the policy.

Packaging the Policy File
Endpoint Security Gateway Integration Guide 55
c Click Export: XML format.
d Click Save and navigate to the extras directory you just created, and save the file as CPpolicy.xml
3 Go to the Client Configuration | Client Packages.
4 Click New.
5 In the Package Details area, enter the name for the new package.
6 In the Product Information area, enter the package information:
a Select the type of Endpoint Security client.
b Select an Endpoint Security client installer file.
c Enter the product version number.
d Select Add SecureClient installer file to package and specify the SecureClient installer file.
7 In the Install Parameters area, enter the appropriate information:
a In the Install Directory, enter the location where you want the clients installed.
b In the Additional Parameters field, enter the following:
POLICYFILE=”$temp$\CPPolicy.xml”
8 Complete the rest of the New Package screen per your own requirements.
9 Click Save to save the installation package.
You can now distribute the new installation package normally.
For additional information on using installation packages, see the Endpoint Security Client Management Guide.

Chapter
Endpoint Security Gateway Integration Guide 56
4VPN-1 UTM/Power Gateway Integration
In This Chapter
This chapter describes how to configure Check Point VPN-1 UTM or Power and Endpoint Security to provide intra-LAN Cooperative Enforcement.
The information provided here assumes that you have already installed and configured the VPN-1 UTM or Power gateway. For more information about the VPN-1 UTM or Power gateway, refer to the documentation that is provided with the gateway product or available for download as a PDF from the Check Point Web site.
Benefits of VPN-1 UTM or Power Gateway Integration page 57
System Requirements page 57
Configuring the Gateway and Server for Cooperative Enforcement page 57

Benefits of VPN-1 UTM or Power Gateway Integration
Endpoint Security Gateway Integration Guide 57
Benefits of VPN-1 UTM or Power Gateway Integration
Integrating the VPN-1 UTM or Power gateway with Endpoint Security provides Cooperative Enforcement to computers that connect to the network from inside the firewall or VPN gateway perimeter. For example, you may restrict endpoints from going outside of your enterprise firewall if they do not have theEndpoint Security client installed, if they are not compliant with Endpoint Security policies, or if they have not responded to the Endpoint Security server in the specified number of heartbeats.
System RequirementsThese are the general components you will need to integrate your Check Point VPN-1 UTM or Power gateway with Endpoint Security. For more specific system requirements and version information, see the Endpoint Security System Requirements document.
Check Point Endpoint Security
An Endpoint Security client
Check Point VPN-1 UTM or Power gateway
Check Point Smart Dashboard
For more information about the VPN-1 UTM/Power gateway, see the Check Point VPN-1 UTM or Power user manual.
Configuring the Gateway and Server for Cooperative Enforcement
To configure VPN-1 UTM or Power gateway for Cooperative Enforcement:
1 Configure Endpoint Security server to use the gateway. See page 58.
2 Configure the gateway to use Endpoint Security. See page 58.
Once the configuration is complete, the gateway can enforce compliance of Endpoint Security policies on the endpoints, and you can monitor compliance status in SmartView Monitor. See the SmartView Monitor documentation for details.

Configuring the Gateway on Endpoint Security Server
Endpoint Security Gateway Integration Guide 58
Configuring the Gateway on Endpoint Security Server
The following instructions describe settings to make on the Endpoint Security server so that it communicates with the gateway for enforcement.
To configure the VPN-1 UTM or Power gateway on Endpoint Security:
1 From the Home page on the Endpoint Security server, click Gateways to go to the Gateway Manager page.
2 Create a new gateway catalog for the VPN-1 UTM/Power gateway:
a From the New Gateway drop-down menu, choose Check Point VPN-1 UTM/Power.
The New Gateway page appears.
b In the VPN-1 Host Name field, enter the IP address or host name of the VPN-1 UTM/Power gateway.
c Click Save.
About assigning a policy for VPN-1 UTM or Power gateway users
You do not assign security policies directly to the VPN-1 UTM or Power gateway. Instead, you can create a catalog that contains the users or endpoints you want the gateway to monitor, and then assign a policy to the catalog.
If you do not create a catalog for VPN-1 UTM or Power gateway users or endpoints, the users receive a policy according to the Endpoint Security policy inheritance. See the Endpoint Security Administrator Guide for details about policy creation, assignment, and inheritance.
Configuring the Gateway to Use the Endpoint Security Server
The following instructions describe settings to make on the VPN-1 UTM or Power gateway so that it performs Cooperative Enforcement with Endpoint Security.
For more information, please refer to the VPN-1 UTM or Power gateway documentation and the Smart Dashboard online help.
To configure VPN-1 UTM or Power gateway to use Endpoint Security:
1 In Smart Dashboard, open the Cooperative Enforcement window:
a Under Network Objects, select the Check Point gateway that you want to configure.
b In the window that appears, click Cooperative Enforcement.
The Cooperative Enforcement window appears.

Configuring the Gateway to Use the Endpoint Security
Endpoint Security Gateway Integration Guide 59
2 Select the Monitor Only checkbox. (Optional)
Selecting Monitor Only is a best practice in initial setup because it allows all traffic to pass successfully. Connections that would have otherwise been dropped are only tracked, so as not to disrupt endpoint users. Once you have monitored the cooperative enforcement activity and addressed common issues, you will probably want to deselect Monitor Only and allow enforcement.
3 From the Use Integrity Server drop-down menu, select a Endpoint Security server. Or, click New if you need to add the Endpoint Security server you want to select.
4 From the Track Unauthorized Hosts drop-down menu, select the method to be used for tracking.
5 Select one of the following:
Check authorization of all clients: Select to inspect all clients.
Bypass authorization of the following clients: Select to permit all the clients in the group chosen in the drop-down menu to pass without inspection.
Check authorization only of the following clients: Select to choose a group of clients, and to limit authorization checks only to these clients.
6 Choose Install from the Policy menu to establish these settings on the gateway.

Chapter
Endpoint Security Gateway Integration Guide 60
5Cisco VPN Concentrator Integration
In This Chapter
This chapter describes how to configure the Cisco VPN Series Concentrator (Cisco Concentrator) to enable the Cooperative Enforcement feature.
The information provided here assumes that you have already installed and configured the Cisco VPN Concentrator. For more information, see the Cisco Concentrator installation guides.
This chapter also assumes that you have performed the steps for configuring Cooperative Enforcement described in the Endpoint Security Administrator Guide.
System Requirements page 61
Integrating Cisco VPN 3000 Series Concentrator page 62
Configuring the Endpoint Security client page 65
Packaging the Policy File with Flex or Agent page 70
Troubleshooting page 71

System Requirements
Endpoint Security Gateway Integration Guide 61
System RequirementsThese are the general components you will need to use the Cisco Concentrator with Endpoint Security. For more detailed system requirements and version information, see the Endpoint Security System Requirements document.
Check Point Endpoint Security server
An Endpoint Security client
Cisco VPN Concentrator
Cisco VPN client

Integrating Cisco VPN 3000 Series Concentrator
Endpoint Security Gateway Integration Guide 62
Integrating Cisco VPN 3000 Series Concentrator
Perform the following steps to integrate your Cisco Concentrator with the Endpoint Security server.
To integrate the Cisco Concentrator:
1 Configure the Cisco Concentrator.
See “Integrating Cisco VPN 3000 Series Concentrator,” on page 62.
2 Configure client enforcement.
See “Configuring Client Enforcement,” on page 63.
Configuring the Cisco ConcentratorConfigure the Cisco Concentrator with the connection information for the Endpoint Security client.
To configure the Cisco Concentrator:
1 Set the Firewall.
See “Setting the Firewall,” on page 62.
2 Configure Client Enforcement
See “Configuring Client Enforcement,” on page 63.
Setting the Firewall
Set the firewall in the Cisco Concentrator to Zone Labs Integrity Server.
To set the firewall:
1 Open the Cisco VPN Concentrator administrative console and navigate to Configuration | System | Servers | Firewall.
2 In the Zone Labs Integrity Server field, enter the IP address for your Endpoint Security server.
3 Set the Failure Policy options as appropriate for your installation.
If you later change this IP, traffic will still be routed to the Endpoint Security server until you remove the Cisco gateway from Endpoint Security.

Configuring the Cisco Concentrator
Endpoint Security Gateway Integration Guide 63
4 In the Server Port field, enter the port for your Endpoint Security client. The default value is 5055.
5 Choose whether or not to use a SSL certificate to authenticate the Endpoint Security client.
Configuring Client Enforcement
Configure the Cisco Concentrator to require that connecting endpoint computers have an Endpoint Security client installed. Configure client enforcement by performing the following steps.
1 Create a group on the Cisco Concentrator.
See “Creating a group,” on page 63.
2 Set the firewall policy.
See “Setting the firewall policy,” on page 64.
Creating a group
If you have not already created a group, do so now. If you have already created a group, edit it as appropriate.
To create a group:
1 Open the Cisco VPN Concentrator administrative console and navigate to Configuration | User Management | Groups.
2 Click Add Group.
3 Click the Identity tab.
4 In the Group Name field, enter name for the group. You must use the same name you used for the gateway group on the Endpoint Security server.
5 Complete the other fields and click Add.
This value cannot be 5054 and must match the port value in “Checking Port Settings,” on page 73.
Note
If you select the SSL Client Authentication check box, you must import a SSL Certificate into the Endpoint Security server from the Cisco Concentrator before Cooperative Enforcement will occur. Be sure to use the appropriate key for the Concentrator interface. Use the Certificate Manager panel in the Endpoint Security server to import the certificate.

Configuring the Cisco Concentrator
Endpoint Security Gateway Integration Guide 64
Setting the firewall policy
To set the firewall policy
1 Click the Client FW tab.
The VPN Client Firewall Policy page opens.
2 Select the Firewall Required radio button in the Firewall Setting field.
3 In the Firewall drop-down list, select Zone Labs Integrity.
4 Complete the other fields and click Add.

Configuring the Endpoint Security client
Endpoint Security Gateway Integration Guide 65
Configuring the Endpoint Security clientConfigure the Endpoint Security client to allow the Cisco VPN Client to communicate with the Cisco Concentrator.
Overview of client communicationsCisco VPN on the endpoint computers, communicate with the Endpoint Security server in the following way:
1 A Cisco VPN client contacts the Cisco Concentrator.
2 The Cisco Concentrator performs initial authentication of the user.
3 If authentication is successful, the tunnel is placed into a restricted state, only allowing network connectivity to the Endpoint Security server.
4 The Endpoint Security client sends the Cisco gateway group name and user name to Endpoint Security server.
5 If the Endpoint Security server is unreachable, the Cisco VPN reverts to AYT (Are You There) functionality. The Concentrator will then contact the Cisco VPN client and will verify if the Endpoint Security client service is running. If the Endpoint Security client service is running then the VPN user will be allowed VPN access to the network.
6 The Endpoint Security client sends a synchronize request to the server. The Endpoint Security server performs a lookup for the gateway group that matches the VPN group. It then selects the appropriate policy based on this information. The location of the policy to download and other information is sent back to the Endpoint Security client.
7 If the Endpoint Security client does not have the policy it downloads it. It then sends another synchronize call to the server and reports compliance. the connection is removed for restricted mode. If the second synchronize call does not arrive within six heartbeats, the Endpoint Security server tells the VPN gateway to terminate the connection.
8 Once connected, the Endpoint Security client cannot be closed without also terminating the VPN connection. The VPN client hooks directly into the Endpoint Security firewall service and will not allow it to be terminated. If the service is terminated through extraordinary means, the VPN connection will be immediately closed.
9 By default, if the Endpoint Security client misses four consecutive heartbeats, the connection is restricted. If the Endpoint Security client misses six subsequent heartbeats, the VPN tunnel is torn down and the connection is terminated. You can

Configuring the Enterprise Policy
Endpoint Security Gateway Integration Guide 66
set the frequency of heartbeats, and the number of heartbeats before termination or restriction in the Client Settings for a policy.
Perform the following steps to configure your Endpoint Security client so that the Cisco VPN client can connect to the VPN Gateway:
To configure the Endpoint Security client:
1 Configure the Enterprise Policy.
See “Configuring the Enterprise Policy,” on page 66.
2 Package the Policy file for Flex or Agent.
See “Packaging the Policy File with Flex or Agent,” on page 70.
Configuring the Enterprise PolicyConfigure the enterprise policy to allow the Cisco VPN client to establish a VPN connection.
To configure the enterprise policy:
1 Add the Cisco Concentrator Access Zone.
See “Adding the Cisco Concentrator Access Zone,” on page 67.
2 Add the localhost Access Zone.
See “Adding the Localhost Access Zone,” on page 67.
3 Add the LAN Access Zone.
See “Adding the LAN Access Zone,” on page 67.
4 Add the program rules.
See “Adding the Program Rules,” on page 68.
5 Turn off policy arbitration.
See “Turn off Policy Arbitration,” on page 68.
The p
After logging off, the endpoint user cannot be reauthenticated. Endpoint Security therefore places the endpoint user on the restricted VLAN, even if the endpoint computer is compliant. Endpoint Security does not support host-based authentication for EAP connections. Reboot the endpoint computer to reauthenticate.

Configuring the Enterprise Policy
Endpoint Security Gateway Integration Guide 67
Adding the Cisco Concentrator Access Zone
To Add the Cisco Concentrator Access Zone
1 In theEndpoint Security Administrator Console, go to Policies.
2 Choose your policy from the list and click Edit. If you haven’t already created a policy for the gateway defined group for the Cisco Concentrator, do so now.
3 Click the Access Zones tab.
4 Click Add.
5 Choose Include the network in the Trusted Zone.
6 Click New Location.
7 Complete the fields according to the table below.
8 Repeat steps 6 and 7 for each gateway and click Save.
Adding the Localhost Access Zone
To Add the localhost Access Zone
1 In the Access Zones page, click New Location..
2 Complete the fields according to the table below.
3 Click Save.
Adding the LAN Access Zone
To add the LAN Access Zone:
1 In the Access Zones page, click New Location.
Field Value
Type IP Address
Name Cisco Concentrator
Host <public IP address of your Concentrator>
Field Value
Type IP Address
Name localhost
Host 127.0.0/1

Configuring the Enterprise Policy
Endpoint Security Gateway Integration Guide 68
2 Complete the fields according to the table below.
3 Click Save.
Adding the Program Rules
Set the program access rules to allow the VPN client to communicate with the Cisco Concentrator.
To add the program access rules:
1 In the Integrity Administration page, navigate to Policy Studio | Policy List.
2 Choose your policy from the list and click Edit.
3 Click the Program Rules tab.
4 Click Add.
5 Click All Programs.
6 Select the following programs from the list and then click Add:
CVPND.EXE
IPSECDIALER.EXE
IPSXAUTH.EXE
VPNGUI.EXE
PPPTOOL.EXE
7 Select the check boxes for Allow Internet and Allow Trusted for both client and server settings.
Turn off Policy Arbitration
To ensure that the personal policy does not block the VPN communication, turn off policy arbitration.
To turn off policy arbitration:
1 Go to Policies.
Field Value
Type Subnet
Name LAN
Host <your network address and subnet mask>
The p
The executables you see here depend on the version you are using.

Configuring the Enterprise Policy
Endpoint Security Gateway Integration Guide 69
2 Select your policy and click Edit.
3 Click the Client Settings tab.
4 Select the Enforce enterprise policies only check box.

Packaging the Policy File with Flex or Agent
Endpoint Security Gateway Integration Guide 70
Packaging the Policy File with Flex or AgentNow that you have configured your policy, you can add that policy to a Flex or Agent installation package. The policy will automatically allow your endpoints to make a VPN connection.
To package the configuration file:
1 In the directory for the installer package with which you want to bundle the policy, manually create a directory called extras. For example:
c:\Program Files\Zone Labs\Integrity\jakarta-tomcat-4.0.1\webapps\integrity\package\Integrity_Flex_US_5_0_556_026\extras
2 From the Endpoint Security administrator console, export the enterprise policy you just created to the extras directory, saving it as CCpolicy.xml.
a Go to Policies.
b Select the policy you just created.
c Click Export.
d Navigate to the extras directory you just created, and save the file as CCpolicy.xml
3 Go to Client Configuration | Client Packages.
4 Click to select the installation package you want to use.
5 On the Advanced Settings tab, in the Custom Parameters box, add the following:
For Integrity versions earlier than 5.0:
/policy “$temp$\extras\CCPolicy.xml”
For Integrity/Endpoint Security versions 5.0 or later:
POLICYFILE= “$temp$\extras\CCPolicy.xml”
6 Complete the rest of the Edit Package screen per your own requirements.
7 Click Save to save the installation package.
You can now distribute the new installation package normally.
For additional information on using installation packages, see the Endpoint Security Installation and Configuration Guide.

Troubleshooting
Endpoint Security Gateway Integration Guide 71
TroubleshootingIf you experience difficulties with your installation, perform the following checks.
To troubleshoot the connection between the servers:
1 Check the connection to the Endpoint Security server.
See “Checking connection to the Endpoint Security Server,” on page 71.
2 Check the logs.
See “Checking the Log files,” on page 72.
3 Check the SSL certificate exchange.
See “Checking the SSL Certificate Exchange,” on page 72.
4 Check the validity of the SSL certificate.
See “Checking the SSL Certificate Validity,” on page 72.
5 Check the encryption type.
See “Creating a new Secure Socket Layer Certificate,” on page 73.
6 Check the port settings on the Cisco Concentrator.
See “Checking Port Settings,” on page 73.
Checking connection to the Endpoint Security Server
Verify that the Cisco Concentrator can connect to the Endpoint Security server.
To check the connection to the Endpoint Security server:
1 Open the Cisco VPN Concentrator administrative console and navigate to Administration | Ping.
2 In the Address/Hostname to Ping field, enter your Endpoint Security server IP address.
If your ping is successful you will be informed that your Endpoint Security server IP address is ‘alive’. This means that the Cisco Concentrator is able to connect to the Endpoint Security server and you can proceed.
If your ping is not successful, you should check to make sure that traffic can pass between the two servers and that the settings you used when configuring the Cisco Concentrator and the Endpoint Security server are correct. If the settings are all correct, proceed to try the other troubleshooting procedures in this section.

Checking the Log files
Endpoint Security Gateway Integration Guide 72
Checking the Log filesYou can use either theEndpoint Security server log or the Cisco Concentrator log to confirm that the two devices are communicating.
The Endpoint Security server Log
The Endpoint Security log file is located at: C:\Program Files\Zone Labs\Integrity\jakarta-tomcat-4.0.1\webapps\integrity\logs
The file is called integrity.log and can be opened in any text editor. Set the logging level to high. If the Endpoint Security server and Concentrator are not communicating you will see an error message immediately after adding the Concentrator. The log will also indicate a successful connection.
The Concentrator log
The Concentrator live event log shows if communications have failed. Top view the live event log, navigate to Monitoring | Filterable Event Log | Live Event Log. If you see entries resembling the following, you must create a new Secure Socket Layer Certificate:
08/02/2002 11:53:13.140 SEV=4 IKE/159 RPT=1
TCP Connection to Firewall Server has been lost, restricted tunnels are now allowed full network access
See “Creating a new Secure Socket Layer Certificate,” on page 73 for more information.
Checking the SSL Certificate ExchangeThe SSL certificate is exchanged between the Cisco Concentrator and the Endpoint Security server via HTTP. Check that HTTP is enabled on the Cisco Concentrator.
To verify that HTTP is enabled:
1 Open the Cisco VPN Concentrator administrative console and navigate to Configurations | System | Management Protocols | HTTP/HTTPS.
2 Verify that Enable HTTP is checked and that the HTTP Port matches the certificate port that you specified for the gateway device on the Endpoint Security server.
Checking the SSL Certificate ValidityCheck to make sure the SSL Certificate is still valid.
To check the SSL Certificate validity:
1 Open the Cisco VPN Concentrator administrative console and navigate to Administration | Certificate Management.
The Certificate Management page opens.

Checking the Encryption Type
Endpoint Security Gateway Integration Guide 73
2 Find the SSL Certificate in the list of SSL certificates and click View.
3 Check the validity field to see if the certificate has expired and if it matches the Endpoint Security server SSL Certificate.
If the certificate has expired, or does not match, you will need to create a new one. See “Creating a new Secure Socket Layer Certificate,” on page 73 for instructions on how to create a new certificate.
Creating a new Secure Socket Layer Certificate
Perform the following steps to create a new SSL Certificate when needed.
To create a new Secure Socket Layer Certificate:
1 Delete the Concentrator entry from the Endpoint Security server.
2 Delete all SSL certificates from the gateway device.
3 Generate a SSL certificate on the Concentrator.
The Cisco Concentrator and the Endpoint Security server will exchange new certificates automatically.
4 Create a Concentrator entry within Endpoint Security server to the internal interface on the VPN server.
5 Verify the SSL certificate has been exchanged by editing the gateway entity on the Endpoint Security.
Checking the Encryption TypeCheck that the encryption types for the two servers do not match.
To check the encryption type:
1 Open the Cisco VPN Concentrator administrative console and navigate to Configuration | Tunneling and Security | SSL | Protocols.
2 Check that the SSL Version is set to Negotiate SSL V3/TLS V1.
Checking Port SettingsThe Endpoint Security server and clients use the Zone Labs Security Protocol (ZSP). Check to make sure that Cisco Concentrator is not blocking the traffic on this port.
You do not need to change any settings to cause a new certificate exchange to take place. Make sure that the SSL certificate download port on the Cisco Concentrator is not blocked.
Checking Port Settings
Endpoint Security Gateway Integration Guide 74
To check the port:
1 Open the Cisco VPN Concentrator administrative console and navigate Configuration | Policy Management | Traffic Management | Rules.
2 Check that the rules do not prevent ZSP traffic from passing through the Cisco Concentrator. ZSP uses port 5055 by default. This value must match the value you used when setting the firewall, see “Setting the Firewall,” on page 62.

Chapter
Endpoint Security Gateway Integration Guide 75
6Configuring the Cisco Catalyst 2950
In This Chapter
This chapter contains vendor-specific directions for configuring your Cisco Catalyst 2950 G Switch to enable Cooperative Enforcement with Endpoint Security. Before performing the procedures in this chapter, make sure you have read , Network Access Server Integration and have already completed the procedures covered there. The information provided here assumes that you have already installed and configured Endpoint Security and an Internet Authentication Service.
Requirements page 76
Configuring Cisco Catalyst 2950 G Switch page 77
Configuring the Endpoint Computers page 80
Troubleshooting page 81
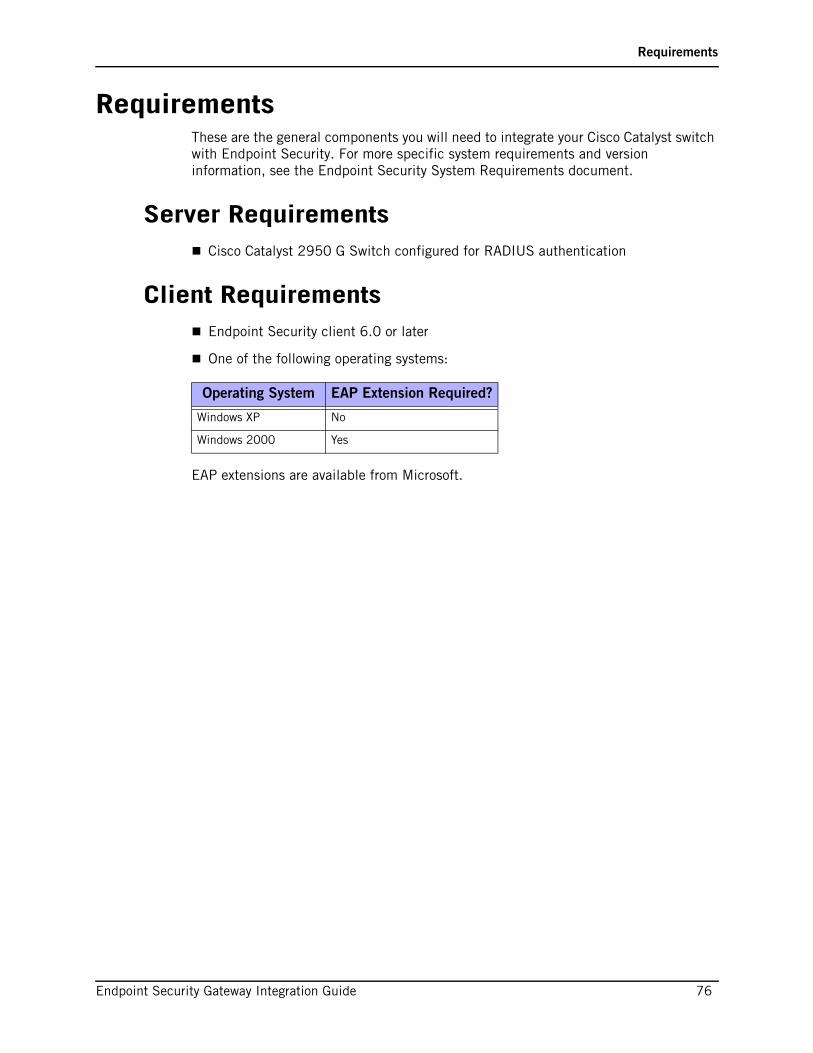
Requirements
Endpoint Security Gateway Integration Guide 76
RequirementsThese are the general components you will need to integrate your Cisco Catalyst switch with Endpoint Security. For more specific system requirements and version information, see the Endpoint Security System Requirements document.
Server RequirementsCisco Catalyst 2950 G Switch configured for RADIUS authentication
Client RequirementsEndpoint Security client 6.0 or later
One of the following operating systems:
EAP extensions are available from Microsoft.
Operating System EAP Extension Required?
Windows XP No
Windows 2000 Yes

Configuring Cisco Catalyst 2950 G Switch
Endpoint Security Gateway Integration Guide 77
Configuring Cisco Catalyst 2950 G SwitchThis section explains how to configure Endpoint Security on the Cisco Catalyst 2950 G Switch.
To configure Endpoint Security:
1 Perform the network access server integration, as described in , “Network Access Server Integration.”

Configuring Cisco Catalyst 2950 G Switch
Endpoint Security Gateway Integration Guide 78
2 Use the command prompt to configure Endpoint Security. Use this example as a model:
version 12.1
no service pad
service timestamps debug uptime
service timestamps log uptime
no service password-encryption
!
hostname Switch
!
aaa new-model
aaa authentication dot1x default group radius
aaa authorization network default group radius
!
ip subnet-zero
!
vtp domain bob
vtp mode transparent
!
spanning-tree mode pvst
no spanning-tree optimize bpdu transmission
spanning-tree extend system-id
dot1x system-auth-control
!
vlan 117
name Guest
!
vlan 120
!
interface FastEthernet0/15
switchport mode access
dot1x port-control auto
dot1x timeout reauth-period 300

Configuring Cisco Catalyst 2950 G Switch
Endpoint Security Gateway Integration Guide 79
dot1x timeout supp-timeout 60
dot1x timeout server-timeout 160
dot1x reauthentication
spanning-tree portfast
!
interface Vlan117
no ip address
no ip route-cache
shutdown
!
interface Vlan120
ip address 172.16.20.252 255.255.255.0
no ip route-cache
ip default-gateway 172.16.20.1
ip http server
!
access-list 101 permit ip any host 172.16.211.161
radius-server host 172.16.20.227 auth-port 1814 acct-port 1815
radius-server retransmit 3
radius-server key password
!
end

Configuring the Endpoint Computers
Endpoint Security Gateway Integration Guide 80
Configuring the Endpoint ComputersAfter you configure the switch, configure the endpoint computer. For details, see “Configuring Endpoints for Use with Wired Connections,” on page 31.
Troubleshooting
Endpoint Security Gateway Integration Guide 81
Troubleshooting This section gives troubleshooting information specific to the Cisco Catalyst 2950 G Switch. For general troubleshooting tips, see , “Network Access Server Integration.”
Symptom: After Logging Off, the User is Restricted to the VLAN
After logging off, the endpoint user cannot be reauthenticated. Endpoint Security therefore places the endpoint user on the restricted VLAN, even if the endpoint computer is compliant. Endpoint Security does not support host-based authentication for EAP connections.
Workaround
Reboot the endpoint computer to reauthenticate.

Chapter
Endpoint Security Gateway Integration Guide 82
7Configuring the Cisco Aironet 1100 Series Wireless Access Point
In This Chapter
This chapter contains vendor-specific directions for configuring your Cisco Aironet 1100 Series Wireless Access Point (WAP) to enable Cooperative Enforcement with Endpoint Security. Before performing the procedures in this chapter, make sure you have read , Network Access Server Integration and have already completed the procedures covered there. The information provided here assumes that you have already installed and configured the Endpoint Security server and an Internet Authentication Service.
System Requirements page 83
Configuring Cisco Aironet 1100 Series Wireless Access Point page 84
Configuring Endpoint Computers page 87
Troubleshooting page 88

System Requirements
Endpoint Security Gateway Integration Guide 83
System RequirementsThese are the general components you will need to integrate your Cisco Aironet gateway with Endpoint Security. For more specific system requirements and version information, see the Endpoint Security System Requirements document.
Server RequirementsCisco Aironet 1100 Series Wireless Access Point configured for 802.1x and RADIUS authentication
Firmware 1.09 or later
Client RequirementsEndpoint Security client 6.0 or later
One of the following operating systems:
EAP extensions are available from Microsoft.
Operating System EAP Extension Required?
Windows XP No
Windows 2000 Yes

Configuring Cisco Aironet 1100 Series Wireless Ac-
Endpoint Security Gateway Integration Guide 84
Configuring Cisco Aironet 1100 Series Wireless Access Point
This section lists the tasks you must perform to configure Cooperative Enforcement for the Cisco Aironet 1100 Series Wireless Access Point.
To configure the gateway:
1 Perform the network access server integration, as described in “Network Access Server Integration.”
2 Create a Cooperative Enforcement SSID. See page 84.
3 Define a Wired Equivalent Privacy Key. See page 85.
4 Define Endpoint Security as the RADIUS server. See page 85.
5 Set the reauthentication interval. See page 86.
Creating a Cooperative Enforcement SSID Users connect from an endpoint computer to the access point using a Service Set Identifier (SSID). This section explains how to create a new Cooperative Enforcement SSID.
To create a Cooperative Enforcement SSID:
1 In the Cisco Aironet 1100 Series Management Interface, select Security | SSID Manager.
2 In the Current SSID List, select <NEW>.
The fields appear blank.
3 In the SSID field, enter a name for the SSID.
The SSID is the connection name used by the endpoint computer.
4 Complete the form with the following information:
a If your access point is set up with a VLAN, select the VLAN number from the Default VLAN drop-down list. Otherwise, leave this field blank.
b Under Authentication Methods Accepted, select Open Authentication and Add. In the Add drop-down list, choose EAP.
If you already have an SSID that you want to configure for Cooperative Enforcement, edit the SSID with the settings in step 4. You do not need to change any other information in your configuration.
If there is a VLAN, you must enter the VLAN ID (number) and Filter ID when creating the gateway catalog on Endpoint Security server.

Defining a Wired Equivalent Privacy (WEP) Key
Endpoint Security Gateway Integration Guide 85
c Under Authentication Methods Accepted, select Network EAP.
5 Click Apply.
The new SSID for Cooperative Enforcement appears in the Current SSID List.
Defining a Wired Equivalent Privacy (WEP) KeyDefine a WEP key to encrypt wireless transmissions.
To define a WEP key:
1 In the Cisco Aironet 1100 Series Management Interface, select Security | Encryption Manager.
2 Define the WEP key as appropriate for your installation.
Defining Endpoint Security as the RADIUS Server on the NAS
On the NAS, define Endpoint Security as the RADIUS server.
To define Endpoint Security as the RADIUS server:
1 In the Cisco Aironet 1100 Series Management Interface, select Security | Server Manager.
2 From the Current Server List, select New.
The fields appear blank.
3 Fill in the following information:
a From the Server Type drop-down list, select RADIUS.
b In the Server field, enter the Endpoint Security hostname or IP address.
c Type the secret in the Shared Secret field. The secret must be the same value you used for the “NAS Secret” when creating the gateway catalog on the Endpoint Security server.
d In Use Server For, select only EAP Authentication.
4 Click Apply to save the definition.
Be sure to change your WEP keys frequently to enhance the security of your wireless transmissions.
If you track accounting on the RADIUS server, define a second server with the Internet Authentication Service information and select Use Server For: Accounting. This will send the accounting data directly to the Internet Authentication Service.
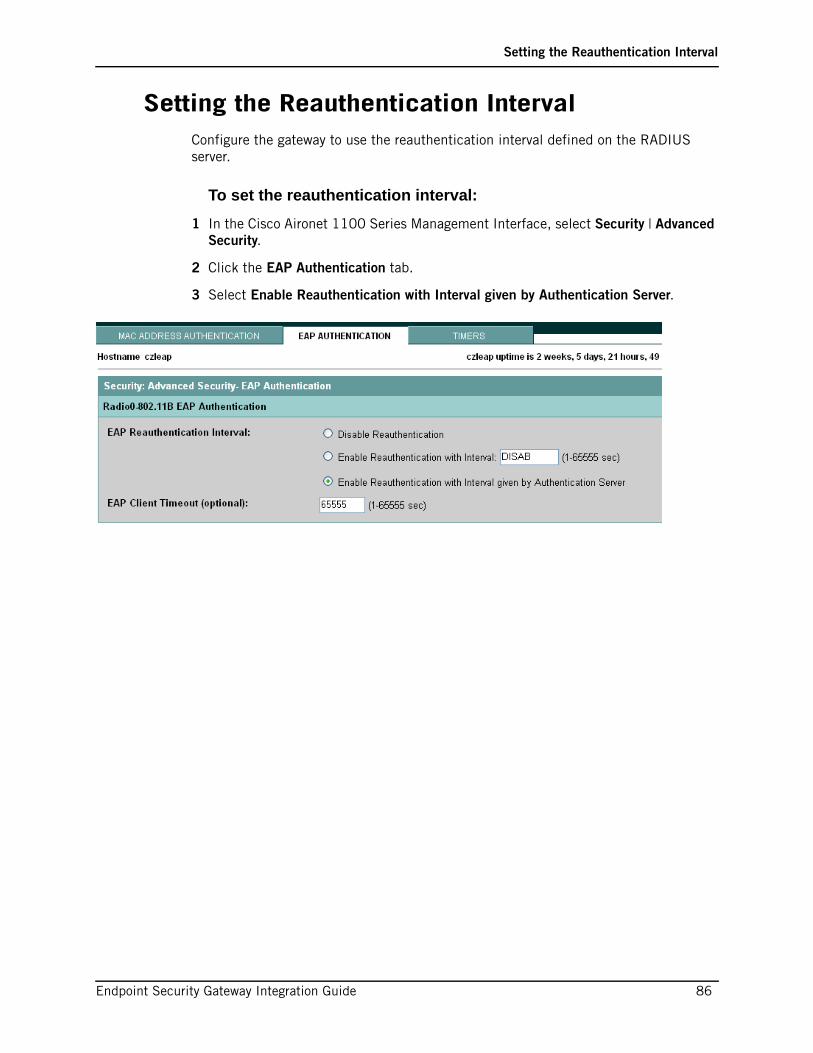
Setting the Reauthentication Interval
Endpoint Security Gateway Integration Guide 86
Setting the Reauthentication IntervalConfigure the gateway to use the reauthentication interval defined on the RADIUS server.
To set the reauthentication interval:
1 In the Cisco Aironet 1100 Series Management Interface, select Security | Advanced Security.
2 Click the EAP Authentication tab.
3 Select Enable Reauthentication with Interval given by Authentication Server.

Configuring Endpoint Computers
Endpoint Security Gateway Integration Guide 87
Configuring Endpoint ComputersAfter configuring the NAS, configure the endpoint computer so it can use the wireless access point. For details, see “Configuring Endpoints for Use with Wireless Access Points,” on page 26.

Troubleshooting
Endpoint Security Gateway Integration Guide 88
Troubleshooting This section gives troubleshooting information specific to the Cisco Aironet 1100 Series Wireless Access Point. For general troubleshooting tips, see the "Network Access Server Integration""Network Access Server Integration" chapter.
Symptom: Non-Compliant Users Cannot Establish a Connection
If Reject the Connection is enabled for the gateway catalog on Endpoint Security, users must be compliant to access the network. (For information on the Reject the Connection option, see the instructions on gateway catalogs in the Endpoint Security Administrator Guide and the associated online help.)
When Reject the Connection is enabled, Endpoint Security only rejects clients if they do not comply with the assigned policy. If you change the policy assignment when the user is not connected, the client gets the new policy the next time he or she attempts to connect.
Workaround
Non-compliant users must connect to the internal network via a Local Area Network connection and receive the current policy. Users can then establish a wireless connection. (Make sure Endpoint Security is configured to assign endpoints the same policy whether they access the network by wireless or wired LAN connection.)
Symptom: After Logging Off, the User is Restricted to the VLAN
After logging off, the endpoint user cannot be reauthenticated. Endpoint Security therefore places the endpoint user on the restricted VLAN, even if the endpoint computer is compliant. Endpoint Security does not support host-based authentication for EAP connections.
Workaround
Reboot the endpoint computer to reauthenticate.

Chapter
Endpoint Security Gateway Integration Guide 89
8Cisco ASA
In This Chapter
This chapter describes how to configure the Cisco ASA 5500 Series Adaptive Security Appliance to perform Cooperative Enforcement with the Endpoint Security. For more information, see the Cisco ASA Hardware Installation Guide.
Throughout this chapter, the term “security appliance” applies to the Cisco ASA.
System Requirements page 90
Cooperative Enforcement with ASA page 91
Workflow page 92
Basic Configuration Tasks page 93
Additional Command Line Parameter Reference page 98
This chapter assumes that you have already performed the basic installation and configuration of your Cisco ASA gateway and have tested connectivity.
This chapter also assumes that you have performed the steps for configuring Cooperative Enforcement described in the Endpoint Security Administrator Guide.

System Requirements
Endpoint Security Gateway Integration Guide 90
System RequirementsThese are the components you will need to use the Cisco Concentrator with Endpoint Security. For more detailed system requirements and version information, see the Endpoint Security System Requirements document.
Check Point Endpoint Security
Endpoint Security clients for your endpoint computers
Cisco ASA Security Appliance

Cooperative Enforcement with ASA
Endpoint Security Gateway Integration Guide 91
Cooperative Enforcement with ASAThe Cisco VPN client software and the Endpoint Security client software are co-resident on an endpoint computer. The following steps summarize the process to establish a VPN session between the endpoint computer and the enterprise private network:
1 The VPN client checks for the presence of the Endpoint Security client and communicates the location of the Endpoint Security to the Endpoint Security client.
2 The VPN client reports the presence of the Endpoint Security client to the VPN Gateway.
The VPN Gateway allows the Endpoint Security client access to the Endpoint Security server.
3 The Endpoint Security client connects to the Endpoint Security server and receives the VPN policy that you have assigned to the VPN Gateway.
The VPN policy includes Enforcement Rules you have configured to require or prohibit software on the endpoint computer.
4 The Endpoint Security client checks for compliance with the Enforcement Rules in the assigned VPN policy and reports the compliance status to the Endpoint Security server for reporting purposes.
5 The Endpoint Security client reports whether or not the endpoint computer complies with the enforcement rules that are set to restrict.
6 The VPN Gateway takes the appropriate action:
If the endpoint computer is in compliance with the restricting enforcement rules, the VPN connection is opened.
If the endpoint computer is not in compliance with enforcement rules that are set to restrict, the VPN connection is restricted or terminated, depending on the settings you configured on the ASA Gateway.
If the endpoint computer is out of compliance with an enforcement rule that is set to warn or observe the user, the VPN connection is opened. If the enforcement rule is set to warn, the endpoint user sees a popup message informing them that they are out of compliance. For more information about Enforcement Rules, see the Endpoint Security Administrator guide.
After logging off, the endpoint user cannot be reauthenticated. Endpoint Security therefore places the endpoint user on the restricted VLAN, even if the endpoint computer is compliant. Endpoint Security does not support host-based authentication for EAP connections. Reboot the endpoint computer to reauthenticate.

Workflow
Endpoint Security Gateway Integration Guide 92
WorkflowThis section describes the minimal steps for configuring the Cisco ASA to perform cooperative enforcement with the Endpoint Security server. Additional related parameters are described in the “Additional Command Line Parameter Reference,” on page 98. The following commands are entered from the Cisco command line in global configuration mode.
1 Name and configure the interface.
See “Naming and Configuring the Interface,” on page 93
2 Configure the Endpoint Security address.
See “Configuring the Server Address,” on page 94
3 Configure the port that the ASA gateway listens on.
See “Configuring the Port,” on page 95
4 Specify whether the server operates inside or outside the VPN.
See “Configuring the Interface Location,” on page 95
5 Specify the length of the connection fail time-out.
See “Configuring the Timeout Interval,” on page 95
6 Configure the VPN to fail open or to fail closed.
See “Configuring the Timeout Interval,” on page 95
7 Set the SSL certificate parameters.
See “Setting the Secure Socket Layer Certificate Options,” on page 96
8 Set the client firewall type to ‘Integrity’.
See “Setting the Client Firewall,” on page 96.
9 Save your work.
See “Saving,” on page 97.
Basic Configuration Tasks
Endpoint Security Gateway Integration Guide 93
Basic Configuration TasksThis section explains the command line tasks applicable to the Endpoint Security server but does not cover every available command line parameter. For complete details on all command line arguments, see the Cisco Security Appliance Command Reference For the Cisco ASA <version number> Series and Cisco PIX 500 Series available on the Cisco Web site.
The tasks in this section are performed in configuration mode. To switch to configuration mode use the following command:
hostname# configure terminal
The following tasks are covered in this section:
“Naming and Configuring the Interface,” on page 93
“Configuring the Server Address,” on page 94
“Configuring the Port,” on page 95
“Configuring the Interface Location,” on page 95
“Configuring the Timeout Interval,” on page 95
“Setting the Fail State,” on page 95
“Setting the Secure Socket Layer Certificate Options,” on page 96
“Setting the Client Firewall,” on page 96
Naming and Configuring the InterfaceBefore you begin, you must name the interface and perform basic configuration. For more information, see the Cisco Security Appliance Command Line Configuration Guide.

Configuring the Server Address
Endpoint Security Gateway Integration Guide 94
To name and configure the interface:
1. Use the following commands to name and configure your interface:
hostname(config)# interface <interface type>
hostname(config-if)# nameif <name>
hostname(config-if)# speed <speed>
hostname(config-if)# duplex <duplex setting>
hostname(config-if)# security-level <security level number>
hostname(config-if)# ip address <IP of the interface> <subnet mask>
hostname(config-if)# no shutdown
Configuring the Server AddressCisco ASA specifies the server address of the Endpoint Security server to the Endpoint Security client using the IP you configure.
You can specify the server address using either the IP or the Hostname
To configure the IP address:
1 Configure the IP address of the Endpoint Security server in global configuration mode:
hostname(config)# zonelabs-integrity server-address <IP>
To configure the hostname:
1. Use the naming commands to specify the hostname for the Endpoint Security server:
a Enter the names command in global configuration mode.
hostname(config)# names
You may need to configure sub interfaces for VLANS, see the Cisco documentation for information on how to do this.
The current release of the security appliance supports one Endpoint Security at a time even though the user interfaces support the configuration of up to five Endpoint Security servers. If the active server fails, configure another Endpoint Security server on the security appliance and then reestablish the client VPN session.

Configuring the Port
Endpoint Security Gateway Integration Guide 95
b Enter the name command followed by the IP address and host name for the server.
hostname(config)# name <IPaddress> <your hostname>
2. Configure the hostname for the Endpoint Security server, using the hostname you created in step 1.
hostname(config)# zonelabs-integrity server-address <your hostname>
Configuring the PortCisco ASA listens to the Endpoint Security server using the port you configure. The default port is 5055.
To configure the port:
1. Assign a port number.
hostname(config)# zonelabs-integrity port <Port Number>
Configuring the Interface LocationSpecify the interface as inside the VPN to communicate with the Endpoint Security.
To configure the interface location:
hostname(config)# zonelabs-integrity interface inside
Configuring the Timeout IntervalSet the number of seconds before fail timeout. After the security appliance waits for the specified number of seconds without a response from the Endpoint Security server, the server is declared non-responsive and the VPN goes into the fail state you specified. The default is 10 seconds.
To configure the timeout interval
hostname(config)# zonelabs-integrity fail-timeout <interval in seconds>
Setting the Fail StateIf the Endpoint Security server does not respond to the security appliance, the security appliance still establishes VPN client connections to the private network by default. It
If the Endpoint Security server is outside of your VPN, you must configure ports 80 and 443 to be open.
Setting the Secure Socket Layer Certificate Options
Endpoint Security Gateway Integration Guide 96
also maintains open, existing connections. This ensures that the enterprise VPN is not disrupted by the failure of a firewall server. You can set the VPN connection to fail open or close.
To set the fail action to ‘close’
hostname(config)# zonelabs-integrity fail-close
To set the fail action to ‘open’
hostname(config)# zonelabs-integrity fail-open
Setting the Secure Socket Layer Certificate Options
For SSL communications between the security appliance and the Endpoint Security server, the security appliance is the SSL server and the Endpoint Security server is the SSL client. When initiating an SSL connection, the certificate of the SSL server (security appliance) must be authenticated by the Endpoint Security client. The zonelabs-integrity ssl-certificate-port command specifies the port to which the Endpoint Security server connects when requesting the SSL server certificate. By default, the security appliance expects the Endpoint Security server to request an SSL certificate on port 80.
To set the SSL certificate port and authentication:
hostname(config)# zonelabs-integrity ssl-certificate-port <port number>
To set the SSL certificate authentication:
hostname(config)# zonelabs-integrity ssl-client-authentication enable
Setting the Client FirewallSet the client firewall to enforce for compliance with the Endpoint Security client’s policy. When setting the client firewall for Endpoint Security, do not use any arguments.
If you have not already configured your group, do so now using the following command to set the group name and specify whether it is internal or external. For more information about configuring groups, see the Cisco documentation.
hostname(config)# group-policy <group name> <internal/external>

Saving
Endpoint Security Gateway Integration Guide 97
To set the client firewall:
hostname(config)# client-firewall {opt | req} <group name>
Saving Your changes are not saved until you use the write memory command to write them to memory.
To save your work:
hostname(config)# write memory

Additional Command Line Parameter Reference
Endpoint Security Gateway Integration Guide 98
Additional Command Line Parameter ReferenceThe command line parameters that are generally required for configuration are given in the “Workflow,” on page 92. Depending on your configuration and needs, you may need to use the additional command line parameters given in this section.
This section describes only those command line options applicable to Endpoint Security. For details on all command line arguments, please consult the Cisco Security Appliance Command Reference For the Cisco ASA <version number> Series and Cisco PIX 500 Series available on the Cisco Web site. The following commands and tasks are included in this section:
“clear configure zonelabs-integrity,” on page 98
“Removing Endpoint Security servers,” on page 98
“show running-config zonelabs-integrity,” on page 98
“Displaying the Endpoint Security Configuration,” on page 98
“zonelabs-integrity interface,” on page 99
“Specifying an interface,” on page 99
clear configure zonelabs-integrity
Removing Endpoint Security servers
Use this command to remove all Endpoint Security servers from your configuration.
To remove all Endpoint Security servers: hostname(config)# clear configure zonelabs-integrity
show running-config zonelabs-integrityUse this command to display the addresses of all Endpoint Security servers and the configured values for the active Endpoint Security server. Use the all parameter to display the default as well as the explicitly configured values.
Displaying the Endpoint Security Configuration
To display the Endpoint Security configuration:
1 Use the show running-config zonelabs-integrity command in privileged EXEC mode.
hostname# show running-config zonelabs-integrity
Example of system response:

zonelabs-integrity interface
Endpoint Security Gateway Integration Guide 99
zonelabs-integrity server-address 10.0.9.1 10.0.9.2
zonelabs-integrity port 300
To use the optional all parameter
1 Use the show running-config all zonelabs-integrity command in privileged EXEC mode:
hostname# show running-config all zonelabs-integrity
Example of system response:
zonelabs-integrity server-address 10.0.9.1 10.0.9.2
zonelabs-integrity port 300
zonelabs-integrity interface none
zonelabs-integrity fail-open
zonelabs-integrity fail-timeout 10
zonelabs-integrity ssl-client-authentication disable
zonelabs-integrity ssl-certificate-port 80
zonelabs-integrity interfaceThe interface parameter specifies the security appliance interface on which the Endpoint Security server communicates. To create the interface name, use the nameif command.
Specifying an interface
To specify an interface:
hostname(config)# zonelabs-integrity interface <interface name>
To reset the interface to none:
hostname(config)# no zonelabs-integrity interface

Chapter
Endpoint Security Gateway Integration Guide 100
9Nortel Contivity VPN Switch Integra-tion
In This Chapter
This chapter describes how to configure a Nortel Contivity™ VPN switch and Nortel Contivity clients to enable the Cooperative Enforcement feature.
The information provided here assumes that you have already installed and configured the Nortel Contivity VPN switch and client as well as the Contivity TunnelGuard Manager and Agent. For more information, see the Nortel Contivity installation guides.
After installing and configuring Contivity and TunnelGuard, use the procedures in this chapter to configure the switch to interoperate with endpoint computers running Endpoint Security client, and operating as VPN clients. Use bundled Java for TunnelGuard.
To integrate Nortel Contivity VPN Switch with Endpoint Security:
1 Configure the Nortel Contivity VPN Switch. (See page 101.)
2 Configure the Endpoint Security clients. (See page 113.)
Configuring the Nortel Contivity VPN Switch page 101
Configuring the Endpoint Security clients page 113
This chapter assumes that you have performed the steps for configuring Cooperative Enforcement described in the Endpoint Security Administrator Guide.
It is recommended that you install the Contivity client as an application.

Configuring the Nortel Contivity VPN Switch
Endpoint Security Gateway Integration Guide 101
Configuring the Nortel Contivity VPN Switch
To configure the Nortel Contivity VPN Switch:
1 Enable the filters.
See “Enabling Tunnel Filter and Tunnel Management Filter,” on page 101.
2 Create the software definition and TunnelGuard rule.
See “Creating an Endpoint Security client Software Definition and TunnelGuard Rule,” on page 103.
3 Create a tunnel filter to the Endpoint Security Sandbox.
See “Creating a Nortel Restricted Access Tunnel Filter to the Endpoint Security server Sandbox,” on page 109.
4 Configure the tunnel filter and TunnelGuard rule.
See “Configuring the Restricted Access Tunnel Filter and the Endpoint Security client TunnelGuard Rule,” on page 111.
Enabling Tunnel Filter and Tunnel Management Filter
Enable the Contivity Tunnel Filter and Contivity Tunnel Management Filter before creating a TunnelGuard filter rule that requires endpoint computers to have the Endpoint Security client running.
To enable Tunnel and Tunnel Management Filters:
1 Log in to the Nortel Contivity Switch Management Portal.
The Contivity Switch Management Portal Welcome page appears.

Enabling Tunnel Filter and Tunnel Management Filter
Endpoint Security Gateway Integration Guide 102
2 In the navigation pane at the left side, choose Services | Firewall/NAT.
The Firewall/NAT window appears.
3 In the Firewall/NAT window:
a Scroll down until the two Contivity check boxes are visible.
b Select the Contivity Tunnel Filter check box.
c Select the Contivity Tunnel Management Filter check box.
d Click OK.
Tunnel Filtering is now enabled; continue with the next section to set up a filter on the gateway which allows endpoint computers running Endpoint Security client to establish a VPN connection and access resources.
The Firewall/NAT window
Creating an Endpoint Security client Software Defini-
Endpoint Security Gateway Integration Guide 103
Creating an Endpoint Security client Software Definition and TunnelGuard Rule
After using the procedure in the preceding section to enable Contivity Tunnel Filter and Tunnel Management Filter, complete the following procedures to create an Endpoint Security client Software Definition and TunnelGuard Rule.
To create the software definition and TunnelGuard rule:
1 Open the SRS Builder Utility Plug-in.
See “Opening the SRS Builder Utility Plug-in,” on page 103.
2 Create a new software definition and TunnelGuard Rule.
See “Creating a New Endpoint Security client Software Definition and TunnelGuard Rule,” on page 105.
3 Add the software definition to a TunnelGuard Rule.
See Adding the Endpoint Security Client Software Definition to an Existing TunnelGuard Rule.
Opening the SRS Builder Utility Plug-in
The SRS Builder Utility Plug-in is a java applet that allows you to create and configure Software Definition and TunnelGuard Rules.

Creating an Endpoint Security client Software Defini-
Endpoint Security Gateway Integration Guide 104
To open the SRS Builder Utility Plug-in:
1 Open the Firewall/NAT window, scroll further down until the Contivity VPN Rule Configuration area appears, then click Contivity VPN Manage Policies.
The Contivity Switch Management Portal displays the Java servlet notification dialog box.
The first time you use the Contivity VPN SRS Builder Utility Plug-in, a prompt to download and install the plug-in from the Internet appears. Follow the instructions provided by Nortel.
The Nortel Contivity Switch Management Portal, with Java download and certificate dialog boxes

Creating an Endpoint Security client Software Defini-
Endpoint Security Gateway Integration Guide 105
2 In the Java servlet dialog box, choose Yes to accept the applet’s Contivity VPN security certificate or Always if you do not wish to receive this notice again.
The Contivity VPN SRS Builder Utility Plug-in takes a few moments to load. The Nortel Networks TunnelGuard Software and Rule Definition Tool window opens once the SRS update is complete.
Creating a New Endpoint Security client Software Definition and TunnelGuard Rule
Create the Endpoint Security client Software Definition and TunnelGuard Rule used by Cooperative Enforcement to ensure the security of the endpoint computer.
To add an Endpoint Security client Software Definition and TunnelGuard Rule:
1 Open the SRS Builder Utility Plug-in. In Firewall/NAT | Rule Configuration, click Manage Policies.
The SRS Policies are updated on your local machine from the Nortel Contivity VPN switch. After the SRS is updated, the Nortel Networks TunnelGuard Software and Rule Definition Tool window appears.
2 In the Software Definition tab, choose Software Definition | Auto Generate TunnelGuard Rule.
The Auto Generate TunnelGuard Rule is now selected.
The Nortel Networks TunnelGuard Software and Rule Definition Tool window

Creating an Endpoint Security client Software Defini-
Endpoint Security Gateway Integration Guide 106
3 Click the New Software Definition button.
The SRS Name dialog box appears.
4 In the SRS Name dialog box, type a name for the new rule (for example: Endpoint Security client), then click OK.
The Software Definition is added to the list and a new TunnelGuard Rule with the same name is automatically created.
5 Add the Endpoint Security client program file (vspubapi.dll) to the program file list. In the Software Definition list, select the Software Definition created in step 1.
a Click on the Add OnDisk File as Entry (leftmost) button at the bottom of the program file list area.
The Open file dialog box appears.
b In the Open dialog box, browse to the Endpoint Security client vspubapi.dll, then click Open.
For example, locate c:\WINNT\system32\vspubapi.dll on a computer that has the Endpoint Security client installed, then click Open.
The vspubapi.dll is added to the Endpoint Security client list of program files.
6 Verify that the new rule has been created. In the TunnelGuard Rule Definition tab, a rule with the same name as the Software Definition you created in step 1 (for example: Endpoint Security client) appears in the list of rules.
7 Save the software definition and rule. Choose File | Save.
This completes the creation of a TunnelGuard rule for Endpoint Security client.
Adding the Endpoint Security Client Software Definition to an Existing TunnelGuard Rule
Once an Endpoint Security client software definition has been created, you can add it to an existing rule or rules. Only one TunnelGuard Rule can be configured per group.
For endpoint computers that are configured differently, i.e., different drives or operating systems, redefine the path to the Endpoint Security client program file using the Windows environment variable.
a In the file list area, select the Endpoint Security client program file you just added.
b Click the Custom Path button.
The Custom Path dialog opens.
c Select the Use Environment Variable radio button, then enter path: %WINDIR%\system32\vspubapi.dll.
d Click OK.
The IEndpoint Security client program file path appears as %WINDIR%\system32\vspuapi.dll.

Creating an Endpoint Security client Software Defini-
Endpoint Security Gateway Integration Guide 107
When you want to require several different programs, all software definitions must be in the same TunnelGuard Rule.
To add the Endpoint Security client software definition to an existing rule:
1 In the TunnelGuard Rule Definition tab, create an expression that includes all the software definitions you want in the rule.
a Select the Endpoint Security client software definition in the available expressions box, then click the right-arrow button to move it to the Rule Expression Constructor box.
For example: Endpoint Security client is moved to the Rule Expression Constructor box.
Groups on the Nortel Contivity VPN switch may already have an existing rule configured. Adding the Endpoint Security client software definition to a configured rule will apply the Endpoint Security client requirement without any additional steps.

Creating an Endpoint Security client Software Defini-
Endpoint Security Gateway Integration Guide 108
b Select the other software definitions and/or existing expressions, then click the right-arrow button.
All the expression are listed in the Rule Expression Constructor box.
c In Group the list using, select And expression, then click Form TunnelGuard Expression.
The new TunnelGuard Expression appears in the available expressions list. (For example: Endpoint Security client AND other expression AND other expression.)
2 In the rule’s TunnelGuard Expression drop-down list, select the expression you built in step 1. (For example: select Endpoint Security client AND other expression AND other expression.)
If you created an expression for Windows 9x, then select the expression ZL-Integrity Client or ZL-Integrity Client 9x and add it to the other conditions you want to apply.

Creating a Nortel Restricted Access Tunnel Filter to
Endpoint Security Gateway Integration Guide 109
3 Save your changes to the rule. Choose File | Save.
The TunnelGuard Rule is added to the Nortel Contivity VPN switch.
4 Close the SRS Builder Utility Plug-in.
Creating a Nortel Restricted Access Tunnel Filter to the Endpoint Security server Sandbox
This section explains how to create a restricted access tunnel filter that allows endpoint computers that are out of compliance to access the Endpoint Security server sandbox and download the data they need to be compliant. Complete the following steps to allow access to the Endpoint Security server Sandbox:
To allow access to the Endpoint Security server Sandbox:
1 Create Access Rules for the Endpoint Security server Sandbox.
See “Create Access Rules for the Endpoint Security server Sandbox,” on page 109.
2 Create a Restricted Access Tunnel Filter using the Endpoint Security server Sandbox Access Rules.
See “Create a Restricted Access Tunnel Filter using the Endpoint Security server Sandbox Access Rules,” on page 110.
Create Access Rules for the Endpoint Security server Sandbox
Inbound and outbound access rules for the Endpoint Security server Sandbox are used to create the Restricted Access Tunnel Filter.
To create Endpoint Security server sandbox inbound and outbound rules:
1 Log in to the Nortel Contivity switch Management Portal, then choose Profiles | Filters.
The Filters dialog box appears.
2 In the Current Contivity Tunnel Filters box, choose Manage Rules.
The Tunnel Filters ->Manage Rules window opens.
3 Click Create.
The New Rule window opens.
The Restricted Access Tunnel Filter created in this section is applied in the following section.

Creating a Nortel Restricted Access Tunnel Filter to
Endpoint Security Gateway Integration Guide 110
4 Complete the new rule form as follows:
5 Click OK.
The new rule appears in the Current Rules list.
6 Repeat steps 4 and 5 to create both an inbound and an outbound rule for Endpoint Security server.
7 Click Close to exit the Tunnel Rule Manager.
Create a Restricted Access Tunnel Filter using the Endpoint Security server Sandbox Access Rules
The Nortel Restricted Access Tunnel Filter is a rule set. Before creating the Filter, you must create inbound and outbound Endpoint Security server Sandbox rules.
To create a Restricted Access Tunnel Filter for the Endpoint Security server sandbox:
1 Create a new filter for the sandbox. In the Current Contivity Tunnel Filters, enter a name for the filter and click Create. (For example: ZL-Integrity Server Sandbox.)
The Tunnel Filter Set window opens.
2 In the Available Rules list, select the Endpoint Security server inbound and outbound access rules, then click the left-arrow button.
The selected rules are listed under Rules in set.
3 Click OK to save the Tunnel Filter set.
The Restricted Access Tunnel Filter appears in the Current Contivity Tunnel Filters.
Field Action
Rule Name Enter a name for the rule (for example: IN_IntegritySandbox for the inbound rule and OUT_IntegritySandbox).
Filter Action Select Permit.
Direction Select Inbound or Outbound; create two rules, one for each direction of traffic.
Address Choose the Endpoint Security server IP address; if the server is not listed click modify and add the Endpoint Security server.
Protocol Select TCP.
Source Port Select GT or Equals (Greater Than or Equals) and any, 0.
Destination Port Select GT or Equals and any, 0.
TCP Connection Select Don’t Care.

Creating a Nortel Restricted Access Tunnel Filter to
Endpoint Security Gateway Integration Guide 111
Configuring the Restricted Access Tunnel Filter and the Endpoint Security client TunnelGuard Rule
The instructions in this section explain how to configure the Endpoint Security client TunnelGuard rule created in ”Creating an Endpoint Security client Software Definition and TunnelGuard Rule” section and the Endpoint Security server Sandbox Restricted Tunnel Filter created in ”Creating a Nortel Restricted Access Tunnel Filter to the Endpoint Security server Sandbox” section to a group.
To configure the connection on the Nortel Contivity VPN Switch:
1 Log in to the Nortel Contivity switch Management Portal.
The Welcome window appears.
2 Select a group. In the Nortel Contivity VPN Switch’s Welcome window, choose Profiles | Groups
The Groups dialog box appears.
3 Edit the group to which you want to apply the Endpoint Security client TunnelGuard Rule. In the Groups dialog box, click Edit next to the group.
Note: To create a new group, click Add, enter a name for the group, then click OK. When you create a new group, be sure to reconfigure all the attributes that you do not want inherited from the parent group.
4 Next modify the TunnelGuard settings. In the Connectivity box, choose Configure.
The Group’s Connectivity Configuration window opens.
a Scroll down to the TunnelGuard options.

Creating a Nortel Restricted Access Tunnel Filter to
Endpoint Security Gateway Integration Guide 112
b If the group is configured to inherit these settings, you must click Configure to activate the drop-down list as shown above.
The following table shows the settings that are required to configure the Endpoint Security server and Endpoint Security client on the Nortel Contivity VPN switch only.
Additionally, put a copy of the Endpoint Security client in the Endpoint Security server sandbox so that users with endpoint computers that are not in compliance with the TunnelGuard policy can update their computer and establish a connection.
c In the remaining TunnelGuard settings, choose the settings that are best suited for your network. Consult with your network administrator for details.
d Click OK to save and apply your changes.
The configuration is saved and applied to the group as well as any group which is a child configured to inherit TunnelGuard attributes.
5 Click Logoff to close the Nortel Contivity Management Portal.
The Endpoint Security server is configured on the Nortel Contivity VPN switch. To complete the Cooperative Enforcement feature, proceed to “Configuring the Endpoint Security clients,” on page 113.
Field Action
TunnelGuard Choose Enable from the drop-down list.
Contivity VPN TunnelGuard: Restricted Filter
Check Point recommends choosing the Endpoint Security server sandbox rule created in the previous section from the drop-down list.
TunnelGuard Policy Choose the Integrity Client TunnelGuard rule created in the previous section
TunnelGuard: Initial Policy Failure Action
Choose Leave Restricted.

Configuring the Endpoint Security clients
Endpoint Security Gateway Integration Guide 113
Configuring the Endpoint Security clientsThe Nortel Contivity VPN switch, Contivity TunnelGuard Manager and Contivity VPN client must be installed before you install Endpoint Security client on your endpoint computers. Refer to the Nortel Contivity installation guides for instructions on installing Nortel products.
To distribute Endpoint Security clientto your endpoint users, create client installation packages in Endpoint Security server and distribute links to them. For instructions, see the Endpoint Security Administrator Guide and the Endpoint Security Client Management Guide.
To configure the Endpoint Security client:
1 Configure the baynet.tbk file.
See “Configuring the baynet.tbk File,” on page 113.
2 Configure the shortcut to iextranet.exe.
See “Configuring the Shortcut to iextranet.exe,” on page 114.
Configuring the baynet.tbk File
In order to integrate the Endpoint Security server with Nortel Contivity, you must modify the baynet.tbk file. After modifying the file, ensure that the updated baynet.tbk file is deployed with the VPN package to the endpoint computer. If you do not deploy the updated baynet.tbk file to the endpoint computer, end users will receive a prompt asking for the Endpoint Security IP address. Deploying the baynet.tbk file prevents the possibility of end user error.
To configure the baynet.tbk file:
1 Open the baynet.tbk file.
2 Set Server to the gateway hostname or public IP address.
3 Set IntegrityServer to the Endpoint Security server IP address and port number: 1.1.1.1:443.
Example:
When you create the installation packages to distribute your Endpoint Security clients, be sure to add the IP address of the Contivity VPN Switch to the Trusted Zone in the default policy. This prevents the Endpoint Security client from automatically blocking the connection to the Switch.
You may specify the Endpoint Security server using either the IP address or the DNS/hostname format, but it must be in the same format as the Nortel Public Host Name you gave for the gateway when you configured the Endpoint Security. For more information, see the Administrator Guide.

Configuring the Endpoint Security clients
Endpoint Security Gateway Integration Guide 114
[172.18.22.15]
Description=
Dialup=(None)
Username=newone
UseTokens=0
TokenType=0
UsePAPGroup=0
GroupName=
SavePassword=1
Server=172.18.22.15
primaryDNS=
secondaryDNS=
primaryWINS=
secondaryWINS=
domainName=
DisableKeepalive=0
EnableSilentKeepalive=0
IntegrityServer=172.18.1.31:443
4 Save the baynet.tbk file.
Configuring the Shortcut to iextranet.exe
When the installer for the Endpoint Security client runs, it detects the presence of the Nortel Contivity client on the endpoint and installs the file iextranet.exe. This application serves as a wrapper for the Endpoint Security client and the Nortel Contivity client, enabling Cooperative Enforcement to function. A shortcut to the iextranet.exe application is placed on the desktop, with the label “Integrity Nortel VPN Client.”

Configuring the Endpoint Security clients
Endpoint Security Gateway Integration Guide 115
To connect to the Nortel VPN, with Cooperative Enforcement, the endpoint user must launch iextranet.exe by using this shortcut.
Option: No Desktop Shortcut
To prevent the shortcut to iextranet.exe from being placed on the desktop, include one of the following command line switches on the installer command line:
For client version 4.5: /nortel_noicon
For client versions 5.0 or later: NORTELICON= NO
Iextranet.exe and all other necessary files for Cooperative Enforcement are still installed.
Setting the Custom Attribute
To prevent users from avoiding cooperative enforcement by directly launching extranet.exe, rename extranet.exe on the end point computers and set the custom executable attribute in the tbk file.
To set the custom attribute:
1 Rename extranet.exe to <yourcustomname>.exe.
2 Open the baynet.tbk file and set the following attribute:
CustomExecutable=“C:\program files\nortel\<yourcustomname>.exe”
Endpoint Security client installation does not remove pre-existing shortcuts to the Contivity client, which are similar in appearance to the Integrity Nortel VPN Client shortcut. If the user launches the VPN client using the old shortcut, Cooperative Enforcement will not operate properly. You may want to remove old shortcuts to avoid confusion. Alternatively, you can rename the extranet.exe and set the custom executable attribute to the new name. See “Setting the Custom Attribute,” on page 115 for more information.
If you do not define a custom executable, iextranet.exe uses the extranet.exe as the default.

Chapter
Endpoint Security Gateway Integration Guide 116
10Configuring the Enterasys RoamAbout R2
In This Chapter
This chapter contains vendor-specific directions for configuring your Enterasys RoamAbout R2 wireless access platform to enable Cooperative Enforcement with Endpoint Security server. Before performing the procedures in this chapter, make sure you have read , Network Access Server Integration and have already completed the procedures covered there. The information provided here assumes that you have already installed and configured the Endpoint Security server and an Internet Authentication Service.
System Requirements page 117
Configuring Enterasys RoamAbout R2 page 118
Configuring Endpoint Computers page 121

System Requirements
Endpoint Security Gateway Integration Guide 117
System RequirementsThese are the general components you will need to integrate your Enterasys RoamAbout with Endpoint Security. For more specific system requirements and version information, see the Endpoint Security System Requirements document.
Server RequirementsEnterasys RoamAbout R2 configured for 802.1x and RADIUS authentication
Client RequirementsEndpoint Security client 6.0 or later
One of the following operating systems:
EAP extensions are available from Microsoft.
Operating System EAP Extension Required?
Windows XP No
Windows 2000 Yes

Configuring Enterasys RoamAbout R2
Endpoint Security Gateway Integration Guide 118
Configuring Enterasys RoamAbout R2This section lists the tasks you must perform to configure Cooperative Enforcement for the Enterasys RoamAbout R2.
Perform the following tasks to configure the gateway:
1 Perform the network access server integration, as described in , “Network Access Server Integration.”
2 Define a Wired Equivalent Privacy Key. See page 118.
3 Define Endpoint Security as the RADIUS proxy server. See page 119.
Defining a Wired Equivalent Privacy (WEP) KeyDefine a WEP key to encrypt wireless transmissions.
To define a WEP key:
1 Open the RoamAbout Access Platform Manager, select the appropriate RoamAbout access platform, and click Static Encryption.
2 Define the WEP key as appropriate for your installation.
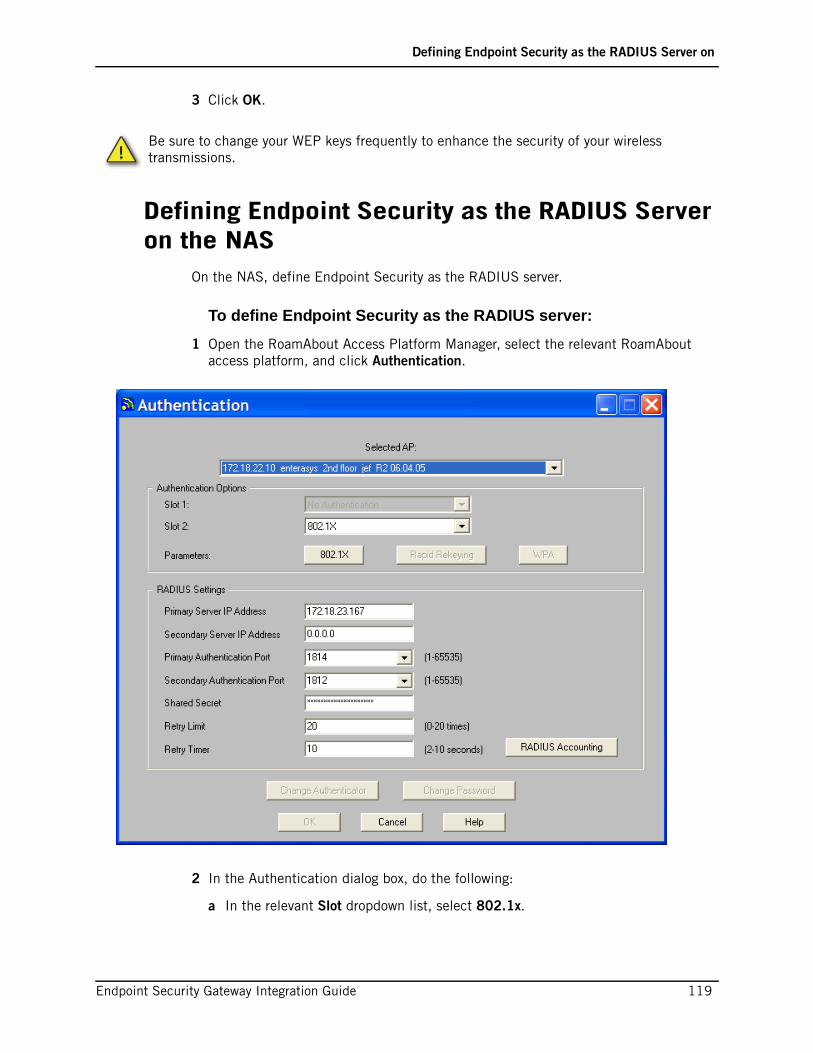
Defining Endpoint Security as the RADIUS Server on
Endpoint Security Gateway Integration Guide 119
3 Click OK.
Defining Endpoint Security as the RADIUS Server on the NAS
On the NAS, define Endpoint Security as the RADIUS server.
To define Endpoint Security as the RADIUS server:
1 Open the RoamAbout Access Platform Manager, select the relevant RoamAbout access platform, and click Authentication.
2 In the Authentication dialog box, do the following:
a In the relevant Slot dropdown list, select 802.1x.
Be sure to change your WEP keys frequently to enhance the security of your wireless transmissions.

Defining Endpoint Security as the RADIUS Server on
Endpoint Security Gateway Integration Guide 120
b In the Primary Server IP Address field, type the Endpoint Security server IP address or hostname.
c In the Primary Authentication Port field, type the authentication port number.
d In the Shared Secret field, type the secret. The secret must be the same value you used for the “NAS Secret” when creating the gateway catalog on the Endpoint Security server.
3 Click OK.

Configuring Endpoint Computers
Endpoint Security Gateway Integration Guide 121
Configuring Endpoint ComputersAfter configuring the NAS, configure the endpoint computer so it can use the wireless access point. For details, see “Configuring Endpoints for Use with Wireless Access Points,” on page 26.

Chapter
Endpoint Security Gateway Integration Guide 122
11Configuring the Check Point Safe@Office 425W
In This Chapter
This chapter contains vendor-specific directions for configuring your Check Point Safe@Office 425W wireless access point (WAP) to enable Cooperative Enforcement with Endpoint Security. Before performing the procedures in this chapter, make sure you have read , Network Access Server Integration and have already completed the procedures covered there. The information provided here assumes that you have already installed and configured the Endpoint Security server and an Internet Authentication Service.
System Requirements page 123
Configuring the Safe@Office 425W page 124
Configuring Endpoint Computers page 127

System Requirements
Endpoint Security Gateway Integration Guide 123
System RequirementsThese are the general components you will need to integrate your Check Point Safe@Officee gateway with Endpoint Security. For more specific system requirements and version information, see the Endpoint Security System Requirements document.
Server RequirementsCheck Point Safe@Office 425W configured for 802.1x and RADIUS authentication
Client RequirementsEndpoint Security client 6.0 or later
One of the following operating systems:
EAP extensions are available from Microsoft.
Operating System EAP Extension Required?
Windows XP No
Windows 2000 Yes

Configuring the Safe@Office 425W
Endpoint Security Gateway Integration Guide 124
Configuring the Safe@Office 425WThis section lists the tasks you must perform to configure Cooperative Enforcement for the Check Point Safe@Office 425W.
Perform the following tasks to configure the gateway:
1 Perform the network access server integration, as described in “Network Access Server Integration,” on page 14
2 Configuring the wireless settings. See page 124.
3 Define Endpoint Security as the RADIUS proxy server. See page 125.
Configuring the Wireless SettingsThis section explains how to configure wireless settings.
To configure wireless settings:
1 In the Safe@Office administration console, select Network and click the My Network tab.

Defining Endpoint Security as the RADIUS Server on
Endpoint Security Gateway Integration Guide 125
2 In the appropriate WLAN entry, click Edit.
3 Type the SSID in the Network Name (SSID) field.
4 From the Security dropdown list, choose 802.1x RADIUS authentication, no encryption.
5 Fill out the other fields as appropriate for your installation.
6 Click Apply.
Defining Endpoint Security as the RADIUS Server on the NAS
On the NAS, define Endpoint Security as the RADIUS server.
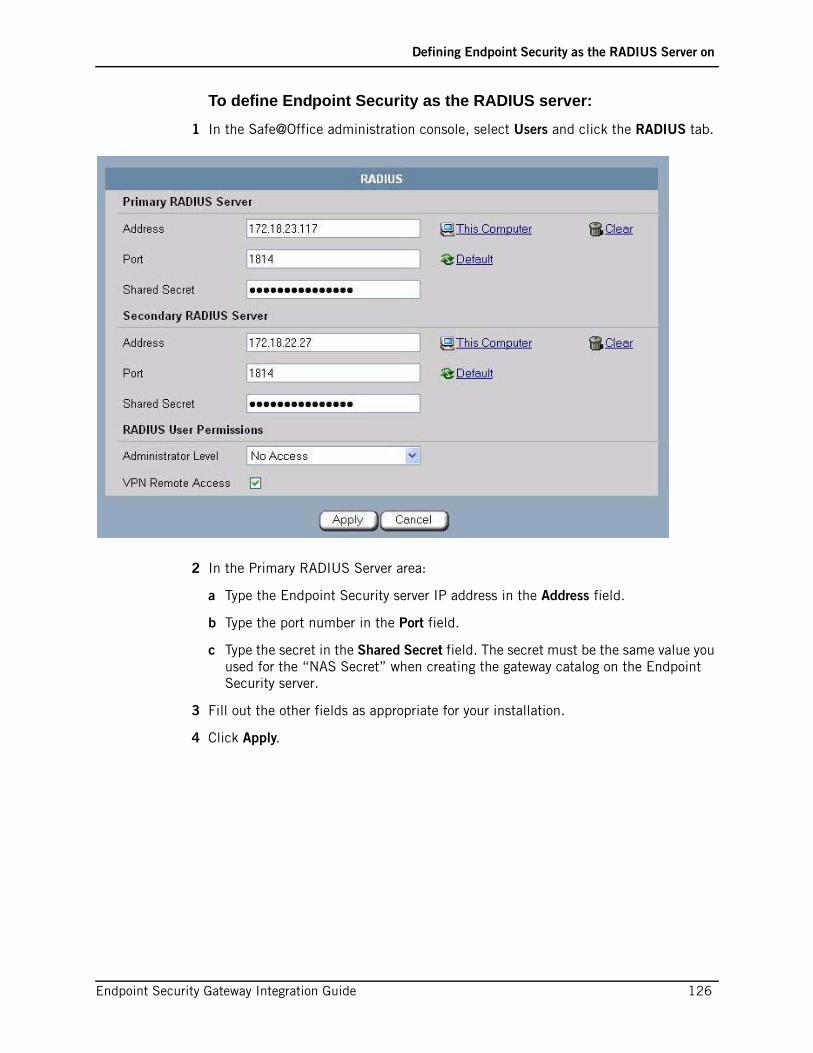
Defining Endpoint Security as the RADIUS Server on
Endpoint Security Gateway Integration Guide 126
To define Endpoint Security as the RADIUS server:
1 In the Safe@Office administration console, select Users and click the RADIUS tab.
2 In the Primary RADIUS Server area:
a Type the Endpoint Security server IP address in the Address field.
b Type the port number in the Port field.
c Type the secret in the Shared Secret field. The secret must be the same value you used for the “NAS Secret” when creating the gateway catalog on the Endpoint Security server.
3 Fill out the other fields as appropriate for your installation.
4 Click Apply.

Configuring Endpoint Computers
Endpoint Security Gateway Integration Guide 127
Configuring Endpoint ComputersAfter configuring the NAS, configure the endpoint computer so it can use the wireless access point. For details, see “Configuring Endpoints for Use with Wireless Access Points,” on page 26.

Endpoint Security Gateway Integration Guide 128
Index
Symbols%WINDIR%system32vspuapi.dll
106
Numerics5000 Series
See Cisco ASA802.1x-compatible NAS 14, 23
AAdaptive Security Appliance
See Cisco ASAadd an Integrity Client Software
Definition and Rule 105ASA
See Cisco ASAauthentication
Check Point 44
CCheck Point
firewall access 44reject connection 37scv editor 49SecureClient 36SecureClient log 53SecureClient, installing 46,
48SecureClient, restart 48system requirements 39troubleshooting 53User authentication 44user interaction 37validation 37VPN 36
VPN-1 36VPN-1,configuring 43VPN-1,installing 43VPN-1/FireWall-1 39
Cisco 89Cisco Aironet 1100 Series WAP
Gateway 25Integrity Gateway 76, 83,
117, 123Cisco ASA 89–99
configuration mode 93Cooperative Enforcement
process 91fail state 95workflow 92
Cisco gatewaySee gateways
Cisco VPN Concentratorlog files 72
Configuration 17configuration mode
Cisco ASA 93Cooperative Enforcement
Cisco ASA 89Nortel Contivity VPN
switch 101Endpoint Security Client
Software Definition 103
Integrity Client Rule 103
SCV 37Create a new group 111
DDocumentation 10
EEndpoint Security Client
TunnelGuard Software Definition 103
FFirewall
Check Point, access 44
GGateway
Cisco Aironet 1100 Series WAP 25
Microsoft RAS 26NAS configuration 25RADIUS client 25remote, installation 25
gatewaygroup 23policy 23
gateway policyassigning 23
gateway-defined groupadding 23
gatewaysCisco ASA 89
IIntegrity Client
Check Point, installing with 47
Nortel Contivity VPN switchprogram dll 106
TunnelGuard Rule 103, 111Integrity Gateway
Cisco Aironet 1100 Series WAP 76, 83, 117, 123
Microsoft RAS 80, 87, 121, 127
Endpoint Security Gateway Integration Guide 129
RADIUS proxy 85, 119, 125
Llocal.scv 49, 50, 53
MMicrosoft Remote Access Server
(RAS)Gateway configuration 26Integrity Gateway
configuration 80, 87, 121, 127
NNAS
20802.1x-compatible 14, 23Cisco Aironet 1100 Series
WAPVLAN 87, 121, 127
clientconfiguration 25
Gateway 25RADIUS proxy 85, 119, 125system requirements 15troubleshooting 35
Nortel Contivity VPN switch 101Add OnDisk File as
Entry 106Auto Generate TunnelGuard
Rule 105configure TunnelGuard
Rule 111enable Tunnel Filter 101enable Tunnel Management
Filter 101enable TunnelGuard 111Endpoint Security Client
Software Definition 103Firewall/NAT settings 102Ingegrity Client
Rule 103Management Portal 101New Software Definition 106
Profiles | Groups 109, 111Software Definition 105SRS Name 106TunnelGuard Policy 112TunnelGuard settings 111TunnelGuard Software and
Rule Definition Tool 105
PPolicy
local.scv 49, 50, 53SCV configure 48, 49SCV dll 49SCV editor 49SCV install new 52SCV sample 50scv, Zone Labs 49, 50VPN, Check Point 44, 45
portsused by ZSP 74
ProRequired, SCV 50
RRADIUS 18RADIUS client
Gateway configuration 25RADIUS configuration 20remoteGateway
installation 25Rule
Nortel Contivity VPN switch 103
SSCV
configure 48, 49dll 49editor 49file 49, 50, 53install new 52ProRequired 50sample 50Zone Labs plug-in 48, 49,
50, 53
Zone Labs policy 49, 50Secure Client 36SecureClient
installing 46, 48log 53restart 48
SSL (Secure Socket Layer) 73system requirements
NAS 15
Ttroubleshooting
Check Point 53Tunnel Filter
enable 101Tunnel Management Filter
enable 101TunnelGuard
configure rule on switch 111enable/disable 111Policy 112
TunnelGuard Policy 111TunnelGuard settings 111TunnelGuard Software and Rule
Definition Tool window 105
Uusers
Check Point policy 37IntegrityRequired 50SCV ProRequired 50
VVLAN
Cisco Aironet 1100 Series WAP 87, 121, 127
VPNCheck Point 36, 37, 39Cisco ASA 89communicating with
clients 65security policies 44, 45VPN-1 36

Endpoint Security Gateway Integration Guide 130
VPN-1, configuring 43VPN-1, installing 43VPN-1/FireWall-1 39
ZZSP 74

Endpoint Security Gateway Integration Guide 131