Embed Size (px)
Citation preview

T535i XP®
EN Operator's manual 2-31

ContentsIntroduction..................................................................... 2
Safety..............................................................................4
Assembly...................................................................... 12
Operation...................................................................... 13
Maintenance................................................................. 18
Troubleshooting............................................................ 26
Transportation, storage and disposal........................... 27
Technical data.............................................................. 27
Accessories.................................................................. 29
EC Declaration of Conformity....................................... 31
IntroductionProduct descriptionThis product is a chainsaw model with an electric motor.
Work is constantly in progress to increase your safetyand efficiency during operation. Speak to your servicingdealer for more information.
Intended useThis product is for professional tree maintenance suchas pruning and to disassemble tree crowns.
Note: National regulations can set limit to the operationof the product.
Product overview
7
6
21
15
1413
21 20 1918 17 16
12
11
10
98
3332
31
30
292827
26
25
24
23
22
3 4
5
1. Front hand guard2. Keypad3. SavE button4. Warning indicator
5. Start and stop button6. Information and warning decal7. Top handle8. Belt eyelet
2 959 - 006 - 15.05.2019

9. Rope eyelet10. Fan housing11. Chain oil tank12. Front handle13. Power trigger lockout14. Power trigger15. Spiked bumper16. Bar tip sprocket17. Saw chain18. Guide bar19. Chain catcher20. Chain tensioning screw21. Drive sprocket cover22. Guide bar cover23. Charging LED24. Warning indicator25. Power cord26. Battery charger27. Combination wrench28. Button, battery status29. Battery status30. Warning indicator31. Battery release button32. Battery33. Operator's manual
Symbols on the product
Risk of serious injury or death to theoperator or others. Be careful and use theproduct correctly. Read the operator'smanual carefully and understand theinstructions before operation of the product.
Use approved protective helmet, hearingprotection and eye protection.
This product complies with applicable ECDirectives.
Noise emission to the environment complieswith applicable EC Directives. The noiseemission of the product is specified in Technical data on page 27 and on thedecal.
Use approved protection for feet, legs,hands and arms.
Warning! Kickback can occur when theguide bar tip touches an object. This causesthe guide bar to be thrown in the direction ofthe operator. Risk of serious injury or death.
L-Max
XX mm / XX"
The direction in which the saw chain rotatesand maximum length of the guide bar.
Chain brake, engaged (right). Chain brake,disengaged (left).
Chain oil.
Direct current.
Protected against splashing water.
Environmental mark. The product orpackage of the product is not domesticwaste. Recycle it at an approved disposallocation for electrical and electronicequipment.
This saw should only beused by persons who arespecially trained in treemaintenance work. Seeoperator's manual!
yyyywwxxxxx The rating plate shows se-rial number. yyyy is theproduction year, ww is theproduction week.
Note: Other symbols/decals on the product refer tocertification requirements for some markets.
Symbols on the battery and/or on thebattery charger
Recycle this product at arecycling station for elec-trical and electronic equip-ment. (Applies to Europeonly)
959 - 006 - 15.05.2019 3

Fail-safe transformer.
Use and keep the battery charger indoorsonly.
Double insulation.
SafetySafety definitionsThe definitions below give the level of severity for eachsignal word.
WARNING: Injury to persons.
CAUTION: Damage to the product.
Note: This information makes the product easier to use.
General power tool safety warningsWARNING: Read all safety warnings and allinstructions. Failure to follow the warningsand instructions may result in electric shock,fire and/or serious injury.
Note: Save all warnings and instructions for futurereference. The term "power tool" in the warnings refersto your mains-operated (corded) power tool or battery-operated (cordless) power tool.
Work area safety• Keep work area clean and well lit. Cluttered or dark
areas invite accidents.• Do not operate power tools in explosive
atmospheres, such as in the presence of flammableliquids, gases or dust. Power tools create sparkswhich may ignite the dust or fumes.
• Keep children and bystanders away while operatinga power tool. Distractions can cause you to losecontrol.
Electrical safety• Power tool plugs must match the outlet. Never
modify the plug in any way. Do not use any adapterplugs with earthed (grounded) power tools.Unmodified plugs and matching outlets will reducerisk of electric shock.
• Avoid body contact with earthed or groundedsurfaces, such as pipes, radiators, ranges andrefrigerators. There is an increased risk of electricshock if your body is earthed or grounded.
• Do not expose power tools to rain or wet conditions.Water entering a power tool will increase the risk ofelectric shock.
• Do not abuse the cord. Never use the cord forcarrying, pulling or unplugging the power tool. Keepcord away from heat, oil, sharp edges or movingparts. Damaged or entangled cords increase the riskof electric shock.
• When operating a power tool outdoors, use anextension cord suitable for outdoor use. Use of acord suitable for outdoor use reduces the risk ofelectric shock.
• If operating a power tool in a damp location isunavoidable, use a ground fault circuit interrupter(GFCI) protected supply. Use of a GFCI reduces therisk of electric shock.
Personal safety• Stay alert, monitor what you are doing and use
common sense when operating a power tool. Do notuse a power tool while you are tired or under theinfluence of drugs, alcohol or medication. A momentof inattention while operating power tools may resultin serious personal injury.
• Use personal protective equipment. Always weareye protection. Protective equipment such as dustmask, non-skid safety shoes, hard hat, or hearingprotection used for appropriate conditions will reducepersonal injuries.
• Prevent unintentional starting. Ensure the switch is inthe OFF-position before connecting to a powersource and/or battery pack, picking up or carryingthe tool. Carrying power tools with your finger on theswitch or energising power tools that have the switchon invites accidents.
• Remove any adjusting key or wrench before turningthe power tool on. A wrench or a key left attached toa rotating part of the power tool may result inpersonal injury.
• Do not overreach. Keep proper footing and balanceat all times. This enables better control of the powertool in unexpected situations.
4 959 - 006 - 15.05.2019

• Dress properly. Do not wear loose clothing orjewellery. Keep your hair, clothing and gloves awayfrom moving parts. Loose clothes, jewellery or longhair can be caught in moving parts.
• If devices are provided for the connection of dustextraction and collection facilities, ensure these areconnected and properly used. Use of dust collectioncan reduce dust-related hazards.
• The vibration emission during actual use of thepower tool can differ from the declared total valuedepending on the ways in which the tool is used.Operators should identify safety measures to protectthemselves that are based on an estimation ofexposure in the actual conditions of use (takingaccount of all parts of the operating cycle such asthe times when the tool is switched off and when it isrunning idle in addition to the trigger).
Power tool use and care• Do not force the power tool. Use the correct power
tool for your application. The correct power tool willdo the job better and safer at the rate for which itwas designed.
• Do not use the power tool if the switch does not turnit on and off. Any power tool that cannot becontrolled with the switch is dangerous and must berepaired.
• Disconnect the plug from the power source and/orthe battery pack from the power tool before makingany adjustments, changing accessories, or storingpower tools. Such preventive safety measuresreduce the risk of starting the power toolaccidentally.
• Store idle power tools out of the reach of childrenand do not allow persons unfamiliar with the powertool or these instructions to operate the power tool.Power tools are dangerous in the hands of untrainedusers.
• Maintain power tools. Check for misalignment orbinding of moving parts, breakage of parts and anyother condition that may affect the power tool´soperation. If damaged, have the power tool repairedbefore use. Many accidents are caused by poorlymaintained power tools.
• Keep cutting tools sharp and clean. Properlymaintained cutting tools with sharp cutting edges areless likely to bind and are easier to control.
• Use the power tool, accessories and tool bits etc. inaccordance with these instructions, taking intoaccount the working conditions and the work to beperformed. Use of the power tool for operationsdifferent from those intended could result in ahazardous situation.
Battery tool use and care• Recharge only with the charger specified by the
manufacturer. A charger that is suitable for one typeof battery pack may create a risk of fire when usedwith another battery pack.
• Use power tools only with specifically designatedbattery packs. Use of any other battery packs maycreate a risk of injury and fire.
• When battery pack is not in use, keep it away fromother metal objects, like paper clips, coins, keys,nails, screws or other small metal objects, that canmake a connection from one terminal to another.Shorting the battery terminals together may causeburns or a fire.
• Under abusive conditions, liquid may be ejected fromthe battery; avoid contact. If contact accidentallyoccurs, flush with water. If liquid contacts eyes,additionally seek medical help. Liquid ejected fromthe battery may cause irritations or burns.
Service• Have your power tool serviced by a qualified repair
person using only identical replacement parts. Thiswill ensure that the safety of the power tool ismaintained.
Chain saw safety warnings• Keep all parts of the body away from the saw chain
when the chain saw is operating. Before you startthe chain saw, make sure the saw chain is notcontacting anything. A moment of inattention whileoperating chain saws may cause entanglement ofyou clothing or body with the saw chain.
• Always hold the chain saw with your right hand onthe rear handle and your left hand on the fronthandle. Holding the chain saw with a reversed handconfiguration increases the risk of personal injuryand should never be done.
• Hold the power tool by insulated gripping surfaceonly, because the saw chain may contact hiddenwiring or its own cord. Saw chain contacting a ”live”wire may make exposed metal parts of the powertool ” live” and could give the operator an electricshock.
• Wear safety glasses and hearing protection. Furtherprotective equipment for head, hands, legs and feetis recommended. Adequate protective clothing willreduce personal injury by flying debris or accidentalcontact with the saw chain.
• Always keep proper footing and operate the chainsaw only when standing on fixed, secure and levelsurface. Slippery or unstable surfaces such asladders may cause a loss of balance or control of thechain saw.
• When cutting a limb that is under tension be alert forspring back. When the tension in the wood fibres isreleased the spring loaded limb may strike theoperator and/or throw the chain saw out of control.
• Use extreme caution when cutting brush andsaplings. The slender material may catch the sawchain and be whipped forward toward you or pull youoff balance.
• Carry the chain saw by the front handle with thechain saw switched off and away from your body.When transporting or storing the chain saw always fit
959 - 006 - 15.05.2019 5

the guide bar cover. Proper handling of the chainsaw will reduce the likelihood of accidental contactwith the moving saw chain.
• Follow instruction for lubricating, chain tensioningand changing accessories. Improperly tensioned orlubricated saw chain may either brake or increasethe chance of kickback.
• Keep handles dry, clean and free from oil andgrease. Greasy, oily handles are slippery causingloss of control.
• Cut wood only. Do not use chain saw for purposesnot intended. For example: do not use chain saw forcutting plastic, masonry or nonwood buildingmaterials. Use of the chain saw for operationsdifferent than intended could result in a hazardoussituation.
• We strongly recommend that first time users practicesawing logs on a saw horse or cradle.
Causes and operator prevention of kickbackKickback may occur when the nose or tip of the guidebar touches an object, or when the wood closes in andpinches the saw chain in the cut. Tip contact in somecases may cause a sudden reverse reaction, kicking theguide bar up and back towards the operator. Pinchingthe saw chain along the top of the guide bar may pushthe guide bar rapidly back towards the operator. Eitherof these reactions may cause you to lose control of thesaw which could result in serious personal injury. Do notrely exclusively upon the safety devises built into yoursaw. As a chain saw user, you should take several stepsto keep your cutting jobs free from accident or injury.Kickback is a result of tool misuse and/or incorrectoperating procedures or conditions and can be avoidedby taking proper precautions as given below:
• Maintain a firm grip, with thumbs and fingersencircling the chain saw handles, with both hands onthe saw and position your body and arm to allow youto resist kickback forces. Kickback forces can becontrolled by the operator, if proper precautions aretaken. Do not let go of the chain saw.
• Do not overreach and do not cut above shoulderheight. This helps prevent unintended tip contact andenables better control of the chain saw inunexpected situations.
• Only use replacement bars and chains specified bythe manufacturer. Incorrect replacement bars andchains may cause chain breakage and/or kickback.
• Follow the manufacturer’s sharpening andmaintenance instructions for the saw chain.Decreasing the depth gauge height can lead toincreased kickback.
SAVE THESE INSTRUCTIONS.
General safety instructions
WARNING: Read the warning instructionsthat follow before you use the product.
• This product is a dangerous tool if you are notcareful or if you use the product incorrectly. Thisproduct can cause serious injury or death to theoperator or others. It is very important that you readand understand the contents of this operator’smanual.
• Do not change the product without an approval fromthe manufacturer. Do not use a product that hasbeen changed by others and always use originalaccessories. Changes that are not approved fromthe manufacturer can result in serious injury or deathto the operator or others.
• Long term inhalation of chain oil fumes and sawdustcan cause health problems.
• This product produces an electromagnetic fieldduring operation. This field may under somecircumstances interfere with active or passivemedical implants. To decrease the risk of seriousinjury or death, we recommend persons with medicalimplants to turn to their physician and the medicalimplant manufacturer before operating this product.
Safety instructions for operation
WARNING: Read the warning instructionsthat follow before you use the product.
• The information in this operator's manual not analternative to professional knowledge andexperience. If you do not feel sure about how tooperate this product, turn to a person withprofessional knowledge and experience.
• Turn to your servicing dealer or Husqvarna if youhave questions about the operation of the product.We can give you information about how to operateyour product correctly and safely. Go to a trainingclass in chainsaw operation if possible. Yourservicing dealer, forestry school or your library cangive you information about training materials andclasses that are available.
• This product has a increased risk of losing control.Only persons who have special training in cuttingand working technique must operate this product in atree. The operator must have safety equipment suchas a lift, ropes and safety harness. Regularchainsaws are recommended for all work at groundlevel.
• Follow instructions on special cutting and workingtechniques to decrease the risk of injury. Do not dowork in a tree unless you have professional trainingfor such work. This training includes safe climbingtechniques and work positions. You must learn howto use equipment such as harnesses, ropes, belts,climbing irons and carabiners.
• Do not cut with the kickback zone at the guide bartip.
• Do not touch a rotating saw chain. It can causeserious injuries of death.
6 959 - 006 - 15.05.2019

• Do not try to catch falling sections or make cuts if theoperator is only attached with one rope. Always usetwo safety ropes.
• During felling operations, lift your hearing protectionimmediately when the sawing is complete. It isimportant that you hear sounds and warning signals.
• You must understand the effects of kickback andhow to prevent them before you use this product.See Kickback information on page 14 and Commonquestions about kickback on page 14forinstructions.
• Do not use a product, battery or battery charger thatis defective.
• Do not use the product if you are tired or while underthe influence of alcohol, drugs or medicine. Do notuse the product if you are in a condition that canhave a negative effect on your vision, alertness,coordination or judgment. The risk of being tiredincreases before the end of a work period.
• Do not start a product unless the guide bar, sawchain and all covers are assembled correctly. If not,the drive sprocket can come loose and causeserious injuries. See Assembly on page 12 forinstructions.
• Make sure that there is no risk that persons oranimals touch or influence on your control of theproduct.
• If you are not careful, the risk of kickback increases.A kickback can occur if the kickback zone of theguide bar accidentally touches a branch, tree orother objects.
• Do not hold the product with one hand. This productis not safely controlled with one hand.
• Hold the product tightly with your right hand on thetop handle and your left hand on the front handle.Put your fingers and thumbs around the handles.This decreases the effect of kickback and lets you
keep control of the product. Do not let go of thehandles!
• Make sure that you have stable feet and that the sawchain does not touch an object.
• Do not use the product above shoulder height andtry not to cut with the guide bar tip.
• Do not try pruning or limbing operations if you do nothave special training.
• The vibration level increases if you cut with cuttingequipment that is incorrect or not correctlysharpened. Cutting hardwoods, such as broadleaftrees, causes more vibration than cutting softwoods,such as conifers.
• Overexposure to vibration can lead to circulatorydamage or nerve damage in persons who havedecreased circulation. Speak to your physician if youexperience symptoms of overexposure to vibration.Such symptoms include numbness, loss of feeling,tingling, pricking, pain, loss of strength, changes inskin colour or condition. These symptoms usuallyoccur in the fingers, hands or wrists increases in coldtemperatures.
• Prevent situations which you think is beyond yourcapability.
959 - 006 - 15.05.2019 7

• It is not possible to include each possible situationyou can face during operation. Always be carefuland use your common sense.
Personal protective equipment
WARNING: Read the warning instructionsthat follow before you use the product.
• Most chainsaw accidents occur when the saw chaintouches the operator. You must use approvedpersonal protective equipment during operation.Personal protective equipment does not give you fullprotection from injuries but it decreases the degreeof injury if an accident occurs. Speak to yourservicing dealer for recommendations about whichequipment to use.
• Your clothing must be close-fitting but not limit yourmovements. Regularly do a check of the condition ofthe personal protective equipment.
• Use an approved protective helmet.• Use approved hearing protection. Long-term
exposure to noise can result in permanent damageto the hearing.
• Use protective glasses or a face visor to decreasethe risk of injury from thrown objects. The productcan throw objects, such as wood chips, small piecesof wood and more, at large force. This can result inserious injury, especially to the eyes.
• Use gloves with saw protection.• Use pants with saw protection.• Use boots with saw protection, steel toe-cap and
non-slip sole.• Always have a first-aid kit with you.• Risk of sparks. Keep fire extinguishing tools and a
shovel near to prevent forest fires.
Safety devices on the product
WARNING: Read the warning instructionsthat follow before you use the product.
• Do not use a product with defective safety devices.• Do a check of the safety devices regularly. Refer to
Maintenance and checks of the safety devices onthe product on page 19.
• If the safety devices are defective, speak to yourHusqvarna servicing dealer.
Keypad
The warning indicator flashes if the chain brake isengaged or if there is a risk of overload. The overloadprotection temporarily stops the product and you can notuse the product until the temperature restores. If theindicator shows a solid light, turn to your servicingdealer.
The automatic stop function
The product has an automatic stop function that stopsthe product if you do not use it for one minute.
Chain brake and front hand guard
Your product has a chain brake that stops the saw chainif you get a kickback. The chain brake decreases therisk of accidents but only you can prevent them.
WARNING: Do not engage in situationswhere there is a risk of kickback. Be carefulwhen you use your product and make surethat the kickback zone of the guide bar doesnot touch an object.
The chain brake engages manually by your left hand orautomatically by the inertia release mechanism. Pushthe front hand guard forward to engage the chain brake
8 959 - 006 - 15.05.2019
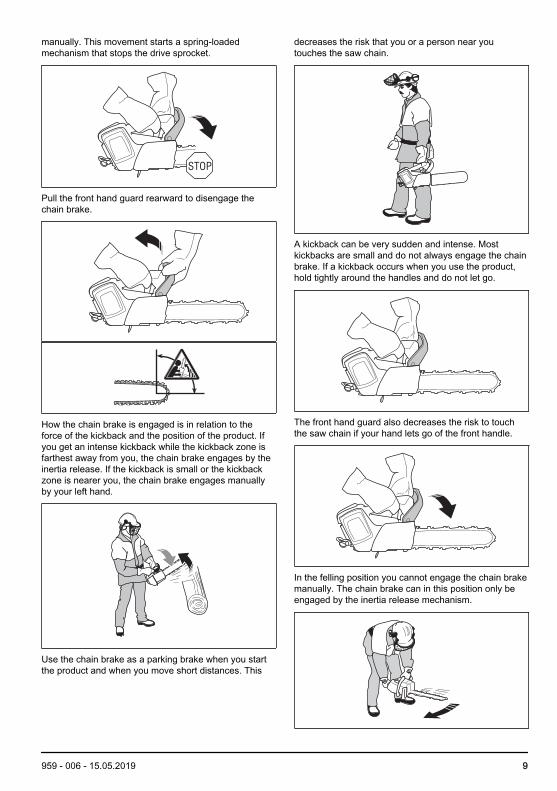
manually. This movement starts a spring-loadedmechanism that stops the drive sprocket.
Pull the front hand guard rearward to disengage thechain brake.
How the chain brake is engaged is in relation to theforce of the kickback and the position of the product. Ifyou get an intense kickback while the kickback zone isfarthest away from you, the chain brake engages by theinertia release. If the kickback is small or the kickbackzone is nearer you, the chain brake engages manuallyby your left hand.
Use the chain brake as a parking brake when you startthe product and when you move short distances. This
decreases the risk that you or a person near youtouches the saw chain.
A kickback can be very sudden and intense. Mostkickbacks are small and do not always engage the chainbrake. If a kickback occurs when you use the product,hold tightly around the handles and do not let go.
The front hand guard also decreases the risk to touchthe saw chain if your hand lets go of the front handle.
In the felling position you cannot engage the chain brakemanually. The chain brake can in this position only beengaged by the inertia release mechanism.
959 - 006 - 15.05.2019 9

Power trigger lockout
The power trigger lockout prevents accidental operationof the power trigger. If you put your hand around thehandle and press the power trigger lockout (A), itreleases the power trigger (B). If you release the handle,the power trigger and the power trigger lockout moveback to their initial positions.
A B
Chain catcher
The chain catcher catches the saw chain if it breaks orcomes loose. If you have the correct chain tension, therisk decreases. You also decrease the risk if you do thecorrect maintenance on the guide bar and saw chain.See Assembly on page 12 and Maintenance on page18 for instructions.
Battery safety
WARNING: Read the warning instructionsthat follow before you use the product.
• Only use the BLi batteries that we recommend foryour product. The batteries are software encrypted.
• Use the BLi batteries that are rechargable as apower supply for the related Husqvarna productsonly. To prevent injury, do not use the battery as apower supply for other devices.
• Risk of electrical shock. Do not connect the batteryterminals to keys, screws or other metal. This cancause a short circuit of the battery.
• Do not use batteries that are non-rechargable.• Do not put objects into the air slots of the battery.• Keep the battery away from sunlight, heat or open
flame. The battery can cause burns and/or chemicalburns.
• Keep the battery away from rain and wet conditions.
• Keep the battery away from microwaves and highpressure.
• Do not try to disassemble or break the battery.• Do not let battery acid touch your skin. Battery acid
causes injuries to the skin, corrosion and burns. Ifyou get battery acid in your eyes, do not rub butflush with water for minimum 15 minutes. If batteryacid has touched your skin, you must clean the skinwith a large quantity of water and soap. Get medicalaid.
• Use the battery in temperatures between -10 °C (14°F) and 40 °C (104 °F).
• Do not clean the battery or the battery charger withwater. See To do a check of the battery and thebattery holder on page 21.
• Do not use a defective or damaged battery.• Keep batteries in storage away from metal objects
such as nails, screws or jewelry.• Keep the battery away from children.
Battery charger safety
WARNING: Read the warning instructionsthat follow before you use the product.
• Risk of electrical shock or short circuit if the safetyinstructions are not obeyed.
• Use an approved grounded mains socket that is notdamaged.
• Do not use other battery chargers than the onesupplied for your product. Only use Husqvarna QCchargers when you charge Husqvarna replacementbatteries BLi.
• Do not try to disassemble the battery charger.• Do not use a defective or damaged battery charger.• Do not lift the battery charger by the power cord. To
disconnect the battery charger from a mains socket,pull out the plug. Do not pull the power cord.
• Keep all cables and extension leads away fromwater, oil and sharp edges. Make sure that the cableis not caught between doors, fences or similar.
• Do not use the battery charger near flammablematerials or materials that can cause corrosion.Make sure that the battery charger is not covered.Pull out the plug to the battery charger if there issmoke or fire.
• Only charge the battery indoors in a location withgood airflow and away from sunlight. Do not chargethe battery outdoors. Do not charge the battery inwet conditions.
• Only use the battery charger where the temperatureis between 5 °C (41 °F) and 40 °C (104 °F). Use thecharger in an environment which has a good airflow,dry and free from dust.
• Do not put objects into the cooling slots of thebattery charger.
10 959 - 006 - 15.05.2019

• Do not connect the battery charger terminals tometal objects as this can short circuit the batterycharger.
• Use approved wall sockets that are not damaged.
Safety instructions for maintenance
WARNING: Read the warning instructionsthat follow before you do maintenance onthe product.
• Remove the battery before you do maintenance,other checks or assemble the product.
• The operator must only do the maintenance andservicing shown in this operator's manual. Turn toyour servicing dealer for maintenance and servicingof a larger extension.
• Do not clean the battery or the battery charger withwater. Strong detergent can cause damage to theplastic.
• If you do not do maintenance, it decreases the lifecycle of the product and increases the risk ofaccidents.
• Special training is necessary for all servicing andrepair work, especially for the safety devices on theproduct. If not all checks in this operator's manualare approved after you have done maintenance, turnto your servicing dealer. We guarantee that there areprofessional repairs and servicing available for yourproduct.
• Only use original spare parts.
Safety instructions for the cutting equipment
WARNING: Read the warning instructionsthat follow before you use the product.
• Only use the guide bar/saw chain combinations andfiling equipment that we recommend. Refer to Accessories on page 29 for instructions.
• Use protective gloves when you use or domaintenance on the saw chain. A saw chain thatdoes not move can also cause injuries.
• Keep the cutting teeth correctly sharpened. Obey theinstructions and use the recommended file gauge. Asaw chain that is damaged or incorrectly sharpenedincreases the risk of accidents.
• Keep the correct depth gauge setting. Obey theinstructions and use the recommended depth gaugesetting. Too large depth gauge setting increases therisk of kickback.
• Make sure that the saw chain has the correcttension. If the saw chain is not tight against the guidebar, the saw chain can derail. An incorrect saw chaintension increases wear on the guide bar, saw chainand chain drive sprocket. Refer to To adjust thetension of the saw chain on page 23.
• Do maintenance on the cutting equipment regularlyand keep it correctly lubricated. If the saw chain isnot correctly lubricated, the risk of wear on the guidebar, saw chain and chain drive sprocket increases.
959 - 006 - 15.05.2019 11

AssemblyTo assemble the guide bar and sawchain
WARNING: Always remove the batterybefore you assemble or do maintenance onthe product.
1. Disengage the chain brake.
2. Remove the bar nut, the drive sprocket cover andthe transportation ring (A).
A
3. Put the guide bar on top of the bar bolt. Steer theguide bar to its most rear position. Lift the saw chainabove the drive sprocket and engage it in the grooveon the guide bar. Start on the top edge of the guidebar.
4. Make sure that the edges of the cutting links areturned forward on the top edge of the guide bar.
5. Assemble the drive sprocket cover and steer thechain adjuster pin to the hole in the guide bar.
6. Make sure that the drive links of the saw chain fitcorrectly on the drive sprocket.
7. Make sure that the saw chain is correctly engaged inthe groove in the guide bar.
8. Tighten the bar nut finger-tight.9. Tighten the saw chain. See To adjust the tension of
the saw chain on page 23 for instructions.
12 959 - 006 - 15.05.2019

OperationIntroduction
WARNING: Read and understand the safetychapter before you use the product.
To do a function check before you usethe product1. Do a check of the chain brake to make sure that it
operates correctly and that it is not damaged.2. Do a check of the power trigger lockout to make sure
that it operates correctly and that it is not damaged.3. Do a check of the keypad to make sure that it
operates correctly.4. Make sure that there is no oil on the handles.5. Do a check to make sure that all parts are correctly
attached and not damaged or missing.6. Do a check of the chain catcher to make sure that it
is attached correctly.7. Do a check of the chain tension.8. Charge the battery and make sure that it is correctly
attached to the product.9. Make sure that the saw chain stops when you
release the power trigger.
7
13924
8 5 6
To use the correct chain oilWARNING: Do not use waste oil, which cancause injury to you and the environment.Waste oil also causes damage to the oilpump, the guide bar and the saw chain.
WARNING: The saw chain can break if thelubrication of the cutting equipment is notsufficient. Risk of serious injury or death tothe operator.
WARNING: Use the correct chain oil for thisfunction to operate correctly. Speak to yourservicing dealer when you select your chainoil.
• Use Husqvarna chain oil for maximum saw chain lifeand to prevent negative effects on the environment.If Husqvarna chain oil is not available, werecommend you to use a standard chain oil.
• Use a chain oil with good adherence to the sawchain.
• Use a chain oil with correct viscosity range thatagrees with the air temperature.
CAUTION: In temperatures below 0°C/32°F some chain oils become too thick,which can cause damage to the oil pumpcomponents.
• Use the recommended cutting equipment. Refer to Accessories on page 29.
• Remove the cap to the chain oil tank.• Fill the chain oil tank with chain oil.• Attach the cap carefully.
Note: To see where the chain oil tank is on you product,refer to Product overview on page 2.
To connect the battery charger1. Connect the battery charger to the voltage and
frequency that is specified on the rating plate.2. Put the plug in a grounded socket outlet. The LED
on the battery charger flashes green one time.
Note: The battery does not charge if the batterytemperature is more than 50 °C/122 °F. If thetemperature is more than 50 °C/122 °F, the batterycharger makes the battery become cool before thebattery charges.
To connect the battery to the batterychargerNote: Charge the battery if it is the first time that you useit. A new battery is only 30% charged.
959 - 006 - 15.05.2019 13
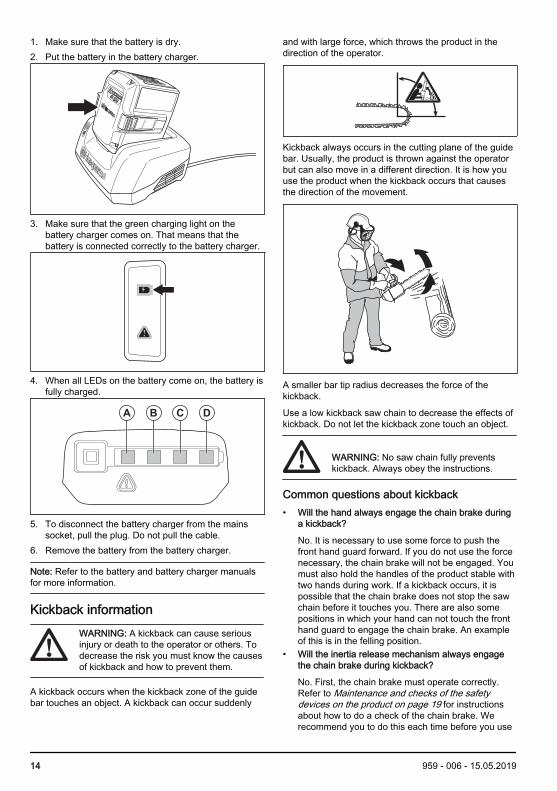
1. Make sure that the battery is dry.2. Put the battery in the battery charger.
3. Make sure that the green charging light on thebattery charger comes on. That means that thebattery is connected correctly to the battery charger.
4. When all LEDs on the battery come on, the battery isfully charged.
A B C D
5. To disconnect the battery charger from the mainssocket, pull the plug. Do not pull the cable.
6. Remove the battery from the battery charger.
Note: Refer to the battery and battery charger manualsfor more information.
Kickback informationWARNING: A kickback can cause seriousinjury or death to the operator or others. Todecrease the risk you must know the causesof kickback and how to prevent them.
A kickback occurs when the kickback zone of the guidebar touches an object. A kickback can occur suddenly
and with large force, which throws the product in thedirection of the operator.
Kickback always occurs in the cutting plane of the guidebar. Usually, the product is thrown against the operatorbut can also move in a different direction. It is how youuse the product when the kickback occurs that causesthe direction of the movement.
A smaller bar tip radius decreases the force of thekickback.
Use a low kickback saw chain to decrease the effects ofkickback. Do not let the kickback zone touch an object.
WARNING: No saw chain fully preventskickback. Always obey the instructions.
Common questions about kickback• Will the hand always engage the chain brake during
a kickback?
No. It is necessary to use some force to push thefront hand guard forward. If you do not use the forcenecessary, the chain brake will not be engaged. Youmust also hold the handles of the product stable withtwo hands during work. If a kickback occurs, it ispossible that the chain brake does not stop the sawchain before it touches you. There are also somepositions in which your hand can not touch the fronthand guard to engage the chain brake. An exampleof this is in the felling position.
• Will the inertia release mechanism always engagethe chain brake during kickback?
No. First, the chain brake must operate correctly.Refer to Maintenance and checks of the safetydevices on the product on page 19 for instructionsabout how to do a check of the chain brake. Werecommend you to do this each time before you use
14 959 - 006 - 15.05.2019

the product. Second, the force of the kickback mustbe large to engage the chain brake. If the chainbrake is too sensitive, it can engage during roughoperation.
• Will the chain brake always protect me from injuryduring a kickback?
No. The chain brake must operate correctly to giveprotection. The chain brake must also be engagedduring a kickback to stop the saw chain. If you arenear the guide bar, it is possible that the chain brakedoes not have time to stop the saw chain before ithits you.
WARNING: Only you and the correctworking technique can prevent kickbacks.
To start the product1. Do a check of the power trigger and power trigger
lockout. Refer to To do a check of the power triggerlockout on page 20.
2. Push the front hand guard forward to engage thechain brake.
3. Put the battery in the battery holder.
CAUTION: Make sure that the battery isinstalled correctly into the battery holder.If the battery does not move easily intothe battery holder, the position is notcorrect.
4. Push on the lower part of the battery until you hear aclick.
5. Push and hold the start/stop button until a greenLED light comes on.
WARNING: If you start the product in a tree,engage the chain brake before you lower theproduct onto its strop.
To use the SavE functionThe SavE function decreases the chain speed andincreases the capacity of the battery.
Note: The SavE function does not decrease the powerof the product.
1. Push the SavE button. The green LED comes on.2. Push the SavE button again to disconnect the
function. The green LED goes off.
To stop the product1. Push and hold the start/stop button until the green
LED light comes off.
959 - 006 - 15.05.2019 15

2. Push the battery release buttons and remove thebattery from the battery holder to prevent accidentalstart.
General information about workingtechniqueBelow we give you some general information about howto use this product.
WARNING: The information related toworking technique in this operator's manualis not considered correct training to operatethis tree-service product. This product mustbe used by tree-service operators withspecial training only! Use without the correcttraining can result in serious injuries. Do nottry any task that you do not feel sure of!
• To cut on the pull stroke is when you cut with thebottom of the guide bar. The saw chain pulls throughthe tree when you cut. In this position you havebetter control of the product and the position of thekickback zone.
• To cut on the push stroke is when you cut with thetop of the guide bar. The saw chain pushes theproduct in the direction of the operator.
WARNING: Be careful when you cut onthe push stroke. If the saw chain getstrapped in the trunk, the product can bepushed at you. You must prevent thisforce or there is a risk that the kickbackzone of the guide bar touches the tree.This will lead to a kickback.
• Use full power when you cut.• Let go of the power trigger after each cut.
CAUTION: Motor damage can occur ifyou run the motor for too long at fullpower and without load. One example isif you cut without resistance from thesaw chain.
To prepare the product for operation inthe treeGround operatorAs a ground operator, do the steps that follow.
1. Examine the product.2. Charge the battery.3. Attach the end of an approved safety strop to the
rope eyelet.
16 959 - 006 - 15.05.2019

Note: A safety strop makes sure that the productdoes not hit the ground if it falls.
4. Make sure that there is a carabiner on the other endof the safety strop.
5. Start the product.6. Stop the product.7. Engage the chain brake.8. Lift the product to the operator in the tree. Use
ascent tools.
WARNING: Make sure that the productis safely attached when you lift it to theoperator in the tree.
Tree operatorAs a tree operator, follow the instructions below.
1. Before you disconnect the safety strop from theascent tools, you must attach the product to theharness. Attach the product to the harness throughthe belt eyelet or a steel ring on the safety strop.
WARNING: Attach the safety strop to 1of the recommended connection pointson the harness.
WARNING: If you use only the safetystrop to attach the product to theharness, lower the product fully downwith the safety strop. Do not let go of theproduct from a height.
2. Use approved carabiners to attach the free end ofthe safety strop to one of the connection points onthe harness. This is your primary connection point.
CAUTION: The safety strop must only beattached to the rope eyelet.
3. Make sure that you are in a stable and safe positionto make the cut.
4. Release the product from the secondary connectionpoint, start the product and make the cut.
5. Engage the chain brake directly after the cut iscompleted.
6. Stop the product and put it in its secondaryconnection point.
To operate the product in a treeWARNING: Most accidents occur when theoperator does not have full control of theproduct or the work position.
• Keep a safe work position.• Cut horizontal sections at hip level and vertical
sections at solar plexus level.• Hold the product with 2 hands.• Make sure that you are stable on your feet and keep
a low lateral force when you cut vertical branches.Steer the safety line through a different connectionpoint to remove or prevent increasing lateral forces.You can also use an adjustable strop directly fromthe harness to a different connection point.
959 - 006 - 15.05.2019 17

• Use a foot loop to keep a safe work position.
• Do a check of the harness, belt and ropes at aregular interval.
• If you must climb with the product, attach the productto the rear connection point on the harness. The rearconnection point keeps the product clear fromclimbing lines and makes sure that the weight hascentral support down your spine.
WARNING: You must engage the chainbrake when you lower the product ontoits strop.
To remove a trapped product1. Stop the product.2. Attach the product safely to the tree inboard, against
the trunk side, of the cut or a different tool line.3. Carefully pull the saw away from the kerf while you
lift the branch as necessary.
WARNING: Do not try to pull the productfree. Risk of serious injury.
4. If it is necessary, use a hand saw or a secondchainsaw to release the product. Cut the branch at aminimum of 30 cm/12 in from the caught product.Make the cut on the outer end from where theproduct is caught.
MaintenanceIntroduction
WARNING: Read and understand the safetychapter before you do maintenance on theproduct.
Maintenance schedule
WARNING: Remove the battery before youdo maintenance.
The following is a list of the maintenance steps that youmust do on the product. See Maintenance on page 18for more information.
Maintenance Beforeuse Weekly Monthly
Clean the external parts of the product. X
Make sure that the power trigger and the power trigger lockout function correctlyfrom a safety point of view. X
18 959 - 006 - 15.05.2019

Maintenance Beforeuse Weekly Monthly
Clean the chain brake and make sure that it operates safely. Make sure that thechain catcher is not damaged. Replace it if necessary. X
Turn the guide bar for more equal wear. Make sure that the lubrication hole inthe guide bar is not clogged. Clean the bar groove. X
Make sure that the cutter and cutter guard have no cracks and that they are notdamaged. Replace the cutter or cutter guard if they have cracks or if they havebeen exposed to impact.
X
Make sure that the guide bar and saw chain have sufficient oil. X
Do a check of the saw chain. Look for cracks and make sure that the saw chainis not rigid or unusually worn. Replace if necessary. X
Sharpen the saw chain. Do a check of its tension and condition. Do a check forwear on the drive sprocket and replace is necessary. X
Clean the air inlet on the product. X
Make sure that the screws and nuts are tight. X
Make sure that the keypad works correctly and that it is not damaged. X
Use a file to remove burrs from the edges of the guide bar. X
Do a check of the connections between the battery and the product. Do a checkof the connection between the battery and the battery charger. X
Empty and clean the oil tank. X
Blow through the product and battery cooling slots gently with compressed air. X
Maintenance and checks of the safetydevices on the productTo do a check of the front hand guardRegularly do a check of the front hand guard.
1. Make sure that the front hand guard is not damagedand that there are no defects, such as cracks.
2. Make sure that the front hand guard moves freelyand that it is attached safely to the product.
To do a check of the brake trigger1. Start the product and make sure that the saw chain
does not touch the ground or an object. See To startthe product on page 15 for instructions.
959 - 006 - 15.05.2019 19

2. Hold the product tight. Put your hands around thehandles.
3. Apply full power and tilt your left wrist forward toengage the chain brake.
4. Make sure that the saw chain stops directly.
WARNING: Do not let go of the front handle!
To do a check of the power trigger lockout1. Make sure that the power trigger and power trigger
lockout move freely and that the return spring workscorrectly.
2. Press down the power trigger lockout and make surethat it goes back to its initial position when yourelease it.
3. Make sure that the power trigger is locked at the idleposition when the power trigger lockout is released.
4. Start the product and apply full power.5. Release the power trigger and make sure that the
saw chain stops and stays stationary. If the sawchain rotates when the power trigger is in the idleposition, turn to your servicing dealer.
To do a check of the chain catcher1. Make sure that there is no damage on the chain
catcher.2. Make sure that the chain catcher is stable and
attached to the body of the product.
To do a check of the keypad1. Start the product. See To start the product on page
152. Press the start/stop button again.
20 959 - 006 - 15.05.2019

3. Make sure that the product stops when you pressand hold the button. The green LED will go off.
To do a check of the battery and thebattery holder1. Clean the battery and the battery holder with a soft
brush.2. Clean the cooling slots and battery connectors.
3. Make sure that the battery is not damaged and thereare no other defects, such as cracks.
To do a check of the battery charger1. Make sure that the battery charger and the power
supply cord is not damaged. Look for cracks andother defects.
To clean the cooling systemThe product has a cooling system that keeps thetemperature of the product as low as possible.
The cooling system includes an air intake on the left sideof the product and a fan on the motor.
1. Clean the cooling system with a brush weekly ormore frequently if necessary.
2. Make sure that the cooling system is not dirty orblocked.
CAUTION: A dirty or blocked coolingsystem can cause the product tobecome too hot. This causes damage tothe piston and cylinder.
To sharpen the saw chainInformation about the guide bar and saw chain
WARNING: Use protective gloves when youuse or do maintenance on the saw chain. Asaw chain that does not move can alsocause injuries.
Replace a worn or damaged guide bar or saw chain withthe guide bar and saw chain combination recommendedby Husqvarna. This is necessary to keep the safetyfunctions of the product. Refer to Accessories on page29, for a list of replacement bar and chaincombinations that we recommend.
• Guide bar length, in/cm. Information about the guidebar length can usually be found on the rear end ofthe guide bar.
• Number of teeth on bar tip sprocket (T).
959 - 006 - 15.05.2019 21

• Chain pitch, in. The distance between the drive linksof the saw chain must align with the distance of theteeth on the bar tip sprocket and drive sprocket.
PITCH = D
D
2
• Number of drive links. The number of drive links isdecided by the type of guide bar.
• Bar groove width, in/mm. The groove width in guidebar must be the same as the chain drive links width.
• Chain oil hole and hole for chain tensioner. Theguide bar must align with product.
• Drive link width, mm/in.
General information about how to sharpen thecuttersDo not use a blunt saw chain. If the saw chain is blunt,you must apply more pressure to push the guide barthrough the wood. If the saw chain is very blunt, therewill be no wood chips but sawdust.
A sharp saw chain eats through the wood and the woodchips becomes long and thick.
The cutting tooth (A) and the depth gauge (B) togethermakes the cutting part of the saw chain, the cutter. Thedifference in height between the two gives the cuttingdepth (depth gauge setting).
A
B
When you sharpen the cutter, think about the following:
• Filing angle.
• Cutting angle.
• File position.
• Round file diameter.
It is not easy to sharpen a saw chain correctly withoutthe correct equipment. Use Husqvarna file gauge. This
22 959 - 006 - 15.05.2019

will help you to keep maximum cutting performance andthe kickback risk at a minimum.
WARNING: The force of the kickbackincreases a lot if you do not follow thesharpening instructions.
Note: Refer to To sharpen the saw chain on page 21 forinformation about sharpening of the saw chain.
To sharpen the cutters1. Use a round file and a file gauge to sharpen the
cutting teeth.
Note: Refer to Filing equipment and filing angles onpage 29 for information about which file and gaugethat Husqvarna recommends for your saw chain.
2. Apply the file gauge correctly on to the cutter. Referto the instruction supplied with the file gauge.
3. Move the file from the inner side of the cutting teethand out. Decrease the pressure on the pull stroke.
4. Remove material from one side of all the cuttingteeth.
5. Turn the product around and remove material on theother side.
6. Make sure that all cutting teeth are the same length.
General information about how to adjust thedepth gauge settingThe depth gauge setting (C) decreases when yousharpen the cutting tooth (A). To keep maximum cuttingperformance you must remove filing material from thedepth gauge (B) to receive the recommended depthgauge setting. See Filing equipment and filing angles on
page 29 for instructions about how to receive thecorrect depth gauge setting for your saw chain.
A
B
C
WARNING: The risk of kickback increases ifthe depth gauge setting is too large!
To adjust the depth gauge settingBefore you adjust the depth gauge setting or sharpenthe cutters, refer to To sharpen the cutters on page 23,for instructions. We recommend you to adjust the depthgauge setting after each third operation that yousharpen the cutting teeth.
We recommend that you use our depth gauge tool toreceive the correct depth gauge setting and bevel for thedepth gauge.
1. Use a flat file and a depth gauge tool to adjust thedepth gauge setting. Only use Husqvarna depthgauge tool to get the correct depth gauge setting andbevel for the depth gauge.
2. Put the depth gauge tool on the saw chain.
Note: See the package of the depth gauge tool formore information about how to use the tool.
3. Use the flat file to remove the part of the depthgauge that extends through the depth gauge tool.
To adjust the tension of the saw chainWARNING: A saw chain with an incorrecttension can come loose from the guide barand cause serious injury or death.
A saw chain becomes longer when you use it. Adjust thesaw chain regularly.
959 - 006 - 15.05.2019 23

1. Loosen the bar nut that holds the drive sprocketcover and chain brake. Use the combination wrench.
2. Lift the front of the guide bar and turn the chaintensioning screw. Use the combination wrench.
3. Tighten the saw chain until it is tight against theguide bar.
4. Tighten the bar nut with the combination wrench andlift the front of the guide bar at the same time.
5. Make sure that you can pull the saw chain aroundfreely by hand and that it does not hang from theguide bar.
Note: Refer to Product overview on page 2 for theposition of the chain tensioning screw on your product.
To do a check of the saw chainlubricationDo a check of the saw chain lubrication each thirdbattery charge.
1. Start the product and let it run at 3/4 power. Hold thebar approximately 20 cm (8 inches) above a lightcoloured surface.
2. If the saw chain lubrication is correct, you will see aclear line of oil on the surface after 1 minute.
3. If the saw chain lubrication is not correct, do thefollowing checks.a) Do a check of the oil channel in the guide bar to
make sure that it is not blocked. Clean ifnecessary.
b) Do a check of the groove in the edge of the guidebar to make sure that it is clean. Clean ifnecessary.
c) Make sure that the bar tip sprocket turns freelyand that the lubricating hole in the guide bar tipsprocket is not blocked. Clean and lubricate ifnecessary.
4. If the saw chain lubrication does not work afterfollowing the steps above, speak to your servicingdealer.
24 959 - 006 - 15.05.2019

To do a check of the chain drivesprocket• Examine the chain drive sprocket for wear. Replace
the chain drive sprocket if it is necessary.• Replace the chain drive sprocket each time that you
replace the saw chain.
To examine the cutting equipment1. Make sure that there are no cracks in rivets and links
and that no rivets are loose. Replace if it isnecessary.
2. Make sure that the saw chain is easy to bend.Replace the saw chain if it is rigid.
3. Compare the saw chain with a new saw chain toexamine if the rivets and links are worn.
4. Replace the saw chain when the longest part of thecutting tooth is less than 4 mm/0.16 in. Also replacethe saw chain if there are cracks on the cutters.
To do a check of the guide bar1. Make sure that the oil channel is not blocked. Clean
if it is necessary.
2. Examine if there are burrs on the edges of the guidebar. Remove the burrs using a file.
3. Clean the groove in the guide bar.
4. Examine the groove in the guide bar for wear.Replace the guide bar if it is necessary.
5. Examine if the guide bar tip is rough or very worn.
6. Make sure that the bar tip sprocket turns freely andthat the lubricating hole in the bar tip sprocket is notblocked. Clean and lubricate if it is necessary.
959 - 006 - 15.05.2019 25

7. Turn the guide bar daily to extend its life cycle.
Troubleshooting
Keypad
Possible fault codes on the keypad of the product.
LED display Possible faults Possible action
Warning indicator flashing. Chain brake engaged. Pull back the front hand guard to re-lease the chain brake.
Temperature deviation. Allow the product to cool down.
Overload. Cutting attachment jam-med.
The cutting attachment is jammed.Release the cutting attachment.
The power trigger and the activatebutton are pressed at the same time.
Release the power trigger and theproduct is active.
Green activate LED flashing. Low battery voltage. Charge the battery.
Warning indicator lit. Service. Turn to your servicing dealer.
Battery
Problem Possible faults Possible solution
Green LED flashes. Low battery voltage. Charge the battery.
Red error LED flashes. The battery is empty. Charge the battery.
Temperature deviation. Use the battery in temperatures between-10°C (14°F) and 40°C (104°F).
Overvoltage. Remove the battery from the battery charger.
Red error LED comes on. Cell difference is to much (1V). Speak to your servicing dealer.
26 959 - 006 - 15.05.2019

Battery charger
LED display Possible faults Possible action
Warning indicator flashing. Temperature deviation. Use the battery in surroundingswhere temperatures are between5°C/41°F and 40°C/104°F.
Warning indicator lit. Turn to your servicing dealer.
Transportation, storage and disposalTransportation and storage• The supplied Li-ion batteries obey the Dangerous
Goods Legislation requirements.• Obey the special requirement on package and labels
for commercial transportation, including by thirdparties and forwarding agents.
• Speak to a person with special training in dangerousmaterial before you send the product. Obey allapplicable national regulations.
• Use tape on open contacts when you put the batteryin a package. Put the battery in the package tightlyto prevent movement.
• Remove the battery for storage or transportation.• Put the battery and the battery charger in a space
that is dry and free from moisture and frost.• Do not keep the battery in an area where static
electricity can occur. Do not keep the battery in ametal box.
• Put the battery in storage where the temperature isbetween 5 °C (41 °F) and 25 °C (77 °F) and awayfrom open sunlight.
• Put the battery charger in storage where thetemperature is between 5 °C (41 °F) and 45 °C (113°F) and away from open sunlight.
• Charge the battery 30% to 50% before you put it instorage for long periods.
• Put the battery charger in storage in a space that isclosed and dry.
• Keep the battery away from the battery chargerduring storage. Do not let children and other notapproved persons to touch the equipment. Keep theequipment in a space that you can lock.
• Clean the product and do a full servicing before youput the product in storage for a long time.
• Use the transportation guard on the product toprevent injuries or damage on the product duringtransportation and storage.
• Attach the product safely during transportation.
Disposal of the battery, battery chargerand productThe symbol below means that the product is notdomestic waste. Recycle it at a recycling station forelectrical and electronic equipment. This helps toprevent damage to the environment and to persons.
Speak to local authorities, domestic waste service oryour dealer for more information.
Note: The symbol shows on the product or package ofthe product.
Technical data
Technical data
T535i XPMotor
Type BLDC (brushless) 36V
Features
959 - 006 - 15.05.2019 27

T535i XPLow energy mode savE
Lubrication system
Type of oil pump Automatic
Oil tank capacity, liter/cm2 0.20/200
Weight
Chainsaw without battery, guide bar, saw chain and empty chain oil tank, kg 2.4
Water protection level
IPX4 Yes
Noise emissions 1
Sound power level, measured dB(A) 104
Sound power level, guaranteed LWA dB(A) 106
Sound levels 2
Equivalent sound pressure level at the operator's ear, dB(A) 93
Vibration levels 3
Front handle m/s2 3.3
Rear handle m/s2 3.7
Equivalent vibration levels 4
Front handle m/s2 2.0
Rear handle m/s2 2.4
Saw chain/guide bar
Recommended bar lengths, inch/cm 10-14/25-35
Usable cutting length, inch/cm 9-13/23-33
Type of drive sprocket/number of teeth Spur/7
Maximum chain speed / (savE), m/s 20 (15)
1 Noise emissions in the environment measured as sound power (LWA) in conformity with EC directive2000/14/EC.
2 Equivalent sound pressure level, according to ISO 22868, is calculated as the time-weighted energy total fordifferent sound pressure levels under various working conditions. Typical statistical dispersion for equivalentsound pressure level is a standard deviation of 1 dB (A).
3 Vibration level, according to EN 60745-2-13. Reported data for vibration level has a typical statistical disper-sion (standard deviation) of 1 m/s2. Declared vibration data from measurements when the machine is fittedwith a bar length and recommended chain type. If the machine is fitted with a different bar length, the vibrationlevel may vary by max ± 1.5 m/s2.
4 Equivalent vibration level is measured and calculated as for combustion engine powered chainsaws. Thesefigures are quoted to be able to compare vibration data regardless of type of engine according to ISO22867:2011.
28 959 - 006 - 15.05.2019

AccessoriesGuide bar and saw chain combinationsThe following cutting attachments are approved forHusqvarna T535i XP.
Guide bar Saw chain
Length, in Chain pitch, in Gauge, mm Max. nose radius Type Length, drivelinks (no.)
10 3/8 1.1 7T Husqvarna H38 40
12 9T 45
14 52
10 0.325 mini 1.1 8T HusqvarnaSP21G
46
12 51
14 59
Filing equipment and filing anglesUsing Husqvarna file gauge will give you the correctfiling angles. We recommend you to always use aHusqvarna file gauge to restore the sharpness of the
saw chain. The part numbers are given in the tablebelow.
If you do not know which saw chain you have on yourproduct, turn to your servicing dealer.
38 11/64 in /4.5 mm 75° 30° 0° 0.025 in/
0.65 mm 5056981-03 5795588-01
21 5/32 in / 4.0mm 60° 30° 0° 0.025 in/
0.65 mm 5950046-01 5950047-01
Approved batteriesOnly use original BLi batteries for this product.
959 - 006 - 15.05.2019 29

Approved battery chargers
Battery charger QC330 QC500
Input voltage, V 100-240 100-240
Frequency, Hz 50-60 50-60
Power, W 330 500
30 959 - 006 - 15.05.2019

EC Declaration of ConformityEC Declaration of conformityHusqvarna AB, SE-561 82 Huskvarna, Sweden, tel:+46-36-146500, declares under sole responsibility thatthe cordless battery chainsaw Husqvarna T535i XP from2019’s serial numbers and onwards (the year is clearlystated in plain text on the type plate with subsequentserial number), are in conformity with the requirementsof the COUNCIL’S DIRECTIVES:
• of May 17, 2006 ”relating to machinery” 2006/42/EC.• of February 26, 2014 ”relating to electromagnetic
compatibility” 2014/30/EU.• of May 8, 2000 ”relating to the noise emissions in the
environment” 2000/14/EC.• of June 8, 2011 on the "restriction of use of certain
hazardous substances" 2011/65/EU
The following standards have been applied: EN60745-1:2009+A11:2010, EN60745-2-13:2009+A1:2010, EN 55014:2006+A1:2009,EN 61000-6-2:2005, EN 50581:2012
Notified body (0404): RISE SMP, SvenskMaskinprovning AB, Box 7035, SE-750 07, Uppsala,Sweden, has carried out EC type examination inaccordance with the machinery directive's (2006/42/EC)article 12, clause 3b. The certificates for EC typeexamination have the numbers: 0404/19/2523
In addition, RISE SMP, Svensk Maskinprovning AB, Box7035, SE-750 07, Uppsala, Sweden, has certifiedconformity with annex V of the Council's Directive ofMay 8, 2000 "relating to the noise emissions in theenvironment" 2000/14/EC. The certificates have thenumbers: 01/162/003.
The supplied chainsaw conforms to the example thatunderwent EC type examination.
For information relating to noise emissions, see Technical data on page 27.
Huskvarna, 2019-01-15
Pär Martinsson, Development manager (Authorizedrepresentative for Husqvarna AB and responsible fortechnical documentation.)
959 - 006 - 15.05.2019 31

www.husqvarna.com
Original instructions
1140982-26
2019-05-17