Embed Size (px)
Citation preview

Employee Support

Employee Support
General Account Information1
How do I reset my password? 51.1
Why can't I log into my account? 71.2
How do I view my current Timesheet status? 91.3
Report Questions2
How do I print off my Timesheets and Expense Reports? 112.1
Time Entry Questions3
How do I enter time on a Time In Time Out Timesheet? 143.1
Time Entry Methods 173.2
Why am I not able to make Edits? 193.3
How do I enter time on a Time In Time Out Timesheet that has lunch? 203.4
How do I text in my hours? 243.5
How do I enter a Timesheet Note? 273.6
How do I enter time on a Simple Time In/ Time Out Timesheet with lunch? 293.7
How do I enter lunch on a Simple Hours Timesheet? 323.8
How do I enter lunch or break time on an In/Out Timesheet? 353.9
How do I enter time using Clock In/Out? 383.10
How do I enter lunch or break time on a daily hours Timesheet? 413.11
How do I enter time in a daily hours Timesheet? 443.12
How do I enter time on a Simple Hours Timesheet? 483.13
How do I unsubmit my Timesheet? 503.14
How do I enter time for multiple assignments? 523.15

Expense Entry Questions4
How do I enter Expenses? 564.1
How do I attach receipts to my Expenses? 594.2

Employee Support - 4
General Account Information

Employee Support - 5
How do I reset my password?
From the login screen, Select "Forgot Password"
Type your username and Select "Send Email Reminder"
An email will be sent to you with a new password.

Employee Support - 6
Select Back to Login

Employee Support - 7
Why can't I log into my account?
Invalid Login- this error message means you are entering your username or password incorrectly
Select forget password to have a new password sent to your email. If you still can't log in with the new password call your staffing company to make sure you are using the correct username.

Employee Support - 8
No Current Assignments- if you do not have an active assignment in the system you will not be able to log in
If you believe this is an error, contact your staffing company and have them double check your Assignment end date.

Employee Support - 9
How do I view my current Timesheet status?
You can always view your timesheet status in the upper right hand corner of your timesheet.
As soon as you select the Submit button, the status will change to submitted and be sent to your approving Manager.

Employee Support - 10
Report Questions

Employee Support - 11
How do I print off my Timesheets and Expense Reports?
This lesson will demonstrate how to print off previous timesheets and expenses.
Once you are logged in as an Employee, click on the Reports Tab
Under the Report: heading, select the desired report type.
Select the date range of the period that you are looking for, and click Run Report.

Employee Support - 12
Once you Run the Report, your results will appear in the results list. If you see a Status of Running, click on the (1) Orange icon to refresh the results. You will receive two files: a Zip file containing a copy of all the Timesheets or Expenses in that data range as well as an Excel file summarizing the data.
If you are looking to just print off a single Timesheet, the best option is to select the timeframe on the Timesheets tab and click the View Timesheet button at the bottom of the page. This will provide you with a PDF of the Timesheet.

Employee Support - 13
Time Entry Questions

Employee Support - 14
How do I enter time on a Time In Time Out Timesheet?
Log into the system, select the appropriate time period (1) and click Create (2)
Select the first date to enter in hours. A block of time entry will appear on the right side.

Employee Support - 15
Fill in the beginning and end times for the block of time. You can also add notes for that specific block of time.
You can add multiple blocks of time per day if you need to by clicking the Add Block button

Employee Support - 16
If you have been assigned to any Projects or have other Hours Types (lunch, break, PTO), you can handle this on the block level for Hours Type and Project.
Once you have finished entering in time for the timesheet period, click on the Submit Timesheet button to Submit your Timesheet.

Employee Support - 17
Time Entry Methods
Daily Hours
Hours Simple Mode

Employee Support - 18
Time In/Out
Time In/Out Simple Mode

Employee Support - 19
Why am I not able to make Edits?
Check your timesheet status. If it's Submitted, you must Unsubmit in order to make edits.
Make sure to submit your timesheet when complete.

Employee Support - 20
How do I enter time on a Time In Time Out Timesheet that has lunch?
Log in with your provided credentials. If you need assistance with your password click the “Forgot my password” link.
If you have multiple assignments, select the assignment that you are logging hours for.
If you are only on one assignment, you will not have this option.
Select Blank Timesheet and Create
You will automatically land in the current timesheet period. You can navigate to future or past weeks with the Timesheet Period calendar.

Employee Support - 21
Select the day of the week that you want to add your arrival and departure times.
Add your Time In, Time Out. If you have multiple Hours Types, you can enter that here as well as any Projects. You can also add Notes to the individual block of time.
Depending on how your firm requires you to enter time, you may only have normal as an option for the hours type dropdown.There will be other options if you are required to account for break time, meal time, or other paid and non paid time off.If you are working on specific Projects, you will have additional options here as well. If you are not, you will only see the word None.
Employee Support - 22
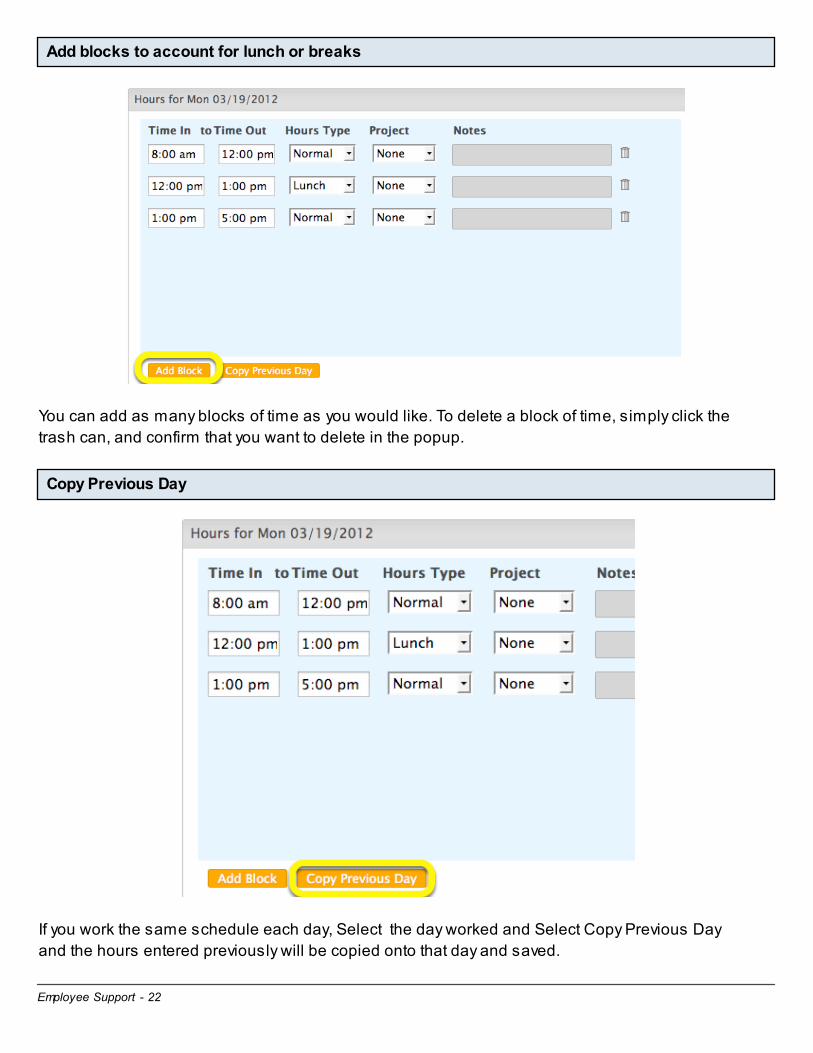
Add blocks to account for lunch or breaks
You can add as many blocks of time as you would like. To delete a block of time, simply click the trash can, and confirm that you want to delete in the popup.
Copy Previous Day
If you work the same schedule each day, Select the day worked and Select Copy Previous Day and the hours entered previously will be copied onto that day and saved.

Employee Support - 23
Submit Time
Once finished entering hours for the week, Select Submit. Accept any Notifications that pop up. You can also view your timesheet by Selecting View.

Employee Support - 24
How do I text in my hours?
When your office sets you up to text in your hours, you will receive a text message from (804)318-3592. You can only text in your hours from your phone #. If you need to change the phone # used please contact your office.
Initial Text- contains your pin # and instructions
Save this phone number in your contacts so you can easily text it in the future.
To access your Timesheets at any time, text your pin # to the phone number given in the original text.
If you don't text anything else within 10 minutes you will be logged out. To log back in text your pin # to the phone # again.
After texting your pin #, you will receive a response with instructions

Employee Support - 25
To add hours for today, reply: Add x.x
To add hours for another day, reply: Add x.x MM/DD/YYYY
You can only text in hours for one day at a time.
You'll receive a confirmation of the hours, if the hours are correct reply with the Confirm message given in the text
You must reply with the Confirm message or your hours will not be saved. Please note that Confirm only saves those hours, you still must reply Submit for the hours to go to your manager for approval.
View
Once you've confirmed your hours, you can reply View to see a list of what has been entered for that week.

Employee Support - 26
When done texting in hours for the week, Reply Submit
You'll receive a confirmation to submit the timesheet, reply with the Confirm message given in the text
If you do not reply with the confirmation message, your hours will not be submitted.
You'll receive one last text stating that your timesheet for that period has been submitted

Employee Support - 27
How do I enter a Timesheet Note?
Log in with your provided credentials. If you need assistance with your password click the “Forgot my password” link.
Select the calendar icon and then any day within the desired Timesheet period
Your Timesheet period will automatically become highlighted.
Some timesheet types give you the ability to enter notes for individual time blocks, while others only allow overall timesheet notes.
If your timesheet type allows for entering notes per block then simply enter a note in the text field corresponding to that block.

Employee Support - 28
To add an overall timesheet note, simply click “Add Note” and type your note in the pop up and then click Add Note on the popup to finish.
This note will apply to your entire timesheet.

Employee Support - 29
How do I enter time on a Simple Time In/ Time Out Timesheet with lunch?
Log in with your provided credentials. If you need assistance with your password click the “Forgot my password” link.
Select a day within your timesheet period
Your calendar will reflect your staffing company's start day of the week. In this example it is Sunday.
Employee Support - 30
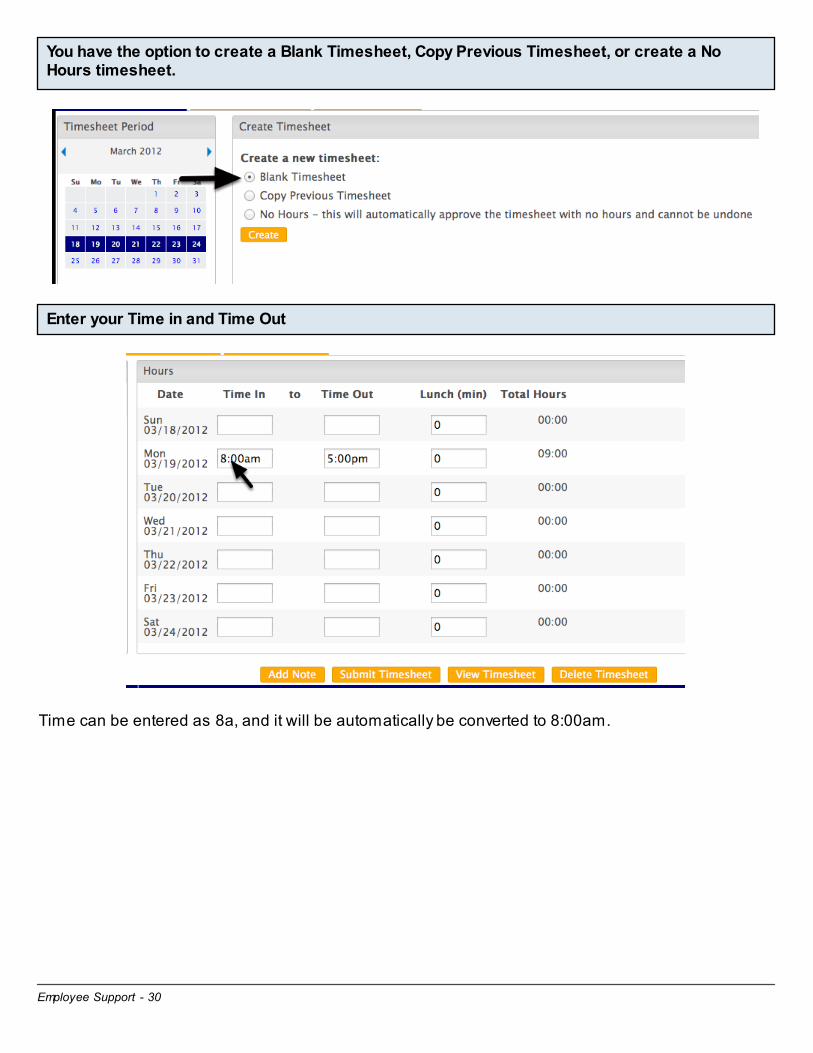
You have the option to create a Blank Timesheet, Copy Previous Timesheet, or create a No Hours timesheet.
Enter your Time in and Time Out
Time can be entered as 8a, and it will be automatically be converted to 8:00am.

Employee Support - 31
Enter any time spent at lunch.
In this example the employee began work at 8am, left at 5pm and spent 45 minutes at lunch. Because time spent at lunch is unpaid, this example will have 8 hours and 15 minutes on that day for this timesheet. Repeat these steps for each day worked.
Select Submit when your timesheet is ready to be sent to your approving Manager.

Employee Support - 32
How do I enter lunch on a Simple Hours Timesheet?
Log in with your provided credentials. If you need assistance with your password click the “Forgot my password” link.
Select a day within your timesheet period
Your calendar will reflect your staffing company's start day of the week. In this example it is Sunday.

Employee Support - 33
You have the option to create a Blank Timesheet, Copy Previous Timesheet, create a 40 Hour Worked Timesheet, or a No Hours timesheet.
Enter the number of Hours and Minutes worked, and then enter your number of Minutes for lunch.
1. Enter hours2. Enter minutes3. Enter minutes for lunch

Employee Support - 34
Select Submit when your timesheet is ready to be sent to your approving Manager.

Employee Support - 35
How do I enter lunch or break time on an In/Out Timesheet?
Log in with your provided credentials. If you need assistance with your password click the “Forgot my password” link.
If you have multiple Assignments, select the appropriate assignment and click OK.
If you only have one assignment, proceed to the next step.
Select the day you want to enter time for

Employee Support - 36
Select Add Block and adjust Hours Type accordingly
Select Add Block to enter another block of time. Break up each block based on the hours type. Hours Type selections will vary based on your assignment's settings. If you have questions contact your firm.
Example: Worked from 8:00am to 5:00pm and took a break from 12:00pm to 1:00pm
Time Blocks must be broken up based on the hours type. If you try to enter only two blocks of time (8am-5pm Normal and 12pm-1pm Break) you will receive an error message because the system views this as overlapping time.

Employee Support - 37
Deleting a block of time
Select the trash icon next to that block of time to have it removed from the timesheet.
Copy Previous Day
When you Select your next work day, if you worked the same hours as the shift before you can Select Copy Previous Day. The hours will automatically be copied and saved on that day.

Employee Support - 38
How do I enter time using Clock In/Out?
Log in with your provided credentials. If you need assistance with your password click the “Forgot my password” link.
You will be presented with a green clock in button. It will display the current time, click it to clock in.
If you are eligible for different hours types from your firm, you will choose the type here, or just leave as Normal.
This is also where you will select the specific project or task you are billing hours against. Once you have selected those fields, click OK. You will be presented with a confirmation pop up that lets you know that you are clocked in, click Ok on that popup.

Employee Support - 39
Once clocked in, the green Clock In box will turn to red and the text will change to Clock Out.
If you log out of the application while clocked in your time will continue to add up.
Once you have clocked your time, you hit the red Clock Out button to end your time on that time block.
You will be presented with a confirmation pop up that lets you know that you have successfully clocked out of the specific assignment and project.You are able to clock in and out as often as you wish.
To Delete a block of time
Not all Clock In / Out timesheets are editable. Call your firm if you have any questions.
To delete a block of time, simply click the trash can, and confirm that you want to delete in the popup.

Employee Support - 40
Submit completed time for the week
Once finished clocking in/out for the week, Select Submit. Accept any Notifications that pop up. You can also view your timesheet by Selecting View.

Employee Support - 41
How do I enter lunch or break time on a daily hours Timesheet?
Log in with your provided credentials. If you need assistance with your password click the “Forgot my password” link.
Select any day within you Timesheet period
Your Timesheet period will automatically become highlighted.
Create your Timesheet
You can select a Blank Timesheet, Copy Previous Timesheet, a 40 Hour Worked Timesheet, or a No Hours Timesheet.

Employee Support - 42
Select the day you want to enter time for
Select Add Block, Enter additional hours and minuts, and select the Hours Type.
Add Block creates another row for you to enter hours. Hours should be broken up based on Hours TypeIf you worked from 8am-5pm and took a one hour Lunch during the day, you would enter 8

Employee Support - 43
Hours and 1 Lunch Hour. Hours Type selection will vary based on what your office's preferences. Repeat for each day worked.
Copy Previous Day
When you Select your next work day, if you worked the same hours as the previous day you can Select Copy Previous Day. The hours will automatically be copied and saved on that day.

Employee Support - 44
How do I enter time in a daily hours Timesheet?
Log in with your provided credentials. If you need assistance with your password click the “Forgot my password” link.
Click the calendar icon and then select any day within your Timesheet period
Your Timesheet period will automatically become highlighted.
Choose Blank Timesheet, Copy Previous Timesheet, 40 Hour Timesheet or No Hours and Select Create
Blank timesheets- you'll enter your hours from scratchCopy Previous Timesheet- you'll start with the hours from your last week's timesheet. If you don't have a previous timesheet, an error message will alert you to that.40 hour timesheet- automatically pre-populates 8 hours per business day within your specific timesheet duration, which you can edit accordingly.No Hours- will automatically submit and approve zero hours and cannot be undone. If you do this by accident, contact your firm.

Employee Support - 45
Select the day that you want to enter your hours worked for.
Enter your Total Hours and Total Minutes for that block of time
Select the Hours Type
You may only have normal as an option in this dropdown, depending on how your firm requires you to enter time. There will be other options if you are required to account for break time, meal time, or other paid and non paid time off.

Employee Support - 46
Select the Project you are specifically entering time for
If you are not assigned to any specific projects, you can skip this by just leaving the dropdown at “None”
Add multiple blocks for the day (when accounting for breaks, PTO, etc)
You can add as many blocks of time as you would like. To delete a block of time, simply click the trash can, and confirm that you want to delete in the popup.

Employee Support - 47
Copy Previous Day
If you work the same schedule each day, Select the day worked and Select Copy Previous Day and the hours entered previously will be copied onto that day and saved.
Submit Hours
Once finished entering hours for the week, Select Submit. Accept any Notifications that pop up. You can also view your timesheet by Selecting View.

Employee Support - 48
How do I enter time on a Simple Hours Timesheet?
Once you log into the system, select the appropriate timeframe on the calendar. From there, you will be able to create a new timesheet.
"Blank Timesheet" - will create a standard timesheet that is not prepopulated. "Copy Previous Timesheet " - will replicate the last timesheet that is available in the system from you. "40 Hour Worked Timesheet" - will populate 8 hours per day Monday through Friday. "No Hours" - will notify the Administrator that you had no hours that week.
Once you have selected the appropriate Timesheet scenario, click through the appropriate dates in the Timesheet.

Employee Support - 49
In the upper right portion of the screen, you will see your Time Period, Total Hours and the Timesheet Status.
You can also enter in a Timesheet note that you want your Manager to see. Please note that these Timesheet Notes are visible by the Manager and cannot be removed from the Timesheet unless completely deleting the Timesheet and starting over..
Once you are done, you may either Submit your Timesheet, View the PDF of the Timesheet, or Delete the entire Timesheet and start over.

Employee Support - 50
How do I unsubmit my Timesheet?
Log in with your provided credentials. If you need assistance with your password click the “Forgot my password” link.
Select Payroll Period that you wish to unsubmit
Click the Calendar icon, and then the week. Selecting one day within that period will automatically highlight the entire period.
Select Unsubmit
Notice your Timesheet Status in the upper right corner.

Employee Support - 51
Pop up will appear, Select OK
Timesheet status will now go from Submitted to In Progress
Make any changes and Submit when complete

Employee Support - 52
How do I enter time for multiple assignments?
It is important to understand that each Assignment/ Placement that you have will involve it's own Timesheet. Each Timesheet will need to be Submitted on their own. In order to make sure that you are entering in time on the appropriate Timesheet, please follow the instructions below.
If you have been placed on multiple assignments, upon logging in you will be prompted to select the Timesheet that you will initially be entering time for.

Employee Support - 53
At any point while in the application, you can move between multiple assignments and Timesheets. To do so, select the Assignment drop down on the left hand side of the Application and click on the appropriate Assignment.
You can move between multiple assignments to log time respectively at any time by selecting the assignment in the drop down selector above the date picker.

Employee Support - 54
You can also see how many hours you have across all Assignment / Project timesheets.
If you do have hours on multiple assignment / project timesheets you can see the total for the day in the Total Hours column.

Employee Support - 55
Expense Entry Questions

Employee Support - 56
How do I enter Expenses?
Log in with your provided credentials. If you need assistance with your password click the “Forgot my password” link.
Select the Expenses Tab
If your Timesheet status is "Not Created" you must Create a Timesheet so Expenses can be entered.
Add the details of the expense.
First, select Add Expense...1. Select Date2. Select Project / Task3. Select Service Category (if no category is availabe contact your firm)4. Enter a description5. Enter Amount6. Select if the expense is Billable
Employee Support - 57
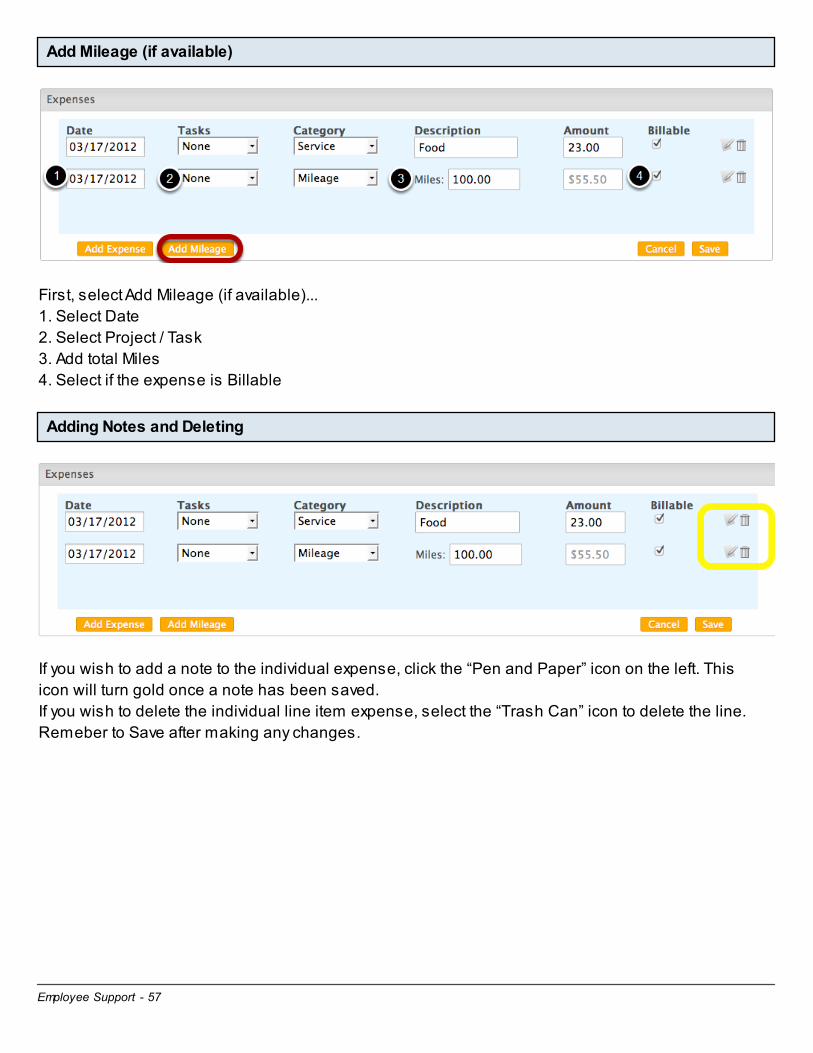
Add Mileage (if available)
First, select Add Mileage (if available)...1. Select Date2. Select Project / Task3. Add total Miles4. Select if the expense is Billable
Adding Notes and Deleting
If you wish to add a note to the individual expense, click the “Pen and Paper” icon on the left. This icon will turn gold once a note has been saved. If you wish to delete the individual line item expense, select the “Trash Can” icon to delete the line. Remeber to Save after making any changes.

Employee Support - 58
Save when Complete. Once Saved, you'll be able to see the Expense total for that period.
The Hours and Expense Totals will not be updated until you save.
Submit your Expenses with the Timesheet by clicking Submit, or select View to see how the Expenses will appear on your Timesheet.
The next lesson explains how to attach receipts to your expenses.

Employee Support - 59
How do I attach receipts to my Expenses?
Log in with your provided credentials. If you need assistance with your password click the “Forgot my password” link.
To add a receipt, first make sure you have scanned your receipts and saved them on your hard drive.
Select the Expenses Tab
In the Receipts section, Select Browse
If you have not entered and saved your expense data, please see the previous lesson.

Employee Support - 60
A pop up will appear with all of your documents, Select the receipt image and Open
Please remember that this pop up will look different based on the computer your using. When you scan receipts to your computer make sure you save them in an easy area so you can quickly select them from this pop up.
Select Upload to Save this receipt image in your account
If upload is successful, you will receive a confirmation pop up.
After uploading, you still have to link your receipt to your expense.

Employee Support - 61
To attach the receipt to your Expense, Selet the paperclip icon
Pop Up will appear, Link Receipt to the Expense
This pop up allows you to select the specific expense that the receipt corresponds with. Once you have selected the link click Save.

Employee Support - 62
Once attached, the paperclip image will turn gold. Only Select Submit if you are ready to send your entire timesheet to your Manager.
By Selecting Submit, you are submitting both your expense and timesheet for approval. If you still need to make edits to your timesheet, select the timesheet tab and submit once you are complete.