Embed Size (px)
Citation preview

Employee Self Service: Time and Labor Entering Your Timesheet Online (Employees)
Hobart and William Smith Colleges • Information Technology Services Page 1 of 5
Entering Time Online Employees may now enter their time in an online timesheet through Self Service in PeopleSoft. The timesheet will be approved online by the employee’s manager. If submitted times need correction, the manager may request the employee to make corrections before approval. In this case, the manager may either “push back” or “deny” times. The employee will receive an e-mail alerting him or her of this situation, and the employee must make a correction to the rejected time and re-submit it.
To enter time in Self Service: Your timesheet is now online in Self Service. Once you have submitted the time, your manager will receive an e-mail so he or she can approve the time. When your submitted time has been approved, you will receive an e-mail confirmation that your time has been approved for payment. 1. Log in to PeopleSoft Portal at
http://psportal.hws.edu using your HWS username and password
2. On the portal page, click
Human Resources 3. On the menu, click Self Service > Time Reporting > Report Time >
Timesheet

Employee Self Service: Time and Labor Entering Your Timesheet Online (Employees)
Hobart and William Smith Colleges • Information Technology Services Page 2 of 5
4. From the dropdown menu on the first line, select the appropriate Time Reporting Code (such as REG for Regular Hours) Use one time reporting code per line. If more than one time reporting code is needed, enter the additional codes each on their own line. If necessary, use the plus sign at the far right to add a row.
5. Enter the hours for each day worked Note: Dates go across to the right.
6. When finished, below the time grid click Submit An e-mail will be sent to your manager, indicating the timesheet requires approval. A Submit Confirmation screen will appear.
7. On the Submit Confirmation
screen, click OK Other information is shown in the grids below the timesheet: Check the status (Approved, Needs Approval, Pushed Back) of submitted times under Reported Time Status. Check your total hours under Reported Time Summary. Check your sick, vacation, and personal time under Leave and Compensatory Time Balances.

Employee Self Service: Time and Labor Entering Your Timesheet Online (Employees)
Hobart and William Smith Colleges • Information Technology Services Page 3 of 5
Correcting Entered Time If a mistake has been made and the time has already been submitted, a manager may push back or deny the time, rather than approving it. The employee may then edit the pushed back or denied times, then re-submit them. If time has been pushed back or denied, the employee will receive an e-mail to that effect, as an alert of the unapproved status. Approved time will be communicated in a separate e-mail.
To correct a time entry from Pushed Back: You have received an e-mail saying “Pushed Back reported time requires your review.” The e-mail contains a link to your timesheet. Your time edits must be made in a new row on the timesheet.
1. Click on the link in the e-mail
2. Log in to Self Service You will see your submitted time.
3. Expand the list of days by clicking Reported Time Status You will see the reported status of Pushed Back.
4. Click the plus sign to add a row
5. Enter a different time reporting code, if applicable
6. Reference the Reported Time Status table for the date of pushed back time
7. Move (cut/paste) the pushed back time to the new row, verifying the date is correct
8. Click Submit An e-mail will be sent to your manager, indicating the timesheet requires approval. A Submit Confirmation screen will appear.

Employee Self Service: Time and Labor Entering Your Timesheet Online (Employees)
Hobart and William Smith Colleges • Information Technology Services Page 4 of 5
9. On the Submit Confirmation page,
click OK
The Reported Time status for the pushed back date now should say Needs Approval.
To correct a time entry from Denied Time: You have received an e-mail saying “Timesheet denied for payment.” Any time in Denied status will not be paid. If the time was entered in error, you may ignore it. If the time was entered incorrectly (incorrect TRC, etc.) you must correct it to be paid. The e-mail contains a link to your timesheet. Your time edits must be made in a new row on the timesheet.
1. Click on the link in the e-mail
2. Log in to Self Service You will see your submitted time.
3. Expand the list of days by clicking Reported Time Status You will see the Reported Status of Denied.
4. Click the plus sign to add
a row
5. Enter a different time reporting code, if applicable
6. Reference the Reported Time Status table for the date of denied time
7. Move (cut/paste) the denied time to the new row, verifying the date and hours are correct
8. Click Submit An e-mail will be sent to your manager, indicating the timesheet requires approval. A Submit Confirmation screen will appear.

Employee Self Service: Time and Labor Entering Your Timesheet Online (Employees)
Hobart and William Smith Colleges • Information Technology Services Page 5 of 5
9. On the Submit Confirmation page, click OK The Reported Time status for the denied date now should say Needs Approval.

Employee Self Service: Time and Labor Approving Time (Manager)
Hobart and William Smith Colleges • Information Technology Services Page 1 of 6
Approving Time Entries on Employees’ Timesheets Employees may now enter their timesheets online. When they submit their timesheets, their manager receives an e-mail alerting that time requires approval. For an employee to be paid for time entered, the employee’s manager must approve the entry. When the manager approves the timesheet, the employee will receive an e-mail indicating the approval. If time has been entered in error, the manager may send the time back to the employee to be corrected, either by “pushing back” or denying the time. Time pushed back or denied must be re-submitted by the employee, and then approved by the manager.
To approve an employee’s time: Once your employees have submitted their time, you will receive an e-mail indicating that time requires approval.
1. Click on the link in the e-mail
2. Log in to PeopleSoft
The Timesheet Summary page will appear on the Approve Reported Time page. Any employees who have submitted time will appear in the list.
3. Click on the name of an employee You will see the employee’s timesheet page.
4. Review the expanded Reported
Time Status list
5. Select specific days to approve (or use the Select All link below the grid)
6. Click Approve An assurance message will appear.
7. On the message, click Yes

Employee Self Service: Time and Labor Approving Time (Manager)
Hobart and William Smith Colleges • Information Technology Services Page 2 of 6
8. On the Approve Confirmation, click OK An e-mail indicating approval will be sent to each employee whose time has been approved.
Note: To see all employees with reported time, navigate to Manager Self Service > Time Management > Approve Time > Reported Time and click Get Employees.
Rejecting Time Entries on Employees’ Timesheets
To push back time for correction: If time has been entered in error, the manager may “push back” the time to the employee to be corrected.
1. Click on the link in the e-mail
2. Log in to PeopleSoft
The Timesheet Summary page will appear on the Approve Reported Time page. Any employees who have submitted time will appear in the list.
3. Click on the name of an employee You will see the employee’s timesheet page.
4. Expand the list of days by clicking
Reported Time Status
5. Select the row for the date/time that needs to be corrected
6. Click Push Back The remaining days will still need to be approved. An assurance message will appear.
7. On the message, click Yes

Employee Self Service: Time and Labor Approving Time (Manager)
Hobart and William Smith Colleges • Information Technology Services Page 3 of 6
8. On the PushBack Confirmation, click OK Employees whose time has been pushed back will receive an e-mail notification of push back.
9. Select the rest of the days that are correct
10. Click Approve An assurance message will appear.
9. On the message, click Yes
10. On the Approve Confirmation, click OK An e-mail indicating approval will be sent to each employee whose time has been approved.
To approve a corrected pushed back time When an employee corrects time from a push back, he or she must re-submit it for approval, and the manager will receive an e-mail notification.
1. Click on the link in the e-mail
2. Log in to PeopleSoft
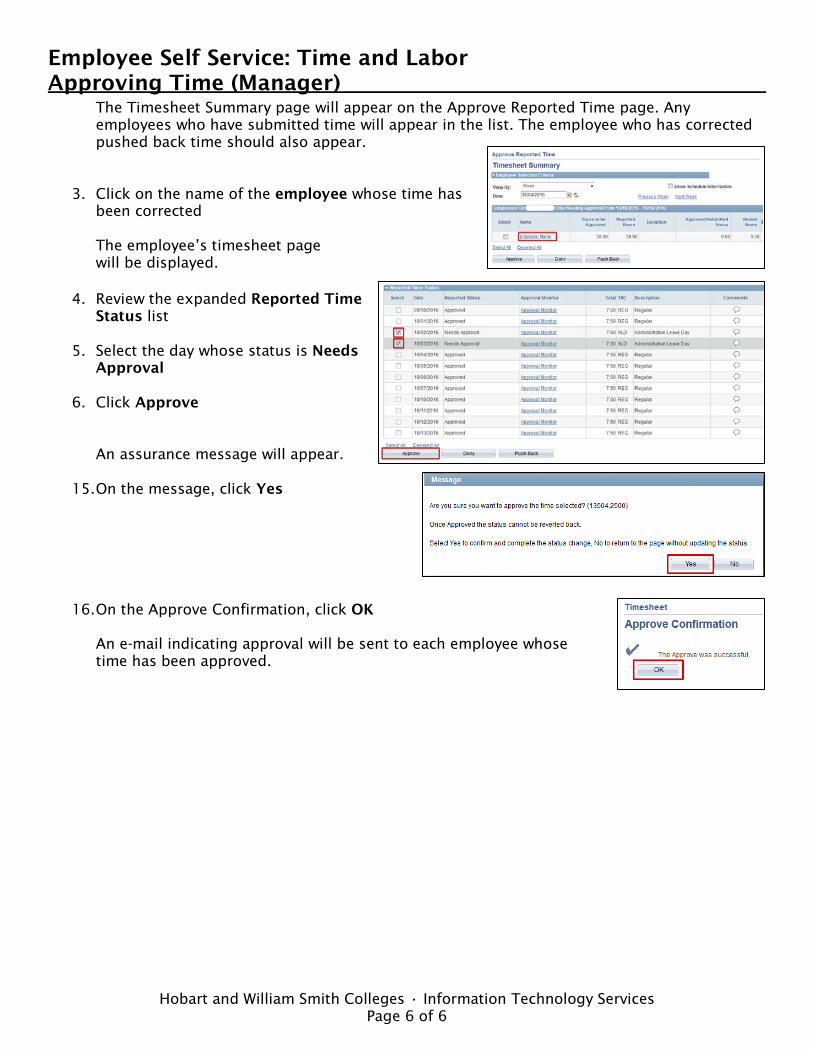
The Timesheet Summary page will appear on the Approve Reported Time page. Any employees who have submitted time will appear in the list. The employee who has corrected pushed back time should also appear.
3. Click on the name of the employee whose time has been corrected
The employee’s timesheet page will be displayed.

Employee Self Service: Time and Labor Approving Time (Manager)
Hobart and William Smith Colleges • Information Technology Services Page 4 of 6
4. Review the expanded Reported Time Status list
5. Select the day whose status is Needs Approval
6. Click Approve An assurance message will appear.
11. On the message, click Yes
12. On the Approve Confirmation, click OK An e-mail indicating approval will be sent to each employee whose time has been approved.
To Deny Time: If time has been entered in error, the manager may deny the time to the employee.
1. Click on the link in the e-mail
2. Log in to PeopleSoft
The Timesheet Summary page will appear on the Approve Reported Time page. Any employees who have submitted time will appear in the list.
3. Click on the name of an employee You will see the employee’s timesheet page.
4. Review the expanded
Reported Time Status list
7. Select the day that needs to be denied
8. Click Deny

Employee Self Service: Time and Labor Approving Time (Manager)
Hobart and William Smith Colleges • Information Technology Services Page 5 of 6
An e-mail notification will be sent to the employee. The remaining days will still need to be approved. An assurance message will appear.
11. On the message, click Yes
12. On the Deny Confirmation, click OK
13. Select the rest of the days that are correct
14. Click Approve An assurance message will appear.
13. On the message, click Yes
14. On the Approve Confirmation, click OK An e-mail indicating approval will be sent to each employee whose time has been approved.
To approve a corrected denied time: When an employee corrects time from a denial, he or she must re-submit it for approval, and the manager will receive an e-mail notification.
1. Click on the link in the e-mail
2. Log in to PeopleSoft
Employee Self Service: Time and Labor Approving Time (Manager)
Hobart and William Smith Colleges • Information Technology Services Page 6 of 6
The Timesheet Summary page will appear on the Approve Reported Time page. Any employees who have submitted time will appear in the list. The employee who has corrected pushed back time should also appear.
3. Click on the name of the employee whose time has been corrected
The employee’s timesheet page will be displayed.
4. Review the expanded Reported Time
Status list
5. Select the day whose status is Needs Approval
6. Click Approve An assurance message will appear.
15. On the message, click Yes
16. On the Approve Confirmation, click OK An e-mail indicating approval will be sent to each employee whose time has been approved.

Employee Self Service: Time and Labor Delegating Time Approval (Manager)
Hobart and William Smith Colleges • Information Technology Services Page 1 of 4
Delegating Time Approval A manager may delegate time approval for a specific, limited time period to a proxy. The person to whom time entry approval is delegated will receive an e-mail notification of the request, and must accept the delegation.
To delegate time approval: 1. Log in to PeopleSoft Portal at
http://psportal.hws.edu using your HWS username and password
2. On the portal page, click Human Resources 3. On the menu, click Self Service >
Manage Delegation
4. On the Manage Delegation page, click Create Delegation Request
5. On the Create Delegation Request Enter Dates page, select the start and end dates for the delegate to enter time
6. Click Next

Employee Self Service: Time and Labor Delegating Time Approval (Manager)
Hobart and William Smith Colleges • Information Technology Services Page 2 of 4
7. Check Manage Approve Reported Time
8. Click Next 9. On the Select Proxy by
Hierarchy page, click Search by Name to find the person to whom to delegate
10. Use the search to find the
proxy: enter the person’s name and click Search
11. In the Choose Delegate area,
select the person 12. Click Next
13. On the Delegation Detail page, click Submit An e-mail notification will be sent to the chosen delegate.
14. On the delegation confirmation page,
click OK

Employee Self Service: Time and Labor Delegating Time Approval (Manager)
Hobart and William Smith Colleges • Information Technology Services Page 3 of 4
Revoking Delegation Managers may also revoke delegation of a proxy.
To revoke delegation (before the delegation expire date): 1. Log in to PeopleSoft Portal at
http://psportal.hws.edu using your HWS username and password
2. On the portal page, click Human Resources
3. On the Main Menu, go to Self Service > Manage Delegation
4. On the Manage Delegation page, click Review My Proxies

Employee Self Service: Time and Labor Delegating Time Approval (Manager)
Hobart and William Smith Colleges • Information Technology Services Page 4 of 4
5. On the My Proxies page, check the name of the proxy to revoke
6. Click Revoke The delegate will receive an e-mail notification of the revocation.
7. On the first Revoke Delegation Request confirmation, click Yes-Continue
8. On the second Revoke Delegation request confirmation, click OK

Employee Self Service: Time and Labor Accepting a Delegation to Enter or Approve Time
Hobart and William Smith Colleges • Information Technology Services Page 1 of 1
Accepting Delegation of Time Entry or Time Approval Timekeepers and managers may delegate time entry and time approval for a specific, limited time period to a proxy. The proxy to whom the duty is delegated will receive an e-mail notification of the request, and must accept the delegation.
To accept the delegation: You have received an e-mail notification of a delegation request. You must review, then accept or reject, the request.
1. Find the e-mail and click on the
link within
2. Log in to PeopleSoft
3. On the Manage Delegation page, click Review My Delegated Authorities
4. On the My Delegated Authorities page, check one of the following:
• Manage Reported Time • Manage Approve Reported
Time
5. Click Accept An e-mail notification of acceptance is sent to the timekeeper or manager.
6. On the Confirmation of Success, click OK You must sign off and sign back on in order to enter or approve time as a delegate.

Employee Self Service: Time and Labor Entering Time as a Timekeeper
Hobart and William Smith Colleges • Information Technology Services Page 1 of 2
Entering Time as a Timekeeper A Timekeeper is someone who enters time for a group of other people.
To enter time: 1. Log in to PeopleSoft Portal at
http://psportal.hws.edu using your HWS username and password
2. On the portal page, click Human Resources
3. On the menu, click Manager Self Service > Time Management > Report Time > Timesheet
4. On the Timesheet Summary page, click Get Employees All the individuals for whom time should be input will appear (scroll down).

Employee Self Service: Time and Labor Entering Time as a Timekeeper
Hobart and William Smith Colleges • Information Technology Services Page 2 of 2
5. Click on the name of the first person for whom to enter time
6. From the dropdown menu on the first
line, select the appropriate Time Reporting Code (such as REG for Regular Hours) Use one time reporting code per line. If more than one time reporting code is needed, enter the additional codes each on their own line. If necessary, use the plus sign at the far right to add a row.
7. Enter the hours for each day worked
Note: Dates go across to the right.
8. When finished, below the time grid click Submit An e-mail will be sent to the manager, indicating the timesheet requires approval. A Submit Confirmation screen will appear.
9. On the Submit Confirmation screen, click OK On the Timesheet page, in the Reported Time Status section, the reported status will now be Approval in Process.
10. Below the Reported Times Status section, click Return to Select Employee
11. Select the next employee to enter time
12. Repeat the above steps until all time has been entered
13. When finished, log out

Employee Self Service: Time and Labor Delegating Time Entry (Timekeeper)
Hobart and William Smith Colleges • Information Technology Services Page 1 of 4
Delegating Time Entry A timekeeper may delegate time entry for a specific, limited time period to a proxy. The person to whom time entry is delegated will receive an e-mail notification of the request, and must accept the delegation.
To delegate time entry: 1. Log in to PeopleSoft Portal at
http://psportal.hws.edu using your HWS username and password
2. On the portal page, click Human Resources
3. On the menu, click Self Service > Manage Delegation
4. On the Manage Delegation page, click Create Delegation Request
5. On the Create Delegation Request Enter Dates page, select the start and end dates for the delegate to enter time
6. Click Next
Employee Self Service: Time and Labor Delegating Time Entry (Timekeeper)
Hobart and William Smith Colleges • Information Technology Services Page 2 of 4
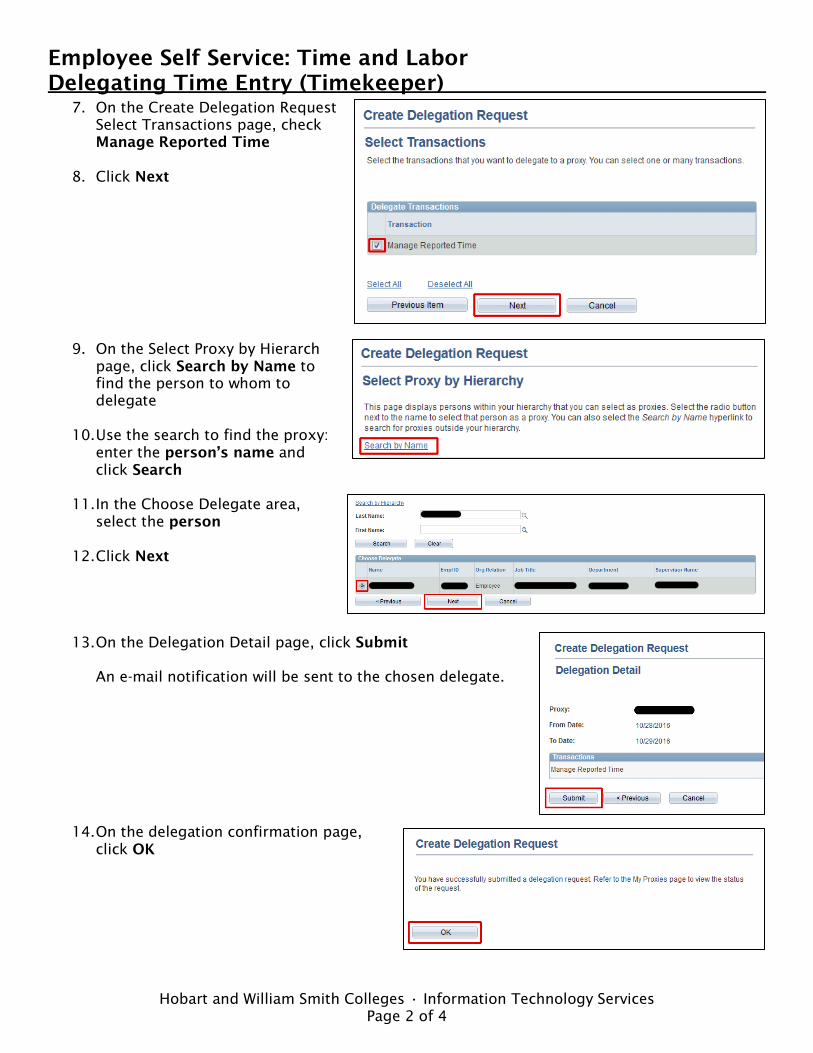
7. On the Create Delegation Request Select Transactions page, check Manage Reported Time
8. Click Next
9. On the Select Proxy by Hierarch page, click Search by Name to find the person to whom to delegate
10. Use the search to find the proxy: enter the person’s name and click Search
11. In the Choose Delegate area, select the person
12. Click Next
13. On the Delegation Detail page, click Submit An e-mail notification will be sent to the chosen delegate.
14. On the delegation confirmation page, click OK

Employee Self Service: Time and Labor Delegating Time Entry (Timekeeper)
Hobart and William Smith Colleges • Information Technology Services Page 3 of 4
Revoking Delegation Timekeepers may also revoke delegation of a proxy.
To revoke delegation (before the delegation expire date): 1. Log in to PeopleSoft Portal at
http://psportal.hws.edu using your HWSusername and password
2. On the portal page, click Human Resources
3. On the Main Menu, go to Self Service >Manage Delegation
4. On the Manage Delegation page, click ReviewMy Proxies

Employee Self Service: Time and Labor Delegating Time Entry (Timekeeper)
Hobart and William Smith Colleges • Information Technology Services Page 4 of 4
5. On the My Proxies page, check the name of the proxy to revoke
6. Click Revoke The delegate will receive an e-mail notification of the revocation.
7. On the first Revoke Delegation Request confirmation, click Yes-Continue
8. On the second Revoke Delegation request confirmation, click OK