Embed Size (px)
Citation preview

2009
TechnicalHelp Guide
Thermal Expansion ValvesElectronic Valves & Controls
Solenoid ValvesSystem Protectors
RegulatorsOil Controls
Temperature Pressure ControlsBasic Rules of Good Practice
Troubleshooting Guide


2009
Introduction
This Technical Guide from Emerson Climate Technologies provides a detailed explanation on the operation of common refrigeration system components such as thermal expansion valves, solenoid valves, system protectors, regulators, oil controls and temperature pressure controls. Also included in this guide is a listing of the basic rules of good practice and a detailed troubleshooting guide. This guide is designed to fi ll a need which exists for a concise, elementary text to aid service-men, salesmen, students and others interested in refrigeration and air conditioning. It is intended to cover only the fundamentals of refrigeration and air conditioning theory and practice. Detailed information for specifi c products is available from manufacturers of complete units and accessories. Used to supplement such literature, and to improve general knowledge of refrigeration and air conditioning, this guide should prove to be very helpful.
Emerson Climate Technologies, a business of Emerson, is the world’s leading provider of heating, ventilation, air conditioning and refrigeration solutions for residential, industrial and commercial applications. The group combines best-in-class technology with proven engineering, design, distribution, educational and monitoring services to provide customized, integrated climate-control solutions for customers worldwide. Emerson Climate Technologies’ innovative solutions, which include industry-leading brands such as Copeland Scroll® and White-Rodgers®, improve human comfort, safeguard food and protect the environment.
Emerson Climate Technologies - Flow Controls Division is a leading manufacturer of valves, controls and system protectors commonly applied in air conditioning and refrigeration systems worldwide. The company continues to pioneer the control of refrigerant fl ow through innovative, high performance components, such as thermal expansion valves and fi lter driers.

2009
Table of ContentsThermal Expansion Valves . . . . . . . . . . . . . . . . . . . . . . . . . . . . . . . . . . . . . . . 1 Internal Equalizer Internal Equalizer . . . . . . . . . . . . . . . . . . . . . . . . . . . . . . . . . . . . . . . . . . . . . . . . . . . . . . . . . . . . . . . . . . . . . . . . . . . . . . . . . . . . . . 22 Factory Setting of TXVs Factory Setting of TXVs . . . . . . . . . . . . . . . . . . . . . . . . . . . . . . . . . . . . . . . . . . . . . . . . . . . . . . . . . . . . . . . . . . . . . . . . . . . . 33 External Equalizer External Equalizer. . . . . . . . . . . . . . . . . . . . . . . . . . . . . . . . . . . . . . . . . . . . . . . . . . . . . . . . . . . . . . . . . . . . . . . . . . . . . . . . . . . . . . 33 Superheat Superheat . . . . . . . . . . . . . . . . . . . . . . . . . . . . . . . . . . . . . . . . . . . . . . . . . . . . . . . . . . . . . . . . . . . . . . . . . . . . . . . . . . . . . . . . . . . . . . . . . . 55 TXV Selection TXV Selection . . . . . . . . . . . . . . . . . . . . . . . . . . . . . . . . . . . . . . . . . . . . . . . . . . . . . . . . . . . . . . . . . . . . . . . . . . . . . . . . . . . . . . . . . . . . 66 Application Tips Application Tips . . . . . . . . . . . . . . . . . . . . . . . . . . . . . . . . . . . . . . . . . . . . . . . . . . . . . . . . . . . . . . . . . . . . . . . . . . . . . . . . . . . . . . . . 77 Balanced Port TXVs Balanced Port TXVs . . . . . . . . . . . . . . . . . . . . . . . . . . . . . . . . . . . . . . . . . . . . . . . . . . . . . . . . . . . . . . . . . . . . . . . . . . . . . . . . . . 99 M.O.P. M.O.P. . . . . . . . . . . . . . . . . . . . . . . . . . . . . . . . . . . . . . . . . . . . . . . . . . . . . . . . . . . . . . . . . . . . . . . . . . . . . . . . . . . . . . . . . . . . . . . . . . . . . . . . . . . 99 Other TXV Considerations Other TXV Considerations . . . . . . . . . . . . . . . . . . . . . . . . . . . . . . . . . . . . . . . . . . . . . . . . . . . . . . . . . . . . . . . . . . . . . . 1111 Emerson TXVs Emerson TXVs. . . . . . . . . . . . . . . . . . . . . . . . . . . . . . . . . . . . . . . . . . . . . . . . . . . . . . . . . . . . . . . . . . . . . . . . . . . . . . . . . . . . . . . . . . 1111Electronic Valves & Controls . . . . . . . . . . . . . . . . . . . . . . . . . . . . . . . . . . . . 14 Electronic Valve Introduction Electronic Valve Introduction . . . . . . . . . . . . . . . . . . . . . . . . . . . . . . . . . . . . . . . . . . . . . . . . . . . . . . . . . . . . . . . . 1515 Parts Required for Electronic Valves Parts Required for Electronic Valves . . . . . . . . . . . . . . . . . . . . . . . . . . . . . . . . . . . . . . . . . . . . . . . . . . . . 1616 Pressure Transmitter – PT4 Pressure Transmitter – PT4 . . . . . . . . . . . . . . . . . . . . . . . . . . . . . . . . . . . . . . . . . . . . . . . . . . . . . . . . . . . . . . . . . . . . 1717 TXV Controller – EC3-X32 TXV Controller – EC3-X32 . . . . . . . . . . . . . . . . . . . . . . . . . . . . . . . . . . . . . . . . . . . . . . . . . . . . . . . . . . . . . . . . . . . . . . 1717 TXV Controller – EC3-X33 TXV Controller – EC3-X33 . . . . . . . . . . . . . . . . . . . . . . . . . . . . . . . . . . . . . . . . . . . . . . . . . . . . . . . . . . . . . . . . . . . . . . 1818 Universal Driver – EXD-U00 Universal Driver – EXD-U00 . . . . . . . . . . . . . . . . . . . . . . . . . . . . . . . . . . . . . . . . . . . . . . . . . . . . . . . . . . . . . . . . . . . . 1818 Electrical Control Valve – EX Electrical Control Valve – EX . . . . . . . . . . . . . . . . . . . . . . . . . . . . . . . . . . . . . . . . . . . . . . . . . . . . . . . . . . . . . . . . . . 1919 Component Selection Table Component Selection Table . . . . . . . . . . . . . . . . . . . . . . . . . . . . . . . . . . . . . . . . . . . . . . . . . . . . . . . . . . . . . . . . . . . . 2020 Solenoid Valves . . . . . . . . . . . . . . . . . . . . . . . . . . . . . . . . . . . . . . . . . . . . . . 21 What are Solenoid Valves? . . . . . . . . . . . . . . . . . . . . . . . . . . . . . . . . . . 22 Principles of Solenoid Operation . . . . . . . . . . . . . . . . . . . . . . . . . . . . . 22 Types of Solenoids . . . . . . . . . . . . . . . . . . . . . . . . . . . . . . . . . . . . . . . . . 23 Installation . . . . . . . . . . . . . . . . . . . . . . . . . . . . . . . . . . . . . . . . . . . . . . . . 25 Emerson Solenoid Valves . . . . . . . . . . . . . . . . . . . . . . . . . . . . . . . . . . . 25System Protectors. . . . . . . . . . . . . . . . . . . . . . . . . . . . . . . . . . . . . . . . . . . . . 26 Filter driers . . . . . . . . . . . . . . . . . . . . . . . . . . . . . . . . . . . . . . . . . . . . . . . 28 HFC Refrigerants and POE Lubricants . . . . . . . . . . . . . . . . . . . . . . . . . 29 Clean-up Procedure for Compressor Motor Burnout . . . . . . . . . . . . . 32 Emerson System Protectors . . . . . . . . . . . . . . . . . . . . . . . . . . . . . . . . . 34Regulators . . . . . . . . . . . . . . . . . . . . . . . . . . . . . . . . . . . . . . . . . . . . . . . . . . . 35 Suction Line Regulators. . . . . . . . . . . . . . . . . . . . . . . . . . . . . . . . . . . . . 36 Applications of EPRs . . . . . . . . . . . . . . . . . . . . . . . . . . . . . . . . . . . . . . . 36 Crankcase Regulators . . . . . . . . . . . . . . . . . . . . . . . . . . . . . . . . . . . . . . 38 Headmaster Pressure Control . . . . . . . . . . . . . . . . . . . . . . . . . . . . . . . . 39 Hot Gas Bypass . . . . . . . . . . . . . . . . . . . . . . . . . . . . . . . . . . . . . . . . . . . 41 Liquid Injection . . . . . . . . . . . . . . . . . . . . . . . . . . . . . . . . . . . . . . . . . . . . 43Oil Controls . . . . . . . . . . . . . . . . . . . . . . . . . . . . . . . . . . . . . . . . . . . . . . . . . . 45Temperature Pressure Controls. . . . . . . . . . . . . . . . . . . . . . . . . . . . . . . . . . 47Basic Rules of Good Practice . . . . . . . . . . . . . . . . . . . . . . . . . . . . . . . . . . . 54Troubleshooting Guide . . . . . . . . . . . . . . . . . . . . . . . . . . . . . . . . . . . . . . . . . 57

1 2009
Thermal Expansion Valves

2
Thermal Expansion Valves Emerson Climate Technologies
P1 = 45.4 PSIG
P2 = 35 PSIGP3 = 10.4 PSIG
35 PSIG = 40°F
35 PSIG = 40°F
35 PSIG = 50°F
B
C
TXV with internalequalizer on evaporator with
no pressure drop. Fig. 1
A
is charged with the same refrigerant as that in the sys-tem. The power assembly pressure (P1), which corre-sponds to the saturation pressure of the refrigerant gas temperature leaving the evaporator, moves the TXV pin in the opening direction. Opposed to this opening force on the underneath side of the diaphragm and acting in the closing direc-tion are two forces: the force exerted by the evaporator pressure (P2) and that exerted by the superheat spring (P3). In the fi rst condition, the TXV will assume a stable control position when these three forces are in balance (P1 = P2 + P3). See fi gure 1A.
Thermal Expansion Valves The most commonly used device for controlling the fl ow of liquid refrigerant into the evaporator is the ther-mostatic expansion valve (TXV). Also known as thermal expansion valves, TXVs are precision devices designed to regulate refrigerant liquid fl ow into the evaporator in exact proportion to evaporation of refrigerant liquid in the evaporator. Refrigerant gas leaving the evaporator can be regu-lated since the TXV responds to the temperature of the refrigerant gas leaving the evaporator and the pres-sure in the evaporator. This controlled fl ow prevents the return of refrigerant liquid to the compressor. The TXV controls the fl ow of refrigerant by maintaining a pre-de-termined superheat. An orifi ce in the TXV meters the fl ow into the evapo-rator. Flow is modulated as required by a needle type plunger and seat, which varies the orifi ce opening. The needle is controlled by a diaphragm subject to three forces:1. The power element and remote bulb pressure (P1)2. The evaporator pressure (P2)3. The superheat spring equivalent pressure (P3)These forces are shown in Figure 1.
Internal Equalizer Three conditions are present in the operation of a TXV: 1. The balanced forces 2. An increase in superheat 3. A decrease in superheat The remote bulb and power element make up a closed system (power assembly), and in the following discussion, it’s assumed that the power assembly
If the temperature of the refrigerant gas at the evaporator outlet (remote bulb location) rises above the saturation temperature corresponding to the evaporator pressure as it becomes superheated (P1 greater than P2 + P3), the TXV pin moves in an opening direction. When the temperature of the refrigerant gas leaving the evaporator decreases, the pressure in the remote bulb and power assembly also decreases and the com-bined evaporator and spring pressure cause the TXV pin to move in a closing direction (P1 less than P2 + P3). For example, when the evaporator is operating with R-134a at a temperature of 40°F or a pressure of 35 psig and the refrigerant gas leaving the evaporator at the remote bulb location is 45°F a condition of 10°F superheat exists. Since the remote bulb and power as-sembly are charged with the same refrigerant as that used in the system R-134a, its pressure (P1) will follow its saturation pressure-temperature characteristics. With the liquid in the remote bulb at 45°F, the pressure inside the remote bulb and power assembly will be 40 psig acting in an opening direction. Beneath the diaphragm and acting in a closing direction are the evaporator pres-sure (P2) of 35 psig and the spring pressure (P3) for a 10°F superheat setting of 5 psig (35 psi + 5 psi = 40 psi) making a total of 40 psig. The TXV is balanced, 40 psig above and 40 psig below the diaphragm.
The following sections describe the operation and ap-plication of single-outlet TXVs in two general categories: internally equalized and externally equalized.

3
Thermal Expansion ValvesEmerson Climate Technologies
Changes in load cause the TXV pin to move:• Increasing the superheat will cause the TXV to open• Decreasing the superheat will cause the TXV to close
Factory Settings of TXVs The factory superheat setting of TXVs is made with the TXV pin just starting to move away from the seat. The superheat necessary to get the pin ready to move is called static superheat. TXVs are designed so that an increase in superheat of refrigerant gas leaving the evaporator is needed for the TXV pin to open to its rated position. This added superheat is known as gradient. For ex-ample, if the factory static is 6°F superheat, the operat-ing superheat at the rated stroke or pin position (full load rating of TXV) will be 10°F to 14°F superheat (See fi g. 2).
Manufacturers usually furnish the adjustable type TXV with a factory static superheat setting of 6°F to 10°F unless otherwise specifi ed. When using non-adjustable TXVs, it’s important that they are ordered with the correct factory superheat setting. For manufacturer’s production lines it is recom-mended that an adjustable TXV be used in a pilot model lab test to determine the correct factory superheat set-ting before ordering the non-adjustable type TXV. If the operating superheat is raised unnecessarily high, the evaporator capacity decreases, since more of the evaporator surface is required to produce the super-heat needed to operate the TXV. A minimum change of superheat to open the TXV is important because it provides savings in fi rst cost of the evaporator and cost of operation. The TXV described so far is internally equalized, where the evaporator pressure at the TXV outlet is admitted internally and allowed to exert its force beneath the diaphragm. In the next section the externally equal-ized TXV will be discussed.
External EqualizerA TXV with an external equalizer is required when the
pressure drop through the evaporator is substantial: • 3°F for residential air conditioning • 2°F for commercial air conditioning • 1°F for refrigeration low temperature range
This is because the pressure drop will hold the TXV in a fairly “restricted” position and reduce system capac-ity. The evaporator should be designed or selected for the operating conditions and the TXV selected and ap-plied accordingly.
For example, an evaporator is fed by a TXV with an internal equalizer, where a sizable pressure drop of 10 psi is present (See fi g. 3). The pressure at point “C” is 25 psig or 10 psi lower than at the TXV outlet, point “A”, however, the pressure of 35 psig at point “A” is the pressure acting on the lower side of the diaphragm in a closing direction. With the TXV spring set at a compres-sion equivalent to 10°F superheat or a pressure of 10.4 psig, the required pressure above the diaphragm to equalize the forces is (35 + 10.4) or 45.4 psig. This pres-sure corresponds to a saturation temperature of 50°F. The refrigerant temperature at point “C” must be 50°F if the TXV is to be in equilibrium. Since the pressure at this point is only 25 psig and the corresponding satura-tion temperature is 28°F, a superheat of (50°F - 29°F) or 21°F is required to open the TXV.
This increase in superheat, from 10°F to 21°F means that more of the evaporator surface needs to be used to produce this higher superheated refrigerant gas. The evaporator surface available for absorption of heat is re-duced and the evaporator is starved before the required superheat is reached.
P1 = 45.4 PSIG
P2 = 35 PSIGP3 = 10.4 PSIG
35 PSIG = 40°F
25 PSIG = 29°F
25 PSIG = 50°F
B
C
TXV with internalequalizer on evaporator with
10 PSI drop. Fig. 3
A
Since the pressure drop across the evaporator in-creases with load, the restricting effect becomes worse when the demand on the TXV capacity is greatest.

4
Thermal Expansion Valves Emerson Climate Technologies
This change from 10°F to 11°F in the operating superheat is caused by the change in the pressure-temperature characteristic of R-134a at the lower suction pressure of 25 psig.
Location of External EqualizerThe external equalizer line must be installed beyond
the point of greatest pressure drop. Since it may be diffi cult to determine this point, it is best to connect the equalizer line to the suction line at the evaporator outlet on the compressor side of the remote bulb location. (See fi g. 4 & 5). When the external equalizer is con-nected to a horizontal line, always make the connection at the top of the line to avoid oil logging in the equalizer line.
On a multi-evaporator system including two or more evaporators each fed by a separate TXV, the external equalizer lines must be installed so that they will be free from the effect of pressure changes in the evaporators fed by other TXVs. At no time should the equalizer lines be joined in a common line to the main suction line.
If individual suction lines from the separate evapora-tor outlets to the common suction line are short, then install the external equalizer lines into the separate evaporator suction headers, or as described in the pre-ceding paragraph.
When the pressure drop through the evaporator is not substantial, install the external equalizer connection at one of the return bends midway through the evapora-tor. This equalizer location will provide smoother TXV control when used in conjunction with an Evaporator Pressure Regulator. Anytime a control valve is installed in the suction line, the external equalizer line for the TXV must be connected on the evaporator side of the control valve or regulator.
Never cap or plug the external equalizer connection on a TXV, as it will not operate. If the TXV is furnished with an external equalizer feature, the external equalizer line must be connected.
P1 = 35 PSIG
P2 = 25 PSIGP3 = 10 PSIG
35 PSIG = 40°F
25 PSIG = 29°F
25 PSIG & 40°F
B
C
TXV with externalequalizer on evaporator with
10 PSI pressure drop. Fig. 4
A
To compensate for an excessive pressure drop through an evaporator, the TXV must be externally equalized. The equalizer line should be connected to the suction line at the evaporator outlet, past the remote bulb location so that the true evaporator outlet pressure is exerted beneath the TXV diaphragm. The operating pressure on the TXV diaphragm is now free from any effect of the pressure drop through the evaporator, and the TXV will respond to the superheat of the refrigerant gas leaving the evaporator.
When the same conditions of pressure drop exist in a system with an externally equalized TXV (see fi g. 4), the same pressure drop still exists through the evaporator, however, the pressure under the diaphragm is now the same as the pressure at the end of the evaporator, point “C”, or 25 psig.
The required pressure above the diaphragm for equi-librium is (25 + 10) or 35 psig. This pressure, 35 psig, corresponds to a saturation temperature of 40°F and the superheat required is now (40°F minus 29°F) 11°F. The external equalizer has lowered superheat from 22°F to 11°F. The capacity of a system having an evapora-tor with a sizable pressure drop will be increased by a TXV with the external equalizer when compared to an internally equalized TXV.
When the pressure drop through an evaporator is substantial, or when a refrigerant distributor is used at the evaporator inlet, the TXV must have the external equalizer feature for best performance.
An externally equalized TXV is required when a liquid distributor is used. Although a multi-circuit evaporator may not have an excessive pressure drop, the liquid distributor will introduce a pressure drop, because the distributor is installed between the TXV outlet and the evaporator inlet (See fi g. 5).

5
Thermal Expansion ValvesEmerson Climate Technologies
P1 = 45.5 PSIG
P2 = 35 PSIGP3 = 10.4 PSIG
35 PSIG = 40°F
35 PSIG = 40°F
35 PSIG = 50°F
B
C
TXV with internalequalizer on evaporator with
no pressure drop. Fig. 6
A
SuperheatA vapor is said to be superheated whenever its
temperature is higher than the saturation temperature corresponding to its pressure. The superheat equals the temperature increase above the saturation temperature at that pressure. For example, a refrigeration evapora-tor is operating with R-134a at 35 psig suction pressure (See fi g. 6). The R-134a saturation temperature at 35 psig is 40°F. As long as any liquid exists at this pressure, the refrigerant temperature will remain 40°F as it evapo-rates or boils off in the evaporator.
suring superheat, install a calibrated pressure gauge in a gauge connection at the evaporator outlet. In the ab-sence of a gauge connection, a tee installed in the TXV external equalizer line can be used just as effectively.
A refrigeration type pocket thermometer with appro-priate bulb clamp or an electric thermometer with ther-mocouples may be used to measure gas temperature.
The temperature element from the thermometer should be taped to the suction line at the point of remote bulb location and must be insulated. Thermometers will give an average reading of suction line and ambient if not insulated. Assuming an accurate gauge and ther-mometer, this method will provide accurate superheat readings.
Approximate Methods of Reading Superheat
When a gauge connection is not available and the TXV is internally equalized there are two ways of esti-mating superheat. Neither of these methods will yield an exact superheat reading.
The fi rst is the two-temperature method, which uses the difference in temperature between the evaporator inlet and outlet as the superheat. The error is caused by the pressure drop in the evaporator. When the pressure drop between the evaporator inlet and outlet is 1 psi or less, the two-temperature method will yield fairly accu-rate results. But evaporator pressure drop is usually not known and will vary with load. For this reason, the two-temperature method cannot be relied on for absolute superheat readings. The error in this method is negative and always shows a lower superheat.
The second method involves taking the temperature at the evaporator outlet and using the compressor suc-tion pressure as the evaporator saturation pressure. The error is caused by the pressure drop in the suction line between the evaporator outlet and the compressor suc-tion gauge. On packaged equipment and close-coupled installations, the pressure drop and resulting error are usually small. But on large built-up systems or systems with long runs of suction lines, considerable error can result. Since estimates of suction line pressure drop are usually not accurate enough to give a true picture of the superheat, this method cannot be relied on for absolute values. The error in this method is positive and always shows a higher superheat.
The only method for checking superheat that will yield an absolute value involves a pressure and tem-perature reading at the evaporator outlet.
By realizing the limitations of these approximate methods and the direction of the error, it is often pos-
As the refrigerant moves along in the coil, the liquid boils off into a vapor. The liquid is completely evapo-rated at point B because it has absorbed enough heat to change the refrigerant liquid to a vapor. The refrigerant gas continues along the coil and remains at the same pressure (35 psig); however, its temperature increases due to continued absorption of heat. When the refriger-ant gas reaches the end of the evaporator (point “C”) its temperature is 50°F. This refrigerant gas is now super-heated and the superheat is 10°F. (50°F minus 40°F).
The amount of superheat depends on how much re-frigerant is being fed into the evaporator by the TXV and the heat load to which the evaporator is exposed.
Superheat AdjustmentThe function of a TXV is to control the superheat of
the suction gas leaving the evaporator. If superheat is within reasonable limits, the TXV is operating in a satis-factory way. If superheat cannot be checked directly, it is important to know the size and direction of whatever error is present.
The pressure and temperature of the refrigerant suc-tion gas passing the TXV remote bulb are required for an accurate determination of superheat. When mea-

6
Thermal Expansion Valves Emerson Climate Technologies
sible to determine that the cause of the trouble call is because of improper methods of instrumentation rather than any malfunction of the TXV.
When troubleshooting in mountain areas (such as Denver, Colorado or Salt Lake City, Utah) use a Pressure-Temperature chart that has correct readings such as Emerson Climate Technologies’ 5,000 ft. pocket chart. Gauge pressures will read lower than they would at sea level.
TXV Selection Proper TXV size is determined by the BTU/HR or
tons load requirement, the pressure drop across the TXV, and the evaporator temperature. Do not assume that the pressure drop across the TXV is equal to the difference between discharge and suction pressures at the compressor. This assumption could lead to incorrect sizing of the TXV.
The pressure at the TXV outlet will be higher than the suction pressure at the compressor because of the fric-tional losses through the distribution header, evaporator tubes, suction lines, fi ttings, and hand valves. On rack systems, the EPR valve also adds substantial pressure drop.
The pressure at the TXV inlet will be lower than the discharge pressure at the compressor because of fric-tional losses created by the length of liquid line, valves and fi ttings, and vertical lift. The only exception is if the TXV is installed considerably below the receiver and static head built up is more than enough to offset fric-tional loses. The liquid line should be properly sized for its actual length plus equivalent length due to fi tting and hand valves. Vertical lift in the liquid line adds pressure drop and thus static head must be included.
The pressure drop across the TXV will be the differ-ence between the discharge and suction pressures at the compressor less the pressure drops in the liquid line, through the distributor, evaporator, and suction line.
ASHRAE tables should be consulted for determining pressure drops in liquid and suction line.
Here is the procedure for properly selecting a TXV:
1. Determine pressure drop across TXV: using the maximum and minimum condensing pressures, subtract the evaporating pressure from each to get the total high-to-low side pressure drop. From these values subtract the other possible pressure losses– piping and heat exchanger losses; pressure drop thru accessories; verti-cal lift pressure drop; and the pressure drop across the refrigerant distributor.
2. Consider the maximum and minimum liquid tempera-tures of the refrigerant entering the TXV and select the correction factors for those temperatures from the table below the capacity ratings. Determine the corrected ca-pacity requirement by dividing the maximum evaporator load in tons by the liquid correction factors.
3. Select the TXV size from the proper capacity table for the evaporator temperature, pressure drop available, and corrected capacity requirement.
4. Select the proper thermostatic charge based on the evaporator temperature, refrigerant, and whether a Maximum Operating Pressure (see MOP section) type charge is needed.
5. Determine connections and whether an externally equalized model is required. Always use an externally equalized TXV when a distributor is used.
A solid column of liquid refrigerant is required for proper TXV operation. Calculate the pressure drop in the liquid line to determine if there will be enough subcooling to prevent fl ash gas. If the subcooling of the liquid refrigerant from the condenser is not adequate, then a heat exchanger, liquid subcooler, or some other means must be used to get enough subcooling to en-sure solid liquid entering the TXV at all times.
Emerson Climate Technologies has prepared extended TXV capacity tables. These tables can be found in the Emerson catalog. Always select a TXV based on operating conditions rather than nominal TXV capacities.
7
Thermal Expansion ValvesEmerson Climate Technologies
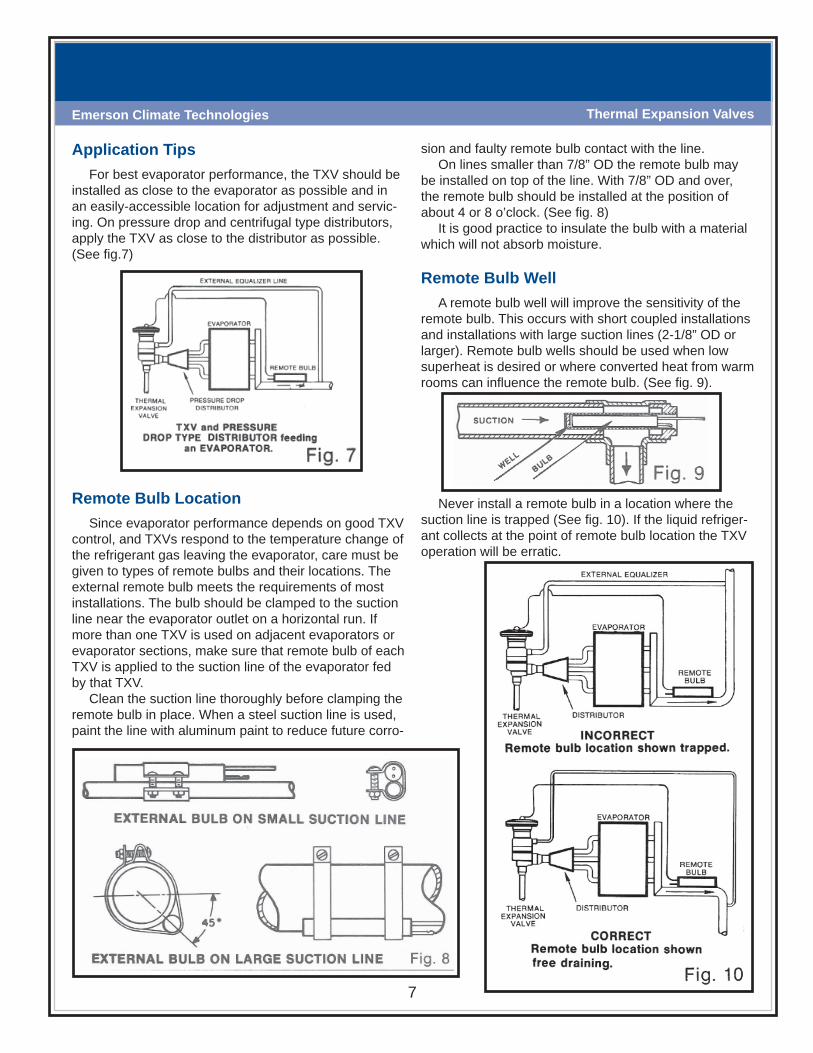
Application TipsFor best evaporator performance, the TXV should be
installed as close to the evaporator as possible and in an easily-accessible location for adjustment and servic-ing. On pressure drop and centrifugal type distributors, apply the TXV as close to the distributor as possible. (See fi g.7)
sion and faulty remote bulb contact with the line.On lines smaller than 7/8” OD the remote bulb may
be installed on top of the line. With 7/8” OD and over, the remote bulb should be installed at the position of about 4 or 8 o’clock. (See fi g. 8)
It is good practice to insulate the bulb with a material which will not absorb moisture.
Remote Bulb WellA remote bulb well will improve the sensitivity of the
remote bulb. This occurs with short coupled installations and installations with large suction lines (2-1/8” OD or larger). Remote bulb wells should be used when low superheat is desired or where converted heat from warm rooms can infl uence the remote bulb. (See fi g. 9).
Remote Bulb LocationSince evaporator performance depends on good TXV
control, and TXVs respond to the temperature change of the refrigerant gas leaving the evaporator, care must be given to types of remote bulbs and their locations. The external remote bulb meets the requirements of most installations. The bulb should be clamped to the suction line near the evaporator outlet on a horizontal run. If more than one TXV is used on adjacent evaporators or evaporator sections, make sure that remote bulb of each TXV is applied to the suction line of the evaporator fed by that TXV.
Clean the suction line thoroughly before clamping the remote bulb in place. When a steel suction line is used, paint the line with aluminum paint to reduce future corro-
Never install a remote bulb in a location where the suction line is trapped (See fi g. 10). If the liquid refriger-ant collects at the point of remote bulb location the TXV operation will be erratic.

8
Thermal Expansion Valves Emerson Climate Technologies
Large fl uctuations in superheat in the suction gas are usually the result of trapped liquid at the remote bulb location. Even on properly designed suction lines, it is sometimes necessary to move the remote bulb a few inches from the original location to improve TXV perfor-mance.
On multi-circuit evaporators fed by one TXV, install the remote bulb at a point where the suction gas has had an opportunity to mix in the suction header. Tighten clamps so that the remote bulb makes good contact with the suction line. NEVER APPLY HEAT NEAR THE REMOTE BULB LOCATION WITHOUT FIRST RE-MOVING THE REMOTE BULB.
Hunting“Hunting” of TXVs is defi ned as the alternate over-
feeding and starving of the refrigerant fl ow to the evaporator. Hunting is characterized by extreme cyclic changes in the superheat of the refrigerant gas leaving the evaporator and the evaporator or suction pressure.
Hunting is a function of the evaporator design, length and diameter of tubing in each circuit, load per circuit, refrigerant velocity in each circuit, temperature differ-ence (TD) under which the evaporator is operated, ar-rangements of suction piping and application of the TXV remote bulb. “Hunting” can be reduced or eliminated by the correct rearrangement of the suction piping, reloca-tion of the bulb and use of the recommended remote bulb and power assembly charge for the TXV.
Operation at Reduced CapacityThe conventional TXV is a self-contained direct oper-
ated regulator which is inherently susceptible to hunting because of its design and the design of the system to which it is applied.
The ideal fl ow rate would require a TXV with perfect dynamic balance, capable of instantaneous response to any change in evaporation (anticipation) and with a means of preventing the TXV from over shooting the control point because of inertia (compensation). With these features a TXV would be in phase with the system demand at all times and hunting would not occur.
A conventional TXV does not have built in anticipating or compensating factors. A time lag will exist between demand and response, along with the tendency to over shoot the control point. The conventional TXV may get out of phase with the system and hunt. An example of overshooting occurs when the load increases, causing the superheat of the suction gas to increase. The time interval between the instant the remote bulb senses the increase and causes the TXV pin to move into opening
direction allows the superheat of the gas to increase still further.
In response to the rising superheat during the time lags, the TXV has moved further in the opening direc-tion, overshooting the control point and allowing more refrigerant to fl ow to the evaporator than can be boiled off by load.
When the TXV fi nally responds to the over-feeding of the evaporator coil, it closes and will tend to again over-shoot the control point and remain overly throttled until most of the liquid refrigerant has left the evaporator.
The ensuing time delay before the TXV moves in the opening direction allows superheat of the suction gas to again rise beyond the control point. This cycle, being self-propagating, continues to repeat.
Experience has shown that a TXV is more likely to hunt at low load conditions when the TXV pin is close to the valve seat. This is because of an unbalance be-tween the forces which operate the TXV.
Besides the three main forces that operate the TXV, the pressure difference across the TXV port also acts against the port area and depending on TXV construc-tion, tends to force the TXV either open or closed.
When operating with the pin close to seat, the follow-ing will occur:
With the TXV closed, there is liquid pressure on the inlet side of the pin and evaporator pressure on the outlet.
When the TXV starts to open allowing fl ow to take place, the velocity through the TXV throat will cause a point of lower pressure at the throat, raising the pressure difference across the pin and seat.
This sudden rise in pressure differential while acting on the port area will tend to force the TXV pin back into the seat. When the TXV again opens, the same type of action occurs and the pin bounces off the seat with a rapid frequency. This phenomenon is more frequently encountered with the larger conventional ported TXVs as compared to balance ported TXVs as the force caused by the pressure differential is magnifi ed by the larger port area.
Most TXVs, when properly selected and applied, will overcome these factors and operate with virtually no hunting over a fairly wide load range.
Conventional ported TXVs will perform well to some-what below 50% of nominal capacity depending on evaporator design, refrigerant piping, size and length of evaporator, and rapid changes in loading.
Nothing will cause a TXV to hunt quicker than un-equal feeding of the parallel circuits by a distributor or unequal air loading across the evaporator circuits.

9
Thermal Expansion ValvesEmerson Climate Technologies
Balanced Port TXV OperationIn conventional TXVs, as the pressure drop across
the TXV port changes due to changes in head pressure or suction pressure, the operating superheat of the TXV will vary.
Depending on the operating conditions under which the superheat was originally set, this “unbalance” can sometimes result in compressor fl ooding or evaporator starvation. A unique design concept called “Balanced Port” cancels the effect of this pressure unbalance, per-mitting the TXV to operate at a fairly constant superheat over a wide range of operating conditions.
There are 2 fundamental Balanced Port designs:Double Ported Design (Figure 11a) – In this design, there are 2 paths for the refrigerant to fl ow. One path creates a force that tends to push the pin in the “open” direction; whereas the other path creates a force push-ing the pin in the “closed” position. These paths are de-signed in such a way that the forces generated in each path are equal to one another, resulting in a “balanced” design.Single Ported Design (Figure 11b) – In this design, the valve pin has a shoulder added that is on the inlet side of the valve. The high pressure times the area of the shoulder results in an upward (closing) force. The pres-sure differential across the pin results in a “downward” force. By designing the shoulder carefully, the downward force is negated or “balanced”.
Any refrigeration system which experiences changes in operating pressures because of varying ambient, gas defrost, heat reclaim, or swings in evaporator load will benefi t from using a balanced port TXV.
M.O.P.Maximum Operating Pressure (sometimes referred
to as Motor Overload Protection) is the ability of a TXV to close down, starve, or shut off if the suction pressure should approach a dangerously high predetermined limit condition. These conditions could overheat a suction cooled compressor or load the crankcase with too dense a vapor pressure. With the TXV in a closed condition the compressor has a chance to pull the suction back down to satisfactory operating conditions. Once below the MOP, the TXV will re-open and feed normally or until there is an overload again.
Power Element Charges There are several basic types of charges in use
today. Most common are the: liquid charge; gas charge; liquid cross-charge; gas cross-charge; and the adsorp-tion charge.
Liquid ChargesThe power element contains the same refrigerant
as the system in which the TXV is used. When manu-factured, it is put into the remote bulb in a liquid state. Volume is controlled so that within the design tempera-ture range some liquid always remains in the bulb. Therefore, the power element pressure is always the saturation pressure corresponding to the temperature of the remote bulb.
IN IN
OUTOUTBALANCED CAGE
ASSEMBLY
Fig. 11a
Fig. 11b

10
Thermal Expansion Valves Emerson Climate Technologies
As in liquid charges, the remote bulb can be fi lled with the same refrigerant as the system refrigerant (pro-ducing a gas charge). Or, it can be fi lled with a different refrigerant, producing a gas cross-charge.
Adsorption ChargesThe fi nal type of charge is adsorption. In adsorption,
solids hold large quantities of gas, not by taking them into the body of the solid, as in absorption, but by gath-ering them and holding them on the surface of the solid without chemical reaction.
The vapor penetrates into the cracks and furrows of the solid, allowing far greater capacity than possible with absorption.
The advantage of an adsorption charge is that in a fi xed volume, the quantity of vapor adsorbed varies with the temperature and the system. So it can be used to exert operating pressure as a function of temperature.
Typical adsorbents include: charcoal, silica gel, acti-vated alumina.
Liquid charges have the following properties:• Not subject to cross-ambient control loss• Little or no superheat at start-up• Superheat increase at lower evaporator temperatures• Slow suction pressure pulldown after start-up
REFRIGERANT CODE NAMES
ARI Standard 750-2007 recommends the following color coding of the TXVs:
R-12 White R-22 Green R-502 Orchid R-134a Light Blue R-410A Rose R-404A Orange R-507A Blue Green (Teal)
Liquid Cross-ChargesLiquid cross-charges means that the power element
contains a liquid refrigerant different from the system refrigerant in which the TXV is used. The pressure tem-perature curve of the charge crosses the curve of the system refrigerant.
Liquid cross-charge advantages are: • Moderately slow pull down• Insensitive to cross-ambient conditions. • Damped response to suction line temperature changes (reduces tendency for TXV hunting) • Superheat characteristics can be tailored for special applications
Gas & Gas Cross-ChargesUsing a gas charge in place of a liquid alters the
operational characteristics, because gas is compress-ible. At some predetermined temperature, the gas in the remote bulb becomes superheated, limiting the force it exerts. This produces higher superheats at higher evap-orator pressures and is labeled the Maximum Operating Pressure (MOP) effect.
The MOP point temperature depends on how that bulb was charged and where it will be used. All gas charges are susceptible to cross-ambient control loss when the power element is colder than the remote bulb. They respond faster, but tend to hunt for the proper operating level, so a ballast is often added to the remote bulb to reduce that tendency.
What happens with an adsorption charge
Which Charge to Use?Here are some typical examples of applications by
refrigerant charge:
Liquid ChargeIce makers, pilots, liquid injection valves
Liquid Cross-ChargesCommercial refrigeration (low & medium temp.), ice makers, transport refrigeration and air conditioning
Gas ChargeAir conditioning (including mobile), water chillers
Gas Cross-ChargeHeat pumps and air conditioning
MOP Maximum Operating Pressure
11
Thermal Expansion ValvesEmerson Climate Technologies
Other TXV ConsiderationsSolenoid Liquid Stop Valves
The TXV is produced as a tight seating device. But if the TXV is exposed to dirt, moisture, corrosion, and erosion the TXV will not be able to positively shut off. If the remote bulb is installed in a location where during the “off’ cycle it is infl uenced by a higher ambient tem-perature than the evaporator, the valve will open and ad-mit liquid to the evaporator. Installing a Solenoid Liquid Stop Valve ahead of any TXV is highly recommended.
Filter driers for System ProtectionTo protect the precision working parts of control
valves from dirt and chips which can damage them and make them inoperative, and to protect the entire system from the damaging affects of moisture, sludge and ac-ids, a fi lter drier should be installed on every system.
Pressure Switch SettingOn TXVs with M.O.P., a Pressure Switch must be set
to cut in at a pressure lower than M.O.P. rating of the TXV.
Emerson TXVsEmerson’s TXVs are designed for a wide range of air
conditioning, refrigeration, heat pump, and chiller ap-plications. Emerson uses stainless steel power elements that will not corrode.
Emerson’s integral TXV line includes valves for com-mercial and refrigeration applications, and heat pump and residential applications. The “Take-Apart Series” TXVs are available for almost any type of application, temperature range, or refrigerant. Emerson also offers a complete line of specialty TXVs.
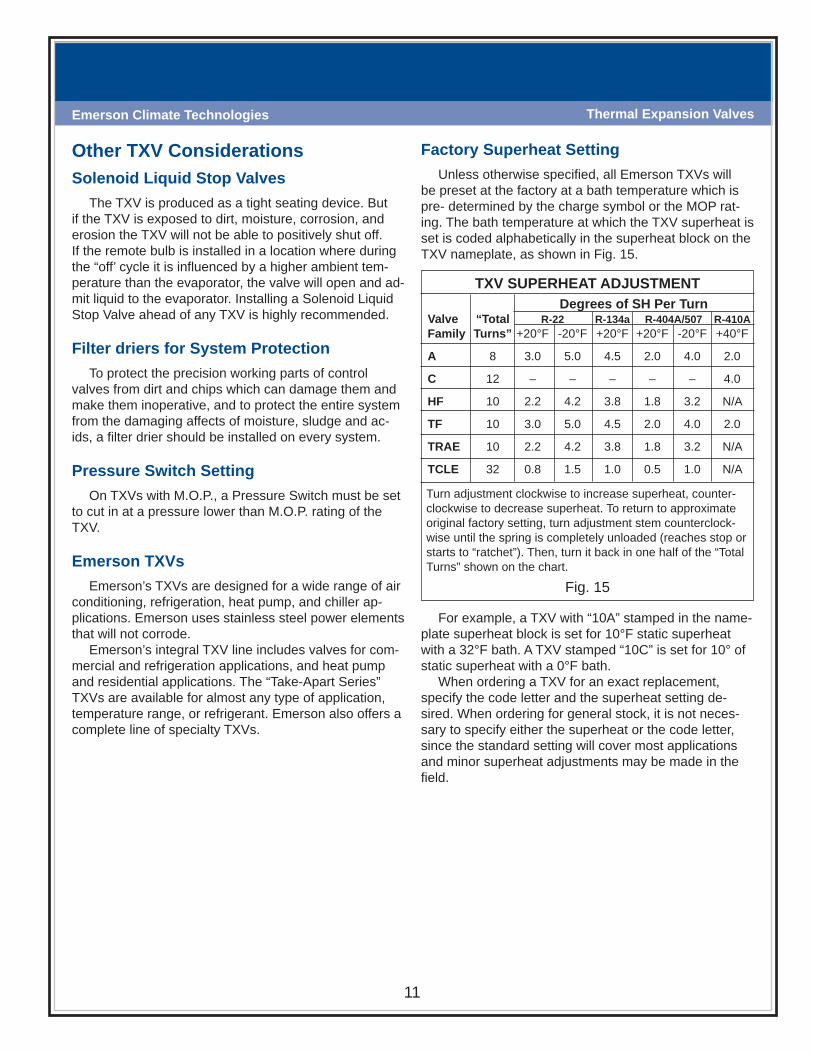
Factory Superheat SettingUnless otherwise specifi ed, all Emerson TXVs will
be preset at the factory at a bath temperature which is pre- determined by the charge symbol or the MOP rat-ing. The bath temperature at which the TXV superheat is set is coded alphabetically in the superheat block on the TXV nameplate, as shown in Fig. 15.
Fig. 15
For example, a TXV with “10A” stamped in the name-plate superheat block is set for 10°F static superheat with a 32°F bath. A TXV stamped “10C” is set for 10° of static superheat with a 0°F bath.
When ordering a TXV for an exact replacement, specify the code letter and the superheat setting de-sired. When ordering for general stock, it is not neces-sary to specify either the superheat or the code letter, since the standard setting will cover most applications and minor superheat adjustments may be made in the fi eld.
Degrees of SH Per TurnValve “Total R-22 R-134a R-404A/507 R-410AFamily Turns” +20°F -20°F +20°F +20°F -20°F +40°F
A 8 3.0 5.0 4.5 2.0 4.0 2.0
C 12 – – – – – 4.0
HF 10 2.2 4.2 3.8 1.8 3.2 N/A
TF 10 3.0 5.0 4.5 2.0 4.0 2.0
TRAE 10 2.2 4.2 3.8 1.8 3.2 N/A
TCLE 32 0.8 1.5 1.0 0.5 1.0 N/A
TXV SUPERHEAT ADJUSTMENT
Turn adjustment clockwise to increase superheat, counter-clockwise to decrease superheat. To return to approximate original factory setting, turn adjustment stem counterclock-wise until the spring is completely unloaded (reaches stop or starts to “ratchet”). Then, turn it back in one half of the “Total Turns” shown on the chart.
12
Thermal Expansion Valves Emerson Climate Technologies
To help you match the correct charge to your specifi c application, see the TXV Charge Code Selector on the next page. Also provided here are some typical exam-ples of applications by refrigerant charge.
Liquid Charge – LIce makers, pilots, liquid injection valves
Liquid Cross-Charges – C, ZCommercial refrigeration (low & medium temp.), ice makers, transport refrigeration and air conditioning
Gas Charge – GAir conditioning (including mobile), water chillers
Gas Cross-Charge – CA, AAHeat pumps and air conditioning
Gas Cross-Charge – HAAHeat pumps and air conditioning
W(MOP)Maximum Operating Pressure
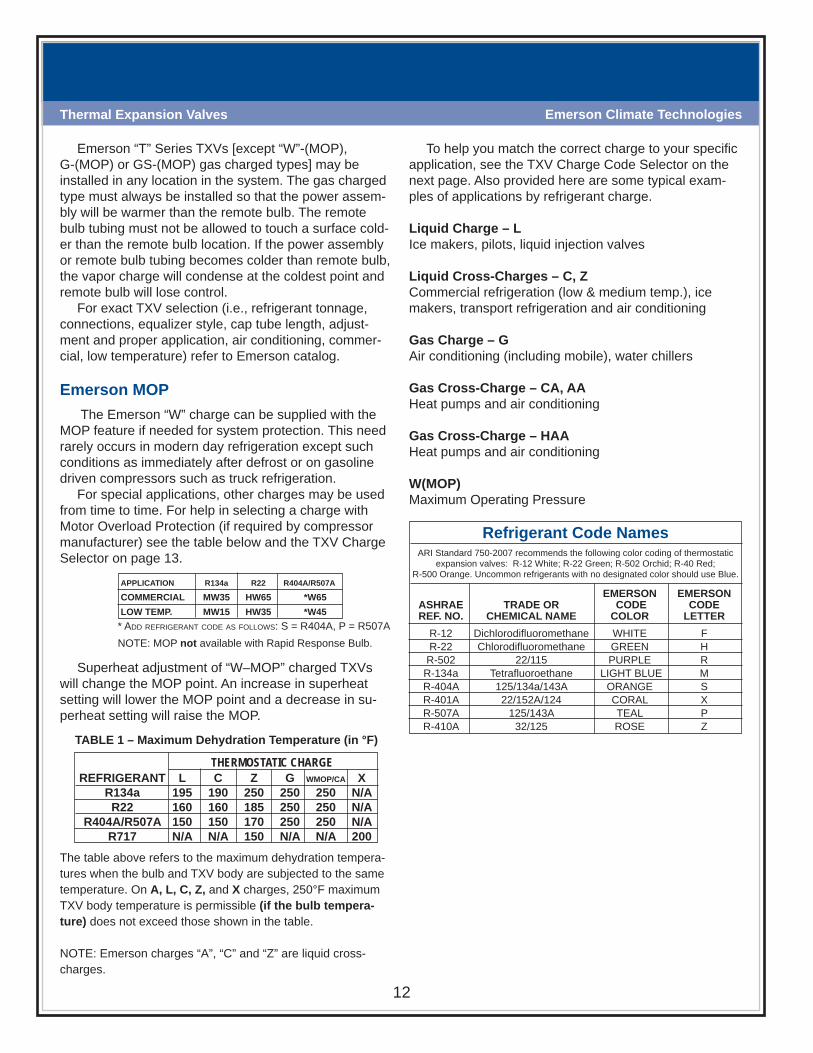
EMERSON EMERSON ASHRAE TRADE OR CODE CODE REF. NO. CHEMICAL NAME COLOR LETTER R-12 Dichlorodifl uoromethane WHITE F R-22 Chlorodifl uoromethane GREEN H R-502 22/115 PURPLE R R-134a Tetrafl uoroethane LIGHT BLUE M R-404A 125/134a/143A ORANGE S R-401A 22/152A/124 CORAL X R-507A 125/143A TEAL P R-410A 32/125 ROSE Z
ARI Standard 750-2007 recommends the following color coding of thermostaticexpansion valves: R-12 White; R-22 Green; R-502 Orchid; R-40 Red;
R-500 Orange. Uncommon refrigerants with no designated color should use Blue.
Refrigerant Code Names
Emerson “T” Series TXVs [except “W”-(MOP), G-(MOP) or GS-(MOP) gas charged types] may be installed in any location in the system. The gas charged type must always be installed so that the power assem-bly will be warmer than the remote bulb. The remote bulb tubing must not be allowed to touch a surface cold-er than the remote bulb location. If the power assembly or remote bulb tubing becomes colder than remote bulb, the vapor charge will condense at the coldest point and remote bulb will lose control.
For exact TXV selection (i.e., refrigerant tonnage, connections, equalizer style, cap tube length, adjust-ment and proper application, air conditioning, commer-cial, low temperature) refer to Emerson catalog.
Emerson MOP The Emerson “W” charge can be supplied with the
MOP feature if needed for system protection. This need rarely occurs in modern day refrigeration except such conditions as immediately after defrost or on gasoline driven compressors such as truck refrigeration.
For special applications, other charges may be used from time to time. For help in selecting a charge with Motor Overload Protection (if required by compressor manufacturer) see the table below and the TXV Charge Selector on page 13.
NOTE: MOP not available with Rapid Response Bulb.
APPLICATION R134a R22 R404A/R507A
COMMERCIAL MW35 HW65 *W65 LOW TEMP. MW15 HW35 *W45* ADD REFRIGERANT CODE AS FOLLOWS: S = R404A, P = R507A
Superheat adjustment of “W–MOP” charged TXVs will change the MOP point. An increase in superheat setting will lower the MOP point and a decrease in su-perheat setting will raise the MOP.
THERMOSTATIC CHARGE
The table above refers to the maximum dehydration tempera-tures when the bulb and TXV body are subjected to the same temperature. On A, L, C, Z, and X charges, 250°F maximum TXV body temperature is permissible (if the bulb tempera-ture) does not exceed those shown in the table.
NOTE: Emerson charges “A”, “C” and “Z” are liquid cross-charges.
REFRIGERANT L C Z G WMOP/CA X R134a 195 190 250 250 250 N/A R22 160 160 185 250 250 N/A R404A/R507A 150 150 170 250 250 N/A R717 N/A N/A 150 N/A N/A 200
TABLE 1 – Maximum Dehydration Temperature (in °F)

13
Thermal Expansion ValvesEmerson Climate Technologies
HW35
AIR CONDITIONING COMMERCIAL REFRIGERATION LOW TEMPERATURE OLD CHARGE REPLACEMENT OLD CHARGE REPLACEMENT OLD CHARGE REPLACEMENT
REFRIGERANT R12/R134a F OR FL — — FC FC — FW FW FWZ FG55 FC FG35 — — FW55 FW35 FW35 FW15 FQ55 FQ35 FW15 FGA FLA — — FGS FGS35 FGS35 FWS FWS FWS FWS FWS FWS FZ/MZ FZ/MZ FX FX
REFRIGERANT R22 H OR HL — — HC HC — HW HCA HW HWZ HG100 HG65 — — HW100 HW65 HW65 HW35 HQ100 HC HQ65 HQ35 HGA HLA — — HW85 HW85 — — HGS HGS65 HGS65 HWS HWS HWS HWS HWS HWS HZ HZ HX HX
REFRIGERANT R502/R404A/R507A RL — — RW RC/SC/PC RW RWZ RZ RW110 RW65 RW65 RW35 RW45/SW45 RWS RWS RZ RZ/SZ/PZ
HZ HC
— —
FW15/MW15
RC/SC/PC
RWS RWS RWS RWS
FZ
TXV Replacement Charge Symbols Cross ReferenceOld Bulb Charges vs. New Replacement Bulb Charge
NOTE: ALL OTHER CHARGE SYMBOLS MUST BE REPLACED WITH AN IDENTICAL MODEL OR AT THE OPTION OF THE EMERSON TECHNICAL SERVICE DEPART-MENT WHO MAY MAKE ENGINEERING AUTHORIZED SUBSTITUTION OF EQUIVALENT TYPE TO PROVIDE EQUIVALENT OPERATION AND PERFORMANCE.NOTE: FOR FIELD REPLACEMENT PURPOSES, HC CAN BE USED TO REPLACE HCA.
TXV Charge Code SelectorApplications Operating Ranges
R-134a/R-12Domestic Refrigerators and Freezers, Ice Makers,Dehumidifi ers,
Transport Refrigeration, Medium Temperature Supermarket Equipment,Medium Temperature Commercial Equipment
MC/FCMZ/FZ
MW15/FW15 (MOP)MW35/FW35 (MOP)
MW55
R-22Residential Air Conditioners &Heat Pumps, Commercial and
Industrial Chillers, Medium Temperature Supermarket Equipment, Commercial Air Handlers
HCA/HAA AIR COND. & HEAT PUMPHW/HW100
HCHW65 (MOP)
HZ
R-404A/R-507A/R-502Low Temperature Cases, Ice Makers, Commercial Air Handlers,
Conditioners, Soft Ice Cream Machines, Environmental Chambers
SC/RCSZ/RZ
SW45/RW45 (MOP)R-410A ZW195/ZAA
-50 -40 -30 -20 -10 0 +10 +20 +30 +40 +50

14 2009
Electronic Valves& Controls

Emerson Climate Technologies
15
Electronic Valves & ControlsEmerson Climate Technologies
Electronic Valve ApplicationsValves can be used for a variety of applications: • Expansion valves • Capacity control valves – Hot gas bypass – Controlled by temperature or pressure • Evaporator pressure regulator – Controlled by temperature or pressure • Liquid injection – oil cooling – Desuperheating In screw compressors • Liquid level control – Flooded evaporator • Crankcase pressure regulator • Head pressure control
Electronic Valves – IntroductionThermostatic expansion valves and mechanical
regulator valves have been used in the refrigeration and air conditioning industry to control superheat and refrig-erant mass fl ow since the very beginning. As today’s systems require improved energy effi ciency, tighter temperature control, wider range of operating conditions and incorporate new features like remote monitoring and diagnostics, the application of electronically oper-ated valves becomes mandatory. These valves offer the control performance necessary to meet these needs.
As more new refrigerants appear on the market requiring an ever increasing number of different charges and settings for thermostatic expansion valves, electri-cal control valves can work with all refrigerants.
Advantages of Electronic Solution • Wide operating range – Fewer valves to cover the entire capacity and refrigerant range • Energy savings – Allows fl oating head pressures and provides tighter superheat control • Suitable for higher pressure refrigerants (R-410A and CO2) • Diagnostics and remote monitoring capabilities

Emerson Climate Technologies
16
Electronic Valves & Controls Emerson Climate Technologies
Parts Required for Electronic Valves when used as TXV and Driven by Superheat
Description Type PCN Notes
Electronic Valves
EX4 097719 Select one valve based on capacity requirements of systemEX5 097720
EX6 097721
EX7 097722
EX8 097723
Valve Cable Connector EX5-N60 097718
Cable used to connect valve to controller EXD-U00
Universal Superheat Controller
EC3-33 097707 Basic SH controller
EC3-32 097708 Basic with option to con-nect to PC
Terminal Kit K03-X32 097711 Needed for EC3 to con-nect wires
Pressure Transducer
PT4-07M 097715Use with R22, R134a, R507, R404A, R407C, R124
PT4-18M 097716 Use with R410A systems
PT4-30M 097728 Use with R744 systems
Pressure Transducer
CablePT4-M60 097717
This is required always when transducer ordered
Temperature Sensor ECN-N60 097714 This is a required item
Display/Key-board Unit ECD-002 097712
Must be used with EC3-33 but is an option with EC3-32. Used to set param-eters of system
Ethernet Cable ECC-N30 097713Used for both ECD-002 and connection to PC thru router
Transformer T2 097724
Transformer has primary 120/208/240V AC, second-ary 24V AC. This is only for customer who cannot obtain 24V AC to run this system.
EC3-32 and EC3-33 Systems DIRECTIONS FOR
MOUNTING VALVE CABLE
ELECTRONIC VALVE
VALVE CABLE/CONNECTORCUSTOMERS
CONTROLS
TERMINAL KIT
DISPLAY/KEYBOARD
UNIT
ETHERNET CABLE
OUTPUT TO CUSTOMERS CONTROL IF NEEDED
TEMPERATURE SENSOR
TRANFORMER(IF NEEDED)
PRESSURE TRANSDUCERCABLE/CONNECTOR
PRESSURETRANSDUCERTemperature/Resistance
Conversion Temperature Resistance °C °F K 25 77 10,0 10 50 19,9 5 41 25,4 0 32 32,7 -10 14 55,3 -20 -4 97,0 -30 -22 176,7 -40 -40 335,7 -45 -49 470,6
Temperature Sensor ECN-N60

Emerson Climate Technologies
17
Electronic Valves & ControlsEmerson Climate Technologies
Pressure Transmitter – PT4The heart of the transmitter is a pressure sensitive
piezo resistive cell. This is surrounded by an oil cushion enclosed by a stainless steel diaphragm. The integrated electronic module conditions the output of the pressure cell to produce a temperature compensated signal of 4…20 mA.
The pressure cell consists of a silicon diaphragm with strain gauges diffused into it. A particular advantage of using silicon is its good hysteresis and creeping behav-ior. The direct integration of the strain gauges means that no additional errors can be introduced between the location where the pressure acts and where it is mea-sured.
Separation of the pressure sensitive element by the oil cushion protects the sensor cell against external me-chanical loads such as vibrations, pressure pulsations. This ensures reliable operation and a long life-time expectation even under severe operating conditions.
ElectronicBoard
Stainless SteelDiaphragm
Sensor
Oil Cushion
PRESSURE
The protective stainless steel diaphragm ensures compatibility with the media frequently encountered in refrigeration systems. The outside of the PT4 consists of a corrosion resistant stainless steel enclosure. It is sealed at the electrical connector socket and at the pressure connector joint. This way, the PT4 meets the requirements of IP65.
The sensor works internally as an absolute measur-ing device. However, it is calibrated to produce a relative output signal assuming an ambient pressure of 14.5 psi. When using PT4 in heights signifi cantly above sea level the output signal deviation must be taken into account. i.e. at a height of 1000m the signal reads approximately 1 psi lower than the actual pressure.
Short-term protection against wrong polarity is pro-vided by an internal diode, up to 33 Vdc for the 4...20 mA output version PT4.
PT4 is compliant with the present electromagnetic compatibility legislation and in particular with the EMC
directives 89/336/EC complying with EN-61000-6-2, EN-61000-6-3, EN-61000-6-4.
Pressure transmitters PT4 with current output (two wire connection) offer the following advantages:
• More suitable for signal transmission over long distance.• Higher immunity to electro-magnetic interference.• Open circuit detection enables fail-safe operation.
PT4 – PRESSURE TRANSMITTER
TXV Controller – EC3-X32EC3-X32 is a stand-alone universal superheat con-
troller for air conditioning, refrigeration and industrial applications such as chillers, industrial process cool-ing, rooftops, heat pumps, package unit, close control, cold room, food process and air driers. EC3-X32 offers remote access with built-in TCP/IP Ethernet commu-nications and WebServer functionality. Any standard WebBrowser (e.g. Internet Explorer® 5.0 or higher or Mozilla Firefox) can be used for monitoring or parameter setting.
EC3-X32
The EC3-X32 controls the opening of an electrical control valve according to desired superheat. As Emer-son Electrical Control Valves (ECV) are able to provide a positive shut-off function better than conventional solenoid valves, there will be no fl ow through Emerson ECV as long as the compressor is not running. In the event of cooling request and compressor start-up, EC3-X32 needs to be informed. This can be achieved by a digital input. EC3-X32 will start to control the refrigerant mass fl ow stand alone by precise positioning of the ECV

Emerson Climate Technologies
18
Electronic Valves & Controls Emerson Climate Technologies
under different operating conditions such as com-pressor start-up, start of further compressor, high head pressure, low head pressure, high load, low load and partial load operation.
EC3-X32 is capable for diagnostics and alarm. The alarm can be received via relay output, via TCP/IP net-work as well as optical LED/alarm code on ECD-002.
TXV Controller – EC3-X33
EC3-X33 is a stand-alone universal superheat con-troller for air conditioning, refrigeration and industrial applications such as chillers, industrial process cooling, rooftops, heat pumps, package unit, close control, cold room, food process and air driers. The optional ECD-002 Display/Keypad Unit is necessary for setup but not for operation of the controllers. ECD-002 can be con-nected or disconnected to EC3-X33 at any time.
EC3-X33 with ECD-002
Third Party ControllerThe EXD-U driver simply converts a 4-20ma/0-10
volt signal directly proportional to the valves position of 0-100%, a third party controller is required to supply the input signal to the EXD-U00. The third party control-ler is typically a programmable, stand alone set point control. It would contain built-in PID control or algo-rithms capable of being tuned and modifi ed to achieve optimum control of the controlled medium. This signal could also originate from a BAS (building automation system), EMCS (energy management control system) or industrial process controller as long as the signal type is compatible and the proper programming capabilities are available.
Universal Driver – EXD-U00EXD-U Universal driver is a stepper motor driver
which uses an analogue input signal to defi ne the valve opening. It enables the operation of EX4/EX5/EX6/EX7/EX8 as:
• Electronic expansion valve.• Capacity control by means of hot gas bypass or evaporating pressure regulator.• Crankcase pressure regulator.• Condenser pressure regulator.• Liquid level actuator.• Liquid injection valve.The input signal for the driver module can be
4…20mA or 0…10V. The output pulses provide the pro-portional opening/closing of EX4/EX5/EX6/EX7/EX8 and consequently the control of liquid or vapor refrigerant mass fl ow. The universal driver module can be connect-ed to any controller which provides the analogue signal. This gives system manufacturers the extreme fl exibility to use any desired controller in conjunction with the universal driver module to achieve different functionality. For further details please refer to EXD-U technical data sheet.
EXD-U00
Blinking: valve is closingON: valve is fully closed
Blinking: valve is openingON: valve is fully open
Parameters setting/saving
Next parameter/value (higher)
Next parameter/value (lower)
Selecting/confirming
Prg & Sel (5 sec)Manual reset forblinking alarm codes
ON: alarmOFF: no alarm
ON: demandOFF: no demand
Optional ECD-002 Display/Keypad UnitThe ECD-002 is required to set parameters during
start-up. After completion of start-up of the EC3-X33, it may be left connected or removed.
The display unit can be switched from K/bar/°C to R/psig/°F. Indicator LEDs show the status of valve open-ing, valve closing, demand and alarm.

Emerson Climate Technologies
19
Electronic Valves & ControlsEmerson Climate Technologies
FunctionDip Switch Number
1 2 3 4 5 6 7 8EX4/EX5/EX6 operation 0 1 1 0 1 0 – –EX7 operation 1 0 0 1 0 1 – –EX8 operation 1 1 0 1 1 1 – –4-20 mA analogue input signal – – – – – – – 00-10V analogue input signal – – – – – – – 1With start mode – – – – – – 1 –Without start mode – – – – – – 0 –
SettingThe universal driver needs no setting except confi gu-
ration with dip-switches for the application of a different valve, different analogue input signal, and type of start mode.
Electrical Control Valve – EXFunction1) Motor
A 2-phase bipolar stepper motor drives the EX4/5/6/7/8. This motor follows the basic operating characteristics of any stepper motor i.e. the motor will be held in position unless current pulses from a driver board initiate rotation in either direction. The direction of the rotation depends on the phase relationship of the current pulses, the amount of rotation is dependent on the number of pulses. One pulse will drive the motor one step i.e. the rotor will move by =1.8°. Successive pulses will lead to continuous rotation.
The drive shaft of the rotor is connected to a spindle which transforms the rotation into linear motion of the valve slide.
3α 2α 1α 0
2 3 1
Time
Pulse
Angular rotation (cross section of shaft)
2) ValveThe gate type valve is optimized to provide a wide
range of capacity with a linear relation between fl ow and positioning of the valve (capacity vs. number of steps). Slide and ports are made from ceramic for precise fl ow characteristics, high resolution and infi nite life.
The compliant slide eliminates undesirable horizontal forces caused by differential pressure (across the valve) to the cage assembly and shaft of stepper motor. The internal design of the EX4/5/6/7/8 is patented.
Total valve travel is 750 full steps for EX4/5/6, 1600 steps for EX7 and 2600 steps for EX8.
A mechanical stop in the fully closed position of the valve acts as reference point. The controller is reset by driving the valve towards the fully closed position against the mechanical stop. By overdriving the valve i.e. applying more than the full number of steps, it can be assured that the reference point is correct.
MM
closed open

Emerson Climate Technologies
20
Electronic Valves & Controls Emerson Climate Technologies
COMPONENT
APPLICATION
TXVLIQUID
INJECTIONHOTGAS
HEADPRESSURE EPR CPR
KEYPAD (ECD-002) YES NO NO NO NO NOLAPTOP * NO NO NO NO NOTEMP SENSOR (ECN-N60) YES NO NO NO NO NOPRESSURE TRANSDUCER (PT4) YES NO NO NO NO NOCONTROLLER (EC3-X33) YES NO NO NO NO NOCONTROLLER (EC3-X32) * NO NO NO NO NOAUXILLARY CONTROLLER ** NO YES YES YES YES YESDRIVER (EXD-U00) NO YES YES YES YES YESVALVE (EX) YES YES YES YES YES YES
COMPONENT SELECTION TABLE
* Optional ** 3rd party (Emerson does not offer an auxillary controller)
Electronic Valves ProgrammingProgramming Emerson TXV Controller (5):1) Enter specifi c data using keypad or laptop com- puter (i.e. refrigerant, tonnage, superheat, etc.).
3) Driving of stepper motorThere are many different options to drive stepper
motors like the one used in the EX4/5/6/7/8. Emerson stepper motors need a driver board with chopper drive function (constant current), an interface and a controller.
Chopper drive (constant current)The stepper motor of EX4/5/6/7/8 is a bipolar, 2-
phase permanent-magnet motor and operates with constant DC current in each phase.
36
2
5
19
67
8
410
1 Stainless steel body 2 Stepper motor 3 Electrical connector 4 Cage assembly 5 Shaft 6 Welding and/or brazing 7 Ceramic inlet port 8 Ceramic slide 9 Ceramic outlet port 10 Brass ball
Programming a 3rd Party Auxillary Controller (6):1) Follow manufacturers additional instructions. NOTE: The keypad (1) cannot be used to program these auxillary controllers.
EX VALVECUTAWAY VIEW

21 2009
Solenoid Valves

22
Solenoid Valves Emerson Climate Technologies
Direct Acting Solenoid Anatomy
What Are Solenoid Valves?A solenoid valve consists of two distinct but integral
acting parts, a coil and a valve. See drawing below for complete valve anatomy.
Solenoid ValvesIn most refrigeration applications, it is necessary to
start or stop the fl ow in a refrigerant circuit to automati-cally control the fl uids in the system. An electrically operated solenoid valve is usually used for this purpose. Its basic function is the same as a manually operated shut off valve, but by being solenoid actuated, it can be positioned in remote locations and may be conveniently controlled by simple electrical switches.
Solenoid valves can be operated by a thermostatic switch, fl oat switches, low pressure switches, high pres-sure switches or any other device for making or breaking an electric circuit, with the thermostatic switch being the most common device used in refrigeration systems.
Principles of Solenoid OperationSolenoids are either direct acting or pilot operated.
The application determines the need for either of these types. The direct acting valve is used on valves with low capacities and small port sizes. The pilot operated type is used on the larger valves, eliminating the need for larger coils and plungers.
1. Direct Acting In the direct acting type valve, as discussed under
Solenoid Valve operation, the plunger is mechanically connected to the needle valve. When the coil is ener-gized, the plunger pulling the needle off the orifi ce is raised into the center of the coil. A direct acting valve will operate from zero pressure differential to its maximum rated pressure differential, regardless of the line pres-sure.
The direct acting type valve is only used on small capacity circuits because of the increased coil size that would be required to counter the large pressure dif-ferential of large capacities. The required coil would be large, uneconomical, and not feasible for large capacity circuits. To overcome this problem on large systems, pilot operated solenoid valves are used.
The coil is nothing more than electrical wire wound around the surface of a cylindrical form usually of circu-lar cross section. When an electric current is sent thru the windings, they act as an electromagnet. The force fi eld that is created in the center of the solenoid is the driving force for opening the valve. Inside is a moveable magnetic steel plunger that is drawn toward the center of the coil when energized.
The valve contains an orifi ce through which fl uid fl ows when open. A needle or rod is seated on or in the orifi ce and is attached directly to the lower part of the plunger.
When the coil is energized, the plunger is forced toward the center of the coil, lifting the needle valve off of the orifi ce and allowing fl ow. With a normally-closed valve, when the coil is de-energized, the weight of the plunger and in some designs, a spring, causes it to fall and close off the orifi ce, thus stopping the fl ow through
the valve. Less common are normally-open valves which are open when the coil is de-energized.
Enclosing TubeTop PlugAssembly
Return Spring
Plunger Assembly
Collar
BodyAssemblyO-Ring

23
Solenoid ValvesEmerson Climate Technologies
Figures 1A and 1B show a simple schematic of a Direct Acting Solenoid Valve in operation.
2. Pilot Operated ValveThe pilot operated solenoid valve uses a combination
of the solenoid coil and the line pressure to operate. In this type valve the plunger is attached to a needle valve covering a pilot orifi ce rather than the main port. The line pressure holds an independent piston or diaphragm closed against the main port. See fi gures 2a and 2b. When the coil is energized, the plunger is pulled into the center of the coil, opening the pilot orifi ce. Once the pilot port is opened, the line pressure above the diaphragm is allowed to bleed off to the low side or outlet of the valve, thus relieving the pressure on the top of the diaphragm. The inlet pressure then pushes the diaphragm up and off of the main valve port and holds it there allowing full fl uid fl ow. When the coil is de-energized, the plunger drops and closes the pilot orifi ce. Pressure starts to build up above the diaphragm by means of a bleed hole in the piston diaphragm until it and the diaphragm’s weight and spring cause it to close on the main valve port. A pilot operated solenoid valve requires a minimum pressure difference of several pounds between inlet and outlet to operate.
Types of SolenoidsThere are different types of solenoid valves for differ-
ent applications. The three main types of valves are the 2-way, 3-way, and 4-way valves. The 2-way valve is the most common.
2-Way Valves The 2-way valve controls fl uid fl ow in one line. It has
an inlet and an outlet connection. This valve can be of the direct acting or pilot operated type of valve depend-ing on the need. When the coil is de-energized, the 2-way valve is normally closed. Although normally closed is the most widely used, two-way and three-way valves are manufactured to be normally open when the coil is de-energized. See Figure 3 for an example of a 2-way valve.
Figures 2A and 2B show a simple schematic of a Pilot Operated Solenoid Valve in operation.
NOTE: 2-way valves are usually designed to have fl ow in one direction only. Some valves may be modifi ed to have fl ow in both directions. A “bi-fl ow” kit must be used.
Figure 3
FIG. 1A DE-ENERGIZED
FIG. 1B ENERGIZED
FIG. 2A DE-ENERGIZED
FIG. 2B ENERGIZED
24
Solenoid Valves Emerson Climate Technologies
Solenoid Valve SelectionThe selection of a Solenoid Valve for a control ap-
plication requires the following information:1. Fluid to be controlled2. Capacity required3. Maximum operating pressure differential (MOPD)4. Electrical characteristics5. Maximum working pressure required (MWP)
The capacities of Solenoid Valves for normal liquid or suction gas refrigerant service are given in tons of refrigeration at some nominal pressure drop and stan-dard conditions. Manufacturers’ catalogs provide ex-tended tables to cover nearly all operating conditions for common refrigerants. Follow the manufacturer’s sizing recommendations. Do not select a valve based on line size. Pilot operated valves require a pressure drop to operate and selecting an oversize valve will result in the valve failing to open. Undersized valves result in exces-sive pressure drops.
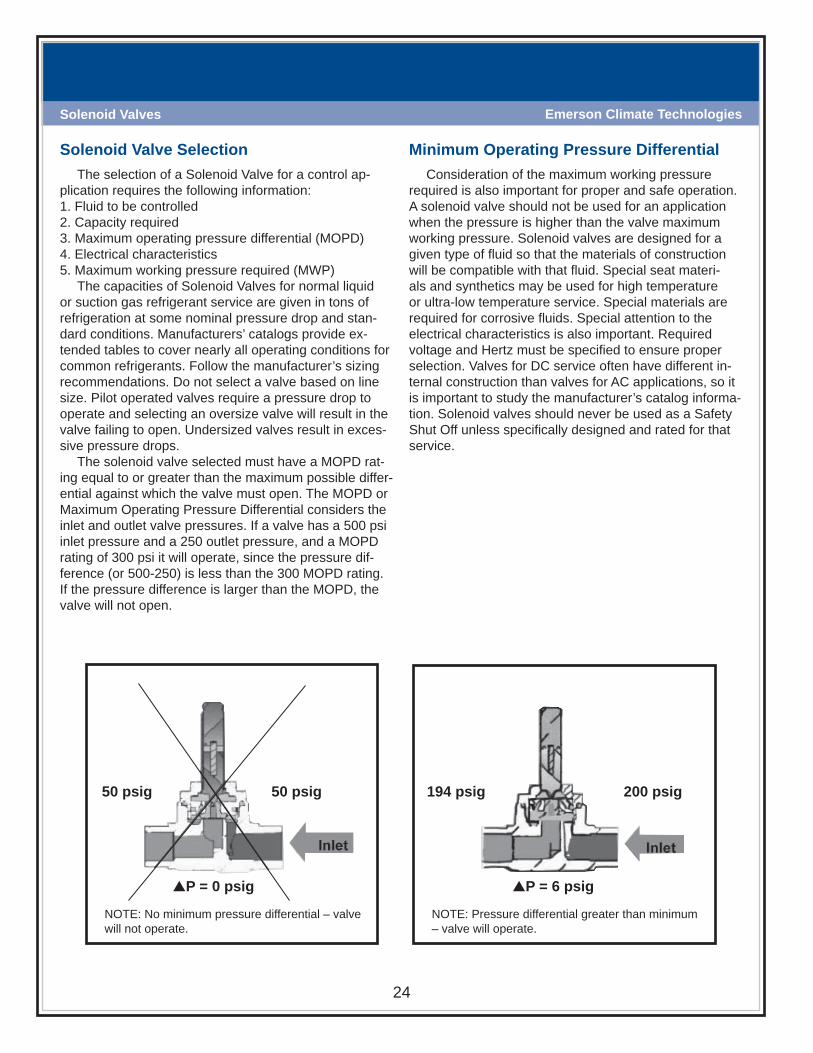
The solenoid valve selected must have a MOPD rat-ing equal to or greater than the maximum possible differ-ential against which the valve must open. The MOPD or Maximum Operating Pressure Differential considers the inlet and outlet valve pressures. If a valve has a 500 psi inlet pressure and a 250 outlet pressure, and a MOPD rating of 300 psi it will operate, since the pressure dif-ference (or 500-250) is less than the 300 MOPD rating. If the pressure difference is larger than the MOPD, the valve will not open.
Minimum Operating Pressure DifferentialConsideration of the maximum working pressure
required is also important for proper and safe operation. A solenoid valve should not be used for an application when the pressure is higher than the valve maximum working pressure. Solenoid valves are designed for a given type of fl uid so that the materials of construction will be compatible with that fl uid. Special seat materi-als and synthetics may be used for high temperature or ultra-low temperature service. Special materials are required for corrosive fl uids. Special attention to the electrical characteristics is also important. Required voltage and Hertz must be specifi ed to ensure proper selection. Valves for DC service often have different in-ternal construction than valves for AC applications, so it is important to study the manufacturer’s catalog informa-tion. Solenoid valves should never be used as a Safety Shut Off unless specifi cally designed and rated for that service.
NOTE: No minimum pressure differential – valve will not operate.
NOTE: Pressure differential greater than minimum – valve will operate.
50 psig 50 psig 194 psig 200 psig
▲P = 0 psig ▲P = 6 psig

25
Solenoid ValvesEmerson Climate Technologies
Installation Solenoid Valves having a spring loaded piston or dia-
phragm may be installed and operated in any position, but installing more than 90° from vertical is not recom-mended since dirt or debris may collect in the solenoid area and prevent it from operating. An adequate strainer or fi lter drier should be installed ahead of each solenoid valve to keep scale, pipe dope, solder, and other foreign matter out of the valve.
When installing a solenoid valve, be sure the arrow on the valve body points in the direction of refrigerant fl ow.
When brazing valves with extended solder type con-nections do not use too hot a torch and point the fl ow away from the valve. These valves do not normally need to be disassembled before installation; if the valve does not have extended connections, disassemble the valve before brazing. Wet rags or chill blocks are recom-mended during brazing. They are needed to keep the valve body cool so that body distortion on close-coupled valves will not occur. Allow the valve body to cool before replacing the valve’s operating insides to ensure that the seat material and gaskets are not damaged by the heat. When reassembling, do not over torque.
Application Overview
Application Product Family
Liquid, Suction Line Service 240RA/540RA or Hot Gas By-Pass 50RB 100RB 200RB/500RB Pressure Differential Valve for Gas Defrost 710RA 713RA
Emerson Solenoid Valves Emerson offers a complete line of refrigerant solenoid
valves for refrigeration and air-conditioning applications. As part of Emerson’s commitment to the industry, each valve undergoes stringent Emerson testing to ensure fail-safe operation. And, with the lowest external leak rates in the industry, Emerson solenoid valves ensure precise refrigerant fl ow, preventing system failures and aiding in environmental protection.
26 2009
System Protectors
27
System ProtectorsEmerson Climate Technologies
Acid Pick-Up CapabilityVarious organic acids result during the decomposition
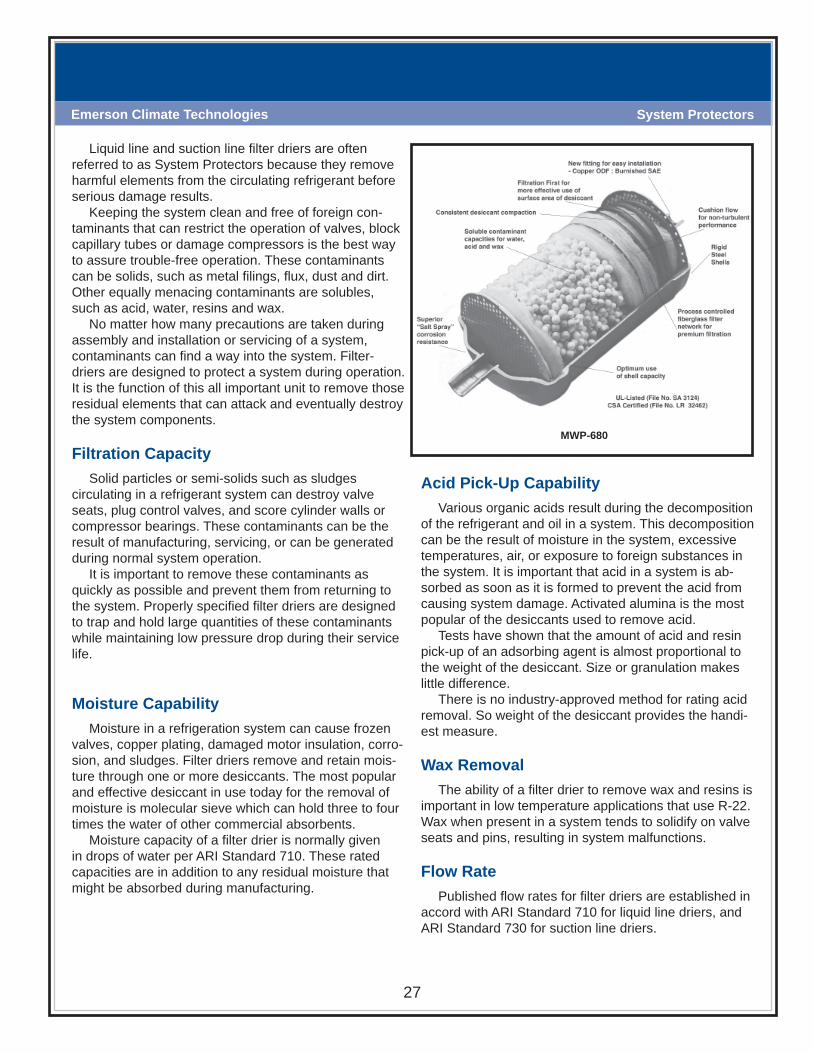
of the refrigerant and oil in a system. This decomposition can be the result of moisture in the system, excessive temperatures, air, or exposure to foreign substances in the system. It is important that acid in a system is ab-sorbed as soon as it is formed to prevent the acid from causing system damage. Activated alumina is the most popular of the desiccants used to remove acid.
Tests have shown that the amount of acid and resin pick-up of an adsorbing agent is almost proportional to the weight of the desiccant. Size or granulation makes little difference.
There is no industry-approved method for rating acid removal. So weight of the desiccant provides the handi-est measure.
Wax RemovalThe ability of a fi lter drier to remove wax and resins is
important in low temperature applications that use R-22. Wax when present in a system tends to solidify on valve seats and pins, resulting in system malfunctions.
Flow RatePublished fl ow rates for fi lter driers are established in
accord with ARI Standard 710 for liquid line driers, and ARI Standard 730 for suction line driers.
Liquid line and suction line fi lter driers are often referred to as System Protectors because they remove harmful elements from the circulating refrigerant before serious damage results.
Keeping the system clean and free of foreign con-taminants that can restrict the operation of valves, block capillary tubes or damage compressors is the best way to assure trouble-free operation. These contaminants can be solids, such as metal fi lings, fl ux, dust and dirt. Other equally menacing contaminants are solubles, such as acid, water, resins and wax.
No matter how many precautions are taken during assembly and installation or servicing of a system, contaminants can fi nd a way into the system. Filter-driers are designed to protect a system during operation. It is the function of this all important unit to remove those residual elements that can attack and eventually destroy the system components.
Filtration CapacitySolid particles or semi-solids such as sludges
circulating in a refrigerant system can destroy valve seats, plug control valves, and score cylinder walls or compressor bearings. These contaminants can be the result of manufacturing, servicing, or can be generated during normal system operation.
It is important to remove these contaminants as quickly as possible and prevent them from returning to the system. Properly specifi ed fi lter driers are designed to trap and hold large quantities of these contaminants while maintaining low pressure drop during their service life.
Moisture CapabilityMoisture in a refrigeration system can cause frozen
valves, copper plating, damaged motor insulation, corro-sion, and sludges. Filter driers remove and retain mois-ture through one or more desiccants. The most popular and effective desiccant in use today for the removal of moisture is molecular sieve which can hold three to four times the water of other commercial absorbents.
Moisture capacity of a fi lter drier is normally given in drops of water per ARI Standard 710. These rated capacities are in addition to any residual moisture that might be absorbed during manufacturing.
MWP-680

28
System Protectors Emerson Climate Technologies
Compacted bead style fi lter drier, Emerson’s EK-Plus
Absorption vs. AdsorptionOne factor to consider in selection is ab- vs. ad-
sorption. Absorption means a material’s ability to take another substance into its inner molecular structure.
An adsorbed substance doesn’t penetrate the mo-lecular structure. It simply starts building up on the sur-face of the adsorbent. Walls, cracks, crevices are part of the surface area and are able to hold other substances, greatly increasing capacity.
Modern desiccants are extremely porous and have a large surface area and internal pore volume of a size and shape to adsorb and retain water molecules.
Types of Filter driersAll the liquid line fi lter driers on the market today are
a variation of one of two types: the molded core type or the bead type.
Molded core type fi lter driers are manufactured by mixing desiccants (which remove the soluble contami-nants) with a bonding agent, then baking them to give them permanent shape and to activate the drying ingre-dients. The result is a porous core which acts as fi lter and drying agent.
Compacted bead style fi lter driers are manufactured with the active desiccant in bead or pellet form; no bond-ing material is used. Rather, compacting comes from mechanical pressure exerted by a spring. Compacted bead-style fi lter driers usually include an additional fi lter network to trap solid contaminants from the refrigerant, unlike most core styles.
The separate and distinctive fi lter media can take various forms that permit depth fi ltration with greater solid contaminant capacity and contaminant retention during start-up and shut- down when turbulent condi-tions exist.
Compacted bead fi lter driers offer the maximum volume of desiccant because fi ltering and drying is done in one mass. But, because a molded core is porous, it does not hold all solid contaminants; often particles are washed through channels within in the core when pressures surge. Better holding power is possible with a more compacted core. But pressure drops increase inversely.
Fig 1. Proper placement of fi lter drier in the system
Dirt, Waxes, AcidEvery system has contaminants in it as soon as it is
opened. These contaminants may be insoluble, such as metal fi lings not removed in manufacturing, or airborne dirt that entered when the system was opened. Or they may be soluble, such as waxes, acids, water and resins that develop through reactions between air, the refriger-ant, or lubricant.
Any of these can cause system failure. Installing an all-purpose fi lter drier can lessen chances for trouble.
There are basic differences to consider: type of fi lter, how it fi lters, and its true capacity.
Most manufacturers rate their fi lters to ARI Standard 710. But even though two clean fi lter driers may be rated the same, there can be a vast difference in fl ow as the quantity of solids picked up increases.

29
System ProtectorsEmerson Climate Technologies
Refrigerant Water Concentration (ppm)
0
0.05
0.1
0.15
0.2
0 100 200 300 400 500 600 700
Tota
l Aci
d N
umbe
r
HFC Refrigerants and POE LubricantsThe use of HFC refrigerants and Polyolester (POE)
lubricants for air-conditioning and refrigeration has generated new system chemistry related problems. New and redesigned system protectors have been developed to counter these problems and provide a long, reliable life for the operating refrigeration system.
Moisture is the major problem causing contaminate for HFC/POE oil systems just as it was for CFC and HCFC systems using Mineral oil. Many HFCs can hold much more water than their CFC counterparts but the oil differences are much worse than those of the refriger-ant. POE oil can hold as much as 10 times more water than Mineral oils. Evacuation alone has proved ineffec-tive at removing this moisture so a fi lter drier is required to perform this function.
Water poses a new problem for POE oils above and beyond those experienced with Mineral oil. POE oil will react with water to form organic acids at normal operat-ing conditions in refrigerating and air-conditioning sys-tems. This reaction starts at water levels as low as 75 ppm. These acids attack system components including motor insulation and metallic parts, reducing system life.
To combat the detrimental effects of water in HFC and POE oil systems it is imperative to hold moisture levels as low as possible. Water level must be main-tained less than 50 ppm in the refrigerant and the same for the oil.
Figure 2Acid Generation in a 1.5 Ton POE Oil Containing System
Another aspect of POE oil is the ability to keep more solid particles in suspension than Mineral oil. This is important in retrofi tted systems where pockets of solid contamination are now fl ushed from low fl ow areas and need to be removed before moving parts in the system are damaged. The fi lter drier for POE oils needs to have higher solid particle holding capacity with little impact to refrigerant fl ow capacity or pressure drop.
The fi lter drier should also have improved contami-nate removal effi ciency as well to ensure that all par-ticles are captured the fi rst time they enter the fi lter drier. The ability to remove smaller particles is also advanta-geous. The Emerson EK series fi lter driers provide a unique combination of these characteristics to provide outstanding fi ltration as shown in Figure 4.
0
25
50
75
100
125
75 100 125
HMI
TypicalSightglass
R-134a Refrigerant Temperature
Moi
stur
e Le
vel (
ppm
)
Figure 3Dry Indication Water Level
0
500
1000
1500
2000
2500
Water Content (ppm)
MineralOil
POE Oil R-12 R-134a R-22 R-502 R-404A R-410A

30
System Protectors Emerson Climate Technologies
EKTypical drier
Solid Contamination Captured
Flow
Res
tric
tion
The fi lter driers for use in HFC and POE oil systems must keep the system dry and free of any acids gener-ated. However, since water capacity is of primary im-portance the fi lter drier should contain a higher percent-age of molecular sieve than was required for CFC and HCFC systems. But molecular sieve alone is not enough since it has almost no organic acid capacity. An organic acid removal desiccant must be used such as activated alumina to ensure low acid levels are maintained. The fi lter drier should also have higher fi ltration capacity and effi ciency. The EK series of fi lter driers provides the best combination of these properties to ensure the long, trouble-free life of any air-conditioning or refrigeration system.
The moisture indicating sightglass must also indicate moisture levels less than 50 ppm moisture. Also, it must be able to perform this function at the temperature of the liquid line on which it is placed. Many sightglasses can-not perform this function at all liquid line temperatures. This low level indication ability is needed to ensure that the system moisture never exceeds the level at which organic acid formation starts. The Emerson HMI mois-ture indicating sightglass provides this low level detec-tion ability.
Figure 4Filtration Capability of Filter driers
Emerson ASD suction line fi lter drier
Such protection is encouraged by compressor manu-facturers in any case, but there are two circumstances that make suction line fi lters or fi lter driers advisable:
1) It is practically impossible to avoid contamination when assembling a refrigeration system in the fi eld. Dirt, moisture, metal particles, and copper oxide from brazing all can be present in the system de spite the greatest care, and all can damage or reduce the service life of the compressor.
2) In large and complex systems, such as a single system serving several food cases throughout a supermarket, it is a generally accepted practice to install a cartridge-type fi lter in the suction line. Then, because of the virtual certainty of contamination during assembly of the system, the initial cartridge is removed and replaced after the fi rst few days of system operation.
When considering the price of a compressor, the cost of protecting it with a suction line fi lter is insignifi cant.
Suction Filter DriersThe function of fi lter driers in refrigeration and air
conditioning systems is to trap moisture and harmful contaminants. But their use in the liquid line still tends to be thought of as the “standard” application; including them also in the suction line hasn’t yet become stan-dard practice to the same degree.
A fi lter drier in the liquid line essentially protects the system controls – solenoid valves, expansion valves, and pressure regulators. The function of the fi lter or fi lter drier in the suction line is specifi cally to protect the compressor against contaminants.

31
System ProtectorsEmerson Climate Technologies
Cross-section shows desiccant beads surrounding accordion-type fi lter element
Typical system arrangements show suction line fi lter drier installed ahead of the compressor.
Internal DesignInternally, suction line fi lter driers employ the
same types of elements as liquid line units. One is the core type, in which the fi lter drier consists of a rigid, cylindrical, porous core that may perform both the fi lter and drier functions, or be used in combination with a separate accordion-type fi lter element.
The core type fi lter drier is available either in a hermetically sealed confi guration or in take-apart designs with a replaceable element.
The latest advancement is the bead-type unit, in which the desiccant is compacted into the shell. This design offers several advantages over older types, including lower pressure drop, more desic-cant surface area, and greater capacity.
Application TipsUsing a liquid line fi lter drier as a suction line
fi lter drier is not recommended. A suction line fi lter drier should provide for greater capacity than a liquid line unit, for better compressor protection and for less pressure drop. Two access valves are required to measure pressure drop across the suction line fi lter drier.

32
System Protectors Emerson Climate Technologies
Clean-Up Procedure for Compressor Motor Burnout
1. Determine the extent of the burnout. For mild burnouts where contamination has not spread thru the system it may be economical to save the refrigerant charge, if the system has service valves on the compressor. A severe burnout exists if the oil is discolored, an acid odor is present, and contamination products are found on the high and low side. In this condition, caution should be exercised to avoid breathing the acid vapors. Also, avoid skin contact with the contaminated liquid.
2. Thoroughly clean and replace all system controls such as TXVs, solenoids, check valves, and reversing valves. Remove all strainers and fi lter driers.
3. Install replacement compressor and make a complete electrical check.
4. Make sure that the suction line near the compressor is clean. Install an over-sized liquid line fi lter drier and a suction line fi lter drier.
5. Pressure and leak-test the system according to unit manufacturer’s recommendations.
6. Triple evacuate to at least 200 microns. Break the vacuum with clean, dry refrigerant at 0 psig.
7. Charge the system through an Emerson EK fi lter drier to equipment manufacturer’s recommendations.
8. Start the compressor and put the system in operation. Record the pressure drop across the suction line fi lter drier on the enclosed label and apply label to the side of the shell.
9. Replace the suction line fi lter drier if the pressure drop becomes excessive.
10. Observe the system during the fi rst 4 hours. Repeat step 9 as often as required, until no further change in pres-sure drop is observed.
11. After the system has been in operation for 48 hours, check the condition of the oil with an acid test kit. If the oil test indicates an acid condition, replace the liquid and suction line fi lter driers.
12. Check the system again after 2 weeks of operation. If the oil is still discolored, replace the liquid and suction line fi lter drier.
13. Clean-up is fi nished when the oil is clean and odor-free, and is determined to be acceptable with the acid test kit.
For detailed burnout clean-up procedure and recommendations, consult the RSES Service Manual, Section 91.
Compressor BurnoutA compressor burnout can be expected to release a
variety of pollutants into the system, including acids. The clean-up procedure below describes the use of system protectors in cleaning up a system.

33
System ProtectorsEmerson Climate Technologies
Schematic of a basic heat pump system.
Filter Driers for Heat PumpsA heat pump is essentially a refrigeration sys-
tem that can fl ow in either direction. The key to its operation is a four-way reversing valve that routes the discharge gas from the compressor.
Depending on whether the system is cooling or heating, the indoor and outdoor coils swap roles, taking turns serving as the condenser and evapo-rator.
Since conventional refrigerant control compo-nents are designed for unidirectional operation, their use in heat pumps requires installation in pairs, one for each direction, with check valves routing the fl ow through or around them. Today, because of the growing use of heat pumps, com-ponents such as thermostatic expansion valves are available in bi-directional versions, as are fi lter driers.
Removing ContaminantsJust like any other refrigeration system, heat
pump system components need fi lter drier protec-tion to remove solid and soluble contaminants. This may be handled several ways.
First, in systems with one-way expansion valves and check valves, a one-way fi lter drier might be installed in series with a check valve. This would be a “part-time” arrangement, in that fi ltration would be provided in only one direction.
Second, a one-way fi lter drier might be installed with each of the check valves, so that one pro-vides fi ltration in each direction.
Third, the simplest arrangement is to install a bi-directional fi lter drier in the common liquid line. Used in combination with a bi-directional thermo-static expansion valve such as Emerson’s HF se-ries, the complexity of multiple expansion valves, check valves, and fi lter driers can be completely eliminated.
Emerson BKF bi-directional pump fi lter drier
One-Way Flow, Both DirectionsInside a bi-directional fi lter drier the refrigerant al-
ways fl ows in the same direction through the dessicant core regardless of which way the refrigerant is fl owing through the system. The internal fl ow in this case is controlled by an inlet fl apper valve and an outlet poppet valve on each side of the desiccant core. As the liquid enters the fi lter drier from either direction, the inlet fl ap-per valve routes it to the outside of the desiccant core. After it fl ows through to the inside of the desiccant core, it exits through the opposite poppet valve.
The purpose of the arrangement shown below is to prevent contaminants collected in one direction from be-ing fl ushed back out when the fl ow reverses.
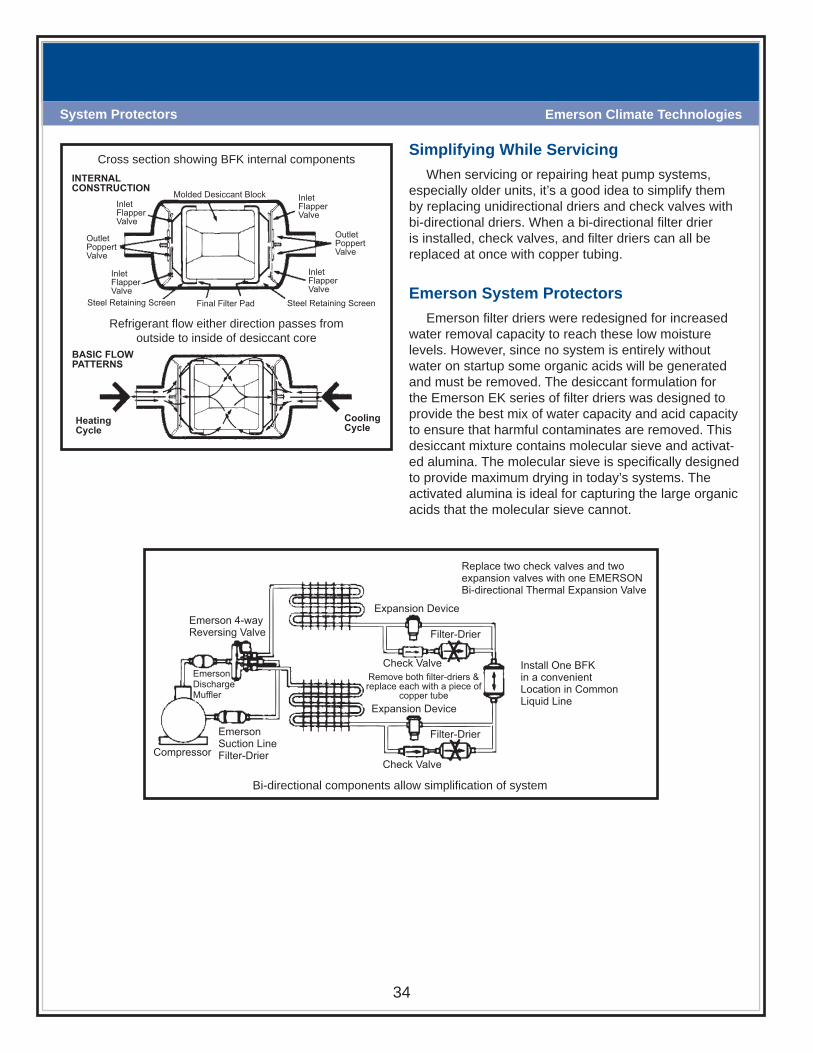
34
System Protectors Emerson Climate Technologies
Bi-directional components allow simplifi cation of system
Cross section showing BFK internal componentsSimplifying While Servicing
When servicing or repairing heat pump systems, especially older units, it’s a good idea to simplify them by replacing unidirectional driers and check valves with bi-directional driers. When a bi-directional fi lter drier is installed, check valves, and fi lter driers can all be replaced at once with copper tubing.
Refrigerant fl ow either direction passes from outside to inside of desiccant core
Emerson System Protectors Emerson fi lter driers were redesigned for increased
water removal capacity to reach these low moisture levels. However, since no system is entirely without water on startup some organic acids will be generated and must be removed. The desiccant formulation for the Emerson EK series of fi lter driers was designed to provide the best mix of water capacity and acid capacity to ensure that harmful contaminates are removed. This desiccant mixture contains molecular sieve and activat-ed alumina. The molecular sieve is specifi cally designed to provide maximum drying in today’s systems. The activated alumina is ideal for capturing the large organic acids that the molecular sieve cannot.
Replace two check valves and twoexpansion valves with one EMERSONBi-directional Thermal Expansion Valve
Expansion Device
Filter-Drier
Check Valve
Check Valve
Filter-Drier
Expansion Device
Remove both filter-driers &replace each with a piece of
copper tube
Install One BFKin a convenientLocation in CommonLiquid Line
EmersonSuction LineFilter-Drier
EmersonDischargeMuffler
Emerson 4-wayReversing Valve
Compressor
Molded Desiccant Block InletFlapperValve
OutletPoppertValve
OutletPoppertValve
InletFlapperValve
InletFlapperValve
InletFlapperValve
Steel Retaining ScreenSteel Retaining Screen Final Filter Pad
INTERNALCONSTRUCTION
BASIC FLOWPATTERNS
HeatingCycle
CoolingCycle

35 2009
Regulators

36
Regulators Emerson Climate Technologies
EVAPORATORPRESSUREREGULATOR EVAPORATOR
PRESSUREREGULATOR
EXTERNALSTRAINERRECOMMENDED
NOTE: HIGH SIDE PILOTPRESSURE REQUIRED
FOR EPRBS
NOTE: HIGH SIDE PILOTPRESSURE REQUIRED
FOR EPRBS
EXTERNALSTRAINERRECOMMENDED
60 PSIGHIGH
EVAPORATORPRESSURE
50 PSIGINTERMEDIATEEVAPORATORPRESSURE
20 PSIGLOW
EVAPORATORPRESSURE
Types of Regulators:Suction Line Regulators
Suction line regulators provide a wide variety of re-frigerant control functions, but are mainly used for regu-lating suction gas pressures. These regulators provide a method of balancing the output of the refrigeration system with the load requirements. Two basic types are covered here:1) Upstream pressure regulators, which control from an inlet pressure signal.2) Downstream pressure regulators, which control from an outlet pressure signal.
Application of Evaporator Pressure Regulators
Evaporator Pressure Regulators are normally used on multiple-compressor refrigeration systems fed by TXVs, low side fl oats or solenoid liquid valve and fl oat switch combination. They are used whenever a mini-mum evaporator pressure or temperature is desired. Controlling from an inlet side pressure signal, they prevent upstream pressure from going below a pre-set point.
EPR valves are used on brine or water chillers to pre-vent freeze-up during low load periods, by keeping the refrigerant saturation pressure above the fl uid freezing temperature. Similarly, they may be used to prevent frost formation on fan coil evaporators. They may also be used to provide a given evaporator saturation pressure to produce the required evaporation/room temperature difference, (especially useful where humidity control is required). On multiple evaporator systems where differ-ent evaporator temperatures are required, EPR valves will hold the saturation pressure at the required set point above the common system suction pressure. Here, the EPRs prevent lowering of the desired temperature in the warmer evaporators, while the compressor continues operating to satisfy the coldest evaporators. See fi gure 1.
Figure 1: Evaporator Pressure Regulators used in multiple system.
EPR InstallationEPRs may be installed at the compressor rack or
close to the evaporator. Suction line regulators can be direct acting or inter-
nally piloted such as an Emerson IPR regulator. These are hermetically sealed, non-repairable valves for use on low capacity systems.
For higher sensitivity and accurate control, an exter-nally piloted EPRB regulator will provide control of larger units. These are repairable in the line. The EPRB valve is a lightweight, brass body valve which eliminates the need for normal system pressure drop needed to make the valve move through the full stroke. This is accom-plished by using compressor discharge gas to pilot the regulator.
Combining an EPRB with a suction stop or shut off is done with the EPRBS models. When the pilot solenoid is de-energized, the valve closes. This eliminates the cost of a separate suction solenoid and offers a tight shut off.
Figure 2: Cutaway view of an EPRBS.

37
RegulatorsEmerson Climate Technologies
Upstream RegulatorsThe sole function of the Evaporator Pressure Regu-
lator is to prevent the evaporator pressure from falling below a predetermined pressure setting. This enables the system to meet certain load requirements over a wide range of conditions and offers improvement over the simple “on-off” compressor control usually provided by thermostats or pressure switches.
Downstream Pressure RegulatorsSuction pressure regulators are used to prevent
compressor motor overload. By throttling the suction gas fl ow during high load conditions, the compressor motor is permitted to remain within current draw limitations. Often referred to as holdback valves, crankcase pres-sure regulators or suction pressure regulators, they also serve many other useful applications.
A downstream pressure regulator can be direct acting such as an OPR valve. These are hermetically sealed, non-repairable outlet pressure regulators for use on low capacity systems.
Figure 3: EPRB(S) Brass BodyUpstream Pressure Regulator with Suction Stop Option
Valve Adjustable Range EPRB(S)-12 thru -20 0 to 110 psig 0 to 50 psig IPR-6, -10 30 to 100 psig 65 to 225 psig 0 to 60 psig OPR-6, -10 50 to 130 psig 100 to 225 psig
Adjustable Range Table
Voltage Cycles 24 120 50-60 Hz, AC 208-240
Standard Voltage & Frequencies Table
Series EPRB & IPRThese are all upstream regulators which can be
selected from the capacity charts available. Combin-ing the regulator with a suction stop or shutoff solenoid will cause the regulator to act as a suction stop valve. Certain basic design operating condition data must be determined to properly apply the regulator. For best results, follow the simple procedure outlined below.
To select the proper regulator port size, the following information is required:1. System refrigerant (R134a, R22, R404A/R507A). 2. The required pressure setting (lowest allowable
evaporator pressure and corresponding refrigerant saturation temperature).
3. The system suction pressure at the regulator outlet (suction pressure where compressor capacity bal-ances with system load) making allowance for any common suction line pressure drop.
4. Pressure drop across regulator port. Subtract suction pressure (3) from regulator set point (2).
5. Evaporator load in tons at regulator setting (required minimum evaporator saturation temperature).
With the above information, select the proper regula-tor as follows:1. Select the valve extended capacity table from that
page which covers the system refrigerant.2. Find the required evaporator saturation temperature
column.3. For the available regulator pressure drop, fi nd the
rated capacity for each regulator port size.4. Select the proper port size from the capacity which
matches the evaporator load.

38
Regulators Emerson Climate Technologies
Fig 4. Cutaway of crankcase pressure regulator (Emerson OPR)
Fig 5. Cutaway of evaporator pressure regulator (Emerson EPRB).
Crankcase RegulatorsNormally open, the CPR (Fig. 4) closes when com-
pressor pressure rises above the pre-set maximum, forcing the valve back onto its seat. As suction pressure drops, the valve starts to reopen, maintaining a balance.
Where to Apply RegulatorsEPRs are most commonly used on multiple evapo-
rator systems, installed in the branch lines close to the required control source. They are used for indirect temperature control. They also maintain evaporator pressure during defrost, conserving power, expediting the defrost and reducing fl ood back.
CPRs are usually only applied if the system is being continually “over-pressured,” causing the compressor to be overloaded. If you suspect that’s the case, check the amp draw on the compressor while it’s running. If it’s higher than the plate rating, the system may be a CPR candidate.
How to Apply Regulators It isn’t normally necessary to apply both an EPR and
a crankcase regulator. Most installations only utilize an EPR.
Typical installations of EPRs are in supermarket systems, large chillers, and industrial processes where large amounts of heat must be absorbed. Smaller (including residential) systems of less than 5 tons are usually equipped with compressors designed to operate well within 30°-40°F variations.
One of the advantages of suction line regulators in supermarkets is that by adding EPRs you can control the operating temperatures of the individual cases in a single loop system.

39
RegulatorsEmerson Climate Technologies
HeadMaster Head Pressure ControlsThe application of air-cooled condensers for year-
round operation, or during periods of low ambient temperature, requires some means of control to main-tain adequate condensing pressures that ensure proper system performance. It is essential that proper liquid refrigerant pressure be controlled to:1) Maintain liquid subcooling and prevent liquid line
fl ash gas.2) Provide adequate pressure at the inlet side of the
Thermostatic Expansion Valve to get enough pres-sure drop across the valve port.
3) Properly operate systems with hot gas defrost or hot gas bypass.
4) Provide adequate temperature for operation of heat reclaim systems.
Without proper control of condensing pressure a refrigeration system might not perform properly and components can be damaged. Emerson’s HeadMaster Control offers an effi cient and economical approach to this common industry problem on air cooled condensers.
The HeadMaster 3-Way Head Pressure Control eliminates the need for special piping or multiple con-trol valves. As a single unit it simplifi es piping and cuts installation costs.
HeadMaster HP OperationThe HP control is a three-way modulating valve
controlled by the discharge pressure. The charged dome exerts a constant pressure on top of the diaphragm. At high ambient air temperature, bypass gas entering Port B is allowed under the diaphragm where it counters the pressure of the dome charge. This upward push on the diaphragm allows the seat disc to seal against the top seat, preventing fl ow from Port B (discharge gas) while fl ow from Port C is unrestricted (see fi gure 6).
Figure 6: HeadMaster HP Valve CutAway View
As ambient air temperature falls, an uncontrolled air cooled condenser will exhibit a corresponding decrease in head pressure. As the discharge (bypass) pressure falls, it no longer counters the dome charge pressure and the diaphragm moves downward, moving the push-rod and seat disc toward the bottom seat. This allows discharge (bypass) gas to be metered into the receiver, creating a higher pressure at the condenser outlet. The higher pressure at the condenser outlet reduces the fl ow from Port C and causes the level of condensed liquid to rise in the condenser.
The fl ooding of the condenser with liquid cuts the available condensing surface. The result is to raise the pressure in the condenser and maintain an adequate high side pressure. Figure 7 illustrates a typical appli-cation of the 3-way control valve. This system is per-haps the most economical and reliable way to control discharge pressure. The three-way valve as shown in fi gure 6 is a fi xed, non-adjustable valve. The wholesaler replacement setting is normally furnished for a pressure corresponding to 95° to 98°F condensing temperature for the given system refrigerant.
Figure 7: Typical 3-Way Valve Head Pressure Control Application
As with all head pressure control applications, addi-tional liquid receiver capacity is required to prevent loss of a liquid seal in the receiver when the condenser is fl ooded. The receiver must be large enough to hold the total system charge. The total system charge consists of the following:1. An operating charge which is the amount of refriger-
ant needed to operate the system during summer (high ambient temperature) conditions.
2. An additional charge equaling the amount of refriger-ant required to fl ood the condenser with liquid. The condenser must be fi lled with liquid to a point where a minimum head pressure is created for cold weather (low ambient temperature) conditions.

40
Regulators Emerson Climate Technologies
NOTE: Should the outdoor temperature fall below de-sign conditions, more refrigerant will be required.
The total above is the total charge needed for satis-factory system performance during the lowest expected ambient air temperature conditions. During summer operation the receiver must be sized to safely hold the total system charge. Good refrigeration practice states that the total system charge should not exceed 80% of the receiver capacity.
CAUTION:1. The HP control should not be used on a system
which does not have a liquid receiver or on one with a receiver which is too small. If the receiver does not have adequate storage space, the refrigerant will back up in the condenser to produce excessively high discharge pressures during high ambient air tempera-tures, with could cause system damage or personal injury.
2. The HP control should be used only on systems which employ a Thermostatic Expansion Valve.
Installation of HP HeadMaster SeriesHead pressure control systems are used on refrig-
eration systems that are temperature operated. The compressor is started by a thermostat or the system operates on a pump down cycle, where the thermostat controls the liquid line solenoid valve and the compres-sor starts on a rise in suction pressure with a low pres-sure switch.
On systems that are pressure operated, migration of the refrigerant to the cold condenser on the “off” cycle should be prevented. If the system does not oper-ate on a pump down cycle, migration can take place through some compressors, from the suction line to the condenser. Crankcase heaters will prevent liquid from condensing in the crankcase, but will not stop migration to the cold condenser. If the system is properly charged, the fi lled condenser will permit the excess to remain in the receiver and low side.
Under some conditions where the receiver is located in a warm ambient, a check valve in the liquid drain line between the HeadMaster control and the receiver may be required to prevent the liquid receiver pressure from equalizing to that of the condenser during the “off” cycle. This enables the system to start on a pressure switch. Some systems may require a time delay on the low pressure switch. Condenser fans should not be cycled when using the HeadMaster control. The sudden chang-es in high side pressure caused by fan cycling will result in erratic Thermostatic Expansion Valve performance, and shortened head pressure control life. To prevent this
from happening, make sure fan controls are set to oper-ate at pressures above the HP valve setting.
HP Series Capacity & SelectionThe nominal HP control capacity in tons for various
refrigerants is shown in Table 1 for R134a, R22 and R404A/R507A. The nominal capacity is based on 100°F liquid, 40°F evaporator and the pressure drop shown. To get capacities in tons at other liquid and evaporator conditions, multiply the nominal capacity at the desired pressure drop by the correction factor given in the catalog for the liquid temperature and evaporator temperature.
Pressure Drop – PSI Valve Refrigerant 1 2 3 4 5 HP-5 2.0 2.9 3.6 4.1 4.6 HP-8 R-134a 5.5 7.8 9.6 11.0 12.4 HP-14 14.0 19.8 24.2 28.3 31.7 HP-5 2.2 3.2 3.9 4.5 5.0 HP-8 R-22 6.0 8.5 10.5 12.0 13.5 HP-14 14.7 20.8 25.6 29.7 33.8 HP-5 1.5 2.1 2.6 3.0 3.3 HP-8 3.9 5.5 6.7 7.8 8.7 HP-14 10.1 14.3 17.6 20.5 23.0
Based on 100°F liquid and 40°F evaporator
Table 1 – Nominal Capacity (tons)
R-404A R-507A
NOTE: Not recommended for systems utilizing patented sub-cooling coils in conjunction with low head pressure systems or on sytems where the condensate line bypassses the receiver in order to maintain subcooling effect in the liquid line.
NOTE: Do not select a valve for a capacity rating ex-ceeding 5 psi pressure drop from Port C to Port B or for a system with more than 20 psi pressure drop across the condenser.
During normal ambient conditions, the available liquid subcooling in the condenser will be adequate to cover the pressure drop through the HeadMaster control.
If a valve is selected for a given fl ow rate, the result-ing pressure drop must not cause the liquid pressure to drop below saturation and produce fl ash gas. If enough sub-cooling is not available to cover this pressure drop, it is suggested that more than one valve be installed in parallel to lower the pressure drop to tolerable limits.
Do not parallel valves of different capacities. Liquid drain lines from the condenser to receiver are sized for a velocity of 150 ft./min. or less.
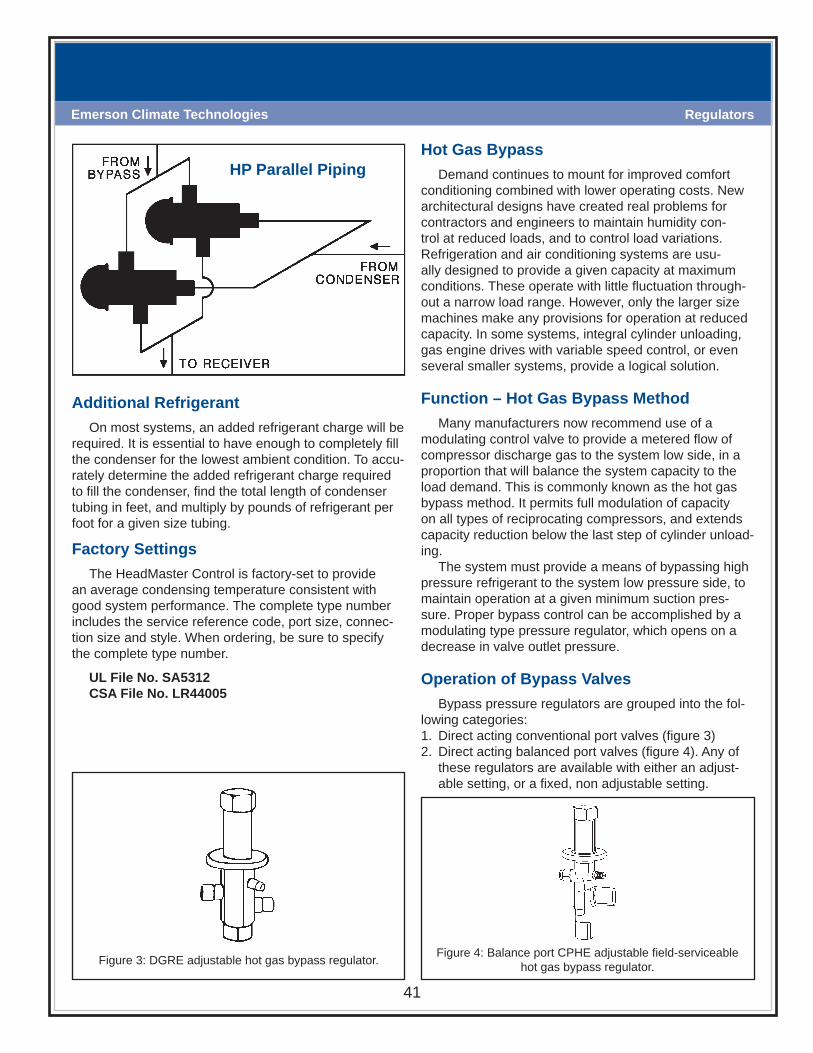
41
RegulatorsEmerson Climate Technologies
HP Parallel PipingHot Gas Bypass
Demand continues to mount for improved comfort conditioning combined with lower operating costs. New architectural designs have created real problems for contractors and engineers to maintain humidity con-trol at reduced loads, and to control load variations. Refrigeration and air conditioning systems are usu-ally designed to provide a given capacity at maximum conditions. These operate with little fl uctuation through-out a narrow load range. However, only the larger size machines make any provisions for operation at reduced capacity. In some systems, integral cylinder unloading, gas engine drives with variable speed control, or even several smaller systems, provide a logical solution.
Function – Hot Gas Bypass MethodMany manufacturers now recommend use of a
modulating control valve to provide a metered fl ow of compressor discharge gas to the system low side, in a proportion that will balance the system capacity to the load demand. This is commonly known as the hot gas bypass method. It permits full modulation of capacity on all types of reciprocating compressors, and extends capacity reduction below the last step of cylinder unload-ing.
The system must provide a means of bypassing high pressure refrigerant to the system low pressure side, to maintain operation at a given minimum suction pres-sure. Proper bypass control can be accomplished by a modulating type pressure regulator, which opens on a decrease in valve outlet pressure.
Operation of Bypass ValvesBypass pressure regulators are grouped into the fol-
lowing categories:1. Direct acting conventional port valves (fi gure 3)2. Direct acting balanced port valves (fi gure 4). Any of
these regulators are available with either an adjust-able setting, or a fi xed, non adjustable setting.
Figure 4: Balance port CPHE adjustable fi eld-serviceable hot gas bypass regulator.
Additional RefrigerantOn most systems, an added refrigerant charge will be
required. It is essential to have enough to completely fi ll the condenser for the lowest ambient condition. To accu-rately determine the added refrigerant charge required to fi ll the condenser, fi nd the total length of condenser tubing in feet, and multiply by pounds of refrigerant per foot for a given size tubing.
Factory SettingsThe HeadMaster Control is factory-set to provide
an average condensing temperature consistent with good system performance. The complete type number includes the service reference code, port size, connec-tion size and style. When ordering, be sure to specify the complete type number.
UL File No. SA5312CSA File No. LR44005
Figure 3: DGRE adjustable hot gas bypass regulator.

42
Regulators Emerson Climate Technologies
Figure 7: Direct acting hot gas regulator admitting fl owbetween TEV and venturi distributor.
Applications: Hot Gas Bypass to Compressor Suction Line
Figure 6 shows the most common hot gas bypass system. In this system, the bypass line is taken directly from the compressor discharge line, through a bypass regulator, and into the suction line at the compressor. Although the hot gas bypass regulator is considered a downstream control, there is a big difference in function between a Crankcase Regulator and a hot gas regulator.
Pilot operated bypass valve main regulators have a long stroke stem with a restrictor plug characterized by either a parabolic or vee port restrictor plug design. This prevents the valve from operating close to the seat where pressure differential unbalance may occur, elimi-nating the need for a balanced port design.
The characterized port will provide smooth bypass fl ow modulation. Pilot operated valves usually have the extra features of a manual opening stem for testing or emergency operation, fl anged connections, synthetic tight seating seats, and replaceable parts. Hot gas bypass valves can be applied to a system in several ways, differing only in the point to which the hot gas is to be bypassed. Several mixing methods are available. The one recommended is piped so that discharge gas is admitted to the suction line to fl ow against the direction of the suction gas as in fi gure 6.
Applications: Bypass to Evaporator InletAnother method is to bypass the hot discharge gas to
the evaporator inlet, usually between the Thermal Valve and the refrigerant distributor (see fi gure 7). This pro-vides distinct advantages. The artifi cial load imposed on the evaporator causes the Thermal Valve to respond to the rise in superheat, eliminating the need for the liquid injection valve. The evaporator serves as an excellent chamber to provide homogeneous mixing of the gases before reaching the compressor.
Hot gas bypass into the evaporator is suggested when the evaporator elevation is below the compres-sor, to prevent oil trapping caused by low velocity at low loads. This assures proper oil return. Although there are many advantages to this system, it is not used on a multiple coil system, or where the evaporator sections may be located a distance from the compressor. The coil should be a free draining circuiting design to prevent the increase in velocity, due to forcing a large quantity of trapped liquid out of the low side, which in some cases may have enough volume to fl ood the compressor crankcase. Separate regulators must be used for each evaporator when bypassing to multiple evaporators located below the compressor to help oil return.
Figure 6: Hot gas bypass using type LCL liquid injection valve.
LIQUIDINJECTION
SOLENOID VALVE
Bypass to fl ooded evaporators and suction line accumulators also present special cases. Contact the equipment manufacturer or the bypass control valve manufacturer for specifi c, detailed information.
Solenoid Valve for Positive Shut-off & Pump-down Cycle
It is recommended that a solenoid valve be installed ahead of the bypass regulator. This permits the system to operate on an automatic pump-down cycle.

43
RegulatorsEmerson Climate Technologies
Thermal Valves for Liquid InjectionWhen hot gas is bypassed directly into the suction
line, it is necessary to make some provision for desuper-heating the gas returning to the compressor. Without a small Thermal valve to lower suction gas temperature to tolerable limits, compressor damage may occur. Stan-dard Thermal Valves cannot be adjusted for control over 20°F superheat and, therefore, are not recommended. Liquid Injection Thermal Valves with special adjustment ranges are used to conform to compressor manufacturer temperature recommendations.
To simplify selection, Emerson has developed Liquid Injection Thermal Valves with four basic adjustment ranges. These are designated as models A, B, C and D. The adjustable superheat range chart (page 11) shows the proper power assembly charge symbol suffi x for a given saturated suction temperature and a given super-heated suction gas temperature entering the compres-sor.
Nearly all Thermal valves for liquid injection may be internally equalized. However, if pressure drop occurs at the valve outlet due to a distributor, spray nozzle or other restrictive device, externally equalized valves may be needed.
Model LER and LIR valves are furnished with a 1/4” SAE male fl are external equalizer as standard. Other models must include the code letter “E” to specify the 1/4” SAE male fl are external equalizer connection. Example: LCLE and LJLE.
Application and InstallationLiquid injected into a gas to be desuperheated should
be injected in a way which provides a homogeneous mixing of the liquid and superheated gas. Desuperheat-ing hot gas bypass in the suction line may be accom-plished in several ways.
The preferred method is to bullhead the hot gas and liquid injection in a tee to permit good mixing before it enters the suction line. A good mix with the suction gas may be gained by injecting the liquid/hot gas mixture into the suction line at a 45° angle against the fl ow of suction gas to the compressor. See fi gure 6.
For suction lines 7/8” OD and smaller, the bypass mixture may be introduced into a tee rather than an angle connection. For lines larger than 2-5/8” OD, intro-duce the desuperheated bypass mixture into a 90° ell inserted against the fl ow of suction gas to the compres-sor.
Arranging a bypass directly into a suction accumula-tor is often a convenient way to get proper desuperheat-ing of suction gas.
Introducing the hot gas and liquid into the suction line with separate connections is not recommended.
NOTE: Excessive suction gas superheat can cause serious damage to the compressor. As a safety precau-tion, the bypass line solenoid valve should be wired in series with a discharge line thermostat.
Special ApplicationsOn systems where evaporator pressure regulators
are used, better control can be reached by installing the bypass regulator equalizer line on the downstream (outlet) side of the EPR so it responds to compressor suction pressure, not evaporator pressure. This results in nearly constant evaporator load balance. See fi gure 8.
Figure 8

44
Regulators Emerson Climate Technologies
Application Tips • In systems that use a Venturi type distributor, the
bypass gas should be fed into the system between the outlet of the expansion valve and the inlet to the distributor. For pressure drop distributors that use an orifi ce, the inlet must be between the orifi ce and the inlet to the distributor.
• The hot gas bypass line should be insulated to mini-mize system heat loss.
• In systems with sequential compressor unloading, the valve should be set to start opening at two to three pounds below the last stage of unloading, because compressor unloading is considerably more effi cient and should be used before resorting to bypassing.
• For oil return considerations, the bypass line must feed in ahead of the evaporator when the evaporator is installed below the compressor.
• The hot gas bypass valve should be installed as close as practical to the condensing unit, to reduce con-densing ahead of it.
• In systems that operate on a pump down cycle, there must be a solenoid valve or some other means of shutoff in the bypass line.
Adjusting the Set PointThe suction pressure at which the valve opens is
selectable by increasing or decreasing the load on the spring by turning an adjusting screw. To set it, the evap-orator must be cooled down by shutting off the fans, blocking off the airfl ow, or some other means, until the suction pressure drops to at least fi ve pounds below the desired set point. Then, by allowing the pressure to be raised by the bypass gas, the spring load can be varied until the valve closes at precisely the desired set point.
The pressure is set to maintain an evaporator tem-perature just above that at which frost forms.

45 2009
Oil Controls

Emerson Climate Technologies
46
Oil Controls Emerson Climate Technologies
OMB
Common Suction
ToCondenser
Filter-Drier CompressorDischarge
OMB OMB OMBOil SeparatorReservoir
Oil ControlsAny time that compressors are operated in a paral-
lel operation (Suction and Discharge lines manifolded together), an oil control system in needed to ensure that each compressor has enough oil to operate properly.
Oil control systems are sometimes as basic as a common line connected between compressors to allow oil and gas equalization. This is usually referred to as a “passive” oil system. Although this may suffi ce on two-compressor systems, compressor racks of three or more compressors almost always have an “active” system since even small differences in crankcase pressures can cause oil starving. This system uses an oil separator to capture most of the oil from the compressor discharge gas since some oil is carried out of the compressor with the refrigerant. Several types of oil separators are commonly used in these applications. The older style is called an impingement type while newer, more effi cient types are the centrifugal and coalescing types.
After the oil is separated from the refrigerant, it col-lects in the bottom of the oil separator where it is fed directly to the crankcase in a high-pressure oil system using oil controls on the compressor crankcases.
OMB
Low-Pressure Oil System
High-Pressure Oil System
A low-pressure oil system incorporates a separate oil reservoir which is downstream of the separator. Oil separators in low-pressure oil systems have a fl oat valve in the bottom to allow excess oil to pass to the reservoir whenever the level is high enough in the separator to open the valve. The pressure in the oil reservoir is usually held 20-30 psi above the crank-case pressure through a differential check valve. This lower pressure allows mechanical oil fl oats, which use a fl oat valve which opens when the crankcase oil level falls below 1/sight glass, to be used to feed oil into the compressor crankcases. The mechanical fl oats cannot be used on high-pressure oil systems because the oil pressure entering them would be too high and cause them to not be able to control the oil level.
On all oil systems, it is important to install an oil fi lter downstream of the oil separator to ensure a supply of clean oil to the compressors.
Emerson Oil ControlsA high-pressure oil system can use an Emerson OMB
oil control mounted on the compressor crankcase. The OMB is a device which uses a reverse Hall-effect mag-netic fl oat to activate a solenoid to allow oil to fl ow into the crankcase whenever the level falls below 1/2sight glass level. It is designed to operate at oil pressures up to 350 psid.
OMBOMB
Common Suction
ToCondenser
OilSeparator
Filter-Drier
Reservoir
DifferentialPressure Valve
OMB
CompressorDischarge

47 2009
TemperaturePressure Controls

Emerson Climate TechnologiesEmerson Climate TechnologiesTemperature-Pressure Controls
48
Emerson Climate Technologies
Temperature Pressure ControlsTemperature pressure controls serve a number of
purposes in refrigeration systems, including the control of compressor cycling, pump-down, defrost control, pressure limiting, loss of charge freeze protection and fan speed control.
TS1 IntroductionThe TS1 Series is Emerson’s adjustable thermostats
for application in refrigeration and heat pump systems. In these systems, thermostats provide space tempera-ture control, high/low temperature alarming or defrost termination. By operating an electrical contact, a tem-perature value is kept inside a certain limit.
Housing VariantsTS1 controls are top operated. Top operated
controls have adjustment spindles at the top and a display scale, showing temperature setpoint and dif-ferential, at the front. A knob which may be permanently plugged onto one of the adjustment spindles comes with every control. Frost monitors and room thermostats are derivatives of top operated thermostats. They differ by their sensors and other features to suit their target applications.
TS1 Top Operated
Vapor Charge – Sensor Type A, E, PThese sensing elements always sense from the cold-
est point on the capillary, coil, bulb or power element head. For proper operation, the coldest point must be at the part of the sensor which is exposed to the medium temperature to be sensed. The sensing location should be at least 4 degrees F colder than the other parts of the thermal system.
To avoid unwanted effects of heat transfer, for exam-ple from a cold wall, vapor charged thermostats come with an integrated bellows heater (not for frost monitors), which is rated for 230V applications. For other applica-tions, the heater must be disabled or a bellows heater with a different rating should be used.
Besides the bellows heater, room thermostats are supplied with an insulation console for the same reason.
Sensor type ‘A’ is a coiled bulb sensor with two meter capillary, which may be used with or without a bulb well. Style ‘E’ is a coil sensor for space temperature sensing, and type ‘P’ is a capillary type of sensor which can be wrapped around a heat exchanger’s surface to sense the coldest point on the heat exchanger for frost protec-tion applications.
Vapor charges respond faster to temperature chang-es than adsorption and liquid charges.
Vapour Charge
Adsorption Charge
Liquid Charge
-148°F -58 32 122 212 302 392°F
tion are capillary type of sensors, which do not have a bulb, instead, their capillary serves as the bulb directly.
Charges and sensor types are matched to tempera-ture ranges and other application specifi c characteris-tics. TS1 thermostats come with one of three charge types: vapor charges, adsorption charges or liquid charges. The application temperature range covered by each charge type is shown below:
Temperature SensingTS1 thermostats sense temperature by a thermal
system, consisting of temperature charge, bulb, capillary and bellows. The temperature charge changes its pres-sure based on the refrigerant temperature to be sensed. The sensor is the part of the system which is in thermal contact with the refrigerant. The capillary connects the sensor with the bellows and the bellows contracts or expands depending on the temperature, causing the thermostat to operate the electrical contacts. An excep-

Emerson Climate TechnologiesEmerson Climate Technologies
49
Temperature-Pressure ControlsEmerson Climate Technologies
+-
2 4
1
+-
2 4
1
Adsorption Charge – Sensor Type FAdsorption charged sensor types operate on a tem-
perature dependent adsorption material, which is inside the bulb only. These sensor types always respond to temperature changes at the bulb only. This makes them suitable to applications where it is not always defi ned which part of the thermal system the coldest point is (cross ambient applications). An example for such ap-plications is defrost control. Adsorption charges are slower in response to tempera-ture changes than vapor charges.
Liquid Charge – Sensor Type CLiquid charge sensors of type ‘C’ always sense from
the warmest point of the thermal system. The sensing location must always be 4 degrees F warmer than other parts of the thermal system.
SetpointsTS1 are adjustable controls with adjustment spindles
for range and differential. Note that manual reset con-trols and some other controls have a fi xed differential and no differential spindle. By turning the range spindle, the upper setpoint is defi ned and by adjusting the dif-ferential spindle, the differential and the lower setpoint is defi ned.
The dependency between upper and lower setpoint is always as follows:
lower setpoint = upper setpoint – differentialThe following two rules should be kept in mind:➯ an adjustment of the range spindle always affects both upper and lower setpoint.➯ an adjustment of the differential spindle affects the lower setpoint only.
The controls are equipped with display scale and pointers to show the approximate settings.
Top operated controls have display scales in units °C and °F, front operated controls have a display scale in units °C.
For precise setting of the controls, external thermom-eters must be used.
Electrical ContactsTS1 temperature controls are equipped with high
rated double snap action contacts for shatter-free and reliable operation.
All contacts in these controls are designed as Single Pole Double Throw (SPDT) contacts. One contact may be used for control and the other contact for alarm/sta-tus indication or auxiliary control.
Gold plated contacts are available on request for low
electrical loads, for example in electronic signaling ap-plications.
For applications using a supply voltage other than 230V and for applications using gold plated contacts, the bellows heater of vapor charged thermostats (sensor style A, E or P – not for frost monitors function C or D) must be disabled.
Contact FunctionThermostat contacts TS1 are labeled 1-2-4 where ‘1’
refers to the common pole, ‘2’ refers to the lower set-point and ‘4’ refers to the upper setpoint.
The contact function for automatic and manual reset versions is as described below.
Automatic ResetOn temperature rise above the upper setpoint,
contacts 1-open and contacts 4 close. On decreasing temperature lower setpoint contacts 4 open and con-tacts close.
Automatic reset contact function
Manual Reset Low TemperatureOn decreasing temperature below the lower setpoint,
contacts 1-4 open, contacts close and latch. Only on temperature rise above upper setpoint and after press-ing the manual reset button contacts will open and contacts 4 will close again.
Manual reset low temperature contact function
Manual Reset High TemperatureOn increasing temperature above the upper setpoint,
contacts 1-open, contacts 4 close and latch. Only on falling temperature below lower setpoint and after press-ing the manual reset button, contacts 4 will open and contacts 1-will close again.
Manual reset high temperature contact function+-
2 4
1

Emerson Climate TechnologiesEmerson Climate TechnologiesTemperature-Pressure Controls
50
Emerson Climate Technologies
For operational safety, all TS1 with manual reset are designed as trip-free controls, i.e. pressing the manual reset button while the temperature has not reached its reset threshold will not operate the electrical contacts.
Bellows HeaterTS1 with vapor charges, i.e. sensor types A, E, P
(not frost monitors function C or D) have a bellows heater wired across the contacts in the following way.
Bellows heater
PS1/PS2 IntroductionThe PS1/PS2 Series is Emerson’s adjustable pres-
sostats for application in refrigeration and heat pump systems.
In these systems, pressure controls serve control and protection functions. Examples of control are compressor cycling, pump-down or defrost control. Protection includes pressure limiting and cut out against excessive pressures, against loss of charge or for freeze protection.
Pressure SensingAll pressures mentioned in this document are un-
derstood as gauge pressures. PS1/PS2 controls sense pressure by bellows which expand or contract when exposed to medium pressure.
High pressure limiters and pressure cut outs with type approval according to EN 12263 feature a double bellows design. The inner bellows serves as the operat-ing bellows and is enclosed by the outer bellows featur-ing a larger surface area.
Single Pressostat PS1
Dual Pressostat PS2
Should the inner bellows leak, then the larger sur-face area of the outer bellows creates a larger force and causes the pressostat to a pre-empted cut out. This represents a fail-safe function. Standard controls for refrigeration applications are equipped with a bronze bellows and can be used with all common HFC, HCFC and CFC refrigerants.
Pressure ConnectorsA variety of pressure connectors, including male
and female fl are type connectors, capillary and solder connectors are available. The standard connector is a 7-16”-20 UNF male fl are connector, which, in its high pressure versions, is equipped with a snubber to protect against pressure pulsations.
Electrical ContactsPS1/PS2 pressure controls are equipped with high
rated double snap action contacts for shatter-free and reliable operation.
All contacts in these controls are designed as Single Pole Double Throw (SPDT) contacts. One contact may be used for control and the other contact for alarm/sta-tus indication or auxiliary control. Dual Pressostats PS2 come with two independently actuated SPDT contacts, providing for even further application fl exibility by allow-ing for a variety of wiring options.
Ω
2
41
+-

Emerson Climate TechnologiesEmerson Climate Technologies
51
Temperature-Pressure ControlsEmerson Climate Technologies
SetpointsPS1/PS2 are adjustable controls with external ad-
justment spindles for range and differential. Note that manual reset controls have a fi xed differential and no differential spindle. By turning the range spindle, the upper setpoint is defi ned and by adjusting the differential spindle, the differential and the lower setpoint is defi ned.
The dependency between upper and lower setpoint is always as follows:
lower setpoint = upper setpoint – differential
The following two rules should be kept in mind:➯ an adjustment of the range spindle always affects both upper and lower setpoint.➯ an adjustment of the differential spindle affects the lower setpoint, only.The controls are equipped with display scale and point-ers to show the approximate settings. The display scales are printed in relative pressure units “bar” and “psi”. For precise setting of the controls, external gauges must be used.
Contact FunctionContacts on Single Pressostats, PS1 are labeled
1-2-4 where ‘1’ refers to the common pole, ‘2’ refers to the lower setpoint and ‘4’ refers to the upper setpoint. This is true for all types of controls, irrespective whether they are low pressure controls, high pressure controls, manual or automatic reset types.
The contact function for automatic and manual reset versions is as described below.
Automatic ResetWhen pressure rises above the upper setpoint,
contacts 1-2 open and contacts 1-4 close. On decreas-ing temperature lower setpoint contacts 1-4 open and contacts 1-2 close.
Automatic reset contact function
Manual Reset Low PressureWhen pressure drops below the lower setpoint,
contacts 1-4 open, contacts 1-2 close and latch. Only on pressure rise above upper setpoint and after press-ing the manual reset button contacts 1-2 will open and contacts 1-4 will close again.
Manual reset low pressure contact function
Manual Reset High PressureWhen pressure rises above the upper setpoint,
contacts 1-2 open, contacts 1-4 close and latch. Only on falling pressure below lower setpoint and after press-ing the manual reset button, contacts 1-4 will open and contacts 1-2 will close again.
Manual reset high pressure contact function
For operational safety, all PS1/PS2 with manual reset are designed as trip-free controls, i.e. pressing the manual reset button while the pressure has not reached its reset threshold will not operate the electrical contacts.
As Dual Pressostats PS2 have two sets of contacts, their function is the same as on Single Pressostats PS1 with the only difference that the contact labels are pre-ceded by an additional index. One side of the control is labeled 11-12-14 and the second side is 21-22-24.
The contact function of controls with convertible reset is as described above but depends on the position of the convertible reset toggle, i.e. automatic or manual reset position.
+-
2 4
1
+-
2 4
1
+-
2 4
1
P
P
P

Emerson Climate TechnologiesEmerson Climate TechnologiesTemperature-Pressure Controls
52
Emerson Climate Technologies
PSC Pressure SwitchThe Emerson PSC is a Pressure Switch with fi xed
switch-point settings.
Features• Maximum Operating Pressure up to 623 psig Test
Pressure up to 696 psig• Standard factory settings from stock in small volumes• High and low pressure switches• High temperature version with snubber for direct com-
pressor mounting (Range 6)• Direct mounting reduces the number of joints and thus
avoiding potential leakage• Precise setting and repeatability• IP 65 protection if used with the cables with plug
Options• For direct mounting on a pressure connection (free standing) or with a capillary tube• Direct compressor head mounting with high temperature bellows and snubber - reduces the number of joints - avoids potential leakage - saves high cost of fl exible hose• TÜV approved versions for high and low pressure• Micro-switch for narrow pressure differentials• Gold plated contacts for low voltage/current applications• Cables with plug ordered separately
PSC IntroductionPSC is equipped with a SPDT snap action contact,
switching from 1-2 to 1-4 on rising pressure and from 4 to on falling pressure (see diagram). Several models are available:
• Low pressure switch, with automatic or manual reset• High pressure switch, with automatic or manual reset• DIN/TÜV approved safety high pressure limiter with
automatic reset• DIN/TÜV approved safety high pressure cut-out, with
internal or external manual reset
TÜV approval for pressure switches can be reached either by using a double diaphragm (Pressure range 1-5) which acts in a fail-safe mode or by a single pres-sure element (Bellows, Pressure range 6) which is able to resist to >Mio. cycles between 50% and 100% of the maximum operating pressure (see 4.6.1 of EN 12263).
PSC
1
P
2
4
+
-
Bellows (Pressure Range 6)
Single Diaphragm

Emerson Climate TechnologiesEmerson Climate Technologies
53
Temperature-Pressure ControlsEmerson Climate Technologies
FSX IntroductionFSX electronic speed controllers are designed to
control the speed of fan motors in commercial refrigera-tion system depending on condensing pressure chang-es. It is suitable for single phase. FSX can be used in air-cooled condensers, air-cooled condensing units and air-conditioning units.
Using variable fan speed controllers offers the following benefi ts in commercial refrigeration or air-conditioning applications:• Head pressure can be kept high enough to ensure proper operation of the expansion valve, and suffi cient mass fl ow through the expansion valve to feed the evaporator. This maintains the required cooling capacity.• Effi ciency increase of the compressor by controlling the head pressure, improved performance and energy saving for the complete system.• The noise of the motor can be kept at a minimum by avoiding permanent on/off cycling.
Figure 1 – FSX Output Voltage Versus Input Pressure
SupplyVoltage230 V
OutputVoltage99% Maximum range
Minimumrange50%
Cut-off0%
Proportional range
Pressure (bar)Proportional range:FSX-41_: 2,5 barFSX-42_: 3,8 barFSX-43_: 4,6 bar
FSX-43S
Description of control behaviorFSX control behavior can be easily described by
looking at the function of output voltage versus input pressure (see fi gure 1) and by dividing it into maximum, proportional and minimum range.
In the maximum range, the FSX provides a constant output voltage of about 1% below the supply voltage. The fan runs at maximum speed.
Along the proportional range the output voltage var-ies between maximum and minimum voltage of approxi-mately 50% of the supply voltage. This causes the fan speed to slow down from maximum speed to minimum speed.
Further decrease of pressure in the minimum range leads to cut-off of the fan motor. Increase of input pres-sure will start the motor with a hysteresis of approxi-mately 10 psig to avoid cycling (Fig. 1).
The pressure from which motor is cut off (FSX), see column “pressure range” in the selection chart. The pro-portional range is fi xed at:
36 psig for FSX-41_/FSM-41_ 55 psig for FSX-42_/FSM-42_ 66 psig for FSX-43_/FSM-43_

54 2009
Basic Rules ofGood Practice

55
Basic Rules of Good PracticeEmerson Climate Technologies
DOs DO maintain test instruments in good working order and periodically check them against accurately calibrated instruments.
Good diagnoses can’t be made with faulty inputs.
DO familiarize yourself with the operation of a control before attempting to make adjustments or repairs.
If you don’t understand how a control is supposed to function, you can’t be sure if it’s defective or not. When you know what you’re doing, you achieve good results on purpose; when you don’t know what you’re doing, you achieve good results only by accident.
DO make it a practice to check suction gas superheat at the compressor.
Too low superheat may result in liquid fl ood-back, while high superheats cause high discharge temperatures. Always follow equipment manufacturers’ instructions.
DO replace fi lter driers or replaceable cartridges whenever it’s necessary to open a system for service.
Regardless of how careful you are, it’s virtually impossible to prevent the entry of moisture and other contaminants while the system is open. Driers or cartridges cannot be successfully activated in the fi eld for reuse. A new fi lter drier or cartridge is cheap insurance for a compressor.
DO use an accurate moisture indicator in the liquid line to watch out for moisture contamination.
It is the single most common contaminant, and it can lead to a variety of problems including acid, sludge, and freeze-ups.
DO check expansion valve superheat by using the temperature-pressure method.
This involves measuring the suction line pressure at the evaporator outlet and then referring to the appropriate temperature-pressure chart to determine the satura-tion temperature. Subtracting this temperature from the suction line temperature measured at the remote bulb gives you the operating superheat, which should be adjusted to the equipment manufacturer’s specifi cations.
Basic Rules of Good PracticeDoing a good job in any line of work almost always involves following some basic “good practice” rules, and ser-
vicing refrigeration systems is no exception. Knowing and observing such basic rules, to the point that it becomes automatic, can prevent a lot of problems by cutting them off at the pass before they have a chance to happen.
A list of DO’s, procedures that should be followed, and a list of DON’Ts representing pitfalls that should be avoided are presented here to promote the general adoption of good servicing practices and a better understand-ing of the WHYs behind them. An occasional quick review may serve to reinforce awareness and help make their application second nature.
R-22
6.14.83.41.90.40.61.42.23.14.04.95.96.98.09.110.211.412.613.915.216.517.919.420.922.424.025.727.429.131.032.834.836.838.840.943.145.347.650.052.455.057.560.262.9
R-134a
18.718.017.316.515.714.813.913.012.010.99.88.77.56.35.03.72.30.80.31.11.92.83.64.65.56.57.58.59.610.811.913.114.415.717.018.419.921.322.924.526.127.829.531.3
R-12
15.514.613.812.912.011.010.08.97.96.75.54.33.01.70.30.51.32.02.83.64.55.36.27.28.19.110.111.212.313.414.615.817.018.319.621.022.423.825.326.828.430.031.633.3
P R E S S U R E T E M P E R AT U R E C H A R T AT S E A L E V E L
R-401AMP-39
17.917.216.415.614.713.812.911.910.99.88.77.56.35.03.62.20.80.31.11.92.83.64.55.46.47.48.59.510.711.813.014.215.516.918.219.621.122.624.225.827.429.130.932.7
R-402AHP-80
1.11.92.83.74.75.76.87.89.010.111.412.613.915.316.718.219.721.222.924.526.328.029.931.833.835.837.940.042.344.646.949.451.954.457.159.862.665.568.571.574.777.981.284.6
°F
-50-48-46-44-42-40-38-36-34-32-30-28-26-24-22-20-18-16-14-12-10-8-6-4-202468
1012141618202224262830323436
Red (in of Hg) = Vacuum Black (psig) = Vapor Bold (psig) = Liquid
The Brand You Know.The Products You Trust.
TXV SUPERHEAT ADJUSTMENT
R-404AHP-62
0.10.71.62.43.44.35.36.37.48.59.610.812.013.314.616.017.418.920.422.023.625.327.028.830.732.634.636.638.740.943.145.447.850.252.755.358.060.763.566.469.372.475.578.7
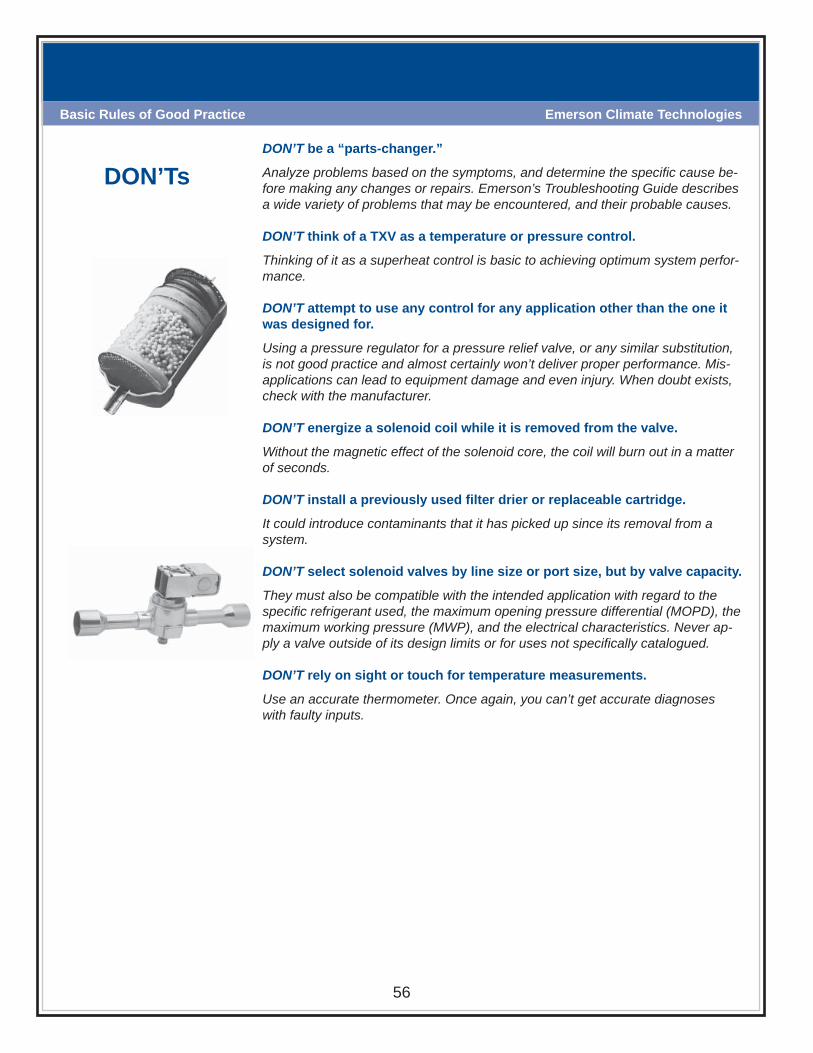
56
Basic Rules of Good Practice Emerson Climate Technologies
DON’Ts DON’T be a “parts-changer.”
Analyze problems based on the symptoms, and determine the specifi c cause be-fore making any changes or repairs. Emerson’s Troubleshooting Guide describes a wide variety of problems that may be encountered, and their probable causes.
DON’T think of a TXV as a temperature or pressure control.
Thinking of it as a superheat control is basic to achieving optimum system perfor-mance.
DON’T attempt to use any control for any application other than the one it was designed for.
Using a pressure regulator for a pressure relief valve, or any similar substitution, is not good practice and almost certainly won’t deliver proper performance. Mis-applications can lead to equipment damage and even injury. When doubt exists, check with the manufacturer.
DON’T energize a solenoid coil while it is removed from the valve.
Without the magnetic effect of the solenoid core, the coil will burn out in a matter of seconds.
DON’T install a previously used fi lter drier or replaceable cartridge.
It could introduce contaminants that it has picked up since its removal from a system.
DON’T select solenoid valves by line size or port size, but by valve capacity.
They must also be compatible with the intended application with regard to the specifi c refrigerant used, the maximum opening pressure differential (MOPD), the maximum working pressure (MWP), and the electrical characteristics. Never ap-ply a valve outside of its design limits or for uses not specifi cally catalogued.
DON’T rely on sight or touch for temperature measurements.
Use an accurate thermometer. Once again, you can’t get accurate diagnoses with faulty inputs.

57 2009
TroubleshootingGuide

58
SystemProblem
DischargePressure
SuctionPressure Superheat Subcooling Amps
Overcharge
Undercharge
LiquidRestriction
(Drier)
LowEvaporator
Airfl ow
DirtyCondenser
Low OutsideAmbient
Temperature
Ineffi cientCompressor
TXV BulbLoose
Mounted
TXV BulbLost
Charge
PoorlyInsulated
Bulb
SYSTEM TROUBLESHOOTING GUIDE

59
Superheat Is Too Low -- TXV Feeds Too MuchProblem Symptoms Causes Corrective Action
Valve FeedsToo Much
1) Liquid Slugging
2) Low Superheat
3) Suction Pressure Normal or High
Oversized Valve Replace with correct size valve
Incorrect Superheat Setting Adjust the superheat to correct setting
Moisture Replace the filter-driers; evacuate the systemand replace the refrigerant
Dirt or Foreign Material Clean out the material or replace the valveIncorrect Charge Selection Select proper charge based on refrigerant typeIncorrect Bulb Location Relocate the bulb to proper locationIncorrect Equalizer Location Relocate the equalizer to proper locationPlugged Equalizer (Balanced Port Valve) Remove any restriction in the equalizer tube
Superheat Is Too High -- TXV Doesn't Feed or Doesn't Feed EnoughProblem Symptoms Causes Corrective Action
ValveDoesn'tFeed orDoesn'tFeed
Enough
1) Evaporator Temperature Too High2) High Superheat3) Low Suction Pressure
Short of Refrigerant Add correct amount of refrigerant
High Superheat Change superheat setting
Flash Gas In Liquid Line Remove source of restriction
Low or Lost Bulb Charge Replace power element or valve
Moisture Replace driers or evacuate the system andreplace refrigerant
Plugged Equalizer (Conventional Valve) Remove restriction in equalizer tube
Insufficient Pressure Drop or Valve TooSmall Replace existing valve with properly sized valve
Dirt or Foreign Material Clean out material or replace valve
Incorrect Charge Selection Select correct charge
Incorrect Bulb Location Move bulb to correct location
Incorrect Equalizer Location Move equalizer to correct location
Charge Migration (MOP Only, VaporCharges)
Move valve to a warmer location or apply heattape to powerhead
Wax Use charcoal drier
Wrong equalizer Type Valve Use externally equalized valve
Rod Leakage (Balanced Port Valve) Replace valve
Heat Damaged Powerhead Replace powerhead or valve
No Superheat At Start Up OnlyProblem Symptoms Causes Corrective Action
Valve FeedsToo Much At
Start Up
1) Liquid Slugging2) Zero Superheat3) Suction Pressure Too High
Refrigerant Drainage Use pump down control; Install trap at the topof the evaporator
Compressor or Suction Line in a ColdLocation Install crankcase heater; Install suction solenoid
Partially Restricted or Plugged ExternalEqualizer (Balanced Port Valve) Remove restriction
Liquid Line Solenoid Won't Shut Replace powerhead or valve
Superheat Is Erratic Or HuntsProblem Symptoms Causes Corrective Action
SystemHunts orCycles
1) Suction Pressure Hunts2) Superheat Hunts3) Erratic Valve Feeding
Bulb Location Incorrect Reposition BulbValve Too Large Replace with correctly sized valveIncorrect Superheat Setting Adjust superheat to correct settingSystem Design Redesign system
Troubleshooting Expansion Valves

60
Symptom Possible Cause Action Remark
Valve is not moving
Digital input has priority to analogue signal input
Digital input must be activated and deactivated along with compressor start and stop
Wrong setting of dipswitchesAdjust the dip switches cor-rectly. The power supply must be off during this action
Supply voltage too low
Supply voltage: 24VAC ± 10%if external ECP-024 is used.Supply voltage: 24VAC or VDC ± 10% if external ECP-024 is not connected
Wrong wiring between valve and driver Correct the wiring
Valve operating in reverse direction
Wrong wiring between driver and valve Correct the wiring
The valve is not at the posi-tion corresponding to input signal
Digital input of driver has been jumpered so there is no synchronization at all
Driver does not show any life Wrong supply voltage applied Change EXDU00Temporary high voltage such as 110V/230V may damage the driver
EXD-U00 TROUBLESHOOTING – (Driver with Auxillary Controller)
FunctionDip Switch Number
1 2 3 4 5 6 7 8EX4/EX5/EX6 operation 0 1 1 0 1 0 – –EX7 operation 1 0 0 1 0 1 – –EX8 operation 1 1 0 1 1 1 – –4-20 mA analogue input signal – – – – – – – 00-10V analogue input signal – – – – – – – 1With start mode – – – – – – 1 –Without start mode – – – – – – 0 –
3 4 5 6 7 8
1
0 1 2
Superheat Appears Normal -- System Performs PoorlyProblem Symptoms Causes Corrective Action
Valve Doesn't Feed Properly1) Poor System Performance2) Low or Normal Superheat3) Low Suction Pressure
Unequal Circuit Loading Make modification to balance load
Flow From One Coil AffectingAnother Coil Correct piping
Low Load Correct conditions causing low load
Mismatched Coil/Compressor Correct match
Incorrect Distributor Install correct distributor
Evaporator Oil-Logged Increase gas velocity through coil
Troubleshooting Electronic Valves & Controls
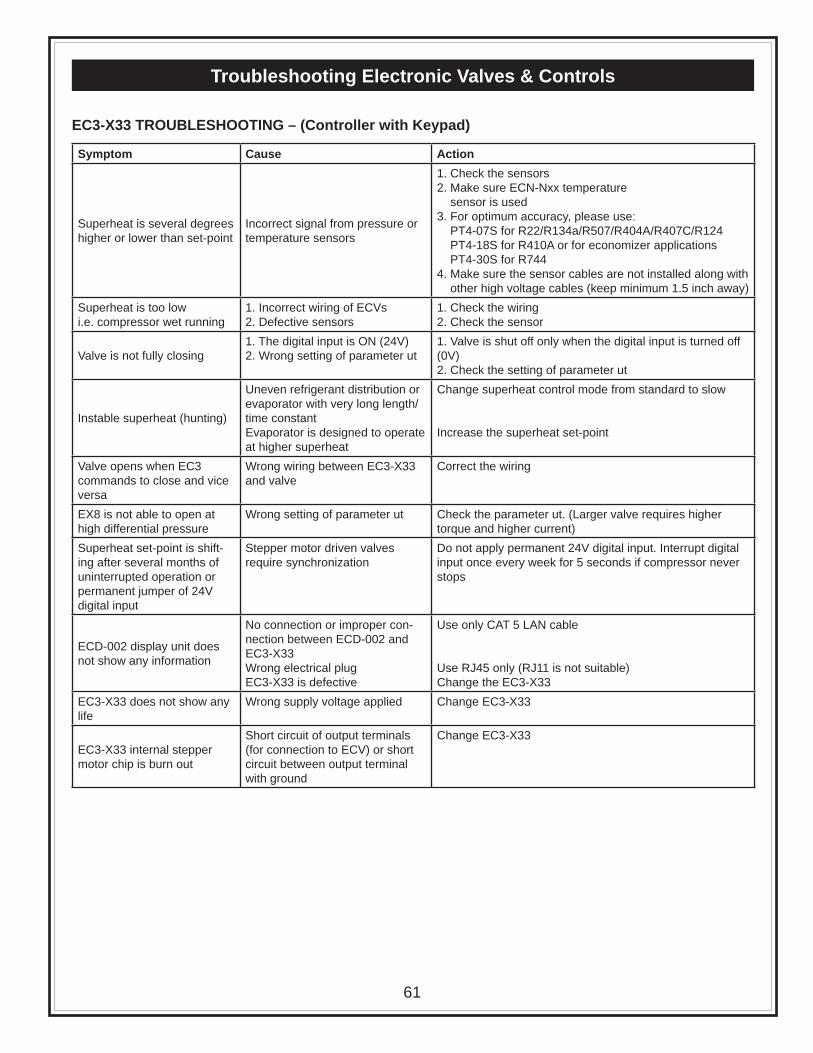
61
EC3-X33 TROUBLESHOOTING – (Controller with Keypad)
Symptom Cause Action
Superheat is several degrees higher or lower than set-point
Incorrect signal from pressure or temperature sensors
1. Check the sensors2. Make sure ECN-Nxx temperature sensor is used3. For optimum accuracy, please use: PT4-07S for R22/R134a/R507/R404A/R407C/R124 PT4-18S for R410A or for economizer applications PT4-30S for R7444. Make sure the sensor cables are not installed along with other high voltage cables (keep minimum 1.5 inch away)
Superheat is too low i.e. compressor wet running
1. Incorrect wiring of ECVs2. Defective sensors
1. Check the wiring2. Check the sensor
Valve is not fully closing1. The digital input is ON (24V)2. Wrong setting of parameter ut
1. Valve is shut off only when the digital input is turned off (0V)2. Check the setting of parameter ut
Instable superheat (hunting)
Uneven refrigerant distribution or evaporator with very long length/time constant Evaporator is designed to operate at higher superheat
Change superheat control mode from standard to slow
Increase the superheat set-point
Valve opens when EC3 commands to close and vice versa
Wrong wiring between EC3-X33 and valve
Correct the wiring
EX8 is not able to open at high differential pressure
Wrong setting of parameter ut Check the parameter ut. (Larger valve requires higher torque and higher current)
Superheat set-point is shift-ing after several months of uninterrupted operation or permanent jumper of 24V digital input
Stepper motor driven valves require synchronization
Do not apply permanent 24V digital input. Interrupt digital input once every week for 5 seconds if compressor never stops
ECD-002 display unit does not show any information
No connection or improper con-nection between ECD-002 and EC3-X33 Wrong electrical plugEC3-X33 is defective
Use only CAT 5 LAN cable
Use RJ45 only (RJ11 is not suitable)Change the EC3-X33
EC3-X33 does not show any life
Wrong supply voltage applied Change EC3-X33
EC3-X33 internal stepper motor chip is burn out
Short circuit of output terminals (for connection to ECV) or short circuit between output terminal with ground
Change EC3-X33
Troubleshooting Electronic Valves & Controls

62
EC3-X33 TROUBLESHOOTING – (Controller with Computer)
Symptom Cause Action
Superheat is several degrees higher or lower than set-point
Incorrect signal from pressure or temperature sensors
1. Check the sensors2. Make sure ECN-Nxx temperature sensor is used3. For optimum accuracy, please use: PT4-07S for R22/R134a/R507/R404A/R407C/R124 PT4-18S for R410A or for economizer applications PT4-30S for R7444. Make sure the sensor cables are not installed along with other high voltage cables (keep minimum 1.5 inch away)
Superheat is too low i.e. compressor wet running
1. Incorrect wiring of ECVs2. Defective sensors
1. Check the wiring2. Check the sensor
Valve is not fully closing1. The digital input is ON (24V)
2. Wrong setting of parameter ut
1. Valve is shut off only when the digital input is turned off (0V)2. Check the setting of parameter ut
Instable superheat (hunting)
Uneven refrigerant distribution or evaporator with very long length/time constant Evaporator is designed to operate at higher superheat
Change superheat control mode from standard to slow
Increase the superheat set-point
Valve opens when EC3 commands to close and vice versa
Wrong wiring between EC3-X32 and valve
Correct the wiring
EX8 is not able to open at high differential pressure
Wrong setting of parameter ut Check the parameter ut. (Larger valve requires higher torque and higher current)
Superheat set-point is shift-ing after several months of uninterrupted operation or permanent jumper of 24V digital input
Stepper motor driven valves require synchronization
Do not apply permanent 24V digital input. Interrupt digital input once every week for 5 seconds if compressor never stops
Not able to get data on PC monitor
No connection or improper connection between PC and EC3-X32Wrong electrical plugEC3-X32 and PC are not in a logi-cal network
Check the network wiring
Use RJ45 only (RJ11 is not suitable)Check TCP/IP confi guration of Windows(2000, XP or Vista)
EC3-X32 does not show any life
Wrong supply voltage applied Change EC3-X32
EC3-X32 internal stepper motor chip is burn out
Short circuit of output terminals (for connection to ECV) or short circuit between output terminal with ground
Change EC3-X32
Troubleshooting Electronic Valves & Controls

63
Troubleshooting Solenoid ValvesProblem Causes Corrective Action
Normally Closed Valve Will Not Open-or-
Normally Open Valve Will Not Close
Movement of plunger or diaphragm restricteda) Corroded partsb) Foreign material lodged in valvec) Dented or bent enclosing tubed) Warped or distorted body due to improperbrazing or crushing in vice
Clean affected parts and replace parts asrequired. Correct the cause of corrosion or sourceof foreign materials in the system.
Improper wiringCheck electrical circuit for loose or brokenconnections. Attach voltmeter to coil leads andcheck voltage, inrush and holding currents
Faulty contacts on relays or thermostats Check contacts in relays and thermostats. clean orreplace as required.
Voltage and frequency rating or solenoid coil notmatched to electrical supply:a) low voltageb) high voltagec) incorrect frequency
Check voltage and frequency stamped on coilassembly to make certain it matches electricalsource. If it does not, obtain new coil assemblywith proper voltage and frequency rating:a) Locate cause of voltage drop and correct.Install proper transformer, wire size as needed. Besure all connections are tight and that relaysfunction properly.b) Excessively high voltage will cause coil burnout.Obtain new coil assembly with proper voltagerating.c) Obtain new coil assembly with proper frequencyrating.
Oversized Valve Install correct sized valve. Consult extendedcapacities tables.
Valve improperly assembled. Assemble parts in proper position making certainnone are missing from valve assembly.
Coil Burnouta) Supply voltage at coil too low (below 85% ofrated coil voltage)b) Supply voltage at valve too high (more than10% above coil voltage rating)c) Valve located at high ambient
d) Plunger restricted due to: corroded parts,foreign materials lodged in valve, dented or bentenclosing tube or warped or distorted body due toimproper brazing or curshing in visee) With valve closed, pressure difference acrossvalve is too high preventing valve from openingf) Improper wiring. Inrush voltage drop causingplunger to fail to pull magnetic field due to:- Wiring the valve to the load side of the motorstarter- Wiring the valve in parallel with anotherappliance with high inrush current draw- Poor connetions, especially on low voltage,where connections should be soldered- Wire size of electrical supply too smallg) Electrical supply (voltage and frequency) notmatched to solenoid coil rating
a) Locate cause of low voltage and correct (checktransformer, wire size, and control rating)b) Locate cause of high voltage and correct(install proper transformer or service)c) Ventilate the area from high ambient. Removecovering from coil housingd) Clean affected parts and replace as required.Connect cause of corrosion or source of foreignmaterial in the system
e) Reduce pressure differential to less than300psif) Correct wiring according to valve manufacturers'instructions. Solder all low voltage connections.Use correct wire size.
g) Check coil voltage and frequency to ensure match to electrical service rating. Install new coil with proper voltage and frequency rating.
Normally Closed Valve Will Not Close-or-
Normally Open Valve Will Not Open
Diaphragm or plunger restricted due to: corrodedparts, foreign material lodged in valve, dented orbent closing tube, or warped body due toimproper brazing or crushing in vise
Clean affected parts and replace parts asrequired. Correct the cause of corrosion or sourceof foreign materials in the system. Install a filter-drier upstream of solenoid valve
Manual opening stem holding valve open With coil de-energized, turn manual stem incounter clockwise direction until valve closes
Closing spring missing or inoperative Re-assemble with spring in proper position
Electrical feedback keeping coil energized, orswitch contacts not breaking circuit to coil
Attach voltmeter at coil leads and check forfeedack or closed circuit. Correct faulty contactsor wiring
Reverse pressures (outlet pressure greater thaninlet pressure), or valve installed backwards
Install check valve at valve outlet, or install withflow arrow in proper direction
Problem Causes Corrective Action
Valve Closes, But Flow Continues (Seat Leakage)
Foreign material lodged under seat Clean internal parts and remove foreign material
Valve seat damaged Replace valve or affected parts
Synthetic seat materials chipped Replace valve or affected parts
Valve improperly applied or assembled Replace valve with proper valve or re-assemble

64
Symptoms Causes Corrective Action
Doesn't Flow Valve Isn't Open Turn Stem
Leak at Access Schrader Valve Schrader Valve Isn't Tight Tighten Schrader Valve
Leak at Stem Valve Stem is Leaking Replace Valve
Excessive Pressure Drop Valve Isn't Fully Open Turn Stem to Open Valve
Troubleshooting Ball Valves
Special Considerations For Industrial Solenoid ValvesSymptoms Causes Corrective Action
High Internal Seat Leakage (high temperaturesteam up to 400°) Wrong Seat Elastomer Used (Buna N) Use Valve with Teflon Seat Elastomer
External Leakage (high temperature steam up to400°) Wrong Gasket Material Used (Neoprene) Use Ethylene Propylene Gasket
High Internal Seat Leakage (high temperaturesteam up to 250° or water up to 210°) Wrong Seat Elastomer Used (Buna N) Use Valve with Ethylene Propylene Seat
ElastomerExternal leakage (high temperature steam up to250° or water up to 210°) Wrong Gasket Material Used (Neoprene) Use Ethylene Propylene Gasket
Suction Line AccumulatorsProblem Causes Corrective Action
Oil Not Returning to Compressor
Bleed Hole in U-Tube Plugged Replace Accumulator; Install Filter Ahead ofAccumulator
U-Tube Broken Off Replace Accumulator
Accumulator Too Large for Application Replace with Smaller Accumulator
Accumulator Installed Incorrectly Re-Install with Correct Inlet & Outlet Connections
Troubleshooting Storage Devices
Allowable Pressure Drop -- Permanent Installation
RefrigerantEvaporator Temperature
40°F 20°F 0°F -20°F -40°F
R12, R134a 2.0 1.5 1.0 0.5 -
R22, R410A 3.0 2.0 1.5 1.0 0.5
R502, R404A/507 3.0 2.0 1.5 1.0 0.5
Troubleshooting System Protectors
Liquid Refrigerant ReceiversProblem Causes Corrective Action
Flashing In Liquid Sight Glass Downstream OfReceiver
Receiver Outlet Not Fully Open Open Valve Fully
On Receivers with Top Outlet Connections, theDip Tube may be Broken Off Or Plugged Replace Receiver
Receiver Installed Upside Down Re-Install Receiver Correctly

65
Problem Causes Corrective Action
Valve Won't Adjust or Is Erratic Dirt under seatWith system running, open the valve adjustmentto open the valve and flush away the contaminant.If this fails, replace valve.
Valve Throttles Constantly On system equipped with Hot Gas Bypas Valves,the bypass valve setting is higher than CPR
Re-adjust bypass and/or CPR valve so that theCPR setting is higher than the discharge bypassvalve
Temperature Pull-Down After Defrost is Too LongTXV with MOP feature used with the CPR To improve pull-down time, replace TXV with
equivalent without MOP feature
Valve setting is too low Re-adjust the CPR to a higher setting - seeadjustment procedure
Troubleshooting Crankcase Regulators
Problem Causes Corrective Action
Low Suction Pressure - Valve Open Valve undersized Replace valve with correct size
Will Not Bypass - Valve Not Open
1. Solenoid (if present) not energized2. Valve sticking closed3. Not set properly4. Bad pilot
1. Repair (replace solenoid coil)2. Replace3. Recalibrate4. Replace
Suction Pressure Swings Erratically Oversized valve Replace valve with correct size
Bypass Continuously - Suction Pressure High1. Manual stem screwed down2. Valve sticking open3. Bad pilot
1. Back stem out2. Repair/replace valve3. Replace pilot
Setpoint Drifts Bad pilot Replace pilot
Troubleshooting Hot Gas Regulators
Troubleshooting RegulatorsProblem Causes Corrective Action
Erratic Pressure ControlPilot inlet filter screen obstructed Clean or replace.
Piston bleed hole restrictionDisassemble valve and clean. Replace ifnecessary.
Regulator Will Not Open(EPRBS Version)
Excessive dirt in pilot/solenoid
Piston bleed hole restriction
Coil is damaged or not energized Verify coil is energized. Replace if necessary.
Excessive Pressure Drop Across the Regulator
Piston bleed partially obstructed Disassemble and clean regulator.
Pilot or solenoid leaking internally Replace pilot assembly.
Regulator undersized Refer to extended capacities table. Install correctsized regulator.
Regulator Hunting(Fluctuations in Controlled Pressure)
Piston bleed port obstructedClean or replace.
Pilot inlet filter screen obstructed
Regulator oversized Refer to extended capacities table. Install correctsized regulator.
Regulator and TXV have control interactionTurn off pilot pressure. Ensure regulator is wideopen. Adjust superheat to required setting. Turnpilot pressure back on.
Regulator and cylinder unloaders have controlinteraction
The unloader should be set to control at least 5psig lower than regulator.
Regulator Will Not Provide Pressure Control
Pilot inlet filter screen obstructed Clean or replace.
Pilot inlet pressure is too low Increase pressure to a minimum of 25 psi higherthan the main valve outlet pressure.
Piston jammed due to excessive dirt; Inoperativepilot or broken diaphragm
Locate and remove the stoppage or dirt. Replacepilot. A broken diaphragm can be detected bychecking for leaks around the adjusting stem.
Regulator Will Not Close(EPRBS Version)
Dirt under seat Disassemble and clean.
Excessive piston seal leakage Replace bell piston assembly.
Plugged pilot filter Clean or replace.
Pilot supply turned off or restricted Verify pilot inlet pressure is at least 25 psiggreater than valve outlet.
Excessive dirt in pilot/solenoid Replace pilot assembly.

66
Problem Causes Corrective Action
Compressor tripping on Internal ThermalProtector - Fails to Start-Up and Run Long
Enough to Pull Down TemperatureCPR setting too high Re-adjust the CPR to a lower setting - see
adjustment procedure
Valve Fails to OpenCPR setting is too low
Valve defective - bellows leak, pressurizing theupper adjustment assembly Replace valve
Table 3 - Refrigerant lbs. per ft.*
Refrigerant
Condenser Tube Size - O.D. (in inches)** and Ambient Temperature ° F
3/8" 1/2" 5/8"
40° 0° -20° -40° 40° 0° -20° -40° 40° 0° -20° -40°
R134a .051 .054 .055 .057 .095 .099 .102 .105 .150 .157 .164 .167
R22 .051 .054 .055 .056 .094 .099 .102 .104 .150 .159 .163 .167
R404A/R507A .053 .056 .058 .059 .098 .104 .107 .109 .157 .166 .171 .175
Problem Causes Corrective Action
Low Head Pressure During Operation
Valve unable to throttle "C" port1. Foreign material wedged between "C" portseat and seat disc2. Power element lost its charge3. Insufficient winter-time system charge
1. Artificially raise head pressure and tap valvebody to dislodge foreign material2. Change valve3. Add refrigerant per Table 3
Wrong charge pressure in valve for refrigerant Change valve
Receiver exposed to low ambient conditions isacting as condenser Insulate the receiver
Hot gas bypass line restricted or shut off Clear obstruction or open valve
System Runs High Head Pressure-or-
Cycles on High Pressure Cut-Out
Compressor not pumping, restriction in liquidline, low side causing very low suction pressure
Change or repair compressor; clear obstructionor other reason for low suction pressure
Condenser fan not running or turning in wrongdirection
Replace or repair fan motor, belts, wiring orcontrols as required
Fan cycling Run condenser fan continuously while system isrunning
Pressure drop through condenser exceedsallowable 20 psi forcing "B" port partially open
Repipe, recircuit, or change condenser asrequired to reduce condenser pressure drop toless than 20 psi
Condenser undersized or air flow restricted orshort circuiting
Increase size of condenser or remove air flowrestriction or short circuit as required
"B" port wedged open due to foreign materialbetween seat and seat disc
Artificially reduce head pressure below valvesetpoint and tap valve body with system runningto dislodge foreign material
"B" port seat damaged due to foreign materialChange valve
Wrong charge pressure in valve for refrigerant
Excessive system charge or air in system Purge or bleed off refrigerant or non-condensables as system requires
Obstruction or valve closed in discharge orcondenser drain line Clear obstruction or open valve
Liquid line solenoid fails to open Check solenoid
Troubleshooting Head Pressure Controls
CHARGING THE SYSTEM - THEORETICAL METHODWeighing the Charge (Method has practical limitations)
Add refrigerant until the sight glass is clear and free of bubbles.Determine refrigerant required to fi ll the condenser, see Table 3 below. Add this additional amount.
* Return bends: 3/8” O.D. - 20 ft; 1/2 O.D. - 25 ft.; 5/8 O.D. - 30 ft. (equivalent length of tubing/return bend)** Wall thickness: 3/8” O.D. - .016”; 1/2 O.D. - .017”; 5/8 O.D. - .018”

67
Troubleshooting Oil Controls - OMB
Troubleshooting Oil SeparatorsProblem Causes Corrective Action
Reduced or No Oil Feed to Compressor
Oil outlet valve closed or partially closed Open oil outlet valve
Inadequate oil charge in system Add oil in system
Oil float defective or dirty (will not open)Disassemble and clean or replace defective floatcomponent (flanged versions); Replace oilseparator (welded version).
Separator too small for application Replace separator with larger size
Hot Gas Entering Compressor Oil float defective or dirty (will not close)Disassemble and clean or replace defective floatcomponent (flanged versions); Replace oilseparator (welded version).
Problem Causes Corrective Action
Oil Level Too High In Sight Glass
OMB out of calibration Replace OMB
Too much oil in system Remove oil from oil separator or reservoir untilproper level is maintained
Too much oil coming back from evaporator
Check system piping design for:- Proper velocities- P-traps at the bottom of all suction risers- Piping pitched to compressor- Overlapping or defrosts that are not staggered
Debris under solenoid valve seat Unscrew solenoid valve, clean & replace
Problem Causes Corrective Action
Oil Level Too Low In Sight Glass
Oil separator or reservoir empty Add oil to maintain a liquid seal in the bottom ofthe separator or reservoir
Plugged oil line filter Replace filter
Plugged inlet strainer(s) on OMB Remove and clean strainer on all affected OMB
Solenoid coil defective Replace coil
Power loss to OMB Check power to OMB. Green light should be lit.
Problem Causes Corrective Action
Foaming In Sight Glass
Liquid refrigerant in oil
Flood back through suction; Increase superheaton expansion valve; Refrigerant condensing in oilseparator - add heater to oil separator and/oradjust system setting to eliminate flood back
If so equipped, liquid injection overfeeding Correct liquid injection overfeed
Excess quantity of oil in crankcase Remove excess oil
Problem Causes Corrective Action
Nuisance Oil Alarms
"Filling" light remains on even though level is 1/2above sight glass Replace OMB
Alarm light on all the time Replace OMB
Intermittent oil return from system
Check system piping design for:- Proper veloicties- P-traps at the bottom of all suction risers- Piping pitched to compressor- Overlapping or defrosts that are not staggered

Emerson Climate Technologies Flow Controls DivisionSt. Louis, Missouri 63141(314) 569-4500WEBSITE: www.emersonclimate.com/fl owcontrolsE-MAIL: sales.fl [email protected]
2004FC-141 R7 (5/10)Emerson is a trademark of Emerson Electric Co.© 2004 Emerson Electric Co. All rights reserved. Printed in the USA.


