Embed Size (px)
Citation preview

Embarcadero® Rapid SQL Developer™ 2.1 User Guide

Copyright © 1994-2009 Embarcadero Technologies, Inc.
Embarcadero Technologies, Inc. 100 California Street, 12th FloorSan Francisco, CA 94111 U.S.A.All rights reserved.
All brands and product names are trademarks or registered trademarks of their respective owners. This software/documentation contains proprietary information of Embarcadero Technologies, Inc.; it is provided under a license agreement containing restrictions on use and disclosure and is also protected by copyright law. Reverse engineering of the software is prohibited.
If this software/documentation is delivered to a U.S. Government Agency of the Department of Defense, then it is delivered with Restricted Rights and the following legend is applicable:
Restricted Rights Legend Use, duplication, or disclosure by the Government is subject to restrictions as set forth in subparagraph (c)(1)(ii) of DFARS 252.227-7013, Rights in Technical Data and Computer Software (October 1988).
If this software/documentation is delivered to a U.S. Government Agency not within the Department of Defense, then it is delivered with Restricted Rights, as defined in FAR 552.227-14, Rights in Data-General, including Alternate III (June 1987).
Information in this document is subject to change without notice. Revisions may be issued to advise of such changes and additions. Embarcadero Technologies, Inc. does not warrant that this documentation is error-free.
Contents
Welcome to Rapid SQL Developer. . . . . . . . . . . . . . . . . . . . . . . . . . . . . . . . . . . . . . . . . . . . . . . . . . . . . . . . . . . . . . . . . 5
Technical Requirements . . . . . . . . . . . . . . . . . . . . . . . . . . . . . . . . . . . . . . . . . . . . . . . . . . . . . . . . . . . . . . . . . . . . . . 5
Rapid SQL Developer Overview. . . . . . . . . . . . . . . . . . . . . . . . . . . . . . . . . . . . . . . . . . . . . . . . . . . . . . . . . . . . . . . . . . . 7
Using Rapid SQL Developer. . . . . . . . . . . . . . . . . . . . . . . . . . . . . . . . . . . . . . . . . . . . . . . . . . . . . . . . . . . . . . . . . . . . . . 8
Working with Data Sources. . . . . . . . . . . . . . . . . . . . . . . . . . . . . . . . . . . . . . . . . . . . . . . . . . . . . . . . . . . . . . . . . . . . 8
Register Data Sources . . . . . . . . . . . . . . . . . . . . . . . . . . . . . . . . . . . . . . . . . . . . . . . . . . . . . . . . . . . . . . . . . . . . 8
Importing and Exporting Data Sources . . . . . . . . . . . . . . . . . . . . . . . . . . . . . . . . . . . . . . . . . . . . . . . . . . . . 11
Browse a Data Source . . . . . . . . . . . . . . . . . . . . . . . . . . . . . . . . . . . . . . . . . . . . . . . . . . . . . . . . . . . . . . . . . . . 12
View Database Object Properties . . . . . . . . . . . . . . . . . . . . . . . . . . . . . . . . . . . . . . . . . . . . . . . . . . . . . . . . . . . 12
Search for Database Objects . . . . . . . . . . . . . . . . . . . . . . . . . . . . . . . . . . . . . . . . . . . . . . . . . . . . . . . . . . . . . . 15
Filter Database Objects. . . . . . . . . . . . . . . . . . . . . . . . . . . . . . . . . . . . . . . . . . . . . . . . . . . . . . . . . . . . . . . . . . . 16
Define Data Source-Specific Object Filters . . . . . . . . . . . . . . . . . . . . . . . . . . . . . . . . . . . . . . . . . . . . . . . . . 17
Define Global Database Object Filters . . . . . . . . . . . . . . . . . . . . . . . . . . . . . . . . . . . . . . . . . . . . . . . . . . . . 17
Drop a Database Object . . . . . . . . . . . . . . . . . . . . . . . . . . . . . . . . . . . . . . . . . . . . . . . . . . . . . . . . . . . . . . . . . . 18
Working with Projects . . . . . . . . . . . . . . . . . . . . . . . . . . . . . . . . . . . . . . . . . . . . . . . . . . . . . . . . . . . . . . . . . . . . . . . 18
Create a New Project . . . . . . . . . . . . . . . . . . . . . . . . . . . . . . . . . . . . . . . . . . . . . . . . . . . . . . . . . . . . . . . . . . . . 19
Open an Existing Project. . . . . . . . . . . . . . . . . . . . . . . . . . . . . . . . . . . . . . . . . . . . . . . . . . . . . . . . . . . . . . . . . . 19
Search a Project . . . . . . . . . . . . . . . . . . . . . . . . . . . . . . . . . . . . . . . . . . . . . . . . . . . . . . . . . . . . . . . . . . . . . . . . 20
Add Files to a Project . . . . . . . . . . . . . . . . . . . . . . . . . . . . . . . . . . . . . . . . . . . . . . . . . . . . . . . . . . . . . . . . . . . . 20
Delete a Project. . . . . . . . . . . . . . . . . . . . . . . . . . . . . . . . . . . . . . . . . . . . . . . . . . . . . . . . . . . . . . . . . . . . . . . . . 21
Creating and Editing SQL Files (SQL Editor) . . . . . . . . . . . . . . . . . . . . . . . . . . . . . . . . . . . . . . . . . . . . . . . . . . . . . 22
Create an SQL File . . . . . . . . . . . . . . . . . . . . . . . . . . . . . . . . . . . . . . . . . . . . . . . . . . . . . . . . . . . . . . . . . . . . . . 23
Open an Existing SQL File . . . . . . . . . . . . . . . . . . . . . . . . . . . . . . . . . . . . . . . . . . . . . . . . . . . . . . . . . . . . . . . . 23
Working in SQL Editor. . . . . . . . . . . . . . . . . . . . . . . . . . . . . . . . . . . . . . . . . . . . . . . . . . . . . . . . . . . . . . . . . . . . 23
Understanding Automatic Error Detection. . . . . . . . . . . . . . . . . . . . . . . . . . . . . . . . . . . . . . . . . . . . . . . . . . 25
Understanding Code Assist. . . . . . . . . . . . . . . . . . . . . . . . . . . . . . . . . . . . . . . . . . . . . . . . . . . . . . . . . . . . . 26
Understanding Hyperlinks . . . . . . . . . . . . . . . . . . . . . . . . . . . . . . . . . . . . . . . . . . . . . . . . . . . . . . . . . . . . . . 28
Understanding Code Formatting . . . . . . . . . . . . . . . . . . . . . . . . . . . . . . . . . . . . . . . . . . . . . . . . . . . . . . . . . 29
Understanding Code Folding. . . . . . . . . . . . . . . . . . . . . . . . . . . . . . . . . . . . . . . . . . . . . . . . . . . . . . . . . . . . 32
Understanding Code Quality Checks . . . . . . . . . . . . . . . . . . . . . . . . . . . . . . . . . . . . . . . . . . . . . . . . . . . . . 33
Understanding SQL Templates . . . . . . . . . . . . . . . . . . . . . . . . . . . . . . . . . . . . . . . . . . . . . . . . . . . . . . . . . . 36
View Change History. . . . . . . . . . . . . . . . . . . . . . . . . . . . . . . . . . . . . . . . . . . . . . . . . . . . . . . . . . . . . . . . . . . . . 37
Revert to an Old Version of a File . . . . . . . . . . . . . . . . . . . . . . . . . . . . . . . . . . . . . . . . . . . . . . . . . . . . . . . . . . . 38
Delete an SQL File . . . . . . . . . . . . . . . . . . . . . . . . . . . . . . . . . . . . . . . . . . . . . . . . . . . . . . . . . . . . . . . . . . . . . . 38
Executing SQL Files . . . . . . . . . . . . . . . . . . . . . . . . . . . . . . . . . . . . . . . . . . . . . . . . . . . . . . . . . . . . . . . . . . . . . . . . 38
Associate an SQL File with a Data Source . . . . . . . . . . . . . . . . . . . . . . . . . . . . . . . . . . . . . . . . . . . . . . . . . . . . 39
EMBARCADERO TECHNOLOGIES > EMBARCADERO® RAPID SQL DEVELOPER™ 2.1 USER GUIDE 3

CONTENTS >
Configure an SQL Session . . . . . . . . . . . . . . . . . . . . . . . . . . . . . . . . . . . . . . . . . . . . . . . . . . . . . . . . . . . . . . . . 41
Execute SQL Code . . . . . . . . . . . . . . . . . . . . . . . . . . . . . . . . . . . . . . . . . . . . . . . . . . . . . . . . . . . . . . . . . . . . . . 42
View and Save Results . . . . . . . . . . . . . . . . . . . . . . . . . . . . . . . . . . . . . . . . . . . . . . . . . . . . . . . . . . . . . . . . . . . 42
Troubleshooting . . . . . . . . . . . . . . . . . . . . . . . . . . . . . . . . . . . . . . . . . . . . . . . . . . . . . . . . . . . . . . . . . . . . . . . . . . . 43
View Log Details . . . . . . . . . . . . . . . . . . . . . . . . . . . . . . . . . . . . . . . . . . . . . . . . . . . . . . . . . . . . . . . . . . . . . . . . 45
Maintain Logs . . . . . . . . . . . . . . . . . . . . . . . . . . . . . . . . . . . . . . . . . . . . . . . . . . . . . . . . . . . . . . . . . . . . . . . . . . 46
Filter Logs . . . . . . . . . . . . . . . . . . . . . . . . . . . . . . . . . . . . . . . . . . . . . . . . . . . . . . . . . . . . . . . . . . . . . . . . . . . . . 47
Import and Export Error Logs . . . . . . . . . . . . . . . . . . . . . . . . . . . . . . . . . . . . . . . . . . . . . . . . . . . . . . . . . . . . . . 49
Find and Fix SQL Code Errors . . . . . . . . . . . . . . . . . . . . . . . . . . . . . . . . . . . . . . . . . . . . . . . . . . . . . . . . . . . . . 50
Find and Fix Other Problems . . . . . . . . . . . . . . . . . . . . . . . . . . . . . . . . . . . . . . . . . . . . . . . . . . . . . . . . . . . . . . 50
Configuring Rapid SQL Developer . . . . . . . . . . . . . . . . . . . . . . . . . . . . . . . . . . . . . . . . . . . . . . . . . . . . . . . . . . . . . . . . 52
Initial Setup . . . . . . . . . . . . . . . . . . . . . . . . . . . . . . . . . . . . . . . . . . . . . . . . . . . . . . . . . . . . . . . . . . . . . . . . . . . . . . . 52
Specify a Workspace . . . . . . . . . . . . . . . . . . . . . . . . . . . . . . . . . . . . . . . . . . . . . . . . . . . . . . . . . . . . . . . . . . . . 53
License Rapid SQL Developer . . . . . . . . . . . . . . . . . . . . . . . . . . . . . . . . . . . . . . . . . . . . . . . . . . . . . . . . . . . . . 53
Customizing Rapid SQL Developer (Preferences) . . . . . . . . . . . . . . . . . . . . . . . . . . . . . . . . . . . . . . . . . . . . . . . . . 53
Set Data Source Indexing Preferences. . . . . . . . . . . . . . . . . . . . . . . . . . . . . . . . . . . . . . . . . . . . . . . . . . . . . . . 53
Set SQL Editor Preferences . . . . . . . . . . . . . . . . . . . . . . . . . . . . . . . . . . . . . . . . . . . . . . . . . . . . . . . . . . . . . . . 55
Set SQL Execution Preferences . . . . . . . . . . . . . . . . . . . . . . . . . . . . . . . . . . . . . . . . . . . . . . . . . . . . . . . . . . . . 55
Set Code Assist Preferences . . . . . . . . . . . . . . . . . . . . . . . . . . . . . . . . . . . . . . . . . . . . . . . . . . . . . . . . . . . . . . 55
Set Code Formatter Preferences . . . . . . . . . . . . . . . . . . . . . . . . . . . . . . . . . . . . . . . . . . . . . . . . . . . . . . . . . . . 56
Set Results View Preferences. . . . . . . . . . . . . . . . . . . . . . . . . . . . . . . . . . . . . . . . . . . . . . . . . . . . . . . . . . . . . . 56
Set Syntax Coloring Preferences . . . . . . . . . . . . . . . . . . . . . . . . . . . . . . . . . . . . . . . . . . . . . . . . . . . . . . . . . . . 56
Set SQL Filter Preferences . . . . . . . . . . . . . . . . . . . . . . . . . . . . . . . . . . . . . . . . . . . . . . . . . . . . . . . . . . . . . . . . 56
Set SQL Code Template Preferences. . . . . . . . . . . . . . . . . . . . . . . . . . . . . . . . . . . . . . . . . . . . . . . . . . . . . . . . 57
Set File Encoding Preferences . . . . . . . . . . . . . . . . . . . . . . . . . . . . . . . . . . . . . . . . . . . . . . . . . . . . . . . . . . . . . 58
Set Data Source Preferences . . . . . . . . . . . . . . . . . . . . . . . . . . . . . . . . . . . . . . . . . . . . . . . . . . . . . . . . . . . . . . 59
Reference . . . . . . . . . . . . . . . . . . . . . . . . . . . . . . . . . . . . . . . . . . . . . . . . . . . . . . . . . . . . . . . . . . . . . . . . . . . . . . . . . . . 61
Database Objects . . . . . . . . . . . . . . . . . . . . . . . . . . . . . . . . . . . . . . . . . . . . . . . . . . . . . . . . . . . . . . . . . . . . . . . . . . 61
DBMS Connection Parameters by Platform . . . . . . . . . . . . . . . . . . . . . . . . . . . . . . . . . . . . . . . . . . . . . . . . . . . . . . 69
IBM DB2 LUW. . . . . . . . . . . . . . . . . . . . . . . . . . . . . . . . . . . . . . . . . . . . . . . . . . . . . . . . . . . . . . . . . . . . . . . . . . 71
IBM DB2 z/OS. . . . . . . . . . . . . . . . . . . . . . . . . . . . . . . . . . . . . . . . . . . . . . . . . . . . . . . . . . . . . . . . . . . . . . . . . . 71
Microsoft SQL Server . . . . . . . . . . . . . . . . . . . . . . . . . . . . . . . . . . . . . . . . . . . . . . . . . . . . . . . . . . . . . . . . . . . . 72
JDBC Connection Parameters . . . . . . . . . . . . . . . . . . . . . . . . . . . . . . . . . . . . . . . . . . . . . . . . . . . . . . . . . . . . . 72
Oracle Connection Parameters. . . . . . . . . . . . . . . . . . . . . . . . . . . . . . . . . . . . . . . . . . . . . . . . . . . . . . . . . . . . . 73
Sybase Connection Parameters . . . . . . . . . . . . . . . . . . . . . . . . . . . . . . . . . . . . . . . . . . . . . . . . . . . . . . . . . . . . 73
InterBase Connection Parameter . . . . . . . . . . . . . . . . . . . . . . . . . . . . . . . . . . . . . . . . . . . . . . . . . . . . . . . . . . . 74
Firebird Connection Parameters . . . . . . . . . . . . . . . . . . . . . . . . . . . . . . . . . . . . . . . . . . . . . . . . . . . . . . . . . . . . 74
EMBARCADERO TECHNOLOGIES > EMBARCADERO® RAPID SQL DEVELOPER™ 2.1 USER GUIDE 4
Welcome to Rapid SQL DeveloperEmbarcadero Rapid SQL Developer simplifies SQL development for application developers with many features for improving productivity and reducing errors. A rich SQL IDE with code completion, real-time error checking, code formatting and sophisticated object validation tools helps streamline coding tasks. Rapid SQL Developer’s user interface helps improve overall productivity with database object look up functionality and side-by-side views of application code and SQL code. Rapid SQL Developer offers native support for the following DBMS platforms:
• Firebird
• IBM DB2 for Linux, Unix, and Windows
• IBM DB2 for z/OS
• InterBase
• Oracle
• Microsoft SQL Server
• Sybase
• JDBC (support for other DBMS)
Rapid SQL Developer is available as a stand-alone application or as an Eclipse plug-in.
For more information, see:Technical Requirements
Using Rapid SQL Developer
Configuring Rapid SQL Developer
Reference
Technical RequirementsBefore installing Rapid SQL Developer, verify that your environment meets the following requirements.
Hardware RequirementsThe following minimum hardware requirements are required to run Rapid SQL Developer:
• Pentium 4-Level Processor
• 512 MB of memory
• 500 MB of disk space
• 1024 x 768 screen resolution
Operating System RequirementsRapid SQL Developer supports the following operating systems:
• Microsoft Windows XP, x86-32, Win32
• Microsoft Vista, x86-32, Win32
EMBARCADERO TECHNOLOGIES > EMBARCADERO® RAPID SQL DEVELOPER™ 2.1 USER GUIDE 5

WELCOME TO RAPID SQL DEVELOPER > TECHNICAL REQUIREMENTS
• Microsoft Windows Server 2003
• Linux, x86-32, GTK 2
• Red Hat Enterprise Linux 5.0
• SuSe Linux Enterprise Server 10
DBMS SupportRapid SQL Developer provides native support for the following platforms (no additional DBMS client software is required):
• IBM DB2 LUW (8.0 - 9.5)
• IBM DB2 z/OS (8.0 - 9.0)
• Interbase (2007, 2009)
• Microsoft SQL Server (2000, 2005, and 2008)
• Oracle (8i - 11g)
• Sybase ASE (12.5 - 15.0.2)
• Generic JDBC
Installation NotesRapid SQL Developer can be installed as a standalone application (RCP installation) or as an Eclipse plug-in (Plug-in Installation). Eclipse is an open source development framework that supports application plug-ins to provide additional functionality.
The Eclipse plug-in version of Rapid SQL Developer requires Eclipse version 3.5 or higher, and Sun Java Standard Edition 5.0 Update 11 or later in addition to regular system requirements.
Before installing the plug-in version of Rapid SQL Developer, ensure that Eclipse and Java is installed on your machine. You can download Eclipse from the following Web site: http://www.eclipse.org/downloads.
EMBARCADERO TECHNOLOGIES > EMBARCADERO® RAPID SQL DEVELOPER™ 2.1 USER GUIDE 6
RAPID SQL DEVELOPER OVERVIEW > TECHNICAL REQUIREMENTS
Rapid SQL Developer Overview
Key Features• Data source migration from Eclipse DTP (Data Tools Project) or Quest TOAD, including auto-detection of DBMS
residing on the network.
• Fully-contained cross-language (Java and SQL) debugging processes with comprehensive views and robust functionality including breakpoint, step over, variable, and dependency management tools. For Oracle, IBM DB2, and Sybase platforms.
• Data Source Explorer window that provides users with the ability to easily navigate, search, extract DDL, execute commands, and browse outline views without opening SQL files.
• Code Assist functionality providing context-sensitive database object names to eliminate misspellings and the need to look them up. Also available offline.
• Profile formatting and code templates ensure consistent, quality code layout for easy review and extension. Both profiles and templates can be customized and shared.
• Real-time SQL validation to ensure there are no parser violations or object names used that are not found in the database.
For more information, see:Technical Requirements
Using Rapid SQL Developer
Configuring Rapid SQL Developer
Reference
EMBARCADERO TECHNOLOGIES > EMBARCADERO® RAPID SQL DEVELOPER™ 2.1 USER GUIDE 7

USING RAPID SQL DEVELOPER > WORKING WITH DATA SOURCES
Using Rapid SQL DeveloperThis section contains detailed instructions for:
• Working with Data Sources
• Working with Projects
• Creating and Editing SQL Files (SQL Editor)
• Executing SQL Files
• Troubleshooting.
Working with Data SourcesThe Data Source Explorer provides a tree view of all registered data sources and associated database objects.
When you first start Rapid SQL Developer, a prompt appears and offers to populate Data Source Explorer from multiple sources on the system. This includes previously-registered data sources on other Embarcadero products, and third-party DBMS clients such as TOAD. If Rapid SQL Developer cannot detect a data source, you can register it manually.
Additionally, you can initiate this feature by clicking Discover Data Sources icon on the Toolbar or via the File > Import command in the Main Menu.
Register Data SourcesWhen Rapid SQL Developer is started, it prompts you to discover data source catalogs that have been created by any previously installed Embarcadero products (DBArtisan, Rapid SQL, DB Optimizer), or other instances of Rapid SQL Developer.
Additionally, the system scans your machine for the client software of all supported third-party DBMS platforms (TOAD, Eclipse Data Tools Platform, etc.). These data sources are automatically added to the data source catalog.
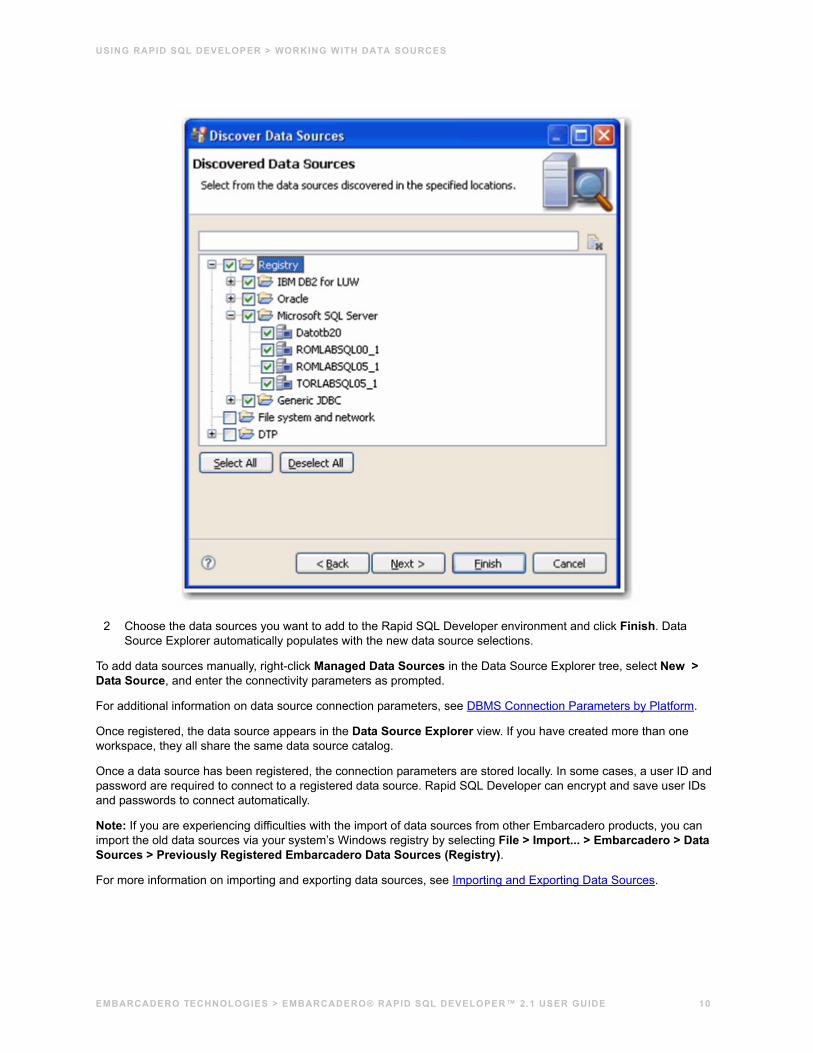
To manually initiate the scan later, click the Discover Data Sources icon at the top of Data Source Explorer. The Discover Data Sources dialog appears.
EMBARCADERO TECHNOLOGIES > EMBARCADERO® RAPID SQL DEVELOPER™ 2.1 USER GUIDE 8

USING RAPID SQL DEVELOPER > WORKING WITH DATA SOURCES
1 Choose the type of data sources you want to scan for and click Next. The wizard automatically returns all data sources it finds on your machine based on the criteria you specified.
EMBARCADERO TECHNOLOGIES > EMBARCADERO® RAPID SQL DEVELOPER™ 2.1 USER GUIDE 9
USING RAPID SQL DEVELOPER > WORKING WITH DATA SOURCES
2 Choose the data sources you want to add to the Rapid SQL Developer environment and click Finish. Data Source Explorer automatically populates with the new data source selections.
To add data sources manually, right-click Managed Data Sources in the Data Source Explorer tree, select New > Data Source, and enter the connectivity parameters as prompted.
For additional information on data source connection parameters, see DBMS Connection Parameters by Platform.
Once registered, the data source appears in the Data Source Explorer view. If you have created more than one workspace, they all share the same data source catalog.
Once a data source has been registered, the connection parameters are stored locally. In some cases, a user ID and password are required to connect to a registered data source. Rapid SQL Developer can encrypt and save user IDs and passwords to connect automatically.
Note: If you are experiencing difficulties with the import of data sources from other Embarcadero products, you can import the old data sources via your system’s Windows registry by selecting File > Import... > Embarcadero > Data Sources > Previously Registered Embarcadero Data Sources (Registry).
For more information on importing and exporting data sources, see Importing and Exporting Data Sources.
EMBARCADERO TECHNOLOGIES > EMBARCADERO® RAPID SQL DEVELOPER™ 2.1 USER GUIDE 10

USING RAPID SQL DEVELOPER > WORKING WITH DATA SOURCES
Importing and Exporting Data SourcesSome Embarcadero products contain data source catalogs that are shared with Rapid SQL Developer. In other words, instead of manually adding data sources to the environment, you can import an existing data source catalog from other Embarcadero products or third-party DBMS sources.
You import Data Sources via the File > Import command in the Main Menu, expanding the Embarcadero folder in the Data Source Selection tree, and choosing Data Sources.
The following types of sources can be imported to Data Source Explorer:
• Eclipse Data Tools Platform (DTP)
• Previously Registered Embarcadero Data Sources (File)
• Previously Registered Embarcadero Data Sources (Registry)
EMBARCADERO TECHNOLOGIES > EMBARCADERO® RAPID SQL DEVELOPER™ 2.1 USER GUIDE 11

USING RAPID SQL DEVELOPER > WORKING WITH DATA SOURCES
• Quest Software (TOAD)
Once a data source is registered, it automatically appears in Data Source Explorer. Connection parameters are stored locally, and Rapid SQL Developer can be set to connect automatically each time you select the data source from the tree.
Conversely, you can also Export your current data source catalog to a file, which can then be imported into other instances of Rapid SQL Developer via the Previously Registered Embarcadero Data Sources (File) option. This is performed using the File > Export command in the Main Menu, and then selecting Embarcadero > Data Sources from the tree view in the Export Data Sources dialog.
To import data sources:
1 Select File > Import. The Import Data Sources dialog appears.
2 Choose Embarcadero > Data Sources from the tree and click Next.
3 Choose a source from which you want to import the data sources. You can choose to import data sources from the DTP, TOAD, or an existing Embarcadero data source catalog stored in the Windows registry or as a file (created via the Export command). Click Next.
4 Specify the location of the import source and click Finish. Data Source Explorer is automatically populated with the new data sources.
To export data sources:
1 Select File > Export. The Export Data Sources dialog appears.
2 Choose Embarcadero > Data Sources from the export tree and click Next.
3 Use the check boxes beside each listed data source to indicate which data sources you want to export. Click Next.
4 Click Finish.
5 The data sources are automatically exported in the form of an XML file. You can import this file to other instances of Rapid SQL Developer via the Import command.
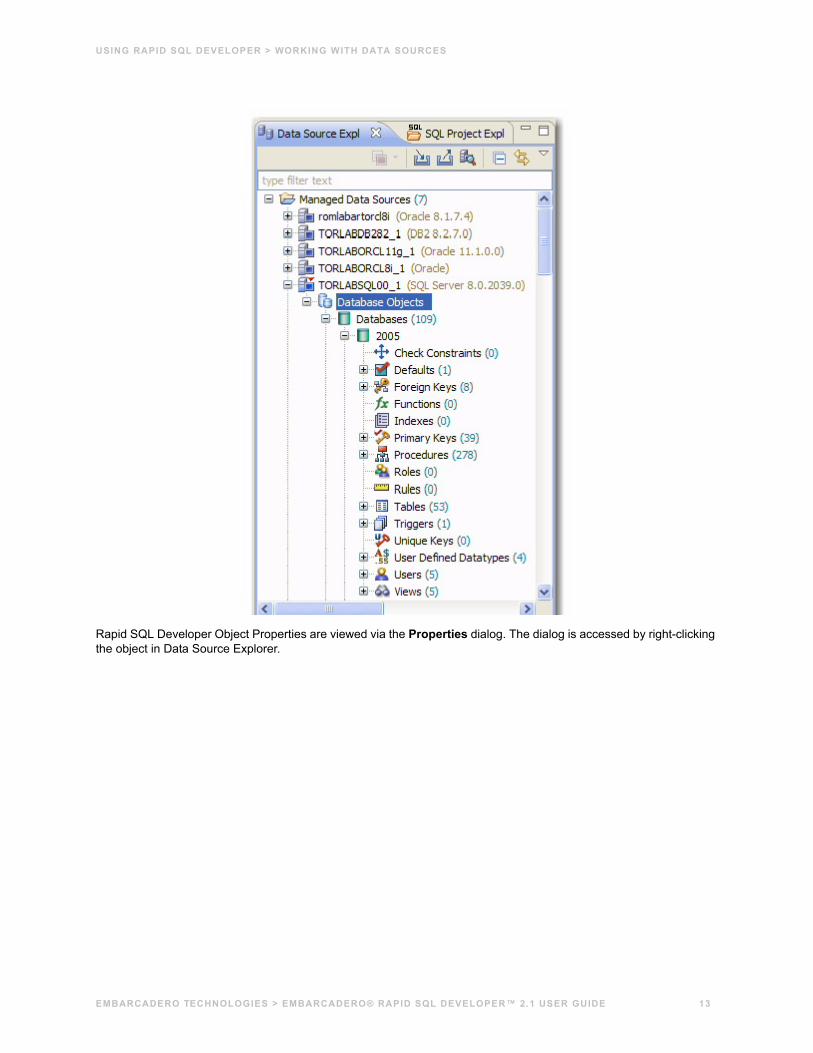
Browse a Data SourceYou can drill down in the Data Source Explorer tree to view registered databases on a server, and view tables, and other objects in a database. Additionally, you can view the structure of individual objects such as the columns and indexes of a table. Right-click the object for a menu of available commands, such as Extract to Project, which creates a new SQL file containing the object’s DDL.
In most cases, whenever you browse a data source, Rapid SQL Developer requires login information in order to connect with the data source. Enter a valid user name and password in the fields provided. The Auto Connect option retains your login credentials for future connections to the same data source.
You can turn off the Auto Connect feature by right-clicking on a specified data source and toggling the Connect on Expand option. By default, when Connect on Expand is active, Rapid SQL Developer automatically attempts to connect to the server each time you browse a data source.
View Database Object PropertiesAll objects in Data Source Explorer contain properties as they relate to the Rapid SQL Developer application.
EMBARCADERO TECHNOLOGIES > EMBARCADERO® RAPID SQL DEVELOPER™ 2.1 USER GUIDE 12
USING RAPID SQL DEVELOPER > WORKING WITH DATA SOURCES
Rapid SQL Developer Object Properties are viewed via the Properties dialog. The dialog is accessed by right-clicking the object in Data Source Explorer.
EMBARCADERO TECHNOLOGIES > EMBARCADERO® RAPID SQL DEVELOPER™ 2.1 USER GUIDE 13
USING RAPID SQL DEVELOPER > WORKING WITH DATA SOURCES
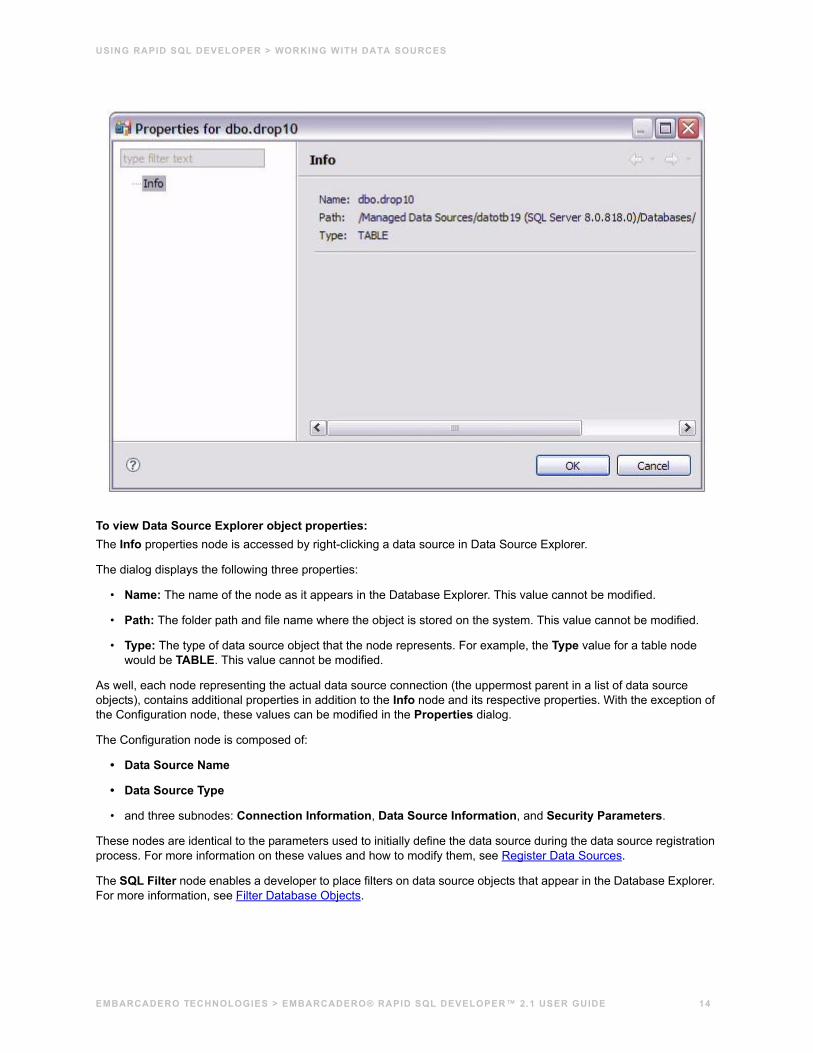
To view Data Source Explorer object properties:The Info properties node is accessed by right-clicking a data source in Data Source Explorer.
The dialog displays the following three properties:
• Name: The name of the node as it appears in the Database Explorer. This value cannot be modified.
• Path: The folder path and file name where the object is stored on the system. This value cannot be modified.
• Type: The type of data source object that the node represents. For example, the Type value for a table node would be TABLE. This value cannot be modified.
As well, each node representing the actual data source connection (the uppermost parent in a list of data source objects), contains additional properties in addition to the Info node and its respective properties. With the exception of the Configuration node, these values can be modified in the Properties dialog.
The Configuration node is composed of:
• Data Source Name
• Data Source Type
• and three subnodes: Connection Information, Data Source Information, and Security Parameters.
These nodes are identical to the parameters used to initially define the data source during the data source registration process. For more information on these values and how to modify them, see Register Data Sources.
The SQL Filter node enables a developer to place filters on data source objects that appear in the Database Explorer. For more information, see Filter Database Objects.
EMBARCADERO TECHNOLOGIES > EMBARCADERO® RAPID SQL DEVELOPER™ 2.1 USER GUIDE 14
USING RAPID SQL DEVELOPER > WORKING WITH DATA SOURCES
Search for Database ObjectsDatabase object searches rely on the Object Index when returning results. By default, caching is set to configure only parts of a database. To configure the Index to expand object searches, see Set Data Source Indexing Preferences.
1 Select Search > Database. By default, the search scope is all currently connected databases. Under Specify the scope for the search, clear any databases or server check boxes you do not want to search.
2 Specify the search criteria:
• Type the value to search for in the Search String field. Use the * character to indicate wildcard string values and the ? character to indicate wildcard character values.
• Select Case Sensitive to indicate to the search function that you want case sensitivity to be a factor when searching for appropriate string matches.
• Select Search Indexed Data to indicate that the search function should read the Index. This increases the performance of the search function and will typically result in faster returns on any hits the search might make.
• Select Apply SQL Filters to apply any relevant database or vendor filters to the search.
• Choose Declarations, References, or All Occurrences to specify what the search is restricted to in terms of database objects.
• A declaration is an instance where an object is declared. For example, an object is declared in a CREATE table.
• A reference is an instance where an object is used or referred to. For example, an object is referred to in a procedure or as a foreign key in a table.
• Choose All Occurrences to return both declarations and references in the search results.
• Use the check boxes beside the database object panel to select and deselect the specific database objects that you want to be included in the search process.
EMBARCADERO TECHNOLOGIES > EMBARCADERO® RAPID SQL DEVELOPER™ 2.1 USER GUIDE 15
USING RAPID SQL DEVELOPER > WORKING WITH DATA SOURCES
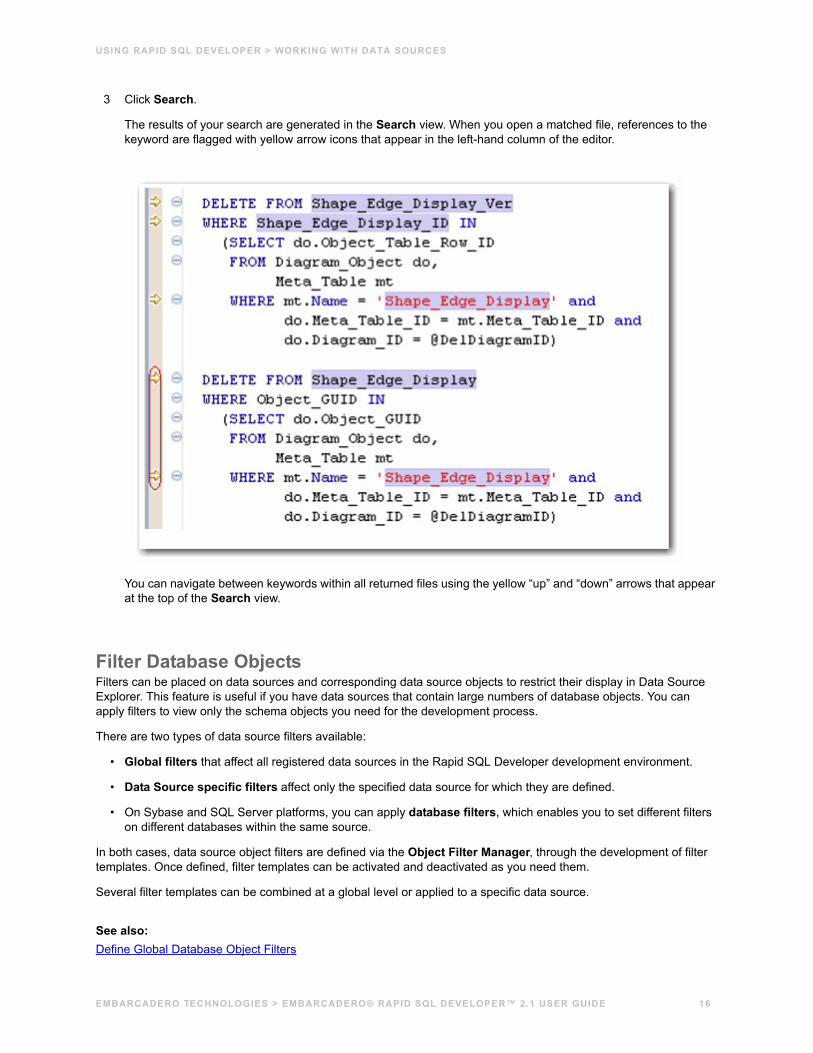
3 Click Search.
The results of your search are generated in the Search view. When you open a matched file, references to the keyword are flagged with yellow arrow icons that appear in the left-hand column of the editor.
You can navigate between keywords within all returned files using the yellow “up” and “down” arrows that appear at the top of the Search view.
Filter Database ObjectsFilters can be placed on data sources and corresponding data source objects to restrict their display in Data Source Explorer. This feature is useful if you have data sources that contain large numbers of database objects. You can apply filters to view only the schema objects you need for the development process.
There are two types of data source filters available:
• Global filters that affect all registered data sources in the Rapid SQL Developer development environment.
• Data Source specific filters affect only the specified data source for which they are defined.
• On Sybase and SQL Server platforms, you can apply database filters, which enables you to set different filters on different databases within the same source.
In both cases, data source object filters are defined via the Object Filter Manager, through the development of filter templates. Once defined, filter templates can be activated and deactivated as you need them.
Several filter templates can be combined at a global level or applied to a specific data source.
See also:Define Global Database Object Filters
EMBARCADERO TECHNOLOGIES > EMBARCADERO® RAPID SQL DEVELOPER™ 2.1 USER GUIDE 16

USING RAPID SQL DEVELOPER > WORKING WITH DATA SOURCES
Define Data Source-Specific Object Filters
Define Data Source-Specific Object FiltersData source-specific object filters affect only the specified data source.
To define data source-specific filters:1 In Data Source Explorer, right-click the data source and select Properties.
The Properties dialog appears.
2 Select the SQL Filter node and then choose Enable Data Source Specific Settings. The other controls on the dialog become enabled.
3 Click Add. The Filter Template dialog appears.
4 Specify the parameters of the filter.
• In the Name field, enter the name of the filter as you want it to appear in the selection window on the SQL Filter node.
• The Database Type pane provides a list of data source objects. Deselect the data source objects that this template filters so that they do not appear in Database Explorer when displaying data source objects for the data source.
• Click New to add filter parameters for data source object properties. The New SQL Filter Predicate dialog appears.
• Use the Property and Operator fields to supply the filter criteria. Property specifies whether the value is a Name or Schema, and Operator specifies the matching type of the filter syntax. (Equals, Not Equals, Like, Not Like, In, Not In)
• In the Value field, enter the full or partial syntax of the property or properties you want to filter in Data Source Explorer.
Click OK. The filter property specification is added to the Filter Template.
5 When you have finished defining the filter template, click OK. The template name is added to the Properties dialog. It can be enabled and disabled by selecting or deselecting the check box beside its name, respectively.
Define Global Database Object FiltersGlobal filters affect all registered data sources in the Rapid SQL Developer development environment. When you create and apply a global filter to a platform vendor in Rapid SQL Developer, all databases associated with that vendor are affected by the filter, as defined.
Individual global filter templates are separated, by supported data source platform, on tabs in the SQL Filter window. Select the appropriate tab to view existing filter templates or add new ones, as needed.
To define a global filter:1 Select Window > Preferences from the Main Menu. The Preferences dialog appears.
2 Expand the SQL Development node and select the SQL Filter subnode. The SQL Filter pane appears.
3 Click New. The Filter Template dialog appears.
EMBARCADERO TECHNOLOGIES > EMBARCADERO® RAPID SQL DEVELOPER™ 2.1 USER GUIDE 17

USING RAPID SQL DEVELOPER > WORKING WITH PROJECTS
4 Specify the parameters of the filter template:
• In the Name field, enter the name of the filter as you want it to appear in the selection window on the SQL Filter node.
• The Database Type pane provides a list of data source objects. Deselect the data source objects that this template filters so that they do not appear in Database Explorer when displaying data source objects for the data source.
• Click New to add filter parameters for data source objects properties. The New SQL Filter Predicate dialog appears.
• Use the Property and Operator fields to supply the filter criteria. Property specifies whether the value is a Name or Schema, and Operator specifies the matching type of the filter syntax. (Equals, Not Equals, Like, Not Like, In, Not In)
• In the Value field, enter the full or partial syntax of the property or properties you want the template to filter in data source Explorer.
5 Click OK. The filter property specification is added to the Filter Template.
6 When you have finished defining the filter template, click OK. The template name is added to the Properties dialog. It can be enabled and disabled by selecting or de-selecting the check box beside its name, respectively.
Data Source object filters are added and removed from the development environment by selecting and de-selecting the checkboxes associated with each filter template on both the global and data source-specific dialogs.
Drop a Database ObjectTo delete an object permanently from a database, right-click the object in Data Source Explorer and choose Drop from the menu. The Drop Wizard asks you to confirm removal of the object and provides a DDL preview of the deletion code.
Working with ProjectsYou create projects to organize and store SQL development files. The purpose of projects is to keep your work-in-progress files organized, as well as maintain a common directory structure when developing code and executing files on registered data sources. Once a file has been developed and is ready for deployment, that file can then be executed on a registered data source.
SQL Project Explorer is used to view and access files. It uses a tree view to display the project as a series of folder directories with a folder labeled with the project name as the parent directory, and with project categories, and associated project files as its children.
All files in a project are organized under the following categories:
• Connections: List the connections of any given SQL file of a data source associated with the project.
• Creation Scripts: Provide DDL statements and statements that define database objects.
• General SQL: Provide a category for all other SQL files that are not used in database object creation. This includes DML files, and so on.
Physically, the projects and files you create as you work in Rapid SQL Developer are stored under the Workspace directory you specified at the prompt when Rapid SQL Developer was started. The directory and files can be shared, and other tools may be used to work on the files, outside the Rapid SQL Developer development environment.
You can move existing files within a project by clicking and dragging the file you want to move in the Project Explorer from one node to another, or via the File > Move command.
EMBARCADERO TECHNOLOGIES > EMBARCADERO® RAPID SQL DEVELOPER™ 2.1 USER GUIDE 18

USING RAPID SQL DEVELOPER > WORKING WITH PROJECTS
Create a New Project1 Select File > New > SQL Project from the Rapid SQL Developer Main Menu. The New Project Wizard
appears.
2 Enter the appropriate information in the fields provided:
• Name: Enter the name of the project as you want it to display in the Project Explorer view.
• DBMS Platform: Select the data source platform to which the new project will be associated. This enables Rapid SQL Developer to properly parse SQL development code for project files.
• Location: When selected, the Use Default Location check box indicates the project is to be created under the currently selected Workspace. Deselect the check box and specify a new folder path if you do not want to create the project in the currently selected Workspace.
3 Click Finish. The new project icon appears in the Project Explorer view under the name that you specified. If you did not select Use Default Location, the project will appear in the appropriate Workspace when you open it in Rapid SQL Developer.
NOTE: Alternatively, you can select New > SQL Project from the Main Menu or click the New Project icon in the Tool Bar to create a new project.
Open an Existing ProjectYou can open projects by navigating to SQL Project Explorer and expanding the node of the project that contains the files you want to access.
Below each project name are a series of nodes that categorize any existing SQL files by development type:
• Connections: Lists the connections of any given SQL file of a data source associated with the project.
• Creation Scripts: General data source object development scripts. This node contains DDL statements and statements that define database objects.
• General SQL: Provides a category for all other SQL files that are not used in database object creation. DML files, etc.
Note: Physically, the projects and files you create as you work in Rapid SQL Developer are stored under the project directory that you specified at the prompt when the project was created. The directory and files can be shared, and other tools may be used to work on the files, completely exempt from the Rapid SQL Developer development environment.
EMBARCADERO TECHNOLOGIES > EMBARCADERO® RAPID SQL DEVELOPER™ 2.1 USER GUIDE 19
USING RAPID SQL DEVELOPER > WORKING WITH PROJECTS
Search a Project1 Select Search > File.
2 Specify the search criteria:
• Type the value to search in the Containing Text field. Use the * character to indicate wildcard string values, the ? character to indicate wildcard character values, and the \ character to indicate an escape character for literals (* ? /).
• Select Case Sensitive and indicate to the search function that it should take into account case when searching for appropriate string matches.
• Select Regular Expression to indicate to the search function that the string is a regular function.
• In the File Name Pattern field, specify the extension name of the files to search for explicitly. If the value in this field is a * character, the search function searches all files regardless of extension. Manually type in the extensions to indicate file type (separate multiple file types with commas), or click Choose and use the Select Types dialog to select the file extensions the process will search for the string by.
• Select Consider Derived Resources to include derived resources in the search.
• Select Workspace or Working Set to choose the scope of the search. If you choose Working Set, specify the name of the defined working set manually, or click Choose and navigate to the working set you want to search for in the provided string.
3 Click Search. The results of your search are generated in the Search view on the Workbench.
Add Files to a ProjectExisting files that reside in directories outside of the workspace can be added to a project via the following methods:
• Dragging and dropping the file set from a system directory to SQL Project Explorer.
• Copying and pasting the file set from a system directory to SQL Project Explorer.
• Executing the Import command.
To drag/drop or copy/paste files from a system directory to SQL Project Explorer:1 With the SQL Project Explorer view open, navigate to the directory where the files you want to add to the project
are located on the system.
2 Drag and drop the files you need from Windows Explorer into SQL Project Explorer. The files appear in the tree view under the appropriate categories.
NOTE: Alternatively, you can use the Copy command on the files you want to add in Windows Explorer, and then right-click the Project Explorer and select Paste from the menu. The files appear in the tree view under the appropriate categories.
EMBARCADERO TECHNOLOGIES > EMBARCADERO® RAPID SQL DEVELOPER™ 2.1 USER GUIDE 20

USING RAPID SQL DEVELOPER > WORKING WITH PROJECTS
To use the Import command:1 Right-click anywhere on the Project Explorer and select Import. The Import dialog appears.
2 Expand the General node and double-click File System. A dialog containing the import specification parameters appears.
• In the From directory field, manually type the directory location of the files you want to import to Project Explorer, or click Browse and navigate to the appropriate folder. The panels below the field populate with the folder selection and a list of suitable files contained in that folder. Use the check boxes beside each folder and file to specify what folders/files you want the import function to add in Project Explorer.
• In the Into folder field, manually type the name of the folder within Project Explorer where you want to import the files specified in the panels above, or click Browse and navigate to the appropriate folder.
• Select the Overwrite existing resources without warning check box if you do not want to be prompted when the import process overwrites Project Explorer files that contain the same name as the imported files.
• Choose Create complete folder structure or Create selected folders only, depending on whether you want the import process to build the folder structure of the imported directory automatically, or only create those folders you selected in the panels above, respectively.
3 Click Finish. The import process moves all selected folders and files into Project Explorer and thus into the Rapid SQL Developer development environment.
NOTE: In addition to accessing the Import command via the shortcut menu, you can also access the Import dialog by choosing File > Import ... from the Main Menu.
Delete a ProjectYou can delete a project by right-clicking its folder in the SQL Project Explorer and selecting Delete.
When you delete a project, Rapid SQL Developer will prompt you with a Confirm Project Delete dialog that asks you to confirm the deletion of the project, and offers you the option of deleting the project from the Rapid SQL Developer interface, or deleting the project from the system.
• If you select Do not delete contents, the files and directory structure will be removed from SQL Project Explorer, but they will still exist on your machine.
• If you select Also delete contents …, the files and directory structure will be removed from SQL Project Explorer and deleted from your machine.
EMBARCADERO TECHNOLOGIES > EMBARCADERO® RAPID SQL DEVELOPER™ 2.1 USER GUIDE 21
> CREATING AND EDITING SQL FILES (SQL EDITOR)
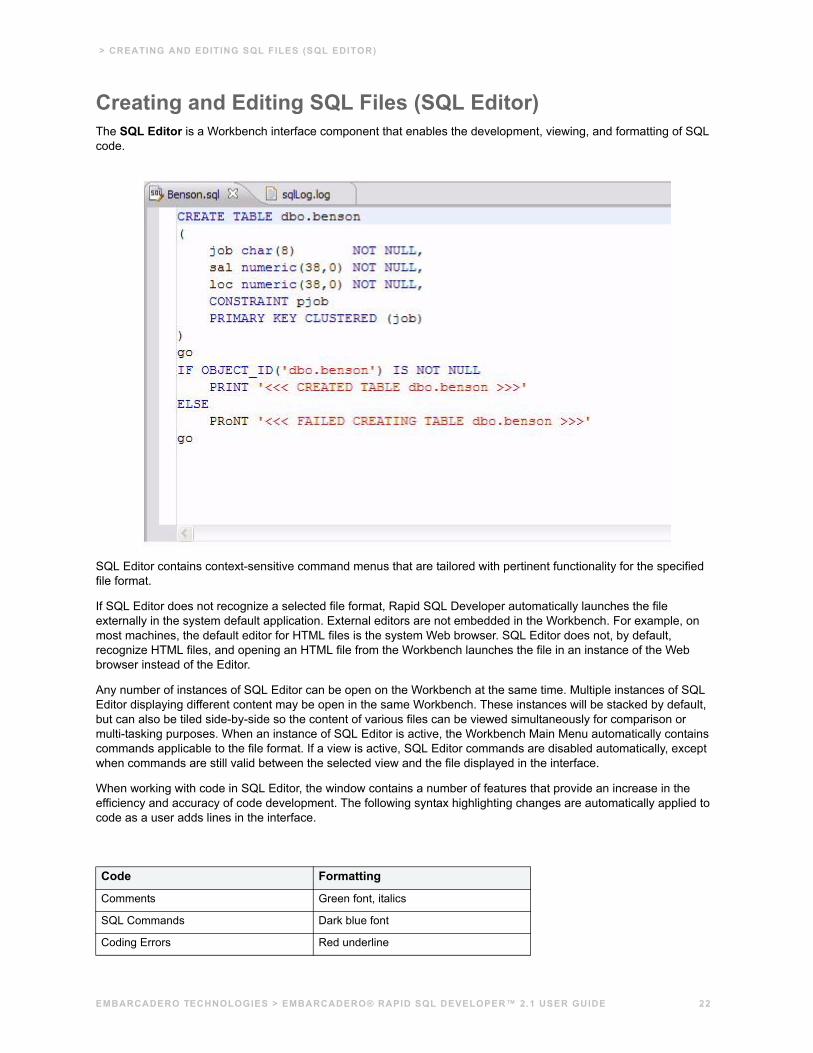
Creating and Editing SQL Files (SQL Editor)The SQL Editor is a Workbench interface component that enables the development, viewing, and formatting of SQL code.
SQL Editor contains context-sensitive command menus that are tailored with pertinent functionality for the specified file format.
If SQL Editor does not recognize a selected file format, Rapid SQL Developer automatically launches the file externally in the system default application. External editors are not embedded in the Workbench. For example, on most machines, the default editor for HTML files is the system Web browser. SQL Editor does not, by default, recognize HTML files, and opening an HTML file from the Workbench launches the file in an instance of the Web browser instead of the Editor.
Any number of instances of SQL Editor can be open on the Workbench at the same time. Multiple instances of SQL Editor displaying different content may be open in the same Workbench. These instances will be stacked by default, but can also be tiled side-by-side so the content of various files can be viewed simultaneously for comparison or multi-tasking purposes. When an instance of SQL Editor is active, the Workbench Main Menu automatically contains commands applicable to the file format. If a view is active, SQL Editor commands are disabled automatically, except when commands are still valid between the selected view and the file displayed in the interface.
When working with code in SQL Editor, the window contains a number of features that provide an increase in the efficiency and accuracy of code development. The following syntax highlighting changes are automatically applied to code as a user adds lines in the interface.
Code Formatting
Comments Green font, italics
SQL Commands Dark blue font
Coding Errors Red underline
EMBARCADERO TECHNOLOGIES > EMBARCADERO® RAPID SQL DEVELOPER™ 2.1 USER GUIDE 22
> CREATING AND EDITING SQL FILES (SQL EDITOR)
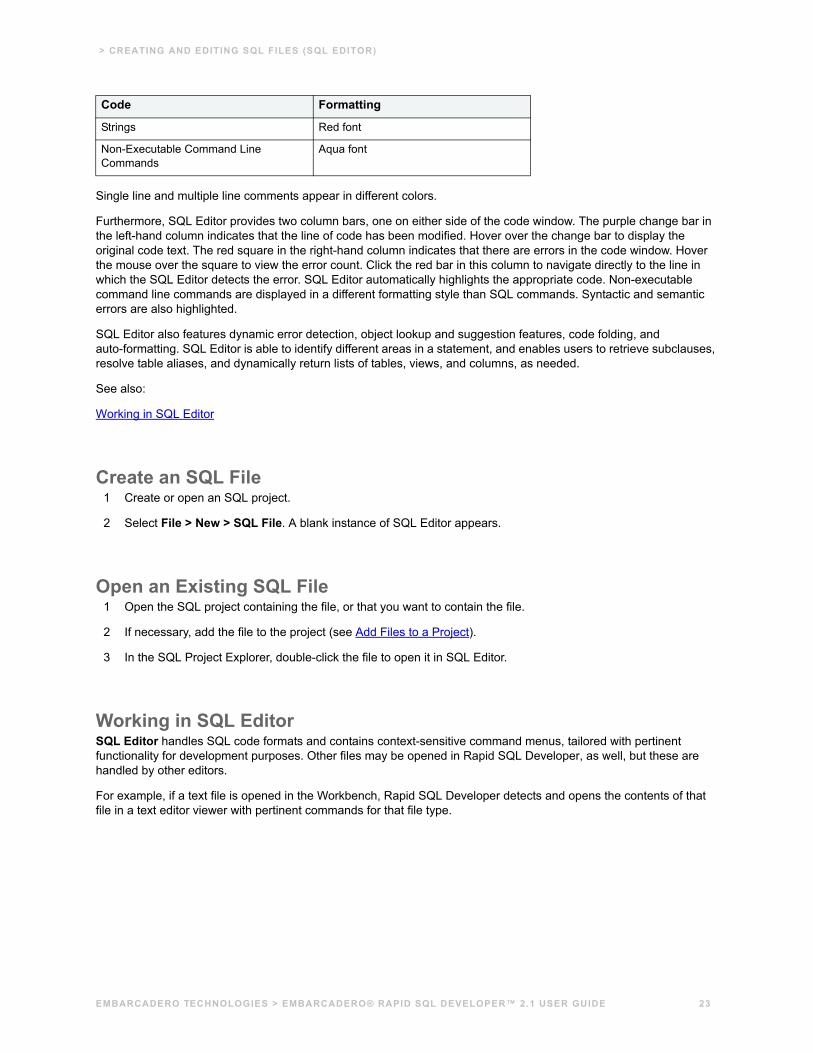
Single line and multiple line comments appear in different colors.
Furthermore, SQL Editor provides two column bars, one on either side of the code window. The purple change bar in the left-hand column indicates that the line of code has been modified. Hover over the change bar to display the original code text. The red square in the right-hand column indicates that there are errors in the code window. Hover the mouse over the square to view the error count. Click the red bar in this column to navigate directly to the line in which the SQL Editor detects the error. SQL Editor automatically highlights the appropriate code. Non-executable command line commands are displayed in a different formatting style than SQL commands. Syntactic and semantic errors are also highlighted.
SQL Editor also features dynamic error detection, object lookup and suggestion features, code folding, and auto-formatting. SQL Editor is able to identify different areas in a statement, and enables users to retrieve subclauses, resolve table aliases, and dynamically return lists of tables, views, and columns, as needed.
See also:
Working in SQL Editor
Create an SQL File1 Create or open an SQL project.
2 Select File > New > SQL File. A blank instance of SQL Editor appears.
Open an Existing SQL File1 Open the SQL project containing the file, or that you want to contain the file.
2 If necessary, add the file to the project (see Add Files to a Project).
3 In the SQL Project Explorer, double-click the file to open it in SQL Editor.
Working in SQL EditorSQL Editor handles SQL code formats and contains context-sensitive command menus, tailored with pertinent functionality for development purposes. Other files may be opened in Rapid SQL Developer, as well, but these are handled by other editors.
For example, if a text file is opened in the Workbench, Rapid SQL Developer detects and opens the contents of that file in a text editor viewer with pertinent commands for that file type.
Strings Red font
Non-Executable Command Line Commands
Aqua font
Code Formatting
EMBARCADERO TECHNOLOGIES > EMBARCADERO® RAPID SQL DEVELOPER™ 2.1 USER GUIDE 23

> CREATING AND EDITING SQL FILES (SQL EDITOR)
Any number of instances of SQL Editor can be active on the Workbench at the same time. Multiple instances of SQL Editor displaying different content may be active on the same Workbench. These instances will be stacked, by default, but can also be tiled side-by-side, so the content of various files can be view simultaneously for comparison or multi-tasking purposes. When an instance of SQL Editor is active, the Main Menu contains commands applicable to the file format. If a view is active, SQL Editor commands are disabled automatically, except when commands are still valid between the selected view and the file displayed in the interface.
Among the commands SQL Editor supports via the right-click menu:
• Revert File: Automatically restores the working file to the original text as it appeared the last time the Save command was issued.
• Shift Right/Shift Left: Indents the line of code in the working file to the right or left, respectively.
• Toggle Comments: Hides or displays comments in the code of the working file, depending on the current hide/show state.
• Add Block Comment/Remove Block Comment: A block comment is used to insert a comment into SQL code that spans multiple lines and begins with a forward slash and asterisk. While block comments are typically used to insert a command that spans multiple lines, some developers find them more useful than line comments, especially if a development team is using different text editors on an individual basis. Moving code from one text editor to another often breaks line comments in the middle of a line and causes errors. Block comments can be broken without causing errors.
NOTE: In addition to editing commands, some commands such as extract, drop, and execute can be accessed by right-clicking over statements in SQL code that are performed on specific tables, views, and columns. These commands will appear automatically in the appropriate menu when the code is highlighted. Full information on using these commands is found elsewhere in this documentation, based on the task each executable performs.
EMBARCADERO TECHNOLOGIES > EMBARCADERO® RAPID SQL DEVELOPER™ 2.1 USER GUIDE 24

> CREATING AND EDITING SQL FILES (SQL EDITOR)
• Explain Plan: An explain plan details the steps that occur in SELECT, UPDATE, INSERT, and DELETE statements and is primarily used to determine the execution path followed by the database in its SQL execution.
See also:Understanding Automatic Error Detection
Understanding Code Assist
Understanding Hyperlinks
Understanding Code Formatting
Understanding Code Folding
Understanding Code Quality Checks
Understanding SQL Templates
Understanding Automatic Error DetectionSQL Editor orders and classifies SQL statements. This enables it to edit code as you work within SQL Editor and highlight errors and typographical errors in “real time”. As you work, SQL Editor examines each clause in a statement and provides error reporting and other features as required.
SQL Editor identifies the following clauses and elements:
• SELECT: Specifies the field, constants, and expressions to display in the query results.
• FROM: Specifies one or more tables containing the data that the query retrieves from.
• WHERE: Specifies join and filter conditions that determine the rows that query returns. Join operations in a WHERE clause function in the same manner as JOIN operations in a FROM clause.
• GROUP BY: Specifies one or more columns used to group rows returned by the query. Columns referenced in the SQL SELECT statement list, except for aggregate expressions, must be included in the GROUP BY clause. You cannot group by Memo, General or Blob fields.
• HAVING: Specifies conditions that determine the groups included in the query. If the SQL statement does not contain aggregate functions, you can use the SQL SELECT statement containing a HAVING clause without the GROUP BY clause.
• ORDER BY: Specifies one or more items used to sort the final query result set and the order for sorting the results.
As you develop code in SQL Editor, it automatically detects semantic errors on a line-by-line basis. Whenever an error is detected, the line is flagged by an icon located in the left-hand column of the editor.
EMBARCADERO TECHNOLOGIES > EMBARCADERO® RAPID SQL DEVELOPER™ 2.1 USER GUIDE 25

> CREATING AND EDITING SQL FILES (SQL EDITOR)
Additionally, all semantic errors detected in SQL Editor are displayed in the Problems view.
Right-click the an error and select Go To in order to find the error. Rapid SQL Developer opens and navigates to the specific line of code containing the specified error.
NOTE: Automatic error detection functions, such as syntax checking and semantic validation are suspended if #define or #include directives are detected in an editor window. Rapid SQL Developer does not perform #define/#include substitutions on execution.
Understanding Code AssistWhen SQL Editor has finished analyzing a partial piece of code, it displays a list of data source objects for you to select from.
SQL Editor takes the following into consideration when analyzing code for a list of possible data source objects for insertion:
• Text to be inserted
• Original text to be replaced
• Content assist request location in original text
• The database object represented by the insertion text
Generally, insertion suggestions use the following format:
<insertion_text > - <qualification_information >
Code assist is available for SELECT, UPDATE, INSERT, and DELETE statements, as well as stored procedures, and functions (built-in and user defined.)
Additionally, code suggestions can be made for DML statements nestled within DDL statements. This functions in the same manner as code assist for statements that are not nestled, and applies to CREATE PROCEDURE, FUNCTION, TRIGGER, TABLE, and VIEW statements.
When the code assist window is open, you can filter out singular object suggestions by pressing ( Ctrl + Spacebar). This removes all objects from the assist window while retaining procedures and functions. To display objects again, press ( Ctrl + Spacebar ) again.
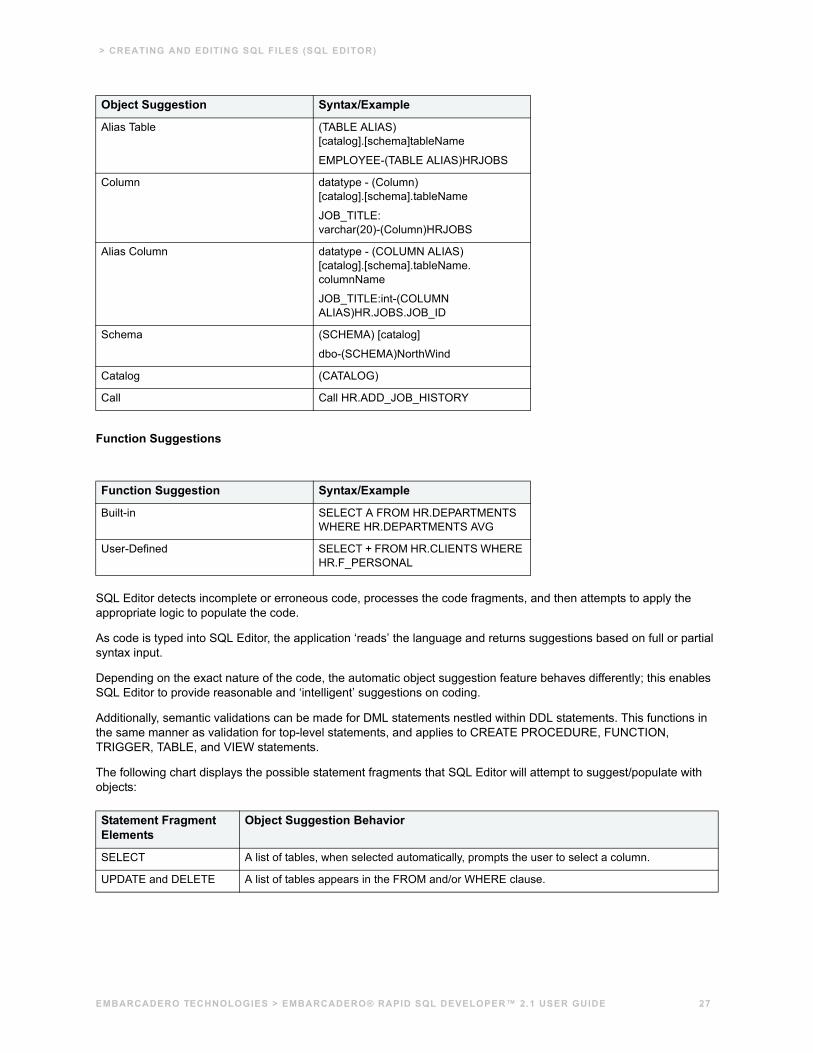
The following table displays a list of all possible object suggestions, and the format in which SQL Editor inserts the suggestions into a statement:
Object and Stored Procedure Suggestions
Object Suggestion Syntax/Example
Table (TABLE) [catalog].[schema]
EMPLOYEE - (TABLE)HR
EMBARCADERO TECHNOLOGIES > EMBARCADERO® RAPID SQL DEVELOPER™ 2.1 USER GUIDE 26
> CREATING AND EDITING SQL FILES (SQL EDITOR)
Function Suggestions
SQL Editor detects incomplete or erroneous code, processes the code fragments, and then attempts to apply the appropriate logic to populate the code.
As code is typed into SQL Editor, the application ‘reads’ the language and returns suggestions based on full or partial syntax input.
Depending on the exact nature of the code, the automatic object suggestion feature behaves differently; this enables SQL Editor to provide reasonable and ‘intelligent’ suggestions on coding.
Additionally, semantic validations can be made for DML statements nestled within DDL statements. This functions in the same manner as validation for top-level statements, and applies to CREATE PROCEDURE, FUNCTION, TRIGGER, TABLE, and VIEW statements.
The following chart displays the possible statement fragments that SQL Editor will attempt to suggest/populate with objects:
Alias Table (TABLE ALIAS) [catalog].[schema]tableName
EMPLOYEE-(TABLE ALIAS)HRJOBS
Column datatype - (Column) [catalog].[schema].tableName
JOB_TITLE: varchar(20)-(Column)HRJOBS
Alias Column datatype - (COLUMN ALIAS) [catalog].[schema].tableName.columnName
JOB_TITLE:int-(COLUMN ALIAS)HR.JOBS.JOB_ID
Schema (SCHEMA) [catalog]
dbo-(SCHEMA)NorthWind
Catalog (CATALOG)
Call Call HR.ADD_JOB_HISTORY
Function Suggestion Syntax/Example
Built-in SELECT A FROM HR.DEPARTMENTS WHERE HR.DEPARTMENTS AVG
User-Defined SELECT + FROM HR.CLIENTS WHERE HR.F_PERSONAL
Statement Fragment Elements
Object Suggestion Behavior
SELECT A list of tables, when selected automatically, prompts the user to select a column.
UPDATE and DELETE A list of tables appears in the FROM and/or WHERE clause.
Object Suggestion Syntax/Example
EMBARCADERO TECHNOLOGIES > EMBARCADERO® RAPID SQL DEVELOPER™ 2.1 USER GUIDE 27

> CREATING AND EDITING SQL FILES (SQL EDITOR)
In addition to DML statements, SQL Editor also suggests objects based on specific fragmented syntax per line of code:
To activate code suggestions:• By default, code suggestions are automatically offered if you stop tying in SQL Editor for one second. You can
turn off the automated suggestion feature on the Code Assist preferences page.
If automated code suggestion is disabled, you can still access the suggestion window using the following method:
1 Click the line that you want SQL Editor to suggest an object for.
2 Press (CTRL + Spacebar) on your keyboard. SQL Editor ‘reads’ the line and presents a list of tables, views or columns as appropriate based on statement elements.
NOTE: On a per platform basis, auto-suggestion behavior may vary. (For example, the WITH statement on DB2 platforms.)
To modify object suggestion parameters, including setting it from automatic to manual, see Set Code Assist Preferences.
Understanding HyperlinksSQL Editor supports hyperlinks that are activated when a user hovers their mouse over a word and presses the CTRL key. If a hyperlink can be created, it becomes underlined and changes color. When the hyperlink is selected, the creation script for the hyperlink object is opened in a new editor.
Hyperlinks can be used to link to tables, columns, packages, and other reference objects in development code. Additionally, hovering over a hyperlink on a procedure or function of a call statement will open it. You can also use the hyperlink feature on function calls in DML statements.
INSERT A list of tables and views appears in the INSERT INTO and OPEN BRACKET clause prior to values.
A list of columns based on the table or view name appears in the OPEN BRACKET or VALUES clause.
Statement Syntax Object Suggestion Behavior
A partial DML statement (for example SEL ... indicates a fragment of the SELECT clause)
The keyword is completed automatically, assuming SQL Editor can match it. Otherwise, a list of suggested keywords is displayed.
If the preceding character is a period, and the word prior is a table or view, a list of columns appears.
If the word being typed is a part of a table name (denoted by a schema in front of it) the table name is autocompleted.
If the word being typed has a part of a column name (denoted by a table in front of it) the column name is autocompleted.
Without typing anything. A list of keywords appears.
A period is typed. If the word prior to the period is a name of a table or view, a list of columns is displayed.
If the word prior to the period is a schema name, a list of table names is displayed.
If the word prior to the period is either a table name or a schema name, then both a list of columns and a list of table names is displayed.
Statement Fragment Elements
Object Suggestion Behavior
EMBARCADERO TECHNOLOGIES > EMBARCADERO® RAPID SQL DEVELOPER™ 2.1 USER GUIDE 28
> CREATING AND EDITING SQL FILES (SQL EDITOR)
Clicking a hyperlink performs an action. The text editor provides a default hyperlink capability. It allows a user to click on a URL (for example, www.embarcadero.com) and database object links.
Hyperlink options (look and feel) can be modified via the Hyperlinking subnode in the Editors > Text Editors node of the Preferences panel.
NOTE: Hyperlink functionality relies on certain objects being captured in the Object Index. If the index is turned off, or has been restricted in what information it captures, users will be unable to link them (as they are non-existent within the Index.) To specify object index types, see Set Data Source Indexing Preferences.
Understanding Code FormattingCode formatting provides automatic code formatting in SQL Editor while you are developing code.
To access the code formatter, select the open editor you want to format and select Ctrl+Shift+F. The code is formatted automatically based on formatting parameters specified in the Code Formatter subnode of the SQL Editor node in the Preferences panel. (See Set Code Formatter Preferences for more information on these formatting options.)
You can also format an entire group of files from Project Explorer. To do so, select the directory or file and execute the Format command via the shortcut menu. The files will be formatted automatically based on your formatting preferences.
The following examples display a list of code formatting parameters and the resultant output in SQL Editor, based on the same set of SQL statements.
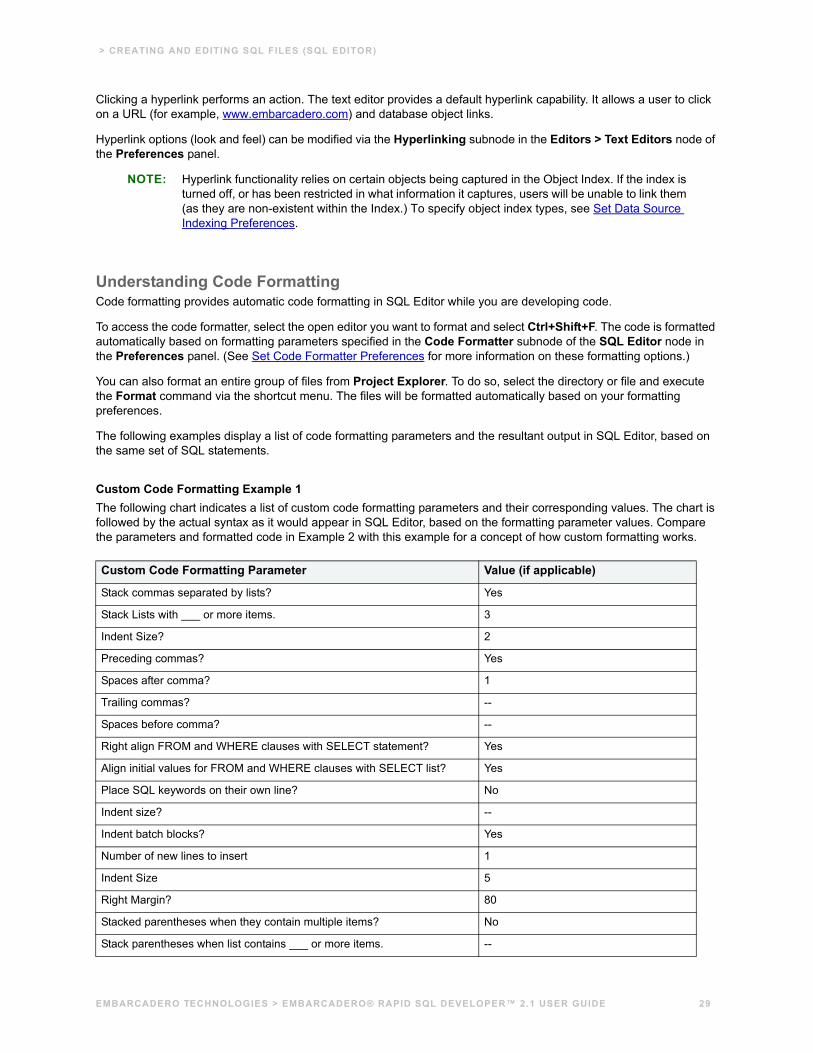
Custom Code Formatting Example 1The following chart indicates a list of custom code formatting parameters and their corresponding values. The chart is followed by the actual syntax as it would appear in SQL Editor, based on the formatting parameter values. Compare the parameters and formatted code in Example 2 with this example for a concept of how custom formatting works.
Custom Code Formatting Parameter Value (if applicable)
Stack commas separated by lists? Yes
Stack Lists with ___ or more items. 3
Indent Size? 2
Preceding commas? Yes
Spaces after comma? 1
Trailing commas? --
Spaces before comma? --
Right align FROM and WHERE clauses with SELECT statement? Yes
Align initial values for FROM and WHERE clauses with SELECT list? Yes
Place SQL keywords on their own line? No
Indent size? --
Indent batch blocks? Yes
Number of new lines to insert 1
Indent Size 5
Right Margin? 80
Stacked parentheses when they contain multiple items? No
Stack parentheses when list contains ___ or more items. --
EMBARCADERO TECHNOLOGIES > EMBARCADERO® RAPID SQL DEVELOPER™ 2.1 USER GUIDE 29

> CREATING AND EDITING SQL FILES (SQL EDITOR)
Indent Size? 5
New line after first parentheses? No
Indent content of conditional and looping constructs? Yes
Number of new lines to insert? 1
Indent size? 5
Custom Code Formatting Parameter Value (if applicable)
EMBARCADERO TECHNOLOGIES > EMBARCADERO® RAPID SQL DEVELOPER™ 2.1 USER GUIDE 30
> CREATING AND EDITING SQL FILES (SQL EDITOR)
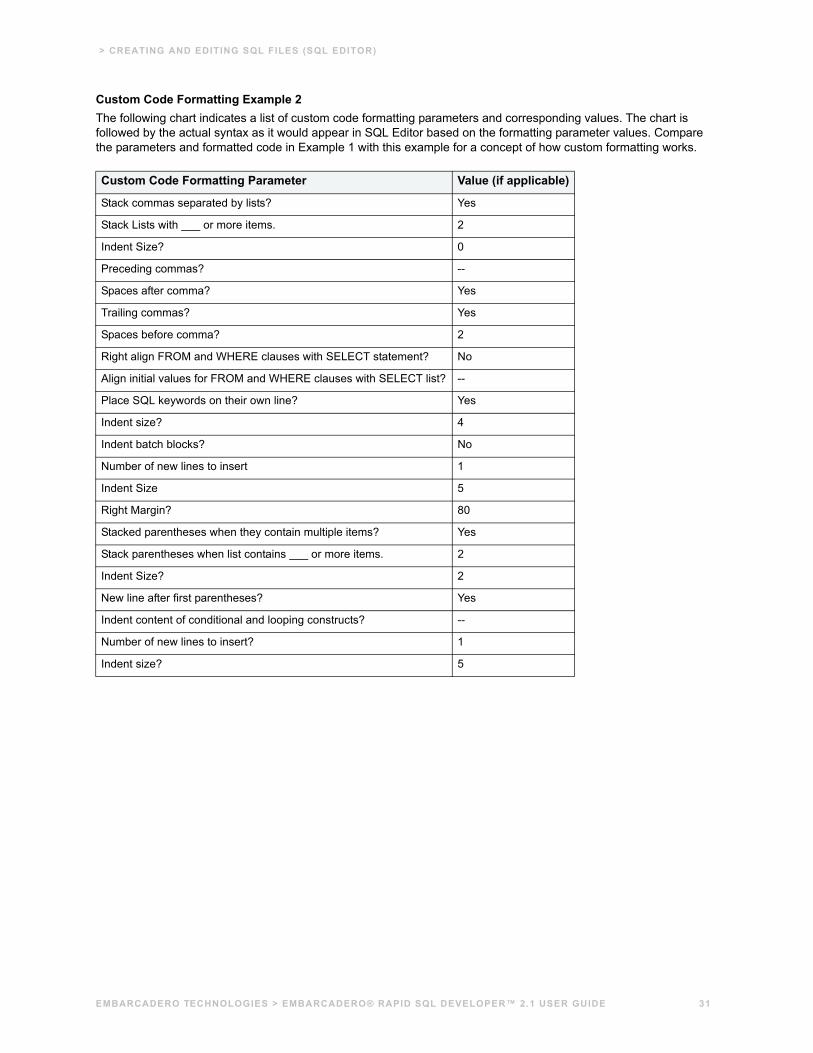
Custom Code Formatting Example 2The following chart indicates a list of custom code formatting parameters and corresponding values. The chart is followed by the actual syntax as it would appear in SQL Editor based on the formatting parameter values. Compare the parameters and formatted code in Example 1 with this example for a concept of how custom formatting works.
Custom Code Formatting Parameter Value (if applicable)
Stack commas separated by lists? Yes
Stack Lists with ___ or more items. 2
Indent Size? 0
Preceding commas? --
Spaces after comma? Yes
Trailing commas? Yes
Spaces before comma? 2
Right align FROM and WHERE clauses with SELECT statement? No
Align initial values for FROM and WHERE clauses with SELECT list? --
Place SQL keywords on their own line? Yes
Indent size? 4
Indent batch blocks? No
Number of new lines to insert 1
Indent Size 5
Right Margin? 80
Stacked parentheses when they contain multiple items? Yes
Stack parentheses when list contains ___ or more items. 2
Indent Size? 2
New line after first parentheses? Yes
Indent content of conditional and looping constructs? --
Number of new lines to insert? 1
Indent size? 5
EMBARCADERO TECHNOLOGIES > EMBARCADERO® RAPID SQL DEVELOPER™ 2.1 USER GUIDE 31
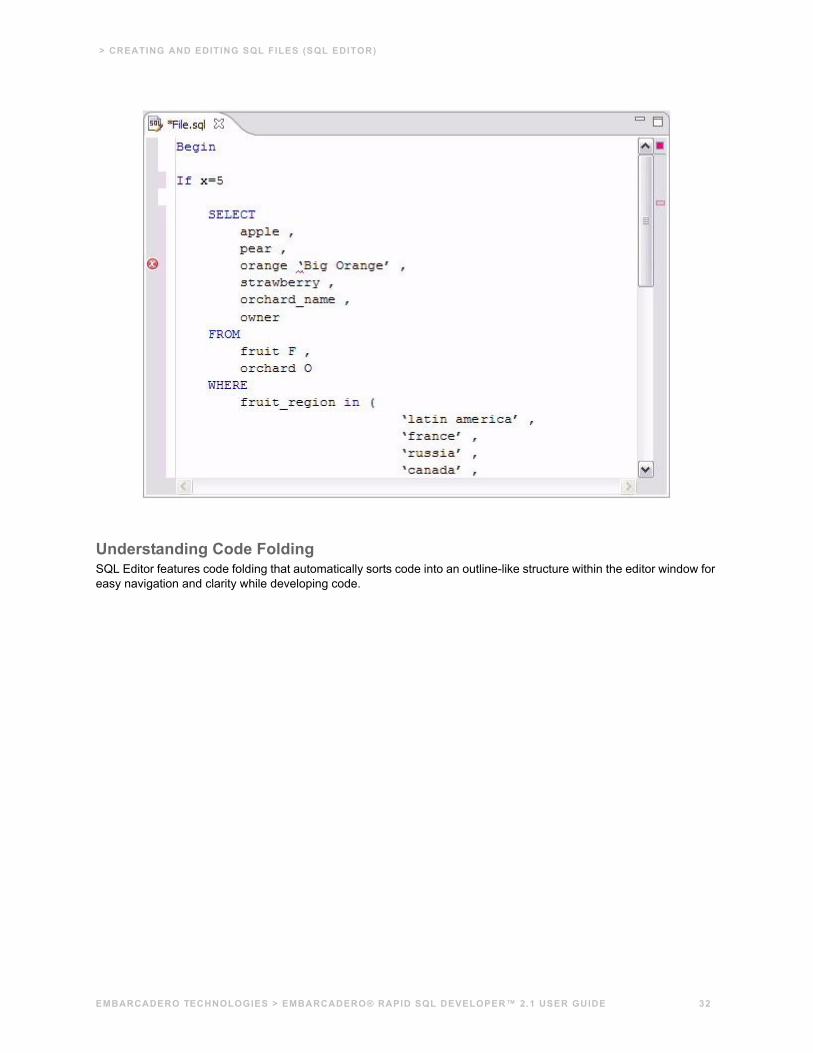
> CREATING AND EDITING SQL FILES (SQL EDITOR)
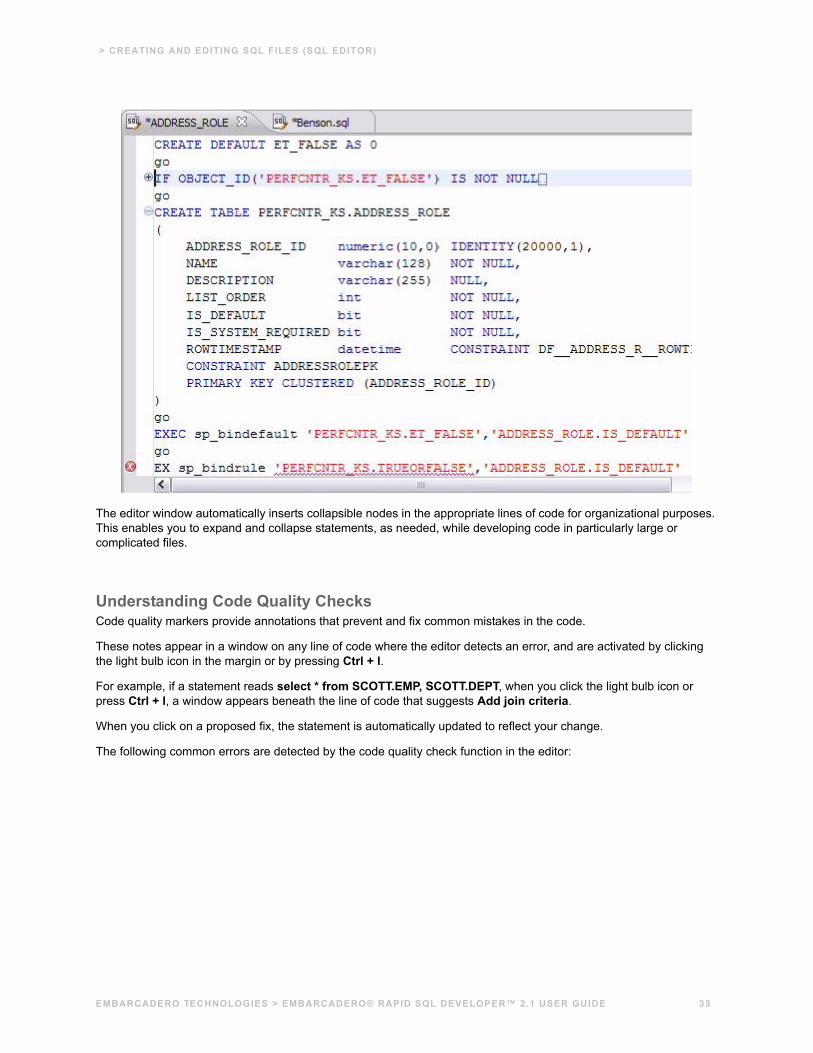
Understanding Code FoldingSQL Editor features code folding that automatically sorts code into an outline-like structure within the editor window for easy navigation and clarity while developing code.
EMBARCADERO TECHNOLOGIES > EMBARCADERO® RAPID SQL DEVELOPER™ 2.1 USER GUIDE 32
> CREATING AND EDITING SQL FILES (SQL EDITOR)
The editor window automatically inserts collapsible nodes in the appropriate lines of code for organizational purposes. This enables you to expand and collapse statements, as needed, while developing code in particularly large or complicated files.
Understanding Code Quality ChecksCode quality markers provide annotations that prevent and fix common mistakes in the code.
These notes appear in a window on any line of code where the editor detects an error, and are activated by clicking the light bulb icon in the margin or by pressing Ctrl + l.
For example, if a statement reads select * from SCOTT.EMP, SCOTT.DEPT, when you click the light bulb icon or press Ctrl + l, a window appears beneath the line of code that suggests Add join criteria.
When you click on a proposed fix, the statement is automatically updated to reflect your change.
The following common errors are detected by the code quality check function in the editor:
EMBARCADERO TECHNOLOGIES > EMBARCADERO® RAPID SQL DEVELOPER™ 2.1 USER GUIDE 33
> CREATING AND EDITING SQL FILES (SQL EDITOR)
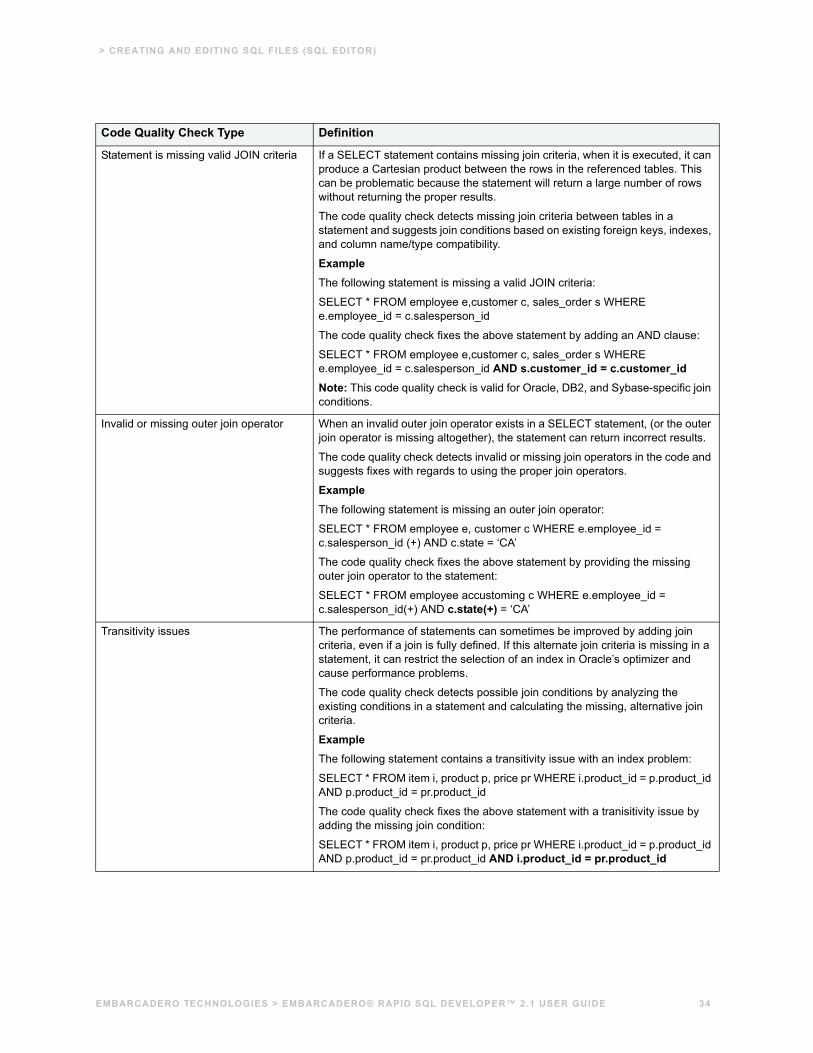
Code Quality Check Type Definition
Statement is missing valid JOIN criteria If a SELECT statement contains missing join criteria, when it is executed, it can produce a Cartesian product between the rows in the referenced tables. This can be problematic because the statement will return a large number of rows without returning the proper results.
The code quality check detects missing join criteria between tables in a statement and suggests join conditions based on existing foreign keys, indexes, and column name/type compatibility.
ExampleThe following statement is missing a valid JOIN criteria:
SELECT * FROM employee e,customer c, sales_order s WHERE e.employee_id = c.salesperson_id
The code quality check fixes the above statement by adding an AND clause:
SELECT * FROM employee e,customer c, sales_order s WHERE e.employee_id = c.salesperson_id AND s.customer_id = c.customer_idNote: This code quality check is valid for Oracle, DB2, and Sybase-specific join conditions.
Invalid or missing outer join operator When an invalid outer join operator exists in a SELECT statement, (or the outer join operator is missing altogether), the statement can return incorrect results.
The code quality check detects invalid or missing join operators in the code and suggests fixes with regards to using the proper join operators.
ExampleThe following statement is missing an outer join operator:
SELECT * FROM employee e, customer c WHERE e.employee_id = c.salesperson_id (+) AND c.state = ‘CA’
The code quality check fixes the above statement by providing the missing outer join operator to the statement:
SELECT * FROM employee accustoming c WHERE e.employee_id = c.salesperson_id(+) AND c.state(+) = ‘CA’
Transitivity issues The performance of statements can sometimes be improved by adding join criteria, even if a join is fully defined. If this alternate join criteria is missing in a statement, it can restrict the selection of an index in Oracle’s optimizer and cause performance problems.
The code quality check detects possible join conditions by analyzing the existing conditions in a statement and calculating the missing, alternative join criteria.
ExampleThe following statement contains a transitivity issue with an index problem:
SELECT * FROM item i, product p, price pr WHERE i.product_id = p.product_id AND p.product_id = pr.product_id
The code quality check fixes the above statement with a tranisitivity issue by adding the missing join condition:
SELECT * FROM item i, product p, price pr WHERE i.product_id = p.product_id AND p.product_id = pr.product_id AND i.product_id = pr.product_id
EMBARCADERO TECHNOLOGIES > EMBARCADERO® RAPID SQL DEVELOPER™ 2.1 USER GUIDE 34
> CREATING AND EDITING SQL FILES (SQL EDITOR)
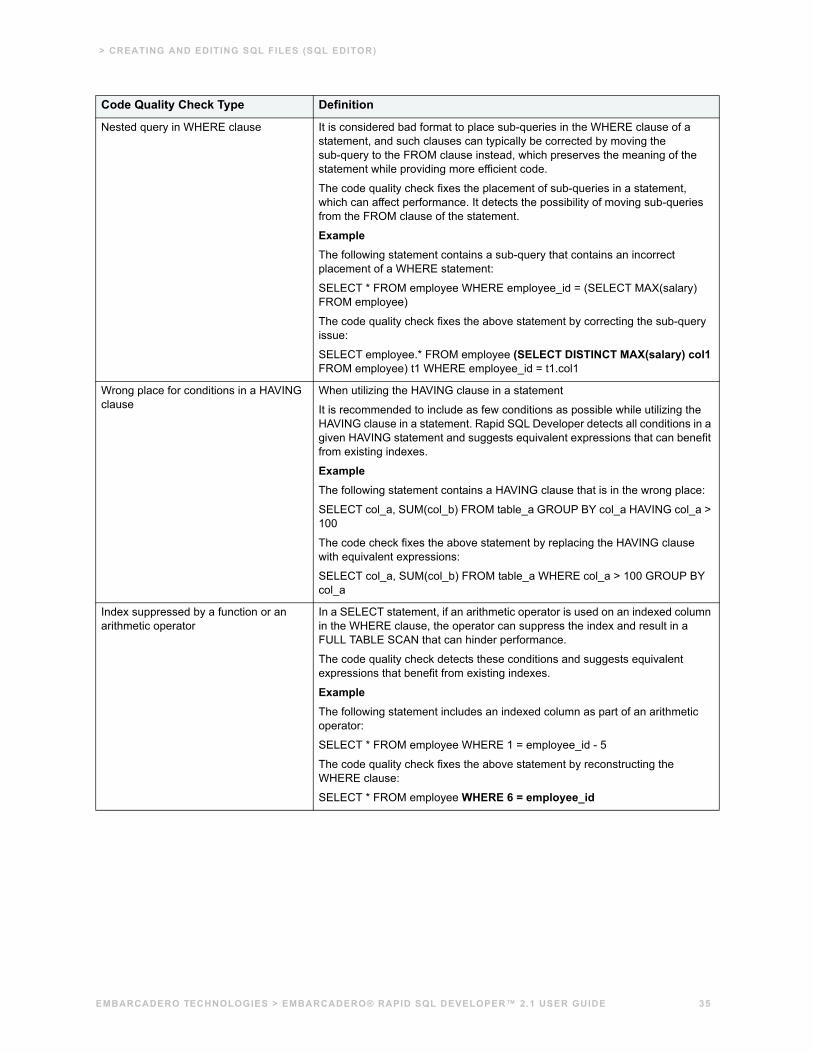
Nested query in WHERE clause It is considered bad format to place sub-queries in the WHERE clause of a statement, and such clauses can typically be corrected by moving the sub-query to the FROM clause instead, which preserves the meaning of the statement while providing more efficient code.
The code quality check fixes the placement of sub-queries in a statement, which can affect performance. It detects the possibility of moving sub-queries from the FROM clause of the statement.
ExampleThe following statement contains a sub-query that contains an incorrect placement of a WHERE statement:
SELECT * FROM employee WHERE employee_id = (SELECT MAX(salary) FROM employee)
The code quality check fixes the above statement by correcting the sub-query issue:
SELECT employee.* FROM employee (SELECT DISTINCT MAX(salary) col1 FROM employee) t1 WHERE employee_id = t1.col1
Wrong place for conditions in a HAVING clause
When utilizing the HAVING clause in a statement
It is recommended to include as few conditions as possible while utilizing the HAVING clause in a statement. Rapid SQL Developer detects all conditions in a given HAVING statement and suggests equivalent expressions that can benefit from existing indexes.
ExampleThe following statement contains a HAVING clause that is in the wrong place:
SELECT col_a, SUM(col_b) FROM table_a GROUP BY col_a HAVING col_a > 100
The code check fixes the above statement by replacing the HAVING clause with equivalent expressions:
SELECT col_a, SUM(col_b) FROM table_a WHERE col_a > 100 GROUP BY col_a
Index suppressed by a function or an arithmetic operator
In a SELECT statement, if an arithmetic operator is used on an indexed column in the WHERE clause, the operator can suppress the index and result in a FULL TABLE SCAN that can hinder performance.
The code quality check detects these conditions and suggests equivalent expressions that benefit from existing indexes.
ExampleThe following statement includes an indexed column as part of an arithmetic operator:
SELECT * FROM employee WHERE 1 = employee_id - 5
The code quality check fixes the above statement by reconstructing the WHERE clause:
SELECT * FROM employee WHERE 6 = employee_id
Code Quality Check Type Definition
EMBARCADERO TECHNOLOGIES > EMBARCADERO® RAPID SQL DEVELOPER™ 2.1 USER GUIDE 35
> CREATING AND EDITING SQL FILES (SQL EDITOR)
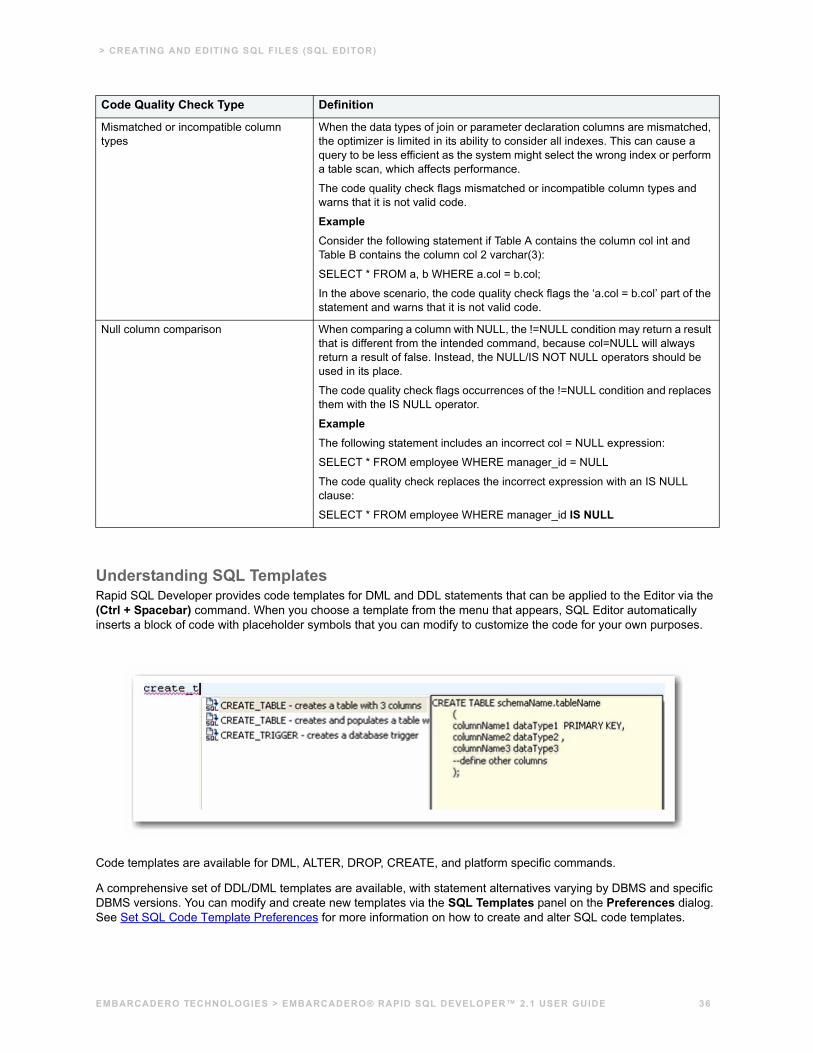
Understanding SQL TemplatesRapid SQL Developer provides code templates for DML and DDL statements that can be applied to the Editor via the (Ctrl + Spacebar) command. When you choose a template from the menu that appears, SQL Editor automatically inserts a block of code with placeholder symbols that you can modify to customize the code for your own purposes.
Code templates are available for DML, ALTER, DROP, CREATE, and platform specific commands.
A comprehensive set of DDL/DML templates are available, with statement alternatives varying by DBMS and specific DBMS versions. You can modify and create new templates via the SQL Templates panel on the Preferences dialog. See Set SQL Code Template Preferences for more information on how to create and alter SQL code templates.
Mismatched or incompatible column types
When the data types of join or parameter declaration columns are mismatched, the optimizer is limited in its ability to consider all indexes. This can cause a query to be less efficient as the system might select the wrong index or perform a table scan, which affects performance.
The code quality check flags mismatched or incompatible column types and warns that it is not valid code.
ExampleConsider the following statement if Table A contains the column col int and Table B contains the column col 2 varchar(3):
SELECT * FROM a, b WHERE a.col = b.col;
In the above scenario, the code quality check flags the ‘a.col = b.col’ part of the statement and warns that it is not valid code.
Null column comparison When comparing a column with NULL, the !=NULL condition may return a result that is different from the intended command, because col=NULL will always return a result of false. Instead, the NULL/IS NOT NULL operators should be used in its place.
The code quality check flags occurrences of the !=NULL condition and replaces them with the IS NULL operator.
ExampleThe following statement includes an incorrect col = NULL expression:
SELECT * FROM employee WHERE manager_id = NULL
The code quality check replaces the incorrect expression with an IS NULL clause:
SELECT * FROM employee WHERE manager_id IS NULL
Code Quality Check Type Definition
EMBARCADERO TECHNOLOGIES > EMBARCADERO® RAPID SQL DEVELOPER™ 2.1 USER GUIDE 36
> CREATING AND EDITING SQL FILES (SQL EDITOR)
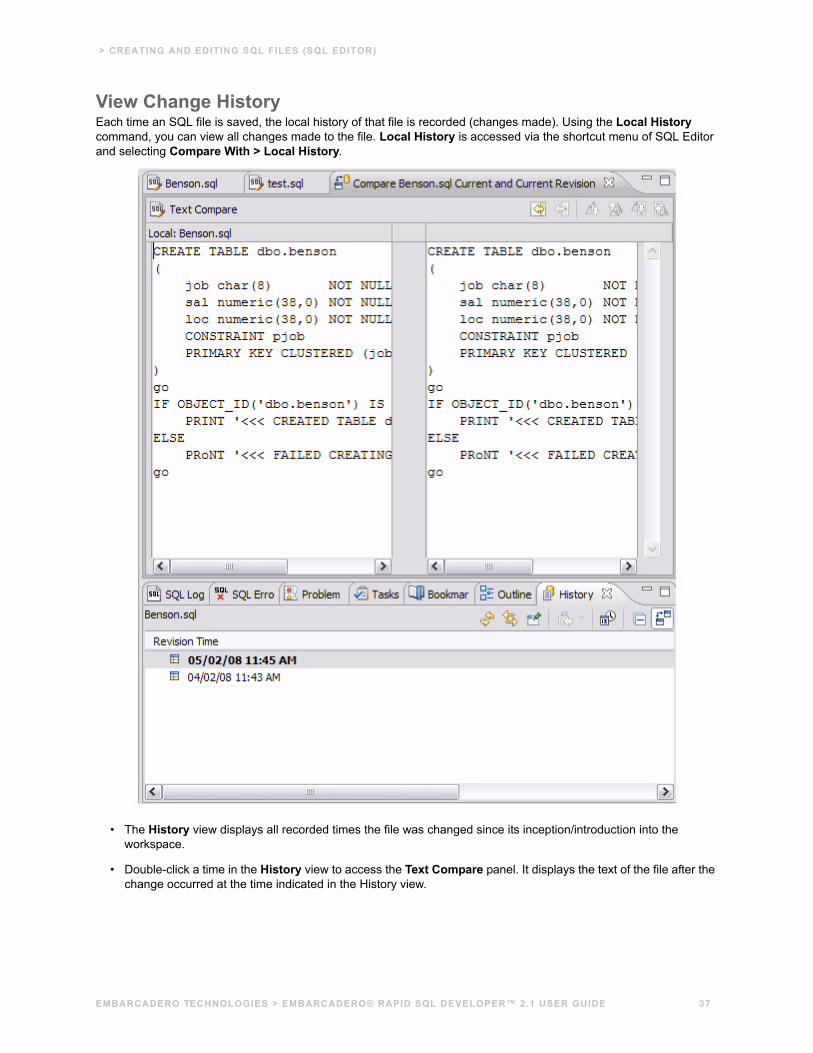
View Change HistoryEach time an SQL file is saved, the local history of that file is recorded (changes made). Using the Local History command, you can view all changes made to the file. Local History is accessed via the shortcut menu of SQL Editor and selecting Compare With > Local History.
• The History view displays all recorded times the file was changed since its inception/introduction into the workspace.
• Double-click a time in the History view to access the Text Compare panel. It displays the text of the file after the change occurred at the time indicated in the History view.
EMBARCADERO TECHNOLOGIES > EMBARCADERO® RAPID SQL DEVELOPER™ 2.1 USER GUIDE 37
> EXECUTING SQL FILES
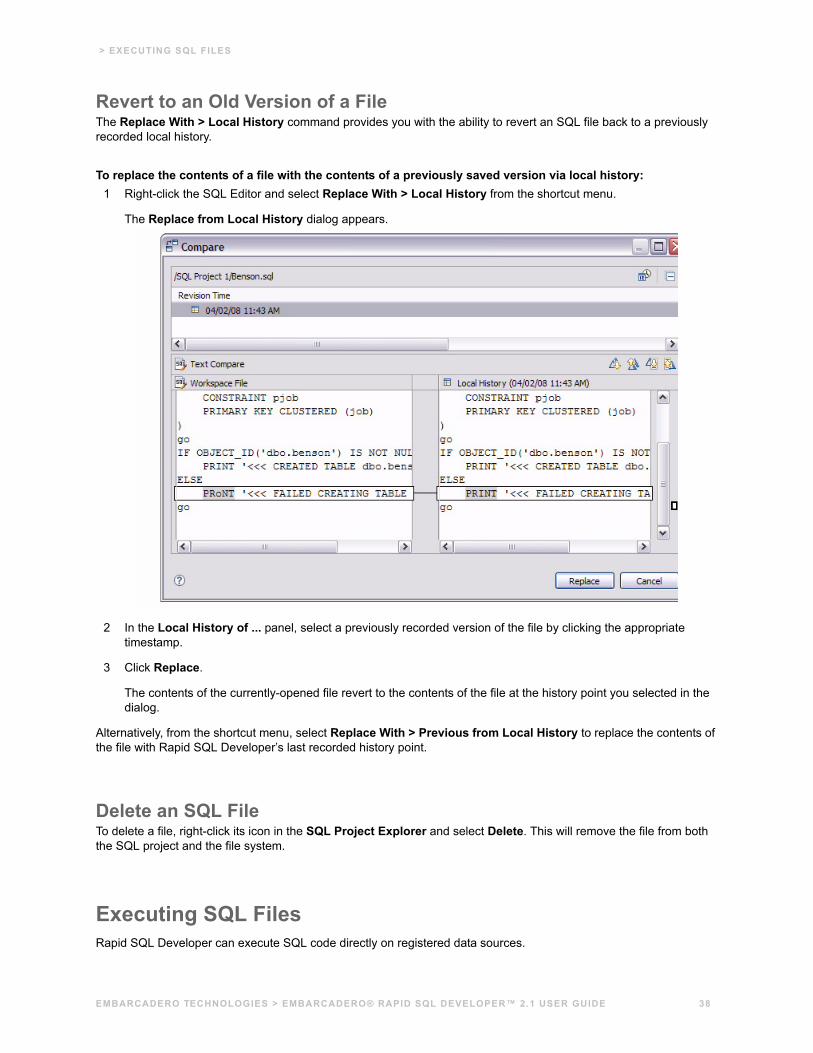
Revert to an Old Version of a FileThe Replace With > Local History command provides you with the ability to revert an SQL file back to a previously recorded local history.
To replace the contents of a file with the contents of a previously saved version via local history:1 Right-click the SQL Editor and select Replace With > Local History from the shortcut menu.
The Replace from Local History dialog appears.
2 In the Local History of ... panel, select a previously recorded version of the file by clicking the appropriate timestamp.
3 Click Replace.
The contents of the currently-opened file revert to the contents of the file at the history point you selected in the dialog.
Alternatively, from the shortcut menu, select Replace With > Previous from Local History to replace the contents of the file with Rapid SQL Developer’s last recorded history point.
Delete an SQL FileTo delete a file, right-click its icon in the SQL Project Explorer and select Delete. This will remove the file from both the SQL project and the file system.
Executing SQL FilesRapid SQL Developer can execute SQL code directly on registered data sources.
EMBARCADERO TECHNOLOGIES > EMBARCADERO® RAPID SQL DEVELOPER™ 2.1 USER GUIDE 38
> EXECUTING SQL FILES
Files are executed via the Execute SQL command in the Run menu, or by clicking the green arrow button in SQL Editor.
When an SQL file is open in the Workspace, select it and choose a database and an associated catalog on which you want to execute the file via the lists in the Toolbar.
You can click the execute icon to execute code on the specified database and catalog, start a transaction or commit a transaction, or modify SQL session options prior to execution.
To execute a file:Open the SQL file you want to run, ensure it is associated with the correct database, and click Execute. Rapid SQL Developer executes the code on the data source you specified. Results are displayed in the Results view and can be exported to a file via the Data Export wizard, or displayed in multiple file formats (HTML, XML, and TXT formats).
To execute a transaction:To execute transactions, you need to ensure that the auto commit feature is turned off. See Set SQL Execution Preferences for more information on how to turn off auto commit.
Open the transaction file you want to run, ensure it is associated with the correct database, and click Start Transaction. Rapid SQL Developer executes the transaction on the data source you specified.
Once the transaction runs, you can execute the file as normal.
NOTE: Click Commit or Rollback to finish or cancel a transaction.
To commit a transaction:Open the transaction file you want to commit, ensure it is associated with the correct database, and click Commit Transaction. Rapid SQL Developer commits the transaction on the data source you specified.
TIP: You can set transactions to auto-commit prior to execution on the SQL Execution node of the Preferences panel.
See Also:
Associate an SQL File with a Data Source
Configure an SQL Session
Execute SQL Code
View and Save Results
Associate an SQL File with a Data SourceWhen working with files, SQL Editor enables developers to view and change the data source to which they are connected.
The bread crumb line in SQL editor is used to display and specify a data source in relation to the specified SQL Editor file. The menu contains a list of all registered data sources. Additionally, on platforms that support catalogs, these are displayed as well.
EMBARCADERO TECHNOLOGIES > EMBARCADERO® RAPID SQL DEVELOPER™ 2.1 USER GUIDE 39

> EXECUTING SQL FILES
Changing a catalog via the drop down lists is the equivalent of issuing a USE DATABASE command on SQL Server, Sybase, and MySQL platforms. Any change will not affect the current connection, and the list automatically updates to display the name of the newly selected data source.
To change or associate a registered data source with an SQL file:
Click the database list and select the name of a registered database from the list provided. Depending on the state of the code in SQL Editor, Rapid SQL Developer’s behavior differs when the connection is made:
TIP: If you are receiving multiple syntax errors, always check that the file is associated with the correct data source and corresponding database/catalog before troubleshooting further.
EMBARCADERO TECHNOLOGIES > EMBARCADERO® RAPID SQL DEVELOPER™ 2.1 USER GUIDE 40
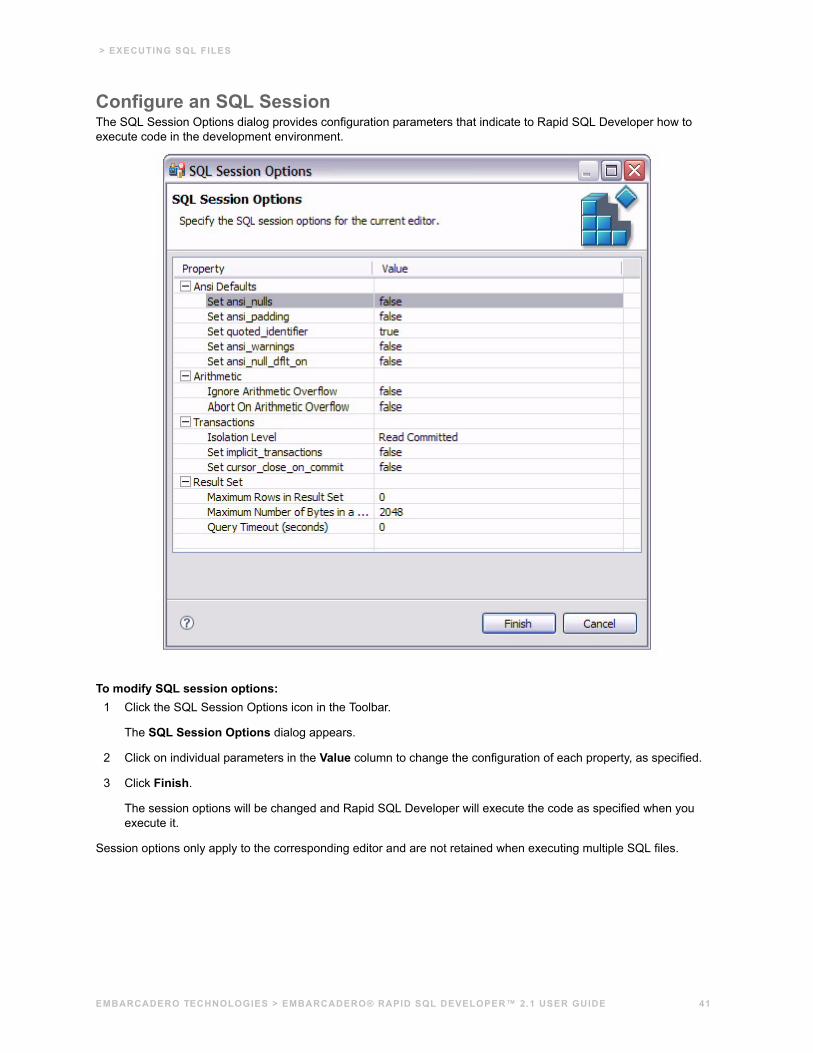
> EXECUTING SQL FILES
Configure an SQL SessionThe SQL Session Options dialog provides configuration parameters that indicate to Rapid SQL Developer how to execute code in the development environment.
To modify SQL session options:1 Click the SQL Session Options icon in the Toolbar.
The SQL Session Options dialog appears.
2 Click on individual parameters in the Value column to change the configuration of each property, as specified.
3 Click Finish.
The session options will be changed and Rapid SQL Developer will execute the code as specified when you execute it.
Session options only apply to the corresponding editor and are not retained when executing multiple SQL files.
EMBARCADERO TECHNOLOGIES > EMBARCADERO® RAPID SQL DEVELOPER™ 2.1 USER GUIDE 41

> EXECUTING SQL FILES
Execute SQL CodeFiles can be launched from within the Rapid SQL Developer development environment for execution on a registered data source Files are executed via the commands in the Run menu or via the command icons located along the top of SQL Editor.
When an SQL file is open in the Workspace, select it and choose a database and an associated catalog on which you want to execute file using the drop down menus in SQL Editor. You can click the execute icon to execute the code on the specified database and catalog, start a transaction or commit a transaction, or modify the SQL session options prior to execution.
To execute code:Open the SQL file you want to run, ensure it is associated with the correct database and click the Execute icon. Rapid SQL Developer executes the code on the data source you specified. Results are displayed in the same tab or in a new tab.
To execute a transaction:Open the transaction file you want to run and ensure it is associated with the correct database, and then click the Start Transaction icon. Rapid SQL Developer executes the transaction on the data source you specified.
To commit a transaction:Open the transaction file you want to commit, ensure it is associated with the correct database, and then click the Commit Transaction icon. Rapid SQL Developer commits the transaction on the data source you specified.
TIP: You can set transactions to auto-commit prior to execution on the SQL Execution node of the Preferences panel in Rapid SQL Developer.
View and Save ResultsOnce a file has been executed, the results are displayed in the Results view. Here, you can examine the outcome of the execution process, as well as save the results in other file formats, as needed.
You can view results in the following formats:
• Grid (default)
• HTML
• XML
• TXT
EMBARCADERO TECHNOLOGIES > EMBARCADERO® RAPID SQL DEVELOPER™ 2.1 USER GUIDE 42
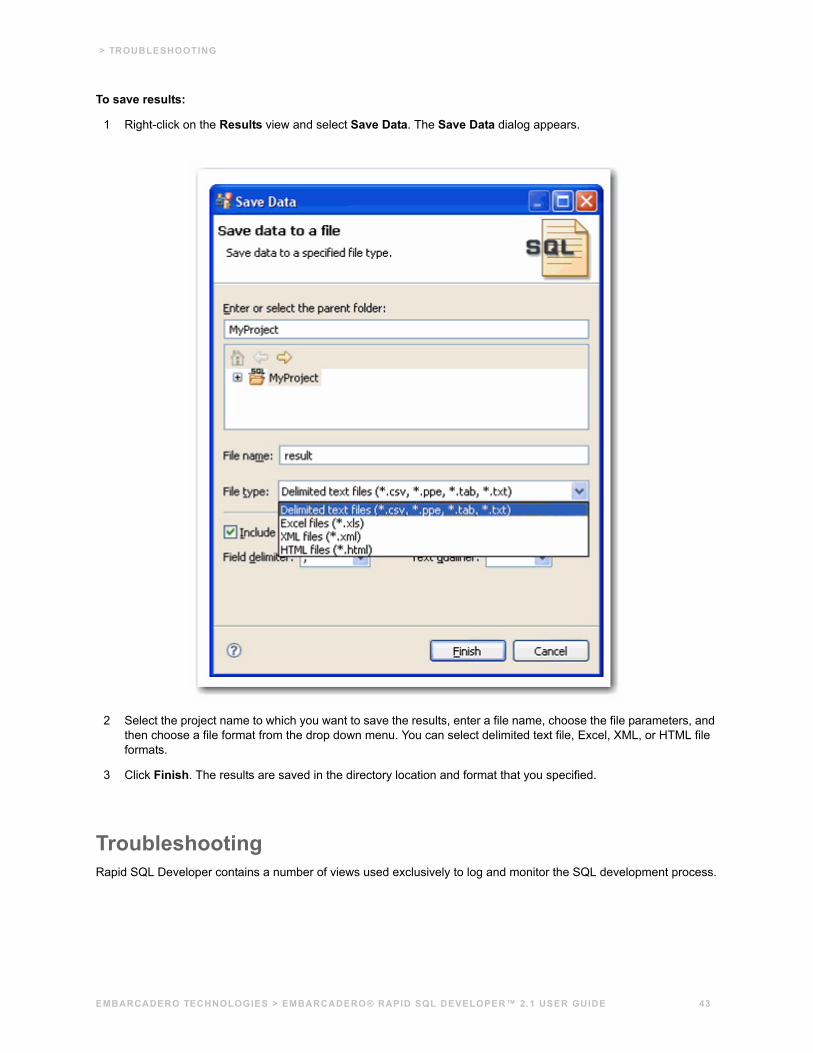
> TROUBLESHOOTING
To save results:
1 Right-click on the Results view and select Save Data. The Save Data dialog appears.
2 Select the project name to which you want to save the results, enter a file name, choose the file parameters, and then choose a file format from the drop down menu. You can select delimited text file, Excel, XML, or HTML file formats.
3 Click Finish. The results are saved in the directory location and format that you specified.
TroubleshootingRapid SQL Developer contains a number of views used exclusively to log and monitor the SQL development process.
EMBARCADERO TECHNOLOGIES > EMBARCADERO® RAPID SQL DEVELOPER™ 2.1 USER GUIDE 43
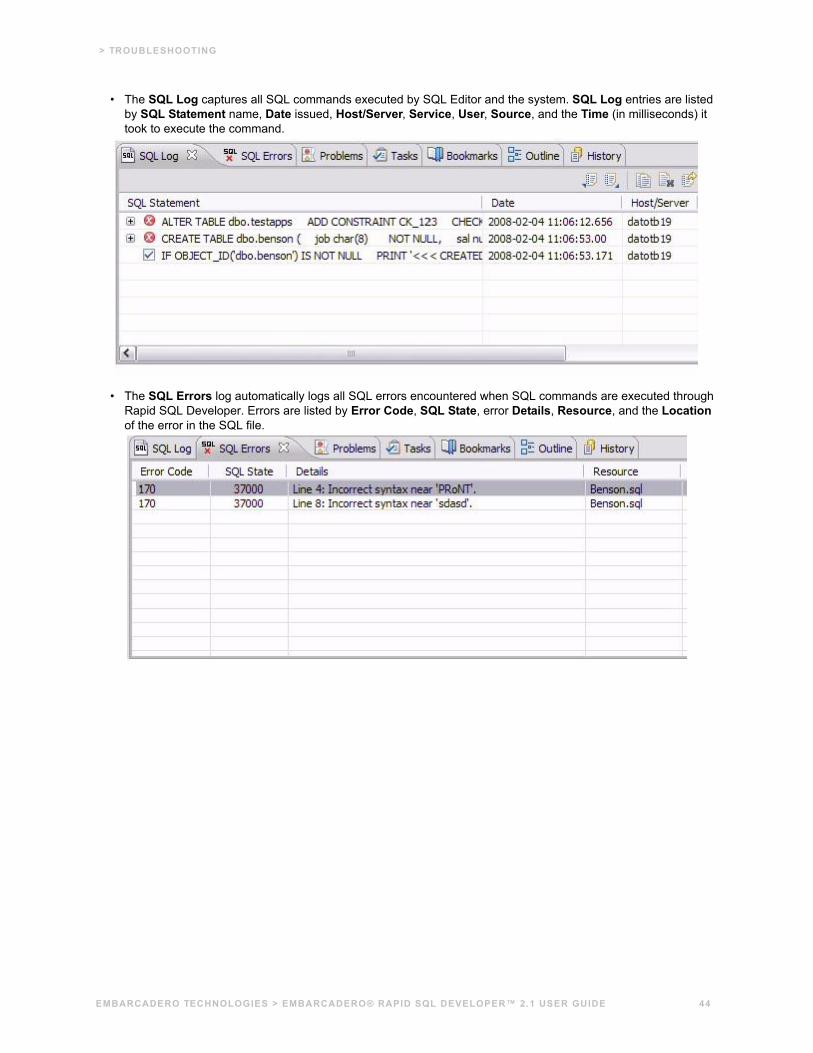
> TROUBLESHOOTING
• The SQL Log captures all SQL commands executed by SQL Editor and the system. SQL Log entries are listed by SQL Statement name, Date issued, Host/Server, Service, User, Source, and the Time (in milliseconds) it took to execute the command.
• The SQL Errors log automatically logs all SQL errors encountered when SQL commands are executed through Rapid SQL Developer. Errors are listed by Error Code, SQL State, error Details, Resource, and the Location of the error in the SQL file.
EMBARCADERO TECHNOLOGIES > EMBARCADERO® RAPID SQL DEVELOPER™ 2.1 USER GUIDE 44
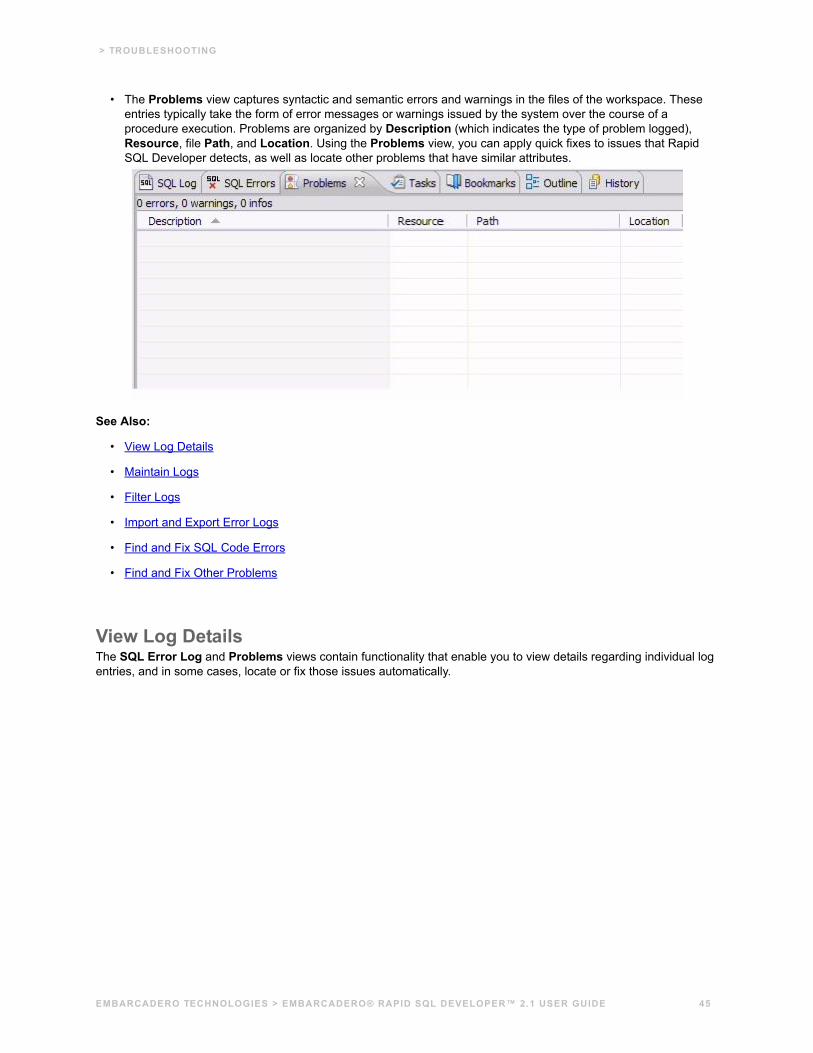
> TROUBLESHOOTING
• The Problems view captures syntactic and semantic errors and warnings in the files of the workspace. These entries typically take the form of error messages or warnings issued by the system over the course of a procedure execution. Problems are organized by Description (which indicates the type of problem logged), Resource, file Path, and Location. Using the Problems view, you can apply quick fixes to issues that Rapid SQL Developer detects, as well as locate other problems that have similar attributes.
See Also:
• View Log Details
• Maintain Logs
• Filter Logs
• Import and Export Error Logs
• Find and Fix SQL Code Errors
• Find and Fix Other Problems
View Log DetailsThe SQL Error Log and Problems views contain functionality that enable you to view details regarding individual log entries, and in some cases, locate or fix those issues automatically.
EMBARCADERO TECHNOLOGIES > EMBARCADERO® RAPID SQL DEVELOPER™ 2.1 USER GUIDE 45

> TROUBLESHOOTING
To view details about SQL Errors entries:Right-click the error whose details you want to view and select SQL Error Details.
The SQL Error Details dialog provides information about the specified SQL error.
Additionally, you can double-click the error to view the problem code in SQL Editor.
To view details about Problems• Right-click the entry whose details you want to view and select Properties. The Properties dialog appears,
summarizing the issue.
Maintain LogsThe SQL Log and SQL Errors views both contain commands that enable you to save, restore, or otherwise move log entries into files outside of Rapid SQL Developer. Additionally, both views also contain commands that enable the clearing of the view.
The current editor option will only show users statements as generated by the active editor.
To maintain log entries:All entries automatically captured by the Error Log are written to a file (.log suffix) that resides in the Workspace .metadata folder.
• From Rapid SQL Developer, right-click in the SQL Log and select Clear Log Viewer to remove all messages.
• In the shortcut menu, select Delete Log to delete the .log file. If entries are created after the Delete Log command is issued, Rapid SQL Developer will automatically generate a new .log file in the .metadata subfolder.
NOTE: Old Error Log entries cannot be recovered once the .log file is deleted. To prevent data loss, archive the .log file via the Export command prior to deletion.
• To clear the Error Log view without deleting the .log file, select Clear Log Viewer from the shortcut menu. The View will be cleared of entries, but these entries will still be contained in the .log file.
EMBARCADERO TECHNOLOGIES > EMBARCADERO® RAPID SQL DEVELOPER™ 2.1 USER GUIDE 46
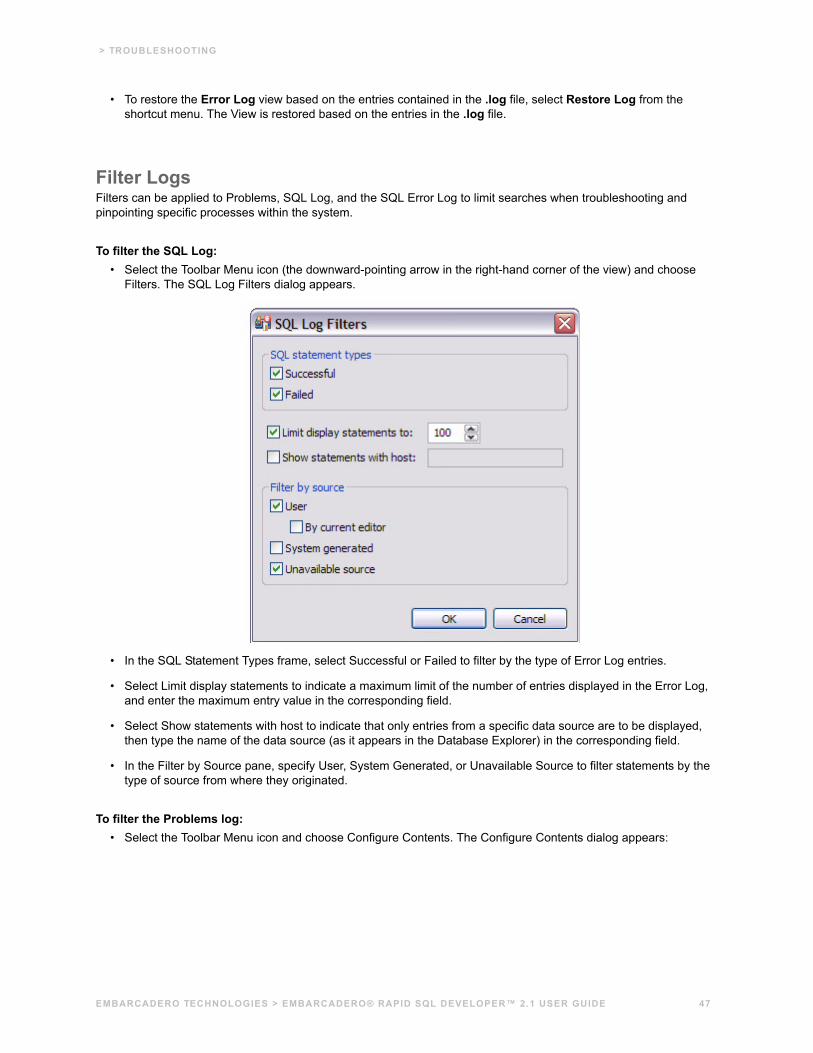
> TROUBLESHOOTING
• To restore the Error Log view based on the entries contained in the .log file, select Restore Log from the shortcut menu. The View is restored based on the entries in the .log file.
Filter LogsFilters can be applied to Problems, SQL Log, and the SQL Error Log to limit searches when troubleshooting and pinpointing specific processes within the system.
To filter the SQL Log:• Select the Toolbar Menu icon (the downward-pointing arrow in the right-hand corner of the view) and choose
Filters. The SQL Log Filters dialog appears.
• In the SQL Statement Types frame, select Successful or Failed to filter by the type of Error Log entries.
• Select Limit display statements to indicate a maximum limit of the number of entries displayed in the Error Log, and enter the maximum entry value in the corresponding field.
• Select Show statements with host to indicate that only entries from a specific data source are to be displayed, then type the name of the data source (as it appears in the Database Explorer) in the corresponding field.
• In the Filter by Source pane, specify User, System Generated, or Unavailable Source to filter statements by the type of source from where they originated.
To filter the Problems log:• Select the Toolbar Menu icon and choose Configure Contents. The Configure Contents dialog appears:
EMBARCADERO TECHNOLOGIES > EMBARCADERO® RAPID SQL DEVELOPER™ 2.1 USER GUIDE 47

> TROUBLESHOOTING
The Filters dialog enables the creation of multiple filter profiles that can be applied to the log via the Toolbar Menu. The User Filters panel on the left-hand side of the dialog displays all existing filter profiles stored in the Workspace. Initially, the Workspace only contains the Default filter profile. Selecting it displays its filter parameters, and selecting the check box associated with its name enables the filter in the Problems view (only problems that match the criteria defined in the Filters dialog will appear in the view).
The ability to define different profiles enables the selection of multiple filter profiles. For each profile selected, the profile criteria is applied to the View, concurrently. You can filter problems by:
• Working Set
• Character String
• Problem Severity
• Problem Type
• A combination of the above four filter options
EMBARCADERO TECHNOLOGIES > EMBARCADERO® RAPID SQL DEVELOPER™ 2.1 USER GUIDE 48
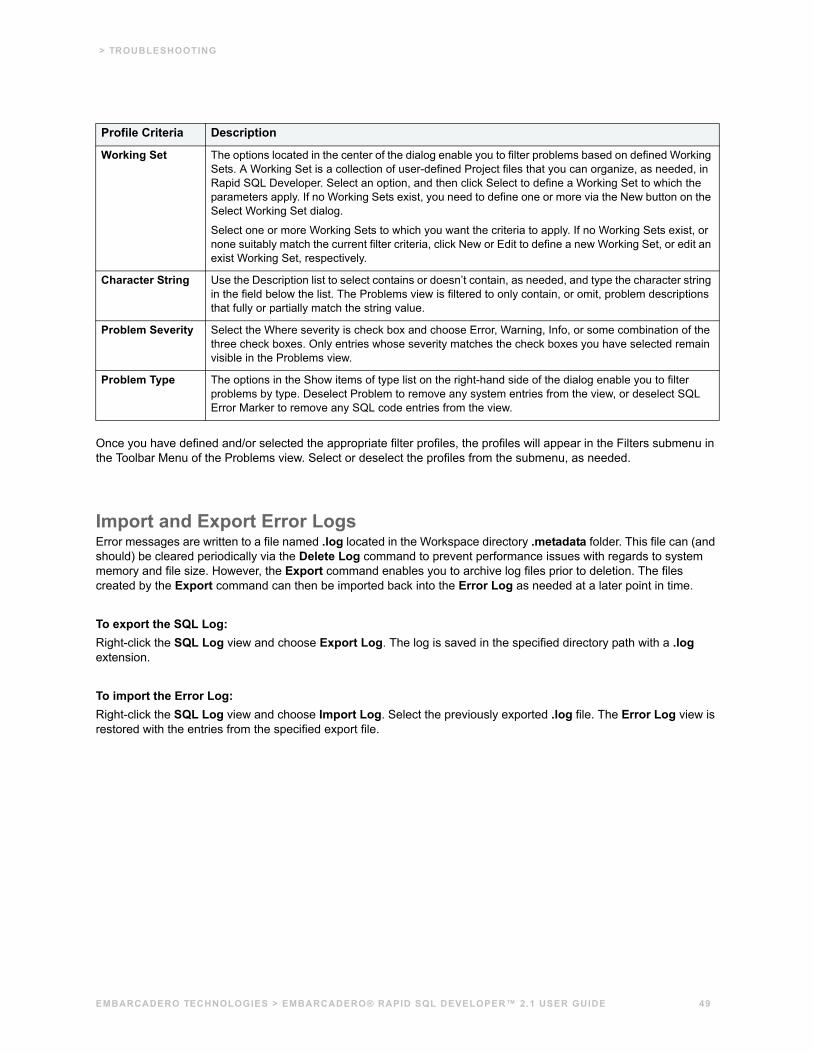
> TROUBLESHOOTING
Once you have defined and/or selected the appropriate filter profiles, the profiles will appear in the Filters submenu in the Toolbar Menu of the Problems view. Select or deselect the profiles from the submenu, as needed.
Import and Export Error LogsError messages are written to a file named .log located in the Workspace directory .metadata folder. This file can (and should) be cleared periodically via the Delete Log command to prevent performance issues with regards to system memory and file size. However, the Export command enables you to archive log files prior to deletion. The files created by the Export command can then be imported back into the Error Log as needed at a later point in time.
To export the SQL Log:Right-click the SQL Log view and choose Export Log. The log is saved in the specified directory path with a .log extension.
To import the Error Log:Right-click the SQL Log view and choose Import Log. Select the previously exported .log file. The Error Log view is restored with the entries from the specified export file.
Profile Criteria Description
Working Set The options located in the center of the dialog enable you to filter problems based on defined Working Sets. A Working Set is a collection of user-defined Project files that you can organize, as needed, in Rapid SQL Developer. Select an option, and then click Select to define a Working Set to which the parameters apply. If no Working Sets exist, you need to define one or more via the New button on the Select Working Set dialog.
Select one or more Working Sets to which you want the criteria to apply. If no Working Sets exist, or none suitably match the current filter criteria, click New or Edit to define a new Working Set, or edit an exist Working Set, respectively.
Character String Use the Description list to select contains or doesn’t contain, as needed, and type the character string in the field below the list. The Problems view is filtered to only contain, or omit, problem descriptions that fully or partially match the string value.
Problem Severity Select the Where severity is check box and choose Error, Warning, Info, or some combination of the three check boxes. Only entries whose severity matches the check boxes you have selected remain visible in the Problems view.
Problem Type The options in the Show items of type list on the right-hand side of the dialog enable you to filter problems by type. Deselect Problem to remove any system entries from the view, or deselect SQL Error Marker to remove any SQL code entries from the view.
EMBARCADERO TECHNOLOGIES > EMBARCADERO® RAPID SQL DEVELOPER™ 2.1 USER GUIDE 49
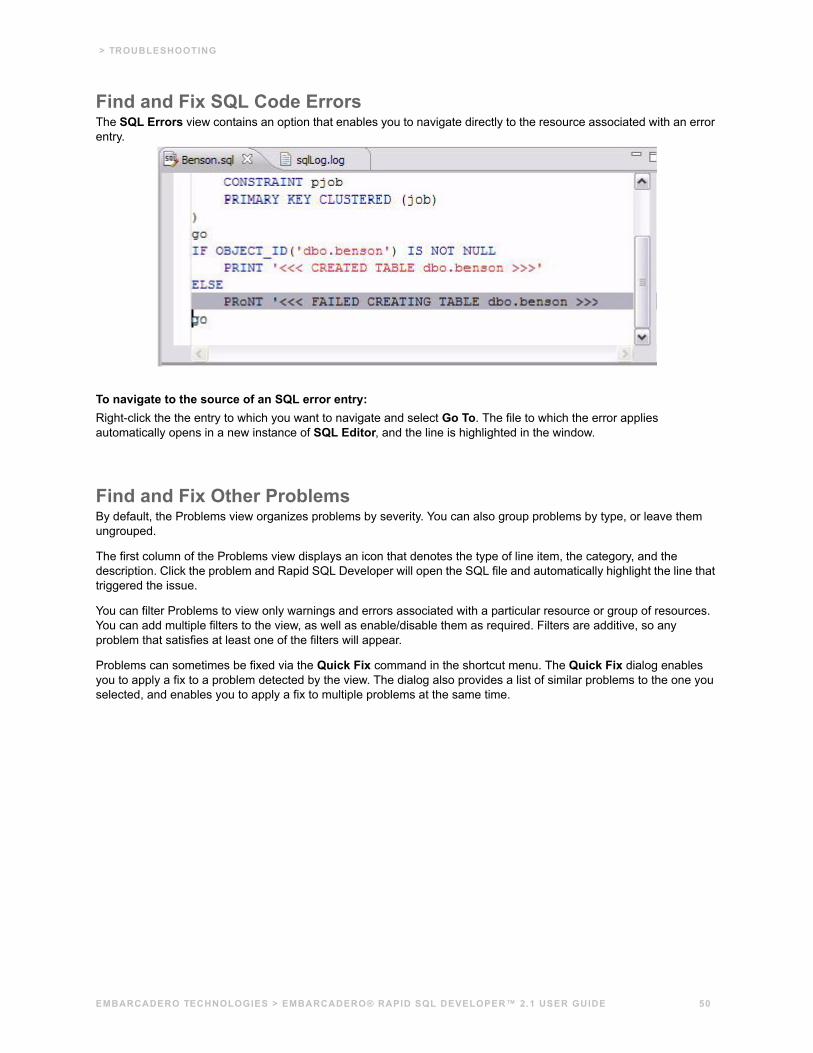
> TROUBLESHOOTING
Find and Fix SQL Code ErrorsThe SQL Errors view contains an option that enables you to navigate directly to the resource associated with an error entry.
To navigate to the source of an SQL error entry:Right-click the the entry to which you want to navigate and select Go To. The file to which the error applies automatically opens in a new instance of SQL Editor, and the line is highlighted in the window.
Find and Fix Other ProblemsBy default, the Problems view organizes problems by severity. You can also group problems by type, or leave them ungrouped.
The first column of the Problems view displays an icon that denotes the type of line item, the category, and the description. Click the problem and Rapid SQL Developer will open the SQL file and automatically highlight the line that triggered the issue.
You can filter Problems to view only warnings and errors associated with a particular resource or group of resources. You can add multiple filters to the view, as well as enable/disable them as required. Filters are additive, so any problem that satisfies at least one of the filters will appear.
Problems can sometimes be fixed via the Quick Fix command in the shortcut menu. The Quick Fix dialog enables you to apply a fix to a problem detected by the view. The dialog also provides a list of similar problems to the one you selected, and enables you to apply a fix to multiple problems at the same time.
EMBARCADERO TECHNOLOGIES > EMBARCADERO® RAPID SQL DEVELOPER™ 2.1 USER GUIDE 50
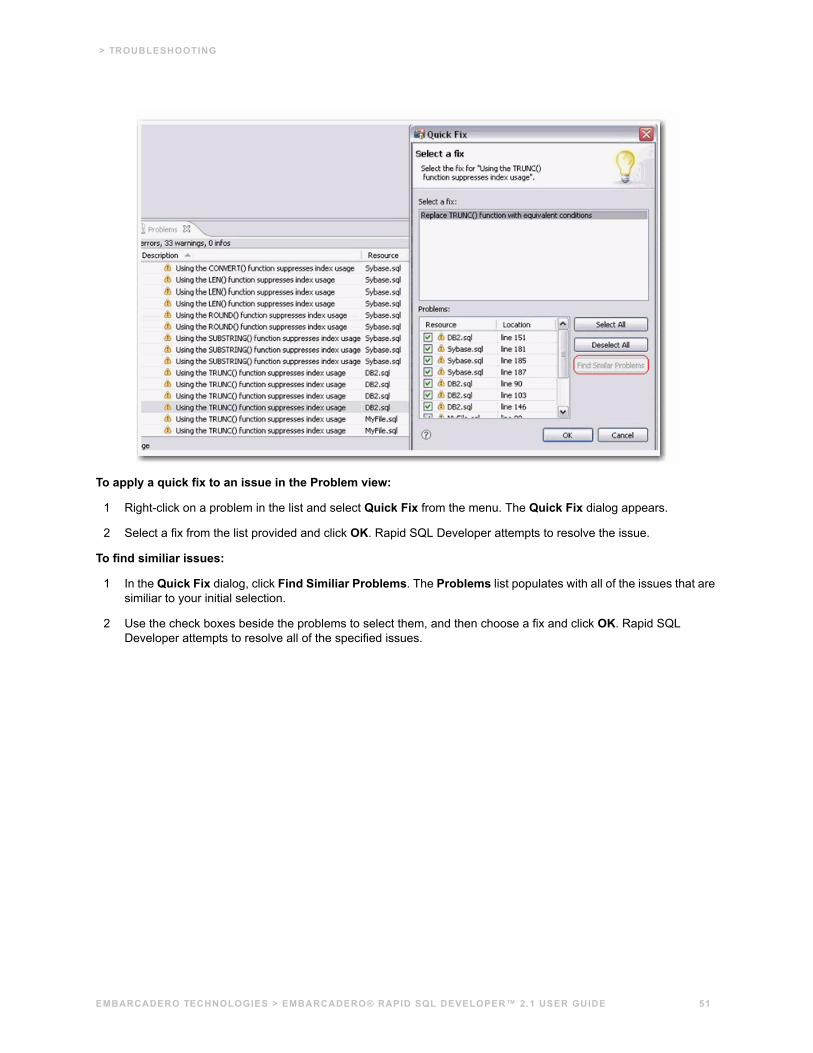
> TROUBLESHOOTING
To apply a quick fix to an issue in the Problem view:
1 Right-click on a problem in the list and select Quick Fix from the menu. The Quick Fix dialog appears.
2 Select a fix from the list provided and click OK. Rapid SQL Developer attempts to resolve the issue.
To find similiar issues:
1 In the Quick Fix dialog, click Find Similiar Problems. The Problems list populates with all of the issues that are similiar to your initial selection.
2 Use the check boxes beside the problems to select them, and then choose a fix and click OK. Rapid SQL Developer attempts to resolve all of the specified issues.
EMBARCADERO TECHNOLOGIES > EMBARCADERO® RAPID SQL DEVELOPER™ 2.1 USER GUIDE 51
Configuring Rapid SQL DeveloperThis section contains information on configuring Rapid SQL Developer. It includes information on setting up the system directory for project files, as well as licensing information. Additionally, this section contains information on setting preferences within the application for the customization of various features and functionality.
Initial Setup
Customizing Rapid SQL Developer (Preferences)
Initial SetupThe following topics provide general help for configuring Rapid SQL Developer:
Specify a Workspace
License Rapid SQL Developer
Additionally, the following preferences are available to help you customize and tune functions within the application:
Set Data Source Indexing Preferences
Set SQL Editor Preferences
Set SQL Execution Preferences
Set Code Assist Preferences
Set Code Formatter Preferences
Set Results View Preferences
Set Syntax Coloring Preferences
Set SQL Filter Preferences
Set SQL Code Template Preferences
Set File Encoding Preferences
Set Data Source Preferences
EMBARCADERO TECHNOLOGIES > EMBARCADERO® RAPID SQL DEVELOPER™ 2.1 USER GUIDE 52
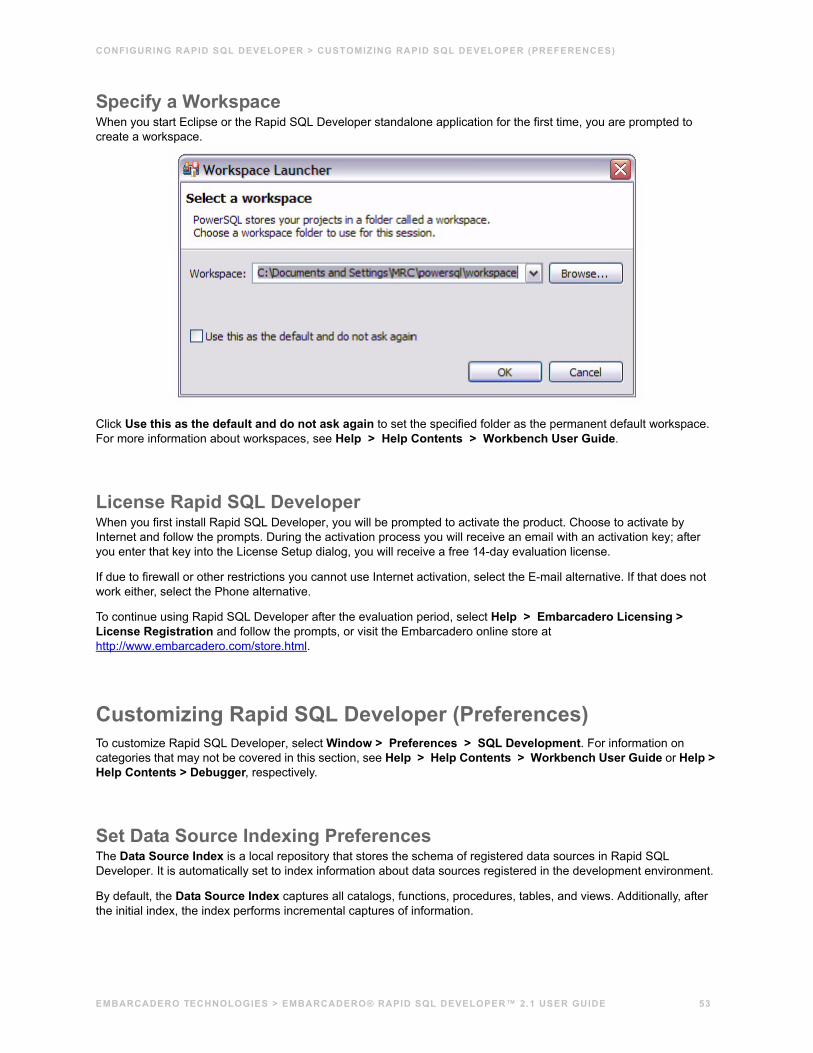
CONFIGURING RAPID SQL DEVELOPER > CUSTOMIZING RAPID SQL DEVELOPER (PREFERENCES)
Specify a WorkspaceWhen you start Eclipse or the Rapid SQL Developer standalone application for the first time, you are prompted to create a workspace.
Click Use this as the default and do not ask again to set the specified folder as the permanent default workspace. For more information about workspaces, see Help > Help Contents > Workbench User Guide.
License Rapid SQL DeveloperWhen you first install Rapid SQL Developer, you will be prompted to activate the product. Choose to activate by Internet and follow the prompts. During the activation process you will receive an email with an activation key; after you enter that key into the License Setup dialog, you will receive a free 14-day evaluation license.
If due to firewall or other restrictions you cannot use Internet activation, select the E-mail alternative. If that does not work either, select the Phone alternative.
To continue using Rapid SQL Developer after the evaluation period, select Help > Embarcadero Licensing > License Registration and follow the prompts, or visit the Embarcadero online store at http://www.embarcadero.com/store.html.
Customizing Rapid SQL Developer (Preferences)To customize Rapid SQL Developer, select Window > Preferences > SQL Development. For information on categories that may not be covered in this section, see Help > Help Contents > Workbench User Guide or Help > Help Contents > Debugger, respectively.
Set Data Source Indexing PreferencesThe Data Source Index is a local repository that stores the schema of registered data sources in Rapid SQL Developer. It is automatically set to index information about data sources registered in the development environment.
By default, the Data Source Index captures all catalogs, functions, procedures, tables, and views. Additionally, after the initial index, the index performs incremental captures of information.
EMBARCADERO TECHNOLOGIES > EMBARCADERO® RAPID SQL DEVELOPER™ 2.1 USER GUIDE 53

CONFIGURING RAPID SQL DEVELOPER > CUSTOMIZING RAPID SQL DEVELOPER (PREFERENCES)
However, there is a definitive trade-off when indexing a full database schema. The time it takes to fully capture a large schema and logical space considerations on local workstations, often makes it inefficient for Rapid SQL Developer to perform this task each time a new data source is registered in Rapid SQL Developer. Thus, the Index can be configured via the Rapid SQL Developer Preferences dialog to accommodate machine processing ability and speed.
By default, when a data source connects to Rapid SQL Developer, the Index automatically begins indexing its schema.
Data Source Indexing parameters enable you to indicate how schema caching behaves by specifying at what level data source objects will be indexed, the specific catalogs, schemas, and data source objects to index, and other factors that speed up the indexing process at a cost of slower retrieval for those objects not indexed by the process.
Additionally, over the course of a Rapid SQL Developer session, index information is periodically updated by Rapid SQL Developer. The index refresh process uses the same specified parameters as the initial indexing process and therefore can cause application slowdown and performance issues if the index behavior has not been configured in an efficient manner.
Rapid SQL Developer also provides the ability to index at the individual data source level. In Data Source Explorer, right-click on a data source and select Properties, then on the Properties dialog, choose Data Source Indexing to access index options for the specified data source.
To configure the global index:1 Select Window > Preferences > SQL Development > Data Source Indexing. Change the settings as
appropriate:
• The window displays a list of database objects as they are organized in the Database Explorer view. Use the check boxes beside each object to specify the data sources that are to be included in the indexing process.
• Select Clear Index to delete the Object Index each time the application is started.
• Select the Apply SQL Filters tab if you want to apply any pre-defined filters to the index.
• If you are having performance problems due to a caching issue (such as a configuration error), the Stop Indexing, Clear Indexing, and Start Indexing buttons enable you to stop, clear, and/or restart the index process, respectively.
• The Max. number of objects to index field indicates how many logical data source objects can be indexed before the Index has reached maximum size.
• The Objects to include in index pane contains a list of data source objects. Select or clear the check boxes beside each data source object to indicate the specific data source objects that are included and excluded, respectively, from the indexing process.
• The Index Expiration Time (hours) setting indicates that an index job will not start automatically until the specified number of hours have passed. The index can also be started manually via Start Indexing.
2 When you are finished configuring the Index, click Apply to save your changes.
To configure individual data source indexing:1 In Data Source Explorer, right-click on the data source you want to specify indexing, and select Properties. The
Properties dialog appears.
2 Choose Data Source Indexing and modify the properties, as required:
• Choose Enable Data Source Specific Settings to indicate to Rapid SQL Developer that you want to specify individual indexing properties for this data source. Data sources that do not have this option selected will index under global indexing parameters.
EMBARCADERO TECHNOLOGIES > EMBARCADERO® RAPID SQL DEVELOPER™ 2.1 USER GUIDE 54

CONFIGURING RAPID SQL DEVELOPER > CUSTOMIZING RAPID SQL DEVELOPER (PREFERENCES)
• The window displays a list of database objects as they are organized in the Database Explorer view. Use the check boxes beside each object to specify the data sources that are to be included in the indexing process.
• Select Clear Index to delete the Object Index each time the application is started.
• Select the Apply SQL Filters tab if you want to apply any pre-defined filters to the index.
• If you are having performance problems due to a caching issue (such as a configuration error), the Stop Indexing, Clear Indexing, and Start Indexing buttons enable you to stop, clear, and/or restart the index process, respectively.
• The Objects to include in index pane contains a list of data source objects. Select or clear the check boxes beside each data source object to indicate the specific data source objects that are included and excluded, respectively, from the indexing process.
• The Index Expiration Time (hours) setting indicates that an indexing job will not start automatically until the specified number of hours have passed. The index can also be started manually via Start Indexing.
Set SQL Editor Preferences1 Select Window > Preferences > SQL Development > SQL Editor.
2 Change the settings as appropriate in each section and then click Apply.
• Severity Level for Semantic Validation Problems determines how semantic code errors are flagged in the editor and the Problems view.
Set SQL Execution PreferencesSelect Window > Preferences > SQL Development > SQL Execution.
NOTE: If you disable auto-commit for a platform, you must use SQL Editor’s transaction features to execute code on that platform.
Set Code Assist PreferencesThe Code Assist panel is used to specify configuration parameters that determine how code completion features in SQL Editor behave.
Select Window > Preferences > SQL Development > SQL Editor > Code Assist.
• Enable Auto Activation enables or disables code assist functionality with the Ctrl + Space command. If this option is selected, the code assist window automatically appears when you stop typing. Specify the amount of time in milliseconds that the window automatically appears in the Auto Activation Delay field beneath the option.
• Insert Single Proposals Automatically specifies if only a single code completion suggestion is returned, it is inserted automatically.
• Fully Qualified Completions Automatically specifies if code completion results are returned specific (fully qualified), rather than the minimum required to identify the object.
• Code Assist Color Options specifies the color formatting of code completion proposals. Select background or foreground options from the menu and modify them as appropriate.
EMBARCADERO TECHNOLOGIES > EMBARCADERO® RAPID SQL DEVELOPER™ 2.1 USER GUIDE 55

CONFIGURING RAPID SQL DEVELOPER > CUSTOMIZING RAPID SQL DEVELOPER (PREFERENCES)
Set Code Formatter PreferencesThe Code Formatter pane provides configuration options for code formatting functionality in SQL Editor.
Select Window > Preferences > SQL Development > SQL Editor > Code Formatter.
The panel provides a drop down list of formatting profiles and a preview window that displays how each profile formats code.
• Click New to define additional code formatting profiles.
• Click Edit to modify existing profiles. You can modify how code characters appear in the interface and how SQL Editor determines line breaks.
• Click Rename to change the name of an existing profile. The new name cannot be the same as another existing profile.
NOTE: If you create a new profile with a name that already exists in the system, a prompt will appear asking you to change the name of the new code formatting template.
Set Results View PreferencesThe Results Viewer pane provides configuration options that specify how the Results view displays results.
Select Window > Preferences > SQL Development > SQL Editor > Results Viewer.
• Grid Refresh Interval indicates the speed in milliseconds that the Results view refreshes.
• Maximum Result Rows to Sort indicates the maximum number of rows that the Results view returns.
• Maximum Number of Result Sets indicates the maximum number of result sets that the Results view returns.
• Stripe the Rows of the Results Table adds intermittent highlighted bars in the Results view.
• Display Results in Separate Tab in SQL Editor opens the Results view in a separate window on the Workbench.
• Suppress Execution Messages filters out all execution messages returned by the system from the Results view.
• Results Format specifies the default format in which results are displayed in the view. Choose Grid, HTML, XML, or Text to indicate the file format you want displayed when Rapid SQL Developer initially returns the results.
Set Syntax Coloring PreferencesThe Syntax Coloring panel provides configuration options that change the look and feel of code syntax in SQL Editor.
• Select Window > Preferences > SQL Development > SQL Editor > Syntax Coloring.
Use the tree view provided in the Element window to select the comment type or code element you want to modify. Select the options to the right-hand side of the window to modify it. The Preview window shows a piece of sample code that updates according to the changes you made.
Set SQL Filter PreferencesSee Filter Database Objects for instructions.
EMBARCADERO TECHNOLOGIES > EMBARCADERO® RAPID SQL DEVELOPER™ 2.1 USER GUIDE 56
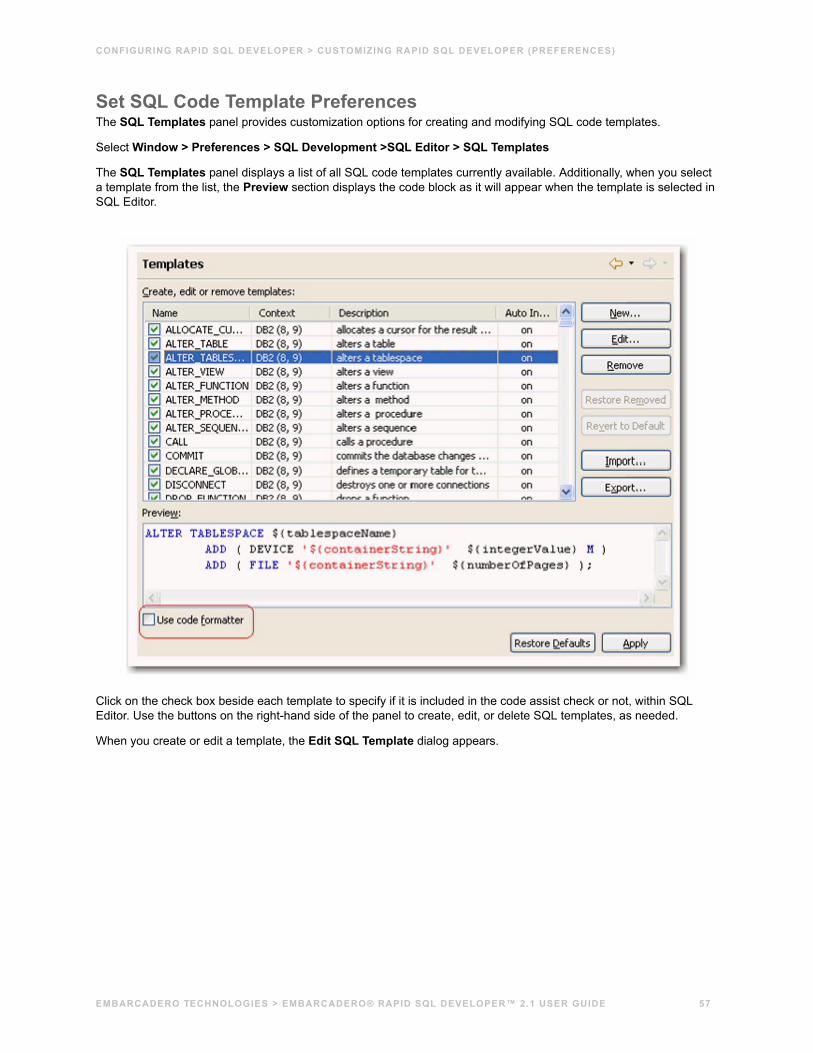
CONFIGURING RAPID SQL DEVELOPER > CUSTOMIZING RAPID SQL DEVELOPER (PREFERENCES)
Set SQL Code Template PreferencesThe SQL Templates panel provides customization options for creating and modifying SQL code templates.
Select Window > Preferences > SQL Development >SQL Editor > SQL Templates
The SQL Templates panel displays a list of all SQL code templates currently available. Additionally, when you select a template from the list, the Preview section displays the code block as it will appear when the template is selected in SQL Editor.
Click on the check box beside each template to specify if it is included in the code assist check or not, within SQL Editor. Use the buttons on the right-hand side of the panel to create, edit, or delete SQL templates, as needed.
When you create or edit a template, the Edit SQL Template dialog appears.
EMBARCADERO TECHNOLOGIES > EMBARCADERO® RAPID SQL DEVELOPER™ 2.1 USER GUIDE 57
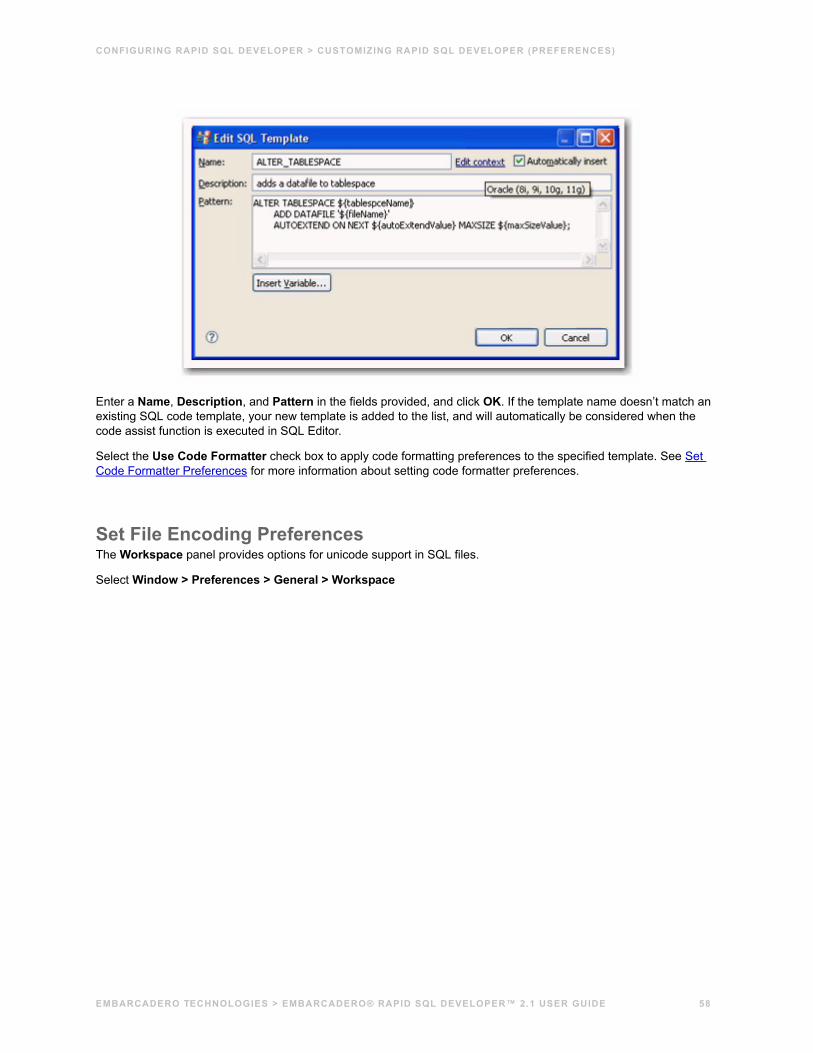
CONFIGURING RAPID SQL DEVELOPER > CUSTOMIZING RAPID SQL DEVELOPER (PREFERENCES)
Enter a Name, Description, and Pattern in the fields provided, and click OK. If the template name doesn’t match an existing SQL code template, your new template is added to the list, and will automatically be considered when the code assist function is executed in SQL Editor.
Select the Use Code Formatter check box to apply code formatting preferences to the specified template. See Set Code Formatter Preferences for more information about setting code formatter preferences.
Set File Encoding PreferencesThe Workspace panel provides options for unicode support in SQL files.
Select Window > Preferences > General > Workspace
EMBARCADERO TECHNOLOGIES > EMBARCADERO® RAPID SQL DEVELOPER™ 2.1 USER GUIDE 58
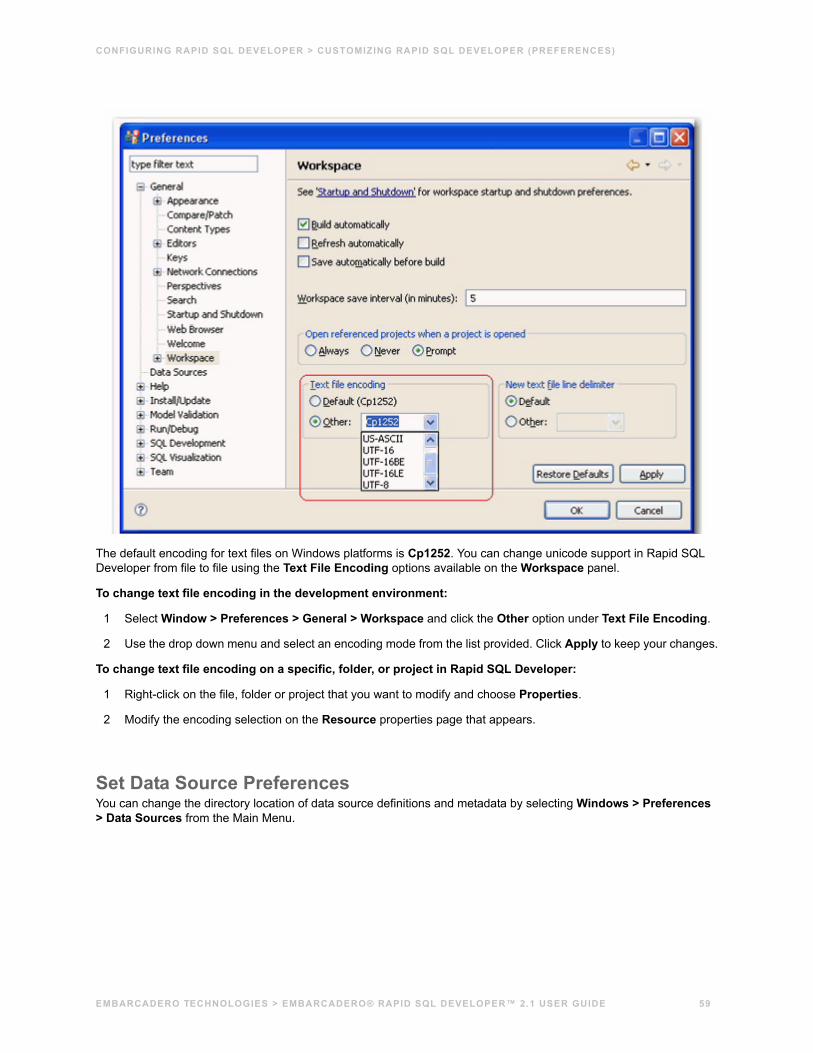
CONFIGURING RAPID SQL DEVELOPER > CUSTOMIZING RAPID SQL DEVELOPER (PREFERENCES)
The default encoding for text files on Windows platforms is Cp1252. You can change unicode support in Rapid SQL Developer from file to file using the Text File Encoding options available on the Workspace panel.
To change text file encoding in the development environment:
1 Select Window > Preferences > General > Workspace and click the Other option under Text File Encoding.
2 Use the drop down menu and select an encoding mode from the list provided. Click Apply to keep your changes.
To change text file encoding on a specific, folder, or project in Rapid SQL Developer:
1 Right-click on the file, folder or project that you want to modify and choose Properties.
2 Modify the encoding selection on the Resource properties page that appears.
Set Data Source PreferencesYou can change the directory location of data source definitions and metadata by selecting Windows > Preferences > Data Sources from the Main Menu.
EMBARCADERO TECHNOLOGIES > EMBARCADERO® RAPID SQL DEVELOPER™ 2.1 USER GUIDE 59
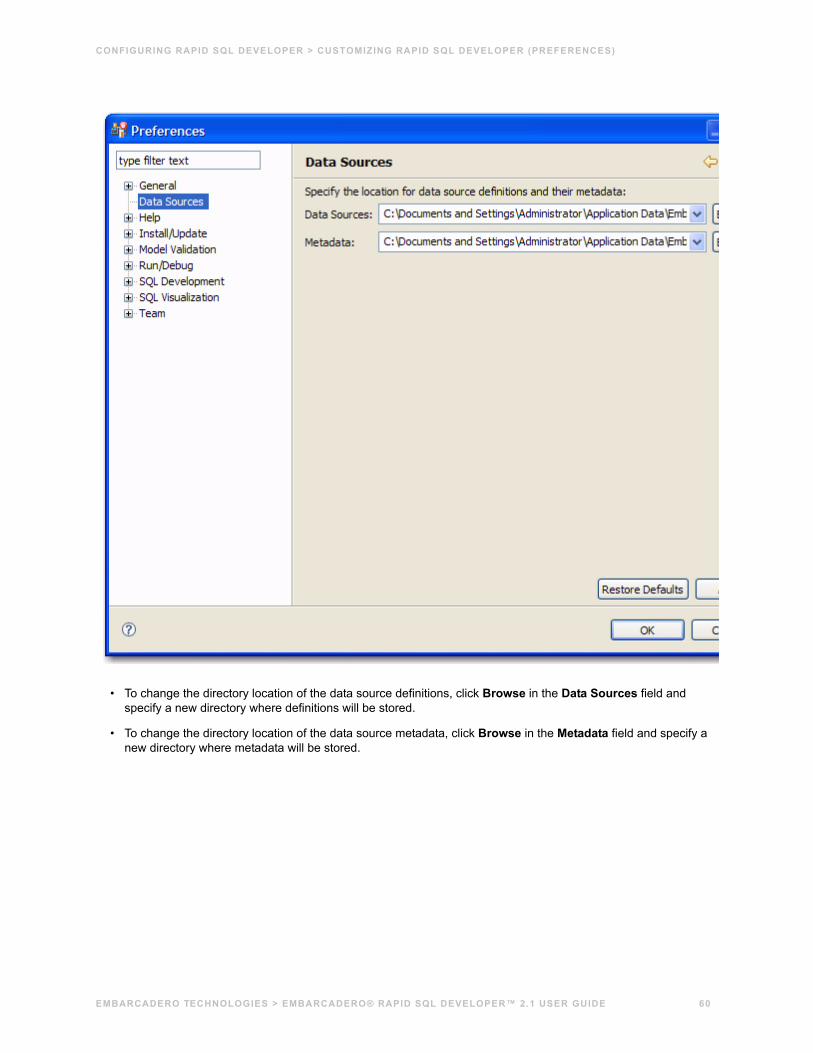
CONFIGURING RAPID SQL DEVELOPER > CUSTOMIZING RAPID SQL DEVELOPER (PREFERENCES)
• To change the directory location of the data source definitions, click Browse in the Data Sources field and specify a new directory where definitions will be stored.
• To change the directory location of the data source metadata, click Browse in the Metadata field and specify a new directory where metadata will be stored.
EMBARCADERO TECHNOLOGIES > EMBARCADERO® RAPID SQL DEVELOPER™ 2.1 USER GUIDE 60
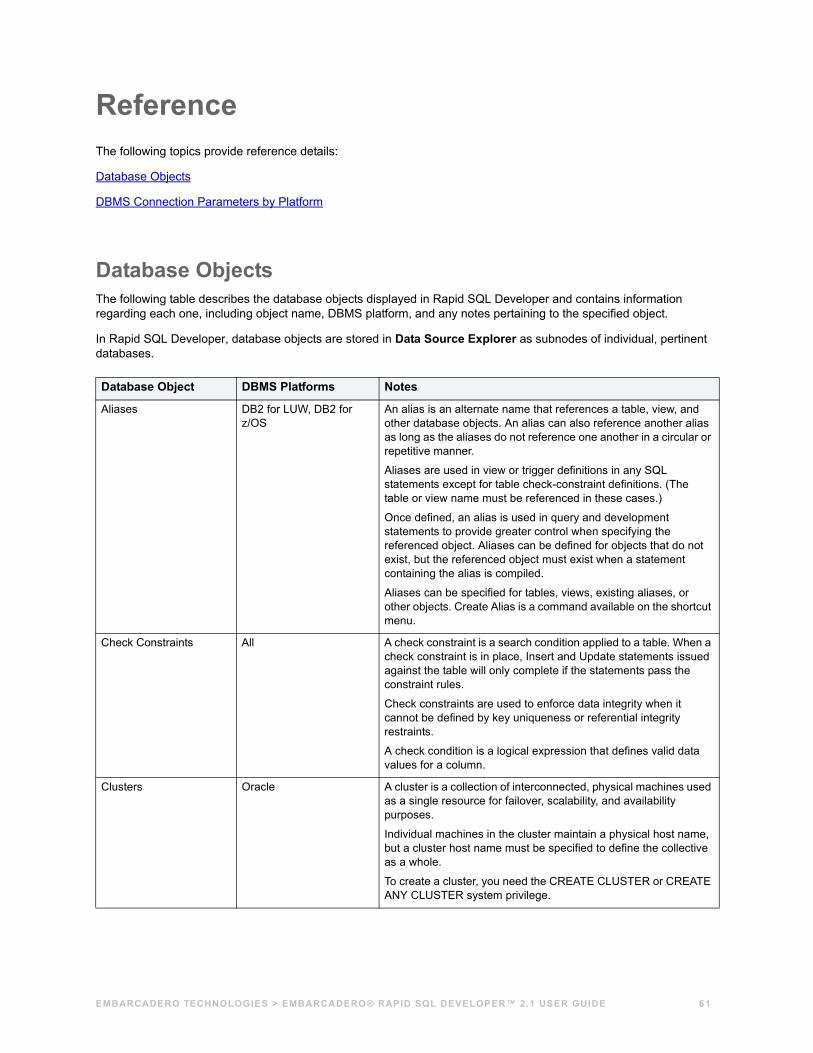
ReferenceThe following topics provide reference details:
Database Objects
DBMS Connection Parameters by Platform
Database ObjectsThe following table describes the database objects displayed in Rapid SQL Developer and contains information regarding each one, including object name, DBMS platform, and any notes pertaining to the specified object.
In Rapid SQL Developer, database objects are stored in Data Source Explorer as subnodes of individual, pertinent databases.
Database Object DBMS Platforms Notes
Aliases DB2 for LUW, DB2 for z/OS
An alias is an alternate name that references a table, view, and other database objects. An alias can also reference another alias as long as the aliases do not reference one another in a circular or repetitive manner.
Aliases are used in view or trigger definitions in any SQL statements except for table check-constraint definitions. (The table or view name must be referenced in these cases.)
Once defined, an alias is used in query and development statements to provide greater control when specifying the referenced object. Aliases can be defined for objects that do not exist, but the referenced object must exist when a statement containing the alias is compiled.
Aliases can be specified for tables, views, existing aliases, or other objects. Create Alias is a command available on the shortcut menu.
Check Constraints All A check constraint is a search condition applied to a table. When a check constraint is in place, Insert and Update statements issued against the table will only complete if the statements pass the constraint rules.
Check constraints are used to enforce data integrity when it cannot be defined by key uniqueness or referential integrity restraints.
A check condition is a logical expression that defines valid data values for a column.
Clusters Oracle A cluster is a collection of interconnected, physical machines used as a single resource for failover, scalability, and availability purposes.
Individual machines in the cluster maintain a physical host name, but a cluster host name must be specified to define the collective as a whole.
To create a cluster, you need the CREATE CLUSTER or CREATE ANY CLUSTER system privilege.
EMBARCADERO TECHNOLOGIES > EMBARCADERO® RAPID SQL DEVELOPER™ 2.1 USER GUIDE 61

REFERENCE > DATABASE OBJECTS
Database Links Oracle A database link is a network path stored locally, that provides the database with the ability to communicate with a remote database.
A database link is composed of the name of the remote database, a communication path to the database, and a user ID and password (if required).
Database links cannot be edited or altered. To make changes, drop and re-create.
Defaults SQL Server Defaults promote data integrity by supplying a default value to a table column if the user does not explicitly provide one.
Directories Oracle Directories create an alias to an external operating system directory to your database files, which can be used for storing large binary object files.
Domains
(User-defined Types)
Interbase, Firebird A domain provides a way to define a new data type.
Encryption Keys Interbase Used to encrypt a database’s pages and/or the database’s columns.
Exceptions Interbase, Firebird A named error message that can be raised from a stored procedure.
Foreign Keys All A foreign key references a primary or unique key of a table (the same table the foreign key is defined on, or another table and is created as a result of an established relationship). Its purpose is to indicate that referential integrity is maintained according to the constraints.
The number of columns in a foreign key must be equal to the number of columns in the corresponding primary or unique key. Additionally, the column definitions of the foreign key must have the same data types and lengths.
Foreign key names are automatically assigned if one is not specified.
Functions DB2, Oracle A function is a relationship between a set of input data values and a set of result values.
For example, the TIMESTAMP function passes input data values of type DATE and TIME, and the result is TIMESTAMP.
Functions can be built-in or user-defined. Built-in functions are provided with the database. They return a single value and are part of the default database schema. User-defined functions extend the capabilities of the database system by adding function definitions (provided by users or third-party vendors) that can be applied in the database engine itself.
A function is identified by its schema, a function name, the number of parameters, and the data types of its parameters.
Access to functions is controlled through the EXECUTE privilege. GRANT and REVOKE statements are used to specify who can or cannot execute a specific function or set of functions.
Groups All Groups are units that contain items. Typically, groups contain the result of a single business transaction where several items are involved.
For example, a group is the set of articles bought by a customer during a visit to the supermarket.
Database Object DBMS Platforms Notes
EMBARCADERO TECHNOLOGIES > EMBARCADERO® RAPID SQL DEVELOPER™ 2.1 USER GUIDE 62
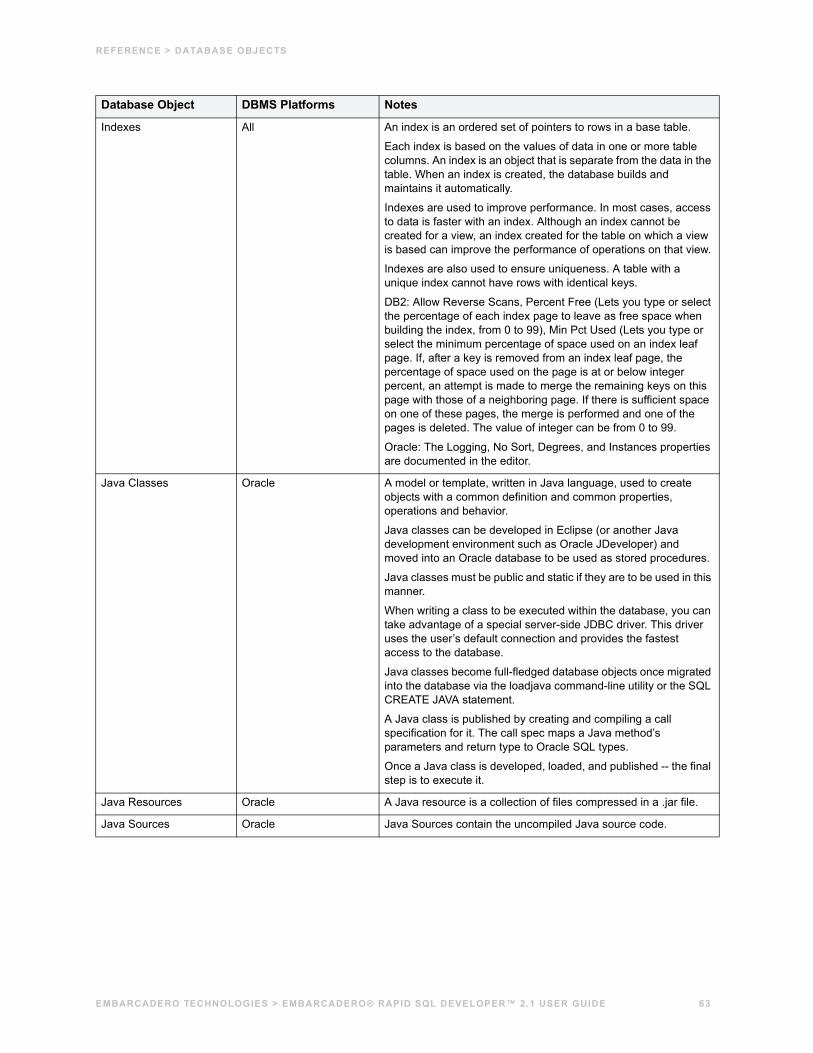
REFERENCE > DATABASE OBJECTS
Indexes All An index is an ordered set of pointers to rows in a base table.
Each index is based on the values of data in one or more table columns. An index is an object that is separate from the data in the table. When an index is created, the database builds and maintains it automatically.
Indexes are used to improve performance. In most cases, access to data is faster with an index. Although an index cannot be created for a view, an index created for the table on which a view is based can improve the performance of operations on that view.
Indexes are also used to ensure uniqueness. A table with a unique index cannot have rows with identical keys.
DB2: Allow Reverse Scans, Percent Free (Lets you type or select the percentage of each index page to leave as free space when building the index, from 0 to 99), Min Pct Used (Lets you type or select the minimum percentage of space used on an index leaf page. If, after a key is removed from an index leaf page, the percentage of space used on the page is at or below integer percent, an attempt is made to merge the remaining keys on this page with those of a neighboring page. If there is sufficient space on one of these pages, the merge is performed and one of the pages is deleted. The value of integer can be from 0 to 99.
Oracle: The Logging, No Sort, Degrees, and Instances properties are documented in the editor.
Java Classes Oracle A model or template, written in Java language, used to create objects with a common definition and common properties, operations and behavior.
Java classes can be developed in Eclipse (or another Java development environment such as Oracle JDeveloper) and moved into an Oracle database to be used as stored procedures.
Java classes must be public and static if they are to be used in this manner.
When writing a class to be executed within the database, you can take advantage of a special server-side JDBC driver. This driver uses the user’s default connection and provides the fastest access to the database.
Java classes become full-fledged database objects once migrated into the database via the loadjava command-line utility or the SQL CREATE JAVA statement.
A Java class is published by creating and compiling a call specification for it. The call spec maps a Java method’s parameters and return type to Oracle SQL types.
Once a Java class is developed, loaded, and published -- the final step is to execute it.
Java Resources Oracle A Java resource is a collection of files compressed in a .jar file.
Java Sources Oracle Java Sources contain the uncompiled Java source code.
Database Object DBMS Platforms Notes
EMBARCADERO TECHNOLOGIES > EMBARCADERO® RAPID SQL DEVELOPER™ 2.1 USER GUIDE 63

REFERENCE > DATABASE OBJECTS
Libraries Oracle A library is a configurable folder for storing and sharing content with an allocated quota. Multiple libraries may exist in the same database environment.
A library is a special type of folder in Oracle Content Services. Unlike Containers and regular folders, each library has a Trash Folder and an allocated amount of disk space.
A library is composed of a name (mandatory), description, quota, path, and library members.
The library service allows you to create folders, list quotas, and manage categories, workflow, trash folders, and versioning. The Library service does not allow you to create or upload files.
Materialized Views Oracle A database object that contains the results of a query. They are local copies of data located remotely, or are used to create summary tables based on aggregations of table data. Materialized views are also known as snapshots.
A materialized view can query tables, views, and other materialized views. Collectively, these are called master tables (a replication term) or detail tables (a data warehouse term).
For replication purposes, materialized views allow you to maintain copies of remote data on your local node. These copies are read-only. If you want to update the local copies, you need to use the Advanced Replication feature. You can select data from a materialized view as you would from a table or view.
For data warehousing purposes, the materialized views commonly created are aggregate views, single-table aggregate views, and join views.
Materialized View Logs Oracle Because Materialized Views are used to return faster queries (a query against a materialized view is faster than a query against a base table because querying the materialized view does not query the source table), the Materialized View often returns the data at the time the view was created, not the current table data.
There are two ways to refresh data in Materialized Views, manually or automatically. In a manual refresh, the Materialized View is completely wiped clean and then repopulated with data from the source tables (this is known as a complete refresh). If source tables have changed very little, however, it is possible to refresh the Materialized View only for changed records -- this is known as a fast refresh.
In the case of Materialized Views that are updated via fast refresh, it is necessary to create Materialized View Logs on the base tables that compose the Materialized View to reflect the changes.
If the number of entries in this table is too high, it is an indication that you might need to refresh the Materialized Views more frequently to ensure that each update does not take longer than it needs.
Select owner, then select from tables with Materialized Views, etc.
Database Object DBMS Platforms Notes
EMBARCADERO TECHNOLOGIES > EMBARCADERO® RAPID SQL DEVELOPER™ 2.1 USER GUIDE 64
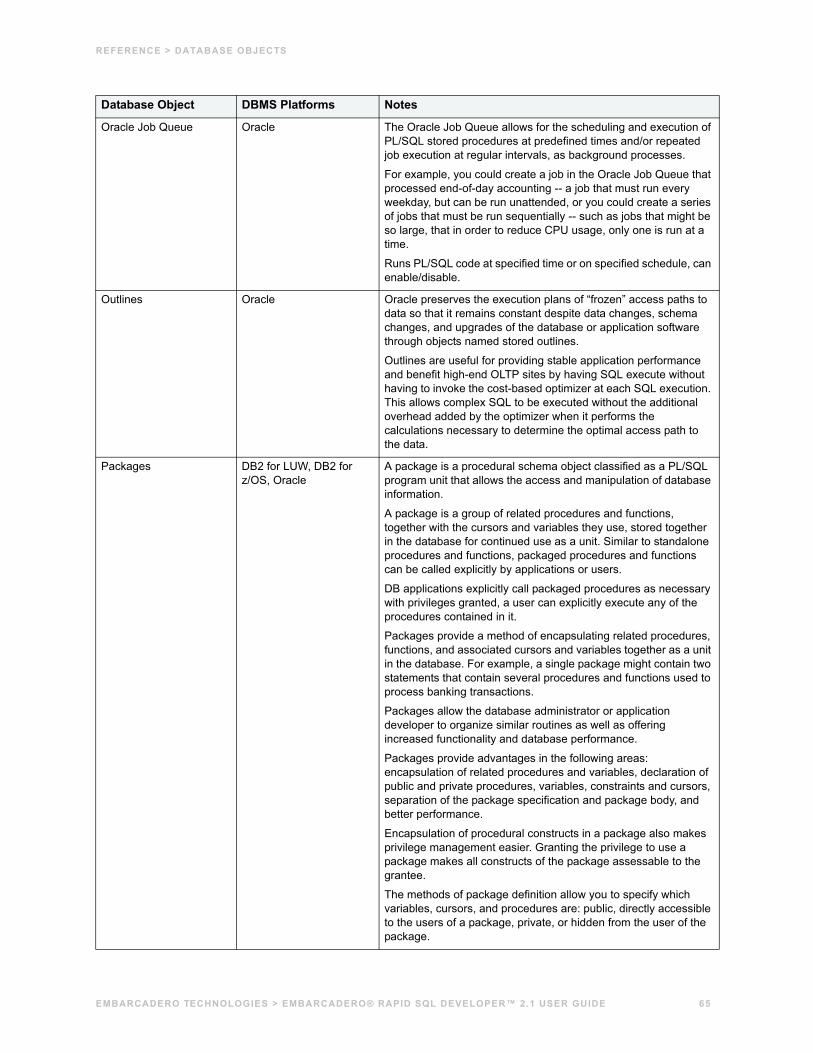
REFERENCE > DATABASE OBJECTS
Oracle Job Queue Oracle The Oracle Job Queue allows for the scheduling and execution of PL/SQL stored procedures at predefined times and/or repeated job execution at regular intervals, as background processes.
For example, you could create a job in the Oracle Job Queue that processed end-of-day accounting -- a job that must run every weekday, but can be run unattended, or you could create a series of jobs that must be run sequentially -- such as jobs that might be so large, that in order to reduce CPU usage, only one is run at a time.
Runs PL/SQL code at specified time or on specified schedule, can enable/disable.
Outlines Oracle Oracle preserves the execution plans of “frozen” access paths to data so that it remains constant despite data changes, schema changes, and upgrades of the database or application software through objects named stored outlines.
Outlines are useful for providing stable application performance and benefit high-end OLTP sites by having SQL execute without having to invoke the cost-based optimizer at each SQL execution. This allows complex SQL to be executed without the additional overhead added by the optimizer when it performs the calculations necessary to determine the optimal access path to the data.
Packages DB2 for LUW, DB2 for z/OS, Oracle
A package is a procedural schema object classified as a PL/SQL program unit that allows the access and manipulation of database information.
A package is a group of related procedures and functions, together with the cursors and variables they use, stored together in the database for continued use as a unit. Similar to standalone procedures and functions, packaged procedures and functions can be called explicitly by applications or users.
DB applications explicitly call packaged procedures as necessary with privileges granted, a user can explicitly execute any of the procedures contained in it.
Packages provide a method of encapsulating related procedures, functions, and associated cursors and variables together as a unit in the database. For example, a single package might contain two statements that contain several procedures and functions used to process banking transactions.
Packages allow the database administrator or application developer to organize similar routines as well as offering increased functionality and database performance.
Packages provide advantages in the following areas: encapsulation of related procedures and variables, declaration of public and private procedures, variables, constraints and cursors, separation of the package specification and package body, and better performance.
Encapsulation of procedural constructs in a package also makes privilege management easier. Granting the privilege to use a package makes all constructs of the package assessable to the grantee.
The methods of package definition allow you to specify which variables, cursors, and procedures are: public, directly accessible to the users of a package, private, or hidden from the user of the package.
Database Object DBMS Platforms Notes
EMBARCADERO TECHNOLOGIES > EMBARCADERO® RAPID SQL DEVELOPER™ 2.1 USER GUIDE 65
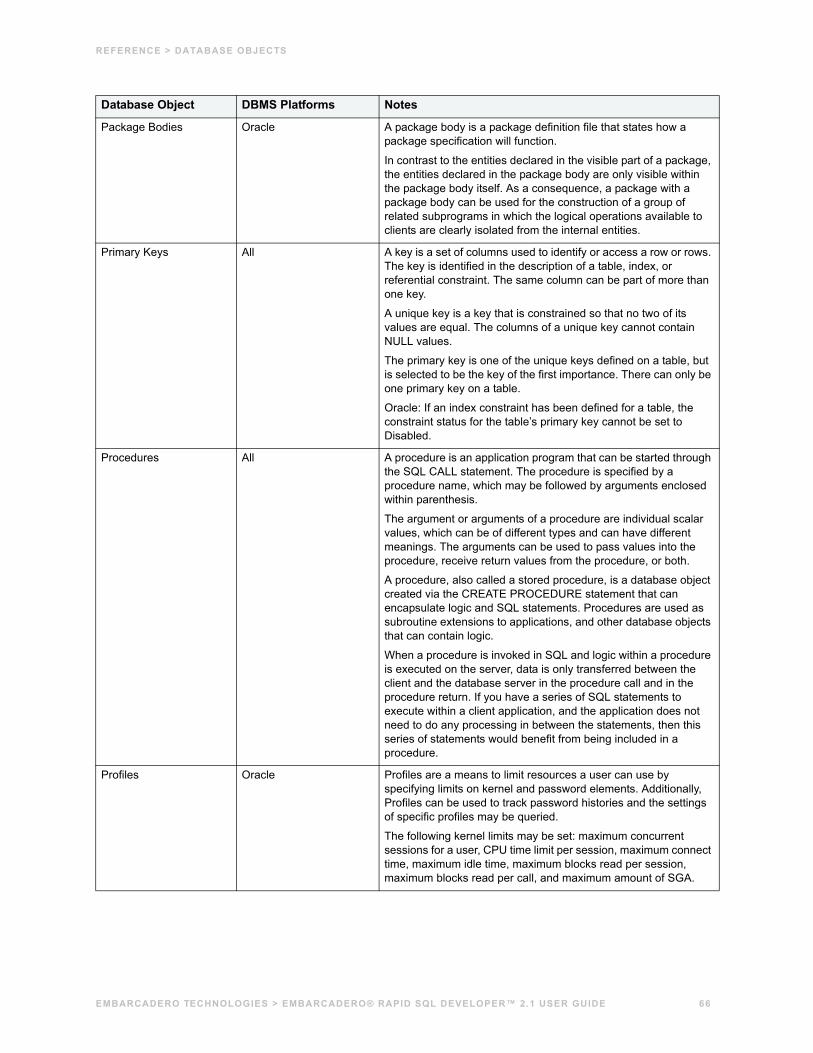
REFERENCE > DATABASE OBJECTS
Package Bodies Oracle A package body is a package definition file that states how a package specification will function.
In contrast to the entities declared in the visible part of a package, the entities declared in the package body are only visible within the package body itself. As a consequence, a package with a package body can be used for the construction of a group of related subprograms in which the logical operations available to clients are clearly isolated from the internal entities.
Primary Keys All A key is a set of columns used to identify or access a row or rows. The key is identified in the description of a table, index, or referential constraint. The same column can be part of more than one key.
A unique key is a key that is constrained so that no two of its values are equal. The columns of a unique key cannot contain NULL values.
The primary key is one of the unique keys defined on a table, but is selected to be the key of the first importance. There can only be one primary key on a table.
Oracle: If an index constraint has been defined for a table, the constraint status for the table’s primary key cannot be set to Disabled.
Procedures All A procedure is an application program that can be started through the SQL CALL statement. The procedure is specified by a procedure name, which may be followed by arguments enclosed within parenthesis.
The argument or arguments of a procedure are individual scalar values, which can be of different types and can have different meanings. The arguments can be used to pass values into the procedure, receive return values from the procedure, or both.
A procedure, also called a stored procedure, is a database object created via the CREATE PROCEDURE statement that can encapsulate logic and SQL statements. Procedures are used as subroutine extensions to applications, and other database objects that can contain logic.
When a procedure is invoked in SQL and logic within a procedure is executed on the server, data is only transferred between the client and the database server in the procedure call and in the procedure return. If you have a series of SQL statements to execute within a client application, and the application does not need to do any processing in between the statements, then this series of statements would benefit from being included in a procedure.
Profiles Oracle Profiles are a means to limit resources a user can use by specifying limits on kernel and password elements. Additionally, Profiles can be used to track password histories and the settings of specific profiles may be queried.
The following kernel limits may be set: maximum concurrent sessions for a user, CPU time limit per session, maximum connect time, maximum idle time, maximum blocks read per session, maximum blocks read per call, and maximum amount of SGA.
Database Object DBMS Platforms Notes
EMBARCADERO TECHNOLOGIES > EMBARCADERO® RAPID SQL DEVELOPER™ 2.1 USER GUIDE 66
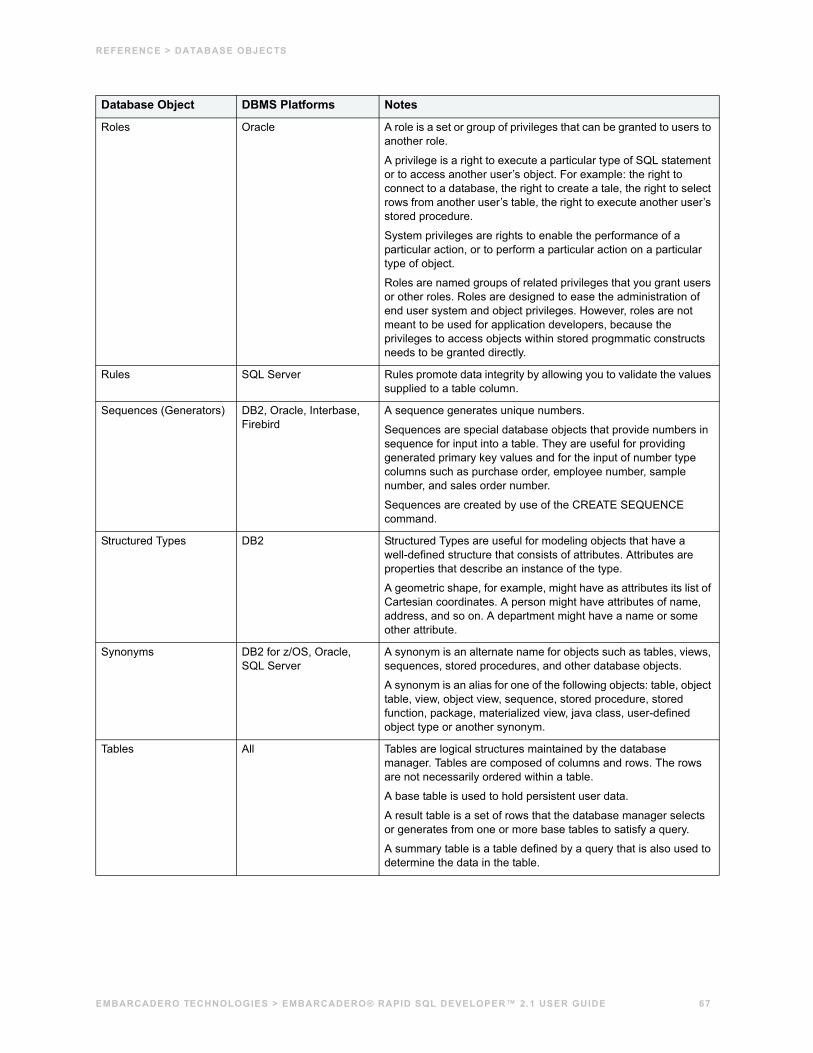
REFERENCE > DATABASE OBJECTS
Roles Oracle A role is a set or group of privileges that can be granted to users to another role.
A privilege is a right to execute a particular type of SQL statement or to access another user’s object. For example: the right to connect to a database, the right to create a tale, the right to select rows from another user’s table, the right to execute another user’s stored procedure.
System privileges are rights to enable the performance of a particular action, or to perform a particular action on a particular type of object.
Roles are named groups of related privileges that you grant users or other roles. Roles are designed to ease the administration of end user system and object privileges. However, roles are not meant to be used for application developers, because the privileges to access objects within stored progmmatic constructs needs to be granted directly.
Rules SQL Server Rules promote data integrity by allowing you to validate the values supplied to a table column.
Sequences (Generators) DB2, Oracle, Interbase, Firebird
A sequence generates unique numbers.
Sequences are special database objects that provide numbers in sequence for input into a table. They are useful for providing generated primary key values and for the input of number type columns such as purchase order, employee number, sample number, and sales order number.
Sequences are created by use of the CREATE SEQUENCE command.
Structured Types DB2 Structured Types are useful for modeling objects that have a well-defined structure that consists of attributes. Attributes are properties that describe an instance of the type.
A geometric shape, for example, might have as attributes its list of Cartesian coordinates. A person might have attributes of name, address, and so on. A department might have a name or some other attribute.
Synonyms DB2 for z/OS, Oracle, SQL Server
A synonym is an alternate name for objects such as tables, views, sequences, stored procedures, and other database objects.
A synonym is an alias for one of the following objects: table, object table, view, object view, sequence, stored procedure, stored function, package, materialized view, java class, user-defined object type or another synonym.
Tables All Tables are logical structures maintained by the database manager. Tables are composed of columns and rows. The rows are not necessarily ordered within a table.
A base table is used to hold persistent user data.
A result table is a set of rows that the database manager selects or generates from one or more base tables to satisfy a query.
A summary table is a table defined by a query that is also used to determine the data in the table.
Database Object DBMS Platforms Notes
EMBARCADERO TECHNOLOGIES > EMBARCADERO® RAPID SQL DEVELOPER™ 2.1 USER GUIDE 67

REFERENCE > DATABASE OBJECTS
Tablespaces DB2 for LUW, DB2 for z/OS, Oracle
A tablespace is a storage structure containing tables, indexes, large objects, and long data. Tablespaces reside in database partition groups. They allow you to assign the location of database and table data directly onto containers. (A container can be a directory name, a device name, or a file name.) This can provide improved performance and more flexible configuration.
Triggers All A trigger defines a set of actions that are performed when a specified SQL operation (such as delete, insert, or update) occurs on a specified table. When the specified SQL operation occurs, the trigger is activated and starts the defined actions.
Triggers can be used, along with referential constraints and check constraints, to enforce data integrity rules. Triggers can also be used to cause updates to other tables, automatically generate or transform values for inserted or updated rows, or invoke functions to perform tasks such as issuing alerts.
Types Oracle Types define an abstract data type or object composed of a collection of similar types of data.
Type Bodies Oracle Type Bodies implement object type specification by containing the definition of every cursor and subprogram declared in the object type specification.
Undo Segments Oracle In an Oracle database, Undo tablespace data is an image or snapshot of the original contents of a row (or rows) in a table. The data is stored in Undo segments in the Undo table space.
When a user begins to make a change to the data in a row in an Oracle table, the original data is first written to Undo segments in the Undo tablespace. The entire process (including the creation of the Undo data is recorded in Redo logs before the change is completed and written in the Database Buffer Cache, and then the data files via the database writer (DBW) process.)
Database Object DBMS Platforms Notes
EMBARCADERO TECHNOLOGIES > EMBARCADERO® RAPID SQL DEVELOPER™ 2.1 USER GUIDE 68
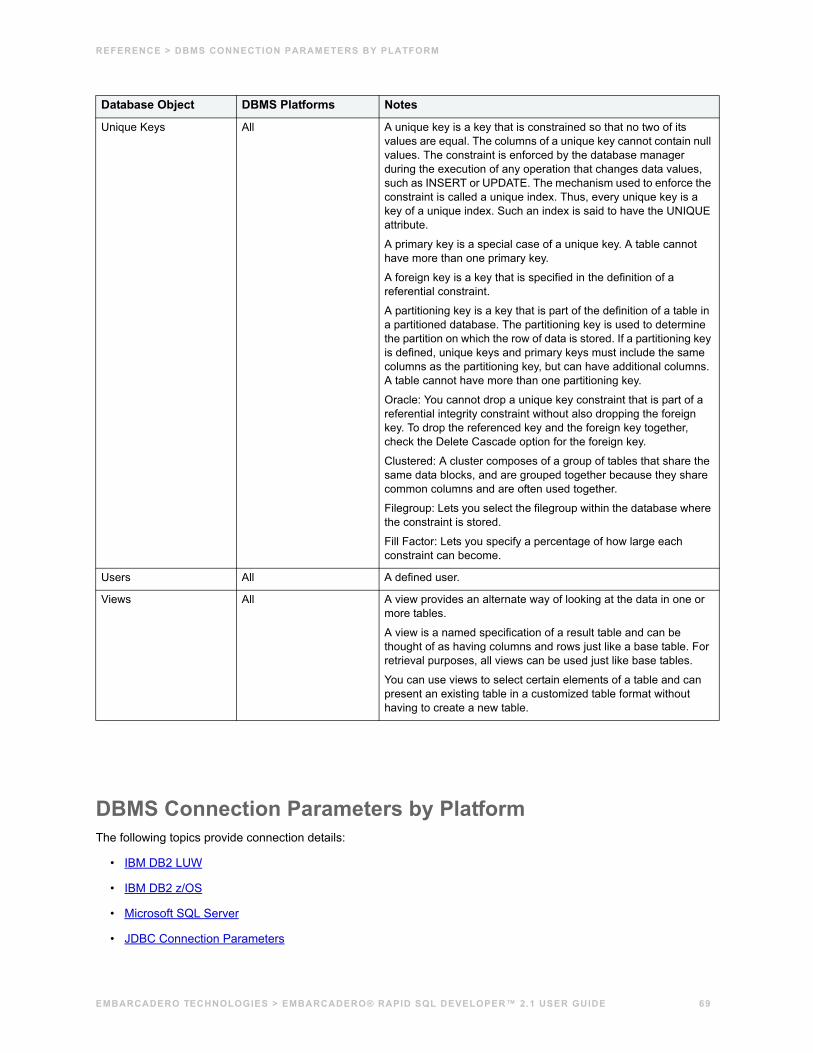
REFERENCE > DBMS CONNECTION PARAMETERS BY PLATFORM
DBMS Connection Parameters by PlatformThe following topics provide connection details:
• IBM DB2 LUW
• IBM DB2 z/OS
• Microsoft SQL Server
• JDBC Connection Parameters
Unique Keys All A unique key is a key that is constrained so that no two of its values are equal. The columns of a unique key cannot contain null values. The constraint is enforced by the database manager during the execution of any operation that changes data values, such as INSERT or UPDATE. The mechanism used to enforce the constraint is called a unique index. Thus, every unique key is a key of a unique index. Such an index is said to have the UNIQUE attribute.
A primary key is a special case of a unique key. A table cannot have more than one primary key.
A foreign key is a key that is specified in the definition of a referential constraint.
A partitioning key is a key that is part of the definition of a table in a partitioned database. The partitioning key is used to determine the partition on which the row of data is stored. If a partitioning key is defined, unique keys and primary keys must include the same columns as the partitioning key, but can have additional columns. A table cannot have more than one partitioning key.
Oracle: You cannot drop a unique key constraint that is part of a referential integrity constraint without also dropping the foreign key. To drop the referenced key and the foreign key together, check the Delete Cascade option for the foreign key.
Clustered: A cluster composes of a group of tables that share the same data blocks, and are grouped together because they share common columns and are often used together.
Filegroup: Lets you select the filegroup within the database where the constraint is stored.
Fill Factor: Lets you specify a percentage of how large each constraint can become.
Users All A defined user.
Views All A view provides an alternate way of looking at the data in one or more tables.
A view is a named specification of a result table and can be thought of as having columns and rows just like a base table. For retrieval purposes, all views can be used just like base tables.
You can use views to select certain elements of a table and can present an existing table in a customized table format without having to create a new table.
Database Object DBMS Platforms Notes
EMBARCADERO TECHNOLOGIES > EMBARCADERO® RAPID SQL DEVELOPER™ 2.1 USER GUIDE 69

REFERENCE > DBMS CONNECTION PARAMETERS BY PLATFORM
• Oracle Connection Parameters
• Sybase Connection Parameters
• InterBase Connection Parameter
• Firebird Connection Parameters
EMBARCADERO TECHNOLOGIES > EMBARCADERO® RAPID SQL DEVELOPER™ 2.1 USER GUIDE 70
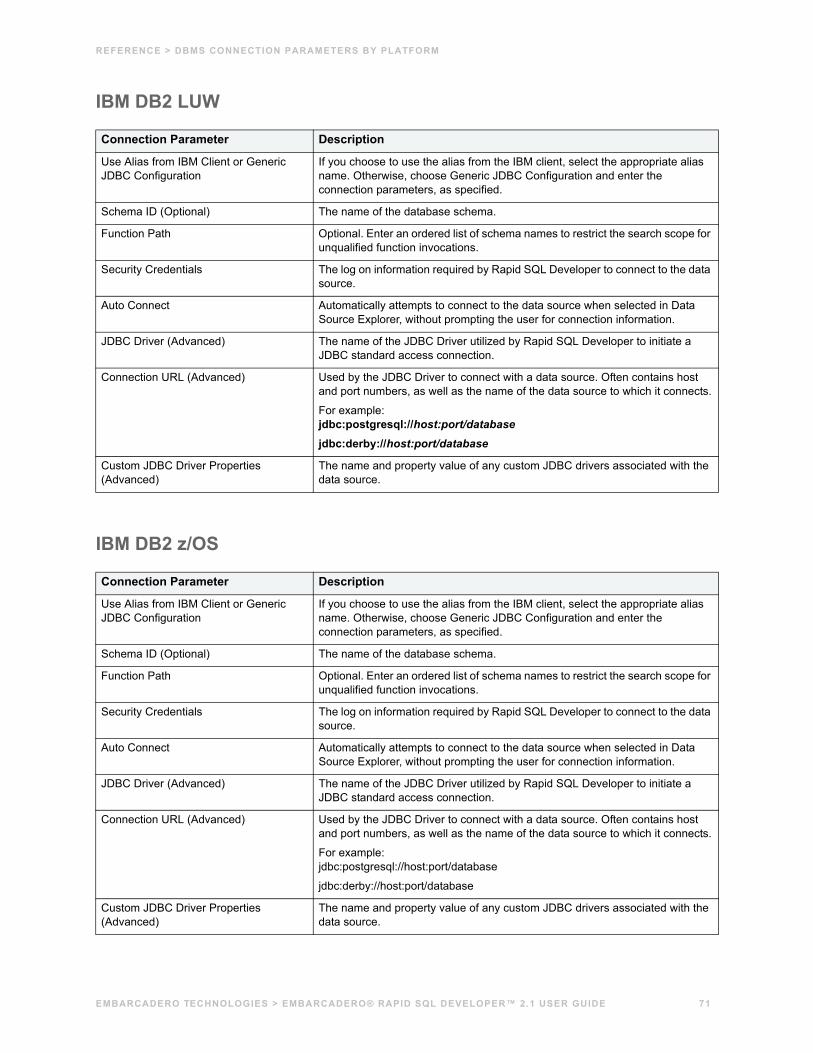
REFERENCE > DBMS CONNECTION PARAMETERS BY PLATFORM
IBM DB2 LUW
IBM DB2 z/OS
Connection Parameter Description
Use Alias from IBM Client or Generic JDBC Configuration
If you choose to use the alias from the IBM client, select the appropriate alias name. Otherwise, choose Generic JDBC Configuration and enter the connection parameters, as specified.
Schema ID (Optional) The name of the database schema.
Function Path Optional. Enter an ordered list of schema names to restrict the search scope for unqualified function invocations.
Security Credentials The log on information required by Rapid SQL Developer to connect to the data source.
Auto Connect Automatically attempts to connect to the data source when selected in Data Source Explorer, without prompting the user for connection information.
JDBC Driver (Advanced) The name of the JDBC Driver utilized by Rapid SQL Developer to initiate a JDBC standard access connection.
Connection URL (Advanced) Used by the JDBC Driver to connect with a data source. Often contains host and port numbers, as well as the name of the data source to which it connects.
For example:jdbc:postgresql://host:port/databasejdbc:derby://host:port/database
Custom JDBC Driver Properties (Advanced)
The name and property value of any custom JDBC drivers associated with the data source.
Connection Parameter Description
Use Alias from IBM Client or Generic JDBC Configuration
If you choose to use the alias from the IBM client, select the appropriate alias name. Otherwise, choose Generic JDBC Configuration and enter the connection parameters, as specified.
Schema ID (Optional) The name of the database schema.
Function Path Optional. Enter an ordered list of schema names to restrict the search scope for unqualified function invocations.
Security Credentials The log on information required by Rapid SQL Developer to connect to the data source.
Auto Connect Automatically attempts to connect to the data source when selected in Data Source Explorer, without prompting the user for connection information.
JDBC Driver (Advanced) The name of the JDBC Driver utilized by Rapid SQL Developer to initiate a JDBC standard access connection.
Connection URL (Advanced) Used by the JDBC Driver to connect with a data source. Often contains host and port numbers, as well as the name of the data source to which it connects.
For example:jdbc:postgresql://host:port/database
jdbc:derby://host:port/database
Custom JDBC Driver Properties (Advanced)
The name and property value of any custom JDBC drivers associated with the data source.
EMBARCADERO TECHNOLOGIES > EMBARCADERO® RAPID SQL DEVELOPER™ 2.1 USER GUIDE 71
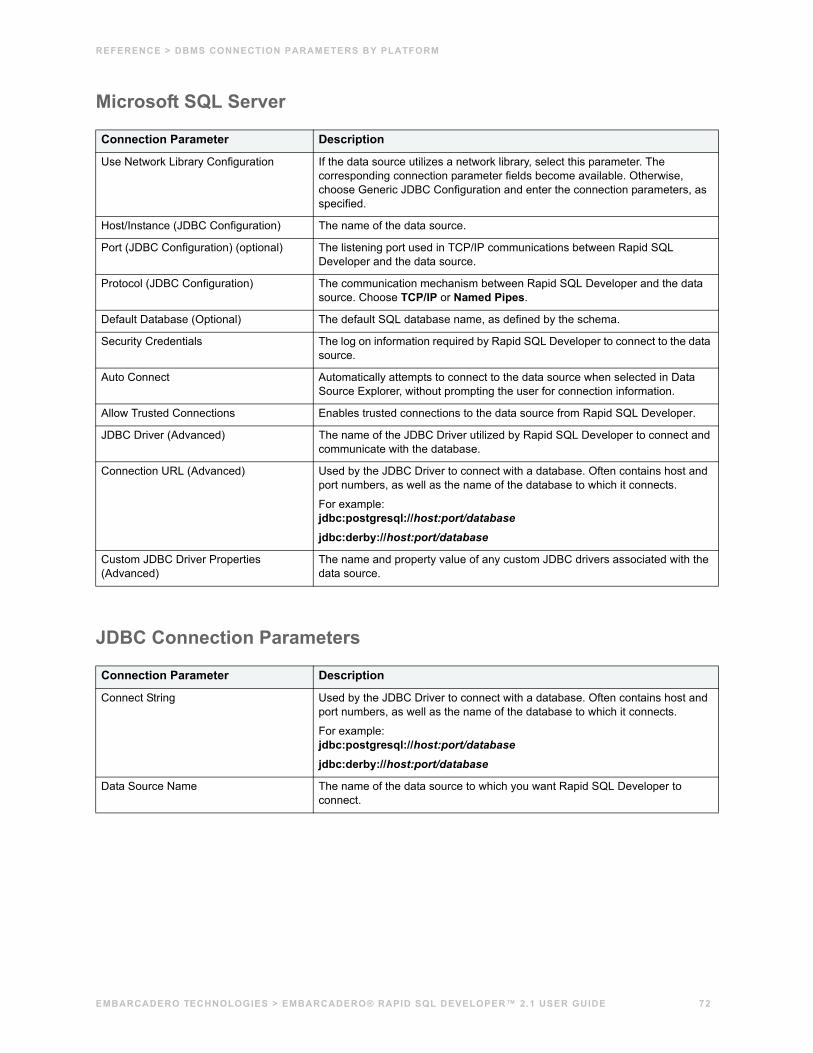
REFERENCE > DBMS CONNECTION PARAMETERS BY PLATFORM
Microsoft SQL Server
JDBC Connection Parameters
Connection Parameter Description
Use Network Library Configuration If the data source utilizes a network library, select this parameter. The corresponding connection parameter fields become available. Otherwise, choose Generic JDBC Configuration and enter the connection parameters, as specified.
Host/Instance (JDBC Configuration) The name of the data source.
Port (JDBC Configuration) (optional) The listening port used in TCP/IP communications between Rapid SQL Developer and the data source.
Protocol (JDBC Configuration) The communication mechanism between Rapid SQL Developer and the data source. Choose TCP/IP or Named Pipes.
Default Database (Optional) The default SQL database name, as defined by the schema.
Security Credentials The log on information required by Rapid SQL Developer to connect to the data source.
Auto Connect Automatically attempts to connect to the data source when selected in Data Source Explorer, without prompting the user for connection information.
Allow Trusted Connections Enables trusted connections to the data source from Rapid SQL Developer.
JDBC Driver (Advanced) The name of the JDBC Driver utilized by Rapid SQL Developer to connect and communicate with the database.
Connection URL (Advanced) Used by the JDBC Driver to connect with a database. Often contains host and port numbers, as well as the name of the database to which it connects.
For example:jdbc:postgresql://host:port/databasejdbc:derby://host:port/database
Custom JDBC Driver Properties (Advanced)
The name and property value of any custom JDBC drivers associated with the data source.
Connection Parameter Description
Connect String Used by the JDBC Driver to connect with a database. Often contains host and port numbers, as well as the name of the database to which it connects.
For example:jdbc:postgresql://host:port/databasejdbc:derby://host:port/database
Data Source Name The name of the data source to which you want Rapid SQL Developer to connect.
EMBARCADERO TECHNOLOGIES > EMBARCADERO® RAPID SQL DEVELOPER™ 2.1 USER GUIDE 72
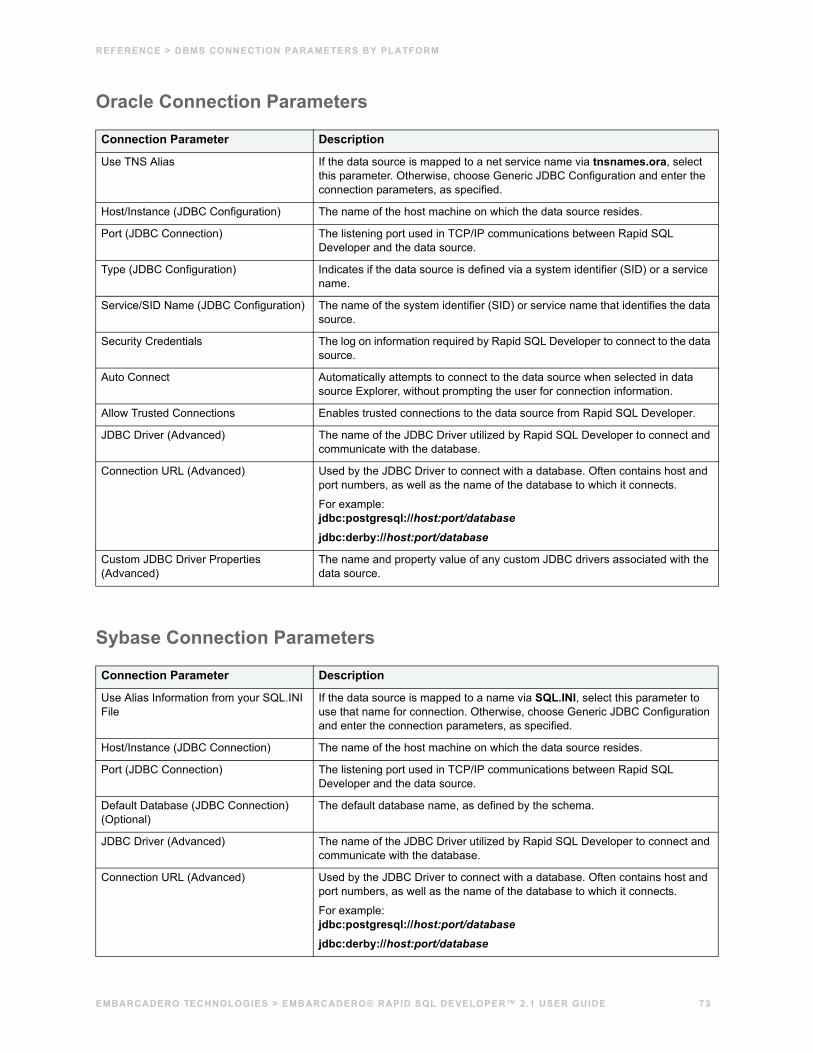
REFERENCE > DBMS CONNECTION PARAMETERS BY PLATFORM
Oracle Connection Parameters
Sybase Connection Parameters
Connection Parameter Description
Use TNS Alias If the data source is mapped to a net service name via tnsnames.ora, select this parameter. Otherwise, choose Generic JDBC Configuration and enter the connection parameters, as specified.
Host/Instance (JDBC Configuration) The name of the host machine on which the data source resides.
Port (JDBC Connection) The listening port used in TCP/IP communications between Rapid SQL Developer and the data source.
Type (JDBC Configuration) Indicates if the data source is defined via a system identifier (SID) or a service name.
Service/SID Name (JDBC Configuration) The name of the system identifier (SID) or service name that identifies the data source.
Security Credentials The log on information required by Rapid SQL Developer to connect to the data source.
Auto Connect Automatically attempts to connect to the data source when selected in data source Explorer, without prompting the user for connection information.
Allow Trusted Connections Enables trusted connections to the data source from Rapid SQL Developer.
JDBC Driver (Advanced) The name of the JDBC Driver utilized by Rapid SQL Developer to connect and communicate with the database.
Connection URL (Advanced) Used by the JDBC Driver to connect with a database. Often contains host and port numbers, as well as the name of the database to which it connects.
For example:jdbc:postgresql://host:port/databasejdbc:derby://host:port/database
Custom JDBC Driver Properties (Advanced)
The name and property value of any custom JDBC drivers associated with the data source.
Connection Parameter Description
Use Alias Information from your SQL.INI File
If the data source is mapped to a name via SQL.INI, select this parameter to use that name for connection. Otherwise, choose Generic JDBC Configuration and enter the connection parameters, as specified.
Host/Instance (JDBC Connection) The name of the host machine on which the data source resides.
Port (JDBC Connection) The listening port used in TCP/IP communications between Rapid SQL Developer and the data source.
Default Database (JDBC Connection) (Optional)
The default database name, as defined by the schema.
JDBC Driver (Advanced) The name of the JDBC Driver utilized by Rapid SQL Developer to connect and communicate with the database.
Connection URL (Advanced) Used by the JDBC Driver to connect with a database. Often contains host and port numbers, as well as the name of the database to which it connects.
For example:jdbc:postgresql://host:port/databasejdbc:derby://host:port/database
EMBARCADERO TECHNOLOGIES > EMBARCADERO® RAPID SQL DEVELOPER™ 2.1 USER GUIDE 73
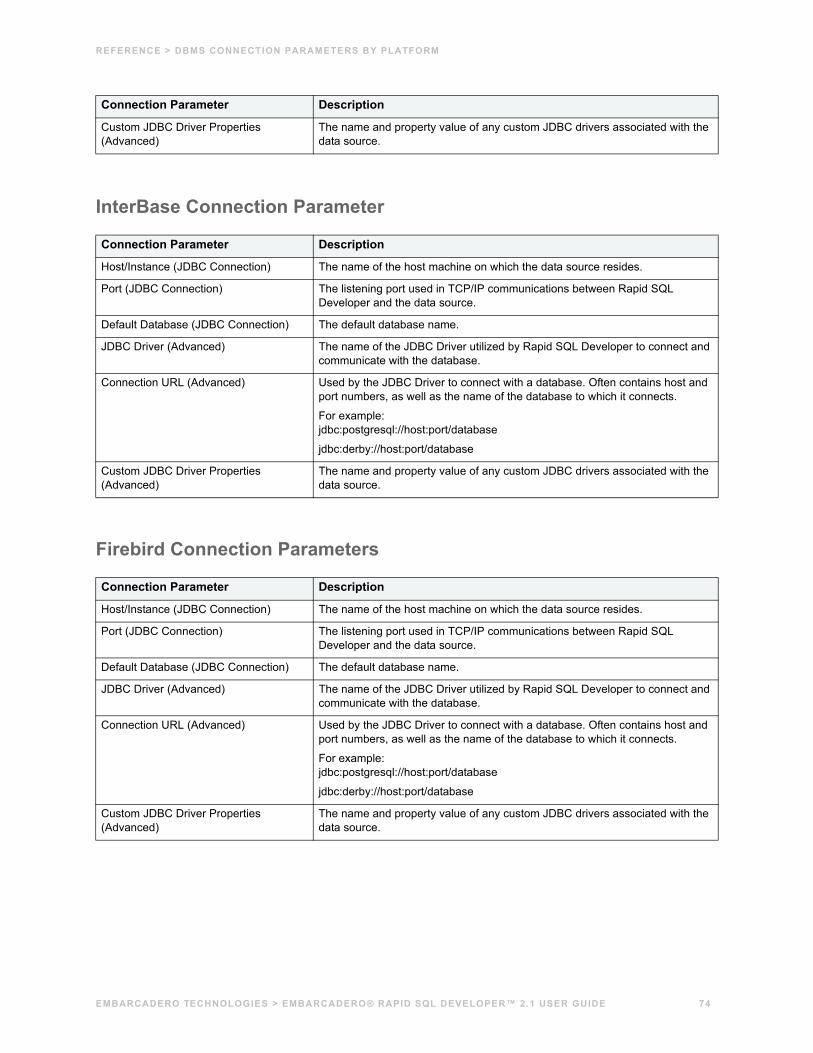
REFERENCE > DBMS CONNECTION PARAMETERS BY PLATFORM
InterBase Connection Parameter
Firebird Connection Parameters
Custom JDBC Driver Properties (Advanced)
The name and property value of any custom JDBC drivers associated with the data source.
Connection Parameter Description
Host/Instance (JDBC Connection) The name of the host machine on which the data source resides.
Port (JDBC Connection) The listening port used in TCP/IP communications between Rapid SQL Developer and the data source.
Default Database (JDBC Connection) The default database name.
JDBC Driver (Advanced) The name of the JDBC Driver utilized by Rapid SQL Developer to connect and communicate with the database.
Connection URL (Advanced) Used by the JDBC Driver to connect with a database. Often contains host and port numbers, as well as the name of the database to which it connects.
For example:jdbc:postgresql://host:port/database
jdbc:derby://host:port/database
Custom JDBC Driver Properties (Advanced)
The name and property value of any custom JDBC drivers associated with the data source.
Connection Parameter Description
EMBARCADERO TECHNOLOGIES > EMBARCADERO® RAPID SQL DEVELOPER™ 2.1 USER GUIDE 74

EMBARCADERO TECHNOLOGIES > EMBARCADERO® RAPID SQL DEVELOPER™ 2.1 USER GUIDE 75
Aassociating 39
Cchange history 37code folding 32code formatting 29
Ddata source 8database objects 16, 61DB2 LUW 71delete 21DMBS 6
Eediting 23error 50error detection 25error logs 49execute 42
Ffiles 20filters 16
Gglobal filters 17
HHardware 5hyperlinks 28
IIBM DB2 LUW 71Import 21
JJDBC connection 72
Llicense 53local history 38log 49
Nnection 73new_project_wizard_page 19new_sql_file_wizard_page 23
Oobject properties 12objects 12opening 19Operating System 5Oracle 73
PPowerSQL 5project_info_page 19Projects 18
SSQL file 23SQL Server 72Sybase 73
Ttechnical Requirements 5
Wworkspace 53